

Page 1
Installation and Operation
Circuit Monitor
Series 2000
3020IB9814
December 1998
Page 2
NOTICE
Read these instructions carefully and look at the equipment to become familiar with the device before trying
to install, operate, or maintain it. The following special messages may appear throughout this bulletin to warn
of potential hazards or to call attention to information that clarifies or simplifies a procedure.
DANGER
!
Used where there is hazard of serious injury or death. Failure to
follow a “DANGER” instruction
!
Used where there is hazard of serious injury or death. Failure to
follow a “WARNING” instruction
!
will
result in death or serious injury.
WARNING
can
result in death or serious injury.
CAUTION
Used where there is hazard of equipment damage. Failure to follow a
“CAUTION” instruction can result in damage to equipment.
Note: Provides additional information to clarify or simplify a procedure.
PLEASE NOTE: Electrical equipment should be serviced only by qualified electrical maintenance personnel,
and this document should not be viewed as sufficient for those who are not otherwise
qualified to operate, service, or maintain the equipment discussed. Although reasonable care
has been taken to provide accurate and authoritative information in this document, no
responsibility is assumed by Square D for any consequences arising out of the use of this
material.
FCC NOTICE: This equipment complies with the requirements in Part 15 of FCC rules for a Class A
computing device. Operation of this equipment in a residential area may cause unacceptable
interference to radio and TV reception, requiring the operator to take whatever steps are
necessary to correct the interference.
TECHNICAL SUPPORT
For technical support, please contact your Schneider Electric representative, who will
contact the Power Management Operation Technical Support Center. The Technical Support
Center will respond to your questions by telephone, fax, or mail.
POWERLOGIC, SY/MAX, SY/NET, SY/LINK, POWER-ZONE, VISI-VAC, ISO-FLEX and are Registered Trademarks of Square D Company.
SYSTEM MANAGER and CIRCUIT TRACKER are Trademarks of Square D Company.
Windows, Windows NT, and Windows 95 are Registered Trademarks of Microsoft Corporation.
Other names are trademarks or service marks of their respective companies.
1998 Square D Company All Rights Reserved
Page 3

Contents
CONTENTS
CHAPTER 1—INTRODUCTION......................................................................................................................1
What is the Circuit Monitor? ................................................................................................................................. 1
Expanded Memory.................................................................................................................................................. 3
Requirements for Using.................................................................................................................................. 4
Identifying the Series and Firmware Revisions .......................................................................................... 4
Model Numbers ............................................................................................................................................... 4
Upgrading Existing Circuit Monitors........................................................................................................... 5
Memory Options Summary ........................................................................................................................... 5
Safety Precautions ................................................................................................................................................... 6
Using This Bulletin .................................................................................................................................................. 6
Notational Conventions.................................................................................................................................. 6
Topics Not Covered Here............................................................................................................................... 7
Related Documents ................................................................................................................................................. 7
Reference Manual ............................................................................................................................................ 8
CHAPTER 2—HARDWARE DESCRIPTION ..................................................................................................9
Front Panel................................................................................................................................................................ 9
Rear Connections ................................................................................................................................................... 11
CHAPTER 3—INSTALLATION .....................................................................................................................13
CE Compliance ...................................................................................................................................................... 14
Mounting the Circuit Monitor ............................................................................................................................. 15
Wiring CTs, PTs, and Control Power ................................................................................................................. 17
Wiring Multiple Circuit Monitors to a Single Set of PTs/CPT ............................................................... 25
Deriving Control Power from Phase PT Inputs ........................................................................................ 26
Grounding the Circuit Monitor .......................................................................................................................... 27
Communications Wiring ...................................................................................................................................... 28
Connecting to a System Display.................................................................................................................. 29
Connecting to a Personal Computer........................................................................................................... 30
Connecting to a POWERLOGIC Ethernet Gateway................................................................................. 31
Connecting to a POWERLOGIC Network Interface Module ................................................................. 32
Connecting to a SY/MAX Programmable Controller .............................................................................. 33
Length of the Communications Link .......................................................................................................... 34
Daisy-Chaining POWERLOGIC Devices ................................................................................................... 35
Terminating the Communications Link ..................................................................................................... 36
Biasing the Communications Link .............................................................................................................. 37
CHAPTER 4—FRONT PANEL OPERATION ...............................................................................................39
The Setup Mode ..................................................................................................................................................... 40
The Configuration Option............................................................................................................................ 40
The Resets Option.......................................................................................................................................... 40
The Alarm/Relay Option ............................................................................................................................. 40
The Diagnostics Option ................................................................................................................................ 40
Choosing a Setup Option ............................................................................................................................. 41
How the Buttons Work ................................................................................................................................. 41
i
Page 4

Bulletin No. 3020IB9814
December 1998
Configuring the Circuit Monitor ......................................................................................................................... 42
Configuring the Circuit Monitor (cont.)
Performing Resets Using the Resets Option ...................................................................................................... 56
Setting Up Alarm/Relay Functions .................................................................................................................... 58
Viewing Active Alarms ........................................................................................................................................ 63
Viewing the Priority 1 Log ................................................................................................................................... 64
Clearing the Priority 1 Log ................................................................................................................................... 65
Factory Defaults ............................................................................................................................................. 42
General Configuration Procedure ............................................................................................................... 42
Viewing Configuration Data in Protected Mode ...................................................................................... 45
Setting the Master Password........................................................................................................................ 46
Setting the CT Ratios ..................................................................................................................................... 47
Setting the PT Ratio ....................................................................................................................................... 48
Setting the System Type ............................................................................................................................... 48
Setting the Demand Interval ........................................................................................................................ 49
Setting the Watthour/Pulse Output ........................................................................................................... 51
Setting the Device Address .......................................................................................................................... 52
Setting the Baud Rate .................................................................................................................................... 53
Setting the Nominal Frequency ................................................................................................................... 54
Resetting Demand, Energy, and Min/Max Values .................................................................................. 55
General Setup Procedure.............................................................................................................................. 59
Detailed Setup Procedure............................................................................................................................. 60
CHAPTER 5—MAINTENANCE AND TROUBLESHOOTING ......................................................................67
Maintenance ........................................................................................................................................................... 67
Battery-Backed RAM..................................................................................................................................... 67
Troubleshooting..................................................................................................................................................... 68
Getting Technical Support ................................................................................................................................... 69
APPENDICES
Appendix A—Circuit Monitor Dimensions ...................................................................................................... 71
Appendix B—Specifications ................................................................................................................................ 73
Appendix C—Installing Terminal Strip Covers ............................................................................................... 75
FIGURES
2-1 Circuit monitor front panel ...................................................................................................................... 10
2-2 Back of the circuit monitor ....................................................................................................................... 11
3-1 Example of disconnect breaker for CE compliance ..............................................................................14
3-2 Panel preparation ...................................................................................................................................... 16
3-3 Circuit monitor mounted in electrical panel ......................................................................................... 16
3-4 3-phase, 3-wire delta connection ............................................................................................................. 18
3-5 3-phase, 4-wire wye, ground connection ............................................................................................... 19
3-6 3-phase, 4-wire wye, ground connection, metered neutral ................................................................. 20
3-7 3-phase, 4-wire wye, 3-wire load ............................................................................................................ 21
3-8 2-1/2 element metering system type 42 (calculated neutral).............................................................. 22
3-9 2-1/2 element metering system type 43 ................................................................................................. 23
ii
Page 5

Contents
3-10 DC control power connections ................................................................................................................ 24
3-11 Circuit monitors connected to one set of PTs and one CPT ................................................................ 25
3-12 Deriving L-L control power from phase PT inputs .............................................................................. 27
3-13 Deriving L-N control power from phase PT inputs .............................................................................27
3-14 Grounding the circuit monitor ................................................................................................................ 28
3-15 Circuit monitors connected to a system display for circuit monitors................................................ 29
3-16 POWERLOGIC devices connected directly to a personal computer ................................................. 30
3-17 POWERLOGIC devices connected to an Ethernet gateway ............................................................... 31
3-18 POWERLOGIC devices connected to a PNIM ......................................................................................32
3-19 POWERLOGIC devices connected to a SY/MAX programmable controller................................... 33
3-20 Daisy-chaining the RS-485 communications terminals........................................................................ 35
3-21 Terminator placement when last device on the link is a circuit monitor .......................................... 36
3-22 Multipoint communications adapter connected to PNIM .................................................................. 37
4-1 Choosing a Setup option .......................................................................................................................... 41
4-2 Flowchart for front panel configuration................................................................................................. 44
4-3 Flowchart for performing resets using the Resets option.................................................................... 57
4-4 Alarm/Relay setup.................................................................................................................................... 59
A-1 Circuit monitor dimensions ..................................................................................................................... 71
A-2 Circuit monitor dimensions with Input/Output and Voltage/Power Modules............................. 72
A-3 Circuit monitor with Input/Output Module ........................................................................................ 72
C-1 Installing terminal strip covers ................................................................................................................ 75
TABLES
1-1 Summary of circuit monitor instrumentation ......................................................................................... 3
1-2 Class 3020 circuit monitors......................................................................................................................... 3
1-3 Circuit monitor feature comparison ......................................................................................................... 3
3-1 Typical circuit monitor mounting locations .......................................................................................... 15
3-2 Supported system wiring connections ................................................................................................... 17
3-3 Maximum distances of comms link at different baud rates ................................................................ 34
4-1 Factory defaults for front panel configuration parameters ................................................................. 42
4-2 Supported system type system code selections .................................................................................... 48
4-3 Maximum distances of comms link at varying baud rates ................................................................. 53
iii
Page 6

Chapter 1—Introduction
CHAPTER 1—INTRODUCTION
CHAPTER CONTENTS This chapter offers a general description of the circuit monitor, describes
important safety precautions, tells how to best use this bulletin, and lists
related documents. Topics are discussed in the following order:
What is the Circuit Monitor?................................................................................. 1
Expanded Memory ...................................................................................................3
Requirements for Using ...............................................................................4
Identifying the Series and Firmware Revisions........................................4
Model Numbers ............................................................................................4
Upgrading Existing Circuit Monitors ........................................................ 5
Memory Options Summary.........................................................................5
Safety Precautions................................................................................................... 6
Using This Bulletin ................................................................................................. 6
Notational Conventions ......................................................................... 6
Topics Not Covered Here ...................................................................... 7
Related Documents ................................................................................................. 7
Reference Manual ...................................................................................... 8
Note: This edition of the circuit monitor instruction bulletin describes features available
in series G4 or later and firmware version 17.009 (or higher). Series 2000 circuit
monitors with older series numbers or firmware versions will not include all features
described in this instruction bulletin.
not have the latest firmware version and you want to upgrade their firmware,
contact your local Schneider Electric representative for information on purchasing
the Class 3020 Type CM-2000U Circuit Monitor Firmware Upgrade Kit.
If you have Series 2000 circuit monitors that do
WHAT IS THE The POWERLOGIC Circuit Monitor is a multifunction, digital
CIRCUIT MONITOR? instrumentation, data acquisition and control device. It can replace a variety
of meters, relays, transducers and other components. The circuit monitor is
equipped with RS-485 communications for integration into any power
monitoring and control system. However, POWERLOGIC System Manager
application software—written specifically for power monitoring and
control—best supports the circuit monitor’s advanced features.
The circuit monitor is a true rms meter capable of exceptionally accurate
measurement of highly nonlinear loads. A sophisticated sampling technique
enables accurate, true rms measurement through the 31st harmonic. Over 50
metered values plus extensive minimum and maximum data can be viewed
from the six-digit LED display. Table 1-1 on page 3 provides a summary of
circuit monitor instrumentation.
The circuit monitor is available in several models to meet a broad range of
power monitoring and control applications. Table 1-2 on page 3 lists the
circuit monitor models. Table 1-3 compares the features available by model.
Circuit monitor capabilities can be expanded using add-on modules that
mount on the back of the circuit monitor. A voltage/power module and
several input/output modules are available. See I/O Capabilities in the Circuit
Monitor Reference Manual for a description of the available I/O modules.
1
Page 7

Bulletin No. 3020IB9814
December 1998
What is the Circuit Monitor?
(cont.)
Using POWERLOGIC application software, users can upgrade circuit
monitor firmware through either the RS-485 or front panel optical communications ports. This feature can be used to keep all circuit monitors up to date
with the latest system enhancements.
Some of the circuit monitor’s many features include:
• True rms metering (31st harmonic)
• Accepts standard CT and PT inputs
• Certified ANSI C12.16 revenue accuracy
• High accuracy—0.2% current and voltage
• Over 50 displayed meter values
• Min/Max displays for metered data
• Power quality readings—THD, K-factor, crest factor
• Real time harmonic magnitudes and angles
• Current and voltage sag/swell detection and recording
• On-board clock/calendar
• Easy front panel setup (password protected)
• RS-485 communications standard
• Front panel, RS-232 optical communications port standard
• Modular, field-installable analog and digital I/O
• 1 ms time stamping of status inputs for sequence-of-events recording
• I/O modules support programmable KYZ pulse output
• Setpoint-controlled alarm/relay functions
• On-board event and data logging
• Waveform and event captures, user-selectable for 4, 12, 36, 48, or 60 cycles
• 64 and 128 point/cycle waveform captures
• High-speed, triggered event capture
• Programming language for application specific solutions
• Downloadable firmware
• System connections
– 3-phase, 3-wire Delta
– 3-phase, 4-wire Wye
– Metered or calculated neutral
– Other metering connections
• Optional voltage/power module for direct connection to 480Y/277V
•
Optional control power module for connecting to 18–60 Vdc control power
• Wide operating temperature range standard (-25 to +70°C)
• UL Listed, CSA certified, and CE marked
• MV-90TM billing compatible
• Pre-configured data log and alarms
2
Page 8

Chapter 1—Introduction
Table 1-1
Summary of Circuit Monitor Instrumentation
Real-Time Readings
•Current (per phase, N, G, 3Ø)
•Voltage (L-L, L-N)
•Real Power (per phase, 3Ø)
•Reactive Power (per phase, 3Ø)
•Apparent Power (per phase, 3Ø)
•Power Factor (per phase, 3Ø)
•Frequency
•Temperature (internal ambient)*
•THD (current and voltage)
•K-Factor (per phase)
Demand Readings
•Demand Current (per-phase present, peak)
• Demand Voltage (per-phase present, peak)*
•Average Power Factor (3Ø total)*
•Demand Real Power (3Ø total)
•Demand Reactive Power (3Ø total)*
•Demand Apparent Power (3Ø total)
•Coincident Readings*
•Predicted Demands*
• Accumulated Energy, Real
• Accumulated Energy, Reactive
• Accumulated Energy, Apparent*
• Bidirectional Readings*
• Crest Factor (per phase)
• K-Factor Demand (per phase)
• Displacement Power Factor (per phase, 3Ø)
• Fundamental Voltages (per phase)
• Fundamental Currents (per phase)
• Fundamental Real Power (per phase)
• Fundamental Reactive Power (per phase)
• Harmonic Power
• Unbalance (current and voltage)
• Phase Rotation
•
Harmonic Magnitudes & Angles (per phase)
* Available via communications only.
Energy Readings
Power Analysis Values*
Table 1-2
Class 3020 Circuit Monitors
Type Description
CM-2050 Instrumentation, 1% accuracy
CM-2150 Instrumentation, 0.2% accuracy, data logging, alarm/relay functions
CM-2250 Waveform capture, plus CM-2150 features
CM-2350 Instrumentation, waveform capture, 0.2% accuracy
CM-2450 Programmable for custom applications, plus-2350 features
Table 1-3
Circuit Monitor Feature Comparison
Feature CM-2050 CM-2150 CM-2250 CM-2350 CM-2450
Full Instrumentation ✘✘✘✘✘
RS-485 Comm Port ✘✘✘✘✘
Front Panel Optical Comm Port ✘✘✘✘✘
1% Accuracy Class ✘
0.2% Accuracy Class ✘✘✘✘
Alarm/Relay Functions ✘✘✘✘
On-board Data Logging ✘✘✘✘
Downloadable Firmware ✘✘✘✘
Date/Time for Each Min/Max ✘✘✘✘
Waveform Capture ✘✘✘
Extended Event Capture ✘✘✘
Extended Memory (up to 1.1 Meg.)* ✘✘✘✘
Sag/Swell Detection ✘✘
Programmable for Custom Applications ✘
* Standard memory: CM-2150, CM-2250, CM-2350, and CM-2450 = 100K; CM-2452 = 356K
EXPANDED MEMORY New Series G4 (or higher) circuit monitor models CM-2150 and higher now
are factory-equipped with 100 kilobytes (100K) of nonvolatile memory.
(Earlier Series G3 models CM-2150 and CM-2250 shipped with 11K of
memory, models CM-2350 and CM-2450 with 100K of memory.)
3
Page 9
Bulletin No. 3020IB9814
December 1998
EXPANDED MEMORY (cont.) For applications where additional memory is required, you can order a
circuit monitor with an optional 512K or 1024K memory expansion card,
resulting in 612K or 1124K, respectively, total nonvolatile memory (100K
base memory plus the expansion card memory). Memory upgrade kits are
also available for most earlier circuit monitors. See Upgrading Existing
Circuit Monitors, page 5.
Requirements for Using System Manager software version 3.02 with Service Update 1, 3.02a with
Expanded Memory Service Update 1, or 3.1 (or higher) is required to take advantage of expan-
sion card memory or the 100K of memory standard on G4 circuit monitors.
Earlier versions of System Manager software will recognize only 11K (the
Series G3 and earlier memory capacity) of available memory.
Also, your circuit monitor must be equipped with firmware version 17.008 or
later to take advantage of expanded memory. The following section tells how
to determine the firmware version shipped with your circuit monitor.
To determine if your circuit monitor firmware version has been updated
with downloadable firmware, see Viewing Configuration Data in Protected
Mode, page 45.
To obtain the latest available firmware revision contact your local Schneider
Electric representative (see Note, page 1.)
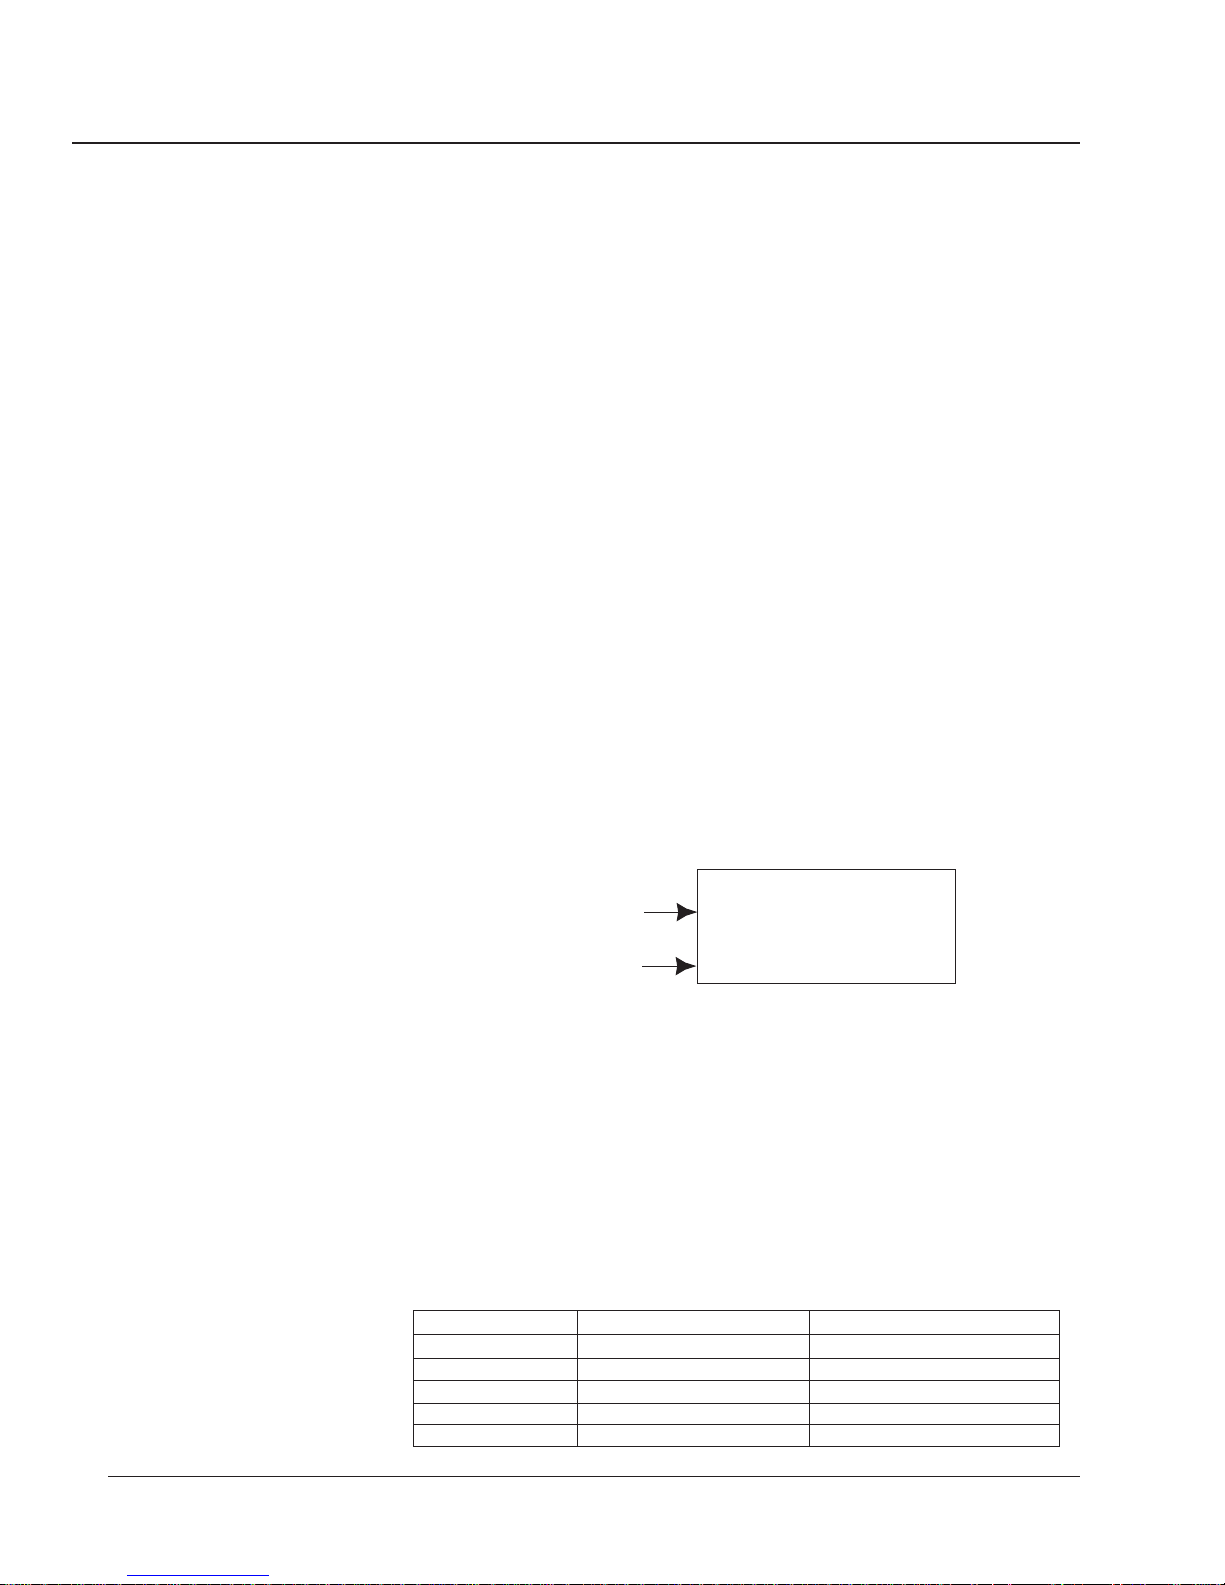
Identifying the Series and The circuit monitor series and firmware revision number are printed on a
Firmware Revisions sticker on the top of the circuit monitor enclosure. Figure 1-1 shows a sample
sticker.
63230-204-106
Series
Series: G2C
U6 REV: 16-16.007
Firmware Revision
Figure 1-1: Circuit monitor series/firmware revision sticker
U33 REV: 16.007
Model Numbers Circuit monitor models equipped with an optional memory expansion card
are differentiated from standard models by a suffix—either -512k or -1024k—
added to the model number (table 1-4). As shown in the table, the memory
expansion option is available for model numbers CM-2150, CM-2250,
CM-2350, and CM-2450. The CM-2452 circuit monitor is now obsolete and
has been replaced by the CM-2450-512k, which has more memory at a lower
price than the CM-2452. However, existing CM-2452 circuit monitors can be
upgraded as detailed on the following page.
Table 1-4
Circuit Monitor Model Numbers
Standard Models Models with 512k Option Models with 1024k Option
3020 CM-2050 N/A N/A
3020 CM-2150 3020 CM-2150-512k 3020 CM-2150-1024k
3020 CM-2250 3020 CM-2250-512k 3020 CM-2250-1024k
3020 CM-2350 3020 CM-2350-512k 3020 CM-2350-1024k
3020 CM-2450 3020 CM-2450-512k 3020 CM-2450-1024k
4
Page 10

Chapter 1—Introduction
Upgrading Existing Memory upgrade kits are available for field installation by a qualified
Circuit Monitors electrician. No special tools are required.
DANGER
!
HAZARD OF ELECTRIC SHOCK, BURN, OR EXPLOSION
Only qualified electrical workers should install a memory upgrade kit
in a circuit monitor. Perform the upgrade only after reading the
installation instructions shipped with the upgrade kit. Before removing the cover of the circuit monitor to install the memory board:
• Disconnect all voltage inputs to the circuit monitor
• Short the CT secondaries
• De-energize the control power inputs
Failure to observe this precaution will result in death or
serious injury.
For Series G3 and earlier circuit monitors, the memory upgrade kit can be
installed only in circuit monitor models CM-2350 and CM-2450.
Note: Model CM-2452 was factory-equipped with 100K of memory and a 256K
memory expansion card, for a total of 356K of memory. The 256K card can be
removed and replaced with a 512K or 1024K expansion card, for total memory of
either 612K or 1124K.
The memory upgrade kit can be installed in Series G4 models CM-2150 and
higher. Memory upgrade kits are available with either the 512k or 1024k
memory card (see table 1-5). No special tools are required for installation.
Table 1-5
Memory Upgrade Kit Part Numbers
Part Number Description
3020 CM-MEM-512K 512K Memory Upgrade Kit for Series 2000 Circuit Monitors
3020 CM-MEM-1024K 1024K Memory Upgrade Kit for Series 2000 Circuit Monitors
Memory Options Summary Table 1-6 summarizes the memory options now available for Series 2000
Circuit Monitors. To obtain price and availability on circuit monitors with
expanded memory and circuit monitor memory upgrade kits, contact your
local sales representative.
Table 1-6
Series 2000 Circuit Monitor Memory Options
Total Memory Capacity
Model Number Series G3 or Earlier Series G4 or Later
Standard 512K Expansion 1024K Expansion Standard 512K Expansion 1024K Expansion
CM-2050 N/A N/A N/A N/A N/A N/A
CM-2150 11K N/A N/A 100K 612K 1124K
CM-2250 11K N/A N/A 100K 612K 1124K
CM-2350 100K 612K 1124K 100K 612K 1124K
CM-2450 100K 612K 1124K 100K 612K 1124K
CM-2452 356K 612K ➀ 1124K ➀ Obsolete
➀ CM-2452 256K memory expansion card removed and replaced with 512K or 1024K memory expansion card.
5
Page 11

Bulletin No. 3020IB9814
December 1998
SAFETY PRECAUTIONS
DANGER
!
HAZARD OF BODILY INJURY OR EQUIPMENT DAMAGE
• Only qualified electrical workers should install this equipment.
Such work should be performed only after reading this entire set
of instructions.
• The successful operation of this equipment depends upon proper
handling, installation, and operation. Neglecting fundamental
installation requirements may lead to personal injury as well as
damage to electrical equipment or other property.
• Before performing visual inspections, tests, or maintenance on this
equipment, disconnect all sources of electric power. Assume that
all circuits are live until they have been completely de-energized,
tested, grounded, and tagged. Pay particular attention to the
design of the power system. Consider all sources of power,
including the possibility of backfeeding.
Failure to observe this precaution will result in death, serious
injury or equipment damage.
USING THIS BULLETIN This document provides the information required to install and operate the
circuit monitor. The document consists of a table of contents, five chapters,
and three appendices. Chapters longer than a few pages begin with a chapter
table of contents. To locate information on a specific topic, refer to the table
of contents at the beginning of the document, or the table of contents at the
beginning of a specific chapter.
Notational Conventions This document uses the following notational conventions:
• Procedures. Each procedure begins with an italicized statement of the
task, followed by a numbered list of steps. Procedures require you to take
action.
• Bullets. Bulleted lists, such as this one, provide information but not
procedural steps. They do not require you to take action.
• Cross-References. Cross-references to other sections in the document
appear in boldface. Example: see Mounting the Circuit Monitor in
Chapter 3.
6
Page 12

Chapter 1—Introduction
Topics Not Covered Here Some of the circuit monitor’s advanced features, such as on-board data log
and event log files, must be set up over the communications link using
POWERLOGIC application software. This circuit monitor instruction bulletin
describes these advanced features, but does not tell how to set them up. For
instructions on setting up these advanced features, refer to the appropriate
application software instruction bulletin.
RELATED DOCUMENTS Several optional add-on modules are available for use with the circuit
monitor. Each module is shipped with an instruction bulletin detailing
installation and use of the product. Available add-on modules for the
circuit monitor are listed below.
Instruction Bulletin Title Reference No.
• POWERLOGIC Control Power Module (CPM-48) 3090IM9305
• POWERLOGIC Ride-Through Module 3090IM9701
• I/O Modules (IOM-11/44/18) 3020IM9304
• I/O Modules (IOM-4411/4444) 3020IM9401
• Voltage/Power Module 3090IM9302
• Optical Communications Interface (OCI-2000) 3090IM9303
• Ethernet Communications Module (ECM-2000/ECM-RM) 3020IB9818
➀
➀ Reference numbers listed are the original document numbers. If a document has been revised, the listed number will be followed by a
revision number, for example R10/97.
7
Page 13

Bulletin No. 3020IB9814
December 1998
Reference Manual This Installation and Operation manual provides the information necessary
to install and operate the circuit monitor. Additional information on the
circuit monitor’s advanced features is available in English only in the
POWERLOGIC Circuit Monitor Reference Manual. The reference manual
includes information on the following topics:
• Metering Capabilities
• Input/Output Capabilities
• Alarm Functions
• Logging
• Waveform Capture
• Disturbance Monitoring
• CM-2450 with Programming Language
• Advance Topics
• Communication Cable Pinouts
• Abbreviated Register Listing
• Calculating Log File Sizes
• Alarm Setup Information
• Reading and Writing Registers from the Front Panel
8
Page 14

Chapter 2—Hardware Description
CHAPTER 2—HARDWARE DESCRIPTION
FRONT PANEL The circuit monitor front panel is designed for maximum ease of use. The
circuit monitor has five modes of operation:
• METERS — for viewing real-time metered data
• MIN — for viewing the minimum of the selected metered value
• MAX — for viewing the maximum of the selected metered value
• ALARM — for viewing the status of on-board alarms
• [Setup] — for setting up the circuit monitor
The general procedure for displaying data is simple:
1. Press the MODE button to select one of the five available modes.
2. Press the SELECT METER buttons to select a metered value.
3. Press the PHASE button to select a phase.
In [Setup] mode, use the alternate descriptions in grey to the right of the
LEDs. In SETUP mode, the PHASE, MODE, and SELECT METER buttons
function differently than in the other display modes. For details see
Chapter 4—Front Panel Operation.
Figure 2-1 shows the front panel of the circuit monitor. A description of the
front panel follows.
➀ 6-Digit LED display. For local display of metered values.
➁ Kilo/Mega LEDs. The Kilo LED lights when the displayed value is in
Kilo units. The Mega LED lights when the displayed value is in Mega
units.
➂ Meter Indication LEDs. The lit LED indicates the value being displayed.
➃ Setup/Reset Parameters. These grey, bracketed values are used to set up
the circuit monitor and perform resets. Refer to these values when in
[Setup] mode.
➄ Phase Indication LEDs. Indicate the phase for the displayed value.
Note: If you select a metered value that does not provide a reading for
the selected phase, the circuit monitor automatically jumps to a phase for
which a reading exists. For example, assume that you are viewing Phase
A Power Factor, then change to Frequency; the circuit monitor
automatically jumps from Phase A to 3-Phase, since the circuit monitor
does not provide a Phase A Frequency reading.
➅ PHASE Select Button. Press to select the phase for the selected meter
value. Note: In [Setup] mode, press this button to move from one setup
parameter to the next. See Chapter 4—Front Panel Operation for details.
➆ SELECT METER buttons. Press to change the metered value being
displayed. Note: In [Setup] mode, press these buttons to change the value of
the displayed setup parameter. See Chapter 4—Front Panel Operation
for details.
9
Page 15

Bulletin No. 3020IB9814
December 1998
➇ Mode Indication LEDs. These LEDs indicate the present display mode.
The Alarm LED flashes when an alarm is active.
➈ MODE Select Button. Press to select the display mode.
➉ Optical Communications Port. This port allows the circuit monitor to
communicate to a portable computer using the optional optical
communications interface (Class 3090 Type OCI-2000). The OCI-2000
mounts magnetically to the circuit monitor and provides a standard
RS-232 interface. Anything that can be done over the RS-485
communications link—including circuit monitor setup—can also be done
using the optical communications port.
➀
➂
➃
➉
o AMMETER (A)
o VOLTMETER, L-L (V)
o VOLTMETER, L-N (V)
o WATTMETER (W)
o VARMETER (VAr)
o VA METER (VA)
o POWER FACTOR METER
o FREQUENCY METER (Hz)
o DEMAND AMMETER (A)
o DEMAND POWER (W)
o DEMAND POWER (VA)
o WATTHOUR METER
o VARHOUR METER
o THD, CURRENT (%)
o THD, VOLTAGE (%)
o K-FACTOR
Optical
Comm Port
CIRCUIT MONITOR
[CT Primary]
[PT Primary]
[Sys. Type]
[Dmd. Int.]
[WH/Pulse]
[Address]
[Baud Rate]
[Nom. Freq.]
[Reset]
[Reset]
[Reset]
[Reset]
[Reset]
[Rst. Min/Max]
[Set Password]
[Accept]
3-PHASE
A (A-B)
B (B-C)
C (C-A)
N
SELECT
METER
[Value]
METERS
MIN
MAX
ALARM
[Setup]
Kilo
Mega
PHASE
MODE
➁
➅
➄
➆
➇
➈
10
Figure 2-1: Circuit monitor front panel
Page 16
Chapter 2—Hardware Description
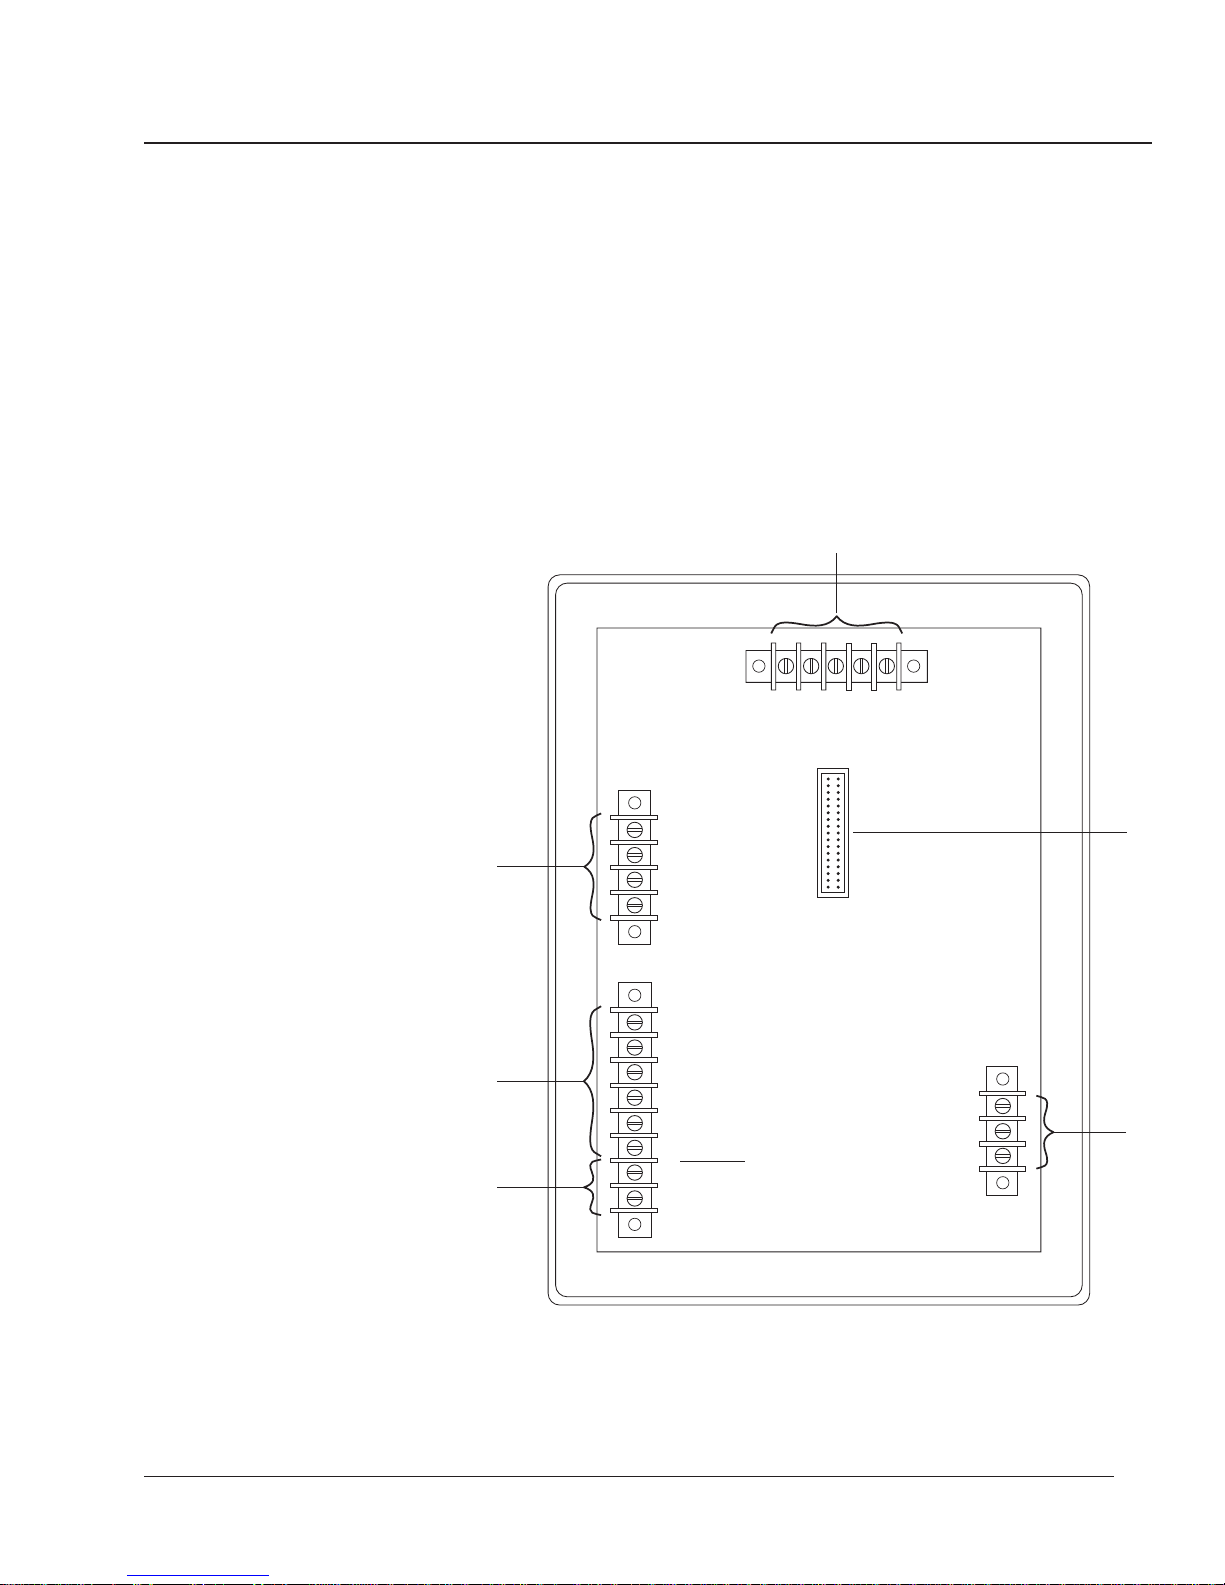
REAR CONNECTIONS Figure 2-2 shows the rear of the circuit monitor. Identified parts are as
follows:
➀ Auxiliary Current Inputs
➁ 3-Phase Current Inputs
➂ 3-Phase Voltage Inputs
➃ RS-485 Communications Terminals
➄ Input/Output Module Connector
➅ Control Power Terminals
Note: See Chapter 3—Installation for wiring instructions.
➃
➂
➁
➀
TYPE 1 ENCLOSURE
INDOOR USE ONLY
a
V
3 PHASE
b
VOLTAGE
V
INPUTS
c
120 VOLTS
V
NOMINAL
n
910111256781234
V
a+
I
a-
I
3 PHASE
CURRENT
b+
I
INPUTS
5 AMPS
b-
I
NOMINAL
c+
I
c-
I
AUXILIARY
n+
I
CURRENT
INPUTS
n-
5 AMPS
I
NOMINAL
20 21 22 23 24
IN+ IN- OUT+ OUT- SHLD
RS-485
DATA COMMUNICATIONS
CONTROL
POWER
(+)L G N(-)
➄
25 26 27
➅
Figure 2-2: Back of the circuit monitor
11
Page 17

Chapter 3—Installation
CHAPTER 3—INSTALLATION
CHAPTER CONTENTS This chapter tells how to mount and wire the circuit monitor. Refer to the
table of contents below to locate a specific topic.
CE Compliance........................................................................................................14
Mounting the Circuit Monitor ............................................................................ 15
Wiring CTs, PTs, and Control Power................................................................. 17
Wiring Multiple Circuit Monitors to a Single Set of PTs/CPT .......... 25
Deriving Control Power from Phase PT Inputs.................................... 26
Grounding the Circuit Monitor .......................................................................... 27
Communications Wiring ..................................................................................... 28
Connecting to a System Display ............................................................. 29
Connecting to a Personal Computer ...................................................... 30
Connecting to a POWERLOGIC Ethernet Gateway .............................. 31
Connecting to a POWERLOGIC Network Interface Module ............. 32
Connecting to a SY/MAX Programmable Controller ....................... 33
Length of the Communications Link ..................................................... 34
Daisy-Chaining POWERLOGIC Devices .............................................. 35
Terminating the Communications Link ................................................ 36
Biasing the Communications Link ......................................................... 37
DANGER
!
HAZARD OF PERSONAL INJURY OR DEATH
Only qualified electrical workers should install and wire this
equipment. Such work should be performed only after reading this
complete set of instructions.
Failure to observe this precaution will result in death, serious
injury or equipment damage.
13
Page 18
Bulletin No. 3020IB9814
December 1998
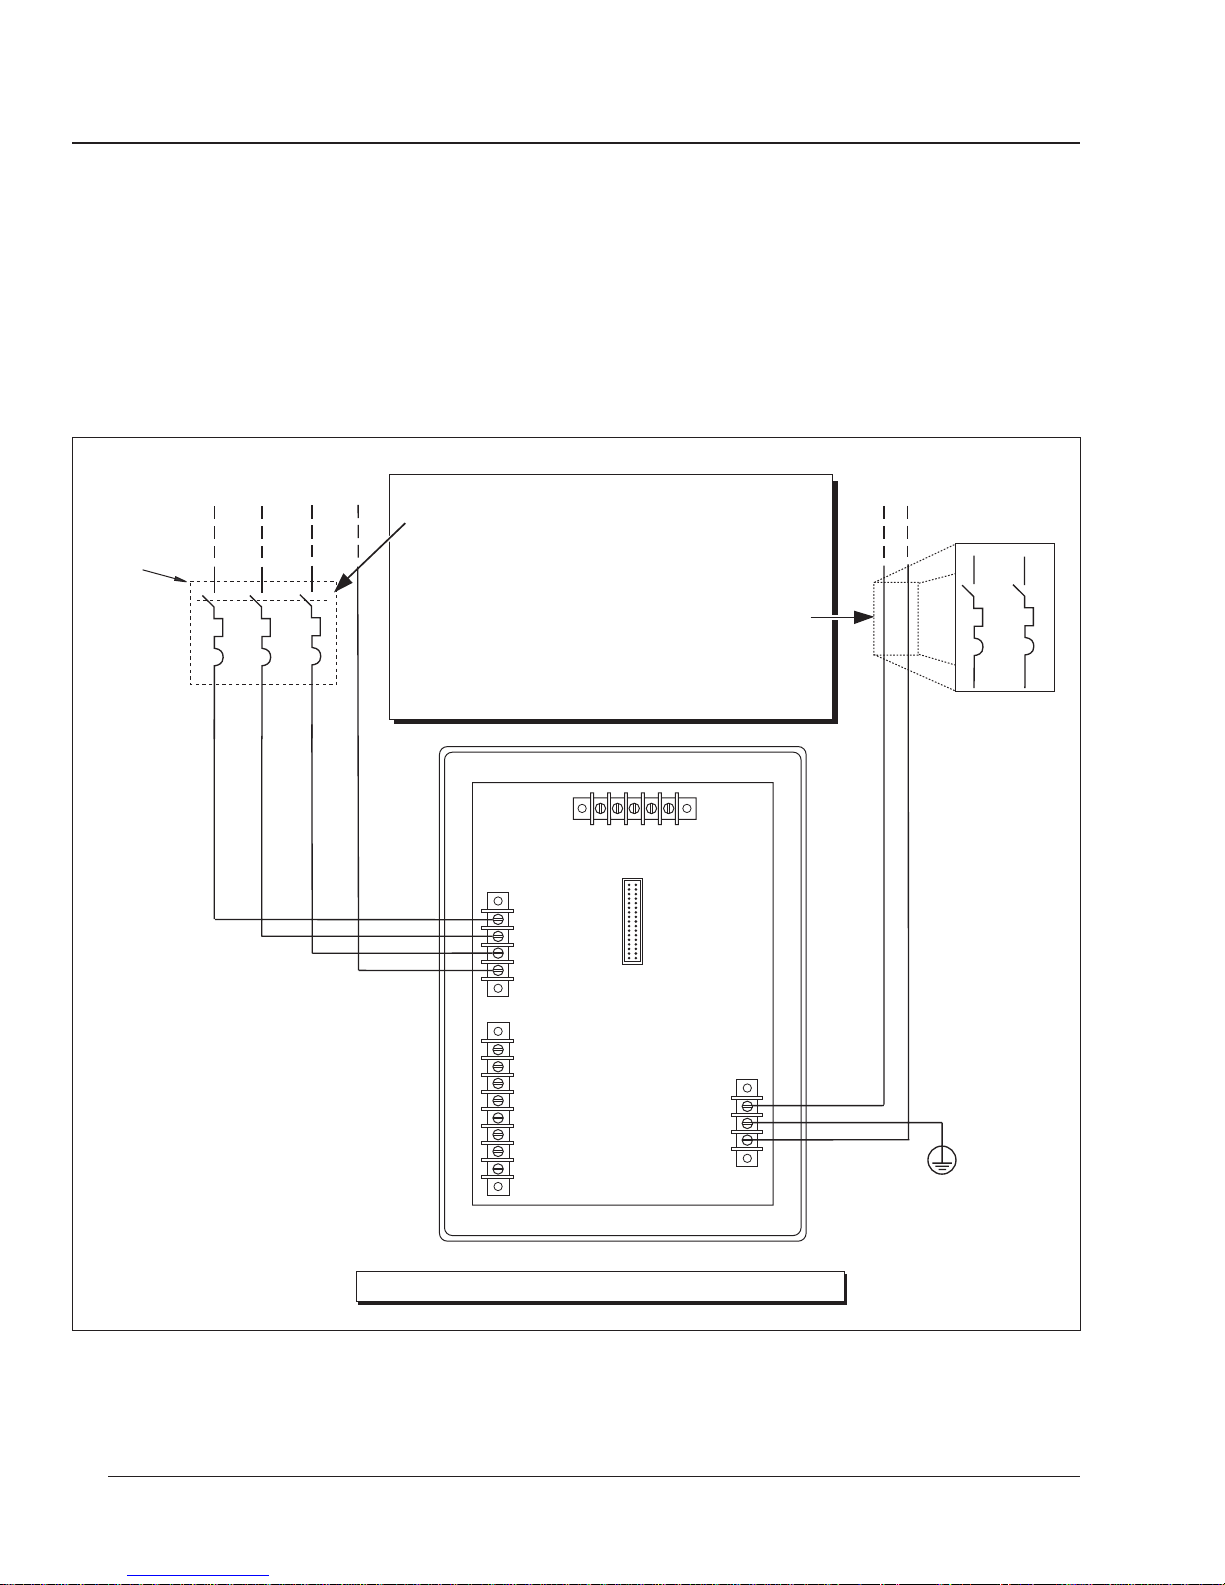
CE COMPLIANCE To comply with CE Electromagnetic Compatibility requirements, the circuit
monitor must be installed in a metallic enclosure (switchgear, for example).
For CE compliance, Merlin Gerin Disconnect Breakers Type P25M #21104 or
IEC 947 equivalent must be connected directly to the metering voltage and
control power inputs (figure 3-1).
Note: The disconnect switch must be placed within reach of the circuit monitor
and labeled “Disconnect Switch for Circuit Monitor.”
Disconnect
Breaker
Metering Voltage Source
must
Note: The disconnect breaker
here
If control power is derived from the metering voltage source,
no additional disconnect device is necessary.
However, if control power is derived from a separate source,
an
additional
between the control power terminals and the control power
source.
(See inset box at right for detail of additional disconnect
breaker.)
disconnect breaker
V
a
V
b
V
c
V
n
be installed
must
be installed here
Control Power
Source
L
L
2
1
Note: See figures 3-4 through 3-10 for possible connection types.
Figure 3-1: Example of disconnect breaker for CE compliance
14
L
G
N
Page 19

Chapter 3—Installation
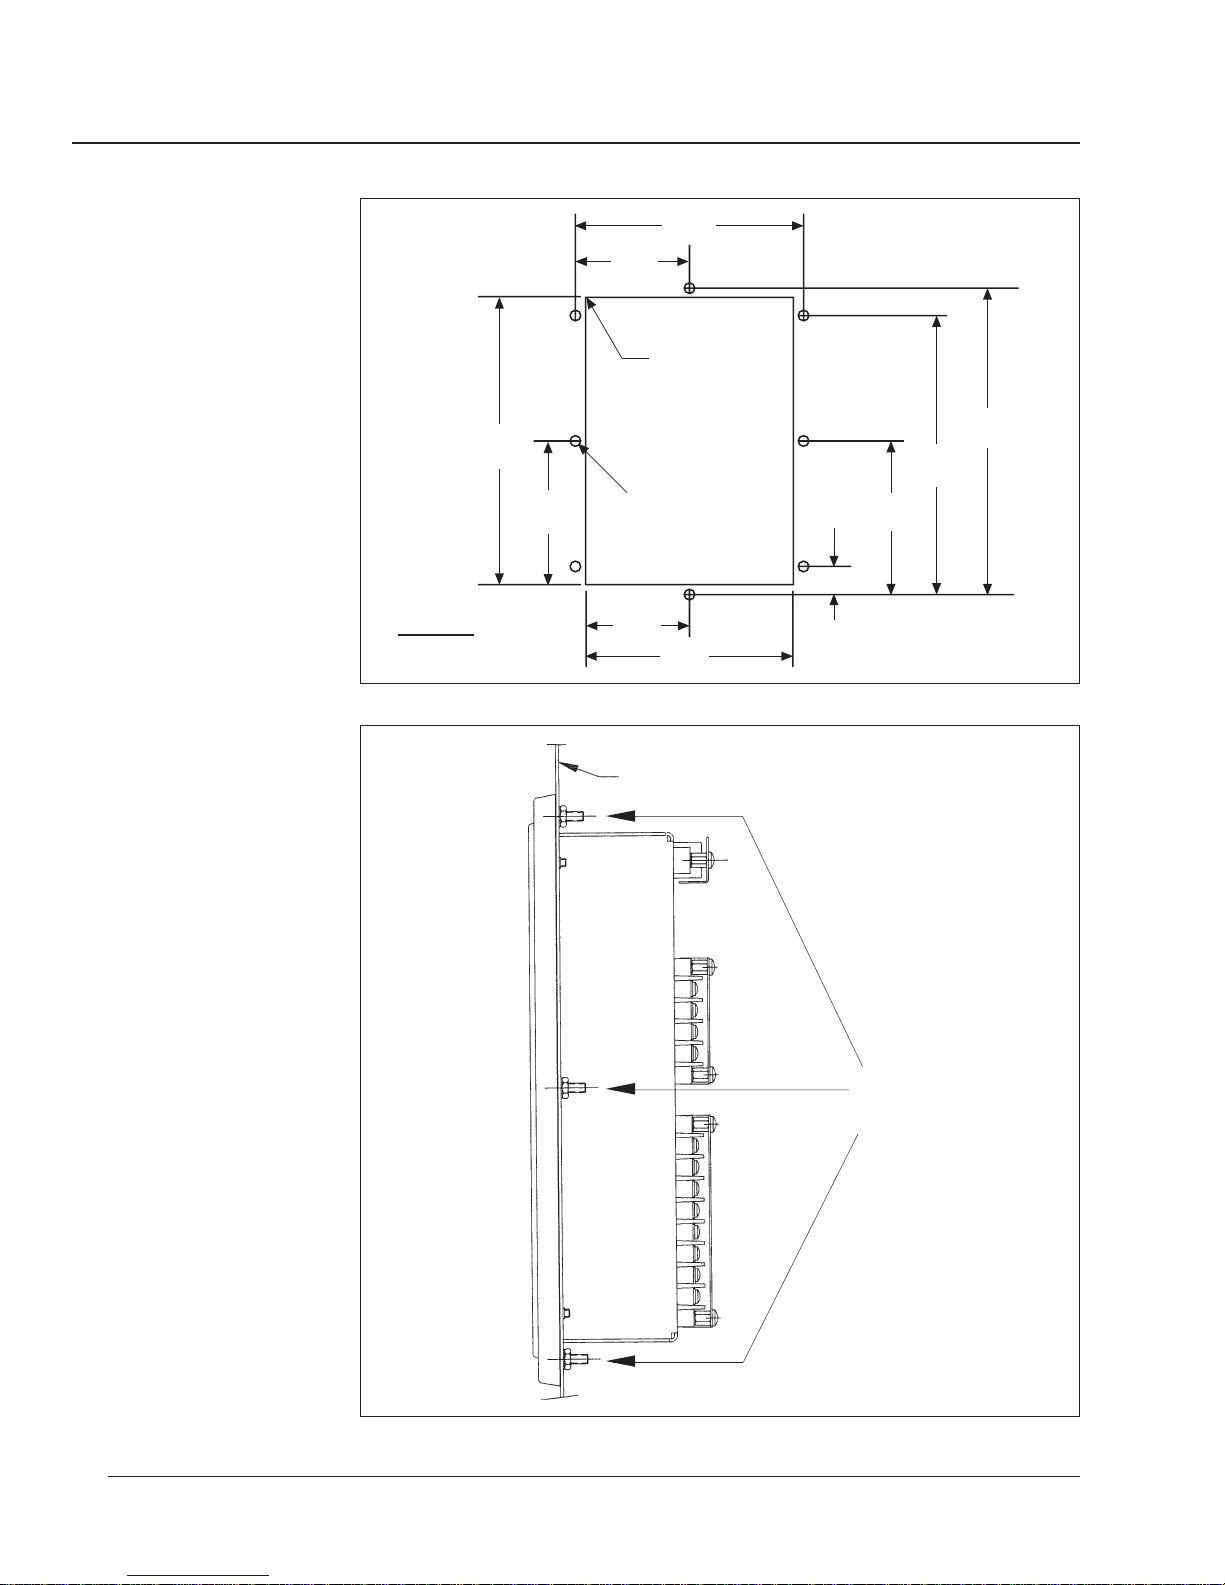
MOUNTING THE CIRCUIT The circuit monitor is a flush-mounted device that projects through the back
MONITOR of a panel or breaker cell door. Table 3-1 lists typical mounting locations in
various power equipment designs.
Note: Series 2000 circuit monitors use the same cutout dimensions and
hole patterns as the Series 100, 200 circuit monitors, but the required rear clearances
have increased.
When choosing a mounting location, consider the following points:
• Allow for easy access to the rear of the circuit monitor.
• Allow extra space for all wires, shorting blocks, or other components.
• Consider the depth of the circuit monitor. Include extra depth for add–on
modules that you might add in the future. See Appendix A for circuit
monitor dimensions.
• Be sure that ambient conditions fall within the acceptable range: operating
temperature –25°C to +70°C, relative humidity, 5–95% non-condensing.
For CE mounting requirements, see CE Compliance, page 14.
Note: Before preparing the cutout, refer to Appendix A and verify that the
required clearances exist.
To mount the circuit monitor, complete the following steps:
1. Prepare the cutout and mounting holes. Refer to figure 3-2 for exact
dimensions.
2. Insert the circuit monitor through the cutout from the front of the panel
or breaker cell door. Guide the circuit monitor mounting studs through
the holes in the panel.
3. Secure the circuit monitor to the panel using four #10-32 hex nuts
included in the circuit monitor hardware kit (63230-204-16). Figure 3-3
shows the circuit monitor mounted in an electrical panel.
Table 3-1
Typical Circuit Monitor Mounting Locations
Equipment Type Mounting Location
QED Switchboards, Model 6 MCCs Main Meter Location or Aux. Section
POWER-ZONE III Switchgear Main Instrument Compartment Door
HVL and VISI/VAC Switchgear 9-inch Front Panel or Instrument Door
Metal-Clad and Substation CBs Standard Relaying Locations
ISO-FLEX Medium Voltage MCCs Standard Relaying Locations
15
Page 20
Bulletin No. 3020IB9814
December 1998
10.41
264
5.21
132
4.06
104
R Typical
8 Holes
0.28
7
8.11
206
0.09
2
Diameter
5.52
140
10.10
256
11.03
280
Inches
Millimeters
3.71
94
7.41
188
0.93
Figure 3-2: Panel preparation
Panel
24
Secure to panel
using #10-32 hex
nuts (4 required)
16
Figure 3-3: Circuit monitor mounted in electrical panel
Page 21

Chapter 3—Installation
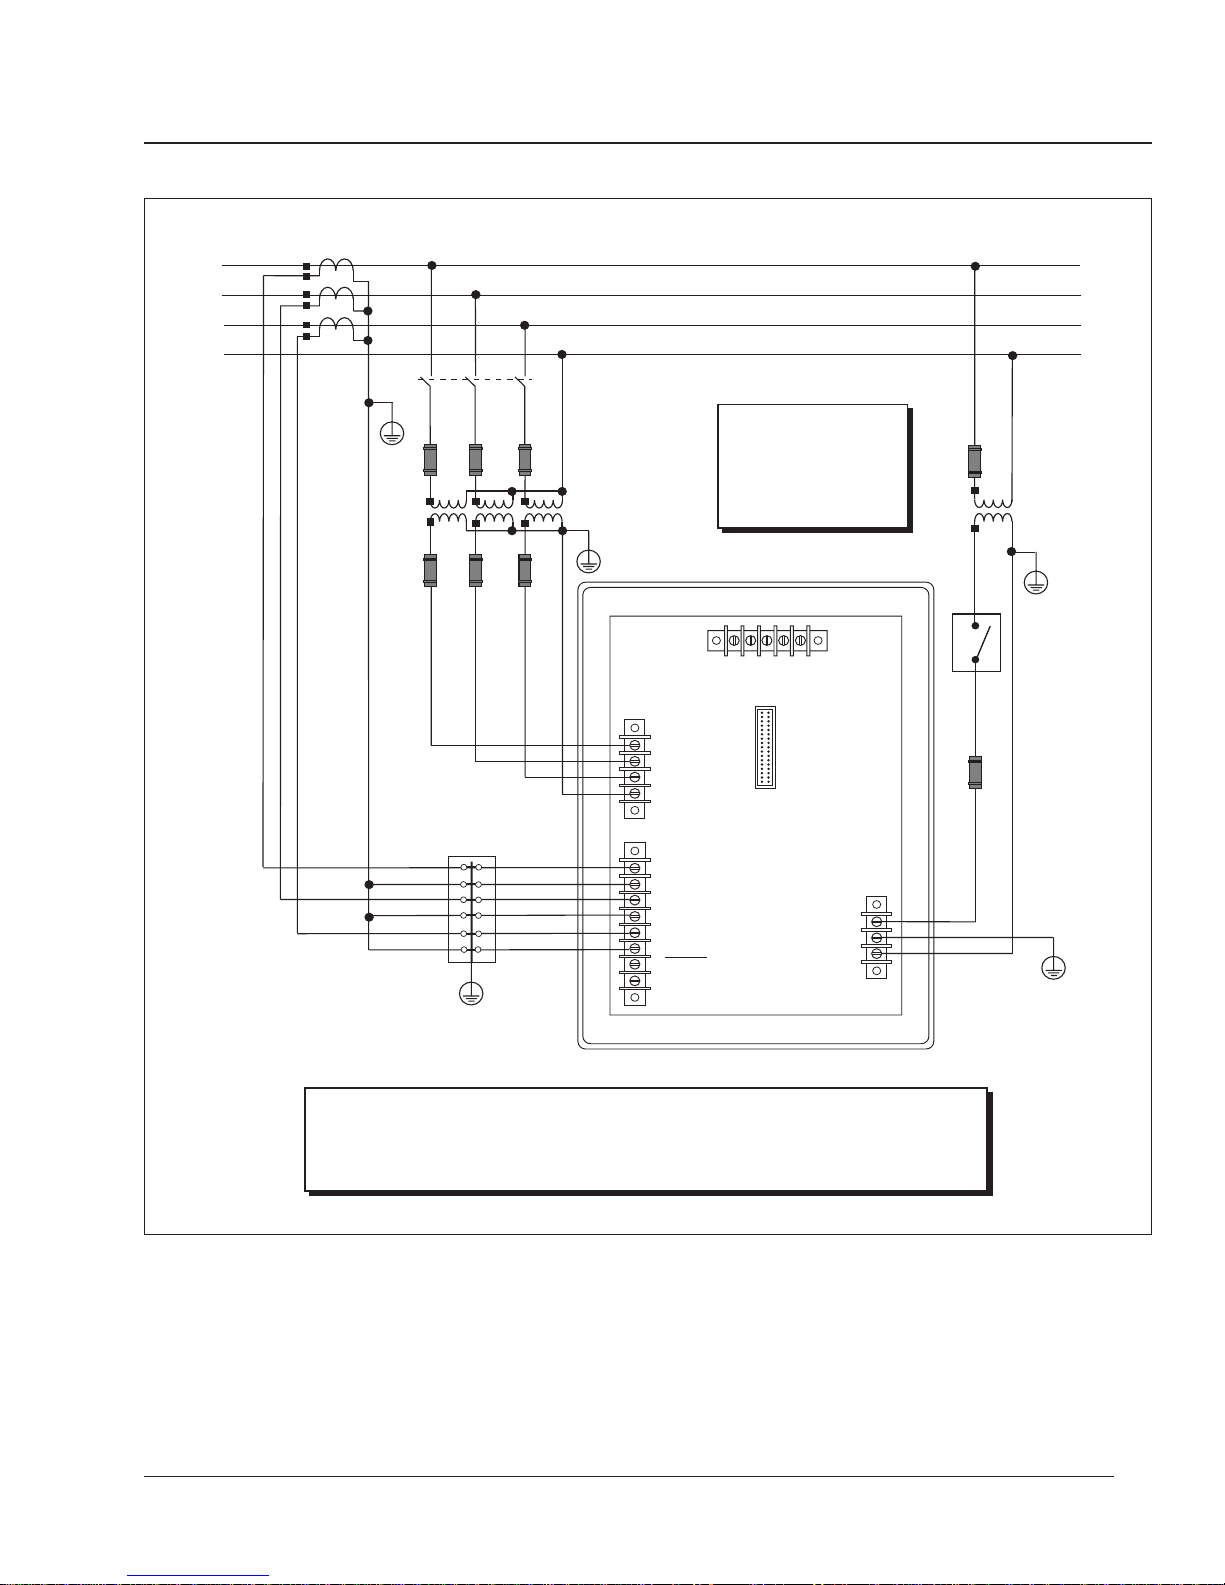
WIRING CTs, PTs, AND The circuit monitor supports a variety of 3-phase power system wiring
CONTROL POWER connections, including 3-wire delta, and 4-wire wye. Table 3-2 lists the
supported system connections. Figures 3-4 through 3-9 show CT, PT, and
control power wiring. Figure 3-10 on page 24 shows dc control power.
Notes:
• When wiring the circuit monitor, route wires outward to make room for
add-on modules that you might install in the future.
• Wiring instructions are also included in CM hardware kit.
• For CE wiring requirements, see CE Compliance, page 14.
To wire the circuit monitor, complete the following steps:
1. Using a suitable crimping tool, crimp the blue spade connectors included
with the circuit monitor onto the wires for the voltage, current, and
control power inputs.
2.
Connect the spade connectors to the circuit monitor terminals as shown in
the appropriate wiring diagram. (Figures 3-4 through 3-10 show wiring
connections.) Do not overtighten screws, but ensure that they are snug.
3. Ground the circuit monitor. See Grounding the Circuit Monitor in this
chapter for instructions.
4. Install protective terminal strip covers. See Appendix C for instructions.
DANGER
!
HAZARD OF PERSONAL INJURY OR DEATH
Only qualified electrical workers should install and wire this equipment.
Such work should be performed only after reading this complete set of
instructions. Follow proper safety procedures regarding CT secondary
wiring. Never open circuit the secondary of a CT.
Failure to observe this precaution will result in death, serious injury
or equipment damage.
Table 3-2
Supported System Wiring Connections
System Type Sys ID➀# CTs Aux. CT # PTs PT Conn. Currents Voltages Figure #
3∅, 3-wire 30 2 None 2 Open Delta A, B➁, C A-B, B-C, C-A
Delta
3∅, 4-wire 40 3 None 3 Wye-Wye A, B, C, N
Wye, Ground A-B➁, B-C➁, C-A
3∅, 4-wire 41 3 Neut 3 Wye-Wye A, B, C, N, G
Wye, Ground A-B➁, B-C➁, C-A
3∅, 4-wire 40 2 None 3 Wye-Wye A, B, C, N
Wye, Ground
3∅, 4-wire 42 3 None 2 Open Wye A, B, C, N
Wye, Ground A-B➁, B-C➁, C-A
3∅, 4-wire 43 3 Neut 2 Open Wye A, B, C, N, G
Wye, Ground A-B➁, B-C➁, C-A
➀ The System ID is used during setup to specify the system type.
➁ Indicates a value that is calculated rather than measured directly.
➂ For 3-wire loads only.
➂
➁
➁
➁
➁
➁
A-N, B-N, C-N 3-5
A-N, B-N, C-N 3-6
A-N, B-N, C-N 3-7
A-B➁, B-C➁, C-A
A-N, B-N➁, C-N 3-8
A-N, B-N➁, C-N 3-9
➁
➁
➁
➁
➁
➁
3-4
17
Page 22

Bulletin No. 3020IB9814
December 1998
Line
AØ
BØ
CØ
CTs (5 Amp Secondaries)
CT Shorting
Block
VDS
Fuses
OPEN DELTA PT
CONNECTION
(120 V L-L
Secondaries)
Fuses
TYPE 1 ENCLOSURE
INDOOR USE ONLY
a
V
b
V
c
V
n
910111256781234
V
a+
I
a-
I
b+
I
b-
I
c+
I
c-
I
n+
I
n-
I
Note: Control power can be drawn
from phase PT inputs. See
Deriving Control Power from
Phase PT Inputs
For DC control power connections,
see figure 3-10.
20 21 22 23 24
IN+ IN- OUT+ OUT- SHLD
DATA COMMUNICATIONS
3 PHASE
VOLTAGE
INPUTS
120 VOLTS
NOMINAL
3 PHASE
CURRENT
INPUTS
5 AMPS
NOMINAL
AUXILIARY
CURRENT
INPUTS
5 AMPS
NOMINAL
RS-485
in this chapter.
CONTROL
POWER
14 VA
Load
Fuses
CPT
(120 or 240 Vac
Secondary, 14 VA)
Disconnect
Switch
Fuse
(+)L G N(-)
25 26 27
True Earth
Ground
Notes:
• Pay close attention to polarity marks (■) when connecting CTs and PTs.
• Installation Category II
Figure 3-4: 3-phase, 3-wire delta connection
18
Page 23
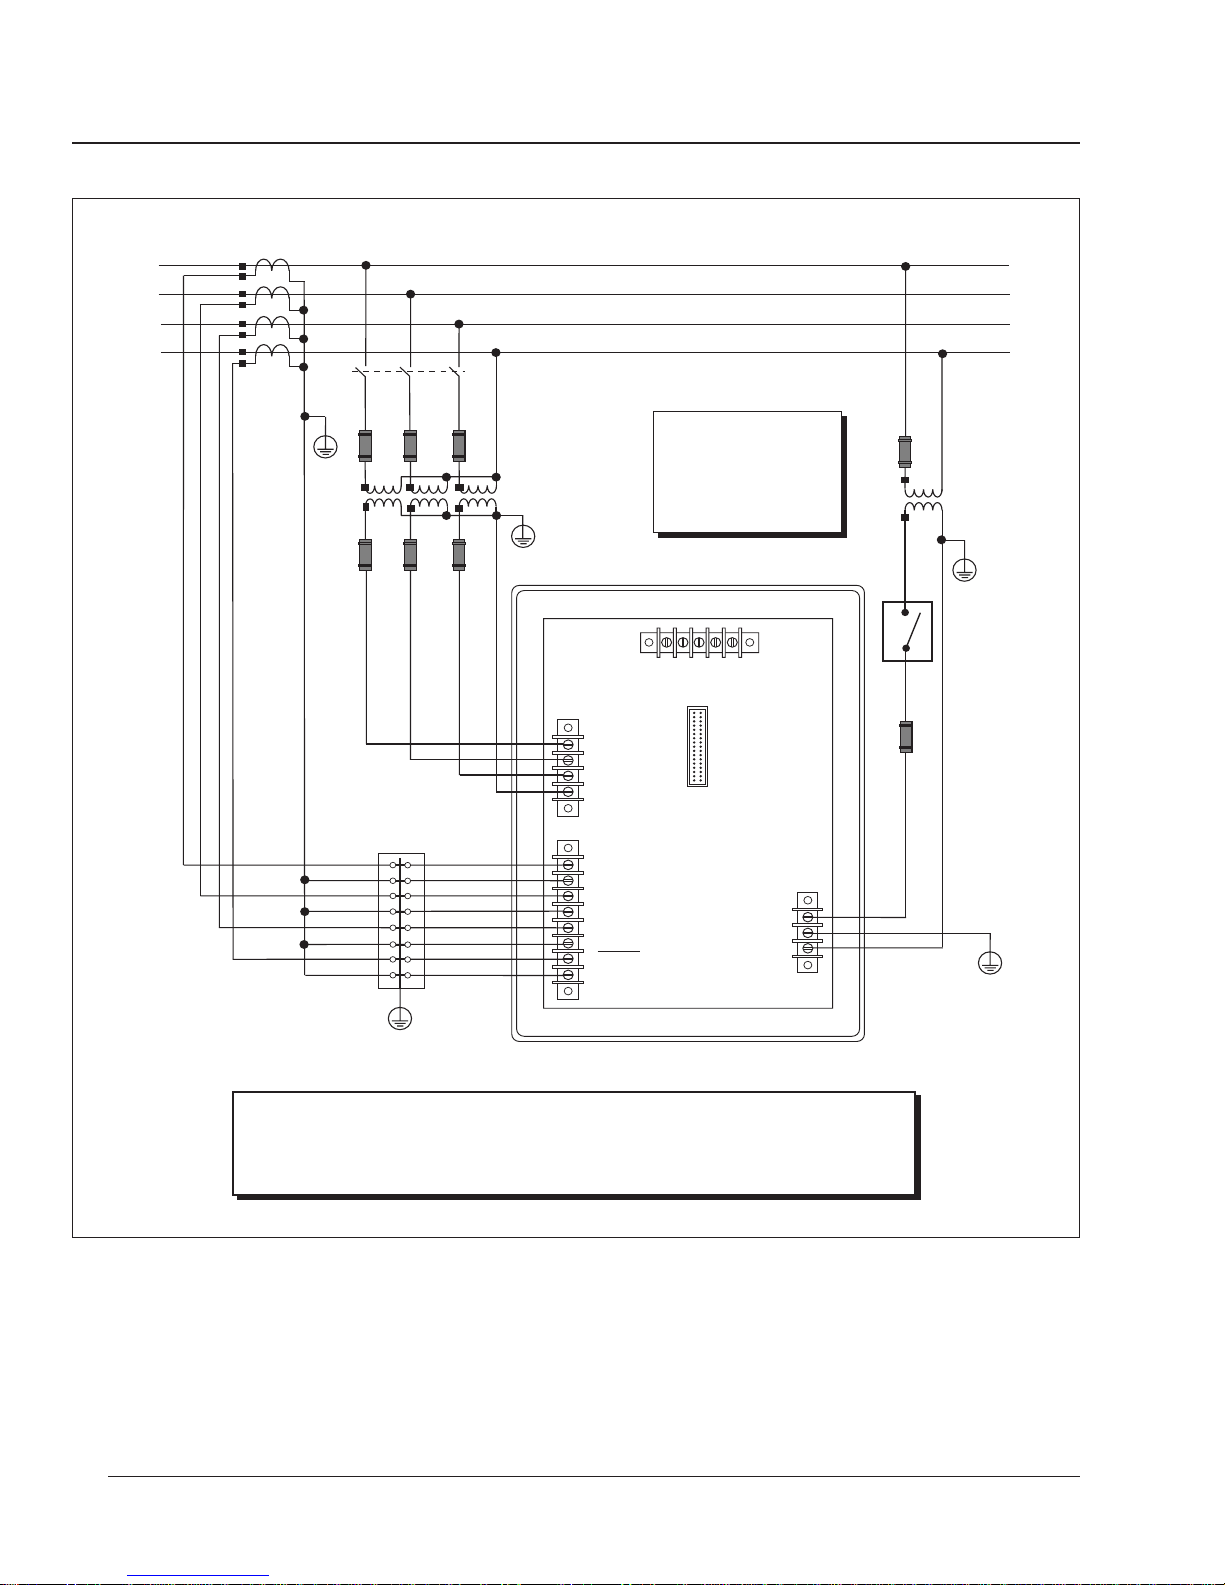
Chapter 3—Installation
Line
AØ
BØ
CØ
CTs (5 Amp Secondaries)
Load
N
VDS
Note: Control power can
be drawn from phase PT
Fuses
Fuses
WYE PT
CONNECTION
(120 V L-N
Secondaries)
TYPE 1 ENCLOSURE
INDOOR USE ONLY
a
V
3 PHASE
b
VOLTAGE
V
INPUTS
c
120 VOLTS
V
NOMINAL
n
910111256781234
V
inputs. See
Control Power from
Phase PT Inputs
chapter. For dc control
power connections, see
figure 3-10.
20 21 22 23 24
IN+ IN- OUT+ OUT- SHLD
DATA COMMUNICATIONS
RS-485
Deriving
in this
Fuse
Fuse
CPT
(120 or 240 Vac
Secondary, 14 VA)
Disconnect
Switch
CT Shorting
Block
a+
I
a-
I
3 PHASE
CURRENT
b+
I
b-
I
c+
I
c-
I
n+
I
n-
I
INPUTS
5 AMPS
NOMINAL
AUXILIARY
CURRENT
INPUTS
5 AMPS
NOMINAL
CONTROL
POWER
14 VA
(+)L G N(-)
25 26 27
Notes:
• Pay close attention to polarity marks (■) when connecting CTs and PTs.
• Installation Category II
Figure 3-5: 3-phase, 4-wire wye, ground connection
True Earth
Ground
19
Page 24
Bulletin No. 3020IB9814
December 1998
Line
AØ
BØ
CØ
CTs (5 Amp Secondaries)
Load
N
VDS
Note: Control power can
Fuses
Fuses
CT Shorting
Block
WYE PT
CONNECTION
(120 V L-N
Secondaries)
TYPE 1 ENCLOSURE
INDOOR USE ONLY
a
V
3 PHASE
b
VOLTAGE
V
INPUTS
c
120 VOLTS
V
NOMINAL
n
910111256781234
V
a+
I
a-
I
3 PHASE
CURRENT
b+
I
INPUTS
5 AMPS
b-
I
NOMINAL
c+
I
c-
I
AUXILIARY
n+
I
CURRENT
INPUTS
n-
5 AMPS
I
NOMINAL
be drawn from phase PT
inputs. See
Control Power from
Phase PT Inputs
chapter. For dc control
power connections, see
figure 3-10.
20 21 22 23 24
IN+ IN- OUT+ OUT- SHLD
DATA COMMUNICATIONS
RS-485
Deriving
CONTROL
POWER
14 VA
in this
(+)L G N(-)
Fuse
CPT
(120 or 240 Vac
Secondary, 14 VA)
Disconnect
Switch
Fuse
25 26 27
True Earth
Ground
Notes:
• Pay close attention to polarity marks (■) when connecting CTs and PTs.
• Installation Category II
Figure 3-6: 3-phase, 4-wire wye, ground connection, metered neutral
20
Page 25

Chapter 3—Installation
Line
AØ
BØ
CØ
CTs (5 Amp Secondaries)
3-Wire
Load
N
VDS
Note: Control power can
be drawn from phase PT
Fuses
WYE PT
CONNECTION
(120 V L-N
Secondaries)
inputs. See
Control Power from
Phase PT Inputs
chapter. For dc control
power connections, see
figure 3-10.
Deriving
in this
Fuse
CPT
(120 or 240 Vac
Secondary, 14 VA)
Fuses
CT Shorting
Block
TYPE 1 ENCLOSURE
INDOOR USE ONLY
a
1256781234
V
b
11
V
c
10
V
9
n
V
a
I
a-
I
b+
I
b-
I
c+
I
c-
I
n+
I
n-
I
3 PHASE
VOLTAGE
INPUTS
120 VOLTS
NOMINAL
3 PHASE
CURRENT
INPUTS
5 AMPS
NOMINAL
AUXILIARY
CURRENT
INPUTS
5 AMPS
NOMINAL
20 21 22 23 24
IN+ IN-
OUT- SHLD
OUT+
RS-485
DATA COMMUNICATIONS
CONTROL
POWER
14 VA
Fuse
(+)L G N(-)
25 26 27
Disconnect
Switch
True Earth
Ground
Notes:
• Pay close attention to polarity marks (■) when connecting CTs and PTs.
• Installation Category II
Figure 3-7: 3-phase, 4-wire wye, 3-wire load
21
Page 26

Bulletin No. 3020IB9814
December 1998
Line
AØ
BØ
CØ
CTs (5 Amp Secondaries)
Load
N
VDS
Note: Control power can
be drawn from phase PT
inputs. See
Control Power from
Phase PT Inputs
chapter. For dc control
power connections, see
figure 3-10.
20 21 22 23 24
IN+ IN- OUT+ OUT- SHLD
DATA COMMUNICATIONS
Deriving
in this
RS-485
Fuse
Fuse
CPT
(120 or 240 Vac
Secondary, 14 VA)
Disconnect
Switch
Fuses
Fuses
WYE PT
CONNECTION
(120 V L-N
Secondaries)
TYPE 1 ENCLOSURE
INDOOR USE ONLY
a
V
3 PHASE
b
VOLTAGE
V
INPUTS
c
120 VOLTS
V
NOMINAL
n
910111256781234
V
CT Shorting
Block
a+
I
a-
I
3 PHASE
CURRENT
b+
I
b-
I
c+
I
c-
I
n+
I
n-
I
INPUTS
5 AMPS
NOMINAL
AUXILIARY
CURRENT
INPUTS
5 AMPS
NOMINAL
CONTROL
POWER
14 VA
(+)L G N(-)
25 26 27
Notes:
• Pay close attention to polarity marks (■) when connecting CTs and PTs.
• Installation Category II
Figure 3-8: 2-1/2 element metering system type 42 (calculated neutral)
True Earth
Ground
22
Page 27

Chapter 3—Installation
Line
AØ
BØ
CØ
CTs (5 Amp Secondaries)
Load
N
VDS
Fuses
Fuses
CT Shorting
Block
WYE PT
CONNECTION
(120 V L-N
Secondaries)
TYPE 1 ENCLOSURE
INDOOR USE ONLY
a
V
3 PHASE
b
VOLTAGE
V
INPUTS
c
120 VOLTS
V
NOMINAL
n
910111256781234
V
a+
I
a-
I
3 PHASE
CURRENT
b+
I
INPUTS
5 AMPS
b-
I
NOMINAL
c+
I
c-
I
AUXILIARY
n+
I
CURRENT
INPUTS
n-
5 AMPS
I
NOMINAL
Note: Control power can
be drawn from phase PT
inputs. See
Control Power from
Phase PT Inputs
chapter. For dc control
power connections, see
figure 3-10.
20 21 22 23 24
IN+ IN- OUT+ OUT- SHLD
DATA COMMUNICATIONS
RS-485
Deriving
CONTROL
POWER
14 VA
in this
(+)L G N(-)
Fuse
CPT
(120 or 240 Vac
Secondary, 14 VA)
Disconnect
Switch
Fuse
25 26 27
True Earth
Ground
Notes:
• Pay close attention to polarity marks (■) when connecting CTs and PTs.
• Installation Category II
Figure 3-9: 2-1/2 element metering system type 43
23
Page 28

Bulletin No. 3020IB9814
December 1998
TYPE 1 ENCLOSURE
INDOOR USE ONLY
a
1256781234
V
b
11
V
c
10
V
9
n
V
a
I
a-
I
b+
I
b-
I
c+
I
c-
I
n+
I
n-
I
3 PHASE
VOLTAGE
INPUTS
120 VOLTS
NOMINAL
3 PHASE
CURRENT
INPUTS
5 AMPS
NOMINAL
AUXILIARY
CURRENT
INPUTS
5 AMPS
NOMINAL
20 21 22 23 24
IN+ IN-
DATA COMMUNICATIONS
OUT+
RS-485
OUT- SHLD
CONTROL
POWER
(+)L G N(-)
25 26 27
(+)
dc Control Power
(–)
120/250 Vdc Nominal
24
Note: Installation Category II
Figure 3-10: DC control power connections
Page 29

Chapter 3—Installation
Wiring Multiple Circuit Multiple circuit monitors can share one set of 3-phase PTs. Also, multiple
Monitors to a Single Set circuit monitors can share a single control power transformer (CPT). In all
of PTs/CPT cases, each circuit monitor must use a separate set of CTs. Figure 3-11 shows
how to connect multiple circuit monitors to a single set of PTs and CPT.
Note: When using this wiring method, ground the PT secondaries in only one
location.
PTs
CPT
CM
CTs
CM
CTs
Figure 3-11: Circuit monitors connected to one set of PTs and one CPT
CTs CTs
CM CM
25
Page 30

Bulletin No. 3020IB9814
December 1998
Deriving Control Power Whenever possible, derive circuit monitor control power from a stable
from Phase PT Inputs voltage source. If such a source is unavailable, the circuit monitor can derive
control power from its phase PT inputs. Due to the wide range of permissible
control power inputs, the circuit monitor can accept either L-N or L-L control
power inputs up to 240 V nominal. Using the L-L control power option
increases the circuit monitor ride-through time and enables more reliable
operation during voltage disturbances.
Referring to figures 3-12 and 3-13, complete the following steps to derive control
power from phase PT inputs:
1. Connect the Va terminal (terminal 12) to the L terminal (terminal 25).
2. For L-N control power, connect the Vn terminal (terminal 9) to the N
terminal (terminal 27). For L-L control power, connect the Vc terminal
(terminal 10) to the N terminal (terminal 27).
3. Install protective terminal strip covers. See Appendix C for instructions.
CAUTION
!
HAZARD OF EQUIPMENT DAMAGE
When deriving control power from the phase PT inputs, the phase
PT used must have a VA rating sufficient for all connected burdens.
If the VA rating is exceeded, it could reduce the voltage transformer’s
accuracy or damage the PT.
Failure to observe this precaution can result in equipment
damage.
26
Page 31

Chapter 3—Installation
TYPE 1 ENCLOSURE
INDOOR USE ONLY
a
V
b
V
c
V
n
910111256781234
V
a+
I
a-
I
b+
I
b-
I
c+
I
c-
I
n+
I
n-
I
3 PHASE
VOLTAGE
INPUTS
120 VOLTS
NOMINAL
3 PHASE
CURRENT
INPUTS
5 AMPS
NOMINAL
AUXILIARY
CURRENT
INPUTS
5 AMPS
NOMINAL
20 21 22 23 24
IN+ IN- OUT+ OUT- SHLD
RS-485
DATA COMMUNICATIONS
CONTROL
POWER
TYPE 1 ENCLOSURE
INDOOR USE ONLY
aVbVcVnIa+Ia-Ib+Ib-Ic+Ic-In+In-
V
3 PHASE
VOLTAGE
INPUTS
120 VOLTS
NOMINAL
910111256781234
3 PHASE
CURRENT
(+)L G N(-)
25 26 27
INPUTS
5 AMPS
NOMINAL
AUXILIARY
CURRENT
INPUTS
5 AMPS
NOMINAL
20 21 22 23 24
IN+ IN- OUT+ OUT- SHLD
RS-485
DATA COMMUNICATIONS
CONTROL
POWER
(+)L G N(-)
25 26 27
Figure 3-12: Deriving L-L control power from phase PT inputs Figure 3-13: Deriving L-N control power from phase PT inputs
GROUNDING THE For optimal grounding, connect the circuit monitor to a true earth ground.
CIRCUIT MONITOR
To ground the circuit monitor, complete the following steps:
1. Connect the Ground terminal (terminal 26) to a true earth ground, using
#14 AWG wire or larger with spade connector (see figure 3-14).
2. Install protective terminal strip cover. See Appendix C for instructions.
DANGER
!
HAZARD OF ELECTRIC SHOCK
Ground the circuit monitor as described in these instructions. Failure
to properly ground the circuit monitor may allow hazardous voltages
to be present on the circuit monitor chassis, and may result in
equipment damage.
Failure to observe this precaution will result in death, serious
injury or equipment damage.
27
Page 32

Bulletin No. 3020IB9814
December 1998
a+
I
a-
I
3 PHASE
CURRENT
b+
I
56781234
b-
I
c+
I
c-
I
n+
I
n-
I
INPUTS
5 AMPS
NOMINAL
AUXILIARY
CURRENT
INPUTS
5 AMPS
NOMINAL
CONTROL
POWER
(+)L G N(-)
25 26 27
#14 AWG Wire
(or Larger)
True Earth
Ground
Figure 3-14: Grounding the circuit monitor
COMMUNICATIONS WIRING POWERLOGIC devices are equipped with RS-485 communications. The
RS-485 standard lets you daisy-chain up to 32 POWERLOGIC-compatible
devices to a single communications port. This document refers to a chain of
POWERLOGIC devices connected by communications cable as a
communications link.
A POWERLOGIC communications link can consist of up to 32
POWERLOGIC-compatible devices connected to a communications port on
one of the following:
• POWERLOGIC System Display
• Personal computer
• POWERLOGIC Network Interface Module
• SY/MAX programmable controller
• Other host devices with a POWERLOGIC-compatible port
Figures 3-15 through 3-19 show circuit monitors and other POWERLOGIC
compatible devices connected in typical systems. The accompanying text
describes important considerations for each connection alternative.
The figures also show the placement of communications adapters and
terminators. For additional information on using the communications
adapter and terminator, see Terminating the Communications Link and
Biasing the Communications Link in this chapter.
28
Page 33

Chapter 3—Installation
Connecting to a System • Connect up to 32 circuit monitors to the system display for Circuit
Display Monitors (Class 3050 Types SD-200, SD-220). See Length of the
Communications Link in this chapter for distance limitations at
varying baud rates.
• Connect circuit monitors to the RS-485 port on the bottom of the system
display.
• Configure the system display’s baud rate to match the baud rate of circuit
monitors on the communications link.
• Refer to the instruction bulletin for the system display for circuit monitors
(Class 3050 Types SD-200, SD-220) for detailed instructions on
configuring the system display.
System Display
To RS-485
communications port
BELDEN 8723
(or equivalent)
MCT-485
MCA-485
CAB-107
CAB-107
(see Appendix B
(See Appendix D
for cable pinouts)
for cable pinouts)
1–32 Circuit Monitors
Figure 3-15: Circuit monitors connected to a system display for circuit monitors
29
Page 34

Bulletin No. 3020IB9814
December 1998
Connecting to a • Connect up to 32 POWERLOGIC devices to a personal computer. See
Personal Computer Length of the Communications Link in this chapter for distance
limitations at varying baud rates.
• POWERLOGIC devices can be connected to a SY/LINK card installed in
the personal computer. To do this, connect the POWERLOGIC devices to
the RS-422 port (female DB-9 connector) of the SY/LINK card.
• POWERLOGIC devices can be connected to a serial COMM port on the
personal computer. To do this, the POWERLOGIC devices must be
connected to an RS-232 to RS-422/RS-485 converter which is connected
to the personal computer. POWERLOGIC offers a converter kit for this
purpose (Class 3090 Type MCI-101). Refer to the instruction bulletin
included with the MCI-101 for connection instructions.
Connected to RS-422 port of SY/LINK
Connected to RS-422 port of SY/LINK card
card or RS-422 PC serial port
BELDEN 8723
(or equivalent)
MCT-485
MCA-485
1–32 Devices (Circuit Monitors and other POWERLOGIC-compatible devices)
Figure 3-16: POWERLOGIC devices connected directly to a personal computer
CAB-107
CAB-107
(see Appendix B
(See Appendix D
for cable pinouts)
for cable pinouts)
30
Page 35

Chapter 3—Installation
Connecting to a POWERLOGIC
• There are two models of the POWERLOGIC Ethernet Gateway: a single
Ethernet Gateway (EGW) port version (EGW1) and a dual port version (EGW2).
• The serial port on the EGW1 can support up to 8 POWERLOGIC devices.
• Each serial port on the EGW2 can support up to 32 POWERLOGIC
devices on a daisy-chain, or up to 64 devices when a signal repeater
is used.
• Connection to the Ethernet can be made via a UTP or AUI port.
POWERLOGIC
Network Server
with Client
POWERLOGIC
Ethernet Gateway
(dual port version)
UNIT STATUS
Ethernet
Belden 8723
(or equivalent)
MCT-485
Transmit
Receive
Collision
UTP Link
UTP Parity
RS-232
UTP
RS-485
PORT 1 PORT 2
(AMBER•OK)
AUI
MCT-485
1–32 Devices (Circuit Monitors and Other
POWERLOGIC-Compatible Devices)
Figure 3-17: POWERLOGIC devices connected to an Ethernet gateway
1–32 Devices (Circuit Monitors and Other
POWERLOGIC-Compatible Devices)
31
Page 36

Bulletin No. 3020IB9814
December 1998
Connecting to a POWERLOGIC • Connect up to 32 POWERLOGIC devices to a PNIM. See Length of the
Network Interface Module Communications Link in this chapter for distance limitations at different
(PNIM) baud rates.
• Connect POWERLOGIC devices to PNIM port 0 (top RS-485 port) only.
• Configure PNIM port 0 for “POWERLOGIC” mode. (See side of PNIM for
instructions on setting dip switches.
• Configure the baud rate of PNIM port 0 to match the baud rate of the
POWERLOGIC devices on the communications link.
• Refer to the PNIM instruction bulletin for detailed instructions on
configuring the PNIM.
System Display
BELDEN 8723
(or equivalent)
MCT-485
1–32 Devices (Circuit Monitors and other
Figure 3-18: POWERLOGIC devices connected to a PNIM
POWERLOGIC
-compatible devices)
Connect Circuit Monitors
to top port (port 0) of
PNIM only.
MCA-485
CAB-107
CAB-107
(See Appendix D
(see Appendix B
for cable pinouts)
for cable pinouts)
PNIM
Remote PC
32
Page 37

Chapter 3—Installation
Connecting to a SY/MAX • Connect up to 32 POWERLOGIC devices to a programmable
Programmable Controller
controller. See Length of the Communications Link in this chapter for
distance limitations at different baud rates.
• Connect POWERLOGIC devices to the RS-422 port of the programmable
controller.
• The programmable controller must contain a program to access
POWERLOGIC device data.
• Configure the baud rate of the programmable controller’s port to match
the baud rate of the POWERLOGIC devices on the communications link.
• Refer to the programmable controller instruction manual for detailed
instructions on configuring the programmable controller.
Note: POWERLOGIC devices can be connected to other manufacturer’s
systems using available communication interfaces. For further information,
contact the POWERLOGIC Technical Support Center. See Getting Technical
Support in Chapter 5.
Programmable
Controller
Connect Circuit Monitors
to RS-422 port of
programmable controller.
BELDEN 8723
(or equivalent)
MCT-485
1–32 Devices (Circuit Monitors and other
POWERLOGIC
-compatible devices)
(See Appendix D
for cable pinouts)
MCA-485
CAB-107
CAB-107
(see Appendix B
for cable pinouts)
Figure 3-19: POWERLOGIC devices connected to a SY/MAX programmable controller
33
Page 38

Bulletin No. 3020IB9814
December 1998
Length of the The length of the communications link cannot exceed 10,000 feet (3,050 m).
Communications Link This means that the total length of the communications cable from the
PNIM, personal computer, system display, or processor, to the last device
in the daisy-chain, cannot exceed 10,000 feet. When 17 or more devices are
on a communications link, the maximum distance may be shorter,
depending on the baud rate. Table 3-3 shows the maximum distances at
different baud rates.
Table 3-3
Maximum Distances of Comms Link at Different Baud Rates
Maximum Distances
Baud Rate 1–16 devices 17–32 devices
1200 10,000 ft (3,050 m) 10,000 ft (3,050 m)
2400 10,000 ft (3,050 m) 5,000 ft (1,525 m)
4800 10,000 ft (3,050 m) 5,000 ft (1,525 m)
9600 10,000 ft (3,050 m) 4,000 ft (1,220 m)
19200 10,000 ft (3,050 m) 2,500 ft (762.5 m)
34
Page 39

Chapter 3—Installation
Daisy-Chaining
POWERLOGIC Devices
Note: To daisy-chain POWERLOGIC devices, use communications cable
containing two twisted-shielded pairs (Belden 8723 or equivalent). Connect the
wires to the circuit monitor’s terminals using the red spade connectors included
with the circuit monitor. Using a suitable crimping tool, crimp the red
connectors onto the communications wires.
Each communicating POWERLOGIC device has five RS-485 terminals for
connection to a POWERLOGIC communications link. On all devices, the
terminals are labeled IN+, IN-, OUT+, OUT-, and SHLD. On the circuit
monitor, the IN+, IN-, OUT+, OUT-, and SHLD terminals are numbered 20,
21, 22, 23, and 24, respectively.
To daisy-chain the circuit monitor to another POWERLOGIC device, wire the
circuit monitor’s RS-485 communications terminals to the matching
communications terminals of the next device. In other words, wire the IN+
terminal of the circuit monitor to the IN+ terminal of the next device, wire
IN- to IN-, OUT+ to OUT+, OUT- to OUT-, and SHLD to SHLD.
See Figure 3-20.
If the circuit monitor is the last device on the daisy-chain, terminate it. See
Terminating the Communications Link in this chapter for instructions. If
the circuit monitor is the first device on the daisy-chain, connect it to the
PNIM, personal computer, system display, or programmable controller using
a CAB-107 or equivalent cable and a Multipoint Communications Adapter.
See Biasing the Communications Link in this chapter for instructions. See
Communication Cable Pinouts in the Circuit Monitor Reference Manual for
the CAB-107 pinout.
or other POWERLOGIC-
Green*
White
To RS-485
Terminals of
next device
* Standard conductor color convention
Red
Black
Circuit Monitor
compatible Device
IN+
IN-
OUT+
OUT-
SHLD
Circuit Monitor
or other POWERLOGIC-
compatible Device
IN+
IN-
OUT+
OUT-
SHLD
Belden 8723
(or equivalent)
Circuit Monitor
or other POWERLOGIC-
compatible Device
IN+
IN-
OUT+
OUT-
SHLD
Figure 3-20: Daisy-chaining the RS-485 communications terminals
To RS-485
Terminals of
next device
35
Page 40

Bulletin No. 3020IB9814
December 1998
Terminating the To ensure reliable communications, terminate the last device on a
Communications Link POWERLOGIC communications link. To terminate the last device, use a
POWERLOGIC Multipoint Communications Terminator (Class 3090 Type
MCT-485).
To terminate a circuit monitor, slide the terminator’s four spade connectors
under the IN+, IN-, OUT+, and OUT- terminals on the back of the circuit
monitor and tighten. Figure 3-20 shows proper placement of the terminator.
Figures 3-15 to 3-19 show the terminator applied in typical systems.
Notes:
• Terminate only the last device on the link. If a link has only one device,
terminate that device.
• Some POWERLOGIC devices use a removable communications connector. If
the last device on the communications link is not a circuit monitor, refer to
the instruction bulletin for that device for termination instructions.
TYPE 1 ENCLOSURE
INDOOR USE ONLY
a
V
b
V
c
V
n
9101112
V
3 PHASE
VOLTAGE
INPUTS
120 VOLTS
NOMINAL
20 21 22 23 24
IN+ IN- OUT+ OUT- SHLD
RS-485
DATA COMMUNICATIONS
Figure 3-21: Terminator placement when last device on the link
is a circuit monitor
36
Page 41

Chapter 3—Installation
Biasing the To ensure reliable communications, bias the communications
Communications Link link. To bias the communications link, use a POWERLOGIC Multipoint
Communications Adapter (Class 3090 Type MCA-485).
To bias the communications link, plug the adapter into the communications
port of the device to which one or more POWERLOGIC devices are
connected. Plug the CAB-107 cable connected to the first POWERLOGIC
device on the link into the other end of the adapter.
Figure 3-22 shows the adapter connected to a POWERLOGIC Network
Interface Module (PNIM). Figures 3-15, 3-16, 3-18, and 3-19 show the adapter
applied in typical systems.
MCA-485
Communications
Adapter
CAB-107 Cable
to first device in
daisy-chain
Figure 3-22: Multipoint Communications Adapter connected to PNIM
2
1
0
1
37
Page 42

Chapter 4—Front Panel Operation
CHAPTER 4—FRONT PANEL OPERATION
CHAPTER CONTENTS This chapter tells how to set up the circuit monitor from the front panel only.
Some advanced circuit monitor features, such as event log/data log
configuration, must be set up over the communications link. You can set up
these advanced features using POWERLOGIC software. Refer to the
software instruction bulletin for instructions on setting up advanced
features.
The Setup Mode ...................................................................................................... 40
The Configuration Option............................................................................. 40
The Resets Option........................................................................................... 40
The Alarm/Relay Option .............................................................................. 40
The Diagnostics Option ................................................................................. 40
Choosing a Setup Option ................................................................................41
How the Buttons Work .................................................................................... 41
Configuring the Circuit Monitor .......................................................................... 42
Factory Defaults.............................................................................................. 42
General Configuration Procedure................................................................ 42
Viewing Configuration Data in Protected Mode ....................................... 45
Setting the Master Password ........................................................................ 46
Setting the CT Ratios...................................................................................... 47
Setting the PT Ratio ........................................................................................ 48
Setting the System Type ................................................................................ 48
Setting the Demand Interval ......................................................................... 49
Setting the Watthour/Pulse Output ............................................................ 51
Setting the Device Address ........................................................................... 52
Setting the Baud Rate ..................................................................................... 53
Setting the Nominal Frequency.................................................................... 54
Resetting Demand, Energy, and Min./Max. Values ................................. 55
Performing Resets Using The Resets Option ...................................................... 56
Setting Up Alarm/Relay Functions ..................................................................58
General Setup Procedure ...............................................................................59
Detailed Setup Procedure .............................................................................60
Viewing Active Alarms........................................................................................63
Viewing the Priority 1 Log..................................................................................64
Clearing the Priority 1 Log .................................................................................65
39
Page 43

Bulletin No. 3020IB9814
December 1998
THE SETUP MODE To access the Setup Mode, press the MODE button until the red LED next to
[Setup] is lit. The circuit monitor displays “Config”—the first of four setup
options. The circuit monitor displays the options as abbreviated
combinations of uppercase and lowercase letters. The abbreviations
displayed by the circuit monitor, and their full names are shown below.
Full Name CM Display
Configuration Option ConFig
Resets Option rESETs
Alarm/Relay Option AL.rLy
Diagnostics Option diAG
The Configuration Option The Configuration option lets you configure the following values: CT and PT
primaries, system type, demand interval, WH/pulse output, device address,
baud rate, nominal frequency, and password. You can also reset energy,
demand, and min/max values. See Configuring the Circuit Monitor, page
42, for more information.
The Resets Option The Resets option lets you reset energy, demand and min/max values. These
same reset operations can be done using the Configuration option. The
difference is that using the Resets option, you cannot change circuit monitor
configuration values. See Performing Resets Using the Resets Option in this
chapter for more information.
The Alarm/Relay Option The Alarm/Relay option lets you configure the circuit monitor’s on-board
alarm/relay functions. (See Alarm Setup Information in the Circuit Monitor
Reference Manual for a complete listing of the circuit monitor’s predefined
alarm conditions.) For each of the circuit monitor’s predefined alarm
conditions, you can:
• Enable or disable it
• Assign a priority to it
• Define any required pickup and dropout setpoints, and pickup and
dropout time delays
• Setup the circuit monitor to operate up to three relay outputs when the
alarm condition occurs
See Setting Up Alarm/Relay Functions in the Circuit Monitor Reference
Manual for details on how to use this option.
The Diagnostics Option The Diagnostics option lets you read and write circuit monitor registers. Use
this feature with caution. Writing an incorrect value, could cause the circuit
monitor to operate incorrectly. See Reading and Writing Registers from the
Front Panel in the Circuit Monitor Reference Manual for instructions on
reading and writing registers using the Diagnostics option.
40
Page 44

Chapter 4—Front Panel Operation
Choosing a Setup Option To enter the [Setup] mode, press the MODE button until the [Setup] LED is
lit. The circuit monitor displays “ConFig.” To move to a specific option, use
the SELECT METER [Value] buttons. To select an option, press the PHASE
[Enter] button (see figure 4-1).
Setup Mode
Config rESETS AL.rLY diAg
Use the SELECT METER [Value]
buttons to move to the desired option
(Config, rESETS, AL.rLY, or diAg).
Press the PHASE
PHASE
[Enter] button to
select an option.
Figure 4-1: Choosing a Setup option
How the Buttons Work The circuit monitor’s front panel buttons perform different functions in
Setup mode than in Meters mode. In Setup mode, the buttons work as
described below.
The PHASE [Enter] button. In Setup mode, use this button as an “Enter” key
to accept a new configuration value and move to the next configuration item.
PHASE
For example, after changing the CT Primary value, press this button to enter
the new value and move to the next configuration item (PT Primary). Also,
press this button to move through configuration items that don’t need to be
changed, to reach a specific item.
SELECT METER [Value] buttons. In Setup mode, use these buttons to
increase or decrease the displayed value. Also, use these buttons to toggle
between Yes and No when required.
MODE
MODE button. Use this button to exit a setup option after making all desired
changes. For example, after making all desired changes within the
Configuration option, press the mode key. The circuit monitor then asks you
to accept or reject your changes.
41
Page 45

Bulletin No. 3020IB9814
December 1998
CONFIGURING THE This section tells how to use the Configuration option to define the following
CIRCUIT MONITOR values: CT and PT ratios, system type, demand interval, WH/pulse output,
device address, baud rate, nominal frequency, and password. It also tells
how to reset energy, demand and min/max values.
The section General Configuration Procedure describes the general steps
required to configure the circuit monitor. The remaining sections tell how to
configure specific values.
Factory Defaults Table 4-1 lists the front panel configuration parameters, their allowed values,
and their factory defaults.
Table 4-1
Factory Defaults for Front Panel Configuration Parameters
Parameter Allowed Values Default
CT Primary
Primary, 3-Phase 1 to 32,767 5
Primary, Neutral 1 to 32,767 5
PT Primary
Primary, 3-Phase 1 to 1,700,000 120
System Type 30, 40, 41 40
Demand Interval 5 to 60 min. 15
WH/Pulse output 0 to 3276.7 kWH 0
Device Address 0 to 199 1
Baud Rate 1,200–19,200 9,600
Frequency (Nom.) 50, 60, 400 60
Password 0 to 9998 0
General Configuration This section describes the general steps required to configure the circuit
Procedure monitor from the front panel. The configuration items (and reset items) are
the grey items in square brackets on the front panel of the circuit monitor.
Refer to these items when configuring the circuit monitor.
The front panel configuration procedure is described below. Alternately,
figure 4-2 on page 44 shows the configuration procedure, with less detail, as
a flow chart.
To configure the circuit monitor, complete the following steps:
1. Press the MODE button until the red LED next to [Setup] is lit.
The circuit monitor displays “ConFig”.
2. Press the PHASE [Enter] button to select the Configuration option.
The circuit monitor displays the password prompt “P - - - -.”
42
Page 46

Chapter 4—Front Panel Operation
3. Enter the password.
To enter the password, use the SELECT METER [Value] buttons to
increase or decrease the displayed value until it reaches the password
value. Then press the PHASE [Enter] button. (The circuit monitor’s
default password is 0.)
The red LED next to [CT Primary] flashes.
4. Press the PHASE [Enter] button to select a configuration item.
The red LED next to the selected configuration item flashes.
5. Press the SELECT METER [Value] buttons to increase or decrease the
displayed value until the desired value is displayed.
In the case of the [Reset] items, use the SELECT METER [Value] buttons
to toggle between Yes and No. See Resetting Demand, Energy, and
Min/Max Values in this chapter for more on resets.
6. Repeat steps 4 and 5 until you’ve made all desired configuration
changes.
7. After making all desired configuration changes, press the MODE
button once.
The red LED next to [Accept] flashes. The circuit monitor display reads
No, and the red LEDs next to the items that you have changed are lit.
Verify that only the LEDs next to the setup items you wish to change
are lit.
8. To reject the changes, press the PHASE [Enter] button once.
The circuit monitor returns to Meters mode.
9. To accept the changes, press the SELECT METER [Value] button to
change from No to Yes. Then, press the PHASE [Enter] button.
The circuit monitor goes through its restart procedure. This indicates
that the changes have been made.
43
Page 47

Bulletin No. 3020IB9814
December 1998
START
Press the MODE
key until the
[Setup] LED is lit.
Press the PHASE
[Enter] key to enter
Configuration mode.
Use the SELECT
METER keys to
display the
password. Then
press the PHASE
[Enter] key.
The CM enters
Configuration mode.
Press the PHASE
[Enter] key to
move to the value
to be changed.
Use the SELECT
METER keys to
change the value.
Do you want
to change
another
value?
NO
Press the
MODE key
once.
Do you want
to accept the
changes?
YES
Press SELECT
METER key.
YES
NO
Press the PHASE
[Enter] key.
The CM leaves
Configuration mode.
Figure 4-2: Flowchart for front panel configuration
44
Press the PHASE
[Enter] key.
CM accepts changes
and restarts.
Page 48

Chapter 4—Front Panel Operation
Viewing Configuration Data The circuit monitor provides a special protected viewing mode that lets you
In Protected Mode view, but not change, configuration data.
To view configuration data, complete the following steps:
1. Press the MODE button until the red LED next to [Setup] is lit.
The circuit monitor displays “ConFig”.
2. Press the PHASE [Enter] button.
The circuit monitor displays the password prompt “P - - - -.”
3. Enter 9999 for the password.
To enter 9999, use the SELECT METER [Value] buttons to decrease the
displayed value until it reaches 9999. Then press the PHASE [Enter]
button.
The circuit monitor enters the protected viewing mode and scrolls
through the following device information:
• d=2350 (the number after “d=” represents the device model number)
• s=0345 (the numbers following “s=” represent the last four digits of
the device serial number)
• r=1516 (the first two digits after “r=” represent the reset code
revision and the last two digits represent the circuit monitor
firmware revision level
• 1=001 (the digits following “1=” represent the circuit monitor
firmware sub-revision level, as in firmware version 17.002)
After this scrolling sequence, the display shows the present CT ratio.
4. Press the PHASE [Enter] button to move from one configuration item to
the next.
5. To exit the protected viewing mode, press the MODE button.
The circuit monitor returns to METERS mode.
45
Page 49

Bulletin No. 3020IB9814
December 1998
Setting the Master The circuit monitor’s four setup modes are password protected. A master
Password password can be used to access any of the four setup modes. In addition to the
master password, the circuit monitor provides a reset password. The reset
password provides access to the Resets option only. Until you define a
unique reset password, the reset password defaults to the master password.
For instructions on defining and using the reset password see Performing
Resets Using the Resets Option in this chapter.
The master password can be any value in the range 0 to 9998. The factory
default is 0.
To change the master password, complete the following steps:
1. Press the MODE button until the red LED next to [Setup] is lit.
The circuit monitor displays “ConFig.”
2. Press the PHASE [Enter] button to select the Configuration option.
The circuit monitor displays the password prompt “P - - - -.”
3. Enter the existing master password.
To enter the password, use the SELECT METER [Value] buttons to
increase or decrease the displayed value until it reaches the password
value. Then press the PHASE [Enter] button. (The circuit monitor’s
default password is 0.)
4. Press the PHASE [Enter] button until the red LED next to [Set Password]
flashes.
5. Press the SELECT METER [Value] buttons until the desired password
value is displayed.
The password can be any value from 0 to 9998.
6. Press the MODE button once.
The red LED next to [Accept] flashes. The red LED next to [Set
Password] glows steadily.
7. To reject the new password, press the PHASE [Enter] button once.
The circuit monitor returns to METERS mode.
8. To accept the new password, press the up arrow SELECT METER
[Value] button to change from No to Yes. Then, press the PHASE [Enter]
button.
The circuit monitor returns to METERS mode.
46
Page 50

Chapter 4—Front Panel Operation
Setting the CT Ratios The circuit monitor supports two primary CT ratings: one for the phase CTs
and one for the neutral CT. The allowable range is 1 to 32,767. The factory
default for both CT secondaries is 5.
Note: The neutral CT is optional. If the circuit monitor is set up for any system type
that does not require a neutral CT, the circuit monitor ignores the neutral CT rating
(even if neutral currents are reported).
To change the primary CT ratings, complete the following steps:
1. Press the MODE button until the red LED next to [Setup] is lit.
The circuit monitor displays “ConFig”.
2. Press the PHASE [Enter] button to select the Configuration option.
The circuit monitor displays the password prompt “P - - - -.”
3. Enter the master password.
To enter the password, use the SELECT METER [Value] buttons to
increase or decrease the displayed value until it reaches the password
value. Then press the PHASE [Enter] button.
The red LED next to [CT Primary] flashes indicating that the circuit
monitor is in Configuration mode. The 3-PHASE LED also lights
indicating that the circuit monitor is displaying the 3-phase, primary
CT rating.
4. Press the SELECT METER [Value] buttons until the desired 3-phase,
primary CT rating is displayed.
5. Press the PHASE [Enter] button once.
The N (Neutral) phase LED lights, and the circuit monitor displays the
primary CT rating for the neutral CT.
6. Press the SELECT METER [Value] buttons until the desired neutral
primary CT rating is displayed.
7. Press the MODE button once.
The red LED next to [Accept] flashes. The red LED next to [CT Primary]
glows steadily.
8. To reject the new CT rating(s), press the PHASE [Enter] button once.
The circuit monitor returns to METERS mode.
9. To accept the new CT rating(s), press the UP ARROW SELECT METER
[Value] button to change from No to Yes. Then, press the PHASE [Enter]
button.
The circuit monitor restarts.
47
Page 51

Bulletin No. 3020IB9814
December 1998
Setting the PT Ratio The circuit monitor supports one primary PT rating. The allowable range is 1
to 1,700,000 volts. The factory default PT secondary is 120 V.
To change the primary PT rating, complete the following steps:
1. Press the MODE button until the red LED next to [Setup] is lit.
The circuit monitor displays “ConFig”.
2. Press the PHASE [Enter] button to select the Configuration option.
The circuit monitor displays the password prompt “P - - - -.”
3. Enter the master password.
To enter the password, use the SELECT METER [Value] buttons to
increase or decrease the displayed value until it reaches the password
value. Then press the PHASE [Enter] button.
3. Press the PHASE [Enter] button twice.
The red LED next to the [PT Primary] item flashes. The 3-PHASE LED
lights, and the circuit monitor displays the primary PT rating for the
3-Phase PTs.
4. Press the SELECT METER [Value] buttons until the desired primary PT
rating is displayed.
5. Press the MODE button once.
The red LED next to [Accept] flashes. The red LED next to [PT Primary]
glows steadily.
6. To reject the new PT rating, press the PHASE [Enter] button once.
The circuit monitor returns to METERS mode.
7. To accept the new PT rating, press the up arrow SELECT METER
[Value] button to change from No to Yes. Then, press the PHASE [Enter]
button.
Setting the System Type For the circuit monitor to meter correctly, you must specify the system
connection type. The circuit monitor supports three system wiring
connections. Table 4-2 shows the system connection types. The factory
default is 40.
Table 4-2
Supported System Type System Code Selections
System Type # Phase CTs Aux CT # PTs PT Conn. System Code
3∅, 3-wire 2 None 2 Open Delta 30
Delta
3∅, 4-wire 3 None 3 Wye-Wye 40
Wye, Grounded
3∅, 4-wire 3 1 (Neut) 3 Wye-Wye 41
Wye, Grounded
3∅, 4-wire 3 None 2 Open Wye 42
Wye, Grounded
3∅, 4-wire 3 1 (Neut) 2 Open Wye 43
Wye, Grounded
48
Page 52

Chapter 4—Front Panel Operation
To change the system type, complete the following steps:
1. Press the MODE button until the red LED next to [Setup] is lit.
The circuit monitor displays “ConFig.”
2. Press the PHASE [Enter] button to select the Configuration option.
The circuit monitor displays the password prompt “P - - - -.”
3. Enter the password.
To enter the password, use the SELECT METER [Value] buttons to
increase or decrease the displayed value until it reaches the password
value. Then press the PHASE [Enter] button.
4. Press the PHASE [Enter] button until the red LED next to [Sys. Type]
flashes.
5. Press the SELECT METER [Value] buttons until the system code
matching your system type is displayed.
Refer to table 4-2 to determine the system code for your system type.
6. Press the MODE button once.
The red LED next to [Accept] flashes. The red LED next to [Sys. Type]
glows steadily.
7. To reject the new system type, press the PHASE [Enter] button once.
The circuit monitor returns to METERS mode.
8. To accept the new system type, press the SELECT METER [Value] button
to change from No to Yes. Then, press the PHASE [Enter] button.
The circuit monitor restarts.
Setting the Demand The circuit monitor supports several methods to calculate average demand
Interval real power. The default method is the thermal demand method. For a
description of available demand calculation methods, see Demand Readings
in the Circuit Monitor Reference Manual.
One optional method is the demand synch pulse input method. In this
method, the circuit monitor accepts an external synch pulse from another
demand meter. The circuit monitor then uses the same time interval as the
other meter for each demand calculation. For a more detailed description of
the demand synch pulse input method, see Demand Synch Pulse Input in
the Circuit Monitor Reference Manual.
Note: The circuit monitor must be equipped with an input/output module to use the
Demand Synch Pulse Input feature.
The thermal demand (default) method and the demand synch pulse input
method can be set up from the circuit monitor front panel. Other methods
must be set up over the communications link, or using the front panel
diagnostics feature (see Reading and Writing Registers from the Front
Panel in the Circuit Monitor Reference Manual for instructions on using this
feature).
49
Page 53

Bulletin No. 3020IB9814
December 1998
Setting the Demand To set up the circuit monitor for the default thermal demand method,
Interval (cont.) complete the procedure below—entering a demand interval from 5 to 60
minutes (the factory default is 15). To set up the circuit monitor for the
demand synch pulse input method, follow the procedure below and set the
demand interval to 0 minutes.
To change the demand interval, complete the following steps:
1. Press the MODE button until the red LED next to [Setup] is lit.
The circuit monitor displays “ConFig.”
2. Press the PHASE [Enter] button to select the Configuration option.
The circuit monitor displays the password prompt “P - - - -.”
3. Enter the password.
To enter the password, use the SELECT METER [Value] buttons to
increase or decrease the displayed value until it reaches the password
value. Then press the PHASE [Enter] button.
4. Press the PHASE [Enter] button until the red LED next to [Dmd. Int.]
flashes.
5. Press the SELECT METER [Value] buttons until the desired demand
interval is displayed.
Select 0 for the demand synch pulse input method.
6. Press the MODE button once.
The red LED next to [Accept] flashes. The red LED next to [Dmd. Int.]
glows steadily.
7. To reject the new demand interval, press the PHASE [Enter] button.
The circuit monitor returns to METERS mode.
8. To accept the new demand interval, press the SELECT METER [Value]
button to change from No to Yes. Then, press the PHASE [Enter] button.
The circuit monitor restarts.
50
Page 54

Chapter 4—Front Panel Operation
Setting the Watthour/ The allowable range for the watthours-per-pulse output is 0 to 3,276.7 kWH.
Pulse Output The watthours per pulse can be set in one-tenth kWH increments, generating
a pulse as often as every 0.1 kWH (not to exceed 10 pulses per second), or as
seldom as every 3276.0 kWH. Setting the watthours per pulse to 0 disables
the pulse. The factory default is 0.
Note: The circuit monitor must be equipped with an input/output module to use this
feature. For a more detailed description of the watthour pulse output feature, see
Solid-State KYZ Pulse Output in the Circuit Monitor Reference Manual.
To change the Watthour/Pulse output, complete the following steps:
1. Press the MODE button until the red LED next to [Setup] is lit.
The circuit monitor displays “ConFig.”
2. Press the PHASE [Enter] button to select the Configuration option.
The circuit monitor displays the password prompt “P - - - -.”
3. Enter the password.
To enter the password, use the SELECT METER [Value] buttons to
increase or decrease the displayed value until it reaches the password
value. Then press the PHASE [Enter] button.
4. Press the PHASE [Enter] button until the red LED next to [WH/Pulse]
flashes.
5. Press the SELECT METER [Value] buttons until the desired
kilowatthours per pulse value is displayed.
6. Press the MODE button once.
The red LED next to [Accept] flashes. The red LED next to [WH/Pulse]
glows steadily.
7. To reject the new pulse interval, press the PHASE [Enter] button once.
The circuit monitor returns to METERS mode.
8. To accept the new pulse interval, press the SELECT METER [Value]
button to change from No to Yes. Then, press the PHASE [Enter] button.
The circuit monitor restarts.
51
Page 55

Bulletin No. 3020IB9814
December 1998
Setting the Device Each POWERLOGIC device on a communications link must have a
Address unique device address. (The term communications link refers to 1-32
POWERLOGIC compatible devices daisy-chained to a single
communications port.) The allowable range of addresses is 1 to 198. The
factory default address is 1. (The circuit monitor will actually accept address
199, but address 199 is a special reserved address and we recommend that
you not use it.)
Note: By networking groups of devices, POWERLOGIC systems can support a
virtually unlimited number of devices.
When addressing POWERLOGIC devices, remember the following points:
• Each device on a single communications link—including the PNIM or
SY/LINK card—must be assigned a unique address.
• Normally, the last device on a communications link—the device farthest
from the communications port—should be assigned device address 1.
• If a communications link has only a single device, assign it address 1.
• If you add devices to the communications link, the last device should
retain the address 1.
To change the device address, complete the following steps:
1. Press the MODE button until the red LED next to [Setup] is lit.
The circuit monitor displays “ConFig.”
2. Press the PHASE [Enter] button to select the Configuration option.
The circuit monitor displays the password prompt “P - - - -.”
3. Enter the password.
To enter the password, use the SELECT METER [Value] buttons to
increase or decrease the displayed value until it reaches the password
value. Then press the PHASE [Enter] button.
4. Press the PHASE [Enter] button until the red LED next to
[Address] flashes.
5. Press the SELECT METER [Value] buttons until the desired address is
displayed.
6. Press the MODE button once.
The red LED next to [Accept] flashes. The red LED next to [Address]
glows steadily.
7. To reject the new address, press the PHASE [Enter] button once.
The circuit monitor returns to METERS mode.
8. To accept the new address, press the SELECT METER [Value] button to
52
change from No to Yes. Then, press the PHASE [Enter] button.
The circuit monitor restarts.
Page 56

Chapter 4—Front Panel Operation
Setting the Baud Rate Set the circuit monitor’s baud rate to match the baud rate of all other devices
on the communications link. The available baud rates are 1200, 2400, 4800,
9600, and 19200. The factory default is 9600 bps.
The maximum baud rate may be limited by the number of devices and total
length of the communications link. Table 4-3 shows distance restrictions at
varying baud rates.
To change the baud rate, complete the following steps:
1. Press the MODE button until the red LED next to [Setup] is lit.
The circuit monitor displays “ConFig.”
2. Press the PHASE [Enter] button to select the Configuration option.
The circuit monitor displays the password prompt “P - - - -.”
3. Enter the password.
To enter the password, use the SELECT METER [Value] buttons to
increase or decrease the displayed value until it reaches the password
value. Then press the PHASE [Enter] button.
4. Press the PHASE [Enter] button until the red LED next to [Baud Rate]
flashes.
5. Press the SELECT METER [Value] buttons until the desired baud rate is
displayed.
6. Press the MODE button once.
The red LED next to [Accept] flashes. The red LED next to [Baud Rate]
glows steadily.
7. To reject the new baud rate, press the PHASE [Enter] button once.
The circuit monitor returns to METERS mode.
8. To accept the new baud rate, press the SELECT METER [Value] button
once to change from No to Yes. Then, press the PHASE [Enter] button.
The circuit monitor restarts.
Table 4-3
Maximum Distances of Comms Link at Varying Baud Rates
Maximum Distances
Baud Rate (bps) 1–16 devices 17–32 devices
1200 10,000 ft (3,050 m) 10,000 ft (3,050 m)
2400 10,000 ft (3,050 m) 5,000 ft (1,525 m)
4800 10,000 ft (3,050 m) 5,000 ft (1,525 m)
9600 10,000 ft (3,050 m) 4,000 ft (1,220 m)
19200 10,000 ft (3,050 m) 2,500 ft (762.5 m)
53
Page 57

Bulletin No. 3020IB9814
December 1998
Setting the Nominal The circuit monitor supports three nominal frequencies: 50 Hz, 60 Hz, and
Frequency 400 Hz. The factory default is 60 Hz.
To change the nominal frequency, complete the following steps:
1. Press the MODE button until the red LED next to [Setup] is lit.
The circuit monitor displays “ConFig.”
2. Press the PHASE [Enter] button to select the Configuration option.
The circuit monitor displays the password prompt “P - - - -.”
3. Enter the password.
To enter the password, use the SELECT METER [Value] buttons to
increase or decrease the displayed value until it reaches the password
value. Then press the PHASE [Enter] button.
4. Press the PHASE [Enter] button until the red LED next to [Nom. Freq.]
flashes.
5. Press the SELECT METER [Value] buttons until the desired frequency is
displayed.
6. Press the MODE button once.
The red LED next to [Accept] flashes. The red LED next to [Nom. Freq.]
glows steadily.
7. To reject the new nominal frequency, press the PHASE [Enter] button
once.
The circuit monitor returns to METERS mode.
8. To accept the new nominal frequency, press the SELECT METER [Value]
button once to change from No to Yes. Then, press the PHASE [Enter]
button.
The circuit monitor restarts.
Note: If the circuit monitor cannot measure a valid frequency, it uses the nominal
frequency to perform metering calculations. For example, with no voltage present,
the circuit monitor will meter amps using the nominal frequency in place of the
missing measured frequency. Some metered values—such as THD and K-Factor—
require a valid frequency. When a valid frequency cannot be measured, the circuit
monitor displays dashes in place of values.
54
Page 58

Chapter 4—Front Panel Operation
Resetting Demand, The following values can be reset from the circuit monitor front
Energy, and Min./Max. Values panel: Demand Ammeter (A), Demand Power (W), Demand Power (VA),
Watthour Meter, Varhour Meter, and Minimums and Maximums.
Demand Power (W) and Demand Power (VA) are reset together; you cannot
reset one without resetting the other. Likewise, the Watthour Meter and
Varhour Meter are reset together.
Note: You can also reset energy, demand, and min/max values using the Resets
option. The Resets option lets you perform resets but not change configuration
values. See Performing Resets Using the Resets Option on
the next page for more information.
To reset data, complete the following steps:
1. Press the MODE button until the red LED next to [Setup] is lit.
The circuit monitor displays “ConFig.”
2. Press the PHASE [Enter] button to select the Configuration option.
The circuit monitor displays the password prompt “P - - - -.”
3. Enter the password.
To enter the password, use the SELECT METER [Value] buttons to
increase or decrease the displayed value until it reaches the password
value. Then press the PHASE [Enter] button.
4. Press the PHASE [Enter] button until the red LED next to
the desired reset item flashes.
Remember, if you choose Demand Power (W), the LED for Demand
Power (VA) also lights, and vice versa. Likewise, if you choose Watthour
Meter, the LED for Varhour Meter also lights, and vice versa.
5. Press the up arrow SELECT METER [Value] button to change the circuit
monitor display from No to Yes.
6. Repeat steps 4 and 5 until you’ve said Yes to all items to be reset.
7. Press the MODE button once.
The red LED next to [Accept] flashes. The red LEDs next to the selected
reset items glow steadily.
8. To cancel the reset(s), press the PHASE [Enter] button once.
The circuit monitor display flashes and the circuit monitor returns to
METERS mode.
9. To perform the reset(s), press the SELECT METER [Value] button once to
change from No to Yes. Then, press the PHASE [Enter] button.
The circuit monitor performs the resets and returns to METERS mode.
55
Page 59

Bulletin No. 3020IB9814
December 1998
PERFORMING RESETS The Resets option lets you reset energy, demand, and min/max values. The
USING THE RESETS same reset operations can be done using the Configuration option (described
OPTION on the previous page). The difference is that using the Resets option, you can
perform resets only—you cannot change configuration values.
The Resets option is password protected. To access the Resets option, you
must enter either the master password, or a special reset password. (See
Setting the Master Password in this chapter for instructions on defining the
master password.)
The reset password can be used to prevent accidental changes to
configuration values. For example, you could provide an operator with the
reset password only, allowing the operator to perform resets, but not change
configuration values.
The reset password defaults to the master password. The circuit monitor’s
factory default master password is 0. Therefore, when you receive a new
circuit monitor, its reset password is also 0. When you change the master
password, the reset password changes to match it. To define a reset
password different than the master password, you must write a unique
value—in the range 1–9998—to circuit monitor register 2031. You can write
to register 2031 in one of two ways:
• From a remote PC, using POWERLOGIC application software. (Refer to
the software instruction manual for specific instructions on writing to
circuit monitor registers.)
• From the front panel of the circuit monitor, using the Diagnostics option.
(See Reading and Writing Registers from the Front Panel in the Circuit
Monitor Reference Manual for instructions on reading and writing registers
using the Diagnostics option.)
Important: After you’ve defined a reset password, you can access the Resets
option using either the reset password or the master password.
To perform resets using the Resets option, refer to figure 4-3 and complete the
following steps:
1. Press the MODE button until the red LED next to [Setup] is lit.
The circuit monitor displays “ConFig.”
2. Press the down arrow SELECT METER button once.
The circuit monitor displays “rESETS.”
3. Press the PHASE [Enter] button to select the Resets option.
The circuit monitor displays the password prompt “P - - - -.”
4. Enter either the master password or the reset password.
To enter a password, use the SELECT METER [Value] buttons to increase
or decrease the displayed value until it reaches the password value. Then
press the PHASE [Enter] button.
5. Follow steps 4–9 of the reset procedure described on the previous page.
56
Page 60

Start
Press MODE key
until [Setup] LED
is lit.
Press the
▼ SELECT METER
key until “rESETS”
is displayed.
Press the PHASE
(Enter) key to select
the “rESETS” option.
P----
is displayed.
Press the SELECT
METER keys until your
password is displayed
Then press t
PHASE (Enter) key.
No
Press the PHASE
(Enter) key until the
LED next to the value
to be reset is lit.
h
is displayed.
e
Chapter 4—Front Panel Operation
.
Press the ▲ SELECT
METER (Value) key
to change from
No
to
Yes
.
Do you want to
select another
reset option?
NO
Press the MODE key
once.
Circuit Monitor
No
selected
resets?
.
displays
Execute the
YES
Press
the ▲ SELECT
METER (Value) key
to select Yes
YES
NO
Press the PHASE
(Enter) key
Circuit Monitor returns
to METERS mode.
Figure 4-3: Flowchart for performing resets using the Resets option
Press PHASE (Enter)
key
Circuit Monitor
performs resets
57
Page 61

Bulletin No. 3020IB9814
December 1998
SETTING UP ALARM/RELAY The circuit monitor (models CM-2150 and higher) can detect over 100 alarm
FUNCTIONS conditions, including over/under conditions, status input changes, phase
unbalance conditions, and more. (See Alarm Conditions and Alarm Codes
in the Circuit Monitor Reference Manual for a complete listing.)
Each alarm condition can be set up to automatically operate one or more
circuit monitor relays. Also, multiple alarm conditions can be assigned to
operate the same relay(s). For a description of the circuit monitor’s alarm/
relay functions, see Alarm Functions in the Circuit Monitor Reference Manual.
If you do not have POWERLOGIC application software, you can set up the
circuit monitor’s on-board alarm/relay functions from the circuit monitor’s
front panel. Perform this set up using the Alarm/Relay (AL.rLY) option, one
of the circuit monitor’s four setup options. For each alarm condition you can:
• Enable or disable the alarm condition
• Assign a priority level to the alarm condition
• Define any required pickup and dropout setpoints, and pickup and
dropout time delays
• Set up the circuit monitor to operate up to three relay outputs when the
alarm condition occurs
The circuit monitor’s relay outputs provide ten operating modes. (See Relay
Output Operating Modes in the Circuit Monitor Reference Manual for
descriptions of the modes.) When you assign an alarm condition to operate a
relay from the front panel of the circuit monitor, the circuit monitor
configures the relay to operate in Normal
mode. If Normal mode is not
acceptable, you’ll need to do one of the following:
• Set up the circuit monitor’s alarm/relay functions over the
communications link, using POWERLOGIC application software (which
lets you choose from the 10 available modes)
• First set up the alarm/relay functions from the circuit monitor’s front
panel, then change the relay’s operating mode by performing register
read/writes using either POWERLOGIC application software or the
circuit monitor’s Diagnostics option (see Reading and Writing Registers
from the Front Panel in the Circuit Monitor Reference Manual for
instructions on reading and writing registers using the Diagnostics
option)
58
Page 62

Chapter 4—Front Panel Operation
General Setup Procedure The procedure below describes the general steps required to set up
alarm/relay functions. Figure 4-4 illustrates the procedure. For detailed
steps, see Detailed Setup Procedure on the following page.
The general steps required to set up alarm/relay functions are:
1. Enter [Setup] Mode.
2. Choose the Alarm/Relay (AL.rLy) option.
3. Select an alarm number to configure. (See Alarm Setup Information in
the Circuit Monitor Reference Manual for a list of alarm numbers.)
4. Define the required alarm/relay configuration items (priority level,
pickup setpoint, pickup delay, and so on).
5. Accept or reject the changes just made.
6. Repeat steps 3–5 until you’ve configured all desired alarms.
7. Exit to Meters mode.
AL.rLY
Exit to
Meters
Mode
MODE
If you've made
no changes, the
Circuit Monitor
skips this step.
Enter
Password
Select
Alarm No.
(ALr No)
Accept
Changes?
(No/Yes)
Enable/Set Priority Level
Pickup Setpoint (PU SP)
MODE
Pickup Delay (PU DLY)
Dropout Setpoint (DO SP)
Dropout Delay (DO DLY)
Assign Relays (rLY)
Alarm/Relay Configuration Items
Figure 4-4: Alarm/Relay setup
For each item,
use the
SELECT
METER [Value]
buttons to change
the displayed
value (if desired).
Press the
[ENTER]
accept the value
and move to the
next item.
PHASE
button to
59
Page 63

Bulletin No. 3020IB9814
December 1998
Detailed Setup Procedure This section offers detailed steps on how to set up alarm/relay functions
from the front panel. Figure 4-4 illustrates the general flow of the setup
procedure.
To set up alarm/relay functions, complete the following steps:
1. Press the MODE button until the red LED next to [Setup] is lit.
The circuit monitor displays “ConFig.”
2. Press the down arrow SELECT METER button until the Circuit
Monitor displays “AL.rLy.”
3. Press the PHASE [Enter] button to select the Alarm/Relay option.
The circuit monitor displays the password prompt “P - - - -.”
4. Enter the master password.
To enter the password, use the SELECT METER [Value] buttons to
increase or decrease the displayed value until it reaches the password
value. Then press the PHASE [Enter] button.
The display alternates between “ALr No” (an abbreviation for alarm
number) and “1”. Appendix I shows that alarm number 1 corresponds to
the alarm condition “Over Current Phase A.” Refer to Alarm Setup
Information in the Circuit Monitor Reference Manual while setting up
alarm/relay functions.
5. Use the SELECT METER [Value] buttons to increase or decrease the
displayed alarm number until you reach the desired number.
The circuit monitor display stops alternating while you change the alarm
number. If an alarm condition is enabled, the circuit monitor displays the
alarm condition’s priority to the left of the alarm number. For example, if
you had previously enabled alarm number 1 and assigned it priority 0,
the circuit monitor would display “P0 1”.
6. Press the PHASE [Enter] button to select the alarm number.
If you have not previously enabled this alarm condition, the display
alternates between “ENAbLE” and “OFF.” If you’ve previously enabled
this alarm condition, the display alternates between “ENAbLE” and the
chosen alarm priority (P0, P1, P2, or P3).
7. To enable the selected alarm condition, and to assign the alarm condition
a priority level, press the down arrow SELECT METER [Value] button
until the desired priority level is displayed.
Note: Using POWERLOGIC software, you can assign one or more of the
following actions for each alarm condition. The circuit monitor performs the
assigned actions each time the alarm condition occurs, no matter what the
priority level.
– Operate one or more relay outputs
– Force data log entries into 1–14 user-defined data log files
– Perform a 4-cycle waveform capture
– Perform a 12-cycle event capture
60
Page 64

Chapter 4—Front Panel Operation
Detailed Setup Procedure
(cont.)
You must assign these actions to alarm conditions using POWERLOGIC
software.
Depending on the chosen priority level, the circuit monitor also performs
the actions described below.
P0—No priority. On the occurrence of a P0 alarm, the circuit monitor
does the following:
• Performs any assigned actions
P1—Highest priority level. On the occurrence of a P1 alarm, the circuit
monitor does the following:
• Puts the alarm number in the list of active alarms, accessible from the
front panel (see Viewing Active Alarms in the Circuit Monitor
Reference Manual for instructions on viewing active alarms)
• Records the occurrence in the circuit monitor’s event log file
• Enters the alarm number in the P1 log, accessible from the front panel
(see Viewing the Priority 1 Log in the Circuit Monitor Reference Manual
for a instructions on viewing the P1 log)
• Performs any assigned actions
P2—Middle priority level. On the occurrence of a P2 alarm, the circuit
monitor does the following:
• Puts the alarm number in the list of active alarms, accessible from the
front panel (see Viewing Active Alarms in the Circuit Monitor
Reference Manual for instructions on viewing active alarms)
• Records the alarm occurrence in the circuit monitor’s event log file
• Performs any assigned actions
P3—Lowest priority level. On the occurrence of a P3 alarm, the circuit
monitor does the following:
• Puts the alarm number in the list of active alarms, accessible from the
front panel (see Viewing Active Alarms in the Circuit Monitor
Reference Manual for instructions on viewing active alarms)
• Records the alarm occurrence in the circuit monitor’s event log file
• Performs any assigned actions
8. Press the PHASE [Enter] button to select the priority level.
The display alternates between “PU SP” (an abbreviation for pickup
setpoint) and the setpoint value.
9. Use the SELECT METER [Value] buttons to increase or decrease the
displayed value until you reach the desired pickup setpoint.
See Setpoint-Driven Alarms in the Circuit Monitor Reference Manual for a
description of pickup and dropout setpoint and time delays.
If you are configuring an alarm condition that does not require some or
all of the pickup and dropout setpoints and delays, for example status
61
Page 65

Bulletin No. 3020IB9814
December 1998
Detailed Setup Procedure
(cont.)
input transition alarm conditions, the circuit monitor allows you to enter
setpoints and delays, but it ignores any values that don’t apply.
10. Press the PHASE [Enter] button.
The display alternates between “PU dLy” (an abbreviation for pickup
delay) and the delay value.
11. Use the SELECT METER [Value] buttons to increase or decrease the
displayed value until you reach the desired pickup delay (in seconds).
12. Press the PHASE [Enter] button.
The circuit monitor display alternates between “do SP” (an abbreviation
for dropout setpoint) and the setpoint value.
13. Use the SELECT METER [Value] buttons to increase or decrease the
displayed value until you reach the desired dropout setpoint.
14. Press the PHASE [Enter] button.
The display alternates between “do dLy” (an abbreviation for dropout
delay) and the delay value.
15. Use the SELECT METER [Value] buttons to increase or decrease the
displayed value until you reach the desired dropout delay (in seconds).
16. Press the PHASE [Enter] button.
The circuit monitor displays “r1 No”. “r1” stands for relay 1.
17. If you want the circuit monitor to operate relay R1 each time the alarm
condition occurs, press the up arrow SELECT METER [Value] button to
change from “No” to “Yes.” Then press the PHASE [Enter] button.
The circuit monitor displays “r2 No”.
18. If you want the circuit monitor to operate relay R2 each time the alarm
condition occurs, press the up arrow SELECT METER [Value] button to
change from “No” to “Yes.” Then press the PHASE [Enter] button.
The circuit monitor displays “r3 No”.
19. If you want the circuit monitor to operate relay R3 each time the alarm
condition occurs, press the up arrow SELECT METER [Value] button to
change from “No” to “Yes.” Then press the PHASE [Enter] button.
The display alternates between “ENAbLE” and the priority level.
20. Press the MODE button.
The circuit monitor displays “No.”
21. To save the configuration changes you just made, press the up arrow
SELECT METER [Value] button to change from “No” to “Yes.” Then
press the PHASE [Enter] button. To discard the changes, press the
PHASE [Enter] button.
The circuit monitor displays the alarm number. At this point you’ve
completed the configuration process for one alarm condition.
62
Page 66

Chapter 4—Front Panel Operation
Detailed Setup Procedure
(cont.)
22. Repeat steps 5-21 above for each additional alarm condition that you’d
like to configure.
23. To leave the Alarm/Relay setup option, press the MODE button while
the circuit monitor is displaying the “ALr No” prompt.
The circuit monitor returns to METERS mode.
VIEWING ACTIVE ALARMS Each of the circuit monitor’s alarm conditions has an associated alarm code.
The alarm codes of the active alarms can be viewed from the front panel.
(The alarm conditions and their associated alarm codes are listed in
Alarm Setup Information in the Circuit Monitor Reference Manual.)
Note: The ALARM mode LED, on the circuit monitor’s front panel, flashes while at
least one of the following conditions is true: a nonzero priority alarm is active, or a
priority one alarm has occurred since the last time the priority 1 log was cleared.
To view the active alarm codes, complete the following steps:
1. Press the MODE button until the red LED next to Alarm glows steadily.
The circuit monitor displays “P1.Log.”
2. Press the up arrow SELECT METER [Value] button until “AL.CodE” (an
abbreviation for alarm code) is displayed.
3. Press the PHASE [Enter] button.
The circuit monitor displays the lowest active alarm code. If there are no
active alarms, the circuit monitor displays -None-.
Each alarm code is displayed with either an “rLY” extension or an “AL”
extension. If you have set up the alarm condition to operate one or more
relays, the code appears with an rLY extension (for relay). If you did not
set up the alarm condition to operate a relay, the code appears with an
AL extension (for alarm only).
4. Press the down arrow SELECT METER [Value] button to cycle through
the active alarms.
The circuit monitor displays the codes from lowest to highest.
63
Page 67

Bulletin No. 3020IB9814
December 1998
VIEWING THE To provide a record of high priority alarm occurrences, the circuit monitor
PRIORITY 1 LOG maintains a priority 1 log (P1 log). See Setting Up Alarm/Relay Functions in
this chapter for a complete description of the priority levels, and instructions
on assigning priority levels from the front panel.
The P1 log stores up to 10 of the last priority 1 alarms. The log operates in a
first-in-first-out (FIFO) manner. In other words, when the log is full, the
oldest log entry (the first in) is removed to make room for the new entry.
When a priority 1 alarm occurs, the circuit monitor records it in the P1 log.
The alarm remains in the P1 log until one of the following occurs: 10 new P1
alarms occur pushing it out of the log, or you manually clear the P1 log (see
Clearing the Priority 1 Log on the next page).
Note: The ALARM mode LED, on the circuit monitor’s front panel, flashes while at
least one of the following conditions is true: a nonzero priority alarm is active, or a
priority one alarm has occurred since the last time the priority 1 log was cleared.
You can view the P1 log from the circuit monitor’s front panel. The following
procedure tells how.
To view the P1 log, complete the following steps:
1. Press the MODE button until the red LED next to ALARM glows
steadily.
The circuit monitor displays “P1.Log.”
2. Press the PHASE [Enter] button.
The circuit monitor displays the alarm code of the lowest priority 1
alarm. If no priority 1 alarms have occurred since the P1 log was last
cleared, the circuit monitor displays -None-.
Each alarm code is displayed with either an “rLY” extension or an “AL”
extension. If you have set up the alarm condition to operate one or more
relays, the code appears with an rLY extension (for relay). If you did not
set up the alarm condition to operate a relay, the code appears with an
AL extension (for alarm only).
4. Press the down arrow SELECT METER [Value] button to cycle through
the alarm codes.
The circuit monitor displays the codes from lowest to highest.
5. To exit the P1 log but remain in the ALARM mode, press the PHASE
[Enter] button. To exit the ALARM mode altogether, press the MODE
button.
64
Page 68

Chapter 4—Front Panel Operation
CLEARING To provide a record of high priority alarm occurrences available for display
THE PRIORITY 1 LOG from the front panel, the circuit monitor maintains a priority 1 log (P1 log).
See Setting Up Alarm/Relay Functions in this chapter for a complete
description of the priority levels, and instructions on assigning priority levels
from the front panel. See Viewing the Priority 1 Log on the previous page
for instructions on viewing the P1 log.
The P1 log stores up to 10 of the last priority 1 alarms. The log operates in a
first-in-first-out (FIFO) manner. In other words, when the log is full, the first
alarm entry in (the oldest) is the first out.
When a priority 1 alarm occurs, the circuit monitor records it in the P1 log.
The alarm remains in the P1 log until one of the following occurs: 10 new P1
alarms occur (pushing it out of the log), or you manually clear the P1 log.
The procedure below tells how to clear the P1 log.
IMPORTANT: Clearing the P1 log causes the circuit monitor to release all
relays that meet the following conditions:
• The relay must be configured to operate in latched mode.
• The relay must be configured for internal control. In other words, you
must have set up the circuit monitor to operate the relay in response to an
alarm condition.
• All alarms assigned to operate the latched relay must not be in their alarm
state.
To clear the P1 log, complete the following steps:
1. Press the MODE button until the red LED next to ALARM glows
steadily.
The circuit monitor displays “P1.Log.”
2. Press the SELECT METER [Value] buttons until “CLEAr” is
displayed.
3. Press the PHASE [Enter] button.
The circuit monitor displays “CLr. No”.
4. To abort the clear, press the PHASE [Enter] button.
5. To clear the log, press the up arrow SELECT METER [Value] button to
change from “CLr. No” to “CLr.YES.” Then press the PHASE [Enter]
button.
The circuit monitor clears the P1 Log, and releases any relays that meet
the conditions described above.
65
Page 69

Chapter 5—Maintenance and Troubleshooting
CHAPTER 5—MAINTENANCE AND TROUBLESHOOTING
MAINTENANCE The circuit monitor does not require regular maintenance, nor does it
contain any user-serviceable parts. If the circuit monitor requires service,
contact your local Schneider Electric sales representative, or call the
POWERLOGIC Technical Support Center for assistance. See Getting
Technical Support in this chapter. Do not open the circuit monitor. Opening the
circuit monitor voids the warranty.
Battery-Backed RAM The circuit monitor uses battery-backed nonvolatile RAM to retain all data
except calibration constants. Calibration constants are stored in nonvolatile
EEPROM, which requires no battery. The circuit monitor’s battery-backed
RAM lasts many decades under typical operating conditions. The
battery-backed RAM is activated when the circuit monitor is manufactured.
With no control power applied to the circuit monitor, the battery can back up
RAM for a continuous period of 7 years at 70°C. Once control power is
applied, the RAM battery is no longer under load. Under no load, the life of
the battery-backed RAM is 100 years at 55°C continuous, 40 years at 60°C
continuous, and 10 years at 70°C continuous. Should the RAM ever need
replacement, contact your Schneider Electric representative.
DANGER
!
HAZARD OF ELECTRIC SHOCK
Do not attempt to service the circuit monitor. CT and PT inputs may
contain hazardous currents and voltages. Only authorized Schneider
Electric service personnel should service the circuit monitor.
Failure to observe this precaution will result in death or serious
injury.
CAUTION
!
HAZARD OF EQUIPMENT DAMAGE
Dielectric (Hi-Pot) testing of the circuit monitor may damage the unit.
Do not Hi-Pot or Megger. Before Hi-Pot or Megger testing any
equipment in which the circuit monitor is installed, disconnect all
input and output wires to the circuit monitor.
Failure to observe this precaution can result in equipment
damage.
67
Page 70

Bulletin No. 3020IB9814
December 1998
TROUBLESHOOTING This section describes three potential problems, their possible causes, and
checks and/or cure for each. If, after completing the listed checks, you cannot
solve the problem, contact the POWERLOGIC Technical Support Center for
assistance. See Getting Technical Support on the next page.
PROBLEM: After applying control power to the circuit monitor, the display
is still blank.
Possible Cause: The circuit monitor is not receiving the necessary
power.
Check or Cure: Verify that circuit monitor L and N terminals (terminals
25 and 27) are receiving the necessary power. If you are using an
optional Voltage/Power Module (VPM), check to see that the module is
properly installed on the circuit monitor. Refer to your VPM instruction
bulletin.
PROBLEM: The data being displayed is inaccurate or not what you expect.
Possible Cause: Incorrect setup values.
Check or Cure: Check to see that the correct values have been entered
for circuit monitor setup parameters (CT and PT ratings, System Type,
Nominal Frequency, and so on). See Configuring the Circuit Monitor in
Chapter 4 for setup instructions.
Possible Cause: Circuit monitor is wired improperly.
Check or Cure: Check that CTs and PTs are connected correctly (proper
polarity observed) and energized. Check shorting terminals. See Wiring
CTs, PTs, and Control Power in Chapter 3 for wiring diagrams.
Possible Cause: Incorrect voltage inputs.
Check or Cure: Check circuit monitor voltage input terminals
(terminals 9, 10, 11,12) to verify that adequate voltage is present.
Possible Cause: Circuit monitor is grounded incorrectly.
Check or Cure: Verify that the circuit monitor is grounded as described
in Grounding the Circuit Monitor in Chapter 3.
68
Page 71

Chapter 5—Maintenance and Troubleshooting
Troubleshooting (cont.) PROBLEM: Cannot communicate with circuit monitor from a remote
personal computer.
Possible Cause: Circuit monitor address is incorrect.
Check or Cure: Check to see that the circuit monitor is correctly
addressed. See Setting the Device Address in Chapter 4 for instructions.
Possible Cause: Circuit monitor baud rate is incorrect.
Check or Cure: Verify that the baud rate of the circuit monitor matches
the baud rate of all other devices on its communications link. See Setting
the Baud Rate in Chapter 4 for instructions.
Possible Cause: Communications lines are improperly biased.
Check or Cure: Check to see that a multipoint communications adapter
is being properly used to bias the communication lines. See Biasing the
Communications Link in Chapter 3 for instructions.
Possible Cause: Communications lines are improperly terminated.
Check or Cure: Check to see that a multipoint communications
terminator is properly installed. See Terminating the Communications
Link in Chapter 3 for instructions.
Possible Cause: Incorrect route statement to circuit monitor.
Check or Cure: Check route statement. Refer to the software instruction
bulletin for instructions on defining route statements.
GETTING TECHNICAL If you have questions about this product, or any other POWERLOGIC or
SUPPORT POWERLINK products, please contact your local Schneider Electric
representative, who will contact the Power Management Operations
Technical Support Center. The Technical Support Center will respond to
your questions by telephone, fax, or mail as soon as possible.
To get the most from your POWERLOGIC and POWERLINK systems,
consider attending POWERLOGIC University. POWERLOGIC University
offers a series of customer training courses designed to improve your skills
using the POWERLOGIC and POWERLINK systems. Contact your
Schneider Electric representative for more information.
69
Page 72

APPENDIX A—CIRCUIT MONITOR DIMENSIONS
9.14
232
12.02
305
Appendix A—Circuit Monitor Dimensions
3.71
94
3.15
80
.56
14
10.35
263
.83
21
Rear View Side View
Dimensions
Inches
Millimeters
Protective covers
shown installed.
Figure A-1: Circuit monitor dimensions
7.35
187
Top View
.89
23
71
Page 73

Bulletin No. 3020IB9814
December 1998
APPENDIX A (cont.)
10.35
263
.83
21
5.65
5.09
129
144
.56
14
10.35
263
.83
21
4.58
116
5.14
131
.56
14
Figure A-2: Circuit monitor with Input/Output
and Voltage/Power modules
72
Dimensions
Figure A-3: Circuit monitor
with Input/Output module
Inches
Millimeters
Page 74

APPENDIX B—SPECIFICATIONS
Metering Specifications Current Inputs (Each Channel)
Current Range........................................................................... 0–7.4 A ac
Nominal Current ............................................................................. 5 A ac
Voltage Inputs (Each Channel)
Voltage Range ........................................................................... 0–180 Vac
Nominal Voltage (typical)........................................................... 120 Vac
Frequency Range ........................................................................... 45 to 65 Hz
........................................................................ 350 to 400 Hz
Harmonic Response—Phase Voltages and Currents
Frequency 45 Hz to 65 Hz ............................................... 31st Harmonic
Data Update Rate.................................................................. 1 second typical
Accuracy (CM-2150 and higher)
Current➀........................................... ±0.15% reading + 0.05% full scale
Voltage .............................................. ±0.15% reading + 0.05% full scale
Power ................................................ ±0.30% reading + 0.05% full scale
True Power Factor ............................................ ±1% (0.5 lag to 0.5 lead)
Displacement Power Factor ............................ ±1% (0.5 lag to 0.5 lead)
Energy ............................................................................................. ±0.30%
Demand........................................................................................... ±0.30%
Frequency 50/60 Hz................................................................... ±0.01 Hz
Temperature (Unit Temperature –25°C to 75°C) .......................... ±1°C
Time of Day Clock (At 25°C) .......................... ±1.5 second in 24 hours
THD ..................................................................................................... 1.0%
K-Factor............................................................................................... 1.0%
Crest Factor ........................................................................................ 1.0%
Accuracy (CM-2050 only)
Current➀............................................. ±0.5% reading + 0.25% full scale
Voltage ................................................ ±0.5% reading + 0.25% full scale
Power .................................................. ±1.0% reading + 0.25% full scale
True Power Factor .............................................................. ±1% full scale
Displacement Power Factor .............................................. ±1% full scale
Energy and Demand .................... ±0.5% reading above 50% full scale
Frequency 50/60 Hz................................................................... ±0.05 Hz
Temperature (Unit Temperature –25°C to 75°C) .......................... ±1°C
Time of Day Clock (At 25°C) .......................... ±1.5 second in 24 hours
THD ..................................................................................................... 2.0%
K-Factor............................................................................................... 2.0%
Crest Factor ........................................................................................ 2.0%
Appendix B—Specifications
±1.0% reading above 20% full scale
➀ Any CT secondary currents less than 20 mA are reported as zero.
73
Page 75

Bulletin No. 3020IB9814
December 1998
Metering Input Current Inputs
Electrical Specifications Nominal Full Scale ............................................................ 5.0 Amps rms
Metering Over-range ....................................................................... 145%
Overcurrent Withstand........................................ 15 A rms Continuous
50 A rms 10 seconds in 1 hour
500 A rms 1 second in 1 hour
Input Impedance ....................................................... Less than 0.1 Ohm
Burden.......................................................................... Less than 0.15 VA
Isolation.............................................................................. 1500 V, 1 MIN
Voltage Inputs
Nominal Full Scale ........................................... 120 Vac Line to Neutral
Metering Over-range ....................................................................... 150%
Dielectric Withstand .................................................. 180 V Continuous
1500 V 1 Second
Input Impedance ............................................. Greater than 2 Megohm
Control Power Input Specifications 120/240 Vac Nominal
Operating Input Range ........................................................ 100–264 Vac
Burden.................................................................................. 11 VA–15 VA
Burden, max.➀...................................................................................27 VA
Frequency Range .................................................................... 47 to 65 Hz
Isolation................................................................................ 1500 V, 1 min
Ride-through on Power Loss ............................. 0.1 sec at 120/240 Vac
125/250 Vdc Nominal
Operating Input Range ........................................................ 100–300 Vdc
Burden............................................................................................... 0.12 A
Isolation.......................................................................... 1500 V, 1 minute
Ride-through on Power Loss ..................................... 0.1 sec at 120 Vdc
Main’s Supply Voltage Fluctuations.......................... not to exceed +/–10%
Environmental Specifications Operating Temperature ............................................................. –25 to +70°C
Storage Temperature.................................................................. –40 to +85°C
Humidity Rating ..... 5–95% Relative Humidity (non-condensing) at 40ºC
Pollution Degree ................................................................................................2
Installation Category ........................................................................................ II
Altitude Range ........................................................... 0 to 4,570 m (15,000 ft.)
Physical Specifications Weight (approximate, without add-on modules)................................. 7 lbs
Dimensions ............................................................................ See Appendix A
Regulatory/Standards Compliance Electromagnetic Interference
Radiated ...................................................................... FCC Part 15 Class A
Conducted .................................................................. FCC Part 15 Class A
Electrostatic Discharge (Air Discharge) .......................IEC 1000-4-2 Level 4
Electrical Fast Transient..................................................IEC 1000-4-4 Level 3
Immunity to Surge........................................................... IEC 1000-4-5 Level 4
Dielectric Withstand..................................................................... CSA, UL 508
Safety .............................................................................................. CSA, UL 508
CE Marking
➀ See table 3-1, page 17, in the
output modules present.
Circuit Monitor Reference Manual
for burden with input/
74
Page 76

Appendix C—Installing Terminal Strip Covers
APPENDIX C—INSTALLING TERMINAL STRIP COVERS
The hardware kit provided with the circuit monitor includes several grey
protective terminal strip covers. After wiring the circuit monitor, install these
terminal strip covers for protection.
Figure F-1 illustrates terminal strip cover installation. Refer to this figure
when completing the procedure below.
To install the terminal strip covers, complete the following steps:
1. Bend the terminal strip covers at the crease so they form a right angle.
2. Install each terminal strip cover using two #8-32 SEMS screws, provided
in the circuit monitor hardware kit.
Be certain to orient the covers so that you can route wires outward.
Wires should be routed outward to provide room for future addition of
optional modules.
#8-32 SEMS screw
(Two required for each cover)
Bend covers at crease to form right
angle. Install as shown so wires can
be routed outward.
Figure C-1: Installing terminal strip covers
PANEL
75
Page 77

INDEX
Index
A
Alarm/relay functions 58
Alarms, viewing active 63
B
Battery-backed RAM 67
Baud rate
max. distances of comms link 53
setting 53
Biasing
comms link 37
Buttons
how they work in setup mode 41
C
CE Compliance 14
Circuit monitor
configuration procedure 42
configuring 42
connections 11
defaults 42
description 1
dimensions 71
dimensions w/ I/O and VPM modules 72
dimensions w/ I/O module 72
feature comparison 3, 4, 5
front panel 9
front panel operation 39
grounding 27
instrumentation 3
mounting 15
setup, detailed 60
setup, general 59
types 3
Clearing the priority 1 log 65
comms link
terminating 36
Communications
wiring 28
Communications link
biasing 37
length of 34
Communications wiring
Ethernet gateway 31
network interface module 32
personal computer 30
SY/MAX programmable controller 33
system display 29
Configuration data
viewing in protected mode 45
Configuring
circuit monitor 42
Control power
deriving from phase PT inputs 26
Current Transformers (CTs)
setting ratios 47
D
Daisy-chaining 35
Default 42
Demand, energy , and min/max values
resetting 55
Demand interval
setting 49
Device address
setting 52
Dimensions 71
E
Ethernet gateway
connecting to 31
F
Front panel operation 39
G
Getting technical support 69
Grounding
circuit monitor 27
I
Installing terminal strip covers 75
Introduction 1
M
Maintenance 67
Maintenance and troubleshooting 67–69
Mode
setup 40
77
Page 78

Bulletin No. 3020IB9814
December 1998
N
Network interface module, POWERLOGIC
connecting to 32
Nominal frequency
setting 54
P
Password
setting 46
Performing resets
flowchart 57
Personal computer
connecting to 30
Phase PT inputs
deriving control power from 26
Potential Transformers (PTs)
setting ratios 48
POWERLOGIC devices
daisy-chaining 35
POWERLOGIC University 69
Priority 1 log
clearing 65
viewing 64
R
RAM, battery-backed 67
Related documents 7
Resetting demand, energy , and min/max values 55
S
Safety precautions 5, 6
Setting the baud rate 53
Setting the CT ratios 47
Setting the demand interval 49
Setting the device address 52
Setting the nominal frequency 54
Setting the password 46
Setting the PT ratio 48
Setting the watthour/pulse output 51
Setting up alarm/relay functions 58
Setup mode 40
alarm/relay 40
choosing setup option 41
configuration 40
diagnostics 40
how the buttons work 41
resets 40
Software
instruction bulletins 7
SY/MAX programmable controller
connecting to 33
System display
connecting to 29
System types 48
setting 48
T
Technical support 69
Terminal strip covers, installing 75
Terminating
comms link 36
Troubleshooting 68
V
Viewing active alarms 63
Viewing the priority 1 log 64
W
Watthour/pulse output
setting 51
Wiring
2-1/2 element metering system type 42 (calcu-
lated 22
2-1/2 element metering system type 43 23
3-phase, 3-wire delta 18
3-phase, 4-wire wye, 3-wire load 21
3-phase, 4-wire wye, ground 19
3-phase, 4-wire wye, ground, metered neutral 20
biasing comms link 37
circuit monitors to one set of PTs and one CPT 25
communications 28
CTs, PTs, control power 17
DC control power 24
length of comms link 34
supported systems 17
terminating comms link 36
78
 Loading...