

Page 1

MERIDIAN DSP5000 USER MANUAL
©
Meridian Audio Ltd 1993, 1994
Meridian Audio Ltd
14 Clifton Road
Huntingdon
Cambridgeshire PE18 7EJ
England
Tel (0) 480 52144
Telex 32577 (MERIDN)
Fax (0) 480 459934
Meridian America Inc.
3800 Camp Creek Parkway
Building 2400 Suite 112
Atlanta GA 30331
USA
Tel (404) 344-7111
Fax (404) 346-7111
Version 4: 500 mode compatible with MSR
Surround, 2-room and Meridian Digital
Theatre: July 1994
Author: J R Stuart
“Boothroyd|Stuart Meridian”,
Meridian Digital Theatre
trademarks of Meridian Audio Ltd
MERIDIÅN and
are registered
Page 2

Contents
2
Introduction............................................5
About this manual..................................5
DSP5000 description..............................6
Master and slave speakers..................6
Centre, left, right and surround ............6
Control.................................................7
General background ............................7
Unpacking the DSP5000.........................7
Meridian System Remote
(MSR).............................................8
Installing your DSP5000.......................10
General precautions ..........................10
Customising features.........................10
Connections ......................................11
Siting................................ .................11
Starting off with DSP5000....................12
Checking ...........................................12
Switching on......................................12
If there are no lights...........................12
Starting the DSP5000........................13
Standby.............................................13
Basic operation of DSP5000 ................14
Selecting sources ..............................14
Putting the DSP5000 in
Standby........................................ 14
Coming out of Standby ......................14
Display ..............................................15
Changing the display .........................15
Volume..............................................16
Mute..................................................18
The menu system..............................18
Balance.............................................18
Tilt control..........................................21
Bass control.......................................22
Phase................................................22
Axis...................................................23
Storing settings..................................23
Recalling settings...............................24
Controlling a Meridian CD player ........25
Use of handset to control CD.............25
Playing a disc ....................................25
Scanning a disc.................................25
Selecting tracks.................................25
Selecting index points........................26
Setting up programmed
sequences....................................26
Use with 504, 204 or 604 FM
tuner.................................................27
Operation summary..............................28
On the remote control........................28
Customising DSP5000: an
overview .......................................... 29
Restoring default settings.................. 29
Storing preferred tone settings ..........29
How to customise DSP5000 ................30
Customising: general procedure........30
Type: an overview............................. 30
Config: an overview........................... 30
Setup: an overview............................31
Customising using Type .....................32
Selecting Types ................................32
Customising using Config ..................33
How to use Config.............................34
Root menu options............................34
System menu....................................34
Surround system options................... 36
Source menus...................................36
Completing Config............................. 39
Customising using Setup....................39
Features of Setup .............................39
How to use Setup.............................. 39
Boundary controls.............................40
Centre-channel options .....................41
Centre-channel options .....................42
Connecting DSP5000...........................42
Digital audio connections................... 45
Communications connections............46
RS232 connection.............................48
Meridian Digital Theatre ....................48
Specification ........................................49
Help! .....................................................50
Standby point not lit...........................50
No sound ..........................................50
Sound from one channel only............50
Channels reversed............................50
Settings lost......................................50
Hum..................................................50
Clicks with digital sources..................50
Meridian CD does not respond..........51
504, 204 or 604 does not
respond........................................ 51
562, 201, 603 or 601 does not
respond........................................ 51
DSP5000s do not respond ................52
DSP5000s go silent when used
hard ............................................. 52
Communications not working
between DSP5000 and other
Meridian products.........................52
Radio interference.............................52
Cleaning ...............................................53
Maintenance & service......................... 53
DSP5000 User Guide
Page 3

3
Guarantee .............................................54
Appendix 1 DSP5000 types.................55
Type 1 setup, Meridian 500
series system using 562 ...............55
Type 2 setup, Meridian CD as
preamp (via 607), 204
connected.....................................56
Type 3 setup, 601, 201, 603 or
562 as preamp via 607,
Meridian CD and 204
connected.....................................56
Type 4 setup, 601 preamp or
201 or 603 as preamp via
607, Meridian CD and 204,
CD with direct connection .............57
Type 5 setup, Meridian 500
system not using 562 ................... 58
Type 6 Meridian Digital Theatre......... 58
Type 7 Second room in
Multiroom system.........................58
Type 8 Additional room in
Multiroom system.........................58
Appendix 2 Test mode.........................58
Appendix 3 Calibrate mode.................59
Appendix 4 ........................................... 61
Index................................ ..................... 63
Notes.....................................................65
DSP5000 User Guide
Page 4

This page intentionally blank.
4
DSP5000 User Guide
Page 5

Introduction
Introduction 5
Congratulations on choosing DSP5000 digital loudspeakers. We are
confident that they will give a quality to your music that is unprecedented,
and bring years of listening pleasure. This manual will enable you to get
the most from them.
The DSP5000 is a sophisticated product. You should therefore read all
the supplied documentation before fully installing the DSP5000,
particularly if you intend to customise its functions.
We have supplied a Getting going sheet for those of you who want to
hear the DSP5000s immediately, and then perhaps spend a little longer
deciding on how best to set them up in your home.
DSP5000s can be adjusted in many ways, all of which are explained in
this manual. If you have any queries regarding the DSP5000, remember
that your Meridian dealer has been selected for his expertise. You should
refer to him in the first instance.
We have made this unique product as simple to use as possible so that it
will bring you a new dimension of listening pleasure.
About this manual
602 A number such as 602 refers to a component in the Meridian 600-
208 A number such as 208 refers to a component in the Meridian 200-
506 A number such as 506 refers to a component in the Meridian 500-
Series of audio equipment.
Series of audio equipment.
Series of audio equipment.
DSP5000 User Guide
Page 6

DSP5000 description
You will find it simpler to understand how the DSP5000 works if you
consider it as a combination of the following components:
• digital preamplifier, to select and control up to two digital sources
directly, and to provide fixed and switched digital output for the other
DSP5000
• digital audio processor, whose functions include decoding as well as
error detection and correction
• digital signal-processor, dealing with tone controls, digital crossover,
dynamic bass control, balance and volume
• two precision digital to analogue ∆Σ converters for bass-mid and
tweeter
• remote control for all functions, including volume, balance, mute and
various tone controls
• controlling computer
• RS232 control and display capability
• Meridian 500-Series communicator
• Meridian 200- or 600-Series communicator
• 2½-way active loudspeaker, with three drive units and three 75W
power amplifiers per speaker
Description 6
Master and slave speakers
In every room containing DSP5000s, one speaker is chosen (by means of
either factory setting or user setup) to be in charge of the other Meridian
components in that room. We refer to this as the master speaker. It
controls the functions of the other DSP5000, and communicates with all
the other Meridian products in the system via the M5-lead provided. The
master speaker is also the one that ‘watches’ the remote control, and
should therefore be placed so that it has the best possible view of the
room, although the connections between the other components of your
system must also be considered.
An installation may use 1, 2, 3 or 5
master speaker and the others used as slaves.
The master is identified by a red light in the display window.
1
DSP5000s: one will always be the
Centre, left, right and surround
Since the digital audio signal is in stereo format, the DSP5000 needs to
be told if it is a centre, or on the left or right. We refer to the DSP5000
which is on the left when viewed from the listening position as the left
speaker.
If you have more than one Meridian Digital Speaker, the master can be
any of the positions. The choices master/slave and position can be made
independently – since selecting which is to be master affects the way the
cables run in your installation. As supplied, the DSP5000 is set up as a
left master, but you can alter this if necessary using a Type setting (see
page 33) or in Config (see page 34).
DSP5000s can be used as surround speakers. In this case they are set to
be surround left or right.
1
Three as left, right, centre – five with surrounds.
DSP5000 User Guide
Page 7

Description 7
Control
The DSP5000s are operated either by commands received from the
Meridian System Remote (MSR) supplied with the loudspeakers, or by
commands received through the communications cables of a Meridian
installation (for example, from the front panel of a 562 or 601).
The remote control provides enough keys to allow you to drive a Meridian
installation via the DSP5000s, and this is the method to be preferred.
Note If you have any 200-Series components to connect to the
DSP5000, then the DSP5000s and any 500-Series components must be
operated in 200 mode. See page 30.
Note In a 200-Series system DSP5000 must be set to Type 2 (see page
32) and the MSR must be configured to Option 3 (see MSR User Guide).
An MSR not set to Option 3 will give very confusing results in a 200Series system. In all cases where DSP5000 is used in a system
containing 200-Series components the Meridian 209 system handset
should not be used.
General background
The DSP5000 contains unique combinations of technology, and you
should bear the following in mind.
1. Each DSP5000 is controlled by an internal computer. This interprets
the commands from the remote control, communicates with other
Meridian components, operates the display and supervises the digital
audio process.
2. The DSP5000, in common with other components of the Meridian
Multiroom system, uses a technique called ‘source mapping’.
Source mapping allows flexibility in the following attributes of the
source:
• its identity
• the associated display
• which key on the MSR calls the source up
• which physical input of the DSP5000 receives the signal from this
source
• whether the source is controllable
3. As a convenience feature, the tone-control settings of DSP5000 can
be restored to your chosen favourite settings for each source. This
means that if you want to keep a combination of tone settings you
must set these up in the Setup mode. See page 31 for an overview.
Unpacking the DSP5000
In the two packs you should find:
• 2 DSP5000 digital active speaker base units complete with grilles
• 8 screw-in spikes with lock nuts and foot caps
• wrench for spikes
• MSR handset and user guide
• battery for handset
• DSP5000 user manual (this manual)
• Getting going sheet
• 2 power cords suitable for your territory
• composite system cable M5 (phono + DIN to phono + DIN, 8 metres)
• composite system cable S5 (phono + DIN to phono + DIN, 6 metres)
DSP5000 User Guide
Page 8

Installation 8
• hex wrench (3mm), for drive units
If any of these items is missing, please contact your dealer. We suggest
that you retain the packing carefully, as it provides maximum protection
for the unit in transit.
NOTE Take great care when unpacking or re-packing the DSP5000 that
you do not put undue pressure on the front, as the drive units may be
damaged if pressed.
Fitting the feet
It is easiest to fit the feet with the speakers upside down, before removing
the inner carton or foam packing. Each DSP5000 needs four feet, fitted as
follows:
1. Find the eight screw-in spikes, and the lock nuts, foot caps and wrench
provided.
2. Fit a lock nut to each spike, about 2mm away from the end of its
thread. If a foot is required rather than a spike, fit a foot cap. Screw
each foot into the threads on the bottom of the base units. Do not fully
tighten the foot at this stage.
3. When all four feet have been fitted, carefully set the DSP5000s upright
in their playing positions.
4. Remove the rest of the packaging.
Meridian System Remote (MSR)
The MSR uses infra-red transmission to operate the DSP5000. It uses a
PP3 battery (supplied but not installed).
When a key is pressed, an indicating light shows in the window of the
MSR. This light becomes inconsistent or weak when the battery needs
changing. Normally the battery will last for up to a year, but we
recommend that you change the battery routinely every six months, since
there are no front-panel controls on the DSP5000 and the system
therefore cannot be used without a working handset.
The MSR is supplied with its own user guide. This explains many details
of operation and also how to fit and change batteries.
The MSR is suitable for DSP5000 fitted with control EPROM version 2.2
or later. (See page 16). If you want to use MSR with an earlier version of
DSP5000 (EPROM version 1.x) or with any 200-Series components in the
system, then the MSR needs to be configured to Option 3 – see the MSR
User Guide and the DSP5000s have to be set to type 2 – see page 32.
To check the MSR, press any key and look for the flashing yellow light.
Note Good-quality alkaline batteries last longer than other sorts of
battery, and we advise you to use one in your MSR.
Note Do not store the unit where it may get too hot.
Note Do not store the unit face down, or rest objects (e.g. magazines) on
top of it. Doing so could cause one of the keys to be left pressed down,
which would considerably shorten the life of the battery.
Note Do not allow the MSR to become wet. If drinks are accidentally spilt
on it, remove the battery and let the MSR dry out. If necessary consult
your dealer.
DSP5000 User Guide
Page 9

Installation 9
Note Additional MSRs can be obtained from your dealer if you would
prefer to have more than one.
DSP5000 User Guide
Page 10

Installing your DSP5000
page
General precautions
Before carrying out any installation, you should ensure that the DSP5000
is marked with the correct voltage for your local AC supply. Should this
not be the case, do not proceed, but contact your dealer.
As a general rule, you should not make any connections to the DSP5000,
or to any other component in your system, when the AC power supply is
switched on.
Customising features
For full details of
Type settings and
configuring
DSP5000, see
Customising
DSP5000: an
overview, on
29
The DSP5000 is very flexible. Its functions can be significantly
customised, which means that you can set up your system so that it suits
you exactly.
Customising DSP5000: an overview, on page 29, describes your
options in detail. By the time you have set up DSP5000 according to your
needs, you will be aware of how the alternative choices available to you
can differ from the standard configurations.
We recommend that you first get to know the DSP5000 by using one of
the standard setups, and by working through this manual. Do not be afraid
later to experiment with customising – we have given you a simple way of
getting back to where you started from! (see page 32).
DSP5000 as provided has 3 standard configurations which we call Type
settings. Each Type gives a different set of standard options; this feature
is described fully on page 32.
Using DSP5000 10
Warning By selecting a Type, you automatically reset all custom settings
for DSP5000 to the factory defaults – this includes all tone settings.
DSP5000 has 7 operating modes (not to be confused with setup Types):
• Standby
• Normal
• Type
• Config
• Setup
• Calibrate
• Test
Standby and Normal are the everyday operating modes. The basic
operating instructions refer to these.
Type is used to reset the DSP5000 to one of five factory-preset
conditions. The main uses of Type are to specify what type of preamplifier
is being used, and to make an initial choice of left/right and master/slave
speakers.
Config could be considered as an editing setup mode. In Config you can
choose any aspect of left/right, master/slave, sources or preamplifiers
individually, without losing any other settings you may have made.
Setup is an operating mode in which the speaker plays and in which
additional menu items are available. The idea behind Setup is that in this
mode you can choose and store in memory the preferred tone settings for
every source. Going to Normal operation then prevents them from being
accidentally lost, and can simplify everyday operation.
Customisation is described more fully in Configuring DSP5000: an
overview, on page 29.
DSP5000 User Guide
Page 11

For details of
page
making all connections, see
Connecting
DSP5000, on
42
Using DSP5000 11
Calibration and Test are intended only for use by the factory or by service
engineers.
Connections
You will need to make four types of connection to the DSP5000:
• digital audio
• communications
• master–slave
• AC power
Digital audio connections will need to be made to other components in
your system. Communications connections have to be made to most of
the other Meridian components in your system in order for them to act as
one system. The connections to your DSP5000 are very important, and
care should be taken in deciding which connections to make.
Connection details for a wide variety of systems are described in the
sections following page 42.
Siting
We recommend that you now set up the system so that you can listen to
music and adjust the position of the DSP5000s if necessary. This can be
accomplished by following the instructions in the Getting going sheet, or
those in the rest of this manual.
The locations chosen for a pair of DSP5000s are crucial to getting the
best possible acoustic result. For stereo, the two speakers should ideally
be equidistant from the main listening position, and the same distance
apart.
The DSP5000 has bass controls to allow adjustment of the low-frequency
response to room acoustics and positioning. You should nevertheless try
to achieve the following:
• If possible, have the most acoustically absorbent wall in the room
behind the speakers. They could, for example, be in front of an open
bookcase or curtained window, or on each side of a bow window.
• If possible, have each DSP5000 at least 50cm from a corner.
• If possible, have each DSP5000 at least 20cm from the back wall.
• After finding by trial and error the best positions for the DSP5000s, use
the spiked feet under the protective black plastic foot caps where
possible. This will give improved definition to the sound, and better
physical stability.
• If possible, locate the listening position so that your head is at least
60cm from the wall behind you (unless this is acoustically absorbent).
Consider the following practical points:
• If possible, you should locate the DSP5000s so that the electronics
(back) of the speaker are not subjected to long-term strong sunshine.
In Standby the back plates should be cool (less than hand-hot).
• If possible, you should locate the DSP5000s so that the one chosen to
be the master speaker does not receive direct sunlight on the front
display window. If it does, the DSP5000 may not ‘see’ your commands
from the MSR. No harm will be done to the DSP5000; it will simply be
inconvenient.
• The location of the master speaker also depends on the connections
to it from the rest of your system. See page 42.
• You should not, if possible, locate the DSP5000s with their backs to
any heat source – for example, a central heating radiator.
• You should try to arrange a separate AC power outlet for each
DSP5000. The use of adapter units is discouraged, since at best they
degrade the possible sound quality.
DSP5000 User Guide
Page 12

Using DSP5000 12
Final adjustments
When you are sure that the DSP5000s are in the right places, you should
adjust and finally tighten the feet with the wrench provided.
We strongly suggest that you try to use the spike feet, in order to get the
best sound.
• Foot caps may be fitted if the spikes are unacceptable
The spikes allow the DSP5000s to rest firmly on the floor. A spike passes
through carpet to the wood or concrete below, and does less damage in
the long run than a wide foot.
The best sound possible will only be obtained if the DSP5000s are firmly
mounted and cannot rock at all. If the finish of the floor prevents the use
of spikes, leave the plastic covers on, but adjust the feet to the floor so
that the DSP5000s are vertical and show no tendency to rock.
One or two days after installation, check the tightness of the screws
retaining the drivers. These screws may loosen during shipping or with
extremes of temperature or humidity, and the speaker will not sound its
best if they are loose. The screws should be checked every few months,
particularly if the speakers are used to play loud music for long periods.
Tip Like all digital products, the DSP5000 emits some radio-frequency
signals. For this reason, try to keep all power cables and communications
leads away from audio, TV and FM antennae, and from loudspeaker
cables. If you spend some time laying out the cables carefully, you will be
rewarded with the best possible performance later.
Starting off with DSP5000
First install the DSP5000s, using the information in the Getting going
sheet. When they have been used for a while, you may wish to change
the setup in order to fine-tune it to your requirements. To achieve this,
refer to the setup section of this manual, beginning on page 30.
Checking
Before turning on the power, check once again that you have made all the
connections correctly and that you have not disturbed any existing
connections in the process.
Switching on
The power switch is located directly next to the power inlet on the rightrear of DSP5000.
1. Switch on the power to the sources, but for now do not start them
playing.
2. Turn on the power switch at the rear of the master DSP5000. A small
point on the display should now be illuminated:
••
3. Turn on the power switch at the rear of the slave DSP5000. A small
point on the display should now be illuminated:
If there are no lights
Check the integrity of your power connections, including any fuses in your
supply. If the Standby point is still not illuminated and the rest of your
system is functioning, contact your dealer for help.
DSP5000 User Guide
Page 13

Using DSP5000 13
Starting the DSP5000
To start the system, press any of the input keys on the MSR (CD, LP,
Radio, Video, Tape 1, and Tape 2). For example:
1. Press CD
In Type 1 this will select the physical input D1, and both DSP5000s will
display
cd 65
65 is the volume number, and cd means that the DSP5000 expects the
source to be a Meridian CD player which can be controlled by the MSR.
Cd would be the correct display if your CD player were not a Meridian
product, in which case you could still listen to it, but the MSR would not
control it.
Note The response of the DSP5000 to commands will be slower if it is
set up to expect a Meridian component when one is not connected. If nonMeridian components are used, the DSP5000 should be set up
accordingly.
The Meridian components will now have come out of Standby.
1. Start up your CD player in the normal way. If all is well you will soon
hear the music. If you do not, check all connections, and if necessary
refer to the DSP5000 setup manual.
To put the system into Standby:
1. Press Off
If the connections are correct, both DSP5000s and any other Meridian
components should revert to Standby mode.
Note If they do not, there may have been a mistake in the setup of the
DSP5000s, or in the connection of the communications network.
Standby
The entire Meridian system is designed to be left connected to AC power
at all times.
• The Standby state ensures that the components operate at maximum
efficiency from the moment when you start listening. It is perfectly safe
and consumes a negligible amount of power. However, when you are
not going to use your system for some time (when you are going on
holiday, for instance), we would advise you to disconnect it from the
AC power supply.
• The memory functions of DSP5000 use EEPROM, which is non-
volatile, and therefore has the ability to store your data indefinitely
when the power is switched off.
DSP5000 User Guide
Page 14
Basic operation of DSP5000
Note DSP5000 is factory set for the most common installation, one using
the full features of a Meridian 500-Series CD player and 562 controller.
We call this a Type 1 installation. For more details, see Appendix 1 on
page 55.
Selecting sources
To switch from CD to another input, say Radio:
1. Press Radio
In Type 1, this will select RD on a Meridian 562.
Both DSP5000s display
rd 65
Here rd means that the source is a radio tuner, and that the DSP5000
expects a Meridian 504 to be connected to the Radio input of the 562 and
into the communications system. The 504 can now be controlled by the
MSR, and its status can be displayed on the master DSP5000. 65 is the
volume number.
The other input keys on the MSR (e.g. LP, Tape 1, Video and Tape 2)
operate in a similar way in Type 1:
The LP input of a Meridian 562 is engaged. The D1 input of the DSP5000
is selected. The display shows
LP 65
Using DSP5000 14
The Tape 1 input of a Meridian 562 is engaged. The D1 input of the
DSP5000 is selected. The display shows
t1 65
Note These responses are for DSP5000s set up for Type 1, and can be
changed. See later.
Selecting a source will bring DSP5000 out of Standby.
Note If you have stored a preferred tone setting for a source, you must
recall it after switching to the source; recall settings by pressing Store.
Putting the DSP5000 in Standby
1. Press Off on the remote control
Coming out of Standby
To start up the DSP5000 from Standby:
1. Select a source, using the remote control
or
1. If the DSP5000 is part of a Meridian
of Standby (for example, start up a Meridian CD player).
system, bring any component out
DSP5000 User Guide
Page 15

Using DSP5000 15
Display
DSP5000 displays information to help you operate it. Display information
can include:
• master indication – red light in the window
• digital ‘overload’ – flashing yellow light in the window
• blank display, in which the speaker only illuminates the display when
you use the remote control
• Standby indication
••
• setup information during programming
• selected source type
• selected physical input connection
• volume number
• tone control information
• absolute phase
• muted condition
• track and time information, when the source is a digital one that
includes these codes, e.g. a CD
• error messages
• CD track selection, if a Meridian CD is connected
• frequency, preset number and preset selection when the installation
includes a Meridian tuner
Note Using the Display key, you can change the master speaker's
display. For example, the slave speaker can display source and volume
while the master displays track, time or frequency.
Note Only the master can display tuner, track and time information, as
this comes from the products to the master speaker via the M5-lead, and
is not passed on to the slave.
Changing the display
The DSP5000 has several display modes. To change the display:
1. Press Display
The master DSP5000 will cycle through the five display options, which
are:
• source + volume number (convenient legends which you have
chosen are displayed)
• blank
• track number for CD; preset number for radio
• track time for CD; frequency for radio
• disc time for CD
The blank display is for those users who are distracted by lights. If you
have chosen this option, the lights and display will only come on when you
are operating the DSP5000.
The source + volume display looks like the following example:
t3
This indicates that you are using the Tape 3 source with a volume of 56.
56
CD displays
1. With the CD playing, press Display
The display on the master will change to give something like this:
DSP5000 User Guide
Page 16
Using DSP5000 16
1
Here 1 is the number of the track currently playing on the disc.
If the disc includes significant index points, the display will be like this:
3.4
3.4 here means track 3, index point 4. In theory, with the right disc, we
could see displays of track and index up to 99.99. Index point 1 is never
displayed.
While the CD player is loading a disc (reading the disc’s directory), the
DSP5000 will show the directory message:
dir
At the end of a CD, the DSP5000 will detect the lead-out track and
momentarily display the message
End
1. With the disc playing, press Display again. You will see a disc time
display, counting up as the disc plays.
2. Press Display again. You now have a display of time for the current
track only, also counting up as the disc plays.
3. Press Display again. The display should go blank on both master and
slave.
4. Pressing Display again brings you back to the source and volume
display.
One useful way to set up DSP5000s is to leave the track display on the
master, since the slave always displays the source and volume.
If the CD player is in the same room, you can adjust its display to give you
additional time information.
Try pressing Display until you are familiar with its operation.
Other information reviewed in Standby
1. Press and hold Display
The display will show the version number of the microcontroller
software, followed by the currently-loaded DSP software. For example:
2.2
P1.81
d1.2
441b
Note The last DSP version number will depend on the operating mode of
the DSP5000. The first two digits represent the sampling frequency;
DSP5000 automatically reloads a new program for each sampling rate.
The version numbers will also be different in Test and Calibrate.
Volume
To raise or lower the volume:
1. Press the upper or lower
The volume level displayed should count up or down, and will range from
1 to 99. Each step is precisely 1dB.
∧∧ or ∨∨ red key
DSP5000 User Guide
Page 17

Using DSP5000 17
Note Subjectively one judges a volume increase of 9dB to be equivalent
to a doubling of loudness, so each volume number represents about a
11% change in loudness, with nine steps to double loudness.
DSP5000 User Guide
Page 18

Using DSP5000 18
Mute
To mute the sound:
1. Press Mute
The display now shows that the sound is ‘attenuated’:
Att.
To demute (restore the sound level):
1. Press Mute
The Mute key toggles between mute and demute.
The system may also be demuted by selecting another source, or
adjusting the volume.
The menu system
The DSP5000 offers a number of user choices which are normally
accessed less frequently than, for example, source and volume. To make
it easier to operate these less commonly used functions, we have
provided a flexible menu system to guide you through the options. One
important advantage this gives is complete flexibility for future system
control options. Please note:
• The menus are different in Normal and Setup modes
To access the menus
1. Use the menu keys on the remote control w n s e
To move between menus
1. Press either the w or the e menu key on the remote control
In Normal mode, the menu choices are:
• Tilt
• Bass
• Phase
• Balance
• Axis
Tip This is also the way to review settings you have made. The DSP5000
will cycle through its menus, displaying the current choice in each one as
it goes.
In Setup mode, an additional menu item appears for boundary or free
bass alignment or choice of subwoofer modes.
To change the choice in a menu
1. Press either the n or the s menu key on the remote control
Balance
The balance control in the speaker is only used if you have two
DSP5000s connected as a conventional stereo pair.
If you have set up the DSP5000 as a centre-channel then the balance
control is ignored. If the speaker is used with a Meridian 565 Digital
Surround Processor, then the balance function is taken over by the 565.
See the manual supplied with 565.
Use of balance controls
The use of the balance control has been misunderstood for some time. It
has been assumed that you can use it to move the image to one side,
DSP5000 User Guide
Page 19

Using DSP5000 19
perhaps to compensate for a non-central listening position or a highly
asymmetric layout.
This is certainly not the case. Stereo sound is dependent upon time
differences between the signals from the channels. To get the best out of
a normal stereo system, you should be in the correct position in relation to
the speakers.
The balance control of the DSP5000, however, uses digital signalprocessing to delay and diminish the sound in one speaker, thus
effectively shifting the speaker’s image back. Thus balance control
compensates, to a certain extent, for an off-centre listening position. If you
sit off-axis, this control will rotate the image.
Note Because the use of the balance control processes the digital signal,
you may hear a slight clicking as the balance is adjusted.
How to use the balance control in a pair of DSP5000
If you are playing a CD, press Display enough times to get the
permanent display:
cd ##
Here ## represents the volume number. (This will help you to understand
the functioning of the balance control better, but it is not essential).
1. Press the
master display will momentarily show
L. 0
This allows you to ask the DSP5000 what its balance setting is without
changing it.
Note We call this kind of display a cursor – in this case, the tilt cursor.
DSP5000 uses several cursors to access functions such as tilt, bass,
phase, track selection and preset selection.
To get rid of a cursor, either
• wait a few seconds, or
• select another cursor, or
• hit another (inactive) key
To change the balance setting:
1. Make sure that you can see the balance cursor display on the master:
L. 0
2. Press the n menu key. The display will change to
L. 1
showing that you have moved the balance one volume number towards
the left. After a few moments the display will revert, but you will now see
that the left speaker has a volume number one greater than the right.
w or the e menu key until the balance display shows. The
3. Press
To move the sound towards the right:
1. Use the menu
The balance can be adjusted between ±30 dBs, incremented in 1 dB
steps.
To restore the central condition, press Clear.
n again. The display will move to
L. 2
s key instead
DSP5000 User Guide
Page 20

Using DSP5000 20
Note This will also reset the bass and tilt controls.
DSP5000 User Guide
Page 21

Using DSP5000 21
Tilt control
Tilt controls are combination controls that slope the frequency response of
the system slowly over the frequency range to make the sound brighter or
dimmer. They are less crude than conventional tone controls. The
responses of the tilt control in DSP5000 are shown in Appendix 4 on page
61.
To review the tilt setting:
1. Press the
master display will momentarily show
t. 0.0
This allows you to ask the DSP5000 what its tilt setting is without
changing it.
Note We call this kind of display a cursor – in this case, the tilt cursor.
DSP5000 uses several cursors to access functions such as tilt, bass,
track selection and preset selection.
To get rid of a cursor, either
• wait a few seconds, or
• select another cursor, or
• hit another (inactive) key
To change the tilt setting:
1. Make sure that you can see the tilt cursor display on the master:
t. 0.0
2. Press the n menu key. The display will change to
t. 0.5
and the sound will get a little brighter.
3. Press
t. 1.0
w or the e menu key until the tilt display shows. The
n again. The display will move to
To dim the sound:
1. Use the menu
The tilt can be adjusted between ±10 dBs, incremented in 0.5 dB steps.
To restore the flat condition, press Clear.
Note This also restores balance and bass.
To store a tilt setting, you must be in Setup mode; see page 39.
To recall a tilt setting, use the Store key; see page 24.
s key instead
Tilt explained
The tilt control allows you to adjust the broad balance of the DSP5000 to
correct for the acoustics of your listening room, or for a misbalanced
recording.
Normally, settings between 1.0 and –2.0 will give the most natural result.
All DSP5000s in the installation take on the same tilt setting as the
master. This is essential for correct stereo.
DSP5000 User Guide
Page 22

Using DSP5000 22
Bass control
The bass control allows you to adjust the bass response in the room. The
responses of the bass control in DSP5000 are shown in Appendix 4 on
page 61.
To adjust the bass:
1. Press the
master display will momentarily show
b. 0.0
This allows you to ask the DSP5000 what its bass setting is without
changing it.
To change the bass:
1. Make sure that you can see the bass cursor display on the master.
2. Press the
b. 0.5
and the bass will increase by 0.5dB. The bass can be adjusted by ±5 dB,
incremented in 0.5 dB steps.
To restore the flat condition:
1. Press Clear
Note This also restores balance and tilt.
• To store a bass setting, you must be in Setup mode; see pages 39
and 23
• To recall a bass setting, use the Store key; see page 24
w or e menu key until the bass cursor display shows. The
n menu key. The display will change to
Bass explained
The bass control allows you to adjust the broad balance of the DSP5000
to correct for the acoustics of your listening room, or for a misbalanced
recording. Normally, settings between 1.0 and –2.0 will give the most
natural result.
All DSP5000s in the installation take on the same bass setting as the
master. This is essential for correct stereo.
Phase
You can invert the absolute phase of the signal. To review the absolute
phase:
1. Press the
master display will momentarily show
POS.
or this:
nEG.
This allows you to ask the DSP5000 what its phase setting is without
changing it.
To change the absolute phase
1. Press the n or s menu key
Phase explained
The phase function controls the absolute phase of the digital conversion
and is used to compensate for recordings which are out of phase.
w or e menu key until the phase display shows. The
DSP5000 User Guide
Page 23

Using DSP5000 23
Experiment with the sound of the setting. If you are not sure, set it to
positive phase.
Axis
To adjust the axis:
1. Press the
master display will momentarily show
A. 0
This allows you to ask the DSP5000 what its axis setting is without
changing it.
To change the axis:
1. Make sure that you can see the axis cursor display on the master:
A. 0
2. Press either the n or s menu key. For example, if you press the
display will change to
A. 1
All DSP5000s in the installation take on the same axis setting as the
master. This is essential for correct stereo.
w or e menu key until the axis cursor display shows. The
Axis explained
The axis control allows you to adjust the optimum listening height of the
DSP5000 speakers. This means that you should be able to use the axis
function to bring the image more clearly into focus for different listening
heights. It changes the focus of the stereo image, not its perceived
position. You could think of it as a balance control operating in the vertical
plane.
The axis can be adjusted between 3 and –2, covering a range of listening
positions from standing eight feet from the speakers to sitting on the floor
at the same distance. Nominally 0 corresponds to on-tweeter-axis
listening; usually a listener will be below that position, so we recommend
that you start with –1 or –2.
Storing settings
In Setup mode you can store settings for:
• tilt – overall frequency balance
• bass
• boundary alignment (wall or free-standing)
• phase
• axis
An unusual feature of DSP5000 is that the tone control settings for tilt and
bass can be stored separately for each source. If, for example, you
happen to prefer a tilt setting only when listening to the video source, use
Setup to programme the DSP5000 for that setting. You can then recall the
setting by pressing Store while listening to the video source in Normal
mode.
At any time, you can use the Clear key to restore the following factory
settings :
• bass to 0.0
• tilt to 0.0
• balance to middle
You cannot store settings in Normal mode. See page 41.
DSP5000 User Guide
Page 24

Using DSP5000 24
Recalling settings
The settings stored in the DSP5000 can be recalled at any time. When
the display is normal (i.e. not a tone cursor):
1. Press Store
The DSP5000 will respond with
rEc.
Tip You can now compare the stored settings with the standard ones.
Use the Clear key to restore a flat response, then Store to recall the
stored settings.
Note When you change sources, you will need to press Store to recall
any favourite tone setting you may have stored.
Note Clear does not reset the phase and axis settings.
DSP5000 User Guide
Page 25

Controlling a Meridian CD player
Use of handset to control CD
You are advised to operate the system with the MSR.
Playing a disc
On the MSR, the following keys operate the Meridian CD:
To start a disc
1. Press Play
To stop the disc
1. Press Stop
To make the disc pause
1. Press Pause
The Pause indication on the Meridian CD will light up. If the DSP5000
master was displaying track or time information, it will display
PSE
Operation 25
To start it again (‘unpause’)
1. Press Pause
To cause a disc to repeat
1. Press Repeat
The Repeat light on the CD player will light up.
Scanning a disc
To move forward or backward in a track
1. Press
u or v
Selecting tracks
To move on to the next track at any time
1. Press Play
or
Next and Previous can be used – as on the Meridian CD front panel – to
select a track number. This will result in the appearance of the ‘select
cursor’ display. For example
1. Press Next repeatedly until you see the 'select track 5' display. In 500
mode the display looks like:
– 5
In 200 mode the display looks like:
S. 5
You can now either engage Track 5 by pressing Play, or simply wait for
the track to engage.
The DSP5000 directs instructions from the MSR to the current source.
Note When selecting tracks by number, you do not need to worry about
Track and Preset buttons, as you do with the Meridian 209 remote
control.
DSP5000 User Guide
Page 26

Operation 26
To select a track by number, press the appropriate number key or keys.
For example, to select track 6
1. Press 6
The DSP5000 will respond with the display
– 6
To engage this selection, press Play or wait for a short time.
To select track 15
1. Press 1 followed by 5
The DSP5000 will show
– 15
Again, press Play or wait for a short time.
If you select a track that does not exist on the disc, the DSP5000 will
show an error message:
Err.
Selecting index points
To select index points you need to enter both the track and index point by
number. Press the appropriate number key or keys, followed by the
decimal point key, followed by the index number. For example, to select
track 6 index 2
1. Press 6
The DSP5000 will respond with the display
– 6
2. Press decimal point , then
3. Press 2
The DSP5000 will respond with the display
– 6.2
To engage this selection, press Play or wait for a short time.
Setting up programmed sequences
To set up a sequence use the number keys with the Store and Clear
keys – as described in the CD player User Guide.
For example to store track 6:
1. Press 6
The DSP5000 will respond with the display
– 6
2. Press Store
The DSP5000 will respond with the display
S. 6
For example to cancel track 4:
1. Press 4
The DSP5000 will respond with the display
– 4
2. Press Cancel
The DSP5000 will respond with the display
DSP5000 User Guide
Page 27

C. 6
Press Play to action a programmed sequence.
Use with 504, 204 or 604 FM tuner
When a 204 or 604 is the system tuner, it can be controlled by the MSR
but only if the DSP5000s are set up in 200 mode (for example by
selecting Type 2. A 504 tuner can operate in both 200 and 500 modes.
Select the tuner with Radio. The display will show
rd. ##
where ## is the volume number. (If you are using another tuner which the
DSP5000 cannot control, see the setup section on page 38, select
Comms to ‘N.C.’)
To select a preset station, e.g. preset 4
1. Press 4
The DSP5000 will show a 'select cursor' display. For 500 mode the
display is:
P. 4
Operation 27
For 200 mode the display is:
S. 4
2. Either press Play or wait for a short time. The tuner will go to preset
number 4.
To select a higher preset, e.g. 23
1. Press 2 followed by 3
The DSP5000 will display
P. 23
and then the tuner will go to preset 23.
The master DSP5000 can display either the preset number of the tuned
station or its frequency. For example, if we tune to 92.3MHz and store this
frequency as preset number 3, we can then press Display repeatedly and
watch the master rotate its display between the following:
rd ##
P. 3
92.3
Note The DSP5000 cannot show the time displays of the 204.
6. Use the system, or put it into Standby.
DSP5000 User Guide
Page 28

Operation summary
On the remote control
KEY FUNCTION
Operation 28
Off
CD, LP etc.
Display
Play (green)
Stop
Pause
Repeat
Next
Previous
ww ee (menu)
nn ss (menu)
*
Clear
Store Recalls tone settings for the current source
Mute
nn (red)
ss (red)
Puts the DSP5000 into Standby mode
Selects a source to listen to
Cycles the display through:
source and volume number
blank (display off)
preset on tuner; track on CD
frequency on tuner; disc time on CD
track time on CD
Starts a CD playing; moves CD to the next
track; moves tuner to the next preset
Stops a CD playing
Makes the CD pause
Sets or clears Repeat on the CD player
For track or preset selection
For track or preset selection
Move between menus; can be used to
review settings
Change items within a menu
Reserved
Restores factory tone settings
Mutes or demutes the system
Increases volume
Decreases volume
DSP5000 User Guide
Page 29

Customising DSP5000: overview 29
Customising DSP5000: an overview
DSP5000 is a very sophisticated device, with a number of options which
allow you to set up exactly the system you need.
Programming of DSP5000s should take place after you have set up the
speakers and sorted out most of the connections. If you first get the
speakers working with some kind of digital input (e.g. a CD player), and
with some of the programming provided (e.g. Type 1), then you can
always go back to that starting point if you make a mistake.
Programming DSP5000 is a straightforward process, and you should not
be timid about experimenting. Although the setup is stored in non-volatile
memory called EEPROM, the EPROM (which you cannot change)
contains default Type settings, and you can return to these at any time.
Programming is the process of telling the DSP5000 what you want it to do
when the MSR is used. It is based round the Type system, which has five
different Types; you can choose the best Type for your own system.
Programming is carried out using the MSR, so you must first get the MSR
working, following the instructions on page 8.
The first step in programming DSP5000s is selection of the start Type.
Page 30 gives an overview of the five different Types, and these are
described further in Appendix 1, on page 55.
Note At any time during your programming of the DSP5000s, you can
turn off the power to the speaker you are working on, and all that you
have done will be remembered.
Note When you have finished programming, you can get out of the
programming mode simply by turning the power to the speaker off and
turning it back on again.
Restoring default settings
1. Switch off the DSP5000, using the power switch on the back, and wait
for 3 seconds
2. While pressing the 1 key on the remote control, switch the power on
again. The display will read
TY. 1
3. Release the 1 key
4. At this stage, you can change the Type from 1 to 8, using the number
keys; see details on page 32
5. Switch off the DSP5000, using the power switch on the back
6. After a second, switch the DSP5000's power on again
Storing preferred tone settings
There is a special mode called Setup in which you can listen to the
loudspeakers normally, but in which the Memory feature is extended to
allow you to store tone settings as well as recall them. See page 23.
Note It is an unusual feature of DSP5000 that the speaker stores your
preferred tone settings for every source. You must therefore adjust these
settings one at a time and store each one.
DSP5000 User Guide
Page 30

How to customise DSP5000
1, on page
see page
DSP5000 needs no customising to become operational. Once you have
your system established, you may wish to review the customising options
by reading Customising DSP5000: an overview (page 29).
Customising: general procedure
DSP5000 has seven operating modes (not to be confused with Types):
• Standby
• Normal
• Type
• Config
• Setup
• Calibrate
• Test
Standby and Normal are the everyday operating modes. The basic
operating instructions refer to these.
When customising, you may need to use Type, Config and Setup, in that
order, before reverting to Normal. In other cases, you may only need to
use Config or Setup. Neither of these modes resets the DSP5000, so you
will not necessarily lose any settings you have previously made.
Customising DSP5000: how to 30
The Type
settings are
described in
detail in Appendix
55
How to change back to Normal
To revert to Normal
1. Switch off the DSP5000, using the power switch on the back
2. After a second, switch the DSP5000's power on again
Note If you are in Calibrate or Test mode, refer to page 60 or 59.
Type: an overview
Type restores one of the default settings. Other than selecting
master/slave and left/right/centre/surround, no further actions are
possible. Type always resets all stored settings, with the exception of
calibration information. The DSP5000 does not play music in Type.
For example, Type 1 setup gives:
• 500 Series system only
• All sources select the D1 input
• DSP5000 expects a Meridian 500-Series CD and/or a controller such
as 562
For example, Type 2 setup gives:
• 200/600 Series system only
• CD selects the D1 input
• all other sources select the D2 input
• DSP5000 expects a Meridian CD preamp controller such as 208
To use Config,
33
Config: an overview
Config could be considered as an editing setup mode. In Config you can
make individual choices about any aspect of left/right, master/slave,
sources and preamplifiers without losing any other settings you may have
made. In this mode, the DSP5000 is muted while you make the necessary
choices. The choices available in Config are outlined in the following
sections.
DSP5000 User Guide
Page 31

To use Setup,
see page
39
Customising DSP5000: how to 31
Config: control settings
In Config, you can make selections that affect the way in which DSP5000
responds to certain keys. The main choices of this kind are:
• left or right
• master or slave
• Multiroom standby option
• sort of preamplifier or source switch box in the installation
Config: sources and inputs
In Config you can make decisions about sources, e.g.
• how many inputs (up to six) will be active
• which sources you can select
• which key on the remote control selects which source
• which logo on the DSP5000 display represents which input
• which physical input connection to DSP5000 will be used
Setup: an overview
Setup mode is quite different from Type or Config in that the speakers
function in this mode. In Setup, the master speaker menus are extended
to give you additional control, so that you can establish sonic preferences.
Setup mode lets you make choices based on extended listening.
The idea behind Setup is that you can choose, while listening,
• the boundary parameter (free or wall-mount)
• tilt settings for each source
• bass settings for each source
When you are happy with the settings you have chosen, they can be
stored in Setup. You then switch the system back to Normal.
The particular advantage of this system is that other users will not
inadvertently lose the settings you have chosen. When the system is in
Normal mode, the Store key will not store, performing only a recall
function. At any time you can
• reset factory default settings, using the Reset key
• adjust the settings, using the Menu keys
• recall your preferred tone settings with the Store key
DSP5000 User Guide
Page 32

Customising using Type
Type is a mode used specifically to restore the entire memory (except the
calibration memory) of DSP5000 to one of three factory-preset
configurations. For all three Types, Type resets the following:
• phase to positive
• axis to –1
• balance to central (L 0)
• tilt to 0.0
• bass to 0.0
• boundary to Free
• speaker to left master
Depending on the Type selected, the other options are set as follows.
More information is given in Appendix 1, on page 55.
Customising using Config 32
Type Application D1 input
for
source
1 500 mode, controller like 562 all na
2 208 mode, with other Meridian
equipment in the system
3 201/601 mode, with other Meridian
equipment in the system
4 201/601 mode, with other Meridian
equipment in the system
5 500 mode, CD direct CD others
6 500 mode, Meridian Digital Theatre all na
7 500 mode, Second room system all na
8 500 mode, Additional room system all na
When programming DSP5000 speakers, it is best to choose one of the
three standard Types as a starting point, and it may be possible to find
one that meets your needs exactly. Otherwise, choose the one that is
closest to your requirements. Select it, and set up the master/slave and
left/right speakers, by means of the following steps:
CD others
all na
CD others
D2 input
for
source
Selecting Types
1. Switch off the DSP5000, using the power switch on the back, and wait
for 3 seconds
2. While pressing the 1 key (2 for Type 2, 5 for Type 5) on the remote
control, switch the power on again. The display will read
TY. #
where # is the Type you have selected.
3. Release the # key
After a couple of seconds, the display will change to
L.
This indicates that this speaker will be a left master.
DSP5000 User Guide
Page 33

Customising using Config 33
page
Choosing centre, left or right
If you have Typed the speaker with a 6, then the ‘Cen.y’ option is enabled.
This tells the speaker that there is a centre in the system and enables the
option to make the DSP5000 into a centre.
If you Typed the speaker with a number other than 6 then the ‘Cen.n’
option is selected and you do not get the ‘centre’ choice in this section.
To change the speaker from left to right, or vice versa.
1. Press the menu
The choices offered are L, r, C, LS, RS (for left and right surround).
nn or ss on the remote control
Choosing master or slave
To change a master to a slave, or back again:
1. Press Play on the remote control
r. S.
This display indicates a right slave.
Completing Type
When you are happy with your left/right and master/slave choices for this
speaker:
1. Switch off the DSP5000, using the power switch on the back
2. After a second, switch the DSP5000's power on again
Note Ensure that you have set the two speakers to opposite settings. One
must be left, the other right; similarly one must be the master and the
other a slave.
3. Make a note of your choices by marking both speakers on the back, in
the area provided on the label. Use a pencil so that you can change
the marking in future.
You now have your speakers set up in the start Type of your choice. The
following sections explain how to modify this setting to fine-tune the
system.
Note Under normal circumstances, you should not switch on the
DSP5000s while any key on the MSR is being pressed. If you do this, you
may accidentally select a new Type and change any previous
programming.
The Types are summarised in Appendix 1.
Customising using Config
For an overview
of Config, see
30
Config is a fine-tuning customising process carried out only on the master.
It will not cause any difficulty if you accidentally go to Config for a slave,
since the only options offered there will be left/right and master/slave.
In Config you can make choices about the way in which your system
responds to source-key selections. The important feature of Config
(differentiating it from Type) is that you can use it to change any setting of
the DSP5000 without erasing all the other setup choices you may have
made. Think of it as a configuration editor.
Config has three sorts of menu:
• root menu
• system menu
• source menus
DSP5000 User Guide
Page 34

Customising using Config 34
Inside Config you can move between them at will. To go to
1. root: press Clear
2. system: press Off
3. source: press a source key – e.g. CD
Note In Config, the speaker is silenced.
How to use Config
1. Switch off the master DSP5000, using the power switch on the back,
and wait for 3 seconds
2. While pressing the 0 key on the remote control, switch the power on
again. The display will indicate the root menu that shows the left/right
and master/slave settings; for example,
r.
indicates a right master.
3. Release the 0 key
Root menu options
The root menu controls the overall operation of the DSP5000s, with
options for master/slave and left/right.
You get to the root menu by
1. Selecting Config, as above
or, at any stage in the Config programming process,
1. Pressing Clear or Off
Choosing left or right
To change a left speaker into a right speaker, or vice versa:
1. Press
Note If you have started with Type 6 or selected ‘CEn.Y’ elsewhere in
Config, then you also have the choices ‘C’ and ‘S’ for Centre and
Subwoofer. If you want the speaker to be a Centre in a 565-based
system, choose ‘C’.
nn or ss on the remote control
1
Choosing master or slave
To change a master to a slave, or back again:
1. Press Play on the remote control
r. S.
This display indicates a right slave.
System menu
To get into the system menu:
1. Press the menu
Preamplifier options
The first digit in the system menu identifies the dominant preamplifier in
the system.
ee key
1
This choice also permits you to make the DSP5000 the system
subwoofer. This choice would normally be made only for diagnosis!
DSP5000 User Guide
Page 35

Customising using Config 35
The display looks like this:
Cd ??
The first letters tell you which options are available to you, as follows:
• 500 tells you that this system operates in Meridian 500-Series mode.
All controllable Meridian products must be 500 compatible. Also use
this if the DSP5000 is the only controllable preamplifier connected (i.e.
the source keys on the MSR will only select between the two inputs of
the DSP5000).
• Pr. means that the preamplifier for this system will be a Meridian 201,
601, 603 or compatible, and that source keys on the MSR will
automatically switch the inputs on the preamplifier regardless of other
selections. Implies and engages 200 mode.
• Cd means that the preamplifier for this system will be a Meridian
CD/Pre (e.g. a 207 or 208). The first four input keys (CD, Radio, LP
and Tape1) on the MSR will automatically switch the inputs on the
CD/Pre regardless of other selections. Input keys Tape2 and Video will
select CD on the CD/Pre. Implies 200 mode.
To move through these options:
1. Press
nn or ss (menu keys)
Configuring options
This sections allows you to make choices about whether the speaker will
be system controller. This choice is only relevant to the master.
After a Type the display shows:
Auto
Choose from:
• Auto This preferred option allows the system to ‘Auto Configure’.
• N.Con Sets the speaker to be ‘Not Controller’ if it is a Master.
• Con Sets the speaker to be ‘Controller’ if it is a Master.
System address
1. Press the menu ee key
The display typically shows:
S.A. 1
This means the system address is 1. The 500 Comms allows for up to
eight systems connected to the same bus for multiroom installations.
Unless specifically instructed otherwise by Meridian personnel; or your
dealer, leave this set to 1.
Product address
1. Press the menu ee key
The display typically shows:
P.A. 1
This means the system address is 1. The 500 Comms allows for up to
eight systems connected to the same bus for multiroom installations.
Unless specifically instructed otherwise by Meridian personnel; or your
dealer, leave this set to 1.
System protocols
Multiroom systems have protocols which allow you to define the extent to
which any room can interfere with the main system. You can choose to
DSP5000 User Guide
Page 36

Customising using Config 36
have the DSP5000 ignore the Standby state of the associated
preamplifier, looking after its own Standby independently. To select this
mode while in the system menu:
1. Press Fn - Record
The display should indicate 'preamplifier off' like this:
?? P.
Toggle this choice with Fn - Record.
Setting the Volume mode
1. Press the menu ee key
LE. 1
In the 500 Comms system there is provision for two volume controls, main
and secondary.
2. Use the
• 1. Volume main means that the DSP5000 volume control will follow
• 2. Volume secondary means that the internal volume control will
• 3. Volume is handled in the speaker independently of other
Options 2 and 3 are for Multiroom installations. If in doubt select 1.
and menu keys to choose between:
the main system and respond to the red keys on the remote.
Shifted (secondary) volume commands will be passed on to
another product.
follow the second volume control in the system and respond to the
shifted volume command on the remote.
products on the Comms.
Surround system options
Balance control operation
Installations including the Meridian 565 Digital Surround Processor
normally release the system balance function to 565.
1. Press the menu
The display should indicate the balance control status:
bAL. y
Toggle this choice with the and menu keys.
Choose ‘n’ if you have a 565, ‘y’ otherwise.
DSP Centre channel exists?
This choice tells the master that a Meridian DSP Centre speaker will be in
use as a centre-channel on the system.
1. Press the menu
The display should indicate the centre status:
CEn. y
Toggle this choice with the and menu keys.
Choose ‘y’ if you are using a DSP speaker with centre-channel features
as a centre.
ee key
ee key
Source menus
The source menus are used to change what happens when you press a
key on the MSR (i.e. what the DSP5000 then displays, and which input it
selects).
DSP5000 User Guide
Page 37

Customising using Config 37
These parameters are already set up by the Type chosen as the start
Type, but they can be adjusted using the following menus.
Source menu 1 options
Source menu 1 controls the display that will be seen on the DSP5000
when a key on the MSR is pressed in normal use. Think of its function as
adapting the keypad to your needs. There are a large number of available
legends.
To get into source menu 1
1. Press the source key you want to define, e.g. CD
or
1. When in source menu 2, press the menu
control.
The 'source menu 1' display looks like this:
cd. cd
The first cd indicates the MSR key being defined, and the second
indicates the display that will result after pressing this key. Display options
include the following:
cd
w key on the remote
This means that the source selected will be a Meridian CD player.
Depending on the Comms setting (see page 38), DSP5000 will try to
control the CD player in normal use for such functions as Play, Stop, and
track selection; also the DSP5000 will look for and check subcode in a
digital input.
rd
This means that the source is a Meridian FM tuner. (See page 38)
LP
This means that the source is a turntable.
dt
This means that the source is a digital tape recorder.
SA
This indicates a satellite audio source.
t#
The Tape 1, 2, 3 and 4 displays have no special meaning.
n
This final option causes the source key to select a non-existent source.
By using this option, you can prevent the selection of unused inputs to the
installation.
Use the menu
display.
Note The choice of display/input type is completely independent of the
MSR key to which it is assigned. If it suits your purpose you can make
several sources non-existent, or several ‘phantoms’ of the same type, e.g.
CD = ‘rd’ and Radio = ‘rd’.
n and s menu keys to adjust the second part of the
Source menu 2 options
Source menu 2 is used to define which DSP5000 input will be selected for
any given source key on the MSR.
DSP5000 User Guide
Page 38

Customising using Config 38
You get to source menu 2 by using the menu
e key while in source
menu 1.
The display will be like this:
cd d1
The first part of the display tells you which key on the MSR you are
setting up. The second part of the display tells you which input on the
back panel of the master DSP5000 will be selected when this key is
pressed. The choices are:
d1
Input D1 selected
d2
Input D2 selected
Use the
n and s menu keys to select the second part of the display.
Source menu 3 options
Source menu 3 is used to define the control or communication type for
any given source key on the MSR.
You get to source menu 3 by using the menu
menu 1.
The display will be like this:
cd 1C
e key while in source
The first part of the display tells you which key on the MSR you are
setting up. The second part of the display tells you which Comms type
has been selected. The choices are:
1C
In 500 or 200 mode this tells the DSP5000 that the source is a
controllable Meridian CD player/transport.
2C
In 500 or 200 mode this tells the DSP5000 that the source is a
controllable Meridian tuner.
3C
For 200 mode only, this tells the DSP5000 that the source is a Meridian
232 Multiroom translator.
4C
For 200 mode only, this tells the DSP5000 that the source is a Meridian
232 controlling a CD changer.
5C
In 500 or 200 mode this tells the DSP5000 that the source is like a
Laserdisc player. Some laserdiscs carry digital subcode (chapter, time
etc.) that can be displayed by the speaker.
2
Use the n and s menu keys to select the second part of the display.
Source menu 4 options
Source menu 4 is used only in 500 mode, and to define the Comms
address of the source product.
2
You can also use this option to allow time-code to be displayed from a
non-Meridian CD player if you also have a Meridian CD player connected.
DSP5000 User Guide
Page 39

Customising using Config 39
page
You get to source menu 4 by using the menu
menu 1.
The display will be like this:
cd 1A
The first part of the display tells you which key on the MSR you are
setting up. The second part of the display tells you the address. Normally
you should leave this set to ‘1A’ unless advised otherwise by your dealer
or Meridian technical support.
Use the
n and s menu keys to select the second part of the display.
e key while in source
Completing Config
When you are happy with your left/right and master/slave choices, and
with your other choices for this speaker:
1. Switch off the DSP5000, using the power switch on the back
2. After a second, switch the DSP5000's power on again
Note Ensure that you have set the two speakers to opposite settings. One
must be left, the other right; similarly, one must be the master and the
other a slave.
3. Make a note of your choices by marking both speakers on the back in
the area provided on the label. Use a pencil so that you can change
the marking in future.
Note When customisation is complete, switch the power off, wait for 3
seconds, then switch it on again to restore Normal operation and to save
what you have done.
Customising using Setup
For an overview
of Setup, see
31
Features of Setup
Setup provides additional functions:
• Choice of wall alignment for the low-frequency response of the
speaker
• The Store key takes on a ‘Store’ capability
• Access to DSP Centre-channel features.
How to use Setup
Note It is not necessary to make any adjustments to the slave for Setup.
1. Switch off the master DSP5000, using the power switch on the back,
and wait for 3 seconds
2. While pressing the Store key on the remote control, switch the power
on again. The display will momentarily show
SEt
3. Release the Store key
The master will revert to the Standby display and condition. You may now
use the speakers normally.
When customisation is complete and you are sure that you have stored
the correct tone settings independently for every source you wish to
change:
1. Switch the power off and then on again to restore Normal operation
DSP5000 User Guide
Page 40

Customising using Setup 40
In Normal operation, the settings you have made will be retained and
cannot be changed without going back to Setup.
Boundary controls
The frequency balance of a loudspeaker is changed, particularly in the
low-frequency regions, according to its proximity to walls or boundaries.
The DSP5000 is designed as a floor-standing system, so one boundary –
the floor – is nominally fixed. The DSP5000's response is also optimised
for a rear air-space of about 30cm behind the cabinet.
In certain circumstances, it will not be possible to pull the loudspeakers
out into the room, and they will have to stand with their backs to the wall.
DSP5000 has adequate DSP power to correct for the gross effects of
‘wall-mounting’. Of course, no signal-processing will remove the more
rapid echo from a nearer boundary, and such reflections will to some
extent disturb the depth of the stereo image.
In Setup, new menu entries appear, which allow a listening choice
between boundary-position settings and these can be made
independently for a left–right pair (or left + right + surrounds) and for a
centre.
Using the system boundary control for a left-right pair
This menu will appear on any master DSP5000 which is in Setup – even if
it is a centre channel and even if there is no left or right DSP speaker.
Note When DSP5000 is a master this menu operates the boundary
settings for any DSP5000 or DSP5000C in the system which is configured
to be left or right. D6000 ignores this menu.
To change the system boundary setting:
1. Press the
master display will momentarily show
FrEE
This allows you to ask the DSP5000 what its wall setting is without
changing it.
To change the setting:
1. Make sure that you can see the wall cursor display on the master:
FrEE
2. Press either the n or s menu key. The display will change to
boun.
and the sound will change in balance.
w or e menu key until the wall cursor display shows. The
3. Press either the
Corn.
and the sound will change in balance. This setting may be better for
corner or under-TV positions
In this menu you are also offered two choices for use with associated
subwoofers:
n or s menu key. The display will change to
DSP5000 User Guide
Page 41

Customising using Setup 41
Sub.1
Sub.2
Centre-channel options
The following two adjustments will appear on the master if the ‘Cen.y’
option is selected in Config or if the speaker has been set to Type 6. It
appears on the master – whether or not it is a centre. A DSP5000C (or
DSP5000) which is configured as a centre responds to these menu
settings.
Using the centre boundary control
The centre boundary control is like the system boundary control, but it can
be operated independently of other speakers in the system.
To change the centre boundary setting:
1. Press the
The master display will momentarily show the centre equivalent of the
system ‘FrEE’ setting:
C.FrE.
2. Press either the n or s menu key. Choose from:
C.bou. equivalent to the system ‘boun.’ setting.
C.Sb1 equivalent to the system ‘Sub.1’ setting
C.Sb2 equivalent to the system ‘Sub.2’ setting
C.Cor. equivalent to the system ‘Corn.’ setting.
w or e menu key until the centre boundary display shows.
Using the centre tilt-offset control
The centre tilt-offset allows the centre to be permanently dimmer or
brighter in balance to the other speakers (or 565 decoder outputs) in a
system. It is intended to help you match the sound of the centre to the left
and right main pair.
To change the centre tilt-offset:
1. Press the
The master display will momentarily show
C.t. 0
2. Press either the n or s menu key.
w or e menu key until the centre tilt-offset display shows.
While listening to the system make a choice between ±9dB. A normal
choice should be in the range ±3dB. For further details of using this
setting in a surround system, see the Meridian 565 user manual.
Note When customisation is complete, switch the power off, wait for 3
seconds, then switch it on again to restore normal operation and to save
what you have done.
Storing settings
To store the current settings, get into a bass, tilt, axis or phase cursor by
1. Pressing the
2. While this display is up, pressing Store
Sto.
The DSP5000 will respond with the store message
w or e menu key until a cursor display appears
DSP5000 User Guide
Page 42

Customising using Setup 42
Recalling settings in Setup
The Store key operates normally as a recall when there is no tone cursor
displayed.
1. Wait for a volume, track or time display on the master
2. Press Store
Limitations of storing
Tilt and bass settings are stored by each source independently. Phase,
axis and boundary settings are stored for all sources, and the last setting
stored is that used for all sources.
Centre-channel options
Using the centre position control
To change the centre position setting:
1. Press the
The master display will momentarily show
C.P. 1
2. Press either the n or s menu key. Choose a setting 1–4 following the
guidelines in the handbook for the Centre speaker.
Using the centre tilt-offset control
To change the centre tilt offset:
1. Press the
The master display will momentarily show
C.t. 0
2. Press either the n or s menu key. Choose a setting following the
guidelines in the handbook for the Centre speaker.
Note When customisation is complete, switch the power off, wait for 3
seconds, then switch it on again to restore normal operation and to save
what you have done.
Connecting DSP5000
Four types of connection must be made to the DSP5000:
• power (see page 12)
• digital audio (see page 45)
• communications (see page 46)
• RS232 to a computer (see page 48)
You will need to plan the connections with the installation you wish to
achieve in mind. It is best to do this while deciding where to put the
DSP5000s, as this decision may affect the positioning of the rest of your
system, and the way in which you connect it. The decision as to which
speaker should be master is also dependent on both positioning and
connections.
The following sections will explain in detail the options open to you.
Remember that your Meridian dealer is chosen for his expertise in this
area. If in doubt, you can always refer to him.
w or e menu key until the centre position display shows.
w or e menu key until the centre tilt-offset display shows.
DSP5000 User Guide
Page 43

Connecting DSP5000 43
Connectors
The connection sockets on the back panel of the DSP5000, and their
uses, are as follows:
• Comms Output A DIN connector which is used to send information on
to the DSP5000 slave or to a 565 Digital Surround Decoder.
NEVER connect an audio DIN lead to this socket.
• Comms Input A DIN connector which is used to exchange information
with other Meridian components
NEVER connect an audio DIN lead to this socket.
• D1 The first digital input, using a coaxial cable
• D2 The second digital input, using a coaxial cable
• D OUT A digital output which is selected by the DSP5000 to pass on a
signal to the other DSP5000. This means that the slave only needs to
have one digital input connected.
• AC The lower panel contains the power supply, and should already be
adjusted for your local supply voltage – check the labelling. The panel
contains a 3-pin IEC power inlet plug, with a power switch and integral
fuse holder.
• RS232 A standard serial connection for a computer
Where to put the master
The master has more connections made to it than the slave has, since it
is the speaker which is directly connected to any other Meridian products
in the system (for example, a 602, 603, or 607, or any Multiroom
components). It is therefore sensible to put it closer than the slave to the
sources, for the sake of tidiness. You should now be able to decide where
the master will be, and whether it will be a left or a right speaker.
Routing cables
Do not route the DSP5000 cables any nearer to TV or radio antenna
cables than is necessary. Try to keep any excess cable lengths coiled up,
as far from any tuner or television receiver as possible.
Where possible, use a dedicated AC power outlet for each DSP5000. In
any case, try not to use the same outlet group for any tuner or TV.
DSP5000 is a digital audio product, and its use involves distributing digital
audio signals. This is a new field, and it is important to follow our
instructions. Incorrect distribution of digital audio could lead to radio
interference, noticeable errors, or unnecessarily reduced sound quality.
Correct distribution will give you the best sound it is possible to have. You
may be able to use the cables we supply.
AC connection
Before connecting any unit to the AC supply, check that it is adjusted to
the correct voltage for your supply.
IMPORTANT: DO NOT MAKE CONNECTIONS OR INSERT OR
REMOVE PLUGS WHILE THE UNIT IS CONNECTED TO THE AC
SUPPLY AND SWITCHED ON.
1. Connect the unit to the AC power supply with the cord provided
• Each DSP5000 should be connected to an approved AC outlet, using
the cord provided
• If at all possible, adapter or extension accessories should not be used,
even if they are of an approved type
DSP5000 User Guide
Page 44

Connecting DSP5000 44
• If a power-line filter is to be used, try to use a permanent type, and be
sure that it is approved to the standards of your territory and that it
retains the grounding
WARNING: DSP5000 must be grounded.
Connection using M5- and S5-leads
Many systems will require only the supplied composite M5- and S5-leads.
If these are not appropriate, further information can be found in the
section starting on page 46.
To get a CD player working with the DSP5000s, proceed as follows:
1. Locate the cable marked with ‘S5’. This is a DIN + Phono to DIN +
Phono lead, about 6m long.
2. Connect one DIN plug to the Comms Input socket and the
accompanying phono plug to the D1 socket on the slave DSP5000.
3. Connect the other end to the Comms Output socket and the D OUT
socket of the master.
This completes the interconnection of the DSP5000 pair. Now:
4. Locate the cable marked with ‘M5’. This is a DIN + Phono to DIN +
Phono lead, about 8m long.
5. Locate the end with the single DIN and phono plug. Connect this DIN
plug to the Comms Input socket and the phono plug to the D1 socket
on the master.
6. At the other end of this cable, locate the phono plug and connect it to
the digital output of the CD player.
Note Getting this far should provide you with audio, and further
connections will give you control of any Meridian products in your system.
For connection of Meridian Comms, see page 46.
DSP5000 User Guide
Page 45

Connecting DSP5000 45
Digital audio connections
Note A digital audio connection will be made into the D1 input if you use
the M5- and S5-leads supplied as directed in the section starting on page
46.
Digital audio has to be conveyed to both DSP5000s in the installation.
This can be done directly from your source to each DSP5000 if
• the source has multiple outputs, or
• you are using a splitter device
Normally each digital audio source is connected only to the master; the
signal from the selected source is then passed from the D OUT socket of
the master, via the S5-lead, to the D1 socket of the slave.
Digital connections are made to the master DSP5000:
• directly from the digital outputs of up to two sources such as CD, DAT,
DCC, MD, or the Meridian 604 digital FM tuner
• from the digital output of an analogue-to-digital converter such as the
Meridian 607. A converter like this can be used to process the signals
from all your analogue sources (for example, the output of a
conventional preamplifier)
• from the digital output of a digital processor or digital control unit such
as the Meridian 562 or 601
• from the digital output of a Multimedia computing device
Digital connections should be made using high-quality 75
cable. For advice on the right type of cable to use, we suggest you
consult your dealer and the manual supplied with the source equipment.
Meridian
accessories. We advise you not to use cables intended for analogue
connection, since usually these have neither the necessary degree of
shielding nor the 75
UHF applications (for example, antenna down-lead) is also unsuitable,
since it does not shield adequately in the 1–30MHz region.
has a range of suitable digital interconnects available as
Ω impedance which is required. Cable intended for
Ω screened
Warning We strongly recommend the use of well-screened precision
coaxial cable. Certain ‘audiophile’ cables are not screened. Screened
cable will minimise RF interaction with your system. Unscreened cables
for digital connections may cause illegal levels of RF interference.
The DSP5000 has two coaxial digital inputs, D1 and D2. The M5- and S5leads provided, which will be sufficient for the great majority of
installations, connect to the D1 input and the D OUT output.
You will need to provide custom cables if
• you wish to use D1 and D2, or
• you are wiring a Multiroom installation, or
• you require cable lengths different from those provided
DSP5000 User Guide
Page 46

Connecting DSP5000 46
Communications connections
Communications connections are only made to other Meridian equipment.
In general, you can follow the instructions given for the other equipment,
and view DSP5000 as a D600 or D6000 for communication purposes. The
following sections describe the major points.
If you have a Meridian 500-Series only system
For example; 500 or 506 CD, 562 controller, 504 FM tuner
1. Connect the analogue output of analogue sources (including) 504 to
the appropriate inputs on 562
2. Connect the phono plug at the far end of the M5-lead (from the
master) to the digital output of the 562
3. Locate the DIN plugs at the far end of the M5-lead (from the master).
Connect one of these to the socket marked COMMS on the rear of the
562
4. Connect a Meridian 500 Comms lead between the second COMMS
socket on the 562 and one of the COMMS sockets on the CD player
5. Connect a Meridian 500 Comms lead between the second COMMS
socket on the CD player and one of the COMMS sockets on the 504
6. Configure the DSP5000 for Type 1 (see page 32)
7. Set up the 504, 500 or 506 and 562 according to their user manuals.
We suggest you start with Type 1 on all units.
Caution The end of the M5-lead used to make connections with other
Meridian products has two different plugs. Care should be taken to
choose the correct one for the product, and not to force any connection.
If you have a Meridian 201 or 603 preamplifier and no
Meridian CD player
Unless you have an older M-lead (as opposed to M5 lead) you will need to
obtain an SP5 adapter. An M-lead has two DIN plugs at one end and this
is the end to connect to the preamplifier. The SP5 adapter allows an M5lead to connect to 200-Series preamplifier.
1. Connect the analogue output of the 201 or 603 to an analogue–digital
converter such as the Meridian 607
2. Connect the phono plug at the far end of the M5-lead (from the
master) to the digital output of the 607
3. Connect the SP5 adapter to the DIN plug at the far end of the M5-lead
(from the master)
4. Locate the two added DIN plugs. Connect one of these to the socket
marked 200 COMMS on the rear of the 201, or 600 COMMS on the
603
5. Configure the DSP5000 for Type 3 (see page 32)
6. Set up the 603 according to its user manual
If you are using Meridian 207 or 208 as your preamplifier
1. Connect the phono plug at the far end of the M5-lead (from the
master) to the digital output of the CD player
2. Connect the analogue output of the 207 or 208 to an analogue–digital
converter such as the Meridian 607
3. Connect a second digital audio lead (not provided) between the D2
input of the master DSP5000 and the digital output of the 607
4. Locate the DIN plug at the far end of the M5-lead (from the master).
Connect it to the socket marked 200 COMMS on the rear of the 207 or
208
5. Configure the DSP5000 for Type 2 (see page 32)
DSP5000 User Guide
Page 47

Connecting DSP5000 47
If you are using a Meridian 201 or 603 and a Meridian 200- or
600-Series CD player
Unless you have an older M-lead (as opposed to M5 lead) you will need to
obtain an SP5 adapter. An M-lead has two DIN plugs at one end and this
is the end to connect to the preamplifier. The SP5 adapter allows an M5lead to connect to 200-Series products.
1. Connect the phono plug at the far end of the M5-lead (from the
master) to the digital output of the CD player
2. Connect the analogue output of the 201 or 603 to an analogue–digital
converter such as the Meridian 607
3. Connect a second digital audio lead (not provided) between the D2
input of the master DSP5000 and the digital output of the 607
4. Connect the SP5 adapter to the DIN plug at the far end of the M5-lead
(from the master)
5. Locate the two added DIN plugs. Connect one of these to the socket
marked 200 COMMS on the rear of 207 or 208
6. Connect the other DIN plug to the socket marked 200 COMMS on the
rear of the 201, or 600 COMMS on the 603
7. Configure the DSP5000 for Type 3 (see page 32)
8. Set up the 603 according to its user manual
If you have a Meridian 601 preamplifier and a Meridian 200-or
600-Series CD player
The 601 will control all analogue and digital sources.
Unless you have an older M-lead (as opposed to M5 lead) you will need to
obtain an SP5 adapter. An M-lead has two DIN plugs at one end and this
is the end to connect to the preamplifier and CD player. The SP5 adapter
allows an M5-lead to connect to 200-Series preamplifiers.
1. Connect the phono plug at the far end of the M5-lead (from the
master) to one of the 601's digital outputs – normally, use output 1
2. Connect the SP5 adapter to the DIN plug at the far end of the M5-lead
(from the master)
3. Locate the two added DIN plugs. Connect one of these to the socket
marked 200 COMMS or 600 COMMS on the rear of the CD player
4. Connect the other DIN plug to the socket marked 600 COMMS on the
601
5. Configure the DSP5000 for Type 3 (see page 32)
6. Set up the 601 according to its user manual
If you have a Meridian 200- or 600-Series preamplifier, CD
player and a tuner
Unless you have an older M-lead (as opposed to M5 lead) you will need to
obtain an SP5 adapter. An M-lead has two DIN plugs at one end and this
is the end to connect to the preamplifier and CD player. The SP5 adapter
allows an M5-lead to connect to 200-Series preamplifiers.
1. Connect the SP5 adapter to the DIN plug at the far end of the M5-lead
(from the master)
1. Connect one of the DIN plugs on the free end of the SP5 adapter to
the socket marked 200/600 COMMS on the CD player
2. Connect the other DIN plug on the M5-lead to the socket marked CD
on the tuner
3. Use the Q-lead to connect the socket marked 200/600 COMMS on the
preamp to the socket marked 201/2 or Preamp on the tuner
DSP5000 User Guide
Page 48

Connecting DSP5000 48
If you are mixing Meridian 200- or 600-Series with 500-Series
components
1. Connect the digital and analogue audio as described in the previous
sections.
2. Locate the DIN plug at the source end of the M5-Lead. Connect it to
one of the sockets COMMS on the rear of a 500-Series unit.
3. Connect the 500-Series communications together as described earlier
and in the 500 User Guide(s).
4. Make a communications connection between one of the 500-Series
and one of the 200-Series units with a CD5 lead – obtainable from
your dealer. (The P-lead supplied with the 200-Series will work, but the
CD5 is preferred)
5. Configure the DSP5000 and 500-Series item for 200 mode (see page
32)
If you are using no other Meridian equipment
1 Connect the DSP5000's D1 and D2 digital inputs to appropriate digital
sources
2 Configure the DSP5000 for Type 5 (see page 32)
DO NOT, under any circumstances, connect anything other than another
Meridian product to the sockets marked Comms Input and Comms
Output on the rear of the DSP5000.
RS232 connection
The DSP5000 installation can be controlled directly from a computer over
a standard RS232 interface.
Separate documentation and application programs are available from your
Meridian dealer.
Meridian Digital Theatre
For details on connecting a Meridian Digital Theatre, or for connecting the
DSP5000 with a Meridian 565 Digital Surround Processor, see the
handbook supplied with 565.
DSP5000 User Guide
Page 49

Specification
Specification 49
Digital inputs
Cable inputs: D1–2
Digital outputs
Cable outputs: D Out
32kHz, 44.1kHz or 48kHz. Double PLL locks at
44.1kHz ± 120ppm
IEC958, 75
Copy of the selected input
IEC958, 75
Ω
Ω
Communication
s
200-Comms Via Input and Output connections
RS232 Standard 9-pin: 2400b, 8, N, 1 no handshake
Power
Amplifiers
Tweeter 75W mean power
Mid + Bass 75W mean power
Bass 75W mean power
Digital to Analogue
conversion
Distortion <0.02%, typically less than 0.01% up to full
Noise and hum < –94dBr at all volume settings
Distortion <0.02%, typically less than 0.01% up to full
DSP processor Motorola DSP56001 running at 32MHz
Complementary bipolar design, with outputstage error correction and twin loop design
18-bit Delta–Sigma converter running with 64times over sampling
power at all frequencies
power at all frequencies
Acoustic
Output Typically > 108dB spl @ 1m
Noise < 15dB spl @ 1m
Frequency response In room response within 3dB, 35Hz–20kHz
Crossover
Low frequency 6th-order quasi-Butterworth at 35Hz
Linear-phase ±30
° at 2.6kHz
Drive units
Bass 2 x 160mm polypropylene high-efficiency long-
throw custom drivers
Tweeter Meridian 25mm piston in short horn: aluminium
dome with silver voice-coil.
Cabinet
Dimensions 210 x 900 x 295mm
Weight 32 kg each
Power 100–125; 200-230; 210–250V AC 50–60Hz
Constructed from fine veneered MDF
20VA standby; 300VA max
DSP5000 User Guide
Page 50

Help!
Help 50
Standby point not lit
Check the following:
1. There is AC power connected to the socket on the rear of the
DSP5000
2. The power switch on the rear panel of the DSP5000 is turned on
If the DSP5000 still will not light up, check any fuses in your power supply
and the fuse in the DSP5000. If these are all intact, contact your dealer.
No sound
1. Check the AC power supply to DSP5000. If the power is on, you
should be able to see the Standby display in the window:
••
2. Check the AC supply to the other units in the system
3. Check that the correct source has been selected, and that this source
is running and producing music
4. Check that all interconnections have been made to the correct sockets
5. Check that the DSP5000 is not in Mute. If it is, you will see this
display:
Att.
6. Check that the volume is set sufficiently high for audibility (say at 50)
7. If there is still no sound, reset the DSP5000 by switching the power off,
waiting for 30 seconds, then switching it back on
Sound from one channel only
1. Check interconnect and speaker wiring
2. Do both displays say the same thing?
Channels reversed
Remember that for digital inputs left or right is determined at setup; see
the sections on pages 33 and 34. Default conditions set the master to left.
1. If necessary re-configure; see page 34
Settings lost
1. Check the procedures set out in the section following page 30
2. Check EPROM version is 2.2 or higher, see page 16.
3. Contact your dealer
Hum
Hum is normally only to be expected with analogue sources. Check the
grounding of the analogue preamplifier. See the handbook supplied with
your preamplifier for help.
Clicks with digital sources
If clicks appear in the sound when the system is switched to a digital
source, the two most likely reasons are as follows:
1. If clicks only occur when the source is running (playing), the problem is
due to error correction or transmission failure. First check the condition of
the disc or tape. If the player is a Meridian 207, 208 or 602, look for a
flashing Error light. Check the integrity of the connections between the
digital audio source and the DSP5000. Are you using good 75-ohm cable?
DSP5000 User Guide
Page 51

Help 51
2. If clicks occur randomly with the source selected but stopped, the
problem may be the result of loss of lock due to gross electrical
interference. Find out whether there is an appliance elsewhere in the
house causing the disturbance (e.g. central heating, a pump or a fan). If
there is, suppress it.
Meridian CD does not respond
1. Check that all connections between the master speaker and the
Meridian CD player have been made correctly
2. Make sure that the whole system is set up in either 200 mode or in 500
mode.
Note All Meridian products must be in the same mode. 200 or 600-Series
products can only work in 200 mode and if you intend to incorporate these
in a DSP5000 system, the speakers and any 500-Series components
must be put into 200-mode (normally Type 2).
3. Make sure that the DSP5000 has been set up so that this source is
Comms type ‘1C’ – see page 38.
4. Make sure that the Comms address corresponds in DSP5000 and in
the CD player (normally ‘1A’) – see page 38.
504, 204 or 604 does not respond
1. Check that all connections between the master and the 504/204/604
have been made correctly. If a 204/604 is the only other Meridian
equipment in the system you will need an SP5 adapter to allow the
M5-lead to connect to the socket marked CD on the 204/604.
2. Check that a 204 is fitted with software of an adequate level. DSP5000
requires version 204.A or later. To see the version, press Mode * Set
on the front panel of the 204 when the unit is not in Standby. Version
numbers count 1–9, then A–Y. If the software in your 204 is earlier
than 204.A, your dealer will be able to obtain an up-to-date EPROM
and fit it. Operating code can always be updated.
2. Make sure that the whole system is set up in either 200 mode or in 500
mode.
Note All Meridian products must be in the same mode. 200 or 600-Series
products can only work in 200 mode and if you intend to incorporate these
in a DSP5000 system, the speakers and any 500-Series components
must be put into 200-mode (normally Type 2).
3. Make sure that the DSP5000 has been set up so that this source is
Comms type ‘2C’ – see page 38.
4. Make sure that the Comms address corresponds in DSP5000 and in
the CD player (normally ‘1A’) – see page 38.
562, 201, 603 or 601 does not respond
1. Check that all connections have been made between the master and
the preamplifier. If the preamp is the only other Meridian equipment in
the system you will need an SP5 adapter to allow the M5-lead to
connect to the 200/600 Comms socket on the preamp.
2. Check that a 201 is fitted with software of an adequate level. DSP5000
requires 201.7 or later for 201MkII, or 0.4 or later for 201MkIII. To find
out which version you have, follow the instructions in the manual
supplied with the 201. Version numbers count 1–9, then A–Y. If the
software in your 201 is earlier than 201.7, your dealer will be able to
DSP5000 User Guide
Page 52

Help 52
obtain an up-to-date EPROM and fit it. Operating code can always be
updated.
3. Make sure that the whole system is set up in either 200 mode or in 500
mode.
Note All Meridian products must be in the same mode. 200 or 600-Series
products can only work in 200 mode and if you intend to incorporate these
in a DSP5000 system, the speakers and any 500-Series components
must be put into 200-mode (normally Type 2).
DSP5000s do not respond
The communications between MSR and speaker could be being
interrupted by sunlight in the infra-red pickup behind the display.
DSP5000s go silent when used hard
DSP5000 has a temperature-sensing system on board that prevents
overheating of the electronics by cutting out the sound. The sound will
reset when they have cooled down.
When this system is activated, the display on the offending speaker will
show
Hot
What have you been playing?
Communications not working between DSP5000 and
other Meridian products
If you have this problem, check the connections carefully. The section
starting on page 46 deals with this in some detail. Then check the
following:
• Are you using a B-lead or P-lead instead of a B1-lead?
• Are you using a Q-lead instead of a Q1-lead?
• Are you using an A-lead with a Meridian tuner? The A-Lead is not
suitable for this; you should request a B1-Lead.
If you cannot see an obvious problem, connect the Comms one product at
a time. If you cannot solve the difficulty refer to your dealer, but first note
the software versions fitted in all of your Meridian items.
To find out the software version for a Meridian product:
1. Press its Display key while it is in Standby. (If it does not have a
display key, use a 209 remote control or refer to the manual supplied
with the product).
Note your connections carefully.
Note Make sure that the whole system is set up in either 200 mode or in
500 mode.
Note All Meridian products must be in the same mode. 200 or 600-Series
products can only work in 200 mode and if you intend to incorporate these
in a DSP5000 system, the speakers and any 500-Series components
must be put into 200-mode (normally Type 2).
Radio interference
Note DSP5000 is designed to comply with all relevant international
standards concerning local-oscillator re-radiation.
DSP5000 User Guide
Page 53

Help 53
Note DSP5000 is a digital audio and computing device which has been
designed to very high standards of electromagnetic compatibility.
FCC WARNING: This equipment generates and can radiate radio frequency energy, and if not installed and used correctly in accordance with
our instructions may interfere with radio communications or radio and
television reception. It has been type-tested, and complies with the limits
set out in Subpart J, Part 15 of FCC rules for a Class B computing device.
These limits are intended to provide reasonable protection against such
interference in home installations.
If this equipment does interfere with or suffer interference from radio or
television reception, then the following measures should be tried:
1. Reorient the receiving aerial (or antenna), or route the antenna cable
of the receiver as far away as possible from the DSP5000 and its
cabling
2. Ensure that the receiver uses well-screened antenna cable
3. Relocate the receiver with respect to the DSP5000
4. Connect the receiver and this product to different AC outlets
5. If the problem persists, contact your dealer
EEC This product has been designed to comply with the limits set out in
EN55013 and EN55020C.
REMEMBER to switch all units off before changing any connections.
Cleaning
The cabinet of the DSP5000 is finished with veneer.
The display panel is glass, and should be cleaned using a barely damp
chamois leather.
Do not use abrasive cleaners on any part of the DSP5000.
The phono connectors on the rear of the DSP5000 are gold-plated, and
need no cleaning if gold-plated phono plugs are used. Otherwise, we
recommend that you remove and replace each plug at least once a year.
A proprietary contact cleaner can be used to some advantage.
Maintenance & service
The Meridian DSP5000 has been carefully designed to give years of
untroubled service. There are no user-serviceable parts inside the case,
nor do the units require any form of maintenance.
In the unlikely event that your DSP5000 fails to function correctly, it
should be returned, in its original packing, to your Meridian dealer. In case
of difficulty, please write to the following address if you live in the UK:
Digital Gramophone & Wireless Ltd
14 Clifton Road
Huntingdon
Cambridgeshire PE18 7EJ
Outside the UK, contact the importing agent for the territory. A list of
Meridian agents abroad is available from the above address.
No responsibility can be accepted for the DSP5000 while it is in transit to
the factory or an agent, and customers are therefore advised to insure the
unit.
DSP5000 User Guide
Page 54

Guarantee
Help 54
In the USA and Canada, contact
Meridian America Inc.
3800 Camp Creek Parkway
Building 2400 Suite 112
Atlanta GA 30331
Tel (404) 344-7111
Fax (404) 346-7111
The Meridian DSP5000 is guaranteed against defects in material and
workmanship for 12 months from the date of purchase.
The guarantee is void if the DSP5000 has been subjected to misuse,
accident or negligence, or has been in any way tampered with or modified
without the written authorisation of DGW Ltd.
Note that connecting anything other than the correct network-lead to the
sockets marked Comms Input and Comms Output may cause damage
to the DSP5000 which will not be covered by this guarantee. Attempted
servicing by unauthorised people may invalidate the guarantee.
Labour and carriage charges are not covered unless by local agreement.
If you request service under guarantee, proof of the date of purchase will
be required.
Outside the UK, local warranty liability is restricted to equipment pur-
chased within the territory. Our agents abroad are contractually obliged to
service under guarantee only equipment sold through them. They are
entitled to make a non-refundable charge for any service carried out on
other equipment.
This guarantee does not limit your statutory rights within the United Kingdom.
DSP5000 User Guide
Page 55

Appendix 1 DSP5000 types
Type 1 setup, Meridian 500 series system using 562
The Meridian 562 allows simple control and routing of analogue and digital
sources. All connections from sources are made to 562 which then sends
a single digital feed to the DSP5000s. Type 1 sets the DSP5000 as a left
master, so you will need to make the other a right slave, or adjust left/right
on both speakers.
Type 1 500 500, 506, 508
Appendix 55
Remote key Logo Input on
DSP5000
CD cd D1 1C 1A
Radio rd D1 2C 1A
LP LP D1 NC 1A
Video tn D1 NC 1A
Tape 1 t1 D1 NC 1A
Tape 2 t2 D1 NC 1A
CDR Cr D1 1C 1A
Cable Cb D1 NC 1A
Text tt D1 NC 1A
VCR1 U1 D1 NC 1A
VCR2 U2 D1 NC 1A
LaserDisc Ld D1 5C 1A
Control? Address
DSP5000 User Guide
Page 56

Appendix 56
Type 2 setup, Meridian CD as preamp (via 607), 204
connected
The Meridian compact disc player range includes players with built-in
preamplifiers, such as the 207 and the 208. To use the analogue inputs
of these units, it is necessary to put a 607 (or similar) A/D converter
between the fixed output of the preamp section and the D2 input of the
DSP5000. It is possible to control one of the previously mentioned CD
preamp combinations and a Meridian FM tuner using Type 1. Type 1 sets
the DSP5000 as a left master, so you will need to make the other a right
slave, or adjust left/right on both speakers.
Type 2 200 208, 207
Remote key Logo Input on
DSP5000
CD cd D1 1C CD
Radio rd D2 2C Line
LP LP D2 NC LP
Tape 1 t1 D2 NC Tape
Video N D2 NC No change
Tape 2 N D2 NC No change
Control? Input on CD
Preamp
Type 3 setup, 601, 201, 603 or 562 as preamp via
607, Meridian CD and 204 connected
In this Type, all sources are mediated through an external control unit or
preamplifier. The output of an analogue preamplifier (201 or 603) will have
to be converted to a digital signal for DSP5000. A Meridian 607 converter
is recommended.
The Meridian 601 preamplifier incorporates an analogue–to–digital
converter for analogue sources. The 601 has very comprehensive
customisation facilities, and these are covered in its manual. If you are
using DSP5000 with a 601, you are advised to study the 601 user guide,
bearing in mind that recommendations concerning D6000 apply equally to
DSP5000.
It does not make sense to connect a Meridian CD player to an analogueonly preamplifier such as the 201 or 603. For such a connection you
should use Type 4.
Type 3 200 201, 601, 603
Remote key Logo Input on
DSP5000
CD cd D1 1C CD
Radio rd D1 2C Radio
LP LP D1 NC LP
Tape 1 t1 D1 NC Tape 1
Video tn D1 NC Video
Tape 2 t2 D1 NC Tape 2
Control? Input on
Preamp
DSP5000 User Guide
Page 57

Appendix 57
Type 4 setup, 601 preamp or 201 or 603 as preamp
via 607, Meridian CD and 204, CD with direct
connection
In this Type, the CD player is directly connected to D1, and all other
sources are mediated through an external control unit or preamplifier. The
output of an analogue preamplifier (201 or 603) will have to be converted
to a digital signal for DSP5000. A Meridian 607 converter is
recommended.
The Meridian 601 preamplifier incorporates an analogue–to–digital
converter for analogue sources. The 601 has very comprehensive
customisation facilities, and these are covered in its manual. If you are
using DSP5000 with a 601, you are advised to study the 601 user guide,
bearing in mind that recommendations concerning D6000 apply equally to
DSP5000.
Type 4
Remote key Logo Input on
DSP5000
CD cd D1 1C CD
Radio rd D2 2C Radio
LP LP D2 NC LP
Tape 1 t1 D2 NC Tape 1
Video tn D2 NC Video
Tape 2 t2 D2 NC Tape 2
Control? Input on
Preamp
DSP5000 User Guide
Page 58

Appendix 58
Type 5 setup, Meridian 500 system not using 562
The CD is connected directly to D1, all other sources are routed directly or
via an A/D converter to D2. Type 5 sets the DSP5000 as a left master, so
you will need to make the other a right slave, or adjust left/right on both
speakers.
Type 5 500 500, 506, 508
Remote key Logo Input on
DSP5000
CD cd D1 1C 1A
Radio rd D2 2C 1A
LP LP D2 NC 1A
Video tn D2 NC 1A
Tape 1 t1 D2 NC 1A
Tape 2 t2 D2 NC 1A
CDR Cr D2 1C 1A
Cable Cb D2 NC 1A
Text tt D2 NC 1A
VCR1 U1 D2 NC 1A
VCR2 U2 D2 NC 1A
LaserDisc Ld D2 5C 1A
Control? Address
Type 6 Meridian Digital Theatre
Type 6 has inputs like Type 1. The main differences selected in Type 6
are:
• Balance control set to ‘no’
• Centre-channel choice set ‘yes’
Type 7 Second room in Multiroom system
Type 7 has inputs like Type 1. In Type 7 the volume option is set to 2.
Type 8 Additional room in Multiroom system
Type 8 has inputs like Type 1. In Type 8 the volume option is set to 3.
Appendix 2 Test mode
Test mode is not recommended for everyday use. As its name suggests,
however, it is very useful for testing the installation and the speakers.
The main advantages of Test mode are that you can directly display
which of the DSP5000's physical inputs has been selected, and that
entering or leaving this mode does not change any of the programming
you may have done previously.
1. Switch on the power supply to the master speaker only while
continuously pressing the Next key on the MSR. The speaker will
display
1L 65
and the red light will be on.
DSP5000 User Guide
Page 59

Appendix 59
2. Switch the power off. You have now set the test master.
3. Switch on the power supply to the slave speaker only while
continuously pressing the Previous key on the MSR
1L 65
4. Switch the power off. You have now set the test slave.
If you now turn both speakers on, they will come up in Test mode.
To get back to normal user mode:
1. Switch on the power to each speaker with the Clear key pressed
Controls
Test mode
Remote key Logo Input on
CD 1L D1 No Left
Radio 1r D1 No Right
LP 2L D2 No Left
Tape 1 2r D2 No Right
Appendix 3 Calibrate mode
WARNING: THIS MODE MAY CHANGE THE RESPONSE OF YOUR
SPEAKER, AND SHOULD ONLY BE USED BY A QUALIFIED SERVICE
ENGINEER.
The process of calibration is carried out during production; it alters the
level of tweeter to compensate for the variability found in drive units. It
should therefore only be used if a drive unit needs to be replaced.
The calibration levels are noted on the back panel.
To enter Calibrate mode:
1. Switch on the power supply to the speaker while pressing the Repeat
key on the MSR
The calibration display looks like the Test mode display (see Appendix 2):
1L 65
DSP5000
Control? Channel
selected
This shows that you are in Calibrate mode and that the volume level is 65.
This mode operates like Test, but two menus are enabled.
DSP5000 User Guide
Page 60

Controls
Test mode
Appendix 60
Remote key Logo Input on
DSP5000
CD 1L D1 No Left
Radio 1r D1 No Right
LP 2L D2 No Left
Tape 1 2r D2 No Right
Control? Channel
selected
Internally generated test signals
A number of internally generated test signals are available in Calibrate
mode. These include:
• one sample width impulse with 2Hz repetition rate
• four sample width impulse with 2Hz repetition rate
• pink noise
To switch from the input to the test signals:
1. Press the
OFF
indicating that signal generation is off.
2. Press the
wide impulse and pink noise, with these displays:
thin
FAt
PIn.
w or e menu key until you see a display like this:
n or s menu key to move between a narrow impulse, a
To set the relative level of the tweeter:
1. Press the
G. 0.0
indicating a relative setting of 0.0dB
2. Press the
±3.5dB
w or e menu key until you see a display like this:
n or s menu key to move in 0.5dB steps over the range
Getting out of Calibrate
Once calibration is compete, switch the DSP5000 off and then on again
while pressing Clear.
This should bring you back into the normal playing state.
DSP5000 User Guide
Page 61
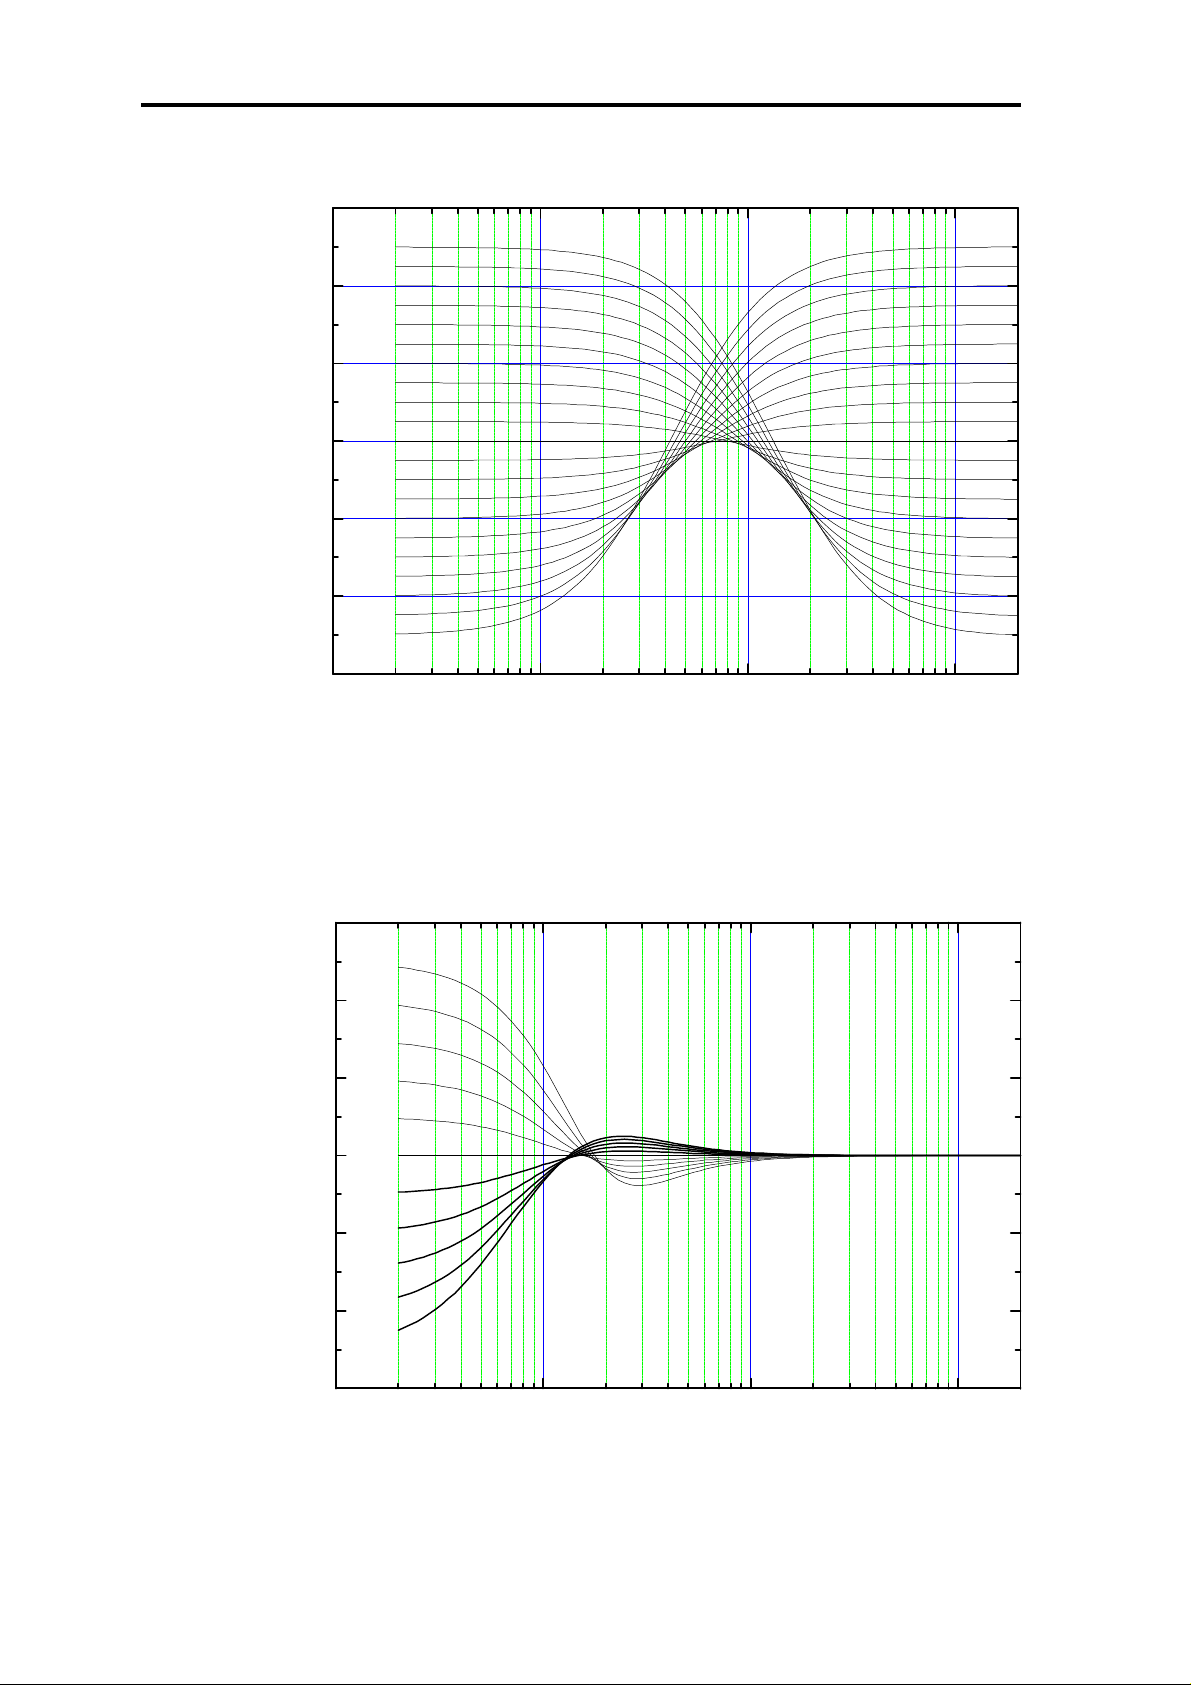
Appendix 4
6dB
4dB
2dB
0dB
-2dB
-4dB
Appendix 61
-6dB
10Hz 100Hz 1kHz 10kHz
Tilt control responses, showing the steps between +10 and –10
6dB
4dB
2dB
0dB
-2dB
-4dB
-6dB
10Hz 100Hz 1kHz 10kHz
DSP5000 bass control, showing 1dB steps between +5 and –5
DSP5000 User Guide
Page 62

0dB
qygp
-5dB
-10dB
-15dB
-20dB
-25dB
-30dB
Appendix 62
Boundary
Sub1
Sub2
-35dB
10Hz 100Hz 1000Hz 10000Hz
Relative response of the ‘boundary’ and subwoofer settings
DSP5000 User Guide
Page 63

Index
201,use with, 46
207,use with, 46
208,use with, 46
500- and 200-Series mixed, 48
601
use with, 47
603,use with, 46
Address
product, 35
system, 35
Att. display, 18
Autoconfigure, 35
Axis
explained, 23
listening, 23
using the control, 23
Balance
explained, 18
option in surround, 36
using the control, 18
Bass control
explained, 22
using, 22
boun. display, 40
Boundary
centre setting, 41
Boundary explained, 40
Boundary or free alignment, 31
Cable
for digital audio, 45
Cables and interference, 43
Calibrate mode, 59
CD
controlling, 25
CD, scanning a, 25
Centre
boundary control, 41
choosing, 34
DSP exists?, 36
position control, 42
tilt offset, 41, 42
Cleaning, 53
Communications
not working, 52
Config
how to use, 34
menus explained, 33
using, 33
Connections
communications, 42, 46
digital, 42, 45
digital audio, 45
general, 11, 42
power, 42
problems with comms., 52
RS232, 42
Contents, 2
Control
how a system works, 7
of a Meridian CD player,
25
of a tuner, 27
Phase, 22
remote, 7
Control of CD player not
working, 51
Customising
displays, 31
how to, 30
inputs, 31
Left/right, 31
low-frequency alignment,
31
Master/Slave, 31
Multiroom options, 31
overview, 29
preamplifier used with, 31
sources, 31
storing tone settings, 41
tone control settings for
each source, 31
using Setup, 33, 39
using Type, 32
with Config, 31, 33
with setup, 31
with Type, 30
Default
restoring default settings,
29
Digital signal processing, 6
Digital,connection, 45
Dir display, 16
Display
blank, 15
CD displays, 15
CD track and index, 15
controlling, 15
Disc time for CD, 15
end of disc, 16
explanation, 15
Frequency for tuner, 15
index points, 16
source and volume, 15
to change, 15
Track time in CD, 15
Tuner preset, 15
DSP, 6
DSP centre, 36
DSP5000
description, 6
general description, 7
getting going, 12
Index 63
Edit the setup with Config, 34
End display, 16
EPROM, 8
EPROM,version number, 16
Feet
fitting, 8
using spikes, 8
FrEE display, 40
Free or boundary alignment,
31
Guarantee. see Warranty
Help!, 50
Hot display, 52
Hum, 50
Image height. see Axis
Index
display of, 26
selection on a CD, 26
Input
digital audio connections,
45
Installation
customising, 10
general, 10
siting, 11
Types, 10
Introduction, 5
Left
choosing, 34
explained, 6
setting, 33
should be right, 50
Logos. see Customising
M5 and S5 Leads, 44
Master
choosing, 34
explained, 6
locating, 43
setting, 33
Memory, 13
recalling settings, 42
recalling user settings, 24
setting up, 42
storing settings, 23, 42
user memory explained,
23
Menu
background, 18
keys, 18
reviewing settings, 18
root in Config, 33
DSP5000 User Guide
Page 64

Index 64
source in Config, 33
source menus in Config,
36
system in Config, 33
Meridian products,use with
other, 46
MSR, 7, 8
Multiroom protocols, 35, 36
Mute and demute, 18
Normal
how to get back to, 30
Operating
basics, 14
summary, 28
Pause, 25
Phase
control, 22
explained, 22
Play, 25
Positioning the loudspeakers,
11
Power switch, 12
Preamplifier
differences explained, 35
options at setup, 34
Preset
favourite, 14
Programming. see
Customising
Radio interference, 52
rEc message, 24
Recall. see Memory
Remote control, 7, 8
Repeat, 25
Restoring default settings, 29
Right
choosing, 34
explained, 6
setting, 33
should be left, 50
Root menu. see Config
RS232, 48
Scanning a CD, 25
Service
cleaning, 53
where to get, 53
Settings get lost, 50
Setup. see Customising
an overview, 31
expalined, 39
how to use, 39
storing settings in, 23
Slave
choosing, 34
explained, 6
setting, 33
Source
storing tone settings for
each, 31
Sources
selecting, 14
Specification, 49
Standby
display, 12
explained, 13
getting into, 14
to get out of, 14
Starting the speakers off, 13
Stereo, 6
Stereo reversed, 50
Stop, 25
Storing settings, 23
Subwoofer, using with, 40
Surround options, 36
Switching on, 12
System configuring, 35
Temperature protection, 52
Test mode, 58
Tilt control
explained, 21
using, 21
Tone control
bass function, 22
tilt function, 21
Track
display of, 15
selection on a CD, 25
Type
list of types, 55, 56, 58
overview, 30
selecting, 32
Unpacking DSP5000, 7
Version. see EPROM
Volume
display, 15
explanation, 17
mode, 36
Wall correction, 31
Warranty, 54
DSP5000 User Guide
Page 65

Notes
Notes 65
DSP5000 User Guide
Page 66

Notes 66
DSP5000 User Guide
 Loading...