

Page 1

Touch Music Center
with Docking Station for iPhone*/iPod*
MEDION® LIFE® P64077 (MD 83187)
Instruction Manual
* iPod/iPhone are trademarks of Apple Inc. registered in the
U.S. and other countries.
* iPod/iPhone not included
Page 2

Contents
Contents ................................................................................................... 3
Device overview ....................................................................................... 5
Left and right sides ................................................................................ 5
Front and rear sides ............................................................................... 6
Top ....................................................................................................... 7
Back ...................................................................................................... 7
Remote control ..................................................................................... 8
Safety instructions .................................................................................... 9
Warning symbols and key words used in these instructions ................... 9
Proper use ........................................................................................... 10
Set-up location .................................................................................... 10
Power supply ...................................................................................... 11
General ............................................................................................... 12
Ensure accessibility of mains power socket .......................................... 12
Cleaning and care ............................................................................... 12
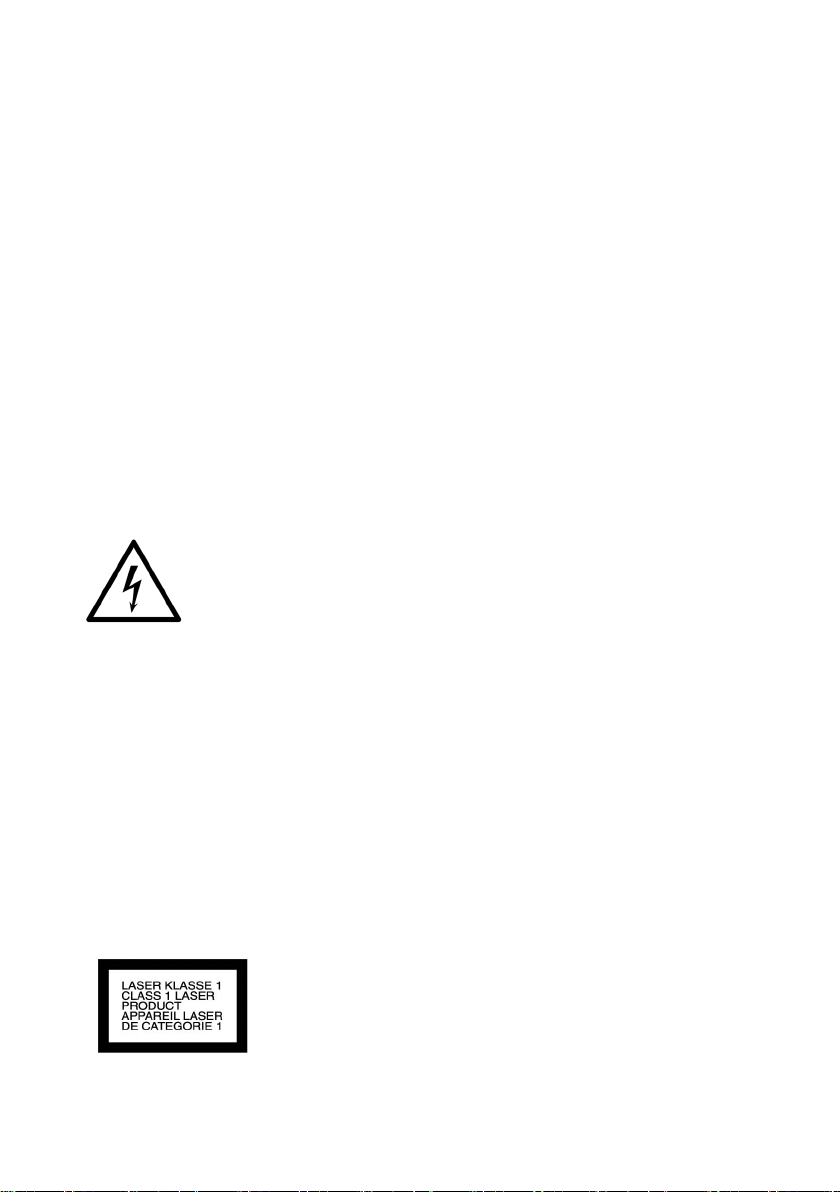
Laser class ........................................................................................... 12
Information on electrostatic charge ..................................................... 13
Safe handling of batteries .................................................................... 13
Earphones ........................................................................................... 14
Preparation ............................................................................................. 14
Check package contents ...................................................................... 14
Inserting the battery in the remote control .......................................... 14
Changing the battery .......................................................................... 15
Set-up and connections .......................................................................... 15
Setting up the device........................................................................... 15
Attaching the stand ............................................................................. 15
Wall mounting .................................................................................... 16
Aerial connection ................................................................................ 16
Inputs ................................................................................................. 17
EN
DE
FR
IT
NL
DK
NO
SE
3
Page 3

Connecting headphones ..................................................................... 18
Basic functions ........................................................................................ 18
Sensor keys ......................................................................................... 18
Switching on/off – POWER .................................................................. 18
Setting the time ................................................................................... 19
Automatic switch-off – SLEEP ............................................................... 20
Switch on and off automatically – TIMER ............................................. 20
General operating functions ................................................................... 21
Select operating mode ........................................................................ 21
iPod mode .............................................................................................. 22
Radio ...................................................................................................... 23
Tuning ................................................................................................ 23
Search function ................................................................................... 23
Saving and selecting stations ............................................................... 23
Stereo/mono reception ....................................................................... 24
RDS reception ..................................................................................... 24
CD/USB/memory card operation ............................................................ 25
Playback media ................................................................................... 25
Playable formats .................................................................................. 25
Inserting and removing CDs ................................................................ 26
Playback functions .............................................................................. 27
Program the playing order of tracks .................................................... 29
Troubleshooting ..................................................................................... 30
Cleaning ................................................................................................. 32
Disposal .................................................................................................. 32
Technical data ........................................................................................ 33
Restricted Warranty ................................................................................. 35
4
Page 4
Device overview
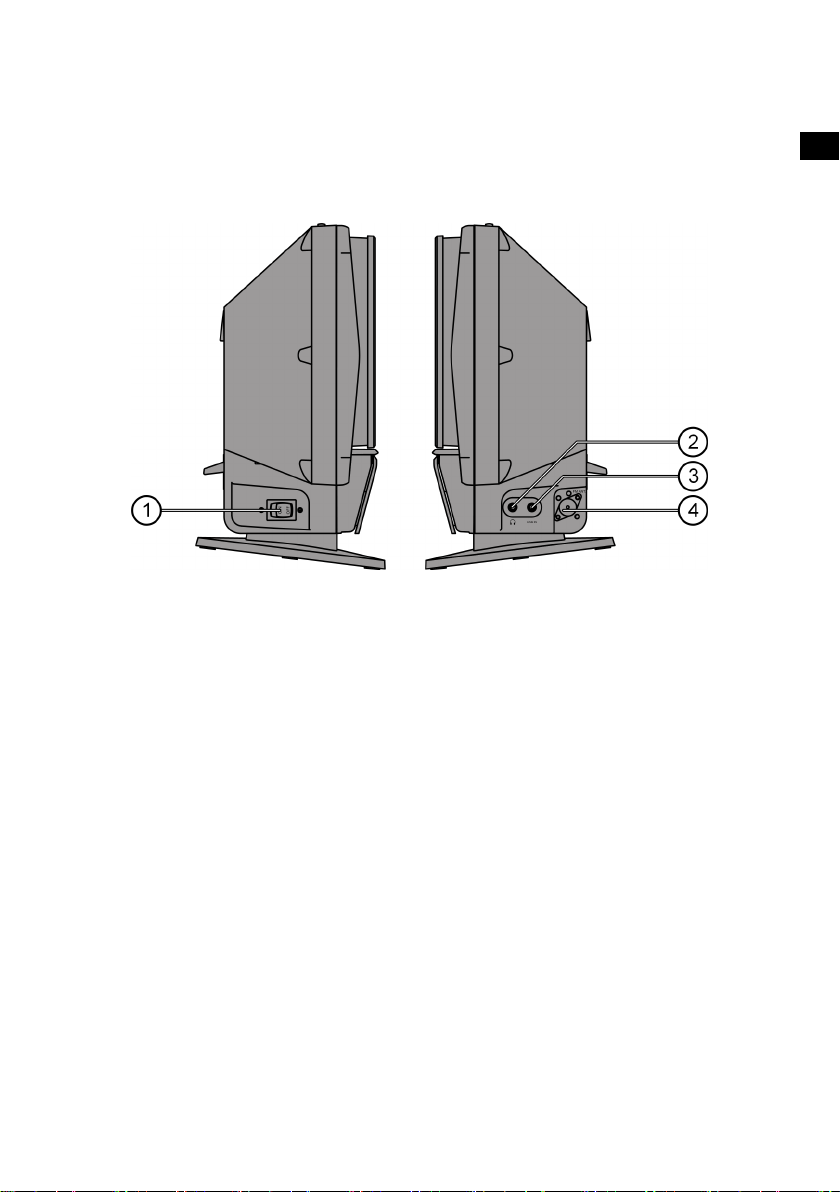
Left and right sides
1. POWER ON/OFF: Switch device on/off
2. Headphone socket 3.5 mm jack
3. LINE IN: Audio cinch inputs L/R
4. FM ANT: Aerial input
EN
DE
FR
IT
NL
DK
NO
SE
5
Page 5
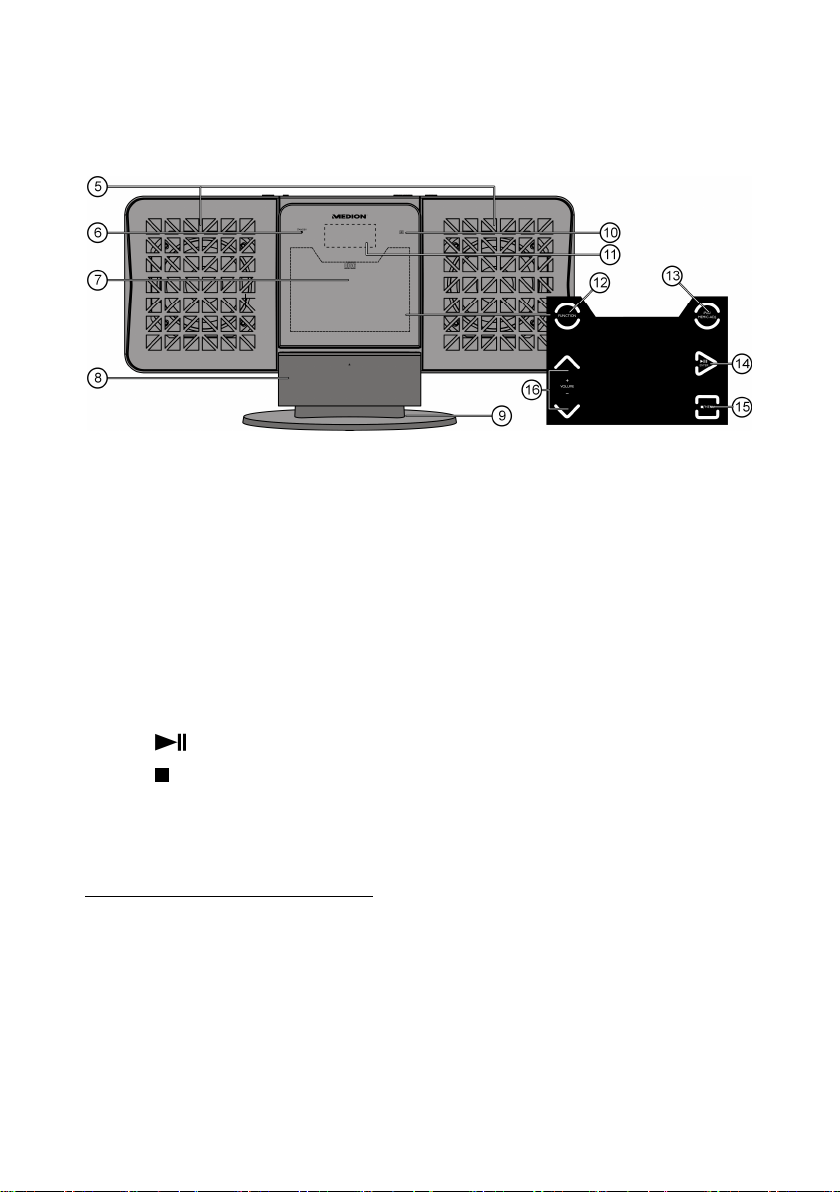
Front and rear sides
5. Loudspeaker
6. Standby LED
7. Disc compartment
8. iPod cradle: “Docking Station” for an iPod device
9. Stand
10. IR sensor for remote control
11. Display
12. FUNCTION: Select operating mode
13. IPOD/MEM/C.-ADJ.: iPod menu control, programming function
and setting time
14.
15.
/ENTER : Start and pause playback, confirm entry
/MENU: Stop playback/open menu (iPod operation)
16. VOLUME: Setting the volume
1
1
Applies to music playback from current iPod/iPhone models, excluding iPod shuffle. iPod,
iPhone is a brand/registered trademark of Apple Inc. in the USA and other countries.
“Made for iPod”, “Made for iPhone” means the manufacturer has developed and certified an
electronic accessory for connection with iPods/iPhones according to Apple performance
standards. Apple is not responsible for the handling of the device, nor for compliance with
safety and statutory provisions.
6
Page 6
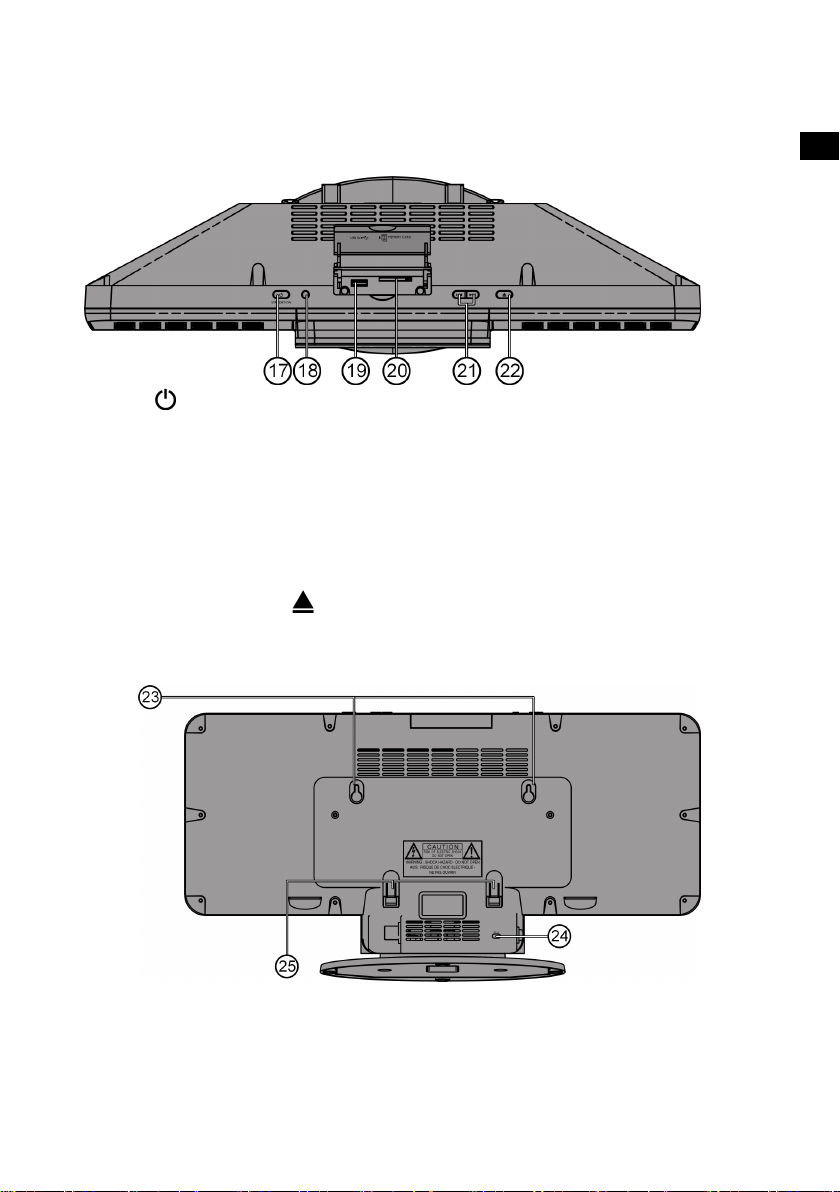
Top
STANDBY: Switch on the device from standby mode and
17.
switch back to standby mode
18. RADIO SEARCH: Search for stations using their PTY code
19. USB connection
20. Card slot for SD memory cards
21. SKIP/TUNE SEARCH /: Previous/next track, search
forwards/backwards
22. OPEN/CLOSE
: Open and close disc compartment
Back
EN
DE
FR
IT
NL
DK
NO
SE
23. Holes for wall mounting
24. Mains cable
25. Spacer (fold out for wall mounting)
7
Page 7

Remote control
1. STANDBY: Switch on the device
from standby mode and switch back to
standby mode
2. RADIO SEARCH: Search for stations
using their PTY code
3. RADIO MODE: Change RDS display
4. IPOD/MEM/C.-ADJ: iPod menu control,
programming function and setting
time
5.
6. REPEAT: Set repeat function
7. EQ: Setting the equaliser
8. INTRO: Introduction function
9.
10. FUNCTION: Select operating mode
11. OPEN/CLOSE: Open and close disc compartment
12. ID3/MONO/ST.: Set ID3 tag for MP3 playback, stereo/mono reception
13.
14.
15. PRESET/FOL. : Select station memory position, select folder
16. TIMER: Set timer function
17. RANDOM: Set to random playback
18. SLEEP: Set automatic switch-off function
19. VOLUME: Setting the volume
20. Battery compartment (on the rear side)
/ : Media – previous/next track;
In radio operation skip to next/previous
saved station
MUTE: Mute
in radio operation
/ENTER: Start and pause playback
/MENU: Stop playback/open menu (iPod operation)
(MP3 playback)
8
Page 8
Safety instructions
Please be sure to read these operating instructions carefully
and follow all instructions given. The instructions will help you
to operate the device reliably and help increase its service life.
Always store these instructions near the device. Keep these
operating instructions so that you can pass them on with the
device if you sell it.
Warning symbols and key words used in these
instructions
DANGER!
Warning: immediate mortal danger!
WARNING!
Warning: possible mortal danger and/or serious
irreversible injuries
CAUTION!
Please follow the guidelines to avoid injuries and/or property
damage!
CAUTION!
Please follow the guidelines to avoid property damage!
EN
DE
FR
IT
NL
DK
NO
SE
PLEASE NOTE!
Additional information on using the device!
PLEASE NOTE!
Observe the notes in the operating instructions!
WARNING!
Warning: danger of electric shock!
9
Page 9

Proper use
The device is intended for playing sound and image media (CDs, MP3 data
media, USB devices and memory cards), as well as for radio reception. In
addition, you can connect an iPod device to the charging cradle for
charging and for the playback of audio files. Never use the device for any
other purpose.
This device is not intended for use by people (including children) with
reduced physical, sensory or mental abilities or by those without
experience and/or knowledge, unless they are supervised by a person
responsible for their safety or they have been instructed in its use by that
person. Children should be supervised to ensure they do not play with this
device.
Set-up location
Set up and operate all components on a stable, level and vibration-free
surface to prevent the device from falling down.
Do not jolt or shake the device. Impacts may damage the sensitive
electronics.
Please ensure that you do not place the device near heat sources (e.g.
heaters) that could affect it.
Do not place naked flames (e.g. lit candles) on or near the device.
Make sure that the vents are never covered so as to ensure there is
always adequate ventilation.
Do not place any objects on the cable as these could damage it.
Ensure that there is always a minimum distance of approx. 10 cm above
and around the device and between the device and any walls. Ensure
that ventilation is adequate.
Do not use the device outdoors because external elements such as rain,
snow, etc. could damage it.
Keep the device at a distance of at least one metre from high frequency
or magnetic interference sources (televisions, loudspeaker boxes,
mobile telephones, etc.) to avoid malfunctions.
10
Page 10

Large changes in temperature or fluctuations in humidity can cause
moisture build-up within the device due to condensation, which can
cause an electrical short circuit.
WARNING!
Never try to open and/or repair the device yourself. There
is a risk of electric shock.
Please contact our service centre if you have problems with your device.
Power supply
ATTENTION!
Even when the mains switch is off, some components of the
device are live. To disconnect the power from your device or
to completely isolate the device from voltage sources, unplug
the device completely from the mains.
Connect the device to convenient and easily accessible 230 V ~ 50 Hz
power sockets only.
In an emergency, you need to be able to disconnect the device from
the mains supply. To disconnect the device from the mains supply,
always pull on the plug rather than on the cable.
Remove the plug from the mains socket and the aerial cable from the
aerial socket during thunderstorms or if the device is not going to be
used for long periods.
Remove the mains plug and aerial cable if you are away for a long
period of time or there is a thunder storm.
Unwind the cable fully when using the device.
Do not bend or crush the mains cable.
To avoid tripping hazards, please avoid using an extension cable.
Please ensure that the mains cable does not come into contact with hot
objects or surfaces.
EN
DE
FR
IT
NL
DK
NO
SE
11
Page 11
General
Do not place containers containing liquid, e.g. vases, on or near to the
product, and protect all the parts from rain and water.
The container may tip over and the liquid may impair the electrical
safety of the product. If the plug, cable or device is damaged,
immediately remove the plug from the power supply.
The device is for private use only and not intended for use by
companies in the heavy industry sector.
If the device has been moved from a cold to a warm room, wait a while
before connecting it to the power supply. The ensuing condensation could
damage the device. The device can be operated as soon as it reaches room
temperature.
Ensure accessibility of mains power socket
Only connect the machine to a power socket (230 V ~ 50 Hz)
that is easy to reach and close to the place where you have set
up the device. The socket must be easily accessible so that
you can quickly unplug the device from the mains if
necessary.
Unplug the device from the mains during a storm or when it is not going
to be used for an extended period.
Cleaning and care
Before cleaning the device, always disconnect it from the mains supply.
Only use a dry, soft cloth to clean the device. Do not use chemical
solutions and cleaning products because these may damage the
device’s surface and/or inscriptions.
Laser class
The CD player is a class 1 laser product. The device
has a safety system that prevents dangerous laser rays
from escaping during normal use. In order to avoid
eye injuries, never tamper with or cause damage to
12
Page 12

the safety system of the device.
The universal remote control has a class 1M infrared
diode. Never use optical devices to look at the LED.
Information on electrostatic charge
If the device does not work correctly because of electrostatic charge, reset
it by disconnecting it from the mains for a short period of time.
Safe handling of batteries
The remote control is battery-operated. Please observe the following
instructions:
Batteries may contain combustible materials. If not handled correctly,
batteries can leak, become very hot, ignite or even explode, which could
damage your device and/or your health. It is very important that you
follow the instructions below:
Keep batteries away from children. If batteries are swallowed, consult
your doctor immediately.
Before inserting the batteries, check that the contacts in the device and
on the batteries are clean. If necessary, clean them.
Never charge batteries (unless they are designed to be recharged).
There is a risk of explosion!
Never short-circuit the batteries.
Do not dismantle or deform the batteries. You could injure your hands
or fingers, and battery fluid could come into contact with your eyes or
skin. If this should happen, rinse the affected areas immediately with a
large amount of clean water and contact your doctor immediately.
Never expose the batteries to excessive heat (such as direct sunlight, fire
or similar).
Always observe the correct polarity. Make sure that the plus (+) and
minus (−) poles are correctly inserted to avoid short-circuits.
Remove the batteries from the device if you do not intend to use it for
an extended period.
Replace all the old batteries in a device with new batteries of the same
type.
EN
DE
FR
IT
NL
DK
NO
SE
13
Page 13

CAUTION!
Remove leaking batteries from the device immediately. Avoid
contact with skin, eyes and mucous membranes. Rinse the areas
affected by the battery acid immediately with plenty of clean
water and contact a doctor immediately. There is a risk of
chemical burning due to battery acid.
Remove dead batteries from the device immediately. There is an
increased risk of leakage.Remove the batteries from the device if you do
not intend to use it for a long period of time.
Earphones
CAUTION!
Listening with earphones at a high volume can damage your
hearing. Before putting on earphones, reduce the volume to
minimum! Your hearing can be damaged if you listen at high
volumes over a long period or if the volume is increased too
suddenly.
Preparation
Check package contents
CAUTION!
Keep the packaging out of reach of children. There is a risk of
suffocation.
Unpack the device and ensure that the following parts are included:
Micro Audio System
Remote control
FM aerial
These operating instructions and warranty card
Inserting the battery in the remote control
The battery is already inserted in the remote control upon delivery. To
activate the remote control, remove the insulation strip containing the
notice “PLEASE REMOVE IT BEFORE USE” from the underside of the
remote control.
14
Page 14

Changing the battery
The remote control works with one 3 V button battery, type CR2032.
WARNING!
Risk of explosion if batteries are replaced incorrectly.
Replace batteries only with the same or equivalent type.
Press the latch and pull out the battery
compartment.
Remove the old battery and take it to a used
battery collection point for proper disposal.
Insert a fresh CR 2032 battery into the battery
compartment with the positive pole facing up.
Ensure the +/− terminals are correct.
Slide the compartment back into place.
Set-up and connections
Setting up the device
Place the device on a sturdy, level surface. Please take note of the safety
instructions on page 8.
Some aggressive furniture paints can corrode the device’s rubber feet. If
necessary, place the device on a suitable underlay.
CAUTION!
Before making a connection to an external device, unplug all
devices from the mains.
EN
DE
FR
IT
NL
DK
NO
SE
Attaching the stand
If you want to position the device in an upright position, use the supplied
stand.
Place the device onto the stand with the four hooks in the
corresponding notches and push the device onto the stand until it
clicks into place.
15
Page 15
To remove the stand, push the stand towards the rear of the device and
then pull it from the device.
Wall mounting
You can attach the main device to a wall. To do so, you must attach two
screws to the wall. The heads of the screws must fit into the keyhole
notches on the back of the device.
ATTENTION!
Before drilling the holes for assembly, make sure that there are no
power or supply cables or pipes in the wall.
Mark the holes to be drilled. Distance between the drill holes for device:
160 mm. Drill 2 holes for 6 mm wall plugs using these markings.
Insert 6 mm plastic wall plugs into the drilled holes. Insert the screws
into the wall plugs and tighten them with a screw driver.
Hang the device using the keyhole notches provided and fold out the
spacer so that the device hangs straight on the wall.
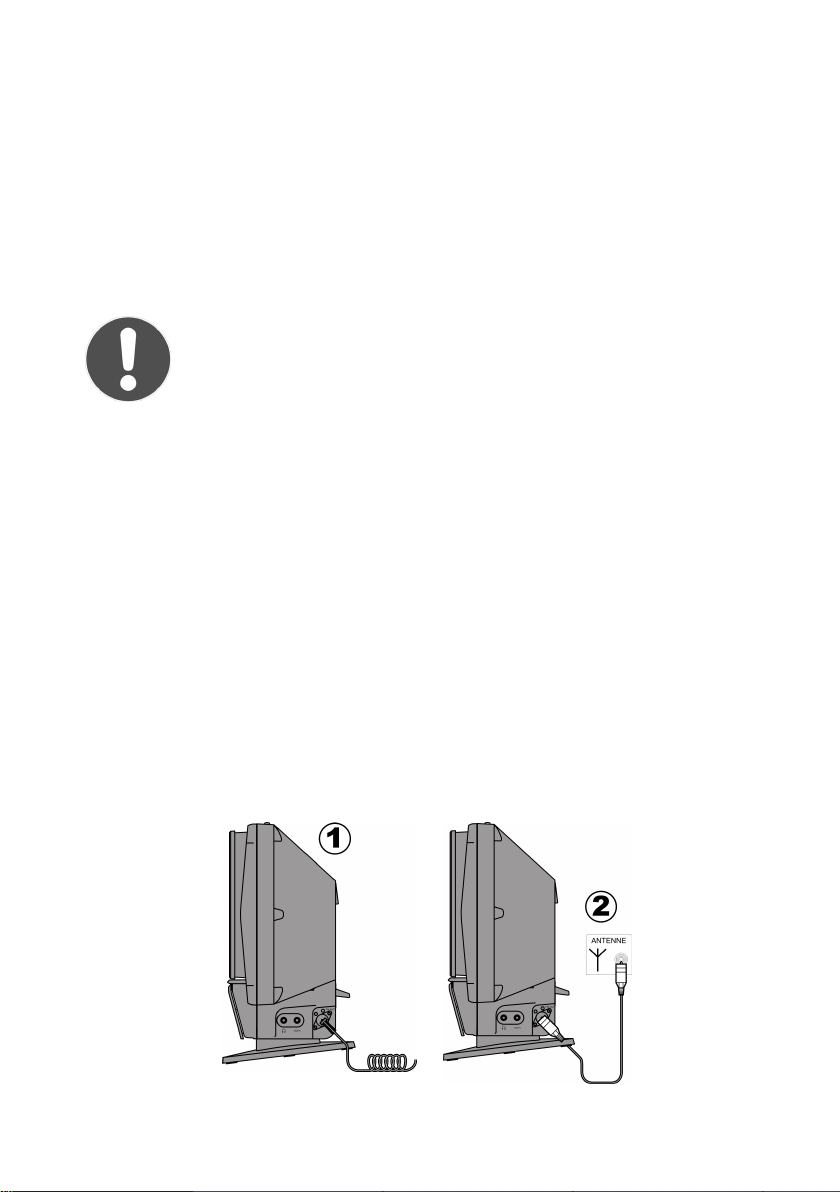
Aerial connection
Connect an aerial cable to the FM ANT Ohm aerial connection on the
device to enable radio reception.
A wire aerial is included in the delivery. Connect the wire aerial to the
device and position it to achieve the best reception (1).
Alternatively, you can connect an aerial cable to an appropriate wall
socket (2).
16
Page 16

Inputs
Playing audio signals from an external device
The device has an analogue sound input for connection to an external
audio device.
Connect a 3.5 mm stereo jack cable to the LINE IN socket on the device
and to the corresponding outputs on the external device.
USB connection
Open the cover on the top of the device.
You can connect a USB device such as an MP3 player to the USB
connection on the front of the device.
Select USB mode using the FUNCTION button.
PLEASE NOTE!
The playback functions are described from page 25 onwards.
SD/MMC memory cards
Open the cover on the top of the device.
Insert an SD/MMC memory card into the card slot with the bevelled
corner on the left and the contacts pointing backwards.
Select CARD mode using the FUNCTION button.
PLEASE NOTE!
The playback functions are described from page 25 onwards.
EN
DE
FR
IT
NL
DK
NO
SE
17
Page 17

Connecting headphones
Connect a set of headphones with a 3.5 mm jack plug to the
headphone socket. This deactivates the speakers automatically.
CAUTION!
Excessive volume when using headphones or earphones can
damage your hearing. Before putting on headphones, set the
volume to minimum!
Basic functions
Sensor keys
The sensor keys are touch sensitive and merely need to be touched
(without applying any pressure).
Switching on/off – POWER
Use the operating switch ON/OFF on the back of the device to switch the
device on. The device is now in standby mode. The STANDBY-LED on the
device will light up red.
To switch on the device, press the STANDBY/ON button on the
device or on the remote control. Information will appear on the
display.
To switch the device off, press the STANDBY/ON button on the
device or on the remote control.
The device is now in standby mode again.
PLEASE NOTE!
If you touch one of the sensor keys the time is shown in the
display. After approx. 10 seconds the light will go out.
To switch the device off completely, move the operating switch to the
OFF position.
18
Page 18
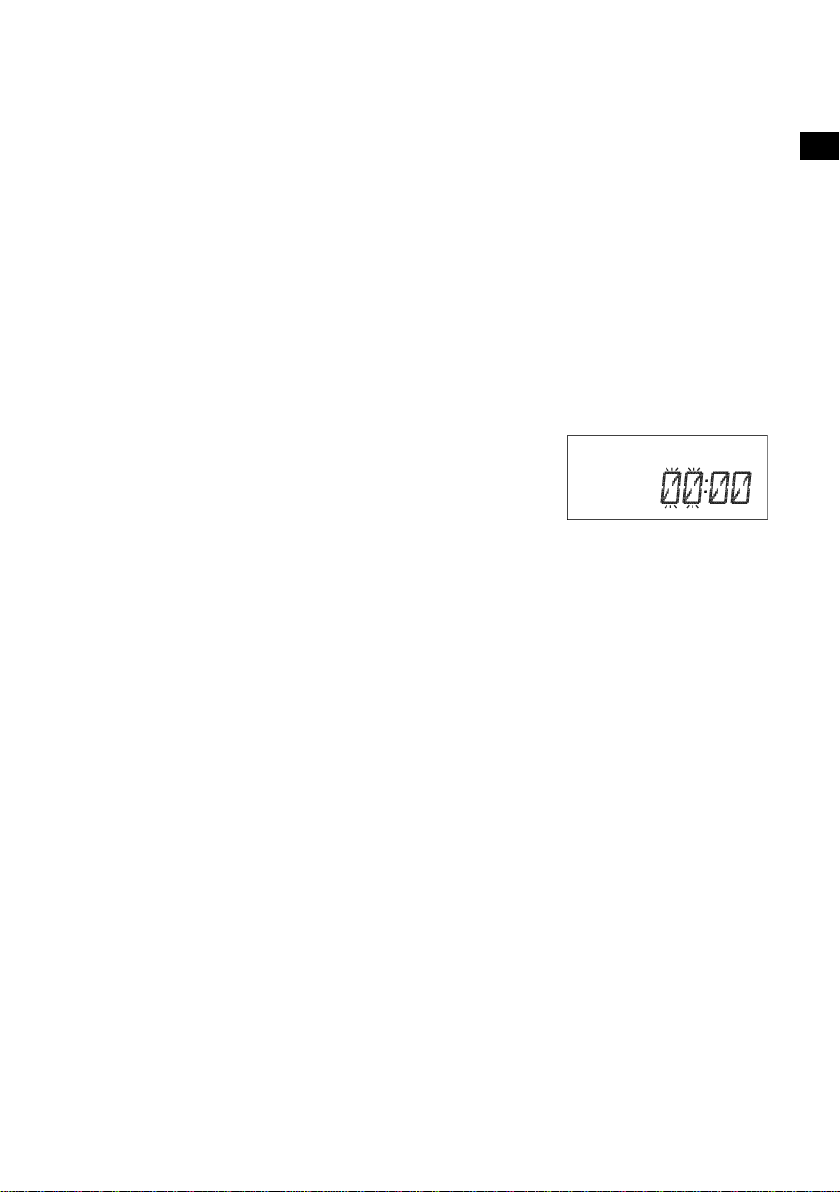
Setting the time
The time is automatically set when using RDS reception and does not need
to be set manually. A manually set time will be reset when using RDS
reception. However, the 12/24 hour setting will remain unchanged.
To display the time during operation, press the IPOD/MEM/C.-ADJ. button
for approx. 2 seconds.
How to set the time manually:
Switch the device to standby mode.
Press the IPOD/MEM/C-ADJ. button on the device. Use the
buttons to choose between 24 and 12 hour display (24 HOUR
or 12 HOUR).
If you select 12 hour display, “AM” or “PM”
will appear before the hour display:
AM: the hours from 00:00 to 11:59;
PM: the hours from 12:00 to 23:59.
Press the IPOD/MEM/C.-ADJ. button again.
The hour display flashes. Press the
to enter
Press the button IPOD/MEM/C-ADJ. The minute display will flash.
Press the
Press the IPOD/MEM/C.-ADJ. button again. The time is now set and
the figures will have stopped flashing.
the hour.
or buttons within 6 seconds to enter the minutes.
or buttons within 6 seconds
or
EN
DE
FR
IT
NL
DK
NO
SE
19
Page 19
Automatic switch-off – SLEEP
You can set a time after which the device will automatically switch into
standby mode.
Press the SLEEP button on the remote control repeatedly to set the
required time: 90 minutes > 80 minutes > 70 minutes, etc. down to
10 minutes.
The bed symbol will appear on the display to show that the SLEEP
timer has been set.
To switch off the SLEEP timer, press SLEEP until the bed symbol
disappears.
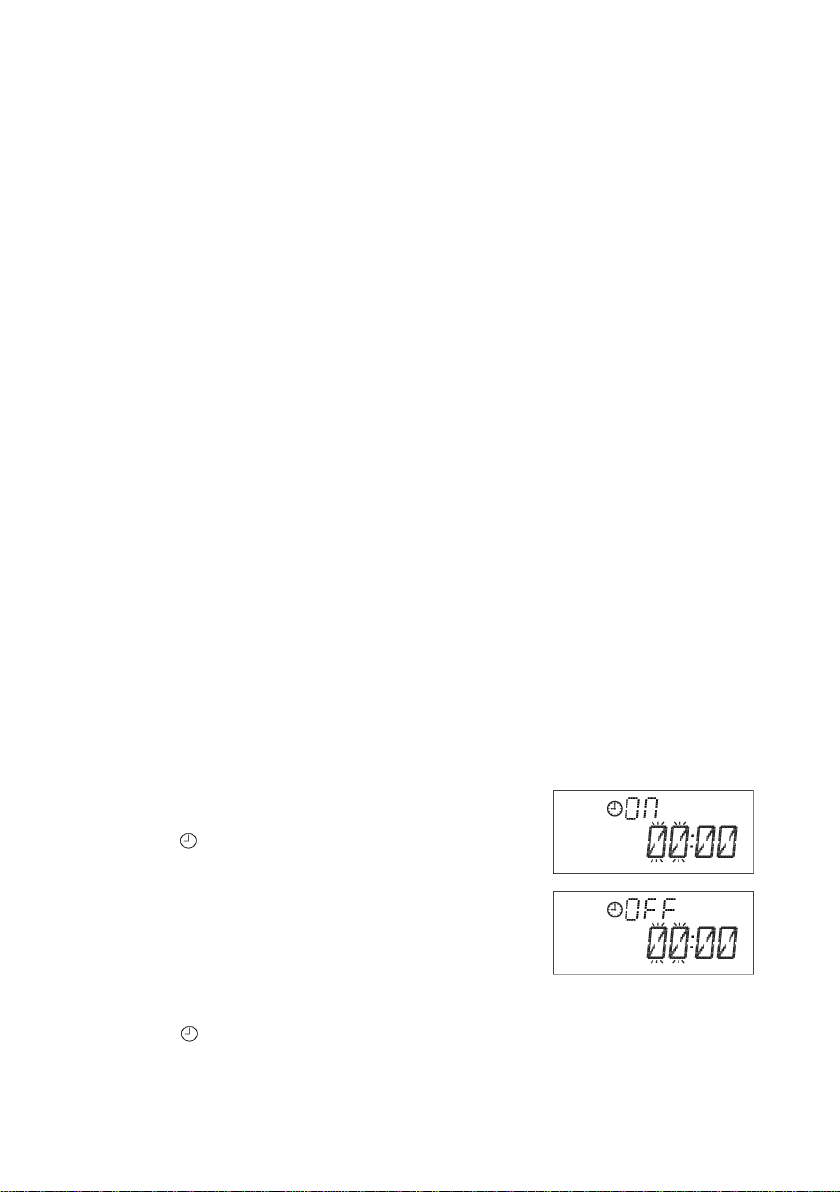
Switch on and off automatically – TIMER
You can set the player to switch on or off at a specified time (timer
function).
Selecting a music source
An audio source must be present so that the device can switch on at the
preprogrammed time.
Set the required radio station and volume level for the radio function.
Set the required sources for the other functions. Insert a CD, connect
a USB device or insert a card.
Setting the timer
How to set the switch on/off time:
Press the TIMER button on the remote
control to set the switch-on time. The display
reads
Press
hour.
Press TIMER again. The minutes flash on the
display.
Use
Press the TIMER button again to set the switch-off time. The display
reads
20
ON and the hour digit flashes.
or within 6 seconds to set the
or to enter the minutes.
OFF and the hour digit flashes.
Page 20
Press
Press TIMER again. The minutes flash on the display.
Use
Press TIMER again. Now use
Press the TIMER button. Now use
Press the TIMER button again.
The timer is now set. All the settings are now displayed once again. The
time and the clock symbol for the programmed timer will appear.
or to set the hour.
or to enter the minutes.
or to select the music source:
TUNER > CD > USB > CARD > IPOD.
or to set the volume at
which the device should switch on.
Switching off the timer
Press the TIMER button on the remote control.
The clock symbol
disappears and the timer is switched off.
General operating functions
Volume
Press the VOLUME+ button to increase the volume.
Press the VOLUME− button to decrease the volume.
Switch sound off – MUTE
EN
DE
FR
IT
NL
DK
NO
SE
Press the button to turn the sound off completely.
Press the button again or a volume button to turn the sound back
on.
Setting the equaliser
Press the EQ button repeatedly to call up the following sound effects:
CLASSIC > ROCK> POP> JAZZ> PASS.
Select operating mode
Radio, CD, USB, CARD, IPOD, AUX
Select the operating mode using the FUNCTION button.
TUNER: Radio
21
Page 21

CD: Playback of an audio or MP3 CD
USB: Playback from USB storage media
CARD: Playback from a memory card
IPOD: Playback from an iPod/iPhone
AUX: Playback from an external device
iPod mode
Insert your iPod/iPhone into the slide-in cradle for the player.
Press the FUNCTION button a number of times until ”iPod” is shown
in the display.
When the iPod has been correctly connected, IPOD will be shown in the
display. The iPod playback control is active.
NOTE
The iPod mode can only be called up when an iPod is inserted
into the iPod cradle. Otherwise, “NO IPOD” will be shown on
the display.
You can operate your iPod as usual. You may need to press the
IPOD/MEM/C-ADJ. button in order to activate the iPod menu control.
IPODMENU will appear in the display.
You can also carry out some of the iPod functions on the docking
station.
You can now operate the iPod via the following buttons on the device and
on the remote control:
IPOD/MEM/C-ADJ.: Switch between iPod menu control and iPod playback
control
VOLUME: Setting the volume
Operation with active iPod menu control
/MENU: Open menu.
/ENTER: Confirm selection
and Move the selection in the menus
22
Page 22
Operation with active iPod playback control
/ENTER: Start playback. To stop playback, press the button again.
Pressing the button once more resumes playback.
/MENU: To stop playback.
and : Hold down the buttons to rewind/fast forward within a
track. Touch lightly to play previous/next track.
Radio
Press the FUNCTION button a number of times until “Tuner” is
shown in the display.
The current radio frequency is shown in the display.
If you have connected a wire aerial, arrange the aerial to achieve the
optimum reception.
NOTE
The display always shows the RDS station name. In order to
view the radio frequency, press the RADIO MODE button a
number of times until the radio frequency is shown in the
display.
EN
DE
FR
IT
NL
DK
NO
SE
Tuning
Press the or buttons to manually tune into a station.
Search function
Hold down the or buttons for a couple of seconds to carry out
an automatic station search forwards or backwards.
Saving and selecting stations
The radio has 30 memory spaces where you can save your favourite
stations.
Tune in to the station that you want to save.
23
Page 23

In order to save the station that you are tuned to, press the
IPOD/MEM/C-ADJ. button and then select the station position with the
PRESET/FOL. buttons.
To complete the saving process, press the IPOD/MEM/C-ADJ. button
again.
You can call up the saved stations consecutively with the
PRESET/FOL. buttons.
Stereo/mono reception
If the stereo reception is too weak, you may be able to achieve clear
reception with the mono setting.
Press the ID3/MONO/ST. button on the remote control to switch
between stereo and mono reception. “Mono” or “Stereo” will
appear in the display.
RDS reception
If a radio station transmits RDS signals then the RDS will appear in the
display.
Display RDS
Press the RADIO MODE button to show the following information in
the display:
RDS NAME: Station name (if this is not available, the display will show
PS NONE)
RDS TYPE: PTY code for the currently played station (if this is not
available, the display will show PTY NONE)
RDS TEXT: Further information from the radio text (if this is not
available, the display will show RT NONE).
CT: The time received via RDS (if this is not available, the display will
show CT NONE)
Frequency
24
Page 24

RDS search
Press the RADIO SEARCH button to search for the station according to
its PTY code.
Then select the PTY code you want to find using the PRESET/FOL.
buttons.
To start the search backwards or forwards, press the or button.
The search will stop at the first station that corresponds to the code
entered.
If no station is found with the corresponding code then the display will
show the message “NO FOUND”.
CD/USB/memory card operation
Playback media
Playable media are:
Audio CDs, CD-Rs, CD-RWs
USB memory stick or MP3 player (USB version 1.1 and 2.0). Please
note that it is not possible to guarantee full compatibility with all
memory sticks.
SD/MMC memory card.
PLEASE NOTE!
The playback functions for these media are largely identical and
have therefore been described together in these instructions.
EN
DE
FR
IT
NL
DK
NO
SE
Playable formats
The device can play MP3 and WMA media.
About MP3 and WMA
MP3 and WMA formats are Windows compression formats for audio data.
WMA stands for “Windows Media Audio”.
MP3 and WMA files have to be saved with the right file extension *.mp3 or
*.wma in order to be recognised.
25
Page 25
Media with MP3 and WMA tracks can be structured in directories,
subdirectories and individual files (individual tracks). They often contain a
much larger number of individual tracks than an audio CD which means
that the reading and navigation time may be increased.
“ID3 tags” can be allocated when MP3 discs are made, depending on the
creation programme. These ID3 tags contain information such as the name
of the musicians, the name of the track and possibly other information.
The ID3 tags can be read by your device’s MP3 function and then shown
on the display.
Inserting and removing CDs
Information about the CD compartment
Never insert foreign objects into the CD compartment as this could
destroy the mechanism.
To prevent the accumulation of dust in the device, do not leave the
CD compartment open for long periods of time.
Never touch the lens in the CD compartment.
If the CD is very dirty or badly marked with fingerprints, the playback
function may be delayed or the disc may start from another position.
Dirt on the scanning lens may cause interruptions during playback or
other malfunctions.
If you want to remove dust from the CD compartment, simply use a
normal blower brush (found in photographic supplies shops).
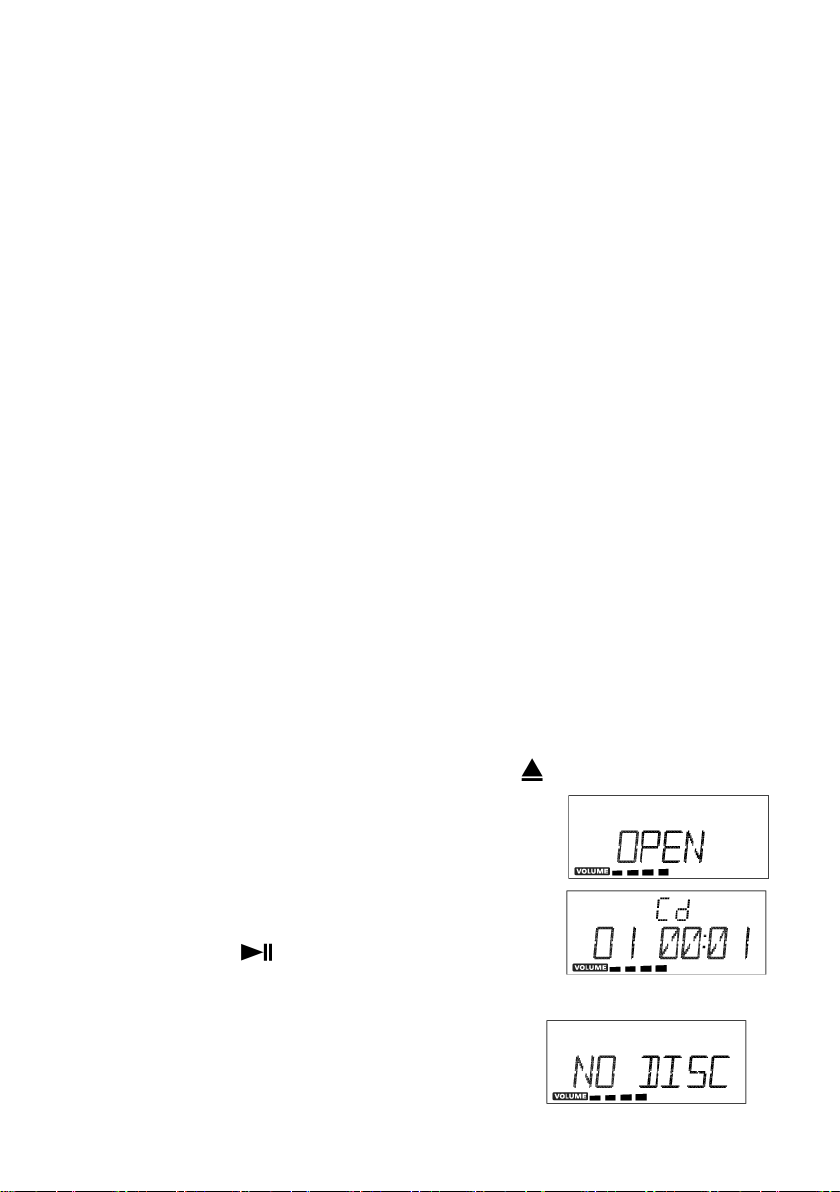
Open the CD compartment by pressing the button on the device
or the remote control. The disc compartment
opens.
Insert a CD into the compartment with the
label side up.
Close the CD compartment by pressing the
OPEN/CLOSE button once again or by
pressing the
to rotate and READING appears on the
display.
CD playback starts automatically.
If there is no disc inserted or if the disc
26
/ENTER button. The CD starts
Page 26

cannot be read, the display reads NO DISC.
CAUTION!
Do not open the CD compartment while the disc is still playing
or rotating. Press STOP first.
Playback functions
PLAY, PAUSE, STOP, skip
Press the /ENTER button on the player or on the remote control
in order to start playback.
To stop playback, press the
The remaining time flashes in the pause display.
Press
from the same point.
Press
To jump to the start of a track press
Hold down
/ENTER again to continue playback
/MENU to end playback. The device goes into stop mode.
or to start fast forward/rewind.
MP3/WMA folders
To change folders in MP3/WMA media, press PRESET/FOLDER or.
If the tracks are written in ID3 format, you can display the information
stored.
Press ID3/MONO/ST. and ID3 ON will appear on the display. The
information appears in scrolling text: “TITLE” – track name –
“ARTIST” – name of the artist.
If you want to exit the ID3 function, press the ID3/MO./ST. button again
and ID3 OFF will appear on the display.
button again.
or .
EN
DE
FR
IT
NL
DK
NO
SE
27
Page 27
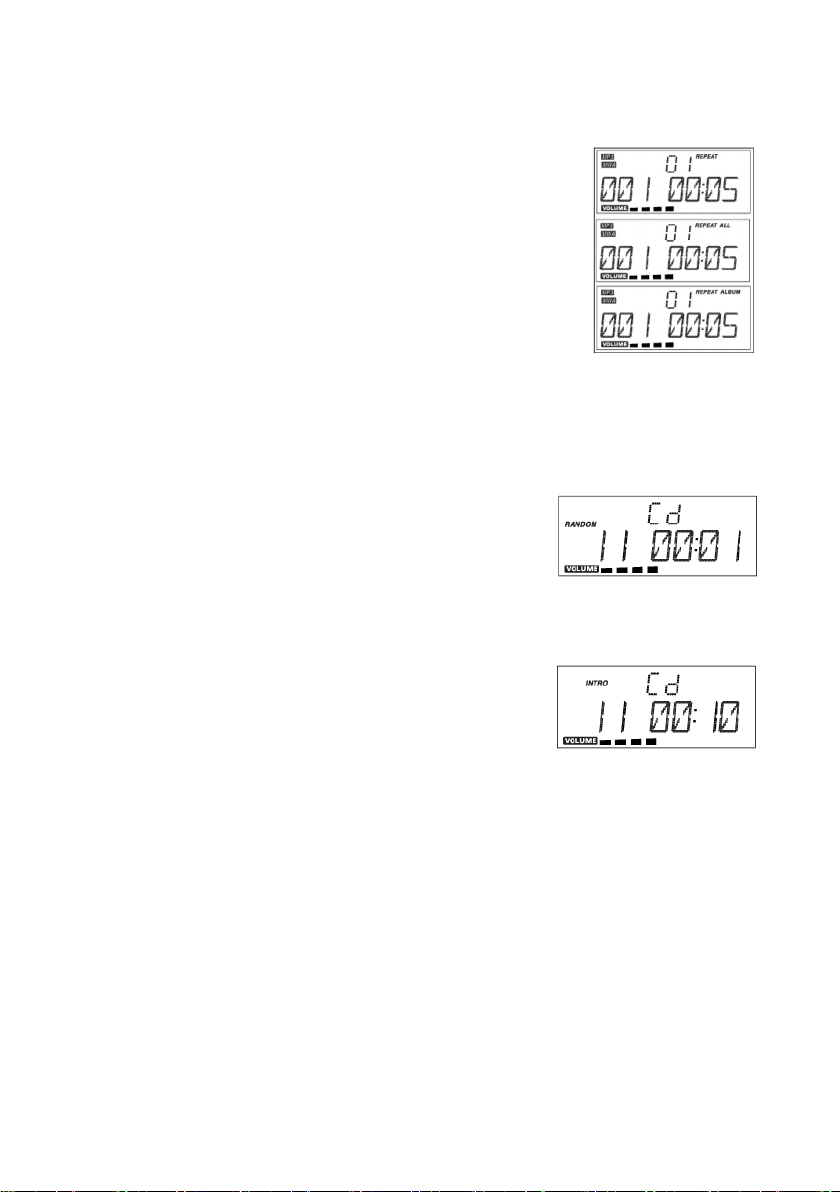
REPEAT
Press REPEAT while in stop mode or during play.
REPEAT will appear in the display. The current
track will then be repeated.
Press REPEAT again. The display will show
REPEAT ALL. All the tracks will be repeated.
In MP3/WMA mode press REPEAT again, to
repeat the whole folder.
To cancel the REPEAT function, press the REPEAT
button until the word disappears from the display.
RANDOM
With the RANDOM function enabled all the tracks are played in a random
order.
Press the RANDOM button on the remote
control during playback or in stop mode.
Random playback now starts.
Press the RANDOM button again to revert to
normal playback mode.
INTRO
Press the INTRO button on the remote
control during playback or in stop mode.
The first 10 seconds of each track on the CD
will be played.
Press the INTRO button on the remote control again to return to
normal play mode.
28
Page 28
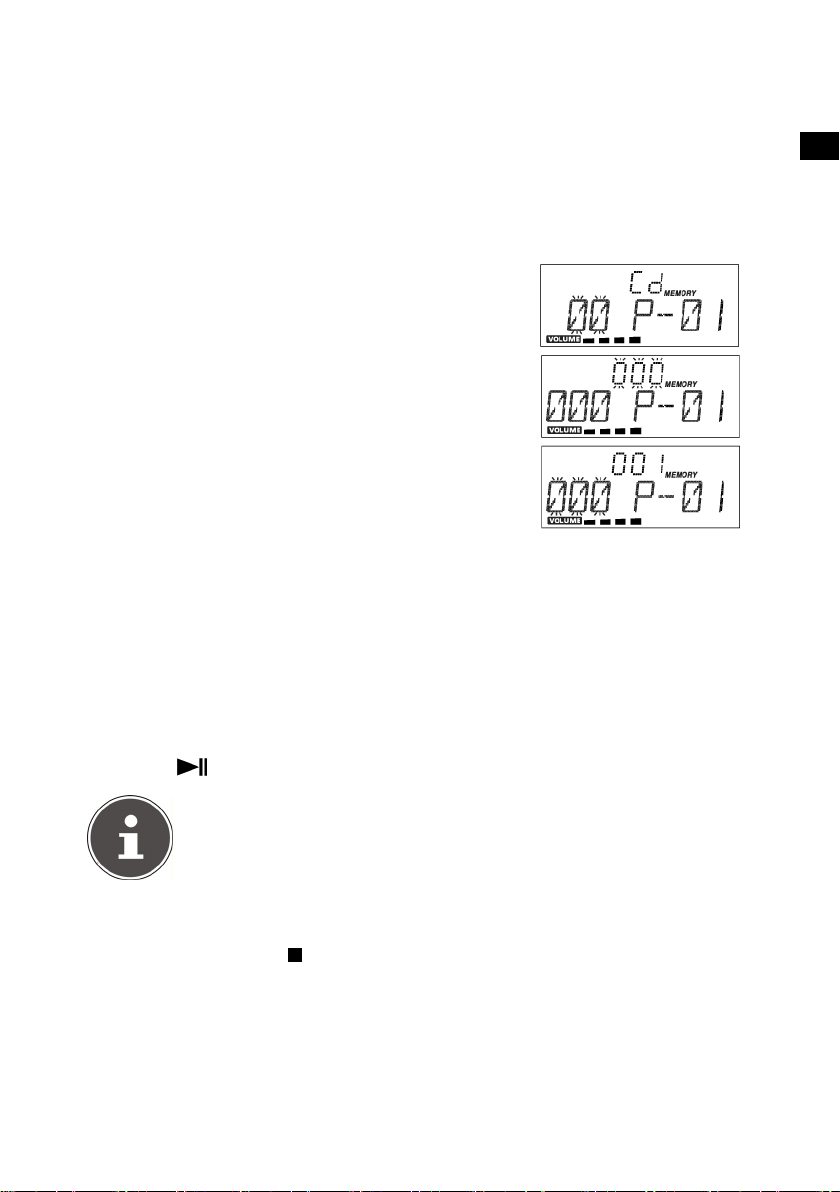
Program the playing order of tracks
You can set a playing order for up to 32 tracks in CD mode and 64 tracks
in MP3/WMA mode. The device must be in stop mode before
programming can begin.
Stop playback so that STOP appears on
the display.
Press the button IPOD/MEM/C-ADJ. on the
device or remote control. MEMORY and
programme position p-01 will appear on
the display.
Track 00 will flash during CD playback.
Folder 00 will flash during MP3/WMA
playback.
During CD playback, now use the
buttons to select a track.
For MP3/WMA playback, use
PRESET/FOLDER
Press the button IPOD/MEM/C-ADJ.
Select another track in CD playback.
Now select a track in MP3/WMA playback.
Press IPOD/MEM/C-ADJ. and save more tracks in the same way.
Press IPOD/MEM/C-ADJ. to go through the tracks in the list
consecutively.
Press
NOTE
You can also use the REPEAT function described above with a
programmed list.
to select a folder.
/ENTER to play the list.
or
EN
DE
FR
IT
NL
DK
NO
SE
Editing a programmed list
To end playback press /MENU.
Press IPOD/MEM/C-ADJ. again to make a new list.
Deleting a programmed list
A programmed list will be deleted if
29
Page 29

the CD compartment is opened,
another operating mode is selected,
or the device is switched off.
Troubleshooting
If errors occur, check first whether you can correct the problem yourself.
The following overview may help you.
CAUTION!
Never try to repair the device yourself. Contact our service centre
or other qualified personnel if a repair is necessary.
30
Page 30

PROBLEM POSSIBLE CAUSE / REMEDY
GENERAL
No standby display Check the mains connection: is the plug firmly inserted
in the mains socket?
The player does not
work
The disc does not
play even though
(PLAY) has been
pressed, or stops
again immediately
Move the POWER switch on the device to ON, then
press the
If the device has been affected by a storm, static
charging or other external factor, try the following
procedure:
move the POWER switch on the device to the OFF
position. Then pull out the mains cable and plug it
back in.
Is the disc inserted with the title (printed) side facing
upwards?
Check whether the disc is damaged by trying another
disc. If the disc is dirty, clean it carefully, wiping it from
the centre to the edge with a soft, dry cloth.
If condensation has formed inside the device: leave the
player for one to two hours to dry off.
(STANDBY) button on the remote control.
EN
DE
FR
IT
NL
DK
NO
SE
The device does not
respond to the
remote control
No sound Has the sound been switched off
Check whether the batteries need changing and have
been inserted correctly. Remove anything which may
be blocking the signal between the infrared
transmitter, the remote control and the device’s sensor.
Is the distance between the remote control and the
player too great?
(MUTE)?
31
Page 31

Cleaning
Always disconnect the device from the mains supply before cleaning it.
Only use a dry, soft cloth to clean the device. Do not use chemical solutions or
cleaning products because these may damage the device’s surface and/or
inscriptions.
Disposal
Packaging
Your device has been packaged to protect it from damage during
transit. Packaging materials are raw materials and can therefore be
reused or recycled.
Device
At the end of its service life, the device should not be disposed of
with the household rubbish. Seek the advice of your local
authority on proper environmentally friendly disposal facilities.
Batteries
32
Do not dispose of used batteries in the normal household rubbish.
Batteries should be taken to a collection point for used batteries.
Page 32

Technical data
Voltage: 230 V ~ 50 Hz
Power consumption: 38 W
Output power 2 x 10 watts RMS
Batteries for remote control: 3 V (CR2032)
Radio
FM waveband: 87.5–108 MHz
Connections
FM aerial: 75 ohms
Headphone socket (front): 3.5 mm jack plug
USB input: Version 2.0
CD player
Laser output: Class 1 laser
Supported formats: CD-R, CD-RW, audio
CD, MP3 CD
Only play audio CDs which are labelled as follows:
Please note:
These days there are many non-standard ways of recording CDs, copy
protection methods, and also a wide variety of blank CD-R and CD-RW
discs. Therefore, there may occasionally be read errors or delays. This does
not mean that the machine is faulty.
EN
DE
FR
IT
NL
DK
NO
SE
Subject to technical modifications.
33
Page 33

Copyright © 2010. All rights reserved.
®
The company Medion
Trademarks: Other trademarks used in this document are the property of their respective
owners.
Subject to technical and optical changes, as well as printing errors.
owns the copyright.
34
Page 34

Restricted Warranty
I. General Conditions of Warranty
1. General
This warranty covers defects relating to workmanship and manufacture in
MEDION products. The period during which this warranty is valid and
during which claims against the warranty can be made to MEDION must
be in accordance with the following terms in order to be considered
eligible:
Is effective from the date of purchase or receipt of the MEDION product
from an authorised seller of MEDION products; and
expires at the end of the warranty period specified on the warranty card
provided with the product.
For the warranty to be valid, you must:
provide suitable evidence of purchase, a copy of the original purchase
receipt from an authorised seller of MEDION products is preferred; or
register your product within 28 days of purchase either online at
www.MEDION.co.uk
registration card included with the product.
Please keep the original purchase receipt and the warranty card in a safe
place. MEDION and its authorised sellers reserve the right to refuse a repair
under warranty or a warranty confirmation if a proof of purchase [or
registration of purchase] cannot be established, or has not been,
submitted.
When it is necessary to return your product for repair please ensure that
your product is suitably packed for transportation.
Provided that your product is still within warranty (please check the
duration of the warranty period as described above) and is eligible for
repair or replacement under the terms of the warranty, to return your
product, please telephone MEDION on the service hotline number. You
will be sent a pre-paid transportation box suitable for returning your
product to MEDION. PLEASE MAKE SURE THAT YOU HAVE A BACKUP COPY
OF ALL DATA ON THE PRODUCT BEFORE RETURNING THE PRODUCT TO
MEDION. MEDION shall bear the costs of postage and packaging for
or by completing and returning the pre-paid
35
EN
DE
FR
IT
NL
DK
NO
SE
Page 35

returning the product and the transportation risk. However, if following
examination of the defective product in question, MEDION, in its
reasonable opinion, considers that the defect has been caused by:
your operating and/or using the product other than as instructed in the
accompanying documentation;
damage caused in transit as a result of your negligence in packaging of
the product; and/or
otherwise than in accordance with the terms of this warranty;
This warranty shall be void and you may be required by MEDION to
reimburse MEDION for the reasonable costs of postage and packaging
before MEDION will return the product to you. If so and you would still
like MEDION to repair or replace the product, MEDION may do so but you
will be charged MEDION’s standard rates for repair and replacement for
this service.
Before returning the product, please contact MEDION via the service
hotline or via the internet (www.MEDION.co.uk
). You will receive a
reference number (RMA No.) on the warranty card. Please mark the
outside of your package to ensure that this reference number is clearly
visible. Please submit a letter containing as much detailed information as
possible and, a full description of the defect or fault.
This should include:
a description of the fault;
when it occurred, how long it has been evident and how frequently it
occurs ;
any errors message(s) displayed when using the product;
a description of the circumstance(s) and conditions in which the fault
occurs; and
whether it is an intermittent or persistent fault;
This will greatly assist MEDION in identifying the defect, when submitted
together with the defective product.
Unless otherwise instructed by a MEDION representative in all cases, the
product must be returned complete with all parts which were included
with the original product. Incomplete contents of the returned package
may lead to a delay in the repair or replacement. MEDION does not accept
any liability for any additionally submitted material(s) which were not
supplied with the original MEDION product.
36
Page 36

This warranty does not affect your statutory rights in any way and is
subject to the applicable legal statutes of the country where the product
was sold to you by an authorised MEDION seller.
2. Scope
Subject to any exclusions set out within this warranty, where there is a
defect in your MEDION product covered by this warranty, MEDION will
repair or replace the MEDION product. The decision whether to repair or
replace the product will be made solely at the discretion of MEDION.
MEDION may, in its own discretion, replace the product returned for
repair under warranty with a replacement product that is either identical
or, in the event that such product(s) are no longer available, a product of
equal or superior specification and quality.
No warranty is given for batteries or rechargeable batteries or for
consumable materials subject to wear and tear, i.e. for parts which have to
be replaced periodically during the normal use of the product, such as
video-projector lamp.
Non critical failures that fall within industry specified tolerances e.g. noise,
LCD pixels are not covered by this warranty. Please consult the appropriate
section in your user or instruction manual for this product for exact
specifications and tolerances.
To the extent which is permitted under law, MEDION will accept no
liability for burnt-in images on plasma or LCD products as a result of
normal wear and tear during the operation of the product. Please refer to
your user or instruction manual for this product for detailed operating
instructions for your plasma or LCD product.
The warranty does not cover errors relating to the playback of data media
in an incompatible format or created with unsuitable software.
If it is found during repair or assessment that the defect concerned is not
covered under warranty, MEDION reserves the right to invoice you for all
reasonable costs incurred by MEDION. These costs will be in relation to the
return of the product, including reasonable administration costs, plus
reasonable costs for materials used and labour provided when repairing or
replacing the product. This is subject to MEDION providing you with an
estimate for carrying out such work prior to costs being incurred and that
you have accepted the estimate.
EN
DE
FR
IT
NL
DK
NO
SE
37
Page 37

You are entitled to seek independent advice or consultation relating to
your product or any of MEDION’s findings. MEDION will not be liable for
any costs incurred to you when doing so.
3. Exclusion from warranty
To the extent permitted by law, this warranty shall be void in the event
that defects or loss caused by:
a) failure and damage resulting from the operation of the product in an
environment other than that recommended in the accompanying user or
instruction manual (e.g. in direct sunlight or in a damp room);
b) accidental damage;
c) use other than in accordance with the accompanying user or instruction
manual;
d) modifications, conversions, expansions, maintenance and/or repairs
made to the MEDION product by unauthorised repairers or use of
unauthorised third party parts;
e) negligence;
f) virus attack or software errors; or
g) improper transportation or packaging during return of the product.
This warranty will also be considered void if labels or serial numbers of the
product or of a component of the product are modified or made illegible.
To the extent permitted by law, MEDION shall; only be responsible for
losses which are a reasonably foreseeable consequence of the relevant
defect in the product; MEDION will not be responsible for any costs
incurred in relation to software configuration; economic loss; loss of
opportunity; loss of income; or loss of data or software arising out of its
repair or replacement of a MEDION product under this warranty
4. Service Hotline
Before returning the product to MEDION you must contact us using the
service hotline or via the internet (www.MEDION.co.uk). You will receive
further instructions for making your claim under warranty when you call.
The service hotline is available on 362 days in the year, including Sundays
and bank holidays but excluding Christmas day, New Years Day and Easter
day. The service hotline is subject to [national rate] telephone call charges.
These charges are subject to change. The price of your call will be stated at
the beginning of the call.
38
Page 38

II. Special warranty conditions for MEDION PC,
notebook, pocket PC (PDA) and navigation devices
(PNA)
The following terms apply to MEDION PC, notebook, desktop, pocket PC
and laptop products and optional items included with such products. If
one of these items has a fault, you also have a warranty claim for its repair
or replacement, from MEDION. The warranty covers the costs of materials
and labour for repairing or replacing the defective MEDION product or the
optional item in question.
Hardware connected to your product that was not produced or marketed
by MEDION can invalidate the warranty if MEDION can reasonably
demonstrate that damage to the MEDION product or of the optional item
included with the delivery was caused by such hardware. You are entitled
to seek independent advice or consultation relating to your product or any
of MEDION’s findings. MEDION will not be liable for any costs incurred to
you when doing so.
This warranty is restricted in relation to any pre-installed operating system
as well as to application programme software that is included with the
MEDION product in question. This warranty is restricted as follows:
For pre-installed operating system as well as to application programme
software included in the MEDION product, MEDION only guarantees the
data media (e.g. the diskettes and CD-ROMs) upon which this software is
delivered and warrants that such data media shall be free from material
and processing defects for a period of 90 days from the date of purchase of
the MEDION product from an authorised seller of MEDION. MEDION will
replace defective data media free of charge.
Any claims in respect of defective pre-installed operating system as well as
to application programme software are hereby expressly excluded and you
should contact the relevant licensor or copyright owner of the defective
software in question. MEDION does not guarantee that any software
supplied with MEDION products will function without interruption, will be
free from errors or that it will fulfil your requirements. MEDION does not
guarantee the 100% accuracy of the maps provided with the Navigation
device.
EN
DE
FR
IT
NL
DK
NO
SE
39
Page 39

It may be necessary to delete all data in the product in order to repair the
MEDION product. PLEASE MAKE SURE THAT YOU HAVE A BACKUP COPY
OF ALL DATA ON THE PRODUCT BEFORE RETURNING THE PRODUCT TO
MEDION. To the extent permitted by law, MEDION excludes all liability for
loss of data and MEDION recommends in all cases that you back up all
data on your MEDION product before returning the product to MEDION.
III. Special warranty conditions for repair on site or
replacement on site
If a claim for repair or replacement on site is included within the terms of
the warranty card provided with the product, the special warranty
conditions for repair or replacement of your MEDION product on site
apply.
The following provisions must be made by you for carrying out repairs or
replacements on site:
MEDION or its authorised personnel must have unrestricted, safe and
immediate access to the products.
Telecommunication facilities required by MEDION or its authorised
personnel for proper execution of your order, for testing and diagnostic
purposes and for remedying faults are provided by you at your own
expense.
You are responsible yourself for restoring the application software after
the repair services have been carried out by MEDION or its authorised
personnel.
You must take all other necessary steps to enable MEDION or its
authorised personnel to carry out your order properly.
You are responsible yourself for connecting and configuring any existing
external peripheral products after MEDION or its authorised personnel
have carried out their repairs.
The free cancellation period for repairs or replacements on site is
24 hours, thereafter our reasonable costs resulting from late or missing
cancellation shall be invoiced at your expense.
40
Page 40

Inhaltsverzeichnis
Inhaltsverzeichnis ..................................................................................... 3
Geräteüberblick ........................................................................................ 5
Linke und Rechte Seiten ........................................................................ 5
Vorderseite und Rückseite ..................................................................... 6
Oberseite .............................................................................................. 7
Rückseite ............................................................................................... 7
Fernbedienung ...................................................................................... 8
Sicherheitshinweise ................................................................................... 9
In dieser Anleitung verwendete Warnsymbole und Signalwörter ........... 9
Bestimmungsgemäßer Gebrauch ........................................................ 10
Aufstellort ........................................................................................... 10
Stromversorgung ................................................................................ 11
Allgemein ............................................................................................ 12
Netzanschluss zugänglich lassen ......................................................... 12
Reinigung und Pflege .......................................................................... 12
Laserklasse .......................................................................................... 13
Hinweis zur elektrostatischen Aufladung ............................................. 13
Sicherer Umgang mit Batterien ............................................................ 13
Ohrhörer ............................................................................................. 14
Vorbereitung .......................................................................................... 15
Lieferumfang prüfen ........................................................................... 15
Batterie in die Fernbedienung einlegen ............................................... 15
Batterie wechseln ................................................................................ 15
Aufstellung und Anschlüsse .................................................................... 16
Gerät aufstellen ................................................................................... 16
Standfuss anbringen ........................................................................... 16
Wandmontage .................................................................................... 16
Antennenanschluss ............................................................................. 17
Eingänge ............................................................................................. 18
EN
DE
FR
IT
NL
DK
NO
SE
3
Page 41

Kopfhörer anschließen ........................................................................ 18
Grundfunktionen .................................................................................... 19
Sensortasten ....................................................................................... 19
Ein-/Ausschalten – POWER .................................................................. 19
Uhr stellen ........................................................................................... 19
Automatisches Ausschalten – SLEEP ..................................................... 21
Automatisches Ein- und Ausschalten – TIMER ...................................... 21
Allgemeine Bedienfunktionen ................................................................. 22
Betriebsart wählen .............................................................................. 23
iPod-Betrieb ............................................................................................ 23
Radio ...................................................................................................... 24
Sender einstellen ................................................................................. 24
Sendersuchlauf ................................................................................... 25
Sender speichern und aufrufen ........................................................... 25
Stereo-/Monoempfang ........................................................................ 25
RDS-Empfang ...................................................................................... 26
CD-/USB-/Speicherkartenbetrieb ............................................................. 27
Abspielbare Datenträger ...................................................................... 27
Abspielbare Formate ........................................................................... 27
CDs einlegen und entnehmen ............................................................. 28
Wiedergabefunktionen ........................................................................ 29
Abspielreihenfolge programmieren ..................................................... 30
Wenn Störungen auftreten ..................................................................... 31
Reinigung ............................................................................................... 33
Entsorgung ............................................................................................. 33
Technische Daten ................................................................................... 34
Eingeschränkte Garantie Deutschland ..................................................... 36
4
Page 42

Geräteüberblick
Linke und Rechte Seiten
1. POWER ON/OFF: Gerät einschalten/ausschalten
2. Kopfhörerbuchse 3,5 mm Klinke
3. LINE IN: Audioeingang Cinch L/R
4. FM ANT: Antenneneingang
EN
DE
FR
IT
NL
DK
NO
SE
5
Page 43

Vorderseite und Rückseite
5. Lautsprecher
6. Standby-LED
7. Diskfach
8. iPod Schale: „Docking Station“ für ein iPod Gerät
9. Standfuss
10. IR-Sensor für Fernbedienung
11. Display
12. FUNCTION: Betriebsart wählen
13. IPOD/MEM/C.-ADJ.: iPod-Menüsteuerung, Programmierfunktion und
Uhrzeit einstellen
14.
/ENTER : Wiedergabe starten und unterbrechen, Eingaben
bestätigen
/MENU: Wiedergabe stoppen/Menü aufrufen (iPod-Betrieb)
15.
16. VOLUME: Lautstärke einstellen
1
1
Gilt für die Musikwiedergabe der aktuellen iPod/iPhone Modelle, ausgenommen iPod shuffle.
iPod, iPhone ist eine Marke Markenanmeldung der Apple Inc. in den USA und anderen Ländern.
“Made for iPod”, “Made for iPhone” bedeutet, dass ein elektronisches Zubehör speziell zur
Verbindungmit iPod, iPhone nach Apple Leistungsstandards vom Hersteller entwickelt und zertifiziert
wurde. Apple ist für die Handhabung des Gerätes, sowie für die Einhaltung von Sicherheits- und
gesetzlichen Bestimmungen, nicht verantwortlich.
6
Page 44

Oberseite
STANDBY: Gerät vom Standby-Modus einschalten und wieder in
17.
den Standby-Modus schalten,
18. RADIO SEARCH: Sender anhand ihrer PTY-Kennung suchen
19. USB-Anschuss
20. Kartensteckplatz für SD-Speicherkarten
21. SKIP/TUNE SEARCH /: Vorheriger/Nächster Titel, Sendersuchlauf
rückwärts/vorwärts
22. OPEN/CLOSE
: Diskfach öffnen und schließen
Rückseite
EN
DE
FR
IT
NL
DK
NO
SE
23. Löcher für Wandmontage
24. Netzkabel
25. Abstandshalter (Ausklappen für Wandmontage)
7
Page 45

Fernbedienung
1. STANDBY: Gerät vom Standby-
Modus einschalten und wieder in den
Standby-Modus schalten
2. RADIO SEARCH: Sender anhand ihrer
PTY-Kennung suchen
3. RADIO MODE: RDS-Anzeige wechseln
4. IPOD/MEM/C.-ADJ: iPod-
Menüsteuerung, Programmierfunktion
und Uhrzeit einstellen
5.
6. REPEAT: Wiederholfunktion einstellen
7. EQ: Equalizer einstellen
8. INTRO: Anspielfunktion
9.
10. FUNCTION: Betriebsart einstellen
11. OPEN/CLOSE: Diskfach öffnen und schließen
12. ID3/MONO/ST.: ID3-Tag bei MP3-Wiedergabe einstellen,
13.
14.
15. PRESET/FOL. : Senderspeicherplätze auswählen, Ordner
16. TIMER: Timerfunktion einstellen
17. RANDOM: Zufallswiedergabe einstellen
18. SLEEP: Abschaltfunktion einstellen
19. VOLUME: Lautstärke einstellen
20. Batteriefach (a. d. Rückseite)
/ : Medien –
vorheriger/nächster Titel;
Im Radiobetrieb zum nächsten/
vorherigen gespeicherten Sender
MUTE: Stummschaltung
Stereo/Monoempfang im Radiobetrieb
/ENTER: Wiedergabe starten und unterbrechen
/MENU: Wiedergabe stoppen/
Menü aufrufen (iPod-Betrieb)
anwählen (MP3 Wiedergabe)
8
Page 46

Sicherheitshinweise
Lesen Sie unbedingt diese Anleitung aufmerksam durch und
befolgen Sie alle aufgeführten Hinweise. So gewährleisten Sie
einen zuverlässigen Betrieb und eine lange Lebenserwartung
Ihres Gerätes. Halten Sie diese Anleitung stets griffbereit in der
Nähe Ihres Gerätes. Bewahren Sie die Bedienungsanleitung gut
auf, um sie bei einer Veräußerung des Gerätes dem neuen
Besitzer weitergeben zu können.
In dieser Anleitung verwendete Warnsymbole und
Signalwörter
GEFAHR!
Warnung vor unmittelbarer Lebensgefahr!
WARNUNG!
Warnung vor möglicher Lebensgefahr und/oder
schweren irreversiblen Verletzungen!
VORSICHT!
Hinweise beachten, um Verletzungen und Sachschäden zu
vermeiden!
ACHTUNG!
Hinweise beachten, um Sachschäden zu vermeiden!
EN
DE
FR
IT
NL
DK
NO
SE
HINWEIS!
Weiterführende Informationen für den Gebrauch des
Gerätes!
HINWEIS!
Hinweise in der Bedienungsanleitung beachten!
WARNUNG!
Warnung vor Gefahr durch elektrischen Schlag!
9
Page 47

Bestimmungsgemäßer Gebrauch
Das Gerät dient zum Abspielen von Ton- und Bildmedien (CDs, MP3Datenträger, USB-Geräte und Speicherkarten) sowie zum Radioempfang.
Darüber hinaus können Sie in der Ladeschale iPod Geräte zum Aufladen
und zur Wiedergabe von Audiodaten anschließen. Benutzen Sie das Gerät
zu keinem anderen Zweck.
Das Gerät ist nicht dafür bestimmt, durch Personen (einschließlich Kinder)
mit eingeschränkten physischen, sensorischen oder geistigen Fähigkeiten
oder mangels Erfahrung und/oder mangels Wissen benutzt zu werden, es
sei denn, sie werden durch eine für ihre Sicherheit zuständige Person
beaufsichtigt oder erhielten von ihr Anweisungen, wie das Gerät zu
benutzen ist. Kinder sollten beaufsichtigt werden, um sicherzustellen, dass
sie nicht mit dem Gerät spielen.
Aufstellort
Stellen und betreiben Sie alle Komponenten auf einer stabilen, ebenen
und vibrationsfreien Unterlage, um Stürze des Gerätes zu vermeiden.
Setzen Sie das Gerät keinen Erschütterungen aus. Erschütterungen
können der empfindlichen Elektronik schaden.
Achten Sie darauf, dass keine direkten Wärmequellen (z. B. Heizungen)
auf das Gerät wirken.
Es dürfen keine offenen Brandquellen (z. B. brennende Kerzen) auf oder
in der Nähe des Gerätes stehen.
Achten Sie darauf, dass die Lüftungsschlitze nicht verdeckt sind, damit
immer eine ausreichende Belüftung gewährleistet ist.
Stellen Sie keine Gegenstände auf die Kabel, da diese sonst beschädigt
werden könnten.
Halten Sie einen Mindestabstand von ca. 10 cm nach oben und um das
Gerät herum zwischen Wänden und Gerät ein. Sorgen Sie für eine
ausreichende Belüftung.
Betreiben Sie Ihr Gerät nicht im Freien, da äußere Einflüsse wie Regen,
Schnee etc. das Gerät beschädigen könnten.
10
Page 48

Halten Sie mindestens einen Meter Abstand von hochfrequenten und
magnetischen Störquellen (Fernsehgerät, Lautsprecherboxen,
Mobiltelefon usw.), um Funktionsstörungen zu vermeiden.
Bei großen Temperatur- oder Feuchtigkeitsschwankungen kann es
durch Kondensation zur Feuchtigkeitsbildung innerhalb des Gerätes
kommen, die einen elektrischen Kurzschluss verursachen kann.
WARNUNG!
Versuchen Sie auf keinen Fall, das Gerät selber zu öffnen
und/oder zu reparieren. Es besteht die Gefahr des
elektrischen Schlags!
Wenden Sie sich an unser Service Center, wenn Sie technische Probleme
mit Ihrem Gerät haben.
Stromversorgung
ACHTUNG!
Auch bei ausgeschaltetem Netzschalter sind Teile des Gerätes
unter Spannung. Um die Stromversorgung zu Ihrem Gerät zu
unterbrechen oder das Gerät gänzlich von Spannung frei zu
schalten, trennen Sie das Gerät vollständig vom Netz.
Schließen Sie das Gerät nur an gut erreichbare und leicht zugängliche
Netzsteckdosen 230 V ~ 50 Hz an. Sie müssen im Notfall das Gerät
sofort vom Netz trennen können
Ziehen Sie das Netzkabel stets am Stecker aus der Steckdose, ziehen Sie
nicht am Kabel.
Ziehen Sie während eines Unwetters oder wenn das Gerät für längere
Zeit nicht benutzt wird, den Netzstecker aus der Steckdose und das
Antennenkabel aus der Antennenbuchse.
Ziehen Sie bei längerer Abwesenheit oder Gewitter den Netzstecker und
das Antennenkabel ab.
Wickeln Sie das Kabel für den Betrieb vollständig ab.
Knicken oder quetschen Sie das Netzkabel nicht.
Verwenden Sie keine Verlängerungskabel, um Stolperfallen zu
vermeiden.
EN
DE
FR
IT
NL
DK
NO
SE
11
Page 49

Achten Sie darauf, dass das Netzkabel nicht mit heißen Gegenständen
oder Oberflächen in Berührung kommt.
Allgemein
Stellen Sie keine mit Flüssigkeit gefüllten Gefäße, wie z. B. Vasen, auf
das Gerät oder in die nähere Umgebung und schützen Sie alle Teile vor
Tropf- und Spritzwasser. Das Gefäß kann umkippen und die Flüssigkeit
kann die elektrische Sicherheit beeinträchtigen.
Ziehen Sie bei Beschädigungen des Steckers, der Anschlussleitung oder
des Gerätes sofort den Stecker aus der Steckdose.
Das Gerät ist nur für den privaten Gebrauch und nicht für den Betrieb
in einem Unternehmen der Schwerindustrie konzipiert.
Warten Sie mit dem Anschluss des Geräts, wenn das Gerät von einem
kalten in einen warmen Raum gebracht wird. Das dabei entstehende
Kondenswasser kann unter Umständen das Gerät zerstören. Wenn das
Gerät Zimmertemperatur erreicht hat, kann es gefahrlos in Betrieb
genommen werden
Netzanschluss zugänglich lassen
Schließen Sie das Gerät nur an eine gut erreichbare Steckdose
(230 V ~ 50 Hz) an, die sich in der Nähe des Aufstellorts
befindet. Für den Fall, dass Sie das Gerät schnell vom Netz
nehmen müssen, muss die Steckdose frei zugänglich sein.
Bei Gewitter, oder wenn Sie das Gerät längere Zeit nicht
benutzen möchten, nehmen Sie es vom Netz.
Reinigung und Pflege
Bevor Sie das Gerät reinigen, ziehen Sie unbedingt immer zuerst den
Netzstecker.
Verwenden Sie für die Reinigung nur ein trockenes, weiches Tuch.
Benutzen Sie keine chemischen Lösungs- und Reinigungsmittel, weil
diese die Oberfläche und/oder die Beschriftungen des Geräts
beschädigen können.
12
Page 50

Laserklasse
Das Gerät ist ein Laserprodukt der Klasse 1. Das Gerät
ist mit einem Sicherheitssystem ausgerüstet, das das
Austreten von gefährlichen Laserstrahlen während des
normalen Gebrauchs verhindert. Um
Augenverletzungen zu vermeiden, manipulieren oder
beschädigen Sie niemals das Sicherheitssystem des
Geräts.
Die Fernbedienung besitzt eine Infrarot-Diode der
Klasse 1. Betrachten Sie die LED nicht mit optischen
Geräten.
Hinweis zur elektrostatischen Aufladung
Sollte das Gerät aufgrund elektrostatischer Aufladung nicht
ordnungsgemäß funktionieren, setzen Sie das Gerät zurück, indem Sie es
vorübergehend vom Netz trennen.
Sicherer Umgang mit Batterien
Die Fernbedienung wird mit Batterien betrieben. Beachten Sie hierzu
folgende Hinweise:
Batterien können brennbare Stoffe enthalten. Bei unsachgemäßer
Behandlung können Batterien auslaufen, sich stark erhitzen, entzünden
oder gar explodieren, was Schäden für Ihr Gerät und ihre Gesundheit zur
Folge haben kann. Bitte befolgen Sie unbedingt folgende Hinweise:
Halten Sie Kinder von Batterien fern. Sollten versehentlich Batterien
verschluckt worden sein, melden Sie dies sofort Ihrem Arzt.
Prüfen Sie vor dem Einlegen der Batterien, ob die Kontakte im Gerät
und an den Batterien sauber sind, und reinigen Sie diese
gegebenenfalls.
Laden Sie niemals Batterien (es sei denn, dies ist ausdrücklich
angegeben). Es besteht Explosionsgefahr!
Schließen Sie die Batterien niemals kurz.
EN
DE
FR
IT
NL
DK
NO
SE
13
Page 51

Zerlegen oder verformen Sie Batterien nicht. Ihre Hände oder Finger
könnten verletzt werden oder Batterieflüssigkeit könnte in Ihre Augen
oder auf Ihre Haut gelangen. Sollte dies passieren, spülen Sie die
entsprechenden Stellen mit einer großen Menge klaren Wassers und
informieren Sie umgehend Ihren Arzt.
Setzen Sie Batterien niemals übermäßiger Wärme (wie Sonnenschein,
Feuer oder dergleichen) aus.
Vertauschen Sie niemals die Polarität. Achten Sie darauf, dass die Pole
Plus (+) und Minus (-) korrekt eingesetzt sind, um Kurzschlüsse zu
vermeiden.
Entfernen Sie Batterien aus Ihrem Gerät, wenn dieses über einen
längeren Zeitraum nicht benutzt wird.
Ersetzen Sie alle verbrauchten Batterien in einem Gerät gleichzeitig mit
neuen Batterien des gleichen Typs.
VORSICHT!
Nehmen Sie ausgelaufene Batterien sofort aus dem Gerät.
Vermeiden Sie Kontakt mit Haut, Augen und Schleimhäuten.
Spülen Sie die mit Batteriesäure betroffenen Stellen sofort mit
reichlich klarem Wasser und suchen Sie umgehend einen Arzt auf.
Es besteht Ätzgefahr durch Batteriesäure!
Entfernen Sie verbrauchte Batterien sofort aus dem Gerät. Es besteht
erhöhte Auslaufgefahr.
Entfernen Sie die Batterien aus Ihrem Gerät, wenn dieses über einen
längeren Zeitraum nicht benutzt wird.
Ohrhörer
14
VORSICHT!
Hohe Lautstärke bei der Verwendung des Ohrhörers kann zum
Verlust des Hörsinns führt. Bevor Sie den Ohrhörer aufsetzen,
stellen Sie die Lautstärke auf ein Minimum! Ihr Gehör kann
Schaden nehmen, wenn es zu lange oder zu plötzlich hohen
Lautstärken ausgesetzt wird.
Page 52

Vorbereitung
Lieferumfang prüfen
ACHTUNG!
Halten Sie Verpackungen von Kindern fern. Es besteht
Erstickungsgefahr
Vergewissern Sie sich beim Auspacken, dass folgende Teile mitgeliefert
wurden:
Micro-Audio-System
Fernbedienung
UKW-Antenne
Diese Bedienungsanleitung und Garantiekarte
Batterie in die Fernbedienung einlegen
Im Auslieferzustand ist die Batterie bereits in der Fernbedienung
eingelegt. Ziehen Sie zum Aktivieren den Isolationsstreifen mit der
Aufschrift „PLEASE REMOVE IT BEFORE USE“ an der Unterseite der
Fernbedienung heraus.
Batterie wechseln
Die Fernbedienung benötigt eine Knopfzellen-Batterie 3 V, CR2032.
WARNUNG!
Explosionsgefahr bei unsachgemäßem Auswechseln der
Batterien.
Ersatz nur durch denselben oder einen gleichwertigen
Batterietyp.
Drücken Sie auf die Verriegelung und ziehen Sie
das Batteriefach heraus.
Entnehmen Sie die leere Batterie und entsorgen
Sie diese bei einer Sammelstelle für Altbatterien.
Legen Sie die neue Batterie vom Typ CR 2032 mit
dem Pluspol nach oben in das Fach ein. Achten Sie
unbedingt auf die richtige Polarität (+/-).
Schieben Sie das Fach wieder ein
EN
DE
FR
IT
NL
DK
NO
SE
15
Page 53

Aufstellung und Anschlüsse
Gerät aufstellen
Stellen Sie die Geräte auf eine ebene, feste Oberfläche. Beachten Sie
hierzu auch die Sicherheitshinweise auf Seite 9.
Einige aggressive Möbellacke können die Gummifüße der Geräte angreifen.
Stellen Sie das Gerät ggf. auf eine Unterlage.
ACHTUNG!
Wenn Sie Anschlüsse an ein externes Gerät vornehmen, ziehen Sie
vorher die Netzstecker aller Geräte ab!
Standfuss anbringen
Wenn Sie das Gerät aufstellen wollen, verwenden Sie den mitgelieferten
Standfuß.
Setzen Sie das Gerät mit den 4 Haken in die entsprechenden Kerben am
Standfuß und schieben Sie das Gerät dann auf den Standfuß, bis es
einrastet.
Um den Standfuß wieder abzunehmen, schieben Sie den Standfuß in
Richtung Geräterückseite und ziehen Sie ihn dann ab.
Wandmontage
Sie können das Hauptgerät an einer Wand befestigen. Dazu müssen Sie
zwei Schrauben in der Wand befestigen, deren Köpfe in die
Schlüssellöcher auf der Rückseite passen.
ACHTUNG!
Vergewissern Sie sich, dass keine Strom- oder
Versorgungsleitungen in der Wand verlaufen, bevor Sie die Löcher
für die Montage bohren.
Markieren Sie die zu bohrenden Löcher. Abstand der Bohrlöcher für das
Gerät: 160 mm. Bohren Sie in diese Markierungen 2 Löcher für 6-mm
Dübel.
16
Page 54

Fügen Sie 6-mm-Plastikdübel in die gebohrten Löcher ein. Fügen Sie die
Schrauben in die Dübel ein und ziehen Sie sie mit einem
Schraubendreher fest.
Hängen Sie das Gerät in die vorgesehenen Schlüssellöcher ein und
klappen Sie die Abstandshalter aus, damit das Gerät gerade an der
Wand hängt.
Antennenanschluss
Für den Radioempfang verbinden Sie ein Antennenkabel mit dem
Antennenanschluss FM ANT Ohm am Gerät.
Eine Wurfantenne ist mitgeliefert. Schließen Sie die Wurfantenne an
und richten Sie sie für den besten Empfang aus (1).
Alternativ können Sie ein Antennenkabel verwenden, das Sie mit dem
entsprechenden Anschluss in der Wand verbinden (2).
EN
DE
FR
IT
NL
DK
NO
SE
17
Page 55

Eingänge
Audiosignale eines externen Geräts wiedergeben
Das Gerät verfügt über einen analogen Toneingang für den Anschluss
externer Audiogeräte.
Schließen Sie ein 3,5 mm Stereo-Klinkenkabel an die Buchse LINE IN
am Gerät und an die entsprechenden Ausgänge am externen Gerät an.
USB-Anschluss
Öffnen Sie die Klappe an der Oberseite des Geräts.
An den USB-Anschluss an der Vorderseite des Geräts können Sie ein
USB-Gerät, wie z. B. einen MP3-Player, anschließen.
Wählen Sie mit der Taste FUNCTION die Betriebsart USB.
HINWEIS!
Die Abspielfunktionen werden ab Seite 27 beschrieben.
SD-/MMC-Speicherkarten
Öffnen Sie die Klappe an der Oberseite des Geräts.
Stecken Sie eine SD-/MMC-Speicherkarte mit der abgekanteten Ecke
nach links und den Kontakten nach hinten zeigend in den Kartenschlitz.
Wählen Sie mit der Taste FUNCTION die Betriebsart CARD.
HINWEIS!
Die Abspielfunktionen werden ab Seite 27 beschrieben.
Kopfhörer anschließen
Schließen Sie einen Kopfhörer mit einem 3,5-mm-Klinkenstecker an die
Kopfhörerbuchse an. Die Lautsprecher schalten sich dann automatisch
ab.
ACHTUNG!
Zu hohe Lautstärke bei der Verwendung von Ohrhörern oder
Kopfhörern erzeugt übermäßigen Schalldruck und kann zum
18
Page 56

Verlust des Hörsinns führen. Stellen Sie die Lautstärke auf ein Minimum,
bevor Sie einen Ohrhörer aufsetzen.
Grundfunktionen
Sensortasten
Die Sensortasten sind berührungsempfindlich und müssen lediglich
berührt werden ohne dabei Druck auszuüben.
Ein-/Ausschalten – POWER
Mit dem Betriebsschalter ON/OFF an der Rückseite des Gerätes schalten Sie
das Gerät ein. Das Gerät befindet sich nun im Standby-Modus. Die
STANDBY-LED am Gerät leuchtet rot.
Drücken Sie zum Einschalten des Geräts die Taste STANDBY/ON am
Gerät oder an der Fernbedienung. Es erscheinen Anzeigen im Display.
Um das Gerät auszuschalten, drücken Sie die Taste STANDBY/ON am
Gerät oder an der Fernbedienung.
Das Gerät befindet sich nun im wieder im Standby-Modus.
HINWEIS!
Wenn Sie eine der Sensortasten berühren, erscheint im Display
die Uhrzeit. Nach ca. 10 Sekunden erlischt die Beleuchtung.
Um das Gerät ganz auszuschalten, stellen Sie den Betriebsschalter auf
die Stellung OFF.
EN
DE
FR
IT
NL
DK
NO
SE
Uhr stellen
Bei RDS-Empfang stellt sich die Uhrzeit automatisch ein und braucht nicht
manuell eingestellt werden. Eine manuell eingestellte Uhrzeit wird bei
RDS-Empfang nachgestellt, die 12/24-Stunden-Einstellung bleibt jedoch
erhalten.
Um die Uhrzeit während des Betriebs anzuzeigen, drücken Sie für ca. 2
Sekunden lang die Taste IPOD/MEM/C.-ADJ..
So stellen Sie die Uhrzeit manuell ein:
Schalten Sie das Gerät in den Standby-Modus.
19
Page 57

Drücken Sie die Taste IPOD/MEM/C.-ADJ. Wählen Sie mit der Taste
zwischen der 24- oder 12-Stunden Anzeige (24 HOUR oder
oder
12 HOUR) .
Wenn Sie die 12-Stunden-Anzeige wählen,
erscheint vor der Stundenanzeige ein „AM"
oder „PM":
AM: die Stunden von 00:00 bis 11:59;
PM: die Stunden von 12:00 bis 23:59.
Drücken Sie erneut IPOD/MEM/C.-ADJ.. Die Stundenanzeige blinkt.
Geben Sie innerhalb von 6 Sekunden mit den Tasten
Stunden ein.
Drücken Sie wieder IPOD/MEM/C.-ADJ. Die Minutenanzeige blinkt.
Geben Sie innerhalb von 6 Sekunden mit
Drücken Sie wieder IPOD/MEM/C.-ADJ.. Die Uhr ist gestellt und die
Ziffern blinken nicht mehr.
oder die Minuten ein.
oder die
20
Page 58

Automatisches Ausschalten – SLEEP
Sie können eine Zeit einstellen, nach der das Gerät automatisch in den
Standby-Modus schaltet.
Drücken Sie die Taste SLEEP an der Fernbedienung wiederholt, um
die gewünschte Zeit einzustellen: 90 Minuten > 80 Minuten > 70
Minuten usw. bis 10 Minuten.
Im Display erscheint das Bett-Symbol zum Zeichen dafür, dass der
SLEEP-Timer eingestellt ist.
Um den SLEEP-Timer auszuschalten, drücken Sie SLEEP so oft, bis das
Bett-Symbol verschwindet.
Automatisches Ein- und Ausschalten – TIMER
Sie können das Gerät so einstellen, dass es sich zu einer vorgegeben Zeit
ein- oder ausschaltet (Timer-Funktion).
Musikquelle wählen
Damit das Gerät zur eingestellten starten kann, muss ggf. eine Audioquelle
vorbereitet sein:
Für die Radiofunktion stellen Sie den gewünschten Radiosender und
die Lautstärke ein.
Für die anderen Funktionen setzen Sie die entsprechenden Quellen
ein: CD einlegen, USB-Gerät anschließen oder Karte einstecken.
EN
DE
FR
IT
NL
DK
NO
SE
Timer programmieren
So stellen Sie die Ein- und Ausschaltzeit ein:
Drücken Sie die Taste TIMER auf der
Fernbedienung, um die Einschaltzeit
einzustellen. Die Anzeige
und die Stundenziffer blinkt.
Drücken Sie innerhalb von 6 Sekunden auf
ON erscheint
oder, um die Stunde einzustellen.
Drücken Sie die Taste TIMER erneut. Im
Display blinkt die Minutenanzeige.
Stellen Sie mit oder die Minuten ein.
21
Page 59

Drücken Sie die Taste TIMER erneut, um die Ausschaltzeit
einzustellen. Die Anzeige
OFF erscheint und die Stundenziffer
blinkt.
Drücken Sie auf oder , um die Stunde einzustellen.
Drücken Sie die Taste TIMER erneut. Im Display blinkt die
Minutenanzeige.
Stellen Sie mit oder die Minuten ein.
Drücken Sie die Taste TIMER erneut. Wählen Sie nun mit oder
die Musikquelle: TUNER > CD > USB > CARD > IPOD.
Drücken Sie die Taste TIMER. Wählen Sie nun mit oder die
Lautstärke, mit der sich das Gerät einschalten soll.
Bestätigen Sie erneut mit der Taste TIMER.
Der Timer ist gestellt. – Im Display werden noch mal alle eingestellten
Parameter angezeigt und es erscheinen die Uhrzeit und das Uhrsymbol für
den programmierten Timer.
Timer abschalten
Drücken Sie die Taste TIMER auf der Fernbedienung.
Das Uhrsymbol
wird ausgeblendet und der Timer ist ausgeschaltet
Allgemeine Bedienfunktionen
Lautstärke
Drücken Sie die Taste VOLUME+, um die Lautstärke anzuheben.
Drücken Sie die Taste VOLUME–, um die Lautstärke zu senken.
Stummschaltung – MUTE
Drücken Sie die Taste , um den Ton ganz abzuschalten.
Drücken Sie die Taste oder eine Lautstärketaste, um den Ton wieder
einzuschalten.
Equalizer einstellen
Drücken Sie die Taste EQ wiederholt, um einen der folgenden Klang-
Effekte aufzurufen: CLASSIC > ROCK> POP> JAZZ> PASS.
22
Page 60

Betriebsart wählen
Radio, CD, USB, CARD, IPOD, AUX
Wählen Sie mit der Taste FUNCTION die Betriebsart:
TUNER: Radio
CD: Wiedergabe von einer Audio- oder MP3-CD
USB: Wiedergabe von einem USB-Datenträger
CARD: Wiedergabe von einer Speicherkarte
IPOD: Wiedergabe von einem iPod/iPhone
AUX: Wiedergabe von einem externen Gerät
iPod-Betrieb
Schieben Sie Ihren iPod/iPhone in das Einschubfach für den Player.
Drücken Sie die Taste FUNCTION mehrmals, bis im Display „iPod“
angezeigt wird.
Wenn der iPod richtig angeschlossen wurde, erscheint im Display die
Anzeige IPOD. Die iPod-Wiedergabesteuerung ist aktiv.
HINWEIS
Der IPOD Modus kann nur aufgerufen werden, wenn ein iPod
in die iPod-Schale eingesetzt ist. Ansonsten erscheint im
Display „NO IPOD“.
Sie können Ihren iPod wie gewohnt bedienen. Gegebenenfalls müssen
Sie die Taste IPOD/MEM/C-ADJ. drücken, um die iPod-Menüsteuerung
zu aktivieren. Im Display erscheint IPODMENU.
Zusätzlich haben Sie die Möglichkeit, einige Funktionen des iPod an der
Dockingstation auszuführen.
EN
DE
FR
IT
NL
DK
NO
SE
23
Page 61

Über die folgenden Tasten am Gerät und auf der Fernbedienung können
Sie nun den iPod bedienen:
IPOD/MEM/C-ADJ.: Zwischen iPod-Menüsteuerung und iPodWiedergabesteuerung wechseln
VOLUME: Lautstärke einstellen
Bedienung bei aktivierter iPod-Menüsteuerung
/MENU: Menü aufrufen.
/ENTER: Auswahl bestätigen
und : Auswahl in Menüs bewegen
Bedienung bei aktivierter iPod-Wiedergabesteuerung
/ENTER: Wiedergabe starten. Um die Wiedergabe zu unterbrechen,
drücken Sie die Taste erneut. Ein weiterer Druck auf die Taste setzt die
Wiedergabe fort.
/MENU: Wiedergabe anhalten.
und : Gedrückt halten, um einen schnellen Rücklauf/Vorlauf
innerhalb eines Titels durchzuführen. Antippen vorherigen/nächsten Titel
wiederzugeben.
Radio
Drücken Sie die Taste FUNCTION mehrmals, bis im Display kurz
„TUNER“ angezeigt wird.
Im Display erscheint die aktuelle Frequenz.
Wenn Sie die Wurfantenne angeschlossen haben, richten Sie die
Antenne für den optimalen Empfang aus.
HINWEIS
Das Display zeigt immer den RDS-Sendernamen an. Um die
Radiofrequenz einzusehen, drücken Sie mehrmals die Taste
RADIO MODE, bis die Radiofrequenz im Display erscheint.
Sender einstellen
Drücken Sie die Tasten bzw. , um einen Sender manuell
einzustellen.
24
Page 62

Sendersuchlauf
Halten Sie eine der Tasten bzw. länger gedrückt, um eine
automatische Sendersuche vorwärts/rückwärts durchzuführen.
Sender speichern und aufrufen
Das Radio verfügt über 30 Speicherplätze, auf denen Sie Sender ablegen
können.
Stellen Sie den Sender ein, den Sie speichern wollen.
Um einen eingestellten Sender zu speichern, drücken Sie die Taste
IPOD/MEM/C-ADJ. und wählen anschließend mit den Tasten
PRESET/FOL. den Programmplatz.
Um das Speichern abzuschließen, drücken Sie die Taste IPOD/MEM/C-
ADJ. erneut.
Sie können die gespeicherten Sender nacheinander mit den Tasten
PRESET/FOL. aufrufen.
Stereo-/Monoempfang
Falls der Stereoempfang schwach ist, können Sie u.U. mit der
Monoeinstellung einen störungsfreieren Empfang erzielen.
Drücken Sie ID3/MONO/ST. auf der Fernbedienung, um zwischen
Stereo- und Monoempfang umzuschalten. Im Display erscheint
„STEREO“ bzw. „MONO“.
EN
DE
FR
IT
NL
DK
NO
SE
25
Page 63

RDS-Empfang
Strahlt ein Radiosender RDS-Signale aus, so erscheint RDS im Display.
RDS-Anzeigen
Drücken Sie die Taste RADIO MODE, um die folgenden
Informationen im Display anzuzeigen:
RDS NAME: Sendername (falls nicht verfügbar erscheint die Anzeige
PS NONE)
RDS TYPE: PTY-Kennung des aktuell wiedergegebenen Senders (falls
nicht verfügbar erscheint die Anzeige PTY NONE)
RDS TEXT: Weitere Informationen des Radiotextes (falls nicht
verfügbar erscheint die Anzeige RT NONE).
CT: Über RDS empfangene Uhrzeit (falls nicht verfügbar erscheint die
Anzeige CT NONE)
Frequenz
RDS-Suche
Drücken Sie die Taste RADIO SEARCH, um Sender anhand ihrer PTY-
Kennung zu suchen.
Wählen Sie anschließend mit den Tasten PRESET/FOL. die PTY-
Kennung aus, nach der Sie suchen wollen.
Um den Suchlauf rückwärts bzw. vorwärts zu starten, drücken Sie die
Taste
Der Suchlauf hält beim ersten Sender, der dieser Kennung entspricht, an.
Wird kein Sender mit der entsprechenden Kennung gefunden, erscheint
im Display die Anzeige “NO FOUND”.
bzw. .
26
Page 64

CD-/USB-/Speicherkartenbetrieb
Abspielbare Datenträger
Abspielbare Datenträger sind:
Audio-CDs, CD-Rs, CD-RWs.
USB-Memory-Stick oder MP3-Player (USB-Version 1.1 und 2.0). Bitte
beachten Sie, dass die Kompatibilität mit allen Memory Sticks nicht zu
100 Prozent gewährleistet werden kann.
Speicherkarte SD/MMC.
HINWEIS!
Die Abspielfunktionen für diese Datenträger sind weitgehend
identisch und werden in dieser Anleitung daher zusammen
beschrieben.
Abspielbare Formate
Das Gerät kann MP3- und WMA-Datenträger wiedergeben.
Über MP3 und WMA
Das MP3- und WMA-Format sind Windows-Kompressionsformate für
Audio-Daten. WMA steht für "Windows Media Audio".
MP3-/WMA-Dateien müssen zur Erkennung mit den entsprechenden
Dateierweiterung *.mp3 bzw. *.wma abgespeichert sein.
Datenträger mit MP3- und WMA-Titel können in Verzeichnisse,
Unterverzeichnisse und Einzeldateien (Einzeltitel) strukturiert sein. Sie
enthalten oft sehr viel mehr Einzeltitel als eine Audio-CD, so dass sich die
Einlese- und Navigationszeit erhöhen kann.
Beim Erstellen von MP3-Disks können, abhängig vom
Erstellungsprogramm, so genannte "ID3-Tags" vergeben werden. In diesen
ID3-Tags können Informationen wie der Name des Interpreten, der Name
des Stücks und ggf. weitere Informationen enthalten sein.
Diese ID3-Tags können mit der MP3-Funktion Ihres Gerätes ausgelesen
und im Display angezeigt werden.
EN
DE
FR
IT
NL
DK
NO
SE
27
Page 65

CDs einlegen und entnehmen
Hinweise zum CD-Fach
Legen Sie keine fremden Gegenstände in das CD-Fach, da hierdurch
die Mechanik zerstört werden kann.
Um Verschmutzung durch Staub zu vermeiden, lassen Sie den Deckel
des CD-Fachs nicht für längere Zeit offen stehen.
Berühren Sie auf keinen Fall die Linse im CD-Fach.
Ist die CD stark verschmutzt oder weist sie starke Fingerabdrücke auf,
kann es passieren, dass das Abspielen verzögert wird oder an einer
anderen Stelle beginnt.
Schmutz auf der Abtastlinse kann zu Unterbrechungen während des
Abspielens oder zu anderen Störungen führen.
Wenn Sie Staubpartikel aus dem CD-Fach entfernen möchten,
benutzen Sie hierfür einen handelsüblichen Staubblasepinsel (im
Fotogeschäft erhältlich).
Öffnen Sie das CD-Fach durch Druck auf die
Taste
Das Diskfachöffnet sich.
Legen Sie eine CD mit der beschrifteten Seite
nach oben ein.
Schließen Sie das CD-Fach durch nochmaliges
Drücken der Taste OPEN/CLOSE oder durch
Drücken der
beginnt zu rotieren und im Display erscheint
READING.
Die CD startet automatisch mit der
Wiedergabe.
Wenn keine oder eine nicht lesbare Disk
eingelegt ist, erscheint NO DISC im Display.
am Gerät oder an der Fernbedienung.
/ENTER Taste. Die CD
VORSICHT!
Öffnen Sie das CD-Fach nicht, solange die CD noch spielt oder
rotiert. Drücken Sie vorher STOP.
28
Page 66

Wiedergabefunktionen
PLAY, PAUSE, STOP, Titelsprung
Drücken Sie die Taste /ENTER am Gerät oder an der
Fernbedienung, um die Wiedergabe zu starten.
Um die Wiedergabe zu unterbrechen, drücken
Sie die Taste
Anzeige blinkt die ablaufende Zeit.
Drücken Sie /ENTER erneut, um die Wiedergabe zu an derselben
Stelle fortzusetzen.
Drücken Sie /MENU, um die Wiedergabe zu beenden. Das Gerät
geht in den Stoppmodus.
Um an den Anfang eines Titels zu springen, drücken Sie oder .
Wenn Sie Sie oder gedrückt halten, starten Sie einen Schnellsuchlauf.
Ordner im MP3-/WMA-Format
Um bei einem MP3-/WMA-Datenträger den Ordner zu wechseln, drücken
Sie die Taste PRESET/FOLDER
Wenn die vorhandenen Titel im ID3-Format geschrieben sind, können
Sie sich die hinterlegten Informationen anzeigen lassen.
Drücken Sie die ID3/MONO/ST. und im dem Display erscheint ID3
ON. Die Daten werden in Laufschrift angezeigt: „TITLE" – Name
des Titels – „ARTIST" – Name des Künstlers.
Wenn Sie die ID3 Funktion verlassen wollen, drücken Sie die ID3/MO./ST.
Taste erneut und auf dem Display erscheint ID3 OFF.
erneut. In der Pausen-
oder.
EN
DE
FR
IT
NL
DK
NO
SE
REPEAT – Wiederholungsfunktionen
Drücken Sie während der Wiedergabe oder im Stopp-
Modus die Taste REPEAT . Im Display erscheint
REPEAT. Der aktuelle Titel wird wiederholt.
Drücken Sie die Taste REPEAT erneut. Im Display
erscheint REPEAT ALL. Es werden alle Titel
wiederholt.
Im MP3-/WMA-Modus drücken Sie REPEAT ein
weiteres Mal, um den ganzen Ordner zu wiederholen
Um die REPEAT-Funktion zu beenden, drücken Sie die Taste REPEAT,
bis die Anzeige verschwindet.
29
Page 67

RANDOM – Zufallswiedergabe
Bei der RANDOM-Funktion werden alle Titel in einer zufälligen Reihenfolge
wiedergegeben.
Drücken Sie während der Wiedergabe oder
im Stopp-Modus die Taste RANDOM auf der
Fernbedienung. Die Zufallswiedergabe
startet nun.
Drücken Sie die Taste RANDOM erneut, um in den normalen
Wiedergabemodus überzugehen.
INTRO – Titel anspielen
Drücken Sie während der Wiedergabe oder
im Stopp-Modus die Taste INTRO auf der
Fernbedienung. Es werden alle Titel auf der
CD für 10 Sekunden angespielt.
Drücken Sie die Taste INTRO auf der Fernbedienung erneut und Sie
befinden sich wieder im normalen Abspielmodus.
Abspielreihenfolge programmieren
Sie können eine Abspielreihenfolge für bis zu 32 Titel im CD-Modus und
64 Titel im MP3-/ WMA-Modus programmieren. Das Gerät muss sich
hierfür im Stopp-Modus befinden.
Stoppen Sie die Wiedergabe, so dass
STOP im Display erscheint.
Drücken Sie die Taste IPOD/MEM/C-ADJ.
am Gerät oder auf der Fernbedienung. Im
Display erscheint MEMORY und der
Programmplatz p-01.
Bei CD-Wiedergabe blinken die Titel 00.
Bei MP3/WMA-Wiedergabe blinken die
Ordner 00.
Bei CD-Wiedergabe wählen Sie jetzt mit
oder
einen Titel aus.
Bei MP3/WMA-Wiedergabe wählen Sie
zunächst mit PRESET/FOLDER
einen Ordner.
30
Page 68

Drücken Sie wieder IPOD/MEM/C-ADJ.
Bei CD-Wiedergabe wählen Sie einen weiteren Titel.
Bei MP3-/WMA-Wiedergabe wählen Sie jetzt einen Titel.
Drücken Sie wieder IPOD/MEM/C-ADJ. und speichern Sie weitere
Titel auf die gleiche Weise.
Drücken Sie IPOD/MEM/C-ADJ. um die Lieder in der Liste
nacheinander durchzugehen.
Wenn Sie die Liste abspielen wollen, drücken Sie /ENTER.
HINWEIS
Sie können die REPEAT-Funktionen wie oben beschrieben auf
die programmierte Liste anwenden.
Programmierte Liste bearbeiten
Beenden Sie die Wiedergabe mit /MENU.
Drücken Sie erneut IPOD/MEM/C-ADJ., um die Liste nach Wunsch
neu zu belegen.
Programmierte Liste löschen
Die programmierte Liste wird gelöscht, wenn
das CD-Fach geöffnet wird,
eine andere Betriebsart gewählt wird,
das Gerät ausgeschaltet wird.
EN
DE
FR
IT
NL
DK
NO
SE
Wenn Störungen auftreten
Sollten Störungen auftreten, prüfen Sie bitte zunächst, ob Sie das Problem
selbst beheben können. Die folgende Übersicht kann Ihnen dabei helfen.
ACHTUNG!
Versuchen Sie auf keinen Fall, das Gerät selbst zu reparieren.
Wenn eine Reparatur notwendig ist, wenden Sie sich bitte an
unser Service-Center oder eine andere geeignete Fachwerkstatt.
31
Page 69

STÖRUNG MÖGLICHE URSACHE / MASSNAHME
ALLGEMEIN
Keine StandbyAnzeige
Keine Funktion Stellen Sie den POWER-Schalter am Gerät auf ON,
Die Disk läuft nicht
an, obwohl
(PLAY) gedrückt ist,
oder stoppt sofort
wieder
Das Gerät reagiert
nicht auf die
Fernbedienung
Prüfen Sie den Netzanschluss: sitzt der Stecker fest in
der Steckdose?
dann drücken Sie die Taste
Fernbedienung.
Falls das Gerät durch ein Gewitter, eine statische
Aufladung oder einen anderen externen Faktor gestört
ist, versuchen Sie folgendes Vorgehen:
Stellen Sie den POWER-Schalter am Gerät auf OFF.
Ziehen Sie dann das Netzkabel und stecken es wieder
ein.
Ist die Disk mit der beschrifteten Seite nach oben
eingelegt?
Prüfen Sie, ob die Disk beschädigt ist, indem Sie eine
andere Disk einlegen. Falls die Disk verschmutzt ist,
wischen Sie sie mit einem weichen, trockenen Tuch
von der Mitte zum Rand vorsichtig ab.
Es hat sich Kondenswasser gebildet; geben Sie dem
Gerät ein bis zwei Stunden Zeit zum Trocknen.
Prüfen Sie, ob die Batterien nicht verbraucht und
richtig eingelegt sind. Entfernen Sie eventuelle
Hindernisse zwischen dem Infrarotsender, der
Fernbedienung und dem Sensor am Gerät.
Sind Sie eventuell zu weit vom Gerät entfernt?
(STANDBY) an der
Kein Ton Ist eventuell die Stummschaltung
eingeschaltet?
32
(MUTE)
Page 70

Reinigung
Bevor Sie das Gerät reinigen, ziehen Sie unbedingt immer zuerst den
Netzstecker.
Verwenden Sie für die Reinigung nur ein trockenes, weiches Tuch. Benutzen Sie
keine chemischen Lösungs- und Reinigungsmittel, weil diese die Oberfläche
und/oder die Beschriftungen des Gerätes beschädigen können.
Entsorgung
Verpackung
Ihr Gerät befindet sich zum Schutz vor Transportschäden in einer
Verpackung. Verpackungen sind Rohstoffe und somit
wiederverwendungsfähig oder können dem Rohstoffkreislauf
zurückgeführt werden.
Gerät
Werfen Sie das Gerät am Ende seiner Lebenszeit keinesfalls in den
normalen Hausmüll. Erkundigen Sie sich in Ihrer Stadt- oder
Gemeindeverwaltung nach Möglichkeiten einer umwelt- und
sachgerechten Entsorgung.
EN
DE
FR
IT
NL
DK
NO
SE
Batterien
Verbrauchte Batterien gehören nicht in den Hausmüll. Die
Batterien müssen bei einer Sammelstelle für Altbatterien
abgegeben werden.
33
Page 71

Technische Daten
Spannung: 230 V ~ 50 Hz
Leistungsaufnahme: 38 W
Ausgangsleistung 2 x 10 Watt RMS
Batterie Fernbedienung: 3 V (CR2032)
Radio
UKW-Band: 87,5 – 108 MHz
Anschlüsse
FM-Antenne: 75 Ohm
Kopfhöreranschluss (Front): 3,5-mm-Klinkenstecker
USB-Eingang: Version 2.0
CD- Spieler
Laserleistung: Laser Klasse 1
Unterstützte Formate: CD-R, CD-RW, Audio-CD,
MP3-CD
Wenn Sie Audio-CDs abspielen, verwenden Sie ausschließlich CDs, die wie
nebenstehend gekennzeichnet sind:
34
Page 72

Bitte beachten Sie:
Es gibt heute viele, zum Teil nicht standardisierte CD-Aufnahmeverfahren
und Kopierschutzverfahren, sowie unterschiedliche CD-R- und CD-RWRohlinge. Darum kann es in Einzelfällen zu Einlesefehlern oder
Verzögerungen kommen. Dies ist kein Defekt des Geräts.
Technische Änderungen vorbehalten!
----------------------------------------------
Copyright © 2010. Alle Rechte vorbehalten.
Das Copyright liegt bei der Firma Medion®.
Warenzeichen: Warenzeichen sind Eigentum ihrer jeweiligen Besitzer.
Technische und optische Änderungen sowie Druckfehler vorbehalten.
EN
DE
FR
IT
NL
DK
NO
SE
35
Page 73

Eingeschränkte Garantie Deutschland
I. Allgemeine Garantiebedingungen
1. Allgemeines
Die Garantie beginnt immer am Tag des Einkaufs des MEDION Gerätes von der MEDION oder
einem offiziellen Handelspartner der MEDION und bezieht sich auf Material- und
Produktionsschäden aller Art, die bei normaler Verwendung auftreten können. Die
Garantiezeit ergibt sich aus der dem Gerät anliegenden Garantiekarte in Zusammenhang mit
dem Kaufbeleg des autorisierten MEDION-Handelspartners.
Liegt den Geräten keine Garantiekarte bei, besteht für diese Geräte keine Garantie. Neue
Geräte unterliegen den gesetzlichen Gewährleistungsfristen von 24 Monaten. Bei
gebrauchten Geräten (B-Ware) unterliegt die Ware der eingeschränkten Gewährleistungsfrist
von 12 Monaten.
Bitte bewahren Sie den original Kaufnachweis und die Garantiekarte gut auf. MEDION und
sein autorisierter Servicepartner behalten sich vor, eine Garantiereparatur oder eine
Garantiebestätigung zu verweigern, wenn dieser Nachweis nicht erbracht werden kann.
Bitte stellen Sie sicher, dass Ihr Gerät im Falle einer notwendigen Einsendung transportsicher
verpackt ist. Sofern nichts anderes auf ihrer Garantiekarte vermerkt, tragen sie die Kosten der
Einsendung sowie das Transportrisiko. Für zusätzlich eingesendete Materialien, die nicht zum
ursprünglichen Lieferumfang des MEDION Gerätes gehören, übernimmt MEDION keine
Haftung.
Bitte überlassen Sie uns mit dem Gerät eine möglichst detaillierte Fehlerbeschreibung. Zur
Geltendmachung ihrer Ansprüche bzw. vor Einsendung, kontaktieren sie bitte die MEDION
Hotline. Sie erhalten dort eine Referenznummer (RMA Nr.), die sie bitte außen auf dem Paket,
gut sichtbar anbringen.
Diese Garantie hat keine Auswirkungen auf Ihre gesetzlichen Ansprüche und unterliegt dem
geltenden Recht des Landes, in dem der Ersterwerb des Gerätes durch den Endkunden vom
autorisierten Händler der MEDION erfolgte.
2. Umfang
Im Falle eines durch diese Garantie abgedeckten Defekts an ihrem MEDION Gerät
gewährleistet die MEDION mit dieser Garantie die Reparatur oder den Ersatz des MEDION
Gerätes. Die Entscheidung zwischen Reparatur oder Ersatz der Geräte obliegt MEDION.
36
Page 74

Insoweit kann MEDION nach eigenem Ermessen entscheiden, das zur Garantiereparatur
eingesendet Gerät durch ein generalüberholtes Gerät gleicher Qualität zu ersetzen.
Für Batterien oder Akkus wird keine Garantie übernommen, gleiches gilt für
Verbrauchsmaterialien, d.h. Teile, die bei der Nutzung des Gerätes in regelmäßigen
Abständen ersetzt werden müssen, wie z.B. Projektionslampe in Beamer.
Ein Pixelfehler (dauerhaft farbiger, heller oder dunkler Bildpunkt) ist nicht grundsätzlich als
Mangel zu betrachten. Die genaue Anzahl zulässiger defekter Bildpunkte entnehmen Sie bitte
der Beschreibung im Handbuch für dieses Produkt.
Für eingebrannte Bilder bei Plasma oder LCD-Geräten, die durch unsachgemäße Verwendung
des Gerätes entstanden sind, übernimmt MEDION keine Garantie. Die genaue
Vorgehensweise zum Betrieb Ihres Plasmas bzw. LCD- Gerätes entnehmen Sie bitte der
Beschreibung im Handbuch für dieses Produkt.
Die Garantie erstreckt sich nicht auf Wiedergabefehler von Datenträgern, die in einem nicht
kompatiblen Format oder mit ungeeigneter Software erstellt wurden.
Sollte sich bei der Reparatur herausstellen, dass es sich um einen Fehler handelt, der von der
Garantie nicht gedeckt ist, behält sich MEDION das Recht vor, die anfallenden Kosten in Form
einer Handling Pauschale sowie die kostenpflichtige Reparatur für Material und Arbeit nach
einem Kostenvoranschlag dem Kunden in Rechnung zu stellen.
3. Ausschluss
EN
DE
FR
IT
NL
DK
NO
SE
Für Versagen und Schäden, die durch äußere Einflüsse, versehentliche Beschädigungen,
unsachgemäße Verwendung, am MEDION Gerät vorgenommene Veränderungen, Umbauten,
Erweiterungen, Verwendung von Fremdteilen, Vernachlässigung, Viren oder Softwarefehler,
unsachgemäßen Transport, unsachgemäße Verpackung oder Verlust bei Rücksendung des
Gerätes an MEDION entstanden sind, übernimmt MEDION keine Garantie.
Die Garantie erlischt, wenn der Fehler am Gerät durch Wartung oder Reparatur entstanden ist,
die durch jemand anderen als durch MEDION oder einen durch MEDION für dieses Gerät
autorisierten Servicepartner durchgeführt wurde. Die Garantie erlischt auch, wenn Aufkleber
oder Seriennummern des Gerätes oder eines Bestandteils des Gerätes verändert oder
unleserlich gemacht wurden.
4. Service Hotline
Vor Einsendung des Gerätes an MEDION müssen Sie sich über die Service Hotline oder das
MEDION Service Portal an uns wenden. Sie erhalten insoweit weitergehende Informationen,
wie Sie Ihren Garantieanspruch geltend machen können.
Die Inanspruchnahme der Hotline ist kostenpflichtig.
37
Page 75

Die Service Hotline ersetzt auf keinen Fall eine Anwenderschulung für Soft- bzw. Hardware,
das Nachschlagen im Handbuch oder die Betreuung von Fremdprodukten.
Zusätzlich bietet MEDION eine kostenpflichtige Hotline für über die Garantie hinaus gehende
Anfragen.
II. Besondere Garantiebedingungen für MEDION PC,
Notebook, Pocket PC (PDA), Geräte mit
Navigationsfunktion (PNA), Telefongeräte,
Mobiltelefone und Geräte mit Speicherfunktion
Hat eine der mitgelieferten Optionen (z.B. Speicherkarten, Modems etc.) einen Defekt, so
haben Sie auch einen Anspruch auf Reparatur oder Ersatz. Die Garantie deckt Material- und
Arbeitskosten für die Wiederherstellung der Funktionsfähigkeit für das betroffene MEDION
Gerät.
Hardware zu Ihrem Gerät, die nicht von MEDION produziert oder vertrieben wurde, kann die
Garantie zum Erlöschen bringen, wenn dadurch ein Schaden am MEDION Gerät oder den
mitgelieferten Optionen entstanden ist.
Für mitgelieferte Software wird eine eingeschränkte Garantie übernommen. Dies gilt für ein
vorinstalliertes Betriebssystem, aber auch für mitgelieferte Programme. Bei der von MEDION
mitgelieferten Software garantiert MEDION für die Datenträger, z.B. Disketten und CD-ROMs,
auf denen diese Software geliefert wird, die Freiheit von Material- und Verarbeitungsfehlern
für eine Frist von 90 Tagen nach Einkauf des MEDION Gerätes von der MEDION oder einem
offiziellen Handelspartner der MEDION. Bei Lieferung defekter Datenträger ersetzt MEDION
die defekten Datenträger kostenfrei; darüber hinausgehende Ansprüche sind ausgeschlossen.
Mit Ausnahme der Garantie für die Datenträger wird jede Software ohne Mängelgewähr
geliefert. MEDION sichert nicht zu, dass diese Software ohne Unterbrechungen oder fehlerfrei
funktioniert oder Ihren Anforderungen genügt. Für mitgeliefertes Kartenmaterial bei Geräten
mit Navigationsfunktion wird keine Garantie für die Vollständigkeit übernommen.
Bei der Reparatur des MEDION Gerätes kann es notwendig sein, alle Daten vom Gerät zu
löschen. Stellen Sie vor dem Versand des Gerätes sicher, dass Sie von allen auf dem Gerät
befindlichen Daten eine Sicherungskopie besitzen. Es wird ausdrücklich darauf hingewiesen,
dass im Falle einer Reparatur der Auslieferzustand wiederhergestellt wird. Für die Kosten einer
Softwarekonfiguration, für entgangene Einnahmen, den Verlust von Daten bzw. Software
oder sonstige Folgeschäden übernimmt MEDION keine Haftung.
38
Page 76

III. Besondere Garantiebedingungen für die Vorort
Reparatur bzw. den Vorort Austausch
Soweit sich aus der dem Gerät anliegenden Garantiekarte ein Anspruch auf Vorort Reparatur
bzw. Vorort Austausch ergibt, gelten die besonderen Garantiebedingungen für die Vorort
Reparatur bzw. Vorort Austausch für Ihr MEDION Gerät.
Zur Durchführung der Vorort Reparatur bzw. des Vorort Austauschs muss von Ihrer Seite
Folgendes sichergestellt werden:
• Mitarbeitern der MEDION muss uneingeschränkter, sicherer und unverzüglicher Zugang
zu den Geräten gewährt werden.
• Telekommunikationseinrichtungen, die von Mitarbeitern von MEDION zur
ordnungsgemäßen Ausführung Ihres Auftrages, für Test- und Diagnosezwecke sowie zur
Fehlerbehebung benötigt werden, müssen von Ihnen auf eigene Kosten zur Verfügung
gestellt werden.
• Sie sind für die Wiederherstellung der eigenen Anwendungssoftware nach der
Inanspruchnahme der Dienstleistungen durch MEDION selbst verantwortlich.
• Sie haben alle sonstigen Maßnahmen zu ergreifen, die von MEDION zu einer
ordnungsgemäßen Ausführung des Auftrags benötigt werden.
• Sie sind für die Konfiguration und Verbindung ggf. vorhandener, externer Geräte nach
der Inanspruchnahme der Dienstleistung durch MEDION selbst verantwortlich.
• Der kostenfreie Storno-Zeitraum für die Vorort Reparatur bzw. den Vorort Austausch
beträgt mind. 48 Stunden, danach müssen die uns durch den verspäteten oder nicht
erfolgten Storno entstandenen Kosten in Rechnung gestellt werden.
EN
DE
FR
IT
NL
DK
NO
SE
39
Page 77

Eingeschränkte Garantie Österreich
I. Allgemeine Garantiebedingungen
Name und Anschrift des Garanten:
1. Allgemeines
Diese allgemeinen Garantiebedingungen gelten nur in Verbindung mit dem zum Zeitpunkt
des Einkaufs des Gerätes geltenden Allgemeinen Verkaufs- und Geschäftsbedingungen
(„AGB“) der MEDION Austria GmbH. Die geltende Fassung der AGB ist auf der Homepage der
MEDION Austria (http://www.MEDION.at ) einsichtbar.
Die Garantie beginnt immer am Tag der Übergabe des gekauften MEDION Gerätes von der
MEDION oder einem offiziellen Handelspartner der MEDION und bezieht sich auf Materialund Produktionsschäden aller Art, die bei normaler Verwendung auftreten können. Die
Garantiezeit ergibt sich aus der dem Gerät anliegenden Garantiekarte in Zusammenhang mit
dem Kaufbeleg des autorisierten MEDION-Handelspartners.
Liegt den Geräten keine Garantiekarte bei, besteht für diese Geräte keine Garantie. Neue
Geräte unterliegen den gesetzlichen Gewährleistungsfristen von 24 Monaten. Bei
gebrauchten Geräten (B-Ware) unterliegt die Ware der eingeschränkten Gewährleistungsfrist
von 12 Monaten.
Bitte bewahren Sie den original Kaufnachweis und die Garantiekarte gut auf. MEDION und
sein autorisierter Servicepartner behalten sich vor, eine Garantiereparatur oder eine
Garantiebestätigung zu verweigern, wenn dieser Nachweis nicht erbracht werden kann.
Bitte stellen Sie sicher, dass Ihr Gerät im Falle einer notwendigen Einsendung, transportsicher
verpackt ist.
Bitte überlassen Sie uns mit dem Gerät eine möglichst detaillierte Fehlerbeschreibung. Zur
Geltendmachung ihrer Ansprüche, bzw. vor Einsendung, kontaktieren sie bitte die MEDION
Hotline. Sie erhalten dort eine Referenznummer (RMA Nr.), die sie bitte außen auf dem Paket,
gut sichtbar anbringen.
Das Gerät muss grundsätzlich komplett, d. h. mit allen im Lieferumfang enthaltenen Teilen,
eingesendet werden. Ein nicht kompletter Erhalt der Sendung führt zur Verzögerung der
Reparatur / des Austausches. Für zusätzlich eingesendete Materialien, die nicht zum
40
Page 78

ursprünglichen Lieferumfang des MEDION Gerätes gehören, übernimmt MEDION keine
Haftung.
Diese Garantie hat keine Auswirkungen auf Ihre bestehenden, gesetzlichen
Gewährleistungsansprüche und unterliegt dem geltenden Recht des Landes, in dem der
Ersterwerb des Gerätes durch den Endkunden vom autorisierten Händler der MEDION
erfolgte und gilt nur für dieses Land.
2. Umfang
Im Falle eines durch diese Garantie abgedeckten Defekts an ihrem MEDION Gerät
gewährleistet die MEDION mit dieser Garantie die Reparatur oder den Ersatz des MEDION
Gerätes. Die Entscheidung zwischen Reparatur oder Ersatz der Geräte obliegt MEDION.
Insoweit kann MEDION nach eigenem Ermessen entscheiden das zur Garantiereparatur
eingesendet Gerät durch ein Gerät gleicher Qualität zu ersetzen.
Für Batterien oder Akkus wird keine Garantie übernommen, gleiches gilt für
Verbrauchsmaterialien, d.h. Teile, die bei der Nutzung des Gerätes in regelmäßigen
Abständen ersetzt werden müssen, wie z.B. Projektionslampe in Beamer.
Ein Pixelfehler (dauerhaft farbiger, heller oder dunkler Bildpunkt) ist nicht grundsätzlich als
Mangel zu betrachten. Die genaue Anzahl zulässiger defekter Bildpunkte entnehmen Sie bitte
der Beschreibung im Handbuch für dieses Produkt.
Für eingebrannte Bilder bei Plasma oder LCD-Geräten, die durch unsachgemäße Verwendung
des Gerätes entstanden sind, übernimmt MEDION keine Garantie. Die genaue
Vorgehensweise zum Betrieb Ihres Plasma bzw. LCD- Gerätes entnehmen Sie bitte der
Beschreibung im Handbuch für dieses Produkt.
Die Garantie erstreckt sich nicht auf Wiedergabefehler von Datenträgern, die in einem nicht
kompatiblen Format oder mit ungeeigneter Software erstellt wurden.
Sollte sich bei der Reparatur herausstellen, dass es sich um einen Fehler handelt, der von der
Garantie nicht gedeckt ist, behält sich MEDION das Recht vor, die anfallenden Kosten in Form
einer Handling Pauschale, sowie die kostenpflichtige Reparatur für Material und Arbeit nach
einem Kostenvoranschlag und Zustimmung des Kunden dem Kunden in Rechnung zu stellen.
EN
DE
FR
IT
NL
DK
NO
SE
3. Ausschluss
Für Versagen und Schäden, die durch äußere Einflüsse, versehentliche Beschädigungen,
unsachgemäße Verwendung, am MEDION Gerät vorgenommene Veränderungen, Umbauten,
Erweiterungen, Verwendung von Fremdteilen, Vernachlässigung, Viren oder Softwarefehler,
unsachgemäßer Transport, unsachgemäße Verpackung oder Verlust bei Rücksendung des
Gerätes an MEDION entstanden sind, übernimmt MEDION keine Garantie.
41
Page 79

Der Garantieanspruch erlischt, wenn der Fehler am Gerät durch Wartung oder Reparatur
entstanden ist, die durch jemand anderen als durch MEDION für dieses Gerät oder einen
durch MEDION für dieses Gerät autorisierten Servicepartner durchgeführt wurde. Die
Garantie erlischt auch, wenn Aufkleber oder Seriennummern des Gerätes oder eines
Bestandteils des Gerätes verändert oder unleserlich gemacht wurden.
4. Service Hotline
Vor Einsendung des Gerätes an die MEDION empfehlen wir Ihnen sich über die Service
Hotline an uns zu wenden. Sie erhalten insoweit weitergehende Informationen, wie Sie Ihren
Garantieanspruch geltend machen können.
Die Service Hotline steht Ihnen 365 Tage im Jahr zum Ortstarif zur Verfügung.
Die Service Hotline ersetzt auf keinen Fall eine Anwenderschulung für Soft-, bzw. Hardware,
das Nachschlagen im Handbuch, oder die Betreuung von Fremdprodukten.
II. Besondere Garantiebedingungen für
MEDION PC, Notebook, Pocket PC (PDA),
Geräte mit Navigationsfunktion (PNA), Telefongeräte,
Mobiltelefone und Geräte mit Speicherfunktion
Hat ein Teil der mitgelieferten Ware einen Defekt, so haben Sie auch einen Anspruch auf
Reparatur oder Ersatz. Die Garantie deckt Material- und Arbeitskosten für die
Wiederherstellung der Funktionsfähigkeit für das betroffene MEDION Gerät.
Hardware zu Ihrem Gerät, die nicht von MEDION produziert oder vertrieben wurde, kann die
Garantie zum Erlöschen bringen, wenn dadurch nachweislich ein Schaden am MEDION Gerät
oder an einem Teil der mitgelieferten Ware entstanden ist.
Für mitgelieferte Software wird eine eingeschränkte Garantie übernommen. Dies gilt für ein
vorinstalliertes Betriebssystem aber auch für mitgelieferte Programme. Bei der von MEDION
mitgelieferten Software garantiert MEDION für die Datenträger, z.B. Disketten und CD-ROMs,
auf denen diese Software geliefert wird, die Freiheit von Material- und Verarbeitungsfehlern
für eine Frist von 90 Tagen nach Einkauf des MEDION Gerätes von der MEDION oder einem
offiziellen Handelspartner der MEDION. Bei Lieferung defekter Datenträger ersetzt MEDION
die defekten Datenträger kostenfrei; darüber hinausgehende Ansprüche sind ausgeschlossen.
Mit Ausnahme der Garantie für die Datenträger wird jede Software ohne Mängelgewähr
geliefert. MEDION sichert nicht zu, dass diese Software ohne Unterbrechungen oder fehlerfrei
funktioniert oder Ihren Anforderungen genügt. Für mitgeliefertes Kartenmaterial bei Geräten
mit Navigationsfunktion wird keine Garantie für die Vollständigkeit übernommen.
42
Page 80

Wie auch in der AGB angeführt kann es sein, dass bei der Reparatur des MEDION Gerätes alle
Daten vom Gerät gelöscht werden müssen. Stellen Sie vor dem Versand des Gerätes sicher,
das Sie von allen auf dem Gerät befindlichen Daten eine Sicherungskopie besitzen. Es wird
ausdrücklich darauf hingewiesen, dass im Falle einer Reparatur der Auslieferzustand
wiederhergestellt wird. Für die Kosten einer Softwarekonfiguration, für entgangene
Einnahmen, den Verlust von Daten bzw. Software, oder sonstige Folgeschäden übernimmt
MEDION keine Haftung.
III. Besondere Garantiebedingungen für die Vorort
Reparatur bzw. den Vorort Austausch
Soweit sich aus der dem Gerät anliegenden Garantiekarte ein Anspruch auf Vorort Reparatur
bzw. den Vorort Austausch ergibt, gelten die besonderen Garantiebedingungen für die Vorort
Reparatur bzw. Vorort Austausch für Ihr MEDION Gerät.
Zur Durchführung der Vorort Reparatur bzw. den Vorort Austausch muss von Ihrer Seite
folgendes sichergestellt werden:
• Mitarbeiter der MEDION muss uneingeschränkter, sicherer und unverzüglicher Zugang
zu den Geräten gewährt werden.
• Telekommunikationseinrichtungen, die von Mitarbeitern von MEDION zur
ordnungsgemäßen Ausführung Ihres Auftrages, für Test- und Diagnosezwecke sowie zur
Fehlerbehebung benötigt werden, müssen von Ihnen auf eigene Kosten zur Verfügung
gestellt werden.
• Sie sind für die Wiederherstellung der eigenen Anwendungssoftware nach der
Inanspruchnahme der Dienstleistungen durch MEDION selbst verantwortlich.
• Sie haben alle sonstigen Maßnahmen zu ergreifen, die von MEDION zu einer
ordnungsgemäßen Ausführung des Auftrags benötigt werden.
• Sie sind für die Konfiguration und Verbindung ggf. vorhandener, externer Geräte nach
der Inanspruchnahme der Dienstleistung durch MEDION selbst verantwortlich.
• Der kostenfreie Storno-Zeitraum für die Vorort Reparatur bzw. den Vorort Austausch
beträgt mind. 24 Stunden, danach müssen die uns durch den verspäteten oder nicht
erfolgten Storno entstandenen Kosten in Rechnung gestellt werden.
EN
DE
FR
IT
NL
DK
NO
SE
43
Page 81

44
Page 82

Sommaire
Sommaire ................................................................................................. 3
Vue d'ensemble de l'appareil .................................................................... 5
Côtés droit et gauche ............................................................................ 5
Façade et arrière .................................................................................... 6
Vue de dessus ....................................................................................... 7
Arrière ................................................................................................... 7
Télécommande ..................................................................................... 8
Consignes de sécurité ............................................................................... 9
Symboles et avertissements utilisés dans ce mode d'emploi .................. 9
Utilisation conforme ............................................................................ 10
Lieu d'installation ................................................................................ 10
Alimentation ....................................................................................... 11
Généralités .......................................................................................... 12
Accès à la prise secteur ........................................................................ 12
Nettoyage et entretien ......................................................................... 12
Classe laser .......................................................................................... 13
Remarque concernant la charge électrostatique .................................. 13
Manipulation sûre des piles ................................................................. 13
Écouteurs ............................................................................................ 14
Préparation ............................................................................................. 15
Contenu de l’emballage ...................................................................... 15
Insérer la pile dans la télécommande ................................................... 15
Remplacer la pile ................................................................................. 15
Installation et prises ................................................................................ 16
Installer l'appareil ................................................................................ 16
Utilisation du pied ............................................................................... 16
Montage mural ................................................................................... 16
Prise antenne ...................................................................................... 17
Entrées ................................................................................................ 17
Branchement du casque ...................................................................... 18
EN
DE
FR
IT
NL
DK
NO
SE
3
Page 83

Fonctions de base ................................................................................... 19
Touches tactiles ................................................................................... 19
Mise en marche/arrêt – POWER ........................................................... 19
Réglage de l'heure .............................................................................. 19
Arrêt automatique – SLEEP .................................................................. 20
Allumage et arrêt automatique – TIMER .............................................. 20
Fonctions de commande générales ......................................................... 22
Sélectionner le mode ........................................................................... 22
Mode iPod .............................................................................................. 22
Radio ...................................................................................................... 23
Réglage des stations ............................................................................ 24
Recherche automatique des stations .................................................... 24
Mémorisation et sélection d'une station .............................................. 24
Réception stéréo/mono ....................................................................... 24
Réception RDS ..................................................................................... 25
Mode CD/USB/Carte mémoire ................................................................ 26
Supports de données pris en charge ................................................... 26
Formats compatibles ........................................................................... 26
Insertion et retrait de CD ..................................................................... 27
Fonctions de lecture ............................................................................... 28
Programmation de l'ordre de lecture ................................................... 30
En cas de problèmes ............................................................................... 32
Recyclage ............................................................................................... 34
Données techniques ............................................................................... 35
Garantie commerciale limitee ................................................................. 37
4
Page 84

Vue d'ensemble de l'appareil
Côtés droit et gauche
1) POWER ON/OFF : allumer/éteindre l'appareil
2) Prise casque jack 3,5 mm
3) LINE IN : entrée audio Cinch L/R
4) FM ANT : entrée antenne
EN
DE
FR
IT
NL
DK
NO
SE
5
Page 85

Façade et arrière
5) Haut-parleurs
6) Témoin de veille
7) Tiroir CD
8) Support iPod : station d'accueil pour un iPod
9) Pied
10) Capteur IR pour télécommande
11) Écran
12) FUNCTION : sélectionner le mode
13) IPOD/MEM/C.-ADJ. : commande de menu iPod, fonction de
programmation et réglage de l'heure
14)
15)
/ENTER : lancer et interrompre la lecture, confirmer les saisies
/MENU : arrêter la lecture/afficher un menu (mode iPod)
16) VOLUME: régler le volume
1
1
S'applique pour l'écoute de musique sur les modèles d'iPod/iPhone actuels, excepté iPod Shuffle.
iPod/iPhone sont des marques déposées d'Apple Inc. aux États-Unis et dans d'autres pays.
« Made for iPod »/« Made for iPhone » signifie qu'un accessoire électronique a été conçu spécifiquement pour se connecter à
l'iPod/iPhone et a été certifié par Apple pour répondre à des normes de performances. Apple n'est pas responsable du
fonctionnement de ce dispositif ou de sa conformité avec les normes de sécurité et de réglementation.
6
Page 86

Vue de dessus
17)
18) RADIO SEARCH : rechercher une station selon son code PTY
19) Port USB
20) Fente pour carte mémoire SD
21) SKIP/TUNE SEARCH / : titre précédent/suivant, recherche des
22) OPEN/CLOSE
STANDBY : allumer l'appareil en mode Veille et le remettre en
veille
stations en avant/arrière
: ouvrir et fermer le tiroir CD
Arrière
EN
DE
FR
IT
NL
DK
NO
SE
23) Trous pour montage mural
24) Cordon d'alimentation
25) Écarteur (à déplier pour le montage mural)
7
Page 87

Télécommande
1) STANDBY : allumer
l'appareil en mode Veille et le
remettre en veille
2) RADIO SEARCH : rechercher
une station selon son code PTY
3) RADIO MODE : afficher les
informations RDS
4) IPOD/MEM/C.-ADJ : commande
de menu iPod, fonction de
programmation et réglage de
l'heure
5)
6) REPEAT : régler la fonction de
7) EQ : régler l'égaliseur
8) INTRO : lecture du début de chaque titre
9)
10) FUNCTION : régler le mode
11) OPEN/CLOSE : ouvrir et fermer le tiroir CD
12) ID3/MONO/ST. : afficher les tags ID3 en lecture MP3, réception
13)
14)
15) PRESET/FOL. : sélectionner les emplacements mémoire,
16) TIMER : régler la fonction Minuterie
17) RANDOM : régler la lecture aléatoire
18) SLEEP : régler la fonction d'arrêt automatique
19) VOLUME : régler le volume
20) Compartiment à pile (au dos)
/ : supports audio – titre
précédent/suivant ;
en mode Radio, passer à la
station précédente/suivante
mémorisée
répétition
MUTE : désactivation du son
stéréo/mono en mode Radio
/ENTER : lancer et interrompre la lecture
/MENU : arrêter la lecture/afficher un menu (mode iPod)
accéder à un dossier (lecture MP3)
8
Page 88

Consignes de sécurité
Veuillez lire attentivement le présent mode d'emploi dans son
intégralité et respecter toutes les consignes indiquées. Vous
serez ainsi assuré du bon fonctionnement et de la durée de vie
de votre appareil. Gardez toujours le présent mode d'emploi à
portée de main à proximité de l'appareil. Conservez bien le
mode d'emploi afin de pouvoir le remettre au nouveau
propriétaire si vous donnez ou vendez l'appareil.
Symboles et avertissements utilisés dans ce mode
d'emploi
DANGER !
Avertissement d'un risque vital immédiat !
AVERTISSEMENT !
Avertissement d'un risque vital possible et/ou de
blessures graves irréversibles !
PRUDENCE !
Respecter les consignes pour éviter toute blessure et tout
dommage matériel !
ATTENTION !
Respecter les consignes pour éviter tout dommage matériel !
EN
DE
FR
IT
NL
DK
NO
SE
REMARQUE !
Informations supplémentaires pour l'utilisation de
l'appareil !
REMARQUE !
Respecter les consignes du mode d'emploi !
AVERTISSEMENT !
Avertissement d'un risque d'électrocution !
9
Page 89

Utilisation conforme
Le présent appareil sert à la lecture de données audio et vidéo (CD,
supports de données MP3, appareils USB et cartes mémoire) et à écouter la
radio. Vous pouvez en plus y recharger des appareils iPod et les y
raccorder pour lire des données audio. N'utilisez cet appareil dans aucun
autre but.
L'appareil n'est pas destiné à être utilisé par des personnes (y compris les
enfants) dont les capacités physiques, sensorielles ou mentales sont
limitées ou qui manquent d'expérience et/ou de connaissances, sauf si
elles sont surveillées par une personne responsable de leur sécurité ou ont
reçu de cette personne les instructions pour utiliser l'appareil. Surveillez
les enfants afin de garantir qu'ils ne jouent pas avec l'appareil.
Lieu d'installation
Placez et utilisez tous les composants sur une surface stable, plane et
exempte de vibrations afin d’éviter que l’appareil tombe.
N’exposez pas l’appareil à des vibrations. Les vibrations peuvent
endommager l’électronique sensible.
Veillez à ce que l’appareil ne soit pas exposé à une source de chaleur
directe (p. ex. des radiateurs).
Aucune source de feu nu (p. ex. des bougies allumées) ne doit se
trouver sur ou à proximité de l’appareil.
Veillez à ce que les fentes d’aération ne soient pas obstruées afin de
toujours garantir une ventilation suffisante.
Ne posez aucun objet sur les câbles, ils pourraient être endommagés.
Veillez à laisser au-dessus et autour de l'appareil un espace minimum
d'env. 10 cm par rapport aux murs. Garantissez une aération suffisante
de l'appareil.
N'utilisez jamais votre appareil en plein air, des facteurs externes (pluie,
neige, etc.) pourraient l'endommager.
Prévoyez au moins un mètre de distance entre l'appareil et les sources
de brouillage à haute fréquence et magnétiques éventuelles (téléviseur,
autres haut-parleurs, téléphone portable, etc.) afin d'éviter tout
dysfonctionnement.
10
Page 90

En cas de fortes variations de température ou d'humidité, il est possible
que, par condensation, de l'humidité se forme à l'intérieur de
l'appareil, pouvant provoquer un court-circuit.
AVERTISSEMENT !
N’essayez en aucun cas d’ouvrir et/ou de réparer vousmême l’appareil. Vous risqueriez de vous électrocuter !
Adressez-vous à notre Centre de Service si vous rencontrez des problèmes
techniques avec votre appareil.
Alimentation
ATTENTION !
Certaines pièces de l’appareil restent sous tension même si
l'interrupteur d'alimentation est éteint. Pour interrompre
l’alimentation de votre appareil ou pour le mettre totalement
hors tension, débranchez-le complètement du courant secteur.
Branchez l'appareil uniquement sur une prise de courant facilement
accessible de 230 V ~ 50 Hz. Vous devez pouvoir débrancher
immédiatement l'appareil en cas d'urgence.
Lorsque vous débranchez la fiche de la prise, ne tirez jamais sur le
cordon lui-même, mais toujours au niveau de la fiche.
Pendant un orage ou si vous n'utilisez pas l'appareil durant une
période prolongée, débranchez la fiche de la prise et le câble antenne
de la prise antenne.
En cas d’absence prolongée ou d’orage, débranchez la fiche de la prise
et le câble antenne.
Pour utiliser l'appareil, déroulez entièrement le cordon d'alimentation.
Évitez de plier ou de coincer le cordon d'alimentation.
N'utilisez pas de rallonge pour éviter que quelqu'un puisse trébucher
dessus.
Veillez toujours à ce que le cordon d'alimentation n'entre pas en
contact avec des surfaces ou objets chauds.
EN
DE
FR
IT
NL
DK
NO
SE
11
Page 91

Généralités
Ne posez pas sur l’appareil ni à proximité de l'appareil de récipients
contenant du liquide, tels que des vases, et protégez toutes les pièces
contre les gouttes d'eau et éclaboussures. Le récipient pourrait se
renverser et le liquide porter atteinte à la sécurité électrique.
Si la fiche, le cordon d’alimentation ou l’appareil est endommagé(e),
débranchez immédiatement la fiche de la prise.
L’appareil est exclusivement réservé à un usage privé et n’a pas été
conçu pour une utilisation dans une entreprise de l'industrie lourde.
Si l'appareil a été transporté d'un environnement froid dans une pièce
chaude, attendez avant de le brancher. L’eau de condensation due au
changement de température pourrait détruire l’appareil. Lorsque
l'appareil a atteint la température ambiante, il peut être mis en marche
sans danger.
Accès à la prise secteur
Branchez l'appareil uniquement sur une prise de courant
facilement accessible (230 V ~ 50 Hz) située à proximité de
l'appareil. La prise doit rester accessible s'il devait s'avérer
nécessaire de débrancher rapidement l'appareil.
En cas d'orage ou si vous n'utilisez pas l'appareil pendant une
période prolongée, débranchez-le.
Nettoyage et entretien
Avant de nettoyer l'appareil, débranchez impérativement la fiche de la
prise.
Pour nettoyer l’appareil, utilisez uniquement un chiffon doux et sec.
N’utilisez ni solvants ni détergents chimiques qui pourraient
endommager la surface et/ou les inscriptions figurant sur l’appareil.
12
Page 92

Classe laser
Le présent appareil est un produit laser de classe 1. Il
est équipé d'un système de sécurité qui empêche la
fuite de rayons laser dangereux au cours d'une
utilisation normale. Pour prévenir tout risque de
blessure des yeux, prenez garde de ne jamais
manipuler ni abîmer le système de sécurité de
l'appareil. La télécommande comporte une diode
infrarouge de classe 1. N'observez pas la LED avec des
appareils optiques.
Remarque concernant la charge électrostatique
En cas de dysfonctionnement de l'appareil dû à une accumulation de
charge électrostatique, réinitialisez l'appareil en le débranchant
provisoirement du réseau électrique.
Manipulation sûre des piles
La télécommande fonctionne avec une pile. Respectez impérativement les
consignes suivantes pour une manipulation sûre des piles :
Les piles peuvent contenir des substances inflammables. En cas de
manipulation incorrecte, les piles peuvent fuir, chauffer fortement,
s'enflammer, voire même exploser, ce qui pourrait endommager votre
appareil et nuire à votre santé.
Conservez les piles hors de la portée des enfants. En cas d’ingestion
accidentelle d'une pile, contactez immédiatement votre médecin.
Avant d'insérer des piles, vérifiez que les contacts de l'appareil et des
piles sont bien propres et nettoyez-les si nécessaire.
Ne rechargez jamais les piles (sauf si cela est indiqué expressément) :
risque d'explosion !
Ne court-circuitez jamais les piles.
Ne démontez pas les piles et n'essayez pas de les déformer. Vous
risqueriez de vous blesser aux mains/doigts ou le liquide qui se trouve à
l'intérieur des piles pourrait entrer en contact avec vos yeux ou votre
peau. Si cela devait se produire, rincez les parties affectées
abondamment à l'eau claire et consultez immédiatement votre
médecin.
EN
DE
FR
IT
NL
DK
NO
SE
13
Page 93

Veillez à ce que les piles ne soient jamais exposées à une source de
chaleur intense (par ex. rayons du soleil, feu, etc.).
N'inversez jamais la polarité. Veillez à respecter le pôle plus (+) et le
pôle moins (-) afin d'éviter tout court-circuit.
Retirez les piles de votre appareil si vous n'avez pas l'intention de
l'utiliser pendant un certain temps.
Remplacez simultanément toutes les piles usées d'un appareil par des
piles neuves du même type.
PRUDENCE !
Si les piles ont coulé, sortez-les immédiatement de l'appareil.
Évitez tout contact avec la peau, les yeux et les muqueuses. Si
l'acide des piles devait malgré tout entrer en contact avec la
peau, rincez immédiatement et abondamment les zones
concernées à l'eau claire et consultez un médecin sans tarder.
Danger de brûlure par l'acide des piles !
Si les piles sont usées, retirez-les immédiatement de l'appareil. Risque
de fuite accru !
Retirez les piles de l'appareil si vous n'avez pas l'intention de l'utiliser
pendant une période prolongée.
Écouteurs
PRUDENCE !
L'utilisation d'écouteurs à un volume élevé peut entraîner une
perte de l'ouïe. Avant de mettre les écouteurs, réglez le
volume sur le minimum ! Si votre ouïe est exposée trop
longuement ou soudainement à un niveau sonore élevé, elle
risque de subir des dommages !
14
Page 94

Préparation
Contenu de l’emballage
ATTENTION !
Conservez les emballages hors de portée des enfants : ils
pourraient s'étouffer !
Au cours du déballage, vérifiez que les éléments suivants ont bien été
livrés :
Micro chaîne hifi
Télécommande
Antenne FM
Le présent mode d'emploi et la carte de garantie
Insérer la pile dans la télécommande
La pile est déjà insérée dans la télécommande à la livraison. Pour
activer la télécommande, retirez la bande d’isolation avec la mention
« PLEASE REMOVE IT BEFORE USE» au bas de la télécommande.
Remplacer la pile
La télécommande fonctionne avec une pile bouton 3 V de type CR2032.
AVERTISSEMENT !
Risque d'explosion en cas de remplacement incorrect de la
pile.
Remplacement uniquement par une pile du même type ou de
type équivalent.
Appuyez sur le verrouillage et sortez le
compartiment à pile.
Enlevez la pile vide et déposez-la pour recyclage
dans un lieu de collecte des piles usagées.
Insérez la pile neuve de type CR 2032 avec le pôle
plus vers le haut dans le compartiment. Respectez
absolument la polarité (+/-).
Repoussez le compartiment à pile.
EN
DE
FR
IT
NL
DK
NO
SE
15
Page 95

Installation et prises
Installer l'appareil
Installez l'appareil sur une surface stable et plane. Veuillez tenir compte
à ce sujet des consignes de sécurité indiquées à la page 8.
Le vernis particulièrement agressif de certains meubles peut attaquer les
pieds en caoutchouc de l'appareil. Placez éventuellement une protection
sous l'appareil.
ATTENTION !
Avant de procéder au branchement sur un appareil externe,
débranchez la fiche secteur de tous les appareils !
Utilisation du pied
Si vous souhaitez poser l'appareil, utilisez le pied fourni :
Placez l'appareil avec les 4 crochets dans les encoches correspondantes
sur le pied puis poussez l'appareil sur le pied jusqu'à ce qu'il
s'enclenche.
Pour enlever le pied, poussez-le vers l'arrière de l'appareil et retirez-le.
Montage mural
Vous pouvez monter l'appareil principal sur un mur. Vous devez pour cela
fixer dans le mur deux vis dont les têtes rentrent dans les trous de serrure
au dos de l'appareil.
ATTENTION !
Avant de percer les trous pour accrocher l'appareil, assurezvous qu'aucun câble électrique ou d'alimentation ne passe à
cet endroit dans le mur.
Marquez les 2 trous à percer. Distance entre les trous pour l'appareil :
160 mm. Percez aux endroits marqués 2 trous pour des chevilles de 6
mm.
16
Page 96

Insérez des chevilles en plastique de 6 mm dans les trous percés.
Insérez les vis dans les chevilles et serrez-les solidement à l'aide d'un
tournevis.
Accrochez l'appareil par les trous de serrure prévus et dépliez l'écarteur
pour que l'appareil soit bien droit sur le mur.
Prise antenne
Pour écouter la radio, raccordez un câble antenne à la prise antenne FM
ANT de 75 ohms de l'appareil.
Une antenne-fil est fournie avec l'appareil. Branchez l'antenne-fil et
orientez-la de manière à obtenir la meilleure réception possible (1).
Vous pouvez également utiliser un câble d'antenne murale que vous
branchez sur la prise murale correspondante (2).
EN
DE
FR
IT
NL
DK
NO
SE
Entrées
Restituer les signaux audio d'un appareil externe
L'appareil comporte une entrée son analogique pour le branchement
d'appareils audio externes.
Raccordez un câble Cinch stéréo de 3,5 mm à la prise LINE IN de
l'appareil et aux sorties correspondantes de l'appareil externe.
17
Page 97

Port USB
Ouvrez le clapet sur le dessus de l'appareil.
Vous pouvez brancher sur le port USB situé en façade un appareil USB
tel qu'un lecteur MP3.
Sélectionnez le mode USB avec la touche FUNCTION.
REMARQUE !
Les fonctions de lecture sont décrites à partir de la page 25.
Cartes mémoire SD/MMC
Ouvrez le clapet sur le dessus de l'appareil.
Insérez dans la fente de carte une carte mémoire SD/MMC avec le coin
biseauté à gauche et les contacts dirigés vers l'arrière.
Sélectionnez le mode Card avec la touche FUNCTION.
REMARQUE !
Les fonctions de lecture sont décrites à partir de la page 26.
Branchement du casque
Vous pouvez brancher sur la prise casque un casque équipé d'un
connecteur jack 3,5 mm. Les haut-parleurs sont alors automatiquement
désactivés.
ATTENTION !
Un volume trop élevé lors de l'utilisation d'un casque ou
d'écouteurs engendre une surpression acoustique et peut
provoquer une surdité. Réglez le volume sur le minimum avant
de mettre un casque ou des écouteurs.
18
Page 98

Fonctions de base
Touches tactiles
Les touches tactiles sont sensibles au toucher et doivent être simplement
effleurées sans exercer de pression.
Mise en marche/arrêt – POWER
L'interrupteur d'alimentation ON/OFF au dos de l'appareil vous permet
d'allumer votre appareil. Celui-ci se trouve alors en mode Veille. Le témoin
de veille rouge s'allume sur l'appareil.
Pour mettre l'appareil en marche, appuyez sur la touche STANDBY/ON de
l'appareil ou de la télécommande. Des informations s'affichent sur l'écran.
Pour éteindre l'appareil, appuyez de nouveau sur la touche STANDBY/ON
de l'appareil ou de la télécommande.
L'appareil se trouve alors de nouveau en mode Veille.
REMARQUE !
Si vous effleurez une des touches tactiles, l'heure s'affiche sur
l'écran. L'éclairage s'éteint au bout d'une dizaine de secondes.
Pour éteindre complètement l'appareil, mettez l'interrupteur
d'alimentation en position OFF.
EN
DE
FR
IT
NL
DK
NO
SE
Réglage de l'heure
En réception RDS, l'heure se règle automatiquement et vous n'avez donc
pas besoin de la régler manuellement. Une heure réglée manuellement est
réajustée en réception RDS, mais le réglage du format 12/24 heures reste
cependant conservé.
Pour afficher l'heure en cours de fonctionnement, maintenez la touche
IPOD/MEM/C.-ADJ. enfoncée env. 2 secondes.
Pour régler l'heure manuellement :
Mettez l'appareil en mode Veille.
Appuyez sur la touche IPOD/MEM/C.-ADJ. et sélectionnez avec la touche
/ l'affichage au format 24 ou 12 heures (24 HOUR ou 12
HOUR).
19
Page 99

Si vous sélectionnez le format 12 heures, « AM »
ou « PM » s'affiche devant l'heure :
AM : les heures de 00:00 à 11:59 ;
PM : les heures de 12:00 à 23:59.
Appuyez une nouvelle fois sur IPOD/MEM/C.-ADJ. : l'affichage des heures
clignote. Dans les 6 secondes qui suivent, entrez les heures avec la touche
/ .
Appuyez de nouveau sur IPOD/MEM/C.-ADJ. : l'affichage des minutes
clignote. Dans les 6 secondes qui suivent, entrez les minutes avec la
touche
Appuyez de nouveau sur IPOD/MEM/C.-ADJ. : l'heure est réglée et les
chiffres ne clignotent plus.
/ .
Arrêt automatique – SLEEP
Vous pouvez régler une durée au bout de laquelle l'appareil passe
automatiquement en mode Veille.
Appuyez plusieurs fois sur la touche SLEEP de la télécommande pour
régler la durée souhaitée : 90 minutes > 80 minutes > 70 minutes, etc.,
jusqu'à 10 minutes.
Lorsque le symbole du lit apparaît sur l'écran, indiquant que le sleeptimer
est réglé.
Pour désactiver le sleeptimer, appuyez sur SLEEP jusqu'à ce que le
symbole du lit disparaisse.
Allumage et arrêt automatique – TIMER
Vous pouvez régler l'appareil pour qu'il s'allume ou s'éteigne à une heure
programmée (fonction Timer).
Sélectionner une source musicale
Pour que l'appareil puisse s'allumer à l'heure programmée, une source
audio doit éventuellement être préparée :
Pour la fonction Radio, réglez la station de radio souhaitée et le volume.
Pour les autres fonctions, préparez la source correspondante : insérez un
CD/une carte mémoire ou raccordez un appareil USB.
20
Page 100

Programmer la minuterie
Pour régler l'heure d'allumage et d'arrêt automatique :
Appuyez sur la touche TIMER de la
télécommande pour régler l'heure d'allumage
automatique. L'affichage
l'écran et les chiffres des heures clignotent.
Appuyez dans les 6 secondes qui suivent sur
ou
pour régler les heures.
Appuyez une nouvelle fois sur la touche TIMER.
L'affichage des minutes clignote.
Réglez les minutes avec
Appuyez de nouveau sur la touche TIMER pour régler l'heure d'arrêt
automatique. L'affichage
heures clignotent.
Appuyez sur
Appuyez une nouvelle fois sur la touche TIMER. L'affichage des minutes
clignote.
Réglez les minutes avec
Appuyez une nouvelle fois sur la touche TIMER. Puis sélectionnez avec
la source musicale : TUNER > CD > USB > CARD > IPOD.
ou
Appuyez sur la touche TIMER et sélectionnez avec
avec lequel l'appareil doit s'allumer.
Confirmez en appuyant de nouveau sur TIMER.
La minuterie est réglée. Tous les paramètres réglés sont affichés encore
une fois sur l'écran et l'heure de même que le symbole d'horloge pour la
minuterie programmée apparaissent.
ou pour régler les heures.
ON apparaît sur
ou .
OFF apparaît sur l'écran et les chiffres des
ou .
ou le volume
EN
DE
FR
IT
NL
DK
NO
SE
Désactiver la minuterie
Appuyez sur la touche TIMER de la télécommande.
Le symbole d'horloge
disparaît et la minuterie est désactivée.
21
 Loading...