

Page 1

TABLE OF CONTENTS
Safety instructions . . . . . . . . . . . . . . . 4
Preparation . . . . . . . . . . . . . . . . . . . . . . . 6
Unpacking the device . . . . . . . . . . . . . . . . . . . . 6
The remote control . . . . . . . . . . . . . . . . . . . . . . 6
Connections and connection options 7
Connecting the television with a SCART cable . 7
Connecting the television with an antenna cable 8
Connecting the DVD player/VCR
through a satellite receiver . . . . . . . . . . . . . . . . . 9
Connecting the DVD player/VCR
to a HI-FI system . . . . . . . . . . . . . . . . . . . . . . . . 10
Connecting a surround amplifier or receiver . . 10
Connecting another video device . . . . . . . . . . 11
Basic Operation . . . . . . . . . . . . . . . . . . 12
Turning the DVD player/VCR on and off . . . . . 12
Auto power off . . . . . . . . . . . . . . . . . . . . . . . . . 12
Child lock . . . . . . . . . . . . . . . . . . . . . . . . . . . . . 12
Output selection . . . . . . . . . . . . . . . . . . . . . . . 12
The DVD player/VCR’s operation display . . . . . 13
Initial Installation and VCR Mode . . 14
Autotuning . . . . . . . . . . . . . . . . . . . . . . . . . . . 14
Arranging programme locations . . . . . . . . . . 14
Manual tuning . . . . . . . . . . . . . . . . . . . . . . . . 15
Clearing programme locations . . . . . . . . . . . . 15
Creating station names . . . . . . . . . . . . . . . . . . 16
Setting time and date . . . . . . . . . . . . . . . . . . . . 16
OSD ON and OFF . . . . . . . . . . . . . . . . . . . . . . . 16
Disc Operation . . . . . . . . . . . . . . . . . . 25
About DVDs. . . . . . . . . . . . . . . . . . . . . . . . . . . . 25
Inserting a disc . . . . . . . . . . . . . . . . . . . . . . . . 26
Basic playback . . . . . . . . . . . . . . . . . . . . . . . . . 26
Searching options . . . . . . . . . . . . . . . . . . . . . . 26
Repeat functions . . . . . . . . . . . . . . . . . . . . . . . . 28
Picture adjustments . . . . . . . . . . . . . . . . . . . . . 29
Audio settings . . . . . . . . . . . . . . . . . . . . . . . . . . 29
Displaying and editing the current status . . . . 30
Other disc types . . . . . . . . . . . . . . . . . . 31
Playing CD or MP3 discs . . . . . . . . . . . . . . . . . 31
Playing JPEG pictures . . . . . . . . . . . . . . . . . . . . 32
Playing MPEG movies . . . . . . . . . . . . . . . . . . . . 33
Settings in the DVD SETUP menu . . . . 34
Navigating the menu . . . . . . . . . . . . . . . . . . . . 34
The menu “Language“ . . . . . . . . . . . . . . . . . . . 34
The menu “Video“ . . . . . . . . . . . . . . . . . . . . . . 35
The menu “Audio“ . . . . . . . . . . . . . . . . . . . . . . 35
The menu “Others“ . . . . . . . . . . . . . . . . . . . . . 35
Table of language codes . . . . . . . . . . . . . . . . . 37
Troubleshooting . . . . . . . . . . . . . . . . . 38
Disposal . . . . . . . . . . . . . . . . . . . . . . . . . . . . . . 39
Technical data . . . . . . . . . . . . . . . . . . . 40
VCR Playback . . . . . . . . . . . . . . . . . . . . . 17
Playback functions . . . . . . . . . . . . . . . . . . . . . . 17
VCR Recording . . . . . . . . . . . . . . . . . . . 18
Manual recordings . . . . . . . . . . . . . . . . . . . . . 18
Preterming the picture format (4:3, 16:9) . . . . 18
Selecting the recording source . . . . . . . . . . . . 19
To watch a TV Channel or DVD during
recording . . . . . . . . . . . . . . . . . . . . . . . . . . . . . 19
Timer recording . . . . . . . . . . . . . . . . . . . . . . . . 20
More video cassette functions . . . . . . . . . . . . . 22
The menu TAPE CONTROL . . . . . . . . . . . . . . . . 22
The VCR Hi-Fi sound system . . . . . . . . . . . . . . 23
DVD PLAYER/VCR – MD 80975 3
Page 2
SAFETY INSTRUCTIONS
About these instructions
Please read these instructions carefully before using the system. Note the warnings on the device
and in the operating instructions
Always keep the operating instructions close to hand. If you sell or give the unit away, please
ensure that you also pass on these instructions.
Never let children handle electrical devices
The appliance is not intended for use by young children without
supervision.
If swallowed, batteries may endanger life. Therefore keep the device and
batteries out of the reach of children. If a battery is swallowed get
immediate medical assistance.
Keep plastic packaging out of the reach of children. There is a risk of
asphyxiation.
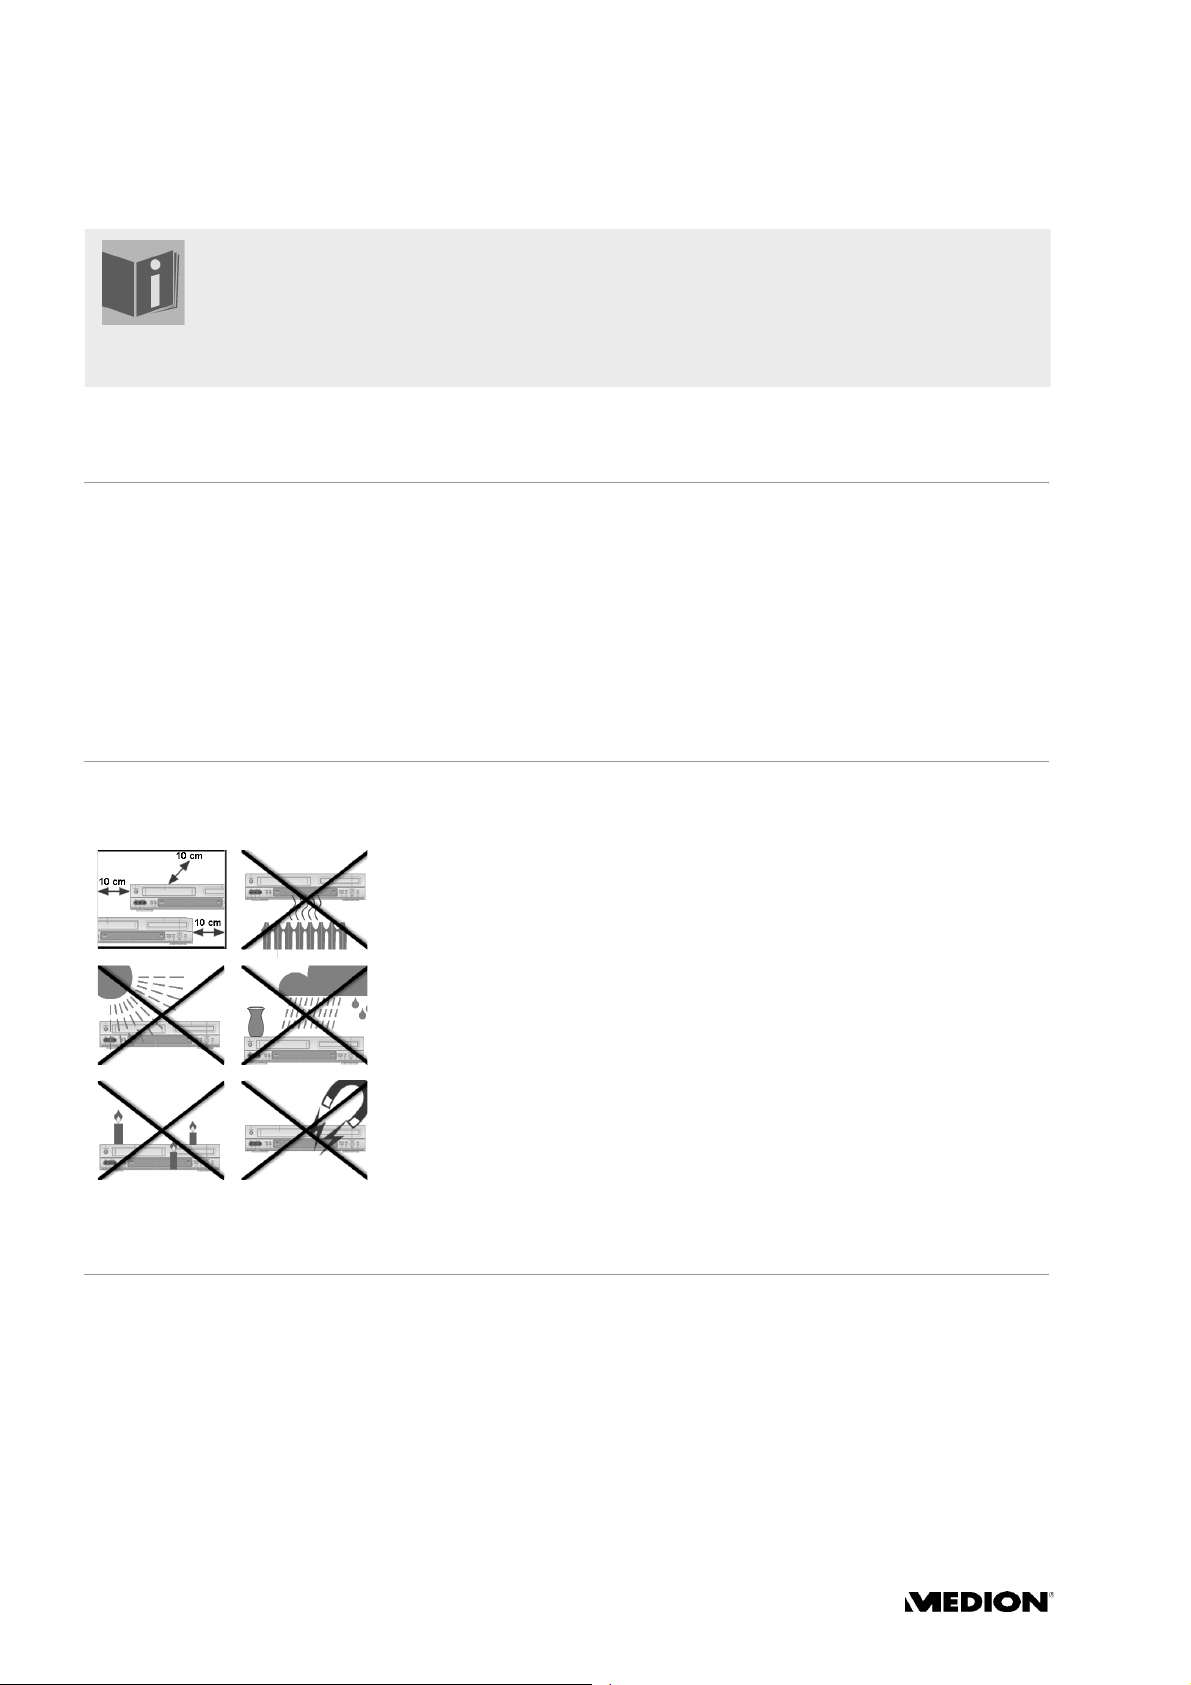
Setting the device up safely
Place the device on a stable, level surface. It is not designed for use in
rooms that are very humid (e.g. bathrooms). Always ensure that
the ventilation grille is uncovered to make sure there is adequate
ventilation;
there are no direct heat sources (e. g. heaters) that could affect the
device;
the device is not in direct sunlight;
you avoid contact with damp, still or sprayed water (e. g. do not place
vases on top of the device);
the device is not placed close to magnetic fields (e. g. loudspeakers);
naked flames such as lit candles are not placed near the device.
If the device is moved from a cold to a warm location, condensation
may occur in the device. Wait for a few hours before using it.
Do not subject the device to shocks. These could damage the sensitive
electronics.
Ensure that the mains power socket is easily accessible.
Only connect the unit to a power socket (200-240 V ~ 50/60 Hz) that is
easy to reach and is close to the place where you have set the unit up. The
power socket must be freely accessible so that you can unplug the device
quickly if you should need to.
To avoid the risk of tripping, please avoid using extension cables.
4
Page 3
Never do your own repairs
If the plug, cable or device is damaged, pull the plug out of the socket
immediately.
Do not use the device if the mains plug, mains cable or unit itself is
damaged.
Do not insert any objects into the device, e.g. through the ventilation
slots. They could touch parts that carry current or damage the
components in the device.
Unplug the device from the mains using the plug. Never pull on the cable.
Never try to open and/or repair the device yourself. There is a risk of
electric shock. If there is a defect, contact our Service Centre or other
suitable specialist workshop service.
Storms
Pull the plug and antenna cable out of the mains if you are away for a long
period or if there is a storm.
SAFETY INSTRUCTIONS
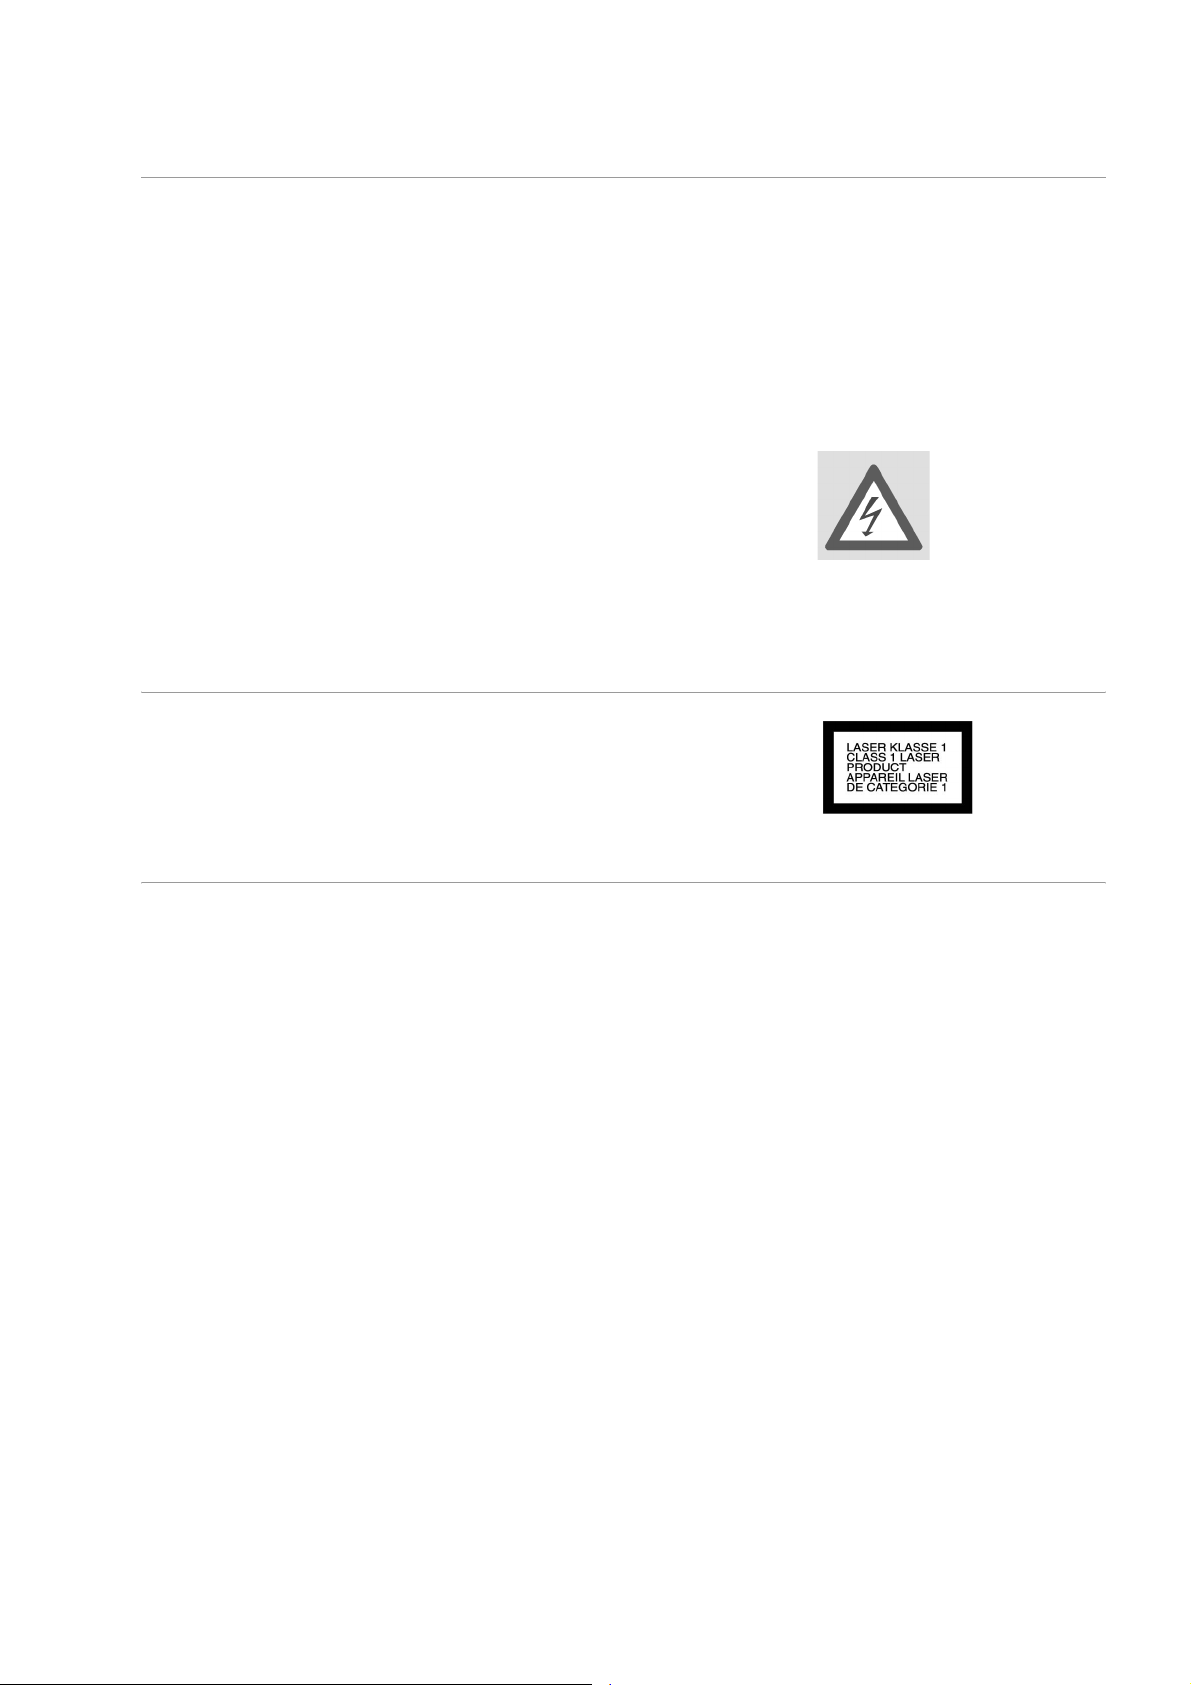
Laser class
The DVD player is a Class 1 laser product. The device has a safety system
that prevents dangerous laser rays escaping during normal use. In order
to avoid injury to the eyes never manipulate or damage the unit's security
system.
Cleaning the unit
Before cleaning, pull the plug out of the mains socket. Use a dry, soft cloth
to clean the unit. Avoid the use of chemical solutions and cleaning
products because these may damage the unit's surface and/or labels.
DVD PLAYER/VCR – MD 80975 5
Page 4
PREPARATION
Unpacking the device
Remove all packaging materials including the film on the front of the unit.
WARNING!
Do not let children play with the plastic film. There is a risk of
asphyxiation!
Checking package contents
When unpacking, ensure that the following parts are included:
DVD player/video recorder
SCART cable
RF antenna cable
Remote control
2 x batteries (AAA size, 1.5 V)
Operating instructions
Guarantee document
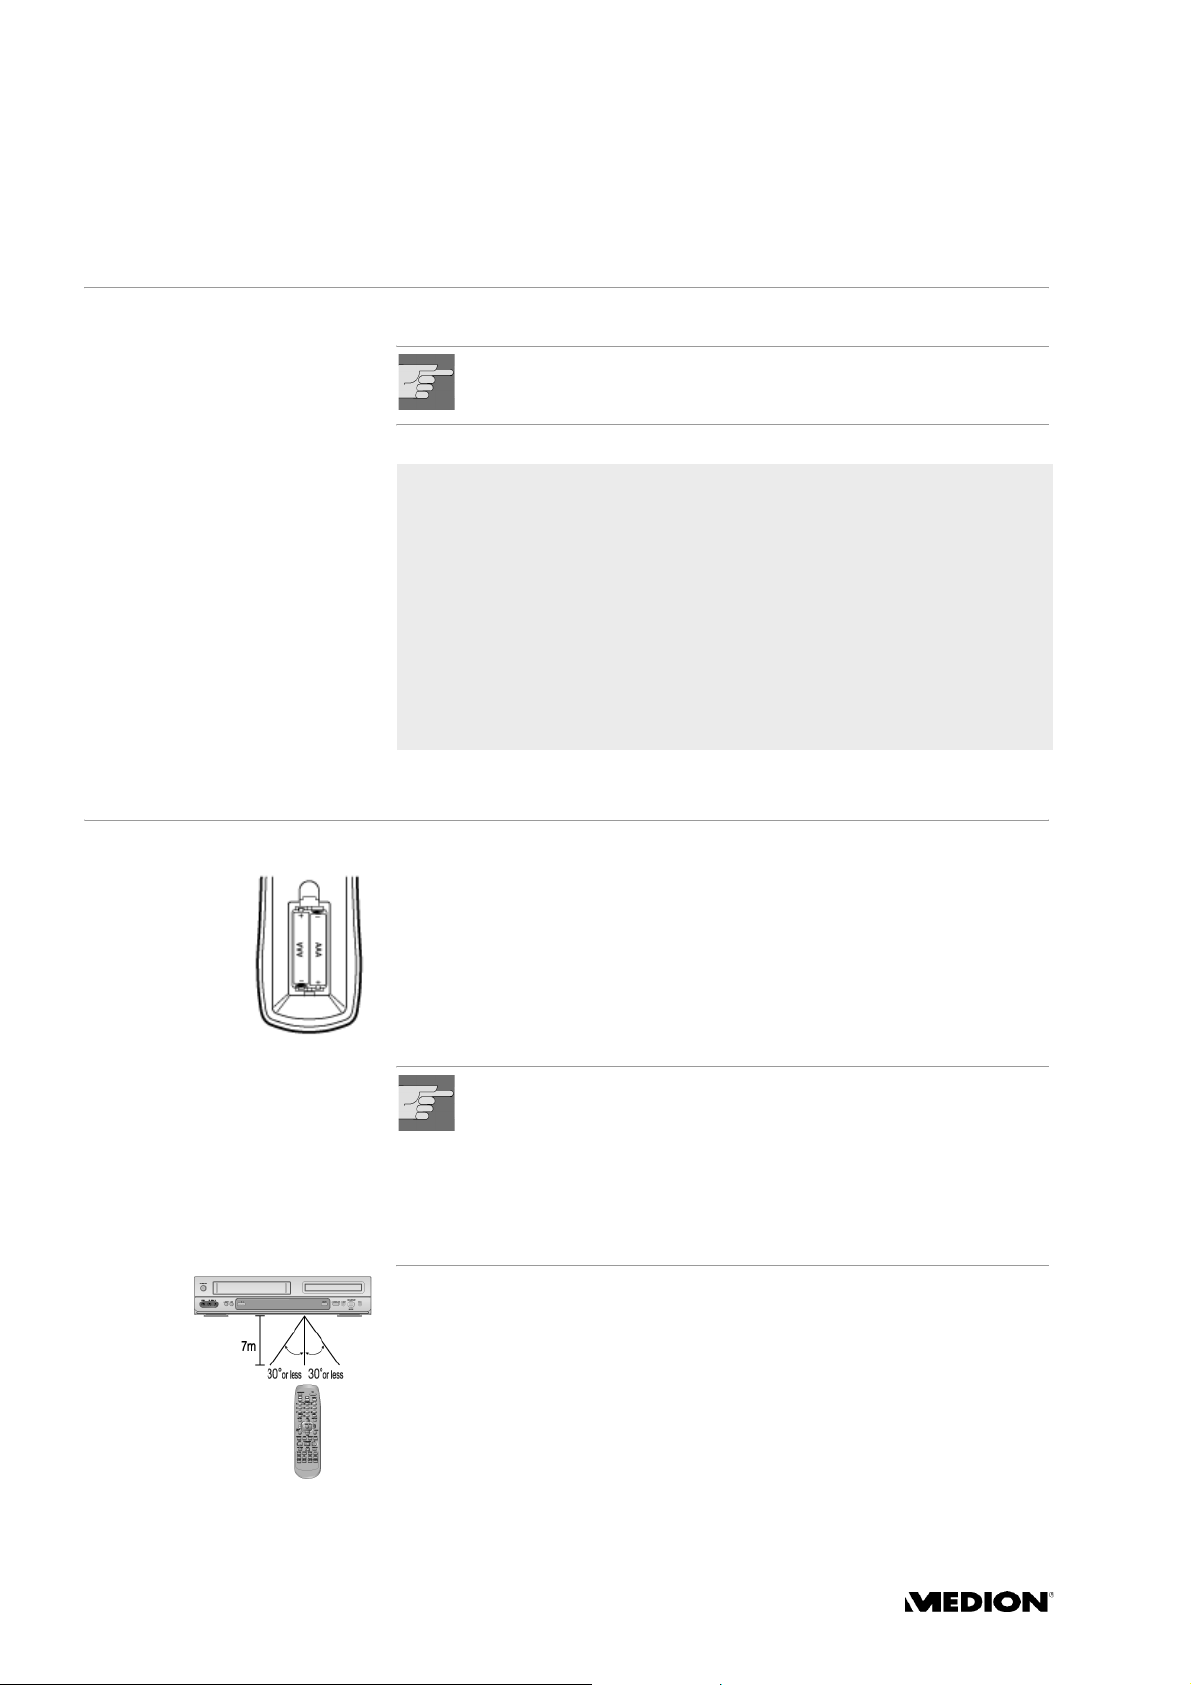
The remote control
Inserting batteries
Two 1.5V batteries (AAA size) are supplied for the remote control.
` Open the battery compartment by sliding the panel on the back of the
remote control in the direction of the arrow.
` Insert the batteries so that the negative end is placed next to the springs.
` Close the battery compartment.
WARNING!
The batteries supplied should not be charged, disassembled,
thrown into a fire, or short-circuited. Do not expose the remote
control to excessive sun light. Do not keep it at places with much
dust and humidity.
If swallowed, batteries may endanger life. For this reason keep the
batteries and remote control out of the reach of children. If a
battery is swallowed, please obtain immediate medical assistance.
How to use the remote control
` Operate the remote control within 7 m from the unit, within a range of
60° towards the infrared sensor on the front.
` Do not press two buttons at the same time.
6
Page 5
CONNECTIONS AND CONNECTION OPTIONS
The DVD player/VCR can be connected in various ways to other input and
output devices:
to a television
to an amplifier/receiver
to other audio/video devices
Make sure that all devices are switched off before connecting them.
Only connect the units to the mains when the other connections are
complete.
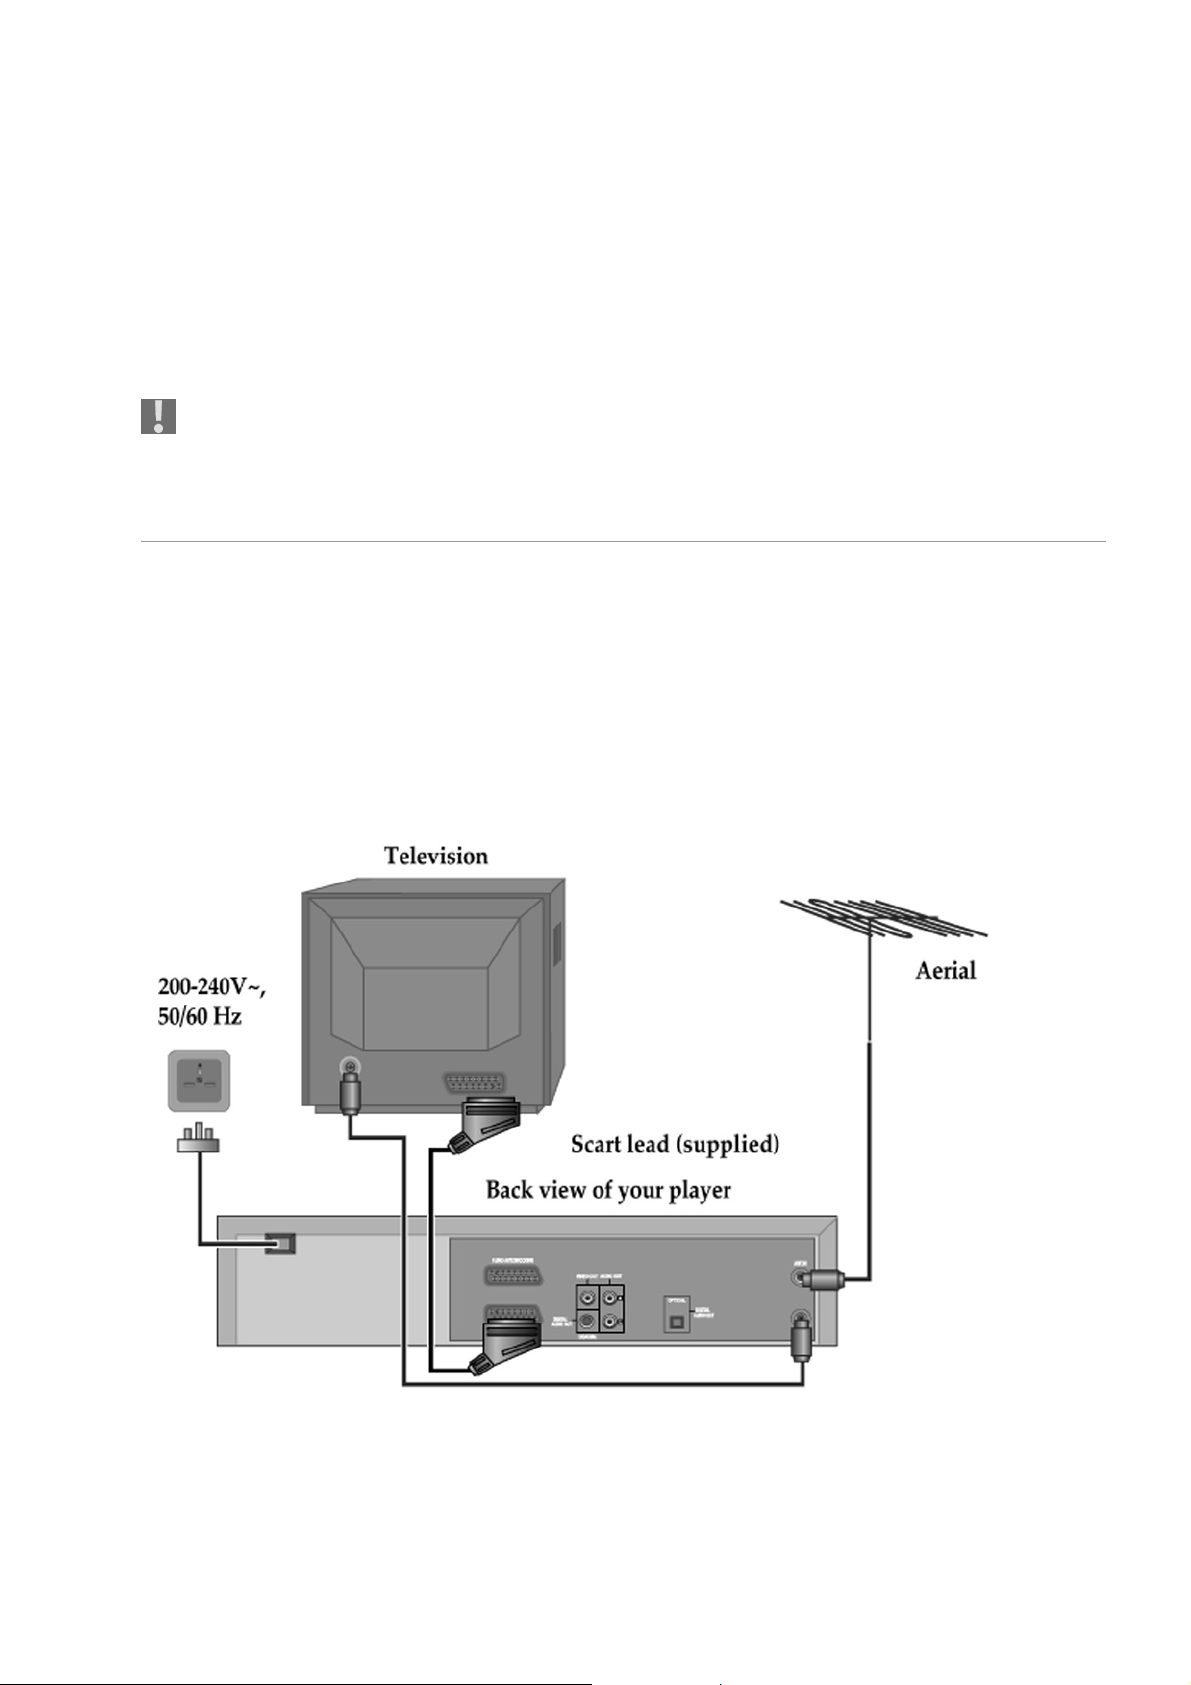
Connecting the television with a SCART cable
The SCART cable is the simplest connection between your DVD player/
VCR and the television. This connection provides a good picture and
sound quality.
` Connect the antenna cable to
VCR and the
` Use another antenna cable to connect the
player/VCR to the antenna socket in the wall.
` Connect the SCART cable to the EURO AV1 socket on your DVD player/
VCR and the SCART IN socket of you TV:
ANTENNA IN socket of your TV.
ANT OUT socket of your DVD player/
ANT IN socket of your DVD
` Press the
switch channels with the
player/VCR.
Press
TV/VCR button to switch into the VCR mode. You can now
PR buttons on the remote control of you DVD
TV/VCR again to switch back into the TV mode.
DVD PLAYER/VCR – MD 80975 7
Page 6
CONNECTIONS AND CONNECTION OPTIONS
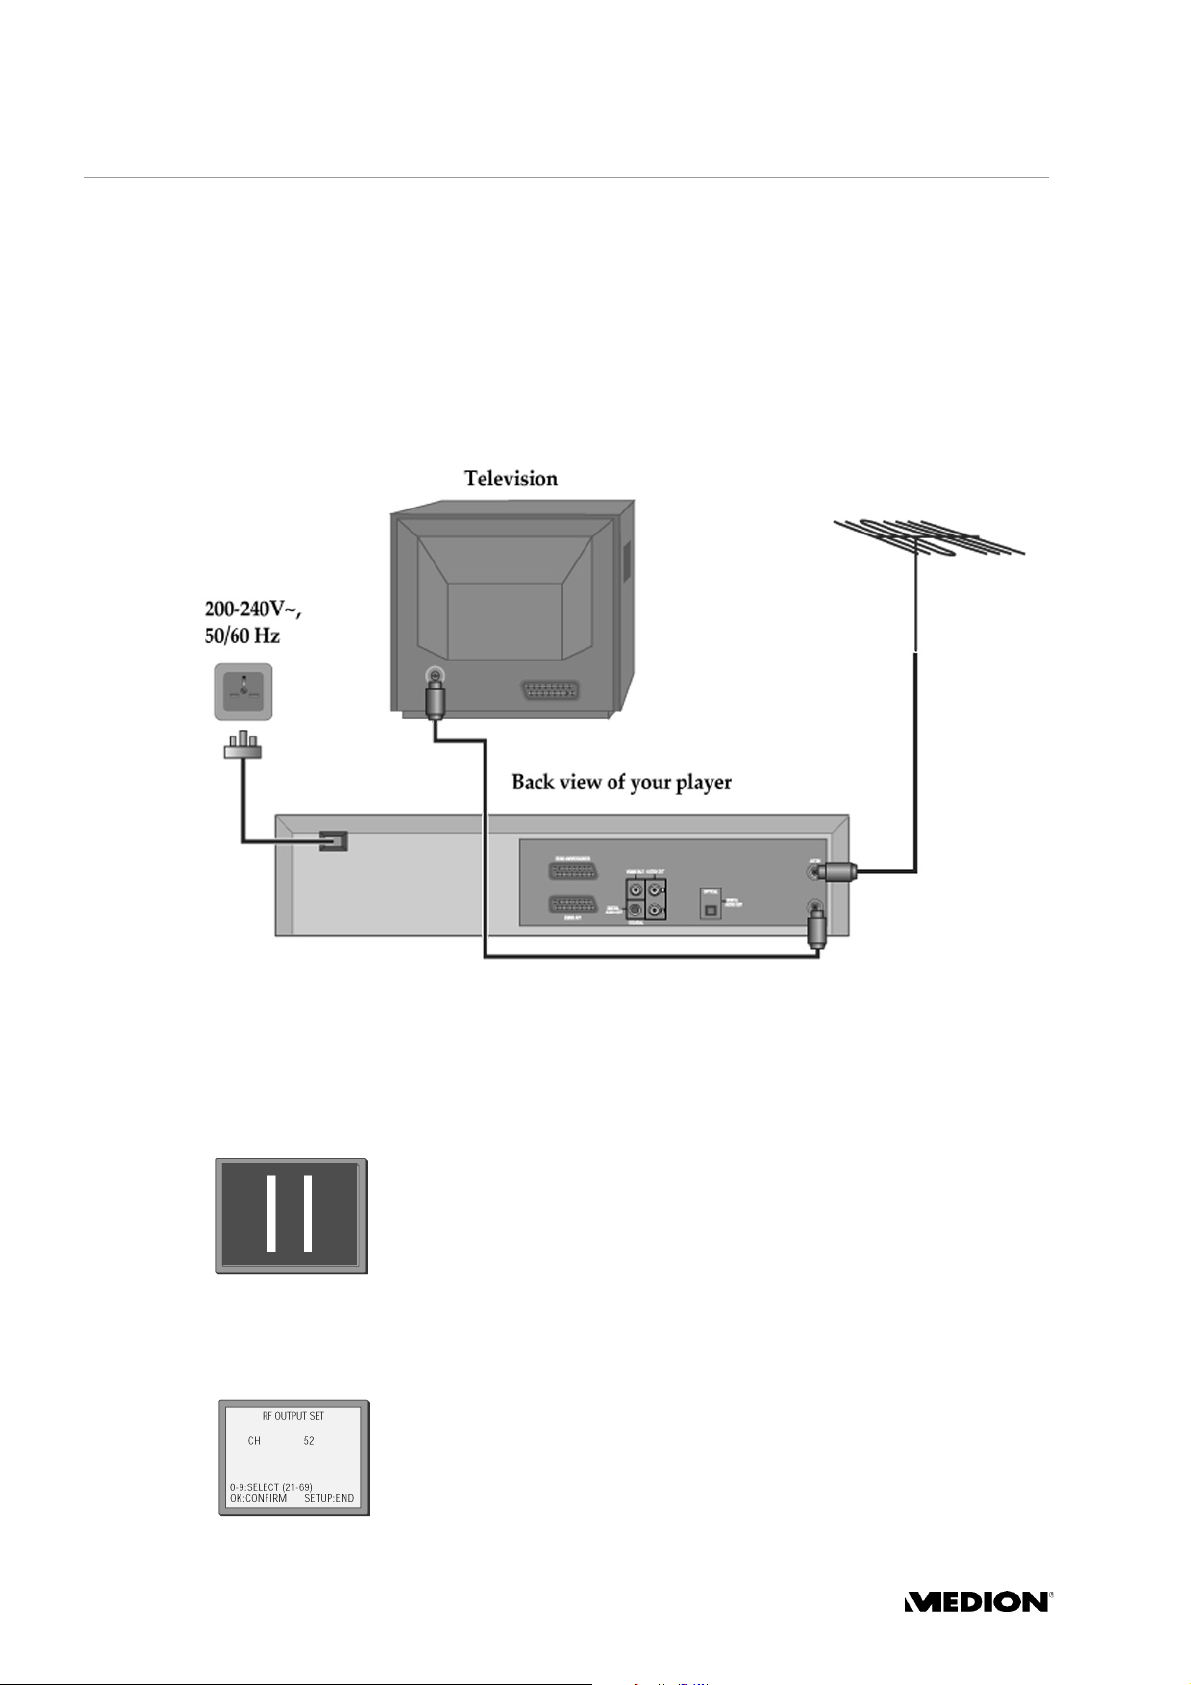
Connecting the television with an antenna cable
Your DVD player/VCR can transmit pictures and sound to the TV via the
antenna cable (coax aerial cable). Please note that without a SCART cable,
you will not get stereo sound from a TV capable of stereo sound.
` Connect the antenna cable to
VCR and the
` Use another antenna cable to connect the
player/VCR to the antenna socket in the wall.
ANTENNA IN socket of your TV.
ANT OUT socket of your DVD player/
ANT IN socket of your DVD
Tuning the TV to the DVD player/VCR’s transmitting channel
52
With an antenna connection, you have to carry out the following steps:
` Press
` Tune the TV to the test signal (if necessary, refer to the TV’s manual to
` When the test signal appears on the TV screen, with the remote control
` Press
ENTER for longer than 5 seconds to call up the player’s test signal.
In the display,
channel. (You can change this channel using the number buttons.)
do this). The TV will search for the test signal as shown on the side (two
vertical white bars).
of the TV store it under the desired channel number .
ENTER for longer than 5 seconds to remove the test signal.
RF 52 appears as the unit’s factory set transmitting
Using a different transmitting channel
If the quality of the test signal transmitted to the TV is poor due to
interference caused by a station transmitting on channel 52, you can tune
the player to a diffferent transmitting channel. Find a free channel
between 21 and 69 on your TV.
` In the VCR mode, press
SETUP to open the VCR SETUP.
8
Page 7
CONNECTIONS AND CONNECTION OPTIONS
` Select VCR OUTPUT and confirm with OK/ENTER.
` Select
` Using the number buttons, type in different channel number between
` Confirm with
If the quality of the test signal transmitted to the TV is poor for other
reasons, fine-tuning on the TV may help (if necessary, refer to the TV
manual).
RF OUTPUT SET and confirm with OK/ENTER.
21 and 69.
OK/ENTER and exit with SETUP.
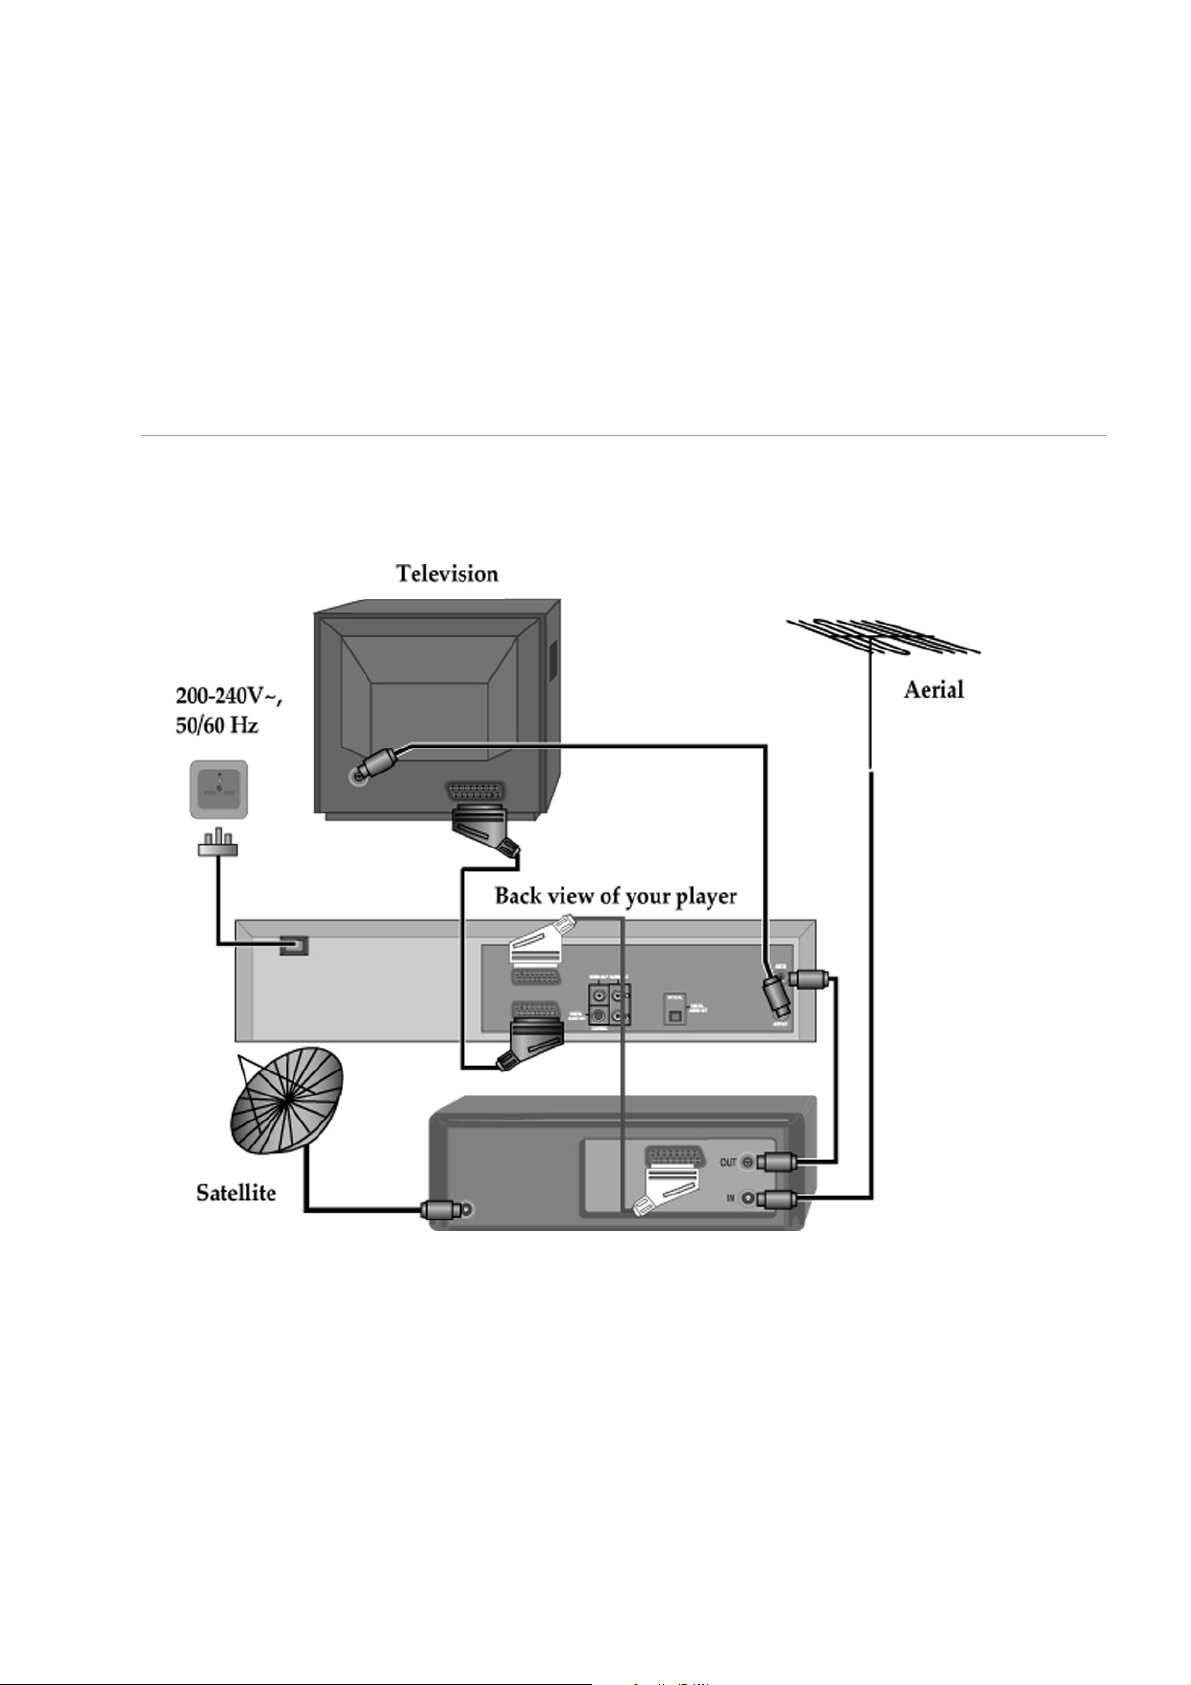
Connecting the DVD player/VCR through a satellite receiver
If you use a satellite receiver for the TV reception, connect your DVD
player/VCR as shown in this illustration:
` Press the button
to select the satellite receiver
INPUT on the remote control of your DVD player/VCR
[AV2].
DVD PLAYER/VCR – MD 80975 9
Page 8
CONNECTIONS AND CONNECTION OPTIONS
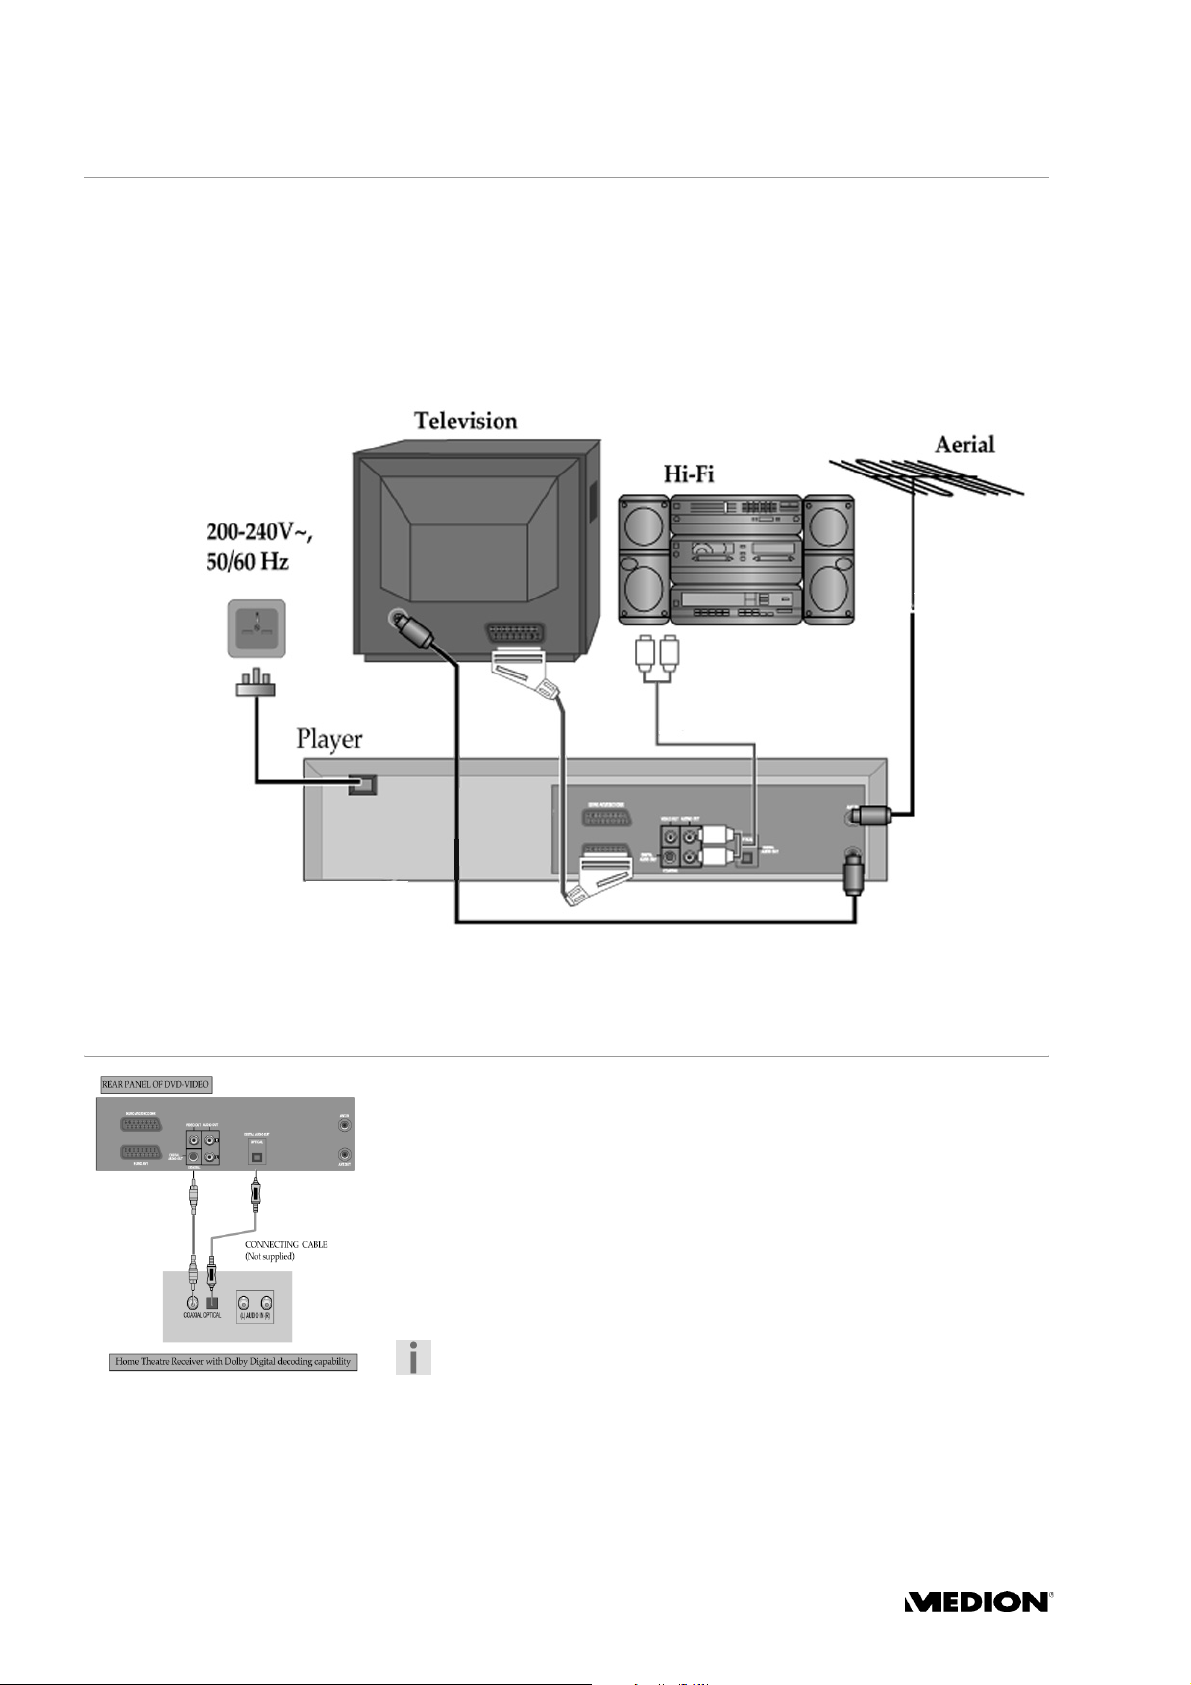
Connecting the DVD player/VCR to a HI-FI system
You can transfer the sound of your DVD player/VCR to a HI-FI system.
` Connect a phono cable (red/white) to the left and right audio output
sockets of your DVD player/VCR and the matching audio inputs of you
Hi-Fi system.
` Connect the TV as explained above.
Use an audio cinch cable (red/white) to transmit the sound.
.
Connecting a surround amplifier or receiver
Your DVD player/VCR has digital outputs which allow you to transfer the
sound to a Dolby Digital amplifier or Home Theatre Receiver with Dolby
Digital decoding capability.
For this connection, you can use:
- either the
- or the
` Connect a a coaxial cable (or an optical cable) to the coaxial input (or
optical input) of your surround amplifier.
COAXIAL DIGITAL AUDIO OUT,
OPTICAL DIGITAL AUDIO OUT:
Please note that to activate the digital output, you have to select the
option
“Audio“”, page 35).
DIGITAL OUT in the DVD AUDIO menu (cf. “The menu
10
Page 9
CONNECTIONS AND CONNECTION OPTIONS
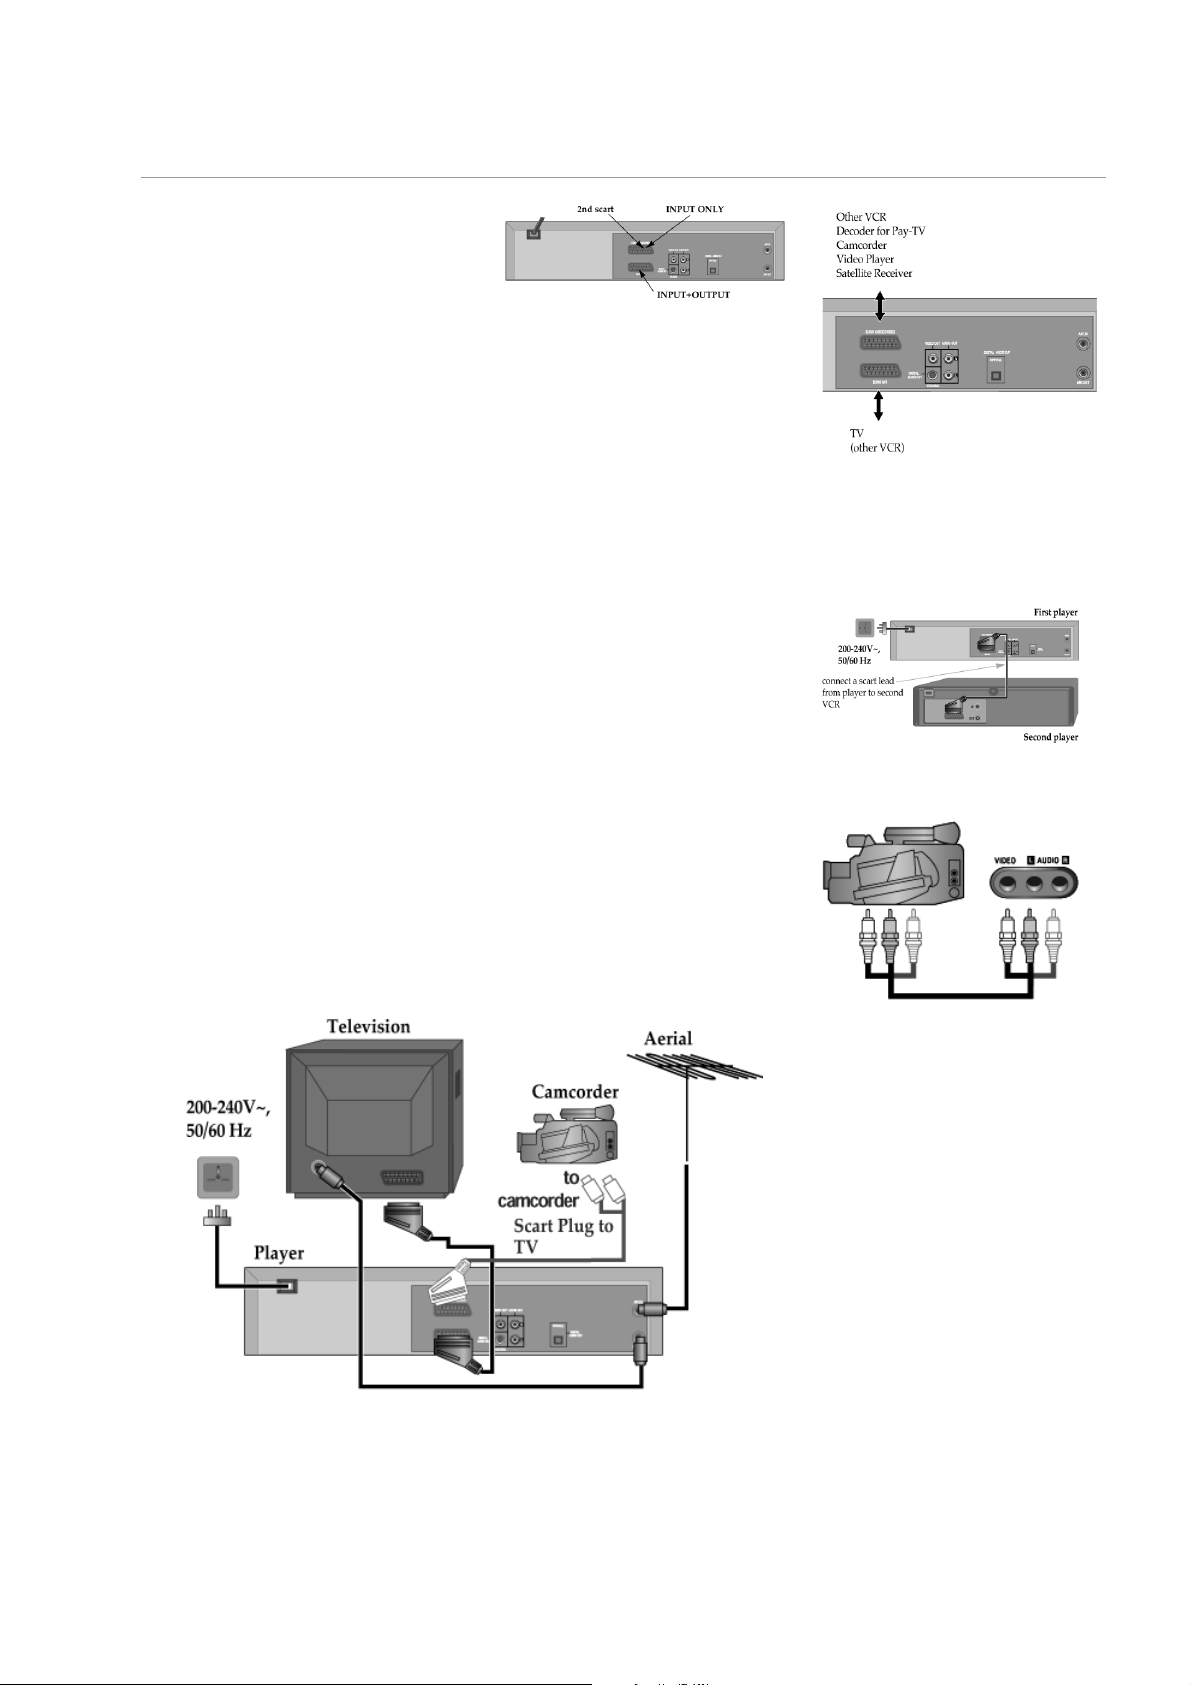
Connecting another video device
Being equipped with two SCART
connections,
SCART IN and
OUT, your VCR can both record the
signals from another video device (such
as a SAT receiver, a video camera,
another VCR or a DVD player), as well
as record to another VCR.
To copy from another device to your DVD player/VCR
` Use a SCART cable to connect the SCART OUT socket of the other device
to the
VCR.
EURO AV2/DECODER for
EURO AV1 for SCART IN/
SCART IN socket ( EURO AV2/DECODER) of your DVD player/
To copy from your DVD player/VCR to another VCR
` Use a SCART cable to connect the SCART IN socket of the other device
to the
SCART OUT socket (EURO AV1) of your DVD player/VCR.
Connecting a video camera
You can connect a camcorder in two ways:
- to the front AV inputs sockets, using a phono cable, either with one audio
cable red or with two audio cable red/white (see picture on the side);
- to the SCART input socket, using a SCART phono-cable (see picture
below).
DVD PLAYER/VCR – MD 80975 11
Page 10
BASIC OPERATION
Turning the DVD player/VCR on and off
` Plug in the mains cable.
` Press the button to switch the DVD player/VCR on.
` Press on the remote control to switch back to standby mode.
The display will be dimmed.
Auto power off
When no tape or disc is played and no tuning signal is received for five
minutes, the DVD player/VCR will switch into the standby mode.
Child lock
You can lock the buttons on the front panel.
` In the standby mode, press the button on the remote control for
about five seconds. The lock indicator
Keep the remote control in a safe place.
` To release the child lock, press any button on the remote control.
SAFE will appear on the display.
Output selection
The default mode of the device is the VCR mode.
To select DVD
` Press the button DVD.
In the DVD mode,
works in the DVD function.
DVD is displayed on the display. The remote control then
To select VCR
` Press the button VCR.
In the VCR mode,
then works in the VCR function.
DVD disappears from the display. The remote control
To select the external input
` Press the button INPUT.
With
INPUT you select external devices which are connected to the DVD
player/VCR’s input sockets:
AV1: the SCART socket
AV2: the SCART socket
AV-F: the front AV-sockets.
EURO AV1;
EURO AV2/DECODER
12
This button does not work during playback, during recording, and in the
DVD mode.
Page 11

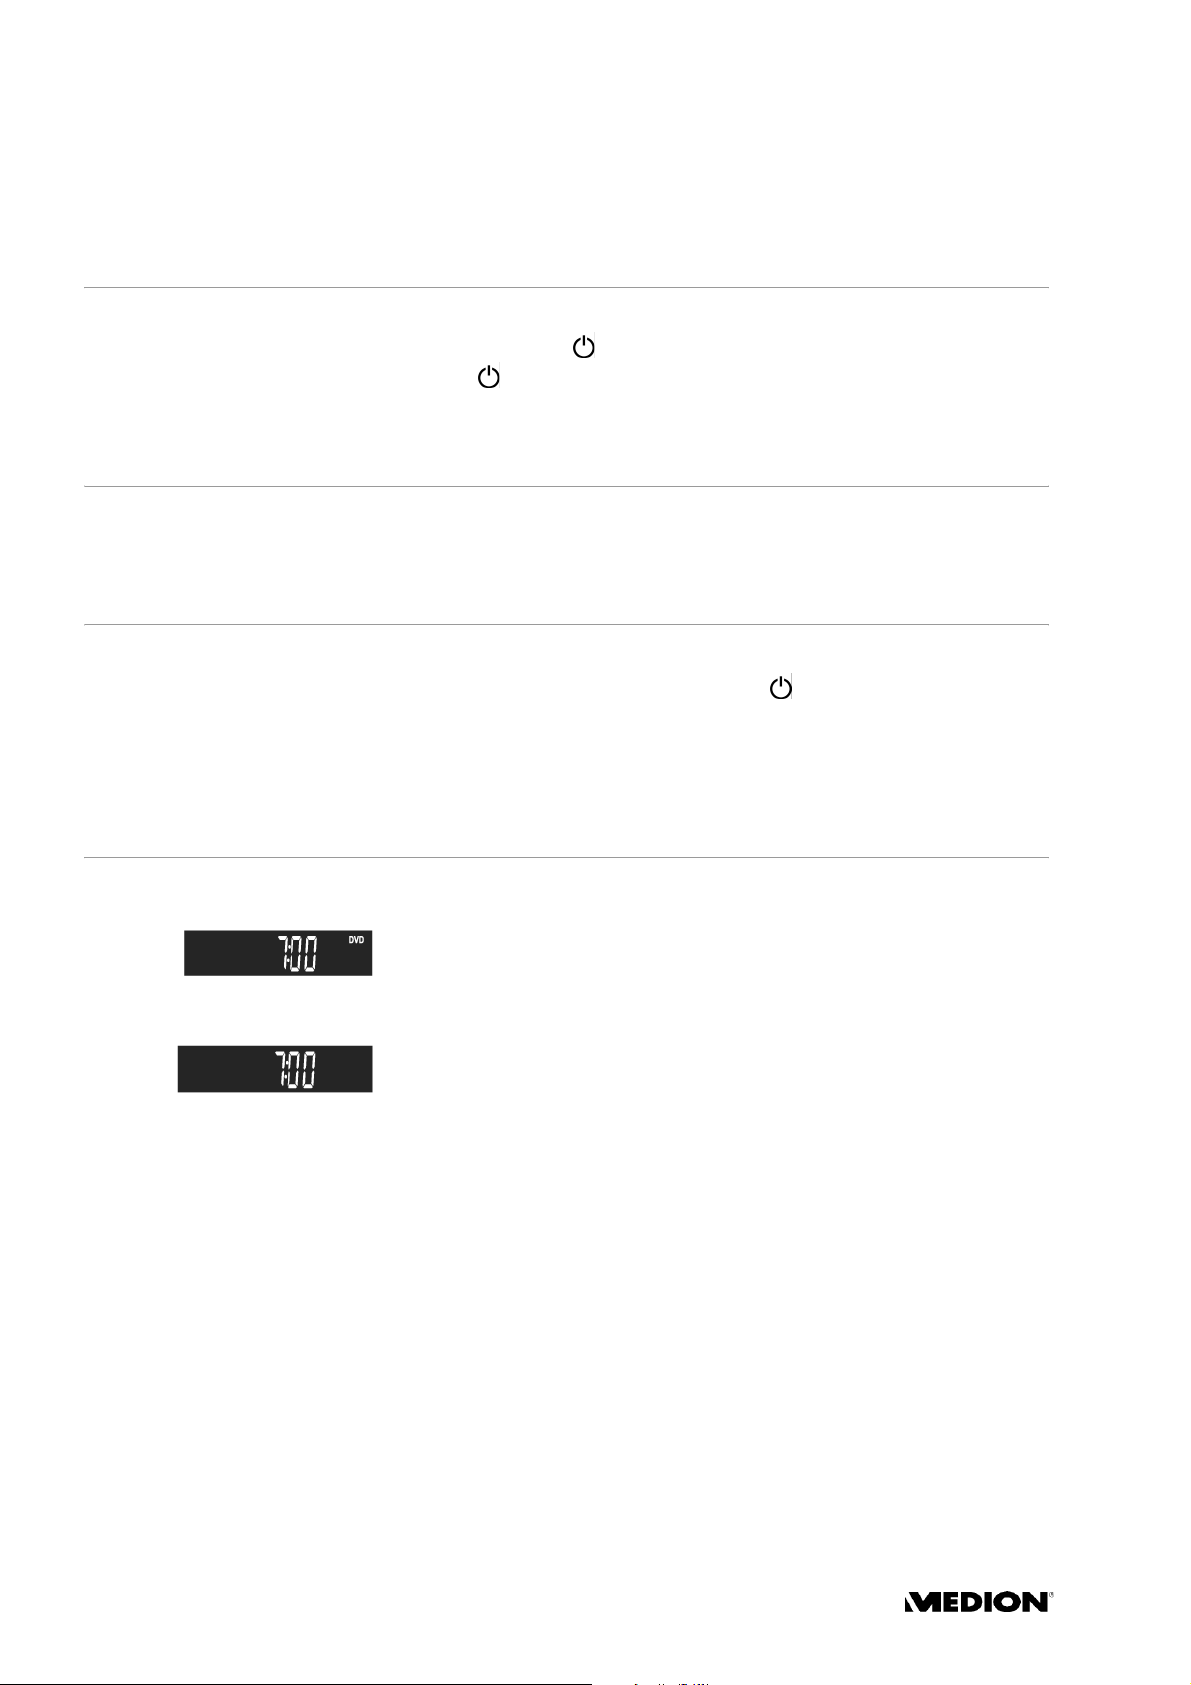
The DVD player/VCR’s operation display
different operation modes.
DVD and VCR operation:
BASIC OPERATION
Full display:The DVD player/VCR’s display shows the following pictures for the
Recording and repeat mode:
DVD PLAYER/VCR – MD 80975 13
Page 12
INITIAL INSTALLATION AND VCR MODE
After the DVD player/VCR, the television set and the power supply have
been connected, switch on the DVD player/VCR and the television set.
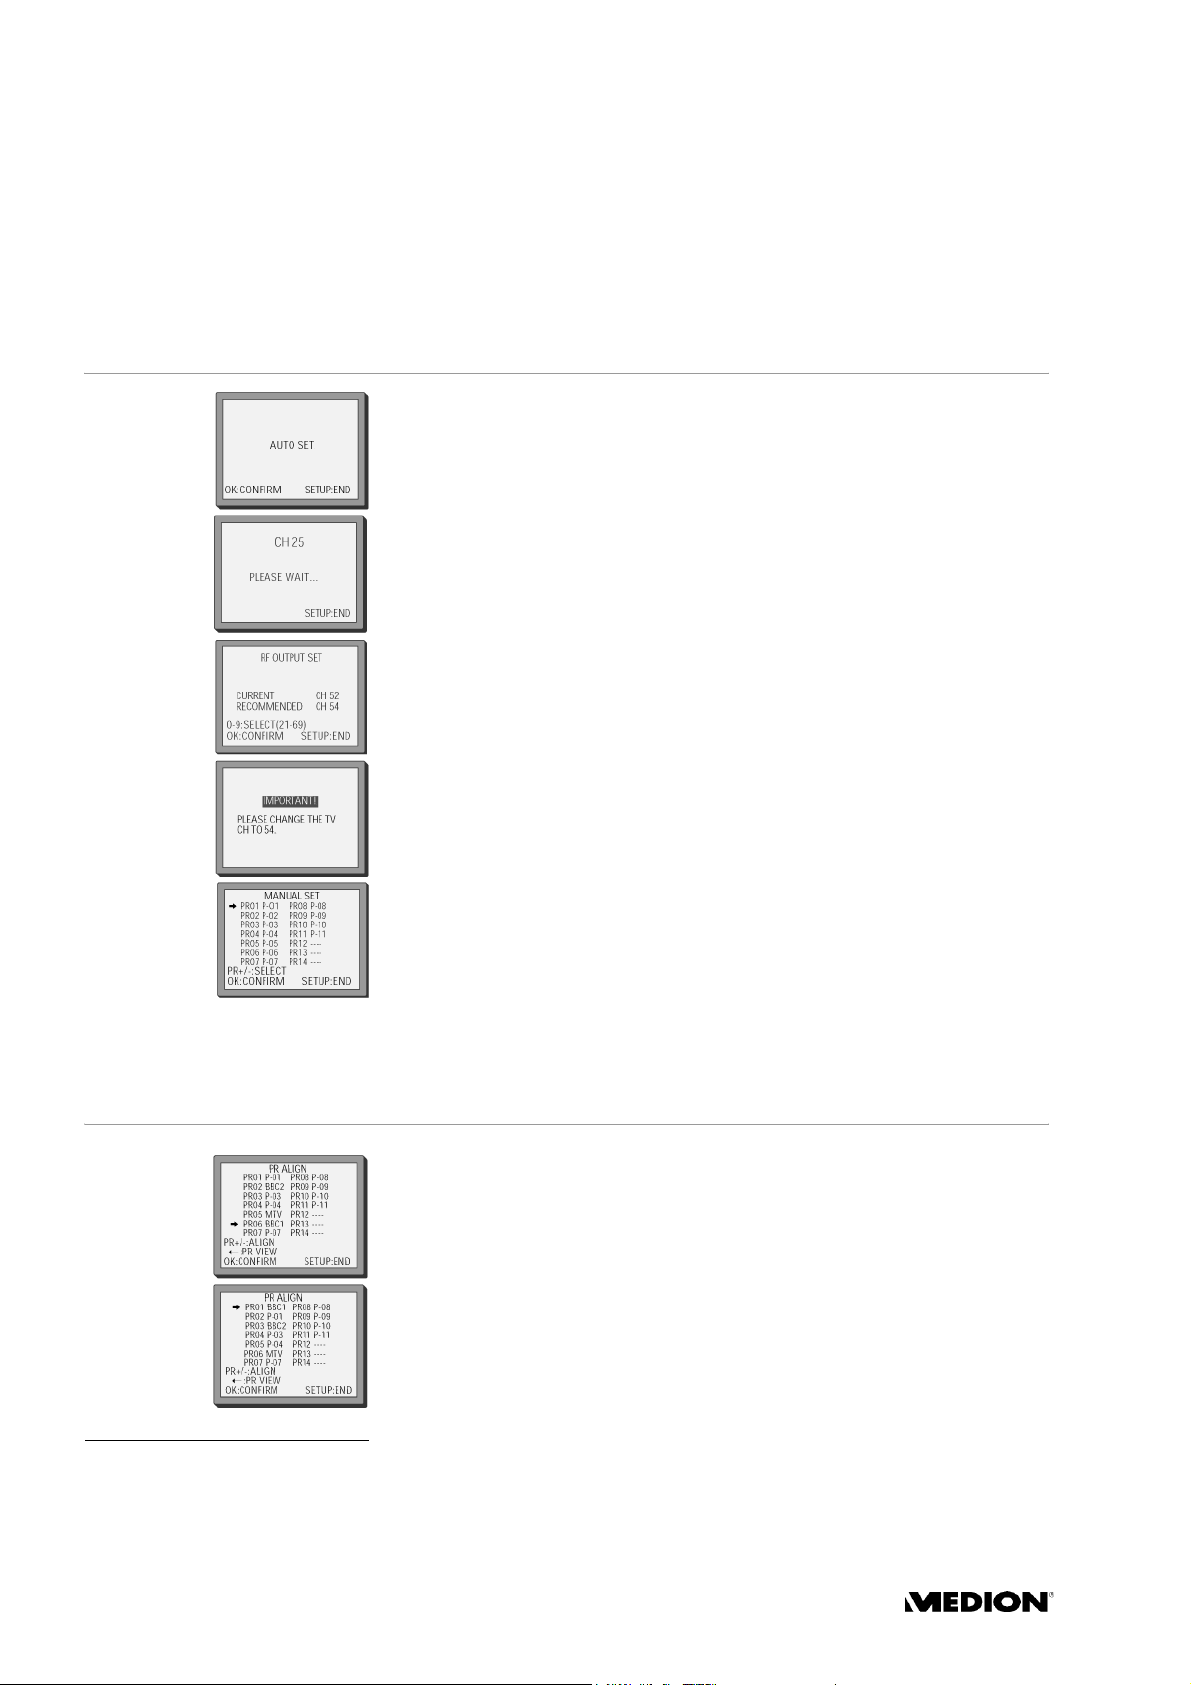
Autotuning
You should see the picture „AUTO SET“ after switching on the TV and
DVD player/VCR for the first time
you can receive in your country.
` Wait for the end of the automatic tuning and then press
The clock is set automatically.
The DVD player/VCR’s transmitting channel for the RF (antenna) output is
factory set to UHF CH 52. While tuning in, if other stations are found
positioned on or near the
automatically.
The DVD player/VCR recommends the best RF OUTPUT CH number
automatically.
` Press
You can change the programme locations according to your wishes (see
next chapter).
` Press
OK/ENTER to confirm the recommended PR number.
SETUP to exit the AUTO SET menu.
RF OUTPUT CH 52, a guide message appears
1
. The AUTO SET tunes in all stations
ENTER.
Arranging programme locations
After the Autotuning, a list of the channels will appear in the menu in the
order t hey w ere found . You might wish to ar range the chan nels in an othe r
order (e. g., BB1 as
PRO4, Channel5 as PRO5).
To allocate the new locations follow this procedure:
` In the VCR mode, call up the SETUP menu with
` Select
` In the menu
1. If you do not see this picture because you do not use a SCART cable, search this picture with the station tuning function
of your TV set (refer to the TV’s user manual if necessary).
First look for CH 52 on the TV set.
In case of interference problems on CH 52, type in another transmission channel between 21 and 69.
PR PRESET and confirm with OK/ENTER.
ENTER
.
14
PRO1, BB2 as PRO2, ITV as PRO3, Channel4 as
SETUP.
PR PRESET, select PR ALIGN and confirm with OK/
Page 13

INITIAL INSTALLATION AND VCR MODE
` Select the channel which needs to be moved and press OK/ENTER. The
channel will blink.
` Use the arrow buttons to move the channel to the desired new place.
` Press
Proceed like this for all other channels which are to be moved.
OK/ENTER to confirm.
Manual tuning
If the DVD player/VCR is connected to the TV via a SCART cable, press
the
AV button of the TV set to see the picture from your DVD player/
VCR.
If the DVD player/VCR is connected to the TV via an antenna cable,
select that channel on the TV where the player’s RF Channel 52 was
stored.
` Press
` Select
` In the menu
` Choose any unused programme number „
SETUP to call up the SETUP menu.
PR PRESET and confirm with OK/ENTER.
PR PRESET, select MANUAL SET and confirm with
OK/ENTER. You will see the stations which have been stored so far.
-----“ or „P-xx“. Confirm
with
OK/ENTER.
IIf possible, use the the same programme number for the video as for
the TV.
After choosing the programme number, you can carry out various settings
for the new programme:
RECEPTION: the broadcast system you want (Aerial - CH; or
Cabel - CC);
AUTOSEARCH: you can enter the channel number with the number
buttons or you can use the arrow buttons . A channel search
starts. If a channel has been found, it will show on the TV.
FINE TUNING: press OK/ENTER longer or repeatedly to tune in the
picture;
DECODER: If the programme is encoded and you have a decoder
connected to the socket
select
ON or OFF;
NAME: change or create the station name (see “Creating station
names”, p. 16).
EURO AV2, press the arrow buttons to
Clearing programme locations
` In the menu PR PRESET, select the entry PR ERASE.
` Select the station (the location number) you want to clear.
` Review the picture by pressing the arrow button .
` Press
OK/ENTER to clear the programm location.
DVD PLAYER/VCR – MD 80975 15
Page 14

INITIAL INSTALLATION AND VCR MODE
Creating station names
` In the menu MANUAL SET, select the entry NAME.
Setting time and date
If you want to change the given name, press
` In this case, select a name from the stored list using the buttons .
If you want to create a new name, press
four letters or digits.
` Select a character with the arrow buttons .
` Move to the next letter with the arrow buttons .
` In the end, store with
` You can exit the menu with
Althouth the clock is set automatically, you can also set time and date
manually.
` Press
` Select the entry
` Move to the entry fields and type in the new values. Wait a few seconds
` Store with
SETUP to call up the SETUP menu.
entry
CLOCK SET and confirm with OK/ENTER.
after typing a one-digit number.
OK/ENTER and exit the SETUP menu with SETUP.
OK/ENTER.
SETUP.
VCR SETUP, confirm with OK/ENTER, then select the
0 .
1. The name must consist of
OSD ON and OFF
The DVD player/VCR is factory set to OSD ON. Thus, the On Screen
Display (information on current functions, such as the number of the
current TV channel) will be displayed in the normal picture.
If you do not want to display the OSD to show , you can switch it off.
` Press
` Select
` In the
` In the menu
SETUP to call up the DVD player/VCR’s SETUP menu.
VCR SETUP and press OK/SETUP.
VCR SETUP, select OSDN ON/OFF and press OK/SETUP.
OSD ON/OFF, select OFF and press OK/SETUP.
16
Page 15

VCR PLAYBACK
` Press VCR to select the VCR mode.
` Insert a tape in the tape compartment.
Playback functions
` Press PLAY/PAUSE to start playback.
` To stop the tape, press
` Press
` To interrupt the playback, press
` Press
` For a fast forward or reverse search, press
EJECT on the device or OPEN/CLOSE on the remote to eject the
tape.
now in pause mode.
PLAY/PAUSE again to resume playback.
mode. Press twice to double the speed. If the tape was recorded in LP
(Long Play), no colour is seen during the fast search. Press
again to return to normal speed.
STOP.
PLAY/PAUSE. The DVD player/VCR is
FF or REW during playback
PLAY/PAUSE
` For slow forward search, press
PAUSE
The slow reverse function is not available for the VCR function.
` If you want the tape to advance frame by frame, press
pause mode. Each time you press the button, the picture advances by
one frame.
` To rewind 15 seconds of the tape and start again automatically, press
REPLAY during playback.
` To skip 30 seconds of the tape and revert to normal playback, press
CM_SKIP („Commercial Skip“).
again to return to normal speed.
FF during pause mode. Press PLAY/
NEXT during
Automatic Picture Adjustment
The DVD player/VCR is equipped with an automatic tracking feature. If the picture is poor, flickering, if
noises occur in the upper or lower part of the picture in slow playback, or if the picture vibrates up and down
in pause mode, the tracking function can improve the picture. The tracks are corrected.
` To apply the function, press the buttons
TRACKING – or + (number buttons 1 or 3) during playback.
Auto-detector
The DVD player/VCR is also equipped with an auto-detector which detects contaminated video heads. If a
contaminated video head is found, a message will appear on the screen. In this case, apply a special cleaning
cassette.
DVD PLAYER/VCR – MD 80975 17
Page 16

VCR RECORDING
Manual recordings
SP = Standard Play;
LP = Long Play. In LP, more
recording time will fit on the
tape; however, in a slightly
poorer quality.
` Turn on all connected devices.
` Select the VCR mode with the button
` Insert a recording tape.
` Select the source from which you want to tape (see the following
chapter: “Selecting the recording source“).
` Choose the desired taping speed (
` Press
REC to start the recording.
VCR.
SP or LP) with the button SPEED.
Predeterming the recording time
` If you press REC once, the VCR will continue the recording until STOP
is pressed.
` By pressing the
increments of 30 minutes up to a maximum of 10 hours:
REC pressed twice: records 30 minutes, then stops;
REC pressed three times: records 60 minute, then stops;
....
REC pressed 21 times: records 10 hours, then stops;
REC pressed 22 times: Like REC pressed once.
` If you want to stop this recording, press
again in the display, then press
REC button repeatedly, you can set a recording time in
REC repeatedly until REC shows
STOP.
Preterming the picture format (4:3, 16:9)
With this DVD player/VCR, you can play and record programmes in the
16:9 wide screen format.
` Press
` Select
` Select
AUTO: The video automatically detects the picture format (16:9 or 4:3)
and records or plays this programme in the original format.
ON: The video will play or record all broadcasts in the 16:9 format. 4:3
formats will be converted to 16:9.
OFF: The video will play or record all broadcasts in the 4:3 format.
On video cassettes
Only use good quality video cassettes the the VHS logo.
Keep cassettes away from excessive mosture or dust, magnetic and electrical fiels (e. g.
loud speakers and computer monitors).
Always wind the tape to the beginning when you have finished. Store with the full spoof
at the bottom and with the cassette in its cover.
You can protext your recordings from being accidentally deleted by breaking out the
safety tab on the back of the cassette (some cassettes have a slide). Should you wish to
re-use the tape after removing the tab, cover the hole with adhesive tape.
SETUP to open the SETUP menu.
VCR SETUP and confirm with OK/ENTER.
16:9 SET and The menu 16:9 SET opens.
18
Page 17

Selecting the recording source
To record from the TV
` Select the desired channel with the PR+/– oder number buttons:
` If you use a satellite receiver for the TV reception, press
the satellite receiver and, on the remote control of the satellite receiver,
select the channel.
INPUT to select
VCR RECORDING
To record from the internal DVD player
` Insert the desired DVD.
` Play the DVD.
` Press
If you press
If you press
REC to start the recording.
STOP in the DVD mode, the DVD and VCR will stop at the
same time.
STOP in the VCR mode, the VCR will stop recording and the
DVD continues to play.
To record from another device connected to your DVD player/
VCR
Connect another device as explained in the chapter „Connections“: “To
copy from another device to your DVD player/VCR”, page 11.
` Insert a tape into your DVD player/VCR.
` With the button
- for a device connected to the SCART socket
-
for a device connected to the SCART socket
- for a device connected to the front AV sockets, select AV-F.
` Set the other machine to playback.
` Press
REC on your DVD player/VCR.
INPUT, Select the source you want to record from:
EURO AV1, select AV1;
EURO AV2
,
select AV2;
To record from your DVD player/VCR to another video VCR
Connect another device as explained in the chapter „Connections“: “To
copy from your DVD player/VCR to another VCR”, page 11.
Please note that copyright
protected DVD’s cannot
be copied.
` On the other video, select its
` Switch your DVD player/VCR to playback.
AV input. Set the machine to record.
To watch a TV Channel or DVD during recording
If you want to play a DVD during recording a videotape, insert the DVD.
Press
DVD to select the DVD mode and play the DVD.
If you want to watch a TV channel recording from the internal DVD
player, press
the
PR+/– buttons.
DVD PLAYER/VCR – MD 80975 19
VCR to select the VCR mode and select the channel with
Page 18

VCR RECORDING
Timer recording
Notes on timer recording and VPS/PDC
You can set a fixed time and date for a scheduled recording. Additionally,
your DVD player/VCR can receive VPS/PDC signals.
VPS/PDC is a service provided by some stations to enable you to
perform timer recordings precisely even if the broadcaster delays
the start time of the programm. Not all stations offer VPS/PDC, in
which case the DVD player/VCR will start at the time you enter and
not at the actual starting time of the programme.
For a scheduled recording, clock, date and stations must be set
correctly.
Load a cassette with its safety tab in place. If the safety tab is removed,
the recorder will eject the cassette.
If there is not sufficient free space for the recording on the cassette, the
video switches automatically to „LP“ for double recording speed.
Timer recording using VideoPlus *
You will find the VideoPlus numbers in you TV magazine.
` In the VCR mode, call up the VideoPlus menu by pressing the button
PROGRAM on the remote control.
` From your TV magazine, type in the number next to the programme
you want to record.
` If you mistype a number, press the arrow button to clear.
` Confirm with
` Select the frequency („
ENTER
The
TIMER PROGRAM menu shows the time and date matching the
entered VideoPlus number.
` To make changes in menu, select the entry using the arrow buttons
and make another choice with the arrow buttons .
PR: If there is no programme location displayed in this line, type in the
programme location with the number buttons.
If you wish to record from a satellite receiver, select under
satellite programm location or
with the antenna cable or the SCART cable.
TAPE SPEED: SP(normal recording time) or LP(double recording
time);
VPS/PDC: Select OFF if you want to start the recording at the set time
regardless of any delays in the programme.
The VPS dominates any manual time setting. When VPS is activated,
the recording will start and stop at the time which is transmitted by
the broadcasting station.
If the recording should overlap with another recording, you will get a
warning “
OK/ENTER. The menu „HOW OFTEN ...“ appears.
Once“, „Weekly“ etc.) and confirm with OK/
. The menu TIMER PROGRAM opens.
PR the
AV1/2, depending on the connection
OVERLAP!“.
* VIDEOPLUS is a trademark applied for by Gemstar Development Corp. the VIDEOPLUS system is
manufactured under license from Gemstar Development Corporation.
20
Page 19

After finishing the timer programming, a screen message “INSERT A
CASSETTE
“ and “TURN VCR OFF“ appears.
` Switch your DVD player/VCR off.
Normal timer recording
` Call up the SETUP menu by pressing SETUP.
` Select
` Select a free line in the schedule and press
` The menu “
` Select the frequency („
` Type in one after the other:
After typing a one digit-number, wait a few seconds.
TIMER PROGRAM and confirm with OK/ENTER. The menu
TIMER PROGRAM appears.
OK/ENTER.
HOW OFTEN ...“ appears.
Once“, „Weekly“ etc.) and confirm with OK/
ENTER
. The menu TIMER PROGRAM opens.
- the programme location number;
- the starting time of the recording,
- the end time of the recording,
- the date of the broadcast, unless it is today,
-
TAPE SPEED: SP (normal recording time) or LP (double recording
time);
VPS/PDC: Select OFF if you want to start the recording at the set time
regardless of any delays in the programme.
VCR RECORDING
` If you wish to make changes, move to the position using the arrow
buttons . Change the setting using the arrow buttons or
the number buttons.
` When all settings are ok, press or until you see
OK:CONFIRM
in the bottom line.
` Press
OK/ENTER and leave the menu with SETUP.
` Switch your DVD player/VCR off.
Please note: If you want to switch on the DVD player/VCR before or during a timer recording, make
sure the unit is not in the VCR mode. The recording will fail if the unit is switched into the VCR while
a timer recording is to start. However, you can use the unit in the DVD mode (e. g., to watch DVD’s
during the recording).
Deleting and changing timer recordings
` Select TIMER PROGRAM and confirm with OK/ENTER . The menu
„
TIMER PROGRAM ...“ appears. The menu displays an overview for
all scheduled progammes.
` In order to delete a programming, select it with the arrow buttons
and press
the number button 0 and Confirm with OK/ENTER.
` In order to change a programming, select it with the arrow buttons
and press
can carry out the changes as described in the section “Normal timer
recording”, page 21.
OK/ENTER. The programming menu appears. Press
OK/ENTER. The programming menu appears. You
DVD PLAYER/VCR – MD 80975 21
Page 20

VCR RECORDING
More video cassette functions
The counter
The counter counts in real time from the point you load the cassette.
The counter does not count unrecorded parts of the tape.
If you rewind beyond the zero position, the counter counts in
negative values (e. g. –0:01:15).
Display information
` When a cassette is loaded, you can call up information by pressing the
DISPLAY button:
1 x: Complete information on current status > time and date;
2 x: Counter.
When the cassette is not playing (playback, fast forward, fast reverse),
the remaining time does not appear.
Auto repeat
` To turn on the auto repeat function, press the PLAY button for five
seconds during stop or still mode. The DVD player/VCR will then
repeatedly play the tape from beginning to end.
` To stop this mode, press the button or a playback mode button (
FF, REW, STOP
PLAY,
).
The menu TAPE CONTROL
The menu tape controls provides more control functions. This menu only
appears when a cassette is loaded.
` To open the menu, press
Tape remain
This function allows you to see if there is enough space on the cassette for
a planned recording.
` Confirm
` In the next menu, select the length of the cassette currently inserted.
SETUP, then select TAPE CONTROL, and
confirm with
Confirm with .
You will see the remaining time in the format HH:MM for a few seconds
in the right bottom corner of the TV screen (in the picture below: 1 hour
27 minutes).
OK/ENTER.
TAPE REMAIN with OK/ENTER.
22
Go to zero
` With this function you can access the zero position of the cassette. This
is the position where the cassette started after inserting it, after
switching the device on, or after resetting the counter (see next
chapter).
Page 21

` In the menu TAPE CONTROL, select GO TO ZERO and confirm
with
OK/ENTER.
The cassette will automatically rewind to the zero position and then
stop.
Counter reset
` In the menu TAPE CONTROL, select COUNTER RESET and
confirm with
The current position of the cassette will be set to
OK/ENTER.
0:00:00.
Finding the index marks
When you record a programme, the VCR places an index mark at the start
of the recording.
` In the menu
confirm with
backwards on the tape. The VCR will search forward or backwards and
start playback at the next index mark.
TAPE CONTROL, select INDEX+ or INDEX- and
OK/ENTER. INDEX+ searches forward, INDEX- searches
VCR RECORDING
The unit will search all index marks successively. When the search has
found the mark where you wish to start the playback, press
PLAY.
The VCR Hi-Fi sound system
The DVD player/VCR records the complete sound signal transmitted by
the TV station. In addition to the normal mono sound track of VHS video
recorders, your DVD player/VCR is equipped with a high quality Hi-Fi
sound system.
This means you can enjoy stereo sound, surround sound, and two
dialogue modes (dual, bilingual; usually with the original sound track and
dubbed sound track).
Displaying the sound mode
sound mode of the current broadcasting station in the top right corner of
TV screen (if no sound mode is displayed, press the button
STEREO: sterero sound;
BIL I/BIL II: bilingual sound;
no display: monaural sound.
on the cassette (if not, press the button
HI-FI: stereo/bilingual;
no display: monaural sound.
AUDIO).
AUDIO).
In the stop modeIn the stop mode of a tape playback, the DVD player/VCR displays the
During playbackDuring playback of a VCR, the DVD player/VCR displays what is recorded
DVD PLAYER/VCR – MD 80975 23
Page 22

VCR RECORDING
Selecting the sound output
By pressing the button AUDIO repeatedly, you can select the sound
output.
During a stereo playback:
HI-FI L+R: Hi-Fi stereo;
HI-FI LEFT: left audio channel only;
HI-FI RIGHT: right audio channel only;
HI-FI OFF: the normal mono sound track of Hi-Fi cassette.
During playback of a bilingual playback:
BIL I: main language (original soundtrack);
BIL II: sub-language (dubbed);
BIL I+II: both main and sub-language;
BIL OFF: bilingual off.
For mono playback, there is no choice available.
24
Page 23

DISC OPERATION
This chapter encompasses the playback functions of all
supported disc formats, i. e. DVD, VCD, SVCD0, CD, MP3, JPEG,
MPEG.
About DVDs
A DVD – Digital Versatile Disk – is a digital medium that stores information.
DVDs are marked with one of the symbols shown here.
There are different types of DVD with different storage capacities
depending on how the information is stored.
DVD structure
Video DVDs are divided into titles and chapters. A DVD can have several
titles, which may in turn be made up of several chapters. The titles and
chapters are each numbered sequentially
The first title of a DVD usually comprises licence details and
manufacturer's information. The next title is usually the film itself. Other
titles may include such items as "making of" documentaries, film previews
or information on the actors.
can be stored on DVDs. Any combination of languages and subtitles can
be selected for playing back discs.
Languages and subtitlesUp to eight languages and subtitles in as many as 32 different languages
Regional codes
For reasons connected with global DVD sales, a code has been developed
for DVDs that allows the recording to be played only on units purchased
in a particular region.
This code is based on a system that divides the world into six
regions. As Europe is zone 2, your DVD player will only play
DVDs that have the regional code 2. The regional code is printed
on the DVD packaging (refer to the following logo).
Apart from DVDs with the regional code 2, the unit will only play DVDs
with the regional code 0 (suitable for any DVD player).
If you have problems when playing certain DVDs, make sure that the
DVD has the regional code 2 or 0.
DVD PLAYER/VCR – MD 80975 25
Page 24

DISC OPERATION
Inserting a disc
To activate the DVD
mode, press the button
DVD.
Basic playback
` Make sure that there is about 15 cm of space in front of the disc
compartment so that it can open without hindrance. Press
CLOSE
` Insert a disc into the disc compartment with the title side upwards.
Make sure you place the disc in the middle of the disc holder, so that it
does not stick when you close the compartment.
` Press the
The disc usually start playing automatically after a few seconds. The
display indicator depends on the type of disc (DVD, video CD, music CD,
MP3 or JPEG CD etc.) and its format.
You may need to press
to make a selection using the arrow keys.
` To stop the disc, press
` To interrupt the playback, press
now in pause mode.
` Press
to open the disc tray.
OPEN/CLOSE button. The disc compartment closes.
PLAY/PAUSE or a menu may appear and you need
STOP.
PLAY/PAUSE. The DVD player/VCR is
PLAY/PAUSE again to resume playback.
OPEN/
Searching options
Fast search
` For a fast forward or reverse search, press FF or REW during playback
mode. Press repeatedly to increase the speed
Press
` VCD’s, CD’s, MP3-discs will increase the speed
The reverse playback may be not available for certain DVD’s.
PLAY/PAUSE again to return to normal speed.
2 x > 4 x > 8 x > 32 x.
2 x > 4 x > 8 x.
Slow search
` For slow forward or reverse search, press FF or REW during pause
mode. Press repeatedly to reduce the speed
1/32 x
` VCD will reduce the speed 1/
not search in slow reverse.
. Press PLAY/PAUSE again to return to normal speed.
2 x > 1/4 x > 1/8 x. Some VCD’s will
1/2 x > 1/4 x > 1/8 x >
Skip
` To move to the next chapter or track, press NEXT .
` To skip to the beginning of the current chapter or track or to the
previous chapter/track, press
PREV .
Special message
When trying to activate a function which is not available in the current mode or does not exist on
the disc, a message as depicted here appears. The message disappears after a few seconds.
26
Page 25

Direct search of DVD with the number buttons
You can search a title number, a chapter number or a time directly.
DISC OPERATION
` To search a title number, press the button
shows the current title number and the total number of titles.
` Enter the desired title number using the number buttons and confirm
with
OK/ENTER.
` To search a chapter number, press the button
entry field shows the current chapter number and the total nuber of
chapters.
` Enter the desired chapter number using the number buttons and
confirm with
` To search a time, press the button
shows the current time.
` Enter the desired time using the number buttons and confirm with
ENTER
OK/ENTER.
SEARCH three times. The entry field
.
SEARCH once. The entry field
SEARCH twice. The
OK/
Direct search of VCD with the number buttons
You can search a track number or a time directly.
` To search a track number, press the button
field shows the current track number and the total number of tracks.
` Enter the desired track number using the number buttons and confirm
with
OK/ENTER.
` To search a time, press the button
the current time.
` Enter the desired time using the number buttons and confirm with
ENTER
.
SEARCH twice. The entry field shows
SEARCH once. The entry
OK/
Searching in the DVD menus
DVDs usually have one or more menus stored on them and you can use
these to navigate on the DVD.
` Using the buttons
stored on the DVD during DVD playback.
` You navigate to the items in the DVD menu using the arrow keys.
Confirm each entry with
Please note that the precise functions available in each menu depend on
the DVD. E. g. some DVDs only have one menu that appears, no matter
which method is used.
TITLE/PBC and MENU you can access the menus
OK/ENTER.
PBC function
Some type 2.0 VCDs that have a title/chapter structure give the option of
playback control.
Using the
off, for controlling the title/chapter. Possible functions include:
- Direct title selection of title/chapter
- SKIP functions
TITLE/PBC button you can switch the extended functions on or
Please note that the precise functions available depend on the VCD.
DVD PLAYER/VCR – MD 80975 27
Page 26

DISC OPERATION
Repeat functions
Storing markers
You can store a „bookmark“ at any scene you wish to quickly return to at
any point of the disc.
` Press the button
` To set the first bookmark, press
(“
1 “) is set and highlighted.
` To set the second bookmark, press
place (“
` Proceed like this to set more bookmarks.
` Press
` To access a set marker, use the arrow buttons .
` Press
` If you want to delete a marker, highlight it and press
2 “) is set and highlighted.
MARK again to close the entry field.
PLAY to play the disc from the marker.
MARK to open the marker entry field.
OK/ENTER twice. The first entry place is
OK/ENTER again. The second entry
CLEAR.
Repeating a defined period
` Each time you press the button REPEAT during the playback mode, the
repeat plaback starts as described below:
CHAPTER: The current chapter will be repeated.
TITLE: The current title will be repeated.
TRACK: The current track will be repeated.
ALL: The whole disc will be repeated.
Repeat one: The current file will be repeated.
Repeat all: All files on the disc will be repeated.
Random: The files on the disc will be played in random order.
OFF: End of repeat playback.
28
For VCD’s, the PBC must be turned off for repear playback.
Page 27

Repeating a period from A to B
You can repeat a defined period from A to B.
DISC OPERATION
` During playback press the button
sequence.
` Press
` Press the
A-B again to set the end of the repeat sequence. A–B symbol
appears on the screen. The defined section will now be repeated
continuously.
on the screen.
A– appears on the screen.
A-B a third time to end the repeat sequence. OFF appears
A-B to set the start of the repeat
Picture adjustments
Zoom
` Press the button ZOOM once. The image is enlarged x2.
` Press the button
` To return to the normal size, press
` You can use the arrow buttons to select the section of the enlarged
image that you wish to view (only for DVDs).
During zoom mode, the subtitles cannot be seen.
ZOOM twice. The image is enlarged x4.
ZOOM again.
Angle
On a few DVDs, some individual scenes are recorded from various camera
angles.
` Press the button
various perspectives, the symbol and the current perspective/total
number of perspectives are displayed.
` Press
ANGLE again to switch to the next camera position.
ANGLE to activate the function. If the scene has
Audio settings
Audio language
` Press the button AUDIO repeatedly to select another language that is
available on the DVD. The change is made immediately and does not
need to be confirmed.
During zoom mode, the subtitles cannot be seen.
Sound output
` With VCD’s, press the button AUDIO repeatedly to select different
sound outputs. The sound toggles between
(monaural sound on the left speaker) and
on the right speaker).
STEREO, L-MONO
R-MONO (monaural sound
DVD PLAYER/VCR – MD 80975 29
Page 28

DISC OPERATION
Subtitle language
` Press SUBTITLE repeatedly to select another subtitle language that is
available on the DVD. The change is made immediately and does not
need to be confirmed.
3D Audio
` The function 3D AUDIO provides a virtual 3D sound effect from 2-
channel sources.
` Press the button
3D OFF.
3D repeatedly to toggle between the 3D ON and
Displaying and editing the current status
You can open the display menu which shows the current time status and
the current settings with the button
Display with DVD’s
` Press DISPLAY in playback mode. The display menu opens:
DISPLAY.
` Select the entry you would like to change using the buttons.
` If you would like to change the title, chapter or time, type in a different
value using the number buttons or the arrow buttons .
` If you would like to change other entries, use the buttons.
` At the end, confirm with
OK/ENTER.
Display with VCD’s
` Press DISPLAY in playback mode. The display menu opens:
` Edit the menu as explained in the previous paragraph on DVD’s.
30
Page 29

OTHER DISC TYPES
When you insert a MP3 disc, a CD disc, a JPEG disc or an MPEG disc, a
menu will appear which shows the directories and files on this disc.
Playing CD or MP3 discs
The MP3 format
The MP3 format is a compression format used for audio data. The MP3 format was developed in order to
greatly reduce the size of audio data.
MP3 files can only be played if they have been saved with the file extension *.mp3. Unlike traditional
audio CDs, MP3 CDs can be subdivided into directories (folders, albums) and files (tracks, titles) – just like
a data CD on your computer.
When a CD is inserted, a list of the titles will appear in the menu.
When an MP3 is inserted, its structure of folders and files will appear in
the menu.
The playback functions are similar.
Playback
` To select a title, move the cursor to th title using the arrow buttons
and press
` To open a folder (of a MP3 disc), move the cursor to the desired folder
using the arrow buttons and press
` To go back to a folder above the current folder, select the uppermost
folder and press the arrow button .
` To playback a file (a title), move the cursor to the desired folder using
the arrow buttons and press
playback.
You can also select a title by typing in the title number using the
number buttons.
OK/ENTER to confirm.
OK/ENTER to confirm.
OK/ENTER or PLAY start the
Repeat mode
` You can use the button REPEAT to toggle between REPEAT ONE >
REPEAT ALL > RANDOM
the cursor to the
press
OK/ENTER repeatedly.
REPEAT symbol using the arrow button and
and OFF. Alternatively, you can move
DVD PLAYER/VCR – MD 80975 31
Page 30

OTHER DISC TYPES
Playing JPEG pictures
Programming titles
` Move the cursor to the first title you want in the programmed list.
` Press
` Proceed like this with all titles you want in the list.
` If you want to delete one title from the list, select this title using the
` If you want to delete the complete list, select the dustbin symbol in the
PROGRAM. The title moves to the PROGRAM list on the right
side of the menu.
arrow buttons and press
middle of the menu and press
CLEAR.
OK/ENTER.
Playback
` Navigate the folders and titles as described above in the paragraph
“Playback“ in the chapter "Playing CD or MP3 discs".
When you select a file, you will see the preview of the picture on the
right side of the menu.
` To start a slide show of the pictures, select a picture and press
OK/ENTER.
All pictures in the current folder will be shown successively until you
press
STOP.
` Return to the menu using the button
On the bottom bar of the display window, you will find playback options:
Rotate the picture using the arrow buttons ;
skip to the previous or next picture with
STOP.
PREV or NEXT.
PLAY or
Slide show delay time
You can control the speed of the slideshow.
` To do so, select the symbol “
arrow button .
` Press
OK/ENTER repeatedly to toggle between 2 seconds, 4 seconds 10
seconds and
prompted and the selected picture will remain displayed.
OFF. With the setting OFF, no slide show will be
Time“ in the middle of the menu using the
Combination of music and picture
You can combine the playback of picture and sound, if there are both
picture (JPEG) and sound (MP3) files on the disc.
` Insert the disc with JPEG and MP3 files. The menu shows the music
symbol (musical notes) and the picture symbol (camera) on the left side
of the menu.
` In order only to playback the music, select the music symbol (notes)
with the arrow button . The list of MP3 files appears and you can
playback as usual.
` In order to prepare the combined playback of music and pictures, select
the picture symbol (camera) with the arrow button . The list of JPEG
files appears.
` Then select the symbol “
menu using the arrow button and .
` Press
PLAY. The combined playback will start.
Combination Play“ in the middle of the
32
Page 31

Playing MPEG movies
When you insert a MP3 or CDDA disc, a file menu appears which shows
the directories and files on this disc.
Playback
` Navigate the folders and titles as described above in the paragraph
“Playback“ in the chapter “Playing MP3 or CD(DA) discs“.
When you select a file, you will see the preview of the movie on the right
side of the menu.
` To start the movie in full screen size, select it and press
ENTER
` Return to the menu using the button
` To skip to the previous or next movie, press
.
STOP.
PREV or NEXT.
Time display
` Press DISPLAY to open a menu which shows the current disc mode:
PLAY or OK/
OTHER DISC TYPES
DVD PLAYER/VCR – MD 80975 33
Page 32

SETTINGS IN THE DVD SETUP MENU
All DVD settings are done in the SETUP menu that you open using the
button
player/VCR must be in the stop mode.
The SETUP covers the menus:
Video
Audio
Others
Navigating the menu
` After opening the SETUP menu, use the arrow buttons to select
` To enter the first entry of the menu, press .
` Press again to select the first of the options displayed in the right
` Select the desired option with and confirm with
` Return to the menus on left side with .
` You can leave the
SETUP when in DVD mode. To open the SETUP menu, the DVD
Language
a menu
column of the menu.
SETUP menu at any time with the button SETUP.
OK/ENTER.
The menu “Language“
OSD
` Select the OSD language here; i. e. the language of the SETUP menu
and the other text displays (OSD stand for "on-screen display").
AUDIO
` Select the default setting for the spoken language on the DVD here. If
the DVD does not contain the selected language, it is played back in the
original language.
Last option
spread languages.
Of course you can change the setting for the current DVD during playback
using the
Others: Here you can enter a four-digit code for less wide-
You will find the list of the codes on page 37of the manual.
AUDIO or DISPLAY buttons.
SUBTITLE
` Select the default setting for the subtitle language here.
Off: No subtitles are displayed.
Others: See above.
Of course you can change the setting for the current DVD during playback
using the
SUBTITLE or DISPLAY buttons.
34
Page 33

SETTINGS IN THE DVD SETUP MENU
DISC MENU
` Select the default setting for the DVD menu language here.
Auto: The first language on the disc will be displayed.
Others: See above.
The menu “Video“
TV ASPECT
4:3 LB: Select this setting to display a film in 16:9 format on a
traditional TV with a 4:3 format. The image is shown
with a black bar at the lower and upper edges.
4:3 Pan Scan: Select this setting to display a program in the usual 4:3
format on a 4:3 format TV. Programs in 16:9 format are
shown at full size without a bar but the edges of the
images are cut.
16:9 Wide: Select this option to output to a wide-screen television
in 16:9 format.
The menu “Audio“
DIGITAL OUT
Bitstream: The DVD player/VCR outputs the raw audio signal recorded
on the disc goes to the digital audio output.
LPCM:Select LPCM if there is a connection to a digital amplifier/
receiver. Your DVD player/VCR will transmit the decoded
audio signal to the digital audio output.
DYNAMIC RANGE
Full: You will hear the loud sounds softer and soft sounds louder.
Off: You will hear the sound as it was originally recorded on the disc.
The menu “Others“
OSD
On: The OSD which accompanies some button controls (e. g.
REWIND and FAST FORWARD) appears on the screen.
Off: This OSD does not appear on the screen when the button is
pressed. This does not affect such controls where the OSD is
necessary for the controls, which will alway appear.
Screen Saver
On: After five minutes in the stop mode or pause mode, the screen
saver (a moving DVD logo) will turn on in order to prevent the
screen from being damaged.
Off: The screen saver will not be turned on.
DVD PLAYER/VCR – MD 80975 35
Page 34

SETTINGS IN THE DVD SETUP MENU
Defaults
Reset: You can reset the device to the factory settings here. To do so,
Please note that individual parental control setting (see next chapter) and
the password will not be reset.
Parental
Some DVDs and CDs are coded with encryption signals. This enables
DVDs to be sub-divided into 8 different authorisation classes.
For your information we list here the authorisation classes that the
Motion Picture Association has established:
1 KIDS: Suitable even for small children;
2 G: For all age groups;
3 PG: Parental guidance recommended;
4 PG-13: Parental guidance strongly recommended;
5 PG-R: Under 17 parental guidance recommended;
6 R: Parental guidance strongly recommended for children
7 NC-17: Not suitable for young people under 17;
8 ADULT: Only for adults.
For example , if you have inserted a DVD that is coded with authorisation
class 7 or 8 (ADULT) and you have selected authorisation classes 1 to 6, a
message appears and the viewer must enter a password. Parts of a DVD –
certain scenes, for example – may also be encoded with an authorisation
class or a range of authorisation classes.
` When you move to the right column of the menu to change the
authorisation class, you have to enter the password first (see the next
chapter).
confirm the entry
RESET with OK/ENTER.
An „Are you sure?“-message comes up. Confirm
ENTER
.
Some scenes not suitable for children under 13;
and teenagers below 17;
OK with OK/
36
Password
You can alter the password set by the factory here.
` Select
` Enter the four digits using the number keys. The factory-set password
If you enter a wrong password, the message
If you enter the correct password, the message
` Enter the new four digits using the number keys and confirm with
` Enter the new four digits again and confirm with
PASSWORD with . A new menu INPUT PASSWORD
comes up.
is:
3308.
WRONG PASSWORD
appears in the right column.
CHANGE
PASSWORD
ENTER
. The message CONFIRM PASSWORD appears in the right
appears in the right column.
column.
OK/ENTER.
Note down your password and keep it in a safe place.
OK/
Page 35

SETTINGS IN THE DVD SETUP MENU
Table of language codes
In the menus AUDIO, SUBTITLE and DISC you can select additional
languages under the entry „
Others“ by entering a four-digit code:
DVD PLAYER/VCR – MD 80975 37
Page 36

TROUBLESHOOTING
If errors occur, check first whether you can correct the problem yourself.
The following list may help you.
Never try to repair the device yourself. Contact our service centre
or other qualified personnel if a repair is necessary.
PROBLEM POSSIBLE CAUSE / REMEDY
GENERAL
No standby display Check the mains connection: Is the plug firmly inserted in the mains
socket?
The DVD player/VCR does not
work
The unit does not respond to the
remote control
No picture Are the cable connections between the DVD and television correct and
Incorrect image format (4:3, 16:9) Check in the
No sound Has the sound been switched off (
The remote control does not work No batteries inserted or batteries flat.
Press the
control.
If the unit has been affected by a storm, static charging or other external
factor, try the following procedure:
Press the
Then pull out the mains cable and plug it back in.
Check whether the batteries need changing and have been inserted
correctly. Remove anything which may be blocking the signal between
the infrared transmitter on the remote control and the unit's sensor.
Is the distance between the remote control and the DVD player/VCR too
great (over 7 m)?
undamaged?
Is the television switched on?
Have you selected the video channel on the television?
Have you selected the correct video output on the DVD player/VCR?
Do you need to carry out the channel search again?
selected format matches the television.
Check the audio connections.
Incorrect audio output settings.
DVD playback is either in fast forward or slow motion.
The remote control is not pointing to the device.
STANDBY/ON button on the DVD player/VCR or remote
STANDBY/ON button on the DVD player/VCR (standby mode).
SETUPmenu > VIDEO > TV ASPECT whether the
MUTE)?
DVD-RELATED PROBLEMS
Distorted picture Check whether the DVD is dirty and if necessary clean it carefully, wiping
it from the centre to the edge with a soft, dry cloth. Slight picture
distortion is not a malfunction.
38
Page 37

TROUBLESHOOTING
The disc does not play even
though
or stops again immediately
Wrong language
Wrong subtitle language
SKIP function does not work Some DVDs disable the SKIP function for certain titles or chapters.
The camera angle cannot be
changed
You have forgotten the password
VCR-RELATED PROBLEMS
No recording on cassette The recording protection tab on the cassette has been removed. Either
VCR playback produces a very
snowy picture
PLAY has been pressed,
Is the disc inserted with the title facing upwards?
Check whether the disc has been damaged by trying another disc. If the
disc is dirty, clean it carefully, wiping it from the centre to the edge with
a soft, dry cloth.
Have you inserted a type of disc that can not be played?
For commercial DVDs: Does the DVD have the correct regional code (2)?
If condensation has formed: give the recorder one to two hours to dry off.
Change the language setting in the SETUP menu (
SUBTITLES
TITLEkey).
Check on the DVD cover or DVD menu whether the selected language is
actually on the DVD.
Only a few discs allow camera angles to be selected and usually only for
selected scenes on any one DVD.
Use the factory password 3308.
use a different cassette or cover the record protection slot with a piece of
adhesive tape.
The video heads are dirty. Clean the video heads using a special cleaning
cassette.
), via the SUBTITLE key or in the DVD menu (MENU or
LANGUAGE -
Disposal
Packaging
All packaging and packaging materials that are no longer required can and
should be recycled.
Device
At the end of its life, the appliance must not be disposed of in household
rubbish. Enquire about the options for environmentally-friendly disposal.
Batteries
Do not dispose of used batteries in the household rubbish! They must be
deposited at a collection point for used batteries.
DVD PLAYER/VCR – MD 80975 39
Page 38

TECHNICAL DATA
Voltage supply: 200-240 V ~ 50/60 Hz
Power consumption: 22 W
Batteries for the remote control: 2 x 1.5 V R3/LR03 Type "AAA"
Colour TV system: PAL/NTSC
Video system: VHS
Recording qualities (VCR) SP, LP
Laser output: Class 1 laser product
Playback formats: VHS-video cassette; DVD (Digital Versatile Disk), DVD+RW, DVD-R,
DVD-RW; VCD, SVCD, CD-Audio; CD-R, CD-RW, JPEG-CD, MP3-CD
When playing audio CDs, please check the label.
Please note: These days, there are many non standard CD recording
and copy protection procedures as well as various blank CD-R and
CD-RW discs. Therefore in individual cases there may be read errors
or delays. This does not mean the unit is faulty.
Subject to technical changes.
40
 Loading...