

DVD-Porty MD 80686 D EN.book Seite 3 Montag, 30. Mai 2005 4:05 16
NHALTSVERZEICHNIS
I
Sicherheitsvorschriften . . . . . . . . . . . . . . . . . . . . . . . . . . . . . . . . . 4
Das Gerät. . . . . . . . . . . . . . . . . . . . . . . . . . . . . . . . . . . . . . . . . . 4
Betrieb mit Akku . . . . . . . . . . . . . . . . . . . . . . . . . . . . . . . . . . . . . 5
Über DVDs . . . . . . . . . . . . . . . . . . . . . . . . . . . . . . . . . . . . . . . . 6
Lieferumfang . . . . . . . . . . . . . . . . . . . . . . . . . . . . . . . . . . . . . . . 7
Die Geräteteile . . . . . . . . . . . . . . . . . . . . . . . . . . . . . . . . . . . . . . 8
Das Hauptgerät . . . . . . . . . . . . . . . . . . . . . . . . . . . . . . . . . . . . . . 8
Die Fernbedienung . . . . . . . . . . . . . . . . . . . . . . . . . . . . . . . . . . . 10
Der Akku . . . . . . . . . . . . . . . . . . . . . . . . . . . . . . . . . . . . . . . . . . 11
Den Akku aufladen . . . . . . . . . . . . . . . . . . . . . . . . . . . . . . . . . . . 11
DVD-Player mit Strom versorgen . . . . . . . . . . . . . . . . . . . . . . . . . . 12
Anschlussmöglichkeiten . . . . . . . . . . . . . . . . . . . . . . . . . . . . . . . 14
Umstellen von AV OUT zu AV IN . . . . . . . . . . . . . . . . . . . . . . . . . 14
Anschluss an ein TV-Gerät . . . . . . . . . . . . . . . . . . . . . . . . . . . . . . 15
Ton auf 5.1-Lautsprecheranlage ausgeben . . . . . . . . . . . . . . . . . . . 16
Anschluss an ein aktives Lautsprechersystem . . . . . . . . . . . . . . . . . . 17
Den DVD-Player im Auto anschließen . . . . . . . . . . . . . . . . . . . . . . 18
Betrieb . . . . . . . . . . . . . . . . . . . . . . . . . . . . . . . . . . . . . . . . . . . 19
Disk einlegen/auswerfen . . . . . . . . . . . . . . . . . . . . . . . . . . . . . . . 19
Tastenfunktionen der Fernbedienung . . . . . . . . . . . . . . . . . . . . . . . 20
Wiedergabe von MP3- und JPEG-CDs . . . . . . . . . . . . . . . . . . . . 24
Einstellungen im SETUP-Menü . . . . . . . . . . . . . . . . . . . . . . . . . . 25
Menü SYSTEM . . . . . . . . . . . . . . . . . . . . . . . . . . . . . . . . . . . . . . 25
Menü LANGUAGE (Sprache) . . . . . . . . . . . . . . . . . . . . . . . . . . . . 27
Menü AUDIO . . . . . . . . . . . . . . . . . . . . . . . . . . . . . . . . . . . . . . 27
Menü VIDEO (Bild) . . . . . . . . . . . . . . . . . . . . . . . . . . . . . . . . . . . 28
Menü DIGITAL . . . . . . . . . . . . . . . . . . . . . . . . . . . . . . . . . . . . . . 28
Wenn Störungen auftreten . . . . . . . . . . . . . . . . . . . . . . . . . . . . 29
Entsorgung . . . . . . . . . . . . . . . . . . . . . . . . . . . . . . . . . . . . . . . . 31
Technische Daten. . . . . . . . . . . . . . . . . . . . . . . . . . . . . . . . . . . . 32
D
D-3
DVD-Porty MD 80686 D EN.book Seite 4 Montag, 30. Mai 2005 4:05 16
SICHERHEITSVORSCHRIFTEN
Zu dieser Anleitung
Lesen Sie vor Inbetriebnahme die Sicherheitsvorschriften aufmerksam durch.
Beachten Sie die Warnungen in der Bedienungsanleitung.
Bewahren Sie die Bedienungsanleitung immer in Reichweite auf. Wenn Sie
das Gerät verkaufen oder weitergeben, händigen Sie unbedingt auch diese
Anleitung und den Garantieschein aus.
Das Gerät
Elektrische Geräte nicht in Kinderhände
Lassen Sie Kinder niemals unbeaufsichtigt elektrische Geräte benutzen.
Batterien/Akkus können bei Verschlucken lebensgefährlich sein. Bewahren Sie des-
halb das Gerät und die Batterien für Kleinkinder unerreichbar auf. Wurde eine Batterie
verschluckt, muss sofort medizinische Hilfe in Anspruch genommen werden.
Halten Sie auch die Verpackungsfolien von Kindern fern. Es besteht Erstickungsgefahr.
Das Gerät sicher aufstellen
Stellen Sie das Gerät auf eine feste, ebene Oberfläche. Es ist nicht für den Betrieb in
Räumen mit hoher Luftfeuchtigkeit (z. B. Badezimmer) und außergewöhnlich viel Staub
ausgelegt. Achten Sie darauf, dass
immer eine ausreichende Belüftung gewährleistet ist;
keine direkten Wärmequellen (z. B. Heizungen) auf das Gerät wirken;
kein direktes Sonnenlicht auf das Gerät trifft;
der Kontakt mit Feuchtigkeit, Wasser oder Spritzwasser vermieden wird (stellen Sie
z. B. keine Vasen auf das Gerät);
das Gerät nicht in unmittelbarer Nähe von Magnetfeldern (z. B. Fernseher oder an-
deren Lautsprechern) steht;
keine offenen Brandquellen (z. B. brennende Kerzen) in der Nähe des Geräts ste-
hen.
Während der Wiedergabe darf das Gerät nicht bewegt oder hochgehoben werden.
Dies könnte die eingelegte Disk beschädigen. Entfernen Sie die Disk vor einem Transport des Geräts. Stellen Sie keinen Gegenstand auf das Gerät.
D-4
DVD-Player_MD42451_D.fm
DVD-Porty MD 80686 D EN.book Seite 5 Montag, 30. Mai 2005 4:05 16
Netzanschluss
Schließen Sie den Netzadapter nur an eine gut erreichbare Steckdose 230 V ~ 50
Hz (Wechselstrom) an, die sich in der Nähe des Aufstellortes befindet. Für den Fall,
dass Sie das Gerät schnell vom Netz nehmen müssen, muss die Steckdose frei zugänglich sein.
Niemals selbst reparieren
Ziehen Sie bei Beschädigungen des Steckers, der Anschlussleitung oder
des Geräts sofort den Stecker aus der Steckdose.
Versuchen Sie auf keinen Fall, das Gerät selber zu öffnen und/oder zu
reparieren. Es besteht die Gefahr des elektrischen Schlags. Wenden Sie
sich im Störungsfall an unser Service Center oder eine andere geeignete
Fachwerkstatt.
Der DVD-Spieler
Der DVD-Spieler ist ein Laserprodukt der Klasse 1. Das Gerät
ist mit einem Sicherheitssystem ausgerüstet, das das Austreten
von gefährlichen Laserstrahlen während des normalen Gebrauchs verhindert. Um Augenverletzungen zu vermeiden,
manipulieren oder beschädigen Sie niemals das Sicherheitssystem des Geräts.
Reinigung des Geräts
Verwenden Sie zum Reinigen nur ein trockenes, weiches Tuch.Verwenden Sie keine
Reinigungslösungen, die die Oberfläche der Geräteteile angreifen können.
Betrieb mit Akku
Nehmen Sie den Akku heraus, wenn Sie das Gerät mit Netzstrom betreiben wollen.
Wenn der Akku angeschlossen bleibt, fließt noch etwas Strom. Hierdurch kann er zu
stark aufgeladen und unbrauchbar werden.
Bewahren Sie den Akku an einem trockenen Platz bei einer Temperatur zwischen
15°C und 25°C auf.
Auch, wenn Sie das Gerät vorwiegend am Stromnetz betreiben, sollten Sie den Akku
mindestens einmal im Jahr durch normalen Gebrauch ganz entleeren.
VORSICHT!
Falls Sie einen anderen Akku einsetzen möchten, nehmen Sie einen Akku
desselben Typs (7,4 V 4000 mAh). Der Einsatz eines anderen Akkus
als angegeben kann zu einer Explosion führen!
D
D-5
DVD-Porty MD 80686 D EN.book Seite 6 Montag, 30. Mai 2005 4:05 16
ÜBER DVDS
Die DVD - Digital Versatile Disc (englisch für „vielseitige digitale Scheibe“) ist ein digitales Speichermedium für Informationen. DVDs sind durch eins der nebenstehenden
Symbole gekennzeichnet.
Abhängig davon, wie die Informationen aufgebracht sind, ergeben sich verschiedene
DVD-Typen mit unterschiedlichen Speicherkapazitäten.
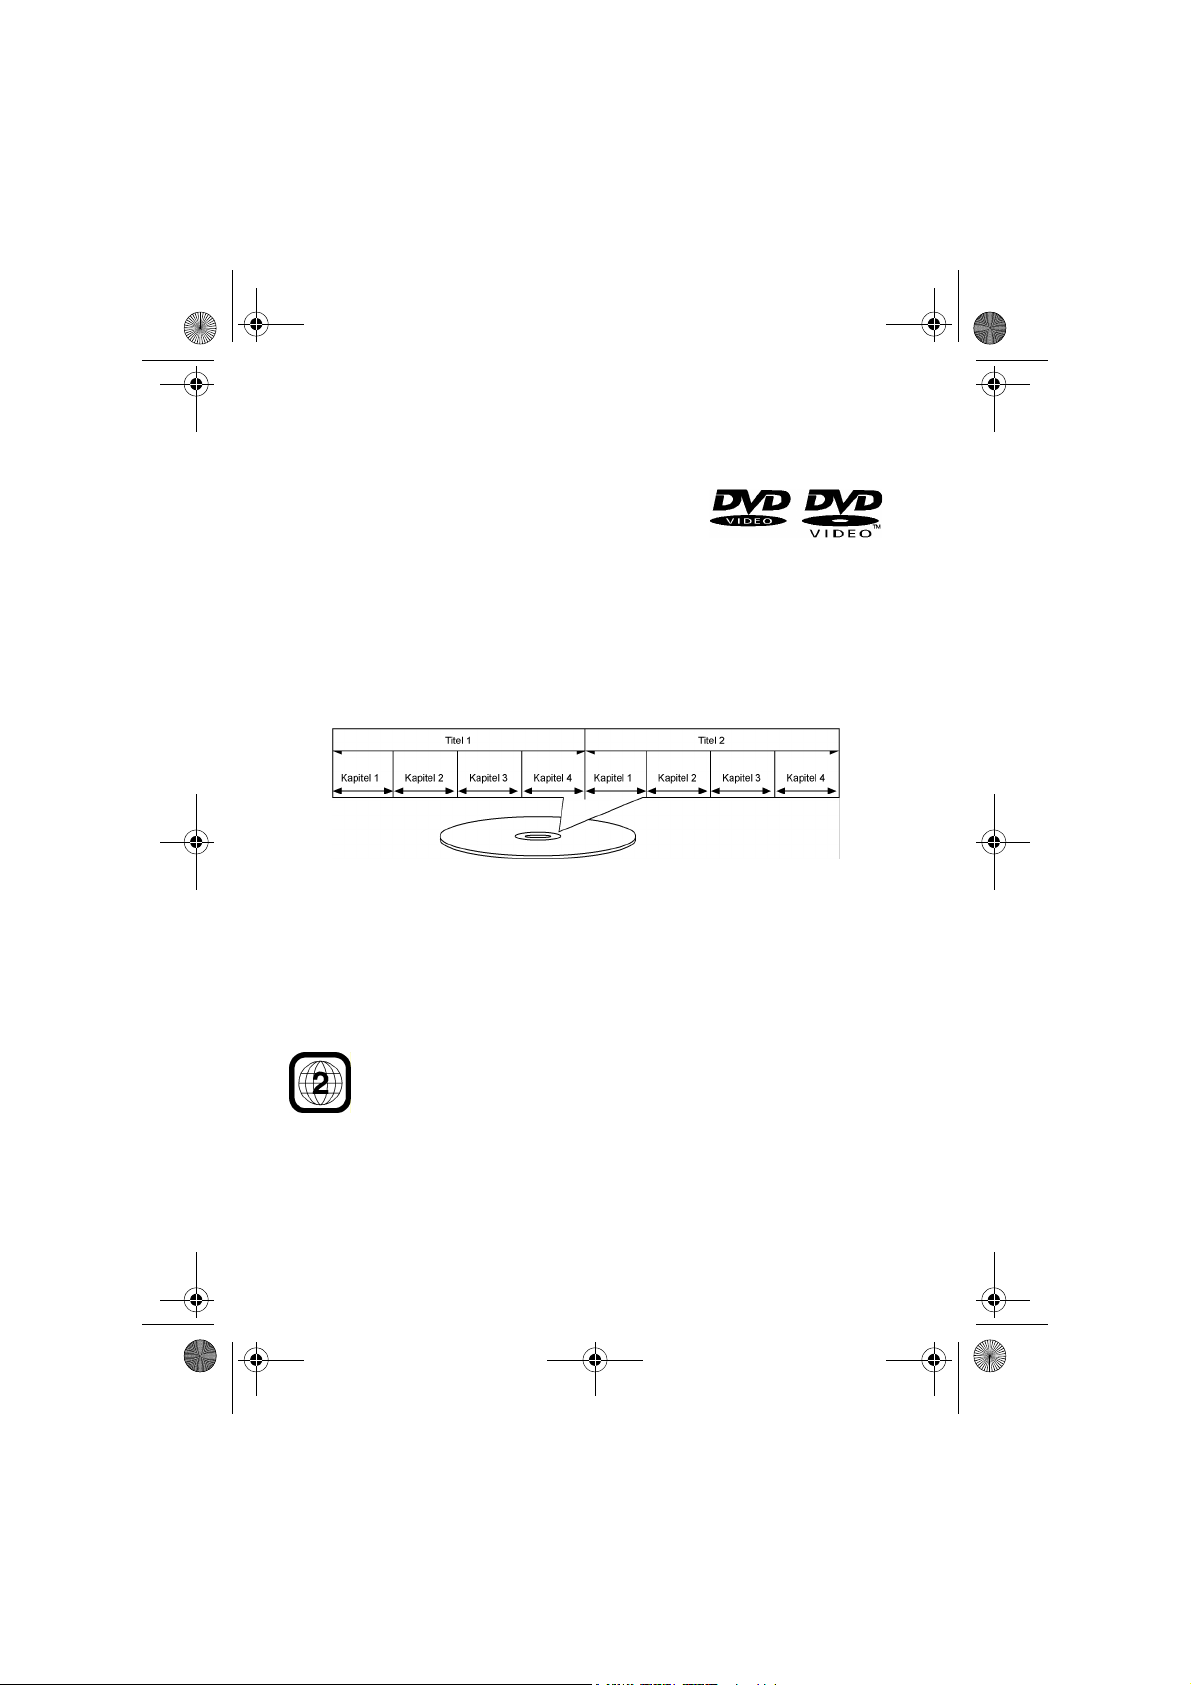
DVD- Aufbau
Video-DVDs sind in Titel und Kapitel unterteilt. Eine DVD kann mehrere Titel haben, die
wiederum aus mehreren Kapiteln bestehen können. Titel und Kapitel sind jeweils fortlaufend nummeriert.
Normalerweise besteht der erste Titel einer DVD aus Lizenzhinweisen und Informationen zum Hersteller. Der nächste Titel ist meist der Film selbst. Weitere Titel können z.
B. „Making-Of“-Reportagen, Filmvorschauen oder Informationen zu den Schauspielern
enthalten.
Regiocodes
Aufgrund weltweiter Vertriebsstrategien wurde für die DVD ein Code entwickelt, der
das Abspielen nur auf Geräten erlaubt, die in bestimmten Regionen erworben wurden.
Dieser Code basiert auf einem System, das die Welt in sechs Regionen einteilt. Europa gehört zur Zone 2. Auf Ihrem DVD-Player lassen sich daher nur
DVDs abspielen, die mit dem Regionalcode 2 (oder 0) versehen sind.
Der Regionalcode ist auf der Verpackung der DVD aufgedruckt (siehe nebenstehendes Logo).
D-6
DVD-Porty MD 80686 D EN.book Seite 7 Montag, 30. Mai 2005 4:05 16
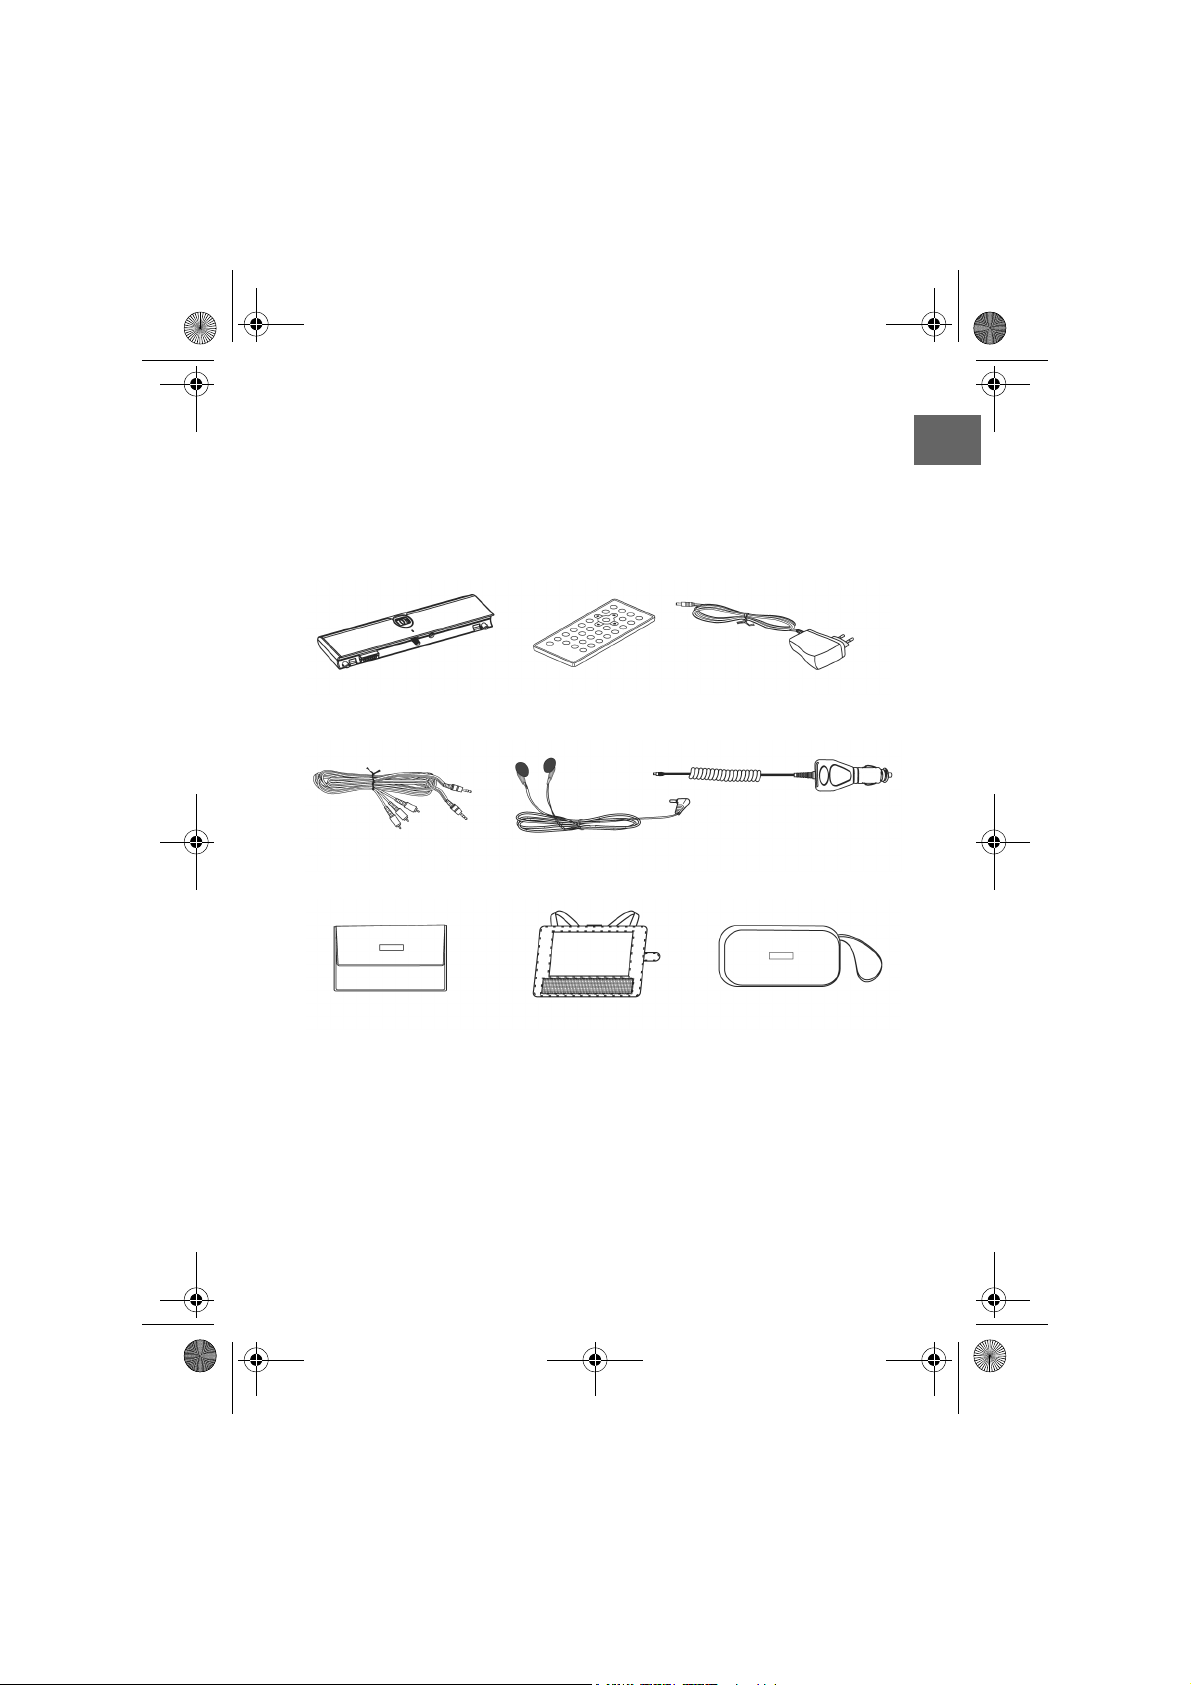
IEFERUMFANG
L
Vergewissern Sie sich beim Auspacken, dass folgende Teile mitgeliefert wurden:
•DVD-Player
• Akku • Fernbedienung • Netzadapter
•AV-Kabel • Ohrhörer •Kfz.-Adapter
• Weiche Tragetasche • Autotasche • Tasche für Zubehör
D
• 1 Lithiumbatterie (Cr 2025)
• Bedienungsanleitung mit Garantiedokumenten
D-7
DVD-Porty MD 80686 D EN.book Seite 8 Montag, 30. Mai 2005 4:05 16
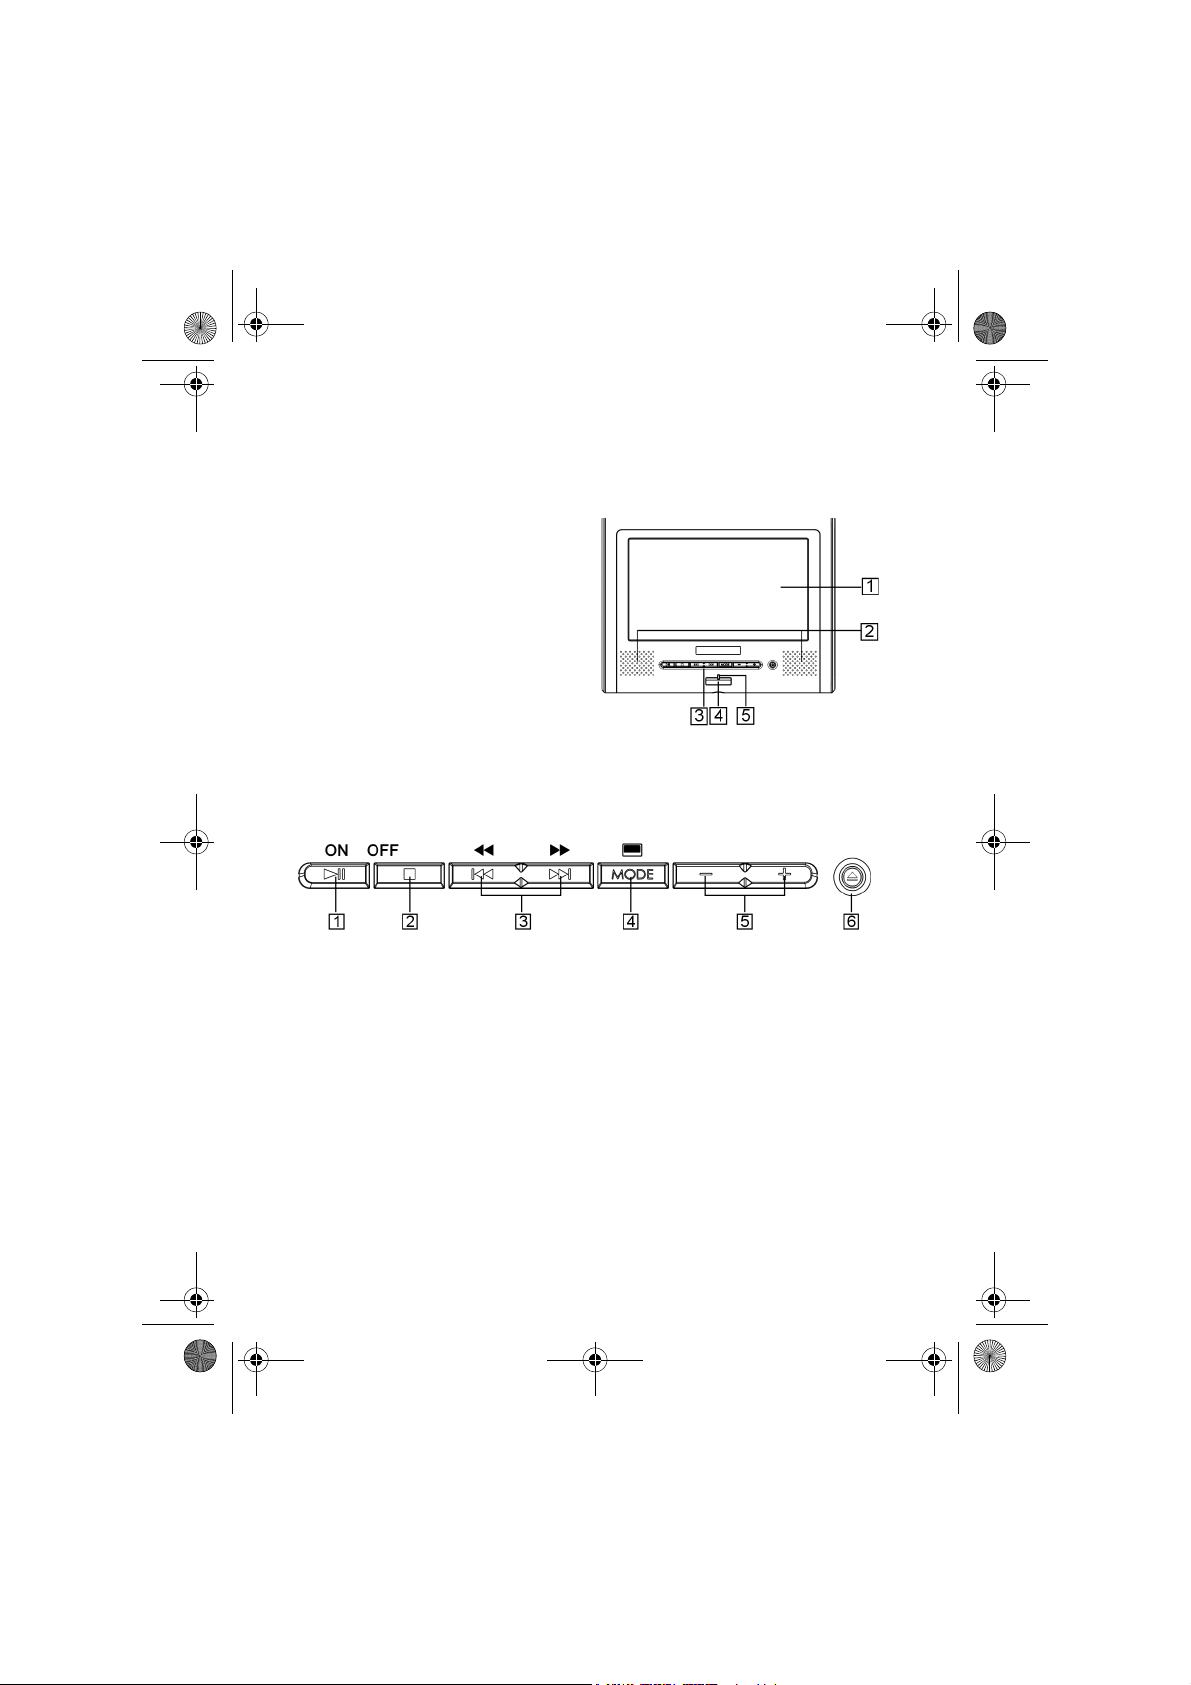
DIE GERÄTETEILE
Das Hauptgerät
1 LCD-Display
2 Lautsprecher
3 Bedientasten
4 Sensor für die Fernbedienung
5 Spannungsanzeige
Aus: kein Betrieb
Rot: Gerät auf Standby
Blau:Der DVD-Player hat Spannung.
Mit der Taste ON am Gerät oder der
Taste STANDBY an der Fernbedienung schalten Sie das Gerät ein.
Bedienelemente am Hauptgerät:
1 ON: Taste ungefähr 1,5 Sekunden gedrückt halten, um das Gerät einzuschalten
PLAY: Wiedergabe
PAUSE: Wiedergabe unterbrechen
2 OFF: Taste ungefähr 1,5 Sekunden gedrückt halten, um das Gerät auszuschalten
STOP: Wiedergabe stoppen
3 SKIP: vorheriger/nächster Titel
4 MODE: Verschiedene Einstellungen auswählen:
HELLIGKEIT
FARBE
TFT-Modus: Bildschirm zwischen 16:9 und 4:3 umschalten
VIEW-Modus: Bild umschalten zwischen normaler Wiedergabe und Wiedergabe
auf dem Kopf
D-8

DVD-Porty MD 80686 D EN.book Seite 9 Montag, 30. Mai 2005 4:05 16
AV INPUT/OUTPUT: AV-Funktion umschalten zwischen Eingang und Ausgang (s.
“Umstellen von AV OUT zu AV IN” S. 14.).
Halten Sie die Taste ungefähr 1,5 Sekunden gedrückt, um das Display abzuschal-
ten. Drücken Sie die Taste kurz, um das Display wieder einzuschalten.
5 Mit den Tasten + und - ändern Sie die Werte für die verschiedenen Einstellungen.
6 OPEN: Diskfach öffnen und schließen
Die linke Seite des Hauptgeräts
1 PHONE: Anschluss für Ohr- oder
Kopfhörer;
der Lautsprecher schaltet sich im
Kopfhörerbetrieb aus.
Bevor Sie Ohr- oder Kopfhörer aufsetzen, stellen Sie die Lautstärke auf ein Minimum!
2 VOLUME: Lautstärkeregler für das Gerät oder für den Kopfhörer
3 VIDEO IN/OUT: Über diese Buchse können Sie mittels eines AV-Kabels Eingangs-
oder Ausgangssignale zu einem angeschlossenen Gerät senden (je nachdem, ob
mit der MODE-Taste „AV INPUT“ oder „AV OUTPUT“ gewählt wurde; s. o.).
4 AUDIO IN/OUT, OPTICAL OUT
Über diese Buchse können Sie mittels eines AV-Kabels Eingangs- oder Ausgangs-
Audiosignale zu einem angeschlossenen Gerät senden (je nachdem, ob mit der
MODE-Taste „AV INPUT“ oder „AV OUTPUT“ gewählt wurde; s. o.).
Wahlweise kann der Anschluss auch als optischer Ausgang zu Wiedergabe des
Audiosignals auf einem 5.1-Verstärker genutzt werden (Auch für diesen Fall muss
mit der MODE Taste die Einstellung „AV OUTPUT“ gewählt sein; s. o.).
5 DC IN: Anschluss für den mitgelieferten Netzadapter und für den Autoadapter.
Die rechte Seite des Hauptgeräts
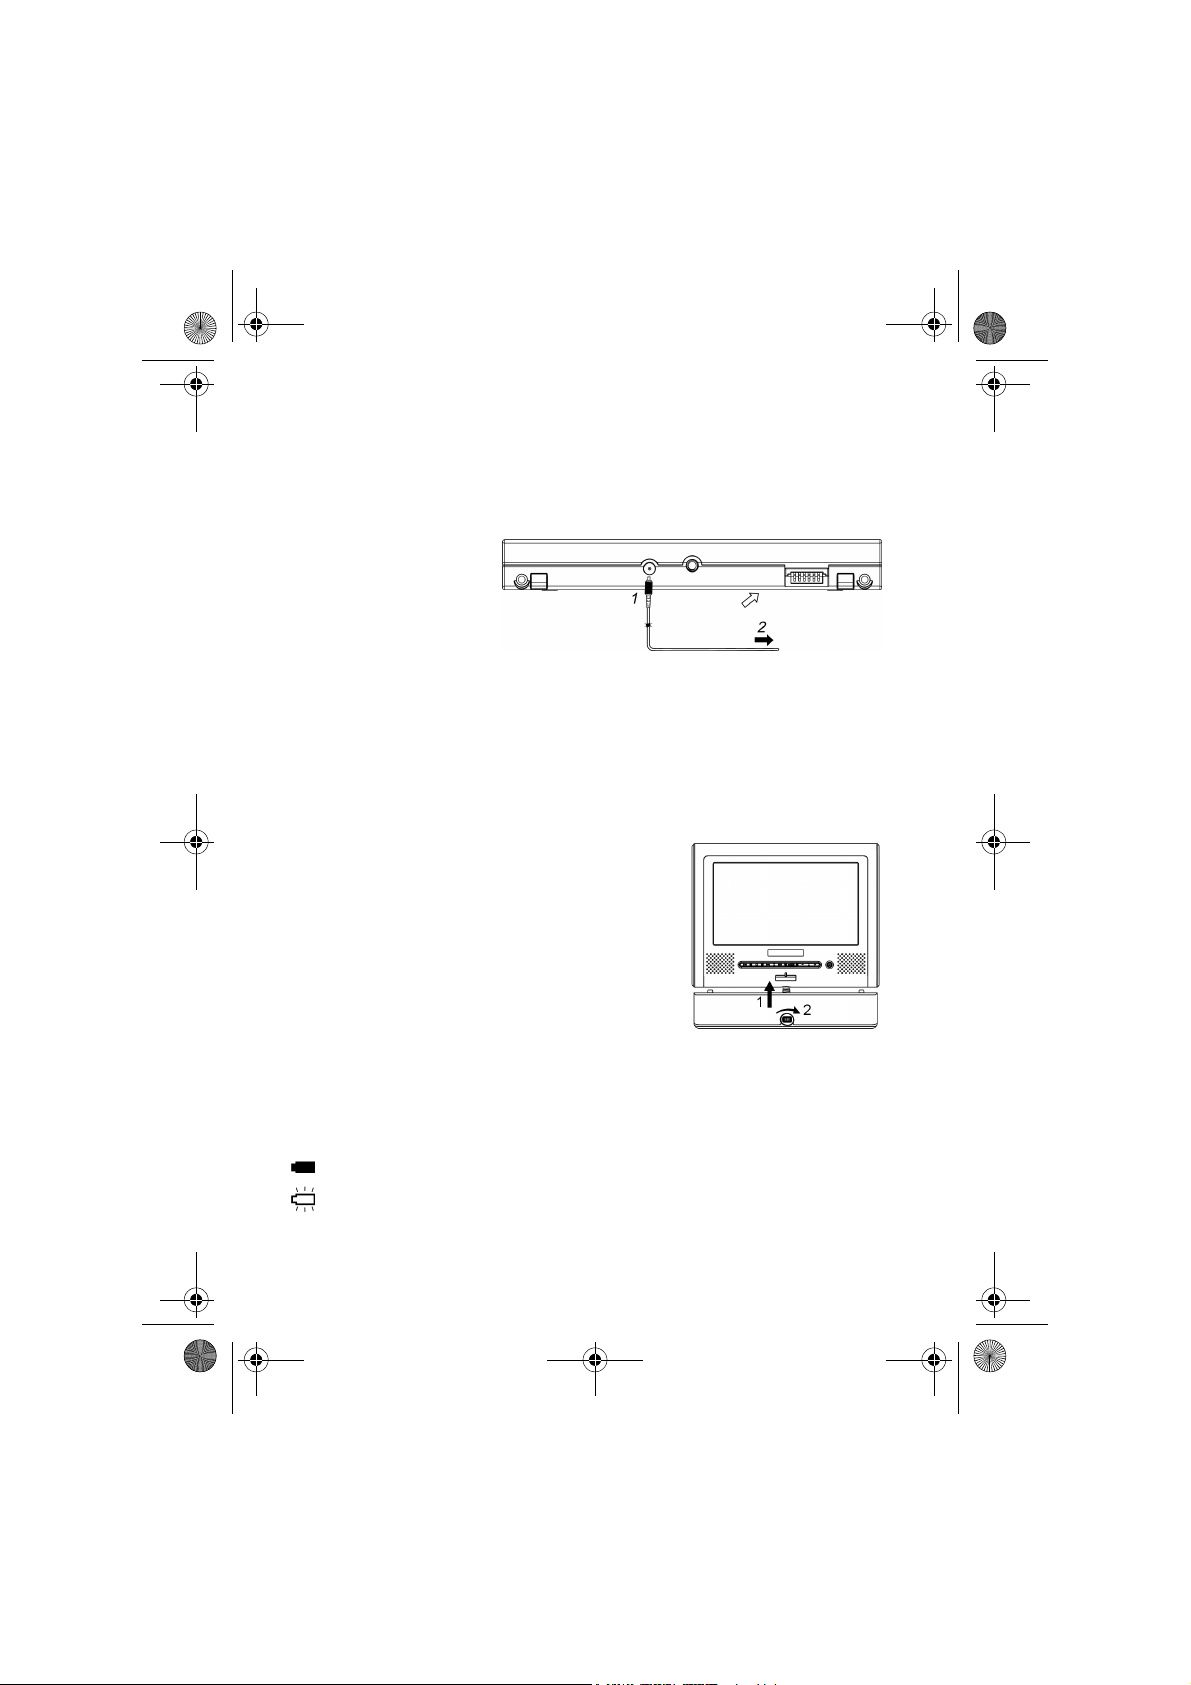
1 CD/DVD Schlitz des Laufwerks
2 LED: Blinkt, wenn das Laufwerk aktiv ist
D
D-9
DVD-Porty MD 80686 D EN.book Seite 10 Montag, 30. Mai 2005 4:05 16
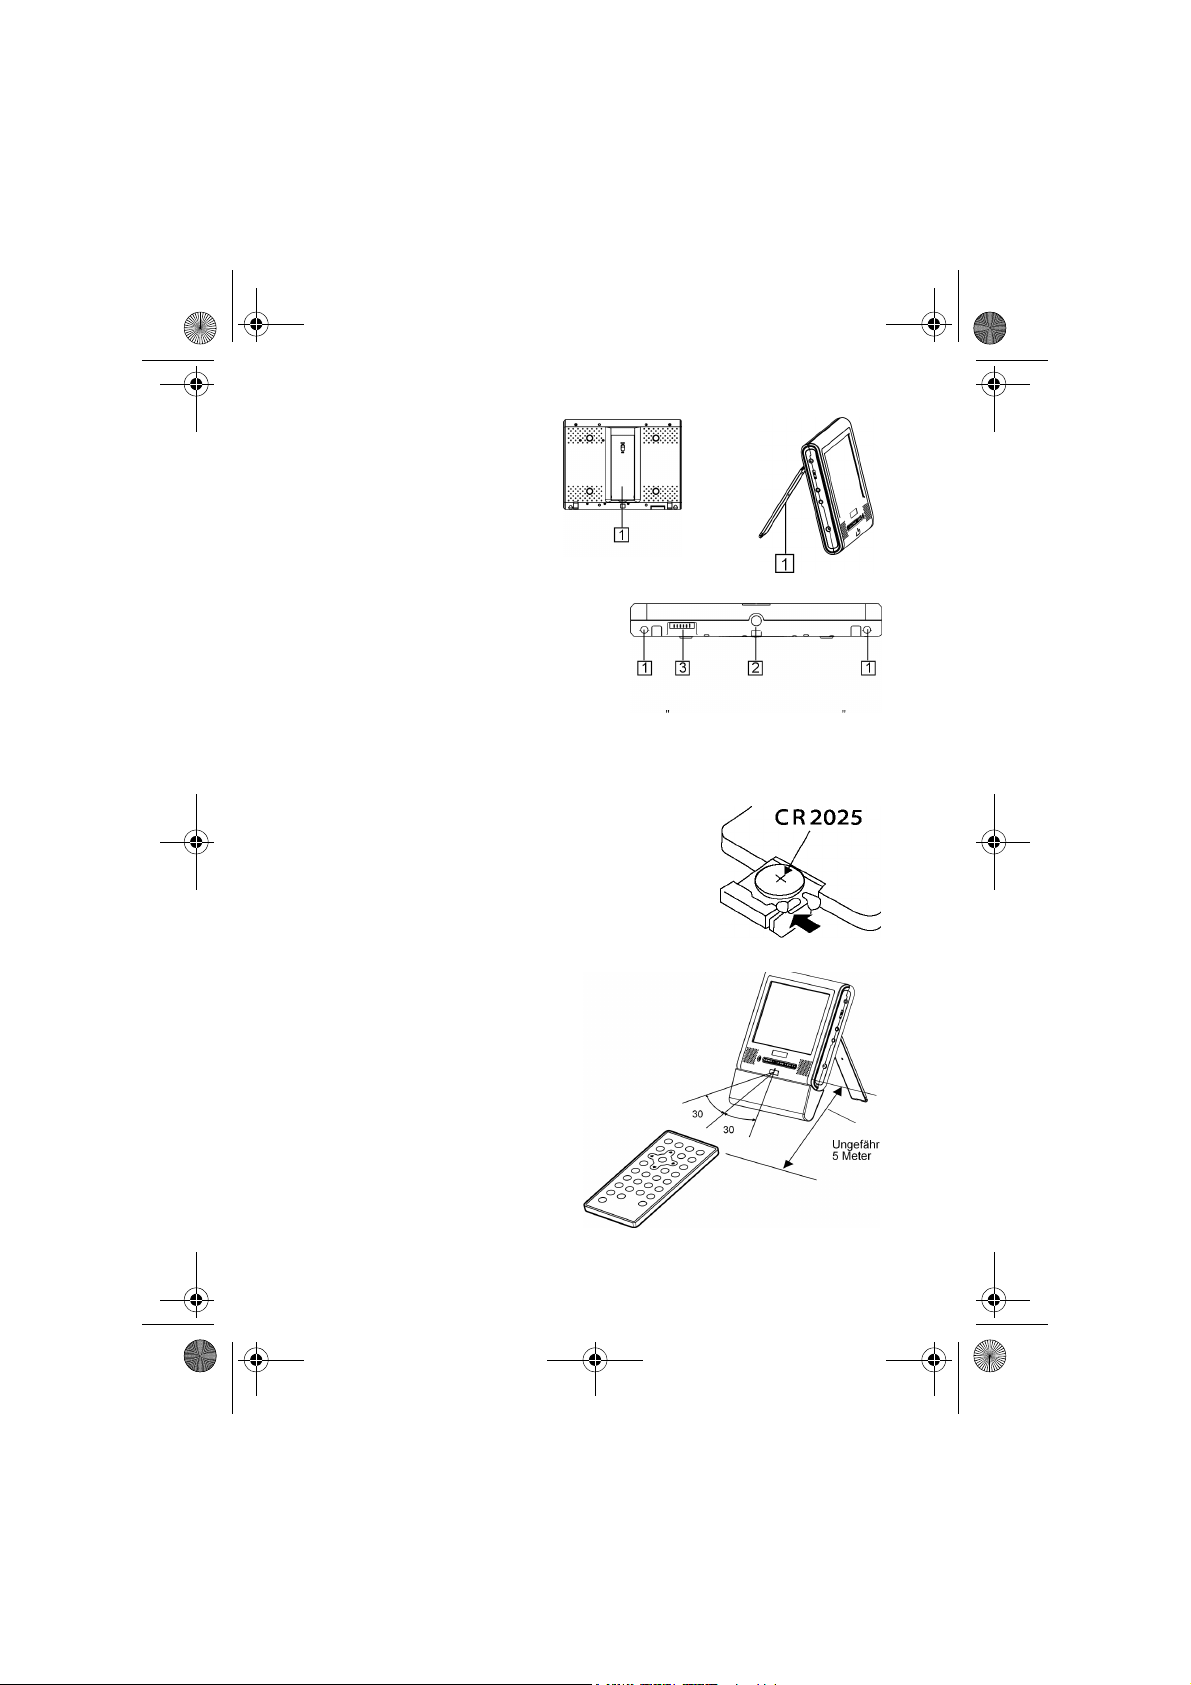
Die Rückseite des Hauptgeräts
1 Ständer: Dient zum Aufstellen des
Geräts
Ziehen Sie den Ständer bis zu
gewünschten Position aus und
verriegeln Sie ihn, indem Sie den
Knopf auf die Position „LOCK“
schieben.
Die Unterseite des Hauptgeräts
1 Halterungsöffnungen für den Akku
2 Schraubverschlussöffnung für den Akku
3 Akku-Anschluss (ohne Akku mit Gummiab-
deckung versehen)
Die Fernbedienung
Batterie in die Fernbedienung einsetzen
• Nehmen Sie die Batteriehalterung heraus, indem Sie die
kleine Klemme nach innen drücken (s. Pfeil) und dabei die
Batteriehalterung mit einem Fingernagel herausziehen.
• Legen Sie eine Lithiumbatterie CR 2025 mit dem Pluspol
nach oben zeigend ein.
• Schieben Sie die Batteriehalterung wieder in die Fernbedienung.
Reichweite
Die Fernbedienung funktioniert innerhalb einer Reichweite von ungefähr 5
Metern.
D-10
DVD-Porty MD 80686 D EN.book Seite 11 Montag, 30. Mai 2005 4:05 16
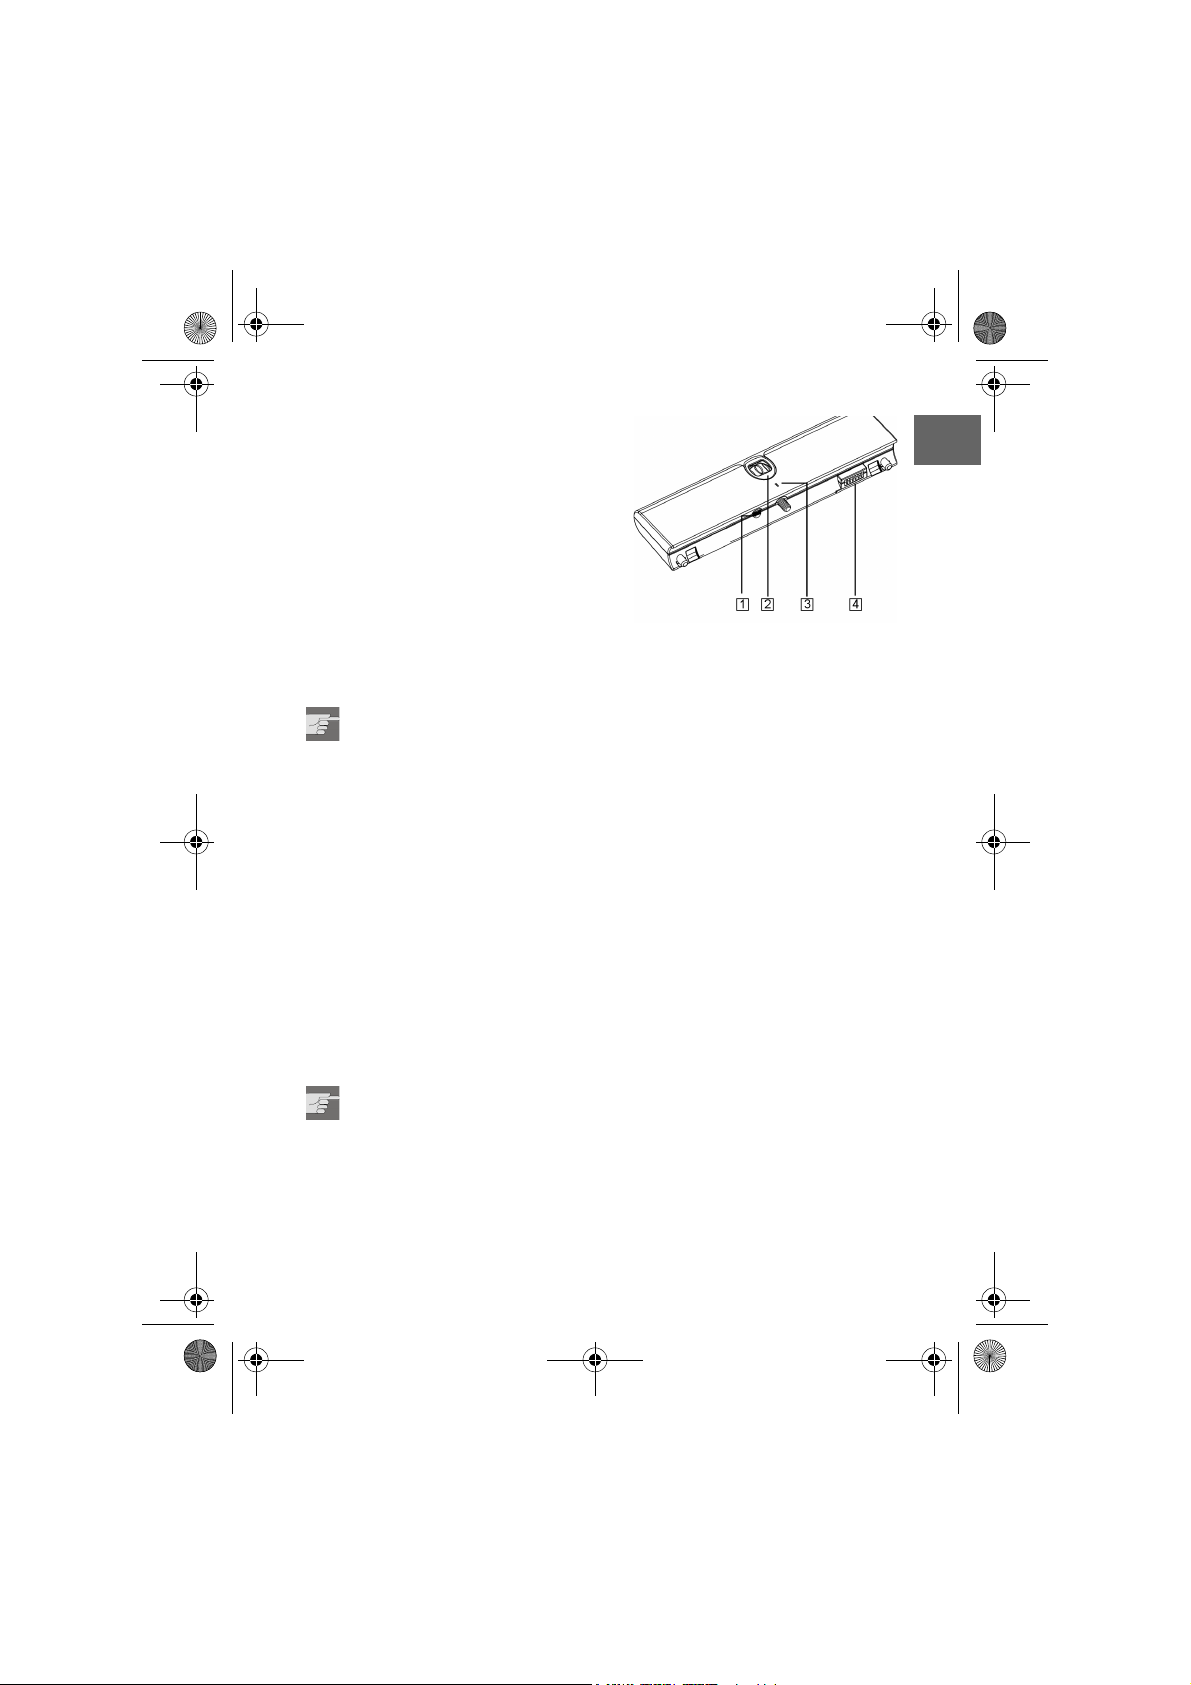
Der Akku
1DC IN-Buchse
2 Schraubknopf: Drehen Sie diesen Knopf,
um den Akku mittels der Schraube am
Hauptgerät zu befestigen bzw. es zu lösen.
3 LED Ladezustandsanzeige;
LED aus: Der Akku ist leer;
LED rot: Der Akku wird aufgeladen;
LED grün: Das Aufladen ist beendet.
4 Klemmen für die Stromeinspeisung in den DVD-Player.
Wichtige Hinweise
Beachten Sie auch die speziellen Sicherheitshinweise zum Akku am Anfang dieser Anleitung!
Laden Sie den Akku voll auf, bevor Sie ihn zum ersten Mal verwenden.
Der Akku wird während des Gebrauchs heiß, das Hauptgerät ebenfalls. Dies be-
deutet keine Funktionsstörung.
Wenn das Gerät über den Akku gespeist wird und der Player ca. 10 Minuten lang
angeschaltet, aber untätig war, schaltet sich das Gerät aus („Auto Power Off“).
Wenn der DVD-Player eingeschaltet wird, während der Akku nicht voll aufgeladen
ist, wird der Betrieb manchmal instabil. Stellen Sie sicher, dass der Akku voll aufgeladen ist, wenn Sie ihn verwenden.
Den Akku aufladen
Hinweise zu Aufladung
Wenn der Akku bereits vor der Aufladung warm ist, kann das Aufladen länger dauern
als normal. Unter Umständen lädt er dann nicht richtig auf. Lassen Sie ihn zunächst
abkühlen.
Der Akku darf jedoch nicht an einem sehr heißen Ort aufgeladen werden; er
könnte explodieren!
Das Aufladen dauert normalerweise 4 bis 5 Stunden.
Stoppen Sie die Aufladung, sobald der Akku voll ist.
Der Akku liefert Strom für ca. 3 Stunden kontinuierlichen Betrieb.
D
D-11
DVD-Porty MD 80686 D EN.book Seite 12 Montag, 30. Mai 2005 4:05 16
Aufladung vornehmen
Sie können den Akku einzeln aufladen oder wenn er mit dem Gerät verbunden ist. Gehen Sie dazu wie folgt vor:
• Nehmen Sie den Akku ggf. vom Hauptgerät ab.
• Stellen Sie Akku und Netzadapter auf eine ebene Fläche.
• Schließen Sie den DCAusgangsstecker des
Netzadapters an den
Akku oder die DC-IN
Buchse des Players an.
• Schließen Sie den
Netzadapter an eine Stromsteckdose 230 V ~ 50 Hz an. Die LED des Akkus leuchtet rot.
Wenn die LED des Akkus grün leuchtet (nach 4 bis 5 Stunden), ist die Aufladung beendet. Nehmen Sie dann den Netzadapter ab.
DVD-Player mit Strom versorgen
Akku anschließen
• Nehmen Sie die Gummiabdeckung von der Steckstelle an der Unterseite des Hauptgeräts. Damit Sie die
Abdeckung nicht verlieren, bewahren Sie sie in der
Zubehörtasche auf.
• Befestigen Sie den Akku am Gerät, indem Sie die
Schraube mittels des Feststellrads festdrehen.
Wenn die Wiedergabe instabil ist, ist der Akku möglicherweise nicht ganz aufgeladen.
• Wenn Sie den Akku wieder abnehmen, setzen Sie
die Gummiabdeckung wieder auf.
Wenn der Akku und gleichzeitig der Netzadapter angeschlossen sind, wird der Akku
langsam aufgeladen.
• Um den Ladezustand des Akkus zu erfahren, drücken Sie die Taste OSD auf der
Fernbedienung (der Netzadapter darf dabei nicht angeschlossen sein).
Der Akku ist voll;
Der Akku wird schwach.
D-12
DVD-Porty MD 80686 D EN.book Seite 13 Montag, 30. Mai 2005 4:05 16
Netzadapter anschließen
• Stecken Sie den DC-Stecker des Netzadapters in die DC IN-Buchse des Hauptgeräts.
• Schließen Sie den Netzadapter an ein Stromsteckdose 230 V ~ 50 Hz an.
Verwenden Sie ausschließlich den mitgelieferten Netzadapter!
Schalten Sie den DVD-Player ggf. aus, bevor Sie den Netzadapter
anschließen.
D
D-13
DVD-Porty MD 80686 D EN.book Seite 14 Montag, 30. Mai 2005 4:05 16
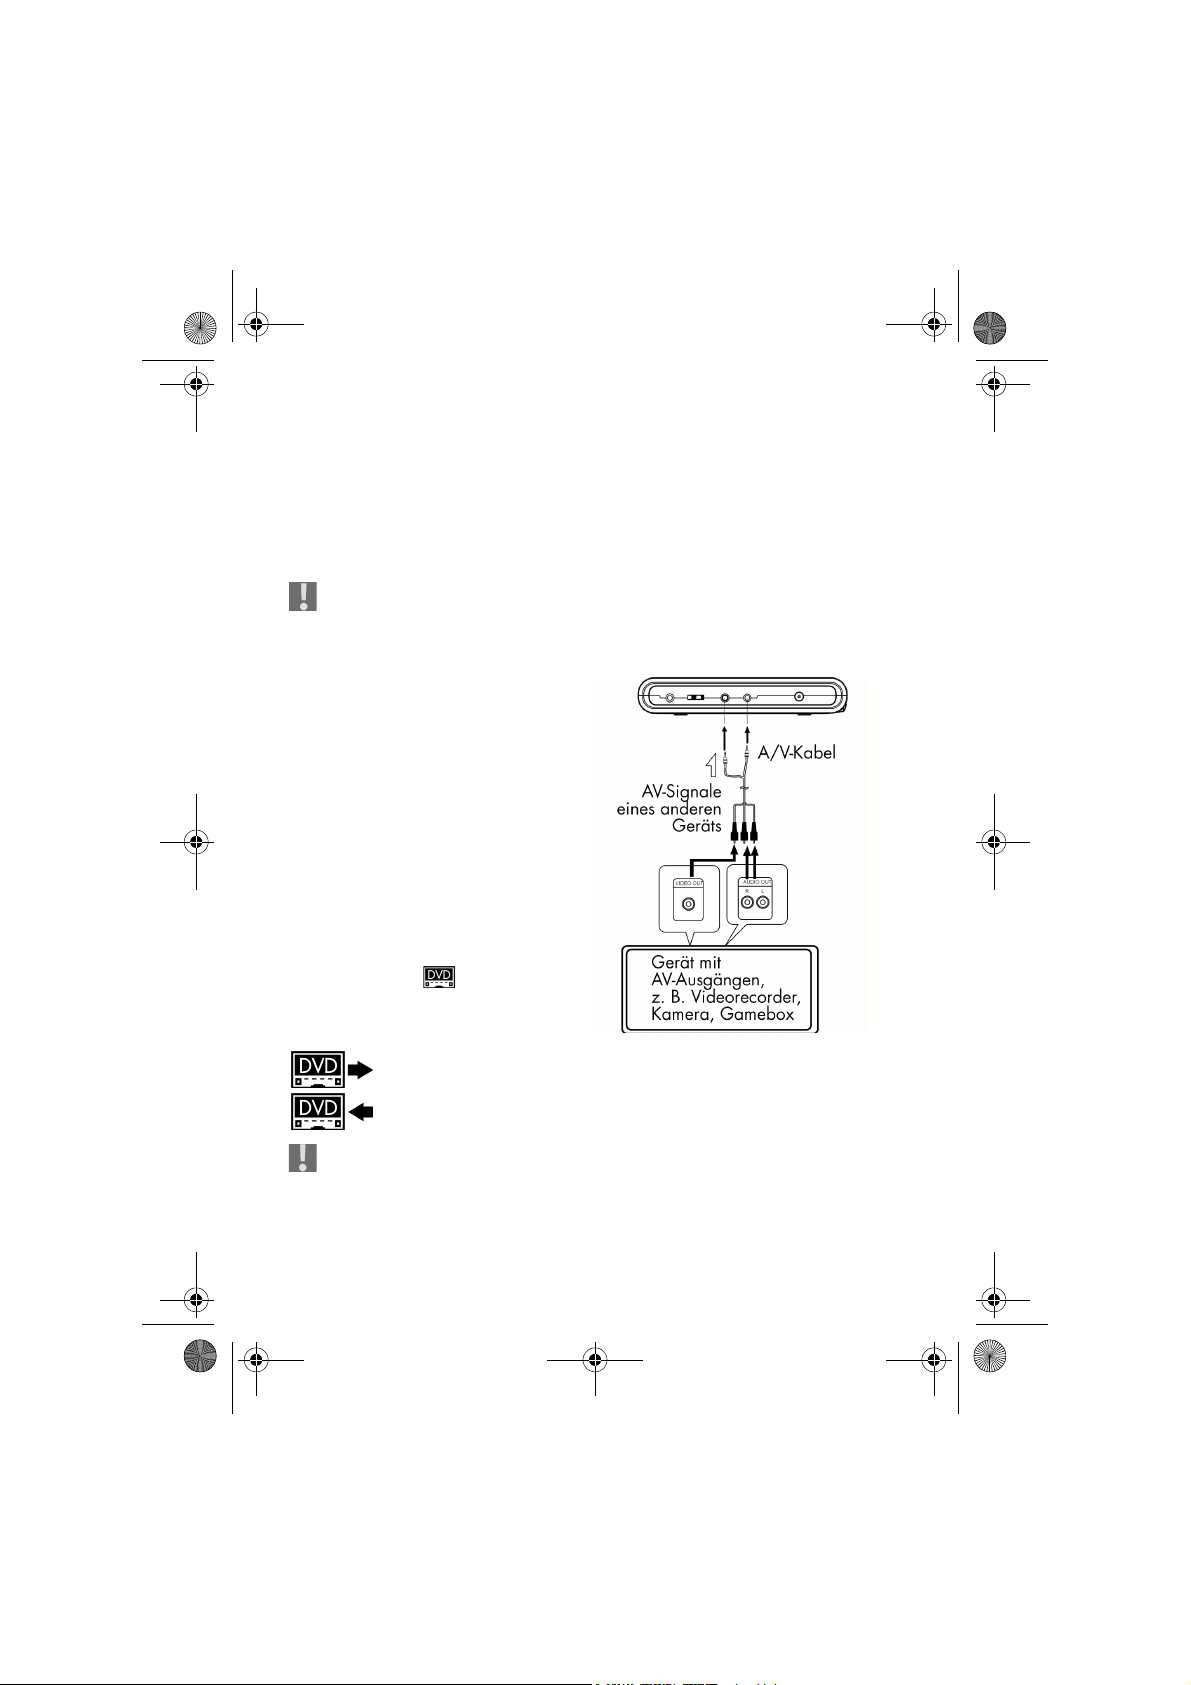
ANSCHLUSSMÖGLICHKEITEN
Sie können sowohl Bild als auch Ton auf anderen Geräten ausgeben. Dies können
auch Geräte sein, die einen Dolby Digital/DTS 5.1-Klang ausgeben.
Andererseits können Sie auch Bild und Ton anderer Geräte auf dem tragbaren DVDPlayer ausgeben.
Bevor Sie Anschlüsse vornehmen, schalten Sie die Stromversorgung des DVDPlayers und aller Geräte aus!
Umstellen von AV OUT zu AV IN
Sie können die Buchsen VIDEO IN/
OUT und AUDIO IN/OUT an der Geräteseite von der Grundeinstellung OUT
(Ausgabe von AV-Signalen zu anderen
Geräten) auf IN umstellen. Mit dieser
Einstellung können Sie den DVD-Player
z. B. als TFT-Monitor verwenden.
AUDIO IN/OUT-Buchse umstellen
• Halten Sie die MODE-Taste am
Hauptgerät ca. 1,5 Sekunden gedrückt, bis die erste MODE-Einstellung
erscheint.
• Drücken Sie MODE wiederholt kurz,
bis die Anzeige erscheint.
Mit den Tasten – und + am Hauptgerät
nehmen Sie die Einstellung vor:
= AUDIO OUT (die Signal gehen raus);
= AUDIO IN (die Signale kommen rein).
Vermeiden Sie das Eingeben von AV-Signalen über die AV-Buchsen, wenn der
DVD-Player auf AV OUT steht: Dies verursacht Interferenzen bei der laufenden
Wiedergabe.
D-14
DVD-Porty MD 80686 D EN.book Seite 15 Montag, 30. Mai 2005 4:05 16
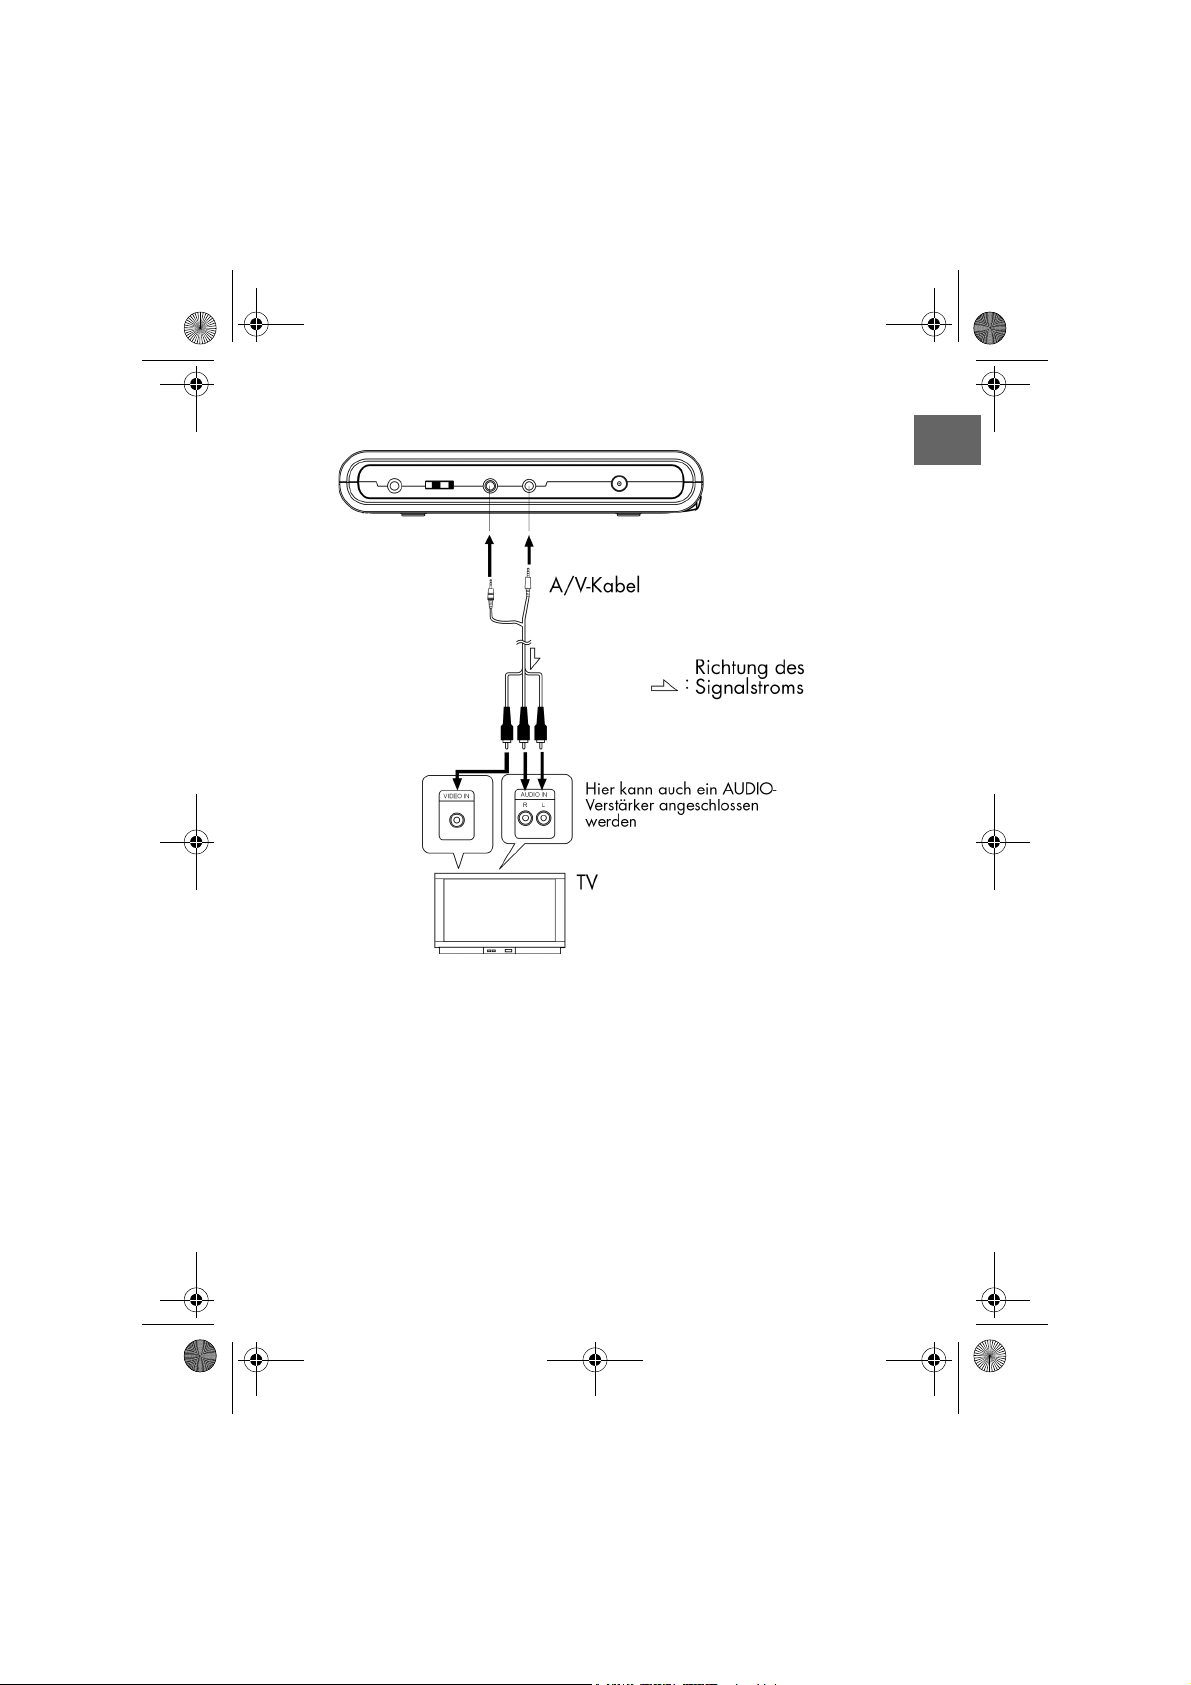
Anschluss an ein TV-Gerät
D
D-15
DVD-Porty MD 80686 D EN.book Seite 16 Montag, 30. Mai 2005 4:05 16
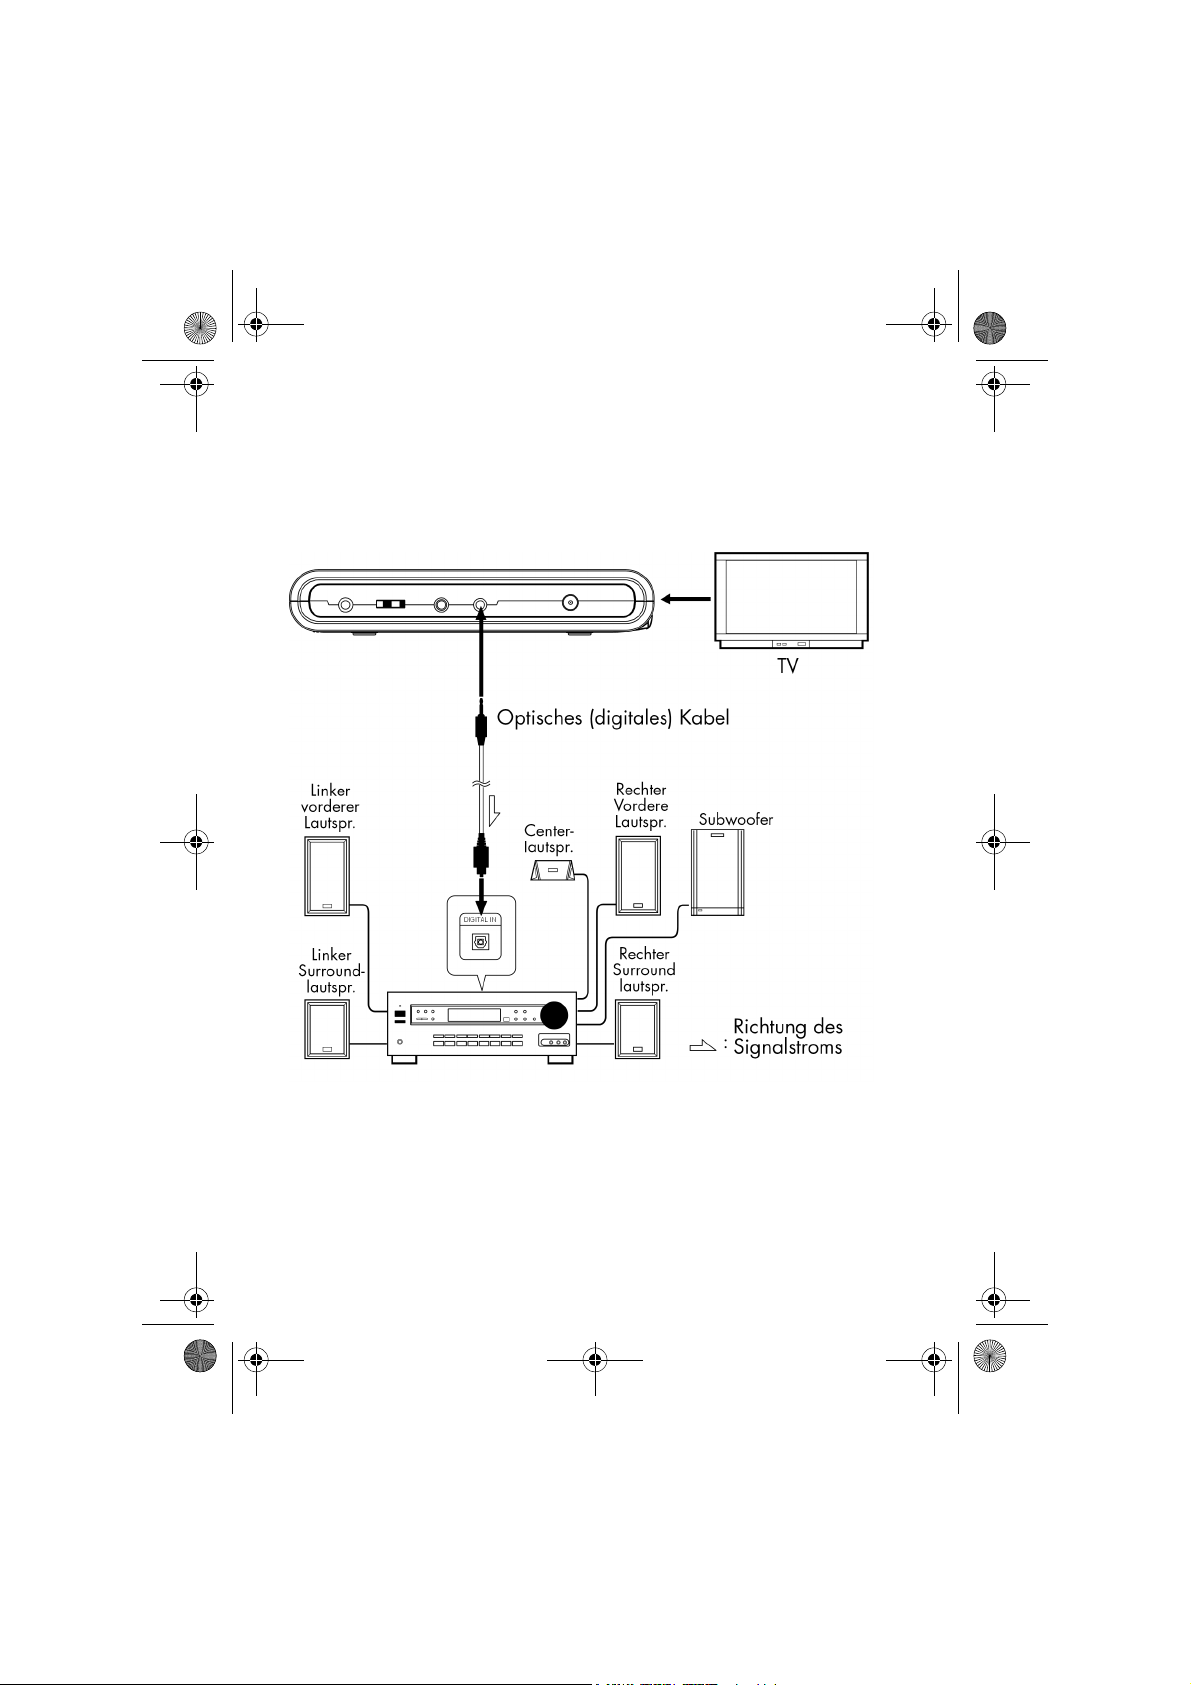
Ton auf 5.1-Lautsprecheranlage ausgeben
Sie können den DVD-Player über den digitalen Ausgang an einen Dolby Digital/DTS/
MPEG-2-Decoder oder an einen Verstärker mit eingebautem Decoder anschließen.
Damit Sie den 5.1-Kanal-Klang genießen können, benötigen Sie fünf Lautsprecher und
einen Subwoofer.
D-16
DVD-Porty MD 80686 D EN.book Seite 17 Montag, 30. Mai 2005 4:05 16
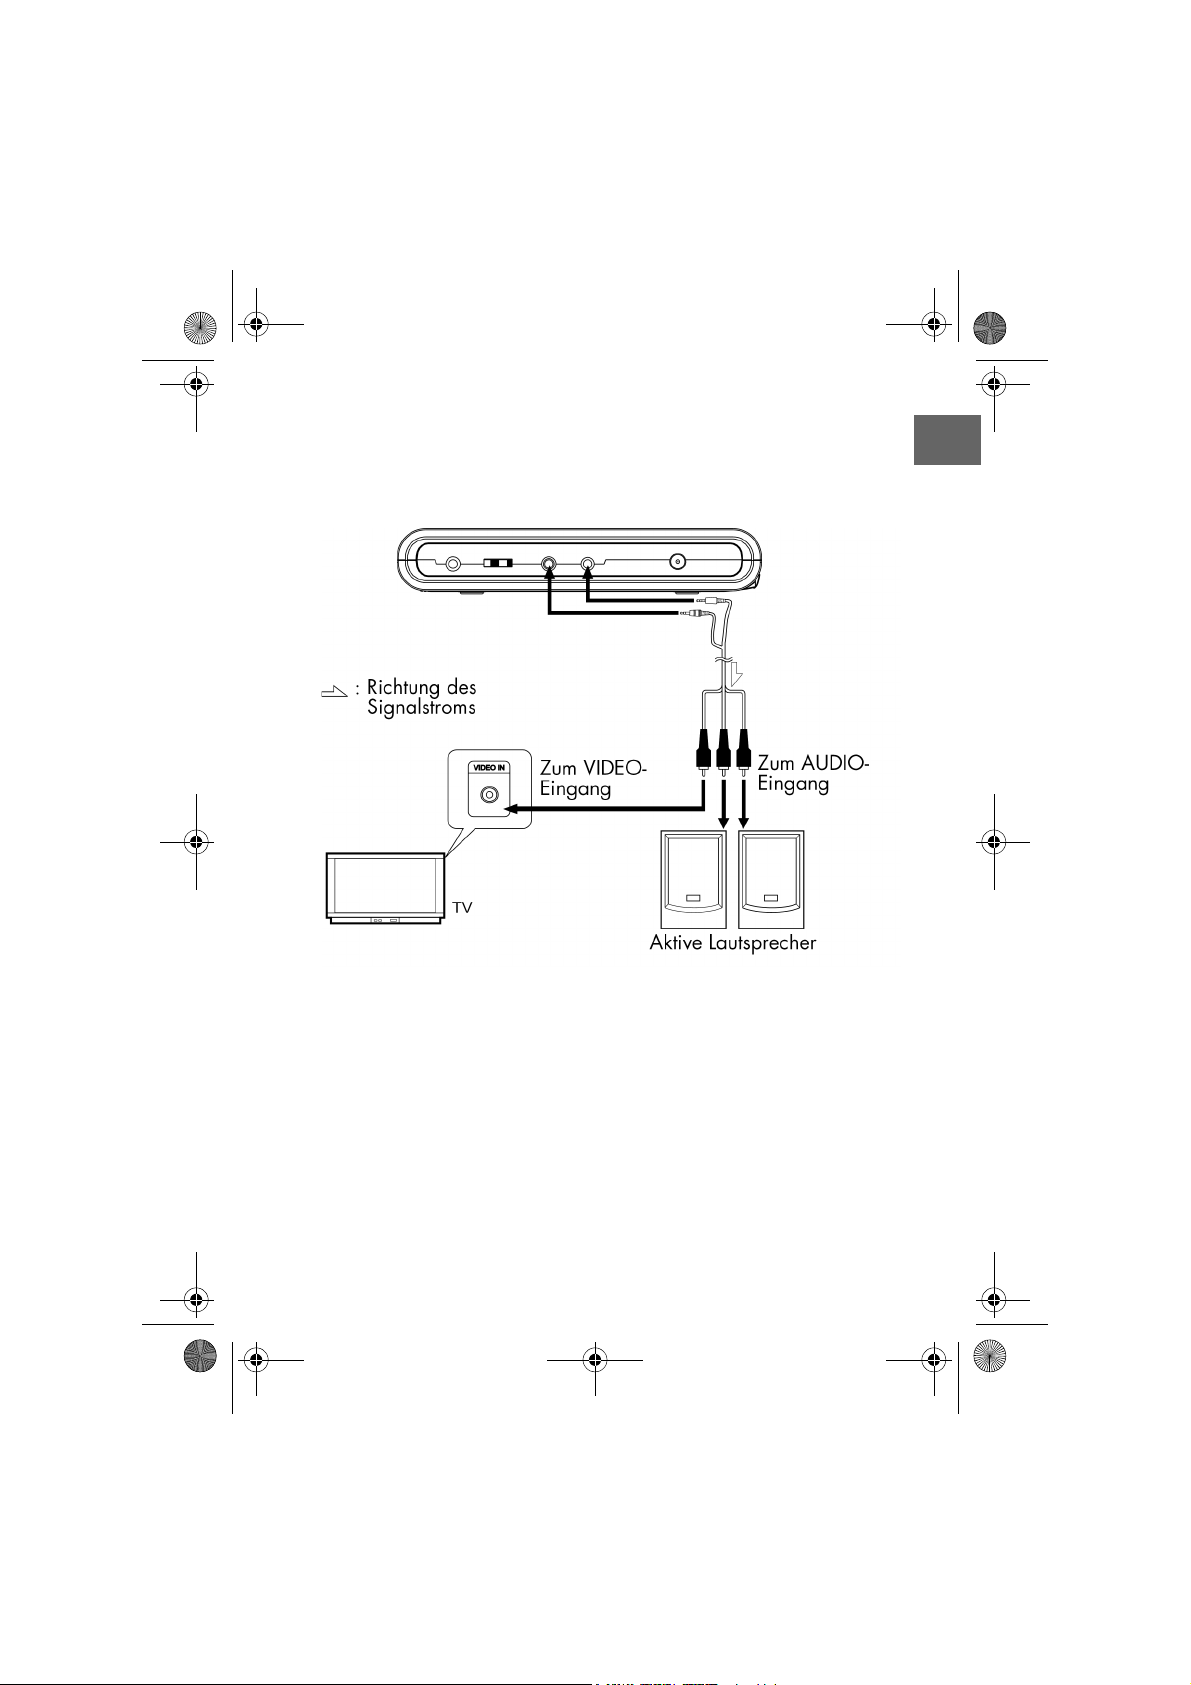
Anschluss an ein aktives Lautsprechersystem
.
D
D-17
DVD-Porty MD 80686 D EN.book Seite 18 Montag, 30. Mai 2005 4:05 16
Den DVD-Player im Auto anschließen
Mittels des mitgelieferten Autoadapters haben Sie die Möglichkeit, den DVD-Player im
Auto zu betreiben.
• Verbinden Sie den Autoadapter auf der einen Seite mit der DC IN-Buchse des
Hauptgeräts, auf der anderen Seite mit dem Zigarettenanzünder des Autos.
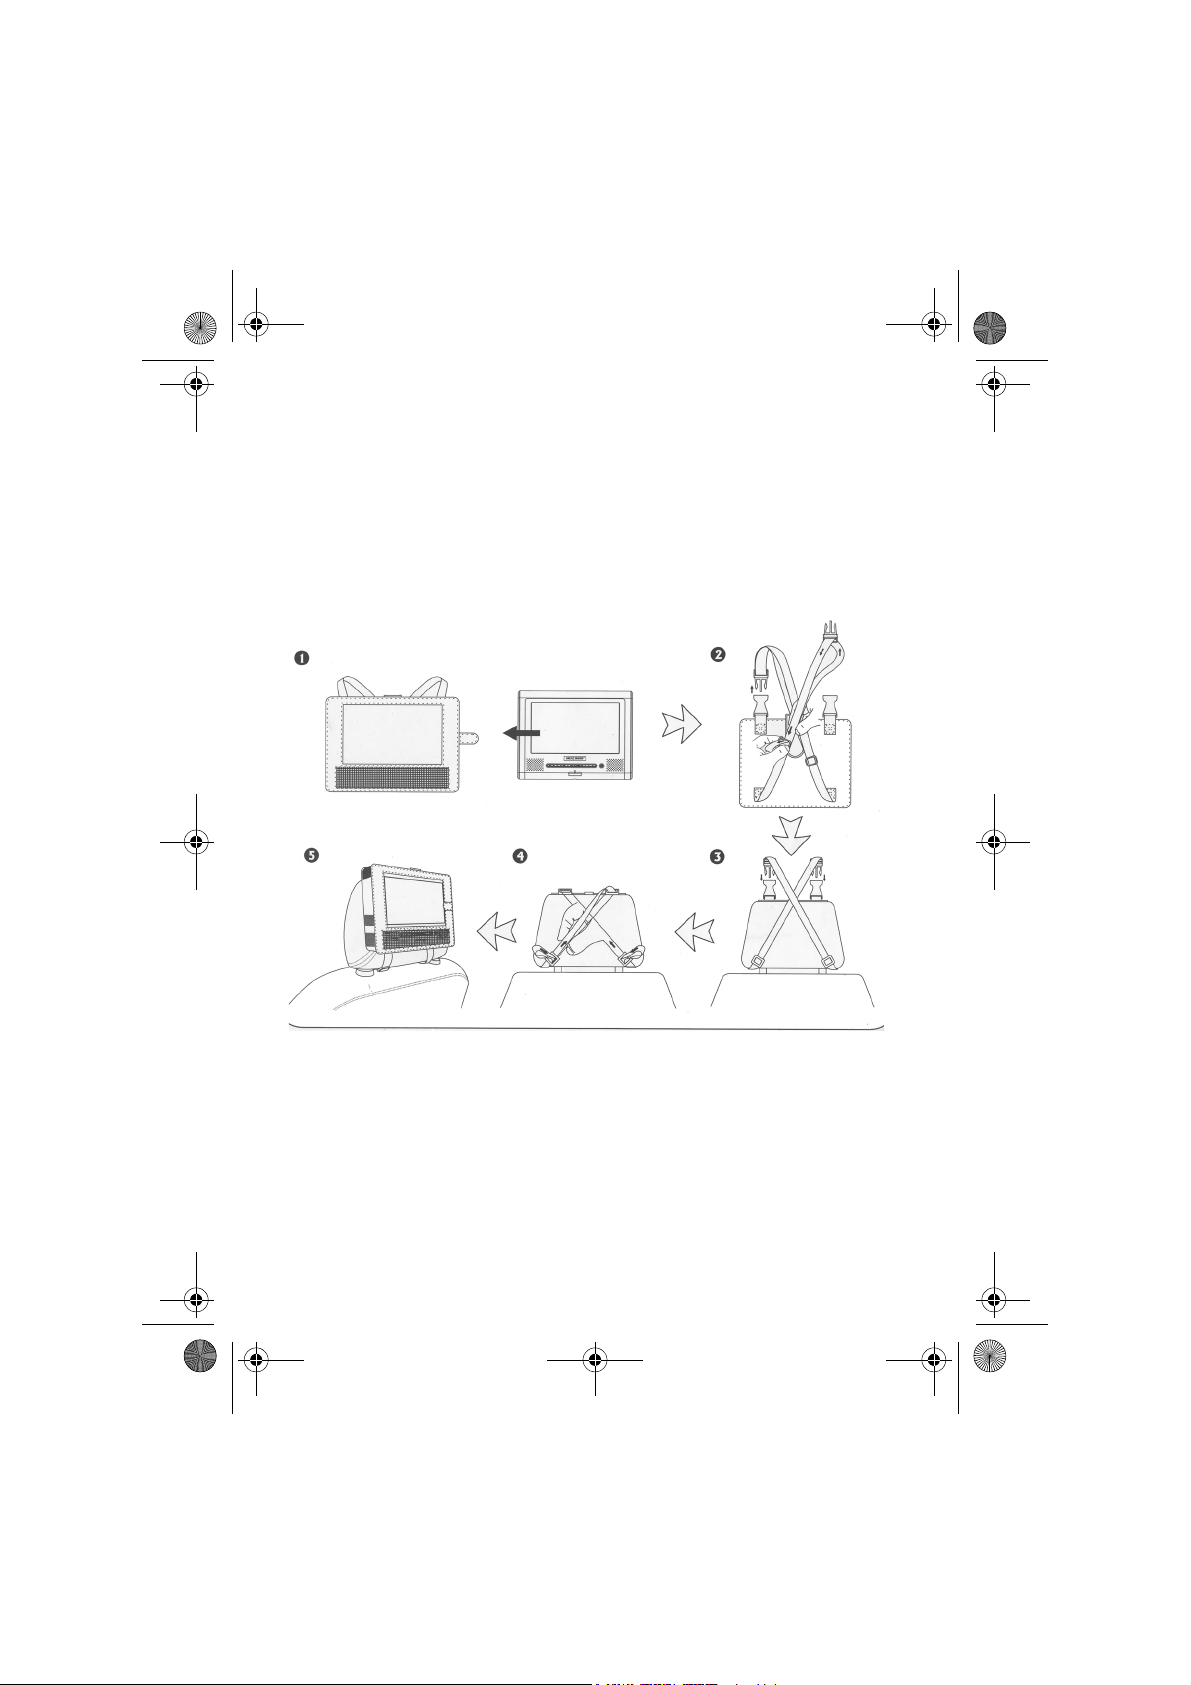
Befestigung der Autotasche
Sie können die Autotasche mit dem DVD-Player folgendermaßen an der Kopfstütze
eines Autositzes befestigen:
D-18

DVD-Porty MD 80686 D EN.book Seite 19 Montag, 30. Mai 2005 4:05 16
ETRIEB
B
Disk einlegen/auswerfen
• Versorgen Sie das Gerät mit Strom (siehe oben).
• Um das Gerät anzuschalten, halten Sie die Taste ON am Hauptgerät für ca. 1,5
Sekunden gedrückt. Die LED am Gerät leuchtet blau.
• Aus dem Standby-Modus (die LED am Gerät leuchtet rot) können Sie das Gerät auch
mit der Standby-Taste der Fernbedienung anschalten.
• Schieben Sie die Disk mit der beschrifteten Seite nach vorne in den Schlitz des Laufwerks (bei einseitig beschriebenen Disks).
• Sobald Sie die Disk weit genug eingeschoben haben, zieht das Laufwerk die Disk
automatisch ein.
• Um die Disk wieder auszuwerfen, drücken Sie die Taste OPEN auf der Fernbedienung oder am Gerät. Das Laufwerk wirf die Disk aus und Sie können Sie herausziehen.
• Um das Gerät auszuschalten, halten Sie die Taste OFF am Hauptgerät für ca. 1,5
Sekunden gedrückt. Die LED am Gerät leuchtet rot (Standby-Modus).
Wiedergabe
Wenn eine Disk eingelegt ist, startet die Wiedergabe automatisch. Ohne Disk erscheint das Standbild des DVD-Players.
Auf dem Bildschirm werden die Disk-Art angezeigt (DVD, VCD, CD, MP3) und das
entsprechende Menü eingeblendet.
D
D-19
DVD-Porty MD 80686 D EN.book Seite 20 Montag, 30. Mai 2005 4:05 16
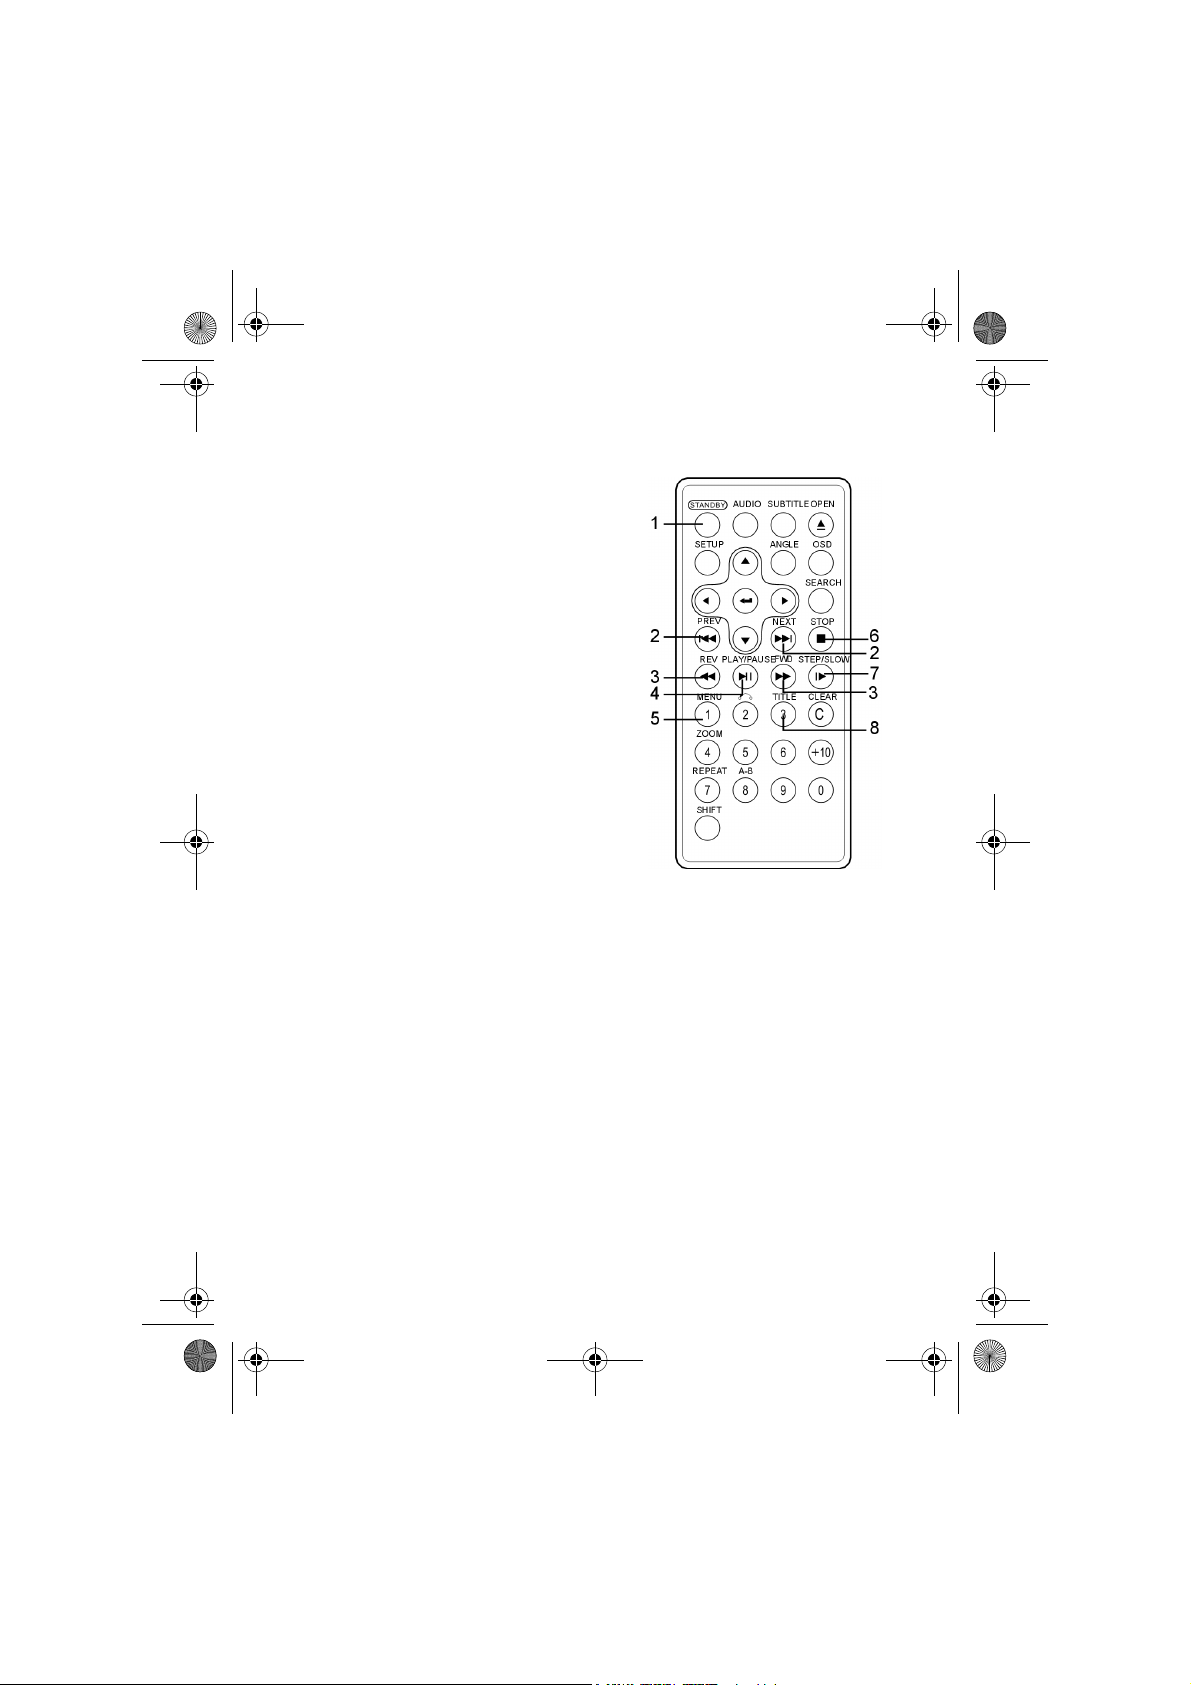
Tastenfunktionen der Fernbedienung
Im Folgenden werden die Tastenfunktionen des
Geräts anhand der Fernbedienungstasten erläutert.
Häufig benutzte Funktionen
1 STANDBY: Drücken Sie STANDBY, um das
Gerät in den Standby-Modus zu schalten.
2 PREV/NEXT: Drücken Sie während der Wie-
dergabe PREV oder NEXT, um vorwärts oder
rückwärts zu springen (bei DVDs: von Kapitel
zu Kapitel; bei CDs: von Titel zu Titel).
Bitte beachten Sie, dass auf vielen DVDs die
Lizenzhinweise am Anfang nicht übersprungen werden können.
3 REV/FWD: Schnelllauf vorwärts oder rück-
wärts.
1x drücken: doppelte Geschwindigkeit (2x)
2x drücken: vierfache Geschwindigkeit (4x)
3x drücken: achtfache Geschwindigkeit (8x)
4x drücken: 20-fache Geschwindigkeit (20x).
Wenn Sie PLAY drücken, kehren Sie zur normalen Abspielgeschwindigkeit zurück.
4 PLAY: Wiedergabe starten
PAUSE: Wiedergabe unterbrechen.
5/8MENU: Mit den Tasten TITLE/PBC und MENU öffnen Sie die Menüs auf der DVD
(TITLE/PBC nicht bei allen DVDs). Mit den Navigationstasten wählen Sie die Einträge in den DVD-Menüs aus. Bestätigen Sie jede Auswahl mit ENTER.
Bitte beachten Sie, dass es von der DVD abhängt, welches Menü bei welchem
Tastendruck erscheint. Viele DVDs haben nur ein Menü, dass bei beiden Tasten
erscheint.
Drücken Sie die Taste MENU während der JPEG-CD Wiedergabe, um Voransichten der auf der CD enthaltenen Bilder anzuzeigen.
6 STOP: Drücken Sie einmal STOP, um die Wiedergabe zu stoppen. Das Gerät be-
findet sich jetzt im Resume-Modus. In diesem Modus können Sie die Wiedergabe
an derselben Stelle mit PLAY fortsetzen.
Drücken Sie nochmals STOP, um die Wiedergabe ganz zu stoppen.
D-20

DVD-Porty MD 80686 D EN.book Seite 21 Montag, 30. Mai 2005 4:05 16
7 STEP: Drücken Sie PAUSE und anschließend STEP für die Einzelbildwiedergabe.
Mit jedem Tastendruck schalten Sie ein Bild weiter.
SLOW: Drücken Sie während der Wiedergabe SLOW, um die Zeitlupe einzuschalten:
1x SLOW: 1/2 Geschwindigkeit
2x SLOW: 1/3 Geschwindigkeit
3x SLOW: 1/4 Geschwindigkeit
4x SLOW: 1/5 Geschwindigkeit
5x SLOW: 1/6 Geschwindigkeit
6x SLOW: 1/7 Geschwindigkeit
Drücken Sie PLAY, um zur normalen Abspielgeschwindigkeit zurückzukehren.
Sonstige Funktionen
1 AUDIO: Drücken Sie wiederholt die Ta-
ste AUDIO, um eine andere der verfügbaren Sprachen auf der DVD
auszuwählen.
Bitte beachten Sie, dass diese Funktion
auf vielen DVDs nicht verfügbar ist.
2SETUP:
Auf dem Bildschirm erscheint die Hauptseite des SETUP-Menüs (“Einstellungen
im SETUP-Menü” auf Seite 25).
3 Mit den Navigationstasten bewegen
Sie sich in den Menüs.
4 ENTER: Auswahl bestätigen.
5 RETURN: Zum vorhergehenden Element
zurückkehren (nur bei VCD, wenn PBC
aktiviert ist).
D
D-21

DVD-Porty MD 80686 D EN.book Seite 22 Montag, 30. Mai 2005 4:05 16
6 ZOOM: Bildvergrößerung/-verkleinerung
1x ZOOM: Vergrößerungsfaktor x 2
2x ZOOM: Vergrößerungsfaktor x 3
3x ZOOM: Vergrößerungsfaktor x 4
4x ZOOM: Verkleinerungsfaktor x 1/2
5x ZOOM: Verkleinerungsfaktor x 1/3
6x ZOOM: Verkleinerungsfaktor x 1/4
7x ZOOM: normale Darstellung
Mit den Navigationstasten können Sie innerhalb des vergrößerten Bilds einen Bildausschnitt wählen.
7 Zifferntasten: Eingabe von Ziffern/direkte Auswahl eines Kapitels. Drücken Sie
mehrmals die Taste 10+, um die Zehnerstellen von zweistelligen Ziffern einzugeben.
Damit die Ziffern aufgerufen werden können, muss vorher die Taste SHIFT (10)
gedrückt werden. Im Display erscheint der Eintrag SELECT NUM.
8 REPEAT: Wiederholungsfunktionen
DVD:
Aktuelles Kapitel wiederholen (CHAPTER) > aktuellen Titel wiederholen (TITLE)>
aus (OFF).
CD:
Aktuellen Titel wiederholen (REP1) > ganze CD (REP ALL) wiederholen > aus )OFF).
MP3/JPEG:
Aktuellen Titel wiederholen (REP1)> aktuellen Ordner wiederholen (REP DIR)> gan-
ze CD (REP ALL) wiederholen > aus )OFF).
9 REPEAT A-B: selbstdefinierten Abschnitt wiederholen.
Drücken Sie einmal A - B, um den Beginn des zu wiederholenden Abschnitts festzulegen. Auf dem Bildschirm erscheint A.
Drücken Sie noch einmal A - B, um das Ende des zu wiederholenden Abschnitts
festzulegen. Auf dem Bildschirm erscheint A – B. Der definierte Abschnitt wird endlos wiederholt.
Drücken Sie noch mal A - B, um die Wiederholung zu beenden (A-B CANCEL).
10 SHIFT: Mit dieser Taste schalten Sie zwischen den Zifferntasten (SELECT NUM)
und den Funktionen (SELECT FUNC) um. Die Standardeinstellung sind die Funktionen.
11 OPEN: CD/DVD auswerfen.
D-22

DVD-Porty MD 80686 D EN.book Seite 23 Montag, 30. Mai 2005 4:05 16
12 SUBTITLE: Drücken Sie wiederholt auf SUBTITLE, um eine der auf der DVD verfüg-
baren Untertitelsprachen auszuwählen.
Bitte beachten Sie, dass diese Funktion auf vielen DVDs nicht verfügbar ist.
13 OSD: Zeigt Informationen zur aktuell laufenden Disk an.
DVD-Modus
Einmal OSD: aktueller Titel > aktuelles Kapitel > Abgelaufene Zeit.
Zweimal OSD: Aktuelle Audiosprache> Audioeinstellung> Untertitel> Kamerapo-
sition.
CD-/MP3-Modus
Anzeige: aktueller Track> Wiederholmodus> abgelaufene Zeit
Wenn das Gerät mit Akku ohne Netzstrom betrieben wird, wird auch der Batte-
rieladestand angezeigt.
14 ANGLE: Kameraposition (Perspektive).
Bitte beachten Sie, dass diese Funktion auf vielen DVDs nicht verfügbar ist.
15 SEARCH: Direktauswahl von Titel und Zeit.
Das Eingabefeld „TT (Title) --/--, CH (Chapter) --/--, TIME --:--:--“ erscheint. Wählen
Sie ein Eingabefeld und geben Sie mit den Zifferntasten die gewünschte Startzeit,
den gewünschten Starttitel oder das gewünschte Startkapitel ein. Drücken Sie die
Taste ENTER, um zur angegebenen Stelle zu wechseln.
16 CLEAR: Eingabe löschen.
D
D-23

DVD-Porty MD 80686 D EN.book Seite 24 Montag, 30. Mai 2005 4:05 16
WIEDERGABE VON MP3- UND JPEG-CDS
Wenn Sie eine MP3- oder JPEG-CD einlegen, erscheint nach dem Einlesen der Disk
folgendes Menü:
In der linken Spalte sind die auf der CD enthaltenen Ordner aufgelistet.
• Bewegen Sie die blaue Markierung mit den Navigationstasten um einen Ordner
auszuwählen und bestätigen Sie Ihre Auswahl mit ENTER.
In der rechten Spalte sind die im aktuellen Ordner enthaltenen Titel oder Bilder aufgelistet.
• Mit ENTER wählen Sie einen Titel/ein Bild aus und spielen es an, bzw. zeigen ein
Bild auf dem Bildschirm an.
• Drücken Sie, wie bei der CD- oder DVD-Wiedergabe die Tasten PREV oder NEXT,
um einen Titel/ein Bild weiterzuschalten bzw. den vorherigen Titel/das vorherige
Bild aufzurufen.
Zusätzliche Funktionen der JPEG-Wiedergabe
• Drücken Sie in der Menüansicht die Taste MENU, um die auf der CD enthaltenen
Bilder als Voransichten darzustellen.
• Mit den Navigationstasten können Sie ein JPEG-Bild in 90°-Schritten drehen.
• Mit der Taste ZOOM können Sie die verschiedenen Vergrößerungs- und Verkleinerungsstufen anwenden, wie im DVD-Betrieb.
• Mit der Taste STOP kehren Sie zur Menüansicht der JPEG-CD zurück.
D-24

DVD-Porty MD 80686 D EN.book Seite 25 Montag, 30. Mai 2005 4:05 16
INSTELLUNGEN IM SETUP-MENÜ
E
Die Sprache des On-Screen-Displays (OSD) wird in dieser Anleitung auf
Englisch wiedergegeben.
Im SETUP-Menü, das Sie mit der Taste SETUP öffnen, machen Sie alle Einstellungen.
Drücken Sie im Stopp-Modus oder während der Wiedergabe auf SETUP.
Auf dem Bildschirm erscheint die Hauptseite des SETUP-Menüs mit den fünf Unterme-
nüs: SYSTEM, LANGUAGE (Sprache), AUDIO, VIDEO und DIGITAL.
Navigieren in den Menüs
Mit den Navigationstasten bewegen Sie sich in den Menüs. Die aktiven Punkte haben
einen farbigen Hintergrund.
Bei den meisten Untermenüs erscheint auf der rechten Seite ein Auswahlmenü. Um die
Auswahl zu ändern, gehen Sie zunächst mit nach rechts. Wählen Sie dann mit
oder einen anderen Eintrag. Drücken Sie ENTER, um die neue Auswahl zu bestätigen.
Mit SETUP können Sie das SETUP-Menü an jeder Stelle verlassen.
Menü SYSTEM
D
TV SYSTEM
NTSC: In Nord-Amerika übliches Farbformat.
PAL: In vielen europäischen Ländern übliches Farbformat.
AUTO: Einige TV-Geräte sind in der Lage, den Farbstandard des Landes selbst zu er-
kennen. In diesem Fall können Sie diese Einstellung wählen.
SCREEN SAVER (Bildschirmschoner)
Stellen Sie hier ein, ob sich ein Bildschirmschoner einschalten soll (ON), wenn keine
DVD abgespielt und das Gerät nicht benutzt wird. Wählen Sie andernfalls den Eintrag
OFF.
TV TYPE
4:3 PS
Auswahl für TV-Geräte im 4:3-Format. Das Pan&Scan-Format gibt Filme im16:9-Format
in vollständiger Höhe, aber an den Seiten abgeschnitten, wieder.
D-25

DVD-Porty MD 80686 D EN.book Seite 26 Montag, 30. Mai 2005 4:05 16
4:3 LB
Auswahl für TV-Geräte im 4:3-Format. Das Letterbox-Format verkleinert Filme im 16:9Format auf Bildschirmbreite.
16:9
Auswahl für TV-Geräte im 16:9-Format.
PASSWORD (Passwort)
Hier können Sie ein Passwort einstellen, um den Zugang durch andere Personen zu
kontrollieren.
Schlosssymbol geöffnet : Sie können ein neues Passwort vergeben. Geben Sie mit
den Zifferntasten der Fernbedienung eine vierstellige Nummer ein und bestätigen Sie
mit ENTER.
Schlosssymbol geschlossen : Geben Sie das bestehende Passwort ein und bestätigen Sie mit ENTER. Das Schlosssymbol öffnet sich und Sie können auf die Zugangssperre (RATING) zugreifen.
Das Masterpasswort ist 9999. Verwenden Sie dieses Passwort, falls Sie das eigene
Passwort einmal vergessen haben sollten.
RATING (Freigabeklasse der DVD)
Einige DVDs und CDs sind mit Verschlüsselungssignalen der von der Motion Picture
Association etablierten Freigabeklassen kodiert. Die acht Freigabeklassen lauten:
1 KID SAFE: auch für kleine Kinder geeignet;
2 G („General“): für alle Altersgruppen;
3 PG („Parental Guidance“): elterliche Aufsicht empfohlen;
4 PG_13: elterliche Aufsicht strengstens empfohlen; einige Szenen für Jugendliche un-
ter 13 nicht geeignet;
5 PG_R („Parental Guidance Restriction): für Jugendliche unter 17 elterliche Aufsicht
empfohlen;
6 R („Restriction„): für Jugendliche unter 17 elterliche Aufsicht strengstens empfohlen;
7 NC_17: nicht für Jugendliche unter 17 Jahren;
8 ADULT: nur für Erwachsene.
DEFAULT
Wählen Sie hier mit der Taste den Eintrag RESTORE aus und drücken Sie die Taste
ENTER zur Bestätigung, um das Gerät auf die Werkseinstellungen zurückzusetzen.
D-26

DVD-Porty MD 80686 D EN.book Seite 27 Montag, 30. Mai 2005 4:05 16
Menü LANGUAGE (Sprache)
OSD LANGUAGE
Hier stellen Sie die Sprache des OSD („On Screen Display“), d. h. die Sprache der
Menüs des DVD-Players.
AUDIO LANG
Die gesprochene Sprache.
SUB LANG
Die Sprache der Untertitel.
MENU LANG
Die Sprache des Menüs auf der Disk.
Bei einigen DVDs können Sie die gesprochene Sprache auch mit der Taste AUDIO
und die Untertitelsprache mit der Taste SUBTITLE verändern.
Bitte beachten Sie: Es kann nur eine Sprache wiedergegeben werden, die auf der
DVD vorhanden ist. Wenn Sie eine andere Sprache wählen, wird die erste auf der
DVD gespeicherte Sprache wiedergegeben.
Menü AUDIO
Mit den AUDIO-Einstellungen können Sie den Digital-Ausgang des Geräts für die verschiedenen Tonformate (Dolby Digital, DTS, MP3/WMA) ein- oder ausstellen.
SPDIF/OFF
Der digitale Ausgang (der Anschluss OPTICAL OUT) ist ausgeschaltet. Wählen Sie diese Einstellung für den Anschluss an eine Stereoanlage.
SPDIF/RAW
Der digitale Ausgang (der Anschluss OPTICAL OUT) ist eingeschaltet. Wählen Sie diese Einstellung für den Anschluss an einen Dolby Digital-Decoder; bei der Wiedergabe
von DVD/DTS ist durch die Surround-Einstellung auch eine 5.1-Wiedergabe („KinoEffekt“) möglich.
SPDIF/PCM
Der digitale Ausgang (der Anschluss OPTICAL OUT) ist eingeschaltet. Wählen Sie diese Einstellung, wenn der DVD-Spieler an eine 2-Kanal-Stereoanlage mit digitalen Eingängen angeschlossen ist. Wenn eine Dolby Digital- oder MPEG-DVD abgespielt
wird, wird über den digitalen Ausgang ein Ausgangssignal in ein PCM-2-Kanal-Format
umgewandelt.
D
D-27

DVD-Porty MD 80686 D EN.book Seite 28 Montag, 30. Mai 2005 4:05 16
Menü VIDEO (Bild)
BRIGHTNESS (Helligkeit)
Stellen Sie hier mit den Tasten oder die Helligkeit ein.
CONTRAST (Kontrast)
Stellen Sie hier mit den Tasten oder den Kontrast ein.
HUE (Farbton)
Stellen Sie hier mit den Tasten oder den Farbton ein.
SATURATION (Sättigung)
Stellen Sie hier mit den Tasten oder die Sättigung ein.
Menü DIGITAL
Wählen Sie den Menüpunkt DYNAMIC RANGE aus, um mit den Tasten oder
die Dynamik zu beeinflussen. Bei eingeschalteter Dynamik (FULL) werden leise und
laute Passagen auf eine Lautstärke angeglichen. Wenn Sie die normale Filmlautstärke
hören wollen, stellen Sie diese Funktion auf OFF.
D-28

DVD-Porty MD 80686 D EN.book Seite 29 Montag, 30. Mai 2005 4:05 16
ENN STÖRUNGEN AUFTRETEN
W
Sollten Störungen auftreten, prüfen Sie bitte zunächst, ob Sie das Problem selbst beheben können. Die folgende Übersicht kann Ihnen dabei helfen.
Versuchen Sie auf keinen Fall, das Gerät selbst zu reparieren. Wenn eine Reparatur notwendig ist, wenden Sie sich bitte an unser Service-Center oder eine andere geeignete Fachwerkstatt.
STÖRUNG MÖGLICHE URSACHE / MASSNAHME
ALLGEMEIN
Keine Funktion,
Keine Standby-Anzeige
Die Disk läuft nicht an,
obwohl PLAY gedrückt
ist, oder stoppt sofort
wieder
Das Gerät reagiert
nicht auf die Fernbedienung
Schlechter Klang, wenn
das Gerät an ein TVGerät, einen Verstärker
o. ä. angeschlossen ist
Die Stromversorgung (Batterie oder Netzadapter) ist
nicht richtig hergestellt.
Ist die Disk mit der beschrifteten Seite nach oben eingelegt?
Prüfen Sie, ob die Disk beschädigt ist, indem Sie eine
andere Disk einlegen. Falls die Disk verschmutzt ist, wischen Sie sie mit einem weichen, trockenen Tuch von
der Mitte zum Rand vorsichtig ab.
DVD: Hat die DVD den richtigen Regionalcode (2)?
Es hat sich Kondenswasser gebildet; geben Sie dem
Gerät ein bis zwei Stunden Zeit zum Trocknen.
Prüfen Sie, ob die Batterien nicht verbraucht und richtig
eingelegt sind. Entfernen Sie eventuelle Hindernisse zwischen dem Infrarotsender, der Fernbedienung und dem
Sensor am Gerät.
Sind Sie eventuell zu weit vom Gerät entfernt?
Die Anschlüsse sind nicht richtig vorgenommen.
Die Kontakte sind verschmutzt.
Der digitale Audio-Ausgang ist an ein nicht kompatibles
Gerät angeschlossen.
D
D-29

DVD-Porty MD 80686 D EN.book Seite 30 Montag, 30. Mai 2005 4:05 16
Schlechte Bildqualität. Es ist ein falsches Videoformat (PAL – NTSC) gewählt.
Falsches Bildformat (16:9; 4:3 PS oder 4:3 LB).
Der Player ist auf AV OUT gestellt, aber es bestehen an-
dere Signale, die über den AV-Anschluss eingegeben
werden.
Die Disk ist verschmutzt.
Kleine Bildstörungen sind keine Fehlfunktionen.
Schlechtes Bild bei einer DVD, die mit einem
Videorekorder aufge-
Dieser DVD-Player enthält eine Copyright-Schutztechnologie. Bestimmte Disks enthalten Signale, die ein Kopieren auf eine Videokassette verhindern.
nommen wurde.
Kein oder schlechter
Klang.
Der Kopfhörer ist angeschlossen.
Die Lautstärke des Hauptgeräts ist zu niedrig.
Die PAUSE-Taste ist gedrückt.
Die Zeitlupe ist aktiv.
Das Gerät wird heiß. Dies ist normal und keine Fehlfunktion.
DVD-SPEZIFISCH
Falsche Sprache;
Falsche Untertitelsprache.
Ändern Sie die Spracheinstellung im SETUP-Menü (Ta-
sten MENU oder TITLE).
Prüfen Sie auf dem DVD-Cover oder im DVD-Menü, ob
die gewählte Sprache auf der DVD existiert
Keine SKIP-Funktion
möglich.
Sie haben das Pass-
Einige DVDs haben Titel/Kapitel, für die die SKIP-Funkti-
on gesperrt sind (z. B. Intro, Lizenzhinweise, etc.).
Verwenden Sie das Master-Passwort 9999.
wort vergessen.
D-30

DVD-Porty MD 80686 D EN.book Seite 31 Montag, 30. Mai 2005 4:05 16
NTSORGUNG
E
Verpackung
Nicht mehr benötigte Verpackungen und Packhilfsmittel sind recyclingfähig
und sollten grundsätzlich der Wiederverwertung zugeführt werden.
Batterien und Akkus
Verbrauchte Batterien und defekte Akkus gehören nicht in den Hausmüll.
Die Batterien und Akkus müssen umweltgerecht bei einer Sammelstelle für
Altbatterien abgegeben werden.
Gerät
Werfen Sie den DVD-Player am Ende seiner Lebenszeit keinesfalls in den
normalen Hausmüll. Erkundigen Sie sich in Ihrer Stadt- oder Gemeindeverwaltung nach Möglichkeiten einer umwelt- und sachgerechten Entsorgung
des DVD-Players.
D
D-31

DVD-Porty MD 80686 D EN.book Seite 32 Montag, 30. Mai 2005 4:05 16
TECHNISCHE DATEN
Netzadapter: Eingang 230 V ~ 50 Hz
Ausgang 12 V 1,5 A
Akku: 7,4 V 4000 mAh
Leistungsaufnahme: < 10 W
Stand-by Leistungsaufnahme: < 0,1 W
Batterie für Fernbedienung: 1 x Lithium CR 2025
Farbfernsehsystem: PAL/NTSC
Laser: Laser klasse 1
Unterstützte Diskformate: DVD (Digital Versatile Disk), DVD+R, DVD+RW,
DVD-R, DVD-RW; VCD, SVCD, Audio-CD; CD-R,
CD-RW, JPEG, MP3, WMA.
Wenn Sie Audio-CDs verwenden, achten Sie auf den nebenstehenden
Aufdruck Es gibt heute viele nicht standardisierte CD-Aufnahmeverfahren
und Kopierschutzverfahren, sowie unterschiedliche CD-R/RW-Rohlinge.
Darum kann es in Einzelfällen zu Einlesefehlern oder Verzögerungen
kommen. Dies ist kein Defekt des Geräts.
MP3-Kodierung
ISO 9660-Format
Sampling-Frequenz: MPEG 1: 32, 44.1, 48 kHz
Bit-Rate: 32 - 320 kbps
Technische Änderungen vorbehalten!
D-32

DVD-Porty MD 80686 D EN.book Seite 3 Montag, 30. Mai 2005 4:05 16
ABLE OF CONTENTS
T
Safety regulations . . . . . . . . . . . . . . . . . . . . . . . . . . . . . . . . . . . . 4
The device . . . . . . . . . . . . . . . . . . . . . . . . . . . . . . . . . . . . . . . . . 4
Battery operation . . . . . . . . . . . . . . . . . . . . . . . . . . . . . . . . . . . . . 5
About DVDs . . . . . . . . . . . . . . . . . . . . . . . . . . . . . . . . . . . . . . . . 6
Contents of package . . . . . . . . . . . . . . . . . . . . . . . . . . . . . . . . . . 7
Parts of the device . . . . . . . . . . . . . . . . . . . . . . . . . . . . . . . . . . . 8
Main device . . . . . . . . . . . . . . . . . . . . . . . . . . . . . . . . . . . . . . . . . 8
Remote control . . . . . . . . . . . . . . . . . . . . . . . . . . . . . . . . . . . . . . 10
Battery . . . . . . . . . . . . . . . . . . . . . . . . . . . . . . . . . . . . . . . . . . . 11
Recharging the battery . . . . . . . . . . . . . . . . . . . . . . . . . . . . . . . . 11
Powering the DVD player . . . . . . . . . . . . . . . . . . . . . . . . . . . . . . 12
Connection options . . . . . . . . . . . . . . . . . . . . . . . . . . . . . . . . . . 13
Converting from AV OUT to AV IN . . . . . . . . . . . . . . . . . . . . . . . . 13
Connecting a TV . . . . . . . . . . . . . . . . . . . . . . . . . . . . . . . . . . . . . 14
Output sound to 5.1 loudspeakers . . . . . . . . . . . . . . . . . . . . . . . . 15
Connection to an active loudspeaker system . . . . . . . . . . . . . . . . . 16
Connecting the DVD player in the car . . . . . . . . . . . . . . . . . . . . . . 17
Operation . . . . . . . . . . . . . . . . . . . . . . . . . . . . . . . . . . . . . . . . 18
Inserting/removing a disc . . . . . . . . . . . . . . . . . . . . . . . . . . . . . . 18
Remote control button functions . . . . . . . . . . . . . . . . . . . . . . . . . . 19
Playing back MP3 and JPEG CDs . . . . . . . . . . . . . . . . . . . . . . . 22
Settings in the SETUP menu . . . . . . . . . . . . . . . . . . . . . . . . . . . . 23
SYSTEM menu . . . . . . . . . . . . . . . . . . . . . . . . . . . . . . . . . . . . . . 23
Menu LANGUAGE . . . . . . . . . . . . . . . . . . . . . . . . . . . . . . . . . . . 25
AUDIO menu . . . . . . . . . . . . . . . . . . . . . . . . . . . . . . . . . . . . . . . 25
VIDEO menu . . . . . . . . . . . . . . . . . . . . . . . . . . . . . . . . . . . . . . . 26
DIGITAL menu . . . . . . . . . . . . . . . . . . . . . . . . . . . . . . . . . . . . . . . 26
Troubleshooting . . . . . . . . . . . . . . . . . . . . . . . . . . . . . . . . . . . . . 27
Disposal . . . . . . . . . . . . . . . . . . . . . . . . . . . . . . . . . . . . . . . . . . 29
Technical data. . . . . . . . . . . . . . . . . . . . . . . . . . . . . . . . . . . . . . 30
EN
EN-3

DVD-Porty MD 80686 D EN.book Seite 4 Montag, 30. Mai 2005 4:05 16
SAFETY REGULATIONS
About these instructions
Please read these instructions carefully before using the system. Note the
warnings in the operating instructions
Always keep the operating instructions close to hand. If you sell the device
or give it away, make sure you also hand over these instructions and the guarantee slip.
The device
Keep electrical equipment out of reach of children
Never allow children to use electrical devices unattended.
If swallowed, batteries may endanger life. For this reason, keep the device and batte-
ries out of reach of children. If a battery is swallowed, please obtain immediate medical assistance.
Keep plastic packaging out of the reach of children. There is a risk of suffocation.
Setting the device up safely
Place the device on a sturdy, level surface. It is not designed for use in rooms that are
very humid (e.g. bathrooms) or have an unusual amount of dust. Always ensure that
there is adequate ventilation;
there are no direct heat sources (e.g. heaters) that could affect the device,
the device is not in direct sunlight;
you avoid contact with liquids and water (e.g. do not place vases close to the de-
vice);
the device is not placed close to magnetic fields (e.g. televisions or other loudspea-
kers);
naked flames such as lit candles are not placed near the device.
Do not switch off or lift up the device during playback. This could damage the disc
that is being played. Remove the disc before transporting the device. Do not place
any objects on the device.
EN-4
DVD-Player_MD42451_D.fm

DVD-Porty MD 80686 D EN.book Seite 5 Montag, 30. Mai 2005 4:05 16
Power connection
Only connect the mains adapter to a 230V ~ 50Hz power socket that is easy to reach
and is close to the place where you have set up the device. The power socket must
be freely accessible so that you can unplug the device quickly if necessary.
Never undertake your own repairs
If the plug, cable or device is damaged, immediately remove the plug
from the power supply.
Never try to open and/or repair the device yourself. There is a risk of
electric shock. If there is a defect contact our Service Centre or other suitable specialist workshop.
DVD player
The DVD player is a class 1 laser product. The device has a
safety system that prevents dangerous laser rays escaping from
the device during normal use. In order to avoid eye injuries, never manipulate or damage the device’s security system.
Cleaning the device
Only use a clean, soft cloth for cleaning. Never use cleaning solutions that could damage the surface of the devices.
Battery operation
Remove the battery if you want to use mains power. If the battery is connected some
power still flows. This can charge it too strongly and make it unusable.
Store the battery in a dry location at a temperature between 15°C and 25°C.
Even if you normally power the device from the mains you should empty the battery
completely through normal use at least once per year.
CAUTION!
If you want to use a different battery, make sure it is the same type
(7.4V 4000mAh). The use of the wrong kinds of batteries may result in
an explosion!
EN
EN-5

DVD-Porty MD 80686 D EN.book Seite 6 Montag, 30. Mai 2005 4:05 16
ABOUT DVDS
A DVD – Digital Versatile Disc – is a digital medium for
storing information. DVDs are marked with one of the symbols shown here.
There are different types of DVD with different storage capacities depending on how
the information is stored.
DVD structure
Video DVDs are divided into titles and chapters. A DVD may contain several titles,
which may in turn be made up of several chapters. The titles and chapters are each
numbered sequentially.
The first title of a DVD usually comprises licence details and manufacturer's information.
The next title is usually the film itself. Other titles may include such items as "making of"
documentaries, film previews or information on the actors.
Regional codes
For reasons connected with global DVD sales strategy, a code has been developed
for DVDs that allows the recording to be played only on devices purchased in a particular region.
This code is based on a system that divides the world into six regions. As
Europe is in Zone 2, your DVD player will only play DVDs that have the
regional code 2 (or 0).
The regional code is printed on the DVD packaging (refer to the following
logo).
EN-6

DVD-Porty MD 80686 D EN.book Seite 7 Montag, 30. Mai 2005 4:05 16
ONTENTS OF PACKAGE
C
When unpacking, ensure that the following parts are included:
•DVD player
• Battery • Remote control • Mains adapter
• AV cable • Earphones • Car adapter
• Soft carrying case • Car bag • Accessory bag
EN
• 1 Lithium battery (Cr 2025)
• Instructions and guarantee documents
EN-7

DVD-Porty MD 80686 D EN.book Seite 8 Montag, 30. Mai 2005 4:05 16
PARTS OF THE DEVICE
Main device
1 LCD Display
2 Loudspeaker
3 Operating buttons
4 Sensor for remote control
5 Voltage indicator
Off: Not in use
Red: Device on standby
Blue:DVD player has power. You can
switch on the device by pressing ON
on the device or the STANDBY button
on the remote control.
Control elements on main device:
1 ON: Hold down button for around 1.5 seconds to switch device on
PLAY: Playback
PAUSE: To pause playback
2 OFF: Hold down button for around 1.5 seconds to switch device off
STOP: Stop playback
3 SKIP: Previous/next title
4 MODE: Choose various settings:
BRIGHTNESS
COLOUR
TFT mode: Switch screen between 16:9 and 4:3
VIEW mode: switch image between normal and headphone playback
AV INPUT/OUTPUT: Switch AV function between input and output
EN-8

DVD-Porty MD 80686 D EN.book Seite 9 Montag, 30. Mai 2005 4:05 16
(“Converting from AV OUT to AV IN” p. 13.).
Hold down the button for around 1.5 seconds to switch the display off. Press the
button briefly to switch the display on again.
5 Press the + and – buttons to change the values for the various settings.
6 OPEN: Open and close disc compartment
Left side of the main device
1 PHONE: Socket for ear and head-
phones;
the loudspeaker switches itself off
when headphones are used.
Before putting on ear or headphones set the volume to minimum!
2VOLUME: Volume control for the device and headphones
3 VIDEO IN/OUT: Use this socket to send input and output signals to a device con-
nected via an AV cable (depending on whether "AV INPUT" or "AV OUTPUT" was
selected via the MODE button; see above).
4 AUDIO IN/OUT; OPTICAL OUT
Use this socket to send input and output signals to a device connected via an AV
cable (depending on whether "AV INPUT" or "AV OUTPUT" was selected via the
MODE button; see above).
The socket can also be used as an optical output to play audio signals on a 5.1
amplifier (The MODE button must also be set to "AV OUTPUT" for this to occur; see
above).
5 DC IN: Socket for the mains adapter supplied and the car adapter.
Right side of the main device
1 CD/DVD slot in the drive
2 LED: Flashes when the drive is working
EN
EN-9

DVD-Porty MD 80686 D EN.book Seite 10 Montag, 30. Mai 2005 4:05 16
Rear of the main device
1 Stand: Is used to set up device
Pull the stand into the desired position and lock it by pushing the
button to the "LOCK" position.
Underside of the main device
1 Battery opening brackets
2 Battery screw-top opening
3 Battery socket (covered with rubber cover
if no battery is used)
Remote control
Inserting the battery into the remote control.
• Remove the battery bracket by pressing the small clip (see
arrow) and pulling out the battery bracket with a finger
nail at the same time.
• Insert a lithium CR 2025 battery with the plus pole
showing upwards.
• Slide the battery compartment back into the remote control.
Range
The remote control has a range of about
5 metres.
EN-10

DVD-Porty MD 80686 D EN.book Seite 11 Montag, 30. Mai 2005 4:05 16
Battery
1DC IN socket
2 Screw button: Turn this button to fix the
battery to the main device via the screw,
and to loosen it.
3 LED Charge indicator;
LED off: Battery is empty;
LED red: Battery is being charged;
LED green: Charging has ended.
4 Clips for power input to the DVD player.
Important information
Please adhere to the special safety advice for the battery at the start of these
instructions!
Charge the battery fully before using it for the first time.
Both the battery and main device heat up during use. This is not a defect.
If the device is on battery power and the player is left switched on for 10 minutes
but is not in use, the device will switch itself off (Auto Power Off).
Operation may become unstable if the DVD player is switched on but the battery
is not fully charged. Ensure that the battery is fully charged if you want to use it.
Recharging the battery
Notes on charging
If the battery is warm before charging, it may take longer to charge than normal. It
may not charge properly. Allow the battery to cool down first.
The battery should not be charged in a very hot location; there is a risk of explosion!
Charging normally takes 4 to 5 hours.
Stop charging as soon as the battery is full.
The battery supplies power for around 3 hours of continuous operation.
Charging
You can charge the battery separately or while it is connected to the device. This is
done as follows:
• If necessary detach the battery from the main device.
EN
EN-11

DVD-Porty MD 80686 D EN.book Seite 12 Montag, 30. Mai 2005 4:05 16
• Place the battery and mains adapter on a flat surface.
• Connect the DC output
plug on the mains adapter
to the battery or the DC IN
socket on the player.
• Connect the mains adapter to an easily accessible
230V ~ 50Hz power socket; The battery LED will light up red.
Charging is complete when the battery LED turns green (after 4 to 5 hours). The mains
adapter should then be disconnected.
Powering the DVD player
Connecting the battery
• Remove the rubber cover from the insertion point under the main device. Store the cover in the accessory
bag so that it does not get lost.
• Fix the battery to the device by turning the screw tightly using the setting wheel.
If playback is unstable the battery may not be fully charged.
• If you remove the battery again, replace the rubber
cover.
If both the battery and mains adapter are connected the
battery is charged slowly.
• In order to discover the charging status of the battery, press the OSD button on the
remote control (for this to work the mains adapter must not be plugged in).
The battery is full:
The battery is weak.
Connecting the mains adapter
• Insert the mains adapter DC plug into the DC IN socket on the main device.
• Connect the mains adapter to an easily accessible 230V ~ 50Hz power socket;
Use only the mains adapter supplied.
If necessary switch the DVD player off before connecting the mains adapter.
EN-12

DVD-Porty MD 80686 D EN.book Seite 13 Montag, 30. Mai 2005 4:05 16
ONNECTION OPTIONS
C
You can output both images and sound to other devices. These include devices that
output Dolby Digital/DTS 5.1 sound.
In contrast you can also output images and sounds from other devices on the portable
DVD player.
Before making connections switch off the power supply to the DVD player and
all other devices!
Converting from AV OUT to AV IN
You can convert the VIDEO IN/OUT
and AUDIO IN/OUT sockets on the
side of the device from the default OUT
setting (output of AV signals to other devices) to IN. For example, this setting enables you to use the DVD player as a
TFT monitor.
Converting AUDIO IN/OUT socket
• Hold down the MODE button on the
main device for around 1.5 seconds
until the first MODE setting appears.
• Press MODE repeatedly in quick succession until the message is displayed.
Use the – and + on the main device to
make the setting:
EN
= AUDIO OUT (the signals are output);
= AUDIO IN (the signals are input).
Avoid inputting AV signals via the AV sockets if the DVD player is set to AV OUT:
This produces interference during ongoing playback.
EN-13

DVD-Porty MD 80686 D EN.book Seite 14 Montag, 30. Mai 2005 4:05 16
Connecting a TV
EN-14

DVD-Porty MD 80686 D EN.book Seite 15 Montag, 30. Mai 2005 4:05 16
Output sound to 5.1 loudspeakers
You can connect the DVD player via the digital output to a Dolby Digital/DTS/MPEG2 decoder or an amplifier with integrated decoder. To make the most of 5.1 channel
sound you need five loudspeakers and a subwoofer.
EN
EN-15

DVD-Porty MD 80686 D EN.book Seite 16 Montag, 30. Mai 2005 4:05 16
Connection to an active loudspeaker system
.
EN-16

DVD-Porty MD 80686 D EN.book Seite 17 Montag, 30. Mai 2005 4:05 16
Connecting the DVD player in the car
You can use the DVD player in a car by using the car adapter supplied.
• Connect the car adapter at one end with the DC IN socket on the main device and
at the other with the car's cigarette lighter.
Mounting the car bag
You can fix the car bag together with the DVD player as follows to the car seat headrest:
EN
EN-17

DVD-Porty MD 80686 D EN.book Seite 18 Montag, 30. Mai 2005 4:05 16
OPERATION
Inserting/removing a disc
• Make sure that the device has power (see above).
• To switch on the device hold down the ON button on the main device for around
1.5 seconds. The LED on the device will light up blue.
• You can also switch on the device from standby mode (the device LED will light up
red) using the standby button on the remote control.
• Insert the disc with the written side to the front into the disc slot (for discs written on
one side).
• As soon as you have inserted the disc far enough the drive will pull in the disc automatically.
• To eject the disc again press the OPEN button on the remote control or device. The
drive will eject the disc and you can pull it out.
• To switch off the device hold down the OFF button on the main device for around
1.5 seconds. The device LED will light up red (standby mode).
Playback
If a disc has been inserted playback starts automatically. If no disc has been inserted
the DVD player's standard image is displayed.
The screen shows the disc type (DVD, VCD, CD, MP3) and the relevant menu.
EN-18

DVD-Porty MD 80686 D EN.book Seite 19 Montag, 30. Mai 2005 4:05 16
Remote control button functions
There follows a description of the device's button
functions using the remote control buttons.
Frequently used functions
1 STANDBY: Press STANDBY to switch the de-
vice to standby mode.
2 PREV/NEXT: During playback press PREV or
NEXT to skip forwards or backwards (for
DVDs: from chapter to chapter; for CDs: from
title to title).
Please note that on many DVDs it is not possible to skip over the licensing information at the
start.
3 REV/FWD: Fast forward or back.
Press once: double speed (2x)
press twice: four times speed (2x)
press three times: eight times speed (8x)
press 4 times: twenty times speed (20x).
If you press PLAY you return to normal playback speed.
4 PLAY: To start playback
PAUSE: To pause playback
5/8MENU: You can call up the menus stored on the DVD using the TITLE/PBC and
MENU buttons (TITLE/PBC is not ava ilable on all DVDs). You navigate to the items
in the DVD menus using the navigation keys. Confirm each entry with ENTER.
Please note that the precise functions available in each menu when you press a
button will depend on the DVD. Many DVDs have only one menu that appears
when either button is pressed.
Press the MENU button during JPEG-CD playback to display previews of the
images shown on the CD.
6 STOP: Press STOP once to stop playback. The device is now in resume mode. In
this mode you can continue the playback from the same place using PLAY.
Press STOP again to finally stop playback.
7 STEP: Press PAUSE and then STEP to play back individual images. You move to
the next frame each time a button is pressed.
SLOW: To switch on slow motion press SLOW during playback:
EN
EN-19

DVD-Porty MD 80686 D EN.book Seite 20 Montag, 30. Mai 2005 4:05 16
1x SLOW: 1/2 speed
2x SLOW: 1/3 speed
3x SLOW: 1/4 speed
4x SLOW: 1/5 speed
5x SLOW: 1/6 speed
6x SLOW: 1/7 speed
Press PLAY to return to normal playback speed.
Other functions
1 AUDIO: Press AUDIO MENU repeated-
ly to select other languages stored on
the DVD.
Please note, however, that this language selection function is not available on
many DVDs.
2SETUP:
The main page of the SETUP menu appears on the screen (“Settings in the SETUP menu” auf Seite 23).
3 You can move through the menus using
the navigation keys.
4 ENTER: Confirms selection.
5 RETURN: Return to previous element (on-
ly for VCD when PBC is activated).
6 ZOOM: Enlarging/reducing the image
1x ZOOM: Enlargement factor x 2
2x ZOOM: Enlargement factor x 3
3x ZOOM: Enlargement factor x 4
4x ZOOM: Enlargement factor x 1/2
5x ZOOM: Reduction factor x 1/3
6x ZOOM: Reduction factor x 1/4
7x ZOOM: normal depiction
You can use the navigation keys to select the section of the enlarged image that
you wish to view.
7 Number buttons: Enter figures/select a chapter directly. Press the 10+ button re-
peatedly to enter the first digit for double digit numbers.
Before the numbers can be entered you have to press the SHIFT (10) button.
The screen displays the entry SELECT NUM.
EN-20

DVD-Porty MD 80686 D EN.book Seite 21 Montag, 30. Mai 2005 4:05 16
8 REPEAT: Repeat functions
DVD:
Repeat current chapter (CHAPTER) > Repeat current title (TITLE)> off (OFF).
CD:
Repeat current title (REP1) > Repeat whole CD (REP ALL) > off (OFF).
MP3/JPEG:
Repeat current title (REP1) > Repeat current folder (REP DIR)>Repeat whole CD (REP
ALL) > off (OFF).
9 REPEAT A-B: Repeat self-defined section.
Press A – B once to stipulate the start of the section that is to be repeated. A appears on the screen.
Press the A – B button again to set the end of the repeat sequence. A – B is displayed. The defined section will be repeated endlessly.
Press A-B again to end the repetition (A-B CANCEL).
10 SHIFT: Use this button to switch between the number buttons (SELECT NUM) and
the functions (SELECT FUNC). The default setting is for functions.
11 OPEN: Eject CD/DVD.
12 SUBTITLE: Press SUBTITLE repeatedly to select another subtitle language stored on
the DVD.
Please note, however, that this selection function is not available on many DVDs.
13 OSD: Shows information on the current disc.
DVD mode
OSD once: current title > current chapter > elapsed time.
OSD twice: Current audio language> Audio setting> Subtitles> Camera position.
CD/MP3 mode
Indicator: Current track> Repeat mode> elapsed time
If the device is operated via the battery without mains power, the battery charging
status is also displayed.
14 ANGLE: Camera position (perspective).
Please note, however, that this function is not available on many DVDs.
15 SEARCH: Direct title and time selection.
the "TT (Title) --/--, CH (Chapter) --/--, TIME --:--:--" entry fields appear. Select an ent-
ry field and enter the desired starting time, desired starting title or desired starting
chapter using the number buttons. Press ENTER to move to the stated location.
16 CLEAR: delete entry.
EN
EN-21

DVD-Porty MD 80686 D EN.book Seite 22 Montag, 30. Mai 2005 4:05 16
PLAYING BACK MP3 AND JPEG CDS
If you insert an MP3 or JPEG disc the appropriate menu appears on the screen after
the disc has been read:.
The left column lists the folders contained on the CD.
• Move the blue bar using the navigation buttons to select a folder and confirm your
selection by pressing ENTER.
The right column lists the titles or images contained in the current folder.
• Use ENTER to select a title/image and play a title or display an image on the
screen.
• As for CD and DVD playback, press the PREV or NEXT buttons to move to the next
title/image or to open the previous title/image.
Additional functions for JPEG playback
• In menu view press the MENU button to show the images contained on the CD as
previews.
• You can turn JPEG images through 90° using the navigation buttons.
• Use the ZOOM button to apply the various enlargement and reduction steps as for
DVD operation.
• Use the STOP button to return to the JPEG-CD menu view.
EN-22

DVD-Porty MD 80686 D EN.book Seite 23 Montag, 30. Mai 2005 4:05 16
ETTINGS IN THE SETUP MENU
S
You can make all the settings in the SETUP menu that you can open with the SETUP
button.
Press SETUP in stop mode or during playback.
The main page of the SETUP menu appears on the screen with five menus: SYSTEM,
LANGUAGE, AUDIO, VIDEO and DIGITAL.
Navigating in the menus
You move through the menus using the navigation buttons. The active options have a
coloured background.
A selection menu on the right hand side is opened for most sub-menus. To change the
selection, press to move to the right. Then select another entry with or . Press
ENTER to confirm the new selection.
Press SETUP at any point to close the SETUP menu.
SYSTEM menu
TV SYSTEM
NTSC: Usual colour format for North America.
PAL: Usual colour format for many European countries.
AUTO: Some televisions are able to recognise the country's colour standard themsel-
ves. In this case, you can select this setting.
SCREEN SAVER
You can select whether to use a screen saver (ON) if no DVD is playing and the device
is not in use. Otherwise select OFF.
TV TYPE
4:3 PS
Selection for televisions with a 4:3 format. The pan&scan format plays back films in a
16:9 format with their full height but the sides are cut.
4:3 LB
Selection for televisions with a 4:3 format. The letterbox format reduces the 16:9 film
format to the size of the screen.
EN
EN-23

DVD-Porty MD 80686 D EN.book Seite 24 Montag, 30. Mai 2005 4:05 16
16:9
Selection for televisions with 16:9 format.
PASSWORD
With this option a password can be entered so as to restrict access to the player by
others.
Lock icon open : You can enter a new password. Enter a four-digit number with
the number buttons on the remote control and confirm by pressing ENTER.
Lock icon closed : Enter the existing password and confirm by pressing ENTER.
The lock icon opens and you can access the parental lock (RATING).
The master password is 9999. Use this password if you have forgotten your own password.
RATING (DVD rating class)
Some DVDs and CDs are encoded with encryption signals in line with the authorisation
classes established by the Motion Picture Association. The eight authorisation classes
are:
1 KID SAFE: Suitable even for small children;
2 G ("General"): For all age groups,
3 PG ("Parental Guidance"): parental guidance recommended;
4 PG_13: ("Parental Guidance Strongly Recommended"); some scenes not suitable for
children under 13;
5 PG_R ("Parental Guidance Restriction"): under 17 parental guidance recommended;
6 R ("Restriction"): Parental guidance strongly recommended for children and teenagers
under 17;
7 NC_17: Not suitable for young people under 17;
8 ADULT: For adults only.
DEFAULT
To restore the device's factory settings, press the button to select the RESTORE entry
and ENTER to confirm your selection.
EN-24

DVD-Porty MD 80686 D EN.book Seite 25 Montag, 30. Mai 2005 4:05 16
Menu LANGUAGE
OSD LANGUAGE
This sets the OSD (on screen display) language, i.e. the language for the DVD player's
menus.
AUDIO LANG
The spoken language
SUB LANG
The language for subtitles
MENU LANG
The language of the menu on the disc.
You can also change the spoken language of some DVDs by pressing the AUDIO but-
ton and the subtitle language by pressing the SUBTITLE button.
Please note: It is only possible to play back a language that is actually on the DVD. If
you select a different language the first language saved on the DVD is used.
AUDIO menu
The AUDIO settings enable you to switch on or off the device's digital output for the various
sound formats (Dolby Digital, DTS, MP3/WMA).
SPDIF/OFF
The digital output (OPTICAL OUT socket) is switched off. Select this setting to connect
to a stereo system.
SPDIF/RAW
The digital output (OPTICAL OUT socket) is switched on. Select this setting to connect
to a Dolby Digital decoder; when playing back DVD/DTS it is possible to achieve 5.1
playback ("cinema effect") using the surround setting.
SPDIF/PCM
The digital output (OPTICAL OUT socket) is switched on. Select this setting if the DVD
player is connected to a 2-channel stereo system with digital inputs. When playing
back a Dolby Digital or MPEG DVD an output signal is converted to a PCM 2-channel
format via the digital output.
EN
EN-25

DVD-Porty MD 80686 D EN.book Seite 26 Montag, 30. Mai 2005 4:05 16
VIDEO menu
BRIGHTNESS
Use the or buttons to set the brightness.
CONTRAST
Use the or buttons to set the contrast.
HUE
Use the or buttons to set the hue.
SATURATION
Use the or buttons to set the saturation.
DIGITAL menu
Select the DYNAMIC RANGE menu option to change the dynamic using the or
buttons. If dynamic is switched on (FULL) the volume of quiet and loud sections is adjusted. If you want to hear the film at normal volume set this function to OFF.
EN-26

DVD-Porty MD 80686 D EN.book Seite 27 Montag, 30. Mai 2005 4:05 16
ROUBLESHOOTING
T
If errors occur, check first whether you can correct the problem yourself. The following
overview may help you.
Never try to repair the device yourself. Contact our service centre or other qualified personnel if a repair is necessary.
PROBLEM POSSIBLE CAUSE / REMEDY
GENERAL
No function,
No standby display
The disc does not play
even though PLAY has
been pressed, or stops
again immediately
The device does not respond to the remote
control
Poor sound when the
device is connected to
a TV, amplifier etc.
Power supply is incorrect (battery or mains adapter).
Is the disc inserted with the title facing upwards?
Check whether the disc is damaged by trying another
disc. If the disc is dirty, clean it carefully, wiping it from
the centre to the edge with a soft, dry cloth.
DVD: Does the DVD have the correct regional code (2)?
If condensation has formed: give the player one to two
hours to dry off.
Check whether the batteries need changing and have
been inserted correctly. Remove anything which may be
blocking the signal between the infrared transmitter, the
remote control and the device's sensor.
Is the distance between the remote control and the player too great?
The connections were not made correctly.
The contacts are dirty.
The digital audio output is not connected to a compati-
ble device.
EN
EN-27

DVD-Porty MD 80686 D EN.book Seite 28 Montag, 30. Mai 2005 4:05 16
Poor picture quality An incorrect video format (PAL – NTSC) has been selec-
ted.
Wrong image format (16:9; 4:3 PS or 4:3 LB).
The player is set to AV OUT but there are signals that are
being input via the AV connection.
The disc is dirty.
Slight picture distortion is not a malfunction.
Poor image for a DVD
that was recorded
using a video recorder.
This DVD player contains copyright protection technology. Certain discs contain signals that prevent copying
them onto a video cassette.
No or poor sound The headphones are connected
The main device's volume is too low.
The PAUSE button has been pressed
Slow motion is active.
The device becomes
This is normal and not a defect.
hot.
DVD-RELATED PROBLEMS
Wrong language;
wrong subtitlelanguage.
Change the language setting in the SETUP menu
(MENU or TITLE buttons).
Check on the DVD cover or in the DVD menu whether
the selected language is actually available on the DVD.
SKIP function does not
work
You have forgotten the
Some DVDs disable the SKIP function for certain titles or
chapters (e. g. intro, licence information, etc.).
Use the master password 9999.
password.
EN-28

DVD-Porty MD 80686 D EN.book Seite 29 Montag, 30. Mai 2005 4:05 16
ISPOSAL
D
Packaging
All packaging and packaging materials that are no longer required can
and should be recycled.
Batteries and rechargeable batteries
Do not dispose of used and defective batteries in the household rubbish.
Batteries should be deposited at a collection point for used batteries.
Device
At the end of its life, the DVD player must not be disposed of in household
rubbish. Ask your local or city authorities for options on disposing of the
DVD player properly and in an environmentally friendly method.
EN
EN-29

DVD-Porty MD 80686 D EN.book Seite 30 Montag, 30. Mai 2005 4:05 16
TECHNICAL DATA
Mains adapter: Input 230V ~ 50Hz
Output 12V 1.5A
Battery: 7.4V 4000mAh
Power consumption: < 10W
Stand-by power consumption < 0.1W
Remote control battery: 1 x Lithium CR 2025
Colour TV system: PAL/NTSC
Laser: class 1 laser product
Supported disc formats: DVD (Digital Versatile Disc), DVD+R, DVD+RW,
DVD-R, DVD-RW; VCD, SVCD, audio CD; CD-R,
CD-RW, JPEG, MP3, WMA.
Please note the following label if you use audio CDs. These days there
are many non-standard CD recording and copy protection procedures
as well as various blank CD-R and CD-RW discs. Therefore, in individual cases there may be read errors or delays. This does not mean the
device is faulty.
MP3 coding
ISO 9660 format
Sampling frequency: MPEG 1: 32, 44.1, 48 kHz
Bit rate: 32 -320 kbps
Subject to technical changes.
EN-30
 Loading...