

Page 1

Flat Panel TV
U
SSEER
U
© 2006 All rights reserved.
Trademarks:
Manufactured under license by Dolby Laboratories.
‘Dolby’, ‘Pro Logic’ and the Double D symbol are trademarks of Dolby Laboratories.
The “HD ready” Logo is a trademark of EICTA.
HDMI, the HDMI Logo and High-Definition Multimedia Interface are
trade marks or registered trade marks of HDMI Licensing LLC.
Additional trademarks are the property of their respective owners.
make no warranty of any kind with regard to this material, including, but
We
not limited to, the implied warranties of merchantability and fitness for a particular purpose.
We
will not be liable for errors contained herein or for incidental or consequential damages in connection with the furnishing, per-
formance, or use of this material.
We assume no responsibility for the use or reliability of its software on equipment that is not furnished by our company.
This document contains proprietary information that is protected by copyright. All rights are reserved. No part of this document
may be photocopied, reproduced, or translated to another language without the prior written consent of our company.
The information in this document is subject to change without notice.
Medion AG, Am Zehnthof 77, 45307 Essen, Germany
BDA00103700
R
’
’
SS
M
AANNUUAAL
M
L
Page 2

C
OONNTTEENNT
C
1. SAFETY AND PRECAUTIONS 1
Operating Safety .................................................................................................. 1
Precautions ......................................................................................................... 3
Important Additional Safety Instructions.................................................................. 3
Recycling and Disposal.......................................................................................... 4
2. INTRODUCTION 5
Service ............................................................................................................... 5
Performance Characteristics................................................................................... 5
3. CONTROL ELEMENTS AND FRONT CONNECTIONS 6
4. BACK OF THE DEVICE AND CONNECTIONS 7
T
Repair........................................................................................................... 1
Notes for Service Engineers ............................................................................. 1
Point of use ................................................................................................... 2
Environmental conditions................................................................................. 2
Connecting .................................................................................................... 2
Standards/Electro-Magnetic Compatibility .......................................................... 3
5. REMOTE CONTROL 8
Summary of Control Buttons.................................................................................. 9
6. APSAS FIRST TIME INSTALLATION 10
7. GENERAL CONTROLS & ADJUSTMENT 12
Turning the display On and Off............................................................................. 12
Calling up Menus and operating the on-screen control ............................................. 12
Continue switching channels ................................................................................ 13
Switch between TV / PC / AV ............................................................................... 13
Volume Control .................................................................................................. 13
Using Volume Control.................................................................................... 13
Using Mute .................................................................................................. 13
Picture (Contrast, Colour, Brightness, etc.) ............................................................ 13
Additional picture settings ................................................................................... 15
Sound (Balance, Equalizer, etc.)........................................................................... 16
8. TV MODE ADJUSTMENT 18
Adjusting TV settings .......................................................................................... 18
Program table .............................................................................................. 18
Delete a program ......................................................................................... 18
Moving and sorting channels .......................................................................... 19
Changing the names of channels .................................................................... 19
Setting channels manually ............................................................................. 20
Manual addition of channels................................................................................. 22
Add new channels automatically........................................................................... 22
ii
Page 3

9. TELETEXT 23
To operate Teletext ............................................................................................ 23
Teletext Page Selection ....................................................................................... 23
Select Teletext display functions........................................................................... 23
Useful features for Teletext.................................................................................. 24
10. CONNECTING EXTERNAL DEVICES 25
Connection of an external device to the Scart socket ............................................... 25
Connecting a video recorder to the aerial socket ..................................................... 25
Connecting a decoder ......................................................................................... 25
Connecting a camera recorder.............................................................................. 25
Settings for external devices (Picture, Sound, Name, etc.) ....................................... 26
AV Menu settings ............................................................................................... 26
11. VGA AND HDMI PC MODE 28
Connection ........................................................................................................ 28
Settings in the PC VGA and PC HDMI Mode ............................................................ 28
12. COMFORT FUNCTIONS 30
Picture in Picture (PIP) ........................................................................................ 30
Multi-Image (Station Overview) – Green Button...................................................... 30
Child lock .......................................................................................................... 30
Sleep Timer....................................................................................................... 31
Swap Function ................................................................................................... 32
Establish swap channel (Preferred channel) ...................................................... 32
Reverting to the Factory Setting ........................................................................... 32
Switching On Mode............................................................................................. 33
English Deutsch Français Italiano
Español
Settings for all channels ...................................................................................... 33
Time display TIME........................................................................................ 34
Switch picture format - ARC................................................................................. 34
Switch picture presets - APC ................................................................................ 34
Freeze Frame function – Yellow Button .................................................................. 34
Games.............................................................................................................. 34
13. TROUBLESHOOTING 35
14. OTHER QUESTIONS 36
Do you require additional Support? ....................................................................... 36
Warranty .......................................................................................................... 37
Duplication of the Instructions for Use / Technical Data............................................ 37
Nederlands
Português Dansk
iii
Page 4

Device
At the end of its life, the appliance must not be disposed of in household rubbish. Enquire
about the options for environmentally-friendly disposal
Batteries
Do not dispose of used batteries in the household rubbish! They must be deposited at a collection point for used batteries.
iv
Page 5

S
11.. S
Please read through this section carefully and follow the instructions to maximize the reliable
operation and lifetime of your display. Always keep these instructions handy and close by
your display. Keep the instructions and the packaging so that if you sell or give away your
display you can supply them to the new owner.
AAFFEETTYY AANNDD
P
RREECCAAUUTTIIOONNS
P
S
OPERATING SAFETY
• The TV device must not be subjected to drips or sprayed water on any account.
• Do not allow children to play unattended with electrical equipment. Children may not
always correctly recognize danger.
• This display is intended for personal use only. It not intended for commercial use in a
heavy industry environment.
• An injury hazard exists when the display breaks. Wear protective gloves to pack the bro-
ken parts and send them into your service center for proper disposal. Then wash your
hands with soap, because it is possible for chemicals to escape.
• Never exert pressure on the display. This could break the monitor.
• Do not touch the display with your fingers or with sharp objects to avoid damage.
• Never open the housing of the display! When the housing is open there is a
danger of injury from electric shock!
• Do not insert any objects through the slots and openings of the monitor. This may
lead to an electrical short-circuit or even fire resulting in damage to your display.
• Slots and openings in the display are for ventilation purpose. Do not cover
these openings, as this may lead to overheating.
English Deutsch Français Italiano
Contact the Call Center immediately in any of the following situations. Do NOT plug in or
turn on your display:
♦ if the power cable/power supply overheats or is damaged
♦ if liquid has gotten into the monitor
♦ if the display is dropped or the housing damaged
REPAIR
• Leave all repairs of your display to authorized and qualified personnel only.
• Should a repair be necessary, please contact one of our authorized service partners only.
NOTES FOR SERVICE ENGINEERS
• Before opening the housing, disconnect the product from all power sources and re-
move any connecting cables. If the display has not been disconnected from the power
outlet before being opened, there is a danger to life through electric shock. There is also a
risk of damage to the components.
• Internal components of the display may be damaged by electrostatic discharge
(ESD). Carry out repairs in an ESD-protected workshop. If no such workshop is
available, wear an antistatic wrist strap or touch a highly conductive metal object.
We can repair damage sustained by inappropriate handling for a fee.
• Use only original spare parts.
Español
Nederlands
Português Dansk
11.. S
S
AAFFEETTYY AANNDD
P
RREECCAAUUTTIIOONNS
P
S
1
Page 6

POINT OF USE
• Keep your display and all units connected to it away from moisture and avoid dust, heat
and direct sunlight. Failure to observe these instructions can lead to malfunctions or damage to the display.
• Do not place any containers filled with liquid (vases or similar) on the TV. The con-
tainer could tip over and the liquid could impair electrical safety.
• Do not place any open sources of fire (candles or similar objects) onto the TV device.
• Pay attention to sufficiently large distances in the wall unit. Maintain a minimum
distance of 10 cm around the device for sufficient ventilation.
• Place and operate all units on a stable, level and vibration-free surface in order to
avoid the display from falling.
• The optimum viewing distance is 5 times the screen diagonal.
ENVIRONMENTAL CONDITIONS
• The display can be operated most reliably at ambient temperatures between +41°F and +95°F
(5° C to 35° C) and at a relative humidity between 20% and 85% (without condensation).
• When switched off, the monitor can be stored most reliably between +14°F and +140°F (-
10° C - +60° C), up to the maximum height of 39,000 ft (12,000 m) above sea level at a
relative humidity between 10% and 85% (without condensation).
• After transporting your display please wait until it has assumed the ambient temperature
before connecting and switching it on. Extremely high variations in the temperature or
humidity may result in condensation forming on the inside of the display which could
cause an electrical short-circuit.
CONNECTING
Observe the following instructions to connect your display properly:
POWER SUPPLY
• Operate your display only with grounded outlets with AC 230V/240V~ 50 Hz. If you are not
sure about the power supply at your location, check with your power company.
• Use only power connection cable provided.
• For additional safety we recommend use of a surge protector to protect your display from
damage resulting from voltage surges or lightning.
• To remove the display from the power supply, disconnect the plug from the AC outlet.
• The mains switch installed does not detach the TV from the mains supply completely.
• The power outlet must be in the vicinity of your display and within reach of the power
cables. DO NOT stretch the power cables tightly to reach a power outlet.
• You should arrange the display cables in a manner that no one can trip over or step on
them.
• To avoid damage of cable do not place any objects or furniture on the cable.
REMOTE OPERATION
• Open the battery compartment of the remote by removing the cover.
• Insert Micro / AAA type batteries into the battery compartment on the back of the re-
mote. Pay attention to the polarity of the batteries (marked on the base of the battery
compartment) at the same time.
• Environmental note: Batteries, also non-metal ones – must not be disposed of in the
domestic waste. Used batteries must be put into the used battery collection container at
the seller or into public disposal facilities.
2
NNGGLLIISSH
H
E
E
Page 7

STANDARDS/ELECTRO-MAGNETIC COMPATIBILITY
Your display fulfils the requirements for electro-magnetic compatibility and electrical safety
specified in the following standards:
EN 55013, EN 55020, EN 60065, EN 61000-3-2, EN 61000-3-3
• Provide a space of at least three feet from high-frequency and magnetic sources of
interference (television sets, loudspeakers, mobile telephones, etc.) in order to avoid
malfunctions.
ERGONOMICS
• For ergonomic reasons we suggest not to use dark text with a blue background. This would
cause bad readability and would increase eye strain.
• While working with display you should take breaks periodically to avoid tension and
fatigue.
• In order to protect your eyes and to create a pleasant working area you should avoid glare,
reflections and strong contrasts on the screen.
TRANSPORT AND RECYCLING
• Keep the original packaging and use it to protect the display during transport or storage.
English Deutsch Français Italiano
PRECAUTIONS
Caution! There are no parts which can be serviced or cleaned inside of
the monitor housing.
You can increase the life of your display by taking the following precautions:
• Before cleaning always disconnect the power line and all connection cables.
• Do not use any solvents, caustic or gaseous cleaning agents. Clean the display with a
soft, lint-free cloth.
• Ensure that no water droplets remain on the screen. Water can cause permanent dis-
colouration.
• Do not expose the screen to bright sunlight or ultraviolet radiation.
IMPORTANT ADDITIONAL SAFETY INSTRUCTIONS
When using any electronic equipment, basic safety precautions should always be taken. Following the guidelines below can reduce the risk of fire, electric shock and injury to person:
• Do not use this product near water (e.g., near a bathtub, wash bowl, kitchen sink or
laundry tub, in a wet basement or near a swimming pool).
• Use only the power cord indicated in this manual. Do not dispose of batteries in a
fire. They may explode. Check with local codes for possible special disposal instructions.
• Keep batteries away from children at all times.
Español
Nederlands
Português Dansk
11.. S
S
AAFFEETTYY AANNDD
P
RREECCAAUUTTIIOONNS
P
S
3
Page 8

RECYCLING AND DISPOSAL
This device and its packaging have manufactured from materials that can be disposed of in
an environmentally-friendly way and sent to correct recycling to a great extent.
The device will be taken back after use, in order to send it to reutilization or exploitation of
the materials, as far as is it is returned in a state that corresponds to use in accordance with
regulations. Parts of the device that cannot be made use of will be disposed of correctly.
Please contact your point of sale or our service if you have questions about disposal.
4
NNGGLLIISSH
H
E
E
Page 9

I
NNTTRROODDUUCCTTIIOONN
22.. I
Thank you for purchasing our Multi-display. We thank you for your confidence in our products and are pleased to greet you as a new customer. We focused on great features, ease of
use and reliability in manufacturing your display.
SERVICE
Service and support will be available every time you use your new monitor. Contact us, we
will be glad to help you. This manual contains a separate chapter on the subject of Troubleshooting on page 35.
PERFORMANCE CHARACTERISTICS
Advantages in relation to CRT (cathode ray tube) displays:
Less space required
Lower weight
Power savings
Low radiation
Features
High resolution display
On Screen Display (OSD) – Graphic operating surface
499 channel slots, 3 AV settings, HDMI and VGA modes
Multi-standard PAL, SECAM, NTSC
“HD ready” - HDTV compatible
The following connections are available:
- Tuner connection
- SCART/AV1 (Video, S-Video, RGB, YCrCb, YPrPb)
- SCART/AV2 (Video, S-Video, RGB, YCrCb, YPrPb)
- Front AV.SV (Video/S-Video and Audio In)
- Headphones
- Analogue and digital multimedia input (VGA and HDMI connection)
- Audio-in for VGA and HDMI
Easy to operate remote
Easy to operate Picture Menu system
Automatic APSAS installation system (A
TOP/FLOF Teletext function with 2,100 page memory and multi-page text
Completely digital picture improvements:
- Dynamic noise reduction
- Comb filter
- Perfect Clear
- Image sharpness
- CTI
Dual-tuner PIP: PIP from two different signal sources
Freeze frame and multi-image (station overview)
Full picture format independent of the signal source
Headphones socket for screened listening pleasure
Integrated 2-way loudspeaker system with 6 loudspeakers
Decoder function
Intelligent Swap Function
Sleep Timer
Child Lock
Plug and Play: automatic recognition of your operating system
Four games: Brixx, Anaconda, Scramble and Outer Space
utomatic Program Search And Sort)
English Deutsch Français Italiano
Español
Nederlands
Português Dansk
I
NNTTRROODDUUCCTTIIOON
22.. I
N
5
Page 10

C
p
33.. C
The Buttons on the device control the basic functioning of the TV, including the On-Screen
Menu. You will reach the advanced functions through the remote.
• Detailed view - Closed cover flap:
• Detailed view - Open cover flap:
Note: Please read chapter “10. Connecting External Devices” on page 25 for further information about operating external device.
OONNTTRROOLL
E
LLEEMMEENNTTSS AANNDD
E
F
RROONNTT
F
C
OONNNNEECCTTIIOONNS
C
Operating display
A yellow light indicates that the device
is switched on but is in Readiness
Mode.
The light shines blue if the device is
switched on.
Sensor window
Point the remote to this region of the
screen.
Cover Flap
The front connections and the control
elements are located behind the cover
.
fla
Opening of the cover flap
Press on the three embossed points.
Power: Switches the TV on or into
Readiness Mode
P+/P- Program +/-
Setting Buttons in the Screen Menu
\+/\- Volume +/-
Setting Buttons in the Screen Menu
EXIT Button
MENU Button
Headphones output
AV.SV input
S
6
E
E
NNGGLLIISSH
H
Page 11
B
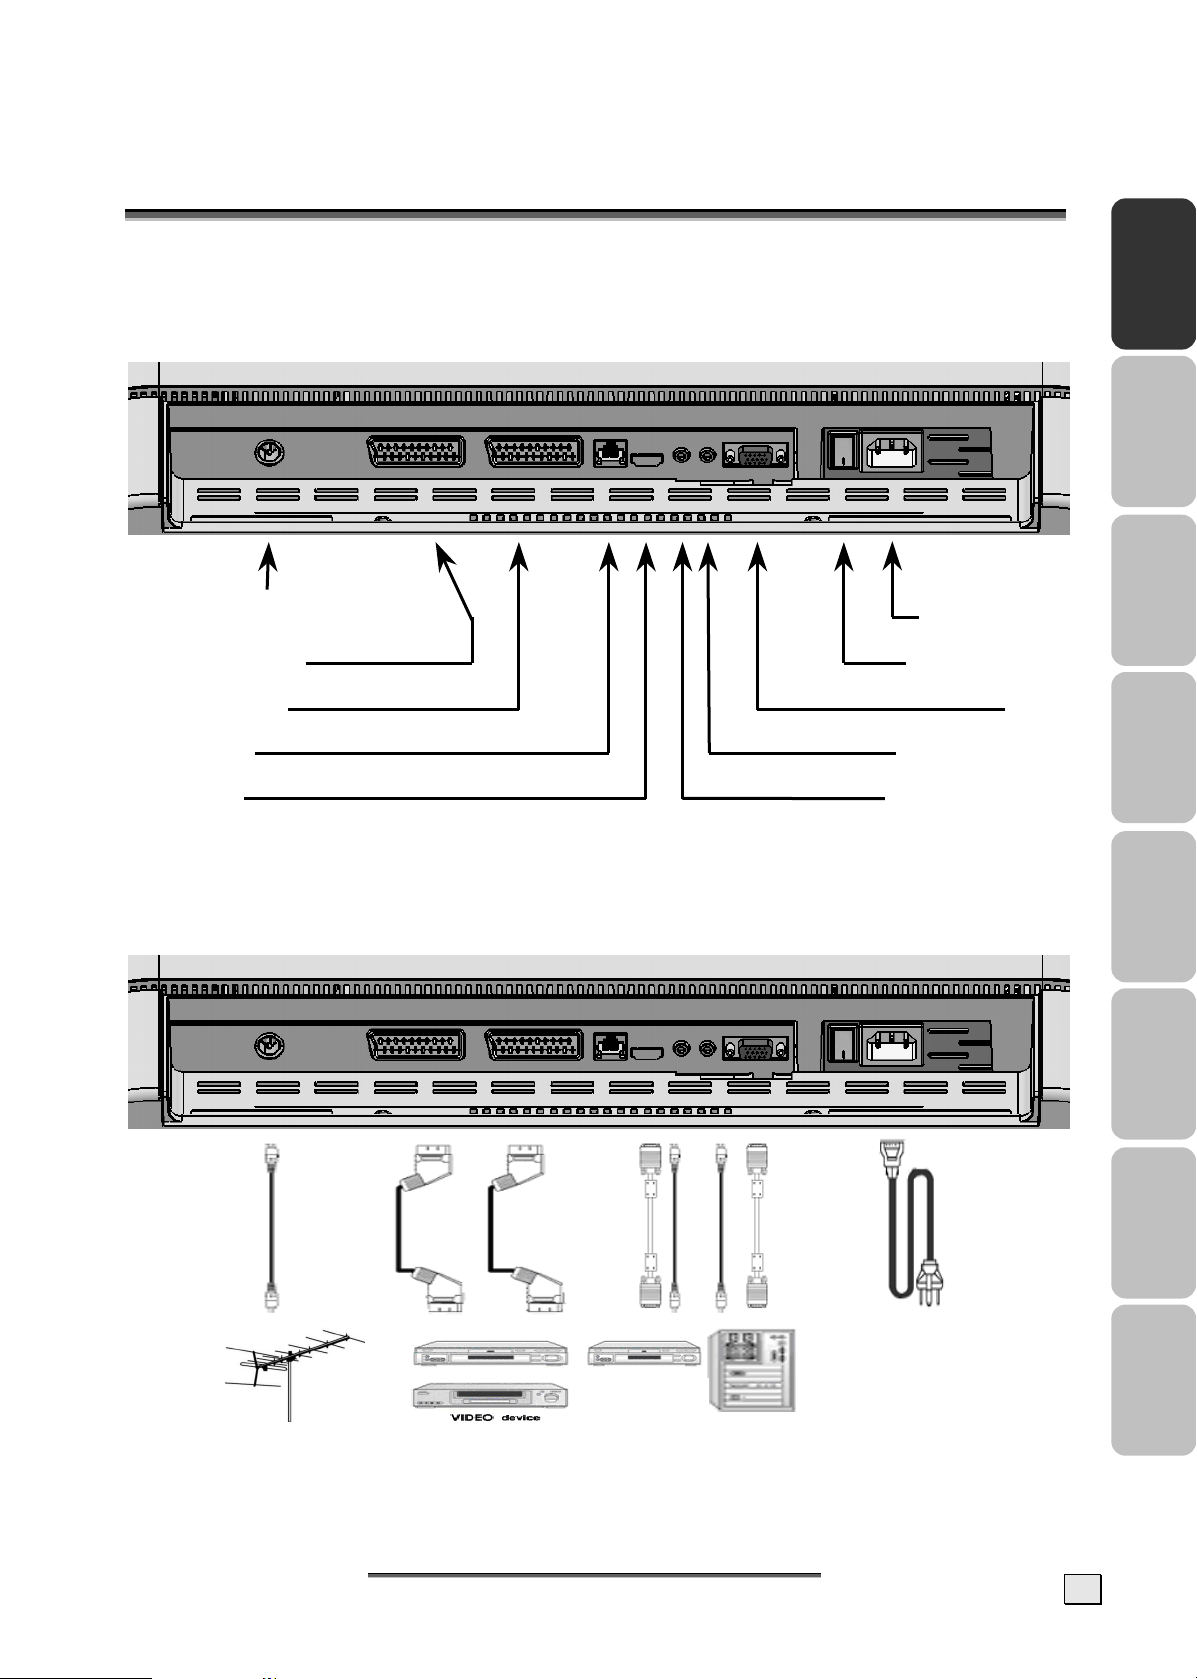
44.. B
The connections and the mains switch on the back of the device are located behind an attached cover, which can be removed simply by pulling it.
• View from diagonally below - Cover removed:
Information: The service socket is exclusively intended for our authorized service partners.
Improper use can lead to damage to your TV device.
Note: Please read chapter „10. Connecting External Devices“on page 25 for further information about operating external devices.
AACCKK OOFF TTHHEE
Aerial connection
Scart/AV1
Scart/AV2
Service VGA Audio IN
HDMI HDMI Audio IN
D
EEVVIICCEE AANNDD
D
C
OONNNNEECCTTIIOONNS
C
S
Mains plug
Mains switch
VGA
English Deutsch Français Italiano
Español
Nederlands
Português Dansk
B
AACCKK OOFF TTHHEE
44.. B
D
EEVVIICCEE AANNDD
D
C
OONNNNEECCTTIIOONNS
C
S
7
Page 12

R
55.. R
This is for a remote that is suitable for your TV; you will find the relevant Button identification and arrangement on the following page:
EEMMOOTTEE
C
OONNTTRROOLL
C
8
NNGGLLIISSH
H
E
E
Page 13

SUMMARY OF CONTROL BUTTONS
Device on or switch to Readiness Mode
POWER
Selecting the Signal Source
TV Switch to the TV mode.
PC Switches between PC VGA and PC HDMI
AV.SV Switches to video mode or S-video mode (See “AV Menu settings” from Page 26)
SCART 1 Switches to SCART 1. Switches between video, S-video, RGB and Auto if pressed several
SCART 2 Switches to SCART 2. Switches between video, S-video Auto if pressed several times.
0 Switches between PC VGA, PC HDMI, AV.SV, SCART/AV 1 and SCART/AV 2
Menu Setting
MENU/ENTER Display the main on-screen menu or enter the next menu.
ST P+/P- Press to select the item you want to adjust in the OSD menu.
VOL -/+, WX Press to decrease or increase the value in the OSD control bar.
EXIT One level back in the Menu.
Changing Channels
ST P+/P- Press P+ or P- to change programs in TV mode.
0-9 To select programs directly in TV mode.
RTN Press to return to the previous program.
Sound Control
VOL -/+, WX Press to turn up or turn down the volume.
MUTE
SOUND Press to change directly to the Sound Menu
Teletext Control
TELETEXT
INDEX
STOP
INTERRUPT
REVEAL
EXPAND
ST P+/P- Press P+ or P- to use Page Catching
PIP Control
ON/OFF Press to watch one of the video sources on Sub-display, whilst in OC mode. Press again to
PIP SOURCE, ST Selects the source of the PIP Window.
POSITION To shift the PIP Window.
SIZE Sets the size of the PIP Window.
Other Functions
RST, RESET Reset the original factory setting, such as Contrast and Colour.
YELLOW BUTTON Press to switch freeze frame function on and off
GREEN BUTTON Press to switch multi-image (station overview) on and off
RED BUTTON Press to call up the Picture Menu
BLUE BUTTON Press to call up the Sound Menu
ARC
APC
DISPLAY Displays the current signal source, program number and sound options.
SLEEP Press to select a preset time interval for automatic power off.
TIME
+100 No function
Switches the device on or into Operating Mode alternately
times.
Press to switch the sound on or off.
Press to show the Teletext Service. Press again to return to TV viewing.
Press to show the list of Teletext contents.
Press to stop the automatic page change.
Press to switch to TV while waiting for the next page.
Press to display concealed information, such as solutions of riddles or a quiz.
Press to enlarge the top half or bottom half of the Teletext page.
turn off the Sub-display.
Changes the format.
Adjusts the backlight in three levels.
Press to display the digital or the analog clock alternately and switch off
English Deutsch Français Italiano
Español
Nederlands
Português Dansk
55.. R
R
EEMMOOTTEE
C
OONNTTRROOL
C
L
9
Page 14

F
66.. AAPPSSAASS F
Your TV device has the APSAS (Automatic Program Search And Sort) automatic installation
system and a graphic OSD (On Screen Display) operating surface. Both systems will make
the initial installation and the operation of your device in future easier for you.
1. After removing the display packaging, ensure the product is installed in a safe and
well ventilated position.
2. Insert two AAA type batteries into battery compartment on the rear of the remote
control.
3. Connect the external 75 Ohm aerial cable and the electricity cable to the relevant connections and make sure that the mains switch on the back is switched
on.
4. The initial Installation Menu will appear when you switch on your TV for the
first time by pressing the POWER Button on the remote. Carry out the following settings and use the STWX P+/P-, VOL+/- and MENU Buttons to control
the menus.
5. The flags of all locations for which the TV is suitable will appear on your screen.
IIRRSSTT
T
T
IIMMEE
I
NNSSTTAALLLLAATTIIOON
I
N
10
6. Please select the flag of the location where you are with the STWX P+/P-,
VOL+/- setting Buttons and confirm your selection with the MENU Button.
The Menu will appear after you have made your selection.
1. Location select Germany
2. Language German
3. Start Cancel/Continue
7. The location will have been set in accordance with your flag selection. You can
return to the flag selection at the Location Select Menu Point, if you want to
correct the country setting again.
8. The language of the country suitable to the selected location will have been
preset automatically. However, you can select any other Menu language at the
Language Menu Point.
New installation
NNGGLLIISSH
H
E
E
Page 15

9. Please go to the Start Menu Point with the assistance of the ST P+/P- setting But-
tons, after you have selected your preferred language.
The automatic initial setting is started by selecting ‘Further’ by means of MENU and
the ST P+/P- buttons. During this, the device will automatically search for all the
television channels that can be received at your location, and sort them and store
them according to your entries concerning the location and the language. The following Menu will appear at the same time:
English Deutsch Français Italiano
Frequency
Automatical Search
Channel type
Last station
Found so far
Cancel
10. This Menu simply has a display function to inform you about the progress of
the initial installation. However, press the MENU Button if you want to cancel
the station search. No television channels will, however, be stored in this case.
You will reach the start of the initial installation again if you switch the device
off and on again.
11. The program table will appear on the screen after the initial sound setting has
finished. You can move, rename, delete and add channels, or carry out fine adjustments in the program table (you will find details about this in „Program table“ from Page 18).
Program table
SCART1 TV.........
SCART2 TV.........
AV.SV TV.........
PC TV.........
TV 1 ARD TV.........
TV 2 ZDF TV.........
TV 3 …… TV.........
• Delete • Move • Edit
Español
12. Press EXIT to reach the TV Mode directly, if you do not want to carry out any
changes to the automatically stored and sorted channels.
66.. AAPPSSAASS F
F
IIRRSSTT
T
T
IIMMEE
I
NNSSTTAALLLLAATTIIOON
I
N
Nederlands
Português Dansk
11
Page 16

G
77.. G
EENNEERRAALL
C
OONNTTRROOLLSS
C
&& A
A
DDJJUUSSTTMMEENNT
T
TURNING THE DISPLAY ON AND OFF
The mains switch of the TV is located on the back of the device. The device moves to
Readiness Mode if this switch is switched on.
The operating display shines yellow in Readiness Mode. It is possible to switch the device to
the normal Operating Mode by means of the POWER Button on the remote or on the device.
The operating display shines blue in the normal Operating Mode. It is possible to switch the
TV back to the Readiness Mode by means of the POWER Button on the remote or on the
device.
Please wait 15 seconds before operating the mains switch again if you switch the device off
with the mains switch.
Note: The energy consumption of the TV reduced to the minimum necessary in Readiness
Mode. No energy is consumed, but there is no complete detachment from the mains, if the
mains switch of the TV is switched off!
CALLING UP MENUS AND OPERATING THE ON-SCREEN CONTROL
Your TV device has a graphic OSD (On Screen Display) operating surface, which will make
the operation and management of your TV device easier for you.
1. Press the MENU Button when the device is switched on. The Main Menu will appear on
the screen then.
Main Menu
1. Picture
2. Sound
3. Program table
4. Installation
5. Child lock
6. Sleeptimer
7. Swap function
8. Games
2. You navigate through the Menus with the ST P+/P- Buttons. Press the MENU Button
when the cursor is on the required Menu Point. This will activate that Menu Point.
3. The Menu Points can be called up and activated directly by means of the Number Buttons.
4. A selection window will appear or the Setting / Entry Mode will be switched on when a
sub-menu is activated, according to the Menu Point.
5. You can leave the relevant Menus, sub-menus, selection window or the Setting / Entry
Mode again by pressing EXIT.
6. The Buttons that each function in the respective Menu has are displayed in the last line
of the Menu.
7. Functions that cannot be selected in a particular additional status of the device are pre-
sented in grey type.
12
NNGGLLIISSH
H
E
E
Page 17

CONTINUE SWITCHING CHANNELS
You have three different possibilities to switch through the channels available:
1. Through direct entry of the channel number:
You will call up the channel directly through the 0-9 Buttons. You can enter the following
digit within 2 seconds after entering the first digit, in order to call up multi-digit channel
numbers.
2. You switch through the channels running by pressing the ST P+/P- Buttons briefly.
3. A list of channels, within which you are able to change the ST P+/P- Buttons, is dis-
played by pressing these Buttons for a longer time. This list of channels can also be displayed directly by pressing the DISPLAY Button.
SWITCH BETWEEN TV / PC / AV
Switch on connected devices (video recorder, DVD player, PC, SAT receiver, etc.) and press
the relevant button on the remote:
Press the TV button to switch to TV mode.
Press the PC Button to switch alternately between the PC VGA and the PC HDMI
mode.
Press the AV.SV button to switch to video mode.
Press the SCART 1 or SCART 2 Button, to select the SCART/AV1 or SCART/AV2
input.
The Scart sockets have automatic recognition whether the connected device has been
switched on (provided that this is supported by the connected device). In most cases,
switching over to the Scart inputs used takes place automatically through this and does not
have to be selected manually.
English Deutsch Français Italiano
VOLUME CONTROL
USING VOLUME CONTROL
Press WX VOL-/VOL+ button to turn up or turn down the sound volume.
USING MUTE
At any time, you can temporarily turn off the sound by pressing the MUTE button.
1. Press the MUTE
2. Press the MUTE
previous level.
button and the sound cuts off.
again or WX VOL-/VOL+ button to turn the sound back to the
PICTURE (CONTRAST, COLOUR, BRIGHTNESS, ETC.)
Your TV offers you the possibility of establishing values for the picture for the TV, PC operation and AV settings according to your taste.
For example, lower brightness and contrast values are used for the PC Mode than for other
types of operation. Apart from this, there is the possibility of selecting optimized factory
presets for contrast and brightness (EVENING, DAYTIME).
Español
Nederlands
Português Dansk
G
77.. G
EENNEERRAALL
C
OONNTTRROOLLSS
C
A
DDJJUUSSTTMMEENNT
&& A
T
13
Page 18

Variation 1: Press the RED Button to reach the Picture Menu directly.
Variation 2: Press the MENU Button to call up the Main Menu, set the cursor on PICTURE
by means of the ST P+/P- Buttons and call up the appropriate Menu by
means of the MENU Button.
1. Preset
2. Contrast
3. Colour
4. Brightness
5. Format
6. Tint
7. PC settings VGA HDMI
8. Continue Picture
Picture
1. Preset:
Here, you can choose between the optimal factory presets or manual contrast and
brightness setting. The selection is made with the WX VOL-/VOL+ Buttons or through a
menu by means of MENU. The preset can also be selected outside the Picture Menu by
means of the APC Button.
DAYTIME:
Here, the contrast of the picture is increased, to achieve an optimum presentation of
the picture in daylight or in the case of night scenes.
EVENING:
The contrast of the picture is reduced here. An attractive picture arises through this,
particularly in the evening, when there is little surrounding light.
MANUAL:
You can establish contrast and brightness yourself, to adjust the picture to your requirements.
2. You can adjust the contrast, brightness and colour values with the WX VOL-/VOL+ But-
tons, depending on the preset. Contrast and brightness are only available if the PRESET
Menu Point has been set at MANUAL.
3. Format:
The required picture format can be set with the WX VOL-/VOL+ Buttons. This setting
can also be carried out directly outside the Picture Menu with the ARC Button.
AUTO: The device selects the picture setting suitable to the channel transmitted at
the time independently and adjusts it continuously to the channel in this mode.
4:3: This setting sets the side ratios of the picture at 4:3 for traditional television
programs. Black bars appear on both sides of the screen.
PANORAMA: Adjusts a 4:3 video source to the 16:9 ratio, where the corners of the
picture are mainly stretched. This reduces distortion in the center of the picture.
CINEMA: Some DVD films or Cinemascope broadcasts do not fill the upper and lower
edges of the screen. The Cinema function stretches the height, to fill the screen.
WIDE PICTURE 16:9: 16:9 broadcasts are reproduced without distortion. 4:3 video
sources are stretched evenly to fill the screen. Distortion arises both in the centre
and at the corners of the picture here.
4. Tint:
The colour impression can be changed for NTSC images (e.g. video cassettes from the
USA) with the WX VOL-/VOL+ Buttons.
5. PC settings VGA HDMI:
This point can only be selected in the PC VGA and the PC HDMI mode. See chapter “11.
14
NNGGLLIISSH
H
E
E
Page 19

VGA and HDMI PC mode“ on page 28 Fehler! Textmarke nicht definiert.for a more
detailed explanation.
ADDITIONAL PICTURE SETTINGS
Move the cursor to ADDITIONAL PICTURE SETTINGS with the ST P+/P- Buttons and
press the MENU Button.
1. Noise reduction
2. Sharpness
3. Comb filter
4. Colour registration
5. Backlight
6. White balance
7. Perfect Clear
8. Antiflicker
Continue Picture
Further fine adjustments in relation to the impression made by the picture can be carried
out in this Menu.
1. Noise Reduction:
The picture quality can be improved, in the case of grainy pictures with this function.
The AUTOMATIC/OFF/WEAK/MEDIUM/LOUD settings can be selected through a menu
with the WX VOL-/VOL+ Buttons or the MENU Button.
The device will adjust the noise reduction automatically to the reception quality at the
AUTOMATIC setting. The MEDIUM and LOUD settings should only be selected in the case
of a heavily distorted picture, because jerky movements can arise if the picture content
is moving fast. This setting can be set individually for each channel slot.
2. Sharpness:
The picture sharpness can be adjusted to your personal requirements with the WX VOL-
/VOL+ Buttons. You reach the Settings Mode by pressing the MENU Button. The menu
is faded out, in order to be able to assess the picture, and the setting can be carried out
through a setting bar. This setting can be set individually for each channel slot.
English Deutsch Français Italiano
Español
3. Comb Filter:
Disruptive wave lines in check patters in the picture content can be avoided by activating this function.
4. Colour Registration:
This function serves to even out differences arising between the coloured parts of the
picture and the picture contours.
The setting can take place in the Menu with the WX VOL-/VOL+ Buttons. You also
reach the Settings Mode, by pressing the MENU Button. The menu is faded out and it is
possible to carry out the setting through a setting bar. This setting can be established
individually for each channel slot.
5. Backlight (Only active in the case of LCD TV devices – not in the case of plasma TVs):
The brightness of the background lighting of the TV can be controlled with this function.
You can choose between the WEAK/ MEDIUM/ NORMAL/ FULL settings through one
menu with the WX VOL-/VOL+ Buttons or the MENU Button.
6. White Balance:
You can adjust the whiteness impression to your requirements in three stages with the
WX VOL-/VOL+ Buttons.
7. Perfect Clear:
You can activate a special digital Picture Improvement Mode with the WX VOL-/VOL+
Buttons under this Point.
Nederlands
Português Dansk
G
77.. G
EENNEERRAALL
C
OONNTTRROOLLSS
C
A
DDJJUUSSTTMMEENNT
&& A
T
15
Page 20

8. Antiflicker (only active in the case of Plasma-TVs– not in the case of LCD-TV-devices):
Disruptive, large-surface flickering can be reduced by activating this function. However,
quick movements will become less sharp and jerky through this.
SOUND (BALANCE, EQUALIZER, ETC.)
Different settings in relation to the sound reproduction of your TV can be made in this Menu.
Variation 1: Press the BLUE Button to reach the Sound Menu directly.
Variation 2: Press the MENU Button to call up the Main Menu, set the cursor on SOUND by
means of the ST P+/P- Buttons and call up the associated Menu by means of
the MENU Button.
1. Volume
2. Balance
3. Equalizer
4. Preset
5. Headphone
6. Surround
7. Audio channel
8. Automatic Volume
9. Loudness
Sound
1. Volume:
This Point corresponds to the volume setting, which can also be regulated directly outside the Menu with the WX VOL-/VOL+ Buttons.
2. Balance:
Differences in volume between the left and the right loudspeaker can be evened out
here, managed around an optimum sound impression, if your viewing position in front of
the TV is not central.
3. Equalizer:
You can increase or reduce individual frequencies of the sound reproduction at this
Point, as you can in the case of your stereo equipment. It is only possible to select this
Menu Point if the PRESET Menu Point is set at MANUAL. Set the Selection Bar at
EQUALIZER by means of the ST P+/P- Buttons and press the MENU Button.
Equalizer
1. Preset
2. Basic settings
3. 120 Hz
4. 500 Hz
5. 1500 Hz
6. 5000 Hz
7. 10000 Hz
16
You can choose between POP/ CLASSIC/ LANGUAGE/ JAZZ/ FLAT Equalizer pre-
settings under PRESET. The selection is made either through the WX VOL-/VOL+
Buttons or through a Menu that can be reached through the MENU Button.
Each Equalizer preset corresponds to a particular predetermined setting in relation to
increasing or lowering the individual frequencies to achieve particular sound effects.
The individual frequencies cannot be changed and are thus presented as grey, if one
of the presets previously listed has been selected.
NNGGLLIISSH
H
E
E
Page 21

T
You will be able to set the sound reproduction of your TV for the frequencies given
according to your personal perceptions, if the MANUAL setting under PRESET is selected. Move the Selection Bar to the relevant frequency with the ST P+/P- But-
tons and carry out the setting by means of the WX VOL-/VOL+ Buttons.
You can return to the preset basic values by calling up the basic settings, if you are
not satisfied with your changes. To do this, set the Selection Bar on BASIC
SETTINGS with the ST P+/P- Buttons and press the MENU Button.
4. Preset:
Fast selection for the equalizer presets – see Equalizer
5. Headphones:
You can adjust the volume, bass and treble settings for headphones under this Point.
Move the Selection Bar to HEADPHONES with the ST P+/P- Buttons and call up the
relevant Menu by pressing the MENU Button. The values can be changed by means of
the WX VOL-/VOL+ Buttons.
English Deutsch Français Italiano
Headphone
1. Volume
2. Bass
3.
reble
6. Surround Sound:
The different NORMAL/WIDE/CINEMA surround sound settings can be selected through a
Menu by means of the WX VOL-/VOL+ Buttons or by pressing the MENU Button.
Note: Cinema Surround is a technology certified by Dolby Laboratories, which creates a
virtual surround sound experience with only two loudspeakers through the use of Dolby
Pro Logic.
Cinema Surround reproduces all original multi-channel audio information and gives the
listener the impression of being surrounded by additional loudspeakers
7. Audio Channel:
You can select the audio channel with this function. For example, it offers the possibility
of choosing between two languages in the case of dual language broadcasts.
You can choose between the STEREO/ MONO/ DUAL SOUND A/ DUAL SOUND B/ MONO
C settings either with the WX VOL-/VOL+ Buttons or through a Menu, accessible by
means of the MENU Button, after you have set the Selection Bar at AUDIO CHANNEL
with the ST P+/P- Buttons.
The sound channels that can be selected are dependant on the broadcast that you are
watching at the time. Settings that cannot be selected are represented in grey. The setting that you make in this Menu will be set back after a channel slot change.
If you want a long-term change to the audio channel on one station (e.g. you want to
always receive the second language of one station), make this setting in the PROGRAM
EDIT Menu – see chapter “Setting channels manually” on page 20. You will also find a
more description in relation to the possible settings in this section.
Español
Nederlands
Português Dansk
8. Automatic Volume:
The volume of your TV will be regulated automatically after this function has been activated, so that loud sound passages (e.g. during advertising breaks) are no longer disruptive.
9. Loudness:
You can switch a volume-dependant sound adjustment on or off under this Point.
G
EENNEERRAALL
77.. G
C
OONNTTRROOLLSS
C
A
DDJJUUSSTTMMEENNT
&& A
T
17
Page 22

88.. TTVV M
M
OODDEE
A
DDJJUUSSTTMMEENNT
A
T
ADJUSTING TV SETTINGS
1. Select "TV" mode as signal source using the TV key on the remote control.
2. Press the Menu key and select TV on the screen menu.
Main Menu
1. Picture
2. Sound
3. Program table
4. Installation
5. Child lock
6. Sleeptimer
7. Swap function
8. Games
3. Select the PROGRAM TABLE Menu Point with the ST P+/P- Buttons and press the
MENU Button.
PROGRAM TABLE
The program table indicates the names and numbers of the channels. You can change program names, edit, delete, add or move programs or carry out fine adjustments in this list.
SCART1 TV.........
SCART2 TV.........
AV.SV TV.........
PC TV.........
TV 1 ARD TV.........
TV 2 ZDF TV.........
TV 3 …… TV.........
• Delete • Move • Edit
Note: The SCART1, SCART2, AV.SV, PC VGA and PC HDMI channels cannot be deleted or
moved.
Program table
DELETE A PROGRAM
1. Go to the program in the program table that you want to delete with the help of the
STWX P+/P-, VOL+/- Buttons.
2. Press the RED Button to call up the delete function directly or call up an Edit Functions
Menu with the MENU function and select DELETE.
3. Now, you will reach the security query. Select DELETE with the assistance of the ST
P+/P- Buttons and carry the action out directly with the MENU Button or by pressing
the RED Button again.
18
NNGGLLIISSH
H
E
E
Page 23

MOVING AND SORTING CHANNELS
1. Go to the channel slot in the program table that you would like to move or sort with the
assistance of the STWX P+/P-, VOL+/- Buttons.
2. Press the GREEN Button to call up the sorting function directly or call up an Edit Func-
tions Menu with the MENU function and select MOVE.
3. The respective channel will now be marked in colour.
4. Move the channel to the channel slot that you require with the assistance of the STWX
P+/P-, VOL+/- Buttons.
5.
Store the changes that you have carried out by pressing the GREEN or the MENU Button again.
CHANGING THE NAMES OF CHANNELS
1. Go to the channel slot that you would like to edit with the help of the STWX P+/P-,
VOL+/- Buttons.
2. Either press the YELLOW Button to call up the processing function directly or call up an
Edit Functions Menu with the MENU function and select EDIT.
English Deutsch Français Italiano
3. The screen will now display the CHANNEL EDIT or AV EDIT Menu:
Program edit
1. Frequency input
2. Tuning
3. Channel grid
4. Channel type
5. Channel number
6. Change name
7. TV-Standard
8. Colour standard
9. Audio channel
10. Adjustment
11. Decoder
1. Change name
2. Colour standard
3. Adjustment
AV edit
4. Go to the CHANGE NAME Menu Point with the assistance of the ST P+/P- Buttons and
press the MENU Button.
5. Now, you can select the letters required with the ST P+/P- Buttons. You will reach the
next position with the WX VOL-/VOL+ Buttons (each channel name can be 8 symbols
long). You will leave the name selection with the MENU or EXIT Button.
6. Press the EXIT Button and confirm that you would like to store the changes that you
have carried out with YES.
Español
Nederlands
Português Dansk
M
88.. TTVV M
OODDEE
A
DDJJUUSSTTMMEENNT
A
T
19
Page 24

SETTING CHANNELS MANUALLY
1. Go to the channel slot in the program table that you would like to edit with the assistance of the STWX P+/P-, VOL+/- Buttons.
2. Either press the YELLOW Button to call up the processing function directly or call up an
Edit Functions Menu with the MENU function and select EDIT.
3. Now the screen will display the PROGRAM EDIT or AV EDIT Menu:
1. Frequency input
Program edit
2. Tuning
3. Channel grid
4. Channel type
5. Channel number
6. Change name
7. TV-standard
8. Colour standard
9. Audio channel
10. Adjustment
11. Decoder
1. Change name
2. Colour standard
3. Adjustment
AV edit
4. Frequency entry:
Here, you can change the reception frequency or enter it directly. Position the Selection
Bar at FREQUENCY ENTRY with the ST P+/P- Buttons. Now, you will be able to change
the reception frequency with the WX VOL-/VOL+ Buttons.
At the same time, attention should be paid that that the display bar of the 2nd TUNING
Menu Point is positioned in the center, because the station is set optimally then.
You can also enter the reception frequency directly with the number Buttons by pressing
the MENU Button. You will leave direct sound entry again with the MENU Button.
5. Channel grid:
The channel grid can be changed with the MENU Button (Menu) or the WX VOL-/VOL+
Buttons. The channel grid represents the setting of the channels to the frequencies
available and can vary according to the location (e. g. CCIR in Germany differs from the
setting necessary in France).
6. Channel type:
The channel type can be changed with the MENU Button (Menu) or the WX VOL-/VOL+
Buttons. It is possible to select between channels and special channels or special channels in individual states (e.g. C1 in France), depending on the setting of the channel
grid.
7. Channel number:
You can enter the channel number of the channel slot that you require directly here. You
can increase or decrease the current sound channel number with the WX VOL-/VOL+
Buttons. A cursor will appear and you will be able to enter the channel number directly
with the number Buttons when you press the MENU Button.
8. TV Standard:
The TV standard can be changed with the MENU Button (menu) or the WX VOL-/VOL+
Buttons. Settings related to the transmission norm (location-dependant) of a station can
be made here.
20
E
NNGGLLIISSH
E
H
Page 25

9. Colour Standard:
The colour standard can be changed with the MENU Button (menu) or the WX VOL-
/VOL+ Buttons. Changes to the colour norm of a station can be made here.
10. Audio channel:
The preferred audio channel can be selected with the MENU Button (Menu) or the WX
VOL-/VOL+ Buttons. The device selects the optimum sound setting in accordance with
the NICAM priority (a digital sound norm used by some stations) before stereo or mono,
independently the AUTOMATIC position. Setting it to MONO can sometimes be advantageous in the case of audio problems on a stereo station. The second language on a dual
language station can be selected with DUAL SOUND B. The MONO C setting is only relevant to NICAM stations that broadcast in several languages.
11. Adjustment:
The ADJUSTMENT Menu Point on this channel slot should be positioned at VCR, to avoid
picture distortion (conversion to fast time constants), if you want to operate a video recorder through an HF channel slot (connection with aerial cable) or through an AV channel (connection with Scart cable). The setting can be made by means of the MENU Button (Menu) or the WX VOL-/VOL+ Buttons.
12. Decoder:
This setting is important for the operation of a decoder on the SCART/AV2 socket, in order to be able to receive encrypted stations. The setting can be made by means of the
MENU Button (Menu) or the WX VOL-/VOL+ Buttons.
The OFF setting usually means normal television operation without a decoder. The decoded picture signal is presented automatically at all other settings. The difference between the decoder settings consists of whether the respective station decrypts the
sound additionally or not. The following Table is intended to explain the connections.
Decoder Setting Station/Sound Sta-
tion/Picture
Off Decrypted Decrypted TV TV
External/Internal
Sound
Analog Encrypted
Nicam Decrypted
Encrypted Analog Decoder
Sound Output
Source
NICAM TV
Picture Presen-
tation of
Decoder
English Deutsch Français Italiano
Español
External Sound Analog Encrypted
Nicam Encrypted
Internal Sound Analog Decrypted
Nicam Decrypted
Encrypted Analog Decoder
NICAM Decoder
Encrypted Analog TV
Nicam TV
Decoder
Decoder
Note: Read the instructions for use of your decoder or ask the provider of the encrypted
channel for the correct setting.
13. Press the EXIT Button and confirm that you want to store the changes carried out with
YES.
Note: The settings described above are only necessary in exceptional cases (manual setting
of a new station, connection of a decoder, etc.). The automatic APSAS station search carries
out most of the settings independently.
Nederlands
Português Dansk
M
88.. TTVV M
OODDEE
A
DDJJUUSSTTMMEENNT
A
T
21
Page 26

MANUAL ADDITION OF CHANNELS
1. Go to the first empty channel slot following the channel slots already stored in the program table with the STWX P+/P-, VOL+/- Buttons. Press the MENU Button and select the NEW TV signal source.
2. Now enter the channel type and subsequently the channel number or the relevant frequency. Check the remaining settings for correctness in relation to the required station(see chapter „Setting channels manually“from page 20).
3. Press the EXIT Button and confirm that you want to store the changes carried out with
YES.
ADD NEW CHANNELS AUTOMATICALLY
This function is very useful if the range of channels in your reception area (e.g. on the cable
network) is increased. An automatic station search, which will store all channels newly
added since the last station search, is started.
1. Press the MENU Button to reach the Main Menu.
2. Select the INSTALLATION Point with the ST P+/P- Buttons and press the MENU Button again.
Installation
1. Select Location
2. Language
3. New installation
4. Search new programs
5. AV Settings
6. Switch on
7. Setting of all programs
8. Basic settings
9. Start logo
10. Service
3. Select the SEARCH FOR NEW CHANNELS Menu Point with the ST P+/P- Buttons, press
the MENU Button and select START. The AUTOMATIC STATION SEARCH Menu will now
appear on the screen:
Frequency
Channel type
Last station
Found so far
Automatical Search
Cancel
4. This Menu serves to display the progress of the station search so far. You can cancel the
station search at any time with the MENU or the EXIT Button. No new stations will be
stored in this case.
5. You will reach the program table when the station search has finished, as following the
initial installation. New channels will have been added following the channels already
available. Please refer to chapter „Program table“ on Page 18, if you want to change the
sorting or the names.
22
NNGGLLIISSH
H
E
E
Page 27

T
99.. T
Teletext is a free service that is broadcast by the majority of television stations and offers
current information in relation to news, the weather, television programs, share prices, subtitles and other subjects. Your TV offers many useful functions for operating Teletext and
multi-page text, storing sub-pages or fast navigation.
EELLEETTEEXXT
T
TO OPERATE TELETEXT
1. Select a TV station on which Teletext is being transmitted.
2. Press the TELETEXT button once to appear the Teletext screen.
3. Press the TELETEXT button again to switch off Teletext. The previous program re-
appears.
TELETEXT PAGE SELECTION
1. Enter the required Teletext page as a three digit numbers.
2. The selected page number is displayed at the top left corner of the screen. The
Teletext page counter searches until the selected page number is located, so that the
desired page is displayed on the screen.
English Deutsch Français Italiano
3. Fastext movement by the 4 coloured buttons.
Four subject-heading pages can be selected quickly by pressing the corresponding
coloured button Red, Green, Yellow, or Blue on the remote control handset. The
function of the respective Colour Button is displayed at the lower edge of the picture
(e. g. +/-, to turn on page forward/back or the title of the Teletext block to be
reached).
4. Fast navigation with Page Catching:
This function enables the fast selection of page numbers displayed on the current
Teletext page. Navigate to the page number that interests you with the ST P+/P-
Buttons (a flashing cursor appears at the same time) and press the MENU Button to
call it up.
5. Some Teletext pages also contain sub-pages that are displayed at the lower edge of
the picture. You can turn between the sub-pages forward and back by pressing the
POSITION/SIZE Buttons.
SELECT TELETEXT DISPLAY FUNCTIONS
Your TV offers you several possibilities of presenting several Teletext pages or the television
picture and Teletext clearly at the same time.
1. Multi-page text:
This function presents several interconnected Teletext pages on one screen. Press the
DISPLAY Button. You will receive one large and two small display windows. The main
page will be presented in the large picture; the associated, following sub-pages or those
pages that can be selected quickly by pressing the YELLOW or BLUE Buttons are presented in the small pictures. Press the DISPLAY Button again to return to the normal,
full Teletext picture.
Español
Nederlands
Português Dansk
99.. T
T
EELLEETTEEXXT
T
23
Page 28

2. Split Screen:
Press the PIP ON/OFF Button (= divided screen), to display the current television picture as split screen, in addition to Teletext.
3. Television picture in Multi-Page Text:
The television picture in the upper field of the two small Teletext pictures will be presented in Multi-Page Mode by pressing the PIP ON/OFF Button again.
4. Teletext as Picture in Picture:
The television picture is presented as a full picture and the current Teletext page is presented as a small picture in the picture inserted into the upper right screen area, by
pressing the PIP ON/OFF Button again.
USEFUL FEATURES FOR TELETEXT
INDEX
Press this button to select the index page that displays the list of Teletext contents.
STOP
The Teletext page you have selected may contain more information than what is on the
screen; the rest of the information will be displayed after a period of time on a sub-page.
Press STOP button to stop the automatic page change. The STOP symbol will be dis-
played at the top left-hand corner on the screen and the automatic page change will
be stopped.
Press STOP button again to continue.
INTERRUPT
In the Teletext mode, pressing INTERRUPT button will switch the screen to the TV mode
while waiting for the next text page.
Select required page number in Teletext mode.
Press INTERRUPT button to switch to TV mode while waiting for the text page. The
upper and lower row of the videotext page information is displayed for 6 seconds,
before it disappears.
When the required text page is found, the page number is displayed in a black box in
the upper left corner.
Press INTERRUPT button again to revert to Teletext mode.
REVEAL
Press this button once to display concealed information, such as solutions of riddles,
puzzles, or a quiz.
Press this button again to conceal the revealed answers.
EXPAND
Select double height text.
Press this button to enlarge the top half of the page.
Press this button again to enlarge the bottom half of the page.
Press this button once more to return to the normal display.
24
NNGGLLIISSH
H
E
E
Page 29

1100.. C
C
OONNNNEECCTTIINNGG
E
XXTTEERRNNAALL
E
D
EEVVIICCEES
D
S
CONNECTION OF AN EXTERNAL DEVICE TO THE SCART SOCKET
Please connect the SCART/AV1 or the SCART/AV2 socket of the TV to the device to be connected with a EURO AV cable (Scart cable), to connect a video recorder, a DVD player, a
SAT receiver or similar to one of the two Scart sockets of your TV, for example.
Note: Please pay attention to the instruction for use of the device to be connected.
CONNECTING A VIDEO RECORDER TO THE AERIAL SOCKET
Please connect the aerial input of the TV to the aerial output of your video recorder by
means of an aerial cable, to connect a video recorder to the aerial socket of your TV. Please
connect your domestic aerial to the aerial output of your video recorder.
You can choose any channel slot on the TV to represent the picture and sound signals of
your video recorder. The selected channel slot must be coordinated with the station frequency of the aerial output of your video recorder to achieve this (usually between channels
30 and 40) – see chapter „Setting channels manually“ on Page 20.
You should set the ‘10th ADJUSTMENT’ Menu Point in the PROGRAM EDIT Menu to VCR after
carrying out the tuning, to avoid picture distortion.
Note: Please pay attention to the instructions for use of your video recorder.
CONNECTING A PC OR A SOURCE OF MULTIMEDIA VIDEO
Your TV device is able to represent both analogue and digital multimedia input signals and
offers you the possibility of connecting a PC or a source of video with a DVI, HDMI or components output (a DVD player for example).
To do so, connect the VGA or HDMI socket of the TV device to the video display adapter of
your PC or to your source of video. Digital sound signals are usually contained in the HDMI
signal and do not have to be additionally connected.
Connect the line output of your PC or the audio output of your source of video to the respective in input (black jack socket next to the VGA or HDMI input on the back of the device), in order to reproduce analogue sound signals on the TV device. You may have to use
a corresponding adapter or adapter cable for the connections.
Note: Please pay attention to the instructions for using your PC and the sound and video
display adapter or your source of video and the technical data of your TV device, in order to
select the necessary sound settings and the settings for the resolution and the vertical
scanning frequency.
English Deutsch Français Italiano
Español
Nederlands
CONNECTING A DECODER
You need a decoder to be able to receive encrypted channels. Please connect it to the
SCART/AV2 socket of your TV by means of a EURO AV cable (Scart cable).
Please refer to the chapter “Setting channels manually” on page 20 for advanced settings in
relation to decoder operation.
Note: Please pay attention to the instructions for use of your decoder.
CONNECTING A CAMERA RECORDER
Connect the device to the front AV.SV socket of your TV with a commercially available cable
(cinch cable and/or S-video cable), in accordance with the coloured cable and socket identification, to connect a camera recorder.
Note: Please pay attention to the instructions for use of your camera recorder.
1100.. C
C
OONNNNEECCTTIINNGG
E
XXTTEERRNNAALL
E
D
EEVVIICCEES
D
S
Português Dansk
25
Page 30

SETTINGS FOR EXTERNAL DEVICES (PICTURE, SOUND, NAME, ETC.)
Please refer to the Chapters „Picture (Contrast, Colour, Brightness, etc.)“ on Page 13 and
„Additional picture settings“ on Page 15, to change the picture for AV settings. The functions
described in these Chapters also apply to the AV positions.
You will find more precise descriptions in chapter „Sound (Balance, Equalizer, etc.)“ on page
16, if you want to adjust the sound. The points described there also apply to the AV settings.
You will find more precise descriptions in Chapters „Changing the names of channels“ and
„Setting channels manually“ on Pages 19 and 20, if you want to adjust the channel names
or the channel settings.
AV MENU SETTINGS
The type of input signal, the source of the output signal and the volume offset in comparison the basic volume can be established for the Scart 1, Scart 2, and AV.SV AV settings in
this Menu.
1. Press the MENU Button to reach the Main Menu.
2. Select the INSTALLATION Menu Point with the ST P+/P- Buttons and press the MENU
Button again.
3. Position the Selection Bar on AV SETTINGS Menu Point by means of the ST P+/P-
Buttons and press the MENU Button again. This will take you to the following Menu:
1. AV1 Signal type
2. AV1 Video Out
3. AV1 Volume Offset
4. AV2 Signal type
5. AV2 Video Out
6. AV2 Volume Offset
7. AV.SV Signal type
8. AV.SV Volume Offset
4. AV 1 Signal type:
You can choose between different settings for the signal type supplied by an external
device attached to the SCART/AV 1 socket with the WX VOL-/VOL+ Buttons or by
pressing the MENU Button (Menu). Please always bear in mind that your external device
must also supply the respective signal type to achieve perfect pictures.
Note: Please pay attention to the instructions for use of the connected device.
AV Settings
26
VIDEO/RGB AUTO:
FBAS (e. g. Video recorder) and RGB signals (e. g. playing console) can be represented at this setting, if this function is supported, automatically recognized and presented by the device connected.
S-VIDEO:
Serves to connect S-VIDEO signals. In the case of this signal type, the picture and
the colour signals are separate, in order to avoid disruptive wave lines in checked
patterns.
RGB:
Serves to connect sources of RGB signal sources (e. g. playing console) that do not
support automatic recognition.
NNGGLLIISSH
H
E
E
Page 31

YCrCb:
A YcrCb signal that is the output of a many DVD players can be represented at this
setting. It will be recognized automatically whether the pictures are transmitted in
the line interlaced or full picture (progressive) process.
YPrPb:
A YprPb signal that is the output of a many DVD players can be represented at this
setting. It will be recognized automatically whether the pictures are transmitted in
the line interlaced or full picture (progressive) process.
English Deutsch Français Italiano
5. AV1 Video Output:
You can choose between different settings for the output signal emitted at the
SCART/AV 1 socket with the WX VOL-/VOL+ Buttons or by pressing the MENU Button
(Menu).
Note: No signals can be emitted in the Readiness Mode!
AUTO:
The pictures and sounds presented by the device are output at the SCART/AV 1
socket (exception: The device is at the SCART 1 AV setting).
TV:
The signal received through the aerial is always output at the SCART/AV 1 socket
your TV is operated at one AV setting).
(even if
AV2 (Copy Mode):
The picture and sound signal coming from the SCART/AV 2 socket is emitted at the
SCART/AV 1 socket, independently of the mode (TV, PC, etc.) in which the TV is operating. This function is very useful for transferring from one external device to another.
AV.SV (Copy Mode):
The same function as under the AV2 setting, with the difference that the picture and
sound signals are emitted from the front AV.SV input, through the Cinch sockets to
the SCART/AV 1 socket (e. g. to transfer from a video camera to a video recorder).
AV1 Volume Offset:
6.
You can establish a volume offset (shifting – quieter or louder) for the sound input signals at the SCART/AV 1 socket, in comparison to the basic volume of your device, with
the WX VOL-/VOL+ Buttons.
7. AV2 Signal Type/ AV2 Video Output/ AV2 Volume Offset:
The settings and functions for the AV position described above also apply to the AV2 position.
Español
8. AV.SV Signal type:
You can choose whether the picture signal of your external device (e.g. camera) is processed by the video input (yellow) or by the S-video input (4-pole black socket) with the
WX VOL-/VOL+ Buttons or by pressing the MENU Button (Menu). In both cases, the
sound signal is processed by the red and white cinch socket.
9. AV.SV Volume Offset:
You can establish a volume offset (shifting – quieter or louder) for the sound input signals at the cinch sockets at the front AV.SV input, in comparison to the basic volume of
your device, with the WX VOL-/VOL+ Buttons.
10. You leave the Menu with the EXIT Button.
1100.. C
C
OONNNNEECCTTIINNGG
E
XXTTEERRNNAALL
E
D
EEVVIICCEES
D
S
Nederlands
Português Dansk
27
Page 32

1111.. VVGGAA
AANNDD
HHDDMMII PPC
C
MMOODDE
E
CONNECTION
Your TV device is able to represent both analogue and digital multimedia input signals and
offers you the possibility of connecting a PC or a source of video with a DVI, HDMI or components output (a DVD player for example).
To do so, connect the VGA or HDMI socket of the TV device to the video display adapter of
your PC or to your source of video. Digital sound signals are usually contained in the HDMI
signal and do not have to be additionally connected.
Connect the line output of your PC or the audio output of your source of video to the respective in input (black jack socket next to the VGA or HDMI input on the back of the device), in order to reproduce analogue sound signals on the TV device. You may have to use
a corresponding adapter or adapter cable for the connections.
Note: Please pay attention to the instructions for using your PC and the sound and video
display adapter or your source of video and the technical data of your TV device, in order to
select the necessary sound settings and the settings for the resolution and the vertical
scanning frequency.
SETTINGS IN THE PC VGA AND PC HDMI MODE
Press the PC Button, to switch alternately between the PC VGA and the PC HDMI mode. All
image and sound settings in the PC mode function precisely as in the TV mode.
Press the MENU Button to reach the Main Menu, select the PICTURE Menu Point and press
the MENU Button again. Move the Selection Bar to the PC SETTINGS Point with the ST
P+/P- Buttons and press the MENU Button again. You will reach the Menu for the PC
SETTINGS:
1. Mode
2. Change name
3. Input
4. Horizontal position
5. Width
6. Vertical position
7. Phase
8. Frequency
9. Audio input
1. Mode:
This point shows whether a signal is present at the VGA or the HDMI input socket of the
TV device. The settings for the picture representation will not be reachable as long as
NO SIGNAL is displayed (shown in grey).
2. Change name:
A name can be given for the PC VGA and the PC HDMI setting. Press the MENU Button,
in order to reach the input mode. Now you will be able to select the symbols with the
ST P+/P- Buttons and to change the position with the WX VOL+/VOL- Buttons.
Leave the Input mode again by means of the MENU or the EXIT Button.
3. Input:
It is possible to select between the AUTO/PC/VIDEO settings with the WX VOL+/VOL-
Buttons or through a list of choices, which can be reached by pressing the MENU Button.
PC settings
28
NNGGLLIISSH
H
E
E
Page 33

AUTO:
Your TV device will recognize the type of signal at the VGA or HDMI socket automatically.
PC:
In this setting, your TV device will expect an input signal at the VGA or the HDMI
socket from the video display adapter of your PC. Please pay attention to the correct
selection and setting of your video display adapter.
VIDEO:
In this setting, your TV device will expect an input signal at the VGA or the HDMI
socket from a source of video. Please pay attention to the correct selection and setting of the output of your source of video.
Note: The TV device is equipped with an automatic, complex recognition of the type of
signal and the source of the signal. However, incorrect identifications can arise because
of different tolerances of the source of your signal. Use the manual settings for the input
in this case.
4. Horizontal position:
You can change the horizontal position of the image from the VGA or the HDMI socket
with the WX VOL+/VOL- Buttons.
5. Width:
You can change the width of the image from the VGA or the HDMI socket with the
WX VOL+/VOL- Buttons.
English Deutsch Français Italiano
6. Vertical position:
You can change the vertical position of the image from the VGA or the HDMI socket with
the WX VOL+/VOL- Buttons.
7. Phase:
You can optimize the presentation of text on the TV device (e.g. in the case of quivering
letters) and compensate for possible disruptions to the image (disruption in the picture
or wave lines) with the WX VOL+/VOL- Buttons.
8. Frequency:
Possible disruptions to the image (disruption in the picture or wave lines) can be compensated for with the WX VOL+/VOL- Buttons. This setting should only be changed in
the case of problems.
9. Audio input (only active in the PC HDMI mode, not in the PC VGA mode):
It is possible to choose between the DIGITAL/ANALOG settings with the WX VOL+/VOL-
Buttons or through a list of choices, which can be reached by pressing the MENU Button.
DIGITAL:
Your TV device will reproduce the digital sound present in the HDMI signal.
ANALOG:
The sound signal from the analogue Audio In socket will be reproduced.
Note: The digital HDMI signal usually consists of image and sound. However, it can
definitely occur that your PC or your source of video does not transmit the sound information by means of an HDMI signal or DVI signals are reproduced through a so-called
DVI-HDMI adapter. In this case, you will have to make the audio signal available
through the analogue HDMI Audio In socket of your TV device and switch the audio input
to the ANALOG setting.
Español
Nederlands
Português Dansk
10. You leave the Menu with the
EXIT Button.
Note: The device is provided with standardized pre-settings for the above setting values.
Nevertheless, manual adjustment of the settings values may be necessary, to achieve undisrupted reproduction and complete reproduction, because of deviating signals of your
video adapter or your video source!
1111.. VVGGAA
AANNDD
HHDDMMII PPCC
MMOODDE
E
29
Page 34

1122.. C
C
OOMMFFOORRTT
F
UUNNCCTTIIOONNS
F
S
PICTURE IN PICTURE (PIP)
You can use the PIP function to display two programs at the same time.
1. Press the PIP ON/OFF Button on the remote. Channel slot 1 will be displayed as a small
picture when you call up the PIP function for the first time, after switching the TV on.
2. You will now be able to have the required channel slot or AV setting (SCART 1, PC, AV,
SV, etc.) displayed in the small picture with the PIP SOURCE ST-Buttons. The PIP
channel viewed most recently will be displayed if you switch off the PIP function and
switch it on again later.
3. The large and the small picture can be exchanged by pressing the PIP ON/OFF Button
for about 2 seconds, if the small picture has already been displayed.
4. You can choose the corner of the large picture in which the small picture should be displayed with the PIP POSITION Button.
5. You can select 3 different sizes for the small picture with the PIP SIZE Button.
Note: Not all signal combinations of large and small pictures are necessary. In these cases,
the OSD channel display shows ‘NoPIP’.
MULTI-IMAGE (STATION OVERVIEW) – GREEN BUTTON
You will be able to call up the Multi-Image Function by pressing the GREEN Button in the
TV mode. This function will displays an overview of 12 channels each time.
The channel selected – indicated by a frame - will be reproduced with running image and
sound; the other channels will be regularly updated.
You will be able to move the frame and change to other channels with the aid of the
STWX P+/P-, VOL+/- Buttons. You will be able to switch to the previous or subsequent
12 channels by moving the frame beyond the screen edge.
Operate the MENU Button, in order to represent the selected channel as a complete image.
CHILD LOCK
You can block all the functions of the device with the Child Lock. The entry of a PIN will be
required automatically when the device is switched on again, if the Child Lock has been activated and the device has been switched off.
The picture and the sound will not be switched on and the operation of the device will not be
permitted until a PIN number has been entered.
30
NNGGLLIISSH
H
E
E
Page 35

f
1. Press the MENU Button. The Main Menu will be displayed.
Main Menu
1. Picture
2. Sound
3. Program table
4. Installation
5. Child lock
6. Sleeptimer
7. Swap function
8. Games
2. Move the Selection Bar to the CHILD LOCK Menu Point with the ST P+/P- Buttons and
press the MENU Button to call up the sub-menu.
English Deutsch Français Italiano
1. PIN xxxx
2. Child lock On/Of
Child lock
3. Press the MENU Button and then enter a single digit number = your PIN number. The
CHILD LOCK Point cannot be selected as long as no PIN number has been entered; the
Point cannot be selected and is represented as grey.
4. The CHILD LOCK can be switched on under the relevant Menu Point after entering your
PIN number. You will have to call up the CHILD LOCK Menu again and set the CHILD
LOCK to OFF after entering your PIN number, in order to switch off the Child Lock again
later.
SLEEP TIMER
The Sleep Timer switches the device into the Readiness Mode automatically according to the
period of time selected by you.
Variation 1: Press the SLEEP Button to reach the Sleep Timer Menu directly.
Variation 2: Press the MENU Button to call up the Main Menu, position the Selection Bar on
Sleep Timer by means of the ST P+/P- Buttons and call up the relevant Menu
by means of the MENU Button.
1. Sleeptimer
2. Current counter in minutes:
You can set the switching off time in steps of 5 MIN./10 MIN./15 MIN./30 MIN./1 HOUR/2
HOURS/OFF by operating the SLEEP Button or the WX VOL-/VOL+ Buttons, or call up this
Menu by pressing the MENU Button. The OFF setting means that the Sleep Timer is
switched off.
You can check how many minutes still remain until switching off at any time in the
CURRENT COUNTER line by calling up the Sleep Timer Menu again.
Sleeptimer
Español
Nederlands
Português Dansk
C
OOMMFFOORRTT
1122.. C
F
UUNNCCTTIIOONNS
F
S
31
Page 36

SWAP FUNCTION
The Swap Function enables you to change between two channels positioned separately or
to switch back to a preferred channel fast. For example, if you want to switch channels during an advertising break, you can switch back quickly at any time, by pressing the RTN
Button, to see whether the advertising break has already finished and your desired program is continuing. Each further operation of the RTN Button will lead to a switch between
the channel most recently viewed and your preferred channel.
ESTABLISH SWAP CHANNEL (PREFERRED CHANNEL)
Variation 1: Press the MENU Button to call up the Main Menu. Position the Selection Bar on
SWAP FUNCTION by means of the ST P+/P- Buttons and press the MENU
Button again. You can choose between MANUAL/ 3 MIN/ 5 MIN/ 10 MIN settings with the WX VOL-/VOL+ Buttons or through a Menu that can be reached
by means of the MENU Button.
The Swap Channel must be defined in accordance with Variation 2 in the case
of the MANUAL setting. The channel viewed is automatically defined as the
Swap Channel after the period has expired whenever a period of time is set.
SWAP CH will be faded in into the left upper corner. Now, you will be able to
select any other channel slot and switch between the channel viewed and your
Swap Channel by pressing the RTN Button for a short time. The channel that is
your preferred channel will be displayed for 4 seconds at each channel change.
Variation 2: Press on the channel slot to which you want to revert quickly as long as the
RTN Button appears, until SWAP CH OSD is faded in. You will now have established your preferred channel manually.
However, if a period of time has been set in the SWAP FUNCTION Menu, your
preferred channel will change automatically with your television viewing.
REVERTING TO THE FACTORY SETTING
This function sets all settings of the TV, such as brightness, colour, contrast, sharpness and
white balance, etc. back again to the status of delivery from the factory.
1. Press the MENU Button to reach the Main Menu.
2. Select the INSTALLATION Point with the ST P+/P- Buttons and press the MENU Button again.
3. Select the FACTORY SETTINGS Point with the ST P+/P- Buttons and press the MENU
Button again. Now, select SET and confirm this selection with the MENU Button.
Note: You can set most important picture and sound (brightness, colour, contrast, volume)
settings back to the factory settings by pressing the RST, RESET Button for a longer period.
32
NNGGLLIISSH
H
E
E
Page 37

SWITCHING ON MODE
You can establish your preferred Operating Mode of the TV after switching it on with this
setting.
1. Press the MENU Button to reach the Main Menu.
2. Select the INSTALLATION Menu Point with the ST P+/P- Buttons and press the MENU
Button again.
3. Move the Selection Bar to the SWITCH ON WITH Menu Point with the ST P+/P- Buttons. Now, you will be able to choose between the PC/CH 1/LAST CH/AV/INSTALLATION
modes of operation by means of the WX VOL-/VOL+ Button, or by pressing the MENU
Button (Menu).
PC: Switch it on in the PC operating mode used most recently (VGA or HDMI)
CHANNEL 1: Switch on with channel slot 1
LAST CHANNEL: Switch on with the channel most recently viewed.
AV: Switch on with AV setting most recently used.
INSTALLATION: Switch on as at the status of the initial installation – see chapter „6.
APSAS First Time Installation“on page 10.
English Deutsch Français Italiano
SETTINGS FOR ALL CHANNELS
1. Press the MENU Button to reach the Main Menu.
2. Select the INSTALLATION Menu Point with the ST P+/P- Buttons and press the MENU
Button again.
3. Select the SETTING ALL CHANNELS Menu Point with the ST P+/P- Buttons and press
the MENU Button again.
Settings of all programs
1. Sharpness setting
2. Noise reduction setting
3. Decoder setting
4. Sharpness Setting:
This function sets the sharpness setting for all channels. You can choose between set-
tings 0-3 through a Menu by pressing the MENU Button. There is a more detailed de-
scription of this function in chapter „Additional picture settings“ on page 15.
5. Noise Reduction Setting:
This function sets the noise reduction setting for all channels. You can choose between
the AUTOMATIC/ OFF/ WEAK/ MEDIUM/ LOUD settings through a Menu by pressing the
MENU Button.
You will find a more detailed description of the settings in chapter „Additional picture
settings“ on page 15.
6. Decoder Setting:
This function sets the decoder function for all channels. You can choose between the
OFF/ EXTERNAL/ INTERNAL SOUND/ EXTERNAL SOUND/ INTERNAL SOUND settings
through a Menu by pressing the MENU Button.
You will find a more detailed description of the settings in chapter „Setting channels
manually“ on page 20.
Español
Nederlands
Português Dansk
1122.. C
C
OOMMFFOORRTT
F
UUNNCCTTIIOONNS
F
S
33
Page 38

TIME DISPLAY TIME
In TV Mode, the time will be displayed by pressing this Button.
Press the TIME Button while your TV is transmitting a television channel with Teletext
transmission. The current time will be displayed in the form of a digital clock in the right
upper corner of the screen.
The display will switch to an analog clock if the TIME Button is pressed again. The time
display will disappear as soon as the TIME Button is pressed a third time.
SWITCH PICTURE FORMAT - ARC
You can change the representation of the picture format of your TV quickly with the ARC
Button. You will find a more detailed description in relation to the possible picture formats
in chapter „Picture (Contrast, Colour, Brightness, etc.)“ on page 13.
SWITCH PICTURE PRESETS - APC
You can choose between the possible DAYTIME/EVENING/MANUAL presets quickly with the
APC Button. You will find a more detailed description in relation to these presets in chapter
„Picture (Contrast, Colour, Brightness, etc.)“ on page 13.
FREEZE FRAME FUNCTION – YELLOW BUTTON
You can freeze the picture at any time (apart from in the PC VGA mode or the HDMI PC
mode) by pressing the YELLOW Button. Press the YELLOW Button again to allow the picture to continue.
GAMES
Your TV is equipped with four games and an associated high score list.
Move to the game that you would like to play with the aid of the ST P+/P- Buttons and
press the MENU Button to call up the game.
The control of the games functions with the STWX P+/P-, VOL+/- Buttons. Special functions (e.g. shooting) can be called up with the MENU Button.
You will be requested to enter your score in the High Score List after ending the game, provided that you have achieved a new high score. Now, you will be able to select the letters
required with the ST P+/P- Buttons. You will reach the next position with the
WX VOL-/VOL+ Buttons. You will leave the name entry with MENU or EXIT Button.
Games
Highscores
Brixx
Anaconda
Scramble
Outer Space
You can end the games early by pressing the EXIT Button.
34
E
E
NNGGLLIISSH
H
Page 39

1133.. T
T
RROOUUBBLLEESSHHOOOOTTIINNG
G
Many times, problems have simple causes. We would like to give you some tips to solve
some common problems. Should these tips not help, please call us!
There is no picture or sound.
Make sure the AC adapter is properly inserted in the power outlet.
Make sure the input mode is set to correctly.
Make sure the main power switch of the main unit is on.
There is no picture. There is no picture from AV.
Make sure the Contrast/Brightness is properly adjusted.
Make sure all external devices are connected properly.
Check that the correct AV setting has been selected.
There is no sound.
Make sure the volume is not set to minimum.
Make sure the sound is not set to mute.
Make sure that headphones are not connected.
There is no picture or sound, just noise.
The reception may be weak. Make sure the aerial is not disconnected.
Picture is not clear.
The reception may be weak.
Make sure the aerial is not disconnected.
The picture is too bright or too dark.
Check the settings of contrast / brightness / Backlight in the menu picture settings.
Remote control does not work.
Check the batteries in the remote control are not flat.
Make sure the remote sensor window is not under strong lighting.
Switch the device on and on again with the main switch on the back of the device.
The picture is not sharp.
The reception may be weak.
Make sure the aerial is not disconnected.
Check the settings of the picture sharpness and the noise reduction in the Picture Menu.
The picture jitters.
The reception may be weak.
Make sure the aerial is not disconnected.
The picture is doubled or tripled.
Make sure the aerial is facing the right direction.
There may be reflected electric waves from mountains or buildings.
The picture is spotted.
There may be interference from automobiles, trains, high voltage lines, neon light, etc.
There may be interference between the antenna cable and power cable. Try moving them further apart.
There are stripes on the screen or colours fade.
Is the unit receiving interference from other devices? Transmission antennas of radio broadcasting station and
transmission antennas of amateur radio and cellular phones may also cause interference.
Place the unit as far apart as possible from device that may cause possible interference.
The Child lock cannot be deactivated.
Enter 1973 as the PIN number. The devices should be fully functioning again with this.
English Deutsch Français Italiano
Español
Nederlands
Português Dansk
T
RROOUUBBLLEESSHHOOOOTTIINNG
1133.. T
G
35
Page 40

1144.. O
O
TTHHEERR
Q
UUEESSTTIIOONNSS
Q
DO YOU REQUIRE ADDITIONAL SUPPORT?
If the suggestions in the above section have not solved your problem, please contact the
hotline. We will try and help you over the telephone. However, before you contact your
Technology Center, please keep the following information available:
- What additional peripheral devices are you using?
- What messages are appearing on the screen?
- During which operational step did the problem arise?
- How does your computer configuration look, if you have connected a PC to the device?
- What software were you using when the error occurred, if you have connected a PC to the
device?
- What steps have you already taken to solve the problem?
- Give us your Customer Number, if you have already received one.
36
NNGGLLIISSH
H
E
E
Page 41

WARRANTY
We warrant to our customers that this product is free from defects in materials and workmanship as follows: for a
determined period from the date of original purchase, defective parts or a defective product returned to a repair
facility or an Authorized Service Facility ("ASF") for such product, as applicable, and proven to be defective upon
inspection, will be exchanged for new or comparable rebuilt parts, or a refurbished product, as determined by the
repair facility or the ASF.
Limited warranty repair or replacement shall not extend the original limited warranty period of the defective product. This limited warranty does not cover any supplies or accessories, including but not limited to: software, blank
media, user-installed drives, etc.
EXCLUSIONS: this limited warranty does not apply, and you will have no remedy hereunder with respect to (a)
products that have been modified, opened, repaired or otherwise altered, except by an ASF, (b) products that have
been damaged or destroyed after delivery to the customer, (c) any third party software, interfaces, parts, supplies,
peripherals or other products or any defects resulting from use of the product in connection with such third party
products, (d) defects resulting from improper or inadequate maintenance, calibration or site preparation, (e) defects resulting from any misuse, abuse, accident, neglect, negligence or any use other than in accordance with the
handling or operating instructions provided, (f) defects resulting from exposure to unusual physical or electrical
stress or from any operation other than in accordance with the published environmental specifications for the product.
TO THE EXTENT ALLOWED UNDER APPLICABLE LAW, THE ABOVE WARRANTIES ARE EXCLUSIVE AND NO OTHER
WARRANTY OR CONDITION, WHETHER WRITTEN OR ORAL, IS EXPRESSED OR IMPLIED AND WE SPECIFICALLY
DISCLAIM ANY IMPLIED WARRANTIES, INCLUDING ANY IMPLIED WARRANTY OF MERCHANTABILITY OR FITNESS
FOR A PARTICULAR PURPOSE AND NO IMPLIED WARRANTY APPLIES TO THE PRODUCT AFTER THE APPLICABLE
PERIOD OF THE EXPRESS LIMITED WARRANTY STATED ABOVE. Some countries, states or provinces do not allow
exclusions or limitations on the duration of an implied warranty, so the above limitation or exclusion might not
apply to you. This limited warranty gives you specific legal rights and you might also have other rights that vary
from country to country, state to state, or province to province.
Our limited warranty is valid in any country or locality where we have a support presence for this product and
where we have marketed this product. The level of warranty service you receive may vary according to local standards. We will not alter form, fit or function of the product to make it operate in a country for which it was never
intended to function.
TO THE EXTENT ALLOWED UNDER APPLICABLE LAW, THE REMEDIES IN THIS LIMITED WARRANTY STATEMENT
ARE YOUR SOLE AND EXCLUSIVE REMEDIES. EXCEPT AS INDICATED ABOVE, IN NO EVENT WILL OUR COMPANY
OR ITS SUPPLIERS BE LIABLE FOR LOSS OF DATA OR FOR INDIRECT, SPECIAL, INCIDENTAL, CONSEQUENTIAL
(INCLUDING LOST PROFIT OR DATA), OR OTHER DAMAGE, WHETHER BASED IN CONTRACT, TORT, OR
OTHERWISE. IN NO EVENT SHALL RECOVERY OF ANY KIND AGAINST OUR COMPANY BE GREATER IN AMOUNT
THAN THE PURCHASE PRICE OF THE PRODUCT SOLD BY US WHICH CAUSED THE ALLEGED DAMAGE. WITHOUT
LIMITING THE FOREGOING, YOU ASSUME ALL RISK AND LIABILITY FOR LOSS, DAMAGE OR INJURY TO YOU AND
YOUR PROPERTY AND TO OTHERS AND THEIR PROPERTY ARISING OUT OF USE OR MISUSE OF, OR INABILITY TO
USE THE PRODUCT NOT CAUSED DIRECTLY BY THE NEGLIGENCE OF OUR COMPANY. Some countries, states or
provinces do not allow the exclusion or limitation of incidental or consequential damages, so the above limitation or
exclusion may not apply to you.
THE WARRANTY TERMS CONTAINED IN THIS STATEMENT, EXCEPT AS LAWFULLY PERMITTED, DO NOT EXCLUDE,
RESTRICT OR MODIFY AND ARE IN ADDITION TO THE MANDATORY STATUTORY RIGHTS APPLICABLE TO THE SALE
OF THIS PRODUCT TO YOU.
Please note the following:
Be sure to keep your purchase receipt in a safe place. Our company, at its option, may require a copy of the receipt to validate the warranty period effective date (i.e. date of purchase). Warranty liability only applies to material or factory faults. It does not apply to damage due to breakage, for example, a crack in the housing. Our service includes unit exchange or send-in repair:
Unit Exchange
In locations where Unit Exchange is available, we will send you a replacement unit. You must return the defective
unit to our company (using the shipping carton that the new one came in.)
Send-In Repairs
In locations where Send-In Repair Service is available, repair service can be obtained by shipping your unit to the
Repair Center. The unit will be repaired and returned to you.
For either Unit Exchange or Send-In Repairs, you must have an authorized RMA number from our support before
shipping your defective product.
Replacement products may be either new or equivalent in performance to new. Replacement or repaired products
may contain remanufactured parts equivalent to new in performance or may have been subject to incidental use.
Out-of-Warranty Support
In addition to providing free technical support during the warranty period, We are also available to support your
product after the warranty period has ended. This out-of-warranty support will be provided on a fee basis.
English Deutsch Français Italiano
Español
Nederlands
Português Dansk
DUPLICATION OF THE INSTRUCTIONS FOR USE / TECHNICAL DATA
The documents contain legally protected information. All rights reserved. Duplication in a mechanical, electronic or
any other form is forbidden without the written authorization of the manufacturer.
O
1144.. O
TTHHEERR
Q
UUEESSTTIIOONNS
Q
S
37
Page 42

38
NNGGLLIISSH
H
E
E
 Loading...