

Page 1

Notes on these Operating Instructions
The operating instructions and installation guidelines have been organized so that subjectrelated information can be easily found using the contents list.
Note
You will find comprehensive Operating Instructions for navigation on
relevant CDs/DVDs and at the online help of the device.
The section "Frequently Asked Questions" contains answers to questions that are frequently addressed to our customer service department.
Document Your Navigation Unit
It is important to record the details of your Navigation Unit and the purchase thereof. In
the event you require warranty support you may be asked for this information. The serial
number can be found on the back of the device:
Serial Number ....................................................................................
Password ....................................................................................
Information note ....................................................................................
SuperPIN ....................................................................................
UUID ....................................................................................
Date of Purchase ....................................................................................
Place of Purchase ....................................................................................
Please record the serial number into any appropriate guarantee documents.
You will enter your own password and information note using the Security Function.
The SuperPIN and the UUID will be provided following the activation of the Security Func-
tion. See Page 17.
Page 2

Quality
The components used have been selected to provide a product that has a high level of
functionality and is user friendly, safe and reliable. A well-balanced hardware and software
design allows us to offer you a technologically advanced navigation system, which is both
practical and enjoyable to use.
Service
Our customer care is there to provide support and assistance whenever you have questions or are experiencing problems.
This manual contains a section specific to Customer Service starting on page 41.
Copyright © 2009, version 25/03/2009. All rights reserved. Microsoft®, MS-DOS®, and Windows are
registered trademarks of Microsoft Corporation in the U.S. and other countries. Pentium
tered trademark of Intel Corporation. The names of actual companies and products mentioned herein
may be the trademarks of their respective owners. Information in this document is subject to change
without notice
.
®
is a regis-
ii
Page 3

Contents
Safety and Maintenance .................................................................................. 1
Safety Instructions ......................................................................................................... 1
Data Security ................................................................................................................. 1
Operating Environment ................................................................................................. 2
Repair ............................................................................................................................ 2
Ambient temperature .................................................................................................... 2
Electromagnetic Compatibility ...................................................................................... 3
Connection ................................................................................................................... 4
Power supply through Car Adapter ............................................................................ 4
Power Supply through AC adapter (optional) ............................................................ 4
Cabling ......................................................................................................................... 4
Information about the Regulatory Compliance according to R&TTE .............................. 5
Battery Operation .......................................................................................................... 5
Cleaning and Maintenance ............................................................................................ 5
Care of the Display ........................................................................................................ 6
Recycling and Disposal .................................................................................................. 6
Transport ...................................................................................................................... 7
Supplied Items .............................................................................................................. 8
Views ............................................................................................................... 9
Front Components ........................................................................................................ 9
Back Components ....................................................................................................... 10
Bottom Components ................................................................................................... 11
Top Components ........................................................................................................ 11
Right Components ...................................................................................................... 12
Left Components ......................................................................................................... 13
Holder with extension socket (optional) ...................................................................... 14
Front components ................................................................................................... 14
Back components..................................................................................................... 15
Initial Set up .................................................................................................. 16
I. Charging the Battery ................................................................................................ 16
II. Power Supply .......................................................................................................... 17
Car Adapter .............................................................................................................. 17
Alternative possibility of charging the battery ........................................................... 17
AC Adapter (optional) .............................................................................................. 18
III. Switching on the Device ......................................................................................... 19
IV. Installing the Navigation Software .......................................................................... 20
iii
Page 4

General Operating Instructions ..................................................................... 21
Switching on/off the device ......................................................................................... 21
Security ......................................................................................................... 23
Storing the password and the information note .......................................................... 23
Making settings ........................................................................................................... 24
SuperPIN and UUID ..................................................................................................... 25
Fingerprint Sensor ....................................................................................................... 26
Benefits of this technology ....................................................................................... 26
Storing a fingerprint .................................................................................................... 26
Making subsequent settings ........................................................................................ 28
Password Request ....................................................................................................... 29
Resetting the Navigation System ................................................................................. 30
Soft Reset .................................................................................................................... 30
1. Possibility ............................................................................................................. 30
2. Possibility ............................................................................................................. 30
Switching the Device off Completely / Hard Reset ....................................................... 31
Navigation ..................................................................................................... 32
Safety Instructions for Navigation ................................................................................ 32
General Instructions ................................................................................................. 32
Notes for Use in a Vehicle ......................................................................................... 33
Aerial Orientation ........................................................................................................ 33
I. Mounting the Car Holder ......................................................................................... 34
II. Attaching the Navigation System ............................................................................. 35
Fixing the navigation system via cradle with extension socket .................................. 36
III. Connecting the Car Adapter ................................................................................... 37
IV. Starting the Navigation Software ............................................................................ 38
Warning function for traffic monitoring points ............................................................ 39
Integrated FM Transmitter (optional) ........................................................... 41
Starting the FM Transmitter ......................................................................................... 41
Overview of the main screen ....................................................................................... 41
Description of the Interfaces ........................................................................................ 42
Selecting the frequency ............................................................................................ 42
Speech commands (optional) ........................................................................ 44
Handsfree Facility by means of Bluetooth (optional) ........................................ 49
Starting the Bluetooth Application............................................................................... 49
Overview of the Main Screen ................................................................................... 50
Pairing the Navigation Device and the Mobile Phone ............................................... 51
Accepting incoming calls ......................................................................................... 52
Making Calls ............................................................................................................ 52
iv
Page 5

During a Call ............................................................................................................ 53
MP3 Player (optional) ................................................................................... 54
Main Screen Overview................................................................................................. 54
Select a Title and Move it into the List of Favourites .................................................. 56
List of Favourites ...................................................................................................... 57
List of the established bookmarks ................................................................................ 57
Picture Viewer (optional) .............................................................................. 58
Operating the Picture Viewer ....................................................................................... 58
Main Screen ................................................................................................................ 58
Full Image View........................................................................................................ 59
Video Player (optional) ................................................................................. 61
Main Screen Overview................................................................................................. 61
Selecting and playing video ..................................................................................... 61
Travelguide (optional) .................................................................................. 63
AlarmClock (Wake up function) (optional) ................................................... 64
Overview of the main screen ....................................................................................... 64
Description of the Interfaces ........................................................................................ 65
Setting the System Time ........................................................................................... 66
Selecting an Alarm Signal ......................................................................................... 67
Setting the Volume .................................................................................................. 67
Snooze Function ...................................................................................................... 68
Ending the Alarm Clock Application ......................................................................... 68
Contact Viewer (optional) ............................................................................. 69
Create the contacts database ....................................................................................... 69
Operating the Contact Viewers .................................................................................... 70
Contacts list view ........................................................................................................ 70
Visiting card view ........................................................................................................ 71
Selection of addresses and phone numbers ................................................................. 72
Sudoku (optional) ......................................................................................... 73
Main Screen ................................................................................................................ 73
Description of the switch fields .................................................................................... 73
FAQ ................................................................................................................ 75
Customer Service ........................................................................................... 76
Faults and Possible Causes .......................................................................................... 76
Additional Support ...................................................................................................... 76
v
Page 6

Appendix ....................................................................................................... 77
Special CleanUp Function............................................................................................ 77
Synchronisation with the PC ........................................................................................ 80
I. Installing Microsoft® ActiveSync® ............................................................................ 80
II. Connecting with the PC ....................................................................................... 81
Alternative possibility of charging the battery ........................................................... 81
III. Working with Microsoft® ActiveSync® .................................................................... 82
GPS (Global Positioning System) ................................................................................. 83
Dead Reckoning (gyroscope) (only in the case of Model X5535) .............................. 83
TMC (Traffic Message Channel) ................................................................................... 84
Pay TMC (optional) ..................................................................................................... 84
Connecting an additional TMC Dipole Aerial (optional) ........................................... 85
The Remote Control (optional) .................................................................................... 86
Safety Instructions ....................................................................................................... 86
Batteries and Proper Treatment ................................................................................... 86
Button Layout ............................................................................................................. 87
Installation .................................................................................................................. 88
Working with Memory Cards ....................................................................................... 90
Inserting Memory Cards ........................................................................................... 90
Removing Memory Cards ......................................................................................... 90
Accessing Memory Cards ......................................................................................... 90
Data Exchange via Card Reader ................................................................................ 91
Additional Card Material .............................................................................................. 91
Transfer of card material to a memory card .............................................................. 91
Alternate method of installing Navigation Software (using a Memory Card) ........... 92
Transferring Installation Files and Map Material to the Internal Memory .................. 92
Specifications ................................................................................................ 93
Model Overview ............................................................................................. 94
Conditions of Warranty for the United Kingdom ........................................... 95
Index ........................................................................................................... 101
vi
Page 7

Safety and Maintenance
Safety Instructions
Please read this section carefully and follow all the instructions provided. This will help
ensure reliable operation and prolong the life for your appliance.
Keep the packaging and the user instructions for future reference or inquiries at a later
date. If you pass the article on to another person, you should pass on these instructions.
• Never allow children to play with electrical equipment unsupervised.
• Keep the packing materials, such as plastic bags away from children as there is a
danger of suffocation.
• Never open up the housing of the appliance or the power adapter. These contain
no user-serviceable parts. If the housing is opened there is a danger of electric
shock.
• Do not place any objects on the appliance and do not exert any pressure on the
display. Otherwise there is a danger that the screen will break.
• To avoid damage, do not touch the screen with sharp objects. We recommend us-
ing only the stylus provided or finger when using the touch-screen functionality of
the product.
• There is a risk of injury if the display breaks. If this should occur, use protective
gloves to pack the broken parts and contact customer support to arrange for disposal. Then wash your hands with soap, since there is a possibility that chemicals
may have escaped.
Remove the power adapter from the outlet, switch the appliance off immediately, or do
not switch it on, and contact Customer Service.
• If the housing of the appliance or the power pack becomes damaged or liquid may
have leaked into it the components must be checked by Customer Service in order
to avoid damage!
Data Security
• Every time your data is updated or modified backup copies should be made on an
external storage medium. The supplier assumes NO liability for data loss or damage
to data storage units, and no claims can be accepted for damages resulting from
the loss of data or for consequential damages.
Safety and Maintenance
1
Page 8

Operating Environment
Failure to follow these instructions may lead to your appliance being damaged. In cases
where products are damaged as a result of misuse of neglect the associated guarantee will
be considered void.
• Keep your navigation System and all connected devices away from moisture and
avoid exposure to dust, heat and direct sunlight, especially in the car.
• Make sure you prevent your appliance from getting wet, e.g. from rain and hail, at
all times. Please note that moisture can even build up inside a protective pouch as a
result of condensation.
• Avoid heavy vibrations and shaking.
• Please note the device should be installed vertically, this will ensure that the device
remains secured within its holder.
Repair
• Please contact our Service Center if you encounter technical problems with your
appliance.
• In the event repair becomes necessary, please use only our authorized Service
Partners. You will find the address on the back of your guarantee card.
Ambient temperature
• The appliance will operate effectively at an ambient temperature of between +32°F
and +95°F (0° C and 35° C) and at a relative humidity of between 10% and 90%
(non-condensing).
• In the powered down state the appliance can be stored at between -4°F and
+140°F (-20°C and +60°C).
• Store the appliance in a safe location, away from high temperatures (e.g. when
parking or from direct sunlight).
2
Safety and Maintenance
Page 9

Electromagnetic Compatibility
• When connecting additional or other components the “Electromagnetic Compati-
bility Directive” (EMC) must be adhered to. Please note that only screened cable
(maximum 10ft) should be used with this appliance.
• For optimal performance, maintain a distance of at least 10 ft. from sources of high-
frequency and magnetic interference (televisions, loudspeaker systems, mobile
telephones etc. This will help to avoid malfunctions and loss of data.
• Electronic devices emit electromagnetic waves during operation.
These emissions are harmless, but can interfere with other devices operated in close
proximity.
While our devices are tested and optimized for electromagnetic compliance in our
laboratories, interference during operation may still occur in the device itself and
with other devices in its proximity.
Should such interference occur, try to eliminate it by adjusting the positions of and
the distances between the devices.
Before driving, please ensure that the electronic systems of the car are working
properly.
Safety and Maintenance
3
Page 10

Connection
When connecting your appliance it is important to observe the following instructions:
Power supply through Car Adapter
• The car adapter should only be connected to the lighter socket of a car
(car battery = DC 12V , truck battery = DC 24V ). If you are in any doubt about
the power source in your car, please contact your car manufacturer.
Power Supply through AC adapter (optional)
• The outlet must be in the vicinity of the appliance and must be easily
accessible.
• To disconnect your appliance from the power source, remove the mains adapter
from the power socket.
• Only use the mains adapter on sockets at AC 100–240 V~ AC, 50/60 Hz. If you are
unsure about the power supply to the place of use, ask the relevant energy supplier.
• Use only the power adapter provided with your appliance.
• Do not cover the power supply unit, in order to avoid damage through unaccept-
able warming.
• Stop using the power supply unit if the housing or the feed line to the device is
damaged. Replace it with a power supply unit of the same type.
• For additional safety, we recommend the use of a surge protector in order to pro-
tect your appliance from damage from spikes or lighting strikes on the power
network.
Cabling
• Arrange cables so that they do not cause unnecessary obstruction or risk entan-
glement or snaring. E.g. ensure that the cables cannot be trod on, or tripped over.
• Do not place any items on the cable.
4
Safety and Maintenance
Page 11
Information about the Regulatory Compliance according
to R&TTE
The following radio equipment has been supplied with this device (optional):
• Bluetooth (only in the case of model P5435 and X5535)
• FM-Transmitter (optional)
The company declares that this device is in compliance with the essential requirements
and other relevant provisions of Directive 1999/5/EC. Complete declarations of conformity
are available under www.medion.com/conformity
.
Battery Operation
Your appliance is powered by an integrated battery, Li-Ion. In order to prolong the life and
efficiency of your battery and ensure safe operation, follow the instructions below:
• Batteries cannot withstand excessive heat. Take care to avoid overheating of appli-
ance and the integrated battery. Failure to comply with this instruction may lead to
damage to or, even explosion of the battery.
• Only use the car adapter to charge the battery from the navigation kit.
•
The batteries are special category waste. When disposing of the appliance en-
sure that this is done correctly. Contact Customer Service for more details.
Cleaning and Maintenance
Warning
There are no user-serviceable or parts which require cleaning inside the
housing of the appliance.
You can prolong the life of the appliance by taking the following simple steps:
• Always remove the power plug and all connecting cables before cleaning.
• Clean the appliance only with a damp, lint-free cloth.
• Do not use solvents, caustic or gaseous cleaners.
Safety and Maintenance
5
Page 12

Care of the Display
• Avoid scratching the display surface as this may be easily damaged. We recom-
mended using a display protection film (mylar) to prevent scratching to the screen.
Please contact your nearest dealer for this accessory.
The foil on the display at delivery is purely for protection during transportation!
• Ensure that no traces of water remain on the screen. Water can cause irreversible
discoloration.
• Use only a soft, lint-free cloth to clean the screen.
• Do not expose the screen to strong sunlight or ultraviolet radiation.
Recycling and Disposal
The device and its packaging are recyclable.
Device
At the end of its life, the appliance must not be disposed of in household rubbish. Consult
your local waste disposal company to enquire about environmentally-friendly options for
disposal.
Packaging
To avoid damage during transport, the appliance is supplied in protective packaging. The
majority of packaging is manufactured from materials which can be disposed of in an
environmentally friendly manner and be recycled professionally.
6
Safety and Maintenance
Page 13

Transport
When transporting the appliance please follow the instructions below:
• In the event of large fluctuations in temperature or humidity, condensation or
moisture may form inside the appliance. This can cause an electrical short-circuit.
• After transporting the appliance wait until the unit has acclimatised and adjusted to
surrounding conditions (e.g. room temperature and humidity) prior to use.
• In order to protect the appliance from dirt, knocks and scratching, please use an
appropriate protective case.
• Before travelling ensure that you are aware of the power and communications pro-
visions at your destination. Before travelling obtain any power or communications
adapters that may be required for the operation of your device.
• When shipping your appliance we recommend using the original packaging. If the
original packaging isn’t available please contact customer service for advice.
• When passing through baggage control at airports, it is recommended that you
pass the appliance and all magnetic storage media (external hard drives) through
the X-ray system (the machine on which your bags are placed). Avoid the magnetic
detector (the structure through which you yourself pass) or the magnetic wand
(the hand device that the security staff use), since this may corrupt your data.
Safety and Maintenance
7
Page 14

Supplied Items
Please check the condition of items supplied and check for missing items using the list
below. If you find your package to be incomplete, please forward us all claims for missing
items within 14 days from the date of purchase.
The package should include the following:
• Navigation system
• Power cable for cigarette lighter
• USB cable
• TMC dipole antenna
• Car holder
• CDs/DVDs with navigation software, digital maps, ActiveSync®, data for rapidly re-
setting the contents of the memory card/internal memory
• Instruction manual and warranty card
Optional
• AC adapter
• Memory card SD
• Earphones
• Holder with extension socket
• Protective case
8
Safety and Maintenance
Page 15
Views
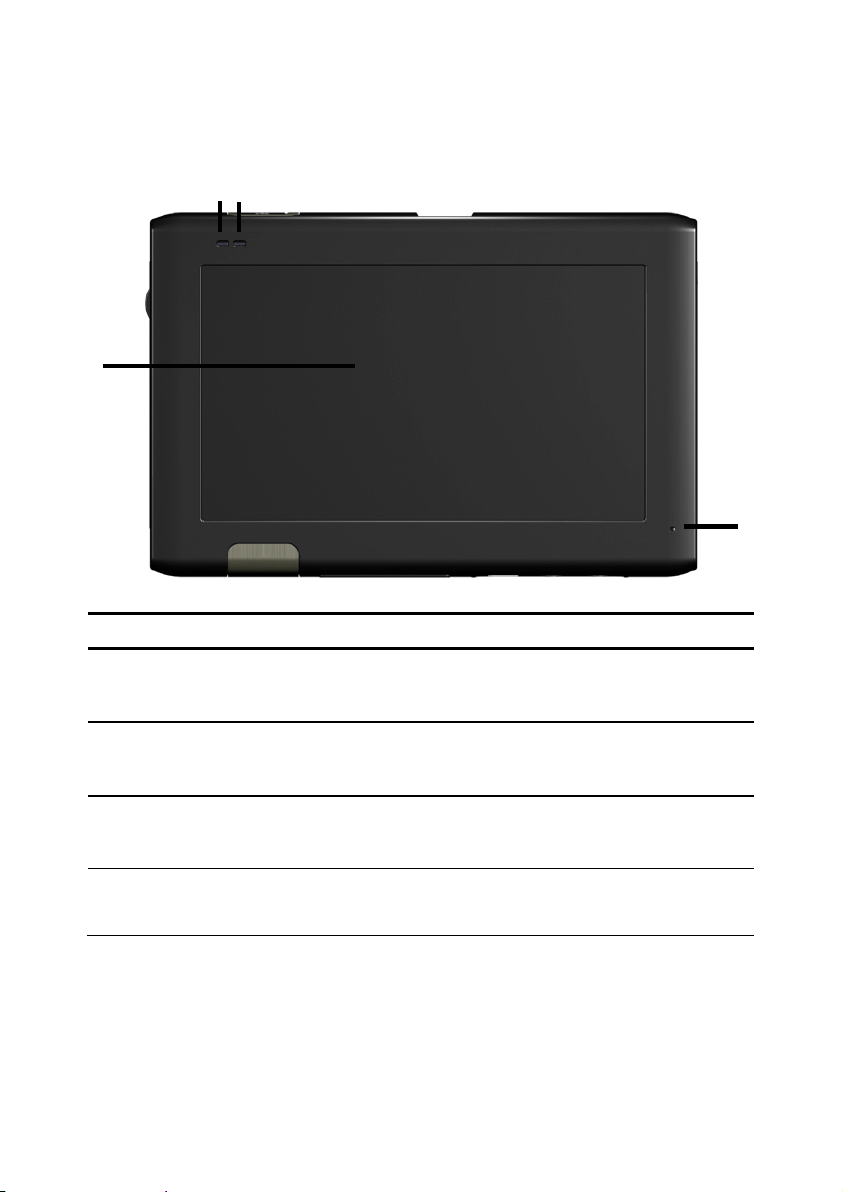
Front Components
op
n
Ref Component Description
Touch Screen Displays the output of your appliance. Tap on the
n
Battery charge
o
indicator
Bluetooth indicator This LED will blink at different speeds, according to the
p
Microphone only in the case of model P5435 and X5535
q
screen with the stylus (found in the holder, see page
35) to select menu commands or enter data.
The LED will flash orange during the charging process.
It will shine constant green when the accumulator is
fully charged.
connection status, if Bluetooth has been activated
(only in the case of model P5435 and X5535).
q
Views
9
Page 16
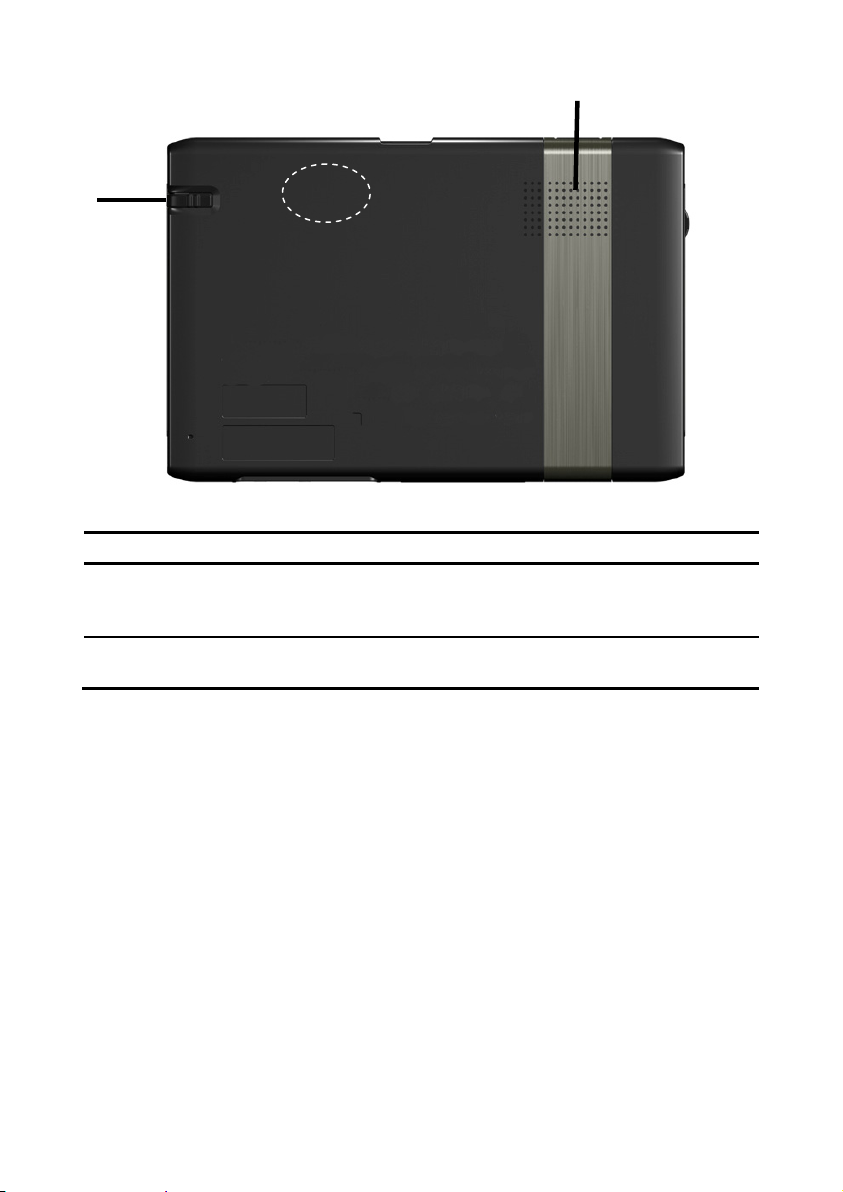
Back Components
GPS
n
Ref Component Description
Stylus Take the stylus out of it's compartment in order to
n
Loudspeaker Provides audible language statements and warn-
o
aerial
use it, and replace it after use. The stylus is required
for operating the touch screen.
ings.
o
10
Views
Page 17
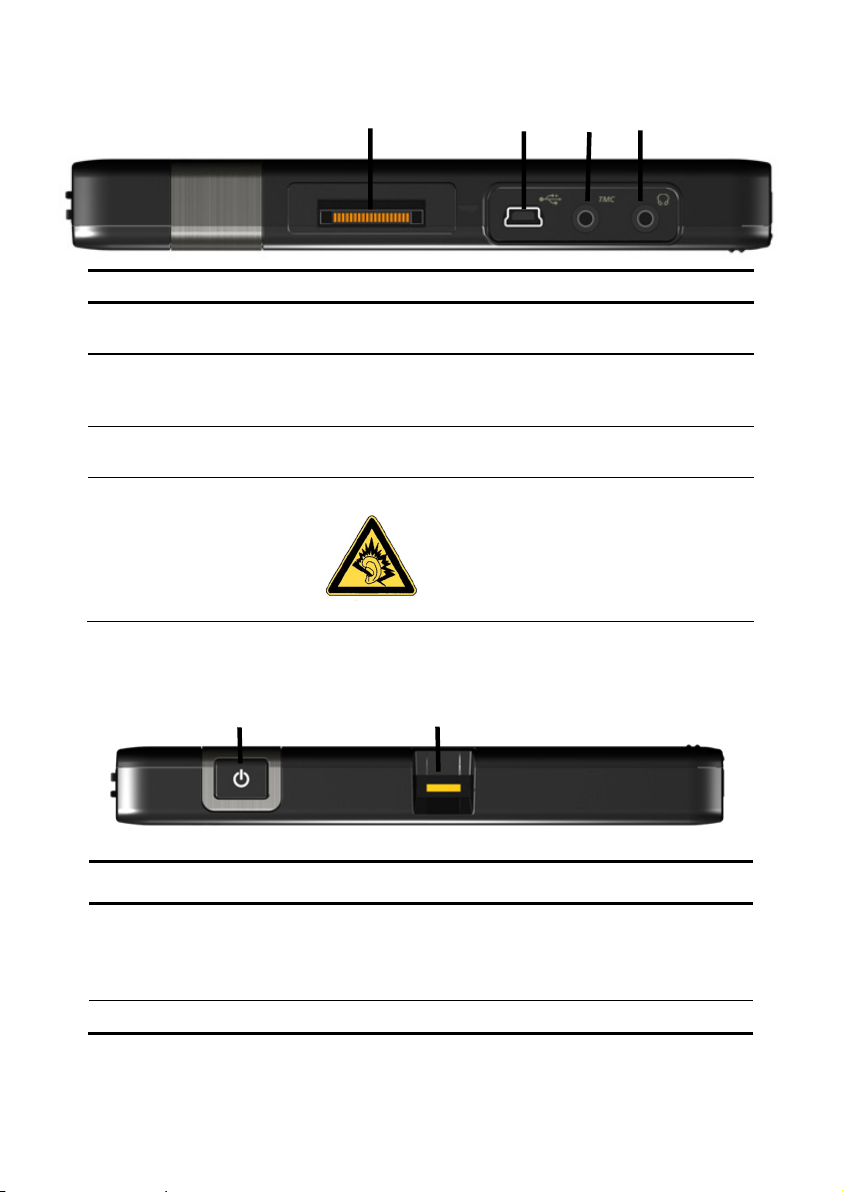
Bottom Components
Ref Component Description
Extension
n
socket
Mini-USB-
o
Connector
TMC connection You also have the possibility to connect a TMC dipole
p
Headphone
q
connection
For the expansion for future components.
Connection for connecting to a PC by means of a USB
cable (for data transfer) as well as connection to external power supply.
antenna here.
Connection for a pair of stereo headphones (3.5 mm).
n o p q
Using this appliance at full or
high volumes for extended
periods of time may cause
damage to the hearing of the
listener.
Top Components
Ref Component Description
On/Off button
n
Fingerprint sensor See page 26
o
o
n
Turn the device on or off by pressing and holding the
On/Off button. You will switch to the stand-by mode
or reactivate the device by quickly pressing the button
(> ½ sec.).
Views
11
Page 18
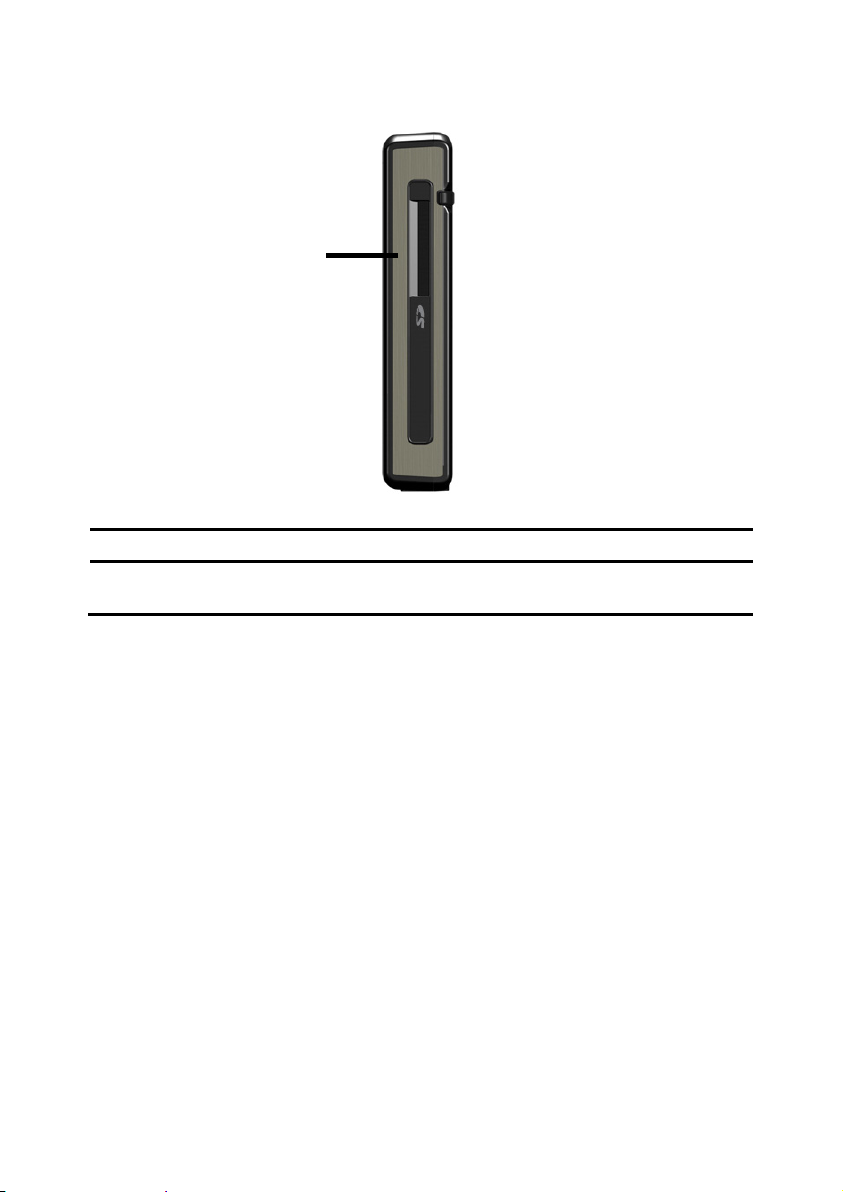
Right Components
n
Ref Component Description
SD Slot
n
Accepts an optional SD (Secure Digital) card for
removable storage.
12
Views
Page 19
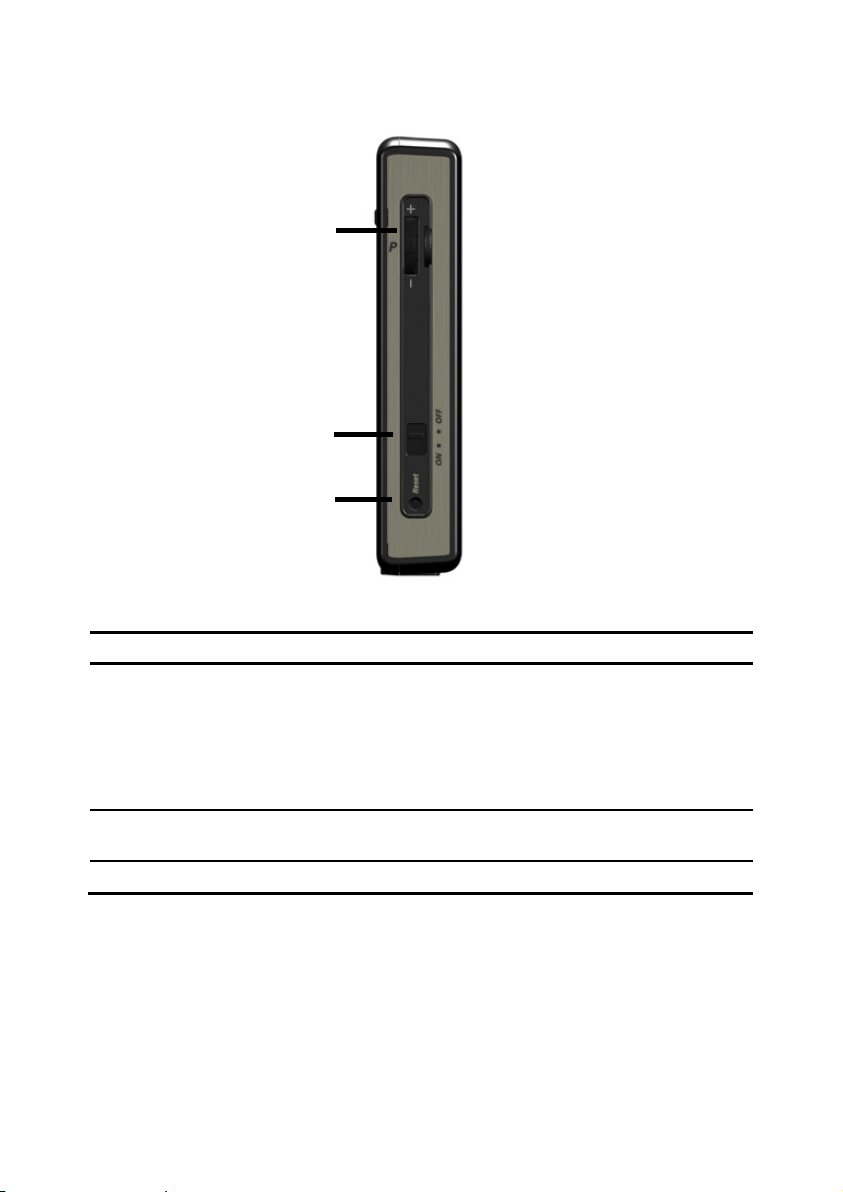
Left Components
n
o
p
Ref Component Description
Volume control /
n
Activation of the
voice entry
(optional)
Main switch /
o
Battery switch
Reset opening Restarts your appliance (Reset, see page 30).
p
You can control the volume of your device as follows:
You can increase the volume by turning the wheel
upwards (+). You can reduce the volume by turning
the wheel downwards (-).
Press the wheel briefly to activate speech input
(optional).
Switches the device completely off (Hard Reset).
Views
13
Page 20
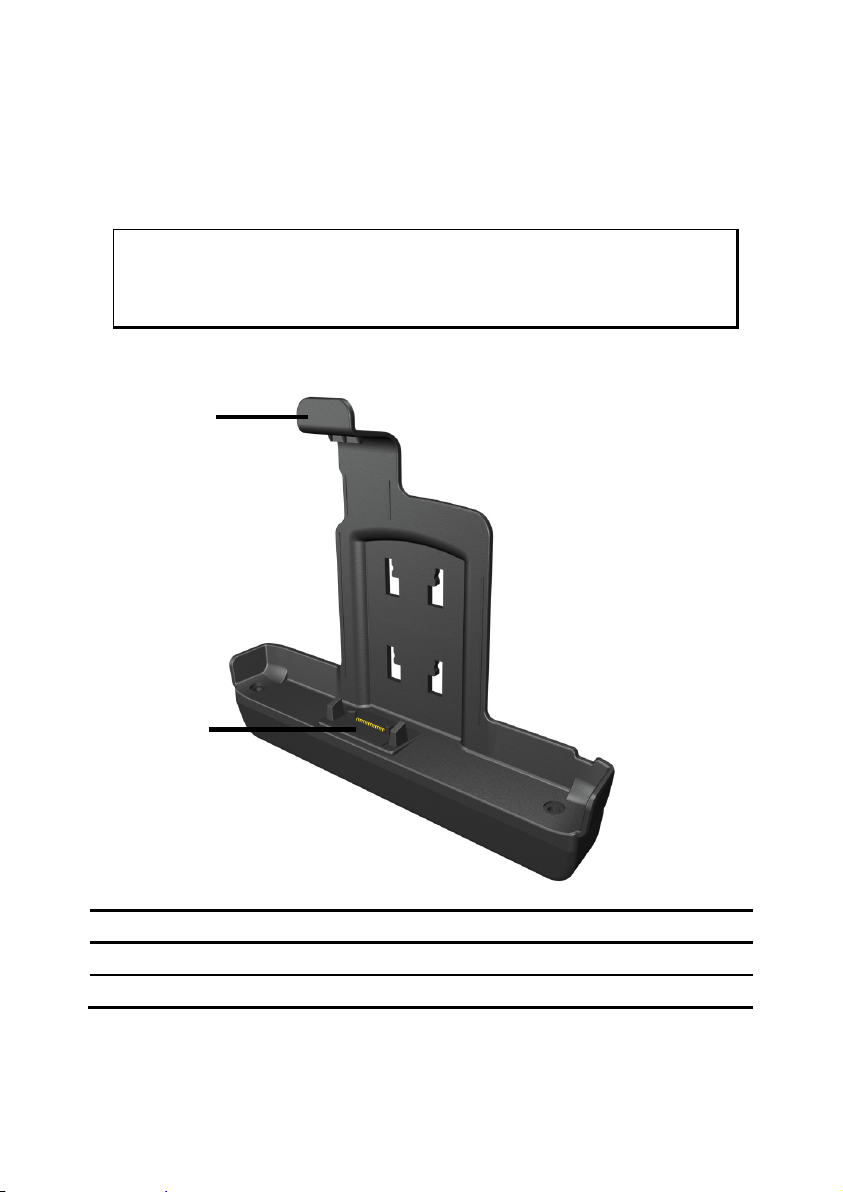
Holder with extension socket (optional)
This holding casing offers extended possible connections and, in addition, it has a receiver
for the optional steering wheel remote.
Proceed as described on Page 36 in order to connect your navigation system by means of
this optional holding casing with expansion plugs.
Attention !
Please pay attention to the fact that the steering wheel remote will only be
available in the case that an electricity supply has been connected.
Front components
n
o
Ref Component Description
Holding clip
n
Extension socket Connection plug to the main device
o
14
Views
Page 21
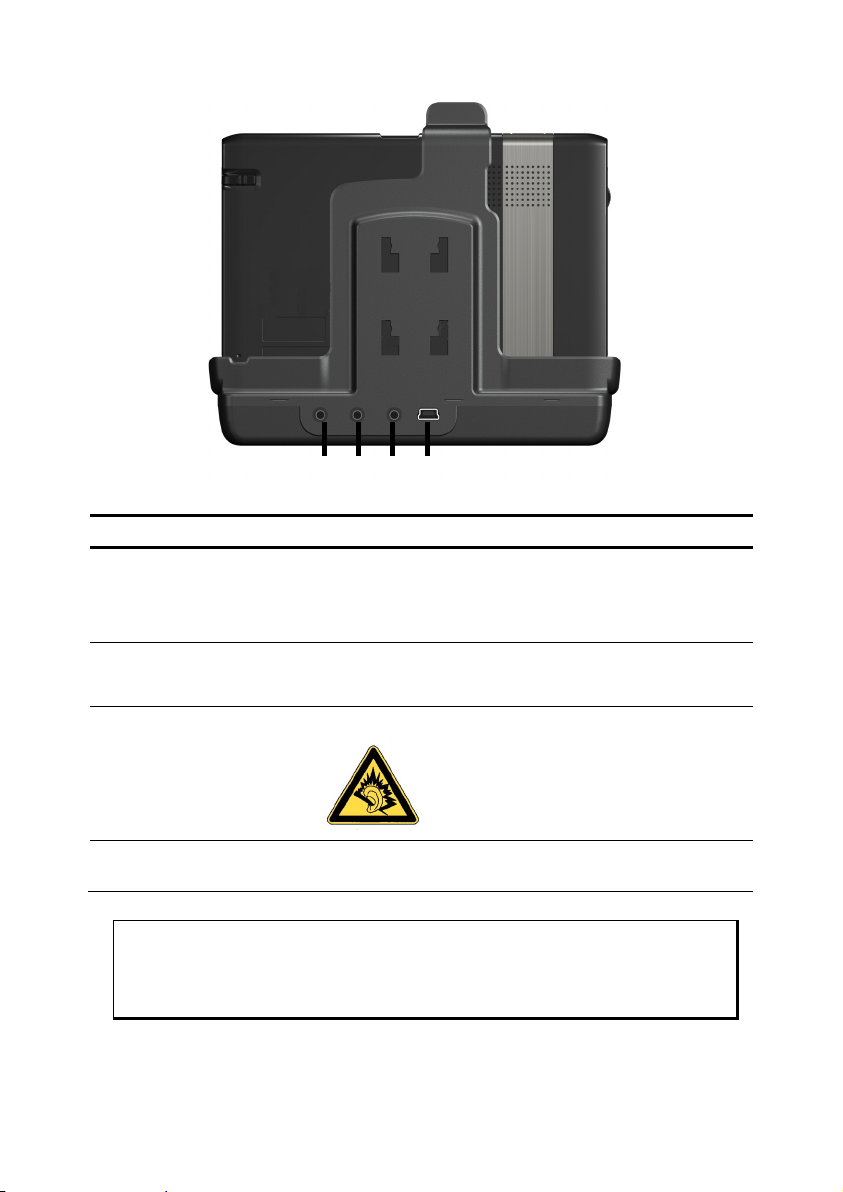
Back components
n o p q
Ref Component Description
TMC Connector Connector for a TMC dipole antenna
n
Microphone For connection of an external microphone (only for the
o
Earphone
p
connector
Mini-USB-
q
Connector
Attention!
Pay attention that the contacts are not touched, contaminated or shortcircuited.
(serves to improve the reception, if no reception or
only long-lasting inadequate reception is possible
through the TMC aerial installed in the holder)
models P5435 and X5535)
Connects to a pair of stereo headphones (3.5 mm).
Connection to an external electricity supply by means
of a mini-USB plug (not to the data adjustment!)
Using this appliance at full volume
for extended periods of time may
cause damage to the hearing capacity of the listener.
Views
15
Page 22

Initial Set up
The following is a step by step guide to assist in the initial Set-up of the navigation system.
Start by removing the protective plastic sheet from the display.
I. Charging the Battery
The battery of your navigation system can be charged in the following ways:
• Using the supplied car adapter,
• using a suitable USB cable or
• by using a mains adapter (purchased as an optional extra).
Attention!
It may be necessary to initially charge the battery for a considerable period
of time prior to commencing and running through the initial installation,
this is dependent on the level of charge held at the time by the internal
battery.
Please observe the following notes:
• The charging status display LED will flash orange until the navigation system is
charged. If possible, do not interrupt the charging process until the
battery is fully charged. This may take a few hours. The charging status LED will
shine constant green if the battery has a high level of charge. Leave the device
charging for 20 further minutes, to ensure the battery is charged-up fully.
• The navigation system can be used during the charging process, but the power
supply must not be interrupted during initial set-up.
• Leave the external power supply connected to the navigation system for around
24 hours, so that the backup battery also charges-up fully.
• The external power supply can remain connected; this is recommended for con-
tinuous operation.
• Even after a power source has been connected to the device it may take several
minutes until the device is once again ready to operate again, this occurs if the
charging state of the battery is exceptionally low. The battery will continue to be
charged if the power supply is connected and the device is switched off.
16
Initial Set up
Page 23
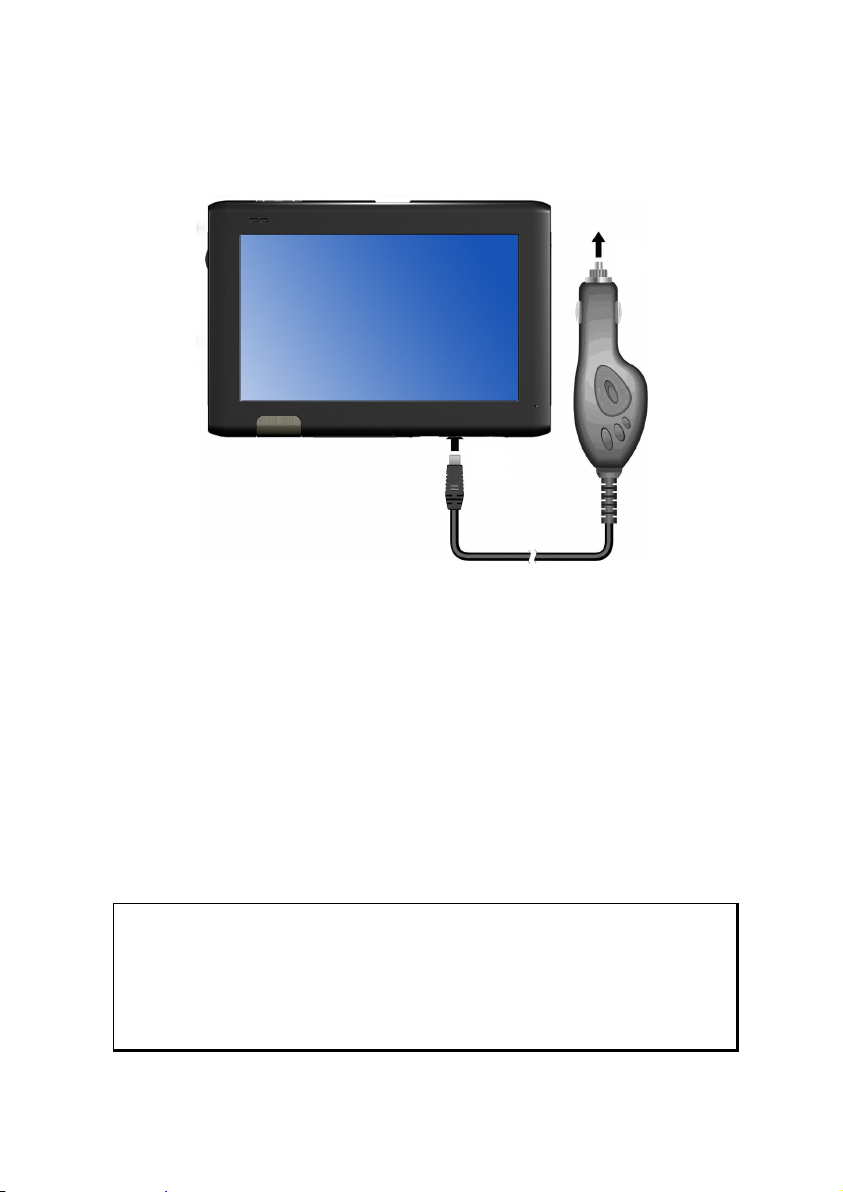
II. Power Supply
Car Adapter
o
n
(similar picture)
1. Plug the jack (n) of the connection cable into the corresponding receptor at the
bottom of your navigation system.
2. Insert the power adapter (o) into the cigar lighter socket ensuring, that it will not
lose contact while driving. This could cause a malfunction.
Alternative possibility of charging the battery
The battery will charge as soon as you connect your navigation device to a switched-on PC
or notebook by means of a USB cable.
Please pay attention to the fact that both USB plugs of the USB cable supplied with the
device must be connected to your PC or laptop to guarantee a sufficient supply of electricity.
No additional software or updates are required for your PC to perform this function. Do
not interrupt the charging process if possible during the initial charge.
Note
The brightness will be adjusted downwards, if necessary, if a USB connection is being set up when the device is switched on.
It is recommended to set the device to the stand-by mode, in order to
shorten the charging time by USB.
Initial Set up
17
Page 24
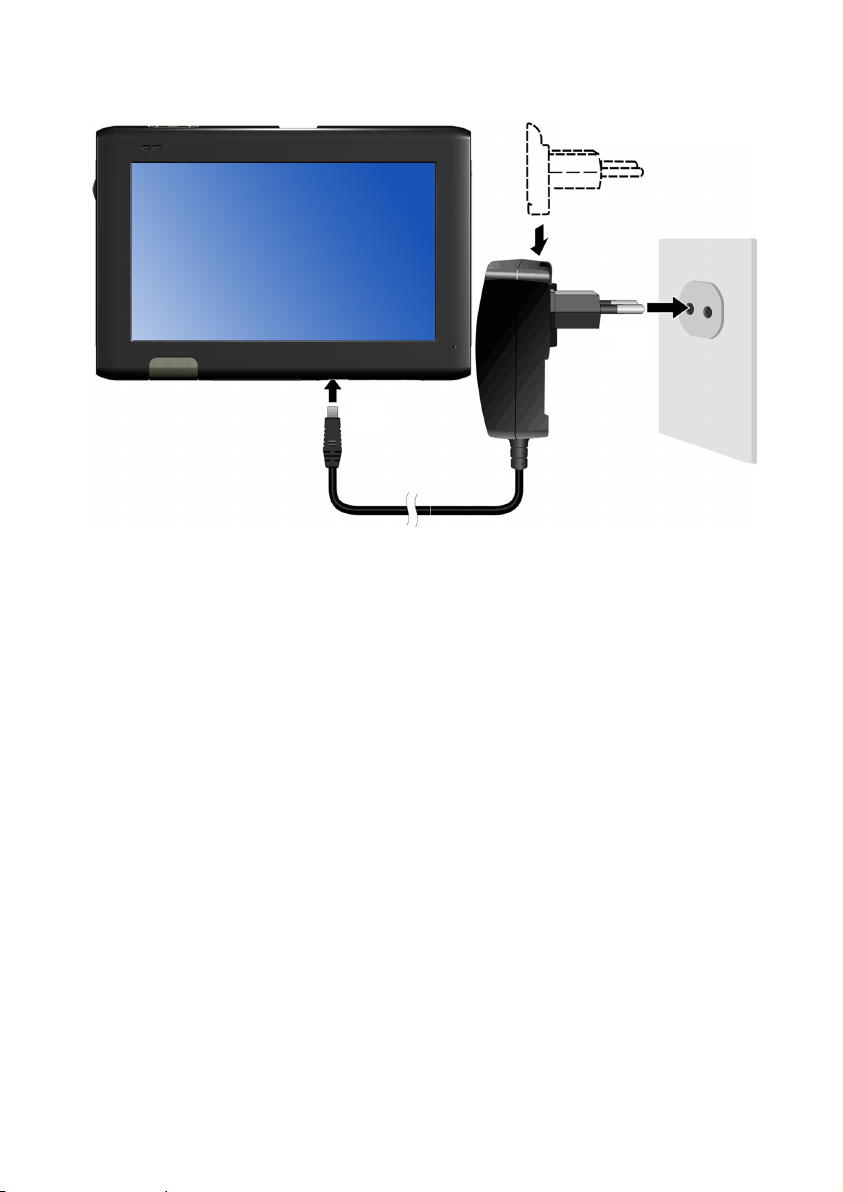
AC Adapter (optional)
Adapter plug
o
n
(similar picture)
1. Push the adapter connector into the guide on the back of the AC adapter. Press the
push button at the same time, so that the adapter plug can engage.
2. Plug the cable of the mains adapter (n) into the mini-USB connection on of the
navigation system.
3. Push the AC adapter (o) into a power point that is easily accessible.
18
Initial Set up
Page 25
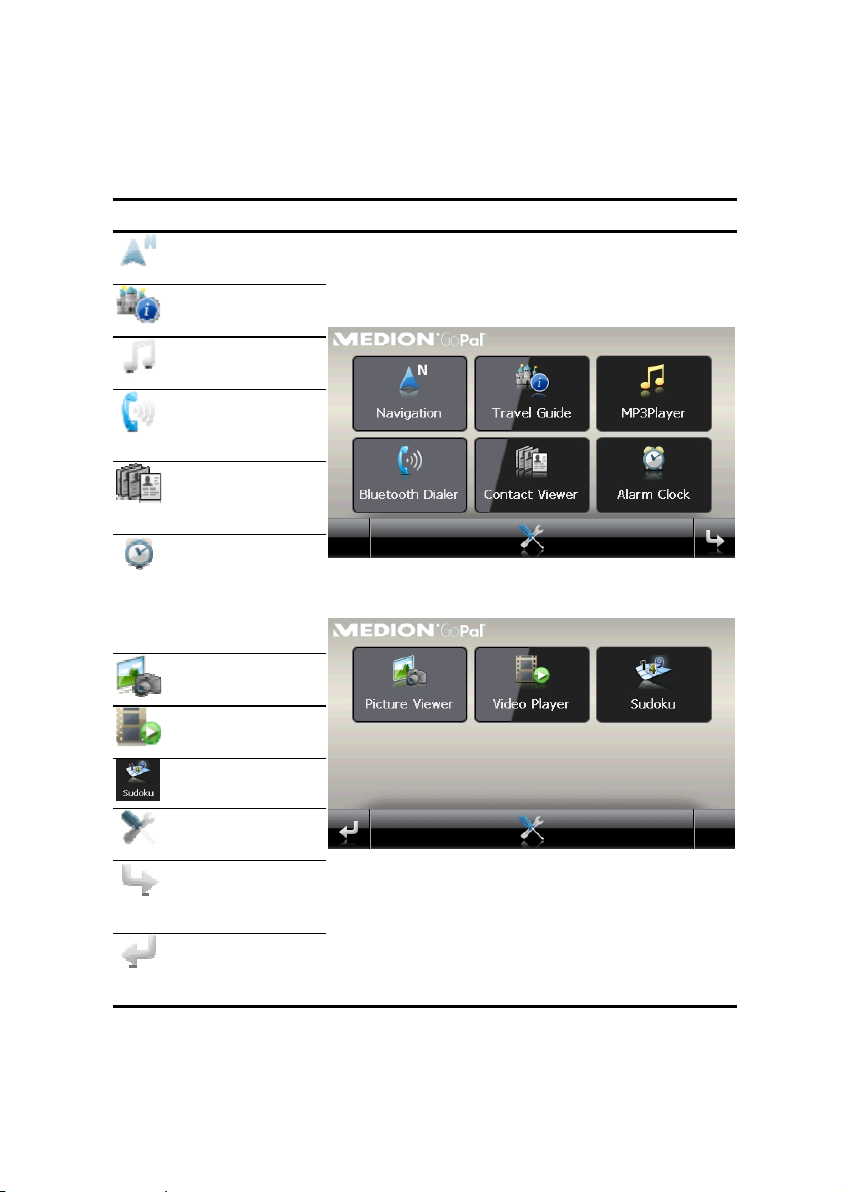
III. Switching on the Device
Switch the main switch ( see page 13) to ON.
The Navigation System will start the initial installation automatically. The brand logo will
appear. Your device will display the application screen after a few seconds.
Button Description Main Screen
Navigation,
page 32
Travel Guide,
page 64
MP3Player,
page 54
Bluetooth
Dialer,
page 49
Contact
Viewer,
page 69
Alarm Clock,
page Fehler!
Textmarke
nicht
definiert.
Picture Viewer,
page 58
Video Player
page 61
Sudoku,
page 73
Settings
Next page of
the main
screen
Previous page
of the main
screen
Initial Set up
19
Page 26

Note
Brief pressure on the On/Off button will be enough to switch the
device on or off, provided that your navigation system is connected to an
external source of electricity or is running in battery operation (standby
mode). The device will be reactivated by pressing the On/Off button
once (> ½ sec.).
You can adjust the period of operation to suit your needs using the
Settings button on the main screen of your device. Your device is delivered in a status in which it will not switch off independently.
To switch your navigation system completely off, push the main switch to
the OFF position.
No data will be lost as data is stored in the internal memory. The starting
process will only take slightly longer.
Your navigation system will use a low amount of electricity and the batteries will be discharged, even when in standby mode.
IV. Installing the Navigation Software
The final installation of the navigation software will take place automatically from the internal memory, during the initial setting up, if your device has already been equipped with
the basic data of the navigation software at the factory. Follow the instructions on the
screen.
An optional memory card must always be inserted in the device while the navigation system is being used.
It will be necessary to carry out a Reset to restart the navigation system if the memory card
has been removed (see page 30).
Please also read the chapter Navigation starting on page 32.
20
Initial Set up
Page 27
General Operating Instructions
Switching on/off the device
Your device will be in its normal operating state after the initial setting up. You can activate
and deactivate your device with the On/Off button.
1. To start your navigation system press briefly the On/Off button
charge indicator will blink briefly and the application screen will appear.
Note
Your device is delivered in a status in which it will not switch off independently. You can adjust the period of operation to suit your needs using the
Settings button on the main screen of your device.
Your navigation system will use a low amount of electricity and the batteries will be discharged, even when it is in the standby mode.
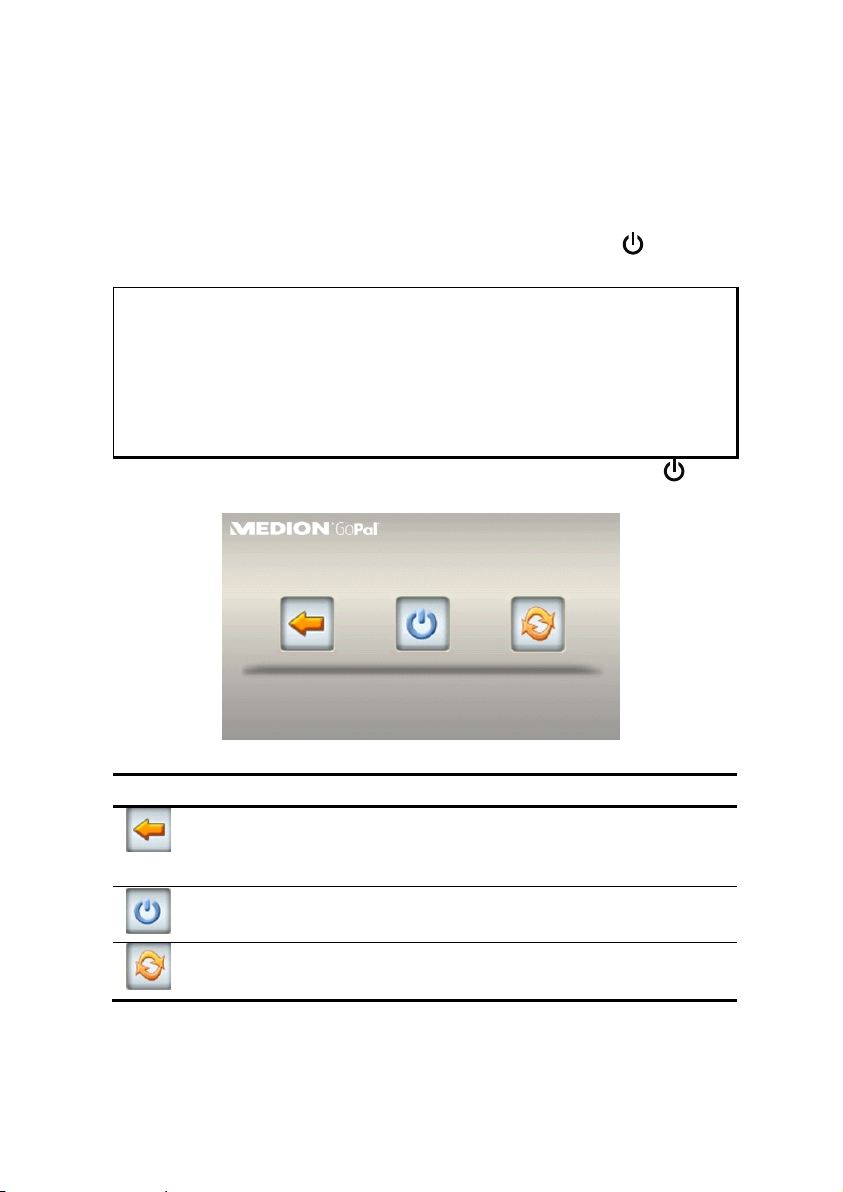
2. To switch off your navigation system briefly press the Power button .
The following screen will appear:
. The battery
You have three possible choices:
Button Description
Cancel/Back
Return to previous view with this key, if you have accidently called
up this screen.
Standby Mode
The device will go into Standby Mode if this key is clicked.
Reset
You can carry out a reset by clicking this key.
General Operating Instructions
21
Page 28

The device will go into the Standby mode automatically after a few seconds if you do not
want to select any of these three possibilities.
For further settings within the Standby mode also see the chapter on “Special CleanUp
Function”, page 77, point 8.
This display will also appear after the delay period of a few seconds has expired, if you
have activated the DC AutoSuspend Comfort Function.
22
General Operating Instructions
Page 29
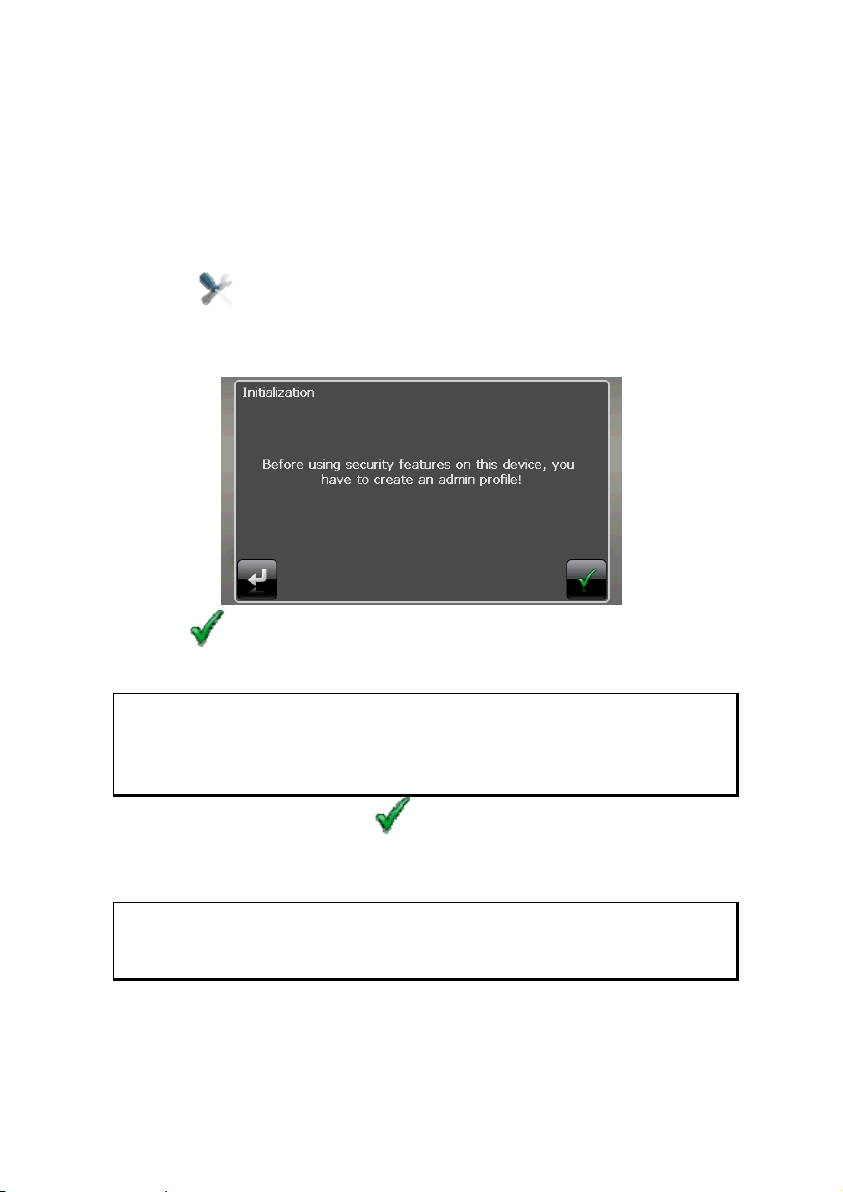
Security
You have the possibility of protecting your device against external access by means of this
function. Some one-off settings will have to be made before you will be able to use this
function. Proceed as follows to do this:
Storing the password and the information note
1. Go to the settings by means of the main display.
2. Click on Security, in order to start the respective function. The following display
will appear:
3. Click on
4. A keyboard will appear. Enter a password with it.
Note
The password must consist of at least 4 symbols. Use a combination of
letters (A - Z) and numbers (0 - 9). Keep the password in a safe place.
5. Confirm the password with the symbol after you have entered it.
6. Enter the password in the second field to reconfirm it and in order to avoid potential careless mistakes.
Note
The password will be displayed in the form of small stars (****).
7. An additional text field will appear after you have entered the password. Enter an
information note here that will serve as a support for remembering your password.
You will be able to call up this information if you have forgotten or mislaid the
password.
, in order to enter a password.
Security
23
Page 30
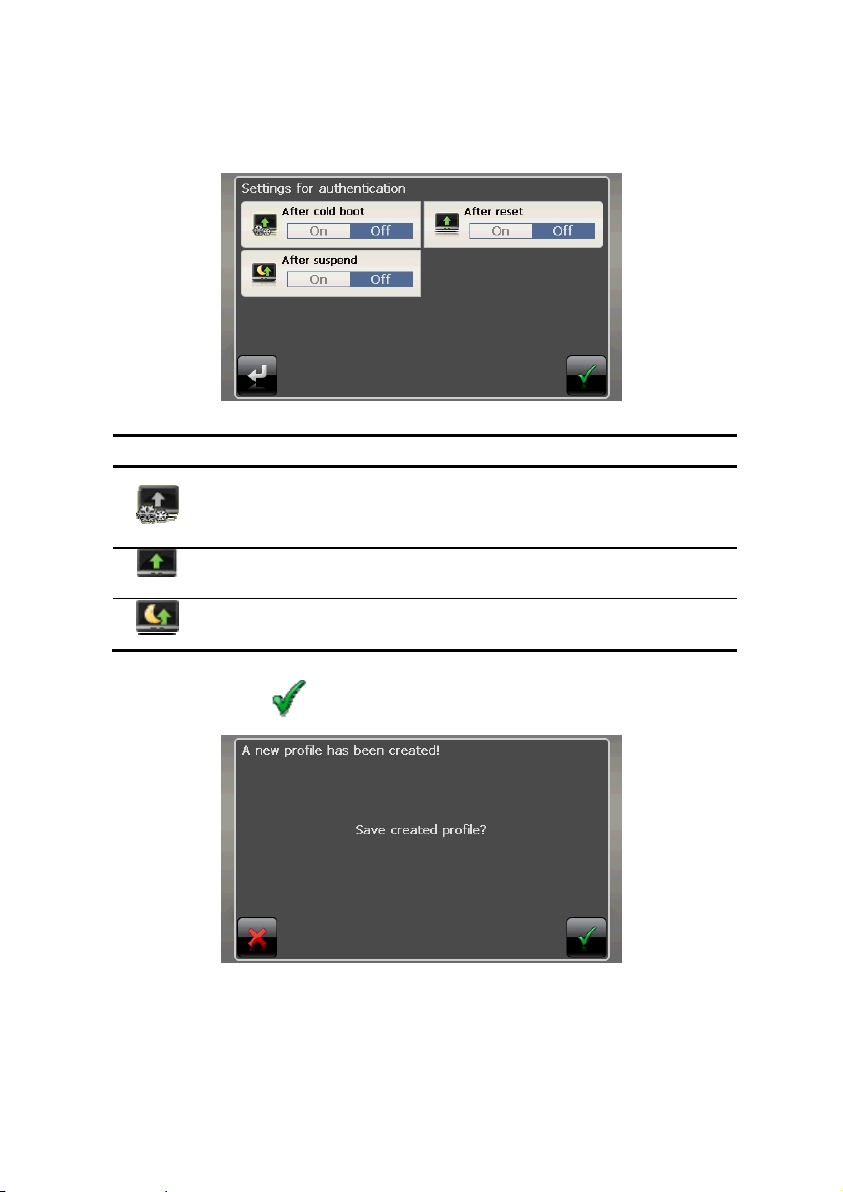
Making settings
The following selection window, through which you will make the settings for the Security
Function, will appear after you have entered the password and the information note
successfully.
Button Description
Set here whether the device should request the password after a
hard reset.
Set here whether the device should request the password after a
restart.
Set here whether the device should request the password after
the device has been switched on from the Standby mode.
Confirm you settings with during the set-up. The following screen will appear:
24
Security
Page 31

SuperPIN and UUID
The SuperPIN and the UUID (Universally Unique IDentifier = definite device identification)
will appear on the display after you have confirmed the settings.
Note
Record this data in your Operating Instructions (see Page 1) and keep
them in a safe place.
You will need this information if you have entered the password incorrectly 3 times. The navigation device can then only be released with this
information.
Security
25
Page 32

Fingerprint Sensor
Your new navigation system is equipped with a fingerprint sensor.
Benefits of this technology
Comfort is the first priority, because you no longer have to enter a password; simply prove
your identity with your fingerprint.
Note
Store your passwords and access data in a safe place. If you cannot identify
yourself by your fingerprint (e.g., when working on someone else's device), you can log in with your access data in the usual way.
Storing a fingerprint
1. Go to the sub-menu and select the point there, to
store your fingerprint.
2. You will be requested to stroke your finger slowly across the sensor several times:
26
Security
Page 33

3. The following screen will appear if the scanning process of the fingerprint has
been successful:
4. Repeat this process until the fingerprint has been scanned in successfully several
times.
5. You will be requested whether you want to store the fingerprint that has been
scanned in the following screen:
6. Confirm with .
Now, you will be able to log into your device with the stored fingerprint.
Security
27
Page 34

Making subsequent settings
Start the Security Function if you have already entered a password or stored a fingerprint
and would like to make a subsequent setting or to change the password. The following
display will appear:
Button Description
Change the password or the information text;
Store /change a fingerprint
Authentication settings (see Page 24, Making settings)
28
Display SuperPIN and UUID (see Page 25)
Reverses the complete security function. All security settings and passwords will have been deleted after this function has been carried out. You will have to enter and confirm your password again to be able to carry out the security function.
Security
Page 35

Password Request
A password request will appear at the restarting of the device, according to the setting, if
you have established a password or a fingerprint by means of the Security Function.
1. Enter the password stored by you by means of the keyboard or draw the finger
(fingerprint) previously chosen by you across the sensor. The symbol shows
you if you have stored a fingerprint.
Note
The password will be displayed in the form of small stars (****).
2. If you tap the question mark, the hint text you have established will be shown.
3. Click on
Note
You will have to enter the SuperPIN if you have entered the password
incorrectly 3 times. Contact your Service Center, giving the UUID, if you
have also mislaid it. The UUID will be faded out in the lower display.
to confirm the entry.
Security
29
Page 36

Resetting the Navigation System
You can reset your navigation system if it is no longer reacting or working properly.
This option restarts the navigation system, without reinstallation being necessary. A reset is
often used in order to reorganize the memory. In doing so all programs that are running
are interrupted and the working memory is reinitialized.
You can carry out two different Reset procedures with your device.
Soft Reset
1. Possibility
1. The following screen will appear if you press the On/Off button for a short time:
2. If you want to carry out a Reset, tap on
You will find further information in the chapter “Switching on/off the device”, page 21.
.
2. Possibility
Press the tip of the stylus into the soft-reset opening or insert a pointy object (e.g. a paper
clip, which has been bent open) with slight pressure into the reset opening.
30
Security
Page 37

Switching the Device off Completely / Hard Reset
Attention!
A hard reset will delete all data in the temporary memory.
Your navigation system will normally be in the Standby Mode, if you have switched it off
by pressing the on/off button briefly. In addition, the system can be switched off completely; the consumption of energy can be kept as low as possible through this. All the
data in the temporary memory will be lost if the device is switched off completely (hard reset).
To switch your navigation system off completely:
1. Push the main switch to the position OFF to swich the device off.
2. Push the main switch to the position ON again to carry out the Hard Reset.
A reinstallation will not be necessary after a hard reset if your device has already been
equipped with the basic data of the navigation software in the permanent memory at the
factory.
Security
31
Page 38

Navigation
Safety Instructions for Navigation
The bundled product DVD contains a comprehensive instruction manual.
General Instructions
• Do not manipulate the navigation system while driving to protect yourself and
others from accidents!
• In the event that you do not understand the voice instruction or if you are in any
doubt about what to do at the next intersection, then the map or arrow display
will provide you with a quick orientation. Only look at the display when you are in
a safe driving situation!
Legal remark
The use of devices that warn for traffic monitoring systems (like „speed
traps”) is prohibited in some countries, like Germany, Ireland and Switzerland. Please obtain information about the legal situation and apply
the waning function only where allowed. We cannot be held liable for
damages caused by the use of the warning function.
Attention!
The road layout and driving rules take precedence over the instructions
of the navigation system. Only follow the instructions when circumstances and driving rules permit it! The navigation system will guide you
to your destination even when you have to deviate from your planned
route.
• The direction statements of the navigation system given do not release the driver
of the vehicle from his or her duty of care or personal responsibility.
• Plan routes before you leave. If you want to plan a new route whilst on the road
pull over and stop driving.
• In order to receive the GPS signal correctly, keep away from metal objects as
they may hinder reception. Attach the navigation system onto the inside of
the windscreen or near the windscreen with the suction cup. Try out different
positions in your vehicle in order to find the best reception.
32
Navigation
Page 39

Notes for Use in a Vehicle
• Take care that the holder does not present any risk to safety, even in the case of an
accident, when installing it.
• Take care that the cable does not impede any safety components.
• The display of your navigation system may show “light reflections”. Please take
care of not being “blinded” during operation.
• Do not mount the components within the operating range of any airbags.
• Check the secure adherence of the suction cup at regular intervals.
• The power plug will consume power, even if no device is connected. Remove it
when not in use to avoid draining the car battery.
• Check all safety equipment in your car after installation.
Note
Do not leave your navigation software in the vehicle when you leave it.
You should also uninstall the holder for security reasons.
Aerial Orientation
The aerial must have unrestricted access to the sky to receive GPS satellite signals. Place the
aerial as horizontally as possible for this reason. Try out aerial and installation possibilities
in the vehicle if the reception is inadequate.
Navigation
33
Page 40

r
I. Mounting the Car Holder
Attention!
Only fix the holder for the navigation system to the windscreen, if it does
not impede the view.
Snap-in leve
(similar picture)
Note
Your navigation device can also be equipped with a different but similar
vehicle attachment as an alternative, according to the version.
Note
Clean the disk thoroughly with a glass cleaner. Warm the disk and the
nipple slightly at temperatures below 59°F (15° C).
Place the holder with the suction head directly onto the wind screen and press the lever on
the suction head downwards. The sucker will attach itself to the background firmly.
34
Navigation
Page 41

II. Attaching the Navigation System
1. Place the device below in the centre of the holder (n).
2. Press it gently backwards (o) until it engages audibly.
3. Connect the car adapter (see page 17) and, if necessary, the TMC aerial to your
navigation system and insert the memory card.
4. Place the holder on the fixing catches of the car holder.
5. Now, push the unit downwards until it engages audibly.
6. Now you will be able to place the complete unit on the cleaned windscreen.
Snap-in lever
o
n
(similar picture)
Navigation
35
Page 42

Fixing the navigation system via cradle with extension socket
You will find a detailed illustration of the optional holding casing with expansion plugs on
Pages 14 and 15. Proceed as follows in order to attach your navigation system by means of
this holding casing:
1. Place the device below in the centre of the holder (n).
2. Press it gently backwards (o) until it engages audibly.
3. Connect the car adapter (see page 17) and, if necessary other connecting cables to
the extension socket.
4. Place the holder on the fixing catches of the car holder.
5. Now, push the unit downwards until it engages audibly.
6. Now you will be able to place the complete unit on the cleaned windscreen or the
suction plate.
Holding clip
o
n
(similar picture)
36
Navigation
Page 43

III. Connecting the Car Adapter
o
n
(similar picture)
1. Plug the jack (n) of the connection cable into the corresponding receptor at the
bottom of your navigation system (see Page 11).
2. Insert the power adapter (o) into the cigarette lighter socket and ensure, that it will
not lose contact while driving. This could cause a malfunction.
Note
Remove the power adapter from the cigarette lighter socket when ending a trip or when parking the car for a extended period of time. Otherwise the car battery could be drained. In this case use the power switch
to turn off the navigation system.
Navigation
37
Page 44

IV. Starting the Navigation Software
Note
Your memory card will always have to be inserted into the device during
the use of the navigation system, if the card contains (additional) mapping
material.
It will be necessary to carry out a reset to restart the navigation system if
the memory card has been removed while the system was being used (see
page 30). According to the navigation system the reset is carried out
automatically.
1. Switch on your navigation system.
2. The Navigation software will start automatically or after tapping on the naviga-
tion control button on the main screen, according to the version.
3. Tap on Navigation on the screen for entering the destination. Enter the desti-
nation address. Confirm your entry by clicking the 9 symbol to start the navigation. After a short time, if the satellite reception is adequate you will receive
augmented language statements.
Further information regarding the navigation software can be found on the comprehensive
manual on your navigation DVD. This is a PDF-file you can read and print with any Acrobat Reader.
38
Note
The GPS-receiver will require some minutes for initialization when deployed for the first time. Even when GPS signal reception is indicated the
navigation could be imprecise. In all future instances it will take about 3060 seconds until a correct GPS-signal is available, sufficient “sight” of the
satellite is a prerequisite.
Navigation
Page 45

Warning function for traffic monitoring points
The following display will appear if the warning function for traffic monitoring points
(optional) has been installed:
Confirm with
monitoring points.
Click on the Configure special destinations interface in the Settings Menu, in order
to configure the warning function.
The following screen appears:
, if you want to use navigation with the warning function for traffic
Navigation
39
Page 46

Click on (Radars) fixes here, in order to make the settings for the ‘radar fixes’:
Here, you have the option of having the traffic monitoring points represented on a map or
faded out. You can also set whether you would like to be informed by acoustic signals
before reaching a traffic monitoring point.
Acoustic information about a traffic monitoring point will be given by a warning sound
approx. 15 seconds before it is reached. Then, another double warning sound will be
given approx. 7 seconds before it is reached. Four warning sounds will give information
that the speed is too high. In addition, the distance to a monitoring point will be indicated
by a bar indicating closeness (left lower edge of the display).
Sample view if map presentation has been activated:
40
Note
Please pay attention to the fact that traffic monitoring points are not preset
in all countries.
* Legal remark
The use of devices that warn about traffic monitoring systems (like “speed
traps”) is prohibited in some countries, i. e. Germany, Ireland and Switzerland. Please obtain information about the legal situation and apply the
warning function only where allowed. We cannot be held liable for damages caused by the warning function.
Navigation
Page 47

Integrated FM Transmitter (optional)
Depending on the software equipment your navigation system is equipped with an
FM transmitter (UKW transmitter with a weak transmission performance).
For using the FM transmitter we recommend the power supply through the cigarette
lighter. You will be able to transmit navigation announcements and other audio announcements from the navigation system to the car radio without a cable with the aid of
the FM transmitter.
Legal remark
The use of an FM transmitter is forbidden in some countries. Please obtain
information about the legal position and only use this function where it is
permitted. We shall not be liable for damages arising from the use of this
device.
Starting the FM Transmitter
To start the FM Transmitter, tap on . Alternatively, the FM Transmitter can also be started from the navigation software itself.
Overview of the main screen
Integrated FM Transmitter (optional)
41
Page 48

Description of the Interfaces
Button Description
To swith the FM Transmitter on/off
Reactivate the FM transmitter (reactivation notification
when the device is inserted into the holder)
Setting the frequency (see page 42)
Activates/deactivates the sample piece of music for the
setting in the radio.
Back
Selecting the frequency
You can set the required radio frequency (UKW) here with the
faces.
Note
Move to a different frequency (through the radio transmitter, for example)
if the use of the frequency is overloaded. You have the possibility of storing
up to six different frequencies.
1. Proceed as follows, in order to store the frequency currently set:
2. Choose the desired frequency.
and the inter-
42
Integrated FM Transmitter (optional)
Page 49

3. Click on this interface longer, in order to allocate the respective frequency to a specific channel position. The following display will appear:
4. Confirm with
.
Integrated FM Transmitter (optional)
43
Page 50

Speech commands (optional)
The Speech Entry mode can be activated by means of the function during navigation. A
short information sound will indicate that the navigation system is ready for the speech
entry.
Explanation of the symbol:
• ( ) optional words;
• [ ] Fillers
• „|“Alternatives;
• < > Content displayed can be spoken
The following commands will be possible here according to the current view:
Range of
validity
Always
applicable
• no [ thank you ]
• yes [please] | okay
• accept
• [go] (back | backwards)
• (cancel | abort) [ dialog ]
• ( (enter | select) [a] [new] | new) (city | town | location)
• ( (enter | select) [a] [new] | new) destination
• ( (enter | select) [a] [new] | new) (zip [code] | postal code)
• help
• (general | global) (Help| Commands)
• [show] map [view]
• volume settings | change volume
• decrease volume
• increase volume
• mute volume | shut up
• unmute volume
Main menu
• settings
• ( enter | select) [a] [new] | new) destination
• favourites
• (change | modify) tour | tour planning
• route information
• start (route guidance | navigation) | yes [please] | go
• stop route guidance
Command
• [main] menu
• (other | more) applications
44
Speech commands (optional)
Page 51

Range of
validity
In maps
• [display|show] (dynamic | smart) (view | map)
• [display|show] next (view | map [view])
• [display|show] (2 D | two dimensional) [view | map | perspective]
• zoom out
In the quickmenu
More
applications
• contacts | addresses | addressbook
• travel guide
• M P 3 [Player]
• Navigation | Navi
• Telephone | Phone
• picture viewer
Volume
settings
• decrease | M P 3 volume) | M P 3 volume) down
• increase | M P 3 volume) | M P 3 volume) up
• decrease | speech volume) | speech volume) down
• increase | speech volume) | speech volume) up
In lists
• previous page | scroll up
Detailed
information
Detailed
information
• start (route guidance | navigation) | yes [please] | go
Command
• [display|show] (compass [view] | G P S view)
• [display|show] (normal|simple) (map [view] | view) | [dis-
play|show] only [the] map
• [display|show] (splitted (map | view) | arrow and map | map with
arrows)
• [display|show] (3 D | three dimensional) [view | map | perspec-
tive]
• [display|show] [2 D | two dimensional] (north | northern) [view |
map [view]]
• zoom in
• [quick menu] settings
• (other | additional) applications
• decrease | (signal | keyboard click) volume) | (signal | keyboard
click) volume) down
• increase | (signal | keyboard click) volume) | (signal | keyboard
click) volume) up
• next page | scroll down
• hide map
• (show | display) map
if Button is active
Speech commands (optional)
45
Page 52

Range of
validity
• (call | phone | dial) [number]
• route options
Lastest destinations
For destination
entry
• [enter | select | change] [the] coordinates
• [enter | select | change] [the|a] [new] country
• [enter | select | change] [the|a] [new] house number
• [to] [the] middle of [the] (road | street)
• [enter | select | change] [a|the] [new] [name of the] (street | road)
• [to] [the] [city] center | downtown
• keyboard [entry]
• repeat [entry] | repetition | once again
• [enter | select | change] [the|a] [new] (zip [code] | postal code)
• [my] favorites | (stored | my) destinations
• start (route guidance | navigation)
• [enter] new destination
• points of interest POI
• nearby
With
favourites
• [enter] new destination
• point of interest
• Current position
Tour planning
• add destination
• optimise route
Tour planning
• Save [current] [route]
• delete
Command
• delete
• [enter | select | change] [the|a] [new] (city | town | location)
delete | delete all favourites
• new favourite
If a new favourite has been entered:
In the tour editor:
• last known position
• load | save
In the tour file list:
In the route processing:
• edit
46
Speech commands (optional)
Page 53

Range of
validity
• rename
• Save [current] [route]
Route
information
• (traffic [jam] | congestion) (information | situation | info)
• block route
• delete [all] [blockings | blocking]
• go to
• current position
• destination [area]
• overview
• Start point | Start
• [route] simulation
Settings
• by pass
• Ferries
• Motorways
• Toll roads
• route type
• [type of] vehicle
In the display settings:
• auto zoom
• map colours
• [ 2 D ] map orientation
• map display
Settings
• Time format | Time display
• Set language | language settings
• Set language | language settings
Command
• directions
In the submenu traffic:
• T M C settings
In the submenu block routes:
In the submenu: go to
• route (options | settings)
In the route options:
• (map | display) [ settings ]
• (map | display) [ settings ]
in the language settings:
• Keyboard selection
• T T S
Speech commands (optional)
47
Page 54

Range of
validity
• Device configuration
• application settings
• G P S Track
• speed limit |
• (Units)
• Station search
• next station
• T M C providers
• by pass
Note
Speak the commands loudly and clearly in the direction of the navigation
system. No incidental noises (radio, ventilation or loud conversation)
should arise during the speech entry.
Command
In the program settings:
• active map
• Time format | Time display
• TMC settings | TMC [Sender]
in the TMC settings:
• Previous station
48
Speech commands (optional)
Page 55

Handsfree Facility by means of Bluetooth (optional)
The Bluetooth technology serves to bridge short distances wirelessly. Bluetooth devices
transmit data wirelessly, so that other devices that also support this technology can communicate with each other without cables.
Both devices will have to be adjusted to each other (pairing), before you will be able to use
your navigation system as handsfree equipment with your Bluetooth mobile phone.
Note
Please read how you switch on the Bluetooth function in the Operating
Instructions of your mobile phone.
Starting the Bluetooth Application
1. Click on Bluetooth Dialer.
Note
The function for active use will have to be reactivated first if Bluetooth has
been deactivated manually.
2. Now the main Bluetooth screen will appear on your navigation device.
Handsfree Facility by means of Bluetooth (optional)
49
Page 56

Overview of the Main Screen
Button Name Description
Exit Leave the application by means of this field.
Course of
call
News View the postbox of your mobile phone through this
Telephone
Book
Displays the course of calls put through and received.
symbol. You will be able to receive, write and send
messages.
Call the contacts stored in the mobile phone through
this symbol. The support of this function depends on
the respective mobile.
50
Back Previous Page of the main display.
Delete Delete the number entered by means of the keyboard
Calling Select the number entered by means of the keyboard
Keypad Enter the digits of the telephone number to be called
Volume Set the volume of the microphone and the loud-
Handsfree Facility by means of Bluetooth (optional)
with this field.
with this field.
by means of the keyboard.
speaker by means of this symbol.
Page 57

Button Name Description
Settings of
the handsfree facility
Pairing – Link the navigation device to the mobile
Settings for automatic SMS synchronization
between the navigation device and the mobile
phone
Settings for automatic synchronization between
the navigation device and the mobile phone
Setting of the basic volume of the microphone
and the loudspeaker.
or
Activate or deactivate the Bluetooth function
Pairing the Navigation Device and the Mobile Phone
1. Activate the Bluetooth function on your mobile phone.
Note
Each mobile phone uses different paths to do this. Read the instructions of
your mobile phone under all circumstances for this reason.
2. Select the option (Pairing – link the navigation device to the mobile phone) under the settings of the open speech facility of your navigation device. The search for
a Bluetooth-enabled device will start.
3. Select the corresponding mobile phone from the list.
4. Start the link by operating the Pair field.
5. Your mobile phone will recognize the navigation device. You will be requested to
enter a 4-digit PIN code. This is 1 2 3 4 for your navigation device.
6. Your mobile phone will be recognized and the open speech facility through the
navigation system will now be available to you.
Note
This procedure will have to be repeated as soon as you have switched off
the navigation system or a spatial separation between your mobile phone
and the navigation device arises.
Handsfree Facility by means of Bluetooth (optional)
51
Page 58

Accepting incoming calls
Button Description
Accept calls
Reject/terminate calls
Making Calls
1. Tap on the keypad in the main Bluetooth screen and enter the number that you
wish to call.
2. Start the call with
52
.
Handsfree Facility by means of Bluetooth (optional)
Page 59

During a Call
Button Description
End call
Increase the volume of the microphone
Reduce the volume of the microphone
Return the conversation to your mobile
Handsfree Facility by means of Bluetooth (optional)
53
Page 60

MP3 Player (optional)
Depending on the software equipment your navigation system is equipped with a MP3
Player.
Start the MP3 player from the main screen by tapping the ‘MP3 Player’ switch area.
Alternatively, the MP3 player can also be started from the navigation software itself.
All the MP3 files located on the memory card can be taken over into a List of Favourites
and will be ready to be played.
Main Screen Overview
Button Description
Close the application
Opens the List of Favourites
For the title selection
Changing the mode of playing:
Normal: Plays all the files in their sequence and stops
after the last file.
Shuffle: Plays a file selected at random.
Repeat: Repeats the current file continuously.
Repeat all: Plays all the files in their sequence and will
restart from the first file, after the last one has been
played.
Display of the current Reproduction mode
54
MP3 Player (optional)
Page 61

Button Description
Reduces the screen brightness to a minimum, to save
electricity.
Determine/add bookmarks
Increase or decrease the volume.
or
or
The display in the upper right corner of the screen will
show the current level of the volume.
Break off action / Back to the previous Menu
Move to the previous or next file. It will be possible to
skip backwards or forwards within the title playing
while it is being played.
Play the playback.
Stop the playback
MP3 Player (optional)
55
Page 62

Select a Title and Move it into the List of Favourites
Tap on and select the title that you would like to move into the List of Favourites, in
order to select a title.
You will have three possibilities of marking the title here:
• Tap on
• Tap on in order to mark all titles currently in view.
• Tap on
The selected titles will be indicated by a
Tap on
the List of Favourites until then.
Tap the file required and select the requisite title, in order to select a title in the subdirectories.
The
, in order to confirm your selection. The titles marked will not be moved into
symbol will be shown if not all the titles in a directory have not been selected.
in order to mark all the titles, including all sub-directories.
to delete all marks within a directory.
.
56
MP3 Player (optional)
Page 63

List of Favourites
You will reach the List of Favourites by tapping on the :
You will delete all titles with
You will delete individual titles with .
Confirm with
, in order to take over the new selection into the List of Favourites.
.
List of the established bookmarks
You will reach the list of the established bookmarks by clicking on the symbol :
You will delete all bookmarks with the
You will delete an individual bookmark with the
symbol.
symbol.
Operation with the
symbol to take over a new selection into the list of bookmarks.
MP3 Player (optional)
57
Page 64

Picture Viewer (optional)
Depending on the software equipment your navigation system is equipped with a
Picture Viewer.
You can view the jpg format images on your memory card on your navigation system,
with the Picture Viewer. All the images on the memory card will be available immediately.
Operating the Picture Viewer
Start the Picture Viewer from the main screen by tapping on the ‘Picture Viewer’
switch area. Alternatively, the Picture Viewer can also be started from the navigation software itself.
Main Screen
Fig.: Miniature view
Move the miniature view to the left or to the right with the arrow keys. Tap on a specific
images to display it in the Full Image Mode.
Return to the start in miniature view by tapping on .
You can end the application by tapping on the
Start the slide show by tapping the
58
Picture Viewer (optional)
symbol.
symbol.
Page 65

Full Image View
Fig.: Full image view without service strip
Tap in the lower area of the screen in the full image view, in order to activate the service
strip:
Fig.: Full image view with service strip
Button Description
Previous picture
Turn it clockwise by 90°
in stages
Fade in grid
Start the slide show
Pause the slide show
Turn it counter-clockwise by 90° in stages
Next picture
You can return to the miniature view by tapping in the centre of the image.
Picture Viewer (optional)
59
Page 66

The image displayed will be subdivided into 6 fields by tapping on the symbol
(fade in grid).
Fig.: Full image mode with grid
Tap on a square in the grid to zoom in on that area of the picture:
Fig.: Zoom-in Mode
Tap on the centre of the image to go back to viewing the full picture.
60
Picture Viewer (optional)
Page 67

Video Player (optional)
Depending on the software equipment your navigation system is equipped with a Video
Player.
Start the Video Player from the main screen by tapping the Video Player button.
Main Screen Overview
Selecting and playing video
Tap on on the main screen to open the file explorer:
Video Player (optional)
61
Page 68

Select the desired video and confirm with :
Button Description
or
or
Forward / Backward
Increase or decrease the volume.
The display in the upper right corner of the screen
will show the current level of the volume.
File Explorer
Play the playback.
Pause the playback.
Stop the playback.
Confirming an action
Return to the previous menu.
Close Video player.
62
Video Player (optional)
Page 69

Travelguide (optional)
Depending on the software equipment your navigation system is equipped with a
Travelguide.
The Travel Guide will supply general information about the different areas of individual
towns and cities or regions in Europe, such as sights, restaurants, culture and travel information.
Start the Travel Guide from the main screen by tapping the ‘Travel Guide switch areas.
Alternatively, the Travel Guide can also be started from the navigation software itself.
Select the country initially, then the town or city (or the region). Then, select the category.
Fig. 1 Fig. 2
Fig. 3 Fig. 4
Confirm with , if you want to navigate to the destination displayed. The address will
then be available to the navigation software as the destination.
Travelguide (optional)
63
Page 70

AlarmClock (Wake up function) (optional)
Depending on the software equipment your navigation system is equipped with a an
AlarmClock/ Wake up function.
Start this function from the main screen by tapping on the ‘Alarm Clock’ button.
The waking function can work both as normal when the device is switched off (Standby
Mode / Power Saving Mode) and as a reminder during the current navigation.
Overview of the main screen
This view will appear if you have not yet set up a waking time. Enter an alarm time in the
24-hour format and confirm your entry with .
64
AlarmClock (Wake up function) (optional)
Page 71

Description of the Interfaces
Button Description
Current system time
Setting-up mode (Setting volumes, system time and
alarm)
Night mode (Standby mode)
Reset/deactivate the waking function
Setting the alarm time
Delete the entry
Confirmation interface
Reduce the volume
Increase the volume
Back to the previous menu
Close the application
AlarmClock (Wake up function) (optional)
65
Page 72

Setting the System Time
The display of the current time will be located in the upper right corner of the screen. You
can adjust it as follows:
1. Tap on
2. Tap on
in the main screen. The following screen will appear:
to change the time setting.
Note
The system time is updated by GPS reception. Pay attention to the time
zone settings.
66
AlarmClock (Wake up function) (optional)
Page 73

Selecting an Alarm Signal
1. To select an alarm signal touch the symbol.
2. Select the desired alarm sound and confirm the selection with
3. The selected alarm signal is marked by a
4. Close the application with
.
.
.
Setting the Volume
You can adjust the volume of the alarm signal by tapping on the interface.
Note
The volume configured here only relates to the alarm signal and will not
change the volume of the language output of the navigation system or
other functions of the system.
AlarmClock (Wake up function) (optional)
67
Page 74

Snooze Function
You will have the possibility of making the waking signal repeat at regular intervals by
means of the Snooze function, once it has sounded at the alarm time set.
1. Tap on to activate the Snooze function.
Current
system time
Waking time set
2. To be wakened again at the same time on the following day tap on the
ton.
3. Tap on
to return to the screen before the alarm signal started.
Ending the Alarm Clock Application
1. Tap on to deactivate the alarm time set.
2. You will find yourself in the Setting-up mode.
3. Tap on
in order to leave the application. An alarm time is not set.
but-
68
AlarmClock (Wake up function) (optional)
Page 75

Contact Viewer (optional)
Depending on the software equipment your navigation system is equipped with a Contact Viewer.
You will be able to create the contacts database (from Outlook 2003 or Outlook XP) and
administrate your contacts with the Contact Viewer.
Create the contacts database
The Contact Viewer will search for the contacts database on your storage card and in
‘My Flash Disk’, in order to deposit contacts. The ‘contacts.db’ file must be present in
the contacts sub-directory for this purpose:
• \Storage Card\contacts\contacts.db or
• \My Flash Disk\contacts\contacts.db
Note
The memory card must not be write-protected.
The more recent contacts database will be used if one is found both on the Storage Card
and in My Flash Disk. The internal date (date of creation) will be decisive to the selection
of the database.
You will be able to the export contacts from Microsoft Outlook with the Medion GoPal
Assistant. Proceed as follows to do this:
1. Connect your navigation system to the computer or insert a storage card into your
card reader.
2. Select the destination for the synchronization (memory card or internal memory of
the device) in Gopal Assistant.
3. Select Synchronize.
4. Activate the Export Outlook Contacts Option.
5. Confirm with Synchronize.
6. The contacts database will be transferred to your navigation system.
Contact Viewer (optional)
69
Page 76

Operating the Contact Viewers
Start this function from the main screen by tapping on the Contact Viewer button.
Contacts list view
• Select the blocks of initial letters, such as ABC or DEF, with the buttons to the left
and the right in the upper list.
• You can have all the contacts displayed by tapping the interface.
• The LAST Button displays the last 10 contacts selected and the contacts starting
with a particular number will be displayed by tapping the 123 interface.
70
Contact Viewer (optional)
Page 77

Visiting card view
The address and telephone number of the person currently selected will be displayed in
the Visiting card view. You will be able to transfer the address to the navigation system and
the telephone number to the mobile phone from here.
Tap on the light grey button with the address or the telephone number to do this. The
following screen will appear:
The address will be passed on to the navigation system and the destination guidance will
be started by tapping on the
The relevant button will not be displayed, if no address or telephone data have been
stored for the contact.
You will return to the Contacts list view by tapping on the
interface.
interface.
Contact Viewer (optional)
71
Page 78

The symbols show the type of contact:
Symbol Description
General address without type information
Private address
Business address
General phone number without type information
private phone number
Business phone number
Mobile phone
Selection of addresses and phone numbers
It will be indicated by a dark grey arrow button, if several addresses for a contact are available. A list displaying all the address stored in relation to the selected contact will be displayed by means of this button. You will return to the Visiting card view by selecting an
entry in the list. The address on the light grey button will be adjusted according to the
selection.
You will be able to select telephone numbers in the same way, if several of them are available for one contact.
You will return to the Visiting card view, without changing the old address, by tapping on
the
72
interface.
Contact Viewer (optional)
Page 79

Sudoku (optional)
Depending on the software equipment your navigation system is equipped with the game
Sudoku.
Start the game from the main screen by tapping on the Sudoku switch field.
Sudoku is a number puzzle. The puzzle area is square and subdivided into nine sections.
Each section consists of 9 smaller squares.
When playing Sudoku, the aim is to fill all the 81 number fields using the numbers 1-9.
Each number must only appear once in each section at the same time. Each number must
only appear once in each row and column.
Some number fields will already have been populated prior to the start of the game.
Main Screen
Description of the switch fields
Button Description
Strip of numbers to be entered
Strip for the selection of the numbers to be entered in
the number fields. The selected number will stand out
and it will now be possible to enter it into a number
or
field.
Entry mode
First, tap on the number in the strip of numbers to be
entered that should appear in particular number field
and then on the corresponding number field.
Deletion mode
Tap on the number to be deleted.
Sudoku (optional)
73
Page 80

Button Description
You will receive the information about the deletion by
tapping on this switch field.
Conceal the information about the deletion.
A new Sudoku game will open by a tap on this switch
field.
Settings
You will have the following possibilities in the Settings
Menu:
You can select the storage location of your
game (internal memory
or memory card) here.
The current game will be
stored by a tap on this
switch field.
You will load a game
that has been started on
the screen by a tap on
this switch field.
Deletion of a stored
game status.
You can set the level of
difficulty (1-4) here.
You will be able to see
during a game whether
the number that you
have entered is correct
or incorrect here.
Update the view
Back to the current
game.
Leave the application by means of this field.
74
Sudoku (optional)
Page 81

FAQ
Where can I find more information on the navigation
system?
Detailed operating instructions for navigation can be found on the
corresponding CDs/DVDs, which accompany your navigation system.
Also use the additional Help functions that are available with a single
touch of a button (usually F1 on the PC), or by selecting the Help
option, as additional assistance. These aids will be provided to you
while you are using the computer or the device.
What do I need the accompanied CDs/DVDs for?
The CDs/DVDs contain:
• the ActiveSync
gation system and the PC.
• Additional programs (optional).
• This User manual in digital form.
®
program for balancing data between the navi-
• digital maps
• PC-application for rapidly resetting the data material
• Manual of the navigation software
Depending on the configuration one or more CDs/DVDs may be
included in the package.
The navigation system is no longer responding. What should I do?
Carry out a reset (see page 30).
How can I adjust the lighting?
Under Settings.
FAQ
75
Page 82

Customer Service
Faults and Possible Causes
The navigation system no longer reacts or is behaving atypically.
• Carry out a reset (see page 30).
The navigation system is recognized only as a guest by ActiveSync®.
• See information on page 82.
The GPS receiver cannot be initialized or found.
If a GPS signal continues not to be reported on the screen, in spite of the correct installation of the system, this can be caused by the following factors:
• Sufficient satellite reception is not possible.
Solution:
Change the position of your navigation system and ensure that unrestricted
“sight” of the aerial is not impaired.
No language statements can be heard.
• Check the volume setting.
Additional Support
If the suggestions in the above section have not solved your problem, please contact our
customer service hotline. However, before you contact your customer service hotline,
please have the following information available:
• How is your navigation unit configured?
• What additional peripherals do you use?
• What messages, if any, appear on your screen?
• What software were you using when the error occurred?
• What steps have you already undertaken to solve the problem?
• If you have been given a customer number previously, please give this number to
the technician.
76
Customer Service
Page 83

Appendix
Special CleanUp Function
The CleanUp function serves the targeted deletion of data, without using a PC.
Note
Please use this function very carefully, because it is possible for data to be
deleted that can only be entered again manually afterwards.
The CleanUp function is activated when the ‘o’ is pressed in the Gopal lettering of the
Main Menu, immediately after the start tone following a reset.
The CleanUp function offers 10 options:
1. Remove Installation Only
Removes the software installed from the ‘My Flash Disk’
memory [= part of the permanent memory in which the executable parts of the navigation
software will be located following the initial alignment (\My Flash Disk\Navigation)].
2. Remove MAP Only
Removes the digital maps from the ‘My Flash Disk’ memory (\My Flash
Disk\MapRegions).
3. Remove Preload Only
Removes the data needed for the installation of the navigation software from the permanent memory (\My Flash Disk\Install).
4. Remove All
Deletes the whole contents of the ‘My Flash Disk’ memory. It will not be necessary to
recalibrate the screen after this function has been carried out.
5. Factoryreset
Sets the device back to the delivery status in the case of an intact main installation.
Appendix
77
Page 84

6. Format Flash
Formats the internal ‘My Flash Disk’ memory. This formatting can be necessary in the
case of a prolonged removal of errors. It will be necessary to recalibrate the screen after the
formatting function has been carried out. All data will be deleted from the internal ‘My
Flash Disk’ memory irrevocably.
7. GPS Factory Reset
Performs a factory reset of the GPS receiver. When using the GPS function after having
performed a factory reset, the GPS receiver must orientate itself again. This process may
take a while.
8. DC AutoSuspend
You can select here when your navigation system should go into Standby mode automatically after the withdrawal of the external power supply. For example, this function is useful
in the case of vehicles where the cigarette lighter also switches off when the ignition is
switched off.
The AutoSuspend function will be activated several seconds after the discontinuation of
the external power supply and the Standby display will appear for the time set (see
Page 21).
The DC AutoSuspend function will be deactivated again if the power has been reconnected within the total period (in the case that the engine has been switched off for a short
time, for example). Otherwise, the navigation system will go into the Standby mode after
the expiry of the time set.
Set the required time by clicking on it and confirm your selection with OK.
78
Note
This function is deactivated and can be set individually in the status at
delivery and after a hard reset (see Page 31).
Appendix
Page 85

9. DRControl
Here you can switch on/off the Dead Reckoning (see page 83).
Note
This function is only available with model X5535.
10. Exit
Leaving the CleanUp function and restarting the device (like reset).
Note
The deletion of the data must be confirmed before the action actually takes
place. To do this, press on YES. There will be a corresponding report if the
data to be deleted is no longer available.
Please read the “Transferring Installation Files and Map Material to
the Internal Memory“ chapter on Page 92, in order to recreate the files
(installation files and map material) in the internal memory.
Appendix
79
Page 86

Synchronisation with the PC
I. Installing Microsoft® ActiveSync®
In order to transfer data between your PC and your navigation system you need the Microsoft® ActiveSync® program. The cost of the navigation system includes a license for this
program which can be found on the CDs/DVDs.
Note
You will not need the ActiveSync® communications software, if you are a
user of the Windows Vista® operating system. The system files necessary
for the simple data transfer are already integrated into your Vista® operating system.
Procedure for Vista users:
Please connect your device to your PC with the help of the USB synchronization cable. The necessary drivers will be installed automatically, after the
new device has been found. Your new device will be listed under the
‘Portable Devices’ point in the Windows Explorer overview, following a
successful installation.
Attention!
Important files can be overwritten or changed during the installation of
software. You should create a hard disk backup, in order to be able to have
access to the original files in the case of possible problems following the
installation.
You must have administrator rights to install the software under Windows® 2000 or XP.
Important
You should not connect the navigation system to your computer yet.
1. Insert the CD/DVD and wait until the program starts automatically.
Note
If it does not function, the Auto Run function is probably deactivated. The
Setup program on the CD/DVD must be started, to start installation
manually.
2. Choose the language, click then Install ActiveSync® and follow the instructions
on the screen.
Note
When installing the GoPal Assistant, ActiveSync® will be installed automatically.
80
Appendix
Page 87

II. Connecting with the PC
1. Press the On/Off button to start your navigation system.
2. Connect the USB cable to your navigation system.
3. Push the USB connector into a free USB port on your computer.
4. The hardware installation assistant will recognize a new appliance and installs a
suitable driver which can take some minutes. Repeat the connection search if it fails
the first time.
5. Follow the instructions on the screen. The program will now set up a partnership
between your PC and the device.
Alternative possibility of charging the battery
The battery will charge as soon as you connect your navigation device to a switched-on PC
or notebook by means of a USB cable.
Please pay attention to the fact that both USB plugs of the USB cable supplied with the
device must be connected to your PC or laptop to guarantee a sufficient supply of
electricity.
No type of software or driver installation will be necessary for this. Do not interrupt the
charging process if possible during the initial charge.
Note
The brightness will be adjusted downwards, if necessary, if a USB connection is being set up when the device is switched on.
It is recommended to set the device to the stand-by mode, in order to
shorten the charging time by USB.
Appendix
81
Page 88

III. Working with Microsoft® ActiveSync®
ActiveSync® will be started automatically if you connect your navigation system to the PC.
The program will check whether the device is one with which a partnership has been entered. If this is the case, the changes that have taken place on the PC and on the navigation
system since the last synchronisation will be compared and adjusted to each other. You
will be able to define exactly which data will have priority during the synchronisation in
the settings of the ActiveSync
ton), in order to become familiar with the effects of the respective settings. A restricted
Guest Access, with which you will be able to exchange data, for example, will become
active automatically if the navigation system has not been recognised as a partner. If this is
the case, although the process concerns the registered partner device, separate your navigation system from the PC and switch it off and on again. Now connect your navigation
system to the PC, to restart the recognition process. Repeat the process and, restart your
PC in addition, if your device continues to be recognised as a guest.
Note
Make sure that you always connect your navigation system to your PC
with the same USB connection, otherwise your PC will allocate an
additional ID and reinstall the device.
®
Program. Call up the Help of the Program (with the F1 But-
82
Appendix
Page 89

GPS (Global Positioning System)
GPS is a satellite-backed system for determining your position. With the help of 24 satellites revolving around the earth, it is possible to determine your position on earth with the
accuracy of a few meters. The satellite signals are received by the antenna of the built-in
GPS receiver, which must have a "line of sight" to at least 4 of these.
Note
When the line of sight is interrupted (eg in tunnels, between houses, in
woods or also in vehicles with metal-coated windows) it is not possible to
determine the position. The satellite reception however automatically picks
up again as soon as the obstacle has been passed and the line of sight is reestablished. Moving slowly (e.g. slow walking) also limits the accuracy of
the navigation.
The GPS receiver consumes additional power. This is especially of concern when running
on batteries. To conserve power do not turn on the GPS receiver unnecessarily. Also terminate the navigation software if it is not needed or satellite reception is not possible for a
longer period. You can also switch the device off by means of the On/Off switch if you
experience a short interruption in your journey, pressing the same switch again will reactivate a restart. The GPS receiver will also be reactivated at the same time, if the navigation
software is still active. There may be a delay for the position to be updated again, this is
dependant on the reception situation.
Note
Please note that your appliance is preset to not shut down automatically
after a few minutes without activity. You can change this preset in the
Settings mode. If the GPS receiver has not been active for some hours, it
must orientate itself again. This process may take a while.
Dead Reckoning (gyroscope) (only in the case of Model X5535)
The current position can be established momentarily, for driving through a tunnel, for
example, with the aid of this function, even without a valid GPS signal.
The navigation system will receive the necessary information during the absence of the
GPS signal for a short time, to continue to establish the position through an installed magnetic field and acceleration sensor.
The methods for establishing the position by means of the sensor described represents
merely one device, so that deviations can arise. Sufficient GPS reception must be available
before the transfer to establishment of the position by means of dead reckoning because of
the system.
Dead reckoning is not a complete replacement for GPS-supported navigation.
Appendix
83
Page 90

TMC (Traffic Message Channel)
The Traffic Message Channel (TMC) is a digital radio data service that functions in a
similar way to RDS and is used to transmit disruptions to traffic to a suitable reception
device.
The traffic information is continuously transmitted across FM.
The user is less dependent on the half-hourly broadcast traffic information, because the
signal is continuously transmitted. Apart from this, important information, as in the case of
an accident in the road ahead, can be passed on immediately.
The transmission is planned for the whole of Europe and is already offered by radio transmitters in many countries. The precision of the TMC messages can deviate greatly according to the country. At time of printing a TMC service is not available in Ireland.
The evaluation of TMC messages is not supported by every type of navigation software.
Enquire whether your system supports TMC before the possible purchase of a TMC receiver.
Pay TMC (optional)
PayTMC is interpreted as TMC Services that offer TMC information free of charge, such as
TMCpro in Germany, Trafficmaster in the UK or V-Trafic in France, for example. These
providers are distinguished from normal ‘free TMC’ because of more up-to-date information about the traffic flow.
Sensors in motorway bridges and set into the carriageway, and a large number of vehicles
equipped with ‘floating car’ data technology, supply a more precise and up-to-date picture of the traffic situation on German highways, inc. possible predictions, quickly.
The licence fees for the use of the PayTMC services will have already been settled with the
purchase of your navigation system and these services will be available to you for as long
as they are offered on the part of the provider.
Your navigation system will support both free TMC and PayTMC and will have been preset
for the reception of both services in the status at delivery.
84
Appendix
Page 91

Connecting an additional TMC Dipole Aerial (optional)
A TMC receiver and an active TMC dipole aerial are already integrated into your navigation
system, to receive traffic information. However, if the TMC signal is too weak, you have the
possibility to connect an addition TMC dipole antenna:
1. Plug the jack plug of the TMC angled aerial into the TMC connection of your
navigation system.
2. Attach the aerial, on the edge or your windscreen, for example, with the help of the
sucker.
3. Place the aerial so that a distance of approx. 10 cm from the metal frame of the
screen is maintained.
TMC reception can be improved by different aerial positioning, according to the vehicle.
(similar pictures)
Note
You will also be able to connect the internal aerial to the optional holding
casing with expansion plugs.
Your navigation system will now be able to receive traffic information through the TMC
receiver and thus direct you away from disruptions to traffic.
Appendix
85
Page 92

The Remote Control (optional)
Operation with the remote can only be used in connection with the optional holding casing with expansion plugs.
Safety Instructions
• Always pay attention to the road traffic and never make settings while driving.
• Installation within the steering wheel, in order not to impair driving.
• Pay attention to the safety information related to your navigation system.
Batteries and Proper Treatment
• KEEP CHILDREN AWAY from batteries. If by any chance, the batteries are swallowed,
consult a doctor immediately.
• DO NOT CHARGE batteries (except rechargeable batteries).
• DO NOT FORCIBLY DISCHARGE batteries.
• DO NOT SHORT-CIRCUIT batteries.
• DO NOT HEAT or DISPOSE OFF IN FIRE.
• DO NOT DISASSEMBLE or DEFORM batteries. Your hands and fingers may be in-
jured, or the liquid of the battery may get into your eyes or adhere to your skin. If
this happens, rinse with a large quantity of water immediately and consult a doctor.
• DO NOT expose batteries to strong impact by dropping or throwing the batteries.
• DO NOT reverse the positive (+) and negative (-) terminals to avoid short-circuit.
• Do NOT MIX used and new or different types of batteries together.
Your equipment may not operate properly. In addition, the battery exhausted first
may be excessively drained (over-discharged).
• REMOVE PROMPTLY the used batteries from the device.
• REPLACE ALL BATTERIES with new batteries of the same type at the same time.
• INSULATE THE TERMINAL parts with tape or the like at the storage or disposal of the
batteries.
• DO NOT throw rundown batteries in the domestic refuses! Respect the environ-
ment and throw them in the specific containers for separate collection. If necessary,
turn to your reseller or to our service assistance. Thank you!
86
Appendix
Page 93

Button Layout
OK Confirm your selection
+VOL Increase the volume
-VOL Decrease the volume
Replay and Pause in the case of the use of an
MP3-player
Previous title
Next title
Navigation button
Navigation button
Navigation button; this button is always occupied by the function on the right under the
display in Navigation Mode
Navigation button; this button is always occupied by the function on the left under the
display
Accept a call
Terminate a call
Readiness mode - Power off if the button is
pressed for a long time
Appendix
87
Page 94

Installation
1. Open the battery compartment of the
remote.
2. Place two button batteries (type: LR44,
3V) into the battery compartment. Pay
attention that the polarity corresponds
to the illustration engraved in the battery compartment (+ and + and – and –
must agree).
3. Open the support on the cover of the
battery compartment and lay it around
the steering wheel together with the
cover of the battery compartment.
88
Appendix
Page 95

4. Attach the support so that it sits firmly
around the steering wheel.
The cover of the battery compartment
must lie on the inner side of the steering
wheel here.
The locking pins of the cover of the battery compartment must be pointing in
the direction of the dashboard.
Note
Select a position on the steering
wheel at which the remote will not
disturb your normal holding behaviour at the steering wheel.
5. Turn the support so that the remote is
lying well in the inside of the steering
wheel later.
6. Then, place the remote on the cover of
the battery compartment so that it engages audibly.
Note
Do not apply any force, in order to
avoid damage to the support
and/or the remote.
Appendix
89
Page 96

Working with Memory Cards
Your navigation system supports SD memory cards.
Inserting Memory Cards
1. Carefully take the optional memory card out of its packing (if included). Take care
not to touch or dirty the contacts.
2. Insert the memory card carefully into the card bay with contacts pointing forward.
The card must lock easily.
Removing Memory Cards
Note
Only remove the memory card if the navigation software has been closed
and the device has been switched off by means of the On/Off button beforehand. Otherwise you will risk a loss of data.
1. To remove the card press lightly onto the upper edge until it ejects.
2. Pull the card out without touching the contacts.
3. Store the memory card in the packing or in another safe location.
Note
Memory cards are very fragile. Take care not to dirty the contacts and not
to force the card.
Accessing Memory Cards
• The appliance only supports memory cards in the FAT16/32 file format. If you
insert a card prepared with a different format (e.g. in cameras, MP3 players),
your navigation system may not recognize it and will ask you to format it
again.
Attention!
Formatting the memory card irretrievably wipes out all data.
90
Appendix
Page 97

Data Exchange via Card Reader
If you wish to copy large quantities of data (MP3 files, navigation maps) to the memory
card, these can also be stored directly to the memory card.
Many computers already have memory card devices. Insert the card into your computer
and copy the data directly to the card.
Because of the direct access you can achieve a much higher transfer rate compared to
using ActiveSync®.
Additional Card Material
Your navigation system is already equipped with digitalized map material in the internal
memory and/or memory card at the factory. Depending on the configuration, additional
maps may be included on your navigation CD/DVD. You will be able to transfer these
cards to a memory card immediately. It is recommended that you use an external card
reader (see also page 91). The GoPal Assistant supplied with the device enables a simple
and individual compilation of the map material to be transferred.
Depending on the amount of map data on the navigation CD/DVD, memory cards with
capacities of 256 MB, 512 MB, 1.024 MB or more may be required.
You can obtain additional memory cards (SD cards) in specialist stores.
Transfer of card material to a memory card
The transfer of additional card material to a memory card can take place through Explorer
on your PC via the following steps:
1. Insert the CD/DVD with the card material required.
2. Start your workstation and select your CD/DVD Drive.
3. Copy the file with the .psf ending out of the Directory of the region that you re-
quire to the MapRegions Directory on your memory card, from the CD/DVD.
You can transfer several files with map material to your memory card, depending on the
capacity of the memory card.
If you have copied digitized maps of several countries or country groups onto your memory card, you will be required to select the desired map in the navigation
application of your device.
Appendix
91
Page 98

Alternate method of installing Navigation Software (using a
Memory Card)
The software for your navigation system can be installed directly from a memory card.
The pre-installed software may have to be uninstalled beforehand (see special Clean Up
function, Page 77).
You will be requested to install the navigation software during the initial adjustment.
Please proceed as follows:
1. Remove the memory card from the packaging carefully. Ensure the contacts are not
touched or soiled.
2. Push the memory card into the SD slot until it engages.
3. Click on OK, in order to install the application.
The main screen, through which you will now be able to carry out the navigation settings,
will appear after all data has been copied to your navigation system.
Transferring Installation Files and Map Material to the Internal
Memory
Note
The navigation system must be connected to a computer by means of
ActiveSync® for the transfer of the data.
Your device has an internal, permanent memory, which is located in the \My Flash Disk
directory.
You will be able to make this directory, and others, visible with ActiveSync®, by means of
the Search option. Directories and files can be manipulated as in Windows Explorer.
The required directory must have been stored, in order to make the installation files and
the map material for the device available.
Deposit the INSTALL directory for the installation files at (\My Flash Disk\INSTALL). Deposit the map material in the MapRegions directory (\My Flash Disk\MapRegions). Please
pay attention to the modes of lettering given above when naming the directories.
Pay attention to the fact that sufficient drive capacity must be available, if you have stored
additional data on your navigation device. Remove files not needed if sufficient drive capacity is not available.
92
Appendix
Page 99

r
Specifications
Paramete
Power supply
Power supply cable for a cigarette
lighter
Input
Output
Power supply
Mains adapter (optional)
Input
Output
Battery Li-Ion, 3.7 V
Earphone connection For stereo earphones (3.5 mm)
Memory card type SD
Bluetooth (optional) Class 2
FM-Transmitter (optional) 87.5 – 108 MHz
USB interface USB 1.1
Information
Phihong CLM10D-050
12-24V
+5V
Phihong PSAA10R-050
100-240V ~0.4A (max.)
+5V
/ 1400 mA (max.)
/ 2A (max.)
/ 2A (max.)
Dimensions approx. 141 mm x 94 mm x 19 mm
Weight incl. battery approx. 260 g (without packaging)
Operating
Temperatures
Storage
Humidity (without condensation) 10 – 90 %
Specifications
+32°F - +95°F
(+0° C - +35° C)
-4°F - +140°F
(-20°C - +60°C)
93
Page 100

Model Overview
Model
P5235
P5435
X5535
Bluetooth /
Microphone
{ z z {
z z z {
z z z z
z = Equipment available
{ = Equipment not available
FM-
Transmitter
TMC via
external
TMC
receiver
Dead
Reckoning
94
Model Overview
 Loading...