

Page 1

Software manual
GoPal Navigator Version 4
Page 2

- 2 -
Table of Contents
1 Introduction ............................................................................................................................ 4
1.1 Welcome ....................................................................................................................... 5
1.2 Content of CD/DVD ........................................................................................................ 5
1.3 System requirements ..................................................................................................... 7
1.4 Design conventions used in this manual .......................................................................... 8
1.5 Tips and warnings .......................................................................................................... 9
1.6 Important information ..................................................................................................... 9
1.7 Trademarks ................................................................................................................. 10
1.8 Copyright and guarantee .............................................................................................. 10
2 Manual Installation and Start-Up ........................................................................................... 11
2.1 Initial Operation ........................................................................................................... 13
2.2 Software Reinstallation and Update ............................................................................... 14
2.3 Transferring the Card Material and Extra Destination Data from the Memory Card ............ 14
2.4 Transferring Data onto the Internal Memory of the Navigation Device .............................. 15
3 Installation and Setup using GoPal®Assistant ..................................................................... 17
3.1 Installing GoPal®Assistant ........................................................................................... 18
3.2 The User Interface of GoPal®Assistant ......................................................................... 19
3.3 Transferring Data Manually ........................................................................................... 21
3.4 Using Content Import Wizard ........................................................................................ 22
3.5 Hardware Management Functions ................................................................................. 23
3.5.1 Rename Hardware Device ................................................................................. 23
3.5.2 Formatting external memory cards ..................................................................... 24
4 Quick start ............................................................................................................................ 25
5 Operation using the voice command function ...................................................................... 27
5.1 The voice command function in practice ........................................................................ 29
5.1.1 Enter new destination using the voice command function ..................................... 31
5.1.2 Selecting POIs using the voice command function ............................................... 33
5.1.3 Managing favourites using the voice command function ....................................... 34
5.1.4 Change route using the voice command function ................................................. 34
5.1.5 Call up route information using the voice command function ................................ 34
5.1.6 Control navigation using the voice command function .......................................... 35
5.1.7 Open navigation using the voice command function ............................................ 35
5.1.8 Call up other applications using the voice command function ............................... 35
5.1.9 Change settings using the voice command function ............................................. 36
5.2 Adjusting the settings ................................................................................................... 36
5.2.1 Route options ................................................................................................... 36
5.2.2 TMC sender ...................................................................................................... 36
Page 3

- 3 -
5.2.3 Program settings ............................................................................................... 36
5.2.4 Device settings ................................................................................................. 37
5.3 Voice command in the map view ................................................................................... 37
Page 4

1. Introduction
1.1 Welcome
1.2 Content of CD/DVD
1.3 System requirements
1.4 Design conventions used in this manual
1.5 Tips and warnings
1.6 Important information
1.7 Trademarks
1.8 Copyright and guarantee
- 4 -
Page 5

- 5 -
1.1 Welcome
Many thanks for choosing our mobile navigation system. You will find out about how to use your navig-
ation system as well as additional applications such as MP3 Player, Picture Viewer etc. in the User
Manual included with the device. This manual covers the following topics:
■ Software installation and start-up
■ Using the navigation software (quick guide and thorough description)
■ Technical support for fault-free operation
Apart from this version of the manual, you will find a quick guide on the CD/DVD to get you started with
your new navigation system in a few simple steps. The Help function in your navigation system will also
give you information on the main control procedures and functions.
The software in your mobile navigation device is subject to constant improvement, and can be updated
using updates supplied free of charge or for payment. The information printed in this manual refers to
the functionality available at the time that your navigation system was shipped. If there have been
changes and/or updates in the software and/or hardware, the information printed here may vary from
the actual control procedures in the device. If this is the case, please refer to the Support section on the
Medion website (www.medion.de/downloads) for an updated version of this manual with any changes
in your device documented. Note that the manufacturer will not take any responsibility for loss or damage
incurred by the information given or any possible errors in this manual.
1.2 Content of CD/DVD
You will find all of the software packages necessary to run you new navigation system along with install-
ation files for additional applications on the CD/DVD included with the device. You can either install the
setup files on your Windows PC or into the memory of your navigation device. After inserting the CD/DVD
into your PC’s CD/DVD drive, a setup wizard will automatically run that will support you with the install-
ation. Simply follow the instructions on the screen, and the files selected will be installed automatically.
If the installation wizard on the CD/DVD does not start automatically, you can also install the data
manually. The following section will tell you about the components you will find on your CD/DVD and
what directories you should install them into on your memory card or navigation device’s flash memory
to ensure fault-free operation.
Target directoryDescriptionElement
ActiveSync
Adobe
This directory contains the installation data
for Microsoft®ActiveSync®synchronisation
software. Use this software to synchronise
your navigation system with a Windows PC.
This directory contains the installation data
for Adobe®Acrobat®Reader®. This software
will allow you to view the digital PDF version
of this manual on your Windows PC.
Install this program in the Program files
directory on your PC. You can do this
manually or automatically, using the setup
wizard
Install this program in the Program files
directory on your PC. You can do this
manually or automatically, using the setup
wizard.
Page 6

- 6 -
APD
Assistant
Installation
License Agree-
ments
Manuals
This directory contains the GoPal®wizard
data.
This directory contains the GoPal®installation
wizard data.
This directory contains the installation data
for your navigation software.
License Agreement) for your navigation soft-
ware. The EULA files are in PDF format.
This directory contains the PDF versions of
this manual in your national language.
This data is only needed for installing the
GoPal®wizard on your PC, and does not
need to be copied manually.
This data is only needed for installing the
GoPal®wizard on your PC, and does not
need to be copied manually.
Install these files into the My Flash Disk
> INSTALL directory on the external
memory card or into the flash memory of
your navigation device, either manually
or using the GoPal®wizard.
You do not need to copy these files.This directory contains the EULA (End User
You can install these files into the Pro-
gram files > Medion GoPal Assistant >
Manuals directory on your PC manually,
or using the setup wizard.
MapRegions
POI
TSD
AUTORUN
This directory contains the map data that your
navigation device will need to operate.
This directory contains data that your naviga-
tion device will need to find special destina-
tions (Points of Interest).
This directory contains speech recognition
data that you will need to give your navigation
system your destination by voice.
ensures that the setup wizard that helps you
install your software components automatic-
ally runs after you insert your CD/DVD into
your PC.
Install these files into the MapRegions
directory on your external memory card
or into the flash memory of your naviga-
tion device, either manually or using the
GoPal®wizard).
Install these files into the MapRegions
directory on your external memory card
or into the flash memory of your naviga-
tion device, either manually or using the
GoPal®wizard).
Install these files into the MapRegions
directory on your external memory card
or into the flash memory of your naviga-
tion device, either manually or using the
GoPal®wizard).
You do not need to copy these files.This setup information and application file
readme.txt
You do not need to copy these files.IThis text file contains important information
on the content of this CD/DVD as well as how
to install various applications on the CD/DVD
in your national language.
Page 7
- 7 -
Setup Assistant
you insert your CD/DVD, and will help you
install the software components.
Depending on the features supplied with your navigation system, some of the directories and files named
in the above may be missing on your CD/DVD, or you may find additional directories and files. Please
refer to the CD/DVD’s readme.txt file for the files supplied on your CD/DVD.
Certain components, such as the operating system and navigation software, you will find already installed
on your navigation device and/or the memory card. This means you will already be able to use your
navigation system out of the box, without any additional installation.
However, we would recommend that you install additional applications such as GoPal®wizard and
Adobe®Acrobat®Reader®on your PC to be able to use the features that they offer. You may also need
to reinstall various software components if you find that your navigation system is not working properly.
Please refer to sections Chapter 2, Manual Installation and Start-Up and Chapter 3, Installation and
Setup using GoPal®Assistant for further details.
You do not need to copy these files.DThis application will start automatically after
1.3 System requirements
Your mobile navigation system can be connected to an ordinary Windows PC to install or reinstall ap-
plications such as the navigation software, additional maps and so on as needed. Your PC will need to
meet the following requirements to be able to communicate with your navigation system properly:
■ Operating systems supported: Windows 2000 SP4 or later, Windows XP & Vista
■ Hardware specifications should match the current PC generation – at least 128 RAM, at
least one free USB 1.1 port
■ Additional Microsoft ActiveSync®software is only required on Windows 2000/XP to connect your
navigation system as a mobile device to your PC, GoPal®wizard for automatic data transfer between
your navigation device and PC (if required)
Tip
If you are running Microsoft Windows VistaTMon your PC, you will not need to install Active-
Sync®communications software. The system files needed are already integrated in Windows
VistaTM. Use the USB cable supplied with your navigation device to connect it to the PC. After
your navigation system has been recognised as a new device, Vista will automatically install
the necessary drivers. Once installed, you will find your new device listed in Explorer under
Mobile devices . If you have installed any additional data on your navigation device, make
sure that there is enough free memory left if you wish to transfer more data. Otherwise, remove
any data you do not need.
TM
If your PC fulfils these specifications, you can connect your navigation device to a free USB port on your
PC using the USB cable supplied in order to transfer data. Please refer to Sections Chapter 2, Manual
Installation and Start-Up and Chapter 3, Installation and Setup using GoPal®Assistant for more details.
Page 8

- 8 -
1.4 Design conventions used in this manual
Your navigation device’s control software is laid out the same way as you would find when using your
PC’s software. That means that software entries are shown visually on the screen and can be started
from there. However, there are differences in the way you control the device hardware – where
you would use a mouse to control your PC, you can either use the stylus supplied with your navigation
device or use manual entry on the navigations device’s touchscreen. Please remember the points below
in the passages that follow:
■ We use the term “click” for operations that you would use your mouse for on your PC.
■ We use the term “touch” for entries that you enter onto the device’s touchscreen using the stylus
or your finger.
We refer to options within the software application itself or to directories on your PC or memory card in
various places in this manual. These references are shown below, and apply to the passages that follow:
■ Software control options such as keys, menu options and field marking labels are shown in bold
type.
■
Special functions and programs in your navigation system (such as the MP3 Player etc.) and PC
(such as Windows Explorer etc.) are shown in Italics.
■ Information on directory names on your external SD card or flash memory in your navigation device
are shown in Italics.
This manual contains information on how to control the navigation software on your device, covering
the visual presentation on your navigation device’s screen und the options available for individual software
features. The points below following apply to all of the passages that follow:
■ Points on how to use the software’s features are listed numerically and define the sequence of steps
for each procedure.
■ Points that refer to various elements in a software dialogue screen or similar have also been numer-
ically listed, but in colour.
■ Points that list various options that carry equal priority (such as in this case) are listed as bullet
points.
Page 9
- 9 -
1.5 Tips and warnings
We have included practical tips as well as warnings on circumstances that might prevent your navigation
system from working properly at various places in this manual. These sections are marked as described
below, and apply to the passages that follow.
This symbol refers to a function or feature that will speed up the procedure or increase your convenience
in using the navigation software.
Tip
This symbol refers to a function or feature that will speed up the procedure or increase your
convenience in using the navigation software.
Note
This symbol refers to critically important functions and features for running your navigation
system. Ignoring these instructions may result in making mistakes or giving the wrong inform-
ation to your navigation system, which might cause it to malfunction.
1.6 Important information
IThe following information is important in operating your navigation system. This information will be re-
peated as comments and instructions at the relevant places in the manual.
■ For safety reasons, never enter any information into the navigation system while driving. Enter the
information necessary for the navigation system before you start your journey.
■ If you need to make alterations during the journey, park your vehicle at a suitable place first.
■ Vehicles with thermoglass windscreens or windscreens with metallic coatings will hamper GPS re-
ception. In most cases, you will find a space in the coating where you can position your navigation
device. If that is not the case, you will need to mount a standard external GPS antenna outside the
passenger compartment, such as on the roof.
■ The routing instructions given by the navigation system are recommendations. Remember that the
rules of the road come first.
■ Remember that your navigation system will have to receive a valid GPS signal to calculate your
route from your current location.
■ Remember that your navigation system will need to be set to local time to calculate the correct ETA
in future route calculations.
■ You can also follow your current position on the map without entering a destination. If available, the
name of the street or road you are currently driving on will be displayed.
■ Remember that local changes or restrictions in road regulations (such as maximum speeds) cannot
be included in the route calculation. In any case, you will need to observe local traffic signs and/or
road layouts.
Page 10

- 10 -
■ Remember that the road maps match the state of the roads at the time your navigation system is
shipped. The manufacturer cannot guarantee that the information contained is absolutely correct
and corresponds a hundred percent to the actual road layout or traffic signs.
1.7 Trademarks
All brand names and trademarks referred to in the manual, also those of third parties, are unconditionally
protected by the corresponding intellectual property laws and rights of their respective registered owners.
All brand names, trademarks and company names referred to in the manual are or may be registered
brand names or trademarks of the respective owners. All rights reserved unless expressly granted in
this manual.
Even if a registered trademark or brand name used in this manual is not expressly marked as such, it
must not be assumed that this trademark or brand name is free from third-party rights.
■ Windows®, Windows XP®, Windows 2000®, Windows VistaTMand ActiveSync®are registered
trademarks of Microsoft®Corporation.
■ Acrobat®and Acrobat®Reader®are registered trademarks of Adobe®Systems Incorporated.
■ Google EarthTMis a registered trademark of Google Inc.
1.8 Copyright and guarantee
Copyright © 2007
Version 4
All rights reserved.
All information given in this manual is subject to alteration without notice, and represents no guarantee
on the part of the manufacturer. The manufacturer shall not be held liable for loss or damage arising
from the information or any errors that may possibly exist in this manual.
We always appreciate feedback on errors or areas of improvement to enable us to supply you with an
even more powerful product.
This manual may not be reproduced, saved as an electronic file or otherwise disseminated in whole or
in part by electronic, electrical, mechanical, optical, chemical, as a photocopy or by any other means
for any purpose without the express written permission of the manufacturer.
Page 11

- 11 -
2. Manual Installation and Start-Up
2.1 Initial Operation
2.2 Software Reinstallation and Update
2.3 Transferring the Card Material and Extra Destination Data from the Memory Card
2.4 Transferring Data onto the Internal Memory of the Navigation Device
Page 12
- 12 -
The Windows CE operating system comes installed on your navigation device as standard. In addition
to this, initial software components such as the navigation software or card material for different countries
(version-dependent) may also be preinstalled on the device or on the memory card provided. If this is
not the case, you will have to initially install the navigation software and the necessary card material
before you will be able to operate your navigation system.
If you wish to carry out an update or install subsequent navigation software or additional card or destin-
ation data onto your navigation device, you will have to remove some or all of the data installed on your
device in order to be able to install the newly acquired software. The following data can be manually in-
stalled by the user:
■ GoPal®Navigator navigation software
■ Card material in the form of PSF files
■ Extra destination data (POI data) in the form of PSF data
■ Voice recognition data in the form of TSD data
Tip
Although it is possible to carry out a manual install, we would recommend that you transfer
and update software components on your navigation system using the GoPal®Assistant
software included in delivery which can be installed on your PC. Installation and data exchange
using the GoPal®Assistant is described in the following chapter.
The manual transfer of software components from the CD/DVD to your mobile navigation device is carried
out in Windows Explorer on your PC. You can select one of the following two methods when exchanging
data between your navigation system and your PC:
■ If you have installed the Microsoft ActiveSync®software from the CD/DVD, you can directly connect
your navigation device via the USB cable supplied to a USB port on your PC in order to synchronise
the data you require. This will give you direct access to your navigation device’s internal flash
memory.
■ If your PC has a card reader, you can insert the external memory card supplied directly into this
and manually transfer the data into File Explorer. In this case you don’t have direct access to your
navigation device’s internal flash memory.
Page 13
- 13 -
2.1 Initial Operation
Depending on the version of your navigation system, the software needed to operate it may not be pre-
installed on your navigation device but may be on the enclosed memory card instead. You will find the
relevant comment in the README file and on the packaging of your navigation device. In this case, you
will have to install the software in order to operate your navigation system.
Proceed as follows to carry out the installation:
1. Remove the memory card carefully from its packaging. Please take care not to touch the contacts or
to get them dirty, otherwise it may no longer be possible to transfer the data.
2. Insert the memory card into your navigation device’s MMC/SD card slot until you hear it click into
place.
3. Turn on the navigation device by pressing its on/off button(see the technical manual).
The software components required will now be installed automatically.
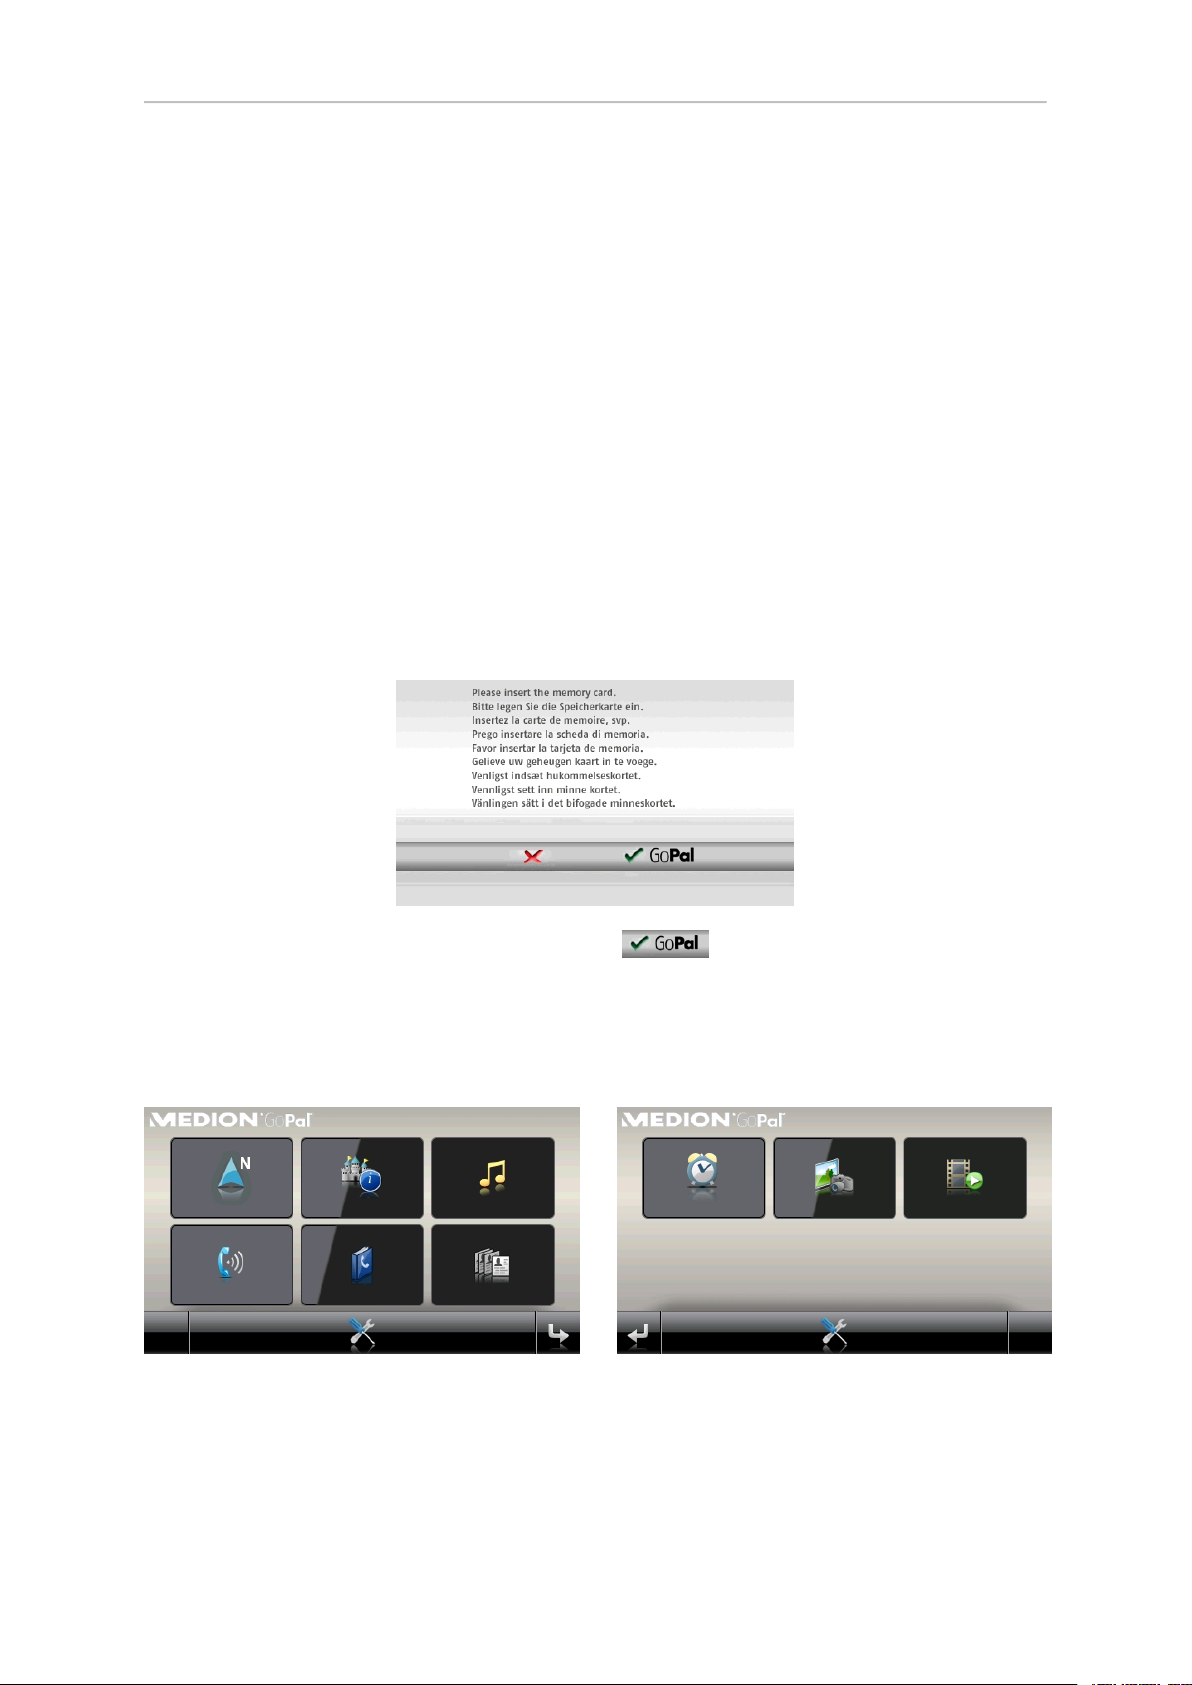
If you turn on your navigation device before the enclosed memory card has been inserted, the navigation
system will display the following screen.
Insert the memory card into your device and select the button in order to initiate the automatic
installation.
Once the installation has finished, the start screen of your navigation system will appear and you will be
able to access the various functions such as the navigation and the MP3 player, etc.
Page 14

- 14 -
2.2 Software Reinstallation and Update
If necessary, you can remove all or some of the application data, such as the navigation software and
the card material, from the memory of your navigation device (see also the technical manual). This is
necessary, for instance, in order to install an updated version of the GoPal®Navigator software which
you may purchase at a later point in time. The software for the reinstallation/update can be found in the
Installation folder on the CD/DVD and can be transferred to the navigation device using the memory
card included in delivery.
Proceed as follows in order to manually install the navigation software on to the external memory card:
1. If you have not done so already, remove the memory card carefully from its packaging and insert it
into your PC’s (internal or external) card reader. The card will click into place and the contents of the
card will be shown in a new Windows Explorer window.
2. Open your PC’s CD/DVD drive and insert the CD/DVD. If the CD/DVD’s Setup Assistant starts up
automatically, you should terminate this.
3.
Open the directory for your CD/DVD drive and select the Installation directory.
4. Copy all folders and files in this directory.
5. Change to the directory window of the external memory card and paste the copied contents in here.
To install software copied on the memory card onto your navigation device, please follow the steps de-
scribed in Section 2.1, “Initial Operation”.
Note
You will have to remove the old software components before you will be able to install the
new software onto your navigation device. You can find information on this in the instruction
manual for your navigation device.
2.3 Transferring the Card Material and Extra Destination Data from the Memory
Card
Regardless of the navigation software, you can also install additional card and extra destination material
on to your device or replace existing data with updated material from a subsequently purchased CD/DVD.
However, your navigation device will only be able to read this data automatically if it is stored in the
MapRegions directory of the memory card.
Proceed as follows to transfer card material and extra destination data from the memory card:
1. Insert the memory card into your PC’s (internal or external) card reader. The card will click into place
and the contents of the card will be shown in a new Windows Explorer window.
2. Open your PC’s CD/DVD drive and insert the CD/DVD. If the CD/DVD’s Setup Assistant starts up
automatically, you should terminate this.
3.
Open the directory for your CD/DVD drive and select the MapRegions directory.
Page 15

- 15 -
4.
Copy all of the data you require here with the file ending .psf: The file names will indicate the card
data region.
5.
Change to the directory window of the external memory card and create a new folder called MapRe-
gions here.
6. Now paste all of the copied files into this folder.
Proceed as follows to copy additional destination data from the inserted CD/DVD onto the memory card:
1.
Open thePOIfolder in the CD/DVD directory.
2.
Copy the required files (e.g. hotel.de.psf and the like).
3.
Change to the MapRegions directory window on the external memory card and paste the copied
content there.
To install the card material and/or extra destination data copied on the memory card onto the navigation
device, follow the steps outlined in Section 2.1, “Initial Operation”.
Note
You will have to remove (some of) the old data before you will be able to install the new card
and/or extra destination data onto your navigation device. You will find information on this in
the instruction manual for your navigation device.
Please note also that it is only possible to transfer data onto the memory card and/or your
navigation device’s internal memory (see next section) if there is sufficient memory available
there. In certain circumstances you may have to delete data that you do not require in order
to free up memory.
2.4 Transferring Data onto the Internal Memory of the Navigation Device
Your mobile navigation device has an internal non-volatile memory which is located in the My Flash Disk
folder. You can use this memory to transfer and then install the navigation software, card material and/or
voice recognition data onto your navigation device. However, a precondition for this is that you have
previously manually installed the Microsoft ActiveSync®software from the CD/DVD supplied onto your
PC or via the CD/DVD’s Setup Assistant. In addition to this, your navigation device must be connected
to the PC via the USB cable supplied.
In the following description, we will assume that you have already installed Microsoft ActiveSync®. Proceed
as follows to copy the installation data for your navigation software into your navigation device’s internal
memory:
1. Connect your navigation system via the USB cable to your PC.
2.
Once the navigation device has been detected, your PC will show theNew Partnershipdialog box.
Choose the Yes option to compare the data on your navigation device and PC. Choose the No option
to register the navigation device as a guest on your PC (recommended). Then click on the Continue
button.
Page 16

- 16 -
3.
Select the Mobile Device item in your Windows Explorer and change to the My Flash Disk drive.
4.
Right-click within the directory and select the New Folder option from the menu. Give the newly created
folder the name INSTALL and press the return key to end.
5. Copy all files and folders in this (country) directory.
6.
Change to the Mobile Device > My Flash Disk > INSTALL directory and paste in the copied content
here.
Proceed as follows to also copy card material into the internal memory of your navigation device:
1.
Select the MapRegions directory of your CD/DVD drive and copy all required data with the file ending
.psf. The file names will indicate the card data region.
2.
Select the Mobile Device item in Windows Explorer and change to the My Flash Disk directory.
3.
Right-click within the directory and select the New Folder option from the menu. Name the newly
created folder MapRegions and end by pressing the return key.
4. Now paste all copied files into this folder.
If you have upgraded your navigation software by paying to update the extra destination data or to acquire
the “voice entry” feature, you will have to transfer the associated data into the internal memory of your
navigation device. The respective functions will only be available after the data has been automatically
installed. Proceed as follows to copy extra destination and/or voice recognition data into the internal
memory of your navigation device:
1.
To transfer extra destination data, select the POI directory in your CD/DVD drive and copy the required
PSF files (e.g. hotel.de.psf).
2.
Change to the Mobile Device > My Flash Disk > MapRegions directory and paste the copied content
here.
3.
To transfer voice entry data, select the TSD directory in your CD/DVD drive and copy your country-
specific folder here. In the Germany TSD folder, for example, you will find the voice recognition data
for German-speaking countries. If needed, you can of course also copy the voice entry data/folders
for other countries in order to install them onto your navigation device.
4.
Change to the Mobile Device > My Flash Disk > MapRegions directory and paste the copied content
here.
Page 17

- 17 -
3. Installation and Setup using GoPal®Assistant
3.1 Installing GoPal®Assistant
3.2 The User Interface of GoPal®Assistant
3.3 Transferring Data Manually
3.4 Using Content Import Wizard
3.5 Hardware Management Functions
Page 18

- 18 -
As an alternative to manual installation, you can transfer the necessary data from your CD/DVD to your
navigation system using GoPal®Assistant. GoPal®Assistant is a tool specially designed to facilitate the
connection between your navigation system and your computer and make it a lot easier to transfer se-
lected data. Moreover, using GoPal®Assistant is the only way to transfer GPS tracking data recorded
by your navigation system onto your computer. This means you can back tracking data up, share it with
other users or transform it into the KML-file format for use with Google-EarthTM. In order to use GoPal
Assistant, you must first install it onto your computer.
Tip
Although it is possible to transfer data to your Navigation system manually, we recommend
you use GoPal®Assistant.
3.1 Installing GoPal®Assistant
When you insert the CD/DVD included in your delivery package into the disc-drive of your computer, a
Setup wizard automatically appears to guide you through installation of the various software features.
®
Follow the instructions below to install GoPal®Assistant on your computer:
1.
Open the CD/DVD drive of your computer and insert the CD/DVD provided. The Setup wizard will
start automatically as soon as your computer has read the CD/DVD. Follow the instructions as they
appear on the screen.
2.
In the dialog box Choose Software click the box Medion GoPal Assistant (tick appears) to select
GoPal®Assistant for installation. If required, you can click further boxes to install additional software
modules (for example Medion GoPal Navigator, Microsoft ActiveSync®, handbooks, etc). Having
selected the desired options, click Next.
3. In this dialog box, you have to enter a file path for the installation. Accept the set path or select your
own path and then click Next.
4. In this dialog box, you can rename the folder (not recommended): click Install to accept the set name
and install the selected software onto your computer
GoPal®Assistant has been installed in the start menu of your computer and can be used immediately
after installation. If at any point you no longer require GoPal®Assistant, you can remove it from your
system by going to Control Panel> Add or Remove Programs or clicking deinstall in the program list in
the start menu: Start > All programs > Medion GoPal Assistant .
To set up a connection with your Navigation system using GoPal®Assistant, Microsoft ActiveSync
must first be installed on your computer. You can also install this software using the Setup wizard on
your CD/DVD. The Navigation system must also be plugged into the USB port of your computer.
®
Tip
ActiveSync®can only be installed with Windows 2000 SP4 or Windows XP. The software re-
quired for data transfer is already integrated in Windows VistaTM.
Page 19

- 19 -
3.2 The User Interface of GoPal®Assistant
Having successfully installed GoPal®Assistant, click Medion GoPal Assistant in the folder Start > All
Programs > Medion GoPal Assistant to start the program.
The user interface of GoPal®Assistant organizes the available functions into the following modules:
Menu Bar
You can access all basic program functions via the Menu Bar. The menus are structured as follows:
■
File
Click End to close GoPal®Assistant.
■
Options
■
Click Import Data to the Library to open the Content Import Wizard , which guides you through
the process of transferring new contents to your GoPal®Assistant library (see Section 3.4,
“Using Content Import Wizard” [22]).
■
Click Check for Program Updates Now to look online for automatic software updates for your
Navigation system using GoPal®Assistant.
■
Click Check for Content Updates Now to look online for automatic content updates for library
data using GoPal®Assistant.
■
Settings
■
If you tick Check automatically for program updates when the program is started , GoPal®As-
sistant will look online for automatic software updates for your Navigation System whenever
you start the program. This setting is saved and reloaded the next time you start the program.
■
If you tick Check for content updates automatically when the program is started , GoPal®As-
sistant will look online for automatic content updates for your navigation system. The current
setting will be saved and reloaded the next time you start the program.
If you tick Check for program updates automatically when the program is started , GoPal®Assistant
will look for automatic software updates for your Navigation System.
Page 20

- 20 -
■
Help
Click Program Information to open a dialog box showing information on the current version of GoPal
Assistant and the licensing agreements.
Library, data selection, hardware information and info
This is the central module of GoPal®Assistant and allows you to manage software and content data on
your Navigation system and hardware devices.
■
Library
In the library, you can chose from various categories to transfer data onto your navigation hardware
device or from the navigation hardware device onto your computer. The categories are as follows:
Map data, Special Destinations, Language Recognition, Software, Contacts and GPS Tracking .
■
Hardware
In this area, you can select an attached navigation hardware device, transfer information and rename
it.
®
■
Data Selection Area
This area changes according to the options chosen in the other sections. If you select a category
in the library, the data available for that category will be displayed in this module. If you chose the
option Hardware, information on the hardware device will be shown here.
■
Info
Click Latest for online access to the latest product innovations, other information and offers relating
to you navigation system.
Note
In order to access product innovations online and view them in the data selection module,
you computer must be connected to the internet. If your computer is not connected to the in-
ternet, no contents can be displayed.
Memory Drives
In this module, you can manage disk space on your computer’s memory card, on the memory card of
any navigation hardware device attached to your computer, or any memory card attached to the computer
by means of an external memory card drive. You can chose a target memory drive for import / export
options and format the external disk space (SD card in the navigation hardware device or memory card
drive) as required.
Tip
This module also recognizes USB keys attached to your computer. You can select and format
your USB key as required by clicking Selected Memory Drive in the popup menu.
Page 21

- 21 -
3.3 Transferring Data Manually
You can use the library categories and Data Selection Area to select and transfer specific information
either to the flash memory card in the navigation hardware device or from the navigation hardware device
onto the computer. When a category is selected in the library, the options available are immediately
displayed in the Data Selection Area. The following options can be selected:
...you can select the following data in the Data Selection Area...Via library cat-
egory...
Map Data
Special Destinations
Language Recogni-
tion
Software
Contacts
GPS Tracking
The following description is based on the assumption that GoPal®Assistant and all necessary map and
special destination data were installed on your computer’s hard drive using the Setup Assistant. Follow
the instructions below to select data manually and transfer it onto your mobile navigation hardware
device:
1.
Open GoPal®Assistant by clicking: Start > All programs > Medion GoPal Assistant .
2.
Select a category in the library : the Data Selection Area display will adjust automatically to the category
chosen.
the regions available on your CD/DVD for automatic transfer to your navigation
system.
the special destination data which is available on your CD/DVD for automatic
transfer onto your navigation system.
the language recognition data available on your CD/DVD for automatic transfer
onto your navigation system.
the country-specific installation data available on your CD/DVD for transfer onto
your navigation hardware device.
your Microsoft Outlook contact data can be automatically synchronised with the
contact data on your navigation system.
the GPS tracking data which has already been imported onto your computer.
3. Select the data you require.
■
Map Data
In the map displayed, left-click the region required: the popup window gives you the name of the
region and tells you how much memory is required for the map data. Regions selected are shown
in green, regions not selected in yellow. To deselect a region, click it a second time: the region
is displayed in yellow again and is not selected for data transfer.
■
Special Destinations
Left-click the box next to the special destination required (tick appears): information on the provider,
version number, number of records and file size and a description, if one has been entered, then
appear alongside the option. To deselect, click the box a second time: the option is no longer
selected for data transfer.
■
Language Recognition
Page 22

- 22 -
Left-click the box next to the language recognition data you require (tick appears): information
on the version number and file size as well as a description, if one has been entered, then appear
alongside the option. To deselect, click the box a second time: the option is no longer selected
for data transfer.
■
Software
Left-click the box next to the country-specific installation data (tick appears): information on the
provider, version number and file size and a description, if one has been entered, then appear
alongside the option. To deselect, click the box a second time: the option is no longer selected
for data transfer.
■
Contacts
Left-click the box next to the Microsoft Outlook contact data required (tick appears): information
on the number of source contacts and file size then appear alongside the option. To deselect,
click the box a second time: the option is no longer selected for data transfer.
4.
In the popup menu Selected Memory Drive in the memory drive module, select the drive onto which
you would like to save the data. The free space and space required are displayed in the section
Storage Space :
■
Free Space
This is the memory available on the drive selected. It is shown graphically by the drive bar.
■
Space Required
This is the memory required to install the data selected in the library on the drive selected.
■
Space Used
This is the capacity already in use on the drive selected.
5. Click Synchronize.
GoPal®Assistant now brings the selected data in the library up to date with the data in the chosen drive:
this involves installing data on the chosen drive.
3.4 Using Content Import Wizard
As an alternative to manual synchronization, GoPal®Assistant offers the option of transferring data into
the library automatically using the Content Import Wizard. This also allows you to select specific data
and install it on your computer. Follow the instructions below to transfer data using the Content Import
Wizard:
1.
Select the option Import data to the library in the menu Options in the GoPal®Assistant menu bar.
This opens the dialog box Content Import Wizard : click Next.
2. The Content Import Wizard searches for new contents and saves it automatically in the module
Contents found . If you want to define a specific source folder manually, click Search. In the dialog
box which appears, type in the folder name where the data may be found and click Open. Any available
data will be saved in Contents found .
Page 23

- 23 -
3. Left-click in the box next to the data files required (tick appears): information on the file-type and name
and on both the new and previous versions appear next to the box. To deselect, click the box a second
time (tick disappears): the file is no longer selected for data transfer. Click Next.
4. This starts the import process. Progress for the current file and total progress is displayed on the
progress bar. When the data transfer is completed, click Finish to close the Content Import Wizard.
The selected files are immediately available for use in the appropriate category of the library.
3.5 Hardware Management Functions
Under Hardware and in the memory drive module, GoPal®Assistant offers access to the navigation
hardware device attached to the computer. It is not possible to attach more than one navigation hardware
device to your computer at once, though you can connect the different devices to the computer one by
one, for example in order to back up saved GPS tracking data onto your computer. GoPal®Assistant
saves the IDs of all navigation hardware devices which are attached to your computer and lists them
under Hardware . The navigation hardware device currently attached is marked green.
If you select the navigation hardware device attached to your computer in the option Hardware , the
following information on the system is given in the Data Selection Area:
■
Name
The current device name is given here. You can rename the device at any time (see below).
■
Hardware ID
The device identification number is given here .
■
Installed Navigation Software
The navigation software currently installed on the device is given here.
■
Last Synchronized
This shows when the files on the device and those on your computer were last synchronized.
3.5.1 Rename Hardware Device
On delivery, your navigation hardware device has a standard name derived from the product specifications.
You can change this name at any time and replace it with your own name, which is then used whenever
you connect the device to your computer. Follow the instructions below to rename your navigation
hardware device:
1.
Select the navigation hardware device attached to your computer in the Hardware area.
2. Left click Rename Device .
3.
Enter the new name in the dialog box Rename Device and confirm by clicking on OK.
The new name is then adopted and given to the navigation hardware device on any subsequent occasions
that it is used on this computer with GoPal®Assistant.
Page 24
- 24 -
Note
Please note that this personalized name is not transferred to the device itself: if you attach
the device to another computer, it will appear under the original delivery name.
3.5.2 Formatting external memory cards
In the memory drive module, GoPal®Assistant offers the option of formatting an external memory card
in the MMC/SD card-drive of your navigation hardware device or of an external card drive, or a USB key
inserted in your computer. It is only possible to format a memory card in a navigation hardware device
if the connected device is recognized as the current device. If you change navigation systems while
continuing to run GoPal®Assistant, you must first activate the attached device. Follow the instructions
below:
1.
In the area Hardware chose the device connected to your computer and marked green.
2. Left-click Change to this Device. If the command is not available, the device connected is already
recognized as the current device.
When the navigation hardware device is recognized as the current device, follow the instructions below
to format the memory card:
1.
In the insert menu, select Selected Memory Drive , then click Current System Name / External Drive
.
2. Left click Format.
3.
The dialog box Format appears: Left-click OK to start formatting the memory card. To cancel the op-
eration, click Cancel.
4. GoPal®Assistant formats the drive and then opens a message saying that the formatting operation
was successfully completed. Left-click OK to close this message.
Tip
Memory cards in external card drives and USB sticks can be selected and formatted at any
time in the pop up menu Selected Memory Drive.
When the formatting operation is complete, the remaining free space is shown by the drive icons and
memory bars in the Storage Space area.
Page 25

4. Quick start
- 25 -
Page 26

- 26 -
You can find a description of this function in the latest version of this handbook, which you can download
from www.medion.de/downloads.
Page 27

- 27 -
5. Operation using the voice command function
5.1 The voice command function in practice
5.2 Adjusting the settings
5.3 Voice command in the map view
Page 28
- 28 -
In addition to manual operation via the touchscreen, your navigation system offers you the option of
entering or controlling certain functions using voice commands. This means, for example, you can select
a function on the start screen of your navigation system or enter a new destination by issuing a voice
command. You also have the option of calling up lists of entries via a series of list numbers or to browse
up or down the list view.
Tip
Please note that the voice command function is currently only available for selected languages.
If you do not operate your navigation system in one of the following languages, you can skip
the next section.
The following languages are currently supported:
■ German
■ English
■ French
■ Italian
■ Dutch
■ Spanish
While manual operation of your navigation system is possible at all times, the voice command function
must be activated separately: this ensures that your navigation device only reacts to certain voice com-
mands and does not accidentally misinterpret other parts of the conversation. Proceed as follows to
start the voice command function for your navigation system:
■ Press the button called Push-to-Talk (PTT) on your navigation device. A tone then sounds (a rising
tone sequence): the voice command function is now activated on your navigation device.
During normal operation, the voice command function is ended once route planning has been entered
successfully or the navigation system has not received a voice command for a certain period of time. If
necessary, however, you can also stop the voice command function before this. Proceed as follows to
stop the voice command function for your navigation system:
■ Press and hold the PTT button on your navigation device for approx. 2 seconds. A tone then sounds
(a descending tone sequence): the voice command function on your navigation device is now deac-
tivated.
Note
The allocation of the PTT function button differs between devices. Information regarding which
button carries out the PTT function on your device can be found in the device manual.
The voice command or voice recognition function is based in principle on the language set when your
navigation device is installed. If, for example, you have selected “German” as the language for your
Page 29

- 29 -
navigation system, the voice command function will also be in German. The following points must be
observed when using the voice command function:
■ Try to speak naturally!
■ Strong dialects, speaking too clearly or too loudly may interfere with the voice command function.
■ When using the voice command function, avoid loud background noise such as the radio or ventil-
ation.
■ For safety reasons, entries may not be made by the driver whilst they are driving: Please make the
necessary entries before beginning the journey.
Tip
There are special terms for destinations entered for journeys abroad: while functional controls
(such as destination entry itself) are carried out in the pre-set language (e.g. German), the
destination and street names must be entered in the language of the destination country: for
planning a route to a destination in France, the destination information must be entered in
French. This can, however, lead to voice recognition being affected by foreign accents.
The following functions can be controlled using the voice command function:
■
Start destination entry in the Enter new destination menu
■
Select POIs in the POIs menu
■
Manage favourites in the Favourites menu
■
Change route planning in the Change route menu
■
Show route information in the Route information menu
■ Start and stop navigation in the menu of the same name
■ Call up the navigation application
■ Call up other applications (such as MP3 player, Picture Viewer etc.)
■
Call up Settings
5.1 The voice command function in practice
In these menus there are selected functions which can be controlled using the voice command function.
The following section describes which functions can be controlled using the voice command function
and which commands must be given to do so. As a rule, there is a choice of several commands meaning
the same thing for each function. These can be used alternatively.
Along with the specific commands in each menu, there are commands for basic control and navigation.
The following commands are identical in all menus:
Alternative voice commandVoice commandFunction command
Reject term/suggestion/command
No
Page 30
- 30 -
Accept term/suggestion/command
Go back a step
Cancel dialogue
Open help
Repeat entry
The selection of an option from a list is also identical for all menus
Select first option
Select second option
Select third option
Select fourth option
Go to next page
Go to previous page
The following instructions apply to entering numbers:
Back
Help
One
Two
Three
Four
OKYes
StopCancel
General help, global help, general commands,
global commands
Repeat entry, please repeat, repeat, againRepeat
Alternative voice commandVoice commandFunction command
Next pageNext
Previous pagePrevious
NoteEntering the…
House number
Postcode
Note
You can also carry out individual commands manually at any time whilst using the voice
command function: The voice command function can then be continued as normal with the
next step.
If your navigation system cannot interpret a voice command clearly, it shows possible options in a list.
If required, you can repeat the entry: to do so, say the command Repeat or tap the repeat button at the
bottom of the screen. Using the button keyboard selection, you can now end the voice command function:
the device switches to the screen for making an entry using the keyboard. The voice command function
can be restarted at any time, however.
The following assumes that you have already activated voice command mode using the PTT button. If
the navigation device cannot interpret a voice command, you will hear the message “Pardon?” Repeat
your voice command. If the command can be interpreted it will be carried out immediately, or, if there is
a choice of more than one option, a list will appear.
Please say the house number as a whole number (e.g. 46 must
be said forty-six).
Please say the postcode as a series of individual numbers (e.g.:
91058 must be said nine one zero five eight).
If you do not say anything after the tone or entry prompt, you will also hear “Pardon?”. If a voice command
still does not follow, a help message will be announced and the dialogue will ultimately be cancelled.
Page 31

- 31 -
Note
The voice command function features a help function, which you can access by saying Help.
The help announcement can be interrupted at any time by pressing the PTT button. The entire
user guide is designed to make the voice command function as easy as possible. In case of
any doubt, you can repeat entries and are informed which options are currently available via
an announcement.
5.1.1 Enter new destination using the voice command function
Proceed as follows to enter a new destination using the voice command function:
1.
Say Enter destination. Alternatively, you can use the following voice commands:
■
Enter new destination
■
Destination entry
The Enter new destination screen appears.
2.
If you would like to change the destination country, say Country. Alternatively, you can use the following
voice commands:
■
Enter country
■
Country entry
The menu for selecting a new country is opened.
3.
Say the name of the desired entry on the list (e.g. Germany). If the desired entry is not shown, say
Next/previous page to view the next entries in the list.
If you would like to leave this screen without selecting anything, say Back.
4.
The entry is accepted and you are asked to enter a postcode or town. Say the Postcode to enter the
town via its destination. Alternatively, you can use the following voice commands:
■ New postcode
■ New PC
■ Enter postcode
■ Enter PC
■ Postcode entry
The menu for entering the postcode is opened.
5. Say the individual numbers in the postcode. If the postcode entered applies to several towns, these
will be shown in a list.
6.
Say the number of the desired entry on the list (e.g. 1).
Page 32
- 32 -
Note
If you opt for entering a town by voice command, you will be asked to say the name of
the town. If the entry was not clear, all possible options will be shown in a list. You can
select items as described.
After entering the destination, you will be asked to say the street name: If the street name
said is not recognised clearly, the names interpreted will be shown in a list. Say the
number of the desired entry on the list (e.g. 3).
7. After entering the street name, you will be asked to say the house number: If the house number said
is not recognised clearly, the entries interpreted will be shown in a list. Say the number of the desired
entry on the list (e.g. 3).
Note
Instead of a street name, you can also use the commands Town centre and
Start navigation to enter a destination. With Start navigation, navigation to the town
centre is automatically started.
8. After entering the street name, you will be asked to say the house number: If the house number said
is not recognised clearly, the entries interpreted will be shown in a list. Say the number of the desired
entry on the list (e.g. 3).
Note
Instead of a house number, you can also use the commands Middle of street and
Start navigation to enter a destination. With Start navigation, navigation to the middle of
the street is automatically started.
The destination entered is shown on the Detail information screen. Your navigation system will now ask
if you would like to start navigation. Say Yes (alternatively: OK) to start route calculation.
Note
The other options on the Detail information screen cannot be controlled using the voice com-
mand function; instead they must be selected manually when required.
Page 33

- 33 -
5.1.2 Selecting POIs using the voice command function
Proceed as follows to select a POI using the voice command function:
1.
Change to the Navigation selection menu, if you have not already done so (manually or using the
voice command function, see later section).
2.
Say POIs. The selection menu for POIs is opened..
3.
Now say the entry in the POI list (e.g. airport). The screen Where do you want to look? then appears.
Note
If the POI list contains more entries than it can display, you can view further entries by
giving the command Next/previous page.
4. Say your desired option:
■
If you select At a certain place, enter the destination as described in the previous section.
■
If you select Nearby, the POIs available nearby will be shown in a list. Say the number of the
desired entry on the list: The POI entered is shown on the Detail information screen. Your navig-
ation system will now ask if you would like to start navigation. Say Yes (alternatively: OK) to start
route calculation.
■
If you select Along the route, the POIs available along the planned route will be shown in a list.
Say the number of the desired entry on the list: The POI entered is shown on the Detail information
screen. Your navigation system will now ask if you would like to start navigation. Say Yes (altern-
atively: OK) to start route calculation.
■
If you have already entered a destination, you can select the option At destination: The available
POIs at the destination are then shown in a list. Say the number of the desired entry on the list:
The POI entered is shown on the Detail information screen. Your navigation system will now ask
if you would like to start navigation. Say Yes (alternatively: OK) to start route calculation.
Note
The other options on the Detail information screen cannot be controlled using the voice com-
mand function, instead they must be selected manually when required.
Page 34

- 34 -
5.1.3 Managing favourites using the voice command function
Proceed as follows to select a favourite using the voice command function:
1.
Change to the Navigation selection menu, if you have not already done so (manually or using the
voice command function, see later section).
2.
Say Favourites. The selection menu for Favourites is opened.
3.
Say the number of the desired entry on the list (e.g. 2). If the desired entry is not shown, say
Next/previous page’ to view the next entries in the list.
4.
Once you have selected the desired favourite by its number, the Detail information screen is shown.
Your navigation system will now ask if you would like to start navigation. Say Yes (alternatively: OK) to
start route calculation.
Note
The other options on the Detail information screen cannot be controlled using the voice com-
mand function, instead they must be selected manually when required.
5.1.4 Change route using the voice command function
Proceed as follows to select the Change route menu using the voice command function:
1.
Change to the Navigation selection menu, if you have not already done so (manually or using the
voice command function, see later section).
2.
Say Change route (alternatively: Route planning) The selection menu for Change route is opened.
Other options in this menu must be selected manually.
5.1.5 Call up route information using the voice command function
Proceed as follows to select the Route information menu using the voice command function:
1.
Change to the Navigation selection menu, if you have not already done so (manually or using the
voice command function, see later section).
2.
Say Route information. The selection menu for this is opened.
3. Here you can select from the following options:
■ If you have already entered a destination and/or navigation is active, you can say the option
Directions: all route information, along with the distance, is given in a list on the Directions screen
and therefore acts as a preview for the planned manoeuvre. Say Back to leave this screen.
■ If you have already entered a destination and/or navigation is active, you can say the option
Traffic situation (alternatively: Traffic information): All traffic information, along with the distance,
is shown in a list on the traffic situation screen. Say Back to leave this screen.
Page 35

- 35 -
■
If navigation is active, you can say the option Avoid route: A list is then shown where you can
select the distance of the route to be avoided and therefore an alternative route: Any additional
entries are made manually. Say Back to leave this screen.
■
If you have already entered a destination and/or navigation is active, you can say the option Go
to: The screen shows a selection menu with the options location, destination area and overview.
Any additional entries are made manually. Say Back to leave this screen.
■
If you have already entered a destination, you can select the option Traffic situation (alternatively:
Traffic information): All traffic information, along with the distance, is shown in a list on the traffic
situation screen. Say Back to leave this screen.
Other options in this menu must be selected manually.
5.1.6 Control navigation using the voice command function
Proceed as follows to start navigating a route:
1.
Change to the Navigation selection menu, if you have not already done so (manually or using the
voice command function, see later section).
2.
Say Start navigation.
The planned route is calculated and your navigation system starts navigation automatically.
5.1.7 Open navigation using the voice command function
Proceed as follows to open the Navigation menu using the voice command function:
■
While in the Other applications or Settings menu, say Navigation. The navigation menu is then
opened, where you can call up the sub-menus Enter new destination, POIs, Favourites, Change
route, Route information, Start navigation, Other applications and Settings using the voice command
function: All entries that can be called up using the voice command function are marked accordingly.
Further operation of these menus is described in the previous chapters.
5.1.8 Call up other applications using the voice command function
Proceed as follows to select the Other applications selection menu using the voice command function:
■
While in the Navigation or Settings menu, say Other applications (alternatively: Applications). The
Other applications menu is then opened: Here you can access other programs such as the MP3
Player, Picture Viewer, Phone Book and others. The desired program must be selected manually.
Page 36

- 36 -
5.1.9 Change settings using the voice command function
Proceed as follows to open the Settings menu using the voice command function:
■
While in the ‘Other applications’ or ‘Navigation’ menu, say ‘Settings’. The ‘Settings’ menu is then
opened, where you can call up the sub-menus Route options, Display, TMC sender, Program settings,
Configure POI and Device settings: All entries that can be called up using the voice command
function are marked accordingly. Further operation of these menus is described in the following
chapters.
5.2 Adjusting the settings
If required, you can select various settings for your navigation system using the voice command function
and adjust them as described below. To do this, call up the Settings selection menu: If you have opened
the menu manually, the PTT button on the device should now be reset.
5.2.1 Route options
Say Route options. The selection menu for route options is opened and you are asked to call up the
desired route option. The following options can now be spoken:
■ Routes for cars, Routes for pedestrians
■ Use motorway (Motorway, Motorways, Use motorway)
After the desired route option has been selected, the menu is closed.
5.2.2 TMC sender
Say TMC sender to open the relevant settings menu. Further operation of this menu is carried out
manually.
5.2.3 Program settings
Say Program settings to open the relevant settings menu. Further operation of this menu is carried out
manually.
Page 37

- 37 -
5.2.4 Device settings
Say Device settings (alternatively Device). The selection menu for the device settings is opened and
you are asked to call up the desired device setting. The following options can be now be spoken:
■
Say Display (alternatively: Display settings) to open the relevant settings menu. Further operation
of this menu is carried out manually.
■
Say Volume to open the relevant settings menu. Here you can control the volume with the following
voice commands:
■
Quieter key click (lower key click volume)
■
Louder key click (increase key click volume)
■
Quieter MP3 (lower MP3 volume)
■
Louder MP3 (increase MP3 volume)
■
Quieter speech (lower speech volume)
■
Louder speech (increase speech volume)
After the desired option has been selected, the menu is closed.
5.3 Voice command in the map view
Using the voice command function you can switch between the menu and map view, if required, by
saying Map (alternatively: Show map, Map view):
■
If you are in the menu view, switch to map view by using the voice command Map (alternatively:
Show map, Map view).
■
If you are in the map view, switch to menu view by using the voice command Menu (alternatively:
Main menu).
In the map view you have the following options for adjusting the display:
■
By saying Enlarge (alternatively: Zoom in), you can increase the map’s size and the current zoom
level.
■
By saying Reduce (alternatively: Zoom out), you can reduce the map’s size and the current zoom
level.
If required, you can change the display mode of the map in the following ways:
■
By saying Compass view (alternatively: Compass display, Compass), you open the compass display.
■
By saying Next (alternatively: Next screen, Next map view, Next map, Next display) you can switch
between normal and split-screen display options.
■
By saying 3D (alternatively: 3D display, 3D view), you activate the three-dimensional map display.
■
By saying North (alternatively: 2D north, North view, Orientate north, North map, North perspective),
you activate the two-dimensional, north-oriented map display.
Page 38

- 38 -
■
By saying 2D (alternatively: Normal view, 2D view, Normal display, 2D display, Normal map, 2D
map, Normal perspective, 2D perspective) you activate the normal two-dimensional map display.
 Loading...