


DWU7702AAB

IMPORTANT PERSONAL SAFETY INSTRUCTIONS
Products _th a (_) label have been listed with 8. Be careful not to touch the heating element on t_
Underwriter's Laboratories, Inc. - those with a CSA tag the bottom of the tub during or at the completion
have been listed "Mth Canadian Standards Association. of a cycle. It may be hot.
Nevertheless, as with any other equipment using elec- 9. Use only detergents and rinse additives designed
trieity and moving parts, there is a potential hazard, for an automatic dishwasher. Never use soap,
WARNING - When using your dishwasher, fol!ow laundry detergent, or hand washing detergent in
basic precautions, including the following: your dishwasher. Keep these products out of _"
............................. reach of children.
1. Read all instructions before using the dishwasher. 10. Do not sit, stand on or abuse the door or dish
2. Use the dishwasher only for its intended function, racks of the dishwasher.
3. Disconnect electrical power to dishwasher befbre 11. Under certain conditions, hydrogen gas may be
attempting to service, produced in a hot water system that has not been
used for two weeks or more. Hydrogen gas is
4. To avoid electrical shock hazard, the sides and explosive. If the hot water system has not been
back must be enclosed and the front panels must used for such a period, tuna on all hot water
be attached before electrical power is applied to faucets and let the water flow from each for sev-
the dishwasher. Refer to the installation instruc- eraI minutes. This will release any accumulated _'_
tions for proper grounding procedures, hydrogen gas. As the gas is flammable, do not
5. Connect to a properly rated, protected and sized smoke or use an open flame during this process.
power supply circuit to avoid electrical overload. 12. Do not wash plastic items unless marked "dish-
6. Children should never be permitted to operate washer safe" or the equivalent. For plastic items
or play in, with, or around this dishwasher, not so marked, check the manufacturer's reeom-
7. To reduce the risk of injury when loading items to mendations.
be washed, sharp or pointed items should be 13. Do not tamper with controls.
located with the handles up. Also, load sharp 14. Always remove the door to the wai_hing eompart-
items so they are not likely to damage the door ment when removing an old dishwasher from ser-
seal. vice or discarding it. ;
g
SAVE THESE INSTRUCTIONS
g
.7
Page

LOADING INFORMATION
Before Washing Upper Rack
(Features vary depending on model)
T_qgieall?;tile majority of loads contain items of"varying
size and type. That's why your new Maytag dishwasher The upper rack is designed with great flexibility arid
is designed to aeeolnmodate a variety of dishes, glasses, versatility: Glasses, cups, stemware, light-weight plas-
stemware, utensils and pots and pans. tics, small plates, bowls, pans, long-handled utensils
The tbllowing illustrations and information will help etc. can be loaded in this rack.
you becnme more f_miliar with your dishwasher rack-
ing system. After a few dishloads, you will be able to
determine the best arrangement for your items.
• Don't Prerinse! Simply scrape off any bones or
large food particles. The disposer in your dish-
washer will handle the occasional pits, fruit seeds and
popcorn. These items will be chopped into small
pieces during drain and removed with the drain
water. You may hear a chopping noise dnring drain.
This is normal.
• If connected to a food waste disposer, make eertain
the disposer is empty before starting the dish-
washer. This allows proper draining.
• Remove certain foods (such as mustard, mayon- Items can be centered behind a single tine or loaded at
naise, lemon juice, vinegm; salt or dressings) from an angle to maximize space. For best results, leave a
stainless steel flatware as soon as possible. These small space between pieces so they do not touch during
foods may cause rusting and pitting if allowed to the cycle.
remain in contact with the surface for an extended
period of trine.
• Serape or soak items with burnt on foods as they
require more energy than the rest of the load to clean
satisfaetorily.
• Soak or wipe a starchy film from utensils used to
cook foods such as potatoes, pasta, rice, oatmeal,
etc...as they require more ener_, than the rest of the
load to clean satisfaetoril}_
General Recommendations
Glasses, tmnblers, stemware and cups can be placed in
• Place all items in the racks so they are separated and the top rack. Do not load these items over the tines.
facing center. This ensures the water sprav can reach It makes them more difficult to rinse.
soiled surfaces for good washing and rinsing results. Correct Incorrect
• Wedge flat, lightweight items (such as plastic lids)
next to the silverware basket or along the sides and
back of the racks.
• Load items so they do not rest over the top of the
wash tower. This water spray- is needed to properly
clean items in the upper rack.
• Avoid blocking the upper and lower spray arms by not ill
allowing items to extend beyond the racks.
• Place glasses in any row of the racks for proper clean-
ing and rinsing. Do not load glasses over the tines.
Page2
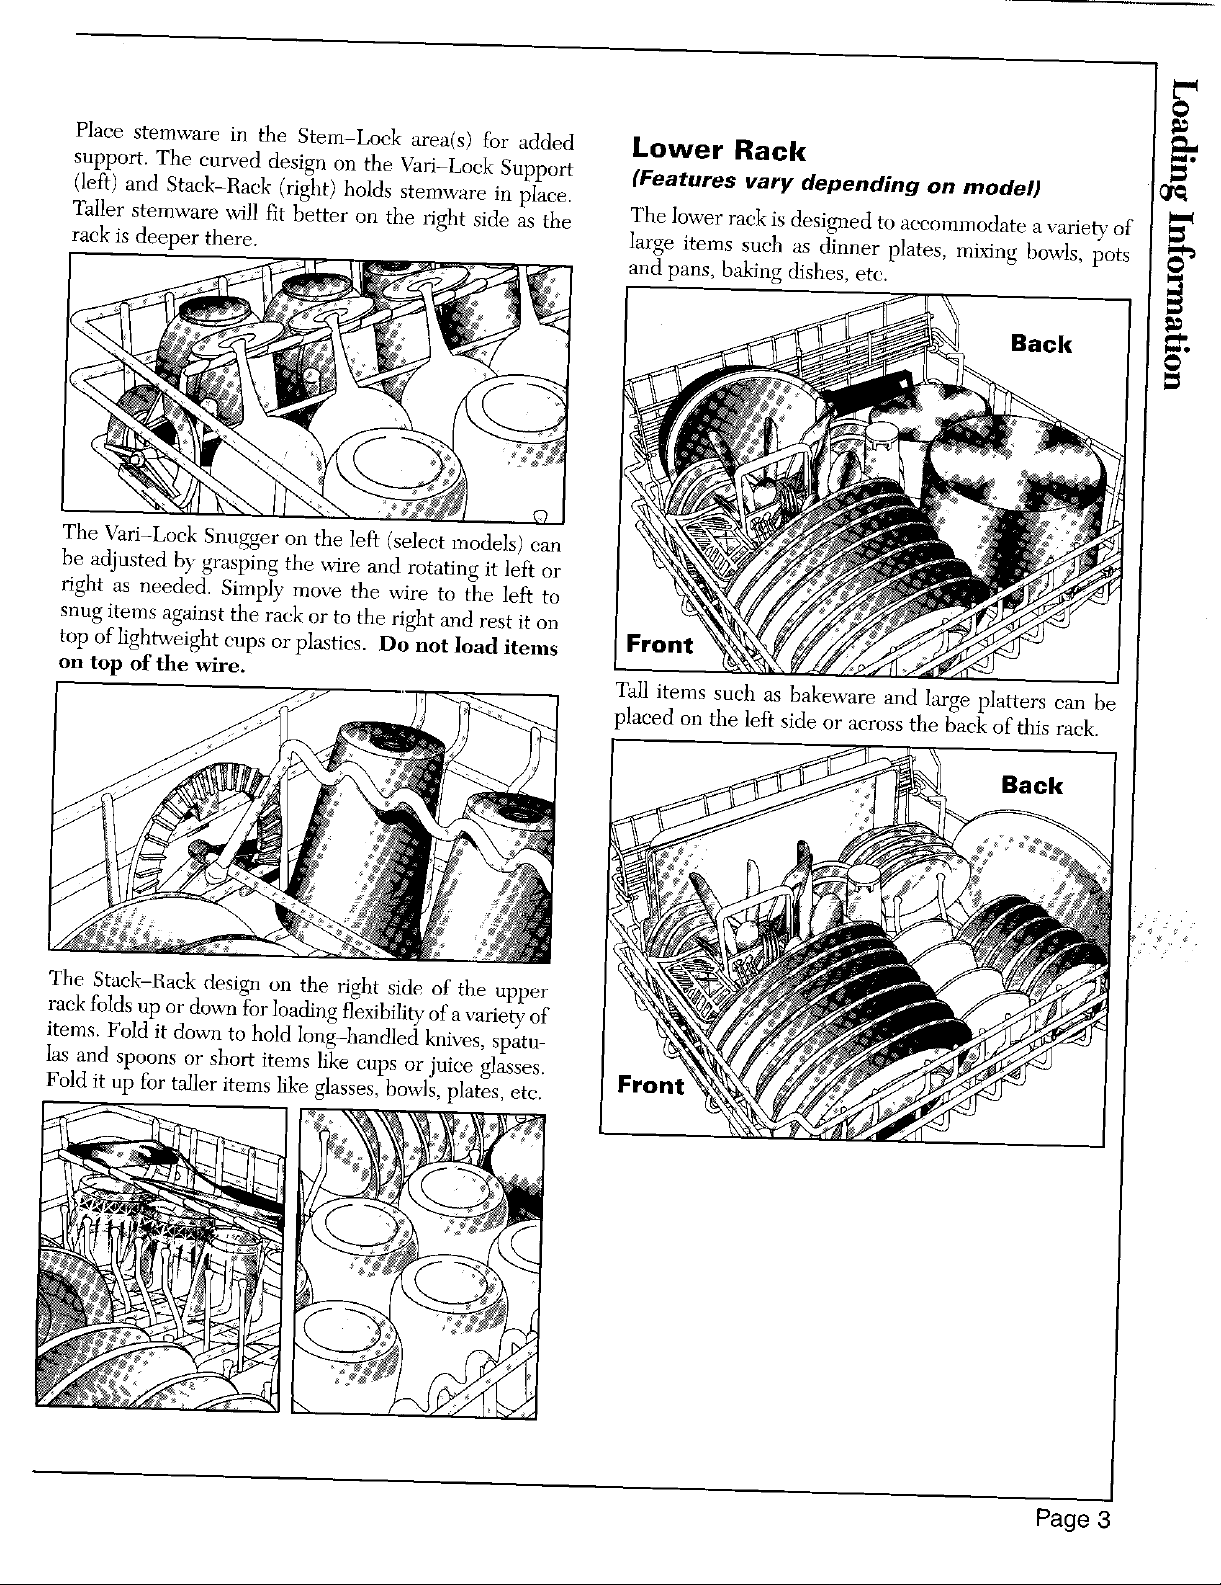
Place stemware in the Stem-Lock area(s) for added Lower Rack
support. The curved design on the Vari-Lock Support (Features vary depending on model)
(left) and Stack-Rack (right) holds stemware in place.
Taller stemware will fit better on the right side as the The lower rack is designed to accommodate a variety of
rack is deeper there, large items such as dinner plates, mixing bowls, pots _,
and pans, baking dishes, etc.
Back _'.
=
The Vari-Lock Snngger on the left (select models) can
be adjusted by grasping the wire and rotating it left: or
right as needed. Simply move the wire to the left to
snug items against the rack or to the right and rest it on
top of lightweight cups or plastics. Do not load items Front
on top of the wire. Tall items such as bakeware and large platters can be
placed on the left side or across the hack of this rack.
Back
The Stack-Rack design on the right side of the upper
rack folds up or down for loading flexibility of a variety of
items. Fold it down to hold long-handled knives, spatu-
las and spoons or shor_ items like cups or juice glasses.
Fold it up for taller items like glasses, bowls, plates, etc. Front
Page
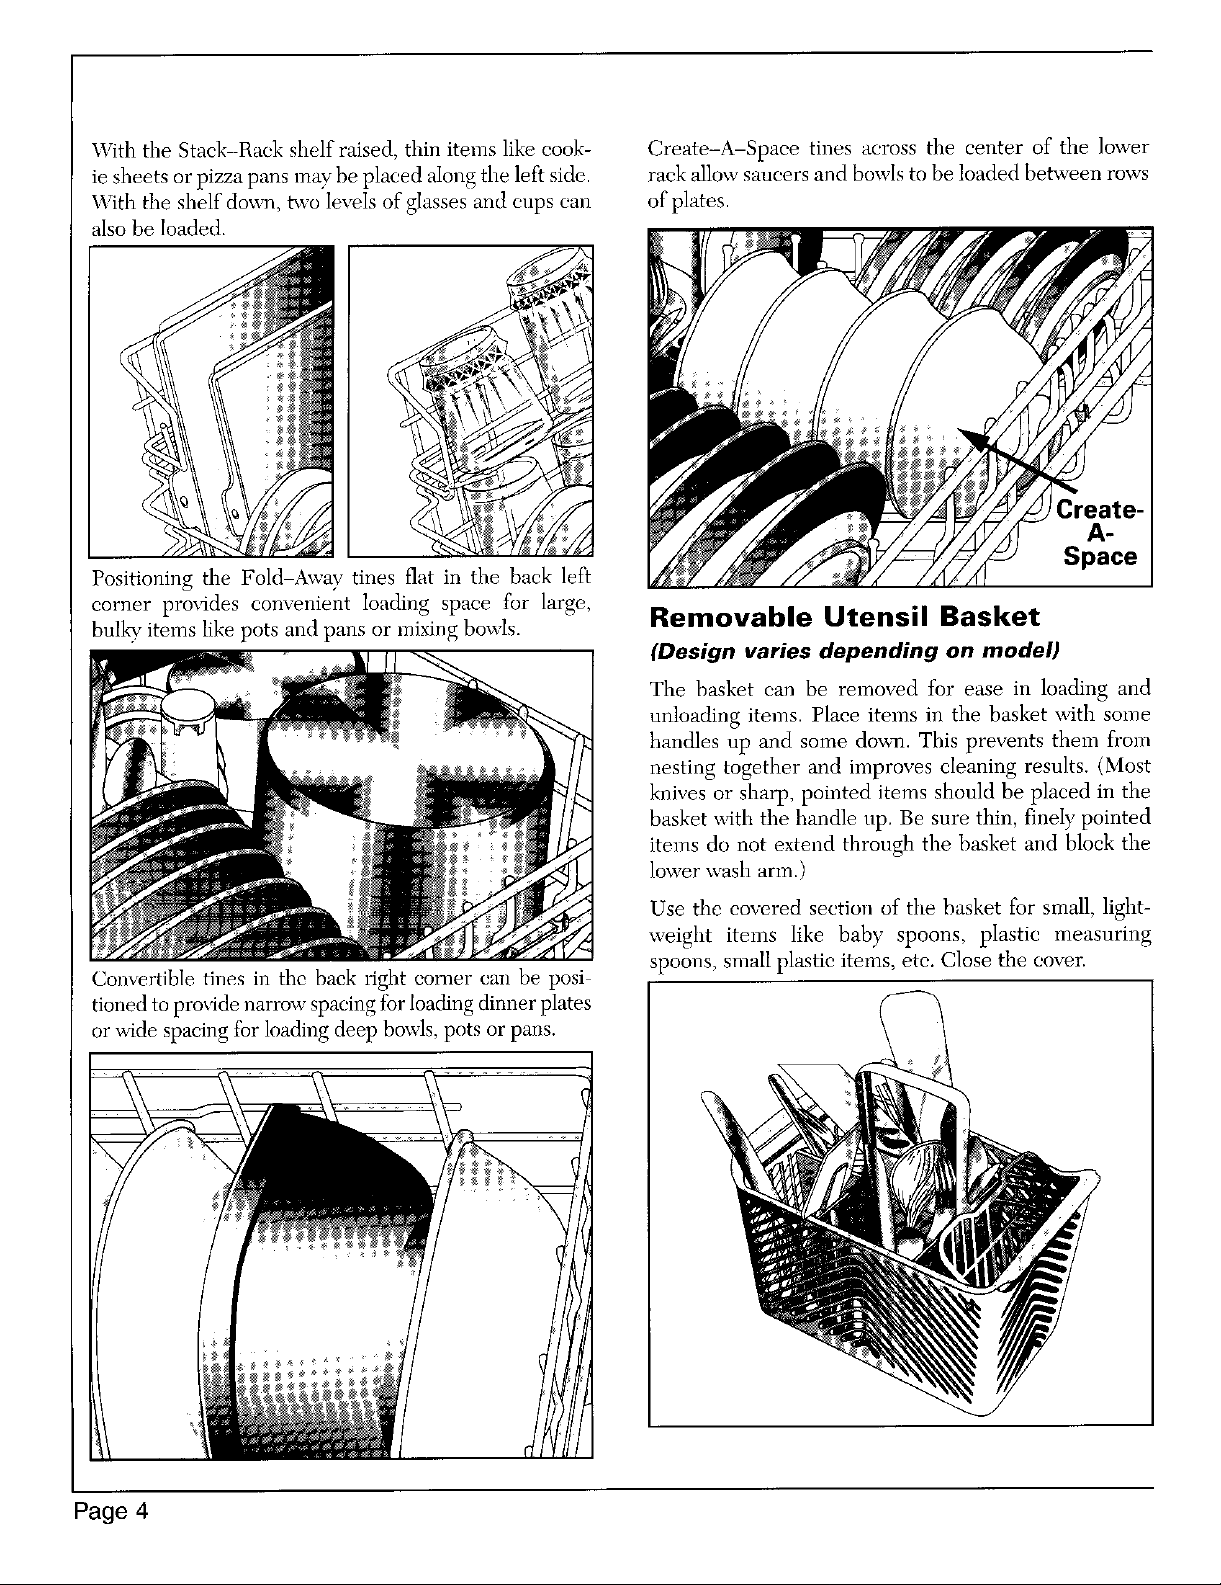
With the Stack-Rack shelf raised, thin items like cook- Create-A-Space tines across the center of the lower
ie sheets or pizza pans may be placed along the left side. rack allow saucers and bowls to be loaded between rows
With the shelf down, tnvo levels of glasses and cups can of plates.
also be loaded.
Create-
A-
Positioning the Fold-Away tines flat in the back left Space
corner proxides convenient loading space for large,
bulky items like pots and pans or mixing bowls. Removable Utensil Basket
(Design vanes depending on model)
The basket ean be removed for ease in loading and
unloading items. Place items in the basket \_dth some
handles up and some down. This prevents them from
nesting together and improves cleaning results. (Most
knives or sharp, pointed items should be placed in the
basket with the handle up. Be sure thin, finely pointed
items do not extend through the basket and block the
lower wash arm.)
Use the covered section of the basket for small, light-
weight items like baby spoons, plastic measuring
spoons, small plastic items, etc. Close the eover.
Convertible tines in the back right comer can be posi
tioned to provide narrow spacing tbr loading dinner plates
or wide spacing for loading deep bowls, pots or pans.
Page 4

ADDING DETERGENT
Use a deter_ent designed specifically for use in an auto- Detergent Placement _-
matic dishwasher. Be sure it is fresh and stored in a Acid detergent just before starting the cycle.
cool, dry place (not under the sink).
Nover--laun.."o,orgeo,ordishwashing detergent in your dishwasher as it I
will cause severe oversudslng and possible [
leaks. ] _'.
Recommended Amount l::
The amount of detergent to use depends on the water
hardness (measured in grains per gallon gpg) and
the amount of soil on the dishes. Too little detergent
results in poor cleaning, hard water filming and spot- _
ting and poor drying. Too much detergent causes per-
manent etching/cloudiness. _f_
As a rule, use 1 teaspoon of detergent per grain of water For Normal, Pots & Pans or Power Scrub cycles
hardness. Use a minimum of 3 teaspoons in soft water, place the recommended amount of detergent in both _"
Place the recommended amount of detergent in both the PRE WASH and MAIN WASH cups. Close the
cups for Normal and longer cycles. Do not divide the cover. The dishwasher automatically releases detergent.
recommended amount between the cups.
The following chart includes specific recommenda- A Light/China cycle requires detergent in the main
tions. (Refer to the package directions on concentrated wash cup (right side) only. Close the cover after adding
detergents.) detergent.
The Quiek Wash/Rinse cycle needs detergent in the
Water Hardness* Detergent Use
PRE WASH cup (left side) only. Close the cover after
Sof_ (0 3 gpg) 3 teaspoons adding detergent.
Medium (4 9 gpg) _9 teaspoons Rinse & Hold does not use detergent.
Hard (i0-12 gpg) 10 12 teaspoons
*Yourlocalwater utility or .stateuniversity extension ,service
carttell you the degree of water harzhwss in your area.
:i
For water hardness of 13-14 gpg add more detergent (1 o; _ o
teaspoon for each gpg) to the beginning of the main , : -
wash portion of the cycle. Unlatch the door. Open it
slowly and add detergent to the bottom of the tub. The
dishwasher will continue through the cycle.
If water hardness is 15 gpg or hardel; it is virtually
impossible to get good results with any dishwasher.
The only solution is a mechanical water softener to
improve water quality and detergent ettbetiveness.
Page 5
 Loading...