

Page 1
User Guide
English ( 2 – 8 )
Guía del usuario
Español ( 9– 15 )
Guide d'utilisation
Français ( 16 – 22 )
Guida per l'uso
Italiano ( 23 – 29 )
Benutzerhandbuch
Deutsch ( 30– 36 )
Appendix
English ( 37 – 39 )
Page 2
User Guide (English)
Introduction
Box Contents
M-Track Solo
USB-B–to–USB-A Cable
Software Download Cards
Support
For the latest information about this product (system requirements, compatibility
information, etc.) and product registration, visit m-audio.com.
For additional product support, visit m-audio.com/support.
User Guide
Safety & Warranty Manual
2
Page 3
Quick Start
macOS users: No driver installation is needed for class-compliant operation with M-
Track Solo.
iOS users: The power available from an iOS device is not sufficient to power M-Track
Solo. Use the Apple Camera Connection Kit (sold separately), a USB break-out cable
(sold separately), and a USB power adapter (sold separately) which will provide an
additional USB connector to power M-Track Solo.
Windows users: Before connecting M-Track Solo to your computer, install the drivers:
1. Go to m-audio.com/drivers and download the latest M-Track Solo driver for your
operating system.
2. Open the file you downloaded and double-click the driver installer file.
3. Follow the on-screen instructions to install the drivers.
Software: We've included Pro Tools | First M-Audio Edition and MPC Beats with your
M-Track Solo so you can get started making music with professional software right out
of the box. Register your M-Track Solo on m-audio.com/softwaredownload, and
follow the install instructions in your User Account.
Virtual Instruments: Follow the instructions in your user account for installing the
included virtual instrument plugins. After installation, most DAWs will not load virtual
instrument plugins automatically. In order to access the virtual instrument plugins with
Pro Tools | First M-Audio Edition, you will need to choose the plugin folder for the
software to scan:
Pro Tools | First M-Audio Edition (AAX) plugin folders:
Windows (32-bit): C:\Program Files (x86)\Common Files\Avid\Audio\Plug-Ins
Windows (64-bit): C:\Program Files\Common Files\Avid\Audio\Plug-Ins
macOS: Macintosh HD/Library/Application Support/Avid/Audio/Plug-Ins
3
Page 4
To set M-Track Solo as your default playback device, follow the directions below based
on your computer’s operating system.
Windows:
1. Use the included USB cable to connect the M-Track Solo to your computer.
2. In the Taskbar, locate the Volume Control "speaker" icon. Right-click the speaker
and open Sound Settings > Sounds.
Alternatively, go to Start Menu > System > Sound > Sound Control Panel.
3. In the Windows Sound control panel select the Playback tab and select USB
Audio Codec as the default device.
4. Click the Recording tab and select USB Audio Codec as the default device.
5. Click Properties in the lower right-hand corner.
6. In the new window, click the Advanced tab and select 2-channel, 24-bit, 48000 Hz
(Studio Quality) as the default format.
7. Uncheck both boxes under Exclusive Mode.
8. Click OK to close the Properties window.
9. Click OK to close the Sound control panel.
macOS:
1. Use the included USB cable to connect the M-Track Solo to your computer.
2. Go to Applications > Utilities > Audio MIDI Setup.
3. In the Audio Devices window, select USB Audio Codec in the left column.
4. Right-click USB Audio Codec, and select Use this device for sound input.
5. Right-click USB Audio Codec, and select Use this device for sound output.
6. Quit Audio MIDI Setup.
4
Page 5
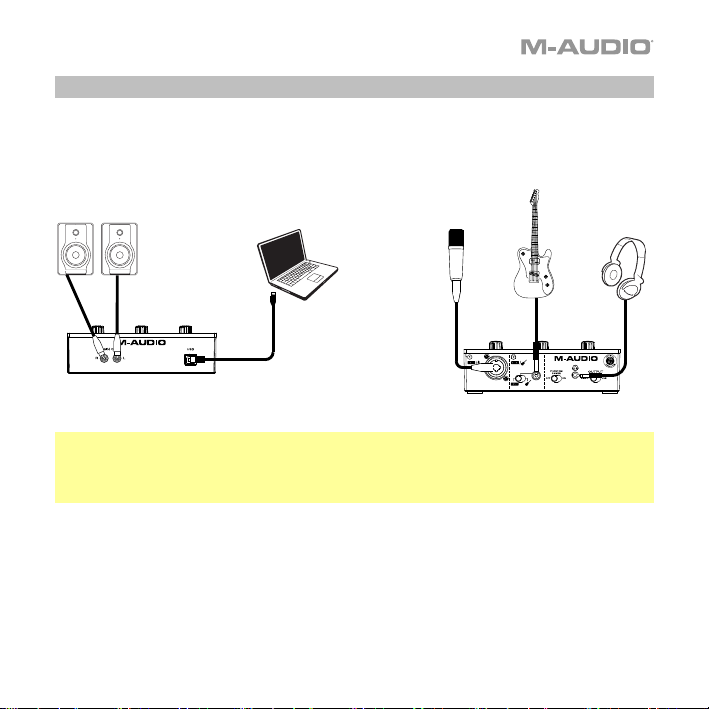
Connection Diagram
Items not listed under Introduction > Box Contents are sold separately.
Monitors
Computer
Microphone
Rear Panel
Note: Use the +48V (Phantom Power) Switch only if a microphone requires phantom
power. Most dynamic microphones and ribbon microphones do not require phantom
power, but most condenser microphones do. Consult your microphone's documentation
to find out whether it needs phantom power.
Guitar
Headphones
Front Panel
5
Page 6
Setting Up M-Track Solo with Your Software
Setting Up M-Track Solo with Pro Tools | First M-Audio Edition
1. Use the included USB cable to connect the M-Track Solo to your computer.
2. Open Pro Tools | First M-Audio Edition.
3. Go to Setup > Playback Engine….
4. Open the Playback Engine dropdown menu and select USB Audio Codec.
Note: You may need to save and restart your project.
5. Select your Sample Rate and then click OK to close the Setup window.
You can now add tracks to send and receive audio from sources connected to M-Track Solo
inputs and stream recorded audio back through the M-Track Solo outputs.
Setting Up M-Track Solo with MPC Beats
1. Use the included USB cable to connect the M-Track Solo to your computer.
2. Open MPC Beats.
3. Go to Edit > Preferences….
4. For Windows Users: In the Audio window, select ASIO under the Audio Device Type
dropdown menu. In the Device dropdown menu, select M-Track Solo and Duo ASIO.
For MacOS Users: In the Audio window, select USB Audio Codec under the Output and
Input dropdown menus.
Note: You may need to save and restart your project.
5. Select your Sample Rate and then click OK to close the Preferences window.
You can now add tracks to send and receive audio from sources connected to M-Track
Solo inputs and stream recorded audio back through the M-Track Solo outputs.
6
Page 7
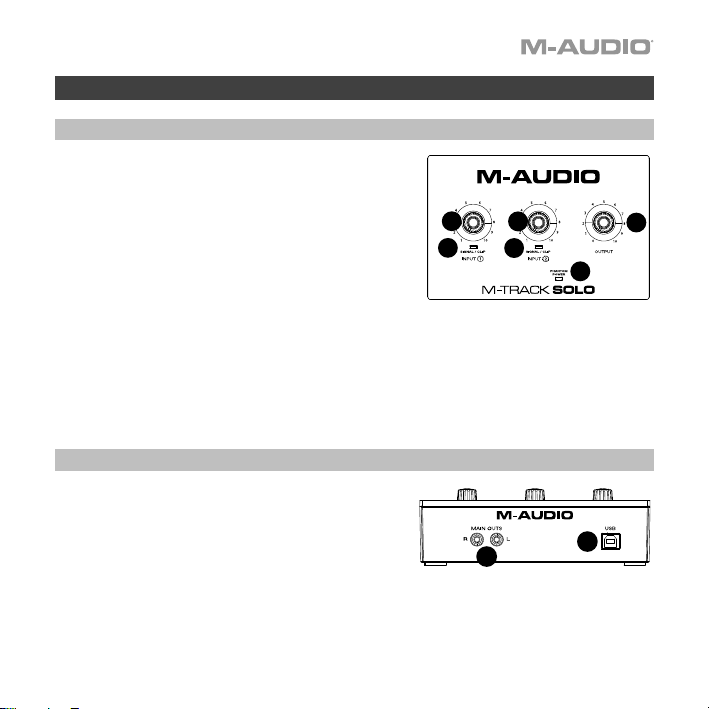
Features
Top Panel
1. Input Gain: Adjusts the input's gain level. Set this
knob so the corresponding Signal/Clip LED
(located below the knob) displays a "healthy" level
during performance—but not so high that the LED
"clips" or peaks, causing distortion in the audio.
2. Signal/Clip LED: The LED will light up green
when an input signal is detected. The LED will
light up red if the signal level is too high which
may cause distortion or “clipping”. If this occurs,
turn down the Input Gain and/or reduce the
output level from your sound source.
3. Monitor Level: Adjusts the output volume of the Main Outputs, which should be
connected to your powered monitors or amplifier system, and the Headphone Output.
4. +48V (Phantom Power) LED: This lights up when phantom power is engaged for use
with the Combo Input.
Rear Panel
1. USB Port (Type B): This connection will allow
you to send audio to and from a computer. Use
the included USB-B-to-USB-A cable to connect
the M-Track Solo to a computer. The M-Track
Solo requires a USB 2.0 connection (or higher).
2. Main Outputs: Use standard RCA cables to connect these outputs to your powered
monitors, amplifier system, etc. The mix you hear from these outputs will be determined
by the Direct/USB Switch. The level of these outputs is controlled by the Monitor Level
knob.
1
2
1
3
2
4
2
1
7
Page 8
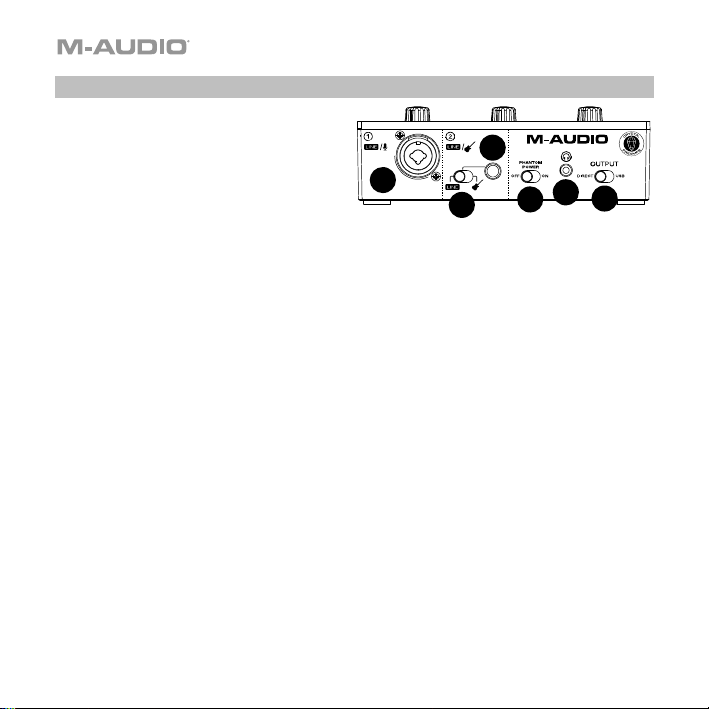
Front Panel
1. Combo Input: Connect a microphone,
a guitar or bass with an active pickup,
or a line-level device to this input. For
microphones, use an XLR or 1/4” (6.35
mm) TRS cable. For a guitar or bass
with an active pickup, use a standard
1/4” (6.35 mm) TS cable.
2. 1/4" Input: For line-level signals, use a 1/4" (6.35 mm) TRS cable. For a guitar or bass
with an active pickup, use a standard 1/4” (6.35 mm) TS cable.
3. Line/Instrument Switch: Set the switch to Line when connecting a microphone, or
keyboard. Set the switch to Instrument when connecting a guitar or bass.
4. +48V (Phantom Power) Switch: This switch activates and deactivates phantom power.
When activated (lit), phantom power supplies +48 volts to the Combo Input. Please note
that most dynamic microphones and ribbon microphones do not require phantom
power, while most condenser microphones do. Consult your microphone's
documentation to find out whether it needs phantom power.
5. Headphone Output: Connect 1/8" (3.5 mm) TRS headphones to this output. The mix
you hear from this output will be determined by the Direct/USB Switch. The level of this
output is controlled by the Monitor Level knob.
6. Direct/USB: This switch controls whether or not the direct input signal or the USB
stream return signal is sent to the Headphone Output and Main Outputs.
• When set to USB, only the USB audio playback from your computer will be heard.
• Set the switch to Direct to monitor the direct input signal with all inputs summed to
mono and heard equally on each side. This is useful for monitoring a guitar or vocal
mic signal. This switch does not affect the DAW playback or how your sound is
recorded into your DAW; it only affects how you hear the input signal in the
Headphone Output and Main Outputs.
1
2
5
1
3
4
6
8
Page 9
Guía del usuario (Español)
Introducción
Contenido de la caja
M-Track Solo
Cable USB-B-a-USB-A
Tarjetas de descarga de software
Soporte
Para obtener la información más completa acerca de este product (los requisitos del sistema,
compatibilidad, etc) y registro del producto, visite m-audio.com.
Para soporte adicional del producto, visite m-audio.com/support.
Guía del usuario
Manual sobre la seguridad y garantía
9
Page 10
Conexión rápida
Usuarios de macOS: no se necesita la instalación del controlador para una operación
compatible con la clase con M-Track Solo.
Usuarios de iOS: la potencia disponible desde un dispositivo iOS no es suficiente para
alimentar M-Track Solo. Utilice el Kit de conexión de cámara de Apple (se vende por
separado), un cable de conexión USB (se vende por separado) y un adaptador de
alimentación USB (se vende por separado) que proporcionará un conector USB adicional para
alimentar M-Track Solo.
Usuarios de Windows: Antes de conectar el M-Track Solo a su computadora, instale los
drivers:
1. Vaya a m-audio.com/drivers y descargue el driver M-Track Solo más reciente para su
sistema operativo.
2. Abra el archivo que descargó y haga doble clic en el archivo instalador del driver.
3. Siga las instrucciones de la pantalla para instalar los drivers.
Software: Hemos incluido Pro Tools | First M-Audio Edition y MPC Beats con su M-Track Solo
de modo que puede comenzar a hacer música con software profesional en cuanto lo saca de
la caja. Registre su M-Track Solo en m-audio.com/softwaredownload y siga las
instrucciones de instalación en su Cuenta de usuario.
Instrumentos virtuales: Siga las instrucciones en su cuenta de usuario para instalar los
complementos de instrumentos virtuales incluidos. Tras la instalación, muchos DAW no
cargarán plugins de instrumentos virtuales de forma automática. A fin de acceder a los plugins
de instrumentos virtuales con Pro Tools | First M-Audio Edition, deberá seleccionar la carpeta
con plugins para que el software explore:
Carpetas de plugins de Pro Tools | First M-Audio Edition (AAX):
Windows (32-bit): C:\Program Files (x86)\Common Files\Avid\Audio\Plug-Ins
Windows (64-bit): C:\Program Files\Common Files\Avid\Audio\Plug-Ins
macOS: Macintosh HD/Library/Application Support/Avid/Audio/Plug-Ins
10
Page 11
Para configurar el M-Track Solo como dispositivo de reproducción predeterminado, siga las
indicaciones que se incluyen a continuación sobre la base del sistema operativo de su ordenador.
Windows:
1. Utilice el cable USB incluido para conectar el M-Track Solo a su ordenador.
2. Localice en la barra de tareas el icono del "altavoz" del control de volumen. Haga clic derecho
en el altavoz y abierto Ajustes de sonido > Sonidos.
Como alternativa, haga clic en Start Menu (menú Inicio) System > Sound > Sound Control
Panel (Sistema > Sonido > Panel de control de sonido).
3. En el panel de control Windows Sound (Sonido de Windows), seleccione la pestaña Playback
(Reproducción) y seleccione USB Audio Codec como dispositivo predeterminado.
4. Haga clic en la pestaña Recording (Grabación) y seleccione USB Audio Codec como
dispositivo predeterminado.
5. Haga clic en Properties (Propiedades) en la esquina inferior derecha.
6. En la nueva ventana, haga clic en la pestaña Advanced (Avanzadas) y seleccione 2-channel, 24-
bit, 48000 Hz (Studio Quality) (2 canales, 24 bits, 48000 Hz, calidad de estudio) como formato
predeterminado.
7. Deshaga la selección de las dos casillas que están bajo Exclusive Mode (Modo exclusivo).
8. Haga clic en OK (Aceptar) para cerrar la ventana de propiedades.
9. Haga clic en OK (Aceptar) para cerrar el panel de control de sonido.
macOS:
1. Utilice el cable USB incluido para conectar el M-Track Solo a su ordenador.
2. Vaya a Applications > Utilities > Audio MIDI Setup (Aplicaciones > Utilidades > Configuración
MIDI de audio).
3. En la ventana Audio Devices (Dispositivos de audio), seleccione USB Audio Codec en la
columna izquierda.
4. Haga clic derecho en USB Audio Codec y seleccione Use this device for sound input (Utilizar
este dispositivo para la entrada de sonido).
5. Haga clic derecho en USB Audio Codec y seleccione
este dispositivo para la salida de sonido).
6. Salga de la configuración MIDI de audio.
Use this device for sound output (Utilizar
11
Page 12
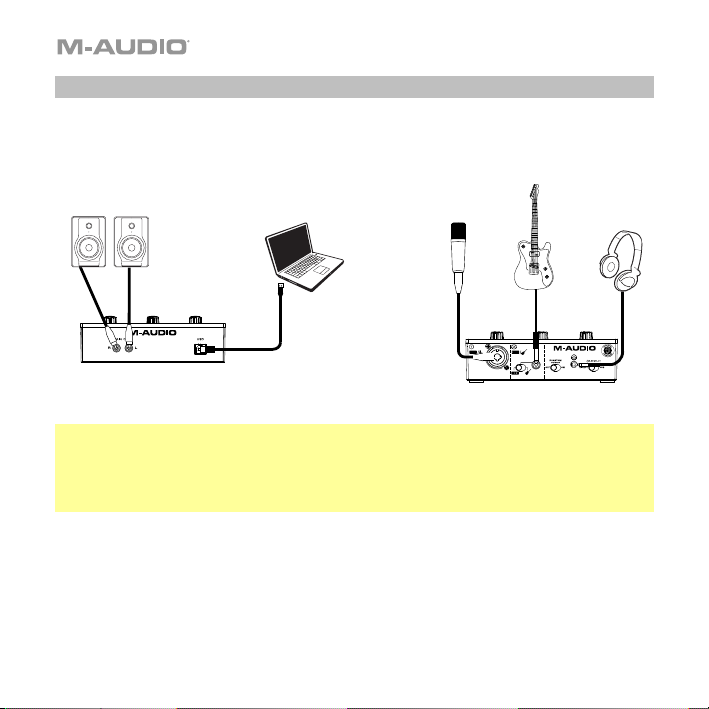
Diagrama de instalación
Los elementos que no se enumeran en Introducción > Contenido de la caja se venden
por separado.
Monitores alimentados
Computadora
Micrófono
Panel trasero
Nota: Utilice el interruptor +48 V (potencia fantasma) solamente si un micrófono
requiere potencia fantasma. Más dinámicos y de cinta micrófonos no requieren
alimentación fantasma, mientras que la mayoría de los micrófonos de condensador la
requieren. Consulte la documentación de su micrófono para averiguar si necesita
alimentación fantasma.
Guitarra
Auriculares
Panel frontal
12
Page 13

Configuración del M-Track Solo con su software
Para configurar el M-Track Solo con Pro Tools | First M-Audio Edition
1. Use el cable USB incluido para conectar el M-Track Solo a su ordenador.
2. Abra Pro Tools | First M-Audio Edition.
3. Vaya a Setup > Playback Engine… (Configuración > Motor de reproducción).
4. Abra el menú desplegable Playback Engine y seleccione USB Audio Codec.
Nota: Es posible que tenga que guardar y reiniciar su proyecto.
5. Seleccione su Sample Rate (Tasa de muestreo) y luego haga clic en OK para cerrar la
ventana de configuración.
Ahora puede añadir pistas para enviar y recibir audio desde las fuentes conectadas a las
entradas del M-Track Solo y transmitir el audio grabado de regreso por las salidas del M-Track
Solo.
Instalación del M-Track Solo con MPC Beats
1. Utilice el cable USB incluido para conectar el M-Track Solo a su ordenador.
2. Abra MPC Beats.
3. Vaya a Edit > Preferences….
4. Para usuarios de Windows: En la ventana de audio, seleccione ASIO dentro del menú
desplegable Audio Device Type. Dentro del menú desplegable Device, seleccione M-
Track Solo and Duo ASIO.
Para usuarios de MacOS: En la ventana Audio, seleccione USB Audio Codec dentro de
los menús desplegables Output e Input.
Nota: Es posible que tenga que guardar y reiniciar su proyecto.
5. Seleccione su Sample Rate (Tasa de muestreo) y luego haga clic en OK para cerrar la
ventana Preferencias. Ahora puede agregar pistas para enviar y recibir audio desde
fuentes conectadas a las entradas del M-Track Solo y transmitir audio grabado de regreso
a través de las salidas del M-Track Solo.
13
Page 14

Características
Panel superior
1. Ganancia de entrada: Ajusta el nivel de ganancia de la
entrada. Ajuste esta perilla de manera que el LED de
señal / clip correspondiente (ubicado debajo de la
perilla) muestre un nivel "saludable" durante la
ejecución—pero no tan alto que el LED "recorte" o
llegue al pico, causando distorsiones en el audio.
2. LED de señal / clip: El LED se iluminará en verde
cuando se detecte una señal de entrada. El LED se
iluminará en rojo si el nivel de señal es demasiado alto,
lo que puede causar distorsión o "recorte". Si esto
ocurre, baje la ganancia de entrada y / o reduzca el
nivel de salida de su fuente de sonido.
3. Nivel de monitoreo: Ajusta el volumen de salida de las salidas salidas principales (Main
Outputs), las cuales deberían estar conectadas a monitores alimentados o a un sistema
de amplificación, y la salida de auriculares.
4. LED de phantom power: Se enciende cuando se acopla la alimentación fantasma para
usar con la entrada combinada.
Panel trasero
1. Puerto USB (tipo B): Esta conexión le permitirá
enviar audio hacia o desde un ordenador. Utilice los
cable USB-B–a–USB-A para conectar el M-Track
Solo a un ordenador. El M-Track Solo requiere una
conexión USB 2.0 (o superior).
2. Salidas principales: Utilice cables RCA para conectar estas salidas a sus monitores
alimentados, sistema de amplificación, etc. La mezcla que escuche por estas salidas es
determinada por la Interruptor Direct/USB. El nivel de estas salidas está controlado por
la perilla nivel de monitor (Monitor Level).
14
1
1
2
2
3
4
2
1
Page 15

Panel frontal
1. Entrada combinada: Conecte un micrófono,
guitarra o bajo con captador activo o un
dispositivo de nivel de línea a esta entrada.
Para micrófonos, utilice un cable XLR o TRS de
6,35 mm (1/4 pulg.).
2. Entrada de 1/4": para señales de nivel de
línea, use un cable TRS de 1/4" (6.35 mm).
Para una guitarra o bajo con una pastilla activa,
use un cable TS estándar de 1/4” (6.35 mm).
3. Interruptor de línea / instrumento: configure el interruptor en Línea cuando conecte un
micrófono, o teclado. Ajuste el interruptor a Instrumento cuando conecte una guitarra o bajo.
4. Interruptor +48V (potencia fantasma): Este interruptor activa y desactiva la potencia fantasma
para las entradas combinadas. Al activarse, la potencia fantasma proporciona +48 voltios a las
entradas XLR de los micrófonos. Tenga en cuenta que más dinámicos y de cinta micrófonos no
requieren alimentación fantasma, mientras que la mayoría de los micrófonos de condensador la
requieren. Consulte la documentación de su micrófono para averiguar si necesita alimentación
fantasma.
5. Salida para auriculares: Conecte auriculares estéreo de 1/8 pulg. (3,5 mm) a esta salida. La
mezcla que escuche por eta salida es determinada por la Interruptor Direct/USB. El nivel de
esta señal de salida está controlado por la perilla nivel de monitoreo (Monitor Level).
6. Interruptor Direct/USB: Este interruptor controla si la señal de entrada directa o la señal de
retorno de flujo USB se envían o no a la salida de auriculares y a las salidas principales.
• Cuando se establece en USB, solo se escuchará la reproducción de audio USB desde su
computadora.
• Ajuste el interruptor en Directo para monitorear la señal de entrada directa con todas las
entradas sumadas a mono y escuchadas por igual en cada lado. Esto es útil para monitorear
una guitarra o una señal de micrófono vocal. Este interruptor no afecta la reproducción DAW
o cómo se graba su sonido en su DAW; solo afecta la forma en que escucha la señal de
entrada en la salida de auriculares y las salidas principales.
1
2
5
1
3
4
6
15
Page 16

Guide d'utilisation (Français)
Présentation
Contenu de la boîte
M-Track Solo Guide d'utilisation
Câble USB-B-à-USB-A
Cartes de téléchargement de logiciel
Assistance
Pour les dernières informations concernant ce produit (la configuration système
minimale requise, la compatibilité, etc) et l’enregistrement du produit, veuillez visitez le
site m-audio.com.
Pour toute assistance supplémentaire, veuillez visiter le site m-audio.com/support.
Consignes de sécurité et informations
concernant la garantie
16
Page 17

Utilisation rapide
Utilisateurs de macOS : aucune installation de pilote n'est nécessaire pour un fonctionnement
conforme à la classe avec M-Track Solo.
Utilisateurs iOS : la puissance disponible à partir d'un appareil iOS n'est pas suffisante pour
alimenter M-Track Solo. Utilisez le kit de connexion d'appareil photo Apple (vendu séparément), un
câble de dérivation USB (vendu séparément) et un adaptateur d'alimentation USB (vendu
séparément) qui fourniront un connecteur USB supplémentaire pour alimenter M-Track Solo.
Utilisateurs de Windows : Avant de brancher l'M-Track Solo à votre ordinateur pour la première
fois, vous devez installer les pilotes :
1. Veuillez visiter m-audio.com/drivers et télécharger le dernier pilote M-Track Solo pour votre
système d'exploitation.
2. Ouvrez le fichier téléchargé, puis double-cliquez sur le fichier d'installation du pilote.
3. Suivez les instructions à l’écran pour installer les pilotes.
Logiciel : Nous avons inclus l’application Pro Tools | First M-Audio Edition et MPC Beats avec
l'M-Track Solo afin que vous puissiez commencer à créer de la musique avec un logiciel de qualité
professionnelle aussitôt que vous le sortez de la boîte. Veuillez enregistrer l'M-Track Solo sur le site
m-audio.com/softwaredownload et suivre les instructions d’installation à partir de votre compte
utilisateur.
Instruments virtuels : Veuillez suivre les instructions de votre compte utilisateur pour installer les
plug-ins d'instruments virtuels. La plupart des logiciels audionumériques ne chargent pas
automatiquement les plug-ins d'instruments virtuels après l’installation. Afin d’accéder aux plug-ins
d'instruments virtuels à partir de Pro Tools | First M-Audio Edition, vous devez sélectionner le dossier
des plug-ins afin que le logiciel puisse y accéder :
Dossiers des plug-ins Pro Tools | First M-Audio Edition (AAX) :
Windows (32 bits) : C:\Fichiers de programme (x86)\Fichiers communs\Avid\Audio\Plug-ins
Windows (64 bits) : C:\Fichiers de programme\Fichiers communs\Avid\Audio\Plug-ins
macOS : Macintosh HD/Bibliothèque/Application Support/Avid/Audio/Plug-ins
17
Page 18

Pour définir le M-Track Solo comme périphérique de lecture par défaut, veuillez suivre les instructions
ci-dessous, selon le système d'exploitation de votre ordinateur.
Windows :
1. Utilisez le câble USB inclus pour brancher le M-Track Solo à votre ordinateur.
2. Dans la barre des tâches, recherchez l’icône de la commande de volume (haut-parleur). Faites
un clic droit sur l'icône du haut-parleur et ouvrir Paramètres son> Sons.
Vous pouvez également cliquer sur Démarrer > System > Sound > Sound Control Panel
(Système > Son > Panneau de configuration du son).
3. Dans le panneau de configuration Son, sélectionnez l'onglet Lecture, puis sélectionnez
USB Audio Codec comme le périphérique par défaut.
4. Cliquez sur l'onglet Enregistrement et sélectionnez USB Audio Codec comme appareil par
défaut.
5. Cliquez sur Propriétés dans le coin inférieur droit.
6. À partir de la nouvelle fenêtre, cliquez sur l'onglet Advancé et sélectionnez l'option 2 canaux, 24
bits, 48 000 Hz (Qualité CD) comme le format par défaut.
7. Décochez les deux options sous Mode exclusif.
8. Cliquez OK pour fermer la fenêtre Propriétés.
9. Cliquez OK pour fermer le panneau de configuration Son.
macOS :
1. Utilisez le câble USB inclus pour brancher le M-Track Solo à votre ordinateur.
2. Allez à Applications > Utilitaires > Configuration audio et MIDI.
3. Dans la fenêtre Périphériques audio qui s'affiche, sélectionnez USB Audio Codec dans la
fenêtre de gauche.
4. Faite un clic droit sur USB Audio Codec et sélectionnez Utiliser ce périphérique pour l'entrée
audio.
5. Faite un clic droit sur USB Audio Codec et sélectionnez Utiliser ce périphérique pour la sortie
audio.
6. Quitter le menu de Configuration audio et MIDI.
18
Page 19

Schéma de connexion
Les éléments qui ne figurent pas dans la section Présentation > Contenu de la boîte
sont vendus séparément.
Moniteurs amplifiés
Ordinateur
Microphone
Panneau arrière
Important : Utiliser la touche d'alimentation fantôme (+48V) uniquement lorsqu’un
microphone nécessite une alimentation fantôme. Veuillez noter que les microphones
électrodynamiques et à ruban ne nécessitent pas d'alimentation fantôme, alors que les
microphones à condensateur en ont besoin. Veuillez consulter la documentation fournie
avec votre microphone pour savoir si vous devez utiliser l'alimentation fantôme.
Guitare
Casque
d'écoute
Panneau avant
19
Page 20

Configuration de l'M-Track Solo pour votre logiciel
Pour configurer l'M-Track Solo pour Pro Tools | First M-Audio Edition
1. Utilisez le câble USB fourni pour brancher l'M-Track Solo à votre ordinateur.
2. Lancez le logiciel Pro Tools | First M-Audio Edition.
3. Ouvrez le menu Setup > Playback Engine….
4. Ouvrez le menu déroulant Playback Engine et sélectionnez USB Audio Codec.
Remarque : Il se peut que vous ayez à sauvegarder et à relancer votre projet.
5. Sélectionnez la fréquence d'échantillonnage, puis cliquez sur OK pour fermer la fenêtre
Setup.
Vous pouvez maintenant ajouter des pistes et recevoir un signal audio des sources branchées
aux entrées de l'M-Track Solo et transmettre en continu des fichiers par le biais des sorties de
l'M-Track Solo.
Installation de M-Track Solo avec MPC Beats
1. Utilisez le câble USB fourni pour brancher l’interface M-Track Solo à votre ordinateur.
2. Lancez MPC Beats.
3. Cliquez sur Edit > Preferences….
4. Pour les utilisateurs Windows : Dans la fenêtre Audio, sélectionnez ASIO dans le menu
déroulant Audio Device Type. Dans le menu déroulant Device, sélectionnez M-Track
Solo and Duo ASIO.
Pour les utilisateurs de MacOS : Dans la fenêtre Audio, sélectionnez USB Audio Codec
dans les menus déroulants Output et Input.
Remarque : Il se peut que vous ayez à sauvegarder et à redémarrer votre projet.
5. Sélectionnez le taux d’échantillonnage dans le champ Sample Rate, puis cliquez sur OK
pour fermer la fenêtre des préférences. Vous pouvez maintenant ajouter des pistes pour
transmettre et recevoir de l'audio à partir de sources reliées aux entrées de la M-Track
Solo et retransmettre l'audio enregistré via les sorties
20
de la M-Track Solo.
Page 21

Caractéristiques
Panneau supérieur
1. Gain d’entrée : Ces boutons permettent d'ajuster le niveau
de gain du signal d’entrée. Réglez ces boutons afin que le
LED signal / clip correspondant affiche un niveau
« raisonnable » durant la prestation — mais pas si élevé que
le LED écrête, ajoutant de la distorsion dans le signal.
2. LED signal / clip : La LED s'allume en vert lorsqu'un signal
d'entrée est détecté. La LED s'allume en rouge si le niveau
du signal est trop élevé, ce qui peut provoquer une distorsion
ou un «écrêtage». Dans ce cas, diminuez le gain d'entrée et
/ ou réduisez le niveau de sortie de votre source sonore.
3. Bouton moniteur : Ce bouton permet de régler le volume des sorties principales reliées à des
moniteurs amplifiés ou à un système d’amplification, et la sortie casque.
4. DEL de phantom power (alimentation fantôme) : S'allume lorsque l'alimentation fantôme à
utiliser avec l'entrée combo.
Panneau arrière
1. Port USB (type B) : Cette connexion permet de transmettre et
de recevoir des signaux audio vers et depuis un ordinateur.
Utilisez le câble USB-B–vers–USB-A fourni pour brancher l'MTrack Solo à un ordinateur. L'M-Track Solo requiert une
connexion USB 2.0 (ou version ultérieure).
2. Sorties principales : Utilisez des câbles RCA pour relier ces sorties à vos moniteurs amplifiés, à
un système d’amplification, etc. Le mix que vous entendez via ces sorties est déterminé par le
interrupteur Direct/USB. Le niveau de ces sorties est commandé par le bouton moniteur.
1
1
2
2
3
4
2
1
21
Page 22

Panneau avant
1. Entrée combo : Cette entrée permet de brancher
un microphone, une guitare ou une basse avec un
micro actif, ou un appareil à niveau ligne. Pour
brancher un microphone, utilisez un câble XLR ou
TRS 6,35 mm.
2. Entrée 1/4" : pour les signaux de niveau ligne,
utilisez un câble TRS 1/4" (6,35 mm). Pour une
guitare ou une basse avec un micro actif, utilisez
un câble TS 1/4” (6,35 mm) standard.
3. Commutateur Line / Instrument : réglez le commutateur sur Line lorsque vous connectez un
microphone, ou un clavier. Réglez le commutateur sur Instrument lorsque vous connectez une
guitare ou une basse.
4. Alimentation fantôme : Cette touche permet d’activer et de désactiver l'alimentation fantôme
de l’entrée combo. Lorsqu'elle est activée (allumée), l’alimentation fantôme fournit +48 volts à
l’entrée micro XLR. Veuillez noter que la plupart des microphones électrodynamiques et
microphones à ruban ne nécessitent pas d’alimentation fantôme, alors que les microphones à
condensateur en ont besoin. Veuillez consulter la documentation fournie avec votre microphone
pour savoir si vous devez utiliser l'alimentation fantôme.
5. Sortie casque : Cette sortie permet de brancher un casque d’écoute TRS 3,5 mm (1/8”). Le mix
que vous entendez via cette sortie est déterminé par le interrupteur Direct/USB. Le niveau de
cette sortie est commandé par le bouton du moniteur.
6. Interrupteur Direct/USB: Ce commutateur contrôle si le signal d'entrée direct ou le signal de
retour de flux USB est envoyé ou non à la sortie casque et aux sorties principales.
• Lorsqu'il est réglé sur USB, seule la lecture audio USB de votre ordinateur sera entendue.
• Réglez le commutateur sur Direct pour surveiller le signal d'entrée direct avec toutes les
entrées sommées en mono et entendues de manière égale de chaque côté. Ceci est utile
pour contrôler un signal de guitare ou de micro vocal. Ce commutateur n'affecte pas la
lecture DAW ou la façon dont votre son est enregistré dans votre DAW; il affecte
uniquement la façon dont vous entendez le signal d'entrée dans la sortie casque et les
sorties principales.
1
22
2
5
4
1
3
6
Page 23

Guida per l'uso (Italiano)
Introduzione
Contenuti della confezione
M-Track Solo
Cavo USB-B-a-USB-A
Schede di download del software
Assistenza
Per conoscere le ultime informazioni in merito a questo prodotto (i requisiti di sistema
complete, compatibilità, ecc) e per la registrazione del prodotto, recarsi alla pagina
m-audio.com.
Per ulteriore assistenza, recarsi alla pagina m-audio.com/support.
Guida per l'uso
Istruzioni di sicurezza e garanzia
23
Page 24

Inizio rapido
Utenti macOS: non è necessaria l'installazione di driver per operazioni conformi alla
classe con M-Track Solo.
Utenti iOS: la potenza disponibile da un dispositivo iOS non è sufficiente per alimentare
M-Track Solo. Usa il kit di connessione fotocamera Apple (venduto separatamente), un
cavo USB breakout (venduto separatamente) e un adattatore di alimentazione USB
(venduto separatamente) che fornirà un connettore USB aggiuntivo per l'alimentazione
M-Track Solo.
Utenti Windows: Prima di collegare l'M-Track Solo computer, installare i driver:
1. Recarsi alla pagina m-audio.com/drivers e scaricare i più recenti driver del M-
Track Solo per il proprio sistema operativo.
2. Aprire il file scaricato e fare doppio clic sul file di installazione dei driver.
3. Seguire le istruzioni su schermo per installare i driver.
Software: Con l'M-Track Solo abbiamo incluso il Pro Tools | First M-Audio Edition e
MPC Beats in modo da consentirvi di iniziare immediatamente a fare musica con
software professionale. Registrare l’M-Track Solo su m-audio.com/softwaredownload,
e seguire le istruzioni di installazione nel proprio Account utente.
Virtual Instruments: seguire le istruzioni nel proprio account utente per installare i plugin dello strumento virtuale forniti. Dopo l’installazione, la maggior parte dei DAW non
caricherà i plugin Virtual Instrument automaticamente. Per accedere ai plugin Virtual
Instrument con Pro Tools | First M-Audio Edition, bisogna scegliere la cartella plugin per
il software da scansionare:
Pro Tools | First M-Audio Edition (AAX) cartelle plugin:
Windows (32-bit): C:\Program Files (x86)\Common Files\Avid\Audio\Plug-Ins
Windows (64-bit): C:\Program Files\Common Files\Avid\Audio\Plug-Ins
macOS: Macintosh HD/Library/Application Support/Avid/Audio/Plug-Ins
24
Page 25

Per configurare l’M-Track Solo come dispositivo di riproduzione predefinito, seguire le indicazioni
seguenti, basandosi sul proprio sistema operativo.
Windows:
1. Servirsi del cavo USB in dotazione per collegare l’M-Track Solo al computer.
2. Nella Barra delle applicazioni, individuare l'icona "Speaker" di controllo del Volume. Fare clic col
tasto destro del mouse e aperto Impostazioni audio> Suoni.
Cliccare sul menu Start > Pannello di controllo (o Impostazioni > Pannello di controllo nella
vista Classica) > Hardware e suoni > Suoni (Sistema > Audio > Pannello di controllo audio).
3. Nel pannello di controllo Audio di Windows selezionare la scheda Riproduzione e selezionare
USB Audio Codec come dispositivo predefinito.
4. Cliccare sulla scheda Registrazione e selezionare USB Audio Codec come periferica
predefinita.
5. Cliccare su Proprietà nell’angolo inferiore destro.
6. Nella nuova finestra, cliccare sulla scheda Avanzate e selezionare 2 canali, 24-bit, 48000 Hz
(qualità da Studio) come formato predefinito.
7. Togliere il segno di spunta da entrambe le caselle in Modalità esclusiva.
8. Cliccare su OK per chiudere la finestra Proprietà.
9. Cliccare su OK per chiudere il pannello di controllo Audio.
macOS:
1. Servirsi del cavo USB in dotazione per collegare l’M-Track Solo al computer.
2. Recarsi su Applicazioni > Utilità > Audio MIDI Setup.
3. Nella finestra Audio Devices (dispositivi audio), selezionare M-Track Solo nella colonna
sinistra.
4. Fare clic col tasto destro su USB Audio Codec e selezionare Use this device for sound input
(utilizza questo dispositivo per ingresso audio).
5. Fare clic col tasto destro su USB Audio Codec e selezionare Use this device for sound output
(utilizza questo dispositivo per uscita audio).
6. Lasciare Audio MIDI Setup.
25
Page 26

Schema dei collegamenti
Elementi non elencati sotto Introduzione > Contenuti della confezione sono venduti
separatamente.
Monitor
Computer
Microfono
Pannello posteriore
Importante: Servirsi dell'interruttore +48V (l’alimentazione phantom) solo se un
microfono richiede l'alimentazione phantom. La maggior parte microfoni dinamici e i
microfoni a nastro non richiedono alimentazione phantom, mentre la maggior parte dei
microfoni a condensatore sì. Consultare la documentazione del microfono per scoprire
se necessita di alimentazione phantom o meno.
Chitarra
Cuffie
Pannello anteriore
26
Page 27

Configurazione dell’M-Track Solo con il Software
Per configurare l’M-Track Solo con Pro Tools | First M-Audio Edition
1. Servirsi del cavo USB in dotazione per collegare l’M-Track Solo al computer.
2. Aprire Pro Tools | First M-Audio Edition.
3. Recarsi su Setup > Playback Engine….
4. Aprire il menu a discesa Playback Engine e selezionare USB Audio Codec.
Nota bene: può essere necessario salvare e riavviare il progetto.
5. Selezionare la Frequenza di campionamento e cliccare su OK per chiudere la finestra di
configurazione (Setup).
È ora possibile aggiungere tracce per inviare e ricevere audio dalle fonti collegate agli ingressi
dell’M-Track Solo e inviare lo streaming dell’audio registrato attraverso le uscite dell’M-Track
Solo.
Configurazione dell’M-Track Solo con MPC Beats
1. Servirsi del cavo USB in dotazione per collegare l'M-Track Solo al computer.
2. Aprire MPC Beats.
3. Recarsi su Edit > Preferences….
4. Per utenti Windows: Nella finestra Audio, selezionare ASIO nel menu a discesa Audio
Device Type. Nel menu a discesa Device selezionare M-Track Solo and Duo ASIO.
Per utenti MacOS: Nella finestra Audio, selezionare USB Audio Codec sotto i menu a
discesa Output e Input.
Nota bene: può essere necessario salvare e riavviare il progetto.
5. Selezionare la Sample Rate e quindi fare clic su OK per chiudere la finestra Preferences.
È ora possibile aggiungere tracce per inviare e ricevere audio dalle fonti collegate agli
ingressi dell’M-Track Solo e inviare lo streaming dell’audio registrato attraverso le uscite
dell’M-Track Solo.
27
Page 28

Caratteristiche
Pannello superiore
1. Gain d'ingresso: regola il livello di guadagno degli
ingressi. Impostare questa manopola in modo che il
corrispondente LED segnale / clip mostri a LED un
livello "sano" durante le esibizioni, ma non un livello
tale da provocare "salti" o picchi, causando
distorsione dell'audio.
2. LED segnale / clip: Il LED si illumina in verde quando
viene rilevato un segnale di ingresso. Il LED si
accenderà in rosso se il livello del segnale è troppo
alto, il che potrebbe causare distorsione o "clipping".
In tal caso, abbassare il Gain d'ingresso e / o ridurre
il livello di uscita dalla sorgente audio.
3. Livello monitor: Questo pulsante regola il volume delle uscite principali collegate a
monitor amplificati o un sistema di amplificazione e l'uscita cuffie.
4. LED di alimentazione phantom: Si accende quando è attivata l'alimentazione phantom
per l'uso con l'ingresso combinato.
Pannello posteriore
1. Porta USB (tipo B): questo collegamento consente di
inviare audio da/a un computer. Servirsi dei cavo da
USB-B–a–USB-A in dotazione per collegare l'M-Track
Solo al computer. L'M-Track Solo richiede un
collegamento USB 2.0 (o superiore).
2. Uscite principali: servirsi di cavi RCA per collegare queste uscite a monitor, impianto di
amplificazione, ecc. Il mix che si sente da queste uscite sarà determinato dalla
interruttore Direct/USB. Il livello di queste uscite è controllato dalla manopola livello
monitor (Monitor Level).
28
1
2
1
3
2
4
2
1
Page 29

Pannello anteriore
1. Ingresso combo: collegare un microfono,
una chitarra o un basso con pickup attivo
o un dispositivo a livello di linea a questo
ingresso. Per i microfoni, servirsi di un
cavo TRS XLR o da 1/4” (6,35 mm).
2. Ingresso 1/4": per segnali a livello di linea,
utilizzare un cavo TRS da 1/4" (6,35 mm).
Per una chitarra o un basso con un pickup
attivo, utilizzare un cavo TS standard da
1/4” (6,35 mm).
3. Interruttore linea / strumento: impostare l'interruttore su Linea quando si collega un
microfono, o una tastiera. Impostare l'interruttore su Instrument quando si collega una chitarra
o un basso.
4. Interruttore +48V (l’alimentazione phantom): questo interruttore attiva e disattiva
l'alimentazione phantom per agli ingresso combo. Quando attivata (accesso), l’alimentazione
phantom fornisce +48 volt agli ingresso mic XLR. Va notato che la maggior parte microfoni
dinamici e i microfoni a nastro non richiedono alimentazione phantom, mentre la maggior parte
dei microfoni a condensatore sì. Consultare la documentazione del microfono per scoprire se
necessita di alimentazione phantom o meno.
5. Uscita cuffie: collegare cuffie TRS da 1/8" (3,5 mm) a questa uscita. Il mix che si sente in
questa uscita sarà determinato dalla interruttore Direct/USB. Il livello di questa uscita è
controllato dalla manopola livello monitor (Monitor Level).
6. Interruttore Direct/USB: Questo interruttore controlla se il segnale di ingresso diretto o il
segnale di ritorno del flusso USB viene inviato o meno all'uscita cuffie e alle uscite principali.
• Se impostato su USB, verrà riprodotta solo la riproduzione audio USB dal computer.
• Impostare l'interruttore su Diretto per monitorare il segnale di ingresso diretto con tutti gli
ingressi sommati su mono e ascoltati equamente su ciascun lato. Ciò è utile per
monitorare un segnale di chitarra o microfono vocale. Questo interruttore non influisce
sulla riproduzione DAW o sul modo in cui il suono viene registrato nella DAW; influisce
solo sulla modalità di ascolto del segnale di ingresso nell'uscita cuffie e nelle uscite
principali.
1
2
5
1
3
4
6
29
Page 30

Benutzerhandbuch (Deutsch)
Einführung
Lieferumfang
M-Track Solo Benutzerhandbuch
USB-B-zu-USB-A Kabel Sicherheitshinweise undantieinformationen
Software Download-Karten
Kundendienst
Für aktuelle Informationen zu diesem Produkt (Systemanforderungen,
Informationen zur Kompatibilität etc.) und zur Produktregistrierung besuchen Sie
m-audio.com.
Um weitere Unterstützung zu Ihrem Produkt zu erhalten besuchen Sie
m-audio.com/support.
30
Page 31

Schnellstart
MacOS-Benutzer: Für den klassenkonformen Betrieb mit M-Track Solo ist keine Treiberinstallation
erforderlich.
iOS-Benutzer: Die von einem iOS-Gerät verfügbare Leistung reicht nicht aus, um M-Track Solo mit
Strom zu versorgen. Verwenden Sie das Apple Camera Connection Kit (separat erhältlich), ein USBBreakout-Kabel (separat erhältlich) und ein USB-Netzteil (separat erhältlich), über das ein zusätzlicher
USB-Anschluss für die Stromversorgung bereitgestellt wird M-Track Solo.
Windows Anwender: Installieren Sie die Treiber bevor Sie M-Track Solo mit Ihrem Computer
verbinden:
1. Besuchen Sie m-audio.com/drivers und laden Sie die neuesten M-Track Solo-Treiber für Ihr
Betriebssystem herunter.
2. Öffnen Sie die heruntergeladene Datei und doppelklicken Sie auf die Treiber-Installationsdatei.
3. Befolgen Sie die Anweisungen am Bildschirm, um die Treiber zu installieren.
Software: Wir liefern M-Track Solo mit Pro Tools | First M-Audio Edition und MPC Beats aus, damit
Sie Ihre Musikproduktion gleich mit professioneller Software starten können. Registrieren Sie Ihren MTrack Solo zuerst auf m-audio.com/softwaredownload und folgen den Installationsanweisungen in
Ihrem Benutzerkonto.
Virtuelle Instrumente: Befolgen Sie die Anweisungen in Ihrem Benutzerkonto, um die enthaltenen
Virtual Instrument Plugins zu installieren. Nach der Installation werden die meisten DAWs die Virtual
Instrument Plugins nicht automatisch laden. Um über Pro Tools | First M-Audio Edition auf die Virtual
Instrument Plugins zuzugreifen, müssen Sie den Plugin-Ordner für die zu scannende Software
auswählen:
Pro Tools | First M-Audio Edition (AAX) Plugin-Ordner:
Windows (32-bit): C:\Programme (x86)\Gemeinsame Dateien\Avid\Audio\Plug-Ins
Windows (64-bit): C:\Programme\Gemeinsame Dateien\Avid\Audio\Plug-Ins
macOS: Macintosh HD/Library/Application Support/Avid/Audio/Plug-Ins
31
Page 32

Um M-Track Solo als Standard-Wiedergabegerät einzustellen, folgen Sie den nachstehenden
Anweisungen je nach Betriebssystem Ihres Computers.
Windows:
1. Schließen Sie Ihr M-Track Solo mit dem mitgelieferten USB-Kabel an Ihren Computer an.
2. Suchen Sie das Lautsprechersymbol für die Lautstärke in der Taskleiste. Klicken Sie mit der
rechten Maustaste auf den Lautsprecher und öffnen Soundeinstellungen > Sounds.
Klicken Sie auf Startmenü > System > Sound > Sound Control Panel (System > Sound >
Sound-Systemsteuerung).
3. In der Windows-Systemsteuerung für Sound wählen Sie die Registerkarte Wiedergabe und
wählen USB Audio Codec als Standard-Gerät aus.
4. Klicken Sie auf die Registerkarte Aufnahme und wählen Sie USB Audio Codec als Standard-
Gerät aus.
5. Klicken Sie in der rechten unteren Ecke auf Eigenschaften.
6. Klicken Sie im neuen Fenster auf die Registerkarte Erweitert und wählen Sie 2-Kanal, 24 Bit,
48000 Hz (Studio-Qualität) als Standardformat aus.
7. Deaktivieren Sie beide Kontrollkästchen unter Exklusivmodus.
8. Klicken Sie auf OK, um das Fenster Eigenschaften zu schließen.
9. Klicken Sie auf OK, um das Fenster Sound zu schließen.
macOS:
1. Schließen Sie Ihr M-Track Solo mit dem mitgelieferten USB-Kabel an Ihren Computer an.
2. Wählen Sie Anwendungen > Dienstprogramme > Audio-MIDI-Setup.
3. Wählen Sie im Fenster Audiogeräte die Option USB Audio Codec in der linken Spalte aus.
4. Klicken Sie mit der rechten Maustaste auf USB Audio Codec, und wählen Sie Dieses Gerät für
Soundeingabe verwenden.
5. Klicken Sie mit der rechten Maustaste auf USB Audio Codec und wählen Sie Dieses Gerät für
Soundausgabe verwenden.
6. Schließen Sie das Fenster Audio-MIDI-Setup.
32
Page 33

Anschlussdiagramm
Teile, die nicht unter Einführung > Lieferumfang angegeben sind, sind separat
erhältlich.
Aktivemonitore
Computer
Mikrofon
Rückseite
Wichtig: Verwenden Sie den +48V (Phantomspeisung)-Schalter nur dann, wenn ein
Mikrofon eine Phantomspeisung benötigt. Die meisten dynamischen Mikrofone und
Bändchenmikrofone benötigen keine Phantomspeisung. Die meisten
Kondensatormikrofone tun dies jedoch. Schlagen Sie im Handbuch Ihres Mikrofons
nach, um herauszufinden, ob es eine Phantomspeisung benötigt.
Gitarre
Kopfhörer
Vorderseite
33
Page 34

Einrichten von M-Track Solo mit Ihrer Software
So richten Sie den M-Track Solo mit Pro Tools | First M-Audio Edition
1. Schließen Sie Ihr M-Track Solo mit dem mitgelieferten USB-Kabel an Ihren Computer an.
2. Öffnen Sie Pro Tools | First M-Audio Edition.
3. Navigieren Sie zu Setup > Playback-Engine….
4. Öffnen Sie das Dropdown-Menü der Playback-Engine und wählen Sie USB Audio Codec.
Hinweis: Möglicherweise müssen Sie Ihr Projekt speichern und neu starten.
5. Wählen Sie Ihre Abtastrate aus und klicken Sie auf OK, um das Setup-Fenster zu schließen.
Sie können jetzt Tracks zum Senden und Empfangen von Audio von Quellen hinzufügen, die an die MTrack Solo-Eingänge angeschlossen sind, und die aufgenommenen Audiosignale über die M-Track
Solo-Ausgänge wiedergeben.
M-Track Solo mit MPC-Beats einrichten
1. Schließen Sie Ihr M-Track Solo mit dem mitgelieferten USB-Kabel an Ihren Computer an.
2. Öffnen Sie MPC Beats.
3. Gehen Sie zu Edit > Preferences….
4. Für Windows-Anwender: Wählen Sie im Audio-Fenster die Option ASIO im Dropdown-Menü
Audio Device Type aus. Im Dropdown-Menü Device wählen Sie die Option M-Track Solo and
Duo ASIO.
Für MacOS-Anwender: Wählen Sie im Audio-Fenster die Option USB Audio Codec unter den
Output - und Input-Dropdown-Menüs aus.
Hinweis: Möglicherweise müssen Sie Ihr Projekt speichern und neu starten.
5. Wählen Sie Ihre Sample Rate aus und klicken Sie auf OK, um das Einstellungen-Fenster zu
schließen. Sie können nun Audiospuren hinzufügen, um Audiosignale von den mit den M-Track
Solo-Eingängen verbundenen Quellen zu empfangen/senden und die aufgenommenen Signale
zurück an die M-Track Solo -Ausgänge zu streamen.
34
Page 35

Funktionen
Oberseite
1. Eingangsverstärkung: Passt den Verstärkungsfaktor des
Eingangs an. Stellen Sie diesen Regler so ein, bis die
entsprechende Signal-/Clip-LED (unterhalb des Reglers)
während der Performance einen "gesunden" Pegel anzeigt.
Der Pegel sollte jedoch nicht so hoch sein, dass die LED
"clippt" oder Pegelspitzen erreicht werden, die das
Audiosignal verzerren.
2. Signal-/Clip-LED: Die LED leuchtet grün, wenn ein
Eingangssignal erkannt wird. Die LED leuchtet rot, wenn
der Signalpegel zu hoch ist, was zu Verzerrungen oder
„Übersteuerungen“ führen kann. Verringern Sie in diesem
Fall die Eingangsverstärkung und / oder verringern Sie
den Ausgangspegel Ihrer Tonquelle.
3. Monitorpegel: Passt die Ausgangslautstärke der Hauptausgänge an, welche mit den
Aktivboxen oder dem Verstärker verbunden sein sollten, und der Kopfhörerausgang.
4. Phantomspeisung LED: Leuchtet bei aktivierter Phantomspeisung zur Verwendung mit dem
Combo-Eingang.
Rückseite
1. USB-Port (Typ B): Über diesen Anschluss können Sie
Audio- an und vom Computer senden. Verwenden Sie die im
Lieferumfang enthaltenen USB-B-auf-USB-A-Kabel, um Ihr
M-Track Solo an einen Computer anzuschließen. M-Track
Solo benötigt einen USB 2.0-Anschluss (oder höher).
2. Hauptausgäng: Verwenden Sie handelsübliche RCA-Kabel, um diese Ausgänge an
Aktivmonitore, ein Verstärkersystem oder Ähnliches anzuschließen. Der Mix, den Sie aus diesen
Ausgängen hören werden, hängen vom Direct/USB-Schalter ab. Die Lautstärke dieser
Ausgänge wird über den Monitorpegelregler kontrolliert.
1
2
1
3
2
4
2
1
35
Page 36

Vorderseite
1. Combo-Eingang: Schließen Sie ein Mikrofon, eine
Gitarre, einen Bass mit einem aktiven Pickup oder ein
Line-Level-Gerät an diesen Eingang an. Für Mikrofone
verwenden Sie ein XLR- oder 1/4" (6,35 mm) TRSKabel.
2. 1/4" Eingang: Verwenden Sie für Signale mit LinePegel ein 6,35 mm (1/4") TRS-Kabel. Verwenden Sie
für eine Gitarre oder einen Bass mit aktivem
Tonabnehmer ein Standard-TS-Kabel (6,35 mm).
3. Line / Instrument-Schalter: Stellen Sie den Schalter auf Line, wenn Sie ein Mikrofon, oder eine
Tastatur anschließen. Stellen Sie den Schalter auf Instrument, wenn Sie eine Gitarre oder einen
Bass anschließen.
4. +48V (Phantomspeisung)-Schalter: Dieser Schalter aktiviert/deaktiviert die Phantomspeisung für die
Combo-Eingang. Wenn diese Funktion aktiviert ist (leuchtend), versorgt die Phantomspeisung die XLRMikrofoneingäng mit +48 Volt. Bitte beachten Sie, dass die meisten dynamischen Mikrofone und
Bändchenmikrofone keine Phantomspeisung benötigen. Die meisten Kondensatormikrofone tun dies
jedoch. Schlagen Sie im Handbuch Ihres Mikrofons nach, um herauszufinden, ob es eine Phantomspeisung
benötigt. Beachten Sie, daß Phantomspeisung manche Bändchenmikrofone beschädigen kann!
Konsultieren Sie das Handbuch des Mikrofons.
5. Kopfhörerausgang: Verbinden Sie 1/8" (3,5 mm) TRS-Kopfhörer mit diesem Ausgang. Der Mix, den Sie
aus diesen Ausgängen hören werden, hängt von der Einstellung des Direct/USB-Schalter ab. Der Pegel
dieses Ausgangs wird über den Monitorpegel eingestellt.
6. Direct/USB-Schalter: Dieser Schalter steuert, ob das direkte Eingangssignal oder das USBStream-Rücksignal an den Kopfhörerausgang und den Hauptausgang gesendet wird.
• Bei Einstellung auf USB ist nur die USB-Audiowiedergabe von Ihrem Computer zu hören.
• Stellen Sie den Schalter auf Direkt, um das direkte Eingangssignal zu überwachen, wobei
alle Eingänge zu Mono summiert und auf jeder Seite gleich zu hören sind. Dies ist nützlich
für die Überwachung eines Gitarren- oder Gesangsmikrofonsignals. Dieser Schalter hat
keinen Einfluss auf die DAW-Wiedergabe oder darauf, wie Ihr Sound in Ihre DAW
aufgenommen wird. Dies wirkt sich nur darauf aus, wie Sie das Eingangssignal im
Kopfhörerausgang und im Hauptausgang hören.
36
1
2
5
6
4
1
3
Page 37

Appendix (English)
Technical Specifications
All specifications are measured at 20 kHz bandwidth. Specifications are subject to change
without notice.
Mic Input (balanced XLR)
Frequency Response
Signal-to-Noise Ratio
THD+N
Preamp EIN
Gain Range
Line Input (balanced 1/4" [6.35 mm] TRS)
Frequency Response
Sensitivity
THD+N
Gain Range
20 Hz – 20 kHz (+0.1 dB)
109 dB (A-weighted)
0.003% (min. gain, 0 dBu out, A-weighted)
-128 dBu (max. gain, 40 Ω source, A-weighted)
0 dB to +54 dB
20 Hz – 20 kHz (+0.1 dB)
-43 dBu
0.002% (min. gain, 0 dBu out, A-weighted)
-10 dB to +44 dB
37
Page 38

Instrument Input (unbalanced 1/4" [6.35 mm] TS)
Frequency Response
THD+N
Input Impedance
Gain Range
RCA Outputs
Frequency Response
Signal-to-Noise Ratio
THD+N
Max Output Level
Headphone Output (1/8” [3.5 mm] TRS)
Power
Frequency Response
THD+N
Signal-to-Noise Ratio
20 Hz – 20 kHz (+0.1 dB)
0.005% (min. gain, 0 dBu output, A-weighted)
1 MΩ
-10 dB to +44 dB
20 Hz – 20 kHz (+0.1 dB)
109 dB (A-weighted)
0.002% ( 0 dBu output, A-weighted)
+4 dBu
60 mW/Ch, 32 Ω
20 Hz – 20 kHz (+0.5 dB)
0.02% (A-weighted)
100 dB (A-weighted)
38
Page 39

General
Power
Dimensions
(width x depth x height)
Weight
USB-bus-powered
6.4” x 4.5” x 2.1”
16.4 x 11.4 x 5.5 cm
0.66 lbs. / 0.30 kg
Trademarks & Licenses
M-Audio and MPC Beats are trademarks of inMusic Brands, Inc., registered in the U.S. and
other countries.
Windows is a registered trademark of Microsoft Corporation in the United States and other
countries.
Macintosh and macOS are trademarks of Apple Inc., registered in the U.S. and other
countries.
Avid and Pro Tools are registered trademarks of Avid Technology, Inc. in the U.S. and other
countries.
All other product or company names are trademarks or registered trademarks of their
respective owners.
39
Page 40

Manual Version 1.4
 Loading...