

Page 1
Page 2

English - . . . . . . . . . . . . . . . . . . . . . . . . . . . . . . . . . . . . . . . . . . . . . . . . . . . . . . . . . . . . . . . . . . . . . . .3
Introduction . . . . . . . . . . . . . . . . . . . . . . . . . . . . . . . . . . . . . . . . . . . . . . . . . . . . . . . . . . . . . . . . . . . . . . . . . . . . . . . . . . . . . . . . . . . .3
Product Features . . . . . . . . . . . . . . . . . . . . . . . . . . . . . . . . . . . . . . . . . . . . . . . . . . . . . . . . . . . . . . . . . . . . . . . . . . . . . . . . . . . . . . .3
What’s in the Box? . . . . . . . . . . . . . . . . . . . . . . . . . . . . . . . . . . . . . . . . . . . . . . . . . . . . . . . . . . . . . . . . . . . . . . . . . . . . . . . . . . . . . .3
About The Manual . . . . . . . . . . . . . . . . . . . . . . . . . . . . . . . . . . . . . . . . . . . . . . . . . . . . . . . . . . . . . . . . . . . . . . . . . . . . . . . . . . . . . .3
Connecting Your Keyboard . . . . . . . . . . . . . . . . . . . . . . . . . . . . . . . . . . . . . . . . . . . . . . . . . . . . . . . . . . . . . . . . . . . . . . . . . . . . . . .3
Windows XP and Mac OS X . . . . . . . . . . . . . . . . . . . . . . . . . . . . . . . . . . . . . . . . . . . . . . . . . . . . . . . . . . . . . . . . . . . . . . . . . . . . . .4
Other Operating Systems . . . . . . . . . . . . . . . . . . . . . . . . . . . . . . . . . . . . . . . . . . . . . . . . . . . . . . . . . . . . . . . . . . . . . . . . . . . . . . . .4
Getting Started . . . . . . . . . . . . . . . . . . . . . . . . . . . . . . . . . . . . . . . . . . . . . . . . . . . . . . . . . . . . . . . . . . . . . . . . . . . . . . . . . . . . . . . . .5
Advanced functions . . . . . . . . . . . . . . . . . . . . . . . . . . . . . . . . . . . . . . . . . . . . . . . . . . . . . . . . . . . . . . . . . . . . . . . . . . . . . . . . . . . . .7
MIDI - If All Goes Wrong . . . . . . . . . . . . . . . . . . . . . . . . . . . . . . . . . . . . . . . . . . . . . . . . . . . . . . . . . . . . . . . . . . . . . . . . . . . . . . . .10
Trouble-Shooting . . . . . . . . . . . . . . . . . . . . . . . . . . . . . . . . . . . . . . . . . . . . . . . . . . . . . . . . . . . . . . . . . . . . . . . . . . . . . . . . . . . . . . .11
Contact M-Audio . . . . . . . . . . . . . . . . . . . . . . . . . . . . . . . . . . . . . . . . . . . . . . . . . . . . . . . . . . . . . . . . . . . . . . . . . . . . . . . . . . . . . . .11
Warranty Info . . . . . . . . . . . . . . . . . . . . . . . . . . . . . . . . . . . . . . . . . . . . . . . . . . . . . . . . . . . . . . . . . . . . . . . . . . . . . . . . . . . . . . . . . .12
Technical Info . . . . . . . . . . . . . . . . . . . . . . . . . . . . . . . . . . . . . . . . . . . . . . . . . . . . . . . . . . . . . . . . . . . . . . . . . . . . . . . . . . . . . . . . .12
Appendices - Useful MIDI Data . . . . . . . . . . . . . . . . . . . . . . . . . . . . . . . . . . . . . . . . . . . . . . . . . . . . . . . . . . . . . . . . . . . . . . . . . .13
Français - . . . . . . . . . . . . . . . . . . . . . . . . . . . . . . . . . . . . . . . . . . . . . . . . . . . . . . . . . . . . . . . . . . . . .15
Introduction . . . . . . . . . . . . . . . . . . . . . . . . . . . . . . . . . . . . . . . . . . . . . . . . . . . . . . . . . . . . . . . . . . . . . . . . . . . . . . . . . . . . . . . . . . .15
Caractéristiques . . . . . . . . . . . . . . . . . . . . . . . . . . . . . . . . . . . . . . . . . . . . . . . . . . . . . . . . . . . . . . . . . . . . . . . . . . . . . . . . . . . . . . .15
Contenu de l'emballage . . . . . . . . . . . . . . . . . . . . . . . . . . . . . . . . . . . . . . . . . . . . . . . . . . . . . . . . . . . . . . . . . . . . . . . . . . . . . . . .15
Sur ce manuel . . . . . . . . . . . . . . . . . . . . . . . . . . . . . . . . . . . . . . . . . . . . . . . . . . . . . . . . . . . . . . . . . . . . . . . . . . . . . . . . . . . . . . . . .15
Avant de brancher votre clavier . . . . . . . . . . . . . . . . . . . . . . . . . . . . . . . . . . . . . . . . . . . . . . . . . . . . . . . . . . . . . . . . . . . . . . . . . .15
Windows XP et Mac OS X . . . . . . . . . . . . . . . . . . . . . . . . . . . . . . . . . . . . . . . . . . . . . . . . . . . . . . . . . . . . . . . . . . . . . . . . . . . . . . .16
Autres systèmes d'exploitation . . . . . . . . . . . . . . . . . . . . . . . . . . . . . . . . . . . . . . . . . . . . . . . . . . . . . . . . . . . . . . . . . . . . . . . . . . .16
Instructions de départ . . . . . . . . . . . . . . . . . . . . . . . . . . . . . . . . . . . . . . . . . . . . . . . . . . . . . . . . . . . . . . . . . . . . . . . . . . . . . . . . . .17
Fonctions avancées . . . . . . . . . . . . . . . . . . . . . . . . . . . . . . . . . . . . . . . . . . . . . . . . . . . . . . . . . . . . . . . . . . . . . . . . . . . . . . . . . . . .19
En cas de difficultés techniques . . . . . . . . . . . . . . . . . . . . . . . . . . . . . . . . . . . . . . . . . . . . . . . . . . . . . . . . . . . . . . . . . . . . . . . . . .22
Dépannage . . . . . . . . . . . . . . . . . . . . . . . . . . . . . . . . . . . . . . . . . . . . . . . . . . . . . . . . . . . . . . . . . . . . . . . . . . . . . . . . . . . . . . . . . .23
Contacter M-Audio France . . . . . . . . . . . . . . . . . . . . . . . . . . . . . . . . . . . . . . . . . . . . . . . . . . . . . . . . . . . . . . . . . . . . . . . . . . . . . .24
Garantie . . . . . . . . . . . . . . . . . . . . . . . . . . . . . . . . . . . . . . . . . . . . . . . . . . . . . . . . . . . . . . . . . . . . . . . . . . . . . . . . . . . . . . . . . . . . .24
Spécifications . . . . . . . . . . . . . . . . . . . . . . . . . . . . . . . . . . . . . . . . . . . . . . . . . . . . . . . . . . . . . . . . . . . . . . . . . . . . . . . . . . . . . . . . .24
Annexes : Données MIDI utiles . . . . . . . . . . . . . . . . . . . . . . . . . . . . . . . . . . . . . . . . . . . . . . . . . . . . . . . . . . . . . . . . . . . . . . . . . .25
Deutsch - . . . . . . . . . . . . . . . . . . . . . . . . . . . . . . . . . . . . . . . . . . . . . . . . . . . . . . . . . . . . . . . . . . . . .27
Einführung . . . . . . . . . . . . . . . . . . . . . . . . . . . . . . . . . . . . . . . . . . . . . . . . . . . . . . . . . . . . . . . . . . . . . . . . . . . . . . . . . . . . . . . . . . . .27
Produktmerkmale . . . . . . . . . . . . . . . . . . . . . . . . . . . . . . . . . . . . . . . . . . . . . . . . . . . . . . . . . . . . . . . . . . . . . . . . . . . . . . . . . . . . .27
Lieferumfang: . . . . . . . . . . . . . . . . . . . . . . . . . . . . . . . . . . . . . . . . . . . . . . . . . . . . . . . . . . . . . . . . . . . . . . . . . . . . . . . . . . . . . . . . .27
Über dieses Handbuch . . . . . . . . . . . . . . . . . . . . . . . . . . . . . . . . . . . . . . . . . . . . . . . . . . . . . . . . . . . . . . . . . . . . . . . . . . . . . . . . .27
Allgemeine Hinweise . . . . . . . . . . . . . . . . . . . . . . . . . . . . . . . . . . . . . . . . . . . . . . . . . . . . . . . . . . . . . . . . . . . . . . . . . . . . . . . . . .27
Windows XP und Mac OSX . . . . . . . . . . . . . . . . . . . . . . . . . . . . . . . . . . . . . . . . . . . . . . . . . . . . . . . . . . . . . . . . . . . . . . . . . . . . .28
Sonstige Betriebssysteme . . . . . . . . . . . . . . . . . . . . . . . . . . . . . . . . . . . . . . . . . . . . . . . . . . . . . . . . . . . . . . . . . . . . . . . . . . . . . . .28
Erste Schritte . . . . . . . . . . . . . . . . . . . . . . . . . . . . . . . . . . . . . . . . . . . . . . . . . . . . . . . . . . . . . . . . . . . . . . . . . . . . . . . . . . . . . . . . . .29
Spezialfunktionen . . . . . . . . . . . . . . . . . . . . . . . . . . . . . . . . . . . . . . . . . . . . . . . . . . . . . . . . . . . . . . . . . . . . . . . . . . . . . . . . . . . . . .31
Technische Probleme . . . . . . . . . . . . . . . . . . . . . . . . . . . . . . . . . . . . . . . . . . . . . . . . . . . . . . . . . . . . . . . . . . . . . . . . . . . . . . . . . .35
Fehlerbehebung . . . . . . . . . . . . . . . . . . . . . . . . . . . . . . . . . . . . . . . . . . . . . . . . . . . . . . . . . . . . . . . . . . . . . . . . . . . . . . . . . . . . . .35
So erreichen Sie uns: . . . . . . . . . . . . . . . . . . . . . . . . . . . . . . . . . . . . . . . . . . . . . . . . . . . . . . . . . . . . . . . . . . . . . . . . . . . . . . . . . . .36
Produktgarantie . . . . . . . . . . . . . . . . . . . . . . . . . . . . . . . . . . . . . . . . . . . . . . . . . . . . . . . . . . . . . . . . . . . . . . . . . . . . . . . . . . . . . . .36
Technische Informationen . . . . . . . . . . . . . . . . . . . . . . . . . . . . . . . . . . . . . . . . . . . . . . . . . . . . . . . . . . . . . . . . . . . . . . . . . . . . . . .36
Anhang - ANützliche MIDI-Daten . . . . . . . . . . . . . . . . . . . . . . . . . . . . . . . . . . . . . . . . . . . . . . . . . . . . . . . . . . . . . . . . . . . . . . . .37
Español - . . . . . . . . . . . . . . . . . . . . . . . . . . . . . . . . . . . . . . . . . . . . . . . . . . . . . . . . . . . . . . . . . . . . .39
Introducción . . . . . . . . . . . . . . . . . . . . . . . . . . . . . . . . . . . . . . . . . . . . . . . . . . . . . . . . . . . . . . . . . . . . . . . . . . . . . . . . . . . . . . . . . .39
Características . . . . . . . . . . . . . . . . . . . . . . . . . . . . . . . . . . . . . . . . . . . . . . . . . . . . . . . . . . . . . . . . . . . . . . . . . . . . . . . . . . . . . . . .39
¿Qué hay dentro de la caja? . . . . . . . . . . . . . . . . . . . . . . . . . . . . . . . . . . . . . . . . . . . . . . . . . . . . . . . . . . . . . . . . . . . . . . . . . . . .39
Acerca del Manual . . . . . . . . . . . . . . . . . . . . . . . . . . . . . . . . . . . . . . . . . . . . . . . . . . . . . . . . . . . . . . . . . . . . . . . . . . . . . . . . . . . .39
Antes de conectar el teclado . . . . . . . . . . . . . . . . . . . . . . . . . . . . . . . . . . . . . . . . . . . . . . . . . . . . . . . . . . . . . . . . . . . . . . . . . . . .39
Windows XP y Mac OSX . . . . . . . . . . . . . . . . . . . . . . . . . . . . . . . . . . . . . . . . . . . . . . . . . . . . . . . . . . . . . . . . . . . . . . . . . . . . . . . .40
Otros sistemas operativos . . . . . . . . . . . . . . . . . . . . . . . . . . . . . . . . . . . . . . . . . . . . . . . . . . . . . . . . . . . . . . . . . . . . . . . . . . . . . .40
Guía de inicio rápido . . . . . . . . . . . . . . . . . . . . . . . . . . . . . . . . . . . . . . . . . . . . . . . . . . . . . . . . . . . . . . . . . . . . . . . . . . . . . . . . . . .41
Funciones avanzadas . . . . . . . . . . . . . . . . . . . . . . . . . . . . . . . . . . . . . . . . . . . . . . . . . . . . . . . . . . . . . . . . . . . . . . . . . . . . . . . . . .43
Si surgen problemas técnicos... . . . . . . . . . . . . . . . . . . . . . . . . . . . . . . . . . . . . . . . . . . . . . . . . . . . . . . . . . . . . . . . . . . . . . . . . . .46
Resolución de problemas . . . . . . . . . . . . . . . . . . . . . . . . . . . . . . . . . . . . . . . . . . . . . . . . . . . . . . . . . . . . . . . . . . . . . . . . . . . . . . .47
Contactar con M-Audio . . . . . . . . . . . . . . . . . . . . . . . . . . . . . . . . . . . . . . . . . . . . . . . . . . . . . . . . . . . . . . . . . . . . . . . . . . . . . . . .48
Información sobre la garantía . . . . . . . . . . . . . . . . . . . . . . . . . . . . . . . . . . . . . . . . . . . . . . . . . . . . . . . . . . . . . . . . . . . . . . . . . . .48
Información técnica . . . . . . . . . . . . . . . . . . . . . . . . . . . . . . . . . . . . . . . . . . . . . . . . . . . . . . . . . . . . . . . . . . . . . . . . . . . . . . . . . . . .48
Apéndices - Datos MIDI útiles . . . . . . . . . . . . . . . . . . . . . . . . . . . . . . . . . . . . . . . . . . . . . . . . . . . . . . . . . . . . . . . . . . . . . . . . . . .49
Page 3

Italiano - . . . . . . . . . . . . . . . . . . . . . . . . . . . . . . . . . . . . . . . . . . . . . . . . . . . . . . . . . . . . . . . . . . . . . .51
Introduzione . . . . . . . . . . . . . . . . . . . . . . . . . . . . . . . . . . . . . . . . . . . . . . . . . . . . . . . . . . . . . . . . . . . . . . . . . . . . . . . . . . . . . . . . . .51
Caratteristiche . . . . . . . . . . . . . . . . . . . . . . . . . . . . . . . . . . . . . . . . . . . . . . . . . . . . . . . . . . . . . . . . . . . . . . . . . . . . . . . . . . . . . . . . .51
Cosa c’è dentro la scatola? . . . . . . . . . . . . . . . . . . . . . . . . . . . . . . . . . . . . . . . . . . . . . . . . . . . . . . . . . . . . . . . . . . . . . . . . . . . . . .51
Informazioni sul manuale . . . . . . . . . . . . . . . . . . . . . . . . . . . . . . . . . . . . . . . . . . . . . . . . . . . . . . . . . . . . . . . . . . . . . . . . . . . . . . .51
Prima di effettuare il collegamento della tastiera . . . . . . . . . . . . . . . . . . . . . . . . . . . . . . . . . . . . . . . . . . . . . . . . . . . . . . . . . . . .51
Windows XP e Mac OSX . . . . . . . . . . . . . . . . . . . . . . . . . . . . . . . . . . . . . . . . . . . . . . . . . . . . . . . . . . . . . . . . . . . . . . . . . . . . . . . .52
Altri sistemi operativi . . . . . . . . . . . . . . . . . . . . . . . . . . . . . . . . . . . . . . . . . . . . . . . . . . . . . . . . . . . . . . . . . . . . . . . . . . . . . . . . . . .52
Guida introduttiva . . . . . . . . . . . . . . . . . . . . . . . . . . . . . . . . . . . . . . . . . . . . . . . . . . . . . . . . . . . . . . . . . . . . . . . . . . . . . . . . . . . . .53
Funzioni avanzate . . . . . . . . . . . . . . . . . . . . . . . . . . . . . . . . . . . . . . . . . . . . . . . . . . . . . . . . . . . . . . . . . . . . . . . . . . . . . . . . . . . . .55
In caso di difficoltà tecniche . . . . . . . . . . . . . . . . . . . . . . . . . . . . . . . . . . . . . . . . . . . . . . . . . . . . . . . . . . . . . . . . . . . . . . . . . . . . .58
Risoluzione dei problemi . . . . . . . . . . . . . . . . . . . . . . . . . . . . . . . . . . . . . . . . . . . . . . . . . . . . . . . . . . . . . . . . . . . . . . . . . . . . . . .59
Contattare M-Audio . . . . . . . . . . . . . . . . . . . . . . . . . . . . . . . . . . . . . . . . . . . . . . . . . . . . . . . . . . . . . . . . . . . . . . . . . . . . . . . . . . . .59
Informazioni sulla garanzia . . . . . . . . . . . . . . . . . . . . . . . . . . . . . . . . . . . . . . . . . . . . . . . . . . . . . . . . . . . . . . . . . . . . . . . . . . . . .60
Informazioni tecniche . . . . . . . . . . . . . . . . . . . . . . . . . . . . . . . . . . . . . . . . . . . . . . . . . . . . . . . . . . . . . . . . . . . . . . . . . . . . . . . . . .60
Appendici - Dati MIDI utili . . . . . . . . . . . . . . . . . . . . . . . . . . . . . . . . . . . . . . . . . . . . . . . . . . . . . . . . . . . . . . . . . . . . . . . . . . . . . . .61
. . . . . . . . . . . . . . . . . . . . . . . . . . . . . . . . . . . . . . . . . . . . . . . . . . . . . . . . . . . . . . . . . . . . . . . . .63
. . . . . . . . . . . . . . . . . . . . . . . . . . . . . . . . . . . . . . . . . . . . . . . . . . . . . . . . . . . . . . . . . . . . . . . . . . . . . . . . . . . . . . . . . . . . .63
. . . . . . . . . . . . . . . . . . . . . . . . . . . . . . . . . . . . . . . . . . . . . . . . . . . . . . . . . . . . . . . . . . . . . . . . . . . . . . . . . . . . . . . . . . . . . . . .63
. . . . . . . . . . . . . . . . . . . . . . . . . . . . . . . . . . . . . . . . . . . . . . . . . . . . . . . . . . . . . . . . . . . . . . . . . . . . . . . . . . . . . . . . . . . . .63
. . . . . . . . . . . . . . . . . . . . . . . . . . . . . . . . . . . . . . . . . . . . . . . . . . . . . . . . . . . . . . . . . . . . . . . . . . . . . . . . . .63
. . . . . . . . . . . . . . . . . . . . . . . . . . . . . . . . . . . . . . . . . . . . . . . . . . . . . . . . . . . . . . . . . . . . . . . . . . . . . . . . . . . . . . . . .63
. . . . . . . . . . . . . . . . . . . . . . . . . . . . . . . . . . . . . . . . . . . . . . . . . . . . . . . . . . . . . . . . . . . . . . . . . . . . .64
. . . . . . . . . . . . . . . . . . . . . . . . . . . . . . . . . . . . . . . . . . . . . . . . . . . . . . . . . . . . . . . . . . . . . .64
. . . . . . . . . . . . . . . . . . . . . . . . . . . . . . . . . . . . . . . . . . . . . . . . . . . . . . . . . . . . . . . . . . . . . . . . . . . . . . . . . . . . . . . . . . . . .65
. . . . . . . . . . . . . . . . . . . . . . . . . . . . . . . . . . . . . . . . . . . . . . . . . . . . . . . . . . . . . . . . . . . . . . . . . . . . .67
I . . . . . . . . . . . . . . . . . . . . . . . . . . . . . . . . . . . . . . . . . . . . . . . . . . . . . . . . . . . . . . . . . . . . . . . . . . . . .70
. . . . . . . . . . . . . . . . . . . . . . . . . . . . . . . . . . . . . . . . . . . . . . . . . . . . . . . . . . . . . . . . . . . . . . . . . . . . . . . .71
. . . . . . . . . . . . . . . . . . . . . . . . . . . . . . . . . . . . . . . . . . . . . . . . . . . . . . . . . . . . . . . . . . . . . . . . . . . . .72
. . . . . . . . . . . . . . . . . . . . . . . . . . . . . . . . . . . . . . . . . . . . . . . . . . . . . . . . . . . . . . . . . . . . . . . . . . . . . . . . . . . . . .72
. . . . . . . . . . . . . . . . . . . . . . . . . . . . . . . . . . . . . . . . . . . . . . . . . . . . . . . . . . . . . . . . . . . . . . . . . . . . . . . . . . . . . .74
はじめに
特徴
同梱内容
本マニュアルについて
キーボードを接続する前に
WindowsXP と MacOSX
その他のオペレーティングシステム
基本操作
アドバンスドファンクション
MIDI の問題が発生した場合
トラブルシューティング
M-Audio へのお問い合わせ
製品保証について
参考 MIDI データ
Page 4

English -
Introduction
Congratulations on your purchase of the M-Audio Keystation 61e, a 61-note USB keyboard with velocity-sensitive, semi-weighted keys
that is designed to easily integrate with your PC or Macintosh computer. The Keystation 61es offers semi-weighted keys that give you
the feel of a piano in a compact, affordable MIDI controller. Ideal for a multitude of music creation and education applications, the
Keystation 61es offers you modulation and Pitch Bend Wheels, plus assignable buttons and a slider for hands on control. Though the
Keystation 61es is class compliant and features true plug-and-play operation under Windows XP and Mac OS X, we recommend that
you spend a few minutes reviewing this manual to learn about proper operation, advanced functionality, and programmability.
Product Features
Ports:
MIDI out
USB MIDI in/out
Power:
USB powered
DC in for external PSU
Keyboard:
61-note velocity-sensitive keyboard
Pitch Bend Wheel
Modulation Wheel
Volume/Control slider
Sustain foot pedal input
Octave +/- buttons
Advanced Functions button
What’s in the Box?
Your M-Audio Keystation 61es package should contain the following items:
M-Audio Keystation 61es USB keyboard
User Manual
USB cable
If any of the above listed items are missing, please contact the retailer where you purchased the product.
About The Manual
This instruction manual covers the operation of the Keystation 61es USB keyboard. Though this manual does not provide a detailed
explanation about how to set up your keyboard for use with third party music software, the majority of music software applications will
work seamlessly with the Keystation 61es keyboard. Please consult your software application’s manual for additional information.
Connecting Your Keyboard
You can power the keyboard either via a powered USB port or an optional external power supply. However, the Keystation 61es is a
very low power device and an external power supply should not be necessary. It is recommended that you connect the Keystation 61es
to an onboard USB port or to a powered USB hub.
3
Page 5

Power and Connection Via USB
1. Check that the on/off button on the back of the unit is set to “OFF.”
2. Plug the USB cable provided with the Keystation 61es keyboard to a free USB port on your computer.
3. Plug the other end of the USB cable to the USB input on the Keystation 61es keyboard.
The single USB cable not only powers the keyboard but also sends MIDI data to and from your computer system.
Using An External Power Supply
You can also use a power adapter (not included) with the following specification: 9V DC output, 250- 300mA, center positive.
Make sure you are not already powering the Keystation 49e keyboard via USB—if you are receiving power from the USB hub, no external
supply is needed. If not, then simply plug the power supply in to the “DC 9V” input and switch the power on.
Note: Do not leave the adapter plugged in for long periods of time if the unit is not in use.
Windows XP and Mac OS X
If you are using Windows XP or Mac OS X, you can now simply move the keyboard’s power switch to the “ON” position. Because the
Keystation 61es keyboard is class compliant, it will work without any further installation.
Other Operating Systems
If you are using an operating system other than OSX or Windows XP, please refer to our website at www.m-audio.com for the latest
Keystation 61es drivers for Macintosh or Windows operating systems.
Installation in Mac OS9
If you do not have OMS installed, please run the OMS installer first. Otherwise start by “Installing the OMS Driver.”
Installing OMS:
Make sure that all programs are shut down before you begin the installer. Also make sure you have removed any dongles or copy
protection devices you may be using.
1 Insert the Keystation 61es Installer CD-ROM.
2. Double click on the Keystation 61es Installer CD icon on your desktop
3. Double click on the OS 9 folder.
4. Double click on Install OMS 2.3.8
5. Follow the on-screen instructions
6. It will now take a few moments to install OMS. When it has finished, it will ask you to restart the computer. Click “Restart.”
Installing the OMS driver
1. Click and drag the USB Drivers Installer to the desktop from the OS 9 window it resides in.
2. Double click on the icon. If a window appears, click “Open.”
3. Double click on the newly created USB Drivers Installer on your desktop.
4. Click ’Install’. (The installer automatically places the drivers in the correct system folders.)
5. Once the installer has finished installing the drivers, click “Restart.”
6. Once your computer has restarted, switch on the Keystation 61es.
OMS Setup
You now have to run the OMS Setup program:
1. Open the Hard Drive > Opcode folder > OMS Applications folder > OMS Setup.
2. If you get a message to switch Appletalk on or off, you may choose either option, as this will not affect the OMS Setup.
3. In the next window, click “OK.”
4
Page 6

4. Click “Search.”
5. Click “OK.”
6. Click “OK” again.
7. Click “Save.”
8. If asked, click “Replace.”
You should now have a final window showing your current Studio Setup. If “Quicktime Music” is crossed out, double click on it, and
then click in the “on” circle to enable it. Then click “OK.” Now you’re ready to go. Just make sure your Keystation 61es keyboard is
selected as the MIDI input in your music software.
Installation in Windows 98 or ME
1. Power up your PC.
2. Insert the Keystation 61es Installer CD-ROM. Open My Computer or Windows Explorer to locate your CD-ROM drive. Click on the
folder labeled “Keystation 61es.”
3. Open the Keystation 61es folder and click on the installer icon.
4. Follow instructions on screen.
5. When finished, exit the setup.
6. Switch on the Keystation 61es.
Windows will proceed with the installation of a USB driver and a MIDI driver. Once completed, you are ready to go. Windows may ask
you to restart your computer, in which case click “Restart.’
Installation in Windows 2000
1. Power up your PC.
2. Insert the Keystation 61es Installer CD-ROM. Open My Computer or Windows Explorer to locate your CD-ROM drive. Click on the
folder labeled “Keystation 61es.”
3. Open the Keystation 61es folder and click on the installer icon.
4. Follow the instructions on your screen.
5. When finished, exit the setup.
6. Switch on the Keystation 61es keyboard. Windows will automatically recognize the keyboard and ask for the Keystation 61es
Installer CD-ROM.
7. Select the CD-ROM drive and click “OK.” Windows will ask you to select the CD-ROM drive again for the MIDI driver.
8. If Windows reports the drivers have not been digitally signed, click on “Continue Installation.”
9. Select the drive once more.
10. Click “OK.”
11. In the event that Windows asks you to restart your computer, click “Restart.”
Getting Started
Once you have finished installation you will need to configure your MIDI application software to use the Keystation 61es. Please notice
that when you press a key on the keyboard you will not hear any sound. This is because pressing a key causes the keyboard to send
out MIDI data. MIDI data gives instructions on how a sound should play, but in order to actually hear that sound you need to configure
your music software to read the MIDI data being sent from the Keystation 61es and play the sound back accordingly. This setup will
more than likely entail going into an Options or Device Set-Up menu in your music software application and selecting the appropriate
device. The Keystation 61es should appear under the name “USB Audio Device” for Windows XP or as “Keystation 61es” for other
Operating Systems in the MIDI devices section of your music software application. Please consult the manual that came with your
software for the proper set up procedure.
Key Names
Each white key on the Keystation 61es is labeled with a letter and a number. The letter represents the note played and the number
represents the octave (the definition of “octave” is explained in the next section).
Although the black keys are not labeled, they also have names (“F# 4” or “Eb2” are examples of black key names).
If the name of a black key contains a “#” sign, it is referring to the black key above the same note white key. For example, “F# 3”
refers to the black key above F3. If the name of a black key is expressed with a “b” sign, it is referring to the black key below the
same note white key. For example, “Eb3” refers to the black key below E3. As a result, the black key between C3 and D3 is both C# 3
and Db3.
5
Page 7

Octave Buttons
An octave contains 12 notes. Each octave is denoted on your Keystation 61es by black and white sections starting on C. Each octave is
given a number.
If you press the octave “+” button once, the led above the octave “-“ button will go out, indicating the keyboards’ octave is now shifted
up. If you press the octave “+” key again, you will shift one more octave up, and so on. It is possible to shift the keyboard up 3 octaves
or down 3 octaves from 0 octave shift.
To shift the octave down, press the octave “-“ button and notice that the led above the octave “+” goes out. If only the led above the octave
“-“ key is lit, the octave is shifted down and, if only the led above the octave “+” key is lit, the octave is shifted up.
To return the octave shift to 0, press both the octave “+” and “-“ keys together. Both LED's will light, indicating that the octave shift has
returned to 0.
The Pitch Bend Wheel
As the name indicates, the assignable Pitch Bend Wheel is primarily used to bend the notes played on the keyboard up or down. This
allows you to play phrases not normally associated with keyboard playing, such as guitar-style riffs.
Your sound source determines how far you can bend the note. The usual setting is two semitones, but it can be up to two octaves +/-.
The Modulation Wheel
The Modulation Wheel is typically used for modulation of the sound you are playing. This type of real-time controller was originally
introduced on electronic keyboard instruments to give the performer options such as adding vibrato just like players of acoustic
instruments do.
Just like the Pitch Bend Wheel, the Modulation Wheel is fully MIDI assignable.
The Volume Slider
The Volume Slider sends a MIDI message that controls the volume of the notes you are playing.
The Volume Slider can also be assigned to different effects such as pan (balance), attack, reverb, chorus and many more. (See
“Advanced Functions” for more information.)
Using with a Foot Pedal
A foot pedal can be used for sustaining the sound that you are playing, without having to keep your hands on the keyboard (just like the
sustain pedal on a piano).
You can plug a foot pedal of any polarity, sold separately, into the foot pedal input on your M-Audio keyboard. The keyboard will
automatically detect the correct polarity when powering up. If you want to reverse the polarity, simply depress the pedal when you switch
on your keyboard.
The Advanced Function Button
The Advanced Functions button is used to access all the advanced functions of the keyboard that are located on the keybed.
When the Advanced Functions button is pressed, the keyboard goes into “Edit Mode.” In Edit Mode, the keys on the keyboard are used
for selecting functions and entering data.
The light above the Advanced Functions button indicates whether or not Edit Mode is engaged. In Edit Mode, the black keys on the
keyboard are used for selecting functions, while the white keys are used for data entry and channel selection.
Your keyboard will slip out of Edit Mode as soon as a function is selected, or the CANCEL or ENTER keys are pressed (the light above the
Advanced Functions button will turn off). The keyboard can then be used to play notes again.
6
Page 8
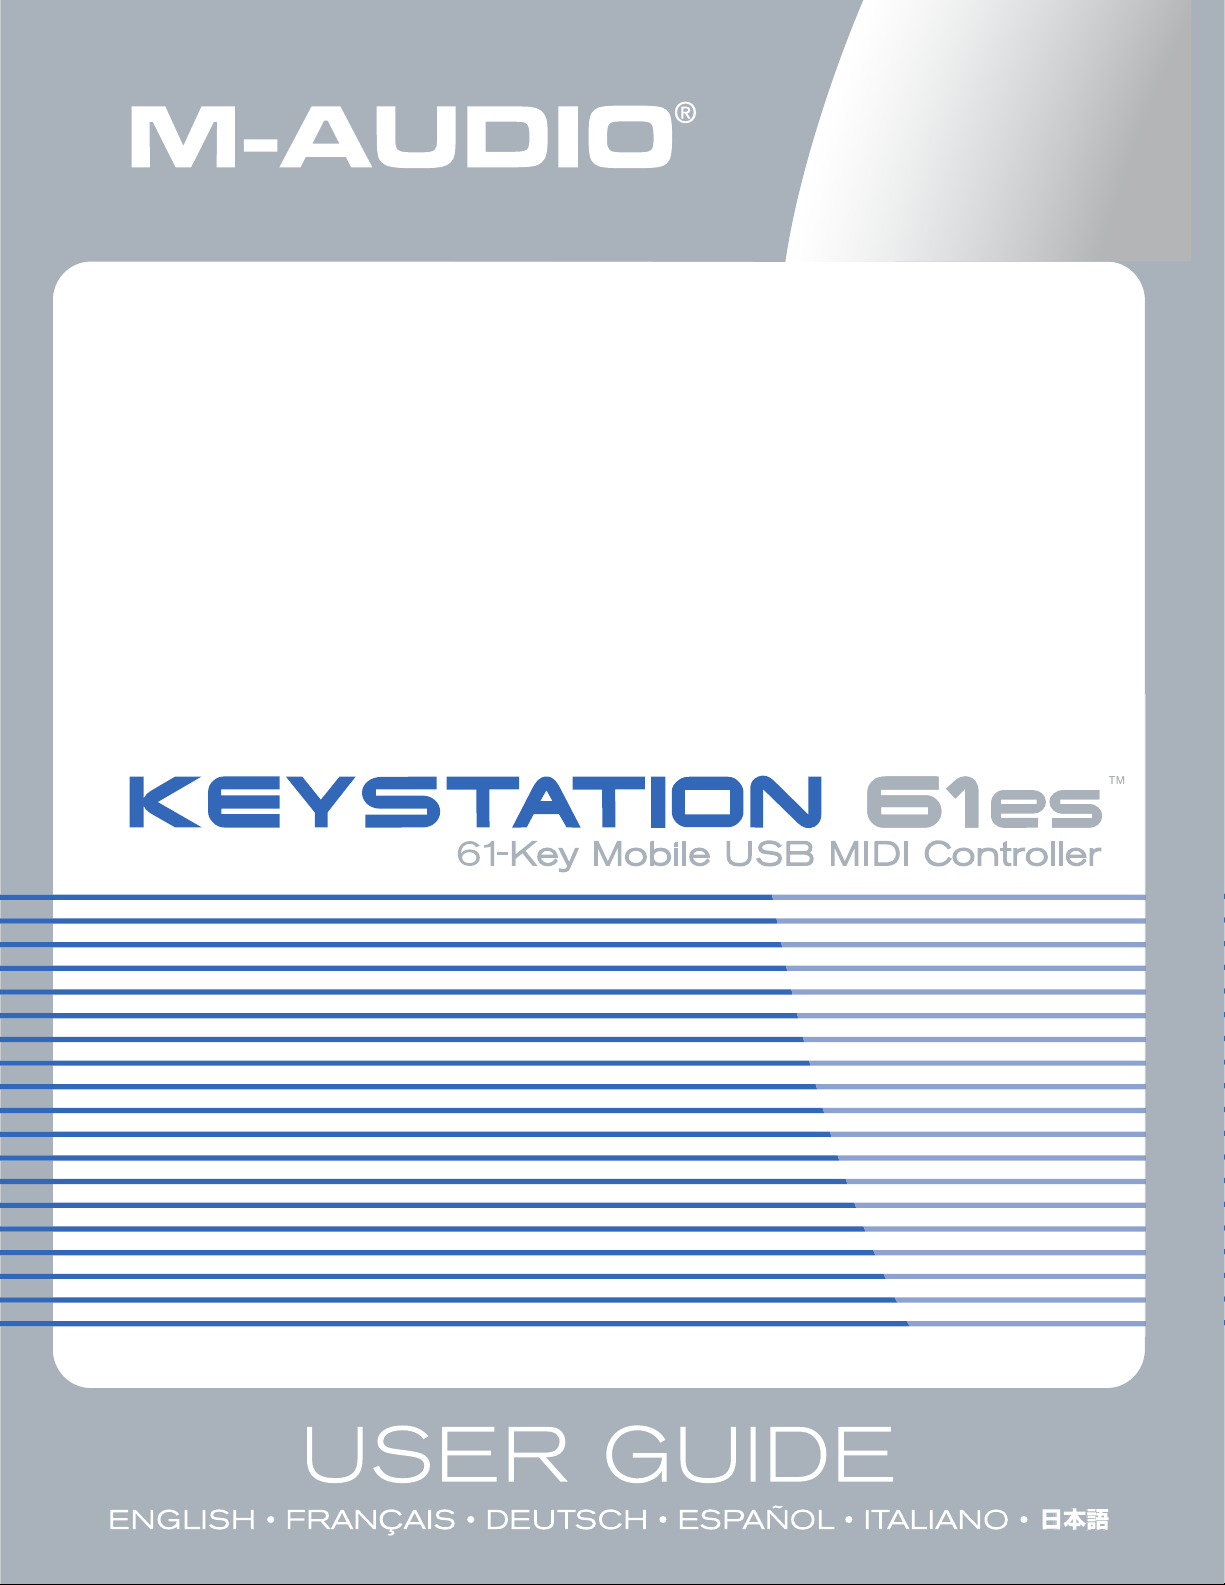
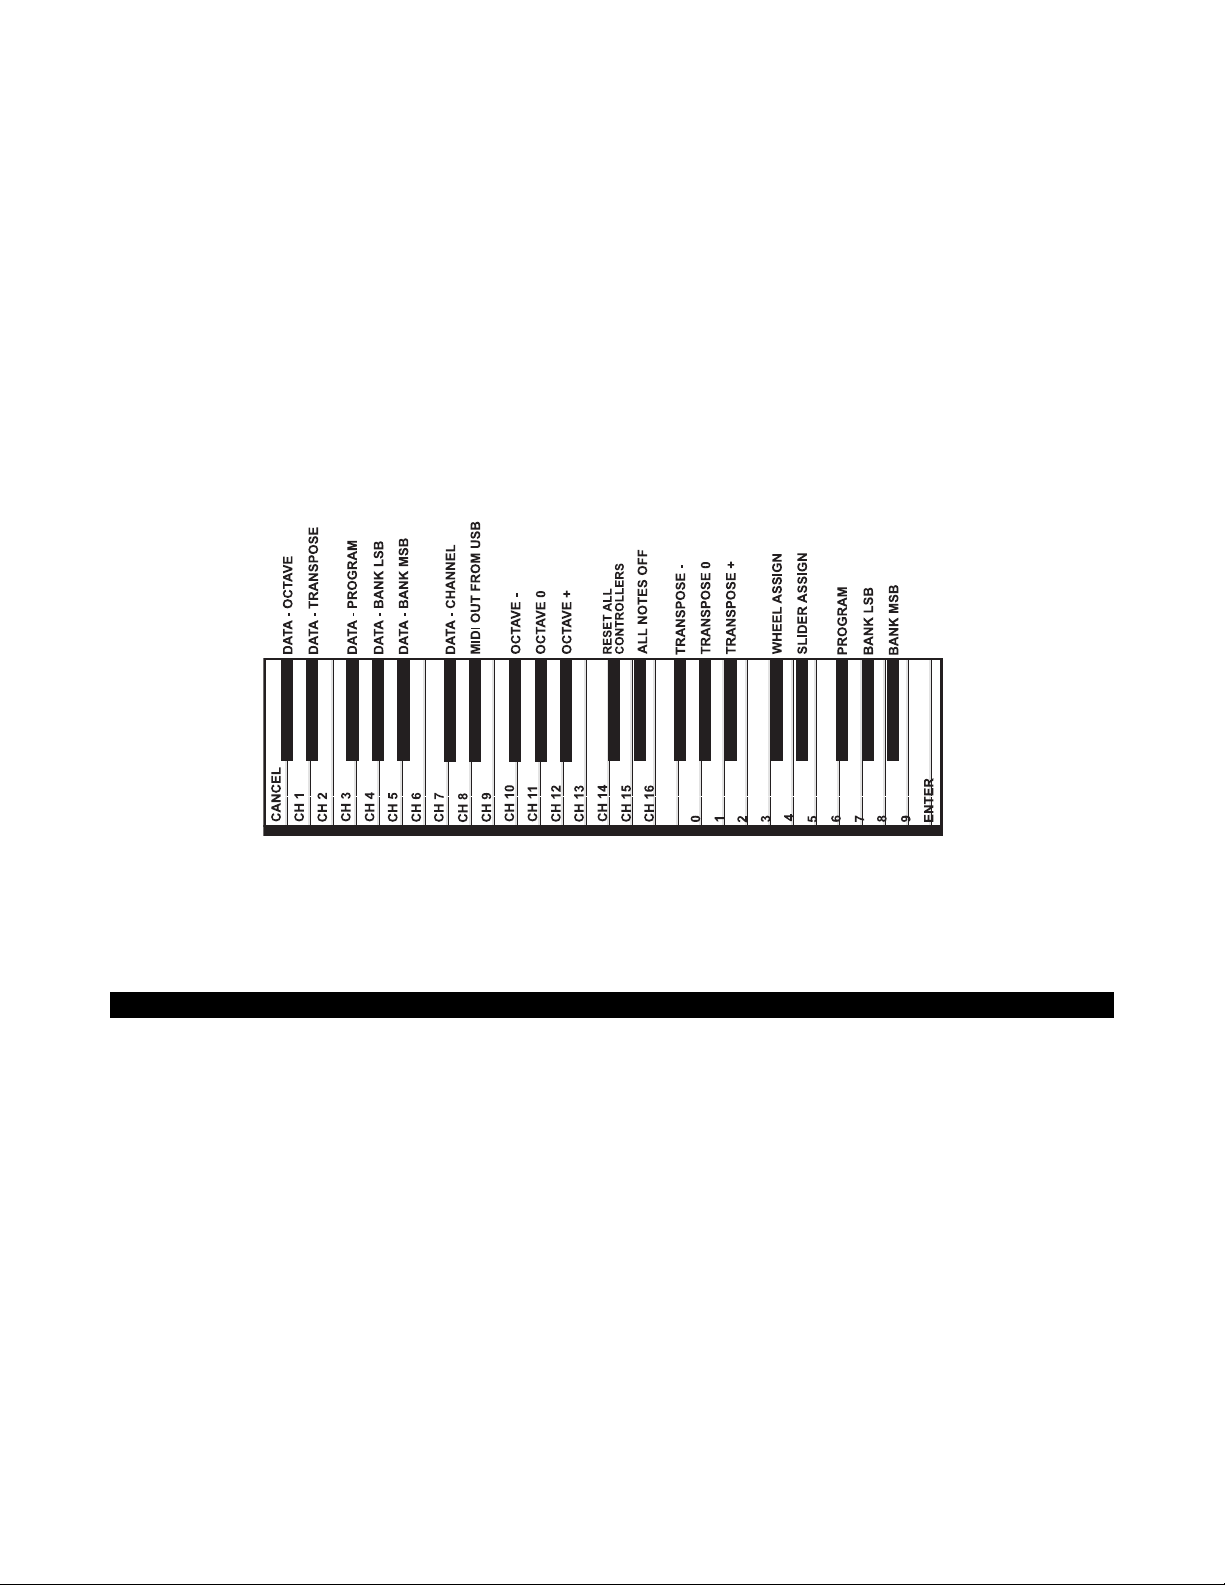
The following diagram shows what each key on the keyboard represents in Edit Mode:
Advanced functions
In addition to setting an octave shift, the two octave “+” and ’“-“ buttons discussed earlier in the manual under the section “Octave
Buttons” can also be used to control one of five MIDI functions.
In the diagram above, you will see that the first 6 black keys are labeled “DATA = ________.” These keys are used to select the function
of the octave buttons. Some of the functions that these keys can be used for cannot send out a value less than 0. When used to control
these functions, both lights above the buttons will remain on, regardless of the current setting of that function.
To select an alternate function:
Press the Advanced Functions button, putting the keyboard into Edit Mode.
Press the black key that represents the function you want. Edit Mode will finish as soon as you have selected the function and you will
be able to play notes again.
The five available alternate functions of the octave buttons are described next:
Octave Shift
The Octave “+” And “-” Keys
Another method of shifting the Keystation 49e’s octaves is with the use of the keys labeled octave “+” and “-“. After the Advanced Function
button has been pressed, placing the keyboard is in Edit Mode, pressing these keys will shift the keyboards pitch up or down one or
more octaves (one for time each pressed). The default octave shift designation is “0” and will be the octave setting each time you power
up the keyboard. The lights above the octave buttons indicate that 0 octave shift is set when both are on.
To assign the “+” and “-” keys to control the octave:
Press the Advanced Functions button to get the keyboard into Edit Mode.
Press the black key above C1 (named C# 1), representing DATA = OCTAVE. Edit Mode will finish as soon as C# 1 has been pressed.
There is also a method of performing a ‘quick’ octave change, which can be useful when using the octave buttons to control another
MIDI function and is accompplished as follows:
Press the Advanced Functions button to put the keyboard in Edit Mode.
Press the black key below B2 (Bb2)—in Edit Mode, this key functions as “OCTAVE +”, increasing the octave by 1 (you may press it again
to increase the octave by 2, and so on),
Press the black key above F2 (F# 2)—in Edit Mode, this key functions as “OCTAVE -”, decreasing the octave by 1 (you may press it again
to decrease the octave by 2, and so on), OR, press the black key above G2 (named G# 2)—in Edit Mode, this key functions as “OCTAVE
0” to reset the octave shift to 0).
When you have chosen your octave shift press C5, representing “ENTER,” to leave Edit Mode.
7
Page 9

Transposition
In some cases it may be useful to reduce or increase the pitch by a number of semitones rather than an entire octave. For example, if
you are playing a song with a singer that is having difficulty hitting the top notes, you may want to reduce the pitch by one or two
semitones.* This is achieved using a MIDI function called “Transpose.”
Transpose works in the same way as Octave Shift above, except the shift is +/- 12. As with Octave Shift, there are two ways of transposing the
keyboard. You can use the Octave “+” and “-” buttons, or the black keys F# 3, G# 3 and Bb3. These black keys represent “TRANSPOSE -,”
“TRANSPOSE 0” and “TRANSPOSE +,” respectively.
To assign the octave “+” and “-” buttons to transpose:
Press the Advanced Functions button to engage Edit Mode.
Press the black key above D1 (named D# 1), representing “DATA = TRANSPOSE.” (Edit Mode will disengage as soon as D# 1 has
been pressed.)
Press the “+” key and you will hear the pitch of the note you play go up.
Press both “+” and “-“ together to cancel transpose.
*A semitone represents the change in pitch from one note to another. Therefore, changing two semitones is the same as playing a note
two notes higher.
Channel
MIDI data from the keyboard can be sent on any of 16 MIDI Channels. However, certain MIDI devices and MIDI software applications
require the keyboard to send data on a specified channel. If this is the case, you can change the channel the data is sent using the
following method:
Press the Advanced Functions button to engage Edit Mode.
Press one of the 16 Channel keys from D1 to E3, according to the Channel that you need.
For example, if a device specifies that you need to send data on Channel 10, press the Advanced Functions button, and then key F2 to
select Channel 10.
The Channel can also be assigned to the Octave “+” and “-” buttons. Once assigned, pressing “+” or “-“ will increase or decrease the
channel incrementally. When Channel 16 is reached and “+” is pressed, Channel 1 will be selected. If the Octave “+” and “-” keys are
selected to vary the Channel, the lights above the buttons will not change, since it is not possible to have a Channel with a negative
value. Pressing both the “+” and “-” buttons together will recall Channel 1.
Program Change
Program Changes are used to change the instrument or voice you are using. For the sake of example, we will change the instrument to
a bass sound. To do this we need to send a program change of 32, which will select an acoustic bass sound from the General MIDI
Instruments list in the Appendix. There are two ways to send a program change:
1. Incremental/Decremental Program Change:
Press the Advanced Functions button.
Press the black key above F1 (named F# 1).
Now the Octave “+” and “-” keys can be used to change the program.
Press “+” and continue to play notes until you find the instrument you want.
2. Quick Select Program Change:
Press the Advanced Functions button.
Press the black key above F4 (named F# 4), representing “Program.”
Press keys C4, then E3 then C5. This enters the combination: “3,” “2,” “ENTER.” Alternatively, you can use the “+” and “-” buttons to change
the value, then press ENTER. Now the keyboard will play a bass sound: Number 32 as listed in the General MIDI Instruments list.
The first method is useful if you want to cycle through different instruments to see which sounds best in your song. The second is more
useful if you want to select a specific number, as is the case here.
If the Octave “+” and “-” keys are selected to vary the Program number (Method 1), the lights above the buttons will not change, since it
is not possible to have a Program with a negative value. Pressing both the “+” and “-” buttons together will recall Program 0, which
selects a grand piano sound.
The full list of instruments that can be accessed via Program Changes is listed in the Appendix at the end of this manual.
8
Page 10

Bank LSB and Bank MSB
Program Changes are most commonly used to change instruments and voices. However, the number of instruments accessible via
Program Changes is limited to 128. Some devices have more than 128 voices and require a different method to access these extra
voices. Generally, these devices use Bank LSB and Bank MSB messages.
1. Incremental/Decremental Bank LSB and Bank MSB Changes:
Press the Advanced Functions button.
Press the black key above G1 (named G# 1).
Now the Octave “+” and “-” keys can be used to change the program.
Press “+” and continue to play notes until you find the instrument you want.
2. Using the Quick Select Method:
Press the Advanced Functions button.
Press the black key above G4 (named G# 4), or A4 (named A# 4), representing Bank LSB or Bank MSB respectively.
Press keys C4, then E3 then C5. This enters the combination: “3,” “2,” “ENTER.”
Alternatively, you can use the “+” and “-” buttons to change the value, and then press “ENTER.”
As with Program Change, if the Octave “+” and “-” keys are selected to vary the Bank LSB or MSB number (Method 1), the lights above
the buttons will not change, since it is not possible to have a Bank with a negative value. Pressing both the “+” and “-” buttons together
will recall Bank 0.
The Modulation Wheel
It is possible to assign MIDI effects to the Modulation Wheel. Some useful effects are:
01 Modulation
07 Volume
10 Pan (balance)
05 Portamento
There are 131 effects in total. However, for these effects to have any affect on the sound, the receiving MIDI device has to be able to read
and respond to these MIDI effect messages. Most devices will at least respond to volume, modulation, and pan data. (The full list of
effects is given at the back of this manual.)
To assign an effect to the Modulation Wheel:
Press the Advanced Functions button to engage Edit Mode.
Press the black key above C4 (named C# 4), representing “WHEEL ASSIGN.”
Use the Numerical Data Entry keys G3-B4 to enter the number of the effect you want to assign to the Modulation Wheel.
Alternatively, you can use the “+” and “-” buttons to change the value.
Press the ENTER key (C5).
Move the Modulation Wheel upwards to increase the value of the effect.
If you have made an error while entering the numerical data value, you can press the CANCEL key (C1) to exit Edit Mode without changing
the effect assigned to the Modulation Wheel.
Note that each time the keyboard is turned off the data assigned to the Modulation Wheel will be lost. Each time the keyboard is powered
up, the Modulation Wheel will be assigned to modulation (effect number 01) by default.
For the sake of example, we will assign effect number 10 (pan, or balance) to the Modulation Wheel.
Press the Advanced Functions button to engage Edit Mode.
Press the black key above C4 (named C# 4), representing “WHEEL ASSIGN.”
Press A3 to enter “1.”
Press G3 to enter “0” so you have entered “10.”
Press C5 for “ENTER.”
9
Page 11

The Volume Slider
As with the Modulation Wheel, the Volume Slider can be assigned to any of the 131 effects listed at the end of this manual.
To assign the Volume Slider to an effect:
Press the Advanced Functions button to engage Edit Mode.
Press the black key above D4 (named D# 4), representing “SLIDER ASSIGN.”
Use the Numerical Data Entry keys G3-B4 to enter the number of the effect you want to assign to the Volume Slider.
Alternatively, you can use the “+” and “-” buttons to change the value.
Press the ENTER key (C5).
Move the Volume Slider upwards to increase the value of the effect.
If you have made an error while entering the numerical data value, you can press the CANCEL key (C1) to exit Edit Mode without changing
the effect assigned to the Volume Slider.
Note that each time the keyboard is turned off, the data assigned to the Volume Slider will be lost. Each time the keyboard is powered
up, the Volume Slider will be assigned to volume (effect number 07) by default.
Pitch Bend Sensitivity
It is possible to alter the sensitivity of the Pitch Bend Wheel by assigning effect number 128 to the Modulation Wheel or Volume Slider. This
will allow you to alter the pitch bend range up to one octave up and down.
MIDI - If All Goes Wrong
The Keystation 61es has been designed to make working with MIDI on your computer as simple as possible. Nonetheless, you may still
experience some difficulties. In many cases, the keyboard is not at fault; the problem lies with the receiving device. To counter this, there
are two useful MIDI functions:
All Notes Off
If you find there are hanging notes that you cannot stop playing, send an “All Notes Off” MIDI message by performing the following:
Press the Advanced Functions button to engage Edit Mode.
Press the black key above D3 (named D# 3), representing “ALL NOTES OFF.”
Edit Mode will disengage, eliminating any hanging notes.
Reset All Controllers
If you find there is an effect on a voice that you do not want, rather than having to isolate and identify that effect, you can send a “Reset
All Controllers” MIDI message by performing the following:
Press the Advanced Functions button to engage Edit Mode.
Press the black key above C3 (named C# 3), representing “RESET ALL CONTROLLERS.”
Edit Mode will disengage, eliminating all effects.
MIDI Out
The MIDI Out port is located on the back of the keyboard, and can be used to connect the keyboard to an external sound module or MIDI
keyboard. By default (when you switch the unit on), all controller data is sent out via the MIDI output as well as the USB out.
If you want the MIDI output to act like a traditional USB-to-MIDI interface, engage “MIDI Out from USB” mode by carrying out the following:
Press the Advanced Functions button to engage Edit Mode.
Press the black key above D2 (named D# 2), representing “MIDI OUT FROM USB.”
Edit Mode will disengage.
The keyboard is now able to send data received from the computer via its MIDI OUT jack to whatever device is connected.
In order to use the MIDI output, select the Keystation 61es USB MIDI Out as the MIDI output device in your sequencer.
10
Page 12

Trouble-Shooting
Here are answers to common trouble-related questions you may have, using your Keystation 49e:
Problem 1: My M-Audio hardware suddenly stopped working after having performed fine since installation.
Solution 1: Switch off the unit and leave for 10 seconds. Then restart your computer and try again. If the problem persists you may have
to re- install drivers for the unit.
Problem 2: I have plugged in a sustain pedal into my M-Audio keyboard, but it works the wrong way around.
Solution 2: The polarity of the sustain pedal is calculated by the keyboard when it is powered up. On power up, the sustain pedal is
assumed to be in the OFF position. So if you want the sustain pedal to be off when it is unpressed, make sure the pedal is unpressed
when you power up.
Problem 3: When I press a key, there is a delay before I hear any sound.
Solution 3: This delay is known as latency. Latency with MIDI signals is due to the softsynth you are using. MIDI data is simply control
data. The MIDI is read by the softsynth. The softsynth then completes a large number of complex calculations in order to produce the
sound you hear–all this takes time.
We strongly recommend a proper soundcard. Refer to www.m-audio.com for a selection of USB, PCI and Firewire audio cards. If you already
have an adequate sound card, try reinstalling the latest drivers for the sound card, or try reducing the buffer sizes of the audio drivers.
Contact M-Audio
M-AUDIO U.S.
5795 Martin Road, Irwindale, CA 91706-6211, U.S.A.
Sales Information: 626-633-9050
Sales Information (email): info@m-audio.com
Tech Support: 626-633-9055
Tech Support (email): techsupt@m-audio.com
Fax: 626-633-9060
Internet Home Page: http://www.m-audio.com
M-AUDIO U.K.
Unit 5, Saracen Industrial Estate, Mark Road, Hemel Hempstead, Herts HP2 7BJ, England
Sales Information (phone): 44 (0) 1442 416590
Sales Information (fax): 44 (0) 1442 246832
Sales Information (email): info@maudio.co.uk
Technical Support (PC): 44 (0) 1309 671301
Technical Support (Mac): 44 (0) 1765 650072
Technical Support (email): richard@maudio.freeserve.co.uk
Internet Home Page: http://www.maudio.co.uk
M-AUDIO France
Unit 5, Saracen Industrial Estate, Mark Road, Hemel Hempstead, Herts HP2 7BJ, England
Informations Commerciales: 0810 001 105
Informations Commerciales (email): info@m-audio.fr
Assistance Technique:
Fax: +44 (0) 144 224 6832
Site Internet: http://www.m-audio.fr
0820 000 731 (PC) ou 0820 391 191 (Mac at général)
support@m-audio.fr.com ou mac@m-audio.fr (email)
M-AUDIO Deutschland (Germany)
Kuhallmand 34, D-74613 Ohringen, Germany
Sales Information: 49 7941 98 7000
Sales Information (email): info@m-audio.de
Technical Support: 49 7941 98 70030
Technical Support (email): support@m-audio.de
Fax: 0 7941 98 70070
Internet Home Page: http://www.m-audio.de
M-AUDIO Canada
1400 St-Jean Baptiste Ave. #150, Quebec City, QC G2E 5B7, Canada
Tel: 418-872-0444
Fax: 418-872-0034
Email: midimancanada@m-audio.com
Internet Home Page: http://www.m-audio.ca
M-AUDIO Japan
Annex Buliding 6F, 2-18-10 Marunouchi, Naka-Ku, Nagoya 460-0002, Japan
Tel: 81 52 218 3375
Fax: 81 52 218 0875
Technical Support: 08 200 0731
Email: info@m-audio.co.jp
Internet Home Page: http://www.m-audio.co.jp
11
Page 13

Warranty Info
Register your Keystation 61es online to receive FREE product updates and be entered to win FREE M-Audio gear
(www.m-audio.com/register).
M-AUDIO warrants this product, under normal use, to be free of defects in materials and workmanship for a period of One (1) Year from
date of purchase, so long as: the product is owned by the original purchaser, with proof of purchase from an authorized M-AUDIO
dealer and, the product has been registered to the original purchaser, the purchaser having returned to M-AUDIO the completed
product warranty card. This warranty explicitly excludes power supplies and included cables which may become defective as a result
of normal wear and tear.
In the event that M-AUDIO receives, from an original purchaser and within the warranty coverage period, written notice of defects in
materials or workmanship, M-AUDIO will either replace the product, repair the product, or refund the purchase price at its option. In the
event repair is required, shipment to and from M-AUDIO and possible nominal handling charges shall be born by the purchaser. In the
event that repair is required, a Return Authorization number must be obtained from M-AUDIO. After this number is obtained, the unit
should be shipped back to M-AUDIO in a protective package with a description of the problem and the Return Authorization clearly
written on the package.
In the event that M-AUDIO determines that the product requires repair because of user misuse or regular wear, it will assess a fair repair
or replacement fee. The customer will have the option to pay this fee and have the unit repaired and returned, or not pay this fee and
have the unit returned un-repaired.
The remedy for breach of this limited warranty shall not include any other damages. M-AUDIO will not be liable for consequential,
special, indirect, or similar damages or claims including loss of profit or any other commercial damage, even if its agents have been
advised of the possibility of such damages, and in no event will M-AUDIO's liability for any damages to the purchaser or any other person
exceed the price paid for the product, regardless of any form of the claim. M-AUDIO specifically disclaims all other warranties, expressed
or implied. Specifically, M-AUDIO makes no warranty that the product is fit for any particular purpose.
This warranty shall be construed, interpreted, and governed by the laws of the state of California. If any provision of this warranty is found
void, invalid or unenforceable, it will not affect the validity of the balance of the warranty, which shall remain valid and enforceable
according to its terms. In the event any remedy hereunder is determined to have failed of its essential purpose, all limitations of liability
and exclusion of damages set forth herein shall remain in full force and effect.
Technical Info
Caution: Electro Static Discharge, Electrical Fast Transient and Conducted RF interference may cause the unit malfunctioning. In such
case, unplug the unit and plug in again to restore normal operation.
Note: Your M-AUDIO Keyatation 61es has been tested To Comply With FCC Standards FOR HOME OR OFFICE USE. Modifications not
authorized by the manufacturer may void users authority to operate this device.
Note: This equipment has been tested and found to comply with the limits for a Class B digital device, pursuant to Part 15 of the FCC
Rules. These limits are designed to provide reasonable protection against harmful interference in a residential installation. This
equipment generates, uses and can radiate radio frequency energy and, if not installed and used in accordance with the instructions,
may cause harmful interference to radio communications. However, there is no guarantee that interference will not occur in a particular
installation. If this equipment does cause harmful interference to radio or television reception, which can be determined by turning the
equipment off and on, the user is encouraged to try to correct the interference by one or more of the following measures:
Re-orient or relocate the receiving antenna.
Increase the separation between the equipment and receiver.
Connect the equipment into an outlet on a circuit different from that to which the receiver is connected.
Consult the dealer or an experienced radio/ TV technician for help.
ASIO is a trademark of Steinberg Soft– und Hardware GmbH.
VST is a trademark of Steinberg Soft– und Hardware GmbH
Keystation 61es
Tested to comply with
FCC standards
FOR HOME OR STUDIO USE
12
Page 14
Appendices - Useful MIDI Data
Appendix A - General MIDI Instruments
Piano
0 Acoustic Grand Piano
1 Bright Acoustic Piano
2 Electric Grand Piano
3 Honky Tonk Piano
4 Electric Piano 1
5 Electric Piano 2
6 Harpsichord
7 Clavinet
Chromatic Percussion
8 Celesta
9 Glockenspiel
10 Music Box
11 Vibraphone
12 Marimba
13 Xylophone
14 Tubular bells
15 Dulcimer
Organ
16 Drawbar Organ
17 Percussive Organ
18 Rock Organ
19 Church Organ
20 Reed Organ
21 Accordion
22 Harmonica
23 Tango Accordion
Bass
32 Acoustic Bass
33 Electric Fingered Bass
34 Electric Picked Bass
35 Fretless Bass
36 Slap Bass 1
37 Slap Bass 2
38 Syn Bass 1
39 Syn Bass 2
Strings/ Orchestra
40 Violin
41 Viola
42 Cello
43 Contrabass
44 Tremolo Strings
45 Pizzicato Strings
46 Orchestral Harp
47 Timpani
Ensemble
48 String Ensemble 1
49 String Ensemble 2 (Slow)
50 Syn Strings 1
51 Syn Strings 2
52 Choir Aahs
53 Voice Oohs
54 Syn Choir
55 Orchestral Hit
Reed
64 Soprano Sax
65 Alto Sax
66 Tenor Sax
67 Baritone Sax
68 Oboe
69 English Horn
70 Bassoon
71 Clarinet
Pipe
72 Piccolo
73 Flute
74 Recorder
75 Pan Flute
76 Bottle Blow
77 Shakuhachi
78 Whistle
79 Ocarina
Synth Lead
80 Syn Square Wave
81 Syn Sawtooth Wave
82 Syn Calliope
83 Syn Chiff
84 Syn Charang
85 Syn Voice
86 Syn Fifths Sawtooth Wave
87 Syn Brass & Lead
Synth Effects
96 SFX Rain
97 SFX Soundtrack
98 SFX Crystal
99 SFX Atmosphere
100 SFX Brightness
101 SFX Goblins
102 SFX Echoes
103 SFX Sci- Fi
Ethnic
104 Sitar
105 Banjo
106 Shamisen
107 Koto
108 Kalimba
109 Bag Pipe
110 Fiddle
111 Shanai
Percussive
112 Tinkle Bell
113 Agogo
114 Steel Drums
115 Woodblock
116 Taiko Drum
117 Melodic Tom
118 Syn Drum
119 Reverse Cymbal
Guitar
24 Nylon Acoustic
25 Steel Acoustic
26 Jazz Electric
27 Clean Electric
28 Muted Electric
29 Overdrive
30 Distorted
31 Harmonics
Brass
56 Trumpet
57 Trombone
58 Tuba
59 Muted Trumpet
60 French Horn
61 Brass Section
62 Syn Brass 1
63 Syn Brass 2
Synth Pad
88 New Age Syn Pad
89 Warm Syn Pad
90 Polysynth Syn Pad
91 Choir Syn Pad
92 Bowed Syn Pad
93 Metal Syn Pad
94 Halo Syn Pad
95 Sweep Syn Pad
13
Sound Effects
120 Guitar Fret Noise
121 Breath Noise
122 Seashore
123 Bird Tweet
124 Telephone Ring
125 Helicopter
126 Applause
127 Gun Shot
Page 15
Appendix B - Standard MIDI Controller Numbers (MIDI CC’s)
00 Bank Select
01 Modulation
02 Breath Control
03 Controller 3
04 Foot Control
05 Porta Time
06 Data Entry
07 Channel Volume
08 Balance
09 Controller 9
10 Pan
11 Expression
12 Effects Controller 1
13 Effects Controller 2
14 Controller 14
15 Controller 15
16 Gen Purpose 1
17 Gen Purpose 2
18 Gen Purpose 3
19 Gen Purpose 4
20 Controller 20
21 Controller 21
22 Controller 22
23 Controller 23
24 Controller 24
25 Controller 25
26 Controller 26
27 Controller 27
28 Controller 28
29 Controller 29
30 Controller 30
31 Controller 31
32 Bank Select LSB
33 Modulation LSB
34 Breath Control LSB
35 Controller 35
36 Foot Control LSB
37 Porta Time LSB
38 Data Entry LSB
39 Channel Volume LSB
40 Balance LSB
41 Controller 41
42 Pan LSB
43 Expression LSB
44 Controller 44
45 Controller 45
46 Controller 46
47 Controller 47
48 Gen Purpose 1 LSB
49 Gen Purpose 2 LSB
50 Gen Purpose 3 LSB
51 Gen Purpose 4 LSB
52 Controller 52
53 Controller 53
54 Controller 54
55 Controller 55
56 Controller 56
57 Controller 57
58 Controller 58
59 Controller 59
60 Controller 60
61 Controller 61
62 Controller 62
63 Controller 63
64 Sustain Pedal
65 Portamento
66 Sostenuto
67 Soft Pedal
68 Legato Pedal
69 Hold 2
70 Sound Variation
71 Resonance
72 Release Time
73 Attack Time
74 Cut- off Frequency
75 Controller 75
76 Controller 76
77 Controller 77
78 Controller 78
79 Controller 79
80 Gen Purpose 5
81 Gen Purpose 6
82 Gen Purpose 7
83 Gen Purpose 8
84 Portamento Control
85 Controller 85
86 Controller 86
87 Controller 87
88 Controller 88
89 Controller 89
90 Controller 90
91 Reverb Depth
92 Tremelo Depth
93 Chorus Depth
94 Celeste (De- tune)
95 Phaser Depth
96 Data Increment
97 Data Decrement
98 Non- Reg Param LSB
99 Non- Reg Param MSB
100 Reg Param LSB
101 Reg Param MSB
102 Controller 102
103 Controller 103
104 Controller 104
105 Controller 105
106 Controller 106
107 Controller 107
108 Controller 108
109 Controller 109
110 Controller 110
111 Controller 111
112 Controller 112
113 Controller 113
114 Controller 114
115 Controller 115
116 Controller 116
117 Controller 117
118 Controller 118
119 Controller 119
Channel Mode Messages:
120 All Sound off
121 Reset all Controllers
122 Local Control
123 All Notes Off
124 Omni Off
125 Omni On
126 Mono On (Poly Off)
127 Poly On (Mono Off)
Extra RPN Messages:
128 Pitch Bend sensitivity
129 Fine Tune
130 Coarse Tune
131 Channel Pressure
14
Page 16

Français -
Introduction
Nous vous félicitons d'avoir acheté le Keystation 61es de M-Audio, clavier USB 61 notes dynamiques avec toucher semi-lourd conçu pour
une intégration facile avec votre ordinateur PC ou Macintosh. Le Keystation 61es offre des touches avec toucher semi-lourd, ce qui vous
permet de retrouver les sensations d'un piano dans un clavier de commande MIDI compact et abordable. Idéal pour de très
nombreuses applications de création et d'éducation musicales, le Keystation 61es vous offre des molettes de modulation et de pitch,
des boutons programmables et un curseur pour un contrôle à portée de main. Bien que le Keystation 61es offre un fonctionnement
réellement “plug-and-play“ sous Windows XP et Mac OS X, nous vous recommandons de consacrer quelques minutes à l'examen de
ce manuel pour apprendre comment utiliser correctement le clavier, ses fonctionnalités avancées, et sa programmation.
Caractéristiques
Clavier :
Clavier dynamique de 61 touches
Molette de pitch
Molette de modulation
Curseur volume/contrôle
Entrée pour pédale sustain
Boutons d'octave +/-
Bouton de fonctions avancées
Ports :
MIDI out
USB MIDI in/out
Alimentation :
par le bus USB
DC IN pour bloc d'alimentation externe
Contenu de l'emballage
L'emballage de votre M-Audio Keystation 61es devrait contenir les éléments suivants ;
Clavier USB Keystation 61es M-Audio
Manuel d'utilisation
Câble USB
Si l'un des éléments indiqués ci-dessus ne se trouve pas dans votre emballage, veuillez contacter le détaillant chez qui vous avez acheté
le produit.
Sur ce manuel
Ce manuel d'utilisation concerne le fonctionnement du clavier USB Keystation 61es. Bien que nous ne donnions pas d'explications
détaillées sur la façon dont votre clavier peut être employé avec les divers logiciels musicaux du marché, la plupart de ces logiciels
fonctionneront sans la moindre difficulté avec le clavier Keystation 61es. Veuillez consulter le manuel de votre logiciel pour plus
d'informations.
Avant de brancher votre clavier
Vous pouvez alimenter le clavier, soit par le port USB, soit par une source d'alimentation externe facultative. Cependant, le Keystation
61es étant un appareil qui nécessite peu de courant, une alimentation externe ne devrait pas être nécessaire.
Nous vous recommandons de brancher le Keystation 61es directement sur le port USB de votre ordinateur ou d'utiliser un concentrateur
USB alimenté.
15
Page 17

Alimentation et connexion par le port USB
1. Vérifiez que le commutateur on/off à l'arrière de l'appareil est réglé sur "off".
2. Branchez le câble USB fourni avec le clavier Keystation 61es sur un port USB disponible de votre ordinateur.
3. Branchez l'autre bout du câble USB à l'entrée USB sur le clavier Keystation 61es.
Le câble USB à lui seul alimente le clavier et envoie/reçoit les données MIDI vers/de votre ordinateur.
Utilisation d'une alimentation externe
Vous pouvez aussi utiliser un adaptateur d'alimentation (non inclus) avec les spécifications suivantes : sortie 9 V en courant continu,
250-300 mA, polarité centre = positif.
Assurez-vous que le clavier Keystation 61es n'est pas déjà alimenté par le port USB : si vous recevez l'alimentation du port USB, aucune
alimentation externe n'est nécessaire. Si le clavier n'est pas alimenté par le port USB, alors branchez simplement l'alimentation dans
l'entrée "DC 9V" et mettez le clavier en marche avec le commutateur.
Remarque : ne laissez pas l'adaptateur branché pendant de longues périodes si le clavier n'est pas utilisé.
Windows XP et Mac OS X
Si vous utilisez Windows XP ou Mac OS X, il suffira désormais de placer le commutateur de mise en marche sur la position "ON". Comme
le clavier Keystation 61es est pris en charge nativement, il fonctionnera sans nécessiter d'installation supplémentaire.
Autres systèmes d'exploitation
Si vous utilisez un système d'exploitation autre qu’OS X ou Windows XP, veuillez consulter notre site web à l'adresse
www.m-audio-france.com pour y trouver les derniers pilotes du Keystation 61es pour les systèmes d'exploitation Macintosh ou Windows.
Installation sous Mac OS9
Si OMS n'est pas installé, veuillez commencer par exécuter le programme d'installation OMS. Si OMS est déjà installé, passez à
"Installation du pilote OMS".
Pour installer OMS :
Assurez-vous que toutes les applications soient fermées avant de commencer l'installation. Assurez-vous également que vous ayez
retiré les éventuels “dongles” (dispositifs de protection contre la copie) que vous utiliseriez.
1. Insérez le CD-ROM d'installation du Keystation 61es.
2. Double-cliquez sur l'icône du CD d'installation du Keystation 61es sur votre bureau.
3. Double-cliquez sur le dossier OS 9.
4. Double-cliquez sur Install OMS 2.3.8.
5. Suivez les instructions qui s'affichent à l'écran.
6. Veuillez patienter pendant que le programme installe OMS sur votre disque dur. Quand le programme a terminé l'installation, il
vous invite à redémarrer l'ordinateur. Cliquez sur "Restart" (Redémarrer).
Installation du pilote OMS
1. Faites glisser le fichier “USB Drivers Installer” (installation de pilotes USB) depuis la fenêtre OS 9 où il se trouve vers le bureau de
votre ordinateur.
2. Double-cliquez sur l'icône. Si une fenêtre apparaît, cliquez sur "Open" (Ouvrir).
3. Double-cliquez sur l'icône d'installation de pilotes USB que vous venez de créer sur votre bureau.
4. Cliquez sur "Install". (Le programme d'installation placera automatiquement les pilotes dans les dossiers système appropriés.)
5. Une fois que le programme d'installation a fini d'installer les pilotes, cliquez sur "Restart" (Redémarrer).
6. Une fois que l'ordinateur a redémarré, allumez le Keystation 61es.
16
Page 18

Configuration OMS
Vous devez maintenant exécuter le programme de configuration OMS :
1. Cherchez sur votre disque dur le dossier Opcode, ouvrez ensuite le dossier OMS Applications et lancez OMS Setup.
2. Si vous recevez un message vous disant d'activer ou de désactiver Appletalk, choisissez n'importe quelle option ; cela n'aura
pas d'influence sur l'installation.
3. Dans la fenêtre suivante, cliquez sur OK.
4. Cliquez sur Search.
5. Cliquez sur OK.
6. Cliquez sur "OK" à nouveau.
7. Cliquez sur "Save".
8. Si on vous le demande, cliquez sur "Replace".
Vous devriez maintenant obtenir une fenêtre finale qui vous montre votre configuration de studio actuelle. Si "Quicktime Music" est barré,
double-cliquez dessus, puis cliquez sur le cercle "ON" pour l'activer. Puis cliquez sur "OK". Vous pouvez maintenant utiliser votre clavier.
Assurez-vous simplement que votre clavier Keystation 61es est sélectionné en tant qu'entrée MIDI dans votre logiciel de musique.
Installation sous Windows 98 ou ME
1. Allumez votre PC.
2. Insérez le CD-ROM d'installation du Keystation 61es. Ouvrez le Poste de travail ou l'Explorateur Windows pour accéder à votre
lecteur CD-Rom. Cliquez sur le dossier "Keystation 61es".
3. Ouvrez le dossier Keystation 61es et cliquez sur l'icône du programme d'installation.
4. Suivez les instructions qui s'affichent à l'écran.
5. Une fois terminé, quittez le programme d'installation.
6. Allumez le Keystation 61es.
Windows poursuivra l'installation du pilote USB et d'un pilote MIDI. Une fois terminé, vous pouvez utiliser le clavier. Il se peut que
Windows vous demande de redémarrer votre ordinateur ; si c'est le cas, cliquez sur "Restart" (Redémarrer).
Installation sous Windows 2000
1. Allumez votre PC.
2. Insérez le CD-ROM d'installation du Keystation 61es. Ouvrez le Poste de travail ou l'Explorateur Windows pour accéder à votre
lecteur CD-Rom. Cliquez sur le dossier "Keystation 61es".
3. Ouvrez le dossier Keystation 61es et cliquez sur l'icône du programme d'installation.
4. Suivez les instructions qui s'affichent à l'écran.
5. Une fois terminé, quittez le programme d'installation.
6. Allumez le clavier Keystation 61es. Windows reconnaîtra automatiquement le clavier et demandera le CD-ROM d'installation du
Keystation 61es.
7. Sélectionnez le lecteur de CD-ROM et cliquez sur "OK". Windows vous demandera à nouveau de sélectionner le lecteur de
CD-ROM, cette fois pour le pilote MIDI.
8. Si Windows indique que les pilotes n'ont pas été signés numériquement, cliquez sur "Continue Installation" (Poursuivre
l'installation).
9. Sélectionnez une nouvelle fois le lecteur de CD-ROM.
10. Cliquez sur OK.
11. Il se peut que Windows vous demande de redémarrer votre ordinateur ; si c'est le cas, cliquez sur "Restart" (Redémarrer).
Instructions de départ
Une fois l'installation terminée, vous devez configurer votre logiciel MIDI afin de pouvoir utiliser le clavier. Notez que, lorsque vous
appuyez sur une touche, vous n'entendrez aucun son. La raison est que la pression d'une touche entraîne l'envoi de données MIDI vers
l'extérieur. Les données MIDI spécifient comment un son doit être joué. Pour réellement entendre un son, vous devrez configurer votre
logiciel musical afin qu'il lise les données MIDI envoyées depuis le Keystation 61es et joue le son en fonction de ces données. Cette
configuration consistera très probablement à vous rendre dans un menu Options ou Configuration périphériques (Device Setup) dans
votre logiciel de musique, et à sélectionner le périphérique approprié. Le Keystation 61es devrait apparaître sous le nom "USB Audio
Device" (Périphérique audio USB) pour Windows XP ou, pour d'autres systèmes d'exploitation, sous le nom "Keystation 61es", dans la
partie réservée aux périphériques MIDI de votre logiciel musical. Veuillez consulter le manuel livré avec ce dernier pour connaître la
procédure de configuration.
17
Page 19

Les touches
Chaque touche blanche du Keystation 61es comporte une lettre et un chiffre. La lettre représente la note que vous jouez, et le chiffre
représente l'octave (le concept "d'octave" est expliqué dans la section suivante).
Bien que les touches noires ne soient pas étiquetées, elles ont également des noms ("F#4" ou "Eb2", par exemple.)
Si un nom de touche (noire) comporte un signe #, il s'agit de la touche noire placée au-dessus de la touche blanche dont le nom est
formé par la même lettre. F#3, par exemple, désigne la touche noire au-dessus de F3. Si un nom de touche comporte un signe b, il
s'agit de la touche noire placée au-dessous de la touche blanche dont le nom est formé par la même lettre. Eb3, par exemple, désigne
la touche noire au-dessous de E3. Il s'ensuit que le nom de la touche noire entre C3 et D3 est à la fois C#3 et Db3.
Octave
Une octave contient 12 notes. Chaque octave est mise en évidence clairement sur votre Keystation 61es, par des zones noires et
blanches commençant par C (Do). Chaque octave reçoit un numéro.
Si vous pressez le bouton de décalage d'octave "+" une fois, le témoin au-dessus du bouton "-" s'éteindra, indiquant que le clavier joue
maintenant une octave plus haut.
Si vous pressez le bouton de décalage d'octave "+" encore une fois, vous jouerez le do suivant, etc. Il est possible de décaler le clavier
de 3 octaves vers le haut ou de 3 octaves vers le bas.
Pour abaisser l'octave, pressez sur le bouton d'octave "-".
Pour retrouver un décalage d'octave de 0, pressez les deux boutons d'octave "+" et "-" en même temps. Les deux diodes s'allumeront,
indiquant que le décalage d'octave est à nouveau de 0. (Si seule la diode au-dessus du bouton "-" est allumée, il y a un décalage
d'octave vers le bas. Si seule la diode au-dessus du bouton "+" est allumée, il y a un décalage d'octave vers le haut.)
Molette de pitch
Comme son nom l'indique, la molette programmable de pitch est surtout utilisée pour modifier vers le haut ou vers le bas le "pitch",
c'est-à-dire la hauteur tonale, des notes jouées par le clavier. Ceci vous permet de jouer des phrases musicales qui ne sont pas
normalement associées à un jeu au clavier, comme des riffs de guitare.
C'est votre source sonore qui détermine de combien le pitch est modifié par cette molette. Le réglage habituel est de deux demi-tons
mais peut aller jusqu'à 2 octaves + ou -.
Molette de modulation
La molette de modulation est généralement utilisée pour moduler le son que vous jouez. Ce type de contrôleur temps-réel a été introduit
à l'origine sur les claviers électroniques pour offrir des options au musicien, comme l'ajout de vibrato, permettant d'imiter le travail d'un
musicien qui joue un instrument acoustique.
Exactement comme dans le cas de la molette de pitch, la molette de modulation est pleinement programmable par MIDI.
Le curseur de volume
Le curseur de volume envoie un message MIDI qui contrôle le volume des notes que vous jouez.
On peut aussi assigner au curseur de volume différents effets comme le panoramique (balance), l'attaque, la reverb, le chorus, et bien
d'autres. (Voir "Fonctions avancées" pour plus d'informations.)
Pédale
Vous pouvez brancher une pédale (non incluse) utilisant n'importe quelle polarité dans l'entrée de pédale (foot pedal) de votre clavier
M-Audio. Le clavier détectera automatiquement la polarité correcte à la mise en marche. Si vous voulez inverser la polarité, pressez
simplement la pédale quand vous allumez votre clavier.
La pédale est normalement utilisée pour le sustain (soutien du son que vous jouez sans avoir à garder les mains sur le clavier,
exactement comme pour un piano).
18
Page 20
Bouton de fonctions avancées
Le bouton de fonctions avancées (Advanced functions) est utilisé pour accéder aux fonctions avancées du clavier, placées sur les touches.
Quand ce bouton est pressé, le clavier entre en mode de programmation. Dans ce mode, les touches du clavier peuvent être utilisées
pour choisir des fonctions et entrer des données.
Le témoin au-dessus du bouton "Advanced Functions" indique si le clavier est ou non en mode de programmation. En mode de
programmation, les touches noires du clavier sont utilisées pour choisir des fonctions, tandis que les touches blanches sont utilisées
pour l'entrée de données et le choix des canaux.
Votre clavier sortira du mode de programmation lorsqu'une des conditions suivantes est remplie : une fonction est choisie, ou la touche
CANCEL ou ENTER est pressée (le témoin au-dessus du bouton Advanced Functions s'éteindra). Le clavier peut alors à nouveau être
utilisé pour jouer des notes.
Le schéma suivant indique ce que chaque touche du clavier représente en mode de programmation.
Fonctions avancées
Fonctions supplémentaires des touches de décalage d'octave "+" et "-"
Par défaut, les touches d'octave "+" et "-" contrôlent le décalage d'octave, au-dessus ou au-dessous de 0. Ces boutons peuvent
également être utilisés pour contrôler une des cinq fonctions MIDI supplémentaires.
Dans le schéma ci-dessus, vous voyez que les 6 premières touches noires sont libellées "DATA = ----". Ces touches sont utilisées pour
choisir la fonction alternative désirée des boutons d'octaves. Certaines des fonctions correspondant à ces touches ne peuvent pas
envoyer une valeur plus petite que 0. Dans ce cas, les lumières au-dessus des boutons "+" et "-" resteront allumées.
Pour choisir la fonction de ces boutons :
Pressez le bouton Advanced Functions pour placer le clavier en mode de programmation.
Pressez la touche noire au-dessus de C1 (appelée C#1), qui représente DATA = OCTAVE. (Presser C#1 sortira du mode de
programmation.)
Pressez "+" pour décaler d'une octave vers le haut, et "-" pour décaler d'une octave vers le bas.
Pressez les deux boutons simultanément pour annuler le décalage d'octave.
19
Page 21

Décalage d'octave
Le décalage d'octave peut être obtenu de deux façon différentes. La première façon a déjà été décrite dans la section sur les octaves,
et consiste à utiliser les boutons d'octave "+" et "-".
Pour programmer les touches "+" et "-" afin qu'elles contrôlent l'octave :
Pressez le bouton Advanced Functions pour placer le clavier en mode de programmation.
Pressez la touche noire au-dessus de C1 (appelée C#1), qui représente DATA = OCTAVE. (Le clavier sortira du mode de programmation
dès que C#1 aura été pressé.)
La deuxième méthode permettra un changement d'octave rapide. Elle est utile si vous utilisez les boutons d'octave "+" et "-" pour une
autre fonction MIDI et que vous ne voulez continuer ainsi :
Pressez le bouton Advanced Functions pour placer le clavier en mode de programmation.
Enfoncez la touche noire au-dessous de B2 (appelée Bb2), libellée "OCTAVE +", pour augmenter l'octave d'1. Enfoncez-la à nouveau
pour augmenter l'octave de 2, et ainsi de suite.
ou
Enfoncez la touche noire au-dessus de F2 (appelée F#2), libellée "OCTAVE -", pour diminuer l'octave d'1. Enfoncez-la à nouveau pour
diminuer l'octave de 2, et ainsi de suite.
ou
Enfoncez la touche noire au-dessus de G2 (appelée G#2), libellée "OCTAVE 0", pour rétablir le décalage d'octave à 0.
Quand vous avez choisi votre décalage d'octave, pressez C5, équivalent à "ENTER", pour quitter le mode de programmation.
Transposition
Dans certains cas, il est utile de réduire ou d'augmenter le ton d'un certain nombre de demi-tons plutôt que d'une octave entière. Par
exemple, si vous jouez une chanson avec une chanteuse qui a du mal à chanter les notes les plus hautes, vous souhaiterez peut-être
réduire le ton d'un ou deux demi-tons.* Ceci peut être réalisé par une fonction MIDI appelée transposition.
La transposition fonctionne exactement comme le décalage d'octave décrit ci-dessus, à ceci près que le décalage dans celui-ci est
+/- 12. Comme dans le décalage d'octave, il y a deux manières de transposer votre clavier. Vous pouvez utiliser les boutons de
décalage d'octave "+" et "-", ou les touches noires F#3, G#3 et Bb3. Ces touches noires représentent respectivement les fonctions MIDI
"TRANSPOSE -", "TRANSPOSE 0" et "TRANSPOSE +".
Pour programmer les boutons d'octaves "+" et "-" pour qu'ils réalisent une transposition :
Pressez le bouton Advanced Functions pour placer le clavier en mode de programmation.
Enfoncez la touche noire au-dessus de D1 (D#1), représentant "DATA = TRANSPOSE". (Le clavier sortira du mode de programmation
dès que vous avez pressé la touche D#1.)
Pressez la touche "+" et vous entendrez monter le ton de la note que vous jouez.
Pressez simultanément "+" et "-" pour annuler la transposition.
*Un demi-ton représente le changement de ton d'une note à la suivante. Un changement de deux demi-tons revient donc à jouer une
note deux notes plus haut.
Canal
Les données MIDI en provenance du clavier peuvent être envoyées sur n'importe lequel des 16 canaux MIDI. Cependant, certains
périphériques MIDI et certains logiciels MIDI ont besoin que le clavier envoie les données sur un canal spécifique. Si c'est le cas, vous
pouvez modifier le canal sur lequel les données sont envoyées en utilisant la méthode suivante :
Pressez le bouton Advanced Functions pour placer le clavier en mode de programmation.
Enfoncez une des 16 touches de canal de D1 à E3, en choisissant celle correspondant au canal dont vous avez besoin.
Par exemple, si un périphérique spécifie que vous devez envoyer les données sur le canal 10, pressez le bouton Advanced Functions,
puis la touche F2 pour choisir le canal 10.
Le canal peut également être assigné aux boutons d'octaves "+" et "-". Une fois l'assignation réalisée, la pression sur "+" ou "-"
augmentera ou diminuera le canal par une unité pour chaque pression. Quand le canal 16 est atteint et que "+" est pressé, le canal 1
sera sélectionné. Si les touches d'octaves "+" et "-" sont sélectionnées pour modifier le canal, les témoins au-dessus des boutons ne
changeront pas, puisqu'il n'est pas possible d'avoir un canal avec une valeur négative. En pressant simultanément sur les boutons "+"
et "-", le canal 1 sera à nouveau sélectionné.
20
Page 22

Changement de programme
Les changements de programme (Program Changes) sont utilisés pour changer l'instrument ou le "patch" que vous utilisez. Pour donner
un exemple, nous allons changer l'instrument pour avoir un son de basse. Pour cela, nous devons envoyer un changement de
programme de valeur 32, qui sélectionnera une basse acoustique dans la liste d'instruments General MIDI en Annexe. Il y a deux
méthodes pour envoyer un changement de programme :
1. Changement de programme +/-
Appuyez sur le bouton Advanced Functions.
Enfoncez la touche noire au-dessus de F1 (appelée F#1).
Les touches d'octave "+" et "-" peuvent maintenant être utilisées pour changer le programme.
Enfoncez "+" et continuez à jouer quelques notes jusqu'à ce que vous trouviez l'instrument désiré.
2 Changement de programme en sélection rapide :
Appuyez sur le bouton Advanced Functions.
Enfoncez la touche noire au-dessus de F4 (appelée F#4), libellée "program".
Enfoncez les touches C4, puis E3 puis C5. Ceci revient à entrer la combinaison "3", "2", "ENTER".
Vous pouvez également utiliser les boutons "+" et "-" pour modifier la valeur, puis presser "ENTER".
Le clavier est maintenant réglé pour jouer le son de basse GM n° 32 de la liste standard d'instruments General MIDI.
La première méthode est utile si vous voulez parcourir les différents instruments pour voir quels sons correspondent le mieux à votre
chanson. La deuxième méthode est plus pratique si vous voulez sélectionner un numéro particulier, comme c'est le cas ici.
Si les touches d'octaves "+" et "-" sont sélectionnées pour modifier le numéro de programme (méthode 1), les témoins au-dessus des
boutons ne changeront pas, puisqu'il n'est pas possible d'avoir un programme avec une valeur négative. En pressant simultanément
sur les boutons "+" et "-", le programme 0, correspondant à un son de piano, sera à nouveau sélectionné.
La liste complète des instruments disponibles par changement de programme est donnée dans l'annexe à la fin de ce document.
Messages Bank LSB et Bank MSB
Les messages de changement de programme sont ceux qui sont le plus utilisés pour modifier les instruments et les voix. Cependant,
le nombre d'instruments accessibles par changement de programme est limité à 128. Comme de nombreux appareils disposent de
plus de 128 programmes, ils nécessitent une méthode différente pour accéder à ces voix supplémentaires. Généralement, ces
dispositifs utilisent les messages MIDI "Bank LSB" et "Bank MSB".
1. Changements Bank LSB et Bank MSB +/- :
Appuyez sur le bouton Advanced Functions.
Enfoncez la touche noire au-dessus de G1 (appelée G#1).
Les touches d'octave "+" et "-" peuvent maintenant être utilisées pour changer le programme.
Enfoncez "+" et continuez à jouer quelques notes jusqu'à ce que vous trouviez l'instrument désiré.
2. Sélection rapide :
Appuyez sur le bouton Advanced Functions.
Enfoncez la touche noire au-dessus de G4 (appelée G#4) ou de A4 (appelée A#4), représentant respectivement les messages Bank
LSB et Bank MSB.
Enfoncez les touches C4, puis E3 puis C5. Ceci revient à entrer la combinaison "3", "2", "ENTER".
Vous pouvez également utiliser les boutons "+" et "-" pour modifier la valeur, puis presser "ENTER".
Comme avec le changement de programme, si les touches d'octaves "+" et "-" sont sélectionnées pour modifier le numéro de Bank LSB
ou MSB (méthode 1), les témoins au-dessus des boutons ne changeront pas, puisqu'il n'est pas possible d'avoir un numéro de Bank
avec une valeur négative. En pressant simultanément sur les boutons "+" et "-", le Bank 0 sera à nouveau sélectionné.
La molette de modulation
Il est possible d'assigner des effets MIDI à la molette de modulation. Certains effets utiles sont :
01 Modulation
07 Volume
10 Pan (panoramique, balance)
05 Portamento
21
Page 23

Il y a 131 effets en tout. Cependant, pour que ces effets affectent le son, l’appareil MIDI récepteur doit être capable de lire et d'interpréter
ces messages d'effets MIDI. La plupart des appareils interpréteront au moins les données de volume, de modulation et de panoramique
(pan). (La liste complète des effets est donnée au dos du manuel.)
Pour assigner un effet à la molette de modulation :
Pressez le bouton Advanced Functions pour placer le clavier en mode de programmation.
Enfoncez la touche au-dessus de C4 (appelée C#4), représentant "WHEEL ASSIGN".
Utilisez les touches de saisie numérique G3 à B4 pour saisir le nombre correspondant à l'effet que vous voulez assigner au curseur
de volume.
Vous pouvez également utiliser les boutons "+" et "-" pour modifier la valeur.
Enfoncez la touche ENTER (C5).
Faites glisser la molette de modulation vers le haut pour augmenter la valeur de l'effet.
Si vous avez fait une erreur en entrant la valeur numérique, vous pouvez enfoncer la touche CANCEL (annuler) (C1) pour sortir du mode
de programmation sans changer l'effet assigné à la molette de modulation.
Notez qu'à chaque fois que le clavier est éteint, les assignations à la molette de modulation seront perdues. À chaque fois que le clavier
est allumé, la molette de modulation reprendra son assignation par défaut, dans laquelle elle contrôle l'effet de Modulation, qui est
l'effet n° 01.
Pour donner un exemple, nous allons assigner l'effet n° 10 (pan, ou balance) à la molette de modulation.
Pressez le bouton Advanced Functions pour placer le clavier en mode de programmation.
Enfoncez la touche au-dessus de C4 (appelée C#4), représentant "WHEEL ASSIGN".
Enfoncez A3 pour entrer "1".
Pressez G3 pour entrer "0", ce qui nous donne "10".
Pressez C5 ("ENTER").
Le curseur de volume
Comme pour la molette de modulation, on peut assigner au curseur de volume n'importe lequel des 131 effets donnés dans la liste à
la fin de ce manuel.
Pour assigner un effet au curseur de volume :
Pressez le bouton Advanced Functions pour placer le clavier en mode de programmation.
Enfoncez la touche noire au-dessus de D4 (appelée D#4), représentant "SLIDER ASSIGN".
Utilisez les touches de saisie numérique G3 à B4 pour saisir le nombre correspondant à l'effet que vous voulez assigner au curseur
de volume.
Vous pouvez également utiliser les boutons "+" et "-" pour modifier la valeur.
Enfoncez la touche ENTER (C5).
Faites glisser le curseur de volume vers le haut pour augmenter la valeur de l'effet.
Si vous avez fait une erreur en entrant la valeur numérique, vous pouvez enfoncer la touche CANCEL (annuler) (C1) pour sortir du mode
de programmation sans changer l'effet assigné au curseur de volume.
Prenez note qu'à chaque fois que le clavier est éteint, les assignations au curseur de volume seront perdues. À chaque fois que le clavier
est allumé, le curseur de volume reprendra son assignation par défaut, dans laquelle il contrôle le volume (effet n° 07).
Sensibilité de la molette de pitch
Il est possible de modifier la sensibilité de la molette de pitch en assignant l'effet n° 128 à la molette de modulation ou au curseur de
volume. Ceci vous permettra de modifier la portée du changement de pitch jusqu'à 1 octave vers le haut et vers le bas.
En cas de difficultés techniques
Le Keystation 61es a été conçu pour rendre le travail MIDI sur votre ordinateur aussi simple que possible. Il se peut toutefois que vous
rencontriez une quelconque difficulté. Dans de nombreux cas, ça n'est pas un problème au niveau du clavier, mais au niveau de
l’appareil récepteur. Pour résoudre un tel problème, il y a deux fonctions MIDI utiles :
22
Page 24

All Notes Off
Utilisez le message MIDI "All Notes Off" si vous avez des notes bloquées qui ne peuvent pas être arrêtées, en procédant de la façon
suivante :
Pressez le bouton Advanced Functions pour placer le clavier en mode de programmation.
Enfoncez la touche noire au-dessus de D3 (appelée D#3), représentant le message "ALL NOTES OFF".
Le clavier sortira du mode programmation, supprimant toute note bloquée.
Reset All Controllers
Si vous vous apercevez qu'il y a un effet sur une voix que vous ne voulez pas, vous pouvez, plutôt que de vous soucier de savoir de quel
effet il s'agit, envoyer un message MIDI "Reset All Controllers" (réinitialiser tous les contrôleurs), en procédant de la façon suivante :
Pressez le bouton Advanced Functions pour placer le clavier en mode de programmation.
Pressez la touche noire au-dessus de C3 (appelée C#3), représentant le message "RESET ALL CONTROLLERS".
Le clavier sortira du mode programmation, supprimant tout effet.
MIDI Out (sortie MIDI)
Le port MIDI OUT est situé sur la face arrière du clavier, et peut être utilisé pour connecter le clavier à un module de son externe ou à un
clavier MIDI. Par défaut (quand vous allumez le clavier), toutes les données de contrôleur sont envoyées par la sortie MIDI en plus de la
sortie USB
Si vous voulez que la sortie MIDI fonctionne comme une interface classique "USB vers MIDI", entrez dans le mode "Sortie MIDI à partir de
l'USB" en suivant cette procédure :
Pressez le bouton Advanced Functions pour placer le clavier en mode de programmation.
Enfoncez la touche noire au-dessus de D2 (appelée D#2), représentant le message "MIDI OUT FROM USB".
Le clavier sortira du mode de programmation.
Le clavier peut maintenant envoyer les données en provenance de l'ordinateur sur sa sortie MIDI en direction de n'importe quel
périphérique qui y serait connecté.
Pour utiliser la sortie MIDI, sélectionnez la sortie MIDI USB Keystation 61es comme dispositif de sortie MIDI dans votre séquenceur.
Dépannage
Si vous rencontrez l'un des problèmes suivants, suivez les instructions simples correspondantes :
Mon appareil M-Audio a soudainement cessé de fonctionner après un fonctionnement sans problème depuis l'installation.
Éteignez l'appareil et laissez-le éteint 10 secondes. Redémarrez ensuite votre ordinateur et essayez à nouveau. Si le problème persiste,
il se peut que vous deviez réinstaller les pilotes de l'appareil.
J'ai branché une pédale de sustain dans mon clavier M-Audio, mais elle fonctionne à l'envers.
La polarité de la pédale de sustain est calculée par le clavier quand il est allumé. Quand vous allumez le clavier, celui-ci fait l'hypothèse
que la pédale est en position "inactive". Donc, si vous voulez que la pédale soit inactive lorsqu'elle est lâchée, assurez-vous que la pédale
est lâchée au moment où vous allumez le clavier.
Quand j'enfonce une touche, il y a un délai avant que j'entende un son.
Ce délai est appelé "latence", et il résulte du synthétiseur logiciel que vous utilisez. Les données MIDI sont simplement des données de
contrôle, qui sont lues par le synthétiseur logiciel. Celui-ci réalise alors une grand nombre de calculs complexes de façon à produire le
son que vous entendez, et ces calculs prennent du temps.
Nous vous recommandons vivement une carte son adéquate. Visitez www.m-audio-france.com pour découvrir notre sélection de cartes
audio USB, PCI et Firewire. Si vous avez déjà une carte son adéquate, essayez de réinstaller les derniers pilotes pour la carte son, ou
essayez de réduire la taille des mémoires tampons (“buffers”) du pilote audio.
23
Page 25

Contacter M-Audio France
M-AUDIO France
Unit 5, Saracen Industrial Estate
Mark Road
Hemel Hampstead HP2 7BJ
Royaume-Uni
Avant de contacter l’assistance technique M-Audio, il est indispensable de consulter le site internet www.m-audio-france.com pour
bénéficier de l’aide en ligne (FAQ, Guide d’installations, Trucs et Astuces, pilotes, etc.) et des dernières informations concernant le produit.
Assistance Technique PC :
Téléphone: 0820 000 731 (0,12¤ par minute) du lundi au vendredi 9h-13h et 14h-17h
Email : support@m-audio-france.com
Assistance Technique MAC et Service Après Vente :
Téléphone: 0820 391 191 (0,12¤ par minute) du lundi au vendredi 9h-13h et 14h-17h
Email : mac@m-audio-france.com ou sav@m-audio-france.com
Renseignements commerciaux :
Téléphone : 0810 001 105 (prix appel local)
Email : info@m-audio-france.com
Site Internet : www.m-audio-france.com
Garantie
Enregistrez votre Keystation 61es en ligne (rendez-vous sur www.m-audio.com/register) : vous recevrez des mises à jour GRATUITES pour le
produit et pourrez gagner de l’équipement M-Audio GRATUIT. Si vous le faites immédiatement, vous bénéficierez d’une couverture complète
de la garantie, en même temps que vous aiderez M-Audio à développer et à fabriquer les produits de la meilleure qualité qui soit.
M-Audio garantit que les produits sont dépourvus de défauts de matériaux et de fabrication, dans le cadre d’un usage normal et pour
autant que le produit soit en possession de son acquéreur originel et que celui-ci soit enregistré. Consultez la page de garantie sur le
site de M-Audio (www.m-audio.com/warranty) pour prendre connaissance des termes et des limitations qui s’appliquent
spécifiquement au Keystation 61es.
Spécifications
Attention : Des décharges électrostatiques, des brefs parasites électriques temporaires et des perturbations radio transmises par
conduction peuvent enrayer le bon fonctionnement de l’appareil. Si vous rencontrez ce problème, débranchez l’appareil et rebranchezle pour rétablir un fonctionnement normal.
Remarque : Votre Keystation 61es a été testé pour assurer sa conformité avec les normes FCC POUR L’UTILISATION DOMESTIQUE OU
PROFESSIONNELLE. Des modifications non autorisées par le fabricant peuvent annuler l’autorisation des utilisateurs de faire fonctionner
cet appareil.
Remarque : Cet équipement a été testé et s’est avéré conforme aux limites pour la classe B des appareils numériques, selon les termes
de la partie 15 des règles FCC. Ces limites sont conçues pour offrir une protection raisonnable contre les interférences dommageables
dans une installation domestique. Cet équipement produit, utilise et peut entraîner un rayonnement d’énergie de fréquence radio et, s’il
n’est pas utilisé conformément aux instructions, peut causer des interférences dommageables au communications radio. Cependant,
il n’y a aucune garantie que des interférences ne se produiront pas dans une installation particulière. Si cet équipement produit en effet
des interférences dommageables à la réception radio ou télévisuelle, ce qui peut être établi en éteignant et rallumant l’équipement,
l’utilisateur est encouragé à essayer de corriger les interférences en appliquant les mesures suivantes :
Réorientez ou déplacez l’antenne réceptrice.
Augmentez la séparation entre l’équipement et le récepteur.
Connectez l’équipement sur une prise appartenant à un circuit différent de celui auquel le récepteur est connecté.
Consultez le vendeur ou un technicien expérimenté dans le domaine radio/TV pour obtenir une assistance.
ASIO est une marque déposée de Steinberg Soft- und Hardware GmbH.
VST est une marque déposée de Steinberg Soft- und Hardware GmbH.
onnées MIDI utiles
FOR HOME OR STUDIO USE
24
Keystation 61es
Tested to comply with
FCC standards
Page 26

Annexes : Données MIDI utiles
Annexe A : Instruments General MIDI
Piano
0 Piano acoustique
1 Piano mécanique
2 Piano électrique
3 Piano Honky-tonk
4 Piano Rhodes
5 Piano avec chorus
6 Clavecin
7 Clavicorde
Percussions
chromatiques
8 Célesta
9 Glockenspiel
10 Boîte à musique
11 Vibraphone
12 Marimba
13 Xylophone
14 Résonateurs tubulaires
15 Dulcimer
Orgue
16 Orgue Hammond
17 Orgue percussif
18 Orgue Rock
19 Orgue d'église
20 Orgue à anches
21 Accordéon
22 Harmonica
23 Accordéon de Tango
Basse
32 Basse acoustique
33 Basse électrique
Basse jouée aux doigts
34 Électrique (médiator)
35 Basse Fretless
36 Basse slappée 1
37 Basse slappée 2
38 Synthé Basse 1
39 Synthé Basse 2
Cordes / orchestre
40 Violon
41 Viole
42 Violoncelle
43 Contrebasse
44 Trémolo (cordes)
45 Pizzicato (cordes)
46 Harpe orchestrale
47 Timbales
Ensemble
48 Ensemble à cordes 1
49 Ensemble à cordes 2 (lent)
50 Synthé Cordes 1
51 Synthé Cordes 2
52 Aaah en choeur
53 Oooh en choeur
54 Voix de synthèse
55 Succès d'orchestre
Instruments à anche
64 Saxo soprano
65 Saxo alto
66 Saxo ténor
67 Saxo baryton
68 Hautbois
69 Cor anglais
70 Basson
71Clarinette
Tuyaux
72 Piccolo
73 Flûte traversière
74 Flûte à bec
75 Flûte de Pan
76 Bris de verre
77 Shakuhachi
78 Sifflet
79 Ocarina
Lead synthé
80 Lead 1 (carré)
81 Lead 2 (dents de scie)
82 Lead 3 (calliope)
83 Lead 4 (suspense)
84 Lead 5 (charango)
85 Lead 6 (voix)
86 Lead 7 (quintes)
Effets synthé
96 FX 1 (pluie)
97 FX 2 (bande son)
98 FX 3 (cristal)
99 FX 4 (atmosphère)
100 FX 5 (brillance)
101 FX 6 (farfadets)
102 FX 7 (échos)
103 FX 8 (science-fiction)
Ethnique
104 Sitar
105 Banjo
106 Shamisen
107 Koto
108 Kalimba
109 Cornemuse
110 Violon populaire
111 Shanai
Percussifs
112 Tintement de cloche
113 Agogo
114 Cymbales
115 Percussion bois
116 Percussion Taiko
117 Tom mélodique
118 Batterie électronique
119 Cymbales inversée
Guitare
24 Acoustique (cordes nylon)
25 Acoustique (cordes acier)
26Electrique (jazz)
27 Electrique (clean)
28 Electrique (muted)
29 Overdrive (guitare)
30 Distorsion (guitare)
31 Harmoniques (guitare)
Cuivres
56 Trompette
57 Trombone
58 Tuba
59 Trompette muette
60 Cor français
61 Section de cuivres
62 Synthé Cuivre 1
63 Synthé Cuivre 2
Onde dents de scie
87 Lead 8 (lead+cuivres)
Pad synthé
88 Pad 1 (new age)
89 Pad 2 (chaud)
90 Pad 3 (polysynthé)
91 Pad 4 (choeur)
92 Pad 5 (courbe)
93 Pad 6 (métallique)
94 Pad 7 (halo)
95 Pad 8 (balayage)
Effets sonores
120 Frettes (guitare)
121 Respiration
122 Ressac
123 Gazouillis
124 Sonnerie téléphone
125 Hélicoptère
126 Applaudissements
127 Coup de feu
25
Page 27

Annexe B : contrôleurs MIDI standard (CC MIDI)
00 Bank Select (sélection banque)
01 Modulation
02 Breath Control (souffle)
03 Controller 3 (contrôleur 3)
04 Foot Control (contrôle pédale)
05 Porta Time (portamento)
06 Data Entry (entrée de données)
07 Volume
08 Balance
09 Controller 9
10 Pan (panoramique, balance)
11 Expression
12 Effects Controller 1
(contrôleur d'effets 1)
13 Effects Controller 2
14 Controller 14
15 Controller 15
16 Gen Purpose 1 (usage général 1)
17 Gen Purpose 2
18 Gen Purpose 3
19 Gen Purpose 4
20 Controller 20
21 Controller 21
22 Controller 22
23 Controller 23
24 Controller 24
25 Controller 25
26 Controller 26
27 Controller 27
28 Controller 28
29 Controller 29
30 Controller 30
31 Controller 31
32 Bank Select LSB
(sélection de banque LSB)
33 Modulation LSB
(modulation LSB)
34 Breath Control LSB (souffle LSB)
35 Controller 35
36 Foot Control LSB (pédale LSB)
37 Porta Time LSB (portamento LSB)
38 Data Entry LSB
(entrée de données LSB)
39 Channel Volume LSB
(volume de canal LSB)
40 Balance LSB (balance LSB)
41 Controller 41
42 Pan LSB (panoramique LSB)
43 Expression LSB (expression LSB)
44 Controller 44
45 Controller 45
46 Controller 46
47 Controller 47
48 Gen Purpose 1 LSB
(usage général 1 LSB)
49 Gen Purpose 2 LSB
50 Gen Purpose 3 LSB
51 Gen Purpose 4 LSB
52 Controller 52
53 Controller 53
54 Controller 54
55 Controller 55
56 Controller 56
57 Controller 57
58 Controller 58
59 Controller 59
60 Controller 60
61 Controller 61
62 Controller 62
63 Controller 63
64 Sustain Pedal (pédale sustain)
65 Portamento
66 Sostenuto
67 Soft Pedal (pédale douce)
68 Legato Pedal (pédale legato)
69 Hold 2 (retenue 2)
70 Sound Variation (variation de son)
71 Resonance (résonance)
72 Release Time (release)
73 Attack Time (attaque)
74 Cut-off Frequency
(fréquence de cut-off)
75 Controller 75
76 Controller 76
77 Controller 77
78 Controller 78
79 Controller 79
80 Gen Purpose 5
81 Gen Purpose 6
82 Gen Purpose 7
83 Gen Purpose 8
84 Portamento Control
(contrôle portamento)
85 Controller 85
86 Controller 86
87 Controller 87
88 Controller 88
89 Controller 89
90 Controller 90
91 Reverb Depth
(profondeur de réverb)
92 Tremelo Depth
(profondeur de trémolo)
93 Chorus Depth
(profondeur de chorus)
94 Celeste (désaccordage)
95 Phaser Depth
(profondeur phaser)
96 Data Increment (données + 1)
97 Data Decrement (données - 1)
98 Non-Reg Param LSB
(param LSB non standard)
99 Non- Reg Param MSB
(param MSB non standard)
100 Reg Param LSB
(param LSB standard)
101 Reg Param MSB
(param MSB standard)
102 Controller 102
103 Controller 103
104 Controller 104
105 Controller 105
106 Controller 106
107 Controller 107
108 Controller 108
109 Controller 109
110 Controller 110
111 Controller 111
112 Controller 112
113 Controller 113
114 Controller 114
115 Controller 115
116 Controller 116
117 Controller 117
118 Controller 118
119 Controller 119
Messages de mode de canal
120 All Sound off (arrêt de tous
les sons)
121 Reset All Controllers
(arrêt de tous les contrôleurs)
122 Local Control (contrôle local)
123 All Notes Off
(arrête de toutes les notes)
124 Omni Off
125 Omni On
126 Mono On (Poly Off)
127 Poly On (Mono Off)
Messages RPN supplémentaires
128 Pitch Bend sensitivity
(sensibilité de la molette de pitch)
129 Fine Tune (réglage fin du pitch)
130 Coarse Tune
(réglage grossier du pitch)
131 Channel Pressure
(pression de canal)
26
Page 28

Deutsch -
Einführung
Wir beglückwünschen Sie zum Kauf von Keystation 61es von M-Audio! Die Keystation 61es ist ein 61-Tasten-USB-Keyboard mit
anschlagdynamischer, halbgewichteter Tastatur, das sich problemlos in jedes Computer-Setup (MacIntosh oder PC) integrieren lässt. Die
halbgewichteten Tasten dieses kompakten, erschwinglichen MIDI-Controllers geben Ihnen das Gefühl, an einer Klaviertastatur zu sitzen.
Keystation 61es ist ideal für den Einsatz mit Kompositionsprogrammen und Musikerziehungsanwendungen. Ferner ist das Instrument
mit Modulationsrad und Pitchrad sowie frei programmierbaren Tastern und einem Slider für die manuelle Parameterregelung
ausgestattet. Da Keystation 61es unter Windows XP und Mac OS X als Plug&Play-Instrument eingesetzt werden kann, sollten Sie sich
etwas Zeit für die folgenden Ausführungen nehmen, um sich mit dem Betrieb, den Funktionen und den Programmen des Keyboards
vertraut zu machen.
Produktmerkmale
Keyboard:
Keyboard mit 61 anschlagdynamischen Tasten
Pitchrad
Modulationsrad
Lautstärkeregler
Anschluss für Sustain-Pedal
Oktav-Tasten "+"/ "-"
Taste für Spezialfunktionen
Anschlüsse:
MIDI Out
USB-MIDI-Ein- und Ausgang
Stromversorgung:
Über USB
Netzbuchse für Anschluss über externes Gleichstrom-Netzteil
Lieferumfang:
Bitte prüfen Sie, ob Ihr M-Audio Keystation 61es-Paket folgende Elemente enthält:
M-Audio Keystation 61es USB-Keyboard
Benutzerhandbuch
USB-Anschlusskabel
Sollten Sie beim Auspacken eines der aufgeführten Elemente vermissen, setzen Sie sich bitte unverzüglich mit Ihrem zuständigen
Händler in Verbindung:
Über dieses Handbuch
Dieses Benutzerhandbuch enthält wichtige Hinweise zum Betrieb des USB-Keyboards Keystation 61es. Detaillierte Ausführungen zur
Konfiguration von Keystation 61es für den Einsatz mit Audioprogrammen anderer Hersteller würden den Rahmen des Handbuchs
allerdings sprengen. Ihre Keystation 61es ist jedoch mit den gängigsten Anwendungen vollständig kompatibel. Lesen Sie hierzu bitte
die Bedienungsanleitung der betreffenden Anwendung.
Allgemeine Hinweise
Ihr Keyboard kann entweder über den USB-Anschluss Ihres Computers oder über ein optional erhältliches Netzteil mit Strom versorgt
werden. Das Keystation 61es-Keyboard hat einen sehr geringen Stromverbrauch. Eine externe Stromversorgung ist daher nicht
unbedingt erforderlich.
Wir empfehlen Ihnen, Keystation 61es entweder an den USB-Anschluss Ihres Computers bzw. an einen USB-Hub anzustecken.
27
Page 29

Stromversorgung über USB
1. Der Ein/Aus-Schalter an der Rückseite des Gerätes muss auf "OFF" stehen.
2. Schließen Sie das mitgelieferte USB-Kabel an einen freien USB-Steckplatz Ihres Computers an.
3. Schließen Sie das andere Ende des USB-Kabels an die USb-Buchse des Keystation 61es Keyboards an.
Über das USB-Kabel wird neben der Stromversorgung des Keyboards auch der MIDI-Datenaustausch mit Ihrem Computersystem
gewährleistet.
Stromversorgung über externes Netzteil
Sie können Keystation 61es alternativ über ein externes Netzteil mit Strom versorgen. Bitte verwenden Sie ausschließlich GleichstromNetzteile, die für 9V und 250- 300mA (Mitte positiv) ausgelegt sind.
Stellen Sie vorher sicher, dass Ihr Keystation 61es-Keyboard nicht bereits über den USB-Anschluss mit Ihrem Computer verbunden ist. In
diesem Falle ist ein Netzteil überflüssig. Stecken Sie das Kabel des Netzteils in den mit der Aufschrift "DC 9V" gekennzeichneten Eingang
und schalten Sie das Keyboard ein..
Hinweis: Vergessen Sie nicht, das Netzteil vom Keyboard abzuziehen, wenn Sie das Instrument längere Zeit
nicht nutzen.
Windows XP und Mac OSX
Wenn Sie mit Windows XP oder Mac OSX arbeiten, können Sie Keystation 61es direkt nach dem Anstecken einschalten (Ein/Aus-Schalter
auf "ON"). Unter diesen Betriebssystemen ist keine Treiberinstallation erforderlich.
Sonstige Betriebssysteme
Wenn Sie weder Mac OSX noch Windows XP verwenden, besuchen Sie bitte unsere Website www.m-audio.com und laden Sie sich die
neuesten Treiber für Macintosh / Windows-Betriebssysteme herunter.
Installation unter Mac OS9
Bitte installieren Sie zuerst die Anwendung OMS, bevor Sie das Keyboard in Betrieb nehmen, falls Sie es noch nicht installiert haben.
Wenn OMS bereits installiert ist, folgen Sie den Anweisungen im Abschnitt "Installation der OMS-Treiber".
Installation der OMS-Anwendung:
Stellen Sie sicher, dass alle anderen Anwendungen geschlossen sind, bevor Sie das Installationsprogramm starten. Überprüfen Sie
ferner, dass alle Dongles (Copyschutzvorrichtungen) von Ihrem Computer abgezogen sind.
1. Legen Sie die Treiber-CD für Keystation 61es in das CD-Laufwerk Ihres Computers ein.
2. Doppelklicken Sie auf das im Verzeichnis der Treiber-CD abgebildete Installationssymbol.
3. Doppelklicken Sie dann auf den Systemordner "OS 9".
4. Doppelklicken Sie auf "Install OMS 2.3.8".
5. Folgen Sie der Bildschirmführung.
6. OMS wird installiert. Sobald die Installation abgeschlossen it, werden Sie aufgefordert, den Computer neu zu starten. Klicken Sie
auf "Neustart".
Installation des OMS-Treibers
1. Klicken Sie auf das im Systemordner "OS 9" abgebildete Symbol des USB-Treiber-Installationsprogramms und ziehen Sie das
Symbol auf den Desktop.
2. Doppelklicken Sie anschließend auf dieses Programmsymbol. Falls ein Fenster erscheint, klicken Sie auf "Öffnen" ("Open").
3. Doppelklicken Sie dann auf den neu erstellten USB-Treiber-Installer auf Ihrem Desktop.
4. Klicken Sie auf "Installieren" ("Install"). (Die Treiber werden nun automatisch in den entsprechenden Systemordnern abgelegt.)
5. Klicken Sie nach Abschluss der Installation auf "Neustart".
6. Schalten Sie Ihre Keystation 61es ein, sobald Ihr Computer hochgefahren ist.
28
Page 30

Konfiguration von OMS
Starten Sie das OMS-Konfigurationsprogramm. Gehen Sie wie folgt vor:
1. Öffnen Sie auf Ihrem Laufwerk das Verzeichnis Opcode > Verzeichnis OMS Anwendungen > OMS Setup.
2. Möglicherweise erscheint nun ein Dialogfenster, in welchem Sie aufgefordert werden, Appletalk zu aktivieren bzw. zu
deaktivieren. Dies hat allerdings keinen Einfluss auf die Konfiguration von OMS.
3. Klicken Sie im nächsten Dialogfenster auf "OK".
4. Klicken Sie auf "Durchsuchen" ("Search").
5. Bestätigen Sie mit "OK".
6. Bestätigen Sie die Meldung mit "Ja".
7. Klicken Sie auf "Speichern" ("Save").
8. Wenn Sie danach gefragt werden, klicken Sie auf "Ersetzen" ("Replace").
Im letzten Konfigurationsfenster wird Ihr aktuelles Studio-Setup angezeigt. Falls in diesem Fenster die Option "Quicktime Music"
deaktiviert ist, sollten Sie sie per Doppelklick aktivieren und anschließend in die kreisrunde "ON"-Schaltfläche klicken. Klicken Sie auf "OK".
Nun können Sie das Keyboard erstmalig in Betrieb nehmen. Stellen Sie jedoch zuvor sicher, dass in Ihrer Audiosoftware Keystation 61es
als MIDI-Eingangsgerät ausgewählt ist.
Installation unter Windows 98 oder ME
1. Schalten Sie Ihren PC ein.
2. Legen Sie die Treiber-CD für Keystation 61es in das CD-Laufwerk Ihres Computers ein. Öffnen Sie den Ordner "Arbeitsplatz" bzw.
den Windows Explorer, um den Inhalt der CD-ROM zu durchsuchen. Öffnen Sie das Verzeichnis "Keystation 61es".
3. Klicken Sie auf das Symbol des Installationsprogramms.
4. Folgen Sie der Bildschirmführung.
5. Verlassen Sie das Programm nach Abschluss der Installation.
6. Schalten Sie anschließend das Keyboard ein.
Windows installiert nun jeweils einen USB- und einen MIDI-Treiber. Nach Abschluss der Treiberinstallation können Sie Keystation 61es
erstmalig in Betrieb nehmen. Sollten Sie aufgefordert werden, Ihren Computer neu zu starten, klicken Sie auf "Neustart".
Installation unter Windows 2000
1. Schalten Sie Ihren PC ein.
2. Legen Sie die Treiber-CD für Keystation 61es in das CD-Laufwerk Ihres Computers ein. Öffnen Sie den Ordner "Arbeitsplatz" bzw.
den Windows Explorer, um den Inhalt der CD-ROM zu durchsuchen. Öffnen Sie das Verzeichnis "Keystation 61es".
3. Klicken Sie auf das Symbol des Installationsprogramms.
4. Folgen Sie der Bildschirmführung.
5. Verlassen Sie das Programm nach Abschluss der Installation.
6. Schalten Sie anschließend das Keyboard ein. Keystation 61es wird automatisch von Windows erkannt. Sie werden nun
aufgefordert, die Treiber auszuwählen.
7. Wählen Sie Ihr CD-ROM-Laufwerk aus und klicken Sie auf "OK". Windows wird Sie vor der Installation des MIDI-Treibers erneut
nach dem Laufwerk fragen.
8. Falls Windows meldet, dass die Treiber nicht digital von Microsoft signiert wurden, können Sie auf "Installation fortsetzen" klicken.
9. Wählen Sie das CD-ROM-Laufwerk aus.
10. Bestätigen Sie mit "OK".
11. Sollten Sie aufgefordert werden, Ihren Computer neu zu starten, klicken Sie auf "Neustart".
Erste Schritte
Nach der Installation der Gerätetreiber müssen Sie Ihre MIDI-Software für die Keystation 61es konfigurieren. Bitte beachten Sie, dass Sie
nach der Treiberinstallation bei Tastendruck noch keinen Sound hören werden, da lediglich MIDI-Daten übertragen werden. MIDI-Daten
beinhalten Informationen zur Art und Weise der Wiedergabe. Für die tatsächliche Soundwiedergabe müssen Sie Ihre Audiosoftware
entsprechend konfigurieren. Hierzu müssen Sie sicherlich im Optionen- oder Konfigurationsmenü Ihrer Audiosoftware Keystation 61es
als Audio- bzw. MIDI-Gerät auswählen. Im Abschnitt "MIDI-Geräte" Ihrer Audioanwendung sollte Keystation 61es unter der Bezeichnung
"USB Audio Device" (für Windows XP) bzw. unter der Bezeichnung "Keystation 61es" (für sonstige Betriebssysteme) aufgeführt werden.
Genauere Hinweise zur Konfiguration entnehmen Sie bitte dem Benutzerhandbuch Ihrer Audioanwendung.
29
Page 31

Die Tasten
Den weißen Tasten von Keystation 61es sind jeweils ein Buchstabe und eine Ziffer zugeordnet. Der Buchstabe bezieht sich auf die zu
spielende Note, während die Ziffer die Oktavhöhe angibt. Der Begriff "Oktave" wird im nächsten Abschnitt erläutert.
Die schwarzen Tasten (z.B. Fis 4/F# 4 oder Es 2/Eb 2) sind nicht bezeichnet, sind jedoch gleichermaßen Funktionsträger.
Noten mit Rautezeichen (#) sind mit derjenigen schwarzen Taste wiederzugeben, die sich unmittelbar rechts neben der weißen Taste mit
demselben Buchstaben wie in der Note angegeben, befindet. Beispiel: Die Note F# 3 bezieht sich auf die schwarze Taste, die sich
unmittelbar rechts neben der weißen Taste F3 befindet. Gleiches gilt für das Vorzeichen b. Noten mit diesem Vorzeichen entsprechen
den schwarzen Tasten, die sich unmittelbar links neben den weißen Tasten mit dem in der Note angegebenen Buchstaben befindet.
Beispiel: Der Note Eb3 entspricht die schwarze Taste links neben der weißen Taste E3. Demnach trägt die schwarze Taste zwischen C3
und D3 die Bezeichnung C#3 sowie Db3.
Oktave
Eine Oktave umfasst 12 Noten. Den Oktaven entsprechen die weißen und schwarzen Tasten ab der Note C. Die Oktaven sind
durchgehend nummeriert.
Wenn Sie die Oktav-"+"-Taste drücken, erlischt die LED über der Oktav-"-"-Taste. Die Noten werden eine Oktave höher wiedergegeben.
Bei erneutem Drücken der "+"-Taste werden die Noten zwei Oktaven höher gesetzt, usw. Auf diese Weise können Sie bis zu 3 Oktaven
höher oder tiefer als Oktave 0 spielen.
Um die Tonhöhe eine, zwei oder drei Oktaven tiefer zu spielen, drücken Sie die Oktav-"-"-Taste.
Drücken Sie beide Oktav-Tasten gleichzeitig, um die Tonhöhe wieder auf 0 zu setzen. Die LEDs über beiden Oktav-Tasten leuchten. (Wenn
nur die LED über der "-"-Taste leuchtet, werden die Noten nach unten transponiert. Wenn nur die LED über der "+"-Taste leuchtet, werden
die Noten nach oben transponiert.)
Pitchrad
Mit dem programmierbaren Pitchrad können Sie die Tonhöhe einzelner Noten während des Spielens verändern. So können Sie Sounds
erzeugen, die normalerweise nicht mit Keyboard-Klängen assoziiert werden - zum Beispiel Gitarrenriffs.
Inwieweit Sie die Tonhöhe verändern können, hängt von Ihrer Soundquelle ab. Normalerweise wird der Bereich von zwei Halbtönen
beansprucht; potentiell sind jedoch Tonerweiterungen bis zu zwei Oktaven höher oder niedriger möglich.
Modulationsrad
Mit dem Modulationsrad können Sie den Klang während des Spielens in Echtzeit modulieren. Diese Funktion wurde ursprünglich für
elektronische Keyboardinstrumente entwickelt, um Effekte wie Vibrato zu ermöglichen, wie man sie von akustischen Instrumenten kennt.
Pitchrad und Modulationsrad sind voll MIDI-fähig.
Lautstärkeregler
Über den Lautstärkeregler werden normalerweise MIDI-Befehle zur Regelung der Tonlautstärke gesendet.
Sie können dem Slider allerdings auch für andere Kontrollfunktionen wie Pan (Balance), Attack, Reverb, Chorus, usw. programmieren.
(Weitere Informationen hierzu entnehmen Sie bitte dem Abschnitt "Spezialfunktionen".)
Sustain-Pedal
Sie können Pedale jeder Polarität (nicht im Lieferumfang enthalten) problemlos an den Pedalanschluss Ihres M-Audio-Keyboards
anschließen. Die richtige Polarität wird automatisch beim Einschalten des Keyboards erkannt. Wenn Sie Polarität verändern wollen,
halten Sie das Pedal beim Einschalten des Keyboards gedrückt.
Ähnlich wie bei einem Klavier können Sie mit dem Pedal einen Ton beliebig lange anhalten, ohne die entsprechende Taste gedrückt
halten zu müssen.
30
Page 32

Taste für Spezialfunktionen
Über diese Taste werden sämtliche Spezialfunktionen des Keyboards aufgerufen.
Durch Drücken des Tasters setzen Sie das Keyboard in den Edit-Modus. In diesem Modus werden über die Tastatur die gewünschten
Funktionen ausgewählt und/oder Daten eingegeben.
Die LED über dem Taster zeigt an, ob der Edit-Modus aktiviert oder deaktiviert ist. Im Edit-Modus werden die Funktionen über die
schwarzen Tasten des Keyboards ausgewählt. Über die weißen Tasten geben Sie die Daten ein und wählen die Kanäle aus.
Sobald die gewünschte Funktion ausgewählt wurde, bzw. die CANCEL- oder die ENTER-Tasten gedrückt wurden, wird der Edit-Modus
deaktiviert und die LED über der Taste "Advanced Functions" erlischt. Nach Verlassen des Edit-Modus steht die Tastatur wieder für die
Tonerzeugung zur Verfügung.
Im nachstehenden Diagramm sind die im Edit-Modus verfügbaren Funktionen aufgeführt.
Spezialfunktionen
Erweiterte Funktionalität der Oktav-Tasten "+"- und "-"
Ab Werk sind die Oktav-Tasten "+" und "-" für die Transponierung bestimmt. Sie können Sie jedoch auch für eine von fünf zusätzlichen
MIDI-Funktionen programmieren.
In oben stehendem Diagramm tragen die ersten 6 schwarzen Tasten die Bezeichnung "DATA = _________". Über diese Tasten können
Sie die für die "+" und "-"-Tasten gewünschte Spezialfunktion auswählen. Für manche dieser Funktionen können allerdings keine Werte
unter 0 gesendet werden. In diesem Fall bleiben die LEDs über den "+" und "-"-Tasten an.
So wählen Sie eine Funktion für diese Tasten aus:
Drücken Sie die Taste "Advanced Functions", um den Edit-Modus zu aktivieren.
Drücken Sie die schwarze Taste C# 1 rechts neben der weißen Taste C1. Diese Taste entspricht der Einstellung DATA = OCTAVE. (Wenn
Sie die Taste C# 1 drücken, verlassen Sie den Edit.Modus.)
Drücken Sie "+", um eine Oktave höher zu spielen, und "-", um eine Oktave tiefer zu spielen.
Drücken Sie beide Tasten gleichzeitig, um zur ursprünglichen Tonhöhe zurückzukehren.
31
Page 33

Oktavierung
Sie können Oktavierung auf zweierlei Weise erreichen. Die erste wurde bereits im Abschnitt "Oktave" beschrieben - hierfür verwenden
Sie die Oktav-Tasten "+" und "-".
Um die "+" und "-" Tasten für eine andere Funktion zu programmieren, gehen Sie wie folgt vor:
Drücken Sie die Taste "Advanced Functions", um den Edit-Modus zu aktivieren.
Drücken Sie die schwarze Taste C# 1 rechts neben der weißen Taste C1. Diese Taste entspricht der Einstellung DATA = OCTAVE.
(Danach wird der Edit-Modus deaktiviert.)
Die zweite Methode erlaubt eine schnelle Oktavierung. Verwenden Sie diese Methode, wenn Sie den Oktav-Tasten "+" und "-" eine
andere MIDI-Funktion zugewiesen haben, und dies nicht ändern möchten:
Drücken Sie die Taste "Advanced Functions", um den Edit-Modus zu aktivieren.
Drücken Sie die schwarze Taste links neben H2 (also b2), die der Einstellung "OKTAVE +" entspricht, um die Tonhöhe um eine Oktave
zu erhöhen. Drücken Sie die Taste erneut, um sie um zwei Oktaven zu erhöhen, usf..
oder
drücken Sie die schwarze Taste rechts neben F2 (also F# 2), die der Einstellung "OKTAVE -" entspricht, um die Tonhöhe um eine
Oktave zu verringern. Drücken Sie die Taste erneut, um sie um zwei Oktaven zu erhöhen, usf..
oder
drücken Sie die schwarze Taste rechts neben G2 (also G# 2), die der Einstellung "OKTAVE 0" entspricht, um die Original-Tonhöhe aufzurufen.
Sobald Sie die gewünschte Oktavierung vorgenommen haben, drücken Sie die Taste C5 (entspricht: ENTER), um den Edit-Modus zu verlassen.
Transposition
In bestimmten Fällen werden Sie die Höhe der am Keyboard generierten Töne nicht um eine ganze Oktave, sondern nur um einige
Halbtöne verändern wollen. Wenn Sie z.B. mit einem Sänger oder Sängerin arbeiten, der Schwierigkeiten hat, die höchsten Töne eines
Liedes zu singen, können Sie die Tonhöhe des gesamten Liedes einfach um einen oder zwei Halbtöne verringern. * Sie erreichen dies
über die MIDI-Funktion "Transposition".
Die Funktion "Transposition" works in the same way as Octave Shift above, except the shift is +/- 12. Diese Funktion kann ebenfalls auf
zwei Weisen aktiviert werden: entweder über die Tasten "+" und "-" oder über die schwarzen Keyboardtasten F# 3, G# 3 und Bb3, welche
"TRANSPOSE -", "TRANSPOSE 0" und "TRANSPOSE +" entsprechen.
Um den Oktav-Tasten "+" und "-" diese Funktion zuzuordnen, gehen Sie wie folgt vor:
Drücken Sie die Taste "Advanced Functions", um den Edit-Modus zu aktivieren.
Drücken Sie dann die schwarze Taste D# 1 rechts neben der weißen Taste D1, welche für die Funktion "DATA = TRANSPOSE"
programmiert ist. (Damit verlassen Sie den Edit-Modus).
Wenn Sie nun die "+"-Taste drücken, können Sie hören, wie der Ton transponiert wird.
Drücken Sie beide Tasten gleichzeitig, um zur ursprünglichen Tonhöhe zurückzukehren.
*Ein Halbton entspricht dem Abstand zwischen zwei Noten. Wenn Sie also eine Note um zwei Halbtöne transponieren, klingt sie zwei
Noten höher, bzw. tiefer.
Kanal
MIDI-Daten können vom Keyboard über jeden der 16 MIDI-Kanäle gesendet werden. Beachten Sie jedoch, dass einige MIDI-Geräte und
MIDI-Software MIDI-Daten des Keyboards nur über einen bestimmten Kanal empfangen können. In diesem Fall können Sie den Kanal,
auf dem die Daten gesendet werden sollen, wie folgt einstellen:
Drücken Sie die Taste "Advanced Functions", um den Edit-Modus zu aktivieren.
Drücken Sie die Taste auf der Tastatur zwischen D1 und E3, die dem zugeordneten Kanal (1 - 16) entspricht.
Wenn ein MIDI-Gerät zum Beispiel MIDI-Daten nur auf Kanal 10 empfangen kann, drücken Sie die Advanced Functions-Taste und
anschließend die Taste F2, um Kanal 10 auszuwählen.
Der Kanal kann auch den Oktav-Tasten "+" und "-" zugewiesen werden. Wenn sie den Tasten diese Funktion zugeordnet haben, wählen
Sie mit "+" aufsteigend, mit "-" absteigend die Kanäle aus. Sobald Kanal 16 erreicht ist, wird durch erneutes Drücken der "+"-Taste wieder
32
Page 34

Kanal 1 angezeigt und ausgewählt. Wenn die Oktav-Tasten "+" und "-" ausgewählt wurden, um den Kanal zu ändern, ändert sich die
Leuchtanzeige über den Tasten nicht, da es nicht möglich ist, Kanäle mit negativem Wert auszuwählen. Drücken Sie die "+" und die
"-"-Taste gleichzeitig, um Kanal 1 anzuzeigen.
Program Change
Mittels Program Change können Sie zwischen Instrumenten und Stimmen wechseln. So ändern wir beispielsweise das Instrument zu
einem Bass-Sound. Hierzu können Sie einen Program Change (Programm-Wechsel-Befehl) 32 senden, der aus der General
MIDI-Instrumentenliste einen Acoustic-Bass-Sound auswählt (s. Anhang). Program Changes können auf zwei Weisen gesendet werden:
1. Aufsteigender/Absteigender Program Change:
Drücken Sie die Advanced Functions-Taste.
Drücken Sie die schwarze Taste über F1 (Fis 1 oder F#1 genannt).
Jetzt können Sie über die Oktav-Tasten "+"- und "-" das Programm ändern.
Drücken Sie die "+"-Taste und spielen Sie die Tastatur, bis Sie das gewünschte Instrument gefunden haben.
2. Direkter Program Change
Drücken Sie die Advanced Functions-Taste.
Drücken Sie die schwarze Taste über F4 (Fis 4 oder F# 4 genannt), die dem "Programm" zugeordnet ist.
Drücken Sie nacheinander die Tasten C4, E3 und C5. Dadurch wird die Folge "3", "2" und "ENTER" eingegeben.
Oder drücken Sie die "+"- und "-"-Tasten, und anschließend "ENTER", um den Wert zu verändern.
Ihr Keyboard ist nun eingerichtet, den GM-Bass-Sound 32 (aus der General MIDI Standard-Instrumentenliste) zu spielen.
Mit der ersten Methode können Sie die Sounds in der Instrumentenliste nacheinander anhören, um den gewünschten Sound zu finden.
Mit der zweiten Methode können Sie einen bestimmten Sound direkt über seine Programmnummer anwählen.
Wenn die Oktav-Tasten "+" und "-" ausgewählt wurden, um die Programm-Nummer zu ändern (erste Methode), ändert sich die
Leuchtanzeige über den Tasten nicht, da es nicht möglich ist, Programme mit negativem Wert auszuwählen. Drücken Sie die "+" und die
"-"-Taste gleichzeitig, um Programm 0 (Konzertflügel bzw. Grand Piano) auszuwählen.
Die komplette Liste der Instrumente, die Sie über Program Change auswählen können, finden Sie im Anhang dieses Handbuchs.
Bank LSB und Bank MSB
Program Change ist der am häufigsten verwendete Befehl, um verschiedene Instrumente und Stimmen auszuwählen. Allerdings ist die
Anzahl der mittels Program Change auszuwählenden Instrumente auf 128 beschränkt. Da einige Geräte aber über mehr als 128
Stimmen verfügen, ist eine andere Methode erforderlich, um auf die zusätzlichen Stimmen zugreifen zu können. Hierzu verwenden
diese Geräte in der Regel Bank LSB- und Bank MSB-Befehle.
1. Aufsteigender/Absteigender LSB-/MSB-Bankwechsel:
Drücken Sie die Advanced Functions-Taste.
Drücken Sie die schwarze Taste über G1 (Gis 1 oder G# 1 genannt).
Jetzt können Sie über die Oktav-Tasten "+"- und "-" das Programm ändern.
Drücken Sie die "+"-Taste und spielen Sie die Tastatur, bis Sie das gewünschte Instrument gefunden haben.
2. Direktauswahl:
Drücken Sie die Advanced Functions-Taste.
Drücken Sie die schwarze Taste über G4 (Gis 4 oder G# 4 genannt) für die LSB-Bank oder A4 (Ais 4 oder A#4 genannt) für die
MSB-Bank
Drücken Sie nacheinander die Tasten C4, E3 und C5. Dadurch wird die Folge "3", "2" und "ENTER" eingegeben.
Oder drücken Sie die "+"- und "-"-Tasten, und anschließend "ENTER", um den Wert zu verändern.
Ähnlich wie beim Program Change, ändert sich die Leuchtanzeige über den Tasten nicht, wenn die Oktav-Tasten "+" und "-" ausgewählt
wurden, um die LSB- oder MSB-Bank-Nummer zu ändern, da es nicht möglich ist, eine Bank mit negativem Wert auszuwählen. Drücken
Sie die "+" und die "-"-Taste gleichzeitig, um Bank 0 aufzurufen.
33
Page 35

Modulationsrad
Sie können auch dem Modulationsrad MIDI-Befehle zuweisen. Folgende Effekte sind denkbar:
01 Modulation
07 Lautstärke
10 Pan (Balance)
05 Portamento
Sie können zwischen 131 Effekten auswählen. Damit sie jedoch auf den Sound angewandt werden können, muss das MIDI-Gerät, das
die Daten empfängt, diese MIDI-Effekt-Befehle auch lesen und verarbeiten können. Die allermeisten Geräte reagieren auf Daten
bezüglich der Lautstärke, Modulation und Balance. (Die komplette Liste aller Effekte finden Sie weiter hinten in diesem Handbuch.)
Gehen Sie wie folgt vor, um dem Modulationsrad einen Effekt zuzuweisen:
Drücken Sie die Taste "Advanced Functions", um den Edit-Modus zu aktivieren.
Drücken Sie die schwarze Taste über C4 (Cis 4 oder C# 4 genannt), die der "ZUWEISUNG MODULATIONSRAD" zugeordnet ist.
Drücken Sie die nummerischen Dateneingabe-Tasten G3-B4, um die Nummer des gewünschten Effektes für das
Modulationsrad einzugeben.
Oder drücken Sie die "+"- und "-"-Tasten, um den Wert zu verändern.
Drücken Sie auf ENTER (C5).
Drehen Sie das Modulationsrad nach oben, um den Wert des Effektes zu erhöhen.
Falls Sie einen falschen Zahlenwert eingegeben haben, drücken Sie die CANCEL-Taste (C1), um den Edit-Modus zu verlassen, ohne den
dem Modulationsrad zugewiesenen Effekt zu verändern.
(Beachten Sie bitte, dass der dem Modulationsrad zugewiesene Effekt nicht gespeichert wird, wenn Sie das Keyboard ausschalten.
Wenn das Keyboard angeschaltet wird, wird dem Modulationsrad der Standardeffekt Nummer 01 - Modulation - zugewiesen)
So weisen Sie dem Modulationsrad z.B. den Effekt Nr. 10 (Pan, oder Balance) zu:
Drücken Sie die Taste "Advanced Functions", um den Edit-Modus zu aktivieren.
Drücken Sie die schwarze Taste über C4 (Cis 4 oder C# 4 genannt), die der "ZUWEISUNG MODULATIONSRAD" zugeordnet ist.
Drücken Sie A3, um den Wert "1" einzugeben.
Drücken Sie G3, um den Wert "0" einzugeben. Damit haben Sie "10" eingegeben.
Drücken Sie C5 ("ENTER").
Lautstärkeregler
Auf die selbe Weise können Sie dem Lautstärkeregler jeden der in der Liste aufgeführten 131 Effekte zuweisen.
Gehen sie wie folgt vor, um dem Lautstärkeregler einen Effekt zuzuweisen:
Drücken Sie die Taste "Advanced Functions", um den Edit-Modus zu aktivieren.
Drücken Sie die schwarze Taste über D4 (Dis 4 oder D# 4 genannt), die der "ZUWEISUNG LAUTSTÄRKEREGLER" zugeordnet ist.
Drücken Sie die nummerischen Dateneingabe-Tasten G3-B4, um die Nummer des gewünschten Effektes für den
Lautstärkeregler einzugeben.
Oder drücken Sie die "+"- und "-"-Tasten, um den Wert zu verändern.
Drücken Sie auf ENTER (C5).
Schieben Sie den Lautstärkeregler nach oben, um den Wert des Effektes zu erhöhen.
Falls Sie einen falschen Zahlenwert eingegeben haben, drücken Sie die CANCEL-Taste (C1), um den Edit-Modus zu verlassen, ohne den
dem Lautstärkeregler zugewiesenen Effekt zu verändern.
(Beachten Sie bitte, dass der dem Lautstärkeregler zugewiesene Effekt nicht gespeichert wird, wenn Sie das Keyboard ausschalten.
Wenn das Keyboard angeschaltet wird, wird dem Lautstärkeregler der Standardeffekt Nummer 07 - Lautstärke - zugewiesen.)
Empfindlichkeit des Pitchbend-Rades
Sie können die Empfindlichkeit des Pitchbend-Rades ändern, indem Sie den Effekt Nummer 128 entweder dem Modulationsrad oder dem
Lautstärkeregler zuweisen. Auf diese Weise können Sie den Pitch-Bend-Bereich um bis zu einer Oktave nach oben oder unten erweitern.
34
Page 36

Technische Probleme
Ihre Keystation 61es wurde so konstruiert, um das Arbeiten mit MIDI mit ihrem Computer so einfach wie möglich zu gestalten. Sollten
Sie dennoch Schwierigkeiten haben, wird Ihnen hier geholfen. Oft liegt es in diesen Fällen nicht am Keyboard, sondern am
Empfängergerät. Hier können zwei MIDI-Befehle von Nutzen sein:
All Notes Off
Senden Sie diesen Befehl, wenn ein Sound "hängen" bleibt, und Sie ihn nicht stoppen können.
Drücken Sie die Taste "Advanced Functions", um den Edit-Modus zu aktivieren.
Drücken Sie die schwarze Taste über D3 (Dis 3 oder D# 4 genannt), die dem Befehl "ALL NOTES OFF" zugeordnet ist.
Damit werden alle klingenden Noten sofort ausgeschaltet.
Reset All Controllers
Wenn Sie mit einem einer Stimme zugewiesenen Effekt nicht zufrieden sind, aber nicht lange rumrätseln wollen, welcher es sein könnte,
können Sie den MIDI-Befehl "Reset All Controllers" senden, um sämtliche Effekte auf 0 zurück zu setzen.
Drücken Sie die Taste "Advanced Functions", um den Edit-Modus zu aktivieren.
Drücken Sie die schwarze Taste über C3 (Cis 3 oder C# 4 genannt), die dem Befehl "RESET ALL CONTROLLERS" zugeordnet ist.
Sämtliche Effektzuordnungen werden zurückgesetzt und das Keyboard verlässt den Edit-Modus.
MIDI Out
Der MIDI-Ausgang befindet sich an der Rückseite des Gerätes. Schließen Sie hier ein externes Soundmodul oder MIDI-Keyboard an.
Beim Einschalten des Geräts werden sämtliche Controller-Daten standardmäßig über den MIDI-Ausgang sowie den USB-Ausgang
ausgegeben.
Wenn Sie möchten, dass der MIDI-Ausgang wie ein herkömmliches USB-to-MIDI Interface reagiert, aktivieren Sie den "MIDI Out from
USB"-Modus wie folgt:
Drücken Sie die Taste "Advanced Functions", um den Edit-Modus zu aktivieren.
Drücken Sie die schwarze Taste über D2 (Dis 2 oder D# 4 genannt), die dem Befehl "MIDI OUT FROM USB" zugeordnet ist.
Damit verlassen Sie den Edit-Modus.
Das Keyboard kann nun die vom Computer empfangenen Daten über den MIDI-Ausgang an jedes angeschlossene Gerät senden.
Um den MIDI-Ausgang zu verwenden, wählen Sie Keystation 61es USB MIDI Out als MIDI-Ausgabegerät in Ihrem Sequenzer.
Fehlerbehebung
Bei Problemen folgen Sie einfach diesen Anweisungen:
Meine M-Audio-Hardware funktioniert plötzlich nicht mehr, nachdem Sie seit der Installation problemlos arbeitete.
Schalten Sie das Gerät für 10 Sekunden aus. Starten Sie anschließend Ihren Computer neu und versuchen Sie es erneut. Sollte das
Problem weiter bestehen, müssen Sie eventuell die Gerätetreiber neu installieren.
Ich habe ein Sustain-Pedal an mein M-Audio-Keyboard angeschlossen, aber es es funktioniert "falsch herum".
Das Keyboard errechnet die Polarität des Sustain-Pedals, wenn es eingeschaltet wird. Das Keyboard ist so eingestellt, dass das
Sustain-Pedal beim Einschalten auf AUS steht. Wenn Sie möchten, dass das Pedal aus ist, wenn es nicht gedrückt ist, halten Sie es nicht
gedrückt, wenn Sie das Keyboard einschalten.
Wenn ich eine Keyboardtaste drücke, gibt es eine kurze Verzögerung, bevor ich den Sound höre.
Für diese Verzögerung (Latenz) ist Ihre Synthesizer-Software verantwortlich. Bei MIDI-Daten handelt es sich um Kontrolldaten, die von
Ihrer Synthesizer-Software empfangen und gelesen werden. Anschließend muss sie eine große anzahl komplexer Berechnungen
bewältigen, bevor der Sound ausgegeben werden kann - dafür benötigt die Software eine gewisse Zeit.
Verwenden Sie stets eine gute Soundkarte. Auf unserer Webseite www.m-audio.com erhalten sie Informationen zu einer Auswahl von
USB-, PCI- und Firewire Soundkarten. Falls Sie bereits über eine gute Soundkarte verfügen, installieren Sie die neuesten Treiber oder
setzen Sie die Puffergröße der Audio-Treiber herunter.
35
Page 37

So erreichen Sie uns:
M-AUDIO Deutschland
Kuhallmand 34
D-74613 Öhringen
Deutschland
E-Mail (Vertrieb): info@m-audio.de
Technische Unterstützung: +49 (0)7941 - 9870030
Technische Unterstützung (E-Mail): support@m-audio.de
Homepage: http://www.m-audio.de
Produktgarantie
Registrieren Sie Ihre Keystation 61es online ( www.m-audio.com/register) , um KOSTENLOSE Produkt-Updates zu erhalten und an der
Verlosung von M-Audio-Podukten teilzunehmen. Damit haben Sie sofort Anspruch auf volle Garantie und helfen M-Audio zudem,
weiterhin die hochwertigsten Qualitätsprodukte zu entwickeln und herzustellen.
Vorausgesetzt, dass das Gerät sachgemäß bedient wird, garantiert M-Audio dem registrierten Eigentümer, dass Ihr M-Audio-Produkte
keine Material-, noch Verarbeitungsfehler ausweist. Auf der Seite www.m-audio.com/warranty finden Sie die Nutzungsbedingungen
und Einschränkungen die speziell für die Keystation 61es gelten
Technische Informationen
Achtung: Elektrostatische Entladungen, elektrische schnelle Übergangsvorgänge und leitungsgebundene RF-Interferenzen könen zu
Störungen des Gerätes führen. In diesen Fällen, ziehen Sie den Netzstecker des Gerätes und stecken sie ihn erneut in die Steckdose, um
die Störung zu beheben.
Hinweis: Ihre M-AUDIO Keystation 61es wurde daraufhin getestet, die FCC-Standards FÜR DEN GEBRAUCH ZUHAUSE ODER IM BÜRO zu
erfüllen. Vom Hersteller nicht zugelassene Veränderungen an diesem Gerät, können die Nutzungserlaubnis des Eigentümers
unwirksam machen.
Hinweis: Dieses Gerät wurde getestet und entspricht den Bestimmungen für digitale Geräte der Klasse B nach Teil 15 der
FCC-Bestimmungen. Diese Grenzwerte bieten angemessenen Schutz vor Funkstörungen beim Betrieb des Geräts in einer Wohngegend.
Dieses Gerät erzeugt und nutzt Hochfrequenzenergie und kann diese abstrahlen und den Funkverkehr stören, wenn es nicht
anweisungsgemäß installiert und betrieben wird. Es kann jedoch nicht gewährleistet werden, dass bei einer bestimmten Installation
keine Störungen auftreten werden. Sollte dieses Gerät den Radio- und Fernsehempfang stören, was sich durch Ein- und Ausschalten
des Geräts nachprüfen lässt, müssen Sie die Störungen durch eine oder mehrere der folgenden Maßnahmen beheben:
Richten Sie die Empfangsantenne neu aus oder verlegen Sie sie neu.
Vergrößern Sie den Abstand zwischen Gerät und Empfänger.
Schließen Sie das Gerät an eine andere Steckdose an, so dass Gerät und Empfänger an verschiedene Stromkreise angeschlossen sind.
Fragen Sie den Händler oder einen erfahrenen Radio-/Fernsehtechniker um Rat.
ASIO ist ein Warenzeichen der Steinberg Soft– und Hardware GmbH.
VST ist ein Warenzeichen der Steinberg Soft– und Hardware GmbH.
Keystation 61es
Tested to comply with
FCC standards
FOR HOME OR STUDIO USE
36
Page 38

Anhang - ANützliche MIDI-Daten
Anhang A - General MIDI Instrumente
Piano
0 Flügel
1 Konzertflügel
2 E-Piano
3 Bar-Piano
4 E-Piano 1
5 E-Piano 2
6 Cembalo
7 Clavichord
Chromatic Percussion
8 Celesta
9 Glockenspiel
10 Spieldose
11 Vibraphone
12 Marimba
13 Xylophon
14 Röhrenglocken
15 Hackbrett
Orgeln
16 Hammond
17 Schlagorgel
18 Rockorgal
19 Kirchenorgel
20 Harmonium
21 Akkordeon
22 Mundharmonika
23 Tango-Akkordeon
Gitarre
24 Konzertgitarre
25 Western-Gitarre
26 Elektrische Gitarre (Jazz)
27 Elektrische Gitarre
28 Elektrische Git. (gedämpft)
29 Gitarre (Overdrive)
30 Gitarre (verzerrt)
31 Akkord-Gitarre
Bass
32 Kontrabass
33 Elektrischer Bass (gezupft)
34 Elektrischer Bass (Schlag)
35 Bass (Bottleneck)
36 Schlagbass 1
37 Schlagbass 2
38 Synth Bass 1
39 Synth Bass 2
Streicher/ Orchester
40 Geige
41 Bratsche
42 Cello
43 Kontrabass
44 Streicher (tremolo)
45 Streicher (pizzicato)
46 Harfe
47 Pauke
Ensemble
48 Streichorchester 1
49 Streichorchester 2 (slow)
50 Synth Streicher 1
51 Synth Streicher 2
52 Chorgesang
53 Vox humana
54 Synth Chor
55 Orchester-Sforzato
Blechinstrumente
56 Trompete
57 Posaune
58 Tuba
59 Trompete (gedämpft)
60 Waldhorn
61 Blechbläser
62 Synth-Blechinstrumente 1
63 Synth-Blechinstrumente 2
Holzblasinstrumente
64 Sopran-Saxophon
65 Alt-Saxophon
66 Tenor-Saxophon
67 Bariton-Saxophon
68 Oboe
69 Englischhorn
70 Fagott
71Klarinette
Pfeifen und Flöten
72 Pikkolo-Flöte
73 Flöte
74 Blockflöte
75 Pan-Flöte
76 Flaschenhals
77 Shakuhachi
78 Pfeife
79 Ocarina
Synth Lead
80 Synth Rechteck-Modulation
81 Synth Sägezahn-Modulation
82 Synth Calliope
83 Synth Chiff
84 Synth Charang
85 Synth Stimme
86 Synth Fifths
Sägezahn-Modulation
87 Synth Brass & Lead
Synth Klangmischungen
88 New Age
89 Klangmischung (warm)
90 Klangmischung (polysynth)
91 Klangmischung Chor
92 Klangmischung Streicher
93Klangmischung (metallic)
94 Klangmischung (halo)
95 Klangmischung Tusch
Synth-Effekte
96 SFX Regen
97 SFX Soundtrack
98 SFX Kristall
99 SFX Atmosphäre
100 SFX Helligkeit
101 SFX Kobolde
102 SFX Echos
103 SFX Sci-Fi
Ethno-Instrumente
104 Sitar
105 Banjo
106 Shamisen
107 Koto
108 Kalimba
109 Dudelsack
110 Fiedel
111 Shanai
Schlaginstrumente
112 Glöckchen
113 Agogo
114 Steel Drums
115 Holzblock
116 Taiko-Trommel
117 Tamtam
118 Drum Pad
119 Reverse Cymbal
Soundeffekte
120 Gitarrenbund
121 Atemgeräusch
122 Meeresküste
123 Vogelmist
124 Klingelzeichen
125 Hubschrauber
126 Applaus
127 Gewehrschuss
37
Page 39

Anhang B - Standard MIDI Controller-Nummern (MIDI CCs)
00 Bank Select
(Auswahl der Klangspeicherbank)
01 Modulation (Modulationsrad)
02 Breath Control
(Blasdruckwandler)
03 Controller 3
04 Foot Control (Pedal)
05 Porta Time (Portamento Zeit)
06 Data Entry (Dateneingabe)
07 Channel Volume
(Lautstärke / Kanal)
08 Balance
09 Controller 9
10 Pan
11 Expression
12 Effects Controller 1
13 Effects Controller 2
14 Controller 14
15 Controller 15
16 Gen Purpose 1
17 Gen Purpose 2
18 Gen Purpose 3
19 Gen Purpose 4
20 Controller 20
21 Controller 21
22 Controller 22
23 Controller 23
24 Controller 24
25 Controller 25
26 Controller 26
27 Controller 27
28 Controller 28
29 Controller 29
30 Controller 30
31 Controller 31
32 Bank Select LSB
(Auswahl der Klangspeiche
bank LSB)
33 Modulation LSB
(Modulationsrad)
34 Breath Control LSB
(Blasdruckwandler)
35 Controller 35
36 Foot Control LSB (Pedal)
37 Porta Time LSB (Portamento Zeit)
38 Data Entry LSB (Dateneingabe)
39 Channel Volume LSB
(Lautstärke / Kanal)
40 Balance LSB
41 Controller 41
42 Pan LSB
43 Expression LSB
44 Controller 44
45 Controller 45
46 Controller 46
47 Controller 47
48 Gen Purpose 1 LSB
49 Gen Purpose 2 LSB
50 Gen Purpose 3 LSB
51 Gen Purpose 4 LSB
52 Controller 52
53 Controller 53
54 Controller 54
55 Controller 55
56 Controller 56
57 Controller 57
58 Controller 58
59 Controller 59
60 Controller 60
61 Controller 61
62 Controller 62
63 Controller 63
64 Sustain Pedal (Haltepedal)
65 Portamento
66 Sostenuto
67 Soft Pedal
68 Legato Pedal
69 Hold 2
70 Sound Variation
71 Resonance
72 Release Time (Abklingzeit)
73 Attack Time (Anklingzeit)
74 Cut-off Frequency
(Filterfrequenz)
75 Controller 75
76 Controller 76
77 Controller 77
78 Controller 78
79 Controller 79
80 Gen Purpose 5
81 Gen Purpose 6
82 Gen Purpose 7
83 Gen Purpose 8
84 Portamento Control
85 Controller 85
86 Controller 86
87 Controller 87
88 Controller 88
89 Controller 89
90 Controller 90
91 Reverb Depth
92 Tremelo Depth
93 Chorus Depth
94 Celeste (De- tune)
95 Phaser Depth
96 Data Increment
97 Data Decrement
98 Non- Reg Param LSB
99 Non- Reg Param MSB
100 Reg Param LSB
101 Reg Param MSB
102 Controller 102
103 Controller 103
104 Controller 104
105 Controller 105
106 Controller 106
107 Controller 107
108 Controller 108
109 Controller 109
110 Controller 110
111 Controller 111
112 Controller 112
113 Controller 113
114 Controller 114
115 Controller 115
116 Controller 116
117 Controller 117
118 Controller 118
119 Controller 119
Channel Mode Messages
120 All Sound off
121 Reset All Controllers
122 Local Control
123 All Notes Off
124 Omni Off
125 Omni On
126 Mono On (Poly Off)
127 Poly On (Mono Off)
Extra RPN Messages
128 Pitch Bend sensitivity
129 Fine Tune
130 Coarse Tune
131 Channel Pressure
38
Page 40

Español -
Introducción
Felicidades por la compra del Keystation 61es de M-Audio, un teclado contra-pesado USB de 49 teclas de tamaño estándar sensibles
a la dinámica, diseñado para integrarse fácilmente en cualquier sistema PC o Macintosh. Este teclado contra-pesado, compacto y
asequible, responde al tacto de una manera similar a la de un auténtico piano. Ideal para numerosas aplicaciones de creación y
educación musical, el Keystation 61es dispone de ruedas de modulación y pitch bend, además de botones asignables y un deslizador,
gracias a los cuales obtendrá un perfecto control manual del teclado. A pesar de que Keystation 61es ofrece un funcionamiento plugand-play auténtico bajo Windows XP y Mac OS X, le recomendamos que invierta algunos minutos en leer este manual y familiarizarse
con el uso del teclado, sus funciones avanzadas y posibilidades de programación.
Características
Teclado:
Teclado de 61 teclas sensibles a la dinámica
Rueda de Pitch Bend
Rueda de modulación
Deslizadores de volumen/control
Toma para pedal de sustain
Botones octava +/-
Botón funciones avanzadas
Puertos:
Salida MIDI
USB MIDI IN/OUT
Alimentación:
Alimentado a través del bus USB
Entrada de CC (DC IN) para fuente de alimentación externa
¿Qué hay dentro de la caja?
La caja del Keystation 61es de M-Audio deberá contener los siguientes elementos:
Teclado USB Keystation 61es de M-Audio
Manual de instrucciones
Cable USB
Si falta alguno de los elementos anteriormente enumerados, por favor, póngase en contacto con el establecimiento donde adquirió
el producto.
Acerca del Manual
Este manual de instrucciones ilustra el funcionamiento del teclado USB Keystation 61ew. A pesar de no ofrecer una explicación detallada
de cómo configurar el teclado para su uso con software musical de terceras partes, el Keystation 61es se integrará perfectamente con
la mayoría de las aplicaciones musicales. Consulte la documentación de su software musical para más información.
Antes de conectar el teclado
El teclado puede alimentarse a través del bus USB o mediante una fuente de alimentación externa. No obstante, Keystation 61es es un
dispositivo de bajo consumo, por lo que una fuente de alimentación externa no es absolutamente necesaria.
Le recomendamos que conecte el Keystation 61es a un puerto USB nativo o a un concentrador USB alimentado.
39
Page 41

Alimentación y conexión a través del bus USB
1. Compruebe que el botón on/off de la parte trasera de la unidad está en posición "OFF".
2. A continuación, conecte el cable USB suministrado con el teclado Keystation 61es a un puerto USB de su computadora.
3. Finalmente, conecte el otro extremo del cable USB en la entrada USB del Keystation 61.
El cable USB alimenta el teclado a la vez que envía datos MIDI hacia y desde su computadora.
Uso de una fuente de alimentación externa
También puede usar un adaptador de alimentación (no suministrado) con las siguientes características: salida de 9V CC, 250-300mA,
positivo-centro.
Asegúrese de que el Keystation 61es no recibe alimentación a través del bus USB. Si recibe alimentación a través de un concentrador
USB alimentado no necesita fuente de alimentación externa. Si no es así, conecte la fuente de alimentación en la entrada "DC 9V" y
ponga en marcha la unidad.
Nota: No deje la fuente de alimentación conectada a la red eléctrica si no va a usar la unidad durante un largo
periodo de tiempo.
Windows XP y Mac OSX
Si usa Windows XP o Mac OSX, basta con poner el teclado en marcha colocando el interruptor de alimentación en la posición "ON".
Gracias al soporte nativo que el teclado ofrece para estos sistemas operativos, Keystation 61es funcionará sin realizar ninguna
instalación adicional.
Otros sistemas operativos
Si usa un sistema operativo diferente de OSX o Windows XP, por favor, visite el sitio web de M-Audio en www.m-audio.com para
comprobar si existen controladores actualizados para los diversos sistemas operativos Macintosh y Windows.
Instalación en Mac OS9
Si no ha instalado OMS antes, por favor, ejecute el instalador de OMS. En caso contrario, empiece con la sección "Instalación del
controlador OMS".
Instalación OMS:
Compruebe que ha cerrado todos los programas antes de iniciar la instalación. Asimismo, asegúrese de haber desconectado
cualquier dispositivo de protección anticopia (dongles) que tenga conectados.
1. Inserte el CD-ROM del instalador del Keystation 61ew.
2. Haga doble clic sobre el icono del instalador del Keystation 61es de su escritorio.
3. Haga doble clic sobre la carpeta OS 9.
4. Haga doble clic sobre Install OMS 2.3.8
5. Siga la instrucciones que aparecen en la pantalla.
6. OMS tardará unos instantes en instalarse. Una vez finalizada la instalación, el sistema le pedirá que reinicie su equipo.
Pulse “Reiniciar”.
Instalación del controlador OMS
1. Pulse y arrastre el instalador de los controladores USB (USB Drivers Installer) de la ventana OS 9 en la que están actualmente
hacia su escritorio.
2. Haga doble clic sobre el icono. Si aparece una ventana, pulse "Abrir".
3. Haga doble clic sobre el recién creado instalador de controladores USB.
4. Pulse “Instalar”. (El instalador colocará automáticamente los controladores en las carpetas de sistema adecuadas.)
5. Una vez el instalador haya acabado de instalar los controladores, pulse "Reiniciar".
6. Una vez reiniciado el sistema, ponga en marcha el Keystation 61ew.
40
Page 42

Configuración de OMS
Ahora debe ejecutar el programa de configuración de OMS.
1. Busque en su disco duro la carpeta Opcode, seleccione la carpeta de aplicaciones OMS y, a continuación, OMS Setup
(Configuración OMS).
2. Si aparece un mensaje solicitándole que active o desactive Appletalk, seleccione cualquiera de ambas opciones ya que dicha
selección no alterará la configuración de OMS.
3. En la siguiente ventana, pulse "OK".
4. Pulse "Search" (Buscar).
5. Pulse "OK".
6. Una vez más, pulse “OK”.
7. Pulse "Save".
8. Si se lo pide el programa, pulse “Replace.”
Ahora debería visualizar una ventana final que muestra su configuración de estudio actual (Studio Setup). Si ‘Quicktime Music’ aparece
deshabilitado, haga doble clic sobre el icono y pulse después el círculo "on" para habilitarlo. Pulse "OK" y ya está listo para trabajar.
Compruebe sencillamente que el Keystation 61es esté seleccionado como entrada MIDI en su software musical.
Instalación en Windows 98 o ME
1. Ponga en marcha la computadora.
2. Inserte el CD-ROM del instalador del Keystation 61ew. Abra Mi PC, o utilice el explorador de Windows para localizar su unidad
de CD-ROM. Pulse sobre la carpeta llamada "Keystation 61ew".
3. Abra la carpeta Keystation 61es y pulse sobre el icono del instalador.
4. Siga la instrucciones de la pantalla.
5. Cuando termine, abandone el programa de instalación.
6. Ponga en marcha el Keystation 61ew.
Windows procederá a instalar un controlador USB y otro MIDI. Una vez finalizado este paso, ya estará listo para trabajar. Puede que
Windows le pida que reinicie la computadora. Si es así, pulse "Reiniciar".
Instalación en Windows 2000
1. Ponga en marcha la computadora.
2. Inserte el CD-ROM del instalador de Keystation 61ew.
Abra Mi PC, o utilice el explorador de Windows para localizar su unidad de CD-ROM. Pulse sobre la carpeta llamada "Keystation
61ew".
3. Abra la carpeta Keystation 61es y pulse sobre el icono del instalador.
4. Siga la instrucciones de la pantalla.
5. Cuando termine, abandone el programa de instalación.
6. Ponga en marcha el Keystation 61es . Windows reconocerá automáticamente el teclado y le pedirá el CD-ROM del instalador de
Keystation 61ew.
7. Seleccione la unidad de CD-ROM y pulse "Aceptar". Windows le pedirá de nuevo que seleccione la unidad de CD-ROM para el
controlador MIDI.
8. Si aparece un mensaje de Windows advirtiéndole que los controladores no están firmados digitalmente, pulse sobre
"Continuar instalación".
9. Seleccione la unidad de CD una vez más.
10. Pulse 'Aceptar'.
11. Si Windows le pide que reinicie la computadora, pulse "Reiniciar".
Guía de inicio rápido
Una vez finalizada la instalación, deberá configurar su software MIDI para poder utilizar el Keystation 61ew. Recuerde que de momento
el teclado no producirá ninguna clase de sonido cuando pulse una tecla. Esto se debe a que, al pulsar una tecla, el teclado se limita a
enviar datos MIDI. Los datos MIDI son información acerca de cómo debe reproducirse un sonido, pero para poder oírlo necesita
configurar su software musical para que lea los datos MIDI que Keystation 61es le envía y los reproduzca de manera adecuada. Muy
probablemente, esta configuración implicará la selección del dispositivo adecuado en algún menú "Opciones" o "Configuración de
dispositivos" de su software musical. Keystation 61es aparecerá en sus programas como “Dispositivo de audio USB" (en Windows XP)
o como "Keystation 61ew" (en otros sistemas operativos) en la sección de dispositivos MIDI de su software musical. Por favor, consulte
el manual suministrado con su software para realizar una configuración correcta.
41
Page 43

Teclas
Cada tecla blanca del Keystation 61es está etiquetada con una letra y un número. La letra representa la nota y el número representa
la octava (el concepto de "octava" se explica en la siguiente sección).
Aunque las teclas negras no están etiquetadas, obviamente también tienen nombre (F#4 o Eb2 son ejemplos de negras).
Si una nota (negra) aparece listada con un signo #, ello significa que se trata de la tecla negra situada justo encima de la tecla blanca
que lleva el mismo nombre. Por ejemplo, F#3 indica la tecla negra situada encima de la tecla (blanca) F3. Si está marcada con un signo
b, ello indica que se trata de la tecla negra situada justo debajo la nota blanca del mismo nombre. Por ejemplo, Eb3 indica la tecla
negra situada debajo de la tecla (blanca) E3. En consecuencia, el nombre de la tecla negra situada entre C3 y D3 puede ser tanto C#3
como Db3.
Octava
Una octava contiene 12 notas. Cada octava está marcada en el Keystation 61es por una sección blanca o negra que empieza en una
tecla C (Do). A cada octava le corresponde un número.
Si pulsa una vez el botón de octava "+", el indicador situado sobre el botón de octava "-" se apagará, indicando que el teclado está
ajustado una octava por encima del valor predeterminado.
Si pulsa de nuevo el botón de octava "+", el rango del teclado aumentará en dos octavas, y así sucesivamente. Puede modificar el
rango del teclado hasta 3 octavas hacia arriba o hacia abajo partiendo del ajuste predeterminado ("0").
Para cambiar el rango de octavas hacia abajo, pulse el botón "-".
Para regresar al rango de teclado "0", pulse al mismo tiempo los botones "+" y "-". Se iluminarán ambos LEDs, indicando que el rango
de octava es de nuevo "0". (Si sólo se ilumina el indicador situado sobre el botón "-" el rango del teclado está desplazado hacia abajo.)
(Si se ilumina el del botón "+", el rango del teclado está desplazado hacia arriba.)
Rueda de Pitch Bend
La rueda de pitch bend asignable se usa generalmente para alterar el tono de las notas tocadas en el teclado hacia arriba o hacia
abajo, lo cual le permite tocar frases que no se asocian normalmente con un instrumento de teclado, por ejemplo un fraseo de guitarra.
Su fuente de sonido determina el rango en que la rueda de pitchbend altera el tono. El ajuste más común es dos semitonos, aunque
puede ser de hasta dos octavas hacia arriba o hacia abajo.
Rueda de modulación
La rueda de modulación se usa normalmente para modular el sonido que está tocando. Este tipo de controlador en tiempo real se
incorporó originalmente en los teclados electrónicos para ofrecer al instrumentista opciones como las de agregar vibrato, tal como lo
hace un músico al tocar un instrumento acústico.
Al igual que la rueda de pitch bend, la rueda de modulación es totalmente asignable vía MIDI.
Deslizador de volumen
El deslizador de volumen envía un mensaje MIDI que controla el volumen de las notas que está tocando.
También puede asignarlo a diferentes efectos, como por ejemplo el panorama (balance), ataque, reverberación o chorus, entre otros.
(Para más información, consulte la sección "Funciones avanzadas" de este manual.)
Pedal
Puede conectar un pedal (no suministrado) de cualquier polaridad en la entrada para pedal del teclado. Al ponerse en marcha, el
teclado detectará automáticamente la polaridad del pedal conectado. Si desea invertir la polaridad, mantenga el pedal pulsado al
poner el teclado en funcionamiento.
El pedal se usa normalmente para sostener el sonido sin necesidad de mantener las manos sobre el teclado, tal como sucede con un
piano acústico.
42
Page 44

Botón Advanced Functions (Funciones avanzadas)
El botón Advanced Functions permite acceder a las funciones avanzadas del teclado.
Al pulsar este botón, el teclado entra en modo de programación ("Edit Mode"). Mientras se encuentre en este modo, las teclas del
teclado permiten seleccionar funciones e introducir datos.
El indicador situado sobre el botón Advanced Functions indica si el teclado está o no en modo de programación. Cuando está en modo
de programación, las teclas negras permiten seleccionar funciones, mientras que las blancas se usan para introducir datos y
seleccionar canales.
El teclado abandonará el modo de programación en cuanto seleccione una función o pulse las teclas CANCEL o ENTER (el indicador
situado sobre el botón Advanced Functions se apagará). Entonces podrá volver a utilizar el teclado para tocar notas.
El siguiente diagrama muestra las funciones de las teclas mientras el Keystation 61es se encuentra en modo de programación.
Funciones avanzadas
Funcionalidad adicional de los botones de octava “+” y “-”
Por defecto, los botones de octava “+”’ y “-“ controlan el rango de octavas hacia arriba y hacia abajo. Sin embargo, estos botones se
utilizan también para controlar cualquiera de las cinco funciones MIDI adicionales.
Tal como se aprecia en la ilustración anterior, las 6 primeras teclas negras están etiquetadas “DATA = ________”. Estas teclas se usan
para seleccionar la función de los botones de octava “+” y “-”. Algunas de las funciones asignadas a estas teclas no admiten valores
inferiores a 0. En ese caso, los indicadores situados sobre los botones “+” y “-” permanecerán iluminados.
Para seleccionar la función de estos botones:
Pulse el botón Advanced Functions para acceder al modo de programación.
Pulse la tecla negra situada justo encima de C1 (llamada C# 1), y que representa DATA = OCTAVE. (pulsando C# 1 abandonará el
modo de programación.)
Pulse “+” para subir una octava o pulse “-“ para bajarla.
Pulse ambos botones (“+” y “-“) al mismo tiempo para regresar al valor de octava predeterminado.
Cambio de octava
El cambio del rango de octavas puede realizarse de dos maneras diferentes: La primera, es decir la que se detalla en la sección
“Octava”, se basa en la utilización de las teclas de octava “+” y “-”.
Para asignar los botones “+” y “-” al control del rango de octavas:
Pulse el botón Advanced Functions para acceder al modo de programación.
Pulse la tecla negra situada justo encima de C1 (llamada C# 1), y que representa DATA = OCTAVE. El teclado abandonará el modo
de programación en cuanto pulse C# 1.
43
Page 45

El segundo método permite un cambio rápido del rango de octavas. Puede ser útil si usa los botones de octava “+” and “-” para
controlar otra función MIDI y no desea cambiar dicha configuración:
Pulse el botón Advanced Functions para acceder al modo de programación.
Pulse la tecla negra situada justo debajo de B2 (Bb2), que representa “OCTAVE +”, para desplazar el rango una octava hacia arriba.
Púlsela de nuevo para subir dos octavas, y así sucesivamente.
o
Pulse la tecla negra situada justo encima de F2 (F#2), que representa “OCTAVE +” para desplazar el rango en una octava hacia
abajo. Púlsela de nuevo para bajar dos octavas, y así sucesivamente.
o
Pulse la tecla negra situada justo encima de G2 (G#2), que representa “OCTAVE 0” para que la transposición de octava
regrese al valor predeterminado (0).
Una vez seleccionado el rango de octava deseado, pulse C5 ("ENTER") para abandonar el modo de programación.
Transposición
En algunos casos resulta práctico subir o bajar el tono del teclado en un determinado número de semitonos, más que en octavas
completas. Por ejemplo, si está tocando una canción con un cantante que tiene dificultades con las notas más altas podría
resultarle útil bajar el tono del teclado en uno o dos semitonos*. Ello se consigue a través de una función MIDI llamada
"Transpose" (Transposición).
"Transpose" funciona del mismo modo que el cambio de rango de octava; la única diferencia es que esta última permite subir o bajar
el tono en +/- 12 semitonos. Al igual que sucede con el desplazamiento de octava, existen dos métodos para transportar el tono del
teclado. Puede usar los botones de octava "+" y "-", o las teclas negras F# 3, G# 3 y Bb3. Estas teclas corresponden a “TRANSPOSE -,”
“TRANSPOSE 0” y “TRANSPOSE +,” respectivamente.
Asignación de los botones “+” y “-” a la función de transposición:
Pulse el botón Advanced Functions para acceder al modo de programación.
Pulse la tecla negra situada justo encima de D1 (llamada D# 1), que representa “DATA = TRANSPOSE.” (El teclado abandonará el
modo de programación en cuanto pulse D#1).
Pulse la tecla “+” para escuchar como sube el tono del teclado.
Pulse los botones “+” y “-“ al mismo tiempo para cancelar la función de transposición.
*Un semitono representa el intervalo tonal que existe entre una nota y la siguiente. Por lo tanto, subir dos semitonos es lo mismo que
pulsar la tecla situada dos notas por encima.
Canal
Los datos MIDI del teclado pueden enviarse a través de cualquiera de los 16 canales MIDI. Sin embargo, ciertos dispositivos y
programas MIDI requieren que los datos sean enviados por un canal específico. En este caso, cambie el canal a través del cual el
teclado envía los datos siguiendo este método:
Pulse el botón Advanced Functions para acceder al modo de programación.
Pulse una de las 16 teclas de canal, de D1 a E3 (toque la tecla que corresponda al canal deseado).
Por ejemplo, si trabaja con un dispositivo que debe recibir datos a través del canal 10, pulse el botón Advanced Functions y a
continuación toque la tecla F2 para seleccionar el canal 10.
También puede asignar la selección de canal a los botones Octave “+” y “-”. Una vez asignado, pulse “+” o “-“ para aumentar o
disminuir gradualmente de canal. Si pulsa el botón “+” una vez alcanzado el canal 16, se seleccionará el canal 1. Si los botones de
octava “+” y “-” están asignados al cambio de canal, los indicadores situados sobre los mismos no cambiarán de estado, ya que no
es posible seleccionar un canal con valor negativo. Pulsando simultáneamente los botones “+” y “-” seleccionará el canal 1.
Cambios de programa
Los mensajes de cambio de programa permiten seleccionar el instrumento o "programa" en uso. Por ejemplo, vamos a cambiar el
instrumento a un sonido de bajo. Para ello deberemos enviar un mensaje de cambio de programa con un valor de 32, lo cual
seleccionará el sonido de bajo acústico de la lista de instrumentos General MIDI (vea el Apéndice). Puede enviar el cambio de programa
de dos maneras:
44
Page 46

1. Cambio de programa +/-:
Pulse el botón Advanced Functions.
Pulse la tecla negra situada sobre F1 (llamada F# 1).
Ahora puede utilizar los botones Octave “+” y “-” para cambiar el programa.
Pulse “+” y a continuación toque algunas notas; repita la operación hasta encontrar el instrumento que busca.
2. Selección rápida de cambio de programa
Pulse el botón Advanced Functions.
Pulse la tecla negra situada sobre F4 (llamada F# 4), que representa “programa”.
Pulse sucesivamente las teclas C4, E3 y C5. De esta manera introducirá la combinación: “3,” “2,” “ENTER.”
Como alternativa, también puede utilizar los botones “+” y “-” para cambiar el valor y pulsar ENTER. Ahora, el teclado esta ajustado para
reproducir el sonido de bajo GM 32 (de la lista estándar de instrumentos General MIDI).
El primer método es útil si desea ir probando distintos sonidos hasta encontrar el que mejor se adapta a su canción. No obstante, el
segundo método es más adecuado si desea seleccionar un número específico, como en nuestro ejemplo.
Si los botones de octava “+” y “-” están asignados al cambio de programa (método 1), los indicadores situados sobre los mismos no
cambiarán de estado, ya que no es posible seleccionar un programa con valor negativo. Si pulsa simultáneamente los botones “+” y
“-” seleccionará el programa 0 (sonido de piano de cola).
En el Apéndice que figura al final de este manual encontrará la lista completa de los instrumentos accesibles mediante cambios
de programa.
Banco LSB y Banco MSB
Los cambios de programa son los mensajes que más se utilizan para seleccionar instrumentos y voces. Sin embargo, el número de
instrumentos disponibles mediante cambios de programa está limitado a 128. Dado que algunos dispositivos ofrecen más de 128
voces, la selección de estas voces adicionales requiere el uso de un método distinto. Generalmente, dichos dispositivos utilizan
mensajes de Banco LSB y Banco MSB.
1. Cambio de Banco LSB y Banco MSB +/-:
Pulse el botón Advanced Functions.
Pulse la tecla negra situada sobre G1 (llamada G# 1).
Ahora puede utilizar los botones Octave “+” y “-” para cambiar el programa.
Pulse “+” y a continuación toque algunas notas; repita la operación hasta encontrar el instrumento que busca.
2. Método de selección rápida:
Pulse el botón Advanced Functions.
Pulse la tecla negra situada encima de G4 (llamada G# 4) o de A4 (llamada A# 4), que representan Banco LSB y Banco MSB
respectivamente.
Pulse sucesivamente las teclas C4, E3 y C5. De esta manera introducirá la combinación: “3,” “2,” “ENTER.”
Como alternativa, también puede utilizar los botones “+” y “-” para cambiar el valor y pulsar ENTER.
Al igual que ocurre con los cambios de programa, si los botones de octava “+” y “-” están asignados al cambio de número de Banco
LSB o MSB (método 1), los indicadores situados sobre los mismos no cambiarán de estado, ya que no es posible seleccionar un banco
con valor negativo. Si pulsa simultáneamente los botones “+” y “-” seleccionará el banco 0.
Rueda de modulación
Es posible asignar efectos MIDI a la rueda de modulación. Algunos efectos muy útiles son:
01 Modulación
07 Volumen
10 Panorama (balance)
05 Portamento
Existen en total 131 efectos. No obstante, para que estos efectos tengan alguna incidencia sobre el sonido, el dispositivo MIDI receptor
deberá ser capaz de interpretar dichos mensajes MIDI y responder a ellos. La mayoría de dispositivos responden como mínimo a los
datos de volumen, modulación y panorama. (Al final de este manual encontrará la lista completa de efectos.)
45
Page 47

Cómo asignar un efecto a la rueda de modulación:
Pulse el botón Advanced Functions para acceder al modo de programación.
Pulse la tecla negra situada sobre C4 (llamada C# 4), que representa “WHEEL ASSIGN” (Asignación de rueda).
Utilice las teclas de introducción de datos numéricos (G3-B4) para introducir el número del efecto que desee asignar a la rueda
de modulación.
Como alternativa, también puede utilizar los botones “+” y “-” para cambiar el valor.
Pulse la tecla ENTER (C5).
Desplace la rueda de modulación hacia arriba para incrementar el valor del efecto.
Si comete un error al introducir el valor numérico, pulse la tecla CANCEL (C1) para salir del modo de programación sin modificar la
asignación de efecto.
Recuerde que cada vez que apague el teclado, la asignación de la rueda de modulación se perderá. Cada vez que ponga el teclado
en marcha, la rueda de modulación estará asignada por defecto al efecto número 01 (Modulación).
A título de ejemplo, vamos a asignar el efecto número 10 (panorama o balance) a la rueda de modulación.
Pulse el botón Advanced Functions para acceder al modo de programación.
Pulse la tecla negra situada sobre C4 (llamada C# 4), que representa “WHEEL ASSIGN” (Asignación de rueda).
Pulse A3 para introducir “1”.
Pulse G3 para introducir “0” de manera que el valor final sea “10”.
Pulse C5 para “ENTER”.
Deslizador de volumen
Al igual que ocurre con la rueda de modulación, el deslizador de volumen puede asignarse a cualquiera de los 131 efectos que
aparecen listados al final de este manual.
Para asignar el deslizador de volumen a un efecto:
Pulse el botón Advanced Functions para acceder al modo de programación.
Pulse la tecla negra situada sobre D4 (llamada D# 4), que representa “SLIDER ASSIGN” (Asignación de deslizador).
Utilice las teclas de introducción de datos numéricos (G3-B4) para introducir el número del efecto que desee asignar al deslizador
de volumen.
Como alternativa, también puede utilizar los botones “+” y “-” para cambiar el valor.
Pulse la tecla ENTER (C5).
Desplace el deslizador de volumen hacia arriba para incrementar el valor del efecto.
Si comete un error al introducir el valor numérico, pulse la tecla CANCEL (C1) para salir del modo de programación sin modificar la
asignación de efecto.
Recuerde que cada vez que apague el teclado, la asignación del deslizador de volumen se perderá. Cada vez que ponga el teclado
en marcha, el deslizador de volumen estará asignado por defecto al efecto número 07 (Volumen).
Sensibilidad de pitchbend
Es posible alterar la sensibilidad de la rueda de pitchbend; para ello, asigne el efecto número 128 a la rueda de modulación o al
deslizador de volumen. De esta manera podrá alterar el rango de pitchbend hasta una octava hacia arriba o hacia abajo.
Si surgen problemas técnicos...
El Keystation 61es ha sido diseñado para que pueda trabajar con MIDI en su computadora de la forma más fácil posible. A pesar de
ello, no es imposible que surja alguna dificultad. En muchos casos el problema no estará en el teclado sino en el dispositivo receptor.
Para solucionarlo, dispone de dos útiles funciones MIDI:
All Notes Off (Desactivación de todas las notas)
Utilice esta función si quedan notas "colgadas" que no dejan de sonar.
46
Page 48

Pulse el botón Advanced Functions para acceder al modo de programación.
Pulse la tecla negra situada sobre D3 (llamada D# 3), que representa “ALL NOTES OFF”.
Con ello saldrá del modo de programación y todas las notas dejarán de sonar.
Reset All Controllers (Reinicio de todos los controladores)
Si advierte un efecto no deseado sobre una voz, en lugar de preocuparse de buscar el efecto puede enviar un mensaje MIDI “Reset All
Controllers” para desactivarlo. Siga este procedimiento:
Pulse el botón Advanced Functions para acceder al modo de programación.
Pulse la tecla negra situada sobre C3 (llamada C# 3), que representa “RESET ALL CONTROLLERS”.
Con ello saldrá del modo de programación y se desactivarán todos los efectos.
Salida MIDI
En el panel trasero del teclado hallará un puerto de salida MIDI (MIDI Out) que puede conectar a un módulo de sonido o a un teclado
MIDI externo. Cuando ponga el teclado en marcha, todos los datos de controlador serán enviados por defecto a través de la salida
MIDI y de la salida USB.
Si desea que la salida MIDI funcione como una interfaz USB-MIDI convencional, active el modo "MIDI Out from USB". Para ello, siga estas
instrucciones:
Pulse el botón Advanced Functions para acceder al modo de programación.
Pulse la tecla negra situada sobre D2 (llamada D# 2), que representa “MIDI OUT FROM USB”.
Al hacerlo abandonará el modo de programación.
Ahora, el teclado podrá enviar datos procedentes de la computadora a cualquier dispositivo conectado a través del jack MIDI OUT.
Para utilizar la salida MIDI, deberá seleccionar la salida MIDI USB del Keystation 61es en su secuenciador como dispositivo salida MIDI.
Resolución de problemas
Si surge alguno de los siguientes problemas durante el uso del teclado, proceda de este modo:
Mi hardware M-Audio ha dejado de funcionar de repente, cuando hasta ahora lo he estado utilizando sin problemas.
Apague la unidad durante unos 10 segundos. A continuación, reinicie la computadora e inténtelo de nuevo. Si el problema persiste,
quizá deberá reinstalar los controladores de la unidad.
He conectado un pedal de sustain a mi teclado pero funciona al revés de como yo esperaba.
El teclado detecta la polaridad del pedal de sustain en el momento de su puesta en marcha, asumiendo que el pedal está en posición
OFF. Por lo tanto, si desea que el pedal de sustain permanezca desactivado cuando no esté pulsado, asegúrese de que no está
pulsado en el momento de poner el teclado en marcha.
Existe un retardo entre el momento en que toco una tecla y el momento en que escucho el sonido.
Este retardo se conoce como latencia y la provoca el sintetizador virtual que está utilizando. Los datos MIDI son simplemente datos de
control que el sintetizador virtual recibe y lee. A continuación, el sintetizador virtual realiza una gran cantidad de complejos cálculos
para generar el sonido que usted escucha, y estas operaciones necesitan algún tiempo.
Es altamente recomendable utilizar una buena tarjeta de sonido. Visite www.m-audio.com para más información acerca de nuestras
interfaces de audio USB, PCI y Firewire. Si ya dispone de una tarjeta de sonido adecuada, intente reinstalar la última versión de los
controladores o reduzca los tamaños de búfer de los controladores de audio.
47
Page 49

Contactar con M-Audio
M-AUDIO US
5795 Martin Rd.
Irwindale, Ca 91706
U.S.A
Sales information (e-mail): info@m-audio.com
Technical Support: 626-633-9055
Technical Support (e-mail): techsupt@m-audio.com
Internet Home Page: http://www.m-audio.com
Información sobre la garantía
Registre su Keystation 61es en línea (visite www.m-audio.com/register) para recibir actualizaciones de producto GRATIS y participar en
el sorteo de equipos de M-Audio. Registrándose disfrutará inmediatamente de la cobertura de garantía y ayudará a M-Audio a
desarrollar y fabricar productos de la máxima calidad posible.
M-Audio garantiza este producto contra defectos de materiales y mano de obra, en condiciones de uso normales y siempre que su
propietario sea el comprador original y haya registrado el producto. Consulte la sección de información de garantía en la página web
de M-Audio (vaya a www.m-audio.com/warranty) para más información acerca de las condiciones y limitaciones específicas
aplicables al Keystation 61es.
Información técnica
Precaución: las descargas electroestáticas, los transitorios eléctricos rápidos y las interferencias de radiofrecuencia pueden provocar el
mal funcionamiento de la unidad. En tales casos, desenchufe la unidad y enchúfela de nuevo para restablecer el funcionamiento normal.
Nota: M-Audio Keystation 61es es conforme con los estándares FCC PARA USO DOMÉSTICO O DE OFICINA. Las modificaciones no
autorizadas por el fabricante pueden invalidar el derecho del usuario a utilizar este aparato.
Nota: Este dispositivo es conforme con los límites establecidos por la Clase B para aparatos digitales, según lo estipulado en la Parte
15 de las normas FCC. Estos límites han sido establecidos para ofrecer una protección razonable contra interferencias no deseables en
instalaciones domésticas. Esta unidad genera, usa y puede transmitir señales de radiofrecuencia y, si no se instala y utiliza de
conformidad con las instrucciones de este manual, puede provocar interferencias no deseables en las radiocomunicaciones. Sin
embargo, esto no garantiza que no se produzcan interferencias en instalaciones concretas. Si la unidad provoca interferencias en la
recepción de radio o televisión, lo cual podrá comprobar conectando y desconectando la unidad, intente reducir la interferencia
aplicando alguna de las medias siguientes:
Reoriente o cambie la ubicación de la antena receptora.
Aumente la separación entre la unidad y el receptor.
Conecte la unidad y el receptor en tomas eléctricas diferentes, de modo que ambos utilicen circuitos eléctricos distintos.
Consulte con su proveedor o técnico especializado en radio/TV.
ASIO es una marca registrada de Steinberg Soft– und Hardware GmbH.
VST es una marca registrada de Steinberg Soft– und Hardware GmbH.
Keystation 61es
Tested to comply with
FCC standards
FOR HOME OR STUDIO USE
48
Page 50

Apéndices - Datos MIDI útiles
Apéndice A - Instrumentos General MIDI
Piano
0 Piano acústico Grand
1 Piano horizontal
2 Piano eléctrico Grand
3 Piano Honky-tonk
4 Piano eléctrico 1
5 Piano eléctrico 2
6 Clavicémbalo
7 Clavinet
Percusión cromática
8 Celesta
9 Xilófono
10 Caja de música
11 Vibráfono
12 Marimba
13 Xilófono
14 Campanas tubulares
15 Dulcimer
Órgano
16 Órgano de tiradores
17 Órgano de percusión
18 Órgano rock
19 Órgano de iglesia
20 Órgano de lengüeta
21 Acordeón
22 Armónica
23 Acordeón de tango
Bajo
32 Bajo acústico
33 Bajo eléctrico
Bajo pulsado con los dedos
34 Bajo eléctrico (punteado)
35 Bajo sin trastes
36 Bajo Slap 1
37 Bajo Slap 2
38 Bajo de sintetizador 1
39 Bajo de sintetizador 2
Cuerdas/Orquesta
40 Violín
41 Viola
42 Violonchelo
43 Contrabajo
44 Trémolo de cuerdas
45 Pizzicato de cuerdas
46 Arpa orquestal
47 Timbales
Conjuntos de cuerdas
48 Conjunto de cuerdas 1
4 9 Conjunto de cuerdas 2 (lento)
50 Cuerdas de sintetizador 1
51 Cuerdas de sintetizador 2
52 Coro "a"
53 Voz "o"
54 Coro de sintetizador
55 Golpe de orquesta
Caña
64 Saxo soprano
65 Saxo alto
66 Saxo tenor
67 Saxo barítono
68 Oboe
69 Trompa inglesa
70 Fagot
71Clarinete
Madera
72 Piccolo
73 Flauta
74 Flauta dulce
75 Flauta de pan
76 Soplado de botellas
77 Shakuhachi
78 Silbido
79 Ocarina
Lead sintético
80 Onda cuadrada
81 Onda de diente de sierra
82 Calliope
83 Chiff
84 Charanga
85 Voz
86 Quintas
Efectos sintéticos
96 SFX Lluvia
97 SFX Banda sonora
98 SFX Cristal
99 SFX Atmósfera
100 SFX Brillo
101 SFX Duendes
102 SFX Ecos
103 SFX Ciencia-ficción
Étnicos
104 Sitar
105 Banjo
106 Shamisen
107 Koto
108 Kalimba
109 Bag Pipe
110 Violín
111 Shanai
Percusión
112 Campanita
113 Agogó
114 Tambores de acero
115 Bloque de madera
116 Tambor Taiko
117 Tom melódico
118 Tambor sintético
119 Címbalo inverso
Guitarra
24 Guitarra acústica (nailon)
25 Guitarra acústica (acero)
26 Guitarra eléctrica (jazz)
27 Guitarra eléctrica (limpia)
28 Guitarra eléctrica (muda)
29 Guitarra saturada
30 Guitarra distorsionada
31 Armónicos
Metales
56 Trompeta
57 Trombón
58 Tuba
59 Trompeta con sordina
60 Trompa de pistone
(corno de caza)
61 Sección de metal
62 Metal de sintetizador 1
63 Metal de sintetizador 2
Onda de diente de sierra
87 Metal de sintetizador & solo
Pad sintético
88 Pad New Age
89 Pad cálido
90 Pad polifónico
91 Pad coros
92 Pad arco
93 Pad metal
94 Pad etéreo
95 Pad barrido
Efectos de sonido
120 Ruido de traste
de guitarra
121 Respiración
122 Orilla del mar
123 Pájaros piando
124 Llamada telefónica
125 Helicóptero
126 Aplauso
127 Disparo
49
Page 51

Apéndice B - Controladores Standard MIDI (MIDI CCs)
00 Selección de banco
01 Modulación
02 Breath Control
03 Controller 3
04 Foot Control
05 Porta Time
06 Introducción de datos
07 Volumen de canal
08 Balance
09 Controller 9
10 Pan
11 Expression
12 Effects Controller 1
13 Effects Controller 2
14 Controller 14
15 Controller 15
16 Gen Purpose 1
17 Gen Purpose 2
18 Gen Purpose 3
19 Gen Purpose 4
20 Controller 20
21 Controller 21
22 Controller 22
23 Controller 23
24 Controller 24
25 Controller 25
26 Controller 26
27 Controller 27
28 Controller 28
29 Controller 29
30 Controller 30
31 Controller 31
32 Bank Select LSB
33 Modulation LSB
34 Breath Control LSB
35 Controller 35
36 Foot Control LSB
37 Porta Time LSB
38 Data Entry LSB
39 Channel Volume LSB
40 Balance LSB
41 Controller 41
42 Pan LSB
43 Expression LSB
44 Controller 44
45 Controller 45
46 Controller 46
47 Controller 47
48 Gen Purpose 1 LSB
49 Gen Purpose 2 LSB
50 Gen Purpose 3 LSB
51 Gen Purpose 4 LSB
52 Controller 52
53 Controller 53
54 Controller 54
55 Controller 55
56 Controller 56
57 Controller 57
58 Controller 58
59 Controller 59
60 Controller 60
61 Controller 61
62 Controller 62
63 Controller 63
64 Pedal de sustain
65 Portamento
66 Sostenuto
67 Soft Pedal
68 Legato Pedal
69 Hold 2
70 Sound Variation
71 Resonance
72 Release Time
73 Attack Time
74 Cut- off Frequency
75 Controller 75
76 Controller 76
77 Controller 77
78 Controller 78
79 Controller 79
80 Gen Purpose 5
81 Gen Purpose 6
82 Gen Purpose 7
83 Gen Purpose 8
84 Portamento Control
85 Controller 85
86 Controller 86
87 Controller 87
88 Controller 88
89 Controller 89
90 Controller 90
91 Reverb Depth
92 Tremelo Depth
93 Chorus Depth
94 Celeste (De- tune)
95 Phaser Depth
96 Data Increment
97 Data Decrement
98 Non- Reg Param LSB
99 Non- Reg Param MSB
100 Reg Param LSB
101 Reg Param MSB
102 Controller 102
103 Controller 103
104 Controller 104
105 Controller 105
106 Controller 106
107 Controller 107
108 Controller 108
109 Controller 109
110 Controller 110
111 Controller 111
112 Controller 112
113 Controller 113
114 Controller 114
115 Controller 115
116 Controller 116
117 Controller 117
118 Controller 118
119 Controller 119
Messaggi di canale:
120 All Sound off
(tutti i suoni spenti)
121 Reset all Controllers
(reimposta tutti i controller)
122 Local Control
(controllo locale)
123 All Notes Off
(tutte le note spente)
124 Omni Off
125 Omni On
126 Mono On (Poly Off)
127 Poly On (Mono Off)
Messaggi suppplementari RPN:
128 Pitch Bend sensitivity
129 Fine Tune
130 Coarse Tune
131 Channel Pressure
50
Page 52

Italiano -
Introduzione
Congratulazioni per aver scelto Keystation 61es, una tastiera USB con 61 tasti semi-pesati sensibili alla velocità, prodotta dalla M-Audio
e progettata per una facile integrazione con PC o Macintosh. La Keystation 61es è dotata di tasti semi-pesati per un tocco simile al piano,
in un controller MIDI compatto ed economico. Ideale per svariate applicazioni didattiche e di creazione musicale, la Keystation 61es offre
ruote per pitch e modulation, più pulsanti assegnabili e slider per il controllo manuale. Sebbene la Keystation 61es sia caratterizzata
dalla funzione plug-and-play in Windows XP e Mac OS X, si consiglia di dedicare alcuni minuti alla lettura del presente manuale per
apprendere le corrette operazioni, le funzionalità avanzate e la programmabilità della tastiera.
Caratteristiche
Tastiera:
Tastiera a 61 tasti sensibile alla velocità
Ruota Pitch Bend
Ruota Modulation
Slider volume/controllo
Ingresso pedale sustain
Pulsanti di ottava +/-
Pulsante Advanced Functions
Porte:
Uscita MIDI
Uscita e ingresso MIDI USB
Alimentazione:
Alimentazione via USB
Ingresso c.c. per alimentatore esterno
Cosa c’è dentro la scatola?
La confezione di M-Audio Keystation 61es contiene i seguenti elementi:
Tastiera USB M-Audio Keystation 61es
Manuale dell'utente
Cavo USB
Nel caso qualsiasi parte risultasse mancante, rivolgersi al rivenditore presso il quale è stato acquistato il prodotto.
Informazioni sul manuale
Questo manuale di istruzioni illustra il funzionamento della tastiera USB Keystation 61es. Sebbene non siano fornite spiegazioni
dettagliate su come impostare la tastiera per l'uso con programmi musicali di terzi, la maggior parte di queste applicazioni funzionano
perfettamente con la tastiera Keystation 61es. Per ulteriori informazioni, consultare il manuale fornito con l'applicazione.
Prima di effettuare il collegamento della tastiera
È possibile alimentare la tastiera tramite porta USB o mediante un alimentatore esterno opzionale. In ogni caso, la Keystation 61es è
un dispositivo a bassissimo consumo e l'alimentazione esterna non dovrebbe essere necessaria.
Si consiglia di collegare la Keystation 61es alla porta USB del computer o a un hub USB alimentato.
51
Page 53

Alimentazione e connessione tramite USB
1. Verificare che il pulsante on/off sul retro dell'unità si trovi in posizione “OFF.”
2. Collegare il cavo USB fornito con la tastiera Keystation 61es in una porta USB libera del computer.
3. Innestare l'altra estremità del cavo USB all'ingresso relativo sulla tastiera Keystation 61es.
Il cavo USB, oltre ad alimentare la tastiera, invia i dati MIDI da e per il computer.
Utilizzo di alimentazione esterna
È inoltre possibile utilizzare un adattatore di alimentazione (non incluso) con le seguenti caratteristiche: uscita 9 V c.c., 250 - 300 mA,
polo positivo centrale.
Accertarsi che la tastiera Keystation 61es non sia già alimentata dalla porta USB (in questo caso, non è richiesta alimentazione esterna).
In caso contrario, è sufficiente collegare l'alimentatore all'ingresso “DC 9V” e accendere l'unità.
Nota: non lasciare collegato l'adattatore per lunghi periodi di tempo se l'unità non viene utilizzata.
Windows XP e Mac OSX
Se si utilizza Windows XP o Mac OSX, è sufficiente accendere la tastiera portando l'interruttore sulla posizione “ON”. Grazie al supporto
nativo per questi sistemi operativi, la tastiera Keystation 61es funzionerà senza ulteriore installazione.
Altri sistemi operativi
Se si utilizza un sistema operativo diverso da OSX o Windows XP, consultare il nostro sito all'indirizzo www.m-audio.com per ottenere i
driver aggiornati della Keystation 61es per i sistemi operativi Macintosh o Windows.
Installazione su Mac OS9
Se non è installato OMS, eseguire prima l'installer di OMS. In caso contrario, saltare alla sezione “Installazione del driver OMS”.
Procedura di installazione OMS:
Accertarsi che tutti i programmi siano chiusi prima di avviare l'installer. Accertarsi inoltre di rimuovere qualsiasi dispositivo hardware di
protezione dalla copia (dongle) in uso nel sistema.
1. Inserire il CD-ROM di installazione della Keystation 61es.
2. Fare doppio clic sull'icona del CD di installazione della Keystation 61es sul desktop
3. Fare doppio clic sulla cartella OS 9
4. Fare doppio clic su Install OMS 2.3.8
5. Seguire le istruzioni sullo schermo
6. L'OMS richiederà alcuni minuti per l'installazione. Una volta terminata l'installazione, verrà richiesto di riavviare il computer. Fare
clic su “Riavvia”.
Installazione del driver OMS.
1. Trascinare l'icona USB Drivers Installer, dalla finestra OS 9 in cui si trova attualmente al desktop.
2. Fare doppio clic sull'icona. Se appare una finestra, fare clic su ‘Apri’.
3. Fare doppio clic sull'USB Drivers Installer appena creato sul desktop.
4. Fare clic su ’Installa’. L'installer collocherà automaticamente i driver nelle opportune cartelle di sistema.
5. Una volta terminata l'installazione dei driver, fare clic su ‘Riavvia’.
6. Quando il computer è riavviato, accendere la Keystation 61es.
52
Page 54

Configurazione OMS
È necessario ora avviare il programma di configurazione dell'OMS:
1. Aprire la cartella delle applicazioni OMS e, successivamente, OMS Setup.
2. Se si ottiene il messaggio di attivare o disattivare Appletalk, scegliere l'una o l'altra opzione.
3. Nella finestra successiva, fare clic su ‘OK’.
4. Fare clic su “Cerca”.
5. Fare clic su “OK”.
6. Selezionare nuovamente "Sì".
7. Fare clic su “Salva”.
8. Se richiesto, fare clic su “Sostituisci”.
Si dovrebbe quindi ottenere una finestra conclusiva che mostra l'impostazione Studio attuale. Se appare una croce su ‘Quicktime Music’,
occorre fare doppio clic su di esso e poi sull'opzione ‘on’ per attivarlo. Quindi fare clic su "OK". A questo punto si è pronti a iniziare.
Accertarsi che la tastiera la Keystation 61es sia selezionata come ingresso MIDI nel programma musicale.
Installazione in Windows 98 o ME
1. Accendere il PC.
2. Inserire il CD-ROM di installazione della Keystation 61es. Aprire Risorse del computer o Windows Explorer per individuare l'unità
CD-ROM ROM. Fare clic sulla cartella denominata Keystation 61es.
3. Aprire la cartella Keystation 61es e fare clic sull'icona dell'installer.
4. Seguire le istruzioni sullo schermo.
5. Una volta terminato, uscire dall'installazione.
6. Accendere la Keystation 61es.
Windows procederà con l’installazione del driver USB e del driver MIDI. Una volta completata, si è pronti a iniziare. Potrebbe essere
richiesto di riavviare il computer; in questo caso, fare clic su "Riavvia".
Installazione su Windows 2000
1. Accendere il PC.
2. Inserire il CD-ROM di installazione della Keystation 61es. Aprire Risorse del computer o Windows Explorer per individuare l'unità
CD-ROM ROM. Fare clic sulla cartella denominata Keystation 61es.
3. Aprire la cartella Keystation 61es e fare clic sull'icona dell'installer.
4. Seguire le istruzioni sullo schermo.
5. Una volta terminato, uscire dall'installazione.
6. Accendere la tastiera Keystation 61es. La tastiera viene automaticamente riconosciuta da Windows e verrà chiesto di inserire il
CD-ROM di installazione della Keystation 61es.
7. Selezionare l'unità CD-ROM e fare clic su “OK.” Windows chiederà di selezionare nuovamente l'unità CD-ROM per il driver MIDI.
8. Se appare il messaggio Windows relativo alla firma digitale dei driver, fare clic su ‘Continua installazione’.
9. Selezionare nuovamente l'unità.
10. Fare clic su “OK”.
11. Nella schermata finale, Windows visualizzerà la richiesta di riavvio del computer.
Guida introduttiva
Una volta terminata l'installazione, è necessario configurare l'applicazione MIDI per poter utilizzare la Keystation 61es. Infatti, se si preme
qualsiasi tasto della tastiera, non si udirà alcun suono. Ciò è dovuto al fatto che la pressione del tasto determina l'invio da parte della
tastiera di dati MIDI. Questi forniscono le istruzioni su come riprodurre il suono, ma per udire effettivamente tale suono, occorre
configurare il programma musicale per la lettura dei dati MIDI inviati dalla Keystation 49e e per la relativa riproduzione. Per effettuare
questa impostazione, è sufficiente accedere al menu Opzioni o Impostazione periferica dell'applicazione e selezionare la periferica
adeguata. La Keystation 61es dovrebbe apparire come “Periferica audio USB” in Windows XP o come “Keystations 61ew” negli altri
sistemi operativi nella sezione delle periferiche MIDI del programma musicale. Per la corretta procedura di impostazione, consultare il
manuale in dotazione al programma.
53
Page 55

I tasti
Ciascun tasto bianco sulla Keystation 61es è contrassegnato con una lettera e un numero. La lettera rappresenta la nota riprodotta e il
numero l'ottava (il concetto di “ottava” è illustrato nella sezione seguente).
Anche i tasti neri hanno una denominazione (ad esempio "F#4" o "Eb2"), nonostante questa non sia riportata su di essi.
Se la lettera di un tasto nero è elencata con il simbolo #, si fa riferimento al tasto nero sopra quello bianco con la stessa lettera. Ad
esempio, F# 3 si riferisce al tasto nero sopra quello bianco denominato F3. Se elencata con la lettera b, si fa riferimento al tasto nero
sotto il tasto bianco con la stessa lettera. Ad esempio, Eb3 si riferisce al tasto nero sotto quello bianco denominato E3. Quindi, il nome
del tasto nero tra i tasti C3 e D3 sarà sia C#3 sia Db3.
Ottava
Un'ottava contiene 12 note. Sulla tastiera Keystation 61es ciascuna ottava è chiaramente contrassegnata con sezioni nere e bianche che
iniziano con la nota C. Ciascuna ottava è contraddistinta da un numero.
Se si preme una volta il pulsante di ottava “+”, la spia soprastante il pulsante “-“ si spegne, indicando che la tastiera funziona ora con
un'ottava più alta.
Se si preme nuovamente il pulsante di ottava “+”, la tastiera verrà spostata di 2 ottave più in alto. È possibile spostare la tastiera in su
o in giù di 3 ottave partendo dallo spostamento di ottava 0.
Per spostare l'ottava verso il basso, premere il pulsante “-“.
Per tornare allo spostamento di ottava 0, premere insieme i pulsanti “+” e “-“. Entrambi i LED si illuminano, a indicare che lo spostamento
di ottava è tornato a 0. (Se la spia è accesa solo sopra il tasto di ottava “-“, lo spostamento di ottava è verso il basso. Viceversa, se la
spia è accesa solo sopra il tasto di ottava “+”, lo spostamento è verso l'alto).
Ruota Pitch Bend
Come indicato dal nome, questa ruota viene generalmente utilizzata per modificare l’intonazione delle note riprodotte dalla tastiera
verso l'alto o verso il basso. Ciò consente di suonare fraseggi normalmente non associati alla tastiera, tra cui i riff di chitarra.
La sorgente del suono determina l'entità dell'estensione della variazione d’intonazione della nota. L'impostazione normale è di due
semitoni ma può essere spinta fino a +/- due ottave.
Ruota Modulation
Questa ruota viene generalmente utilizzata per la modulazione del suono in esecuzione. Questo tipo di controller in tempo reale è stato
originariamente introdotto sugli strumenti a tastiera elettronici per offrire al musicista l'effetto vibrato, tipicamente disponibile con gli
strumenti acustici.
La ruota modulation è completamente assegnabile via MIDI, esattamente come la ruota pitch bend.
Slider Volume
Lo slider Volume invia un messaggio MIDI che controlla il volume delle note in esecuzione.
Tale slider può anche essere assegnato a effetti diversi, quali pan (bilanciamento), attack, reverb, chorus e molti altri. Per ulteriori
informazioni, consultare la sezione di installazione di questo manuale.
Pedale
È possibile collegare un pedale (non incluso) con qualsiasi polarità nell'ingresso "foot switch" della tastiera M-Audio. La tastiera sarà in
grado di rilevare la corretta polarità al momento dell'accensione. Se si desidera invertire la polarità, è sufficiente tenere premuto il
pedale al momento dell'accensione della tastiera.
Il pedale viene normalmente usato per sostenere il suono in esecuzione senza dover tenere le mani sulla tastiera, esattamente come
accade con il pianoforte.
54
Page 56

Pulsante Advanced Functions
Il pulsante Advanced Functions viene utilizzato per accedere a tutte le funzioni avanzate della tastiera situate sul piano dei tasti.
Una volta premuto, la tastiera passa in “modalità di programmazione”. Durante questa modalità, i tasti possono essere utilizzati per
selezionare funzioni e immettere dati.
La spia soprastante il pulsante Advanced Functions indica se la tastiera si trova o meno nella modalità di programmazione. In modalità
di programmazione, i tasti neri vengono utilizzati per la selezione delle funzioni, mentre quelli bianchi per l'immissione dei dati e la
selezione dei canali.
La tastiera uscirà dalla modalità di programmazione non appena viene selezionata una funzione o vengono premuti i tasti CANCEL o
ENTER (la spia soprastante il pulsante Advanced Functions si spegne). La tastiera può essere nuovamente utilizzata per suonare.
Il diagramma seguente illustra il significato di ciascun tasto nella modalità di programmazione della tastiera:
Funzioni avanzate
Funzionalità supplementari dei tasti di ottava “+” e “-”
Per impostazione predefinita, i tasti di ottava “+”’ e “-“ controllano lo spostamento di ottava sia al di sotto sia al di sopra dello 0. Questi
tasti possono essere utilizzati anche per controllare una delle cinque funzioni MIDI aggiuntive.
Nel diagramma precedente si nota che i primi 6 tasti neri sono contrassegnati come “DATA = ----.” Questi tasti vengono utilizzati per
selezionare la funzione dei tasti di ottava "+" e "-". Alcune funzioni per le quali è possibile usare questi tasti non possono inviare un
valore inferiore a 0. In questo caso, le spie soprastanti i tasti “+” e “-” restano accese.
Per selezionare la funzione di questi tasti:
Premere il pulsante Advanced Functions per portare la tastiera nella modalità di programmazione.
Premere il tasto nero sopra C1 (denominato C# 1), che rappresenta DATA = OCTAVE (la pressione del tasto C# 1 termina la modalità
di programmazione).
Premere “+” per spostarsi in su di un'ottava o “-“ per spostarsi in giù di un'ottava.
Premere entrambi i tasti “+” e “-“ per tornare alla condizione di nessun spostamento di ottava.
Spostamento di ottava
Lo spostamento di ottava può essere ottenuto in due modi diversi. Il primo modo è già stato descritto nella sezione "Ottava" e riguarda
l'utilizzo dei tasti di ottava “+” e “-”.
Per assegnare i tasti “+” e “-” al controllo delle ottave:
Premere il pulsante Advanced Functions per portare la tastiera nella modalità di programmazione.
Premere il tasto nero sopra C1 (denominato C# 1), che rappresenta DATA = OCTAVE. La tastiera esce dalla modalità di
programmazione non appena si preme il tasto C# 1.
55
Page 57

Il secondo modo consente un rapido cambio di ottava. È utile se si utilizzano i tasti di ottava “+” e “-” per una diversa funzione MIDI e
non si desidera modificare questa impostazione:
Premere il pulsante Advanced Functions per portare la tastiera nella modalità di programmazione.
Premere il tasto nero sotto B2 (denominato Bb2), che rappresenta “OCTAVE +” per aumentare di 1 ottava. Premerlo ancora per
aumentare di 2 ottave e così via,
oppure
Premere il tasto nero sopra F2 (denominato F# 2), che rappresenta “OCTAVE -“ per diminuire di 1 ottava. Premerlo ancora per
diminuire di 2 ottave e così via,
oppure
Premere il tasto nero sopra G2 (denominato G# 2), che rappresenta “OCTAVE 0” per impostare nuovamente lo spostamento di
ottava a 0.
Una volta scelta l'estensione di ottava premere C5, che rappresenta “ENTER,” per uscire dalla modalità di programmazione.
Trasposizione
In alcuni casi è utile ridurre o aumentare il pitch di alcuni semitoni invece che di un'intera ottava. Se ad esempio si sta suonando una
canzone con un interprete che presenta difficoltà a raggiungere note elevate, è opportuno ridurre il pitch di uno o due semitoni*. Questo
si ottiene mediante la funzione MIDI denominata “Trasposizione.”
La trasposizione funziona allo stesso modo dello spostamento di ottava illustrato in precedenza, tranne per lo spostamento che è di +/-
12. Come nel caso dello spostamento di ottava, sono disponibili due modi per eseguire la trasposizione della tastiera. È possibile
utilizzare i pulsanti di ottava “+” e “-” o i tasti neri F# 3, G# 3 e Bb3. Questi tasti neri rappresentano rispettivamente “TRASPOSIZIONE -,”
“TRASPOSIZIONE 0” e “TRASPOSIZIONE +”.
Per assegnare i pulsanti di ottava “+” e “-”alla trasposizione:
Premere il pulsante Advanced Functions per portare la tastiera nella modalità di programmazione.
Premere il tasto nero sopra D1 (denominato D# 1), che rappresenta “DATA = TRANSPOSE” (la pressione del tasto D# 1 termina la
modalità di programmazione).
Premere il tasto “+” per sentire che il pitch della nota si alza.
Premere insieme i tasti “+” e “-“ per annullare la trasposizione.
*Un semitono rappresenta il cambiamento in tono da una nota all'altra. In questo modo, cambiando due semitoni si ottiene lo stesso
risultato dell'eseguire una nota due note più in su.
Canale
I dati MIDI provenienti dalla tastiera possono essere inviati a uno qualsiasi dei 16 canali MIDI. Tuttavia, determinate periferiche MIDI e
programmi MIDI richiedono che la tastiera invii i dati su un canale specifico. In questo caso, è possibile cambiare il canale di invio dei
dati mediante il seguente metodo:
Premere il pulsante Advanced Functions per portare la tastiera nella modalità di programmazione.
Premere uno dei 16 tasti di canale da D1 a E3, qualunque sia quello che rappresenta il canale desiderato.
Ad esempio, se la periferica indica che occorre inviare i dati sul canale 10, premere il pulsante Funzione avanzate, quindi il tasto F2 per
selezionare il canale 10.
Il canale può essere inoltre assegnato ai pulsanti di ottava “+” e “-”. Una volta assegnato, premendo “+” o “-“ si aumenta o diminuisce
il canale in modo incrementale. Quando viene raggiunto il canale 16 e si preme nuovamente il tasto “+”, viene selezionato il canale 1.
Se si selezionano i pulsanti di ottava “+” e “-” per la variazione del canale, le spie soprastanti i pulsanti non cambiano, poiché non è
possibile avere un canale con valore negativo. Premendo insieme i pulsanti “+” e “-” viene richiamato il canale 1.
Cambio di programma
I cambi di programma vengono utilizzati per cambiare lo strumento o la voce in uso. A titolo di esempio, viene cambiato lo strumento
in un suono di basso. Per fare questo occorre un cambio di programma 32, che selezionerà il suono di un basso acustico dall'elenco
degli strumenti GM (vedere Appendice). Per inviare il cambio di programma sono disponibili due metodi:
56
Page 58

1. Cambio di programma incrementale e decrementale:
Premere il pulsante Advanced Functions.
Premere il tasto nero sopra F1 (denominato F# 1).
Ora i tasti di ottava “+” e “-” possono essere usati per cambiare il programma.
Premere “+” e continuare a suonare note finché non si trova lo strumento desiderato.
2. Selezione rapida del cambio di programma:
Premere il pulsante Advanced Functions.
Premere il tasto nero sopra F4 (denominato F# 4), che rappresenta “Program”.
Premere i tasti C4, quindi E3 e C5. In questo modo viene immessa la combinazione: “3,” “2,” “ENTER.”
In alternativa, è possibile utilizzare i pulsanti “+” e “-” per cambiare il valore, quindi premere ENTER.
A questo punto la tastiera è impostata per suonare il suono basso GM 32 (dall'elenco standard generale degli strumenti GM).
Il primo metodo è utile se si desidera passare ciclicamente attraverso diversi strumenti per verificare quali sono i suoni più adatti alla
canzone. Il secondo è più utile se si desidera selezionare un numero specifico, com'è in questo caso.
Se sono selezionati i tasti di ottava “+” e “-” per cambiare il numero di programma (metodo 1), le spie soprastanti i pulsanti non
cambiano, poiché non è possibile avere un programma con valore negativo. Premendo insieme i pulsanti “+” e “-” viene richiamato il
programma 0, che seleziona il suono di un gran piano.
L'elenco completo di strumenti accessibili usando il cambio di programma è riportato nell'appendice alla fine del presente manuale.
Banco LSB e Banco MSB
I cambi di programma sono i messaggi più comunemente usati per cambiare strumenti e voci. Tuttavia, il numero di strumenti
accessibili usando i cambi di programma è limitato a 128, Poiché alcune periferiche hanno più di 128 voci, queste richiedono un metodo
diverso per accedere alle voci supplementari. Generalmente, questi dispositivi usano messaggi di banco LSB e di banco MSB.
1. Cambio banco LSB e banco MSB incrementale e decrementale:
Premere il pulsante Advanced Functions.
Premere il tasto nero sopra G1 (denominato G# 1).
Ora i tasti di ottava “+” e “-” possono essere usati per cambiare il programma.
Premere “+” e continuare a suonare note finché non si trova lo strumento desiderato.
2. Uso del metodo di selezione rapida:
Premere il pulsante Advanced Functions.
Premere il tasto nero sopra G4 (denominato G# 4) o A4 (denominato A# 4), che rappresentano rispettivamente il banco LSB o il
banco MSB.
Premere i tasti C4, quindi E3 e C5. In questo modo viene immessa la combinazione: “3,” “2,” “ENTER.”
In alternativa, è possibile utilizzare i pulsanti “+” e “-” per cambiare il valore, quindi premere "ENTER".
Come nel caso del cambio di programma, se sono selezionati i tasti di ottava “+” e “-” per cambiare il numero del banco LSB o MSB
(metodo 1), le spie soprastanti i pulsanti non cambiano, poiché non è possibile avere un banco con valore negativo. Premendo insieme
i pulsanti “+” e “-” si richiama il banco 0.
Ruota Modulation
È possibile assegnare effetti MIDI alla ruota Modulation. Alcuni effetti utili sono:
01 Modulation
07 Volume
10 Pan (bilanciamento)
05 Portamento
In totale sono presenti 132 effetti. In ogni caso, affinché essi influiscano sul suono, la periferica MIDI di ricezione deve essere in grado di
leggere e rispondere ai messaggi degli stessi. La maggior parte delle periferiche risponderà almeno ai dati di volume, modulation e
pan. (L'elenco completo degli effetti è riportato sul retro del presente manuale).
Per assegnare un effetto alla ruota Modulation:
Premere il pulsante Advanced Functions per portare la tastiera nella modalità di programmazione.
Premere il tasto nero sopra C4 (denominato C# 4), che rappresenta “WHEEL ASSIGN.”
Usare i tasti di immissione dei dati numerici G3-B4 per immettere il numero dell'effetto che si desidera assegnare alla ruota Modulation.
57
Page 59

In alternativa, è possibile utilizzare i pulsanti “+” e “-” per cambiare il valore.
Premere il tasto ENTER (C5).
Spostare la ruota Modulation verso l'alto per aumentare l’intesità o il valore dell'effetto.
Se si commette un errore durante l'immissione del valore dei dati numerici, è possibile premere il tasto CANCEL (C1) per uscire dalla
modalità di programmazione senza cambiare l'effetto assegnato alla ruota Modulation.
Notare che ogni volta che la tastiera viene spenta, i dati assegnati alla ruota Modulation andranno persi. Ogni volta che la tastiera viene
accesa, la ruota verrà assegnata al valore predefinito Modulation, (numero di effetto 01.)
A titolo di esempio, viene assegnato il numero di effetto 10 (pan o balance) alla ruota modulation.
Premere il pulsante Advanced Functions per portare la tastiera nella modalità di programmazione.
Premere il tasto nero sopra C4 (denominato C# 4), che rappresenta “WHEEL ASSIGN.”
Premere A3 per immettere “1.”
Premere G3 per immettere “0” (così facendo si immette “10”).
Premere C5 per “ENTER.”
Slider Volume
Come nel caso della ruota Modulation, lo slider Volume può essere assegnato a uno qualsiasi dei 132 effetti riportati alla fine del manuale.
Per assegnare lo slider Volume a un effetto:
premere il pulsante Advanced Functions per portare la tastiera nella modalità di programmazione.
Premere il tasto nero sopra D4 (denominato D# 4), che rappresenta “SLIDER ASSIGN.”
Usare i tasti di immissione dei dati numerici G3-B4 per immettere il numero dell'effetto che si desidera assegnare allo slider Volume
In alternativa, è possibile utilizzare i pulsanti “+” e “-” per cambiare il valore.
Premere il tasto ENTER (C5).
Spostare lo slider Volume verso l'alto per aumentare il valore dell'effetto.
Se si commette un errore durante l'immissione del valore dei dati numerici, è possibile premere il tasto CANCEL (C1) per uscire dalla
modalità di programmazione senza cambiare l'effetto assegnato allo slider Volume.
Notare che ogni volta che la tastiera viene spenta, i dati assegnati allo slider Volume andranno persi. Ogni volta che la tastiera viene
accesa, lo slider Volume verrà assegnato al valore predefinito Volume, (numero di effetto 07).
Sensibilità Pitchbend
È possibile alterare la sensibilità della ruota Pitchbend assegnando l'effetto numero 128 alla ruota Modulation o allo slider Volume. In
questo modo è possibile alterare la gamma di pitchbend fino a un'ottava in su o in giù.
In caso di difficoltà tecniche
La Keystation 61es è stata progettata per funzionare con il MIDI sul computer nel modo più semplice possibile. Ciononostante, è
possibile che si verifichino alcune difficoltà. In molti casi, la tastiera non è guasta; il problema risiede nella periferica ricevente. Per evitare
questo problema, sono presenti due utili funzioni MIDI:
All Notes Off (Tutte le note spente)
Utilizzare questa funzione se si riscontrano note bloccate che non smettono di suonare.
Premere il pulsante Advanced Functions per portare la tastiera nella modalità di programmazione.
Premere il tasto nero sopra D3 (denominato D# 3), che rappresenta “ALL NOTES OFF.”
La modalità di programmazione si disattiva, eliminando qualsiasi nota bloccata.
Reset All Controllers (Reimposta tutti i controller)
Se si riscontra un effetto indesiderato su una voce, invece di tentare di scoprire di quale effetto si tratta, è possibile inviare un messaggio
MIDI “Reset All Controllers” per impostare tutti gli effetti a 0.
58
Page 60

Premere il pulsante Advanced Functions per portare la tastiera nella modalità di programmazione.
Premere il tasto nero sopra C3 (denominato C# 3), che rappresenta “RESET ALL CONTROLLERS.”
La modalità di programmazione si disattiva, eliminando tutti gli effetti.
Uscita MIDI
La porta MIDI Out è situata sul retro della tastiera e può essere utilizzata per connettere la tastiera a un modulo sonoro esterno o a una
tastiera MIDI. Come impostazione predefinita (quando si accende l'unità), tutti i dati del controller vengono inviati tramite l'uscita MIDI e
tramite l'uscita USB.
Se si desidera che l'uscita MIDI agisca come un'interfaccia tradizionale USB-MIDI, attivare la modalità “MIDI Out from USB (Uscita MIDI
da USB)” eseguendo le seguenti istruzioni:
Premere il pulsante Advanced Functions per portare la tastiera nella modalità di programmazione.
Premere il tasto nero sopra D2 (denominato D# 2), che rappresenta “MIDI OUT FROM USB.”
La modalità di programmazione si disattiva.
La tastiera è ora in grado di inviare e ricevere dati dal computer attraverso il jack MIDI OUT verso qualsiasi periferica connessa.
Per utilizzare l'uscita MIDI, selezionare Keystation 61es USB MIDI Out come dispositivo MIDI di uscita nel sequencer.
Risoluzione dei problemi
Nel caso si verifichino i seguenti problemi, seguire le seguenti semplici istruzioni:
L'hardware M-Audio smette improvvisamente di funzionare dopo un normale funzionamento successivo all'installazione.
Spegnere l'unità e lasciarla spenta per 10 secondi. Quindi riavviare il computer e riprovare. Se il problema persiste, potrebbe essere
necessario reinstallare i driver dell'unità.
È stato collegato il pedale sustain nella tastiera M-Audio, ma questo funziona in modo scorretto.
La polarità del pedale sustain viene determinata dalla tastiera al momento dell'accensione. All'accensione, si presume che il pedale
sustain si trovi nella posizione OFF. Quindi, se si desidera che il pedale sustain sia spento quando non è premuto, accertarsi che sia in
questa posizione al momento dell'accensione.
Quando si preme un tasto, è presente un ritardo prima di poter sentire qualsiasi suono.
Questo ritardo è noto come latenza ed è il risultato del softsynth che si utilizza. I dati MIDI sono semplicemente dati di controllo, che
vengono letti dal softsynth. Il softsynth esegue quindi un grande numero di calcoli complessi per la creazione del suono emesso: tale
operazione richiede tempo.
Si consiglia un'adeguata scheda audio. Fare riferimento a www.m-audio.com per una selezione di schede audio USB, PCI e Firewire.
Se invece si dispone di una scheda audio adeguata, provare a installare nuovamente i driver più recenti o ridurre le dimensioni dei
buffer dei driver audio.
Contattare M-Audio
M-AUDIO US
5795 Martin Rd.
Irwindale, Ca 91706
U.S.A
Informazioni vendite (e-mail): info@m-audio.com
Assistenza tecnica: 626-633-9055
Assistenza tecnica (e-mail): techsupt@m-audio.com
Home page Internet: http://www.m-audio.com
59
Page 61

Informazioni sulla garanzia
Effettuare la registrazione in linea della Keystation 61es (accedere a www.m-audio.com/register) per ricevere aggiornamenti di prodotto
GRATUITI e per partecipare all’estrazione di prodotti M-Audio. Così facendo, si ha immediatamente diritto alla completa copertura di
garanzia e si aiuta M-Audio a sviluppare e realizzare prodotti della migliore qualità possibile.
M-Audio garantisce che i prodotti sono esenti da difetti nei materiali e nella manodopera in condizioni di utilizzo normale e la garanzia è
valida a condizione che essi siano in possesso dell’utente originale registrato. Consultare la pagina informativa sulla garanzia nel sito web
di M-Audio (accedere a www.m-audio.com/warranty) per i termini e le limitazioni che si applicano specificamente alla Keystation 61es.
Informazioni tecniche
Attenzione: scariche elettrostatiche, rapidi transienti elettrici e interferenze causate da radiofrequenza possono causare
malfunzionamenti dell’unità. In tali circostanze, scollegare l’unità e collegarla nuovamente per ripristinare il funzionamento normale.
Nota: la Keystation 61es prodotta dalla M-AUDIO è conforme agli standard FCC PER L’USO DOMESTICO O PROFESSIONALE. Eventuali
modifiche non autorizzate dal costruttore potrebbero annullare l’autorizzazione all’uso del dispositivo.
Nota: questa apparecchiatura è stata provata e ritenuta conforme ai limiti dei dispositivi digitali di classe B, secondo la Parte 15 delle
normative FCC. Tali limiti sono stabiliti per fornire una ragionevole protezione contro le interferenze dannose nell’ambito delle
installazioni residenziali. Questa apparecchiatura genera, utilizza e può irradiare energia di radio frequenza e, se non installata e usata
secondo le istruzioni, potrebbe causare interferenze dannose alle comunicazioni radio. Tuttavia, non si garantisce l’assenza di
interferenze in una particolare installazione. Se questa apparecchiatura dovesse generare interferenze dannose alla ricezione radiotelevisiva, cosa che può essere determinata accendendola e spegnendola , si suggerisce all’utente di provare a correggere il problema
adottando una o più delle seguenti misure:
Riorientare o riposizionare l’antenna ricevente.
Aumentare la distanza tra l’apparecchiatura e il ricevitore.
Collegare l’apparecchiatura in una presa di corrente di un circuito diverso da quello in cui è collegato il ricevitore.
Rivolgersi al rivenditore o a un tecnico radio/ TV esperto per assistenza.
ASIO è un marchio di fabbrica di Steinberg Soft– und Hardware GmbH.
VST è un marchio di fabbrica di Steinberg Soft– und Hardware GmbH.
Keystation 61es
Tested to comply with
FCC standards
FOR HOME OR STUDIO USE
60
Page 62

Appendici - Dati MIDI utili
Appendice A - Strumenti generali MIDI
Piani
0 Pianoforte verticale
1 Pianoforte a coda
2 Pianoforte a coda
elettrico
3 Piano Honky
4 Piano Elettrico 1
5 Piano Elettrico 2
6 Clavicembalo
7 Clavinet
Strumenti a percussione
8 Celesta
9 Glockenspiel
10 Carillon
11 Vibrafono
12 Marimba
13 Xilofono
14 Campane tubolari
15 Dulcimer
Organi
16 Organetto
17 Organo a percussione
18 Organo Rock
19 Organo da chiesa
20 Organo a canne
21 Fisarmonica
22 Armonica
23 Fisarmonica da Tango
Chitarre
24 Acustica (corde in naylon)
25 Acustica (corde in acciaio)
26 Elettrica Jazz
27 Elettrica (suono neutro)
28 Elettrica (stoppata)
29 Con overdrive
30 Con distorsione
31 Armonica
Bassi
32 Basso acustico
33 Basso elettrico
Bassi pizzicati
34 Basso elettrico a plettro
35 Basso senza tasti
36 Basso sleppato 1
37 Basso sleppato 2
38 Basso sintetizzato 1
39 Basso sintetizzato 2
Strumenti a corde/Orchestra
40 Violino
41 Viola
42 Violoncello
43 Contrabbasso
44 Archi (effetto tremolo)
45 Archi (effetto pizzicato)
46 Arpa (orchestra)
47 Timpani
Composizioni
48 Insieme di archi 1
49 Insieme di archi 2 (lento)
50 Archi sintetizzati 1
51 Archi sintetizzati 2
52 Coro "Aah"
53 Voci "Ooh"
54 Coro sintetizzato
55 Colpo orchestrale
Ottoni
56 Tromba
57 Trombone
58 Tuba
59 Tromba con sordina
60 Corno francese
61 Insieme di trombe
62 Ottoni sintetizzati 1
63 Ottoni sintetizzati 2
Strumenti ad ancia
64 Sassofono soprano
65 Sassofono alto
66 Sassofono tenore
67 Sassofono baritono
68 Oboe
69 Corno inglese
70 Fagotto
71 Clarinetto
Strumenti a fiato
72 Sopranino
73 Flauto
74 Flauto dolce
75 Flauto di Pan
76 Soffio nella bottiglia
77 Shakuhachi
78 Zufolo
79 Ocarina
Sintetizzatori
(suoni guida)
80 Onda quadra
81 Onda a dente di sega
82 Sintetizzatore Calliope
83 Sintetizzatore Chiff
84 Sintetizzatore Charang
85 Sintetizzatore Voce
86 Sintetizzatore Quinte
Onda a dente di sega
87 Sintetizzatore Ottoni
e suono guida
Sintetizzatori
(suoni di ccompagnamento)
88 New Age
89 Warm
90 Polysynth
91 Coro
92 Archetti
93 Metallico
94 Alone
95 Sweep
Effetti sintetizzati
96 SFX Pioggia
97 SFX Colonna sonora
98 SFX Cristallo
99 SFX Atmosfera
100 SFX Luminosità
101 SFX Spiritello
102 SFX Eco
103 SFX Fantascienza
Strumenti etnici
104 Sitar
105 Banjo
106 Shamisen
107 Koto
108 Kalimba
109 Cornamusa
110 Violino
111 Shanai
Strumenti a percussione
112 Campanello
113 Agogo
114 Percussioni metalliche
115 Percussioni con legni
116 Percussioni Taiko
117 Tom melodico
118 Percussione sintetizzata
119 Cimbalo rovesciato
Effetti sonori
120 Rumore su chitarra
121 Rumore del respiro
122 Onde del mare
123 Cinguettio
124 Squillo del telefono
125 Elicottero
126 Applauso
127 Sparo
61
Page 63

Appendice B - Controller MIDI standard (MIDI CC’s)
00 Bank Select
01 Modulation
02 Breath Control
03 Controller 3
04 Foot Control
05 Porta Time
06 Data Entry
07 Channel Volume
08 Balance
09 Controller 9
10 Pan
11 Expression
12 Effects Controller 1
13 Effects Controller 2
14 Controller 14
15 Controller 15
16 Gen Purpose 1
17 Gen Purpose 2
18 Gen Purpose 3
19 Gen Purpose 4
20 Controller 20
21 Controller 21
22 Controller 22
23 Controller 23
24 Controller 24
25 Controller 25
26 Controller 26
27 Controller 27
28 Controller 28
29 Controller 29
30 Controller 30
31 Controller 31
32 Bank Select LSB
33 Modulation LSB
34 Breath Control LSB
35 Controller 35
36 Foot Control LSB
37 Porta Time LSB
38 Data Entry LSB
39 Channel Volume LSB
40 Balance LSB
41 Controller 41
42 Pan LSB
43 Expression LSB
44 Controller 44
45 Controller 45
46 Controller 46
47 Controller 47
48 Gen Purpose 1 LSB
49 Gen Purpose 2 LSB
50 Gen Purpose 3 LSB
51 Gen Purpose 4 LSB
52 Controller 52
53 Controller 53
54 Controller 54
55 Controller 55
56 Controller 56
57 Controller 57
58 Controller 58
59 Controller 59
60 Controller 60
61 Controller 61
62 Controller 62
63 Controller 63
64 Sustain Pedal
65 Portamento
66 Sostenuto
67 Soft Pedal
68 Legato Pedal
69 Hold 2
70 Sound Variation
71 Resonance
72 Release Time
73 Attack Time
74 Cut- off Frequency
75 Controller 75
76 Controller 76
77 Controller 77
78 Controller 78
79 Controller 79
80 Gen Purpose 5
81 Gen Purpose 6
82 Gen Purpose 7
83 Gen Purpose 8
84 Portamento Control
85 Controller 85
86 Controller 86
87 Controller 87
88 Controller 88
89 Controller 89
90 Controller 90
91 Reverb Depth
92 Tremelo Depth
93 Chorus Depth
94 Celeste (De- tune)
95 Phaser Depth
96 Data Increment
97 Data Decrement
98 Non- Reg Param LSB
99 Non- Reg Param MSB
100 Reg Param LSB
101 Reg Param MSB
102 Controller 102
103 Controller 103
104 Controller 104
105 Controller 105
106 Controller 106
107 Controller 107
108 Controller 108
109 Controller 109
110 Controller 110
111 Controller 111
112 Controller 112
113 Controller 113
114 Controller 114
115 Controller 115
116 Controller 116
117 Controller 117
118 Controller 118
119 Controller 119
Messaggi di canale
120 All Sound off
(tutti i suoni spenti)
121 Reset all Controllers
(reimposta tutti i controller)
122 Local Control
(controllo locale)
123 All Notes Off
(tutte le note spente)
124 Omni Off
125 Omni On
126 Mono On (Poly Off)
127 Poly On (Mono Off)
Messaggi suppplementari RPN
128 Pitch Bend sensitivity
129 Fine Tune
130 Coarse Tune
131 Channel Pressure
62
Page 64

日本語-
はじめに
M-AudioKeystation61es をお買い上げ頂き有難うございます。Keystation 61es は、簡単にコンピュータベースの音楽制作環境の統合を図
るようデザインされた、ベロシティーセンシティブのセミウェイテッド 61 鍵盤を装備した USB キーボードです。ピッチベンドホイール、モジュ
レーションホイール、アサイン可能なボタンとスライダを装備した Keystation61es は、多くの音楽教育・音楽制作用ソフトウェアに最適です。
Keystation61es は、MacOSX および WindowsXP 上で Plug&Play 操作をサポートしていますが、正しい操作法、高度な機能性、プログラ
ミングの仕方など本マニュアルを読んで習得されることをお勧めします。
特徴
端子:
■ MIDI 出力
■ USBMIDI 入出力
電源:
■ USB からの電源
■ 電源アダプタ(USB を使用しない場合)
鍵盤:
■ ベロシティーセンシティブのセミウェイテッド 61 鍵盤キーボード
■ ピッチベンドホイール
■ モジュレーションホイール
■ ボリューム / コントロールスライダ
■ サスティーンペダル入力(ペダル別売)
■ オクターブ+ / ボタン
■ プログラミング用のアドバンスドファンクションボタン
同梱内容
■ M-AudioKeystation61esUSB キーボードコントローラ
■ M-Audio ドライバ CD-ROM
■ USB ケーブル
■ PDF マニュアル(本書)
欠品 / 不良があった場合には、お手数ですがお買上げ頂いたエムオーディオ正規ディーラーまたはエムオーディオジャパンまでご連絡下さい。
本マニュアルについて
このマニュアルは、Keystation61esUSB キーボードの操作法について解説しています。他社の MIDI アプリケーションと使用する際のキーボー
ドの設定について詳しく解説しておりませんが、MIDI アプリケーションの多くは Keystation61es キーボードと正常にご使用頂けます。詳細
については MIDI アプリケーションのマニュアルをご覧下さい。
キーボードを接続する前に
Keystation61es は、USB バスパワーまたは電源アダプター(別売)で動作します。Keystation 61es は低パワーで動作しますので、USB バ
スパワーで使用する場合には電源アダプターは必要ではありません。Keystation61es をコンピュータに装備された USB 端子や外部電源を使
用する USB ハブに接続することを推奨致します。
63
Page 65

USB バスによる電源供給と接続
1. 背面の ON/OFF ボタンが OFF になっていることを確認して下さい。
2. 次に Keystation61es に附属の USB ケーブルをコンピュータの空いている USB 端子に接続します。
3. 最後に USB ケーブルのもう一方の端子を Keystation61es の USB 入力に接続します。
USB ケーブル 1 本での電源を供給するだけでなく、コンピュータとキーボードの間で MIDI データを送受信することもできます。
外部電源を使用する場合:
本製品では、電源アダプタ「別売 /DC9V,500mA, センタープラス(+)」を使用することもできます。電源アダプタを使用する場合は、USB
から電源を取らないようにして DC 電源アダプタ入力コネクタに電源アダプタのコードを差し込んで、電源オン/オフスイッチをオンにして下
さい。
注意:Keystation61es を長時間使用しない場合は、アダプタをコンセントから抜いて下さい。
WindowsXP と MacOSX
WindowsXP または MacOSX をご使用の場合は、USB ケーブルを接続したら電源オン/オフスイッチをオンにします。Keystation61es は
クラスコンプライアント * なので、特にドライバなどをインストールする必要はありません。(*Class compliant:Windows XP や MacOSX
の場合、ドライバをインストールしなくても動作する機器。Keystation61es は、USBMIDI クラスに対応しています。)
その他のオペレーティングシステム
MacOSX または WindowsXP 以外のオペレーティングシステムをご使用の場合は、最新ドライバの有無を弊社 Web サイト(www.m-audio.
co.jp)で確認して下さい。
AppleMacintoshOS9.x でのドライバインストール方法
OMS がインストールされていない場合は、まず OMS インストーラを実行して下さい。OMS のインストールが完了している場合は、「Keystation
61esOMS ドライバインストール方法」に進んで下さい。
OMS のインストール
インストーラを開始する前に、他のプログラムが全て終了していることを確認して下さい。また、ドングル(コピー保護機器)をご使用の場合
は外して下さい。
1. ドライバ CD-ROM を CD-ROM ドライブに挿入します。
2. デスクトップ上でドライバ CD-ROM アイコンをダブルクリックします。
3. OS9 フォルダをダブルクリックします。
4. InstallOMS2.3.8 をダブルクリックします。
5. 画面上の指示に従ってインストールを行います。
6. インストールが完了すると Macintosh を再起動するダイアログボックスが表示されます。ここで[Restart]をクリックします。
Keystation61esOMS ドライバインストール方法
1. OS9 ウインドウ内の USBDriversInstaller をドラッグしてデスクトップに移動します。
2. アイコンをダブルクリックします。ウインドウが表示されたら[Open]をクリックします。
3. デスクトップ上に新たに作成された USBDriversInstaller をダブルクリックします。
4.[Install]をクリックします。ドライバは自動的にシステムフォルダの正しい場所にインストールされます。
5. ドライバのインストールが完了したら[Restart]をクリックします。
6. Keystation61es の電源オン/オフスイッチをオン ON にします。
64
Page 66

OMS セットアップ
OMS セットアッププログラムを起動します。
1. セットアップを開始する前に AppleTalk が OFF になっていることを確認して下さい。(セレクタで選択できます)
2. Opcode フォルダ> OMSApplications フォルダ> OMSSetup フォルダの順に開きます。
3. OMS が未設定であることを知らせるダイアログが表示されます。「OK」をクリックします。
4.「CreateaNewStudioSetup」ダイアログが表示されます。「OK」をクリックします。
5.「OMS Driver Search」ダイアログで、Keystation 61es を接続した端子を選択するための画面(モデムやプリンタ)が表示されます。端
子を選択せずに「Search」をクリックすると OMS が検索を開始します。
重要:USB ケーブルが正しく Keystation61es に接続されていない場合セットアップは失敗します。
6. OMS がドライバの検出に成功した場合、「OMSDriverSetup」ダイアログに Keystation61es がリストアップされます。「OK」をクリッ
クすると OMS は Keystation61es を定義します。
7.「OMSMIDIDeviceSetup」ダイアログに Keystation61es 用の出力端子が表示されます(空白のチェックボックスが左に表示されます)。
チェックボックスをクリックして出力端子を有効にし「OK」をクリックします。
8. 次に「Studio Setup」ダイアログが表示され、その上に設定ファイルを保存するダイアログが表示されます。スタジオセットアップにファ
イル名を付けて(またはデフォルト名称のままで)、「保存」をクリックします。その後に、インストゥルメントを Keystation 61es の
MIDI 端子にアサインしたい場合は行って下さい。
Windows98 または WindowsME でのドライバインストール方法
1. コンピュータを起動します。
2. Keystation61es インストーラ CD-ROM をコンピュータの CD ドライブに挿入します。インストーラの画面が自動的に表示されます。表
示されない場合は、[スタート]メニューから[ファイル名を指定して実行]を選択し、d:¥setup.exe と入力(CD-ROM ドライブが D ド
ライブの場合)して Enter キーを押します。
3.「installdrivers」をクリックします。
4. 画面上の指示に従ってインストールを行います。
5. インストールが完了したらセットアップを終了します。
6. Keystation61es の電源オン/オフスイッチをオンにします。USB ドライバと MIDI ドライバのインストールが完了し Keystation61es を
使用する準備ができました。既に Keystation 61es のデバイスドライバがインストールされている場合には、コンピュータを再起動するか
どうかの確認メッセージが表示されます。
Windows2000 でのドライバインストール方法
1. コンピュータの電源を入れます。
2. ドライバ CD-ROM をコンピュータの CD ドライブに挿入します。インストーラの画面が自動的に表示されます。表示されない場合は、[スター
ト]メニューから[ファイル名を指定して実行]を選択し、d:¥setup.exe と入力(ドライブ D がの場合)して Enter キーを押します。
3.「installdrivers」をクリックします。
4. 画面上の指示に従ってインストールを行います。
5. インストールが完了したらセットアップを終了します。
6. Keystation61es の電源オン/オフスイッチをオンにします。キーボードは自動的に認識され、ドライバ CD-ROM を挿入するようメッセー
ジが表示されます。
7. CD-ROM ドライブを選択し「OK」をクリックします。MIDI ドライバのドライブを選択するようにダイアログが表示されます。
8. ドライバがデジタル署名されていないというメッセージが表示された場合は、[ContinuousInstallation]をクリックします。
9. 再度ドライブを選択します。
10.[OK]をクリックします。これで、Keystation61es を使用する準備ができました。
基本操作
ドライバのインストール作業を完了した後に MIDI アプリケーションの設定をする必要があります。インストール作業を完了した後に鍵盤を押し
ても音は出ません。鍵盤を押すと Keystation 61es からは MIDI データのみが送信されるからです。MIDI データはどのような音が演奏されるの
かについての指示を与えますが、実際にその音を聴くには、Keystation61es から送られてくる MIDI データを読みこんで指示通りにその音を
演奏するように MIDI アプリケーションを設定する必要があります。この設定には、一般に、MIDI アプリケーションのオプションメニューやデ
バイス設定メニューにおいて適当な機器を選択することが必要になります。Keystation61es は、WindowsXP では MIDI アプリケーションの
「USB オーディオデバイス」の内に表示され、その他のオペレーティングシステムでは、音楽アプリケーションの MIDI デバイスセクションの中
の「Keystation61es」として表示されます。正しい設定作業については、MIDI アプリケーションのマニュアルをご参照下さい。
65
Page 67

鍵盤名称について
Keystation61es の白鍵盤には、それぞれアルファベットの文字と数字の番号が表示されています。アルファベット文字はノート(音符)を番
号はオクターブを示しています。(オクターブの概念については次の項で解説しています)
黒の鍵盤には表記がありませんが、それぞれ名称はあります。(例えば、黒鍵盤には F#4 や Eb2 などと言う名称があります)
黒鍵盤の名称に # 記号が付いている場合は、同じアルファベット名の白鍵盤のすぐ右の鍵盤をさします。例えば、F#3 は(白鍵盤)F3 の右の
黒鍵盤です。黒鍵盤の名称に b 記号が付いている場合は、同じアルファベット名の白鍵盤のすぐ左の鍵盤をさします。例えば、Eb3 は(白鍵盤)
E3 の左の黒鍵盤です。この結果、C3 と D3 の間の黒鍵盤は C#3 と Db3 の二通りの名称があります。
オクターブボタン
1 オクターブは 12 ノートから構成されます。Keystation 61es キーボードでは、各オクターブが C 音から始まる白黒表示で明確に示してあり
ます。各オクターブには番号がついてます。
オクターブ「+」ボタンを一回押すと、オクターブ「」ボタンの上のランプが消えキーボードが現在1オクターブ高い状態であることを示します。
再びオクターブ「+」ボタンを押すと、キーボードは2オクターブ高い状態になります。以後、同様にシフトアップします。キーボードはオクター
ブシフト「0」の状態から、それぞれ最高 3 オクターブ高くしたり下げることができます。オクターブを下げるには、オクターブ「」ボタン
を押します。
キーボードのオクターブシフトを「0」の状態に戻すには、オクターブ「+」ボタンとオクターブ「」ボタンを同時に押します。LED が両方
とも点灯して、オクターブシフトが「0」に戻ったことを示します。(もし、オクターブ「-」ボタンの上の LED のみが点灯している場合は、ま
だ0設定より低いオクターブであることを示します。オクターブ「+」ボタンの上の LED のみが点灯している場合は、0設定より高いオクター
ブを示します。
ピッチベンドホイール
ピッチベンドホイールは、キーボードで弾いたノートのピッチ(音程)を上下に変化するのに使います。これを使用すると、一般のキーボード
演奏では見られないギタースタイルのリフ等のフレーズを演奏する事ができます。
ノートの変化の幅は音源によって異なります。一般的な設定は2セミトーン(半音)ですが最大上下2オクターブまで設定できます。
モジュレーションホイール
モジュレーションホイールは、演奏中の音声のモジュレーションを行うのに用います。この種のリアルタイムコントローラは、元々電子キーボー
ド楽器で、アコースティック楽器の演奏者と同様のビブラートなどのオプションを提供するために導入されました。
ピッチベンドホイールと同様に、モジュレーションホイールは完全に MIDI アサイン可能です。
ボリュームスライダ
ボリュームスライダは演奏されるノートのボリューム(音量)をコントロールするための MIDI メッセージを送り出します。
ボリュームスライダに、パン(バランス)、アタック、リバーブ、コーラス、その他多くのエフェクトをアサインすることもできます。(詳しくは「ア
ドバンスドファンクション」の項をご参照下さい)
フットペダルを使用する
キーボードに装備されているフットスイッチ入力には、いかなる極性のフットペダル(別売)でも接続することができます。キーボードが電源
ON 時に自動的に正しい極性を検知します。極性を逆にしたい場合は、ペダルを押した状態でキーボードの電源を入れて下さい。
一般的に、ペダルはピアノと同様に演奏中の音をキーボード上で押さえなくてもサスティーンする時に用います。
66
Page 68

アドバンスドファンクション(AdvancedFunction)ボタン
鍵盤の左側の「AdvancedFunctions」ボタンを使って他のアドバンスド機能が利用できます。
このボタンを押すとキーボードは編集モードになり、キーボード上の鍵盤を使って機能の選択やデータ入力ができます。
AdvancedFunctions ボタン上のランプが点灯しているときは、キーボードが編集モード中であることを示します。編集モードでは、キーボー
ドの黒鍵盤は機能を選択するのに使い、白鍵盤はデータ入力と MIDI チャンネル選択に使います。
機能を選択し終わるか、CANCEL 鍵盤または ENTER 鍵盤を押すと、編集モードは終了します。(AdvancedFunctions ボタン上のランプが消
えます)すると、キーボードは通常の演奏モードに戻ります。
次に編集モード中のキーボードの各鍵盤の役割を示してあります。
アドバンスドファンクション
オクターブ「+」「」ボタンは、初期設定オクターブシフトが行えるように設定されています。このボタンで、オクターブシフト設定以外にも
5種類の MIDI 機能をコントロールすることもできます。
上図に示すように、最初の6つの黒鍵盤は「DATA=」と表記されています。これらの鍵盤でオクターブボタンの機能が選択できます。選
択できる機能には、マイナスの値を送信しないものもあります。この場合、ボタン上の LED は両方とも点灯したままの状態になります。
ボタンの機能を選択するには:
■ AdvancedFunctions ボタンを押してキーボードを編集モードにします。
■ 該当する黒鍵盤を押します。黒鍵盤を押すと編集モードは終了します。
オクターブボタンでは、以下の機能をコントロールすることができます。
オクターブシフト
オクターブ「+」「-」キー
オクターブをシフトする方法は 2 通りあります。最初の方法は、「オクターブ」の項ですでに解説したオクターブ「+」「」ボタンを使う方法です。
「+」「」ボタンをオクターブコントロール用にアサインするには:
■ AdvancedFunctions ボタンを押して、キーボードを編集モードにします。
■「DATA=OCTAVE」を表す C1 の右の黒鍵盤(C#1)を押します。(C#1 を押すと、編集モードは終了します)
67
Page 69

2 番目の方法では、素早くオクターブを変更することができます。これはオクターブボタンを別の MIDI 機能のコントロールに用いている場合に
便利です。
■ AdvancedFunctions ボタンを押してキーボードを編集モードにします。
■「OCTAVE +」を表す、B2 の左の黒鍵盤(Bb2)を押すと1オクターブだけ上がります。再び押すと2オクターブ高くなるという具合に、
オクターブを上げていくことができます。
■「OCTAVE 」を表す、F2 の右の黒鍵盤(F#2)を押すと1オクターブだけ下がります。再び押すと2オクターブ下がるという具合に、オクター
ブを下げていくことができます。
■「OCTAVE0」を表す、G2 の右の黒鍵盤(G#2)を押すとオクターブシフト設定が0にリセットされます。オクターブシフトの選択が終わっ
たら「ENTER」を表す C5 を押して編集モードを終了します。
トランスポーズ
1オクターブ上下するよりも、数セミトーンだけピッチを上下させたい場合もあります。例えば、ある曲をボーカリストと演奏していて、最も
高い音程の発声ができない場合などです。こうした場合には、ピッチを1〜2セミトーンだけ下げると上手くいくかもしれません。*これは、ト
ランスポーズという MIDI 機能で行います。
トランスポーズは、シフト幅が 12 であるという点を除けば、上記のオクターブシフトと同様の操作をします。オクターブシフトと同様、トラ
ンスポーズにも2通りの方法があります。オクターブ「+」「」ボタンを使うか、または、黒鍵盤 F# 3、G# 3、Bb3 を用います。黒鍵盤はそ
れぞれ「TRANSPOSE-」「TRANSPOSE0」と「TRANSPOSE+」を表しています。
オクターブ「+」「」ボタンにトランスポーズ機能をアサインするには:
■ AdvancedFunctions ボタンを押してキーボードを編集モードにします。
■「DATA=TRANSPOSE」を表す、D1 の右の黒鍵盤(D#1)を押します。(D#1 を押すと、編集モードは終了します)
■「+」ボタンを押すと演奏中のノートのピッチが高くなるのがわかります。
■ トランスポーズをキャンセルするには「+」「」ボタンを同時に押します。
* 1 セミトーンは隣接する2ノート間のピッチの違いを表します。2セミトーン変えるということは、そのノートを2ノート分だけ高く演奏す
るのと同じ事です。
MIDI チャンネル
キーボードからは MIDI データを MIDI チャンネル 16 系統のいずれでも送信することができます。しかし、MIDI 機器や MIDI ソフトウェアによっ
ては、特定のチャンネルで送ることが要求される場合があります。この場合、データ送信チャンネルを以下のように変更できます。
■ AdvancedFunctions ボタンを押して、キーボードを編集モードにします。
■ 16 系統のチャンネルを表す鍵盤 D1 〜 E3 の内、いずれか該当するものを押します。
例えば、10 チャンネルでデータ送信しなければならない外部機器を接続する場合、Advanced Functions ボタンを押して、F2 の鍵盤を押して
10 チャンネルを選択します。
オクターブ「+」「」ボタンを使ってチャンネルを選択することもできます。この場合、「+」「」ボタンを使ってチャンネルを 1 つずつ上げ
下げします。16 チャンネルが設定された状態でオクターブ「+」ボタンを押すと 1 チャンネルが選択されます。チャンネル選択にオクターブ「+」
と 1 チャンネルが選択されます。
プログラムチェンジ
プログラムチェンジは、楽器またはボイスを変更するときに使います。一例として、楽器をベース音に変えてみましょう。これには、General
MIDIInstruments リスト(Appendix 参照)からアコースティックベースを選択するプログラムチェンジ 32 を送信します。プログラムチェン
ジを送信するには2通りの方法があります。
1.インクリメンタル / デクリメンタル(+ 1/ 1)式プログラムチェンジ:
■ AdvancedFunctions ボタンを押します。
■ F1 の右の黒鍵盤(F#1)を押します。
■ これでオクターブ「+」「」ボタンを使ってプログラムチェンジできます。
■ 鍵盤を弾きながら、望みの楽器が見つかるまで「+」ボタンを押します。
68
Page 70

2.直接選択式プログラムチェンジ:
■ AdvancedFunctions ボタンを押します。
■「PROGRAM」を表す、F4 の右の黒鍵盤(F#4)を押します。
■ 鍵盤 C4、E3、C5 を順次押します。これによって、「3」「2」「ENTER」が入力されます。あるいは、「+」「」ボタンを使って数値を変えてから、
「ENTER」を押します。これでキーボードは(GeneralMIDIInstruments 標準リストの)GM ベース音 32 を演奏するように設定されました。
1 の方法は、ある曲にどのサウンドが最も適しているか楽器を次々と代えながら聴いて選ぶ際に便利です。2 の方法は、この例の場合のように
特定の番号を選択する場合に便利です。
オクターブ「+」「」ボタンを使ってプログラムチェンジする場合、(マイナスのプログラム番号はないので)ボタン上のランプの点灯表示は変
わりません。「+」「」ボタンを同時に押すと、グランドピアノ音に相当するプログラム 0 が選択されます。
プログラムチェンジで選択できる全楽器の一覧表は本マニュアル末の付録に掲載されています。
バンクセレクト LSB とバンクセレクト MSB
プログラムチェンジは、楽器またはボイスを変更するのに最もよく使われるメッセージです。しかし、プログラムチェンジでアクセスできる楽
器の数は 128 と限られています。機器によっては 128 以上のボイスを内蔵したものもあり、それらのボイスにアクセスするには異なった方法
を要します。一般的にこうした機器では、バンク LSB とバンク MSB のメッセージを用います。
1.インクリメンタル / デクリメンタル(+ 1/ 1)式バンク LSB/ バンク MSB チェンジ:
■ AdvancedFunctions ボタンを押します。
■ G1 の右の黒鍵盤(G#1)を押します。
■ これでオクターブ「+」「」ボタンを使ってプログラムチェンジできます。
■ 鍵盤を弾きながら望みの楽器が見つかるまで「+」ボタンを押します。
2.直接選択法
■ AdvancedFunctions ボタンを押します。
■「BANKLSB」を表す G4 の右の黒鍵盤(G#4)、または「BANKMSB」を表す A4 の右の黒鍵盤(A#4)を押します。
■ 鍵盤 C4、E3、C5 を順次押します。これによって、「3」「2」「ENTER」が入力されます。
あるいは、「+」「」ボタンを使って数値を変えてから、「ENTER」を押します。
プログラムチェンジと同様、オクターブ「+」「」ボタンを使って「バンクセレクト LSB」または「バンクセレクト MSB」の番号を変更する場合(方
法1)、(マイナスのバンク番号はないので)ボタン上のランプの点灯表示は変わりません。「+」「」ボタンを同時に押すとバンク 0 が選択されます。
モジュレーションホイール
MIDI エフェクトをモジュレーションホイールにアサインすることができます。一般的なエフェクトとして次のようなものがあります。
■ 01モジュレーション
■ 07ボリューム
■ 10パン(バランス)
■ 05ポルタメント
全部で 131 種類のエフェクトがあります。これらのエフェクトを音声に実際にかけるには、MIDI エフェクトメッセージを受信する MIDI 機器が
これを読み込み実行できなければなりません。多くの機器では少なくとも、ボリューム、モジュレーション、パンは実行可能です。(全エフェク
トの一覧表は本マニュアル末に掲載してあります)
モジュレーションホイールに MIDI エフェクトをアサインする方法:
■ AdvancedFunctions ボタンを押して、キーボードを編集モードにします。
■「WHEELASSIGN」を表す C4 の右の黒鍵盤(C#4)を押します。
■ 数値データ入力鍵盤 G3 〜 B4 を使い、モジュレーションホイールにアサインしたいエフェクトの番号を入力します。
69
Page 71

あるいは、「+」「」ボタンを使って番号を変えることもできます。
■「ENTER」鍵盤(C5)を押します。
■ エフェクトを強くするにはモジュレーションホイールを上に(リアパネル方向に)動かします。
数値データを入力する際に間違った場合は、「CANCEL」鍵盤(C1)を押して編集モードを終了できます。この場合、モジュレーションホイー
ルにアサインされていたエフェクトは変わりません。
キーボードの電源を OFF にすると、モジュレーションホイールにアサインされたデータは失われます。キーボードの電源を ON にすると、モジュ
レーションホイールには初期値としてモジュレーション(エフェクト番号 01)がアサインされます。
一例として、モジュレーションホイールにエフェクト番号 10(パンまたはバランス)をアサインしてみましょう。
■ AdvancedFunctions ボタンを押して、キーボードを編集モードにします。
■「WHEELASSIGN」を表す、C4 の右の黒鍵盤(C#4)を押します。
■ A3 を押して「1」を入力します。
■ G3 を押して「0」を入力すると「10」を入力したことになります。
■ C5 を押して「ENTER」を入力します。
ボリュームスライダ
モジュレーションホイールと同様に、ボリュームスライダには本マニュアル末に掲載してある 131 種類のエフェクトのいずれでもアサインする
ことができます。
ボリュームスライダにエフェクトをアサインする方法:
■ AdvancedFunctions ボタンを押して、キーボードを編集モードにします。
■「SLIDERASSIGN」を表す D4 の右の黒鍵盤(C#4)を押します。
■ 数値データ入力鍵盤 G3 〜 B4 を使い、ボリュームスライダにアサインしたいエフェクトの番号を入力します。
あるいは、「+」「」ボタンを使って番号を変えることもできます。
■「ENTER」鍵盤(C5)を押します。
■ エフェクトを強くするにはボリュームスライダを上(リアパネルの方向)に動かします。
数値データを入力する際に間違った場合は、「CANCEL」鍵盤(C1)を押して編集モードを終了できます。この場合、ボリュームスライダにア
サインされているエフェクトは変わりません。
キーボードの電源を OFF にすると、ボリュームスライダにアサインされたデータは失われます。キーボードの電源を ON にすると、ボリューム
スライダには初期値としてボリューム(エフェクト番号 07)がアサインされます。
ピッチベンドセンシティビティ
モジュレーションホイールまたはボリュームスライダにエフェクト番号 128 をアサインすると、ピッチベンドホイールのセンシティビティを変
えることができます。これにより、ピッチベンド幅を上下に最大1オクターブまで変えることができます。
MIDI の問題が発生した場合
Keystation 61es は、コンピュータでの MIDI 作業を簡単にできるように設計されています。しかし、時には作業がうまく行かない場合も起こり得
ます。多くの場合、キーボードに原因があるのではなく受信 MIDI 機器の方に問題があります。こうした時に役立つ MIDI 機能が2種類あります。
オールノートオフ
鳴り止まないノートがある場合に「オールノートオフ」の MIDI メッセージを以下のように送信します。
■ AdvancedFunctions ボタンを押してキーボードを編集モードにします。
■「ALLNOTESOFF」を表す D3 の右の黒鍵盤(D#3)を押します。
■ 編集モードは終了しノートは鳴り止みます。
70
Page 72

リセットオールコントローラ
ボイスに望ましくないエフェクトがかかっている場合に、それが何のエフェクトかわからなくても「リセットオールコントローラ」MIDI メッセー
ジを送信して全てのエフェクトを0にリセットできます。
■ AdvancedFunctions ボタンを押して、キーボードを編集モードにします。
■「RESETALLCONTROLLERS」を表す、C3 の右の黒鍵盤(C#3)を押します。
■ 編集モードは終了しボイスのエフェクトは消えます。
MIDI 出力
キーボードの背面には MIDI 出力端子があり、外部サウンドモジュールまた MIDI キーボードに接続できます。全てのコントローラデータは
USB 出力とともに MIDI 出力からも送信されるように、(電源を入れた時点で)初期設定されています。
MIDI 出力を従来の USB-MIDI インターフェースとしてお使いになりたい場合は、次の手順で「USB から MIDI 出力」モードに切り替えて下さい。
■ AdvancedFunctions ボタンを押してキーボードを編集モードにします。
■「MIDIOUTFROMUSB」を表す D2 の右の黒鍵盤(D#2)を押します。
■ 編集モードは終了します。
■ これで、キーボードがコンピュータから受けたデータを MIDI 出力端子から接続された機器に出力できます。
MIDI 出力にシーケンサーを接続する場合は、シーケンサーで Keystation61esUSBMIDI 出力を MIDI 出力機器として選択する必要があります。
トラブルシューティング
ご使用中に次のようなトラブルが生じた場合は、記載された指示に従って操作して下さい。
問題 1:インストール後は適切に動作していたのに突然動作しなくなった。
解決 1:電源を切って 10 秒間置いて下さい。その後、コンピュータを再起動して再度お試し下さい。それでも解決しない場合は、ドライバを
再インストールする必要があるかもしれません。
問題 2:サスティーンフットペダルをキーボードに接続したが逆操作になっている。
解決 2:サスティーンフットペダルの極性は、キーボードの電源が入った段階で検知されます。電源 ON 時に、サスティーンフットペダルは
OFF の位置になっているとみなされます。従って、サスティーンフットペダルを押さえてない状態を OFF に設定したい場合は、フットペダル
が押さえられていないことを確認してから電源を入れて下さい。
問題 3:鍵盤を押してから音が鳴るまでに時間のずれがある。
解決 3:この遅れはレイテンシーと呼ばれています。MIDI 信号のレイテンシーはご使用のソフトシンセに原因しています。MIDI データはコン
トロールデータにすぎません。MIDI はソフトシンセによって読み取られます。それから、ソフトシンセは実際の音を造り出すために複雑な計算
を数多く実行します。この処理には時間がかかります。
高品位のサウンドカードをご使用になる事を強くお勧めします。USB、PCI、Firewire 対応のオーディオカードについては、http://www.
m-audio.co.jp にて参照下さい。既に高性能のオーディオカードをお使いの場合は、最新バージョンのドライバを再インストールするか、オーディ
オドライバのバッファーサイズを小さくしてお試し下さい。
71
Page 73

M-Audio へのお問い合わせ
本製品に関するサポートやドライバ等については、M-AUDIOJapan のウェブサイト http://www.m-audio.co.jp のサポートセクションをご覧
下さい。本製品や他の M-Audio 製品に関するご質問、ご意見等は下記までご連絡頂くようお願い申し上げます。
製品保証について
1.)本製品および本ユーザーズガイドは、株式会社エムオーディオジャパンの著作物です。従って、株式会社エムオーディオジャパンの書面による承諾が
ない限り、目的や形式の如何に関わらず、本書の一部、または全てを記録、複製、他の言語に翻訳することは法律で禁じられています。2.)株式会社エムオー
ディオジャパンは、信頼 性・機 能・デザインを改良するために、本製品及び、本ユーザ ーズ ガイドを予告なしに変 更する権 利を保有します。3.)本ソフト
ウェアプログラムに含まれる著作物等の知的財産権は、お客様へ移転されません。従って、本ソフトウェアプログラムのソースコードについては、いかなる
場合にもお客 様への開示・使用許諾を致しません。また、ソースコードを解明するために本ソフトウェアプログラムを解析し、逆アセンブル・逆コンパイル 、
またはその他のリバースエンジニアリングを行うことを禁止します。4.)Keystation 61es は精密機器です。本製品の操作または使用、ソフトウェアまたは
関連文書に含まれているエラーまたは障害、サービスの中断、業務または予期利益の損失または中断、ソフトウェアおよび関連文書の提供、実行、使用によっ
て生じた付随的または間接的な障害について、株式会社エムオーディオジャパンは一切責任を負わないものとします。
安全上のご注意:
1.)静電気による電子部品の破損を防ぐため、パッケージから取り出す段階から慎重に扱って下さい。また、Keystation61es に触る前に必ずコ
ンピュータのアースされた金属部分に触り、身体、衣服等に帯電した静電気を逃がすようにして下さい。この作業を怠ると、Keystation61es に
ダメージを与える恐れがあります。2.)Keystation61es 本体内に取り付けられている電子部品・基板の配線パターン、USB 端子部分に無理な
力を加えたり、部品を分解したりしないで下さい。感電、火災、故障などの原因になります。3.)Keystation61es を他の機器と接続する場合は、
すべての機器の電源を切ってから行って下さい。また、電源を入 / 切する場合には、必ず機器のボリュームを最小にしてから行って下さい。感電、
機器の破損の原因になります。4.)次のような場所での使用や保存はしないで下さい。:温度が極端に高い場所(直射日光の当たる場所、暖房機
器の近く、発熱する機器の近くなど)、水気の近くや湿度の高い場所・ホコリの多い場所・振動の多い場所
製品保証について:
安全上のご注意に基づいて適切に使用されている場合には、本製品をお買い上げ頂いた日より一年間は保障期間となり修理は無償で行います。しかし な が
ら不適切な使用方法による破損や、保証書に購入店での手続きが無い場合には製品保証は無効になります。日本国内保証書は、必ずお求めになった販売
店で所定の手続きを行った後、大切に保管して下さい。修理に関しては、原則として日本国内保証書を同封の上、株式会社エムオーディオジャパン・カス
タマーサポートへの送付が前提です。送付される場合には、発送時の費用はお客様が負担、修理後の返送費用は弊社負担とさせて頂きます。
M-AUDIOUS.
5795MartinRoad,Irwindale,CA91706-6211,U.S.A.
SalesInformation: 626-633-9050
SalesInformation(email): info@m-audio.com
TechSupport: 626-633-9055
TechSupport(email): techsupt@m-audio.com
Fax: 626-633-9060
InternetHomePage: http://www.m-audio.com
M-AUDIOU.K.
Unit5, Saracen Industrial Estate,Mark Road, Hemel Hempstead,HertsHP2 7BJ,
England
SalesInformation(phone): 44(0)1442-416590
SalesInformation(fax): 44(0)1442-246832
SalesInformation(email): info@maudio.co.uk
TechnicalSupport(PC): 44(0)1309-671301
TechnicalSupport(Mac): 44(0)1765-650072
TechnicalSupport(email): richard@maudio.freeserve.co.uk
M-AUDIOFrance
Unit5, Saracen Industrial Estate,Mark Road, Hemel Hempstead,HertsHP2 7BJ,
England
SalesInformation: 0810-001-105
SalesInformation(email): info@m-audio-france.com
TechnicalSupport: 082-000-731
TechnicalSupport(email): support@m-audio-france.com
Fax: 44(0)1442-246832
InternetHomePage: http://www.m-audio.com
M-AUDIODeutschland(Germany)
Kuhallmand34,D-74613Ohringen,Germany
SalesInformation: 49-7941-98-7000
SalesInformation(email): info@m-audio.de
TechnicalSupport: 49-7941-98-70030
TechnicalSupport(email): support@m-audio.de
Fax: 0-7941-98-70070
InternetHomePage: http://www.m-audio.de
M-AUDIOCanada
1400St-JeanBaptisteAve.#150,QuebecCity,QCG2E5B7,Canada
Tel: 418-872-0444
Fax: 418-872-0034
Email: midimancanada@m-audio.com
InternetHomePage: http://www.m-audio.com
M-AUDIOJapan
460-0002愛知県名古屋市中区丸の内 2-18-10丸の内アネクス 6F
SalesInformation(email): info@m-audio.co.jp
TechnicalSupport: 052-218-0859
TechnicalSupport(PC/email): win-support@m-audio.co.jp
TechnicalSupport(Mac/email): mac-support@m-audio.co.jp
Fax: 052-218-0875
InternetHomePage: http://www.m-audio.co.jp
72
Page 74

Keystation61es
Testedtocomplywith
FCCstandards
FORHOMEORSTUDIO
ユーザー登録について:
ユーザー登録を行わなければ製品保証や技術的なサポートを受けることができません。ユーザー登録を行うには、次の 3 つの方法があります。環境に合
わせた方法でユーザー登録を行って下さい。1.)コンピュータで(一般的な Web ブラウザ)エムオーディオジャパン Web サイトへアクセスできる方:エ
ムオーディオジャパンオンラインユーザー登録ページ http://www.m-audio.co.jp/register/index.html にて、必要事項を入力して送信して頂ければ弊
社製品のユーザーとして御登録致します。尚、ユーザー登録完了の御案内は行っておりませんのでご了承下さい。2.)携帯電話でエムオーディオジャパ
ン Web サイトへアクセスできる方:エムオーディオジャパン モバイルサイトのオンラインユーザー登録ページ http://www.m-audio.co.jp/
mobile/ にて、必要事項を入力して送信して頂ければ弊社製品のユーザーとして御登録致します。尚、ユーザー登録完了の御案内は行ってお
りませんのでご了承下さい。3.)インターネット接続環境が無い方:付属の「ユーザー登録はがき」に必要事項を記入して返信して頂ければ、
弊社製品のユーザーとして御登録致します。尚、ユーザー登録完了の御案内は行っておりませんのでご了承下さい。
73
Page 75

参考 MIDI データ
付録 A:GeneralMIDIInstruments
Piano Bass Reed SynthEffects
0AcousticGrandPiano 32AcousticBass 64SopranoSax
96SFXRain
1BrightAcousticPiano 33ElectricFingeredBass 65AltoSax
97SFXSoundtrack
2ElectricgrandPiano 34ElectricPickedBass 66TenorSax
98SFXCrystal
3HonkyTonkPiano 35FrelessBass 67BaritoneSax
99SFXAtmosphere
4ElectricPiano1 36SlapBass1 68Oboe
100SFXBrightness
5ElectricPiano2 37SlapBass2 69EnglishHorn
101SFXGobkins
6Harpsichord 38SynBass1 70Bassoon
102SFXEchoes
7Clavinet 39SynBass2 71Clarinet
103SFXSci-Fi
ChromaticPercussion Strings/Orchestra Pipe Ethnic
8Celesta 40Violin 72Piccolo
104Sitar
9Glockenspiel 41Viola 73Flute
105Banjo
10MusicBox 42Cello 74Recorder
106Shamisen
11Vibraphone 43Contrabass 75PanFlute
107Koto
12Marimba 44TremoloSrings 76BottleBlow
108Kalimba
13Xylophone 45PizzicatoStrings 77Shakuhachi
109BagPipe
14Tubularbells 46OrchestralHarp 78Whistle
110Fiddle
15Dulcimer 47Timpani 79Ocarina
111Shanai
Organ Ensemble SynthLead Percussive
16DrawbarOrgan 48StringEnsemble1 80SynSquareWave
112TinkleBell
17PercussiveOrgan 49StringEnsemble2 81SynSawtoothWave
113Agogo
18RockOrgan 50SynStrings1 82SynCalliope
114SteelDrums
19ChurchOrgan 51SynStrings2 83SynChiff
115Woodblock
20ReedOrgan 52ChoirAahs 84SynCharang
116TaikoDrum
21Accordion 53VoiceOohs 85SynVoice
117MelodicTom
22Harmonica 54SynChoir 86SynFifthsSawtoothWave
118SynDrum
23TangoAccordion 55OrchestralHit 87SynBrass&Lead
119ReverseCymbal
Guitar Brass SynthPad SoundEffects
24NylonAcoustic 56Trumpet 88NewAgeSynPad
120GuitarFretNoise
25SteelAcoustic 57Trombone 89QarmSynPad
121BreathNoise
26JazzElectric 58Tuba 90PolysynthSynPad
122Seashore
27CleanElectric 59MutedTrumpet 91ChoirSynPad
123BirdTweet
28MutedElectric 60FrenchHorn 92BowedSynPad
124TelephoneRing
29Overdrive 61BrassSection 93MetalSynPad
125Helicopter
30Distorted 62SynBrass1 94HaloSynPad
126Applause
31Harmonics 63SynBrass2 95SweepSynPad
127GunShot
74
Page 76

付録 B:スタンダード MIDI コントロールナンバー(MIDICC)
00 BankSelect 46 Controller46 92 TremeloDepth
01 Modulation 47 Controller47 93 ChorusDepth
02 BreathControl 48 GenPurpose1LSB 94 Celeste(De-tune)
03 Controller3 49 GenPurpose2LSB 95 PhaserDepth
04 FootControl 50 GenPurpose3LSB 96 DataDecrement
05 PortaTime 51 GenPurpose4LSB 97 DataDecrement
06 DataEntry 52 Controller52 98 Non-RegParamLSB
07 ChannelVolume 53 Controller53 99 Non-RegParamMSB
08 Balance 54 Controller54 100 RegParamLSB
09 Controller9 55 Controller55 101 RegparamMSB
10 Pan 56 Controller56 102 Controller102
11 Expression 57 Controller57 103 Controller103
12 EffectsController1 58 Controller58 104 Controller104
13 EffectsController2 59 Controller59 105 Controller105
14 Controller14 60 Controller60 106 Controller106
15 Controller15 61 Controller61 107 Controller107
16 GenPurpose1 62 Controller62 108 Controller108
17 GenPurpose2 63 Controller63 109 Controller109
18 GenPurpose3 64 SustainPedal 110 Controller110
19 GenPurpose4 65 Portamento 111 Controller111
20 Controller20 66 Sostenuto 112 Controller112
21 Controller21 67 SoftPedal 113 Controller113
22 Controller22 68 LegatoPedal 114 Controller114
23 Controller23 69 Hold2 115 Controller115
24 Controller24 70 SoundVariation 116 Controller116
25 Controller25 71 Resonamce 117 Controller117
26 Controller26 72 ReleaseTime 118 Controller118
27 Controller27 73 AttackTime 119 Controller119
28 Controller28 74 Cut-offFrequency ChannelModeMessages
29 Controller29 75 Controller75 120 AllSoundoff
30 Controller30 76 Controller76 121 ResetallControllers
31 Controller31 77 Controller77 122 LocalControl
32 BankSelectLSB 78 Controller78 123 AllNotesOff
33 ModulationLSB 79 Controller79 124 OmniOff
34 BreathControlLSB 80 GenPurpose5 125 OmniOn
35 Controller35 81 GenPurpose6 126 MonoOn(PolyOff)
36 FootControlLSB 82 GenPurpose7 127 PolyOn(MonoOff)
37 PortaTimeLSB 83 GenPurpose8 ExtraRPNMessaages
38 DataEntryLSB 84 PortamentoControl 128 PitchBendsensitivity
39 ChannelVolumeLSB 85 Controller85 129 FineTune
40 BalanceLSB 86 Controller86 130 CoarseTune
41 Controller41 87 Controller87 131 ChannelPressure
42 PanLSB 88 Controller88
43 ExpressionLSB 89 Controller89
44 Controller44 90 Controller90
45 Controller45 91 ReverbDepth
75
Page 77

040722_KS61ES_UG_04
76
 Loading...