

Marmitek IPTV Coax Pro User Manual
o
™
TV Coax Pr
IPTV Coax Pro
USER MANUAL 3
GEBRAUCHSANLEITUNG 13
GUIDE UTILISATEUR 23
MODO DE EMPLEO 33
MANUALE D’ISTRUZIONI 43
GEBRUIKSAANWIJZING 53
20584/ 20131021 • IPTV Coax Pro
ALL RIGHTS RESERVED MARMITEK ©
™


ENGLISH
SAFETY WARNINGS
x To prevent short circuits, this product should only be used inside and
only in dry spaces. Do not expose the components to rain or moisture.
Do not use the product close to a bath, swimming pool etc.
x Do not expose the components of your systems to extremely high
temperatures or bright light sources.
x In case of improper usage or if you have altered and repaired the
product yourself, all guarantees expire. Marmitek does not accept
responsibility in the case of improper usage of the product or when the
product is used for purposes other than specified. Marmitek does not
accept responsibility for additional damage other than covered by the
legal product responsibility.
x This product is not a toy. Keep out of reach of children.
x Do not open the product: the device may contain live parts. The product
should only be repaired or serviced by a qualified expert.
x Only connect the adapter to the mains after checking whether the
mains voltage is the same as the values on the identification tags.
Never connect an adapter or power cord when it is damaged. In that
case, contact your supplier.
1. INTRODUCTION
Congratulations on the purchase of your IPTV Coax Pro™. It helps you
create an additional network connection (IP/internet) on your (existing)
coaxial network, in any room with a coaxial connection. It provides a
guaranteed stable high-bandwidth connection for the most demanding HD
video streaming equipment. This includes services such as IPTV, Smart TV,
Video-on-Demand, Media Player and, for example, a PC, while keeping
your existing coaxial signals (digital/analogue/satellite TV, radio and
telephony).
2. CONTENT
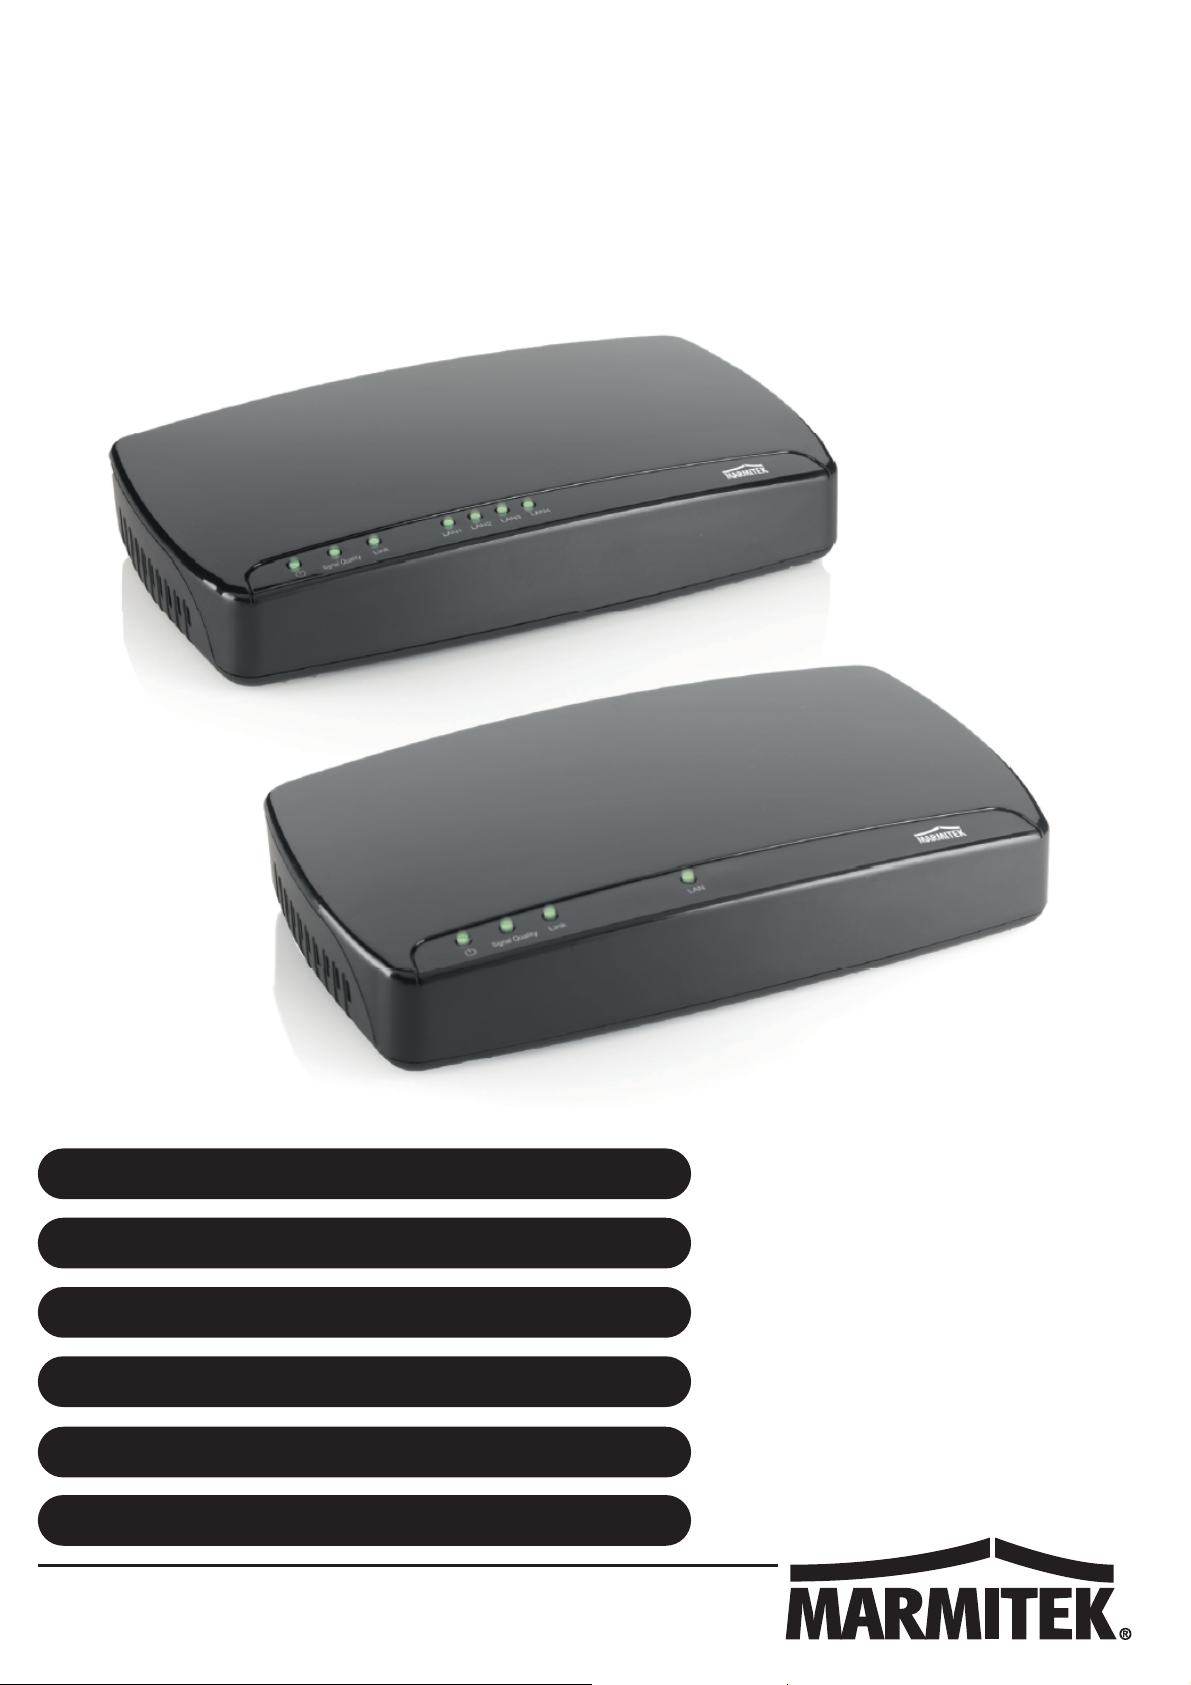
1 x IPTV Coax Pro™ 1P-node (with 1 Ethernet port)
1 x IPTV Coax Pro™ 4P-node (with 4 Ethernet ports)
2 x RJ45 CAT5 network cable
4 x F-connector for coaxial cable
1 x F-connector to IEC male Adapter
1 x F-connector to IEC female Adapter
1 x LPF-1000 coaxial filter
IPTV Coax Pro™ 3

3. OPERATION
Position the IPTV Coax Pro™ 1P-node where your internet and coaxial
cable enters the house. The 1P-node combines the two signals and
distributes them across your entire coaxial network. Position an IPTV Coax
Pro™ 4P-node at the location where you require a network connection to
connect your devices to the internet/IP. This allows you to easily add an
internet signal to your existing coaxial network, while maintaining your
coaxial signals.
Product features:
x Parameterized Quality of Service (PQoS): optimised for HD video
streaming by distinguishing between data traffic for video, voice and
gaming. When a large amount of data is being downloaded within the
network, for example, by a PC, your AV streams will not be
compromised and will be prioritised.
x Bandwidth reservation: provides a guaranteed bandwidth that is
required per connection and thus enables multiple simultaneous
connections.
x Low Latency: very low latency (<5ms) for the best online gaming
experience.
x LPF-1000 coaxial filter: set includes a Low Pass Filter that prevents
network signals from leaving your home (for safety) and increases the
impedance of your coaxial network (prevents signal loss).
x With built-in 4-port Ethernet Switch: simply connect up to 4 devices.
x Status Lights: visual display of the signal quality on the node facilitates
set-up and operation, without requiring any IP or networking
knowledge.
4. PREPARATION
The room in which you want to create a network connection (IP/internet)
must have a coaxial connection. This may be a wall outlet, splitter or the
end of a coaxial cable. Ensure that this coaxial connection has good signal
reception for analogue and/or digital television. If not, it may cause a poor
connection between the two IPTV Coax Pro™ nodes.
4 © MARMITEK
ENGLISH
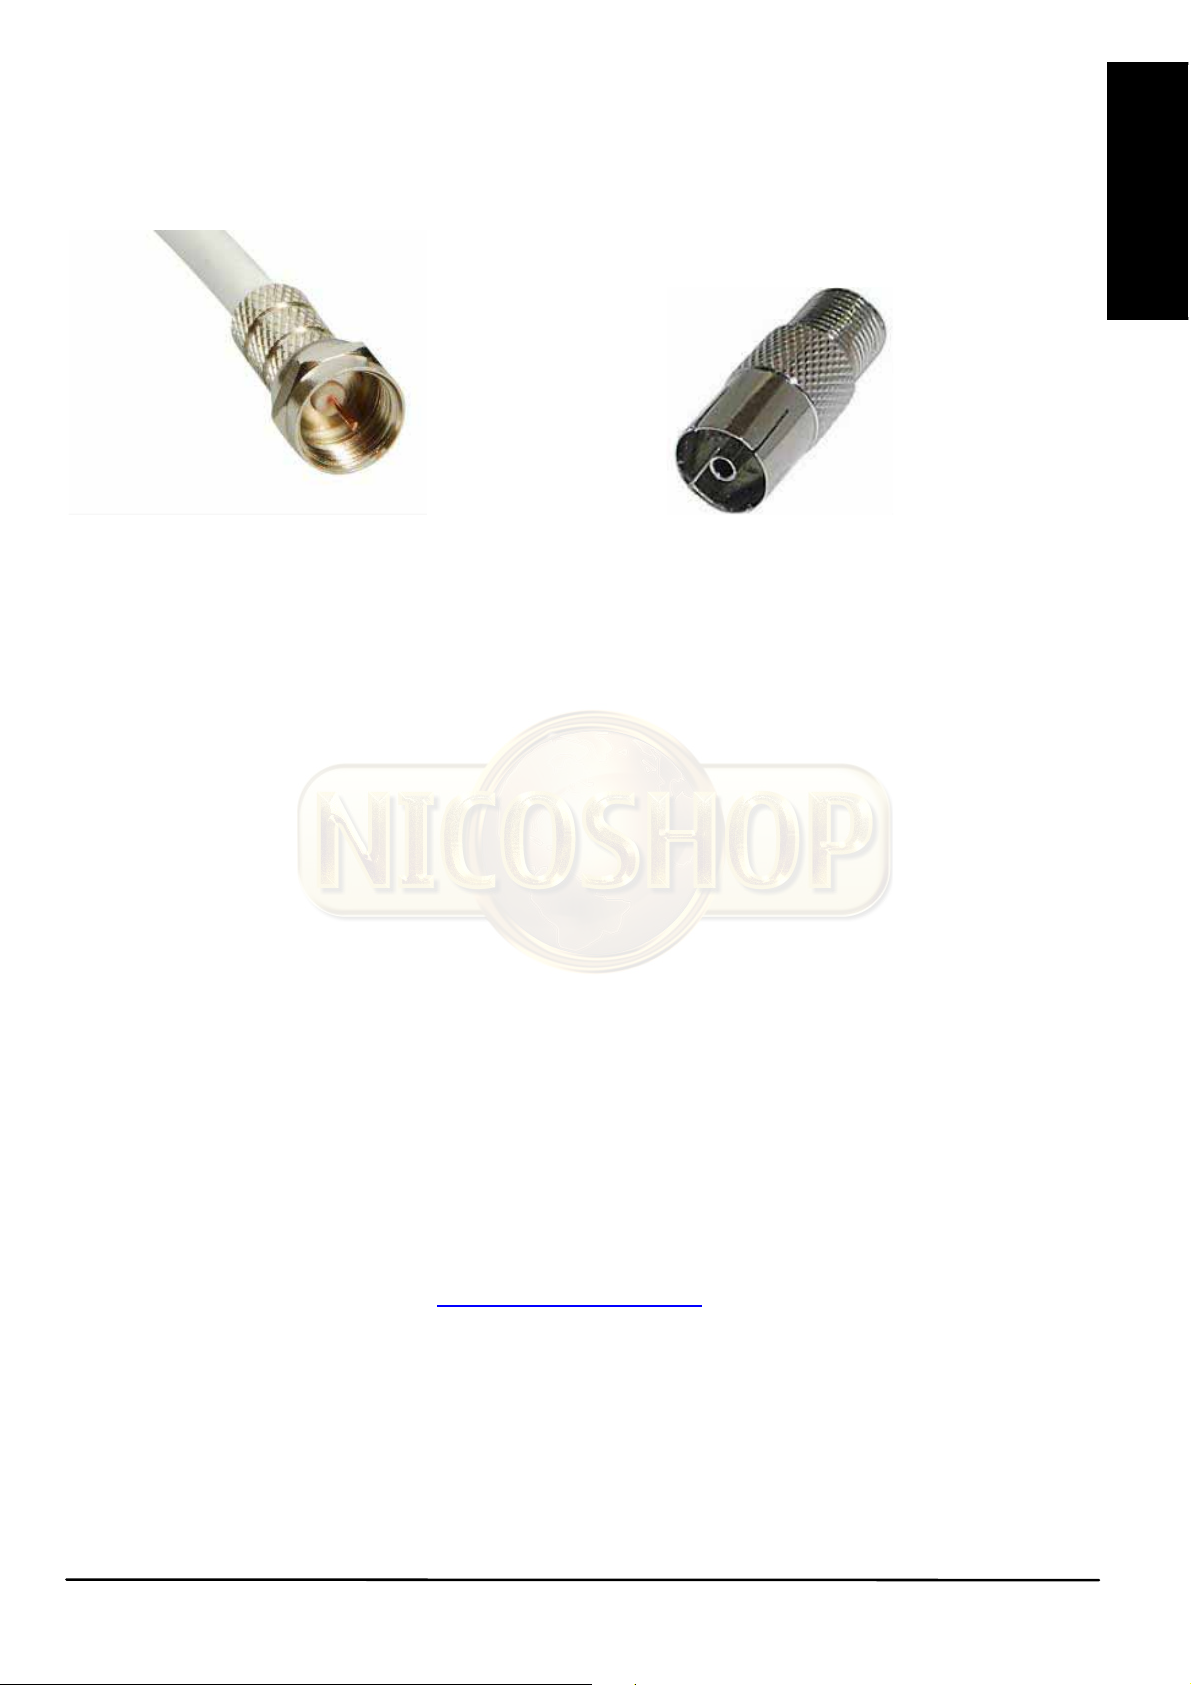
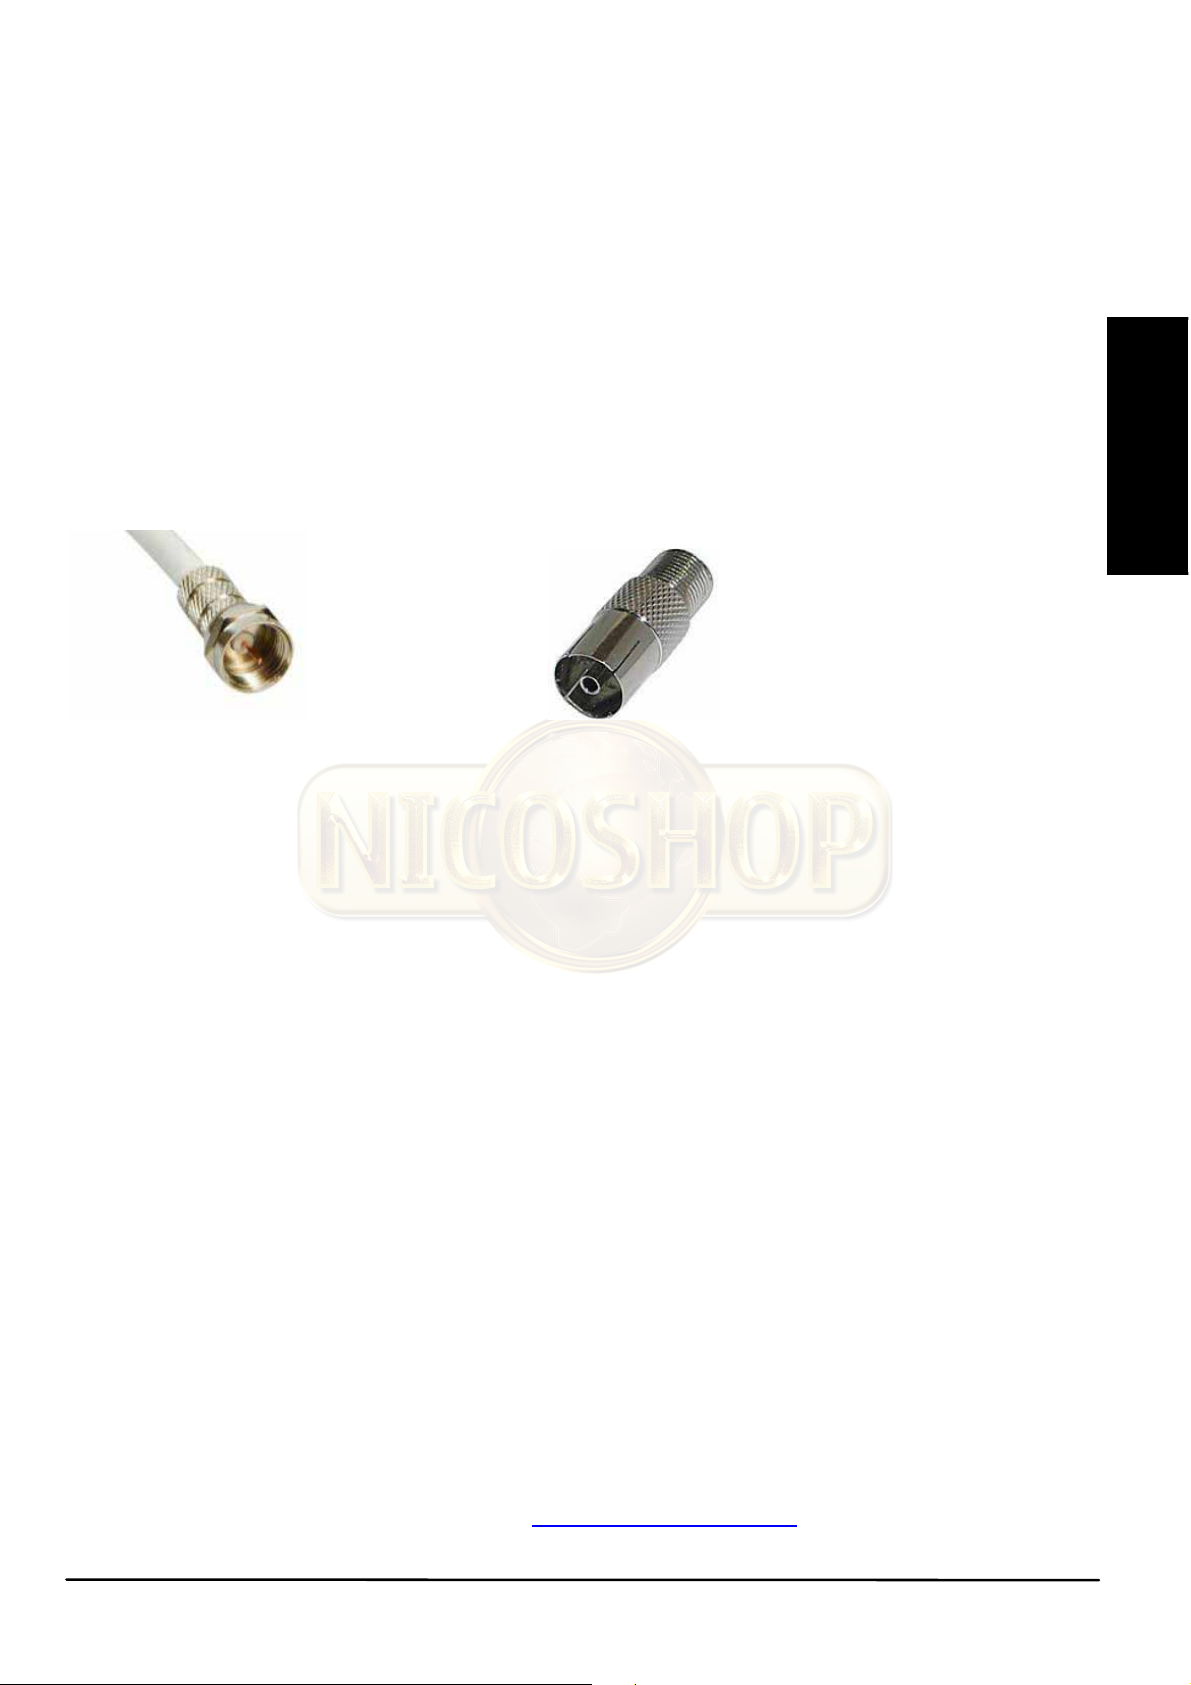
4.2 F-connector sockets
Within your coaxial network you may encounter two types of connectors, the
F-connector and the IEC-connector.
F-connector IEC-connector
Older systems generally still use IEC-connectors, while newer installations
use F-connectors. The use of F-connectors within your coaxial network is
recommended because of the quality of the connection. Compared to an
IEC connector, the F-connector has lower signal loss. To avoid/reduce
signal loss, IPTV Coax Pro™ nodes use an F-connector socket. Use IECconnectors preferably only for loose cables, for example, to connect to your
TV.
No two coaxial home networks are the same, so in practice, there is an
infinite number of different connectivity options. This makes it impossible to
add all possible cables and connectors to the set’s content. However, you
can assemble the appropriate cables yourself, or cut existing cables and
use the supplied F-connectors. Some specialist shops also carry IEC to Fconnector adapter cables; please enquire at your shop.
The remainder of the manual is based on an installation using F-connectors.
For more information about assembling your own coaxial cables using Fconnectors, please refer to www.marmitek.com (FAQs).
IPTV Coax Pro™ 5
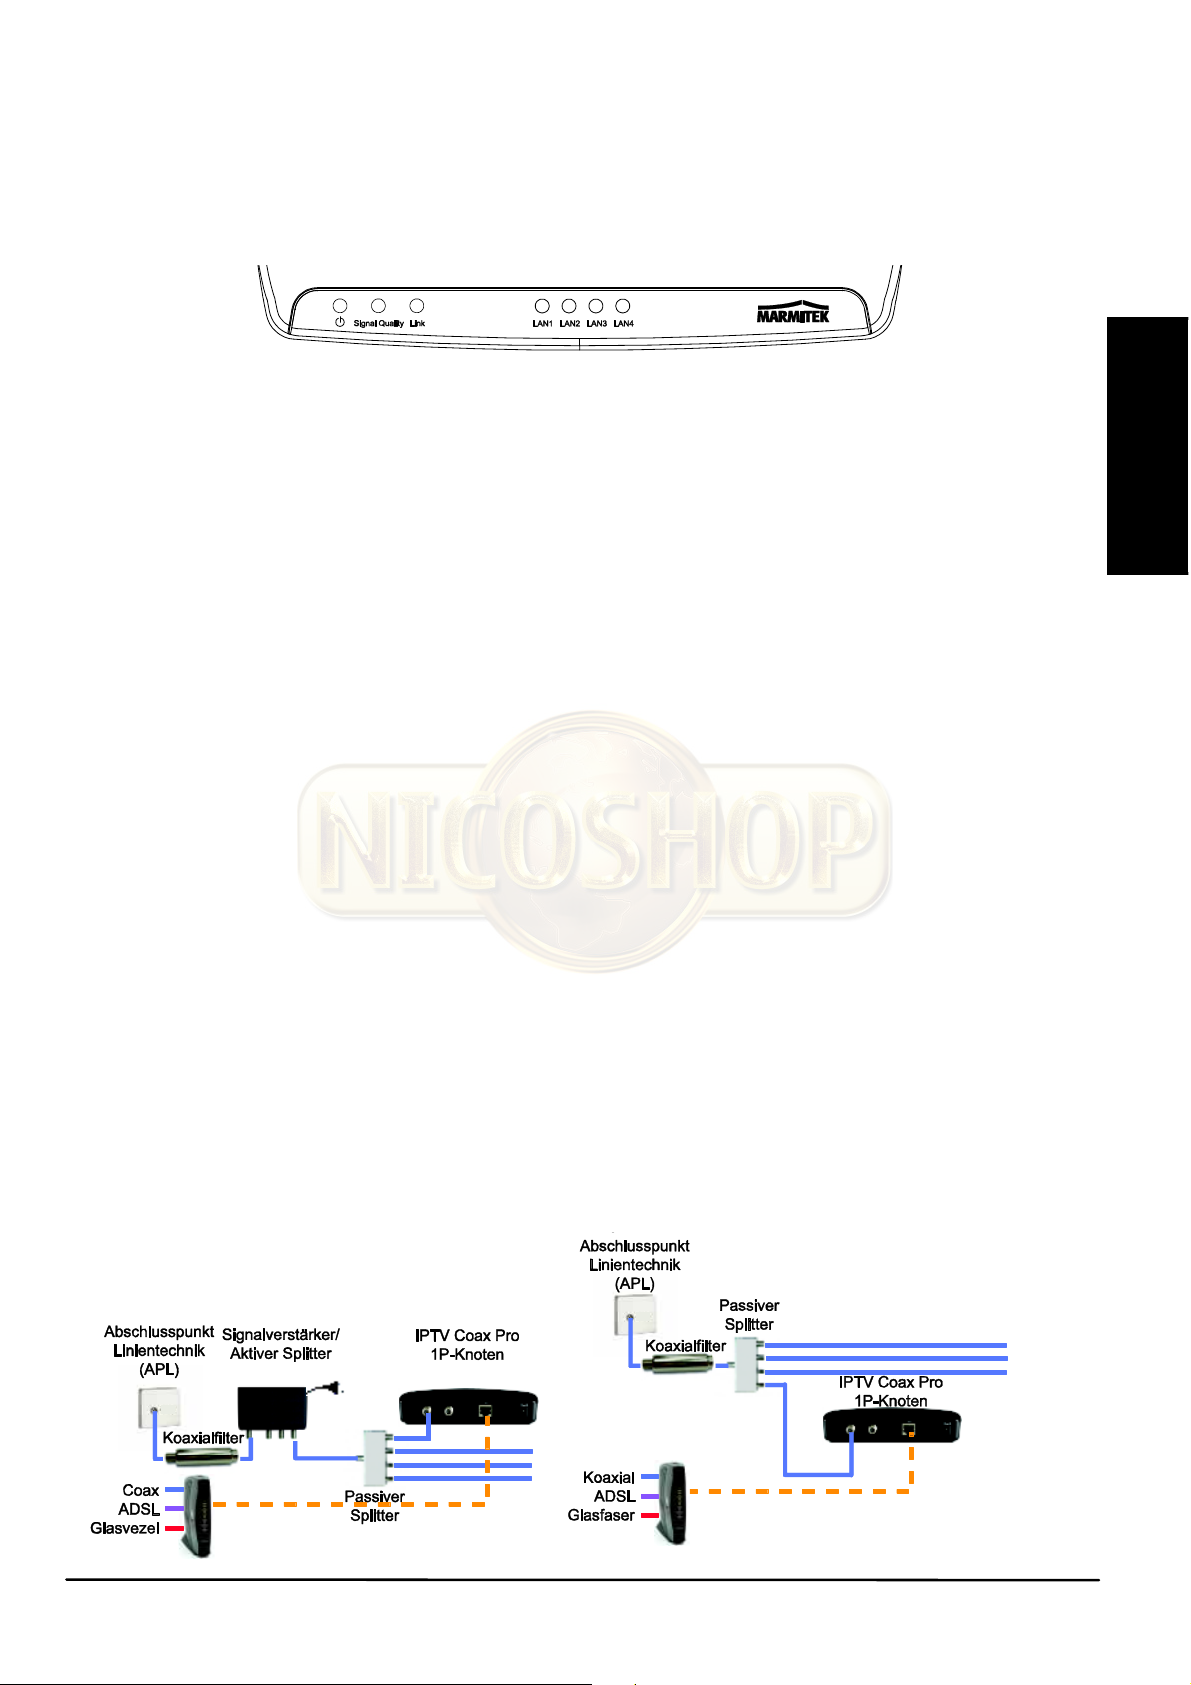
4. INSTALLATION
When installing the IPTV Coax Pro™ nodes, use as few splitters,
connectors, converters, amplifiers and other connections as possible. Each
component that is added to the coaxial network will weaken the coaxial
signals to some extent.
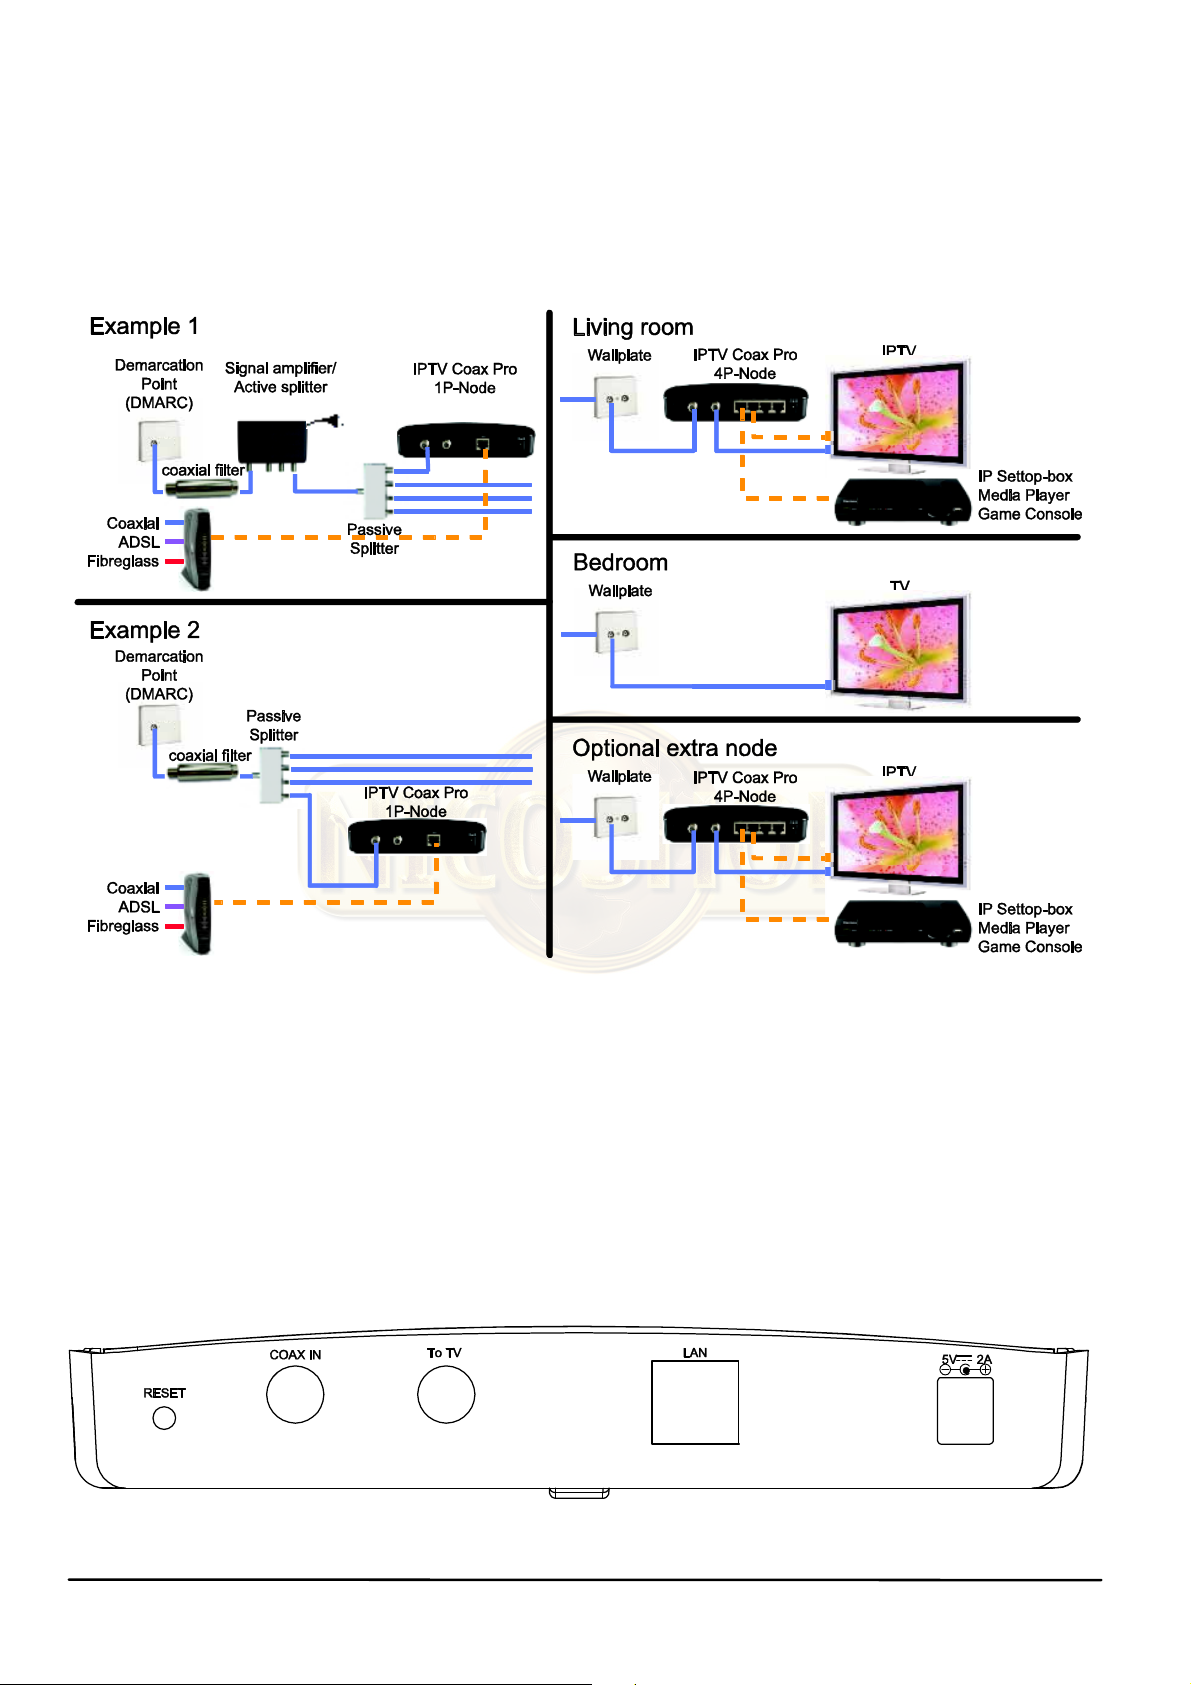
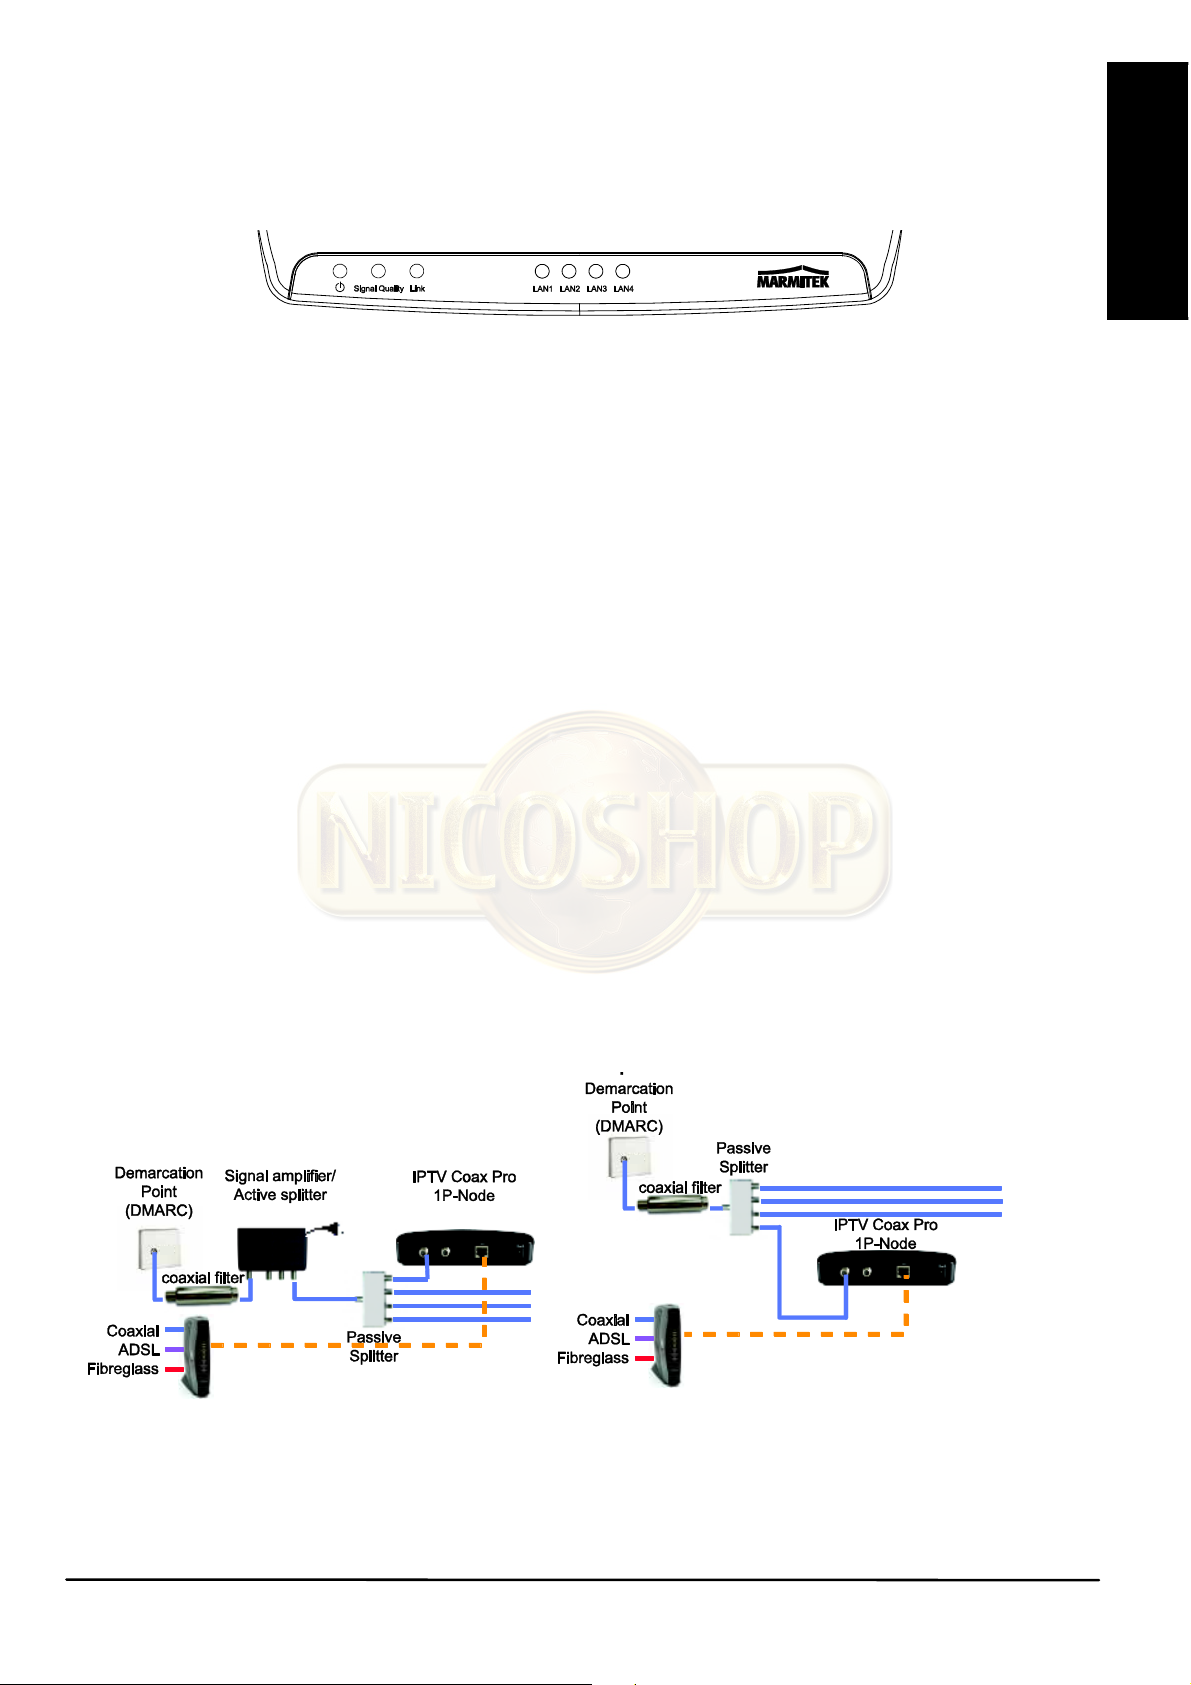
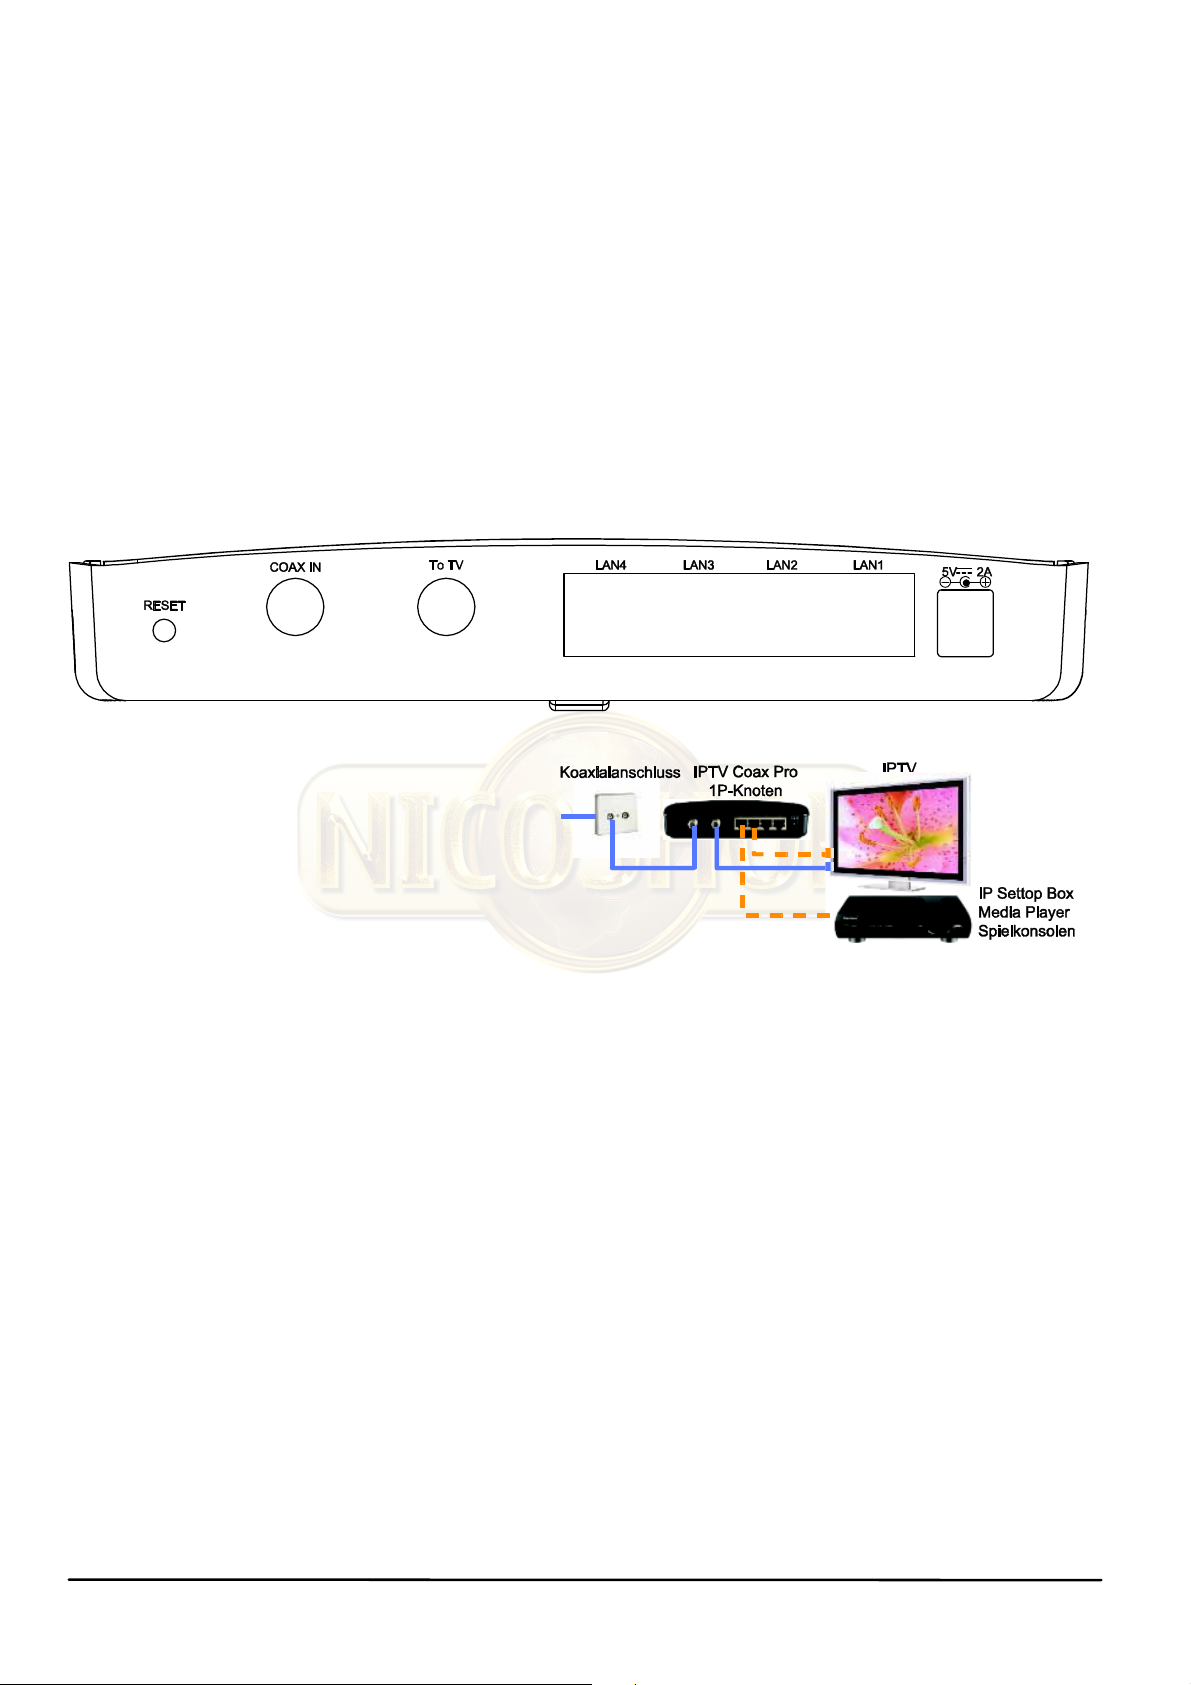
4.3 Connecting the 1P-node (in the meter cupboard)
With the exception of the built-in 4-port Ethernet Switch, there are no
technical differences between the IPTV Coax Pro™ 1P-node and the 4Pnode. In most cases, the 1P-node will be placed in the meter cupboard or at
the Demarcation Point (DMARC) where your coaxial cable and internet
connection enter your home. You can then use the 4P-node to connect up
to 4 devices with a network connection (internet/IP).
6 © MARMITEK
ENGLISH
Meter cupboard example 1
1. Position the IPTV Coax Pro™ 1P-
node as close as possible to the
DMARC in the meter cupboard or
another place where the coaxial
cable enters your home.
2. Connect the 1P-node's COAX IN
to an available connector on your
passive splitter using a coaxial
cable (not supplied) with an F-connector.
3. Please note that the (active) signal amplifier does not transfer the
signal from the IPTV Coax Pro™ nodes. Therefore, never position it
between the 1P-node and the 4P-node.
4. You can leave the To TV unused because the IP/internet signals are
also sent to your coaxial network via the 1P-node's COAX IN
connector.
5. Connect a CAT5 network cable (included) to your internet router and
connect the other end to the 1P-node's LAN port.
6. Then connect the power cable to the 1P-node and plug the adapter into
the wall outlet.
Meter cupboard example 2
1. Position the IPTV Coax Pro™ 1P-
node as close as possible to the
DMARC in the meter cupboard or
another place where the coaxial
cable enters your home.
2. Connect the 1P-node's COAX IN
to an available connector on your
passive splitter using a coaxial
cable (not supplied) with an Fconnector.
3. You can leave the To TV unused because the IP/internet signals are
also sent to your coaxial network via the 1P-node's COAX IN
connector.
4. Connect a CAT5 network cable (included) to your internet router and
connect the other end to the 1P-node's LAN port.
5. Then connect the power cable to the 1P-node and plug the adapter into
the wall outlet.
IPTV Coax Pro™ 7

TIP: After installation, use a spanner to check if the F-connectors are
sufficiently tightened until finger tight.
4.4 Connecting the 4P-node (living room)
Now create a network connection (IP/internet) on your existing coaxial
network in a room that has a coaxial connection. This may be a wall outlet,
splitter, or the end of a coaxial cable.
1. Disconnect your TV’s (or
other device’s) coaxial cable
from the existing coaxial
connection.
2. Connect a coaxial cable (not
included) with an Fconnector to the now vacant socket and connect it to the 4P-node's
COAX IN.
3. Now attach the F-connector to IEC adapter (supplied) to the 4P-node's
To TV to reconnect the previously disconnected cable to your TV (or
other device).
4. Connect a CAT5 network cable (included) to your device (IP set-top
box, SMART TV, Media Player, etc.) and the other to one of the four
LAN ports of the 4P-node. The built-in 4-port switch requires no further
configuration.
5. Then connect the power cable to the 4P-node and plug the adapter into
the wall outlet.
TIP: After installation, use a spanner to check if the F-connectors are
sufficiently tightened until finger tight.
8 © MARMITEK
ENGLISH
4.5 Checking the installation
To verify correct installation, a number of checks need to be performed on
both the 1P-node and the 4P-node.
1. Check that the POWER lamp is lit, indicating the node is powered.
2. Check that the LINK light is lit, indicating the 1P-node is connected
correctly to the 4P-node.
3. Check that the SIGNAL QUALITY light turns green, indicating the
signal quality between the 1P-node and the 4P-node is very good.
4. Check that the LAN light is lit or flashing, indicating that the unit is
connected or data is being transferred, respectively.
In all other cases, please refer to Chapter 5, Frequently Asked Questions.
4.6 Use of the LPF-1000 coaxial filter
If you use analogue or digital television via a coaxial cable, we recommend
using the supplied coaxial filter. This filter prevents network signals from
leaving your house (security) and reflects the signal back into the coaxial
network, improving the signal quality. This filter does not affect your existing
coaxial signals such as TV, radio and telephony. Position the coaxial filter
directly at the point where the coaxial cable enters your home.
IPTV Coax Pro™ 9

5. FREQUENTLY ASKED QUESTIONS
Link and Signal Quality lights are not lit
The IPTV Coax Pro™ node is unable to make a proper connection with
another node on the coaxial network.
x Make sure the POWER light is lit on all IPTV Coax Pro™ nodes.
x The signal between the two IPTV Coax Pro™ nodes may be too weak
to establish a connection. This may be caused by bad connections or
poor quality jacks (splitters, cables, connectors). Use high-quality Fconnector jacks, cables and splitters wherever possible.
x Coaxial cables must not be bent, kinked or damaged.
x Please ensure that no active coaxial signal amplifiers are installed
between two IPTV Coax Pro™ nodes.
x Press and hold the RESET button for 10 seconds to restore the IPTV
Coax Pro™ node's factory settings.
Signal Quality indicator light turns red
The IPTV Coax Pro™ node is connected to another node on the coaxial
network. The signal quality between the two nodes is adequate but not
maximal. This connection is stable and fast enough to connect your highbandwidth internet devices. Please note that adding multiple coaxial
splitters, cables or other connecting materials may weaken the signal,
making the signal quality inadequate and turning the indicator light off.
RESET:
x Hold 1 second to restart the IPTV Coax Pro™ node.
x Hold 10 seconds to restore the IPTV Coax Pro™ node to its factory
settings.
Still have any questions that have not been answered here? Please check
www.marmitek.com.
10 © MARMITEK

ENGLISH
6. TECHNICAL INFORMATION
IPTV Coax Pro™ node
Power adapter: 100~240VAC@50/60Hz, 5VDC 2A
Range: max. 100m for RG-59 coaxial cable
Coaxial input: F-connector, 75ohm
Coaxial output: F-connector, 75ohm
RF output level: E-Band, -3dBm
D-Band, -10dBm
Network connection: 1P-node: 1x 10/100Mbps Ethernet (RJ45)
4P-node: 4x 10/100Mbps Ethernet (RJ45)
Status indication: Power, Link, Signal Quality, LAN
Dimensions: 170 x 95 x 30mm
Environment:
Ambient temperature: +0 to +40ºC
Ambient humidity: 10% to 85%
MoCA
Version MoCA 1.1
Frequency: E-Band, 475~625MHz (5 channels)
D-Band, 1125~1525MHz (8 channels)
Bandwidth: 50MHz
Throughput speed: PHY 250Mbps
Latency: < 5ms
Specifications may change without prior notice.
IPTV Coax Pro™ 11

7. OPTIONALLY AVAILABLE
Additional IPTV Coax Pro™ 4P-node (art. nr. 08185 / 08186)
Use your coaxial network to
create additional network
connections (IP/internet) in
multiple rooms of the house
(living room, bedroom, office, loft).
You can connect up to 16
additional 4P-nodes to your
coaxial network. Please refer to the Additional 4P-node's datasheet at
www.marmitek.com
Environmental Information for Customers in the European Union
European Directive 2002/96/EC requires that the equipment bearing this symbol on
the product and/or its packaging must not be disposed of with unsorted municipal
waste. The symbol indicates that this product should be disposed of separately from
regular household waste streams. It is your responsibility to dispose of this and other
electric and electronic equipment via designated collection facilities appointed by the
government or local authorities. Correct disposal and recycling will help prevent potential negative
consequences to the environment and human health. For more detailed information about the
disposal of your old equipment, please contact your local authorities, waste disposal service, or
the shop where you purchased the product.
12 © MARMITEK

DEUTSCH
SICHERHEITSHINWEISE
x Um Kurzschluss vorzubeugen, dieses Produkt bitte ausschließlich
innerhalb des Hauses und nur in trockenen Räumen nutzen. Setzen
Sie die Komponenten nicht Regen oder Feuchtigkeit aus. Nicht neben
oder nahe eines Bades, Schwimmbades usw. verwenden.
x Setzen Sie die Komponente Ihres Systems nicht extrem hohen
Temperaturen oder starken Lichtquellen aus.
x Bei einer zweckwidrigen Verwendung, selbst angebrachten
Veränderungen oder selbst ausgeführten Reparaturen verfallen alle
Garantiebestimmungen. Marmitek übernimmt bei einer falschen
Verwendung des Produkts oder bei einer anderen Verwendung des
Produktes als für den vorgesehenen Zweck keinerlei Produkthaftung.
Marmitek übernimmt für Folgeschäden keine andere Haftung als die
gesetzliche Produkthaftung.
x Dieses Produkt ist kein Spielzeug. Außer Reichweite von Kindern
halten.
x Das Produkt niemals öffnen: Das Gerät kann Teile enthalten, worauf
lebensgefährliche Stromspannung steht. Überlassen Sie Reparaturen
oder Wartung nur Fachleuten.
x Schließen Sie den Netzadapter erst dann an das Stromnetz an,
nachdem Sie überprüft haben, ob die Netzspannung mit dem auf dem
Typenschild angegeben Wert übereinstimmt. Schließen Sie niemals
einen Netzadapter oder ein Netzkabel an, wenn diese beschädigt sind.
In diesem Fall nehmen Sie Kontakt mit Ihrem Lieferanten auf.
1. EINFÜHRUNG
Herzlichen Glückwunsch zum Erwerb des Marmitek MegaView20. Mit
diesem Gerät richten Sie an Ihrem (vorhandenen) Koaxialnetzwerk, in
jedem gewünschten Raum mit Koaxialanschluss, einen zusätzlichen
Netzwerkanschluss (IP / Internet) ein. Dieser liefert eine garantiert stabile
Verbindung mit hoher Bandbreite für die anspruchvollsten HD Video
Streaming Geräte. Denken Sir nur an Empfangsgeräte wie IPTV, Smart TV,
Video on Demand, Media Player und z.B. ein PC. Unter Beibehaltung Ihrer
vorhandenen Koaxialsignale (Digitales/ Analoges/ Satellit Fernsehen, Radio
und Sprechfunk).
IPTV Coax Pro™ 13

2. INHALT
1 x IPTV Coax Pro™ 1P-Knoten (mit 1 Ethernet Anschluss)
1 x IPTV Coax Pro™ 4P-Knoten (mit 4 Ethernet Anschlüssen)
2 x RJ45 Netzwerkkabel CAT5
4 x F-Anschluss für Koaxialkabel
1 x Adapter F-Anschluss mit IEC-Stecker, male
1 x Adapter F-Anschluss mit IEC-Stecker, female
1 x LPF-1000 Koaxialfilter
3. ARBEITSWEISE
Installieren Sie den IPTV Coax Pro™ 1P-Knoten dort, wo Ihr Internet und
Koaxialkabel ins Haus gelangen. Dieser fügt beide Signale zusammen und
übertragt sie über das gesamte Koaxialnetzwerk. Bringen Sie einen IPTV
Coax Pro™ 4P-Knoten dort an, wo Sie über einen Netzwerkanschluss
verfügen möchten, um Ihre Geräte mit Internet/IP verbinden zu können. Auf
diese Art und Weise können sie einfach und mit Erhalt Ihrer Koaxialsignale
ein Internetsignal an Ihr vorhandenes Koaxialnetzwerk hinzufügen.
Produkteigenschaften:
x Parameterized Quality of Service (PQoS): Optimiert für HD Video-
Streaming, indem ein Unterschied im Datenverkehr für Video, Sprache
und Gaming gemacht wird. Werden von beispielsweise Ihrem PC
innerhalb Ihres Netzwerkes große Mengen an Daten heruntergeladen,
so wird das Ihre AV Streams, die Vortritt haben, nicht negativ
beeinflussen.
x Bandwidth reservation: Bandbreitenreservierung garantiert die
Bandbreite, die pro Anschluss benötigt wird und macht somit mehrere
Verbindungen zugleich möglich.
x Low Latency: Sehr kurze Latenzzeit (<5ms) für das beste online
Gaming Erlebnis.
x LPF-1000 Koaxialfilter: Set enthält einen Low Pass Filter, der
verhindert, dass Netzwerkverbindungen Ihr Haus verlassen
(Schutzvorrichtung) und die Impedanz Ihres Koaxialnetzwerkes erhöht
(begegnet Signalverlust).
x Met eingebautem 4-Port Ethernet Switch: Schließen Sie kinderleicht bis
zu 4 Geräte an.
x Status Lights: Visuelle LED Angabe am Knoten zur Signalqualität
macht Installation und Verwendung kinderleicht, sodass Sie keinerlei
IP- oder Netzwerkwissen benötigen.
14 © MARMITEK
DEUTSCH
4. VORBEREITUNG
Der Raum, in dem Sie einen Netzwerkanschluss (IP/Internet) erstellen
möchten, muss über einen Koaxialanschluss verfügen. Das kann eine
Wandsteckdose, ein Splitter oder das Ende eines Koaxialkabels sein.
Überprüfen Sie, ob dieser Koaxialanschluss einen guten Signalempfang für
analoges und/oder digitales Fernsehen hat. Ist das nicht der Fall, so kann
das zu einer schlechten Verbindung zwischen den zwei IPTV Coax Pro™
Knoten führen.
4.1 F-Steckeranschlüsse
Sie können innerhalb Ihres Koaxialnetzwerks 2 Verbindungsarten
begegnen: der F- und der IEC-Steckverbindung .
F-Steckverbindung IEC-Steckverbindung
Ältere Geräte nutzen im Allgemeinen noch IEC Steckverbindungen und
neuere F-Steckverbindungen. Aufgrund der Qualität der Verbindung wird
die Verwendung von F-Steckverbindungen für Ihr Koaxialnetzwerk
empfohlen. Der Signalverlust der F-Steckverbindung ist im Vergleich zu
einer IEC Steckverbindung geringer. Um Signalverlusten zu begegnen oder
sie zu verringern, machen die IPTV Coax Pro™ Knoten von einer FSteckverbindung Gebrauch. Verwenden Sie IEC Anschlüsse vorzugsweise
nur für lose Kabel, um beispielsweise Ihren Fernseher anzuschließen.
Kein einziges Koaxialnetzwerk im Haus ist dasselbe, sodass es in der
Praxis unendlich viele verschiedene Anschlussmöglichkeiten gibt. Es ist
daher unmöglich, dem Set alle möglichen Kabel und Anschlüsse
hinzuzufügen. Sie können die gewünschten Kabel aber selbst
konfektionieren oder bestehende Kabel abtrennen, indem Sie die
enthaltenen F-Steckverbindungen nutzen. Überdies sind im Fachhandel
IEC in F-Steckverbindung Übergangskabel erhältlich. Lassen Sie sich
diesbezüglich beraten.
In der Fortsetzung dieser Gebrauchsanleitung wird von einer Installation mit
F-Steckverbindungen ausgegangen.
Weitere Infos zum Selbermachen von Koaxialkabeln mit FSteckverbindungen finden Sie auf www.marmitek.com (FAQs).
IPTV Coax Pro™ 15
4. INSTALLATION
Verwenden Sie für die Installation der IPTV Coax Pro Knoten möglichst
wenig Splitter, Anschlüsse, Umformer, Verstärker und andere Anschlüsse.
Jedes an das Koaxialnetzwerk hinzugefügte Teil wird die Koaxialsignale in
bestimmtem Maße abschwächen.
4.3 1P-Knoten anschließen (im Zählerschrank)
Der IPTV Coax Pro™ 1P-Knoten und 4P-Knoten unterscheidet sich bis auf
den eingebauten 4-Port Ethernet nicht voneinander. In den meisten Fällen
wird der IP Knoten im Zählerschrank oder am Abschlusspunkt Linientechnik
(APL), also dort wo Ihr Koaxial- und Internetkabel in Ihr Haus gelangen,
angelegt. Sie können den 4P Knoten dann verwenden, um bis zu 4 Geräte
mit einem Netzwerkanschluss (Internet/IP) zu verbinden.
16 © MARMITEK
DEUTSCH
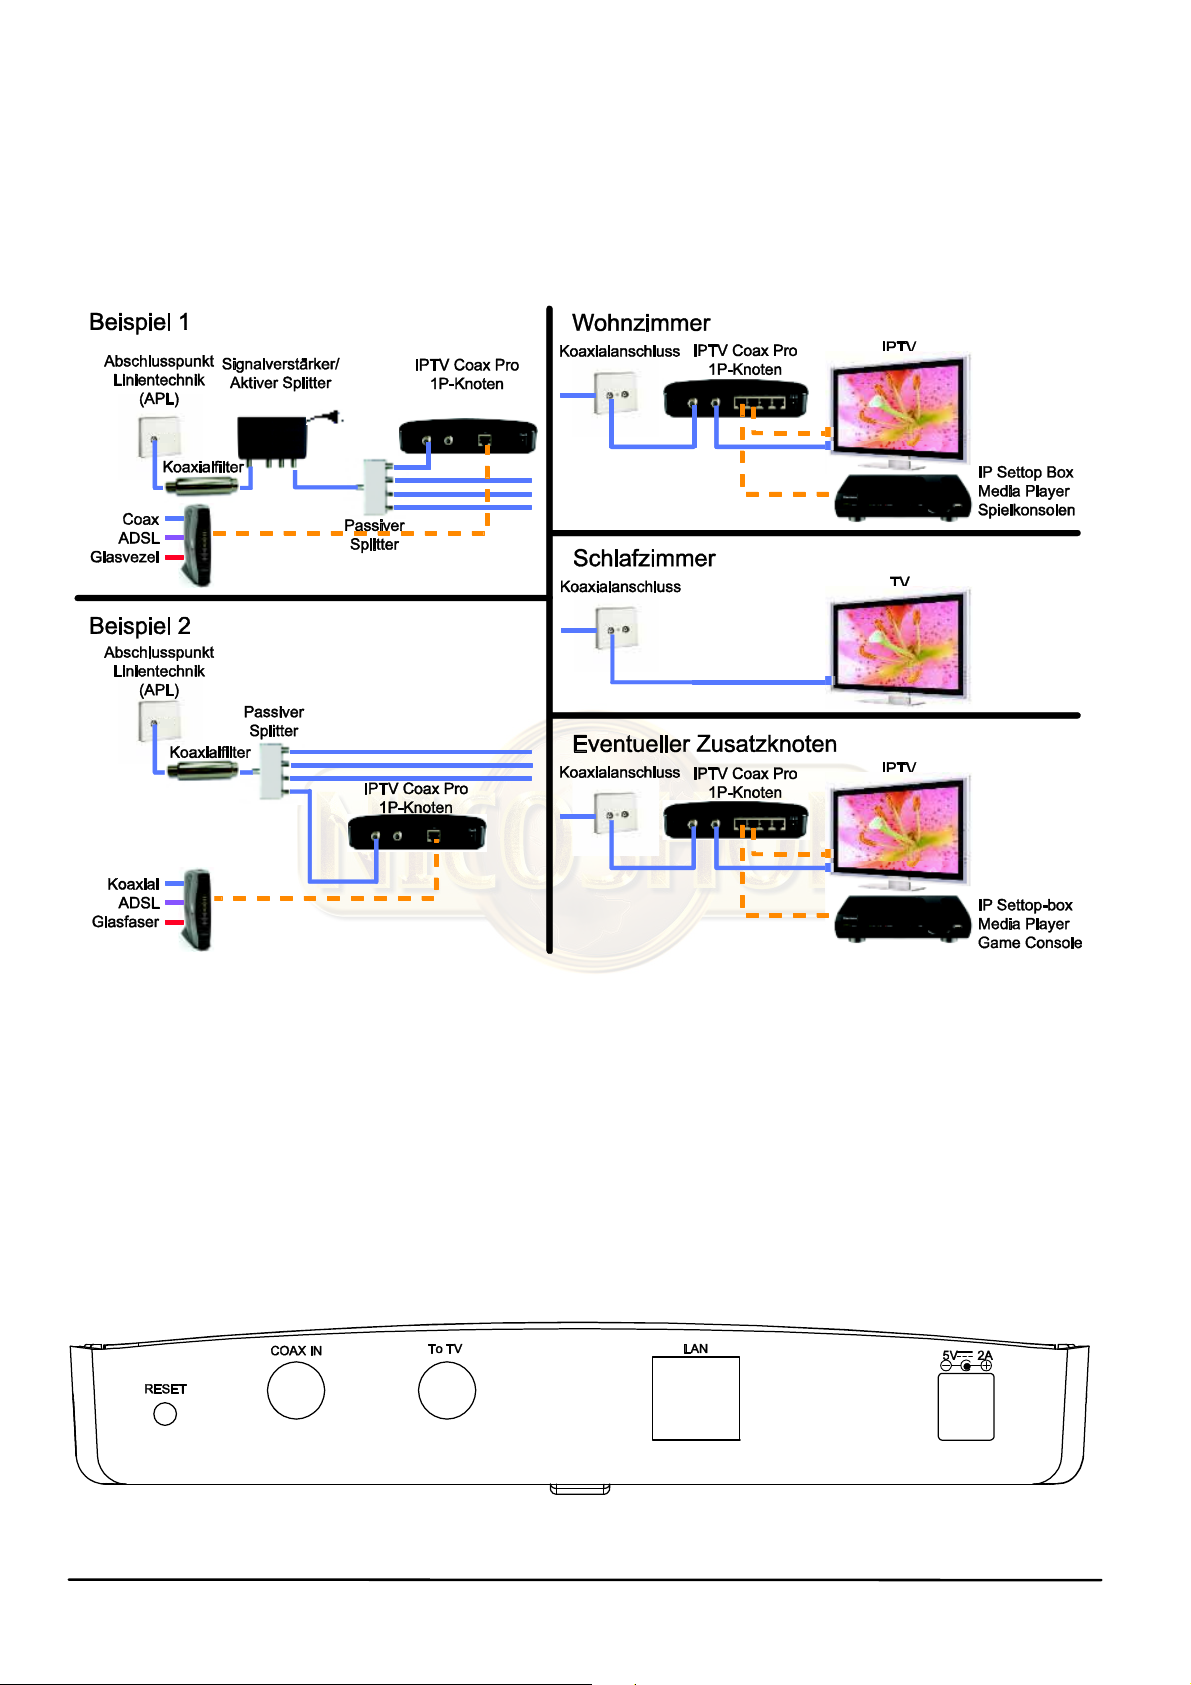
Zählerkasten Beispiel 1
1. Legen sie den IPTV Coax Pro™
1P-Knoten möglichst nahe am
Anschlusspunkt (APL) im
Zählerschrank oder an dem Ort,
an dem Ihr Koaxialkabel in die
Wohnung gelangt, an.
2. Schließen Sie COAX IN des 1P-
Knoten mit einem Koaxialkabel mit F-Steckverbindung (nicht enthalten)
an einen noch freien Anschluss Ihres passives Splitters an.
3. Achtung: der (aktive) Signalverstärker leitet das Signal der IPTV Coax
Pro™ Knoten nicht weiter. Legen Sie diese also niemals zwischen dem
1P und dem 4P Knoten an.
4. Das To TV wird nicht benötigt, da die IP-Internetsignale auch über den
COAX IN Anschluss des 1P-Knoten zu Ihrem Koaxialnetzwerk
versendet werden.
5. Schließen Sie ein Netzwerkkabel CAT5 (im Set enthalten) an Ihren
Internet Router an und die andere Seite an den LAN Anschluss des IP
Knoten.
6. Schließen Sie daraufhin das Speisungskabel an den IP Knoten an und
stecken Sie den Adapter in die Steckdose.
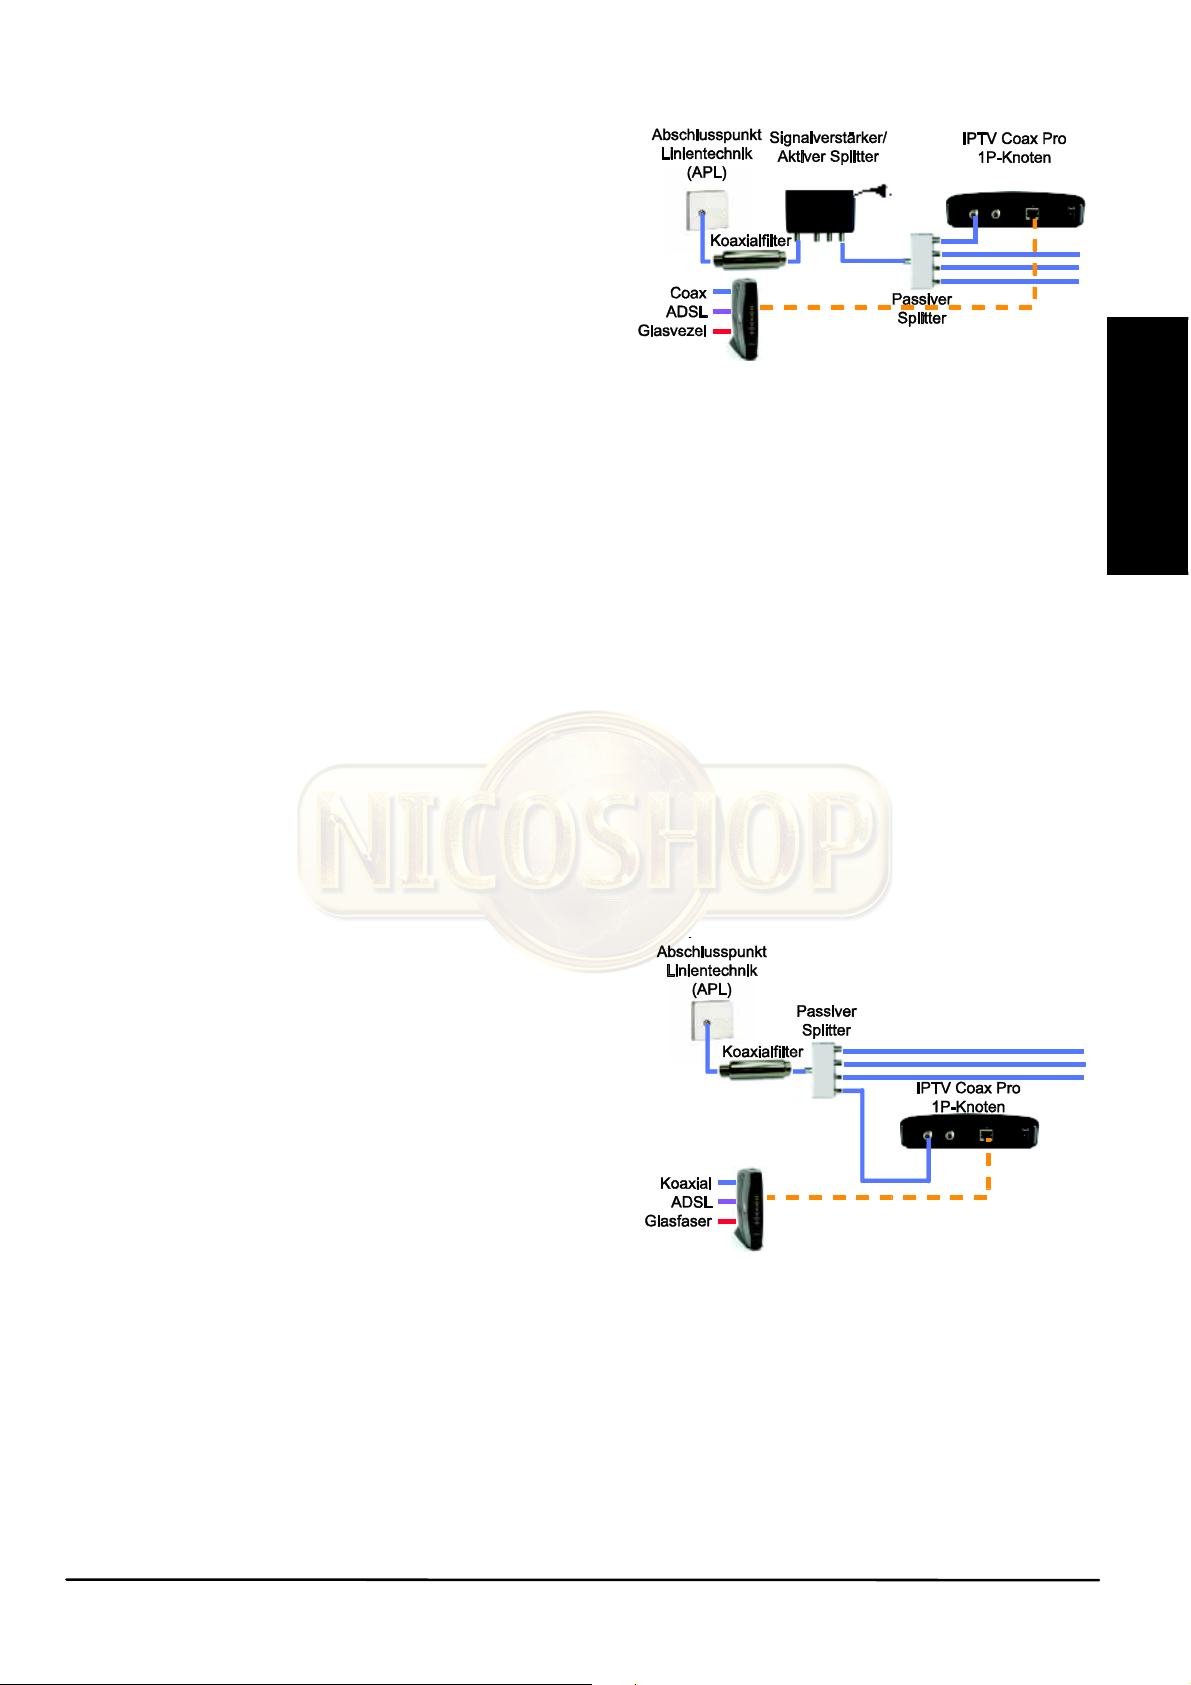
Zählerkasten Beispiel 2
1. Legen sie den IPTV Coax Pro™
1P-Knoten möglichst nahe am
Abschlusspunkt (APL) im
Zählerschrank oder an dem Ort,
an dem Ihr Koaxialkabel in die
Wohnung gelangt, an.
2. Schließen Sie COAX IN des 1P-
Knoten mit einem Koaxialkabel
mit F-Steckverbindung (nicht
enthalten) an einen noch freien
Anschluss Ihres passives Splitters an.
3. Das To TV wird nicht benötigt, da die IP-Internetsignale auch über den
COAX IN Anschluss des 1P-Knoten zu Ihrem Koaxialnetzwerk
versendet werden.
4. Schließen Sie ein Netzwerkkabel CAT5 (im Set enthalten) an Ihren
Internet Router an und die andere Seite an den LAN Anschluss des IP
Knoten.
IPTV Coax Pro™ 17
5. Schließen Sie daraufhin das Speisungskabel an den IP Knoten an und
stecken Sie den Adapter in die Steckdose.
Tipp: Überprüfen Sie nach der Installation mithilfe eines Gabelschlüssels,
ob die F-Steckverbindungen gut festgedreht sind.
4.4 Den 4P-Knoten anschließen (Wohnzimmer)
Gestalten Sie jetzt einen Netzwerkanschluss (IP/ Internet) an Ihrem
vorhandenen Koaxialnetzwerk in einem Raum, der über einen
Koaxialanschluss verfügt. Das kann eine Wandsteckdose, ein Splitter oder
das Ende eines Koaxialkabels sein.
1. Lösen Sie das Koaxialkabel
Ihres Fernsehers (oder
anderes Gerät) von Ihrem
vorhandenen
Koaxialanschluss.
2. Schließen Sie an den frei
gewordenen Anschluss nun ein Koaxialkabel (nicht enthalten) mit FSteckverbindung an und verbinden Sie dieses Kabel mit dem Coax IN
des 4P Knotens.
3. Drehen Sie nun die F-Steckverbindung zum IEC-Adapter (enthalten)
auf den To TV des 4P Knoten, um das vorher gelöste Kabel wieder an
Ihren Fernseher (oder anderes Gerät) anzuschließen.
4. Schließen Sie ein Netzwerkkabel CAT5 (enthalten) an Ihr Gerät (IP
Set-Top-Box, SMART TV, Media Player, etc) an und das andere Ende
an eines der vier LAN Anschlüsse des 4P Knoten. Der eingebaute 4
Port Switch braucht nicht konfiguriert zu werden.
5. Schließen Sie daraufhin das Speisungskabel an den 4P Knoten an und
stecken Sie den Adapter in die Steckdose.
Tipp: Überprüfen Sie nach der Installation mithilfe eines Gabelschlüssels,
ob die F-Steckverbindungen gut festgedreht sind. (handfest)
18 © MARMITEK
DEUTSCH
4.5 Überprüfung der Installation
Um zu überprüfen, ob die Installation adäquat durchgeführt wurde, müssen
Sie sowohl am 1P Knoten wie am 4P Knoten einige Punkte einer Kontrolle
unterziehen.
1. Überprüfen Sie, ob die POWER Leuchte aufleuchtet, der Knoten also
Strom bekommt.
2. Überprüfen Sie, ob die LINK Leuchte aufleuchtet, also ob der 1P
Knoten richtig mit dem 4P Knoten verbunden ist.
3. Überprüfen Sie, ob die SIGNAL QUALITY Leuchte grün aufleuchtet:
Die Signalqualität zwischen dem 1P und dem 4P Knoten ist
ausgezeichnet.
4. Überprüfen Sie, ob die LAN Leuchte aufleuchtet oder blinkt. Leuchtet
sie auf, so ist das Gerät verbunden und blinkt sie, dann findet eine
Datenübertragung statt.
Ziehen Sie in allen anderen Fällen H5, Häufig gestellte Fragen, zurate.
4.6 Verwendung des LPF-1000 Koaxialfilters
Wenn Sie für Ihr analoges oder digitales Fernsehen ein Koaxialkabel
verwenden empfehlen wir, den enthaltenen Koaxialfilter zu verwenden.
Dieser Filter verhindert, dass Netzwerksignale Ihr Haus verlassen können
(Schutzvorrichtung) und reflektiert das Signal zurück ins Koaxialnetzwerk,
was die Signalqualität verbessert. Dieser Filter hat keinen Einfluss auf Ihre
üblichen Koaxialsignale wie zum Beispiel TV, Radio oder Sprechfunk.
Bringen Sie den Koaxialfilter unmittelbar an der Stelle an, wo das
Koaxialkabel in Ihre Wohnung gelangt.
IPTV Coax Pro™ 19

5. HÄUFIG GESTELLTE FRAGEN
Link und Signal Quality Lämpchen leuchten nicht.
Der IPTV Coax Pro™ Knoten kann keine gute Verbindung mit einem
anderen Knoten im Koaxialnetzwerk herstellen.
x Überprüfen Sie, ob an allen IPTV Coax Pro™ Knoten die POWER
Lämpchen leuchten.
x Möglicherweise ist das Signal zwischen den zwei IPTV Coax Pro™
Knoten zu schwach, um eine Verbindung herzustellen. Möglicherweise
sind Verbindungen schlecht oder sind Anschlüsse (Splitter, Kabel,
Anschlüsse) von schlechter Qualität. Nutzen Sie möglichst viele FSteckverbindungen und Kabel und Splitter von hoher Qualität.
x Koaxialkabel dürfen nicht gebogen, geknickt oder beschädigt sein.
x Es dürfen keine aktiven Koaxialsignalverstärker zwischen zwei IPTV
Coax Pro™ Knoten installiert sein.
x Drücken Sie 10 Sekunden lang die RESET Taste, um zu den
Werkeinstellungen des IPTV Coax Pro™ Knotens zurückzukehren.
Signal Quality Lämpchen leuchtet rot
Der IPTV Coax Pro™ Knoten ist mit einem anderen Knoten im
Koaxialnetzwerk verbunden. Die Signalqualität zwischen beiden ist
ausreichend aber nicht maximal. Diese Verbindung ist stabil und schnell
genug, um Ihre Internetgeräte mit einer hohen Bandbreite anzuschließen.
Achtung: Wenn Sie mehrere Koaxialsplitter, -Kabel oder anderes
Anschlussmaterial hinzufügen, kann das Signal abschwächen, wodurch die
Signalqualität unzureichend wird und die Leuchte ausgehen wird.
RESET:
x 1 Sekunde festhalten, um den IPTV Coax Pro™ Knoten erneut zu
starten.
x 10 Sekunden festhalten, um den IPTV Coax Pro™ Knoten in die
Werkeinstellung zurückzusetzen.
Sie haben noch Fragen, die im Obigen nicht beantwortet wurden? Schauen
Sie dann unter www.marmitek.com
20 © MARMITEK

DEUTSCH
6. TECHNISCHE DATEN
IPTV Coax Pro™ Knoten
Speisungsadapter: 100~240VAC@50/60Hz, 5VDC 2A
Reichweite: Max. 100m mit RG-59 Koaxialkabel
Koaxialeingang: F-Steckverbinder, 75Ohm
Koaxialausgang: F-Steckverbinder, 75Ohm
RF Ausgangsniveau: E-Band, -3dBm
D-Band, -10dBm
Netzwerkanschluss: 1P-Knoten: 1x 10/100Mbps Ethernet
4P-Knoten: 4x 10/100Mbps Ethernet
Statusanzeige: Power, Link, Signal Quality, LAN
Maße: 170 x 95 x 30mm
Umgebung
Umgebungstemperatur: +0 bis +40ºC
Relative Feuchte 10% bis 85%
MoCA
Ausführung MoCA 1.1
Frequenz: E-Band, 475~625MHz (5 Kanäle)
D-Band, 1125~1525MHz (8 Kanäle)
Bandbreite: 50MHz
Übertragungsgeschwindigkeit: PHY 250Mbps
Latenzzeit: < 5ms
Angaben können ohne vorherige Mitteilung geändert werden.
IPTV Coax Pro™ 21
 Loading...