


Model TT-15S1 User Guide
Turntable

ENGLISH
WARRANTY
For warranty information, contact your local Marantz distributor.
RETAIN YOUR PURCHASE RECEIPT
Your purchase receipt is your permanent record of a valuable
purchase.
It should be kept in a safe place to be referred to as necessary
for insurance purposes or when corresponding with Marantz.
IMPORTANT
When seeking warranty service, it is the responsibility of
the consumer to establish proof and date of purchase.
Your purchase receipt or invoice is adequate for such proof.
FOR U.K. ONLY
This undertaking is in addition to a consumer's statutory rights
and does not affect those rights in any way.
DEUTSCH
GARANTIE
Bei Garantiefragen wenden Sie sich bitte an Ihren
Marantz-Händler.
HEBEN SIE IHRE QUITTING GUT AUF
Die Quittung dient Ihnen als bleibende Unterlage für Ihren
wertvollen Einkauf Das Aufbewahren der Quittung ist wichtig,
da die darin enthaltenen Angaben für Versicherungswecke oder
bei Korrespondenz mit Marantz angeführt werden müssen.
WICHTIG!
Bei Garantiefragen muß der Kunde eine Kaufunterlage mit
Kaufdatum vorlegen. Ihren Quittung oder Rechnung ist als
Unterlage ausreichend.
FRANÇAIS
GARANTIE
Pour des informations sur la garantie, contacter le distributeur
local Marantz.
CONSERVER L'ATTESTATION D'ACHAT
L'attestation d'achat est la preuve permanente d'un achat de
valeur. La conserver en lieu sur pour s'y reporter aux fins
d'obtention d'une couverture d'assurance ou dans le cadre de
correspondances avec Marantz.
IMPORTANT
Pour l'obtention d'un service couvert par la garantie, il incombe
au client d'établir la preuve de l'achat et d'en corroborer la
date. Le reçu ou la facture constituent des preuves suffisantes.
NEDERLANDS
GARANTIE
Voor inlichtingen omtrent garantie dient u zich tot uw plaatselijke
Marantz Dealer.
UW KWITANTIE, KASSABON E.D. BEWAREN
Uw kwitantie, kassabon e.d. vormen uw bewijs van aankoop
van een waardevol artikel en dienen op een veilige plaats
bewaard te worden voor evt, verwijzing bijv, in verbend met
verzekering of bij correspondentie met Marantz.
BELANGRIJK
Bij een evt, beroep op de garantie is het de verantwoordelijkheid
van de consument een gedateerd bewijs van aankoop te tonen.
Uw kassabon of factuur zijn voldoende bewijs.
ITALIANO
GARANZIA
L’apparecchio è coperto da una garanzia di buon funzionamento
della durata di un anno, o del periodo previsto dalla legge,
a partire dalla data di acquisto comprovata da un documento
attestante il nominativo del Rivenditore e la data di vendita.
La garanzia sarà prestata con la sostituzione o la riparazione
gratuita delle parti difettose.
Non sono coperti da garanzia difetti derivanti da uso improprio,
errata installazione, manutenzione effettuata da personale non
autorizzato o, comunque, da circostanze che non possano
riferirsi a difetti di funzionamento dell’apparecchio.
IMPORTANTE
Sono inoltre esclusi dalla garanzia gli interventi inerenti
l’installazione e l’allacciamento agli impianti di alimentazione.
Gli apparecchi verranno riparati presso i nostri Centri di
Assistenza Autorizzati. Le spese ed i rischi di trasporto sono a
carico del cliente. La casa costruttrice declina ogni responsabilità
per danni diretti o indiretti provocati dalla inosservanza delle
prescrizioni di installazione, uso e manutenzione dettagliate nel
presente manuale o per guasti dovuti ad uso continuato a fini
professionali.
ESPAÑOL
GARANTIA
Para obtener información acerca de la garantia póngase en
contacto con su distribuidor Marantz.
GUARDE SU RECIBO DE COMPRA
Su recibo de compra es su prueba permanente de haber
adquirido un aparato de valor, Este recibo deberá guardarlo en
un lugar seguro y utilizarlo como referencia cuando tenga que
hacer uso del seguro o se ponga en contacto con Marantz.
IMPORTANTE
Cuando solicite el servicio otorgado por la garantia el usuario
tiene la responsabilidad de demonstrar cuá¥do efectuó la
compra. En este caso, su recibo de compra será la prueba
apropiada.

1
Congratulation’s to your choice of the TT-15S1 turntable, a world-class turntable, made by Marantz.
Please read this user manual carefully, to avoid any damages or loss of warranty.
These instructions will help you with an easy set-up and guarantee the highest pleasure for a long time.
We wish you a lot of musical enjoyments with your new Marantz TT-15S1 turntable.
This section must be read before any connection is made to the mains supply.
Warnings
Do not expose the equipment to rain or moisture.
Do not remove the cover from the equipment.
Do not insert anything into the equipment through the ventilation holes.
Do not handle the mains lead with wet hands.
No naked flame sources, such as lighted candles, should be placed on the equipment.
CE MARKING
The Marantz TT-15S1 conforms with the EMC directive and low voltage directive.
EQUIPMENT MAINS WORKING SETTING
Your Marantz product has been prepared to comply with the household power and safety requirements
that exist in your area. This product can be powered by 230 V AC only.
COPYRIGHT
Recording and playback of any material may require consent. For further information refer to the following:
- Copyright Act 1956
- Dramatic and Musical Performers Act 1958
- Performers Protection Acts 1963 and 1972
- Any subsequent statutory enactments and orders
FOREWORD
Table of contents
Product description 2
Scope of supply 2
Installation and set up 4
Specific precautions 6
Service information 6
Technical Specifications 6
2
The ultra low resonance construction in combination
with a stand alone motor unit, guarantees total
isolation of resonance from the turntable chassis,
providing the best music reproduction and authentic
audiophile imaging. A high precision, maintenance
free ceramic bearing is completing the analogue
pleasure.
However it’s the sum of the individual parts that
determines the quality of the Marantz TT-15S1
turntable. That is why Marantz has optimised
the tonearm for the mechanism with a magnetic
floating antiskating system and a matching
ClearAudio Virtuoso MM cartridge executed in
ebony wood.
PRODUCT DESCRIPTION
Marantz has developed a special and secure
turntable packing, to avoid any transportation
damages. Please store this original packing, in
case you need to ship the turntable.
Please confirm the content of the packaging of
the TT-15S1 based on the below overview.
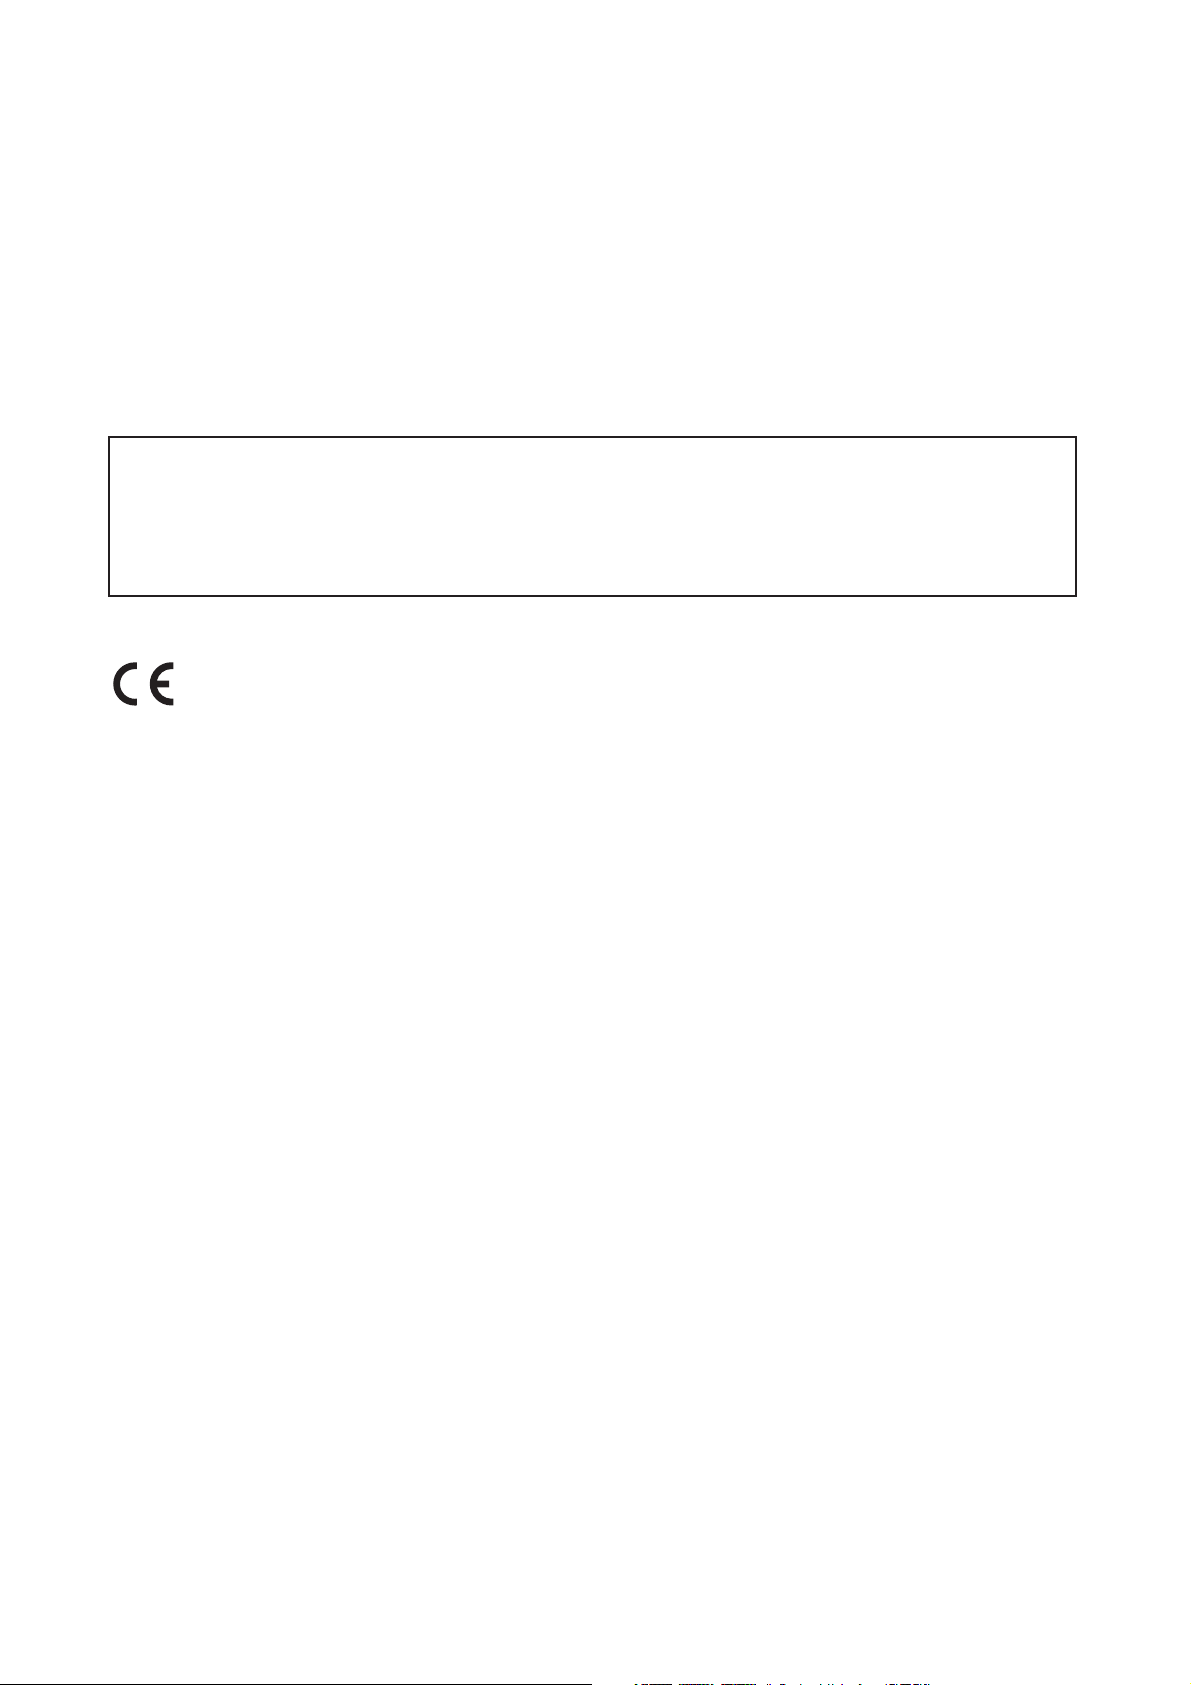
SCOPE OF SUPPLY
1
3
2
4
1 Turntable chassis
3 Tonearm with counterweight and interconnects
2 Bearing (upper part) with adjusted bearing shaft
4 Turntable-Platter made from GS-Acryl
3
5 Motor drive unit with mains cable
7 A pair of white gloves
9 Two drive belts
11 Felt Sheet
13 Record clamp “Clever Clamp”
6 Acrylic motor pulley
8 Grounding wire for the turntables bearing
10 Bearing oil for occasional use
12 Three Allen keys (sizes: 1.5 / 2.5 / 3)
56
78
910
11 12
13
4
The Marantz TT-15S1 comes in several pre mounted
parts, as described in Scope of supply. The set up
and installation is done quickly and very easy.
Please use the white gloves during this procedure,
to avoid scratches.
You should consider a safe and clean working area
for the installation, in spite, as near as possible to
the final position of the turntable.
First take out the accessories, the motor and the
tonearm of the packing. Now you should take out
the first packing layer. After that you can take out
the turntable chassis including the mounted lower
and upper bearing part from the second packing
layer. Place the turntable chassis on its feet on the
area where the final position of your turntable will be.
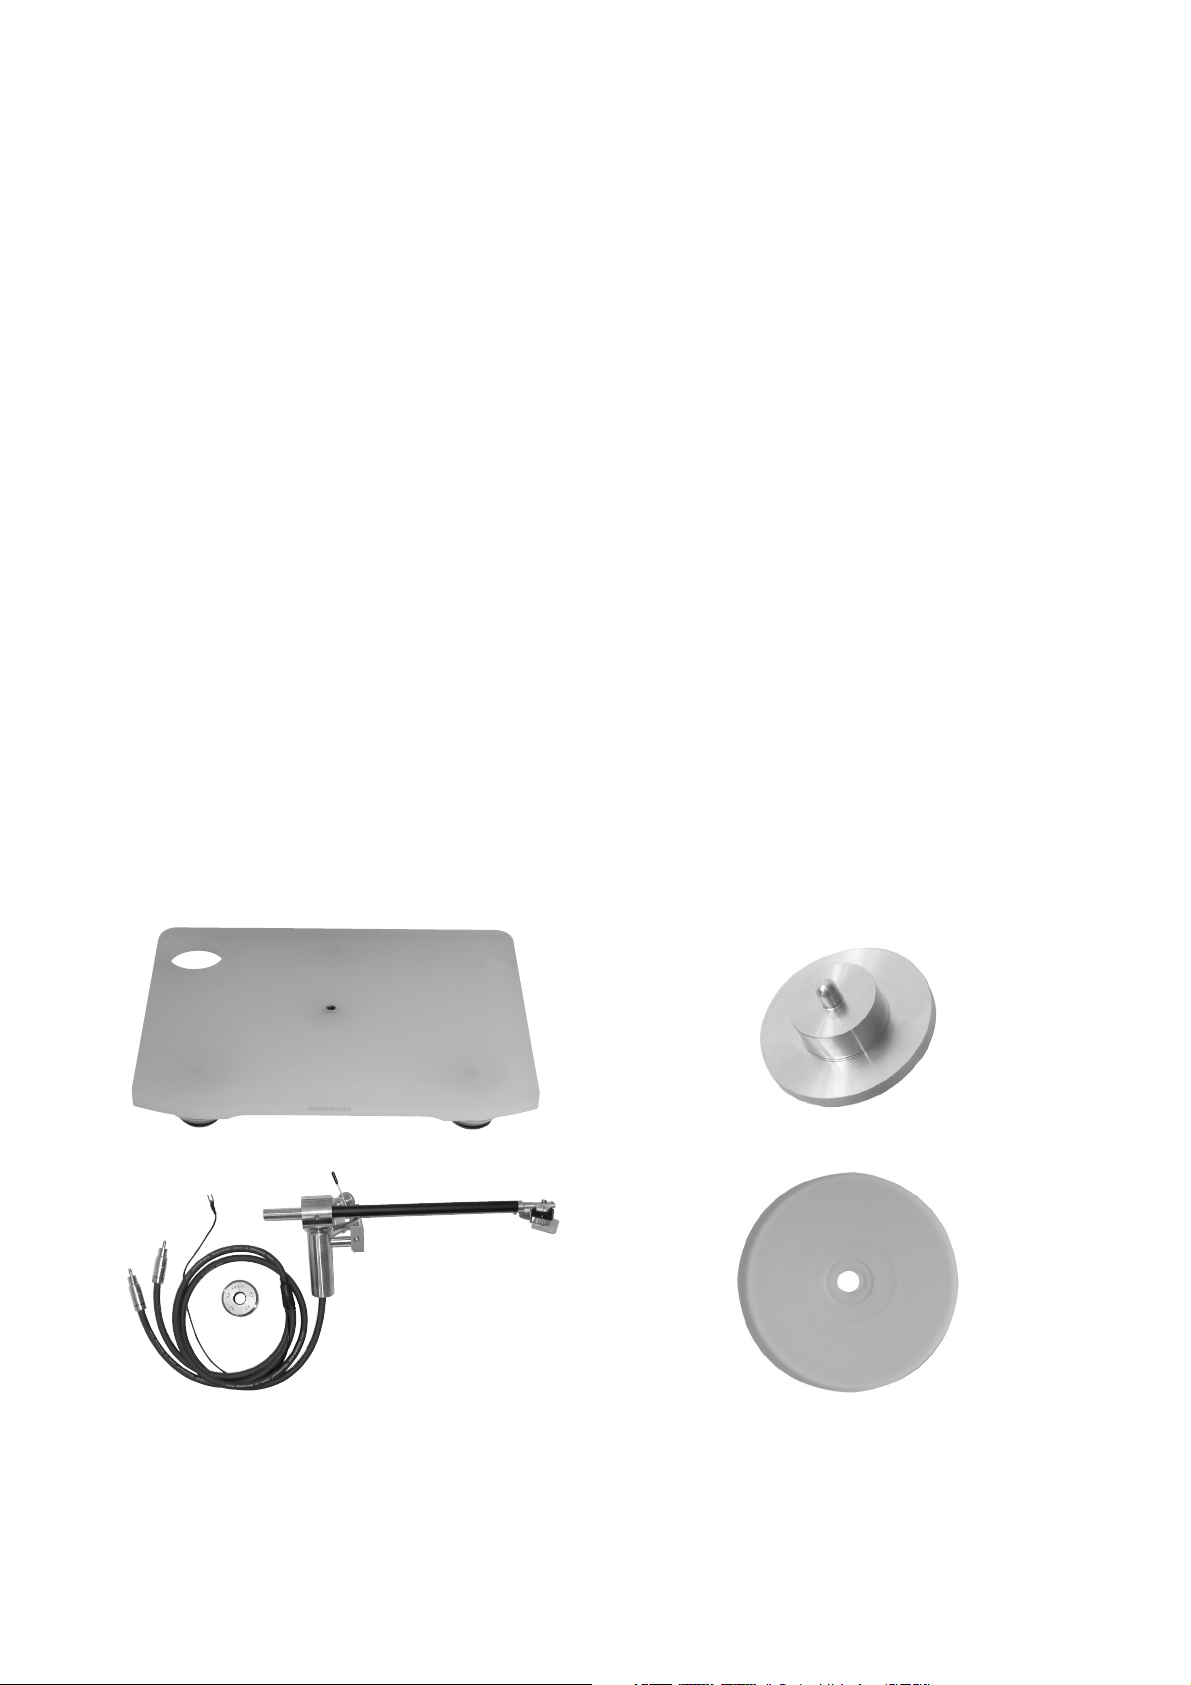
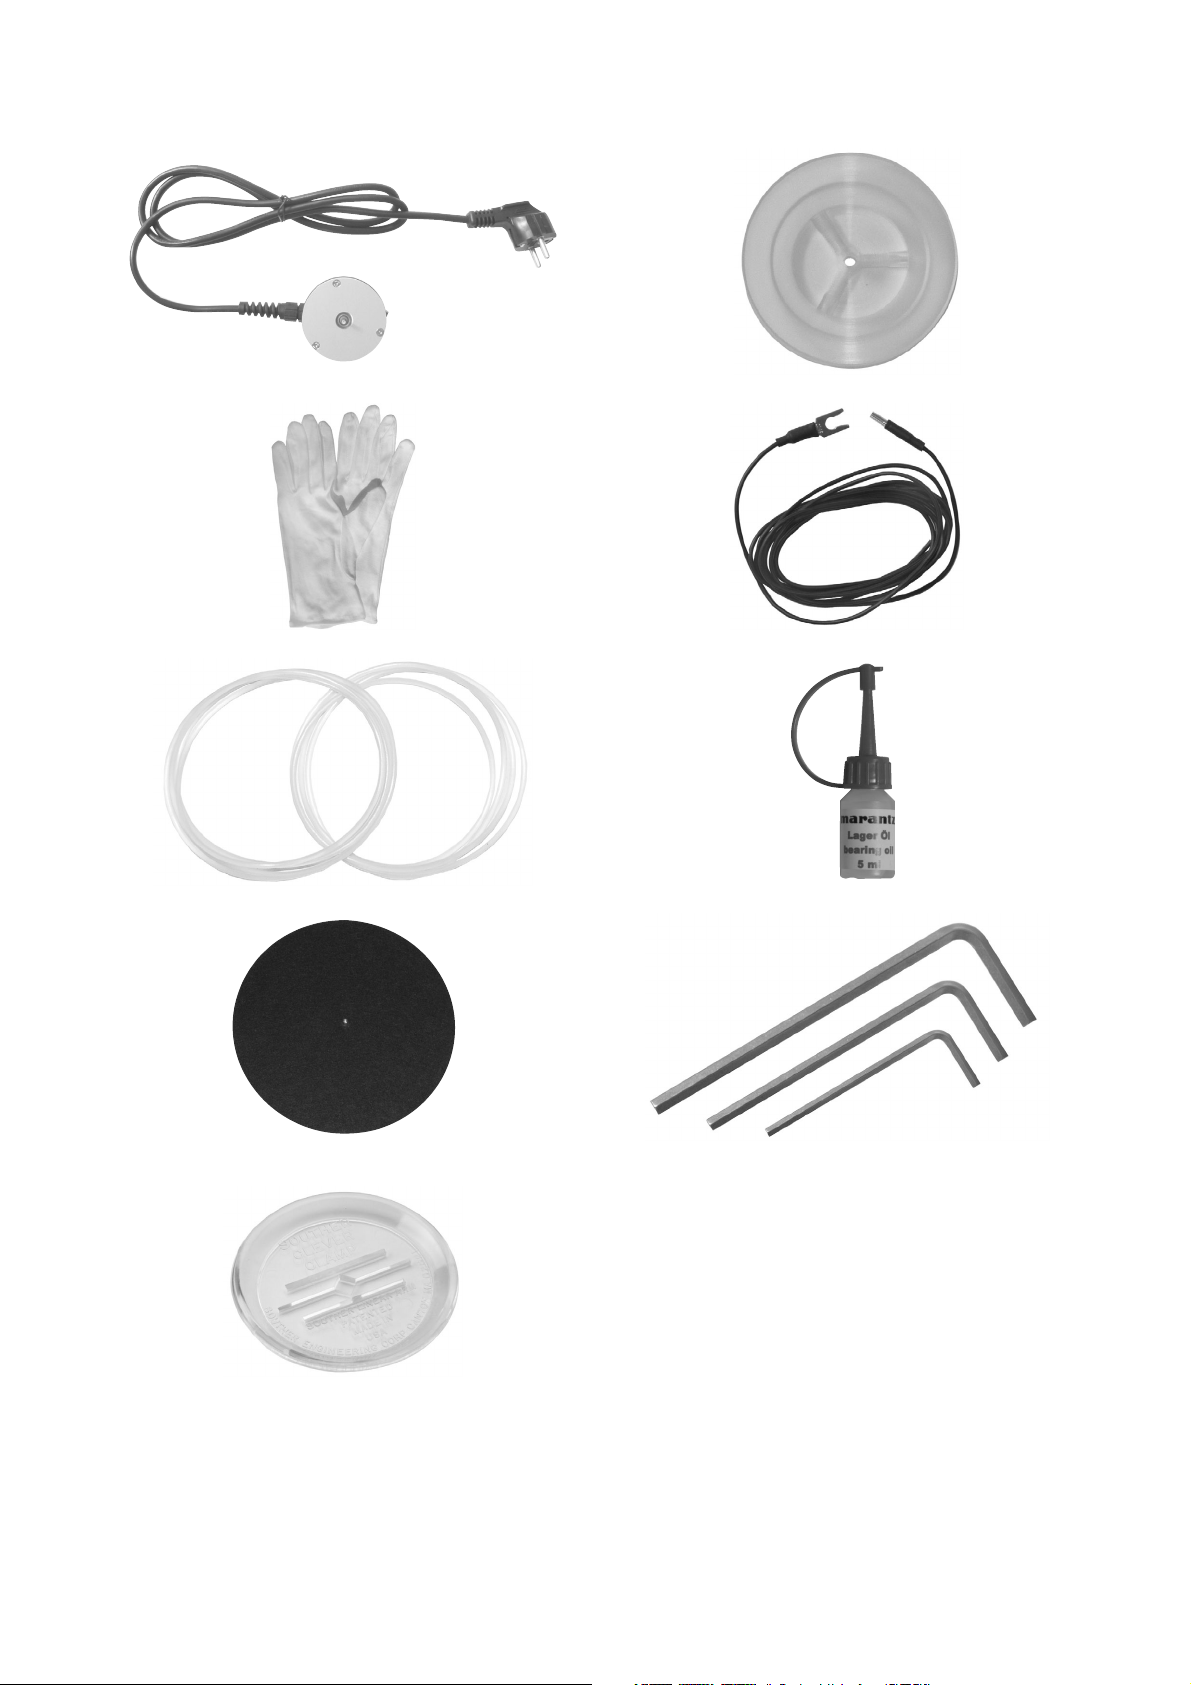
Take the motor-pulley out of the accessory bag and
shift the motor pulley as far as on the motors´ shaft
until you have a distance of approximately 1 mm
between the upper edge of the motor and the lower
edge of the pulley. Now screw the three screws in
the pulley one after the other with a screwdriver.
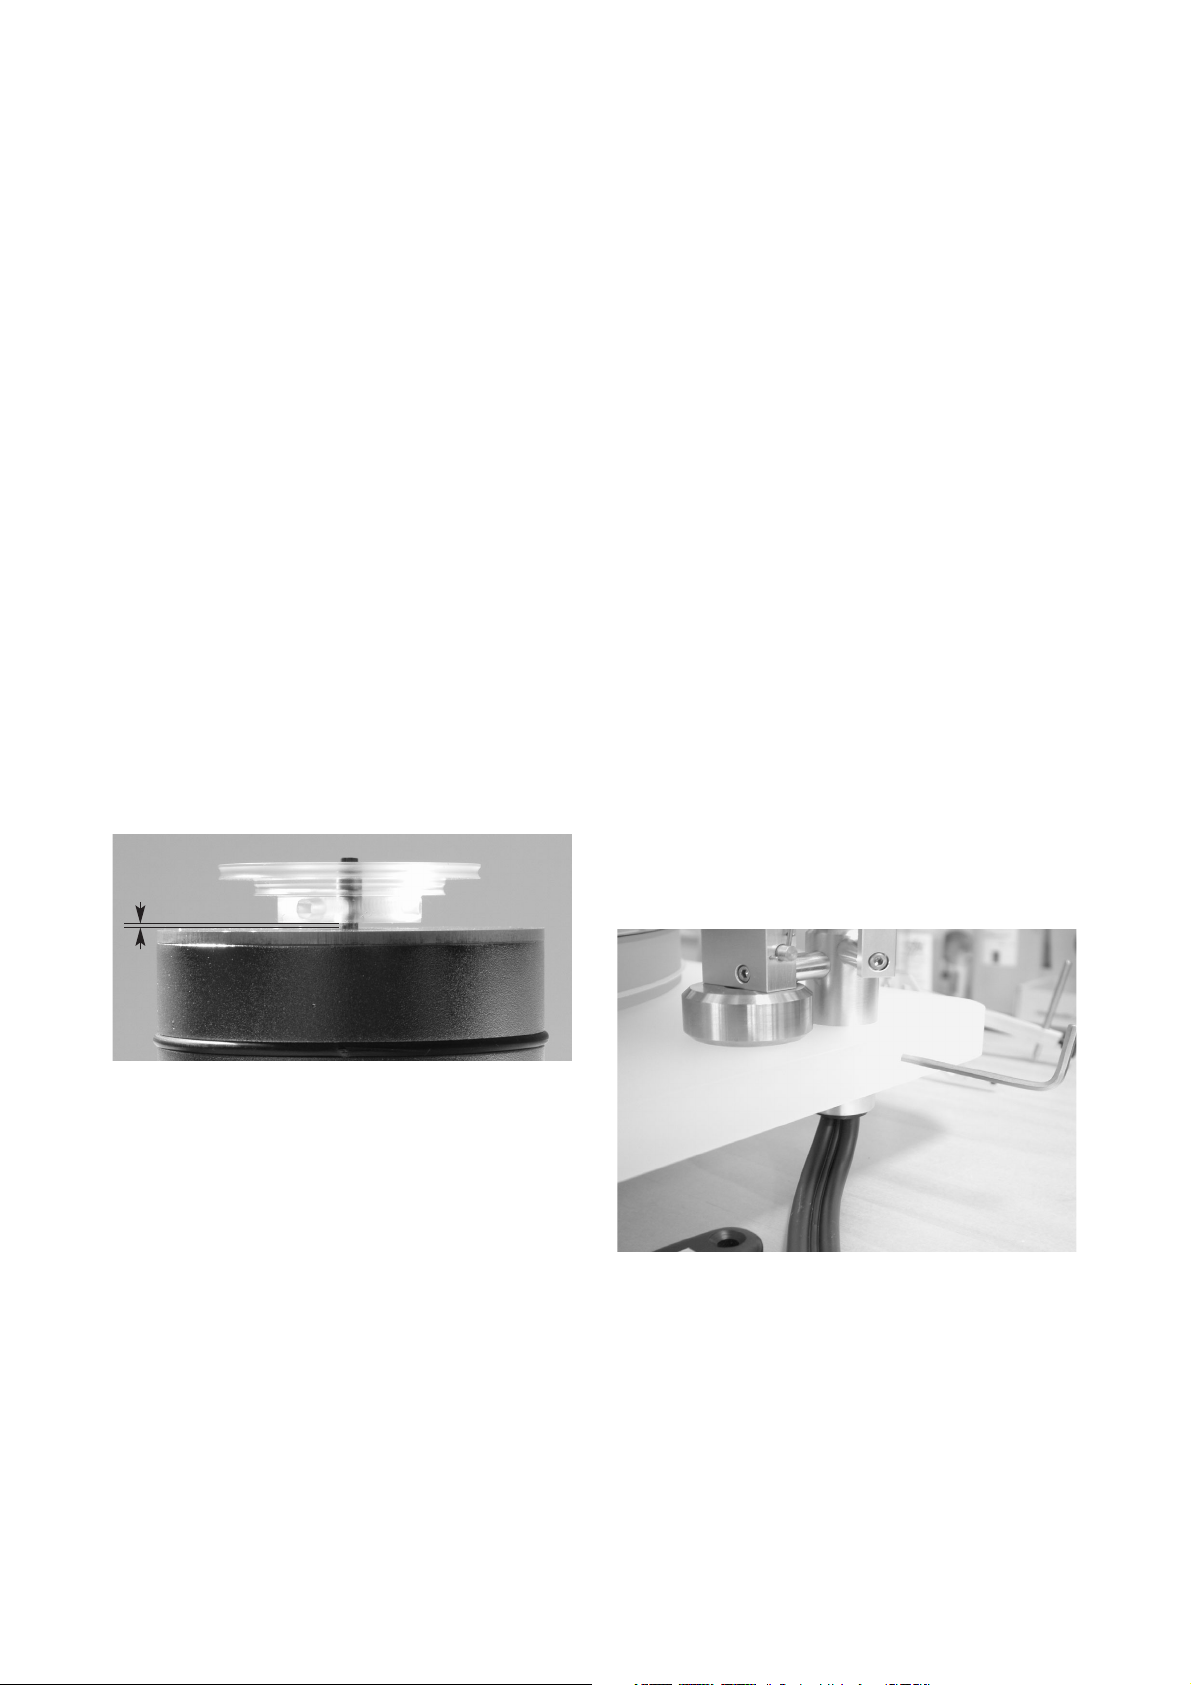
Lift the turntable chassis and slide the motor from
below exactly under the predefined position hole in
the chassis. Please pay attention that the switch of
the motor is outside on the left side of the record
player body. When the motor is at the right position
carefully put the chassis down again.
After that you have to centre the motor in the motorposition hole without any contact to the turntable
chassis. This way you can use your turntable
perfectly decoupled from the motor.
Remove the second packing layer. In the bottom
packing layer you will find the turntable platter.
Please take the platter out with both hands.
Place the platter with the 60mm wide and 5mm
deep cut out on the upper bearing part. Through a
lightly up and down movement the platter will slip
onto the bearing upper part. Ensure with a gently (!)
pressure that the platter is applying on the complete
surface of the bearing.
Take the threaded bolt (M6 x 8) out of your accessory bag and screw it with the adequate Allen key
into the winding near the tonearm cut of the turntable chassis, so that the front of the bolt is not
facing out the inner side of the tonearm cut.
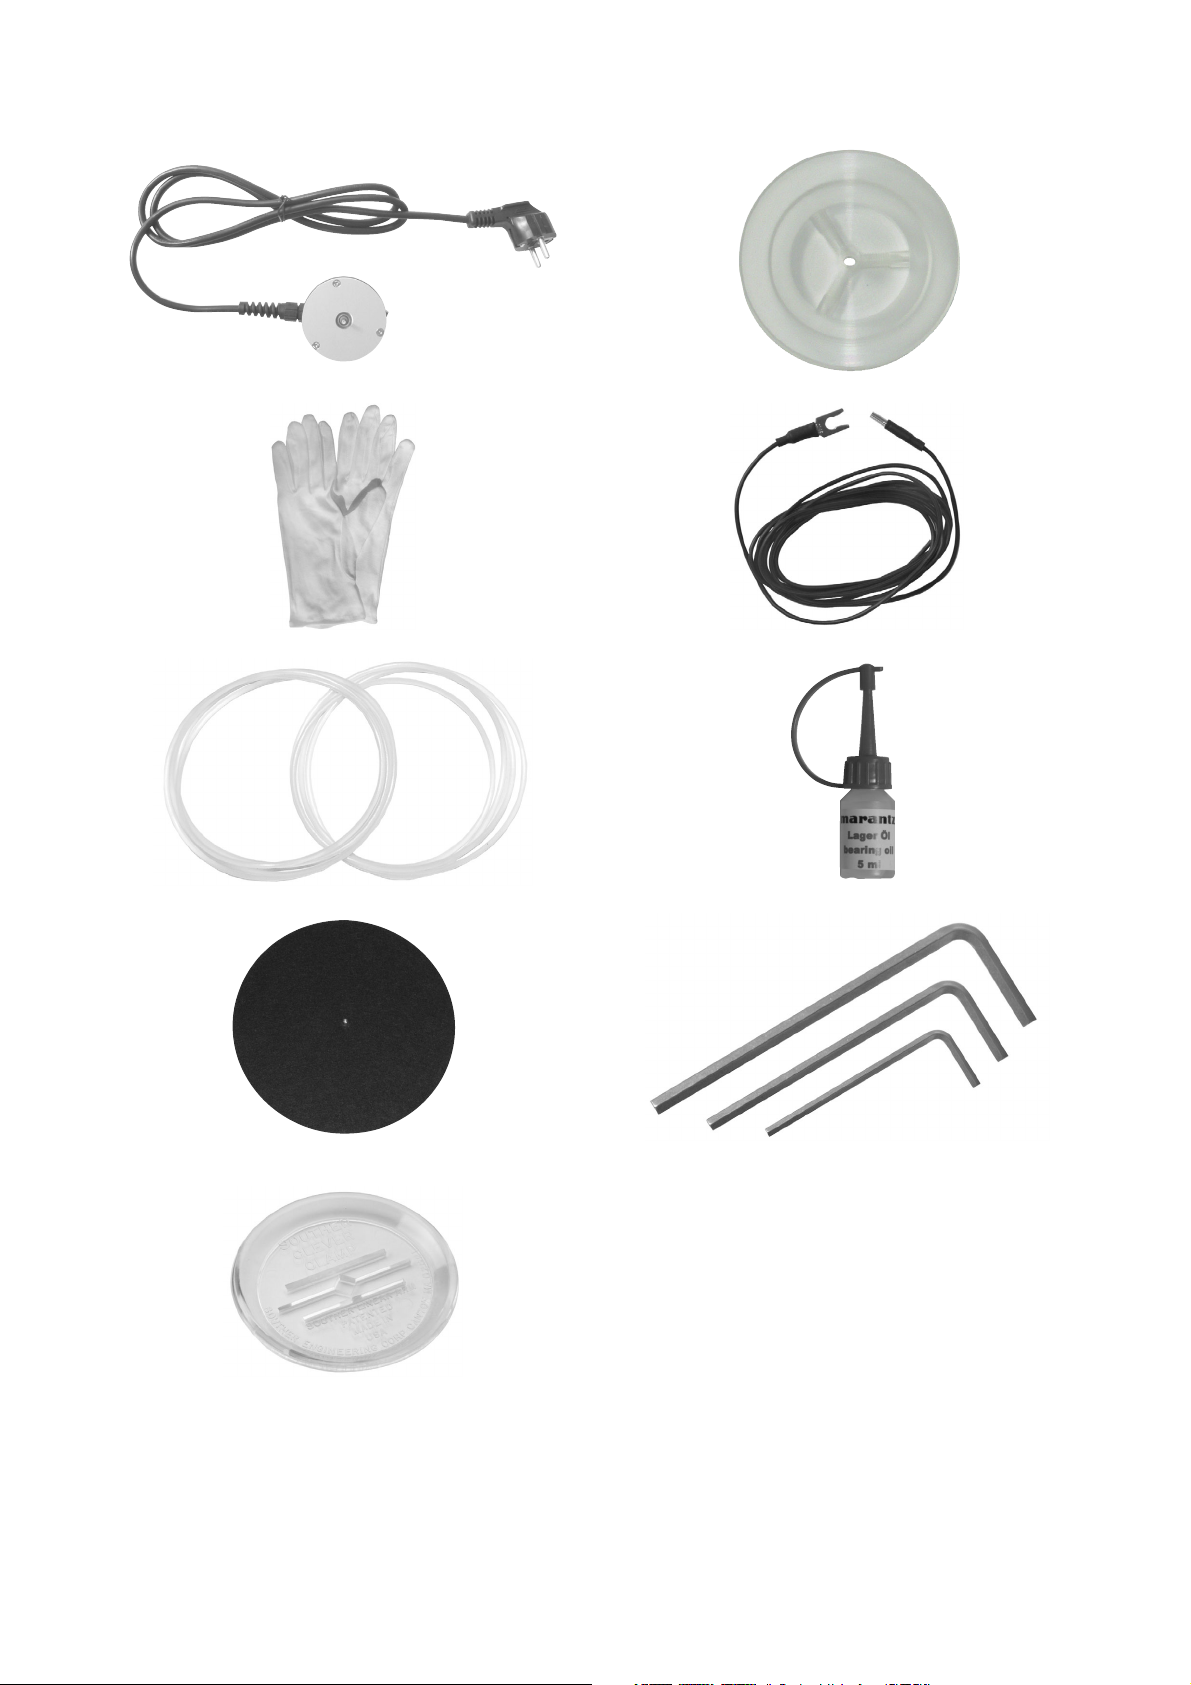
Position the enclosed counterweight on top of the
chassis in front of the cut out for the tonearm. Take
the tonearm and slide first the interconnect cable
through the hole followed by the tonearm’s shaft.
Gently push the arm down into to the hole until the
pickup lift is seated on the counterweight (see figure…). Please ensure that the tonearm tube is in
parallel to the right edge of the turntable body. Now
carefully fix by turning the pick up with an Allen key
and afterwards remove the counterweight.
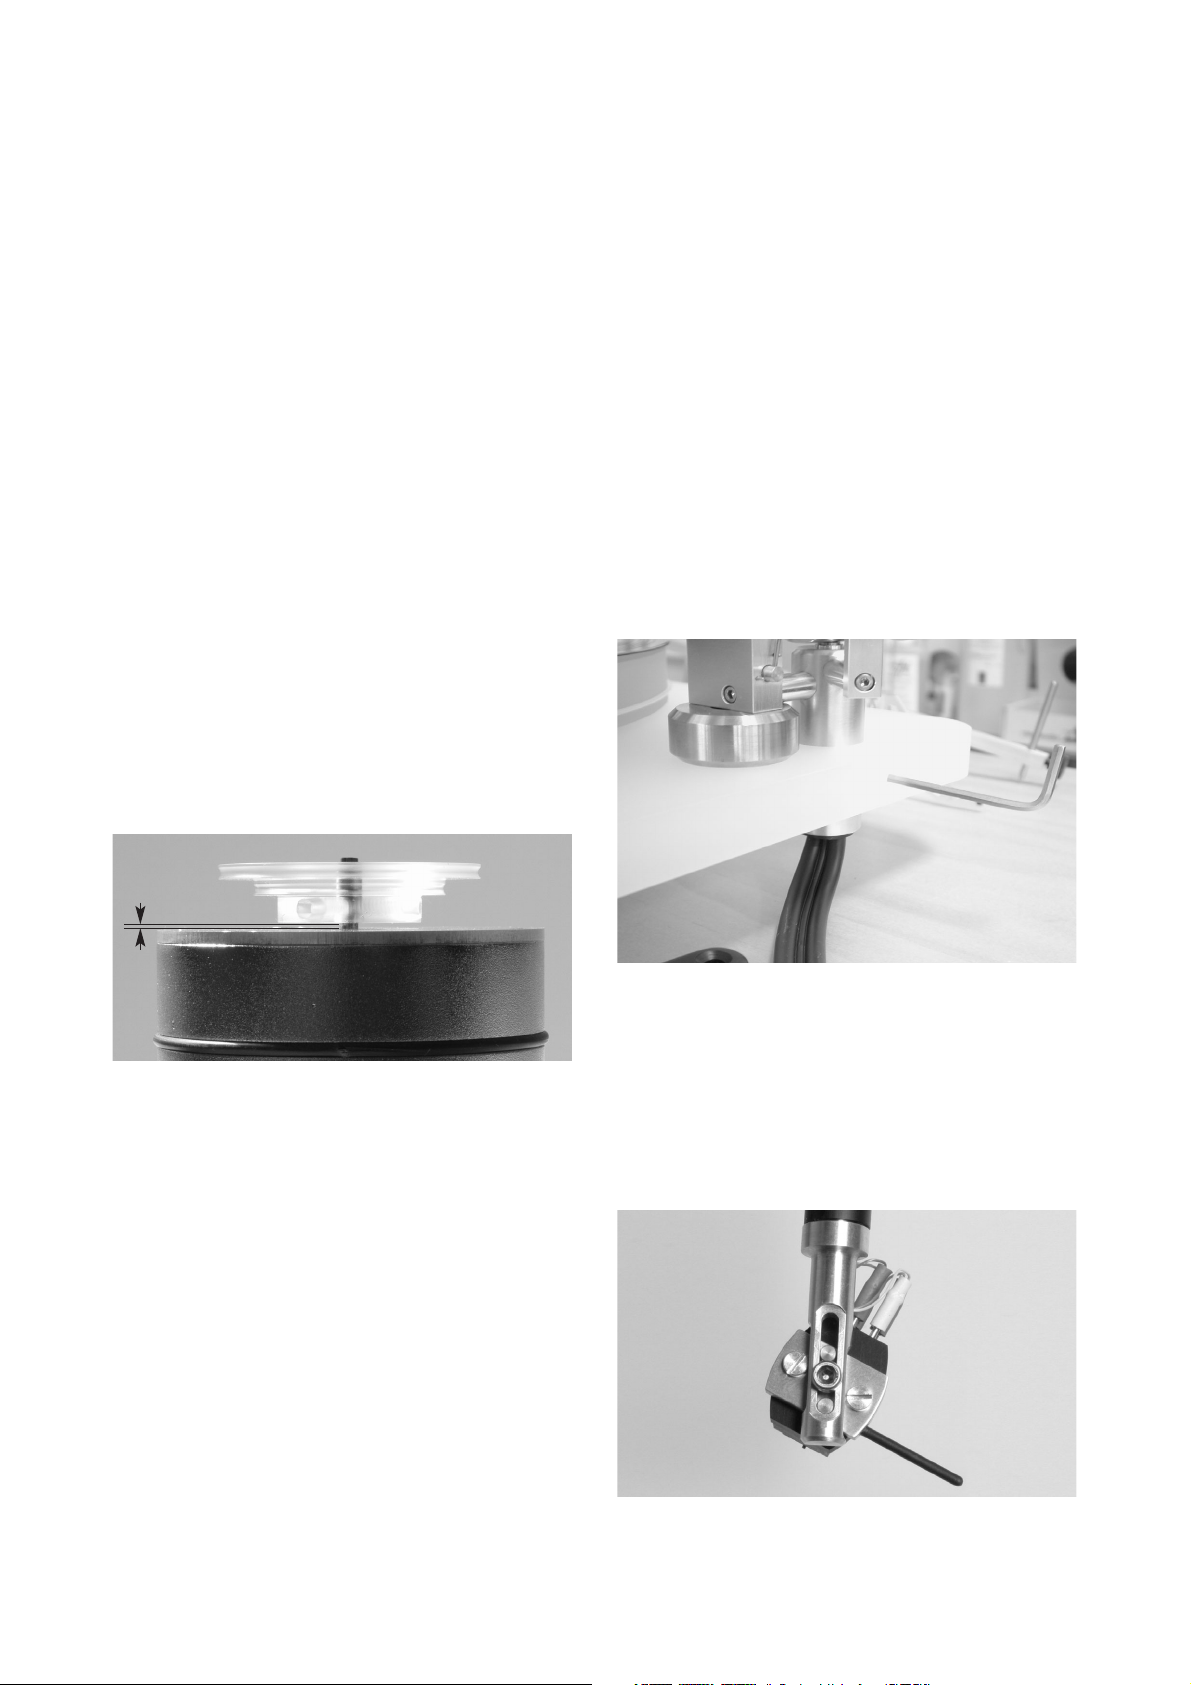
When the tonearm is fixed you can connect the
cartridge to the tonearm. The guideway in the
headshell simplifies the assembling. Please fix the
cartridge, with the screw and appropriate allen key,
to the tonearm when positioned at the lower treshold
(see picture). In this position the cartridge and the
arm will automatically have the correct angle and
an optimised incline.
Carefully connect the cartridge to the tonearm cable.
The headshell wires (cartridge connection leads)
are colour coded according to the international
standard and are given in the below overview:
INSTALLATION AND SET UP
1mm
5
Important: pay attention during the following steps
to avoid any damages to the cartridge.
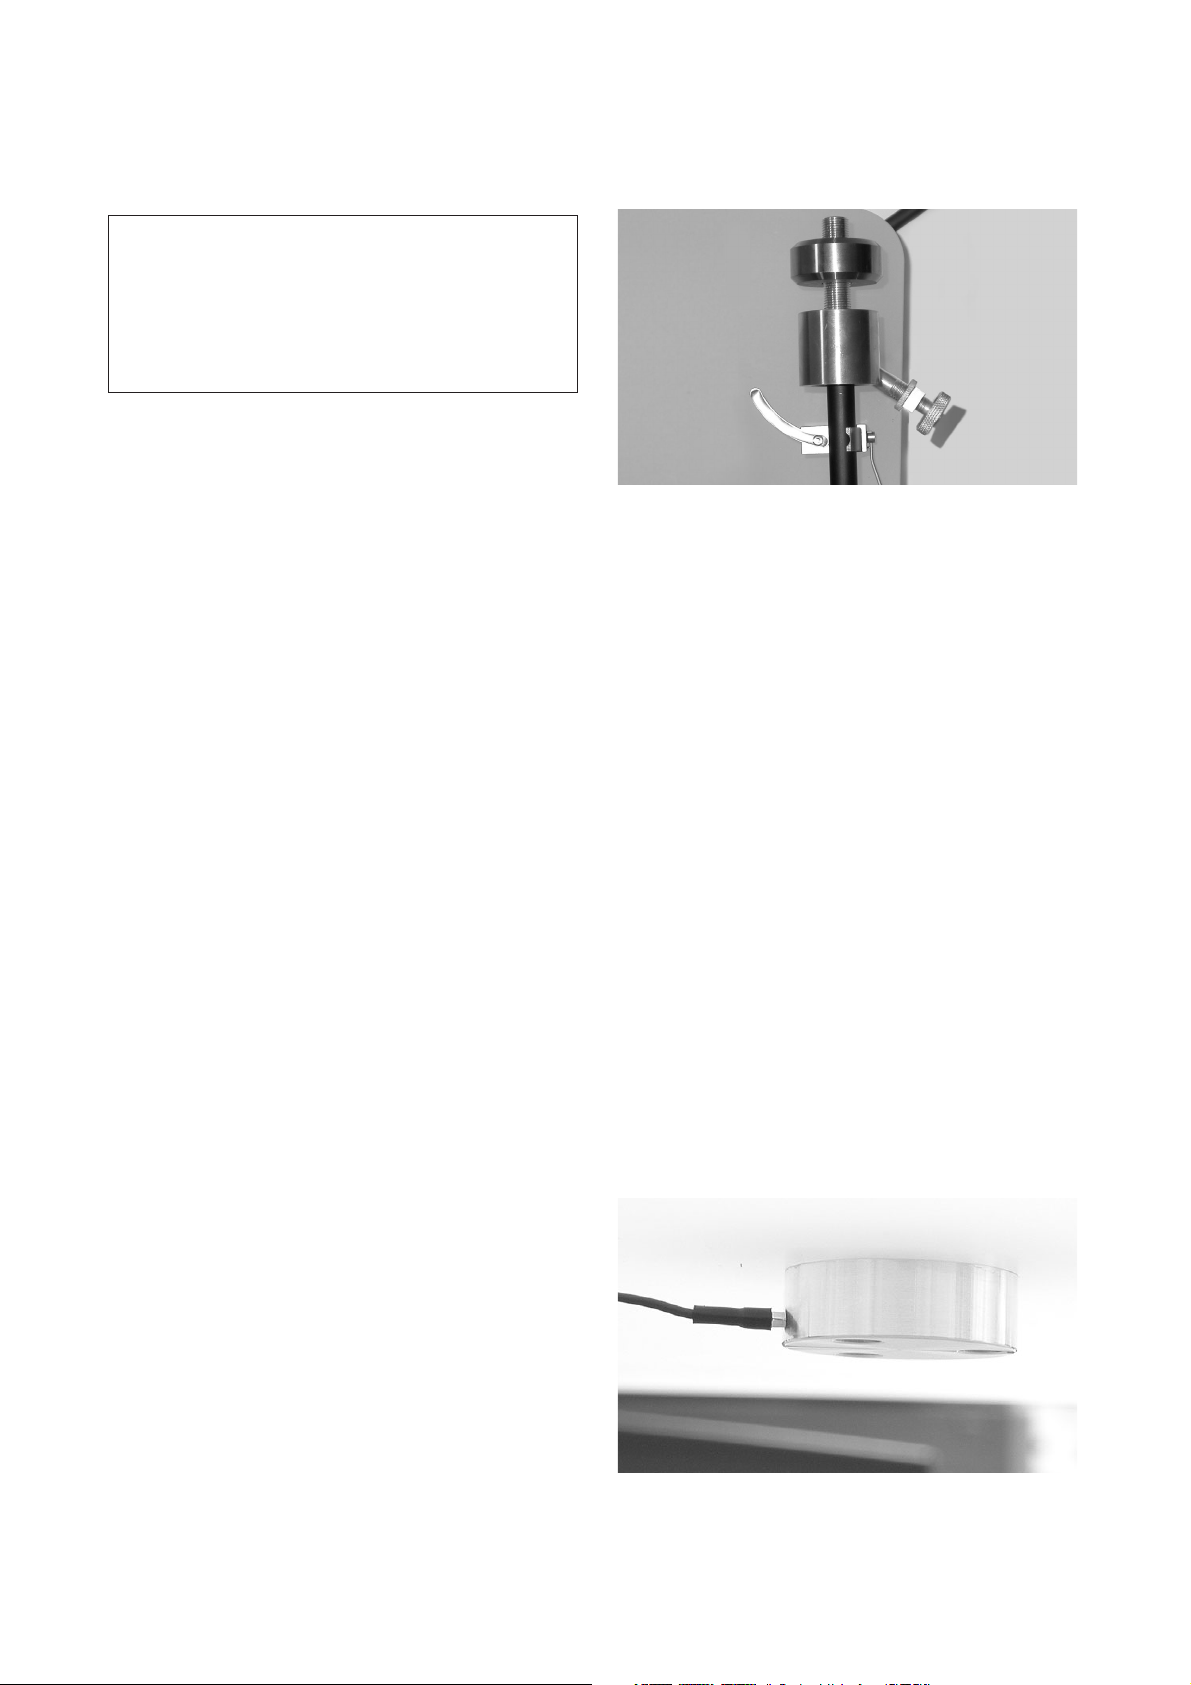
If you are using the enclosed ClearAudio Moving
Magnet cartridge Virtuoso Wood you can adjust the
force to 22 mN. Gently push the counterweight
onto the pick up end so that the imprinted scale
shows in the pick up system direction. When you
let the pick up go, the counterweight moves down
and the system up. Now remove the needle’s
protective cover and turn the counterweight in the
system direction until the pick up is in balance and
hovers freely. Please be careful not to damage the
system’s needle when doing this. The position you
now have corresponds to a load weight of 0mN.
With the scaling on the counterweight you can now
adjust this to exactly 22mN. A complete revolution
corresponds to 5mN, i.e. you must turn the
counterweight 4 complete revolutions plus 2 scaled
units in the system direction. Now the system has
been lowered. Please take care to not damage the
system’s needle when doing this.
For the next settings place any LP on to the platter.
Now you can remove the stylus protector.
If you now lift down the cartridge to the middle of
the turntable platter, you must see (from the side)
that the upper edge of the tonearm tube is parallel to
the surface of the record. You can use the tonearm
tube as orientation. If it is necessary you can adjust
the height of the tonearm. For that you have to
move the tonearm in the chassis´s hole in the right
direction and fix the position through locking the
Allen screw in the edge of the turntable chassis.
In order to finalize the general setup you have to
adjust for antiskating. This is also related to the
tracking force of the cartridge. With the antiskating
screw (on the right hand sight of the main counter
weight) you can complete the calibration of the
tonearm. Given the tracking force of 22Nm,
the screw should be in the middle position.
The fine-tuning can be done best when a well
known recording containing a solo instrument or
voice which should be located in the front centre
position of the sound stage. In case the image has
moved to much to the right hand sight of the sound
stage, you should lower the antiskating by screwing
the antiskatingscrew out. In case the image is
positioned to much to the left hand sight you
should increase the antiskating by screwing the
antiskatingscrew in.
Connect your interconnect cable of your Marantz
TT-15S1 now with the phono input of your
phono-preamplifier and connect the power cord to
the mains.
Place one drive belt (the second is for spare)
around the platter and around the pulley. The smaller
diameter of the pulley is used for 33 1/3 rpm and
the larger diameter for 45 rpm. The position “I” on
the motor-switch indicates that the turntable is
switched on. Please let the turntable be switched
on for the first 15 to 30 minutes, for breaking in.
It is recommended to connect the lower part of the
bearing with the enclosed grounding cable to the
grounding terminal on your amplifier.
You are completely set to play and enjoy your vinyl
records on your Marantz TT-15S1 turntable.
Colour code of the Satisfy tonearm wire:
Signal left channel (L+) white
Signal ground left channel (L -) blue
Signal right channel (R+) red
Signal ground right channel (R -) green

6
SPECIFIC PRECAUTIONS
Every two years you can lubricate (only if you will
recognize speed variations) the bearing of the
turntable platter with the delivered oil. In this case it
is enough to put 4 or 5 drops of the oil into bearing.
Please take special caution to any damages of the
power cord. Any damages should only be repaired
only by authorized personal. A damaged power
cord must be exchanged immediately!
Caution! Please use only non-alcoholic fluids and
only fluids specially used for acrylic, to clean the
Emotion-turntable. Otherwise there could occur
damage to the material or the surface!!!
SERVICE AND REPAIR
Please contact your Authorized Marantz dealer
nearby in case this manual didn’t answer all your
questions regarding your newly purchased
Marantz product.
Only the most competent and qualified service
technicians should be allowed to service the
equipment. The Marantz company and its factorytrained warranty station personnel have the
knowledge and special facilities needed for the
repair and calibration of this precision equipment.
After the warranty period has expired, repairs will
be performed for a charge if the equipment can be
restored to normal operation. In the event of difficulty,
consult your Authorized Marantz dealer. Please
quote the model and serial number of the equipment
and give a full description of what you think is
abnormal about the equipment’s behaviour.
TECHNICAL SPECIFICATIONS
Construction principle: Resonance optimised chassis shape, belt driven
Speed possibillities: 33 1/3 rpm / 45 rpm (78 rpm with optional motor pulley)
Drive unit: Decoupled synchronous motor in a massive metal-housing
Bearing: Hardened steel, polished sinter bronze insert with a ceramic ball
Platter: GS-PMMA, acrylic, precision CNC machined surface
Speed variation: ±0,2 %
Dimensions: Aprox. 400 mm x 330 mm x 150 mm
Warranty: 3 years (excluding the cartridge)
1
Sie haben sich für einen Marantz TT-15S1 Plattenspieler entschieden, ein hochwertiges Produkt aus dem
Hause Marantz. Wir bedanken uns bei Ihnen für das uns entgegengebrachte Vertrauen. Um die volle
Qualität des Marantz TT-15S1 nutzen zu können, lesen Sie bitte diese Bedienungsanleitung aufmerksam
durch. Alle Hinweise dienen der langjährigen Freundschaft mit dem Marantz TT-15S1 und bewahren Sie
vor Fehlbedienungen.
Lesen Sie diesen Abschnitt in jedem Fall, bevor Sie ein Gerät an das Stromnetz anschließen.
Warnungen
Das Gerät nicht Regen oder Feuchtigkeit aussetzen.
Das Netzkabel nicht mit feuchten oder nassen Händen anfassen.
Es dürfen keine Gegenstände mit offener Flamme, wie etwa brennende Kerzen,
auf dem Gerät aufgestellt werden.
CE-MARKIERUNG
Der Marantz TT-15S1 entspricht den Bestimmungen über elektromagnetische Störfreiheit (EMC)
und denen über Niederspannungsgeräte.
GERÄTENETZEINSTELLUNG
Ihr Marantz-Produkt wurde so konstruiert, dass es der Haushaltsleistung und den Sicherheitsbestimmungen
in Ihrer Region genügt. Dieses Produkt kann nur mit 230 V Wechselstrom betrieben werden.
URHEBERRECHT
Aufnahme und Wiedergabe jeglichen Tonmaterials kann die Zustimmung des Urhebers erfordern.
Beachten Sie dazu folgende Informationsschriften.
- Copyright Act 1956 (Urheberrechtsgesetz 1956)
- Dramatic and Musical Performers Act 1958 (Gesetz über dramatische und musikalische
Aufführungsrechte, 1958)
- Performers Protection Acts 1963 and 1972 (Künstler schutzgesetze von 1963 und 1972)
- Jegliche nachfolgende, gesetzliche Verfügungen und Bestimmungen.
VORWORT
Inhaltsverzeichnis
Produktübersicht 2
Lieferumfang 2
Aufbau und Inbetriebnahme 4
Besondere Hinweise 6
Service 6
Technische Daten 6

2
Resonanzreduzierende Formgebung in Verbindung
mit einer ausgelagerten Motoreinheit garantieren
absolute Laufruhe, originalgetreue Wiedergabe und
somit ein echtes Musikerlebnis. Ein hochpräzises,
wartungsfreies Keramiklager sorgt für reibungslosen
Analoggenuss.
Aber erst die Summe aller Einzelteile macht die
ganze Qualität des Marantz TT15S1 aus.
Deshalb befinden sich der zum Laufwerk optimierte
Tonarm mit berührungslosem Antiskating und das
auf den Tonarm abgestimmte clearaudio Virtuoso
MM-System im Ebenholzgehäuse im Lieferumfang.
PRODUKTÜBERSICHT
Der Marantz TT15S1 verlässt unsere Fertigung in
einer besonders sicheren und eigens für dieses
Laufwerk konzipierten Verpackung. Bewahren Sie
diese Verpackung auf, um jederzeit einen sicheren
Transport Ihres Gerätes zu gewährleisten.
Bitte kontrollieren Sie anhand der unten aufgeführten
Listung den Lieferumfang Ihres neu erworbenen
Marantz TT15S1 Laufwerks. Dieser besteht aus:
LIEFERUMFANG
1
3
2
4
1 Plattenspielerchassis
3 Tonarm mit Gegengewicht und Anschlusskabel
2 Lageroberteil mit eingepasster Lagerwelle
4 Plattenteller aus GS-Acryl
3
5 Motorantriebseinheit mit Netzzuleitung
7 1 Paar weiße Handschuhe
9 2 Antriebsriemen
11 Filzmatte
13 Clever Clamp Plattenklemme
6 Antriebsrad aus Acryl
8 Erdungskabel für Laufwerkslager
10 Lageröl
12 3 Inbusschlüssel Größe 1,5 / 2,5 / 3
56
78
910
11 12
13
4
Der Marantz TT15S1 besteht aus mehreren Teilen,
wie unter Lieferumfang beschrieben. Der Aufbau
des Laufwerks ist mit wenigen Handgriffen zu
bewerkstelligen. Benutzen Sie bitte zum Aufbau
unbedingt die mitgelieferten weißen Handschuhe,
um Kratzer zu vermeiden.
Für den Zusammenbau benötigen Sie eine saubere
und staubfreie Arbeitsfläche; im Idealfall in der Nähe
des zukünftigen Aufstellorts. Nehmen Sie zuerst
den Motor und den Tonarm aus der Verpackung
und legen Sie beide zur Seite. Nun können Sie die
gesamte obere Verpackungsschicht aus dem
Karton entnehmen. Nehmen Sie nun das
Laufwerkschassis samt eingepasstem Lageroberund Unterteil aus der Verpackung heraus und stellen
Sie diese auf einer sauberen Unterlage ab.
Schieben Sie nun das Antriebsrad soweit auf die
Achse des Motors, bis zwischen Motoroberkante
und Antriebsradunterkante ein Spalt von ca. 1 mm
besteht. Ziehen Sie die drei Schrauben in dem
Antriebsrad mit dem Feinschraubendreher
nacheinander gleichmäßig an.
Heben Sie nun das Laufwerkchassis von der
Motorenseite aus an und schieben Sie die
Motoreinheit von unten in die dafür vorgesehene
Aussparung des Chassis. Achten Sie hierbei
darauf, dass der Schalter des Motors zur linken
Seite des Plattenspielerkörpers weist.
Lassen Sie das Chassis wieder nach unten ab.
Danach zentrieren Sie die Motoreinheit, sodass
kein Kontakt zum Laufwerkschassis besteht.
Somit haben Sie das Laufwerk perfekt vom Motor
entkoppelt.
Jetzt können Sie die verbleibende Verpackungsebene ebenfalls aus dem Karton entnehmen und
beiseite legen. Auf der untersten Verpackungsebene ist der Plattenteller verpackt.
Nehmen Sie den Plattenteller in beide Hände,
sodass die Plattentellerseite mit der etwa 60mm
breiten und 5mm tiefen Ausdrehung nach unten
weist und setzen diesen auf das zuvor entsprechend
in das Laufwerkchassis eingesetzte Lager auf.
Durch leichtes hin -und herwippen gleitet der
Plattenteller auf das Lageroberteil. Mit sanftem (!)
Druck von oben können Sie sicherstellen, dass der
Plattenteller auf der gesamten Auflagefläche des
Lageroberteiles liegt.
Nehmen Sie aus dem Zubehörbeutel den Gewindestift (M 6 x 8) heraus und schrauben Sie diesen mit
dem passenden Inbusschlüssel in die Gewindebohrung des Laufwerkkörpers nahe der Tonarmaufnahmebohrung. Drehen Sie den Gewindestift
nur soweit ein, dass er nicht in der Tonarmaufnahmebohrung austritt, damit anschließend der
Tonarmfuß ungehindert eingesetzt werden kann.
Legen Sie das Gegengewicht vor die Aussparung
für den Tonarm direkt auf das Chassis. Nehmen
Sie den Tonarm und führen zuerst die
Anschlusskabel und anschließend den Fuß des
Tonarmes in die dafür vorgesehene Bohrung des
Chassis. Schieben Sie den Tonarm so weit in die
Bohrung, bis der Tonarmlift auf dem Gegengewicht
aufliegt (siehe Abbildung …). der Tonarmfuß auf
dem Distanzstück aufliegt. Das Tonarmrohr sollte,
von der Ruheposition gehalten, parallel zur rechten
Kante des Chassis verlaufen. Fixieren Sie nun
vorsichtig durch Drehen des Imbusschlüssel den
Tonarm und entfernen danach das Gegengewicht.
Nun können Sie den Tonabnehmer auf dem Tonarm
montieren.
Die Führungsstifte am Headshell erleichtern die
Montage. Bitte fixieren Sie das System mit der mittig
angebrachten Imbusschraube am unteren Anschlag.
Hieraus ergeben sich der korrekte Kröpfungswinkel
und der optimale Überhang.
AUFBAU UND INBETRIEBNAHME
1mm

5
Jetzt sollten Sie vorsichtig die Tonarmkabel mit dem
Tonabnehmersystem verbinden. Die richtige
Anschlusskodierung entnehmen Sie bitte der
folgenden Tabelle:
Achtung: Gehen Sie bei den folgenden
Arbeitsschritten und Einstellungen unbedingt
behutsam vor, um eine Beschädigung Ihres
Tonabnehmersystems zu vermeiden.
Wenn Sie das mitgelieferte clearaudio Moving
Magnet Tonabnehmer Virtuoso WOOD verwenden,
sollten Sie die Auflagekraft auf 22mN einstellen.
Schieben Sie das Gegengewicht unter leichten
Druck auf das Tonarmende, so dass die aufgedruckte Skalierung in Richtung onabnehmersystem
zeigt. Wenn Sie den Tonarm loslassen, bewegt
sich das Gegengewicht nach unten und das
System nach oben. Entfernen Sie nun den
Nadelschutz und drehen das Gegengewicht
solange in Richtung System, bis der Tonarm in
waage ist und frei schwebt. Bitte gehen Sie
vorsichtig vor, damit die Nadel des Systems nicht
beschädigt wird. Die erreichte Stellung entspricht
einem Auflagegewicht von 0mN. Mit der Skalierung
auf dem Gegengewicht können Sie nun exakt
22mN einstellen. Eine volle Umdrehung
entspricht 5mN, d.h. Sie müssen das
Gegengewicht 4 volle Umdrehungen plus 2
Skaleneinheiten in Richtung System drehen. Das
System senkt sich nun. Bitte achten Sie darauf,
dass die Nadel des Systems nicht beschädigt wird.
Zu den nachfolgenden Einstellungen legen Sie eine
Schallplatte Ihrer Wahl auf den Plattenteller auf.
Entfernen Sie nun den Nadelschutz des
Tonabnehmers. Wenn Sie den Tonabnehmer etwa
auf Plattenmitte absenken, sollte seitlich betrachtet,
die Oberkante des Tonabnehmerkörpers parallel zur
Schallplattenoberfläche verlaufen. Als Orientierung
kann hier auch das Tonarmrohr dienen.
Die genaueste Einstellung erreichen Sie, wenn Sie
die Parallelität mithilfe eines Geodreiecks überprüfen.
Falls nötig, passen Sie die Tonarmhöhe durch
Verschieben des Tonarmes in der Tonarmbohrung
in die entsprechende Richtung an und fixieren Sie
diese Tonarmposition durch Anziehen der seitlichen
Madenschraube.
Jetzt können Sie die Antiskatingeinstellung
vornehmen. Diese wird in Abhängigkeit der
Tonabnehmerauflagekraft getroffen. Mit Hilfe der
Antiskating Schraube (Schraube rechts mit
Kontermutter) wird die Tonarmjustage vervollständigt.
Für Auflagekräfte von ca. 22 mN sollte die Schraube
in etwa Mittelposition haben.
Die Feineinstellung erfolgt am Besten mit einer
bekannten Aufnahme bei der die Stimme oder ein
Soloinstrument in der Mitte zwischen den
Lautsprechern positioniert ist. Sollte die Abbildung
nach rechts verschoben sein ist die Antiskatingkraft
zu groß und sie sollten die Schraube etwas
herausdrehen. Bei einer Verschiebung nach links
ist die Antiskatingkraft zu klein und die Schraube
muss etwas weiter hineingedreht werden.
Legen Sie nun den Antriebsriemen um das
Antriebspulley des Motors und um den Plattenteller.
Der kleinere Durchmesser des Motorantriebsrades
entspricht 33 1/3 Umdrehungen pro Minute, der
größere obere Rillendurchmesser des Antriebsrades
entspricht einer Drehzahl von 45 Upm.
Durch Betätigen des seitlich am Motorgehäuse
angebrachten Schalters in die Position “I” setzen
Sie das Laufwerk in Betrieb. Es empfiehlt sich, das
Laufwerk in diesem Zustand 15-30 Minuten einlaufen
zu lassen.
Farbcodierung der Signalkabel des Tonarms:
Signal linker Kanal (L+) weiß
Signalmasse linker Kanal (L -) blau
Signal rechter Kanal (R+) rot
Signalmasse rechter Kanal (R -) grün

Es empfiehlt sich ebenfalls, Ihr Laufwerk an dem
Lagerunterteil mit dem mitgelieferten Erdungskabel
(siehe nebenstehende Abbildung) zu erden, d.h.
mit dem Masseanschluss ihres Verstärkers zu
verbinden.
BESONDERE HINWEISE
Das Plattentellerlager sollte je nach Beanspruchung
etwa alle 2 Jahre mit dem mitgelieferten Lageröl
geschmiert werden. Es genügt, wenn Sie hierzu
etwa 4-5 Tropfen in die Lagerbuchse geben.
Die regelmäßige Sichtkontrolle über eine evtl.
defekte Isolation der netzspannungsführenden
Zuleitung der Motorantriebseinheit ist zu Ihrer
eigenen Sicherheit empfehlenswert.
Eine beschädigte Zuleitung sofort und ausschließlich
vom Fachmann auswechseln lassen!
Achtung ! Bitte verwenden Sie zur Reinigung der
Acrylglaselemente nur speziellen Acrylglasreiniger
und keinesfalls Spiritus oder andere auf Alkohol
basierende Flüssigkeiten (Gefahr von Oberflächenbeschädigung !!!) Verwenden Sie zum Reinigen
keine trockenen Tücher, da diese elektrostatische
Aufladungen erzeugen.
SERVICE UND REPARATUREN
Konnten Sie einen Fehler trotz Beachtung aller hier
erwähnten Hinweise nicht beheben oder bestimmen,
fragen Sie bitte Ihren Fachhändler um Rat.
Das Gerät darf nur durch qualifizierte Fachtechniker
mit höchster Fachkompetenz gewartet werden.
Die Firma Marantz und ihre werksseitig ausgebildeten Mitarbeiter der für Garantiearbeiten
zuständigen Kundendiensteinrichtungen besitzen
das Wissen und die für Reparaturen und
Einstellungen dieser Präzisionsgeräte notwendigen
Spezialeinrichtungen. Nach Ablauf der Garantiezeit
werden Reparaturen gegen Kostenerstattung
ausgeführt, soweit das Gerät wieder für den
Normalbetrieb eingerichtet werden kann.
Bei Schwierigkeiten wenden Sie sich bitte an Ihren
Fachhändler oder schreiben Sie direkt an die
nächste der in der Liste der autorisierten
Kundendienststationen von Marantz aufgeführten
Geschäftsstellen. Geben Sie bitte das Modell und
die Seriennummer des Gerätes an, und beschreiben
Sie im einzelnen, was nach Ihrer Meinung mit dem
Gerät nicht in Ordnung ist.
TECHNISCHE DATEN
6
Konstruktionsprinzip: Resonanzoptimiertes Laufwerksdesign, Riemenantrieb
Drehzahlbereich: 33 1/3 U/min / 45 U/min
Antrieb: Entkoppelter Synchronmotor in massivem Metall-Druckgussgehäuse
Lager: Gehärteter Stahl, polierte Laufbuchse aus Sinterlagerbronze mit Keramikkugel
Plattenteller: GS-PMMA / Acryl, Oberfläche, CNC-präzisionsgedreht
Gleichlauf (bewertet): ±0,2 %
Abmessungen: Aprox. 400 mm x 330 mm x 150 mm
Garantie: 3 Jahre (Ausgenommen ist hier das Tonabnehmersystem)

1
Nous vous félicitons d’avoir choisi la platine TT-15S1, un tourne-disque de grande classe fabriqué par
Marantz. Nous vous invitons à lire attentivement ce mode d’emploi afin d’éviter tout dommage ou toute
perte de garantie.
Ces instructions vous aideront à installer votre appareil et vous garantiront un plaisir maximal pendant de
nombreuses années. Nous espérons que votre nouvelle platine tourne-disque Marantz TT-15S1 vous
procurera d’innombrables moments de joie musicale.
Veuillez lire cette section avant tout raccordement au secteur.
Avertissements
N’exposez pas l’appareil à la pluie ou à l'humidité.
Ne retirez pas le capot de l’appareil.
N’introduisez aucun objet dans l’appareil à travers les orifices de ventilation.
Ne manipulez pas le cordon d’alimentation avec des mains humides.
Ne placez pas de sources de flammes nues telles que des bougies sur l’appareil.
MARQUE CE
La platine Marantz TT-15S1 satisfait à la directive sur la compatibilité électromagnétique et
à la directive sur la basse tension.
ALIMENTATION ELECTRIQUE
Cet appareil Marantz a été préparé pour être utilisé sur le circuit électrique et dans les conditions
de sécurité applicables à votre région. Il nécessite une alimentation de 230 V c.a.
DROITS D'AUTEUR
L’enregistrement et la reproduction de toute œuvre peut exiger une autorisation.
Pour plus d'informations à ce sujet, reportez-vous à la législation suivante :
- Loi sur le droit d’auteur : Copyright Act 1956
- Loi sur les artistes et interprètes : Dramatic and Musical Performers Act 1958
- Lois de protection des artistes et interprètes : Performers Protection Acts 1963 and 1972
- Toute loi, législation ou réglementation ultérieure
AVANT-PROPOS
Table des matières
Description du produit 2
Emballage 2
Mesures de précaution particulières 4
Service après-vente et réparation 6
Service information 6
Caractéristiques techniques 6

2
La structure à ultra-faible résonance et le moteur
découplé de cet appareil garantissent une isolation
totale du châssis de la platine, afin d’obtenir
la meilleure reproduction musicale et une image
audiophile authentique. Le palier en céramique
haute précision et sans entretien assure un plaisir
analogique constant.
Toutefois, c’est bien la somme des parties qui
détermine la qualité de la platine tourne-disque
Marantz TT-15S1. C’est pourquoi Marantz a optimisé
le bras de lecture au mécanisme avec un système
antiripage flottant magnétique et une cellule à
aimant mobile (MM) ClearAudio Virtuoso en ébène.
DESCRIPTION DU PRODUIT
L’emballage qui vous est fourni a été mis au point
spécialement par Marantz pour protéger parfaitement
la platine tourne-disque et empêcher tout dommage
pendant le transport. Nous vous recommandons de
conserver cet emballage original pour pouvoir
l’utiliser en cas de transport ultérieurement.
Nous vous invitons à vérifier si l’emballage de la
platine TT-15S1 contient tous les éléments suivants :
EMBALLAGE
1
3
2
4
1 Châssis de la platine tourne-disque
3 Bras de lecture avec contrepoids et
interconnexions
2 Palier (partie supérieure) avec axe ajusté
4 Plateau tourne-disque en méthacrylate

3
5 Bloc moteur avec câble secteur
7 Paire de gants blancs
9 Deux courroies d’entraînement
11 Feuille de feutre
13 Pince pour microsillon « Clever Clamp »
6 Poulie moteur acrylique
8 Fil de mise à la terre pour le palier
10 Huile pour palier (utilisation occasionnelle)
12 Trois clés à six pans (Allen) (1,5 / 2,5 / 3)
56
78
910
11 12
13

4
La platine Marantz TT-15S1 est livrée avec plusieurs
pièces prémontées, décrites dans la section
Emballage. La préparation de l’appareil s’effectue
facilement et rapidement. Nous vous recommandons
d’utiliser les gants blancs pendant cette opération
pour éviter les griffures.
Il convient de réaliser le montage final de l’appareil
sur une surface stable et propre, aussi proche que
possible de l’emplacement souhaité de la platine
tourne-disque.
Dans un premier temps, déballez les accessoires,
le moteur et le bras de lecture. Vous pouvez alors
retirer la première couche de protection de
l’emballage. Ensuite, vous pouvez sortir le châssis
de la platine, y compris le palier inférieur et supérieur
monté de la deuxième couche de protection de
l’emballage. Posez le châssis de la platine sur ses
pieds à l’endroit où vous souhaitez placer votre
platine tourne-disque.
Sortez la poulie moteur de l'emballage des
accessoires et faites glisser la poulie le plus loin
possible sur l'axe du moteur jusqu'à une distance
d'environ 1 mm entre le bord supérieur du moteur
et le bord inférieur de la poulie. Vissez les trois vis
de la poulie l’une après l’autre à l’aide d’un tournevis.
Levez le châssis de la platine et faites glisser le
moteur à partir du bas exactement sous le trou de
la position prédéfinie dans le châssis. Veillez à ce
que le commutateur du moteur soit situé à l'extérieur,
à gauche du corps de la platine tourne-disque.
Lorsque le moteur est à la position appropriée,
abaissez le châssis.
Ensuite, centrez le moteur dans le trou de la position
du moteur de façon à ce que le moteur n’entre pas
en contact avec le châssis de la platine tournedisque. Vous pouvez ainsi utiliser votre platine
tourne-disque de manière parfaitement découplée
du moteur.
Retirez la deuxième couche d’emballage. Le plateau
se trouve au fond de l’emballage. Sortez le plateau
à l’aide des deux mains. Placez le plateau en
positionnant l’échancrure de 60 mm de large et de
5 mm de profondeur sur la partie supérieure du
palier. Avec un léger mouvement vers le haut et vers
le bas, le plateau glissera sur la partie supérieure
du palier. Assurez-vous, en exerçant une légère (!)
pression, que la plateau repose bien sur la surface
complète du palier.
Prenez le boulon fileté (M6 x 8) dans le sachet des
accessoires et vissez-le à l’aide de la clé à six
pans (Allen) appropriée dans le trou fileté près de
l’entaille du châssis destinée à accueillir le bras de
lecture, de telle façon que l’avant du boulon ne soit
pas en face du côté intérieur de l’entaille du bras
de lecture.
Placez le contrepoids fourni directement sur le
châssis face à la coupure du bras de lecture.
Prenez le bras de lecture et faites d’abord glisser
le câble d’interconnexion à travers le trou, puis
l’axe du bras. Poussez le bras dans le trou jusqu’à
ce que l’élévateur du bras s’appuie contre le contrepoids (voir illustration …). Assurez-vous que le
tube du bras soit parallèle au bord droit du corps
de la platine. Fixez à présent le bras de lecture en
serrant en douceur la vis Allen et écartez ensuite le
contrepoids.
Lorsque le bras de lecture est fixé, vous pouvez
connecter la cellule au bras de lecture. Le guide dans
la tête simplifie l’assemblage. Fixez la cellule à l'aide
de la vis et de la clé à six pans (Allen) appropriée au
bras de lecture dans la position correspondant au
seuil inférieur (voir illustration). Dans cette position,
la cellule et le bras présentent automatiquement
l’angle approprié et une inclinaison optimisée.
INSTALLATION
1mm

5
Raccordez soigneusement la cellule au câble du
bras de lecture. Les fils de la tête (conducteurs de la
cellule) portent des couleurs conformes à la norme
internationale. Ils sont représentés dans l’aperçu
ci-dessous :
Important : Prenez des précautions particulières
au cours des étapes suivantes pour éviter tout
endommagement de la cellule.
Si vous utilisez la cellule à aimant mobile ClearAudio
Virtuoso Wood fournie, vous pouvez régler la force à
22 mN. Faites glisser le contrepoids en exerçant une
légère pression sur l’extrémité du bras de lecture, de
telle façon que la graduation imprimée se présente
dans la direction de la cellule. Lorsque vous relâchez
le bras de lecture, le contrepoids se déplace vers le
bas et la cellule vers le haut. Enlevez à présent la
protection de la pointe et tournez le contrepoids en
direction de la cellule, jusqu’à ce que le bras atteigne
l’équilibre et qu’il flotte librement dans l’air. Procédez
avec prudence pour ne pas endommager la pointe
de lecture de la cellule. La position atteinte correspond à un poids de charge de 0 mN. La graduation
sur le contrepoids permet de procéder à un réglage
exact de 22 mN. Un tour complet correspond à 5
mN, c.-à-d. que vous devez faire faire au contrepoids
quatre tours complets plus deux unités de graduation
en direction de la cellule. La cellule s’abaisse alors.
Veillez dans tous les cas à ne pas abîmer la pointe
de lecture de la cellule.
Pour les réglages suivants, placez un microsillon
quelconque sur le plateau.
Retirez la protection de la pointe de lecture.
Si vous abaissez à présent la cellule au centre du
plateau de la platine, vous devriez voir (en regardant
depuis le côté) que le bord supérieur de l’axe du
bras de lecture est parallèle à la surface du disque.
Vous pouvez utiliser l’axe du bras de lecture pour
vous orienter. Si nécessaire, vous pouvez régler la
hauteur du bras. Pour cela, vous devez placer le
bras dans le trou du châssis dans la bonne direction
et fixer cette position en serrant la vis Allen dans le
bord du châssis de la platine.
Pour terminer l’installation, réglez l’antiripage
(compensation de la force centripète). Ce réglage
dépend de la force d’appui de la cellule.
L’étalonnage du bras de lecture peut être réalisé à
l’aide de la vis d’antiripage (à droite du contrepoids
principal). Étant donné que la force d’appui est de
22 Nm, la vis doit se trouver au milieu.
Le réglage fin peut être effectué avec un disque
bien connu contenant le son d’un instrument solo
ou une voix qui doit être situé au centre de la
scène. Si l’image est trop à droite de la scène, il
convient de diminuer l’antiripage en dévissant la vis
correspondante.
Si l’image est trop à gauche de la scène, il convient
d’augmenter l’antiripage en vissant la vis
correspondante.
Raccordez le câble d’interconnexion de la platine
Marantz TT-15S1 à l’entrée phono de votre
préamplificateur phono et branchez le cordon
d’alimentation sur la prise secteur.
Placez une courroie d’entraînement (la seconde
est une pièce de rechange) autour du plateau et
de la poulie. Le plus petit diamètre de la poulie
correspond à la vitesse de 33 1/3 tr/mn, le plus
grand à la vitesse de 45 tr/mn. La position « I » sur
le commutateur du moteur indique que la platine
tourne-disque est allumée. Laissez la platine
tourne-disque allumée pendant les premières
15 à 30 minutes, pour rodage.
Code couleur des conducteurs du bras de
lecture Satisfy :
Signal canal gauche (L+) blanc
Signal terre canal gauche (L -) bleu
Signal canal droit (R+) rouge
Signal terre canal droit (R -) vert

6
MESURES DE PRÉCAUTION
PARTICULIÈRES
Vous pouvez graisser le palier du plateau avec
l'huile fournie tous les deux ans (uniquement si des
variations de vitesse sont apparues). Dans ce cas,
4 ou 5 gouttes d’huile dans le palier suffisent.
Veillez particulièrement à ne pas endommager le
cordon d’alimentation. Pour toute réparation,
adressez-vous exclusivement à un service ou à
un technicien agréé. Un cordon d’alimentation
endommagé doit être remplacé immédiatement !
Attention ! Pour nettoyer la platine Emotion,
utilisez exclusivement des liquides ne contenant
pas d’alcool et prévus spécialement pour l’acrylique,
faute de quoi vous pourriez endommager le plateau
ou la surface de la platine !!!
SERVICE APRÈS-VENTE ET
RÉPARATION
Si ce mode d’emploi ne répond pas à toutes vos
questions concernant votre nouvel appareil
Marantz, contactez votre revendeur Marantz agréé.
Seuls les techniciens les plus compétents et les
plus qualifiés doivent être autorisés à intervenir sur
l’appareil. La société Marantz et son personnel de
service après-vente formé spécialement possèdent
les connaissances et les équipements spéciaux
nécessaires à la réparation et à l’étalonnage de cet
appareil de précision.
Une fois la période de garantie expirée, toute
réparation sera effectuée contre paiement si le
fonctionnement normal de l’appareil peut être rétabli.
En cas de difficulté, consultez votre revendeur
Marantz agréé. Mentionnez le modèle et le numéro
de série de l’appareil et donnez une description
complète de ce que vous pensez ne pas fonctionner
correctement.
CARACTÉRISTIQUES TECHNIQUES
Principe de construction : Forme du châssis optimisée d’un point de vue de la résonance et
entraînement par courroie
Vitesses : 33 1/3 tr/mn, 45 tr/mn (78 tr/mn avec poulie en option)
Moteur : Moteur synchrone découplé abrité dans un boîtier en métal massif
Palier : Acier trempé, pièce en bronze aggloméré poli avec bille en céramique
Plateau : GS-PMMA, acrylique, surface usinée par commande numérique par
ordinateur à haute précision
Variation de la vitesse : ±0,2 %
Dimensions : Environ 400 mm x 330 mm x 150 mm
Garantie : 3 ans (à l’exclusion de la cellule)
Il est recommandé de raccorder la partie inférieure
du palier avec le câble de mise à la terre fourni à la
borne de terre de votre amplificateur.
Vous êtes alors prêt à écouter vos microsillons sur
votre platine tourne-disque Marantz TT-15S1.

1
Gefeliciteerd met uw keus voor de TT-15S1-draaitafel, een Marantz-product van wereldklasse. Lees deze
gebruikershandleiding zorgvuldig door om beschadigingen of verlies van de garantie te voorkomen.
Deze instructies helpen u de draaitafel zonder problemen te installeren en garanderen u een langdurig en
optimaal plezier van uw draaitafel. Wij wensen u veel muzikaal genoegen met uw nieuwe Marantz
TT-15S1-draaitafel.
Lees dit gedeelte voordat u de draaitafel aansluit op de netvoeding.
Waarschuwingen
Stel de apparatuur niet bloot aan water of vocht.
Verwijder niet de kap van de apparatuur.
Steek niets door de ventilatieopeningen in de apparatuur.
Pak het netsnoer niet vast met natte handen.
Plaats geen voorwerpen die open vlammen geven, zoals brandende kaarsen, op de apparatuur.
CE-KEURMERK
De Marantz TT-15S1 voldoet aan de EMC-richtlijn en de laagspannningsrichtlijn.
WERKINSTELLING NETVOEDING VAN HET APPARAAT
Uw Marantz-product is ingesteld overeenkomstig de netvoedings- en veiligheidsvereisten voor woonhuizen
in uw land. U mag dit product alleen aansluiten op 230 V wisselstroom.
COPYRIGHT
Voor het opnemen en afspelen van allerlei soorten materiaal kan toestemming vereist zijn. Raadpleeg voor
meer informatie de volgende bronnen:
- De Auteurswet van 1912
- De Wet naburige rechten
- De Databankenwet
- Alle andere regelgeving en bepalingen op dit gebied
VOORWOORD
Inhoudsopgave
Beschrijving van het product 2
Inhoud van de doos 2
Installatie en instelling 4
Specifieke voorzorgsmaatregelen 6
Service-informatie 6
Technische specificaties 6

2
De ultralaagresonante constructie gecombineerd
met een vrijstaande motoreenheid staat garant voor
een totale isolatie van resonantie van het draaitafelchassis. Dit levert de beste muziekweergave en
een authentieke beeldvorming die ook de meest
kritische luisteraar zal bekoren. Verder maakt een
hoogprecisie, onderhoudsvrij keramisch lager het
analoge luistergenot compleet.
Het is echter de som van de afzonderlijke delen die
de kwaliteit van de Marantz TT-15S1-draaitafel
bepaalt. Daarom hebben we de best mogelijke
toonarm voor het mechanisme gemaakt, met een
magnetisch drijvend anti-skatingsysteem en een
bijpassend ClearAudio Virtuoso MM-element van
ebbenhout.
BESCHRIJVING VAN HET PRODUCT
Marantz heeft een speciale, veilige verpakking voor
de draaitafel ontwikkeld, om beschadiging tijdens
het transport te voorkomen. Bewaar de originele
verpakking voor het geval u de draaitafel moet
verzenden.
Controleer aan de hand van onderstaand overzicht
of de verpakking van de TT-15S1 de juiste inhoud
bevat.
INHOUD VAN DE DOOS
1
3
2
4
1 Draaitafelchassis
3 Toonarm met contragewicht en aansluitingen
2 Lager (bovenste deel) met aangepaste lageras
4 Draaitafelplateau van GS-acryl

3
5 Motoraandrijfeenheid met netvoedingskabel
7 Een paar witte handschoenen
9 Twee aandrijfriemen
11 Vilten mat
13 ‘Clever clamp’-platenklem
6 Acryl motorpoelie
8 Aardedraad voor het lager van de draaitafel
10 Lagerolie voor incidenteel gebruik
12 Drie inbus-sleutels (maten: 1,5 / 2,5 / 3)
56
78
910
11 12
13

4
De Marantz TT-15S1 wordt geleverd in verschillende
vooraf gemonteerde onderdelen, zoals beschreven
in Inhoud van de doos. U kunt de draaitafel snel en
zeer eenvoudig installeren en instellen. Draag hierbij
de meegeleverde witte handschoenen om te
voorkomen dat u de draaitafel krast.
Zorg ook voor een veilige en schone werkplek voor
de installatie, zo dicht mogelijk bij de uiteindelijke
locatie van de draaitafel.
Neem eerst de accessoires, de motor en de toonarm
uit de verpakking. Neem nu de eerste laag van de
verpakking uit de doos. Vervolgens kunt u het
chassis van de draaitafel uit de doos nemen, met
het bevestigde bovenste en onderste lagerdeel,
van de tweede verpakkingslaag. Zet het draaitafelchassis op zijn pootjes op de plaats waar u de
draaitafel uiteindelijk wilt plaatsen.
Neem de motorpoelie uit de zak met accessoires
en schuif de motorpoelie op de as van de motor tot
er een afstand van ongeveer 1 mm overblijft tussen
de bovenkant van de motor en de onderkant van
de poelie. Schroef nu met een schroevendraaier
achtereenvolgens de drie schroeven in de poelie.
Til het draaitafelchassis omhoog en schuif de motor
van onderen precies onder het voorgedefinieerde
positiegat in het chassis. Let op dat de schakelaar
van de motor zich aan de buitenkant bevindt, op de
linkerkant van het draaitafelchassis. Wanneer de
motor op de juiste positie is, zet u het chassis
voorzichtig weer neer.
Daarna moet u de motor centreren in het motorpositiegat, waarbij u erop moet letten dat de motor
geen contact maakt met het draaitafelchassis.
Op die manier zorgt u ervoor dat de draaitafel
helemaal geen contact maakt met de motor.
Verwijder de tweede verpakkingslaag. In de onderste
verpakkingslaag vindt u het draaitafelplateau. Neem
het plateau met beide handen uit de verpakking. Leg
het plateau met de 60-mm brede en 5-mm diepe
uitsnede op het bovenste lagerdeel. Beweeg het
plateau lichtjes omhoog en omlaag zodat het op het
bovenste gedeelte van het lager schuift. Zorg er met
een lichte (!) druk voor dat het plateau contact maakt
met de volledige oppervlakte van het lager.
Neem de bout met schroefdraad (M6 x 8) uit de
zak met accessoires en schroef die met de juiste
imbus-sleutel in de wikkeling bij de uitsparing voor
de toonarm van het draaitafelchassis, zodat de
voorkant van de bout niet naar de binnenkant van
de uitsparing voor de toonarm wijst.
Plaats het bijgevoegde contragewicht op het chassis
direct voor de uitsparing voor de toonarm. Neem de
toonarm en schuif eerst de aansluitkabel door het gat
en daarna de as van de toonarm. Duw voorzichtig de
arm omlaag in het gat totdat de armlift op het contragewicht rust (zie afbeelding). Zorg ervoor dat de buis
van de arm parallel loopt aan de rechterkant van het
draaitafelchassis. Zet de arm nu voorzichtig vast
door de arm te draaien met een inbus-sleutel en verwijder vervolgens het contragewicht.
Wanneer de toonarm is vastgezet, kunt u het
element aan de toonarm bevestigen. Dankzij de
geleider in de elementdrager zal de montage geen
problemen geven. Zet het element, met de schroef
en de juiste Allen-sleutel, vast aan de toonarm terwijl
deze in de onderste positie staat (zie afbeelding). In
deze positie hebben het element en de arm automatisch de juiste hoek en een optimale helling.
INSTALLATIE EN INSTELLING
1mm

Kleurcode van de Satisfy-toonarmdraad:
Linkersignaalkanaal (L+) wit
Linkerkanaal signaalaarde (L-) blauw
Rechtersignaalkanaal (R+) rood
Rechterkanaal signaalaarde (R-) groen
5
Sluit het element voorzichtig aan op de toonarmkabel.
De draden van de elementdrager zijn gecodeerd
met kleuren overeenkomstig de internationale normen.
U ziet hierna een overzicht:
Belangrijk: let goed op bij de volgende stappen
om beschadiging van het element te voorkomen.
Als u het bijgeleverde ClearAudio Virtuoso Wood
MM-element gebruikt, kunt u de druk instellen tot
22 mN door het contragewicht van de toonarm op
de bout met schroefdraad te draaien totdat er
ongeveer acht windingen zichtbaar zijn (achteraanzicht van de toonarm). Duw voorzichtig het
contragewicht op het eind van de arm, zodat de
daarop afgedrukte schaal naar het element toe
zichtbaar wordt. Wanneer u de arm loslaat, gaat
het contragewicht omlaag en het element omhoog.
Verwijder nu het beschermkapje van de naald en
draai het contragewicht in de richting van het
element tot de arm in balans is en vrij zweeft.
Wees voorzichtig als u dit doet, om te voorkomen
dat u de naald beschadigt. De huidige positie komt
overeen met een naalddruk van 0 mN. U kunt deze
naalddruk met de schaal op het contragewicht
aanpassen tot exact 22 mN. Eén volledige omwenteling komt overeen met 5 mN, dus u moet het
contragewicht vier maal volledig ronddraaien plus
twee schaaleenheden, in de richting van het
element. Nu staat het element lager. Wees
voorzichtig als u dit doet, om te voorkomen dat u
de naald beschadigt.
Voor de volgende instellingen legt u een willekeurige LP op het plateau. U kunt nu de naaldbeschermer weghalen.
Als u nu het element laat zakken tot het midden
van het draaitafelplateau, zult u (vanaf de zijkant)
zien dat de bovenrand van de toonarmbuis parallel
loopt aan het oppervlak van het plateau. U kunt de
toonarmbuis als oriëntatiepunt gebruiken. Zo nodig
kunt u de hoogte van de toonarm aanpassen.
Daarvoor moet u de toonarm in het gat in het chassis naar rechts verplaatsen en de arm op die
gewenste positie fixeren door de Allen-schroef in
de rand van het draaitafelchassis vast te draaien.
Als laatste stap van de algemene instelling moet u
de anti-skating (of dwarsdrukcompensatie) instellen.
Dit heeft ook te maken met de naalddruk van het
element. Met de anti-skatingschroef (aan de
rechterkant van het hoofdcontragewicht) kunt u de
toonarm kalibreren.
Bij een gewenste naalddruk van 22 mN moet de
schroef in de middelste positie staan.
U kunt de fijnafstemming het best doen aan de
hand van een bekende opname van een soloinstrument of -zanger die middenvoor op de opnamelocatie staat. Wanneer het beeld te veel naar de
rechterkant van de locatie is bewogen, moet u de
anti-skating verlagen door de anti-skatingschroef
naar buiten te draaien. Wanneer het beeld te veel
naar de linkerkant is bewogen, moet u de antiskating verhogen door de anti-skatingschroef naar
binnen te draaien.
Sluit de verbindingskabel van uw Marantz TT-15S1
nu aan op de phono-ingang van de voorversterker
en steek het netsnoer in het stopcontact.
Leg één aandrijfriem (de andere riem is voor
reserve) om het plateau en om de poelie. De
kleinere diameter van de poelie wordt gebruikt voor
33 1/3 toeren en de grotere diameter voor 45 toeren.
De positie “I” op de motorschakelaar geeft aan dat
de draaitafel is ingeschakeld. Laat de draaitafel
eerst 15 tot 30 minuten aanstaan, zodat de riem
kan ‘inlopen’. Het verdient aanbeveling het
onderste deel van het lager met de bijgeleverde
aardekabel aan te sluiten op de aardeaansluiting
op uw versterker.

SPECIFIEKE VOORZORGSMAATREGELEN
U kunt elke twee jaar (alleen als u merkt dat de
snelheid niet constant is) het lager van het
draaitafelplateau smeren met de meegeleverde
olie. Het is dan voldoende om 4 à 5 druppels olie
in het lager te druppelen.
Let vooral goed op eventuele beschadigingen van
het netsnoer. Eventuele beschadigingen mogen
alleen worden gerepareerd door bevoegd personeel.
U moet een beschadigd netsnoer onmiddellijk
vervangen.
Voorzichtig! Gebruik alleen niet-alcoholische
vloeistoffen en alleen vloeistoffen die speciaal
geschikt zijn voor acryl om de Emotion-draaitafel te
reinigen. Anders zou u het materiaal of het oppervlak
kunnen beschadigen.
SERVICE EN REPARATIES
Neem contact op met de erkende Marantz-dealer
bij u in de buurt wanneer deze handleiding niet al
uw vragen met betrekking tot uw nieuwe Marantzproduct beantwoordt.
Laat het apparaat alleen onderhouden en repareren
door zeer competente en volledig gekwalificeerde
onderhoudsmonteurs. De medewerkers van
Marantz en het in de fabriek geschoolde personeel
van reparatiecentra beschikken over de kennis en
de speciale voorzieningen die nodig zijn voor het
repareren en kalibreren van deze precisieapparatuur.
Na afloop van de garantieperiode worden reparaties
tegen betaling uitgevoerd als normale werking van
de apparatuur na herstel mogelijk is. Raadpleeg bij
problemen de erkende Marantz-dealer. Noem het
model en serienummer van het apparaat en geef
een volledige beschrijving van het naar uw mening
afwijkende gedrag van het apparaat.
TECHNISCHE SPECIFICATIES
6
Constructie principe: Voor resonantie geoptimaliseerde chassisvorm, met aandrijfriem
Mogelijke snelheden: 33 1/3 toeren / 45 toeren (78 toeren met een als optie verkrijgbare motorpoelie)
Aandrijfeenheid: Ontkoppelde synchrone motor in een massief metalen behuizing
Lager: Gehard staal, gepolijst sinterbronzen inzet met een keramische kogel
Plateau: GS-PMMA, acryl, precisie CNC-bewerkt oppervlak
Snelheidsvariatie: ±0,2 %
Afmetingen: Ongeveer 400 x 330 x 150 mm
Garantie: 3 jaar (exclusief element)
U bent nu helemaal klaar om uw vinylen platen af te
spelen en te genieten van uw Marantz
TT-15S1-draaitafel.

1
Congratulazioni per il fatto di aver scelto la piastra giradischi TT-15S1, una piastra di classe mondiale
prodotta dalla Marantz. Consigliamo una lettura accurata di questo Manuale di istruzioni, al fine di evitare
eventuali danni o perdite di garanzia.
Queste istruzioni vi assisteranno durante la facile installazione e vi garantiranno il massimo piacere
d’ascolto per un lungo tempo. Vi auguriamo di fruire di molte gioie d’ascolto grazie a questa nuova piastra
giradischi Marantz TT-15S1.
Si deve leggere questo paragrafo prima di effettuare la connessione all’alimentazione di rete.
Avvertenze
Non esporre questo apparecchio alla pioggia o all’umidità.
Non rimuovere il coperchio del contenitore.
Non inserire nell’apparecchio alcun oggetto estraneo attraverso gli orifizi di ventilazione.
Non manipolare il cordone di alimentazione con le mani bagnate.
Sull’apparecchio non devono essere poste sorgenti di fiamme, quali una candela accesa.
MARCHIO CE
Il Marantz TT-15S1 è conforme alla direttiva EMC e a quella sulle apparecchiature
a bassa tensione.
PREDISPOSIZIONE DEL FUNZIONAMENTO DELL’APPARECCHIO CON L’ALIMENTAZIONE DI RETE
Questo prodotto Marantz è stato preparato per essere conforme all’alimentazione domestica di rete e ai
requisiti di sicurezza in vigore nella vostra località. Questo prodotto dev’essere alimentato unicamente a
230 Volt CA.
COPYRIGHT
La registrazione e la riproduzione di un qualsiasi materiale può richiedere un relativo permesso.
Per ulteriori informazioni consultare la seguente documentazione:
- Trattato sulla protezione intellettuale del 1956 (“Copyright Act 1956”)
- Trattato sulle esibizioni teatrali e musicali del 1958 (“Dramatic and Musical Performers 1958”)
- Trattati sulla protezione artistica del 1963 e del 1972 (“Performers Protection Acts 1963 & 1972”)
- Tutte le normative e leggi seguenti, attualmente in vigore
PREAMBOLO
Sommario
Descrizione del prodotto 2
Estensione della fornitura 2
Installazione e predisposizione 4
Precauzioni specifiche 6
Assistenza e riparazioni 6
Specifiche tecniche 6

2
La costruzione a risonanza estremamente ridotta,
abbinata a un motore isolato, garantisce una
protezione totale contro un innesco di risonanza
proveniente dal telaio della piastra, offrendo in tal
modo la miglior riproduzione acustica possibile e
un'immagine sonora ad autentico livello “audiofilo”.
Un cuscinetto di elevata precisione di ceramica,
e quindi esente da manutenzione, completa la
piacevolezza analogica.
È comunque la somma dei singoli pezzi che
determina la qualità della piastra Marantz TT-15S1.
Ecco il motivo per cui abbiamo ottimizzato il
braccetto del meccanismo grazie a un sistema
antiscivolo (“antiskating”) a sospensione magnetica
e a una testina del fonorivelatore di pari livello MM
ClearAudio Virtuoso, realizzata in legno d’ebano.
DESCRIZIONE DEL PRODOTTO
La Marantz ha sviluppato un imballaggio specifico
e sicuro per questa piastra, al fine di evitare tutti i
possibili danni dovuti al trasporto. Si consiglia di
conservare l’imballaggio originale, nel caso si
debba spedire la piastra. Verificare il contenuto
dell’imballaggio della piastra TT-15S1, sulla base
della panoramica riportata qui di seguito.
ESTENSIONE DELLA FORNITURA
1
3
2
4
1 Telaio della piastra
3 Braccetto con contrappeso e interconnessioni
2 Cuscinetto (parte superiore) con alberino del
cuscinetto regolato
4 Piatto della piastra giradischi, realizzato in
GS-Acryl

3
5 Motore di trasmissione con cavo di
alimentazione da rete
7 Un paio di guanti bianchi
9 Due cinghie di trasmissione
11 Foglio di feltrino
13 Clampa da dischi “Clever Clamp”
6 Puleggia acrilica del motore
8 Cavetto di messa a terra per il cuscinetto della
piastra giradischi
10 Olio da cuscinetto per un utilizzo occasionale
12 Tre chiavi Allen (dimensioni: 1,5 / 2,5 / 3)
56
78
910
11 12
13

4
Il Marantz TT-15S1 viene consegnato suddiviso in
diversi componenti premontati, come descritto nell
”Estensione della fornitura”. L’installazione e la
predisposizione vengono effettuate rapidamente e
con estrema facilità. Durante queste procedure è
consigliabile indossare i guanti bianchi, al fine di
evitare eventuali graffi.
Si dovrebbe prevedere uno spazio di lavoro sicuro
e pulito per l’installazione, indipendentemente ma
preferibilmente in prossimità della posizione finale
della piastra giradischi.
Estrarre per primi dall’imballaggio gli accessori,
il motore e il braccetto. A questo punto, rimuovere il
primo strato dell’imballaggio. Dopo di che, si può
estrarre il telaio della piastra giradischi, comprese
la parti premontate relative ai cuscinetti, inferiore e
superiore, dal secondo strato dell’imballaggio.
Sistemare il telaio della piastra giradischi sui suoi
piedini, nella posizione finale prevista per
l’apparecchio.
Estrarre la puleggia del motore dal sacchetto degli
accessori e distanziare tale puleggia il più possibile,
sull'asse del motore, fino ad ottenere una distanza
di circa 1 mm tra il bordo superiore del motore e il
margine inferiore della puleggia. A questo punto,
serrare le tre viti nella puleggia, una dopo l’altra,
mediante un giravite.
Sollevare il telaio della piastra giradischi e far
scorrere il motore dal basso, fino a raggiungere il
foro relativo alla posizione predefinita, praticato nel
telaio. Far attenzione al fatto che l’interruttore del
motore si trova all’esterno del corpo della piastra
giradischi, sul lato sinistro. Una volta che il motore
si trova nella sua posizione corretta, riabbassare di
nuovo il telaio. Dopo di che, è necessario centrare
il motore nel foro apposito, evitando qualsiasi contatto con il telaio della piastra giradischi. In questo
modo, la piastra giradischi potrà funzionare in perfetta isolazione dal motore.
Rimuovere il secondo strato dell’imballaggio.
Nello strato inferiore dell’imballaggio si trova il piatto
della piastra giradischi. Estrarre il piatto servendosi
di entrambe le mani. Sistemare il piatto con l'intaglio
largo 60 mm e profondo 5 mm sulla parte relativa
al cuscinetto superiore. Grazie a un leggero
movimento di su e giù, il piatto scivolerà sulla parte
del cuscinetto superiore. Mediante una delicata (!)
pressione assicurarsi che il piatto si appoggi su
tutta la superficie del cuscinetto.
Estrarre il bullone filettato (M6 x 8) dal sacchetto
degli accessori e avvitarlo, mediante l’apposita
chiave Allen nell’incannatura accanto all’intaglio del
braccetto del telaio della piastra giradischi, in
maniera che la parte anteriore del bullone non
sporga dal lato interno dell’intaglio del braccetto.
Posizionare il contrappeso fornito a corredo sopra
lo chassis di fronte all'intaglio del braccio. Prendere
il braccetto e far scorrere per prima cosa il cavetto
di interconnessione attraverso il foro, seguito dall’albero del braccetto. Spingere delicatamente il
braccetto nel foro, fino a che la presa del braccetto
non sia sistemata sul contrappeso (vedere la
Figura ...). Assicurarsi che il tubo del braccetto sia
parallelo al bordo destro del corpo della piastra
giradischi. Fissare accuratamente ruotando il
braccetto mediante una chiave Allen, per poi
rimuovere il contrappeso.
Una volta fissato il braccetto, si può connettere la
testina del fonorivelatore al braccetto. La guida
presente nel guscio della testina semplifica
l’assemblaggio. Fissare al braccetto la testina del
fonorivelatore grazie alla vite e alla chiave Allen
appropriata, quando il braccetto è posizionato al
soglio inferiore (vedere l’illustrazione). In questa
posizione la testina del fonorivelatore e il braccetto
presenteranno automaticamente un angolo corretto
e un declivio ottimizzato.
INSTALLAZIONE E PREDISPOSIZIONE
1mm

5
Connettere attentamente la testina del fonorivelatore
al cavetto del braccetto. I cavetti del guscio della
testina (conduttori di connessione della testina) sono
codificati mediante colori normalizzati internazionalmente, e che vengono descritti qui di seguito:
Importante: prestare la necessaria attenzione
durante i passi seguenti, al fine di evitare eventuali
danni alla testina del fonorivelatore.
Se si decide di utilizzare la testina a magnete mobile
ClearAudio Virtuoso Wood fornita a corredo, si può
regolare la forza a 22 mN. Spingere delicatamente il
contrappeso sull’estremità del braccetto, in maniera
che la scala incisa si possa vedere nella direzione
del sistema del braccetto. Allorché si lascia andare il
braccetto, il contrappeso si muove verso il basso e il
sistema verso l’alto. A questo pinto, rimuovere il cappuccio di protezione dello stilo e far ruotare il
contrappeso in direzione del sistema, fintantoché il
braccetto non sia in equilibrio e possa librare liberamente. Far attenzione a non provocare danni allo
stilo del sistema durante il compimento di questa
azione. La posizione che si è ora ottenuta corrisponde a un peso di carico di 0 mN. Grazie alla scala
marcata sul contrappeso si può regolare il valore
esattamente a 22 mN. Dato che una rotazione completa corrisponde a 5 mN, si dovrà ruotare il
contrappeso per 4 rotazioni complete, più due unità
della scala marcata sul contrappeso, nella direzione
del sistema. A questo punto il sistema si troverà ad
essere stato abbassato, per cui si consiglia di far
attenzione a non danneggiare lo stilo del sistema
durante questa operazione.
Per le regolazioni che seguono, sistemare un disco
33 giri qualsiasi sul piatto. Si può a questo punto
rimuovere la protezione della puntina. Se ora si
solleva la testina verso il punto di mezzo del disco
della piastra giradischi, si deve poter vedere (di
lato) che il bordo superiore del braccetto è parallelo
alla superficie del disco. Si può utilizzare il tubo del
braccetto come orientazione. Se questo fosse
necessario, si potrà regolare l’altezza del braccetto.
Per poter far questo, si deve spostare il braccetto
nel foro praticato nel telaio nella corretta direzione,
e fissare la posizione mediante il serraggio della vite
Allen nel bordo del telaio della piastra giradischi.
Per poter ultimare la predisposizione generale, si
deve regolare la funzione antiscivolo (“antiskating”).
Ci si riferisce ad essa anche come forza di tracciato
della testina del fonorivelatore. Mediante la vite
“antiskating” (sulla vista destra del peso del contatore
principale), si può completare la calibratura del
braccetto. Stante la forza di 22 Nm, la vite deve
trovarsi in posizione mediana.
La regolazione fine potrà essere effettuata nelle
migliori condizioni quando un disco che si conosce
bene conterrà la riproduzione di un unico strumento o di una voce solista localizzati nella posizione
centrale anteriore della scena sonora. Nel caso che
l’immagine sonora sia spostata troppo verso la
destra della scena, si deve abbassare l’”antiskating” svitandolo. Nel caso che l’immagine sonora
sia posizionata troppo a sinistra, si dovrà incrementare l’”antiskating” avvitandolo.
Collegare a questo punto il cavetto di interconnessione del Marantz TT-15S1 con l’entrata fono
del fono-preamplificatore e raccordare il cordone di
alimentazione alla rete.
Sistemare una delle cinghie di trasmissione (la
seconda è di riserva) attorno al piatto e attorno alla
puleggia. Il diametro inferiore della puleggia viene
impiegato per la velocità di 33 giri e 1/3, mentre il
diametro maggiore per quella di 45 giri al minuto.
La posizione “I” dell'interruttore del motore sta ad
indicare che la piastra giradischi è accesa.
Si consiglia di lasciar accesa la piastra giradischi
per la prima volta tra i 15 e i 30 minuti, per motivi
di test dell’apparecchio.
Colour code of the Satisfy tonearm wire:
Signal left channel (L+) white
Signal ground left channel (L -) blue
Signal right channel (R+) red
Signal ground right channel (R -) green

6
PRECAUZIONI SPECIFICHE
Ogni due anni si può lubrificare (solo in caso che si
avvertano variazioni di velocità di riproduzione) il
cuscinetto del piatto della piastra giradischi grazie
all'olio fornito a corredo. Laddove necessario,
basterà introdurre 4 o 5 gocce d’olio nel cuscinetto.
Far estrema attenzione a qualsiasi danneggiamento
del cordone di alimentazione. Eventuali danni
dovranno essere riparati unicamente da parte di
personale specializzato. Si deve sostituire
immediatamente un cordone di alimentazione
danneggiato!
Avvertenza! Per pulire la piastra giradischi Emotion
utilizzare esclusivamente fluidi esenti da alcol e
fluidi previsti specificatemente per materiali acrilici.
In caso contrario, si può danneggiare il materiale o
la sua superficie!!!
ASSISTENZA E RIPARAZIONI
Mettersi in contatto con il Distributore autorizzato
Marantz più vicino nel caso in cui questo Manuale
non rappresenti una risposta a tutte le proprie
domande relative al prodotto Marantz appena
acquistato.
Si deve consentire l’intervento sull’apparecchio
soltanto da parte di tecnici di alta competenza e di
un servizio di assistenza qualificato. La società
Marantz e il personale dei centri di assistenza,
formati presso la fabbrica, dispongono della
conoscenza e degli strumenti necessari per la
riparazione e la calibratura di questo apparecchio
di precisione.
Una volta terminato il periodo di garanzia,
le eventuali riparazioni verranno eseguite dietro
pagamento delle spese relative, sempre che
l'apparecchio possa essere riportato allo stato
operativo normale. In caso di difficoltà, consultare
il proprio Distributore autorizzato Marantz.
Specificare il modello e il numero di serie
dell’apparecchio e inoltrare una descrizione chiara
e completa di quello che si pensa non sia normale
nel funzionamento dell’apparecchio.
SPECIFICHE TECNICHE
Si raccomanda di connettere la parte inferiore del
cuscinetto, mediante il cavetto di messa a terra
fornito a corredo, al terminale di messa a terra
dell’amplificatore.
Si è così pronti a far funzionare e fruire dell’audizione
dei dischi di vinile sulla piastra giradischi Marantz
TT-15S1.
Principio costruttivo: Forma del telaio ottimizzata contro la risonanza; trasmissione a cinghia
Possibilità di selezione 33 giri 1/3 – 45 giri al minuto (78 giri al minuto con una puleggia di
delle velocità: trasmissione opzionale)
Trasmissione: Motore sincrono isolato in un alloggiamento metallico massiccio
Cuscinetto: Acciaio temperato, inserto di bronzo sinterizzato e lustrato, con una sfera
di ceramica
Piatto: GS-PMMA, acrilico, superficie lavorata con CNC di precisione
Variazione di velocità: ±0,2 %
Dimensioni: Approssimativamente: 400 mm x 330 mm x 150 mm
Garanzia: 3 anni (ad esclusione della testina del fonorivelatore)

1
Felicitaciones por haber elegido el giradiscos TT-15S1, un giradiscos de primer nivel fabricado por Marantz.
Por favor lea este Manual de usuario cuidadosamente para evitar cualquier daño o pérdida de garantía.
Estas instrucciones le ayudarán a configurar de forma sencilla el equipo y le permitirán disfrutar del máximo
placer durante mucho tiempo. Le deseamos un gran disfrute musical con su nuevo giradiscos TT-15S1.
Debe leer esta sección antes de realizar cualquier conexión a la red eléctrica.
Advertencias
No exponga el equipo a la lluvia ni humedad.
No quite la cubierta del equipo.
No introduzca nada dentro del equipo a través de los orificios de ventilación.
No manipule los cables eléctricos con las manos mojadas.
No coloque fuentes de llama viva, como velas encendidas sobre el equipo.
MARCA CE
El equipo Marantz TT-15S1 cumple la directiva EMC y la directiva de baja tensión eléctrica.
AJUSTES DE FUNCIONAMIENTO ELÉCTRICOS DEL EQUIPO
Su equipo Marantz está diseñado para cumplir los requisitos de energía eléctrica doméstica y seguridad
en su zona. Este equipo se puede conectar solamente a 230 VCA.
COPYRIGHT
La grabación y reproducción de cualquier material podría requerir permisos.
Para obtener más información consulte los siguientes documentos:
- Acta de copyright 1956
- Acta de ejecutantes de teatro y musicales 1958
- Acta de protección de ejecutantes 1963 y 1972
- Cualquier otro documento estatutario y normativas posteriores
INTRODUCCIÓN
Índice
Descripción del producto 2
Alcance del suministro 2
Instalación y configuración 4
Precauciones específicas 6
Información de servicio 6
Especificaciones técnicas 6

2
La construcción de resonancia ultra baja combinada
con un motor independiente garantiza el total
aislamiento de la resonancia del chasis del
giradiscos, proporcionando una reproducción musical
óptima y una auténtica imagen acústica para el
melómano. Un cojinete cerámico libre de
mantenimiento, de gran precisión, completa el placer
analógico.
Sin embargo, es la suma de las piezas individuales
lo que determina la calidad del giradiscos Marantz
TT-15S1. Por ese motivo hemos optimizado el
brazo con un mecanismo que cuenta con sistema
antideslizante magnético flotante y un cartucho
ClearAudio Virtuoso MM de calidad equivalente
acabado en madera de ébano.
DESCRIPCIÓN DEL PRODUCTO
Marantz ha desarrollado un embalaje especial y
seguro para el giradiscos, que evitará cualquier daño
en el transporte. Por favor guarde este embalaje
original en caso de necesitar enviar el giradiscos.
Por favor confirme que el contenido del embalaje
del modelo TT-15S1 coincide con la ilustración
siguiente.
ALCANCE DEL SUMINISTRO
1
3
2
4
1 Chasis del giradiscos
3 Brazo con contrapeso y conexiones
2 Cojinete (parte superior) con eje de cojinete
calibrado
4 Plato del giradiscos fabricado en GS-Acryl

3
5 Motor con cable de red eléctrica
7 Un par de guantes blancos
9 Dos correas del motor
11 Hoja de fieltro
13 Abrazadera del disco “Abrazadera inteligente”
6 Polea acrílica del motor
8 Cable de conexión a tierra para el cojinete del
giradiscos
10 Aceite del cojinete para uso ocasional
12 Tres llaves Allen (tamaños: 1.5 / 2.5 / 3)
56
78
910
11 12
13

4
El equipo Marantz TT-15S1 se suministra en varias
piezas pre-instaladas, como se describe en el
Alcance del suministro. La configuración e
instalación se realizan de forma rápida y muy
sencilla. Por favor utilice los guantes blancos
durante este procedimiento, para evitar arañazos.
Debe trabajar en una zona limpia y segura durante
la instalación y, tan cerca como sea posible del
lugar final de colocación del giradiscos.
Lo primero saque todos los accesorios, el motor y
el brazo del embalaje. Ahora saque la primera
parte del embalaje. A continuación puede sacar el
chasis del giradiscos, incluida la parte del cojinete
instalado superior e inferior de la segunda parte
del embalaje. Coloque el chasis del giradiscos
sobre sus patas en la zona donde vaya a colocar
finalmente el giradiscos.
Saque el motor-polea de la bolsa de accesorios y
mueva la polea del motor tanto como pueda en
el eje del motor hasta tener una distancia de
aproximadamente 1 mm entre el borde superior del
motor y el borde inferior de la polea. Ahora atornille
los tres tornillos en la polea, uno después del otro
con un destornillador.
Levante el chasis del giradiscos y deslice el motor
desde debajo, exactamente bajo el orificio de
colocación predefinido en el chasis. Por favor
preste atención al hecho de que el interruptor del
motor está fuera en el lateral izquierdo del cuerpo
del reproductor de discos. Cuando el motor esté en
la posición derecha ponga cuidadosamente el chasis
hacia abajo nuevamente.
A continuación deberá centrar el motor en el orificio
de la posición del motor sin ningún contacto con el
chasis del giradiscos. De esta forma puede utilizar
el giradiscos perfectamente desacoplado del motor.
Quite la segunda parte del embalaje. En la parte
del fondo del embalaje encontrará el plato del
giradiscos. Por favor saque el plato con ambas
manos. Coloque el plato con la muesca de 60mm
de ancho y 5mm de profundidad en la parte superior
del cojinete. Mediante un ligero movimiento hacia
arriba y abajo, deslice el plato en la parte superior
del cojinete. Asegúrese, mediante una presión
suave que el plato quede apoyado completamente
en la superficie del cojinete.
Saque los pernos roscados (M6 x 8) de la bolsa de
accesorios y atorníllelos con la llave Allen
correspondiente en el arrollamiento cerca de la
muesca del brazo en el chasis del giradiscos, de
modo que la parte frontal del perno no quede hacia
el lado interior de la muesca del giradiscos.
Posicione el contrapeso incluido encima del chasis
en frente de la muesca del brazo. Coja el brazo y
deslice primero el cable de conexión a través del
orificio seguido por el eje del brazo. Presione suavemente el brazo hacia abajo en el orificio hasta
que el elevador del cabezal queda posado sobre el
contrapeso (vea la figura). Por favor asegúrese de
que el tubo del brazo esté en paralelo con el borde
derecho del cuerpo del giradiscos. Fíjelo ahora con
cuidado girando el cabezal con una llave Allen y
después retire el contrapeso.
Si el brazo queda fijado podrá conectar el cartucho
al brazo. La guía que hay en la cubierta simplificará
el montaje. Por favor fije el cartucho con el tornillo
y la llave Allen adecuada al brazo cuando esté
colocado en el umbral inferior (vea la figura).
En esta posición el cartucho y el brazo tendrán
automáticamente el ángulo correcto y una inclinación
optimizada.
INSTALACIÓN Y CONFIGURACIÓN
1mm

5
Conecte cuidadosamente el cartucho al cable del
giradiscos. Los cables de la cubierta (hilos de
conexión del cartucho) están codificados mediante
colores según el estándar internacional que se
ilustra a continuación:
Importante: preste atención durante los pasos
siguientes para evitar daños al cartucho.
Si está utilizando el cartucho que se incluye con
imán móvil ClearAudio denominado Virtuoso
Wood, podrá aplicar una fuerza de 22 mN.
Presione suavemente el contrapeso sobre el cabezal, de modo que la escala impresa se muestre en
la dirección del sistema del cabezal. Cuando suelte
el cabezal, el contrapeso se moverá hacia abajo y
el sistema hacia arriba. Ahora quite la cubierta protectora de la aguja y gire el contrapeso en la dirección del sistema hasta que el cabezal quede equilibrado y se mueva libremente. Por favor tenga cuidado de no dañar la aguja del sistema al hacerlo.
La posición que tiene ahora corresponde a una
carga de 0mN. Con la escala sobre el contrapeso,
puede ahora ajustarlo exactamente a 22mN. Una
vuelta completa corresponde a 5mN, es decir,
deberá girar el contrapeso 4 vueltas completas
más 2 unidades de la escala en la dirección del
sistema. Ahora el sistema ha bajado. Por favor
tenga cuidado de no dañar la aguja del sistema al
hacerlo.
Para el siguiente ajuste coloque cualquier disco de
vinilo (LP) en el plato. Ahora podrá quitar el protector
de la aguja.
Si levanta ahora el cartucho hasta el centro del plato
del giradiscos, deberá ver (desde un lado) que el
borde superior del tubo del brazo está en paralelo
con la superficie del disco. Puede utilizar el tubo
del brazo como orientación. Si fuese necesario,
podrá ajustar la altura del brazo. Para ello, tendrá
que mover el brazo en el orificio del chasis en la
dirección correcta y fijar la posición mediante el
tornillo de bloqueo Allen en el borde del chasis del
giradiscos.
Para finalizar el ajuste general tendrá que calibrar
el sistema antideslizamiento. Esto tiene que ver con
la fuerza de arrastre del cartucho. Con un tornillo de
antideslizamiento (a la vista a mano derecha del
contrapeso principal) podrá completar la calibración
del brazo. Con una fuerza de arrastre de 22Nm,
el tornillo debe estar en la posición central.
El ajuste fino se puede realizar de forma óptima
utilizando un disco cuya correcta grabación sea
conocida, con una voz o instrumento solo, que
debe estar localizado en la posición central frontal
del escenario acústico. En caso de que la imagen
se haya movido demasiado a la derecha del
escenario acústico debería bajar el sistema
antideslizamiento desenroscando el tornillo de
antideslizamiento. En el caso de que la imagen
esté posicionada demasiado a la izquierda debería
aumentar el sistema antideslizamiento enroscando
el tornillo de antideslizamiento.
Conecte el cable de conexión del equipo Marantz
TT-15S1 ahora con la entrada phono de su
preamplificador de sonido y conecte el cable de
alimentación a la red eléctrica.
Coloque una correa de accionamiento (la segunda
es de recambio) alrededor del plato y alrededor de
la polea. El diámetro más pequeño de la polea se
utiliza para 33 1/3 rpm y el diámetro mayor para
45 rpm. La posición “I” del interruptor de motor
indica que el giradiscos está encendido. Por favor
deje el giradiscos encendido durante los primeros
15 a 30 minutos, para adaptarlo.
Se recomienda conectar la parte inferior del cojinete
con el cable de toma de tierra que se incluye al
terminal de tierra del amplificador.
Código de colores de los cables del brazo:
Señal canal izq. (L+) blanco
Señal tierra canal izq. (L -) azul
Señal canal der (R+) rojo
Señal tierra canal der. (R -) verde

Ahora el equipo está completamente ajustado y
podrá disfrutar de sus discos de vinilo en el
giradiscos Marantz TT-15S1.
6
PRECAUCIONES ESPECÍFICAS
Cada dos años debería lubricar (solamente si
observa variaciones en la velocidad) el cojinete del
plato de giradiscos con el aceite suministrado.
En este caso sería suficiente poner 4 o 5 gotas de
aceite en el cojinete.
Preste especial cuidado para evitar daños en el
cable de alimentación. Cualquier daño debe ser
reparado solamente por personal autorizado.
Un cable de alimentación defectuoso debe ser
cambiado de inmediato.
Precaución Por favor utilice solamente los líquidos
sin alcohol y los líquidos especialmente utilizados
para la limpieza de acrílicos cuando vaya a limpiar
el giradiscos Emotion. De lo contrario se podrían
producir daños en el material o la superficie.
SERVICIO Y REPARACIÓN
Por favor póngase en contacto con su distribuidor
autorizado Marantz más cercano en caso de que
este manual no responda a todas sus preguntas
respecto a su nuevo producto Marantz.
Sólo los técnicos de servicio más competentes y
cualificados deben dar servicio al equipo.
La compañía Marantz y el personal de gestión de
garantías formado en fábrica tienen los
conocimientos y medios especiales requeridos
para la reparación y calibración de este equipo de
precisión.
Cuando haya caducado el período de garantía,
las reparaciones serán realizadas con un cargo si
el equipo pudiera volver a sus condiciones de
funcionamiento normal. En caso de dificultades
consulte con su distribuidor autorizado Marantz.
Por favor indique el modelo y número de serie del
equipo y dé una descripción completa de lo que
cree es anormal en el comportamiento del equipo.
ESPECIFICACIONES TÉCNICAS
Principio de Forma de chasis optimizado según la resonancia, accionado por correa
construcción:
Posibilidades de 33 1/3 rpm / 45 rpm (78 rpm con polea de motor opcional)
velocidad:
Motor: Motor síncrono desacoplado en carcasa metálica de grandes dimensiones
Cojinete: Acero reforzado, incrustación de bronce aglomerado pulido con bola cerámica
Piatto: GS-PMMA, acrilico, superficie lavorata con CNC di precisione
Variación de velocidad: ±0,2 %
Dimensiones: Approssimativamente: 400 mm x 330 mm x 150 mm
Garantía: 3 anni (ad esclusione della testina del fonorivelatore)

www.marantz.com
JAPAN
Marantz Japan, Inc. 35-1 Sagami Ohno 7-Chome, Sagamihara-shi, Kanagawa 228-8505, Japan
UNITED STATES
Marantz America, Inc. 1100 Maplewood Drive, Itasca, IL 60143, U.S.A.
EUROPE
Marantz Europe B.V. Postbus 8744, 5605 LS Eindhoven, The Netherlands
 Loading...