

Page 1

ENGLISH
Model SR5000 User Guide
AV Surround Receiver
15
Page 2

ENGLISH
WARRANTY
For warranty information, contact your local Marantz distributor.
RETAIN YOUR PURCHASE RECEIPT
Your purchase receipt is your permanent record of a valuable purchase. It
should be kept in a safe place to be referred to as necessary for insurance
purposes of when corresponding with Marantz.
IMPORTANT
When seeking warranty service, it is the responsibility of the
consumer to establish proof and date of purchase. Your purchase
receipt or invoice is adequate for such proof.
FOR U.K. ONLY
This undertaking is in addition to a consumer’s statutory rights and
does not affect those rights in any way.
Non sono coperti da garanzia difetti derivanti da uso improprio, errata
installazione, manutenzione effettuata da personale non autorizzato o,
comunque, da circostanze che non passano riferirsi a difetti di funzionamento
dell’apparecchio.
Sono inoltre esclusi dalla garanzia gli interventi inerenti l’installazione e
l’allacciamento agli impianti di alimentazione.
Gli apparecchi verranno riparati presso i nostri Centri di Assistenza. Le
spese ed i rischi di trasporto sono a carico del cliente.
La casa costruttrice declina ogni responsabilita’ per danni diretti o indiretti
provocati dalla inosservanza delle prescrizioni di installazione, uso e
manutenzione dettagliate nel presente manuale.
Per informazioni sull’abbonamento al servizio Assistenza postgaranzia e
per conoscere l’indirizzo dei Centri Assistenza Marantz rivolgetevi al nostro
servizio consumatori (telefono 1678-20026 – numero verde).
PORTUGUÊS
FRANÇAIS
GARANTIE
Pour des informations sur la garantie, contacter le distributeur local
Marantz.
CONSERVER L’ATTESTATION D’ACHAT
L’attestation d’achat est la preuve permanente d’un achat de valeur. La
conserver en lieur sûr pour s’y reporter aux fins d’obtention d’une
couverture d’assurance ou dans le cadre de correspondances avec Marantz.
IMPORTANT
Pour l’obtention d’un service couvert par la garantie, il incombe au client
d’établir la preuve de lachat et d’en corroborer la date. Le reçu ou la facture
constituent des preuves suffisantes.
DEUTSCH
GRANTIE
Bei Garantiefragen wenden Sie sich bitte an Ihren Marantz-Händler.
HEBEN SIE IHRE QUITTUNG GUT AUF
Die Quittung dient Ihnen als bleibende Unterlage für Ihre wertvolle
Anschaffung Das Aufbewahren der Quittung ist wichtig, da die darin
enthaltenen angaben für Versicherungszwecke oder bei korrespondenz
mit Marantz angeführt werden müssen.
WICHTIG!
Bei Garantiefrangen muß der Kunde eine Kaufunterlage mit kaufdatum
vorlegen. Ihre Quittung oder Rechnung ist als Unterlage ausreichend.
NEDERLANDS
GRANTIE
Voor inlichtingen omtrent garantie dient u zich te wenden tot uw plaatselijke
Marantz-handelaar.
UW KWITANTIE, KASSABON E.D. BEWAREN
Uw Kwitantie, kassabon e.d. vormen uw bewijs van aankoop van een
waardevol artikel en dienen op een veilige plaats bewaard te worden voor
evt. verwijzing, b.v. in verband met verzekering of bij correspondentie met
Marantz.
BELANGRIJK
Bij een evt. beroep op de garantie is het de verantwoordelijkheid van de
consument een gedateerd bewijs van aankoop te tonen. Uw kassabon of
factuur is zijn voldoende bewijs.
ITALIANO
CONDIZIONI DI GARANZIA
L’apparecchio e’ garantito per 365 giorni dalla data di acquisto comprovata
da un documento attestante il nominativo del rivenditore e la data di
vendita. La garanzia sara’ prestata con la sostituzione o riparazione gratuita
delle parti difettose.
GARANTIA
Para informações sobre a garantia, contactar o distribuidor Marantz local.
GUARDAR O RECIBO DE COMPRA
O recibo é o registo permanente da compra que fez. Deve ser guardado
num local seguro, para ser apresentado em questões relacionadas com o
seguro ou para quando tiver de contactar a Marantz.
IMPORTANTE
Quando procurar assisténcia técnica ao abrigo da garantia, é da
responsabilidade do consumidor estabelecer a prova e data de compra. O
recibo é prova adequada.
ESPAÑOL
GARANTÍA
Para información sobre las Condiciones de Garantía, sírvase consultar el
Certificado que encontará en le interior del embalaje del equipo.
CONSERVE EL COMPROBANTE DE LA COMPRA
La factura es el comprobante de la adquisición de un producto valioso.
Consérvela en lugar seguro para poder consultarla en caso necesario.
IMPORTANTE
Para disponer de servicios cubiertos por la garantía, el usuario deberá
acreditar la fecha y el lugar de adquisición del equipo. La factura o recibo
de la compra constituyen un comprobante válido a tal efecto.
SVENSKA
GARANTI
Angáende garanti,kontakta din lokala Marantz handlare.
SPAR KVITTOT
Kvittot är din lnköpshandllng över lnköp av en värdefull vara.Det ska
placeras pá ett säkert ställe och hänvlsas till vid försäkringsfrágor eller vid
korrespondens med Marantz.
VIKTIGT
När garantiservice áberopas är det konsumentens ansver att visa datum
för inköp.Ditt kvitto eller din faktura är ett tillfredsställande bevis.
DANSK
GARANTI
Bed din Marantz-forhandler om oplysninger om garantien.
GEM DIN KVITTERING SOM KØBSEVIS
Din kvittering er bevis på et værdifuldt køb. Opbevar den på et sikkert sted,
hvor du let kan finde den i forbindelse med eventuelle erstatningskrav eller
korrespondance med Maranz.
VIGTIGT
Det er brugerens ansvar at forelægge købsbevis, hvis der er brug for det
i garantiforbindelse. Din kvittering eller faktura er gyldige beviser.
1
Page 3

ENGLISH
CONTENTS LIST
English....................................................................................................................................page 3
Français ................................................................................................................................ page 14
Deutsch ................................................................................................................................Seite 25
Nederlands........................................................................................................................pagina 38
Italiano...............................................................................................................................pagina 50
Português..........................................................................................................................página 61
Español..............................................................................................................................página 73
Svenska ............................................................................................................................... sidan 85
Dansk..................................................................................................................................... side 96
Specifications ....................................................................................................................page 107
Figures................................................................................................................................. page 108
CE MARKING
English
This unit is in conformity with EMC directive and low-voltage directive.
Français
Cet appareil est conforme à la directive EMC et à la directive sur les basses tensions.
Deutsch
Dieses Gerät entspricht den EMC-Richtlinien und den Richtlinien für Niederspannungsgeräte.
Nederlands
Dit apparaat voldoet aan de EMC-richtlijnen en de richtlijnen voor apparatuur met laag voltage.
Italiano
Quest’unità è conforme alle direttive EMC ed alla direttiva sulle basse tensioni.
Português
Esta unidade está em conformidade com as directivas EMC e as directivas de baixa voltagem.
Español
Esta unidad está de acuerdo con las normas EMC y las relacionadas con baja tensión.
Svenska
Denna enhet överensstämmer med EMC direktivet och direktivet för lågspänning.
Dansk
Dette apparat er i overensstemmelse med EMC direktivet og direktivet for lavspænding.
SI DICHIARA CHE L’APPARECCHIO SINTO-AMPLIFICATORE SR5000 RISPONDE ALLE PRESCRIZIONI
DELL’ART. 2 COMMA 1 DEL D.M. 28 AGOSTO 1995 N 548.
FATTO A EINDHOVEN, IL 1/1/1996. MARANTZ EUROPE B.V.
5600 EINDHOVEN
THE NETHERLANDS
"Este aparato lleva elementos antiparasitarios necesarios para cumplir con los limites que se
estableren en el Anexo V del Reglamento sobre Pertubaciones Radioelectricas e Interferencias
aprobado en el Real Decreto 138/1989. (B.O.E. de 9 de Febrero1989)."
2
Page 4

FOREWORD
This section must be read carefully before any connection is made to the
mains supply.
WARNINGS
Do not expose the equipment to rain or moisture.
Do not remove the cover from the equipment.
Do not insert anything into the equipment through the ventilation
holes.
Do not handle the mains lead with wet hands.
INSTALLATION
Remember the following important points when installing the receiver.
• Do not expose the component to rain or moisture, as this may cause
damage to the receiver.
• All receivers produce some heat during operation and this heat must be
allowed to disperse freely. Do not close any ventilation openings and
insure that there is adequate ventilation space behind, beside and
above the receiver.
• Prevent extra heat from reaching the unit. Never put the receiver in the
full glare of the sun or near a heat source.
PRECAUTIONS
The following precautions should be taken when operating the equipment.
EQUIPMENT MAINS WORKING SETTING
Your Marantz product complies with the household power and safety
requirements in your area.
This is a voltage selector on the rear panel of the “Overseas” Version
product,. Be sure to set the voltage selector to the mains voltage of your
area before using the unit.
IMPORTANT
This apparatus is fitted with an approved moulded 13 Amp plug. To change
a fuse in this type of plug proceed as follows:
1. Remove fuse cover and fuse.
2. Fix new fuse which should be a BS1362 5A, A.S.T.A. or BSI approved
type.
3. Refit the fuse cover.
If the fitted plug is not suitable for your socket outlets, it should be cut off
and an appropriate plug fitted in its place.
If the mains plug contains a fuse, this should have a value of 5A. If a plug
without a fuse is used, the fuse at the distribution board should not be
greater than 5A.
NOTE: The severed plug must be destroyed to avoid a possible shock
hazard should it be inserted into a 13A socket elsewhere.
HOW TO CONNECT A PLUG
The wires in the mains lead are coloured in accordance with the following
code:
BLUE—”NEUTRAL” (“N”)
BROWN—”LIVE” (“L”)
1. The BLUE wire must be connected to the terminal which is marked
with the letter “N” or coloured BLACK.
2. The BROWN wire must be connected to the terminal which is marked
with the letter “L” or coloured RED.
3. Do not connect either wires to the earth terminal in the plug which is
marked by the letter “E” or by the safety earth symbol T or coloured
green or green-and-yellow.
Before replacing the plug cover, make certain that the cord grip is clamped
over the sheath of the lead — not simply over the two wires.
COPYRIGHT
Recording and playback of some material may require permission. For
further information refer to the following:
– Copyright Act 1956
– Dramatic and Musical Performers Act 1958
– Performers Protection Acts 1963, and 1972
– Any subsequent statutory enactments and orders
GENERAL PRECAUTIONS
When installing the equipment ensure that:
– the ventilation holes are not covered.
– air is allowed to circulate freely around the equipment.
– it is placed on a vibration-free surface.
– it will not be exposed to excessive heat, cold, moisture or dust.
– it will not be exposed to direct sunlight.
– it will not be exposed to electrostatic discharges.
– always install the unite horizontally.
In addition, never place heavy objects on the equipment.
If a foreign object or water does enter the equipment, contact your nearest
dealer or service center.
Do not pull out the plug by pulling on the mains lead; grasp the plug itself.
It is advisable when leaving the house, or during a thunderstorm, to
disconnect the equipment from the AC outlet.
SR5000 FEATURES
• Equipped with 7 audio inputs and 4 video inputs
• Front 100 watt x 2(stereo mode), 70 watt x 5 (surround mode)
• DTS(Digital Theater System) digital surround decoder
• Dolby digital(AC-3)surround decoder
• 3-in Digital selector (Coax.-1, Coax-2, Opt)
• Surround decoder with digital delay control function.
• 30-station random preset memory.
• Automatic preset memory at tuner.
• Up to 90-minute sleep timer by remote control.
• Radio Data System for European version
To ensure proper ventilation for the amplifier, do not mount it in a rack
or locate it inside a bookshelf. Note the following precautions.
- Do not insert objects into the space underneath the amplifier.
- Do not block the vents on the top of the amplifier.
- Keep the area above the amplifier unobstructed for about one
meter.
- Allow approximately 20 centimeters of space on all sides of the
amplifier.
INTRODUCTION
Thank you for selecting the Marantz AV Surround Stereo Receiver for your
AV system.
This AV Surround Stereo Receiver incorporates a number of features
designed to enhance the listening of your favorite music and home theater
sources.
Please read these operating instructions carefully. We recommend that
you read the entire user guide before you attempt to connect or operate
the receiver.
After you have reviewed the contents of this manual, we suggest that you
make all system connections before you attempt to operate the unit.
Refer to the figures on the pages at the back of this user’s guide. The
callout numbers on the figures correspond to those found in the text. All
references to the connections and controls that are printed in BOLD type
are as they appear on the unit.
3
Page 5
USING THE SURROUND MODES
8 surround modes are provided for reproducing sound with a live
ENGLISH
atmosphere. Select the surround mode appropriate to the music/video
source and your listening room conditions.
1. DTS (Digital Theater System):
Allows you to enjoy 5.1 (or 6) discrete channels of high quality digital audio
from DTS program sources bearing the
DEFINITION SURROUND” trade mark such as laser discs, DVD and
compact discs, etc. DTS Digital Surround delivers up to 6 channels of
transparent audio (which means identical to the original masters) and
results in exceptional clarity throughout a true 36O° soundfield.
The term DTS is a trademark of DTS Technology, LLC.
Manufactured under license from DTS Technology, LLC.
Note: The DTS program sources should be played back in the DTS
mode. If not, it will sound like continuous noise.
2. DOLBY DIGITAL (AC-3) SURROUND
Dolby Digital (also known as AC–3) is new tecnology that was originally
developed to provide six separate channels of high quality discrete multichannel sound for motion picture theaters. The Marantz AV receiver brings
that same high quality sound into your home when used a compatible laser
disc player, as well as from future Dolby Digital sources such as DSS,
Digital Video Disc (DVD) and High Definition Television (HDTV).
The wide dynamic range of Dolby Digital enables the Marantz AV recever
to reproduce soundtracks with their full fidelity and a realism that is not
possible with conventional matrix surround systems.
3. DOLBY PRO LOGIC SURROUND
This is the setting you will probably use for watching most Dolby Surround
( DOLBY SURROUND ) encoded videos. This provides you with left
and right stereo for off-screen imaging, a center channel for most onscreen dialogue, and a surround channel for ambiance and special effects.
There are three center channel modes available in Dolby Surround.
“PHANTOM” (CENTER SPEAKER MODE : NONE) should be used if you
have elected not to use a center channel. This mode of operation directs
the center channel information equally to the left and right channel
speakers, creating a “phantom” center image of the dialogue. This is the
way the first generation Dolby Surround worked.
“NORMAL” should be used if you are using a small center channel
speaker (or speakers) with limited bass response. In NORMAL mode, the
lower frequencies (below 100 Hz) are removed from the center channel
and redirected equally to the left and right speakers. Since bass frequencies are omnidirectional, this will not affect the imaging of the center
channel. The dialogue will still appear to come from the video screen.
“WIDE” should be used if you are using a full-range center channel
speaker that is just as capable of good bass response as your main left and
right speakers. In this mode, all the center channel information remains in
the center channel output.
DIGITAL
SURROUND
TM
HDS
"
" or “HIGH
6. HALL
This mode provides the ambiance of a concert hall for live, un-amplified
classical music sources such as orchestral, chamber music or solo
instrumentals.
7. STADIUM
The reverberation and open air atmosphere of a rock concert or sporting
event is created by this setting, when playing stereo (but not mono) source
material.
8. CHURCH
This mode provides the reverberant ambiance of a church, which can
enhance choral works, as well as adding a rich ambient effect to "dry"
studio recordings.
DOLBY PRO-LOGIC SURROUND
[Speaker Selection and Placement]
Front Speakers: These should be full-range, high quality speakers; the
best speakers in your system. They should be located far enough from
each side of your TV monitor to provide a well defined stereo image. The
TV monitor should be located midway between the left and right front
speakers. You may use smaller speakers if you are using a sub-woofer with
your system.
Surround Speakers: The rear speakers in your surround sound system
provide ambient sound for an open, “concert hall” effect when listening
to music. They also spread the sound and provide special effects on video
soundtracks when used in the Dolby Surround mode.
The demands made on your surround speakers are far less than on your
main speakers. Therefore, these speakers do not need to be as large (and
as expensive) as your main speakers. Deep bass response is not important
at all. Good 2-way bookshelf speakers will handle the job easily, and most
full-range mini-monitors are also quite suitable for this application. Depending on how extensive you want to get with your installation, there are
also several in-wall and wall-mount speakers that are suitable for use as
surround sound speakers. Dipole-type surround speakers can provide
even wider dispersion, with a diffused sound field which provides enveloping surround sound effects.
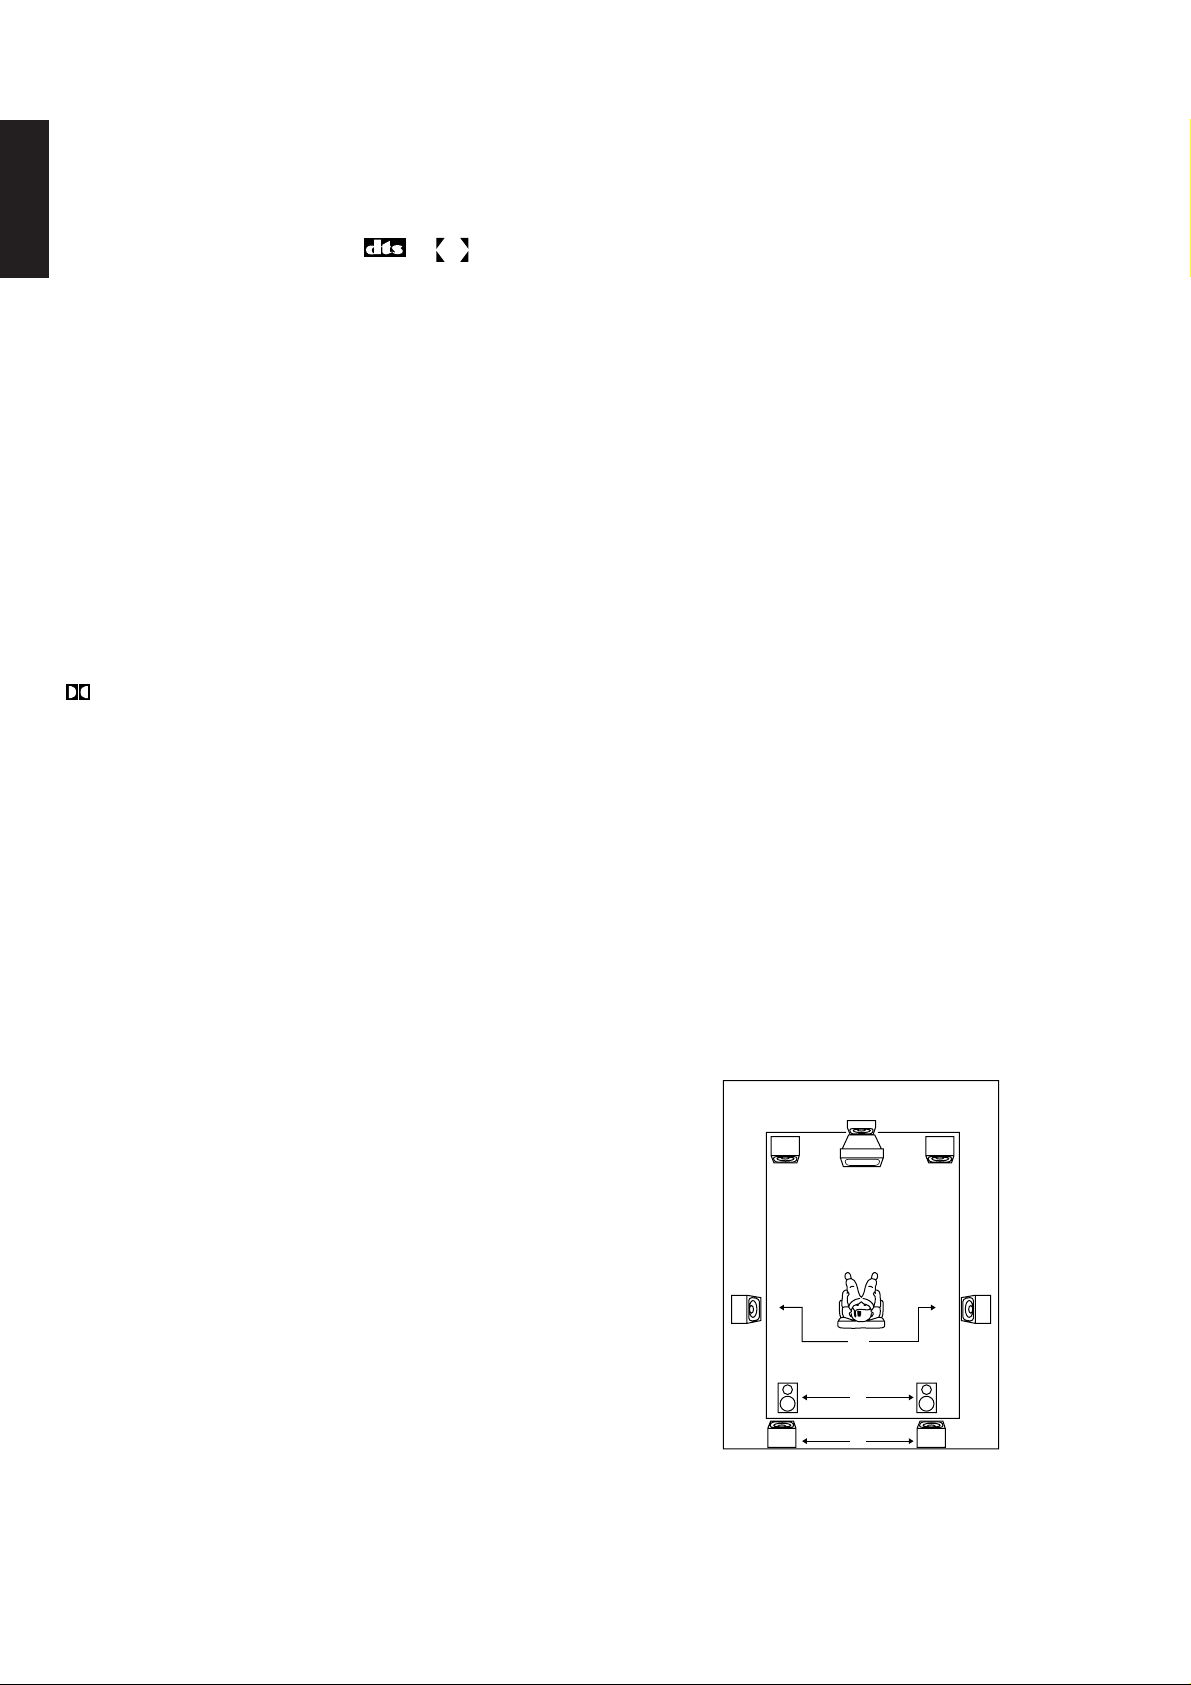
The surround channel speakers should be mounted so that their sound is
dispersed throughout the viewing area.
Ideally, you should install the surround speakers along the side walls of the
listening room, directly above and to the left and right to the listeners or
slightly behind them. Their height should be about 1 meter higher than the
level of the listener’s ears. (Figure 1-A). This will provide the best surround
sound effect and should be used with both conventional direct-radiating as
well as dipole speaker types. If this is not possible or practical, then try
mounting the surround speakers on the back wall of the room, and aim
them so that they are not firing directly sounds do not reach directly toward
the listener’s ears. (Figure 1-B) Another approach is to mount the speakers
facing upward so that their sound is dispersed by the ceiling and rear wall
(Figure 1-C).
DELAY TIMES
Delay times available in Dolby Surround : 15 to 30 mS (milliseconds)
Delay times available in Dolby Digital (AC-3) : 0 to 15 mS (milliseconds)
For most home theater setups, the 20mS setting works best. This setting
should be used if your front speakers are the about the same distance
away from the listening position as the surround speakers are located.
Choose the 30mS setting only if you are sitting much closer to the surround
speakers than to the front speakers. Choose the 15mS setting
if you are further away from the surround speakers than you are to the
front speakers.
4. DOLBY 3 STEREO
This mode of operation is available to provide a center channel image for
stereo program sources that are not encoded with surround sound. This
is use for watching older movies or TV shows that are recorded in stereo,
particularly if your speakers are located relatively far apart from each other.
In this way, dialogue will be correctly located at the video screen, while the
stereo information will provide off-screen imaging. Only NORMAL and
WIDE center channel modes are available in 3 STEREO Mode. Delay time
is 0mS because the SURROUND channel is off.
5. THEATER
This setting creates the same intimate feeling as you get in a theater when
watching plays, musicals and solo acts.
A
C
B
Figure 1.
Figure 1. Surround Speaker Options
Option A: Placed or mounted along side walls
Option B: Placed or mounted behind listeners
Option C: Placed or mounted facing upward
4
Page 6
Center Speaker(s) Again, the center speaker(s) can be of a smaller size and
less expensive than your main speakers. However, the upper midrange
and treble response of the center speaker(s) should resemble that of the
main speakers. If there are significant differences in frequency response
in this range, the stereo image may shift toward the speaker with the
higher output.
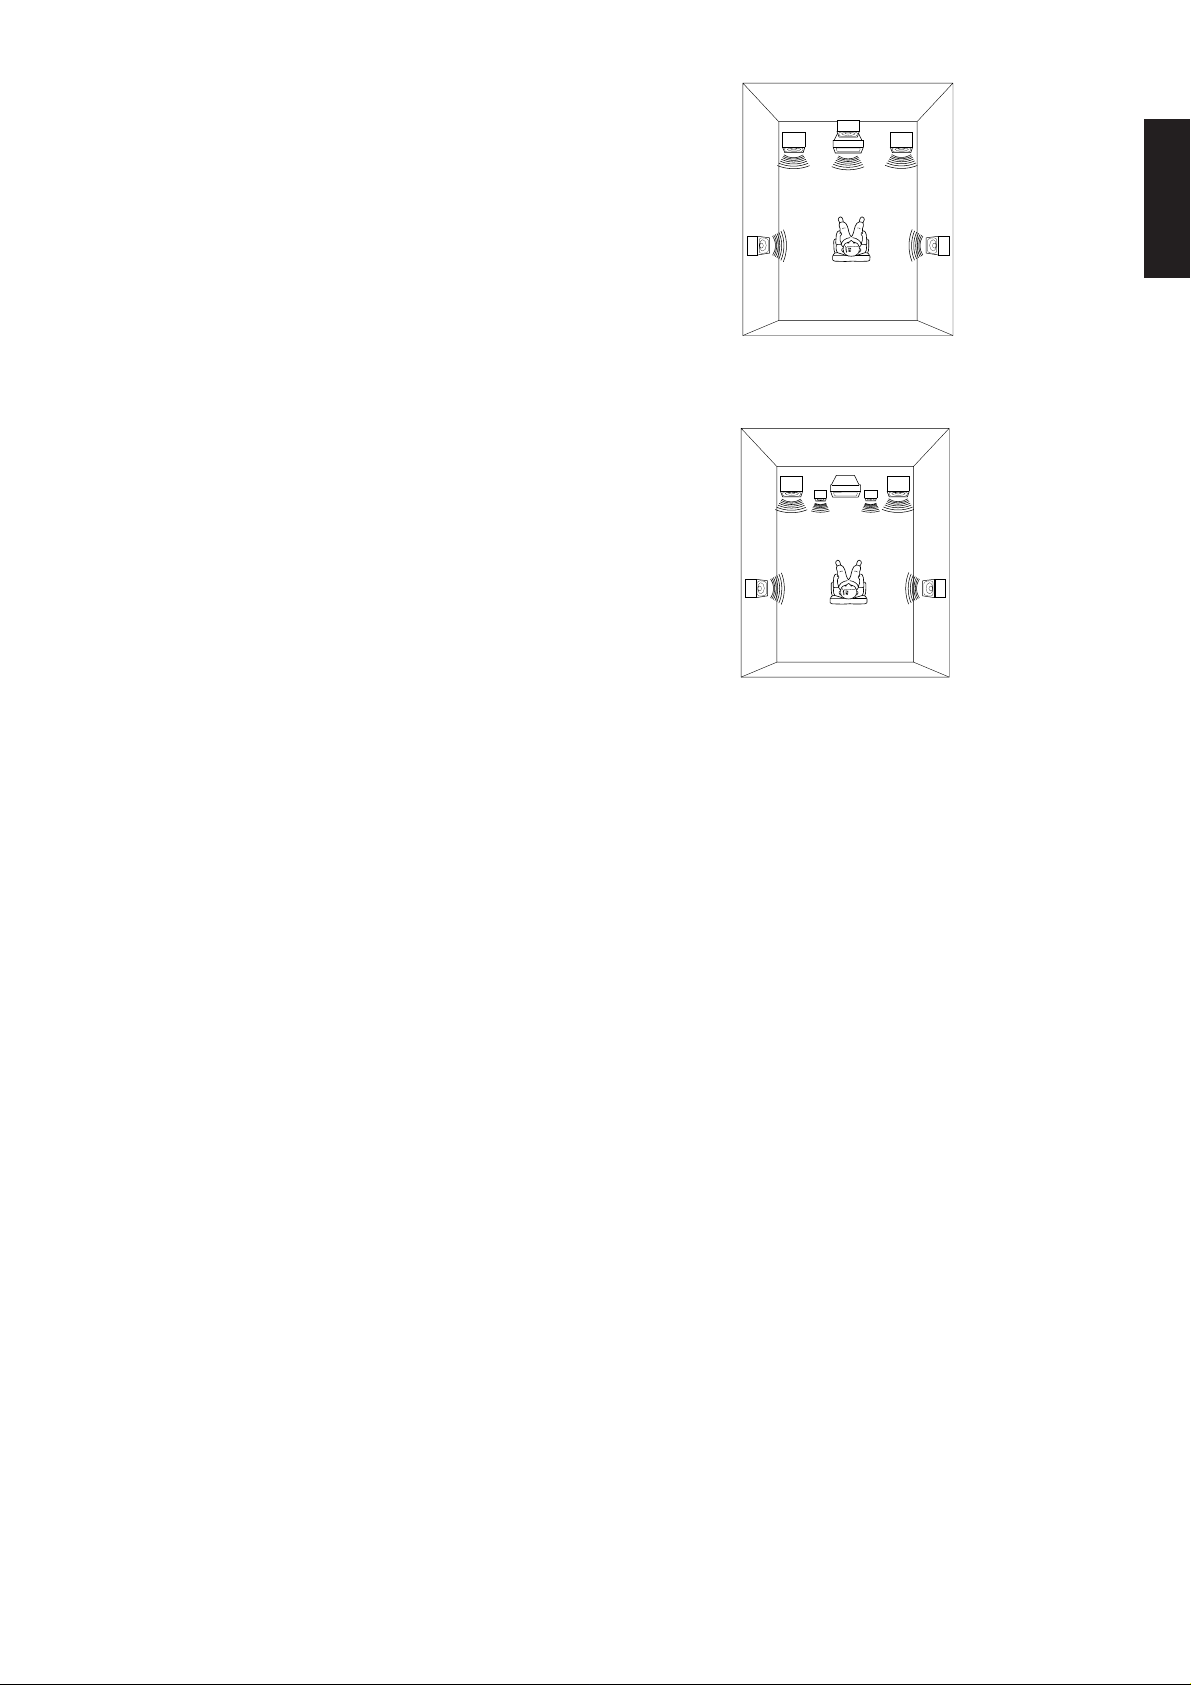
You can use one or two speakers for the center channel.
If you choose to use one speaker (Figure 2A), it should be located
immediately above or below your video screen. Using one center speaker
provides the best results for most home theater system setups.
If you choose to use two speakers (Figure 2B), the same signal will appear
in both speakers since the CENTER channel output is monophonic. They
should be located on each side of your TV monitor, as close as possible so
that the dialogue will seem to come from the center of the TV screen.
In either case, the center speaker(s) should be placed as close to your video
screen as possible, so it must be magnetically shielded. If it is not shielded,
it could cause distortion of the TV picture. Special video- compatible
monitor speakers are available for this application.
Use the center speaker as shown in Figure 2A or 2B.
NOTES
• If using a VCR, to take full advantage of the Surround modes, especially
Dolby Pro Logic, your VCR must be a Hi-Fi Stereo VCR.
A mono VCR cannot provide the stereo soundtracks necessary for
surround decoding.
• The surround modes will not operate correctly if the signal passes
through a graphic equalizer.
If you use a graphic equalizer in your system, set it for flat response or
its “through” or “off” settings.
Figure 2A.
Figure 2B.
Figure 2. Center Speaker Options
Option A: Using one speaker
Option B: Using two speakers
5
Page 7

LOCATION AND FUNCTION OF PARTS AND CONTROLS
ENGLISH
Rear panel connections
(See pages 108 )
All connections to the rear panel should be made with entire power off to
the system. To avoid miss-connection, it is advisable to connect one cable
at a time between the different components. This is the safest way to
avoid cross-connecting channels or mix-up signal inputs with outputs.
A FM antenna terminal (75 ohm or 300 ohm)
For connecting an external FM antenna with a coaxial cable, or for
connecting a cable network.
AM antenna and ground terminals
For connecting the supplied AM loop antenna. Use the terminals
marked “AM” and “GND”.
The supplied AM loop antenna will provide good AM reception in most
areas. Position the loop antenna to the best reception.
B VCR1 video input/output jacks
Connect the IN jack to your main VCR’s video output jack and connect
the OUT jack to the VCR’s video input jack.
C LD/TV video input jack
Connect to a laser disc player’s video output or TV's output jack.
D DVD video input jack
Connect to a DVD's video output.
Q AC OUTLET
Connect the AC power cables of a CD player, cassette deck, etc., of
your system. The power supply from switched outlet is interlocked
with the POWER switch of the unit. The maximum total power
consumption of the connected components must not exceed the
following limit:
100 W MAX.
R AC power cord
Plug into AC 230V household outlet.
S COAX. input terminal
Connect the COAX. output jack of the (digital equipment) Player to the
IN jack.
OPT. input terminal
Connect the OPT. output jack of the (digital equipment) Player to the IN
jack.
IMPORTANT NOTE:
These input jacks are for DTS, AC-3 / PCM digital signals only.
Do not connect standard audio outputs to these DTS, AC-3 / PCM digital
input jacks.
T 6ch direct in
Connect the output jack of the surround processor (e.g. Marantz DP870
etc.) to the IN jack.
E TV MONITOR OUT jack
Connect to a TV’s video input jack.
F REMOTE jacks
Connect to other Marantz components equipped with REMOTE jacks.
(See page 8.)
Marantz components utilize the Philips RC-5 remote control
system language.
G TAPE 1 input jacks
Connect the output (PLAY) jack of the cassette deck to the IN jack.
H TAPE 2 input jacks
Connect the output (PLAY) jack of the cassette deck to the IN jack.
I CD input jacks
Connect to the audio output jacks of a CD player.
J VCR1 audio input/output jacks
Connect the IN jacks to a VCR’s audio output jacks and the OUT jacks
to the VCR’s audio input jacks.
K DVD audio input jacks
Connect the IN jacks to a VCR's/DVD's audio output jacks.
L LD/TV audio input jacks
Connect to the audio output jacks of a laser disc player or TV.
Note on loudspeaker impedance:
The power ratings specified for this Marantz receiver are obtained using
fixed value test load impedances. However, the actual impedance of a
loudspeaker system will vary with frequency, deviating from the nominal
rating. This Marantz amplifier will drive any modern loudspeaker system
with a rated impedance of 8 ohms or higher. A few newer loudspeakers
feature impedances of less than 8 ohms. The high current output capability
of this Marantz receiver can provide the additional power necessary to
drive such low impedance speakers. However, during extended passages
of high volume, the protection circuitry may temporarily interrupt operation. If this occurs, simply reduce the volume accordingly. The protection
circuitry is specially designed so that it cannot affect the sound quality
during normal operation.
M PRE OUT (FRONT, CENTER AND REAR JACKS)
These jacks supply pre-amp output signals, and are used for connection
to external power amplifiers (if necessary).
N SURROUND speaker output terminals
Connect to the surround (rear) speakers.
O CENTER speaker output terminals
Connect to the center speaker.
P FRONT speaker output terminals
Connect to the front speakers.
6
Page 8

Front panel features
(See page 108 )
q POWER switch
When this switch is pressed once, the power turns ON and display
appear on the display panel. When pressed again, the power turns OFF.
After initialization or resetting, press this switch to enter the
standby mode. To turn the power ON, press any of the function
buttons of the main unit or the POWER button of the remote control
unit.
w SPEAKERS (ON-OFF) button
Use this button to select speaker system ON or OFF
e PHONES socket for stereo headphones
This jack is compatible with a wide range of conventional dynamic
headphone types.
NOTE:
Change the surround mode to STEREO when using the headphones.
r Tuning/Preset UP/DOWN, F/P(frequency/preset) buttons
During AM or FM reception, you can scan to other frequencies or preset
number by pressing these buttons.
t FM MODE button
Press this button to select stereo or monaural mode, when listening to
FM broadcasts.
y MEMORY button
Press this button to memorize the desired station frequency. Please
see Page 9 for a detailed usage.
u BASS CONTROL knob
Adjust the low frequency level with this control according to your taste
and room acoustics.
i TREBLE CONTROL knob
Adjust the high frequency level with this control according to your taste
and room acoustics.
o BALANCE CONTROL knob
Adjust the sound volume between left and right front speakers with
this control knob.
!0 VCR2 audio/video input jacks
Connect the audio/video output of the second VCR, etc. to these IN
jacks.
!1 Input selector button
This button selects the audio or audio/video source. The selected
source name will be displayed on FTD. Pushing this button in the
standby mode, allows to turn the power ON.
!2 SET button
When speaker mode is decided, this button is pushed.
!3 Mid night button (for Dolby digital, Digital Down mix mode only)
The source with large dynamic range is compressed.
!4 6-CH INPUT button
When selecting to other surround processor and/or equipment (example
MPEG2), this button is pushed. SR5OOO enters the state which can be
controlled to the input of 6 channels even if any state. All the displays
concerning surround mode are off. SR5OOO returns to former state
when 6 channel direct is made off.
!5 REMOTE SENSOR
This SENSOR receives the signals from the remote control unit.
!6 SPEAKER MODE button
Adjusting the settings of the center ,surround and sub woofer speaker
mode as follows. The setting of the main speakers can be switched
between LARGE ⇔ SMALL except in case “e” below.
Press the speaker mode button:
a.When DTS mode:
Center speaker LARGE ⇔ SMALL ⇔ NONE
When the selection is finished, SET button is pushed, then display
changes to surround speaker mode
Surround speaker LARGE ⇔ SMALL ⇔ NONE
When the selection is finished, SET button is pushed.Then displayed
changes to sub woofer ON or OFF
Sub woofer: ON ⇔ OFF
When the selection is finished, SET button is pushed. The display
returns to the origin.
b.When Dolby Digital mode:
Center speaker LARGE ⇔ SMALL ⇔ NONE
When the selection is finished, SET button is pushed. Then displayed
change to surround speaker mode
Surround speaker LARGE ⇔ SMALL ⇔ NONE
When the selection is finished, SET button is pushed.Then displayed
change to sub woofer ON or OFF
Sub woofer: ON ⇔ OFF
When the selection is finished, SET button is pushed. The display
returns to the origin.
c.When Pro-Logic mode:
Center speaker LARGE ⇔ SMALL ⇔ NONE
When the selection is finished, SET button is pushed. Then displayed
change to sub woofer ON or OFF
Sub woofer: ON ⇔ OFF
When the selection is finished, SET button is pushed. The display
returns to the origin.
d.When 3-Stereo mode:
Center speaker LARGE ⇔ SMALL
When the selection is finished, SET button is pushed. Then displayed
change to sub woofer ON or OFF
Sub woofer: ON ⇔ OFF
When the selection is finished, SET button is pushed. The display
returns to the origin.
e.Other surround, stereo mode
Sub woofer: ON ⇔ OFF
When the selection is finished, SET button is pushed. The display
returns to the origin. Mode of center/surround and sub woofer mode
is memorized.
!7 MASTER VOLUME CONTROL
Adjust the overall sound volume from the front, center, (sub woofer)
and rear speakers with this control.
Pre-Out (front, rear, center, sub woofer) can also be controlled.
!8 RDS Functions
a. SEARCH button
This key is used to search a station broadcasting, TP or PTY data by
scanning.
Press the DISPLAY Button then press the SEARCH button.
Now “RDS” is displayed, each further press of the SEARCH button
changes the display as shown below.
TP / PTY / FREQUENCY
When the desired item is displayed, press the TUNING UP or DOWN
button to start scanning.
b. DISPLAY button
Each press of this button changes the display contents as shown
below.
FREQUENCY / STATION NAME / PROGRAM NAME /
TIME(CLOCK) / TEXT / FREQUENCY
However, the above is not displayed when there is no RDS data with
the station being received.
c. PTY (PROGRAM TYPE)SELECT button
When “PTY” is selected with the SEARCH button, select the desired
program type by pressing the PTY SELECT button.
When the desired program type is displayed, press the TUNING UP or
DOWN button to start scanning.
!9 SURROUND MODE knob
Surround mode changes as follows whenever you adjust this knob.
For the digital equipment: CD, LD, DVD. (when selected optical or
coaxial input)
DTS
Dolby Digital
CHURCH
For the digital equipment: CD, LD, DVD. (when selected analog input)
PRO-LOGIC
3 STEREO
For the analog equipment: TUNER(AM/FM), TAPE-1, TAPE-2, VCR
PRO-LOGIC
3 STEREO
@0 STEREO(SURROUND OFF) button
When switching from surround mode to stereo mode, this button is
pushed.
When Dolby digital mode, This Button operates as down mix (2
channel) function and FTD’s “STEREO”indicator is light up.
@1 DIGITAL SELECT. button
Push this button to switch the digital signal (When CD, LD, DVD.
selected)
When CD function
a. DTS mode
Optical / Coaxial-1 / Coaxial-2
b. Stereo, Pro logic, 3 Stereo, Other surround (Hall etc.) mode
Optical / Coaxial-1 / Coaxial-2 / Analog(Digital off)
When DVD. function
a. DTS, Dolby Digital mode
Optical / Coaxial-1 / Coaxial-2
b. Stereo, Pro logic, 3 Stereo, Other surround (Hall etc.) mode
Optical / Coaxial-1 / Coaxial-2 / OFF (analog)
When LD/TV function
a. Dolby Digital, mode
Optical / Coaxial-1 / Coaxial-2
b. DTS mode
Optical / Coaxial-1 / Coaxial-2
c. Stereo mode
Optical / CoaxiaI-1 / Coaxial-2 / Analog
d. Dolby Pro logic, 3 Stereo, Other surround
Optical / CoaxiaI-1 / CoaxiaI-2 / Analog
7
STADIUM
PRO-LOGIC
HALL
THEATER HALL
CHURCH
THEATER HALL
CHURCH
3 STEREO
THEATER
STADIUM
STADIUM
Page 9
DISPLAY (See page 108 )
IN
OUT
REMOTE
CONT
IN
OUT
REMOTE
CONT
REMOTE
CONTROL
a DISPLAY(On Florescent Tube Display) FREQUENCY/CHARACTER
ENGLISH
DISPLAY
This display the selected station frequency or the corresponding words
when selecting a program source or a sound mode or operating test
tone.
b PRESET NUMBER, SLEEP TIME, DELAY TIME, and VOLUME LEVEL
DISPLAY
This displays the selected preset number, the sleep time, the delay
time, the effect, the center and the rear level when operating the
surround mode.
c Audio MUTE display
This indicator lights up “MUTE ON” on FTD when in the audio mute
mode.(by remote control unit)
d STEREO INDICATOR
This indicator lights up, during in FM stereo mode and/or when make
the down mix (stereo) from AC-3 mode.
e TUNED INDICATOR
This indicator lights up, when a broadcast is received properly.
f MEMORY INDICATOR
When the MEMORY button is pressed, this indicator blinks for about
5 seconds.
g SURROUND mode indicator
This indicator lights up when the surround mode is selected.
h INDICATOR DISPLAY(LED)
STANDBY indicator
This indicator lights up when in the standby mode. This indicator lights
when the digital signal is chosen,
Digital Select indicator Coax-I, Coax-2, Opt
This indicator lights up when in the digital input mode. This indicator
lights when the digital signal is chosen,and it is judged a correct digital
signal format LED blinks when not connected the cord or not formal
signal.
6 ch direct in indicator
This indicator lights up when 6 channel input on mode.
Sub woofer on indicator
This indicator lights up when sub woofer on mode.
Mid night on indicator
This indicator lights up when mid night on mode.
LIGHT Light classic music
CLASSIC Serious classical music
OTHER Other music
WEATHER Weather reports, forecasts
FINANCE Financial reports, commerce, trading
CHILDREN Children’s programmes
SOCIAL A Social affairs
RELIGION Religious programmes
PHONE IN Programmes in which the public expresses its view by
phone
TRAVEL Travel reports
HOBBIES Programmes concerning recreational activities
JAZZ Jazz music
COUNTRY Country music
NATION M National music
OLDIES Music from the so-called ‘golden age’ of popular music
FOLK M Folk music
DOCUMENT Documentaries
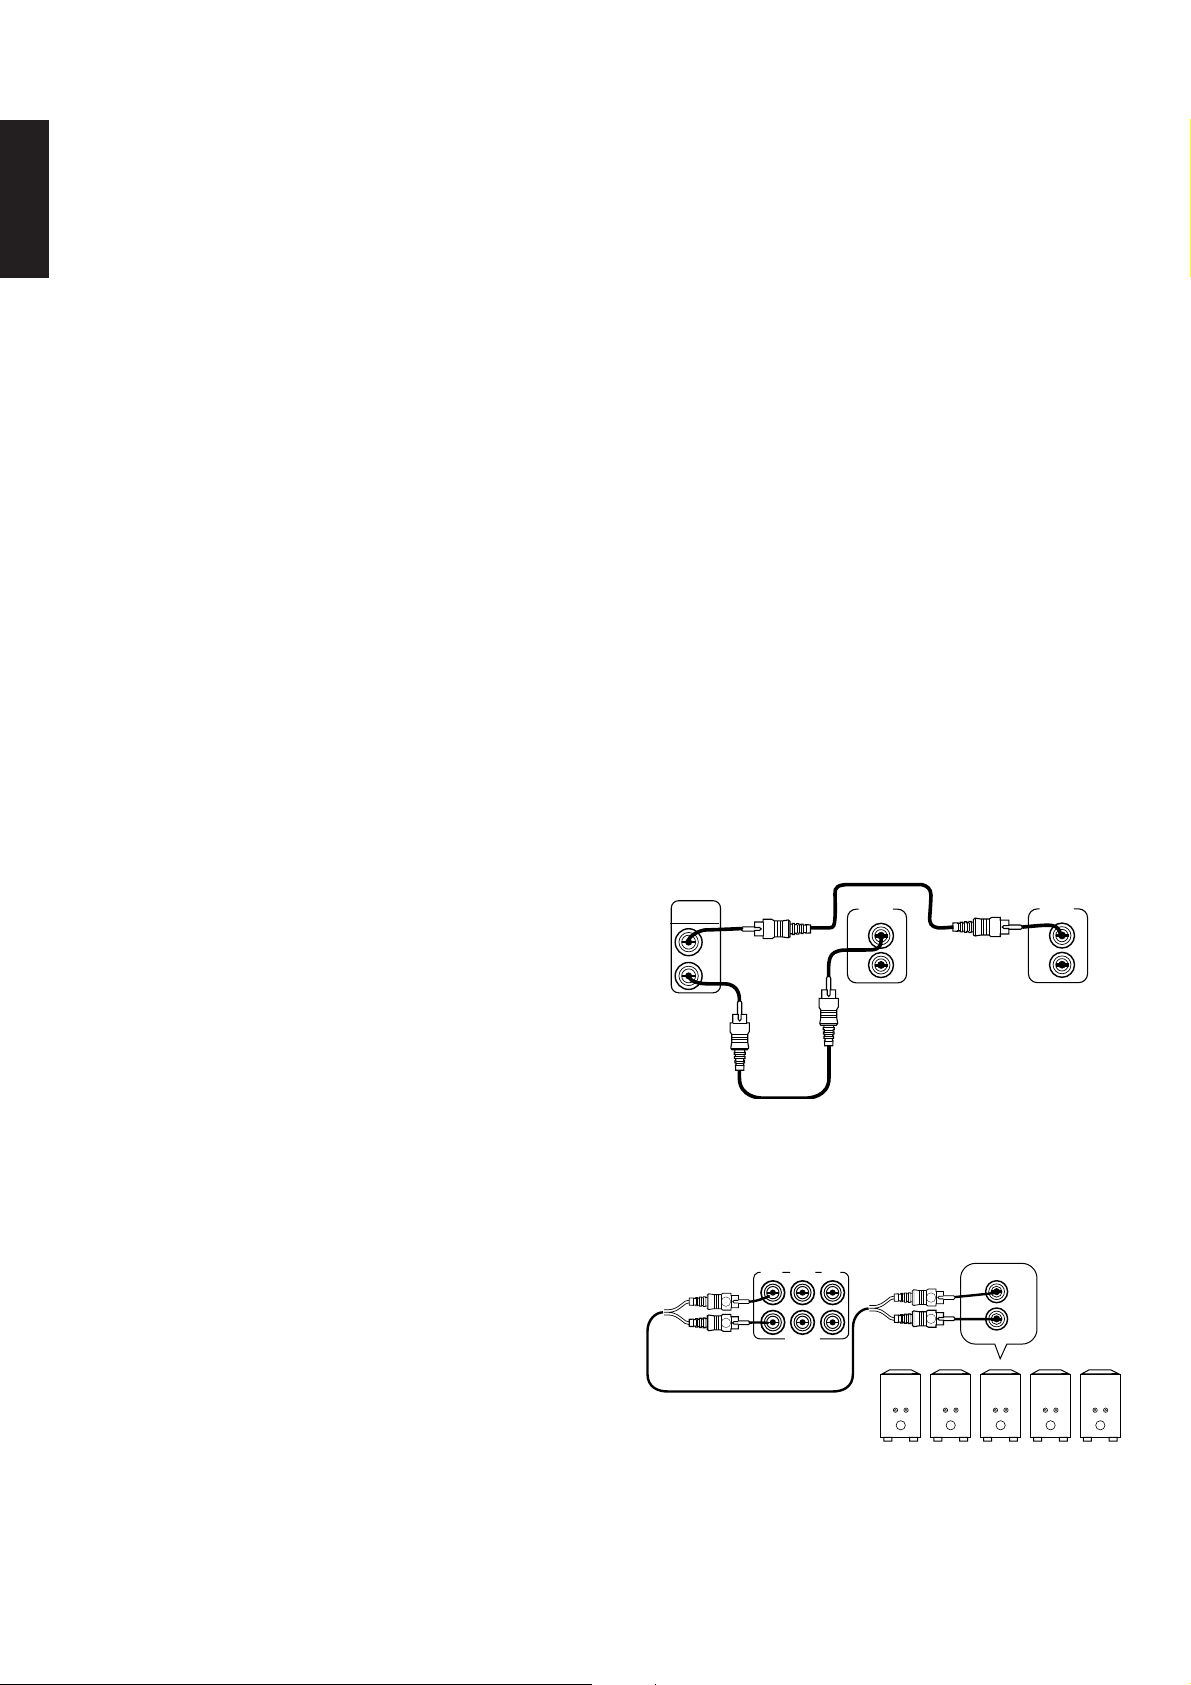
Remote control bus connections
This unit is equipped with a remote control function.
By connecting this unit‘s remote control jacks to a Marantz CD player or
tape deck equipped with remote control (D-BUS) jacks, it allows system
remote control operation.
Connect the REMOTE CONT. OUT jack of unit to REMOTE CONT. IN of
other Marantz equipment, i.e. CD player or Cassette deck, by using an
RCA pin cable.
The connection sequence between components is not important.
Note:
If a component equipped with remote control (D-BUS) jacks has an
INT/EXT switch on the rear panel, set the switch to EXT when using
the system control function.
(Connection example)
CD PLAYER REAR PANEL TAPE DECK REAR PANELRECEIVER REAR PANEL
RDS FUNCTIONS (Europe version only)
DISPLAY key
Each press of this key changes the display contents as shown below.
FREQUENCY ➝ STATION NAME ➝ PROGRAM NAME ➝ TIME(CLOCK)
➝ TEXT ➝ FREQUENCY
However, the above is not displayed when there is no RDS data with the
station being received.
SEARCH key
This key is used to search a station broadcasting, TP or PTY data by
scanning.
Press the DISPLAY key then press the SEARCH key.
Now “RDS” is displayed. Each further press of the SEARCH key changes
the display as shown below.
TP ➝ PTY ➝ FREQUENCY
When the desired item is displayed, press the TUNING UP or DOWN key
to start scanning.
PTY SELECT key
When “PTY” is selected with the SEARCH key, select the desired
programme type by pressing the PTY SELECT key.
When the desired programme type is displayed, press the TUNING UP or
DOWN key to start scanning.
One of the following programme types can be selected:
NEWS News service
AFFAIR Politics and current events
INFO Spatial informative reports
SPORT Sports
EDUCATE Learning and continuation of education
DRAMA Radio plays, literature
CULTURE Learning and continuation of education
SCIENCE Programmers about science and technology
OTHERS Variety
POP Popular music
ROCK Rock music
MOR Middle of the road music, “easy-listening”
PRE OUT jacks
The RECEIVER is equipped with PRE OUT jacks. Use these jacks to
connect to external power amplifiers.
MAIN IN or AUX IN
L
R
POWER AMPLIFIER
L
R
L
R
FRONT CENTER
PRE OUT
REAR
8
Page 10

BASIC OPERATION
PLAYBACK OPERATION
Listening to the tuner
1. Press the POWER switch q to turn on the power.
2. Press the AM or FM button t to select the desired band.
3. Press the TUNING UP and DOWN buttons r to tune in the
desired station. Pressing once for less than a half second changes
the frequency by one step. Pressing longer sequentially scans
frequencies in the indicated direction. Releasing the button in this
state activates the auto tuning function, which automatically scans
the frequencies until it reaches a station, at which point the TUNED
and auto tuning stops.
4. Adjust the sound volume with the VOLUME control !7.
If necessary, adjust the tone controls (BASS/TREBLE) u and i.
PRESETTING STATIONS
Up to 30 stations can be preset at random, regardless of the reception
band.
Tune in the station to be memorized using the auto or manual tuning.
Manual preset
1. Press the MEMO(memory) button y, then the “MEMO” indicator
lights up for about 5 seconds.
• When the MEMO indicator goes off, press again to memorize.
2. Select the preset number with TUNING UP/DOWN button r.
3. Press the MEMO(memory) button y again.
4. Repeat steps 1 to 3 to memorize other stations.
• When memorizing a new station, the prevision memorized station
the same preset number is cleared.
Auto preset
1. The receiver is set in FM.
2. You keeps pushing MEMO(memory) button 6 at about 3 seconds.
3. Then, tuner automatically begins scanning.
Scanning stops automatically after radio stations have been stored in
the Auto Preset memory.
■ PRESET TUNING
• To listen to a radio station stored in the station memory.
■ LISTENING TO FM STEREO BROADCASTS
• During FM braodcasts, press the FM MODE button t to select the
STEREO/MONO mode.
• Each time this button is pressed, the mode changes as follows.
Stereo mode: STEREO indicator lights up.
Mono mode: STEREO indicator goes off.
• When listening to very weak FM stereo stations, you may experience
higher than normal background hiss. Switch to monaural sound to
eliminate the hiss.
■ CHANGE OF 9K/10K SCAN STEP (Eurpe, Overseas only)
When you keeps pushing FM/AM button at about 3 seconds at AM
mode, scan step of 9K/10K Hz is switched.
Normal playback
1. Press the POWER switch q to turn on the power.
2. Press the desired input selector !1 according to the table shown below.
3. Start playing the desired source.
Adjust the volume using the VOLUME control !7.
If necessary, adjust the tone using the BASS and TREBLE controls u
and i.
Source component Input selector
Compact Disc Player CD
FM or AM broadcasting FM / AM
Laser Disc Player or TV LD / TV
Video Cassette Recorder VCR1
Video Cassette Recorder VCR2
Digital Video Disc Player DVD
Cassette deck - 1 TAPE 1
Cassette deck - 2 TAPE 2
ADJUSTMENTS
Adjusting the surround level
To adjust the surround level, locate yourself in your usual listening position
and operate the remote control unit ⁄2. (Please see next page.)
Use this procedure to adjust the volume of each of the front, center, and
rear speakers when watching a movie or other video source in DOLBY
surround mode.
1. Press the DOLBY PRO LOGIC button.
2. Press the SPEAKER MODE !6 button to the select the center mode
corresponding to your speaker system configuration.
In this example, the center mode is set to NORMAL.
3. Press the TEST TONE button. A test signal tone is heard from the left,
center, right, and surround speakers in sequence.
The balance of the surround channel (rear) can be controlled using the
surround up/down keys when Surr-R or L is shown on the display
4. Using the remote control, adjust the volume of the test tone for center
and surround until the volume appears to be set at the same level for
all speakers.
5. When volume adjustment is completed, press the TEST TONE
button again so that the test signal tone stops.
Listening to a different audio source while
watching a video source
1. Select one of the following video sources !0.
VCR1, VCR2, DVD, LD.
2. Next, select one of the following audio sources !0.
CD, FM or AM, TAPE 1, TAPE 2,
Adjust the volume using the VOLUME control !7.
If necessary, adjust the tone using the BASS and TREBLE controls 7
and 8.
■ RECORDING WITH A CASSETTE DECK
■ Recording with TAPE 1, TAPE 2
1. Select the program source to be recorded with the INPUT FUNCTION
SELECTOR buttons !1.
2. Start recording on the cassette deck connected to the TAPE 1, 2 jacks.
3. Play back the desired program source.
• The volume, balance, bass and treble settings have no effect on the
recording or dubbing.
9
Page 11

REMOTE CONTROL OPERATION
(Remote control is applicable to components that
ENGLISH
use the RC-5 remote control cord language.)
TX LEARN
ON
CLEAR
PTY
TV
MUTE
TV
RC-5/6
USER
LEARN
SLEEP
THEATER
CHURCH
3
6
9
MAIN
VOLUME
13
1
9
3
11
14
12
PROGRAMMABLE
REMOTE CONTROL UNIT
RC5000SR
SOURCE
POWER
LD
DTS
DOLBY
DIGITAL
DIGITAL
VCR1
VCR2TVOPT
COAX
F.DIRECT MEMO P.SCAN
TUNER
(AM/FM)
6CH-DRT DELAY
MID NIGHT T. TONE
DISP.
/RDS
CD +/A
REC
PAUSE
TAPE1
TAPE2
OSD DISPLAY STEREO MUTE
CENT.
MODE
LEVEL
SUB. W SURR.CENT.
RF
REC
PRO LOGIC
HALLDVD STADIUM
DISC/
DECK
FM MODE
SURR.
MODE
MAIN POWER
OFF
3-STEREO
SURROUND MODES
ABC1DEF2GHI
JKL4MNO5PQR
STU7VWX
8
0
CHANNEL / SKIP
−/B
TUNE / SEARCH
VOLUME
b MUTE Button
Pressing this button immediately decreases the sound level (The mute
LED will trickery). To restore the sound, press this button again.
8
n SLEEP button
Set the sleep time with this button as follows 10 / 20 / 30 / 60 /
90(minute) / OFF(former display)
m TUNING,PRESET UP/DOWN
During AM or FM reception, you can scan to other frequencies or preset
number by pressing these buttons.
, Main Power
ON button: Power on OFF button: Power off (standby)
. FR. DIRECT Button
6
When this button is pressed while the tuner source is being selected,
the desired station can be selected by directly composing its frequency
using numeric buttons 0 to 9.
12
⁄0 DISPLAY
This button is make the dimmer mode for FTD
This state is released by display button pushed again, Power off and
Standby.
⁄1 6-CH DIRECT button
6-CH input is turned ON or OFF
2
YZ
⁄2 Surround Mode buttons
DTS button: Select the DTS mode.
DOLBY DIGITAL button: Select the Dolby Digital mode.
Dolby Pro logic button: Select the Dolby Pro logic mode.
DOLBY 3 STEREO button: Select the Dolby 3 stereo mode.
THEATER button: Select the effect of theater mode.
HALL button: Select the effect of hall mode.
STADIUM button: Select the effect of stadium mode.
7
CHURCH button: Select the effect of church mode.
STEREO
Change from surround mode to STEREO mode.
Pushing this button when Dolby digital mode, changes from the Dolby
digital to Down mix (STEREO) mode, and this button is pushed again,
5
10
then changes to Analog stereo mode.
DELAY button
According to the surround mode, the display changes as follows.
Dolby Pro logic mode: 15 to 30 mS in 1 mS step.
15 /16 /17 /18…30 /15 mS
4
Dolby Digital mode: Surround channels, 0 to 15 mS in 1 mS step
0 / 1 / 2 / 3 / 4 / 5…15 / 0mS
Center channel, 0 to 5 mS
When Dolby Digital mode, After pushed CENT. MODE, and pushed
DELAY button
0 / 1 / 2 / 3 / 4 / 5 / 0mS
z Function buttons
LD button: Select a Laser Disk player or TV
DVD button: Select a Digital Video Disk player
VCR-1 button: Select a Video Cassette Recorder (number 1)
VCR-2 button: Select a Video Cassette Recorder (number 2)
TUNER button: Select the AM or FM with cyclic operation
CD button: Select a CD
TAPE-1 button: Select a TAPE-1
TAPE-2 button: Select a TAPE-2
TV button: Select a LD/TV
Pressing one of these button selects the program source.
Press the button again to execute.
x Numeric buttons (on TUNER mode)
This is button which makes you input directly the frequency of the
broadcasting station and receive it. You push continuing button of
these after Frequency direct button is pushed.
c MONO/ST Button (FM MONO/STEREO)
Functions as the same as the MODE button in the receiver.
v MAIN VOLUME buttons /
Adjust the total volume level.
SURR.MODE button
When Analog function (TUNER, TAPE-1, TAPE-2, VCR), change as
follows
PRO-LOGIC
3 STEREO
THEATER HALL
CHURCH
STADIUM
When CD function , change as follows
DTS
PRO-LOGIC
CHURCH
3 STEREO
STADIUM
THEATER
HALL
When Digital function (LD, DVD) , change as follows
DTS
CHURCH
Dolby Digital
STADIUM
PRO-LOGIC
HALL
3 STEREO
THEATER
CENT.MODE button
This button is pushed at Dolby Digital. Then, Display becomes Center
Dilay mode. Delay time is changed with Delay button. This button does
not function at other mode.
T.TONE(Test Tone)button
The test tone function is turned ON/OFF. Test tone is output as follows.
When DTS, Dolby Digital mode
Front L Front R Surround-L
Center
(Subwoofer : when sub woofer on)
When Dolby Pro logic mode.
Front L
(Subwoofer : when sub woofer on)
Center (Sub Woofer)
Front R
Surround (Rear)-LR
When Dolby 3 Stereo mode
Front L
Front R(Subwoofer : when sub woofer on)
Center (Sub Woofer)
10
Page 12

SURROUND LEVEL button
When DTS mode
Adjust the center level with CENTER UP/DOWN button : Changeable
range is ±10dB
Adjust the Surround R channel level , and after 2 seconds, adjust the
surround L channel with SURR.UP/DOWN button. Changeable range is ±
15dB
Adjust the Sub woofer level (when sub woofer is ON) with SUB. WOOFER
UP/DOWN button. Changeable range is ±10dB
When Dolby Digital mode
Adjust the center level with CENTER UP/DOWN button : Changeable
range is ±10dB
Adjust the Surround channel level , and after 2 seconds, adjust the
surround L channel with SURR.UP/DOWN button. Changeable range is ±
15dB
Adjust the Sub woofer level (when sub woofer is ON) with SUB. WOOFER
UP/DOWN button. Changeable range is ±10dB
When Dolby Pro logic mode
Adjust the center level with CENTER UP/DOWN button : Changeable
range is ±10dB
Adjust the Surround channel level. Changeable range is ±15dB
Adjust the Sub woofer level (when sub woofer is ON) with SUB.WOOFER
UP/DOWN button. Changeable range is ±10dB
When Other surround mode
Adjust the Surround channel leve. Changeable range is ±15dB
Adjust the Sub woofer level (when sub woofer is ON) with SUB.WOOFER
UP/DOWN button.
Changeable range is ±10dB
When STEREO mode: Does not operate.
⁄3 DIGITAL SELECT buttons
RF button : does not apply in SR5000.
OPT button: Press to select the optical input when digital equipment
(CD, LD, DVD) is selected as the function.
COAX. button: Press to select the coaxial input when digital equipment
(CD, LD, DVD) is selected as the function. Pressing COAX. again
changes the input as follows
Coaxial-1 / CoaxiaI-2
⁄4 MID NIGHT button
When Dolby Digital and Dolby Digital Down mix mode, the source with
large dynamic range is compressed.
OTHER button
Please see the other equipment’s user guide of Marantz models.
LEARNING OF OTHER MAKER'S REMOTE CONTROL CODE
This remote control unit can learn, or program in itself, the remote control
code of any function preset under any button of the remote control unit of
any system component, except for the MAIN POWER switch of the
SR5000. The functions of the components that can be controlled through
the D-BUS (RC-5) need not be learned, but the functions of other components
must be learned before they can be controlled from the RC5000SR remote
control unit. To let the RC5000SR learn the remote control code of a
function of a component, follow the learning procedure described below.
1. Set the mode switch to LEARN.
2. Select the component with the codes to be learned, by pressing one of
the input selector buttons.
For example, when the CD button is pressed, most of the buttons on
the remote handset get ready to learn the CD control codes.
3. On the RC5000SR, press the button corresponding to the function to
be learned. For example, if the function to be learned is playback, press
the PLAY ( ) button on the remote control unit. The Learn indicator
will light up.
4. Place the remote control unit of the component with the function to be
learned at a distance of about 20 cm (8 inches) from the RC5000SR, so
that the head (transmitting side) of the former remote control unit
points the head of the RC5000SR.
5. On the remote control unit of the component, press and hold the button
of the function to be learned, until the learning indicator of the
RC5000SR starts to blink then goes off. The learning operation is
complete when the indicator is extinguished.
6. Set the mode switch to USER.
7. Let the RC5000SR learn other codes by repeating the steps above for
each code.
Note:
When the system mode switch is in the USER position, the buttons
which have not learned any function output the D-BUS (RC-5) codes
when they are pressed. In the RC-5 (D-BUS) position, all buttons output
the D-BUS (RC-5) codes.
RECALLING THE PRESET FUNCTION
Even after a button has learned the remote control code of a function, its
originally preset, D-BUS (RC-5) code can be recalled any time by following
the procedure below.
1. Set the mode switch to LEARN.
2. Press the MAIN POWER OFF button and the button which has learned
a function simultaneously.
3. Set the mode switch to USER.
Learning button indications
Although the learning buttons can be used to operate various components,
the indications printed above the buttons are Marantz D-BUS (RC-5) preset
code indications. To make it easier to remember which buttons perform
which operations, therefore, we recommend that you program operations
into buttons having the same or similar indications.
There are some situations where programming is not possible.
In the following instances, both the TX and LEARN LEDs blink to indicate
that programming cannot be carried out.
1. When the remote control unit’s memory is full.
2. When you attempt to program a command from a remote control unit
using a different signal transmission format.
CLEARING ALL OF THE LEARNED CODES
Use the following procedure to reset all of the buttons which have learned
remote control codes and make them possible to output RC-5 preset
codes.
1. Set the mode switch to LEARN.
2. Hold down the main POWER ON and OFF buttons simultaneously for
more than 3 seconds.
3. Set the mode switch to USER.
11
Page 13

Operation of Remote Control
1. Remote control
ENGLISH
The distance between the transmitter of the remote control unit and the
IR SENSOR of the AV Surround Stereo Receiver should be less than about
5 metres. If the transmitter is pointed to a direction other than the IR
SENSOR or if there is an obstacle between them, remote control may not
be possible.
Remote-controllable range
CARE AND MAINTENANCE
This section describes the care and maintenance tasks that must be
performed to optimize the operation of your Marantz equipment.
CLEANING OF EQUIPMENT EXTERNAL
SURFACES
Receiver
Approx. 5 m meters
60°
Remote control unit
2. Loading batteries
The life of the batteries used with the remote control unit is about one year
with normal use.
qRemove the back cover.
wInsert batteries (AAA type ) with correct
(+) and (–) polarity.
The exterior finish of your unit will last indefinitely with proper care and
cleaning. Never use scouring pads, steel wool, scouring powders or harsh
chemical agents (e.g., lye solution), alcohol, thinners, benzine, insecticide
or other volatile substances as these will mar the finish of the equipment.
Likewise, never use cloths containing chemical substances. If the equipment gets dirty, wipe the external surfaces with a soft, lint-free cloth.
If the equipment becomes heavily soiled:
– dilute some washing up liquid in water, in a ratio of one part detergent
to six parts water;
– dip a soft, lint free cloth in the solution and wring the cloth out until it
is damp;
– wipe the equipment with the damp cloth
– dry the equipment by wiping it with a dry cloth.
REPAIRS
Only the most competent and qualified service technicians should be
allowed to service your unit. Marantz and its factory trained warranty
station personnel have the knowledge and special equipment needed for
the repair and calibration of this precision instrument.
In the event of difficulty, call the proper toll-free telephone number listed
on the face of the warranty to obtain the name and address of the Marantz
Authorized Service Center nearest you. In many cases, the dealer where
you purchased your Marantz unit may be equipped to provide service.
Please include the model, serial number of your unit together with a copy
of your purchase receipt and a full description of what you feel is abnormal
in its behaviour.
THE PROTECTION CIRCUIT
eClose until it clicks.
If the protection circuit does work, the unit will enter to standby mode and
do not only working for 3 seconds.
GENERAL MALFUNCTION
If the equipment malfunctions, this may be because an electrostatic
discharge or AC line interference has corrupted the information in the
equipment memory circuits. Therefore:
– power switch turns OFF
– after waiting at least three minutes, power switch turns ON
– re-attempt to operate the equipment
Memory backup
• In case a power outage occurs or the power cord is accidentally
unplugged, the unit is equipped with a backup function to
prevent memory data such as the preset memory from being
erased.
The memory functions are backed up for up to about 2 week.
12
Page 14

TROUBLESHOOTING GUIDE
If your receiver should not perform as expected, consult the table below to see if the problem can be corrected before seeking help from your dealer or our
service organization.
PROBLEM POSSIBLE CAUSE REMEDY
No power • The AC input cord is disconnected. • Connect cord securely.
• Poor connection at AC wall outlet or the outlet • Check the outlet using lamp or other appliance.
is inactive.
The sound is shut off. • The speaker cables are shorted. • Check the speaker connections.
No sound from the speakers. • The speaker cables are disconnected. • Check the speaker connections.
• The master volume is adjusted too low. • Adjust the master volume and center, surr.vol.
• The surround volume is adgusted too low.
• The center volume is adgusted too low.
• The Mute button is pressed to ON. • Press the MUTE button to cancel the muting
effect.
• The SPEAKER switches are not pressed correctly. • Press the SPEAKER switches to ON correctly.
• Incorrect selection of program source. • Select the desired program source correctly.
• Format of surround is different. • DISK of AC-3 format is used.
• Incorrect connections between the components. • Make connections correctly.
Sound is only heard from one of • The BALANCE control is set to one end. • Adjust the BALANCE control.
front speakers. • One of the connection cords is disconnected. • Connect the right and left connection cords
securely.
No sound from the rear speakers. • The sound field mode is not selected correctly • Select the desired sound field mode correctly.
or is set to off.
• The master volume and rear level are adjusted • Adjust the master volume and rear level.
too low.
• Monaural source is used, or source without • Change the playback source to the stereo or
surround information. surround source.
No sound from the center speaker. • The DTS, Dolby Digital, pro logic, 3stereo mode is • Select the desired mode.
not selected.
• The center mode is set to the NONE mode. • Set to the NORMAL or WIDE mode.
• The master volume and center level are adjusted • Adjust the master volume and center level.
too low.
The remote control unit does not • Batteries are not loaded or exhausted. • Replace the with new batteries.
operate. • The remote sensor is obstructed. • Remove the obstacle from the remote sensor.
Not receiving the stations. • No antenna is connected. • Connect an antenna.
• The desired station frequency is not tuned in. • Tune in the desired station frequency.
Not receiving the preset stations. • An incorrect station frequency has been • Memorized the correct station frequency.
memorized.
• The memorized stations are cleared. • Memorize the stations again.
Poor FM reception. • No antenna is connected. • Connect an antenna.
• The antenna is not positioned for the best • Change the position of the antenna.
reception. Route as high as possible.
Continuous hissing noise during FM • Weak signal. • Change the position of the antenna.
reception, especially when a stereo • In areas remote from the transmitter, a 5 to
broadcast is received. 8 element antenna designed exclusively for
FM is suggested.
Continuous or intermittent hissing • Noise is caused by motors, fluorescent • Keep the receiver away from noise sources.
noise during AM reception, especially lamps or lightning, etc.
at night. • Install an outdoor AM antenna.
A hum can be heard during AM • Position the AC input cord away from the
reception. antenna wire and the AM loop antenna.
• The AC input cord may be too close to the AM
loop antenna or the antenna wire.
• Adjust the position of the AM loop antenna.
13
Page 15

COUNTRY COMPANY ADDRESS
AUSTRALIA Scan audio Pty. Ltd. 4 Station Street, Thornleigh NSW 2120, Australia
AUSTRIA Huber & Prohaska GmbH Taborstraße 95 / Ladestraße 1, Gebäude Hangartner, A-1200 Wien, Austria
BELGIUM Van der Heyden Audio N.V. Brusselbaan 278, 9320 Erembodegem, Belgium
BULGARIA Ariescommerce GmbH Makedonia Blvd. 16, 1606 Sofia, Bulgaria
CANADA Lenbrook Industries Limited 633 Granite Court, Pickering, Ontario
CYPRUS Empire Hifi systems Ltd. P.O. Box 5604, Nicosia, Cyprus
CZECH REPUBLIC Audio International Fugnerova 1, 67801 Blansko, Czech Republic
DENMARK Hi-Fi Klubben Denmark Aboulevarden 1, DK-8000 Arhus C., Denmark
DUBAI V.V.& SONS P.O. Box 105, Dubai, U.A.E.
ESTONIA Audio International Baltic Lo Hu 12, EE0026 Tallin, Estonia
F.Y.R.O.M. T.P. KODI ul.Cedomir Kantargiev 21a, Skopje, Former Yugoslavian Republic of Macedonija
FINLAND Hi-Fi Klubi Finland Uudenmaankatu 4-6, SF-00120 Helsinki, Finland
FRANCE Marantz France A division of Marantz Europe B.V., P.O. Box 301, 92 156 Suresnes Cedex, France
GERMANY Marantz Deutschland Hakenbusch 3, 49078 Osnabrück, Germany
GREECE Adamco S.A. 188, Hippocratous Street, 11471 Athens, Greece
HEADQUARTERS EUROPE: Marantz Europe B.V. Building SFF-2, P.O. Box 80002, 5600 JB Eindhoven, The Netherlands
HONG KONG Marantz Asia Ltd. Unit 1706, Metroplaza II, 223 Hing Fong Road, Kwai Fong, N.T., Kowloon, Hong Kong
HUNGARY Infovox Ltd. Terez Krt.31, 1067 Budapest, Hungary
ICELAND Radiobudin HF Skipholti 19, P.O. Box 424, 121 Reykjavik, Iceland
INDIA Marantz India c/o Philips India Ltd., Plot 80, Bhosari Industrial Estate Pune - 411026, India
IRAN Home Co. 5th floor no 878 Philips Building Enghelab ave, P.O. 11365/7844 Tehran, Iran
IRELAND Marantz Ireland Clonskeagh, Dublin 14, Ireland
ISRAEL Elmor Ltd. 52 Heh Beiyar Street, Kikar Hamedina, Tel Aviv, Israel
ITALY Marantz Italy Via Casati 23, 20052 Monza (Milano), Italy, Servizio Consumatori 1678-20026, Numero Verde
JAPAN Marantz Japan Inc. 35-1 Sagami Ohno 7-Chome, Sagamihara-shi, Kanagawa 228-8505, Japan
KOREA Mk Enterprises Ltd. 121-210, 2F Shinhan Bldg., 247-17 Seokyo-dong, Mapo-ku, Seoul, Korea
KUWAIT alAlamiah Electronics Intl. P.O. Box 8196, Salmiah 22052, Kuwait
LATVIA Ace Ltd. 61, LacPlesa Str., Riga LV 1011, Latvia
LEBANON AZ Electronics S.A., 1, P.O. Box 11 2833, Beirut, Lebanon
LITHUANIA A Accapella Ltd. Ausros, Vartu G5, Pasazo Skg., 2001 Vilnius, Lithuania
MALAYSIA Wo Kee Hong Electronics Sdn. Bhd. 102 Jalan SS 21/35, Damansara Utama, 47400 Petaling Jaya, Selangordarul Ehsan, Malaysia
MALTA Doneo Co Ltd. 78 The Strand, Sliema SLM07, Malta
MAURITIUS SKR Electronics Ltd. P.O. Box 685, Bell Village, Port Louis, Mauritius
NETHERLANDS Marantz Trading
NEW ZEALAND Scan audio Pty. Ltd. 4 Station Street, Thornleigh NSW 2120, Australia
NORWAY Hi-Fi Klubben Norway Lillegrensen 7, N-0159 Oslo, Norway
OMAN Mustafa & Jawad Trading CO. P.O. Box 1918, Ruwi, Oman
POLAND Marantz Polska Ul. Marszalkowska 45/49, 00-648 Warszawa, Poland
PORTUGAL Corel2 Comércio de Electrónica Lda., Av. Luís Bívar, No 85 A, 1050 Lisboa, Portugal
PROFESSIONAL EUROPE Marantz Professional Products Kingsbridge House, Padbury Oaks, 575-583 Bath Road, Longford, Middlesex UB7 0EH, U.K.
PROFESSIONAL U.S.A. Marantz Professional Products Distributed by: Superscope Technologies Inc., 1000 Corporate Blvd. Ste.D, Aurora, IL
QATAR Almana & Partners W.W.L. P.O. Box 49, Doha, Qatar
REUNION Vision + 180 Rue du Marechal Leclerc, 97400 Saint Denis, Ile de la Reunion
ROMANIA Alltrom SRL Soseaua Bucuresti, Ploiesti 10, Sector 1, Bucharest, Romania
RUSSIA Trade Company SV Bld. 2, 7 Montazhnaya Street, 107497 Moscow, Russia
SAUDI ARABIA Ultimate Fidelity Sameria Comm. Center, Roadah Dist., P.O. Box 7760, Jeddah 21472, Saudi Arabia
SINGAPORE Forward Marketing (S) Pte. Ltd. Wo Kee Hong Centre, 29 Leng Kee Road, Singapore 159099, Singapore
SLOVAKIA Audio International Slovakia Nam. SNP 10, 96001 Zvolem, Slovakia
SLOVENIA Bofex Smartinska 152, HALA V/3, 61000 Ljubljana, Slovenia
SOUTH AFRICA Coherent Imports (PTY) Ltd. P.O. Box 1614, Alberton, 1450, South Africa
SPAIN Marantz Spain Martinez Villergas 2, Apartado 2065, Madrid 28027, Spain
SWEDEN Hi-Fi Klubben A.B. Tegnersgatan 21, S-412 52 Gotenborg, Sweden
SWITZERLAND Sound Company AG Postfach, 8010 Zürich, Switzerland
TAHITI Covecolor Av. Prince Hinoi, Cours de l'union sacré, P.O. Box 2334, Papeete, Tahiti
TAIWAN Pai-Yuing Co. Ltd. 6th No 148 Sung Kiang Road, Taipei 10429, Taiwan R.O.C.
THAILAND MRZ Standard Co. Ltd. 746-750 Mahachai Road, Wangburapa, Bangkok 10200, Thailand
TURKEY Penta Elektronic Sanayi Ve Ticaret Ltd. Sti., Selvi Kokak, No. 4/1, Senlikkoy, 34810 Florya, Istanbul, Turkey
U.K. Marantz Hifi UK Ltd. Kingsbridge House, Padbury Oaks, 575-583 Bath Road, Longford, Middlesex UB7 0EH, U.K.
U.S.A. Marantz America Inc. 440 Medinah Road, Roselle, IL 60172, U.S.A.
YUGOSLAVIA ITM Ljutice Bogdana la, Belgrade, Yugoslavia
EXPORT Marantz Trading
www.marantz.com
A division of Marantz Europe B.V., Building SFF-2, P.O. Box 80002, 5600 JB Eindhoven, The Netherlands
A division of Marantz Europe B.V., Building SFF-2, P.O. Box 80002, 5600 JB Eindhoven, The Netherlands
Manufactured under license from Dolby Laboratories. “Dolby”, “AC-3”, “Pro Logic” and the double-D symbol are trademarks of Dolby
Laboratories. Confidential Unpublished Works. ª 1992-1997 Dolby Laboratories, lnc. All rights reserved
is a registered trademark.
PrintedinKorea
99/05SK285W851310
 Loading...