

Marantz PHA-3 Owners Manual

A
User Guide
Guía del usuario
Guide d’utilisation
Guida per l’uso
Benutzerhandbuch
ppendix
English ( 2 – 6 )
Español ( 7 – 11 )
Français ( 12 – 16 )
Italiano ( 17 – 21 )
Deutsch ( 22 – 26 )
English ( 27 )

User Guide (English)
Introduction
Key Features:
• 3 independent headphone outputs with individual volume controls
• Balanced XLR inputs or unbalanced 1/4” (6.35 mm) and 1/8” (3.5 mm) stereo inputs
• 1/4” (6.35 mm) loop output for connecting additional units for extra outputs
• Parallel 1/8” (3.5 mm) and 1/4” (6.35 mm)outputs with two additional 1/4” (6.35 mm) outputs
• Internal power (2 x AA) or external power (5–17 VDC)
Please see this guide’s Setup chapter to learn how to integrate PHA3 with your audio system.
Box Contents
PHA3 User Guide
Power Adapter Safety & Warranty Manual
1/4”-to-1/8” (6.35 mm to 3.5 mm) TRS Cable
Support
For the latest information about this product (system requirements, compatibility information,
etc.) and product registration, visit marantzpro.com.
2
Features
6
55
9
33
2
4
1
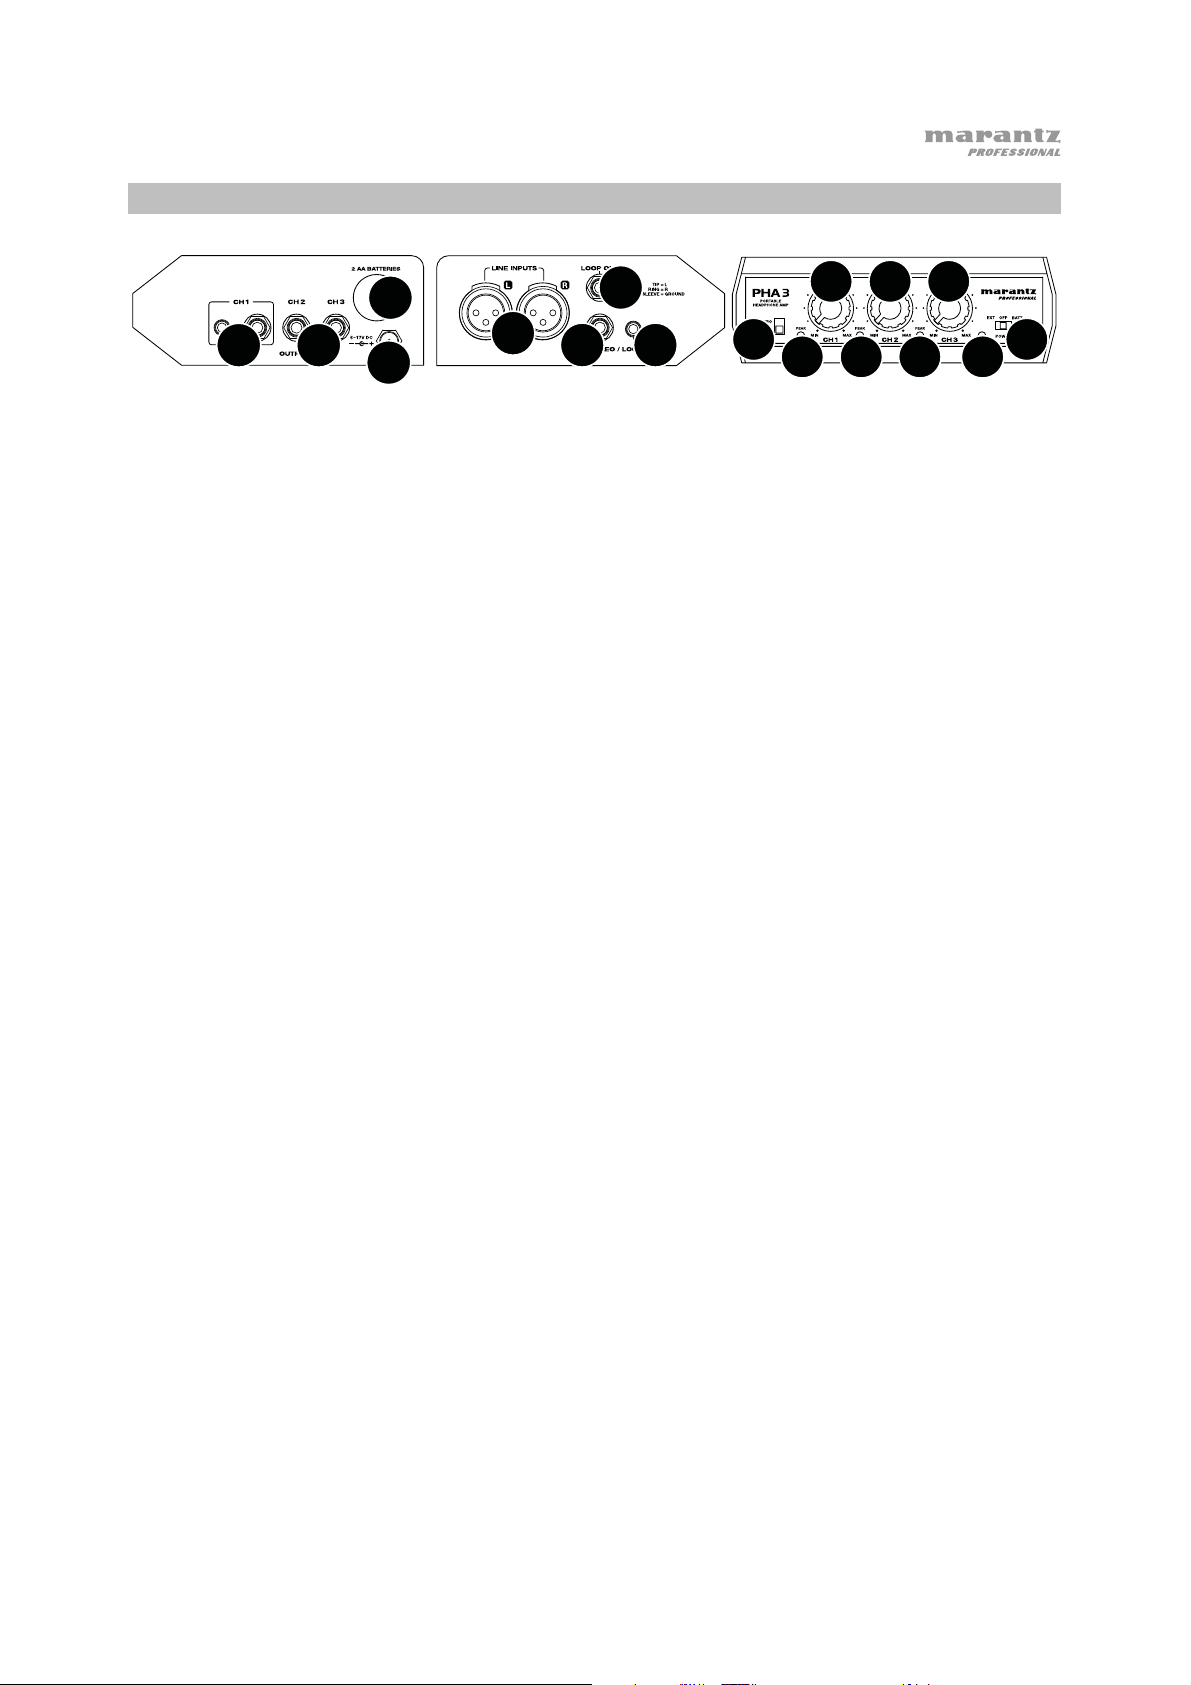
Right Panel Left Panel Front Panel
1. Power Input: Use the included power adapter to connect this input to a power outlet.
Alternatively, install batteries in the battery compartment.
2. Battery Compartment: Remove the cover to this battery compartment to install 2 AA
batteries in it. Insert the positive (+) end of the battery first.
3. Outputs: Connect 1/4” (6.35 mm) stereo headphones to these outputs. Channel 1 can also
accept 1/8” (3.5 mm) stereo headphones.
Use the Level knobs to set the volume level of each output. The Level knob for Channel 1
will control the level of the 1/4” (6.35 mm) and 1/8” (3.5 mm) outputs.
4. Line Inputs: Use standard XLR cables to connect your audio source to these inputs.
5. Stereo/Loop In: Use a standard 1/4” (6.35 mm) or 1/8” (3.5 mm) TRS cable to connect your
audio source to these inputs.
Alternatively, connect this input to the Loop Out of an additional PHA3. This lets you “daisychain” multiple PHA3 units together. Use the included 1/4”-to-1/8” (6.35 mm to 3.5 mm) TRS
cable or a standard 1/4” (6.35 mm) TRS cable.
777
888
10
11
6. Loop Out: Connect this output to the Loop In of an additional PHA3. This lets you “daisychain” multiple PHA3 units together. Use the included 1/4”-to-1/8” (6.35 mm to 3.5 mm) TRS
cable or a standard 1/4” (6.35 mm) TRS cable.
7. Level: Turn these knobs to set the volume level of each output. The Level knob for Channel 1
will control the level of the 1/4” (6.35 mm) and 1/8” (3.5 mm) outputs.
8. Peak LED: These LEDs will light up when the signal of each output is “clipping” (distorting). If
this happens, turn the corresponding Level knob counterclockwise to reduce its level.
9. Stereo/Mono: Use this switch to set whether the outputs send a stereo signal or summed
mono signal.
10. Power Switch: Use this switch to power PHA3 on or off. To use the power adapter, set it to
Ext. To use batteries, set it to Batt.
11. Power LED: This LED will light up when PHA3 is powered on.
3
Setup
Items not listed under Introduction > Box Contents are sold separately.
To set up PHA3 with your sound system:
1. Use the included power adapter to connect PHA3 to a power outlet.
Alternatively, remove the cover to this battery compartment to install 2 AA batteries in it.
Insert the positive (+) end of the battery first.
2. Use standard XLR cables to connect your audio sources to the line inputs.
You can also connect audio sources to the Stereo/Loop In using the included 1/4”-to-1/8”
(6.35 mm to 3.5 mm) TRS cable or a standard 1/4” (6.35 mm) TRS cable.
3. Connect 1/4” (6.35 mm) stereo headphones to the outputs. Channel 1 can also accept 1/8”
(3.5 mm) stereo headphones.
4. Power on all of your audio sources (mixer, stereo, etc.).
5. Power on PHA3. To use the power adapter, set the power switch to Ext. To use batteries,
set it to Batt.
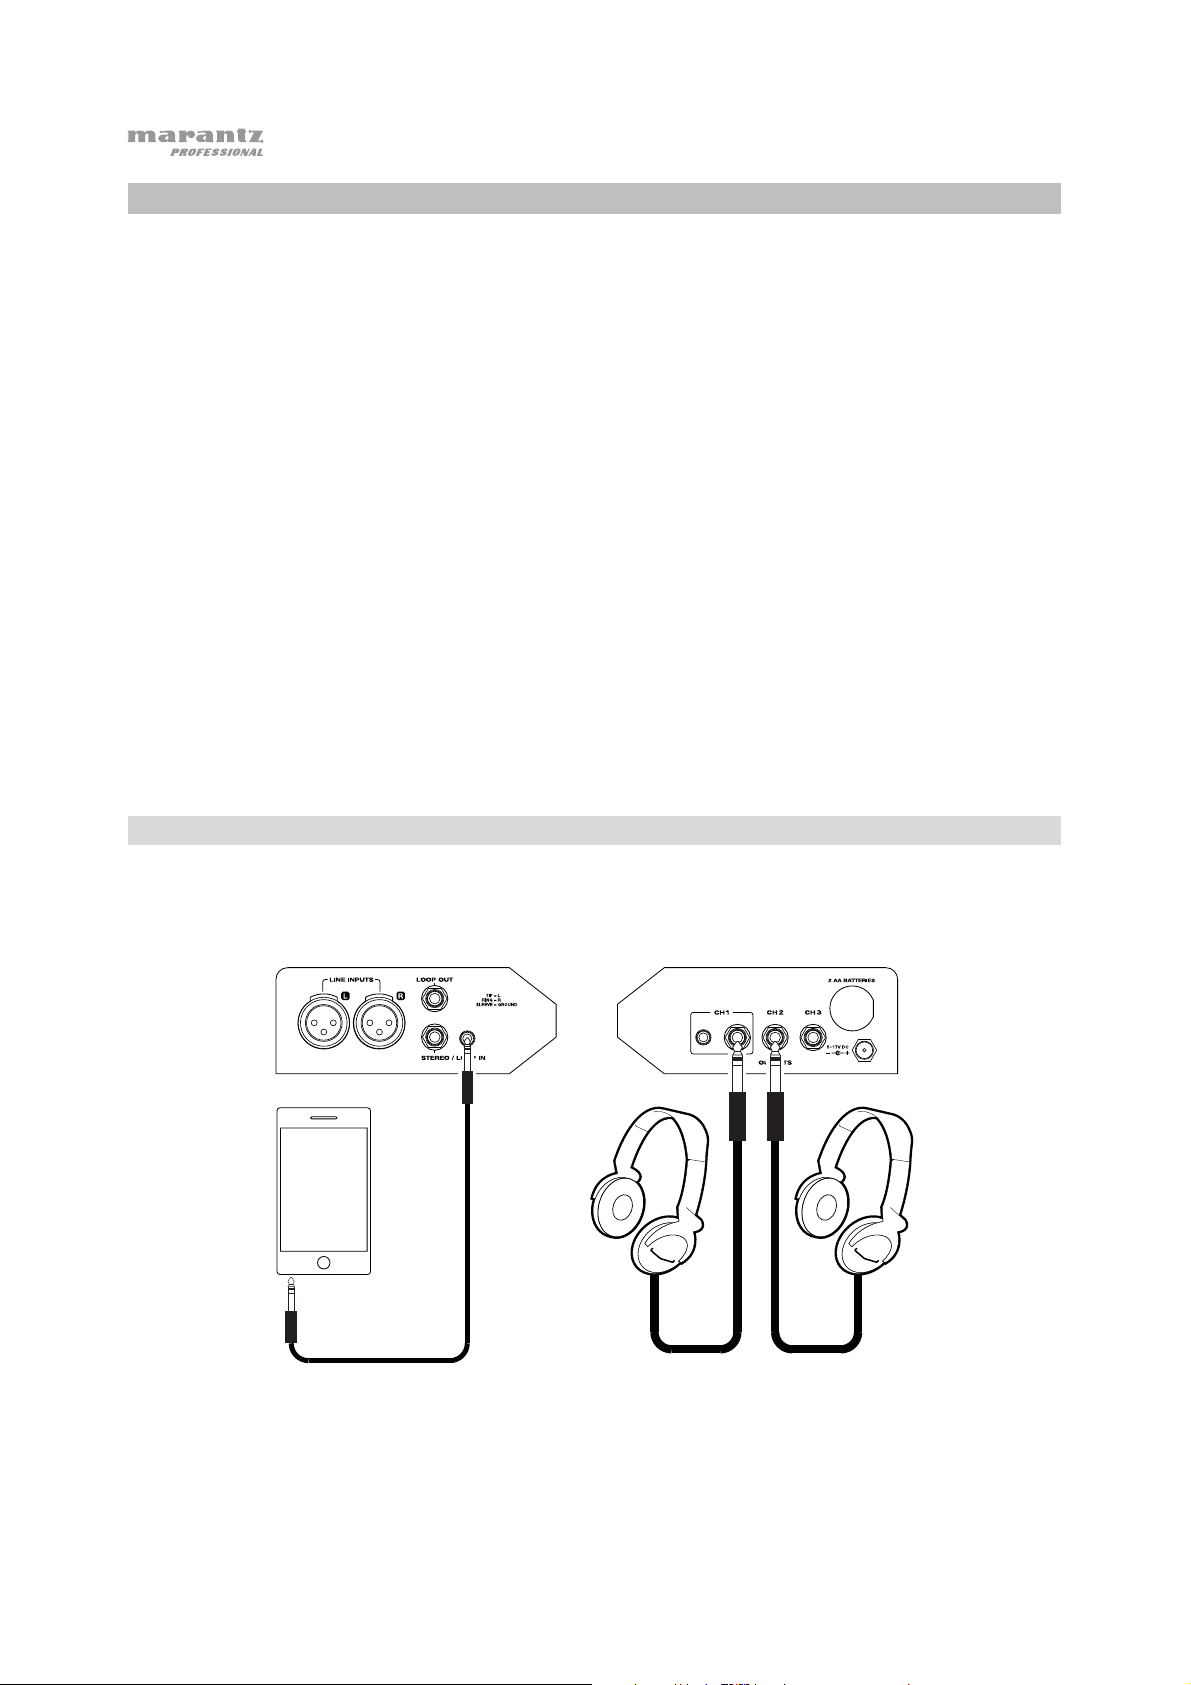
Example 1
This is an example of a basic way to use PHA3.
Smartphone, tablet,
computer, etc.
Right Panel Left Panel
Headphones
4
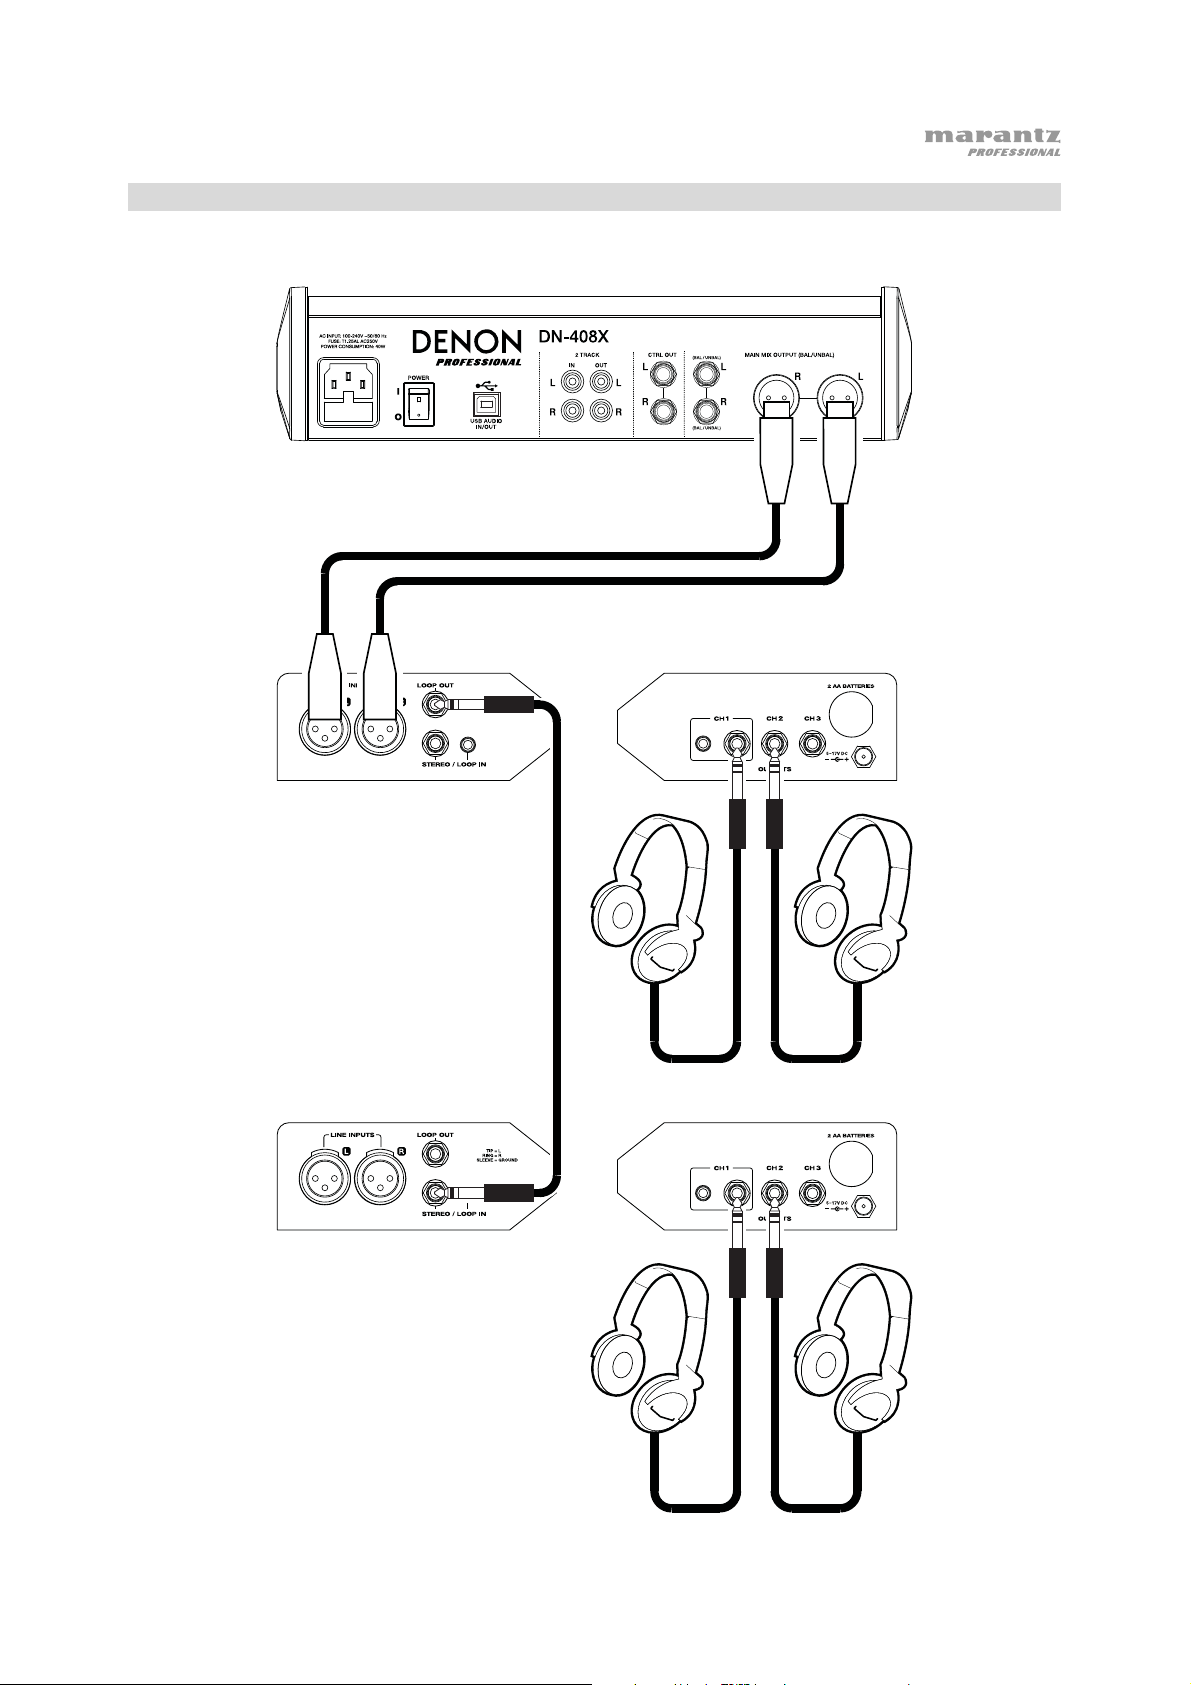
Example 2
This is an example of how to “daisy-chain” multiple PHA3 units together.
Mixer
Right Panel Left Panel
Left Panel
Headphones
Headphones
Right Panel
5

Troubleshooting
If you encounter a problem, try doing these things first:
• Make sure all cables and other connected devices are properly and securely connected.
• Make sure you are using PHA3 as described in this User Guide.
• Make sure your other devices or media are working properly.
• If you believe PHA3 is not working properly, check the following table for your problem and
solution.
Problem: Solution: Please see:
Power does not turn on. If you are using a power adapter, make
sure it is properly connected to the
power input and power outlet.
If you are using batteries, make sure
they are properly installed in the
battery compartment. Insert the
positive (+) end of the battery first.
Make sure you have set the power
switch to the correct position: Ext if
you are using a power adapter, Batt if
you are using batteries.
PHA3 does not produce
any sound, or the sound
is distorted.
Make sure all cable and device
connections are secure and correct.
Make sure none of the cables are
damaged.
Make sure the settings on your
loudspeaker, mixer, etc. are correct.
If the sound is distorted, reduce the
setting of the Level knobs and/or the
level of the audio signal sent into the
line inputs and/or Stereo/Loop In.
Setup
Setup
Features
6

Guía del usuario (Español)
Introducción
Características importantes:
• 3 salidas independientes para auriculares con controles de volumen dedicados
• Salidas XLR balanceadas o entradas estéreo de 6,35 mm (1/4 pulg.) y 3,5 mm (1/8 pulg.) no
balanceadas
• Bucle de salida de 6,35 mm (1/4 pulg.) para conectar unidades adicionales y obtener más salidas
• Salidas estéreo paralelas de 3,5 mm (1/8 pulg.) y 6,35 mm (1/4 pulg.) con dos salidas
adicionales de 6,35 mm (1/4 pulg.)
• Alimentación interna (2 x AA) o externa (5–17 VCC)
Consulte el capítulo Instalación de esta guía para aprender a integrar el PHA3 con su sistema
de audio.
Contenido de la caja
PHA3 Guía del usuario
Adaptador de corriente Manual sobre la seguridad y garantía
Soporte
Para obtener la información más reciente acerca de este producto (requisitos de sistema,
información de compatibilidad, etc.) y registrarlo, visite marantzpro.com.
7

Características
6
55
9
33
2
4
1
Panel derecho Panel izquierdo Panel frontal
1. Entrada de corriente: Utilice el adaptador de corriente incluido para conectar esta entrada a
una toma de corriente. Como alternativa, instale pilas en el compartimento para pilas.
2. Compartimiento para pilas: Retire la tapa de este compartimiento e inserte 2 pilas AA en él.
Inserte primero el extremo positivo (+) de la batería.
3. Salidas: Conecte a estas salidas auriculares estéreo de 6,35 mm (1/4 pulg). El canal 1
también puede aceptar auriculares estéreo de 3,5 mm (1/8 pulg.)
Utilice las perillas Level (nivel) para ajustar el nivel de cada salida. La perilla Level del canal 1
controlará el nivel de las salidas de 6,35 mm (1/4 pulg) y 3,5 mm (1/8 pulg.).
4. Entradas de línea: Utilice cables XLR estéreo estándar para conectar su fuente de audio a
estas entradas.
5. Estéreo/Entrada de loop (bucle): Utilice un cable TRS estándar de 6,35 mm (1/4 pulg.) o 3,5
mm (1/8 pulg.) para conectar su fuente de audio a estas entradas.
777
888
10
11
Como alternativa, conecte esta entrada a la salida de loopde un PHA3 adicional. Este le
permite “conectar en cadena” múltiples unidades PHA3. Utilice el cable TRS de 6,35 a 3,5
mm (1/4 a 1/8 pulg.) incluido o un cable TRS estándar de 6,35 mm (1/4 pulg.).
6. Salida de loop: Como alternativa, conecte esta salida a la entrada de loopde un PHA3
adicional. Este le permite “conectar en cadena” múltiples unidades PHA3. Utilice el cable TRS
de 6,35 a 3,5 mm (1/4 a 1/8 pulg.) incluido o un cable TRS estándar de 6,35 mm (1/4 pulg.).
7. Level (Nivel): Gire estas perillas para ajustar el nivel de volumen de cada salida. La perilla
Level del canal 1 controlará el nivel de las salidas de 6,35 mm (1/4 pulg) y 3,5 mm (1/8 pulg.).
8. LED de pico: Estos LED se iluminarán cuando la señal de cada salida esté siendo
“recortada” (distorsiona). Si esto ocurriera, gire la perilla Level correspondiente en sentido
antihorario para reducir su nivel.
9. Estéreo/mono: Utilice este interruptor para establecer si las salidas envían una señal estéreo
o una señal monoaural sumada.
10. Interruptor de encendido: Utilice este interruptor para encender y apagar el PHA3. Para
utilizar el adaptador de corriente, ajústelo en la posición Ext. Para utilizar pilas, ajústelo a la
posición Batt.
11. LED de encendido: Este LED se ilumina cuando se enciende el PHA3.
8
Instalación
Los elementos que no se enumeran en Introducción > Contenido de la caja se venden por separado.
Cómo instalar el PHA3 a su sistema de sonido:
1. Utilice el adaptador de corriente incluido para conectar el PHA3 a una toma de corriente.
Como alternativa, retire la tapa del compartimiento de pilas e inserte 2 pilas AA en él. Inserte
primero el extremo positivo (+) de la batería.
2. Utilice cables XLR estéreo estándar para conectar sus fuentes de audio a las entradas de
línea.
También puede conectar sus fuentes de audio a la entradaStereo/Loop In mediante el cable
TRS de 6,35 a 3,5 mm (1/4 a 1/8 pulg.) incluido o un cable TRS de 6,35 mm (1/4 pulg)
estándar.
3. Conecte a estas salidas auriculares estéreo de 6,35 mm (1/4 pulg) a estas salidas. El canal 1
también puede aceptar auriculares estéreo de 3,5 mm (1/8 pulg.)
4. Encienda todas sus fuentes de audio (mezcladores, estéreos, etc.).
5. Encienda el PHA3. Para utilizar el adaptador de corriente, ajuste el interruptor de encendido
a la posición Ext. Para utilizar pilas, ajústelo a la posición Batt.
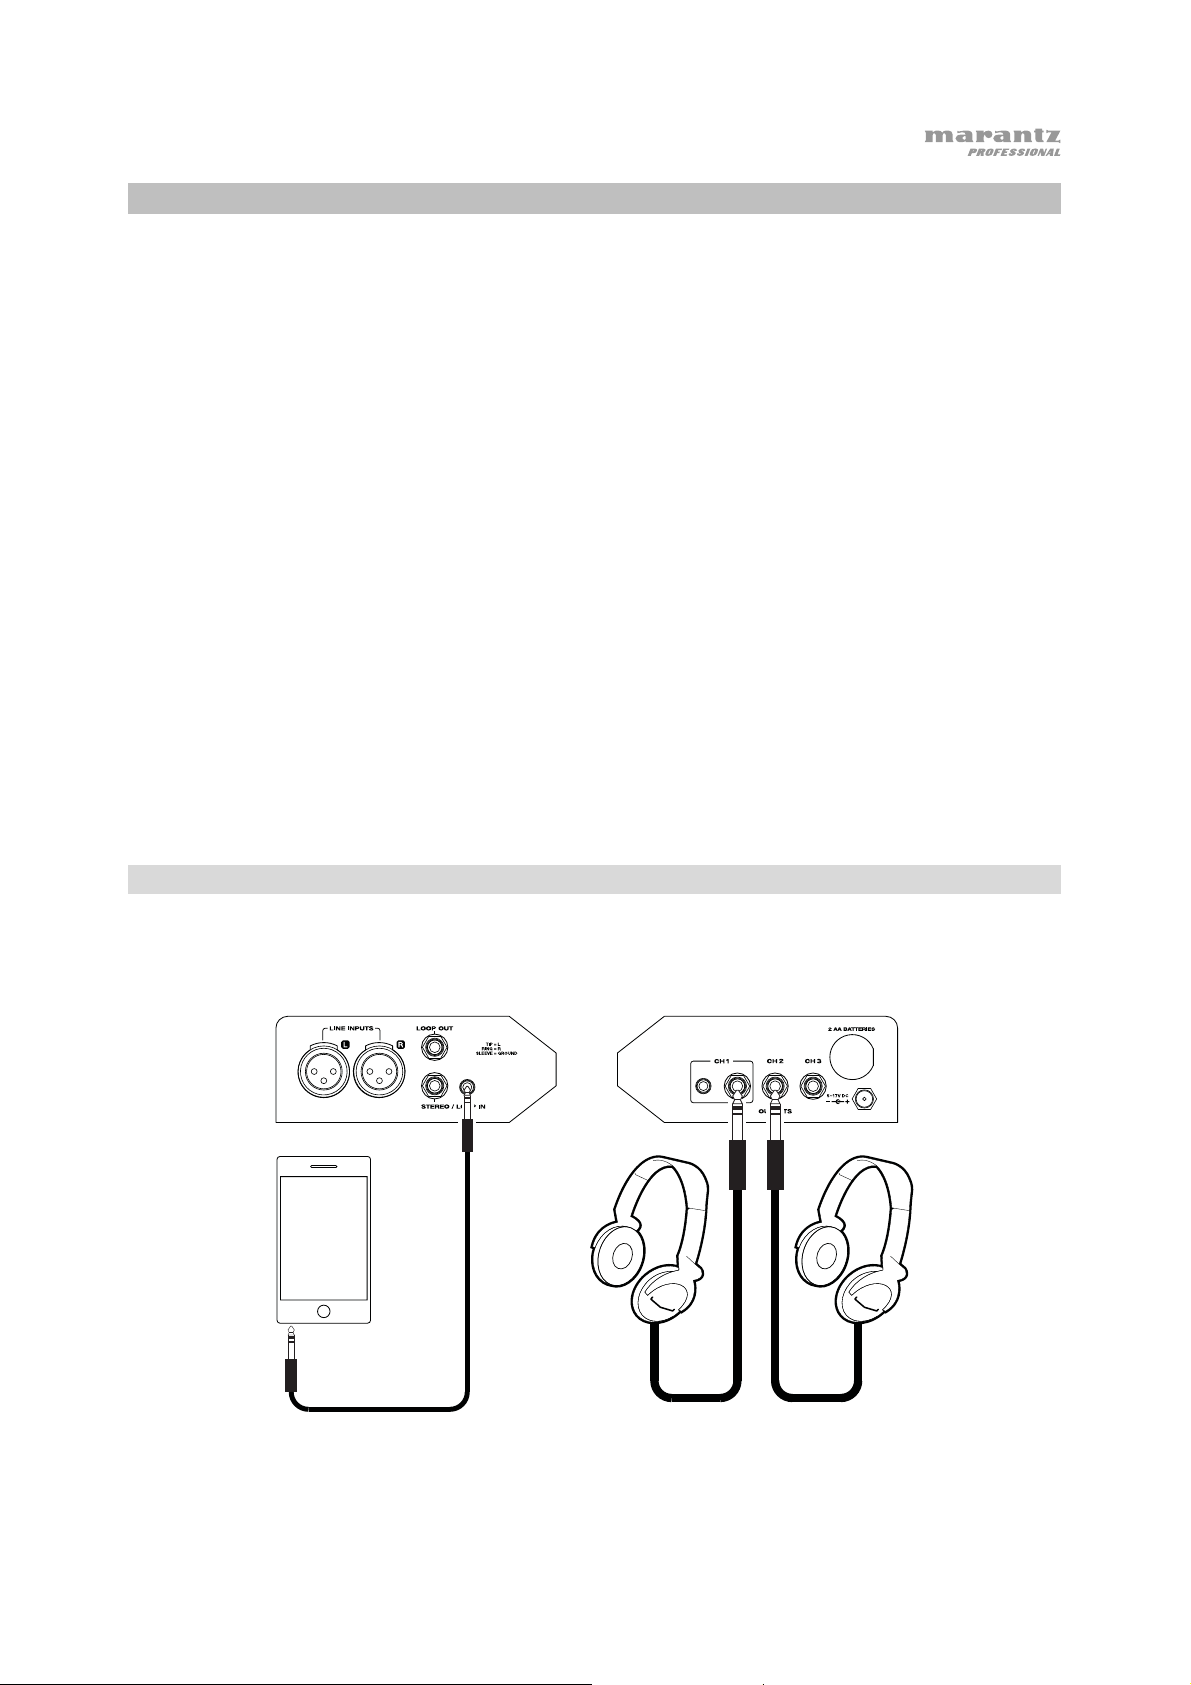
Ejemplo 1
Este es un ejemplo de un uso básico del PHA3.
Panel
izquierdo
Panel
derecho
Smartphone (teléfono
inteligente), tableta,
computadora, etc.
Auriculares
9
 Loading...