

Marantz DV-4300 Owners Manual

Model DV4300 User Guide
DVD Player
R
CLASS 1 LASER PRODUCT
LUOKAN 1 LASERLAITE
KLASS 1 LASERAPPARAT

ENGLISH
ITALIANO
WARRANTY
For warranty information, contact your local Marantz distributor.
RETAIN YOUR PURCHASE RECEIPT
Your purchase receipt is your permanent record of a valuable purchase.
It should be kept in a safe place to be referred to as necessary for
insurance purposes or when corresponding with Marantz.
IMPORTANT
When seeking warranty service, it is the responsibility of the consumer
to establish proof and date of purchase. Your purchase receipt or invoice is adequate for such proof.
FOR U.K. ONLY
This undertaking is in addition to a consumer's statutory rights and does
not affect those rights in any way.
FRANÇAIS
GARANTIE
Pour des informations sur la garantie, contacter le distributeur local
Marantz.
CONSERVER L'ATTESTATION D'ACHAT
L'attestation d'achat est la preuve permanente d'un achat de valeur. La
conserver en lieu sur pour s'y reporter aux fins d'obtention d'une
couverture d'assurance ou dans le cadre de correspondances avec
Marantz.
IMPORTANT
Pour l'obtention d'un service couvert par la garantie, il incombe au client d'établir la preuve de l'achat et d'en corroborer la date. Le reçu ou la
facture constituent des preuves suffisantes.
DEUTSCH
GARANTIE
Bei Garantiefragen wenden Sie sich bitte an Ihren Marantz-Händler.
HEBEN SIE IHRE QUITTING GUT AUF
Die Quittung dient Ihnen als bleibende Unterlage für Ihren wertvollen
Einkauf Das Aufbewahren der Quittung ist wichtig, da die darin
enthaltenen Angaben für Versicherungswecke oder bei Korrespondenz
mit Marantz angeführt werden müssen.
WICHTIG!
Bei Garantiefragen muß der Kunde eine Kaufunterlage mit Kaufdatum
vorlegen. Ihren Quittung oder Rechnung ist als Unterlage ausreichend.
NEDERLANDS
GARANTIE
Voor inlichtingen omtrent garantie dient u zich tot uw plaatselijke Marantz.
UW KWITANTIE, KASSABON E.D. BEWAREN
Uw kwitantie, kassabon e.d. vormen uw bewijs van aankoop van een
waardevol artikel en dienen op een veilige plaats bewaard te worden
voor evt, verwijzing bijv, in verbend met verzekering of bij
correspondentie met Marantz.
BELANGRIJK
Bij een evt, beroep op de garantie is het de verantwoordelijkheid van
de consument een gedateerd bewijs van aankoop te tonen. Uw
kassabon of factuurzijn voldoende bewijs.
GARANZIA
L’apparecchio è coperto da una garanzia di buon funzionamento della
durata di un anno, o del periodo previsto dalla legge, a partire dalla data
di acquisto comprovata da un documento attestante il nominativo del
Rivenditore e la data di vendita. La garanzia sarà prestata con la
sostituzione o la riparazione gratuita delle parti difettose.
Non sono coperti da garanzia difetti derivanti da uso improprio, errata
installazione, manutenzione effettuata da personale non autorizzato o,
comunque, da circostanze che non possano riferirsi a difetti di
funzionamento dell’apparecchio. Sono inoltre esclusi dalla garanzia gli
interventi inerenti l’installazione e l’allacciamento agli impianti di
alimentazione.
Gli apparecchi verranno riparati presso i nostri Centri di Assistenza
Autorizzati. Le spese ed i rischi di trasporto sono a carico del cliente.
La casa costruttrice declina ogni responsabilità per danni diretti o indiretti
provocati dalla inosservanza delle prescrizioni di installazione, uso e
manutenzione dettagliate nel presente manuale o per guasti dovuti ad
uso continuato a fini professionali.
ESPAÑOL
GARANTIA
Para obtener información acerca de la garantia póngase en contacto
con su distribuidor Marantz.
GUARDE SU RECIBO DE COMPRA
Su recibo de compra es su prueba permanente de haber adquirido un
aparato de valor, Este recibo deberá guardarlo en un lugar seguro y
utilizarlo como referencia cuando tenga que hacer uso del seguro o se
ponga en contacto con Marantz.
IMPORTANTE
Cuando solicite el servicio otorgado por la garantia el usuario tiene la
responsabilidad de demonstrar cuá¥do efectuó la compra. En este caso,
su recibo de compra será la prueba apropiada.
PORTUGUÊS
GARANTIA
Para informações sobre a garantia, contactar o distribuidor Marantz local.
GUARDAR O RECIBO DE COMPRA
O recibo é o registo permanente da compra que fez. Deve ser guardado
num local seguro, para ser apresentado em questões relacionadas com
o seguro ou para quando tiver de contactar a Marantz.
IMPORTANTE
Quando procurar assisténcia técnica ao abrigo da garantia, é da
responsabilidade do consumidor estabelecer a prova e data de compra.
O recibe é prova adequada.
SVENSKA
GARANTI
För information om garantin, kontakta Marantz lokalagent.
SPAR KVITTOT
Kvittot är ett inköpsbevis på en värdefull vara. Det skall förvaras säkert
och hänvisas till vid försäkringsfall eller vidkorrespondens mod Marantz.
VIKTIGT
Fö att garantin skall gälla är det kundens sak att framställa bevis och
datum om köpet. Kvitto eller faktura är tillräokligt bevis fö detta.
DANSK
GARANTI
Henvend dem til Deres MARANTZ-forhandler angående inrformation
om garantien.
GEM DERES KVITTERING
Deres købskvittering er Deres varige bevis på et dyrt køb. Den bør
gemmes godt og anvendes som bevis, hvis De vil tegne en forsikring,
eller hvis De kommunikerer med Marantz.
VIGTIGT
Det påhviler forbrugeren at skaffe bevis for købet og købsdatoen, hvis
han eller hun ønsker garantiservice. Deres købskvittering eller faktura
er et fuldgyldigt bevis herpå.

CONGRATULATIONS ON YOUR PURCHASE OF THIS FINE MARANTZ PRODUCT.
MARANTZ is on the leading edge of DVD research for consumer products and this unit incorporates the latest technological developments.
We are sure you will be fully satisfied with the DVD player.
Thank you for your support.
Please read through these operating instructions so you will know how to operate your model properly. After you have finished reading the
instructions, put them away in a safe place for future reference.
• This player is not suitable for commercial use.
TABLE OF CONTENTS
ENGLISH
FOREWORD .................................................2
Precautions ................................................................................................ 2
Laser Safety ............................................................................................... 2
BEFORE YOU START..................................3
What’s in the box ....................................................................................... 3
Putting the batteries in the remote control ................................................. 3
Using the remote control ............................................................................ 3
Discs compatible with this player ............................................................... 4
DVD Video regions .................................................................................... 4
MP3 compatibility information .................................................................... 4
Caution! ...................................................................................................... 4
BASIC CONNECTION .................................. 5
S -Video Out Connection ........................................................................... 5
Composite video out Connection ............................................................... 6
Component video out connection (480i/480p) ........................................... 6
AV Euroconnector Connection ................................................................... 7
Analog Audio Connection ........................................................................... 7
Digital Audio Connection ............................................................................ 8
System Control Connection ....................................................................... 9
CONTROLS & DISPLAY ............................10
Front Panel .............................................................................................. 10
Display ...................................................................................................... 11
Rear Panel ............................................................................................... 12
Remote Controller Unit ............................................................................ 13
ADVANCED FUNCTION ............................ 25
3D sound effect (MP3, CDDA , Dolby Digital 2CH Stereo) ...................... 25
Utilizing Repeat Function ......................................................................... 26
SHUFFLE (VCD with PBC off, MP3, CDDA only) .................................... 27
PROGRAM (VCD, MP3, CDDA only) ...................................................... 27
Digest (VCD,JPEG,Kodak picture CD, CDDA only) ................................. 28
MARKER (DVD, VCD WITH PBC OFF, CDDA)....................................... 29
Display ..................................................................................................... 29
Zoom screen ............................................................................................ 31
CUSTOMIZING DVD PERFORMANCE ..... 32
Audio ........................................................................................................ 32
Video ........................................................................................................ 33
Other ........................................................................................................ 35
Languages (DVD only) ............................................................................. 35
Parental Lock (DVD only) ........................................................................ 36
ADDITIONAL INFORMATION .................... 37
Handling discs .......................................................................................... 37
Cleaning the pickup lens .......................................................................... 37
Problems with condensation .................................................................... 37
Hints on installation .................................................................................. 38
Moving the player ..................................................................................... 38
Power cord caution .................................................................................. 38
Resetting the player ................................................................................. 38
Malfunctioning of this unit ........................................................................ 38
Glossary ................................................................................................... 39
BASIC FUNCTION .....................................16
Open / Close Disc Tray ............................................................................ 16
Basic play of DVD, VIDEO-CD or CDDA ................................................. 17
Basic play of MP3 .................................................................................... 18
Selecting VIDEO MODE .......................................................................... 18
Selecting MENU ITEMS (DVD or Video CD with PBC only) .................... 19
STOP and POWER OFF.......................................................................... 19
SEARCH .................................................................................................. 20
SKIP ......................................................................................................... 21
SLOW ...................................................................................................... 21
Selecting Audio Languages (DVD only) ................................................... 22
Selecting Subtitles (DVD only) ................................................................. 23
Selecting Angles (DVD only) .................................................................... 23
Kodak picture CD play ............................................................................. 24
JPEG file play .......................................................................................... 24
TROUBLESHOOTING................................ 40
SPECIFICATIONS ...................................... 42
1
ENGLISH
FOREWORD
This section must be read carefully before any connection is made to
the mains supply.
WARNINGS
Do not expose the equipment to rain or moisture.
Do not remove the cover from the equipment.
Do not insert anything into the equipment through the ventilation holes.
Do not handle the mains lead with wet hands.
Make a space of about 0.1 meter around the unit.
CE MARKING
This product is in conformity with the EMC directive
and low-voltage directive.
EQUIPMENT MAINS WORKING SETTING
Your Marantz product complies with the household power and safety
requirements in your area.
PRECAUTIONS
The following precautions should be taken when operating the
equipment.
LASER SAFETY
This unit employs a laser. Only a qualified service
person should remove the cover or attempt to service
this device, due to possible eye injury.
USE OF CONTROLS OR ADJUSTMENTS OR PERFORMANCE OF
PROCEDURES OTHER THAN THOSE SPECIFIED HEREIN MAY
RESULT IN HAZARDOUS RADIATION EXPOSURE.
CAUTION VISIBLE AND INVISIBLE LASER RADIATION WHEN
OPEN AVOID EXPOSURE TO BEAM (WARNING
LOCATION: INSIDE ON LASER COVERSHIELD)
This product incorporates copyright protection technology that is
protected by method claims of certain U. S. patents and other intellectual
property rights owned by Macrovision Corporation and other rights
owners. Use of this copyright protection technology must be Authorized
by Macrovision Corporation, and is intended for home and other limited
viewing uses only unless otherwise authorized by Macrovision
corporation. Reverse engineering or disassembly is prohibited.
GENERAL PRECAUTIONS
When installing the equipment ensure that:
– the ventilation holes are not covered.
– air is allowed to circulate freely around the equipment.
– it is placed on a vibration-free surface.
– it will not be exposed to excessive heat, cold, moisture or dust.
– it will not be exposed to direct sunlight.
– it will not be exposed to electrostatic discharges.
In addition, never place heavy objects on the equipment.
If a foreign object or water does enter the equipment, contact your
nearest dealer or service center.
Do not pull out the plug by pulling on the mains lead; grasp the plug.
It is advisable when leaving the house, or during a thunderstorm, to
disconnect the equipment from the mains supply.
Manufactured under license from Dolby Laboratories. "Dolby" and
the double-D symbol are trademarks of Dolby Laboratories.
Confidential unpublished works. © 1992-1997 Dolby Laboratories,
Inc. All rights reserved.
DTS" and "DTS Digital" are trademarks of Digital Theater Systems,Inc.
2
BEFORE YOU START
What’s in the box
Thank you for buying this MARANTZ product. Please confirm
that the following accessories are in the box when you open it.
• Remote control
• AAA/R03 dry cell batteries x2
• Audio/Video cable
• System control cable
• Operating instruction (this manual)
• Warranty card
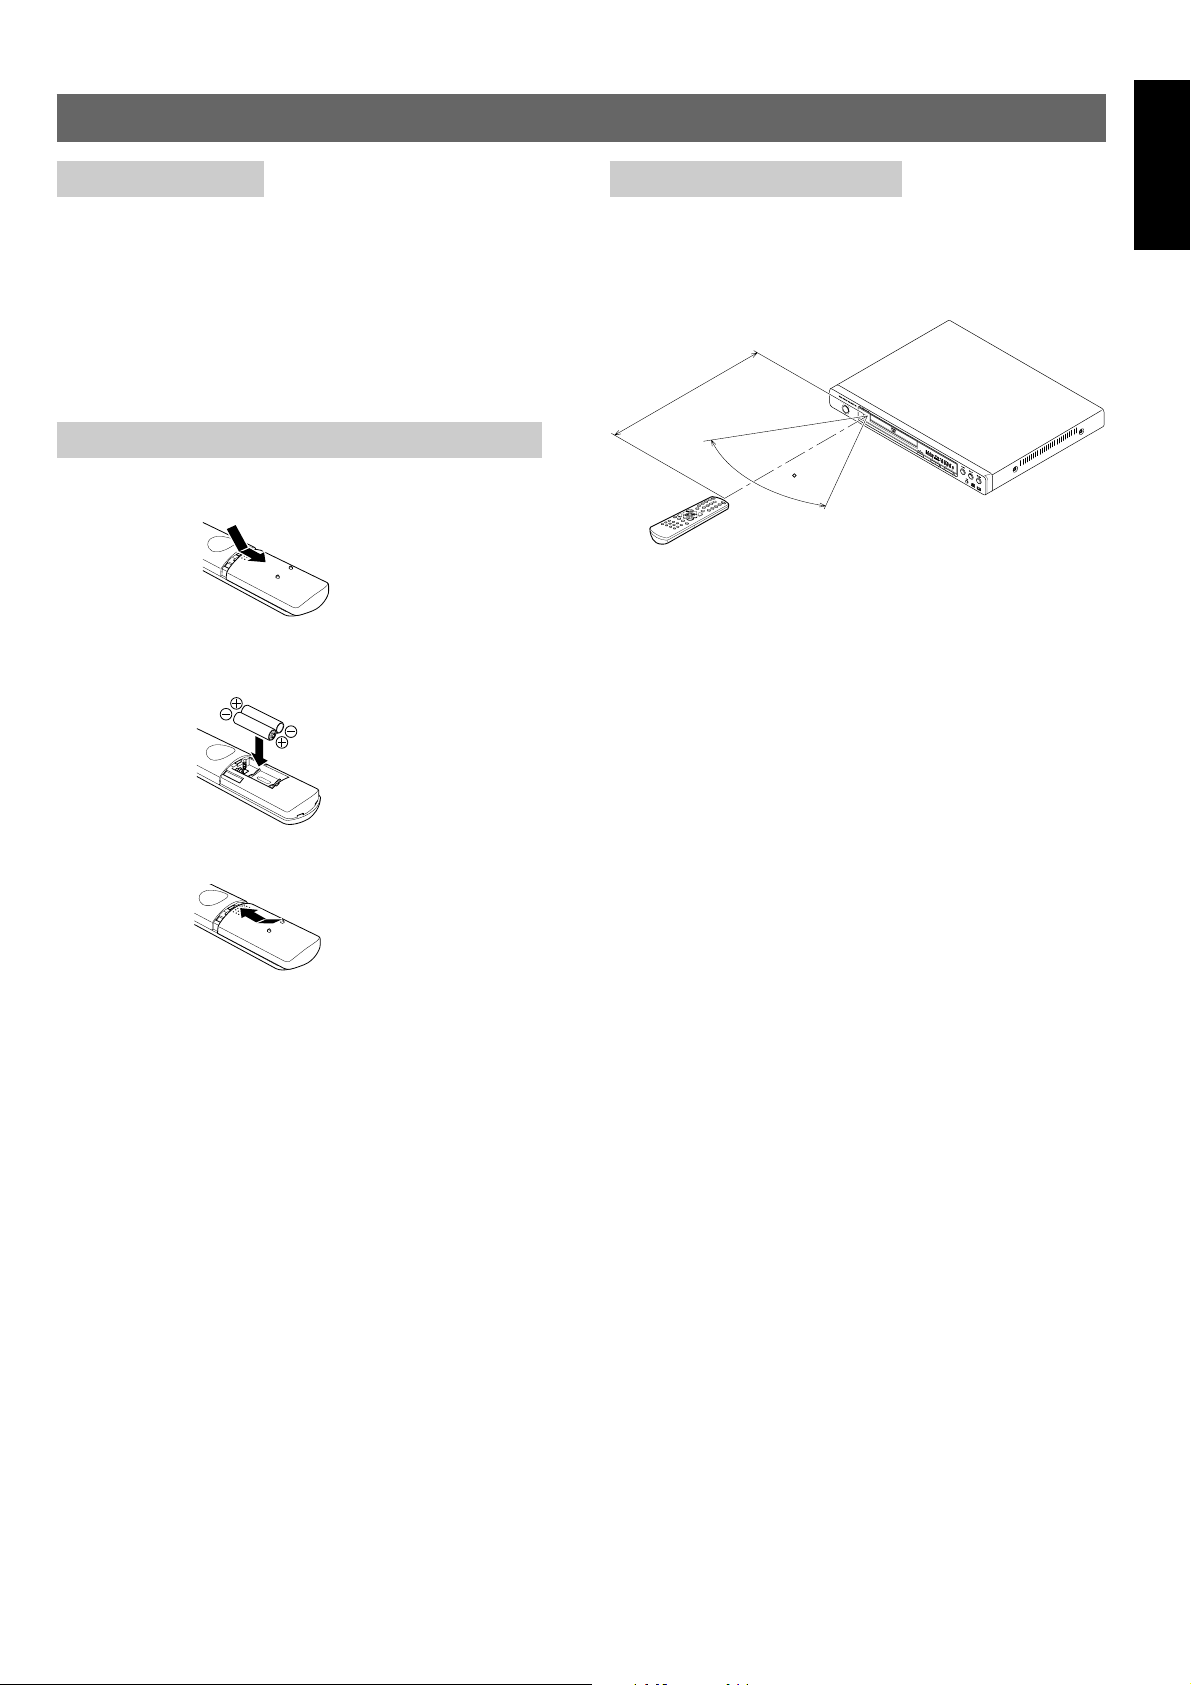
Putting the batteries in the remote control
1 Open the battery compartment cover on the back of the remote
control.
2 Insert two AAA/R03 batteries into the battery compartment
following the indications (+, -) inside the compartment.
Using the remote control
Keep in mind the following when using the remote control:
• Make sure that there are no obstacles between the remote and
the remote sensor on the unit.
• Use within the operating range and angle, as shown.
5m(17 feet)
60
• Remote operation may become unreliable if strong sunlight or
fluorescent light is shining on the unit’s remote sensor.
• Remote controllers for different devices can interfere with each
other. Avoid using remotes for other equipment located close to
this unit.
• Replace the batteries when you notice a fall off in the operating
range of the remote.
Note
When using this player independently, set a REMOTE CONTROL
switch on the rear panel to INTERNAL. (page 9)
ENGLISH
3 Close the cover.
Note
Incorrect use of batteries can result in hazards such as leakage and
bursting. Please observe the following:
• Don’t mix new and old batteries together.
• Don’t use different kinds of battery together—although they may
look similar, different batteries may have different voltages.
• Make sure that the plus and minus ends of each battery match
the indications in the battery compartment.
• Remove batteries from equipment that isn’t going to be used for
a month or more.
When disposing of used batteries, please comply with governmental
regulations or environmental public instruction’s rules that apply in
your country or area.
3
ENGLISH
Discs compatible with this player
Any disc that displays one of the following logos should play in
this player. Other formats, including DVD-RAM, DVD-ROM,
CD-ROM (except those that contain MP3 files), and Photo CD
will not play.
DVD Video compatibility:
• Logos:
• Single-sided or double-sided discs
• Single layer or dual layer discs
• Dolby Digital, DTS (Digital out only), MPEG or Linear PCM
digital audio
• MPEG-2 digital video
Discs are generally divided into one or more titles. Titles may be
further subdivided into chapters.
DVD-R compatibility:
This unit can play DVD-R discs. Please note the following points when
using these discs:
• Logo:
• This unit can play DVD-R discs recorded as DVD video format.
Audio CD compatibility:
• Logos:
• 12cm or 8cm discs
• Linear PCM digital audio
• CD-Audio, CD-R* and CD-RW* formats
CDs are divided into tracks.
*This unit can play CD-R and CD-RW discs recorded in CD Audio or
Video CD format, or with MP3 audio files, or Kodak picture CD files.
Video CD compatibility:
• Logo:
• 12cm or 8cm discs
• MPEG-1 digital audio
• MPEG-1 digital video
Video CDs are divided into tracks.
DVD Video regions
2
All DVD Video discs carry a region mark on the case
somewhere that indicates which region(s) of the world the disc
is compatible with. Your DVD player also has a region mark,
which you can find on the rear panel. Discs from incompatible
regions will not play in this player. Discs marked ALL will play
in any player.
ALL
MP3 compatibility information
• The CD-ROM must be ISO 9660 compatible.
• Mono or stereo MPEG-1 Audio Layer 3 format, 32 or 44.1 or
48kHz, fixed bit-rate. Incompatible files will not play.
• Not compatible with variable bit-rate (VBR) files.
• This player only plays tracks that are named with the file
extension “.mp3” or “.MP3”.
• This player is compatible with multi-session discs.
• Use CD-R or CD-RW media for recording your MP3 files. The
disc must be finalized in order to play.
• Audio encoded at 128Kbps should sound close to regular audio
CD quality. Although this player will play 56 to 256k bit-rate MP3
tracks, the sound quality becomes noticeably worse at lower bitrates.
• This player can recognize a maximum of 126 folders and 255
tracks.
Caution!
• DVD-R and CD-R/RW discs recorded using a personal computer
or a DVD or CD recorder may not play if the disc is damaged or
dirty, or if there is dirt or condensation on the player’s lens.
• If you record a disc using a personal computer, even if it is
recorded in a compatible format, there are cases in which it may
not play because of the settings of the application software used
to create the disc. (Check with the software publisher for more
detailed information.)
• Unfinalized DVD-R discs cannot be played.
• Unfinalized CD-R/RW discs can be played, but not all time
information (playing time, etc.) will be displayed.
• For more information on using DVD-R and CD-R/RW discs, see
Handling discs starting on page 37.
Super VCD compatibility:
• Logo:
• 12cm (5in.) or 8cm (3in.) discs
• MPEG-1 digital audio
• MPEG-2 digital video
Super VCDs are divided into tracks.
4
BASIC CONNECTION
VIDEO
S-VIDEO
COMPONENT
COAXIAL
OPTICAL
INTERNAL
EXTERNAL
S-VIDEO
• First of all, read through the instructions before connecting other equipment. Make sure that this unit and other equipment to be
connected are set to the standby mode or off, and disconnect the AC mains before starting connection. In order for air to
circulate freely, please do not block ventilation holes of any of the equipment. Select the appropriate screen size at the initial
setting according to your TV set, conventional 4:3 or wide screen 16:9.
• TV MODE SETTING
Setup Menu / Video Video Output RGB SW
Progressive Output mode Video Jack S-Video Jack Component Jack
OFF YCbCr Composite
ON YCbCr
-OFF S-Video Composite S-Video
OFF SCART : RGB Composite
OFF SCART : CVBS Composite
-
Interlace mode (480i) Composite
Progressive mode (480p)
--
--
-
Note
• If you select "SCART ; RGB" in Setup menu, your TV can be selected RGB input automatically.
• Do not connect your DVD-player via your VCR, because the video quality could be distorted by the copy protected system.
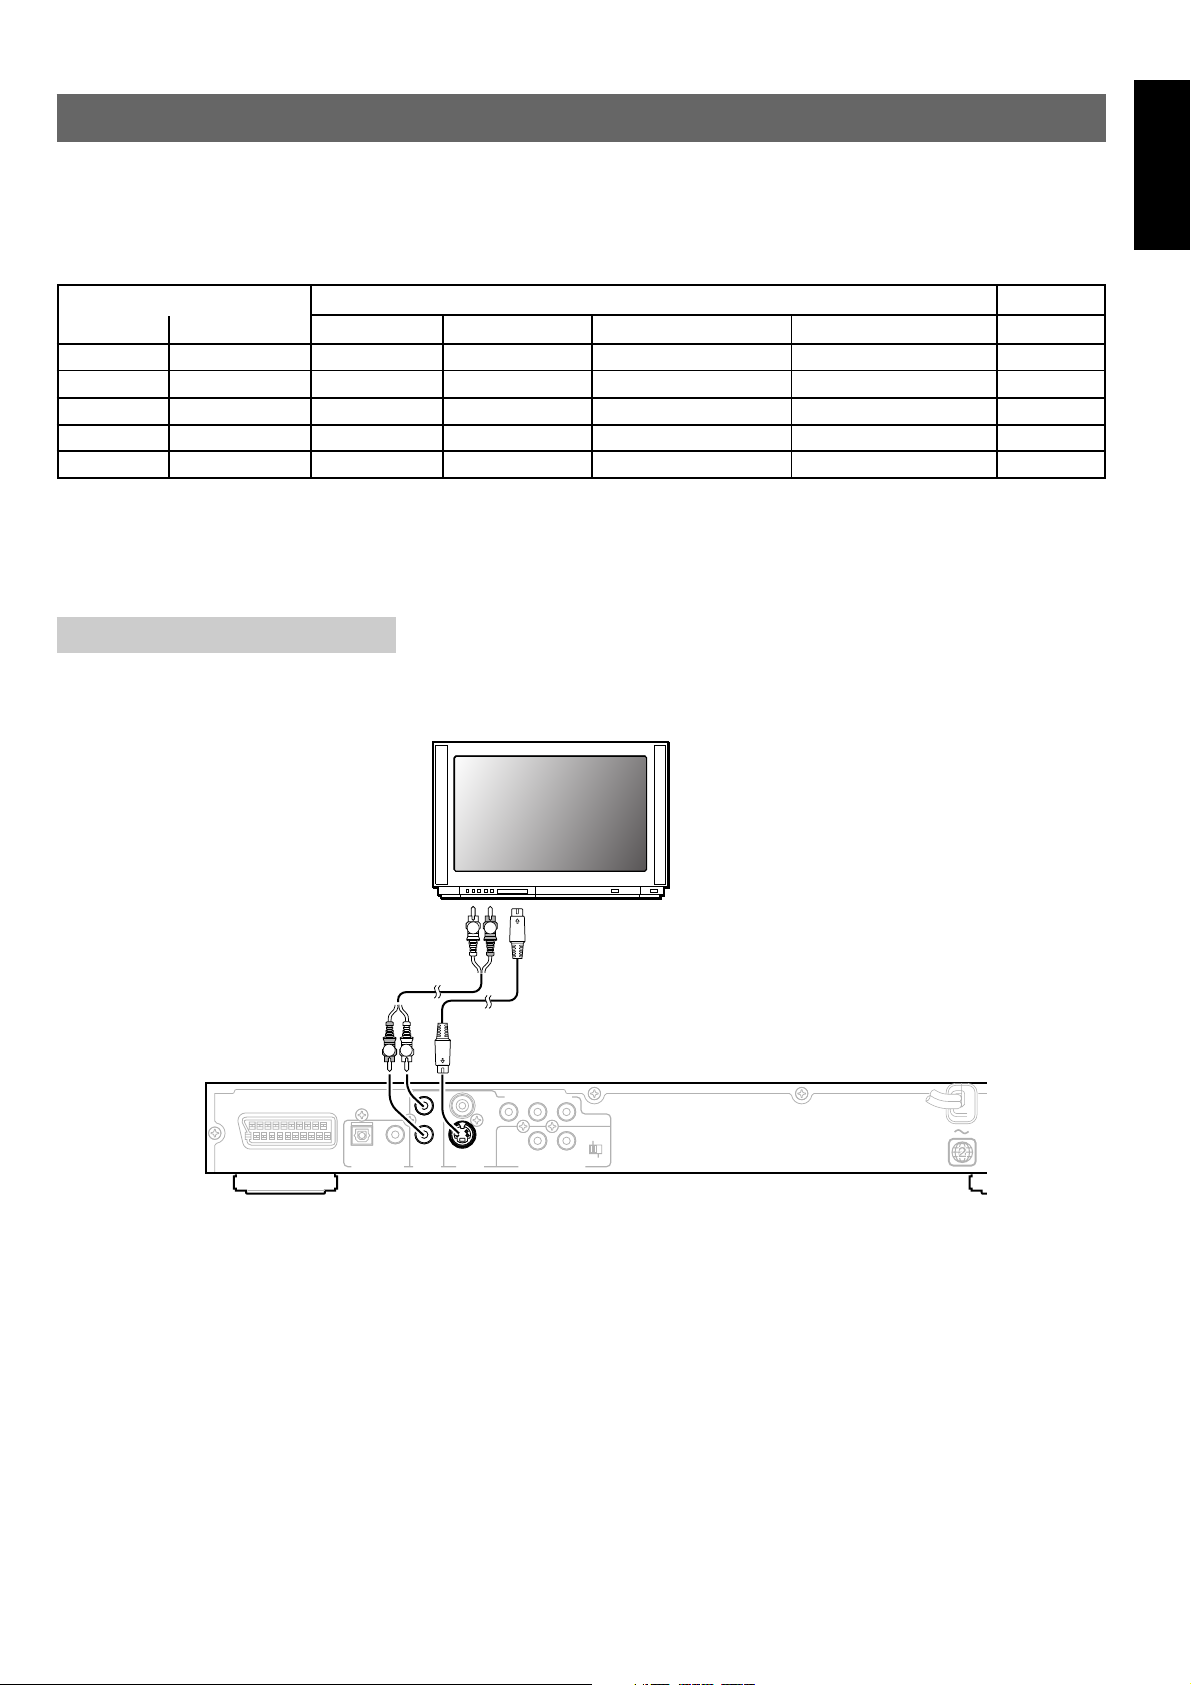
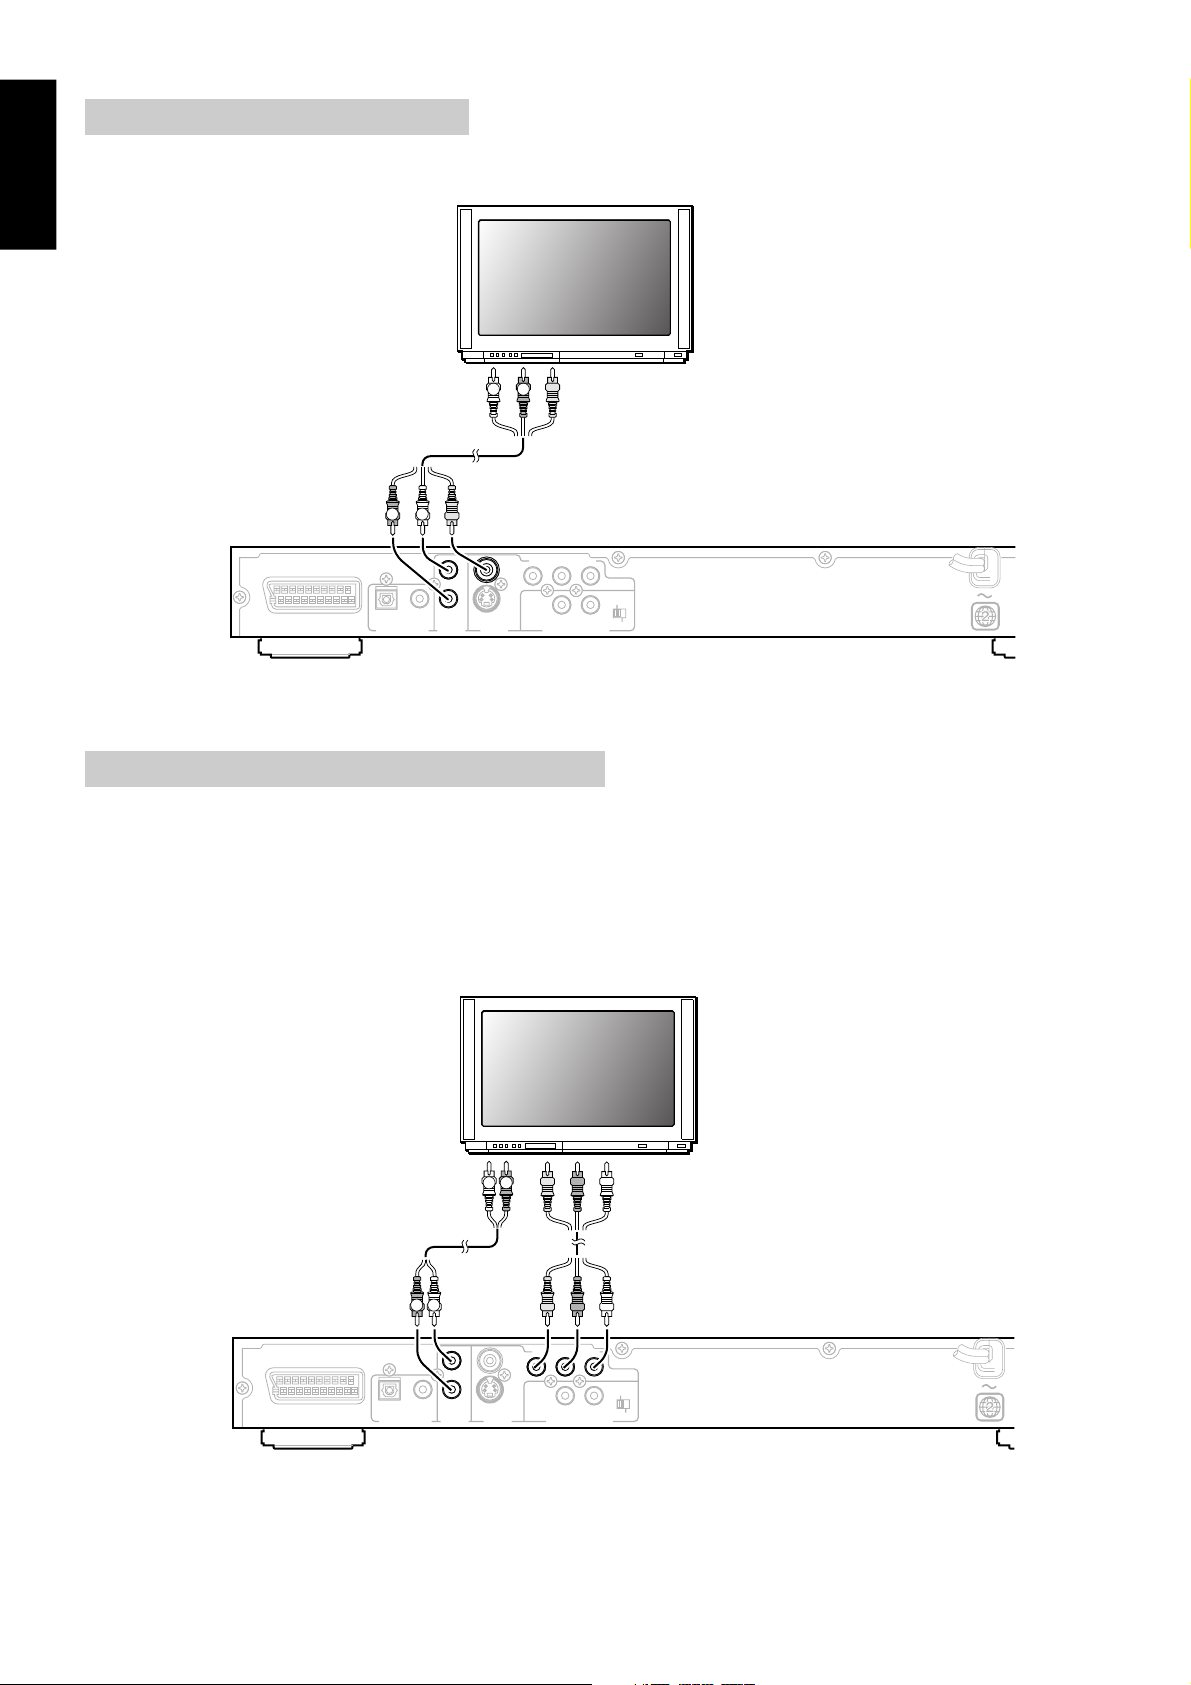
S -VIDEO OUT CONNECTION
Note
From the SETUP menu display, set the OUTPUT MODE to S-VIDEO.
AV EUROCONNECTOR Jack
--
Composite
Composite / RGB Active
Composite / RGB
-
-
-
-
ENGLISH
T V A / V EUROCONNECTOR
L R
a
b
LR
VIDEO
Y
CB /
PBCR /
P
OPTICAL
DIGITAL OUTPUT
COAXIAL
AUDIO
AUDIO
OUTPUT
OUTPUT
L
L
R
R
S-VIDEO
S-VIDEO
VIDEO
VIDEO
OUTPUT
OUTPUT
REMOTE CONTROL
R
COMPONENT
EXTERNAL
OUTIN
INTERNAL
a. audio cable (optional)
To audio input connectors on TV. (red, white)
b. S-Video cable (optional)
To S-Video input connector on TV.
5
ENGLISH
REMOTE CONTROL
EXTERNAL
V EUROCONNECTOR
VIDEO
S-VIDEO
COMPONENT
COAXIAL
OPTICAL
INTERNAL
EXTERNAL
COMPONENT
Composite video out Connection
Note
From the SETUP menu display, set the Progressive to OFF.
LR
T V A / V EUROCONNECTOR
COAXIALOPTICAL
OUTPUT
DIGITAL OUTPUT
OUTPUT
RL
c
VIDEO
VIDEO
Y
CB /
PBCR /
P
REMOTE CONTROL
R
COMPONENT
EXTERNAL
OUTIN
INTERNAL
L
L
R
R
S-VIDEO
AUDIO
AUDIO
VIDEO
VIDEO
OUTPUT
OUTPUT
c. Video/audio cable (accessory)
To audio input connectors on TV. (red, white)
To video input connector on TV. (yellow)
Component video out connection (480i/480p)
Note
• If your TV has progressive (480p) video input, from the SETUP menu display, set the progressive mode to ON and also set the
output mode to YCbCr.
• If your TV has interlace (480i) video input, from the SETUP menu display, set the progressive mode to OFF and also set the output
mode to YCbCr.
• All HD TV are compatible with this player but some TV may cause artifacts in the picture.
• If you set progressive mode to ON [progressive scan mode], you can’t see the picture with your Analog TV or some digital TV. In this
case, press stop button for 5 seconds of your remote controller then you can see the picture on the interlace mode with your TV.
L R
d
e
6
T V A / V EUROCONNECTOR
LR
VIDEO
Y
CB /
PBCR /
Y
CB /
PBCR /
REMOTE CONTROL
OUTIN
OPTICAL
DIGITAL OUTPUT
COAXIAL
AUDIO
AUDIO
OUTPUT
OUTPUT
L
L
R
R
S-VIDEO
VIDEO
OUTPUT
d. Audio cable (optional)
To audio input connectors on TV. (red, white)
e. Component-Video cable (optional)
To Component video input connectors on TV.
P
R
P
R
COMPONENT
COMPONENT
EXTERNAL
INTERNAL
VIDEO
S-VIDEO
COMPONENT
COAXIAL
OPTICAL
INTERNAL
EXTERNAL
VIDEO
S-VIDEO
COMPONENT
COAXIAL
OPTICAL
INTERNAL
EXTERNAL
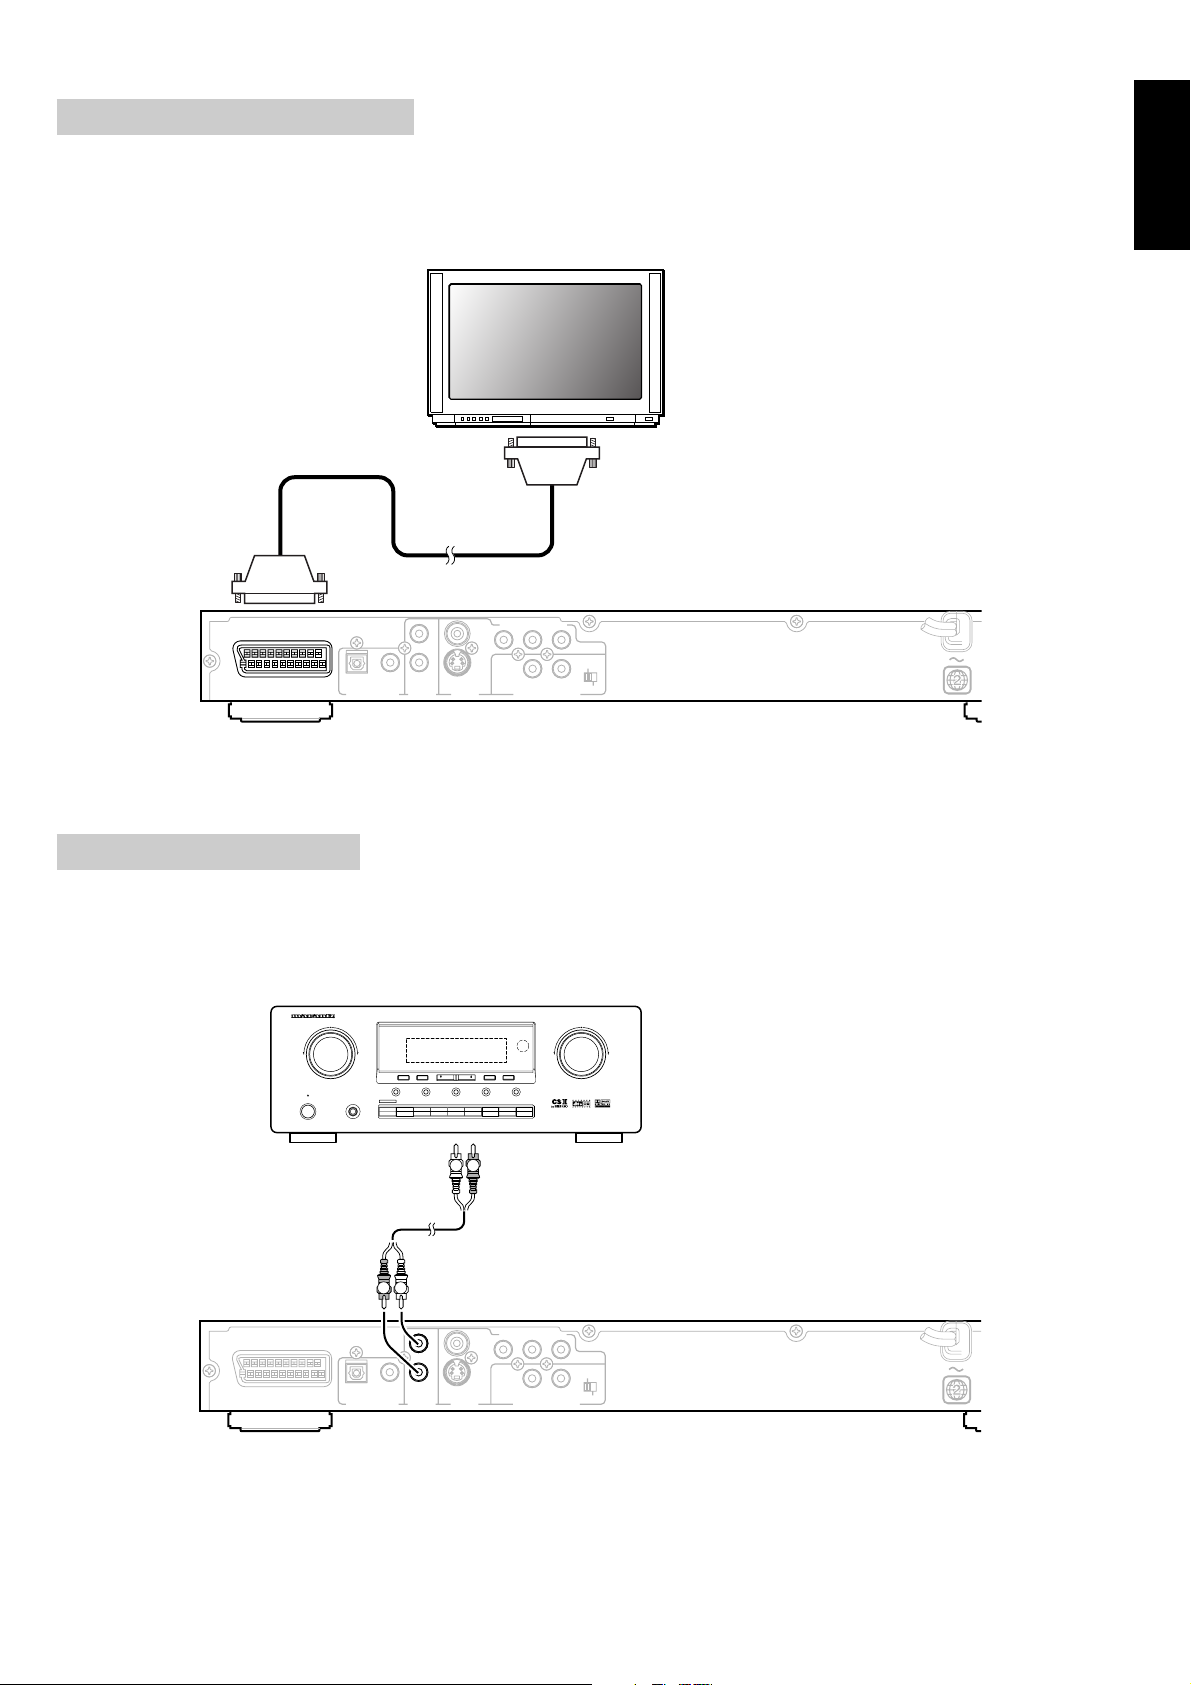
AV Euroconnector Connection
Note
• From the SETUP menu display, set the Output mode to SCART:RGB, if your TV has SCART:RGB video input.
• If you have connected the DVD-player to the TV with a AV EUROCONNECTOR cable, select the appropriate mode for your TV (
Please refer to your TV's operator manual).
f
VIDEO
Y
CB /
PBCR /
P
REMOTE CONTROL
R
COMPONENT
EXTERNAL
OUTIN
INTERNAL
T V A / V EUROCONNECTORT V A / V EUROCONNECTOR
OPTICAL
DIGITAL OUTPUT
COAXIAL
AUDIO
OUTPUT
L
R
S-VIDEO
VIDEO
OUTPUT
ENGLISH
f. AV Euroconnector cable (optional)
To AV Euroconnector input connector on TV.
Analog Audio Connection
Note
• Make analog audio connections to a stereo amplifier or receiver.
• Analog audio connections can also be made to a TV or monitor with stereo input jacks.
• When playing DTS-encoded discs, excessive noise may be output from the Analog Audio out jack. This is not a malfunction.
POWER ON/STANDBY
AV SURROUND RECEIVER SR4300
SURROUND
CLEAR
MEMORY
HT-EQ
STANDBY
A/D
PHONES
DVD
TV
6.1CH-IN
F/P
MODE
TUNING/PRESET
S-DIRECT
DSS/VCR2
VCR1
CDR/MD
DIMMER
TAPECDTUNER
MUTE
L R
VOLUME
DOWN
UP
g
LR
VIDEO
Y
CB /
PBCR /
P
REMOTE CONTROL
R
COMPONENT
EXTERNAL
OUTIN
INTERNAL
T V A / V EUROCONNECTOR
OPTICAL
DIGITAL OUTPUT
COAXIAL
AUDIO
AUDIO
OUTPUT
OUTPUT
L
L
R
R
S-VIDEO
VIDEO
OUTPUT
g. Audio cable (optional)
To audio input connectors on AV amplifier or receiver.
7
ENGLISH
DIGITAL OUTPUT
REMOTE CONTROL
OUTPUT
VIDEO
OUTPUT
OUT
V EUROCONNECTOR
DIGITAL OUTPUT
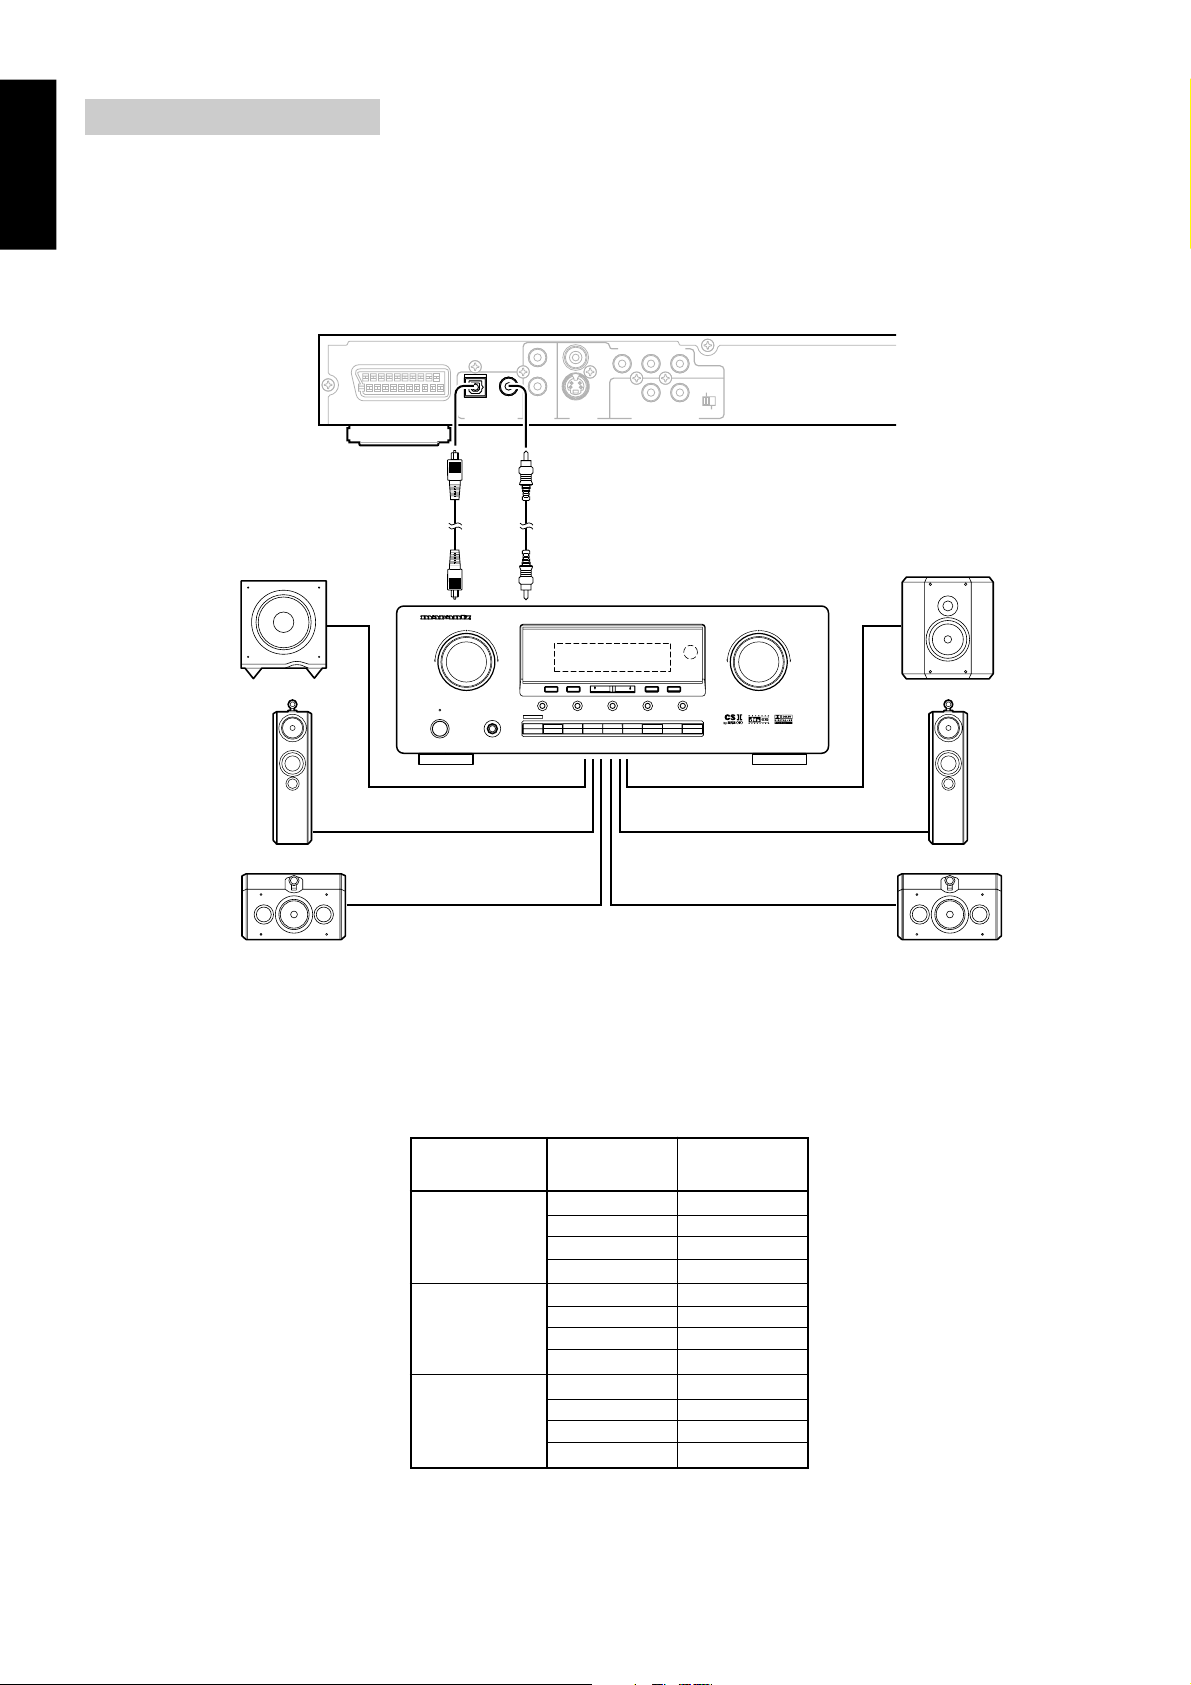
Digital Audio Connection
Note
• When a recorded in a Dolby Digital or DTS is loaded, noise will be output if you have made connections via the digital audio jacks
to a receiver or amplifier that cannot decode a Dolby Digital or DTS digital bitstream.
In this case, be sure to set up the SETUP, Audio setting; Digital out to PCM or OFF.
VIDEO
Y
CB /
PBCR /
P
IN
REMOTE CONTROL
R
COMPONENT
EXTERNAL
OUT
INTERNAL
Center speaker
VOLUME
Subwoofer
T V A / V EUROCONNECTOR
DIGITAL OUTPUT
DIGITAL OUTPUT
SURROUND
COAXIALOPTICAL
COAXIALOPTICAL
AV SURROUND RECEIVER SR4300
L
R
S-VIDEO
AUDIO
VIDEO
OUTPUT
OUTPUT
ih
AV amplifier or receiver with built-in
Dolby Digital and DTS decorder.
Front speaker
(left)
Surround speaker (left)
UP
POWER ON/STANDBY
CLEAR
MEMORY
HT-EQ
STANDBY
A/D
PHONES
DVD
TV
6.1CH-IN
VCR1
F/P
TUNING/PRESET
S-DIRECT
DIMMER
DSS/VCR2
CDR/MD
TAPECDTUNER
DOWN
MODE
MUTE
Surround speaker (right)
h, i. Optical (h) or coaxial (i) audio cable (optional)
To optiacl or coaxial digital input connectors on AV amplifier or receiver.
• DIGITAL OUT SETTING
SETUP menu
Digital Out
OFF
BTSTREAM
PCM
DISC DIGITAL OUT
Dolby Digital
DTS
PCM
MPEG 2
-
-
-
-
Dolby Digital Dolby Digital
DTS DTS
PCM PCM
MPEG 2 MPEG 2
Dolby Digital PCM
DTS DTS
PCM PCM
MPEG 2 PCM
Front speaker
(right)
8
VIDEO
S-VIDEO
COMPONENT
COAXIAL
OPTICAL
INTERNAL
EXTERNAL
INTERNAL
EXTERNAL
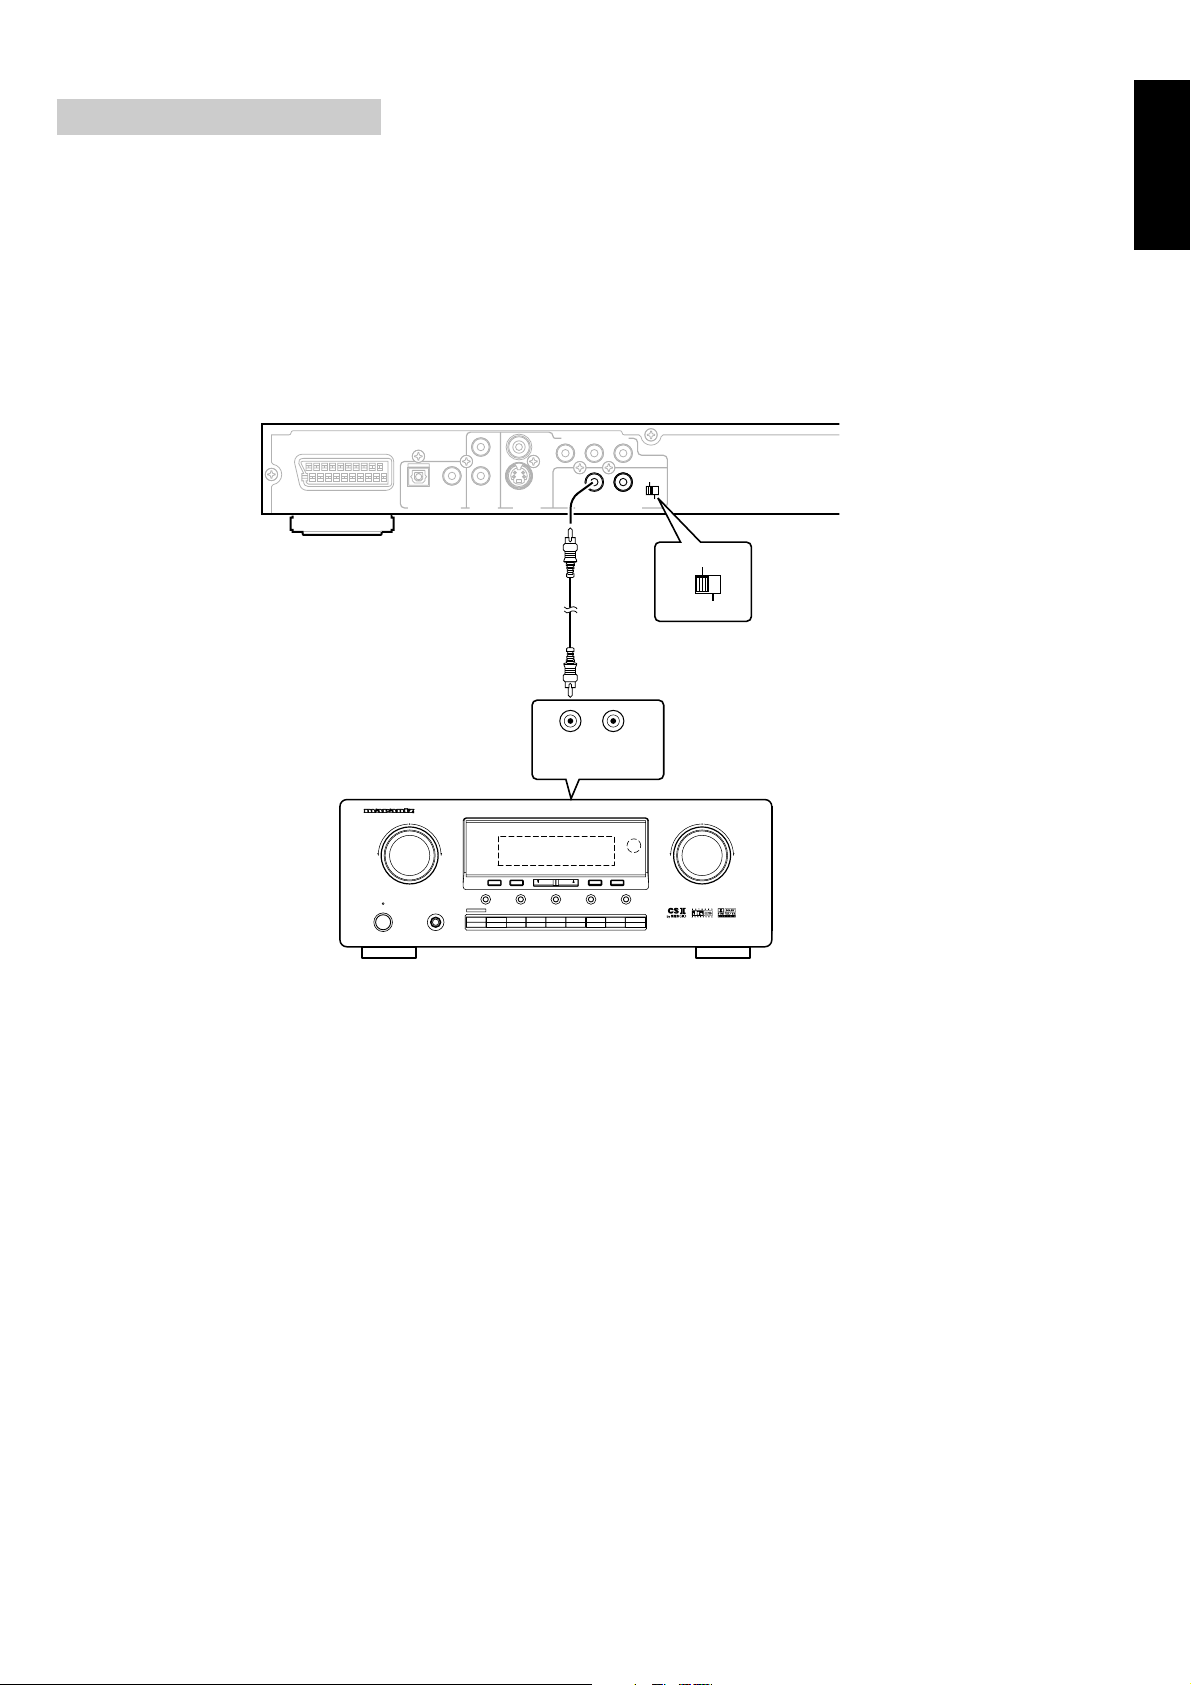
System Control Connection
By connecting this DVD player to another Marantz audio component using a supplied System Control cable, you can remotely
operate the components as a single system.
• When connecting to component with a remote sensor, be sure to connect the REMOTE CONTROL IN jack of this DVD player to
the REMOTE CONTROL OUT jack of the component with the remote sensor.
• When connecting to component which is not equipped with a remote sensor, be sure to connect the component to the REMOTE
CONTROL OUT jack of this DVD player.
Remote switch
• When using this DVD player independently, set this switch to INTERNAL. When using this DVD player in a system with a
Marantz receiver equipped with a remote sensor, set the switch to EXTERNAL.
VIDEO
Y
CB /
PBCR /
P
REMOTE CONTROL
REMOTE CONTROL
R
COMPONENT
EXTERNAL
EXTERNAL
OUTIN
OUTIN
INTERNAL
INTERNAL
EXTERNAL
T V A / V EUROCONNECTOR
OPTICAL
DIGITAL OUTPUT
COAXIAL
AUDIO
OUTPUT
L
R
S-VIDEO
VIDEO
OUTPUT
ENGLISH
j
INTERNAL
OUT IN
REMOTE CONTROL
POWER ON/STANDBY
AV SURROUND RECEIVER SR4300
SURROUND
CLEAR
MEMORY
HT-EQ
STANDBY
A/D
PHONES
DVD
TV
6.1CH-IN
F/P
CDR/MD
DIMMER
TAPECDTUNER
MODE
MUTE
TUNING/PRESET
S-DIRECT
DSS/VCR2
VCR1
VOLUME
DOWN
UP
j. System conrol cable (optional)
To remote control output connector on AV amplifier or receiver.
9

ENGLISH
CONTROLS & DISPLAY
Front Panel
qw retyui
o!0!1 !2!3 !4
q POWER (STANDBY/ON) button
To switch the unit On or into STAND BY when connected to AC
power outlet.
w STAND BY indicator
Lights when Power is STAND BY mode.
e REMOTE SENSOR
Receives a light signal from the remote controller.
r DISC TRAY
To load or unload a disc. Put a disc to be played on here.
t FL DISPLAY
Displays operation status (Refer to Page11 FL Display).
y PLAY button
To play the loaded disc. Press this button to go to the preferred
item when the menu is displayed on the TV screen.
u STOP button
To stop playing. If using a Video CD 2.0, SVCD or CVD with
PBC, this button works as a RETURN function to move to the
previous menu.
oo
o OPEN/CLOSE button
oo
To open or close the disc tray.
00
!
0 FR (Fast Reverse) button
00
To play the disc fast reverse. It can also be used as a Slow
Reverse button when in pause or step mode, and also a left
arrow(
) button when in menu mode.
!1 FF (Fast Forward) button
To play the disc fast forward. It can also be used as a Slow
Forward button when in pause or step mode, and also a right
arrow(
!
To skip back from the current chapter (for DVD) or track (for
VCD or CD). When in menu mode, this button also works as a
down arrow(
button works as the PREV button to move to the previous play
list.
!
To skip forward to the next chapter (for DVD) or track (for VCD
or CD). When in menu mode, this button also works as an up
arrow(
works as the NEXT button to move to the next play list.
) button when in menu mode.
22
2 PREV button
22
) button. If playing a Video CD with PBC, this
33
3 NEXT button
33
) button. If playing a Video CD with PBC, this button
i PAUSE/STEP button
Used to view one frame at a time during play. When you continue pressing this button, it will function continuously. Press
PLAY button for normal play.
10
44
!
4 MENU button
44
To view the general information for the current loaded disc such
as language selection, audio output selection and subtitle language selection and so on.

Display
as dfghj k
ENGLISH
l¡0 ¡1 ¡2
a CDDA/SVCD/DVD/MP3
Illuminates the type of a disc loaded on disc tray.
s TITLE/CHAPTER
Illuminates the information of the TITLE or CHAPTER of the
DVD disc under play.
d PLAY/PAUSE/STEP
Illuminates the current operation mode.
f ROTATION
Rotates when the disc is spinning.
g ANGLE
Indicates the current disc being played is viewed as multi angle.
This function only works for discs having scenes recorded at
different angles.
h SUB-T
Indicates the current disc under play has multi subtitle. This function only works for discs having recordings with multiple subtitle
languages.
j AUDIO
Indicates the current disc under play has multi audio soundtrack
languages. This function only works for discs having recordings
in multiple audio soundtrack languages.
k DTS, LPCM, MPEG, 2
Indicates the audio type of the disc under play is DTS, LPCM,
MPEG or 2.
l SHUFFLE/PROGRAM
Illuminates under shuffle/program mode.
(Video CD with PBC off or CDDA only)
¡0 REPEAT T, C, 1, A-B, ALL
Illuminates when the current play mode is under repeat title,
chapter, track (single), A-B, disc (all) respectively.
¡1 TIME
Indicates time information and sometimes system information
like STOP, MENU and so on.
¡2 L, C, R, LFE, LS, S, RS
Indicates the audio channel information of the disc under play.
For DVD discs having the Dolby Digital audio.
11

ENGLISH
VIDEO
S-VIDEO
COMPONENT
DIGITAL OUTPUT
COAXIAL
OPTICAL
OUTPUT
OUTPUT
INTERNAL
Rear Panel
zxc v b n
VIDEO
Y
CB /
T V A / V EUROCONNECTOR
OPTICAL
DIGITAL OUTPUT
COAXIAL
AUDIO
OUTPUT
L
R
S-VIDEO
VIDEO
OUTPUT
PBCR /
REMOTE CONTROL
m ,. ⁄0
P
R
COMPONENT
EXTERNAL
OUTIN
INTERNAL
SERIAL NO.
z DIGITAL OUT (OPTICAL)
Connects digital audio under play mode into an AV amplifier or
a receiver equipped with digital audio decoder for you to enjoy
the theatre-quality sound in your home.
Note
Remove the dust protection cap from the optical digital audio output
•
connector and connect the cable firmly so that the configurations of
both the cable and connector match.
• Do not connect to the digital audio input of an amplifier that does
not have Dolby Digital and dts decoder when you set the digital out
option of setup information to BITSTREAM.
x DIGITAL OUT (COAXIAL)
Connects digital audio under play mode into an AV amplifier or
a receiver equipped with digital audio decoder for you to enjoy
the theatre-quality sound in your home.
c AUDIO OUT
Analogue 2 channel (L/R) audio output in order to connect to a
TV or stereo amplifier.
v VIDEO OUT
Connects composite video signal to Composite Video input connector of TV or monitor to achieve high fidelity colour reproduction.
b COMPONENT VIDEO OUT (480i or 480p)
Connects component video signal to component video input
connector on TV, if your TV supports interlace video input (480i)
or Progressive video input (480p).
m AV EUROCONNECTOR OUT
Connects to TV or monitor equipped with EUROCONNECTOR
input.
, S-VIDEO OUT
Connects to TV or monitor equipped with S-VIDEO input. In
order to achieve a sharper and cleaner picture than that when
connected via VIDEO OUT (composite video).
. System Control in / out jack
Connect this DVD player to another Marantz Component, to
operate the components as a single system (page 9).
⁄0 System Control external / internal switch
When using this DVD player independently, set this switch to
“INTERNAL” (page 9).
n AC in power cord connection terminal
Creates POWER between wall outlet and the unit.
12
 Loading...