

Page 1
EG
EG241A
EG321A EG321AE
EG441A EG441AE
EG601A EG601AE
EG671A EG671AE
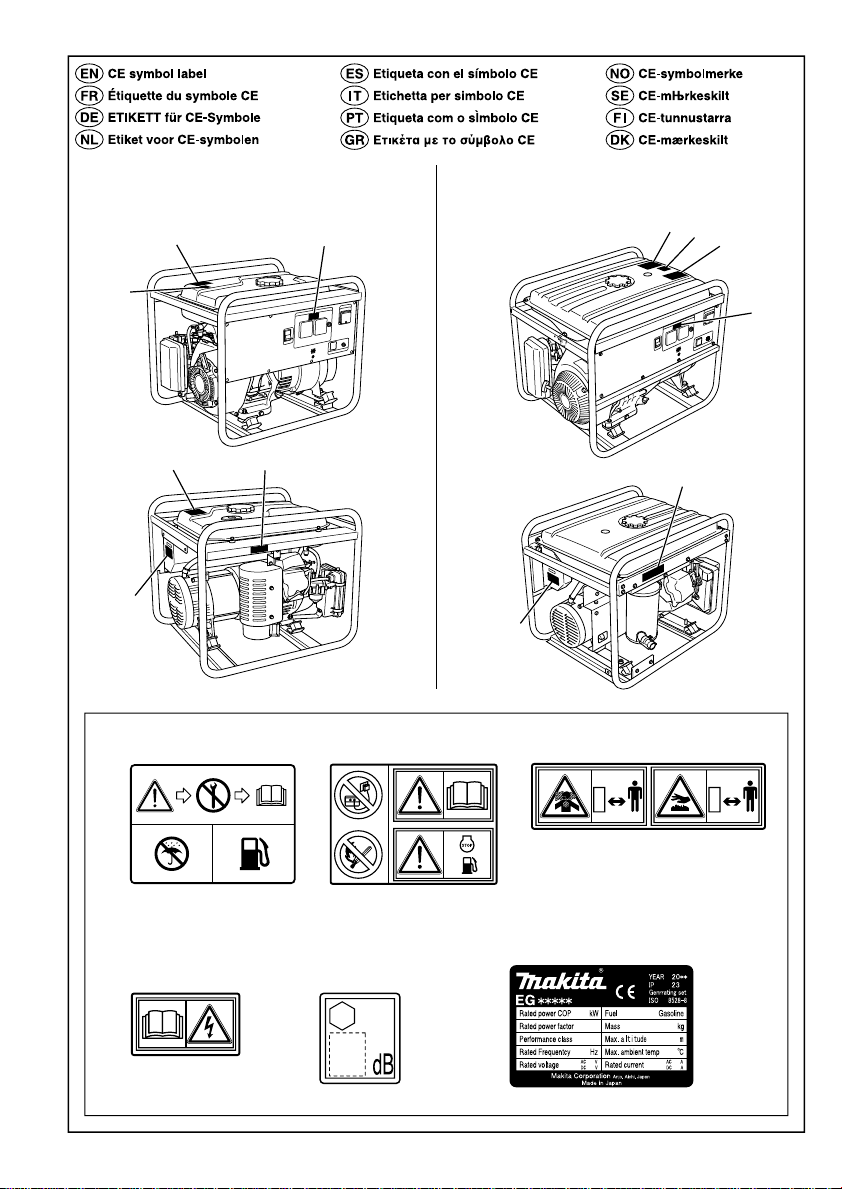
EN
Original
EN
FR
DE
NL
ES
IT
PT
GR
NO
SE
FI
DK
RU
3ZZ9990474
RU
Page 2
EG241A, EG321A, EG321AE
①
EG441A, EG441AE
❹ ❺
❸
❻
①
❶
❷
❸
❹
④
❶
❷
❶
❾ ❿
EG601A, EG601AE
②
EG671A, EG671AE
❹ ❺
❸
❷
❶
❾
❿
⓯
⓮
②
❼❽
❶
❷ ❸
⑤
❷
⓫
③
⓬
EG241A, EG321A, EG321AE
EG441A, EG441AE
⓭
❶
1
❷
EG601A, EG601AE
EG671A, EG671AE
❻
E F
⑥
❶
❷
❶
⑦
⓫
❼❽
❶
❸
❿
❾
❻
❽
⓯
⓮
⓬
⓭
❷
❺
❾
❹
❼
❾
❾
❿
❿
❾
Page 3

[appendix]
Instructions for treatment as waste
When disposing this product ,make sure that the fuel and oil should be drained from the engine ,and
submit to local regulations.
[Annexe]
Instructions pour le traitement des déchets
Quand ce produit doit être mis au rebut, s'assurer que le carburant et l’huile ont été vidangés
correctement à partir du moteur, et que les règlements locaux sont bien observés.
[Anhang]
Anweisungen für die Behandlung als Abfall
Bei der Entsorgung dieses Produkts sicherstellen, dass der Kraftstoff und das Öl aus dem Motor
abgelassen wird und unter Befolgung aller örtlich gültigen Bestimmungen entsorgt wird.
[aanhangsel]
Instructies voor afvalverwerking
Wanneer u dit product weggooit, moet u ervoor zorgen dat alle brandstof en olie uit de motor
verwijderd is en dient u zich te houden aan de ter plaatse geldende regelgeving.
[anexo]
Instrucciones para el tratamiento de los residuos
Cuando este producto debe ponerse al rechazo, asegurarse de que el combustible y el aceite
se purgaron correctamente a partir del motor, y que se observan bien los reglamentos locales.
[appendix]
Istruzioni per lo smaltimento
Per lo smaltimento di questo prodotto, assicurarsi di aspirare il carburante e l'olio dal motore,
in conformità con le regolamentazioni locali.
[apêndice]
Instruções para tratamento como resíduo
Quando eliminar este produto, assegure-se de que o combustível e o óleo são escoados do motor
e sujeitos às regulamentações locais.
[vedlegg]
Instruksjoner for behandling av avfall
Når dette produktet kasseres, må man påse at drivstoffet og oljen tømmes fra motoren og behandles
ifølge lokale renovasjonsforskrifter.
[appendix]
Anvisningar för avfallshantering
När denna produkt ska kasseras, se då till att bränslet och oljan töms ur motorn, och att lokala
bestämmelser efterföljs.
[LIITE]
Ohjeita jätteiden käsittelemisestä
Hävittäessäsi tätä tuotetta muista, että polttoaine ja öljy täytyy tyhjentää moottorista.
Muista myös noudattaa paikallisia säädöksiä.
[tillæg]
Anvisninger for behanling af affald
Når du bortskaffer dette produkt, bedes du sikre dig, at motoren tømmes for brændstof og olie
og afhændes i henhold til lokale regler.
Page 4
①
❶
❷
⑥
⑤
❶
❷
❸
②
③
④
❸
❷
❶
❶
❶
❷
❷
①
②
③
❶
❶
⑥
❶
V
⑦
❶
⑧
❷
❷
❷
❷
❸
❷
❶
⑤
❶
❷
❸
⑨
④
❶
Page 5
①
❶
⑤
0.6 ~ 0.7 mm
⑧
❶
❷
②
EG241A, EG321A, EG321AE
❷
❶
❸
③
EG441A, EG441AE
❷
❶
❸
④
EG601A, EG601AE
EG671A, EG671AE
❷
❶
❹
⑥
⑦
❶
❷
10~11mm
5 mm
①
❺
❻
❸
❹
❶
❸
Page 6
EG241A, EG321A, EG321AE
EG441A, EG441AE
①
④
EG601A, EG601AE
EG671A, EG671AE
①
⑤
②
⑤
②
③
⑥
①②
④
③
⑥
③
④ ⑤⑥
L
WA
Page 7
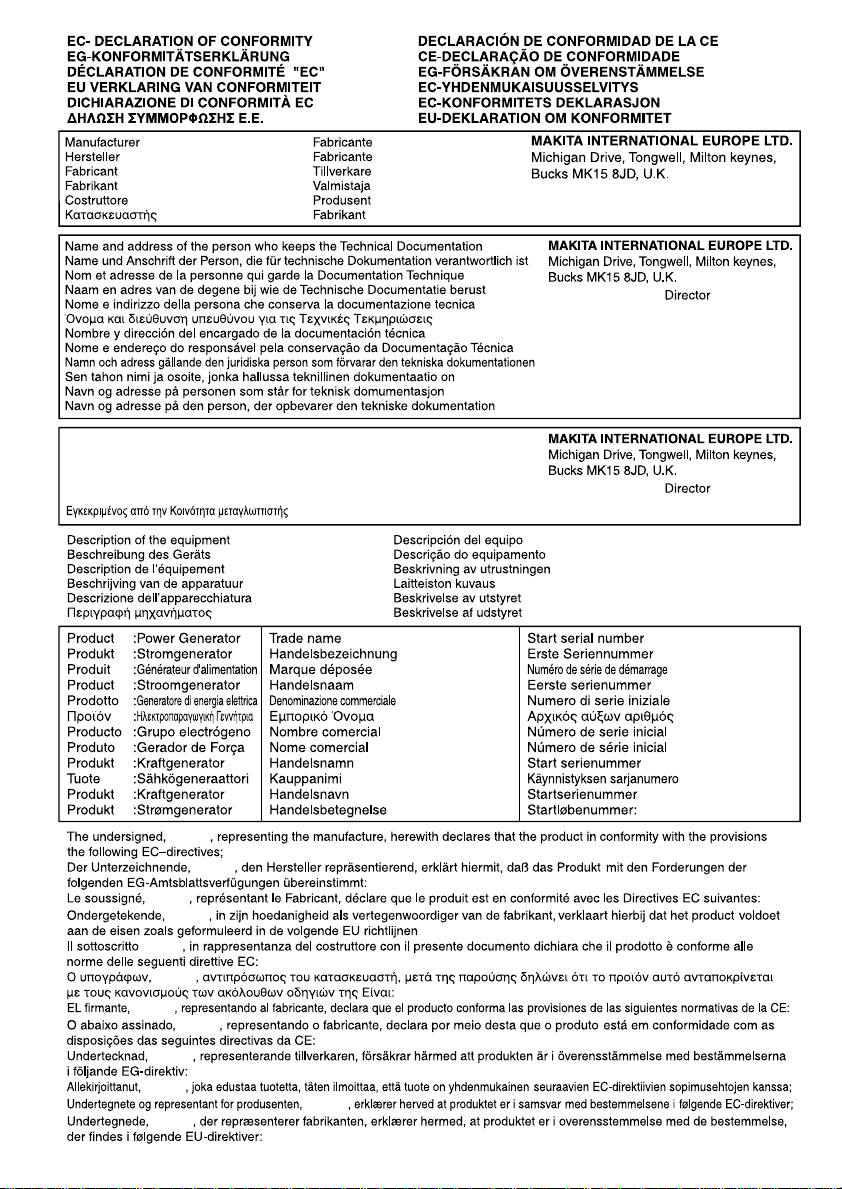
Tomoyasu Kato
Authorized Compiler In The Community
Autorisiertes Montageunternehmen im Gebiet
Compilateur autorisé dans la Communauté
Erkende vertegenwoordiger in het rayon
Compilatore autorizzato nella comunità
T. Kato
T. Kato
T. Kato
T. Kato
T. Kato
T. Kato
T. Kato
T. Kato
T. Kato
T. Kato
T. Kato
T. Kato
Compilador autorizado en la Comunidad
Compilador autorizado na comunidade
Auktoriserad sammanställare inom gemenskapen
Paikallinen edustaja
Autorisert kompilator i EU
Autoriseret computer i samfundet
:EG241A
:EG321A / EG321AE
:EG441A / EG441AE
:EG601A / EG601AE
:EG671A / EG671AE
Tomoyasu Kato
:RGM300-1010001
:RGM380-1010001
:RGM510-1010001
:RGM710-1010001
:RGM780-1010001
Page 8
2004/108/EC
2006/42/EC (98/37/EC)
2006/95/EC
0470 NEMKO AS
N-0314 OSLO
Norway
974404532
EG241A 95.1 dB
EG321A / EG321AE 94.9 dB
EG441A / EG441AE 95.3 dB
EG601A / EG601AE 95.9 dB
EG671A / EG671AE 97.1 dB
EG241A 95 dB
EG321A / EG321AE 96 dB
EG441A / EG441AE 97 dB
EG601A / EG601AE 97 dB
EG671A / EG671AE 97 dB
V
I
Tomoyasu Kato
Kitamoto, JAPAN
Kitamoto, JAPAN
Kitamoto, JAPAN
Kitamoto, JAPAN
Kitamoto, JAPAN
Kitamoto, JAPAN
Kitamoto, JAPAN
Kitamoto, JAPAN
Kitamoto, JAPAN
Kitamoto, JAPAN
Kitamoto, JAPAN
Kitamoto, JAPAN
EN 12601(*1)
EN 55012
EN 55014-1
EN 55014-2
CISPR 12
CISPR 14-1
CISPR 14-2
*1.Water seeping tests is based on ISO8528-6-6-1-2.
*1.Wasseraustrittsprüfung basierend auf ISO8528-6-6-1-2.
Le test d’infiltration d’eau se base sur la Norme ISO8528-6-6-1-2.
*1.
*1.
Waterlekkagetests uitgevoerd op basis van ISO8528-6-6-1-2.
*1.
Test di immersione in acqua basato su standard ISO8528-6-6-1-2.
*1.
La prueba de infiltración de agua se basa en la Norma ISO8528-6-6-1-2.
*1.
*1.
Os testes da água de infiltração baseiam-se na norma ISO 8528-6-6-1-2.
*1.
Vattenläcktest baserat på ISO8528-6-6-1-2.
*1.
Vedenvuotokokeet perustuvat ISO8528-6-6-1-2:een.
*1.
Vannsivingstester er basert på ISO8528-6-6-1-2.
*1.
Vandsivningstests er baseret på ISO8528-6-6-1-2.
January 30. 2009
30. Januar 2009
30. Janvier 2009
30. januari 2009
30. gennaio 2009
30. 2009
30. enero 2009
30. Janeiro 2009
ISO 3744
ISO 8528
EN 61000-4-2
EN 61000-4-3
EN 61000-4-4
EN 61000-4-5
EN 61000-4-6
EN 61000-6-1
30. januari 2009
30. tammikuu 2009
30. januar 2009
30. januar 2009
DC6877
Page 9
FOREWORD
Thank you very much for purchasing a MAKITA GENERATOR.
This manual covers operation and maintenance of the MAKITA GENERATOR.
This MAKITA GENERATOR can be used for general electrical equipments, appliances, lamps,
tools as an AC power source. With regards to DC application, the terminals are used only for
charging 12 volt battery.
Never use this generator for any other purposes.
Please take a moment to familiarize yourself with the proper operation and maintenance
procedures in order to maximize the safe and effi cient use of this product.
Keep this owner’s manual at hand, so that you can refer to it at any time.
Due to constant efforts to improve our products, certain procedures and specifi cations are
subject to change without notice.
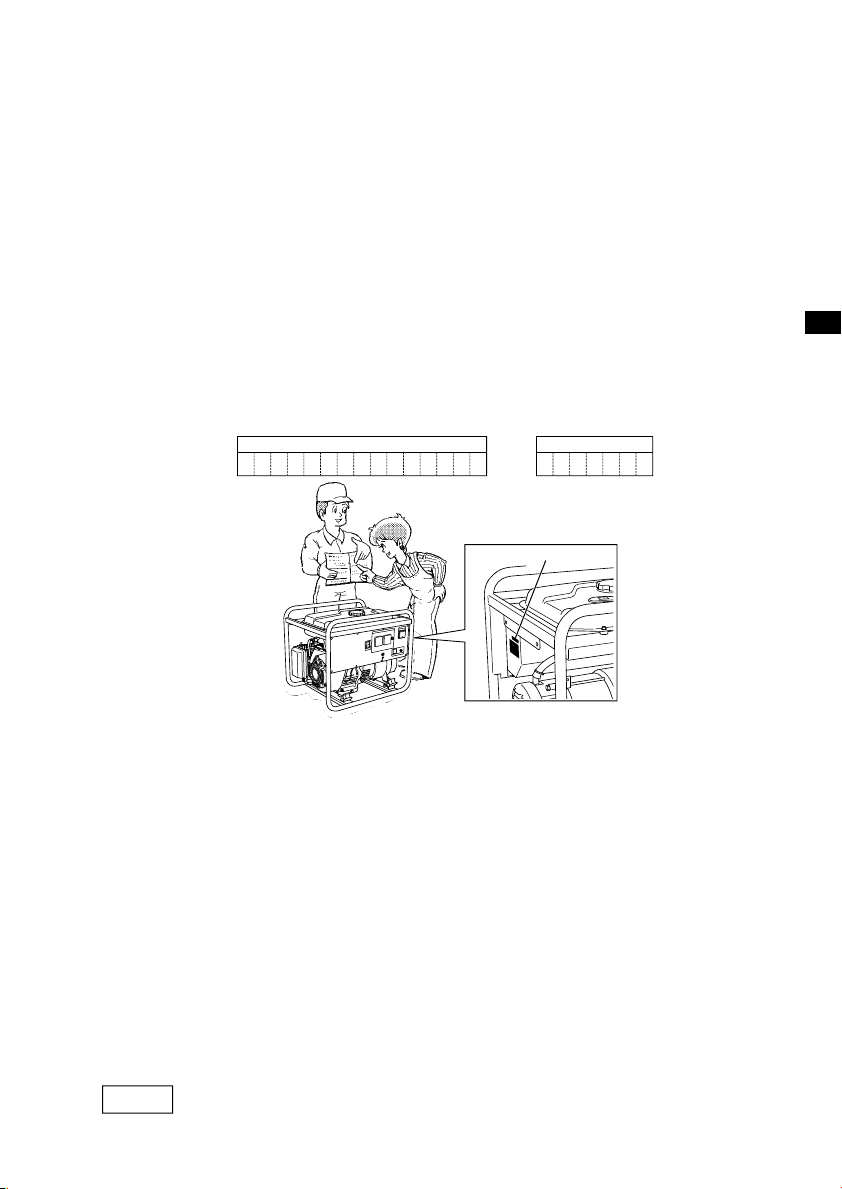
When ordering spare parts, always give us the MODEL, PRODUCTION NUMBER (PROD No.)
and SERIAL NUMBER (SER No.) of your Product.
Please fi ll in the following blanks after checking the production number on your product.
(Location of label is different depending on the product model.)
PROD No. SER No.
PROD No. / SER No. (Label
)
EN
FR
DE
NL
ES
IT
PT
GR
NO
SE
FI
DK
RU
CONTENTS
1. SAFETY PRECAUTIONS . . . . . . . . . . . . . . . . . . . . . . . . . . . . . . . . . . . . . . . . . . . . . . .2
2. COMPONENTS. . . . . . . . . . . . . . . . . . . . . . . . . . . . . . . . . . . . . . . . . . . . . . . . . . . . . . . 5
3. PRE-OPERATION CHECKS. . . . . . . . . . . . . . . . . . . . . . . . . . . . . . . . . . . . . . . . . . . . . 5
4.
OPERATING PROCEDURES . . . . . . . . . . . . . . . . . . . . . . . . . . . . . . . . . . . . . . . . . . . . . . .7
5. WATTAGE INFORMATION. . . . . . . . . . . . . . . . . . . . . . . . . . . . . . . . . . . . . . . . . . . . .11
6. SPARK ARRESTER . . . . . . . . . . . . . . . . . . . . . . . . . . . . . . . . . . . . . . . . . . . . . . . . . .12
7. MAINTENANCE SCHEDULE . . . . . . . . . . . . . . . . . . . . . . . . . . . . . . . . . . . . . . . . . . .13
8. ”HOW-TO” MAINTENANCE . . . . . . . . . . . . . . . . . . . . . . . . . . . . . . . . . . . . . . . . . . . .14
9. PERIODIC OPERATION AND INSPECTION . . . . . . . . . . . . . . . . . . . . . . . . . . . . . . .15
10. TRANSPORTING . . . . . . . . . . . . . . . . . . . . . . . . . . . . . . . . . . . . . . . . . . . . . . . . . . .15
11. PREPARATION FOR STORAGE . . . . . . . . . . . . . . . . . . . . . . . . . . . . . . . . . . . . . . .16
12. TROUBLESHOOTING . . . . . . . . . . . . . . . . . . . . . . . . . . . . . . . . . . . . . . . . . . . . . . .16
13. SPECIFICATIONS. . . . . . . . . . . . . . . . . . . . . . . . . . . . . . . . . . . . . . . . . . . . . . . . . . .17
14. WIRING DIAGRAM . . . . . . . . . . . . . . . . . . . . . . . . . . . . . . . . . . . . . . . . . . . . . . . . . .18
15. OPTIONAL PARTS . . . . . . . . . . . . . . . . . . . . . . . . . . . . . . . . . . . . . . . . . . . . . . . . . .20
NOTE
Please refer to the illustrations on the back page of the front
cover or back cover for Fig. to indicated in the sentence.
Page
1
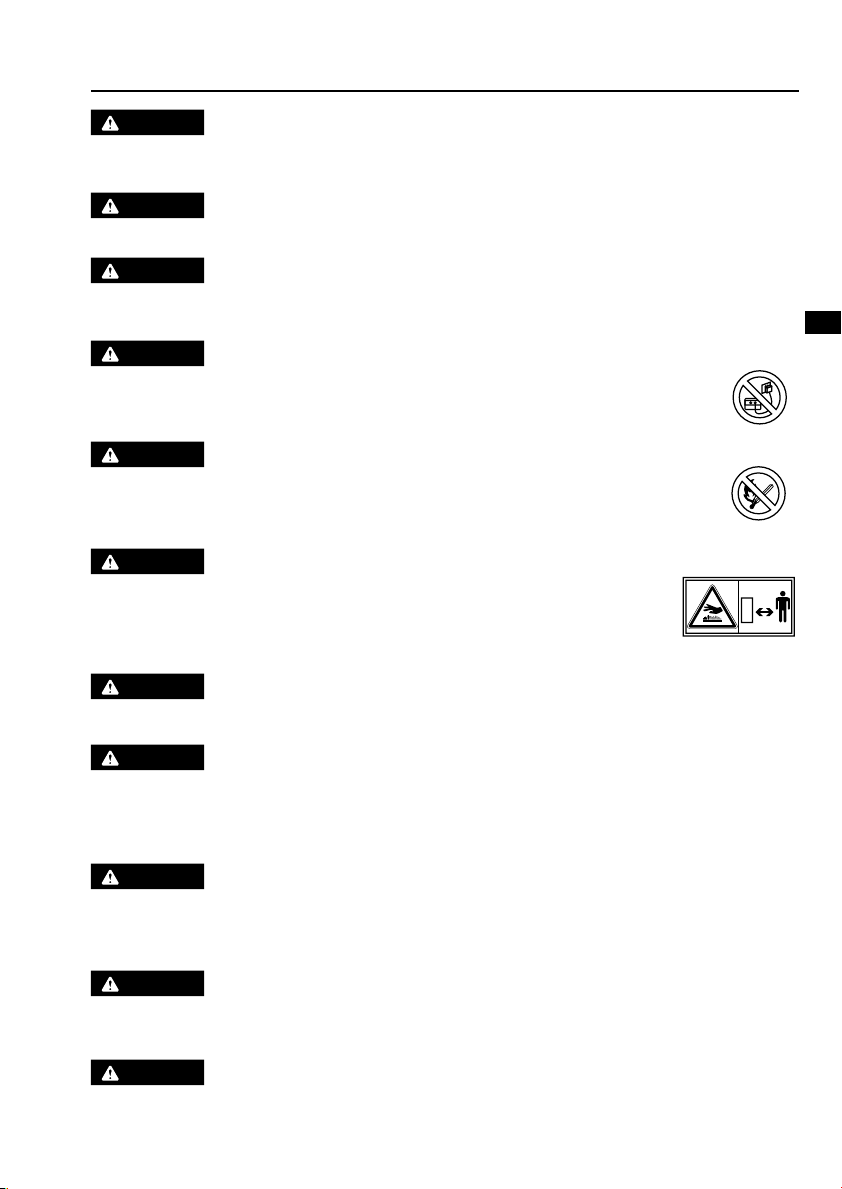
Page 10
1. SAFETY PRECAUTIONS
Please make sure you review each precaution carefully.
Pay special attention to statement preceded by the following words.
WARNING
CAUTION
WARNING
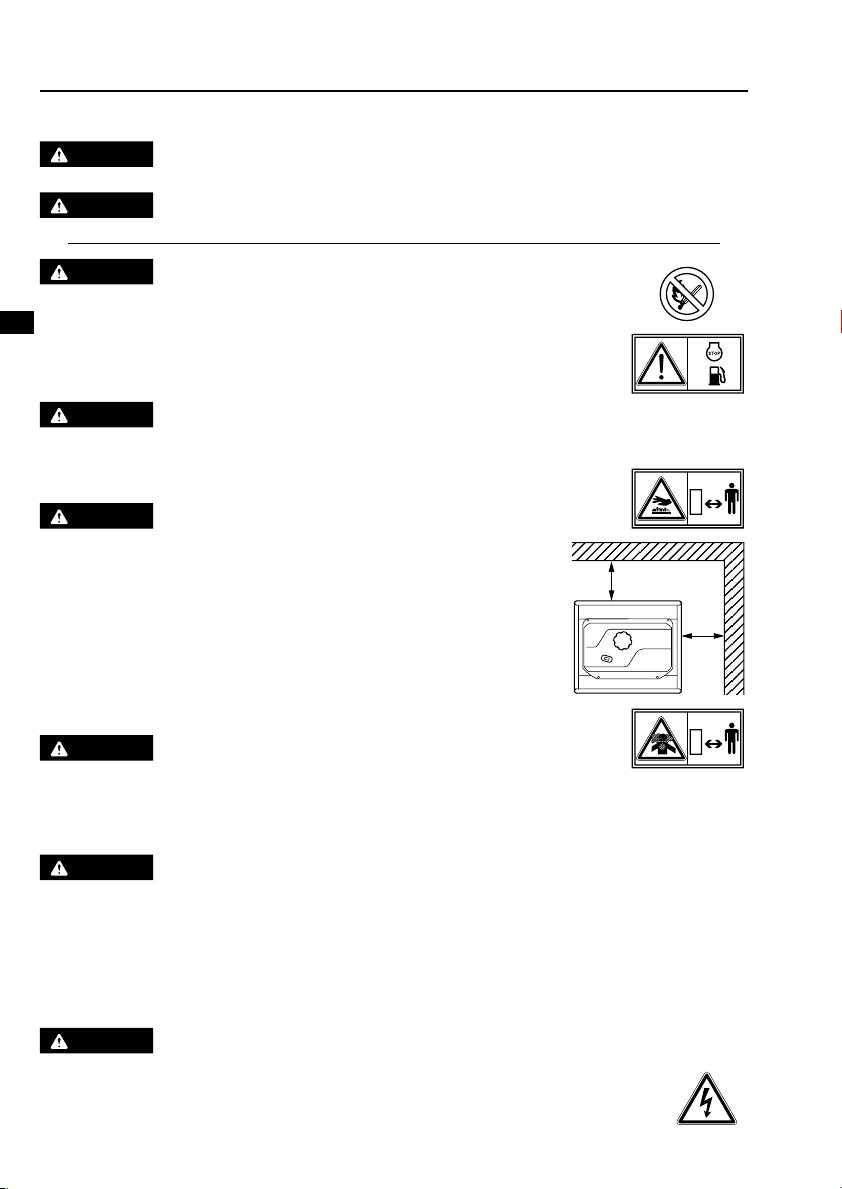
Do not operate the generator near gasoline or gaseous fuel because of the potential danger
of explosion or fi re.
EN
Do not fi ll the fuel tank with fuel while the engine is running. Do not smoke or use open
fl ame near the fuel tank. Be careful not to spill fuel during refueling.
FR
If fuel is spilt, wipe it off and let dry before starting the engine.
DE
NL
ES
WARNING
Do not place in fl ammables near the generator.
Be careful not to place fuel, matches, gunpowder, oily cloths, straw, trash, or any
IT
other in fl ammables near the generator.
PT
GR
NO
SE
DK
RU
WARNING
Do not operate the generator inside a room, cave, tunnel, or other insuffi ciently
ventilated area.
Always operate it in a well-ventilated area, otherwise the engine may become
overheated, and the poisonous carbon monoxide gas, an odorless, colorless,
FI
poison gas, contained in the exhaust gas will endanger human lives.
Operate generator only outdoors and far from open windows, doors, ventilation
intakes and other openings.
Keep the generator at least 1 meter (3 feet) away , including overhead, from any
structure or building use.
“WARNING” indicates a strong possibility of severe personal injury or loss of life if
instructions are not followed.
“CAUTION” indicates a possibility of personal injury or equipment damage if
instructions are not followed.
1m
1m
WARNING
Do not enclose the generator nor cover it with a box.
The generator has a built-in forced air cooling system, and may become overheated if it is enclosed.
If generator has been covered to protect it from the weather during non use, be sure to remove it and keep it well
away from the area during generator use.
WARNING
Operate the generator on a level surface.
It is not necessary to prepare a special foundation for the generator.
However, the generator will vibrate on an irregular surface, so choose a level place without surface irregularities.
If the generator is tilted or moved during operation, fuel may spill and / or the generator may tip over, causing a
hazardous situation.
Proper lubrication cannot be expected if the generator is operated on a steep incline or slope. In such a case,
piston seizure may occur even if the oil is above the upper level.
WARNING
Pay attention to the wiring or extension cords from the generator to the connected device.
If the wire is under the generator or in contact with a vibrating part, it may break and possibly
cause a fi re, generator burnout, or electric shock hazard.
Replace damaged or worn cords immediately.
2
Page 11
WARNING
Do not operate in rain, in wet or damp conditions, or with wet hands.
The operator may suffer severe electric shock if the generator is wet due to rain or snow.
WARNING
If wet, wipe and dry it well before starting. Do not pour water directly over the generator, nor wash it with water.
WARNING
Be extremely careful that all necessary electrical grounding procedures are followed during each and every use.
Failure to do so can be fatal.
WARNING
Do not contact the generator to a commercial power line. Connection to a commercial power line
may short circuit the generator and ruin it or cause electric shock hazard.
Use the transfer switch for connecting to domestic circuit.
WARNING
No smoking while handling the battery. The battery emits fl ammable hydrogen gas,
which can explode if exposed to electric arcing or open fl ame.
Keep the area well-ventilated and keep open fl ames/sparks away when handling the battery.
WARNING
Engine becomes extremely hot during and for some time after operation.
Keep combustible materials well away from generator area.
Be very careful not to touch any parts of the hot engine especially the muffl er area or
serious burns may result.
WARNING
Keep children and all bystanders at a safe distance from work areas.
EN
FR
DE
NL
ES
IT
PT
GR
NO
SE
FI
DK
RU
WARNING
It is absolutely essential that you know the safe and proper use of the power tool or appliance that you intend to
use. All operators must read, understand and follow the tool/appliance owners manual. Tool and appliance
applications and limitations must be understood. Follow all directions given on labels and warnings. Keep all
instruction manuals and literature in a safe place for future reference.
WARNING
Use only “LISTED” extension cords.
When a tool or appliance is used outdoors, use only extension cords marked “For Outdoor Use”. Extension cords,
when not in use should be stored in a dry and well ventilated area.
WARNING
Always switch off generator’s AC circuit breaker and disconnect tools or appliances when not in use, before
servicing, adjusting, or installing accessories and attachments.
CAUTION
Make sure the engine is stopped before starting any maintenance, servicing or repair.
Make sure maintenance and repair of the generator set are performed by properly trained personnel only.
3
Page 12
EN
FR
DE
NL
ES
IT
PT
GR
NO
SE
FI
DK
RU
4
Page 13
2. COMPONENTS 3. PRE-OPERATION CHECKS
(See Fig. ) (See Fig. )
NOTE
Please refer to the illustrations on the back page
of the front cover or back cover for Fig. to
indicated in the sentence.
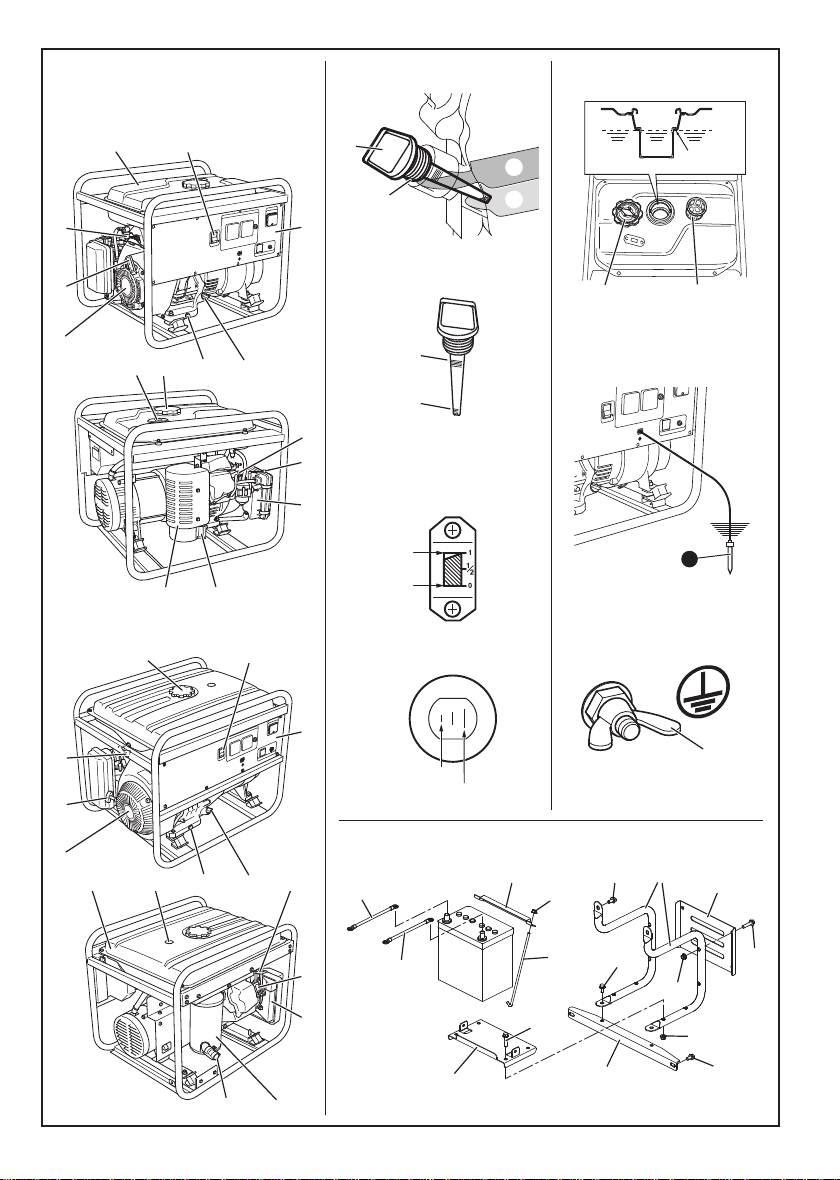
EG241A, EG321A, EG321AE,
EG441A, EG441AE (See Fig. -①)
❶ RECOIL STARTER
❷ RECOIL STARTER HANDLE
❸ FUEL STRAINER (FUEL VALVE)
❹ FUEL TANK
❺ ENGINE SWITCH
❻ CONTROL PANEL
❼ OIL GAUGE (OIL FILLER)
❽ OIL DRAIN PLUG
❾ FUEL GAUGE
❿ TANK CAP
⓫ SPARK PLUG CAP
⓬ CHOKE LEVER
⓭ AIR CLEANER
⓮ EXHAUST OUTLET
⓯ MUFFLER COVER
EG601A, EG601AE, EG671A, EG671AE
(See Fig. -②)
❶ RECOIL STARTER
❷ RECOIL STARTER HANDLE
❸ FUEL STRAINER (FUEL VALVE)
❹ TANK CAP
❺ ENGINE SWITCH
❻ CONTROL PANEL
❼ OIL GAUGE (OIL FILLER)
❽ OIL DRAIN PLUG
❾ FUEL TANK
❿ FUEL GAUGE
⓫ CHOKE LEVER
⓬ SPARK PLUG CAP
⓭ AIR CLEANER
⓮ MUFFLER
⓯ EXHAUST OUTLET
1. CHECK ENGINE OIL (See Fig. -①,②)
Before checking or refi lling oil, be sure generator is
located on stable and level surface with engine
stopped.
■
Remove oil fi ller cap and check the engine oil level.
(See Fig.-①)
❶ OIL GAUGE
❷ OIL FILLER
❸ UPPER LEVEL
❹ LOWER LEVEL
■
If oil level is below the lower level line, refi ll with
suitable oil (see table) to upper level line. Do not
screw in the oil fi ller cap when checking oil level.
(See Fig.-②)
❶ UPPER LEVEL
❷ LOWER LEVEL
■
Change oil if contaminated.
(See “How-To” Maintenance.)
Oil capacity (Upper level) : (L)
EG241A . . . . . . . . . . . . . . . . . . . . . . . . 0.6
EG321A, EG321AE . . . . . . . . . . . . . . 0.6
EG441A, EG441AE . . . . . . . . . . . . . . 1.0
EG601A, EG601AE . . . . . . . . . . . . . . 1.2
EG671A, EG671AE . . . . . . . . . . . . . . 1.2
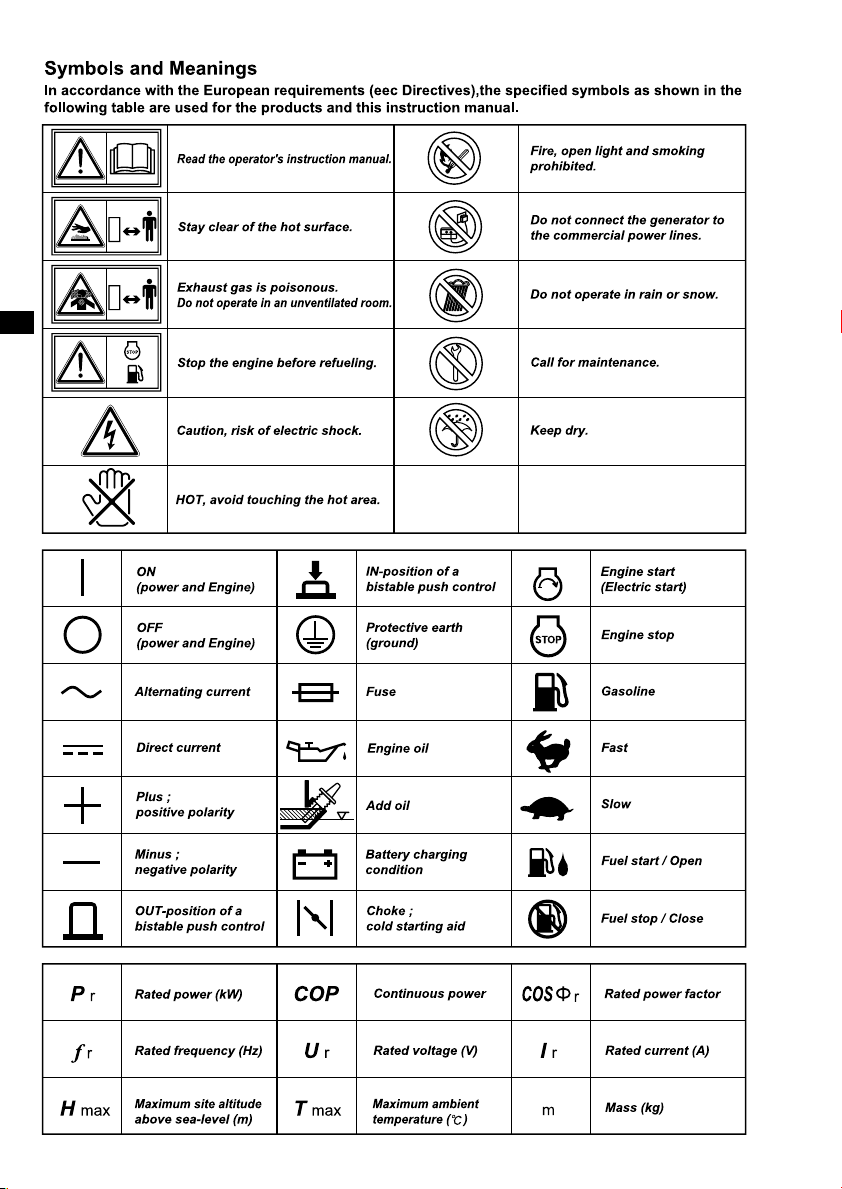
Recommended engine oil:
Use 4-stroke automotive detergent oil of API service class
SE or highergrade (SG, SH or SJ is recommended).
SAE 10W-30 or 10W-40 is recommended for general,
all-temperature use.
If single viscosity oil is used, select the appropriate
viscosity for the average temperature in your area.
5W
10W
Single grade
Multigrade
Ambient
temperature
20W
10W
#20
-
10W
#30
#40
30
-
40
EN
FR
DE
NL
ES
IT
PT
GR
NO
SE
FI
DK
RU
5
Page 14
2. CHECK ENGINE FUEL (See Fig. -③,④)
WARNING
Do not refuel while smoking or near open
fl ame or other such potential fi re hazards.
Otherwise fi re accident may occur.
■
Check fuel level at fuel level gauge (See Fig.-③)
■
If fuel level is low, refi ll with unleaded automotive
gasoline.
EN
■
Be sure to use the fuel fi lter screen on the fuel fi lter
neck. (See Fig.-④)
FR
❶ LEVEL
DE
❷ FUEL TANK CAP
NL
❸ FUEL FILTER SCREEN
ES
IT
Fuel Amount
PT
GR
NO
SE
up to “LEVEL” position : (L)
EG241A . . . . . . . . . . . . . . . . . . . . . . . 12.8
EG321A, EG321AE . . . . . . . . . . . . . 12.8
EG441A, EG441AE . . . . . . . . . . . . . 12.8
EG601A, EG601AE . . . . . . . . . . . . . 22.0
EG671A, EG671AE . . . . . . . . . . . . . 22.0
FI
DK
RU
Make sure you review each warning in order to
prevent fi re hazard.
■
Do not refi ll tank while engine is running or
hot.
■
Close fuel cock before refueling with fuel.
■
Be careful not to admit dust, dirt, water or
other foreign objects Into fuel.
■
Wipe off spilt fuel thoroughly before starting
engine.
■
Keep open fl ames away.
WARNING
4. CHECK GENERATOR SURROUNDINGS
WARNING
Make sure you review each warning in order to
prevent fi re hazard.
■
Keep area clear of in fl ammables or other
hazardous materials.
■
Keep generator at least 3 feet (1 meter) away
from buildings or other structures.
■
Only operate generator in a dry, well
ventilated area.
■
Keep exhaust pipe clear of foreign objects.
■
Keep generator away from open fl ame. No
smoking!
■
Keep generator on a stable and level surface.
■
Do not block generator air vents with paper
or other material.
5. GROUNDING THE GENERATOR
■
To ground the generator to the earth, connect the
grounding lug of the generator to the grounding
spike driven into the earth or to the conductor
which has been already grounded to the earth.
(See Fig.-⑤)
❶ GROUNDING SPIKE
■
If such grounding conductor or grounding electrode
is unavailable, connect the grounding lug of the
generator to the grounding terminal of the using
electric tool or appliance. (See Fig.-⑥)
❶ GROUND TERMINAL
6. BATTERY INSTALLATION (See Fig. -⑦)
(Electric Starter Model)
Recommended Battery
Type ; Lead-acid battery
Capacity
(Ah/5hr) ; 12V-21AH or more
Size ;
Less than 185(L) x 125(W) x 160(H) mm
3. CHECKING COMPONENT PARTS
Check following items before starting engine:
■
Fuel leakage from fuel hose, etc.
■
Bolts and nuts for looseness.
■
Components for damage or breakage.
■
Generator not resting on or against any adjacent
wiring.
6
❶ EARTH CABLE(BLACK)
❷ STARTER CABLE(RED)
❸ SETTING PLATE
❹ SETTING BOLT
❺ BATTERY PLATE
❻ BATTERY FRAME #1
❼ BATTERY FRAME #2
❽ PROTECTION PLATE
❾ BOLT
❿ NUT
Page 15
WARNING
Death, personal injury and/or property damage may
occur unless instructions are followed carefully.
■
Use battery of recommended capacity.
■
Turn the starter switch to the “ 〇 ” (STOP)
position when mounting or dismounting
battery. When mounting battery, connect the
positive (+) cable fi rst and then the negative
(-) cable to the battery. Be careful not to
short battery cables. When dismounting
battery, disconnect negative (-) cable fi rst.
RED CABLE : To positive (+) terminal
BLACK CABLE : To negative (-) terminal
■
Should the connection be made in incorrect
manner, the generator will be broken.
■
Tighten bolts and nuts on terminals securely
so they will not be loosened by vibration.
■
Disconnect battery cables when charging
battery.
4.
OPERATING PROCEDURES
(See Fig. )
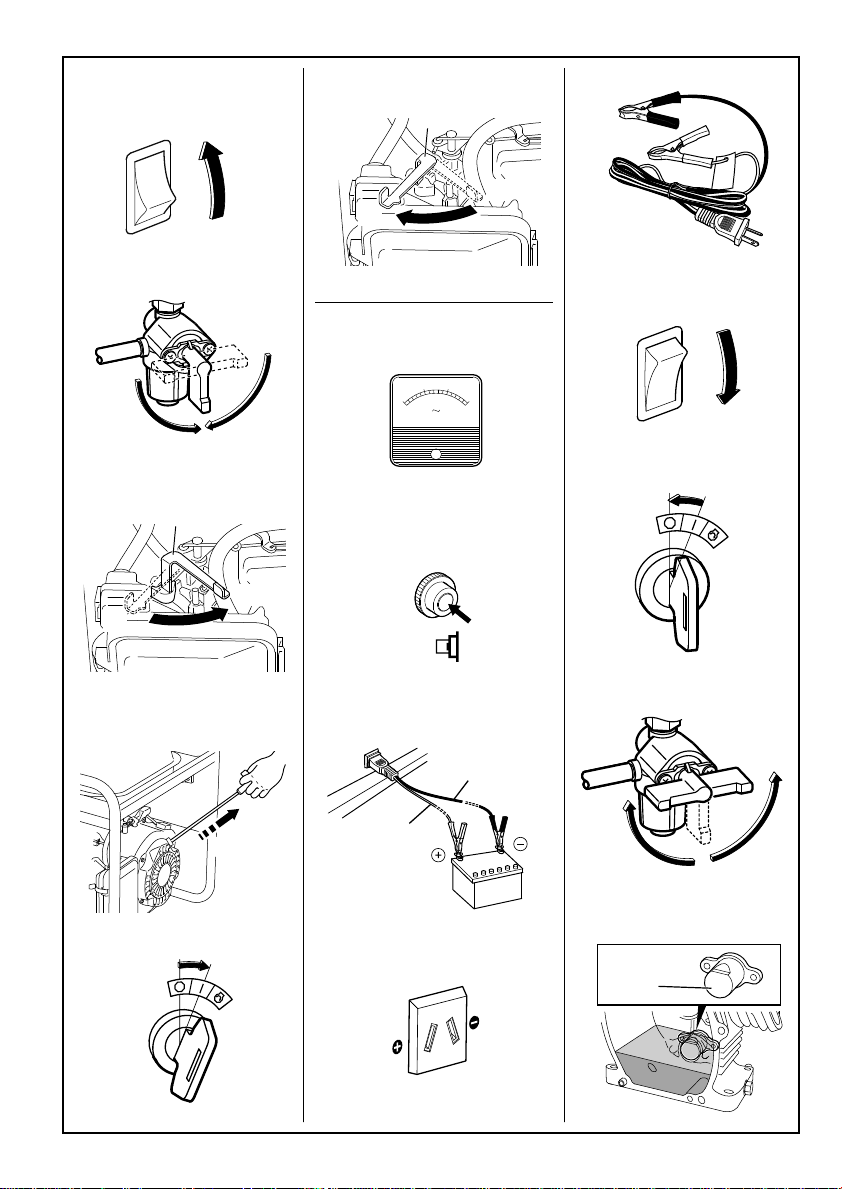
1. STARTING THE GENERATOR
CAUTION
Check the oil level before each operations as
outlined by the article “CHECK ENGINE OIL”
(a) Turn the Engine switch to the position “ | ” (ON).
(See Fig.-①)
❶ “ | ” (ON)
❷ “ 〇 ” (OFF)
(b) Open the fuel valve. (See Fig.-②)
❶ OPEN
❷ CLOSE
(c) Set choke lever to close if the engine is cold.
(See Fig.-③)
❶ CHOKE LEVER
❷ CLOSE
❸ OPEN
(d) [Recoil starter model]
Pull the starter handle slowly until passing the
compression point (resistance will be felt), then
return the handle to its original position
and pull briskly.(See Fig.-④)
❶ PULL BRISKLY
■
If the engine fails to start after several attempts,
repeat above procedures with choke lever returned
to “OPEN” position.
■
Do not fully pull out the rope.
■
After starting, allow the starter handle to return to
its original position while still holding the handle.
(e) [Electric starter model]
Insert the key into the key switch and turn it
clockwise to the “ | ” (RUN) position to start the
engine.
Then turn the key further to the “
position.
The engine will be started by starting motor.
(See Fig.-⑤)
❶ “ 〇 ” (STOP)
❷ “ | ” (RUN)
” (START)
❸ “
CAUTION
■
Do not run the starting motor over 5 seconds
continuously.
If the engine fails to start, return the key to
the “ | ” (RUN) position and wait about 10
seconds then start again.
■
Do not turn the key switch to “
position when the engine is running to
prevent damage of starting motor.
■
When starting the engine by recoil starter,
set the key switch at the “ | ” (RUN) position
and pull the starter handle.
(f) After the engine started, return the choke lever
gradually to “OPEN” position.
(See Fig.-⑥)
❶ CHOKE LEVER
❷ CLOSE
❸ OPEN
(g) Warm up the engine without a load for a few
minutes.
” (START)
” (START)
EN
FR
DE
NL
ES
IT
PT
GR
NO
SE
FI
DK
RU
7
Page 16

2. USING ELECTRIC POWER
WARNING
■
Make sure that the appliance is switched OFF before connecting it to the generator.
■
Do not move the generator while it is running.
■
Be sure to ground the generator if the connected appliance is grounded. Failure to ground unit may
lead to electrical shock.
CONTROL PANEL
EN
(EG241A, EG321A, EG321AE)
FR
DE
NL
[Electric starter model]
ES
IT
Key switch
PT
GR
NO
AC receptacle 20A
AC circuit
breaker
Engine switch
Volt meter
SE
DC
FI
Earth (ground) terminal
receptacle
DK
RU
(EG441A, EG441AE, EG601A, EG601AE, EG671A, EG671AE )
DC circuit
breaker
[Electric starter model]
Key switch
Engine switch
8
AC receptacle 20A
Earth (ground) terminal
AC circuit
breaker
DC
Volt meter
DC circuit
breaker
receptacle
Page 17

(1) AC APPLICATION
(a) Check the voltmeter for proper voltage.
(See Fig.-①)
■
This generator is thoroughly tested and adjusted in
the factory.
If the generator does not produce the specifi ed
voltage, consult your nearest Makita factory or
authorized service center.
(b) Turn off the switch (es) of the electrical
appliance (s) before connecting to the generator.
(c) Insert the plug (s) of the electrical appliance(s) into
the receptacle.
■
Check the amperage of the receptacles, and be
sure not to take a current exceeding the specifi ed
amperage.
■
Be sure that the total wattage of all appliances
dose not exceed the rated output of the generator.
CAUTION
Do not put foreign objects into the plug receptacle.
WARNING
Be sure to ground the generator if the connected
electrical device is grounded.
NOTE
When the AC circuit breaker turns off during
operation, the generator is over loaded or the
appliance is defective.
Stop the generator immediately, check the
appliance and / or generator for overloading or
detect and have repaired as necessary by Makita
factory or authorized service center.
(d) Check and confi rm whether circuit breaker position
is “ | ” (ON). (See Fig.-②)
❶ “ | ” (ON)
(e) Turn on the switch of the appliance.
(2) DC APPLICATION
(Only for charging 12 volt battery)
DC receptacle (Only for charging 12 volt battery)
(See Fig.-③)
❶ RED CABLE
❷ BLACK CABLE
For charging 12 voltage battery, 12V-8.3A (100W) of
maximum AC power can be taken out from the DC
receptacle by means of the exclusive DC cable.
(See Fig.-④)
The exclusive DC cable is come with your generator
set (included in the package) (See Fig.-⑤).
EN
FR
DE
NL
ES
IT
PT
GR
NO
SE
FI
DK
RU
DC Circuit Breaker
DC circuit breaker is turned off to shut down the DC
power, when the DC is over the usage range or the
battery is defective.
Check the generator and/or battery for overloading or
defect, and turn on the DC circuit breaker after no
problem and defect are found out.
Connection of exclusive DC cable :
■
Connect positive (red) clip of DC cable to positive
(+) terminal on battery.
■
Connect negative (black) clip of DC cable to
negative (-) terminal on battery.
9
Page 18

Battery Charging Procedures :
1) Stop engine.
2) Remove all connections from battery.
3) Insert the plug of exclusive DC cable into DC
receptacle.
4) Connect positive (red) clip of DC cable to positive
(+) terminal on battery, and then connect negative
(black) clip of DC cable to negative (-) terminal on
battery.
5) Take out all plugs at the battery electrolyte fl uid
EN
fi ller ports.
6) Check the electrolyte fl uid level, and refi ll the
FR
distilled water as necessary.
DE
7) Start engine.
NL
8) Make sure that the pilot lamp is turned on.
ES
9) Make sure that the DC circuit breaker is in the ON
position.
IT
10) Battery charging will be started.
PT
GR
NO
■
Do not use both AC and DC output at the same
SE
time.
■
Install correct positive (red) or negative (black)
FI
cable to the correct polarity on the battery.
DK
■
Connect and disconnect DC cable with engine
stopped.
RU
■
An explosive hydrogen gas is discharged
through vent holes in the battery during the
charging process.
Do not allow spark or open fl ame around
the generator or battery during the charging
process.
■
Electrolyte fl uid contains sulphuric acid, and
so the fl uid can burn eyes and clothing. Be
extremely careful to avoid contact.
If injured, wash the affected area immediately
with large quantities of water and consult a
doctor for treatment.
■
Charging time is varied according to the kind
of battery and discharged level of battery.
Measure the specifi c gravity of electrolyte fl uid
by means of hydrometer every one hour during
battery charging.
Make sure if the DC circuit breaker is not
turned off.
Battery charging is completed when the
specifi c gravity is in the range of 1.26 to 1.28.
CAUTION
3. STOPPING THE GENERATOR
(a) Turn off the power switch of the electric equipment
and unplug the cord from receptacle of the
generator.
(b) Allow the engine about 3 minutes to cool down at
no-load before stopping.
(c) [Recoil starter model]
Turn the engine switch to the position “ 〇 ” (OFF).
(See Fig.-⑥)
❶ “ | ” (ON)
❷ “ 〇 ” (OFF)
[Electric starter model]
Turn the key switch to the STOP position.
(See Fig.-⑦)
❶ “ 〇 ” (STOP)
❷ “ | ” (RUN)
” (START)
❸ “
(d) Close the fuel valve. (See Fig.-⑧)
❶ OPEN
❷ CLOSE
4. OIL SENSOR (See Fig. -⑨)
❶ OIL SENSOR
(a) The oil sensor detects the fall in oil level in the
crankcase and automati-cally stops the engine
when the oil level falls below a predetermined level.
(b) When engine has stopped automatically, switch off
generator’s AC circuit breaker, and check the oil
level.
Refi ll engine oil to the upper level as instructed on
page 5 and restart the engine.
(c) If the engine does not start by usual starting
procedures, check the oil level.
10
Page 19

5. WATTAGE INFORMATION
Some appliances need a “surge” of energy when starting.
This means that the amount of electrical power needed to start the appliance may exceed the amount needed to
maintain its use.
Electrical appliances and tools normally come with a label indicating voltage, cycles / Hz, amperage (amps) and
electrical power needed to run the appliance or tool.
Check with your nearest dealer or service center with questions regarding power surge of certain appliances or
power tools.
■
Electrical loads such as incandescent lamps and hot plates require the same wattage to start as is needed to
maintain use.
■
Loads such as fl uorescent lamps require 1.2 to 2 times the indicated wattage during start-up.
■
Loads for mercury lamps require 2 to 3 times the indicated wattage during start-up.
■
Electrical motors require a large starting current. Power requirements depend on the type of motor and its use.
Once enough “surge” is attained to start the motor,
the appliance will require only 50% to 30% of the wattage to continue running.
■
Most electrical tools require 1.2 to 3 times their wattage for running under load during use. For example, a
5,000 watt generator can power a 1800 to 4000 watt electrical tool.
■
Loads such as submersible pumps and air compressors require a very large force to start. They need 3 to 5
times the normal running wattage in order to start.
For example, a 5,000 watt generator would only be able to drive a 1,000 to 1,700 watt pump.
NOTE
The following wattage chart is general guide only. Refer to your specifi c appliance for correct wattage.
To determine the total wattage required to run a particular electrical appliance or tool, multiply the voltage fi gure of
the appliance/tool by the amperage (amps) fi gure of same. The voltage and amperage (amps) information can be
found on a name plate which is normally attached to electrical appliances and tools.
Applications
Incandescent lamp, Heater 2000 2400 3600 4600 5500
Fluorescent lamp, Electric tool 1100 1300 2000 2550 3050
Mercury lamp 800 950 1450 1850 2200
Pump, Compressor 500 600 900 1150 1400
EG241A
Applicable Wattage(W)
EG321A
EG321AE
EG441A
EG441AE
EG601A
EG601AE
EG671A
EG671AE
EN
FR
DE
NL
ES
IT
PT
GR
NO
SE
FI
DK
RU
VOLTAGE DROP IN ELECTRIC EXTENSION CORDS
When a long electric extension cord is used to connect an appliance or tool to the generator, a certain amount of
voltage drop or loss occurs in the extension cord which reduces the effective voltage available for the appliance or tool.
The chart below has been prepared to illustrate the approximate voltage loss when an extension cord of 300 feet
(approx. 100 meters) is used to connect an appliance or tool to the generator.
Nominal
cross
section
mm
0.75 18 7 30/0.18 2.477 2.5V 8V
1.27 16 12 50/0.16 1.486 1.5V 5V 7.5V 12V 15V 18V
2.0 14 17 37/0.26 0.952 1V 3V 5V 8V 10V 12V 15V
3.5 12 to 10 23 45/0.32 0.517
5.5 10 to 8 35 70/0.32 0.332
A.W.G.
2
Allowable
current
No. A No./mm
No.of strands
/ strands dia.
Resistance
/100m 1A 3A 5A 8A 10A 12A 15A
Ω
─
─
Current Amp.
12.5V
────
1.5V 2.5V 4V 5V 6.5V 7.5V
1V 2V 2.5V 3.5V 4V 5V
─
Voltage drop
11
Page 20

6. SPARK ARRESTER
In a dry or wooded area, it is recommendable to use the product with a spark arrester. Some areas require the use
of a spark arrester. Please check your local laws and regulations before operating your product.
The spark arrester must be cleaned regularly to keep it functioning as designed.
A clogged spark arrester :
●Prevents the fl ow of exhaust gas
●Reduces engine output
●Increases fuel consumption
●Makes starting diffi cult
If the engine has been running, the muffl er and the spark arrester will be very hot. Allow the muffl er to cool before
cleaning the spark arrester.
EN
FR
DE
How to remove the spark arrester
1. Remove the fl ange bolts from the muffl er cover and
NL
remove the muffl er cover.
ES
IT
2. Remove the special screw from the spark arrester
and remove the spark arrester from the muffl er.
PT
GR
NO
SE
FI
DK
RU
EG601A, EG601AE
EG671A, EG671AE
Muffler
Spark arrester screen
Screw
Clean the spark arrester screen
Use a brush to remove carbon deposits from the
spark arrester screen.
Be careful to avoid damaging the screen.
The spark arrester must be free of breaks and
holes. Replace the spark arrester if it is damaged.
Install the spark arrester, and muffl er protector in
the reverse order of disassembly.
12
EG601A, EG601AE
EG671A, EG671AE
Spark arrester screen
Page 21

7. MAINTENANCE SCHEDULE
■
DAILY
EVERY
50 HOURS
EVERY
100 HOURS
EVERY
200 HOURS
EVERY
500 HOURS
EVERY
1,000 HOURS
(24 MONTHS)
Check oil level.
■
Check all components according to “PRE-OPERATION CHECKS.”
■
Wash cleaner element. -more often if used in dirty or dusty environments.
■
Check spark plug, clean if necessary.
■
Change engine oil. *-more often if used in dusty or dirty environments.
■
Clean spark arrester.
■
Adjust spark plug gap.
■
Clean fuel strainer.
■
Replace spark plug and cleaner element.
■
Clean and adjust carburetor,valve clearance, and valve seat along with
cylinder head.
■
Check and replace carbon brushes
■
Inspect control panel parts.
■
Check rotor and starter.
■
Replace engine mount rubber.
■
Overhaul engine.
■
Change fuel lines.
EN
FR
DE
NL
ES
IT
PT
GR
NO
SE
FI
DK
RU
NOTE : (*)
■
Initial oil change should be performed after fi rst twenty (20) hours of use. Thereafter change oil every 100
hours.
■
Before changing the oil, check for a suitable way to dispose of the old oil.
Do not pour it down sewage drains, onto garden soil or into open streams.
Your local zoning or environmental regulations will give you more detailed instructions on proper disposal.
13
Page 22

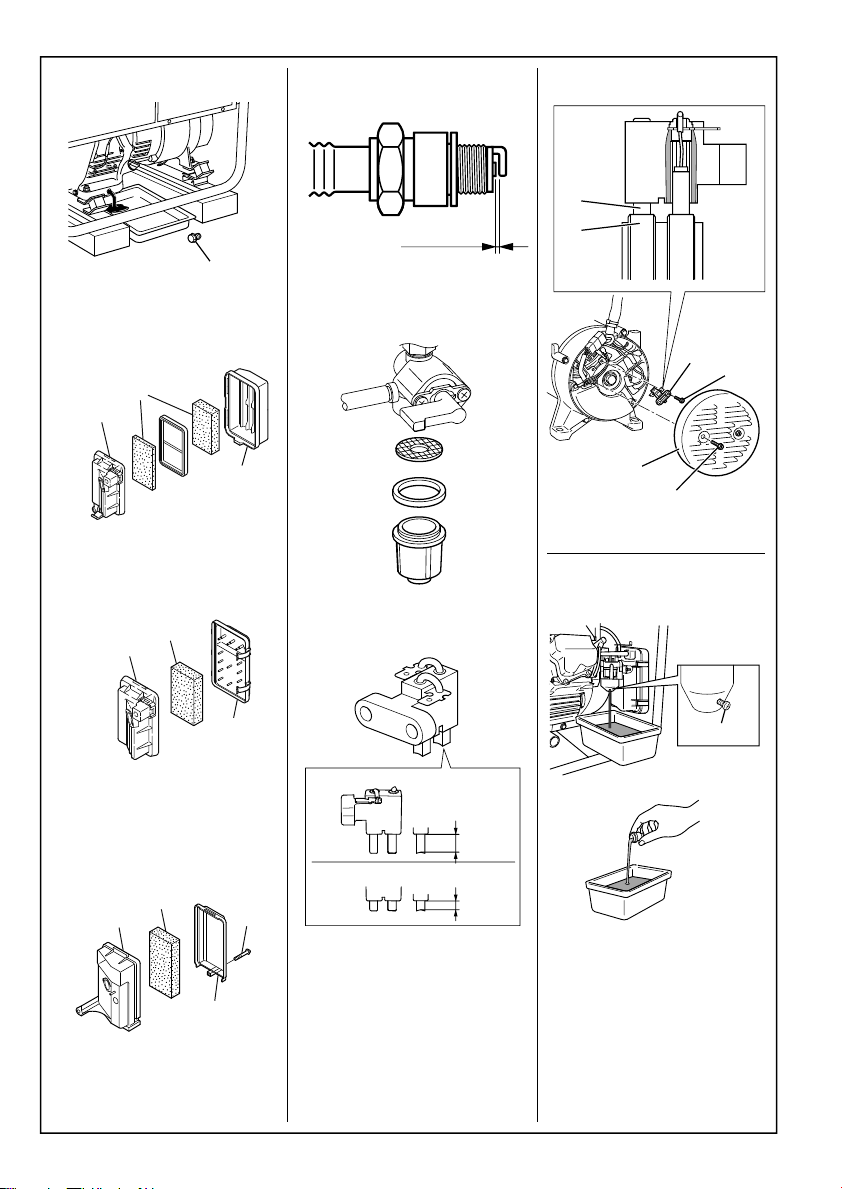
8. ”HOW-TO” MAINTENANCE
CAUTION
Make sure the engine is stopped before starting
any maintenance, servicing or repair.
NOTE
It is recommended to use ear protection when
performing operation, maintenance and repair of
the generator set.
EN
ENGINE OIL CHANGE (See Fig. -①)
FR
■
Change engine oil every 100 hours.
DE
(For new engine, change oil after 20 hours.)
NL
(a) Drain oil by removing the drain plug and the oil fi ller
ES
cap while the engine is warm.
❶ OIL DRAIN PLUG
IT
PT
(b) Reinstall the drain plug and fi ll the engine with oil
until it reaches the upper level on the oil fi ller cap.
GR
■
Use fresh and high quality lubricating oil to
NO
the specifi ed level as directed on page 5. If
SE
contaminated or deteriorated oil is used or the
quantity of the engine oil is not suffi cient, the
FI
engine damage will result and its life will be greatly
shortened.
DK
RU
SERVICING THE AIR CLEANER
(See Fig. -② thru ④)
Maintaining an air cleaner in proper condition is very
important.
Dirt induced through improperly installed, improperly
serviced or inadequate elements damages and wears
out engines. Keep the element always clean.
❶ BASE
❷ ELEMENT
❸ AIR CLEANER COVER
❹ BOLT
(a) Remove the bolt of air cleaner cover.
(EG601A, EG601AE, EG671A, EG671AE)
(See Fig.-④)
Remove the air cleaner cover and cleaner element.
(b) Urethane form : Wash urethane form element in
kerosene or diesel fuel.
Then saturate the element in a mixture of 3 parts
kerosene or diesel fuel and 1 part engine oil.
Squeeze the element to remove the mixture and
install it in the air cleaner.
NOTE
Instead of washing oil (kerosene), it is possible to
wash the urethane foam element in a solution of
mild detergent and warm water.
Then rinse the element thoroughly in clean water.
Allow the element to dry thoroughly.
in clean engine oil and squeeze out excess oil.
CLEANING AND ADJUSTING SPARK PLUG
(See Fig. -⑤)
(a) If the plug is contaminated with carbon, remove it
using a plug cleaner or wire brush.
(b) Adjust the electrode gap to 0.6 to 0.7 mm.
Spark plug : BR-6HS (NGK)
CLEANING FUEL STRAINER
(See Fig. -⑥)
Dirt and water in the fuel are removed by the fuel
strainer.
(a) Remove the strainer cup and throw away water
and dirt.
(b) Clean the screen and strainer cup with gasoline.
(c) Tightly fasten the cup to main body, making sure to
avoid fuel leak.
CHECKING CARBON BRUSH
Brush Maintenance Essentials
(Effective Length)
The brush is the area which touches the slip ring, and
its surface must be kept smooth.
If it is not smooth then carbon and other substances
will adhere between the brush and slip ring.
This must be buffed with sandpaper or the like
because it is hazardous.
The usable length of the brush is 5~11mm, so if the
brush is 5mm long or less replace it with a new one.
(See Fig.-⑦)
❶ LENGTH WHEN NEW
❷ EFFECTIVE BRUSH LENGTH
Soak the element
14
Page 23

This is done because if the length of the brush gets
any shorter, its contact pressure with the slip ring will
decrease, resulting in a drop in generator effi ciency
and the output voltage.
Check the brush every 500 hours to confi rm its length.
In addition, check the brush length if the generator
malfunctions, such as when it is not generating power
or its voltage is low.
Brush Maintenance Essentials
(Disassembly and Assembly) (See Fig. -⑧)
❶ BRUSH
❷ SLIP RING
❸ BRUSH HOLDER
❹ FLANGE BOLTS
❺ BRACKET COVER
❻ FLANGE BOLTS
Disassembly
1. Remove the two fl ange bolts (M5 x 20), then
remove the bracket cover.
2. Remove the two fl ange bolts (M5 x 16), then
remove the brush.
Assembly
1. While pressing the brush against the slip ring,
secure it (1.5~2N•m) by tightening it with the two
fl ange bolts (M5 × 16).
When doing so, confi rm that the brush is in the
proper position relative to the slip ring.
2. Secure the bracket cover (3~4N•m) by tightening it
with the two fl ange bolts (M5 × 20).
(a) Check the fuel (gasoline), engine oil and air
cleaner.
(b) Start engine.
(c) With appliance such as lightings activated, run the
engine for over ten minutes.
(d) Check for the following items;
■
Proper engine running.
■
Adequate output and the indicator lamp turned on
properly.
■
The engine switch normally operated.
■
No leakage of engine oil and fuel (gasoline).
10. TRANSPORTING
When transporting the generator, make sure that the
fuel (gasoline) should be drained from the tank.
WARNING
■
To prevent fuel spillage due to the vibration
and impact, never transport the generator
with the fuel (gasoline) fi lled in the tank.
■
Secure the tank cap thoroughly.
■
To avoid the risk of the gasoline fl ammability,
never leave the generator in an area exposed
to direct sunlight or high temperatures for a
long time.
■
Keep the fuel (gasoline) in the exclusive
gasoline storage tank made by steel when
transporting.
EN
FR
DE
NL
ES
IT
PT
GR
NO
SE
FI
DK
RU
9. PERIODIC OPERATION
AND INSPECTION
When furnishing the generator as emergency electric
power source, periodic operation and inspection are
needed.
Fuel (gasoline) and engine oil will be deteriorated with
time, and this causes that the engine is diffi cult to start
and as the results improper engine operation and fault.
CAUTION
Since the fuel (gasoline) will be deteriorated
with time, replace fuel (gasoline) with fresh one
periodically; once every three (3) months is
recommended.
(a) Turn the engine switch to the “STOP” position.
(b) Drain the fuel from the tank.
(c) Secure the tank cap.
CAUTION
■
Do not place any heavy objects on the
generator.
■
Select and place the generator in the proper
position of the transport vehicle so that the
generator not be moved or fallen down.
Fix the generator with rope as necessary.
15
Page 24

11. PREPARATION FOR STORAGE
(See Fig. )
The following procedures should be followed prior to storage of your generator for periods of 6 months or longer.
■
Drain fuel from fuel tank carefully by disconnecting the fuel line.
Gasoline left in the fuel tank will eventually deteriorate making engine-starting diffi cult.
■
Remove the carburetor fl oat chamber and also drain the carburetor. (See Fig.-①)
❶ DRAIN SCREW
■
Change engine oil.
■
Check for loose bolts and screws, tighten them if necessary.
■
Clean generator thoroughly with oiled cloth.
Spray with preservative if available.
NEVER USE WATER TO CLEAN GENERATOR !
EN
■
Pull starter handle until resistance is felt, leaving handle in that position.
FR
■
Store generator in a well ventilated, low humidity area.
DE
NL
12. TROUBLESHOOTING
ES
When generator engine fails to start after several attempts, or if no electricity is available at the output socket,
check the following chart. If your generator still fails to start or generate electricity, contact your nearest Makita
IT
factory or authorized service center for further information or corrective procedures.
PT
When Engine Fails to Start:
GR
NO
Check if choke lever is in its proper position. Set the choke lever to “CLOSE” position.
SE
Check if fuel valve is open.
FI
Check fuel level.
DK
RU
Check if engine switch is in OFF. Turn engine switch to ON.
If closed, open fuel valve.
If empty, refill fuel tank making sure not to
overfill.
Check to make sure generator is not connected
to an appliance.
Check spark plug for loose spark plug cap.
Check spark plug for contamination. Remove spark plug and clean electrode.
If connected, turn off the power switch on the
connected appliance and unplug.
If loose, push spark plug cap back into place.
When No Electricity Is Generated at Receptacle:
After making sure that the total wattage of the
Check to make sure AC circuit breaker is in the
“ON” position.
Check AC receptacle and DC terminals for
loose connection.
Check to see if engine starting was attempted
with appliances already connected to generator.
Low power. Carbon brushes are excessively worn
electrical appliance is within permissible limits
and there are no defects in the appliance, turn
the AC circuit breaker to the “ON” position.
If breakers continue to actuate, consult your
nearest servicing dealer.
Secure connection if necessary.
Turn off switch on the appliance, and disconnect
cable from receptacle. Reconnect after
generator has been started properly.
16
Page 25

13. SPECIFICATIONS
MODEL EG241A
Type Brush, self-exciting, 2-poles, single phase
Voltage regulating system AVR type
AC Output
Rated voltage-Frequency V-Hz 230 - 50
Rated current A 8.7 10.4 15.7 20.0 23.9
Rated output VA (W) 2000 2400 3600 4600 5500
Maximum output VA (W) 2400 3200 4400 6000 6700
Generator
Rated power factor 1.0
Safety device type Fuse-less circuit breaker
DC Output
Rated voltage V 12
Rated current A 8.3
Safety device type Fuse-less circuit breaker
Model EX17D EX21D EX30D EX35D EX40D
Type ROBIN, Air-cooled, 4-stroke, OHC, Gasoline Engine
Displacement mL 169 211 287 404
Fuel Automotive Unleaded Gasoline
Fuel tank capacity L 12.8 22.0
Engine oil capacity L 0.6 1.0 1.2
Engine
Rated continuous operation H 10.5 9.0 5.6 7.5 6.6
Spark plug BR-6HS (NGK)
Starting system
3/4Load Fuel consumption L/H 1.0 1.3 1.9 2.7 2.9
Direction of rotation Counter - clockwise
Length mm 600
Width mm 420 450 510 530
Dimension
Height mm 500 500 540 580
Dry weight kg 47
Gross weight
Weight according to EPTA procedure 01/2003
Specifications are subject to change without notice.
*1: ( ) shows dimensions with Battery frame.
*2: ( ) shows weight with Electric starter.
kg 57
Recoil
starter
EG321A
EG321AE
620
(870)*1
51
(56)*267 (77)*286 (96)*288 (98)*2
61
(66)*278 (88)*2
EG441A
EG441AE
Electric starter / Recoil
675
(925)*1
EG601A
EG601AE
104
(114)*2
725
(975)*1
EG671A
EG671AE
EN
FR
DE
NL
ES
IT
PT
GR
NO
SE
FI
DK
RU
106
(116)*2
17
Page 26

14. WIRING DIAGRAM
EG241A, EG321A (50Hz-230V) [Recoil starter model]
CONTROL BOXENGINE
Blk
Grn
Engine switch
Noise filter
Gry
GryOrg
DC circuit
breaker
WW
Blk
GENERATOR
EN
FR
DE
NL
ES
IT
PT
GR
NO
Blk
Blu
AVR unit
Brn
Brn
Sub coil
Blu Blu
Ignition coil
Oil sensor switch
Y
Spark plug
ROTOR STATOR
Slip
ring
Y
Org
AC
winding 1
AC
winding 2
YY
Y
Grn/Y
Blk
Y
Y/R
Brn
Bridge
diode
DC winding
Brn
Oil sensor unit
RR R
Gry
Blu Blu
Grn
Grn Grn
W
Blk
SE
FI
EG321AE (50Hz-230V) [Electric starter model]
DK
RU
Blk
Battery
GENERATOR
R
Blk
Spark plug
ROTOR STATOR
Ignition coil
Oil sensor switch
Slip
ring
Y
Blu
Sub coil
Brn
Y
Brn
Blu Blu
AVR unit
Org
Blk
Blk
Y/R
Y
Y
AC
winding 1
AC
winding 2
YY
DC winding
Grn/Y
Oil sensor unit
Electric Starter
Brn
Bridge
diode
Brn
CONTROL BOXENGINE
Gry
Blu
Blu
Charge
coil
Magnetic switch
RR
Gry
Org
Blu Blu
Grn
W
Blk
Noise filter
Gry
Gry
Grn
DC circuit
breaker
WW
Blk
Grn
AC circuit
breaker
Voltmeter
AC circuit
breaker
Voltmeter
R
Blk
AC Output
receptacle
DC Output
receptacle
R
AC Output
receptacle
DC Output
receptacle
DC12V
AC Output
receptacle
DC12V
Fuse
Org Org
Grn
M-
Gry
IG
Key switch
Grn
AC Output
receptacle
Wiring color code
Blk : Black
Blk/W : Black/White
Blu : Blue
LBlu : Light blue
Brn : Brown
Brn/W : Brown/White
Grn : Green
Grn/W : Green/White
Org : Orange
Gry : Gray
R : Red
W : White
Y : Yellow
W/Blk : White/Black
Grn/Y : Green/Yellow
Pur : Purple
Earth
(Ground)
terminal
ST
M+
B
Earth
(Ground)
terminal
18
Page 27

EG441A, EG601A, EG671A (50Hz-230V) [Recoil starter model]
CONTROL BOXENGINE
Grn
Blk
Spark plug
GENERATOR
ROTOR STATOR
Slip
ring
W
R
Sub coil
Grn
W
Grn
W
AVR unit
Org
Ignition coil
Oil sensor switch
AC
winding 1
AC
winding 2
Blu
Blu
Blu
Blu
Grn/Y
Blk
Y
Y/R
Brn
Bridge
diode
DC winding
Brn
Blk
Engine switch
Oil sensor unit
AC circuit
RR R
Gry
Org
Blu Blu
Grn
W
Blk
Noise filter
Gry
Org
Grn
DC circuit
breaker
WW
Blk
breaker
Voltmeter
AC Output
receptacle
DC Output
receptacle
DC12V
AC Output
receptacle
EG441AE, EG601AE, EG671AE (50Hz-230V) [Electric starter model]
Blk
R
Blk
Battery
Spark plug
Ignition coil
GENERATOR
ROTOR STATOR
Slip
ring
W
R
Grn
Grn
AVR unit
Blk
Blk
Org
Y
Oil sensor switch
Y/R
AC
winding 1
AC
winding 2
Sub coil
W
Blu
Blu
W
Blu
Blu
DC winding
Grn/Y
Oil sensor unit
Electric
Starter
Brn
Bridge
diode
Brn
CONTROL BOXENGINE
R
AC circuit
breaker
Voltmeter
Blk
AC Output
receptacle
Gry
Blu
Grn
Blu
Magnetic switch
Charge
coil
RR R
Org Org
Blu Blu
Grn
W
Blk
Noise filter
GryGry
Grn
DC circuit
breaker
WW
Blk
Org Org
Grn
Gry
Grn
DC Output
receptacle
DC12V
Fuse
M-
IG
Key switch
AC Output
receptacle
Wiring color code
Blk : Black
Blk/W : Black/White
Blu : Blue
LBlu : Light blue
Brn : Brown
Brn/W : Brown/White
Grn : Green
Grn/W : Green/White
Org : Orange
Gry : Gray
R : Red
W : White
Y : Yellow
W/Blk : White/Black
Grn/Y : Green/Yellow
Pur : Purple
EN
FR
DE
NL
ES
Earth
(Ground)
terminal
IT
PT
GR
NO
SE
FI
DK
RU
ST
M+
B
Earth
(Ground)
terminal
19
Page 28

15. OPTIONAL PARTS
Wheel Kit Installation
(1) Check the supplied accessories
(2) T ool preparation
■
Crane or square bar (about 100mm by 100mm)
■
Pliers
■
2 sets of spanners (12mm)
(3) Installation procedures
A) Raise the generator about 100mm with the crane or square bar.
B) Install the wheel and stopper in the wheel shaft.
EN
FR
DE
NL
ES
GR
NO
SE
DK
RU
<Stopper section>
Install wheel shaft ⑤ into stopper ① so that wheel ② is inserted between them and fasten with pin ③.
Next, tighten wheel shaft ⑤ and stopper ① with nut ④.
<Non-stopper section>
Install wheel ② and washer ⑧ onto wheel shaft ⑤ and fasten with pin ③.
C) Check that the wheel rotates smoothly.
IT
D) Loosen length adjustment nut ⑨ for wheel shaft ⑤ and bolt ⑩, then align the position of the hole on the
frame with the mounting hole of wheel shaft ⑤ and tighten bolt ⑥ and nut ⑦ to fi x this in place.
PT
-
Tightening torque: 20 to 25N
E) Tighten length adjustment nut ⑨ for wheel shaft ⑤ and bolt ⑩ to fi x the length of wheel shaft ⑤.
m (2.0 to 2.5kg-m)
FI
20
Page 29

VOORWOORD
Hartelijk bedankt voor de aanschaf van deze MAKITA GENERATOR.
Deze handleiding beschrijft het onderhoud en de bediening van deze MAKITA GENERATOR.
Deze MAKITA GENERATOR kan als wisselstroombron worden gebruikt voor algemene
elektrische apparatuur, toestellen, lampen en gereedschappen. Wat gelijkstroom betreft, kunnen
de aansluitingen uitsluitend worden gebruikt om een 12 Volt accu op te laden.
Gebruik deze generator in geen geval voor enig ander doel.
Neem alstublieft even de tijd om vertrouwd te raken met de juiste procedures voor de bediening
en het onderhoud om een veilig en doelmatig gebruik van dit product te kunnen waarborgen.
Houd dit instructieboekje bij de hand zodat u er indien noodzakelijk iets in kunt opzoeken.
Vanwege het feit dat wij te allen tijde proberen onze producten te verbeteren, kunnen bepaalde
procedures en specifi caties zonder kennisgeving vooraf gewijzigd worden.
Als u onderdelen bestelt, geef dan altijd het MODEL, het PROD UCTIENUMMER en het
SERIENUMMER van uw product op.
Hieronder kunt u het productienummer en serienummer zoals vermeld op het product zelf invullen.
(De plaats van het label verschilt afhankelijk van de het model.)
PROD No. SER No.
PROD No. / SER No. (Label)
EN
FR
DE
NL
ES
IT
PT
GR
NO
SE
FI
DK
RU
INHOUD
1. VEILIGHEIDSMAATREGELEN. . . . . . . . . . . . . . . . . . . . . . . . . . . . . . . . . . . . . . . . . . .2
2. COMPONENTEN . . . . . . . . . . . . . . . . . . . . . . . . . . . . . . . . . . . . . . . . . . . . . . . . . . . . .5
3. CONTROLES VOOR HET IN WERKING STELLEN. . . . . . . . . . . . . . . . . . . . . . . . . . .5
4.
BEDIENINGSPROCEDURES
5. INFORMATIE OVER HET VERMOGEN. . . . . . . . . . . . . . . . . . . . . . . . . . . . . . . . . . .11
6. VONKENVANGER . . . . . . . . . . . . . . . . . . . . . . . . . . . . . . . . . . . . . . . . . . . . . . . . . . .12
7. ONDERHOUDSSCHEMA. . . . . . . . . . . . . . . . . . . . . . . . . . . . . . . . . . . . . . . . . . . . . .13
8. ZELF UIT TE VOEREN ONDERHOUD. . . . . . . . . . . . . . . . . . . . . . . . . . . . . . . . . . . .14
9. PERIODIEKE HANDELINGEN EN INSPECTIES
10. VERVOER. . . . . . . . . . . . . . . . . . . . . . . . . . . . . . . . . . . . . . . . . . . . . . . . . . . . . . . . .15
11. VOORBEREIDINGEN VOOR OPSLAG . . . . . . . . . . . . . . . . . . . . . . . . . . . . . . . . . .16
12. OPLOSSEN VAN PROBLEMEN. . . . . . . . . . . . . . . . . . . . . . . . . . . . . . . . . . . . . . . .16
13. TECHNISCHE GEGEVENS . . . . . . . . . . . . . . . . . . . . . . . . . . . . . . . . . . . . . . . . . . .17
14. BEDRADINGSSCHEMA . . . . . . . . . . . . . . . . . . . . . . . . . . . . . . . . . . . . . . . . . . . . . .18
15. OPTIONELE ONDERDELEN . . . . . . . . . . . . . . . . . . . . . . . . . . . . . . . . . . . . . . . . . .20
OPMERKING
Raadpleegt u alstublieft de afbeeldingen binnenin de voor- of
achterfl ap waar in de tekst verwezen wordt naar Afb.
. . . . . . . . . . . . . . . . . . . . . . . . . . . . . . . . . . . . . . . . . . . . . .7
. . . . . . . . . . . . . . . . . . . . . . . . . . . . . .15
t/m .
Bladzijde
1
Page 30

1. VEILIGHEIDSMAATREGELEN
U dient al deze veiligheidsinstructies zorgvuldig te lezen en in acht te nemen.
Let in het bijzonder op de gedeeltes die voorafgegaan worden door de volgende aanduidingen.
WAARSCHUWING
PAS OP
“PAS OP” geeft aan dat er gevaar bestaat voor persoonlijk letsel of beschadiging van de
apparatuur als de aanwijzingen niet worden opgevolgd
WAARSCHUWING
Stel de generator niet in werking in de buurt van benzine of andere vloeibare of gasvormige
brandstoffen, daar dit explosie- of brandgevaar oplevert.
EN
Vul de brandstoftank niet wanneer de motor aan staat. Rook niet in de buurt van de
brandstoftank en gebruik geen open vuur. Let op dat tijdens het vullen geen brandstof wordt
FR
gemorst. Als er brandstof gemorst wordt, dient u deze te verwijderen en op te laten drogen
DE
alvorens de motor te starten.
NL
ES
GR
NO
SE
DK
RU
WAARSCHUWING
Plaats geen brandbare stoffen in de buurt van de generator.
IT
Let op dat er zich geen brandstof, lucifers, buskruit, lappen met olie, stro, afval of andere
brandbare stoffen in de buurt van de generator bevinden.
PT
WAARSCHUWING
Laat de generator niet werken in een vertrek, grot, tunnel, of andere ruimte die
onvoldoende geventileerd is.
Gebruik het toestel altijd in een goed geventileerde omgeving, want anders kan
de motor oververhit raken en kan het giftige koolmonoxide, een geurloos,
FI
kleurloos en giftig uitlaatgas menselijke levens in gevaar brengen.
Gebruik de generator alleen buiten en uit de buurt van open ramen en deuren,
ventilatie-openingen en andere openingen.
Houdt tijdens het gebruik de generator tenminste 1 meter (3 feet) verwijderd van
een constructie of gebouw.
“WAARSCHUWING” geeft aan dat dat er groot gevaar bestaat voor ernstig
persoonlijk letsel of zelfs levensgevaar als de aanwijzingen niet worden opgevolgd.
1m
1m
WAARSCHUWING
Bouw de generator niet in en plaats hem niet in een kist. De generator heeft een ingebouwd
geforceerd luchtkoelsysteem en kan oververhit raken als hij wordt ingesloten. Als de generator bedekt is ter
bescherming tegen weersinvloeden wanneer hij niet wordt gebruikt, dient u er voor te zorgen dat de afdekking uit
de omgeving wordt verwijderd wanneer de generator wel gebruikt wordt.
WAARSCHUWING
Laat de generator werken op een vlakke ondergrond. Het is niet noodzakelijk een speciale grondplaat voor de
generator te vervaardigen. Op een ongelijke ondergrond zal de generator echter gaan trillen, dus u dient een
vlakke ondergrond te kiezen, zonder onregelmatigheden in het oppervlak.
Als de generator schuin staat of verplaatst wordt wanneer hij in bedrijf is, kan brandstof geknoeid worden en/of
kan de generator omvallen, waardoor een gevaarlijke situatie ontstaat.
U kunt niet verwachten dat de generator goed wordt doorgesmeerd als de generator in werking wordt gesteld op
een steile glooiing of helling. De zuigers kunnen dan vastlopen, zelfs als het oliepeil boven het hoogste niveau ligt.
WAARSCHUWING
Let op de bedrading of de verlengsnoeren van de generator naar het aangesloten apparaat. Als de
draad onder de generator ligt of in contact komt met een trillend gedeelte, kan de draad breken of
brand veroorzaken, de generator kan doorbranden, of een elektrische schok veroorzaken. Vervang
beschadigde of versleten snoeren onmiddellijk.Replace damaged or worn cords immediately.
2
Page 31

WAARSCHUWING
Stel de generator niet in bedrijf in de regen, onder natte of vochtige omstandigheden, of met natte handen. De
gebruiker kan een ernstige elektrische schok krijgen als de generator te nat is ten gevolge van regen of sneeuw.
WAARSCHUWING
Als de generator nat is, dient u hem goed af te drogen alvorens hem in werking te stellen.
U mag nooit water over de generator gieten of met water afwassen.
WAARSCHUWING
Let op dat bij elk gebruik alle noodzakelijke procedures voor het aarden van elektrische apparatuur worden
opgevolgd. Het nalaten hiervan kan fataal zijn.
WAARSCHUWING
Sluit de generator niet aan op een normale commerciële elektriciteitsleiding daar een dergelijke
aansluiting de generator kan kortsluiten en vernietigen of elektrische schokken kan veroorzaken.
Gebruik de transferschakelaar voor de aansluiting op het gewone elektriciteitsnet.
WAARSCHUWING
Rook niet wanneer u met de accu bezig bent. De accu geeft brandbaar waterstofgas af dat kan ontploffen
wanneer het wordt blootgesteld aan elektrische vonken of een open vuur. Zorg voor een goede ventilatie in
het vertrek en houdt open vuur/vonken uit de buurt wanneer u met de accu bezig bent.
WAARSCHUWING
De motor wordt ontzettend heet tijdens het gebruik en blijft dit nog geruime tijd daarna.
Houdt brandbaar materiaal uit de buurt van de generator.
Zorg er voor geen delen van de hete motor aan te raken, vooral het gedeelte met de
knaldemper, daar u anders ernstige brandwonden kunt oplopen.
WAARSCHUWING
Houd kinderen en toeschouwers op een veilige afstand van het werkgebied.
EN
FR
DE
NL
ES
IT
PT
GR
NO
SE
FI
DK
RU
WAARSCHUWING
Het is van wezenlijk belang dat u bekend bent met het veilig en juist gebruik van het elektrische gereedschap of
apparaat dat u gaat gebruiken.
Alle gebruikers dienen de handleiding van het gereedschap of apparaat te lezen, te begrijpen en op te volgen. De
toepassingen en grenzen van het gereedschap of apparaat moeten bekend zijn.
Volg alle aanwijzingen op die op labels en in waarschuwingen gegeven worden. Bewaar alle
instructiehandleidingen op een veilige plaats voor latere raadpleging.
WAARSCHUWING
Gebruik uitsluitend “ERKENDE” verlengsnoeren. Wanneer een gereedschap of apparaat buiten wordt gebruikt, dienen slechts
verlengsnoeren gebruikt te worden waarop staat aangegeven “Geschikt voor gebruik buiten”. Wanneer de verlengsnoeren niet
gebruikt worden, dienen ze in een droge en goed geventileerde omgeving te worden bewaard.
WAARSCHUWING
Als de generator niet gebruikt wordt, dient u deze uit te schakelen met de wisselstroomonderbreker; ook moeten
gereedschap en apparaten worden uitgeschakeld en losgekoppeld voordat ze worden schoongemaakt of
afgesteld, of wanneer accessoires of hulpstukken worden aangebracht.
PAS OP
Zorg ervoor dat de motor gestopt is voor u onderhoud, service of reparaties gaat uitvoeren.
Zorg ervoor dat onderhoud en reparatie aan de generator uitsluitend wordt uitgevoerd door daartoe bevoegd personeel.
3
Page 32

EN
FR
DE
NL
ES
IT
PT
GR
NO
SE
FI
DK
RU
4
Page 33

2. COMPONENTEN 3. CONTROLES VOOR HET IN
(Zie Afb. )
OPMERKING
Raadpleegt u alstublieft de afbeeldingen binnenin
de voor- of achterfl ap waar in de tekst verwezen
wordt naar Afb. t/m .
EG241A, EG321A, EG321AE,
EG441A, EG441AE (Zie Afb. -①)
❶ TREKSTARTER
❷ HANDGREEP TREKSTARTER
❸ BRANDSTOFFILTER (BRANDSTOFKRAAN)
❹ BRANDSTOFTANK
❺ MOTORSCHAKELAAR
❻ BEDIENINGSPANEEL
❼ OLIEPEILSTOK (OLIE-VULOPENING)
❽ OLIE-AFTAPPLUG
❾ BRANDSTOFMETER
❿ TANKDOP
⓫ BOUGIEDOP
⓬ CHOKEHENDEL
⓭ UCHTFILTER
⓮ UITLAAT
⓯ KAP KNALDEMPER
EG601A, EG601AE, EG671A, EG671AE
(Zie Afb. -②)
❶ TREKSTARTER
❷ HANDGREEP TREKSTARTER
❸ BRANDSTOFFILTER (BRANDSTOFKRAAN)
❹ TANKDOP
❺ MOTORSCHAKELAAR
❻ BEDIENINGSPANEEL
❼ OLIEPEILSTOK (OLIE-VULOPENING)
❽ OLIE-AFTAPPLUG
❾ BRANDSTOFTANK
❿ BRANDSTOFMETER
⓫ CHOKEHENDEL
⓬ BOUGIEDOP
⓭ UCHTFILTER
⓮ KNALDEMPER
⓯ UITLAAT
WERKING STELLEN
(Zie Afb. )
1. HET CONTROLEREN VAN DE MOTOROLIE
(Zie Afb. -①,②)
Voordat de olie wordt gecontroleerd of bijgevuld, dient
u er voor te zorgen dat de generator op een stabiele
en vlakke ondergrond staat en dat de motor is afgezet.
■
Verwijder de olievuldop en controleer het peil van
de motorolie. (Zie Afb.-①)
❶ OLIEPEILSTOK
❷ OLIE-VULOPENING
❸ HOOGSTE PEIL
❹ LAAGSTE PEIL
■
Als het oliepeil beneden het laagste niveau ligt,
dient met geschikte olie (zie tabel) te worden
bijgevuld tot het streepje dat het bovenste niveau
aangeeft. Draai de olievuldop niet in tijdens het
controleren van het oliepeil. (Zie Afb.-②)
❶ HOOGSTE PEIL
❷ LAAGSTE PEIL
■
Vervang de olie wanneer deze vervuild is.
(Zie het gedeelte over Zelf uit te voeren onderhoud.)
Olie-inhoud (Bij Hoogste niveau) : (L)
EG241A . . . . . . . . . . . . . . . . . . . . . . . . 0,6
EG321A, EG321AE . . . . . . . . . . . . . . 0,6
EG441A, EG441AE . . . . . . . . . . . . . . 1,0
EG601A, EG601AE . . . . . . . . . . . . . . 1,2
EG671A, EG671AE . . . . . . . . . . . . . . 1,2
Aanbevolen motorolie:
Gebruik zelfreinigende 4-takt olie voor automobielen
van API klasse SE, of een olie van een hogere klasse
(SG, SH of SJ wordt aanbevolen).
SAE 10W-30 of 10W-40 wordt aangeraden voor
algemeen gebruik bij alle temperaturen. Als olie met
enkele viscositeit wordt gebruikt, dient de juiste
viscositeit voor de gemiddelde temperatuur in uw
omgeving gekozen te worden.
5W
10W
Single grade
Multigrade
Omgevingstemperatuur
20W
10W
#20
-
10W
#30
#40
30
-
40
EN
FR
DE
NL
ES
IT
PT
GR
NO
SE
FI
DK
RU
5
Page 34

2. CONTROLEER DE BRANDSTOF VAN DE
MOTOR (Zie Afb. -③,④)
WAARSCHUWING
Vul nooit bij met brandstof terwijl u rookt of u in
de buurt bevindt van een open vuur of in
andere omstandigheden die brand kunnen
veroorzaken.
■
Controleer het brandstofpeil op de meter voor het
brandstofpeil. (Zie Afb.-③)
■
Als het brandstofpeil laag is, dient te worden
EN
bijgevuld met loodvrije benzine.
FR
■
Plaats het brandstoffi lterscherm op de
brandstoffi lternek. (Zie Afb.-④)
DE
❶ NIVEAU
NL
❷ DOP BRANDSTOFTANK
ES
❸ BRANDSTOFFILTERSCHERM
IT
PT
GR
NO
SE
Brandstofhoeveelheid
tot het “NIVEAU” : (L)
EG241A . . . . . . . . . . . . . . . . . . . . . . . 12,8
EG321A, EG321AE . . . . . . . . . . . . . 12,8
EG441A, EG441AE . . . . . . . . . . . . . 12,8
EG601A, EG601AE . . . . . . . . . . . . . 22,0
EG671A, EG671AE . . . . . . . . . . . . . 22,0
FI
DK
RU
Zorg er voor dat u alle waarschuwingen naleest
om brandgevaar te voorkomen.
■
Vul de tank niet wanneer de motor loopt of
heet is.
■
Sluit de brandstofkraan voordat de brandstof
wordt bijgevuld.
■
Let op dat er geen stof, vuil, water of andere
vreemde stoffen in de brandstof terecht komen.
■
Veeg gemorste brandstof goed af alvorens
de motor te starten.
■
Houdt open vuur uit de buurt.
WAARSCHUWING
4. CONTROLEER DE OMGEVING VAN DE
GENERATOR
WAARSCHUWING
Zorg er voor dat u alle waarschuwingen naleest, om
brandgevaar te voorkomen.
■
Houdt de omgeving vrij van brandbaar of ander
gevaarlijk materiaal.
■
Houdt de generator tenminste 1 meter verwijderd
van gebouwen of andere constructies.
■
Laat de generator slechts werken in een droge,
goed geventileerde omgeving.
■
Houdt de uitlaatpijp vrij van vreemde voorwerpen.
■
Houdt de generator weg van open vuur. Niet roken!
■
Plaats de generator op een vlakke en stabiele
ondergrond.
■
Blokkeer geen luchtkanalen van de generator met
papier of ander materiaal.
5. HET AARDEN VAN DE GENERATOR
■
Om de generator te aarden dient het aansluitpunt
voor het aarden van de generator verbonden te
worden met een aardepen die in de aarde wordt
gestoken of met een geleider die reeds geaard is.
(Zie Afb.-⑤)
❶ AARDEPEN
■
Als een dergelijke aardegeleider of -elektrode niet
voorhanden is, dient het aansluitpunt voor het
aarden van de generator verbonden te worden met
de aansluitklem voor het aarden van het gebruikte
elektrisch gereedschap of apparaat. (Zie Afb.-⑥)
❶ AARD-AANSLUITING
6.
INSTALLATIE VAN DE ACCU
(Zie Afb. -⑦
(Model met elektrische startmotor)
Aanbevolen accu
Type ; Loodzwavelzuuraccu
Capaciteit
(Ah/5hr) ; 12V-21AH of meer
Afmetingen ;
Minder dan 185(L) x 125(W) x 160(H) mm
3.
HET CONTROLEREN VAN COMPONENTEN
Controleer het onderstaande alvorens de motor te
starten:
■
Lekkage van brandstof uit de brandstofl eiding, enz.
■
Zitten bouten en moeren vast?
■
Schade of breuk van onderdelen.
■
Of de generator niet op of tegen enige bedrading
rust.
6
❶ AARDINGSKABEL (ZWART)
❷ STARTKABEL (ROOD)
❸ INSTELPLAAT
❹ INSTELBOUT
❺ ACCUPLAAT
❻ ACCUFRAME #1
❼ ACCUFRAME #2
❽ BESCHERMPLAAT
❾ BOUT
❿ MOER
Page 35

WAARSCHUWING
Overlijden, persoonlijk letsel en/of zaakschade kunnen
het gevolg zijn wanneer de aanwijzingen niet zorgvuldig
worden opgevolgd.
■
Gebruik uitsluitend een accu met het aanbevolen
vermogen.
■
Draai de startschakelaar naar de “〇” (STOPPEN)
stand voor u de accu monteert of verwijdert. Bij het
monteren of aanbrengen van de accu moet u eerst
de positieve (+) kabel aansluiten op de accu en
daarna pas de negatieve (-) kabel. Wees voorzichtig
dat er geen kortsluiting ontstaat tussen de kabels.
Bij het verwijderen van de accu moet de negatieve
kabel (-) eerst losgekoppeld worden.
RODE KABEL: Naar de positieve (+) aansluiting
ZWARTE KABEL: Naar de negatieve (-) aansluiting
■
Als de aansluiting niet op de juiste manier wordt
gemaakt, zal de generator kapot gaan.
■
Draai de bouten en moeren van de aansluitingen
goed vast zodat ze niet los kunnen trillen.
■
Koppel de accu los van andere apparatuur wanneer
de accu moet worden opgeladen.
4.
BEDIENINGSPROCEDURES
(Zie Afb. )
1. HET STARTEN VAN DE GENERATOR
PAS OP
Controleer het oliepeil voor u de machine gaat
gebruiken zoals beschreven in het hoofdstuk
“HET CONTROLEREN VAN DE MOTOROLIE”.
(a) Zet de motorschakelaar op de stand “ | ” (AAN).
(Zie Afb.-①)
❶ “ | ” (AAN)
❷ “ 〇 ” (UIT)
(b) Open de brandstofkraan. (Zie Afb.-②)
❶ OPEN
❷ DICHT
(c) Zet de chokehendel dicht als de motor koud is.
(Zie Afb.-③)
❶ CHOKEHENDEL
❷ DICHT
❸ OPEN
(d) [Model met trekstarter]
Trek zachtjes aan de handgreep van de starter
totdat u weerstand voelt (dit is de compressie).
Laat de handgreep terugkeren naar de
uitgangspositie en trek dan krachtig.(Zie Afb.-④)
❶ KRACHTIG TREKKEN
■
Als de motor ook na een paar keer proberen niet
wil starten, dient u de bovenstaande procedure
opnieuw te volgen met de chokehendel open.
■
Trek de starter niet volledig uit.
■
Laat de handgreep van de starter terugkeren in zijn
oorspronkelijke stand wanneer de motor eenmaal
draait, maar laat de handgreep hierbij niet los.
(e) [Model met elektrische startmotor]
Doe de sleutel in het contactslot en draai deze met
de klok mee naar “ | ” (ANN).
. Draai vervolgens het contact verder naar “
(START).
De startmotor zal gaan draaien om de motor te
starten. (Zie Afb.-⑤)
❶ “ 〇 ” (STOPPEN)
❷ “ | ” (ANN)
” (START)
❸ “
PAS OP
■
Gebruik de startmotor niet langer dan 5
seconden achter elkaar.
Draai de sleutel weer naar de “ | ” (ANN)
stand en wacht 10 seconden alvorens
opnieuw te starten.
■
Draai de sleutel niet naar “
position when the engine is running to
wanneer de motor draait om schade aan de
startmotor te voorkomen.
■
Draai de sleutel naar “ | ” (ANN) voor het
starten van de motor met de trekstarter en
trek vervolgens aan de handgreep.
(f) Wanneer de motor eenmaal draait kunt u de
chokehendel geleidelijk terugzetten in de “OPEN”
stand. (Zie Afb.-⑥)
❶ CHOKEHENDEL
❷ DICHT
❸ OPEN
(g) Laat de motor een paar minuten onbelast
warmdraaien.
” (START)
EN
FR
DE
NL
”
ES
IT
PT
GR
NO
SE
FI
DK
RU
7
Page 36

2. HET GEBRUIK VAN ELEKTRISCHE STROOM
WAARSCHUWING
■
Controleer of de apparatuur UIT (OFF) staat voor u deze aansluit op de generator.
■
Verplaats of beweeg de generator niet terwijl deze loopt.
■
U moet de generator te aarden als de aangesloten apparatuur geaard is.
Als u de machine niet aardt, kunt u een elektrische schok oplopen.
BEDIENINGSPANEEL
EN
(EG241A, EG321A, EG321AE)
FR
DE
NL
[Model met elektrische
startmotor]
ES
Wisselstroomaansluitingen 20A
Wisselstroomonderbreker
IT
Contactslot
PT
GR
NO
Motorschakelaar
SE
FI
Aardaansluiting
DK
RU
(EG441A, EG441AE, EG601A, EG601AE, EG671A, EG671AE)
Wisselstroomaansluitingen 20A
Wisselstroomonderbreker
[Model met elektrische
startmotor]
Voltmeter
Gelijkstroomonderbreker
Gelijkstroomaansluitingen
Voltmeter
Contactslot
8
Motorschakelaar
Aardaansluiting
Gelijkstroomonderbreker
Gelijkstroomaansluitingen
Page 37

(1) WISSELSTROOM GEBRUIK
(a) Controleer het juiste voltage met behulp van de
voltmeter. (Zie Afb.-①)
■
Deze generator is in de fabriek zorgvuldig getest
en afgesteld.
Als de generator de gespecifi ceerde spanning niet
produceert, neem dan onmiddellijk contact op met
uw dichtstbijzijnde Makita vertegenwoordiger of
een erkende onderhoudsmonteur.
Zet de schakelaar(s) van de elektrische apparatuur uit
(b)
voordat ze op de generator worden aangesloten.
(c) Steek de stekker(s) van de elektrische apparatuur
in de aansluiting(en).
■
Controleer het amperage van de aansluitingen.
Zorg ervoor dat de stroomsterkte niet boven het
aangegeven amperage kan komen.
■
Zorg ervoor dat het totale vermogen van alle
apparaten het nominale vermogen van de
generator niet overschrijdt.
PAS OP
Steek geen vreemde voorwerpen in de stopcontacten
of andere aansluitingen.
WAARSCHUWING
Zorg ervoor de generator te aarden als de
aangesloten elektrische apparatuur geaard is
.
OPMERKING
Wanneer de wisselstroomonderbreker afslaat terwijl
het apparaat in bedrijf is, is de generator overbelast,
of is de aangesloten apparatuur defect.
Stop de generator onmiddellijk, controleer de
apparatuur en / of de generator op overbelasting en
laat indien nodig reparaties uitvoeren door uw Makita
vertegenwoordiger of erkende onderhoudsmonteur.
(d) Controleer of de onderbreker inderdaad op de
stand “ | ” (AAN) staat. (Zie Afb.-②)
❶ “ | ” (AAN)
(e) Zet de aangesloten apparatuur aan met de eigen
hoofdschakelaar.
(2) GELIJKSTROOMAPPLICATIE
(Alleen voor het opladen van een 12 Volt accu)
Gelijkstroomaansluiting (Alleen voor het opladen van
een 12 Volt accu) (Zie Afb.-③)
❶ RODE KABEL
❷ ZWARTE KABEL
Voor het opladen van een 12 Volt accu, kan er
maximaal een stroom van 12 V-8,3 A (100 W) worden
afgetakt via de gelijkstroomaansluiting door middel van
de speciale gelijkstroomkabel. (Zie Afb.-④)
Deze speciale gelijkstroomkabel wordt meegeleverd
met uw generator (bevindt zich in de verpakking).
(Zie Afb.-⑤).
Gelijkstroomonderbreker
De gelijkstroomonderbreker schakelt de
gelijkstroomvoorziening uit wanneer de gelijkstroom te
hoog oploopt, of wanneer de accu defect is.
Controleer de generator en/of de accu op overladen of
defecten en schakel de gelijkstroomonderbreker weer
in als u geen problemen en defecten kunt vinden.
EN
FR
DE
NL
ES
IT
PT
GR
NO
SE
FI
DK
RU
Aansluiten van de speciale gelijkstroomkabel :
■
Verbindt de positieve aansluitklem (rood) op de
generator met de positieve aansluitklem (+) op de accu.
■
Verbindt de negatieve aansluitklem (zwart) op de
generator met de negatieve aansluitklem (-) op de accu.
9
Page 38

Procedure voor het opladen van de accu:
1) Stop de motor.
2) Verwijder alle aansluitingen van de accu.
3) Steek de stekker van de speciale gelijkstroomkabel
in de gelijkstroomaansluiting.
4) Verbind de positieve (rode) klem van de
gelijkstroomkabel met de positieve (+) aansluiting
van de accu en verbind daarna de negatieve
(zwarte) klem van de gelijkstroomkabel met de
negatieve (-) aansluiting van de accu.
EN
5) Verwijder alle doppen van de vulopeningen voor de
accuvloeistof (elektrolyt).
FR
6) Controleer het peil van de accuvloeistof (elektrolyt)
DE
en vul indien nodig bij met gedestilleerd water.
7) Start de motor.
NL
8) Kijk of het controlelampje inderdaad gaat branden.
ES
9) Controleer of de gelijkstroomonderbreker AAN
IT
staat.
PT
10) De accu wordt nu geladen.
GR
NO
■
SE
Gebruik de uitgangsaansluitingen voor
wisselstroom en gelijkstroom in geen geval
FI
tegelijk.
■
Bevestig de positieve (rode) en negatieve
DK
(zwarte) kabels aan de juiste polen van de
RU
accu.
■
Sluit de gelijkstroomkabel aan en koppel
deze weer los wanneer de motor gestopt is.
■
Tijdens het laden ontwijkt er ontplofbaar
waterstofgas via de ontluchtingsopeningen
in de accu.
Zorg er daarom voor dat er tijdens het laden
geen vonken of open vuur voorkomen in de
buurt van de generator.
■
De accuvloeistof (elektrolyt) bevat
zwavelzuur, een bijtende vloeistof die uw
ogen en kleding kan aantasten. Wees zeer
voorzichtig en vermijd contact te allen tijde.
In geval van verwonding dient u het
lichaamsdeel in kwestie onmiddellijk af te
spoelen met grote hoeveelheden water en
dient u een arts te raadplegen.
■
De oplaadtijd hangt mede af van het soort
accu en hoe leeg de accu is. Meet tijdens het
laden om het uur de relatieve dichtheid van
de accuvloeistof met een hydrometer.
Controleer of de gelijkstroomonderbreker
niet uit staat.
De accu is volledig opgeladen wanneer de
relatieve dichtheid zich tussen 1,26 en 1,28
bevindt.
PAS OP
3. HET STOPZETTEN VAN DE GENERATOR
(a) Zet de aangesloten elektrische apparatuur uit en
haal de stekkers uit de stopcontacten
(aansluitingen) op de generator.
(b) Laat de motor zonder belasting ongeveer 3
minuten afkoelen voordat hij wordt stopgezet.
(c) [Model met trekstarter]
Zet de motorschakelaar op “ 〇 ” (UIT).
(Zie Afb.-⑥)
❶ “ | ” (AAN)
❷ “ 〇 ” (UIT)
[Model met elektrische startmotor]
Draai het contactslot naar STOPPEN stand.
(Zie Afb.-⑦)
❶ “ 〇 ” (STOPPEN)
❷ “ | ” (ANN)
” (START)
❸ “
(d) Doe de brandstofkraan dicht. (Zie Afb.-⑧)
❶ OPEN
❷ DICHT
4. OLIESENSOR (Zie Afb. -⑨)
❶ OLIESENSOR
(a) De oliesensor neemt de verlaging van het oliepeil
waar in het carter en zet de motor automatisch stop
als het oliepeil beneden een van te voren bepaald
niveau komt.
(b) Wanneer de motor automatisch gestopt is, moet u
de wisselstroomonderbreker van de generator
uitschakelen en het oliepeil controleren.
Vul olie bij tot het hoogste peil zoals aangegeven
op bladzijde 5 en start de motor opnieuw op.
(c) Als de motor niet start met behulp van de normale
startprocedure, moet het oliepeil worden
10
Page 39

5. INFORMATIE OVER HET VERMOGEN
Sommige apparaten hebben een piekstroom nodig om te kunnen starten. Dit betekent dat de hoeveelheid
elektriciteit die nodig is om het apparaat te starten groter kan zijn dan de hoeveelheid die nodig is om het apparaat
te laten draaien. Elektrische apparaten en gereedschappen hebben normaal gesproken een label waarop hun
spanning, cycli/Hz, stroomsterkte in ampère en elektrisch vermogen staat aangegeven die nodig zijn om het
apparaat of gereedschap te laten werken. Neem contact op met uw dichtstbijzijnde dealer of servicedienst als u
vragen heeft die betrekking hebben op de piekstroom van bepaalde apparaten of elektrisch gereedschap.
■
Elektrische belastingen zoals gloeilampen en warmhoudplaten hebben dezelfde stroomsterkte nodig tijdens
het opstarten als in het gebruik.
■
De belasting van bijvoorbeeld een TL-lamp is 1,2 tot 2 keer de aangegeven hoeveelheid Watt tijdens het starten.
■
De belasting voor kwiklampen is 2 tot 3 keer de aangegeven hoeveelheid Watt tijdens het starten.
■
Elektrische motoren vereisen een grote hoeveelheid stroom bij het opstarten. Het benodigde vermogen is
afhankelijk van het soort motor en het gebruik van die motor.
Zodra genoeg “piekstroom” is bereikt om de motor te starten, heeft het apparaat nog slechts 50% tot 30% van
de stroomsterkte nodig om te blijven lopen.
■
De meeste elektrische apparaten hebben 1,2 tot 3 keer zoveel stroom nodig om tijdens gebruik onder
belasting te lopen. Zo gerekend kan een generator van 5.000 Watt stroom leveren voor elektrisch gereedschap
van 1.800 tot 4.000 watt.
■
Apparaten zoals onderwaterpompen en luchtcompressoren vereisen een zeer grote kracht om te starten. Zij
hebben 3 tot 5 keer de normale stroomsterkte nodig om te kunnen starten. Een generator van 5.000 watt kan
op zo’n manier bijvoorbeeld slechts een pomp van 1.000 tot 1.700 watt aandrijven.
OPMERKING
De volgende tabel met stroomsterkten is slechts een algemene richtlijn.Bekijk uw apparaat voor de
correcte stroomsterkte.
Om de totale stroomsterkte te kunnen bepalen die nodig is om een bepaald elektrisch apparaat of gereedschap te
laten werken, dient het getal van de spanning van het apparaat / gereedschap vermenigvuldigd te worden met het
ampèregetal (amp) van datzelfde apparaat / gereedschap. De spanning en ampères (amp) kunnen gevonden
worden op een plaatje dat gewoonlijk op elektrische apparaten en gereedschap is aangebracht.
Vereiste vermogen (ca. W)
Toepassingen
Gloeilamp, verwarmingselement 2000 2400 3600 4600 5500
TL-lampen, Elektrisch gereedschap 1100 1300 2000 2550 3050
Kwiklamp 800 950 1450 1850 2200
Pomp, compressor 500 600 900 1150 1400
EG241A
EG321A
EG321AE
EG441A
EG441AE
EG601A
EG601AE
EG671A
EG671AE
EN
FR
DE
NL
ES
IT
PT
GR
NO
SE
FI
DK
RU
VOLTAGE VERMINDERING DOOR VERLENGKABELS
Wanneer er een lang verlengsnoer of lange kabel wordt gebruikt om een apparaat of een stuk gereedschap aan te
sluiten op de generator zal er in dat snoer een voltageverlies optreden zodat de effectieve spanning voor het
apparaat of gereedschap lager is dan wat de generator produceert.
In de tabel hieronder is te zien wat een verlengkabel van 100 m voor invloed heeft op de spanning voor het
aangesloten apparaat of gereedschap.
Diameter
v/d
binnenkabel
mm
0,75 18 7 30/0,18 2,477 2,5V 8V
1,27 16 12 50/0,16 1,486 1,5V 5V 7,5V 12V 15V 18V
2,0 14 17 37/0,26 0,952 1V 3V 5V 8V 10V 12V 15V
3,5 12 tot 10 23 45/0,32 0,517
5,5 10 tot 8 35 70/0,32 0,332
A.W.G.
2
Toegestaan
amperage
No. A No./mm
Aantal draden
/ diameter
draden
Weerstand Stroom in ampères
/100m 1A 3A 5A 8A 10A 12A 15A
Ω
12,5V
────
1,5V 2,5V 4V 5V 6,5V 7,5V
─
1V 2V 2,5V 3,5V 4V 5V
─
─
Vermindering v/h
11
Voltage
Page 40

6. VONKENVANGER
In een droge of beboste omgeving verdient het aanbeveling dit product te gebruiken met een vonkenvanger. In
sommige gebieden is het gebruik van een vonkenvanger verplicht. Controleer de regelgeving die geldt op de plek
waar u de machine wilt gebruiken voor u begint.
De vonkenvanger moet regelmatig schoongemaakt worden om ervoor te zorgen dat deze naar behoren functioneert.
Een verstopte vonkenvanger:
● Belemmert de uitstroom van uitlaatgassen.
● Verlaagt het vermogen van de motor.
● Verhoogt het brandstofverbruik.
● Maakt het starten moeilijker.
Als de motor gelopen heeft, zullen de knaldemper en de vonkenvanger zeer heet zijn. Laat de uitlaat afkoelen
EN
voor u de vonkenvanger gaat schoonmaken.
FR
DE
Verwijderen van de vonkenvanger
1. Verwijder de fl ensbouten van de afdekking van de
NL
uitlaat en verwijder de afdekking van de uitlaat.
ES
IT
2. Verwijder de speciale schroef van de vonkenvanger
en verwijder de vonkenvanger van de knaldemper.
PT
GR
NO
SE
FI
DK
RU
EG601A, EG601AE
EG671A, EG671AE
Schroef
Knaldemper
Scherm vonkenvanger
Reinig het scherm van de vonkenvanger
Gebruik een borstel om koolafzetting van het
scherm van de vonkenvanger te verwijderen.
Wees voorzichtig dat u het scherm niet beschadigt.
De vonkenvanger moet vrij zijn van breuken en
gaten. Vervang de vonkenvanger indien deze
beschadigd is.
Installeer de vonkenvanger en de bescherming van
de knaldemper in de omgekeerde volgorde van
demontage.
12
EG601A, EG601AE
EG671A, EG671AE
Scherm vonkenvanger
Page 41

7. ONDERHOUDSSCHEMA
■
DAGELIJKS
IEDERE
50 UUR
Controleer oliepeil
■
Controleer alle componenten, aangegeven in “CONTROLES VOOR HET IN
WERKING STELLEN”
■
Was het fi lterelement - vaker als dit in een vuile of stoffi ge omgeving wordt
gebruikt.
■
Controleer de bougie, reinig indien noodzakelijk.
■
IEDERE
100 UUR
IEDERE
200 UUR
IEDERE
500 UUR
IEDERE
1.000 UUR
(24 MAANDEN)
Vervang de motorolie * - vaker als de motor in een vuile of stoffi ge
omgeving wordt gebruikt.
■
Maak de vonkenvanger schoon.
■
Stel de afstand van de bougie-elektroden in.
■
Maak het brandstoffi lter schoon.
■
Vervang bougie en fi lterelement.
■
Reinig carburateur, kleppenspeling, klepzitting en cilinderkop en stel
opnieuw af.
■
Controleer en, indien nodig, vervang de koolborstels.
■
Controleer de onderdelen van het bedieningspaneel.
■
Controleer de rotor en de starter.
■
Vervang het rubberen montageblok van de motor.
■
Geef de motor een onderhoudsbeurt.
■
Vervang de brandstofl eiding.
OPMERKING : (*)
■
De olie dient voor de eerste keer te worden ververst na twintig (20) uur gebruik. Daarna dient olie verversen
elke 100 uur plaats te vinden.
■
Voordat de olie wordt ververst, moet een geschikte manier worden gevonden om de afgewerkte olie weg te
gooien. Gooi deze niet in de afvoer, in de tuin of in open water.
Uw plaatselijke bestemmings- of milieuregels geven hieromtrent gedetailleerde instructies.
EN
FR
DE
NL
ES
IT
PT
GR
NO
SE
FI
DK
RU
13
Page 42

8. ZELF UIT TE VOEREN
ONDERHOUD
PAS OP
Zorg ervoor dat de motor gestopt is voor u
onderhoud, service of reparaties gaat uitvoeren.
OPMERKING
Het verdient aanbeveling gehoorbescherming te
dragen wanneer u de generator gebruikt, of er
onderhoud of reparaties aan uitvoert.
EN
VERVERSEN VAN MOTOROLIE
FR
(Zie Afb. -①)
DE
■
Ververs de motorolie elke 100 uur. (Bij een nieuwe
NL
motor dient de olie na 20 uur te worden ververst).
(a) Laat de olie weglopen door de aftapplug en de
ES
olievuldop te verwijderen terwijl de motor warm is.
IT
❶ OLIE-AFTAPPLUG
PT
(b) Doe de aftapplug terug en vul de motor met olie
totdat het maximum niveau op de olievuldop is
GR
bereikt.
NO
■
Gebruik verse motorolie van hoge kwaliteit tot
het gespecifi ceerde niveau zoals aangegeven op
SE
blz. 5. Als vervuilde olie of olie van een mindere
FI
kwaliteit wordt gebruikt of als de hoeveelheid
motorolie niet voldoende is, wordt de motor
DK
beschadigd en wordt de levensduur aanzienlijk
verkort.
RU
SCHOONMAKEN VAN HET LUCHTFILTER
(Zie Afb. -② t/m ④)
Het is erg belangrijk het luchtfi lter netjes te houden.
Vuil dat binnen kan komen door slordig geïnstalleerde,
slecht onderhouden of versleten luchtfi lter-elementen
kan de motor beschadigen en sneller doen slijten.
Houd daarom het luchtfi lter te allen tijde schoon.
❶ BASIS
❷ ELEMENT
❸ AFDEKKING LUCHTFILTER
❹ BOUT
(a) Verwijder de bout van de afdekking van het
luchtfi lter. (EG601A, EG601AE, EG671A,
EG671AE) (Zie Afb.-④)
Verwijder de afdekking van het luchtfi lter en het
fi lterelement.
(b) Urethaanschuim: Was het urethaanschuim-element
uit in schone kerosine of diesel.
Laat vervolgens een mengsel van 3 delen kerosine
of dieselolie en 1 deel motorolie in het element
trekken.
Knijp het element uit om dit mengsel te verwijderen
en doe het terug in het luchtfi lter.
14
OPMERKING
In plaats van met schone olie (kerosine) kunt u het
urethaan schuimelement ook wassen in een
oplossing van een mild wasmiddel en warm water
(een sopje). Spoel het element vervolgens grondig
uit met schoon water. Laat het element heel goed
drogen. Drenk het element in schone motorolie en
knijp het teveel aan olie eruit.
HET SCHOONMAKEN EN AFSTELLEN VAN
DE BOUGIE (Zie Afb. -⑤)
(a) Als de bougie vervuild is met koolstof, dient u dit te
verwijderen met behulp van een
schoonmaakmiddel voor bougies of een
staalborstel.
(b) Stel de afstand tussen de elektroden in op 0,6 tot
0,7 mm.
Bougie : BR-6HS (NGK)
HET SCHOONMAKEN VAN HET
BRANDSTOFFILTER (Zie Afb. -⑥)
Vuil en water in de brandstof worden verwijderd door
het brandstoffi lter.
(a) Verwijder de kom van het fi lter en gooi water en
vuil weg.
(b) Reinig het roostertje en de kom van het fi lter met
benzine.
(c) Bevestig de kom stevig op de behuizing en zorg er
voor dat er geen brandstof lekt.
CONTROLEREN VAN DE KOOLBORSTELS
Onderhoudsgegevens koolborstels
(Effectieve lengte)
Het oppervlak van de koolborstel waar deze de
sleepring raakt moet netjes glad zijn.
Is dat niet het geval, dan is het mogelijk dat er stof
o.i.d. tussen de koolborstel en de sleepring komt te
zitten.
Dit moet met schuurpapier o.i.d. worden weggehaald,
want dit kan gevaarlijk zijn.
De bruikbare lengte van de borstel is 5~11mm, dus
vervang de borstel door een nieuwe wanneer deze 5
mm of korter is. (Zie Afb.-⑦)
❶ NIEUWLENGTE
❷ BRUIKBARE KOOLBORSTELLENGTE
Page 43

De reden hiervoor is dat de als de borstel nog korter zou
zijn, de contactdruk op de sleepring minder zou worden,
met als gevolg een vermindering van de effi ciëntie van de
generator en van het uitgangsvoltage.
Controleer de lengte van de koolborstels elke 500
bedrijfsuren.
Controleer de lengte van de koolborstels ook wanneer de
generator storingen vertoont, bijvoorbeeld wanneer er
geen stroom geproduceerd wordt, of wanneer het voltage
te laag is.
Onderhoudsgegevens koolborstels
(Demontage en montage) (Zie Afb. -⑧)
❶ BORSTEL
❷ SLEEPRING
❸ BORSTELHOUDER
❹ FLENSBOUTEN
❺ AFDEKKING BEUGEL
❻ FLENSBOUTEN
Demontage
1. Verwijder de twee fl ensbouten (M5 x 20) en
verwijder vervolgens de afdekking van de beugel.
2. Verwijder de twee fl ensbouten (M5 x 16) en
verwijder vervolgens de koolborstel.
Montage
1. Druk de koolborstel tegen de sleepring en zet hem
vast (1,5~2N•m) met de twee fl ensbouten (M5 x 16).
Blijf terwijl u dit doet controleren of de koolborstel
zich in de juiste positie ten opzichte van de
sleepring bevindt.
2. Zet de afdekking van de beugel vast (3~4N•m) door
de twee fl ensbouten (M5 × 20) aan te draaien.
9. PERIODIEKE HANDELINGEN
EN INSPECTIES
Wanneer u de generator gebruikt als noodstroomvoorziening, is het nodig de machine periodiek
te laten draaien en te controleren.
Brandstof (benzine) en motorolie zullen slechter
worden na verloop van tijd, waardoor de motor moeilijk
zal starten en met als uiteindelijk resultaat storingen
aan de motor en defecten.
PAS OP
Omdat de brandstof (benzine) mettertijd slechter
zal worden, dient u de brandstof (benzine)
regelmatig door verse te vervangen; we raden u
aan dit één keer per drie (3) maanden te doen.
(a) Controleer de brandstof (benzine), de motorolie en
het luchtfi lter.
(b) Start de motor.
(c) Laat de motor tenminste tien minuten lopen met
ingeschakelde apparatuur, bijvoorbeeld verlichting.
(d) Controleer de volgende punten:
■
Loopt de motor naar behoren.
■
Is het geproduceerde vermogen voldoende en
brandt het indicatorlampje correct.
■
Werkt de motorschakelaar naar behoren.
■
Geen lekkage van motorolie en brandstof
(benzine)
10. VERVOER
Wanneer de generator vervoerd moet worden, moet u
ervoor zorgen dat de brandstof (benzine) volledig uit
de tank wordt afgetapt.
WAARSCHUWING
■
Om morsen van brandstof door trillingen en
schokken te voorkomen, mag u de generator
nooit vervoeren wanneer er nog brandstof
(benzine) in de tank zit.
■
Doe de tankdop goed vast.
■
Om het brandrisico dat samengaat met het
gebruik van benzine te voorkomen, mag u de
generator nooit lang in de zon laten staan.
■
Bewaar tijdens vervoer de brandstof
(benzine) in een uitsluitend voor de opslag
van benzine bedoelde stalen tank.
(a) Zet de motorschakelaar op de (STOPPEN) stand.
(b) Tap de brandstof uit de tank af.
(c) Doe de tankdop weer vast.
PAS OP
■
Plaats geen zware dingen op de generator.
■
Kies de juiste plek en plaats de generator
op de juiste positie in het transportvoertuig
zodat de generator niet kan bewegen of
vallen.
Zet de generator indien nodig met touwen
e.d. vast.
15
EN
FR
DE
NL
ES
IT
PT
GR
NO
SE
FI
DK
RU
Page 44

11. VOORBEREIDINGEN VOOR OPSLAG
(Zie Afb. )
Onderstaande procedures dienen gevolgd te worden voordat uw generator wordt
6 maanden of langer.
■
Laat de brandstof voorzichtig uit de tank lopen door de brandstofl eiding los te koppelen. Benzine die
achterblijft in de tank zal na een tijdje achteruit gaan in kwaliteit en het moeilijk maken de motor te starten.
■
Verwijder de aftapschroef van de vlotterkamer van de carburateur en tap de brandstof af. (Zie Afb. -①)
❶ AFTAPSCHROEF
■
Ververs de motorolie.
■
Controleer of er bouten en schroeven zijn losgeraakt, schroef deze vast als dit nodig is.
■
Reinig de generator grondig met behulp van een doek met olie. Spuit met een beschermingsmiddel indien dit
voorhanden is. GEBRUIK NOOIT WATER OM DE GENERATOR TE REINIGEN !
EN
■
Trek aan de handgreep van de starter totdat u weerstand voelt en laat de handgreep in die positie staan.
FR
■
Bewaar de generator in een goed geventileerde, niet te vochtige ruimte.
DE
12. OPLOSSEN VAN PROBLEMEN
NL
Als de motor van de generator na verscheidene pogingen weigert te starten of als er geen elektriciteit
ES
geproduceerd wordt via de aansluitingen, dient u onderstaande tabel te raadplegen. Als uw generator vervolgens
IT
nog steeds niet start of geen elektriciteit opwekt, Neem contact op met de dichtstbijzijnde Makita
vertegenwoordiger of een erkende onderhoudsmonteur voor meer informatie of maatregelen om het probleem te
PT
verhelpen.
GR
Als de motor weigert te starten:
NO
Controleer of de chokehendel in de juiste stand
SE
staat.
Controleer of de brandstofkraan open staat.
FI
DK
Controleer het brandstofpeil.
RU
Controleer of de motorschakelaar niet op “UIT”
staat.
Controleer of de generator niet aan een
apparaat is aangesloten.
Controleer de bougie op losse bougiedop.
Controleer de bougie op vuil.
Zet de chokehendel “DICHT”.
Open de brandstofkraan als deze dicht staat.
Vul de tank als deze leeg is, zorg er voor niet te
ver te vullen.
Zet de motorschakelaar op “AAN”.
Zet de stroomschakelaar van een eventueel
aangesloten apparaat uit en trek de stekker uit
de aansluiting.
Duw de bougiedop op zijn plaats als deze los
zit.
Verwijder de bougie en maak de elektroden
schoon.
opgeslagen voor een periode van
Als er geen elektriciteit geproduceerd wordt via de aansluitingen:
Nadat u heeft gecontroleerd dat het totale
wattage van de aangesloten elektrische
Controleer of de wisselstroomonderbreker op
“AAN” staat.
Controleer het wisselstroom stopcontact en de
gelijkstroom aansluitingen op losse contacten.
Ga na of het starten van de motor werd
geprobeerd terwijl er reeds apparaten waren
aangesloten.
Te laag vermogen. De koolborstel is versleten.
apparatuur binnen de toegestane grenzen valt
en de apparatuur niet defect is, kunt u de
wisselstroomonderbreker op “AAN” zetten.
Als er zekeringen blijven doorslaan, moet u
contact opnemen met uw dichtstbijzijnde dealer.
Zet indien nodig de aansluitingen goed vast.
Zet de schakelaar op het aangesloten apparaat
uit en trek de stekker uit de aansluiting. Doe de
stekker weer terug in het stopcontact nadat de
generator goed gestart is.
16
Page 45

13. TECHNISCHE GEGEVENS
MODEL EG241A
Type Borstel, zelfbekrachtigend, 2-polig, enkele fase
Regelsysteem voor het voltage Automatische voltage-regelaar (AVR)
Wisselstroomuitgang
Nominaal voltage-Frequentie
Nominale stroomsterkte A 8,7 10,4 15,7 20,0 23,9
Nominaal uitgangsvermogen
Maximum uitgangsvermogen
Nominale vermogensfactor 1,0
Type beveiliging Zekeringloze onderbreker
Wisselstroomgenerator
Gelijkstroomuitgang
Nominaal voltage V 12
Nominale stroomsterkte
Type beveiliging Zekeringloze onderbreker
Model EX17D EX21D EX30D EX35D EX40D
Type
Cilinderinhoud mL 169 211 287 404
Brandstof Ongelode benzine voor automobielen
Benzinetankcapaciteit L 12,8 22,0
Oliecapaciteit motor L 0,6 1,0 1,2
Motor
Nominale constante werking H 10,5 9,0 5,6 7,5 6,6
Bougie BR-6HS (NGK)
Startsysteem Trekstarter Elektrische startmotor / Trekstarter
V-Hz 230 - 50
VA (W) 2000 2400 3600 4600 5500
VA (W) 2400 3200 4400 6000 6700
A 8,3
Robin Geforceerd luchtgekoelde, Viertakt, Benzinemotor met
EG321A
EG321AE
EG441A
EG441AE
bovenliggende nokkenas
EG601A
EG601AE
EG671A
EG671AE
EN
FR
DE
NL
ES
IT
PT
GR
NO
SE
FI
DK
RU
3/4 belasting brandstofverbruik
Draairichting Tegen de klok in
Lengte mm 600
Breedte mm 420 450 510 530
Afmetingen
Hoogte mm 500 500 540 580
Netto gewicht kg 47
Brutogewicht
Gewicht volgens de EPTA-procedure 01/2003
Technische gegevens kunnen zonder kennisgeving gewijzigd worden.
*1: ( ) toont de afmetingen inclusief het accuframe.
*2: ( ) toont het gewicht inclusief de elektrische starter.
L/H 1,0 1,3 1,9 2,7 2,9
620
(870)*1
51
(56)*267 (77)*286 (96)*288 (98)*2
kg
57
61
(66)*278 (88)*2
675
(925)*1
(114)*2
104
725
(975)*1
106
(116)*2
17
Page 46

14. BEDRADINGSSCHEMA
EG241A, EG321A (50Hz-230V) [Model met trekstarter]
BEDIENINGSPANEELMOTOR
Blk
Grn
Motorschakelaar
Wisselstroomonderbreker
Ruisfilter
Gry
GryOrg
Gelijkstroomonderbreker
WW
Blk
GENERATOR
EN
FR
DE
NL
ES
IT
PT
GR
NO
Blk
Bougie
ROTOR STATOR
Sleepring
Y
Blu
Secundaire spoel
Brn
Brn
AVR eenheid
Ontstekingsspoel
Oliesensorschakelaar
Y
Blu Blu
Org
Wisselstroom
wikkeling 1
Wisselstroom
wikkeling 2
YY
Y
Gelijkstroom wikkeling
Grn/Y
Blk
Y
Y/R
Brn
Brugdiode
Brn
Oliesensoreenheid
RR R
Gry
Blu Blu
Grn Grn
Grn
W
Blk
SE
FI
EG321AE (50Hz-230V) [Model met elektrische startmotor]
DK
RU
Blk
Bougie
GENERATOR
R
Blk
Accu
ROTOR STATOR
Sleepring
Y
Blu
AVR eenheid
Org
Ontstekingsspoel
Oliesensorschakelaar
Secundaire spoel
Brn
Y
Y
Brn
Blu Blu
Blk
Blk
Y
Y/R
Wisselstroom
wikkeling 1
Wisselstroom
wikkeling 2
Y
Y
Grn/Y
Gelijkstroom wikkeling
Oliesensoreenheid
Elektrische
startmotor
Brn
Brugdiode
Brn
BEDIENINGSPANEELMOTOR
Gry
Blu
Blu
Laadspoel
Magnetische schakelaar
RR
Gry
Org
Blu Blu
Grn
W
Blk
Ruisfilter
Gry
Gry
Grn
Gelijkstroomonderbreker
WW
Blk
Grn
Wisselstroomonderbreker
Voltmeter
Voltmeter
Wisselstroom
stopcontact
R
Blk
R
Gelijkstroom
stopcontact
Gelijkstroom
stopcontact
DC12V
Org Org
Grn
Gry
Grn
Wisselstroom
stopcontact
DC12V
Wisselstroom
stopcontact
Zekering
ST
M-
IG
B
Contactslot
Wisselstroom
stopcontact
Kleurcode bedrading
Blk : Zwart
Blk/W : Zwart/Wit
Blu : Blauw
LBlu : Licht blauw
Brn : Bruin
Brn/W :
Bruin/Wit
Grn : Groen
Grn/W : Groen/Wit
Org : Oranje
Gry : Grijs
R : Rood
W : Wit
Y : Geel
W/Blk : Wit/Zwart
Grn/Y : Groen/Geel
Pur : Paars
Aard
aansluiting
M+
Aard
aansluiting
18
Page 47

EG441A, EG601A, EG671A (50Hz-230V) [Model met trekstarter]
BEDIENINGSPANEELMOTOR
Grn
Blk
Bougie
GENERATOR
ROTOR STATOR
Sleepring
W
R
Secundaire spoel
Grn
W
Grn
W
AVR eenheid
Blk
Org
Y
Ontstekingsspoel
Oliesensorschakelaar
Y/R
Wisselstroom
wikkeling 1
Wisselstroom
wikkeling 2
Blu
Blu
Brn
Brugdiode
Blu
Blu
Brn
Gelijkstroom wikkeling
Grn/Y
Blk
Motorschakelaar
Oliesensoreenheid
Wisselstroomonderbreker
RR R
Gry
Org
Blu Blu
Grn
W
Blk
Ruisfilter
Gry
Org
Grn
Gelijkstroomonderbreker
WW
Blk
Voltmeter
Wisselstroom
stopcontact
Gelijkstroom
stopcontact
DC12V
Wisselstroom
stopcontact
Aard
aansluiting
EG441AE, EG601AE, EG671AE (50Hz-230V) [Model met elektrische startmotor]
Blk
R
Blk
Accu
Bougie
Ontstekingsspoel
GENERATOR
ROTOR STATOR
Sleepring
W
R
Secundaire spoel
Grn
Grn
AVR eenheid
Blk
Blk
Org
Y
Oliesensorschakelaar
Y/R
Wisselstroom
wikkeling 1
Wisselstroom
wikkeling 2
W
Blu
Blu
W
Blu
Blu
Gelijkstroom wikkeling
Grn/Y
Oliesensoreenheid
Elektrische
startmotor
Brn
Brugdiode
Brn
BEDIENINGSPANEELMOTOR
R
Wisselstroomonderbreker
Voltmeter
Blk
Wisselstroom
stopcontact
Gry
Blu
Grn
Blu
Magnetische schakelaar
Laadspoel
RR R
Org Org
Blu Blu
Grn
W
Blk
Ruisfilter
GryGry
Grn
Gelijkstroomonderbreker
WW
Blk
Zekering
Org Org
Grn
Gry
Contactslot
Grn
Wisselstroom
stopcontact
Gelijkstroom
stopcontact
DC12V
ST
M-
M+
IG
B
Aard
aansluiting
Kleurcode bedrading
Blk : Zwart
Blk/W : Zwart/Wit
Blu : Blauw
LBlu : Licht blauw
Brn : Bruin
Brn/W :
Bruin/Wit
Grn : Groen
Grn/W : Groen/Wit
Org : Oranje
Gry : Grijs
R : Rood
W : Wit
Y : Geel
W/Blk : Wit/Zwart
Grn/Y : Groen/Geel
Pur : Paars
EN
FR
DE
NL
ES
IT
PT
GR
NO
SE
FI
DK
RU
19
Page 48

15. OPTIONELE ONDERDELEN
Installatie van de wielenkit
(1) Controleer de meegeleverde accessoires.
(2) Voorbereiden van het benodigde gereedschap
■
Kraan of hefboom (doorsnee ongeveer 100 mm x 100 mm)
■
Tang
■
2 sleutels (12 mm)
(3) Installatieprocedure
A) Gebruik de kraan of de hefboom om de generator ongeveer 100 mm van de grond te tillen.
B) Installeer het wiel en de stopper aan de as.
EN
<Wiel met rem of stopper>
FR
Installeer de as ⑤ in de rem of stopper ① zodat het wiel ② in de rem zit en zet het geheel vast met de
DE
splitpen ③. Zet vervolgens de as ⑤ en de stopper ① vast met de moeren ④.
<Wielen zonder rem of stopper>
NL
Installeer het wiel ② en de ring ⑧ op de as ⑤ en zet het geheel vast met de splitpen ③.
ES
C) Controleer of de wielen soepel kunnen draaien.
IT
D) Draai de stelmoer ⑨ en stelbout ⑩ voor de as ⑤ los, breng de gaten in het frame in lijn met de
bevestigingsgaten voor de as ⑤ en gebruik de boten ⑥ en moeren ⑦ om de as aan het frame vast te
PT
GR
NO
SE
DK
RU
zetten.
Aanhaalkoppel: 20 - 25 Nm (2,0 - 2,5 kgm)
E) Draai de stelmoer ⑨ en stelbout ⑩ aan om de lengte van de as ⑤ te bepalen.
FI
20
Page 49

ISSUE EMD-GU7107
Makita Corporation
3-11-8, Sumiyoshi-cho
Anjo, Aichi 446-8502 Japan
PRINTED IN JAPAN
September 2010
 Loading...