


CLZ8560ADB15
RV Cooking Appliances
Installation Instructions
(Appliance is not approved for marine use)
WARNING
FOR YOUR SAFETY IF YOU SMELL
GAS:
1. Open windows and evacuate all
persons from the vehicle.
2. Shut off the gas supply at the gas
container or source.
3. Extinguish any open flame.
4. Do not touch electrical switches or
use any phone or radio in the
vehicle.
5. Do not start the vehicle's engine or
electric generator.
6. Immediately call your gas supplier or
qualified service technician for
repairs.
7. Do not turn on the gas supply until
the gas leak(s) has been repaired.
CONTENTS
• SAFETY INSTRUCTIONS ......... 3 to 5
• INSTALLATION INSTRUCTIONS .. 6 to 9
• Cooktop • Range
FOR YOUR SAFETY
Do not store or use gasoline or
other flammable vapors and liquids
in the vicinity of this or any other
appliance.
WARNING
Improper installation, adjustment, altera-
tion, service, or maintenance can cause
injury or property damage. Refer to this
manual. For assistance or additional
information consult a qualified installer,
service agency, manufacturer (dealer),
or the gas supplier.
INSTALLER Please leave this manual with the appliance.
CONSUMER To save you time, energy and money, read and keep this manual for future
reference.
FOR CUSTOMER ASSISTANCE CALL: 1-800-544-5513
8101 P573-60
(02-04-00)

Thank You... for purchasing our cooking
appliance. To help you obtain the maximum in cooking
satisfaction, we offer these suggestions:
Review all safety and caution instructions.
Review the Troubleshooting Chart on
pages 22 to 24 if service becomes necessary.
Include the model and serial numbers of your
appliance when requesting service.
• Proof of purchase such as sales receipt
will be needed for warranty service.
You can contact us at: 1-800-544-5513 or write to us at:
Maytag Appliances Sales Company
Attn: CAIRsMCenter
P. O. Box 2370
Cleveland, TN 37320-2370
In our continuing effort to improve the quality and
performance of our cooking appliances, it may be
necessary to make changes to the appliance without
revising this manual.
TABLE OF CONTENTS
IMPORTANT SAFETY INSTRUCTIONS ......... 3-5
INSTALLATION INSTRUCTIONS ............... 6-9
Note to installer ............................... 6
Rating plate location ........................... 8
RV range .................................... 7
RV cooktop ................................ 8-9

Read all instructions before using this appliance.
The following instructions are based on safety considerations
and must be strictly followed to eliminate the potential risks of
fire, electric shock, or personal injury.
Have your appliance installed and properly grounded by a
qualified installer according to the installation instructions.
Have the installer show you the location of the gas shut off
valve and how to shut it off in an emergency.
Always disconnect power to appliance before servicing.
To ensure proper operation and avoid possible injury or
damage to unit do not attempt to adjust, repair, service, or
replace any part of your appliance unless it is specifically
recommended in this book. All other servicing should be
referred to a qualified installer or servicer.
Be sure all packing materials are removed from the
appliance before operating it.
Keep area around appliance clear and free from
combustible materials, gasoline, and other flammable
vapors and materials.
If appliance is installed near a window, proper precautions
should be taken to prevent curtains from blowing over
burners.
Never leave any items unattended on the cooktop. The
hot air from the vent may ignite flammable items and may
increase pressure in closed containers which may cause
them to burst.
Many aerosol-type spray cans are EXPLOSIVE when
exposed to heat and may be highly flammable. Avoid their
use or storage near an appliance.
Many plastics are vulnerable to heat. Keep plastics away
from parts of the appliance that may become warm or hot.
Do not leave plastic items on the cooktop as they may
melt or soften if left too close to the vent or a lighted
surface burner.
To eliminate the hazard of reaching over hot surface
burners, cabinet storage should not be provided directly
above a unit. If such storage is provided, it should be
limited to items which are used infrequently and which are
safely stored in an area subjected to heat from an
appliance. Temperatures may be unsafe for some items,
such as volatile liquids, cleaners or aerosol sprays.
Turn off appliance and ventilating hood to avoid spreading
the flame. Extinguish flame then turn on hood to remove
smoke and odor.
Use dry chemical or foam-type extinguisher or baking
soda to smother fire or flame. Never use water on a
grease fire.
If fire is in the oven or broiler pan, smother by closing
oven door.
If fire is in a pan on the surface burner, cover pan. Never
attempt to pick up or move a flaming pan.
Never leave children alone or unsupervised near the
appliance when it is in use or is still hot. Children should
never be allowed to sit or stand on any part of the
appliance.
Children must be taught that the appliance and utensils
in it can be hot. Let hot utensils
cool in a safe place, out of reach
of small children. Children should
be taught that an appliance is not
a toy. Children should not be
allowed to play with controls or
other parts of the unit.
CAUTION: Never store items of
interest to children in cabinets
above an appliance or on the
backguard of a range. Children
climbing on the appliance or on
the appliance door to reach items
could be seriously injured.
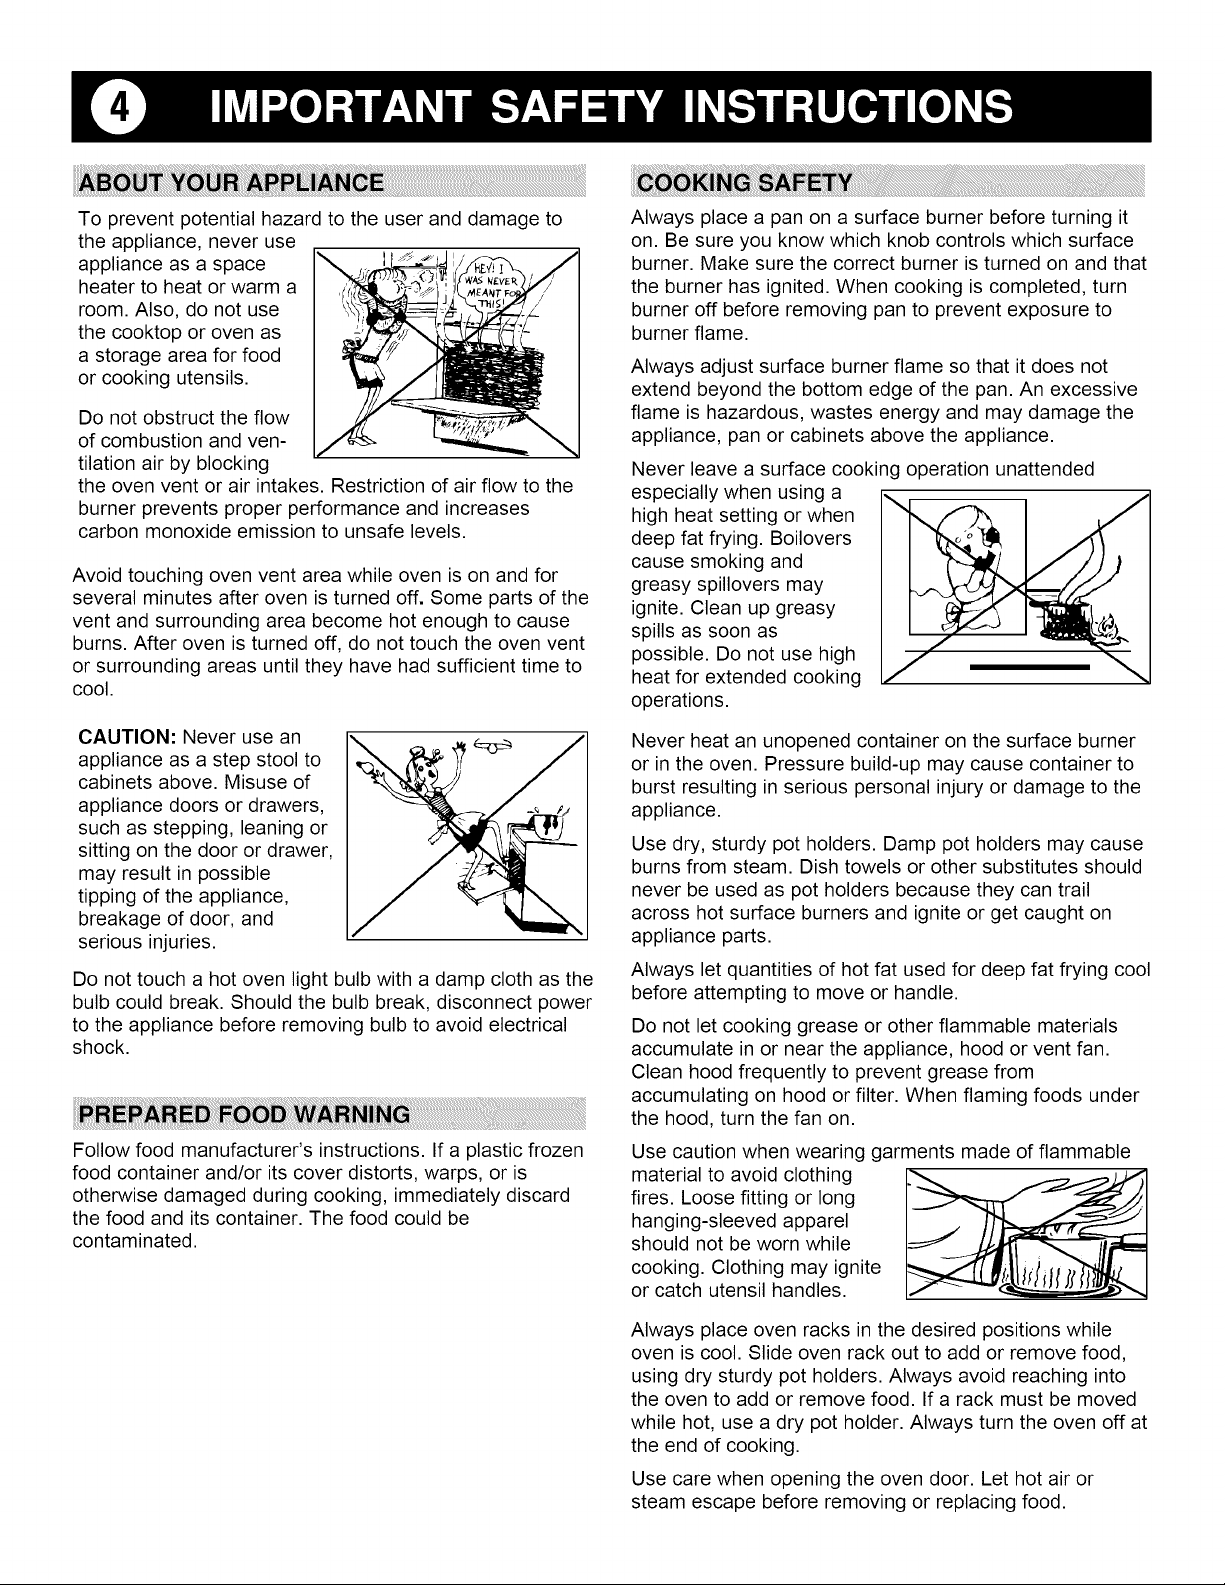
Topreventpotentialhazardtotheuseranddamageto
theappliance,neveruse
applianceasaspace
heatertoheatorwarma
room.Also,donotuse
thecooktoporovenas
astorageareaforfood
orcookingutensils.
Donotobstructtheflow
ofcombustionandven-
tilationairbyblocking
f,r
the oven vent or air intakes. Restriction of air flow to the
burner prevents proper performance and increases
carbon monoxide emission to unsafe levels.
Avoid touching oven vent area while oven is on and for
several minutes after oven is turned off. Some parts of the
vent and surrounding area become hot enough to cause
burns. After oven is turned off, do not touch the oven vent
or surrounding areas until they have had sufficient time to
cool.
CAUTION: Never use an
appliance as a step stool to
cabinets above. Misuse of
appliance doors or drawers,
such as stepping, leaning or
sitting on the door or drawer,
may result in possible
tipping of the appliance,
breakage of door, and
serious injuries.
Do not touch a hot oven light bulb with a damp cloth as the
bulb could break. Should the bulb break, disconnect power
to the appliance before removing bulb to avoid electrical
shock.
Follow food manufacturer's instructions. If a plastic frozen
food container and/or its cover distorts, warps, or is
otherwise damaged during cooking, immediately discard
the food and its container. The food could be
contaminated.
Always place a pan on a surface burner before turning it
on. Be sure you know which knob controls which surface
burner. Make sure the correct burner is turned on and that
the burner has ignited. When cooking is completed, turn
burner off before removing pan to prevent exposure to
burner flame.
Always adjust surface burner flame so that it does not
extend beyond the bottom edge of the pan. An excessive
flame is hazardous, wastes energy and may damage the
appliance, pan or cabinets above the appliance.
Never leave a surface cooking operation unattended
especially when using a
high heat setting or when
deep fat frying. Boilovers
cause smoking and
greasy spillovers may
ignite. Clean up greasy
spills as soon as
possible. Do not use high
heat for extended cooking
operations.
Never heat an unopened container on the surface burner
or in the oven. Pressure build-up may cause container to
burst resulting in serious personal injury or damage to the
appliance.
Use dry, sturdy pot holders. Damp pot holders may cause
burns from steam. Dish towels or other substitutes should
never be used as pot holders because they can trail
across hot surface burners and ignite or get caught on
appliance parts.
Always let quantities of hot fat used for deep fat frying cool
before attempting to move or handle.
Do not let cooking grease or other flammable materials
accumulate in or near the appliance, hood or vent fan.
Clean hood frequently to prevent grease from
accumulating on hood or filter. When flaming foods under
the hood, turn the fan on.
Use caution when wearing garments made of flammable
material to avoid clothing
fires. Loose fitting or long
hanging-sleeved apparel
should not be worn while
cooking. Clothing may ignite
or catch utensil handles.
Always place oven racks in the desired positions while
oven is cool. Slide oven rack out to add or remove food,
using dry sturdy pot holders. Always avoid reaching into
the oven to add or remove food. If a rack must be moved
while hot, use a dry pot holder. Always turn the oven off at
the end of cooking.
Use care when opening the oven door. Let hot air or
steam escape before removing or replacing food.
Usepanswithflatbottomsandhandlesthatareeasily
graspedandstaycool.Avoidusingunstable,warped,
easilytippedorloosehandledpans.Pansthatareheavy
tomovewhenfilledwithfoodmayalsobehazardous.
Besureutensilislargeenoughtoproperlycontainfood
andavoidboilovers.Pansizeisparticularlyimportantin
deepfatfrying.Besurepanwillaccommodatethevolume
offoodthatistobeaddedaswellasthebubbleactionof
fat.
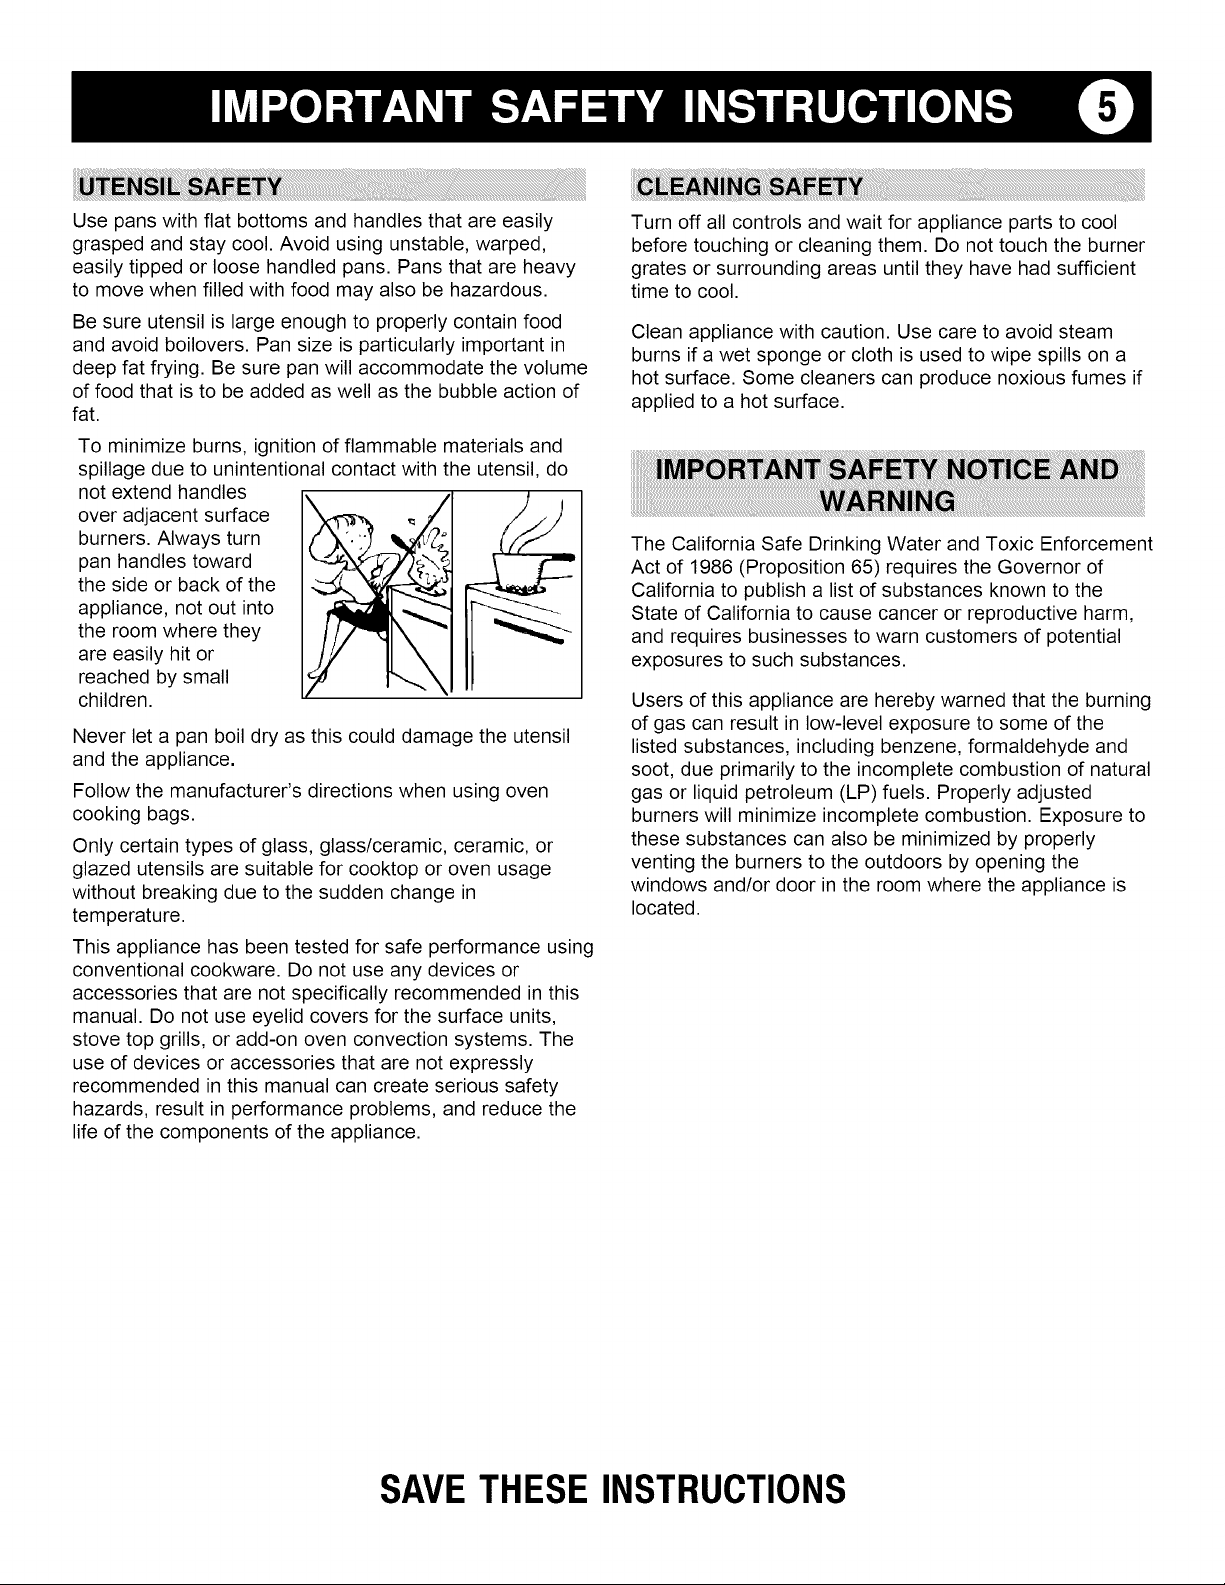
Tominimizeburns,ignitionofflammablematerialsand
spillageduetounintentionalcontactwiththeutensil,do
notextendhandles
overadjacentsurface
burners.Alwaysturn
panhandlestoward
thesideorbackofthe
appliance,notoutinto
theroomwherethey
areeasilyhitor
reachedbysmall
children.
Neverletapanboildryasthiscoulddamagetheutensil
andtheappliance.
Followthemanufacturer'sdirectionswhenusingoven
cookingbags.
Onlycertaintypesofglass,glass/ceramic,ceramic,or
glazedutensilsaresuitableforcooktoporovenusage
withoutbreakingduetothesuddenchangein
temperature.
Thisappliancehasbeentestedforsafeperformanceusing
conventionalcookware.Donotuseanydevicesor
accessoriesthatarenotspecificallyrecommendedinthis
manual.Donotuseeyelidcoversforthesurfaceunits,
stovetopgrills,oradd-onovenconvectionsystems.The
useofdevicesoraccessoriesthatarenotexpressly
recommendedinthismanualcancreateserioussafety
hazards,resultinperformanceproblems,andreducethe
lifeofthecomponentsoftheappliance.
Turnoffallcontrolsandwaitforappliancepartstocool
beforetouchingorcleaningthem.Donottouchtheburner
gratesorsurroundingareasuntiltheyhavehadsufficient
timetocool.
Cleanappliancewithcaution.Usecaretoavoidsteam
burnsifawetspongeorclothisusedtowipespillsona
hotsurface.Somecleanerscanproducenoxiousfumesif
appliedtoa hotsurface.
TheCaliforniaSafeDrinkingWaterandToxicEnforcement
Actof 1986(Proposition65)requirestheGovernorof
Californiatopublishalistofsubstancesknowntothe
Stateof Californiatocausecancerorreproductiveharm,
andrequiresbusinessestowarncustomersofpotential
exposurestosuchsubstances.
Usersofthisapplianceareherebywarnedthattheburning
ofgascanresultinlow-levelexposuretosomeofthe
listedsubstances,includingbenzene,formaldehydeand
soot,dueprimarilytotheincompletecombustionofnatural
gasorliquidpetroleum(LP)fuels.Properlyadjusted
burnerswillminimizeincompletecombustion.Exposureto
thesesubstancescanalsobeminimizedbyproperly
ventingtheburnerstotheoutdoorsbyopeningthe
windowsand/ordoorintheroomwheretheapplianceis
located.
SAVETHESEINSTRUCTIONS
Your appliance may not be equipped with some of the features referred to in this manual.
SPECIAL WARNING
service this appliance, Read the important
Safety Instructions on pages 3 to 5 before
using the appliance,
Always check with local and state codes before
installation. Requirements beyond those as shown may
affect these instructions, for which the manufacturer is not
responsible.
The installation of appliances designed for recreational
vehicles must conform with state or provincial codes, or in
the absence of such codes, with the latest edition of the
Standard for Recreational Vehicles ANSI/NFPA No. 501C.
CUL appliance must be installed in accordance with
CAN/CSA Z240.4 Series Standards, "Gas equipped
recreational vehicles and mobile homes" and/or local
codes having jurisdiction. Minimum clearance from
countertop to combustible ceiling as approved by U.L. is
24" CUL is 19".
WARNING
THISPRODUCTSHOULDNOT
BE INSTALLEDBELOWA
VENTILATIONTYPEHOOD
SYSTEMTHATDIRECTSAIRIN
A DOWNWARDDIRECTION.
(SEEFIGURE)
THESESYSTEMSMAYCAUSE
IGNITIONANDCOMBUSTION
PROBLEMSWITHTHEGAS
BURNERSRESULTINGIN
PERSONALINURYANDMAY
AFFECTTHECOOKING
PERFORMANCEOFTHE UNIT.
ART # 9215-252
NOTE:THEFIGUREMAYNOTACCURATELYREPRESENT
YOURRANGEORCOOKTOP;HOWEVER,THISWARNING
APPLIESTO ALLGASCOOKINGPRODUCTS.
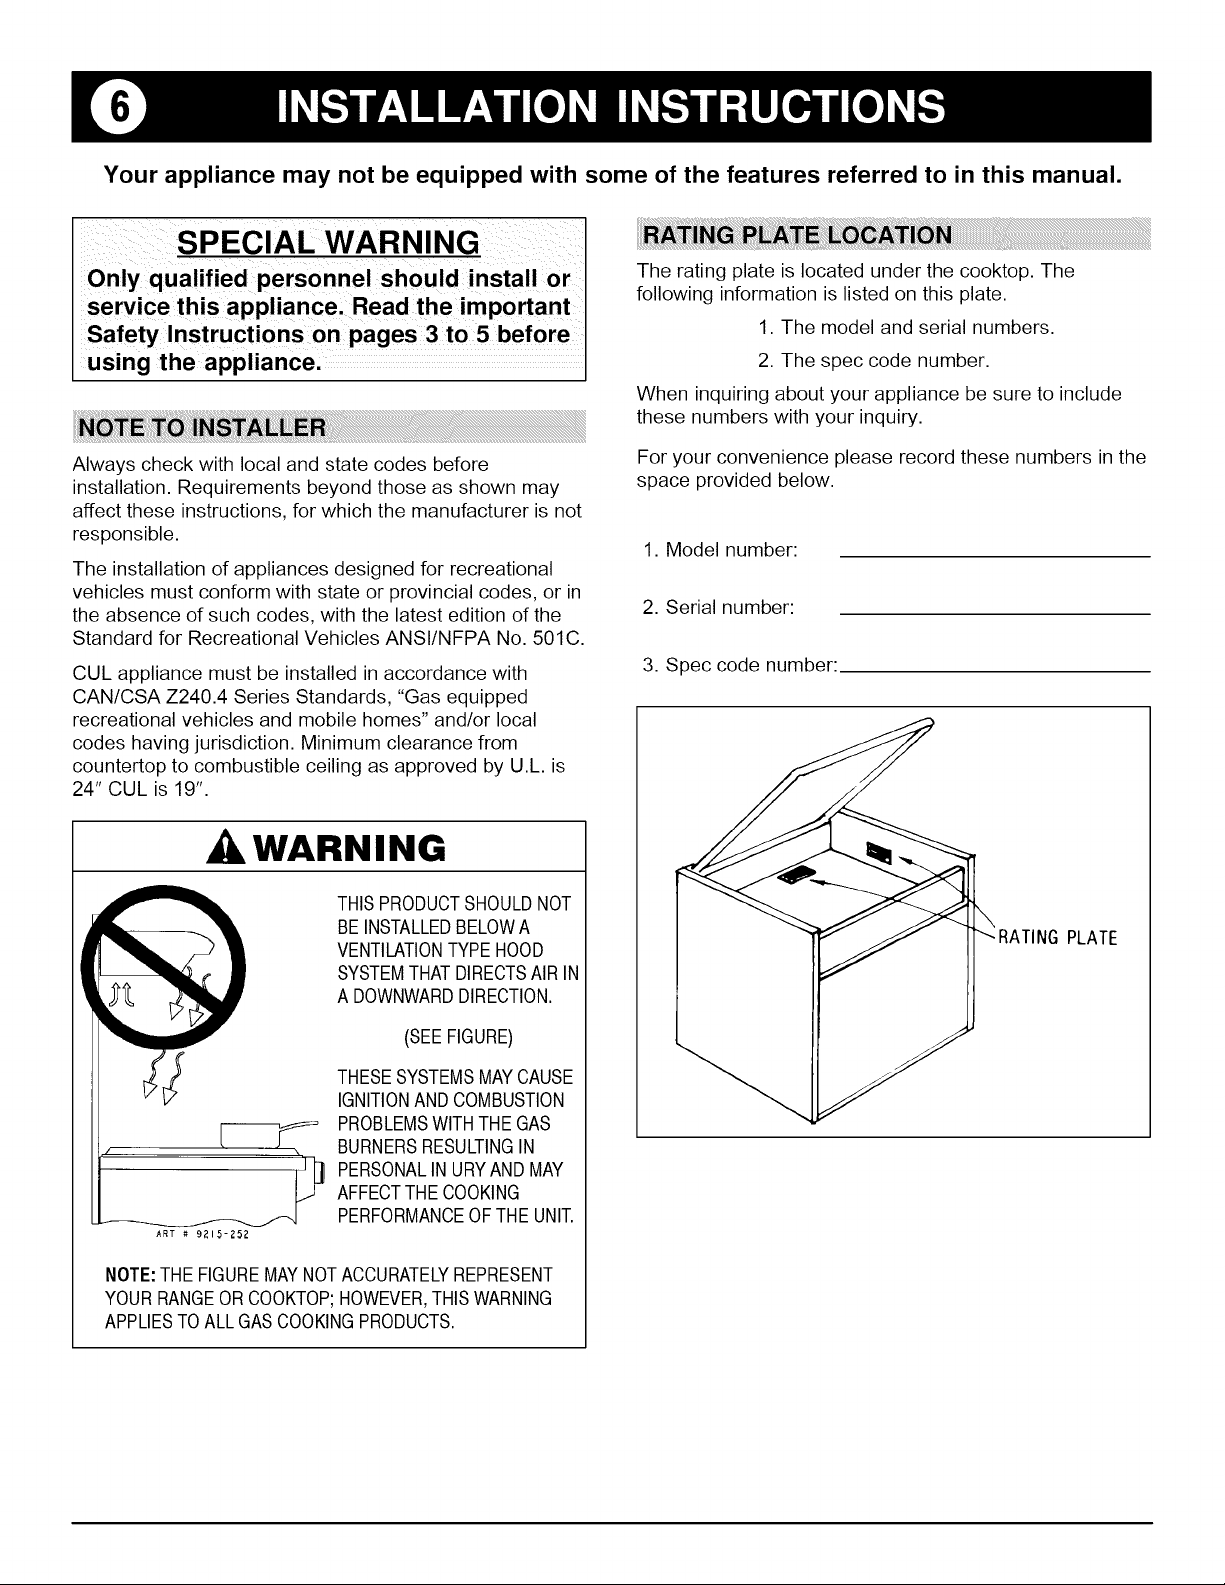
The rating plate is located under the cooktop. The
following information is listed on this plate.
1. The model and serial numbers.
2. The spec code number.
When inquiring about your appliance be sure to include
these numbers with your inquiry.
For your convenience please record these numbers in the
space provided below.
1. Model number:
2. Serial number:
3. Spec code number:
_'_RATINGPLATE
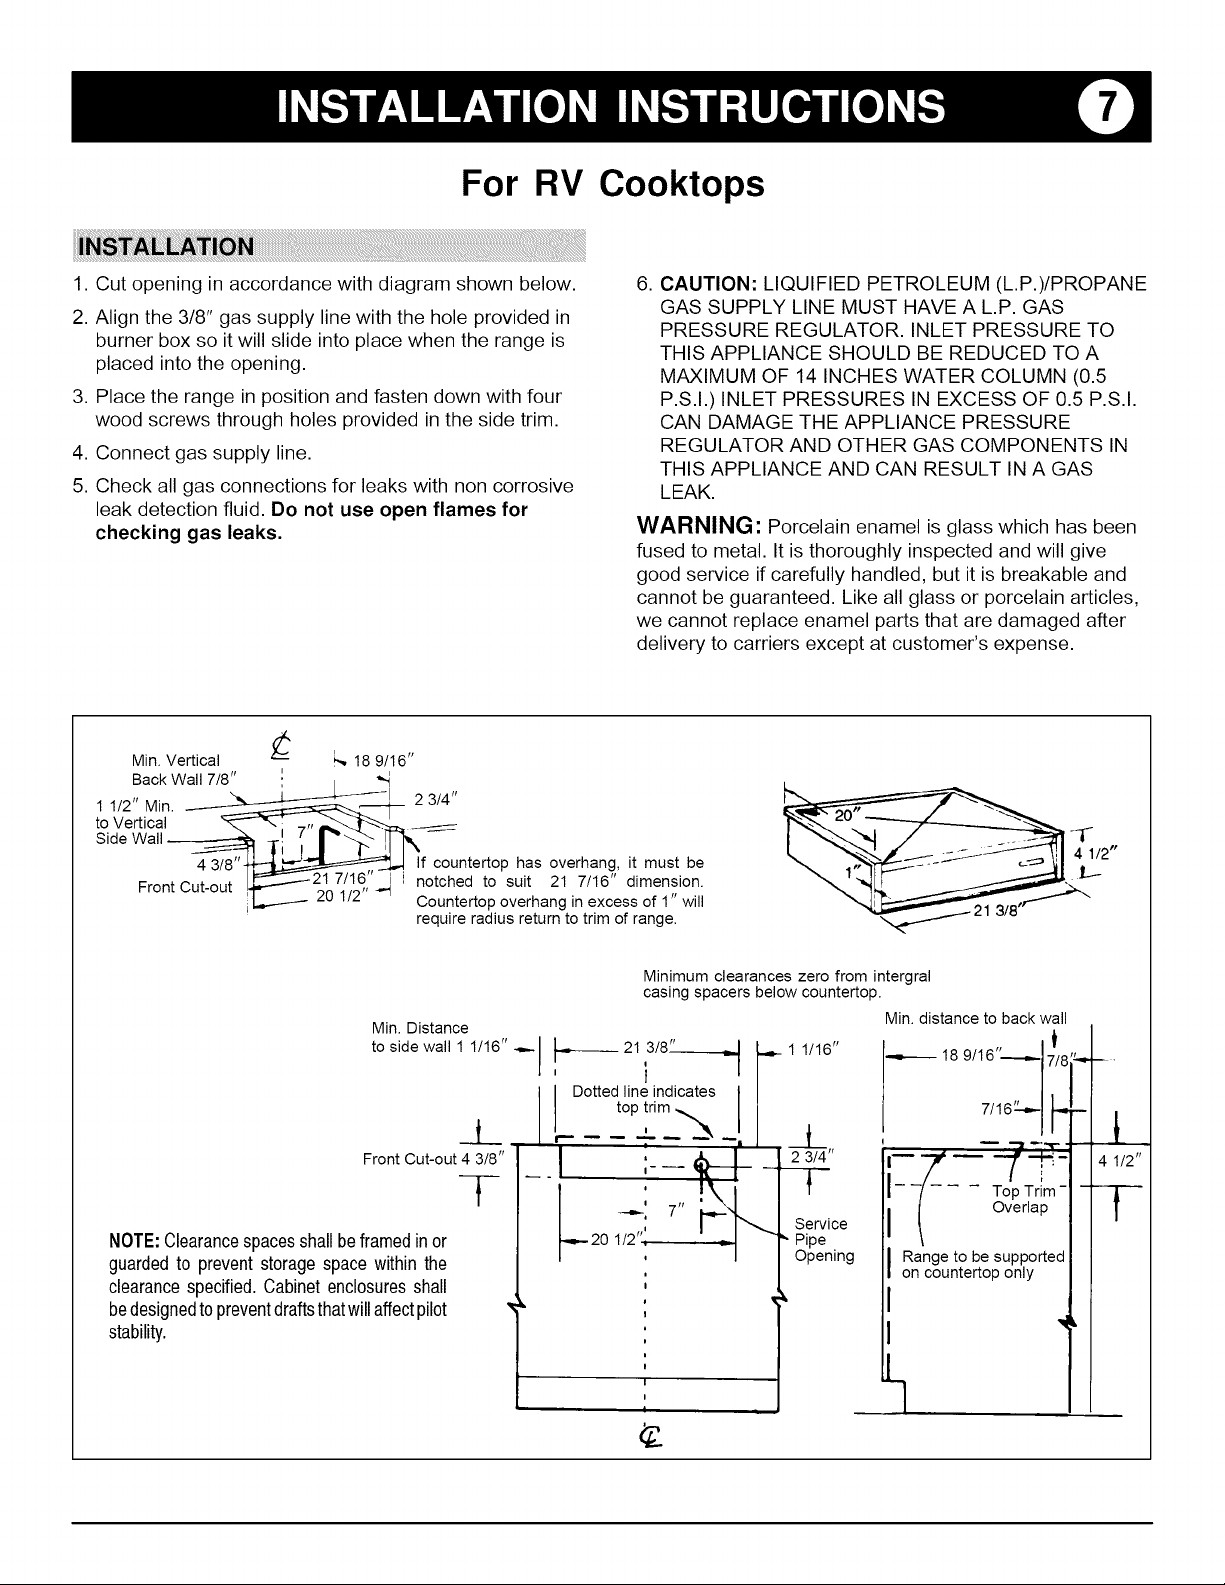
For RV Cooktops
1. Cut opening in accordance with diagram shown below.
2. Align the 3/8" gas supply line with the hole provided in
burner box so it will slide into place when the range is
placed into the opening.
3. Place the range in position and fasten down with four
wood screws through holes provided in the side trim.
4. Connect gas supply line.
5. Check all gas connections for leaks with non corrosive
leak detection fluid. Do not use open flames for
checking gas leaks.
,
CAUTION: LIQUIFIED PETROLEUM (L.P.)/PROPANE
GAS SUPPLY LINE MUST HAVE A L.P. GAS
PRESSURE REGULATOR. INLET PRESSURE TO
THIS APPLIANCE SHOULD BE REDUCED TO A
MAXIMUM OF 14 INCHES WATER COLUMN (0.5
P.S.I.) INLET PRESSURES IN EXCESS OF 0.5 P.S.I.
CAN DAMAGE THE APPLIANCE PRESSURE
REGULATOR AND OTHER GAS COMPONENTS IN
THIS APPLIANCE AND CAN RESULT IN A GAS
LEAK.
WARNING: Porcelain enamel is glass which has been
fused to metal. It is thoroughly inspected and will give
good service if carefully handled, but it is breakable and
cannot be guaranteed. Like all glass or porcelain articles,
we cannot replace enamel parts that are damaged after
delivery to carriers except at customer's expense.
€,
Min. Vertical _ _, 18 9/16"
Back Wall 7/8" ! / *"t
1 _2_:di!!° oPsh!_a !i: !h!!_: sd! r_flS_'!n I
require radius return to trim of range.
-1-
4 1/2"
Minimum clearances zero from intergral
casing spacers below countertop.
J
q-
_-al"-I 7 ,r
r
NOTE:Clearancespacesshallbeframedin or 20 1/2' _, ._
guardedto preventstoragespacewithinthe
clearancespecified.Cabinetenclosuresshall
bedesignedto preventdraftsthatwillaffectpilot
stability.
Min. Distance
to side wall 1 1/16" --'-I _ 21 3/8"
1
i
Dottedline indicates
.-..L top t,rim ,,__--_
Front Cut-out 4 3/8"
i I
i
i
i
I
i
i
I
.,,,._1 1/16"
2 !14"
" Pipe
Opening
Min. distance to back wall
-.--- , tI
18 9/16'----,,.- 17/8
7/16 -1
-7'-- --fm-.
- -[ Top Trim -
Overlap
Range to be supported
on countertop only
I
I
L
I
¢__
t
4 1/2"
1

For RV Ranges
1. Cut opening as shown below (range can be suspended
from top flange; no other support is necessary.)
2. Range equipped with a 120 volt light in the oven will
require the installation of a 120V three prong grounded
receptacle directly behind the range (for correct
location see sketch below.) On range with BX cable
and marked for 12 volt DC power supply connect 12
volt DC power to the tagged wires.
3. Place range in opening and fasten in place. Six screw
holes that are provided are located at points AA and
BB. A minimum of four screws must be used to fasten
range. Recreational vehicle manufacturers may use
appropriate holes as found necessary to suit the
application. Use No. 8 flat head wood screws.
4. Make gas connections and check for leaks with non
corrosive leak detection fluid. Do not check for leaks
with open flame.
,
CAUTION: LIQUIFIED PETROLEUM (L.P.)/PROPANE
GAS SUPPLY LINE MUST HAVE A L.P. GAS
PRESSURE REGULATOR. INLET PRESSURE TO
THIS APPLIANCE SHOULD BE REDUCED TO A
MAXIMUM OF 14 INCHES WATER COLUMN (0.5
P.S.I.) INLET PRESSURES IN EXCESS OF 0.5 P.S.I.
CAN DAMAGE THE APPLIANCE PRESSURE
REGULATOR AND OTHER GAS COMPONENTS IN
THIS APPLIANCE AND CAN RESULT IN A GAS
LEAK.
WARNING: Porcelain enamel is glass which has been
fused to metal. It is thoroughly inspected and will give
good service if carefully handled, but it is breakable and
cannot be guaranteed. Like all glass or porcelain articles,
we cannot replace enamel parts that are damaged after
delivery to carriers except at customer's expense.
NOTE:Clearancespacesshallbeframed
in or guardedto prevent storagespace
within the clearance specified. Cabinet
enclosuresshall be designedto
draftsthatwill affectpilotstability.
18
DIMENION IS FROM
FRONT FACE OF CABINET.
F COUNTERTOP HAS OVERHANG, IT MUST
BE NOTCHED TO SUIT THIS DIMENION.
COUNTERTOP OVERHANG IN EXCESS OF
1" WILL REQUIRE RADIUS RETURN
TO TRIM OF RANGE.
DIMENSION IS
FACE OF CABINET
TO REAR WALL.
21 7/
7/16-
SEE CHART
"CUTOUT HT"
7 8"
THE COUNTERTOP, R/ARt MIN.
DISTANCE TO VERTICLE WALL.
NOTE: MIN. 1 1/2" CLAERANCE
REQUIRFD FOR 16 SERIES
WHEN M,,GIC CHEF BIFOLD
COVER IS USED.
E THE COUNTERTOP, I 1/2" MIN.
DISTANCE TO VERTICLE SIDE WALL.
BB
L"
1"
MODEL CUTOUT HT. PIPE LOC.
16
MAC GROUNDED
3-PRONG RECEPTACLE
(IF REQUIRED)
16 3/8" 1 7/8"
FRONT Vl EW
22 21 13/16" 2 5/8"

1.Theoventhermostatinthisrangewillenableyoutoturn
offtheOvenConstantPilotbysimplyturningthe
thermostatdialtothe"OFF"position.Tolightovenpilot,
pushtheControlknobandrotatecounterclockwiseto
the"OVENPILOTON"position.Pushandholdthe
controlknobwhilelightingtheovenstandingpilot.
2.Theairshutterhasbeenadjustedatthefactory,
however,itmayrequiresomeadditionaladjustment
whenusedathighaltitudes.
3.Toadjust,opentheairshuttertothefullopenposition
whereyouwillhaveablowingcondition.Beginclosing
theshutterslowly,whenyoureachthecorrect
adjustmenttheblowingwillstopandtheburnershould
haveasharpblueflameapproximately3incheslong.
4.Thereisnoovenpilotadjustmentonthethermostat,the
controlhasbeenfactorypresetforuseonLPgas,no
fieldadjustmentnecessary.
ELECTRICAL REQUIREMENTS AND GROUNDING
INSTRUCTIONS FOR 120V 60HZ AC, if equipped.
Observe all governing codes and ordinances. All ranges
requiring electrical supply must be grounded.
If this appliance is factory equipped with a power supply
cord it has a three-pronged grounding plug. It must be
plugged into a mating grounding type receptacle in
accordance with National Electrical Code and applicable
local codes and ordinances. If the circuit does not have a
grounding type receptacle, it is the responsibility and
obligation of the customer to change the existing
receptacle to a proper grounded receptacle in accordance
with the National Electrical Code and applicable local
codes and ordinances. THE THIRD GROUNDING
PRONG SHOULD NOT, UNDER ANY
CIRCUMSTANCES, BE CUT OR REMOVED as it
provides protection against shock hazard.
POWER SUPPLY CORD
FIGURE 1
WITH 3 PRONG
GROUNDINGPLUG
©
GROUNDINGTYPE
WALL RECEPTACLE
NOTE: A unit having an external electrical supply must be
electrically grounded in accordance with National Electric
Code. ANSI/NFPA No. 70-1990. In Canada CAN/CSA -
C22.2 Electrical Code.
WIRING DIAGRAM FOR MODELS WITH
EXTERNAL ELECTRICAL SUPPLY
120 VOLTS N
(12 VOLTS +) (_
LIGHT
SWl TCH
B BLK
L __ J
OVEN
LAMP
 Loading...