


1.6 & 2.0 Cu. Ft. Portable Washer
User’s Manual
Model MCSTCW16W4 / MCSTCW16S4 / MCSTCW20W4 / MCSTCW20S4
PLEASE READ THIS MANUAL CAREFULLY BEFORE USING YOUR WASHER AND KEEP IT FOR FUTURE REFERENCE.

PRODUCT REGISTRATION
Thank you for purchasing this Magic Chef® product The first step to protect your new product is to complete the product registration on our website: www mcappliance com/register The benefits of registering your product include the following:
1 Registering your product will allow us to contact you regarding a safety notification or product update
2 Registering your product will allow for more efficient warranty service processing when warranty service is required 3 Registering your product could act as your proof of purchase in the event of insurance loss
Once again, thank you for purchasing this Magic Chef product
2
CONTENTS
PRODUCT REGISTRATION 2 IMPORTANT SAFETY INSTRUCTIONS 4 SPECIFICATIONS 6 PARTS AND FEATURES 7 INSTALLATION INSTRUCTIONS 8 OPERATING INSTRUCTIONS 11 WASH CYCLE GUIDE 14 CARE AND MAINTENANCE 15 TROUBLESHOOTING 16 LIMITED WARRANTY 20
3
IMPORTANT SAFETY INSTRUCTIONS
This manual contains Safety Instructions, Installation and Operating Instructions, and Troubleshooting Tips. Please carefully read this manual before using your washing machine for instructions on how to use and maintain the product properly. Be sure to follow the safety instructions to avoid injury or damage to the product.
Keep this manual. When passing on/selling the device to a third party, the manual must be handed over along with the device.
Before calling for service, please make sure unit is installed and being used correctly, and read the troubleshooting section.
 WARNING: When using your appliance, follow the precautions listed below:
  NOTE: Specifications may change at any time without notice.
1.Read all instructions before using this product.
2.This appliance is for household use only. It is not intended for commercial applications. DO NOT use this appliance for other than its intended purpose.
3.The appliance is intended for indoor use only. DO NOT use outdoors.
4.DO NOT put anything flammable or explosive in, on, or near the appliance, or install the appliance near a heater or inflammable material. DO NOT wash articles of clothing or items that have been soaked in flammable or explosive chemicals. Keep area around the washer free of combustible materials.
5. WARNING: Risk of child entrapment. DO NOT allow children to play on or in the appliance. Close supervision of children is necessary when the appliance is used around them. Before the appliance is removed from service or discarded, remove the lid of the washing or drying compartment.
6.DO NOT put children on top of, or allow children to climb in or on, the washer.
7.ALWAYS wait for the washer tub to completely stop moving before reaching in to add or remove any clothes.
8.DO NOT install or store this appliance where it will be exposed to the weather or freezing temperatures.
9.DO NOT tamper with or modify the controls.
10.DO NOT modify or repair the unit by yourself. Contact customer service or a qualified service technician if service is required.
11.Under certain conditions, hydrogen gas may be produced in a household hot water system that has not been used for two weeks or more. Hydrogen gas is highly explosive. If the hot water system has not been used for more than two weeks, turn on all hot water faucets and let the water flow for several minutes prior to using your compact washer.
12.This washer is not designed for maritime use or for mobile installations such as in RVs, aircraft, etc.
13.Turn off the water supply and unplug the washer if the machine is to be left for an extended period of time, such as during vacations. It is recommended to unplug the unit when it is not in use.
14.Packaging material can be dangerous for children. There is a risk of suffocation! Keep all packaging materials away from children.
15.ALWAYS check the inside of the washer for foreign objects before loading laundry. Keep the lid closed when not in use.
16.The appliance must be plugged into a properly installed and grounded outlet that meets the voltage requirements listed on the ratings label.
4
17.To reduce the risk of electric shock or fire, DO NOT use an extension cord or outlet adapters to connect the
unit to an electrical power source. The appliance must be properly grounded using a three-prong electric receptacle wall outlet.
18.This appliance must be properly installed in accordance with the installation instructions before it is to be used. It is recommended to have the appliance installed by a qualified technician or service company.
19.Regularly clean the power plug to remove dust and dirt, in order to prevent electrical failure.
20. CAUTION: The power cord is equipped with a 3-prong grounding plug to protect against shock hazards. ALWAYS plug the cord into a properly installed and grounded 3-prong wall receptacle, and DO NOT remove the grounding prong.
21.DO NOT operate any appliance that has a damaged cord or plug, if it is damaged or malfunctions in any way, or if the outlet is not in proper working order. Contact customer service or a service technician.
22.DO NOT unplug your appliance by pulling on its power cord. ALWAYS grasp the plug firmly and pull it straight out from the outlet. DO NOT bend, tie, or twist the power cord, or hang it over or near a sharp object.
23.DO NOT operate the washer by unplugging or plugging in the washer while it is in operation.
24.DO NOT install the washing machine in a humid, oily, or dusty location, or where it can get wet. DO NOT install in direct sunlight or where it will be exposed to the outside elements
25.It is recommended to have two or more people move and install the washer.
26.If the appliance is flooded, cut the power immediately and contact your nearest service center.
27.If the appliance emits a strange noise, a burning smell, or smoke, unplug the power plug immediately and contact your nearest service center.
28.DO NOT force the washer lid open while the washer is operating. The loading door must be closed when the tub is spinning.
29.DO NOT reach into the washer while the tub is spinning. Stop or Pause the unit and allow the tub to stop completely.
30.DO NOT insert your hand or other objects under the washer.
31.DO NOT operate the unit or handle the plug with wet hands.
32.Use only detergents or softeners recommended for use in this manual and keep all cleaning products out of the reach of children.
33.ALWAYS turn off and unplug from outlet before servicing, changing accessories or cleaning the unit. Allow unit to cool down completely before cleaning, moving or servicing. Turning the unit off does not disconnect it from the power source.
34.DO NOT operate this washer unless all enclosure panels are properly installed.
35.ALWAYS be sure to properly and securely connect the power cord to the outlet, and the water hoses to prevent leakage or electrical shock.
36.DO NOT wash raincoats, heavy jackets, throw rugs, or similar, heavy items.
READ AND FOLLOW THIS
SAFETY INFORMATION CAREFULLY SAVE THESE INSTRUCTIONS
5
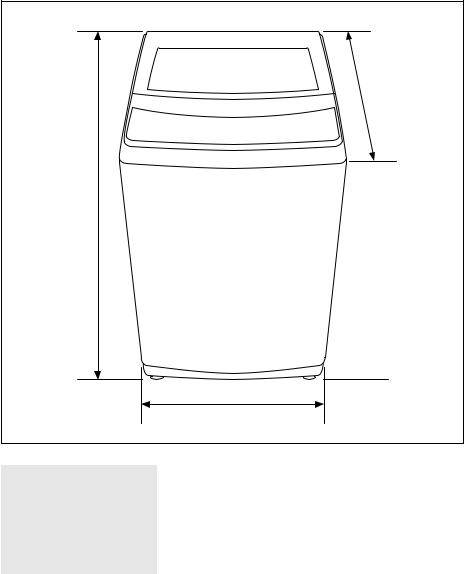
SPECIFICATIONS
Figure 1
D
H
W
Model |
MCSTCW16W4 / MCSTCW16S4 |
MCSTCW20W4 / MCSTCW20S4 |
|
|
|
Capacity |
1.6 cu. ft. |
2.0 cu. ft. |
|
|
|
Dimensions (W x D x H) |
20.3” x 20.7” x 36.6” |
21.7” x 22.2” x 37.0” |
|
|
|
Weight |
70.5 lbs. (32.0 kg) |
79.4 Ibs. (36.0 kg) |
|
|
|
Power Supply |
120V / 60Hz |
120V / 60Hz |
|
|
|
Input Power |
340 W |
450 W |
|
|
|
6


INSTALLATION INSTRUCTIONS
REMOVING PACKAGING AND SET UP
•Remove packing box, foam, and bottom cardboard piece.
•Open the washer door and remove all the accessories in the drum.
•DO NOT use the washer on the foam packaging base.
•Carefully lay the machine down.
•Slide the noise proof plate into place over the opening in the bottom and attach with the mounting screw.
•The washer should be installed on a stable surface close enough to the water supply, drain, and electrical outlet to ensure that the hoses and power cord reach.
 WARNING: Improper connection of the power cord can result in a risk of electric shock. Check with a qualified electrician or serviceman if you are in doubt as to whether the appliance is properly grounded. DO NOT modify the provided plug with the appliance – even if it will not fit into the outlet. Have a qualified technician install the proper wall outlet for you.
INSTALLING THE WASHER
LOCATION
Move the empty washer by carefully tipping it back about 60°~70° degrees until the casters on the rear of the unit are able to roll on the floor. Do not try to move the washer when it has clothes or water in it, and have someone assist you if needed. Do not install on carpet. Install washer on a level and solid
floor that can support its weight. Store and install the washer where it will not be exposed to temperatures below freezing or exposed to outdoor weather conditions. Position the appliance so that the power plug, water inlets, and drain are easily accessible.
INSTALL THE BOTTOM COVER
Slide the bottom cover into the slots on bottom surface of the unit as in the following Figure 5, and fix it with the screw attached with the unit.
LEVEL THE WASHER
The washer must be leveled prior to using. You can check if the washer is level by checking the position of the tub or using a bubble level.
1.Slide the washer into position.
2.Open the lid of the washer, and pour the water into the tub to just below the pulsator level.
Figure 4
Front of
the Washer
Back of
the Washer
60-70°
Figure 5 |
Bottom Cover |
|
|
|
|
Pulsator |
|
Figure 6 |
||
|
|
|
|
|
|
|
||
|
|
|
|
|
|
|
|
|
|
|
|
|
|
|
|
|
|
|
|
|
|
|
|
|
|
|
8

3. |
If the washer is level, the pulsator is positioned at the |
|
Figure 7 |
|
center of the washer as shown in the Figure 7. If not, |
Leveling Gauge |
|
|
|
||
|
level your washer by turning the front leveling foot/feet |
|
|
|
clockwise or counterclockwise as necessary. |
|
|
 NOTE: There is only one adjustable leg on the 1.6 cu. ft. (MCSTCW16W4 and MCSTCW16S4) washers. The 2.0 cu. ft. models (MCSTCW20W4 and MCSTCW20S4) have two adjustable legs.
CONNECT THE WATER HOSE
 NOTE: To correctly fill your washer in the proper amount of time, water pressure of 14-70 p.s.i. (100-500 kPa) is required and the faucet must be within 4 feet of the water inlets on the back of the washer.
1.The Quick Connection Adaptor is primarily for quick connection to a single faucet, such as a typical kitchen sink, in cases where the washer is stored in a different place than where it is used. Skip this step if you are connecting the washer to a sink with separate hot and cold faucets. The adaptor consists of two parts that quickly connect or disconnect. One part, the faucet fitting, is for connection to the faucet and the other part, the hose fitting, connects to the cold water hose of the washer.
•Pull back on the white ring to free the faucet fitting from the adaptor for installation into the faucet.
•Screw the end of the cold water hose onto the base of the hose fitting.
•If the faucet has internal screw threads, unscrew the aerator if present from the tip of the faucet. Then screw the faucet fitting into the faucet. Make sure that the black rubber gasket is on the top of the adaptor before screwing it in.
•If the faucet has external screw threads, remove the gasket from the top of the faucet fitting, and screw the fitting over the external threads.
•Pull back on the white ring to connect the two parts of the adaptor back together.
 NOTE: When connected to a single faucet that can dispense either hot or cold water, both hot and cold water can be run through the cold water line for washing use. However, it is recommended to only run cold water washes when the adaptor is connected to such a faucet.
Figure 8
Top Part:
Faucet Fitting
Bottom Part:
Hose Fitting
Pull down on the white ring
to divide the adaptor into two parts.
Figure 9
Rubber Gasket
Inner Threads for Outer Threaded Faucet Outer Threads for Inner Threaded Faucet
2. |
Connect the ends of the water supply hoses to the HOT and |
Cold |
Hot |
Figure 10 |
|
COLD faucets. For convenience, use the Quick Connection |
|||
|
|
|
|
|
|
Adaptor for connection to the cold water faucet. |
|
|
|
3.Tighten the fittings by hand until they are snug, and then
tighten them an additional two-thirds of a turn with a wrench. |
Water |
|
WARNING: When you fasten the fittings, DO NOT |
Faucet |
|
|
||
over-tighten or apply tape or sealant to the faucets or water |
|
|
supply intakes. This can damage the fittings. After you have |
Water |
|
connected the water supply hoses to the faucets, ensure that |
||
Supply |
||
they are connected securely before turning on the water. |
||
Hose |
||
9 |
||
|
4.Run water through the hoses for 10-15 seconds, allowing it to drain into a bucket or sink to remove any foreign substances from the lines, then turn off the water.
5.Connect the ends of the water supply hoses to the water supply intake connections at the back of the washer.
Figure 11 |
 NOTE: The water supply hose connected to the HOT faucet must be connected to the hot water supply intake and the water hose connected to the COLD faucet must be connected to the cold water supply intake.
6.Tighten the fittings by hand until they are snug, and then tighten them an additional two-thirds of a turn with a wrench. Turn on the water and check for any leaks.
 WARNING: Confirm that the water supply hoses are not twisted or bent. If the hoses are twisted or bent, the hoses can leak and cause electric shock due to the water leakage .To ensure the correct water usage, connect both the HOT and COLD water faucets. If either or both are not connected, an error code can occur. If you do not want to use the HOT water supply hose or can only connect to one faucet, install the water intake cap into the HOT water supply intake hole. In this case, you must select Cold water as the wash temperature choice.
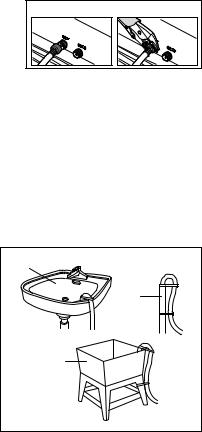
CONNECT THE DRAIN HOSE |
|
Figure 12 |
|
a |
|
Position the other end of the drain hose. It can be |
|
|
|
|
|
positioned in three ways. The recommended height of the |
|
b |
drain hose is 35” (90cm), and should be no higher than 39”. |
|
|
The washer should be located within 5’ of the drain. |
|
|
a.Over the edge of a sink: Secure the guide to the side
of the basin wall with a hook or to the tap with a
piece of string or zip tie to prevent the drain hose c from moving.
b.In a standpipe: The standpipe must be no shorter than 32 in. (81cm) and no longer than 39 in. (100cm). The diameter of the drain pipe must be large enough to easily accept the drain hose.
c.In a laundry tub: The laundry tub must be no shorter than 32 in. (81cm) and no higher than 39 in. (100cm).
 NOTE: The connection between the drain hose and sink, pipe, or tub should not be airtight.
RUN A TEST CYCLE
1.Plug in the washer.
2.Load about 5 lbs. of laundry.
3.Press the “Power” button to turn on the washer.
4.Select the “Rinse & Spin” cycle by pressing the “Function” button to turn on the indicator lights for “Rinse” and “Spin”, and then press the “Start/Pause” button.
5.The washer should not rock or vibrate excessively when water is supplied or when washing or spinning, and should drain well during the spin cycle.
 NOTE: If water leaks while water is being supplied or drained, check the water connections. If the washer rocks and vibrates excessively, level your washer again.
10
OPERATION INSTRUCTIONS
CONTROL PANEL
|
|
|
|
|
|
|
|
|
Figure 13 |
|
|
|
c |
|
|
|
|
|
b |
|
SOAK |
|
|
|
|
LIGHT |
FLASH |
|
|
|
WASH |
|
DELAY (HR) |
LARGE |
HOT |
NORMAL |
QUICK |
CONTROL |
|
FUNCTION |
|
TIME (MIN) |
LOCK |
|
|||||
|
|
|
|
|
|
|
|||
RINSE |
|
MED |
WARM |
HEAVY |
BULKY |
|
|
||
|
|
|
|
|
|||||
|
SPIN |
|
DELAY |
SMALL |
COLD |
DELICATE |
SPIN ONLY |
EXTRA |
START / PAUSE |
|
|
RINSE |
|||||||
|
|
|
|
|
|
|
|
||
|
FUNCTION |
DELAY |
LOAD SIZE |
TEMP. |
|
PROGRAM |
EXTRA RINSE |
|
|
|
|
|
|
|
|
|
|
|
ON / OFF |
|
d |
e |
f |
g |
j |
h |
i |
|
a |
a.ON/OFF: Press the ON/OFF button once to turn the power ON. Press again to turn OFF.
b.START/PAUSE: Press the START/PAUSE button once to the start the wash cycle. Press the button during operation to pause the cycle. Press again to continue the cycle.
c.Digital Display: The digital display will show and count down the estimated minutes for the wash cycle selected. If Delay Start is set, the display will count down the hours until the cycle begins, and then change to a minute countdown for the wash cycle.
d.Function: Press this button to select cycle steps included in your setting cycle. The related light will be ON indicating that the step is selected. Normally, all Wash , Rinse and Spin steps are included with all lights ON.
e.Delay: Press this button to set your desired time to delay start the washer.
f.Load Size: Press this button to set your washing load size. Your setting will decide the water level throughout all steps in the cycle.
g.Temperature: Press this button to select water temperature for washing. Cold light only indicates Cold Water selection, Hot light only indicates Hot Water selection, and both Cold and Hot light together indicate Warm Water selection.
h.Program: Press this button to select the desired wash program.
• |
Normal |
(Lit) |
• |
Quick |
(Flashing) |
• |
Heavy |
(Lit) |
• |
Bulky |
(Flashing) |
• |
Delicate |
(Lit) |
• |
SpinOnly |
(Flashing) |
i.Extra Rinse: Press to add an additional Rinse Cycle.
j.Control Lock: Use to lock the control panel.
USING THE WASHER
1.TURN ON THE WASHER: Press the "  " (On/Off) button to turn the power on.
11

2.LOAD THE WASHER: Sort the laundry by fabric type and color and place in the washer. DO NOT load the tub more than ¾ full.
 NOTE: Be sure to remove all objects (coins, keys, etc.) from pockets and zip up zippers before putting clothes in the washer.
3. |
ADD DETERGENT: This washer is designed for high efficiency (HE) |
|
|
|
Detergent Tray |
Figure 14 |
|||
|
powder detergent only. Pull the detergent compartment out and |
|||
|
|
|
||
|
add the recommended amount of detergent directly into the |
|
|
|
|
detergent compartment before starting your washer. The normal |
|
|
|
|
amount of detergent to use is 1/4 to 1/2 of the maximum amount |
|
|
|
|
recommended by the detergent manufacturer. ALWAYS reduce |
|
|
|
|
the amount of detergent if the load is small or lightly soiled, or |
|
|
|
|
if your water is very soft. NEVER use more than the maximum |
|
|
|
|
amount recommended by the detergent manufacturer. |
|
|
 NOTE: NEVER pour any liquid bleach directly onto the load. Doing so may cause damage to fabrics, such as weakening of cloth fibers or color loss.
4.SELECT WASH CYCLE: Begin by pressing the " " (Program) button to select the desired wash program.
• |
Normal |
(Lit) |
• |
Quick |
(Flashing) |
• |
Heavy |
(Lit) |
• |
Bulky |
(Flashing) |
• |
Delicat |
(Lit) |
• |
SpinOnly |
(Flashing) |
Each time the button is pushed, the selected cycle will change. The light between the choices on the left and right will either be steadily lit (Lit), or will flash (Flashing) to indicate which program is currently selected.
 NOTE: The Spin Only cycle can help remove some moisture from clothing to reduce drying time and cost.
5.SELECT LOAD SIZE: Press " " (Load Size) to select the water level based on a Large, Medium or Small load size.
6.SELECT FUNCTIONS: Press " " (Function) to set the functions you want the washer to perform. The default setting is Soak — Wash — Rinse — Spin, with the indicator next to each lit. Each push of the button will change the selected functions, with the indicator lights showing what functions are selected. You can choose a combination of functions or one individual function by itself.
7.SELECT WATER TEMPERATURE: Press "  " (Water Temperature) to select the desired wash temperature of Hot, Warm, or Cold. The indicator light will display what the current selected water temperature is.
 NOTE: The actual temperature of the water will be determined by the temperature of the water supply. If only one water supply hose is used, it must be connected to the Cold water inlet, and the Water Temperature must be set to Cold.
8.START THE CYCLE: Press "

 "(Start/Pause) to begin the wash cycle. When the washing cycle begins, the estimated time in minutes for the cycle to complete will show and count down in the digital display.
  NOTE: The washer will shut off if the START/PAUSE button is not pressed within ten minutes.
OTHER FEATURES
1.DELAY START: The Delay Start function allows you to delay the starting of the wash cycle from 1-48 hours. Push (Delay) after setting wash cycle functions to set the washer to start at a later time, in increments of 1 hour for each push from 1-24 hours and 6 hours each push from 24-48 hours. When Delay Start is set, the display will count down the hours until the cycle begins, and then change to a minute countdown for the
cycle. When the Delay is set, the indicator light under the display will be lit. Pushing the Delay button once
more after the timer is at 48 hours will cancel the Delay Start and the display indicator will turn off.
12
 NOTE: If you want to cancel the Delay Start Function after it has started, power the unit off and reset all functions before restating the washer.
2.PAUSE: Push "

 " (Pause) to temporarily stop the wash cycle if additional items of clothing need to be added. Push it again to restart.
 WARNING: When the washer is running, wait for the tub to stop moving completely before you open the lid.
3.EXTRA RINSE: Press "  " (Extra Rinse) if you wish the washer to run an additional rinse cycle. This should be done after wash program is set, before pressing (Start/Pause) to begin the cycle.
4.CONTROL LOCK: Press and hold "  " and "
 " (Temp. and Program) simultaneously to activate this function. The digital display will show “CL”. If the washer is running, or has a Delay Start set, the “CL” and remaining time or Delay Start time will alternate on the display. Repeat pressing and holding the Temp and Program buttons to deactivate. When Control Lock is activated, no buttons will function except for POWER and the ability to deactivate Control Lock as described above.
 WARNING: This function is useful to prevent children from changing the operation status of the unit.
DELAY FUNCTION
The washing machine can be set for a delayed start. The delay can be set in 1 hour increments from 1-24 hours, and then in 6 hour increments up to 48 hours. To set the delay start feature:
1.Press the ON/OFF button to turn the washer ON.
2.Properly hang the drain hose and turn on the water tap.
3.Load the laundry and detergent in the washer.
4.Select the appropriate water level.
5.Select the desired program and functions.
6.Press the delay button to set the number of hours to delay the start of the wash cycle.
7.Close the lid and press the Start/Pause button.
Once the delay function is activated, the Delay indicator light will flash, and all other lights will turn off. To check the status of the delay preset, push and hold the Delay button. Release the Delay button to return to the Delay start mode.
To cancel the Delay setting, press the ON/OFF button.
POWER LOSS MEMORY FUNCTION
In the event of the loss of power, the washer will automatically resume operation from previous settings when power is restored.To cancel the Delay setting, press the ON/OFF button.
13
WASH CYCLE GUIDE
MCSTCW16W4 & MCSTCW16S4
Program |
|
Load Size |
Soak Time |
Wash Time |
Rinse |
Final |
Total |
|
Default |
Scope |
(approx.) |
(approx.) |
Cycles |
Spin Time |
Time |
||
|
||||||||
|
|
|
|
|
|
|
|
|
|
|
Small |
- |
15 min |
1 |
7 min |
32 min |
|
|
|
|
|
|
|
|
|
|
Normal |
Large |
Medium |
- |
15 min |
1 |
11 min |
37 min |
|
|
|
|
|
|
|
|
|
|
|
|
Large |
- |
15 min |
1 |
44 min |
69 min |
|
|
|
|
|
|
|
|
|
|
Heavy |
Large |
Small, Medium, Large |
- |
15 min |
2 |
7 min |
44 min |
|
|
|
|
|
|
|
|
|
|
Delicate |
Large |
Small, Medium, Large |
- |
12 min |
2 |
3 min |
37 min |
|
|
|
|
|
|
|
|
|
|
Quick |
Large |
Small, Medium, Large |
- |
3 min |
1 |
3 min |
15 min |
|
|
|
|
|
|
|
|
|
|
Bulky |
Large |
Small, Medium, Large |
15 min |
15 min |
2 |
7 min |
59 min |
|
|
|
|
|
|
|
|
|
|
Spin Only |
Large |
- |
- |
- |
- |
24 min |
25 min |
|
|
|
|
|
|
|
|
|
"Normal" program is the most suitable program to wash soiled cotton or linen clothes and is the most efficient program in terms of combined energy and water consumption for washing that type of laundry.
MCSTCW20W4 & MCSTCW20S4
Program |
|
Load Size |
Soak Time |
Wash Time |
Rinse |
Final |
Total |
|
Default |
Scope |
(approx.) |
(approx.) |
Cycles |
Spin Time |
Time |
||
|
||||||||
|
|
|
|
|
|
|
|
|
|
|
Small |
- |
15 min |
1 |
7 min |
32 min |
|
|
|
|
|
|
|
|
|
|
Normal |
Large |
Medium |
- |
15 min |
1 |
11 min |
37 min |
|
|
|
|
|
|
|
|
|
|
|
|
Large |
- |
15 min |
1 |
34 min |
59 min |
|
|
|
|
|
|
|
|
|
|
Heavy |
Large |
Small, Medium, Large |
- |
15 min |
2 |
7 min |
44 min |
|
|
|
|
|
|
|
|
|
|
Delicate |
Large |
Small, Medium, Large |
- |
12 min |
2 |
3 min |
37 min |
|
|
|
|
|
|
|
|
|
|
Quick |
Large |
Small, Medium, Large |
- |
3 min |
1 |
3 min |
15 min |
|
|
|
|
|
|
|
|
|
|
Bulky |
Large |
Small, Medium, Large |
15 min |
15 min |
2 |
7 min |
59 min |
|
|
|
|
|
|
|
|
|
|
Spin Only |
Large |
- |
- |
- |
- |
24 min |
25 min |
|
|
|
|
|
|
|
|
|
"Normal" program is the most suitable program to wash soiled cotton or linen clothes and is the most efficient program in terms of combined energy and water consumption for washing that type of laundry.
14
 Loading...