


TO BE REMOVED FOR USE BY THE OCCUPANT - RETIRER DE L’UNITÉ AVANT L’UTILISATION - RETIRE DE LA UNIDAD ANTES DE USAR

installationinstructions Guided’installation GuíadeInstalación
View Installation Video - Scan QR code with a mobile device
VoirVidéod'installation-Balayer QR code avec un dispositif mobile
Vervideodeinstalación-EscanearcódigoQRconundispositivomobil
1 |
2 |
|
|
|
1. |
Allia 1 piece shower and tub shower installation video (english) |
|
|
|
2. |
Vidéo pour Allia 1 pièce douche et baignoire-douche (français) |
3 |
|
4 |
3. |
Allia multi-piece shower and tub shower installation video (english) |
|
4. |
Vidéo pour Allia multi-pièce douche et baignoire-douche (français) |
10033762
Read all instructions carefully before proceeding.
Lire toutes les instructions attentivement avant de commencer l’installation.
Leer detenidamente todas las instrucciones antes de comenzar la instalación.
IMPORTANT • Record the serial number IMPORTANT • Noter le numéro de série IMPORTANTE • Registre el número de serie
Save this guide for future reference. Conserver pour un usage ultérieur. Conserve este manual como referencia.
Serial number • Numéro de série • Número de Serie

TSR / TS 6032
Model | Modèle | Modelo 107000 / 107000-S 107001 / 107001-S
SH 3636 / 4834 / 6034
Model | Modèle | Modelo 107007/107007-S 107005/107005-S 107003/107003-S
SHR 3636 / 4834 / 6034
Model | Modèle | Modelo 107006 / 107006-S 107004 / 107004-S 107002 / 107002-S
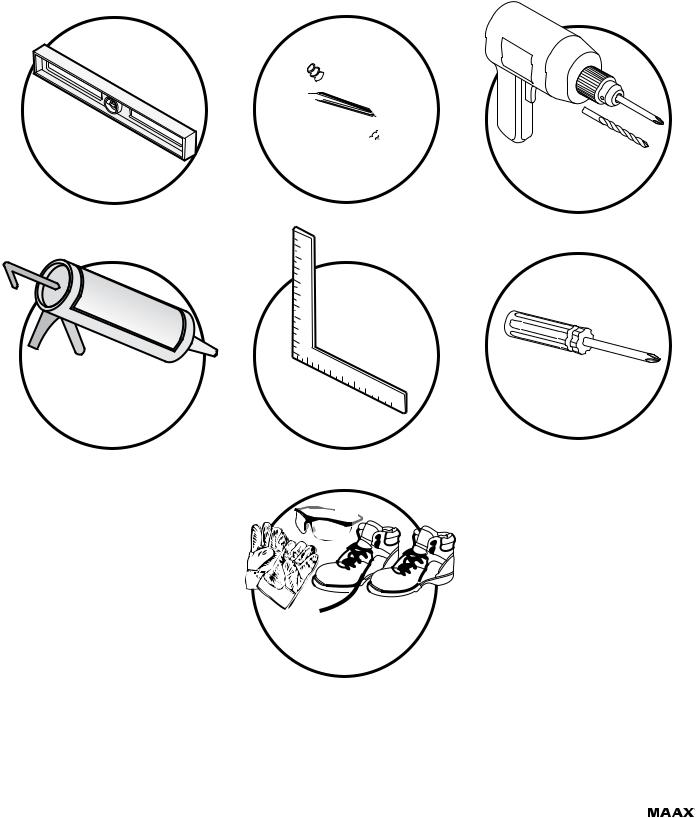
TOOLS |
|
OUTILS |
|
HERRAMIENTAS |
|
|
|||
REQUIRED |
|
REQUIS |
|
Necesarias |
|
Pencil |
Electric drill |
|
|
Crayon |
||
Nivel |
Perceuse électrique |
||
Lápiz |
|||
Taladro eléctrico |
|||
|
|
Silicone sealant |
|
|
Calfeutrage à base |
Square |
Screwdriver |
de silicone |
Tournevis |
|
Sellador de |
Équerre |
Destornillador |
silicona |
Escuadra |
|
Security equipment Équipement de sécurité Equipamiento
de seguridad
3
BEFORE |
|
AVANT |
|
ANTES |
|
|
|||
YOU BEGIN |
|
DE COMMENCER |
|
DE Comenzar |
General Rules
Structure Installation
Do not build the surrounding structure before receiving your
unit. Structure measurements should be verified against the unit to ensure a proper fit.
Plumbing
Install all plumbing and drainage before securing the unit. It is always recommended to have a competent, professional plumber do the plumbing installations.
Before drilling a hole in the floor for the drainpipe, make sure there are no hidden elements underneath (pipes, floor joists, heating ducts, electrical wires).
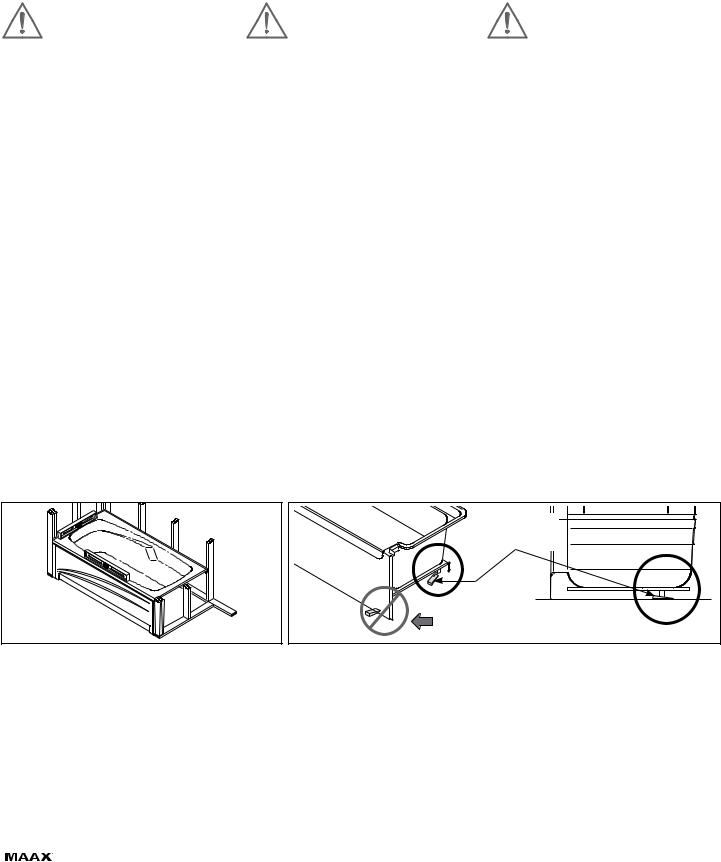
Leveling
To provide additional support, improve soundproofing and facilitate leveling, it is recommended that a layer of mortar or plaster be applied to the base of the bathtub legs, and covered with a 1/16" (2 mm) polyethylene sheet. The layer should be thick enough to facilitate the leveling of the unit without raising it. Once the unit is in position, ensure it is level in both directions for proper draining. Fig. 1.
Leveling must be done under the wood legs located beneath the unit. Do not level directly behind or under the flange at the front of the unit. Fig. 2.
Règles générales
Installation de la structure
Ne pas construire la structureavantd’avoir reçu l’unité. Afin d’assurer
une installation parfaite, les dimensions de la structure doivent être vérifiées à partir des dimensions de l’unité.
Plomberie
Mettre en place toute la plomberie et le tuyau d’évacuation avant de fixer l’unité. Il est recommandédefaireexécuterlaplomberie par un plombier accrédité et compétent.
Avant de percer le plancher pour le tuyau d’évacuation, s’assurer qu’il n’y ait aucun élément caché sous le plancher (tuyaux, solives, conduits de chauffage, fils électriques).
Mise de niveau
Pourprocurerunsupportadditionnel,améliorer l’insonorisation et faciliter la mise de niveau, il est recommandé d’étendre une couche de mortieroudeplâtreetdelarecouvrird’une feuille de polyéthylène de 2 mm. La couche devraitêtreassezépaissepourfaciliterlamise de niveau et non pas hausser l’unité. Une fois l’unité en position, s’assurer qu’elle est de niveau dans les deux directions afin d’assurer le drainage. Fig. 1.
La mise de niveau doit se faire uniquement sous le panneau de bois situé sous l’unité. Ne pas niveler directement derrière ou sous la lèvre à l’avant de l’unité. Fig. 2.
Reglas generales
Instalación de la estructura
Noconstruyalaestructura antes de haber recibido la unidad. Las
dimensiones de la estructura deben ser verificadas a partir de las dimensiones de la unidad, con objeto de asegurar una instalación perfecta.
Plomería
Instale toda la plomería y el tubo de desagüe antes de fijar la unidad. Se recomienda confiar los trabajos de plomería a un plomero calificado y competente.
Antes de perforar el suelo para instalar el tubo de desagüe, cerciórese de que no hay ningún elemento oculto debajo del piso (tuberías, listones, ductos de calefacción, cables eléctricos).
Nivelación
Para proporcionar un soporte adicional, mejorar la insonorización y facilitar la nivelación, le recomendamos echar una capa de mortero o yeso y cubrirla con una hoja de polietileno de 2 mm. La capa debe ser lo suficientemente espesa para facilitar la nivelación y no sobrellevar la unidad. Una vez que la unidad esté en posición, cerciórese de que está nivelada en ambos lados para asegurar un drenaje adecuado. Fig. 1.
Lanivelaciónsólodebehacersebajoelpanel de madera ubicado debajo de la unidad. No nivelar directamente detrás o debajo del borde delantero de la unidad. Fig. 2.
|
|
Wood shim |
|
|
Cale de bois |
|
|
Cuña de madera |
|
|
Do not shim under the front flange |
Fig. 1 |
Fig. 2 |
Ne pas niveler sous la lèvre frontale |
No nivelar debajo del borde delantero |
Before installing the unit, the frame and |
Avant d’installer l’unité, l’encadrement |
Antes de instalar la unidad, deben estar |
plumbing must be completed according |
et la plomberie doivent être complétés |
terminadas la estructura y tuberías con |
to the instructions. If it is renovation work |
conformément aux instructions. S’il |
arreglo a las instrucciones. En caso de |
taking place, the wall surfaces must be |
s’agit de travaux de rénovation, les |
tratarse de labor de renovación, deben |
removed in order to allow for the installation |
surfaces murales existantes doivent être |
retirarse las superficies de las paredes |
of the appropriate structural frame. |
retirées afin de permettre l’installation de |
existentes con miras a posibilitar la |
|
l’ossature appropriée. |
instalación adecuada del armazón. |
Important: |
Important: |
Importante: |
The therapeutic bathtub must never |
La baignoire thérapeutique ne doit |
La bañera hidroterapéutica nunca debe |
rest on the jets: leave a minimum space |
jamais être appuyée sur les jets; laisser |
apoyarse en los chorros: dejar por lo |
of 1/4" (6 mm) under the jets. |
au minimum 1/4" (6 mm) sous les jets. |
menos 1/4" (6 mm) debajo de los chorros. |
4
BEFORE |
|
AVANT |
|
ANTES |
|
|
|||
YOU BEGIN |
|
DE COMMENCER |
|
DE Comenzar |
Support
Ensure that the structure can support the weight of the tub filled with water and a person.
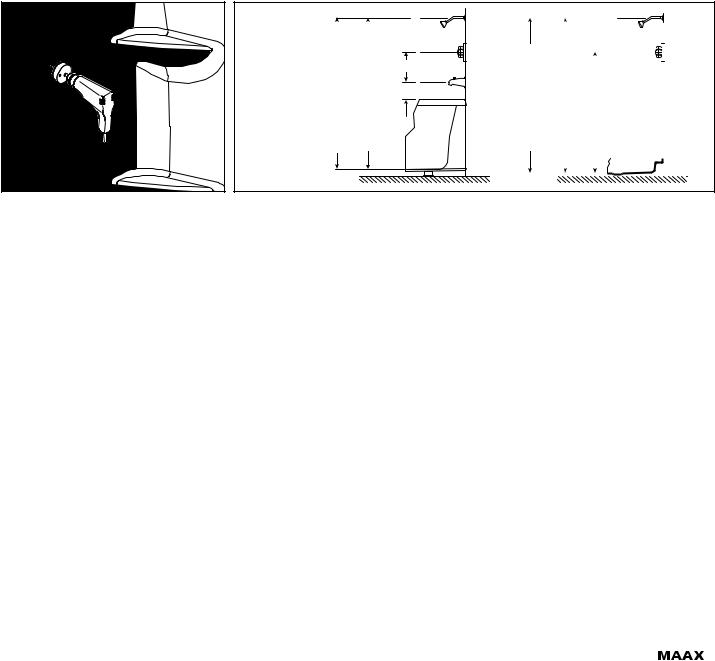
Drilling for the Plumbing
Mark the location of the faucets on the underside of the unit and drill 3/16" (5 mm) pilot holes. Make sure the holes line up with the plumbing. Drill directly on the finished side, following the faucet installation instructions. Fig. 3.
Positioning the Faucets
Position the faucets at the recommended height. Fig. 4.
Fig. 3 |
Obligatory Test
The bathtub must be tested before installation is complete. Fill the tub to the overflow and inspect for leaks.
Tighten any loose connections between the hoses and motor by hand.
MAAX is not responsible for defects and/ or problems discovered in course of this procedure, or those that could have been repaired or avoided by following it.
Support
S’assurer que la structure peut supporter le poids de la baignoire remplie d’eau contenant une personne.
Perçage de la plomberie
Marquer l’emplacement de la robinetterie à l’arrière de l’unité et percer des trous pilotes de 3/16" (5 mm). Vérifier si les trous correspondent bien à la plomberie. Percer directement sur le côté fini (intérieur) selon les instructions d’installation de la robinetterie. Fig. 3.
Positionnement de la robinetterie
Positionner la robinetterie à la hauteur recommandée. Fig. 4.
Bathtub and Tub-shower Baignoire et Bain-douche Bañera y Bañera-ducha
roof |
|
techo |
roof |
|
|
techo |
|
|
|
||||
with |
toit |
without |
toit |
|||
|
con |
|
sin |
|||
|
avec |
|
sans |
|||
|
76" (1930 mm) |
|
78" (1981 mm) |
|
||
Fig. 4
5" (127 mm)
4" (102 mm)
La baignoire doit être testée
Avant de terminer l’installation, la baignoire doit être testée ; remplir la baignoire jusqu’au trop-plein et vérifier s’il y a des fuites.
S’assurer que les raccords des tuyaux au moteur sont bien serrés (serrer à la main seulement).
MAAX n’est pas responsable des défauts ou problèmes découverts ou qui auraient pu être réparés ou évités suite à cette procédure.
Soporte
Asegurarse que la estructura pueda soportar el peso de la bañera llena de agua y una persona.
Perforaciones para tuberías
Marque la ubicación de las llaves de grifo en la parte trasera de la unidad y perfore agujeros provisionales de 3/16" (5 mm). Asegúrese que los agujeros se acoplan a la tubería. Perforar directamente por el lado terminado, según las instrucciones para instalar la grifería. Fig. 3.
Posicionamiento de la grifería
Posicione la grifería a la altura recomendada. Fig. 4.
|
|
|
|
|
|
|
|
|
|
|
|
|
|
|
|
|
|
|
|
|
roof |
techo |
roof |
|
techo |
|
|
|
|
|
|
|
|
|
|
|
|
|
|||
|
|
|
|
|
|
|
|
|
|
|
|
|
|
|||||||
|
|
|
|
|
|
|
|
|
|
|
|
|
|
|||||||
|
|
|
|
|
|
|
|
|
|
|
|
|
|
|||||||
toit |
without |
toit |
|
|
|
|
|
|
|
|
|
|
|
|
|
|||||
|
sin |
|
|
|
|
|
|
|
|
|
|
|
Douche |
|||||||
with |
|
|
|
|
|
|
|
|
|
|
|
|
||||||||
avec |
|
|
sans |
|
|
|
|
|
|
|
|
|
|
|
Shower |
|||||
78" (1981 mm) con |
|
|
80" (2032 mm) |
45" (1143 mm) |
|
|
|
|
|
|
|
|
Ducha |
|||||||
|
|
|
|
|
|
|
|
|
|
|
|
|||||||||
|
|
|
|
|
|
|
|
|
|
|
|
|
|
|
|
|
|
|
|
|
|
|
|
|
|
|
|
|
|
|
|
|
|
|
|
|
|
|
|
|
|
|
|
|
|
|
|
|
|
|
|
|
|
|
|
|
|
|
|
|
|
|
|
|
|
|
|
|
|
|
|
|
|
|
|
|
|
|
|
|
|
|
|
|
|
|
|
|
|
|
|
|
|
|
|
|
|
|
|
|
|
|
|
|
|
|
|
|
|
|
|
|
|
|
|
|
|
|
|
|
|
|
|
|
|
La bañera debe ser probada
Antes de terminar la instalación, la bañera debe ser probada; llenar la bañerahastaelrebosaderoycomprobar si hay fugas.
Cerciorarsedequelastuberíasconectadas al motor estén bien ajustadas (ajuste solamente a mano).
MAAX no es responsable de los defectos o problemas que hubieran podido ser descubiertos, reparados o evitados luego de haber efectuado esta prueba.
5
BEFORE |
|
AVANT |
|
ANTES |
|
|
|||
YOU BEGIN |
|
DE COMMENCER |
|
DE Comenzar |
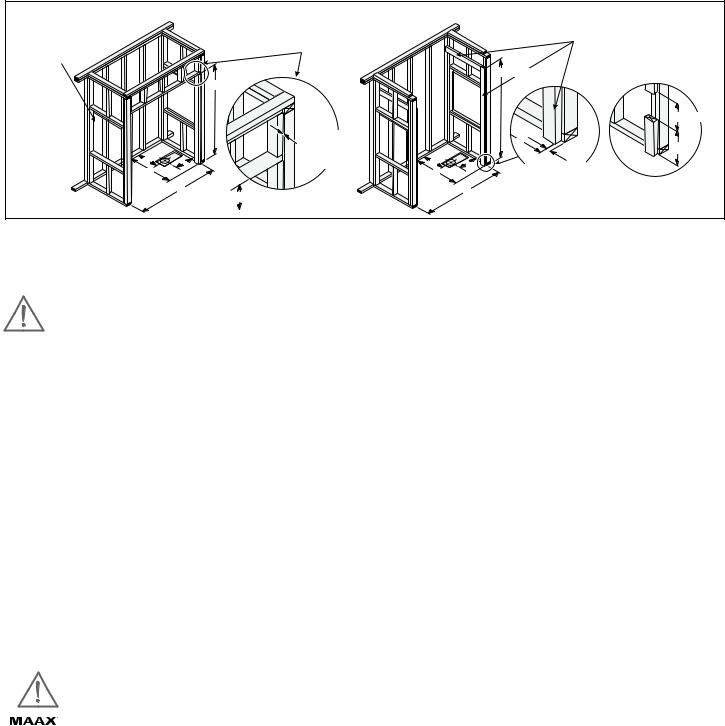
PREPARE THE ALCOVE - 1 PIECE UNITS WITH OR WITHOUT ROOF PRÉPARER L’ALCÔVE - UNITÉS 1 PIÈCE AVEC O SANS TOIT PREPARACIÓN DEL NICHO - UNIDADES DE 1 PIEZA CON O SIN TECHO
Ensure that the structure meets the required dimensions, it is level and square. Place the parts on the front as shown.
Important: When there is a massage system with Allia TSR-6032 and Allia TS-6032 the stud must be cut to be able to push the unit into the alcove.
S’assurer que la structure respecte les dimensions requises, qu’elle est au niveau et à l’équerre. Placer les pièces à l’avant tel qu’illustré.
Important: Lorsqu’il y a un système de massage avec les modèles Allia TS-6032 et Allia TSR-6032 il faut découper le montant pour être capable de pousser l’unité dans l’alcôve.
Asegúrese de que la estructura cumple con las dimensiones requeridas, que esté nivelado y a escuadra. Coloque las piezas en la parte frontal como se muestra.
Importante: Cuando se tiene un sistema de masaje con los modelos Allia TS-6032 y Allia TSR-6032 se debe recortar el montante para poder empujar la unidad dentro del nicho.
Allow an accessway |
|
Additional studs for flange |
|
to the faucet |
|
||
Additional stud for roofcap |
Partie supplémentaire pour bride |
||
Prévoir une trappe d’accès |
|||
pour la robinetterie |
Partie supplémentaire pour toit |
Parte suplementaria para la brida |
|
Prever una trampilla de |
Parte suplementaria para el techo |
|
|
acceso para la griferia |
|
|
|
|
C |
|
|
C(ABFLR) |
|
Fig. 4.1.1 |
|
|
|
|
|
|
|
|
|
|
|
|
|
|
|
12”(305mm) |
|
|
Recessed 3/8” |
|
|
B |
|
* |
|
|
Encastré 3/8” |
|
|
|
||
D |
|
Empotrado 3/8” |
D |
|
|
|
|
E |
(9.5mm) |
E |
Recessed 3/8” |
|
|||
B |
|
|
B |
|
Encastré 3/8” |
|
|
|
A |
|
|
A |
Empotrado 3/8” |
* |
16”(406mm) ABFLR (standard) |
Fig. 4.1 |
C |
|
(9.5mm) |
||||
|
|
|
|
|
|||
|
|
|
|
|
|
*Optional not ABFLR available only on 107000 and 107001, remove 2” to the ABFLR measurement to obtain not ABFLR.
*Non ABFLR optionnel disponible seulement pour 107000 et 107001, enlever 2” de la mesure ABFLR pour obtenir non ABFLR.
*No ABFLR opcional disponible solamente en 107000 y 107001, restar 2” a la medida ABFLR para obtener no ABFLR.
Note: The following measurements are not those of the unit but those required for installation (±1/8” (6mm)). Note: Les dimensions ci-dessous ne sont pas celles de l’unité, mais celles requises pour l’installation (±1/8” (6mm)). Nota: Las dimensiones indicadas a continuación no son las de la unidad, sino las requeridas para la instalación (±1/8” (6mm)).
MODEL |
|
|
|
|
|
|
Overflow height |
Installation Type |
|
||||
MODÈLE |
No |
A |
B |
C |
D |
E |
Hauteur trop-plein |
Type d’installation |
|
||||
MODELO |
|
|
|
|
|
|
Altura del rebosadero |
Tipo de la instalación |
|
||||
Allia TSR-6032 |
107000 |
60 1/8 |
30 1/2 |
87 |
15 1/2 |
8 1/2 |
16 7/8 |
Fig. 4.1 |
and / et / y |
p.13 |
|
||
1-piece with roof / Monocoque avec toît |
(1527) |
(775) |
(2210) |
(394) |
(216) |
(429) |
|
||||||
|
|
|
|
|
|
||||||||
Allia TS-6032 |
107001 |
60 1/8 |
31 1/2 |
80 |
16 1/2 |
8 1/2 |
16 7/8 |
Fig. 4.1 |
and / et / y |
p.14 |
|
||
1-piece without roof / Monocoque sans toît |
(1527) |
(800) |
(2032) |
(419) |
(216) |
(429) |
|
||||||
|
|
|
|
|
|
||||||||
Allia TSR-6032 |
107000 |
60 1/8 |
32 |
87 |
17 |
8 1/2 |
16 7/8 |
Fig. 4.1 , Fig. 4.1.1 |
|
|
p.13 |
||
1-piece with roof / Monocoque avec toît |
and / et / y |
||||||||||||
with massage system / avec système de massage |
(1527) |
(813) |
(2210) |
(432) |
(216) |
(429) |
|||||||
with massage system / avec système de massage |
|
|
|
|
|
||||||||
Allia TS-6032 |
107001 |
60 1/8 |
32 |
80 |
17 |
8 1/2 |
16 7/8 |
Fig. 4.1 , Fig. 4.1.1 |
|
|
p.14 |
||
1-piece without roof / Monocoque sans toît |
and / et / y |
||||||||||||
with massage system / avec système de massage |
(1527) |
(813) |
(2032) |
(432) |
(216) |
(429) |
|||||||
with massage system / avec système de massage |
|
|
|
|
|
||||||||
Allia SHR-6034 |
|
60 1/8 |
32 1/4 |
87 |
16 1/4 |
8 1/2 |
|
Fig. 4.1 |
|
|
p.13 |
|
|
1-piece with roof / Monocoque avec toît |
107002 |
- |
and / et / y |
|
|||||||||
(1527) |
(819) |
(2210) |
(413) |
(216) |
|
||||||||
Right drain / Drain droit / Desagüe a la derecha |
|
|
|
|
|
|
|
||||||
|
|
|
|
|
|
|
|
|
|
|
|
||
Allia SHR-6034 |
|
60 1/8 |
32 1/4 |
87 |
16 1/4 |
30 |
|
Fig. 4.1 |
|
|
p.13 |
|
|
1-piece with roof / Monocoque avec toît |
107002 |
- |
and / et / y |
|
|||||||||
(1527) |
(819) |
(2210) |
(413) |
(762) |
|
||||||||
with central drain / avec drain central |
|
|
|
|
|
|
|
||||||
|
|
|
|
|
|
|
|
|
|
|
|
||
Allia SH-6034 |
|
60 1/8 |
33 |
80 |
17 |
8 1/2 |
|
Fig. 4.1 |
|
|
p.14 |
|
|
1-piece without roof / Monocoque sans toît |
107003 |
- |
and / et / y |
|
|||||||||
(1527) |
(838) |
(2032) |
(432) |
(216) |
|
||||||||
Right drain / Drain droit / Desagüe a la derecha |
|
|
|
|
|
|
|
||||||
|
|
|
|
|
|
|
|
|
|
|
|
||
Allia SH-6034 |
|
60 1/8 |
33 |
80 |
17 |
30 |
|
Fig. 4.1 |
|
|
p.14 |
|
|
1-piece without roof / Monocoque sans toît |
107003 |
- |
and / et / y |
|
|||||||||
(1527) |
(838) |
(2032) |
(432) |
(762) |
|
||||||||
with central drain / avec drain central |
|
|
|
|
|
|
|
||||||
|
|
|
|
|
|
|
|
|
|
|
|
||
Allia SHR-4834 |
107004 |
48 1/8 |
32 1/4 |
87 |
16 1/4 |
24 |
- |
Fig. 4.1 |
and / et / y |
p.13 |
|
||
1-piece with roof / Monocoque avec toît |
(1222) |
(819) |
(2210) |
(413) |
(610) |
|
|||||||
|
|
|
|
|
|
|
|||||||
Allia SH-4834 |
107005 |
48 1/8 |
33 |
80 |
17 |
24 |
- |
Fig. 4.1 |
and / et / y |
p.14 |
|
||
1-piece without roof / Monocoque sans toît |
(1222) |
(838) |
(2032) |
(432) |
(610) |
|
|||||||
|
|
|
|
|
|
|
|||||||
Allia SHR-3636 |
107006 |
36 1/8 |
34 1/4 |
87 |
17 1/4 |
18 |
- |
Fig. 4.1 |
and / et / y |
p.13 |
|
||
1-piece with roof / Monocoque avec toît |
(918) |
(870) |
(2210) |
(438) |
(457) |
|
|||||||
|
|
|
|
|
|
|
|||||||
Allia SH-3636 |
107007 |
36 1/8 |
35 |
80 |
18 |
18 |
- |
Fig. 4.1 |
and / et / y |
p.14 |
|
||
1-piece without roof / Monocoque sans toît |
(918) |
(889) |
(2032) |
(457) |
(457) |
|
|||||||
|
|
|
|
|
|
|
|||||||
|
|
|
|
|
|
|
|
|
|
|
|
|
|
Structure measurements must be verified against the unit
les dimensions de la structure doivent être vérifiées à partir des dimensions de l’unité Lasdimensionesdelaestructuradebenserverificadasapartirdelasdimensionesdelaunidad
6
 Loading...