


Simply Connected
User Guide
XWR-1750
Dual Band Wireless
AC1750 Gigabit Router
Use the XWR-1750 to:
Deliver Next Generation 802.11ac Gigabit Wi-Fi with Speeds up to 1750Mbps
Maximize Data Rates with Concurrent Dual-Band Technology
Optimize VoIP, Streaming Media and Other Demanding Applications
Create a Secure Guest Network
Provide an Affordable High Performance Network

XWR-1750
User Guide
Model Number: XWR-1750
Dual Band Wireless AC1750 Gigabit Router
FCC ID: W59XWR1750
IC: 8584A-XWR1750
© 2015 Luxul. All Rights Reserved.
No part of this publication may be modified or adapted in any way, for any purposes without permission in writing from Luxul. The material in this manual is subject to change without notice. Luxul reserves the right to make changes to any product to improve reliability, function, or design. No license is granted, either expressly or by implication or otherwise under any Luxul intellectual property rights. An implied license only exists for equipment, circuits and subsystems contained in this or any Luxul product.
This product is covered by one or more U.S. and foreign patents.
Patents: 7,379,717, 6,606,075, 6,373,448, other patents pending
DOCUMENT CONVENTIONS
The following graphical alerts are used in this document to indicate notable situations:
 NOTE: Tips, hints, or special requirements that you should take note of.
CAUTION: Care is required. Disregarding a caution can result in data loss or equipment malfunction.
WARNING!: Indicates a condition or procedure that could result in personal injury or equipment damage.
CONTACT LUXUL
Sales |
Technical Support |
P: 801-822-5450 |
P: 801-822-5450 |
E: sales@luxul.com |
E: support@luxul.com |
FCC COMPLIANCE
This device complies with Part 15 of the FCC Rules. Operation is subject to the following two conditions: (1) this device may not cause harmful interference, and
(2) this device must accept any interference received, including interference that may cause undesired operation.
2 |
a: 14203 Minuteman Drive, Suite 201, Draper, UT 84020-1685 | luxul.com | 801-822-5450 |
|
LUX-UG-XWR-1750 Vers: 022515 |
||
|

|
User Guide |
CONTENTS |
|
1 PRODUCT OVERVIEW |
4 |
1.1 Product Introduction |
4 |
1.2 Product Features |
4 |
1.3 Product Specifications |
5 |
1.4 Package Contents |
5 |
2 HARDWARE DESCRIPTION AND INSTALLATION |
5 |
2.1 Panel Layout |
5 |
2.2 System Requirements |
7 |
2.3 Installation Requirements |
7 |
2.4 XWR-1750 Installation |
8 |
2.5 Default IP Address |
8 |
2.6 Connecting a Client Device |
8 |
2.7 Verifying Connectivity |
8 |
3 CONFIGURATION |
9 |
3.1 Quick Setup |
9 |
3.2 Status |
16 |
3.3 Network |
20 |
3.4 Wireless |
24 |
3.5 Guest Network |
31 |
3.6 Firewall/Security |
33 |
3.7 QoS |
37 |
3.8 VPN |
39 |
3.9 Administration |
41 |
3.10 Tools |
48 |
4 REGULATORY COMPLIANCE |
49 |
APPENDIX 1: COMMON COMMANDS |
52 |
© 2015 Luxul. All Rights Reserved. |
3 |
|
Other trademarks and registered trademarks are the property of their respective owners |
||
|

XWR-1750
1 PRODUCT OVERVIEW
1.1 Product Introduction
The Luxul XWR-1750 Wireless Router is a feature rich network device designed to enhance the performance, security and reliability of a home or commercial network. It enables simple monitoring, management and control of network usage to boost efficiency, reduce network bandwidth and minimize security risks. With web-based
management tools; along with advanced security, VPN, and bandwidth control features, the XWR-1750 provides the ideal foundation upon which to build your Luxul network.
1.2 Product Features
Complies with IEEE802.3, IEEE802.3u, IEEE802.3x, IEEE802.11a, IEEE802.11b, IEEE802.11g, IEEE802.11n and IEEE802.11ac
One 10/100/1000M auto-negotiating WAN interface
Four 10/100/1000M auto-negotiating LAN interfaces
Protocol Support for TCP/IP, UDP, VPN, DHCP, NAT, SMTP, DNS, FTP
True QOS support to prioritize traffic by Host, Protocol and Port
600MHz processor and powerful NAT forwarding features support up to 39K+ concurrent sessions
Support for Port Forwarding, DMZ hosts and ALG applications
VPN server supports PPTP VPN clients
PPTP VPN server function gives up to 10 users simultaneous access to the local network providing a secure connection
Supports Dynamic Domain Name System or DDNS
Provides system security logs and flow statistics
Built-in DHCP server with static address lease capability
4 |
a: 14203 Minuteman Drive, Suite 201, Draper, UT 84020-1685 | luxul.com | 801-822-5450 |
|
LUX-UG-XWR-1750 Vers: 022515 |
||
|

|
User Guide |
1.3 Product Specifications |
|
Supported Protocols and |
IEEE802.3, IEEE802.3u, IEEE802.3x, IEEE802.11a, |
Standards |
IEEE802.11b, IEEE802.11g, IEEE802.11n, IEEE802.11ac TCP/ |
|
IP, DHCP, ICMP, NAT, PPPoE, SNTP, HTTP, DNS, ARP |
Network Media |
10Base-TÐCat5 or better 100Base-TXÐCat5 or better |
|
1000Base-TX: Cat5 or better (Cat6 recommended) |
|
Wireless 802.11a/b/g/n/ac adapter |
Dimensions LxWxH in. (mm) |
8.6”x6.2”x1.3” (218.6x156.5x33.8) |
Power and Consumption |
AC 110V 60Hz or 220V 50Hz Consumption: |
1.4 Package Contents
The following items are included in the box:
XWR-1750 Wireless Router
Power Cord
Quick Installation Guide
If any of the listed items are missing or damaged, please contact the reseller from whom you purchased for return/replacement.
2 HARDWARE DESCRIPTION AND INSTALLATION
2.1 Panel Layout
2.1.1 Front Panel
XWR-1750 Front Panel
© 2015 Luxul. All Rights Reserved. |
5 |
|
Other trademarks and registered trademarks are the property of their respective owners |
||
|

XWR-1750
LED Indicators:
Indicator Description |
|
Function |
5GHz |
FLASHING |
Indicates the XWR-1750 is passing 5GHz |
|
|
wireless data. |
|
ON |
Indicates a 5GHz wireless network is |
|
|
configured and broadcasting. |
|
OFF |
Indicates there is no 5GHz wireless network |
|
|
configured or the 5GHz radio is disabled. |
2.4GHz |
FLASHING |
Indicates the XWR-1750 is passing 2.4GHz |
|
|
wireless data. |
|
ON |
Indicates a 2.4GHz wireless network is |
|
|
configured and broadcasting. |
|
OFF |
Indicates there is no 2.4GHz wireless network |
|
|
configured or the 2.4GHz radio is disabled. |
1-4 LAN LED |
ON |
Indicates a device is connected to the |
|
|
Ethernet port number. |
|
FLASHING |
Indicates data packets are being transmitted |
|
|
to the connected device. |
Internet |
ON |
Indicates the XWR-1750 is connected to |
LED |
|
the ISP. |
|
FLASHING |
Indicates data packets are being transmitted |
|
|
to the Internet |
USB LED |
ON |
Indicates a USB enabled device is connected |
|
|
and configured. |
System LED |
ON |
Indicates the XWR-1750 is booting. |
|
FLASHING |
Indicates the XWR-1750 is operating normally. |
|
OFF |
Indicates the XWR-1750 will not boot. |
Power LED |
ON |
Indicates power is applied to the XWR-1750. |
|
OFF |
Indicates power is not applied to the |
|
|
XWR-1750. |
Luxul LED |
|
Unused at this time |
6 |
a: 14203 Minuteman Drive, Suite 201, Draper, UT 84020-1685 | luxul.com | 801-822-5450 |
|
LUX-UG-XWR-1750 Vers: 022515 |
||
|

User Guide
NOTE: If additional local ports are required, it is recommended that a Luxul switch be used in conjunction with the XWR-1750.
2.1.2 Rear Panel
Antenna: 3 RPSMA Antenna ports for connecting 2.4/5GHz wireless Antennas.
Power: Power port used to connect the provided DC power supply.
WAN: 1 WAN RJ-45 Ethernet Port for connecting internet feed.
LAN: 4 LAN RJ-45 Ethernet Ports allowing for four local network connections.
Reset Button: Used for hard reset or factory default reset. To hard reset the router, press and release the button. To reset to factory defaults, press and hold this button for 15 seconds.
CAUTION: Resetting the XWR-1750 to factory defaults will remove all custom settings
XWR-1750 Rear Panel
2.2 System Requirements
Network Connections: 802.3 Ethernet Enabled Computer or 802.11a/b/g/n/ac Wireless Enabled Computer
Web Browsers: Supported Web browser versions include I.E. 9, Firefox 25, Safari 5, Chrome 30, and up. The Web browser is used to configure the XWR-1750.
Internet: Broadband Internet Service (depending on the service provider, a separate modem may be required)
2.3 Installation Requirements
Install the XWR-1750 in a stable/safe place to avoid any possible damage
Inspect the DC power adapter to ensure that it is correctly connected and undamaged
To avoid electric shock, DO NOT open the XWR-1750 housing (no user serviceable parts inside). Opening the XWR-1750 will void your warranty.
© 2015 Luxul. All Rights Reserved. |
7 |
|
Other trademarks and registered trademarks are the property of their respective owners |
||
|

XWR-1750
It is recommended that the Grounding connection to the outlet is functioning properly and the XWR-1750 is positioned away from direct sun light
Ensure there is sufficient space around the XWR-1750 for proper ventilation and heat dissipation. It is recommended to have at least 4-6 inches around all sides.
2.4 XWR-1750 Installation
Before installing the XWR-1750, test the Internet connection to validate that it is functioning properly. When Internet access has been confirmed, follow the steps below for Router installation.
1.Connect the Internet cable to the XWR-1750 WAN port
2.Connect one of the XWR-1750 LAN port to a switch, access point, or computer.
3.Connect DC Power Adapter
4.Establish LAN or Wireless Connection
5.Connect a Wireless device to the 2.4GHz or 5GHz Wireless SSID.
NOTE: Connect the included DC power adapter to the XWR-1750 first and then to the AC outlet.
2.5 Default IP Address
The XWR-1750 default IP address is 192.168.0.1. This address can be changed. However, for hassle free installation of other plug and play Luxul devices, it is recommended that the default IP value be maintained.
2.6 Connecting a Client Device
Connect a client device to one of the XWR-1750 LAN ports or to a switch that is connected to an XWR-1750 LAN port. Connect a wireless client device to one of the wireless SSIDs (Luxul17502G or Luxul17505G). The DHCP server on the XWR-1750 is configured by default. If your client device is set to obtain an address automatically, no further configuration is required.
2.7 Verifying Connectivity
After automatic configuration of the TCP/IP parameters, the ping command can be used to check connectivity between the XWR-1750 and the client device.
Windows Devices:
6. Select Start >> Run. Input cmd in the Run line then press enter.
8 |
a: 14203 Minuteman Drive, Suite 201, Draper, UT 84020-1685 | luxul.com | 801-822-5450 |
|
LUX-UG-XWR-1750 Vers: 022515 |
||
|

User Guide
7.At the newly opened command interface enter the following command: ping 192.168.0.1 and press enter. If connected properly, the system should report back a result as follows: packets sent=4, packets received=4, packets lost=0. This means the device is connected with a valid IP address.
3 CONFIGURATION
This chapter introduces the configuration of the XWR-1750 Enterprise Multi-WAN Router functions via the Web-based management interface.
Quick SetupStatus
Network
Wireless
Guest Network
Firewall/SecurityQoS
VPN
AdministrationTools
3.1 Quick Setup
The Quick Setup page allows you to configure the Primary Internet / WAN connection settings and the Local Network / LAN settings. This page is intended to get your Internet connection up and running as quick and painless as possible.
3.1.1 Connection Type DHCP
This Connection Type option will automatically pull the WAN IP, WAN Subnet Mask, WAN Gateway, WAN Primary DNS and WAN Secondary DNS from your ISP’s Modem.
Select the Menu Quick Setup and Connection Type DHCP from the dropdown to view the following page:
© 2015 Luxul. All Rights Reserved. |
9 |
|
Other trademarks and registered trademarks are the property of their respective owners |
||
|

XWR-1750
Internet/WAN: Displays the WAN connection Options
ww Connection Type: Select the desired WAN Connection Type. When set to DHCP, the Router will pull all connection information automatically from the ISP’s Modem. DHCP is the default setting.
ww Primary DNS: Allows you to select the checkbox and manually configure a Primary DNS Server IP Address. “DNS Assigned By ISP” is the default setting
ww Secondary DNS: Allows you to select the checkbox and manually configure a Secondary DNS Server IP Address. “DNS Assigned By ISP” is the default setting
ww Custom MAC Address: Allows you to set a Custom MAC Address which allows the Router to appear as a Computer to the ISP Modem. Some Modems will cache the MAC Address of the first device used to setup Internet Service and cannot be reset by the user. If this occurs you can clone that setup Device’s MAC Address to allow the XWR-1750 to connect to the Modem.
ww Custom MTU: Allows you to configure a Custom MTU setting. MTU (or Maximum Transmission Unit), is the maximum packet size allowed on the network. Some ISPs (usually DSL or Fiber) will require this value to be set if the Modem is in
Bridge mode.
After making any changes to the Connection Type, you must click the Save button to Save your changes, then you must click the Reboot button for the changes to take effect. You can click the Save button and proceed to other pages without losing your configured changes.
3.1.2 Connection Type PPPOE
This Connection Type option requires a Username and Password that is provided by the ISP and is typically used on Bridged DSL Modem connections. This type will automatically pull the WAN IP, WAN Subnet Mask, WAN Gateway, WAN Primary
DNS and WAN Secondary DNS from the ISP’s Modem once the Router is successfully Authenticated.
10 |
a: 14203 Minuteman Drive, Suite 201, Draper, UT 84020-1685 | luxul.com | 801-822-5450 |
|
LUX-UG-XWR-1750 Vers: 022515 |
||
|
User Guide
Select the Menu Quick Setup and Connection Type PPPOE from the dropdown to view the following page:
Internet/WAN: Displays the WAN connection Options
ww Connection Type: Select the desired WAN Connection Type. When set to PPPOE, enter a Username and Password that the ISP provides to authenticate the Router allowing it to connect. The Router will pull all connection information automatically from the ISP’s Modem once it is successfully authenticated. DHCP is the default setting.
ww Username: Allows you to enter the PPPOE Username specified by the ISP. ww Password: Allows you to enter the PPPOE Password specified by the ISP.
ww Max Failed Pings: Allows you to specify the Maximum number of Failed Pings to the PPPOE Server before the Router attempts to re-authenticate to the PPOE
Sever. We recommend the default value of 3 attempts unless the ISP recommends a different value.
ww Ping Interval: Allows you to specify the number of seconds to wait between Ping attempts to the PPPOE Server. We recommend the default value of 5 seconds in order to preserve WAN resources.
ww Primary DNS: Allows you to select the checkbox and manually configure a Primary DNS Server IP Address. “DNS Assigned By ISP” is the default setting.
ww Secondary DNS: Allows you to select the checkbox and manually configure a Secondary DNS Server IP Address. “DNS Assigned By ISP” is the default setting.
© 2015 Luxul. All Rights Reserved. |
11 |
|
Other trademarks and registered trademarks are the property of their respective owners |
||
|

XWR-1750
ww
ww
Custom MAC Address: Allows you to set a Custom MAC Address which allows the Router to appear as a Computer to the ISP Modem. Some Modems will cache the MAC Address of the first device used to setup Internet Service and cannot be reset by the user. If this occurs you can clone that setup Device’s MAC Address to allow the XWR-1750 to connect to the Modem.
Custom MTU: Allows you to configure a Custom MTU setting. MTU (or Maximum Transmission Unit), is the maximum packet size allowed on the network. Some ISPs (usually DSL or Fiber) will require this value to be set if the Modem is in
Bridge mode.
After making any changes to the Connection Type, you must click the Save button to Save your changes, then you must click the Reboot button for the changes to take effect. You can click the Save button and proceed to other pages without losing your configured changes.
3.1.3 Connection Type Static IP
This Connection Type option requires the Static IP, Netmask, Gateway, Primary DNS and Secondary DNS provided by the ISP to be entered manually. This type will never have an IP Address change on the connection and is typically used in Business or Remote Access implementations.
Select the Menu Quick Setup and Connection Type Static IP from the dropdown to view the following page:
Internet/WAN: Displays the WAN connection Options
ww Connection Type: Select the desired WAN Connection Type. When set to Static IP, you must enter the IP information that the ISP provides allowing the Router to connect.
12 |
a: 14203 Minuteman Drive, Suite 201, Draper, UT 84020-1685 | luxul.com | 801-822-5450 |
|
LUX-UG-XWR-1750 Vers: 022515 |
||
|

User Guide
ww
ww
ww
ww
ww
ww
ww
Static IP: Allows you to enter the WAN connection IP Address specified by the ISP.
Netmask: Allows you to enter the WAN connection Subnet Mask specified by the ISP.
Gateway: Allows you to enter the WAN connection Gateway IP Address specified by your ISP.
Primary DNS: Allows you to manually configure the Primary DNS Server IP Address specified by the ISP or any third party DNS Server IP Address. With the Static IP Connection Type specified, this is a required field.
Secondary DNS: Allows you to manually configure the Primary DNS Server IP Address specified by the ISP or any third party DNS Server IP Address. With the Static IP Connection Type specified this is a required field.
Custom MAC Address: Allows you to set a Custom MAC Address which allows the Router to appear as a Computer to the ISP Modem. Some Modems will cache the MAC Address of the first device used to setup Internet Service and cannot be reset by the user. If this occurs you can clone that setup Device’s MAC Address to allow the XWR-1750 to connect to the Modem.
Custom MTU: Allows you to configure a Custom MTU setting. MTU (or Maximum Transmission Unit), is the maximum packet size allowed on the network. Some ISPs (usually DSL or Fiber) will require this value to be set if the Modem is in
Bridge mode.
After making any changes to the Connection Type, you must click the Save button to Save your changes, then you must click the Reboot button for the changes to take effect. You can click the Save button and proceed to other pages without losing your configured changes.
3.1.4 Local Network / LAN
Allows you to set the Local Network IP Address of the Router and the Subnet Mask used in the Local Network.
Select the Menu Quick Setup to view the following page:
© 2015 Luxul. All Rights Reserved. |
13 |
|
Other trademarks and registered trademarks are the property of their respective owners |
||
|
XWR-1750
Local Network / LAN: Displays the Local Network IP Options
ww LAN IP Address: Allows you to configure the LAN IP of the Router, this will be used by all devices in the LAN as the Default Gateway. If you are installing other Luxul devices, we recommend keeping the default IP of 192.168.0.1.
ww LAN Subnet Mask: Allows you to specify the Subnet Mask to be used in the LAN. The default value of 255.255.255.0 is recommended unless specified otherwise by your Network Administrator.
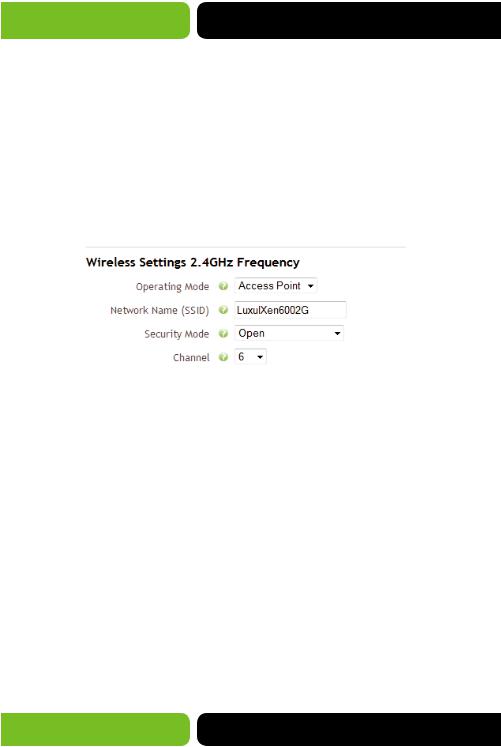
3.1.5 Wireless Settings 2.4GHz Frequency
Allows you to configure the Primary 2.4GHz Wireless Network. Select the Menu Quick Setup to view the following page:
Wireless Settings 2.4GHz Frequency: Displays the 2.4GHz Wireless Network settings.
ww Operating Mode: Allows you to select the Operating Mode of the SSID. Access Point is the default setting.
ww Network Name (SSID): Allows you to specify the Network Name (SSID) used to identify the Wireless Network to client devices.
ww Security Mode: Allows you to set the desired Security Mode used to connect to the SSID, the supported modes include 64bit/128bit WEP, WPA, WPA2 and WPA/ WPA2 Mixed. Open is the default setting, we strongly recommend adding Security to any SSID.
ww WEP Key: When selecting WEP Security a new option will appear WEP Key. This allows you to set the WEP Key, it can consist of Numbers 0-9 and Letters A-F. For 64bit WEP enter 10 hexadecimal digits (0-9 and A-F) or 5 regular characters. For 128bit WEP enter 26 hexadecimal digits (0-9 and A-F) or 13 regular characters.
ww Encryption: When selecting WPA or WPA2 security two new options will appear the first is Encryption. This allows you to set the Encryption type used by WPA/ WPA2 the options include AES, TKIP&AES and TKIP. AES is the default and recommended setting.
14 |
a: 14203 Minuteman Drive, Suite 201, Draper, UT 84020-1685 | luxul.com | 801-822-5450 |
|
LUX-UG-XWR-1750 Vers: 022515 |
||
|

User Guide
ww
ww
WPA Passphrase: When selecting WPA or WPA2 security two new options will appear the second is WPA Passphrase. This allows you to set the Passphrase used to connect to the SSID. WPA Passphrases must be a minimum of 8 to a maximum of 63 Characters and can contain Letters (capitol and lowercase), Numbers, Special Characters and Spaces.
Channel: Allows you to specify the Channel used by the 2.4GHz Radio in the Router, the supported Channels include 1-11 (non-overlapping channels are 1, 6 and 11). 6 is the default setting.
3.1.6 Wireless Settings 5GHz Frequency
Allows you to configure the Primary 5GHz Wireless Network. Select the Menu Quick Setup to view the following page:
Wireless Settings 5GHz Frequency: Displays the 5GHz Wireless Network settings.
ww Operating Mode: Allows you to select the Operating Mode of the SSID. Access Point is the default setting.
ww Network Name (SSID): Allows you to specify the Network Name (SSID) used to identify the Wireless Network to client devices.
ww Security Mode: Allows you to set the desired Security Mode used to connect to the SSID, the supported modes include 64bit/128bit WEP, WPA, WPA2 and WPA/ WPA2 Mixed. Open is the default setting, we strongly recommend adding Security to any SSID.
ww WEP Key: When selecting WEP Security a new option will appear WEP Key. This allows you to set the WEP Key, it can consist of Numbers 0-9 and Letters A-F. For 64bit WEP enter 10 hexadecimal digits (0-9 and A-F) or 5 regular characters. For 128bit WEP enter 26 hexadecimal digits (0-9 and A-F) or 13 regular characters.
© 2015 Luxul. All Rights Reserved. |
15 |
|
Other trademarks and registered trademarks are the property of their respective owners |
||
|

XWR-1750
ww
ww
ww
ww
ww
Encryption: When selecting WPA or WPA2 security two new options will appear the first is Encryption. This allows you to set the Encryption type used by WPA/ WPA2 the options include AES, TKIP&AES and TKIP. AES is the default and recommended setting.
WPA Passphrase: When selecting WPA or WPA2 security two new options will appear the second is WPA Passphrase. This allows you to set the Passphrase used to connect to the SSID. WPA Passphrases must be a minimum of 8 to a maximum of 63 Characters and can contain Letters (capitol and lowercase), Numbers, Special Characters and Spaces.
Channel: Allows you to specify the Channel used by the 5GHz Radio in the Router, the supported Channels will change depending on the Wireless Mode 802.11ac+n+g offers 40 and 153. While 802.11a offers 36, 40, 44, 48, 149, 153, 157, 161 and 165 (the available options are non-overlapping channels) 153 is the default setting.
Save: This button is used to Save the configuration changes made on this page. Once you have clicked Save you may move to other pages in the Router setup. Most changes will require a Reboot to allow the changes to take effect.
Reboot: This button is used to Reboot the Router after making configuration changes or can be used to Reboot the Router for any reason.
ww Cancel: This button Cancels any changes made on this page.
NOTE: After making any changes to the Internet / WAN and/or Local Network / LAN you must click the Save button to Save your changes, then you must click the Reboot button for the changes to take effect. You can click the Save button and proceed to other pages without losing your configured changes.
3.2 Status
There are three submenus in the Status menu; Overview, Connected Clients and Wireless Connections. Click a submenu to view and/or modify the corresponding settings.
3.2.1 Overview
This page displays the System, Internet / WAN Settings and Local Network / LAN Settings configured on the Router.
16 |
a: 14203 Minuteman Drive, Suite 201, Draper, UT 84020-1685 | luxul.com | 801-822-5450 |
|
LUX-UG-XWR-1750 Vers: 022515 |
||
|
 Loading...