

Page 1
SUPER AUDIO CD PLAYER
D-06u
Owner`s Manual
Page 2

Page 3

SUPER AUDIO CD PLAYER D-06u
Contents
Precautions ············································································································· 1
Features of This Unit ································································································ 3
About Discs This Unit Can Play Back ······································································· 7
Before Use ·············································································································· 9
Names and Functions ···························································································· 11
Connections ·········································································································· 21
How to Play Back Discs ························································································ 23
Stop/pause the Playback ······················································································· 25
Skip/Fast-forward/Rewind ····················································································· 27
Direct search/repeat playback ··············································································· 29
Program Playback ································································································· 31
Random playback/disc information/zoom ······························································ 33
Detailed Settings ··································································································· 35
Block Diagram ······································································································· 41
Specifications ········································································································ 42
Before Asking for Repair ························································································ 43
Page 4

Precautions
DO NOT move this unit during playback.
During playback, the disc is rotating at high speed. Do not try
to lift or move this unit as the disc may be damaged. Other-
wise, the disc may be damaged.
When moving this unit
You must remove the disc and close the disc tray when mov-
ing this unit. Then, press the OPERATION switch, and after
"-STANDBY-" disappears from the display, unplug the power
cord from the AC outlet. If the unit is moved with a disc re-
maining inside, this can cause a malfunction.
Installation place
• Choose a stable place near the stereo system that is to be
used in combination with this unit.
• Do not install this unit near a television or color monitor.
Keep this unit away from such devices as cassette decks
that are subject to magnetism.
• Install this unit onto a level place when possible.
Avoid the following locations for
installation.
• Locations exposed to direct sunlight
• Places subject to humidity and with less ventilation
• Places where are extremely hot or cold
• Places subject to strong vibration
• Places subject to dust
• Places subject to oil, steam, and heat (such as kitchens)
Do not put articles.
Do not put any articles on this unit.
To avoid heat emission
Do not place this unit on such device as an amplifier that may
emit heat. If the unit is installed on a rack, install the unit below
the rack where the amplifier is installed so as to avoid heat
emission from the amplifier and other audio devices.
Notice when this unit is installed in a rack
with glass doors
While the glass doors are closed, do not open the disc tray
by pressing the open/close (u) button of the remote control.
Disc tray performance will be blocked, and that may result in
a malfunction.
Power off this unit when it is not used.
Depending on the condition of radio waves emitted during
television broadcasting, interference fringes may appear on
the television monitor, but that is not a malfunction. In such
a case, power off the unit. There may also be a case where
noises are heard on the radio due to radio wave interference.
Dew condensation
In winter, be careful when carrying this unit from a cold place
to a warm place or if the room temperature is suddenly raised
by a heater or the like where this unit is installed. The unit in-
terior (operating blocks and lens) will have dew condensation
on it. In such a condition, this unit cannot work normally and
playback is impossible. This depends on the state of dew
condensation, but you will be able to enjoy the music if the
unit is left untouched for one to two hours after it has been
turned on and the temperature of this unit is maintained at
room temperature until the condensation dries.
Even in summer, dew condensation can occur if this unit is
directly exposed to cool air from an air conditioner. In such a
case, the installation place should be changed.
1
Page 5

SUPER AUDIO CD PLAYER D-06u
How to handle discs
• Do not use any deficient disc (with cracks, warp, etc.).
• Do not damage the signal surface of the disc or grime it.
• Do not place paper or a sticker on the disc. This can warp
the disc and playback may become impossible. In many
cases, rental discs carry labels and paste may protrude
from under the label. Before use, check that the disc is free
from protruding paste or the like.
• Do not play with two discs in a stack.
How to store discs
• Always put your discs in a case. Store them vertically where
high temperature, high humidity, and direct exposure to
sunlight are not prevalent. Places with extremely low tem-
perature should also be avoided.
• Read the caution notes carefully that are attached to discs.
Disc cleaning
• If a disc is dirty from fingerprints or dusty, the sound quality
may be lowered. Lightly wipe the disc with soft cloth, from
the inside to outer periphery. (Refrain from wiping it along
the circumference.)
• Do not use a volatile chemical such as benzine or thinner.
Record spray, anti-static agents, and other such materials
cannot be used either.
• Where the disc seems to be very dirty, dip soft cloth in wa-
ter, wring it well, and remove contaminants. Lastly, remove
the moisture with dry cloth.
Lens cleaning
If the lens is dusty, sound skips may take place. Please read
"After-sales Services and Quality Assurance" (Page XX) and
ask us for cleaning. Do not use any cleaning substance for
discs available on the market because they may hurt the lens.
Notice when handling optical digital cables
• Do not fold the cables. For storage, wind each cable to
make a coil whose diameter is approx.15 cm or larger.
• For connection, insert the cable connectors firmly into the
terminals of this unit and the other device.
• Use the cables whose each length is 3 m or less.
• When the cable connectors get dusty, wipe the dust away
with a dry soft cloth before inserting into the terminals.
Cleaning
• Usually, wipe the unit with a dry soft cloth. When the dirt
is hard to remove, dip soft cloth in detergent diluted 5 or 6
times with water, wring it well, and remove contaminants.
Then, remove the moisture with dry cloth.
• Do not use a solvent like alcohol, benzine, thinner, or pes-
ticide because such a substance can damage the exterior.
In addition, do not let this unit contact a rubber or plastic
form for a long time. That may damage the cabinet surface
of the unit.
• When using a chemical cloth for cleaning, read the caution
provided with the chemical cloth product.
• Before cleaning, unplug the power cord from the AC outlet.
Disc in a specific shape
This unit cannot accept discs in specific shapes (heart-
shaped, hexagonal, etc.) for playback. Never use such discs
as they can cause malfunctions.
2
Page 6

Features of This Unit
— 2-channel-specific Super Audio
CD/CD Compatible Player
LxDTM — LuXman original Disc
Transport Mechanism —
This unit is equipped with a robust transport block. The trans-
port block features high rigidity structure SSB (Stabilized
Support Block) that doubles as a chassis.
The suede-finish aluminum die-cast disc tray can control vi-
bration and resonance.
QLL (Quiet Linear Loader) is applied to open or close the disc
tray quietly and smoothly.
Analog circuit
Amplifier circuit with improved sound quality drives the out-
puts from the D/A converters.
USB input that is applicable to 384kHz /
32 bit
Introduction of a B-type USB input terminal that allows the
input of USB digital audio signal from a PC/Mac.
The sampling frequency of up to 384 kHz and 32-bit quanti-
zation are applicable.
USB input DSD supported
DSD format data can be entered from PC/Mac, or the like.
Sampling frequencies of 2.8224 MHz/5.6448 MHz is appli-
cable.
Asynchronous communication supported
The USB input with low jitter has been achieved with USB
dedicated DSP by asynchronous communication and PLL.
Jitter-reduction function
This unit is equipped with a circuit to reduce the clock jitter in
the system clock.
3
Page 7
SUPER AUDIO CD PLAYER D-06u
Low phase noise crystal oscillator
This unit uses an oscillator with low noise near the oscillating
frequency.
This oscillator provides clocks with less jitter.
Disc layer switchover function
By pressing a switch on the main unit or remote control, the
CD layer and the HD layer of Hybrid Super Audio CD can be
switched over.
Zoom function
When the ZOOM switch is pressed on the remote control,
the track number and time information can be displayed in an
enlarged manner.
4 playback modes
Playback mode can be selected from regular playback, pro-
gram playback, random playback, and repeat playback.
32 bit digital filter
Thanks to the dedicated digital filter with 32 bit arithmetic pro-
cessing, inputs of 44.1 kHz/88.2 kHz/176.4 kHz are upsam-
pled to 352.8 kHz and inputs of 48 kHz/96 kHz/192 kHz are
upsampled to 384 kHz.
For PCM data, 3 types of digital filters are switchable, and for
DSD data, 2 types of analog FIR filters are switchable.
*1 Mac and Mac OS are trademarks of Apple Inc., registered in the
U.S. and other countries.
*2 Windows is a registered trademark of Microsoft Corporation in
the United States and/or other countries.
*3 DSD is a trademark.
*4 The described company names and product names are trade-
marks or registered trademarks of each company.
4
Page 8

Features of This Unit
Digital input terminals
This unit is equipped with a coaxial input terminal and an op-
tical input terminal.
This unit is compatible with S/PDIF format signals between
32 kHz and 192kHz.
Digital inputs (S/PDIF) with low jitter has been achieved with
PCM9211 PLL manufactured by Burr-Brown.
It is possible to play back the digital audio signal that is out-
put from another audio device via the circuit of the unit that
improves the sound quality.
DD converter function
Input of 192 kHz24 bit or less including USB input can be
digitally provided in the S/PDIF format.
Last memory function
Built-in flash memory can memorize settings such as digital
input, Super Audio CD/CD, digital filter.
Dimmer function
The brightness of display can be switched over in 4 steps.
Digital output OFF
The digital audio output can be deactivated to improve the
quality of analog audio output.
Analog output terminals
Introduction of an 18 mm pitch RCA terminal with gold plat-
ing and a high-grade XLR terminal manufactured by Neutrik
allows even a high-performance line cable with large plug to
be connected.
Analog output phase switching
Both balanced output and unbalanced output are phase
switchable.
PCM1792A manufactured by Burr-Brown
For the DAC chip, this unit uses PCM1792A manufactured
by Burr-Brown with the right and left independent monaural
configuration.
5
Page 9

SUPER AUDIO CD PLAYER D-06u
Introduction of original technologies
Our traditional round pattern board, OFC internal wiring, and
original custom-made parts are fully and luxuriously intro-
duced.
High-inertia power supply
High-inertia power supply circuit that combines a large-ca-
pacity CI-core-type power transformer with customizable
3,300 μF × 7 capacitor blocks.
Cast-iron insulator
This unit is equipped with gradation cast-iron insulators that
cuts out unnecessary external vibration and strongly supports
the weight of this unit.
Remote control (RD-21)
The remote control is encased in aluminum. Tactile switches
will satisfy users with light key touch.
AC inlet
This high-grade gold plated (nonmagnetic processing) AC in-
let allows an external power cable to be connected.
Schottky barrier diode
Application of schottky barrier diode manufactured by Nihon
Inter Electronics Corporation that has less switching noises
and higher conversion efficiency to the DC voltage for the
power supply rectifier circuit.
LUXMAN’s original OFC wires
Our original OFC wires are used in the internal wiring to
achieve smooth signal transmission thanks to the non-plating
process on the core wire.
6
Page 10
About Discs This Unit Can Play Back
HD layer
HD layer
HD layer
Types of discs that can be played
The following marks are printed on disc labels, packages, or
CD jackets.
Marks for types of discs this unit can play back
SACD
CD-RCD CD-RW
This unit can play back 8 cm CDs without using an adapter.
Do not use an adapter for 8 cm CDs.
• CD-R/CD-RW discs that have been written by a recorder or
PC (personal computer) may not be played back.
(Due to characteristics of discs, scratches, dirt on the lens of
the unit, or dew condensation)
• Discs written by a PC may not be played back depending on
the application settings or environment.
Write the discs in a proper format. (Refer to the distributor of
application for details.)
• Time information may not be displayed when an unfinalized
CD-R/CD-RW disc is played back.
• Refer to the precautions for discs for details on how to handle
CD-R/CD-R discs.
Super Audio CD
— 3 types of discs —
• Single-layer CD
Dummy layer
• Dual-layer CD
• Hybrid-layer CD
CD layer
HD layer
This is a disc which has a single Super
Audio CD layer.
This is a CD which has a dual Super Au-
dio CD layer that supports long-time re-
cording.
This is a CD which has both a standard
CD layer and Super Audio CD layer.
When the disc is played back on a Super
Audio CD player, it is possible to enjoy
sounds of improved quality on the HD
layer. When the disc is played back on an
existing CD player, it is possible to play
back sounds on the CD layer.
HD layer: Super Audio CD layer
CD layer: Existing CD layer
HD layer has the following areas.
• 2-channel stereo area
• Multi-channel area
• Extra data area
(For future expansion)
HD layer
7
Page 11
SUPER AUDIO CD PLAYER D-06u
Comparison of Super Audio CDs with CDs
Item Super Audio CD CD
Disc diameter (cm) 12 12
Disc thickness (mm) 1.2 1.2
Coding method 1-bit direct stream digital (DSD) 16-bit linear PCM
Sampling frequency 2.8224 MHz (64 times to CDs) 44.1 kHz
Maximum recordable time 109 minutes for 2ch only. 60 to 70 minutes for 2-channel
stereo area + multi-channel area
*1
Number of channels 2, 3, 3.1, 4, 4.1, 5, 5.1 2
Maximum number of tracks 255 99
Maximum number of indexes 255 99
Playback frequency range DC to 100 kHz 5 to 20 kHz
Dynamic range
*2
120 dB or more (audible range) 96 dB
*1 This is the maximum recordable time for a single-layer CD. Depending on the compression rate of DST (Direct Stream Transfer)
the maximum recordable time may vary.
*2 Theoretical value
*3 Lossless compression method that applies a variable bit rate for DSD signals. The method has been developed, focused on the
DSD signal characteristics.
74 minutes
*3
,
8
Page 12
Before Use
Check the accessories.
After unpacking, check if the following accessories are not
missing.
• Power cable
• Remote controller (RD-21)
• “AAA” batteries (2 pieces)
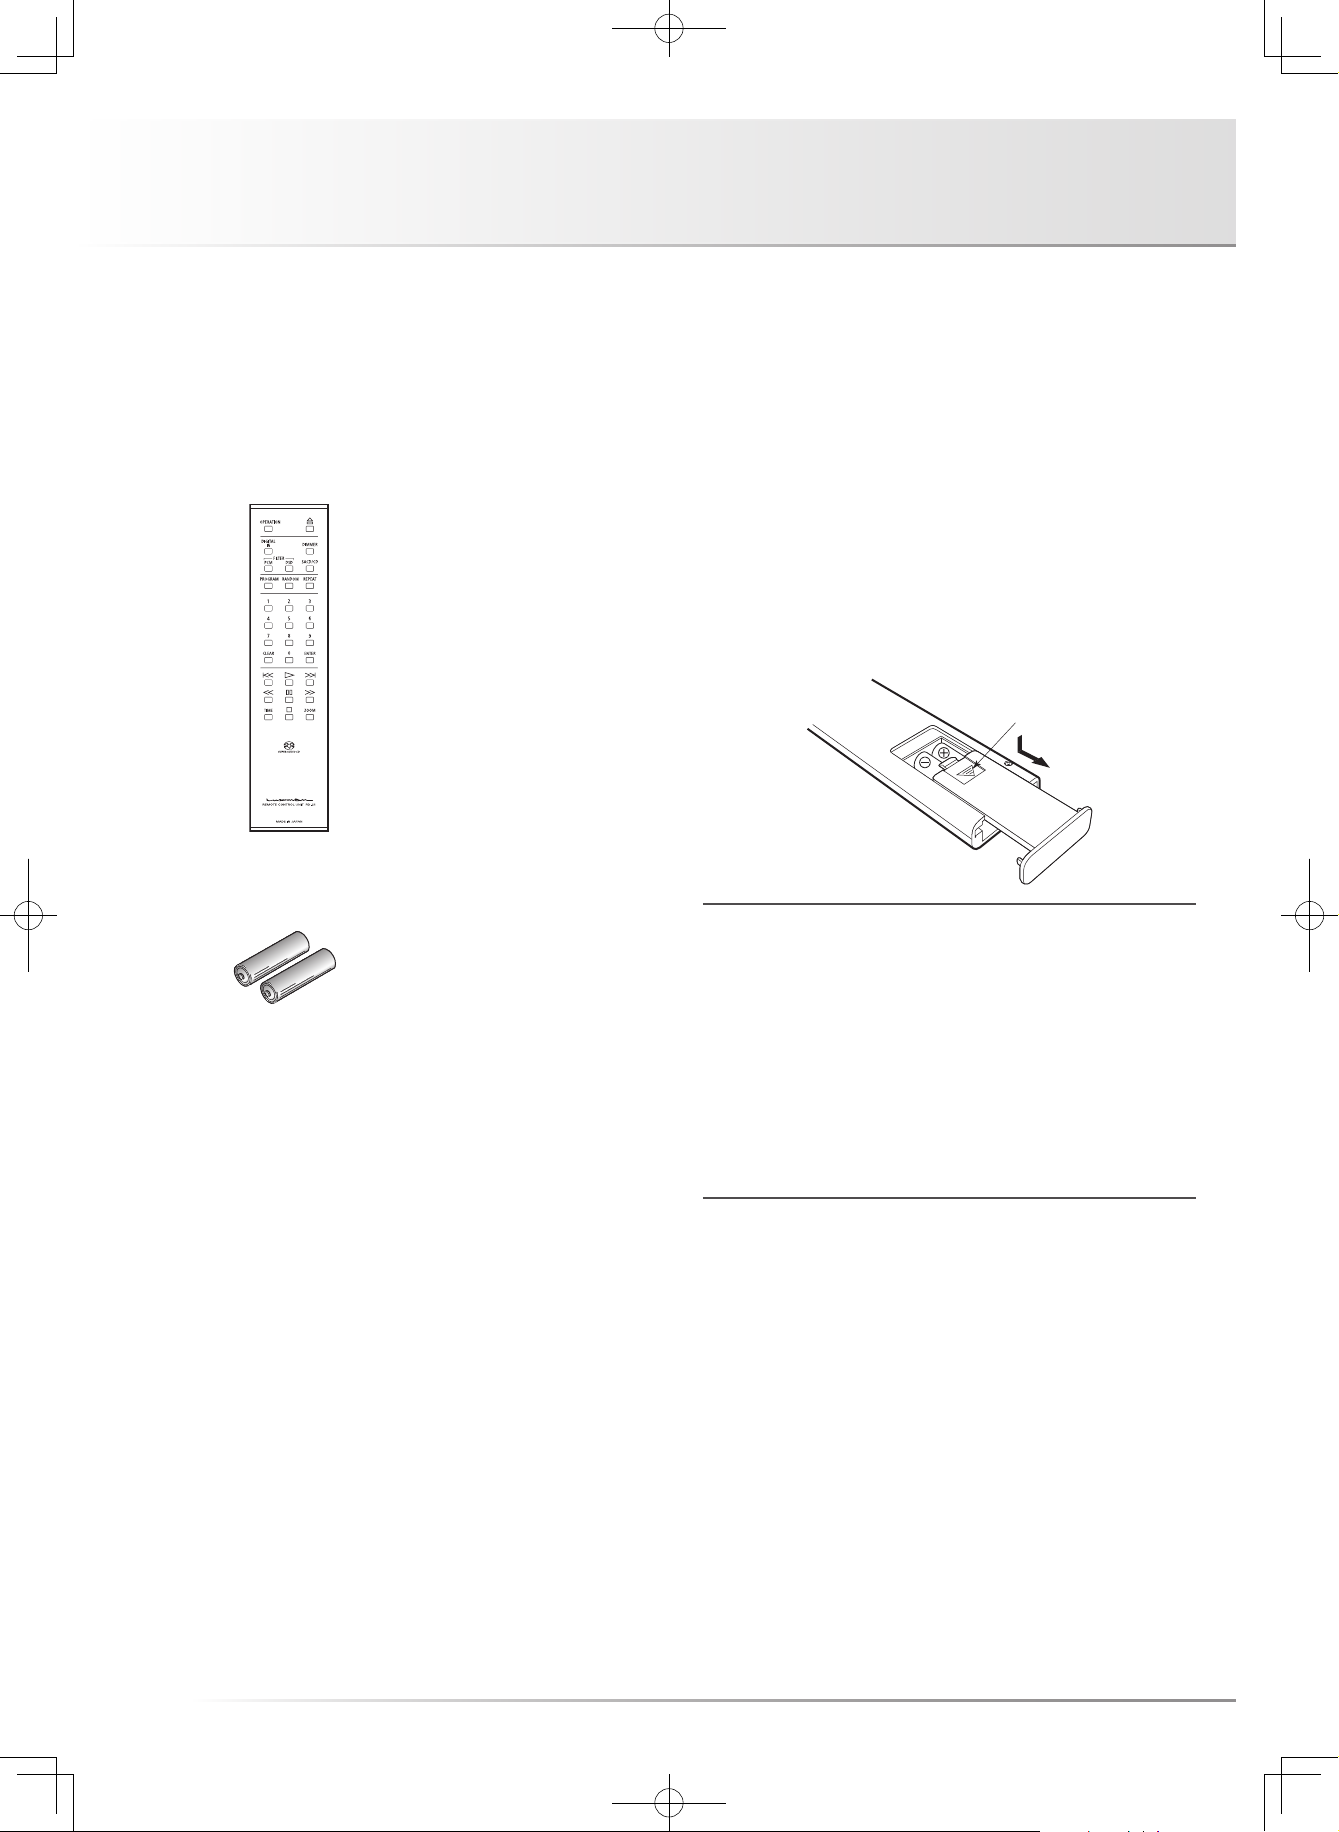
How to Use Remote Control
Insert batteries into the remote control.
1. Remove the battery cover on the rear of the remote control.
Put your finger on the battery cover claw and slide the cover
downward to remove the cover.
2. Put 2 AAA batteries in the battery case as shown in the illus-
tration on the battery case in consideration of the polarity (⊕
and ⊖).
3. In the reverse order of battery cover removal, put the battery
cover back to the opening of the remote control and slide the
cover upward until it clicks.
Claw
• Safety cautions
• Owner's Manual (This document)
• Install software (CD-R)
• Windows-ready USB driver installation manual
• Do not use a new battery and an old one together.
• There may be a case in which the voltages are different between
two batteries even though their shapes are the same. Do not
use the batteries of different types together.
• If the remote control is not used for a long time (more than 1
month), the batteries shall be removed from the case. If the bat-
tery liquid is leaking, wipe away the liquid from the case before
inserting new batteries.
• To discard exhausted batteries, follow the instructions of each
local authority.
9
Page 13

SUPER AUDIO CD PLAYER D-06u
Remote control's range
The remote control can be used by pointing at the remote
control infrared receiver on the front panel of main unit. The
effective distance is approx. 5 m from the main unit and 30°
on both sides from the control infrared receiver.
30°
30°
Effective distance: approx. 5 meters
Do not expose the remote control infrared receiver to direct
sunlight or strong light sources. That may cause malfunction.
10
Page 14

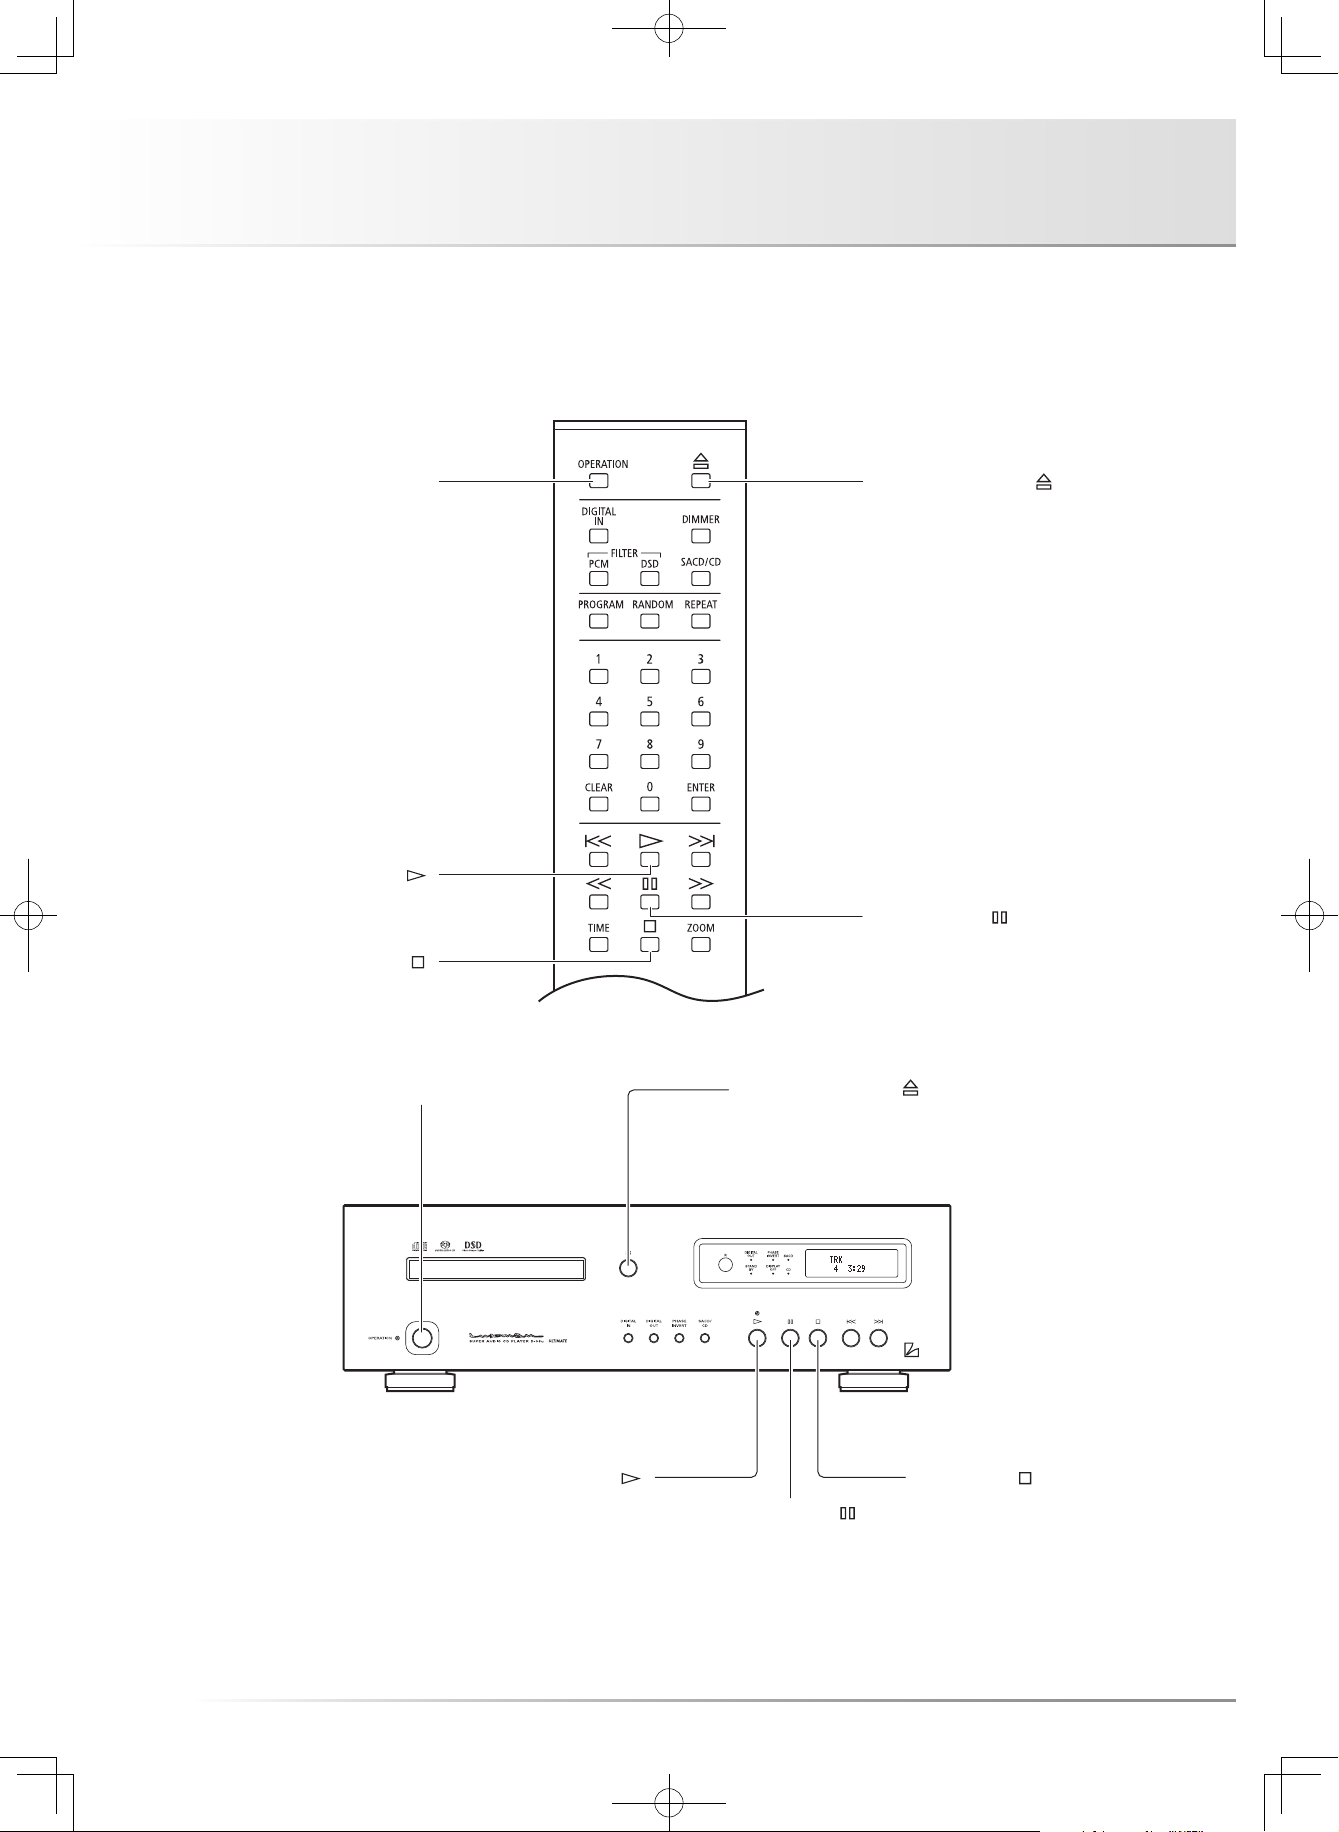
Names and Functions
127 8 9 10 11 13 14 15 16
62 1 53 4
Front panel
1. Operation switch (OPERATION)
Turns this unit from the standby state to operation state.
When the main power switch on the rear panel is turned on
to set this unit to the standby state and this switch is turned
on, this unit is set to the operation state.
2. Operation indicator (OPERATION)
Blinks during warm-up when the operation switch is turned
on and lights up when the operation state is activated af-
terward.
3. Disc tray
When inserting or removing a disc, this tray is opened or
closed by pressing the open/close switch (u).
4. Open/close switch (u)
This switch is pressed when opening or closing the disc
tray.
5. Remote control infrared receiver (R)
Receives signals from the accessory remote control.
6. Display window
Displays the operation status of this unit.
This display is composed of 6 indicators and display tube.
7. Digital input selection switch
(DIGITAL IN)
This switch is pressed when using this unit as a D/A con-
verter. Switchover is performed among coaxial, optical,
USB, and internal player.
8. Digital output selection switch
(DIGITAL OUT)
This switch is pressed when turn on or off the digital audio
output. Each time the switch is pressed, the output can be
turned on or off. The digital audio signal cannot be output
when playing back the HD layer of Super Audio CD.
11
Page 15
SUPER AUDIO CD PLAYER D-06u
9. Phase invert changeover switch
(PHASE INVERT)
The phase of the analog output on the rear panel is inverted.
Both the balanced output and unbalanced output are in-
verted.
This setting is stored on the flash memory even when the
power is turned off.
Every time this switch is pressed, the balanced phase
changes as follows: NORMAL→INVERT→NORMAL→IN-
VERT …
[Normal Position]
1. GROUND
2. COLD (–)
3. HOT (+)
[Invert Position]
1. GROUND
2. HOT (+)
3. COLD (–)
10. Super Audio CD/CD selection switch/
SACD/CD
When playing back a Hybrid Super Audio CD, this switch is
pressed to switch over the playback layer between the HD
(or SACD) layer and CD layer.
16. Next switch (d)
When this switch is pressed, the playback jumps to the be-
ginning of next track.
11. Play switch (5)
This switch is pressed to play back a disc.
12. Play indicator
Lights up while a disc is being played back. Blinks while
playback is being paused.
13. Pause switch (y)
When this switch is pressed during playback, the playback
stops. When this switch is pressed again, the playback
starts again. During pause, the play indicator blinks.
14. Stop switch (3)
This switch is pressed to stop playback.
15. Previous switch (s)
When this switch is pressed, the playback returns to the
beginning of track. When this switch is pressed twice, the
playback returns to the beginning of previous track.
12
Page 16

Names and Functions
7 8 9 10 11
1
3 42
65
Display window
1. Remote control infrared receiver (R)
Receives the infrared signals from the remote control.
2. Digital output indicator (DIGITAL OUT)
Lights up when digital audio output is ON. This indicator
does not light up when playing back the HD layer of Super
Audio CD because the digital audio signal cannot be output.
3. Phase invert indicator (PHASE INVERT)
Lights up when the analog output phase is inverted, which
is caused by pressing the phase invert changeover switch.
[Off]
1. GROUND
2. COLD (–)
3. HOT (+)
[On]
1. GROUND
2. HOT (+)
3. COLD (–)
4. Super Audio CD/CD indicator
(SACD/CD)
SACD indicator lights up when playing back the HD (or
SACD) layer of Hybrid Super Audio CD
CD indicator lights up when playing back the CD layer of
Hybrid Super Audio CD.
5. Track number (TRK)
"TRK" is indicated on the upper side, and the track num-
ber is indicated on the lower side when these display area
shows the track number.
13
Page 17

SUPER AUDIO CD PLAYER D-06u
6. Time display mode
The display mode of time is displayed. "REM" is displayed
when showing the remaining time of current track. "T-REM"
is displayed when showing the total remaining time of
disc. This display area does not light up when showing the
elapsed time of track.
7. Standby indicator (STAND BY)
Lights up when the main power switch on the rear panel is
turned on and the operation switch is turned off.
When the operation switch is turned on or when the main
power switch is turned off, this indicator turns off.
8. Display off indicator (DISPLAY OFF)
Lights up when the VFD (vacuum fluorescent display) in the
main unit display window is turned off.
9. Playback mode
"RD" is displayed during random playback. "PG" is dis-
played during program playback. This display area does not
light up during regular playback.
10. Time
Displays the elapsed time of current track, remaining time
of current track, or remaining time of disc. Time display is
switched over according to time display mode.
11. Repeat mode
Displays the mode for repeat playback. There are two types
of repeat playback: track repeat (T-REP) and all repeat
(A-REP).
14
Page 18

Names and Functions
10
13
14
15
16
17
18
19
20
21
22
11
12
Remote control
1
2
3
4
5
6
7
8
9
1. Operation switch (OPERATION)
Turns this unit to the operating state after turning off the
standby indicator at the standby state. Pressing this switch
again at the operating state turns the unit to the standby
state.
2. Digital input selection switch
(DIGITAL IN)
This switch is pressed when using this unit as a D/A con-
verter. Switchover is performed among coaxial, optical,
USB, and internal player.
3. Digital filter selection switch
(FILTER PCM)
This switch changes the interpolation function of the 32 bit
digital filter while a CD or PCM data is reproduced.
You can hear a change in sound quality, and therefore, se-
lect a filter depending on your taste.
There are 3 types of filters, P-1, P-2, and P-3.
Pressing this switch displays the current setting data (P-1,
P-2, P-3) on the display window. Pressing this switch again
while the setting data is displayed displays the next setting
data. Pressing the enter switch (ENTER) while the setting
data is displayed determines the setting data. If the enter
switch is not pressed, the digital filter is not changed.
The impulse response of the interpolation function shows
the waveform shown in the right page.
This setting is stored on the flash memory even when the
power is turned off.
15
Page 19

SUPER AUDIO CD PLAYER D-06u
P-1 (normal FIR filter)
0
Frequency
Gain − dB
0
Frequency
Gain − dB
P-2 (low latency IIR filter)
4. Analog FIR filter selection switch
(FILTER DSD)
This switch changes the analog FIR filter while a Super Au-
dio CD (HD layer) or a DSD file is reproduced.
You can hear a change in sound quality, and therefore, se-
lect a filter depending on your taste. There are 2 types of
filters, D-1 and D-2.
Pressing this switch displays the current setting data (D-1,
D-2) on the display window.
Pressing this switch again while the setting data is displayed
displays the next setting data.
Pressing the enter switch (ENTER) while the setting data is
displayed determines the setting data.
If the enter switch is not pressed, the filter is not changed.
The analog FIR filter features the following:
D-1 (normal analog FIR filter)
−3
P-3 (high attenuation FIR filter)
−6
0 100 200 kHz
D-2 (high attenuation analog FIR filter)
−3
−6
0 100 200 kHz
16
Page 20

Names and Functions
10
13
14
15
16
17
18
19
20
21
22
11
12
Remote control
1
2
3
4
5
6
7
8
9
5. Program switch (PROGRAM)
Programs the track numbers to play back in a desired order.
6. Numeric keys (1, 2, 3, 4, 5, 6, 7, 8, 9, 0)
These keys are pressed to specify the track numbers for
direct search or program.
7. Clear switch (CLEAR)
This switch is pressed to cancel the program settings.
8. Previous switch ( )
When this switch is pressed, the playback returns to the
beginning of track. When this switch is pressed twice, the
playback returns to the beginning of previous track.
9. Rewind switch ( )
When this switch is played during playback, audio is re-
wound.
10. Time display switch (TIME)
Switches the time display. Switches the elapsed time of
current track, remaining time of current track, or remaining
time of disc.
11. Open/close switch ( )
This switch is pressed when opening or closing the disc
tray.
12. Dimmer switch (DIMMER)
Adjusts the brightness of the main unit display. The bright-
ness can be adjusted in 4 steps from light off to light.
13. Super Audio CD/CD selection switch
(SACD/CD)
When playing back a Hybrid Super Audio CD, this switch is
pressed to switch over the playback layer between the HD
(or SACD) layer and CD layer.
17
Page 21

SUPER AUDIO CD PLAYER D-06u
14. Repeat switch (REPEAT)
This switch is pressed to perform repeat playback. There
are two types of repeat playback: track repeat (T-REP) and
all repeat (A-REP).
15. Random switch (RANDOM)
This switch is pressed to perform random playback.
16. Enter switch (ENTER)
This switch is pressed to execute the set or selected items.
17. Play switch ( )
This switch is pressed to play back a disc.
18. Next switch ( )
When this switch is pressed, the playback jumps to the be-
ginning of next track.
19. Pause switch ( )
When this switch is pressed during playback, the playback
stops. When this switch is pressed again, the playback
starts again. During pause, the play indicator blinks.
20. Fast-forward switch ( )
When this switch is played during playback, audio is
fast-forwarded.
21. Zoom switch (ZOOM)
When this switch is pressed during playback, the track
number and time are displayed in an enlarged manner.
22. Stop switch ( )
This switch is pressed to stop playback.
18
Page 22

Names and Functions
1 3
4 5 6 7 982
Rear panel
1. Analog unbalance output terminals
(LINE)
Coaxial output terminals to provide unbalanced playback
signals of this unit
Connect these terminals to an unbalanced input of such
device as a pre-amplifier with a pin cable.
The phase can be switched with the analog output phase
selection switch (PHASE INVERT) on the front panel.
2. Analog balance output terminals
(BAL LINE)
Cannon connector output terminal to provide balanced
playback signals from this unit
Connect these terminals to a balanced input of an output
device such device as a pre-amplifier with a balanced cable.
The following are the phases of the output terminals of this
unit:
[Normal Position]
1. GROUND
2. COLD (–)
3. HOT (+)
[Invert Position]
1. GROUND
2. HOT (+)
3. COLD (–)
3. Optical digital input terminal (OPT)
When using this unit as a D/A converter, transmit digital sig-
nals from a CD player or the like that has a digital output
terminal to this unit using an optical digital cable.
The terminal is applicable to the following signals.
Sampling frequency : 32kHz, 44.1kHz, 48kHz,
88.2kHz, 96kHz, 176.4kHz,
192kHz
Number of quantization bits : 16bit, 20bit, 24bit
This terminal has a shutter. Direct the cable connector cor-
rectly when inserting the cable into the terminal. If the cable
connector is inserted forcibly with the wrong direction, the
terminal may be deformed, and the shutter may not be able
to close even after cable disconnection.
19
Page 23

SUPER AUDIO CD PLAYER D-06u
4. USB digital input terminal (USB)
This is a USB (B-type) input terminal used for the digital
input signal from such device as a PC/Mac using a USB
cable.
The terminal is applicable to the following signals.
• PCM signal
Sampling frequency : 32kHz, 44.1kHz, 48kHz,
88.2kHz, 96kHz, 176.4kHz,
192kHz, 352.8kHz, 384kHz
Number of quantization bits : 16bit, 24bit, 32bit
• DSD signal
Sampling frequency : 2.8224MHz, 5.6448MHz
Number of quantization bits : 1bit
When the OS is Windows, the dedicated driver software
needs to be installed.
Read the separate software installation manual.
5. Coaxial digital input terminal (COAX)
When using this unit as a D/A converter, transmit digital sig-
nals from a CD player or the like that has a digital output
terminal to this unit using a coaxial digital cable.
The terminal is applicable to the following signals.
Sampling frequency : 32kHz, 44.1kHz, 48kHz,
88.2kHz, 96kHz, 176.4kHz,
192kHz
Number of quantization bits : 16bit, 20bit, 24bit
7. Coaxial digital output terminal (COAX)
Connect this terminal to such device as an amplifier that
has a digital input terminal using an coaxial digital cable.
When a Super Audio CD (HD layer selected) or a DSD file is
reproduced, a digital audio output cannot be not provided.
When the PCM data of 32 kHz, 352.8 kHz, or 384 kHz sam-
pling frequency is reproduced, a digital audio output cannot
be provided.
8. Main power switch (MAIN POWER)
Turns this unit to the standby state.
When this switch is set to ON, the standby indicator on the
front panel lights up to show that this unit turns to the stand-
by state.
When this switch is set to OFF, the standby indicator on the
front panel turns off to show that the main power is turned
off.
9. Power cable terminal (AC IN)
Connect the accessory power cable to supply the power
from the AC outlet on the wall.
6. Optical digital output terminal (OPT)
Connect this terminal to such device as an amplifier that
has a digital input terminal using an optical digital cable.
When a Super Audio CD (HD layer selected) or a DSD file is
reproduced, a digital audio output cannot be not provided.
When the PCM data of 32 kHz, 352.8 kHz, or 384 kHz sam-
pling frequency is reproduced, a digital audio output cannot
be provided.
This terminal has a shutter. Direct the cable connector cor-
rectly when inserting the cable into the terminal. If the cable
connector is inserted forcibly with the wrong direction, the
terminal may be deformed, and the shutter may not be able
to close even after cable disconnection.
20
Page 24

Connections
PC/Mac
DVD PLAYER
(Equipped with digital input terminals)
(C)
(A)
* When the OS is
Windows, the dedicated
driver software needs to
be installed.
CD/SACD PLAYER
(B)
RL RL RL
(D)
D/A CONVERTER
(E) (F)
21
PRE MAIN AMP
PRE AMP
CD PLAYER
Page 25

SUPER AUDIO CD PLAYER D-06u
Before Connecting
Before connecting other devices, connect the jack side of the
accessory power cable to the AC inlet of this unit.
When connecting, turn off the power supply of this unit and
the power supplies of auxiliary devices to prevent unexpected
accidents that may be caused by noise.
How to connect power supply
Use the accessory power cable and insert the AC plug in an
outlet on the wall in the room where the unit will be installed.
2. Digital connection from such device as a CD player
(Refer to "B" and "C" in the connection diagram.)
Connect between the (coaxial or optical) digital output termi-
nal of a CD player, an SACD player, a DVD player, and other
such devices and the digital input terminal (COAX/OPT) of this
unit with a coaxial digital cable and an optical digital cable.
This terminal has a shutter. Direct the cable connector cor-
rectly when inserting the cable into the terminal. If the cable
connector is inserted forcibly with the wrong direction, the
terminal may be deformed, and the shutter may not be able
to close even after cable disconnection.
How to connect input devices
1. Digital connection from a PC/Mac
(Refer to "A" in the connection diagram.)
Connect between the USB terminal (A-type) of the PC/Mac
and the USB terminal (B-type) of this unit with a USB cable.
When the OS is Windows, this unit is not automatically rec-
ognized. The dedicated driver software needs to be installed.
Read the separate software installation manual.
With Mac, this unit is automatically recognized.
Upper side
The optical terminals are directed as illustrat-
ed.
Lower side
How to connect output devices
1. Unbalanced connection with such device as a
pre-main amplifier
(Refer to "D" in the connection diagram.)
Connect between the analog unbalance output terminals
(LINE) of this unit and the unbalance input terminals of such
device as a pre-main amplifier with 2 (R and L) pin-plug ca-
bles.
2. Balanced connection with such device as a
pre-amplifier
(Refer to "E" in the connection diagram.)
Connect between the analog balance output terminals (BAL
LINE) of this unit and the balance input terminals of such de-
vice as a pre-main amplifier with 2 (R and L) XLR balanced
cables.
3. Digital output to such device as another D/A
converter
(Refer to "F" in the connection diagram.)
Connect between digital output terminal (COAX/OPT) of this
unit and such devices as a D/A converter and a CD player
equipped with digital input terminals with a coaxial digital ca-
ble or an optical digital cable.
22
Page 26

How to Play Back Discs
1 5
1
5
2, 4
2, 43
23
Page 27

SUPER AUDIO CD PLAYER D-06u
Playback a disc.
Remote control
•
Main unit
1. Press the OPERATION switch.
"-OPERATION-" appears on the display. When the indica-
tion disappears, the unit becomes operable.
2. Press the open/close ( ) switch.
The disc tray opens.
3. Put the disc on the disc tray according
to the guide on the tray.
4. Press the open/close (
The disc tray closes and the disc is loaded.
To start playback quickly, press the play (
pressing the open/close (
Or select a track by pressing a numeric key without press-
ing the open/close (
or play (
Operation switches and numeric keys are not functional
during the period from disc loading to displaying of disc
type. Specifying the next operation, for example specifying
the number of tracks beforehand, can shorten the time be-
fore playback start.
) switch.
) switch.
) switch, and press the ENTER switch
) switch.
) switch without
5. Press the play ( ) switch.
24
Page 28
Stop/pause the Playback
Operation switch
Open/close switch ( )
Pause switch ( )
Play switch ( )
Pause switch ( )
Stop switch ( )
Operation switch Open/close switch ( )
25
Play switch ( )
Stop switch ( )
Page 29

SUPER AUDIO CD PLAYER D-06u
Pause/stop the playback of the disc.
Remote control
•
Main unit
How to pause playback
1. Press the pause ( ) switch.
During pause, the play indicator blinks.
Resumes the regular playback.
2. During pause, press the play ( ) or
pause ( ) switch.
Stop the playback.
During playback, press the stop ( ) switch.
This unit retrieves the disc information and then displays the
track number and time information at the first stop of disc
playback to shorten the time between disc loading and play-
back start. The CD indicator or SACD indicator is blinking
while this unit retrieves the disc information.
Thus, key operation cannot be accepted for several seconds
only at the 1st stop of disc playback. In such a case, wait for
a while before key operation.
Eject a disc.
Press the open/close ( ) switch.
The disc tray opens.
Power off the unit.
(Turn the unit to the standby state.)
Press the OPERATION switch.
"-STANDBY-" appears on the display, and the STANDBY
indicator lights up.
To turn off the power completely, the main power switch on
the rear panel needs to be turned off.
26
Page 30

Skip/Fast-forward/Rewind
Fast-forward switch ( )
Previous switch ( )
Previous switch ( )
Play switch ( )
Rewind switch ( )
Next switch ( )
27
Play switch ( )
Next switch ( )
Page 31

SUPER AUDIO CD PLAYER D-06u
Skips to the desired track.
(Skip playback)
Fast-forward/rewind the playback.
(Scan)
Remote control
•
Main unit
Skip playback
Skip to the track to play back.
To skip to the track to play back, press the next switch ( )
repeatedly until the desired track is displayed.
Go back to the track to play back.
To go back to the track to play back, press the previous
switch (
When this switch is pressed once, the playback returns to
the beginning of current track. When this switch is pressed
twice, the playback returns to the beginning of previous
track.
) repeatedly until the desired track is displayed.
Remote control
Fast-forward the playback.
1. During playback, press the fast-forward
( ) switch.
Each time the switch is pressed, the rewind speed can be
changed in 4 steps.
">>1, >>2, >>3, >>4" appears on the display to indicate the
fast-forward state and speed.
2. To resume the regular playback, press
the play ( ) switch.
Rewind the playback.
1. During playback, press the rewind (
)
switch.
Each time the switch is pressed, the rewind speed can be
changed in 4 steps.
"<<1, <<2, <<3, <<4" appears on the display to indicate the
rewind state and speed.
2. To resume the regular playback, press
the play ( ) switch.
When a set of tracks are composed of two or more SACDs,
the first track may not be Track 1.
28
Page 32

Direct search/repeat playback
Numeric keys
Repeat switch
Specify the desired track for playback
Remote control
1. Enter a track number by pressing
numeric keys.
For example, when selecting the 15th track, press the "1"
key, and then "5".
2. Press the ENTER or play switch.
Playback is started automatically even without pressing the
ENTER key after the elapse of approx. 4 seconds. The max-
imum number of tracks is 255 for a Super Audio CD, and
it may take longer time to enter a 3-digit track number. For
this reason, approx 4 seconds are given to Super Audio
CDs before auto jump.
29
Page 33

SUPER AUDIO CD PLAYER D-06u
Repeat the playback.
(Repeat playback)
Remote control
There are two types of repeat playback:
track repeat (T-REP) and all repeat
(A-REP).
Track repeat (T-REP)
1. During playback, press the REPEAT
switch once.
2. "T-REP" appears on the display to
indicate the track repeat.
3. When this switch is pressed twice
again, the track repeat is canceled.
All repeat is also canceled when the disc is stopped.
All repeat (A-REP)
1. During playback, press the REPEAT
switch twice.
2. "A-REP" appears on the display to
indicate the all repeat.
3. When this switch is pressed once
again, the track repeat is canceled.
All repeat is also canceled when the disc is stopped.
Track repeat "T-REP"
All repeat "A-REP"
Repeat OFF
30
Page 34

Program Playback
3, 5
CLEAR switch
1
2, 4
Play back the tracks in a programmed order.
(Program playback)
Remote control
It is possible to program up to 24 tracks in
the desired order.
1. During stop, press the PROGRAM
switch.
The following indication appears on the display.
6
2. Enter a desired track number by
pressing numeric keys of the remote
control.
For example, when selecting the 5th track, press the "5"
key.
3. Press the ENTER switch.
The order of the track is determined, and then track number
and total time appear on the display.
31
Page 35

SUPER AUDIO CD PLAYER D-06u
4. Enter the track number to program
next.
For example, when selecting the 15th track, press the "1"
key, and then "5".
5. Press the ENTER switch.
The order of the track is determined, and then track number
and total time appear on the display.
Program the desired tracks by repeating Step 2 and 3.
6. Press the play ( ) switch.
• When pressing the CLEAR switch during stop, all the pro-
gram is deleted.
• When pressing the PROGRAM switch, and then the CLEAR
switch during stop, the tracks will be deleted in the reverse
order.
• It is impossible to program pause.
• When pressing the REPEAT switch during program play-
back, programmed all repeat is performed.
• Track repeat is not available during program playback.
• When pressing the next (
back, the playback jumps to the track programmed next.
• To perform the program playback again, press the PRO-
GRAM switch during stop, and then the play (
Procedure
PROGRAM
) switch during program play-
) switch.
Track number
ENTER
PLAY
32
Page 36

Random playback/disc information/zoom
RANDOM switch
TIME switch
Play back the tracks in a random order.
(Random playback)
Remote control
Each track is selected from all the tracks
and is played back once.
1. Press the RANDOM switch.
ZOOM switch
2. "RD" appears on the display to indicate
the random playback. The playback
stops automatically after all the tracks
are played back.
Random playback stops when a disc is stopped or the
RANDOM switch is pressed once again. When pressing the
next (
is randomly selected and played back. When pressing the
previous (
of current track.
) switch during random playback, the next track
) switch, the playback returns to the beginning
33
Page 37

SUPER AUDIO CD PLAYER D-06u
Disc information
Zoomed display
Remote control
Switch the time display during playback.
Each time the TIME switch is pressed during playback, the
display changes as follows.
1. The current track number and the
elapsed time of the track (In the default
setting)
"TRK" will appear on the display.
2. The current track number and the
remaining time of the track (Remain)
"TRK" and "REM" will appear on the
display.
3. The total remaining time of the disc
(Total remain):
"T-REM" will appear on the display.
Remote control
Enlargement of displayed characters
1. When the ZOOM switch is pressed, the
track number and time are displayed in
an enlarged manner.
2. When the ZOOM switch is pressed
once again, the display returns to the
normal state.
Normal display
Zoomed
display
Elapsed time "TRK"
Remain "TRK", "REM"
Total remain "T-REM"
34
Page 38

Detailed Settings
Analog FIR filter selection switch
Super Audio CD/CD selection switch
Super Audio CD/CD selection switch
Operation switch
Digital input selection switch
Digital filter selection switch
Dimmer switch
Operation switch
Digital input selection switch
Digital output selection switch
Phase invert changeover switch
35
Stop switch
Page 39

SUPER AUDIO CD PLAYER D-06u
Dimmer switch (DIMMER)
Remote control
The brightness of the main unit display can
be adjusted. The brightness can be
adjusted in 4 steps from no light to normal
lighting .
Each time the DIMMER switch is pressed, the display
changes as follows. Normal light → dim → very dim → light
off → Normal light …
Selection of no light displays “DISPLAY OFF” for 1 second
and the sign turns off.
The brightness of LED indicators such as "SACD" and
"DIGITAL OUT" cannot be changed.
Super Audio CD/CD selection switch/
SACD/CD
Remote control
•
Main unit
When playing back a Hybrid Super Audio
CD, this switch is pressed to switch over
the playback layer between the HD (or
SACD) layer and CD layer.
During stop, press the SACD/CD switch.
Each time this switch is pressed, the playback layer is
switched over between the HD (or SACD) layer and CD layer.
When the HD layer is selected, the Super Audio CD (SACD)
indicator lights up on the main unit display.
When the CD layer is selected, the CD indicator lights up on
the main unit display.
• This setting is activated even when another Hybrid Super
Audio CD is loaded.
• When a single-layer CD or dual-layer CD is loaded, the HD
layer is automatically selected.
• This unit does not support SACD multi-channel areas.
36
Page 40

Detailed Settings
Analog FIR filter selection switch
Super Audio CD/CD selection switch
Super Audio CD/CD selection switch
Operation switch
Digital input selection switch
Digital filter selection switch
Dimmer switch
Operation switch
Digital input selection switch
Digital output selection switch
Phase invert changeover switch
37
Stop switch
Page 41

SUPER AUDIO CD PLAYER D-06u
Digital input selection switch (DIGITAL IN)
Remote control
•
Main unit
This switch is pressed when using this unit
as a D/A converter.
1. Each time the DIGITAL IN switch is
pressed, the display changes as
follows. COAXIAL→ OPTICAL → USB →
INTERNAL (Internal player)
The coaxial and optical inputs are applicable to the following
signals.
Sampling frequency : 32kHz, 44.1kHz, 48kHz,
88.2kHz, 96kHz, 176.4kHz,
192kHz
Number of quantization bits : 16bit, 20bit, 24bit
The USB input is applicable to the following signals.
• PCM signal
Sampling frequency : 32kHz, 44.1kHz, 48kHz,
88.2kHz, 96kHz, 176.4kHz,
192kHz, 352.8kHz, 384kHz
Number of quantization bits : 16bit, 24bit, 32bit
• DSD signal
Sampling frequency : 2.8224MHz, 5.6448MHz
Number of quantization bits : 1bit
When the OS is Windows, the dedicated driver software
needs to be installed.
Read the separate software installation manual.
2. The selected input type and sampling
status are displayed on the main unit
display window.
This sampling frequency and bit count of the digital signal
are displayed, which is connected to the input terminal
(COAX/OPT/USB) selected with the digital input selection
switch. When one of COAX/OPTICAL/USB is selected us-
ing the digital input selection switch and the digital signal
from each digital device and this unit are synchronized, the
sampling frequency and bit count of the digital signal are
displayed.
When a digital signal input is not provided or the signal is not
synchronized even if the signal input is provided, "UNLOCK"
is displayed.
When USB is selected, only the sampling frequency is dis-
played. The bit count is not displayed.
• The bit count (word length) indicates the contents of the
word length data included in the channel status which is
specified in IEC60958-3 (digital audio interface - Part 3:
consumer applications).
Some output devices may provide channel status data
(word length data) whose content is different from the actu-
al word length. In such a case, the contents of the channel
status data are indicated on the display instead of the actu-
al bit count.
Alternatively, some devices or sources may provide the
data that states "the word length is not specified". In such
a case, the bit count is not displayed.
• There may be a case where the display indicates "LOCK"
shortly, and then "UNLOCK". (The reverse case is also pos-
sible.) That is because the former state (LOCK/UNLOCK) is
indicated for approx. 0.5 seconds since an input signal is
changed until the circuit gets stable, which please note.
38
Page 42

Detailed Settings
Analog FIR filter selection switch
Super Audio CD/CD selection switch
Super Audio CD/CD selection switch
Operation switch
Digital input selection switch
Digital filter selection switch
Dimmer switch
Operation switch
Digital input selection switch
Digital output selection switch
Phase invert changeover switch
39
Stop switch
Page 43

SUPER AUDIO CD PLAYER D-06u
Digital output selection switch
(DIGITAL OUT)
Main unit
This switch is pressed when turn on or off
the digital audio output. Each time the
switch is pressed, the output can be
turned on or off.
When the HD layer of a Super Audio CD or a DSD file is re-
produced, a digital audio output cannot be provided. At this
time, the DIGITAL OUT indicator turns off.
It is possible to turn on or off the digital audio output when
playing back the CD layer of Hybrid Super Audio CD.
When the PCM data of 32 kHz, 352.8 kHz, or 384 kHz sam-
pling frequency is reproduced, a digital audio output cannot
be provided.
Restore all the settings to the factory
defaults.
All the settings are restored to the factory defaults.
1. Turn this unit to the standby state.
2. Press the OPERATION switch on the main unit while press-
ing the stop (
All the settings are restored to the factory defaults.
Digital input selection INTERNAL (Internal player)
Digital output selection On
Super Audio CD/CD
selection
Phase invert changeover Normal
Dimmer adjustment Normal
Digital filter PCM P-1
Analog FIR filter DSD D-1
Zoomed display Off
) switch on the main unit.
Item Default
Super Audio CD (SACD)
Phase invert changeover switch
(PHASE INVERT)
Main unit
The phase of the analog output on the rear panel is inverted.
Both the balanced output and unbalanced output are in-
verted.
This setting is stored on the flash memory even when the
power is turned off.
Every time this switch is pressed, the balanced phase
changes as follows: NORMAL→INVERT→NORMAL→IN-
VERT …
[Normal Position]
1. GROUND
2. COLD (–)
3. HOT (+)
[Invert Position]
1. GROUND
2. HOT (+)
3. COLD (–)
Last memory function
(Memorization of each setting)
The following are the setting items to be memorized on the
flash memory.
When the power is turned off immediately after setting
change, the setting data may not be successfully memorized.
Item Default
Digital input selection
Digital output selection ON, OFF
Super Audio CD/CD
selection
Phase invert changeover Normal/Invert
Dimmer adjustment
Digital filter PCM P-1, P-2, P-3
Analog FIR filter DSD D-1, D-2
Zoomed display ON, OFF
INTERNAL (Internal player),
COAXIAL, OPTICAL, USB
Super Audio CD (SACD),
CD
Normal, dim, very dim,
light off
40
Page 44

Block Diagram
Analog out
Unbal. L
L. P. F
I-V
Amp
Bal. L
L. P. F
REG.
I-V
Jitter
Reduction
I-V
Amp
DAC
PCM1792A
Sel
Data
I-V
Amp
Amp
32bit
Digital
Unbal. R
L. P. F
I-V
Amp
Filter
TAS3152
Modulator
Sel
Data
Bal. R
Line
Filter
L. P. F
REG.
Audio Circuit
I-V
Clock
I-V
Amp
DAC
PCM1792A
Sel
Data
noise
Generator
low phase-
I-V
Amp
Amp
Sub-System
Control CPU
Power Trans for
for Audio Circuit
Power Regulator
Digital Circuit
Power Trans for
for USB Circuit
Power Regulator
CPU
System Control
Power Regulator
for Digital Circuit
FL Controler
Display
Operation Key
41
PCM9211
Main Decoder
RF Amp
Servo control
System control CPU
Motor
Stepping
Assy
Pick up
Motor
Spindle
Driver
FTS & SPDL
64M SDRAM
Motor
Loading
4K EEPROM
16M PROGAM FLASH
TMS320C6748
USB Controller DSP
USB
DIR / DIT
ultra low jitter
OPT
COAX
Digital in
OPT
COAX
Digital out
Page 45

SUPER AUDIO CD PLAYER D-06u
Specifications
Format 2-channel Super Audio CD, CD
Power supply 230 V ~ (50 Hz)
Power consumption 29 W
1 W (at standby)
Weight 15.7 kg (main unit only)
Max. external dimensions 440 (W) x 133 (H) x 410 (D) mm
(front side knob of 2 mm and rear side terminal of 8 mm included in
depth)
Ambient operating temperature /
Ambient operating humidity
Output voltage / output
impedance:
Frequency response: CD, SACD 5 Hz to 20 kHz (+0, –0.5 dB)
Total harmonic distortion: CD 0.0015 %
Audio output
characteristics
S/N ratio: CD 122 dB
Dynamic range: CD 100 dB
Channel separation: CD 110 dB
+5 °C to +35 °C / 5 % to 85 % (non condensing)
UNBALANCE terminal (RCA terminal) 2.5 Vrms/300Ω
BALANCE terminal (XLR terminal) 2.5 Vrms/600Ω
For SACD/DSD (–0.5 dB) 2.35 Vrms
SACD/USB 5 Hz to 50 kHz (+0, –3 dB)
SACD 0.0011 %
COAX/OPT 0.0009 %
USB 0.0009 %
SACD 104 dB
COAX/OPT 123 dB
USB 123 dB
SACD 104 dB
COAX/OPT 123 dB
USB 123 dB
SACD 103 dB
COAX/OPT 124 dB
USB 124 dB
Digital input
Digital output
* Specifications and appearance are subject to change without notice.
Coaxial digital input: 0.2 to 2.5 Vp-p
Optical digital input: –14.5 to –21 dBm
USB input: (Applicable OS) Microsoft Windows Vista or later, Mac OS X10.7 or later
Sampling frequency: OPT/COAX : 32 kHz, 44.1 kHz, 48 kHz, 88.2 kHz
96 kHz, 176.4 kHz, 192 kHz
(16 bit, 20 bit, 24 bit)
USB input : 32 kHz, 44.1 kHz, 48 kHz, 88.2 kHz
96 kHz, 176.4 kHz, 192 kHz, 352.8 kHz
384 kHz (16 bit, 24 bit, 32 bit)
2.8224 MHz, 5.6448 MHz (1 bit)
Coaxial digital output: RCA terminal 0.5 Vp-p/75Ω
Optical digital output: Optical digital terminal –15 to –21 dBm
42
Page 46

Before Asking for Repair
While the unit is used, an unusual phenomenon may be confused as a malfunction for a certain reason. Prior to asking us for our official
sole distributor of your country, please check the table below and read the instruction manual. If the cause of the malfunction cannot
be identified, please contact your dealer. When we have once accepted your request for repair services, inspection fees and traveling
expenses may be claimed even though the unit is found to be normal.
Problem Cause/Solution Ref. page
No power is supplied even
though the main power switch
is pressed.
The standby indicator does not
light.
The disc tray comes out even
after the tray is closed.
Playback cannot be performed. · Clean the disc to remove dirt. 2
No sound is generated. / Sound
volume is too low. (Digital input)
· Connect the power cable to the AC inlet and the AC outlet firmly. 21
· Set the disc on the disc tray correctly. 23
· Clean the disc to remove dirt. 2
· Set the disc on the disc tray correctly. 23
· Remove dew condensation from the interior of this unit. 1
· Put the disc on the tray with the label facing upwards.
(label face upward)
· Connect digital cables correctly. 20 - 21
· If the USB is selected as an input source, select this unit (D-06u) as
the output destination by configuring the sound setting of a PC/Mac.
· If the unit (D-06u) cannot be selected even when trying the solution
above, reconnect the USB cable.
· If the USB is selected as an input source, adjust the sound volume by
configuring the sound setting of a PC/Mac.
Refer to the instruction manual of
the PC/Mac or the
software in use.
The remote control cannot be
operated.
An electronic device such as a
television malfunctions.
43
· If the USB is selected as an input source, adjust the sound volume on
a player software of a PC/Mac.
· Ensure that the sampling frequency and the number of quantization
bits of the reproduced digital signal are applicable to this unit.
· Check to see whether "UNLOCK" of the digital input is displayed or
not. (When the digital signal from the digital device is not synchronized with this unit, the source may not be reproduced.)
· Operate the remote control within the specified operating range. 9
· Replace the remote control battery with a new one. 8
· The remote control infrared receiver is exposed to direct sunlight or
strong light sources (such as inverter fluorescent lights). Change the
installation place or angle to avoid the exposure to light sources.
· Some devices equipped with a wireless remote control receiver may
malfunction when the remote control of this unit is operated. Keep
this unit away from such devices.
18 - 19
9
9
Page 47

SUPER AUDIO CD PLAYER D-06u
Problem Cause/Solution Ref. page
No sound is generated from the
speakers, or sound is distorted.
Digital audio signals cannot be
output digitally.
The output levels of SACD and
CD are quite different.
This unit may not work normally when the unit is subject to external influence such as static electricity. In such a case, normal operation
may resume by turning off the power once and turning on the power again after several tens of seconds or returning the unit to the fac-
tory setting. If the problem is not solved, please contact your dealer or our service center.
· Confirm that the connections of audio cables are correct. 20 - 21
· If a digital output device is connected to this unit, set [Digital output]
to [On].
· Clean the disc to remove dirt. 2
· When the output level of an amplifier, etc. is minimum, adjust the
volume.
· Confirm that the cable connectors are connected and firmly inserted
into the terminals of the unit.
· Clean the cable connectors and terminals by using a plain dry cloth or
a cloth dipped in a small amount of dehydrated alcohol.
· Set [Digital output] to [On]. 10
· When the HD layer of a Super Audio CD, a DSD file, or a PCM file with
sampling frequency of 32 Hz, 352.8 kHz, or 384 kHz is reproduced,
a digital audio output cannot be provided.
· This is due to the difference in recording format.
10
19
44
Page 48

LUXMAN CORPORATION, JAPAN
AG00987E30A
Printed in Japan
 Loading...