

Logitech WHEEL MOUSE User Manual
®
Logitech® Wheel Mouse
User’s Guide
English
DeutschFrançaisItalianoEspañolPortuguêsNederlandsSvenskaDanskNorskSuomi
Ελληνικά

Copyright
© 2000 Logitech. All Rights Reserved. Logitech, the Logitech logo, and other Logitech marks are owned by Logitech and may be
registered. All other trademarks are the property of their respective owners. Logitech assumes no responsibility for any errors that
may appear in this manual. Information contained herein is subject to change without notice.
Part Number:
Software License Agreement.
THAT YOU ACCEPT ALL OF THE TERMS CONTAINED IN THIS LICENSE AGREEMENT.
an individual end-user or an entity) and Logitech. By opening the software package, you are agreeing to be bound
by the terms and conditions of the Agreement. If you do not agree to the terms of this Agreement, promptly return
the software package and other items that are part of this product in their original package with your payment
receipt to your point of purchase for a full refund. Grant of License.
license to use one copy of the enclosed software program (“Software”) on one computer only with the Logitech product you have
purchased. No other rights are granted. The Software is in use if it is loaded on the computer’s permanent or temporary memory.
For backup purposes only, you may make one copy of the Software. You must include on the backup copy all copyright and other
notices included on the Software as supplied by Logitech. Installation on a network server for the sole purpose of your internal
distribution of the Software is permitted only if you have purchased an individual Software package for each networked computer
to which the Software is distributed.
decompile, disassemble, reverse-engineer, or modify the Software in any way. You may not transmit the Software over a network
(except as expressly permitted above), by telephone, or electronically using any means. You may not transfer the Software except
upon a permanent transfer of the enclosed Logitech product provided that all Software updates are included in the transfer,
you do not retain a copy of the Software, and the transferee agrees to be bound by the terms and conditions in this license. Upon any
violation of any of the provisions of this Agreement, rights to use the Software shall automatically terminate and the Software must
be returned to Logitech or all copies of the Software destroyed.
hardware products accompanying this documentation shall be free from significant defects in material and workmanship for a period
of five years from the date of purchase. Logitech also warrants that the software accompanying this documentation will perform
substantially in accordance with the documentation for a period of 90 days from the date of purchase. Logitech’s hardware and
software warranty is nontransferable and is limited to the original purchaser.
the Licensee’s exclusive remedy for any breach of warranty, shall be, at Logitech’s option, either (a) return of the price paid or (b)
repair or replacement of the hardware or software, provided that the hardware or software is returned to the point of purchase,
with a copy of the sales receipt. Any replacement hardware or software will be warranted for the remainder of the original
warranty period or 30 days for the hardware and 30 days for the software, whichever is longer. These remedies are void if failure
of the hardware or software has resulted from accident, abuse, or misapplication.
LIMITATION OF LIABILITY.
EXPRESSLY DISCLAIMS ALL OTHER WARRANTIES, INCLUDING, BUT NOT LIMITED TO, THE IMPLIED WARRANTIES OF MERCHANTABILITY
AND FITNESS FOR A PARTICULAR PURPOSE AND NONINFRINGEMENT OF THIRD-PARTY RIGHTS WITH RESPECT TO THE DOCUMENTATION,
SOFTWARE, AND HARDWARE. NO LOGITECH DEALER, AGENT, OR EMPLOYEE IS AUTHORIZED TO MAKE ANY MODIFICATION, EXTENSION,
OR ADDITION TO THIS WARRANTY. IN NO EVENT WILL LOGITECH OR ITS SUPPLIERS BE LIABLE FOR ANY COSTS OF PROCUREMENT
OF SUBSTITUTE PRODUCTS OR SERVICES, LOST PROFITS, LOSS OF INFORMATION OR DATA, OR ANY OTHER SPECIAL, INDIRECT,
CONSEQUENTIAL, OR INCIDENTAL DAMAGES ARISING IN ANY WAY OUT OF THE SALE OF, USE OF, OR INABILITY TO USE ANY LOGITECH
PRODUCT OR SERVICE, EVEN IF LOGITECH HAS BEEN ADVISED OF THE POSSIBILITY OF SUCH DAMAGES. IN NO CASE SHALL LOGITECH’S
LIABILITY EXCEED THE ACTUAL MONEY PAID FOR THE PRODUCTS AT ISSUE. Because some jurisdictions do not allow the limitation
of implied warranties or liability for incidental, consequential, special, or indirect damages, the above limitation may not always apply.
The above limitations will not apply in case of personal injury where and to the extent that applicable law requires such liability.
U.S. Government Restricted Rights.
rights. Use, duplication, or disclosure by the U.S. Government is subject to restrictions set forth in 48 C.F.R. 2.101 (October 1995),
consisting of “Commercial Computer Software” and “Commercial Computer Software Documentation” as such terms are used
in 48 C.F.R. 12.212 (September 1995), and in FAR Sections 52-227-14 and 52-227-19 or DFARS Section 52.227-7013 (C) (1) (ii),
or their successors, as applicable. Consistent with 48 C.F.R. 12.212 and 48 C.F.R. 227.7202-1 through 227.7204-4 (June 1995),
or any successor regulations, this Software is provided to U.S. Government users pursuant to the terms and conditions herein.
Contractor/Manufacturer is Logitech Inc., 6505 Kaiser Drive, Fremont, CA 94555.
FCC Compliance and Advisory Statement.
to the following two conditions: 1) this device may not cause harmful interference, and 2) this device must accept any interference
received, including interference that may cause undesired operation. This equipment has been tested and found to comply with the
limits for a Class B digital device, pursuant to Part 15 of the FCC Rules. These limits are designed to provide reasonable protection
against harmful interference in a residential installation. This equipment generates, uses, and can radiate radio frequency energy
and, if not installed or used in accordance with the instructions, may cause harmful interference to radio communications. However,
there is no guarantee that interference will not occur in a particular installation. If this equipment does cause harmful interference
to radio or television reception, which can be determined by turning the equipment off and on, the user is encouraged to try to
correct the interference by one or more of the following measures: 1) reorient or relocate the receiving antenna; 2) increase the
separation between the equipment and the receiver; 3) connect the equipment to an outlet on a circuit different from that to which
the receiver is connected; 4) consult the dealer or an experienced radio/TV technician for help. Any changes or modifications not
expressly approved by the party responsible for compliance could void the user's authority to operate the equipment. Where shielded
interface cables have been provided with the product or specified additional components or accessories elsewhere defined to be
used with the installation of the product, they must be used in order to ensure compliance with FCC regulations.
Canadian DOC Statement.
specified in the interference-causing equipment standard entitled “Digital Apparatus,” ICES-003 of the Department of
Communications.
Cet appareil numérique respecte les limites bruits radioélectriques applicables aux appareils numériques de Classe B prescrites dans
la norme sur le matériel brouilleur: “Appareils Numériques,” NMB-003 édictée par le Ministère des Communications.
This device complies with RSS-210 of Industry and Science Canada. Operation is subject to the following two conditions: 1) this device
may not cause interference, and 2) this device must accept any interference, including interference that may cause undesired
operation of the device.
622681-0909
LOGITECH IS WILLING TO LICENSE THE ENCLOSED SOFTWARE TO YOU ONLY ON THE CONDITION
Restrictions.
THE WARRANTIES SET FORTH IN THIS AGREEMENT REPLACE ALL OTHER WARRANTIES. LOGITECH
The Software is provided to the U.S. Government only with restricted rights and limited
This digital device does not exceed the Class B limits for radio noise emissions from digital apparatus
Logitech and its suppliers retain ownership of the Software. You shall not
This hardware device complies with Part 15 of the FCC Rules. Operation is subject
This is a legal agreement between you (either
Logitech and its suppliers grant you a nonexclusive
Limited Product Warranty.
Product Remedies.
Logitech warrants that any
Logitech’s entire liability and
ii

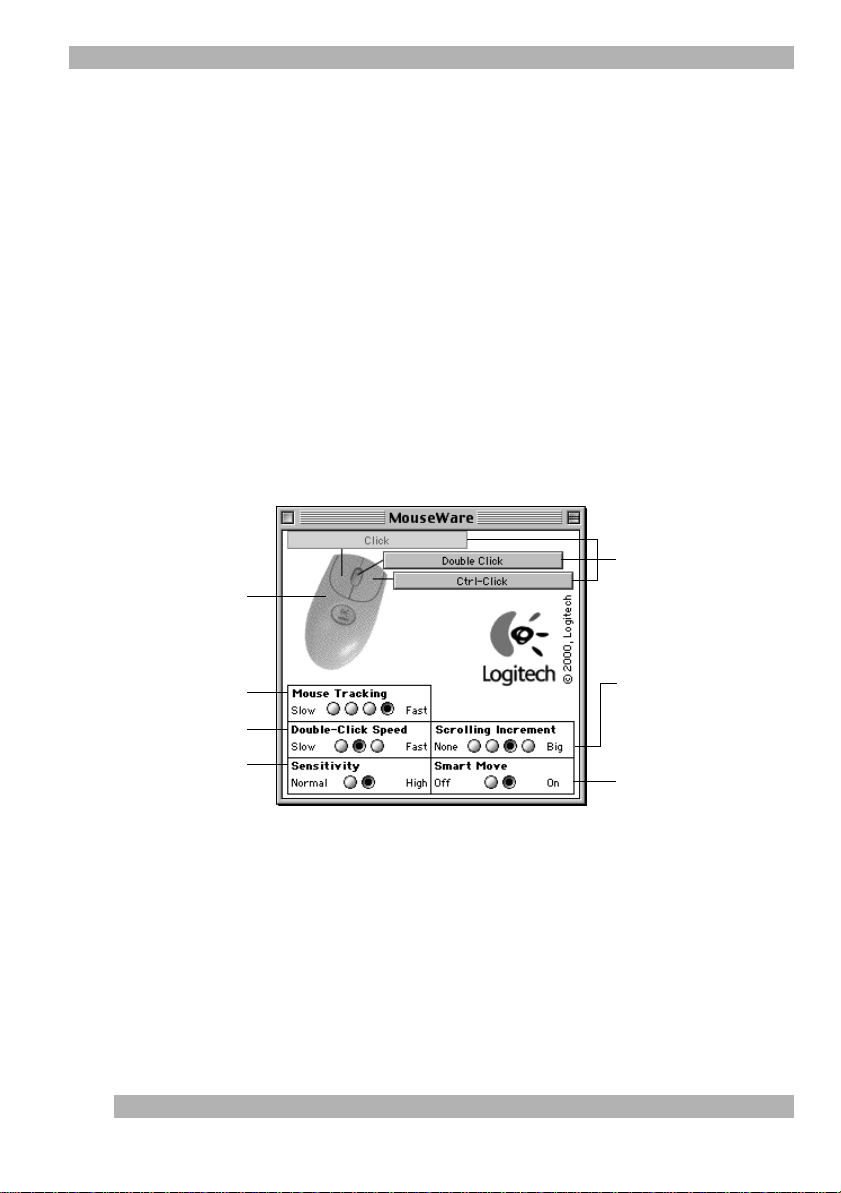
Using the MouseWare Software (Windows)
Using the MouseWare Software (Windows )
®®
Your mouse comes with the MouseWare® software, which includes features for making
button assignments, controlling cursor movement, and setting up the mouse or trackball
in Windows®.
To access the MouseWare software, double-click the mouse icon
on the Windows Taskbar, or start MouseWare from the Control Panel.
The Mouse Properties displays, as shown below. Choose from the available options to set
up the mouse.
Modifies cursor movement Sets mouse orientation
Sets up a mouse
Selects a pointer shape
Click this button to run
the Mouse Wizard which
helps you set up a mouse
Click this button to launch
the Logitech website
Adds another mouse
Shows battery level
Mouse picture varies
depending on device
connected to system
Makes button
assignments
English
Choosing Options for the Mouse (Windows®)
Need help choosing options? Let the Mouse Wizard show you how. To begin, go to
the Mouse Properties. To do this, double-click the mouse icon in the Windows® Taskbar.
Now choose the Quick Setup tab. Click Device Setup, then follow the on-screen
instructions.
1
Using the MouseWare Software (Macintosh)
Button Assignments (Windows®)
By default, the mouse buttons are assigned various useful functions. Using the Buttons
tab of the Mouse Properties, you can change the button settings of your mouse
and configure the wheel. To change button assignments, click the down arrow to select
a function for a button. (Note that at least one button must be assigned to Click/Select.)
Click the down arrow under “Scrolling Size:” to choose the amount of scrolling.
This sets the amount of scrolling in relation to how much you move
the wheel.
and double-click timing. For more information, click the Help button.
Click the Options button to specify settings for AutoScroll, Universal Scroll,
Using the MouseWare Software (Macintosh )
®®
The Logitech® MouseWare® software includes features for making
button assignments, controlling the amount of scrolling, and setting
up the mouse.
To access MouseWare, select MouseWare in the Control Panels.
Choose from the available options to set up your mouse.
Click one of these boxes to make
button assignments. (One button
The picture displayed here will
show the mouse or trackball
connected to your computer.
Adjust cursor speed in relation
to mouse movement.
Choose double-click speed.
Adjust cursor acceleration
in relation to mouse movement.
must be assigned to “Click.”)
Choose how much is scrolled in the
active window when you move the
mouse wheel.
Choose to have the cursor move
automatically to a default
command button when an
application window is opened.
2
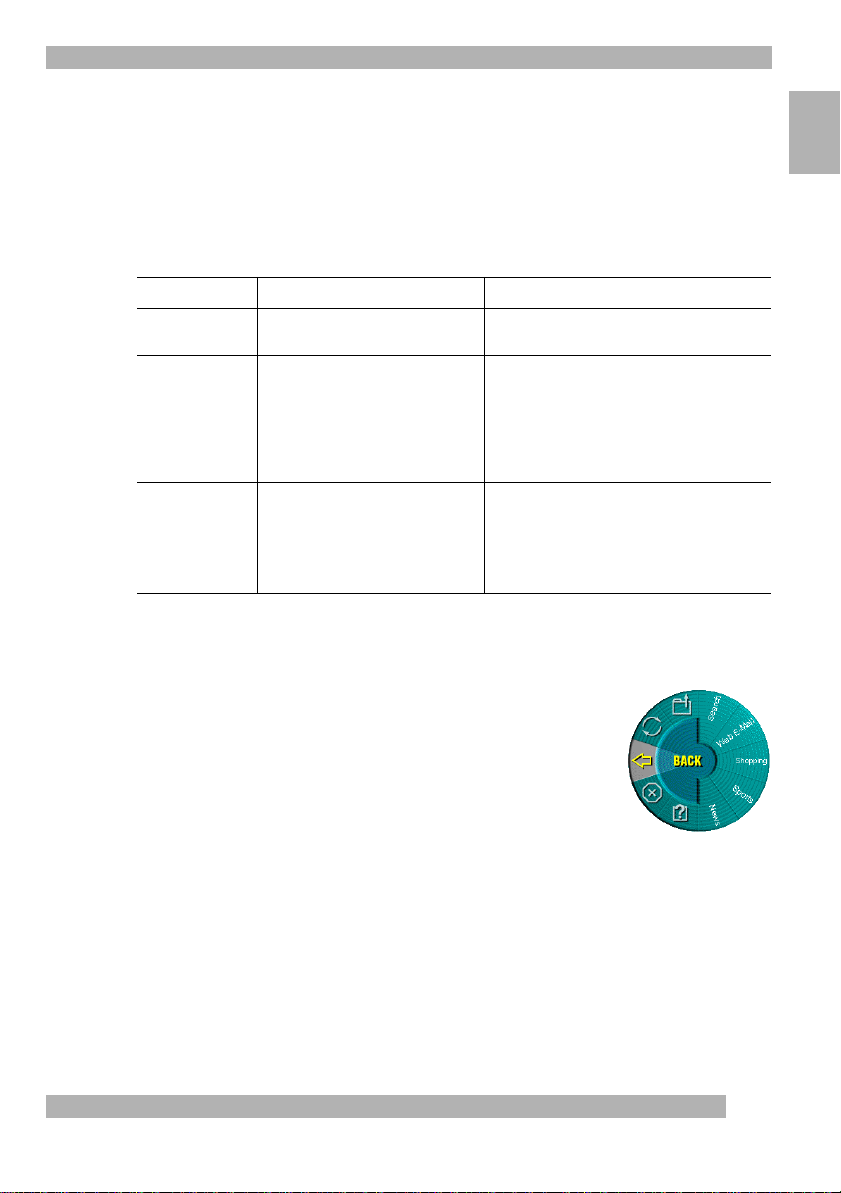
Scrolling: Windows and Macintosh
Scrolling: Windows and Macintosh
®®
Your mouse wheel functions both as a wheel and as a button. As a wheel, you can
use it to scroll both vertically and horizontally, and you can also use it to zoom
(Windows® only). To scroll, simply move the wheel. To use the wheel like a standard
mouse button, click (press down) the wheel.
Scrolling with the Mouse
Task What is It? How to Do It?
Wheel Scroll Use Wheel Scroll for precise up
Horizontal Scroll Use Horizontal Scroll to scroll left
Zoom
®
Only)
(Windows
Using the WebWheel (Windows and Macintosh )
and down movement.
to right, or right to left,
whenever horizontal scroll bars are
present in the active window.
Use Zoom to either magnify
or demagnify the view of a document
in an application that supports it.
™
To scroll up, move the wheel forward; to scroll
down, move the wheel back.
When both vertical and horizontal scroll bars are
present in a window, press the Ctrl and Shift keys
(the Option key for Macintosh
then move the wheel forward to scroll left; move
the wheel backward to scroll right. If no vertical
scroll bars are present, simply move the wheel to
scroll horizontally.
Place the cursor in an application that is
compliant with Microsoft Office 97 (or a higher
version of this application). Press and hold
the Ctrl key on the keyboard, then to zoom in,
move the wheel forward; to zoom out,
move the wheel backwards.
®®
®
) on the keyboard,
English
The Logitech® WebWheel™ helps you work faster and with greater
ease when using your Internet web browser. The WebWheel has
three of the most commonly used web browsing commands
along with five web addresses, which you can personalize.
1. Launch your Internet browser.
2. Click and depress the assigned WebWheel button on
your mouse or trackball.
3

Using the WebWheel (Windows and Macintosh)
3. Roll the wheel-button, or move your mouse, to highlight a selection on the
WebWheel.
Back.
Returns you to the previous web page.
Stop.
Halts the loading of a web page.
Reload.
Open Bookmarks/Favorites.
View WebWheel Help.
Go to a Web Address.
Reloads or refreshes the current web page.
Opens your bookmarks or favorites page.
Opens the WebWheel help file.
Opens the designated URL (Internet address) or one of
the other web address selections on the WebWheel.
4. Click the highlighted WebWheel button, or press your click-select button
on your mouse.
Assigning a Favorite Web Address to the WebWheel
The WebWheel™ comes set up with five web addresses. You may change
these assignments to Internet addresses of your own choosing.
1. Open your web browser, then navigate to the desired web address.
2. Launch the WebWheel by pressing the assigned WebWheel button on
your mouse or trackball.
3. Choose the section of the WebWheel where the web address is to be
placed by rolling the mouse/trackball wheel or moving the mouse.
WebWheel browser command buttons cannot be changed.
4. To assign the web address, press and hold the CTRL key while clicking
the WebWheel button you wish to change.
5. In the dialog box that displays, enter a name for the web address,
then click OK
Note
.
When assigning web addresses within the AOL
®
4.0 browser, the CTRL-click
method may not work. In this case, type the web address
(e.g., http://www.logitech.com) and name in the edit boxes provided.
™
Note that
4
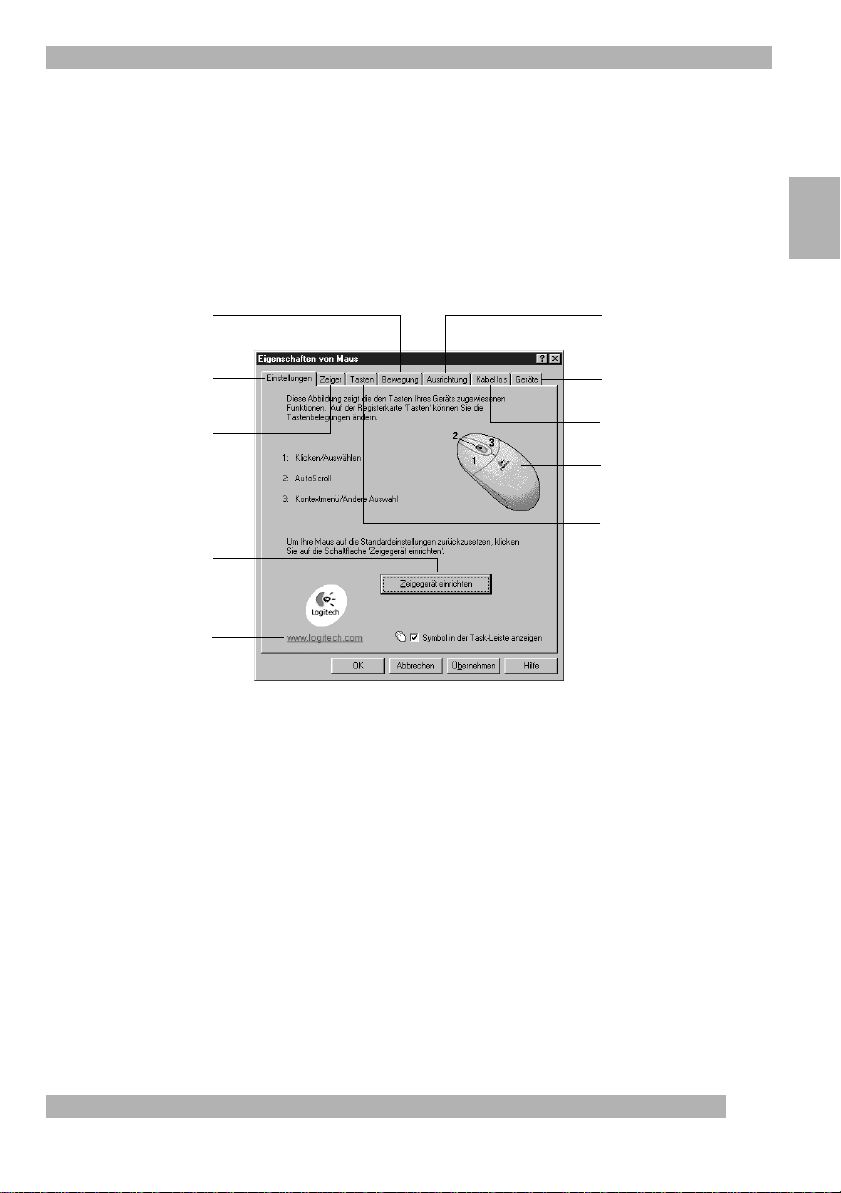
Die MouseWare-Software (Windows)
Die MouseWare-Software (Windows)
Die im Lieferumfang enthaltene MouseWare-Software beinhaltet Funktionen zum
Programmieren der Tasten, zum Steuern der Cursorbewegung und zum Einrichten
der Maus oder des Trackballs unter Windows.
von MouseWare auf das Maussymbol in der Windows-Task-Leiste, oder
doppelklicken Sie auf das entsprechende Symbol in der Systemsteuerung.
Das Dialogfeld “Eigenschaften von Maus” wird geöffnet (siehe Abbildung). Wählen Sie
zum Einrichten der Maus eine der verfügbaren Optionen.
Einrichten der Cursorbewegung Einstellen der Ausrichtung
Doppelklicken Sie zum Starten
Deutsch
Einrichten der Maus
Wählen einer Zeigerform
Klicken Sie auf diese Schaltfläche,
um den Assistenten zum
Einrichten der Maus zu starten
Klicken Sie auf diese Schaltfläche,
um die Logitech-Web-Seite
aufzurufen
Konfigurieren der Maus (Windows)
Benötigen Sie Hilfe beim Wählen der Optionen? Dafür gibt es den Assistenten zum
Einrichten der Maus. Öffnen Sie dazu die Mauseigenschaften: Doppelklicken Sie dazu
auf das Maussymbol in der Windows-Task-Leiste. Aktivieren Sie die Registerkarte
“Einstellungen”. Klicken Sie auf “Zeigegerät einrichten”, und folgen Sie den Anweisungen
auf dem Bildschirm.
Hinzufügen weiterer Zeigegeräte
Ladezustandsanzeige
der Batterien
Hier wird jeweils
das angeschlossene Gerät
angezeigt
Programmierender Tasten
5
Die MouseWare-Software (Macintosh)
Programmieren der Tasten (Windows)
Den Maustasten ist standardmäßig eine Reihe von Funktionen zugewiesen.
Auf der Registerkarte “Tasten” der Mauseigenschaften können Sie
die Tasteneinstellungen ändern und das Tastenrad konfigurieren. Klicken Sie zum Ändern
der Tastenbelegung auf den Pfeil nach unten, und wählen Sie eine Funktion aus der Liste.
Sie müssen mindestens eine Taste mit der Funktion “Klicken/Auswählen” belegen.
Klicken Sie auf den Pfeil unter “Bildlaufgeschwindigkeit:”, um die gewünschte Option
einzustellen.
Je nachdem, wie weit Sie das Tastenrad bewegen, wird
der Fensterinhalt mehr oder weniger weit verschoben.
von “AutoScroll”, “Universal Scroll” und der Doppelklickgeschwindigkeit auf “Optionen”.
Weitere Informationen erhalten Sie, wenn Sie auf “Hilfe” klicken.
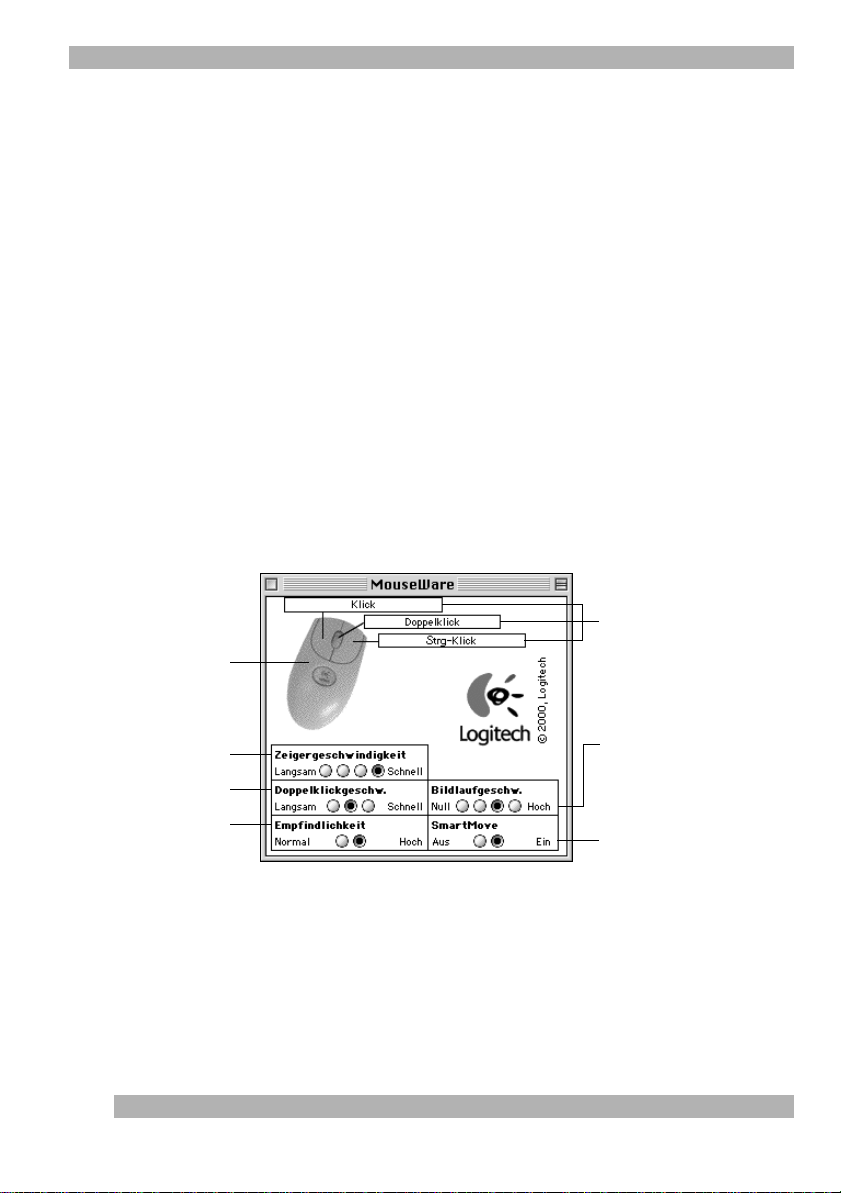
Die MouseWare-Software (Macintosh)
Die Logitech MouseWare-Software beinhaltet Funktionen zum
Programmieren der Tasten, zum Einstellen der Bildlaufgeschwindigkeit
und zum Einrichten der Maus.
“MouseWare”.
Wählen Sie zum Einrichten der Maus eine der verfügbaren
Optionen.
Hier wird ein Bild
des angeschlossenen
Zeigegeräts angezeigt.
Wählen Sie zum Starten von MouseWare das Kontrollfeld
Klicken Sie zum Einstellen
Klicken Sie zum Programmieren
der Tasten auf diese Felder.
(Sie müssen eine Taste mit
der Funktion “Klicken” belegen.)
Stellen Sie hier die Cursor-
Beschleunigung ein.
Stellen Sie hier die Doppelklick-
geschwindigkeit ein.
Stellen Sie hier die Cursor-
Beschleunigung ein.
6
Geben Sie hier an, wie weit das aktive
Fenster verschoben werden soll,
wenn Sie das Tastenrad betätigen.
Aktivieren Sie diese Option,
damit der Cursor beim Öffnen
eines Fensters automatisch auf
eine Standardschaltfläche springt.
Bildlauf: Windows und Macintosh
Bildlauf: Windows und Macintosh
Das Rad funktioniert sowohl als Tastenrad als auch als Taste. Sie können es als Rad für
den vertikalen und horizontalen Bildlauf sowie für Zoom-Funktionen (nur unter Windows)
verwenden. Bewegen Sie das Rad, um Bildlauffunktionen auszuführen. Drücken Sie
das Rad, um es als Taste zu verwenden.
Bildlauf mit der Maus
Funktion Beschreibung Vorgehensweise
Rad-Bildlauf Präziser vertikaler Bildlauf. Bewegen Sie das Rad nach vorne, um das Bild
Horizontaler Bildlauf Wenn das aktive Fenster
Zoom
(nur Windows)
eine horizontale Bildlaufleiste enthält,
können Sie das Bild nach rechts
oder links verschieben.
Mit der Zoom-Funktion können Sie
in einer kompatiblen Anwendung
die Ansicht eines Dokuments
vergrößern bzw. verkleinern.
Deutsch
nach oben zu verschieben, bzw. nach hinten,
um das Bild nach unten zu verschieben.
Wenn in einem Fenster sowohl eine vertikale
als auch eine horizontale Bildlaufleiste
angezeigt werden, halten Sie die Strg- und
die Umschalttaste gedrückt (Option-Taste
beim Macintosh), und bewegen Sie das Tastenrad
nach vorne, um das Bild nach links zu verschieben
bzw. nach hinten, um es nach rechts zu
verschieben. Enthält das Fenster keine vertikalen
Bildlaufleisten, bewegen Sie einfach
das Tastenrad, um das Bild nach links oder rechts
zu verschieben.
Platzieren Sie den Cursor in einer Anwendung,
die mit Microsoft Office 97 (oder höher)
kompatibel ist. Halten Sie die Strg-Taste gedrückt,
und bewegen Sie das Rad nach vorne,
um die Ansicht zu vergrößern bzw. nach hinten,
um die Ansicht zu verkleinern.
Das WebWheel (Windows und Macintosh)
Mit Logitech WebWheel können Sie die Arbeit mit
einem Internet-Browser beschleunigen und erleichtern.
Sie können drei häufig genutzte Browser-Befehle
und fünf beliebig einstellbare Web-Adressen aufrufen.
1. Starten Sie den Internet-Browser.
2. Drücken Sie die mit der WebWheel-Funktion belegte
Maus- bzw. Trackball-Taste.
7

Das WebWheel (Windows und Macintosh)
3. Bewegen Sie das Tastenrad bzw. die Maus, um die gewünschte WebWheel-
Option zu markieren.
Zurück.
Stop.
Aktualisieren.
Lesezeichen/Favoriten öffnen.
WebWheel-Hilfe.
Aufrufen einer Web-Seite.
4. Drücken Sie die Taste, der WebWheel zugewiesen wurde, oder die Taste
zum Klicken/Auswählen.
Ruft die vorherige Seite auf.
Unterbricht das Herunterladen der aktuellen Web-Seite.
Ruft die aktuelle Web-Seite erneut auf.
Ruft die Liste der Lesezeichen/Favoriten auf.
Öffnet die Hilfedatei zu WebWheel.
Ruft die markierte Internet-Adresse auf.
Belegen des WebWheel mit Internet-Adressen
WebWheel enthält bereits fünf Web-Adressen. Sie können diese Belegungen jederzeit
ändern.
1. Starten Sie den Internet-Browser, und rufen Sie die gewünschte Web-Seite
auf.
2. Starten Sie WebWheel, indem Sie die entsprechende Taste drücken.
3. Markieren Sie den Abschnitt von WebWheel, dem Sie die Web-Adresse
zuweisen möchten.
werden.
Die Browser-Befehle in WebWheel können nicht geändert
8
4. Halten Sie dann die Strg-Taste gedrückt, und klicken Sie auf den
WebWheel-Abschnitt, der neu belegt werden soll.
5. Geben Sie einen Namen für die Web-Adresse ein, und klicken Sie auf OK
Hinweis:
Beim Zuweisen von Web-Adressen im AOL 4.0-Browser funktioniert
u.U. die Strg-Klick-Methode nicht. Geben Sie dann die gewünschte WebAdresse (z.B. http://www.logitech.com) in das entsprechende Feld ein.
.
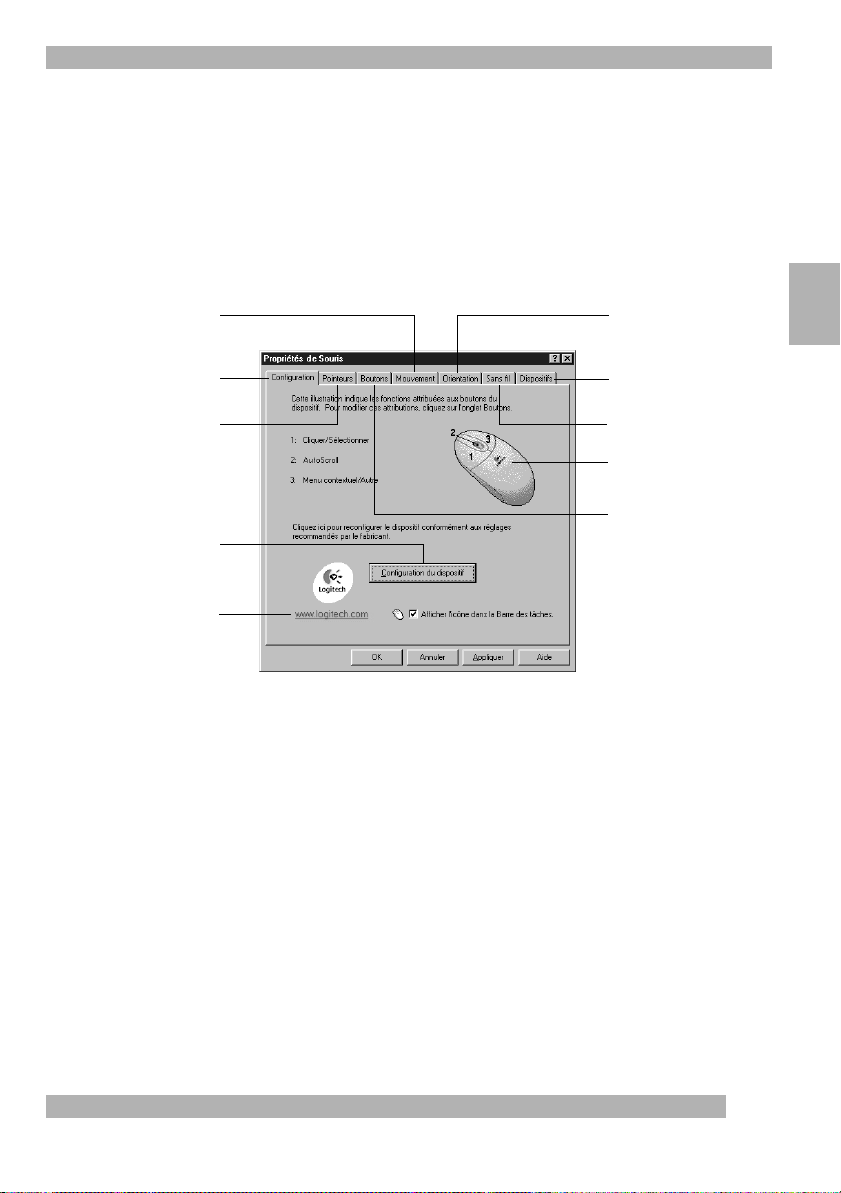
Utilisation du logiciel MouseWare (Windows)
Utilisation du logiciel MouseWare (Windows)
Les fonctions spécifiques au logiciel MouseWare permettent d’attribuer des raccourcis
aux boutons, de contrôler le déplacement du pointeur et de configurer la souris
ou le trackball sous Windows.
cliquez sur l’icône de la souris dans la barre des tâches de Windows ou lancez
MouseWare depuis le “Panneau de configuration”.
“Propriétés de Souris“ s'affiche, comme le montre l'illustration suivante. Sélectionnez les
options de votre choix pour configurer la souris.
Modifie le déplacement
du pointeur
Pour accéder au logiciel MouseWare, double-
La boîte de dialogue
Définit l'orientation de la souris
Français
Configure la souris
Sélectionne la forme
du pointeur
Cliquez sur ce bouton pour lancer
l’Assistant de la souris,
lequel vous permet de configurer
la souris de votre choix
Cliquez sur ce bouton pour
accéder au site Web de Logitech
Sélection d’options pour la souris (Windows)
Besoin d’aide pour choisir parmi les différentes options? Laissez-vous guider par
l'Assistant de la souris. Tout d’abord, ouvrez la boîte de dialogue “Propriétés de Souris”.
Pour ce faire, double-cliquez sur l'icône de la souris sur la barre des tâches de Windows.
Cliquez ensuite sur l'onglet “Configuration”. Cliquez sur le bouton de configuration
du dispositif, puis suivez les instructions qui s'affichent à l'écran.
Ajoute une autre souris
Affiche le niveau des piles
L’illustration de la souris varie en
fonction du dispositif connecté
au système
Attribue des raccourcis
aux boutons
9
Utilisation du logiciel MouseWare (Macintosh)
Attribution de raccourcis (Windows)
Par défaut, diverses fonctions utiles sont attribuées aux boutons de la souris. Cliquez sur
l'onglet “Boutons” de la boîte de dialogue “Propriétés de Souris” pour modifier
les paramètres des boutons de la souris et configurer la roulette. Pour modifier
les raccourcis attribués aux boutons, cliquez sur la flèche pointant vers le bas et
sélectionnez la fonction d’un bouton. (Notez que la fonction Cliquer/Sélectionner doit
être au moins attribuée à l'un des boutons de la souris.) Cliquez sur la flèche pointant
vers le bas sous “Volume du défilement” pour choisir le volume de défilement.
Cette option définit le volume de défilement en fonction du déplacement
que vous imposez à la roulette.
Cliquez sur le bouton “Options” pour spécifier
les paramètres d'AutoScroll, de CyberJump, d'HyperJump et la vitesse du double-clic.
Pour de plus amples informations, cliquez sur le bouton “Aide”.
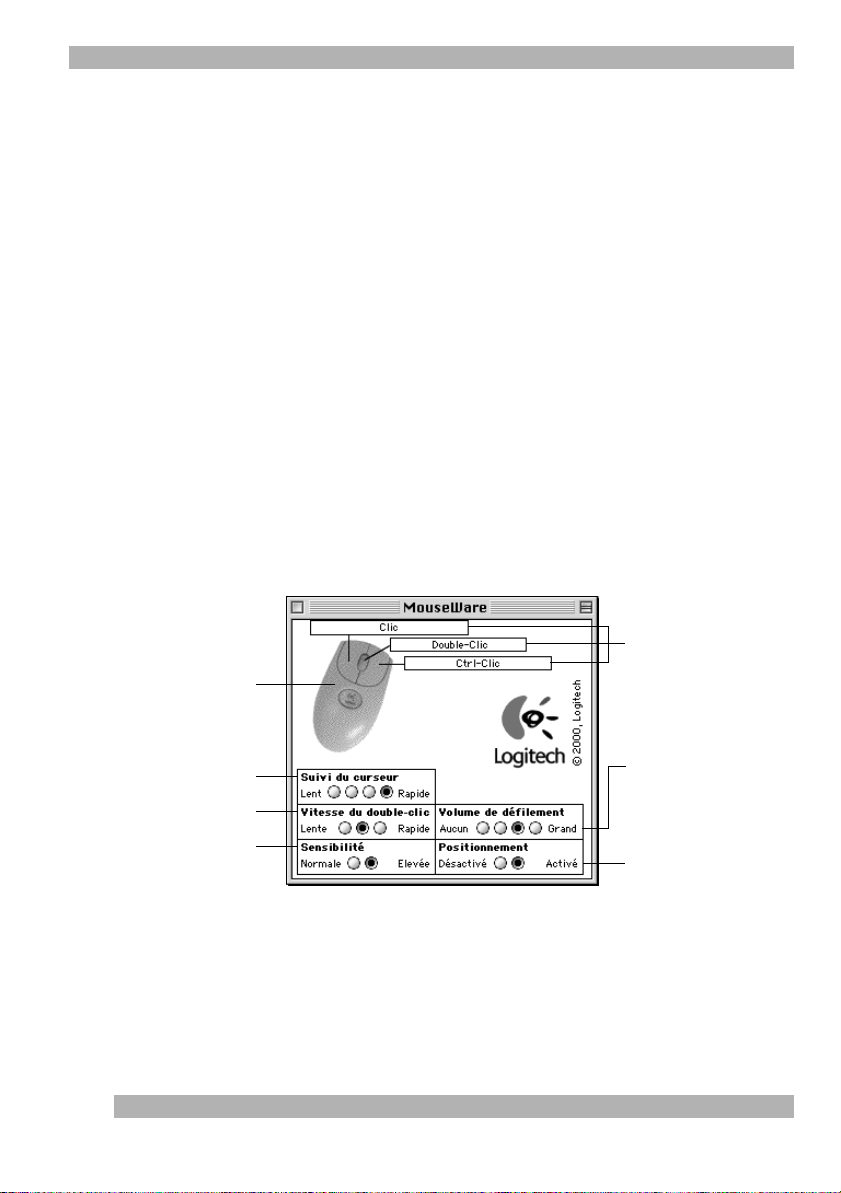
Utilisation du logiciel MouseWare (Macintosh)
Le logiciel MouseWare de Logitech possède des fonctions qui permettent
d’attribuer des raccourcis aux boutons du dispositif, de définir le volume
de défilement et de configurer la souris.
sélectionnez l'icône MouseWare dans les “Tableaux de bord”.
de votre choix pour configurer la souris.
Pour accéder au logiciel MouseWare,
Sélectionnez les options
L’image ici affichée présente
la souris ou la boule de pointage
connectée à votre ordinateur.
Réglage de la vitesse du pointeur
en fonction du déplacement
Choisissez la vitesse du double-clic.
Réglage de l'accélération
du déplacement de la souris.
de la souris.
du pointeur en fonction
10
Cliquez sur l'une de ces cases
pour attribuer des raccourcis
aux boutons. (La fonction de clic
doit être affectée à un bouton.)
Choisissez, dans la fenêtre active,
le volume de défilement souhaité
lorsque vous déplacez la roulette
de la souris.
Spécifiez si vous souhaitez que
le pointeur se place automatiquement sur un bouton
de commande par défaut lors
de l'ouverture d'une application.
Défilement: Windows et Macintosh
Défilement: Windows et Macintosh
La roulette fonctionne à la fois comme roulette et comme bouton. Comme roulette,
elle permet aussi bien le défilement vertical et horizontal que le zoom (Windows
uniquement). Pour faire défiler un document, actionnez la roulette vers l'avant
ou l'arrière. Pour l'utiliser comme un bouton de souris classique, cliquez (appuyez)
sur la roulette.
Défilement à l'aide de la souris
Fonction Finalité Mise en application
Défilement
par roulette
Défilement
horizontal
Zoom (Windows
uniquement)
La fonction “Défilement par roulette”
permet un déplacement précis vers
le haut ou vers le bas.
Utilisez la fonction “Défilement
horizontal” pour effectuer
un défilement de la gauche
vers la droite, ou inversement,
dans la mesure où la fenêtre active
comporte des barres de défilement
horizontal.
La fonction “Zoom” permet d'agrandir
ou de réduire l'affichage
d'un document dans une application
qui prend en charge cette fonction.
Pour effectuer un défilement vers le haut,
actionnez la roulette vers l'avant;
pour effectuer un défilement vers le bas,
actionnez-la vers l'arrière.
Lorsque la fenêtre active comporte des barres
de défilement horizontal et vertical,
appuyez simultanément sur les touches Ctrl
et Maj (touche Option sur Macintosh) du clavier,
puis actionnez la roulette vers l'avant pour
un défilement vers la gauche, et actionnez-la
vers l'arrière pour un défilement vers la droite.
Si la fenêtre ne contient pas de barres
de défilement vertical, vous pouvez uniquement
effectuer un défilement horizontal.
Placez le pointeur dans une application
compatible avec Microsoft Office 97
(ou une version ultérieure de cette application).
Appuyez sur la touche Ctrl du clavier et, tout en
la maintenant enfoncée, actionnez la roulette
vers l'avant pour effectuer un zoom avant,
ou vers l'arrière pour effectuer un zoom arrière.
Utilisation de l'application WebWheel (Windows et Macintosh)
WebWheel de Logitech permet d'utiliser plus facilement et plus
rapidement un navigateur Internet. WebWheel propose trois des
commandes le plus souvent utilisées dans un navigateur Internet,
ainsi que cinq adresses Web que vous pouvez personnaliser.
Français
1. Lancez votre navigateur Internet.
2. Appuyez sur le bouton de la souris ou de la boule
de pointage correspondant à WebWheel.
11

Utilisation de l'application WebWheel (Windows et Macintosh)
3. Actionnez la roulette, ou déplacez votre souris, pour mettre en surbrillance
l’option de votre choix.
Précédente.
Arrêter.
Actualiser.
Ouvrir Signets/Favoris.
Afficher l’Aide de WebWheel.
Accéder à une adresse Web.
des adresses Web de WebWheel.
4. Cliquez sur le bouton WebWheel mis en surbrillance ou appuyez sur
le bouton cliquer-sélectionner de la souris.
Vous ramène à la page Web précédente.
Interrompt le chargement d’une page Web.
Actualise ou effectue un nouveau chargement de la page Web affichée.
Ouvre vos signets ou pages favorites.
Ouvre le fichier d’aide de WebWheel.
Ouvre l’URL (adresse Internet) choisie ou l’une
Attribution d’une adresse Web favorite à WebWheel
Cinq adresses Web sont définies par défaut pour WebWheel. Vous pouvez modifier
ces adresses et définir celles que vous souhaitez.
1. Lancez votre navigateur Web, puis naviguez jusqu’à l’URL désirée.
2. Lancez WebWheel en appuyant sur le bouton de la souris ou du trackball
auquel l'application a été affectée.
3. Déterminez la partie de WebWheel dans laquelle placer l’adresse Web
en actionnant la boule ou la roulette de la souris ou en déplaçant la souris.
Veuillez noter que les commandes de navigation WebWheel ne peuvent être
modifiées.
12
4. Pour affecter l’URL, appuyez sur la touche Ctrl et, tout en la maintenant
enfoncée, cliquez sur le bouton WebWheel que vous désirez modifier.
5. Dans la boîte de dialogue qui s'affiche, tapez un nom correspondant
à l'adresse Web en question, puis cliquez sur OK.
Remarque
La méthode Ctrl+clic peut ne pas fonctionner lorsque vous attribuez
des adresses Web dans le navigateur AOL 4.0. Dans ce cas,
tapez l'adresse Web (par exemple: http://www.logitech.com)
et assignez-lui un nom dans les zones de texte prévues à cet effet.
Uso del software MouseWare in Windows
Uso del software MouseWare in Windows
Il mouse è fornito del software MouseWare che consente di assegnare funzioni
ai pulsanti, controllare lo spostamento del puntatore e configurare il mouse o la trackball
in Windows.
del mouse nella barra delle applicazioni di Windows oppure avviare
MouseWare dal “Pannello di controllo”.
Mouse”, come indicato di seguito. Per impostare il mouse, selezionare le opzioni
desiderate.
Modifica lo spostamento
del puntatore
Per accedere al software MouseWare, fare doppio clic sull’icona
Viene visualizzata la scheda “Proprietà –
Imposta l’orientamento
Imposta il mouse
Seleziona la forma
del puntatore
Fare clic su questo
pulsante per eseguire
l'installazione guidata
Fare clic su questo
pulsante per accedere
al sito Web di Logitech
Selezione delle opzioni per il mouse in Windows
Occorre una mano nello scegliere le opzioni? Attenersi alle istruzioni dell’installazione
guidata del mouse. In primo luogo aprire la finestra “Proprietà – Mouse”. A questo scopo
fare doppio clic sull’icona del mouse nella barra delle applicazioni di Windows.
Selezionare ora la scheda “Setup rapido”. Fare clic su “Imposta dispositivo” e quindi
attenersi alle istruzioni visualizzate sullo schermo.
Aggiunge un mouse
Mostra il livello delle
batterie
L’immagine del mouse
varia a seconda del dispositivo
collegato al sistema
Assegna funzioni
ai pulsanti
Italiano
13
Uso del software MouseWare in Macintosh
Assegnazione delle funzioni ai pulsanti in Windows
Per impostazione predefinita ai pulsanti del mouse vengono assegnate varie funzioni
utili. Utilizzando la scheda “Pulsanti” della finestra “Proprietà – Mouse” è possibile
modificare le impostazioni del mouse e configurare lo scroller. Fare clic sulla freccia
rivolta verso il basso per cambiare la funzione che si desidera assegnare al pulsante
(si noti che la funzione “Clic/Selezione” deve essere assegnata ad almeno uno
dei pulsanti del mouse). Fare clic sulla freccia rivolta verso il basso in “Dimensione
scorrimento”: per selezionare la dimensione di scorrimento.
Ciò consente
di specificare la dimensione di scorrimento in rapporto alla rotazione
dello scroller.
Fare clic sul pulsante “Opzioni” per definire le impostazioni per
le funzioni AutoScroll, Universal Scroll e velocità doppio clic. Per ulteriori informazioni
fare clic sul pulsante “?”.
Uso del software MouseWare in Macintosh
Il software Logitech MouseWare consente di assegnare funzioni ai pulsanti,
controllare la dimensione di scorrimento e configurare il mouse.
a MouseWare, selezionare MouseWare nel “Pannello di controllo”.
il mouse, selezionare le opzioni desiderate.
L’immagine visualizzata mostrerà
il mouse o la trackball collegati
al computer.
Per accedere
Per impostare
Per assegnare le funzioni
ai pulsanti, fare clic su
una delle seguenti caselle
(la funzione “Clic” deve essere
assegnata a un pulsante).
Regola la velocità del puntatore
in base allo spostamento del mouse.
Imposta la velocità del doppio clic.
Regola l'accelerazione del puntatore
in base allo spostamento del mouse.
14
Seleziona la dimensione
dello scorrimento nella finestra
attiva quando si fa ruotare
lo scroller.
Imposta lo spostamento
automatico del puntatore
su un pulsante di comando
predefinito quando viene aperta
la finestra di un’applicazione.
 Loading...