

Page 1
Linksys SPA
Linksys SPA----942
Linksys SPALinksys SPA
942 User’s Guide
942 942
User’s Guide
User’s GuideUser’s Guide
V1.0
Page 2

2
Linksys SPA-942 User Guide
Contents
Linksys SPA-942 Overview …………………………………………………………………………. 3
Using the Call Features of the Linksys SPA-942 …………………………………………… 4-5
Placing a Call
Answering a Call
Ending a Call
Blind Transferring
Warm Transferring
Placing a Call on Hold
Placing a Conference Call
Call Forwarding
Do Not Disturb
Using the Voice Mail Features of the Linksys SPA-942 …………………………………… 6-7
Accessing Voice Mail
Recording Your Message
Fast-Forwarding or Rewinding Messages
Voice Mail Prompt Menu
Accessing Voice Mail from Another Location
Using Additional Features of the Linksys SPA-942 ………………………………………….. 8
Using Call History
Changing Your Settings
Page 3
3
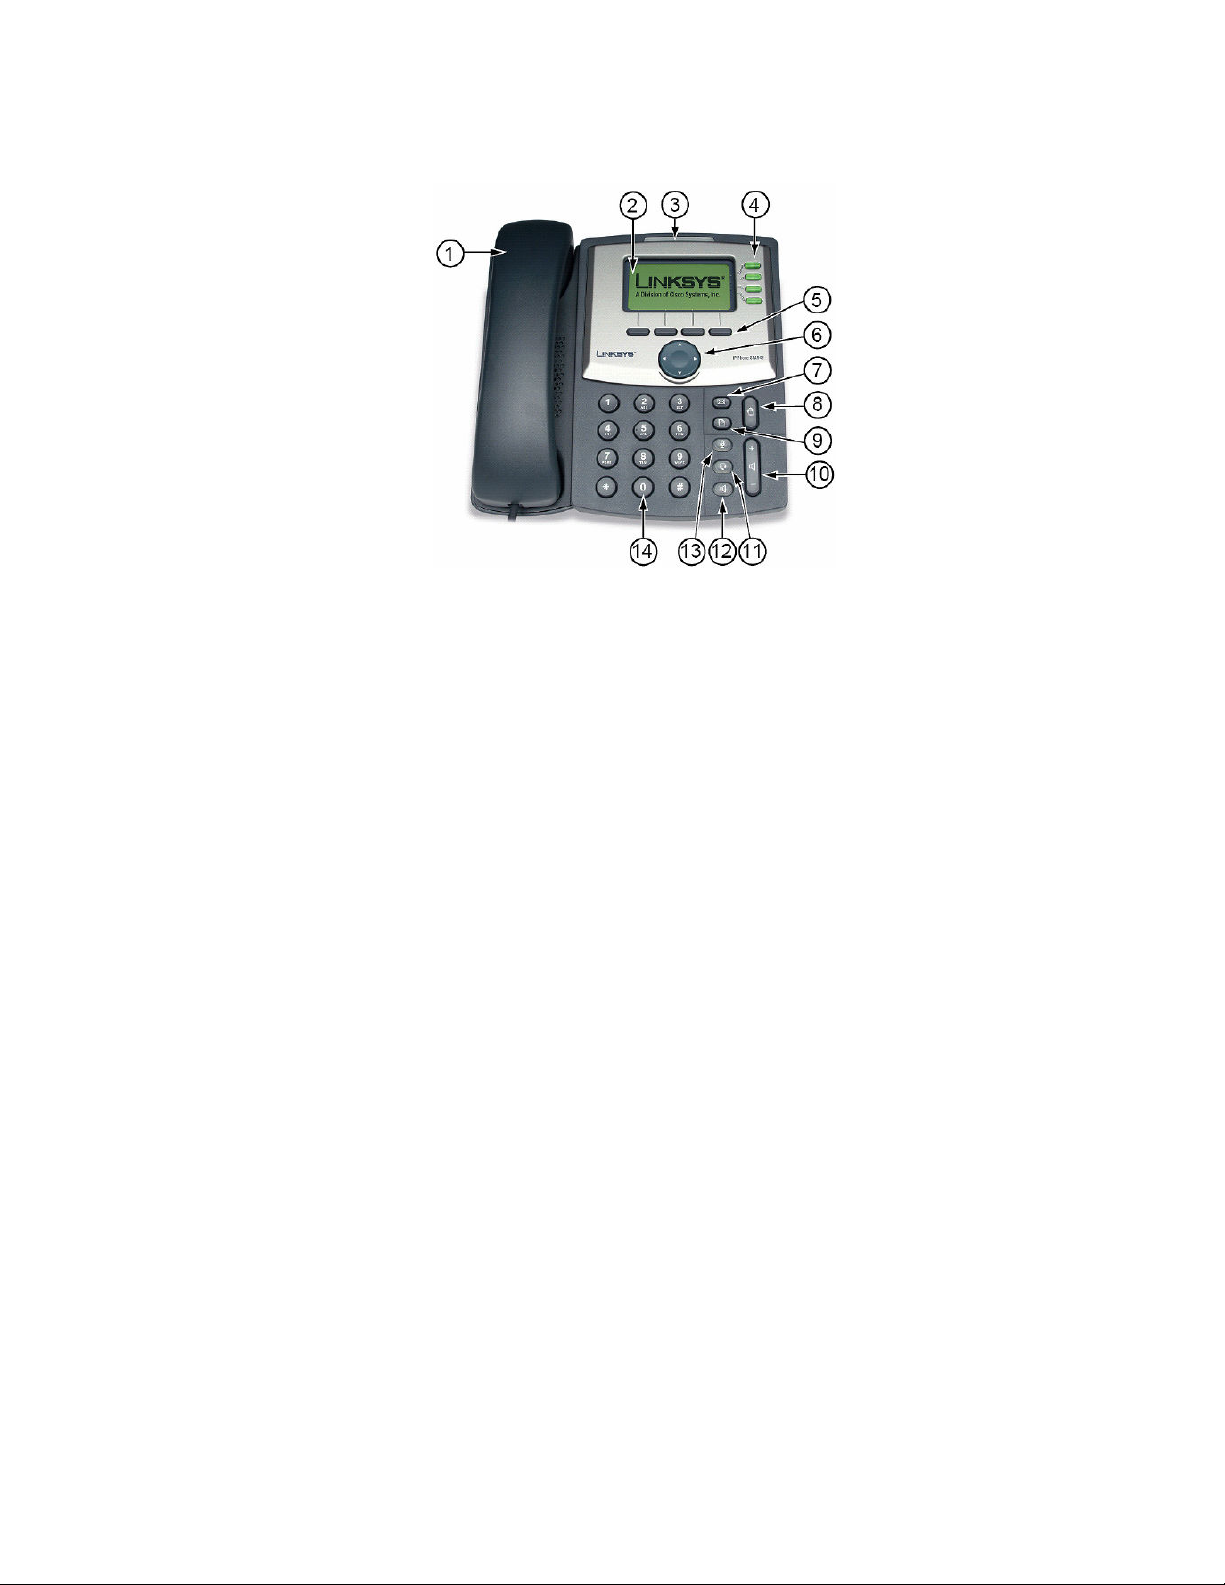
Linksys SPA-942 Overview
The following list highlights some of the features that are available with your Linksys SPA-942
VoIP phone.
1. Handset
2. LCD screen which displays time, date, your phone number, caller ID, call status, and
soft key tabs.
3. Voice Mail indicator light, blinks when the phone is ringing and remains lit to indicate
new voice messages
4. Lines – Shows the lines available to dial from.
5. Soft keys: Enables you to activate any functions displayed along the bottom of
the LCD. Keys change depending on status of phone
6. Navigation button
7. Mailbox button – Allows you to check your voice messages
8. Hold button: Places the active call on hold, resumes a call on hold, and
switches between an active call and an incoming call or an active call and a
call on hold.
9. Setup button: Displays a menu that provides access to phone logs, directories,
settings, and services.
10. Volume button: Increases or decreases volume for the handset and speaker. Also
controls the ringer volume (if on-hook).
11. Headset button – allows for the use of a headset
12. Speaker button – activates speakerphone
13. Mute button – mutes the microphone on your phone so the receiving party cannot
hear you.
14. Keypad: Works exactly like the keypad on a traditional telephone
Page 4

4
Using the Call Features of the Linksys SPA-942
Placing a Call
There are 2 options available to place a call:
• Lift the handset and dial the number.
• Dial the number and press the “dial” soft key.
Answering a Call
There are 2 options available to answer a call.
• Lift the handset.
• Press the “Speakerphone” key.
Ending a Call
• Hang up the Handset.
Blind Transferring
This feature allows you to transfer a call without speaking to the person you are transferring to.
• While on the call, press the “right navigation” button then press the “bxfer” key (this
will place the caller on hold).
• Dial the 4 digit extension or the local or long distance number to which you want to
transfer the call.
• Press the “dial” soft key to transfer the call.
Warm Transferring
This allows you to speak to the person you are transferring to prior to transferring the call.
• While on the call, press the “xfer” key (This will place the caller on hold).
• Dial the 4 digit extension or the local or long distance number to which you want to
transfer the call.
• When the second line rings, wait for the party to answer the call, announce the caller
press “xfer” again to connect the two parties.
• Hang up or end the call.
Placing a Call on Hold
While on the call:
• Press the “hold” button
• To return to the call, press the “hold” button again.
Page 5

5
Placing a Conference Call
To establish a conference call for an existing call:
• Press the “Conf” soft key (this will automatically select a new line and place the other
party on hold).
• Dial the 4 digit extension or the local or long distance number of the second party.
• When the second party answers, press the “Conf” soft key again and the first party will
be added to the call.
• Repeat steps 1 through 3 to add additional parties to the conference call.
Call Forwarding
To start forwarding:
Press the “cfwd” soft key and enter the number you would like to forward to.
To stop forwarding:
Press the “-cfwd” soft key.
Do Not Disturb
To enable Do Not Disturb hit the “dnd” soft key
To disable Do Not Disturb hit the “-dnd” soft key
Page 6

6
Using the Voice Mail Features of the Linksys SPA-942
Accessing Voice Mail
• Press
• Enter your mailbox number which is your extension number.
• Enter your temporary password which is your extension number.
• At this time you may reset your password. Press 0 for Mailbox Options, then 4 and
follow the prompts.
Recording Your Message
• Press the “messages” key below the LCD display.
• Enter your extension number.
• Enter your temporary password which is your extension number or last 4 digits of your
phone number.
• At this time you may record your greeting. Press 0 for Mailbox Options, then 1 to record
your Unavailable message, press 2 to record your Busy message.
Fast-Forwarding or Rewinding Messages
• To fast-forward a message while it is playing, press the pound (#) key. This will fastforward your message in 3 second intervals.
• To rewind a message while it is playing, press the star (*) key. This will rewind the
message in 3 second intervals.
Voice Mail Prompt Menu
Press 1 for new messages. After your message has played you may press:
• 5 to repeat the current message
• 6 to listen to the next message
• 7 to delete this message
• 8 to forward this message to another user
• 9 to save this message
Press 2 to change folders. Your folder options include pressing:
• 0 for new messages
• 1 for old messages
• 2 for work messages
• 3 for family messages
• 4 for friends messages
• # to cancel
Press 3 for advanced options (currently not available).
Page 7

7
Press 0 for mailbox options. Your options include:
• 1 to record your unavailable greeting
• 2 to record your busy greeting.
• 3 to record your name.
• 4 to change your password.
• * to return to the main menu.
Accessing Voice Mail from Another Location
• Dial your office telephone number.
• Enter 8500.
• Enter your mailbox number which is your extension number.
• Enter your password.
Page 8

8
Using the Additional Features of the Linksys SPA-942
Using Call History
To access your Call History press
Select option 3 or “Call History” and press the “select” soft key
You will have the option to view the following call histories:
• Missed Calls
• Received Calls
• Placed calls
Select the Call History you would like to view by highlighting it (using the up and down arrow
keys below the LCD display) and pressing “Select” at the bottom of the LCD display. By
highlighting a specific call in the history you have the option of:
• Dialing
• Exiting the current menu
Changing Your Settings
By using the button you also have the option of:
• Adjusting the contrast of the LCD display
• Changing the ring type
• Adjusting your call preferences
(Other features are available but may be managed by your Network Administrator.)
 Loading...