

Linksys BEFSR11, SIESTA MI, BEFSRU31 Fast Start
You may have different computers than what are pictured here,but the setup is sim-
ilar. The Router lets you share your fast cable or DSL connection among several com-
puters in your home or business. This is called a Local Area Network or LAN.
This Fast Start guide gives you the “big picture”of what you need to set up a basic
home or business network. The next three sections explain how you will set up and
configure your equipment to enable shared high-speed access to the Internet.
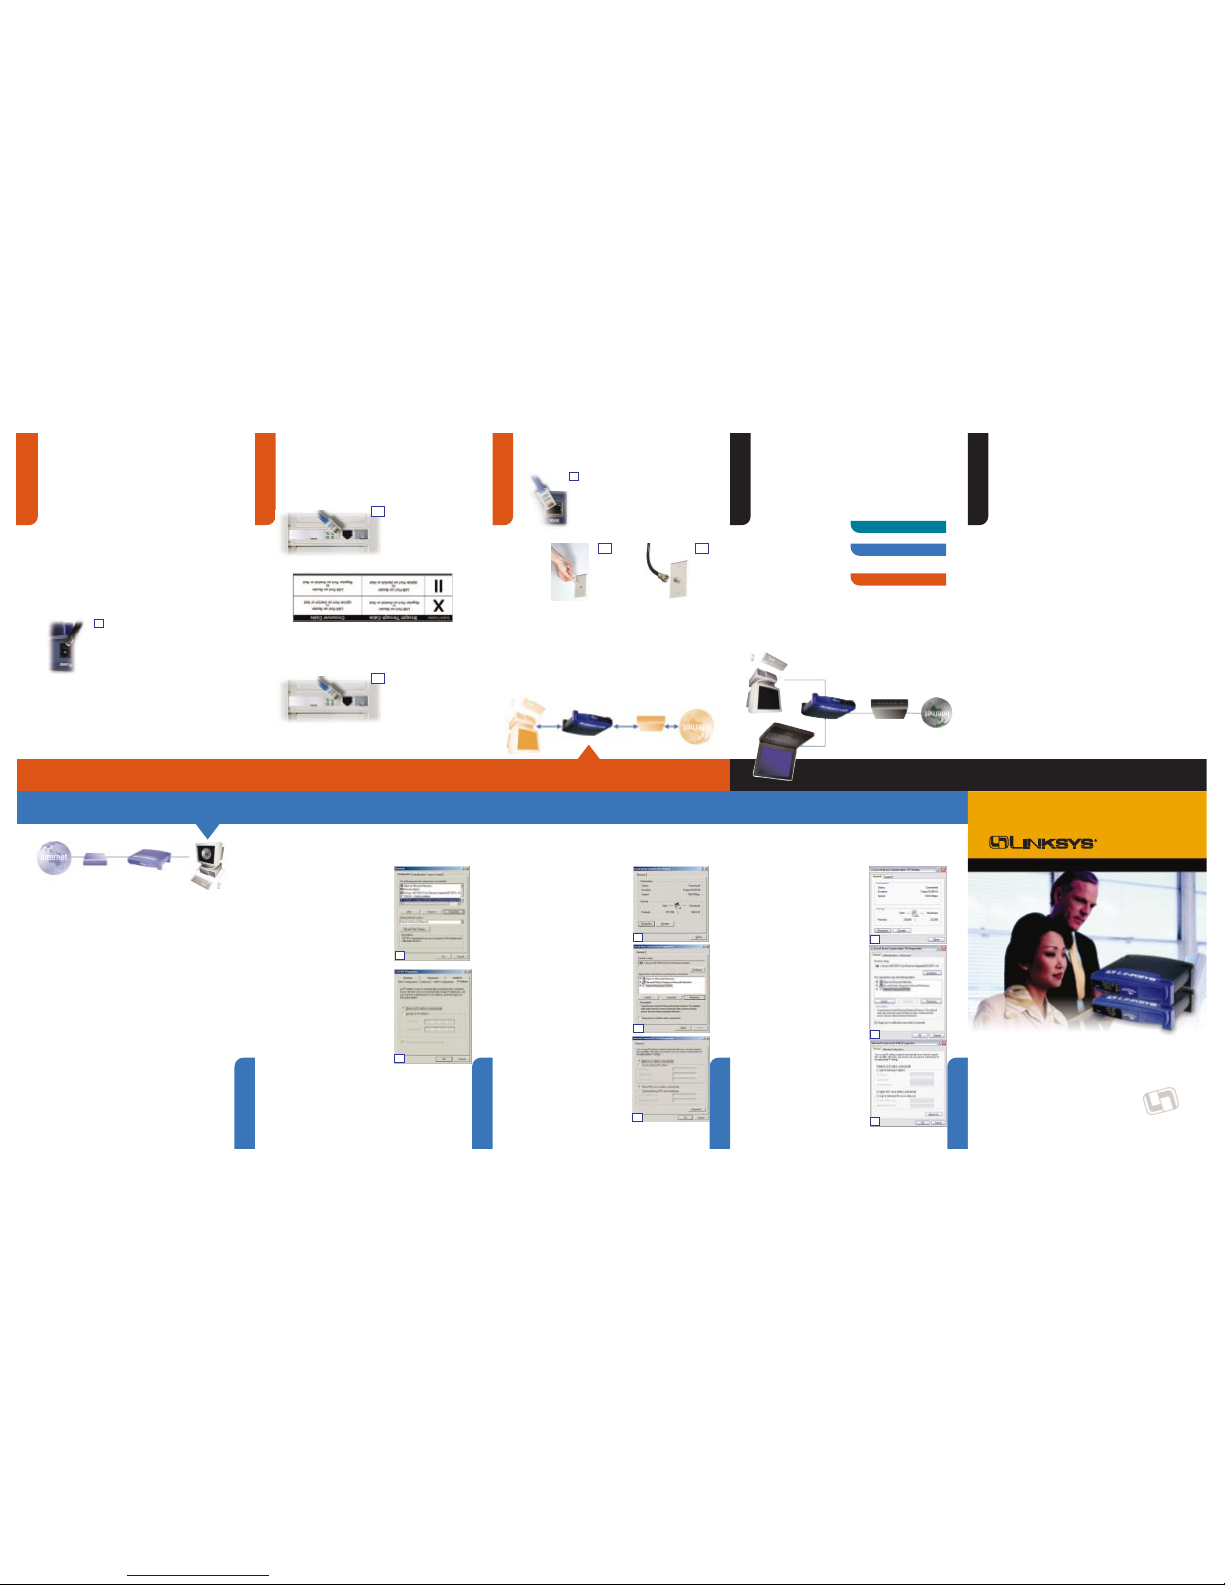
Step 1: Connect the Router
Connect the Router to your cable or DSL modem and to your notebook or desktop
PCs.
Step 2: Configure the PCs
Configure your notebook or desktop PCs to be able to communicate with the Router.
Step 3: Configure the Router
Do the basics to get the Router to work with your cable or DSL modem and your ISP’s
settings.
Step 1: Connect the Router
Step 2: Configure the PCs
Introduction
Introduction
Introduction
Connect Router
Connect Router
Connect Router
Configure PCs
Configure PCs
Configure PCs
Configure PCs
Congratulations! Thank you for choosing the Linksys EtherFast
®
Cable/DSL Router.
The Router allows you to set up a home or small business network to share your
high-speed Internet connection.
Why do I need a network? Networks are useful for sharing computer resources
such as printers,files, and CD-ROM drives. Networks are even used for playing mul-
tiplayer video games. So,not only are networks useful in homes and businesses, but
they can also be used for fun.
The most remarkable thing the Router does is to let you share your high-speed cable
or DSL connection to the Internet. The Router connects your LAN (Local Area
Network) to a WAN (Wide Area Network). The Internet is a network that,being glob-
al,covers the widest area of all! All PCs connected to the Router can share this con-
nection.
How is this accomplished?You will be setting up a simple LAN. Your PCs are con-
nected via Ethernet cable from an Ethernet adapter (in or attached to your PC) to one
of the Router’s LAN ports. The term “Ethernet” is used to refer to your network
accessories, such as cables and adapters, because Ethernet refers to the type of
network you are setting up.
Then the Router is connected to your cable or DSL modem. The Router makes it
seem as if each PC is connected directly to the Internet. Several PCs can then use
one Internet connection simultaneously.
Use the Linksys Router Setup Wizard CD-ROM or the instructions in this Fast
Start to help you connect the Router, configure your PCs,and configure the Router.
These instructions will get you up and running quickly using the most basic settings.
Once you have access to the Internet, you can get advanced configuration informa-
tion (for gaming, VPNs, web hosting, etc.) by visiting our website at
support.linksys.com
or by reading the User Guide on the Setup Wizard CD-ROM.
C. If you have the 1-Port Router, proceed to step C1. If you have the 3-Port Router
with USB,proceed to step C2.
C1.With the 1-Port Router, connect a
second Ethernet cable to your
PC’s Ethernet adapter or a port
on your hub or switch. Connect
the other end of the cable to the
LAN port on the back of the
Router.
Note: If your PC’s Ethernet adapter is not set up, please refer to the Ethernet
adapter’s user guide for more information.
If you are using the LAN port to connect to a PC, set the Crossover switch to
straight-through mode ( ll ). If you are connecting the Router to a hub or switch,
refer to the chart when setting the Crossover switch. Then proceed to step D.
C2.With the 3-Port Router with USB,
connect a second Ethernet cable
to your PC’s Ethernet adapter.
Connect the other end of the
cable to one of the LAN ports on
the back of the Router. Repeat
this process for every PC you
wish to connect to the Router.
Note: If your PC’s Ethernet adapter is not set up, please refer to the Ethernet
adapter’s user guide for more information.
Note:For ease of installation, start with LAN Port 3, then Port 2, and finally Port 1.
To use the USB port on the 3-Port Router,refer to the instructions in the User Guide
on the Setup Wizard CD-ROM.
If you are connecting more than four PCs to the Router,you will need to connect
a hub or switch to the Uplink port of the Router (if you use the Uplink port, then
you cannot use Port 1). Please refer to the User Guide located on the Setup
Wizard CD-ROM.
Proceed to step D.
D. Connect the power adapter to the Router. Connect
the power adapter to the electrical outlet. Turn on
the cable or DSL modem. Then turn on the first PC
you wish to use to configure the Router.
Proceed to Step 2: Configure the PCs on the next page.
In Step 1, you will connect the Router to your cable or DSL modem and to the com-
puters in your home or business.
First, make sure that all devices you’ll be working with are powered down, includ-
ing your PCs, modem, and the Router.
A. If you haven’t already done so, connect your cable or DSL modem to its proper
connection—the coaxial jack for cable (Figure A1), or the phone jack for DSL
(Figure A2). (Follow the instructions from your cable or DSL modem’s installation
guide.)
B. Use the Ethernet cable that had been used to con-
nect your cable or DSL modem to your PC. Connect
this Ethernet cable from the LAN or Ethernet port of
the cable or DSL modem to the WAN port of the
Router.
In Step 2,you will configure each of your computers to be able to communicate with
the Router.
To do this, you need to configure your PC’s network settings to obtain an IP (or
TCP/IP) address automatically (called DHCP). Computers use IP addresses to communicate with each other across a network or the Internet.
Find out which operating system your computer is running,such as Windows 95, 98,
Millennium, NT 4.0, 2000, or XP.
You will need to know which operating system your computer is running. You can
find out by clicking the Start button and then going to the Settings option. Then
click Control Panel, and then double-click the System icon. If your Start menu
doesn’t have a Settings option,you’re running Windows XP. Click the Cancel button
when done.
You may need to do this for each computer you are connecting to the Router.
The next few pages tell you, step by step, how to configure your network settings
based on the type of Windows operating system you are using. Once you've configured your computers,continue to Step 3: Configure the Router.
A. Go to the Network screen by clicking the
Startbutton. Click Settings and then Control
Panel. From there,double-click the Network
icon.
B. On the Configuration tab, select the TCP/IP
line for the applicable Ethernet adapter*. If
the word TCP/IP appears by itself,select that
line.** Click the Propertiesbutton.
C. Click the IP Address tab. Select Obtain an IP
address automatically.
D. Now click the Gateway tab to ensure that the
Installed Gateway field is left blank. Click the
OK button.
E. Click the OK button again. Windows may ask
you for the original Windows installation disk
or additional files. Supply them by pointing to
the correct file location, e.g., D:\win98,
D:\win9x, c:\windows\options\cabs, etc. (if
“D” is the letter of your CD-ROM drive).
F. Windows may ask you to restart your PC.
Click the Yes button. If Windows does not ask
you to restart,restart your computer anyway.
*Note:Do not choose a TCP/IP entry whose name mentions DUN, PPPoE, VPN,or
AOL.
**Note: If there is no TCP/IP line listed,refer to the User Guide found on the Setup
Wizard CD-ROM or your Ethernet adapter’s user guide to install TCP/IP now.
A. Go to the Network screen by clicking the Start
button. Click Settings and then Control
Panel. From there,double-click the Network
and Dial-up Connections icon.
B. Select the Local Area Connection icon for
the applicable Ethernet adapter* (usually it is
the first Local Area Connection listed). Doubleclick the Local Area Connection.
C. The Local Area Connection Status screen will
appear. Click the Propertiesbutton.
D. Select Internet Protocol (TCP/IP), and click
the Propertiesbutton.
E. Select Obtain an IP address automatically.
Once the new window appears, click the OK
button. Click the OK button again to complete
the PC configuration.
F. Restart your computer.
*Note: Do not choose a TCP/IP entry whose
name mentions DUN,PPPoE, VPN, or AOL.
The following instructions assume you are running Windows XP with the default interface. If you
are using the Classic interface (where the icons
and menus look like previous Windows versions),
please follow the instructions for Windows 2000.
A. Click to the Network screen by clicking the
Start button and then Control Panel. From
there, click the Network and Internet
Connections icon and then the Network
Connections icon.
B. Select the Local Area Connection icon for
the applicable Ethernet adapter (usually it is
the first Local Area Connection listed).
Double-click the Local Area Connection.
C. The Local Area Connection Status screen will
appear. Click the Propertiesbutton.
D. Select Internet Protocol (TCP/IP), and click
the Propertiesbutton.
E. Select Obtain an IP address automatically.
Once the new window appears, click the OK
button. Click the OK button again (or the
Close button if any settings were changed) to
complete the PC configuration.
F. Restart your computer.
If you are running:
Windows 95, Windows 98, Windows Millennium
If you are running:
Windows 2000
If you are running:
Windows XP
If you are doing a brand new setup,
please use the Fast Start guide to get
you up and running quickly!
Fast Start
Cable/DSL Router
www.linksys.com
Broadband Networking
Cable or DSL
Modem
Cable/DSLRouter
PCwith Ethernet Adapter
Notebookwith Ethernet Adapter
This is What You Will Be Setting Up
B
D
E
E
D
B
B
C
C1
A1 A2
D
WAN
LAN
B
C2
Help
Step 3: Configure the Router
Configure Router
Help
Help
Help
Help
Help
Configure Router
Configure Router
Configure Router
Configure Router
?
• My
WAN Link
LED isn’t lit. What should I check?
- Check that the cable you are using between your cable or DSL modem and
the Router is the same cable that came with your modem. Depending on
the type of connection your modem uses,you may need either a “straightthrough” or “crossover” Ethernet cable (the “straight-through” type is
more common).
• Some of the lights on the front of the Router don’t light up when I plug in a PC.
- Only the
Link/Act
LED is required for a connection to work correctly.
3. I cannot get onto the Internet, nor can I access the Router’s Setup page.
What should I check?
A. First check that the cable or DSL modem and computers are properly connected
to the Router. See Question #2 for how to verify that the connections are good.
B. Then, check that you have properly configured your PCs to communicate with the
Router. Below you will find instructions for the various versions of Windows.
- Windows 95, 98,or ME
• Click the Start menu, and then click Run. After the Run window appears,
enter winipcfg in the Open field, and then click the OK button.
• When the IP Configuration window appears, click the gray box with a black
arrow pointing down.
• A list of adapters will appear. Select the adapter that you use to connect
to the Internet. These items should not contain “PPP”, “VPN”, “AOL”, or
“Dial-Up adapter” as part of the entry.
• The IP Address field should show an IP address of 192.168.1.100 or
192.168.1.xxx, with “xxx” being any number greater than 100.
If your IP address is not in that range,hold the reset button on the front of
the Router for more than 30 seconds. This will cause your Router to be set
to factory default,so you will need to re-configure the Router's Setup page.
After re-configuring the Setup page,restart the computer.
- Windows NT,2000, and XP
• Click the Start menu, and then click Run. After the Run window appears,
enter cmd in the Open field, and then click the OK button.
• This will open a command prompt. Enter ipconfig /all and then press the
Enter key.
• The IP Address field should show an IP address of 192.168.1.100 or
192.168.1.xxx, with “xxx” being any number greater than 100.
If your IP address is not in that range,hold the reset button on the front of
the Router for more than 30 seconds. This will cause your Router to be set
to factory default,so you will need to re-configure the Router's Setup page.
After re-configuring the Setup page,restart the computer.
C. Now you will configure some settings in Windows.
- Go to your desktop and double-click My Computer, and then double-click
Control Panel (Windows XP users using the default interface,click Start, and
then select Control Panel).
- When the Control Panel window pops up,double-click the Internet Options icon
(Windows XP users using the default interface, click Network and Internet
Connections, and then click Internet Options).
- When the Internet Options window appears,click the Connections tab.
- Check Never Dial Up a Connection. (If this choice is grayed out,that is fine.)
- Click the LAN Settings … button in the lower right-hand corner.
- When the Local Area Network (LAN) Settings window appears,uncheck all boxes.
- Click the OKbutton and the Apply button (the Apply button will be grayed out if
you did not have to make any changes). Then click the OKbutton again.
- Exit the Control Panel,and restart your computer.
4. When I click on the icon to access the Internet, and enter the user name
and password that my ISP gave me,I cannot connect to the Internet. What
is wrong?
This means that you’re using the software given to you by your ISP. Please use
Internet Explorer or Netscape Navigator,which is located on your desktop (located
on the Start Menu in Windows XP).
5. When I use Internet Explorer, a box pops up prompting me to dial up a
connection. How can I disable that?
A. Go to your desktop and double-click My Computer, and then double-click
Control Panel (Windows XP users using the default interface,click Start, and
then select Control Panel).
B. When the Control Panel window pops up, double-click the Internet Optionsicon
(Windows XP users using the default interface, click Network and Internet
Connections, and then click Internet Options).
C. When the Internet Options window appears, click the Connections tab.
D. Check Never Dial Up a Connection.
E. Click the Apply button.
F. Click the OK button.
6. When I click the
Apply
button on the setup page of the Router, I get
prompted for my user name and password again. I try to enter
admin
for
the password, but I get a red screen after 3 tries. How do I fix this?
A. Go to your desktop, and double-click the Internet Explorer icon (located on the
Start Menu for Windows XP).
B. When Internet Explorer appears, enter http://192.168.1.1/Passwd.htm in the
Address field,and click Go.
C. The Enter Network Password screen will appear (Windows XP users will see a
Connect to 192.168.1.1 window).
D. Leave the user name field blank. Type admin in the Password field. Then click
the OK button.
E. You should now be at the Password page of the Router’s utility.
F. Select the first field that displays a series of asterisks, *********** (Windows XP
users will see a series of bullets),and delete each *. (Make sure this field is left
blank.)
G. Select the second field that displays a series of asterisks, *********** (Windows
XP users will see a series of bullets), and delete each *. (Make sure this field is
left blank.)
H. Click the Apply button and then the Continue button.
I. Now the Router does not have a password.
You should now be able to click the Apply button on the Setup page. Don’t forget to
add a password later.
7. I tried the suggestions above and still cannot get access to the Internet
from my Router.What can I do?
You can refer to the Troubleshooting appendix of the User Guide on the Setup Wizard CDROM,or you can get additional assistance through one of the resources listed below.
Technical Support 800-326-7114 (toll free from U.S. or Canada)
949-271-5465 (6:00 am to 5:00 pm PST,M-F)
Email Support support@linksys.com
Website http://www.linksys.com or http://support.linksys.com
FTP Site ftp://ftp.linksys.com
Sales Information 800-546-5797 (800-LINKSYS)
4. RAS
RAS is a service used in Singapore
only. If you are using a RAS connec-
tion, check with your ISP for the
necessary setup information.
5. PPTP
PPTP is a service used in Europe
only. If you are using a PPTP con-
nection, check with your ISP for the
necessary setup information.
2. Static IP Address or Specify an IP Address
If your ISP says that you are con-
necting through a static or fixed IP
address from your ISP, perform
these steps:
a. Select Static IP as the WAN
Connection Type.
b. Enter the IP Address.
c. Enter the Subnet Mask.
d. Enter the Gateway Address.
e. Enter the DNS in the 1, 2, and/or
3 fields. You need to enter at
least one DNS address.
f. Click the Apply and Continue buttons to save the settings.
3. PPPoE
If your DSL provider says that you
are connecting through PPPoE or if
you normally enter a user name and
password to access the Internet,
perform these steps:
a. Select PPPoE as the WAN
Connection Type.
b. Enter the User Name.
c. Enter the Password.
d. Click the Apply and Continue
buttons to save the settings.
e. Click the Status tab, and then click the Connect button to start the connection.
C. The Router configuration screen will appear with the Setup tab selected. Based
on the setup instructions from your ISP,you may need to provide the following
information.
Host Name and Domain Name: These fields allow you to provide a host name
and domain name for the Router. These fields are usually left blank. If requested
by your ISP (usually cable ISPs),complete these two fields.
Device IP Address and Subnet Mask: The values for the Router’s IP Address
and Subnet Mask are shown on the Setup screen. The default value is
192.168.1.1 for the IP Address and 255.255.255.0 for the Subnet Mask. Leave
these settings alone.
D. The Router supports five connection types: DHCP (obtain an IP automatically),
PPPoE,Static IP Address, RAS,and PPTP. These types are listed in the drop-down
menu for the WAN Connection Type setting. Each Setup screen and available
features will differ depending on what kind of connection type you select.
Proceed to the instructions for the connection type you are using.
1. DHCP or Obtain an IP Address Automatically
If your ISP says that you are con-
necting through DHCP or a dynamic
IP address from your ISP, perform
these steps:
a. Select Obtain an IP automati-
cally as the WAN Connection
Type.
b. Click the Apply and Continue
buttons to save the setting.
2. I’m having problems connecting to the Internet, what LEDs should be lit on
the front of the 3-Port Router (BEFSRU31 only)?
• Each Router’s LED will light up for
any proper connection made on
the back of the Router—whether
it is an Ethernet cable or power
cord.
For example,the following are typical LEDs that light up once a computer and a
cable or DSL modem are connected:
- When the Router is turned on (the power adapter is plugged into the
Router), the
Power
LED lights up.
- When an Ethernet cable is properly connected between a PC and Port 3 of
the Router,the
Link/Act,Ful/Col
, and
100
LEDs in Column 3 light up.
- A cable or DSL modem connection causes the
WAN Link
LED to light up.
The Help section contains the most frequently asked Internet connection questions.
If you have additional setup needs or you wish to get information on the Advanced
Features, please visit
kb.linksys.com
or see the User Guide, which contains a
Troubleshooting appendix (available on the Setup Wizard CD-ROM).
1. I’m not sure what information I need from my Internet Service Provider
(ISP) to get my network up and running. What questions should I ask?
What type of connection do I have:dynamic IP address, static IP address, or PPPoE?
• If I am using a dynamic IP address, I should ask:
- What is my Host Name (if needed)?
- What is my Domain Name (if needed)?
• If I am using a static IP address, I should ask:
- What is my IP Address?
- What is my Gateway?
- What is my DNS?
• If I am using PPPoE (typically used by DSL ISPs), I should ask:
- What is my User Name?
- What is my Password?
After you obtain the information, follow the instructions in the Fast Start - Step 3:
Configure the Router,and use this information to enter on the Setup tab. In the WAN
Connection Type section,refer to the chart on the next page:
E. If you haven’t already done so, click the Applybutton and then the Continue but-
ton to save your Setup settings. Close the web browser.
F. Reset the power on your cable or DSL modem.
G. Restart your computers so that they can obtain the Router’s new settings.
Note: If you need advanced set-
ting information, please refer to
the Linksys support website at
support.linksys.com
or the User Guide on the Setup Wizard CD-ROM.
Congratulations! You’ve successfully configured the Router. Test the setup by
opening your web browser from any computer and entering
www.linksys.com/registration
.
If you are unable to reach our website,you may want to review what you did in
this section or refer to the Help section in this Fast Start guide.
In Step 3, you will configure the Router to be able to gain access to the Internet
through your Internet Service Provider (ISP).
You will need the setup information pro-
vided by your ISP.
If you do not have this information,please contact your ISP before
proceeding. To find out what questions you should ask your ISP, refer to Question #1
in the Help section.
The instructions from your ISP tell you how to set up your PC for Internet access.
Because you are now using the Router to share Internet access among several com-
puters,you will use the setup information to configure the Router instead of your PC.
Note:You only need to configure the Router once using the first computer you set up.
A. Open your web browser. (It is all
right if you get an error mes-
sage at this point. Continue fol-
lowing these directions.) Enter
http://192.168.1.1 in the web browser’s Address field. Press the Enterkey.
B. An Enter Network Password window, shown in Figure B1, will appear (Windows
XP users will see a Connect to 192.168.1.1 window,shown in Figure B2). Leave
the User Name field empty,and enter admin in lowercase letters in the Password
field (admin is the default password). Then,click the OK button.
FS-BEFSR11_U31-050602A JL
Dynamic IP
Address (DHCP)
1. Select Obtain an IP automatically as the WAN
Connection Type.
2. Click the Applyand Continue buttons to save the setting.
PPPoE
1. Select PPPoEas the WAN Connection Type.
2. Enter the User Name.
3. Enter the Password.
4. Click the Applyand Continue buttons to save the settings.
Static IP Address
1. Select Static IP as the WAN Connection Type.
2. Enter the IP Address.
3. Enter the Subnet Mask.
4. Enter the Gateway Address.
5. Enter the DNS in the 1, 2, and/or 3 fields. You need to
enter at least one DNS address.
6. Click the Applyand Continue buttons to save the settings.
RAS or PPTP
If you are using RAS (Singapore SingTel) or PPTP (ser vice
in Europe), check with your ISP for the necessary setup
information.
More advanced functions and additional details
are available in the User Guide on the Setup
Wizard CD-ROM or at the Linksys website,
www.linksys.com
.
A
D1
D2
D5
G
D4
D3
Perform these steps:
If you have this type
of connection:
B1
B2
 Loading...