

Page 1

User Guide
AC1900
Wi-Fi Range Extender
Model # RE7000
1
Page 2

Contents
Product Overview ................................................................................................... 3
Front view ................................................................................................................................................... 3
Side view ..................................................................................................................................................... 4
How to Install the Range Extender ................................................................... 6
Setting up as a wireless range extender ......................................................................................... 6
Setting up as wired range extender (access point) .................................................................. 11
How to Access the Settings Interface ......................................................... 13
Using Range Extender Settings ..................................................................... 14
Using Wi-Fi Protected Setup™ (WPS) ............................................................ 15
Connecting the range extender to an existing access point or wireless router ............ 15
Connecting devices to your network through the range extender ..................................... 15
How to Use Site Survey ..................................................................................... 17
Troubleshooting ................................................................................................... 18
You cannot get your range extender connected ....................................................................... 18
You cannot access your range extender ...................................................................................... 18
You have intermittent connection problems .............................................................................. 20
Specifications ....................................................................................................... 21
RE7000 ................................................................................................................................................... 21
Environmental ........................................................................................................................................ 21
2
Page 3
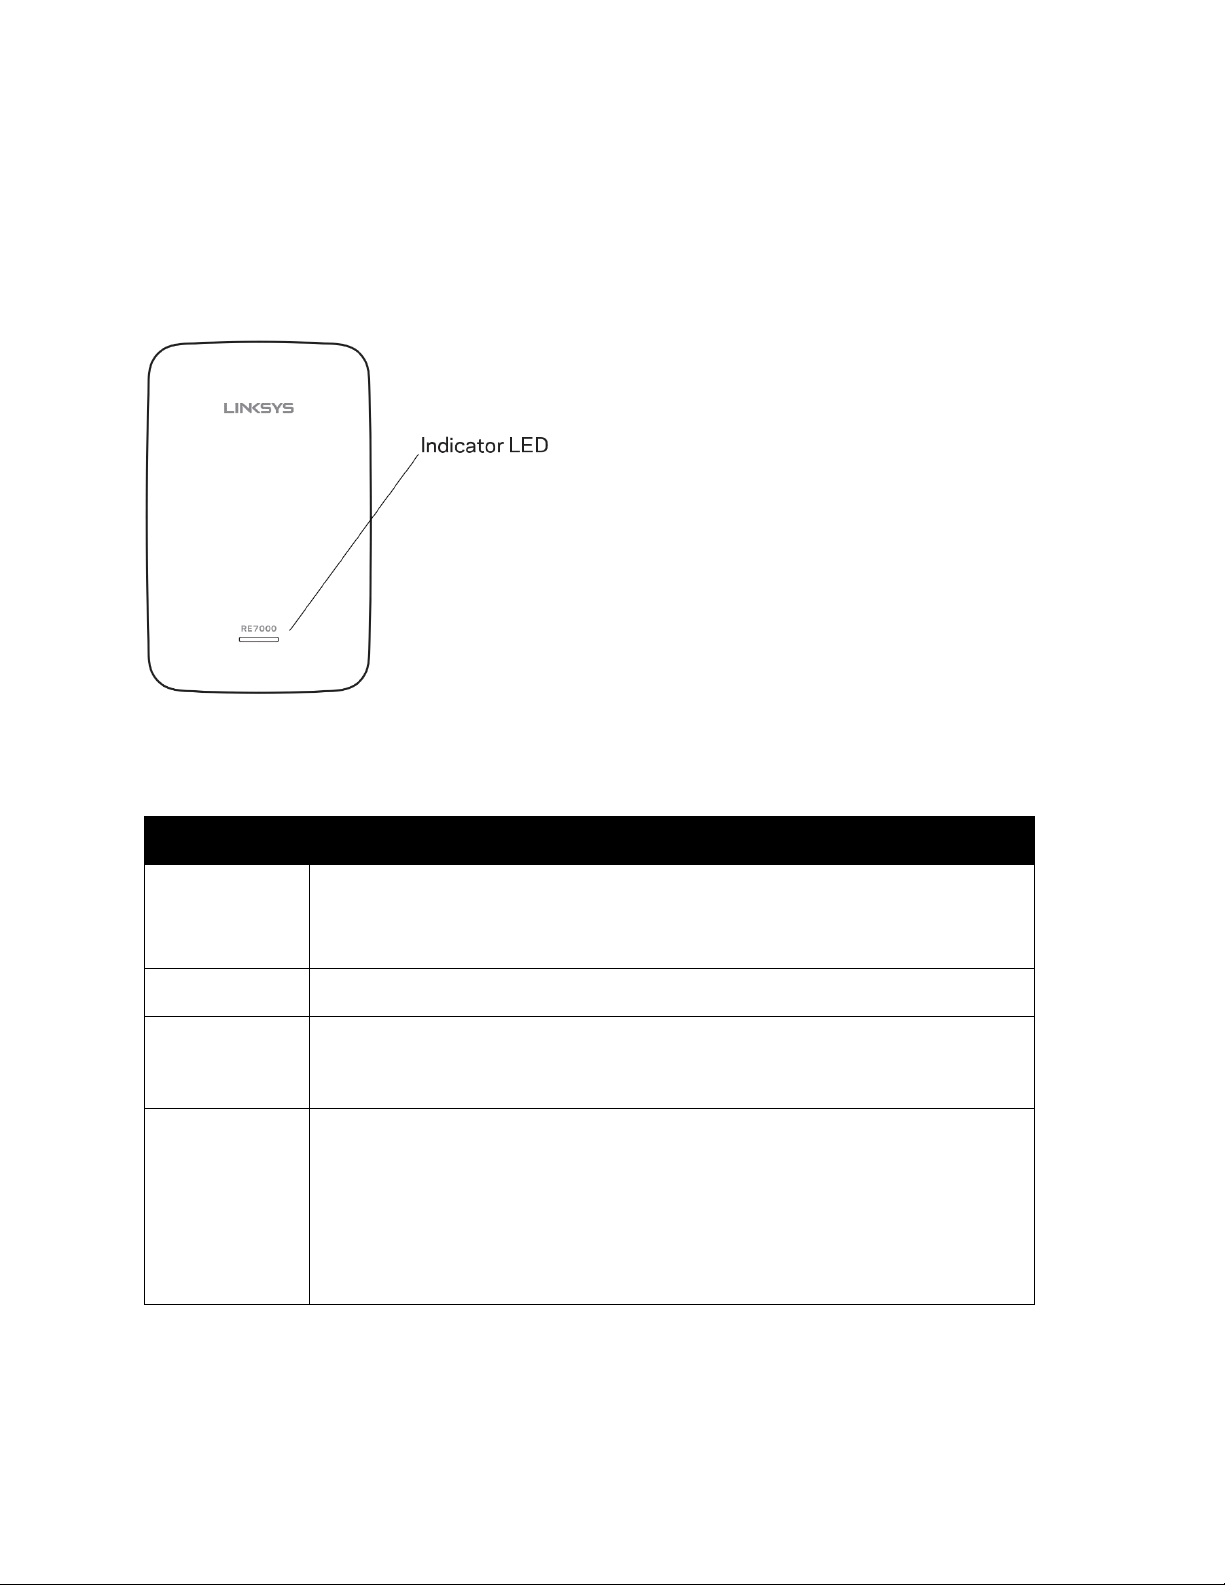
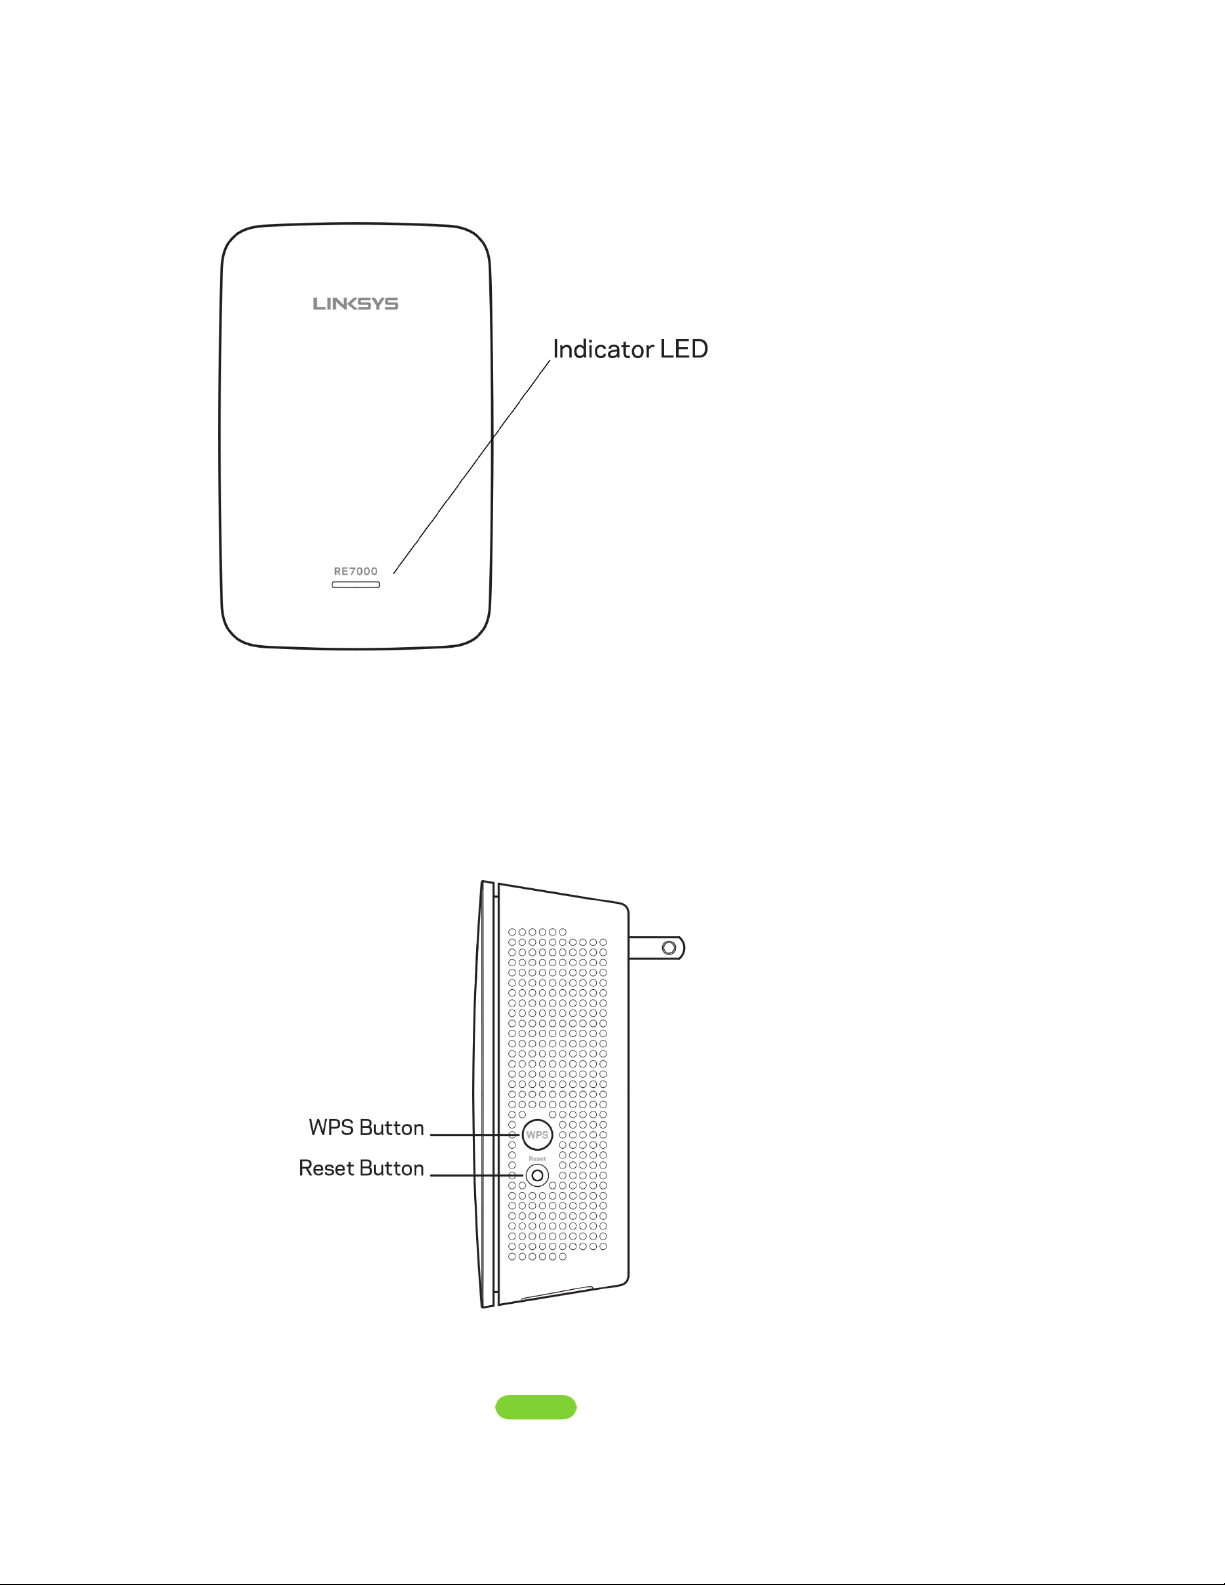
Product Overview
Front view
The indicator LED on the front of the range extender gives you information about power, updating
and signal strength.
Power Light Status/ description
Blinking Green • Starting up.
• Resetting to factory defaults.
• Upgrading firmware.
Solid Green • Ready to use.
Solid Amber • Weak connection with the router.
Fix: Unplug the extender, and move it closer to the router.
Blinking Amber • Not connected to the router or other error.
Fix:
Make sure your router has an Internet connection and Wi-Fi is turned on.
1.
2.
If the router is in order, unplug the extender, move it closer to the router, plug it
back in, wait one minute, reconnect to your network.
3
Page 4
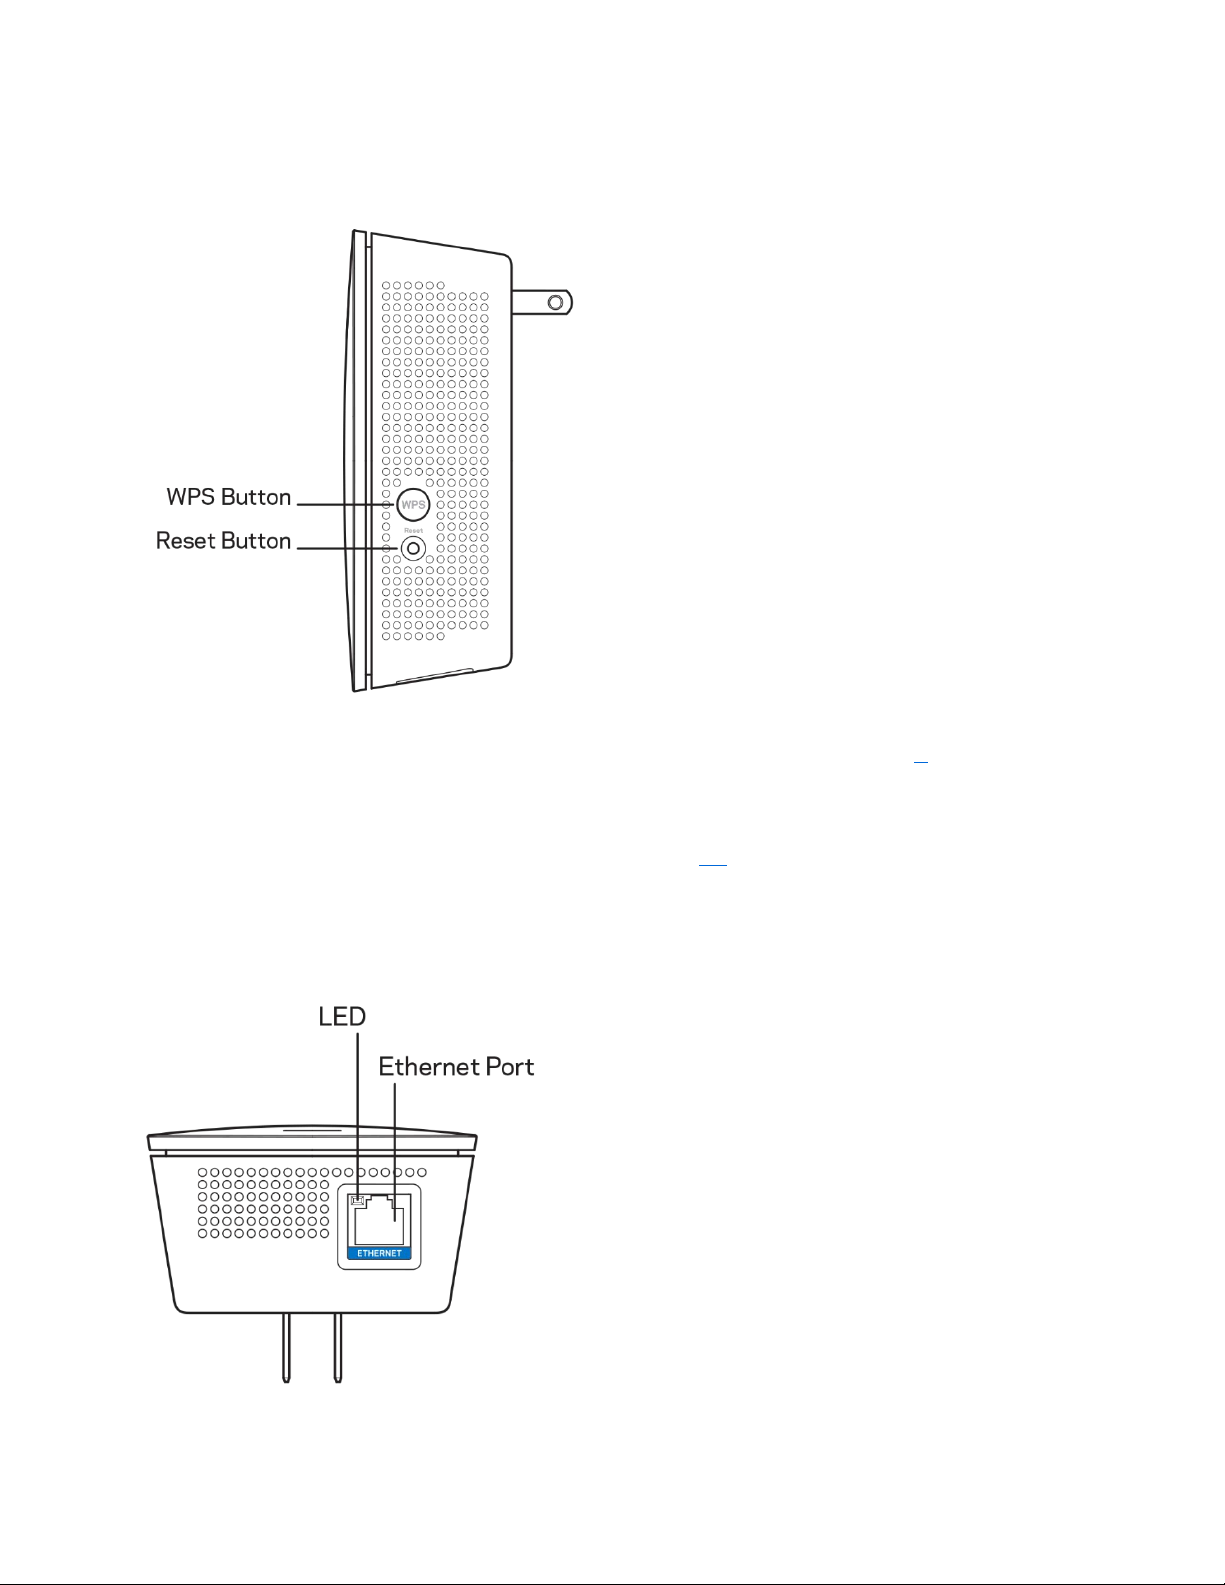
Side view
WPS™ Button—Use Wi-Fi Protected Setup to automatically and securely add compatible wireless
devices to your network with Push Button Connect. Refer to Using WPS on page 6
Reset Button—Press and hold until the power light on the front of the range extender blinks to
reset to factory defaults. You can also restore the defaults from the Administration > Factory
Defaults screen in the extender’s settings interface (page 14
).
.
Bottom view
LED—The LED confirms an Ethernet connection to the main router.
4
Page 5

Ethernet Port (blue)—Connect wired devices to your wireless network with Ethernet (network)
cables. The green light turns on when an Ethernet device is connected and active on this port. The
light blinks when the extender is sending or receiving data over the Ethernet port.
5
Page 6

How to Install the Range Extender
There are two ways to use your Linksys extender: as a wireless range extender or as a wired
range extender (access point). Wireless range extenders repeat existing Wi-Fi signals. Wired
range extenders (access points) create new Wi-Fi hotspots when connected to a router or access
point with an Ethernet cable. Both scenarios require a router with a working Internet connection.
Before starting setup, decide whether you want to use your RE7000 as a wireless range extender
or as a wired range extender (access point). Instructions for both setups are in this user guide.
Setting up as a wireless range extender
Wi-Fi Protected Setup (WPS)
Does your router have a WPS button?
WPS is a simple way to connect Wi-Fi devices with Push Button Connect. Routers that support
WPS have a button that might look like one of these symbols:
If your router has a WPS button, continue with WPS below.
If not, or if you are not sure, continue with browser-based setup on page 9
Note—The WPS button will not work if you have disabled WPS on your router, or if you have
chosen WEP as your network security type. In either case, continue with browser-based setup on
page 9
.
1. Plug the range extender into an electrical outlet close to your router. You can move the
range extender to an ideal location later
the indicator LED on the front will blink green for up to a minute.
in step 5. After the range extender is plugged in,
.
6
Page 7
2. Wait for the indicator LED on the front of your range extender to blink amber before
going to step 3. This can take up to a minute.
3. Extend your 2.4 GHz network.
a. Press the WPS button on your router.
3b.
b.
Press the WPS button on the side of your range extender. The WPS button will
Within the next two minutes complete step
light up and the indicator LED on the front of your range extender will blink
green.
Watch the indicator LED on the front of your range extender to verify whether the
connection was successful.
If it turns solid green , the connection was successful. Move to step 4.
7
Page 8

If it blinks amber , the connection failed. You may try again by
repeating step 3 or try browser-based setup on page 9
4. Extend your 5 GHz network.
You may skip this step if your router does not have a 5 GHz network or if you don't want to
extend that network.
a. Press the WPS button on the side of your router again. Within the next two minutes
complete step 4b.
b. Press the WPS button on your range extender again.
The WPS button will light up and the indicator LED on the front of your range
extender will start to blink green.
Watch the indicator LED on the front of your range extender to verify whether the
connection was successful.
If it turns solid green , the connection was successful.
If it starts to blink amber before it turns solid green, the connection
failed. You may try again by repeating step 4.
5. Move your range extender to an ideal spot.
Unplug your range extender and plug it back in midway between your router and the area
without Wi-Fi. Using your mobile device or laptop, be sure you have at least two bars
(around 50%) of your router’s Wi-Fi signal at that location. If you don’t have two bars,
move the range extender closer to the router.
.
6. Check indicator LED for connection quality.
It can take up to a minute for the ranger extender to boot up after moving it. During this
period you will see the blinking green LED once again.
o
Solid green Ready to use.
8
Page 9
o
Solid amber Weak connection to the router. Find an outlet closer to
your router.
o
Blinking amber Not connected to the router. Find an outlet closer to
you router.
7. Connect your Wi-Fi devices to the extended network you just created.
Select the ex t ended network on your de v i ce's Wi-Fi mana ger . Extend ed network s ar e
identified by "_Ext" added to the end of your main network name(s).
same as those for your main networks.
Your range extender is now set up. Enjoy your extended Wi-Fi coverage.
Browser-based setup
Passwords are the
Use this setup method if you don’t have a WPS button on your router, or if you don’t
want to use WPS to set up your RE7000.
1. Plug in the range extender
Plug in the range extender midway between your router and the area without Wi-Fi. Using
your mobile device or laptop, be sure you have at least two bars (around 50%) of your
router’s Wi-Fi signal at that location. If you don’t have two bars, move the range extender
closer to the router. You can move the range extender to an ideal location later using the
setup software.
9
Page 10

2. Wait for the indicator LED on the front of your range extender to blink amber.
This can take up to a minute
3. Connect to range extender setup network.
On a computer, phone or tablet, connect to the Wi-Fi network: Linksys Extender Setup XXX. (XXX are the last three digits of your range extender’s MAC address.)
10
Page 11

4. Launch setup.
Enter
http://extender.linksys.com (or try http://192.168.1.1) in a browser to complete
setup. Follow the on-screen instructions to select your network to extend, customize your
extended network name and password and find the best spot using Spot Finder
Technology.
5. Connect your Wi-Fi devices to the extended network you just created.
Select the extended network on your device's Wi-Fi manager. Extended networks are
identified by "_Ext" added to the end of your main network name(s).
Setting up as wired range extender (access point)
Browser-based setup
1. Prepare for setup
Be sure your router has a working Internet connection and you have an Ethernet cable
long enough to connect the router to the range extender.
2. Plug the Linksys extender into a wall outlet.
3. Wait for the blinking indicator LED to change from green to amber.
4. Use an Ethernet cable to connect the range extender to the LAN port of your router.
5. Connect to the Linksys Extender Setup network.
On a computer, phone, or tablet, connect to the Wi-Fi network Linksys Extender Setup –
XXX, where XXX are the last 3 digits of your range extender’s MAC address.
6. Launch setup.
11
Page 12

Enter http://extender.linksys.com (or try http://192.168.1.1) in a browser to complete
setup. Be sure to choose “As a wired range extender (access point)” when asked how you
want to use your range extender. Follow the on-screen instructions to create a network
name and password for your access point.
7. Connect your Wi-Fi devices to the extended network you just created.
Select the extended network on your device's Wi-Fi manager. Extended networks are
identified by "_Ext" added to the end of your main network name(s).
12
Page 13

How to Access the Settings Interface
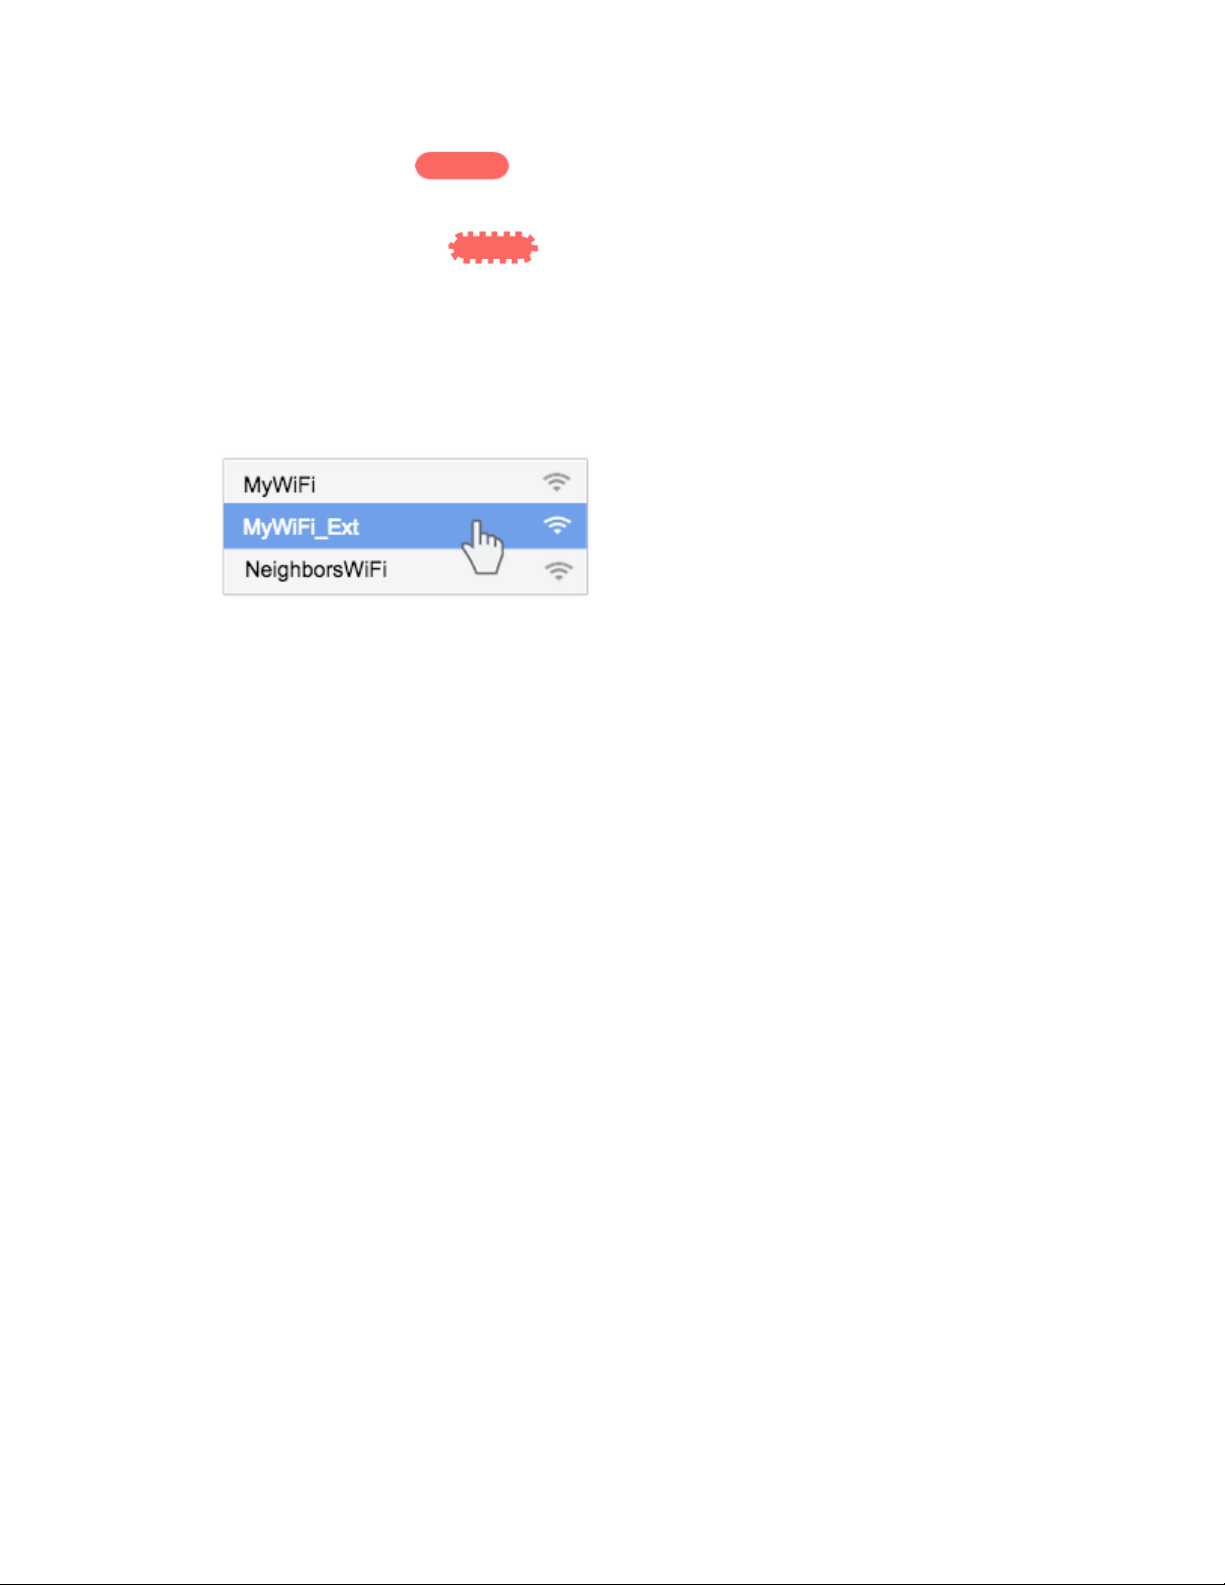
To change or view range extender settings, first connect to an extended network, e.g.,
MyWiFi_Ext. In a browser, go to http://extender.linksys.com and enter admin password.
Note—Your range extender's default admin password is "admin". It is highly recommended that
you change this after WPS setup.
If you have not changed the range extender’s default name, you can also access the settings
interface when connected to your main router.
Enter into a browser http://RE70000-XXX (Windows) or http://RE7000-XXX.local
or iOS).
Note—XXX are the last 3 digits of your range extender’s MAC address. You can find the MAC
address on the back of your RE7000. (You might have to unplug your range extender to see the
MAC address label. Plug it back in and make sure the LED light is solid green before accessing
the URL.)
If you changed your range extender’s name, you can access the settings interface by entering the
new name in a browser. For example: if you named your extender MyExtender, enter
http://MyExtender (Windows) or http://MyExtender.local
You can also enter your range extender’s IP address in a browser. Find the IP address on your
router’s administrative interface.
(Mac OS X or iOS).
or (Mac OS X
13
Page 14

Using Range Extender Settings
Click Help on the right side of the screen for additional information on the screen’s options.
Changes to settings will not be effective until you click Save at the bottom of the screen. You also
can click Cancel to clear any changes.
14
Page 15

Using WPS
WPS makes it easy to connect your extender to your network, and connect other devices to your
network through the extender.
Connecting the range extender to an existing access point
or wireless router (see p. 6)
Connecting devices to your network through the range
extender
Repeat the instructions for each client device that supports WPS.
1. Connecting with the WPS Button
a. Press the WPS button on the client device.
b. Click the WPS button on the extender’s WPS screen, OR press and hold the WPS
button on the side of the extender for one second. When the connection is complete,
the indicator LED on the front of the range extender will be solid green for 10 seconds.
If the indicator LED blinks amber for 10 seconds, the connection failed. Go back to
previous step and try again.
c. If using the extender’s WPS screen, be sure to click OK within two minutes or you will
have to start over.
15
Page 16

2. Connecting with the client device’s PIN
a) Enter the PIN from the client device in the field on the extender’s WPS
screen.
b) Click Register on the extender’s WPS screen. When the connection is
complete, the indicator LED on the front of the range extender will be solid
green for 10 seconds.
c) Click OK on the extender’s WPS screen within two minutes or you will have to
start over.
3. Connecting with the extender’s PIN
a) On the client device, enter the PIN listed on the extender’s WPS screen. (It is
also listed on the product label on the back of the extender.)
b) Click OK on the client device’s WPS screen within two minutes.
16
Page 17

How to Use Site Survey
Site Survey gives a snapshot of all access points and wireless routers within range of the
extender.
Log in to the settings interface (see “How to Access the Settings Interface” on page 13).
Click the
Wireless
tab. Click the
Site Survey
page.
• Select—Click the button next to the wireless network name (SSID) in the
column, and click Connect. For dual-band networks, be sure to connect to both
bands, 2.4 GHz and 5 GHz.
• SSID—The names of neighboring wireless networks.
• GHz—The radio band (in GHz) of the neighboring wireless networks
• Signal Strength—The power of the wireless signal received: dot only = 25%, dot
+ one wave = 50%, dot + two waves = 75%, dot + three waves = 100%. If no
waves are displayed, your extender is too far from the upstream access point or
the signal is blocked. Try to keep the signal strength between 50% and 100%
for optimum performance.
• Security—The mode of security in use by the neighboring wireless networks If a
network supports Wi-Fi Protected Setup, the Wi-Fi Protected Setup icon is also
displayed.
Select
Cross-Band
Cross-Band is the simultaneous use of both bands for high-speed data transfer and uninterrupted
streaming and gaming. When in Auto Cross-Band (default), the range extender selects the
appropriate band (2.4 GHz or 5 GHz) when sending data from wireless clients to the Wi-Fi router.
17
Page 18

Troubleshooting
Your range extender works on 2.4GHz and 5 GHz networks.
You cannot get your range extender connected
Check the position of your router and extender.
• For first-time setup, you may need to place the extender closer to the router. After you’ve
set up your extender, you can unplug it and move it to the final location.
• To reduce signal obstructions, try alternate locations for the router and extender.
• Avoid placing the router and extender near metal objects, masonry walls, and
reflective surfaces such as glass or mirrors.
• Avoid placing the router and extender near other electronics that may cause
signal interference.
If you’re using Wi-Fi Protected Setup to connect, wait until the WPS button LED turns from solid
amber to off before trying to make the connection again.
You cannot access your range extender
To access your range extender, you must be connected to your extended network. If you currently
have wireless Internet access, the problem may be that you have accidentally connected to a
different wireless network.
To fix the problem on Windows computers*:
1. On your Windows desktop, click on the wireless icon in the system tray. A list of available
networks will appear.
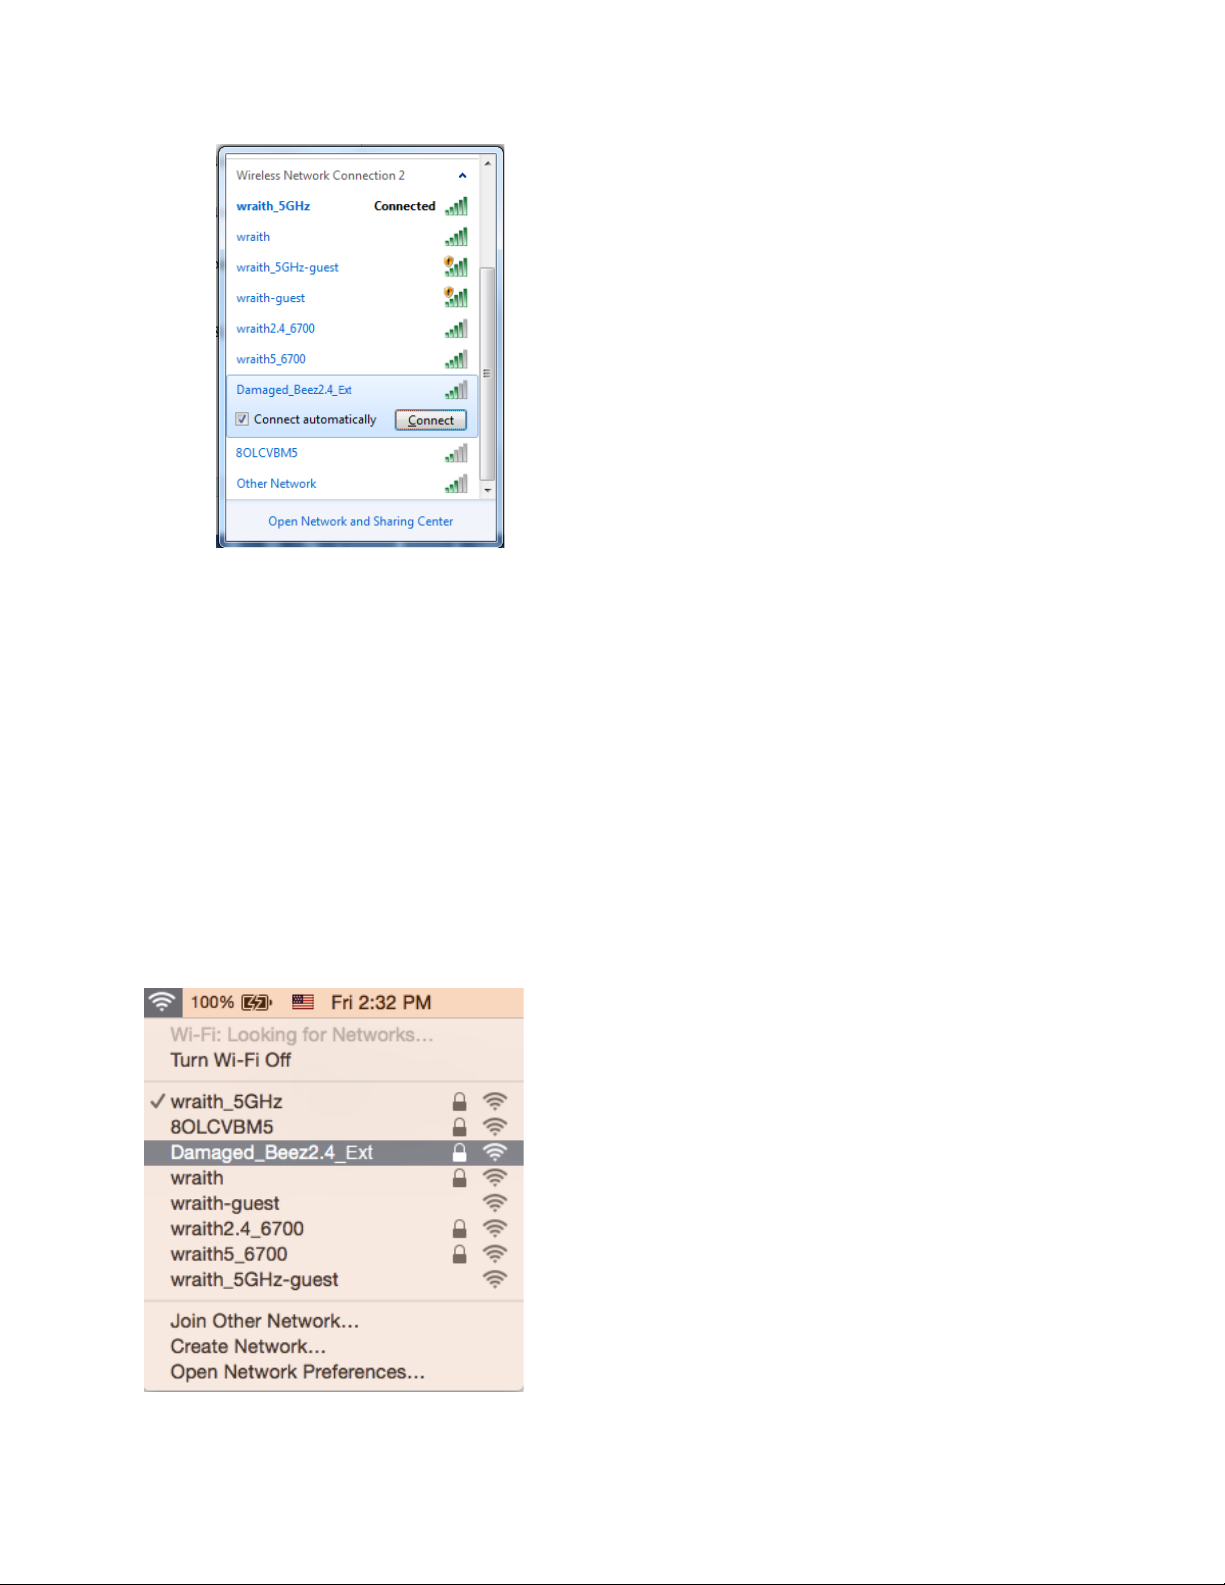
2. Click your extended network name. Click Connect. In the example below, the computer was
connected to another wireless network named wraith_5GHz. Your extended network name,
Damaged_Beez2.4_Ext in this example, is shown selected.
18
Page 19
3. If you are prompted to enter a network security key, type your password (security key) into
the network security key field. Click OK.
4. Your computer will connect to the extended network, and you should be able to access the
range extender’s settings interface.
*Depending on your version of Windows, there could be some differences in wording or icons in
these steps.
To fix the problem on Mac computers, do the following:
1. In the menu bar across the top of the screen, click the Wi-Fi icon. A list of wireless networks
will appear.
2. In the example below, the computer was connected to another wireless network named
wraith_5GHz. Your extended network name, Damaged_Beez2.4_Ext in this example, is
shown selected.
19
Page 20

3. Click the extended network name of your range extender (Damaged_Beez2.4_Ext in the
example).
4. Type your wireless network password (Security Key) into the Password field. Click OK
You have intermittent connection problems
Plug in the range extender midway between your router and the area without Wi-Fi. Be sure you
have at least 50% of your router’s Wi-Fi signal at that point on the device you used for setup. If
you have two bars or lower, move closer to your router.
20
Page 21

Page 22

Visit linksys.com/support/RE7000 for award-winning 24/7 technical support.
BELKIN, LINKSYS and many product names and logos are trademarks of the Belkin group of
companies. Third-party trademarks mentioned are the property of their respective owners.
Licenses and notices for third party software used in this product may be viewed here:
http://support.linksys.com/en-us/license. Please contact http://support.linksys.com/enus/gplcodecenter for questions or GPL source code requests.
© 2016 Belkin International, Inc. and/or its affiliates. All rights reserved.
LNKPG-00286 A00
22
Page 23

FCC Statement
This equipment has been tested and found to comply with the limits for a Class B digital device, pursuant
to part 15 of the FCC Rules. These limits are designed to provide reasonable protection against harmful
interference in a residential installation. This equipment generates, uses and can radiate radio frequency
energy and, if not installed and used in accordance with the instructions, may cause harmful interference
to radio communications. However, there is no guarantee that interference will not occur in a particular
installation. If this equipment does cause harmful interference to radio or television reception, which can
be determined by turning the equipment off and on, the user is encouraged to try to correct the
interference by one or more of the following measures:
—Reorient or relocate the receiving antenna.
—Increase the separation between the equipment and receiver.
—Connect the equipment into an outlet on a circuit different from that to which the receiver is connected.
—Consult the dealer or an experienced radio/TV technician for help.
FCC Radiation Exposure Statement
This device complies with FCC radiation exposure limits set forth for an uncontrolled environment and it
also complies with Part 15 of the FCC RF Rules. This equipment must be installed and operated in
accordance with provided instructions and the antenna(s) used for this transmitter must be installed to
provide a separation distance of at least 20 cm from all persons and must not be co-located or operating
in conjunction with any other antenna or transmitter. End-users and installers must be provide with
antenna installation instructions and consider removing the no-collocation statement.
This device complies with Part 15 of the FCC Rules. Operation is subject to the following two conditions:
(1) this device may not cause harmful interference, and (2) this device must accept any interference
received, including interference that may cause undesired operation.
Caution!
Any changes or modifications not expressly approved by the party responsible for compliance could void
the user's authority to operate the equipment.
Canada Stat ement
This device c omplies with In dustry Canada's licence-exempt R SSs. Operatio n is subject to the f ollowing
two conditi ons:
(1) This dev ice may not cause interference; and
(2) This dev ice must accept any interference, in cluding inter ference that ma y cause undesired ope ration
of the device .
Le présent ap pareil est conf orme aux CNR d'Industrie Canada appl icables aux app areils radio exempt s
de licence. L 'exploitati on est autorisée aux deux conditions s uivantes :
(1) l'appar eil ne doit pas pro duire de brouillage ;
(2) l'utili sateur de l'app areil doit accepter tout brouillag e radioélectr ique subi, même si le brouillage est
susceptib le d'en comprom ettre le fonctionnement.
The device me ets the exempti on from the routi ne evaluation limit s in section 2.5 of R SS 102 and
complianc e with RSS-102 RF e xposure, users can obtain Canadian i nformation on R F exposure and
complianc e.
Le disposit if rencontre l' exemption des limites courantes d' évaluation da ns la section 2.5 de RSS 102 et
la conformi té à l'expositi on de RSS-102 rf, utilisateurs peut ob tenir l'infor mation canadi enne sur
l'exposit ion et la conform ité de rf.
This transm itter must not be c o-located or op erating in conjunct ion with any othe r antenna or tran smitter.
This equipm ent should be ins talled and operated w ith a minimum dis tance of 20 centi meters between the
radiator an d your body.
Cet émetteu r ne doit pas être Co -placé ou ne fonctionnant en même temp s qu'aucune aut re antenne ou
émetteur. Ce t équipement de vrait être installé et actionné avec u ne distance min imum de 20 centimètres
entre le radi ateur et votre co rps.
the device fo r operation in th e band 5150-5250 MHz is only for indoor us e to reduce the pot ential for
harmful int erference to co -channel mobile satellite system s
les disposi tifs fonction nant dans la bande 5150 -5250 MHz sont ré servés unique ment pour une utilisation
à l'intérie ur afin de réduir e les risques de brouil lage préjudic iable aux systè mes de satellites mob iles
utilisant l es mêmes canaux ;
 Loading...