

Page 1

SMART Wi-Fi Router AC1750, EA6500 v2
User Guide
Page 2

Linksys EA-Series
Contents
Contents
Product Overview
EA6500 v2 . . . . . . . . . . . . . . . . . . . . . . . . . . . . . . . . . . .1
Wall-mounting placement 4
Setting Up: Basics
How to create a home network. . . . . . . . . . . . . . . . . . . . . .5
What is a network? 5
How to set up a home network 5
Where to nd more help . . . . . . . . . . . . . . . . . . . . . . . . . .5
How to install your router
How to congure your router
How to connect to Linksys Smart Wi-Fi 7
How to connect directly to your router 8
How to improve your wireless connection speed 8
How to change your network’s name and password 9
How to change your router’s local access password 9
How to change your router’s time zone 10
How to test your Internet connection speed . . . . . . . . . . . . 10
How to connect devices to your network
How to connect a computer to your network 11
How to connect a USB printer 11
How to connect other devices 12
How to view device details 13
How to set up parental controls . . . . . . . . . . . . . . . . . . . . 14
How to set parental controls 14
How to congure your guest network . . . . . . . . . . . . . . . .15
How to back up your router conguration
How to customize Linksys Smart Wi-Fi
Using widgets 17
Customizing the Device List 17
. . . . . . . . . . . . . . . . . . . . . . . . .6
. . . . . . . . . . . . . . . . . . . . . . .7
. . . . . . . . . . . . . . 11
. . . . . . . . . . . . . 16
. . . . . . . . . . . . . . . . 17
Using an External Drive
Overview. . . . . . . . . . . . . . . . . . . . . . . . . . . . . . . . . . .18
How to attach a USB drive
How to use secured folder access
How to set up authorized users and shared folders 19
How to access shared folders 20
How to set up your router as a media server . . . . . . . . . . . . 21
How to connect your UPnP device to the media server 22
How to remotely access storage . . . . . . . . . . . . . . . . . . . .22
. . . . . . . . . . . . . . . . . . . . . . . .18
. . . . . . . . . . . . . . . . . . .19
Setting Up: Advanced
How to manually set up your router. . . . . . . . . . . . . . . . . .24
How to manually set up your Internet connection 24
How to associate a router with your Linksys Smart Wi-Fi account 25
How to get the most out of your dual-band router
How to control access to your network
How to improve security using the built-in rewall 29
How to set up the DHCP server on your router. . . . . . . . . . .30
How to set up DHCP reservation 31
How to access your network on the Internet . . . . . . . . . . . . 32
How to clone a MAC address
How to connect to your corporate oce using a VPN
How to optimize your router for gaming and voice
How to enable Voice over IP on your network
How to congure UPnP
How to use a router as an access point
How to put your new router behind an existing router
. . . . . . . . . . . . . . . . . . . . . .33
. . . . . . . . . . . . . . . . . . . . . . . . . 36
. . . . . . . . . . . . . . . .27
. . . . . . . . . . . . . . . .37
. . . . . . . .26
. . . . . . 33
. . . . . . . .34
. . . . . . . . . . . 35
. . . . . .38
i
i
Page 3

Linksys EA-Series
Contents
To add your router to an existing router or gateway 38
To share an Internet connection 39
To extend your network 41
How to expose a device to the Internet . . . . . . . . . . . . . . .41
Port Forwarding and Port Triggering
How to set up port forwarding . . . . . . . . . . . . . . . . . . . . .43
How to set up port forwarding for a single port 43
How to set up port forwarding for multiple ports 44
How to set up port forwarding for a range of ports 44
How to set up port range triggering for online gaming . . . . . 45
Maintaining and Monitoring
How to back up and restore your router conguration. . . . . .47
How to upgrade the router’s rmware
How to restore factory defaults
How to check the status of your router
How to disable the Ethernet port status lights 50
How to test your Internet connection 50
How to congure and use logs 51
. . . . . . . . . . . . . . . . 48
. . . . . . . . . . . . . . . . . . . . 48
. . . . . . . . . . . . . . . .49
Specications
Linksys EA6500 v2 . . . . . . . . . . . . . . . . . . . . . . . . . . . . .57
Troubleshooting
Your router was not successfully set up . . . . . . . . . . . . . . . 52
Windows XP Service Pack update
Your Internet cable is not plugged in message
Cannot access your router message
After setup
The Internet appears to be unavailable 55
Linksys Smart Wi-Fi does not open in your web browser 55
You cannot access Linksys Smart Wi-Fi 56
All other troubleshooting has been unsuccessful 56
. . . . . . . . . . . . . . . . . . . . . . . . . . . . . . . . . .55
. . . . . . . . . . . . . . . . . . .52
. . . . . . . . . . . . 53
. . . . . . . . . . . . . . . . . . 53
ii
Page 4

Linksys EA-Series
Product Overview
Product Overview
EA6500 v2
Features
Wireless-AC technology
Built with leading 802.11ac wireless technology, your router offers maximum
speed and range to create an ultra-powerful network designed for home
theater performance. Connect your computers, Internet-ready TVs, game
consoles, smartphones and other Wi-Fi devices at blazingly fast transfer rates
for an unrivaled experience.
The power of dual band
Double your network bandwidth with simultaneous dual-band wireless-AC. The
dual-band feature is designed to avoid interference and optimize throughput
for smoother and faster HD video streaming, file transfers, and wireless gaming.
SpeedBoost
Higher quality antenna technology helps maintain high speeds across greater
distances throughout your home.
Advanced security
Keep Wi-Fi freeloaders and Internet threats at bay with WPA2 encryption and
SPI firewall to help keep your network protected.
Benefits of gigabit
Package contents
In addition to your router, your router package includes:
• Network (Ethernet) cable
• AC power adapter
• SimpleTap™ card
Use the four Gigabit Ethernet (10/100/1000) ports for quick file sharing (up to
10× faster than standard Ethernet) between other Gigabit-enabled devices like
computers and servers.
Built-in USB ports and DLNA media server
The USB ports let you add an external USB drive to your network and share
files at home or over the Internet. It also features a built-in DLNA media server
for seamless streaming of your video and media files to an Xbox 360, PS3, or
other DLNA-compatible device. You can also connect a USB printer and share
it across your network.
1
1
Page 5

Linksys EA-Series
Product Overview
Home theater ready
Bring the ultimate entertainment experience to your home by connecting
computers, Internet-ready TVs, game consoles, media players, and more to
your wireless network and the Internet. Simultaneous dual-band N and QoS
traffic prioritization technology delivers maximum speed and performance so
you can enjoy fast downloads, smooth video and music streaming, and reliable
gaming and VoIP.
Quick to install
Linksys Smart Wi-Fi software helps you easily set up your router.
IPv6 enabled
Supports the latest Internet protocol technology to future-proof your network.
Easy to manage
Linksys Smart Wi-Fi software helps you customize your settings and quickly
add multiple devices to your network:
Separate guest network
Create a separate, password-protected network for guests.
Parental controls
Limit access time and websites with parental controls.
Top view
Indicator light
• Indicator light—Stays on steadily while power is connected and
following a successful Wi-Fi Protected Setup connection. Pulses slowly
during bootup, during firmware upgrades, and during a Wi-Fi Protected
Setup connection. Flashes quickly when there is a Wi-Fi Protected Setup
error.
2
Page 6

Linksys EA-Series
Product Overview
Back view
Wi-Fi Protected Setup button
USB ports
Ethernet ports
• Wi-Fi Protected Setup™ button—Press this button to easily configure
wireless security on Wi-Fi Protected Setup-enabled network devices.
• Ethernet ports—Connect Ethernet cables (also called network cables)
to these Gigabit (10/100/1000) ports, color coded blue, and to wired
Ethernet network devices on your network.
NOTE
For best performance, use CAT5E or higher rated cables on the
Ethernet ports.
• Internet port—Connect an Ethernet cable (also called a network or
Internet cable) to this port, color coded yellow, and to your modem.
Internet port
Reset button
Power port
Port activity indicators
Yellow network
activity indicator
Network or Internet port
• Green connectivity indicator—On Ethernet ports, turns on when a
cable connects the port to another Gigabit Ethernet port. On the Internet
port, turns on while connected to a modem.
• Yellow network activity indicator—Flashes to indicate network activity
over that port.
Green connectivity
indicator
• USB ports—To easily share disk storage with other users on your network
or on the Internet, connect a USB drive to one of these ports. You can also
connect a USB printer and share it across your network.
• Reset button—Press and hold this button for 10 seconds (until the port
lights flash at the same time) to reset the router to its factory defaults.
You can also restore the defaults using Linksys Smart Wi-Fi.
• Power port—Connect the included AC power adapter to this port.
CAUTION
Use only the adapter that came with your router.
3
Page 7
Linksys EA-Series
82 mm
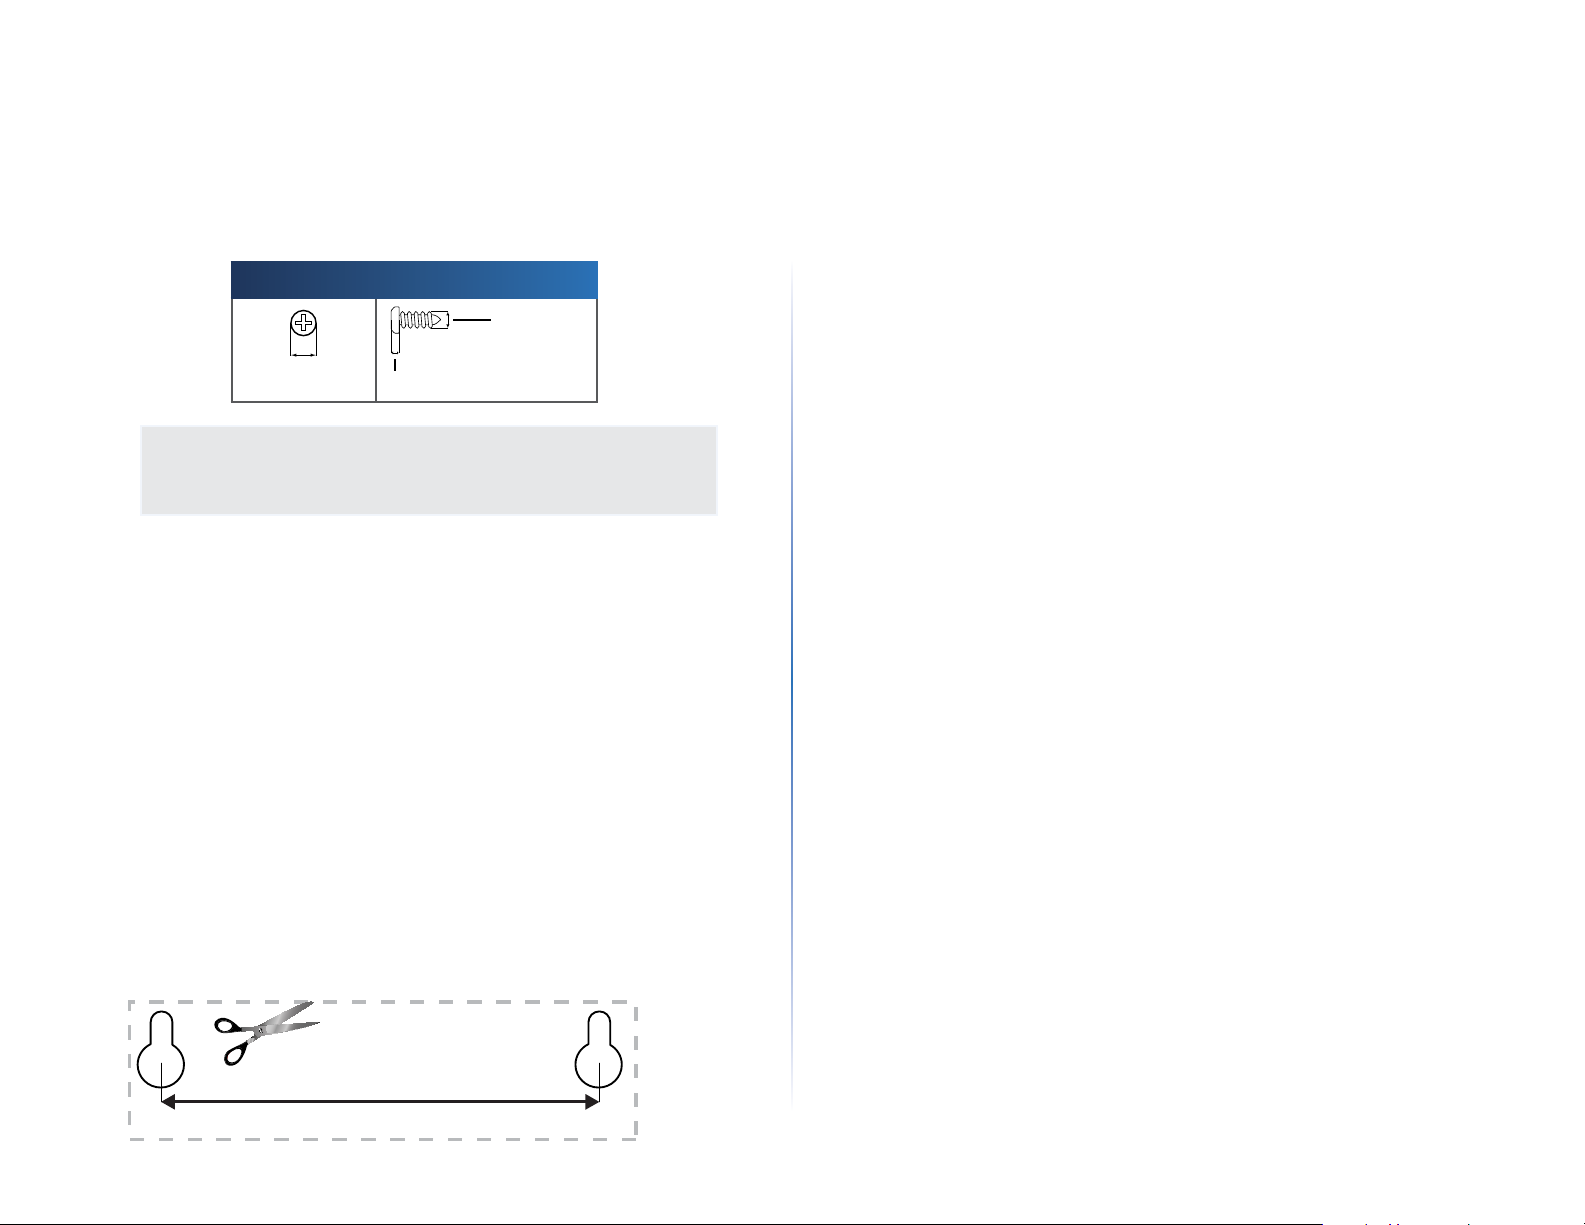
Wall-mounting placement
The router has two wall-mount slots on its bottom panel. The distance between
the slots is 82 mm. Two screws are needed to mount the router.
Suggested Mounting Hardware
3-5 mm
7-8 mm 1.5-2 mm
NOTE
Linksys is not responsible for damages incurred by unsecured wallmounting hardware.
Follow these instructions:
1. Determine where you want to mount the router. Make sure that the wall
you use is smooth, flat, dry, and sturdy. Also make sure the location is
within reach of an electrical outlet.
2. Drill two holes into the wall. Make sure the holes are 82 mm apart.
3. Insert a screw into each hole and leave 3 mm of its head exposed.
4. Position the router so the wall-mount slots line up with the two screws.
5. Place the wall-mount slots over the screws and slide the router down
until the screws fit snugly into the wall-mount slots.
Product Overview
Wall-mounting template
Print this page at 100% size.
Cut along the dotted line, and place on the wall to drill precise spacing.
4
Page 8

Linksys EA-Series
Setting Up: Basics
How to create a home network
What is a network?
A network is any group of devices that can communicate with each other. A
home network can also include Internet access, which requires a router like
this one.
A typical home network may include multiple computers, a printer, a modem,
and a router. A large home network may also have a switch, additional routers,
access points, and many Internet-capable media devices such as TVs, game
consoles, and web cameras.
• Modem—Connects a computer or a router to your ISP (Internet Service
Provider). Your ISP may have provided one. The modem is a device that
connects to a phone jack or your cable TV outlet.
Setting Up: Basics
2.
Make sure that your modem is working. Your ISP can help you set up your
modem and verify that it’s working correctly.
3.
Set up your router. See “How to install your router” on page 6.
4.
To connect a computer or other network device to the network, see
“How to connect a computer to your network” on page 11 and “How to
connect other devices” on page 12.
Where to find more help
In addition to this User Guide, you can find help at these locations:
• Linksys.com/support (documentation, downloads, FAQs, technical
support, live chat, forums)
• Linksys Smart Wi-Fi help (connect to Linksys Smart Wi-Fi, then click
Help at the top of the screen)
• Router—Connects your wireless and wired network devices to each
other and to the modem (and to your ISP).
• Switch—Allows you to connect several wired network devices to your
home network. Your router has a built-in network switch (the Ethernet
ports). If you have more wired network devices than available Ethernet
ports on your router, you will need an additional switch to consolidate
the wired connections.
How to set up a home network
1.
Purchase the proper equipment. For a network that includes Internet
access, you’ll need:
• Computers with an Ethernet port or wireless networking capabilities
• A modem for connecting to your ISP (typically supplied by your ISP)
• A router to connect your computers with each other and to the modem
• Internet service to your home, provided by an ISP (Internet Service
Provider)
5
5
Page 9

Linksys EA-Series
Setting Up: Basics
How to install your router
To install your router:
1.
Power on your new router. If replacing an existing router, disconnect it.
2.
Connect the Internet cable from your modem to the yellow Internet port
on your router. Wait until the power light on the front of the router is
solid.
3.
Connect to the secure wireless name shown in the Quick Start Guide that
came with your router. (You can change the network name and password
later during router setup.) If you need help connecting to the network,
refer to your device documentation. Note: You will not have Internet
access until router setup is complete.
4.
Open a web browser and follow the instructions to complete your
router’s setup. If instructions do not appear in the web browser, enter
linksyssmartwifi.com in the browser’s address bar.
5.
At the end of setup, follow the on-screen instructions to set up your
Linksys Smart Wi-Fi account. Use Linksys Smart Wi-Fi to easily manage
your router’s settings, such as:
• Change your router’s name and password
• Set up guest access
• Configure parental controls
TIP:
Print this page, then record your router and account settings in
the table below as a reference. Store your notes in a safe place.
Setup also saves your setup information as a file to your computer
desktop.
Network Name (SSID)
Network Password
Router Password
Guest Network Name
Guest Network
Password
Linksys Smart Wi-Fi
Username
Linksys Smart Wi-Fi
Password
• Connect devices to your network
• Test your Internet connection speed
NOTE:
As part of the router setup process, you will be sent a verification
e-mail. From your home network, click the link in the e-mail to
associate your router with the Linksys Smart Wi-Fi account. Make
sure that the link opens in a supported web browser, such as
Internet Explorer 8 or higher, Firefox 8 or higher, Google Chrome 10
or higher, and Safari 5 (for Mac) or higher.
If you cannot click the link while behind your new Linksys router, log into
Linksys Smart Wi-Fi while behind the router and add your router there.
For more information, see “How to associate a router with your Linksys
Smart Wi-Fi account” on page 25.
6
Page 10

Linksys EA-Series
Setting Up: Basics
How to configure your router
You can change router settings to make your network more secure or to work
better with a device or game. Being able to adjust the settings while you’re
away from home can help make router administration easier. You can configure
your router from anywhere in the world by using Linksys Smart Wi-Fi, but you
can also configure your router directly from your home network.
Linksys Smart Wi-Fi may be available for your mobile device, as well. See your
device’s app store for information.
Use Linksys Smart Wi-Fi to easily manage your router’s settings, such as:
• Change your router’s name and password
• Set up guest access
• Configure parental controls
• Connect devices to your network
• Test your Internet connection speed
Your Linksys Smart Wi-Fi account can also be used to manage multiple Linksys
routers. For more information, see “How to associate a router with your Linksys
Smart Wi-Fi account” on page 25.
How to connect to Linksys Smart Wi-Fi
To connect to Linksys Smart Wi-Fi:
1.
Open your computer’s web browser.
2.
Go to www.linksyssmartwifi.com and log into your account.
If you can’t remember your password, click Forgot your password? and
follow the on-screen instructions to recover it.
7
Page 11

Linksys EA-Series
Setting Up: Basics
How to disable remote access
If you want to configure your router only while you are on your home network,
you should disable remote access.
To disable remote access:
1.
Log into Linksys Smart Wi-Fi.
2.
Under Router Settings, click Connectivity.
3.
Click the Administration tab, then deselect Allow remote access to
Linksys Smart Wi-Fi.
4.
Click OK.
How to connect directly to your router
You can configure your router by directly accessing it on your home network
instead of through the Internet-based Linksys Smart Wi-Fi.
To connect to your router while you are on your home network:
1.
Open your computer’s web browser.
2.
Go to www.linksyssmartwifi.com and log into your router using the
router password you created when you installed your router. (When
there is no Internet connection, this address re-routes directly to your
router.)
How to improve your wireless connection speed
Follow these tips to improve your network’s wireless connection speed:
• Make sure that your router is in a good location:
• For the widest coverage area, install your router near the center of
your home, and near the ceiling, if possible.
• Avoid placing the router on or near metal objects (such as file cabinets
and metal furniture), reflective surfaces (such as glass or mirrors), or
masonry walls.
• Any obstruction can weaken the wireless signal (even non-metallic
objects), so the fewer obstructions between the router and the
wireless device, the better.
• Place the router in a location away from other electronics, motors, and
fluorescent lighting.
8
Page 12

Linksys EA-Series
Setting Up: Basics
• Many environmental variables can affect the router’s performance, so
if your wireless signal is weak, place the router in several locations and
test the signal strength to determine the ideal position.
• If possible, upgrade wireless network interfaces (such as wireless
network cards in computers) from older wireless standards to 802.11n. If
a wirelessly networked device uses an older standard, the performance
of the entire wireless network may be slower.
• If your router is a dual-band router, split your network traffic so the high-
bandwidth traffic uses the 5GHz band. For more information, see “How
to get the most out of your dual-band router” on page 26.
How to change your network’s name and password
You can change the name (SSID) and password of your network, but if you do so,
all wireless devices connected to your router will lose their Internet connection
until you reconnect them using the new network name and password.
To change your router’s name and password:
1.
Log into Linksys Smart Wi-Fi. (See ““How to connect to Linksys Smart WiFi” on page 7.
2.
Under Router Settings, click Wireless.
3.
Click the Wireless tab, then click Edit.
• To change the network name, type a new name in the Network name
(SSID) box.
• To change the network password, type a new password in the
Password box.
4.
Click OK to apply your changes.
TIP
If you have a dual-band router, each band (2.4 GHz and the 5GHz)
can have a separate network name and password.
How to change your router’s local access password
Your router’s local access password was set when you ran the router’s setup
software, but you can change it at any time. You need the router password to
change router settings when you don’t have an Internet connection. When you
do have an Internet connection, log into your Linksys Smart Wi-Fi account by
following the directions under “How to connect to Linksys Smart Wi-Fi” on page
7.
To change your router’s local access password
1.
Log into Linksys Smart Wi-Fi. (See “How to connect to Linksys Smart WiFi” on page 7.
2.
Click Connectivity under Router Settings.
9
Page 13

Linksys EA-Series
3.
Click the Basic tab.
4.
Under Router Password, type the new password, then click OK.
How to change your router’s time zone
Your router’s time zone should be set to your local time zone.
Setting Up: Basics
How to test your Internet connection speed
NOTE
To run the speed test, you must be accessing the Internet by using
the router you are testing. You cannot run the speed test remotely.
To test your Internet connection speed:
1.
Log into Linksys Smart Wi-Fi. (See “How to connect to Linksys Smart WiFi” on page 7.
2.
Click Speed Test under Apps. The Speed Test screen opens.
To set your router’s time zone:
1.
Log into Linksys Smart Wi-Fi. (See “How to connect to Linksys Smart WiFi” on page 7.
2.
Click Connectivity under Router Settings.
3.
Click the Basic tab, then select your time zone in the Time Zone drop-
down list and click OK.
3.
Click Begin Test. The test measures your download and upload speeds.
10
Page 14

Linksys EA-Series
Setting Up: Basics
NOTE
Internet connection speeds are determined by a variety of factors,
including ISP account type, local and worldwide Internet traffic,
and number of devices in your home that are sharing the Internet
connection.
4.
Click Restart Test to run it again, and click Show History to display the
results of past tests.
How to connect devices to your network
Your Linksys router is the nerve center of your home network. Your router safely
opens the Internet to your network, and all of your computers and network
devices rely on your router to pass files, media, and network commands in an
organized, error-free way. Whether connected wirelessly or with cables, each
part of your network needs the router in order to work reliably with the other
parts of your network.
How to connect a USB printer
When you install a printer that requires a cable, you can:
• Follow the printer’s instructions for setting it up, then follow your
computer’s operating system instructions to share the printer with your
network.
- OR -
• You can connect a USB printer to the router’s USB port to make the
printer available to any networked computer.
When you set up a wireless printer, you need to make sure that:
• Your printer has been completely set up except for being connected to
the network.
• Your printer supports the WPA/WPA2 wireless encryption standard.
• If your wireless printer supports Wi-Fi Protected Setup, you should use
Wi-Fi Protected Setup to connect the printer to your network. See “How
to connect a network device using Wi-Fi Protected Setup” on page 12.
To connect a USB printer to your network through the router’s USB port:
1.
Log into Linksys Smart Wi-Fi. (See “How to connect to Linksys Smart WiFi” on page 7.
2.
Click Device List, then click Add a Device.
How to connect a computer to your network
To connect a computer to your network:
1.
At the computer you want to connect, enter your network’s connection
information into your wireless manager.
2.
After that computer connects to your network, log into Linksys Smart WiFi, then click Device List to confirm that your router recognizes the new
computer. You can use the Device List to monitor all network-attached
devices.
11
Page 15

Linksys EA-Series
Setting Up: Basics
3.
Under Select the type of device to add to your network, click USB Printer.
The Add a USB printer screen opens.
4.
Follow the on-screen instructions for downloading and installing the
VUSB (virtual USB) software for your computer.
To connect a wireless printer to your network:
1.
Follow the printer’s instructions to connect it to your network. Use the
connection information available in Linksys Smart Wi-Fi or saved to your
computer desktop.
2.
After that printer connects to your network, log into Linksys Smart Wi-Fi,
then click Device List to confirm that your router recognizes the new
printer.
Because of the wide variety of devices and methods of connecting, you must
manually enter network information into the devices for a successful network
connection.
TIP
For more instructions on connecting a game console to your
network, see also:
• “How to optimize your router for gaming and voice” on page 34
• “How to set up port forwarding” on page 43
• “How to set up port range triggering for online gaming” on page
45
How to manually connect a network device
To manually connect a device to your network:
1.
Follow the device’s instructions to connect it to your network. Use the
connection information available in Linksys Smart Wi-Fi or saved to your
computer desktop.
2.
After the device connects to your network, log into Linksys Smart Wi-Fi,
then click Device List to confirm that your router recognizes the new
device.
How to connect a network device using Wi-Fi Protected Setup
To connect a device using Wi-Fi Protected Setup™:
How to connect other devices
Many other types of wireless network devices can connect to your home
network, including:
• Game consoles
• Internet-capable TVs and media players
• Digital music players
• Smart phones
1.
Plug in and turn on the network device. If the device does not support
Wi-Fi Protected Setup, follow its instructions for a standard network
installation.
2.
Log into Linksys Smart Wi-Fi. (See “How to connect to Linksys Smart WiFi” on page 7.
3.
Under Wireless, click the Wi-Fi Protected Setup tab.
4.
Use one of the following methods to complete the setup:
12
Page 16

Linksys EA-Series
Setting Up: Basics
• If the device has a Wi-Fi Protected Setup button, press that button,
then click the Wi-Fi Protected Setup button in Linksys Smart Wi-Fi or
press the button on the back of your router.
• If the device has a Wi-Fi Protected Setup PIN, type that number into
the Device PIN box in Linksys Smart Wi-Fi, then click Register.
How to view device details
You can use Linksys Smart Wi-Fi to view any network device’s network
infomation.
To view network device details:
1.
Log into Linksys Smart Wi-Fi. (See “How to connect to Linksys Smart WiFi” on page 7.
2.
Under Apps, click Device List. The Device List screen opens.
3.
Click the i in the lower-right corner of the device.
• If the device’s own setup asks for the router’s Wi-Fi Protected Setup
PIN, enter the number that appears under Router PIN in Linksys Smart
Wi-Fi.
13
Page 17

Linksys EA-Series
Setting Up: Basics
Information about the device appears on the screen.
4.
Click OK.
How to set up parental controls
With your router, you can use parental controls to:
• Set the times that Internet access is allowed.
• Block websites that you specify or based on their content.
• Set the above restrictions for specific computers.
TIP
When someone tries to open a blocked website, a Linksys Smart
Wi-Fi login page appears. To view the blocked content, you must
log into your Linksys Smart Wi-Fi account and change the parental
control restrictions.
How to set parental controls
To set parental controls:
1.
Log into Linksys Smart Wi-Fi. (See “How to connect to Linksys Smart WiFi” on page 7.
2.
Under Apps, click Parental Controls. The Parental Controls screen opens.
3.
To turn on parental controls, click the Enable parental controls button
so that ON is displayed.
TIP
It’s not necessary to set parental controls over each computer
on your home network. You can set the controls on only those
computers that children can access.
4.
To select a computer to apply parental controls to, click the name of the
computer in the Restrict Internet access on list.
5.
To block Internet access on the selected computer(s), under Block
Internet access:
• Click Never to allow Internet access.
• Click Always to always block Internet access.
• Click Specific Times to set the times when Internet access is allowed.
14
Page 18
Linksys EA-Series
Setting Up: Basics
• Click Edit to change the Internet access schedule. You can click and
drag to select or deselect a block of time.
6.
To block specific websites:
a.
Under Block specific sites, click Add.
b.
Type the web address (URL) of the website to block, then click OK.
You can block up to ten websites.
TIP
It’s easier to copy and paste a web address than it is to type it in.
Copy the address from your browser’s web address box, then paste
it into an available box in the Block Specific Sites screen of Linksys
Smart Wi-Fi.
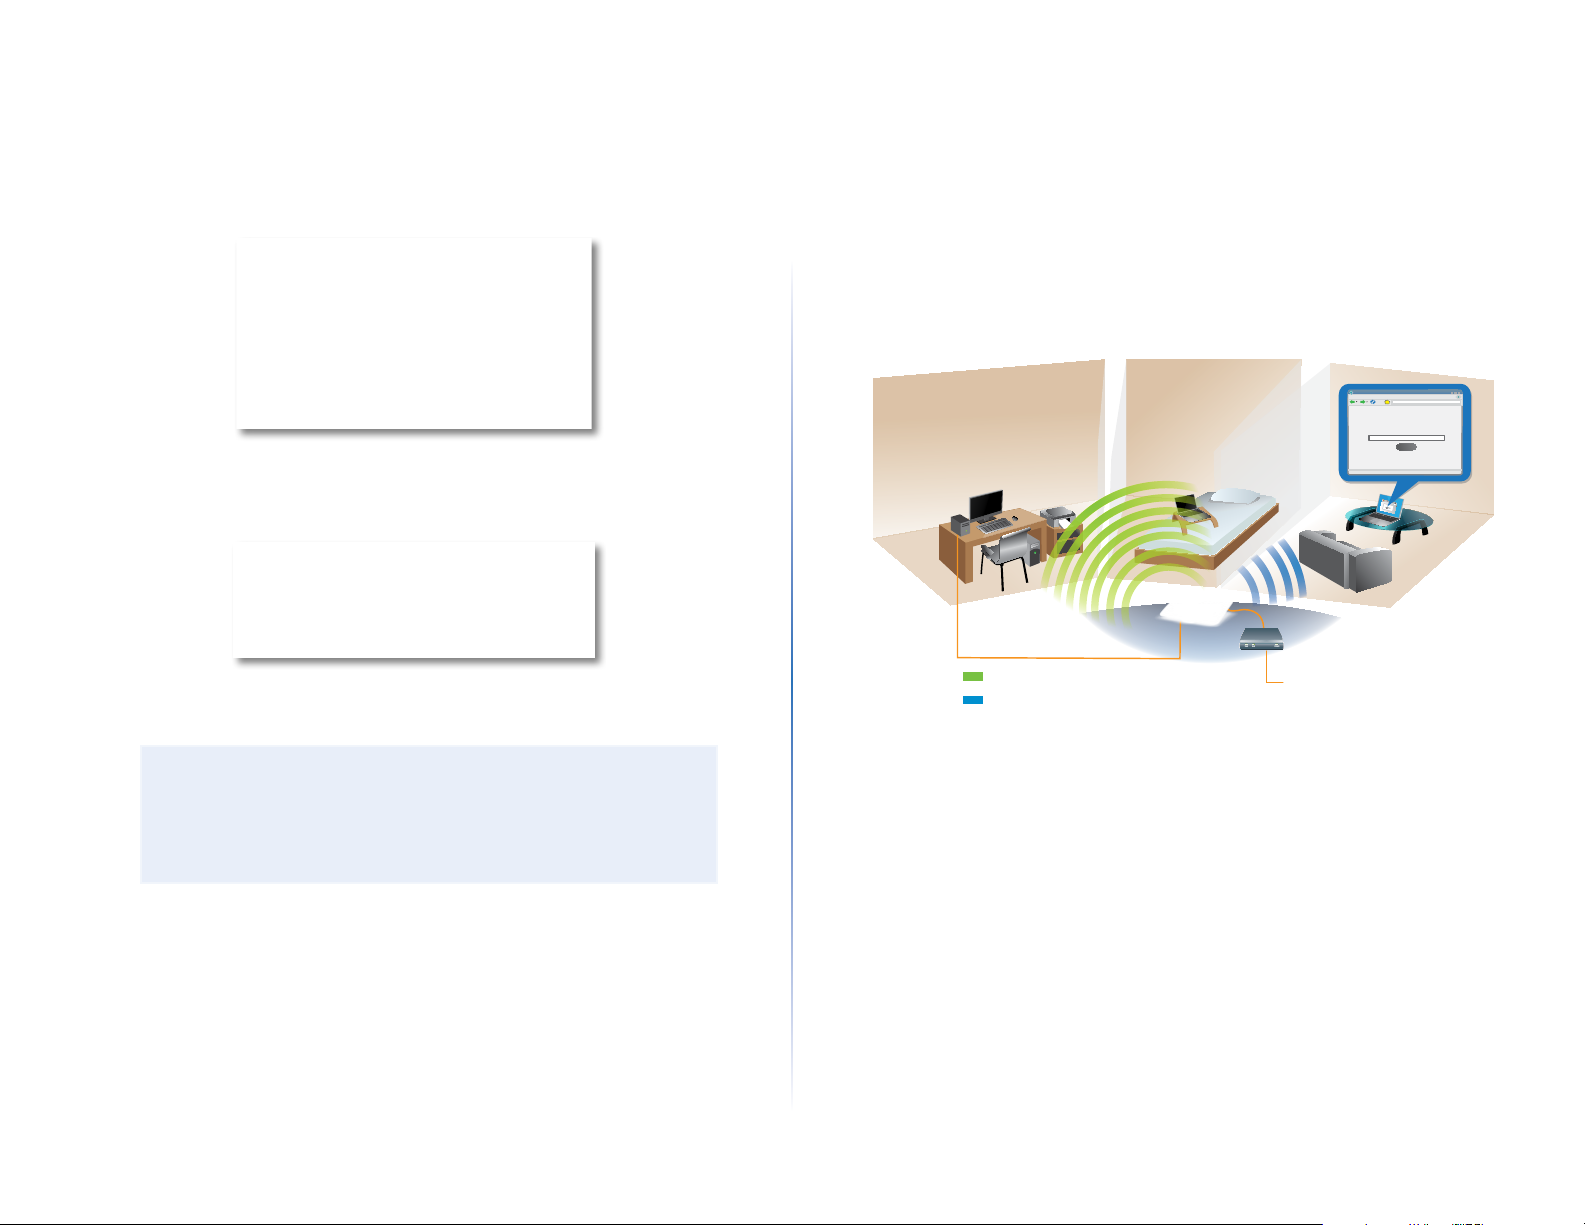
How to configure your guest network
You can use your router’s guest network to provide your guests with access
to the Internet, while restricting their access to other resources on your local
network. To prevent unauthorized users from using your Internet access, your
guest network requires that a password be entered for Internet access. The
guest network is enabled by default.
_
File Edit View Go Shortcuts Options Help
http://mynetwork/guest/login
X
Enter the Guest Password
for Internet Access:
web browser - guest access login - Linksys E4200
http://mynetwork/guest/login
Enter the Guest Password
for Internet Access:
Login
Local Network
Guest Network
Local Access and Guest Access Diagram
Your wireless network’s guest network and password were set when you ran
the router’s setup software, but you can change them at any time.
X
Login
Done
7.
Click OK to apply your changes.
15
Page 19

Linksys EA-Series
Setting Up: Basics
To set up guest access to your network:
1.
Log into Linksys Smart Wi-Fi. (See ““How to connect to Linksys Smart WiFi” on page 7.
2.
Under Apps, click Guest Access. Your guest network, which was set up
during your router installation, is displayed.
• To turn guest access on or off, click the Allow guest access button.
• The guest network name is based on your 2.4GHz network name and
is automatically generated.
• To change the guest network password, click in the box next to Guest
network password, then type the new password.
3.
Click OK to apply your changes.
TIP
The first time your guest tries to access the Internet through a web
browser, they will see the Guest access screen. To continue, they
must enter the password you provided in the Password field, then
click LOGIN.
How to back up your router configuration
When you are done setting up your router, you should back up its settings so
that you can restore them later, if necessary. For instructions, see “How to back
up and restore your router configuration” on page 47.
• To change the number of simultaneous guest network users you want
to allow, click the drop-down box under Total guests allowed, then
click the number that you want.
TIP
To keep your guest network secure, click Change to change the
guest password when the guest no longer needs access to the
account.
16
Page 20

Linksys EA-Series
Setting Up: Basics
How to customize Linksys Smart Wi-Fi
You can customize your Linksys Smart Wi-Fi home page by adding or removing
widgets. Widgets are miniature versions of menus that let you change basic
settings or check the status of your network.
Using widgets
To add a widget:
1.
Log into Linksys Smart Wi-Fi. (See “How to connect to Linksys Smart WiFi” on page 7.
2.
Open a menu, then select Show widget on the homepage in the upperright corner.
To remove a widget:
1.
On the home page, click the × in the upper-right corner of the widget
you want to remove.
Customizing the Device List
You can change the icon and text description of each device on your network.
To change the device appearance:
1.
In the Device List, click the device you want to change the appearance
for. The device’s information screen opens.
2.
To change the description, click Edit, type the new name, then click OK.
3.
To change the icon, click Change, click a new icon, then click OK.
17
Page 21

Linksys EA-Series
Using an External Drive
Overview
You can attach most USB drives (including a thumb drive or a high-capacity
external drive) to the USB port on your router. You can then use the drive as
networked storage, as a media server (for media-enabled devices such as a
networked TV), and as an FTP (File Transfer Protocol) server. You can also specify
which users can access the content on the drive. Menus are subject to change.
To view the status and settings of your attached drive:
1.
Log into Linksys Smart Wi-Fi. (See “How to connect to Linksys Smart WiFi” on page 7.
2.
Click USB Storage under Apps. The Status tab displays information such
as:
• Drive capacity and use
• Secured folder access status
• Addresses for accessing shared folders, the FTP server, and media
server
How to attach a USB drive
If a USB drive is already connected to the router, and you want to attach a
different drive to that USB port, you should safely disconnect the old drive first.
To safely remove a USB drive from the router:
1.
Log into Linksys Smart Wi-Fi, then click USB Storage under Apps.
2.
In the Status tab, click Safely remove drive.
3.
Disconnect the old drive from the router.
To attach a USB drive to the router:
1.
Connect the USB drive to an available USB port on the back of your
router. Your router detects the drive.
2.
To update the USB Storage screen, you may need to click Refresh.
18
18
Page 22

Linksys EA-Series
How to use secured folder access
Why would I need to use secured folder access? By default, when you
connect a USB drive to your router, the entire contents of the drive are available
for read and write access to anyone on your local network (no login credentials
are required). However, you can also make the drive and its folders secure, so
that only authorized users can access the drive’s contents.
TIP
When Secure Folder Access is on, the entire USB drive is secured.
4.
In the Authorized users list, type a Username and Password for each new
user.
How to set up authorized users and shared folders
To enable access to shared folders:
1.
Log into Linksys Smart Wi-Fi. (See “How to connect to Linksys Smart WiFi” on page 7.
2.
Click USB Storage under Apps, then click the Folder Access tab.
3.
Click the setting for Secure Folder Access to turn it on.
The Authorized users list appears.
TIP
Two accounts, Admin and Guest, are already set up and cannot be
deleted.
5.
Select the permissions to give the user.
• Read Only lets the user read (open) the file.
• Read & Write lets the user read, rename, overwrite, or delete the file.
The user can also save new files to the folder.
6.
Click Select Share. The Select Existing Share dialog box opens.
7.
If you already have the shared folder set up:
a.
Select the check box next to each share you want to grant access to,
then click OK.
19
Page 23
Linksys EA-Series
8.
If you need to set up the shared folder:
a.
Click Create new share. The Create New Share dialog box opens.
9.
Click Add User.
10.
In the Authorized users list, you can also:
• Click Edit to change a user’s credentials.
• Click Shares to change the shares that a user can access.
• Click Delete to delete the user account.
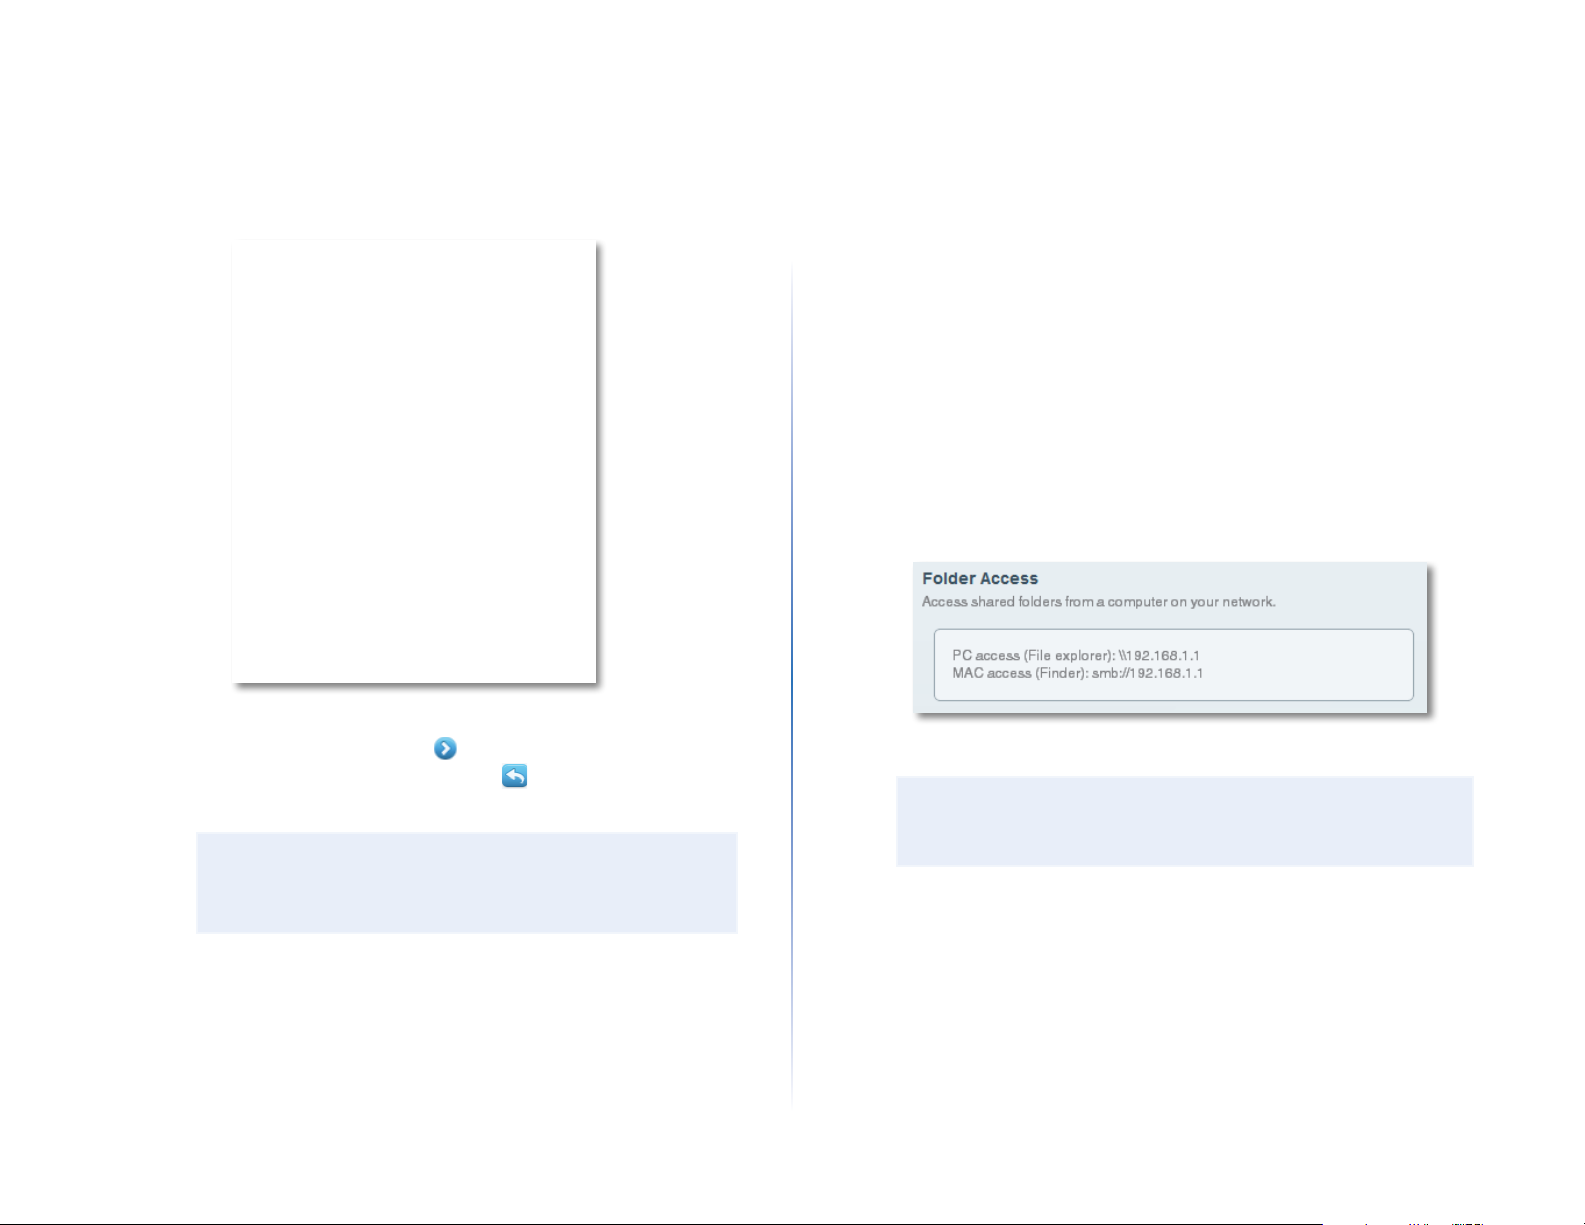
How to access shared folders
To access shared folders while on your network:
1.
While in Linksys Smart Wi-Fi, click USB Storage under Apps.
2.
In the Status tab, note the information under Folder Access. This is the
address you will need to access the shared folders from a file manager.
b.
Click the button next to the folder that you want to share.
• To view subfolders, click the icon next to the folder name.
• To return to a parent folder, click the icon at the top of the list.
• To select the entire drive, select Share entire storage device.
TIPS
• The share name automatically changes to the name of
the folder you selected.
• You cannot select more than one folder for each share.
• To use a different share name, type the name in the Share name
field.
c.
Click OK.
d.
Select the check box next to each share you want to grant access to,
then click OK.
3.
Enter the access address into your file manager.
TIP
You can also usually locate the folder by browsing through your
computer’s file manager.
4.
Enter your user account name and password. The drive’s contents (files
and folders) appear in a window.
5.
Use the file manager to open, copy, or view the folder’s contents.
20
Page 24

Linksys EA-Series
TIPS
File managers display content in many ways, but you can usually
use these common actions to navigate through folders:
• Click or double-click a folder name to open it.
• Click, double-click, or right-click a file to open, copy, or view it.
• Drag a file from another window and drop it into the shared
folder’s window to copy it to the shared folder. (To copy a
file to the shared folder, your user account must have write
access.)
How to set up your router as a media server
What is a media server and how would I use it? A media server lets you share
media content across your network. Your router can act as a media server if it
has a USB drive attached and if you have UPnP AV (Audio and Video)-enabled
or DLNA (Digital Living Network Alliance)-certified devices in your home.
Examples of UPnP AV-enabled devices include digital media players, gaming
consoles with a built-in media player, and digital picture frames.
For example, if you have a digital media adapter that sends content to your
entertainment system, and if your router’s set up as a media server, then the
digital media adapter can access your router’s attached USB drive.
To configure your router as a media server:
1.
Log into Linksys Smart Wi-Fi. (See “How to connect to Linksys Smart WiFi” on page 7.
2.
Click USB Storage under Apps. The USB Storage screen opens.
3.
Click the Media Access tab.
4.
Click the setting for Enable Media Server to turn it on.
You can specify which folders are used by the media server, add and delete
folders, and specify how often the folders are scanned for new content.
NOTE
The EA3500 does not support the media server feature.
21
Page 25

Linksys EA-Series
5.
Click Add New Folder. The Add a new folder dialog box opens.
How to connect your UPnP device to the media server
After you set up your router’s media server, you need to connect an UPnPcompatible device (such as an UPnP-compatible game console or digital media
player) to the network so that you can play the media server’s content.
To connect an UPnP device to your router’s media server:
1.
Connect your UPnP device to your home network with wired (Ethernet
cable) or wireless networking. If you are connecting wirelessly, you
need to know your network’s name and password. See your device’s
documentation for help.
2.
On your UPnP device, change the media source to the media server
name you specified on your router. (See “How to set up your router as a
media server” on page 21)
3.
See your UPnP device’s documentation for help with playing media on
the device.
How to remotely access storage
6.
Click the button next to the folder that you want to share, then click OK.
• To view subfolders, click the icon next to the folder name.
• To return to a parent folder, click the icon at the top of the list.
TIPS
• The share name automatically changes to the name of the
folder you selected.
• You cannot select more than one folder at a time.
7.
Click OK again to save changes.
Why would I need to access my router’s storage remotely? After you enable
the router’s FTP (File Transfer Protocol) server, you can access the attached
drive’s files from anywhere by using either a web browser or FTP software.
To set up the FTP server:
1.
Log into Linksys Smart Wi-Fi. (See “How to connect to Linksys Smart WiFi” on page 7.
2.
Click USB Storage under Apps. The USB Storage screen opens.
3.
Click the FTP Server tab.
22
Page 26

Linksys EA-Series
4.
Click the setting for Enable FTP Server to turn it on.
5.
We recommend that you keep the default settings for FTP Port and
Encoding, unless you are an advanced user and have reason to change
them.
6.
Click OK.
7.
Click the Status tab.
8.
Note the information under FTP Server. This is the information you will
need to access the attached storage remotely.
9.
To access the attached storage using a web browser:
a.
Open a web browser.
b.
In the browser’s Address or URL field, type the address that was
provided on the Status tab above, starting with ftp://... If you have
DDNS (Dynamic Domain Name Service), you can use your router’s
domain name instead.
c.
Enter your user account name and password. This is the same User
Name and Password that were set up in the shared folders Authorized
users list. See “How to set up authorized users and shared folders” on
page 19.
The drive’s contents (files and folders) appear in a browser window.
• The address that was provided on the Status tab above, starting
with ftp://... If you have DDNS (Dynamic Domain Name Service),
you can use your router’s domain name instead.
• The user account name and password. This is the same User Name
and Password that were set up in the shared folders Authorized
users list. See “How to set up authorized users and shared folders”
on page 19.
• The port and encoding specified during your FTP server setup
(usually port 21, and UTF-8 encoding)
c.
Refer to the software’s help to determine how to download and
upload files.
TIPS
FTP software and web browsers display FTP content in many ways,
but you can usually use these common actions to navigate through
FTP folders:
• Click a folder name to open it.
• Click a double period (..) or Up to a higher level directory to
open a parent folder.
• Click or right-click a file to download or view it.
• Drag a file from another window and drop it into the FTP
window to upload it. (To upload a file, your user account must
have write access.)
d.
Click a file to download it to your computer, or click and drag a file
from your computer’s file manager to the browser window to upload
a file (only if you have read and write access).
10.
To access the attached storage using FTP client software:
a.
Run your FTP client software.
b.
Refer to the software’s help to determine how to connect to an FTP
site. Use the following information to connect:
23
Page 27
Linksys EA-Series
Setting Up: Advanced
Setting Up: Advanced
How to manually set up your router
Although running your router’s setup software is the easiest way to set up and
maintain your router, advanced users may want to manually configure their
router. Be careful when changing settings using this method.
To manually set up your router:
1.
Connect your router’s power adapter to a power outlet.
2.
To connect to your router by using a cable:
a.
Connect an Ethernet cable to the computer and to an available
numbered Ethernet (blue) port on the back of your router.
b.
Disconnect the cable from the router’s Internet port.
3.
To connect to your router wirelessly:
a.
Make sure that your computer’s wireless networking is turned on.
b.
Connect to the secure wireless name shown in the Quick Start Guide
that came with your router. (You can change the network name and
password later during router setup.) If you need help connecting to
the network, refer to your device documentation.
4.
Open a web browser on the computer, then go to
www.linksyssmartwifi.com. (When there is no Internet connection,
this address re-routes directly to your router.)
5.
Click I have read and accepted the License Terms for using this
software, read the license agreement, then select the checkbox.
6.
Select I want to skip Setup and and configure my router manually,
then click Next.
7.
Enter admin as the user name, then enter the default password (admin).
The main menu opens.
8.
After you finish changing settings, click Save and close the browser
window.
How to manually set up your Internet connection
Running Setup configures your router’s Internet connection. However, for
some ISPs (Internet Service Providers), especially those outside of the United
States, you may need to manually configure your router’s Internet connection.
How to configure basic Internet connection settings
To manually configure your router’s Internet connection:
1.
Connect to your router and log in using the instructions under “How to
manually set up your router” on page 24.
2.
Under Router Settings, click Connectivity. The Connectivity page opens
to the Basic tab.
3.
Next to Type of Internet Connection, click Edit.
TIP
For descriptions of the settings, click Help at the top of the screen.
24
24
Page 28

Linksys EA-Series
4.
Select your ISP’s Internet connection type from the drop-down list.
Complete the Optional Settings only if required by your ISP.
TIP
For field descriptions, click Help at the top of the screen.
5.
Click OK.
IPv6 Internet connection settings
IPv6 is a new IP protocol that uses simplified packet headers and requires IPSec.
It also has improved support for mobile IP and computing devices.
NOTE
To use your router’s IPv6 Internet connection settings, IPv6 service
from your ISP (Internet service provider) is required. For more
information on this service, ask your ISP.
Setting Up: Advanced
5.
Click Edit. You can now change the following settings:
• IPv6 - Automatic—Select Enabled to use IPv6 for all network
addressing.
• DUID (device user ID)—Used by DHCP to identify network clients.
• 6rd Tunnel—Allows your router to send IPv6 IP addresses over IPv4
networks. To enable this option, IPv6-Automatic must be unselected.
To let your router handle the 6rd Tunnel settings (such as prefixes and
address masks), change the 6rd tunnel setting to Automatic. Select
Manual to change these settings manually.
• Prefix—Enter the prefix address used for the tunnel provided by your
ISP.
• Prefix Length—Enter the prefix length used for the tunnel provided
by your ISP.
• Border Relay—Enter the border relay address used for the tunnel
provided by your ISP.
To manually configure your router’s IPv6 settings:
1.
Use an Ethernet cable to connect an Ethernet port on your router to the
Ethernet port on your computer.
2.
Log into Linksys Smart Wi-Fi. (See “How to connect to Linksys Smart WiFi” on page 7.
3.
Under Router Settings, click Connectivity. The Connectivity page opens.
4.
Click the Internet Settings tab, then click IPV6.
• IPv4 mask length—Enter the IPv4 address mask length used for the
tunnel provided by your ISP.
6.
Click OK.
How to associate a router with your Linksys Smart Wi-Fi account
To associate an additional router to your Linksys Smart Wi-Fi account:
1.
Run Setup for the additional router. When Setup is complete, you are
prompted to create a new Linksys Smart Wi-Fi account.
2.
Instead of creating a new account, click Login at the top of the screen.
You are prompted to enter your account user name (e-mail address) and
password.
3.
Enter your original Linksys Smart Wi-Fi account user name and password,
then click Login. The additional router is added to your Linksys Smart
Wi-Fi account.
4.
To configure the additional router, log into Linksys Smart Wi-Fi, then
select the router’s SSID (network name) from the drop-down list at the
top of the screen.
25
Page 29

Linksys EA-Series
Setting Up: Advanced
How to get the most out of your dualband router
I bought a dual band router, but I’m not sure that I’m getting the most
out of it. What should I check? Of the many reasons for owning a dual-band
router, the most common is to ensure available bandwidth for streaming highdefinition video. At the same time, owners want to make sure that their video
streams won’t be interrupted by other wireless network traffic. To get the most
out of your dual-band router, you can:
• Upgrade your wireless clients
• Split your traffic
Upgrade your wireless clients
If you have network adapters that support only legacy wireless network
standards such as 802.11b, you should consider upgrading them with
Wireless-N (802.11n) network adapters. Wireless-B (802.11b) devices can slow
your entire wireless network. For the best performance, all of your wireless
devices should support Wireless-N. You can then select Wireless-N Only as your
Network Mode below.
NOTE
If you select Wireless-N Only, you may need to temporarily change
your network settings to Mixed to provide access to guests without
Wireless-N networking.
• Even though you are connected to your own wireless network, you are
still sharing “air time” with nearby networks.
• The 5GHz band is much less crowded than the 2.4 GHz band, so it’s ideal
for streaming multimedia.
• The 5GHz band has more available channels, so it is more likely that you
will have your own, interference-free channel for your wireless network.
By default, your dual-band router uses the same network name on both the
2.4GHz band and the 5GHz band. The easiest way to segment your traffic is to
rename one of your wireless networks. With a separate, descriptive name, it will
be easy to connect to the right network.
To reconfigure your wireless network:
1.
Log into Linksys Smart Wi-Fi. (See “How to connect to Linksys Smart WiFi” on page 7.
2.
Under Router Settings, click Wireless. The Wireless page opens to the
Wireless tab.
Split your traffic
The best way to improve your multimedia wireless performance is to split your
wireless traffic between your router’s two bands (ranges of radio frequencies).
Your router supports the 2.4 GHz band and the 5 GHz band, and handles the
two bands as two separate wireless networks to help manage the traffic.
The most common way to split wireless traffic is to use the 2.4GHz band for
basic Internet tasks such as web browsing, email, and downloads, and use
the 5.0GHz band for streaming multimedia. There are several reasons for this
approach:
• Although the 2.4GHz band may be more crowded with wireless traffic
from your neighbors, it’s fine for basic Internet traffic that is not timesensitive (such as e-mail).
3.
Click Edit next to the network band you want to modify. Change any of
the settings below:
a.
Enabled—Deselect this checkbox to disable the network band.
b.
Network name (SSID)—You can provide a unique SSID for each band
of your wireless network. The name must not exceed 32 characters.
c.
Password—You can provide a unique password for each band of
your wireless network.
26
Page 30

Linksys EA-Series
d.
Network mode—Your choice depends upon the clients that will
connect to your network. If all of your devices are Wireless-N capable,
you can select Wireless-N Only for either or both bands.
On the 2.4 GHz band, you can select:
• Mixed
• Wireless-N Only
• Wireless-G Only
On the 5 GHz band, you can select:
• Mixed (default), which accepts connections from 802.11a or
802.11n clients
• Wireless-N Only (802.11n only)
• Wireless-AC Only
e.
Security mode—You can set up different security options for the
5GHz and 2.4GHz networks. If the security mode you select requires
a passphrase, a Passphrase field appears, and you must enter a
passphrase. You can select:
• None (no security)
• WEP
• WPA Personal
• WPA Enterprise
• WPA2 Personal
• WPA2 Enterprise
• WPA2/WPA Mixed Personal
• WPA2/WPA Mixed Enterprise
TIP
Wireless-N networks should use the WP2-Personal security
mode for best performance.
f.
Channel width—We recommend that you keep the default (Auto)
setting for each band. In Auto mode, the router and the network
clients automatically switch to the 40MHz mode if:
• Your wireless clients support the 40 MHz mode (sometimes
called Bonded mode) in which two 20MHz channels are bonded
together for better performance.
• There is no adjacent interference.
Setting Up: Advanced
With more available channels and less chance of interference on the
5GHz band, you have the option to force the 40MHz mode.
On the 2.4GHz band, you can select:
• Auto (20 MHz or 40 Mhz)
• 20 MHz Only
On the 5GHz band, you can select:
• Auto (automatically selects from the options below)
• 20 MHz Only
• 40 MHz Only
• 80 MHz Only
g.
Channel—Choose the operating channel for each band. Your
router will automatically select the channel with the least amount
of interference if you leave the default Auto setting. We recommend
keeping the default settings for both bands.
4.
To save your changes, click OK.
How to control access to your network
Why would I need to control access to my wireless network? By default,
Setup enables industry-standard WPA (Wi-Fi Protected Access) security using
WPA2/WPA mixed mode. If you set up your wireless network manually and
have not enabled wireless security, your wireless network will be an “open”
network that almost anyone nearby with a Wi-Fi-enabled device could access.
What is MAC filtering? If you choose not to use the built-in security features
of your router, you can still control access to your wireless network using
MAC filtering. Every network device has a unique, 12-digit MAC (Media
Access Control) address. Using MAC filtering, you can allow only known MAC
addresses (known devices) onto your network. You can also exclude specific
MAC addresses or deny them access to your wireless network.
TIP
MAC filtering is not strong security. The best way to secure your
network is to use the router’s WPA2 security setting.
27
Page 31

Linksys EA-Series
Setting Up: Advanced
Example: Because each MAC filtering configuration is unique, the following
procedure uses the simplified example of setting up MAC filtering to allow one
wireless device access to the network.
TIP
You can also use MAC filtering to prevent specific PCs from
accessing your network by selecting Deny. However, it’s easier
to select Allow to permit only known devices than to exclude
unknown devices.
To set up MAC filtering to allow one wireless device access to your
network:
1.
Log into Linksys Smart Wi-Fi. (See “How to connect to Linksys Smart WiFi” on page 7.
2.
Under Router Settings, click Wireless. The Wireless page opens.
3.
Click the MAC Filtering tab.
5.
Click Add MAC Address, then enter the MAC address into the MAC Filter
List and click Save.
4.
Select Enabled next to MAC Filters, then select Allow access for ONLY
the listed MAC addresses.
28
Page 32

Linksys EA-Series
Setting Up: Advanced
How to improve security using the built-in firewall
Why would I need to change my security settings? By default, the firewall
settings in your router have been optimized for most home environments, so
no changes are needed. The SPI (Stateful Packet Inspection) firewall is enabled
by default. In addition, anonymous Internet requests and IDENT requests are
filtered by default. All web filters are disabled, because enabling them may
cause problems for sites that depend on ActiveX controls, Java, or cookies.
Changing firewall settings
To change your firewall settings:
1.
Log into Linksys Smart Wi-Fi. (See “How to connect to Linksys Smart WiFi” on page 7.
2.
Under Router Settings, click Security. The Security page opens to the
Firewall tab.
3.
You can now change the following settings:
TIP
For more descriptions of each setting, click Help at the top of the
screen.
• VPN Passthrough:
• IPSec Passthrough – IPSec (Internet Protocol Security) is a suite of
protocols used to implement secure exchange of packets at the IP
layer. The VPN clients on the local network can establish an IPSec
VPN tunnel through the router. This option is enabled by default.
• PPTP Passthrough – PPTP (Point-to-Point Tunneling Protocol)
allows the PPP (Point-to-Point Protocol) to be tunneled through
an IP network. The VPN clients on the local network can establish
a PPTP VPN tunnel through the router. This option is enabled by
default.
• L2TP Passthrough – L2TP (Layer 2 Tunneling Protocol) enables
point-to-point sessions using the Internet on the Layer 2 level.
The VPN clients on the local network can establish an L2TP VPN
tunnel through the router. This option is enabled by default.
• Internet filters:
• Filter anonymous Internet requests—This filter blocks Internet
requests from unknown sources such as ping requests. This option
is enabled by default.
• Filter multicast—Multicasting allows a single transmission
to simultaneously reach specific recipients within your local
network. Select this option to block multicasting. This option is
disabled by default.
• Filter Internet NAT redirection—This filter prevents a local
computer from using a URL or Internet IP address to access the
local server. Select this option to enable the filter. This option is
disabled by default. On some router models, this setting applies
to IPv4 Internet only.
• Filter ident (Port 133)—This filter prevents port 133 from being
scanned by devices from the Internet. This option is enabled by
default.
4.
Click Save to save your changes.
• Firewall: SPI firewall protection—This helps protect your local
network from Internet threats. This option is enabled by default.
On some router models, this setting is separated into IPv6 and IPv4
options so that each can be handled separately.
CAUTION
To help protect your network, you should keep this option enabled.
29
Page 33

Linksys EA-Series
Changing IPv6 firewall settings
On some router models, the IPv6 firewall lets you customize IPv6 port services
for applications. When users send these types of requests to your network via
the Internet, the router will allow those requests to the appropriate computers.
NOTE
To use your router’s IPv6 Internet connectino settings, IPv6 service
from your ISP (Internet service provider) is required. For more
information on this service, ask your ISP.
To set IPv6 firewall settings:
1.
Log into Linksys Smart Wi-Fi. (See “How to connect to Linksys Smart WiFi” on page 7.
2.
Under Router Settings, click Security. The Security page opens to the
Firewall tab.
Setting Up: Advanced
3.
Click Add IPv6 Firewall Setting. You can now change the following fields:
• Description—Enter a description of the application.
• Protocol—Select TCP, UDP, or Both (default).
• IPv6 Address—Enter the IPv6 address of the computer that should
receive the traffic.
• Allow—Select the range of port(s) used by incoming traffic.
4.
Click Save to save your changes. The list is updated to show the settings
you have saved.
• To change a saved setting, click Edit next to the setting.
• To delete a saved setting, click Remove next to the setting.
How to set up the DHCP server on your router
Your router can be used as a DHCP (Dynamic Host Configuration Protocol)
server to automatically assign an IP address to each computer or device on
your network. The DHCP server is enabled by default. If you already have a
DHCP server on your network, or if you do not want to use your router as a
DHCP server, you should disable this setting.
To configure your router’s DHCP server settings:
1.
Log into Linksys Smart Wi-Fi. (See “How to connect to Linksys Smart WiFi” on page 7.
2.
Under Router Settings, click Connectivity.
30
Page 34

Linksys EA-Series
3.
Click the Local Network tab.
Setting Up: Advanced
How to set up DHCP reservation
Why would I use it? DHCP reservation allows you to assign a unique, fixed IP
address to a specific device on your network. Assigning a fixed IP address is
a good way to manage devices such as print servers, web cameras, network
printers, and game consoles. A fixed IP address is also recommended if you
want to use port forwarding for devices that need to receive inbound traffic
from the Internet (“How to set up port forwarding” on page43).
To configure DHCP reservation:
1.
Log into Linksys Smart Wi-Fi. (See “How to connect to Linksys Smart WiFi” on page 7.
2.
Under Router Settings, click Connectivity.
3.
Click the Local Network tab, then click DHCP Reservations. The DHCP
Reservations list opens, which lists attached network devices and current
DHCP reservations.
4.
To disable the DHCP server, deselect the Enabled checkbox.
5.
Leave the Enabled checkbox selected to edit the following settings:
• Start IP address
• Maximum number of users
• IP address range (not editable)
• Client lease time
• Static DNS values
• WINS
6.
Click OK to save changes.
4.
Click the Select checkbox next to the device you want to reserve, then
click Add DHCP Reservation.
31
Page 35

Linksys EA-Series
5.
Click Edit to change the reservation details, or click Delete to delete the
reservation.
TIP
For field descriptions, click Help at the top of the screen.
How to access your network on the Internet
Why would I need to find my network on the Internet? If you want to
remotely access a drive attached to your router or view a web camera on your
home network, you need to be able to easily enter your network’s address into
a web browser.
Working with several DDNS (Dynamic Domain Name System) service providers,
your router’s DDNS feature lets you configure a domain name for your network,
which you can then use to easily find your network on the Internet. If your ISP
changes your network’s IP address (which can happen frequently), the DDNS
service providers detect the address change and continue to route your
domain name to that address.
Setting Up: Advanced
3.
Under Router Settings, click Security, then click the Apps and Gaming
tab. The DDNS screen opens.
4.
In the DDNS Service drop-down list (the list that has Disabled selected
by default), select your DDNS service provider.
TIP
Before you configure DDNS on your router, you must sign up for
DDNS service from a DDNS service provider that’s supported by
your router.
To set up DDNS:
1.
Sign up for DDNS service at either www.dyndns.org or www.tzo.com.
Note all of the information provided to you by the DDNS provider.
2.
Log into Linksys Smart Wi-Fi. (See “How to connect to Linksys Smart WiFi” on page 7.
5.
Complete the fields with information provided by your DDNS provider,
then click OK.
6.
To access the network from the Internet, enter the domain name
provided by the DDNS service provider.
To access one of your network devices on the Internet:
a.
Configure the router to use port forwarding for the device (see “How
to set up port forwarding for a single port” on page43). Note the port
number used for the device.
b.
Enter the domain name for your network, followed by a colon and
the port number. For example, if the domain name registered with
your DDNS provider is HappyBunny.linksysnet.com, and your Internet
camera has been configured to use port 1024, you would enter:
HappyBunny.linksysnet.com:1024
32
Page 36

Linksys EA-Series
How to clone a MAC address
On any home network, each network device has a unique MAC (Media Access
Control) address. Some ISPs register the MAC address of the device (usually a
router or a computer) connected directly to the modem. If your computer’s
MAC address is registered with your ISP and you do not want to re-register
the MAC address, then you can clone the address (assign the registered MAC
address of your previous device to your new router). If you want to use the
MAC address from an old router that you are replacing with your new router,
you should first determine the MAC address of your old router, then manually
enter it into your new router.
NOTE
For many ISPs that provide dynamic IP addresses automatically, the
stored MAC address in the modem is reset each time you reset the
modem. If you are installing this router for the first time, reset your
modem before connecting the router to your modem. To reset your
modem, disconnect power for about one minute, then reconnect
power.
Setting Up: Advanced
4.
Under MAC Address Clone, click Enabled.
5.
Enter the 12-digit MAC address of your old router, then click OK.
How to connect to your corporate office using a VPN
What is a VPN, and do I need to change my router settings? A VPN (Virtual
Private Network) is a network that uses a public network, such as the Internet,
to provide secure communications between a remote computer and another
network. Corporations often provide VPN access to their networks to enable
employees to work from remote offices or while traveling. Most corporate VPNs
use the Internet to provide connectivity between remote employees and the
corporate network.
For a typical VPN, the corporation installs a VPN gateway on their corporate
network. Employees authorized to work remotely connect to the VPN gateway
through the Internet using VPN software and security methods provided by
their employers. Robust security and authentication schemes ensure a secure
connection and access by only authorized users.
To clone a MAC address from your computer:
1.
Log into Linksys Smart Wi-Fi. (See “How to connect to Linksys Smart WiFi” on page 7.
2.
Under Router Settings, click Connectivity. The Connectivity page opens.
3.
Click the Internet Settings tab.
The default VPN settings in your router have been configured to pass through
(allow) the most common types of VPN protocols, so usually no changes are
needed.
To change your VPN passthrough settings:
1.
Log into Linksys Smart Wi-Fi. (See “How to connect to Linksys Smart WiFi” on page 7.
2.
Under Router Settings, click Security. The Security page opens to the
Firewall tab.
33
Page 37

Linksys EA-Series
3.
Enable each setting that you want to change.
• IPSec Passthrough – IPSec (Internet Protocol Security) is a suite of
protocols used to implement secure exchange of packets at the IP
layer. The VPN clients on the local network can establish an IPSec VPN
tunnel through the router. This option is enabled by default.
• PPTP Passthrough – PPTP (Point-to-Point Tunneling Protocol) allows
the PPP (Point-to-Point Protocol) to be tunneled through an IP network.
The VPN clients on the local network can establish a PPTP VPN tunnel
through the router. This option is enabled by default.
• L2TP Passthrough – L2TP (Layer 2 Tunneling Protocol) enables point-
to-point sessions using the Internet on the Layer 2 level. The VPN
clients on the local network can establish an L2TP VPN tunnel through
the router. This option is enabled by default.
4.
Click OK to save your changes.
How to optimize your router for gaming
Setting Up: Advanced
To configure media prioritization:
1.
Log into Linksys Smart Wi-Fi. (See “How to connect to Linksys Smart WiFi” on page 7.
2.
Under Apps, click Media Prioritization. The Media Prioritization screen
opens.
3.
Turn on Prioritization if it is not already on.
4.
Click and drag high-priority devices from the Normal Priority list to the
High Priority list.
and voice
How does my router prioritize traffic to the Internet? Your router can
prioritize traffic between your network and the Internet. Performance for
demanding, real-time applications, such as online gaming, VoIP calls, video
streaming, and videoconferencing, can be improved by configuring media
prioritization.
Prioritization settings are applied only to traffic that is uploaded to the Internet.
The router cannot control the quality of the traffic after it reaches the Internet.
TIP
For more information on optimizing your router for online gaming,
see “Port Forwarding and Port Triggering” on page43.
34
Page 38

Linksys EA-Series
5.
To prioritize an application or game, select the name in the drop-down
list, then click and drag the icon next to the name to the High
Priority list.
• If the application name isn’t listed, click Edit and add the name.
TIP
If you want to add a new application or game, you need
to know its port and protocol information (see the
application or game’s documentation for help).
6.
Click Settings. The Settings screen opens.
Setting Up: Advanced
a.
Set the maximum Downstream Bandwidth. If you set the bandwidth
lower than the actual bandwidth of your router, performance may be
limited.
b.
Set the maximum Upstream Bandwidth.
c.
To help manage traffic priority with devices that support WMM, turn
on WMM Support.
TIP
WMM (Wi-Fi MultiMedia) Support is a wireless feature
based on the IEEE 802.11e standard. WMM improves
quality for audio, video, and voice applications by
prioritizing wireless traffic. This feature requires that the
wireless client devices in your network also support WMM.
d.
To have the router re-send data if an error occurs, turn off No
Acknowledgement.
CAUTION
If you specify a maximum bandwidth that is too high, the
router cannot apply priorities correctly, and prioritization
problems may result.
e.
Click OK.
How to enable Voice over IP on your network
Do I need to configure Voice over IP? VoIP (Voice over Internet Protocol) is a
technology for using the Internet as an interface for telephone communications.
To use VoIP, you need to get an account with a VoIP service provider. The VoIP
service provider typically provides you with a telephone adapter that connects
to your network. If you do not use your network to make phone calls, you don’t
need to change the default settings.
The Application Layer Gateway SIP (Session Initiation Protocol) allows SIP
packets, used by some VOIP service providers, to get through your router’s
firewall.
35
Page 39

Linksys EA-Series
Setting Up: Advanced
To configure the router for VoIP:
1.
Log into Linksys Smart Wi-Fi. (See “How to connect to Linksys Smart WiFi” on page 7.
2.
Under Router Settings, click Connectivity, then click the Administration
tab.
3.
If your VoIP service uses SIP, select the SIP checkbox under Application
Layer Gateway.
– OR –
If your VoIP service uses other NAT traversal solutions such as STUN
(Session Traversal Utilities for NAT), TURN (Traversal Using Relay NAT), or
ICE (Interactive Connectivity Establishment), deselect the SIP
NOTE
You may need to contact your VoIP service provider to determine
the type of NAT traversal configuration they use.
checkbox.
How to configure UPnP
What is UPnP? UPnP (Universal Plug and Play) allows devices connected
to a network to discover each other and automatically create working
configurations. Examples of UPnP-capable devices include web cameras,
online gaming applications, and VoIP devices. UPnP is enabled by default.
To configure UPnP:
1.
Log into Linksys Smart Wi-Fi. (See “How to connect to Linksys Smart WiFi” on page 7.
2.
Under Router Settings, click Connectivity, then click the Administration
tab.
3.
To use UPnP, select Enabled (default) next to UPnP.
4.
To allow changing router settings while using UPnP, select Allow Users
to Configure.
5.
To prevent local network users from disabling your Internet connection
through UPnP, deselect the Allow users to disable Internet access
checkbox.
6.
Click OK.
36
Page 40

Linksys EA-Series
Setting Up: Advanced
How to use a router as an access point
How can I use this new router as an access point? If you have a large area to
cover with your wireless signal, or if part of your home has weak signals due to
interference, you can use this router to extend the range of your old router’s
wireless network.
To set up your new router as an access point:
1.
Use a network cable to connect this router’s Internet port to the Ethernet
or LAN port on the router that is connected to your modem.
2.
Log into Linksys Smart Wi-Fi. (See “How to connect to Linksys Smart WiFi” on page 7.
3.
Under Router Settings, click Connectivity, then click the Internet
Settings tab.
4.
Click IPv4.
5.
For Type of Internet Connection, select Bridge Mode.
6.
Click Obtain an IPv4 address automatically, then click OK. The new
router’s LAN IPaddress will be changed and obtained from the router
that is connected to your modem.
How can I use my old router as an access point? If you have a large area to
cover with your wireless signal, or if part of your home has weak signals due to
interference, you can use your old router to extend the range of your wireless
network. This is a complex process, so this procedure assumes that you have
some networking knowledge.
TIP
Check the documentation for your old router. Some brands of
routers include either a switch on the outside of the case or a
software option to convert it to an access point. If either of these
options is available, follow your old router’s instructions to convert
it to an access point.
You need to take note of your new router’s settings, then apply some of those
settings to the old router so it can work as an access point.
To view your new router’s settings:
1.
Make sure that your new router is connected to the Internet.
2.
Log into Linksys Smart Wi-Fi. (See “How to connect to Linksys Smart WiFi” on page 7.
3.
Under Router Settings, click Wireless, then take note of the Network
name (SSID), Password, Security mode, and Channel.
4.
Under Router Settings, click Connectivity, then click the Local Network
tab. Take note of the DHCP server’s IP address range (192.168.1.100 to
192.168.1.149 by default)
To use your old router as an access point:
1.
With your computer connected to your old router, log into its browserbased administration utility.
NOTE
Save your changes after finishing each step below.
2.
Open the setup page for the local network (LAN).
3.
In the Router IP address field, enter an unused IP address for the LAN
network of your new router.
For example, if your new router has an IP address of 192.168.1.1, you
should choose an IP address on the 192.168.1.0 network. You can choose
any address within the range of 192.168.1.2 to 192.168.1.254. You should
exclude addresses in the range that will be used by the DHCP Server of
your new router (192.168.1.100 to 192.168.1.149). A safe choice might be
192.168.1.250. Take note of this address, because this will be the address
that you will use to manage your old router in the future.
4.
In the Subnet Mask field, enter 255.255.255.0 or, if available, select that
subnet mask from a drop-down list.
5.
Disable the DHCP server on your old router. (Because your old router will
be operating as an access point instead of a router, you don’t want it to
distribute IP addresses. There should be only one active DHCP server on
your network, and that should be your new router.)
37
Page 41

Linksys EA-Series
6.
To reconfigure the wireless network on your old router:
a.
Open the wireless network setup page.
b.
Change the network name (SSID) to match the name of your new
network. Having the same network name and security settings
enables you to seamlessly roam between your new router and your
old router.
c.
Change the security mode to match the security mode on your new
router.
d.
Change the passphrase (sometimes called the pre-shared key) on
your old router to match the passphrase on your new router.
e.
Change the wireless channel to a non-conflicting channel. Some
manufacturers have an “Auto” function for channel selection that
automatically selects a wireless channel that does not interfere with
other nearby wireless networks. If your old router supports an Auto
function, select that. Otherwise, you may need to manually select the
wireless operating channel on your old router. In the 2.4 GHz wireless
spectrum, there are only three non-overlapping channels: 1, 6, and
11. Pick a channel that does not overlap the operating channel of your
new router. For example, if your new router is operating on channel
11, configure your old router for either channel 1 or channel 6.
7.
Connect an Ethernet network cable to one of the LAN/Ethernet ports on
your old router and an Ethernet port on your new router.
CAUTION
Do not connect the cable to the Internet port on your old router. If
you do, you may not be able to set up the router as an access point
on the current network.
Setting Up: Advanced
How to put your new router behind an existing router
Why would I put my new router behind an existing router? There are several
possible scenarios in which you might want to use your new router “behind”
another router:
1.
You might be in an environment that shares the landlord’s Internet
connection with all tenants. In this case, you should put your own router
behind the landlord’s router in order to create your own private network
and to isolate computers on your network from the rest of the building.
2.
You are sharing an office building Internet connection, and you want to
control Internet access or the content viewed by your employees.
3.
You already have an existing network and you want to extend the
network’s range or add wireless capabilities to your network.
4.
You want to separate older, less secure network devices from the rest of
the network.
To add your router to an existing router or gateway
In most cases, you can easily add your router to an existing wireless network by
running Linksys Smart Wi-Fi. If you are unable to set up the additional router
using the instructions below, see “To share an Internet connection” on page39
or “To extend your network” on page41.
To add your router to your existing wireless network:
1.
Connect your router’s Internet port to the LAN/Ethernet port on your
existing (upstream) router or gateway.
2.
Connect to the secure wireless name shown in the Quick Start Guide that
came with your router. (You can change the network name and password
later during router setup.) If you need help connecting to the network,
refer to your device documentation. Note: You will not have Internet
access until router setup is complete.
3.
Open a web browser and follow the instructions to complete your
router’s setup. If instructions do not appear in the web browser, enter
linksyssmartwifi.com in the browser’s address bar.
38
Page 42

Linksys EA-Series
4.
At the end of setup, follow the on-screen instructions to set up your
Linksys Smart Wi-Fi account.
NOTE:
As part of the router setup process, you will be sent a verification
e-mail. From your home network, click the link in the e-mail to
associate your router with the Linksys Smart Wi-Fi account. Make
sure that the link opens in a supported web browser, such as
Internet Explorer 8 or higher, Firefox 8 or higher, Google Chrome 10
or higher, and Safari 5 (for Mac) or higher.
To share an Internet connection
Setting Up: Advanced
d.
Take note of the IP address. In this example, the IP address is
192.168.100.192.
To determine the address range by using a Mac computer:
a.
Connect your computer into your upstream network’s router.
b.
From the Dock, click System preferences, click Network, then click
Ethernet in the window to the left. A network status window opens.
NOTE
This is a complex process, so this procedure assumes that you have
some networking knowledge.
To add another router to share an Internet connection:
This topic covers cases one and two above
1.
Determine the IP address range for your upstream (office or building)
network.
To determine the address range by using a Windows computer:
a.
Connect your computer into your upstream network’s router.
b.
Click Start, Run, type CMD, then click OK. The command prompt
window appears.
c.
Type ipconfig, then press Enter.
TIP
Although you can determine your computer’s IP address in
many ways, this method is quick and relatively easy.
c.
Take note of the IP address. In this example, the IP address is
192.168.100.139.
Example: The above examples show that upstream IP addresses are on
the 192.168.100.0 network. (The “0” indicates the entire network.) Your
upstream network’s address may be different. The default address of
your new Linksys router is 192.168.1.1. In setting up one router behind
another, you must make sure that the local network on your new router is
different than the network of your upstream router. In the above example,
because the default local network on your Linksys router 192.168.1.0 is
on a different subnet than the office network’s 192.168.100.0, you will be
able to place your Linksys router behind the other router.
39
Page 43

Linksys EA-Series
2.
Connect an Ethernet network cable to a LAN/Ethernet port on your
upstream network to the yellow Internet port on your router.
CAUTION
Connect the upstream network to your router’s yellow Internet
port, not one of the blue Ethernet ports. If you connect to an
Ethernet port, you create IP addressing problems for the office
network.
TIPS
An office network often has a wall plate with an Ethernet port that
you can connect to.
If you are doing this in a home environment (without wall ports),
connect an Ethernet network cable between a LAN port on your
upstream router and the Internet port on your Linksys router.
Setting Up: Advanced
Your computers can also use the built-in capabilities of your Linksys router,
such as parental controls. If you need further control over the type of content
your employees or family access, you can create an account with an Internet
filtering site such as www.opendns.com or www.bsecure.com. After you
create an account with them, use their DNS in place of your ISP’s DNS.
To use their DNS:
1.
Log into Linksys Smart Wi-Fi. (See “How to connect to Linksys Smart WiFi” on page 7.
2.
Under Router Settings, click Connectivity.
3.
Click the Local Network tab.
3.
Run your router’s setup CD on each computer that you want to connect
to the Linksys router. Each computer needs either a wired or wireless
connection to the Linksys router. For more information, see “How to
connect a computer to your network” on page11.
The computers that are connected to the Linksys router are now on the same
network, and are isolated from the upstream network. However, you will still
have access to the Internet through the upstream router (by way of your Linksys
router). Because two routers are between your computer and the Internet,
Internet traffic undergoes two network address translations. This is sometimes
referred to as Double NAT.
4.
Complete the Static DNS fields with the information provided by your
content filtering provider.
5.
Click OK.
40
Page 44

Linksys EA-Series
Setting Up: Advanced
To extend your network
This topic covers cases three and four above.
NOTE
This is a complex process, so this procedure assumes that you have
some networking knowledge.
To extend your network or add wireless capabilities:
1.
If you want to extend your network, you may also follow the instructions
above. One example of this might be to provide a separate wireless
network for your children to keep their wireless network traffic separate
from your wireless network. You might also want to isolate one network
from another network so that network shares aren’t visible across
networks. In this case, use an Ethernet cable to connect the Internet
port of the downstream router to one of the LAN ports of the upstream
router. Make sure that the local network subnets on the two routers are
different.
- OR -
You can extend your network by turning the downstream router into an
access point. (See “How to use a router as an access point” on page37).
When you use a router as an access point, computers connected to the
access point are on the same IP subnet as all other devices connected to
the router. File, printer, and media sharing is much easier if all devices are
on the same subnet.
How to expose a device to the Internet
Why would I expose a device to the Internet? If you are operating a web
server, a mail server, or a web camera, you may want to expose that device to
the Internet so anybody can access it. Your router includes a DMZ (Demilitarized
Zone) feature that forwards all inbound ports presented on the WAN interface,
except those that are specifically forwarded, to an individual IP address or
MAC address. This feature is normally not used, because it presents significant
security risks to the device that you designate for the DMZ. The DMZ device is
not protected by the built-in firewalls, Internet filters, or router web filters, and
is open to attacks from hackers.
A much safer way of “exposing” devices to the Internet would be to use port
forwarding. See “How to set up port forwarding” on page43.
To set up a device in the DMZ:
1.
Configure your device with a static IP address. See your device’s
documentation for help with setting a static IP address or use DHCP
reservation (see “How to set up the DHCP server on your router” on
page30).
2.
Log into Linksys Smart Wi-Fi. (See “How to connect to Linksys Smart WiFi” on page 7.
3.
Under Router Settings, click Security, then click the DMZ tab.
41
Page 45

Linksys EA-Series
4.
Click the setting for DMZ to turn it on.
5.
Select Enabled.
6.
In the Source IP Address section, select Any IP Address to allow access to
your DMZ device from the entire Internet, or select the alternate button
and enter a range of allowed source addresses.
7.
In the Destination IP Address section, enter the last three digits of the IP
address of the device that will be in the DMZ. The rest of the IP address is
already completed.
- OR -
If you want to specify the 12-digit MAC address of the device instead of
setting up a DHCP address reservation, you can replace Step 6 with the
following steps:
Setting Up: Advanced
a.
In the Destination IP Address section, select MAC Address, then click
View DHCP Client Table. The DHCP Client Table screen opens.
b.
Click Select next to the device that you want to place in the DMZ,
then click Close. The corresponding MAC address is copied into the
MAC Address field.
c.
Click OK.
42
Page 46

Linksys EA-Series
Port Forwarding and Port Triggering
How to set up port forwarding
Why would I use port forwarding? Port forwarding is a feature that forwards
inbound traffic from the Internet on a specific port or ports to a specific device
or port on your local network. You can set up port forwarding for:
• A single port (see “How to set up port forwarding for a single port” below)
• Multiple ports (see “How to set up port forwarding for multiple ports” on
page 44)
• A range of ports (see “How to set up port forwarding for a range of ports”
on page 44)
Port Forwarding and Port Triggering
3.
Under Router Settings, click Security.
4.
Click the Apps and Gaming tab.
5.
Click Single Port Forwarding. The Single Port Forwarding screen opens.
How to set up port forwarding for a single port
Why would I use port forwarding for a single port? Single port forwarding
is a feature that forwards inbound traffic from the Internet on a specific port to
a single device on your local network. An example of single port forwarding
would be to forward inbound web requests, typically on port 80, to a web
server.
TIP
See the device’s documentation for port and protocol information.
To set up single port forwarding:
1.
Follow your device’s instructions for configuring it with a static IP address
or use DHCP reservation to assign it a permanent address (see “How to
set up the DHCP server on your router” on page 30).
2.
Log into Linksys Smart Wi-Fi. (See “How to connect to Linksys Smart WiFi” on page 7.
6.
Click Add a new Single Port Forwarding.
7.
In the Application name field, enter a descriptive name.
8.
In the External Port field, type the external port number (not always
required).
9.
In the Internal Port field, type the internal port number (not always
required).
10.
In the Protocol drop-down list, select TCP, UDP, or Both (default).
11.
In the Device IP# field, enter the last three digits of the IP address you
have reserved for the computer you want to forward Internet traffic to.
The rest of the IP address has already been completed for you.
12.
Select Enabled, then click Save. If you don’t want to use port forwarding
but want to keep the information in the table, unselect the checkbox.
43
43
Page 47

Linksys EA-Series
How to set up port forwarding for multiple ports
Why would I set up port forwarding for multiple ports? Port forwarding is
a feature that forwards inbound traffic from the Internet on a specific port to
a single device on your local network. Unlike a web camera that typically only
requires a single port to be forwarded, some applications require forwarding
of multiple ports. VNC (Virtual Network Computing) software that allows you to
operate your computer remotely from anywhere on the Internet is an example
of an application that requires multiple ports to be forwarded. To forward to
multiple ports, just create additional entries to forward additional ports to the
same IP address.
Example: You want to set up your computer so you can remotely access it using
VNC software. By default, VNC uses TCP ports 5800 and 5900.
To set up single port forwarding for multiple ports:
1.
Make sure that the software you want to use has been installed onto a
networked computer.
2.
Log into Linksys Smart Wi-Fi. (See “How to connect to Linksys Smart WiFi” on page 7.
3.
Set up DHCP reservation for the IP address of the computer on which
you installed the software. (See “How to set up the DHCP server on your
router” on page 34).
4.
Under Router Settings, click Security.
5.
Click the Apps and Gaming tab.
6.
Click Single Port Forwarding. The Single Port Forwarding screen opens.
Port Forwarding and Port Triggering
7.
Click Add a new Single Port Forwarding.
8.
In the Application name field, enter a descriptive name.
9.
Enter in the same port number for the External Port and the Internal
Port.
10.
In the Protocol drop-down list, select TCP, UDP, or Both (default).
11.
In the Device IP# field, enter the last three digits of the IP address you
have reserved for the computer you want to forward Internet traffic to.
The rest of the IP address has already been completed for you.
12.
Select Enabled, then click Save. If you don’t want to use port forwarding
but want to keep the information in the table, unselect the checkbox.
NOTE
If you want to use software such as VNC on multiple computers,
you will need to reconfigure the default ports that VNC uses on
each additional computer. Then, create additional port forwarding
entries for each additional computer. See your software’s
documentation for help.
How to set up port forwarding for a range of ports
Why would I set up port forwarding for a range of ports? Port forwarding is
a feature that forwards inbound traffic from the Internet on a range of ports to
a single device on your local network. Unlike a web camera that typically only
requires a single port to be forwarded, some applications require forwarding
to a range of ports.
Example: You want to set up your computer so you can use BitTorrent, a
popular peer-to-peer file sharing application. BitTorrent uses port 6881 by
default. If that port is busy, the requesting BitTorrent client tries the next port
in sequence. The most common configuration for home routers with a single
BitTorrent computer is to set up port forwarding using a range of ports starting
with 6881 and ending with port 6889.
44
Page 48

Linksys EA-Series
Port Forwarding and Port Triggering
To set up port range forwarding:
1.
Log into Linksys Smart Wi-Fi. (See “How to connect to Linksys Smart WiFi” on page 7.
2.
Set up a DHCP reservation for the IP address of the computer on which
you installed the software. (See “How to set up the DHCP server on
your router” on page 34). In this example, the IP address of the desktop
computer with BitTorrent installed is 192.168.1.140.
3.
Under Router Settings, click Security.
4.
Click the Apps and Gaming tab.
5.
Click Port Range Forwarding. The Port Range Forwarding screen opens.
6.
Click Add a new Port Range Forwarding.
11.
Select Enabled, then click Save. If you don’t want to use port range
forwarding but want to keep the information in the table, unselect the
checkbox.
TIPS
To use software like BitTorrent on multiple computers on your
network, create additional entries with a unique range of ports as
shown above. BitTorrent works only with ports between 6881 and
6999.
Depending on your computer’s firewall software, you may need to
open a range of ports in your firewall to enable software that uses
port range forwarding.
How to set up port range triggering for online gaming
Why would I use port triggering instead of port forwarding? Port range
triggering allows the router to watch outgoing data for specific port numbers.
The IP address of the computer that sends the matching data is remembered
by the router, so that when the requested data returns through the router,
the data is routed back to the proper computer. An example of port range
triggering would be to enable a USB or Bluetooth headset for online chat and
gaming.
7.
In the Application name field, enter a descriptive name.
8.
In the Start ~ End Port fields, enter the range or ports. In this example,
the range is 6881 to 6889.
9.
Select TCP as the protocol.
10.
In the To IP Address field, enter the last 3 digits of the IP address of the
device running the software. The rest of the IP address fields already
completed. In this example, you would enter 140.
To set up port range triggering for multiple entries:
1.
See your device documentation for information on the ports that the
device uses.
2.
Log into Linksys Smart Wi-Fi. (See “How to connect to Linksys Smart WiFi” on page 7.
45
Page 49

Linksys EA-Series
3.
Under Router Settings, click Security.
4.
Click the Apps and Gaming tab.
5.
Click Port Range Triggering. The Port Range Triggering screen opens.
6.
Click Add a new Port Range Triggering.
Port Forwarding and Port Triggering
7.
In the Device or Application field, enter a descriptive name (such as
PS3Headset).
8.
For single ports, enter the same port number in each Triggered range
and Forwarded range field.
9.
For port ranges, enter the same number ranges in each set of Triggered
Range and Forwarded Range fields.
10.
Select Enabled, then click Save. If you don’t want to use port range
triggering but want to keep the information in the table, unselect the
checkbox.
46
Page 50

Linksys EA-Series
Maintaining and Monitoring
Maintaining and Monitoring
How to back up and restore your router configuration
Why do I need to back up my router configuration? As with any valuable
data, you should back up your router configuration. Your router might contain
many customized settings. Those settings would be lost if you reset your router
to its factory defaults, and you would need to re-enter all of them manually. If
you back up your router configuration, restoring settings is easy.
NOTE
You can only back up the router configuration locally (not
remotely).
To back up your router configuration:
1.
Log into Linksys Smart Wi-Fi. (See “How to connect to Linksys Smart WiFi” on page 7.
2.
Under Router Settings, click Troubleshooting.
3.
Click the Diagnostics tab.
TIP
For save multiple backup files, include the backup date in the
filename as you save.
To restore your router configuration:
1.
Log into Linksys Smart Wi-Fi. (See “How to connect to Linksys Smart WiFi” on page 7.
2.
Under Router Settings, click Troubleshooting.
3.
Click the Diagnostics tab.
4.
Under Router configuration, click Restore. The Restore Router
Configuration dialog box opens.
5.
Click Choose File to navigate to the location of your configuration file,
then select the file and click Open.
6.
To restore the configuration, click Start to Restore.
4.
Under Router configuration, click Backup. You are prompted to save the
file.
5.
Specify a file location, then click Save.
47
47
Page 51

Linksys EA-Series
Maintaining and Monitoring
How to upgrade the router’s firmware
Why would I need to upgrade my router’s firmware? Linksys may periodically
publish a firmware upgrade either to fix a problem or to add features to your
router.
IMPORTANT
Do not interrupt the upgrade process. You should not turn off the
router or press the Reset button during the upgrade. Doing so may
permanently disable the router.
TIPS
Your router automatically checks for available updates and
installs them by default. Use the following instructions only if the
automatic firmware update has been turned off.
To upgrade the router’s firmware:
1.
Log into Linksys Smart Wi-Fi. (See “How to connect to Linksys Smart WiFi” on page 7.
2.
Under Router Settings, click Connectivity.
3.
Click the Basic tab.
4.
Under Firmware Update, click Check for Updates.
5.
If an available update is found, follow the on-screen instructions to install
it.
TIP
To have your router automatically check for updates and install
them, select Automatic under Firmware Update.
How to restore factory defaults
If you’ve tried previous troubleshooting steps and your network still doesn’t
work, you may need to restore your router’s factory defaults. To restore your
router to factory defaults, you can use the Reset button on the router or use
Linksys Smart Wi-Fi.
To reset your router using the reset button:
CAUTION
Whenever you restart the router, all logs that are not saved will be
lost.
1.
With your router connected to power and turned on, press and hold the
Reset button on the back of your router for about 10 seconds (until the
power indicator flashes).
To reset your router to factory defaults using Linksys Smart Wi-Fi:
1.
Log into Linksys Smart Wi-Fi. (See “How to connect to Linksys Smart WiFi” on page 7.
2.
Under Router Settings, click Troubleshooting.
3.
Click the Diagnostics tab.
4.
Under Factory reset, click Reset.
48
Page 52

Linksys EA-Series
Maintaining and Monitoring
A confirmation screen opens.
5.
Click Yes to confirm. All settings and logs are deleted, and your router is
returned to its factory default settings.
How to check the status of your router
Why would I want to check the status of my router? Your router status tells
you whether you have a secure Internet connection and informs you about the
status of your network-connected devices.
To check your router status:
1.
Log into Linksys Smart Wi-Fi. (See “How to connect to Linksys Smart WiFi” on page 7.
2.
Under Router Settings, click Troubleshooting.
3.
Click the Status tab. Detailed information about your router status is
displayed.
TIP
For field descriptions, click Help at the top of the screen.
4.
To view a list of connected network devices, click Devices. To view a full
report of your router status, click Report.
5.
Click OK to close the screen.
49
Page 53

Linksys EA-Series
Maintaining and Monitoring
How to disable the Ethernet port status lights
Why would I want to disable the Ethernet port status lights? Depending on
the placement of the router in a home, you might find the lights distracting.
You can easily disable the lights using Linksys Smart Wi-Fi.
To disable the lights:
1.
Log into Linksys Smart Wi-Fi. (See “How to connect to Linksys Smart WiFi” on page 7.
2.
Under Router Settings, click Connectivity.
3.
Click the Basic tab.
4.
Under Port Lights, click the ON/OFF button.
How to test your Internet connection
What utilities are included in my router to test my Internet connection?
Your router includes two diagnostic tests, Ping and Traceroute, that let you
check network connections, including network devices and your Internet
connection.
To diagnose your Internet connection:
1.
Log into Linksys Smart Wi-Fi. (See “How to connect to Linksys Smart WiFi” on page 7.
2.
Under Router Settings, click Troubleshooting.
3.
Click the Diagnostics tab.
4.
To check whether an address can be reached:
a.
Under Ping IPv4, enter an IP address or URL into the IP or host name
field.
50
Page 54

Linksys EA-Series
b.
Select a number of times to ping from the Number to ping dropdown list.
c.
Click Start to Ping. A window opens showing the ping test results.
You will see a response for each successful ping.
NOTE
If an Internet URL fails to respond to ping, it doesn’t necessarily
mean that the site is down. For security reasons, some sites are
configured to not respond to ping requests.
5.
To trace the route that packets take between your router and a specific
address:
a.
Under Trace route, enter an address in the IP or host name field.
Maintaining and Monitoring
How to configure and use logs
What kind of logging capabilities does my router have? Your router can
track all traffic for your Internet connection and record that information in alog.
To enable and view logs:
1.
Log into Linksys Smart Wi-Fi. (See “How to connect to Linksys Smart WiFi” on page 7.
2.
Under Router Settings, click Troubleshooting.
3.
Click the Logs tab.
b.
Click Start to Traceroute. A window opens with the test results.
4.
To enable logs, click the Enable Logs button so that ON is displayed.
You can:
• View the logs directly in the list
• Open the logs in a separate browser window
• Print the logs
51
Page 55

Linksys EA-Series
Troubleshooting
Troubleshooting
This chapter can help you solve common setup issues and connect to the
Internet. You can find more help from our award-winning customer support at
linksys.com/support.
Your router was not successfully set up
If Linksys Smart Wi-Fi did not complete the setup, you can try the
following:
• Press and hold the Reset button on your router with a paperclip or pin
until the LED starts flashing (about 10 seconds), then install the router
again.
Your router’s appearance may vary
• Temporarily disable your computer’s firewall (see the security software’s
instructions for help), then install the router again.
Windows XP Service Pack update
On Windows XP computers, Linksys Smart Wi-Fi requires Service Pack 3 in order
to work. If the currently installed Service Pack is older than version 3, you need
to download and install Service Pack 3.
TIP
To temporarily connect to the Internet and download the required
Service Pack, you can use the included Ethernet cable to connect
your computer directly to your modem.
To install Service Pack 3:
1.
Connect to the Microsoft Update website (update.microsoft.com/
windowsupdate).
2.
Follow the instructions on the website or contact Microsoft if you need
further help.
3.
After downloading and installing Service Pack 3, install the router again.
• If you have another computer, use that computer to install the router
again.
52
52
Page 56

Linksys EA-Series
Your Internet cable is not plugged in
message
If you get a “Your Internet cable is not plugged in” message when trying to set
up your router, follow these troubleshooting steps.
To fix the problem:
1.
Make sure that an Ethernet or Internet cable (or a cable like the one
supplied with your router) is securely connected to the yellow Internet
port on the back of the router and to the appropriate port on your
modem. This port on the modem is usually labeled Ethernet, but may
be named Internet or WAN.
Troubleshooting
2.
Make sure that your modem is connected to power and is turned on. If it
has a power switch, make sure that it is set to the ON or l position.
3.
If your Internet service is cable, verify that the cable modem’s CABLE port
is connected to the coaxial cable provided by your ISP.
Or, if your Internet service is DSL, make sure that the DSL phone line is
connected to the modem’s DSL port.
4.
If your computer was previously connected to your modem with a USB
cable, disconnect the USB cable.
5.
Install the router again.
Cannot access your router message
If you cannot access your router because your computer is not connected to
your network, follow these troubleshooting steps.
To access your router, you must be connected to your own network. If you
currently have wireless Internet access, the problem may be that you have
accidentally connected to a different wireless network.
Back view of router
Back view of cable modem
Back view of DSL modem
To fix the problem on Windows computers:
1.
On your Windows desktop, right-click the wireless icon in the system tray.
2.
Click View Available Wireless Networks. A list of available networks
appears.
53
Page 57

Linksys EA-Series
3.
Click your own network name, then click Connect. In the example
below, the computer was connected to another wireless network named
JimsRouter. The name of the Linksys E-Series network, BronzeEagle in this
example, is shown selected.
Troubleshooting
To fix the problem on Mac computers:
1.
In the menu bar across the top of the screen, click the AirPort icon. A
list of wireless networks appears. Linksys Smart Wi-Fi has automatically
assigned your network a name.
In the example below, the computer was connected to another wireless
network named JimsRouter. The name of the Linksys E-Series network,
BronzeEagle in this example, is shown selected.
4.
If you are prompted to enter a network key, type your password (Security
Key) into the Network key and Confirm network key fields, then click
Connect.
Your computer connects to the network, and you should now be able to
access the router.
2.
Click the wireless network name of your Linksys E-Series router
(BronzeEagle in the example).
3.
Type your wireless network password (Security Key) into the Password
field, then click OK.
54
Page 58

Linksys EA-Series
Troubleshooting
After setup
The Internet appears to be unavailable
If the Internet has difficulty communicating with your router, the problem may
appear as a “Cannot find [Internet address]” message in your web browser. If
you know that the Internet address is correct, and if you’ve tried several valid
Internet addresses with the same result, the message could mean that there’s a
problem with your ISP or modem communicating with your router.
Try the following:
• Make sure that the network and power cables are securely connected.
• Make sure that the power outlet that your router is connected to has
power.
• Reboot your router.
• Contact your ISP and ask about outages in your area.
Why would I need to reboot my router? The most common method of
troubleshooting your router is to turn off your router’s power, then turn it back
on again. Your router can then reload its custom settings, and other devices
(such as the modem) will be able to “rediscover” the router and communicate
with it. This process is called rebooting.
To reboot your router using Linksys Smart Wi-Fi:
1.
Log into Linksys Smart Wi-Fi. (See “How to connect to Linksys Smart WiFi” on page 7.
2.
Under Router Settings, click Troubleshooting.
3.
Click the Diagnostics tab.
4.
Under Reboot, click Reboot.
A confirmation screen opens.
Rebooting your router
To reboot your router using the power cord:
1.
Disconnect the power cord from the router and the modem.
2.
Wait 10 seconds, then reconnect the power cord to the modem. Make
sure it has power.
3.
Wait until the modem’s Online indicator has stopped flashing, or wait
two minutes, then reconnect the power cord to the router.
4.
Wait until the power indicator stops flashing, then wait two minutes
before trying to connect to the Internet from a computer.
5.
Click Yes to confirm. The router reboots. While the router is rebooting, all
connected devices will lose their Internet connection.
Linksys Smart Wi-Fi does not open in your web browser
The latest versions of the most common web browsers work with Linksys Smart
Wi-Fi. Linksys Smart Wi-Fi works with these web browsers:
• Internet Explorer 8 or higher
• Firefox 8 or higher
• Google Chrome 10 or higher
• Safari 5 (for Mac) or higher
55
Page 59

Linksys EA-Series
You cannot access Linksys Smart Wi-Fi
To access your router directly, see “How to manually set up your router” on
page 24:
All other troubleshooting has been unsuccessful
If you’ve tried previous troubleshooting steps and your network still doesn’t
work, you may need to restore your router’s factory defaults.
Why would I need to restore to factory defaults? When all other
troubleshooting has failed, you may want to try restoring the router to its basic
factory settings, which are the most common settings used in home networks.
Resetting the router erases your custom settings, so you must restore the
settings after. We recommend that you back up your configuration before
resetting your router to factory defaults. See “How to back up and restore your
router configuration” on page 47.
To restore your router to factory defaults, you can use the Reset button on the
router or use Linksys Smart Wi-Fi. For instructions, see “How to restore factory
defaults” on page 48.
Troubleshooting
56
Page 60

Linksys EA-Series
Specifications
Specifications
Linksys EA6500 v2
Model Name Linksys EA6500 v2
Description Linksys Smart Wi-Fi Router AC1750
Model Number EA6500 v2
Switch Port Speed 10/100/1000 Mbps (Gigabit Ethernet)
Radio Frequency 2.4 and 5 GHz
# of Antennas 3 (2.4 GHz) + 3 (5 GHz)
Ports Power, USB (2), Internet, Ethernet (1-4)
Buttons Reset, Wi-Fi Protected Setup,
power (EU models only)
LEDs Top panel: Power
Back panel: Internet, Ethernet (1-4)
UPnP Supported
Security Features WEP, WPA, WPA2, RADIUS
Security Key Bits Up to 128-bit encryption
Storage File System Support FAT, NTFS, and HFS+
Browser Support Internet Explorer 8 or higher, Firefox 4 or
higher, Google Chrome 10 or higher, and
Safari 4 or higher
Environmental
Dimensions 10.8” x 1.58” x 7.25”
(256 x 40 x 184 mm)
Unit Weight 17.67 oz (501 g)
Power 12V, 3.5A
Certications FCC, IC, CE, Wi-Fi a/b/g/n/draft ac,
Windows7, Windows 8, DLNA
Operating Temp. 32 to 104°F (0 to 40°C)
Storage Temp. -4 to 140°F (-20 to 60°C)
Operating Humidity 10 to 80% relative humidity,
non-condensing
Storage Humidity 5 to 90% non-condensing
NOTES
For regulatory, warranty, and safety information, see the CD that
came with your router or go to Linksys.com/support.
Specifications are subject to change without notice.
Maximum performance derived from IEEE Standard 802.11
specifications. Actual performance can vary, including lower
wireless network capacity, data throughput rate, range and
coverage. Performance depends on many factors, conditions and
variables, including distance from the access point, volume of
network traffic, building materials and construction, operating
system used, mix of wireless products used, interference and other
adverse conditions.
57
57
57
Page 61

Visit linksys.com/support for award-winning 24/7 technical support
BELKIN, LINKSYS and many product names and logos are trademarks of the Belkin group of companies. Third-party trademarks mentioned are the property of their respective owners.
© 2013 Belkin International, Inc. and/or its affiliates. All rights reserved.
3425-01685A
130613JLR
Page 62

Routeur sans fil intelligent AC1750, EA6500 v2
Guide de l’utilisateur
Page 63

Linksys EA-Series
Contenu
Contenu
Vue d'ensemble du produit
EA6500 v2 . . . . . . . . . . . . . . . . . . . . . . . . . . . . . . . . . . .1
Montage mural 4
Configuration: notions de base
Création d'un réseau domestique . . . . . . . . . . . . . . . . . . . .5
Qu'est-ce qu'un réseau? 5
Configuration d'un réseau domestique 5
Où trouver de plus amples renseignements . . . . . . . . . . . . .5
Comment installer votre routeur
Configuration de votre routeur
Comment se connecter au sans fil intelligent de Linksys 7
Comment se connecter directement à votre routeur 8
Comment améliorer la vitesse de votre connexion sans fil 8
Comment modifier le nom et le mot de passe du routeur 9
Modification du mot de passe d'accès local de votre routeur 9
Modification du fuseau horaire de votre routeur 10
Vérification de la vitesse de votre connexion Internet . . . . . . 10
Connexion de périphériques à votre réseau
Connexion d'un ordinateur à votre réseau 11
Connexion d'une imprimante USB 11
Connexion des autres périphériques 12
Affichage des détails du périphérique 13
Configuration du contrôle parental . . . . . . . . . . . . . . . . . . 14
Configuration du contrôle parental 14
Configuration de votre réseau d'invité . . . . . . . . . . . . . . . . 15
Création d'une copie de sauvegarde de la configuration de votre
routeur
. . . . . . . . . . . . . . . . . . . . . . . . . . . . . . . . . . . 16
. . . . . . . . . . . . . . . . . . . . .6
. . . . . . . . . . . . . . . . . . . . . .7
. . . . . . . . . . . . .11
Utilisation des objets 17
Personnalisation de la Liste des périphériques 17
Utilisation d'un disque dur externe
Vue d'ensemble . . . . . . . . . . . . . . . . . . . . . . . . . . . . . . 18
Branchement d'un lecteur USB
Utilisation de l'accès au dossier sécurisé
Configuration des utilisateurs autorisés et des dossiers partagés 19
Comment accéder aux dossiers partagés 20
Configuration de votre routeur comme serveur multimédia . . 21
Connexion de votre périphérique UPnP au serveur multimédia 22
Accès à distance au périphérique de stockage . . . . . . . . . . . 23
. . . . . . . . . . . . . . . . . . . . .18
. . . . . . . . . . . . . . . 19
Configuration: avancée
Configuration manuelle de votre routeur . . . . . . . . . . . . . .25
Configuration manuelle de votre connexion Internet 25
Associer un routeur à votre compte sans fil intelligent de Linksys 26
Obtenir de meilleurs résultats avec votre routeur double bande 27
Contrôle de l’accès au réseau
Amélioration de la sécurité à l’aide du pare-feu intégré 30
Configuration du serveur DHCP de votre routeur . . . . . . . . . 32
Configuration des adressesIP réservées dans le serveur DHCP 33
Accéder au réseau à partir d'Internet . . . . . . . . . . . . . . . . . 33
Clonage d'une adresseMAC
Connexion à votre bureau à l’aide d’une connexion VPN
. . . . . . . . . . . . . . . . . . . . . . 29
. . . . . . . . . . . . . . . . . . . . . . 34
. . . . 35
Personnalisation du sans fil intelligent de Linksys
. . . . . . . . . 17
Optimisation du routeur pour les jeux et la téléphonie
. . . . . 35
i
i
Page 64

Linksys EA-Series
Contenu
Activation d’un service VoIP dans votre réseau. . . . . . . . . . .37
Configuration de UPnP
Utilisation d’un routeur comme point d’accès
Utilisation du nouveau routeur derrière un routeur existant
Ajout de votre routeur à un routeur existant ou à une passerelle existante 40
Partage d’une connexion Internet 40
Étendre votre réseau 42
Rendre un périphérique accessible par Internet . . . . . . . . . . 43
. . . . . . . . . . . . . . . . . . . . . . . . . .38
. . . . . . . . . . . 38
. . 40
Routage de ports et Déclenchement de
ports
Configuration du routage de ports . . . . . . . . . . . . . . . . . . 45
Configuration du routage de ports pour un port unique 45
Configuration du routage de plusieurs ports 46
Configuration du routage d’une plage de ports 47
Configuration du déclenchement de plage de ports pour des jeux
en ligne
. . . . . . . . . . . . . . . . . . . . . . . . . . . . . . . . . . .48
Mise à jour de Windows XP Service Pack. . . . . . . . . . . . . . .54
Message Your Internet cable is not plugged in (Votre câble Internet n’est
pas branché)
Message Cannot access your router (
55
Après la configuration
L'accès à Internet ne semble pas être disponible 57
Le sans fil intelligent de Linksys ne s’ouvre pas dans votre navigateur Web
57
Impossible d'accéder au sans fil intelligent de Linksys 58
Toutes les autres étapes de dépannage ont échoué 58
. . . . . . . . . . . . . . . . . . . . . . . . . . . . . . . . . . .55
Impossible d’accéder au routeur)
. . . . . . . . . . . . . . . . . . . . . . . . . . 57
Spécifications
Linksys EA6500 v2 . . . . . . . . . . . . . . . . . . . . . . . . . . . . . 59
Maintien et surveillance
Création et restauration d'une copie de sauvegarde de la
configuration de votre routeur
Mise à niveau du micrologiciel du routeur
Rétablissement des paramètres par défaut
Vérification de l'état de votre routeur
Désactivation des voyants d'état des ports Ethernet 52
Vérification de votre connexion Internet 52
Configuration et utilisation des journaux 53
. . . . . . . . . . . . . . . . . . . .49
. . . . . . . . . . . . . .50
. . . . . . . . . . . . .50
. . . . . . . . . . . . . . . . .51
Dépannage
Votre routeur n’a pas été configuré correctement. . . . . . . . .54
ii
Page 65

Linksys EA-Series
Vue d'ensemble du produit
Vue d'ensemble du produit
EA6500 v2
Caractéristiques
Technologie sans filAC
Votre routeur intègre la technologie de pointe 802.11ac et offre une vitesse
et une portée maximisées, pour vous permettre de créer des réseaux à haut
rendement conçus pour les cinémas maison. Raccordez vos ordinateurs,
téléviseurs Internet, consoles de jeux, téléphones intelligents et autres
périphériques Wi-Fi à des taux de transfert de données incroyablement rapides
pour une expérience inégalée.
La puissance de la double bande
Doublez votre bande passante de réseau avec une double bande AC
en simultanée. La fonction de double bande est conçue pour éviter les
interférences et optimiser le débit pour la diffusion de vidéo HD, les transferts
de fichiers et les jeux sans fil plus fluides et rapides.
SpeedBoost
Une technologie d’antenne de qualité supérieure aide à maintenir des vitesses
élevées sur des distances plus grandes partout dans votre domicile.
Sécurité avancée
Protégez-vous des menaces Internet et de ceux qui veulent profiter de votre
connexion sans fil, grâce au cryptage WPA2 et au pare-feu SPI.
Contenu de l’emballage
En plus de votre routeur, l’emballage comprend:
• Câble réseau (Ethernet)
• Adaptateur courant c.a.
• Carte Réponse à la carte
MC
Avantages du gigabit
Utilisez les quatre ports Ethernet Gigabit (10/100/1000) pour accélérer le
partage de fichiers (jusqu’à dix fois plus rapide qu’une connexion Ethernet
standard) avec d’autres périphériques Gigabit, notamment des ordinateurs et
des serveurs.
PortsUSB et serveur multimédia DLNA intégrés
Les ports USB vous permettent d’ajouter un disque externe USB à votre
réseau pour partager des fichiers dans votre maison ou au travers d’Internet.
Il comprend aussi un serveur multimédia DLNA intégré vous permettant de
diffuser des vidéos et des fichiers multimédia en continu vers une console
Xbox360, PS3 ou tout autre périphérique compatible. Vous pouvez également
connecter une imprimante USB et la partager sur votre réseau.
1
1
Page 66

Linksys EA-Series
Vue d'ensemble du produit
Idéal pour le cinéma maison
Profitez chez vous du meilleur de la technologie de divertissement en
connectant vos ordinateurs, vos téléviseurs compatibles Internet, vos consoles
de jeux, vos lecteurs multimédia, etc. à votre réseau sans fil et à Internet. La
technologie d’établissement des priorités simultanée pour le trafic sur deux
bandesN et pour QoS permet de maximiser la vitesse et le rendement pour
vous offrir des téléchargements plus rapides, des flux de musique et de vidéos
fluides, ainsi que des jeux en ligne et un service VoIP fiables.
Installation rapide
Le logiciel sans fil intelligent de Linksys vous aide à configurer facilement votre
routeur.
IPv6 pris en charge
Prend en charge la dernière technologie de protocole Internet pour un réseau
prêt pour l’avenir.
Gestion aisée
Le logiciel sans fil intelligent de Linksys vous aide à personnaliser vos paramètres
et à ajouter rapidement plusieurs périphériques à votre réseau:
Réseau d’invité distinct
Créez un réseau distinct et protégé par mot de passe pour vos invités.
Contrôle parental
Limitez l’accès à Internet à certaines heures et à certains sites grâce aux
fonctions de contrôle parental.
Vue du dessus
Voyant d’activité
• Voyant d’activité — Est allumé lorsque le routeur est branché et suite à
l’établissement d’une connexion Wi-Fi Protected Setup réussie. Clignote
lentement lors du démarrage, de la mise à niveau du micrologiciel,
du rétablissement des paramètres par défaut et de la procédure Wi-Fi
Protected Setup. Clignote rapidement lorsqu’une erreur se produit
pendant la procédure Wi-Fi Protected Setup.
2
Page 67

Linksys EA-Series
Vue d'ensemble du produit
Vue arrière
Bouton Wi-Fi Protected
(Configuration de l’accès
Setup button
Wi-Fi protégé)
• Ports Ethernet — Connectez des câbles Ethernet (aussi appelés «câbles
Ports USB
Ports Ethernet
réseau») à ces ports Ethernet Gigabit (10/100/1000), de couleur bleue, et
aux périphériques Ethernet câblés de votre réseau.
REMARQUE
Pour obtenir de meilleurs résultats, branchez des câbles de grade
CAT5E ou supérieur aux ports Ethernet.
• Port Internet — Connectez un câble Ethernet (aussi appelé « câble
réseau» ou « câble Internet ») à ce port, de couleur jaune, et à votre
modem.
• Bouton Wi-Fi Protected Setup™ — Appuyez sur ce bouton pour ajouter
automatiquement des périphériques utilisant Wi-Fi Protected Setup.
Pour de plus amples renseignements, consultez la rubrique «Connexion
d’un périphérique à l’aide de Wi-Fi Protected Setup» à la page12.
• Ports USB — Pour partager facilement de l’espace disque avec d’autres
utilisateurs sur votre réseau ou sur l’Internet, connectez un lecteur USB
à l’un des ports. Pour obtenir de plus amples renseignements, consultez
la rubrique « Utilisation d’un disque dur externe» à la page 18. Vous
pouvez également connecter une imprimante USB et la partager sur
votre réseau. Pour obtenir de plus amples renseignements, consultez la
rubrique «Connexion d’une imprimante USB» à la page11.
Port Internet
Bouton Reset
(Réinitialisation)
Port d’alimentation
• Bouton Reset — Appuyez sur ce bouton 10secondes (jusqu’à ce que
les voyants des ports clignotent en même temps) pour restaurer les
paramètres d’usine du routeur. Vous pouvez également restaurer les
paramètres d’usine à l’aide de l’utilitaire basé sur le navigateur Web.
Pour obtenir de plus amples renseignements, consultez la rubrique
«Rétablissement des paramètres par défaut» à la page50.
• Port d’alimentation — Branchez le cordon d’alimentation c.a. fourni
dans cette prise.
MISE EN GARDE
Utilisez uniquement l'adaptateur livré avec le routeur.
Indicateurs d’activité des ports
Voyant jaune
d'activité réseau
Port réseau ou Internet
• Voyant vert de connexion — Sur les ports Ethernet, s’allume quand
un câble connecte le port à un autre port Ethernet Gigabit. Sur le port
Internet, s’allume alors qu’il est raccordé à un modem.
• Voyant d’activité du réseau jaune — Clignote lorsqu’il y a du trafic
réseau sur ce port.
Voyant vert de
connexion
3
Page 68

Linksys EA-Series
Montage mural
Le dessous du routeur est muni de deux fentes pour montage mural. La distance
entre les fentes est de 82mm. Deux vis sont nécessaires pour monter le routeur.
Matériel de montage suggéré
7-8mm 1,5-2mm
REMARQUE
Linksys ne peut être tenue responsable des dommages causés par
l'utilisation de matériel de montage mural mal fixé.
Procédez comme suit:
1. Choisissez l’endroit voulu pour installer le routeur. Assurez-vous que le
mur est plat, sec et suffisamment solide. Choisissez un emplacement
situé près d’une prise électrique.
2. Percez deux trous dans le mur, Assurez-vous que les trous sont séparés
de 82mm.
3. Insérez une vis dans chaque trou en laissant dépasser la tête de 3mm.
4. Placez le routeur de manière à aligner les trous de montage avec les deux
vis.
5. Placez les trous sur les vis et abaissez le routeur jusqu’à ce qu’il soit bien
en place.
3-4mm
Vue d'ensemble du produit
Gabarit pour montage mural
Imprimez cette page grandeur réelle.
Découpez le long de la ligne pointillée et placez le gabarit au mur pour
assurer l’espacement approprié entre les trous.
82 mm
4
Page 69

Linksys EA-Series
Configuration: notions de base
Configuration: notions de base
Création d'un réseau domestique
Qu'est-ce qu'un réseau?
Un réseau est un groupe de périphériques qui peuvent communiquer entre eux.
Un réseau domestique peut également inclure l'accès Internet, qui nécessite
un routeur comme celui-ci.
Un réseau domestique type comprend plusieurs ordinateurs, une imprimante,
un modem et un routeur. Un grand réseau domestique peut également
comprendre un commutateur, des routeurs supplémentaires, des points
d'accès et plusieurs périphériques multimédia Internet, par exemple des
téléviseurs, consoles de jeux et des caméras Web.
• Modem — Connecte un ordinateur ou un routeur à votre FAI (fournisseur
d'accès Internet). Votre FAI pourrait vous en fournir un. Le modem est un
périphérique qui se connecte à une prise téléphonique ou à votre prise
de câblodistribution.
• Routeur — Connecte vos périphériques réseau câblés et sans fil entre
eux et au modem (et à votre FAI).
• Commutateur — Vous permet de connecter plusieurs périphériques
réseau câblés à votre réseau domestique. Votre routeur est doté d'un
commutateur réseau intégré (les ports Ethernet). Si vous possédez
plus de périphériques réseau câblés que le nombre de ports Ethernet
disponibles sur votre routeur, vous aurez besoin d'un commutateur
additionnel pour consolider les connexions câblées.
• d'un routeur pour connecter vos ordinateurs entre eux et au modem;
• de service Internet à votre domicile, fourni par un FAI (fournisseur
d'accès Internet).
2.
Assurez-vous que votre modem fonctionne. Votre FAI peut vous aider à
configurer votre modem et à vérifier qu'il fonctionne correctement.
3.
Configurez votre routeur. Consultez la rubrique « Comment installer
votre routeur» à la page6.
4.
Pour connecter un ordinateur ou un autre périphérique au réseau,
consultez la rubrique «Connexion d’un ordinateur à votre réseau» à la
page11 et «Connexion des autres périphériques» à la page12.
Où trouver de plus amples renseignements
En plus du présent guide d'utilisateur, vous pouvez trouver de l'aide à ces
endroits:
• Linksys.com/support (documentation, téléchargements, FAQ, soutien
technique, clavardage en ligne, forums)
• Aide du sans fil intelligent de Linksys (allez au sans fil intelligent de
Linksys, puis cliquez sur Help (aide) en haut de l'écran)
Configuration d'un réseau domestique
1.
Achetez l'équipement approprié. Pour un réseau qui comprend un accès
Internet, vous avez besoin:
• d'ordinateurs avec un port Ethernet ou des capacités de réseau sans fil;
• d'un modem pour vous connecter à votre FAI (habituellement fourni
par votre FAI);
5
5
Page 70

Linksys EA-Series
Configuration: notions de base
Comment installer votre routeur
Pour installer votre routeur:
1.
Allumez votre nouveau routeur. Si vous remplacez un routeur existant,
déconnectez ce dernier.
2.
Connectez le câble Internet de votre modem au port Internet jaune de
votre routeur. Patientez jusqu’à ce que le voyant d’alimentation à l’avant
du routeur soit allumé.
3.
Connectez-vous sur le réseau sans fil sécurisé indiqué dans le Guide de
démarrage rapide fourni avec votre routeur. (Vous pourrez modifier le
nom et le mot de passe du réseau plus tard, au cours de la configuration
du routeur.) Si vous avez besoin d’aide pour vous connecter au réseau,
reportez-vous à la documentation de votre périphérique. Remarque:
Vous n’aurez pas accès à Internet jusqu’à ce que votre routeur soit
complètement configuré.
4.
Ouvrez un navigateur Internet et suivez les instructions afin de configurer
votre routeur. Si les instructions n’apparaissent pas dans la fenêtre
du navigateur, entrez l’adresse linksyssmartwifi.com dans la barre
d’adresse du navigateur.
5.
À la fin de l’installation, suivez les instructions à l’écran pour configurer
votre compte sans fil intelligent de Linksys. Utilisez le sans fil intelligent
de Linksys pour gérer facilement les paramètres de votre routeur, par
exemple :
• la modification du nom du routeur et du mot de passe;
• la configuration de l’accès d’invités;
• la configuration du contrôle parental;
• l’ajout de périphériques à votre réseau;
Si vous ne pouvez pas cliquer sur le lien tout en étant derrière votre
nouveau routeur Linksys, ouvrez une session sans fil intelligent de Linksys
tout en étant derrière le routeur et ajoutez votre routeur à cet endroit.
Pour de plus amples renseignements, consultez la rubrique «Associer un
routeur à votre compte sans fil intelligent de Linksys» à la page26.
CONSEIL:
Imprimez cette page, puis inscrivez vos paramètres de routeur et
de compte dans le tableau ci-dessous à titre de référence. Gardez
votre notes en lieu sûr. Le programme Setup enregistre aussi vos
informations de configuration dans un fichier sur le bureau de
votre ordinateur.
Nom du réseau (SSID)
Mot de passe du
réseau
Mot de passe du
routeur
Nom du réseau
d'invité
Mot de passe du
réseau d'invité
Nom d'utilisateur
sans fil intelligent de
Linksys
Mot de passe sans fil
intelligent de Linksys
• la vérification de la vitesse de votre connexion Internet.
REMARQUE:
Lors du processus de configuration du routeur, vous recevrez un
courriel de vérification. Depuis votre réseau domestique, cliquez
sur le lien dans le courriel pour associer votre routeur au compte
sans fil intelligent de Linksys. Assurez-vous que le lien s'ouvre dans
un navigateur pris en charge, par exemple Internet Explorer8
ou version ultérieure, Firefox8 ou version ultérieure, Google
Chrome10 ou version ultérieure et Safari5 (pour Mac) ou version
ultérieure.
6
Page 71

Linksys EA-Series
Configuration: notions de base
Configuration de votre routeur
Vous pouvez changer les paramètres du routeur pour rendre votre réseau plus
sécuritaire ou pour qu'il fonctionne mieux avec un périphérique ou un jeu.
Être en mesure de régler les paramètres pendant que vous êtes à l'extérieur
du domicile peut faciliter l'administration du routeur. Vous pouvez configurer
votre routeur de partout dans le monde à l'aide du sans fil intelligent de Linksys,
mais vous pouvez également configurer votre routeur directement de votre
réseau domestique.
Le sans fil intelligent de Linksys pourrait également être disponible pour votre
appareil mobile. Consultez le magasin d'applications de votre appareil pour
des renseignements.
Utilisez le sans fil intelligent de Linksys pour gérer facilement les paramètres de
votre routeur, par exemple:
• la modification du nom du routeur et du mot de passe;
• la configuration de l'accès d'invités;
• la configuration du contrôle parental;
• l'ajout de périphériques à votre réseau;
• la vérification de la vitesse de votre connexion Internet.
Votre compte sans fil intelligent de Linksys peut également être utilisé pour gérer
de multiples routeurs Linksys. Pour de plus amples renseignements, consultez
la rubrique «Associer un routeur à votre compte sans fil intelligent de Linksys»
à la page26.
Comment se connecter au sans fil intelligent de Linksys
Pour se connecter au sans fil intelligent de Linksys:
1.
Ouvrez le navigateur Web de votre ordinateur.
2.
Rendez-vous au le site www.linksyssmartwifi.com et connectez-vous
à votre compte.
Si vous avez oublié votre mot de passe, cliquez sur Forgot your
password? (vous avez oublié votre mot de passe?) et suivez les instructions à l'écran pour le récupérer.
Désactivation d'un accès distant
Si vous désirez configurer votre routeur uniquement lorsque vous êtes sur
votre réseau domestique, vous devriez désactiver l'accès distant.
Pour désactiver l'accès distant:
1.
Ouvrez le sans fil intelligent de Linksys.
2.
Dans Router Settings (paramètres du routeur), cliquez sur Connectivity
(connectivité).
7
Page 72

Linksys EA-Series
3.
Cliquez sur l'onglet Administration, puis désélectionnez Allow remote
access to Linksys Smart Wi-Fi (permettre l’accès à distance au sans fil
intelligent de Linksys).
4.
Cliquez sur OK.
Comment se connecter directement à votre routeur
Vous pouvez configurer votre routeur en y accédant directement sur votre
réseau domestique au lieu d'utiliser le sans fil intelligent de Linksys par le biais
d'Internet.
Pour vous connecter à votre routeur alors que vous êtes sur votre réseau
domestique:
1.
Ouvrez le navigateur Web de votre ordinateur.
2.
Rendez-vous à www.linksyssmartwifi.com et connectez-vous à votre
routeur à l'aide du mot de passe du routeur que vous avez créé lorsque
vous avez installé votre routeur. (Si aucune connexion Internet n'est
disponible, cette adresse est redirigée vers votre routeur.)
Configuration: notions de base
Comment améliorer la vitesse de votre connexion sans fil
Suivez ces conseils afin d'améliorer la vitesse de connexion sans fil de votre
réseau:
• Assurez-vous que votre routeur se situe dans un bon endroit:
• Pour une zone de couverture la plus étendue, installez votre routeur
près du centre de votre domicile, et près du plafond, si possible.
• Évitez de placer le routeur sur ou près des objets métalliques (notam-
ment des classeurs et meubles en métal), des surfaces réfléchissantes
(par exemple du verre ou des miroirs) ou des murs en maçonnerie.
• Toute obstruction peut affaiblir le signal sans fil (même des objets
non métalliques), donc moins il y a d'obstructions entre le routeur et
l'appareil sans fil, plus vous obtiendrez une bonne connexion.
• Placez le routeur dans un endroit éloignée des autres appareils
électroniques, des moteurs et de l'éclairage fluorescent.
• Un grand nombre de variables de l'environnement peuvent affecter
les performances du routeur, donc si votre signal sans fil est faible,
placez le routeur à plusieurs endroits et testez la force du signal afin
de déterminer l'endroit idéal.
• Si possible, mettez à niveau les interfaces réseau sans fil (notamment les
cartes réseau sans fil dans les ordinateurs) des anciennes normes sans fil
à la norme 802.11n. Si un périphérique réseauté sans fil utilise une norme
plus ancienne, les performances du réseau sans fil en entier pourraient
être plus lentes.
• Si votre routeur est un routeur double bande, partagez le trafic de votre
réseau, afin que le trafic de grand calibre utilise la bande de 5GHz. Pour
de plus amples renseignements, consultez la rubrique « Obtenir de
meilleurs résultats avec votre routeur double bande» à la page27.
8
Page 73

Linksys EA-Series
Comment modifier le nom et le mot de passe du routeur
Vous pouvez modifier le nom (SSID) et le mot de passe de votre réseau, mais le
cas échéant, tous les périphériques sans fil connectés à votre routeur perdront
leur connexion Internet jusqu'à ce que vous les reconnectiez à l'aide des
nouveaux nom et mot de passe du réseau.
Configuration: notions de base
4.
Cliquez sur OK pour appliquer vos modifications.
CONSEIL
Si vous possédez un routeur à double bande, chaque bande
(2,4GHz et 5GHz) peut avoir un nom et un mot de passe de réseau
distincts.
Pour modifier le nom du routeur et le mot de passe:
1.
Ouvrez le sans fil intelligent de Linksys. (Consultez la rubrique «Comment
se connecter au sans fil intelligent de Linksys» à la page7).
2.
Dans Router Settings (paramètres du routeur), cliquez sur Wireless
(sans fil).
3.
Cliquez sur l’onglet Wireless (sans fil), puis cliquez sur Edit (modifier).
Modification du mot de passe d'accès local de votre routeur
Le mot de passe d'accès local de votre routeur a été réglé quand vous avez
exécuté le logiciel d'installation du routeur, mais vous pouvez le modifier en
tout temps. Vous avez besoin du mot de passe du routeur pour modifier les
paramètres du routeur quand vous n'avez pas de connexion Internet. Quand
vous avez une connexion Internet, connectez-vous à votre compte sans
fil intelligent de Linksys en suivant les consignes de la section «Comment se
connecter au sans fil intelligent de Linksys» à la page7.
Pour modifier le mot de passe d'accès local de votre routeur
1.
Ouvrez le sans fil intelligent de Linksys. (Consultez la rubrique «Comment
se connecter au sans fil intelligent de Linksys» à la page7).
2.
Cliquez sur Connectivity (connectivité) sous Router Settings (paramètres
du routeur).
3.
Cliquez sur l'onglet Basic (paramètres de base).
4.
Dans Router Password (mot de passe du routeur), tapez le nouveau mot
de passe, puis cliquez sur OK.
• Pour modifier le nom du réseau, tapez un nouveau nom dans la boîte
Network name (SSID) (nom du réseau).
• Pour modifier le mot de passe du réseau, tapez un nouveau mot de
passe dans la boîte Password (mot de passe).
9
Page 74

Linksys EA-Series
Configuration: notions de base
Modification du fuseau horaire de votre routeur
Le fuseau horaire de votre routeur devrait être réglé à votre fuseau horaire local
Pour régler le fuseau horaire de votre routeur:
1.
Ouvrez le sans fil intelligent de Linksys. (Consultez la rubrique «Comment
se connecter au sans fil intelligent de Linksys» à la page7).
2.
Cliquez sur Connectivity (connectivité) sous Router Settings (paramètres
du routeur).
3.
Cliquez sur l'onglet Basic (paramètres de base), puis sélectionnez votre
fuseau horaire dans la liste déroulante Time Zone (fuseau horaire) et
cliquez sur OK.
Vérification de la vitesse de votre connexion Internet
REMARQUE
Pour exécuter le test de vitesse, vous devez accéder à l'Internet en
utilisant le routeur que vous testez. Vous ne pouvez pas exécuter le
test de vitesse à distance.
Pour vérifier la vitesse de votre connexion Internet:
1.
Ouvrez le sans fil intelligent de Linksys. (Consultez la rubrique «Comment
se connecter au sans fil intelligent de Linksys» à la page7).
2.
Cliquez sur Speed Test (test de débit) sous Apps (applications). L’écran
Speed Test (test de débit) s’ouvre.
3.
Cliquez sur Begin Test (commencer le test). Le test mesure vos vitesses
de téléchargement et téléversement.
10
Page 75

Linksys EA-Series
Configuration: notions de base
REMARQUE
Les vitesses de connexion Internet sont déterminées par divers
facteurs, comprenant le type de compte FAI, le trafic Internet
local et mondial, ainsi que le nombre de périphériques dans votre
domicile qui partagent la connexion Internet.
4.
Cliquez sur Restart Test (redémarrer le test) pour l'exécuter à nouveau,
puis cliquez sur Show History (afficher l’historique) pour afficher les
résultats des tests précédents.
Connexion de périphériques à votre réseau
Votre routeur Linksys est le centre nerveux de votre réseau domestique.
Votre routeur ouvre de façon sécuritaire l'Internet à votre réseau, et tous vos
ordinateurs et périphériques réseau se fondent sur votre routeur pour passer
des fichiers, multimédia et commandes de réseau d'une manière organisée et
sans erreur. Qu'elle soit connectée avec des câbles ou sans fil, chaque partie de
votre réseau a besoin du routeur afin de fonctionner de façon fiable avec les
autres parties de votre réseau.
Connexion d'une imprimante USB
Quand vous installez une imprimante qui nécessite un câble, vous pouvez:
• suivre les instructions de l'imprimante pour la configurer, puis suivre les
instructions du système d'exploitation de votre ordinateur pour partager
l'imprimante avec votre réseau.
- OU -
• Vous pouvez raccorder une imprimante USB au port USB du routeur pour
rendre l'imprimante disponible à tout ordinateur du réseau.
Quand vous configurez une imprimante sans fil, vous devez vous assurer que:
• votre imprimante a été complètement configurée, à l'exception de sa
connexion au réseau;
• votre imprimante prend en charge la norme de chiffrement sans fil WPA/
WPA2;
• si votre imprimante sans fil prend en charge Wi-Fi Protected Setup, vous
devriez utiliser Wi-Fi Protected Setup pour connecter l'imprimante à
votre réseau. Consultez la rubrique « Connexion d’un périphérique à
l’aide de Wi-Fi Protected Setup» à la page12.
Pour connecter une imprimante USB à votre réseau par le biais du port
USB du routeur:
1.
Ouvrez le sans fil intelligent de Linksys. (Consultez la rubrique «Comment
se connecter au sans fil intelligent de Linksys» à la page7).
2.
Cliquez sur Device List (liste des périphériques), puis sur Add a Device
(ajouter un périphérique).
Connexion d'un ordinateur à votre réseau
Pour connecter un ordinateur à votre réseau:
1.
À l'ordinateur à connecter, entrez les informations de connexion de votre
réseau dans le gestionnaire de connexion sans fil.
2.
Après que l'ordinateur se connecte à votre réseau, ouvrez une session
sans fil intelligent de Linksys, puis cliquez sur Device List (liste des
périphériques) pour confirmer que votre routeur reconnaît le nouvel
ordinateur. Vous pouvez utiliser la Liste des périphériques pour surveiller
tous les périphériques connectés au réseau.
11
Page 76

Linksys EA-Series
Configuration: notions de base
3.
Sous Select the type of device to add to your network (sélectionnez le type
de périphérique à ajouter sur votre réseau), cliquez sur USB Printer
(imprimante USB). L'écran Add a USB printer (ajouter une imprimante
USB) s'affiche.
4.
Suivez les instructions à l'écran pour télécharger et installer le logiciel
VUSB (virtual USB) pour votre ordinateur.
Pour connecter une imprimante sans fil à votre réseau:
1.
Suivez les instructions de l'imprimante pour la connecter à votre réseau.
Utilisez l'information de connexion disponible dans le sans fil intelligent
de Linksys ou enregistrée sur le bureau de votre ordinateur.
2.
Après que l'imprimante se connecte à votre réseau, ouvrez une session
sans fil intelligent de Linksys, puis cliquez sur Device List (liste des
périphériques) pour confirmer que votre routeur reconnaît la nouvelle
imprimante.
En raison du grand nombre de périphériques et modes de connexion, vous
devez entrer manuellement l'information de réseau dans les périphériques afin
d'obtenir une connexion réseau réussie.
CONSEIL
Pour plus instructions sur la connexion d'une console de jeux à
votre réseau, consultez également les rubriques :
• «Optimisation du routeur pour les jeux et la téléphonie» à la
page35
• «Configuration du routage de ports» à la page45
• «Configuration du déclenchement de plage de ports pour des
jeux en ligne» à la page48
Connexion manuellement d'un périphérique
Pour connecter manuellement un périphérique à votre réseau:
1.
Suivez les instructions du périphérique pour le connecter à votre réseau.
Utilisez l'information de connexion disponible du sans fil intelligent de
Linksys ou enregistrée sur le bureau de votre ordinateur.
2.
Après que le périphérique se connecte à votre réseau, ouvrez une
session sans fil intelligent de Linksys, puis cliquez sur Device List (liste des
périphériques) pour confirmer que votre routeur reconnaît le nouveau
périphérique.
Connexion d'un périphérique à l'aide de Wi-Fi Protected Setup
Pour connecter un périphérique à l'aide de Wi-Fi Protected Setup™:
Connexion des autres périphériques
Bien d'autres types de périphériques réseau sans fil peuvent se connecter à
votre réseau domestique, y compris:
• Consoles de jeux
• Téléviseurs Internet et lecteurs multimédia
• Lecteurs de musique numérique
• Téléphones intelligents
1.
Branchez et allumez le périphérique. Si le périphérique ne prend pas en
charge Wi-Fi Protected Setup, suivez les instructions pour une installation
réseau standard.
2.
Ouvrez le sans fil intelligent de Linksys. (Consultez la rubrique «Comment
se connecter au sans fil intelligent de Linksys» à la page7).
3.
Dans Wireless (sans fil), cliquez sur l'onglet Wi-Fi Protected Setup.
4.
Utilisez une des méthodes suivantes pour compléter la configuration:
12
Page 77

Linksys EA-Series
Configuration: notions de base
• Si le périphérique est doté d'un bouton Wi-Fi Protected Setup, appuyez
sur ce bouton, puis cliquez sur le bouton Wi-Fi Protected Setup dans
le sans fil intelligent de Linksys ou appuyez sur le bouton à l'arrière de
votre routeur.
• Si le périphérique a un NIP de Wi-Fi Protected Setup, entrez ce numéro
dans la boîte Device PIN (NIP périphérique) dans le sans fil intelligent
de Linksys, puis cliquez sur Register (enregistrer).
Affichage des détails du périphérique
Vous pouvez utiliser le sans fil intelligent de Linksys pour afficher les
informations réseau de tout périphérique réseau.
Pour afficher les détails d'un périphérique réseau:
1.
Ouvrez le sans fil intelligent de Linksys. (Consultez la rubrique «Comment
se connecter au sans fil intelligent de Linksys» à la page7).
2.
Dans Apps (applications), cliquez sur Device List (liste des périphériques).
L'écran Device List (liste des périphériques) s'ouvre.
3.
Cliquez sur i dans le coin inférieur droit du périphérique.
• Si le logiciel d'installation du périphérique demande le NIP de Wi-Fi
Protected Setup du routeur, entrez le numéro sous Router PIN (NIP du
routeur) dans le sans fil intelligent de Linksys.
13
Page 78

Linksys EA-Series
Configuration: notions de base
Des informations sur le périphérique s'affichent à l'écran.
4.
Cliquez sur OK.
Configuration du contrôle parental
Vous pouvez utiliser le contrôle parental de votre routeur pour:
• définir à quels moments l'accès à Internet est autorisé;
• bloquer des sites Web en particulier ou encore, des sites Web en fonction
de leur contenu;
• définir ces types de restrictions pour des ordinateurs en particulier.
CONSEIL
Lorsqu'une personne tente d'ouvrir un site Web bloqué, une
page du sans fil intelligent de Linksys s'affiche. Pour afficher le
contenu bloqué, vous devez vous connecter à votre compte sans
fil intelligent de Linksys et modifier les restrictions du contrôle
parental.
Configuration du contrôle parental
Pour définir le contrôle parental:
1.
Ouvrez le sans fil intelligent de Linksys. (Consultez la rubrique «Comment
se connecter au sans fil intelligent de Linksys» à la page7).
2.
Dans Apps (applications), cliquez sur Parental Controls (contrôle
parental). L'écran Parental Controls (contrôle parental) s'affiche.
3.
Pour activer le contrôle parental, cliquez sur le bouton Enable parental
controls (activer le contrôle parental) de manière à ce que ON (Activé)
soit affiché.
CONSEIL
Il n'est pas nécessaire de configurer le contrôle parental pour
chaque ordinateur de votre réseau domestique. Vous pouvez
choisir de ne configurer le contrôle parental que sur les ordinateurs
auxquels les enfants ont accès.
4.
Pour sélectionner un ordinateur auquel le contrôle parental sera appliqué,
cliquez sur le nom de l'ordinateur dans la liste Restrict Internet access
on (restreindre l’accès à Internet sur).
5.
Pour bloquer l'accès à Internet sur des ordinateurs, sous Block Internet
access (bloquer l’accès à Internet):
• Cliquez sur Never (jamais) afin de permettre l'accès à Internet.
• Cliquez sur Always (toujours) afin de toujours bloquer l'accès à Internet.
• Cliquez sur Specific Times (périodes précises) pour définir les périodes
pendant lesquelles l'accès à Internet est autorisé.
14
Page 79

Linksys EA-Series
Configuration: notions de base
• Cliquez sur Edit (modifier) pour changer l'horaire d'accès à Internet.
Vous pouvez glisser-déposer pour sélectionner ou désélectionner une
plage horaire.
6.
Pour bloquer des sites Web en particulier:
a.
Sous Block specific sites (bloquer des sites spécifiques), cliquez sur
Add (ajouter).
b.
Entrez l'adresse Web (URL) du site Web à bloquer, puis cliquez sur OK.
Vous pouvez bloquer jusqu'à dix sites Web.
CONSEIL
Il est plus facile de copier-coller une adresse Web que de l'entrer
manuellement. Copiez l'adresse à partir du champ d'adresse de
votre navigateur Web, puis collez-la dans une case disponible dans
l'écran Block specific sites (bloquer des sites spécifiques) du sans fil
intelligent de Linksys.
Configuration de votre réseau d'invité
Vous pouvez utiliser le réseau d'invité de votre routeur pour offrir à vos invités
un accès à Internet tout en restreignant leur accès aux autres ressources de
votre réseau local. Pour empêcher les utilisateurs non autorisés d'utiliser votre
accès Internet, votre réseau d'invité nécessite la saisie d'un mot de passe. Le
réseau d'invité est activé par défaut.
_
File Edit View Go Shortcuts Options Help
http://mynetwork/guest/login
X
Enter the Guest Password
for Internet Access:
web browser - guest access login - Linksys E4200
http://mynetwork/guest/login
Enter the Guest Password
for Internet Access:
Login
Local Network
Guest Network
Local Access and Guest Access Diagram
Le réseau d'invité et le mot de passe de votre réseau sans fil sont configurés
lorsque vous exécutez le logiciel d'installation du routeur, mais vous pouvez les
modifier en tout temps.
X
Login
Done
7.
Cliquez sur OK pour appliquer vos modifications.
15
Page 80

Linksys EA-Series
Configuration: notions de base
Pour configurer l'accès d'invité sur votre réseau:
1.
Ouvrez le sans fil intelligent de Linksys. (Consultez la rubrique «Comment
se connecter au sans fil intelligent de Linksys» à la page7).
2.
Dans Apps (applications), cliquez sur Guest Access (accès invité). Votre
réseau d'invité, qui a été configuré lors de l'installation du routeur,
s'affiche.
• Pour activer ou désactiver l'accès d'invité, cliquez sur le bouton Allow
guest access (autoriser l’accès invité).
• Le nom du réseau d'invité est généré automatiquement à partir du
nom de votre réseau sans fil 2,4GHz.
• Pour modifier le mot de passe de votre réseau d'invité, cliquez sur
la case près de Guest network password (mot de passe du réseau
d’invité), puis entrez à nouveau le mot de passe.
3.
Cliquez sur OK pour appliquer vos modifications.
CONSEIL
La première fois qu'un invité tente d'accéder à l'Internet à l'aide
d'un navigateur Web, un écran Guest Access (accès invité) lui est
présenté. Pour continuer, il doit entrer le mot de passe que vous lui
avez fourni dans le champ Password (mot de passe), puis cliquer
sur LOGIN (connexion).
Création d'une copie de sauvegarde de la configuration de votre routeur
Lorsque vous avez terminé de configurer votre routeur, vous devriez faire une
copie de sauvegarde de vos paramètres pour être en mesure de les rétablir
plus tard, au besoin. Pour plus de détails, consultez la rubrique «Création et
restauration d’une copie de sauvegarde de la configuration de votre routeur»
à la page49.
• Pour modifier le nombre d'utilisateurs autorisés à utiliser le réseau
d'invité simultanément, cliquez sur la liste déroulante sous Total
guests allowed (nombre total d’invités autorisés), puis cliquez sur le
nombre souhaité.
CONSEIL
Pour assurer la sécurité de votre réseau d'invité, cliquez sur Edit
(modifier) pour modifier le mot de passe des invités lorsqu'ils n'ont
plus besoin d'avoir accès à leur compte.
16
Page 81

Linksys EA-Series
Configuration: notions de base
Personnalisation du sans fil intelligent de Linksys
Vous pouvez personnaliser la page d'accueil du sans fil intelligent de Linksys en
ajoutant ou en retirant des objets. Les objets sont des versions miniatures des
menus vous permettant de modifier les paramètres de base ou de vérifier l'état
de votre réseau.
Utilisation des objets
Pour ajouter un objet:
1.
Ouvrez le sans fil intelligent de Linksys. (Consultez la rubrique «Comment
se connecter au sans fil intelligent de Linksys» à la page7).
2.
Ouvrez un menu, puis sélectionnez Show widget on the homepage
(afficher l’objet sur la page d’accueil) dans le coin supérieur droit.
Personnalisation de la Liste des périphériques
Vous pouvez modifier l'icône et la description de chaque périphérique de votre
réseau.
Pour modifier l'apparence du périphérique:
1.
Dans la Device List (liste des périphériques), cliquez sur le périphérique
dont vous souhaitez modifier l'apparence. L'écran des renseignements
sur le périphérique s'ouvre.
2.
Pour modifier la description, cliquez sur Edit (modifier), saisissez le
nouveau nom, puis cliquez sur OK.
Pour retirer un objet:
1.
Dans la page d'accueil, cliquez sur le × dans le coin supérieur droit de
l'objet que vous souhaitez retirer.
3.
Pour modifier l'icône, cliquez sur Change (modifier), cliquez sur une
nouvelle icône, puis cliquez sur OK.
17
Page 82

Linksys EA-Series
Utilisation d'un disque dur externe
Vue d'ensemble
Vous pouvez fixer la plupart des lecteurs USB (y compris une clé USB ou un
lecteur externe à haute capacité) au port USB de votre routeur. Vous pouvez
alors utiliser le lecteur comme stockage réseauté, comme serveur multimédia
(pour les périphériques compatibles par exemple une télévision en réseau),
et serveur FTP (File Transfer Protocol). Vous pouvez également préciser quels
utilisateurs peuvent accéder au contenu du lecteur. Les menus peuvent
changer.
Pour afficher l'état et les paramètres de votre lecteur connecté:
1.
Ouvrez le sans fil intelligent de Linksys. (Consultez la rubrique «Comment
se connecter au sans fil intelligent de Linksys» à la page7).
2.
Cliquez sur USB Storage (stockage USB) sous Apps (applications).
L'onglet Status (état) affiche des informations, notamment:
• la capacité et l'utilisation du lecteur;
• l'état de l'accès au dossier sécurisé;
• les adresses pour accéder aux dossiers partagés, le serveur FTP et le
serveur multimédia.
Branchement d'un lecteur USB
Si un lecteur USB est déjà connecté au routeur, et que vous désirez raccorder un
lecteur différent à ce port USB, vous devez, tout d'abord, déconnecter l'ancien
lecteur de manière sécuritaire.
Pour retirer un lecteur USB du routeur de manière sécuritaire:
1.
Ouvrez une session sans fil intelligent de Linksys, puis cliquez sur USB
Storage (stockage USB) sous Apps (applications).
2.
Dans l'onglet Status (état), cliquez sur Safely remove drive (retirer le
périphérique en toute sécurité).
3.
Débranchez l'ancien disque dur du routeur.
Pour raccorder un lecteur USB au routeur:
1.
Connectez le lecteur USB à un port USB disponible à l'arrière de votre
routeur. Votre routeur détecte le disque dur.
2.
Pour mettre à jour l'écran USB Storage (stockage USB), vous devrez peut-
être cliquer sur Refresh (actualiser).
18
18
Page 83

Linksys EA-Series
Utilisation de l'accès au dossier sécurisé
Pourquoi devrais-je utiliser l'accès au dossier sécurisé? Par défaut, quand
vous connectez un lecteur USB à votre routeur, tout le contenu du lecteur est
disponible pour un accès de lecture et d'écriture à toute personne se trouvant
sur votre réseau local (aucune donnée d'authentification n'est requise).
Toutefois, vous pouvez également rendre le lecteur et ses dossiers sécuritaire,
afin que seuls les utilisateurs autorisés puissent accéder au contenu du lecteur.
CONSEIL
Quand Secure Folder Access (accès au dossier sécurisé) est activé,
tout le lecteur USB est sécurisé.
Configuration des utilisateurs autorisés et des dossiers partagés
Pour activer l'accès aux dossiers partagés:
1.
Ouvrez le sans fil intelligent de Linksys. (Consultez la rubrique «Comment
se connecter au sans fil intelligent de Linksys» à la page7).
2.
Cliquez sur USB Storage (stockage USB) sous Apps (applications), puis
cliquez sur l'onglet Folder Access (accès au dossier).
4.
Dans la liste Authorized users (utilisateurs autorisés), entrez le Username
(nom d’utilisateur) et le Password (mot de passe) de chaque nouvel
utilisateur.
CONSEIL
Deux comptes, Admin et Guest (invité), sont déjà configurés et ne
peuvent être supprimés.
5.
Sélectionnez les autorisations que vous souhaitez attribuer à l’utilisateur.
• Read Only (lecture seule) permet à l’utilisateur de lire (ouvrir) le fichier.
• Read & Write (lecture et écriture) permet à l’utilisateur de lire, de
renommer, d’écraser et de supprimer le fichier. L’utilisateur peut aussi
enregistrer de nouveaux fichiers dans le dossier.
6.
Cliquez sur Select Share (sélectionner un partage). La boîte de dialogue
Select Existing Share (sélectionner un partage existant) s’ouvre.
7.
Si le dossier partagé est déjà configuré:
a.
Cochez la case près de chaque dossier auquel vous souhaitez donner
accès à l’utilisateur, puis cliquez sur OK.
3.
Cliquez sur le paramètre Secure Folder Access (accès au dossier sécurisé)
pour l’activer.
La liste Authorized users (utilisateurs autorisés) s'affiche.
19
Page 84

Linksys EA-Series
8.
Si vous devez configurer le dossier partagé:
a.
Cliquez sur Create new share (créer un nouveau partage). La boîte
de dialogue Create new share (créer un nouveau partage) s'ouvre.
d.
Cochez la case près de chaque dossier auquel vous souhaitez donner
accès à l’utilisateur, puis cliquez sur OK.
9.
Cliquez sur Add User (ajouter un utilisateur).
10.
Dans la liste Authorized users (utilisateurs autorisés), vous pouvez aussi:
• Cliquer sur Edit (modifier) pour modifier les données d’authentification
d’un utilisateur.
• Cliquer sur Shares (partages) pour modifier les partages accessibles à
un utilisateur.
• Cliquez sur Delete (supprimer) pour supprimer le compte de l'utilisateur.
Comment accéder aux dossiers partagés
Pour accéder aux dossiers partagés à partir de votre réseau:
1.
Dans le sans fil intelligent de Linksys, cliquez sur USB Storage (stockage
USB) sous Apps (applications).
2.
Dans l’onglet Status (état), prenez note des informations sous Folder
Access (accès au dossier). Vous aurez besoin de cette adresse pour
accéder aux dossiers partagés à partir d’un gestionnaire de fichiers.
b.
Cliquez sur le bouton près du dossier que vous souhaitez partager.
• Pour afficher les sous-dossiers, cliquez sur l’icône près du nom
du dossier.
• Pour retourner au dossier parent, cliquez sur l’icône dans le
haut de la liste.
• Pour sélectionner tout le lecteur, sélectionnez Share entire
storage device (partager la totalité du périphérique de stockage).
CONSEILS
• Le nom du dossier sélectionné est automatiquement
choisi comme nom de partage.
• Vous ne pouvez pas sélectionner plus d’un dossier pour
chaque partage.
• Pour utiliser un nom de partage différent, entrez le nom dans le
champ Share name (nom du partage).
c.
Cliquez sur OK.
3.
Entrez l’adresse d’accès dans votre gestionnaire de fichiers.
CONSEIL
Vous pouvez habituellement identifier le dossier en naviguant dans
le gestionnaire de fichiers de votre ordinateur.
4.
Entrez votre nom de compte d'utilisateur et votre mot de passe. Le
contenu du lecteur (fichiers et dossiers) s’affiche dans une fenêtre.
5.
Utilisez le gestionnaire de fichiers pour ouvrir, copier ou afficher le
contenu du dossier.
20
Page 85

Linksys EA-Series
CONSEILS
Les gestionnaires de fichiers affichent le contenu de plusieurs
manières, mais vous pouvez généralement utiliser ces actions
courantes pour naviguer dans les dossiers:
• Cliquez ou double-cliquez sur un dossier pour l’ouvrir.
• Cliquez, double-cliquez ou cliquez avec le bouton droit de la
souris sur un fichier pour l’ouvrir, le copier ou visionner son
contenu.
• Glissez un fichier à partir d’une autre fenêtre et déposez-
le dans la fenêtre du dossier partagé pour le copier dans ce
dossier. (Pour copier un fichier vers le dossier partagé, votre
compte d’utilisateur doit avoir un accès en écriture.)
Configuration de votre routeur comme serveur multimédia
Qu’est-ce qu’un serveur multimédia et comment devrais-je l’utiliser? Un
serveur multimédia vous permet de partager du contenu multimédia dans
tout votre réseau. Votre routeur peut servir de serveur multimédia si une clé
USB y est annexée et si vous avez un périphérique UPnPAV (audio-vidéo) ou
compatible à DLNA (Digital Living Network Alliance) à votre domicile. Des
exemples de périphériques UPnPAV comprennent les lecteurs multimédias
numériques, les consoles de jeux doté d'un lecteur multimédia intégré et les
cadres de photo numérique.
Pour configurer votre routeur comme serveur multimédia:
1.
Ouvrez le sans fil intelligent de Linksys. (Consultez la rubrique «Comment
se connecter au sans fil intelligent de Linksys» à la page7).
2.
Cliquez sur USB Storage (stockage USB) sous Apps (applications). L'écran
USB Storage (stockage USB) s'ouvre.
3.
Cliquez sur l'onglet Media Access (accès multimédia).
4.
Cliquez sur le paramètre Enable Media Server (activer le serveur
multimédia) pour l’activer.
Par exemple, si vous avez un adaptateur multimédia numérique transmettant
du contenu vers votre système de divertissement et votre routeur est configuré
comme serveur multimédia, alors l’adaptateur multimédia numérique peut
accéder au lecteurUSB externe connecté à votre routeur.
Vous pouvez préciser quels dossiers sont utilisés par le serveur multimédia,
ajouter et supprimer des dossiers en plus d'indiquer la fréquence à laquelle
s'effectueront les analyses du contenu.
REMARQUE
Le modèle EA3500 ne prend pas en charge les fonctionnalités de
serveur multimédia.
21
Page 86

Linksys EA-Series
5.
Cliquez sur Add New Folder (ajouter un nouveau dossier). La boîte de
dialogue Add New Folder (ajouter un nouveau dossier) s'ouvre.
6.
Cliquez sur le bouton près du dossier que vous souhaitez partager, puis
cliquez sur OK.
• Pour afficher les sous-dossiers, cliquez sur l’icône près du nom du
dossier.
Connexion de votre périphérique UPnP au serveur multimédia
Après avoir configuré le serveur multimédia de votre routeur, vous devez
connecter un périphérique compatible avec UPnP (par exemple, une console
de jeux vidéo ou un lecteur multimédia numérique compatible avec UPnP) au
réseau pour être en mesure de lire le contenu du serveur multimédia.
Pour connecter un périphérique UPnP au serveur multimédia de votre
routeur:
1.
Connectez votre périphérique UPnP à votre réseau local à l'aide d'un
câble Ethernet ou d'une connexion sans fil. Si vous vous connectez sans fil,
vous devez connaître votre nom d'utilisateur et votre mot de passe pour
accéder au réseau. Pour obtenir de l’aide, consultez la documentation de
votre périphérique.
2.
Sur votre périphérique UPnP, choisissez le nom de serveur multimédia
de votre routeur comme source multimédia. (Consultez la rubrique
« Configuration de votre routeur comme serveur multimédia » à la
page21).
3.
Consultez la documentation de votre périphérique UPnP pour obtenir de
l'aide sur la lecture de contenu multimédia sur le périphérique.
• Pour retourner au dossier parent, cliquez sur l’icône dans le haut
de la liste.
CONSEILS
• Le nom du dossier sélectionné est automatiquement choisi
comme nom de partage.
• Vous ne pouvez pas sélectionner plus d’un dossier à la fois.
7.
Cliquez sur OK de nouveau pour enregistrer les modifications.
22
Page 87

Linksys EA-Series
Accès à distance au périphérique de stockage
Pourquoi devrais-je accéder à distance le périphérique de stockage de
mon serveur? Après avoir activé le serveur FTP (File Transfer Protocol) du
serveur, vous pouvez accéder aux fichiers du lecteur externe connecté au
serveur à partir de n'importe quel endroit, en utilisant un navigateur Web ou
un client FTP.
Pour configurer le serveur FTP:
1.
Ouvrez le sans fil intelligent de Linksys. (Consultez la rubrique «Comment
se connecter au sans fil intelligent de Linksys» à la page7).
2.
Cliquez sur USB Storage (stockage USB) sous Apps (applications). L'écran
USB Storage (stockage USB) s'ouvre.
3.
Cliquez sur l'onglet FTP Server (serveur FTP).
8.
Prenez note des informations sous FTP Server (serveur FTP). Vous aurez
besoin de ces informations pour accéder à distance au périphérique de
stockage.
9.
Pour accéder au périphérique de stockage à l'aide d'un navigateur Web:
a.
Ouvrez un navigateur Web.
b.
Dans le champ Address (adresse) ou URL du navigateur, entrez
l'adresse indiquée dans l'onglet Status (état) ci-dessus, en débutant
avec ftp://... Si vous utilisez DDNS (Dynamic Domain Name Service),
vous pouvez aussi utiliser le nom de domaine de votre routeur.
c.
Entrez votre nom de compte d'utilisateur et votre mot de passe. Il
s'agit du nom et du mot de passe que vous avez configuré dans la liste
Authorized users (utilisateurs autorisés) pour les dossiers partagés.
Consultez la rubrique «Configuration des utilisateurs autorisés et des
dossiers partagés» à la page19.
Le contenu du lecteur (fichiers et dossiers) s'affiche dans une fenêtre
de navigation.
4.
Cliquez sur le paramètre Enable FTP Server (activer le serveur FTP) pour
l'activer.
5.
Il est recommandé de conserver les paramètres par défaut pour FTP
Port (port FTP) et Encoding (encodage),, sauf si vous êtes un utilisateur
chevronné et avez de bonnes raisons de modifier ces paramètres.
6.
Cliquez sur OK.
7.
Cliquez sur l'onglet Status (état).
d.
Cliquez sur un fichier pour le télécharger sur votre ordinateur ou
glissez-déposez un fichier à partir du gestionnaire de fichiers de votre
ordinateur vers la fenêtre de navigation pour téléverser un fichier
(uniquement si vous avez accès en lecture et en écriture).
10.
Pour accéder au périphérique de stockage à l'aide d'un clientFTP:
a.
Exécutez le logiciel de client FTP.
b.
Consultez l'aide du logiciel pour déterminer comment vous pouvez
vous connecter à un site FTP. Utilisez les informations suivantes pour
vous connecter:
• L'adresse indiquée dans l'onglet Status (état) ci-dessus, en
débutant avec ftp://... Si vous utilisez DDNS (Dynamic Domain
Name Service), vous pouvez aussi utiliser le nom de domaine de
votre routeur.
23
Page 88

Linksys EA-Series
• Les nom d'utilisateur et mot de passe. Il s'agit du nom et du mot
de passe que vous avez configuré dans la liste Authorized users
(utilisateurs autorisés) pour les dossiers partagés. (Consultez la
rubrique «Configuration des utilisateurs autorisés et des dossiers
partagés» à la page19).
• Le port et l'encodage sélectionnés lors de la configuration de
votre serveur FTP (il s'agit habituellement du port 21 et de
l'encodageUTF-8)
c.
Consultez l'aide du logiciel pour déterminer comment vous pouvez
télécharger et téléverser des fichiers.
CONSEILS
Les clients FTP et les navigateurs Web affichent le contenu de
plusieurs manières, mais vous pouvez généralement utiliser ces
actions courantes pour naviguer dans les dossiers FTP:
• Cliquez sur le nom d'un dossier pour l’ouvrir.
• Cliquez sur deux points (..) ou sur la flèche vers le dossier de
niveau supérieur pour ouvrir le dossier parent.
• Cliquez ou cliquez avec le bouton droit de la souris sur un
fichier pour le télécharger ou pour visionner son contenu.
• Glissez un fichier à partir d’une autre fenêtre et déposez-le dans
la fenêtre FTP pour le téléverser. (Pour téléverser un fichier,
votre compte d’utilisateur doit avoir un accès en écriture.)
24
Page 89

Linksys EA-Series
Configuration: avancée
Configuration: avancée
Configuration manuelle de votre routeur
Même si la meilleure méthode pour configurer votre routeur consiste à exécuter
son logiciel de configuration, les utilisateurs experts peuvent choisir de le
configurer manuellement. Si vous choisissez cette méthode, soyez prudents
lorsque vous modifiez les paramètres.
Configuration manuelle de votre routeur:
1.
Branchez l'adaptateur d'alimentation de votre routeur à une prise murale.
2.
Branchez un câble Ethernet à l'ordinateur, puis à l'un des ports Ethernet
numérotés (bleus) à l'arrière de votre routeur.
3.
Débranchez le câble du port Internet du routeur.
4.
Ouvrez un navigateurWeb sur l'ordinateur et accédez à la page
www.linksyssmartwifi.com. (Si aucune connexion Internet n'est
disponible, cette adresse est redirigée vers votre routeur.)
5.
Entrez admin comme nom d'utilisateur, puis entrez le mot de passe par
défaut (admin). Le menu principal s'ouvre.
6.
Après avoir terminé la configuration, cliquez sur Save (enregistrer) et
fermez la fenêtre du navigateur Web.
CONSEIL
Pour obtenir une description des paramètres, cliquez sur Help
(aide) en haut de l'écran.
Configuration manuelle de votre connexion Internet
Votre connexion Internet est configurée lorsque vous exécutez le programme
de configuration. Toutefois, certains fournisseurs d'accès Internet (FAI), en
particuliers ceux hors des États-Unis, peuvent nécessiter une configuration
manuelle de la connexion Internet de votre routeur.
Configuration des paramètres de base de la connexion Internet
Pour configurer manuellement la connexion Internet de votre routeur:
1.
Utilisez un câble Ethernet pour raccorder un port Ethernet sur votre
routeur au port Ethernet de votre ordinateur.
2.
Débranchez le câble du port Internet du routeur.
3.
Ouvrez un navigateurWeb sur l'ordinateur et accédez à la page
www.linksyssmartwifi.com. (Si aucune connexion Internet n'est
disponible, cette adresse est redirigée vers votre routeur.)
4.
Connectez-vous à votre routeur à l'aide du mot de passe par défaut, admin.
5.
Dans Router Settings (paramètres du routeur), cliquez sur Connectivity
(connectivité). La page Connectivity (connectivité) s'ouvre et affiche
l'onglet Basic (paramètres de base).
6.
Près de Type of Internet Connection (type de connexion Internet), cliquez
sur Edit (modifier).
25
25
Page 90

Linksys EA-Series
7.
Sélectionnez le type de connexion Internet de votre FAI dans la liste
déroulante. Remplissez les Paramètres facultatifs uniquement si votre FAI
l'exige.
CONSEIL
Pour obtenir une description des champs, cliquez sur Help (aide)
en haut de l'écran.
8.
Cliquez sur OK.
Paramètres de connexion Internet IPv6
IPv6 est un nouveau protocole IP se basant sur les en-têtes de paquets simplifiés
et nécessitant IPSec. Il offre également une meilleure prise en charge des IP et
périphériques informatiques mobiles.
REMARQUE
Pour utiliser les paramètres de connexion Internet IPv6 de votre
routeur, votre fournisseur d'accès à Internet doit prendre en
charge le service IPv6. Pour plus d'information sur ce service,
communiquez avec votre FAI.
Pour configurer manuellement les paramètres IPv6 de votre routeur:
1.
Utilisez un câble Ethernet pour raccorder un port Ethernet sur votre
routeur au port Ethernet de votre ordinateur.
2.
Ouvrez le sans fil intelligent de Linksys. (Consultez la rubrique «Comment
se connecter au sans fil intelligent de Linksys» à la page7).
3.
Dans Router Settings (paramètres du routeur), cliquez sur Connectivity
(connectivité). La page Connectivity (connectivité) s’affiche.
4.
Cliquez sur l’onglet Internet Settings (paramètres Internet), puis cliquez
sur IPV6.
Configuration: avancée
5.
Cliquez sur Edit (modifier). Vous pouvez maintenant modifier les
paramètres suivants:
• IPv6 - Automatic (automatique) — Sélectionnez l'option Enabled
(activé) pour utiliser IPv6 pour tous les adressages de réseau.
• DUID (nom d’utilisateur du périphérique) — Utilisé par DHCP pour
identifier les clients réseau.
• 6rd Tunnel (tunnel 6rd) — Permet au routeur d'envoyer des adresses
IPv6 des réseaux IPv4. Pour qu’il soit possible d’activer cette option,
IPv6-Automatic (automatique) ne doit pas être sélectionné. Pour que
votre routeur puisse gérer les paramètres 6rd Tunnel (tunnel 6rd) (par
exemple les préfixes et les masques d'adresses), réglez le paramètre
6rd Tunnel (tunnel 6rd) à Automatic (automatique). Sélectionnez
Manual (manuel) pour modifier ces paramètres manuellement.
• Prefix (préfixe) — Saisissez l'adresse du préfixe utilisé pour le tunnel
fourni par votre fournisseur d'accès.
• Prefix Length (longueur du préfixe) — Saisissez la longueur de
l'adresse du préfixe utilisé pour le tunnel, fourni par votre fournisseur
d'accès.
• Border Relay (relais frontière) — Saisissez l'adresse du relais frontière
pour le tunnel, fourni par votre fournisseur d'accès.
• IPv4 mask length (longueur du masque IPv4) — Entrez la longueur
du masque de l'adresse IPv4 utilisé par le tunnel fourni par votre FAI.
6.
Cliquez sur OK.
Associer un routeur à votre compte sans fil intelligent de Linksys
Pour associer un autre routeur à votre compte sans fil intelligent de
Linksys:
1.
Exécutez le programme Setup pour le routeur supplémentaire. Lorsque
la configuration est terminée, le système vous demande de créer un
nouveau compte sans fil intelligent de Linksys.
2.
Plutôt que de créer un nouveau compte, cliquez sur Login (connexion)
dans le haut de l’écran. Vous devez entrer votre nom d’utilisateur (votre
adresse courriel) et votre mot de passe.
26
Page 91

Linksys EA-Series
3.
Entrez le nom et le mot de passe correspondant à votre compte sans fil
intelligent de Linksys d’origine, puis cliquez sur Log in (connexion). Le
routeur supplémentaire est ajouté à votre compte sans fil intelligent de
Linksys.
4.
Pour configurer un autre routeur, ouvrez une session dans le sans fil
intelligent de Linksys, puis sélectionnez le SSID (nom du réseau) du
routeur dans la liste déroulante en haut de l’écran.
Obtenir de meilleurs résultats avec votre routeur double bande
J’ai acheté un routeur double bande, mais je ne suis pas certain d’obtenir
des résultats optimaux. Que dois-je vérifier? Parmi les principales raisons
motivant l’achat d’un routeur double bande, la plus courante est d’obtenir
une bande passante suffisante pour diffuser des vidéos haute définition. Le
propriétaire du routeur souhaite aussi s’assurer que ses flux vidéo ne seront
pas interrompus par le reste du trafic réseau. Pour obtenir de meilleurs résultats
avec votre routeur double bande, vous pouvez:
• Mettre à niveau vos clients sans fil
• Répartir votre trafic réseau
Mettre à niveau vos clients sans fil
Si vous possédez des adaptateurs réseau ne prenant en charge que les
anciennes normes de réseau sans fil, comme 802.11b, vous devriez envisager
de les mettre à niveau en installant des adaptateurs réseau sans filN (802.11n).
Les appareils utilisant la norme de réseau sans filB (802.11b) peuvent ralentir
l'ensemble de votre réseau sans fil. Pour obtenir de meilleurs résultats, tous vos
appareils devraient utiliser la norme de réseau sans filN. Vous pouvez ensuite
sélectionner le mode réseau Wireless-N Only (sans fil N seulement) ci-dessous.
Configuration: avancée
Répartir votre trafic réseau
La meilleure manière d'améliorer le rendement multimédia de votre réseau
sans fil consiste à répartir votre trafic réseau dans les deux bandes (plages de
fréquences radio) de votre routeur. Votre routeur prend en charge les bandes
de 2,4GHz et de 5GHz en tant que réseaux sans fil distincts, pour vous aider à
mieux gérer le trafic réseau.
Habituellement, le trafic réseau sans fil est réparti de la manière suivante :
la bande de 2,4GHz est utilisée pour les tâches Internet de base, comme la
navigation sur le Web, les courriels et les téléchargements, tandis que la bande
de 5,0 GHz est utilisée pour les flux multimédia. Plusieurs raisons motivent
cette approche:
• Même si la bande de 2,4 GHz est plus sollicitée par le trafic réseau
provenant de vos voisins, elle est parfaite pour transmettre le trafic réseau
de base, qui n'est pas sensible à la latence (par exemple, les courriels).
• Même si vous êtes connecté à votre propre réseau sans fil, vous partagez
tout de même un «espace de transmission» avec les réseaux voisins.
• La bande de 5 GHz est beaucoup moins sollicitée que la bande de
2,4 GHz, alors elle est idéale pour la transmission de contenu multimédia.
• La bande de 5GHz offre un plus grand nombre de canaux disponibles,
alors vous avez la possibilité d'obtenir votre propre canal dédié et libre
de toute interférence pour votre réseau sans fil.
Par défaut, votre routeur double bande utilise le même nom de réseau sur les
deux bandes de 2,4GHz et de 5GHz. La manière la plus simple de segmenter
votre trafic réseau consiste à renommer l'un de vos réseaux sans fil. Avec un nom
distinct et évocateur, il sera plus facile de se connecter au réseau approprié.
REMARQUE
Si vous sélectionnez Wireless-N Only (sans fil N seulement), vous
devrez peut-être modifier temporairement vos paramètres réseau
et choisir le mode Mixed (mixte), pour offrir un accès aux invités
n'utilisant pas la norme de réseau sans filN.
27
Page 92

Linksys EA-Series
Configuration: avancée
Pour reconfigurer votre réseau sans fil:
1.
Ouvrez le sans fil intelligent de Linksys. (Consultez la rubrique «Comment
se connecter au sans fil intelligent de Linksys» à la page7).
2.
Dans Router Settings (paramètres du routeur), cliquez sur l'onglet Wireless
(sans fil). La page Wireless (sans fil) s'ouvre et affiche l'onglet Wireless (sans fil).
3.
Cliquez sur Edit (modifier) près de la bande réseau que vous souhaitez
modifier. Au besoin, modifiez les paramètres ci-dessous:
a.
Enabled (activé) — Désélectionnez cette option pour désactiver la
bande de réseau.
b.
Network name (SSID) (nom du réseau) — Vous pouvez fournir un
nom SSID unique pour chaque bande de votre réseau sans fil. La
longueur du nom ne doit pas dépasser 32caractères.
c.
Password (mot de passe) — Vous pouvez fournir un mot de passe
unique pour chaque bande de votre réseau sans fil.
d.
Network mode (mode réseau) — Votre choix dépend des clients qui
se connecteront à votre réseau. Si tous vos appareils peuvent utiliser
le réseau sans filN, vous pouvez sélectionner Wireless-N Only (sans
fil N seulement) pour l'une ou l'autre des bandes.
Pour la bande de 2,4 GHz, vous pouvez sélectionner:
• Mixed (mixte)
• Wireless-N Only (sans fil N seulement)
• Wireless-G Only (sans fil G seulement)
Pour la bande de 5GHz, vous pouvez sélectionner:
• Mixed (mixte) (par défaut), qui accepte les connexions de clients
utilisant 802.11a et 802.11n
• Wireless-N Only (sans fil N seulement) (802.11n seulement)
• Wireless-AC Only
e.
Security mode (mode de sécurité) — Vous pouvez choisir diverses
options de sécurité pour les réseaux de 5GHz et 2,4GHz. Si le mode
de sécurité choisi nécessite une phrase de vérification, un champ
Passphrase (phrase de vérification) s’affiche et vous devez le remplir.
Vous pouvez sélectionner:
• None (aucune sécurité)
• WEP
• WPA Personal (WPA personnel)
• WPA Enterprise (WPA Entreprise)
• WPA2 Personal (WPA2 personnel)
• WPA2 Enterprise (WPA2 Entreprise)
• WPA2/WPA Mixed Personal (mode mixte WPA2/WPA personnel)
• WPA2/WPA Mixed Enterprise (mode mixte WPA2/WPA entreprise)
CONSEIL
Pour obtenir de meilleurs résultats, les réseaux sans filN
devraient utiliser le mode de sécurité WP2 personal (WP2
personnel).
f.
Channel width (largeur du canal) — Nous recommandons de
conserver le paramètre par défaut (Automatic) pour chaque bande.
En mode Automatic (automatique), le routeur et les clients du réseau
passent automatiquement au mode 40MHz si:
• Vos clients sans fil prennent en charge le mode 40MHz (parfois
appelé mode Bonded [lié]), qui lie deux canaux de 20MHz pour
améliorer le rendement.
• Il n’y a pas d’interférence adjacente.
Avec un plus grand nombre de canaux disponibles et un risque
moindre d’interférences sur la bande de 5GHz, vous pouvez forcer
l’utilisation du mode 40MHz.
28
Page 93

Linksys EA-Series
Configuration: avancée
Pour la bande de 2,4GHz, vous pouvez sélectionner:
• Auto (20 MHz or 40 Mhz) (automatique)
• 20 MHz Only (20 MHz seulement)
Pour la bande de 5GHz, vous pouvez sélectionner:
• Auto (sélection automatique à partir des options ci-dessous)
• 20 MHz Only (20 MHz seulement)
• 40 MHz Only (40 MHz seulement)
• 80 MHz Only (80 MHz seulement)
g.
Channel (canal) — Choisissez le canal utilisé par chaque bande.
Votre routeur sélectionne automatiquement le canal comportant
le moins d’interférences, si vous conservez le paramètre par défaut
Auto. Il est recommandé de conserver les paramètres par défaut
pour les deux bandes.
4.
Cliquez sur OK pour enregistrer les modifications.
Contrôle de l’accès au réseau
Pourquoi devrais-je contrôler l’accès à mon réseau sans fil? Par défaut,
le logiciel d’installation active la sécurité WPA (Wi-Fi Protected Access)
utilisant le mode mixte WPA2/WPA. Si vous avez configuré votre réseau sans
fil manuellement et n’avez pas activé la sécurité sans fil, votre réseau sera
«ouvert» et toute personne utilisant un appareil Wi-Fi à proximité pourrait y
avoir accès.
Exemple: Puisque chaque configuration de filtrageMAC est unique, la procédure
suivante utilise l’exemple le plus simple qui soit pour la configuration du
filtrageMAC, en ne donnant accès au réseau qu’à un seul périphérique sans fil.
CONSEIL
Vous pouvez aussi utiliser le filtrageMAC pour empêcher certains
ordinateur d’accéder à votre réseau en sélectionnant Deny
(bloquer). Toutefois, il est plus facile de choisir l’option Allow
(autoriser) pour n’autoriser que certains périphériques connus,
plutôt que d’exclure des périphériques inconnus.
Pour configurer le filtrageMAC afin de permettre à un seul périphérique
sans fil d’accéder au réseau:
1.
Ouvrez le sans fil intelligent de Linksys. (Consultez la rubrique «Comment
se connecter au sans fil intelligent de Linksys» à la page7).
2.
Dans Router Settings (paramètres du routeur), cliquez sur l'onglet
Wireless (sans fil). La page Wireless (sans fil) s’affiche.
3.
Cliquez sur l'onglet MAC Filtering (filtrage MAC).
Qu’est-ce que le Filtrage MAC? Si vous choisissez de ne pas utiliser les
caractéristiques de sécurité intégrées à votre routeur, vous pouvez contrôler
l’accès à votre réseau sans fil à l’aide du FiltrageMAC. Chaque périphérique
réseau possède une adresse MAC (Media Access Control) unique de 12chiffres. À
l’aide du FiltrageMAC, vous pouvez choisir de n’autoriser que les adresses MAC
connues (périphériques connus) à accéder à votre réseau. Vous pouvez aussi
exclure certaines adressesMAC ou leur interdire l’accès à votre réseau sans fil.
CONSEIL
Le FiltrageMAC n’est pas une méthode de sécurité puissante. La
meilleure manière de protéger votre réseau consiste à utiliser la
sécurité WPA2.
29
Page 94

Linksys EA-Series
4.
Sélectionnez Enabled (activé) près de MAC Filters (filtres MAC), puis
sélectionnez Allow access for ONLY the listed MAC addresses
(autoriser l’accès UNIQUEMENT aux adresses MAC indiquées).
Configuration: avancée
Amélioration de la sécurité à l’aide du pare-feu intégré
Pourquoi devrais-je modifier mes paramètres de sécurité? Par défaut, les
paramètres de pare-feu dans votre routeur ont été optimisés pour la plupart
des environnements domestiques, de sorte qu'aucun changement n'est
nécessaire. Le pare-feu SPI (Stateful Packet Inspection) est activé par défaut.
De plus, les requêtes anonymes provenant d’Internet et les requêtes IDENT
sont bloquées par défaut. Tous les filtres Web sont désactivés, parce que leur
activation peut causer des problèmes sur des sites utilisant des objets ActiveX,
Java ou des cookies.
5.
Cliquez sur Add MAC Address (ajouter une adresse MAC), puis entrez
l’adresseMAC dans la MAC Filter List (liste de filtrage d’adresses MAC) et
cliquez sur Save (enregistrer).
Modification des paramètres du pare-feu
Pour modifier les paramètres de votre pare-feu:
1.
Ouvrez le sans fil intelligent de Linksys. (Consultez la rubrique ««Comment
se connecter au sans fil intelligent de Linksys» à la page7).
2.
Dans Router Settings (paramètres du routeur), cliquez sur Security (sécurité).
La page Security (sécurité) s'ouvre et affiche l'onglet Firewall (pare-feu).
3.
Vous pouvez maintenant modifier les paramètres suivants:
CONSEIL
Pour obtenir une description des paramètres, cliquez sur Help
(aide) en haut de l'écran.
• Firewall: SPI firewall protection (pare-feu : protection par pare-feu
SPI) — Cette option vous aide à protéger votre réseau local contre les
menaces provenant d’Internet. Par défaut, cette option est activée.
Sur certains modèles de routeur, ce paramètre se subdivise en options
pour IPv6 et IPv4, pour vous permettre de les gérer séparément.
30
Page 95

Linksys EA-Series
Configuration: avancée
MISE EN GARDE
Pour vous aider à protéger votre réseau, vous devriez vous assurer
que cette option est activée.
• VPN Passthrough: (intercommunication VPN :)
• IPSec Passthrough (intercommunication IPSec) — La
technologie IPSec (Internet Protocol Security) désigne une série
de protocoles utilisés pour la mise en place d'un échange sécurisé
des paquets au niveau de la coucheIP. Les clients VPN du réseau
local peuvent établir un tunnelVPNIPSec à travers le routeur. Par
défaut, cette option est activée.
• PPTP Passthrough (intercommunication PPTP) — Le protocole
PPTP (Point-to-Point Tunneling Protocol) permet d’établir un
tunnel PPP (Point-to-Point Protocol) à travers un réseau IP. Les
clients VPN du réseau local peuvent établir un tunnelVPNPPTP à
travers le routeur. Par défaut, cette option est activée.
• L2TP Passthrough (intercommunication L2TP) — Le protocole
L2TP (Layer 2 Tunneling Protocol) permet d’établir une session
point à point par Internet sur la couche liaison de données (2). Les
clients VPN du réseau local peuvent établir un tunnelVPNL2TP à
travers le routeur. Par défaut, cette option est activée.
• Internet filters: (filtres Internet :)
• Filter anonymous Internet requests (filtrage des requêtes
Internet anonymes) — Ce filtre bloque les requêtes provenant
d’Internet, par exemple les requêtes Ping, lorsque la source est
inconnue. Par défaut, cette option est activée.
• Filter multicast (filtrage multidiffusion) — La multidiffusion permet
à une transmission unique d’atteindre plusieurs destinataires
dans votre réseau local. Sélectionnez cette option pour bloquer la
multidiffusion. Cette option est désactivée par défaut.
• Filter Internet NAT redirection (filtrer la redirection NAT Internet)
— Cette option permet d'interdire à un ordinateur de votre
réseau d'utiliser une adresseURL ou une adresseIP pour accéder
au serveur local. Sélectionnez cette fonction pour activer le filtre.
Cette option est désactivée par défaut. Sur certains modèles de
routeur, cette option s’applique à InternetIPv4 seulement.
• Filter ident (Port 133) (Filtrage ident) — Ce filtre empêche les
intrus d'accéder à votre routeur par le biais d'Internet à l'aide du
port113. Par défaut, cette option est activée.
4.
Cliquez sur Save (enregistrer) pour enregistrer vos modifications.
Modification des paramètres du pare-feuIPv6
Sur certains modèles de routeur, le pare-feuIPv6 vous permet de personnaliser
les services de portIPv6 pour les applications. Lorsque des utilisateurs envoient
ce type de requête vers votre réseau par le biais d'Internet, le routeur transfère
ces requêtes vers l'ordinateur approprié.
REMARQUE
Pour utiliser les paramètres de connexion InternetIPv6 de votre
routeur, votre fournisseur d'accès à Internet doit prendre en
charge le service IPv6. Pour plus d'information sur ce service,
communiquez avec votre FAI.
Pour configurer les paramètres du pare-feuIPv6:
1.
Ouvrez le sans fil intelligent de Linksys. (Consultez la rubrique «Comment
se connecter au sans fil intelligent de Linksys» à la page7).
2.
Dans Router Settings (paramètres du routeur), cliquez sur Security
(sécurité). La page Security (sécurité) s'ouvre et affiche l'onglet Firewall
(pare-feu).
31
Page 96

Linksys EA-Series
3.
Cliquez sur Add IPv6 Firewall Setting (ajouter les paramètres du parefeu IPv6). Vous pouvez maintenant modifier les champs suivants:
• Description — Entrez une description de l’application.
• Protocol (protocole) — Sélectionnez TCP, UDP ou Both (les deux)
(valeur par défaut).
• IPv6 Address (adresse IPv6) — Entrez l’adresseIPv6 de l’ordinateur
qui recevra le trafic entrant.
• Allow (autoriser) — Sélectionnez la plage de ports utilisée par le trafic
entrant.
4.
Cliquez sur Save (enregistrer) pour enregistrer vos modifications. La liste
est mise à jour et contient maintenant les paramètres que vous avez
enregistrés.
• Pour modifier un paramètre enregistré, cliquez sur Edit (modifier) près
de celui-ci.
• Pour supprimer un paramètre enregistré, cliquez sur Remove
(supprimer) près de celui-ci.
Configuration: avancée
3.
Cliquez sur l'onglet Local Network (réseau local).
Configuration du serveur DHCP de votre routeur
Votre routeur peut être utilisé comme serveur DHCP (Dynamic Host
Configuration Protocol) pour attribuer automatiquement une adresseIP à tous
les ordinateurs et périphériques de votre réseau. Le serveur DHCP est activé par
défaut. Si votre réseau compte déjà un serveurDHCP ou si vous ne souhaitez
pas utiliser votre routeur comme serveur DHCP, vous devez désactiver ce
paramètre.
Pour configurer les paramètres de serveur DHCP de votre routeur:
1.
Ouvrez le sans fil intelligent de Linksys. (Consultez la rubrique «Comment
se connecter au sans fil intelligent de Linksys» à la page7).
2.
Dans Router Settings (paramètres du routeur), cliquez sur Connectivity
(connectivité).
4.
Pour désactiver le serveurDHCP, décochez la case Enabled (activé).
5.
Pour modifier les paramètres suivants, la case Enabled (activé) doit être
cochée:
• Start IP address (adresse IP de début)
• Maximum number of users (nombre maximal d’utilisateurs)
• IP address range (plage d’adresse IP) (non modifiable)
• Client lease time (durée de validité client)
• Static DNS values (valeurs DNS statiques)
• WINS
6.
Cliquez sur OK pour enregistrer les modifications.
32
Page 97

Linksys EA-Series
Configuration des adressesIP réservées dans le
serveur DHCP
Pourquoi utiliser les adresses IP réservées? La fonctionnalité DHCP
reservation (réservation DHCP) vous permet d’attribuer une adresseIP locale
statique à un périphérique en particulier sur votre réseau. L’attribution d’une
adresseIP statique permet de gérer plus efficacement des périphériques tels
les serveurs d’impression, les caméras Web, les imprimantes réseau et les
consoles de jeux. Il est aussi recommandé d'attribuer une adresseIP statique
aux périphériques recevant du trafic en provenance d'Internet (consultez la
rubrique «Configuration du routage de ports» à la page45).
Configuration: avancée
4.
Pour réserver une adresseIP pour un périphérique, cochez la case Select
(sélectionner) près de celui-ci, puis cliquez sur Add DHCP Reservation
(ajouter une réservationDHCP).
5.
Cliquez sur Edit (modifier) pour modifier les détails de la réservation ou
sur Delete (supprimer) pour supprimer la réservation.
CONSEIL
Pour obtenir une description des champs, cliquez sur Help (aide)
en haut de l'écran.
Pour configurer les adressesIP réservées dans DHCP:
1.
Ouvrez le sans fil intelligent de Linksys. (Consultez la rubrique «Comment
se connecter au sans fil intelligent de Linksys» à la page7).
2.
Dans Router Settings (paramètres du routeur), cliquez sur Connectivity
(connectivité).
3.
Cliquez sur l'onglet Local Network (réseau local), puis sur DHCP reservations (réservations DHCP). La liste DHCP reservations (réservations DHCP)
s'ouvre et indique les périphériques réseau connectés et les adressesIP
actuellement réservées dans DHCP.
Accéder au réseau à partir d'Internet
Pourquoi aurais-je besoin de trouver mon réseau à partir d'Internet? Si
vous souhaitez accéder à distance à un lecteur connecté à votre routeur ou
afficher les images d'une caméraWeb connectée à votre réseau domestique,
vous devez être en mesure d'entrer l'adresse de votre réseau dans un
navigateurWeb.
Compatible avec plusieurs fournisseurs de service DDNS (Dynamic Domain
Name System), la fonctionnalité DDNS de votre routeur vous permet de
configurer un nom de domaine pour votre réseau, que vous pouvez ensuite
utiliser pour accéder à votre réseau à partir d'Internet. Lorsque votre FAI
change l'adresseIP de votre réseau (ce qui peut se produire fréquemment), le
fournisseur de service DDNS détecte le changement d'adresse et continue à
acheminer le trafic destiné à votre nom de domaine vers la nouvelle adresse.
CONSEIL
Avant de configurer DDNS sur votre routeur, vous devez vous
abonner à un serveur DDNS auprès d'un fournisseur pris en charge
par votre routeur.
Pour configurer DDNS:
1.
Abonnez-vous au fournisseur de service DDNS www.dyndns.org ou
www.tzo.com. Prenez en note toutes les informations fournies par votre
fournisseur de service DDNS.
2.
Ouvrez le sans fil intelligent de Linksys. (Consultez la rubrique «Comment
se connecter au sans fil intelligent de Linksys» à la page7).
33
Page 98

Linksys EA-Series
3.
Dans Router Settings (paramètre du routeur), cliquez sur Security
(sécurité), puis cliquez sur l'onglet Apps and Gaming (applications et
jeux). L'écran DDNS s'affiche.
4.
Dans la liste déroulante DDNS Service (service DDNS) (la valeur Disabled
[désactivé] est sélectionnée par défaut), sélectionnez votre fournisseur
de service DDNS.
Configuration: avancée
Clonage d'une adresseMAC
Dans un réseau domestique, chaque périphérique réseau possède une
adresse MAC (Media Access Control) unique. Certains FAI enregistrent
l'adresse MAC du périphérique (en général, un routeur ou un ordinateur)
connecté directement au modem. Si l'adresse MAC de votre ordinateur
est enregistrée auprès de votre FAI et vous ne souhaitez pas réenregistrer
l'adresseMAC, alors vous pouvez cloner l'adresse (attribuer à votre nouveau
routeur l'adresseMAC de votre périphérique précédent, qui est enregistrée
auprès de votre FAI). Si vous souhaitez utiliser l'adresseMAC d'un ancien routeur
que vous remplacez par votre nouveau routeur, vous devriez tout d'abord
déterminer l'adresseMAC de l'ancien routeur, puis l'entrer manuellement dans
votre nouveau routeur.
REMARQUE
De nombreux FAI attribuent des adressesIP dynamiques et
lorsque vous réinitialisez le modem, l'adresseMAC stockée dans
le modem est réinitialisée. Si vous installez ce routeur pour la
première fois, réinitialisez le modem avant d’y connecter le routeur.
Pour réinitialiser le modem, débranchez son câble d’alimentation
pendant environ une minute, puis rebranchez-le.
5.
Remplissez les champs à l'aide des renseignements fournis par votre
fournisseur DDNS, puis cliquez sur OK.
6.
Pour accéder au réseau à partir d'Internet, entrez le nom du domaine
fourni par le fournisseur de service DDNS.
Pour accéder à un périphérique réseau à partir d'Internet:
a.
Configurez le routeur pour utiliser le routage de port pour le
périphérique (consultez la rubrique «Configuration du routage de
ports pour un port unique» à la page45). Prenez note du numéro de
port utilisé pour le périphérique.
b.
Entrez le nom de domaine du réseau, suivi des deux-points (:) et du
numéro de port. Par exemple, si le nom de domaine enregistré auprès
de votre fournisseur de service DDNS est JoyeuxLapin.linksysnet.com
et votre caméra Web est configurée pour utiliser le port1024, vous
devez entrer: JoyeuxLapin.linksysnet.com : 1024
Pour cloner une adresseMAC à partir de votre ordinateur:
1.
Ouvrez le sans fil intelligent de Linksys. «Comment se connecter au sans fil
intelligent de Linksys» à la page7).
2.
Dans Router Settings (paramètres du routeur), cliquez sur Connectivity
(connectivité). La page Connectivity (connectivité) s’affiche.
3.
Cliquez sur l’onglet Internet Settings (paramètres Internet).
34
Page 99

Linksys EA-Series
4.
Dans MAC Address Clone (clonage d’adresse MAC), cliquez sur Enabled
(activé).
5.
Entrez l’adresseMAC à 12chiffres de votre ancien routeur, puis cliquez
sur OK.
Connexion à votre bureau à l’aide d’une connexion VPN
Qu’est-ce qu’un VPN et dois-je modifier les paramètres de mon routeur?
Un VPN (réseau privé virtuel) est un réseau qui utilise un réseau public comme
l'Internet pour établir des communications sécurisées entre un ordinateur
distant et un autre réseau. Les grandes entreprises fournissent souvent un
accès VPN à leur réseau, pour permettre aux employés de travailler à partir
d’emplacements distants ou lors de leurs déplacements. La plupart des VPN
d’entreprise utilisent Internet pour offrir une connectivité entre les employés
distants et le réseau de l’entreprise.
Généralement, pour offrir un serviceVPN à ses employés, une grande entreprise
installe une passerelleVPN dans son réseau d’entreprise. Les employés autorisés
à travailler à distance se connectent à la passerelleVPN par Internet à l’aide
d’un logicielVPN et des méthodes de sécurité fournies par leur employeur.
L’utilisation de méthodes de sécurité et d’authentification robustes garantit la
sécurité de la connexion et limite l’accès aux seuls utilisateurs autorisés.
Les paramètres VPN par défaut de votre routeur ont été configurés pour
autoriser la création de tunnels pour la majorité des protocolesVPN courants,
de sorte qu'aucune modification n'est nécessaire.
Pour modifier les paramètres de création de tunnelsVPN:
1.
Ouvrez le sans fil intelligent de Linksys. (Consultez la rubrique ««Comment
se connecter au sans fil intelligent de Linksys» à la page7).
2.
Dans Router Settings (paramètres du routeur), cliquez sur Security
(sécurité). La page Security (sécurité) s'ouvre et affiche l'onglet Firewall
(pare-feu).
Configuration: avancée
3.
Activez tous les paramètres que vous souhaitez modifier.
• IPSec Passthrough (intercommunication IPSec) — La technologie
IPSec (Internet Protocol Security) désigne une série de protocoles
utilisés pour la mise en place d'un échange sécurisé des paquets au
niveau de la coucheIP. Les clients VPN du réseau local peuvent établir
un tunnelVPNIPSec à travers le routeur. Par défaut, cette option est
activée.
• PPTP Passthrough (intercommunication PPTP) — Le protocole PPTP
(Point-to-Point Tunneling Protocol) permet d’établir un tunnel PPP
(Point-to-Point Protocol) à travers un réseau IP. Les clients VPN du
réseau local peuvent établir un tunnelVPNPPTP à travers le routeur.
Par défaut, cette option est activée.
• L2TP Passthrough (intercommunication L2TP) — Le protocole L2TP
(Layer 2 Tunneling Protocol) permet d’établir une session point à point
par Internet sur la couche liaison de données (2). Les clients VPN du
réseau local peuvent établir un tunnelVPNL2TP à travers le routeur.
Par défaut, cette option est activée.
4.
Cliquez sur OK pour enregistrer vos modifications.
Optimisation du routeur pour les jeux et la téléphonie
Comment mon routeur peut-il accorder des priorités au trafic vers Internet?
Votre routeur peut accorder des priorités au trafic voyageant entre votre réseau
et l’Internet. Le rendement des applications exigeantes et fonctionnant en
temps réel, comme les jeux en ligne, les appels VoIP, la diffusion de contenu
vidéo et la vidéoconférence, peut être amélioré en configurant la priorité du
multimédia.
Les paramètres de priorité sont appliqués uniquement au trafic en direction
d’Internet. Le routeur n’est pas en mesure de contrôler la qualité du trafic après
qu’il a été transmis à Internet.
CONSEIL
Pour de plus amples renseignements sur l'optimisation de votre
routeur pour les jeux en ligne, consultez la rubrique«Routage de
ports et Déclenchement de ports» à la page45.
35
Page 100

Linksys EA-Series
Configuration: avancée
Pour configurer la priorité du multimédia:
1.
Ouvrez le sans fil intelligent de Linksys. (Consultez la rubrique ««Comment
se connecter au sans fil intelligent de Linksys» à la page7).
2.
Dans Apps (applications), cliquez sur Media Prioritization (priorité
du multimédia). L’écran Media Prioritization (priorité du multimédia)
s’affiche.
3.
Activez la Prioritization (priorité) si ce n’est pas déjà fait.
4.
Sélectionnez les périphériques prioritaires dans la liste Normal Priority
(priorité normale) et glissez-déposez-les dans la liste High Priority
(priorité élevée).
5.
Pour attribuer une priorité à une application ou à un jeu, sélectionnez
son nom dans la liste déroulante, puis glissez-déposez l’icône près
du nom vers la liste High Priority (priorité élevée).
• Si le nom de l’application n’est pas dans la liste, cliquez sur Edit
(modifier) et ajoutez le nom.
CONSEIL
Si vous souhaitez ajouter une nouvelle application ou
un nouveau jeu, vous devez connaître les ports et les
protocoles utilisés (consultez la documentation de
l’application ou du jeu pour obtenir de l’aide).
6.
Cliquez sur Settings (paramètres). L’écran Settings (paramètres) s’affiche.
36
 Loading...