


Linksys
SMART Wi-Fi Routers with Wireless-AC
User Guide

Linksys EA-Series
Contents
Contents
Product Overview
EA6300 . . . . . . . . . . . . . . . . . . . . . . . . . . . . . . . . . . . . .1
Wall-mounting placement 4
Setting Up: Basics
How to create a home network. . . . . . . . . . . . . . . . . . . . . .5
What is a network? 5
How to set up a home network 5
Where to nd more help . . . . . . . . . . . . . . . . . . . . . . . . . .5
How to install your router . . . . . . . . . . . . . . . . . . . . . . . . .6
How to congure your router. . . . . . . . . . . . . . . . . . . . . . .7
How to connect to Linksys Smart Wi-Fi 7
How to connect directly to your router 8
How to improve your wireless connection speed 8
How to change your network’s name and password 9
How to change your router’s local access password 9
How to change your router’s time zone 10
How to test your Internet connection speed . . . . . . . . . . . . 10
How to connect devices to your network . . . . . . . . . . . . . . 11
How to connect a computer to your network 11
How to connect a USB printer 11
How to connect other devices 12
How to view device details 13
How to set up parental controls . . . . . . . . . . . . . . . . . . . . 14
How to set parental controls 14
How to congure your guest network . . . . . . . . . . . . . . . .15
How to back up your router conguration . . . . . . . . . . . . . 16
How to customize Linksys Smart Wi-Fi . . . . . . . . . . . . . . . . 17
Using widgets 17
Customizing the Device List 17
Using an External Drive
Overview. . . . . . . . . . . . . . . . . . . . . . . . . . . . . . . . . . .18
How to attach a USB drive . . . . . . . . . . . . . . . . . . . . . . . .18
How to use secured folder access . . . . . . . . . . . . . . . . . . . 19
How to set up authorized users and shared folders 19
How to access shared folders 20
How to set up your router as a media server . . . . . . . . . . . . 21
How to connect your UPnP device to the media server 22
How to remotely access storage . . . . . . . . . . . . . . . . . . . . 22
Setting Up: Advanced
How to manually set up your router. . . . . . . . . . . . . . . . . .24
How to manually set up your Internet connection 24
How to associate a router with your Linksys Smart Wi-Fi account 25
How to get the most out of your dual-band router . . . . . . . . 26
How to control access to your network. . . . . . . . . . . . . . . .27
How to improve security using the built-in rewall 29
How to set up the DHCP server on your router. . . . . . . . . . .30
How to set up DHCP reservation 31
How to access your network on the Internet . . . . . . . . . . . . 32
How to clone a MAC address . . . . . . . . . . . . . . . . . . . . . . 33
How to connect to your corporate oce using a VPN . . . . . . 33
How to optimize your router for gaming and voice . . . . . . . . 34
How to enable Voice over IP on your network . . . . . . . . . . . 35
How to congure UPnP . . . . . . . . . . . . . . . . . . . . . . . . . 36
How to use a router as an access point . . . . . . . . . . . . . . . .37
How to put your new router behind an existing router. . . . . .38
i
i

Linksys EA-Series
Contents
To add your router to an existing router or gateway 38
To share an Internet connection 39
To extend your network 41
How to expose a device to the Internet . . . . . . . . . . . . . . . 41
Port Forwarding and Port Triggering
How to set up port forwarding . . . . . . . . . . . . . . . . . . . . .43
How to set up port forwarding for a single port 43
How to set up port forwarding for multiple ports 44
How to set up port forwarding for a range of ports 44
How to set up port range triggering for online gaming . . . . . 45
Maintaining and Monitoring
How to back up and restore your router conguration. . . . . .47
How to upgrade the router’s rmware . . . . . . . . . . . . . . . . 48
How to restore factory defaults . . . . . . . . . . . . . . . . . . . . 48
How to check the status of your router. . . . . . . . . . . . . . . .49
How to disable the Ethernet port status lights 50
How to test your Internet connection 50
How to congure and use logs 51
Troubleshooting
Your router was not successfully set up . . . . . . . . . . . . . . . 52
Windows XP Service Pack update . . . . . . . . . . . . . . . . . . . 52
Your Internet cable is not plugged in message . . . . . . . . . . . . 53
Cannot access your router message . . . . . . . . . . . . . . . . . . 53
After setup. . . . . . . . . . . . . . . . . . . . . . . . . . . . . . . . . .55
The Internet appears to be unavailable 55
Linksys Smart Wi-Fi does not open in your web browser 55
You cannot access Linksys Smart Wi-Fi 56
All other troubleshooting has been unsuccessful 56
Specications
Linksys EA6300 . . . . . . . . . . . . . . . . . . . . . . . . . . . . . . .57
ii
Linksys EA-Series
Product Overview
Product Overview
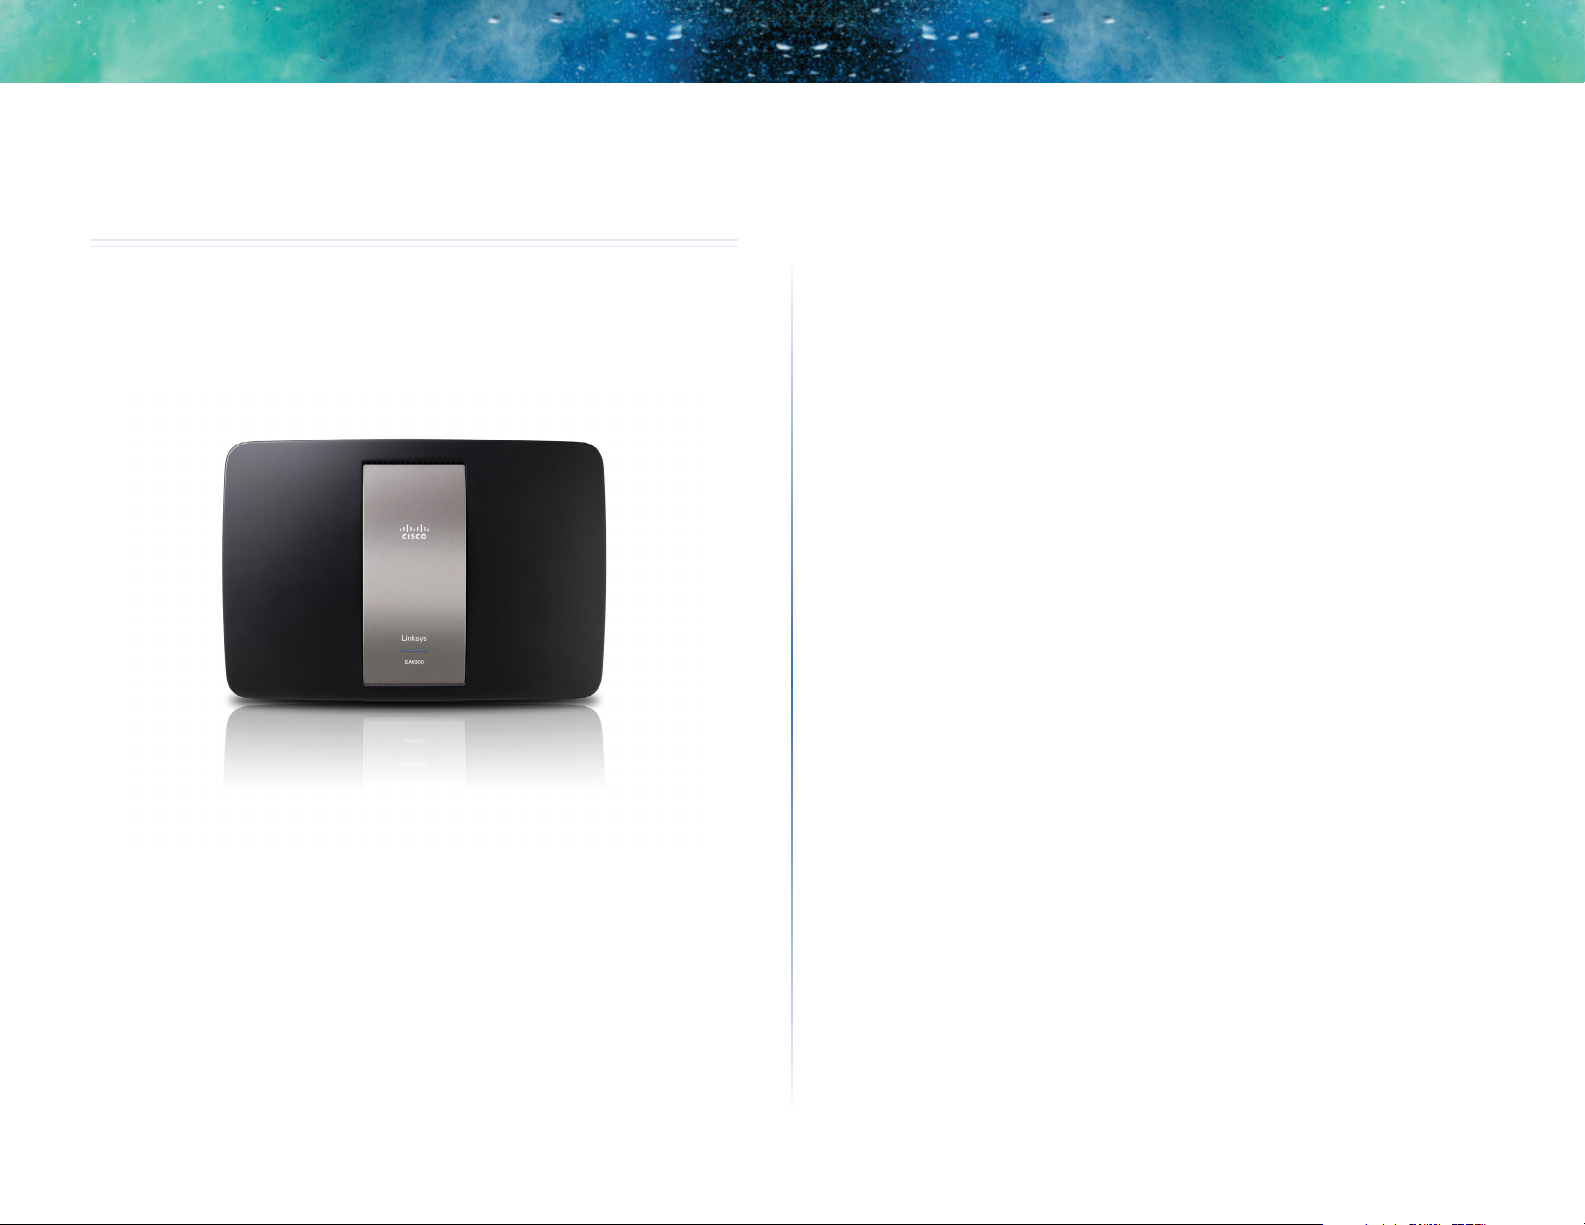
EA6300
Features
Wireless-AC technology
Built with leading 802.11ac wireless technology, your router offers maximum
speed and range to create an ultra-powerful network designed for home
theater performance. Connect your computers, Internet-ready TVs, game
consoles, smartphones and other Wi-Fi devices at blazingly fast transfer rates
for an unrivaled experience.
The power of dual band
Double your network bandwidth with simultaneous dual-band wireless-AC. The
dual-band feature is designed to avoid interference and optimize throughput
for smoother and faster HD video streaming, file transfers, and wireless gaming.
SpeedBoost
Higher quality antenna technology helps maintain high speeds across greater
distances throughout your home.
Advanced security
Keep Wi-Fi freeloaders and Internet threats at bay with WPA2 encryption and
SPI firewall to help keep your network protected.
Benefits of gigabit
Package contents
In addition to your router, your router package includes:
• Network (Ethernet) cable
• AC power adapter
• SimpleTap™ card
Use the four Gigabit Ethernet (10/100/1000) ports for quick file sharing (up to
10× faster than standard Ethernet) between other Gigabit-enabled devices like
computers and servers.
Built-in USB port and DLNA media server
The USB port let you add an external USB drive to your network and share
files at home or over the Internet. It also features a built-in DLNA media server
for seamless streaming of your video and media files to an Xbox 360, PS3, or
other DLNA-compatible device. You can also connect a USB printer and share
it across your network.
1
1
Linksys EA-Series
Product Overview
Home theater ready
Bring the ultimate entertainment experience to your home by connecting
computers, Internet-ready TVs, game consoles, media players, and more to
your wireless network and the Internet. Simultaneous dual-band N and QoS
traffic prioritization technology delivers maximum speed and performance so
you can enjoy fast downloads, smooth video and music streaming, and reliable
gaming and VoIP.
Quick to install
Linksys Smart Wi-Fi software helps you easily set up your router.
IPv6 enabled
Supports the latest Internet protocol technology to future-proof your network.
Easy to manage
Linksys Smart Wi-Fi software helps you customize your settings and quickly
add multiple devices to your network:
Separate guest network
Create a separate, password-protected network for guests.
Parental controls
Limit access time and websites with parental controls.
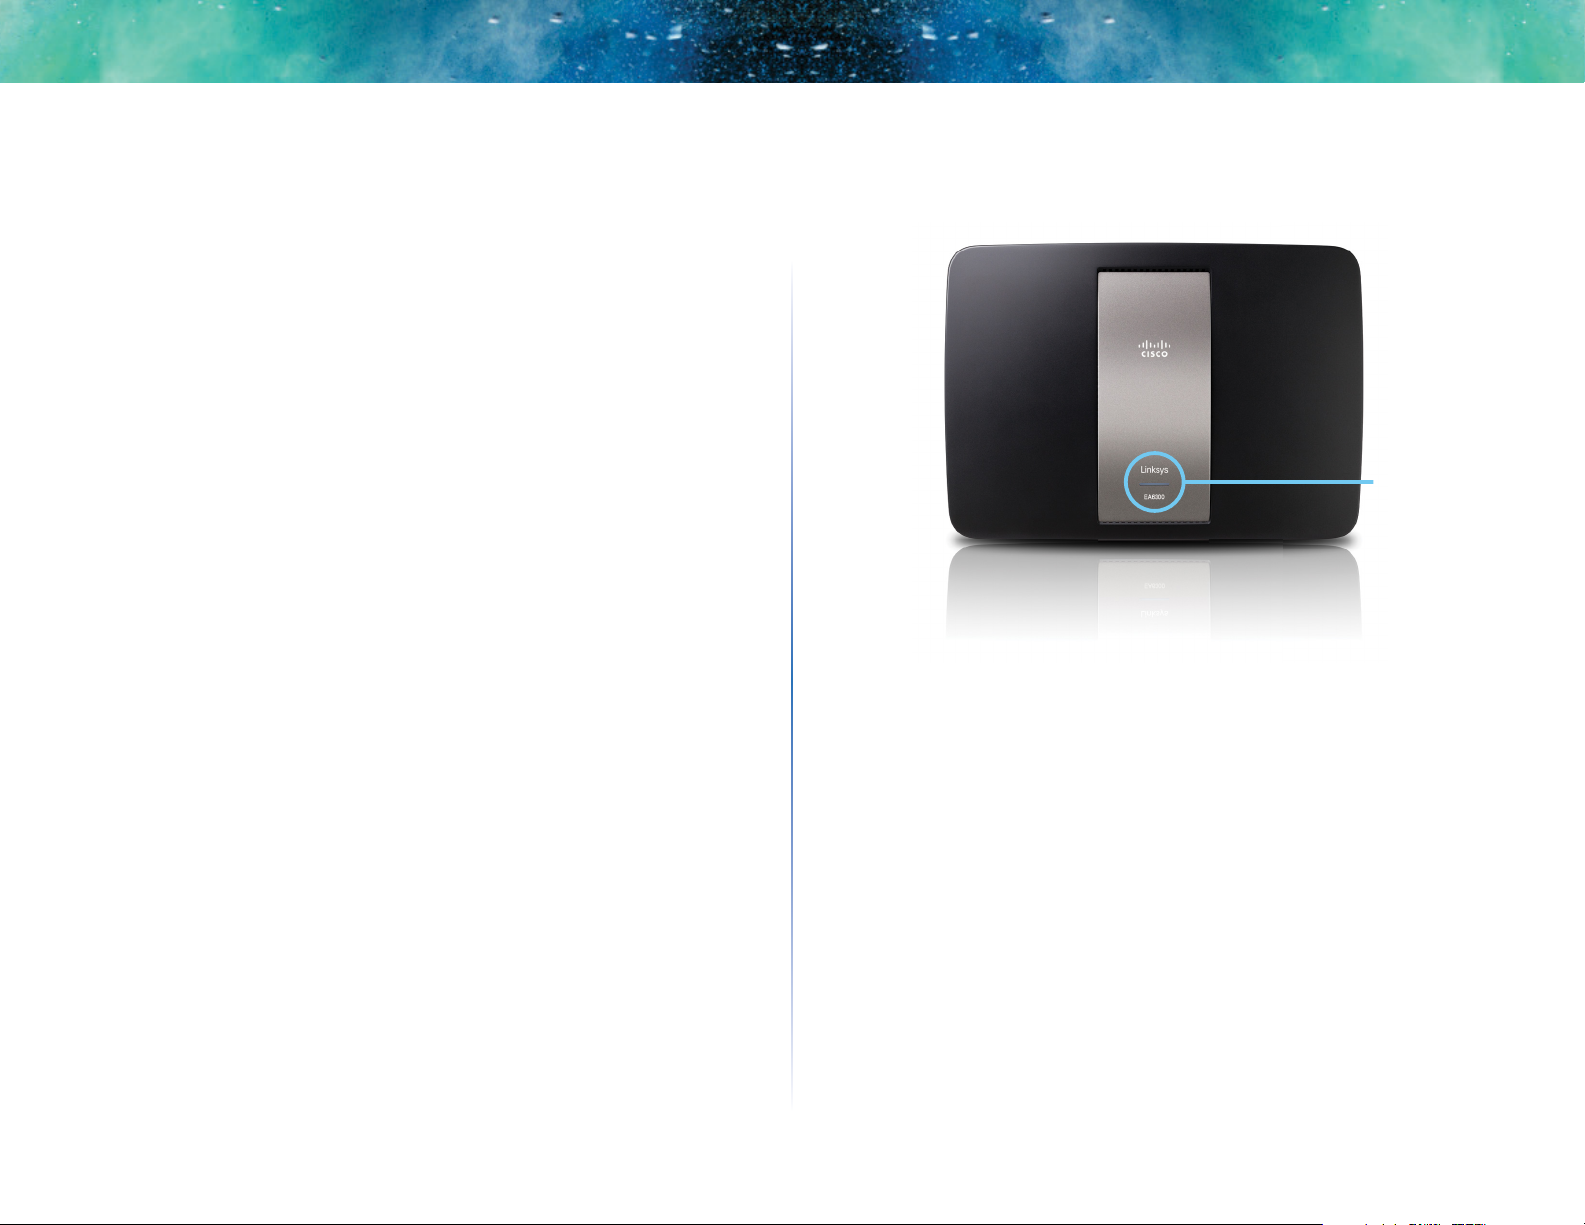
Top view
Indicator light
• Indicator light—Stays on steadily while power is connected and
following a successful Wi-Fi Protected Setup connection. Pulses slowly
during bootup, during firmware upgrades, and during a Wi-Fi Protected
Setup connection. Flashes quickly when there is a Wi-Fi Protected Setup
error.
2
Linksys EA-Series
Product Overview
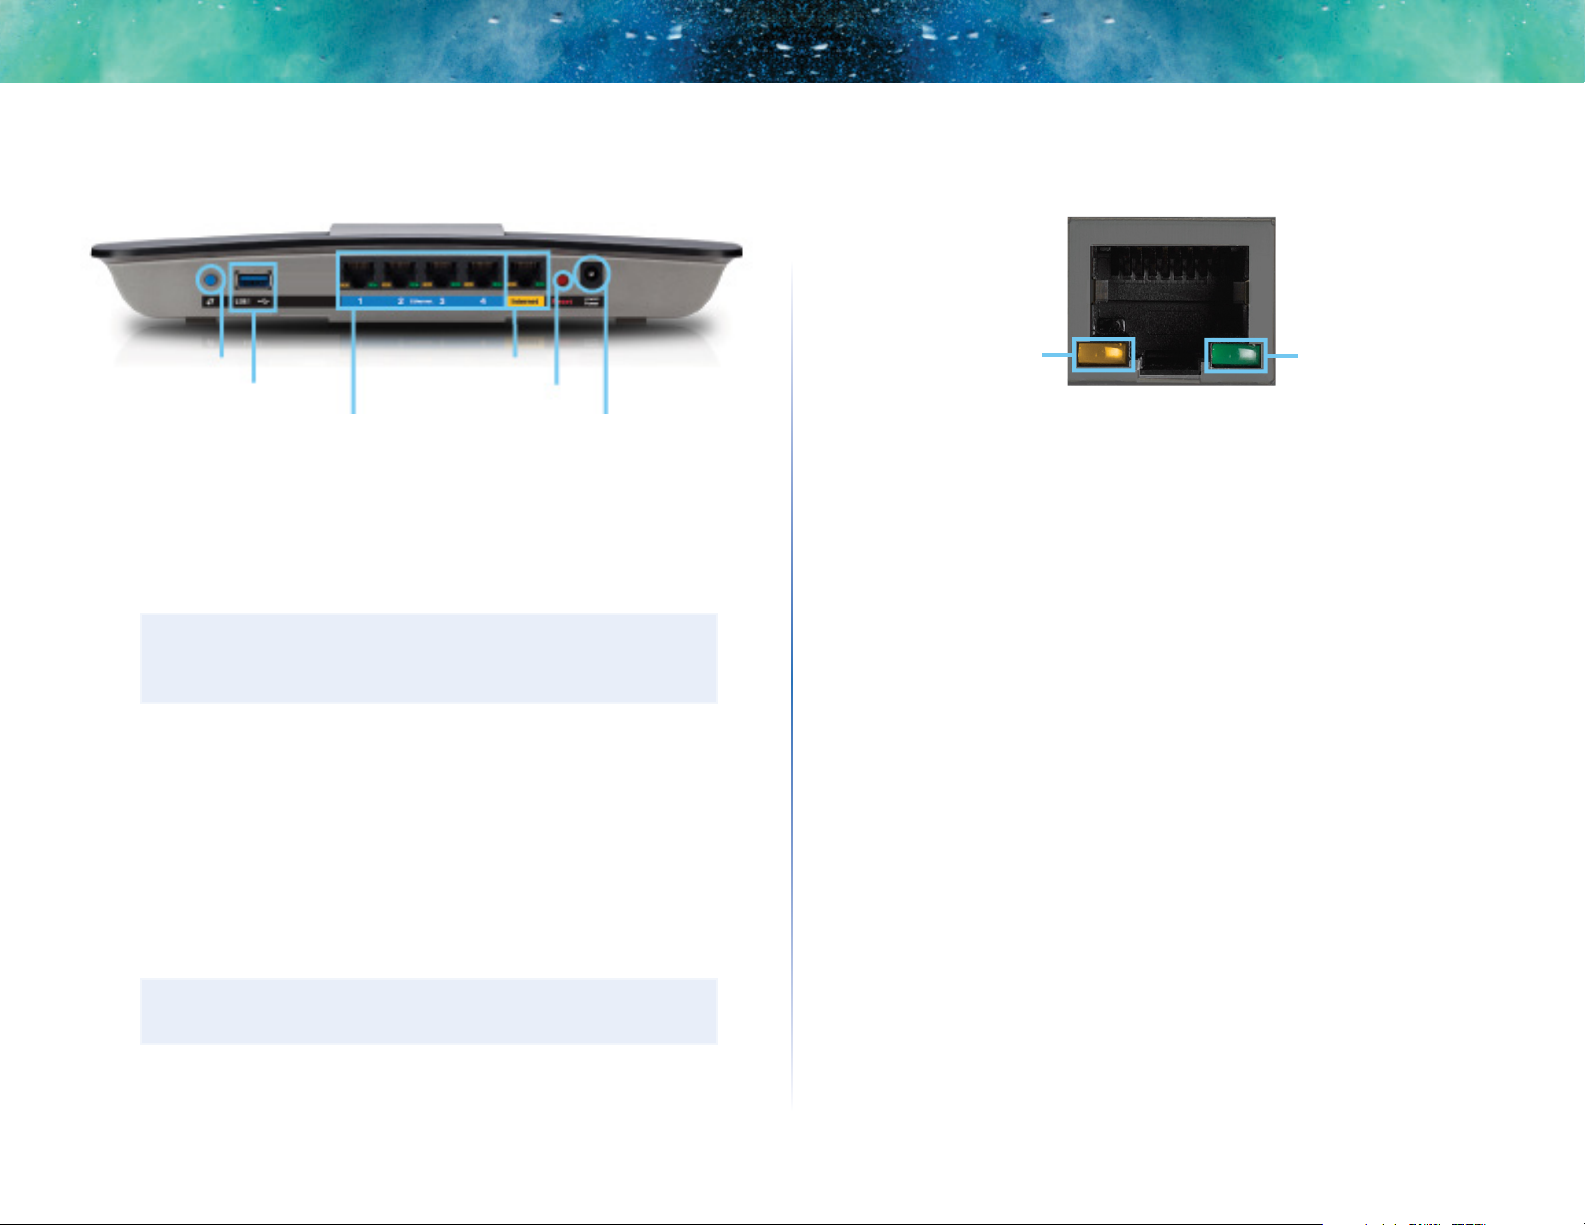
Back view
Wi-Fi Protected Setup button
USB port
Ethernet ports
• Wi-Fi Protected Setup™ button—Press this button to easily configure
wireless security on Wi-Fi Protected Setup-enabled network devices.
• Ethernet ports—Connect Ethernet cables (also called network cables)
to these Gigabit (10/100/1000) ports, color coded blue, and to wired
Ethernet network devices on your network.
NOTE
For best performance, use CAT5E or higher rated cables on the
Ethernet ports.
• Internet port—Connect an Ethernet cable (also called a network or
Internet cable) to this port, color coded yellow, and to your modem.
Internet port
Reset button
Power port
Port activity indicators
Yellow network
activity indicator
Network or Internet port
• Green connectivity indicator—On Ethernet ports, turns on when a
cable connects the port to another Gigabit Ethernet port. On the Internet
port, turns on while connected to a modem.
• Yellow network activity indicator—Flashes to indicate network activity
over that port.
Green connectivity
indicator
• USB ports—To easily share disk storage with other users on your network
or on the Internet, connect a USB drive to one of these ports. You can also
connect a USB printer and share it across your network.
• Reset button—Press and hold this button for 10 seconds (until the port
lights flash at the same time) to reset the router to its factory defaults.
You can also restore the defaults using Linksys Smart Wi-Fi.
• Power port—Connect the included AC power adapter to this port.
CAUTION
Use only the adapter that came with your router.
3
Linksys EA-Series
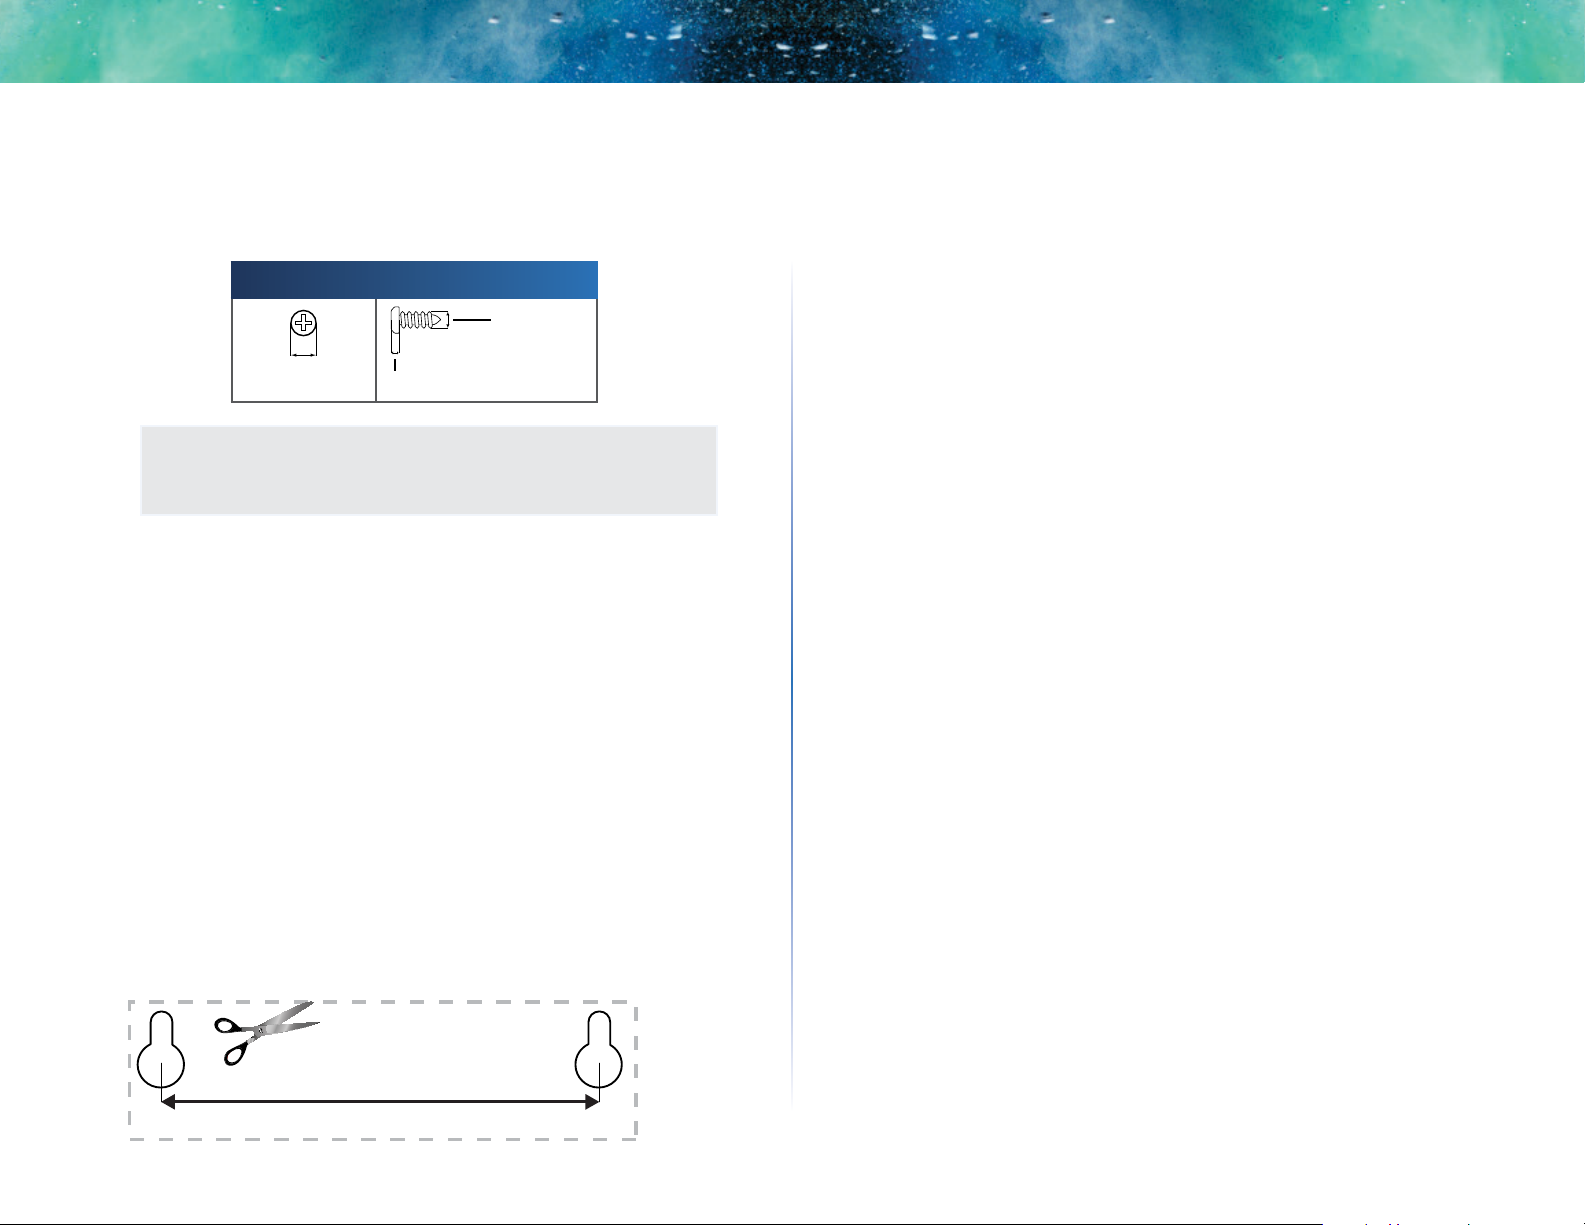
82 mm
Wall-mounting placement
The router has two wall-mount slots on its bottom panel. The distance between
the slots is 82 mm. Two screws are needed to mount the router.
Suggested Mounting Hardware
3-5 mm
7-8 mm 1.5-2 mm
NOTE
Cisco is not responsible for damages incurred by unsecured wallmounting hardware.
Follow these instructions:
1. Determine where you want to mount the router. Make sure that the wall
you use is smooth, flat, dry, and sturdy. Also make sure the location is
within reach of an electrical outlet.
2. Drill two holes into the wall. Make sure the holes are 82 mm apart.
3. Insert a screw into each hole and leave 3 mm of its head exposed.
4. Position the router so the wall-mount slots line up with the two screws.
5. Place the wall-mount slots over the screws and slide the router down
until the screws fit snugly into the wall-mount slots.
Product Overview
Wall-mounting template
Print this page at 100% size.
Cut along the dotted line, and place on the wall to drill precise spacing.
4

Linksys EA-Series
Setting Up: Basics
How to create a home network
What is a network?
A network is any group of devices that can communicate with each other. A
home network can also include Internet access, which requires a router like
this one.
A typical home network may include multiple computers, a printer, a modem,
and a router. A large home network may also have a switch, additional routers,
access points, and many Internet-capable media devices such as TVs, game
consoles, and web cameras.
• Modem—Connects a computer or a router to your ISP (Internet Service
Provider). Your ISP may have provided one. The modem is a device that
connects to a phone jack or your cable TV outlet.
Setting Up: Basics
2.
Make sure that your modem is working. Your ISP can help you set up your
modem and verify that it’s working correctly.
3.
Set up your router. See “How to install your router” on page 6.
4.
To connect a computer or other network device to the network, see
“How to connect a computer to your network” on page 11 and “How to
connect other devices” on page 12.
Where to find more help
In addition to this User Guide, you can find help at these locations:
• Linksys.com/support (documentation, downloads, FAQs, technical
support, live chat, forums)
• Linksys Smart Wi-Fi help (connect to Linksys Smart Wi-Fi, then click
Help at the top of the screen)
• Router—Connects your wireless and wired network devices to each
other and to the modem (and to your ISP).
• Switch—Allows you to connect several wired network devices to your
home network. Your router has a built-in network switch (the Ethernet
ports). If you have more wired network devices than available Ethernet
ports on your router, you will need an additional switch to consolidate
the wired connections.
How to set up a home network
1.
Purchase the proper equipment. For a network that includes Internet
access, you’ll need:
• Computers with an Ethernet port or wireless networking capabilities
• A modem for connecting to your ISP (typically supplied by your ISP)
• A router to connect your computers with each other and to the modem
• Internet service to your home, provided by an ISP (Internet Service
Provider)
5
5

Linksys EA-Series
Setting Up: Basics
How to install your router
To install your router:
1.
Power on your new router. If replacing an existing router, disconnect it.
2.
Connect the Internet cable from your modem to the yellow Internet port
on your router. Wait until the power light on the front of the router is
solid.
3.
Connect to the secure wireless name shown in the Quick Start Guide that
came with your router. (You can change the network name and password
later during router setup.) If you need help connecting to the network,
refer to your device documentation. Note: You will not have Internet
access until router setup is complete.
4.
Open a web browser and follow the instructions to complete your
router’s setup. If instructions do not appear in the web browser, enter
linksyssmartwifi.com in the browser’s address bar.
5.
At the end of setup, follow the on-screen instructions to set up your
Linksys Smart Wi-Fi account. Use Linksys Smart Wi-Fi to easily manage
your router’s settings, such as:
• Change your router’s name and password
• Set up guest access
• Configure parental controls
TIP:
Print this page, then record your router and account settings in
the table below as a reference. Store your notes in a safe place.
Setup also saves your setup information as a file to your computer
desktop.
Network Name (SSID)
Network Password
Router Password
Guest Network Name
Guest Network
Password
Linksys Smart Wi-Fi
Username
Linksys Smart Wi-Fi
Password
• Connect devices to your network
• Test your Internet connection speed
NOTE:
As part of the router setup process, you will be sent a verification
e-mail. From your home network, click the link in the e-mail to
associate your router with the Linksys Smart Wi-Fi account. Make
sure that the link opens in a supported web browser, such as
Internet Explorer 8 or higher, Firefox 8 or higher, Google Chrome 10
or higher, and Safari 5 (for Mac) or higher.
If you cannot click the link while behind your new Linksys router, log into
Linksys Smart Wi-Fi while behind the router and add your router there.
For more information, see “How to associate a router with your Linksys
Smart Wi-Fi account” on page 25.
6
Linksys EA-Series
Setting Up: Basics
How to configure your router
You can change router settings to make your network more secure or to work
better with a device or game. Being able to adjust the settings while you’re
away from home can help make router administration easier. You can configure
your router from anywhere in the world by using Linksys Smart Wi-Fi, but you
can also configure your router directly from your home network.
Linksys Smart Wi-Fi may be available for your mobile device, as well. See your
device’s app store for information.
Use Linksys Smart Wi-Fi to easily manage your router’s settings, such as:
• Change your router’s name and password
• Set up guest access
• Configure parental controls
• Connect devices to your network
• Test your Internet connection speed
Your Linksys Smart Wi-Fi account can also be used to manage multiple Linksys
routers. For more information, see “How to associate a router with your Linksys
Smart Wi-Fi account” on page 25.
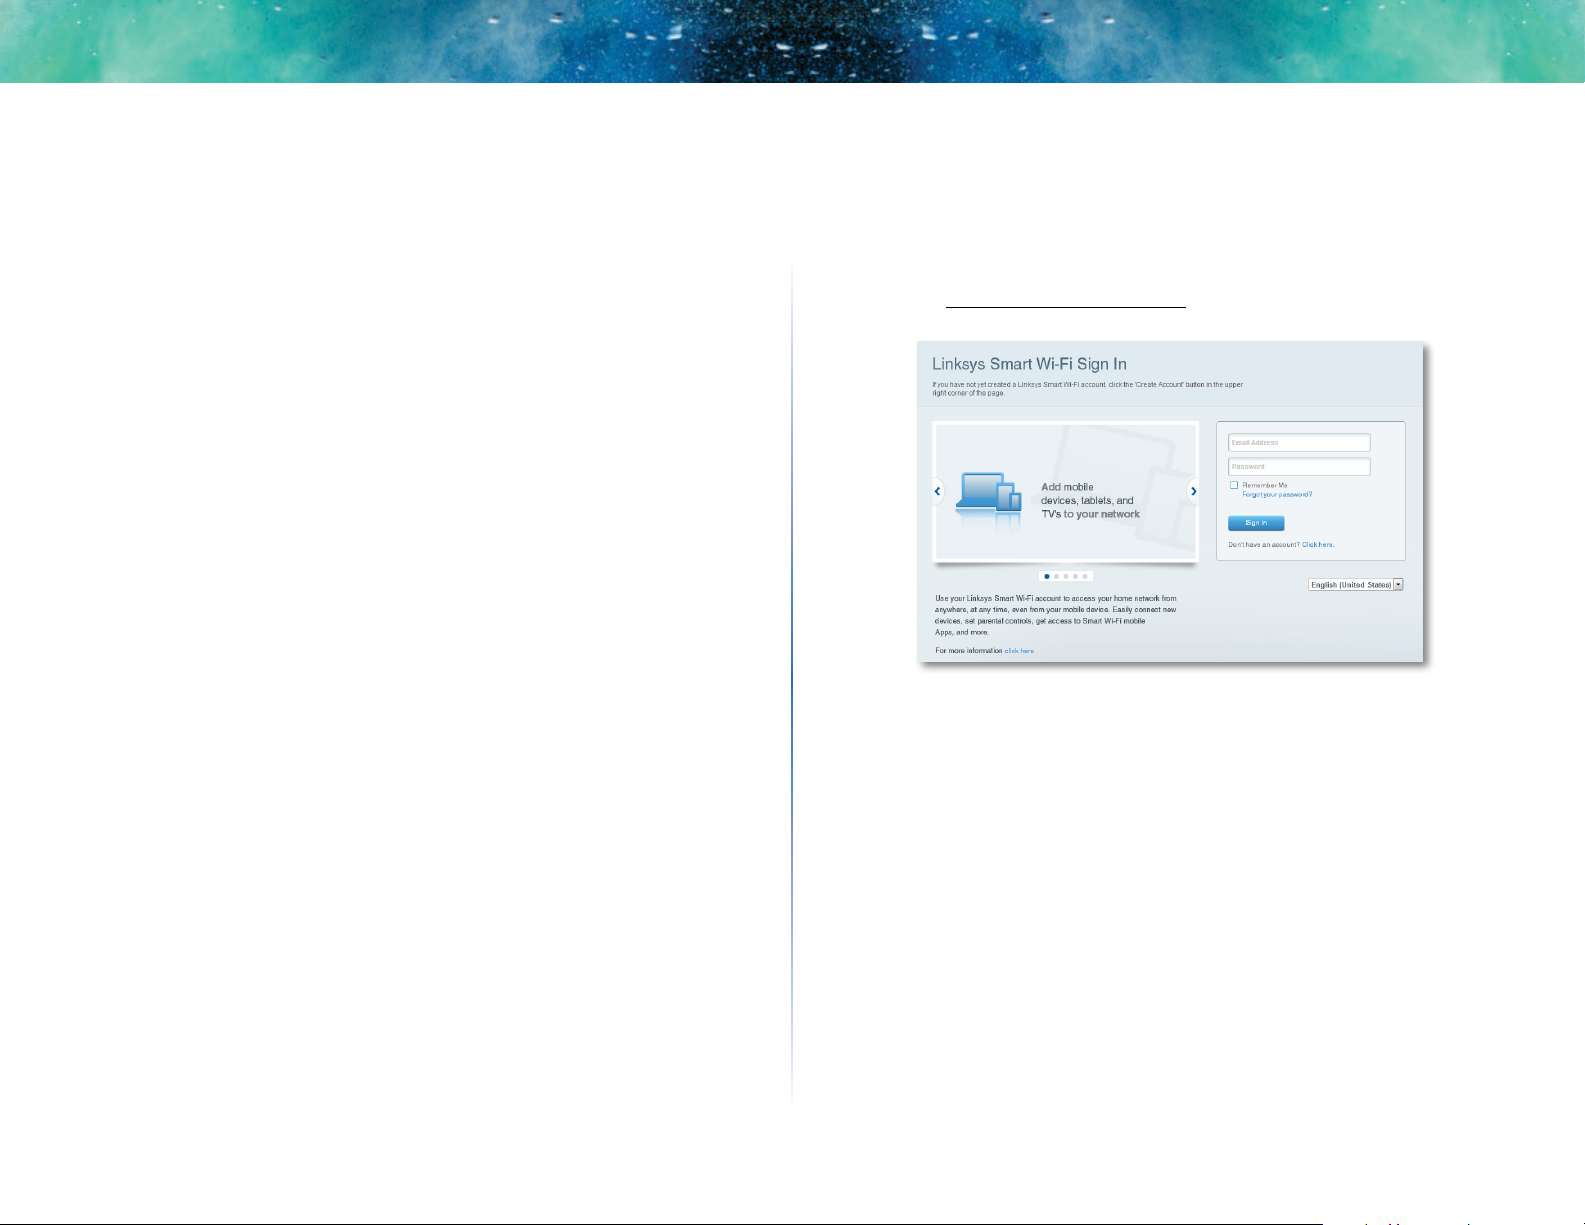
How to connect to Linksys Smart Wi-Fi
To connect to Linksys Smart Wi-Fi:
1.
Open your computer’s web browser.
2.
Go to www.linksyssmartwifi.com and log into your account.
If you can’t remember your password, click Forgot your password? and
follow the on-screen instructions to recover it.
7
Linksys EA-Series
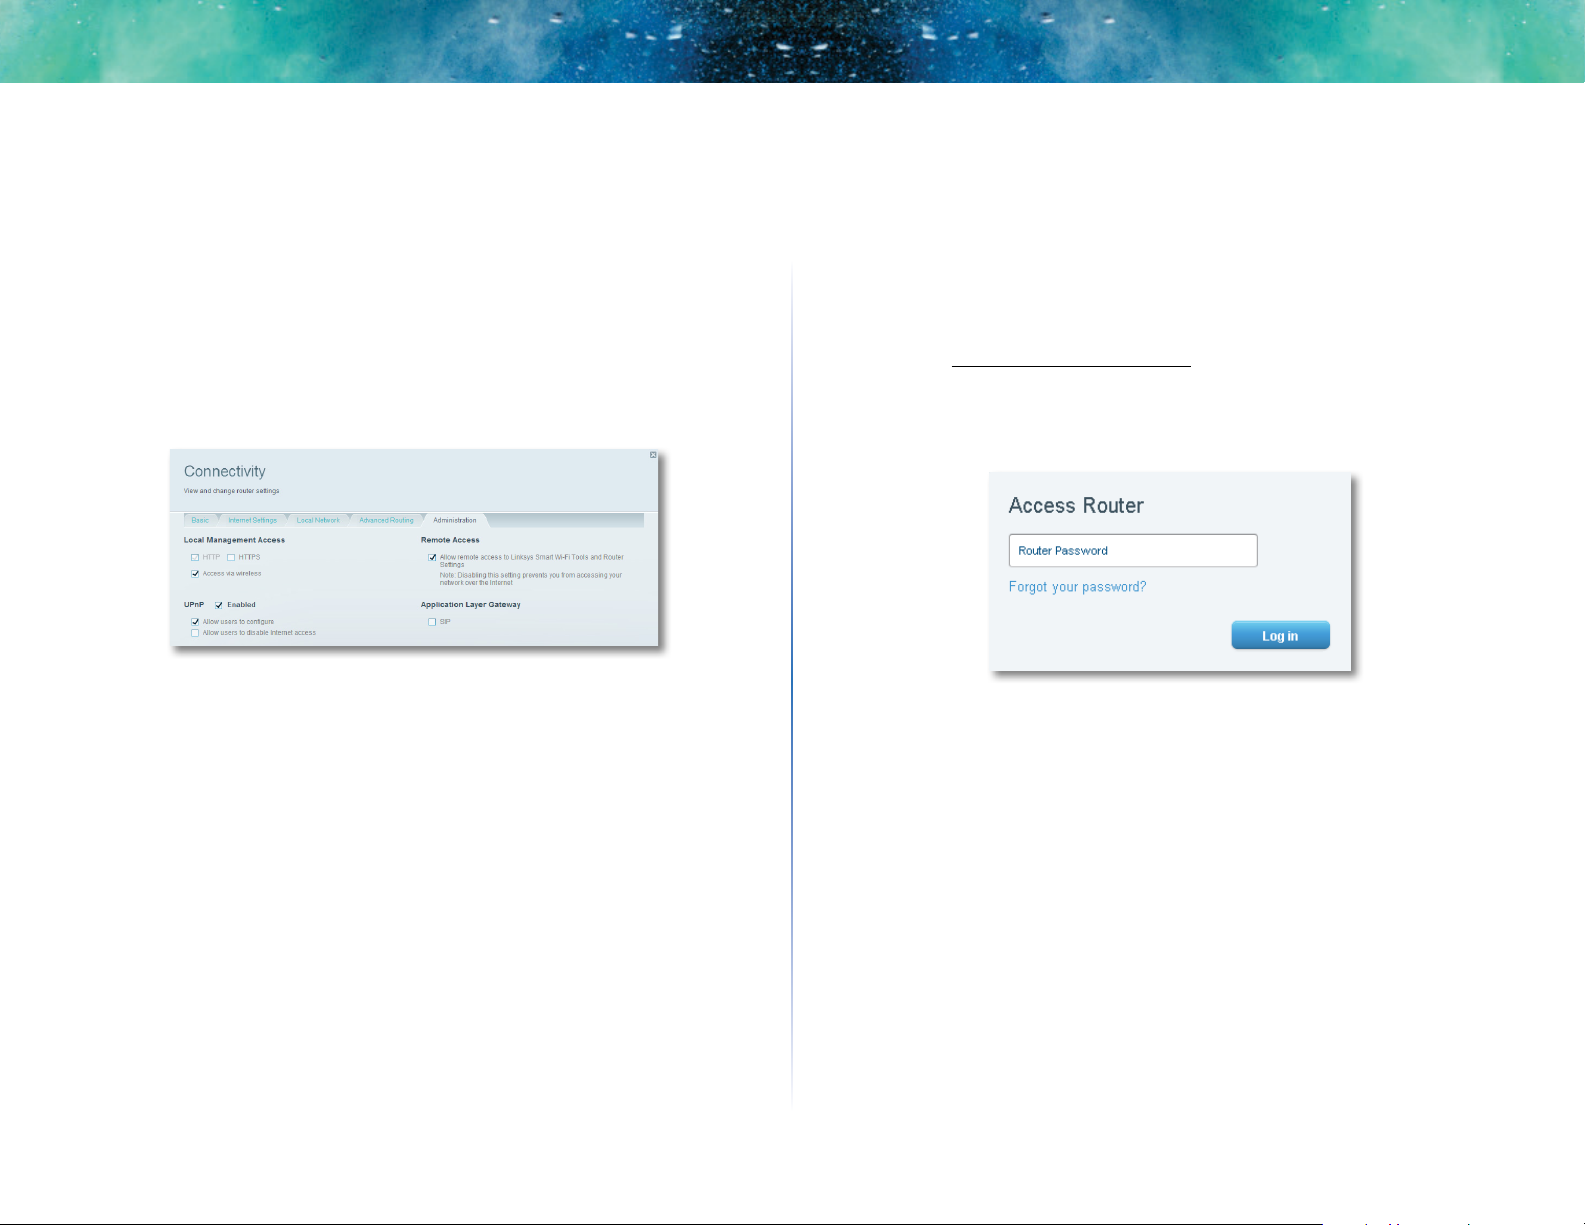
Setting Up: Basics
How to disable remote access
If you want to configure your router only while you are on your home network,
you should disable remote access.
To disable remote access:
1.
Log into Linksys Smart Wi-Fi.
2.
Under Router Settings, click Connectivity.
3.
Click the Administration tab, then deselect Allow remote access to
Linksys Smart Wi-Fi.
4.
Click OK.
How to connect directly to your router
You can configure your router by directly accessing it on your home network
instead of through the Internet-based Linksys Smart Wi-Fi.
To connect to your router while you are on your home network:
1.
Open your computer’s web browser.
2.
Go to www.linksyssmartwifi.com and log into your router using the
router password you created when you installed your router. (When
there is no Internet connection, this address re-routes directly to your
router.)
How to improve your wireless connection speed
Follow these tips to improve your network’s wireless connection speed:
• Make sure that your router is in a good location:
• For the widest coverage area, install your router near the center of
your home, and near the ceiling, if possible.
• Avoid placing the router on or near metal objects (such as file cabinets
and metal furniture), reflective surfaces (such as glass or mirrors), or
masonry walls.
• Any obstruction can weaken the wireless signal (even non-metallic
objects), so the fewer obstructions between the router and the
wireless device, the better.
• Place the router in a location away from other electronics, motors, and
fluorescent lighting.
8
Linksys EA-Series
Setting Up: Basics
• Many environmental variables can affect the router’s performance, so
if your wireless signal is weak, place the router in several locations and
test the signal strength to determine the ideal position.
• If possible, upgrade wireless network interfaces (such as wireless
network cards in computers) from older wireless standards to 802.11n. If
a wirelessly networked device uses an older standard, the performance
of the entire wireless network may be slower.
• If your router is a dual-band router, split your network traffic so the high-
bandwidth traffic uses the 5GHz band. For more information, see “How
to get the most out of your dual-band router” on page 26.
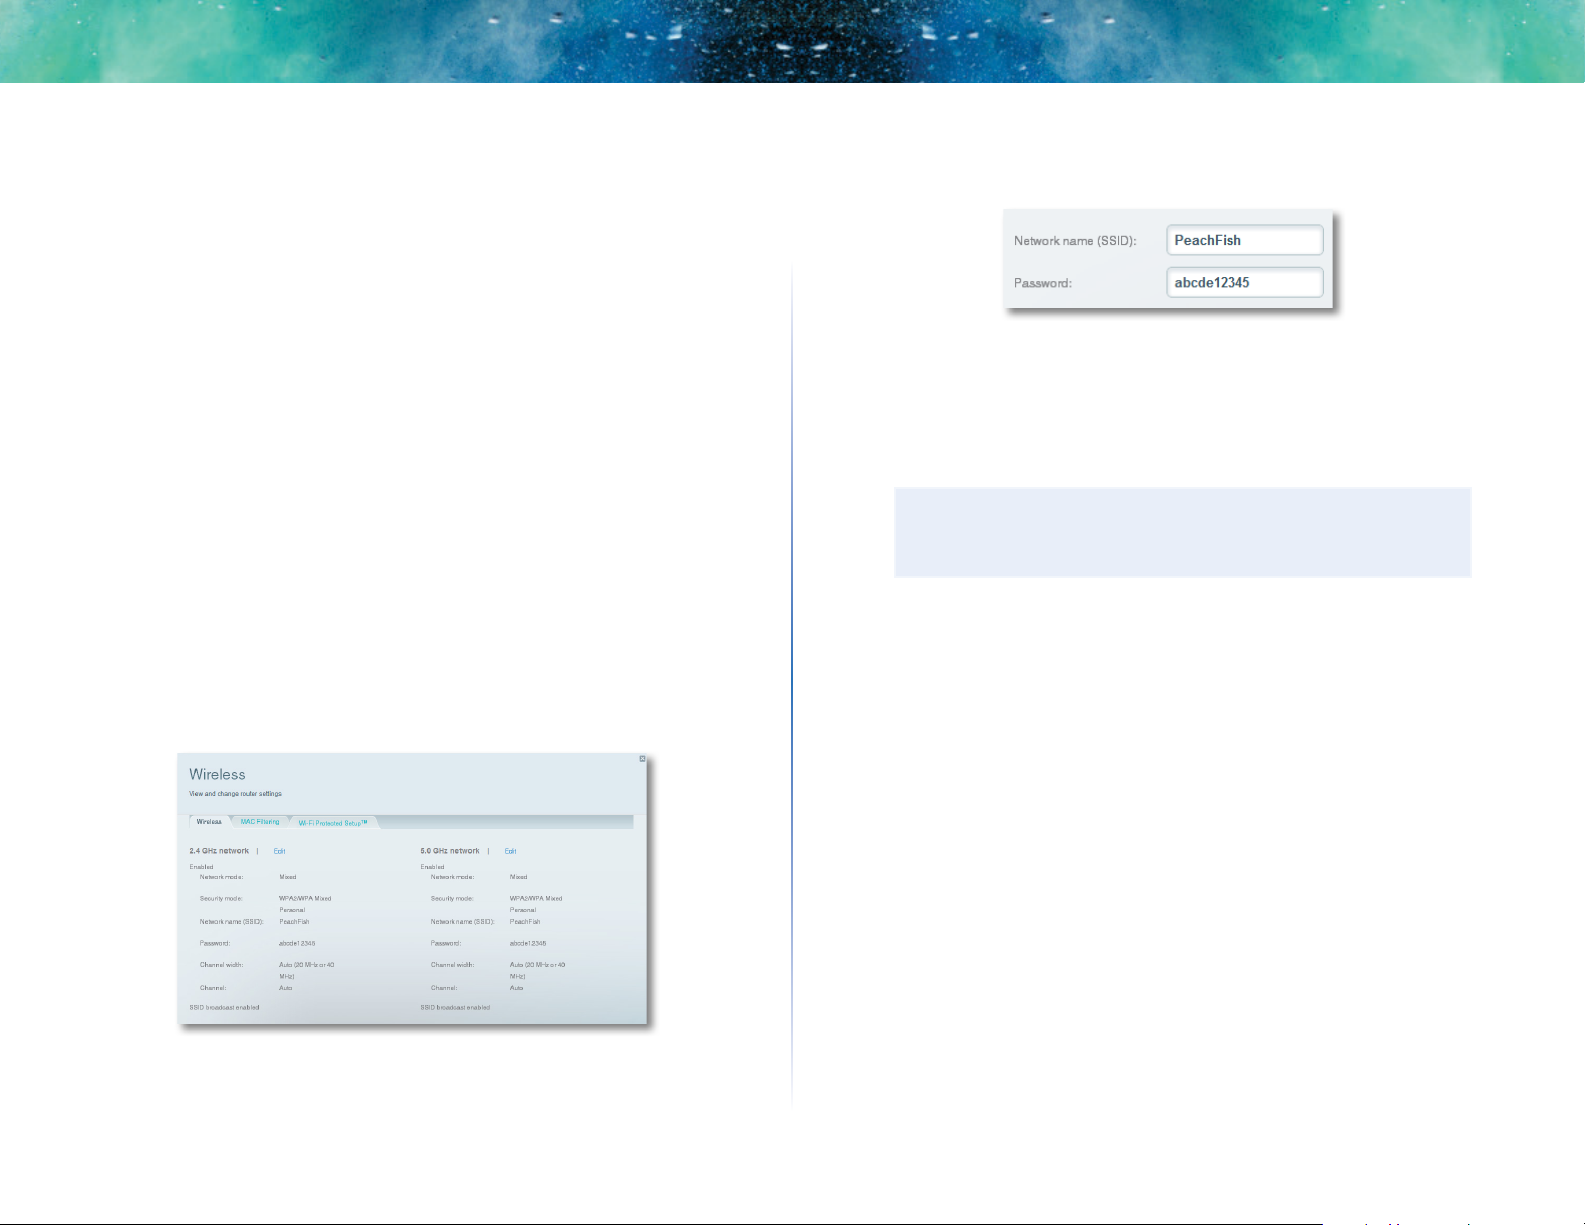
How to change your network’s name and password
You can change the name (SSID) and password of your network, but if you do so,
all wireless devices connected to your router will lose their Internet connection
until you reconnect them using the new network name and password.
To change your router’s name and password:
1.
Log into Linksys Smart Wi-Fi. (See ““How to connect to Linksys Smart WiFi” on page 7.
2.
Under Router Settings, click Wireless.
3.
Click the Wireless tab, then click Edit.
• To change the network name, type a new name in the Network name
(SSID) box.
• To change the network password, type a new password in the
Password box.
4.
Click OK to apply your changes.
TIP
If you have a dual-band router, each band (2.4 GHz and the 5GHz)
can have a separate network name and password.
How to change your router’s local access password
Your router’s local access password was set when you ran the router’s setup
software, but you can change it at any time. You need the router password to
change router settings when you don’t have an Internet connection. When you
do have an Internet connection, log into your Linksys Smart Wi-Fi account by
following the directions under “How to connect to Linksys Smart Wi-Fi” on page
7.
To change your router’s local access password
1.
Log into Linksys Smart Wi-Fi. (See “How to connect to Linksys Smart WiFi” on page 7.
2.
Click Connectivity under Router Settings.
9
Linksys EA-Series
3.
Click the Basic tab.
4.
Under Router Password, type the new password, then click OK.
How to change your router’s time zone
Your router’s time zone should be set to your local time zone.
Setting Up: Basics
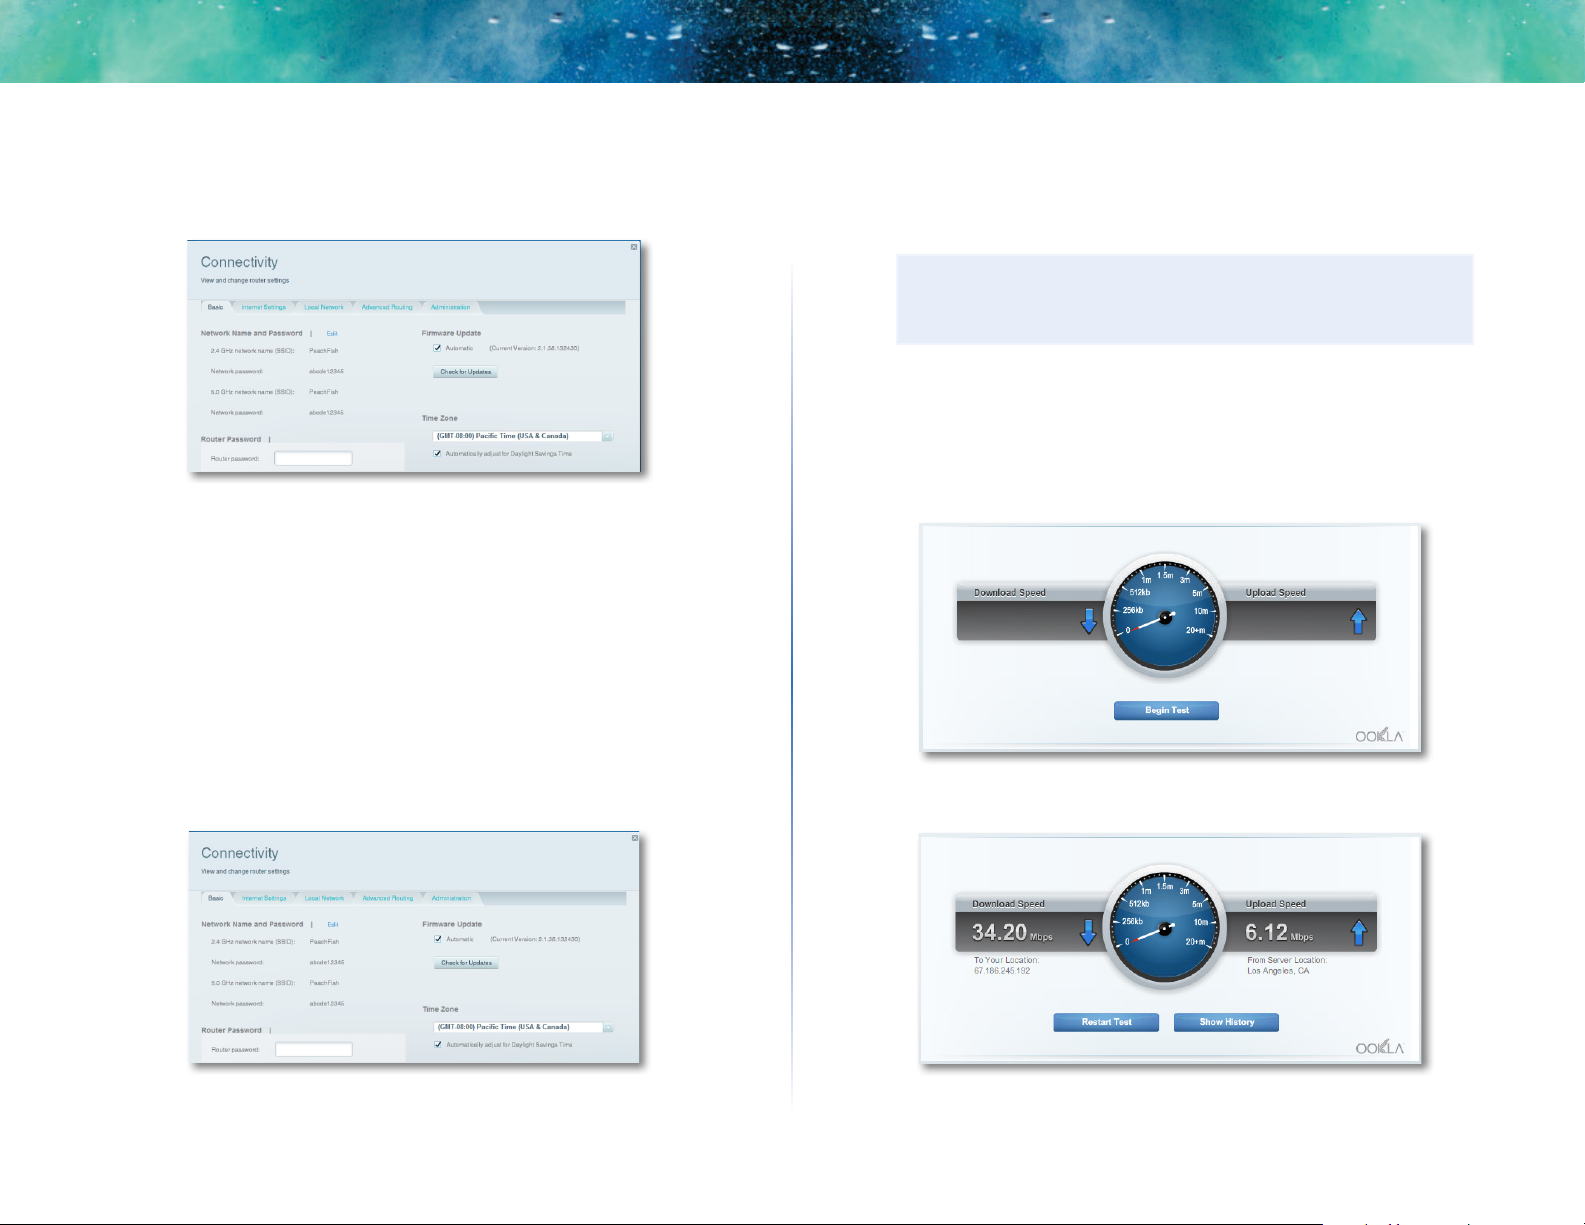
How to test your Internet connection
speed
NOTE
To run the speed test, you must be accessing the Internet by using
the router you are testing. You cannot run the speed test remotely.
To test your Internet connection speed:
1.
Log into Linksys Smart Wi-Fi. (See “How to connect to Linksys Smart WiFi” on page 7.
2.
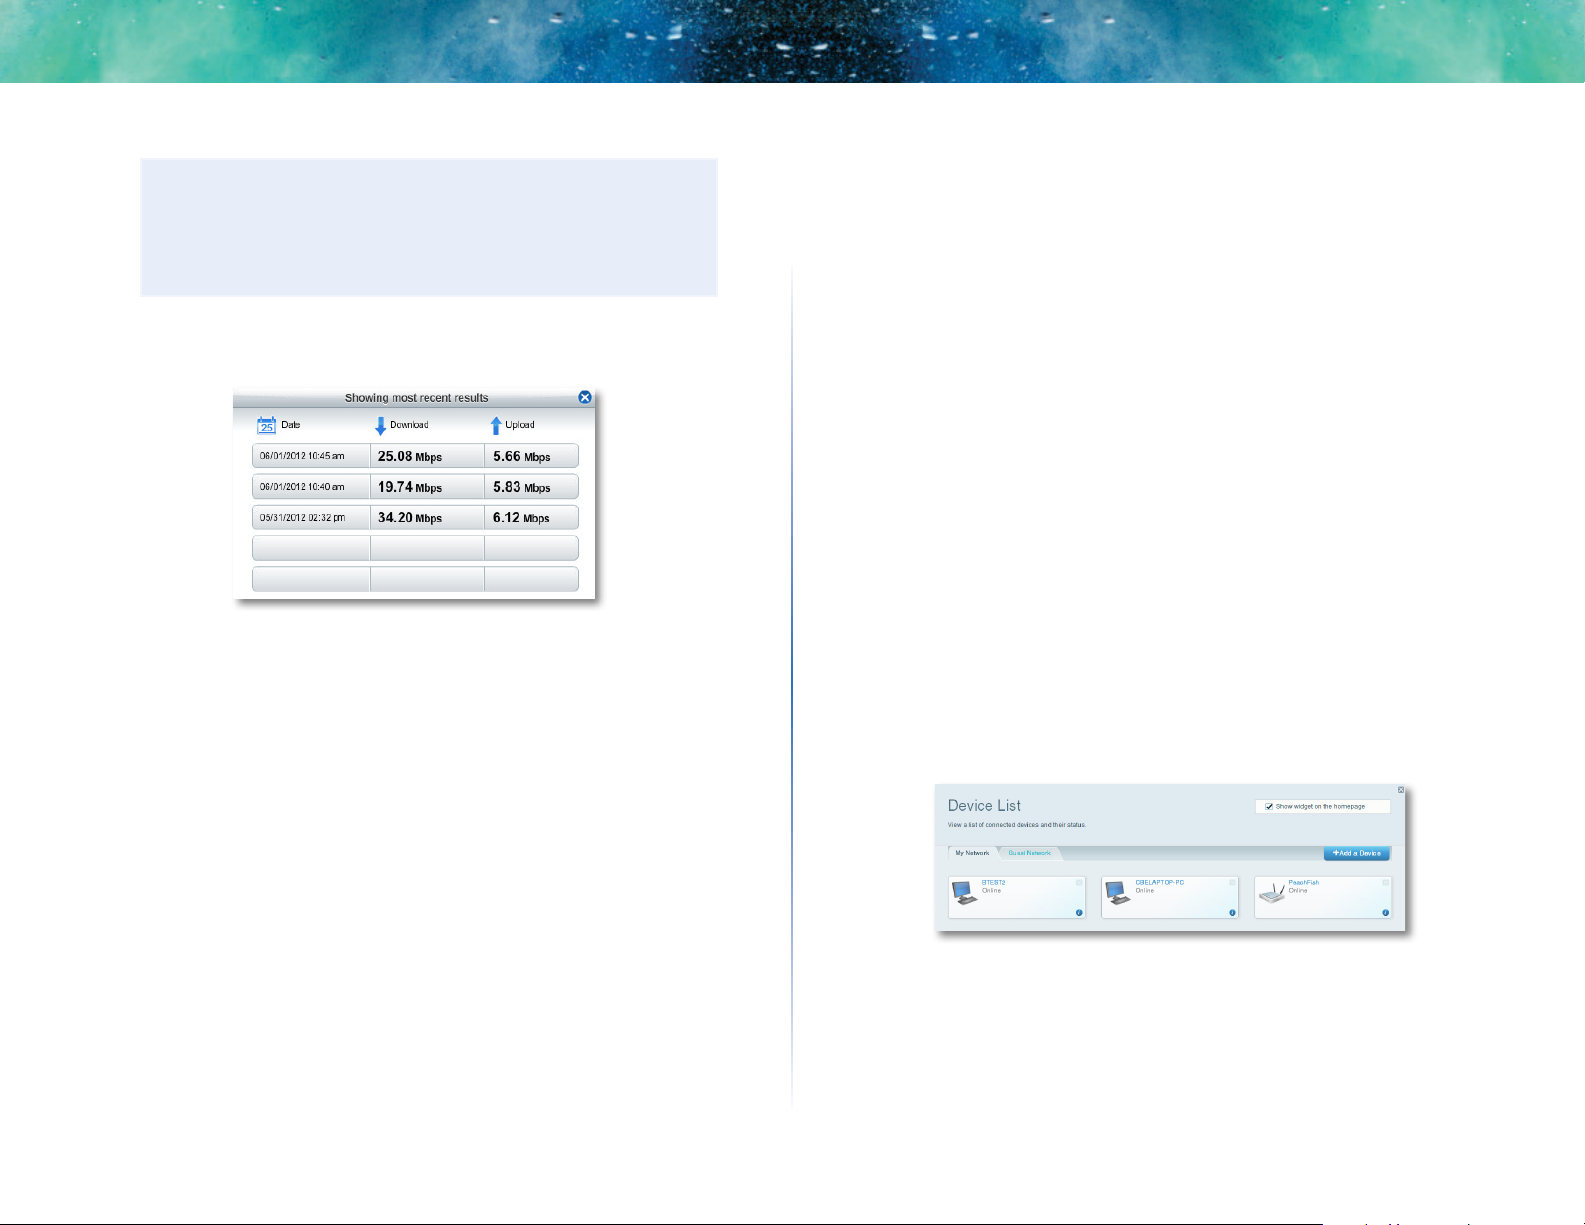
Click Speed Test under Apps. The Speed Test screen opens.
To set your router’s time zone:
1.
Log into Linksys Smart Wi-Fi. (See “How to connect to Linksys Smart WiFi” on page 7.
2.
Click Connectivity under Router Settings.
3.
Click the Basic tab, then select your time zone in the Time Zone dropdown list and click OK.
3.
Click Begin Test. The test measures your download and upload speeds.
10
Linksys EA-Series
Setting Up: Basics
NOTE
Internet connection speeds are determined by a variety of factors,
including ISP account type, local and worldwide Internet traffic,
and number of devices in your home that are sharing the Internet
connection.
4.
Click Restart Test to run it again, and click Show History to display the
results of past tests.
How to connect devices to your network
Your Linksys router is the nerve center of your home network. Your router safely
opens the Internet to your network, and all of your computers and network
devices rely on your router to pass files, media, and network commands in an
organized, error-free way. Whether connected wirelessly or with cables, each
part of your network needs the router in order to work reliably with the other
parts of your network.
How to connect a USB printer
When you install a printer that requires a cable, you can:
• Follow the printer’s instructions for setting it up, then follow your
computer’s operating system instructions to share the printer with your
network.
- OR -
• You can connect a USB printer to the router’s USB port to make the
printer available to any networked computer.
When you set up a wireless printer, you need to make sure that:
• Your printer has been completely set up except for being connected to
the network.
• Your printer supports the WPA/WPA2 wireless encryption standard.
• If your wireless printer supports Wi-Fi Protected Setup, you should use
Wi-Fi Protected Setup to connect the printer to your network. See “How
to connect a network device using Wi-Fi Protected Setup” on page 12.
To connect a USB printer to your network through the router’s USB port:
1.
Log into Linksys Smart Wi-Fi. (See “How to connect to Linksys Smart WiFi” on page 7.
2.
Click Device List, then click Add a Device.
How to connect a computer to your network
To connect a computer to your network:
1.
At the computer you want to connect, enter your network’s connection
information into your wireless manager.
2.
After that computer connects to your network, log into Linksys Smart WiFi, then click Device List to confirm that your router recognizes the new
computer. You can use the Device List to monitor all network-attached
devices.
11

Linksys EA-Series
3.
Under Select the type of device to add to your network, click USB Printer.
The Add a USB printer screen opens.
4.
Follow the on-screen instructions for downloading and installing the
VUSB (virtual USB) software for your computer.
To connect a wireless printer to your network:
1.
Follow the printer’s instructions to connect it to your network. Use the
connection information available in Linksys Smart Wi-Fi or saved to your
computer desktop.
2.
After that printer connects to your network, log into Linksys Smart Wi-Fi,
then click Device List to confirm that your router recognizes the new
printer.
Setting Up: Basics
Because of the wide variety of devices and methods of connecting, you must
manually enter network information into the devices for a successful network
connection.
TIP
For more instructions on connecting a game console to your
network, see also:
• “How to optimize your router for gaming and voice” on page 34
• “How to set up port forwarding” on page 43
• “How to set up port range triggering for online gaming” on page
45
How to manually connect a network device
To manually connect a device to your network:
1.
Follow the device’s instructions to connect it to your network. Use the
connection information available in Linksys Smart Wi-Fi or saved to your
computer desktop.
2.
After the device connects to your network, log into Linksys Smart Wi-Fi,
then click Device List to confirm that your router recognizes the new
device.
How to connect a network device using Wi-Fi Protected Setup
To connect a device using Wi-Fi Protected Setup™:
How to connect other devices
Many other types of wireless network devices can connect to your home
network, including:
• Game consoles
• Internet-capable TVs and media players
• Digital music players
• Smart phones
1.
Plug in and turn on the network device. If the device does not support
Wi-Fi Protected Setup, follow its instructions for a standard network
installation.
2.
Log into Linksys Smart Wi-Fi. (See “How to connect to Linksys Smart WiFi” on page 7.
3.
Under Wireless, click the Wi-Fi Protected Setup tab.
4.
Use one of the following methods to complete the setup:
12

Linksys EA-Series
Setting Up: Basics
• If the device has a Wi-Fi Protected Setup button, press that button,
then click the Wi-Fi Protected Setup button in Linksys Smart Wi-Fi or
press the button on the back of your router.
• If the device has a Wi-Fi Protected Setup PIN, type that number into
the Device PIN box in Linksys Smart Wi-Fi, then click Register.
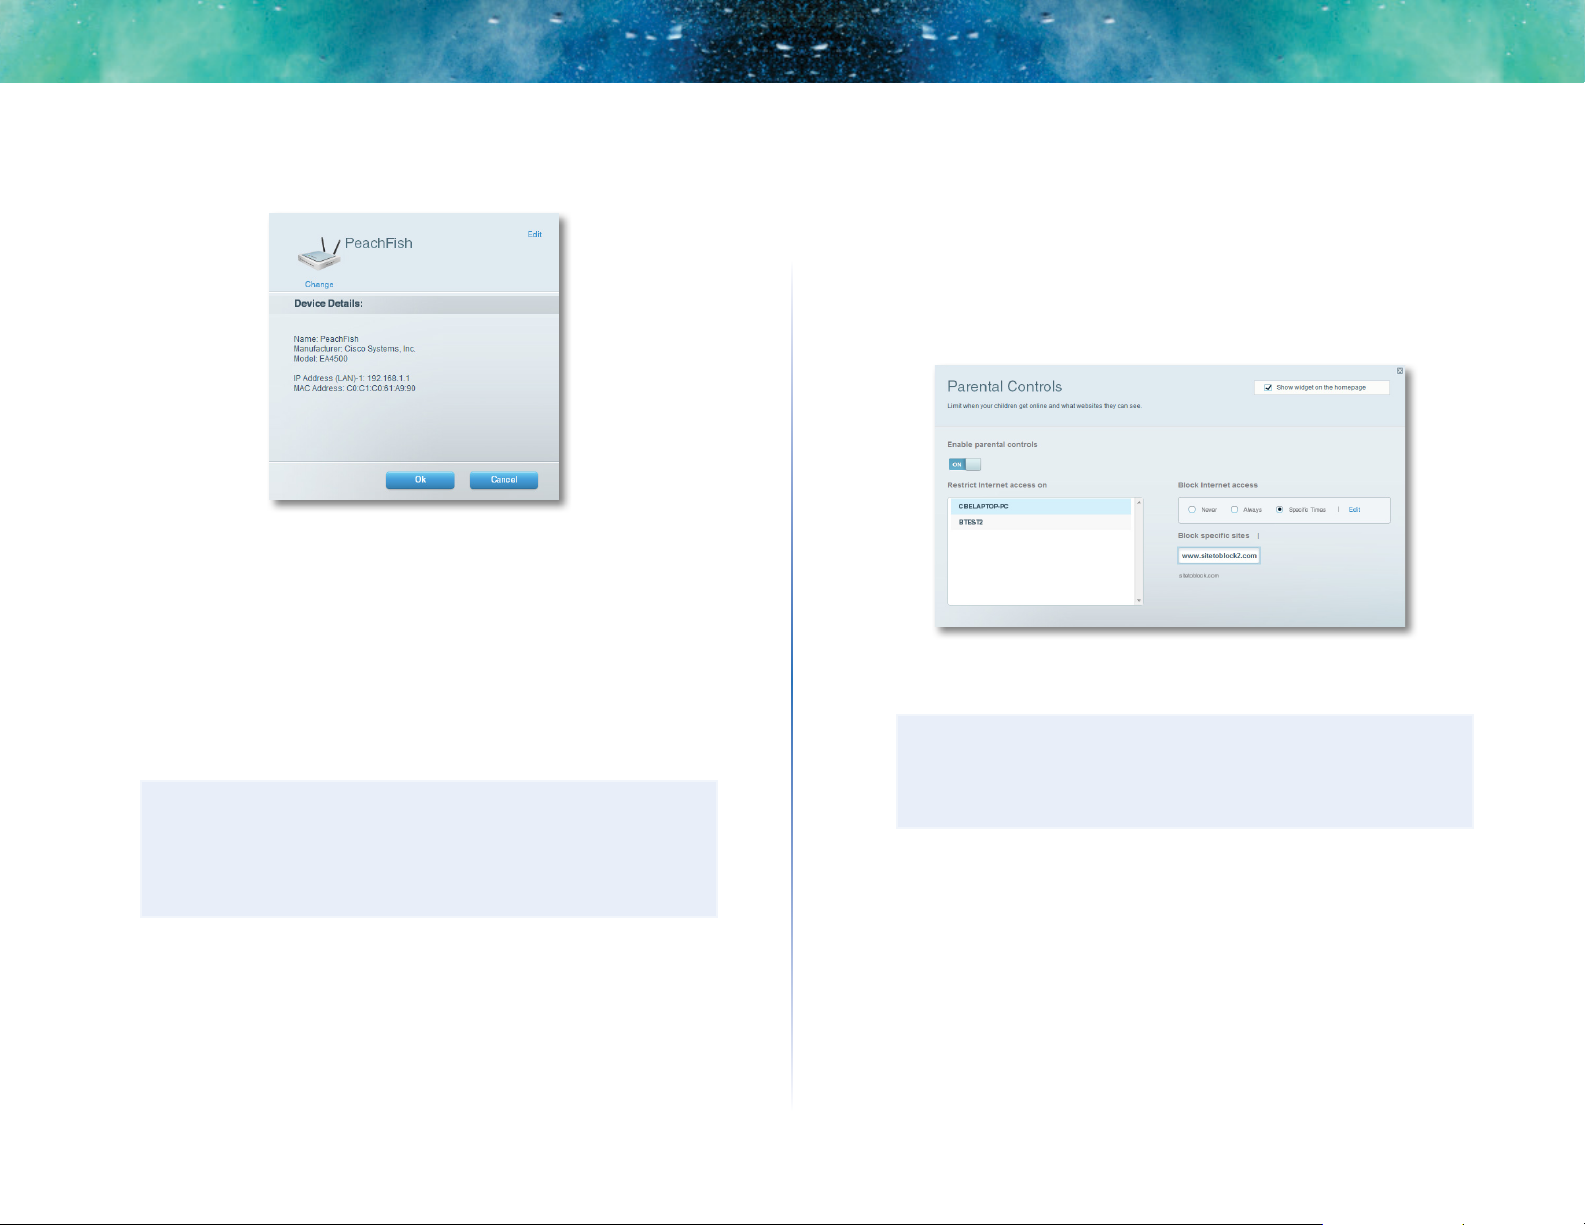
How to view device details
You can use Linksys Smart Wi-Fi to view any network device’s network
infomation.
To view network device details:
1.
Log into Linksys Smart Wi-Fi. (See “How to connect to Linksys Smart WiFi” on page 7.
2.
Under Apps, click Device List. The Device List screen opens.
3.
Click the i in the lower-right corner of the device.
• If the device’s own setup asks for the router’s Wi-Fi Protected Setup
PIN, enter the number that appears under Router PIN in Linksys Smart
Wi-Fi.
13
Linksys EA-Series
Setting Up: Basics
Information about the device appears on the screen.
4.
Click OK.
How to set up parental controls
With your router, you can use parental controls to:
• Set the times that Internet access is allowed.
• Block websites that you specify or based on their content.
• Set the above restrictions for specific computers.
TIP
When someone tries to open a blocked website, a Linksys Smart
Wi-Fi login page appears. To view the blocked content, you must
log into your Linksys Smart Wi-Fi account and change the parental
control restrictions.
How to set parental controls
To set parental controls:
1.
Log into Linksys Smart Wi-Fi. (See “How to connect to Linksys Smart WiFi” on page 7.
2.
Under Apps, click Parental Controls. The Parental Controls screen opens.
3.
To turn on parental controls, click the Enable parental controls button
so that ON is displayed.
TIP
It’s not necessary to set parental controls over each computer
on your home network. You can set the controls on only those
computers that children can access.
4.
To select a computer to apply parental controls to, click the name of the
computer in the Restrict Internet access on list.
5.
To block Internet access on the selected computer(s), under Block
Internet access:
• Click Never to allow Internet access.
• Click Always to always block Internet access.
• Click Specific Times to set the times when Internet access is allowed.
14
Linksys EA-Series
Setting Up: Basics
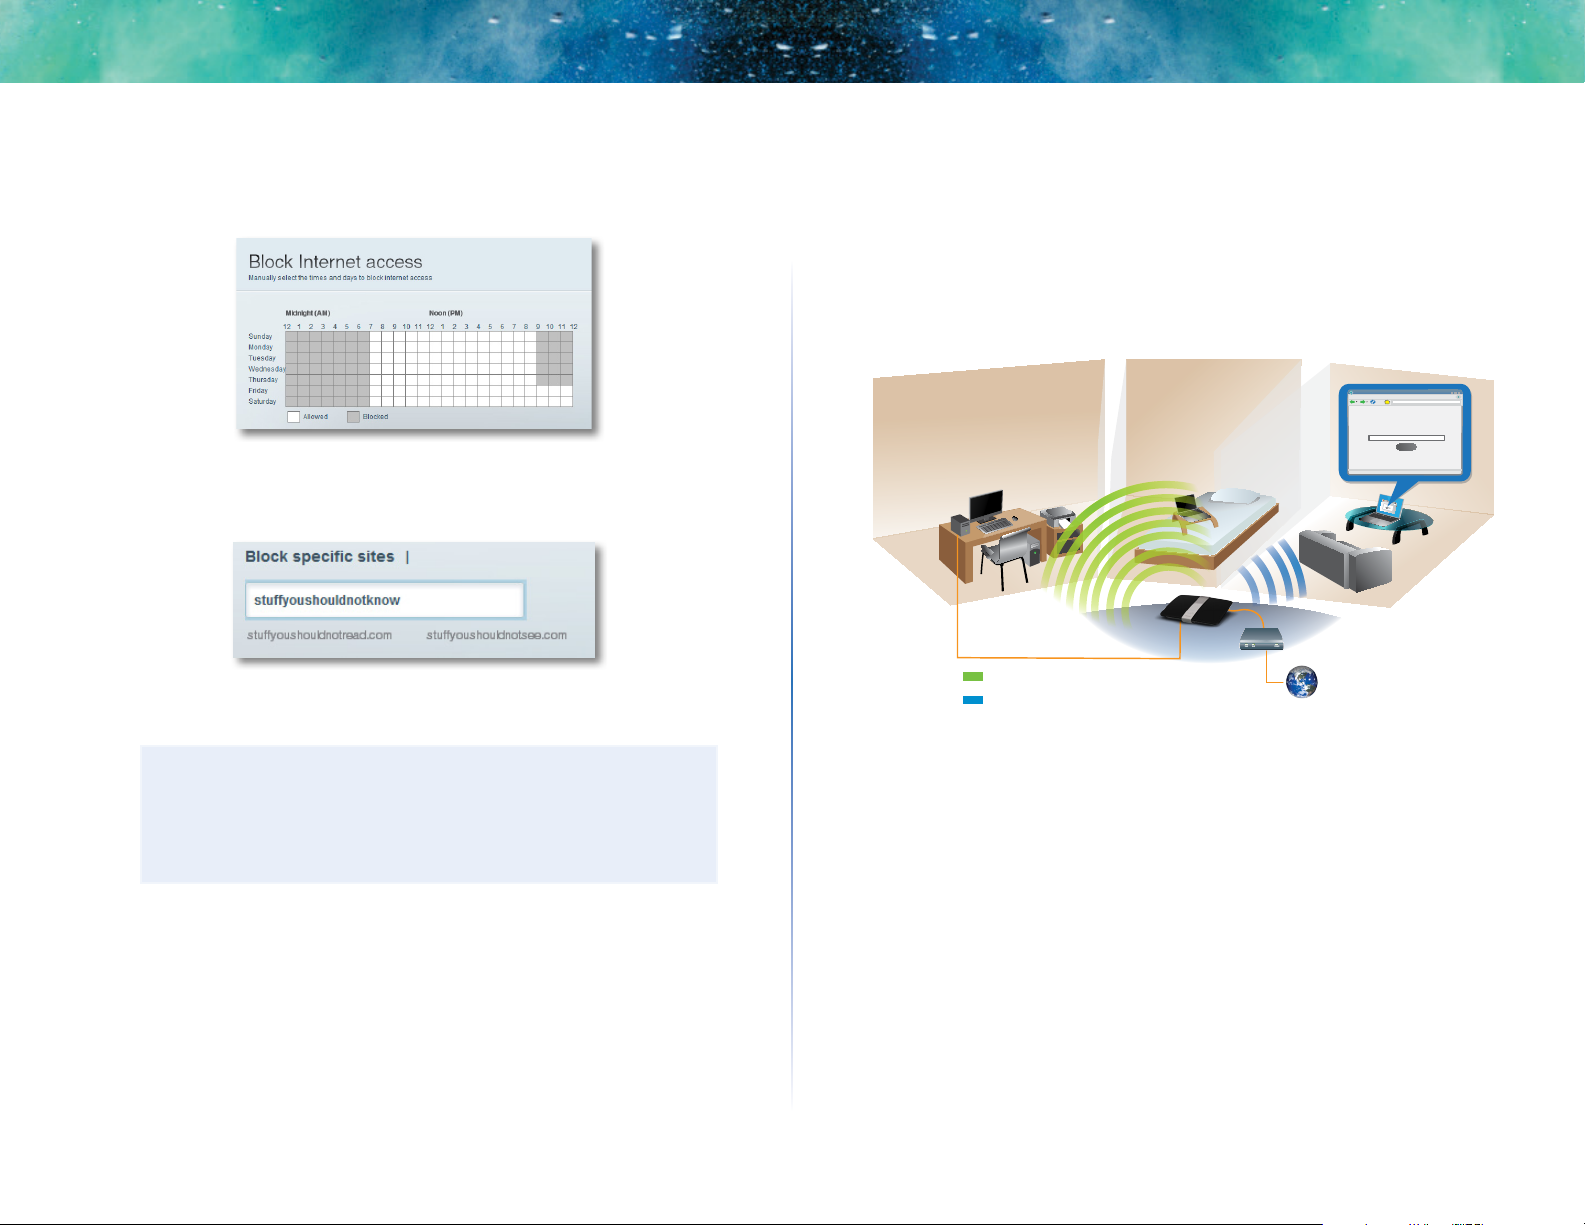
• Click Edit to change the Internet access schedule. You can click and
drag to select or deselect a block of time.
6.
To block specific websites:
a.
Under Block specific sites, click Add.
b.
Type the web address (URL) of the website to block, then click OK.
You can block up to ten websites.
TIP
It’s easier to copy and paste a web address than it is to type it in.
Copy the address from your browser’s web address box, then paste
it into an available box in the Block Specific Sites screen of Linksys
Smart Wi-Fi.
How to configure your guest network
You can use your router’s guest network to provide your guests with access
to the Internet, while restricting their access to other resources on your local
network. To prevent unauthorized users from using your Internet access, your
guest network requires that a password be entered for Internet access. The
guest network is enabled by default.
_
File Edit View Go Shortcuts Options Help
http://mynetwork/guest/login
X
Enter the Guest Password
for Internet Access:
web browser - guest access login - Linksys E4200
http://mynetwork/guest/login
Enter the Guest Password
for Internet Access:
Login
Local Network
Guest Network
Local Access and Guest Access Diagram
Your wireless network’s guest network and password were set when you ran
the router’s setup software, but you can change them at any time.
X
Login
Done
7.
Click OK to apply your changes.
15
Linksys EA-Series
Setting Up: Basics
To set up guest access to your network:
1.
Log into Linksys Smart Wi-Fi. (See ““How to connect to Linksys Smart WiFi” on page 7.
2.
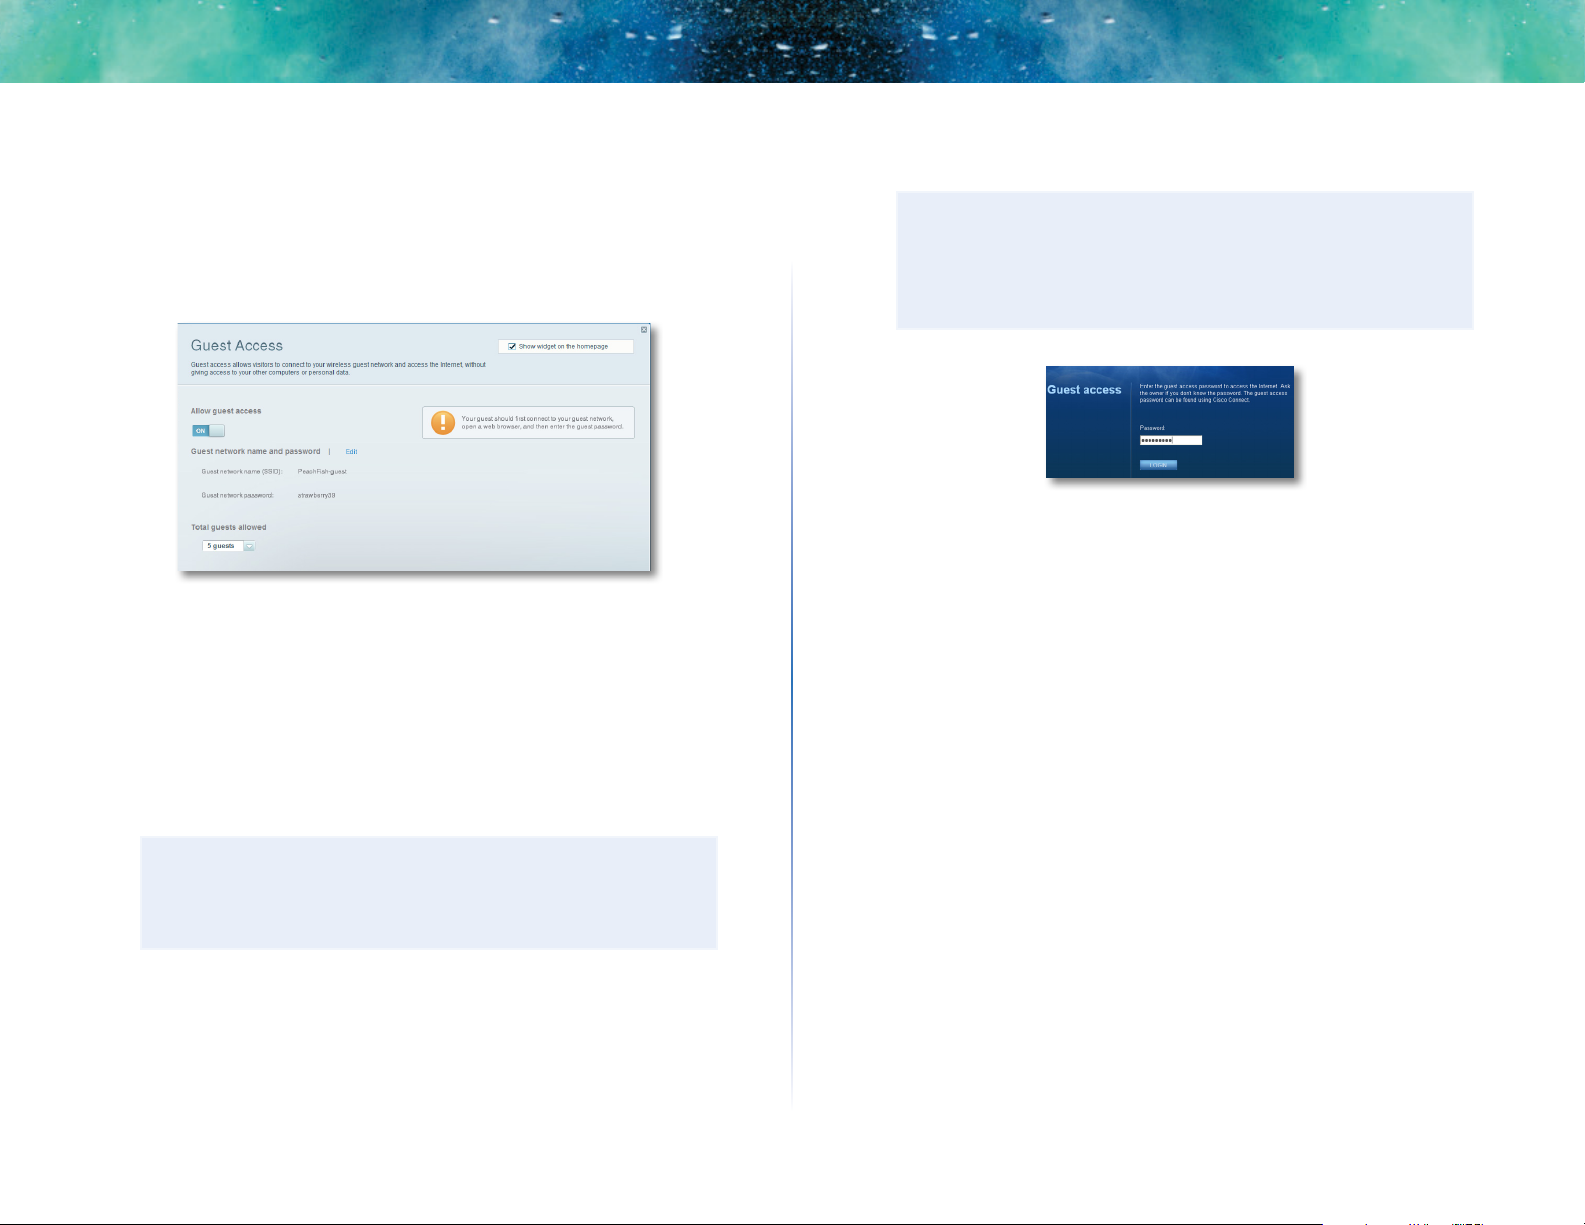
Under Apps, click Guest Access. Your guest network, which was set up
during your router installation, is displayed.
• To turn guest access on or off, click the Allow guest access button.
• The guest network name is based on your 2.4GHz network name and
is automatically generated.
• To change the guest network password, click in the box next to Guest
network password, then type the new password.
3.
Click OK to apply your changes.
TIP
The first time your guest tries to access the Internet through a web
browser, they will see the Guest access screen. To continue, they
must enter the password you provided in the Password field, then
click LOGIN.
How to back up your router configuration
When you are done setting up your router, you should back up its settings so
that you can restore them later, if necessary. For instructions, see “How to back
up and restore your router configuration” on page 47.
• To change the number of simultaneous guest network users you want
to allow, click the drop-down box under Total guests allowed, then
click the number that you want.
TIP
To keep your guest network secure, click Change to change the
guest password when the guest no longer needs access to the
account.
16
 Loading...