

Page 1

Pilot’s Handbook
An in-depth exploration of the revolutionary
technologies and tonal pleasures of the Vetta II.
40-00-0017 - Revision A. Electrophonic Limited Edition available.
Page 2

Page 3

The serial number can be found on the back panel of your Vetta II. It’s the
number that begins with “(21)”. Please note it here for future reference:
SERIAL NO:
WARNING:
electric shock, do not expose this appliance to
rain or moisture.
CAUTION:
pursuant to Part 15 of FCC Rules. Operation is subject to the following two conditions: (1) This device may not cause
harmful interference, and (2) this device must accept any interference received, including interference that may cause
undesired operation.
Before using your Vetta II, carefully read the applicable items of these operating instructions and safety
suggestions:
1. Obey all warnings on the Vetta II and in this Pilot’s Handbook.
2. Do not place near heat sources, such as radiators, heat registers, or appliances which produce heat.
3. Guard against objects or liquids entering the enclosure.
4. Connect only to AC power outlets rated 100-120V or 230V 47-63Hz (depending on the voltage range of the
5. Do not step on power cords. Do not place items on top of power cords so that they are pinched or leaned on.
6. Unplug your Vetta II when not in use for extended periods of time.
7. Do not perform service operations beyond those described in the Vetta II Pilot’s Handbook. In the following
8. Prolonged listening at high volume levels may cause irreparable hearing loss and/or damage. Always be sure
To reduce the risk of fire or
This equipment has been tested and found to comply with the limits for a Class B digital device
CAUTION:
do not remove screws. No user-serviceable parts inside. Refer
servicing to qualified service personnel.
The lightning symbol within a triangle means
“electrical caution!” It indicates the presence
of information about operating voltage and
potential risks of electrical shock.
YOU
SHOULD READ THESE IMPORTANT SAFETY INSTRUCTIONS
K
EEP THESE INSTRUCTIONS IN A SAFE PLACE
unit; refer to the back panel). Current ratings should be 4A for the 120V range and 2 A for the 230V range.
Pay particular attention to the cord at the plug end and the point where it connects to the amp.
circumstances, repairs should be performed only by qualified service personnel:
• liquid is spilled into the unit
• an object falls into the unit
• the unit does not operate normally or changes in performance in a significant way
• the unit is dropped or the enclosure is damaged
to practice “safe listening.”
To reduce the risk of fire or electric shock,
The exclamation point within a
triangle means “caution!” Please
read the information next to all
caution signs.
Vetta II Pilot’s Handbook © 2001, 2003, Line 6, Inc.
Page 4

Page 5

Please Note:
Line 6, Vetta II, POD, Variax and Flextone are
trademarks of Line 6, Inc. All other product names,
trademarks, and artists’ names are the property of
their respective owners, which are in no way
associated or affiliated with Line 6. Product names,
images, and artists’ names are used solely to
identify the products whose tones and sounds were
studied during Line 6’s sound model development
for this product. The use of these products,
trademarks, images, and artists’ names does not
imply any cooperation or endorsement.
Page 6

Welcome to Vetta ......................................................................... 1•1
Really
Quick Start Guide...............................................................2•1
Knobs, Buttons, Flashing Lights
Front Panel: The Big Picture ...............................................................................................3•1
Navigation .....................................................................................................................................3•2
Amp Controls ............................................................................................................................3•3
Effects................................................................................................................................................3•4
Functions .......................................................................................................................................3•5
Global Controls .........................................................................................................................3•6
Main Display ................................................................................................................................3•7
Vetta Combo Rear Panel Power and Speaker Outs ...........................................3•8
Vetta HD Rear Panel Power and Speaker Outs ....................................................3•9
Vetta Combo & HD Common Rear Panel Connections .................................3•10
Vetta Digital Interface Card.................................................................................................3•11
Basic Operations
Selecting Factory/User Memory .......................................................................................4•1
Selecting a Channel .................................................................................................................4•1
Editing Amps, Cabs & Variax .............................................................................................4•2
Effects ..............................................................................................................................................4•9
The Effects Loops......................................................................................................................4•14
Saving ...............................................................................................................................................4•24
Output Setup...............................................................................................................................4•32
Foot Control ...............................................................................................................................4•37
System Setup ..............................................................................................................................4•39
Running External Speakers with Vetta Combo ......................................................4•43
Running External Speakers with Vetta HD.................................................................4•45
Vetta and MIDI ..........................................................................................................................4•52
Page 7

The Amps & Cabs
General Notes About the Models .................................................................................5•1
Line 6 Original Models ..........................................................................................................5•2
Musings on Tone Controls .................................................................................................5•8
Models Based On .....................................................................................................................5•9
The Cabinets ...............................................................................................................................5•32
The Stompboxes
About the Stompboxes .........................................................................................................6•1
Distortions and Overdrives ................................................................................................6•1
Modulation Effects ...................................................................................................................6•6
Delays ..............................................................................................................................................6•12
Dynamics Processors...............................................................................................................6•18
Synth/Filter.....................................................................................................................................6•21
Post Effects
About the Effects ......................................................................................................................7•1
Tremolo .........................................................................................................................................7•1
Gate .................................................................................................................................................7•4
Compressor .................................................................................................................................7•5
EQ .....................................................................................................................................................7•7
Pitch Shift ......................................................................................................................................7•9
Mod ..................................................................................................................................................7•10
Delay.................................................................................................................................................7•14
Reverb ............................................................................................................................................7•15
Double Tracker .........................................................................................................................7•20
Page 8

Hints & Tips
Building a New Tone .............................................................................................................8•1
Using Two Amps at Once ..................................................................................................8•4
Effects Tips & Tricks ................................................................................................................8•8
Making The Factory Bank Your Own ...........................................................................8•9
Using Variax with Vetta..........................................................................................................8•10
Using FBV Foot Controllers
Exercising Your Options ......................................................................................................9•1
Setting Up Your FBV ..............................................................................................................9•2
Punching Your Buttons .........................................................................................................9•3
Waggling Your Toes ...............................................................................................................9•4
Appendices
Amp Models ................................................................................................................................10•1
Cabinet Models...........................................................................................................................10•3
Effects Models..............................................................................................................................10•4
A.I.R. II Mic Options ................................................................................................................10•9
Signal Flow Diagram ...............................................................................................................10•10
MIDI Functions ...........................................................................................................................10•11
Line 6 Contact (Customer Service / Warranty Information)...........................10•13
Page 9

Page 10

Page 11

Welcome to Vetta •
More Than Just An Amplifier
W
ELCOME TO
V
ETTA
More Than Just An Amplifier
First off, thanks for buying a Vetta and taking a great big step into the future of
guitar amplification! You now own extremely detailed models of vintage, classic,
modern, and original guitar amplifier tones as well as a collection of virtual
stompboxes, rack gear, speaker cabinets, switchers and routers. In short, the most
complete and toneful guitar system ever created.
Who is Line 6?
As you may know, Line 6 first came on the scene way back in 1996, with a new
kind of guitar amplifier—the first to put digital software modeling technology to
work in a combo amp for guitarists. In order to pioneer this technology, we had set
ourselves the modest task of understanding everything there is to know about all
the great guitar amps of history. We knew it meant countless hours of playing our
guitars with an endless parade of lust-inspiring amps—but for the good of the world,
we were willing to do it.
1 • 1
So we began what has continued to be our constant quest, assembling the world’s
finest collection of amplifiers, each one a uniquely excellent example of an amp
design recognized by guitarists the world over as a true “tone classic.” We plugged
in, we played, we probed, we measured, we dissected—and we began to discover a
new knowledge to change the world of guitar.
With a guitar in one hand and modern computer measuring gear in the other, we
put our amps through their paces and got them to give up their secrets—a guitar
pickup output, after all, is an electronic signal, and tubes and the rest of the guitar
amplifier electronics, speakers and cabinets are really just a complex form of signal
processing. We figured out how to make software to emulate these world-class
amplifiers. And thus distilled the noble history of guitar tone heritage into a
Page 12

Welcome to Vetta •
Who is Line 6?
1 • 2
revolutionary, patented DSP (digital signal processing) software-based modeling
technology to power the first Line 6 amplifiers and bring a new revolution of tone and
technology to guitarists.
The next stop for Line 6 was the world of direct guitar recording and
preamplification. We stocked up on the coffee, snacks, strings and more gear—the
basic essentials of the guitarist’s lifestyle—and turned our tone technologists loose to
solve the age old problem of getting great live amp tone when recording in the studio.
Behind the security-sealed doors of our research laboratories, electric guitars wailed,
test tones warbled, microphones got poked and prodded, a few people got shocked by
power tubes or filter caps (those things can pack a wallop!) and the magical mysteries
of acoustical physics were gradually revealed as never before.
When it was finally time to get out and see the sunshine again, we emerged to meet
the world with a world-changing direct recording technology we call A.I.R. (which
officially stands for Acoustically Integrated Recording outputs), and an idea for
something we called POD. We realized we were gonna need a bigger building. So we
got a new place, kept cranking out the amps, and expanded the assembly line to
spawn PODs destined to become the choice of platinum recording artists the world
over—as well as regular everyday guitarists—forever changing the world of guitar
recording.
With the new building came space to stretch out, and our thoughts turned from our
amps to our feet. Pretty handy for walking around, but they become
really
useful when
they’re working all those great stompboxes that have been as much a part of the
electric guitar experience as the amplifier. So we began a new quest, assembling the
most in demand and hippest stompboxes ever made in order to put them through the
same rigorous modeling procedures.
Many was the night we had to stay up late drinking way too much Pepsi, comparing
the subtle appeal of different delay pedals, and the weekends we had to spend hauling
vintage effects home for more testing in our personal studios—yes, it’s a rough job,
but someone has to do it. Much caffeine, careful study and a whole lot of strings later,
we proudly premiered our series of Stompbox Modelers and their rack mounted
cousins, the Studio Modelers. Each one contains a dream collection of lovingly
crafted digital software models resulting from our meticulous study of a carpet-full of
the greatest effects of guitar history.
Page 13

Welcome to Vetta •
Vetta Then And Now
Then came our biggest challenge. Ideas that had been fermenting in our lab for
years were finally ready to be distilled in a complete ground-up reworking of our
modeling technology. This was the chance to go far beyond everything we’d done,
combining the knowledge and unique technological tools we’d created along our
way with a whole new round of innovation. That’s when we began a top secret
project to make the greatest guitar amp ever known.
More strings, more snacks, a few new guitars (you’ve gotta keep things fresh) and
we were ready for our new mission. As unsuspecting suburban life continued to spin
on around us, we spent our days and nights crafting a new method for emulating
the amplifier and effects electronics with far greater detail than ever before. We
built brand new software components of each critical stage of the signal chain. All
the classic amps and effects in our collection got a new round of study. We found
new ways to duplicate the effects of tubes and other electronic components with a
quality and exactness that had never been achieved before. We took a thoroughly
fresh approach to our direct out technology, to insure that what goes to a recording
or live sound system can be every bit as satisfying as what comes out of a live amp
setup. And, to put it all together, we created a completely new way to ‘wire’ these
software parts together to work their combined magic. The result was not only
vastly more accurate models based on the great vintage and classic amplifiers and
effects in our collection, but also fresh hybrid amp models and completely unique
and original amp tones that respond in ways physical circuits never could. We call
this new modeling technology “Point to Point Interactive Modeling,” and it’s
what’s pounding along in the heart of your Vetta.
1 • 3
Vetta Then And Now
So, as our little walk through the halls of history shows us, Vetta is the culmination
of years of research in service on Line 6’s endless quest for the great guitar tone. Of
course, we couldn’t leave well enough alone (being an endless quest and all), and
decided to further expand on the ultimate guitar amp. Thanks to Vetta’s
expandable hardware architecture and it’s re programmable software, we managed
to squeeze in several new tricks without having to leave the original Vetta owners
behind. Behold, Vetta II: Even more amp models, more sonic control, and now a
comprehensive digital interface that introduces the perfect marriage between Vetta
and Variax, the world’s first Digital Modeling Guitar.
Page 14

Welcome to Vetta •
Vetta Then And Now
1 • 4
Since each and every Vetta ever produced can be upgraded to Vetta II’s functionality,
we’ve decided to simplify the text in this manual (and save a little ink) by just
referring to this family of products as Vetta. You can add the “II” any time you like.
So, now that you know the history of Vetta, it’s time to fire it up and find out exactly
what this puppy can do...
Page 15

R
EALLY
Q
UICK
S
TART
G
Really Quick Start Guide •
UIDE
POWER:
Don’t turn the power on yet. If you’ve got a Vetta HD, hook up your speakers.
FBV:
Floor Board does
PLUG IN:
panel’s VARIAX IN with the included Variax cable. Turn Vetta’s MASTER
VOLUME knob down. Flick Vetta’s POWER on. Turn MASTER VOLUME up.
PRESETS:
display to select from the 64 Factory channels. There are 16 Factory Banks; each Bank
has four channels (labeled A, B, C, D).
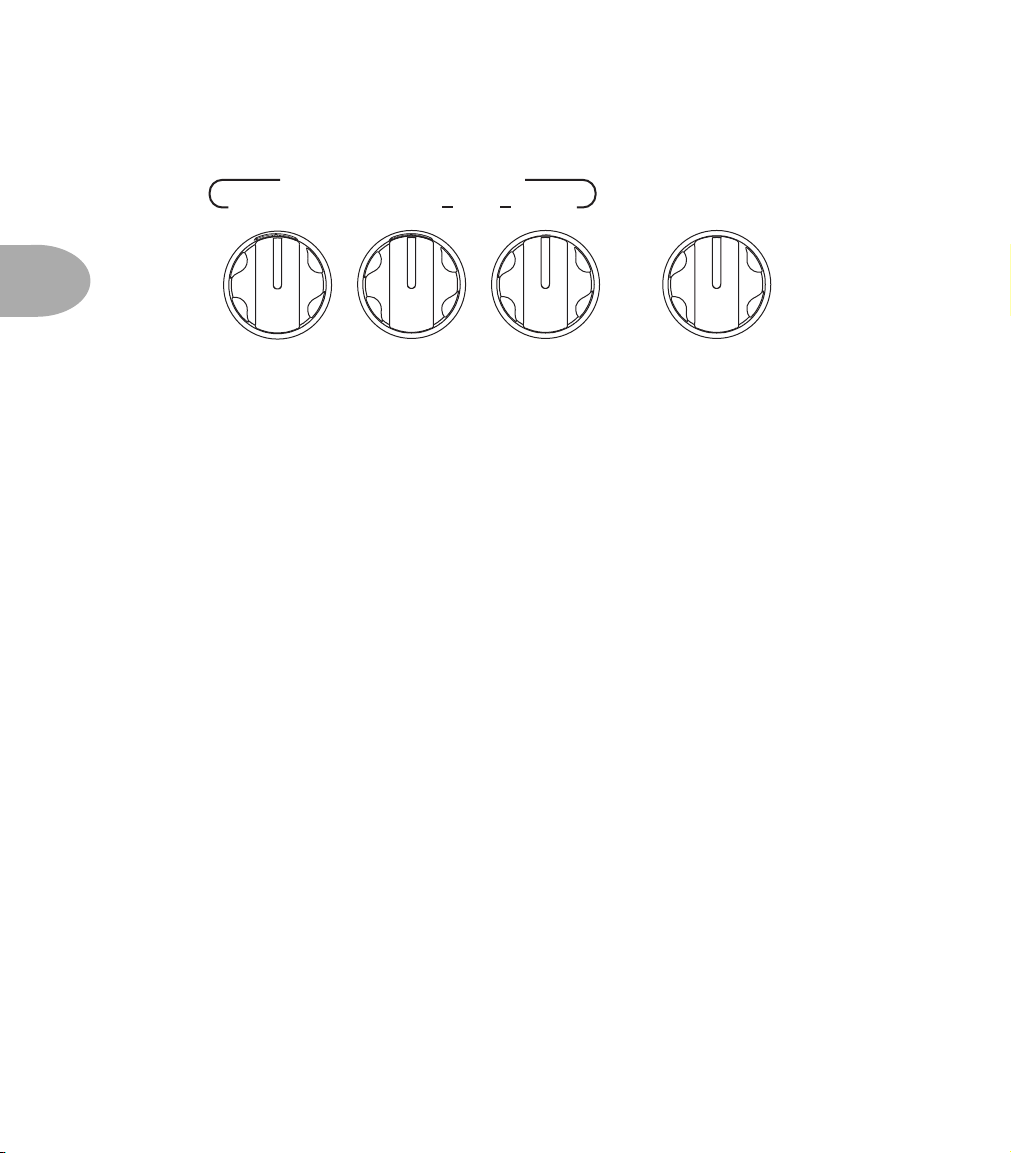
AMP TONE KNOBS:
PRESENCE, VOLUME). The two ON buttons to the left turn Vetta’s two
amps on and off. The KNOBS buttons decide whether the amp tone knobs control
Amp 1, Amp 2, or both (press both buttons at once).
AMP 1 & AMP 2:
display. Press
Turn them both on and experience two amps at once.
EFFECTS:
on the top right of the amp. Press the REVERB button. Play guitar. Press REVERB
again. Play. Get it?
Connect the power cord between Vetta’s rear panel and your power outlet.
Connect the Line 6 FBV foot controller to Vetta’s rear panel (the older Line 6
not
work with Vetta).
Plug your guitar into Vetta’s GUITAR input, or your Variax into the rear
Press the FACTORY button (it lights). Turn the knob near Vetta’s smaller
Look at the amp tone knobs (DRIVE, BASS, MID, TREBLE,
simultaneous
Press
only
Amp 1 on. Spin the AMP MODEL knob, watch the big
only
Amp 2 on, turn the Amp Model knob to set the model for Amp 2.
Turn the Reverb knob to 12 o’clock. Look at the 12 Effect On/Off buttons
2• 1
EDITING:
the display now sets the Reverb model. Turn the PAGE knob for more Reverb pages.
GLOBAL CONTROLS:
when you save. Reverb can be edited and saved per channel, and then this knob adjusts
the overall Vetta experience ‘wetter’ or ‘drier’ to suit your taste. Set the three Global
Control knobs straight up at 12 o’clock for the standard sound experience.
SAVE:
To edit Reverb, press EDIT. Press REVERB. The knob below MODEL on
Unlike most everything else, these knobs don’t get stored
The SAVE button saves your changes. Read on for more details.
Page 16

Page 17

Knobs, Buttons, Flashing Lights •
K
NOBS
L
IGHTS
Front Panel: The Big Picture
We realize that on first glance at your Vetta, you probably thought to yourself, “My,
what a lot of knobs and buttons and flashing lights!” You’re right, we’re not gonna
make any bones about it. There they are. On a
There’s no need for panic, though. We’ve organized everything so that using your Vetta
can be as simple or as complex as you want. If you want to use only the incredibly
toneful amp models and ignore the rest of the amp, you can easily do that. If you want
to tweak everything, we’ve made it easy to do that as well. And all thanks to the knobs
and buttons and flashing lights.
To help you get it all sussed out, let’s break down the control panel of your Vetta into
five different sections: Navigation, Amp Controls, Effects, Functions, and Global
Controls, and let’s look at these one at a time.
, B
UTTONS
, F
LASHING
guitar amp!
Front Panel: The Big Picture
3 •
1
Page 18
Knobs, Buttons, Flashing Lights •
Navigation
Navigation
3 •
2
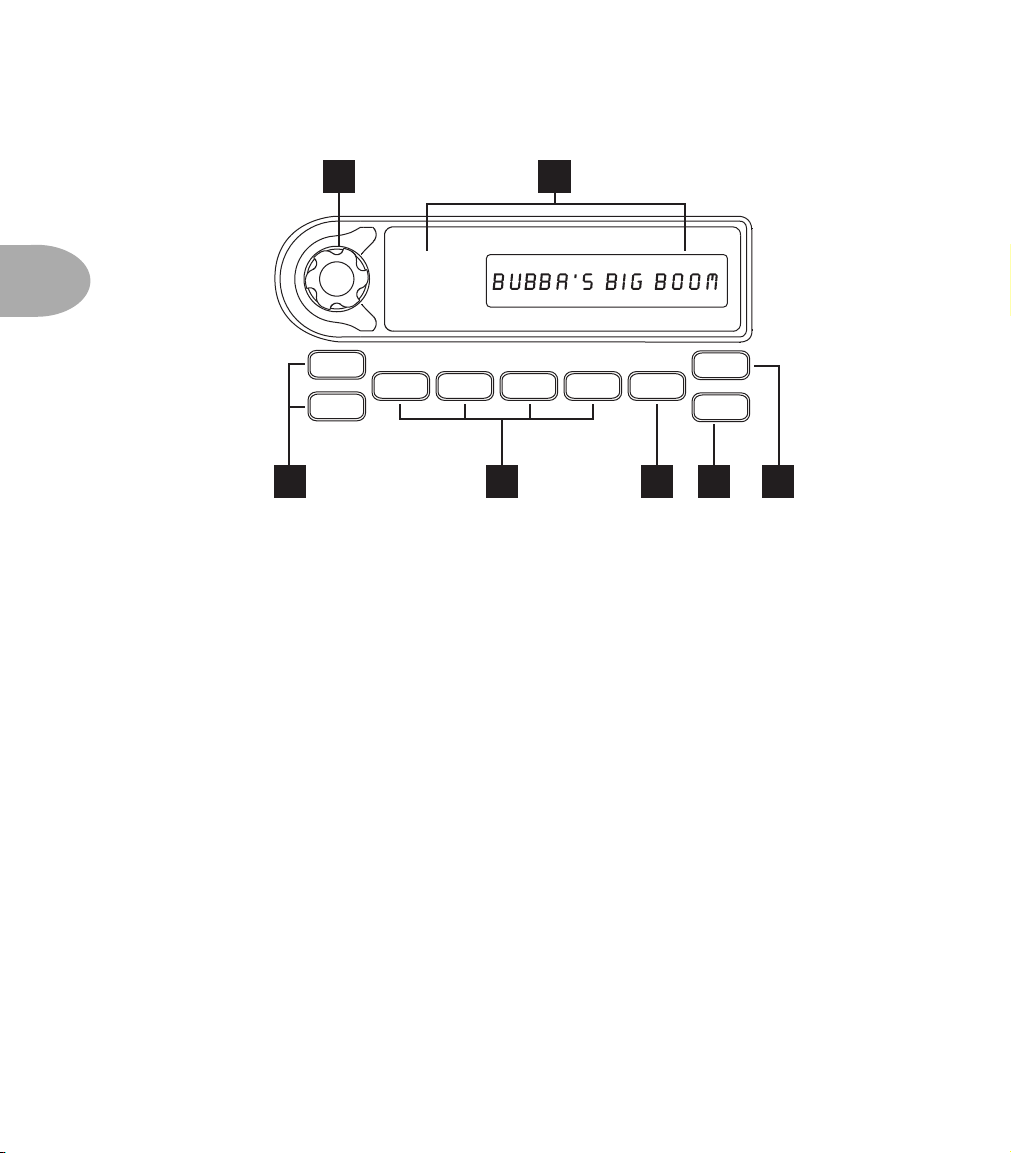
This is where you choose which section of memory (Factory or User) you want to use,
as well as which Channel you want. This is also the place to save, and select the tuner.
1. Select Knob:
(Factory or User) has 16 banks of 4 channels each for a total of 128 channels.
2. Channel Display:
alphanumerically (e.g. 12A) and by channel name (e.g. Bubba’s Big Boom).
3. Factory/User Buttons
Vetta’s memory. User memories are rewritable (you can change them). Factory are
non-rewritable. Vettas leave Line 6 with the same thing in Factory and User memory.
1
2
12A
FACTORY
USER
3 4 5 6 7
Use this knob to choose which channel you want to use. Each area
Shows you which channel you have selected both
CHANNEL SELECT CONTROLS
A B C D
FAVORITE
SAVE
TUNER
: These switch between the Factory and User sections of
4. Channel Select Buttons:
These select between the channels in the current bank.
A, B, C, or D, it’s easy as 1-2-3... 4?
5. Favorite Button:
One button instant access to your favorite channel. The Basic
Operations chapter tells you how to choose a channel as your Favorite.
6. Tuner Button: Press it once to turn on the built-in chromatic tuner. Press it a second
time to turn the tuner off. There’s that easy-to-use technology again.
7. Save Button: Press this when you want to save something, whether it’s the current
channel, custom settings for amps or effects, or even sending Vetta’s memory out the
MIDI port. For more details about saving stuff, see the Basic Operations chapter.
Page 19
Amp Controls
Knobs, Buttons, Flashing Lights • Amp Controls
8 9 10
ONONKNOBS
AMP 1
AMP 2
AMP MODEL PRESENCETREBLEMIDBASSDRIVE VOLUME
KNOBS
11
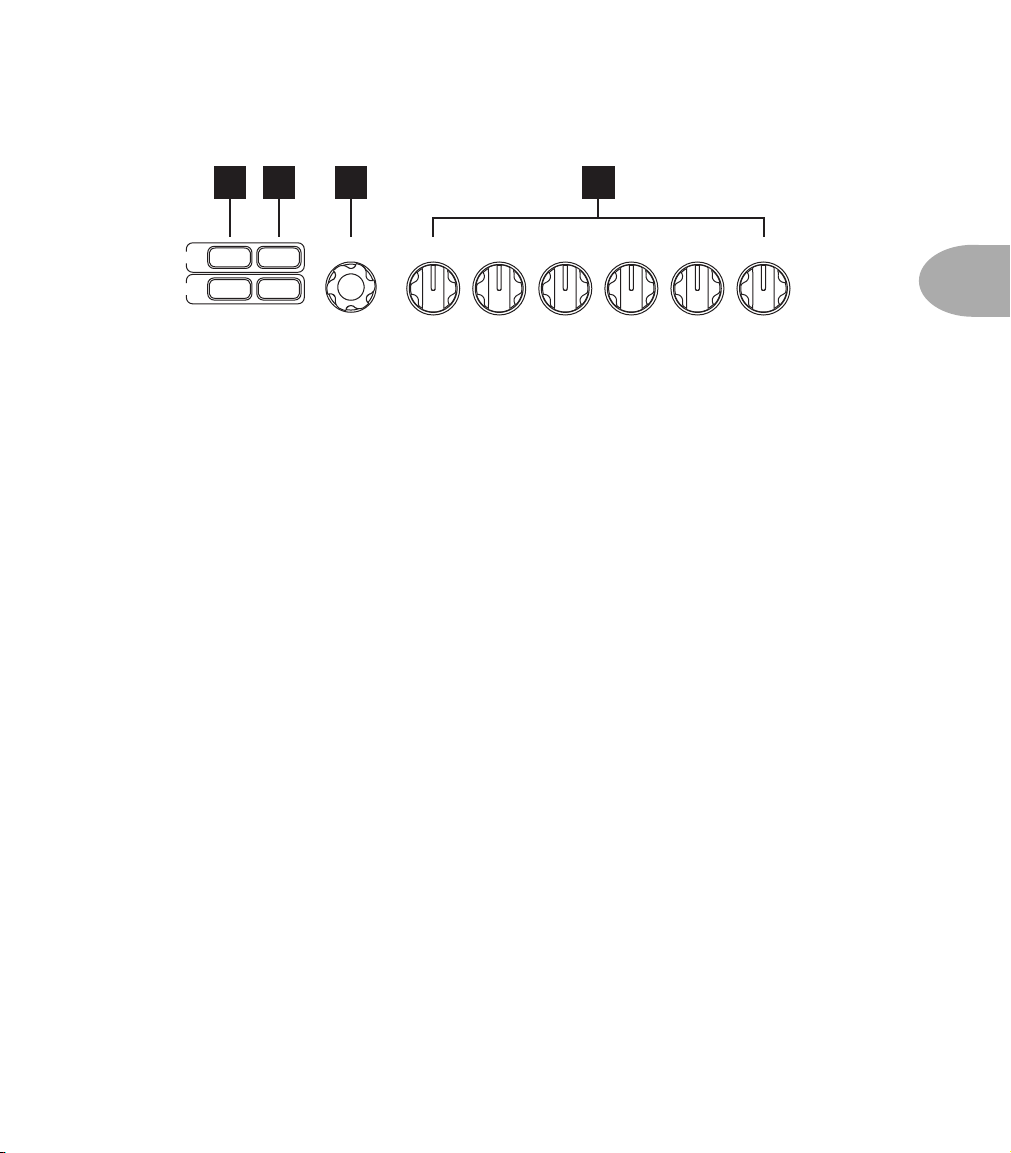
In this area, you select amp models, turn them on and off, and dial in your basic amp
tones.
8. Amp Buttons: These buttons let you turn Amp 1 and Amp 2 on and off (or, more
accurately, toggle between on and standby states for an amp). As you might guess, if
it’s lit, it’s on, and if it’s dark, it’s on standby.
9. Knobs Buttons: Select which amp will be controlled by the Amp Control knobs.
Once again, lit indicates it’s the amp you’re adjusting, dark means it’s not. Press both
buttons at once, and you can lock their controls together and adjust them both at once
(more about this in Basic Operations).
10. Amp Model Knob: Use this to select just which one of Vetta’s amazing amp models
is going to run in the Amp 1 or Amp 2 slot for the sound you’re creating.
11. Amp Tone Control Knobs: Drive, Bass, Mid, Treble, Presence, and Channel
Volume. They do just what you’d expect them to do for the selected amp(s). In the
case of amp models that emulate classic equipment, these tone controls are carefully
crafted, for each model, to mimic the behavior of the controls of the original unit that
we studied to create the amp model.
3 • 3
Page 20
Knobs, Buttons, Flashing Lights • Effects
Effects
3 • 4
12 14
EDIT
STOMP
BOX 1
14
13
STOMP
BOX 2
LOOPEQ
STOMP
BOX 3
PITCH
SHIFT
TREMOLO GATE COMP
REVERBDELAYMODEQEQEQ
15
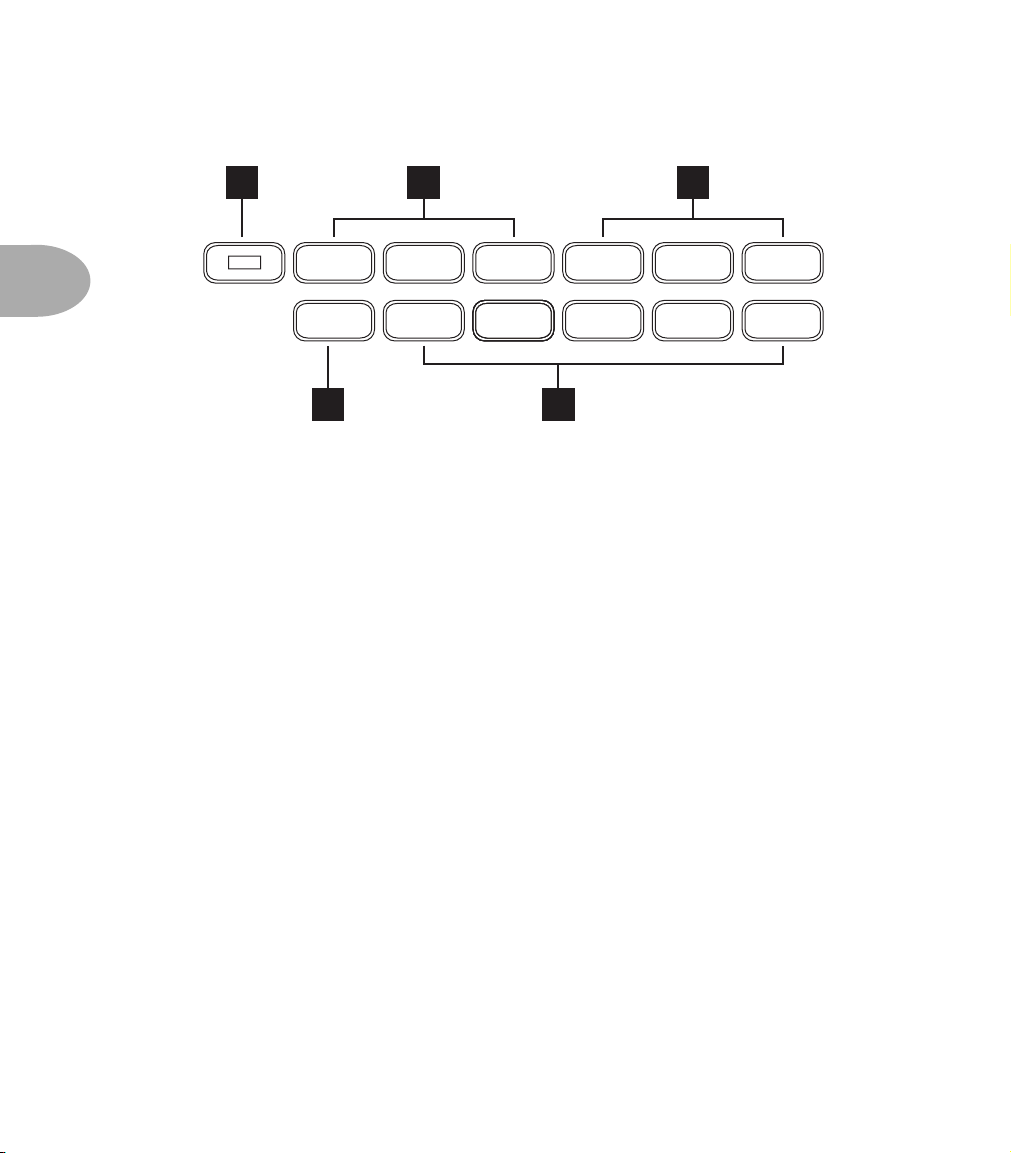
Here’s where you control and setup all your effects. The basic brain dead mode of
operation is light on, effect on. Light off, effect off. All the effects work at the same
time (with the exception of Pitch Shift and Modulation), to achieve any level of
moderation or excess you desire. Press the Edit button to dive deep into the details of
any effect and tweak it to make it your own.
12. Edit Button: When Edit is lit, we call this “Edit Mode”, and the larger Vetta display
(just to the left of this button) can show Edit Pages for fine tuning effect details. The
most important things to know about Edit Mode are that the little knobs below the
display set the values shown on the display, with the PAGE knob on the far right
selecting different pages for the currently selected effect. An effect selected for display/
editing flashes its light. A first press of an effect button in this state selects it for
editing, and additional presses of the same button turn the effect on and off. See the
Basic Operations chapter for the details.
13. Stompbox Buttons: These buttons turn the three stompbox effects on or off. As just
described, when Edit mode is on, they also call up the stompbox effects’ Edit Pages so
you can fine tune stompbox settings.
14. In-Line Effects Buttons: Turns the appropriate effects on or off (Tremolo, Gate,
Comp and EQ), or selects it for editing, as above.
15. Routable Post Effects Buttons: Turns the appropriate effect (or the Effects Loop)
on or off, or selects it for editing, as above.
Page 21
Functions
Knobs, Buttons, Flashing Lights • Functions
16 18 19
TAP
TEMPO
17 20 21 22
AMP/CAB
GATEGATEGATE
DETAILS
EFFECT
COMPRESSCOMPRESSCOMPRESS
ROUTING
DOUBLE
TRACKER
OUTPUT
LOOPLOOPLOOP
SETUP
FOOT
EQEQEQ
CONTROL
SYSTEM
LOOPLOOPLOOP
SETUP
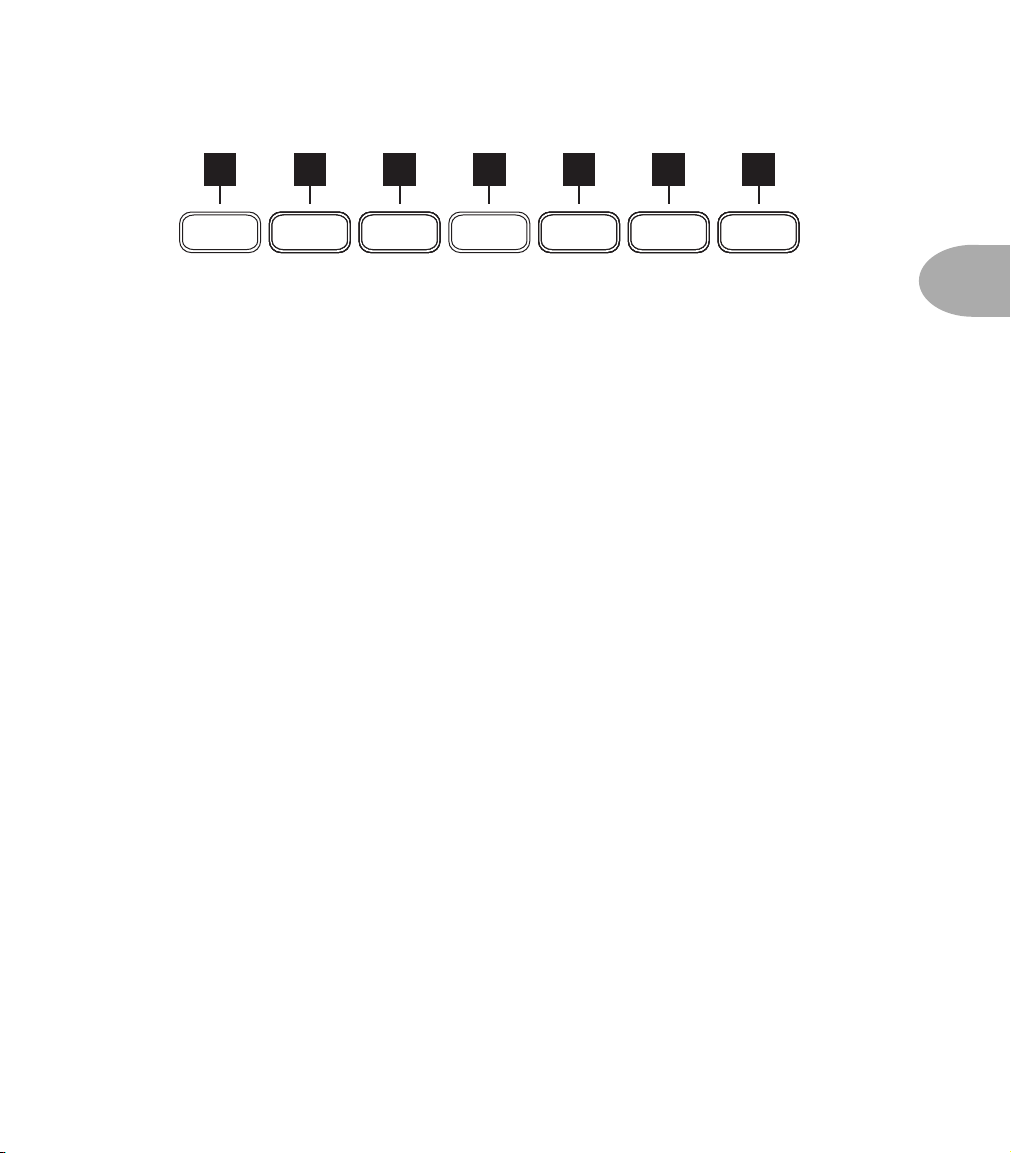
All of these buttons except Tap Tempo and Double Tracker light up when you press
them the first time, and turn off with your second press. When lit, the larger Vetta
display is used to display settings related to the selected Function.
16. Tap Tempo Button: This handy button can be used to set the time for delays,
tremolos, choruses, vibratos, phasers, flangers, or any other effects that have a timebased element. For each effect, you can determine whether the Tap Tempo will affect
it, and how, on a channel-by-channel basis. If you’re into synchronized effects, you
need to know all about this stuff; see the chapters on the Stompboxes and Post Effects
for all the details.
17. Amp/Cab Details Button: Press this when you want to choose which speaker
cabinet model is assigned to which amp and set the panning of the amps in the stereo
field. This is also where you can assign Variax settings for each of Vetta’s channels.
18. Effects Routing Button: Lots of fun to be had here. Press this to move stompboxes,
wah, volume pedal, and post effects around in the signal path.
19. Double Tracker Button: Press this to turn on or off the Double Tracker effect. This
modern wonder simulates the sonic experience of playing along with a second guitar
player, and does it in real time. To edit the Double Tracker’s parameters, press the Edit
button then press the Double Tracker button. Please note that Double Tracker only
works on channels using two amps.
3 • 5
20. Output Setup Button: Press this to display the pages for setting up the Line 6
exclusive A.I.R. II processing for the direct outs, turn the speakers on and off, turn
Vetta’s unique ‘Wide’ mode on and off, set the level for the Direct Outs, or setup the
Digital Outputs.
21. Foot Control Button: Give this a push to set details of operation for the FBV Foot
Controller.
22. System Setup Button: Press this to adjust the contrast of the displays, choose which
MIDI channel Vetta will use, and other basic housekeeping tasks. This is also where
you can turn On or Off the guitar input, Variax input and assign the digital inputs.
Page 22
Knobs, Buttons, Flashing Lights • Global Controls
Global Controls
GLOBAL CONTROLS
3 • 6
REVERB EQ HIGHLOW
-
These knobs give you control over Reverb, your overall bass and treble, and volume.
Unlike most other things on Vetta, the positions of these knobs are NOT saved when
you save a channel.
The basic idea is that, when you are at your gig, recording session or just jamming, you
may find that the space you’re playing in makes it desirable to make a temporary tweak
to your Vetta’s overall sound. Let’s say you’re playing in a place that’s all brick walls,
and things are just way too bright. Or maybe it’s nothing but sumptuous velvet, and
your high end seems to have disappeared. In either case, the Low and High EQ knobs
should help you improve the situation. Straight up, the knobs have no effect (there’s a
little notch to make it easy to set them to this ‘Normal’ position). Turn clockwise past
12 o’clock for more EQ, turn counterclockwise below 12 o’clock for less EQ. This EQ is
independent of, and unrelated to, the Amp Tone Controls Bass, Mid and Treble.
+
NORMALNORMAL NORMAL
-
MASTER VOLUME
+
-
+
The Reverb knob increases or decreases the amount of Reverb you’ll hear when any
Vetta channel is selected and the Reverb is on. This is designed to give you the basic
experience you expect from Reverb on a guitar amp: set the knob high and everything
you do with the amp has a lot of reverb; set it low and there’s less reverb. At the
minimum setting, you hear no reverb at all, regardless of whether the Reverb effect’s
button is on or not.
In general, we recommend that you leave the Reverb knob set to its 12 o’clock
‘Normal’ position any time that you’re setting up sounds that you plan to save or use
regularly. Set the amount of Reverb that you want for the particular channel by
pressing the Edit buttonbutton to light it, pressing the Reverb button to display its Edit
Pages, and turning the little knob below the MIX value shown on Vetta’s larger display.
Then press SAVE to save the channel with that Reverb setting, and if you find you
need a bit more overall Reverb (or less) when you get to the gig, grab the Reverb knob!
Page 23
Knobs, Buttons, Flashing Lights • Main Display
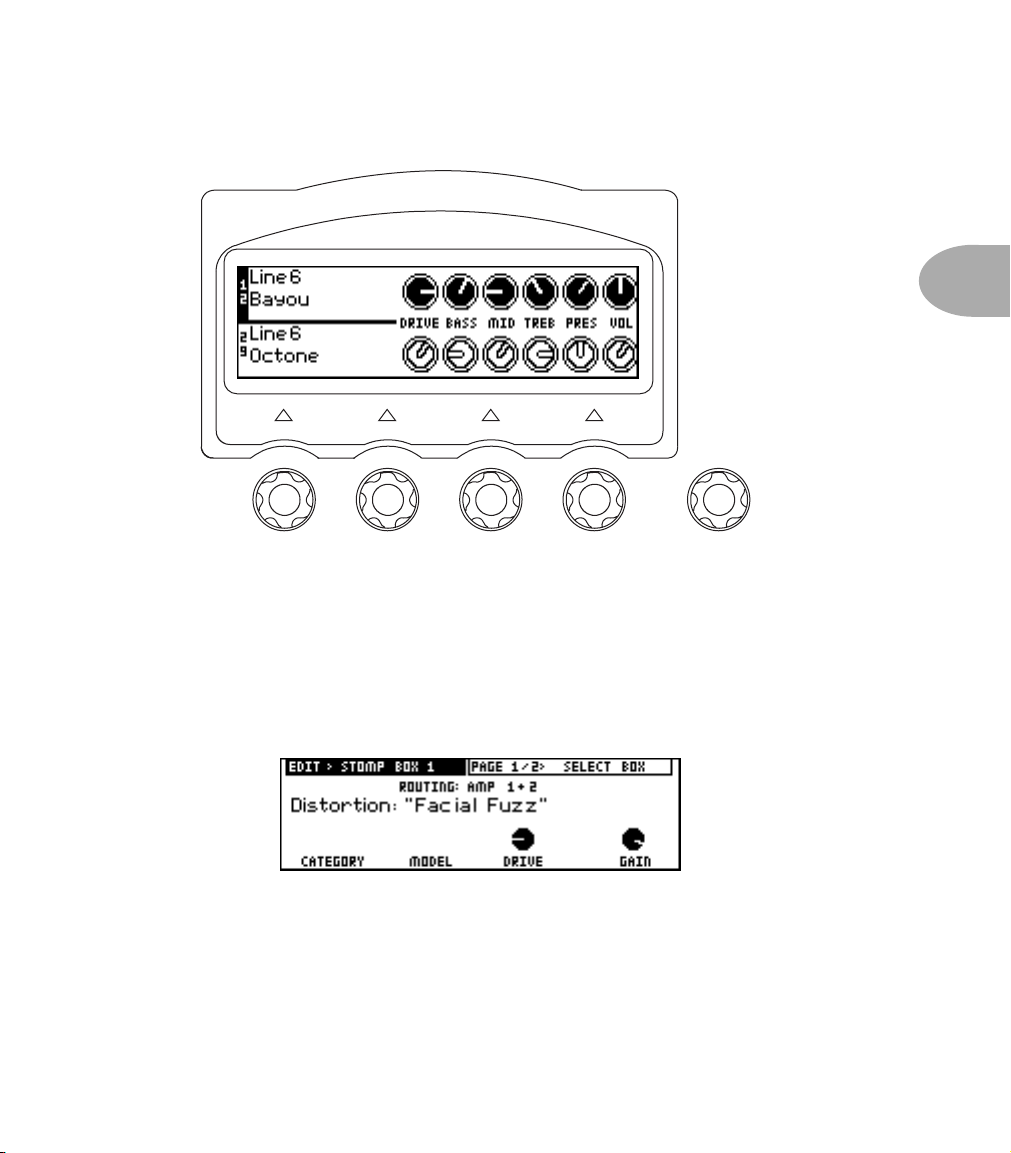
Main Display
PAGE
The normal display state, called the Amps At A Glance Page, shows which amp
models you’ve got going, and how their Tone Controls are set; this is detailed in the
Basic Operations chapter. In this state, the knobs below the display don’t function.
3 • 7
At other times, the red arrow lights between the little knobs and the display will light
to show that one or more of the knobs is ready to do something. When editing a
stompbox, for instance, the display will look something like this, and the little arrow
lights will be lit to show that their knobs set things on this page:
The words ‘Page 1/2’ at the top right box tell you this is the first of two different Edit
Pages for this stompbox. The Page knob moves you through these pages. These versatile
knobs and display make frequent appearances in the Basic Operations chapter.
Page 24
Knobs, Buttons, Flashing Lights • Vetta Combo Rear Panel Power and
Vetta Combo Rear Panel Power and Speaker Outs
And now we come to the combo’s ‘gazintas and gazoutas’, as audio engineer types say:
24
3 • 8
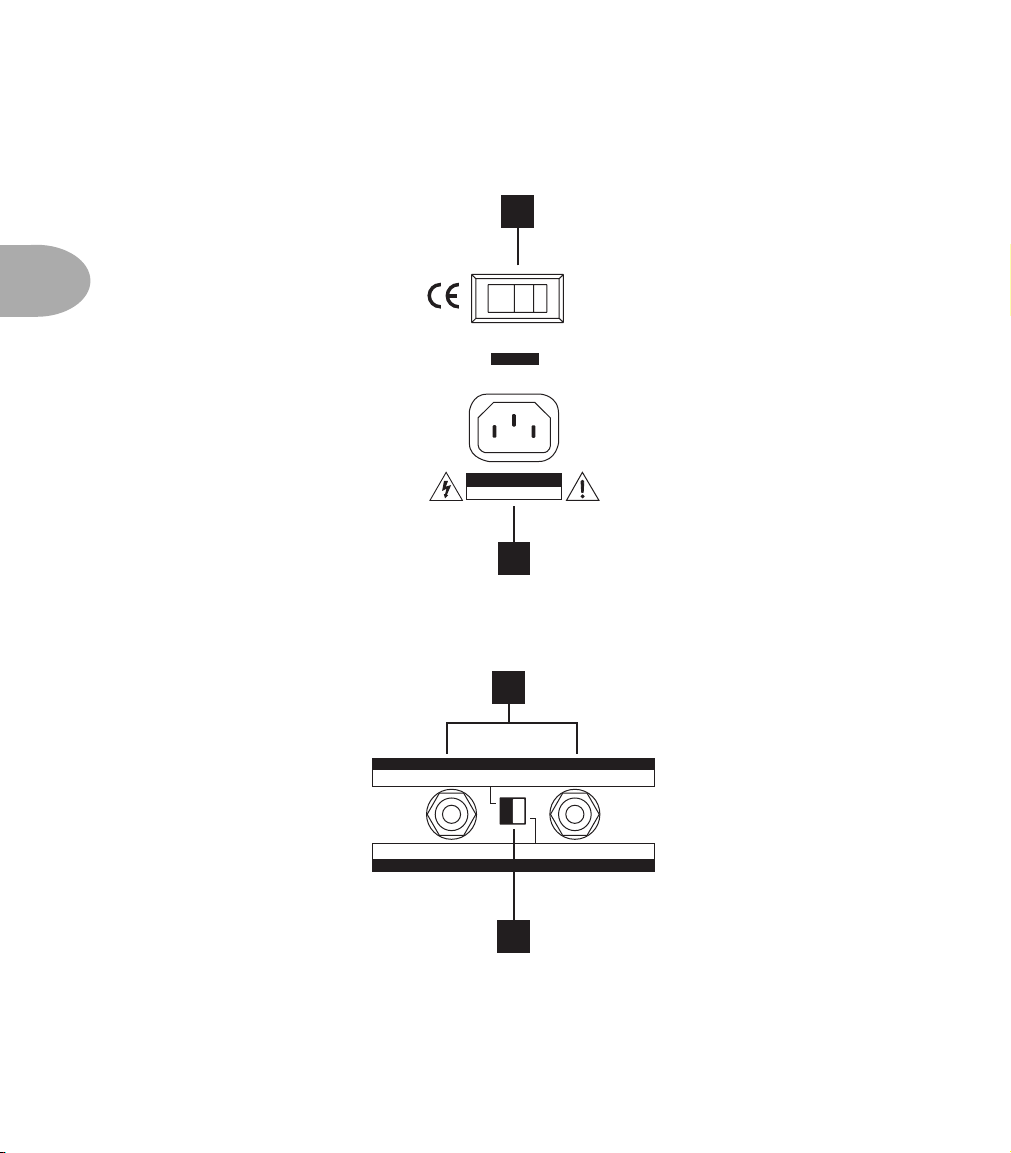
POWER
CAUTION
RISK OF ELECTRIC SHOCK
DO NOT OPEN
23
23. Power Connector: Where the power cable goes. We’ll let you decide which end.
24. Power Switch: The original digital control: one finger determines on or off.
25
CLASS 2 WIRING
SPEAKER OUTPUTS - NORMAL MODE: VETTA COMBO = STEREO, EXTERNAL CABS = STEREO
SPEAKER OUTPUTS - SPLIT STEREO MODE: VETTA COMBO = LEFT, EXTERNAL CAB = RIGHT
8 OHMS EACH
4 OHMS
LeftRight
External CabNot Used
26
25. External Speakers: These jacks are for connecting external speaker cabs.
26. Speaker Configuration Switch: Selects between Split Stereo and Normal modes.
Page 25
Knobs, Buttons, Flashing Lights • Vetta HD Rear Panel Power and
Vetta HD Rear Panel Power and Speaker Outs
Whereas the Vetta HD has things arranged somewhat differently:
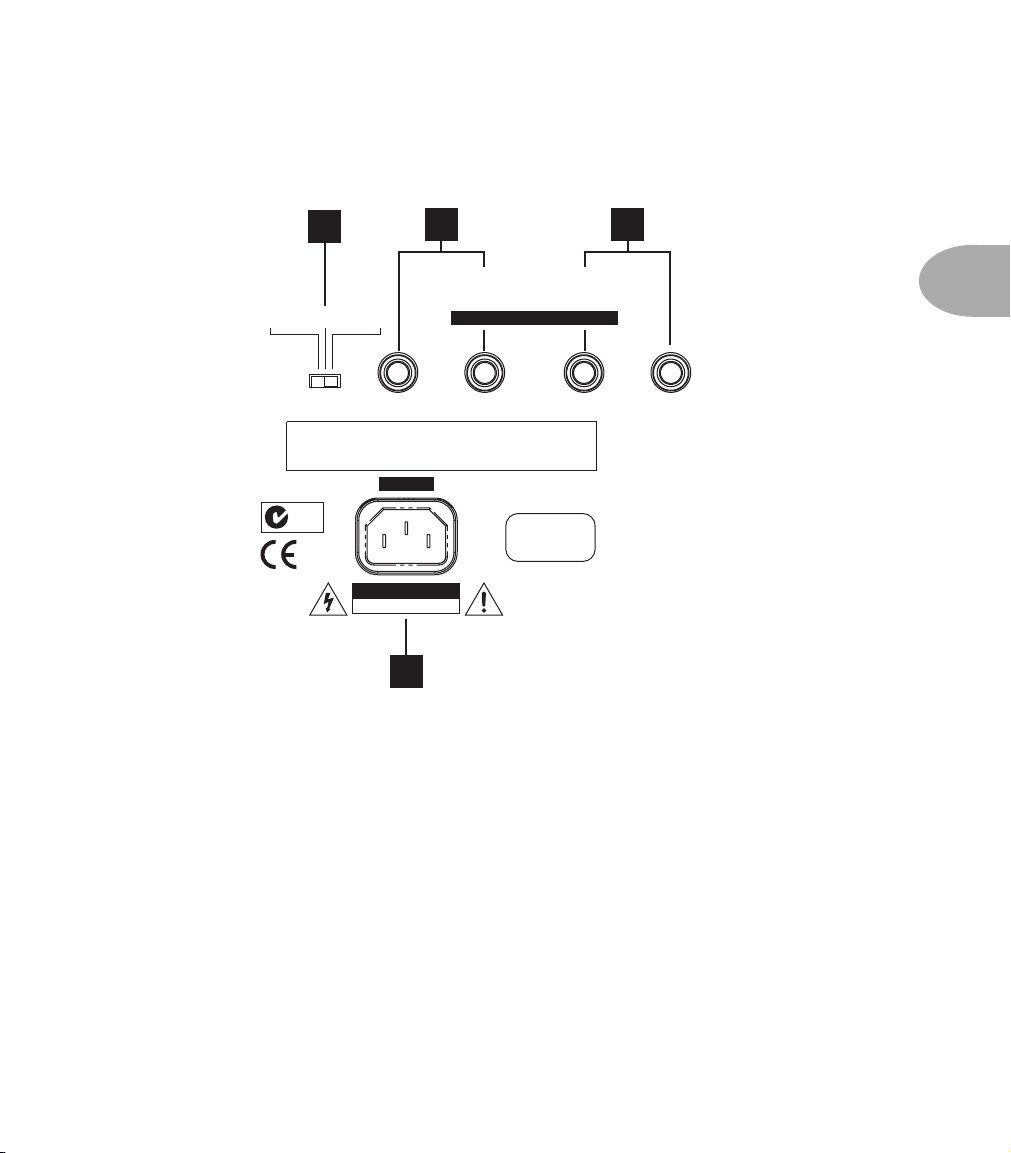
26
4 OHM 8 OHM 16 OHM
N222
RISK OF ELECTRIC SHOCK
25 24
USE THE OUTPUT SETUP BUTTON ON THE
FRONT PANEL TO TUNE VETTA HD FOR THE
SPEAKERS THAT YOU WILL BE CONNECTING.
Right Left/Mono
SERIAL NUMBER
POWER
CAUTION
DO NOT OPEN
SPEAKER OUTPUTS
CLASS 2 WIRING
Left/MonoRight
POWER REQUIREMENTS
100 -120V ~
50 - 60Hz
900 W Max.
23
23. Power Connector: Little bitty electrons flow in here to make things work.
Connect the supplied cable to the source of electrons, then flick the power switch
that’s on the front panel to let the electrons in.
3 • 9
24. Left/Mono: These two jacks are wired in parallel and output the left signal (if
you’re running in stereo) or the mono signal if you’re running mono. Be sure
you’ve chosen the corresponding stereo or mono operation on the Vetta front
panel as described in page 4•35.
25. Right: These jacks carry the right output when you’re running stereo.
26. Ohm Selector: Be sure to set this switch to match the ohm rating of the speaker
cabinets that you are connecting to your Vetta HD. If this switch and your speaker
cabinets’ ohm ratings are mismatched, your Vetta will sound wrong.
Page 26
Knobs, Buttons, Flashing Lights • Vetta Combo & HD Common Rear Panel
Vetta Combo & HD Common Rear Panel Connections
The Vetta combo and HD have these rear panel connections in common:
3 • 10
28 29 30
connect FBV Foot Controller here
(not compatible with Floor Board and FB4)
PEDAL MIDI DIRECT / WIDE OUTPUTSSTEREO EFFECTS LOOP DIRECT / WIDE OUTPUTS
In Out Left/MonoRight Left/MonoRightReturnSend
Tip = Left/Ring = Right
Unbalanced Outs
LIFT/ GROUND
323127
Balanced Outs
27. Pedal Connector: Connect your FBV foot controller here.
28. MIDI In/Out: Hook up MIDI cables for doing MIDI stuff here. Like the rest of your
cables, you should get some decent ones for the job, with nice molded plastic ends.
29. Stereo Effects Loop Send/Return: Stereo Send and Return for the programmable
stereo effects loop of your Vetta. Use a pair of 1/4-inch TRS to dual 1/4-inch TS cables
(commonly called ‘Y’ or ‘insert’ cables), one for the send, one for the return. More
detail, plus pictures are to be found on page 4•14.
30. 1/4-inch Direct/Wet Outputs: Normally, these are your Direct Outs, for recording,
or sending a feed to a house sound system when you’re playing live. These outputs
utilize a new, second generation of Line 6’s exclusive A.I.R. processing which has
made Line 6 products like POD the undisputed standard for recording guitar direct.
The level at these outputs is set via the Outputs Setup button. See page 4•32 for
details.
Vetta also has a ‘Wide Mode’ which lets you use these outputs for the kind of wet cab/
dry cab setup employed by some guitarists, and which is normally only possible with a
much more elaborate switching and routing system (all of which Vetta takes care of for
you). See page 4•34 for more on Wide Mode.
31. Ground Lift Switch: If you’re getting ground loops when connecting Vetta’s Direct/
Wet Outs to other equipment, use this to lift the grounds of the XLR Direct Outs only.
The unbalanced 1/4-inch outs don’t have separate grounds that can be lifted.
32. XLR Direct/Wet Outputs: Same thing as the 1/4-inch outs, only these are the
connections the pros typically use, and the Ground Lift Switch works with these.
Page 27
Knobs, Buttons, Flashing Lights • Vetta Digital Interface Card
A quick note about direct outs:
When using the direct outs, there can be a ‘pop’ on the outputs on power up or
power down. We recommend that you either disconnect the direct outs or power
down whatever the direct outs are connected to before powering your Vetta on or
off.
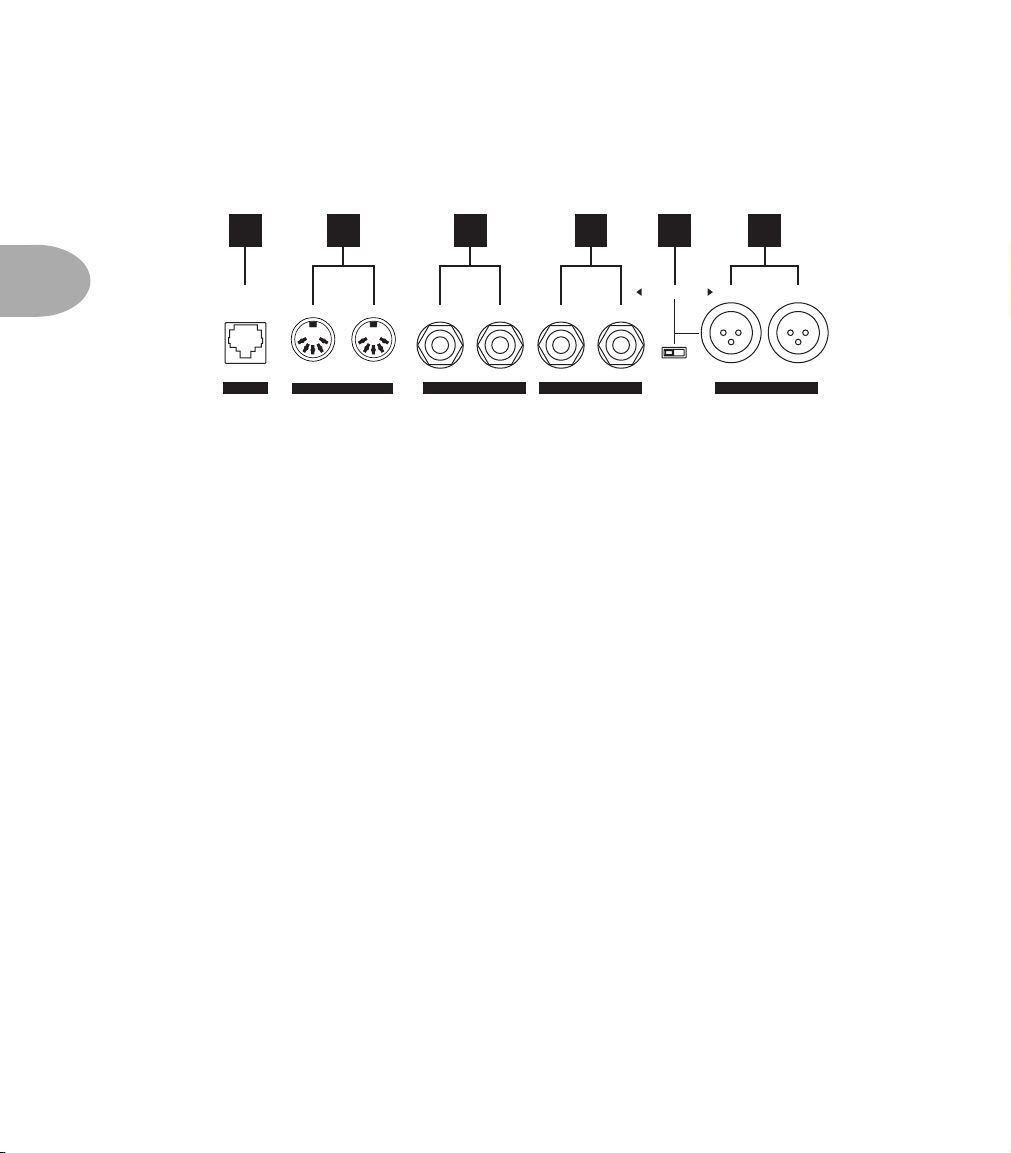
Vetta Digital Interface Card
VETTA DIGITAL INTERFACE
USE SYSTEM SETUP BUTTON TO
SELECT INPUT SOURCE FOR AMP
USE OUTPUT SETUP BUTTON TO
SELECT DIGITAL OUTPUT MODE
33. Variax RJ-45 Digital Input: This allows for digital connection from the
Variax modeling guitar to the Vetta. Vetta will supply power to the Variax from
this connection. Variax settings can be stored and recalled within Vetta channels
when this input is used. Connection can be made with the included locking Variax
cable or with any standard CAT 5 Ethernet computer cable.
34. AES/EBU digital I/O: This allows for digital connection to other digital
devices with AES/EBU interfaces such as effect processors, digital mixing consoles,
digital recorders or computer interface cards. Up to 24-bit, 96kHz quality.
35. S/PDIF digital I/O: This allows for digital connection to other S/PDIF digital
devices such as effect processors, digital mixing consoles, digital recorders or
computer interface cards. Up to 24-bit, 96kHz quality.
3 • 11
33 34 35
IN
OUT
INOUT AES/EBUVARIAX IN S/PDIF
Selection of the Variax input, AES/EBU input or S/PDIF input can be found on
page 2 of the System Setup menu, as described on page 4•39.
The sample rate and resolution of the AES/EBU and S/PDIF outputs can be set on
page 4 of the Output Setup menu, as described on page 4•36.
Page 28

Page 29

Basic Operations • Selecting Factory/User Memory
BASIC OPERATIONS
Selecting Factory/User Memory
From Vetta
Vetta has two sections of memory (Factory and User) of 64 Channels each. These are
organized as 16 banks of 4 channels each, which gives us a total of 128 Channel
Memories. Press the Factory or User button to select one or the other.
From the FBV
From the FBV foot controller, simply press the Bank Up and Bank Down switches
simultaneously to toggle between Factory and User.
Selecting a Channel
From Vetta
Turn the knob to the left of Vetta’s smaller display to spin through all the channels.
You’ll spin through the four channels of a Bank as you go. So, if you start at Bank 1,
you’ll get 1A, 1B, 1C, 1D and then 2A, 2B, etc. Press the A, B, C, D buttons to select
one of the four channels in the current bank. And, because we’re all creatures of habit,
we’ve given you a Favorite button for easy, instant access to any one of the Vetta’s
channels without any knob turning required (see page 4•26 for details). Channel
selection from Vetta is normally ‘instant access’, but you can also choose a ‘deferred’
mode if you prefer (see page 4•40 for details).
4 • 1
From the FBV
On the FBV, you use the Bank Up or Bank Down switches to select a new bank, but a
new channel will not load until you press one of the Channel Select switches. This
enables you to switch to channels that are several banks away without you (or your
audience) having to hear all the channels in between.
From MIDI
Vetta responds to MIDI Patch Change commands. Patch Changes 0-63 select the User
Channels. 64-127 select the Factory Channels.
Page 30

Basic Operations • Editing Amps, Cabs & Variax
Editing Amps, Cabs & Variax
Working With One Amp
One of the revolutionary features of Vetta is its ability to provide two totally
independent amp models at the same time. As amazing as this is, and as hard as it can
be to go back to a single amp after you’ve gotten used to the whole new world of sonic
possibilities opened up by this feature, sometimes you only want to use one amp at a
time. Here’s how.
4 • 2
AMP 1
AMP 2
ON
ON
KNOBS
KNOBS
Standby Mode
The ON knobs are like the standby switches on old tube amps. Simply press an ON
button to turn an amp on (light on) or put in standby mode (light off). Amp 2 is in
Standby in the example shown below:
Note that as you switch from two amps on to only one amp on, the amp that’s left on
may also change its location in the stereo field. The ‘Amp Panning’ page of the
Amp/Cab Details buttonbutton sets separate panning depending on whether an amp
is on by itself or with a second amp. (See ‘Changing Amp Panning’, page 4•3.)
Remember that, although you may choose to work with a single amp, two amps are
always available in every stored channel. The name of the model assigned to the amp
that is in Standby is displayed so you know what you’re gonna get when you turn an
amp on.
Page 31

Basic Operations • Editing Amps, Cabs & Variax
Working With Two Amps
Switching between Amps
When you’re working with two amps, the KNOBS buttons select which amp you
want to control with the Drive, Bass, Mid, Treble, Presence, and Volume knobs. If
you press both KNOBS buttons at the same time, the controls of the two amps will be
locked together (see ‘Synchronized Editing’ page 4•5). You can tell which amp is
being controlled by looking at the display. The amp that’s selected will have its knobs
highlighted black, like Amp 1 below:
Changing Amp Panning
Whether you’re working with a single amp, or two at once, you have complete
control over where they’re placed in the stereo field. You may want to have your
two amps panned hard left and hard right when they’re both on (which gets really
exciting when you’re using separate left and right cabs with Vetta HD, or the Vetta
combo with an external cab in Split Stereo Mode as described on page 4•43), but
then when you kick your FBV switch to turn on only one you may want that amp to
be panned center. To edit your amps’ panning, press the Amp/Cab Details button.
Use the Page knob to select Page 2, ‘Amp Panning’:
4 • 3
AMP1 MIX sets the pan of Amp 1 when it and Amp 2 are both on. AMP1 ONLY
sets pan when only Amp 1 is on. Same idea for the AMP2 controls. Press Amp/Cab
Details again when you’re done, and this display will be dismissed.
Page 32

Basic Operations • Editing Amps, Cabs & Variax
Selecting an Amp Model
When you’ve got 2 amps on, you use the KNOBS buttons to select which amp you
want to control, Amp 1 or Amp 2 (or both). Try pressing the KNOBS buttons to get
only Amp 1’s lit, and turn the Amp Model knob to select the amp model you want.
For a complete list and description of the available amp models, see page 5•1, or you
can see just see a list without the descriptions (less interesting reading, but faster) in
the Amp Models Appendix on page 10•1.
Editing One Amp’s Settings
4 • 4
OK, now here’s the really hard part. With Amp 1 still selected, use the knobs labeled
‘Drive’, ‘Bass’, ‘Mid’, ‘Treble’, ‘Presence’, and ‘Volume’ to control drive, bass, mid,
treble, presence, and channel volume, respectively. As you move the knobs, you’ll see
their movement mirrored in the large display. (We call this view ‘Amps At A
Glance’.) Whew! Told ya it was gonna be hard, didn’t we? In a second we’re gonna
get really fancy and do both amps at the same time, but first, let’s talk some relativity
theory.
Absolutely Relative
There are two different ways that Vetta can respond to you as you turn the amp
knobs. These are called Absolute and Relative knob control. You choose between
them by pressing the System Setup button and turning the small knob under Knob
Mode (page 4•41 has got the details). Here’s how Absolute and Relative work:
In Absolute mode, when you move a knob, its setting will immediately jump to
where the knob is pointing, regardless of where it was set before. In other words, if
you bring up a new channel that has the Treble set to 4, but the Vetta’s physical
Treble knob itself is currently pointing at 8 from the last sound you were messing
around with, when you move the Treble knob, the setting will immediately jump to
8 and then follow along as you turn. This is handy because it means that, if you
know you like the Bass knob pointing a certain place with a certain Amp Model,
you just point the physical knob there and you’re cool. Also, once you’ve turned all
the knobs while editing a sound, all the knobs are pointing the same way as the
‘virtual’ knobs in the large display. Absolute mode is great for creating new tones
from scratch or making big changes in existing sounds, but its one drawback is that
if you liked the sound that was in the channel and had only wanted to make a small
tweak to it, you have to turn the physical knob to where the setting’s virtual knob
was before you can make that small adjustment. That’s why there’s Relative mode.
Page 33

Basic Operations • Editing Amps, Cabs & Variax
In Relative mode, the idea is that the knobs work, as all knobs generally do, as your
basic more/less controls. When you turn one of the Amp Control knobs up, the
sound will simply be adjusted up without any jumping to the value of the physical
knob. Same thing going down. Seems cool, right? The only downside is that the
physical knob doesn’t generally point to where the virtual knob points (as the next
paragraph explains in by-the-numbers detail). Depending on the way you dial up
amp sounds, this may never matter for you. If you don’t care whether Bass happens
to be set to 2 or 8, and you just want to get more or less, Relative Mode may be just
the thing for you. And you can always look at the display if you do happen to want
to see what the setting is.
In the interests of those who hunger for a sense of completeness, let’s return to our
previous example, but this time let’s see what happens if you’re in Relative rather
than Immediate Mode for the knobs. If your channel is set to a value of 4 for Treble
and the physical Vetta Treble knob is pointing to 8, then when you start turning
the physical knob down from 8, you’ll see on the Amps At A Glance display that
the Treble value doesn’t jump to 8. Instead, it simply scales down from 4, reaching
the minimum setting when the physical knob reaches the minimum. The same
thing happens when you turn the knob up: the setting is adjusted upward toward its
maximum as the knob is turned to reach the physical maximum.
Synchronized Editing (A New Olympic Event?)
As we touched on briefly in the section on switching between amps, you can
control both amps simultaneously by locking their controls together. This can be
very handy if you’ve got a basic relation that you like between the two amps, and
you want to experiment with overall tonal subtleties.
4 • 5
The most important basic stuff to know about this is that, when you press the
KNOBS buttons for Amp 1 and 2 at the same time, you can now control them both
together. Turn any amp control knob above 12 o’clock, and the controls for both
amps will be turned up together. Turn down below 12 o’clock, and the controls for
both amps will be turned down together. And if you turn back to 12 o’clock, the
original relationship between the two amps will be restored. The really cool thing is
that the relative settings of the two amps will be maintained as you turn them up
and down. So if Amp 1 has Bass turned higher than Amp 2 when you start, this
relationship will be maintained. And, like we say, if you want to get back where you
started, just turn the knob to 12 o’clock.
Page 34

Basic Operations • Editing Amps, Cabs & Variax
If you’re one of those people who really likes the step by step approach, try this:
1. Turn ON two amps, and press KNOBS for Amp 1 only. Set Bass to 9 o’clock.
2. Press KNOBS for Amp 2 only. Set Bass to 3 o’clock.
3. Press both KNOBS buttons together to engage Synchronized Control....
You should see something like this on Vetta’s larger display:
4 • 6
If you’ve followed the steps, your Vetta’s physical Bass knob should be at the 3
o’clock position. Now, start turning Bass down and watch the display. As you turn,
the two amps’ settings will remain offset, until Amp 1 “bottoms out.” Keep turning
down, and you’ll see Amp 2’s Bass eventually bottom out, too. Now, start turning
up and you’ll see that Amp 2 (which, remember, started out at the higher setting)
will begin turning up while Amp 1 remains at the minimum setting. Keep going up,
and once Amp 2 starts moving past 12 o’clock, Amp 1 will start turning up, too.
The offset between the two amps has been maintained even though you bottomed
out the control. The same thing happens as you turn the knob up. And, as we say, if
you want to restore the initial setting of the two amps, just turn back to 12 o’clock.
Thus, the two amps’ controls can move together in harmony, even as each retains
its own individual tonal identity. It’s the kind of harmonious relationship
management that we all wish we could attain, isn’t it?
Page 35

Basic Operations • Editing Amps, Cabs & Variax
Cabinets
Being able to mix and match speaker cabinets has always been an important part of the
guitarist’s tonal arsenal. It’s a great way to radically alter the sound of an amplifier. You
may have a combo amp that you’ve been using for years, and you figured you’ve heard
everything it has to offer. But then you hook its speaker outputs up to your 4x12
cabinet, and suddenly your old dog is showing you some new tricks! Fortunately, with
Vetta you won’t need a warehouse, a semi-trailer or frequent visits to a chiropractor
when you want to experiment with a wide selection of our amp and cabinet model
combinations.
Selecting a Cabinet
Press the Amp/Cab Details button. Vetta’s larger display should now show something
like this:
Use the knobs under the display to select cabinets for either or both amps. For a
complete list of available cabinets, see the Cabinet Models Appendix on page 10•3.
4 • 7
Variax
Page 3 of the Amp/Cab Details menu allows you to save Variax settings within your
Vetta channels. This means that with the touch of a button on your FBV you can recall
not only the proper amp, cabinet and effects settings, you can also recall the proper
guitar for that channel! This represents the state of the art in total guitar system
integration. Your Variax must be connected digitally to the Vetta for this to work.
Page 36

Basic Operations • Editing Amps, Cabs & Variax
The MODEL parameter is where you choose which Variax instrument model you wish
to recall with the Vetta channel. The first choice you have for the MODEL parameter
is “None.” With this setting the Vetta will not change your Variax’s MODEL or TONE
when this Vetta channel is recalled. The setting is also controllable directly from the
Variax’s Model and Pickup Selector switches.
The TONE parameter allows you to store the tone setting of the Variax model for this
Vetta channel. This can be particularly useful with Variax Acoustic and Reso models,
as the tone control has special functions for those models. The TONE setting can also
4 • 8
be directly controlled by the Variax’s Tone knob.
The CONTROL parameter can be set to On or Off. With this parameter set to Off, the
Vetta will never change the settings your Variax. This is a global settting.
The Vetta is designed to work best when connected to a Variax with software version
1.1 or higher. It can also function just fine with versions below 1.1, but there may be a
few limitations in Variax’s abilitity to communicate its controls to Vetta. The Software
version of your Variax can be displayed on your Vetta on Page 4 of System Setup. If the
version is below 1.1, please visit www.line6.com for details on how to download a
software update for your Variax.
Page 37

Basic Operations • Effects
EDIT
STOMP
BOX 1
STOMP
BOX 2
LOOPEQ
STOMP
BOX 3
PITCH
SHIFT
TREMOLO GATE COMP
REVERBDELAYMODEQEQEQ
Effects
From down and dirty stompbox distortion to studio quality reverb lushness, Vetta lets
you take your pick of effects, and set ’em up and route ’em however you like.
On/Off Control
As we covered on page 3•4, the basic brain dead mode of operation for the
stompboxes and other effects is for the Edit button to be off. Just press effect buttons:
light on means effect on. Light off, effect off.
Edit Mode
When Edit is lit, we call this “Edit Mode”, and the Vetta display just to the left of the
Edit button can show Edit Pages for fine tuning effect details. The most important
things to know about Edit Mode are as follows: The little knobs below the display set
the values shown on the display, with the PAGE knob selecting different pages for
the currently selected effect. An effect selected for display/editing flashes its light.
Pressing the button for the currently selected effect turns the effect on and off just
like non-Edit mode. And, as you tweak things, if you find a setting that you like more
than our factory default for a model (since everybody’s ears are different and your
guitar probably “likes” particular effects settings more than others), you can save it as
your own customized default (see page 4•26).
4 • 9
But before you get all advanced, let’s get a good solid footing in the fundamentals of
the effects world with.…
Stompboxes
Considering the fact that the pedal board owned by one ardent member of the Line 6
stompbox development team is large enough that it could double as a dinette if you
put legs on it, some might say we’re overly fond of stompboxes. These little metal
beasts have been, after all, the guitarist’s principal tool for sonic flexibility for the past
40 years and more.
Page 38

Basic Operations • Effects
Vetta gives you three stompboxes, but not just any three—you get any three. Each of
the internal stompboxes in Vetta can be assigned to be any of the numerous choices
available. They can all be different, they can all be the same, and they can be mixed
and ordered however you want. They can even be routed to feed either or both of the
amps in a channel (see ‘Routing Stompboxes’, page 4•18).
Normally, for Line 6 Factory sounds, Stompbox 1 will be a distortion effect,
Stompbox 2 a modulation effect, and Stompbox 3 a delay effect. That’s mostly
because that’s the order guitarists generally use, but if you feel the need to do
4 • 10
something differently, don’t let yourself feel bound by tradition.
STOMP
BOX 1
STOMP
BOX 2
STOMP
BOX 3
Editing a stompbox
With the Edit button off, press any one of the Stompbox buttons a couple times. This
will turn the selected stompbox (1, 2, or 3) on and off. Now, with that stompbox that
you just pressed still lit up, light up the Edit button. Welcome to Edit mode! At this
point, your display will look much like this:
In this example, the display says “ROUTING: AMP 1 + 2”, meaning this stompbox is
routed to feed both amps (see page 4•18 for Routing details). Since the stompbox is
feeding both amps, this means that whether you have Amp 1 or Amp 2 turned off,
you’ll hear the stompbox. If you did have a stompbox routed to Amp 1 only, and
Amp 1 was off, you would, of course, not hear the stompbox even if you turned the
stompbox on. Just like real amps and stompboxes, right?
The first two knobs below the display select Category and Model. You’ve got five
categories for stompboxes: Dynamics (compression and auto swell), Distortion
(including overdrive and fuzz), Modulation (chorus, phase, flange, etc.), Delay
(including echo) and Synth/Filter. Each of the five types of stompbox have their own
editing pages. Dynamics, being relatively simple, have only one page, while the
others have two or three. As usual, the Page knob selects amongst these pages.
Page 39

Basic Operations • Effects
For a complete list of all Stompboxes with thrilling descriptions including just what
you can edit for each stompbox, see the creatively titled chapter, The Stompboxes
(page 6•1). Or see a boring list with no descriptions on page 10•4.
Delay and Modulation stompboxes include settings for Tap Tempo on their last edit
page. There’s a complete discussion of all the exciting details coming up that you
definitely need to read if you plan to make Tap Tempo a part of your life. But first...
STOMP
BOX 1
STOMP
BOX 2
LOOPEQ
STOMP
BOX 3
PITCH
SHIFT
TREMOLO GATE COMP
REVERBDELAYMODEQEQEQ
In-Line Effects
The Tremolo, Gate, Comp(ressor) and EQ Buttons make up the In-Line Effects group.
These always sit at the same position in Vetta’s effects flow. Gate happens to come
right at the start, before all the stompboxes, and the rest come right after the amp/cab.
The ones after the amps give you independent processing for each amp (natch).
Operation is the usual: light on, effect on. Light off, effect no worky. Light up the Edit
button, and you’ll see that each of these effects has a customized set of edit pages
(described in detail starting on page 7•1) that let you choose models and make other
settings. Tremolo, for instance:
Tremolo also includes Tap Tempo as is about to be described, right after...
4 • 11
LOOP
PITCH
SHIFT
REVERBDELAYMODEQEQEQ
Routable Post Effects
The Loop, Pitch Shift, Mod, Delay and Reverb Buttons are known around Line 6 as the
Routable Post Effects gang. Like the Stompboxes, these guys are always hanging out
together, only their turf is post (in other words, after) instead of before the amps. And,
Page 40

Basic Operations • Effects
also like the stompboxes, their routing can be changed around for whatever fiendish
purpose you may have in mind. As you’ve no doubt guessed, it’s a light on/off, effect on/
off sort of thing with the buttons, and with the Edit button lit you can get down and
dirty with the details. With Edit lit and Mod selected, for example:
4 • 12
As with the Stompboxes, turn the knob below the word MODEL, and you’ll be
selecting amongst the available models for the Modulation effects. The other knobs
on the page allow you to dial in other key settings for the effect, and PAGE lets you
get to any other pages available for the effect. The last page of every Routable Post
Effect gives you IN controls for Amp 1 and Amp 2. This means that you can, for
example, have different levels of reverb on each amp.
The Effects Loop, being sort of the loner in the Routable Post Effects gang, gets its
basic description on page 4•14. For a complete list of the individual editing options
for all the Routable Post Effects, see the (you guessed it) Effects chapter, page 7•1.
And now...
Tap Tempo and Time/Speed control
The Delay and Modulation stompboxes, as well as the Tremolo, Mod and Delay effects
all have Time or Speed parameters, with the option to sync as many of these as you like
together for Tap Tempo control via the Vetta Tap Tempo button and FBV footswitch.
You may find it helpful to think of these time-based effects in Vetta as a band. You
want them to all play in time—at the same tempo—although that doesn’t mean they
all are going to play exactly the same thing. You may want your stompbox delay doing
quarter notes while your post delay effect does half note triplets and your tremolo is
pulsing along on eighth notes and your chorus warbles dotted quarter notes (obviously,
you’re into jazz). You may also want to have some of your time-based effects ignoring
the tempo altogether, free spirits, not locked into anything, kinda like that one kid who
never quite got the rhythm—or never needed it.
Page 41

Basic Operations • Effects
Setting Tap Tempo
The key to getting your sonic landscape sync’d, is the Channel Tempo. With Vetta,
each channel has a tempo, and you can set it one of two ways.
First, you can simply tap on the Tap Tempo button on your Vetta or the Tap Tempo
footswitch on the optional FBV foot controller. These taps are interpreted by Vetta
as quarter notes—just as if you were counting the band off 1-2-3-4. It only takes two
taps for Vetta to calculate a new tempo, and the Tap Tempo button and FBV light
will blink to show the tempo you’ve set.
The second method is to set the Tap Tempo value directly from one of the effects
edit pages. Every effect in Vetta that can lock to Tap Tempo, whether stompbox or
post effect, has a similar edit page. Here’s a delay stompbox, for example:
The TIME knob sets the time for this particular effect in milliseconds, independent
of whether the effect is locked to Tap Tempo or not. As a matter of fact, if the effect
is locked to Tap Tempo, changing the TIME via this knob will unlock that effect
from Tap Tempo. This is the same TIME parameter that you see on the first edit page
for this effect (we put it in both places for convenience). Modulation effects similarly
show speed (instead of time) on their first page and this tempo page.
4 • 13
The TAP TEMPO knob tells the effect to “Ignore” Tap Tempo, or “Lock” to it.
CHNL TEMPO (channel tempo to its friends) shows the Channel Tempo in BPM.
NOTE determines what note value (anywhere from a sixteenth note triplet to a
whole note) the effect will use. Each effect in a channel can have a different note
value.
Tempo Gone Out of Bounds
Vetta’s Delay effects support a maximum of 2 seconds of delay time. When you have
set a delay effect to use a large note value, and you then Tap or dial in a slow Channel
Tempo, you may sometimes come up with a note/tempo combination that goes over
Page 42

Basic Operations • The Effects Loop
this limit. We’ve designed Vetta to deal with this situation in a musical way: it will
simply reduce the time value to one half of the tempo/note calculated value, which
should get things back into range while still keeping everything in sync with your
tempo. This all happens instantly, as soon as you dial or tap in the new, slow tempo.
Turn a stompbox on, for instance, select a delay model (page 4•10 tells how) and
spin the page knob to the last page. Set TAP TEMPO to ‘Lock’, CHNL TEMPO to
‘60bpm’ and NOTE to a half note. You’ll see that this sets your TIME to 2000ms,
which is the maximum available.
4 • 14
Now, turn the knob below CHNL TEMPO counterclockwise to set the tempo to
59.5bpm, and you’ll see that your delay time jumps down to 1008ms—one half of the
2014ms value that would be required for a half note at 59.5bpm. Your delay is still in
sync with the Channel Tempo, but it is effectively working as a quarter note instead
of a half note.
One cool side effect of the way that this is arranged is that Vetta still knows what
note value you had intended for this effect. So if you switch back to a higher tempo
again, the time will once again be set to match to match the note.
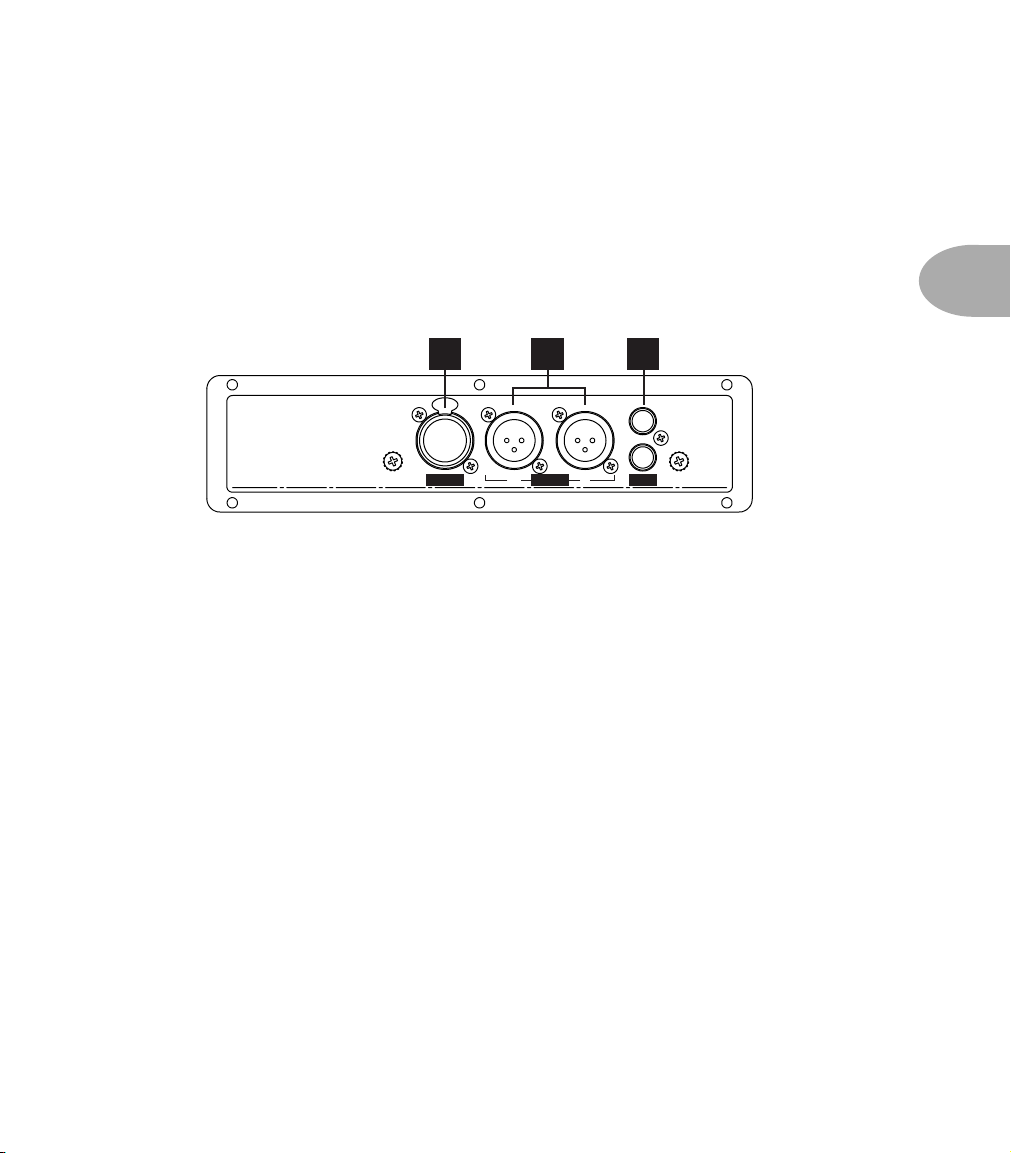
The Effects Loop
While we’ve tried to anticipate all of your effects needs, you may still want to use other
effects with Vetta. That’s okay, we won’t be upset. Obviously, if you’ve got actual
physical world stompboxes you want to use, run them in front of Vetta as you would do
with any other amp. If you’ve got rack mount effects or other devices that work at line
level, these can be hooked up in Vetta’s effects loop. This loop is switchable (from the
front panel or from the FBV foot controller), the on/off state is remembered with each
channel that you save, and you can even route the loop either series or parallel (see
‘Routing Post Effects’ on page 4•18).
Analog Effects Loop
To hook something up to Vetta’s loop, you’ll need a pair of what are commonly referred
to as ‘Y’ or ‘insert’ cables. These cables have a 1/4-inch TRS (Tip, Ring, Sleeve) plug
on one end, that splits out to a pair of 1/4-inch TS (Tip, Sleeve) plugs at the other end.
You’ll need one of these for Vetta’s loop send, and one for the return. You hook them
Page 43

up like this:
Basic Operations • The Effects Loop
Vetta FX Loop
Tip = Left/Ring = Right
ReturnSend
STEREO EFFECTS LOOP
Rack FX unit
RIGHTLEFTRIGHTLEFT
INPUTOUTPUT
It’s worth pointing out here that we haven’t hooked these cables up the way you might
use them for an effect ‘insert.’ An effect insert uses these cables to allow input and
output signals to both be connected at the one jack. If Vetta had an effect insert (like
many mixing boards do), you’d jack the TRS end of a single one of these cables in this
insert, then one of the split ends of the cable would go to the effect’s input and the
other would go to the effect’s output. But as the picture shows, we’re not doing that.
Once you’ve got your external effects hooked up, press the LOOP button as needed to
get the loop turned on. Just as with all the other effects, light on, loop on. Light off,
loop goes bye-bye.
Digital Effects Loop
Vetta’s effects loop can also be assigned to either the S/PDIF or AES/EBU digital I/O
for use with outboard effect processors that have the same digital connections.
4 • 15
Page 4 of Output Setup is where you will make these settings. The first parameter is
FORMAT. This is where you set the bit depth and sample rate coming from the Vetta.
Use the soft knob under FORMAT to change this parameter. You have the choice of
Page 44

Basic Operations • The Effects Loop
16, 20 or 24 bit resolution as well as sample rates of 44.1, 48, 88.2 and 96kHz. It is
wisest to set these parameters for the highest qualities your outboard effect processor
supports and set the processor to lock to the incoming signal from Vetta. Vetta can also
be set to match the bit depth and sample rate of the signal at the digital input. This
means your outboard effect processor can be set to “internal” if you wish. The next
parameter is SOURCE. Use the soft knob to set this to LOOP. The next parameter is
DIG OUT. Simply choose AES/EBU or S/PDIF depending on which format your
outboard effect processor uses. The final parameter is GAIN. If you find that the input
to the effect processor is low, you can boost the gain up to +12dB.
4 • 16
Effects Loop Levels
The next step is to set up the send and return levels for the loop. Press the Edit button.
If the Loop page isn’t showing already, press the Loop button and it will be. You’ll see
something along these lines:
The left most knobs, labeled AMP1/L SEND and AMP 2/R SEND control your signals
differently depending on how your loop is routed. You’ll want to check out Effect
Routing on page 4•18 in order to get your loop properly set for the particular sonic
madness you have in mind. When the loop is first in the chain of post effects or in any
parallel routing, the loop sends are getting signals from the discrete outputs of Amp 1
and Amp 2, regardless of how the amps are panned. When it’s not first in the post
effects signal path, routed in series or chain, the sends are from the left/right outputs of
the previous effect.
When the loop is routed parallel or chain, set the mix control on the effect in the loop to 100%
wet. Use the RETURN MIX knob on the display shown above to determine how much
of the effect you want to hear. If you instead try to run your external effect at something
other than 100%, you’ll get a bad sonic experience known as ‘comb filtering’ to audio
engineers if the external effect unit is digital, and you’ll get your stereo signals
collapsing to mono if your external effect unit sums its left/right inputs to mono (as
many effects processors do).
Page 45

Basic Operations • The Effects Loop
When the loop is routed series, use the mix control on the effect in the loop to set the mix. No
worries about comb filtering here, but if your effect unit sums its left/right inputs to
mono (often, the ‘direct’ signal is summed, even when the ‘effect’ part of the signal is
stereo) then the fancy panning you set up on Vetta may be lost when you hit the loop.
The effects loop outputs can be assigned to the WIDE ouputs on page 2. This setting
can also be made on page 3 of Effect Routing.
Double Tracker
We’re particularly proud of Vetta’s Double Tracker which allows you, for the first time,
to get the experience of studio double tracking when you’re playing live. It’s like having
a second guitarist following you around all the time, only you don’t have to pay him
(hey, sounds like most of the bands we’ve been in).
This effect can be a major size enhancer for your tone, especially when you’re using a
physical set up that includes separated left and right cabinets with a Vetta HD, or a
Vetta combo hooked up to an extension cab like the Vetta 212S Extension Cab
running in Split Stereo (see the back of your Vetta combo and page 3•8).
4 • 17
Unlike the other buttons in the Function row, The Double Tracker works as an Effect
On/Off button. Specifically: If the Double Tracker button is lit, the effect is active. To
edit Double Tracker parameters, the Edit button must be pressed. If Double Tracker was
not the last effect accessed, the Double Tracker button must also be pressed.
Page 46

Basic Operations • The Effects Loop
NOTE: Double Tracker is a feature that requires a large stereo field to be effective.
The distance between the two 12” speakers in the Vetta combo may make this effect
seem subtle. Try running an extention cabinet with the Vetta combo in stereo mode.
Place the extention cabinet about six feet away fron the Vetta combo. You’ll find that
this effect is much more pronounced. The wider the stereo field, the more pronounced
the effect.
Effects Routing
Vetta has versatile routing options for the stompboxes and other effects. Even the
4 • 18
volume and wah pedals can be moved. Routing is stored with each individual channel,
so each of your sounds can have a completely different setup.
Routing Stompboxes & Pedals
Press the Effects Routing button. Turn the Page knob if necessary to get to Routing
Page 1, and the display should look something like this:
Here we see the obvious benefits of that nice graphic display. Turn the knob under
ITEM to select a stompbox or pedal to position, and the knob under POSITION to
move it. Then, as they say in the shampoo biz, repeat as necessary with the other
stompboxes and pedals. That’s it, you’re done setting up your stompboxes and pedals.
Routing Post Effects
Vetta allows for complete control over the routing of the post effects. You can change
the order of the effects, the signal flow (series, parallel or chain) and even the
physical output assignment of the effects. On the bottom of Effect Routing page 2,
there are three parameters called ITEM, POSITION and ROUTE.
ITEM allows you to choose which of the five effects blocks you want to edit.
POSITION allows you to put the selected effect block anywhere in the post effect
chain.
ROUTE allows you to choose series, parallel or chain.
Page 47

Series Routing
All the effects in this example are routed in series:
Basic Operations • The Effects Loop
Series means that an effect in the chain gets the full output of the previous effect, so
that your reverb, for example, is applied to both your amp signal and the effected
signal coming from the delay and modulation effects that are in front of it.
This is exactly like simply connecting together a bunch of stompboxes. Every
stompbox gets its output from the previous stompbox, so that whatever the previous
stompbox does determines what the next stompbox will have to work with. If the first
box adds lots of distortion to the signal, all the rest of the boxes get that distortion fed
into them, too. This works great for stompboxes and many other effects, but there are
times you want to keep a previous effect from determining what a later one will have
to work with. Which leads us to....
Parallel Routing
For instance:
Notice the lines in the signal flow diagram. As they show, each one of the effects is
getting its input directly from the beginning of the signal chain, rather than from the
previous effect. This is what ‘parallel’ means: the input for a particular effect is
parallel to the others, with parallel here meaning that the input is independent from
the other effects and happens at the same time as they are getting their inputs. In this
example all the effects happen to be parallel, so every one of them is getting its input
“direct from the source” rather than from the previous effect.
4 • 19
Page 48

Basic Operations • The Effects Loop
To understand what this means, let’s compare what happens if you take a simple
example of two effects, chorus and delay, running in series versus parallel:
If the chorus comes first and then the delay, and you’ve routed them in series, this
means that what the delay effect does its processing on is the output of the chorus
effect. So when you play a note, you hear a chorused version of it, followed by a
delayed repeat of that chorused signal.
On the other hand, let’s look what happens if the delay is routed in parallel. This
4 • 20
means that the delay gets its input independently of the chorus, so what it’s
processing is the non-chorused version of the signal. Play a note, and what you’ll
hear is chorused guitar, followed by a non-chorused delayed version.
In the example below both LOOP and DELAY are routed in parallel. The DELAY
output is running parallel so the VERB is not getting any input signal from the
delay. The VERB is getting the same pitch-shifted, modulated signal as the DELAY
is. If we don’t want the signal feeding the DELAY to first be pitch shifted and
modulated, we must move the position of the DELAY before those effects.
To move the DELAY block use the soft knob below ITEM to select DELAY. Then
use the soft knob below POSITION to move the DELAY block before PITCH.
Now in this example, both the inputs and outputs of LOOP and DELAY are in
parallel. PITCH, MOD and VERB are all in series. This is unparalleled signal
routing power! (Cheesy pun intended.)
Page 49

Basic Operations • The Effects Loop
Chain Routing
OK, so now that you’ve got the hang of Series and Parallel, let’s get fancy.
Once again, a picture’s worth a thousand words. As this example display shows, the
Loop, Pitch and Mod effects are in series, with each one receiving its signal from the
previous effect. Notice the difference between the inputs of the Delay effect, which is
parallel, and the Reverb. The Delay is getting its input from the main signal flow,
whereas the Reverb, which is routed as a Chain effect, is getting its input directly
from the Delay.
Chain routing means that the wet signal, and only the wet signal, of the previous effect
is fed to the input of the following effect. This is different from Series, where both dry
and wet signals are fed through from the previous effect.
So, what’s it for? In this example, since Reverb is routed as a Chain effect, it’s getting
its input from the wet signal of the delay only. Assume all the other effects (Loop,
Pitch, Mod) are turned off and you’ve got the Mix for the Delay set to 50%. When
you play a note, you’ll first hear it without reverb, and then you’ll hear a delayed
version of it with reverb. If the Reverb was instead routed in parallel, you’d hear
Reverb when you first played the note, but you wouldn’t hear any Reverb on the
delayed signal at all. And, of course, if Delay and Reverb were routed in Series, then
you’d hear Reverb on both the direct signal passing through the delay effect, and on
the delayed wet signal coming out of the delay.
All these configurations are built up from three ways that an individual effect “block”
can be connected to the other effects around it. These three ways are called Series,
Parallel and Chain.
4 • 21
Assigning post effects to the Wide outputs
Wide mode is used when you wish to seperate your amp tone and your effect sounds
by running the effect signal to seperate power amps and speakers. (see page 4•34 for
details on turning Wide mode on or off.) You can assign any or all of your post effects
Page 50

Basic Operations • The Effects Loop
to the wide outputs. These assignments are made on page 4 of the Effects Routing
page. Use the soft knob below ITEM to select an effect block and then use the soft
knob below OUTPUT to assign the effect to either the MAIN or WIDE outputs.
4 • 22
You can also assign post effects to the wide outputs within the parameters of the
individual post effects. Changes made in either area are reflected in the other.
The Wide outputs will only function if the Wide mode parameter is set to ON in
page 2 of the Output Setup screen.
A Few Words About Effects Panning
The Pitch Shift, Mod and Delay effects sum to mono the signals that are sent to them
for processing, and the PAN knob on the last page of all these effects lets you
determine how much of the effect’s output then goes left, and how much goes right.
The stereo placement of the amps and other effects isn’t disturbed by these effects’
mono summing when you route the effects in parallel or chain (which is one of the
advantages of these routing setups), but routing Pitch Shift, Mod or Delay as Series
Page 51

Basic Operations • The Effects Loop
effects will cancel your previous effects’ panning. (For the technically-minded members
of our audience: since the effects’ outputs are stereo, the PAN control is, strictly
speaking, a balance control rather than a pan, but “Effects Output Balance” was a
little bit too much text to fit on the screen, “Out Bal” fit but was confusing, and we
figured “Pan” was gonna get the job done just fine.)
To take an illustrative example, let’s say you’re using one of the simple all-series
routing setups, and you want to have two amps running, with Amp 1 panned hard
left, Amp 2 panned hard right, and Reverb on Amp 2 only. Assuming that you’ve set
your amp panning as described on page 4•3, all you’ll need to do is press the Edit
button to get it lit, press the Reverb button if the Reverb settings aren’t already
shown on the display, and turn the Page knob to select the last page for the Reverb.
AMP1/L IN should be set to zero, and AMP2/R IN should be turned up. Grab the
knob below the label PAN and spin it to set the knob graphic on the display all the
way right. Spin back to the first page of the Reverb and make sure the knob below
MIX is turned up to give you some ‘verb, and that the Global Control for Reverb isn’t
turned off. Press the Edit button to turn its light off, check to make sure that Amp 1,
Amp 2 and Reverb are all on, and you should be hearing Amp 1 coming out reverbfree on the left and Amp 2 coming out reverb-ified on the right.
Also be sure to check out ‘Stupid Effects Tricks’ on page 8•9 for more panning fun.
Setting the Volume Pedal’s Minimum Volume
Page 4 of Effects Routing gives you the option to set a minimum value for the
Volume Pedal. If you set the Volume Pedal to the first possible position, at the
beginning of the signal flow, or the last possible position, at the very end (see
page 4•18), Routing Page 4 looks a whole lot like:
4 • 23
This minimum value determines how much volume you’ll hear when the volume
pedal is at the heel position. The heel position normally turns the volume off (a
setting of 0% for the MIN value), but you may find it preferable to set it so the heel
position is not all the way off. This comes in handy, for instance, when you want to
Page 52

Basic Operations • Saving
use the volume pedal to easily move between preset levels for you rhythm and lead
volume. To adjust the Volume Pedal minimum setting, just spin the knob below the
word MIN.
When you were routing those stompboxes (Gosh, remember those good times? They
seem like only a few pages ago... page 4•18 to be exact), if you happened to place the
volume pedal anywhere other than the first or last possible position, you’ll notice that
you have a few of extra options here:
4 • 24
Well, look at that! You can assign minimum values for each amp independently.
And, if you’re really crazy, the knobs below AMP 1 VOL and AMP 2 VOL allow you
to turn the volume pedal on and off for each amp independently, as well as reverse
the pedal action. When set to Reverse, the volume pedal will act backwards on that
particular amp, so that when the pedal is at its ‘toe-down’ position, the amp will be at
its minimum setting, and you’ll get maximum volume at the ‘heel-back’ position of
the volume pedal. This last feature is very handy for performing live cross fades
between the two amps stored in a channel. Set AMP 1 VOL to On, for instance, and
AMP 2 VOL to Reverse. Now you can pedal the blend of the two amps from all Amp
1 (toe-down on the volume pedal) to all Amp 2 (heel-back) and anywhere in
between.
Saving
Once you’ve got that tone-to-die-for all dialed in, you’re naturally going to want to
store it somewhere so that you can revisit it again and again, if only to be able to tell
yourself, “Wowsers, I sure am clever, aren’t I?” Since we believe that self-affirmation is
a good thing, we’ve provided you with a number of different ways in which you can
store and revisit your incredibly responsive and toneful sound. All of this magic starts
with pressing the Save button. As an added convenience (and as a nice sort of nagging
you so you don’t forget to save that sound you spent half an hour on) the Save button
even lights up whenever you adjust the settings of the current channel, to let you know
that you’ve done something that you might want to think about saving.
Page 53

Basic Operations • Saving
Saving a Channel
This whole party kicks off by pressing that ol’ Save button, at which point your display
should look something like this:
If you simply want to overwrite the channel you’re currently using, leaving the name
the same, all you have to do is hit Save a second time. Vetta defaults to saving the
channel with the same name, and in the same location. The only exception is when
you’re using a Factory channel. In this case, Vetta will pick the corresponding User
channel as the destination. The Factory and User memory areas have the same
information in them when your Vetta ships out from Line 6, so if you haven’t been
filling up the User channels with all your own creations, this should work great.
Selecting a Channel To Save To
If, on the other hand, you don’t want to overwrite the channel you started with, and
you want to save this channel somewhere else, just turn the knob below the word
DESTINATION and choose the channel where you want to save your new sound.
The display also shows you the name currently stored in that destination channel.
When you get to the channel you want to replace, you’re probably going to want to
set a new name for what you’re about to save, so...
Naming a Channel
You’ll notice the labels POSITION and CHARACTER above the right two knobs.
POSITION selects one of the 16 characters of the name, and the CHARACTER sets
the chosen character.
4 • 25
Page 54

Basic Operations • Saving
Finishing the Save Operation
Once you’ve chosen where you want to save your sound, and given it a name, there’s
only one more step. Just press the Save button, and Vetta will write your sound to the
channel you’ve chosen. Now, every time you want to relive the thrill and excitement
of your new sound, just call up that channel. Who says you can’t go home again?
Setting Your Favorite Channel
When you finally find one of Vetta’s sounds that typifies your unique abilities as a
guitar stylist, or just one that you really like and think that you might use a whole lot,
4 • 26
you can store it as your favorite channel. Once you do this, every time you press the
Favorite Channel button on Vetta or Favorite Channel switch on the FBV, your
favorite of all sounds will be at your fingertips. Favorite Channel acts like a TV remote
control’s “Last Channel” button, so that pressing it a second time will take you back to
the Channel you were in before you switched to your Favorite Channel.
Note that Favorite Channel is not an additional channel. It’s just a pointer to one of
the regular Factory or User channels. This makes it very easy if, fickle guitarist that you
are, you suddenly decide that something else is your favorite. You just point Favorite
Channel at something else, but you don’t have to dump your previous favorite out of
the amp. Kinda like staying on speaking terms with your ex.
So, how do you tell Vetta which is your Favorite Channel? Just select that channel,
press Save, press Favorite, and Press Save a second time. You can also select Page 2 of
Save to do the same thing. If, by chance, you’ve made some alterations to the current
channel that you haven’t saved yet, Vetta will prompt you to save these first, since you
presumably want those to be part of what makes this your favorite.
Saving Model Default Settings
You’ve probably got old stompboxes around that you haven’t moved the knobs on in
years, even if you use them all the time. Like all of us, there are certain things you come
back to time and time again, and it’s nice to be able to get them quickly and easily
when you want them. That’s why Vetta lets you customize the default settings of every
amp model and most of the effects. This way, when you pull one of these things out of
Vetta’s digital gig bag, it’s ready to go, just the way you like it.
Page 55

Basic Operations • Saving
As with everything else in this section, the magic starts when you press the Save
button. Then turn the Page knob to this page:
If you want to save your current amp settings as the default for the amp model you’re
using (which means that every time you select that amp model from the Amp Model
knob, these are the settings that will automatically come up), just press Save a second
time. If you play with the knob under the label MODEL, you’ll notice that you can save
defaults for stompboxes and most of the effects, as well. Spend a while doing this, and
by the time you’re finished, your Vetta can be uniquely yours, tuned in to your special
personality and your guitars, the unique embodiment of all you are and all you can be.
OK, so we’re overstating the point, but it is cool, isn’t it?
Backing Up Your Channel Memories
If you’re spending any time at all making your own sounds, it’s a very good idea to back
them up. This way, if your Vetta is stolen by space aliens on their own quest for
advanced tone technology, you’ll be able to get another one from us to restore your
sounds to.
So, how to get a copy of the information that’s stored in your Vetta? Vetta’s MIDI
connections and a computer with MIDI librarian, sequencer, or MIDI sysex utility
software do the trick. If you don’t have a computer, a hardware MIDI sequencer or
MIDI filer can do the same. We’ll give you the basic rundown on what to do here, but
you’ll also have to read the instructions that come with whichever MIDI thingy you’re
using (we can’t take all the hassle out of life, but we can at least give you great tone to
express your frustrations with when you meet it).
4 • 27
Page 56
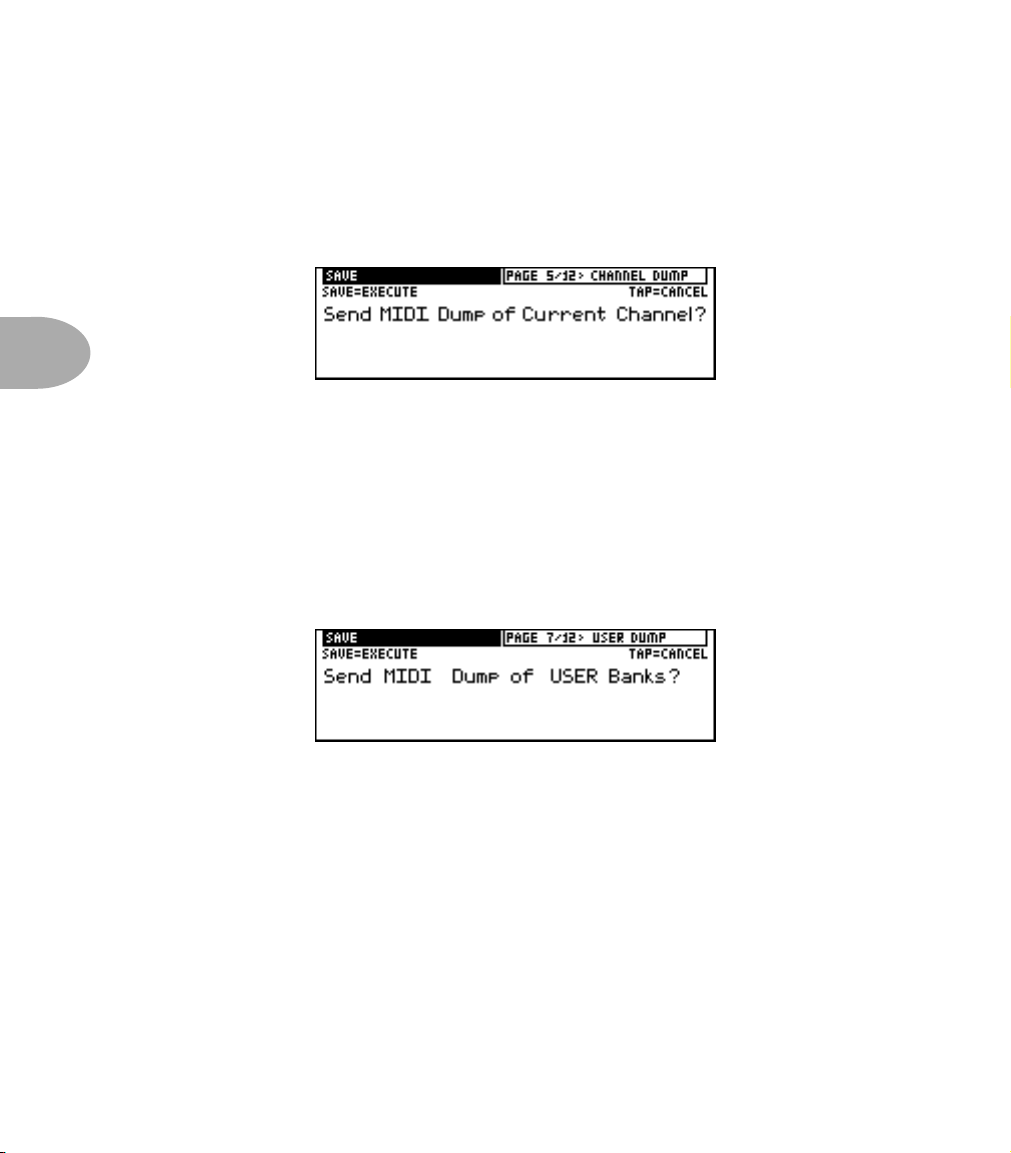
Basic Operations • Saving
Backing Up a Single Channel
One way to build your personal MIDI-based library of sounds is to save them
individually, so each backup file can have its own name. Hook Vetta’s MIDI out to
your MIDI device’s MIDI in, and set the MIDI device or program to receive a sysex
dump. Then press Vetta’s Save button, and turn the Page knob to this page:
4 • 28
Once you’re there, press Save a second time. The display will say “Sending MIDI
Sysex”, and when it finishes, do whatever your MIDI setup needs you to do to save the
dump to disk (or wherever it stores its data).
Backing Up The User Bank
If you want to backup the whole User bank, that’s easy too. As before, connect Vetta’s
MIDI Out to your other MIDI device’s MIDI In. Set your MIDI utility to receive a
sysex dump and press Vetta’s Save button. Then turn the Page knob to this page:
Press Save a second time, and you’ll see the familiar “Sending MIDI Sysex” message.
Once it’s done, you’ll of course need to be sure that the dump you sent was properly
received and saved on your MIDI setup, and you can rest assured in the knowledge that
you precious data is now safely backed up.
Things to Know About Vetta’s Memory
Vetta actually has two sections of memory for its channels. In addition to the memory
that you save to when you hit the Save button, Vetta keeps a separate internal,
compressed backup of the channel data. Each time you hit the Save button, you’re
Page 57

Basic Operations • Saving
saving to the expanded memory, while the compressed, internal backup is kept in its
original state. This compressed memory comes in handy if you should ever decide that
you want to get rid of all the new stuff you’ve made and get back where you started from
(which we’ll describe how to do in the next section).
It’s important to know this because, in order to receive a whole block of channels via
MIDI, Vetta has to use the memory space that it normally uses for the compressed
backup. It has to erase this compressed backup, and then it can receive the block of
channels that you’re dumping in from MIDI. When it does this, you’ll lose Vetta’s
internal copy of its original User sounds. But since we build Vetta with an identical
copy of channels in both the User and Factory memory, you can access these sounds
from the Factory memory banks.
Restoring From Backups
What good is backing up your work if you can’t restore it? Here’s how.
Restoring a Single Channel from MIDI
In this case, you’re gonna need to connect the MIDI Out of the MIDI thingy you’ve
stored your memory on to Vetta’s MIDI In. Then do whatever you have to do to open
the file in your MIDI program or select it on your MIDI device and transmit it to
Vetta. Vetta will receive that data as if you had edited the current channel: the Save
button will be lit to indicate that you should press save if you want Vetta to store this
to an internal channel memory so it will remember it (see page 4•24 for the skinny
on saving a channel).
4 • 29
Restoring the User Banks from MIDI
Again, you’re gonna need to connect the MIDI Out of the MIDI thingy you’ve stored
your memory on to Vetta’s MIDI In. Then do whatever you have to do to open the
file in your MIDI program or select it on your MIDI device to get it ready to send.
Now press Vetta’s Save button and turn the Page knob to this page:
Page 58

Basic Operations • Saving
Now you have to clear Vetta’s internal, compressed memory backup so it has the
memory space required to receive the MIDI dump (as described on page 4•28). This
doesn’t affect the Factory memory, model defaults, or other information that Vetta
stores.
Press the Save button while this page is showing, and you’ll see a message telling you
that Vetta is clearing the memory. When it’s finished, and the message goes away,
you can then start transmitting the MIDI dump from your MIDI setup. When it
finishes transmitting, Vetta will take another few minutes to expand the data from
4 • 30
the compressed form it just received to become the format it uses internally, (you’ll
see it doing this, channel by channel) and then you’re ready to roll.
Expanding the User Bank from Internal Memory
You can instruct Vetta to expand the memory from its internal, compressed backup
(described on page 4•28) to take the place of its active, expanded memory. Vetta
does this automatically when receiving a MIDI dump as we just described. You can
also do this if you ever want to reset Vetta to use the last set of channels that you
dumped to it via MIDI. And if you’ve never dumped channels in via MIDI, you can
use this to restore Vetta to the original memory it had when it shipped from Line 6.
Just press the Save button, and spin the Page knob until you get:
Press the Save button again, and you’ll see Vetta count through the channels one by
one as the memory expands.
Altering the Factory Memory
You may have noticed, as you’ve gotten familiar with the various Save pages, that
pages are also included for Sending the Factory banks as a MIDI Dump, receiving the
Factory memory as a MIDI dump, and expanding the Factory banks from memory
(pages 6, 8, and 11 respectively). While the normal thing is for the Factory channels
to remain unaltered, in the same state as when your Vetta shipped from Line 6, it is
Page 59

Basic Operations • Saving
also possible for you to swap a different set of channels into the Factory’s banks via
MIDI. If you’re a tweaked tone fanatic, this allows you to have all 128 of your Vetta’s
channels fully customized, making it the ultimate hot rod for your personal tone trip.
To take advantage of this feature, you’ll need a MIDI program or device that lets you
assemble a whole bank of Vetta sounds. Or, if you prefer, you can set up the bank of
sounds you want right in Vetta’s own User memory. Then dump the Vetta User
memory out to your MIDI device or program, and turn around and dump the data
back to Vetta again, this time to its Factory bank—there’s no difference in the file
format between User and Factory memory. Before you do all this, you should backup
your Vetta’s original Factory memory (via MIDI) so it’s always handy in case you ever
want to re-visit your original Vetta experience.
Backing Up Your Model Default Settings
If you customize the Model Default Settings of any of your Vetta’s amp models and
effects (as described on page 4•26), you’ll want to be sure to back them up to a MIDI
program or device so you’ve still got them in case anything ever happens to your Vetta.
Once again, we start by connecting Vetta’s MIDI Out to your MIDI setup’s MIDI In,
and then you set your MIDI setup to receive a sysex dump. Press Vetta’s Save button
and turn the Page knob to this page:
4 • 31
Press the Save button a second time to do the deed. When Vetta finishes sending the
sysex dump, be sure to save the dump on your MIDI setup, and you’re done.
Restoring Your Model Default Settings
Again, you’re gonna need to connect the MIDI Out of the MIDI thingy you’ve stored
your memory on to Vetta’s MIDI In. Then do whatever you have to do to open the file
in your MIDI program or select it on your MIDI device to get it ready to send.
Now press Vetta’s Save button and turn the Page knob to this page:
Page 60

Basic Operations • Output Setup
Now you have to clear Vetta’s current Model Default memory so it has the space
required to receive the MIDI dump. Press the Save button while this page is showing,
4 • 32
and you’ll see the message “Erasing model defaults.” When it’s finished, another
message says “Ready to receive model defaults.” You can then start transmitting the
MIDI dump from your MIDI setup.
Output Setup
Vetta has a number of options that determine how the direct outs and speaker outputs
function. To access these, you start by pressing the Output Setup button, at which
point your display is magically transformed to:
If you’re familiar with Line 6’s award-winning POD, you know our first generation of
A.I.R., the revolutionary technology that made recording guitars direct sound like
recording guitars the old fashioned way (you know, stick the amp in the middle of a
room that was specially designed for recording, spend several hours fiddling with
microphone positioning, then finally record the track—that old fashioned way). Vetta
debuts A.I.R. II, the next generation (and no, we’re not going to turn it into a movie
featuring steely jawed heroes and a daffy robot, so don’t even ask us), for an even more
satisfying recording experience. A.I.R. II expands on the original by offering models of
a variety of microphone types and placements (both on and off axis).
Page 61

Basic Operations • Output Setup
A.I.R. Mode
The knob below A.I.R. MODE lets you determine whether the A.I.R. settings will be
global (all channels use the same setting) or per channel (each channel uses the
A.I.R. setting that is stored with it).
MIC Setup
This knob selects which mic type and placement you would like for the current
channel or global setup. For the full menu, see ‘A.I.R. II Mic Options’ on page 10•9.
Output
The OUTPUT parameter selects which outputs are active per channel on the Vetta.
The three choices for this parameter are Direct, Speaker or Normal. A setting of
“Direct” means only the Direct outputs are active. A setting of “Speaker” means only
the Speaker outputs are active. A setting of “Normal,” which is the default, means
that both the Direct and Speaker outputs are active. If you are performing on stage
using a Variax acoustic model, it is likely that you will only want that signal to feed
the Direct outputs and not go to the Vetta speakers. The Direct outputs would feed
the Front Of House mixer which would be amplified through the P.A system. In this
situation it is likely that you would hear your acoustic signal from stage monitors. If it
is a small show and you don’t have stage monitors, you can change this output
parameter to Normal so you can monitor your acoustic guitar sound through your
amp, while the Direct output still feeds the P.A speakers. At a small gig like this you
would probably not want your electric guitar sound to feed the P.A. system. Here you
would set the parameter for “Speaker” so your electric guitar tone only comes from
the Vetta speakers.
NOTE: Wide mode can only be set On or Off if the Output parameter is set to “Normal.”
If Wide mode is On and you set the Output parameter to Speaker or Direct, Wide mode will
turn Off. If Wide mode is turned On while the Output parameter is set to Speaker or Direct,
the Output parameter will change to Normal.
4 • 33
Page 62

Basic Operations • Output Setup
Wide Mode
You use the knob below WIDE MODE on the second Output Setup page to globally
turn Wide mode on and off. What the heck do we mean by ‘Wide’ in the first place?
Good question, and we’re awfully glad you asked.
4 • 34
Wide mode gives you the ability to run what is often referred to as wet/dry setup. When
running like this, the wet portion of post effects that have been assigned to the ‘Wide’
bus (you make this assignment from the last edit page of those effects or on Effects
Routing page 3) will be removed from the signal being sent to the speakers in your
Vetta and will only appear on the “Direct/Wide” outputs (both XLR and 1/4-inch).
You can then connect these outs to a separate power amp and speakers, keeping your
basic ‘dry’ guitar tone pumping out of Vetta while the ‘wet’ effects pump out of the
separate speakers. This can give improved definition for your basic guitar sound, even
when you lay on the ‘grease’, plus you can spread the effects cabinets wide on stage for a
truly huge stereo image.
Dir Trim
Normally, the Master Volume knob on your Vetta sets the level for the internal
speakers (and any external speakers you connect), without having any effect on your
Direct Output level. This is a good thing, for instance, when you’re playing live. It
means you can set a low master volume level for your amp on stage (maybe it’s a small
venue) while still pumping out full level at the direct outs so the house sound system is
getting plenty of juice. This is also a good thing if you’re recording in the studio, using
your amp to monitor with the other band members while your direct out is being
recorded. Once again, an appropriately low master volume level that you might want
for the amp doesn’t force you to have a low level signal going to tape.
Vetta pumps enough level out of its direct outs to light up the input meters for +4 pro
recording. For live sound systems, as well as many recording setups designed to work
with lower levels, this can sometimes be overkill. The DIR TRIM knob lets you roll
back the Direct Out level, and keep your sound guy or lower level recording system
happy.
Page 63

Basic Operations • Output Setup
You may have noticed that we said the Master Volume doesn’t affect the Direct Output
level normally. It does, however, affect the Direct Output level if you turn the speakers
off (see the next page) or plug in headphones. In this scenario, since you’re only
listening to the Direct Outs and headphones, we make the Master Volume knob now
adjust both of these levels. When this is happening, the Dir Trim setting is ignored.
Just for completeness, we should also mention that the Master Volume knob also affects
the Direct Output levels if you’re running in Wide Mode.
Speakers On/Off
The second page available from the Outputs Setup button lets you globally turn the
speakers (both internal and any external cabinets you might be running) on and off, as
you may want to do when recording direct, or even for running direct-only for a live
setup. Although the speakers can be turned off on a per channel basis on Page 1’s
OUTPUT setting, turning off the speakers with the SPEAKERS control is the easy way
to turn off the speakers for all Channels at once.
4 • 35
When you’ve turned the SPEAKERS off, the Master Volume control sets the level for
the direct outs. Plugging headphones into the Vetta combo also turns off the speakers.
Mono/Stereo
This page also lets you choose to operate your Vetta in mono or stereo. This is generally
most valuable on the Vetta HD in case you’re using a mono setup, but feel free to
mono-ize your combo if that’s what makes you happy.
Page 64
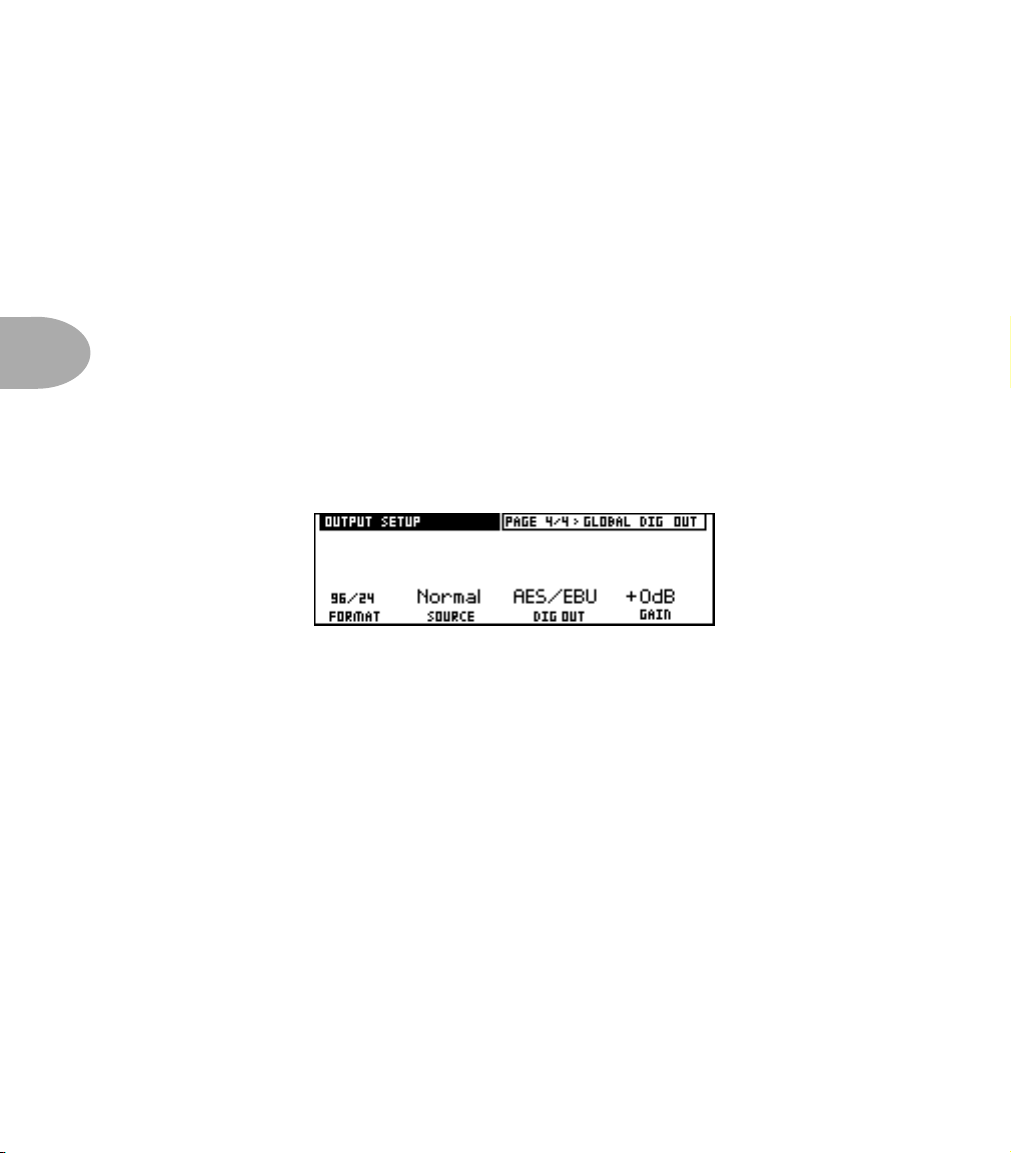
Basic Operations • Output Setup
Speaker Configuration
The CONFIG control tunes the output of the Vetta to match the type of cabinet(s)
you are using. The Vetta Combo leaves the factory set to 2x12; change this setting to
4x12 if you want to use 4x12 cabinets. The Vetta HD leaves the factory set to 4x12;
change this setting to 2x12 if you you want to use 2x12 cabinets. If you are using some
mix of 2x12, 4x12, or other cabinets, select 4x12.
Digital outputs
The FORMAT parameter is where you set the bit depth and sample rate coming from
4 • 36
the Vetta. Use the soft knob under FORMAT to change this parameter. You have the
choice of 16, 20 or 24 bit resolution as well as sample rates of 44.1, 48, 88.2 and 96kHz.
Vetta can also be set to MATCH the bit depth and sample rate of the signal at the
digital input. This allows you to decide the best word clock scenario for your setup.
The SOURCE of digital output can be set to NORMAL, DRY or LOOP.
A setting of NORMAL mirrors the direct outputs. Don’t forget that when WIDE mode
is active, only signals assigned to the wide outputs are sent to the physical direct
outputs. As the NORMAL setting for the digital output mirrors the direct outputs, the
signals assigned to the wide outputs would also feed the digital outputs.
A setting of DRY sends a completely dry, unprocessed instrument signal to the digital
output. This can be useful for Re-amping. (For more info on Re-amping see ‘Advanced
functions of the digital I/O’ on page 4•41)
A setting of LOOP is used when you wish to connect to an external effect processor
digitally. In this mode, the Digital inputs and outputs replace the analog effects loop on
the rear panel.
Page 65

Basic Operations • Foot Control
The DIG OUT parameter allows you to choose the digital format that is sent from both
the AES/EBU and S/PDIF digital output. Although the AES/EBU and S/PDIF formats
are similar, there are differences in the use of some of the non-audio information. This
parameter assures compatibility with other digital devices that might use these extra
bits.
The final parameter is GAIN. This allows you to boost the gain of the digital output
signal up as far as +12dB in 1dB increments.
Foot Control
As the chapter ‘Using FBV Foot Controllers’ on page 9•1 relates in detail, options for
the optional FBV foot controller can be set from the Vetta Foot Control button:
On the first page, you can choose to have the FBV pedals control wah and volume, or
act as expression pedals (more on that in the next paragraph). You also have three
different styles of volume pedals to choose from: Linear, Log and Double Log.
With a LINEAR setting, the volume pedal has a fast rise and reacts very quickly. This
can be handy when using the pedal for a “volume swell” effect. This is also the best
choice when the Volume Pedal is placed after the amps.
With a LOG setting the volume pedal has a little more play room between the heel and
toe position. If you feel that the Linear setting goes from 0 to 100% too quickly, the Log
setting should remedy this for you.
With DOUBLE LOG, the volume pedal reacts a little slowly. It is similar to LOG but
has twice the amount of play room in between the heel and toe postion. With this style
of volume pedal in front of a “high gain” amp setting, the heel position will be OFF and
then slowly move from a very light distortion to the full on high gain setting at the toe
position. Try all three settings and see what feels best to you. Remember that you can
change this setting per channel onVetta.
4 • 37
Page 66

Basic Operations • Foot Control
The Mod Switch parameter sets the Mod switch on the FBV to control Pitch Shift or
Mod, as these two effects cannot be used simultaneously.
4 • 38
The second and third pages of Foot Control (we’re only showing you page 2 here; page
3 works just like it) let you set what the pedals will control if you’re not using them for
Volume or Wah:
The knob below DEST sets the destination for the pedal. In other words, this is the
thing that the pedal is going to control.
The knob below DEPTH sets the percentage of change to be controlled by the pedal
(more on that in a moment).
The knob below RESPONSE lets you select “Contin” (which would be “Continuous”
if we had the space) or “Switch.” Continuous is what you normally expect from a
pedal, smoothly adjusting from one extreme to another. Switch gives you a hard
switchover from one setting at the heel-back position to another at the toe-down.
To understand how this works from a mathematical perspective (just skip to the next
paragraph if you think math is as much fun as a trip to the dentist), let’s say that the
destination parameter is the mix of an effect, which you’ve got saved in this channel
with a setting of 20%. With the pedal at its heel-back position, this mix is unchanged
at 20%. Now if you set your DEPTH here to 50%, this means the pedal is going to
increase your mix setting 50% of the way from what’s stored in the channel (20%) to
the maximum possible mix value (100%). A quick bit of mathematical calculation
(20 + .5 x [100-20] = 60) reveals that this means 60% mix at the toe-down position.
But who needs math? Just set the pedal to the heel-back position, light up the Edit
button and adjust the effect parameter that you’re targeting so that it sounds the way
you want it to when the pedal is at this heel-back position. Then press the Foot Pedal
Page 67

Basic Operations • System Setup
button to get back here, step on the gas to ram the pedal to the toe-down position,
turn the knob below DEPTH ’til you like what you hear, and you’re golden. Now if
only doing your taxes could be so easy!
System Setup
System Setup lets you set up, you know, system type stuff. Press the System button for
this first page:
Display
Human beings come in a variety of shapes and sizes. That kind of variety is good, but it
also means that everybody views the display of their Vetta from a different angle.
Adjusting a display’s contrast makes it more or less readable at different angles. Turn
the knob below L CONTRAST to adjust the contrast of Vetta’s left display (where the
names of the channels are shown). The knob below R CONTRAST lets you dial in
your view of the right display, where this System Setup page is shown. If your Vetta has
been on for a long period of time and the displays start to look washed out, turn the LTEMP and/or the R-TEMP Temperature parameters to ON and readjust the
CONTRAST controls to taste. This will help compensate for wide temperature
variations and bring the displays back in to focus.
4 • 39
Input Select
Page 2 of the System setup allows you to control your Vetta inputs. Each of the inputs
can be independantly turned on or off, allowing for the mixing of multiple inputs.
Page 68

Basic Operations • System Setup
The VARIAX control turns the rear panel Variax In on or off.
The DIGITAL parameter allows you to pick the left, right or stereo input of the S/PDIF
or AES/EBU signal as an input.
The ANALOG parameter refers to the standard guitar input. You can leave both the
VARIAX and the ANALOG inputs turned on. If you’re performing on stage you can
have a regular electric guitar plugged in to the analog input and your Variax plugged in
digitally. Simply leave the volume knob turned down on the instrument you’re not
4 • 40
using at the time.
Spin the Page knob, and feast your eyes on System Setup page three:
Power Mode
Sometimes, too much power can really be too much. When playing in a bedroom or at
a small rehearsal, Vetta’s power ability can make it difficult to play softly! By setting the
POWER mode to Half, setting soft volumes on the Master Volume becomes more
manageable.
Channel Select Mode
There are two Channel Select modes for Vetta: Immediate and Deferred. take your pick
by twisting that little knob below the label CHAN SEL:
Instant Mode
Instant mode is for today’s no-nonsense, gotta- have-it-now crowd. When in
Instant mode, Channels are loaded as you dial through them from the Select knob
on the amp.
Deferred Mode
When you’re in Deferred mode, spinning the knob next to Vetta’s smaller display
lets you see the names and numbers for each channel, without having the channels
actually load. The display will be flashing. When you find the sound you want,
Page 69
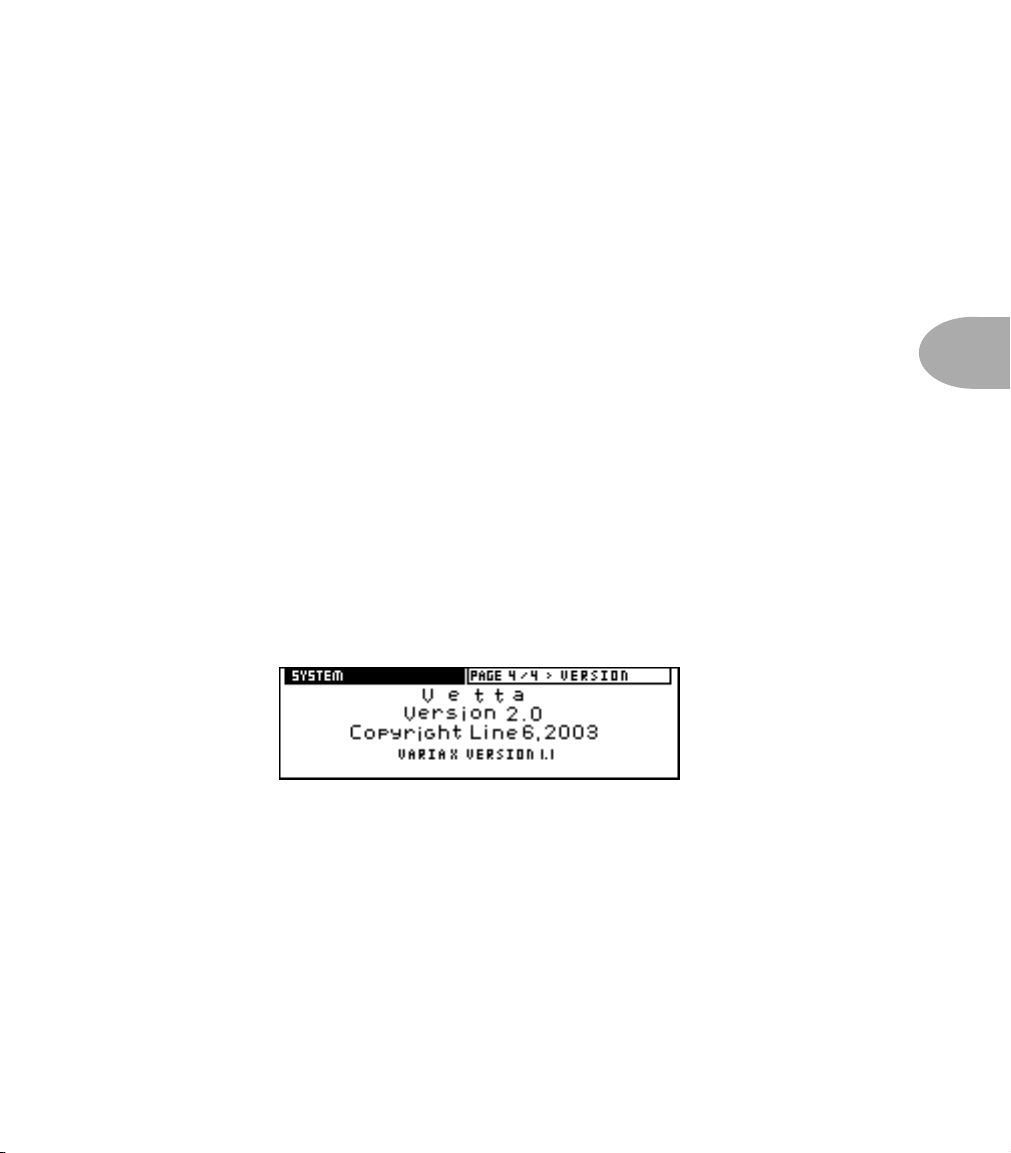
Basic Operations • System Setup
press the A, B, C, or D button that corresponds to the channel in that bank (so if
you’re looking at the display flashing “11C The Big Finale,” which is the channel
you want, press C to load it.).
The FBV always operates in Deferred Mode: Bank Up and Bank Down move up
and down a bank at a time, and the display flashes the name of the channel you’ve
banked up or down to. When you’re in the bank that you want, stomp on A, B, C,
or D to load the corresponding channel.
MIDI Channel
Here’s where you set which MIDI Channel (1-16) Vetta will use to communicate with
other MIDI devices.
Knob Action
We talked a little bit earlier about the two different ways that the knobs on Vetta can
work (see ‘Absolutely Relative’ on page 4•4). Here’s where you set which way your
Vetta will respond to your knob tweaking.
Software Version
Page 4 of System Setup shows you which version of software your Vetta is running. If
you have a Variax connected digitally to the Vetta, your current Variax software
version will be displayed as well.
Advanced functions of the digital I/O
Using the digital I/O, Vetta can be used as an outboard digital effects processor. You
can hook it up to your digital mixing console or your DAW. Simply assign an aux send
to an S/PDIF or AES/EBU digital output and plug that in to a Vetta digital input. Then
plug the digital output of the Vetta into one of the digital inputs on your digital mixer
or DAW and assign that digital input to a pair of channels or effect returns.
4 • 41
Page 70

Basic Operations • System Setup
The digital input enters the signal path right at the beginning just like the guitar input.
So you can add cool stomp effects like the synth/filters. Try running a vocal track
through one of the synth/filter stomps for a crazy effect! You can run a drum loop
through two of the 75 amp models. Pan one amp to the left and one amp to the right to
get a really cool, dirty drum sound. Take advantage of the reverb, chorus and delays for
keyboard parts. The possibilities are endless. Not only is the Vetta an amazing guitar
amplifier, it can also be an amazing studio tool.
NOTE: These are the proper settings to use Vetta as a digital effects processor as described
4 • 42
above: On page 4 of Output Setup, the SOURCE needs to be set to “normal”, FORMAT
needs to be set to MATCH if your DAW or Digital mixer’s clock is set to internal (AES/EBU
or S/PDIF depending on which interface you’re using) and DIG OUT needs to be set properly
to AES/EBU or S/PDIF. Then the DIGITAL input on page 2 of System must be set to match
the digital ouput on page 4 of Output Setup.
The same settings can be used for “re-amping.” This is where you record the dry
instrument signal to a track rather then recording the sound of the amplifier. During
mixdown you can find an amp tone that really fits the mix. The benefit is that you are
not locked in to one sound. This also allows you to change the sound at any point in
the song. Because Vetta responds to MIDI program changes, you can actually have a
sequencer change the Vetta presets at just the right times in the song. Vetta allows you
to send your “dry” instrument sound to the digital output for recording while you listen
to the sound of your amp. Simply set SOURCE to “dry” on page 4 of Output Setup.
This page also has a digital gain control so you can boost the digital output signal as
much as +12dB. Keep in mind that if you boost the output level that is being recorded,
a hotter signal will play back when you get to re-amping, thus driving the input of the
amp harder, causing a more distorted amp tone.
Page 71

Basic Operations • Running External Speakers with Vetta Combo
Running External Speakers with Vetta Combo
The Vetta combo has two different options for running external speaker cabinets, and
the optional Vetta 212S Extension Cab works beautifully with either one (hint, hint).
Remember that Vetta can get loud, and you’ll want whatever extension cabinet you use
to be able to handle at least 80 watts per side. If you have a stereo speaker cabinet with
an impedance of no less than 8 ohms per side, we suggest that you connect it to Vetta
like so:
SPEAKER OUTPUTS - NORMAL MODE: VETTA COMBO = STEREO, EXTERNAL CABS = STEREO
SPEAKER OUTPUTS - SPLIT STEREO MODE: VETTA COMBO = LEFT, EXTERNAL CAB = RIGHT
CLASS 2 WIRING
Right
N222
STEREO - 8
USE BOTH JACKS
80 WATTS MAX PER SPEAKER
8 OHMS EACH
4 OHMS
Left
External CabNot Used
LEFTRIGHT
MONO - 4
THIS JACK ONLY
160 WATTS TOTAL MONO
With this setup, you can set the split switch to either Normal or Split Stereo mode
(controlled by the slide switch between the two speaker out jacks). When the rear
panel switch is set to ‘Normal’ mode, the Left and Right speaker outs feed your
external speakers the same thing that Vetta’s own left and right speakers get (Vetta’s
speakers work at the same time as the external ones that you connect). You’ll
probably want to run this way if you stack Vetta with a second stereo cabinet, or you
want to flank it with separate left and right cabs, or you just want to get a bigger setup
going without having your stereo separated hard left and right.
4 • 43
When the switch is set to ‘Split Stereo’ mode, the external cabinet(s) will carry only
Vetta’s right channel, while the internal Vetta speakers will carry the left channel.
This is the mode to use if you want to set up with the largest possible stereo image by
running the external cabinet on the other side of the stage (besides, you really want
Page 72

Basic Operations • Running External Speakers with Vetta Combo
the bass player to hear your brilliant solo). It’s also great when you’re using Vetta’s 2
Amps at Once feature with the amps panned hard left and right, since your rig then
behaves just like two independent amps, each with its own cabinet.
When you’re running like this, make sure that your external speakers are running at
8 ohms per channel (or greater, in which case everything will still work, but they’ll be
quieter than at 8 ohms). Don’t run lower than 8 ohms per channel or you’ll overheat
your Vetta and its thermal protection circuit will kick in and shut off the power amps
(so you lose your sound).
4 • 44
If, on the other hand, you have a mono speaker cabinet with a minimum impedance
of 4 ohms, you should hook it up like this.
N222
STEREO - 8
USE BOTH JACKS
80 WATTS MAX PER SPEAKER
CLASS 2 WIRING
8 OHMS EACH
4 OHMS
LeftRight
External CabNot Used
LEFTRIGHT
MONO - 4
THIS JACK ONLY
160 WATTS TOTAL MONO
SPEAKER OUTPUTS - NORMAL MODE: VETTA COMBO = STEREO, EXTERNAL CABS = STEREO
SPEAKER OUTPUTS - SPLIT STEREO MODE: VETTA COMBO = LEFT, EXTERNAL CAB = RIGHT
With this wiring, you can only use Vetta’s Split mode. You can, of course, run an
8 ohm or greater cabinet wired like this, but we can’t guarantee that you’ll get the
best balance of level between the amp and extension cab because Vetta’s left and
right power amps will be loaded unevenly. You’ll run into the same uneven loading
problem if you try and run an 8 ohm cabinet wired like this in Normal mode.
Regardless of which setting you choose for the external speaker outs, for the ultimate
in cabling flexibility and simplicity, we suggest that if you are using a Vetta 212S
Extension Cab, you always hook up two cables, one from Vetta’s left speaker output
Page 73

Basic Operations • Running External Speakers with Vetta HD
to the 212S left input, and one from Vetta’s right speaker output to the 212S right
input. Hooking up both cables makes connecting the external speaker cabinet a nobrainer no matter which setting you happen to have going, and it means you can
switch anytime without re-cabling.
No matter how you hook up your external cabinets, make sure that you use cables
specifically made for speaker connections. Avoid using shielded cables (like guitar
cables), since their small wire gauge can limit the amount of power transmitted to the
speakers and keep your audience from hearing every note.
Oh yeah, one more thing. If no external speakers are connected to your Vetta, the
Normal/Split Stereo mode switch will have no effect at all, so you don’t have to
worry about changing it if you unplug your cab.
Running External Speakers with Vetta HD
If you’re the proud owner of a Vetta HD, this information is just for you. In addition to
placing a multitude of amp models, stompbox models, and post effects at your disposal,
the Vetta HD also offers the flexibility and power to drive a wide variety of speaker
cabinets. The type and number of speaker cabinets you choose is up to you, and will
probably depend on your performing situation: some gigs require the focused growl and
grind of a closed back 4x12, while other gigs work better with the classic sound of an
open back 2x12. The Vetta HD can handle either alternative with equal aplomb.
4 • 45
Speaker Cabinet Basics
Be sure to turn the amplifier off when connecting or disconnecting speaker cables and
cabinets. (This protects both the amplifier and the speakers.)
Use only heavy gauge, unshielded cables for hooking up speaker cabinets. (Do not use
standard guitar cables to connect your speaker cabinets, as they will degrade your
sound.)
Take a Load Off
While you would never want to operate a tube amplifier without a load (that means
without speakers attached), operating the Vetta HD without a load is OK! You do not
need to have speakers connected to the amplifier in order to use the balanced Direct
Outputs. Fortunately, you can always simply deactivate the speaker outputs from the
Output Setup edit pages to avoid having to disconnect the speakers.
Page 74

Basic Operations • Running External Speakers with Vetta HD
Volume Levels
Exercise some common sense about volume levels. The Vetta HD can drive four 4x12
cabinets with power to spare, so it’s got enough juice to fry the speakers of most setups if
you really tried. If you see the speakers practically jump out through the speaker grille,
back off on the Vetta HD’s Master Volume a wee bit to get things back into the realm
of reasonable operational levels. Also understand that Line 6 cannot be liable for
replacement of speakers damaged by abuse. So, feel free to crank it up, but do it with a
bit of sense.
4 • 46
Setting the 4/8/16 Ohm Switch
It’s important to set Vetta’s rear panel 4/8/16 OHM switch to match the impedance of
the cabinets that you are driving. You must match impedance to get the full volume
and response, and to avoid overheating and shutting down the power amplifiers.
The correct setting of the 4/8/16 OHM switch may not always be immediately obvious.
While most modern speaker cabinets (like the Line 6 4x12 and Vetta 2x12 Extension
cabinets) will clearly label their jacks with the impedance load that the speakers
present to an amplifier, some vintage cabinets don’t include impedance labeling. There
are, fortunately, some general rules of thumb that you can usually rely on:
The first thing to know is that, due to the magical nature of electricity, the impedance
load that a speaker cabinet creates depends on (1) the impedance of each speaker and
(2) whether these speakers are hooked up in series or parallel. Series means that the
speakers are wired up to the speaker jack in their cabinet so that electricity coming into
the jack from your HD flows first into one speaker, and then into the next. Parallel
means that the speakers are wired so that each has a direct connection to the jack,
giving them each a direct connection to the electrical power supplied by your HD.
Typically, 2x12 cabinets are loaded with 8 ohm speakers. If they operate in mono, their
internal wiring is generally done in parallel for a 4 ohm load. If they have a stereo
option, this splits the speakers so that each acts as an 8 ohm load.
• To use the HD with this typical 2x12 cabinet in mono, you’d set the HD’s 4/8/16
OHM switch to 4 ohms and connect only the HD’s left/mono output to the single
mono input of the cabinet.
• For stereo HD operation with this typical 2x12 cabinet, you’d set the HD’s 4/8/16
OHM switch to 8 ohms and connect cables from HD’s left output to the speaker
cabinet’s left input, and from HD’s right output to the speaker cabinet’s right input.
Page 75

Basic Operations • Running External Speakers with Vetta HD
Most 4x12 cabinets are loaded with 16 ohm speakers. When they operate in mono,
their internal wiring is generally done in a combination parallel/series configuration
that adds up to a 16 ohm load. If they have a stereo option, this configures the speakers
left/right so that each side acts as an 8 ohm load.
Line 6 4x12 cabs are loaded with 8 ohm speakers wired for a 4 or 16 ohm load when
running stereo, and either 2 or 8 ohms in mono.
If you connect two cabinets that have the same impedance to the two left jacks of HD
or the two right jacks (but not one each to left and right), that side of Vetta’s power
amp will be connected to the speakers in parallel, and the result will be an ohm load
that is one half of the impedance of one speaker cabinet alone. For instance, if two 16
ohm 4x12 cabinets are connected to the left outputs (or the right ones) of Vetta HD,
the impedance of the combined cabinet setup is 8 ohms, and you should set the Vetta
HD rear panel 4/8/16 OHM switch to 8 ohms in order to match.
Pictures are handy! See the following pages for illustrations of typical setups.
4 • 47
Page 76

Basic Operations • Running External Speakers with Vetta HD
Hooking up your Vetta HD to a single 2x12 in mono.
HD SPEAKER OUPUTS
4 OHM 8 OHM 16 OHM
4 • 48
SPEAKER OUTPUTS
CLASS 2 WIRING
Left/MonoRightRight Left/Mono
LEFTRIGHT
N222
STEREO - 8
USE BOTH JACKS
80 WATTS MAX PER SPEAKER
MONO - 4
THIS JACK ONLY
160 WATTS TOTAL MONO
Hooking up your Vetta HD to a single 2x12 in stereo.
STEREO - 8
HD SPEAKER OUPUTS
SPEAKER OUTPUTS
CLASS 2 WIRING
MONO - 4
THIS JACK ONLY
160 WATTS TOTAL MONO
Left/MonoRightRight Left/Mono
LEFTRIGHT
N222
Keep the HD’s Master
Volume below 9 o’clock
with this setup so you
don’t blow your
speakers!
4 OHM 8 OHM 16 OHM
USE BOTH JACKS
80 WATTS MAX PER SPEAKER
Page 77

Basic Operations • Running External Speakers with Vetta HD
Hooking up your Vetta HD in side by side stereo with two 2x12s
Hooking up your Vetta HD in stacked stereo with two 2x12s
4 • 49
Page 78

Basic Operations • Running External Speakers with Vetta HD
Hooking up your Vetta HD in mono with single 4x12
4 • 50
Hooking up your Vetta HD in stereo with single 4x12
Page 79

Basic Operations • Running External Speakers with Vetta HD
Hooking up your Vetta HD in side by side stereo with two 4x12s
Hooking up your Vetta HD in stacked stereo with two 4x12s
4 • 51
Page 80

Basic Operations • Vetta and MIDI
Feeling psycho? Running Vetta HD through four 4x12s
4 • 52
Vetta and MIDI
For those of you who are wondering: yes, you can use a MIDI foot controller with Vetta.
Vetta responds to MIDI program change commands as well as continuous controller
messages. See the MIDI Functions Appendix, page 10•11.
Page 81

The Amps & Cabs • General Notes About the Models
THE AMPS & CABS
General Notes About the Models
As you may know (or have guessed by now), we’re tone fanatics here at Line 6. Once
we’ve set our sights on creating a software emulation of a particular kind of amp, we go
to great lengths to be sure that we’ve gotten our hands on the very best example of this
amp that we can find to study. We will (and have) scoured the globe in search of just
the right specimen—that one, very particular amplifier that has the magic. In fact, we
pride ourselves on hand selecting each and every one of the amps and speaker cabinets
that we studied to create the software models in Vetta and all Line 6 amps and PODs.
We are also intensely mindful of the fact that, although amp model names may stay the
same over the years, the circuit designs sometimes change radically (it’s all those circuit
revisions and part substitutions that serious amp freaks are constantly arguing about).
Amps from ’57, ’62, ’65, ’67, ’75, and 2001 may all bear the same model name, yet
sometimes have totally different sound and response, and quite often a different look as
well. This may be why, over the years, the dedicated legions of amp fanatics have
developed a verbal and visual vocabulary that identifies the units that were built during
certain periods of a particular amp model’s history and thereby communicate the
uniqueness of different versions of the same model.
5 • 1
And as we all know, even two amps with the same circuit design, from the same era,
can sound radically different, just on the basis of variance in component tolerances, as
well as how the wiring harness was dressed, and maybe even what the amp assembler
had for lunch that day. Plus, there’s the fact that every amp has its own special way of
settling in over the years. And, just like people, some of them only get better with age.
That’s exactly why we went to so much trouble to find the very best examples we could
of every amp that we wanted to model for Vetta. And it’s why, when describing the
software amp models that are emulations of other amplifiers, we’ve included photos
here of the actual, individual amps that we lovingly selected, studied and measured—
so that you’ll know exactly which amp we’re talking about.
So, now that you know what’s in store, let’s take a tour of the amp models that live
inside your Vetta, and the original equipment that helped to make them possible.
Page 82

The Amps & Cabs • Line 6 Original Amp Models
Line 6 Original Amp Models
The first few dozen amp models in Vetta are inspired by our studies into the 50 year
history of guitar amplification, and the important question “What if?” Since Vetta’s
tubes and tone “circuitry” are all in software, what could we make if we started mixing
and matching the circuits, or wiring things up in new ways? The results of these
experiments range from subtle variations to never-heard-before marvels. Take a spin
through these amps and you’re sure to find some new inspiration.
1. Bypass (no amp)
OK, this one’s not technically an amp at all, so why is it here? Well, Vetta provides so
much effects versatility, we wanted to allow its processing power to be utilized without
5 • 2
having to go through an amp model at all. Since it’s not a model, there are no model
controls. The Drive, Bass, Mid, Treble and Presence knobs won’t do anything while the
Bypass model is selected. The Volume knob does still funtion as a channel volume
control, so that this model’s level can be matched with other models. The Bypass
model can be useful when processing external digital signals in a mix via the digital
inputs (S/PDIF or AES/EBU), or when you just want to experiment with the sound of
your guitar “direct.”
2. Line 6 Tube Preamp
This model is also useful for a direct sound, but includes a tube model in its circuitry.
Add more drive and the tube warmth shines through. The tone controls are active as
well for setting the tone color to taste.
3, Line 6 Variax Acoustic
One of the great features of the Variax Digital Modeling Guitar is its models of acoustic
instruments. These sounds are best appreciated through a full range monitor or P.A.,
due to its high frequency content. This amp model was created in order to allow the
Variax’s acoustic models to sound as full-range as possible through Vetta’s guitar
speakers. This can come in handy when there is no other P.A. or full-range amp
available or when you want to have some stage volume while simultaneously passing
the Variax signal to the house through Vetta’s XLR direct outputs. Keep in mind that
since this model provides a large amount of high frequency boost (to compensate for
the natural roll-off of Vetta’s guitar speakers) and that overdriving a model playing an
accoustic guitar is not usually a desired thing, this model will likely appear softer than
most of its compatriots. If you need more gain, the Drive knob can be used to add some
tube preamplification.
Page 83

The Amps & Cabs • Line 6 Original Amp Models
4. Line 6 Piezacoustic 1
Since there are plenty of other instruments that try to amplify acoustic sounds with
piezo pickups, we figured we’d create a model to help enhance these types of signals as
well. This model was tuned for use with acoustic guitars with piezos, but of course, feel
free to play your electric pickups through this model as well for some interesting
tonalities.
5. Line 6 Piezacoustic 2
This piezo-tuned model is tailored to work best with the solidbody electrics that have
piezo pickup bridges. Since these types of guitars are less susceptible to acoustic
feedback than an acoustic guitar with a pickup, we were able to accentuate more lowmids and low frequencies. As above, don’t feel any obligation to restrict yourself to
acoustic sounds for this one. Layer it with Line 6 Sparkle, for example, for a great big,
fat jazz tone.
6. Line 6 Clean
This model was based on essentially grafting the preamp and tone stack of a
JC-120 (Roland’s popular “Jazz Chorus” solid state combo) onto the poweramp and
transformer of a classic Marshall JTM-45 tube head, thereby giving you the crisp and
clear front end typical of a solid state amp, but with a rich, satisfying tube amp-style
bite as you turn it up.
7. Line 6 Super Clean
Forget what you know about how clean or how bright a guitar amplifier can go. Line 6
Super Clean goes farther, adding a lot of brightness. While this model certainly is
Clean, it has two other fun tricks up its sleeve as well: Setting the Drive knob at max
gives a really broken “small amp on 10 about to die” sound. FUN! And the bass knob
has an extreme effect when set to minimum— for sweet AM radio sounding tone.
5 • 3
Caution: Because Super Clean adds so much brightness, it generally won’t work so well
with distortion pedals, since they usually add lots of high frequencies, too. The
combination may produce unnatural artifacts—or just rip your head off. Plug an undistorted guitar in here, though, and we’re talking super happy shiny bright.
Page 84

The Amps & Cabs • Line 6 Original Amp Models
8. Line 6 Sparkle
We love tweed Fenders. We love blackface Fenders. We love ’em both so much, we can
never really decide which one we like more. Luckily, we were able to come up with the
perfect way to share the love. We took the preamp and tone stack from our model based
on the ’58 Tweed Bassman, and we wired (in the virtual world) our model of a blackface Bandmaster poweramp and transformer onto it. Voilà! Line 6 Sparkle.
9. Line 6 Super Sparkle
You know how all great amps have a certain sweet spot — a particular setting where
they sound magical — dripping with tone? Super Sparkle captures that organic vibe
with a new twist: its voiced in the clean/low gain realm where everything usually
5 • 4
sounds too clinical or too dark. Super Sparkle is an edgy tone that will sparkle and
shimmer if you treat her right. So play nice.
10. Line 6 Sparkle Clean
Need Lots of Sparkle? Need lots of clean? You’ve come to the right place. Plenty of
high end zing.
11. Line 6 Twang
Here’s the flip side of the Sparkle formula. Graft the preamp and tone stack from our
model based on a ’65 blackface Deluxe onto the poweramp and transformer based on a
‘58 Bassman. Whaddya know? It ends up being a great roots and rockabilly amp (like
we should be surprised).
12. Line 6 Bayou
Another Line 6 original model, this is the result of our quest to capture the fondly
remembered tone of a harp player blowing through a beat up old Fender Deluxe, as
heard in a roadhouse in Baton Rouge, Louisiana.
13. Line 6 Class A
One of the most satisfying tonal experiences as a guitarist is to play through an amp
that’s driven to the point where the poweramp is just starting to distort, but before it
achieves full clipping. For many players, this is the coveted ‘sweet spot’ they look for on
an amp. Because we’re not limited to physical reality when we’re creating amps in the
digital world, our goal for this one was to make an amp model that was nothing but
sweet spot. One of the great side effects is the ease of coaxing feedback out of this one.
Page 85

The Amps & Cabs • Line 6 Original Amp Models
14. Line 6 JTS-45
Since the design of early Marshalls was based on the Fender Tweed Bassman circuitry,
we wondered what it would be like if we took the preamp and tone stack based on a
JTM 45 and ran it into the power amp and transformer based on a ‘58 Tweed Bassman.
What we got was way happening, as JTS-45 will attest. Great grind and nice punch. A
tone the whole family can enjoy.
15. Line 6 Mood
And here we give you a fantasia tone, based on our memories of grunge guitar tones we
have known and loved. You can almost hear the Seattle rain tapping on a practice
room window somewhere.
16. Line 6 Purge
Like ‘80s shred guitar? Well, then, you’re gonna love Line 6 Purge. We took our model
of a Marshall JMP-1 preamp and hot-rodded it. It was hard work sticking in that digital
dual overhead cam and hooking up the virtual glasspacks, but when we were done, we
had the ultimate shred machine. Look out world, here you come.
17. Line 6 Crunch
Just like a good chef, our Sound Designers are always experimenting with new recipes.
They added a pinch of plexi, hardwired four inputs for increased gain, and then
rounded it off with a dash of Secret Sauce. The result is this model really cooks. Just
turn up the Drive and tweak to taste.
18. Line 6 Throttle
Pedal to the metal, this Line 6 original is a medium-high gain tone with a nice throaty
growl. Grab the Drive knob to give it some gas.
19. Line 6 Chemical X
Just like those secret ingredients that detergent companies used to crow about (Now!
Contains Ingredient X-27!), the Line 6 sound design guys wouldn’t tell us anything
about what the inspiration for this one was or who it might have belonged to (no matter what type of bribery we attempted). Suffice to say that it’s a very punchy hi-gain
sound that also cleans up quite nicely when you roll your volume back.
5 • 5
Page 86

The Amps & Cabs • Line 6 Original Amp Models
20. Line 6 Smash
Got an axe to grind? Dial up Smash to take it way over the top with an obscene helping
of gain. Smash delivers a tight bottom end, and a serious mid range void that’ll render
Hi-Fi, butt-kicking rhythm tone every time.
21. Line 6 Spinal Puppet
The monster truck of tone. Big, powerful, tight and fast. We studied some of the best
stock and modded Marshalls in the world to create this hybrid monster that goes way
past 11. This is all about serious amounts of gain for discerning high gain players.
22. Line 6 Fuzz
Although not technically an amp, we loved the unique tonal qualities of the classic
5 • 6
1960’s Arbiter Fuzz Face enough to base a special amp model on it. This fuzz box used
broad frequency, transistor-based clipping. The result is a buzzing kind of distortion
that has become popular again with the alternative and grunge set. Jimi Hendrix was
among the first guitarists to popularize the Fuzz Face in the States, but our model is
considerably dirtier than the tones found on “Are You Experienced.” Try playing
“Satisfaction” by the Stones, or the lead from “American Woman” by The Guess
Who. Liberal use of the Bass, Mid, and Treble controls will let you go beyond the
tones that the Fuzz Face could deliver, enabling you to discover your own unique
recipe for those elusive fuzz tones in your head. Just a note: when recording Purple
Haze, Jimi didn't even use an amp – he just went straight from a Fuzz Face to an
Orange power amp to a 4x12 cabinet. Which is the same sort of tone you find here....
23. Line 6 Chnk Chnk
The name says it all. Your gauranteed to feel your pants flapping with this model.
Plenty of low end with a tight response. This high gain model has lots of beef so start
shredding.
24. Line 6 Big Bottom
Just can’t seem to get enough bottom end out of your cabinet? Try punishing it with Big
Bottom. We crossed a Boogie Triple Rectifier with a Rivera Los Lobottom sub rig and
dialed it in for serious disembowelment. But it’s not just about the bass. A super wide
midrange control and an extra presence high midrange maintain articulation and
power throughout the tonal range of this amp.
Page 87

The Amps & Cabs • Line 6 Original Amp Models
25. Line 6 Treadplate
The original POD had a popular amp model that was our best attempt at the time to
pay homage to the Mesa Boogie Rectifier series of amplifiers. In addition to the Boogie
vibe, that model had some unique qualities that were all its own, and which we’ve
captured here. In a way, Treadplate marks the first time we’ve actually modeled another
Line 6 product! Here is an excerpt from the old POD manual to describe it: “...modeled
after a 1994 Mesa Boogie Dual Rectifier Tremoverb. You can use this Amp Model to get that
tight, high gain sound used by bands like Dream Theater or Metallica.”
26. Line 6 Lunatic
High gain with lots of high mids and no mud. Great for layering with other amps to cut
through on the high end. A wide range of top is available with the Treble and Presence
controls (maybe to the edge of lunacy).
27. Line 6 Agro
An aggressive high gain amp with a unique Mid control that will take you though the
entire gamut of tone on one knob. How did we do it? The mid knob for this model
changes the character of the distortion. When set to minimum the distortion exhibits
Fuzz pedal characteristics. When the Mid is set to noon it creates creamy modern high
gain amp tones a la Soldano. And when the Mid knob is turned up to Max it’s very
much reminiscent of that Class A Vox sound. Of course, then there are all the places in
between...
5 • 7
28. Line 6 Insane
Imagine running your Soldano SLO-100 as a preamp for your Boogie Dual Rectifier,
and you’ve got a pretty good picture of just how much sheer gain is involved in Line 6
Insane. It’s entirely possible to get completely out of control with this one, and we
heartily encourage you to do just that.
29. Line 6 Octone
Now here’s something we hope you’ll really like. What would it be like if you built a
tube-based Octave Distortion preamp for a Class A poweramp? Line 6 Octone provides
the answer. You’d get an Octave box that tracks better than anything you’ve ever used,
deals with consonant intervals with a degree of panache that just wasn’t possible before,
and kicks some major rock and roll butt!
Page 88

The Amps & Cabs • Musings on Tone Controls
Musings on Tone Controls
As we are about to present the Vetta models that were created through our meticulous
study of other manufacturers’ amplifier designs, it’s appropriate for us to make a few
remarks regarding tone controls.
As we mentioned at the beginning of this chapter, we’re more than a little obsessive
about the quality of the amps we model. And we pride ourselves on the accuracy with
which we model them, and the effort we go to in capturing the individual quirks and
idiosyncrasies that make each of the amps we study unique. On the other hand, we also
put all the software Amp Models that result from our modeling efforts into an amp with
a fixed set of tone knobs that have to serve every amplifier. What to do when Vetta’s
5 • 8
got more knobs than the original equipment we modeled (as is especially often true for
the Vetta models based on vintage amps)?
Here’s what. Once we’ve done our absolute best to re-create the tone controls of the
original equipment in our software Amp Model, if there are any knobs left over, we
make them do something useful in a way that also makes it easy to “neutralize” them
and stick to the classic tone possibilities.
Here are our rules of thumb:
1. If an amp had only a single tone control (and that will almost always be a treble roll-off)
it will be assigned to the Treble knob and the Bass and Mid knobs will become postamp EQ (rather like the EQ you’d use on a mixing board). If there was no tone control,
like on the ‘61 Tweed Champ model, all the tone controls will be post-amp.
2. If the original amp had a Presence control, the Presence knob of Vetta’s model will
operate as the original did (usually a poweramp feedback circuit). In all other cases,
Presence is a post-amp shelving tone control, and setting it to 0 disables it so you get
classic Presence-free tone.
3. All post-amp tone controls are cut/boost controls and the 12 o’clock position is
effectively a bypass or ‘flat’ setting. So if you want historical accuracy, set the knobs
that weren’t on the original straight up, and have at it with the others!
Page 89

The Amps & Cabs • 30. ‘02 Bomber X-TC: Based on a Bogner Extacy
30. ‘02 Bomber X-TC: Based on a Bogner Extacy
Reinhold Bogner was good enough to
personally select and deliver a Bogner Extacy
for use in crafting this model. Reinhold was
designing and building amplifiers long before
he left Germany in 1989 to move to Los
Angeles. Once in the US, he quickly gained
the trust of many influential players including Steve Stevens, Dann Huff, Allan
Holdsworth, Mike Landau and Steve Vai. They all sought out his skill at modifying and
custom-building their amps. Eddie Van Halen entrusted Reinhold to overhaul and
revitalize Eddie’s #1 Marshall Plexi. We hear that Eddie was pleased.
The Extacy covers a wide range of tone, and you’ll find that your Vetta’s Bomber X-TC
model lets you do much the same as you work the Drive knob, as well as your guitar’s
volume knob. On the top end, this one’ll bark like a Plexi, or you can take it down
through swampy crunch and finally arrive in the realm of lush clean tone. The Extacy is
a really versatile amp from a really great guy, and we’re pleased that he helped us model
it for your Vetta.
31. ‘02 Bomber Uber: Based on a Bogner Uberschall
Much like the Bogner Extacy, the Uberschall
dishes up serious tone for high gain players.
This is a fabulous boutique amp with a focused
high gain tone that’ll cut thought the band and
soar overhead for days.
The Uberschall has a very unique Presence control that we did our best to model here.
Unlike most presence controls that tend to shave off very high frequencies, the
Uberschall presence knob messes with the whole recipe. Mids, treble, bass and presence
will come in and out, effecting both the pre gain and post gain tonality. A tonal roller
coaster ride brought to you by one of the tube amp world’s finest designers.
All product names are trademarks of their respective owners, which are in no way associated or
affiliated with Line 6. These product names, descriptions and images are provided for the sole purpose
of identifying the specific products that were studied during Line 6’s sound model development.
5 • 9
Page 90

The Amps & Cabs • 32. ‘01 Zen Master: Based on the Budda 2001 Twinmaster
32. ‘01 Zen Master: Based on the Budda 2001 Twinmaster
This model is based on a Budda Twinmaster 2x12
combo. The Budda has a great, warm, Class A/B,
sound. The Budda philosophy is all about power
tube distortion. Simplicity is the key. With
relatively low front end gain, highly interactive
tone controls, and tube rectifier “sag,” it’s great at
getting a classic cranked sound for small gigs and
recording (it’s all of 18 watts). Since the original
Twinmaster has no mid control, we’ve added a little
bonus to our model in the form of some post-Amp
5 • 10
Model mid contouring available via Vetta’s Mid
control. As is true for all such “bonus” tone controls
on Vetta’s models, you should set this control to 12 o’clock to get groovy with the
unadorned Budda-style vibe. We used the Twinmaster’s Input 2, which is lower gain,
when creating this model.
33. Connor 50: Based on a Cornford mk50h
The Cornford mk50h is a fine, Britishmade boutique amplifier that our very own
Line 6 UK lads tipped us onto. The
Cornford has a fair amount of gain and
breaks up like a Marshall Plexi, but retains
a certain clarity that is more typical of Vox
amplifiers.
One odd thing about the Cornford is the fact that it actually runs its drive channel in
series with the Clean channel. This provides for some unique interaction that we
captured during our modeling process by sweeping both controls though their range at
the same time, and tying all of this to your Vetta’s Drive knob. Lower Drive settings
give you a tone dominated by the clean channel tonalities. As you turn the knob up
past noon, you’ll be moving it into more progressive high gain territory.
All product names are trademarks of their respective owners, which are in no way associated or
affiliated with Line 6. These product names, descriptions and images are provided for the sole purpose
of identifying the specific products that were studied during Line 6’s sound model development.
Page 91

The Amps & Cabs • 34. ‘03 Deity Crunch: Based on a Diezel VH4 Channel 3
34. ‘03 Deity Crunch: Based on a Diezel VH4 Channel 3
What is it about Deutschland and high gain guitar amplifiers?
When we met Peter Diezel, and opened up the VH4 we new
we were in the presence of a serious tone fanatic. The VH4 is
the Ducati of high performance guitar amplifiers. Meticulous
attention to every detail, and enough tone and power to not
only take on but seriously destroy any competitor.
Some of the most serious players in the Metal genre have
come to depend on their VH4’s for tight, focused and
perfectly refined tone. Our model captures channel 3 on this
sublime beauty.
35. ‘03 Deity Lead: Based on a Diezel VH4 Channel 4
But wait, there's more! This model of channel 4 of the Diezel has even more gain than
channel 3 (Crunch). It is perfect for lead work, and when the drive is brought back to
noon, affords some excellent rhythm tones as well.
36. ‘03 Deity’s Son: Based on a Diezel Herbert
After messing with the VH4 we knew you’d
get into another amp from Peter Diezel.
Herbert is one of those simple, ingenious
designs. It is unique among amps in its ability
to achieve an incredibly wide range of tone
on a single channel. Your Vetta’s model is
very faithful to the original in tone, but due
to a couple extra knobs on the Herbert, we had to make a few choices for you. Our
model tackles Channel 3 with the Deep control preset to 2 O’Clock. The original also
had a Mid Cut Intensity knob — this is the magic control that affords this amp its
serious tonal range. To bring you this same joy, we set Herbert’s Mid knob to about 2
o’clock when modeling the tone stack. That allowed us to offer you control of Herbert’s
unique Mid Cut Intensity with your Vetta’s Mid knob.
5 • 11
All product names are trademarks of their respective owners, which are in no way associated or
affiliated with Line 6. These product names, descriptions and images are provided for the sole purpose
of identifying the specific products that were studied during Line 6’s sound model development.
Page 92

The Amps & Cabs • 37. ‘02 ANGEL P-Ball: Based on the ENGL Powerball
37. ‘02 ANGEL P-Ball: Based on the ENGL Powerball
Designed by Edmund Engl in Bartholoma,
Germany. The ENGL Powerball uses a
combination of 12AX7, ECC 83 and
6L6GC tubes for this 100 watt monster.
Courtesy of its ability to crank out tight,
focused low end, glossy top end and jaw-
dropping sound, it is a favorite of such
artists as Matthis Jabs and Rudolph Schenker of The Scorpions, Phil Campbell of
Motor Head and Ritchie Blackmore.
5 • 12
The Powerball is a four-channel amplifier. We modeled channel 2 (soft lead.) All
aspects of the presence control were modeled. This amp has a “Depth/Punch” control
which we set at 7 o’clock. This control shapes the low frequency response in the power
amp stage.
38. ‘53 Fn Tweed Small Tweed: Based on the Fender Tweed Deluxe
Modeled after a 1953 “wide panel” Fender Tweed Deluxe, this Amp
Model will snarl with the best of them. The original amp had only a
single tone control, essentially a Treble roll off. We set up Vetta’s
Treble knob to give you this Treble roll off when using this Amp
Model. Which left us with the Bass and Mid knobs just sitting
there. That just didn’t seem right, so we figured out a way to put
those knobs to work without messing with the authenticity of this
Amp Model’s treble tone control. We set up the Bass and Mid as
post-Amp Model controls, which essentially lets you EQ up your tone as you would do
on a mixing console after recording your amp. Set the Bass and Mid knobs at halfway to
put them in ‘neutral’, turn the Presence to 0, and try the Treble knob somewhere above
halfway for a classic Tweed sound. We used the Instrument 1 input on the Deluxe
when crafting this model.
All product names are trademarks of their respective owners, which are in no way associated or
affiliated with Line 6. These product names, descriptions and images are provided for the sole purpose
of identifying the specific products that were studied during Line 6’s sound model development.
Page 93

The Amps & Cabs • 39. ‘58 Fn Tweed B-Man: Based on the Fender Tweed Bassman
39. ‘58 Fn Tweed B-Man: Based on the Fender Tweed Bassman
The classic ’58 Fender Bassman 4x10 combo was the amp that
started it all—instant rock and roll tone. Originally a bass guitar
amp, the Bassman became a Blues staple for 6-string guitarists. It has
the fat bottom end you’d expect from a bass amp but also has the
Fender twang on the top. Incidentally, when Jim Marshall built his
first amps with Ken Bran they were heavily influenced by the early
Bassman. One of the interesting things about the Bassman is just
how interactive the Mid and Treble controls are. The Mid control
isn’t a bandpass, as in most tone control setups. Instead, it’s almost like a second treble
control. The two are additive, so if you’re running Vetta’s Mid knob higher than
halfway up with this model, you’ll find that the Treble control might give you more
bright than you really want. On the other hand, when you turn the Mid knob down,
you’ll probably want to boost the Treble. The Bassman, like many of the amps modeled
for Vetta, didn’t have a master volume. So to get the kind of tone that the Bassman can
deliver at higher gain settings, you had to crank it up loud enough to do some serious
damage to anyone who might be standing close by. With Vetta, you can get that kind
of tone at a bedroom or studio level — or through your headphones even! Try a Drive
setting of about 4 or 5—it’s guaranteed to dredge up the best R&B licks you know. We
made our model using the Bassman’s Normal Channel 1 input.
5 • 13
All product names are trademarks of their respective owners, which are in no way associated or
affiliated with Line 6. These product names, descriptions and images are provided for the sole purpose
of identifying the specific products that were studied during Line 6’s sound model development.
Page 94
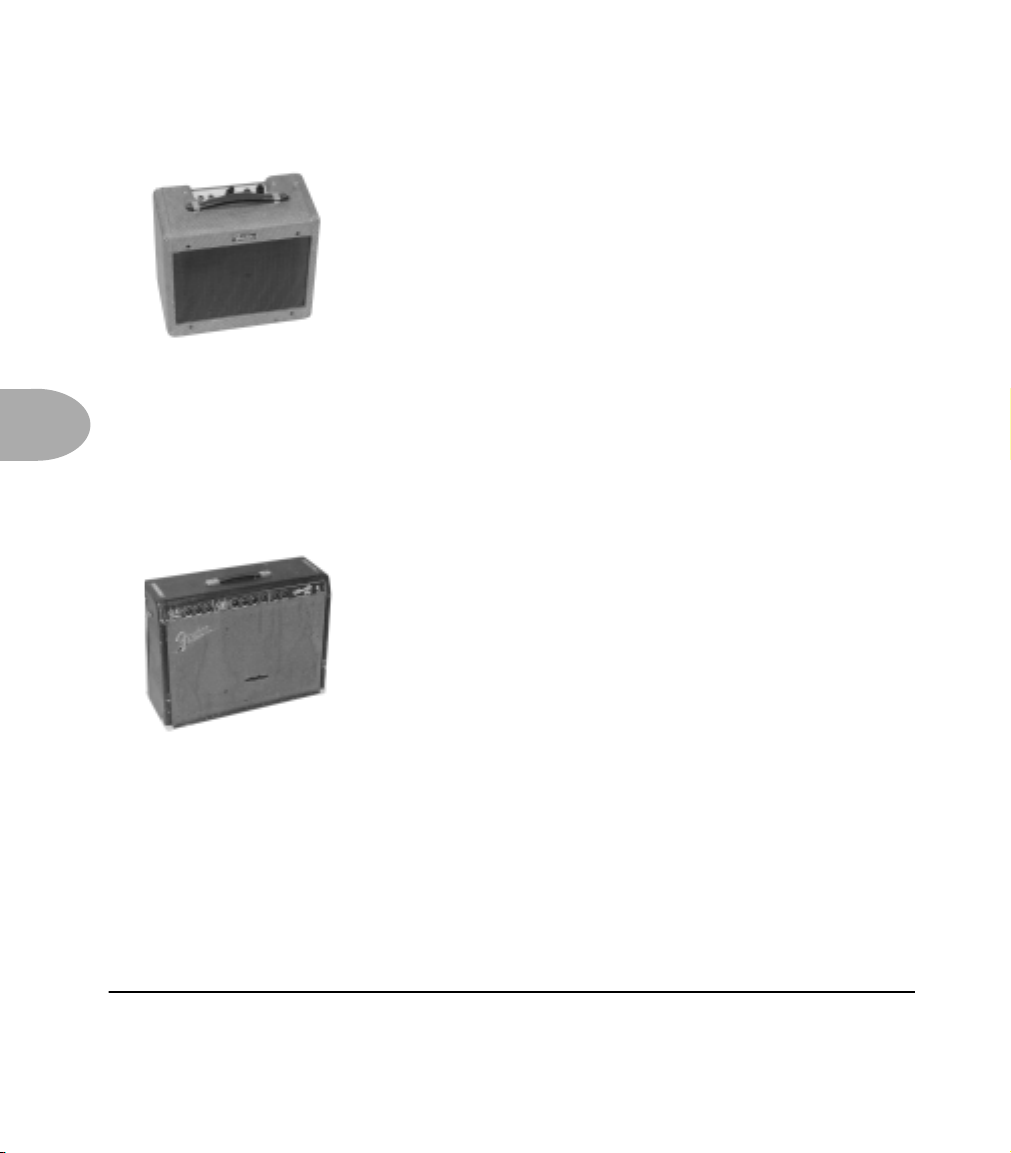
The Amps & Cabs • 40. ‘61 Fn Tweed Tiny Tweed: Based on the Fender Tweed Champ
40. ‘61 Fn Tweed Tiny Tweed: Based on the Fender Tweed Champ
Modeled after a 1961 Tweed Champ, this model has a great
sound when the Drive is cranked (not bad clean, either). These
amps were originally designed to be sold to beginners, but rock
and rollers quickly discovered that you could get a great distorted
sound at fairly low volume levels. Many of the classic guitar solos
of the 50’s were recorded through a Champ. The Champ had no
tone control, only volume. With your Vetta, it’s easy to get a
classic Champ tone. Just leave the Bass, Mid and Treble controls
parked at 12 o’clock, which means they are “flat,” making no contribution to the tone.
Set Presence to 0, and it will also be letting the unadorned classic Champ tone
5 • 14
through. When you’re ready to explore further sonic territory, spin those and work your
magic. Since the Champ’s only got one input jack, that’s what we plugged into as we
burned the midnight oil making our model based on this puppy.
41. ‘63 Fn Black Vib Verb: Based on the Fender Vibroverb 6G16
In early 1963 the Fender 2x10 brown tolex Vibroverb was
introduced and later that same year it was replaced by the 1x15
blackface Vibroverb made famous by SRV only to be
discontinued in 1964. The Vibroverb was introduced right
before Fender decided to change the look of the entire amp line
to what guitarists now call “Blackface Fenders”. The Vibroverb
we studied to create this model has the two 10-inch speakers
and transitional cosmetics. There’s black tolex, a dark brown
numbered faceplate and brown barrel knobs. Like other Vibroverb 2x10 amps, it’s 40
watts of pure heaven. These were the first guitar amps with on-board reverb and also
utilized a vibrato circuit that modulates the bias of the power tubes for creamy smooth
tremolo sounds. It all added up to great tone with the latest guitar effects built-in... sort
of like your Vetta! The electronically-inclined will also appreciate the fact that this
version of the Vibroverb also used a tapped treble control and a 7025 phase inverter (as
opposed to a 12AT7). The Vibroverb had no Mid or Presence controls, so these are
both “extras” on our model. You can set Mid to 12 o’clock and Presence to minimum
for the unadulterated Vibroverb-style sound.
All product names are trademarks of their respective owners, which are in no way associated or
affiliated with Line 6. These product names, descriptions and images are provided for the sole purpose
of identifying the specific products that were studied during Line 6’s sound model development.
Page 95

The Amps & Cabs • 42. ‘64 Fn Black Lux: Based on the Fender Deluxe Reverb
42. ‘64 Fn Black Lux: Based on the Fender Deluxe Reverb
The Holy Grail for many blues, country, and “roots” players has
been a blackface Fender Deluxe Reverb. (Of course, now that
Vetta’s here, that may all change.) After listening to quite a few
candidates back when we were seeking the ultimate Deluxe Reverb
to model during our development of Flextone and POD, we
stumbled upon an extremely cool ’64 Deluxe. We still haven’t
found one better.
Most players love a Deluxe when it’s turned up to about 7 for a nice gritty sound that
cleans up when you back off your guitar’s volume knob just a little. Notice how the
tone control response changes as this Amp Model’s Drive is changed: clean settings are
crisp and present, while more driven settings will mellow the high end. This is typical
of what you get from a Deluxe and is nicely captured here. The Deluxe itself has only
Bass and Treble controls, leaving us, once again, with the prospect of a couple knobs
with nothing to say for themselves. But fear not; in this case, we’ve set up Vetta’s Mid
knob so you can add some post-Amp Model Midrange contouring for a little more
flexibility, while Presence adds, well, Presence. Once again, set the Mid knob to its
“neutral” 12 o’clock position and the Presence knob to 0 for the classic Deluxe sound.
Tweaked up right, this tone will cut through and sing. We jacked into Input 1 of the
Vibrato Channel to get this model cooked up for Vetta.
5 • 15
All product names are trademarks of their respective owners, which are in no way associated or
affiliated with Line 6. These product names, descriptions and images are provided for the sole purpose
of identifying the specific products that were studied during Line 6’s sound model development.
Page 96

The Amps & Cabs • 43. ‘65 Fn Black Double: Based on the Fender Twin Reverb
43. ‘65 Fn Black Double: Based on the Fender Twin Reverb
The classic blackface Fender Twin (in this case, a 1965
Twin) was a real workhorse. Everybody used it, from jazz
and country players to serious rockers. I myself remember
seeing Johnny Winter at a concert where both he and Rick
Derringer—am I dating myself or what?—were using six
Twins stacked in a pyramid. Each. We were in the second
balcony and it was REALLY loud even all the way back
there. The Twin has a lot of tonal flexibility and is at home
in a great many different situations. It never gets extremely
overdriven and dirty, mostly just louder—a lot louder.
5 • 16
This is a great choice for the classic surf sound. Dial up the spring reverb, switch on the
model of the Opto tremolo, crank up the volume, and shake the sand out of your flipflops. Like most everyone who owns one, we plugged into Input 1 of the Normal
Channel for modeling purposes.
44. ‘67 Fn Black Dual Show: Based on the Fender Dual Showman
This sound was made famous by Dick Dale and his brilliant
surf tunes. We modeled the tremolo channel with the bright
switch off. This channel uses two7025 preamp tubes and the
85 watt power amp uses four 6L6GC tubes. The Dual
Showman was sold as a “piggy back” system, an amp head and a 2x15 cabinet. We
added a MID knob with a center frequency of 750Hz. You can cut or boost 10dB. Leave
this setting at 12 noon for the classic sound. We also added a Presence knob. Set this
control to minimum for the classic sound.
All product names are trademarks of their respective owners, which are in no way associated or
affiliated with Line 6. These product names, descriptions and images are provided for the sole purpose
of identifying the specific products that were studied during Line 6’s sound model development.
Page 97

The Amps & Cabs • 45. ‘72 Fn Silver Bass Head: Based on the Fender Bassman
45. ‘72 Fn Silver Bass Head: Based on the Fender Bassman Head
Paul McCartney used this amp durning the Let It Be
sessions, as well as the famous rooftop performance. He also
used this amp in the early years of Wings. This amp has a
very pronounced midrange response.We modeled the Bass
channel, which uses two 7025 preamp tubes. The “Deep”
switch was on. The poweramp uses two 6L6GC tubes. The orignal amp has no Mid
knob, so for the classic sound set the Mid control to12 noon.
46. ‘96 Fn Mini Double: Based on the Fender Mini-Twin
There are times when you find yourself in a unique position to do
something other than what people might have expected, and when our
gaze came to rest on the little plastic Mini Twin, we knew it was one of
those times...
Based on the little battery powered, dual 2-inch speaker Fender novelty item, this
model really shows its mettle when you make it part of a dual amp setup on your Vetta.
There are also hours of fun to be had when you unhitch the cab model from this amp,
and assign it to a different amp in a dual amp blend. Plus, you might as well admit it,
you’ve always wondered what a Dual Rectifier would sound like through a pair of
2-inch speakers, haven’t you? The Mini Twin’s only got one input, so that’s where we
plugged in to make our model.
5 • 17
All product names are trademarks of their respective owners, which are in no way associated or
affiliated with Line 6. These product names, descriptions and images are provided for the sole purpose
of identifying the specific products that were studied during Line 6’s sound model development.
Page 98

The Amps & Cabs • 47. ‘60 Gibtone Explorer: Based on the Gibson Explorer
47. ‘60 Gibtone Explorer: Based on the Gibson Explorer
This one is based on a 1960 Gibson Model GA-18T Explorer
(little brother to the Gibson “Les Paul” GA40T). The
particular amp we modeled originally belonged to the father
of one of the high school buddies of Line 6’s Artist Relations
guru, Tim Godwin. It was sitting in a crawlspace for years,
until Tim happened to ask his friend if he still had the amp,
and whether he was interested in selling it. When Tim
finally got his hands on it, the amp still had the original
Gibson branded tubes in it!
5 • 18
Some time passed, Tim brought his little treasure into the office one day, some of us
played through it and we cried out as one voice, “We’ve got to model this one!”
Working from codes found on the pots and speaker, we were able to date this amp’s
build to the week of May 21, 1960. 14 watts, with a 10-inch Jensen speaker, the amp
runs Class A with 6SJ7 preamp tubes, 6V6 Power tubes, and a 5Y3 rectifier—just in
case you were interested.
48. ‘60 G-Brand Two-Tone: Based on the Gretsch 6156
Just by coincidence, we happened to get this one from Tim
Godwin as well. (What can we say, he obviously has a wellexercised fetish for tiny, old, low wattage amps.) Another amp
made by Valco/Supro, one of its curiosities is that the output
transformer is actually mounted on its single 10-inch speaker,
rather than on the amp chassis. It also has a lovely wraparound
grill cloth, for a real futuristic look (or what passed for it in the
’50s).
All product names are trademarks of their respective owners, which are in no way associated or
affiliated with Line 6. These product names, descriptions and images are provided for the sole purpose
of identifying the specific products that were studied during Line 6’s sound model development.
Page 99

The Amps & Cabs • 49. ‘73 Hiway 100 Custom: Based on the Hiwatt Custom 100
49. ‘73 Hiway 100 Custom: Based on the Hiwatt Custom 100
Based on a Hiwatt DR-103, this model gives a great,
punchy sound that will cut through almost anything
and retains great definition even when cranked.
That’s exactly what designer Dave Reeves was looking
for when he left the Sound City division of Dallas
Arbiter in 1966 to form HyLight Electronics. Though
his first designs were more reminiscent of the Vox and
Selmer amps of the day, it wasn’t long before Reeves
had started producing the amps that ’60s Brit-Rock
fans have become familiar with. Renowned for their
‘tank-like’ construction (due in part to Reeves’ hiring
of ‘mil-spec’ wiring specialist Harry Joyce), it was
small wonder this amp was the choice of Pete
Townshend for so many years. It wasn’t just
Townshend using Hiwatt, either. Many of the then-
current crop of British rockers like Pink Floyd, The
Moody Blues, Manfred Mann, and Jethro Tull were also Hiwatt endorsees. Crank this
one up and you can see for miles. We used Input 1 (and did windmills) as we modeled
this one.
5 • 19
All product names are trademarks of their respective owners, which are in no way associated or
affiliated with Line 6. These product names, descriptions and images are provided for the sole purpose
of identifying the specific products that were studied during Line 6’s sound model development.
Page 100

The Amps & Cabs • 50. ‘65 Brit Plexi J-45: Based on the Marshall JTM-45
50. ‘65 Brit Plexi J-45: Based on the Marshall JTM-45
This Amp Model is based on a ’65 ‘block logo’ JTM-45 head,
complete with a gold Plexiglas front panel (although the
sound that many guitarists associate with ‘Plexi’ amps comes
from the late 60’s, 100-watt Super Lead that was the
inspiration for the next in Vetta’s line up of Amp Models).
When the royal agents we had dispatched to the U.K. found
this particular amp, we instantly fell in love. The amp even
has the original KT-66s in it, still in great shape! It’s one of
the finest examples of a JTM-45 we’ve ever heard, and it’s a
constant battle at Line 6 to see who gets to take it home for
5 • 20
Those interested in the genealogy of tone will be interested to note that the JTM-45
marked the beginning of Marshall’s transition from a mellower Fender-like tone to the
distinctive, bright “crunchy” sound of the later Marshalls. We plugged into Input I (and
thanked our lucky stars for the privilege) to model it.
the weekend.
51. ‘68 Brit Plexi Lead 100: Based on the Marshall Super Lead
Modeled after the infamous Marshall ‘Plexi’ Super Lead—
coveted by tone connoisseurs the world over. We literally
scoured the world for this particular amp, finally finding a
great example of a Super Lead languishing (we like to think
fate preserved it for us) in Holland. By the time this amp was
built (ca. 1968), Marshall had completely changed the
circuitry away from the Fender 6L6 power tube heritage and
moved to an EL34 tube. Another major tone difference was
due to the necessary output & power supply transformer
changes. (See, we told you we spent some time looking into
all this stuff.) All this mucking about added up to create a
tone forever linked with Rock Guitar. Amps of this era didn’t
have any sort of master volume control, so to get
Super Lead to max—just the thing to help you really make friends with the neighbors.
Hendrix used Marshalls of this era; a decade later Van Halen’s first two records owed
the sound you’d have to crank your
All product names are trademarks of their respective owners, which are in no way associated or
affiliated with Line 6. These product names, descriptions and images are provided for the sole purpose
of identifying the specific products that were studied during Line 6’s sound model development.
 Loading...