

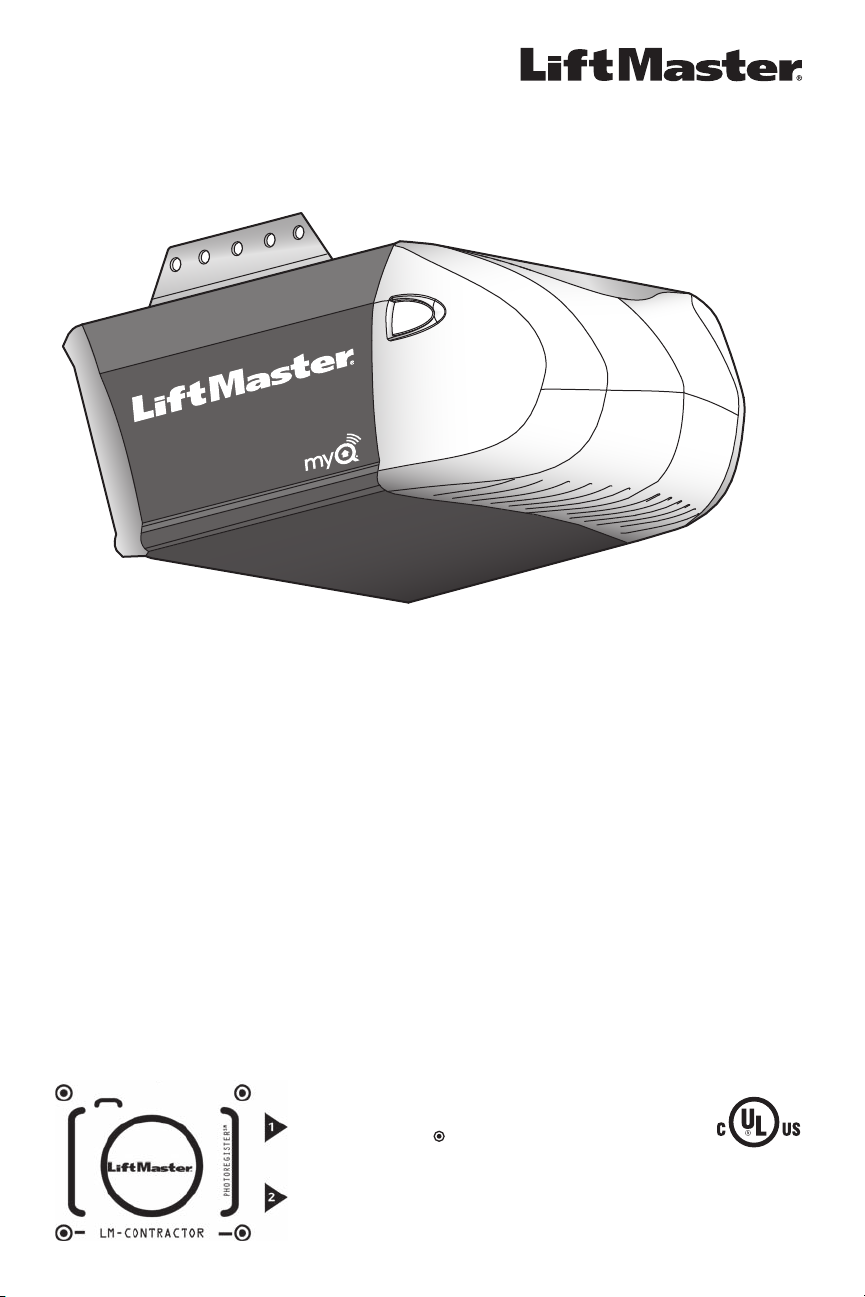
Page 1
USER’S GUIDE
FOR RESIDENTIAL USE ONLY
CONTRACTOR Series Garage Door Opener
MODELS 8155 • 8160 • 8165 • 8065 • 8075
• Please read this guide and the enclosed safety materials carefully!
• The door WILL NOT CLOSE unless the Protector System®
is connected and properly aligned.
• Periodic checks of the garage door opener are required to ensure
safe operation.
• This garage door opener is ONLY compatible with MyQ®
and Security+ 2.0® accessories.
• DO NOT install on a one-piece door if using devices or features
providing unattended close. Unattended devices and features are to
be used ONLY with sectional doors.
• Attach enclosed warning labels to the location indicated on label.
Register your garage door opener to receive
updates and offers from LiftMaster
Take a photo of the camera icon
including the points ( ).
Send it in by texting
the photo to 71403 (US)
or visit www.liftmaster.photo (Global)
Elmhurst, Illinois 60126-1196
LiftMaster.com
LiftMaster
845 Larch Avenue
Page 2
Contents
Important Safety Instructions ............................3-4
Operation...................................................... 5
Using the Door Control.................................... 6
Programming - Push Button Door Control ............. 6
Programming - Multi-Function Control Panel ......... 7
Programming - Remote Controls ........................ 8
To Erase the Memory ..................................... 8
To Open the Door Manually .............................. 9
Adjustment ...................................................10
Program the Travel ....................................... 11
Test the Safety Reversal System ....................... 12
Test the Protector System
Maintenance .................................................13
Troubleshooting .........................................14-15
Repair Parts .................................................16
Accessories .................................................. 17
Registration..................................................17
Warranty .....................................................18
Write down the following information
for future reference:
Serial Number:
Date of Purchase:
®
............................. 12
.
Safety Symbol and Signal Word Review
This garage door opener has been designed and tested
to offer safe service provided it is installed, operated,
maintained and tested in strict accordance with the
instructions and warnings contained in this manual.
When you see these Safety Symbols and Signal
Words on the following pages, they will alert you to
the possibility of serious injury or death if you do not
comply with the warnings that accompany them. The
hazard may come from something mechanical or from
electric shock. Read the warnings carefully.
Mechanical
Electrical
When you see this Signal Word on the following pages, it
will alert you to the possibility of damage to your garage
door and/or the garage door opener if you do not comply
with the cautionary statements that accompany it. Read
them carefully.
Unattended Operation
The Timer-to-Close (TTC) feature, the MyQ® Smartphone
Control app, and MyQ® Garage Door and Gate Monitor are
examples of unattended close and are to be used ONLY
with sectional doors. Any device or feature that allows the
door to close without being in the line of sight of the door
is considered unattended close. The Timer-to-Close (TTC)
feature, the MyQ® Smartphone Control, and any other
MyQ® devices are to be used ONLY with sectional doors.
CONTACT INFORMATION
Leave this Users Guide with the homeowner.
The images throughout this manual are for reference and your product may look different.
2
Page 3

WARNING
WARNING
WARNING
Important Safety Instructions
IMPORTANT INSTALLATION INSTRUCTIONS
WARNING
To reduce the risk of SEVERE INJURY or DEATH:
1. READ AND FOLLOW ALL WARNINGS AND
INSTRUCTIONS.
2. Install garage door opener ONLY on properly
balanced and lubricated garage door. An
improperly balanced door may NOT reverse when
required and could result in SEVERE INJURY or
DEATH.
3. ALL repairs to cables, spring assemblies and
other hardware MUST be made by a trained door
systems technician BEFORE installing opener.
4. Disable ALL locks and remove ALL ropes
connected to garage door BEFORE installing
opener to avoid entanglement.
5. Install garage door opener 7 feet (2.13 m) or
more above fl oor.
6. Mount the emergency release within reach, but at
least 6 feet (1.83 m) above the fl oor and avoiding
contact with vehicles to avoid accidental release.
7. NEVER connect garage door opener to power
source until instructed to do so.
8. NEVER wear watches, rings or loose clothing
while installing or servicing opener. They could
be caught in garage door or opener mechanisms.
9. Install wall-mounted garage door control:
• within sight of the garage door.
• out of reach of children at minimum height of
5 feet (1.5 m).
• away from ALL moving parts of the door.
NOTE: For complete installation instructions visit LiftMaster.com to print the entire owner’s manual.
10. Place entrapment warning label on wall next to
garage door control.
11. Place manual release/safety reverse test label in
plain view on inside of garage door.
12. Upon completion of installation, test safety
reversal system. Door MUST reverse on contact
with a 1-1/2" (3.8 cm) high object (or a 2x4 laid
fl at) on the fl oor.
13. To avoid SERIOUS PERSONAL INJURY or
DEATH from electrocution, disconnect ALL
electric and battery power BEFORE performing
ANY service or maintenance.
14. DO NOT install on a one-piece door if using
devices or features providing unattended close.
Unattended devices and features are to be used
ONLY with sectional doors.
15.
SAVE THESE
INSTRUCTIONS.
3
Page 4

Important Safety Instructions
WARNING
WARNING
WARNING
IMPORTANT SAFETY INSTRUCTIONS
WARNING
To reduce the risk of SEVERE INJURY or DEATH:
1. READ AND FOLLOW ALL WARNINGS AND
INSTRUCTIONS.
2. ALWAYS keep remote controls out of reach of
children. NEVER permit children to operate or
play with garage door control push buttons or
remote controls.
3. ONLY activate garage door when it can be seen
clearly, it is properly adjusted, and there are no
obstructions to door travel.
4. ALWAYS keep garage door in sight and away
from people and objects until completely closed.
NO ONE SHOULD CROSS THE PATH OF THE
MOVING DOOR.
5. NO ONE SHOULD GO UNDER A STOPPED,
PARTIALLY OPENED DOOR.
6. If possible, use emergency release handle to
disengage trolley ONLY when garage door is
CLOSED. Use caution when using this release
with the door open. Weak or broken springs or
unbalanced door could result in an open door
falling rapidly and/or unexpectedly and increasing
the risk of SEVERE INJURY or DEATH.
7. NEVER use emergency release handle unless
garage doorway is clear of persons and
obstructions.
8. NEVER use handle to pull garage door open or
closed. If rope knot becomes untied, you could
fall.
9. After ANY adjustments are made, the safety
reversal system MUST be tested.
10. Safety reversal system MUST be tested every
month. Garage door MUST reverse on contact
with 1-1/2" high (3.8 cm) object (or a 2x4 laid
fl at) on the fl oor. Failure to adjust the garage
door opener properly increases the risk of
SEVERE INJURY or DEATH.
11. ALWAYS KEEP GARAGE DOOR PROPERLY
BALANCED. An improperly balanced door may
NOT reverse when required and could result in
SEVERE INJURY or DEATH.
12. ALL repairs to cables, spring assemblies
and other hardware, ALL of which are under
EXTREME tension, MUST be made by a trained
door systems technician.
13. ALWAYS disconnect electric power to garage
door opener BEFORE making ANY repairs or
removing covers.
14. This operator system is equipped with an
unattended operation feature. The door could
move unexpectedly. NO ONE SHOULD CROSS
THE PATH OF THE MOVING DOOR.
15. DO NOT install on a one-piece door if using
devices or features providing unattended close.
Unattended devices and features are to be used
ONLY with sectional doors.
16.
SAVE THESE
INSTRUCTIONS.
4
Page 5

Operation
Your garage door opener is equipped with features to
provide you with greater control over your garage door
operation.
ALERT2CLOSE
The Alert2Close feature provides a visual and an audible
alert that an unattended door is closing.
TIMER-TO-CLOSE (TTC)
The Timer-to-Close feature automatically closes the door
after a specifi ed time period that can be adjusted using a
TTC enabled door control (Models 881LMW or 880LM).
Prior to and during the door closing the garage door
opener lights will fl ash and the garage door opener will
beep.
®
MyQ
MyQ® technology uses a 900MHz signal to provide twoway communication between the garage door opener and
MyQ® enabled accessories. Your garage door opener is
compatible with up to 16 MyQ® accessories.
SECURITY+ 2.0
®
REMOTE CONTROLS AND DOOR
CONTROLS
Your garage door opener has already been programmed
at the factory to operate with your remote control, which
changes with each use, randomly accessing over 100
billion new codes. Compatible with MyQ
®
and
Security+ 2.0® accessories, see page 17.
NOTE: Older LiftMaster remote controls, door controls,
and third party products are not compatible.
Security+ 2.0
Accessories
®
MEMORY CAPACITY
Remote Controls Up to 12
Door Controls Up to 2 Smart Control Panels or 4
of any other Security+ 2.0
®
door
controls
Keyless Entries Up to 1
®
THE PROTECTOR SYSTEM
(SAFETY REVERSING
SENSORS)
When properly connected and aligned, the safety
reversing sensors will detect an obstruction in the path
of the infrared beam. If an obstruction breaks the infrared
beam while the door is closing, the door will stop and
reverse to full open position, and the opener lights will
fl ash 10 times. If the door is fully open, and the safety
reversing sensors are not installed, or are misaligned,
the door will not close from a remote control. However,
you can close the door if you hold the button on the door
control or keyless entry until the door is fully closed. The
safety reversing sensors do not affect the opening cycle.
ENERGY CONSERVATION
For energy effi ciency the garage door opener will enter
sleep mode when the door is fully closed. The sleep mode
shuts the garage door opener down until activated. The
sleep mode is sequenced with the garage door opener
light bulb; as the light bulb turns off the sensor LEDs will
turn off and whenever the garage door opener lights turn
on the sensor LEDs will light. The garage door opener will
not go into the sleep mode until the garage door opener
has completed 5 cycles upon power up.
LIGHTS
The garage door opener light bulbs will turn on when
the opener is initially plugged in; power is restored after
interruption, or when the garage door opener is activated.
The lights will turn off automatically after 4-1/2 minutes.
An incandescent A19 light bulb (100 watt maximum) or
for maximum energy effi ciency a 26W (100W equivalent)
compact fl uorescent light (CFL) bulb may be used.
Light Feature
The garage door opener is equipped with an added
feature; the lights will turn on when someone enters
through the open garage door and the safety reversing
sensor infrared beam is broken. For added control over
the light bulbs on your garage door opener.
USING YOUR GARAGE DOOR OPENER
The garage door opener can be activated through a
wall-mounted door control, remote control, or wireless
keyless entry. When the door is closed and the garage
door opener is activated the door will open. If the door
senses an obstruction or is interrupted while opening the
door will stop. When the door is in any position other
than closed and the garage door opener is activated the
door will close. If the garage door opener senses an
obstruction while closing, the door will reverse. If the
obstruction interrupts the sensor beam the garage door
opener lights will blink 10 times. However, you can close
the door if you hold the button on the door control or
keyless entry until the door is fully closed. The safety
reversing sensors do not affect the opening cycle. The
safety reversing sensor must be connected and aligned
correctly before the garage door opener will move in the
down direction.
5
Page 6
Operation
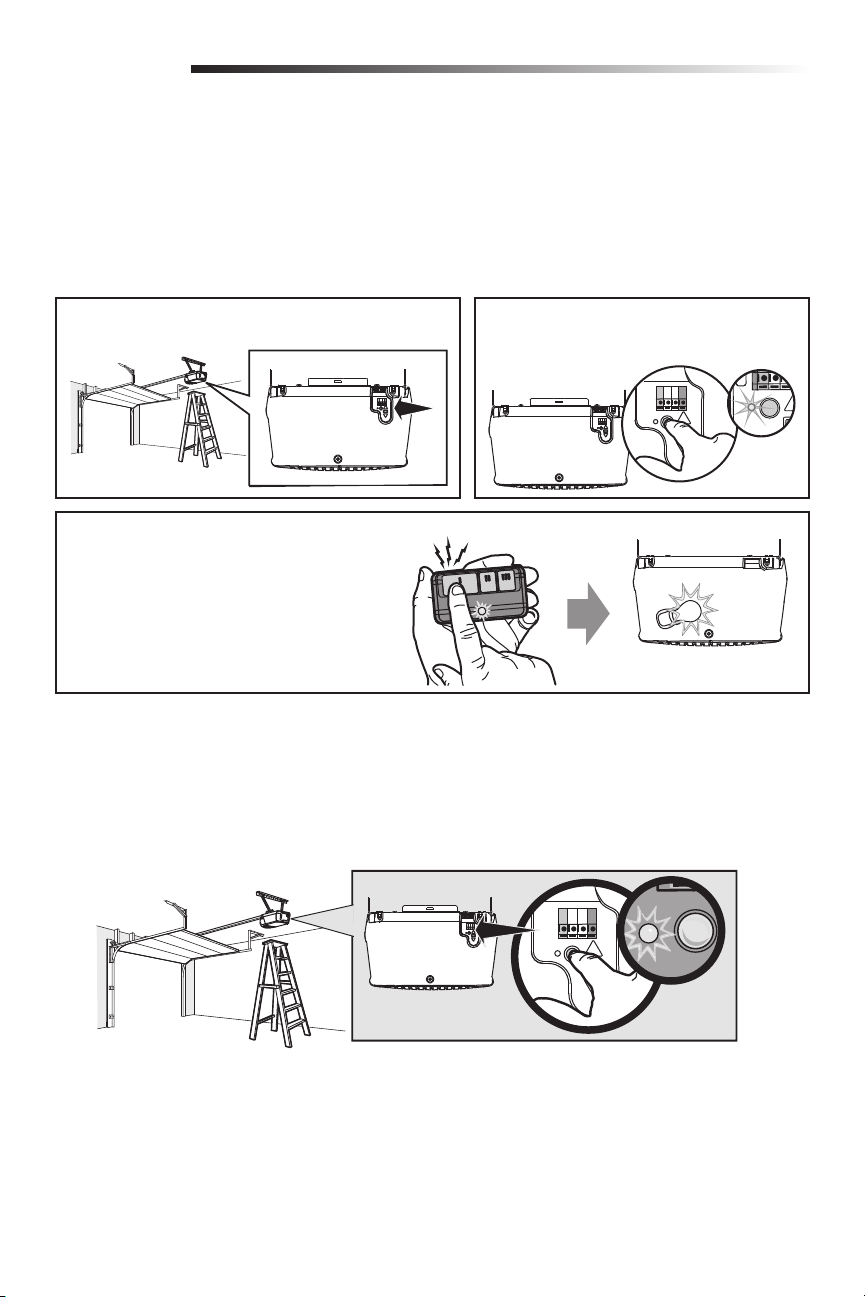
Using the Door Control
SYNCHRONIZE THE DOOR CONTROL
To synchronize the door control to the garage door
opener, press the push bar or push button until the
garage door opener activates (it may take up to 3
presses). Test the door control by pressing the push
bar or push button, each press of the push bar or push
button will activate the garage door opener.
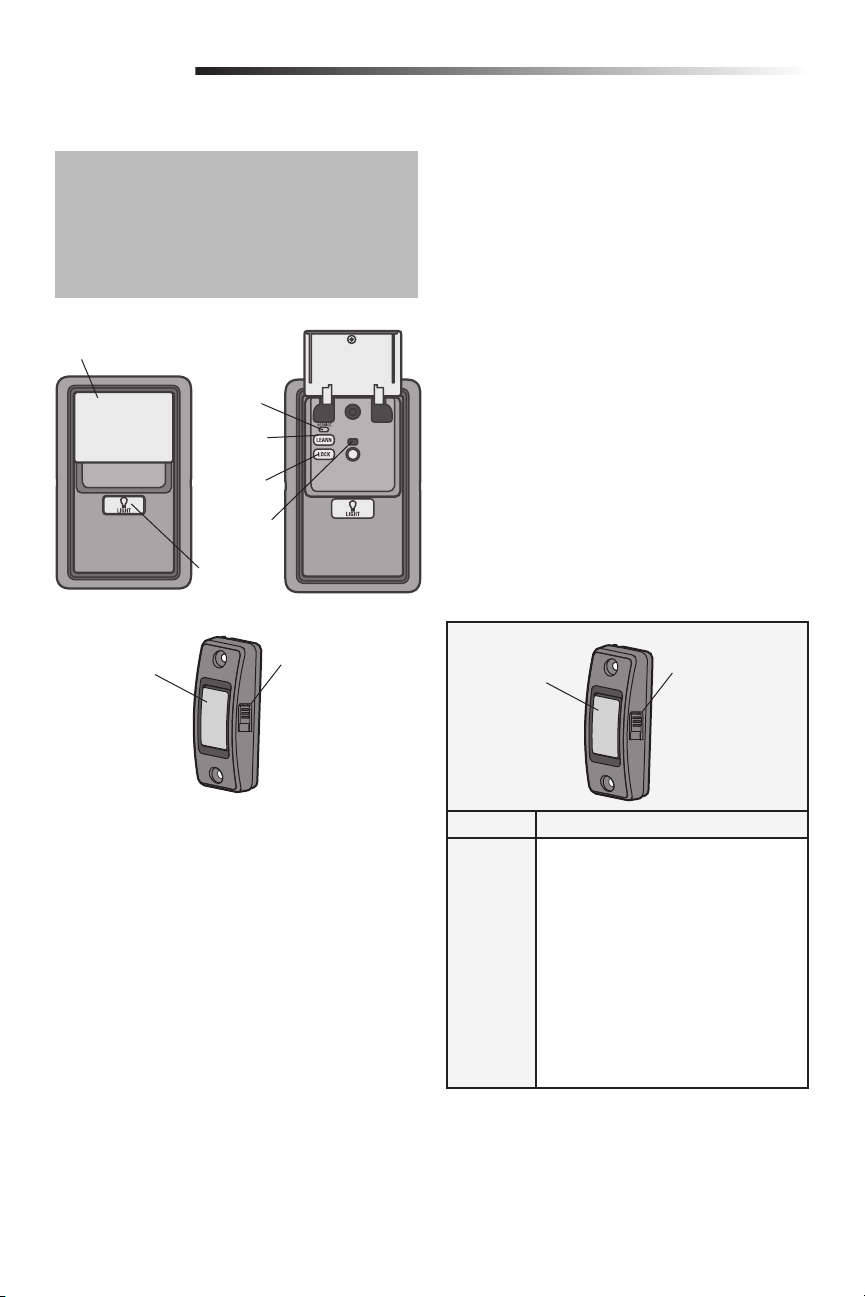
Push Bar
SERVICE
LED
LEARN
Button
LOCK
Button
COMMAND
LED
LIGHT
Button
Push
Button
Light
Button
LOCK
The LOCK feature is designed to prevent activation of
the garage door opener from remote controls while still
allowing activation from the door control and keyless
entry. This feature is useful for added peace of mind
when the home is empty (i.e. vacation).
AUTOMATIC LIGHT
Light Feature
The lights will turn on when someone enters through
the open garage door and the safety reversing sensor
infrared beam is broken.
MAINTENANCE ALERT SYSTEM (MAS)
This feature assists the homeowner in ensuring the
garage door opener system stays in good working
condition. When the garage door opener needs to be
serviced (approximately 4500 garage door opener cycles)
the command (yellow) and service (red) LEDs will begin
to alternately fl ash back and forth. The factory setting for
the MAS feature is off and can be activated at time of
installation. Contact your installing dealer for service.
Programming - Push Button Door
Control
Push
Button
Light
Button
PUSH BAR OR PUSH BUTTON
Press the push bar or push button to open or close the
door.
LIGHT BUTTON
Press the LIGHT button to turn the garage door opener
lights on or off. When the lights are turned on they will
stay on until the LIGHT button is pressed again, or until
the garage door opener is activated. Once the garage
door opener is activated the lights will turn off after the
specifi ed period of time (the factory setting is 4-1/2
minutes). The LIGHT button will not control the lights
when the door is in motion.
The following features are accessible by lifting the
push bar (multi-function door control only):
LEARN A DEVICE
Any compatible remote controls or wireless keyless
entries can be programmed to the garage door opener by
pressing the LEARN button on the Multi-Function Control
Panel.
Feature
To Program
a Remote
Control or
Keyless
Entry
6
1. Press and hold the Light button and
the Push button until the Push button
LED begins to blink.
2. Remote Control: Press the button on
the remote control that you wish to
operate your garage door.
Keyless Entry: Enter a 4-digit personal
identifi cation number (PIN) of your
choice on the keyless entry keypad.
Then press the ENTER button.
The garage door opener lights will fl ash
(or two clicks will be heard) when the
code has been programmed.
Page 7
Operation
Programming - Multi-Function Control Panel
Service
LED
LEARN
Button
LOCK
Button
Features
Lock NOTE: Your remote controls will NOT work when LOCK mode is active however your keyless entry will
Light To change the amount of time the garage door opener lights will stay on (default time is 4-1/2
To Program
a Remote
Control or
Keyless Entry
Maintenance
Alert System
(MAS)
still allow access to your garage.
Activate: Press and hold the LOCK button for 2 seconds. The command LED will fl ash as long as the
lock feature is activated and your handheld remote control will not operate your door at this time.
Deactivate: Press and hold the LOCK button again for 2 seconds. The command LED will stop
fl ashing and normal operation will resume.
Minutes):
Press and hold the LOCK button until the garage door opener lights fl ash.* The garage door opener
lights will then indicate the current light duration by fl ashing up to 4 times (see table below).
NUMBER OF TIMES GARAGE DOOR OPENER LIGHTS FLASH 1234
TIME THE GARAGE DOOR OPENER LIGHT STAYS ON 1½ Minutes 2½ Minutes 3½ Minutes 4½ Minutes
To change the light duration time repeat the steps above until the lights fl ashes indicate your desired
time frame.
NOTE: Factory setting is on.
This feature will turn on the garage door opener lights when the safety reversing sensors beam has
been broken.
Deactivate: Start with the garage door opener lights off. Press and hold the LIGHT button to turn on
the light, continue to hold until the light turns off.*
Activate: Start with the garage door opener lights on. Press and hold the LIGHT button to turn off
the light, continue to hold until the light turns on.*
* Approximately 10 seconds
1. Press the LEARN button on the door control twice. The Command LED will blink.
2. Remote Control: Press and release the button on the remote control that you wish to operate your
garage door.
Keyless Entry: Enter a 4-digit personal identifi cation number (PIN) on the keypad. Then press the
ENTER button.
The garage door opener lights will fl ash (or two clicks will be heard) and the Command LED will stop
blinking when the code has been programmed.
Activate/Deactivate
NOTE: Factory setting is on.
Press and hold the LEARN button. Then press the LIGHT button. The service LED will fl ash the
status; Activated is 2 fl ashes and deactivated is 3 fl ashes.
Command LED
LIGHT
Button
7
Page 8
Operation
Programming - Remote Controls
Your garage door opener has been programmed at the factory to operate with your remote control. Older LiftMaster
remote controls are NOT compatible. Programming can be done through the door control or the Learn button on the
garage door opener. To program additional remote controls refer to the instructions provided with the additional remote
controls or visit LiftMaster.com. If your vehicle is equipped with HomeLink®, a Compatability BridgeTM (not included)
may be necessary for certain vehicles. Visit bridge.LiftMaster.com to fi nd out if a Bridge is needed.
NOTE: The products illustrated in the instructions are for reference. Your product may look different.
PROGRAM A REMOTE USING THE LEARN BUTTON ON THE GARAGE DOOR OPENER
1 Locate the Learn button.
3 Press and hold the button on the remote control that
you wish to use.
Release the button when the garage door opener
lights blink or two clicks are heard.
If programming to other products, press the button a
second time to activate products.
ERASE ALL DEVICES (INCLUDING MYQ® ENABLED ACCESSORIES)
2 Press and immediately release the Learn button.
The Learn LED will glow steady for 30 seconds.
Within 30 seconds...
“click”
“click”
1 Press and hold the learn button on garage door opener until the learn LED goes out (approximately 6 seconds).
2 Immediately press and hold the learn button again until the learn LED goes out. All codes are now erased.
Reprogram any accessory you wish to use.
8
Page 9
Operation
To Open the Door Manually
To prevent possible SERIOUS INJURY or DEATH from
a falling garage door:
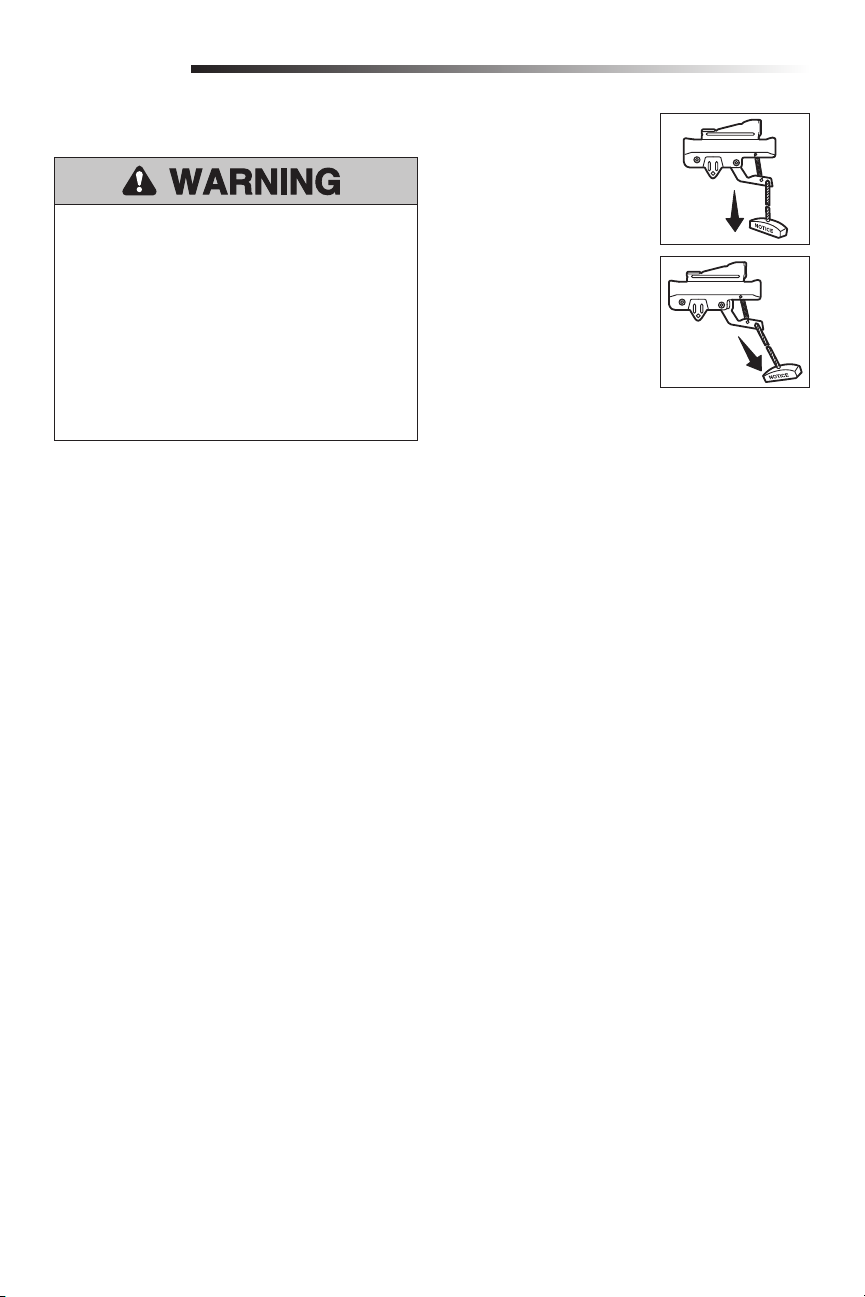
• If possible, use emergency release handle to
disengage trolley ONLY when garage door is
CLOSED. Weak or broken springs or unbalanced
door could result in an open door falling rapidly
and/or unexpectedly.
• NEVER use emergency release handle unless
garage doorway is clear of persons and
obstructions.
• NEVER use handle to pull door open or closed. If
rope knot becomes untied, you could fall.
DISCONNECT THE TROLLEY
1 The door should be fully
closed if possible.
2 Pull down on the emergency
release handle.
RECONNECT THE TROLLEY
The lockout feature prevents
the trolley from reconnecting
automatically.
1 Pull the emergency release
handle down and back
(toward the opener). The
door can then be raised and
lowered manually as often as
necessary.
2 To disengage the lockout feature, pull the handle
straight down.
The trolley will reconnect on the next UP or DOWN
operation, either manually or by using the door control or
remote control.
9
Page 10
Adjustment
Introduction
Without a properly installed safety reversal system,
persons (particularly small children) could be
SERIOUSLY INJURED or KILLED by a closing garage
door.
• Incorrect adjustment of garage door travel limits
will interfere with proper operation of safety
reversal system.
• After ANY adjustments are made, the safety
reversal system MUST be tested. Door MUST
reverse on contact with 1-1/2" (3.8 cm) high object
(or 2x4 laid fl at) on fl oor.
To prevent damage to vehicles, be sure fully open
door provides adequate clearance.
Your garage door opener is designed with electronic
controls to make setup and adjustments easy. The
adjustments allow you to program where the door will
stop in the open (UP) and close (DOWN) position. The
electronic controls sense the amount of force required to
open and close the door.
NOTE: If anything interferes with the door’s upward
travel it will stop. If anything interferes with the door’s
downward travel, it will reverse.
To watch a short instructional video on programming
your new garage door opener use your smartphone to
read the QR Code below:
UP (Open)
PROGRAMMING BUTTONS
The programming buttons are located on the left side panel of the garage door opener and are used to program the travel.
PROGRAMMING BUTTONS
10
DOWN (Close)
UP Button
Adjustment Button
DOWN Button
Page 11
Adjustment
Program the Travel
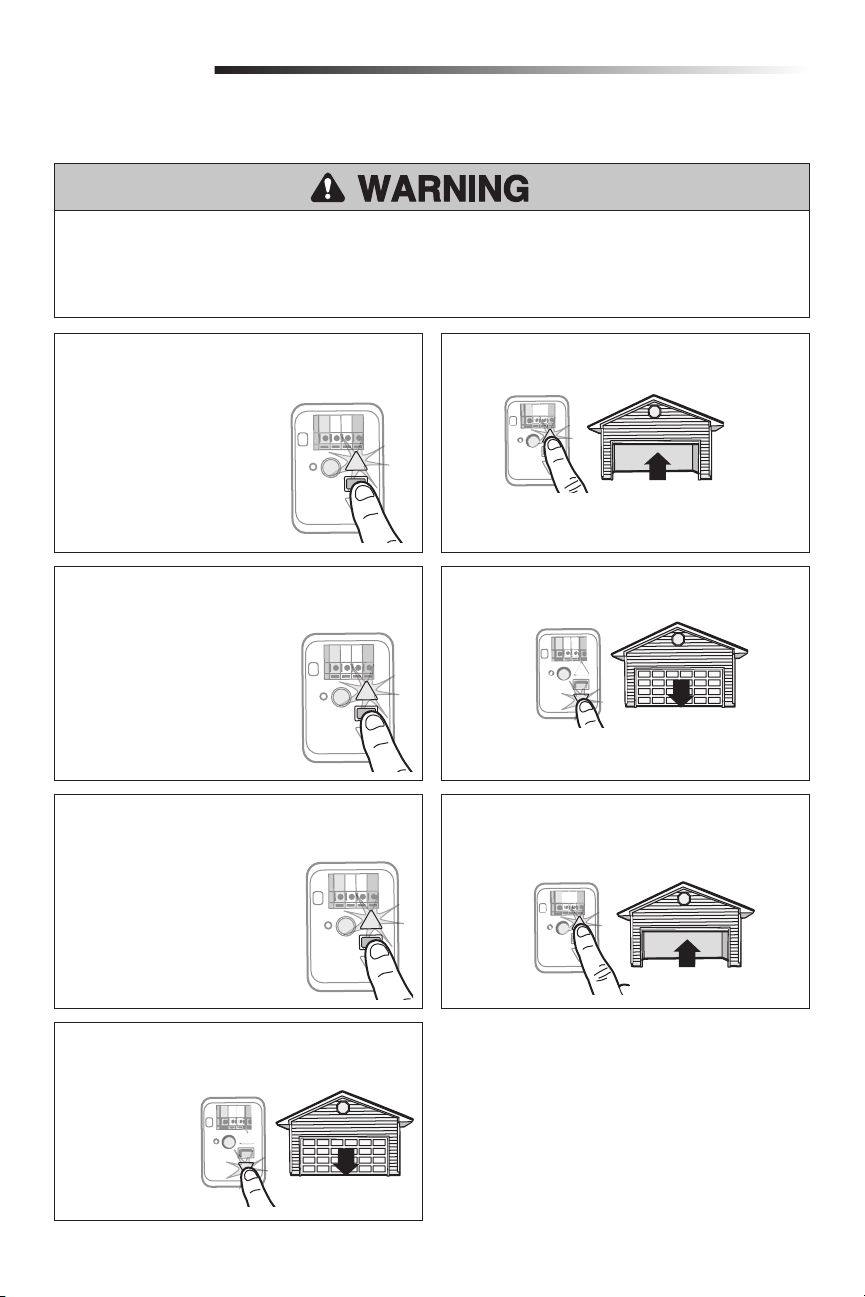
1
Without a properly installed safety reversal system, persons (particularly small children) could be SERIOUSLY
INJURED or KILLED by a closing garage door.
• Incorrect adjustment of garage door travel limits will interfere with proper operation of safety reversal system.
• After ANY adjustments are made, the safety reversal system MUST be tested. Door MUST reverse on contact with
1-1/2" (3.8 cm) high object (or 2x4 laid fl at) on fl oor.
1.1 Press and hold the
Adjustment Button
until the UP Button
begins to fl ash and/or
a beep is heard.
1.3 Once the door is in the
desired UP position press
and release the Adjustment
Button. The garage door
opener lights will fl ash
twice and the DOWN
Button will begin to fl ash.
1.5 Once the door is in the
desired DOWN position
press and release the
Adjustment Button. The
garage door opener lights
will fl ash twice and the UP
Button will begin to fl ash.
1.2 Press and hold the UP Button until the door is
in the desired UP position.
NOTE: The UP and DOWN Buttons can be used to
move the door up and down as needed.
1.4 Press and hold the DOWN Button until the door
is in the desired DOWN position.
NOTE: The UP and DOWN Buttons can be used to
move the door up and down as needed.
1.6 Press and release the UP Button. When the door
travels to the programmed UP position, the
DOWN Button will begin to fl ash.
1.7 Press and release the DOWN Button. The door
will travel to the programmed DOWN position.
Programming is complete.
If the garage door opener lights are fl ashing 5
times during the steps for Program the Travel, the
programming has timed out. If the garage door opener
lights are fl ashing 10 times during the steps for Program
the Travel, the safety reversing sensors are misaligned
or obstructed. When the sensors are aligned and
unobstructed, cycle the door through a complete up
and down cycle using the remote control or the UP and
DOWN buttons. Programming is complete. If you are
unable to operate the door up and down, repeat the steps
for Program the Travel.
11
Page 12

Adjustment
2
Test the Safety Reversal System
2
Without a properly installed safety reversal system,
persons (particularly small children) could be
SERIOUSLY INJURED or KILLED by a closing garage
door.
• Safety reversal system MUST be tested every
month.
• After ANY adjustments are made, the safety reversal
system MUST be tested. Door MUST reverse on
contact with 1-1/2" high (3.8 cm) object (or 2x4 laid
fl at) on the fl oor.
2.1 With the door fully open, place a 1-1/2 inch
(3.8 cm) board (or a 2x4 laid fl at) on the fl oor,
centered under the garage door.
Test the Protector System
3
Without a properly installed safety reversing sensor,
persons (particularly small children) could be
SERIOUSLY INJURED or KILLED by a closing garage
door.
®
3.1 Open the door. Place the garage door opener
carton in the path of the door.
3.2 Press the remote control push button to close
the door. The door will not move more than
an inch (2.5 cm), and the garage door opener
lights will fl ash 10 times.
2.2 Press the remote control push button to close
the door. The door MUST reverse when it makes
contact with the board.
If the door stops and does not reverse on the obstruction,
increase the down travel (see Adjustment Step 1).
Repeat the test. When the door reverses upon contact
with the 1-1/2 inch board, remove the board and open/
close the door 3 or 4 times to test the adjustment.
If the test continues to fail, call a trained door systems
technician.
The garage door opener will not close from a remote
control if the LED in either safety reversing sensor is off
(alerting you to the fact that the sensor is misaligned or
obstructed).
If the garage door opener closes the door when the
safety reversing sensor is obstructed (and the sensors
are no more than 6 inches [15 cm] above the fl oor), call
for a trained door systems technician.
12
Page 13

Maintenance
EVERY MONTH
• Manually operate door. If it is unbalanced or binding,
call a trained door systems technician.
• Check to be sure door opens and closes fully. Adjust if
necessary, page 11.
• Test the safety reversal system. Adjust if necessary,
page 12.
EVERY YEAR
• Oil door rollers, bearings and hinges. The garage door
opener does not require additional lubrication. Do not
grease the door tracks.
EVERY TWO TO THREE YEARS
• Use a rag to wipe away the existing grease from the
garage door opener rail. Reapply a small layer of white
lithium grease to the top and underside of the rail
surface where the trolley slides.
The Remote Control Battery
To prevent possible SERIOUS INJURY or DEATH:
• NEVER allow small children near batteries.
• If battery is swallowed, immediately notify doctor.
To reduce risk of fi re, explosion or chemical burn:
• Replace ONLY with 3V CR2032 coin batteries.
• DO NOT recharge, disassemble, heat above 212°F
(100°C) or incinerate.
The Lithium batteries should produce power for up to 3
years. If the battery is low, the remote control’s LED will
not fl ash when the button is pressed. To replace battery,
pry open the case fi rst in the middle (1), then at each
side (2 and 3) with the visor clip. Insert battery positive
side up.
Replace the batteries with only 3V CR2032 coin cell
batteries. Dispose of old batteries properly.
3
1
2
NOTICE: To comply with FCC and/or Industry Canada (IC) rules, adjustment or modifi cations of this transceiver are prohibited. THERE ARE NO USER
SERVICEABLE PARTS. Any changes or modifi cations not expressly approved by the party responsible for compliance could void the user’s authority to operate
the equipment.
This device complies with Part 15 of the FCC rules and IC RSS-210. Operation is subject to the following two conditions: (1) this device may not cause harmful
interference, and (2) this device must accept any interference received, including interference that may cause undesired operation.
This Class B digital apparatus complies with Canadian ICES-003.
AVIS : Les règles de la FCC et/ou d’Industrie Canada (IC) interdisent tout ajustement ou toute modifi cation de ce récepteur. IL N’EXISTE AUCUNE PIÈCE
SUSCEPTIBLE D’ÊTRE ENTRETENUE PAR L’UTILISATEUR. Tout changement ou toute modifi cation non expressément approuvé par la partie responsable de
la conformité peut avoir pour résultat d’annuler l’autorité de l’utilisateur de faire fonctionner l’équipement.
Cet appareil est conforme aux dispositions de la partie 15 du règlement de la FCC et de la norme IC RSS-210. Son utilisation est assujettie aux deux conditions
suivantes : (1) ce dispositif ne peut causer des interférences nuisibles, et (2) ce dispositif doit accepter toute interférence reçue, y compris une interférence
pouvant causer un fonctionnement non souhaité.
Cet appareil numérique de la classe B est conforme à la norme NMB-003 du Canada.
13
Page 14

Troubleshooting
Diagnostic Chart
Your garage door opener is programmed with self-diagnostic capabilities. The UP and DOWN arrows on the garage
door opener will fl ash the diagnostic codes.
DIAGNOSTIC CODE SYMPTOM SOLUTION
Up arrow
Flash(es)
11
12
13
14
15
16
2 1-5 No movement, or sound. Replace logic board.
32
Down arrow
Flash(es)
The garage door opener
will not close and the
light bulbs fl ash.
The garage door opener
will not close and the
light bulbs fl ash.
The door control will not
function.
The garage door opener
will not close and the
light bulbs fl ash.
Door moves 6-8" (15-20
cm) stops or reverses.
No movement, only a
single click.
Opener hums for 1-2
seconds no movement.
Door coasts after it has
come to a complete stop.
Unable to set the travel
or retain position.
Safety sensors are not installed, connected, or wires
may be cut. Inspect sensor wires for a disconnected
or cut wire.
There is a short or reversed wire for the safety
sensors. Inspect safety sensor wire at all staple and
connection points, replace wire or correct as needed.
The wires for the door control are shorted or the door
control is faulty. Inspect door control wires at all
staple and connection points, replace wire or correct
as needed.
Safety sensors are misaligned or were momentarily
obstructed. Realign both sensors to ensure both LEDs
are steady and not fl ickering. Make sure nothing is
hanging or mounted on the door that would interrupt
the sensor’s path while closing.
Manually open and close the door. Check for binding
or obstructions, such as a broken spring or door lock,
correct as needed. Check wiring connections at travel
module and at the logic board. Replace travel module
if necessary.
Manually open and close the door. Check for binding
or obstructions, such as a broken spring or door lock,
correct as needed. Replace logic board if necessary.
Manually open and close the door. Check for binding
or obstructions, such as a broken spring or door lock,
correct as needed. Replace motor if necessary.
Program travel to coasting position or have door
balanced by a trained door systems technician.
Check travel module for proper assembly, replace if
necessary.
14
Page 15

Troubleshooting
Diagnostic Chart
DIAGNOSTIC CODE SYMPTOM SOLUTION
Up arrow
Flash(es)
4 1-4
45
46
My remote control will not activate the garage door:
• Verify the lock feature is not activated on the door
control.
• Reprogram the remote control.
• If the remote control will still not activate the door check
the diagnostic codes to ensure the garage door opener
is working properly.
My door will not close and the light bulbs blink on my
motor unit:
The safety reversing sensor must be connected and
aligned correctly before the garage door opener will move
in the down direction.
• Verify the safety sensors are properly installed, aligned
and free of any obstructions.
Down arrow
Flash(es)
Door is moving stops or
reverses.
Opener runs approximately
6-8" (15-20 cm), stops and
reverses.
The garage door opener
will not close and the light
bulbs fl ash.
Manually open and close the door. Check for
binding or obstructions, such as a broken spring
or door lock, correct as needed. If the door is
binding or sticking contact a trained door systems
technician. If door is not binding or sticking attempt
to reprogram travel (refer to page 11).
Communication error to travel module. Check
travel module connections, replace travel module if
necessary.
Safety sensors are misaligned or were momentarily
obstructed. Realign both sensors to ensure both
LEDs are steady and not fl ickering. Make sure
nothing is hanging or mounted on the door that
would interrupt the sensor’s path while closing.
My garage door opener light(s) will not turn off when the
door is open:
The garage door opener is equipped with a feature that
turns the light on when the safety reversing sensors have
been obstructed. These features can be disabled using the
door control, see page 7.
My neighbor’s remote control opens my garage door:
Erase the memory from your garage door opener and
reprogram the remote control(s).
My vehicle’s Homelink
garage door opener:
Compatability BridgeTM (not included) may be necessary
for certain vehicles. Visit bridge.LiftMaster.com to fi nd out
if a Bridge is needed.
®
is not programming to my
15
Page 16

3
2
7
1
6a
6b
Repair Parts
NOTE: For additional parts not shown, visit
LiftMaster.com to download or print the full owner’s
manual. The products illustrated in the instructions are
for reference. Your product may look different.
DESCRIPTION
1 Light Lens
Models 8065/8075 108D36-2
Models 8155/8165 108D79
Model 8160 041A7562
2 Logic Board
Models 8155/8065/8075/8165 045ACT
Model 8160 045DCT
3 Travel Module
Models 8155/8065/8075/8165 041D7742-7
Model 8160 041A7114-7
4 3V CR2032 Lithium Battery (Remote Control) 10A20
5 Safety Sensor Kit with receiving and sending
sensors with 3 feet (.9 m) 2-conductor wire
6a Motor - Models 8155/8065/8075/8165 041D7740
6b Motor with Travel Module - Model 8160 041D1739-1
7 Capacitor - Models 8155/8065/8075/8165 30B532
PART
NUMBER
41A5034
5
4
16
Page 17

Accessories
828LM
829LM
893MAX
823LM
LiftMaster® Internet Gateway:
Internet enabled accessory which
connects to the computer and allows
you to monitor and control garage door
openers and lighting accessories enabled
®
technology.
by MyQ
Garage and Gate Monitor:
Monitor open/closed status for up to 4
MyQ® compatible garage door openers
or gate operators and close them from
anywhere in the home.
3-Button MAX Remote Control:
Compatible with LiftMaster® garage
door openers manufactured since 1993.
Includes visor clip.
Remote Light Switch:
Automatically control your lights
using your garage door opener, a
Security+ 2.0® remote control or a
LiftMaster® Internet Gateway. Simply
replaces your current wired wall switch.
374UT
877MAX
975LM
Mini Universal Remote Control:
The Mini Universal Remote Control can
be programmed to activate up to two
products, such as a garage door opener,
MyQ® light controls, gate operator, or
commercial door operator.
MAX Wireless Keyless Entry:
For use outside of the home to enable
access to the garage using a 4-digit PIN.
Works with ALL LiftMaster® openers from
1993- present.
Laser Garage Parking Assist:
Laser enables homeowners to precisely
park vehicles in the garage.
Registration
Register your garage door opener to receive
updates and offers from LiftMaster
Take a photo of the camera icon
including the points ( ).
Send it in by texting
the photo to 71403 (US)
or visit www.liftmaster.photo (Global)
OR register online at
17
www.prodresgister.com/liftmaster
Page 18

Warranty
LIFTMASTER® LIMITED WARRANTY
LiftMaster (“Seller”) warrants to the first retail purchaser of this product, for the residence in which this product
is originally installed, that it is free from defects in materials and/or workmanship for a specific period of time as
defined below (the “Warranty Period”). The warranty period commences from the date of purchase.
WARRANTY PERIOD
Parts Motor Accessories Belt
8155 1 year 4 years 1 year 10 years
8065 8075 8160 8165 1 year 4 years 1 year -
The proper operation of this product is dependent on your compliance with the instructions regarding installation,
operation, and maintenance and testing. Failure to comply strictly with those instructions will void this limited
warranty in its entirety.
If, during the limited warranty period, this product appears to contain a defect covered by this limited warranty,
call 1-800-528-9131, toll free, before dismantling this product. You will be advised of disassembly and shipping
instructions when you call. Then send the product or component, pre-paid and insured, as directed to our service
center for warranty repair. Please include a brief description of the problem and a dated proof-of-purchase receipt
with any product returned for warranty repair. Products returned to Seller for warranty repair, which upon receipt
by Seller are confirmed to be defective and covered by this limited warranty, will be repaired or replaced (at
Seller’s sole option) at no cost to you and returned pre- paid. Defective parts will be repaired or replaced with
new or factory-rebuilt parts at Seller’s sole option. [You are responsible for any costs incurred in removing and/or
reinstalling the product or any component].
ALL IMPLIED WARRANTIES FOR THE PRODUCT, INCLUDING BUT NOT LIMITED TO ANY IMPLIED
WARRANTIES OF MERCHANTABILITY AND FITNESS FOR A PARTICULAR PURPOSE, ARE LIMITED IN
DURATION TO THE APPLICABLE LIMITED WARRANTY PERIOD SET FORTH ABOVE FOR THE RELATED
COMPONENT(S), AND NO IMPLIED WARRANTIES WILL EXIST OR APPLY AFTER SUCH PERIOD. Some States
and Provinces do not allow limitations on how long an implied warranty lasts, so the above limitation may
not apply to you. THIS LIMITED WARRANTY DOES NOT COVER NON-DEFECT DAMAGE, DAMAGE CAUSED BY
IMPROPER INSTALLATION, OPERATION OR CARE (INCLUDING, BUT NOT LIMITED TO ABUSE, MISUSE,
FAILURE TO PROVIDE REASONABLE AND NECESSARY MAINTENANCE, UNAUTHORIZED REPAIRS OR ANY
ALTERATIONS TO THIS PRODUCT), LABOR CHARGES FOR REINSTALLING A REPAIRED OR REPLACED UNIT,
REPLACEMENT OF CONSUMABLE ITEMS (E.G., BATTERIES IN REMOTE CONTROL TRANSMITTERS AND LIGHT
BULBS), OR UNITS INSTALLED FOR NON-RESIDENTIAL USE. THIS LIMITED WARRANTY DOES NOT COVER
ANY PROBLEMS WITH, OR RELATING TO, THE GARAGE DOOR OR GARAGE DOOR HARDWARE, INCLUDING
BUT NOT LIMITED TO THE DOOR SPRINGS, DOOR ROLLERS, DOOR ALIGNMENT OR HINGES. THIS LIMITED
WARRANTY ALSO DOES NOT COVER ANY PROBLEMS CAUSED BY INTERFERENCE. UNDER NO
CIRCUMSTANCES SHALL SELLER BE LIABLE FOR CONSEQUENTIAL, INCIDENTAL OR SPECIAL DAMAGES
ARISING IN CONNECTION WITH USE, OR INABILITY TO USE, THIS PRODUCT. IN NO EVENT SHALL SELLER’S
LIABILITY FOR BREACH OF WARRANTY, BREACH OF CONTRACT, NEGLIGENCE OR STRICT LIABILITY EXCEED
THE COST OF THE PRODUCT COVERED HEREBY. NO PERSON IS AUTHORIZED TO ASSUME FOR US ANY
OTHER LIABILITY IN CONNECTION WITH THE SALE OF THIS PRODUCT.
Some states and provinces do not allow the exclusion or limitation of consequential, incidental or special
damages, so the above limitation or exclusion may not apply to you. This limited warranty gives you specific legal
rights, and you may also have other rights, which vary from state to state and province to province.
114A4415E
© 2016, LiftMaster
All Rights Reserved
Page 19

GUIDE DE L’UTILISATEUR
POUR RÉSIDENCES SEULEMENT
Ouvre-porte de garage de série CONTRACTOR
MODÈLES 8155 • 8160 • 8165 • 8065 • 8075
• Veuillez lire attentivement ce guide de même que la documentation de sécurité
incluse!
• La porte NE SE FERMERA PAS si le Système Protector® n’est pas branché et
réglé correctement.
• Des vérifications périodiques de l’ouvre-porte de garage sont requises pour
garantir un fonctionnement sécuritaire du dispositif.
• Cet ouvre-porte de garage est compatible UNIQUEMENT avec les accessoires
MyQ® et Security+ 2.0®.
• NE PAS installer sur une porte rigide dans le cas de dispositifs ou fonctions
permettant la fermeture non surveillée. Les dispositifs et fonctions non surveillés
doivent être utilisés UNIQUEMENT avec des portes articulées.
• Apposer les étiquettes d’avertissement incluses à l’endroit indiqué sur l’étiquette.
Enregistrez votre ouvre-porte de garage pour recevoir des
mises à jour et des offres de LiftMaster
Prenez une photo de l’icône d’appareil-
photo, y compris les points ( ).
Envoyez la photo par message
textuel à 71403 (É.-U.)
ou allez à www.liftmaster.photo (mondial)
LiftMaster.com
LiftMaster
845 Larch Avenue
Elmhurst, Illinois 60126-1196
Page 20

Matières
ATTENTIONATTENTION
Importantes Consignes de Sécurité ..................... 3-4
Fonctionnement .............................................. 5
Utilisation de la commande de porte ................... 6
Programmation - Commande de porte à boutons-
poussoirs ................................................... 6
Programmation - Panneau de commande
multifonction ............................................... 7
Programmation - Télécommande ....................... 8
Pour effacer tous le codes ............................... 8
Ouverture manuelle de la porte ......................... 9
Réglage ......................................................10
Programmation des courses ............................ 11
Essai du système d’inversion
de sécurité .................................................12
Essai du Protector System
Entretien......................................................13
Dépannage ...............................................14-15
Pièces de Rechange ........................................ 16
Accessories .................................................. 17
Enregistrement .............................................. 17
Garantie ...................................................... 18
®
............................. 12
.
Revue des symboles de sécurité et
des mots de signalement
Cet ouvre-porte de garage a été conçu et mis à l’essai
dans le but d’offrir un service sûr à condition qu’il soit
installé, utilisé, entretenu et mis à l’essai en stricte
conformité avec les instructions et les avertissements
contenus dans le présent manuel.
Lorsque vous verrez ces symboles de sécurité et ces
mots de signalement sur les pages suivantes, ils vous
aviseront de la possibilité de blessures graves ou de
mort si vous ne vous conformez pas aux avertissements
qui les accompagnent. Le danger peut être de source
mécanique ou provenir d’un choc électrique. Lisez
attentivement les avertissements.
Mécanique
Électrique
Lorsque vous verrez ce mot de signalement sur les pages
suivantes, il vous avisera de la possibilité de dommages
à votre porte de garage ou ouvre-porte de garage, ou les
deux, si vous ne vous conformez pas aux énoncés de mise
en garde qui l’accompagnent. Lisez-les attentivement.
Veuillez noter les renseignements
suivants pour référence ultérieure :
Numéro de série :
Date d’achat :
Fonctionnement non surveillé
La fonction de temporisation de fermeture (TTC), l’application
de commande MyQ® pour téléphone intelligent, le dispositif
de surveillance de porte de garage et de barrière MyQ® sont
des exemples de fermeture non surveillée; ces fonctions
doivent être utilisées UNIQUEMENT avec des portes
articulées. Tout dispositif ou toute fonction qui permet
la fermeture de la porte sans visibilité directe de celle-ci
constitue une fermeture non surveillée. La fonction de
temporisation de fermeture (TTC), la commande MyQ® pour
téléphone intelligent et tous les autres dispositifs MyQ®
doivent être utilisés UNIQUEMENT avec des portes articulées.
L’INFORMATION DE CONTACT
Laissez ce Guide de l’utilisateur au propriétaire.
Les illustrations de ce mode d’emploi ne servent qu’à titre de référence. Votre appareil peut avoir un aspect différent.
2
Page 21

Importantes Consignes de Sécurité
AVERTISSEMENT
IMPORTANTES INSTRUCTIONS
CONCERNANT LA POSE
AVERTISSEMENT
Pour réduire le risque de BLESSURES
GRAVES, voire MORTELLES :
1. LIRE ET SUIVRE TOUS LES AVERTISSEMENTS
ET INSTRUCTIONS.
2. Poser l’ouvre-porte de garage UNIQUEMENT sur
une porte de garage bien équilibrée et lubrifi ée.
Une porte mal équilibrée peut ne PAS inverser
sa course en cas de besoin et peut entraîner des
BLESSURES GRAVES, voire MORTELLES.
3. TOUTES les réparations aux câbles, ensembles de
ressort et autres ferrures de montage DOIVENT
être confi ées à un technicien formé en systèmes
de porte AVANT de poser l’ouvre-porte.
4. Désactiver TOUTES les serrures et retirer TOUTES
les cordes raccordées à la porte de garage
AVANT de poser l’ouvre-porte afi n d’éviter un
emmêlement.
5. Poser l’ouvre-porte de garage à au moins 2,13 m
(7 pi) au-dessus du sol.
6. Laisser le déverrouillage de secours à portée de
main, mais à au moins 1,83 m (6 pi) du sol et
éviter tout contact avec des véhicules afi n d’éviter
tout déclenchement accidentel.
7. Ne JAMAIS raccorder l’ouvre-porte de garage
à une source de courant avant d’avoir reçu
l’instruction de le faire.
8. Ne JAMAIS porter de montres, bagues ou
vêtements amples durant la pose ou l’entretien
de l’ouvre-porte. Ils pourraient être happés par la
porte de garage ou les mécanismes de l’ouvreporte.
9. Poser la commande de porte murale :
• bien en vue de la porte de garage.
• hors de la portée des enfants à une hauteur
minimum de 5 pieds (1,5 m).
• à l’écart de TOUTES les pièces mobiles de la
porte.
10. Placer l’étiquette d’avertissement de prise au piège
sur le mur à côté de la commande de la porte de
garage.
11. Placer l’étiquette d’essai d’inversion de sécurité/
ouverture manuelle bien en vue sur le côté intérieur
de la porte de garage.
12. Au terme de la pose, faire l’essai du système
d’inversion de sécurité. La porte DOIT remonter au
contact d’un objet d’une hauteur de 1-1/2 po (3,8
cm) (ou un 2 x 4 posé à plat) sur le sol.
13. Pour éviter des BLESSURES GRAVES ou la MORT
par électrocution, débranchez TOUTE alimentation
électrique ainsi que les piles AVANT TOUTE
intervention.
14. NE PAS installer sur une porte rigide dans le cas
de dispositifs ou fonctions permettant la fermeture
non surveillée. Les dispositifs et fonctions non
surveillés doivent être utilisés UNIQUEMENT avec
des portes articulées.
15.
CONSERVER CES
INSTRUCTIONS.
REMARQUE : Pour des instructions d’installation complètes, allez sur le site LiftMaster.com pour imprimer en entier le
Manuel d’instructions.
3
Page 22

Importantes Consignes de Sécurité
AVERTISSEMENT
IMPORTANTES CONSIGNES DE SÉCURITÉ
AVERTISSEMENT
Pour réduire le risque de BLESSURES
GRAVES, voire MORTELLES :
1. LIRE ET SUIVRE TOUS LES AVERTISSEMENTS
ET INSTRUCTIONS.
2. Gardez EN TOUT TEMPS la télécommande hors
de portée des enfants. Ne JAMAIS laisser les
enfants faire fonctionner les télécommandes ou
les boutonspoussoirs de la commande de porte
ou jouer avec ceux-ci.
3. Actionner la porte de garage UNIQUEMENT
lorsqu’on peut la voir clairement, qu’elle est bien
réglée et qu’il n’y a aucune obstacle à la course de
la porte.
4. Gardez TOUJOURS la porte de garage en vue
TOUTE personne ou tout objet à l’écart de la
porte jusqu’à sa fermeture complète. NE LAISSEZ
PERSONNE TRAVERSER LA TRAJECTOIRE DE LA
PORTE EN MOUVEMENT.
5. PERSONNE NE DOIT PASSER SOUS UNE PORTE
ARRÊTÉE OU PARTIELLEMENT OUVERTE.
6. Si possible, utilisez la poignée de déclenchement
d’urgence pour dégager le chariot UNIQUEMENT
lorsque la porte de garage est FERMÉE. Faites
preuve de prudence lorsque vous utilisez cette
poignée lorsque la porte est ouverte. Des ressorts
affaiblis ou brisés ou une porte déséquilibrée
peuvent entraîner la chute rapide et/ou inattendue
de la porte et accroître le risque de BLESSURES
GRAVES, voire MORTELLES.
7. N’utilisez JAMAIS la poignée de déclenchement
d’urgence à moins que rien ou personne
n’obstrue la trajectoire de la porte.
8. N’utilisez JAMAIS la poignée pour ouvrir ou
fermer la porte de garage. Il y a risque de chute si
le noeud de la corde se défait.
9. Après avoir effectué quelque réglage que ce soit,
on DOIT faire l’essai du système d’inversion de
sécurité.
10. Le système d’inversion de sécurité DOIT être
testé chaque mois. La porte de garage DOIT
remonter au contact d’un objet d’une hauteur de
3,8 cm (1-1/2 po) (ou un 2 x 4 posé à plat) du
sol. À défaut de régler l’ouvre-porte de garage
correctement, le risque de BLESSURE GRAVE ou
de MORT ACCIDENTELLE sera accru.
11. LA PORTE DE GARAGE DOIT TOUJOURS ÊTRE
CORRECTEMENT ÉQUILIBRÉE. Une porte mal
équilibrée peut ne PAS inverser sa course en
cas de besoin et peut entraîner des BLESSURES
GRAVES, voire MORTELLES.
12. TOUTES les réparations sur les câbles, les
ressorts et la quincaillerie, et de TOUT ce qui se
trouve sous une tension EXTRÊME, DOIVENT
être confi ées à des techniciens formés à cet effet.
13. TOUJOURS mettre l’ouvre-porte de garage hors
tension AVANT d’effectuer quelque réparation
que ce soit ou d’enlever des couvercles.
14. Ce système opérateur est équipé d’un dispositif
de fonctionnement sans surveillance. La porte
est susceptible de se mettre en mouvement
inopinément. NE LAISSEZ PERSONNE
TRAVERSER LA TRAJECTOIRE DE LA PORTE EN
MOUVEMENT.
15. NE PAS installer sur une porte rigide dans le
cas de dispositifs ou fonctions permettant la
fermeture non surveillée. Les dispositifs et
fonctions non surveillés doivent être utilisés
UNIQUEMENT avec des portes articulées.
16.
CONSERVER CES
INSTRUCTIONS.
4
Page 23

Fonctionnement
Votre porte de garage est dotée de fonctions qui vous
offrent un meilleur contrôle du fonctionnement de votre
porte de garage.
ALERT2CLOSE (ALERTE DE FERMETURE)
La fonction d’alerte de fermeture fournit une alerte
visuelle et audible vous avertissant de la fermeture d’une
porte non surveillée.
MINUTERIE DE FERMETURE (TTC)
La minuterie de fermeture ferme automatiquement la
porte après une période déterminée qu’on peut régler
en utilisant la commande de porte avec TTC (Modele
881LMW ou 880LM). Avant et pendant la fermeture de la
porte, l’ouvre-porte de garage émet des bips et l’éclairage
se met à clignoter.
®
MyQ
La technologie MyQ® utilise un signal de 900 MHz pour
faciliter une transmission dans les deux sens entre
l’ouvre-porte de garage et les accessoires homologués
MyQ®. Votre ouvre-porte de garage est compatible avec
un maximum de 16 accessoires MyQ®.
TÉLÉCOMMANDES ET COMMANDES DE PORTE
SECURITY+
2.0
®
L’ouvre-porte de garage a été programmé en usine
de manière à fonctionner avec la télécommande, qui
change à chaque utilisation, accédant au hasard à plus
de 100 milliards de nouveaux codes. Compatible avec les
accessoires MyQ® et Security+ 2.0
®
, voir page 17.
REMARQUE : Les anciens telecommandes, commandes
de porte LiftMaster, et les produits de tiers ne son pas
compatibles.
Accessories
Security+ 2.0
®
CAPACITÉ DE MISE EN
MÉMOIRE
Télécommandes Jusqu’à 12
Commande de la
porte
Ouvre-porte sans fi l
Jusqu’à 2 panneaux Smart
Control ou 4 commandes de
portes Security+ 2.0
®
Jusqu’à 1
et sans clé
THE PROTECTOR SYSTEM® (CAPTEURS D’INVERSION
DE SÉCURITÉ)
Lorsqu’il est bien connecté et bien aligné, le capteur
d’inversion détectera un obstacle sur le passage de son
faisceau infrarouge. Si un obstacle brise le faisceau
infrarouge pendant que la porte se ferme, la porte
s’arrêtera et remontera jusqu’à la position entièrement
ouverte et les lumières de l’ouvre-porte clignoteront
10 fois. Si la porte est complètement ouverte et que
les capteurs d’inversion ne sont pas installés ou sont
mal alignés, la porte ne se ferme pas à partir d’une
télécommande. Cependant, vous pouvez fermer la porte
si vous maintenez le bouton de la commande de porte
ou la commande de télédéverrouillage jusqu’à ce que la
porte soit totalement fermée. Le capteur d’inversion n’a
aucun effet sur le cycle d’ouverture.
CONSERVATION DE L’ÉNERGIE
Pour une effi cacité énergétique, l’ouvre-porte de
garage se met en mode de veille lorsque la porte est
complètement fermée. Le mode de veille ferme l’ouvreporte de garage jusqu’à ce qu’il soit activé. Le mode
veille est séquencé à l’ampoule d’éclairage de l’ouvreporte de garage; lorsque l’ampoule s’éteint, le témoin
DEL du capteur s’éteint et chaque fois que l’éclairage
de l’ouvre-porte de garage s’allume, le témoin DEL du
capteur s’allume. L’ouvre-porte de garage ne se mettra
en mode veille que lorsqu’il a achevé cinq cycles de mise
sous tension.
ÉCLAIRAGE
Les ampoules de l’ouvre-porte de garage s’allument
lorsque ce dernier est initialement branchée au courant;
l’alimentation est rétablie, âpres un interruption ou
lorsque l’ouvre-porte de garage est active.
Les lumières s’eteindront automatiquement âpres
4-1/2 minutes. Une ampoule à incandescence A19 (100
watts, au maximum) ou, pour une effi cacité énergétique
maximale, une lampe fl ourescente compacte de 26 W
(équivalant à 100 W).
Fonction D’Éclairage
Fonction d’eclairage s’allume quand quelqu’un entre par
la porte de garage ouverte et que le faisceau infrarouge
du capteur d’inversion de sécurité est défectueux. Pour
un contrôle supplémentaire des ampoules de votre ouvreporte de garage.
UTILISATION DE VOTRE OUVRE-PORTE DE GARAGE
L’ouvre-porte de garage peut être activé par le biais d’une
commande de porte murale, une télécommande, ou
une commande de télédéverrouillage. Lorsque la porte
est fermée et que l’ouvre-porte de garage est activé, la
porte s’ouvrira. Si la porte détecte un obstacle ou est
interrompue lors de son ouverture, elle s’arrêtera. Si le
porte n’est pas fermée et que l’ouvre-porte de garage
est activé, elle fermer. Si l’ouvre-porte de garage détecte
un obstacle pendant la fermeture, la porte inversera sa
course. L’obstacle interrompt le faisceau du détecteur,
les lumières de l’ouvre-porte clignoteront pendant 10
secondes. Cependant, vous pouvez fermer la porte si
vous maintenez le bouton de la commande de porte ou la
commande de télédéverrouillage jusqu’à ce que la porte
soit totalement fermée. Le capteur d’inversion n’a aucun
effet sur le cycle d’ouverture. Le détecteur inverseur de
sécurité doit être connecté et aligné correctement avant
que l’ouvre-porte de garage n’entame le mouvement de
fermeture.
5
Page 24

Fonctionnement
Utilisation de la commande de porte
SYNCHRONISATION DE LA COMMANDE DE PORTE
Pour synchroniser la commande de porte et l’ouvreporte de garage, appuyez sur la barre-poussoir ou
bouton-poussoir jusqu’à ce que l’ouvre-porte de
garage s’active (cela peut prendre jusqu’à 3 pressions).
Vérifi ez la commande de la porte en appuyant sur la
barre-poussoir ou bouton-poussoir, chaque pression
sur la barre-poussoir ou bouton-poussoir activera
l’ouvre-porte de garage.
Barre de poussée
Bouton-poussoir
TÉMOIN
D’ENTRETIEN
DEL
Bouton
« LEARN »
(d’apprentissage)
Bouton « LOCK »
(verrouillage)
DEL Commande
Bouton « LIGHT »
(éclairage)
Bouton
d'éclairage
VERROUILLAGE
La fonction de LOCK (verrouillage) est conçue pour
empêcher l’activation de l’ouvre-porte de garage à partir
des télécommandes tout en permettant l’activation à
partir de la commande de porte et de télédéverrouillage.
Cette fonction est utile pour avoir l’esprit en paix lorsque
la maison est vide (p. ex., pendant les vacances).
ÉCLAIRAGE AUTOMATIQUE
Fonction d’eclairage
L’éclairage s’allume quand quelqu’un entre par la porte
de garage ouverte et que le faisceau infrarouge du
capteur d’inversion de sécurité est défectueux.
SYSTÈME D’ALERTE D’ENTRETIEN (MAS)
Cette fonction permet au propriétaire de s’assurer
que l’ouvre-porte de garage restera en bon état de
fonctionnement. Lorsque l’ouvre-porte de garage doit
faire l’objet d’un entretien (après environ 4500 cycles
d’ouverture-fermeture), les DEL de commande (jaune)
et d’entretien (rouge) commenceront à clignoter en
alternance. La fonction d’alerte d’entretien est réglée en
usine à la position de désactivation, elle peut être activée
au moment de l’installation. Contactez le concessionnaire
chargé de l’installation.
Programmer - Commande de porte à
boutons-poussoirs
BARRE DE POUSSÉE OU BOUTON-POUSSOIR
Appuyez sur la touche-poussoir ou bouton-poussoir pour
ouvrir ou fermer la porte.
BOUTON LIGHT (ÉCLAIRAGE)
Appuyez sur le bouton d’éclairage pour allumer ou
éteindre l’éclairage de l’ouvreporte de garage. Lorsque
les feux sont allumés, ils resteront ainsi jusqu’à ce que le
bouton d’éclairage soit enfoncé à nouveau ou que l’ouvreporte de garage soit activé. Une fois que l’ouvre-porte de
garage est activée, l’éclairage s’éteint après la période de
temps spécifi ée (le réglage d’usine est de 4-1/2 minutes).
Le bouton LIGHT (d’éclairage) ne contrôle pas l’éclairage
lorsque la porte est en mouvement.
Les fonctions suivantes sont accessibles sur en
soulevant la barre-poussoir (Panneau mural d’ouvreporte de garage a multiple fonctions uniquement) :
APPRENTISSAGE D’UN DISPOSITIF
On peut programmer toutes les télécommandes compatibles
ou les commandes de télédéverrouillage pour l’ouvre-porte
de garage en accédant au menu et de navigationen appuyant
sur la touche LEARN (apprentissage) sur le panneau de
commande multifonction.
Fonctions
Pour
programmer à
télécommande
ou Ouvre-porte
sans fi l et sans
clé
6
Bouton-poussoir
Bouton
d'éclairage
1. Appuyez sur le bouton d’éclairage
et le bouton-poussoir et gardez-les
enfoncés jusqu’à ce que le témoin
DEL du boutonpoussoir commence
à clignoter.
2. Télécommande: Appuyez sur le
bouton de la télécommande qui fera
fonctionner votre porte de garage.
Émetteur mural à code: Saisissez
un numéro d’identifi cation
personnelle (NIP) à quatre
chiffres de votre choix sur le pavé
numérique. Appuyer ensuite sur le
bouton ENTER (entrée).
L’éclairage de l’ouvre-porte de garage
se mettra à clignoter (ou deux clics se
feront entendre) lorsque le code a été
programmé.
Page 25

Fonctionnement
Programmer - Panneau de commande multifonction
Fonctions
LOCK
(Verrouillage)
LIGHT
(Éclairage)
Pour programmer à
télécommande ou
Ouvre-porte sans fi l et
sans clé
Système d’alerte
d’entretien (MAS)
Témoin
d’entretien DEL
Bouton
« LEARN »
Bouton
« LOCK »
REMARQUE : Vos télécommandes ne fonctionnent PAS lorsque le mode de verrouillage « LOCK » est actif;
toutefois, la fonction d’entrée sans clé vous permet quand même d’accéder à votre garage.
Pour activer : Maintenez le bouton « LOCK » enfoncé pendant deux secondes. Le témoin DEL de la
commande clignotera tant que la fonction de verrouillage est activée et la télécommande de poche ne fera
pas fonctionner votre porte pour le moment.
Pour désactiver : Maintenez le bouton « LOCK » enfoncé pendant deux secondes. Le témoin DEL de la
commande s’arrête de clignoter et le fonctionnement normal reprend.
Pour modifier la durée d’allumage de l’éclairage de l’ouvre-porte de garage (la durée par défaut est
de 4 1/2 minutes) : Appuyez sur le bouton « LOCK » (verrouillage) et le maintenir enfoncé jusqu’à ce
que l’éclairage de l’ouvre-porte de garage clignote.* Les lampes électriques de l’ouvre-porte de garage
indiqueront alors la durée de l’eclairage en clignotant jusqu’à 4 fois (reportez-vous à la table ci-dessous).
NOMBRE DE CLIGNOTEMENTS DE L’ÉCLAIRAGE DE
Pour changer l’heure la durée de l’éclairage, répéter les étapes ci-dessus jusqu’à ce que les lumières
clignotent, ce qui indique le délai de votre choix.
REMARQUE : Le réglage d’usine est activé.
Cette fonction allume les lampes de l’ouvre-porte de garage quand le faisceau entre les inverseurs de
sécurité est interrompu.
Désactiver : Commencez en maintenant l’éclairage de l’ouvre-porte de garage éteint. Appuyez et gardez
le bouton « LIGHT » (éclairage) enfoncé pour allumer, continuez à le maintenir enfoncé jusqu’à ce que la
lumière s’éteigne.*
Activer : Commencez en maintenant l’éclairage de l’ouvre-porte de garage allumé. Appuyez et gardez le
bouton « LIGHT » (éclairage) enfoncé pour éteindre la lumière, continuez à le maintenir enfoncé jusqu’à
ce qu’elle s’allume.*
* Environ 10 secondes
1. Enfoncer et relâcher deux fois le bouton d’apprentissage sur la commande de porte. La DEL de la
2. Télécommande : Appuyer sur le bouton de la télécommande qui fera fonctionner votre porte de garage.
L’éclairage de l’ouvre-porte de garage clignote (ou deux déclics se font entendre) et la DEL de commande
cesse de clignoter une fois que le code a été programmé.
Activer-désactiver
REMARQUE : Le réglage d’usine est désactivé.
Appuyez sur le bouton « LEARN » (apprentissage) et le maintenir enfoncé. Appuyer ensuite sur le bouton
« LIGHT » (éclairage). Le témoin DEL de l’entretien fera clignoter l’état; 2 éclairs pour l’état actif et 3
éclairs pour l’état inactif.
L’OUVRE-PORTE DE GARAGE
DURÉE D’ALLUMAGE DE L’ÉCLAIRAGE
DEL’OUVRE-PORTE DE GARAGE
commande se met à clignoter.
Émetteur mural à code : Saisir un numéro d’identifi cation personnelle (NIP) à quatre chiffres sur le pavé
numérique. Ensuite, appuyer sur le bouton « ENTER ».
Commande
DEL
Bouton
« LIGHT »
1234
1 ½
Minutes
2 ½
Minutes
3 ½
Minutes
4 ½
Minutes
7
Page 26

Fonctionnement
Programmation - Télécommande
L’ouvre-porte de garage a été programmé en usine de manière à fonctionner avec la télécommande fournie. Les anciens
télécommandes LiftMaster NE son pas compatibles. La programmation peut être réalisée par le biais de la commande de
porte ou du bouton d’apprentissage de l’ouvre-porte de garage. Pour programmer des télécommandes supplémentaires,
se reporter aux instructions fournies avec les télécommandes supplémentaires ou consulter le site LiftMaster.com. Si votre
véhicule est équipé de HomeLink
pour certains véhicules. Aller à bridge.LiftMaster.com pour savoir si un pont sera nécessaire.
REMARQUE : Les produits illustrés dans les instructions sont pour référence. Votre produit peut toutefois avoir l’air différent.
PROGRAMMATION D’UNE TÉLÉCOMMANDE À L’AIDE DU BOUTON LEARN DE OUVRE-PORTE DU GARAGE
®
, il sera peut-être nécessaire de se procurer un pont Compatability BridgeTM (non inclus)
1 Repérer le bouton Learn.
3 Appuyez et relâchez le bouton de la telecommande.
Relâcher le bouton lorsque l’ouvre-porte de garage
clignote ou que deux clics se font entendre.
En cas de programmation d’autres produits, appuyer
sur le bouton une seconde fois pour activer les
produits.
EFFACER TOUS LES DISPOSITIFS (Compris les accessoires permis de MyQ
2 Appuyer sur le bouton Learn et le relâcher
immédiatement. Le témoin DEL du bouton Learn
s’allumera en continu pendant 30 secondes. Dans
les 30 secondes...
“clic”
“clic”
®
)
1 Appuyer sur le bouton « LEARN » de l’ouvre-porte de garage et le maintenir enfoncé jusqu’à ce que le témoin DEL
du bouton « LEARN » s’éteigne (environ 6 secondes).
2 Pressez immédiatement et continuez de pousser le bouton de programmation de nouveau jusqu’à ce que le voyant
lumineux s’éteigne. Tous les codes sont maintenant effacés.
Reprogrammer tout accessoire que vous souhaitez utiliser.
8
Page 27

Fonctionnement
Ouverture manuelle de la porte
Pour prévenir d’éventuelles BLESSURES GRAVES ou
LA MORT par suite de la chute d’une porte de garage :
• Si possible, utilisez la poignée de déclenchement
d’urgence pour dégager le chariot UNIQUEMENT
lorsque la porte de garage est FERMÉE.
Des ressorts faibles ou brisés ou une porte
déséquilibrée peuvent provoquer la chute rapide et/
ou imprévue d’une porte ouverte.
• N’utilisez JAMAIS la poignée de déclenchement
d’urgence à moins que rien ou personne n’obstrue
la trajectoire de la porte.
• Ne JAMAIS utiliser la poignée pour ouvrir ou
fermer la porte. Il y a risque de chute si le noeud de
la corde se défait.
DÉGAGEMENT DU CHARIOT
1 Dans la mesure du possible,
la porte doit être
complètement fermée.
2 Tirer la poignée de
déclenchement d’urgence.
RACCORDEMENT DU CHARIOT
La fonction de verrouillage
empêche le chariot de se
réenclencher automatiquement.
1 Tirez la poignée de
déverrouillage d’urgence vers
le bas et la laisser revenir
(vers l’ouvre-porte). Il sera
alors possible d’ouvrir et de
fermer la porte à la main autant de fois qu’on le
désirera.
2 Pour désactiver la fonction de verrouillage, tirez la
poignée vers le bas.
Le chariot se réenclenchera lors de la prochaine
OUVERTURE ou FERMETURE de la porte, soit
manuellement ou à l’aide de la commande de la porte ou
de la télécommande.
9
Page 28

Réglage
ATTENTIONATTENTION
Introduction
Sans un système d’inversion de sécurité bien installé,
des personnes (plus particulièrement les petits
enfants) pourraient être GRIÈVEMENT BLESSÉES ou
TUÉES par une porte de garage qui se referme.
• Un réglage erroné des courses de la porte de
garage gênera un fonctionnement approprié du
système d’inversion de sécurité.
• Après avoir effectué quelque réglage que ce soit,
on DOIT faire l’essai du système d’inversion de
sécurité. La porte de garage DOIT remonter au
contact d’un objet d’une hauteur de 3,8 cm (1 1/2
po) (ou un 2 x 4 posé à plat) du sol.
Pour prévenir les dommages aux véhicules,
s’assurer que la porte entièrement ouverte offre un
dégagement suffi sant.
Votre ouvre-porte de garage est conçu avec des
commandes électroniques pour rendre la confi guration
et les réglages faciles. Les réglages vous permettent de
programmer là où la porte s’arrêtera en position d’ouverture
« UP » et de fermeture « DOWN ». Les commandes
électroniques détectent la puissance du courant nécessaire à
l’ouverture et à la fermeture de la porte.
REMARQUE : Si quoi que ce soit gêne l’ouverture de la
porte, elle s’arrêtera. Si quoi que ce soit gêne la fermeture
de la porte, elle remontera.
Pour observer un vidéo d’instruction court sur
programmer votre nouvel ouvre porte de garage employez
votre smartphone pour lire le code de QR ci-dessous :
D’ouverture « UP »
BOUTONS DE PROGRAMMATION
Les boutons de programmation sont situés sur le panneau gauche de l’ouvreporte de garage et servent à programmer
la course.
BOUTONS DE PROGRAMMATION
10
Fermeture « DOWN »
Bouton UP
Bouton de réglage
Bouton DOWN
Page 29

Réglage
Programmation de la course
1
Sans un système d’inversion de sécurité bien installé, des personnes (plus particulièrement les petits enfants) pourraient
être GRIÈVEMENT BLESSÉES ou TUÉES par une porte de garage qui se referme :
• Un réglage erroné des courses de la porte de garage gênera un fonctionnement approprié du système d’inversion de
sécurité.
• Après avoir effectué quelque réglage que ce soit, on DOIT faire l’essai du système d’inversion de sécurité. La porte de
garage DOIT remonter au contact d’un objet d’une hauteur de 3,8 cm (1-1/2 po) (ou un 2 x 4 posé à plat) du sol.
1.1 Appuyer sur le
bouton de réglage
et le maintenir
enfoncé jusqu’à ce
que le bouton « UP »
commence à clignoter
ou qu’un bip se fait
entendre.
1.3 Une fois que la porte
est dans la position
d’ouverture « UP » désirée,
appuyer sur le bouton
de réglage et le relâcher.
L’éclairage de l’ouvre-porte
de garage clignotera deux
fois et le bouton « DOWN »
commencera à clignoter.
1.5 Une fois que la porte
est dans la position de
fermeture « DOWN »
désirée, appuyer sur le
bouton de réglage et le
relâcher. L’éclairage de
l’ouvre-porte de garage
clignotera deux fois et le
bouton « UP » commencera
à clignoter.
1.2 Appuyer sur le bouton « UP » et le maintenir
enfoncé jusqu’à ce que la porte soit à la
position d’ouverture désirée.
REMARQUE : On peut utiliser les boutons « UP » et « DOWN »
pour déplacer la porte vers le haut et le bas, au besoin.
1.4 Appuyer sur le bouton « DOWN » et le maintenir
enfoncé jusqu’à ce que la porte soit à la position
de fermeture désirée.
REMARQUE : On peut utiliser les boutons « UP » et « DOWN »
pour déplacer la porte vers le haut et le bas, au besoin.
1.6 Appuyer et relâcher le bouton « UP ». Lorsque
la porte se déplace à la position « UP »
programmée, le bouton « DOWN » commencera
à clignoter.
1.7 Appuyer et relâcher le bouton « DOWN ».
La porte se déplacera jusqu’à la position de
fermeture programmée. La programmation
est terminée.
Si l’éclairage de l’ouvre-porte de garage clignote 5 fois
au cours des étapes de programmation de la course,
le délai de programmation a expiré. Si l’éclairage de
l’ouvre-porte de garage clignote 10 fois au cours des
étapes de programmation de la course, les capteurs
d’inversion de sécurité sont mal alignés ou obstrués.
Lorsque les capteurs sont alignés et dégagés, effectuer
un cycle d’ouverture et de fermeture complet de la porte
en utilisant la télécommande ou les boutons « UP » et
« DOWN » . La programmation est terminée. Si on ne
parvient pas à actionner la porte, répéter les étapes de la
programmation de la course.
11
Page 30

Réglage
2
Essai du système d’inversion de
2
sécurité
Sans un système d’inversion de sécurité bien installé,
des personnes (plus particulièrement les petits
enfants) pourraient être GRIÈVEMENT BLESSÉES ou
TUÉES par une porte de garage qui se referme.
• On DOIT procéder à une vérifi cation mensuelle du
système d’inversion de sécurité.
• Après avoir effectué quelque réglage que ce soit,
on DOIT faire l’essai du système d’inversion de
sécurité. La porte de garage DOIT remonter au
contact d’un objet d’une hauteur de 1-1/2 po (3,8
cm) (ou un 2 x 4 posé à plat) sur le sol.
2.1 La porte étant entièrement ouverte, placer une
planche de 3,8 cm (1-1/2 po) d’épaisseur (ou
un 2 x 4 à plat) sur le plancher, centrée sous la
porte de garage.
Essai du Protector System
3
Sans un système d’inversion de sécurité bien installé,
des personnes (plus particulièrement les petits
enfants) pourraient être GRIÈVEMENT BLESSÉES ou
TUÉES par une porte de garage qui se referme.
®
3.1 Ouvrir la porte. Mettre la boîte en carton de
l’ouvre-porte sur le chemin de la porte.
3.2 Appuyer sur le bouton-poussoir de la
télécommande pour fermer la porte. La porte
ne se déplacera pas plus de 2,5 cm (1 po) et
l’éclairage de l’ouvre-porte de garage clignotera
10 fois.
2.2 Appuyer sur le bouton-poussoir de la
télécommande pour fermer la porte. La porte
DOIT remonter quand elle entre en contact avec
la planche.
Si la porte s’arrête et ne remonte pas en raison de
l’obstruction, augmenter la course de fermeture (voir
l’étape de réglage nº 1).
Répéter l’essai. l’essai. Lorsque la porte remonte au
contact de la planche de 3,8 cm (1-1/2 po), retirer la
planche et ouvrir-fermer la porte 3 ou 4 fois afi n de
vérifi er le réglage.
Si l’essai échoue encore, appeler un technicien formé en
systèmes de porte.
L’ouvre-porte de garage ne se fermera pas à l’aide d’une
télécommande si le témoin DEL d’un des deux capteurs
d’inversion est éteint (ce qui avertit que le détecteur est
mal aligné ou obstrué).
Si l’ouvre-porte de garage ferme la porte lorsque le
capteur d’inversion de sécurité est obstrué (et que les
capteurs ne sont pas à plus de 15 cm (6 po) du sol),
appeler un technicien formé en systèmes de porte.
12
Page 31

Entretien
CHAQUE MOIS
• Faire fonctionner la porte à la main. Si elle est
déséquilibrée ou si elle force, appeler un technicien
formé en systèmes de porte.
• S’assurer que la porte s’ouvre et se ferme
complètement. Ajuster, au besoin, voir page 11.
• Contrôle du système d’inversion de sécurité. Ajuster,
au besoin, voir page 12.
CHAQUE ANNÉE
• Huiler les galets, les roulements et les charnières de
la porte. Il n’est pas nécessaire de lubrifi er davantage
l’ouvre-porte de garage. Ne pas graisser les guides de
la porte.
TOUS LES DEUX OU TROIS ANS
• Utiliser un chiffon pour éliminer la graisse sur le rail de
l’ouvre-porte de garage. Appliquer de nouveau une fi ne
couche de graisse blanche au lithium sur la surface du
rail, là où le chariot glisse.
La pile de la télécommande
Pour éviter des BLESSURES GRAVES, VOIRE
MORTELLES :
• Ne laissez JAMAIS des enfants s’approcher de la
pile.
• Communiquez immédiatement avec un médecin en
cas d’ingestion d’une pile.
Pour réduire les risques d’incendie, d’explosion ou de
brûlure chimique :
• Remplacer UNIQUEMENT par 3V CR2032 piles
bouton.
• NE PAS recharger, démonter, chauffer à plus de
100 °C (212 °F) ou incinérer les piles.
La pile au Lithium devrait durer pendant une période
allant jusqu’à 3 ans. Si la batterie est basse, la DEL à
télécommande ne clignote pas quand le bouton est
appuyé sur. Pour remplacer la pile, soulever le boîtier au
milieu (1), puis de chaque (2 et 3) côté de l’agraphe de
pare-soleil.Insérer la pile avec le côté positif vers le haut.
Remplacer les piles uniquement par 3V CR2032 piles
bouton. Se débarrasser de la pile usée de manière
appropriée.
3
1
2
AVIS : Les règles de la FCC et/ou d’Industrie Canada (IC) interdisent tout ajustement ou toute modifi cation de ce récepteur. IL N’EXISTE AUCUNE PIÈCE
SUSCEPTIBLE D’ÊTRE ENTRETENUE PAR L’UTILISATEUR. Tout changement ou toute modifi cation non expressément approuvé par la partie responsable de
la conformité peut avoir pour résultat d’annuler l’autorité de l’utilisateur de faire fonctionner l’équipement.
Cet appareil est conforme aux dispositions de la partie 15 du règlement de la FCC et de la norme IC RSS-210. Son utilisation est assujettie aux deux
conditions suivantes : (1) ce dispositif ne peut causer des interférences nuisibles, et (2) ce dispositif doit accepter toute interférence reçue, y compris une
interférence pouvant causer un fonctionnement non souhaité.
Cet appareil numérique de la classe B est conforme à la norme NMB-003 du Canada.
13
Page 32

Dépannage
Fiche diagnostique
Des fonctions d’autodiagnostic ont été programmées dans votre ouvre-porte de garage. Les fl èches vers le haut et le
bas de l’ouvre-porte de garage font clignoter les codes d’anomalie.
CODE D’ANOMALIE SYMPTÔME RÉSOLUTION
La fl èche
vers le
haut
clignote
11
12
13
14
15
16
2 1-5
32
La fl èche
vers
le bas
clignote
L’ouvre-porte de garage
ne ferme pas la porte et
l’éclairage clignote.
L’ouvre-porte de garage
ne ferme pas la porte et
l’éclairage clignote.
La commande de porte ne
fonctionne pas.
L’ouvre-porte de garage
ne ferme pas la porte et
l’éclairage clignote.
La porte est en
mouvement sur une
distance de 15 à 20 cm (6
à 8 po), puism s’arrête ou
inverse sa course.
Aucun mouvement,
même pas un déclic.
L’ouvre-porte émet un
faible murmure pendant
une à deux secondes,
mais la porte ne bouge
pas.
La porte glisse
après qu’elle se soit
complètement arrêtée.
Aucun mouvement ni
son.
Impossible de régler la
course ou la position de
retenue.
Les détecteurs inverseurs de sécurité ne sont pas
installés, connectés, ou les fi ls sont coupés. Vérifi er les
fi ls du détecteur pour y déceler tout fi l débranché ou
coupé.
Les détecteurs inverseurs de sécurité sont court-circuités
ou un fi l est inversé. Inspecter le câblage des détecteurs
inverseurs de sécurité et tous les points d’agrafe et de
connexion; remplacer ou corriger les fi ls au besoin.
Les fi ls de la commande de porte sont courtcircuités ou
la commande de porte est défectueuse. Vérifi er les fi ls de
la commande de porte à agrafe et points de connexion
dans le fi l, remplacer le fi l si nécessaire.
Les détecteurs inverseurs de sécurité sont désalignés ou
momentanément obstrués. Réaligner les deux détecteurs
pour s’assurer que les deux DEL s’allument de manière
continue et ne clignotent pas. S’assurer que rien ne pend
ou n’est monté sur la porte, ce qui pourrait perturber le
champ des détecteurs pendant la fermeture.
Ouvrir et fermer manuellement la porte. Vérifi er si un
objet est collé ou obstrue la porte, comme un ressort
ou une serrure brisé(e); corriger au besoin. Vérifi er les
connexions de câble au module de course et à la plaque
logique. Remplacer le module au besoin.
Ouvrir et fermer manuellement la porte. Vérifi er si un
objet est collé ou obstrue la porte, comme un ressort ou
une serrure brisé(e); corriger au besoin. Remplacer la
plaque logique au besoin.
Ouvrir et fermer manuellement la porte. Vérifi er si un
objet est collé ou obstrue la porte, comme un ressort ou
une serrure brisé(e); corriger au besoin. Remplacer le
moteur au besoin.
Programmer la course jusqu’à la position de glissement
ou faire équilibrer la porte par un technicien formé en
systèmes de porte.
Remplacer la plaque logique.
Vérifi er le module de course, le remplacer au besoin.
14
Page 33

Dépannage
Fiche diagnostique
CODE D’ANOMALIE SYMPTÔME RÉSOLUTION
La fl èche
vers le
haut
clignote
4 1-4 Le mouvement de
45La porte est en
46L’ouvre-porte de garage
La fl èche
vers
le bas
clignote
porte s’interrompt ou/
et repart en direction
inverse.
mouvement sur une
distance de 15 à 20 cm
(6 à 8 po), puis s’arrête
ou inverse sa course.
ne ferme pas la porte et
l’éclairage clignote.
Ouvrir et fermer manuellement la porte. Vérifi er si un
objet est collé ou obstrue la porte, comme un ressort ou
une serrure brisé(e); corriger au besoin. Si la porte force
ou colle, appeler un technicien formé en systèmes de
porte. Si la porte ne force pas ou ne colle pas, essayer de
reprogrammer la course (consulter la page 11).
Erreur de communication avec le module de commande
de la course. Vérifi er les connexions du module de course;
remplacer le module au besoin.
Les détecteurs inverseurs de sécurité sont désalignés ou
momentanément obstrués. Réaligner les deux détecteurs
pour s’assurer que les deux DEL s’allument de manière
continue et ne clignotent pas. S’assurer que rien ne pend
ou n’est monté sur la porte, ce qui pourrait perturber le
champ des détecteurs pendant la fermeture.
Ma télécommande n’actionne pas la porte de garage :
• Vérifi er si la fonction de verrouillage n’est pas activée
sur la commande de porte.
• Reprogrammer la télécommande.
• Si la télécommande n’actionne toujours pas la porte,
vérifi er les codes de diagnostic pour s’assurer que
l’ouvre-porte de garage fonctionne correctement.
Ma porte ne se ferme pas et les ampoules de
l’éclairage du moteur clignotent :
Le détecteur inverseur de sécurité doit être connecté et
aligné correctement avant que l’ouvre-porte de garage
n’entame le mouvement de fermeture.
• Vérifi er que les détecteurs inverseurs de sécurité sont
bien installés et libres de toute obstruction.
L’éclairage de l’ouvre-porte de garage ne s’éteint pas
quand la porte est ouverte :
L’ouvre-porte de garage est doté d’une fonction qui allume
l’éclairage lorsque les détecteurs inverseurs de sécurité
sont obstrués. Ces fontions peuvent être désactivées àq
l’aide de la commande de porte voir page 7.
La télécommande de mon voisin ouvre ma porte de
garage :
Effacer la mémoire de votre ouvre-porte de garage et
reprogrammer la ou les télécommandes.
La télécommande Homelink® de mon véhicule n’arrive
pas à programmer mon ouvre-porte de garage :
Un pont Compatability BridgeTM (non inclus) sera
peut-être nécessaire pour certains véhicules. Aller
à bridge.LiftMaster.com pour savoir si un pont sera
nécessaire.
15
Page 34

Pièces de Rechange
3
2
7
1
6a
6b
REMARQUE : Pour les pièces supplémentaires non
affi chées, visitez LiftMaster.com pour télécharger ou
imprimer du plein le manuel propriétaire. Les produits
illustrés dans les instructions sont pour référence. Votre
produit peut toutefois avoir l’air différent.
DESCRIPTION
1 Lentille
Modèles 8065/8075 108D36-2
Modèles 8155/8165 108D79
Modèle 8160 041A7562
2
Carte logique
Modèles 8155/8065/8075/8165 045ACT
Modèle 8160 045DCT
3
Module de voyage
Modèles 8155/8065/8075/8165 041D7742-7
Modèle 8160 041A7114-7
4
Pile au Lithium 3V CR2032 (télécommande) 10A20
5 Capteur d’inversion de sécurité avec cellules
réceptrice et émettrice avec fi l de 0,9 m (3 pi) à
2 conducteurs
6a
Moteur - Modèles 8155/8065/8075/8165 041D7740
6b Moteur et module
de déplacement - Modèle 8160
7
Condensateur - Modèles 8155/8065/8075/8165 30B532
041D1739-1
NUMÉRO
DE LA
PIÈCE
41A5034
5
4
16
Page 35

Accessoires
828LM
829LM
893MAX
823LM
Passerelle Internet de
LiftMaster
Accessoire qui se connecte à un
ordinateur et vous permet de surveiller et
commande les ouvreporte de garage et
les accessoires d’éclairage activés par la
technologie MyQ
Moniteur de garage et de portail :
Surveille l’état de marche-arrêt de 4 ouvreporte de garage ou actionneurs de portail
compatibles avec MyQ
et permet de les fermer depuis n’importe
quel endroit dans la maison.
Télécommandeà trois boutons MAX :
Compatible avec les ouvre-porte de
garage LiftMaster® fabriqués depuis 1993.
Comprend l’agrafe de paresoleil.
Télécommande d’éclairage :
Commandez automatiquement votre
éclairage en vous servant de l’ouvreporte
de garage, d’une télécommande
Security+2.0
LiftMaster®. Remplacez tout simplement
votre interrupteur mural câblé actuel.
®
:
®
.
®
, au maximum,
®
ou d’une passerelle Internet
374UT
877MAX
975LM
Mini-Télécommande Universelle :
La mini-télécommande universelle peut
être programmée pour activer jusqu’à
deux produits, comme un ouvre-porte
de garage, des commandes d’éclairage
MyQ®, un actionneur de barrière ou de
porte commerciale.
Émetteur à code sans fi l MAX :
Pour une utilisation à l’extérieur de la
maison vous permettant d’activer l’accès
au garage à l’aide d’un NIP à quatre
chiffres. Fonctionne avec TOUS les ouvreporte LiftMaster® fabriqués depuis 1993.
Dispositif laser d’assistance au
stationnement du garage :
Le laser permet aux propriétaires de garer
leur véhicule de manière précise dans leur
garage.
Enregistrement
Enregistrez votre ouvre-porte de garage pour recevoir des
mises à jour et des offres de LiftMaster
Prenez une photo de l’icône d’appareil-
photo, y compris les points ( ).
Envoyez la photo par message
textuel à 71403 (É.-U.)
ou allez à www.liftmaster.photo (mondial)
17
OU enregistrez votre ouvre-porte à
www.prodresgister.com/liftmaster
Page 36

Garantie
GARANTIE LIMITÉE LIFTMASTER
LiftMaster (« le Vendeur ») garantit à l’acheteur au détail initial de ce produit pour la résidence dans laquelle ce
produit est originalement installé, que ce dernier est exempt de tout défaut matériel ou de fabrication pour une
période de temps précisée ci-dessous (la « Période de garantie »). La période de garantie commence à la date
d’achat.
®
PÉRIODE DE GARANTIE
Pièces Moteur Accessoires Courroie
8155 1 an 4 ans 1 an 10 ans
8065 8075 8160 8165 1 an 4 ans 1 an -
Le bon fonctionnement de ce produit dépend de la conformité de l’utilisateur aux instructions relatives à
l’installation, au fonctionnement, à l’entretien et aux tests. Tout défaut de se conformer strictement à ces
instructions annulera la présente garantie limitée dans son intégralité.
Si, pendant la période de garantie limitée, ce produit semble présenter un défaut couvert par cette garantie limitée,
prière d’appeler sans frais au 1-800-528-9131 avant de désassembler ce produit. Des instructions de démontage et
d’expédition seront fournies lors de votre appel. Le produit ou la pièce doit ensuite être envoyé à notre centre de
réparation sous garantie, conformément aux instructions reçues, frais d’affranchissement et d’assurance prépayés.
Une brève description du problème et une preuve d’achat datée devront accompagner tout produit retourné pour
une réparation sous garantie. Les produits retournés au vendeur pour une réparation couverte sous garantie qui,
après réception par le vendeur, sont confirmés comme étant défectueux et couverts par la présente garantie
limitée, seront réparés ou remplacés (à la discrétion du Vendeur) sans frais et retournés port payé. Les pièces
défectueuses seront réparées ou remplacées par des pièces neuves ou réusinées, à la seule discrétion du Vendeur.
[Les frais engagés pour le retrait et/ou la réinstallation du produit ou de tout composant incombent à l’acheteur].
TOUTE GARANTIE IMPLICITE POUR CE PRODUIT, Y COMPRIS, MAIS DE FAÇON NON LIMITATIVE, TOUTE
GARANTIE IMPLICITE DE QUALITÉ MARCHANDE ET D’ADÉQUATION À UN USAGE PARTICULIER, SE LIMITE À LA
DURÉE DE LA PÉRIODE DE GARANTIE LIMITÉE APPLICABLE STIPULÉE CI-DESSUS POUR LES COMPOSANTS
CONCERNÉS; AUCUNE GARANTIE IMPLICITE N’EXISTERA OU NE S’APPLIQUERA APRÈS UNE TELLE PÉRIODE.
Certains États et provinces ne permettent pas les limitations de la durée des garanties implicites, auquel cas
la limitation précitée pourrait ne pas s’appliquer à l’Acheteur. LA PRÉSENTE GARANTIE LIMITÉE NE COUVRE
PAS LES DOMMAGES QUI NE SONT PAS DUS À UN DÉFAUT, CEUX CAUSÉS PAR UNE MAUVAISE
INSTALLATION, UNE OPÉRATION OU UN ENTRETIEN INADÉQUATS (INCLUANT, NOTAMMENT, LES AVARIES
DUES À UN MAUVAIS TRAITEMENT, UN USAGE INAPPROPRIÉ, L’ABSENCE D’ENTRETIEN RAISONNABLE ET
NÉCESSAIRE, LES RÉPARATIONS NON AUTORISÉES OU TOUTE MODIFICATION À CE PRODUIT), LES FRAIS DE
MAIN-D’ŒUVRE POUR LA RÉINSTALLATION D’UNE UNITÉ RÉPARÉE OU REMPLACÉE OU LE REMPLACEMENT
DES CONSOMMABLES (P. EX. LES PILES D’ÉMETTEURS À TÉLÉCOMMANDE ET AMPOULES DE LAMPE) OU LES
UNITÉS INSTALLÉES À USAGE NON RÉSIDENTIEL. LA PRÉSENTE GARANTIE LIMITÉE NE COUVRE PAS LES
PROBLÈMES RELATIFS OU CONNEXES À LA PORTE DU GARAGE OU À LA QUINCAILLERIE DE LA PORTE DU
GARAGE, NOTAMMENT LES RESSORTS DE LA PORTE, LES GALETS DE PORTE, L’ALIGNEMENT DE LA PORTE
OU LES CHARNIÈRES. LA PRÉSENTE GARANTIE LIMITÉE NE COUVRE PAS NON PLUS LES PROBLÈMES CAUSÉS
PAR LES INTERFÉRENCES. LE VENDEUR NE SERA EN AUCUN CAS TENU RESPONSABLE DES DOMMAGESINTÉRÊTS PARTICULIERS OU INDIRECTS RÉSULTANT DE L’UTILISATION OU DE L’INAPTITUDE À UTILISER CE
PRODUIT CORRECTEMENT. EN AUCUN CAS, LA RESPONSABILITÉ DU VENDEUR POUR BRIS DE GARANTIE,
RUPTURE DE CONTRAT, NÉGLIGENCE OU RESPONSABILITÉ STRICTE N’EXCÉDERA LE COÛT DU PRODUIT
COUVERT AUX PRÉSENTES. NUL N’EST AUTORISÉ À ASSUMER POUR NOUS D’AUTRES RESPONSABILITÉS
RELATIVEMENT À LA VENTE DE CE PRODUIT.
Certains États et provinces n’acceptant pas l’exclusion ou les restrictions relatives aux dommages spéciaux ou
indirects, les restrictions ou exclusions figurant dans la présente garantie pourraient ne pas s’appliquer à
l’Acheteur. Certains droits légaux particuliers sont conférés à l’Acheteur en vertu de cette garantie et celui-ci
pourrait avoir d’autres droits qui varient selon l’État ou la province dans lequel ou laquelle réside l’Acheteur.
114A4415E
© 2016, LiftMaster
Tous droits réservés
 Loading...