

Page 1
Model 76LM
Lighted Door Control
Locate the door control within sight of the door at a minimum
height of 1.5 m where small children cannot reach, and away from
all moving parts of the door and door hardware.
Installing the Door Control
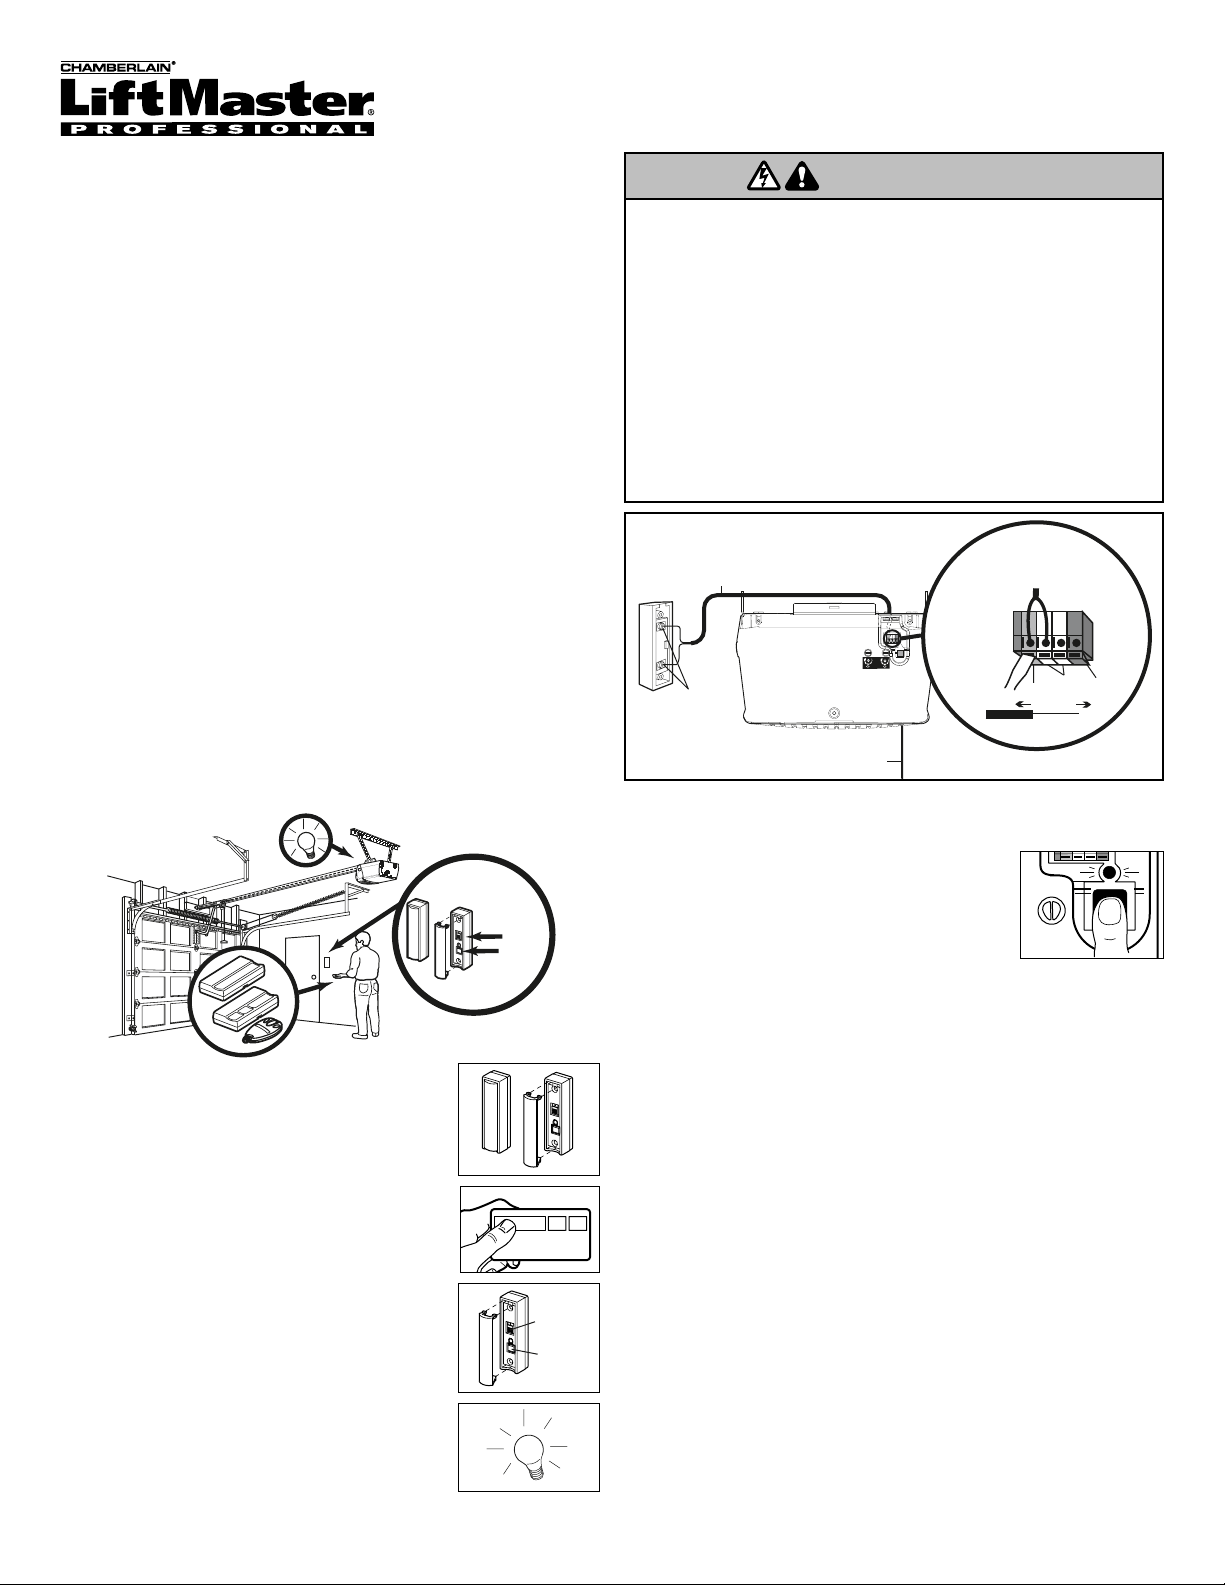
1. Strip 11 mm of insulation from one end of the bell wire. Connect
it to the two screw terminals on the back of the door control by
color: white wire to 2 and white/red wire to 1.
2. Remove the cover from the door control by pushing the bottom
of the cover up then outward. Fasten door control securely with
6ABx1-1/2" screws. If installing into drywall, drill 5/32" holes and
use the anchors provided.
3. Run the bell wire up the wall and across the ceiling to the motor
unit. Use insulated staples to secure the wire in several places.
Do not to pierce the wire with a staple, creating a short or open
circuit.
4. Strip 11 mm of insulation from end of bell wire. Connect the bell
wire to the quick-connect terminals as follows: white to white and
white/red to red (Figure 1).
NOTE: When connecting multiple door controls to the opener, twist
same color wires together. Insert wires into quick-connect holes:
white to white and red/white to red.
5. Use tacks or staples to permanently attach the entrapment
warning label to the wall near the door control, and the manual
release/safety reverse label in a prominent location on the inside
of the garage door.
To prevent possible SERIOUS INJURY or DEATH from electrocution:
• Be sure power is not connected BEFORE installing door control.
• Connect ONLY to 24 VOLT low voltage wires.
To prevent possible SERIOUS INJURY or DEATH from a closing garage
door:
• Install door control within sight of garage door, out of reach of children
at a minimum height of 1.5 m, and away from all moving parts of door.
• NEVER permit children to operate or play with door control push
buttons or remote control transmitters.
• Activate door ONLY when it can be seen clearly, is properly adjusted,
and there are no obstructions to door travel.
• Always keep garage door in sight until completely closed. NEVER
permit anyone to cross path of closing garage door.
WARNING
Figure 1
Programming The Remote Control
Below are instructions for programming your operator to operate
with Security✚
®
remote controls.
1. Remove the cover from the door control.
2. Press and hold the button on the hand-held
remote that you wish to operate your
garage door.
3. While holding the remote button, press and
hold the “A” button on the Lighted Door
Control.
4. Continue holding both buttons while you
press the “B” button on the Lighted Door
Control (all three buttons are held).
5. Release buttons when the motor unit lights
blink. It has learned the code. If light bulbs
are not installed, two clicks will be heard.
"A"
Button
"B"
Button
To Erase All Codes From Motor Unit Memory
To deactivate any unwanted remote, first erase
all codes:
Press and hold the “learn” button on motor unit
until the learn indicator light goes out
(approximately 6 seconds). All previous codes
are now erased. Reprogram each remote or keyless entry you wish
to use.
© 2006, The Chamberlain Group, Inc.
114A3222B All Rights Reserved
"A"
Button
"B"
Button
WARNING
Bell Wire
D
E
R
-1
HT
W
-2
Terminal
Screws
9
1
7
3
5
KG
Back Panel
Antenna
9
1
7
3
5
KG
To release wire, push
in tab with screwdriver tip
Quick-Connect
Terminals
Red
11 mm
Strip wire 11 mm
White
Grey
Page 2
Modelo 76LM
Control Iluminado de la Puerta
Para evitar la posibilidad de una LESIÓN GRAVE O INCLUSO LA MUERTE por
electrocución:
• ANTES de instalar el control de la puerta, asegúrese de que la energía
eléctrica no esté conectada.
• Conecte el control SÓLO a cables de bajo voltaje de 24 VOLTIOS.
Para evitar la posibilidad de una LESIÓN GRAVE O INCLUSO LA MUERTE
cuando la puerta del garaje se esté cerrando:
• Instale el control de la puerta de manera que quede a la vista desde la
puerta del garaje, fuera del alcance de los niños a una altura mínima de 1.5
m y lejos de las partes móviles de la puerta.
• NUNCA permita que los niños hagan funcionar o jueguen con los botones
de control de la puerta ni con los transmisores del controles remotos.
• Haga funcionar la puerta SÓLO si lo puede ver claramente, si la puerta está
debidamente ajustada, y si no hay ninguna obstrucción en su recorrido.
• SIEMPRE tenga a la vista la puerta del garaje hasta que esté completamente
cerrada. NUNCA permita que alguien se atraviese en el recorrido de la
puerta del garaje cuando se está cerrando.
ADVERTENCIAADVERTENCIA
Ubique el control de la puerta a una altura mínima de 1.5 m donde los
niños pequeños no lo puedan alcanzarde y a la vista desde la puerta.
Lejos de las partes móviles de la puerta y de la pernería.
Instalar el Control de la Puerta
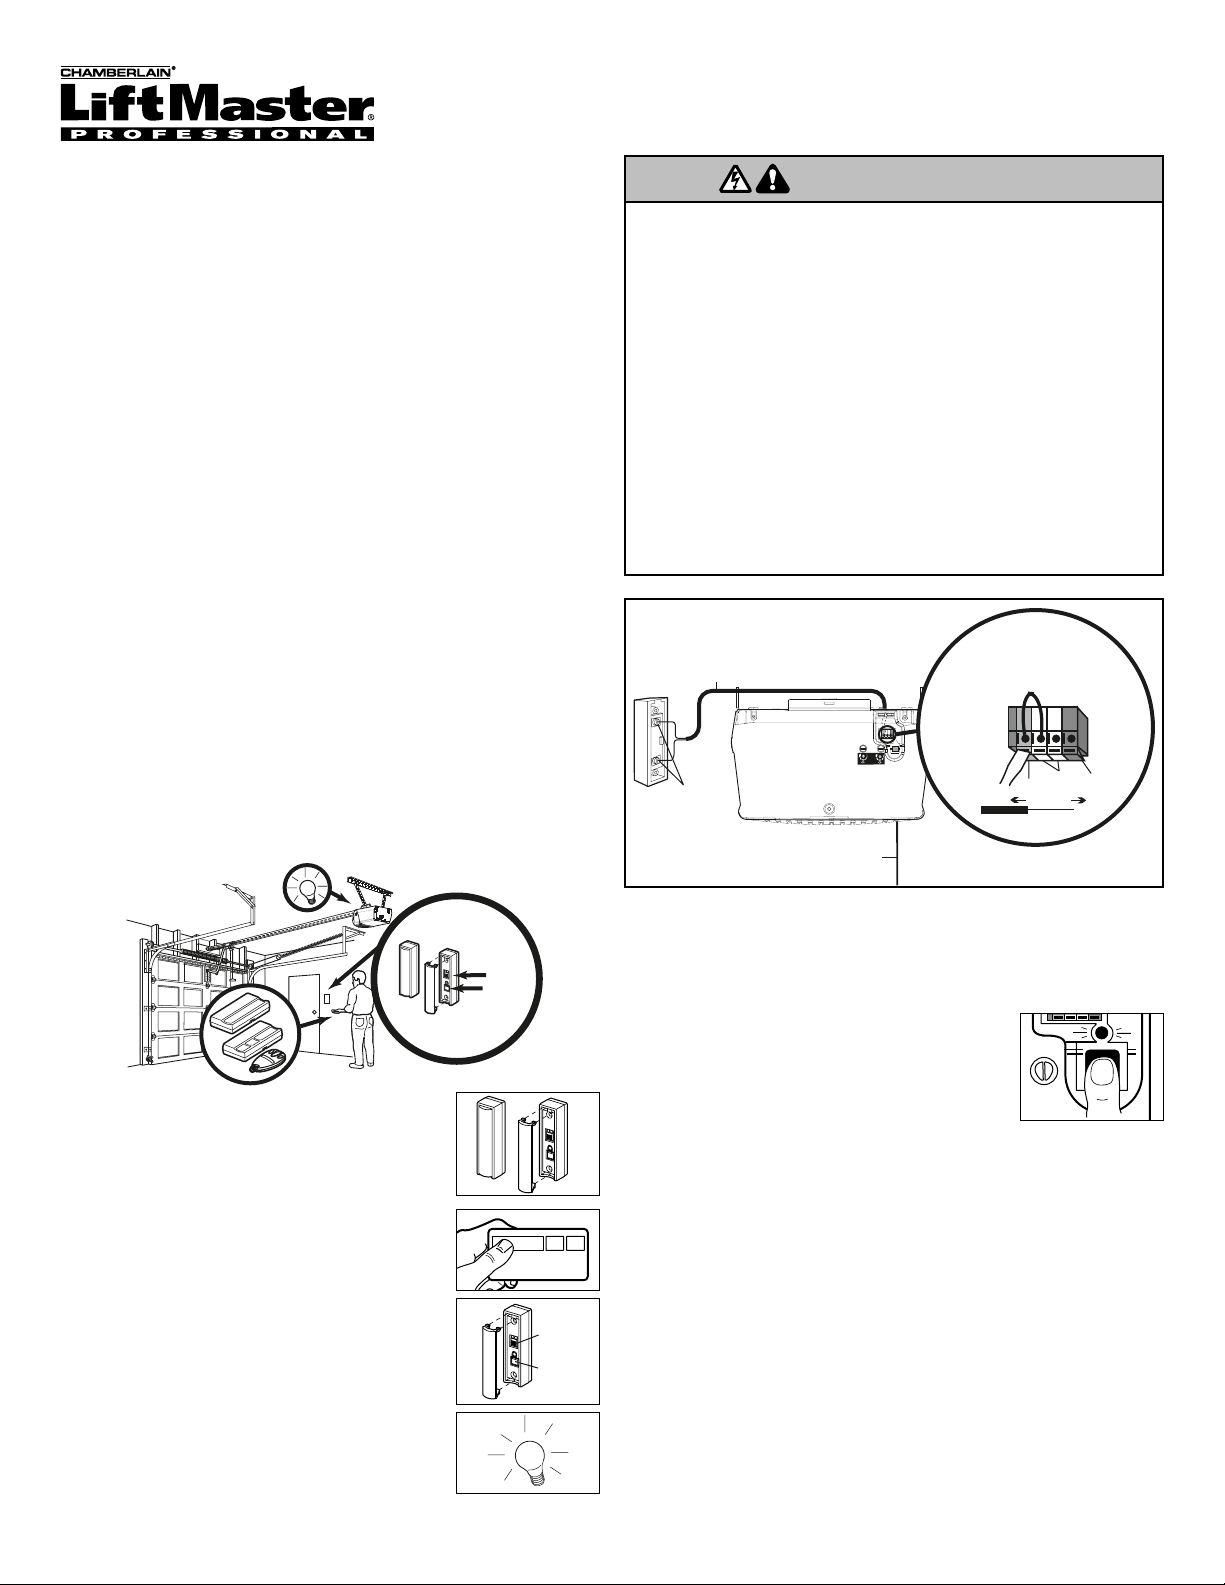
1. Pele el extremo del cable de campana 11mm y conéctelo a los
terminales de tornillo correspondientes al color del cable en la parte
posterior de el contol de la puerta; blanco a 2 y blanco y rojo a 1.
2. Quite la cubierta del control de la puerta empujando la para ariba y
despues para afuera. Sujetar el control de la puerta sólidamente
mediante tornillos 6ABx1-1/2 de pulg. Si la instalación se hace en
pared de yeso, taladrar tornillos de 5/32 de pulg. y utilizar los
taquetes proporcionados.
3. Corra el cable de campana a lo largo de la pared y el techo hasta el
motor, use grapas con aislamiento en various puntos a lo largo del
cable para sujetarlo. Tenga cuidado de no perforar el cable al
engraparlo, creando así un corto circuito o un circuito abierto.
4. Pele 11 mm del aislamiento en un extremo del cable de campana.
Conecte el cable a los terminales de conexión rápida de acuerdo a
su color: el blanco al blanco y el blanco y rojo al rojo (Figura 1.)
NOTA: Al conectar múltiples controles de la puerta, tuerza juntos los
cables del mismo color. Inserte los cables en los orificios de conexión
rápida: blanco a blanco y rojo/blanco a rojo.
5. Use tachuelas o grapas para sujetar permanentemente la
calcomanía de advertencia sobre el riesgo de quedar atrapado.
Coloque la calcomanía en la pared, cerca del control de la puerta.
Coloque la calcomainia para liverar la puerta directamente en la
puerta.
Como Progamar el Abre-Puertas
1. Extraiga la cubierta del control iluminado de la
puerta.
2. Oprima y mantenga oprimido el botón del
control remoto que desee usar para la puerta
de su garaje.
3. Mientras mantiene oprimido el botón del
control remoto, oprima y mantenga oprimido|
el botón "A" en el control iluminado de la
puerta.
4. Continúe oprimiendo los dos botones
mientras oprime también el boton “B” en el
control ilumindada de puerta (con los tres
botones oprimidos).
5. Suelte el botón del control remoto cuando las
luces del motor empiecena parpadear. Ya
aprendió el código. Si no se han puesto
bombillas, se escucharán dos chasquidos.
Vea las siguientes instrucciones para programar cotroles remotos
Security✚
®
adicionales.
Para desactivar cualquier control remoto no
deseados, borre todos los códigos del motor:
Oprima y mantenga oprimido el botón
"aprendizaje" (learn) de la unidad del motor,
hasta que la luz del indicador de "aprender"
(learn) se apague (aproximadamente 6
segundos). Ya estarán borrados todos los códigos anteriores.
Vuelva a programar cada uno de los controles remotos o la llave
digital que desee usar.
Para borrar todos los códigos de la memoria
de la unidad del motor
Figura 1
© 2006, The Chamberlain Group, Inc.
114A3222B Todos los Derechos Reservados
ADVERTENCIA
Cable de campana
D
E
R
-1
HT
W
-2
Tornillos
terminales
9
1
9
1
7
3
7
3
5
5
KG
KG
Panel trasero
Antena
Para soltar el cable,
empuje la lengüeta hacia
dentro con la punta de un
destornillador
Terminales
de conexión
rápida
Pele el cable 11 mm
Rojo
11 mm
Blanco
Gris
Botón
"A"
Botón
"B"
Botón
"A"
Botón
"B"
 Loading...