

LG WD-12273RD, WD-12270RD, WD-12274RD, WD-12275RD, WD-12276RD Owner's Manual
...
WashingMachine
OWNER°S MANUAL
WD(M)-1227(0,-,9)RD(K)
machine.
manualcarefully,it provides
lation,useand maintenance.
ofyourwashing
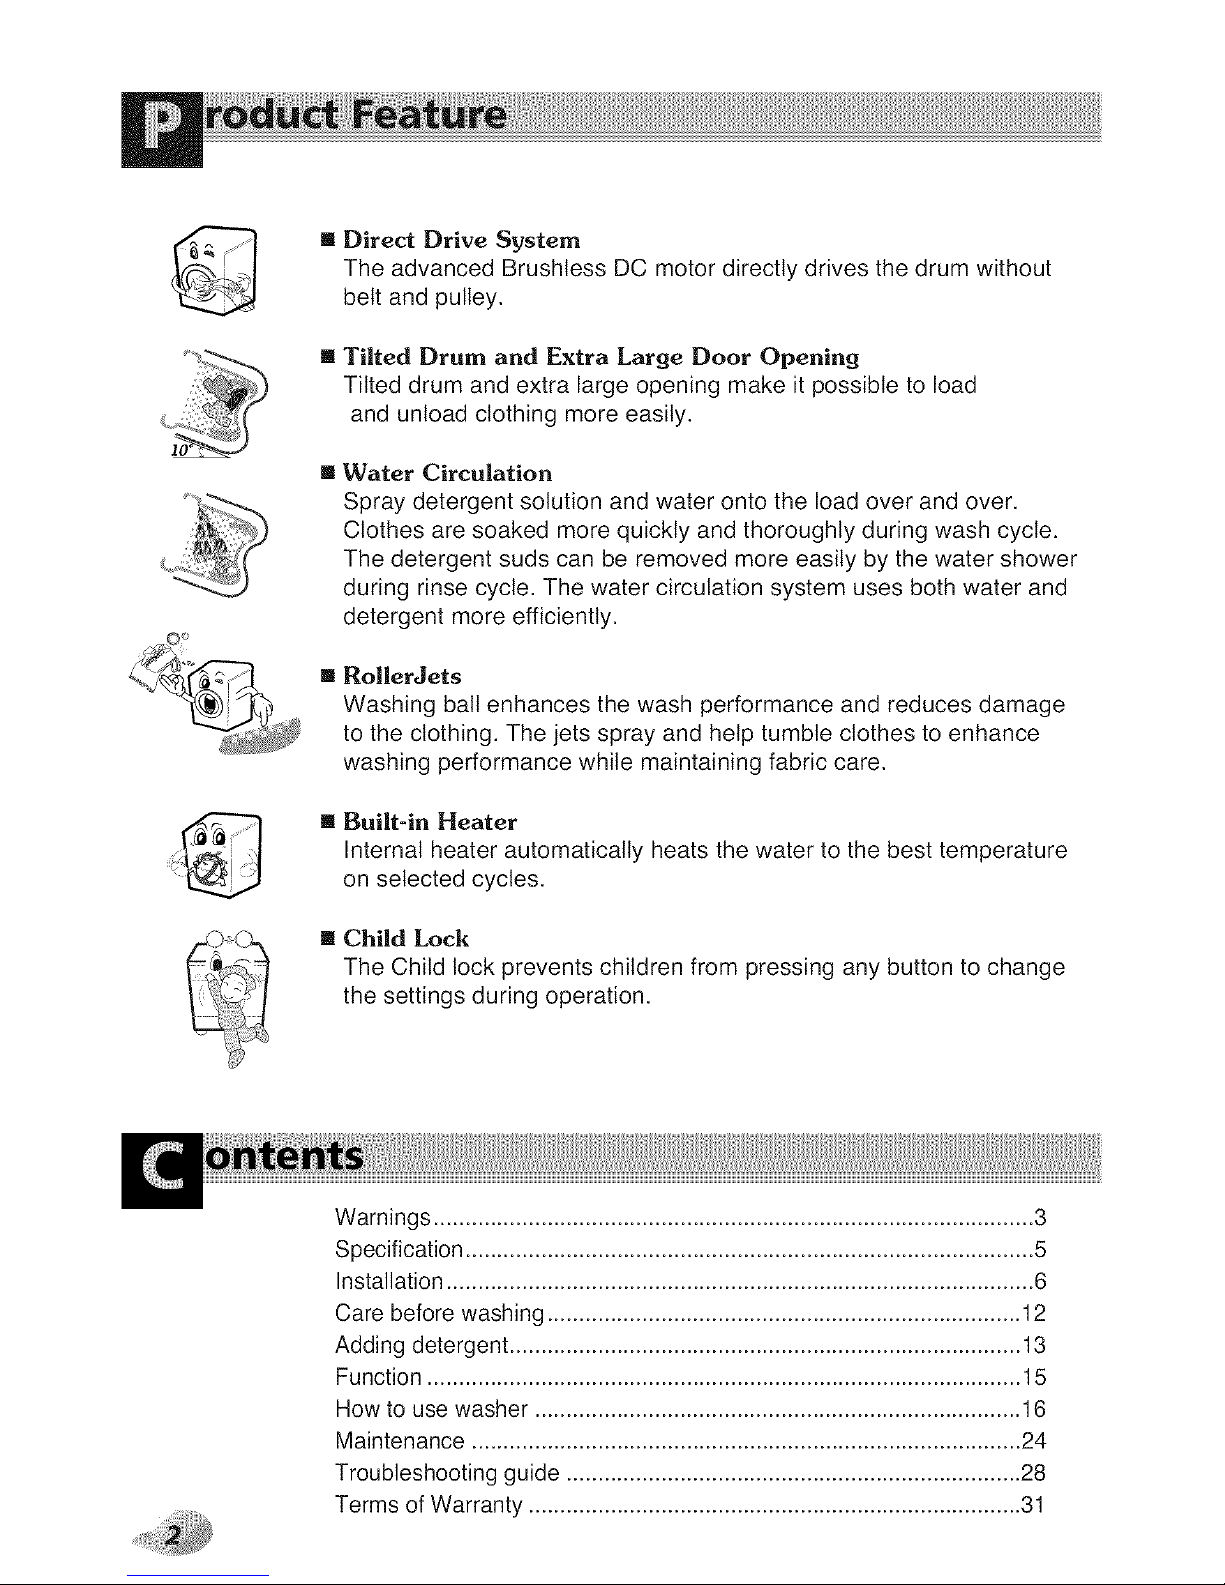
[] Direct Drive System
The advanced Brushless DC motor directly drives the drum without
belt and pulley.
[] Tilted Drum and Extra Large Door Opening
Tilted drum and extra large opening make it possible to load
and unload clothing more easily.
[] Water Circulation
Spray detergent solution and water onto the load over and over.
Clothes are soaked more quickly and thoroughly during wash cycle.
The detergent suds can be removed more easily by the water shower
during rinse cycle. The water circulation system uses both water and
detergent more efficiently.
[] Ro|lerJets
Washing ball enhances the wash performance and reduces damage
to the clothing. The jets spray and help tumble clothes to enhance
washing performance while maintaining fabric care.
[] Built-in Heater
Internal heater automatically heats the water to the best temperature
on selected cycles.
[] Child Lock
The Child lock prevents children from pressing any button to change
the settings during operation.
Warnings ............................................................................................... 3
Specification .......................................................................................... 5
Installation ............................................................................................. 6
Care before washing ........................................................................... 12
Adding detergent ................................................................................. 13
Function .............................................................................................. 15
How to use washer ............................................................................. 16
Maintenance ....................................................................................... 24
Troubleshooting guide ........................................................................ 28
Terms of Warranty .............................................................................. 31
READALL INSTRUCTIONS AND EXPLANATION OF THE INSTALLATION BEFORE USE
For your safety, the information in this manual must be followed to minimize
the risk of fire or explosion, electric shock, or to prevent property damage,
personal injury, or loss of life.
iMPORTANTSAFETYiNSTRUCTiONS
WARNING : To reduce the risk of fire, electric shock, or injury to persons when using
the washer, follow basic precautions, including the following:
• Beforeinstallation, check exterior damages. Ifit has,
do not install.
• Donot install orstore the washer where it will
beexposed to the weather.
• Do nottamper withcontrols.
• Donot repair orreplaceany part ofthe washer
or attempt any servicingunless specifically
recommendedin the user-maintenance instructions
or publisheduser-repair instructions that you
understandand have theskills to carry out.
• Keepthe area underneath and aroundyour
appliances free ofcombustible materials suchas
lint, paper,rags,chemicals, etc.
• Close supervision is necessary if this appliance is
used by or near children or infirm persons.
Do not allow them to play on, with, or inside this
or any other appliance.
• Keep washer away from fire.
• Donot leavethe washerdoor open.
An opendoor could enticechildren to hang onthe
door or crawl insidethe washer.
• Neverreach into washer while it is moving.Wait
untilthe drum hascompletely stopped.
•The laundry processcan reduce the flame retardant
of fabrics.
•Toavoid such a result,carefullyfollow the garment
manufacturer'swash andcare instructions.
• Donot wash or dry articles thathave been cleaned
in, washed in,soaked in, or spottedwith
combustible or explosive substances(such aswax,
oil, paint,gasoline,degreasers, dry-cleaning
solvents,kerosene, etc.) which may ignite or
explode. Oil may remain in the tub after a whole
cycle resultingin fire during drying. So,do not load
oiledclothes.
• Do notslamthe washer door closed or tryto force
thedoor openwhen locked. This could result in
damageto the washer.
• When the machine runs high temperature, the front
door may bevery hot. Don't touchit.
• To minimize the possibility of electric shock, unplug
this appliancefrom the powersupply or disconnect
thewasher atthe household distribution panel by
removingthe fuse or switching off the circuit breaker
beforeattempting any maintenance orcleaning.
• When unplugging power cord,do not pullout by
graspingthe cord.Otherwise, the power cord may
bedamaged.
• Neverattempt to operate this appliance if it is
damaged, malfunctioning, partiallydisassembled, or
has missing or broken parts, including a damaged
cordor plug.
• Beforediscarding anold machine unplug it. Render
the plug useless.Cut offthe cabledirectly behind
theappliance to preventmisuse.
• When a product was under water, Please call
service center. The risk ofelectric shock and fire.
!s Do not push down the door excessively, when washer door open.
This could topple over the washer.
SAVE THESEiNSTRUCTIONS
GROUNDING iNSTRUCTiONS
Thisappliancemustbegrounded.Intheeventofmalfunctionorbreakdown,groundingwillreducetheriskofelectricshockbyprovidingapath
ofleastresistanceforelectriccurrent.Thisapplianceisequippedwithacordhavinganequipment-groundingconductorandgroundingplug.
Theplugmustbepluggedintoanappropriateoutletthatisproperlyinstalledandgroundedinaccordancewithalllocalcodesandordinance.
• Donot use an adapteror otherwise defeat the grounding plug.
• Ifyou don't havethe proper outlet, consult anelectrician.
WARNING : Improperconnectionoftheequipment-groundingconductorcanresultin riskofelectricshock.Checkwith
a qualifiedelectricianor servicemanifyou arein doubtasto whetherthe applianceisproperlygrounded.Do not modify
theplugprovidedwiththeappliance- if it doesnotfit theoutlet,haveaproperoutletinstalledby aqualifiedelectrician.

To minimize the risk of fire in a tumble dryer, the following should be observed:
• Items that have been spotted or soaked with vegetable or cooking oil constitute a fire
hazard and should not be placed in a tumble dryer.
Oil-affected items can ignite spontaneously, especially when exposed to heat
sources Such as in a tumble dryer. The items become warm, causing an oxidation
reaction in the oil. Oxidation creates heat. If the heat cannot escape, the items can
become hot enought to catch fire. Piling, stacking or storing oil-affected items can
prevent heat from escaping and so create a fire hazard.
If it is unavoidable that fabrics that contain vegetable or cooking oil or have been
contaminated by hair care products be placed in a tumble dryer they should first be
washed in hot water with extra detergent-this wilt reduce, but not eliminate, the
hazard. Washed in hot water with extra detergent-this wilt reduce, but not
eliminate, the hazard. The 'coot down' cycle of tumble dryers should be used to
reduce the temperature of the items. They should not be removed from the tumble
dryer or piled or stacked while hot.
• Items that have been previously cleaned in, washed in, soaked in or spotted with
petro/gasoline, dry-cleaning solvents or other flammable or explosive substances
should not be placed in a tumble dryer.
Highly flammable substances commonly used in domestic environments include
acetone, denatured alcohol, petrol/gasoline, kerosene, spot removers (some brands),
turpentine, waxes and was removers.
• Items containing foam rubber (also known as latex foam) or similarly testured rubber.
like materials should not be dried in a tumble dryer on a heat setting.
Foam rubber materials can, when heated, produce fire by spontaneous combustion.
• Fabric softeners or similar products should not be used in a tumble dryer to eliminate
the effects of static electricity unless this practice is specifically recommended by the
manufacturer of the fabric softener or product.
• Undergarments that contain metal reinforcements should not be placed in a tumble
dryer.
Damage to the tumble dryer can result if metal reinforcements come loose during
drying. When available a drying rack could be used for such items.
• Plastic articles such as shower caps or babies waterproof napkin covers should not
be placed in a tumble dryer.
• Rubber-backed articles, clothes fitted with foam rubber pads, pillows, galoshes and
rubber-coated tennis shoes should not be placed in a tumble dryer.
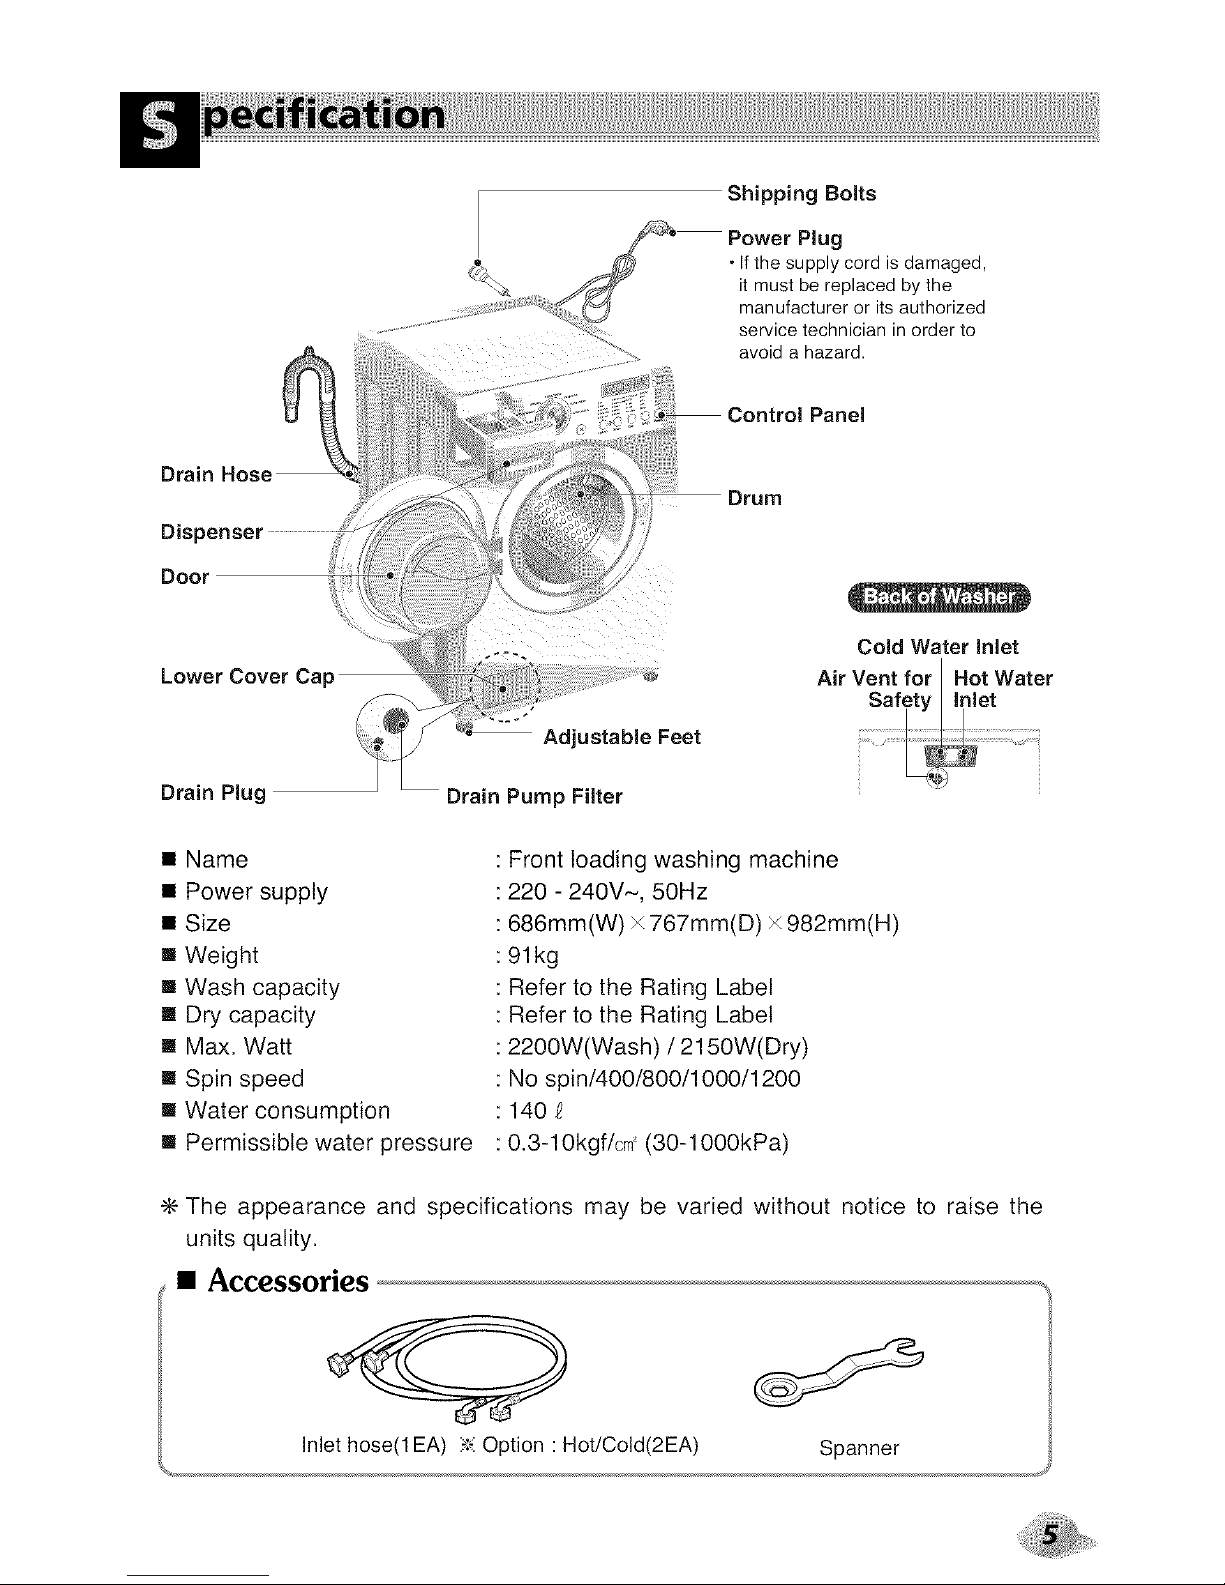
Shipping Bolts
Plug
• If the supply cord is damaged,
it must be replaced by the
manufacturer or its authorized
service technician in order to
avoid a hazard.
Control Panel
Drain F
Dispenser
Doo_
Lower Cover Ca
Drum
Cold Water Inlet
-- Adjustable Feet
Drain Plug Drain Pump Filter
[] Name
[] Power supply
[] Size
[] Weight
[] Wash capacity
I Dry capacity
[] Max. Watt
[] Spin speed
[] Water consumption
[] Permissible water pressure
: Front loading washing machine
: 220 - 240V~, 50Hz
: 686mm(W) x 767mm(D) x 982mm(H)
•91kg
Refer to the Rating Label
Refer to the Rating Label
2200W(Wash) / 2150W(Dry)
No spin/400/800/1000/1200
140
0.3-10kgf/cm_(30-1000kPa)
÷ The appearance and specifications may be varied without notice to raise the
units qua{ity.
Spanner
Install or store where it will not be exposed to temperatures below freezing or exposed to the weather.
Properly ground washer to conform with all governing codes and ordinances.
The base opening must not be obstructed by carpeting when the washing machine is installed on a
carpeted floor.
In countries where there are areas which may be subject to infestation by cockroaches or other
vermin, pay particular attention to keeping the appliance and its surroundings in clean condition at
all times.
Any damage which may be cause by cockroaches or other vermin will not be covered by the
appliance guarantee.
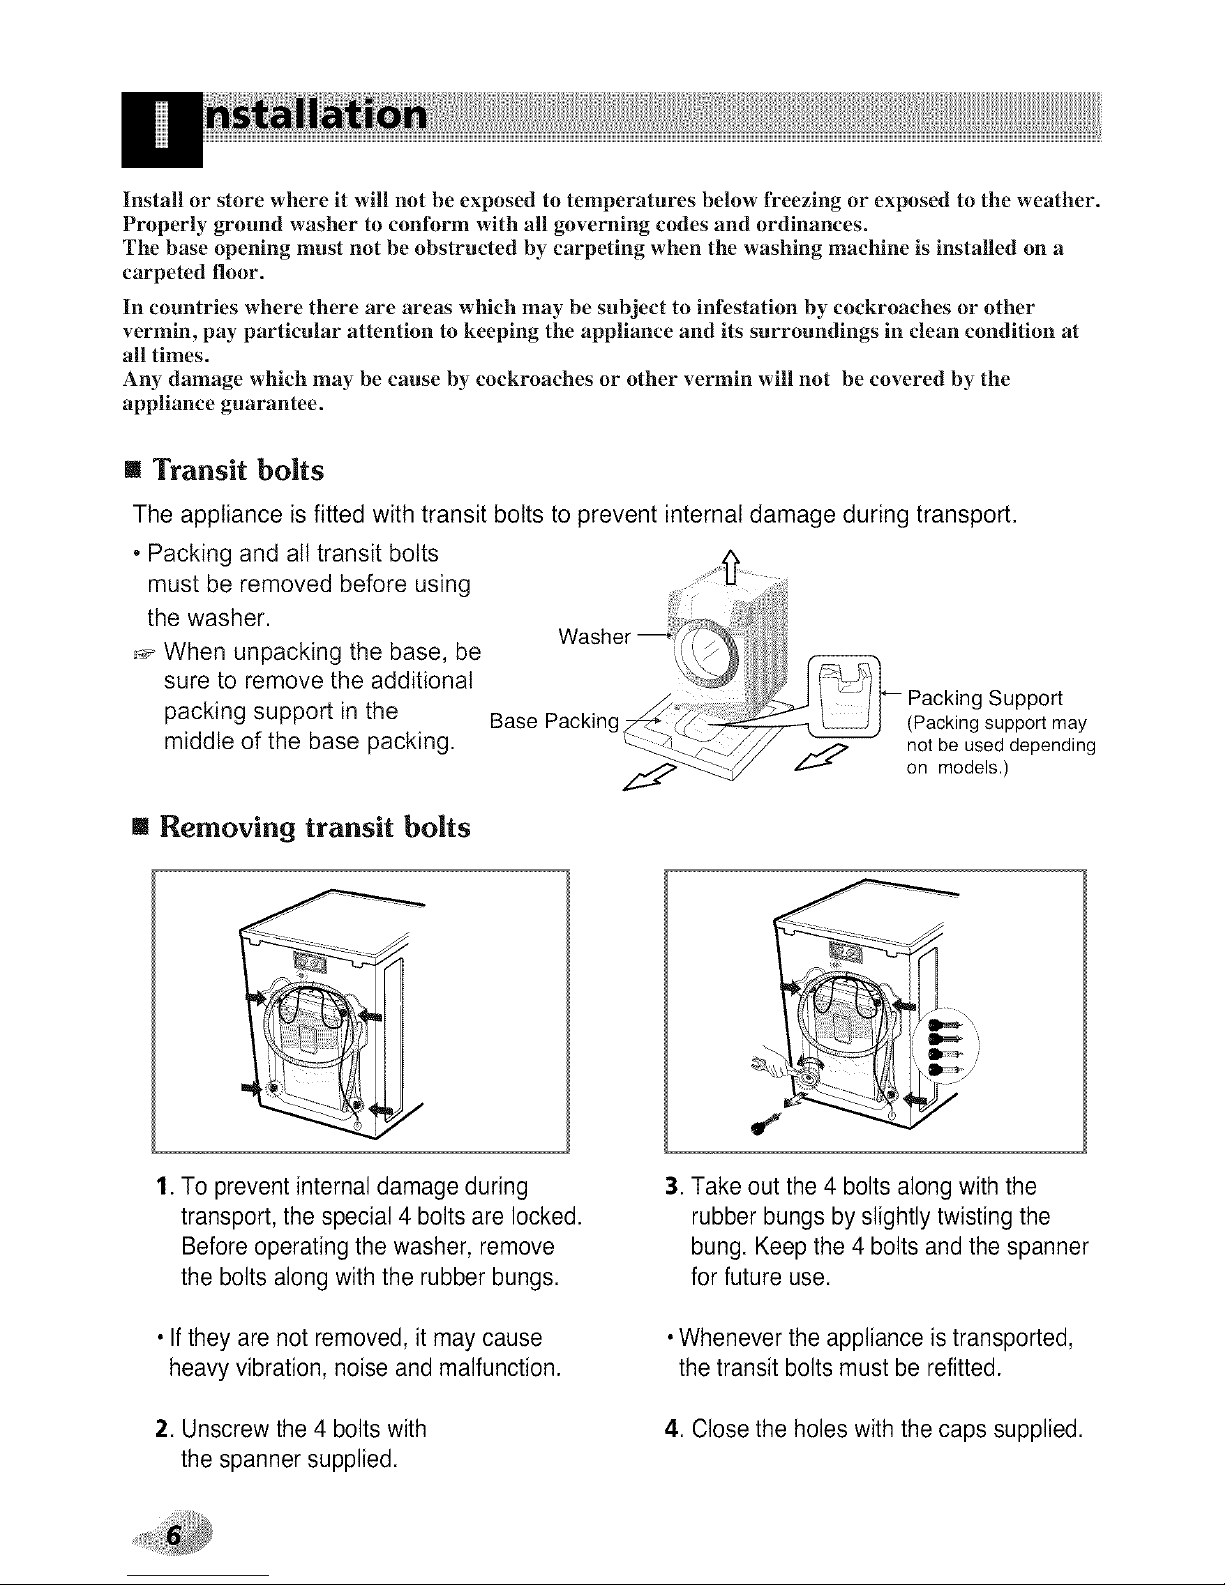
m Transit belts
The appliance is fitted with transit bolts to prevent internal damage during transport.
, Packing and all transit bolts
must be removed before using
the washer.
:_ When unpacking the base, be
sure to remove the additional
packing support in the
middle of the base packing.
on models.)
m Removing transit belts
1. To prevent internal damage during
transport, the special 4 bolts are locked.
Before operating the washer, remove
the bolts along with the rubber bungs.
• Ifthey are not removed, it may cause
heavy vibration, noise and malfunction.
2. Unscrew the 4 bolts with
the spanner supplied.
3. Take out the 4 bolts along with the
rubber bungs by slightly twisting the
bung. Keep the 4 bolts and the spanner
for future use.
• Whenever the appliance is transported,
the transit bolts must be refitted.
4. Close the holes with the caps supplied.
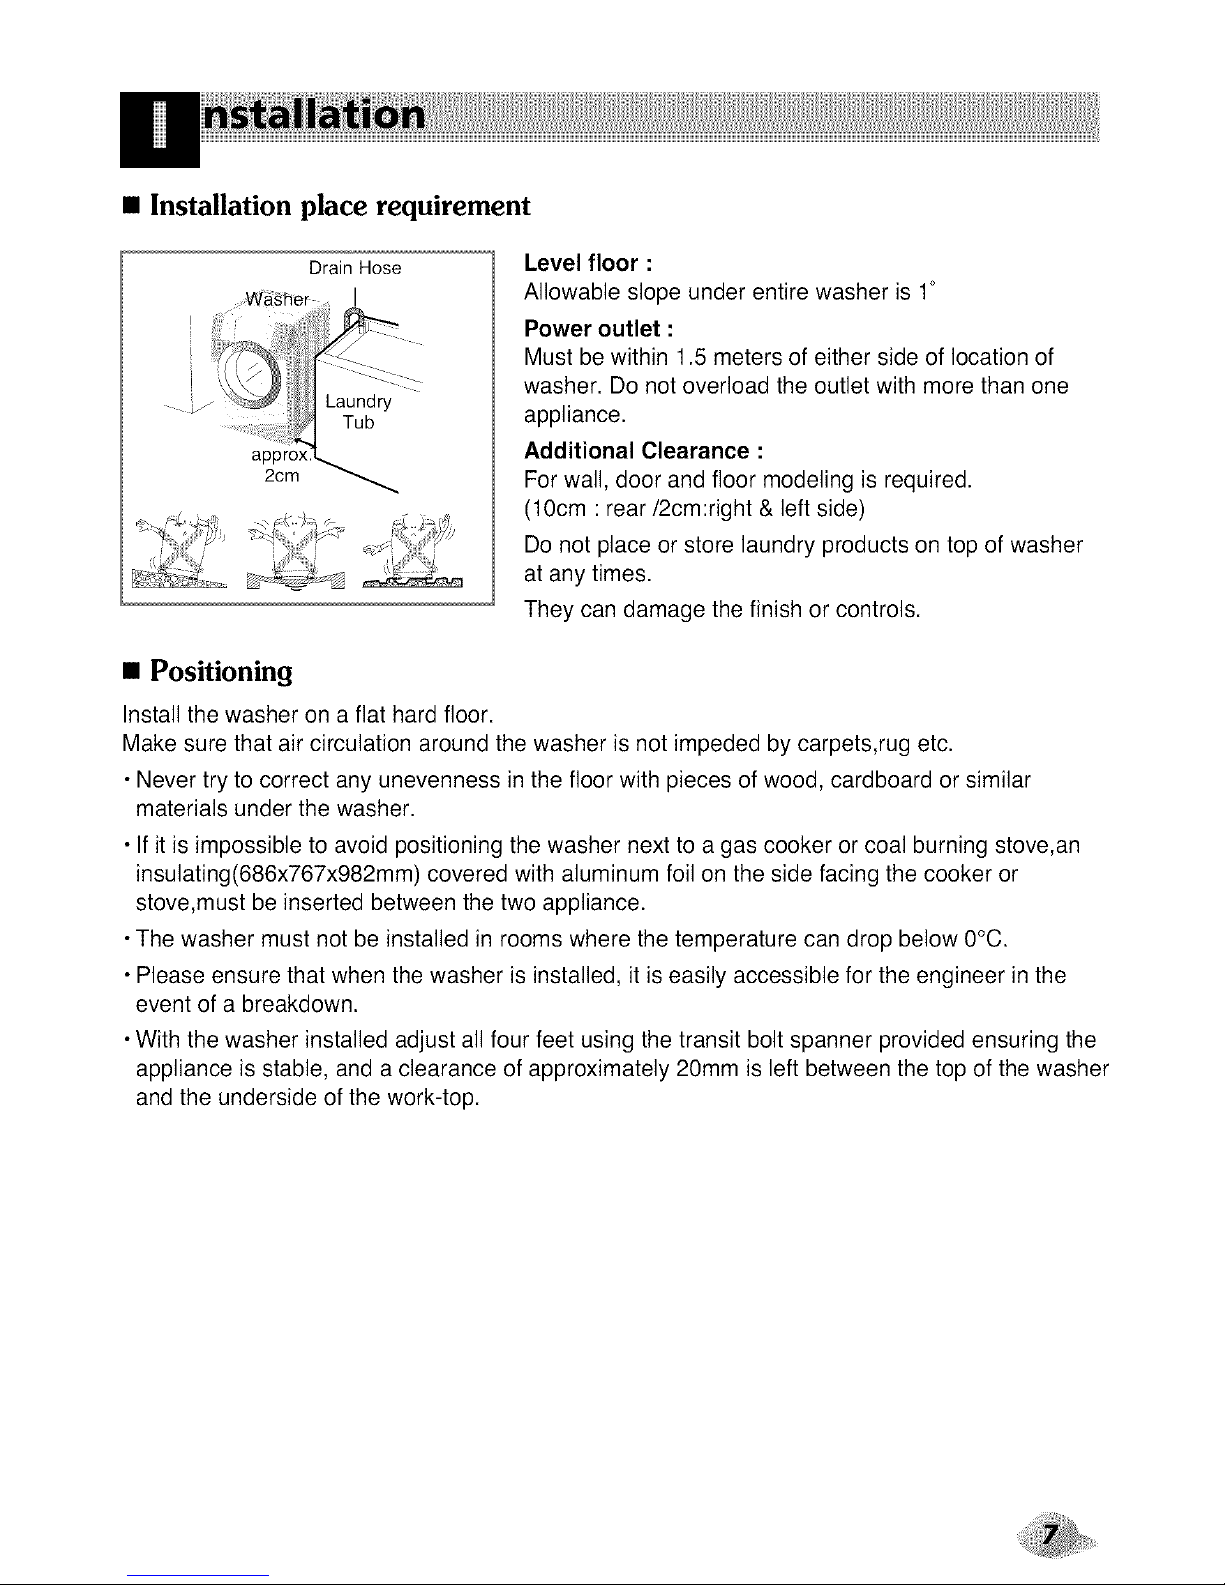
• Installation place requirement
Drain Hose
Level floor :
Allowable slope under entire washer is 1°
Power outlet •
Must be within 1.5 meters of either side of location of
washer. Do not overload the outlet with more than one
appliance.
Additional Clearance :
For wall, door and floor modeling is required.
(10cm : rear/2cm:right & left side)
Do not place or store laundry products on top of washer
at any times.
They can damage the finish or controls.
• Positioning
Install the washer on a flat hard floor.
Make sure that air circulation around the washer is not impeded by carpets,rug etc.
• Never try to correct any unevenness in the floor with pieces of wood, cardboard or similar
materials under the washer.
• If it is impossible to avoid positioning the washer next to a gas cooker or coal burning stove,an
insulating(686x767x982mm) covered with aluminum foil on the side facing the cooker or
stove,must be inserted between the two appliance.
•The washer must not be installed in rooms where the temperature can drop below 0°C.
• Please ensure that when the washer is installed, it is easily accessible for the engineer in the
event of a breakdown.
•With the washer installed adjust all four feet using the transit bolt spanner provided ensuring the
appliance is stable, and a clearance of approximately 20mm is left between the top of the washer
and the underside of the work-top.
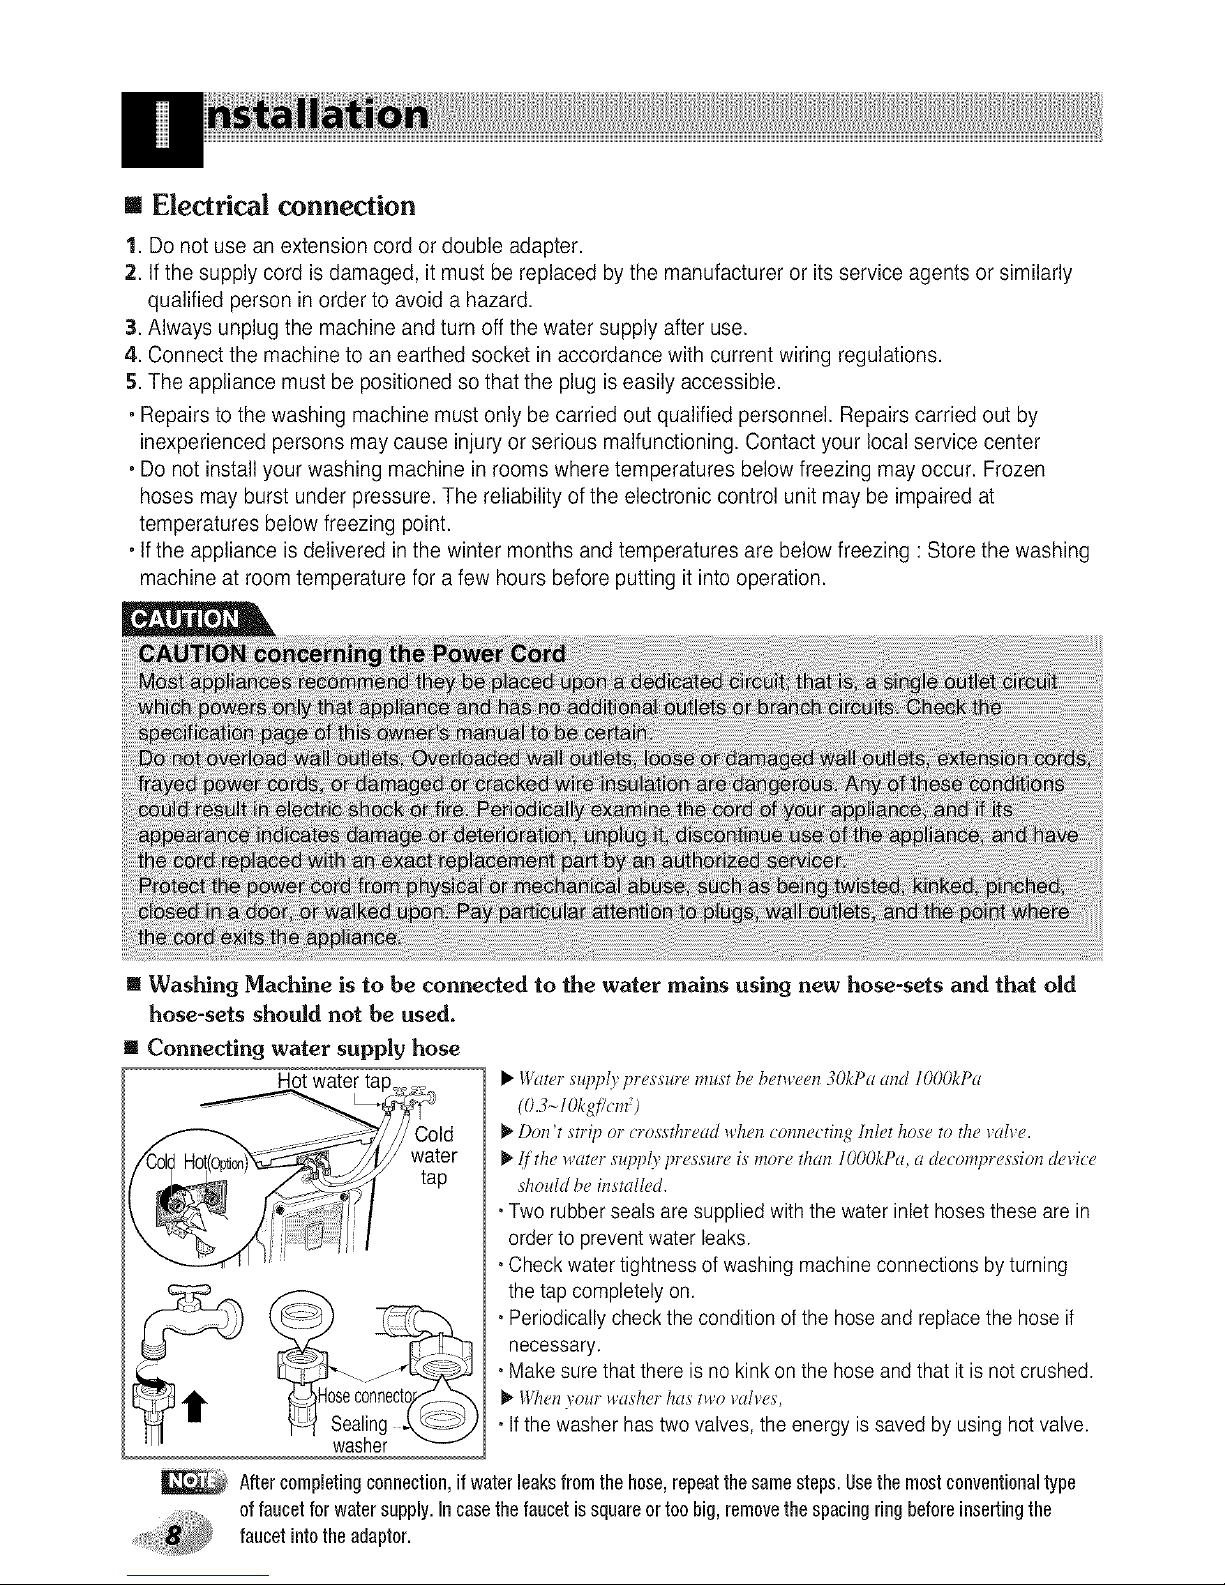
m Electrical connection
1. Do not use an extension cord or double adapter.
2. If the supply cord is damaged, it must be replaced by the manufacturer or its service agents or similarly
qualified person in order to avoid a hazard.
3. Always unplug the machine and turn off the water supply after use.
4. Connect the machine to an earthed socket in accordance with current wiring regulations.
5. The appliance must be positioned so that the plug is easily accessible.
• Repairs to the washing machine must only be carried out qualified personnel. Repairs carried out by
inexperienced persons may cause injury or serious malfunctioning. Contact your local service center
• Do not install your washing machine in rooms where temperatures below freezing may occur. Frozen
hoses may burst under pressure. The reliability of the electronic control unit may be impaired at
temperatures below freezing point.
• If the appliance is delivered in the winter months and temperatures are below freezing : Store the washing
machine at room temperature for a few hours before putting it into operation.
[] Washing Machine is to be connected to the water mains using new hose-sets and that old
hose-sets should not be used.
[] Connecting water supply hose
• Water s_qfl_Ivpressure must be between 30kPu and lO00kPu
(0.3-lOkgFcm +)
• Don't strip oi crossthread _ahenconnecting hdet hose to the _uhe.
• If the _uter sHpplvpressure is more than lO00kPa, a decompression de_ice
should be installed.
• Two rubber seals are supplied with the water inlet hosesthese are in
order to prevent water leaks.
• Check water tightness of washing machine connections by turning
the tap completely on,
• Periodically check the condition of the hose and replace the hose if
necessary,
• Make sure that there is no kink onthe hose and that itis not crushed.
• When )oiir _usher has t++o_uhes,
• Ifthe washer has two valves, the energy is saved by using hot valve.
washer
Aftercompletingconnection,ifwaterleaksfromthehose,repeatthesamesteps.Usethemostconventionaltype
offaucetforwatersupply.Incasethefaucetissquareortoo big,removethespacingring beforeinsertingthe
faucetintotheadaptor.
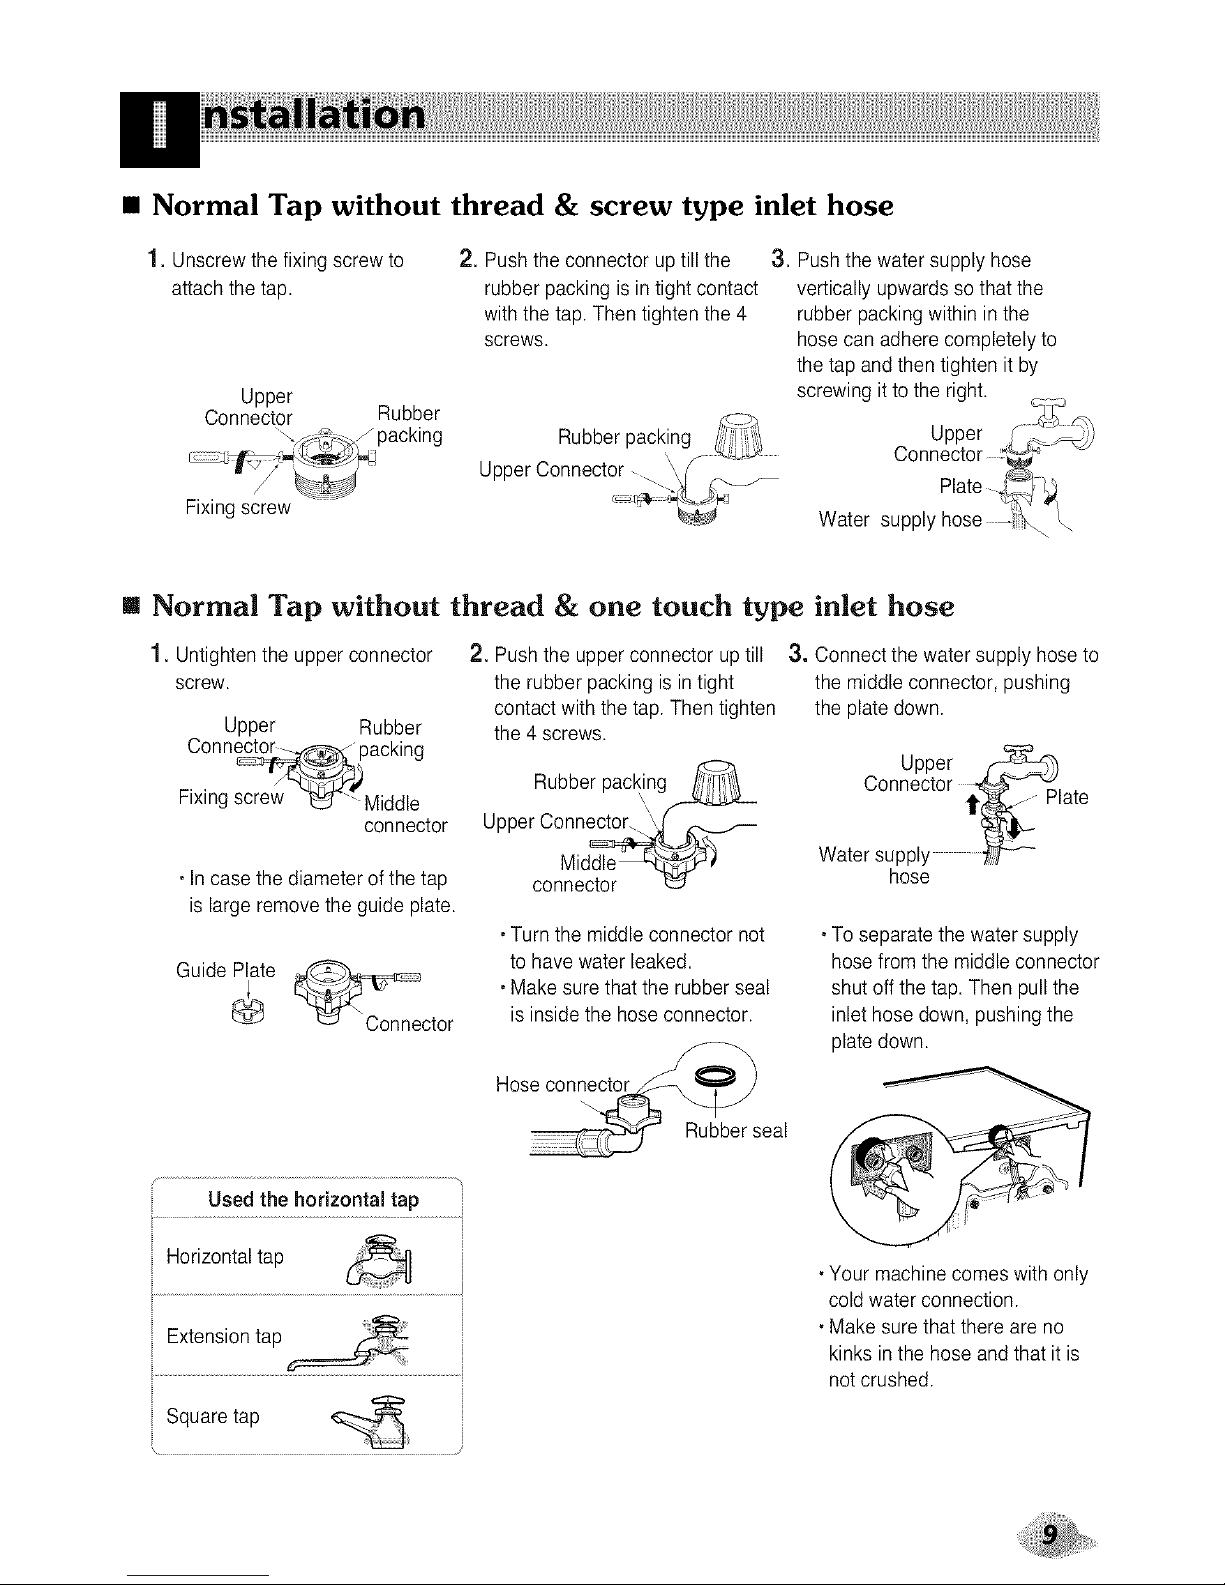
• Normal Tap without thread & screw type inlet hose
1. Unscrew the fixing screw to
attach the tap.
Upper
Connector Rubber
Fixing screw
2. Push the connector uptill the
rubber packing is intight contact
with the tap. Then tighten the 4
screws.
Rubber packing
Upper Connector - --. '_,/ _--
3. Push the water supply hose
vertically upwards so that the
rubber packing within in the
hose can adhere completely to
the tap and then tighten it by
screwing it to the right.
Upper ff:_ _
Connector _
Plate _-'_
Water supply hose _:_ "_
• Normal Tap without thread & one touch type inlet hose
1. Untighten the upper connector
screw.
2. Pushthe upper connector uptill 3o Connect the water supply hose to
the rubber packing is in tight the middle connector, pushing
contact with the tap. Then tighten the plate down.
Upper Rubber the 4 screws.
Conn_ packing
/ _connector Rubber pac_ng__:_g_A,, _&-- Upper i1,_ p
late
FixingJe"_ Middle Upper Conn_ ___fi Connector
Mid__ Water supply ....
• Incase the diameter ofthe tap connector_E_ hose
is large remove the guide plate.
Guide_e _ctor
Used the horizontal tap
• Turn the middle connector not
to have water leaked.
• Make sure that the rubber seal
is inside the hose connector.
Hose conn,@
bber seal
• To separate the water supply
hose from the middle connector
shut off the tap. Then pull the
inlet hose down, pushing the
plate down.
• Your machine comes with only
cold water connection.
• Make sure that there are no
kinks in the hose and that it is
not crushed.
This equipment is not designed for maritime use or for use mobile installations such as
caravans, aircraft etc.
Turn off the stopcock if the machine is to be left for any length of time (e.g. holiday),
especially if there is no floor drain(gully) in the immediate vicinity.
When disposing of the appliance, cut off the mains cable, and destroy the plug Disable the
door lock to prevent young children being trapped inside.
Packaging material (e.g. Films, Styrofoam) can be dangerous for children. There is a risk of
suffocation ) Keep all packaging well away from children
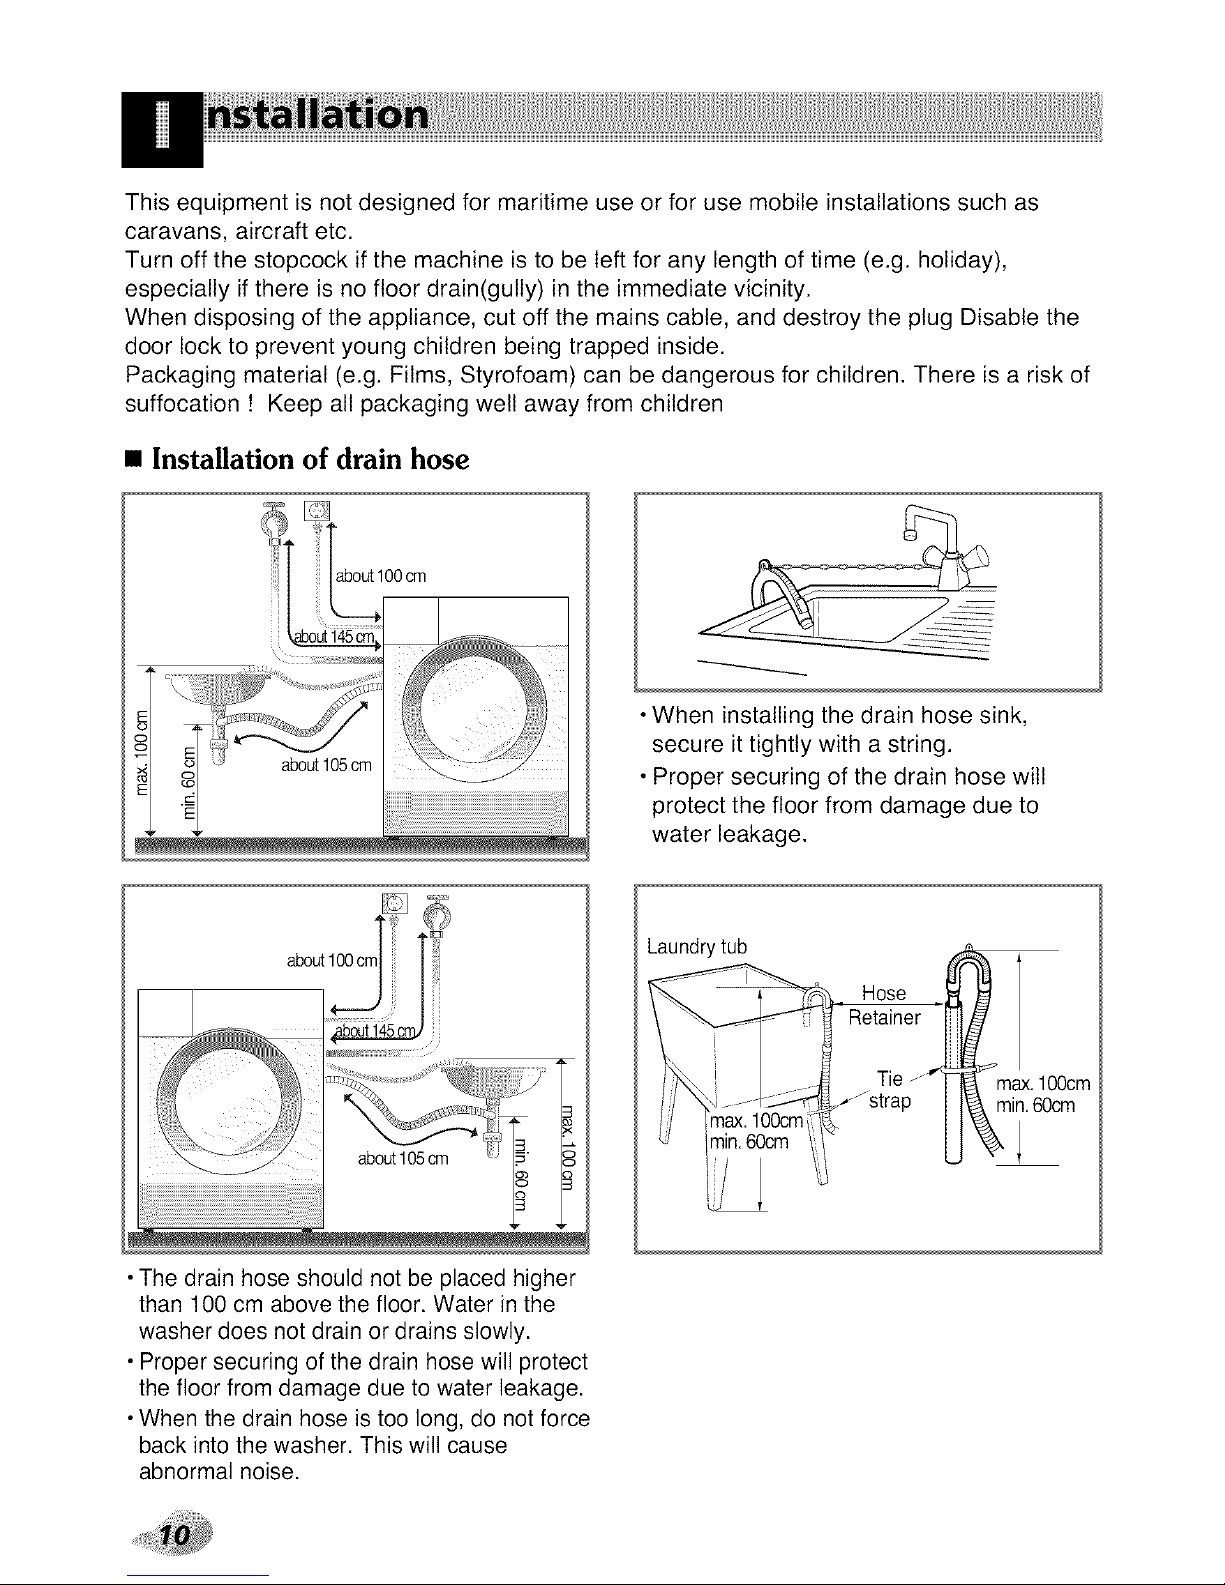
• Installation of drain hose
• When installing the drain hose sink,
secure it tightly with a string.
• Proper securing of the drain hose wilt
protect the floor from damage due to
water leakage.
a
i
• The drain hose should not be placed higher
than 100 cm above the floor. Water in the
washer does not drain or drains slowly.
• Proper securing of the drain hose will protect
the floor from damage due to water leakage.
• When the drain hose is too long, do not force
back into the washer. This will cause
abnormal noise.
Laundry tub
Hose
Retainer _
 Loading...