

LG PDRCUSZ0, PCRCUSZ0 User Manual
LG
LG
Weekly Wired Remote Controller
Owner's & Installation Manual
Models: PCRCUSZ0
PDRCUSZ0
IMPORTANT
•Please read this installation manual completely before installing the product.
•Installation work must be performed in accordance with the national wiring standards by authorized personnel only.
•Please retain this installation manual for future reference after reading it thoroughly.

Weekly Wired Remote Controller Owner’s & Installation Manual
TABLE OF CONTENTS
■ Safety Precaution ............................................................................................. |
3~4 |
■ Part Description ................................................................................................ |
5~8 |
■ Installation instruction ......................................................................................... |
9 |
■ Remote controller connection method ............................................................. |
10 |
■ Address setup of central control ...................................................................... |
11 |
■ E.S.P(DUCT TYPE) .............................................................................................. |
12 |
■ Cooling operation ......................................................................................... |
13~14 |
Standard cooling ................................................................................................ |
13 |
Power cooling ..................................................................................................... |
14 |
■ Heating operation ............................................................................................... |
15 |
■ Temperature control ........................................................................................... |
16 |
Setting desired temperature................................................................................ |
16 |
The room temperature confirmation.................................................................... |
16 |
■ Fan Speed operation ......................................................................................... |
17 |
Fan Speed selector ............................................................................................. |
17 |
Air flow direction control ...................................................................................... |
17 |
■ Additional functions ..................................................................................... |
18~28 |
Auto operation..................................................................................................... |
18 |
Dehumidification operation ................................................................................. |
19 |
Fan operation ..................................................................................................... |
19 |
Plasma ................................................................................................................ |
19 |
Swirl Function...................................................................................................... |
20 |
Heater ................................................................................................................. |
20 |
Ventilation ........................................................................................................... |
21 |
Humidifier ............................................................................................................ |
22 |
Fan Auto.............................................................................................................. |
22 |
Vane control ........................................................................................................ |
23 |
Setting current time ............................................................................................ |
24 |
Setting preset for weekly time ............................................................................. |
25 |
Setting holiday..................................................................................................... |
26 |
On preset ............................................................................................................ |
27 |
Off preset ............................................................................................................ |
27 |
Usage restriction function.................................................................................... |
28 |
Auto restarting Function ..................................................................................... |
28 |
Self diagnosis fuction ......................................................................................... |
28 |
Different mode operation..................................................................................... |
29 |
2 Weekly Wired Remote Controller

Safety Precaution
Safety Precaution
•The installation requires expert skills, and it should be installed by the service center or other shops specialized in the installation and recognized by our company.
•For all the problems arising after installation by someone who has no relevant qualifications, our company will not provide free service.
•The following safety cautions are provided to prevent unexpected dangers or losses.
 WARNING : If the user does not follow the mandatory items, it may result in serious injury or death.
 CAUTION : If the user does not follow the mandatory items, it may cause personal injury or property damage.
:Warning and Caution are to call the user’s attention to the possible danger. Read and follow them carefully in order to prevent a safety accident.
:Warning and Caution are indicated in this guide and the product itself to help protect the users from danger.
 WARNING
■ Installation
Be sure to request to the service center or installation specialty store when installing products.
•It will cause fire or electric shock or explosion or injury.
■ In-use
Request to the service center or installation specialty store when reinstalling the installed product.
•It will cause fire or electric shock or explosion or injury.
Do not disassemble, fix, and modify products randomly.
• It will cause fire or electric shock.
Do not place flammable stuffs close to the product.
• It will cause fire.
Do not allow water to run into the product.
•It will cause electric shock or breakdown.
Do not give the shock to the product.
•It will cause breakdown when giving the shock to the product.
SWING |
OPERATION |
|
|
|
|
|
|
|||
|
|
SET |
|
|
|
|
|
|||
|
|
|
|
|
RoomTEMP |
|
FAN SPEED |
|
||
OnTimer |
|
|
|
|
|
Temp |
|
|
||
Operation unit |
|
|
|
|
|
HI |
AUTO |
|||
Set no.Off |
|
|
Time |
|
MED |
|||||
Time |
01 |
03 |
|
|
|
LO |
JET |
|
||
|
|
|
05 |
07 |
Program set |
|
ZONE |
|
||
|
|
|
|
|
09 |
11 |
13 |
|
|
|
|
|
|
|
|
|
|
15 |
17 |
|
|
|
|
|
|
|
|
|
|
|
19 |
|
SUB |
|
|
|
HeaterFUNCTION |
|||
Defrost |
Preheat |
||
Filter |
|
Humidify |
|
1 |
|
Out door |
|
|
2 3 |
4 |
|
21 |
23 |
|
|
Owner’s

Safety Precaution
Request to the service center or installation specialty store when the product becomes wet.
• It will cause fire or electric shock.
Do not give the shock using sharp and pointed objects.
• It will cause breakdown by damaging parts.
■ In-use
Do not clean using the powerful detergent like solvent but use soft cloths.
•It will cause fire or product deformation.
Do not press the screen using powerful pressure or select two buttons.
•It will cause product breakdown or malfunction.
Do not touch or pull the lead wire with wet hands.
•It will cause product breakdown or electric shock.
AUTO SWING |
|
|
|
|
|
|
|
|
|
|
|
|
|
Timer |
|
|
|
|
|
|
|
|
|
AUTO |
SUB |
FUNCTION |
|
On Off |
Operation |
|
|
|
|
|
|
|
|
||||
Set no. Time |
|
|
|
|
|
O |
|
|
Heater |
Pr |
|
||
|
01 |
03 |
05 |
07 |
Program |
set |
|
|
JET |
Defrost |
Humeheat |
||
|
|
|
|
|
ZONE |
|
Filter |
Out |
idify |
||||
|
|
|
|
|
09 |
11 |
|
|
|
|
1 2 |
3 |
door |
|
|
|
|
|
|
|
13 |
15 |
17 |
|
|
4 |
|
|
|
|
|
|
|
|
|
|
19 |
21 |
|
|
|
|
|
|
|
|
|
|
|
|
|
|
23 |
|
|
AUTO SWING |
OPERATION |
|
|
|
|
|
|
|||
|
|
SET |
|
|
|
|
|
|||
|
|
|
|
|
RoomTEMP |
|
FAN SPEED |
|
||
OnTimer |
|
|
|
|
|
Temp |
|
|
||
Operation unit |
|
|
|
|
|
HI |
AUTO |
|||
Set no.Off |
|
|
Time |
|
MED |
|||||
Time |
01 |
03 |
|
|
|
LO |
JET |
|
||
|
|
|
05 |
07 |
Program set |
|
ZONE |
|
||
|
|
|
|
|
09 |
11 |
13 |
|
|
|
|
|
|
|
|
|
|
15 |
17 |
|
|
|
|
|
|
|
|
|
|
|
19 |
|
SUB |
|
|
|
HeaterFUNCTION |
|||
Defrost |
Preheat |
||
Filter |
|
Humidify |
|
1 |
|
Out door |
|
|
2 3 |
4 |
|
21 |
23 |
|
|
4 Weekly Wired Remote Controller

Part Description
Part Description
Name and Function of Remote Controller
CST TYPE
|
|
AUTO SWING OPERATION |
SET TEMP FAN SPEED |
SUB FUNCTION |
||
|
|
|
Room Temp |
AUTO |
Heater |
Preheat |
1 |
|
|
HI |
|||
|
|
MED |
JET |
Defrost |
Humidify |
|
|
|
LO |
SLo |
Filter |
Out door |
|
|
|
|
2ndF |
Time |
|
ZONE |
|
1 2 3 4 |
|
Timer |
Operation unit No Func |
Program set |
|
|
|
|
|
||
On Off |
|
|
|
|
|
|
|
|
|
Set no. Time 01 |
03 |
05 07 |
09 11 |
13 |
15 17 |
19 |
21 |
23 |
|
14 |
|
|
|
|
|
|
|
|
5 |
|
|
|
|
|
|
|
|
6 |
|
2 |
|
|
|
|
|
|
|
|
|
3 |
|
|
|
|
|
|
|
|
7 |
Timer |
Cancel |
|
2ndF |
|
|
|
|
|
8 |
|
|
|
|
|
|
|
|
|
|
Program |
Week |
|
Holiday |
|
|
|
|
|
9 |
4 |
|
|
Set/Clr |
PLASMA |
|
|
|
10 |
|
|
|
|
|
|
|
|
|
||
Hour |
Min |
|
|
RESET |
|
|
|
|
11 |
|
|
|
|
|
|
|
|||
|
|
|
|
|
|
|
|
|
12 |
|
|
|
|
|
|
|
|
|
13 |
DUCT TYPE |
|
|
|
|
|
|
|
|
|
|
|
|
|
AUTO SWING |
OPERATION |
SET TEMP |
FAN SPEED |
SUB FUNCTION |
|
||||||||
|
|
|
|
|
Room Temp |
|
HI |
|
AUTO |
Heater |
Preheat |
|
|
1 |
|
|
|
|
|
|
|
|
|
||||
|
|
|
|
|
|
|
MED |
|
JET |
Defrost |
Humidify |
|
|
|
|
|
|
|
|
|
LO |
|
SLo |
Filter |
Out door |
|
|
|
|
|
2ndF |
Time |
|
ZONE |
|
1 2 3 4 |
|
||||
Timer |
Operation unit |
No Func |
Program set |
|
|
|
|
|
|
|
|||
On Off |
|
|
|
|
|
|
|
|
|
|
|
|
|
Set no. Time 01 |
03 |
05 |
07 |
09 |
11 |
13 |
15 |
17 |
19 |
21 |
23 |
|
|
14 |
|
|
|
|
|
|
|
|
|
|
|
|
5 |
|
|
|
|
|
|
|
|
|
|
|
|
6 |
|
2 |
|
|
|
|
|
|
|
|
|
|
|
|
|
3 |
|
|
|
|
|
|
|
|
|
|
|
|
7 |
Timer |
Cancel |
2ndF |
|
|
|
|
|
|
|
|
|
8 |
|
Program |
Week |
Holiday |
|
|
|
|
|
|
|
|
|||
|
|
|
|
|
|
|
|
9 |
|||||
4 |
|
|
|
|
|
PLASMA |
|
|
|
|
AUTO |
||
|
|
Set/Clr |
|
|
|
|
|
|
|
|
10 |
||
Hour |
Min |
|
|
|
RESET |
|
|
|
|
|
|
11 |
|
|
|
|
|
|
|
|
|
|
|
|
|||
|
|
|
|
|
|
|
|
|
|
|
|
|
|
|
|
|
|
|
|
|
|
|
|
|
|
|
12 |
|
|
|
|
|
|
|
|
|
|
|
|
|
13 |
1.Operation indication screen
2.Swirl button
3.2ndF button
4.Timer set/cancel Program/Week/Holiday Hour/Min/SET/Clr/Ventilator
5.Set temperature button
6.ON/OFF button
7.Fan operation
8.Operation mode selection button
9.Fan speed button
10.Horizontal/Vertical air flow direction button
11.Room temperatur/filtersign release button
12.Plasma/Heater button
13.Time reset button
14.Operation lamp
1.Operation indication screen
2.Wireless remote controller receiver
3.2ndF button
4.Timer set/cancel Program/Week/Holiday Hour/Min/SET/Clr/Ventilator
5.Set temperature button
6.ON/OFF button
7.Fan operation
8.Operation mode selection button
9.Fan speed button
10.Fan auto/Humidification button
11.Room temperatur/filtersign release button
12.Plasma/Heater button
13.Time reset button
14.Operation lamp
Operation lamp lights on during the indoor operation. If error occurs, the lamp lights on red color.
Owner’s & Installation Manual 5

Part Description
Accessory
Connection wire(1) |
Remote control lock |
Operation/installation |
Insulation |
|
screw(5) |
Manual |
|
|
|
|
|
6 Weekly Wired Remote Controller

Part Description
Information of slide switch
CST TYPE
RESET switch
Room Temperature Sensing select Switch
1.Use Remocon's sensor
2.Use Indoor's sensor
3.Use senor which has lower temrerature between Remocon's and indoor's
Ceiling Height select switch
1.Low
2.Standard
3.High
Mode select switch
1.Cooling only
2.Heater pump
Group control select switch
1.Case of Single control
2.Case of Group control
*When changing the product selection switch and group control switch, you must press the reset switch to use the changed selection.
Owner’s & Installation Manual 7

Part Description
DUCT TYPE
RESET switch
Room Temperature Sensing select Switch
1.Use Remocon's sensor
2.Use Indoor's sensor
3.Use senor which has lower temrerature between Remocon's and indoor's
Zone State/Default E.S.P
1.Variable/Low E.S.P
2.Fixed/High E.S.P
3.Variable/High E.S.P
Mode select switch
1.Cooling only
2.Heater pump
Group control select switch
1.Case of Single control
2.Case of Group control
*When changing the product selection switch and group control switch, you must press the reset switch to use the changed selection.
8 Weekly Wired Remote Controller
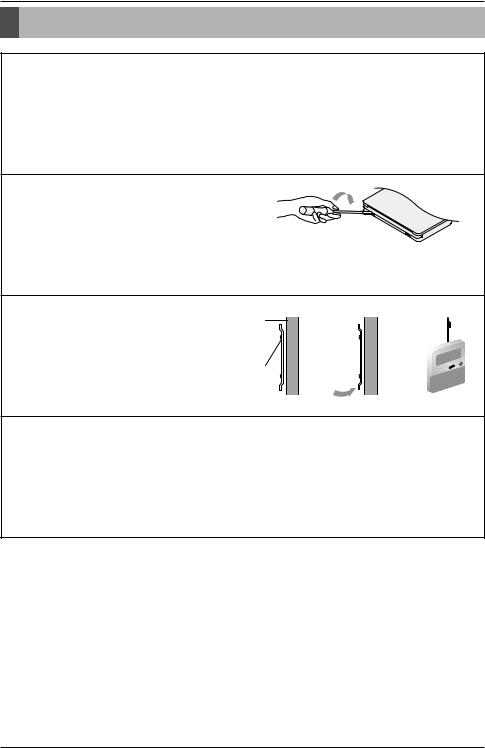
Installation instruction
Installation instruction
1 Remove the sticker that is attached on back of insulation and attach the remote control on the wall you want to install.
2 Separate the cover of remote control like the right hand side.
3 Fix the setup board on top of the insulation.
wall insulation
remote control lock screw 
4 Install each remote control with the distance of at least 2cm between them when installing several wired remote controls horizontally.
2cm
 CAUTION
Before installing the wired remote controller, set the switch on the back of the wired remote controller to the required condition of the product.
Especially, if the switch exclusively for air conditioning and air conditioning/heating selection switch is incorrectly set, it can cause a problem to the product operation.
Owner’s & Installation Manual 9
 Loading...