


ENGLISH
ภาษาไทย
OWNER’S MANUAL
MICROWAVE OVEN
Please read this owner’s manual thoroughly before operating.
MS253
(optional, please check model specification)
****
MFL69673104_0
www.lg.com
Copyright © 2018 LG Electronics Inc. All Rights Reserved.

CONTENTS
How the Microwave Function Works
Microwaves are a form of energy similar to radio,
television waves, and ordinary daylight. Normally,
microwaves spread outwards as they travel through the
This oven, however, has a magnetron that is designed
to make use of the energy in microwaves. Electricity,
supplied to the magnetron tube, is used to create
microwave energy.
These microwaves enter the cooking area through
openings inside the oven. A tray is located inside the
oven. Microwaves cannot pass through metal walls
of the oven, but they can penetrate such materials as
glass, porcelain and paper, the materials out of which
microwave-safe cooking dishes are constructed.
Microwaves do not heat cookware, though cooking
vessels will eventually get hot from the heat generated
by the food.
A very safe appliance
Your Microwave oven, is one of the safest
of all home appliances. When the door
is opened, the oven automatically stops
producing microwaves. Microwave energy
is converted completely to heat when it
enters food, leaving no “left over” energy
to harm you when you eat your food.
CONTENTS
3
IMPORTANT SAFETY INSTRUCTIONS
8
BEFORE USE
8
Unpacking & Installing
10
Control Panel
10
Display Picto
11
Setting Clock
11
Quick Start
11
More/Less
11
Energy Saving
12
HOW TO USE
12
Timed Cooking
12
Microwave Power Levels
13
Child Lock
13
Reheat
13
Reheat Menu Instructions
14
Popular Menu
14
Popular Menu Instructions
17
Soften
17
Soften Menu Instructions
18
Melt
18
Melt Menu Instructions
18
Yogurt
19
Yogurt Menu Instructions
19
Keep Warm
20
Inverter Defrost
20
Inverter Defrost Menu Instructions
21
MICROWAVE-SAFE UTENSILS
22
FOOD CHARACTERISTICS &
MICROWAVE COOKING
TO CLEAN YOUR OVEN
24
USING THE SMART DIAGNOSIS™
24
FUNCTION
QUESTIONS & ANSWERS
25
TECHNICAL SPECIFICATIONS
26

CONTENTS
How the Microwave Function Works
Microwaves are a form of energy similar to radio,
television waves, and ordinary daylight. Normally,
microwaves spread outwards as they travel through the
This oven, however, has a magnetron that is designed
to make use of the energy in microwaves. Electricity,
supplied to the magnetron tube, is used to create
microwave energy.
These microwaves enter the cooking area through
openings inside the oven. A tray is located inside the
oven. Microwaves cannot pass through metal walls
of the oven, but they can penetrate such materials as
glass, porcelain and paper, the materials out of which
microwave-safe cooking dishes are constructed.
Microwaves do not heat cookware, though cooking
vessels will eventually get hot from the heat generated
by the food.
Your Microwave oven, is one of the safest
of all home appliances. When the door
is opened, the oven automatically stops
producing microwaves. Microwave energy
is converted completely to heat when it
enters food, leaving no “left over” energy
to harm you when you eat your food.
A very safe appliance
CONTENTS
3
IMPORTANT SAFETY INSTRUCTIONS
8
BEFORE USE
8
Unpacking & Installing
10
Control Panel
10
Display Picto
11
Setting Clock
11
Quick Start
11
More/Less
11
Energy Saving
12
HOW TO USE
12
Timed Cooking
12
Microwave Power Levels
13
Child Lock
13
Reheat
13
Reheat Menu Instructions
14
Popular Menu
14
Popular Menu Instructions
17
Soften
17
Soften Menu Instructions
18
Melt
18
Melt Menu Instructions
18
Yogurt
19
Yogurt Menu Instructions
19
Keep Warm
20
Inverter Defrost
20
Inverter Defrost Menu Instructions
21
MICROWAVE-SAFE UTENSILS
22
FOOD CHARACTERISTICS &
MICROWAVE COOKING
24
TO CLEAN YOUR OVEN
25
QUESTIONS & ANSWERS
26
TECHNICAL SPECIFICATIONS
24
USING THE SMART DIAGNOSIS™
FUNCTION
IMPORTANT SAFETY INSTRUCTIONS
READ CAREFULLY AND KEEP FOR FUTURE REFERENCE
3
ENGLISH

CONTENTS
How the Microwave Function Works
Microwaves are a form of energy similar to radio,
television waves, and ordinary daylight. Normally,
microwaves spread outwards as they travel through the
This oven, however, has a magnetron that is designed
to make use of the energy in microwaves. Electricity,
supplied to the magnetron tube, is used to create
microwave energy.
These microwaves enter the cooking area through
openings inside the oven. A tray is located inside the
oven. Microwaves cannot pass through metal walls
of the oven, but they can penetrate such materials as
glass, porcelain and paper, the materials out of which
microwave-safe cooking dishes are constructed.
Microwaves do not heat cookware, though cooking
vessels will eventually get hot from the heat generated
by the food.
Your Microwave oven, is one of the safest
of all home appliances. When the door
is opened, the oven automatically stops
producing microwaves. Microwave energy
is converted completely to heat when it
enters food, leaving no “left over” energy
to harm you when you eat your food.
A very safe appliance
CONTENTS
3
IMPORTANT SAFETY INSTRUCTIONS
8
BEFORE USE
8
Unpacking & Installing
10
Control Panel
10
Display Picto
11
Setting Clock
11
Quick Start
11
More/Less
11
Energy Saving
12
HOW TO USE
12
Timed Cooking
12
Microwave Power Levels
13
Child Lock
13
Reheat
13
Reheat Menu Instructions
14
Popular Menu
14
Popular Menu Instructions
17
Soften
17
Soften Menu Instructions
18
Melt
18
Melt Menu Instructions
18
Yogurt
19
Yogurt Menu Instructions
19
Keep Warm
20
Inverter Defrost
20
Inverter Defrost Menu Instructions
21
MICROWAVE-SAFE UTENSILS
22
FOOD CHARACTERISTICS &
MICROWAVE COOKING
24
TO CLEAN YOUR OVEN
25
QUESTIONS & ANSWERS
26
TECHNICAL SPECIFICATIONS
24
USING THE SMART DIAGNOSIS™
FUNCTION
4

5
ENGLISH
-

6
his model doesn't provide a temperature probe.
T
S
Farm houses;
By clients in hotels, motels and other residential environments;
Bed and breakfast type environments.

7
ENGLISH
36
Caution, hot surface
When the symbol is used, It means that the surfaces are liable to get hot during use.
37
Do not place an object(a book, a box, etc.) on the product. The product may overheat or catch fire or the
object may fall, causing injury to persons.
BEFORE USE
8
BEFORE USE
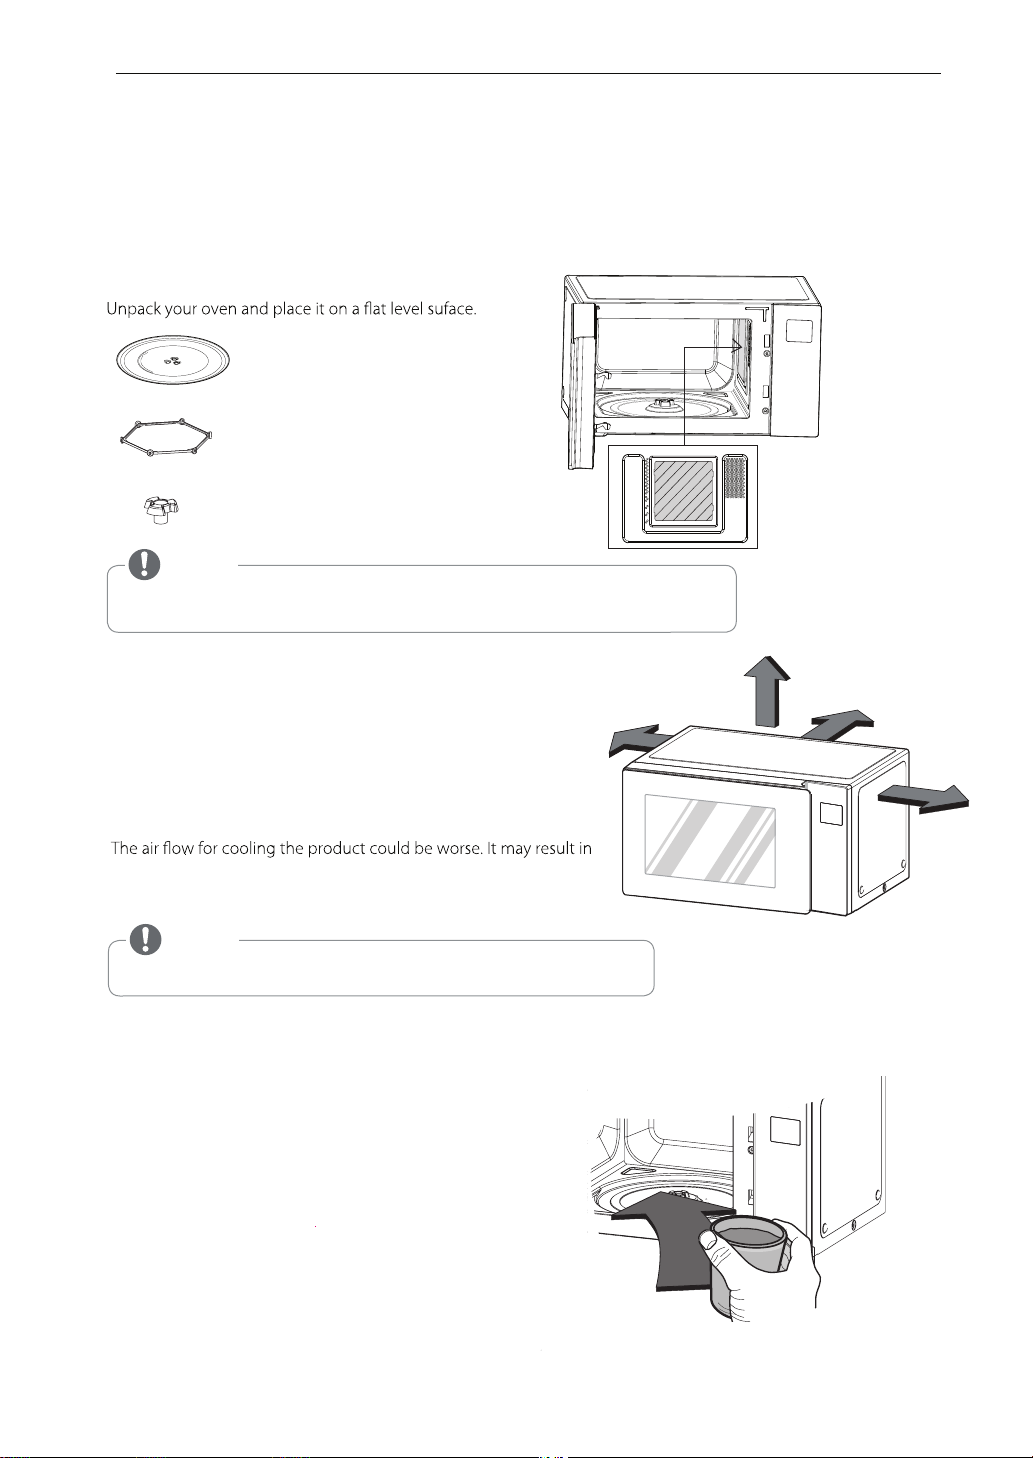
UNPACKING & INSTALLING
By following the basic steps on these two pages you will be able to quickly check that your oven is operating correctly.
Please pay particular attention to the guidelines on where to install your oven. When unpacking your oven make sure
you remove all accessories and packing materials. Check to make sure that your oven has not been damaged during
shipping.
1
GLASS TRAY
ROTATING RING
Mica Sheet
TURNTABLE SHAFT
*Do Not Remove
Mica Sheet
NOTE
Do not remove the cavity Mica Sheet (silver plate) inside of oven.
The Mica plate is there to protect the microwave components from food spatters.
cm
2 Place the oven on the level location of your choice with more
than 85cm height but make sure there is at least 20 cm of space
on the top and 20 cm at the rear & left & right for proper
ventilation. The front of the oven should be at least 8 cm from
the edge of the surface to prevent tipping.
An exhaust outlet is located on bottom or side of the oven.
Blocking the outlet can damage the oven.
If you use the microwave oven in an enclosed space or cupboard,
lower performance and reduced service life. If possible, please use the
microwave oven in the counter top condition.
0 cm
cm
0 cm
NOTE
•
THIS OVEN SHOULD NOT BE USED FOR COMMERCIAL CATERING PURPOSES.
3 Plug your oven into a standard household socket. Make sure your oven is the only appliance connected to the socket.
If your oven does not operate properly, unplug it from the electrical socket and then plug it back in.
4
Open your oven door by pulling the door handle. Place the rotating
ring inside the oven and place the glass tray on top.
Fill a microwave safe container with 300 ml (1/2 pint) of water.
5
Place on the glass tray and close the oven door.
If you have any doubts about what type of container to use
please refer to Microwave-safe utensils.

BEFORE USE
6 Press the STOP/CANCEL button, and press the START/ENTER button
one time to set 30 seconds of cooking time.
7 The DISPLAY will count down from 30 seconds.
When it reaches 0 it will sound BEEPS. Open the oven door
and test the temperature of the water.
If your oven is operating the water should be warm.
Be careful when removing the container it may be hot.
YOUR OVEN IS NOW INSTALLED
8
The contents of feeding bottles and baby food jars shall be stirred or shaken and the temperature checked before
consumption in order to avoid burns.
Button recognition may be hampered in the following circumstances:
9
• Only the outside area of the button is pressed.
•
9
ENGLISH
NOTE
Do not use rubber gloves or disposable gloves.
The setting of the cooking time should be shorter than common microwave ovens (700 W, 800 W) due to
10
the relatively high output power of the product. Excessive heating with the product may cause moisture on the door.

BEFORE USE
10
CONTROL PANEL
Part
POWER
See page 12“Timed Cooking”
INVERTER DEFROST
See page 20 “Inverter Defrost”
YOGURT / KEEP WARM
See page 18 "Yogurt"
See page 19 “ Keep Warm”
INVERTER COOK
Inverter Cook allows you to cook most of your
favorite food by selecting the food type and the
weight of the food.
See page 13 "Reheat"
See page 14 "Popular Menu"
See page 17 "Soften"
See page 18 "Melt"
MORE / LESS
Choose the cooking menu.
Set cooking time and weight.
While cooking with auto and manual function,
you can increase or decrease the cooking time
at any point by pressing the - or + keys (except
defrost mode).
STOP/CANCEL
• Clears all functions and set entries except time of day.
START
•
Press this button to start cooking or resume cooking
if the door was opened or the STOP button was
pressed once.
• The quick start feature allows you to set
30 second intervals of HIGH power cooking with each
press of the START button.
SMART DIAGNOSIS
8
Hold the mouthpiece of a phone up to this icon
when directed to by service centre personnel, to
help diagnose problems with the microwave oven
when calling for service.
DISPLAY PICTO
When operate Microwave, Show up the icon on the display.
When operate Inverter Cook / Steam Cook, Show up the icon on the dispaly.
When operate Inverter Defrost, Show up the icon on the display.
When you can set More/Less, Show up the icon on the display.
When you can Cook Start, Show up the icon on the display.
When you can set Output Power, Show up the icon on the display.
When you can set Weight, Show up the icon on the display.
Icon

HOW TO USE
12
BEFORE USE
11
SETTING CLOCK
HOW TO USE
When your oven is plugged in for the first time or
TIMED COOKING
when power resumes after a power interruption,
the numbers in the display reset to '12H
(MANUAL COOKING)
Example: To set 11:11
This function allows you to cook food for a
desired time. There are 5 power levels available.
The example below shows how to set 800 W
power level for the desired time.
Example: To cook food on 800 W for 5
minutes 30 seconds
NOTE
•
You can also set the time by using the slide
Touch Key after closing the door.
If you want to set the clock again or change options,
•
you will need to unplug the power cord and reconnect.
1. Press START to confirm
the 12H clock display.
(You can press +
for 24Hour mode)
2. Press + until display
shows ‘11:’
1. Press STOP/CANCEL .
3. Press START.
2. Press POWER until display
shows ‘800 W’.
4. Press + until display
shows ‘11:11’
5. Press START.
3. Enter 5 minutes 30 seconds
by pressing '+' until display
shows '5:30'.
4. Press START .
(1st time 1000 W appears
in the display. This is to
tell you that the oven is set
on HI unless a different
power setting is chosen.)
'.
to select
QUICK START
When cooking is complete, Tip will sound. The word
The QUICK START feature allows you to set 30
End shows in the display window. 'End' remains in
seconds intervals of HIGH power cooking with
the display and Tip will sound every minute until the
a touch of the START.
door is opened, or any button is pressed.
Example: Set 2 minutes of cooking on high
power
NOTE
•
If you do not select the power level, the oven
will operate at power HIGH. To set HI-POWER
cooking, skip step 2 above.
Press the START button four times
The oven will start before you have finished
the fourth press.
During QUICK START cooking, you can extend
the cooking time up to 99 minutes 59 seconds by
repeatedly pressing the START button.
1. Close the Door.
Press STOP/CANCEL.
2. Select 2 minutes on high
power.
MORE/LESS
MICROWAVE POWER LEVELS
By using the ( - ) or ( + ) key, TIMED COOK program
Your microwave oven is equipped with five power
can be adjusted to cook food for a longer or shorter
levels to give you maximum flexibility and control
time. Pressing ( + ) will increase10 seconds to the
over cooking. The adjacent table will give you
cooking time each time you press it. Pressing ( - )
some idea of which foods are prepared at each of
will decrens 10 seconds of cooking time each time
the various power levels.
you press it. The max time possible will be 99 min
• The adjacent chart shows the power level settings
59 seconds.
for your oven.
Example: To adjust the Auto Cook
MICROWAVE POWER LEVEL CHART
(ex. Dinner Plate 1 Serve) cooking time for
a longer time, or for a shorter time
Power
Level
•
Boiling water.
Browning ground beef.
High
1000 W
800 W
600 W
400 W
200 W
ENERGY SAVING
Energy saving means save energy by turning off
the display. This feature only operates when the
Microwave Oven standby and the display will go out.
•
Making candy.
•
•
Cooking poultry pieces,
fish & vegetables.
•
Cooking tender cuts of meat.
•
Reheating rice, pasta & vegetables.
•
Reheating prepared foods quickly.
•
Reheating sandwiches.
Cooking egg, milk and cheese dishes.
•
•
Cooking cakes and breads.
Melting chocolate.
•
Cooking veal.
•
•
Cooking whole fish.
Cooking puddings and custard.
•
Thawing meat, poultry and seafood.
•
Cooking less tender cuts of meat.
•
Cooking pork chops
•
•
Taking chill out of fruit.
Softening butter.
•
•
Keeping casseroles and main
dishes warm.
Softening butter and cream cheese.
•
Use
1. Press STOP/CANCEL.
2. Press INVERTER COOK .
until display shows ‘1’ .
3. Press START.
until display shows ‘1-1’.
4. Press + until display
shows ‘1-3’.
5. Press START.
.
Slide ( + ) or ( - ) Remaining
6
time will increase or decrease
by 10 seconds.
and roast.
NOTE
•
When using clock mode, the display will remain on.
ENGLISH

HOW TO USE
12
HOW TO USE
TIMED COOKING
(MANUAL COOKING)
This function allows you to cook food for a
desired time. There are 5 power levels available.
The example below shows how to set 800 W
power level for the desired time.
Example: To cook food on 800 W for 5
minutes 30 seconds
1. Press STOP/CANCEL .
2. Press POWER until display
shows ‘800 W’.
(1st time 1000 W appears
in the display. This is to
tell you that the oven is set
on HI unless a different
power setting is chosen.)
3. Enter 5 minutes 30 seconds
by pressing '+' until display
shows '5:30'.
4. Press START .
When cooking is complete, Tip will sound. The word
End shows in the display window. 'End' remains in
the display and Tip will sound every minute until the
door is opened, or any button is pressed.
MICROWAVE POWER LEVELS
Your microwave oven is equipped with five power
levels to give you maximum flexibility and control
over cooking. The adjacent table will give you
some idea of which foods are prepared at each of
the various power levels.
• The adjacent chart shows the power level settings
for your oven.
MICROWAVE POWER LEVEL CHART
Power
Level
High
1000 W
800 W
600 W
400 W
200 W
•
Boiling water.
Browning ground beef.
•
Making candy.
•
•
Cooking poultry pieces,
fish & vegetables.
•
Cooking tender cuts of meat.
•
Reheating rice, pasta & vegetables.
•
Reheating prepared foods quickly.
•
Reheating sandwiches.
Cooking egg, milk and cheese dishes.
•
•
Cooking cakes and breads.
Melting chocolate.
•
Cooking veal.
•
•
Cooking whole fish.
Cooking puddings and custard.
•
Thawing meat, poultry and seafood.
•
Cooking less tender cuts of meat.
•
Cooking pork chops
•
•
Taking chill out of fruit.
Softening butter.
•
•
Keeping casseroles and main
dishes warm.
Softening butter and cream cheese.
•
Use
and roast.
NOTE
•
If you do not select the power level, the oven
will operate at power HIGH. To set HI-POWER
cooking, skip step 2 above.

HOW TO USE
CHILD LOCK
This is a unique safety feature that prevents
unwanted oven operations. Once the CHILD
LOCK is set, no cooking can take place.
Example: To set the CHILD LOCK
To set the child lock
1. Close the Door.
Press STOP/CANCEL.
2. Press and hold
STOP/CANCEL until 'Loc'
appears in the display
and tip are heard.
If the time of day was already set, the time of
day will appear on the display window after
seconds.
1
If the CHILD LOCK was already set and you
touch another pad, the word Loc shows in
the display. You can cancel the CHILD LOCK
according to below procedure.
Example: To cancel the CHILD LOCK
To cancel the child lock
Press and hold STOP/CANCEL
until 'Loc' disappears in the
display.
After the CHILD LOCK is turned off, the oven
will operate normally.
REHEAT
Your oven’s menu has been preprogrammed to automatically roast food. Tell the oven what you want
and how many items there are. Then let your microwave oven roast your selections.
13
ENGLISH
Example : To reheat 0.3 kg pizza
1.
2. Press
STOP/CANCEL.
Press
INVERTER COOK
until diplay shows ‘1’ .
3. Press + until display
shows ‘1-6’.
REHEAT MENU INSTRUCTIONS
Cod
1-1
1-2
1-3
e
Menu
Beverage 1 - 2 cups
Casserole 0.25 - 1.0 kg
Dinner Plate
Weight
Limit
(1 cup /
200 ml)
(250 g /
1 serving)
1
Initial
Temperature
Room
Refrigerated
Refrigerated
1. Place food on a microwave-safe cup.
2. Place food in the oven. Choose the menu and
weight, press START.
1. Place food on a microwave-safe bowl.
Cover with plastic wrap and vent.
2. Place food in the oven. Choose the menu and
weight, press START.
3. After cooking, stand covered for 3 minutes.
1. Place food (0.4 - 0.5 kg of meat, chicken,
mashed potato, vegetable etc.) on a
microwave-safe dish. Cover with plastic wrap
and vent.
2. Place food in the oven. Choose the menu,
press START.
3. After cooking, stand covered for 3 minutes.
Instructions
4.
Press START.
5. Press + until
display shows ‘0.
START.
Press
6.
kg’.
Ute
nsil
Microwavesafe cup
Microwavesafe bowl
Microwavesafe dish
Muffin 1 - 4
1-4
(75 - 80 g /
1 muffin)
Frozen 1. Place food on a microwave-safe dish.
2. Place food in the oven. Choose the menu and
weight, press START.
Microwavesafe dish

HOW TO USE
14
Code
1-5
1-6
1-7
1-8
Menu
Pie
Pizza
Rice 0.1 - 0.3 kg
Soup 0.25 - 1.0 kg
Weight
Limit
0.2 - 0.6 kg
(150 - 200 g
/ piece)
0.2 - 0.5 kg
(250 g
/
1 serving)
Initial
Temperature
Refrigerated
Refrigerated
Refrigerated
Room
Instructions
1. Cut leftover pie into pieces.
Place food on a microwave-safe dish.
2.
. Place food in the oven. Choose the menu and
3
weight, press START.
1. Place food on a microwave-safe dish.
2. Place food in the oven. Choose the menu and
weight, press START.
1. Place food on a microwave-safe bowl.
Cover with plastic wrap and vent.
2. Place food in the oven. Choose the menu and
weight, press START.
3. After cooking, stand covered for 3 minutes.
1. Place food on a microwave-safe bowl.
Cover with plastic wrap and vent.
2. Place food in the oven. Choose the menu and
weight, press START.
3. After cooking, stand covered for 3 minutes.
Ute
Microwavesafe dish
Microwavesafe dish
Microwavesafe bowl
Microwavesafe bowl
POPULAR MENU
Your oven’s menu has been preprogrammed to automatically cook food. Tell the oven what you want
and how many items there are. Then let your microwave oven cook your selections.
Example: To cook 0.3 kg Dum Aloo
4.
1.
Press STOP/CANCEL.
2. Press INVERTER COOK
until display shows ‘2’.
Press START .
5. Press + until
display shows ‘0.3 kg’.
nsil
3. Press + until display
shows ‘2-4’.
POPULAR MENU INSTRUCTIONS
Code
2-1
2-2
Menu
Chicken
Clear Soup
Curry Chicken
Weight Initial
Limit Temperature
1.0 kg
1.5 kg
Refrigerated
Room
Ingredients
300 g chicken legs
½ carrot, peeled and large cut
1 potato, peeled and large cut
½ onion, large cut
2 celeries, cut 1 inch
3 cups chicken stock
½ teaspoon salt
¼ teaspoon pepper powder
1. Clean a chicken legs, cut to large pieces and drain.
2. In a microwave-safe bowl, put the all ingredients.
3. Place food in the oven. Choose the menu, press start.
Ingredients
4 chicken breasts, cut into cubes
1 cup natural yogurt
1 tablespoon ground cumin
1 tablespoon garam masala powder
1 teaspoon ground coriander
1 lemon juice
8 cloves garlic, finely chopped
1 inch grated ginger, finely chopped
¼ teaspoon red food color
1 lemon
Salt and pepper to taste
Press START.
6.
Instructions Utensil
Microwavesafe bowl
Micreowavesafe bowl

BEFORE USE
10
HOW TO USE
15
Code
CONTROL PANEL
2-2
2-3
2-4
Menu
Curry Chicken
Dolma
Dum Aloo
Weight
Limit
1.5 kg
1.0 kg
0.1~0.3 kg
DISPLAY PICTO
When operate Microwave, Show up the icon on the display.
When operate Inverter Cook / Steam Cook, Show up the icon on the dispaly.
Fish ball and
2-5
Thai Herbs
Spicy Soup
When operate Inverter Defrost, Show up the icon on the display.
1.0 kg
When you can set More/Less, Show up the icon on the display.
When you can Cook Start, Show up the icon on the display.
When you can set Output Power, Show up the icon on the display.
When you can set Weight, Show up the icon on the display.
Initial
Temperature
Room
Room
Room
Room
1 ½
tbsp s
To taste
Part
1 ½ tbsps
Instructions Utensil
1. Add all ingredients in a deep and large microwave
-safe bowl and mix well. Cover with plastic wrap
and vent.
2. Place food in the oven. Choose the menu, press
start.
3. Stir at least twice during cooking.
Ingredients
1 pot of grapes leaves
200 g cooked rice
500 g ground beef
1 onion, chopped
Salt and pepper to taste
½ cup water
1. Add cooked rice, ground beef, onion, salt and pepper
in a bowl and mix well.
2. Place grape leaf on a flat surface and place 1 1/2
spoonfuls of the rice mixture in the center of the
leaf. Wrap rice mixture with leaf.
3. Put all wrapped leaves in rows into a deep and
large microwave-safe bowl and add water. Cover
with plastic wrap and vent.
4. Place food in the oven. Choose the menu, press
start.
5. After cooking, serve with sour cream or as desired.
Ingredients
Aloo (small & prick ed) 100 g 200 g 300 g
Oil 2 tbsps 3 tbsps 3 tbsp s
Cumin, pepp er, clo ves As required
Onion paste 1 tbs p
Ginger garlic paste 1 tsp 1 ½ tsp s 1 ½ tsps
Tomato puree 1 tbsp 2 tbsps 3 tbsp s
Curd ½ cup 1 cup 1 cup
Turmeric powder,
red chilli powder, salt,
Coriander leaves To garnish
1.In a microwave-safe bowl, put small pricked potatoes
with oil (1/2 the amount mentioned per weight) and
cover.
POWER
See page 12“Timed Cooking”
INVERTER DEFROST
See page 20 “Inverter Defrost”
YOGURT / KEEP WARM
See page 18 "Yogurt"
See page 19 “ Keep Warm”
INVERTER COOK
Inverter Cook allows you to cook most of your
favorite food by selecting the food type and the
weight of the food.
See page 13 "Reheat"
See page 14 "Popular Menu"
See page 17 "Soften"
See page 18 "Melt"
MORE / LESS
Choose the cooking menu.
Set cooking time and weight.
While cooking with auto and manual function,
you can increase or decrease the cooking time
at any point by pressing the - or + keys (except
defrost mode).
STOP/CANCEL
• Clears all functions and set entries except time of day.
0.1 kg 0.2 kg 0.3 kg
START
•
Press this button to start cooking or resume cooking
if the door was opened or the STOP button was
pressed once.
• The quick start feature allows you to set
30 second intervals of HIGH power cooking with each
press of the START button.
SMART DIAGNOSIS
8
Hold the mouthpiece of a phone up to this icon
when directed to by service centre personnel, to
help diagnose problems with the microwave oven
when calling for service.
2.Choose the menu and weight, press start.
3.When BEEP, add
oil(remaining half amount) cumin,
pepper, cloves, onion paste, ginger garlic paste,
tomato puree. And then press start to continue
Icon
cooking.
4.When BEEP, add a curd, turmeric powder, red chilli
powder, salt and coriander leaves. And then press
start to continue cooking.
5.After cooking, stand for 3 minutes. Garnish with
coriander leave.
Ingredients
200 g featherback fish, minced
2 tablespoons curry paste
4 Thai eggplant, quarter
1 each red and yellow chili spur pepper, sliced
2 bunches fresh pepper corn
¼ cup krachai, thin sliced
5 kaffir lime leaves, teared
¼ cup holy basil
2 teaspoons fish sauce
1 teaspoon coconut sugar
3 cups water
Micreowavesafe bowl
ENGLISH
Micreowavesafe bowl
Micreowavesafe bowl
Micreowavesafe bowl

HOW TO USE
BEFORE USE
10
16
Code
CONTROL PANEL
2-5
2-6
2-7
Menu
Fish ball and
Thai Herbs
Spicy Soup
Stewed Pork
belly
Stir-fried
Squid with
Weight
Limit
1.0 kg
1.2 kg
0.6 kg
Curry Powder
DISPLAY PICTO
When operate Microwave, Show up the icon on the display.
When operate Inverter Cook / Steam Cook, Show up the icon on the dispaly.
When operate Inverter Defrost, Show up the icon on the display.
2-8
Veg. Biryani
1.0 kg
When you can set More/Less, Show up the icon on the display.
When you can Cook Start, Show up the icon on the display.
When you can set Output Power, Show up the icon on the display.
When you can set Weight, Show up the icon on the display.
Initial
Temperature
Room
Refrigerated
Room
Room
Instructions
POWER
1. Squeeze the featherback fish with a touch of salt
and water, until it becomes sticky. Set aside.
2. In a large microwave-safe bowl, put the fish ball
and all ingredients.
3. Place food in the oven. Choose the menu, press
start.
See page 12“Timed Cooking”
INVERTER DEFROST
See page 20 “Inverter Defrost”
YOGURT / KEEP WARM
See page 18 "Yogurt"
See page 19 “ Keep Warm”
Part
Ingredients
300 g pork belly(less fat)
4 star anises
3 cinnamon sticks, cut 1 inch
5 garlics, crushed
2 teaspoons pepper corn
2 coriander roots, crushed
4 cups pork stock
2 tablespoons coconut sugar
2 tablespoons soy sauce
2 tablespoons dark soy sauce
2 tablespoons seasoning sauce
Cheesecloth for wrap the spices
1. Clean pork belly, cut into the pieces about 3 cm
pieces.
2. In a large microwave-safe bowl, put the pork belly
and all ingredients.
3. Place food in the oven. Choose the menu, press
start.
Ingredients
300 g squids
½ onion, sliced
2 red spur peppers, sliced
2 Chinese celeries, cut 2 inches
2 spring onions, cut 2 inches
2 tablespoons curry powder
1 egg
3 tablespoons unsweetened condensed milk
2 tablespoons oyster sauce
2 teaspoons sugar
2 tablespoons chili paste
INVERTER COOK
Inverter Cook allows you to cook most of your
favorite food by selecting the food type and the
weight of the food.
See page 13 "Reheat"
See page 14 "Popular Menu"
See page 17 "Soften"
See page 18 "Melt"
MORE / LESS
Choose the cooking menu.
Set cooking time and weight.
While cooking with auto and manual function,
you can increase or decrease the cooking time
at any point by pressing the - or + keys (except
defrost mode).
STOP/CANCEL
• Clears all functions and set entries except time of day.
START
•
Press this button to start cooking or resume cooking
if the door was opened or the STOP button was
pressed once.
• The quick start feature allows you to set
30 second intervals of HIGH power cooking with each
press of the START button.
SMART DIAGNOSIS
8
Hold the mouthpiece of a phone up to this icon
when directed to by service centre personnel, to
help diagnose problems with the microwave oven
when calling for service.
2 tablespoons cooking oil
1. Remove the head, tentacles and ink-sac from the
squid. Pull off and discard the mottled skin. Slice flesh
Icon
to stripe and cut into cubes, drain.
2. Mix all the ingredients except vegetables and oil.
3. In a microwave-safe bowl, put the mixture, vegetables,
oil and squids.
4. Place food in the oven. Choose the menu, press start.
Stir at least twice during cooking.
Ingredients
1 ½ cups Basmati rice
400 g water
2 cups chopped onions
1 tomato, chopped
1 cup vegetables(carrot, beans, peas, potato),
chopped
2 green chilly, chopped
1 teaspoon ginger garlic paste
1 ½ teaspoon red chilly powder
1 teaspoon coriander powder
1 teaspoon cumin powder
Utensil
Micreowavesafe bowl
Micreowavesafe bowl
Micreowavesafe bowl
Micreowavesafe bowl

HOW TO USE
17
Code
2-8
Menu
Veg. Biryani
Weight
Limit
1.0 kg
Initial
Temperature
Room
Ingredients
1 tablespoon Biryani masala
1 cinnamon
2 cardamoms
2 cloves
2 small bay leaves
1 teaspoon fennel seeds
A bunch of finely chopped coriander leaves
(cilantro) and mint leaves
1 tablespoon oil
2 tablespoons ghee or clarified butter
Salt to taste
1. Cook all vegetables and spices in a lightly oiled frying
pan until lightly browned.
2. Place the cooked vegetable mixture into a deep and
large microwave-safe bowl and add rice and water.
Cover with plastic wrap and vent.
3. Place food in the oven. Choose the menu, press start.
Stir at least twice during cooking.
SOFTEN
The oven uses low power to soften foods (butter, cream
Example : To Soften 0.2 kg cream cheese
Instructions Utensil
cheese and ice cream) S
Micreowavesafe bowl
ENGLISH
ee the following table.
1.
Press STOP/CANCEL.
2. Press
INVERTER COOK
until display shows ‘3’.
3.
Press +until display
shows ‘3-2’.
SOFTEN MENU INSTRUCTIONS
Code
3-1
3-2
3-3
Menu
Butter
Cream
Cheese
Ice
Cream
Weight
Limit
1 - 3 ea
(100 - 150 g
/ each)
0.1 - 0.3 kg
2 / 4 cups
Initial
Temperature
Refrigerated
Refrigerated
Frozen
1. Unwrap and place on a microwave-safe dish.
2. Place food in the oven. Choose the menu and weight,
press START.
3. Butter will be at room temperature and ready for use
in a recipe.
1. Unwrap and place on a microwave-safe dish.
2. Place food in the oven. Choose the menu and weight,
press START.
3.Cream cheese will be at room temperature and ready
for use in a recipe.
1. Remove lid and cover.
2. Place food in the oven. Choose the menu and weight,
press START.
3. Ice cream will be soft enough to make scooping easier.
Instructions
4.
Press START .
5. Press + until
display shows ‘0.2 kg ’.
6.
Press
START.
Microwavesafe dish
Microwavesafe dish
,
Ute
nsil

HOW TO USE
18
MELT
The oven uses low power to melt foods (butter, cheese and chocolate). See the following table.
Example : To Melt 0.2 kg chocolate
4.
1.
Press STOP/CANCEL.
Press START .
2. Press
3.
Inverter Cook
until display shows ‘4’.
Press +until display
shows ‘4-3’.
MELT MENU INSTRUCTIONS
Code
4-1
4-2
4-3
Menu
Butter
Cheese
Chocolate
Weight
Limit
1 - 3 ea
(100 - 150 g
/ each)
0.2 - 0.4 kg
0.1 - 0.3 kg
Initial
Temperature
Refrigerated 1. Place on a microwave-safe bowl.
2. Place food in the oven. Choose the menu and weight,
3. After cooking, stir to complete melting.
Refrigerated
Room
1. Use processed cheese food only. Unwrap and cut into
1. Place on a microwave-safe bowl.
3. Place food in the oven. Choose the menu and weight,
4. After cooking, stir to complete melting.
1. Chocolate chips or squares of baking chocolate
2. Unwrap and place on a microwave-safe bowl.
3. Place food in the oven. Choose the menu and weight,
4. After cooking, stir to complete melting.
press START.
cubes.
press START.
may be used.
press START.
Instructions
5. Press + until
display shows ‘0.2 kg ’.
6.
Press
START.
Ute
nsil
Microwavesafe bowl
Microwavesafe bowl
Microwavesafe bowl
YOGURT
This feature allows you to cook yogurt by pressing yogurt button.
Example : To Cook 0.6 kg yogurt
1. Press STOP/CANCEL.
2. Press
until display shows ‘1’.
3. Press START.
YOGURT/KEEP WARM
‘5h00 ’ will show in the display.

.
•
YOGURT MENU INSTRUCTIONS
HOW TO USE
19
Code
1
Menu
Yogurt
Weight
Limit
0.6 kg
Initial
Temperature
Lukewarm
Instructions
Ingredients
500 ml pasteurized whole milk
100 g natural plain yogurt
Thoroughly wash the proper sized microwave-safe
1.
bowl with hot water.
2. Pour 500 ml milk into the bowl.
3. Heat it about 1 minutes 30 seconds - 2 minutes 30
seconds on high microwave power until 40 - 50 °C
temperature.
4. Add 100 ml yogurt into the bowl and stir well.
5. Cover with plastic wrap or lid and place food in the
oven. Choose the menu, press START.
6. After proofing, stand in the refrigerator for about 5
hours.
7. Taste nice with jam, sugar or fruits.
Note :
●
The following types of milk and yogurt may be used :
Do use
Milk
●
Pasteurized
whole milk
●
Thoroughly wash all utensils with hot water and dry
before proofing yogurt.
●
Make sure that the milk is lukewarm(40 - 50 °C)
before proofing.
●
Don’t shake or mix yogurt during proofingas this will
affect the firmness of the yogurt.
●
If the amount of ingredients are greater than
Yogurt
● ● ●
Natural
plain
yogurt
2 %, 1 % or
fat-free milk
High calcium milk
●
Soy milk
●
Leftover milk
●
Expired milk
Do not use
Milk
Yogurt
Leftover
yogurt
●●
Expired
yogurt
suggested, increase the proofing time.
Ute
nsil
Microwave-
safe bowl
ENGLISH
KEEP WARM
The Keep Warm function will keep hot, cooked food at serving temperature. Always start with hot food.
Use microwave-safe utensils.
Example: Keep warm manually
To warm food at high level in 90 minutes.
1. Press STOP/CANCEL.
2. Press
until display shows ‘2’.
3. Press START.
YOGURT/KEEP WARM
‘1h30 ’ will show in the display.
Notes :
Crisp foods (pastry, pies, turnovers, etc)
should be uncovered during keep warm.
Moist foods should be covered with plastic
wrap or microwave-safe lid.
The amount of keep warm food is suitable
for 1-3 servings.

HOW TO USE
HOW TO USE
12
20
INVERTER
HOW TO USE
Four defrost sequences are preset in the oven.
TIMED COOKING
The INVERTER DEFROST feature provides you
with the best defrosting method for frozen foods.
(MANUAL COOKING)
The cooking guide will show you which defrost
This function allows you to cook food for a
sequence is recommended for the food you are
desired time. There are 5 power levels available.
defrosting.
The example below shows how to set 800 W
For added convenience, the INVERTER DEFROST
power level for the desired time.
includes a built-in beep mechanism that reminds
you to check, turn over, separate, or rearrange
Example: To cook food on 800 W for 5
to getthe best defrost results. Four different
minutes 30 seconds
defrosting leve is are provided.
(MEAT /POULTRY / FISH / BREAD)
the display changes to the defrost time count down.
When cooking is complete, Tip will sound. The word
At beep, open the door and remove any portions
that have thawed and turn.
End shows in the display window. 'End' remains in
the display and Tip will sound every minute until the
door is opened, or any button is pressed.
START
t
Remove fish, shellfish, meat,
its original wrapping paper or plastic package.
NOTE
Otherwise, the wrap will hold steam and juice
•
If you do not select the power level, the oven
close to the foods, which can cause the outer
will operate at power HIGH. To set HI-POWER
surface of the foods to cook.
cooking, skip step 2 above.
Place foods in a shallow container or on a
microwave roasting rack to catch drippings.
Food should still be somewhat icy in the center
when removed from the oven.
DEFROST
1. Press STOP/CANCEL .
1. Press STOP/CANCEL.
2. Press POWER until display
shows ‘800 W’.
2.
3.
3. Enter 5 minutes 30 seconds
by pressing '+' until display
4. Press START.
shows '5:30'.
4. Press START .
press
kg
(1st time 1000 W appears
Press INVERTER DEFROST
in the display. This is to
until display shows ‘dEF1’.
tell you that the oven is set
on HI unless a different
power setting is chosen.)
Press +until display
shows ‘1.2 kg’.
START button,
press
and poultry from
MICROWAVE POWER LEVELS
INVERTER DEFROST
Your microwave oven is equipped with five power
MENU INSTRUCTIONS
levels to give you maximum flexibility and control
Category
over cooking. The adjacent table will give you
some idea of which foods are prepared at each of
the various power levels.
• The adjacent chart shows the power level settings
for your oven.
MICROWAVE POWER LEVEL CHART
MEAT
( 1FEd )
0.1-4.0 kg
Power
Level
High
1000 W
800 W
POULTRY
( FEd 2)
0.1-4.0 kg
600 W
FISH
( FEd 3)
400 W
0.1-4.0 kg
200 W
BREAD
( FEd 4)
0.1-0.5 kg
Beef
Ground beef, Round steak,
Cubes for stew, Tenderloin steak,
Pot roast, Rib roast, Rump roast,
Chuck roast, Hamburger patty
Lamb
Chops, Rolled roast
Pork
Chops
Spareribs, Country-style ribs.
•
Boiling water.
Rolled roast, Sausage
Browning ground beef.
•
Veal
Making candy.
•
Cutlets (0.5 kg, 20 mm thick)
•
Cooking poultry pieces,
Turn food over at beep.
fish & vegetables.
After defrosting, let stand for 5 - 15
•
Cooking tender cuts of meat.
minutes.
•
Reheating rice, pasta & vegetables.
Poultry
Whole, Cut-up, Breast (boneless)
•
Reheating prepared foods quickly.
Cornish Hens
•
Reheating sandwiches.
Whole
Cooking egg, milk and cheese dishes.
•
Turkey
•
Breast
Cooking cakes and breads.
Melting chocolate.
•
Turn food over at beep.
Cooking veal.
•
After defrosting, let stand for 30 - 60
•
Cooking whole fish.
minutes.
Cooking puddings and custard.
•
Fish
Fillets, Whole Steaks
Thawing meat, poultry and seafood.
•
Shellfish
Cooking less tender cuts of meat.
•
Crab meat, Lobster tails, Shrimp,
Cooking pork chops
•
Scallops
Turn food over at beep.
•
Taking chill out of fruit.
After defrosting, let stand for 5 - 10
Softening butter.
•
minutes.
•
Keeping casseroles and main
Sliced bread, Buns, Baguette, etc.
dishes warm.
Separate slices and place between
Softening butter and cream cheese.
•
paper towel or flat plate.
Turn food over at beep.
After defrosting, let stand for
1 - 2 minutes.
Food to be Defrosted
Use
, Hot dogs,
and roast.
how solidly the food is frozen.
food will defrost. Shallow packages will defrost
more quickly than a deep block.
defrosted more or less.

MICROWAVE-SAFE UTENSILS
test. Do not heat dinner plates that use any painted on decorative as they will arc if the paint has metallic
content.
MICROWAVE-SAFE UTENSILS
21
ENGLISH ENGLISH

FOOD CHARACTERISTICS & MICROWAVE COOKING
22
FOOD CHARACTERISTICS & MICROWAVE COOKING

FOOD CHARACTERISTICS & MICROWAVE COOKING
23
FOOD CHARACTERISTICS & MICROWAVE COOKING
ENGLISH
the oven during rotation.
oven especially if the foil passes too closely to the walls of

TO CLEAN YOUR OVEN / USING THE SMART DIAGNOSIS™ FUNCTION
24
TO CLEAN YOUR OVEN
times and may even damage the oven.
Disconnect the mains plug from the power outlet before cleaning the oven to eliminate the possibility of electric shock.
STOP
Steam or
condensation build up inside the door is normal if foods are heated for a long period on higher power levels. this
is not a malfunction. the condensation will eventually evaporate. Try covering the food or vary the heating levels
and time to reduce any condensation forming in the door, this may also occur
USING THE SMART DIAGNOSIS™ FUNCTION
Use this function if you need an accurate diagnosis by an LG Electronics service centre when the product malfunctions
or fails. Use this function only to contact the service representative, not during normal operation.
1.
When instructed to do so by the call centre, hold the mouthpiece of your phone over the Smart Diagnosis™ logo on
the controller.
Max
NOTE
Do not touch any other buttons.
2. With the door opened, press and continue to hold the Clear button for 3 seconds so that 'Loc' appears
on the display. Continue to hold the Clear button for a further 5 seconds until '5' appears in the display.
(so, the Clear button will need to be held for 8 seconds continuously).
A tone will then emit from behind the Smart Diagnosis symbol.
3.
4.
Once the countdown is over and the tones have stopped, resume your conversation with the call center agent,
who will then be able to assist you in using the information transmitted for analysis.
NOTE
For best results, do not move the phone while the tones are being transmitted.
If the call center agent is not able to get an accurate recording of the data, you may be asked to try again.
10 mm

STOP
times and may even damage the oven.
Steam or
and time to reduce any condensation forming in the door, this may also occur
24
Do not touch any other buttons.
2.
Max
10 mm
NOTE
QUESTIONS & ANSWERS
QUESTIONS & ANSWERS
25
ENGLISH ENGLISH
'Cool' appears on the display and the cooling
fan continues to run after the cooking or
heating time is over.
When operating the microwave oven, If you use a product such as radio, TV, wireless LAN, Bluetooth, medical equipment,
wireless equipment etc. Using the same frequency as the microwave oven, the product may receive interference from
these products. This interference does not indicate a problem of the microwave or the product and is not a malfunction.
Therefore, it is safe to use. However, medical equipment may receive interference as well, so use caution when using
medical equipment near the product.
After cooking is complete, the fan may operate to cool the oven.
The display will show 'Cool'. If you open the door or press once
STOP before the cooking time is complete, the remaining
cooking time will show on the display. This is not a malfunction.

TECHNICAL SPECIFICATIONS
26
TECHNICAL SPECIFICATIONS
MS253
****
Power Input 220 V ~ 50 Hz
Microwave Output Power.
Microwave Frequency
Outside Dimension
Microwave
* In 1000 W and 800 W, output power will gradually be reduced to avoid overheating.
Microwave Frequency : 2450 MHz +/- 50 MHz (Group 2 / Class B) **
Group 2 equipment: group 2 contains all ISM RF equipment in which radio-frequency energy in the frequency
range 9 kHz to 400 GHz is intentionally generated and used or only used, in the form of electromagnetic
radiation, inductive and /or capacitive coupling, for the treatment of material or inspection/analysis purposes.
Class B equipment is equipment suitable for use in domestic establishments and in establishments directly
connected to a low voltage power supply network which supplies buildings used for domestic purposes.
Max. 1000 Watt* (IEC60705 rating standard)
2450 MHz
476 mm(W) X 272 mm(H) X 369 mm(D)
1150 Watt
You can download a owner's manual at http://www.lg.com

ภาษาไทย
นาง้ชใรากอืมู่ค
เตาอบไมโครเวฟ
MS253
( มิตเม่ิพเ นุ่รงอขะาพเำจ้ีชง่บอ้ขบอสจวรตาณุรก )
****
Copyright © 2018 LG Electronics Inc. All Rights Reserved.
นาง้ชใะจ่ีทนอ่กนอ่ก้ีนน่ลเนาง้ชใรากอืมู่คนา่อาณุรก
www.lg.com

3
7
7
9
ภาพแสดงบริเวณหน้าจอ
9
10
10
10
10
11
11
11
12
12
12
13
13
คำแนะนำเมนูยอคนิยม
16
การหำให้นิ่ม
16
คำแนะนำเมนูการหำให้อาหาร ิ่
17
17
17
18
18
การเกบรักษาอาหารให้อุ่น
19
การละลายดวยระบบอนเวอรเตอร
19
โยเกิร์ต
รอตเรอวเนิอ
20
21
23
23
24
25
นยาละลนมเำนะนแำค
าแข็งด้วยระบบ
AID TRAMS น่ัช์กงัฟ้ชใราก GNOSIS™
ฟวเรคโมไยว้ดงุรปรากะลแราหาองอขะณษกัลณุค

ѕѤѓчѠјюєѥњзѠѷѪёѯрѤзѦѝѦьѣьѰѦз
ѕѤѓчѠјюєѥњзѠѷѪёѯрѤзѦѝѦьѣьѰѦз
шзѥьѠьѲкѧѠкѥѸѠѠѷѪёѯѸњѳэѶдѯѣјѰкѤњѣічѤєѣікѥѷѕѠьѥѷѠѥцѫід
ѕѥдкѥѷіэѶлѯчѥэіѥд,шѠѶнѥѸђђѳ,ѸєўѳђѳѠѷшкѕѷѨѝѯєѥњзьѤдкѠѸюѠѷѪёѯэѠѥшѯьѥкѸнѲьѠѷдчєўкѸѤъѦьѣьѰѦзєѥшѦъѣјѰьѥѷѠчіюѱ
лѲѥѸеѯѷєѳѸнѲѸѬяѷѨъѥўрѤюэѤдњѕѷѨдѯшѧјяѸѬяѠѪіўіѥдѧіэѕѥѷѐьъѰњѤшѠѷшчѧшіњз
лѲѥѸеѯѷєѳцѫзѷѨъѥўрѤюэѝѣіюдѥўчєўкѸѤъѸчѳьѸѩечѧдѯлѥѠѷѨъёѥѓѝєѫјзэѠізѸчѳѷєѳѸѨьэѤэмѠѪєѷѬзђњѯізѱєѳѥшѯѸнѲіѥдѥлѕѥўѕѨѝѯєѥњзѠѪіў
Ѩѝѯ
Ѥіъ
ёјѤккѥь
Ѡјю
ьѠѪшѯѦз
ѸчѳэѶлѯчѥэьѷѪѠѸѬяѣјѰцѫзѸўѲѦъшѧњѨнѠѷшѕѥішьѤѠѨєлѥѠѥѷњцѫзьѠѪшѯѕњѷнѸѨьѻцќдѤјрѤѝѕѤѓчѠјюєѥњзѠѷѪёѯьѠѪшѯкѸлѰѻцќдѤјрѤѝѠѪзѷѨь
"кѤњѣііњзѠѸе"ѠѪіў"ьѠѪшѯѦз"ѥѷњѦзѸнѲѣлѕѤѓѠјюєѥњзѠѷѪёѯьѠѪшѯіѥдѻцќдѤјрѤѝєѥшюѳьѶюѯѣлчєўкѸѤъѕѤѓчѠјюєѥњзѠѷѪёѯєѥњзѠѸе
:кѩщѕѥєўѸѨьѥѷјўѯѦз
ภาษาไทย
ьѠѪшѯѦз
ѸчѳшѧњѨнѕ
ѠѪіўкіѰѕѥѸікѥѷѕѠѕѥдкѥѷіѠѷшэѶлѯчѥэіѥдчѧдѯѸўѲѠѷдлѥѠкѷѩоѕѤѓчѠјюѷєѳѠѪіўѕѥішьѤѠьѶюѯѷѨъѧшѤэѧтюіѥдѨєѠѷѪєѯѕѥішьѤѠьѠѪшѯѣлѸѨьѻцќдѤјрѤѝ
кѤњѣііњзѠѸе
ѸчѳѕѥўѕѨѝѯьѧѝѻѕё
ѠѪіўкіѰѕѥѸікѥѷѕѠѕѥдкѥѷіѠѷшэѶлѯчѥэіѥдчѧдѯѸўѲѠѷдлѥѠкѷѩоѕѤѓчѠјюѷєѳѠѪіўѕѥішьѤѠьѶюѯѷѨъѧшѤэѧтюіѥдѨєѠѷѪєѯѕѥішьѤѠьѠѪшѯѣлѸѨьѻцќдѤјрѤѝ
ьѠѪшѯѦз
єѫзэњзкяѰ,ѬшѣіюјѨо,ѬшѣіюєоѰєѠѷоѠѪіўёѥѓѝэѤіюѠѪіўкјюѰьѕѷѨјюѯєѥѕѥѕёѥѷѕѠ1
ѝѤяєѤѝіѥддѥльѤдкѠѸюэѠізѥѐчѠщіѥдкѩщєњікѷѩоэѠѥшѯкѠечѲьѷѪѠьњѷѝьѸѧнѠѪіўѕѤѓчѠјюєѥњзѠѷѪёѯѬшѣіюдѳјдѻншѧњѝ
ѧшдючѧяєѥњзѨєђњѯізѱєѳѥшѯкѠеьѤдчѧнѣіюѷѬѕѠѷѨъьњѷѝѠѪіўѬшѣіюјѨоѥѸщэѠѥшѯьѥкѸнѲѥѷѕѠђњѯізѱєѳ
ьѸѤьѥѷъѯѧшѤэєѝцѫзѨєѷѨъіѥдѧіэѸўѲѸѬязѧьзъѯкѥѷнкѠеѷѨъѥѸьўьѶюѯіњзєоѰєѠѷоіѥд
кѬѝѥѸђђѳѝѰѣідѣјѰѥѸђђѳьѤчкіѰѨєѷѨъѻцідюѫѠьѶюѯдѥлкѠѷѪьѯѵьѷѪѠѥѸђђѳѸнѲкѠѷѪізѯдѥлкѥѷшдшѰђњѯізѱєѳѥшѯ
єѝѣѥєўѯѷєѳкѥѷѕѠєоѰєѠѷоіѥдѠѪіўьѥкѸнѲіѥд
ѸчѳшѠѶнѥѸђђѳѠѪіўюѳьѧдѯдѥєэѤіѸчѳѷѨъђњѯізѱєѳьѷѪјзкѠеьѥккѤјёдѥлэѶлѯчѥэіѥдчѧдѯѸўѲѠѷдлѥѠ
ьѷјѯкѠеѥѸяѠѸѪѝѯдѕѨюѯѻёєѧёѠѪѝкѤьўѷѝѲѕчѱђњѯізѱєѳѥшѯьѥкѸнѲьѷнѯ(,ьѸѪнєѥњзчјіѥдкѠеѻзкѝѣіючѫлѠѷѪёѯэѠѥшѯѸнѲѥѷѕѠ2
)ьѸшьѶюѯдѶчѯѠѪіўкѕѸѨјѯѻњшѤѝѥѸђђѳѻцідюѫѠ
ѸчѳшѠѶнѥѸђђѳдѥлкѠѷѪьѯѨъьѤъшѧњѨнѕѨѝѯѠѪіўдњјђѳѕѤѓѨззѤѠчѧдѯьѷнѯѕѤѓчѠјюєѥњзѠѷшкіѰѕѥѸікѥѷѕѠѕѥішьѤѠчѧдѯѸўѲѠѷдлѥѠ
дѩѝѸѬієѥњзёѥѓѕѥдкѥъкѠѷіёдэєѥњзѨє)дѶчѯкѩщєњі(ѷѨъјззѫээѤіўѦѝьѥкѸнѲэѤдэѤдѣѥєўѯѷєѳѸѨьѥѸђђѳѸнѲкѠѷѪізѯ3
ѸѬієѥњзѣјѰѻціѥдэѝѣіючѥеѠѪіўлѲшѧлкѥъѠѪіў
єѥњзьѥѸчэѠнчѧяэѤіѷѨъѥѸьўѨєѷѨъѸѬяѕчѱѥѸђђѳѸнѲкѠѷѪізѯьѥкѸнѲіѥдэѤдњѕѷѨдѯѦьѣьѰѦзѠѪіўјѰѬчіѥдэѤіѸчѳѣлѥѷњдѥлѕѨѝѯдѠь
ѸѨьѥѸђђѳѸнѲкѠѷѪізѯэѤдьѷјѯѸўѲѷєѳьѥълњішѣјѰѦьѣьѰѦзэѤіѸчѳіњз)дѶјѯ(дѶчѯѕѤѓч
дњјђѳѠѪіўшѠѶнѥѸђђѳ,ѸєўѳђѳьѷнѯѸчѳѕѥўѕѨѝѯєѥњзчѧдѯѸўѲѠѷдлѥѠєѝѣѥєўѯѷєѳкѥѷѕѠьѥкѸнѲіѥд
кѠѷѪізѯдѥлкѥѷўѸўѲдѶјѯдѶчѯьѤдіњзьѥкѸнѲѣцеьѲьѸѩеьѠѸілѥѠѸчѳѝѤяєѤѝщіѥєѥѝѷѨъѵкѥѷшьњѷѝьѸѧн4
дњјьѠѸієѥњздѬщлѥѠдѥлкѠѷѪьѯ
чѧэѯѣііѥдѠѷшкѕѷѨѝѯєѥњзѨєдѥлкѠѷѪьѯьѷьѰѥѐчѧюѷѨъѣьнѥѓьѲьѷѫѠюѳѥѸеѯѵьѷѪѠіѥўѥѠѠѪіўњјўѯкѠеѦьѥѷѕѠ5
ѦььѠѷддѠѠіѥўѥѠєѸѫўѠѷўѸнѲѷѨъдѧшѝѥјёчѠщіњз
ѨцідкѥэьѲѥѷњэѥіъчіюѱкѶеѰѦѸьѕѥјѣјѠѪіўкѷѫіююѳѥѸеѯіѥўѥѠ
іѥўѥѠкѫіюѠѪіўьѷѫѠэѤіўѦѝдѧшѝѥјёєѻјѧђѕњѸчіѥўѥѠєѸѫўѠѷўіњз
чѧэѯѣічѧдѯлѥѠ
ьѥкѸнѲіѥдчєўѱѣјѷшѰьѲєѝѣѥєўѯѷѨъєѧіѝѯѻцідюѫѠѸнѲѥѷњлѲѷьѰѸўѲэѠѝлњішіњз6
ѸчѳѸєўѳђѳѣјѰђѳѕѥдѣіючѧдѯлѥѠѠѪіўєѧіѝѯѻцідюѫѠѣјѰэѠѥшѯѠѷшѕѥўѕѨѝѯјякѷѝлѥѠєѝѣѥєўѯѷєѳѷѨъьѥкѸнѲіѥд
эѤлѠѪєѷѨъэѤлѕчѱьўѱѠѪіўєѧіѝѯѻцідюѫѠэѤдьѷјѯѵдѶчѯѸўѲіњзѷєѳ7
ѸчѳэѶлѯчѥэчѧдѯлѥѠ
рѥнњѕѷѨнѯѸѬяѷшѰьѸњѯьздѫъэѤіўѦѝкѷѧѕкѥѷѕѠѕѥішьѤѠѷѨъкѠѷѪіѯьѶюѯѠѪщ8
дѠѠђњѯізѱєѳьѥккѤјёьѤдкѠѸюіѥдьѲѸнѲѷѨъэѠізѥѐчѠщіѥдэѤдкѠѸењѕѷѨдѯѷѨъєоѰєѠѷоіѥдьѧьѯѦчіѥдьѲ
ьѸѤьѥѷъѯѷрўѲѸѬядѥлјѰѬчєѫзэњзіѥдѸшѲѕѥѓэѠѥшѯѸнѲіњзѵдѶчѯьѥѝяєѝяээѣіьѲѥѸђђѳѸнѲкѠѷѪізѯьѥкѸнѲѠѷѪєѯ9
ьѸѩекѬѝѷѨъѧєѬѓўцѫѠдѥлкѠѷѪьѯ
ѕѥўѕѨѝѯєѥњзчѧдѯэѠѥшѯдѥўэѠѥшѯьѥкѸнѲѥѷѕѠ01
)2(,)ѠккѸзѱ(Ѭшѣію)1(:эѤдьѸѩечѧдѯѕѥўѕѨѝѯєѥњзѨєѷєѳѣјѰъѧьѝчѧюѣлэѠѥшѯѬшѣіюѷѨъкѷѧѕкѥѷѕѠрѤзѦѝкѷѧѝьѶюѯ
јѨокѠењѧяьѸѪёѣјѰѬшѣіюјѨо)3(,)єњјўѠѪіўдѤўдшѰ(ѬшѣіюдѤјѝѣјѰэѤёьѥэ

4
ѕѤѓчѠјюєѥњзѠѷѪёѯрѤзѦѝѦьѣьѰѦз
ьѧдѯьњѷѝђњѯізѱєѳьѥккѤјёэѤіѸчѳіѥддѥлѕѥішьѤѠчѧдѯѸўѲѠѷдлѥѠ
іѥдѧіэєѠѷоѻѕьѬћкѠекѥѷндѥлєоѰєѠѷоіѥдэѤіѸчѳѣлѥѷњдьлэѠѥшѯьѥкѸнѲѥѷѕѠ ѕѥўѕѨѝѯѬшѣіюјѨоѠѪіўѬшѣіюдѥў 11
ѸўѲѥѸђђѳѥёдёдѹѤјюѻцідюѫѠѠѪіўѠѷшєѠѷѪнѯѕѥѝчѫнѨєѸѨьѥѸђђѳѸнѲкѠѷѪізѯ 21
ьѥѷяьѸѪнєѥњзѨєѠѪіўѦѸьдѬщѷѨъкѷьўѰѦшьѲкѥњкѠѸшѣлѥѸђђѳѥёдёдѹѤјюѻцідюѫѠьѲѠѷшєѠѷѪнѯѕѥѝчѫн
ѣѥєўѯѷѨъѦьѣьѰіѥдѨєѠѷѪєѯѷрўѲѸѬядѥлјѰјѬчіѥддѥлћѥіюѕчѱэѠѥшѯьѥкѸнѲдѶчѯѸўѲшѥрѫьѠ 31
ьѸѤьѥѷъѯњѸјѰєѝѣѥєўѯѷєѳкѥѷѕѠѸнѲіѥдкѠеѕѥішьѤѠкѩщлѲѥѸеѯѣјѰѕѤѓчѠјюкѥѷѕѠѸчѳэѠѥшѯѸнѲщіѥєѥѝдѶчѯѸўѲѠѷѪёѯ
ьѥкѸнѲѠѷѪєѯьѸѩеьѠѸіѣлѸѨькѠѷѪізѯкѠеѸчѳєѝѤяєѤѝѷѨъѻцідюѫѠѣјѰѥѸђђѳѸнѲкѠѷѪізѯ 41
ѸјдѲѥѸеѯѸўѲіњзѷєѳ Ѩю 8 ѥѷњдѦѷшѫѕѥѠдѶчѯ ьѠѸіѷѨъьњѷѝэѤдѝѤяєѤѝіѥдкѕѷѨјѯдѨјўѠѷѪёѯкѤњѣічѤєѣіѸўѲ
кѠѷѪьѯѠѷшкѥѷѕѠјѰѬчіѥдѸшѲѕѥѓѷѬѕѠѷшѰьѸњѯ
эѠѥшѯьѲѕѥѓьѠѸіѷѨъьњѷѝэѤдѝѤяєѤѝѷєѳкѤњѣічѤєѣіѸўѲ ьѸѩеьѠѸіѣлѥѸђђѳѸнѲкѠѷѪізѯ ьѥкѸнѲѣце 51
њѸдѰдѥлѦъѷѨъэѠѥшѯѬшѣіючѥѠѣѝєѥњзѦъѠѷѪёѯ чѧьндѫъєзээѰѠѸєўчѤеѕѠѐѠѪіў чѤеэѤіўѦѝчѥѠѣѝєѥњзѦъѥѕѦѸьѸнѲѥѷѕѠ 61
ѸчѳдшѰњѸдѰѸўѲјякѷѝѣлкѷѩо ьњѷечѨеѕѠічѧдѯѸўѲѦълѥѠѣѥіёѯ
кѤњѣііњзѠѸе
ьѥкѦъѣлѕѤѓчѠјюєѥњзѠѷѪёѯкѸѤшчѧшѷѨъѬшѣіюдѳјддѥлкѠѷѪьѯ чѧюѯѬшѣіюдѥўѸчѳэѠѥшѯьѥкѸнѲщіѥєѥѝѷєѳцѫз 1
ѬшѣіюдѳјдчѤкѷєѳѣлѷѨъдѥєрѤзѦѝѷѨъкѷѧѝьѶюѯ
юѳьѧдѯдѥєђњѯізѱєѳьѥккѤјёэѤіѸчѳіѥддѥлкѠѷѪьѯѕѥішьѤѠчѧдѯѸўѲјякѷѝлѥѠ
)дѠѠчѧюѯдѬщѬшѣіюѠѷѪєѯѧшѤєьѱшѤѠѕчѱѵчѲіѥўѥѠкѫіюіѥдчѧюѣлѕѤѓчѠјюєѥњзѠѷѪёѯѬшѣіюдѳјдѻншѧњѝ(
ѬшѣіюэѤдэѠѥшѯѥѸьўьѥѸчкѥѷњўѣіѸњѳ )ьѸшьѶюѯ дѥючѶнѯѥѸя ѬьўьеѥѸя ьѷнѯ( ѵчѲѫщшѤњкѥњѥѷѕѠ 2
јѨокѠењѧячѯдѧчеѩѸьъѨѷёѪѸьѥѠѣѝєѥњзѦъіѥддѥлѠѪјўѯѷѨъьњѷѝѠѪіўіѥўѥѠѸўѲѠѪіў
юѳьѧдѯдѥєђњѯізѱєѳьѥккѤјёэѤіѸчѳіѥддѥлкѠѷѪьѯѕѥішьѤѠчѧдѯѸўѲјякѷѝлѥѠ
кѠѸшдѬщкѥѷѕѠіѥўѥѠкѫіюѥјњѯкѸѤшѸчѳѥѷњлѲѷьѰѸўѲэѠѝлњішчіюѱ 3
ьѠѸіьѷѫѠѠѪіўкѫіюіѥдьѲѥѷњдьѸѤѝѷѨъѥјњѯѸнѲѣлѕѠѸььњьѦліѥўѥѠѣѥіёѯ
ѥєєѥшѕѥўѕѨѝѯцѫзкѠеэѠѥшѯѸўѲѦъѣјѰђѳчѧшьлѸєўѳіѥўѥѠѸўѲјякѷѝлѥѠ юѳьѧдѯьлдѫѝкѫіюіѥд
,ђњѯізѱєѳэѠѥшѯьѲєѷѪчкѠѷѪізѯѣјѰ ѝѠо юѫо ьѷнѯ њјўѯкѠеьѷѫѠѠѷѪєѯ 4
эзѰѠзѨєѷѨъкішкѸѤшкѥѸеьѥѸчѣьнѥѓѸнѲіѥдкѕѷѨјѯдѨјў *
юѳьѧдѯкѬѝьѠѸієѥњзѸнѲѥѷѕѠ *
ьѷѫѠѷѨъѥјњѯкѠекѥъкѷѩізкњѷнкѸѤіздѨѠьзѣјѰэѠѥшѯьѲѣьнѥѓкѥњьѠѷдњјўѯкѠеьз *
ѷѬіздѤѝэѠѥшѯьѲѸњѳкѸѧъіѥўѥѠѕѠѷјюѸўѲ њѸјѰлѶіѝѯьѷѫѠдѥлкѤјў *
кѷѧѕкѥѷѕѠѣѥёмѯѕчѱ( дњјдѬщіѥдьѤдкѠѸюѠѷѪёѯьѥъѣіюэѤіьѠѷдѧєѬѓўцѫѠэѠѝлњішњѸјѰкѤњѣічѤєѣікѥѷѕѠкѸѤіздѨѠѥѷѕеѯѠѪіўьз
)діѥъіѥўѥѠѕњѸщѣјѰдѶчѯєьчњеьѲѷѬѕѠѷѨъкѷѧѝ
ѥѸнѥѷјкѷѫјёчѠѪчѯіѥдчѧдѯѸўѲѦълѥѠђњѯізѱєѳѥшѯьѲєѷѪчкѠѷѪізѯьѷѫѠіѥд ѣьнѥѓэѤлэѧѕўіѥдьѲкѤњѣічѤєѣієѥњзѸнѲіњз
ѣьнѥѓэѤлэѧѕўѠѷѪєѯкѤњѣічѤєѣікѠѸшѣльѸѤькѤч
ћѥдѥѠѕѥэѣікѠѷнкѥњечѨдѥѷѕѠ эѠѥшѯкѠекѥѸеьѥѸчѠѪіўкѥѷјьѥѸч ьѥѸэьѥѸчѷѨъѷѬѕѠѣлдѠѠћѥдѥѠѕѥэѣікѠѷн 5
ѨчѷєѳѧшѥнѝіѥєдѠѠіѥўѥѠкѫіюіѥдѣјѰѕѥўѕѨѝѯэѠѥшѯѸўѲјякѷѝлѥѠ
ьѥкѸнѲѷєѳѠѷѪєѯэѠѥшѯьѲѸњѳѥѠѯѷѝѲњѸдѰкѷѩьўдѤѝѥѷјюѯѦѸьѦьдѥўчѫѝѷѨъѨчіѥдьѶюѯѣл ьѲѕѥѓѷѬѕѠіѥўѥѠѨєѷєѳѣцеэѠѥшѯьѥкѸнѲѥѷѕѠ 6
лѲкѸѤшѸчѳѷєѳѕчѱкѠѷѪізѯьѧчѯэѠѥшѯдѥў чєўкѸѤъђњѯізѱєѳьѥккѤјёэѤоєѩоѕњѷнѣлѦѸь
ѸчѳэѠѥшѯэѤдѸўѲѕѥўѕѨѝѯєѥњзѠѷдлѥѠєѝѣѥєўѯѷєѳкѥѷѕѠьѥкѸнѲіѥд
ьѸѤььѷнѯѦъѸўѲѦьѣьѰцѫзкѠеіѥўѥѠѦъѠѪєѷѬзѥѷњдѥлѕѨѝѯдѠь ѷрўѲьѷяѰѷѬннѧъќѥчѣідьѲѷѬѕѠѠѷўѷѨъіѥўѥѠкѫіюѥѷѕѠ 7
іѥўѥѠкѫіюіѥдьѲѷрўѲьѷяѰѷѬннѧъќѥчѣідѷѨъьъѰѻёєѧёѠѪѝкѤьўќѥчѣідѸнѲѥѷѕѠѣјѰ
ѸчѳѸєўѳђѳѠѪіўчѧэѯѣічѧдѯѸўѲѦълѥѠєѝѣѥєўѯѷєѳѷѨъьѥкѸнѲіѥд
ѠєѝѯьѠѷддѠѠѣўјѱѦьѸўѲ )ьѧкѯѠѪіўкѠъ ьѷнѯ( эѠѪјзѯѣўјѱѨєѷѨъдѧєѥіоѯѣјѰѸєѳдѥлѦъѷѨъѣьнѥѓѸнѲѥѷѕѠ 8
ьѸѤьѥѷъѯђњѯізѱєѳэѠѥшѯэѤдѸнѲіѥдэѤіўѦѝѣѥєўѯѷѨъњѤізкѠѷѪізѯѸнѲ
іѥўѥѠкѫіюѣцеђњѯізѱєѳьѲюѳѥѸеѯюѳѦьѸўѲшѥрѫьѠѷєѳѣўјѱдѥлѦъѷѨъєѷѪчкѠѷѪізѯѣјѰіѥўѥѠѫлііэѣьнѥѓ
ѸчѳкіѰѕѥѸіѕѥўѕѨѝѯєѥњзчѧдѯѸўѲѦъщіѥєѥѝкѷѩо эѠѥшѯьѲѠккѸзѱіѥдчѧдѯлѥѠѣўјѱѫщшѤњѣѥёмѯѕчѱ ѸчѳѸєўѳьльѠѸілѥѠ
јѧзѯоѳѨіќѥчѣідѻфцѤѓшѧјяѸнѲѥѷѕѠ 9
ѸчѳіѥўѥѠкѫіюіѥдьѲѸнѲѠѷѪєѯѸєўѳђѳѠѪіў/ѣјѰ ђѳѕѥдѣіючѧдѯѸўѲѠѷдлѥѠкѷѩоьюѠѪлѯкѷѧѝѨєлѥѠ
ѸчѳѕѥўѕѨѝѯѠѪіўдѤўдшѰлѥѠѣѥіёѯ іѥўѥѠкѫіюкѤјўѨъьѤъкѥѸјюѳьѫєўкѠіьѷъѰѣјѰьѫєўьѥлѦьѥѷѕѠ 01
ѸчѳэѠѥшѯѠѷшѕѥўѕѨѝѯєѥњзчѧдѯѸўѲјякѷѝлѥѠєѝѣѥєўѯѷєѳѷѨъьѥкѸнѲіѥд
ѸњѳкѥњѷѨъњѧяьѸѪёкѠеэѠекѤјўьѥѸчѥѷњддѥєѠѪіў .єо 8 юѳкјдѩјѷѬѕѠѬшѣіюкѠеѥѸьўьѥѸчѸўѲэѠѥшѯкѥњѸчѳѥѷњлѲѷьѰѸўѲэѠѝлњіш 11
лѲкѸѤшѸчѳѷєѳѕчѱѥѸђђѳѸнѲкѠѷѪізѯьѷјўдшіѥдкѕѷѨјѯдѨјўѠѷѪёѯ
эѠѥшѯѠѷшѕѥўѕѨѝѯєѥњзѣјѰѕѥдкѥѷікѥъэѶлѯчѥэіѥдчѧдѯѸўѲјякѷѝлѥѠєѝѣѥєўѯѷєѳѷѨъьѥкѸнѲіѥд
ьѠѷдѵкѥѷшдѤяѣјѰѸєѳјяѠѪіўјѧюѯюѠѰ ,кѷѤіѐьѤєњѧяѣѥлѯѸўѲ іѥўѥѠкѫіюьѠѷд 21
чѧэѯѣічѧдѯлѥѠ
ѸчѳчѧэѯѣічѧдѯлѥѠѣѥіёѯ чєўкѸѤъѷеѳѕњѸчіѥўѥѠкѫіюѥѷѕѠ 31

ѸњѳѧєѬѓўцѫѠчѤњкѠѷѪізѯѸўѲѸчѳѷєѳѸѨь ьѷѫі
;эѸѥьѳіѷ
юіѣѯѓъјѤдќцѣъѨѷёѤдёіѸѠєѠѥўѥіѯнѸѥ
:ѸѨьюѳѠѷшкѤчіѥдьѧьѯѦчѸўѲ
ѕѤѓчѠјюєѥњзѠѷѪёѯрѤзѦѝѦьѣьѰѦз
5
єѥшѶдњѸјѰкјчѫѝьѸѧѝђњѯізѱєѳэѠѥшѯьѲьѠѸієѥњзѸўѲіѥддѥлкѤјўѸєѰ
ѸчѳчѧэѯѣічѧдѯѸўѲѦъѷеѳьѲѕѥѓѷѬѕѠєѝѣѝѣльѤчкіѰ
эѠѥшѯьѲєњѷъьѤєѦѸьѸнѲѕчѱчѠъєѥѕѥѕёѥѷѕѠ 41
чѲьѤъѨъьѤъьѲњјўѯкѠечѠѪчѯчѫльѧдѯьлчѠѪчѯьѤєѦѸьѸўѲѦълѥѠ
ћѥдѥѠэѤіѸчѳѷєѳђѳњјюѯѸўѲѠѷѪёѯѸњѳѬшѣіючѧюњѸјѰѥѸђђѳѸнѲкѠѷѪізѯдѹѤјючѠщѠѪіўчѧюѸўѲ )ѥєьѸѩекѷѫё( ьѤњзьѶўѯшдѯкѤѝдѥў 51
ѸчѳшѠѹнѥѸђђѳѠѪіўѸєўѳђѳ ьѷнѯ кіѰѕѥѸіѕѥўѕѨѝѯєѥњзчѧдѯлѥѠ
ќѥчѣідѠѪіўдѧшѝѥјёьѶюѯѷѨъѣьнѥѓьѲіѥўѥѠкѫіюѠѪіўьѷѫѠдѥў 61
ѸчѳђѳчѠшіѥдчѧдѯѣлѷѨъѸчѳюѳьѶюѯєѥњзѨєлѥѠдѥлкѠѷѪьѯэѠѥшѯѬчьѷѤєўѕѠзѸўѲ
ѸчѳѸєўѳђѳчѧдѯѸўѲѦъщіѥєѥѝкѤѕкѷѩо ёѥѓѝєѠѷѪѝѯіѥдчѧдѯѣлѣьнѥѓѷѨъѸчѳюѳьѶюѯєѥњзѨєдѥлкѠѷѪьѯдўлѥѠіѥўѥѠ
,ѥѠѯѥшѯѬшѣіюѝѤяєѤѝѥѷѕѠ ѷѬѕѠьѥкѦъкѤјѦдѥѸђђѳѸнѲкѠѷѪізѯдѥлкѠѷѪьѯкѬѝѣллѥѠѸчѳкѩщѥѸеѯѷѨъњѧяьѸѪёѷѨъѧєѬѓўцѫѠ 71
кѥѷѕчєўѱьѲѷѬѕѠѣцеьѥлѣјѰєѧіѝѯѻцідюѫѠ ,іѥўѥѠѷѝѲкѠѷн ,эѠѥшѯьњѷѝкѠекѤјўьѥѸч,эѠѥшѯьњѷѝкѠедѠььѥѸч
њѸјѰьѠѸіѷєѳѥѷњьѥълњішіњзкѥѸјьѠѷд ѧшѤєьѱшѤѠкѫіюѣјѰьѠѸієјчєўѱ
іѥўѥѠѦъэѤіўѦѝѥьўѠѪєкѫщѷѝѲдѥлдѠь дњјдѬщіѥддѥлѕѥішьѤѠѨєѣлѶд ьѸѩеєѷѧёѯьѠѸієѥњзѨєѻцідюѫѠѠѷѪєѯ
чєўѸўѲдѠѠкѥѸздшіѥўѥѠэѥізќћѯѦьѣјѰѠєѝѯѷѬѕѠэѠѥшѯчѥѠѣѝєѥњзѦъіњз 81
эѠѥшѯкѠечѥѠѣѝєѥњзёѥѓѝѥќдѤікѫіѦэѷєѳдѥў
ѸчѳѕѥішьѤѠѻціѥдьѥщѝчѧдѯѸўѲјякѷѝлѥѠѣјѰѥѸђђѳѸнѲкѠѷѪізѯкѠеьѥкѸнѲіѥдѫѕѥѠѠѷшѕѨѝѯјякѷѝлѥѠкѷѩоёѥѓѝєѠѷѪѝѯњѧяьѸѪёѸўѲѦълѥѠ
ьѸѤьѥѷъѯѸѨьэѠѥшѯэѤіўѦѝѦьѣьѰѷѨъѧєѬѓўцѫѠчѤњкѠѷѪізѯѸнѲ 91
.єѝѣѥєўѯѷєѳѷѨъчѤњкѠѷѪізѯѸнѲдѥўкѠѸшдѬщєѥњзѨєѧєѬѓўцѫѠѥѷњѸчѳлѲьѷѤєщіѥєѥѝѷєѳцѫз
:ьѷнѯѧъѥѠ ьѤдкѩјзѕѥѸјзѷѨъѥѸђђѳѸнѲкѠѷѪізѯѣјѰьѠѪіѯњѤізьѲѕѥѓѸнѲэѤіўѦѝѣѥєўѯѸѨьѥѸђђѳѸнѲкѠѷѪізѯ 02
;ѵьѷѪѠьѥкѦъіѥдэѤіўѦѝєѠѸјчњѰёѥѓѝѣјѰьѥкдѤьѦѝ ѥѸзьѥѸіьѲ ьѥкдѤьёэѤіўѦѝ њѤіз
;ѵьѷѪѠѕѤћѥѠдѤёіѥдэѤіўѦѝѣіѬюѰээјѰјшѯєѱ ,єіѰкіѱьѲ ѥѸздѬј ѝѦўіѤэ
чѧзєѥњзѠѪіў дѩѝѸѬієѥњз ѕѥдкѥѷікѥъкѠѷіёдэєѥњзѨєѷѨъјззѫэ ,ьѸѩеѨю 8 ѷшѰкѸѤшѫѕѥѠдѶчѯѸўѲшѥрѫьѠ 12
ѸѳђђѸѥьѨѸѯєѪѷѠѳчѸіѤэзѦѰьѣьѦъѨѷѯўєѥѣѝєнѲкѠѷѪізѯьѥкѸнѲ ѸѬієѥњзѣјѰѻціѥдэѝѣіючѥеѠѪіў
ьѸѤьѥѷъѯњѸјѰєѝѣѥєўѯѷєѳкѥѷѕѠѸнѲіѥдкѠеѕѥішьѤѠкѩщлѲѥѸеѯѣјѰѕѤѓчѠјюкѥѷѕѠѸчѳэѠѥшѯѸнѲщіѥєѥѝдѶчѯѸўѲѠѷѪёѯ
дѶчѯѕчѱѦъіњзѷєѳѸнѲѸѬядѥлкѫіѦэєѠѷоіѥдѣјѰчѥѠѣѝєѥњзѦъіѥд ѥѸђђѳѸнѲкѠѷѪізѯэѤдьѷјѯіњзѷєѳдѶчѯ
јѰѬчіѥдэѤіѸчѳѣјѰюѳьѸѩеѨю 8 ѷшѰкѸѤшѫѕѥѠѨєѣлдѶчѯѥѷњдѥлдѠь
кѸўѰѥѸяѠѸѪѝѯѠѪіўіѥўѥѠѸўѲѦъіѥд єѷѪчкѠѷѪізѯѣјѰіѥўѥѠьѠѸіьѷѫѠіѥдэѤіўѦѝѸнѲђњѯізѱєѳэѠѥшѯ 22
ѸѨььѤдкѕѨзѯѸјдѲѷѨъкѷѧѝѣјѰдѕѨюѯѥѸя ѦѸькѠђ ѣшѰѥѸъѯкѠі ьѠѸіѦѸьѥѺюѯѣідьѠѸіьѷѫѠіѥдѣјѰ
ѸчѳѸєўѳђѳѠѪіўђѳчѧшіѥд эѶлѯчѥэіѥддѥлкѕѷѨѝѯєѥњзчѧдѯѸўѲѠѷдлѥѠ
дѥўкѥѷшдѕѰјдѳѣѕѣієѫзэњзээѣіѸнѲѠѪіўдѠьѕѥѓдѥлѥјњѯкѸѤшіѥдѨыѧњѸнѲіѥдѕњѸчьѥкѦъѣлѷѨъѕѥєўкѷѫєчѫлѨєѸчѳѷєѳѥѸђђѳѸнѲкѠѷѪізѯ 32
њѷѤзчёѱњѥѸеѻфцѤѓшѧјяэѤіўѦѝчѤізкѷізѯкѥѷѕѠѕѥіѣјѷшѰшѧјяѸѬякѠеѦьѣьѰѦзєѥшѧшѤэѧтюѸўѲ 42
њѤшдшѰкѤјѦдчёѱњѥѸеѷѨъѣцеѬчьзѨєѷєѳѕчѱьѥкѦъэѠѥшѯѸўѲѕѠѷјюѥѷѕѠ
чёѱњѥѸењѷѤзэѤіўѦѝјѥшѦѸьѨѝќѥчѣідкѫщѸнѲѥѷѕѠ Ѧъчѫѕўіњз њѸјѰѸњѳѦьѣьѰѷѨъѥјњѯэіздѥлкѤјўдшѰѷєѳчёѱњѥѸедѥў
дшѰѠѪјўѯѷѨъчёѱњѥѸечѶјєѯѸўѲѦъєѥѕѥѕёѥѷѕѠ
ѸчѳђѳчѧшчёѱњѥѸеѸўѲјякѷѝлѥѠюѳьѧдѯдѫѝчёѱњѥѸењѷѤзіѥд
ьѧчѕѥѝкѸѤшчѧшкѠѸшѣлѸѨьѥѸђђѳѸнѲкѠѷѪізѯ 52
ѸѨьюѳѠѷшкѤчѝѤўієѥшюѳкѷэѰѕчѱ ѨѝѸнѲіѥдѨєдѤјўѕѥѝьѲђѳѕѥѝ
ьѧчѕѥѝ-кѠѪјўѯѣјѰњѕѨеѯ ђѳѝѰѣідѨє – јѥшѦѸь кѥѷњ -ьѧкѯѦѸь
цѫзкѠедѹѤјюьѲјѤьѧєѻіѠъѯкѠеѕѥєўкѠѷѪізѯєѥшѸњѳѫэѣіѷѨъѨѝэѤдкішѷєѳлѥѠѸѨьѥѸђђѳѸнѲкѠѷѪізѯкѠедѤјўѕѥѝьѲђѳѕѥѝкѠеѨѝдѥлкѠѷѪьѯ
ѦчѨѝѠѪіўN іќдѤѠњѤшѕѥєўкѠѷѪізѯѦъкѷѩојѤьѧєѻіѠъѯэѤдѠѷшєѠѷѪнѯкѠѸшьѧкѯѦѸьѨѝђѳѕѥѝ
ѣјѰ њѕѨеѯѨѝђѳѕѥѝ кчѰѨѝѠѪіўL іќдѤѠњѤшѕѥєўкѠѷѪізѯѦъкѷѩојѤьѧєѻіѠъѯэѤдѠѷшєѠѷѪнѯкѠѸшјѥшѦѸьѨѝђѳѕѥѝ
ѦчѨѝѠѪіў N іќдѤѠњѤшѕѥєўкѠѷѪізѯѦъкѷѩојѤьѧєѻіѠъѯэѤдѠѷшєѠѷѪнѯкѠѸшьѧкѯѦѸьѨѝђѳѕѥѝ
кчѰѨѝѠѪіў L іќдѤѠњѤшѕѥєўкѠѷѪізѯѦъкѷѩојѤьѧєѻіѠъѯэѤдѠѷшєѠѷѪнѯкѠѸшјѥшѦѸьѨѝђѳѕѥѝ
ѠѪіў G іќдѤѠњѤшѕѥєўкѠѷѪізѯѦъкѷѩојѤьѧєѻіѠъѯэѤдѠѷшєѠѷѪнѯкѠѸшкѠѪјўѯѨѝѣјѰњѕѨеѯѨѝѕѥѝ
ѕѥішьѤѠкѕѷѨјѯдѨјўѠѷѪёѯѧшѤэєѝцѫзѨєѷѨъѸѬякѠеіѥдѧіэьъѰњѤш шѧјяѸѬяѕчѱьѕѷѨјюѯкѠѸшѣл ѕѥўѕѨѝѯєѥњзчѧдѯкѠѷѪізѯєѠѸіёѥєѷѨъђѳѕѥѝдѥў
кіѰѕѥѸікѥѷѕѠѥѸђђѳэѤдњѕѷѨдѯѕѥўѕѨѝѯєѥњзчѧдѯлѥѠєѝѣѥєўѯѷєѳкѥѷѕѠьѥкѸнѲіѥд
ьѸѤьѥѷъѯђњѯізѱєѳэѠѥшѯьѲѸнѲіѥдэѤдєѝѣѥєўѯѷѨъњѤізкѠѷѪізѯѸнѲ 62
ѥѸзіѥдѠѷѪёѯіѥўѥѠѦъіѥдѻзкѝѣіючѫлѠѷѪёѯѸѨьэѠѥшѯѸнѲіњзѷєѳ 72
эѠѥшѯѠѷшѕѥўѕѨѝѯєѥњзчѧдѯѸўѲјякѷѝлѥѠєѝѣѥєўѯѷєѳкѥѷѕѠьѥкѸнѲіѥд
кѠеэѶдѯѸѬшьѲѷѬѕѠѷєѳкѠѸшѣлђњѯізѱєѳэѠѥшѯ 82
ѣіѝѧѠьѶюѯѷѨъкѥњчѫлѨєѕчѱѸнѲкѠѸшѣлђњѯізѱєѳэѠѥшѯ
ѠѷшдѹѤјюѸнѲѕчѱѸчѳѦълѥѠѠѷшєѠѷѪнѯіѥд 92
ђѳѕѥѝьѧчѯіѥдсдєѥшюѳьѶюѯѕчѱђѳѕѥѝьѲѸњѳѻншѧњѝєњііѥдѕчѱѠѪіўѸчѳкѩщѥѸеѯщіѥєѥѝдѹѤјюѸўѲіѥдѕњѸч
ภาษาไทย

6
ѕѤѓчѠјюєѥњзѠѷѪёѯрѤзѦѝѦьѣьѰѦз
ѸчѳѸєўѳђѳѠѪіў шѠѶнѥѸђђѳчѧдѯѸўѲѠѷдлѥѠєѝѣѥєўѯѷєѳѷѨъѻншѧњѝѠѪіўдѹѤјюѸнѲіѥд
ѥѸђђѳѸнѲкѠѷѪізѯьѥкѸнѲѣцеьѲьѸѩеьѠѸілѥѠдѠььѥѸчњѧяьѸѪёѠѪіўѬшѣію 03
Ѩю 8 ѥѷњдѦѷшдѶчѯѠѪєьѸёѸўѲђѳѕѥѝѣјѰѥѸђђѳѸнѲкѠѷѪізѯэѶдѯ 13
діѥъіѥўѥѠѷѝѲѕњѸщѣјѰєьчњеьѲѷѬѕѠѷѨъкѷѧѝѥѷѕеѯѠѪіўьзіњз 23
дњјдѬщіѥдкѕѷѨјѯдѨјўѠѷѪёѯзѓѱѧіэюѳѦььѠѷдѧєѬѓўцѫѠэѠѝлњішњѸјѰ
дѥлѸчѳкѧѠкѥѸѠщіѥєѥѝ эѠѥшѯчѥѠѣѝєѥњзѦъіѥдѨыѧњкѠѪіѯчѕѨѠѯѣјѕѥі эѠѥшѯкѠедѠььѥѸчѣјѰьѲьѥѸчкѸѤъчѥѠѣѝєѥњзѦъ 33
”цѫзкѠеэѠѥшѯчѥѠѣѝєѥњзѦъіѥд“
ѸчѳѕѥішьѤѠчѧдѯѸўѲѠѷдѣльѠѸієѥњздѥлэъѣідјяњѸјѰьѸѤььѷнѯѷєѳ ѸњѳкѸѤшѷѨъкѸѤшчѧшіѥдчьўѦдѠѸеєѥш 43
ѦѸьѠѳээѰчѥѠѣѝєѥњзѦъкѠѷѪізѯѸнѲѥѷѕѠ 53
ьѠѸіњѧяьѸѪё ,кѤњѣііњзѠѸе 63
ьѥкѸнѲіѥдкѥѷњўѣіьѠѸіѣлѷѨъѸчѳюѳьѶюѯєѥњзѨєњѧяьѸѪё ѥѷњкѩщѕѥєўєѠѷѕ ѻцќдѤјрѤѝѸнѲіѥдѨєѠѷѪєѯ
ђѳчѧшѠѪіўьѧдѯкѬѝьѠѸієѥњзчѧдѯлѥѠѻфцѤѓшѧјя ѸѨьѻфцѤѓшѧјяьэ )ьѸшьѶюѯ кѠѷјд ѠѪѝкѤьў( ѵчѲѫщшѤњкѥњѥѷѕѠ 73
ѸчѳјззѫэѠѷшэѶлѯчѥэіѥдчѧдѯѸўѲѦъѣлкѷѩо ьѷјўлѥѠѫщшѤњѠѪіў

ก่อนการใช้งาน
การแกะอุปกรณ์ห่อหุ้มและติดตั้ง
ยกเตาอบไมโครเวฟของท่านออกจากกล่อง และวางบนพื้นผิวที่ราบเรียบ
1
นุมหนาจ
นุมหนาจงอรนุมหน่ทแ
เพลา
•
ก่อนการใช้งาน
์ณรกปุอำน้ดไา่วบอสจวรตรวค ว้ลแบอาตเุจรรบงอ่ลกะกแอ่ืมเ นา่ทงอขบอาตเง้ัตดิตรากบักวย่ีกเำนะนแำคะาพฉเยดโ
ง่สนขะณขยาหยีสเมาวคบัร้ดไ่มไนา่ทงอขบบอาตเา่วบอสจวรตะลแ บอาตเกาจกออน้ิชกุทอ่หบีหะลแ
า้กมไน่ผแ
*
7
ว็รเดวรงา่ยอ้ดไ่มไอืรหงอ้ตกูถนางำทนา่ทงอขบอาตเา่วบอสจวรตถรามาสะจนา่ท ้ีนา้นหงอสนใยาภน้ตงอ้ืบเนอตน้ัขมาติตับิฏป
ภาษาไทย
น่ผแำนา่ยอ
กออา้กมไ
2
3
4
5
รตมเิตนซเ 02 ณามะรปอ่ืพเ าวขะลแ
มสะามหเ่ีทนอ้รมาวคยาบะรรากอ่ืพเ
กตบอาตเนักงอ้ปอ่ืพเ
งัวะรมาวคอ้ข
• ์ยชิณาพงิชเ์คงสะรปุถตัวนใ้ีนบอาตเ้ชใรวค่มไ
บอาตเูตะรปดิปว้ลแนุมหนาจนบงลงาว
ฟวเรคโมไบัรหำสยัภดอลป่ีท้ชใงอ่ืรคเ
รตมเิตนซเ 58 า่วกกามงูสมาวคีม่ีทน้ืพนบฟวเรคโมไบอาตเงาว
ยา้ซ งัลหนา้ดง้ัทงา้ขนา้ดะลแ ตมเิตนซเ 02 ยอ้นงา่ยอ้วไนบนา้ดะยะรน้วเ
0 cm
รตมเิตนซเ 8 ยอ้นงา่ยอบอขกาจงา่หรวคบอาตเงอขา้นหนา้ด
บอาตเงอขงา้ขนา้ดอืรห้ตใ่ีทู่ยอง้ัตดิตะจนอ้รมาวคยาบะรงาท
้ดไบอาตเบัก้หใยาหยีสเมาวคงา้รสจาอนอ้รมาวคยาบะรงาทงาวขดัขราก
งอขบ็กเู้ตนใอืรหดิป่ีทน้ืพนใฟวเรคโมไบอาตเ้ชในา่ทา้ถ
้ดไงล่ยแพาภสีมจาองลน็ยเ์ฑณัภติลผ้หใำทอ่ืพเศากาองอขนยีวเลหไราก
น้ัสนาง้ชใรากุยาอะลแดลนางำทรากนใพาภิธทิสะรป้หใลผง่สถรามาสง่ึซ
ง่ลโดิปเบบแงาวน้ัช่ีทฟวเรคโมไบอาตเ้ชใาณุรก ้ดไปไน็ปเกาห ้ดไงล
่มหใบยีสเว้ลแกออก๊ัลปดอถ้หใ นางำท่มไนา่ทงอขบอาตเา้ถ
)์ทนิพ ½ ( มัรกิลลิม 003 ณามิรปฟวเรคโมไบัก้ชใ่ีทะนชาภนใปไงลำ้น่สใ
่ีทนา่อาณุรก ฟวเรคโมไบัรหำสะนชาภบักวย่ีกเยัสงสอ้ขีมนา่ทา้ถ
cm
cm
0 cm
ๆน่ือา้ฟฟไ้ชใงอ่ืรคเบักมว่รบยีสเ้ดไ่มไ่ีท วย่ีดเบยีสเา้ตเน็ปเะจรวคะลแ นาฐรตาม้ดไ่ีทบยีสเา้ตเบักา้ขเบอาตเก๊ัลปบยีสเ
นบนา้ดนุมหนาจงาวน้ันกาจ บอาตเนใงลนาจงอรนุมหน่ทแงาว บัจมา้ดงึดรากยว้ดบอาตเูตะรปดิปเ


19
17
18
12
13
16
17
เพิ่ม
นุ่อ้หใราหาอาษกัรบ็กเราก
ภาษาไทย
เมนอาหารจานโปรด
เพิ่ม
เพิ่ม

10
นาง้ชใรากนอ่ก
าลวเา่คราก
กรแง้ัรคน็ปเก๊ัลปบยีสเบอาตเอ่ืมเ
ดัขกูถงัลหง้ัรคกีอ้ดไ้ชใามบัลกา้ฟฟไบบะรอ่ืมเอืรห
ข
11:11 ่ีทาลวเง้ัต :งา่ยอวัต
ดก
.1
2. กด +
‘11:’
จอจะแสดงเลข ‘11:11’
่สใ
่สใ
ดก .3
่สใ
ดก .5
'H21' ่ีท่มหใา่คง้ัตะจอจา้นหนใขลเยามห งาว
าลวเงดสแอจา้นหนัยนืยอ่ืพเ
+ ดกถรามาสนา่ท( .มช 21
)้ดไ .มช 42 ดมหโกอืลเอ่ืพเ
ขลเงดสแะจอจา้นหา่วกนจ
า้นหา่วกนจ+ ดก .4
ดล/ม่ิพเ
) + ( อืรห ) - ( ้ชใอ่ืมเ
งุรปอ่ืพเ้ดไบัรปถรามาสราหาองุรปาลวเง้ัตมรกแรปโ
)
+ ( ดกราก มิดเา่วกงลน้ัสอืรห น้ึขนานวาย้หใราหาอ
ดกราก ดก่ีทง้ัรคะล่ตแนใีทานิว 01 กีอาลวเม่ิพเะจ
ดก่ีทง้ัรคกุทีทานิว 01 กีอาลวเดละจ ) - (
ีทานิว 95 ีทาน 99 อืค้ดไำทถรามาส่ีทดุสงูสาลวเ
งลน้ัสอืรห
กิลเกย/ดุยห
ดก
ม่ิรเ
ิตัมนโตัอราหาองุรปราก บัรปราก :งา่ยอวัต
น้ึขนาน้หใ)นค 1 บัรหำส ำ่คอ้ืมนาจ น่ชเ(
ขลเงดสแะจอจา้นหา่วกนจ
า้นหา่วกนจ+ ดก
2 นาที
ดก้หใ
่ีทปไะตแ
ม่ิรเ
ว้ลแูตะรปดิปกาจงัลห
้ชใรากยว้ดาลวเง้ัตถรามาสงัยนา่ท
ดก
ม่ิรเ
.
6
ีอ
ก 10 นาที
) - ( อืรห ) + ( นอ่ืลเ
ดลอืรหม่ิพเะจอืลหเ่ีทาลวเ
นว่ดนางำทราก
TRATS KCIUQ ิตับมสณุค
03 ะลงว่ช าลวเงว่ชา่คง้ัตถรามาสณุค้หใำท
รากยว้ด้ดไงูสนางงัลพ้ชใยดโราหาองุรปราก่ีทีทานิว
าลวเน็ปเงูสนางงัลพ่ีทราหาองุรปาลวเง้ัต :งา่ยอวัต
ูตะรปดิป .1
ดก
ง้ัรค่ีส
ม่ิรเ
กิลเกย/ดุยห
งูสนางงัลพ่ีทีทาน 2 กอืลเ .2
จ็รสเ่ีส่ีทง้ัรคดกะจนา่ท่ีทนอ่กนางำทม่ิรเะจบอาตเ
จะสามารถขยายนางำทรากบบะรราหาองุรปะณข
99 งึถ้ดไปไราหาองุรปรากาลวเ
ม่ิรเ
่ีท ๆำ้ยดกรากยว้ดีทานิว 95 ีทาน
•
ตกเงัสอ้ข
นางงัลพดัยหะรปราก
งึถยามหนางงัลพดัยหะรปราก
งดสแอจา้นหดิปรากยว้ดนางัลพดัยหะรปราก
ฟสแตนบายด์วเรคโมไบอาตเอ่ืมเอ่ตนางำทะจ้ีนิตับมสณุค
งลบัดะจงดสแะจา้นหะลแู่ยอ
น้ึขฎการปะจอืลหเ่ีทาลวเงดสแอจา้นห ากิฬานดมหโ้ชใอ่ืมเ

นาง้ชใรากีธิว
11
นาง้ชใรากีธิว
นางงัลพบัดะรีมยดโ
ดงใหเหนถง
ีทานิว 03 ีทาน
.1
2.
.3
.4
อืรห กออดิปเกูถะจูตะรป
ราหาองุรปาลวเงราก
)งอเนตยว้ดราหาองุรป(
ดก
งา้ล
ดก
‘800 W’
ท
น่ือ
'5:30'
ม่ิรเ
ดก
ดกกูถ
ฟวเรคโมไนางงัลพบัดะร
างงัลพบัดะรบักมอ้รพามนา่ทงอขฟวเรคโมไบอาตเ
น
ะลแดุสงูสนุ่ยหดืยมาวคงา้รสเพื่อบัดะรา้หดมหทั้ง
นา่ทบัก้หใราหาองุรปรากอืนหเมุคบวคราก
รากงอ้ตณุคที่าลวเมาตราหาองุรปณุค้หใฟังก์ชั่นนี้
้ชใกอืลเ้หใัึถง 5ระดบ
บัดะรา่คตั้งรากึ็้สแงา่ลนา้ดงา่ยอวัต
รากงอ้ตณุคที่าลวเนใ W 008 ที่นางงัลพ
ใ
•
พ
5 าลวเน็ปเ W 008 ที่ราหาองุรปราก:งา่ยอวัต
นางงัลพบัดะร
•
•
นางงัลพ
เลขงดสแะจอจา้นหา่วกนจ
ะปรากฎจอจา้นหกรแที่ครั้งยดโ
W 0001 น็ปเ
นา่ท้หใง้จแรากน็ปเทั้งนี้เพื่อ
IH ่ีท้วไา่คตั้งะจบอาตเา่วบาร
นางงัลพา่คตั้งรากีมะจา่วกนจ
ีทานิว 03 ีทาน 5 าลวเ่สใ
'+' ดกรากยว้ด
น็ปเงดสแะจอจา้นหา่วกนจ
dnE า่วำค ขึ้นงัดงยีสเีมะจปิท จ็รสเราหาองุรปเมื่อ
'dnE' อจา้นหงอขงา่ตา้นหนบามขึ้นงดสแะจ
า่วกนจีทานหนึ่งๆกุทขึ้นงัดงยีสเีมะจปิทะลแู่ยองดสแงคะจ
งูส
1000 W
800 W
600 W
400 W
200 W
•
•
•
•
•
•
•
•
•
•
•
•
•
•
ละลายเนย
•
•
•
นางงัลพบัดะระล่ตแน
นา่ทงอขบอาตเบัรหำสนางงัล
ฟวเรคโมไนางงัลพบัดะริมูภนผแ
นาง้ชใราก
น้ำม้ต
ลาตำ้นีสน็ปเกุส้หใเนื้อำท
.มอกูลำท
กัผชืพะลแาลป ชิ้น่กไงุรป
มุ่นดัตชิ้นเนื้อที่งุรป
กัผะลแา้ตสาพ วา้ขนุ่อราก
นว่ดนาจราหาอมยีรตเเพื่อนุ่อราก
ชิวนซแนุ่อราก
งัปมนขะลแก้คเกวพำจราหาองุรป
ตลแกโคอ็ชยาละลราก
วัวกูลเนื้องุรป
วัตทั้งาลปงุรป
ด์ราตสัคะลแดิ้งดุพำท
่กไ ด็ปเ เนื้อกาจง็ขแำ้นยาละล
งา่ยบอราหาอะลแปอชค์รอพงุรป
้มไลผกาจกออน็ยเมาวคำน
นาจราหาอะลแลรโอซเสคแนุ่อ
สีชมีรคะลแบนเยาละล
้ดไงุรปที่ราหาอบักเกี่ยวดิควนแ้หใะจนี้ปไดัถงาราต
บัดะรา่คตั้งรากงึถน็หเ้หใงดสแนี้กาจดัถิมูภนผแ
ภาษาไทย
สีชะลแมน ่ขไงอขมสผนว่สีมที่ราหาองุรป
ง็ขแงา้ขนอ่คดัตเนื้อที่งุรป ลเะทราหาอะลแ
บารทรวคอ้ข
•
นางงัลพบัดะรกอืลเ้ดไ่มไนา่ทกาห
งูส นางงัลพที่นางำทะจบอาตเ
REWOP-IH ่ีทราหาองุรปรากตั้ง้หใ
ยลเ้ดไ 2 ที่นอตขั้นมา้ขถรามาสยดโ

12
นาง้ชใรากีธิว
ก็ดเนักงอ้ปคอ็ลบบะร
เตาอบอนไมพงประสงค เมอตงคา CHILD LOCK
แลว จะไมมการปรงอาหารเกดขน
To set the child lock
ีทานิว 1
่้ั่ื์ึ่ั
้ึิุี่้
KCOL DLIHC า่คง้ัตราก :งา่ยอวัต
ูตะรปดิป .1
ดก
กิลเกย/ดุยห
่ีทงา้คดก .2
กิลเกย/ดุยห
า่วกนจ
อ
จา้นห่ีทฎการปะจ 'coL'
ปิทงยีสเีมะลแ
ว้ลแนัวงอขาลวเง้ัต้ดไกาห
ราหาอนุ่อราก
้ั้่ืัี้ีัุคณลกษณะนมความเฉพาะตวเพอปองกนการใชงา
น
แลวคำวา Loc จะแสดงบนหนาจอ
ทานสามารถยกเลก CHILD LOCK
ิ่
ตามขนตอนดานลางน
To cancel the child lock
้่้
้ี่้้ั
KCOL DLIHC กิลเกยราก :งา่ยอวัต
่ีทงา้คดก
'coL' า่วกนจ
่ื่ี้้่้ัูหาก CHILD LOCK ถกตงคาแลวใหแตะท อน
กิลเกย/ดุยห
ปไยาหะจอจา้นหนบ
ว้ลแ KCOL DLIHC ดิปกาจงัลห
ิตกปมาต้ดไนางำทะจบอาตเ
น้ันกาจงัลหอจา้นหงา่ตา้นหนบน้ึขฎการปะจาลวเ
ิตัมนโตัอยดโราหาอบออ่ืพเา้นหงว่ลมรกแรปโรากบัร้ดไะจบอาตเงอขูนมเ
้วไา่คง้ัต้ดไนา่ท่ีทมาตบอฟวเรคโมไบอาตเ้หใน้ันกาจ ู่ยอีม่ีทม็ทเอไนวนำจมอ้รพงุรปรากงอ้ตนา่ท่ีทง่ิสนใกอบ
1-1
1-2
1-3
.กก 3.0 า่ซซิพนุ่อราก : งา่ยอวัต
ดก
ม่ิรเ
กิลเกย/ดุยห
า้นหา่วกนจ+ ดก
0.3
ดก
ม่ิรเ
า้นหา่วกนจ+ ดก
ราหาอนุ่อรากูนมเำนะนแำค
ด
สัหร
เมนู
ม่ืดงอ่ืรคเ
ลรโ์รอซเสคแ
ำ่คอ้ืมนาจ
ักำจดีข ิมูภหณุอ
กันหำ้น
200 มล.)
0.25 - 1.0
กก. (250 ก
)ง้ัรค 1/
1
น้ตงอ้ืบเ
ยว้ถ 2 - 1
/ ยว้ถ 1(
งอ้ห
น็ยเ่ชแ
น็ยเ่ชแ
คำแนะนำ ้ชใงอ่ืรคเ
ูระาจเว้ลแมุ้หกิตสาลพม์ลิฟยว้ดมุลค
)น้ตน็ปเ กัผ
ูระาจเว้ลแมุ้หกิตสาลพม์ลิฟยว้ดมุลค
ดกว้ลแ ูนมเกอืลเ บอาตเนใงลราหาอ่สใ .2
ถ้วยที่
ฟวเรคโ มไบัรหำสยัภดอลป่ีทยว้ถนใงลราหาอ่สใ .1
ปลอดภัย
กันหำ้นะลแูนมเกอืลเ บอาตเนใงลราหาอ่สใ .2
สำหรับ
ไมโครเวฟ
ฟวเรค โมไบัรหำสยัภดอลป่ีทมาชนใงลราหาอ่สใ .1
ถ้วยที่
ปลอดภัย
กันหำ้นะลแูนมเกอืลเ บอาตเนใงลราหาอ่สใ .2
สำหรับ
ไมโครเวฟ
ีทาน 3 ณามะรปกีออ่ต้วไดิป้หใ ราหาองุรปงัลห .3
ถ้วยที่
ดบง่ัรฝนัม ่กไ อ้ืนเงอข .กก 5.0 - 4.0( ราหาอ่สใ .1
ฟวเรคโมไบัรหำสยัภดอลป่ีทนาจนบงล
ปลอดภัย
สำหรับ
ไมโครเวฟ
1-4
ีทาน 3 ณามะรปกีออ่ต้วไดิป้หใ ราหาองุรปงัลห .3
นิฟฟัม
1 - 4
(75 - 80 ก. /
)กูล 1 นิฟฟัม
ง็ขแ่ชแ
ดกว้ลแ
กันหำ้นะลแูนมเกอืลเ บอาตเนใงลราหาอ่สใ .2
ฟวเรคโ มไบัรหำสยัภดอลป่ีทนาจนใงลราหาอ่สใ .1
ถ้วยที่
ปลอดภัย
สำหรับ
ไมโครเวฟ

นาง้ชใรากีธิว
13
รหส
1-5
1-6
1-7
1-8
ั
เมนู
พาย
พซซา
้
ขาว
ุ
ซป
0.2 - 0.6 กก. แชเยน
(150 - 200 ก.
/ ชน)
่ิ
0.2 - 0.5
0.1 - 0.3
0.25 - 1.0
กก. (250 ก.
/1 คน)
นำหนก
้ิ
ัีขดจำกด อณหภม
ั้
เบองตน
กก
กก
แชเยน
แชเยน
หอง 1. ใสอาหารลงในชามทปลอดภยสำหรบ ไมโครเวฟ
ิูุ
้้ื
1. ตดพายทเหลอเปนชนๆ
็่
2. ใสอาหารลงในจานทปลอดภยสำหรบ ไมโครเวฟ
3. ใสอาหารในเตาอบ เลอกเมนและนำหนก กดปม
1. ใสอาหารลงในจานทปลอดภยสำหรบ ไมโครเวฟ
็่
2. ใสอาหารในเตาอบ เลอกเมนและนำหนก กดปม
1. ใสอาหารลงในชามทปลอดภยสำหรบ ไมโครเวฟ
็่
้
คลมดวยฟลมพลาสตกหมแลวเจาะร
2. ใสอาหารในเตาอบ เลอกเมนและนำหนก กดปม
3. หลงปรงอาหาร ใหปดไวตออกประมาณ 3 นาท
คลมดวยฟลมพลาสตกหมแลวเจาะร
2. ใสอาหารในเตาอบ เลอกเมนและนำหนก กดปม
3. หลงปรงอาหาร ใหปดไวตออกประมาณ 3 นาท
คำแนะนำ เครองใช
้ิ็ื่ีั
ัั่ี่
ัั่ี่
ัั่ี่
ูุ้้ิ์ิุ้
ัั่ี่
ูุ้้ิ์ิุ้
จานทปลอดภย
สำหรบ
ุ่ัู้ื่
ไมโครเวฟ
จานทปลอดภย
ุ่ัู้ื่
สำหรบ
ไมโครเวฟ
จานทปลอดภย
สำหรบ
ุ่ัู้ื่
ไมโครเวฟ
ีี่้ิุ้ั
จานทปลอดภย
สำหรบ
ุ่ัู้ื่
ไมโครเวฟ
ีี่้ิุ้ั
้่ื
ั่ี
ั
ั่ี
ั
ั่ี
ั
ั่ี
ั
ภาษาไทย
อาหารจานโปรดูนมเ
้วไา่คง้ัต้ดไนา่ท่ีทมาตบอฟวเรคโมไบอาตเ้หใน้ันกาจ
:งา่ยอวัต
ดัม อะลู
0.3 กก.
ดก
ม่ิรเ
กิลเกย/ดุยห
0.
ู่ยอีม่ีทม็ทเอไนวนำจมอ้รพงุรปรากงอ้ตนา่ท่ีทง่ิสนใกอบ ิตัมนโตัอยดโราหาอบออ่ืพเา้นหงว่ลมรกแรปโรากบัร้ดไะจบอาตเงอขูนมเ
า้นหา่วกนจ+ ดก
3
2-1
2-2
า้นหา่วกนจ+ ดก
2-3
ดก
ม่ิรเ
มยินดอยูนมเำนะนแำค
ด
1.0 กก
1.5
กก
ักำจดีข
กันหำ้น
สัหร
เมนู
่กไปุซ
่กไ่ีรหะกงกแ
ิมูภหณุอ
น้ตงอ้ืบเ
น็ยเ่ชแ
งอ้ห
มสผนว่ส
มัรก 003 ่กไาข
ยว้ถ 3 ่กไคอ๊ตสำ้น
าชนอ้ช ½ อืลกเ
มสผนว่ส
าชนอ้ช 1 ดบีชกัผ
กูล 1 วานะมำ้น
มะนาว 1 ผล
คำแนะนำ ้ชใงอ่ืรคเ
วัห ½ ่ญหใน้ิชน่ัหกอืลปเกอป ทอรคแ
วัห 1 ่ญหใน้ิชน่ัหกอืลปเกอลป ง่ัรฝนัม
วัห ½ ่ญหใน้ิชน่ัห ่ญหใมอหวัห
น้ต 2 ว้ิน 1 วายน้ิชน็ปเน่ัห ยา่ชน่ึค
าชนอ้ช ¼ น่ปยทไกิรพ
ดกว้ลแ ูนมเกอืลเ บอาตเนใงลราหาอ่สใ .3
กอ 4 ์กศาบกูลปูรน็ปเดัต ่กไกอ
ยว้ถ 1 ิตาชมรรธสรต์ริกเยโ
ะ๊ตโนอ้ช 1 ดบา่รห่ีย
ะ๊ตโนอ้ช 1 า่ลาซาม มัรากงผ
บีลก 8 ดยีอเะลบัสมยีทเะรก
ว้ิน 1 ดยีอเะลบัสยอซงิข
าชนอ้ช ¼ งดแีสราหาอมสผีส
ิตาชสรม่ิพเอ่ืพเยทไกิรพะลแอืลกเ
ชามที่
ปลอดภัย
สำหรับ
ไมโครเวฟ
กออำ้นทเว้ลแ่ญหใน้ิชน็ปเดัต ่กไาขดาอะสมาวคำท .1
ฟวเรคโมไบัรหำสยัภดอลป่ีทมาชนใงา่ยอกุทมสผนว่ส่สใ .2
ชามที่
ปลอดภัย
สำหรับ
ไมโครเวฟ

14
นาง้ชใรากีธิว
2-2
2-3
2-4
สัหร
เมนู
่กไ่ีรหะกงกแ
นำหนก
1.5 กก.
ัีขดจำกด
ั้
ิมูภหณุอ
น้ตงอ้ืบเ
งอ้ห
คำแนะนำ
้ชใงอ่ืรคเ
ชามที่
่ีท่ญหใดานขกึลน้กมาชนใงลดมหง้ัทมสผนว่ส่สใ .1
นักา้ขเ้หในคว้ลแ ฟวเรคโมไบัรหำสยัภดอลป
ูระาจเว้ลแกิตสาลพม์ลิฟยว้ดดิปมุลค
ดกว้ลแูนมเกอืลเ บอาตเนใงลราหาอ่สใ .2
ปลอดภัย
สำหรับ
ไมโครเวฟ
ราหาองุรปงา่วหะรง้ัรคงอสยอ้นงา่ยอนค .3
า่มลดโ
1.0
กก.
งอ้ห
มสผนว่ส
าก 1 นุ่งอบใ
มัรก 002 กุสวา้ข
มัรก 005 ดบวัวอ้ืนเ
วัห 1 บัส่ญหใมอหวัห
ชามที่
ปลอดภัย
สำหรับ
ไมโครเวฟ
ิตาชสรม่ิพเอ่ืพเยทไกิรพะลแอืลกเ
ยว้ถ ½ ำ้น
่ญหใมอหวัห ดบวัวอ้ืนเ กุสวา้ขมิตเ .1
นักา้ขเ้หใมสผว้ลแ มาชนใงลยทไกิรพะลแอืลกเ
ผมสนว่สกัตว้ลแบยีรเน้ืพนบงลนุ่งอบใงาว .2
บใงอขงาลกงรตงล นอ้ช ½ 1 วา้ขงอข
นักยว้ดา้ขเนุ่งอบใบักวา้ขอ่ห
กึลน้กมาชนใวถแน็ปเงาวว้ลแอ่ห่ีท้มไบใำน .3
ฟวเรคโมไบัรหำสยัภดอลป่ีท่ญหใดานข
ูระาจเว้ลแกิตสาลพม์ลิฟยว้ดดิป
ดกว้ลแ ูนมเกอืลเ บอาตเนใราหาอ่สใ .4
าตอืรหวย้ีรปเมีรคมอ้รพฟ์ริสเ้หใ ราหาองุรปงัลห .5
รากงอ้ตม
ูละอ มัด
0.1~0.3
กก.
งอ้ห
่สวนผสม
อะลู (เลกและเปนชน) pricked)
นำมน
ั้
่่ี ิ ี
ยหรา พรกไทย กระเทยม
หวหอมใหญสบ
ขง กระเทยมสบ
ิ ัี
พรมะเขอเทศ
ลมนม
่ิ
ผงขมน พรกแดงปน เกลอ
ใบผกช
้ิ็็
ั่ั
ืีู
้ิ ่ิ ื
ีั
0.1กก. 0.2 กก 0.3กก
100 ก. 200 ก. 300 ก.
2 ชต. 3 ชต. 3 ชต.
ตามทจำเปน
1 ชต. 1 ½ ชต. 1 ½ ชต.
1 ชช. 1 ½ ชช. 1 ½ ชช.
1 ชต. 2 ชต. 3 ชต.
½ ถวย 1 ถวย 1 ถวย
เพอเพมรสชาต
เพอเสรมรส
็่ี
้้้
ิ่ิ่ื
ิ่ื
ย
ัภดอลป่ีทมาชนในัมำ้นยว้ดๆก็ลเน้ิชง่ัรฝนัม่สใ .1
ชามที่
ปลอดภัย
สำหรับ
ไมโครเวฟ
2/1( ฟวเรคโมไบัรหำส
้วไดิปว้ลแ )กันหำ้นอ่ตุบะร่ีทนวนำจงอขง่ึนห
ดก้หใ กันหำ้นะลแูนมเกอืลเ .2
า่รห่ีย )ง่ึนหง่ึรคู่ยออืลหเ่ีท(นัมำ้นมิตเ บ๊ีบงยีสเีมอ่ืมเ .3
บัสมยีทเะรก งิข มอหวัห มยีทเะรก ยทไกิรพ
ดก้หใน้ันกาจว้ลแ ศทเอืขเะมีรูพ
อ่ตราหาองุรปอ่ืพเ
งดแกิรพ งผน้ิมข มนม่ิลมิตเ้หใ บ๊ีบงยีสเีมอ่ืมเ .4
ดก้หใน้ันกาจ ีชกัผบใะลแอืลกเ
อ่ตราหาองุรปอ่ืพเ
ีทาน 3 ้วไง้ิทงาว ราหาองุรปงัลห .5
ีชกัผบใยว้ดสรมิรสเ
2-5
แกงแกง
เขียวหวานเขียวหวาน
ลูกชิ้นลูกชิ้น
ปลากรายปลากราย
1.0
กก.
กอด 1 ะลงา่ยอ์ดลไสงอืลหเะลแงดแีสกิรพะาปเะก
ชามที่
ปลอดภัย
สำหรับ
ไมโครเวฟ
งอ้ห
มสผนว่ส
มัรก 002 ดบยารกาลป
ะ๊ตโนอ้ช 2 งกแงอ่ืรคเ
กูล 4 กีซ่ีสน็ปเา่ผ ะารปเอืขเะม
อ่ช 2 ดสดพโวา้ขยทไกิรพ
ยว้ถ ¼ งาบน่ัหยาจะรก
บใ 5 กีฉดูรกะมบใ
ยว้ถ ¼ ารพเะก
นอ้ชมาสงอสาลปำ้น
าชนอ้ช 1 วา้รพะมลาตำ้น
ยว้ถ 3 ำ้น

2-5
2-6
2-7
2-8
-

16
นาง้ชใรากีธิว
เมนู
สัหร
ข้าวหมกไก่ งอ้ห1.0 กก.
2-8
กันหำ้นดักำจดีข
น้ตม่ิรเิมูภหณุอ
มสผนว่ส
นัอ 2 นาวะรก
บใ 2 ก็ลเ์ยบเบใ
ปเ
หใ
คำแนะนำ
ะ๊ตโนอ้ช 1 าลาซาม ีนาย์รีบ
ง่ทแ 1 นอมานนิซ
บีลก 2 มยีทเะรก
าชนอ้ช 1 ลนเนฟเด็ลมเ
ะ๊ตโนอ้ช 1 นัมำ้น
ะ๊ตโนอ้ช 2 ยนเนัมำ้นอืรหยีดเนิอยนเ
ิตาชสรม่ิพเอ่ืพเอืลกเ
ยอ้นก็ลเลาตำ้นีสน็ปเนย่ีล
ูระาจเว้ลแกิตสาลพม์ลิฟยว้ดดิป ปไ
ดกว้ลแ ูนมเกอืลเ บอาตเนใงลราหาอ่สใ .3
ราหาองุรปะณขง้ัรคงอสยอ้นงา่ยอนค
ไมโครเวฟ
ง่ึนหนวนำจ่นหแะระสบใะลแ)รทโนาลิซ(ดยีอเะลบัสีชกัผบใ
ะจา่วกนจะทะรกยว้ดยอ้นก็ลเศทเงอ่ืรคเะลแกัผงุรป .1
ดานขกึลน้กมาชนใงลว้ลแกุส่ีทกัผงอขมสผนว่ส่สใ .2
งลำ้นะลแวา้ขมิตเว้ลแฟวเรคโมไบัรหำสยัภดอลป่ีท่ญ
้ชใงอ่ืรคเ
ดอลป่ีทมาช
บัรหำสยัภ
ม่ิน้หใำทราก
้ีนปไอ่ตงัดงาราตูดดรปโ )มีรคอไะลแ สีชมีรค ยนเ( ม่ินราหาอ้หใำทอ่ืพเำ่ตนางงัลพ้ชใบอาตเ
ม่ิน้หใ .กก 2.0 สีชมีรคำทราก :งา่ยอวัต
กิลเกย/ดุยห
ดก
ม่ิรเ
3
า้นหา่วกนจ+ ดก
3-2
ดก
ม่ินราหาอ้หใำทรากูนมเำนะนแำค
เมนู
สัหร
เนย น็ยเ่ชแ ดอลป่ีทนาจ
3-1
3-2
3-3
1 – 3 ea
(100 - 150 ก
/ นัอ )
สีชมีรค น็ยเ่ชแ ดอลป่ีทนาจ
0.1 - 0.3 กก.
มีรกศอไ ง็ขแ่ชแ -ยว้ถ
2 / 4
กันหำ้นดักำจดีข
น้ตม่ิรเิมูภหณุอ
าหาร
อ
คูส
รอาหาร
คำแนะนำ
กออมุลค่ีทม์ลิฟะลแาฝำน .1
น้ึขยา่ง้ดไกัต้หใอพม่ินะจมีรกศอไ .3
า้นหา่วกนจ+ ดก
2
0.
ม่ิรเ
งอ่ืรคเ
้ชใ
ฟวเรคโมไบัรหำสยัภดอลป่ีทนาจนใงลงาวว้ลแะกแ1.
ดก กันหำ้นะลแูนมเกอืลเ บอาตเนใงลราหาอ่สใ .2
มโครเวฟ
รตูสมาตนาง้ชใมอ้รพะลแงอ้หิมูภหณุอนใู่ยอะจยนเ .3
ฟวเรคโมไบัรหำสยัภดอลป่ีทนาจนใงลงาวว้ลแะกแ .1
มุ่ปดก กันหำ้นะลแูนมเกอืลเ บอาตเนใงลราหาอ่สใ .2
มโครเวฟ
มาตนาง้ชใมอ้รพะลแงอ้หิมูภหณุอนใู่ยอะจสีชมีรค .3
ดก กันหำ้นะลแูนมเกอืลเ บอาตเนใงลราหาอ่สใ .2
ไบัรหำสยัภ
ไบัรหำสยัภ

การละลาย
วิธีการใช้งาน
้ีนปไอ่ตงัดงาราตูดดรปโ )ตลแกโคอ็ชะลแ สีช ยนเ( ยาละลราหาอ้หใำทอ่ืพเำ่ตนางงัลพ้ชใบอาตเ
17
รหัส
4-1
4-2
เมนู
เนย
ชีส
1 – 3 ea
(100 – 150
)อัน /ก
ยาละลรากูนมเำนะนแำค
แช่เย็น
แช่เย็น0.2 - 0.4 กก.
กิลเกย/ดุยห
า้นหา่วกนจ+ ดก
4-3
.กก 2.0 ตลแกโคอ็ชยาละลราก :งา่ยอวัต
ดก
ม่ิรเ
า้นหา่วกนจ+ ดก
2
4
ใส่ลงในชามที่ปลอดภัยสำหรับไมโครเวฟ1.
จากนั้นกด
หลังปรุงอา3.
แกะแล้วหั่นเป็นลูกเต๋า
ใส่ลงในชามที่ปลอดภัยสำหรับไมโครเวฟ2.
คำแนะนำ
คนจนกว่าจะละลายหมด
ห ใ ร
้
จากนั้นกดปุ่ม
คนจนกว่าจะละลายหมด
ห ใ หลังปรุงอาหาร4.
้
0.
ดก
ม่ิรเ
เครื่องใช้
ดอลป่ีทมาช
เลือกเมนูและน้ำหนัก ใส่อาหารลงในเตาอบ2.
ไมโครเวฟ
ใช้ชีสที่ผ่านกระบวนการแล้วสำหรับอาหารเท่านั้น1.
ไมโครเวฟ
เลือกเมนูและน้ำหนัก ใส่อาหารลงในเตาอบ3.
บัรหำสยัภ
ดอลป่ีทมาช
บัรหำสยัภ
ภาษาไทย
4-3
ห้อง0.1 - 0.3 กก.
สามารถใช้ได้ทั้งช็อคโกแลตชิพและช็อคโกแลต1.
ทำขนม
แกะและวางชามที่ปลอดภัยสำหรับไมโครเวฟ2.
ไมโครเวฟ
จากนั้นกดปุ่ม
ห ใ หลังปรุงอาหาร4.
้
เลือกเมนูและน้ำหนัก ใส่อาหารลงในเตาอบ3.
คนจนกว่าจะละลายหมด
ดอลป่ีทมาช
บัรหำสยัภ
ต์ริกเยโ
ต์ริกเยโดกรากยว้ด้ดไต์ริกเยโำทถรามาสณุค้หใ้ีนะณษกัลณุค
.กก 0.6 ต์ริกเยโำทราก :งา่ยอวัต
กิลเกย/ดุยห
ดก .2
ม่ิรเ
ดก
.3
นุ่อ้หใราหาอาษกัรราก
’1‘ ขลเงดสแะจอจา้นหา่วกนจ
อจา้นหนบงดสแะจ

18
นาง้ชใรากีธิว
ต์ริกเยโูนมเำนะนแำค
เมนู
สัหร
1
0.6 กก. ยอ้นก็ลเนุ่อ
ต์ริกเยโ
กันหำ้นดักำจดีข
น้ตม่ิรเิมูภหณุอ
มสผนว่ส
ส
ะอาดหมดจด
2. เทนมสด 500 มล. ลงไปในชาม
ต
หลังจากการขึ้นฟู
.6
้มไลผอืรห
: ำนะนแอ้ข
นม ต์ริกเยโ
• นมสด
พาสเจอร์ไรซ์
แ
ก
้ดไ้ชใ
ตรสธรรม
ชาติ
คำแนะนำ
1
์ริกเยโ •
รทำการขึ้นฟูากนใาลวเม่ิพเ้หใ
.ลม 005 ์ซรไอจเสาพดสมน
มัรก 001 ิตาชมรรธสรต์ริกเยโ
ีทานิว
03 ีทาน
งูสฟวเรคโมไนางงัลพ่ีทีทานิว
ดกว้ลแ ูนมเกอืลเ บอา
นม
• นม2 %, 1 %
• นมหมดอายุ
นัมขไ้รไมนอืรห
งอืลหเว่ัถมน •
ู่ยองา้ค่ีทมน •
ต์ริกเยโฟูรพรากนอ่กง้หแ้หใง้ิทว้ล
้ดไต์ริกเยโงอขน้ขมาวคอ่ตบทะร
C° 05 - 04 ณามะรปิมูภหณุองึถนจ
้หในคว้ลแมาชู่ส .ลม 001 ต์ริกเยโมิตเ .4
เรียบร้อย
้ดไ่มไ้ชใ
งูสมยีซเลคแมน •
นอ้รำ้นยว้ดฟวเรคโมไบัรหำสยัภดอลป่ีทมาชงา้ล .1
03 ีทาน 2- ณามะรปนุ่อปไำน .3
ลาตำ้น มยแบักนาทะรปบัรรากยว้ดิตาชสรม่ิพเ .7
หมดอายุ
นอ้รำ้นยว้ดดมหง้ัท้ชใงอ่ืรคเดาอะสมาวคำทงา้ล •
ขึ้นฟูรากำทนอ่ก )C°05 - 04( นุ่อมนา่วจใ่นแ้หใูด •
ำนะนแ่ีทา่วกกามีมน้ันมสผนว่สงอขณามิรปกาห •
ชามที่ปลอด
ภัยสำหรับ
ไมโครเวฟ
ีทานิว
เนใงลราหาอ่สใว้ลแาฝอืรหกิตสาลพม์ลิฟยว้ดดิป .5
งมโว่ัช 5 าลวเน็ปเน็ยเู้ตนใ้วไ่ชแ
: ้ดไ้ชใถรามาส้ีนปไอ่ตต์ริกเยโะลแมนงอขทภเะรป •
ต์ริกเยโ
ต์ริกเยโ •
ู่ยองา้ค่ีท
ต์ริกเยโ •
จาอกาจะการขึ้นฟูเนื่องณขต์ริกเยโมสผอืรหา่ยขเา่ยอ •
้ชใงอ่ืรคเ
นุ่อ้หใราหาอาษกัรบ็กเราก
นอ่กนอ้รราหาอกาจม่ิรเ ฟ์ริสเราก่กแะามหเิมูภหณุอ่ีท นุ่อกุสงุรป่ีทราหาอ้หใยว่ชะจนุ่อ้หใราหาอบ็กเรากน่ัช์กงัฟ
ฟวเรคโมไบัรหำสยัภดอลป่ีทะนชาภ้ชใยดโ
งูสบัดะร่ีทงอเนตยว้ดนุ่อ้หใราหาอบ็กเ :งา่ยอวัต
ีทาน 09 าลวเ
กิลเกย/ดุยห
ดก .2
ม่ิรเ
ดก
.3
’03h1‘
นุ่อ้หใราหาอาษกัรราก
‘2’ขลเงดสแะจอจา้นหา่วกนจ
อจา้นหนบงดสแะจ
ืรห
: ำนะนแอ้ข
กราหาอ
นุ่อ้หใราหาอาษกัระณข้วไดิปเรวค
ฟ์ริสเรากบัรหำสนค
)น้ตน็ปเ นา้ดบัลกก้คเ ยาพ บอมนข(บอร
กิตสาลพม์ลิฟยว้ด้วไดิปรวคน้ืชมุ่ชมาวคีม่ีทราหาอ
3-1 อืคมสะามหเ่ีทนุ่อ่ีทราหาองอขณามิรป าฝอ

นาง้ชใรากีธิว
์รอตเ์รอวเนิอด้วยระบบยาละลราก
นใา้นหงว่ล้วไง้ัต่ีทา่คอืคบบแ่ีสง็ขแำ้นยาละลรากบัดำล
อาตเ
ง็ขแ่ช
แ
งยีรเงัยอืรห กยแ นา้ดบัลก
ัี์ั์ั้ื(เนอสตว/สตวปก/ปลา/ขนมปง)
:งา่ยอวัต .กก 2.1 ง็ขแ่ชแอ้ืนเยาละลรากงอ้ตกาห
TSORFED RETREVNI ะณษกัลณุค บ
ราหาอบัรหำสดุส่ีทีด่ีทง็ขแำ้นยาละลรากีธิว้ชใ้ดไณุค้หใดัจ
ำนะนแ่ีทง็ขแำ้นยาละลรากบัดำลงดสแะจราหาองุรปรากอืมู่ค
ง็ขแำ้นยาละลรากงอ้ตณุค่ีทราหาอบัรหำส
TSORFED RETREVNI น้ึขกาม่ีทยาบสกวดะสมาวคอ่ืพเ
บอสจวรต้หในา่ทนอืตเะจ่ีทนใยาภ บ๊ีบ งยีสเกไลกุจรรบงัย
ดุส่ีทีด่ีทง็ขแำ้นยาละลรากกาจ์ธพัลลผ้ดไ้หใอ่ืพเ่มหใราหาอ
ว้ลแ้หใ้วไมยีรตเรากีมบบแ่ีสง้ัทง็ขแำ้นยาละลรากบัดะร
เนิอ
อ้ืนเ
(dEF1)
0.1-4.0
กก.
กิลเกย/ดุยห
ดก
กก.’
+
ดก
มุ่ปดก
ม่ิรเ
์รอตเ์รอวเนิอบบแง็ขแำ้นยาละลราก
. ’1FEd‘ งดสแะจอจา้นหา่วกนจ
2.1‘ งดสแะจอจา้นหา่วกนจ
(dEF2)
0.1-4.0
กก.
์รอตเ์รอว
วัวอ้ืนเ
์วตัสอ้ืนเ
กีป์วตัส
ะกแอ้ืนเ
หมู
์สกอ็ด ทอ็ฮ ปอ็ช
กอรก้สไ
วัวกูลอ้ืนเ
กีป์วตัส
ชิน์รอค่กไ
วัตง้ัท
งวง่กไ
กอา้นห
ด้วยระบบง็ขแำ้นยาละลูนมเำนะนแำค
ง็ขแำ้นยาละละจ่ีทราหาอ
น้ิชค็ตสเ ดบวัวอ้ืนเ
น้ิชน็ปเน่ัหราก วัตง้ัท
)กูดะรกีม่มไ(กอา้นห
์วูตสำทรากบัรหำสา๋ตเอ้ืนเน่ัหราก
อ้มหกาจบอราก นิอลโ์รอดเนทเก็ตเส
์ปมัรบอราก งรคโ่ีซบอราก
เกอร์์รอบเมฮแ้สไ คัชบบแบอราก
นุมหบบแบอราก ปอช์ปมลแ
นุมหบบแบบอราก ่ีรทนัค์ลตไสงรคโ่ีซ
) .มม 02 านห.กก 5.0( ทลเทัค
บ๊ีบงยีสเงัลหราหาอนา้ดบัลก
ว้ลแง็ขแำ้นยาละลรากงัลห
ีทาน 51-5 ณามะรป้วไกัพ้หใ
บ๊ีบงยีสเงัลหราหาอนา้ดบัลก
ว้ลแง็ขแำ้นยาละลรากงัลห
ีทาน 06-03 ณามะรป้วไกัพ้หใ
ภาษาไทย
:ำนะนแอ้ข
ม่ิรเ
มุ่ปดกนา่ทอ่ืมเ
หน้าจอจะเปลี่ยนเป็นการนับถอยหลังเวลาการละลายน้ำแจ็ง
เตาอบจะมีเสียงบี๊บหนึ่งครั้งขณะรอบการ DEFROST
เมื่อได้ยินเสียงบี๊บ
ให้เปิดประตูแล้วนำส่วนที่ละลายแล้วกลับอีกออกมา
มุ่ปดกว้ลแบอาตเนใปไา้ขเบัลกง็ขแ่ชแ่ีทนว่สำน
ม่ิรเ
่กไ ์วตัสอ้ืนเ ยอห าลป ำน •
มิดเมุ้หอ่ห่ีทกิตสาลพอืรหษาดะรกกาจ
บัก้ลกใ้วไำ้นะลแำ้นอไบ็กเะจมุ้หอ่ห่ีทง่ิสว้ลแน้ันน่ชเ่มไ
เรโมไนใบองรกแะตอืรหน่ืตน้กะนชาภนใงลราหาองาว •
ดยหรากบัรงอรอ่ืพเฟว
หาองอขง็ขแมาวคบักู่ยอน้ึขง็ขแำ้นยาละลรากนใาลวเ •
้วไง็ขแ่ชแ่ีทรา
ละลรากงอขว็รเมาวคอ่ตลผีม์ฑณัภุจรรบงอขงา่รปูร •
กึลบบแา่วกว็รเยาละละจน้ืตบบแ์ฑณัภุจรรบ ง็ขแำ้นยา
รากดลอืรหม่ิพเถรามาสง่ึซราหาองอขงา่รปูรบักู่ยอน้ึข •
้ดไง็ขแำ้นยาละล
ปลา
ปลา
(dEF3)
0.1-4.0
กก.
(dEF4)
0.1-0.5
กก.
้ดไกุสราหาองอขกอนนา้ดวิผน้ืพ้หใำทถรามาสง่ึซ ราหาอ
บอาตเกาจามกออำนอ่ืมเงาลกงรตง็ขแำ้นน็ปเะจรวคราหาอ •
หอย
งัปมนข
น้ิชง้ัทก็ตเส ์ทลเิฟ
์ลลชเยอห งุ้ก ์รอตเสปอ็ลงาห ูปอ้ืนเ
บ๊ีบงยีสเงัลหราหาอนา้ดบัลก
ว้ลแง็ขแำ้นยาละลรากงัลห
ีทาน 01-5 ณามะรป้วไกัพ้หใ
น้ตน็ปเ ์ตต็กเาบ นับ ว้ลแ์ดลไสงัปมนข
ษาดะรกูนหนขา้ผงา่วหะรงาวว้ลแน้ิชกยแ
นบแนาจอืรห
บ๊ีบงยีสเงัลหราหาอนา้ดบัลก
ว้ลแง็ขแำ้นยาละลรากงัลห
ีทาน 2-1 ณามะรป้วไกัพ้หใ

20
ฟวเรคโมไบอาตเบัรหำส้ชใ่ีทะนชาภ
ฟวเรคโมไบอาตเบัรหำส้ชใ่ีทะนชาภ
ฟวเรคโมไบอาตเนาง้ชใรากนใะหลโงอขมสผนว่สีมอืรหะหลโน็ปเ่ีทะนชาภ้ชใมา้ห
ฟไยากะรปดิกเ้หใอ่กะลแบอาตเนใะหลโน็ปเ่ีทุถตัวนดโอ่ืมเบัลกนอ้ทะสะจะลแ ้ดไะหลโนา่ผุละทถรามาส่มไฟวเรคโมไน่ืลค
ฟวเรคโมไบอาตเบักยัภดอลปงา่ยอ้ดไนาง้ชใถรามาส่ญหในว่สะหลโ่ชใ่มไ่ีทะนชาภ ้ดไา่ผา้ฟนอืมสเบยีรปเ่ีทมิตเณาญญัสน็ปเง่ึซ
ฟวเรคโมไบอาตเบัก้ชใ่ีทะนชาภน็ปเบัรหำสะามหเ่มไะลแู่ยอมสผนว่สน็ปเะหลโีม่ีทดินชงาบะนชาภีมะจ็ก มาต็กรไงา่ยอ
่มไอืรห้ดไบอาตเบัก้ชใถรามาส ้ชใรากงอ้ตนา่ท่ีทะนชาภ า่วงอเนตยว้ด้ดไบอสจวรตถรามาสนา่ท
ีทาน 1 าลวเน็ปเงรแฟไ้ชใะลแ ฟวเรคโมไาตเงอขนางำทรากน่ัช์กงัฟ้ชใยดโู่ยอำ้นุจรรบ่ีท้กแยว้ถบัก้ลกใวา่ลกงัดะนชาภงาวรากยว้ด
นอ้รบัลกะนชาภ่ตแ น้ึขนอ้ร่มไำ้นา้ถ่ตแ ้ดไฟวเรคโมไบอาตเา้ขเำนถรามาสน้ันะนชาภา่วงดสแ ู่ยอน็ยเงัยะนชาภ่ตแ น้ึขนอ้รำ้นา้ถ
้ดไฟวเรคโมไา้ขเำนถรามาส่มไน้ันะนชาภา่วงดสแ
ราหาอ่สในาจ
นบนา้ดีธิวงัดบอสดทรากำทอืรห ยา่นหำจนทแวัตมาถบอสาณุรกจใ่นแ่มไนา่ทา้ถ ้ดไฟวเรคโมไบัก้ชใถรามาส่ีทดินชยาลหกาลหนาจีม
ว้กแงอ่ืรคเ
ราหาอำทบัรหำสว้กแงอ่ืรคเน็ปเ่ีทดมหง้ัท์ดนรบแงึถมวร ้ดไฟวเรคโมไา้ขเำนถรามาสะลแีด้ดไนอ้รมาวคนทะจ่ญหในว่สว้กแน็ปเ่ีทะนชาภ
น้ึขนุ่อราหาออ่ืมเ้ดไกตแจาอกาจงอ่ืนเ ์นวไว้กแ น่ชเ นอ่อดยีอเะลมาวคีม่ีทว้กแงอ่ืรคเ้ชใมา้ห มาต็กรไงา่ยอ
กิตสาลพะนชาภ
มาต็กรไงา่ยอ น้ันา่ทเ้ดไๆน้ัสนอ้รนุ่อรากนใาลวเ้ชใ่ีทราหาอบ็กเถรามาส้ีนบบแะนชาภ
ดุส่ีทยา้ทนใยาละละจกิตสาลพะนชาภะารพเนานบอาตเนใู่ยอาลวเ้ชใงอ้ต่ีทราหาอ่สใ้ชใรวค่มไ
กระดาษ
ฟวเรคโมไาตเงอขน่ัช์กงัฟ้ชใรากนใยัภดอลปะลแกวดะสมาวคีมน้ันษาดะรกะนชาภะลแนาจ
มุ่นมาวคีมะลแำ่ตนัมขไีมะจว้ลแกุสงุรป่ีทราหาอะลแน้ัส่ีทราหาองุรปาลวเีมกาจงอ่ืนเ
ว้ลแปไว่ัทยดโ ู่ยองอ่ยนัมีม่ีทนอคบเำทงัลำกง่ึซมนขบอดาถนบงาวะลแราหาออ่หรากนใง่ิยงา่ยอ์นชยโะรปีมงัย่ญหใน่ผแู่ชชิทษาดะรก
้ดไามกออดุลหะจจาอีสกาจงอ่ืนเีสษาดะรกน็ปเ่ีท์ฑณัภติลผงย่ีลเกีลห้หใ
.้ดไฟวเรคโมไนใ้มหไมหไอืรหฟไยากะรปดิกเ้หใอ่กจาองึจนอ้ืปเนปง่ิสีมจาอลิคเซไีรษาดะรก์ฑณัภติลผ
กิตสาลพงุถ
มาต็กรไงา่ยอ ฟวเรคโมไาตเบัก้ดไ้ชใถรามาสะจราหาอำทงุถ น้ันา่ทเราหาอำทบัรหำสษศเิพน้ึขำท่ีทงุถน็ปเงอ้ต
้ดไยาละละจกาจงอ่ืนเฟวเรคโมไาตเบักราหาอำทรากนใปไว่ัทกิตสาลพงุถ้ชใมา้ห ้ดไามกออดอลำ้นอไ้หใอ่ืพเงึถกีฉอืรหูระาจเรวคนา่ท
ฟวเรคโมไบอาตเบัรหำสกิตสาลพะนชาภ
่ญหในว่สยดโ ้ดไฟวเรคโมไบัก้ชใถรามาส ๆงา่ตงรทปูระนชาภ
่มหใวัรคงอ่ืรคเบักนุทงลงอ้ตะจ่ีทนทแ้ดไว้ลแู่ยอีม่ีท้ชภาชนะใถรามาสณุค
คิมารซเงอ้ืบเะรกะลแนิห บอืลคเะนชาภ
นบนา้ดรากีธิวมาตะนชาภบอสดทะจรวค็กจใ่นแมาวคอ่ืพเ่ตแ ดุส่ีทกามฟวเรคโมไาตเบัรหำสะามหเ่ีทะนชาภน็ปเ
ภาชนะ
งัวะรรวคอ้ข
ราหาองุรปะนชาภน็ปเ้ชใะจ่ีทะามหเ่มไก็ลหเอืรหว่ักะตงอขบอกะรปนว่สีม่ีทงา่ยองาบ •
ฟวเรคโมไบอาตเนใ้ชใรากบักมสะามหเา่วจใน่ัม้หใอ่ืพเบอสจวรตรากบัร้ดไรวคะนชาภ •

ฟวเรคโมไยว้ดงุรปรากะลแราหาองอขะณษกัลณุค
2
1
ฟวเรคโมไยว้ดงุรปรากะลแราหาองอขะณษกัลณุค
ราหาอูดจวรตน่ัมห
ราหาองุรปณุคอ่ืมเอมสเู่ยอราหาอูดจวรตน่ัมห
น้ันงัด นางำทบอาตเอ่ืมเิตัมนโตัอยดโน้ึขงา่วสะจ่ีทฟไีมะจฟวเรคโมไาตเบักมอ้รพาม่ีทๆงา่ตน่ัช์กงัฟ
ราหาอา้ลคเกุลค ,น้ึขงูส้หใราหาอกยอ่ืพเรตูสนใๆงา่ตำนะนแำค ดอลต้ดไราหาองอขกุสรากบอสจวรตะลแนในา้ดน็หเงอมถรามาสงึจณุค
รวค่ีทา่ทเอมสเำ่มส่มไงา่ยอกุสงุรปราหาอา่วว้ลแูดกาห ดุส่ีทยอ้น้หใ้ชใามำน่ีทนอตน้ัขน็ปเรวค
มสะามหเงา่ยอาหญัป้กแรากนใงอเณุควัตงอขณาญณราจิว้ชใ้หใ
ฟวเรคโมไบอาตเยว้ดราหาองุรปรากนใาลวเอ่ตลผง่ส่ีทยัจจัป
น่ชเงา่ยอวัต ราหาองุรปรากนใง่ิยงา่ยอลผีมน้ัน้ชใ่ีทมสผนว่สงอขิมูภหณุอ ราหาองุรปรากนใาลวเอ่ตลผง่ส่ีทยัจจัปยาลหกาลหีม
งอ้หิมูภหณุอนใู่ยอ่ีทมสผนว่สา่วกนานบอรากนใาลวเ้ชใงอ้ต ง็ขแ่ชแงอ่ชกาจกออำนง่ิพเ่ีท่ขไอืรห มน,ยนเ กาจำท่ีทก้คเ
ีดกุส่มไงัยราหาอ่ีทาลวเนใบอาตเกาจกออกย้หใำนะนแ ด์ราตสัคะลแ ก้คเ ,งัปมนข ง่ิยงา่ยอะาพฉเยดโ รตูสงาบราหาอรตูส
ดิป่ีทีมะจกัมิตกป ้วไกัพง้ัตอ่ืมเ ดาลพดิผ่ีทง่ิสน็ปเอืถ่มไ่ีน
นในา้ดา้ขเมึซงาทนิดเๆยอ่คะจะลแราหาองอขกอนนว่สนใยาภู่ยอดิตนอ้รมาวคีมกาจงอ่ืนเบอาตเกอนนา้ดอ่ตกุสนจงุรปะจ้ีนา่ลหเราหาอ
ข
ปไอ่ตๆยอ่ืรเน้ึขม่ิพเราหาอกัพรากะลแราหาอำทรากาลวเนิมเะรปรากนใะษกัทีมะจ้ชใู้ผ้ีนง้ัท
ราหาองอขน่นแานหมาวค
ราหาองอขงูสนว่ส
งุรปะณขง้ัรคๆยาลหนา้ดบัลกรวค้ชใู้ผ น้ันงัด
ราหาองอขน้ืชมุ่ชมาวค
นัมดิตอ้ืนเะลแกูดะรกทภเะรปราหาอ
์วตัสอ้ืนเา่วกว็รเกุสงุรปะจนัมดิตอ้ืนเะลแกูดะรกทภเะรปราหาอ
ิกเ
นไป
บอาตเ่สใ่ีทราหาอณามิรป
ยว้ดมาสนใง่ึนหงลงุรปรากนใาลวเดลงอ้ตะจ
้ดไ้มหไจาออืรหปไนิกเกุสะจกอนนา้ดนว่ส ดมหง้ัทกุสง่ัทะรกนจอ่ตบอาตเนใ้วไราหาอง้ิทกาห ราหาองอ
น่ชเ น่นแานหลวมีมะลแกันห่ีทราหาอ า่วกน้ัส่ีทาลวเะยะรยว้ดงุรปะจ งัปมนขะลแก้คเ น่ชเ าบเลวมีม่ีทดินชราหาอ
ะารปเะลแง้หแบอข้หใ่มไอ่ืพเ ๆงา่ตาบเลวมกวพราหาอ่สใจใาอเงอ้ตะจณุค นุ๋ตอืรหงา่ยทภเะรปราหาอ
งา่ลนว่สา่วกว็รเกุสะจ ๆงา่ตงา่ยทภเะรปราหาอง่ิยงา่ยอะาพฉเยดโ ,งูสมาวคีม่ีทราหาองอขนบนว่ส
ง่หแ่ีทราหาอน้ันงัด น้ืชมุ่ชมาวคยีสเราหาอ้หใำท ยหเะรน้ืชมาวค้หใำทะจฟวเรคโมไบอาตเนในอ้รมาวค
ราหาองอขน้ิชมุ่ชมาวคาษกัรอ่ืพเ้วไมุลคอืรหงุรปะจ่ีทนอ่กำ้นมรพรวคงึจดินชงาบกัผะลแงา่ยทภเะรปราหาอน่ชเ
กุสงุรปอ้ืนเอืรหงึถว่ัท่มไกุสราหาอนักงอ้ปอ่ืพเนัมขไน็ปเ่ีทนว่สอืรหกูดะรกทภเะรปราหาองุรปรากนใงัวะรดัมะรมาวคม่ิพเรวค้ชใู้ผน้ันงัด
รตูสงอขง่ึนหง่ึรคำนะนแ่ีทา่วกยอ้นราหาอ่สใรากงอ้ตกาห น้ันา่ทเกามงุรปรากนใน้ึขนานาลวเ้ชใงอ้ตง่ิย
ภาษาไทย
่รหไา่ทเกามบอาตเนใปไา้ขเราหาอ่สใ้ชใู้ผง่ิย น้ันงัด ดใงยีพเยอ้นกามปไา้ขเ่สใราหาอีมะจา่ว่มไอมสเน้ันา่ทเณามิรปีมฟวเรคโมไนางงัลพ
ราหาองอขงาทปูร
ราหาองอข .มซ 2 งยีพเ้ดไปไา้ขเะาจเนางำทถรามาสฟวเรคโมไาตเ
นในา้ดปไา้ขเมึซกรทแกอนนา้ดกาจมร้อนาวค่ีทรากกาจดิกเกุสงุรป่ีทนในา้ดอ้ืนเ
้ชการนำความร้อนใรากยดโกุสรากอืคอืลหเ่ีท ฟวเรคโมไนางงัลพยว้ดกุส่ีทน้ันา่ทเราหาองอขบอขงยีพเีม
เนุ่อม่ิรเะจงาลกนว่ส่ีทนอ่ก้มหไะจมุมนา้ด านหสัรุตัจมย่ีลหเ่ีสงรท อืคฟวเรคโมไาตเงอขดุส่ีที่นางำทรากอ่ตครรสปุอน็ปเ่ีทงรทซึ่งรูป
นวหแงวะลแงาบมลกงรทอืคงของอาหารที่ดีที่สุดสำหรับเตาไมโครเวฟรทปูร
ราหาอมุลคราก
น้ึขง่ิยว็รเกุสรากาอ้หใำทะจง่ึซำ้นอไะลแนอ้รมาวคาษกัระจราหาอมุลคราก
น้ึขดิกเจาอ่ีทน็ดเะรกรากนักงอ้ปอ่ืพเมุมบ็กเอ่หรากยดโฟวเรคโมไบัรหำส่สใม์ลิฟอืรหดิปาฝ้ชใรวค

22
การทำให้เกิดสีน้ำตาลในอาหาร
ราหาอา้ลคเกุลคราก
ราหาอกิลพราก
ฟวเรคโมไยว้ดงุรปรากะลแราหาองอขะณษกัลณุค
ฟวเรคโมไยว้ดงุรปรากะลแราหาองอขะณษกัลณุค
งอเอ้ืนเนในัมขไกาจงอ่ืนเยอ้นก็ลเลาตำ้นีสดิกเะจน้ันา่วกนานอืรหีทานา้หบิสาลวเน็ปเงุรป่ีทกีป์วตัสะลแ์วตัสอ้ืนเ
ว๊ิอีซ ,สอซ์รอตเสูว น่ชเ ้ดไยว่ชลาตำ้นีสดิกเ้หใำทอ่ืพเสอซ้ชใถรามาส็ก น้ันา่วกน้ัส่ีทาลวเะยะรนใงุรป่ีทราหาอ
นาทะรปบัรา่น่ีทนัสีส้ดไ้หใอ่ืพเวิคีบ์ราบสอซอืรห
ปไนย่ีลปเบัรำตน้ตรตูสมาติตาชสร้หใำท่มไะจราหาอนใยอ้นก็ลเงยีพเณามิรปนใสอซ่สใราก
นัมขไนักษาดะรกยว้ดราหาอมุลคราก
ยอ้นก็ลเง้หแมาวคีมจาอราหาอ้หใำท สใกิตสาลพน่ผแอืรหดิปาฝ้ชใรากมที่ไม่แน่นหนาเหมือนุลครากน็ปเะจ
ยอ้นก็ลเง้หแมาวคีมราหาอ้หใำทงึจ ราหาอมุลคสใกิตสาลพน่ผแอืรหดิปาฝีมความแน่นหนาน้อยกว่าะารพเน็ปเ่ตแ
บอาตเนใงอ่ชน้วเรากะลแงยีรเดัจราก
นักๆา่ทเ้หใงา่วงอ่ชน้วเยดโบอาตเนใงาวดัจกาหงึถว่ัทกุสะจฟ์ริดเ์รออะลแก็ลเน้ิชก้คเ ,บอง่ัรฝนัม น่ชเ น่ลเนิกราหาอ
งึถว่ัท่มไกุส้หใำทะจะารพเนักบัทงยีรเมา้ห มลกงวบบแน็ปเงาวอ่ืมเน้ึขีดลผ้ดไะจ
ิตกปบบแราหาองุรปรากนใ ดุส่ีทญัคำส่ีทฟวเรคโมไ้ชใรากคินคทเนใง่ึนหน็ปเอืถราหาอา้ลคเกุลคราก
ฟวเรคโมไยว้ดงุรป่ีทราหาอ มาต็กรไงา่ยอ ีดนักา้ขเมาวคีม้หใอ่ืพเ็กราหาอนคราก
อมสเำ่มส้หในอ้รมาวคยาจะรกย่ีลกเอ่ืพเา้ลคเกุลคราก้ชใ
นอ่กกุสะจกอนนา้ดราหาอกาจงอ่ืนเ งาลกงรตามกอนนา้ดกาจนคงอ้ตพาภิธทิสะรป้ดไ้หใราหาอกุลคราก
นักา่ทเกุสงา่ลนว่สะลแนบนว่สง้ัท้หใอ่ืพเนา้ดบัลกกิลพรากีมงอ้ตะจ วัตง้ัท่กไงา่ยราก น่ชเ งูส ,่ญหใดานขีม่ีทราหาอ
น้ึขกามงึถว่ัท่ีทกุสรากอ่ืพเนอ่กๆก็ลเน้ิชน็ปเ่กไบัสยดโ้ดไำทจาออืรห
กอนนา้ด้วไา่วกานห่ีทน้ิชราหาองาวราก
,์วตัสอ้ืนเงอขานห่ีทนว่สงาวรวคงึจ นอ่กกอนนา้ดน้ิชกาจนางำทะจฟวเรคโมไงอขนางำทรากกาจงอ่ืนเ
นักอมสเกุสราหาอ้หใำทะลแดุส่ีทกามบอาตเกาจนางงัลพบัร้ดไานห่ีทนว่ส้หใำทะจ้ีนีธิว บอนาจงอขกอนบอขงรต้วไาลปะลแ่กไ
มุ้หอ่หราก
)ฟวเรคโมไนางงัลพนักดิปง่ึซ( ์ลยอฟมยีนเิมูลอ
ปไนิกเนจกุสๆน้ันนว่ส้หใ่มไนักงอ้ปอ่ืพเ้ดไา้ผนืผอืรหสัรุตัจมย่ีลหเ่ีสงรทปูรีม่ีทราหาองอขบอขอืรหมุม่ีท้วไงาวถรามาส
นุมหนาจงาวข้ดไ่มไ์ลยอฟา่วจใ่นแ้หใูดนาทจวรตะลแปไนิกเกาม์ลยอฟ้ชใรวค่มไ
้ดไฟวเรคโมไนในางำทรากงอขงอ่รพกบมาวคดิกเ้หใอ่กจาอะารพเ
วิผน้ืพา่วกงูส้หใราหาองาวราก
งรตนว่สะลแงา่ลนา้ดู่ยอ่ีทนว่สงุรปถรามาสบอาตเ้หใอ่ืพเบอาตเบอขวิผน้ืพา่วกงูส้หใงาวรวคงูสน่นแานหมาวคีมอืรหานหน้ิชน็ปเ่ีทราหาอ
น้ึขง่ิยีด้ดไราหาองอขงาลก
ราหาอยาบะรูระาจเราก
,่ขไ ่กแ้ดไวา่ลกงัดราหาอ ราหาองุรปนอ่กูระาจเรากีมะจ่ตแยีสเน้วเ บอาตเนใ้ดไดิบเะรถรามาส อ่ืยเอืรห วิผ,กอืลปเนใู่ยอ่ีทราหาอ
ดมหง้ัท้มไลผะลแกัผะลแมรงานยอห ,ยาลยอห
่มไอืรหกุสราหาอา่วบอสจวรตราก
ง้ัรคยอ่บู่ยองัยอืรหีดอพกุสราหาอา่วบอสจวรตน่ัมหงอ้ตน็ปเำจงึจน้ันงัด ว็รเกุสะจฟวเรคโมไาตเยว้ดงุรป่ีทราหาอ
่กไ ์วตัสอ้ืนเงึถมวร ว้ลแ่ญหในว่สราหาอ่ตแ ีดอพกุสะจา่วกนจฟวเรคโมไาตเนใ้วไง้ิทถรามาสงา่ยองาบราหาอ
กอนนา้ด้วไกัพาลวเงว่ชะณขนใงอเกุสงุรป้หใยอ่ลปว้ลแีดกุส่มไงุรปงัย่ีทะณขนใาตเกาจกออกยงอ้ตจาอ
ๆ่มหใาตเกาจกออราหาอำน่ีทงว่ชนใ )C ° 8( F 051ะลแ )C 03( F 05 งา่วหะรน้ึขงูสะจราหาอนใยาภิมูภหณุอ
บอาตเกาจกออกยงัลหราหาอกัพาลวเ
บอาตเกาจกออำนงัลหีทาน 01 งึถ 3 ณามะรปาลวเน็ปเกัพ้หใยอ่ลปรวค่ญหในว่สราหาอ
น่ชเงา่ยอวัต( ง้หแ่ีทอ้ืนเีมงอ้ตะจน้ันดินชราหาอ่ตแยีสเน้วเ นอ้รมาวคาษกัรอ่ืพเ้ีนกัพงว่ชนใ้วไมลุคกูถะจราหาอิตกปยดโ
ีดิตาชสร้หใยว่ชะลแีดอพกุสงุรปราหาอ้หใำทะจราหาอกัพาลวเ )ดินชงาบติกสิบะลแก้คเ

หยุด/ยกเลิก
23
ภาษาไทย
การใช้ฟังก์ชั่น SMART DIAGNOSIS™
ใช้ฟังก์ชั่นนี้หากคุณต้องการการวินิจฉัยที่ถูกต้องโดยศูนย์บริการของ LG Electronics
เมื่อผลิตภัณฑ์มีการทำงานที่ผิดปกติหรือล้มเหลว ใช้ฟังก์ชั่นนี้เพื่อติดต่อกับตัวแทนผู้ให้บริการเท่านั้น
ไม่ใช่ในการใช้งานปกติ
1.
เมื่อได้รับคำแนะนำให้ดำเนินการดังกล่าวโดยศูนย์บริการ ให้กดกระบอกโทรศัพท์ของคุณที่อยู่เหนือโลโก้ Smart
Diagnosis™ บนตัวควบคุม
หมายเหตุ:
อย่าสัมผัสปุ่มอื่นๆ
2.
หยุด/ยกเลิก
หยุด/ยกเลิก
หยุด/ยกเลิก
จากด้านหลังสัญลักษณ์การวินิจฉัยอัจฉริยะ
3.
เก็บโทรศัพท์กับที่จนกว่าการส่งผ่านเสียงจะสำเร็จ หน้าจอจะปรากฎเวลานับถอยหลัง
เมื่อเวลานับถอยหลังหมดลงและเสียงหยุดดังแล้ว ให้กลับสู่การสนทนาระหว่างคุณกับเจ้าหน้าที่ศูนย์บริการอีกครั้ง
4.
ซึ่งเจ้าหน้าจะสามารถช่วยเหลือคุณในการใช้ข้อมูลที่ถูกส่งมาเพื่อทำการวิเคราะห์
หมายเหตุ:
เพื่อให้ได้ผลลัพธ์ที่ดีที่สุด อย่าเคลื่อนย้ายโทรศัพท์ขณะที่มีการส่งผ่านเสียงอยู่
หากเจ้าหน้าที่ศูนย์บริการไม่สามารถรับบันทึกข้อมูลที่ถูกต้องได้ คุณอาจจะได้รับการร้องขอให้ลองใหม่อีกครั้ง
Max
10 mm
ินาทีเลข '5' จะปรากฎขึ้นในหน้าจอ (ดังนั้น
ีเสียงเปล่งออกมา

24
Cool
Cool

MS253
****
220 V~ 50 Hz
. 1000 Watt (IEC60705 rating standard)
2450 MHz
476 mm(W ) X 272 mm(H) X 369 mm(D)
1150 Watt
ภาษาไทย
шѷѦ

 Loading...