

LG LDK24 ADSL Router User Manual

LDK24 ADSL Router User’ s Manual
Version 1.0D
Copyright© 2002 LG Electronics Inc., LTD.
Page 1 of 67
L
L
D
D
K
K2244
A
A
D
D
S
S
L
L
R
R
o
o
u
utteerr
U
Usseerr’’ss
M
Maa
n
n
u
uaall

LDK24 ADSL Router User’ s Manual
Version 1.0D
Copyright© 2002 LG Electronics Inc., LTD.
Page 2 of 67
Contents
Chapter 1 Overview of the system.....................................................................................................6
1.1 Introduction........................................................................................................................................................6
1.1.1 What is ADSL ?............................................................................................................................................6
1.1.2 LDK24 System Deployment ......................................................................................................................6
1.1.3 Features of LDK24 ADSL Router............................................................................................................6
Chapter 2 Configuring LDK24 System via Console.........................................................8
2.1 Introduction........................................................................................................................................................8
2.2 Bridged conf igurations....................................................................................................................................8
2.2.1 Ethernet - RFC1483/RFC2684 bridged...................................................................................................8
2.3 Routed configurations .....................................................................................................................................9
2.3.1 Ethernet - IPoA routed ................................................................................................................................9
2.3.2 Ethernet –RFC1483/RFC2684 routed....................................................................................................10
2.3.3 Ethernet - PPP routed ................................................................................................................................11
2.3.4 Ethernet - PPPoE........................................................................................................................................12
Chapter 3 Configuring LDK24 System via Web Server..............................................14
3.1 Introduction......................................................................................................................................................14
3.2 Bridged configurations..................................................................................................................................14
3.2.1 Ethernet - RFC1483/RFC2684 bridged.................................................................................................14
3.3 Routed configurations ...................................................................................................................................16
3.3.1 Ethernet - IPoA routed ..............................................................................................................................16
3.3.2 Ethernet – RFC1483/RFC2684 routed...................................................................................................21
3.3.3 Ethernet – PPP routed ...............................................................................................................................23
3.3.4 Ethernet – PPPoE routed..........................................................................................................................25
3.4 Security configurations for NAT................................................................................................................27
3.4.1 Configuring the security interfaces for NAT........................................................................................27
3.4.2 Start security for NAT...............................................................................................................................30
3.4.3 Enabling NAT............................................................................................................................................31
3.5 Security configurations for Firewall..........................................................................................................32
3.5.1 Starting security and enabling the firewall............................................................................................32

LDK24 ADSL Router User’ s Manual
Version 1.0D
Copyright© 2002 LG Electronics Inc., LTD.
Page 3 of 67
3.5.2 Configuring using default security level................................................................................................33
3.6 Upgrading LDK24 system............................................................................................................................34
3.6.1 Upgrading using HTTP.............................................................................................................................34
3.7 Configuring DHCP .........................................................................................................................................35
3.7.1 Using DHCP Server..................................................................................................................................36
Chapter 4 PC Network Setting...........................................................................................................39
4.1 Configuring PC Network..............................................................................................................................39
Appendix A. LDK24 LAN S witch....................................................................................................43
A.1 Features of LDK24 LAN Switch ................................................................................................................43
A.2 Additional Note for using with/without ADSLU...................................................................................45
Appendix B. Configuring LDK24 USB......................................................................................46
B.1 Installing PC driver in PC...........................................................................................................................46
B.1.1 Installing USB Boot Device D river .......................................................................................................46
B.1.2 Installing PC-USB Driver........................................................................................................................49
B.1.3 Installing PC-Ethernet Client Driver.....................................................................................................50
B.1.4 Configuring PC-Ethernet Client Driver................................................................................................52
B.1.5 Booting LDK24 system via USB cable.................................................................................................54
B.2 Configuring LDK24 system for managing LDK24 system via USB cable.....................................55
B.2.1 Bridged configurations : Ethernet - USB bridged.....................................................................55
B.2.2 Routed configuratio ns : IPoA routed example .............................................................................57
B.2.3 Bridged/Routed configuration: PPPoE routed example ...........................................................59
Appendix C. Changing default LAN IP address................................................................60
Appendix D. Configuring LDK24 system for using external modem.............61
D.1 Ethernet – PPPoE routed.............................................................................................................................61
D.2 Ethernet – Ethernet routed..........................................................................................................................63

LDK24 ADSL Router User’ s Manual
Version 1.0D
Copyright© 2002 LG Electronics Inc., LTD.
Page 4 of 67
All the contents described in the document may not be used without written permission of LG
Electronics Inc., Ltd.
This user manual may be changed without notification as function and specification of LDK24
ADSL Router have changed, and the changed contents can be free downloaded when you visit
our NexSer
The intellectual rights of this user manual belong to LG Electronics Inc., Ltd.
Microsoft, Windows, Windows95, Windows98, Windows ME, Windows 2000 and Windows NT
are trademarks of Microsoft Corporation.
Other company names or products stated in this user manual may be trademarks of each
company or owner.
LDK24 ADSL Router User’ s Manual
Version 1.0D
Copyright© 2002 LG Electronics Inc., LTD.
Page 5 of 67
ADSL Router Revision History
1. ISSUE : V 1.0D
Date By Version Changes
2002.2.15 L.T.H Draft A Updated for CLI
2002-12-18 L.T.H Draft B Updated for Web Admin
2003-01-21 L.T.H V1.0 Added for LAN Switch
2003-02-07 L.T.H V1.0B Added for USB, External type
2003-02-25 L.T.H V1.0B Added for PC network setting
2003-05-16 L.T.H V1.0C Added for External Settings
2003-06-26 L.T.H V1.0D Added for LAN Switch and DHCP server
LDK24 ADSL Router User’ s Manual
Version 1.0D
Copyright© 2002 LG Electronics Inc., LTD.
Page 6 of 67
Chapter 1 Overview of the system
1.1 Introduction
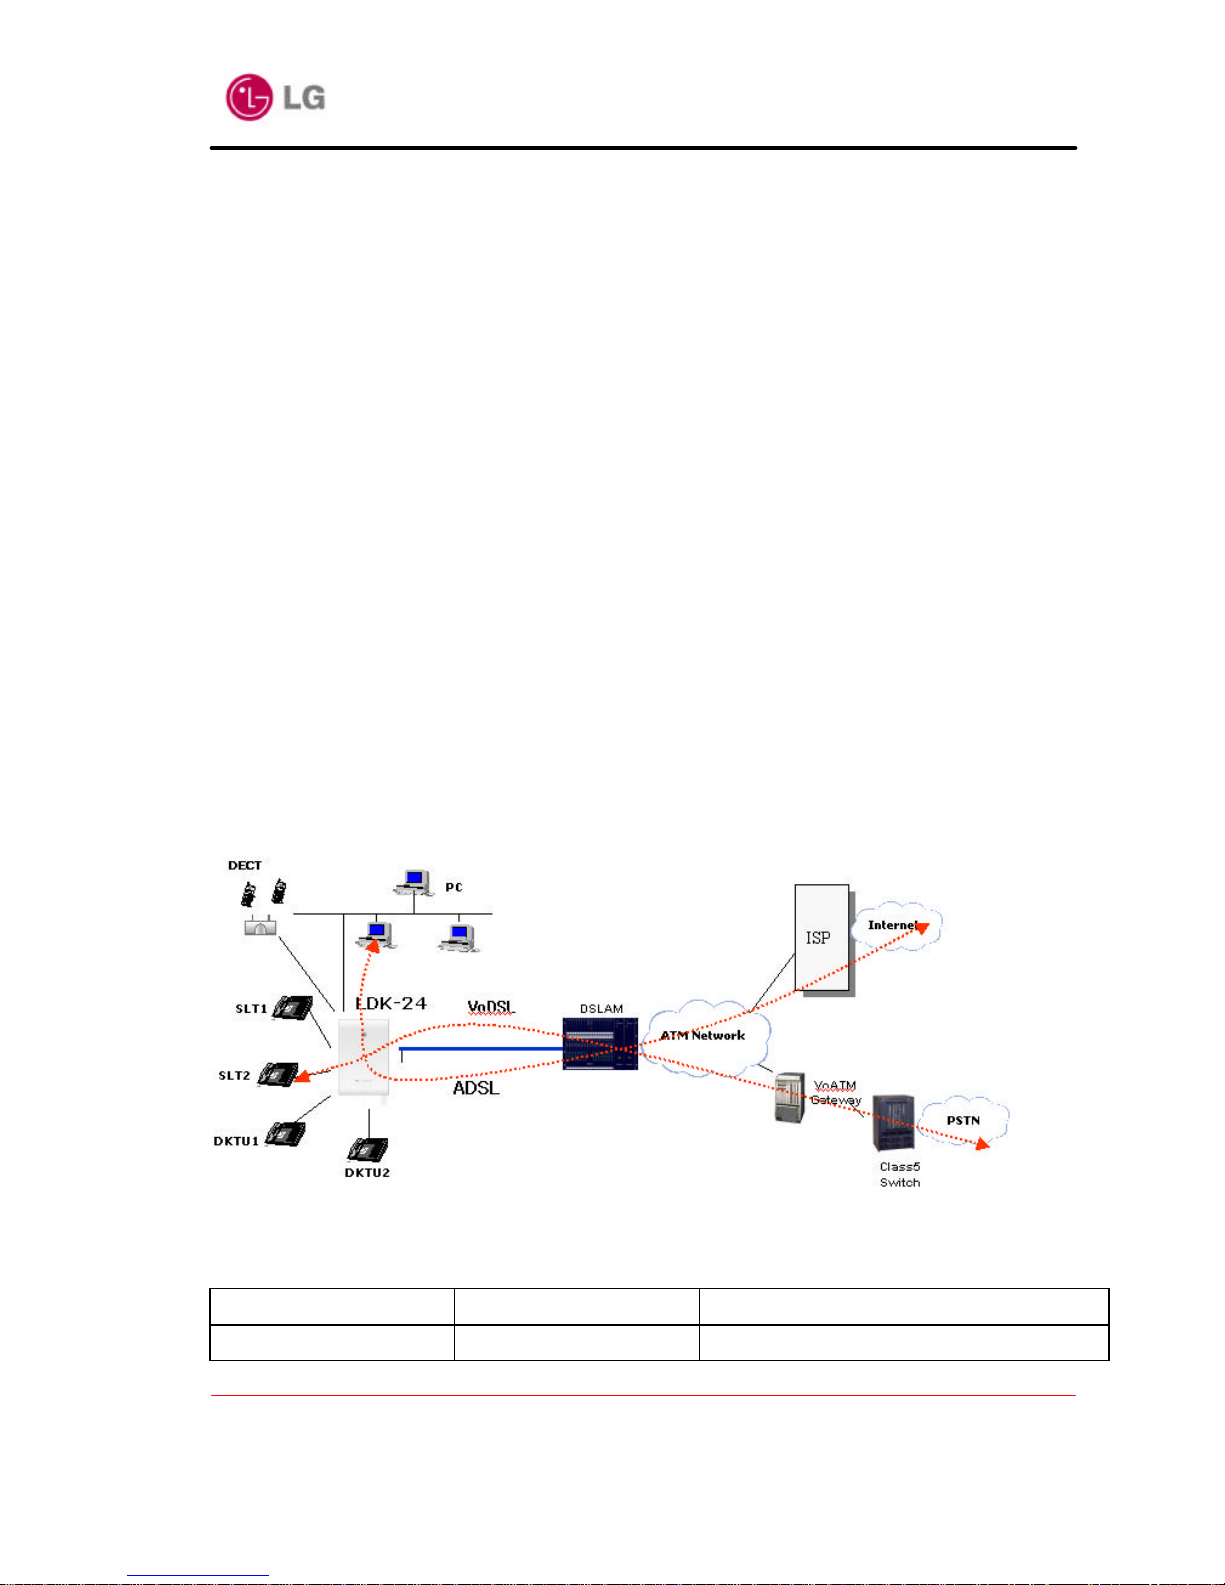
The LDK24 including ADSL option card have an ADSL router functionality used for Internet/LAN access
via an ADSL line. LDK24 ADSL Router can run maximum upstream transmission rates of 640Kbps and
maximum downstream transmission rates of 8Mbps. The actual rate depends on the copper category of
your telephone wire, distance from the central office and the type of ADSL service subscribed to. See the
sections below for more background information on DSL and ADSL.
1.1.1 What is ADSL ?
It is an asymmetrical technology, meaning that the downstream data rate is much higher than the upstr eam
data rate. As mentioned, this works well for a typical Internet session in which more information is
downloaded, e.g., from Web servers, than is uploaded. ADSL operates in a frequency range that is above
the frequency range of voice services, so the tw o systems can operate over the same cable. What are the
advantages of ADSL from the point of view of the Network Service Provider (NSP) and the end user?
1.1.2 LDK24 System Deployment
1.1.3 Features of LDK24 ADSL Router
LDK 24 Router supports the follow ing Router features.
Subject Section Subsection
ADSL physical layer G.992.1(G.DMT)
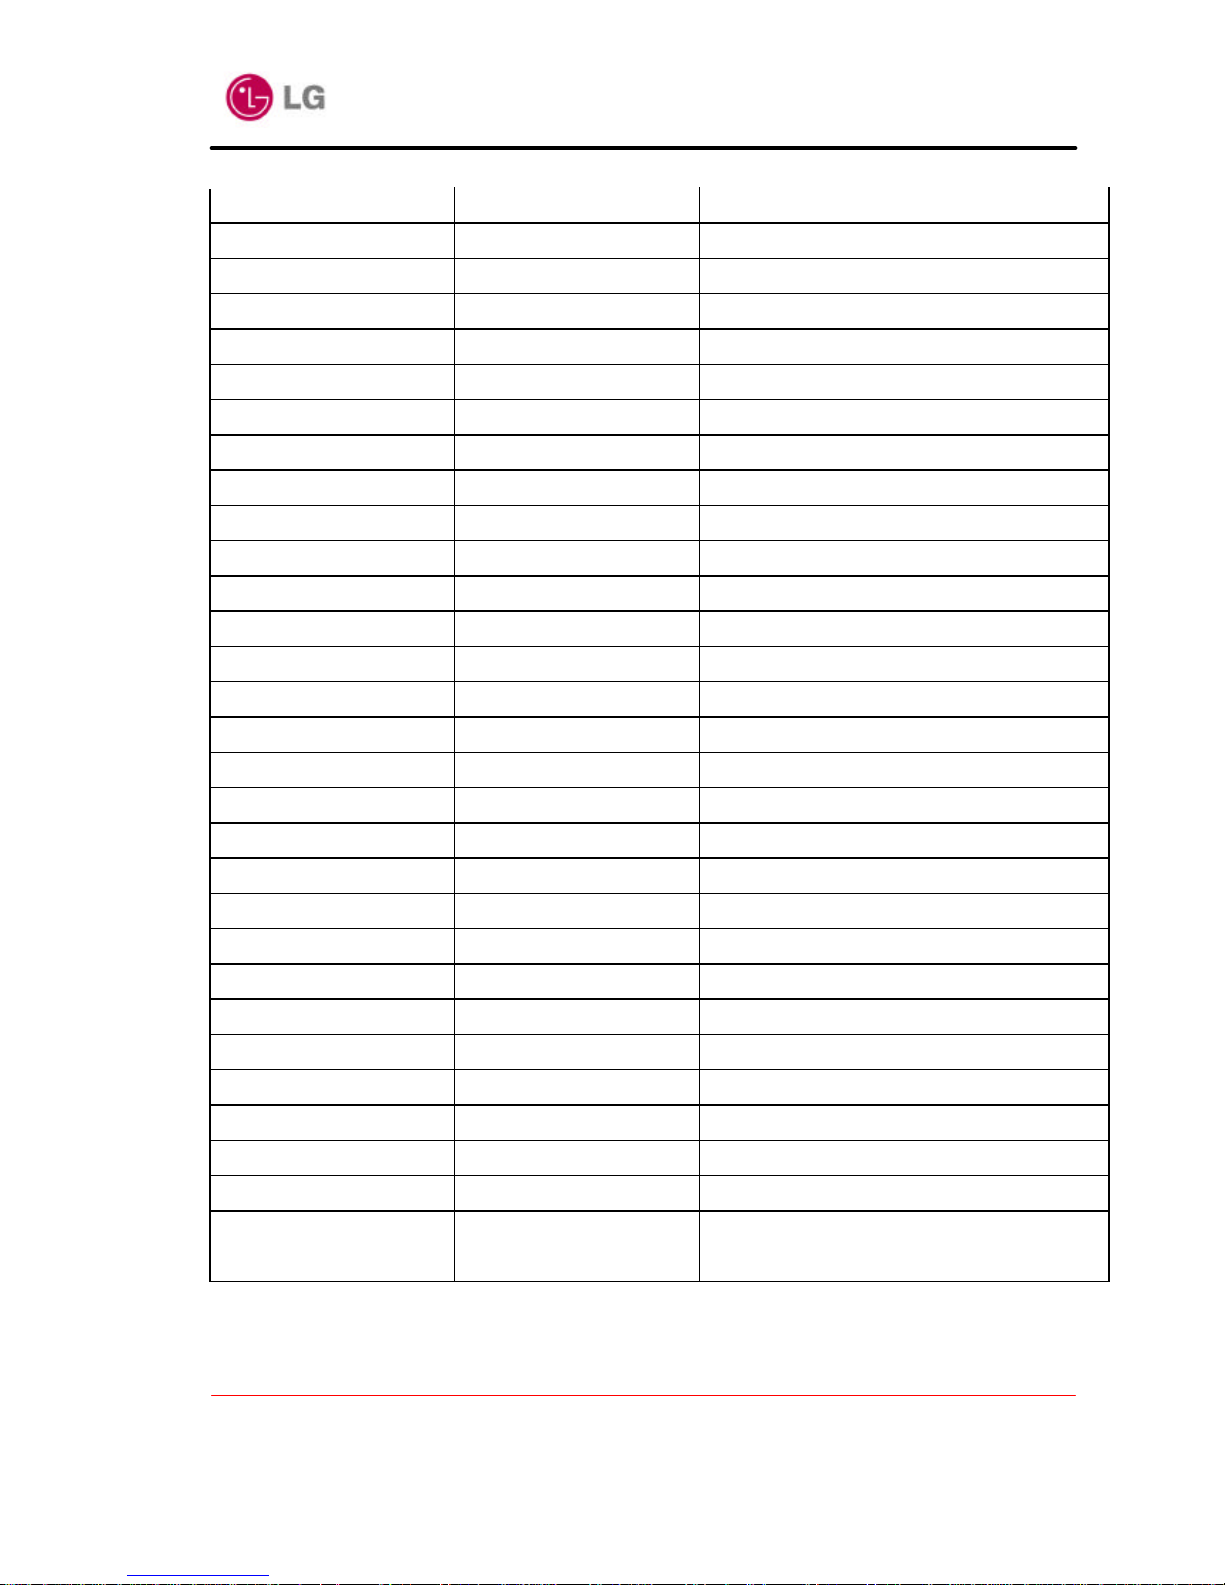
LDK24 ADSL Router User’ s Manual
Version 1.0D
Copyright© 2002 LG Electronics Inc., LTD.
Page 7 of 67
G.992.2(G.Lite)
ANSI T1.413
ADSL Protocol Stack PPP over ATM PVC (RFC 2364)
Classical IP (RFC1577)
RFC1483/RFC2684 routed/bridged *
PPPoE Client(RFC2516) and Relay Agent
ATM Protocol Stack ATM Forum LEC
ATM Layer1, AAL2-CPCS, AAL5
ATM Traffic Control Early Packet Discard (EPD)
Partial Packet Discard (PPD)
ATM Signalling SSCOP
ATM Forum UNI 3.0, 3.1 and 4.0
ATM QoS UBR, CBR, nrt-VBR, rt-VBR
IP Router Protocol Stack Modular TCP/IP stack
IP Multicast
RIP1, 2
TFTP Client and Server
DHCP Client, Server, and Relay
DNS Client and Relay
FireWall NAT/NAPT
IP Filtering
Intrusion Detection
Tunneling PPTP
L2TP
Management ATM OAM I.610
ILMI
IP SNMP v1,2,3
User Management Web based Management
Console
Telnet
* In LDK24 system, now RFC1483/RFC2684 is provided except for a new encapsulations for VPN and
security considerations of RFC2684

LDK24 ADSL Router User’ s Manual
Version 1.0D
Copyright© 2002 LG Electronics Inc., LTD.
Page 8 of 67
Chapter 2 Configuring LDK24 System via Console
This chapter describes how to configure LDK24 ADSL Router System in typical Gateway
configurations by Console.
2.1 Introduction
This chapter describes how to configure the LDK24 ADSL Router Syste m in various gateway
configurations:
• Bridged configurations:
• Ethernet - RFC1483/RFC2684 bridged
• Routed configurations:
• Ethernet - IPoA routed
• Ethernet - RFC1483/RFC2684 routed
• Ethernet - PPP routed.
• Ethernet - PPPoE Client over RFC1483/RFC2684.
2.2 Bridged configurations
All of the configurations in this section use ISOS Bridge module to bridge between Ethernet and
an ATM protocol. These configurations are bridging at Layer 2.
2.2.1 Ethernet - RFC1483/RFC2684 bridged
1. Clear any existing Brid ge interfaces and Ethernet and RFC1483/RFC2684 transports, by
entering the following commands:
- - > bridge clear interfaces
- - > transports clear
2. Add an Ethernet device to the Bridge. In the following commands
--> ethernet add transport <name> [<port>]
--> bridge add interface <name>
--> bridge attach {<name>|<number>} <transport>
Example)
- -> ethernet add transport eth1 ethernet
- -> bridge add interface bridge1
bridge attach bridge1 eth1
3. Add an RFC1483 device to the Bridge, with RFC1483 configured to run on port, using VCI
and LLC encapsulation.
- -> rfc1483 add transport <name> <port> <vpi> <vci> {llc|vcmux}
{bridged|routed}

LDK24 ADSL Router User’ s Manual
Version 1.0D
Copyright© 2002 LG Electronics Inc., LTD.
Page 9 of 67
- -> bridge add interface <name>
- -> bridge attach {<name>|<number>} <transport>
Example)
- -> rfc1483 add transport my1 483 a1 0 600 llc bridged
- - > bridge add interface bridge2
- - > bridge attach bridge2 my1483
2.3 Routed configurations
All of the configurations in this section use the ISOS ip module to route between Ethernet and an
ATM protocol. As these configurations perform IP routing, each part of the network must be on
a different subnet.
2.3.1 Ethernet - IPoA routed
1. Clear any existing IP interfaces and transports. Clearing the IP interfaces also deletes any
existing DHCP client settings on those interfaces. This change to DHCP is not updated in the
DHCP client configuration until you enter the dhcpclient update command.
- -> ip clear interfaces
- -> ip clear routes
- -> transports clear
- -> dhcpclient update
2. Add the Ethernet device to the router.
- -> ethernet add transport <name> [<port>]
- -> ip add interface <name> [<ipaddress> [<netmask>]]
- -> ip attach {<name>|<number>} <transport>
Example)
- -> ethernet add transport eth1 ethernet
- - > ip add interface ip1 192.168.101.2
- - > ip attach ip1 eth1
3. Add the IPoA device to the router configured to run on VCI with a peak cell rate, using the
port.
- -> ipoa add transport <name> pvc <atm-port> <vpi> <vci>
- -> ip add interface <name> [<ipaddress> [<netmask>]]
- -> ip attach {<name>|<number>} <transport>
- -> ipoa transport {<name>|<number>} set pvc <pvc number> pcr <peak cell rate>
Example)

LDK24 ADSL Router User’ s Manual
Version 1.0D
Copyright© 2002 LG Electronics Inc., LTD.
Page 10 of 67
- -> ipoa add transport ipoa1 pvc a1 0 700
- -> ip add interface ip2 192.168.102.2
- -> ip attach ip2 ipoa1
- -> ipoa transport ipoa1 set pvc 1 pcr 50000
4. Add a default route .
- -> ip add route <name> <dest_ip> <netmask> {[gateway <gateway_ip>]|[interface
interface>]}
example)
- -> ip add route default 0.0.0.0 0.0.0.0 gateway 192.168.102.3
2.3.2 Ethernet –RFC1483/RFC2684 routed
1. Clear any existing IP interfaces and transports. Clearing the IP interfaces also deletes any
existing DHCP client settings on those interfaces. This change to DHCP is not updated in the
DHCP client configuration until you enter the dhcpclient update command.
- -> ip clear interfaces
- -> ip clear routes
- -> transports clear
- -> dhcpclient update
2. Add the Ethernet device to the router.
- -> ethernet add transport <name> [<port>]
- -> ip add interface <name> [<ipaddress> [<netmask>]]
- -> ip attach {<name>|<number>} <transport>
Example)
- -> ethernet add transport eth1 ethernet
- - > ip add interface ip1 192.168.101.2
- - > ip attach ip1 eth1
3. Add the RFC1483 device to the router, with RFC1483 configured to run on port using VCI,
vcmux routed or llc encapsulation.
- -> rfc1483 add transport <name> <port> <vpi> <vci> {llc|vcmux}
bridged|routed}
- -> ip add interface <name> [<ipaddress> [<netmask>]]
- -> ip attach {<name>|<number>} <transport>
example)
- -> rfc1483 add transport my1483 a1 0 600 vcmux routed
- -> ip add interface ip2 192.168.102.2

LDK24 ADSL Router User’ s Manual
Version 1.0D
Copyright© 2002 LG Electronics Inc., LTD.
Page 11 of 67
- -> ip attach ip2 my1483
4. Add a default route .
- -> ip add route <name> <dest_ip> <netmask> {[gateway <gateway_ip>]|[interface
interface>]}
example)
- -> ip add route default 0.0.0.0 0.0.0.0 gateway 192.168.102.3
2.3.3 Ethernet - PPP routed
1. Clear any existing IP interfaces and transports. Clearing the IP interfaces also deletes any
existing DHCP client settings on those interfaces. This change to DHCP is not updated in the
DHCP client configuration until you enter the dhcpclient update command.
- -> ip clear interfaces
- -> ip clear routes
- -> transports clear
- -> dhcpclient update
2. Add the Ethernet device to the router.
- -> ethernet add transport <name> [<port>]
- -> ip add interface <name> [<ipaddress> [<netmask>]]
- -> ip attach {<name>|<number>} <transport>
Example)
- -> ethernet add transport eth1 ethernet
- - > ip add interface ip1 192.168.101.2
- - > ip attach ip1 eth1
3. Add the PPP device to the router. The PPP module supports multiple simultaneous
connections.
- -> pppoa add transport <name> dialout pvc <interface> <port> <vpi>
<vci>
- -> ip add interface <name> [<ipaddress> [<netmask>]]
- -> ip attach {<name>|<number>} <transport>
Example)
- -> pppoa add transport ppp1 dialout pvc 1 a1 0 800
- -> ip add interface ip2
- -> ip attach ip2 ppp1
CHAP or PAP authentication can be used; PPP needs a username and password.
--> pppoa set transport {<name>|<number>} welogin {none|auto|pap|chap}
--> pppoa set transport {<name>|<number>} username <username>

LDK24 ADSL Router User’ s Manual
Version 1.0D
Copyright© 2002 LG Electronics Inc., LTD.
Page 12 of 67
--> pppoa set transport {<name>|<number>} password <password>
example)
- -> pppoa add transport ppp1 dialout pvc 1 a1 0 800
- -> ip add interface ip2
- -> ip attach ip2 ppp1
- -> pppoa set transport ppp1 welogin chap
- -> pppoa set transport ppp1 username fred
- -> pppoa set transport ppp1 password password
2.3.4 Ethernet - PPPoE
1. Clear any existing IP interfaces and transports, and update the DHCP client configuration.
- -> ip clear interfaces
- -> transports clear
2. Add the Ethernet device to the router.
- -> ethernet add transport <name> [<port>]
- -> ip add interface <name> [<ipaddress> [<netmask>]]
- -> ip attach {<name>|<number>} <transport>
Example)
- -> ethernet add transport eth1 ethernet
- - > ip add interface ip1 192.168.101.2 255.255.255.0
- - > ip attach ip1 eth1
3. The PPPoE BUN driver uses functionality provided by the PPP module. Configure a PPP
channel for an outgoing PPPoE connection to the remote AC using PVC.
The PPPoE AC utilizes CHAP authentication or PAP authentication. If no authentication is
used, simply omit the welogin command.
Since the PPP module supports multiple, simultaneous connections,
we can be using PPP device 1 and Interface 1. PPP is able to automatically configure the IP
address of the router interface, and add a default route when the connection is made. This is the
reason the IP address of the router interface is not specified in the command:
- -> ip add interface <name> [<ipaddress> [<netmask>]]
- -> pppoe add transport <name> dialout pvc <interface> <port> <vpi> <vci>
[accessconcentrator <concentrator>] [servicename <servicename>]
- -> ip attach {<name>|<number>} <transport>
- -> pppoe set transport {<name>|<number>} welogin {none|auto|pap|chap}
- -> pppoe set transport {<name>|<number>} username <username>

LDK24 ADSL Router User’ s Manual
Version 1.0D
Copyright© 2002 LG Electronics Inc., LTD.
Page 13 of 67
- -> pppoe set transport {<name>|<number>} password <password>
example)
- -> ip add interface ip2
- -> pppoe add transport PPP dialout pvc 1 a1 0 600
- -> ip attach ip2 PPP
- -> pppoe set transport PPP welogin chap
- -> pppoe set transport PPP username viratauser
- -> pppoe set transport PPP password viratapass
LDK24 ADSL Router User’ s Manual
Version 1.0D
Copyright© 2002 LG Electronics Inc., LTD.
Page 14 of 67
Chapter 3 Configuring LDK24 System via Web Server
This chapter describes how to configure LDK24 ADSL Router System in typical Gateway
configurations by Web Admin.
3.1 Introduction
This chapter describes how to configure the LDK24 ADSL Router System in various gateway
configurations by web admin :
• Bridged configurations:
• Ethernet - RFC1483/RFC2684 bridged
• Routed configurations:
• Ethernet - IPoA routed
• Ethernet - RFC1483/RFC2684 routed
• Ethernet - PPP routed.
• Ethernet - PPPoE routed
3.2 Bridged configurations
3.2.1 Ethernet - RFC1483/RFC2684 bridged
you can set RFC1483 bridged by following instructions.
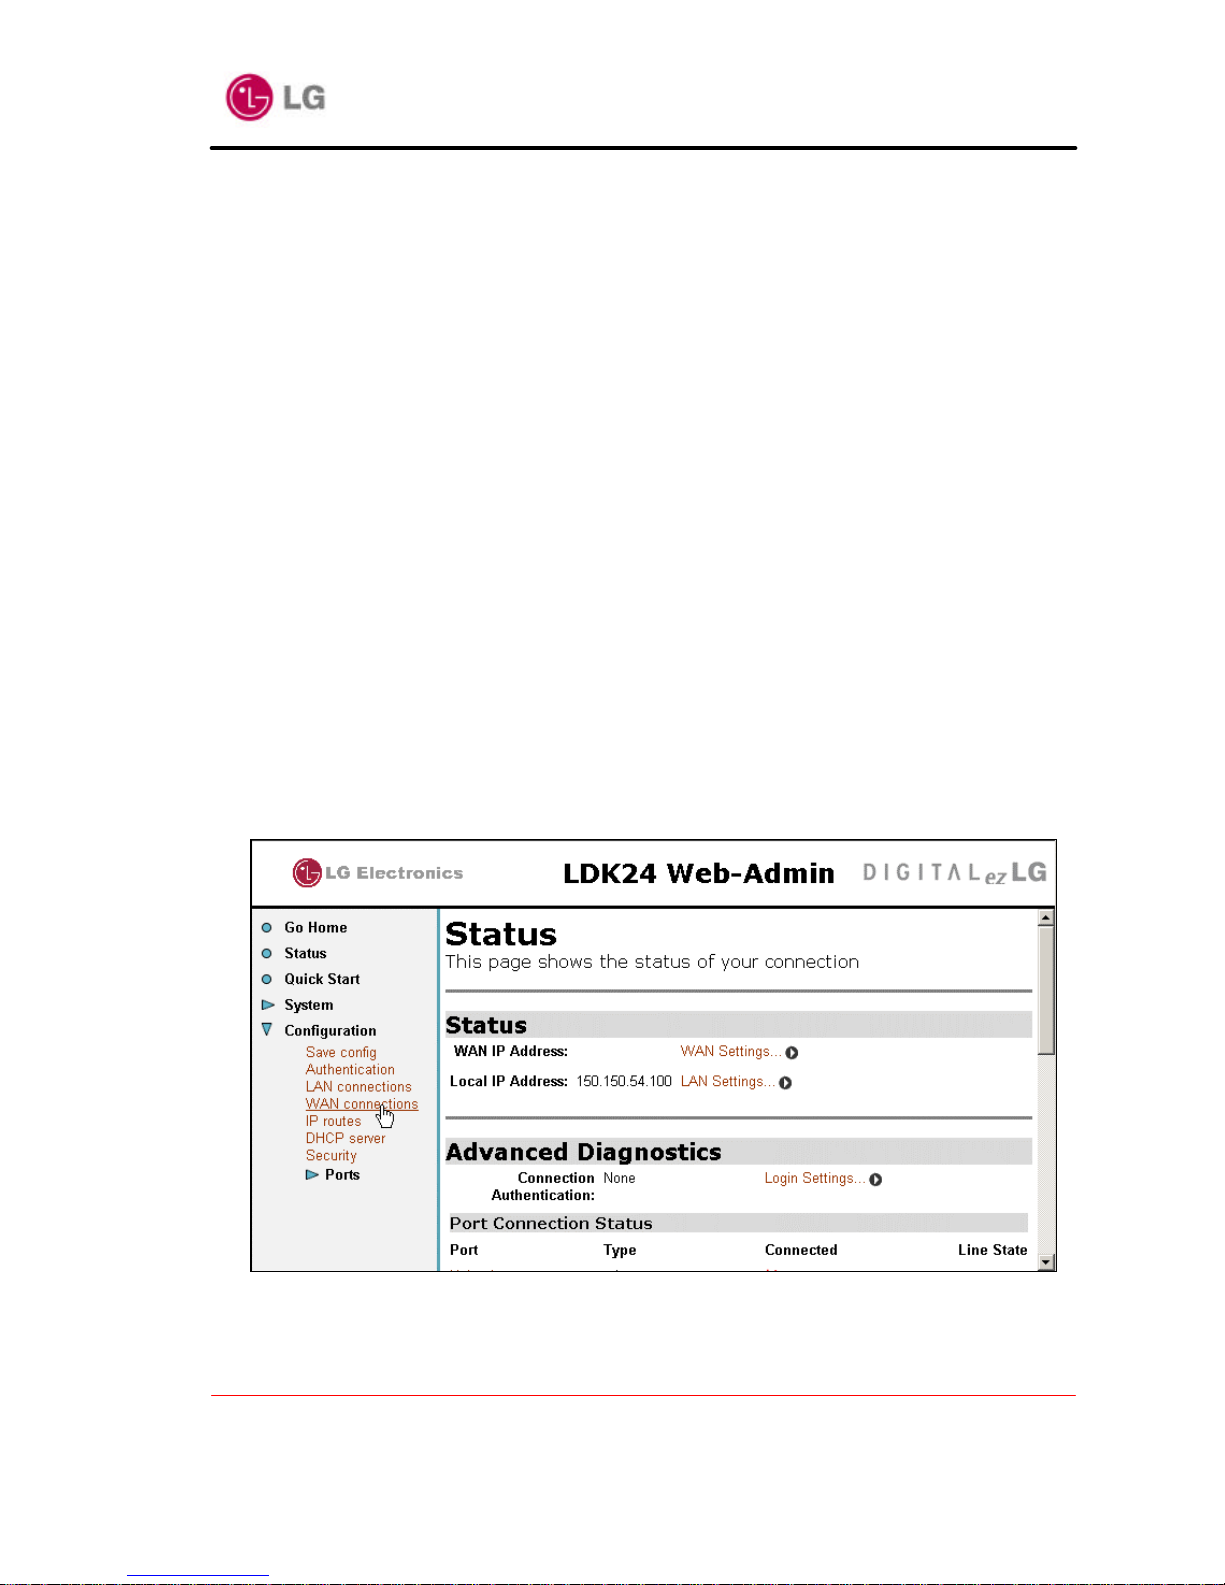
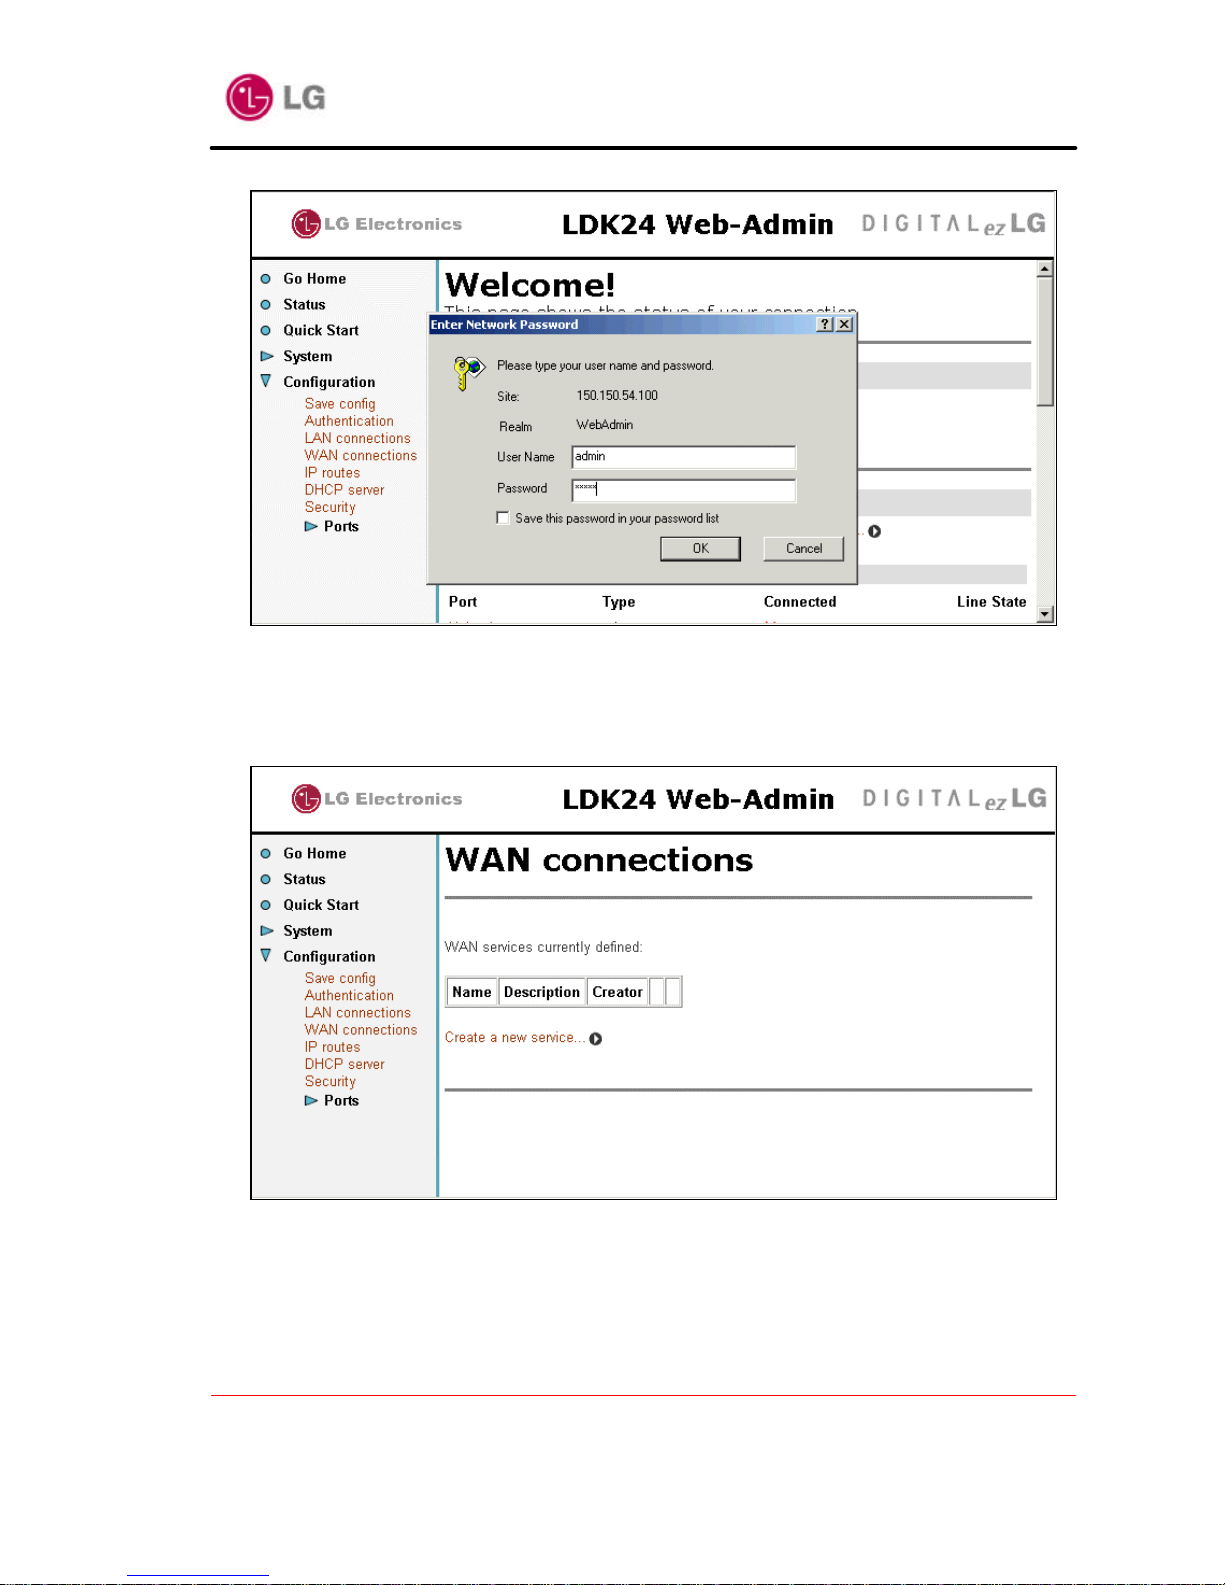
a. From the left-hand menu, click on Configuration>WAN connections.
<figure-1>
b. When you click on Configuration>WAN connections., if asking for username and
password, type username “admin” and password “admin”.
LDK24 ADSL Router User’ s Manual
Version 1.0D
Copyright© 2002 LG Electronics Inc., LTD.
Page 15 of 67
<figure-2>
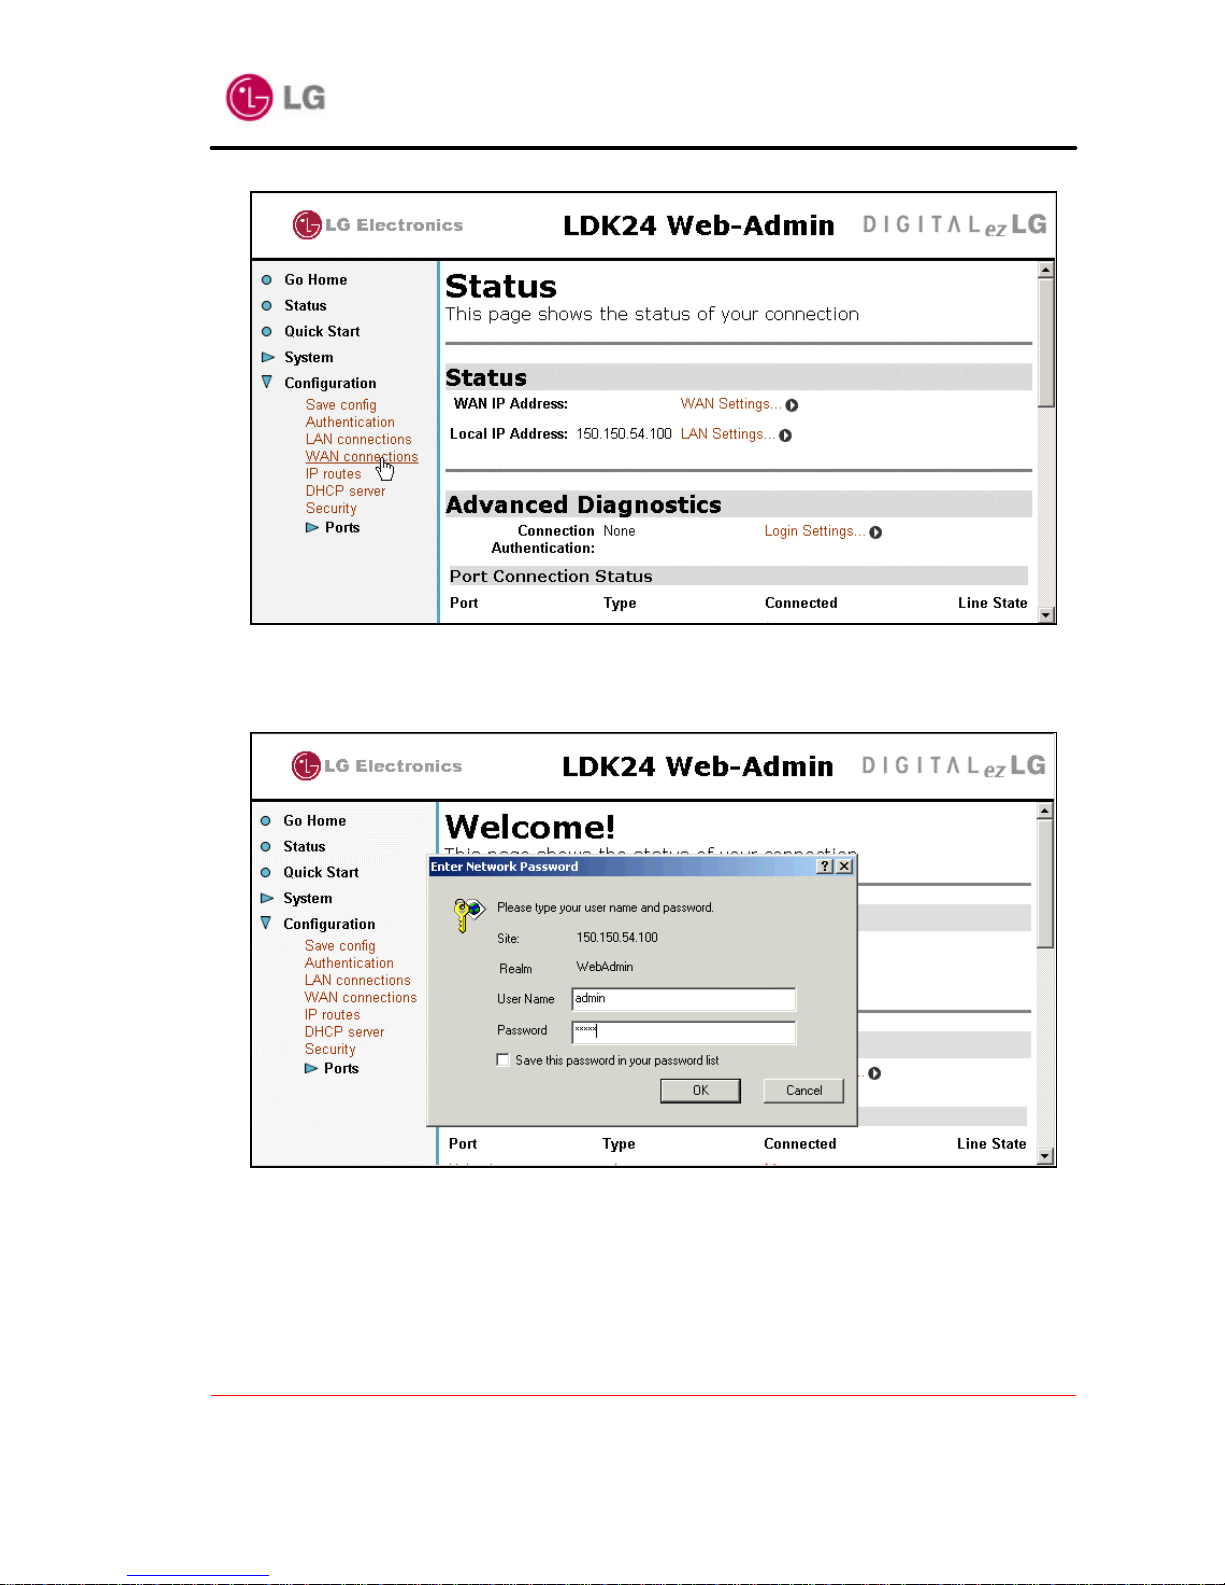
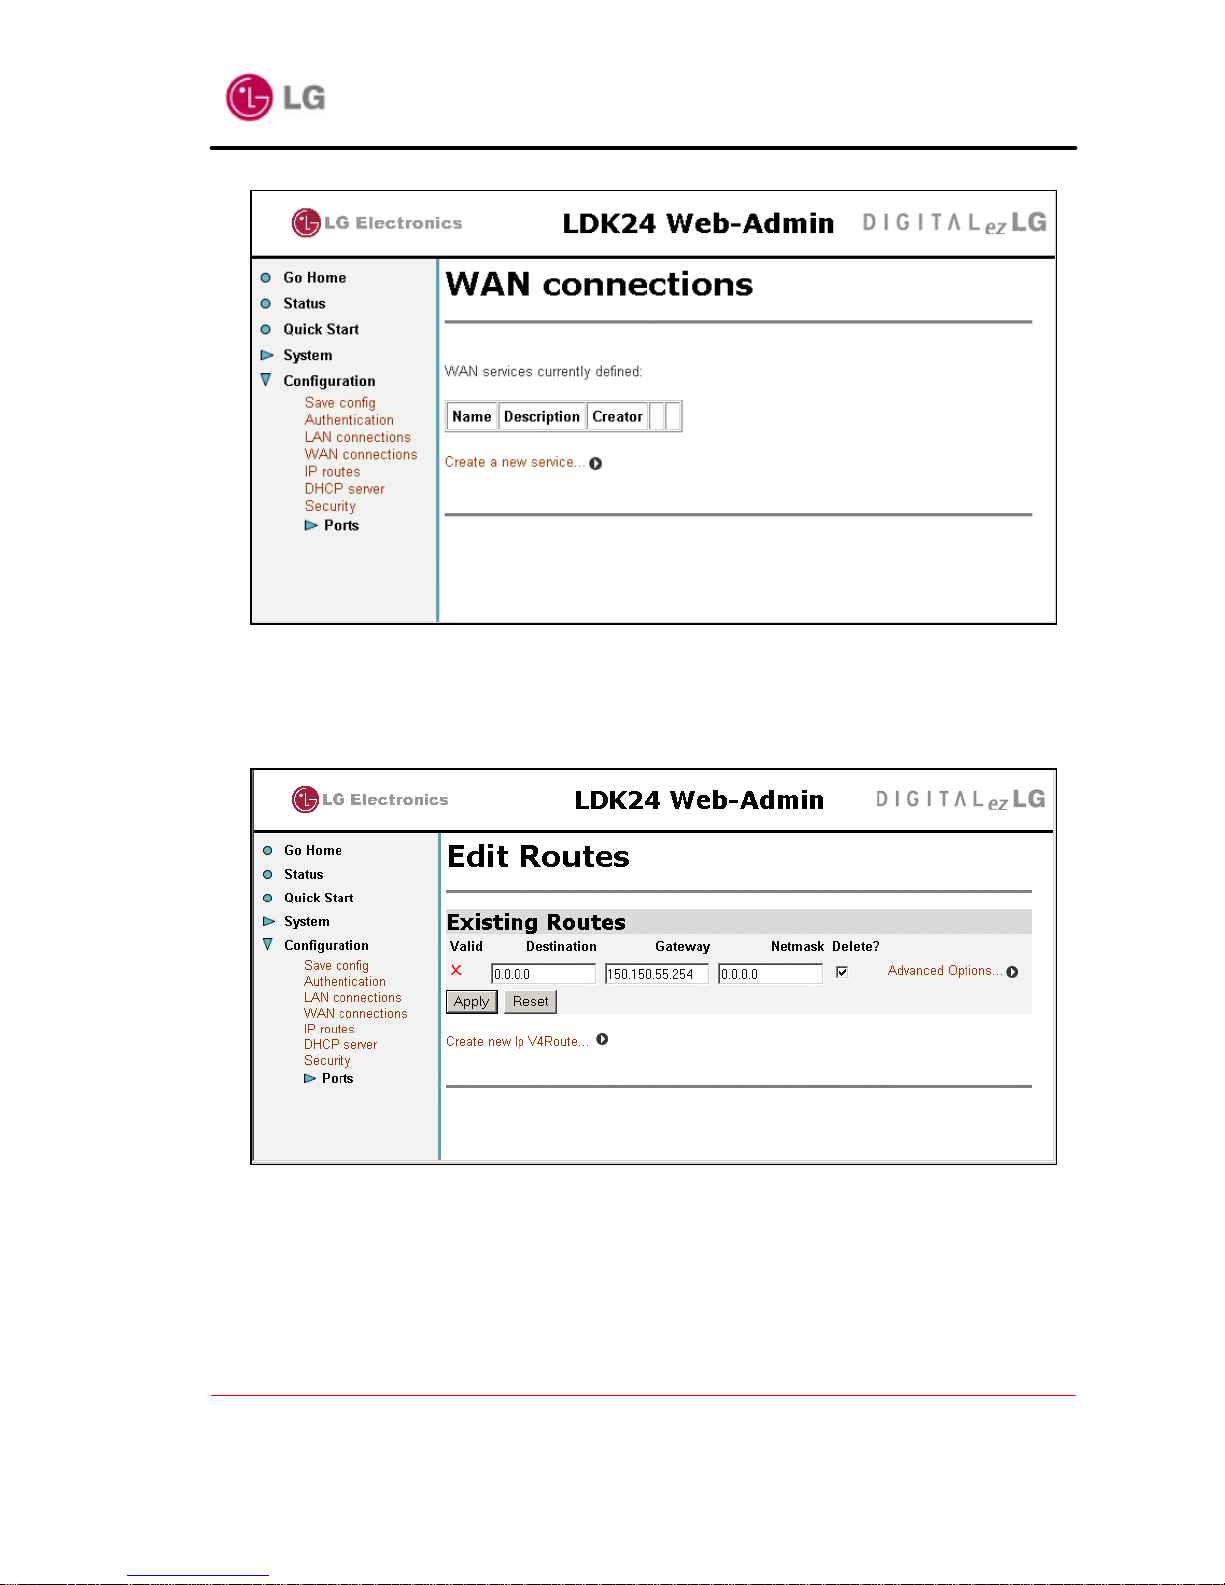
c. The WAN connections page is displayed. If there are any connections listed, click on the
Delete hyperlink, then click on Delete this connection. Repeat until all WAN
connections have been deleted.
<figure-3>
d. From the left-hand menu, click on Configuration>WAN connections. Click on Create a
new service.
e. Click on the RFC 1483 bridged radio button, then click on Configure. At the WAN
connection: RFC 1483 bridged page, complete the following:

LDK24 ADSL Router User’ s Manual
Version 1.0D
Copyright© 2002 LG Electronics Inc., LTD.
Page 16 of 67
Description: rfc1483-bridged : arbitrary name
VPI: 0(for exameple) : this value is assigned by service provider
VCI: 32(for example) : this value is assigned by service provider
Encapsulation method: LLC/SNAP
After setting the above value s, Click on Apply
<figure-4>
3.3 Routed configurations
3.3.1 Ethernet - IPoA routed
you can set IPoA routed by following instructions
a. From the left-hand menu, click on Configuration>WAN connections
LDK24 ADSL Router User’ s Manual
Version 1.0D
Copyright© 2002 LG Electronics Inc., LTD.
Page 17 of 67
<figure-5>
b. When you click on Configuration>WAN connections., if asking for username and
password, type username “admin” and password “admin”.
<figure-6>
c. The WAN connections page is displayed. If there are any connections listed, click on the
Delete hyperlink, then click on Delete this connection. Repeat until all WAN
connections have been deleted like the picture below.
LDK24 ADSL Router User’ s Manual
Version 1.0D
Copyright© 2002 LG Electronics Inc., LTD.
Page 18 of 67
<figure-7>
d. From the left-hand menu, click on Configuration>IP routes. If there are any routes
listed, check the Delete? checkbox and click on Apply. Repeat until all IP routes have
been deleted.
<figure-8>
e. From the left-hand menu, click on Configuration>WAN connections. Click on Create a
new service.

LDK24 ADSL Router User’ s Manual
Version 1.0D
Copyright© 2002 LG Electronics Inc., LTD.
Page 19 of 67
<figure-9>
f. Click on the IPoA routed radio button, then click on Configure. At the WAN connection:
IPoA routed page, complete the following:
Description: ipoa-routed : arbitrary name
VPI: 0 (for example) : this value is assigned by service provider
VCI: 32 (for example) : this value is assigned by service provider
(click on the WAN IP address radio button)
WAN IP address: 192.168.102.2 (for example)
Click on Apply. The WAN connections page is displayed, containing details of the new
IPoA transport.
<figure-10>
LDK24 ADSL Router User’ s Manual
Version 1.0D
Copyright© 2002 LG Electronics Inc., LTD.
Page 20 of 67
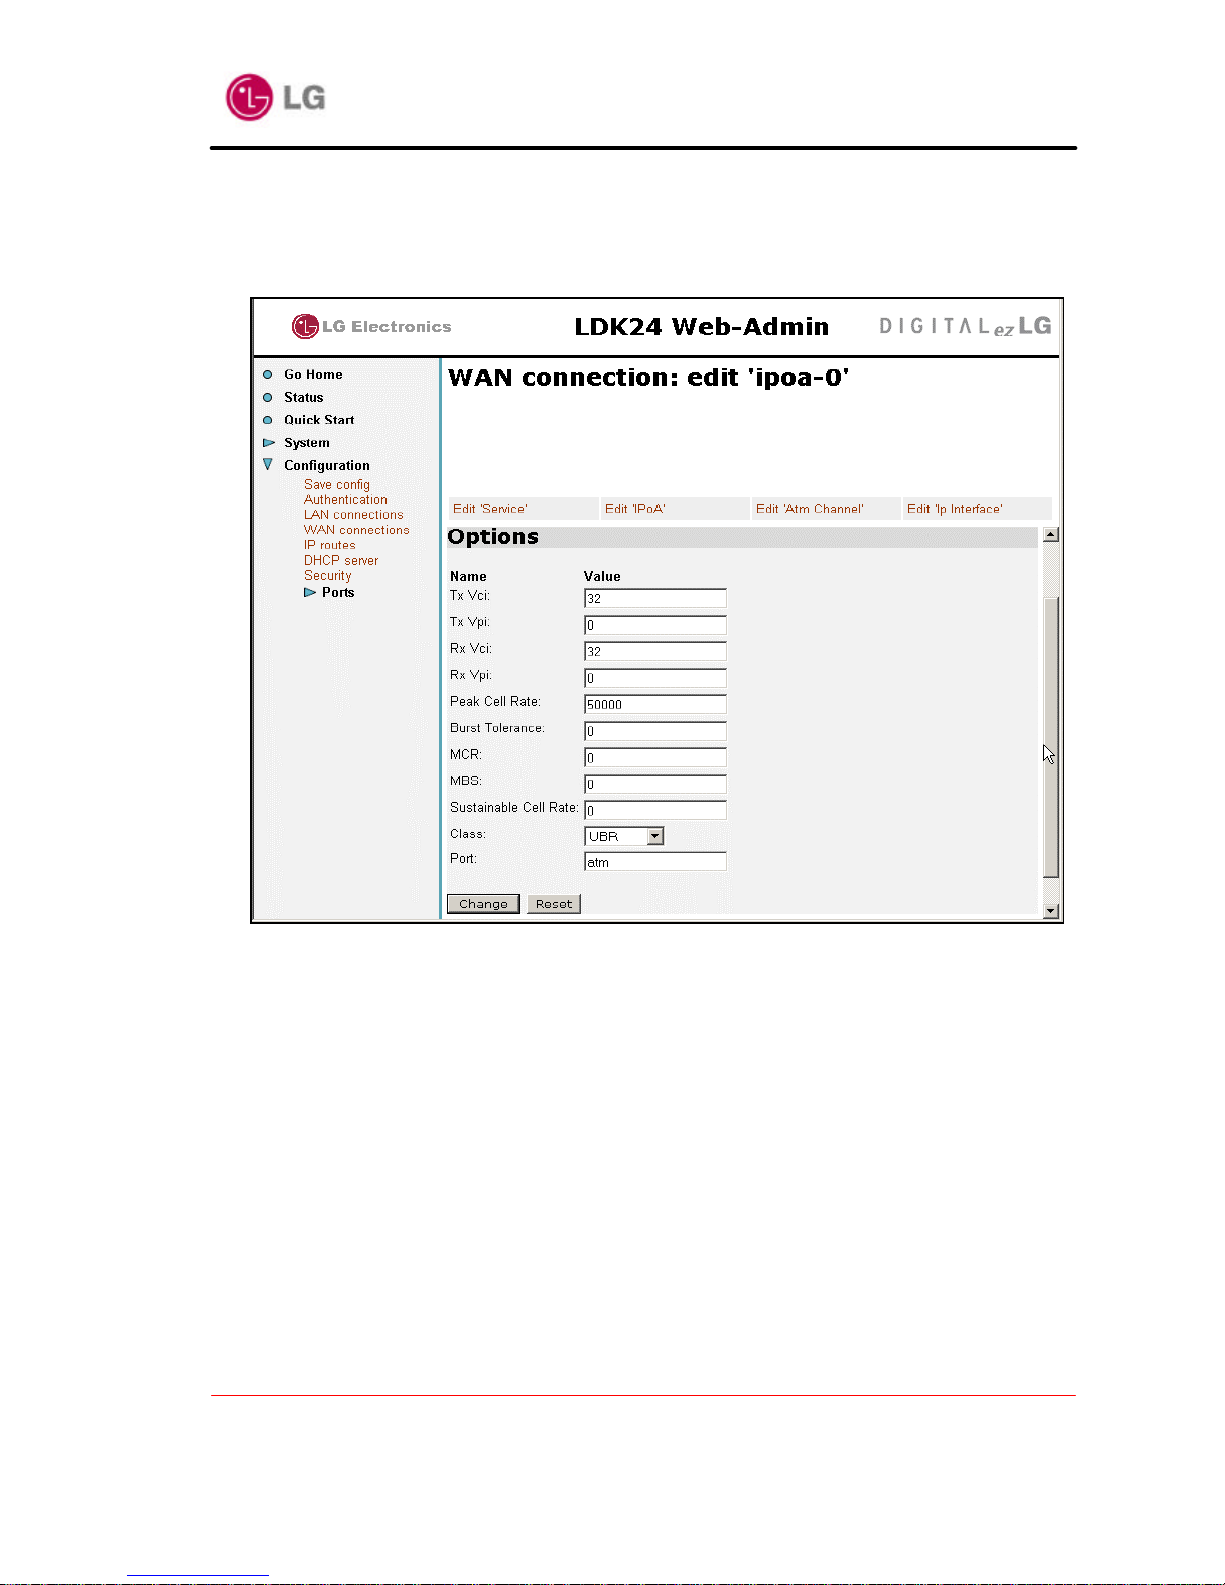
g. From the WAN connections table, Click on the IPoA Edit link. From the Edit Service
page, click on Edit ‘ATM Channel’. Set the Peak Cell Rate text box to 50000. You do
not need to change the other default settings. Click on Change.
<figure-11>
h. In order to add a default route, From the left-hand menu, click on Configuration>IP
routes. Click on the Create new IP V4Route link. The Create IP V4Route page is
displayed. In the Gateway text box, type default gateway address(for example,
192.168.102.3). You do not need to change the other default settings. Click on OK.

LDK24 ADSL Router User’ s Manual
Version 1.0D
Copyright© 2002 LG Electronics Inc., LTD.
Page 21 of 67
<figure-12>
3.3.2 Ethernet – RFC1483/RFC2684 routed
You can set “RFC1483/RFC2684 routed mode ” by following instructions.
a. From the left-hand menu, click on Configuration>WAN connections
Refer to the figure-5.
b. When you click on Configuration>WAN connections., if asking for username and
password, type username “admin” and pa ssword “admin”.
Refer to the figure-6.
c. The WAN connections page is displayed. If there are any connections listed, click on the
Delete hyperlink, then click on Delete this connection. Repeat until all WAN
connections have been deleted like the picture below.
Refer to the figure-7.
d. From the left-hand menu, click on Configuration>IP routes. If there are any routes
listed, check the Delete? checkbox and click on Apply. Repeat until all IP routes have
been deleted.
Refer to the figure-8.
e. From the left-hand menu, click on Configuration>WAN connections. Click on Create a
new service.
Refer to the figure-9.
f. Click on the RFC 1483 routed radio button, then click on Configure. At the WAN
connection: RFC 1483 routed page, complete the following:
Description: rfc1483-routed : arbitrary name
 Loading...