

Page 1

User guide.
MFL69890201 (1.2) ME
This bookl et is made from 98% p ost-c onsume r rec ycled paper.
This booklet is printed with soy ink. Printed in Mexico
User guide.
Guía del usuario.
Page 2

Copyright©2017/LG/Electronics,/Inc./All/rights/reserved.//
LG/and/the/LG/logo/are/registered/trademarks/of/LG/Corp./
K20/V/is/a/trademark/of/LG/Electronics,/Inc.
All/other/trademarks/are/the/property/of/their/respective/
owners.
Page 3

Important Customer Information
Before you begin using your new phone
Included in the box with your phone are separate information leaflets. These
leaflets provide you with important information regarding your new device.
Please read all of the information provided. This information will help you to
get the most out of your phone, reduce the risk of injury, avoid damage to
your device, and make you aware of legal regulations regarding the use of
this device.
It’s important to review the Product Safety and Warranty Information guide
before you begin using your new phone. Please follow all of the product
safety and operating instructions and retain them for future reference.
Observe all warnings to reduce the risk of injury, damage, and legal
liabilities.
1
Page 4

Ta b l e o f C o n t e n t s
2
Important Customer Information...............................................1
Table of Contents
The Basics
Phone Overview .................................................................................................... 5
........................................................................................................................7
Help
Setting Up Your Phone
Removing the Battery and SIM Card
Inserting and Removing a Memory Card
Charging Your Phone
Optimizing Battery Life
Turning Your Phone On and Off
Anti-Theft Guide
Touch Screen
Getting to Know the Home Screen
Apps: How to View, Open, and Switch
Capturing a Screenshot
Phone’s Status Icons
Managing Notifications
Setting Your Lock Screen
Fingerprints and Security
Multi-Tasking
.......................................................................2
...................................................................................5
........................................................................................ 8
................................................................10
..........................................................12
..........................................................................................14
...................................................................................... 16
........................................................................18
................................................................................................20
......................................................................................................20
..................................................................22
............................................................. 29
.....................................................................................33
.........................................................................................34
.....................................................................................36
.................................................................................. 38
..................................................................................40
......................................................................................................43
Connecting to Networks and Devices ................................... 44
Wi-Fi ....................................................................................................................44
Wi-Fi Direct
Bluetooth
........................................................................................................44
.............................................................................................................45
Calls .......................................................................................... 46
Placing and Ending Calls ..................................................................................46
Answering or Rejecting Calls
Working with the Recent Tab
Calling Your Contacts.........................................................................................53
Options During a Call
Managing Multiple Calls
Listening to Your Voicemail
............................................................................49
.............................................................................51
........................................................................................54
....................................................................................54
............................................................................... 56
Page 5

Ta b l e o f C o n t e n t s
Communication ....................................................................... 57
Contacts .............................................................................................................. 57
Messaging
Email
Voicemail
...........................................................................................................62
....................................................................................................................65
.............................................................................................................68
Entertainment .......................................................................... 69
Camera ................................................................................................................69
.................................................................................................................78
Gallery
.................................................................................................................... 81
Music
Tools ..........................................................................................84
Voice Recorder ...................................................................................................84
Calculator
Calendar
Clock
File Manager
QSlide
Google Apps
............................................................................................................86
..............................................................................................................86
....................................................................................................................89
........................................................................................................91
..................................................................................................................95
....................................................................................................... 97
Settings .................................................................................... 99
WIRELESS NETWORKS ...................................................................................99
..............................................................................................................104
DEVICE
PERSONAL
SYSTEM
Accessibility
......................................................................................................108
................................................................................................................11 4
..........................................................................................................114
Safety ........................................................................................118
Consumer Information About Radio Frequency Emissions ......................... 120
Consumer Information on SAR
FCC Hearing-Aid Compatibility (HAC) Regulations for Wireless Devices
Caution: Avoid potential hearing loss.
TIA Safety Information
Safety Information
FDA Consumer Update
........................................................................................... 133
...................................................................... 124
. 126
........................................................... 128
.................................................................................... 130
....................................................................................137
3
Page 6

Ta b l e o f C o n t e n t s
4
Specifications .........................................................................149
..........................................................................................150
FAQ
LIMITED WARRANTY STATEMENT
........................................................................................163
Index
....................................156
Page 7
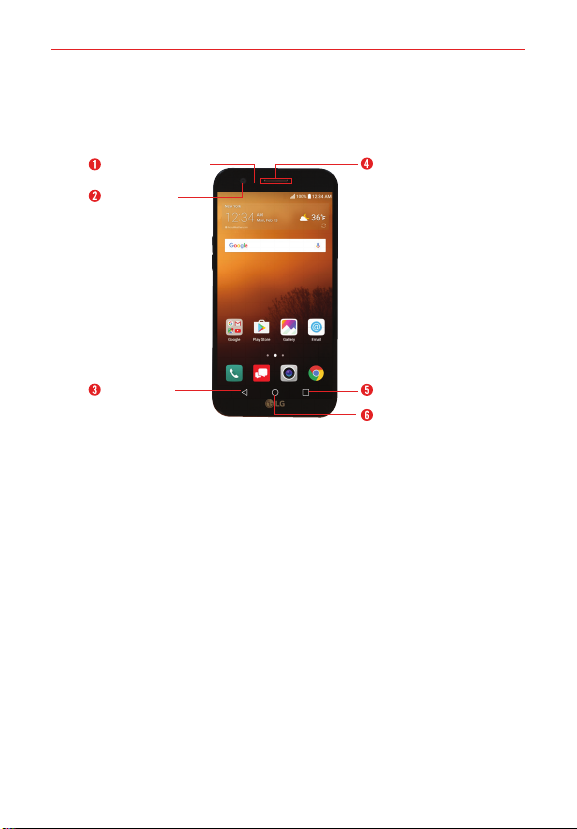
Phone Overview
Fro nt Vi ew
Proximity/Ambient
light sensor
Front camera
Earpiece
The Basics
5
Back button
NOTES t All screen shots in this guide are simulated. Actual displays may vary.
t Instructions to perform tasks in this guide are based on the default settings and may
chan ge d epend ing on t he mo de a nd s oftwar e ver sion on your phon e.
Recent apps button
Home button
1. Proximity/Ambient light sensorSenses proximity toward other objects
(such as your head) so that tap commands are not accidentally activated
during a call or when carried inside a pocket. It also employs an ambient
sensor which measures the surrounding light and adjusts the LCD
brightness to provide a vivid screen.
NOTE Don't block the sensor or near the sensor to avoid problems with the touch screen.
2. Front cameraUse to take pictures and record videos of yourself. You can
also use this for video chatting. Keep it clean for optimal performance.
3. Back buttonReturns to the previous screen. Also closes pop-up items,
such as menus, dialog boxes and the on-screen keyboard.
4. EarpieceLets you hear callers and automated prompts.
Page 8
The Basics
6
5. Recent apps buttonDisplays recently used applications and your open
website tabs. If you touch and hold this button while viewing an app, it
activates the Multi-Window feature.
NOTE The Multi-Window feature cannot be activated from the Home screen, the Recent apps
screen, or the Camera app.
6. Home buttonReturns to the Home screen from any screen. If you touch
and hold this button, it opens the Google app.
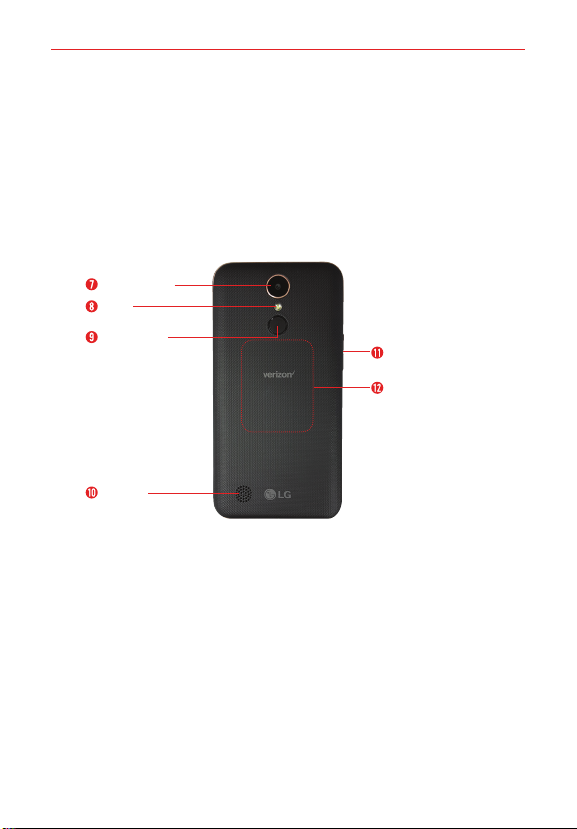
Rear View
Back camera
Flash
Power/Lock
button,
Fingerprint
sensor
Speaker
7. Back cameraUse to take photos and record videos. Keep it clean for
optimal performance.
8. FlashBrightens up the captured image or recorded video when you
turn on the flash. When activated in the Accessibility settings, it will also
flash to alert you (e.g., incoming calls and messages, alarms, etc).
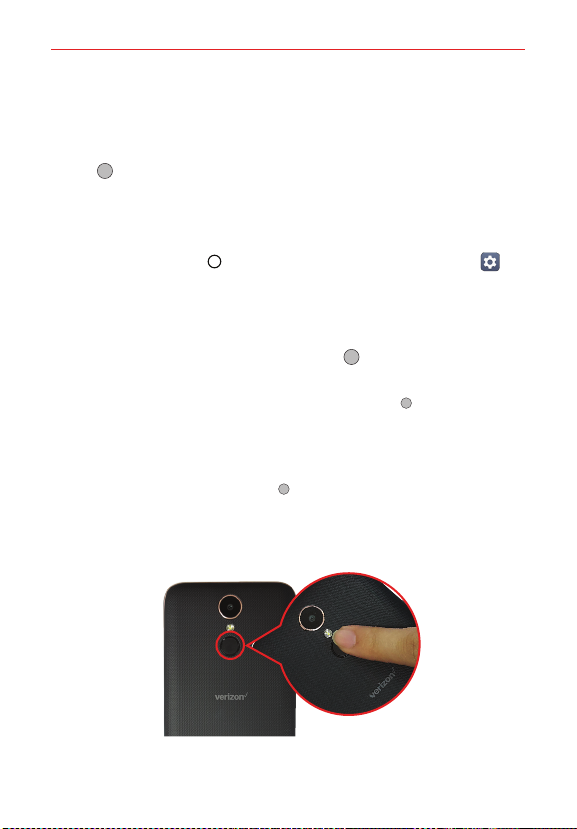
9. Power /Lock button, Fingerprint sen sorPress to turn off the screen
backlight and lock the screen, or turn the screen backlight back on.
Press and hold to turn the phone on/off, restart it, and activate/
deactivate Airplane mode. It also allows you to record and use
fingerprints to secure your phone.
10. SpeakerUse to listen to audio (e.g., music, videos, sound clips,
speakerphone, etc.) from the rear speaker instead of the earpiece.
Vo l u me b u t to n s
NFC touchpoint
Page 9

The Basics
11. Vol um e b utt on sPress to adjust the ringer, the media volumes, or the
in-call volume during a call. They can also activate the camera shutter
and access shortcuts when enabled in the Settings menu.
12. NFC touchpointTap the back of your phone to an NFC tag or another
NFC compatible device in this location to transfer data between them.
To p a n d B o t t o m V i e w s
Microphone
7
Headset jack
USB/Charger port
Microphone
13. MicrophoneTransmits your voice to the other caller. It’s also used for
voice-activated functions.
14. Headset jackAllows you to plug in an optional headset for convenient,
hands-free conversations or recording your voice using the Voice
Recorder app. You can also plug in headphones to listen to music.
15. USB/Charger portAllows you to connect the phone and the USB cable
for use with the charger adapter, or other compatible accessories.
16. MicrophoneTransmits your voice to the other caller. It’s also used for
voice-activated functions.
Help
The Help app allows you to quickly and conveniently view information about
your phone, including how-to tutorials, Icon glossary, etc.
To a c c es s He l p , t a p t h e Home button
Help .
> swipe left, if necessary > tap
Page 10
The Basics
8
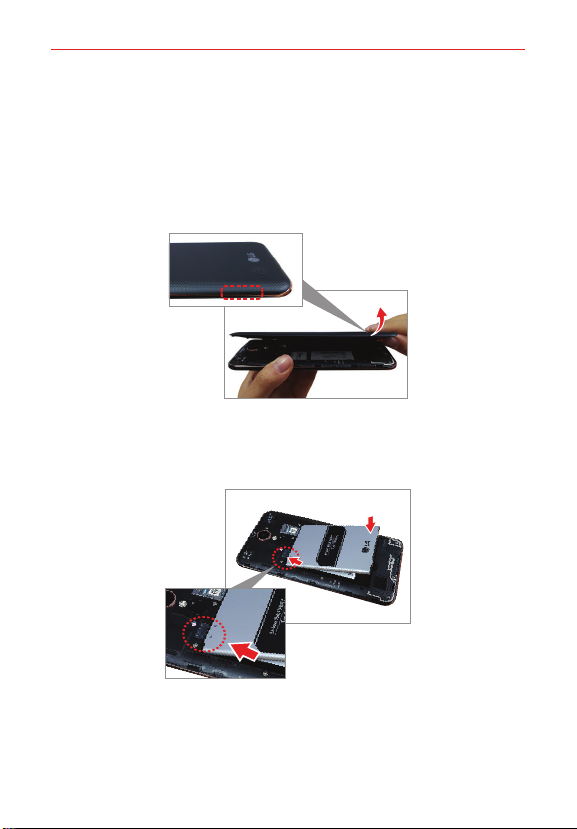
Setting Up Your Phone
Yo u r p h o n e a l r e a d y h a s a S I M c a r d i n s t a l l e d .
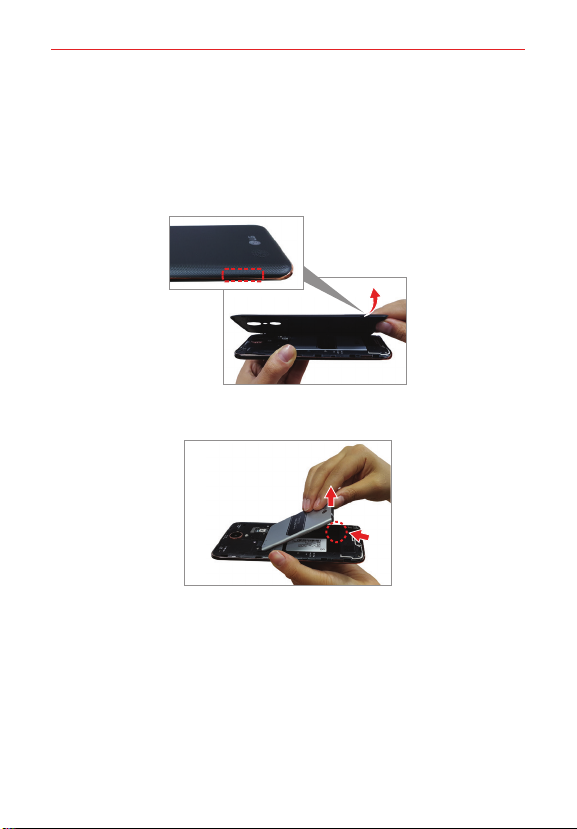
Step 1. Remove the Back Cover
With the phone facing down, insert your fingernail into the cutout located
on the lower left of the back cover and gently lift the cover.
Step 2. Insert the Battery
Insert the battery, making sure the gold contacts line up. Press down gently
to secure it.
Page 11
The Basics
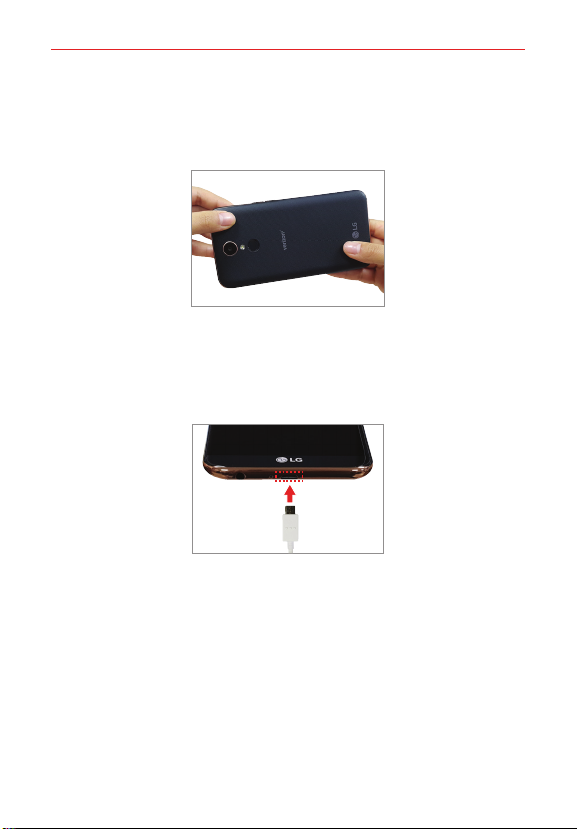
Step 3. Replace the Back Cover
Align the cover over the back of the phone and then press down along the
edges to secure the cover.
Step 4. Charge the Phone
Before turning on your phone, charge it fully.
Insert the small end of the USB cable into the phone. Insert the larger end
into the charger and plug the charger into an outlet.
9
WAR NIN G! Only use approved chargers with your device. Incompatible chargers or tampering
with the charging port could damage your device and void the warranty.
Page 12
The Basics
10
Removing the Battery and SIM Card
Removing the batter y
1. Turn the phone off, then with the phone facing down, insert your
fingernail into the cutout located on the lower left of the back cover and
gently lift the cover.
2. Use the fingertip cutout at the bottom of the battery compartment to lift
the battery out.
Page 13

The Basics
Removing the SIM card
The SIM card is pre-installed in your smartphone. If you need to replace
your SIM card, refer to the following instructions.
1. Turn the phone off, then remove the back cover and the battery (as
demonstrated in the previous instructions).
2. Locate the slot for the SIM card (the lower of the two slots above the
upper-right corner of the battery compartment) and gently slide the SIM
card out to remove it.
11
Page 14
The Basics
12
Inserting and Removing a Memory Card
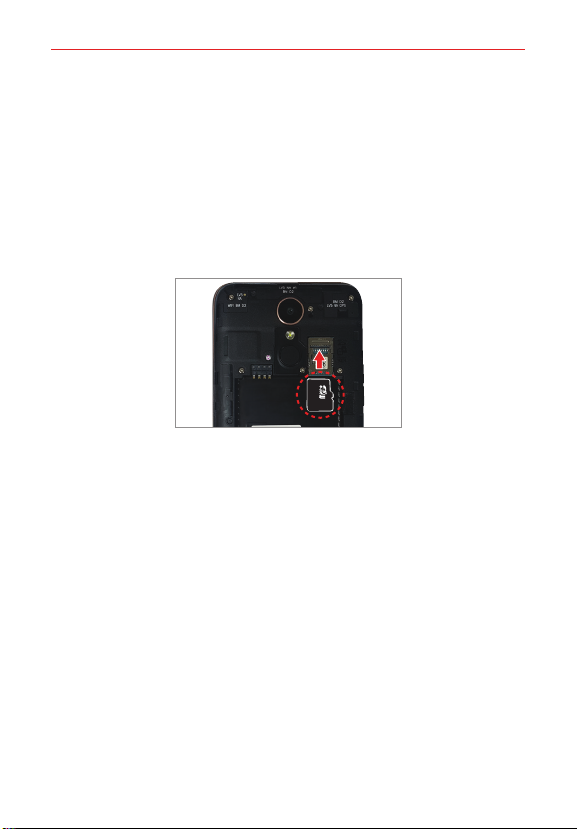
Inserting a microSD card
1. Remove the back cover (as demonstrated in the previous instructions)
and locate the dual slot just above the upper-right corner of the battery
compartment. (microSD is inscribed near the slot opening.)
2. Position the microSD card (sold separately) with the label side facing up
and the gold contacts toward the slot, then carefully slide it into the
upper slot until it's secured in place.
NOTE The microSD card can be easily damaged by improper operation. Please be careful
when inserting, removing, or handling it.
Page 15
The Basics
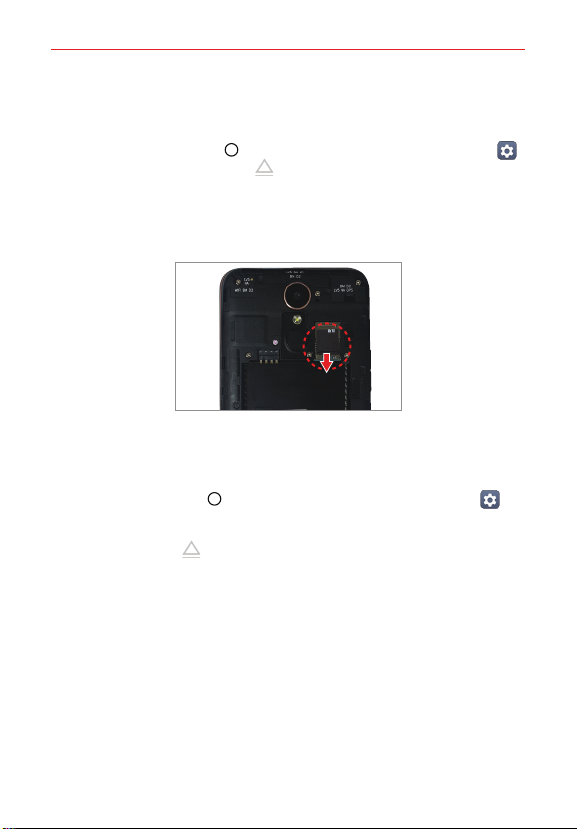
To r e m o v e t h e m i c r o S D c a r d
1. Unmount the microSD card.
Ta p th e Home button > swipe left, if necessary > tap Settings
!
> Storage > the Eject icon .
2. Remove the back cover and locate the microSD card slot (as
demonstrated in the previous instructions).
3. Carefully pull the microSD card out to remove it.
To u n m o u n t t h e m i c r o S D c a r d
It’s important to unmount the microSD card prior to removing it from the
phone to avoid damage to it or the data saved on the card.
1. Tap t he Home button > swipe left, if necessary > tap Settings .
2. Ta p Storage.
3. Ta p t he Eject icon .
13
Page 16
The Basics
14
Charging Your Phone
Your phone comes with a USB cable and a charger adapter. You can connect
them together and charge from a power outlet, or you can use the USB
cable alone to charge from your computer. Correctly orient the plugs before
insertion to avoid damaging your cable, adapter, and/or ports.
NOTE Please only use an approved charging accessory to charge your LG phone. Improper
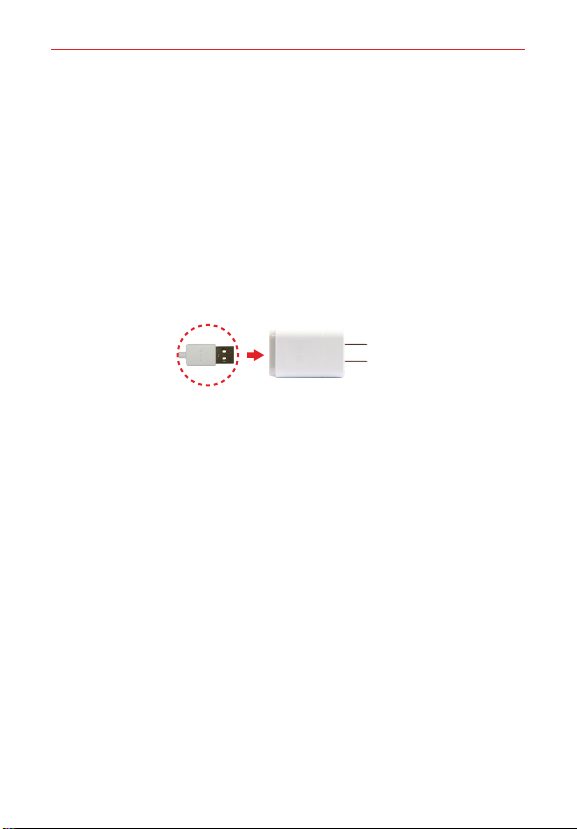
1. Correctly orient the USB cable with the charger adapter and connect
them. Refer to the image below to correctly connect the USB cable and
the adapter.
handling of the USB/Charger port, as well as the use of an incompatible charger,
may cause damage to your phone and void the warranty.
USB Cable
Charger Adapter
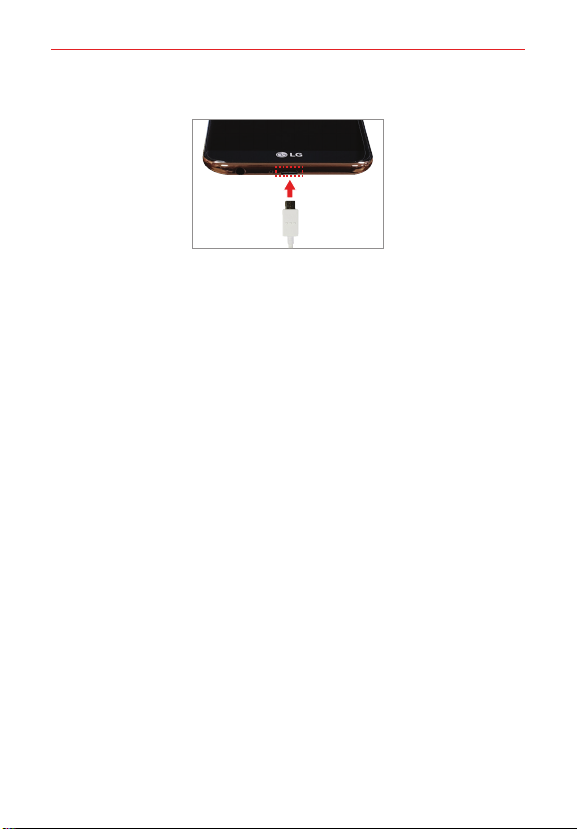
2. The USB/Charger port is located at the bottom of the phone. Correctly
orient the cable's plug with the port before plugging it in. Refer to the
image on the following page to correctly connect the charger to the
phone.
3. Plug the charger adapter into a power outlet to begin charging.
Page 17
The Basics
Charging with the USB Cable
USB Cable
NOTE Make sure to correctly orient the cable's plug with the port before plugging it in.
You can use your computer to charge your phone. To be able to charge with
the USB cable, you need to have the necessary USB drivers installed on
your PC first. Connect one end of the USB cable to the USB/Charger port
on your phone (as shown above) and connect the other end to a USB port
on your PC. It’s best to use the rear USB port when connecting to a
desktop PC. The USB hub should be powered by an external power source.
NOTE Yo u m ay e x p e r i e n c e a s l o w e r c h a r g i n g r a t e w h e n c h a r g i n g f r o m y o u r c o m p u t e r.
Refer to t he image above to correctly plug the charg er.
15
Page 18

The Basics
16
Optimizing Battery Life
You can extend your battery’s life between charges by turning off features
that run in the background. You can also monitor how apps and system
resources consume battery power.
Tips to extend the life of your battery
Reduce the screen brightness and set a shorter screen timeout.
!
Tu rn o ff ra d i o c o mm u n ic a t io n s ( s u ch as W i - Fi , Bl u e to o t h®, GPS, etc.) that
!
you're not actively using. (Note that the GPS receiver is only turned on
when you’re using an app that makes use of it.)
Turn off automatic syncing for Gmail, Calendar, Contacts, and other apps
!
if you don’t need it.
NOTE Allowing other devices to use your device's hotspot connection will drain your
To c h e c k t h e b a t t e r y c h a r g e l e v e l
Ta p th e Home button > swipe left, if necessary > tap Settings >
Battery.
The battery level (as a percent age of fully charged) and the battery status
!
(Charging) is displayed at the top of the screen.
Enable the Battery percentage on Status Bar switch to display the
!
percentage of remaining battery charge on the Status Bar next to the
battery icon.
Ta p Battery saver to view and/or modify your Battery saver settings.
!
To m o n i t o r a n d c o n t r o l w h a t u s e s t h e b a t t e r y
The Battery usage screen allows you to see which apps are consuming the
most battery power. Information on this screen allows you to identify
downloaded apps you may want to turn off when not being used, so you
can get the most out of your battery power.
Ta p th e Home button > swipe left, if necessary > tap Settings >
!
Battery > Battery usage.
OR
battery more quickly.
Page 19
The Basics
Ta p th e Home button > swipe left, if necessary > tap Settings >
!
About phone > Battery > Battery usage.
The top of the Battery usage screen displays a usage graph and below it,
battery usage times. It lists all of the apps or services using battery
power from the greatest amount of energy used to the least amount.
Tap an app or service in the Battery usage screen to see details about its
!
power consumption. Different apps or services offer different kinds of
information, and they may even include options to modify the settings so
you can reduce power consumption by that app (or stop running the
app).
Battery saver
Battery saver changes certain settings to conserve battery power until you
can recharge your phone. If you turn Battery saver on, it will automatically
activate when the battery charge level drops to the level you set. If Battery
saver is off, you’ll be prompted to turn on Battery saver when the battery
reaches low levels.
Ta p th e Home button > swipe left, if necessary > tap Settings >
!
Battery > Battery saver.
From the Batt ery saver screen, tap Tu r n Ba tt e ry s a ve r o n, then select to
!
activate Battery saver immediately, or when the charge drops to 5% or
15%. If you turn off Battery saver, when the battery charge becomes low,
a notification prompts you to turn it on.
After you modify the Battery saver settings to your preferences, tap the
!
Battery saver switch to toggle it On (blue) or Off (gray).
17
Page 20

The Basics
18
Tu r n i ng Yo u r P h o n e O n an d O ff
Tu r n i ng y o u r p h o n e o n
Press and hold the Power/Lock button for a couple of seconds until
!
the screen turns on.
Tu r n i ng y o u r p h o n e o f f
1. Press and hold the Power/Lock button until the Phone options appear.
2. Ta p Power off.
3. Ta p POWER OFF to confirm that you want to turn off the phone.
Tu r n i ng t h e s c re e n o n u si n g t h e Kn o c k O N fe a t u r e
The KnockON feature allows you to double-t ap the screen to easily turn the
screen on or off.
Quickly double-tap the center of the dark screen to turn on the backlight.
!
Quickly double-tap the Status Bar, an empty area on the Home screen,
!
or the Lock screen to turn the screen off.
NOTE The backli ght will not turn on if th e proximity s ensor is cover ed.
Tu r n i ng t h e s c re e n o n u si n g t h e Kn o c k C o d e f e a t u re
You can unlock the screen by creating your own Knock Code. When the
screen is locked, you can directly access the Home screen by tapping the
screen in a specified sequence.
Unlock the screen by inputting the Knock Code you have created. Input
!
your Knock Code(from 6 to 10 taps) on the touch screen when the
screen is turned off.
Setting up the Knock Code feature
1. Tap t he Home button > swipe left, if necessary > tap Settings >
Lock screen.
2. Ta p Select screen lock > Knock Code.
3. Tap the squares in a pattern (from 6 to 10 taps) to set your Knock Code,
tap DONE, enter it again, then tap CONFIRM.
Page 21
The Basics
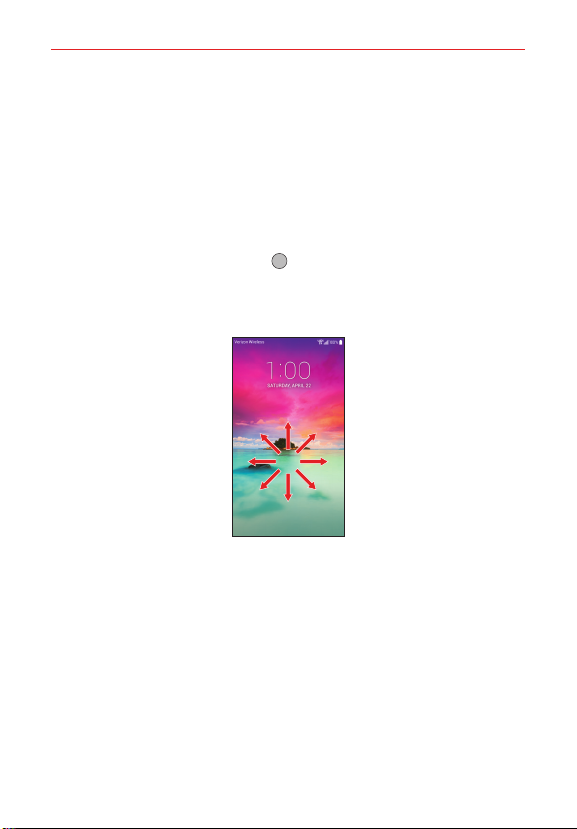
To u n l o c k t h e L o c k S c r e e n
If you don’t use the phone for a while, the screen and backlight will turn off
to conserve battery power. To unlock the phone’s default Lock screen:
NOTE The default Lock screen simply locks the screen to prevent unintentional actions. For
1. Tur n th e sc r e en o n.
OR
2. Fr om the c enter of the screen, swi pe in any dire ctio n to u nlock it.
NOTE Yo u c a n s e t t h e s h o r t c u t a p p s y o u w a n t i n t h e L o ck s c r e e n s e t t i n g s .
more security to guard against unauthorized use, you can set an unlock requirement
(such as a Knock Code, pattern, PIN, password, or fingerprint) that will need to be
entered to unlock it.
Press the Power/Lock button .
!
Quickly double-tap the center of the screen (KnockON).
!
To use a shortcut, swipe upward across the shortcut icon (at the
!
bottom of the screen). The screen will unlock and launch the app.
19
Page 22

The Basics
20
Anti-Theft Guide
You can set up your device to prevent other people from using it if it’s been
reset to factory settings without your permission. For example, if your
device is lost, stolen, or wiped, only someone with your Google Account or
screen lock information can use the device.
All you need to make sure your device is protected is:
Set a screen lock: If your device is lost or stolen but you have a screen
!
lock set, the device can’t be erased using the Settings menu unless your
screen is unlocked.
Add your Google Account on your device: If your device is wiped but
!
you have your Google Account on it, the device can’t finish the setup
process until your Google Account information is entered again.
After your device is protected, you’ll need to either unlock your screen or
enter your Google Account and password if you need to do a factory reset.
This ensures that you or someone you trust is doing the reset.
NOTE Do not forget your Google Account and password you had added to your device
prior to performing a factory reset. If you can't provide the account information
during the setup process, you won't be able to use the device at all after performing
the factory reset.
To u c h S c r e e n
Your touch screen provides an excellent way to interact with and use your
Android™ phone. With the touch of your finger, you can download and use
available apps, make menu selections, and access data saved to your
phone.
To u c h o r t a p A single finger touch selects items. For example, tap an icon
(e.g., an app, widget, or folder), tap words (e.g., menu selection or to
answer an on-screen question), or touch letters and numbers to type.
NOTE Don't press too hard on the screen. It's sensitive enough to detect a light, firm tap.
To u c h a n d h o l d To uc h a n it e m o n th e sc r e en a nd d on ' t l i ft yo u r f i n ge r un t i l
an action occurs. For example, to open a context menu for a contact,
touch and hold the contact entry until the menu pops up.
Page 23

The Basics
DragTouch and hold an item for a moment and then, without lifting your
finger, move your finger on the screen until you reach the target position.
For example, you ca n d rag items o n t he Home scr een to reposit ion them.
Swipe, slide, or flickMove your finger quickly across the surface of the
screen, without pausing when you first touch it (so you don’t drag an item
instead). For example, you can browse through the Home screens by
swiping left and right, slide the screen up or down to scroll through a list,
or remove an app from the Recent apps screen by flicking its graphic off
the screen.
Double-tapTap the screen twice quickly to zoom, highlight text, or turn
the screen on/off. For example, quickly double-tap a section of a web page
to zoom that section to fit the width of the screen and control the zoom in
Maps and in other apps. Double-tap a word to highlight it. Double-tap can
also activate the KnockON feature to turn the screen on or off.
NOTE Certain Accessibility features (such as Touch zoom) use a triple-tap gesture to zoom
Multi-touchUse your index finger and thumb in a pinch motion (to zoom
out) or spread motion (to zoom in) when using Chrome, a map, photos,
the rear camera lens, and in lists (e.g., Contacts, Groups, and the
Messaging list). Spread apart to make screen information larger (easier to
see and read), or pinch together to view more area and information. The
pinch gesture also affects the Home screen. Spread apart on the Home
screen to hide all of your Home screen items, then pinch in to redisplay
them.
Rotate the screenFrom many apps and menus, the orientation of the
screen adjusts to the phone’s physical orientation by rotating the screen.
Yo u c a n d e a c t i v a t e t h i s f u n c t i o n i n t h e D i s p l a y s e t t i n g s m e n u .
or activate functions. A triple-tap will also create a new event in the Calendar app.
21
Page 24
The Basics
22
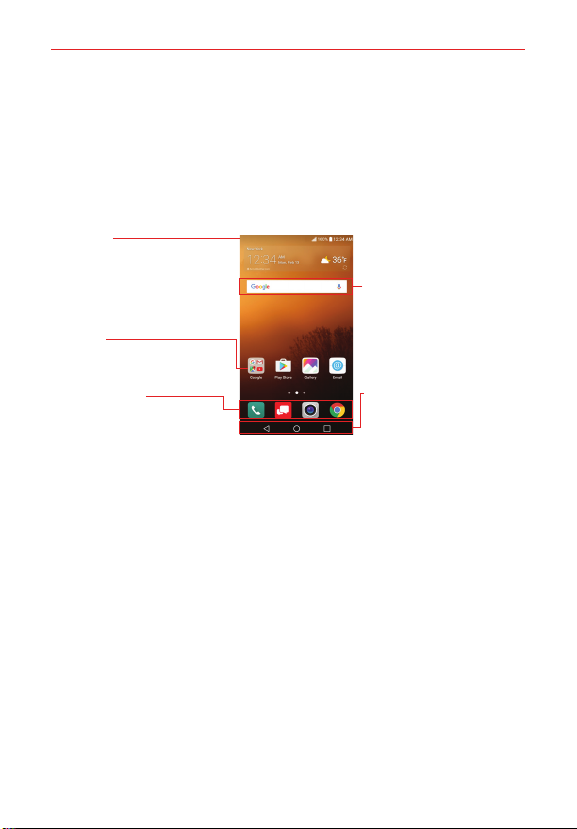
Getting to Know the Home Screen
The Home screen is your starting point to access all of the features on your
phone using simple motions on the screen. It’s comprised of multiple
panels (swipe horizontally to switch). You can customize all of your Home
screen panels with app shortcuts, icons, widgets, folders, and other
features.
Status Bar
Shows device status information,
including the time, signal strength,
battery status, and notification icons.
App Icon
Tap a n i co n (a pp , w id ge t, fol d er, e tc . )
to open and use it.
Quick Access Bar
Icons that provide easy, one-touch
access to the functions used most
often.
Quick Access Bar icons
The Quick Access Bar is located on your Home screen panels to allow quick
and easy access to the apps you use most often.
Modifying the Quick Access Bar icons
Rearrange: Touch and hold the icon to move, then drag it to another
!
position in the Quick Access Bar or on a Home screen panel.
Add: Touch and hold the icon (on any of your Home screen panels), then
!
drag it onto the Quick Access Bar. The Quick Access Bar can
accommodate up to 7 icons. Drag an icon on top of an icon in the Quick
Access Bar to create a folder with multiple apps in it.
Remove: Touch and hold the icon to remove from the bar, then drag it to
!
another location on your Home screen.
Google Search Widget
Tap t o o pe n th e G oo gl e ap p .
Home touch buttons
Displayed on all screens, these
buttons allow you to easily
navigate within the device
software.
Page 25
The Basics
Home touch buttons
The Home touch buttons are displayed in a bar at the bottom of all of the
screens to provide easy navigation within the device software.
Back button: Tap to back up one step at a time and close on-screen
items such as pop-up messages, the on-screen keyboard, etc.
Home button: Tap to immediately return to the Home screen. Touch and
hold it to access the Google shortcut.
Recent apps button: Tap to display the apps you've recently used. If you
touch and hold this button while viewing an app, it launches the MultiWindow feature.
Modifying the Home touch buttons
You can change which buttons are displayed in the Home touch buttons Bar,
as well as their position and color.
1. Tap t he Home button > swipe left, if necessary > tap Settings >
Display > Home touch buttons.
2. Select the modification you want to apply.
Ta p Button combination to select which Home touch buttons you
!
want in the bar and their location within the bar. Choose from the
Back button, the Home button, the Recent apps button, the
Notification button, the Capture+ button, and the QSlide button.
Ta p Background color to set the button color to white or black.
!
23
Page 26
The Basics
24
To r e t u r n t o t h e H o m e s c r e e n
Ta p th e Home button at any time, from any app.
!
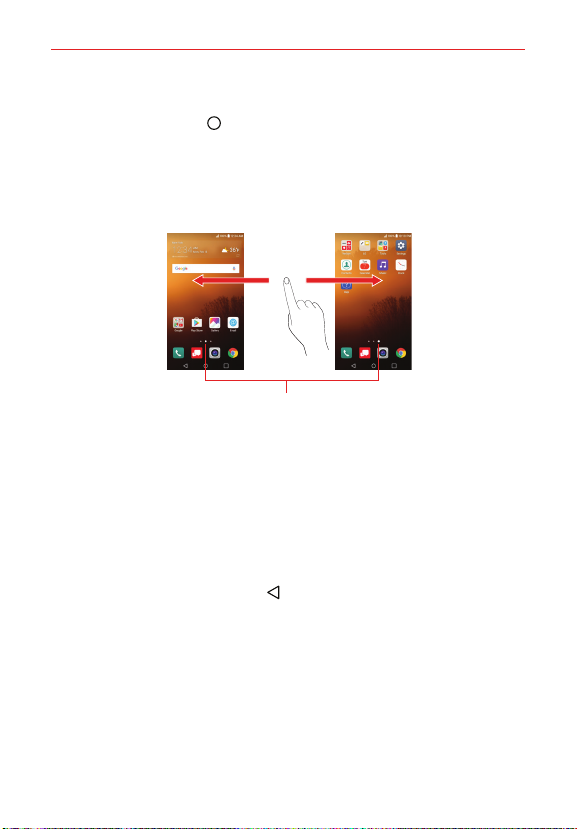
To v i e w o t h e r H o m e s c r e e n p a n e l s
Swipe (or flick) your finger left or right across the Home screen's sliding
!
panels. You can add additional panels to allow more space for icons,
widgets, shortcuts, and other items.
The whit e dot (above t he Quick Access Ba r) indicates the current H ome screen p anel.
Tap any of the Home screen panel indicator dots (above the Quick
!
Access Bar) to immediately jump to that panel.
Home Screen Panel Indicator
Hiding items on the Home screen
Place two fingers on the screen, then spread them apart to hide the items
on your Home screen so that only your wallpaper, the Status Bar, the Home
screen indicator dots, and the Home touch buttons Bar are displayed. To
redisplay your Home screen with all of its icons and widgets, pinch in on
the screen or tap the Back button
NOTE The devic e automatica lly reverts to the ful l screen view after screen t imeout.
.
Moving apps to other Home screen panels
To uc h a n d h o l d t h e a p p i c on , th e n d r a g i t t o th e le f t o r r i g ht e dg e of t he
screen to advance to the other panels before lifting your finger.
TIP To c r ea t e a n ew p an e l , d r ag t he i co n to t he r ig h t e d g e o f t h e l a s t p a ne l on t he r ig h t .
Page 27
The Basics
Using Dual View
Slide the screen right or left to view
different Home screen panels.
Dual View Icons
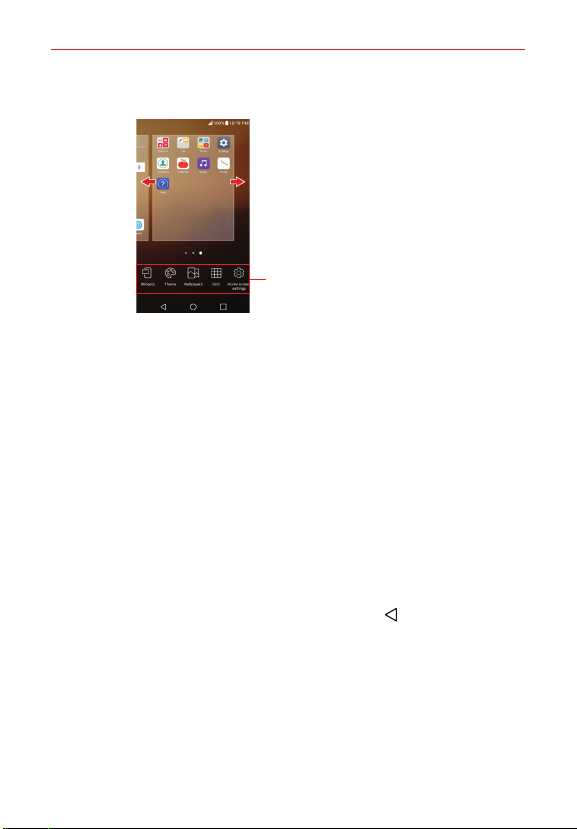
Dual view allows you to easily customize your Home screen. Touch and hold
an empty spot on a Home screen panel to view your Home screen on top
and the Dual view icons (Widgets, Theme, Wallpapers, Grid, and Home
screen settings) on the bottom. Flick sideways to scroll through the Home
screen panels to display the panel you want. Tap the Dual view icon you
want to use. From Grid or Home screen settings, tap the change(s) you
want to make. From Wa llpa per s, select from the available choices and
complete your selection as necessary. From Widgets, scroll horizontally
through the choices. Touch and hold the one you want (tap the widget's
category first, if necessary), then drag it onto the Home screen panel you
want and complete your selection as necessary.
TIP If you drag the widget to the right edge of the screen, it creates a new Home
NOTE The Quick Ac cess Bar isn't displayed whi le in Dual vi ew.
To r e tu r n t o t he f ul l sc r e en v ie w, t ap t he Back button or tap one of the
Home screen panels.
NOTE The devic e automatica lly reverts to full sc reen view after screen timeo ut.
screen panel.
25
Page 28
The Basics
26
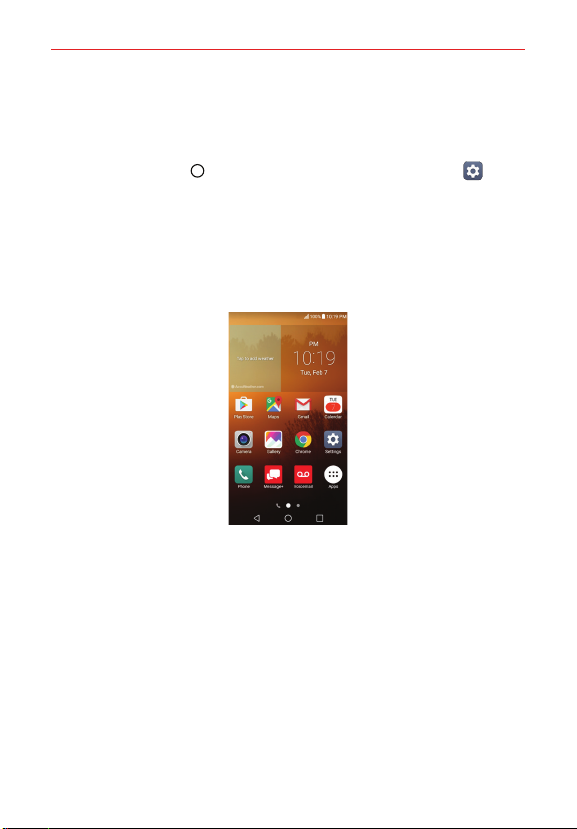
EasyHome screen version
EasyHome is a more simplified version of the Home screen that you can
choose to use on your ph one.
Ta p th e Home button
Home screen > Select Home > EasyHome.
The EasyHome Home screen has three panels.
> swipe left, if necessary > tap Settings >
Main panel
The main panel has 12 application icons, it displays the date and time and
also displays weather information.
Ta p an a pp i c on t o us e i t. Tou ch an d h ol d on e t o re mo ve o r re p la ce i t.
!
The top right of the screen displays the date and time. Tap it to access
!
the Clock app.
The top left of the screen displays a Weather widget. Tap it to access the
!
Wea ther app.
Page 29

The Basics
Communication panel
Swipe to the right on the main panel to access a panel for your Contact
shortcuts as well as access the Phone app's Dial tab, Recent tab, and
Contacts tab.
Tap one of the 9 shortcuts, then tap the contact you want to set. Tap a
!
shortcut's Dial icon to call its number. Tap a shortcut's image to select
Make voice call, Make video call, Send message, or Remove shortcut.
Ta p Dial, Recent, or Contacts to open the Phone app with the
!
corresponding tab displayed (Dial displays the dialpad, Recent lists all of
your recent calls, and Contacts displays your entire Contacts list). You can
change tab s to access oth er Phon e app inf ormatio n.
Additional shortcuts panel
Swipe to the left on the main panel to access a panel you can customize
with additional app shortcuts and open the Applications screen.
Ta p th e Apps icon to open the Applications screen with all of your
!
installed apps.
Ta p an a pp t o u se i t. Tou ch a nd h ol d o ne t o re m ove or r ep la ce it .
!
Ta p th e Add icon , then tap the app you want to add to the shortcuts
!
panel.
Ta p th e Go og l e se ar ch b ox t o op e n th e Google app (or tap its
!
microphone to search by voice).
To c h a n g e b a c k t o t h e A n d r o i d H o m e s c r e e n
Ta p th e Home button > swipe left, if necessary > tap Settings >
Home screen > Select Home > Home.
Home with separate apps list
Home with separate apps list is another version of the Home screen that
you can use on your phone. This version places all of your installed and
downloaded apps in an Applications screen instead of on your Home
screen panels. The Apps icon
access to all of your apps and you can copy just the app shortcuts you want
on to your Home screen.
in the Quick Access Bar provides you with
27
Page 30
The Basics
28
Ta p th e Home button > swipe left, if necessary > tap Settings >
!
Home screen > Select Home > Home with separate apps list.
Using Home with separate apps list
To a d d a n d r e m o v e s h o r t c u t s
To a d d a n ap p sh o r tc u t , t a p t h e Apps icon , touch and hold the app you
!
want, then drag it to the panel you want. Or, touch and hold an empty
spot on a Home screen panel, tap the shortcut you want, then tap the
Back button .
To remove an app shortcut, touch and hold the app icon, drag it to the
!
Remove bar, then lift your finger.
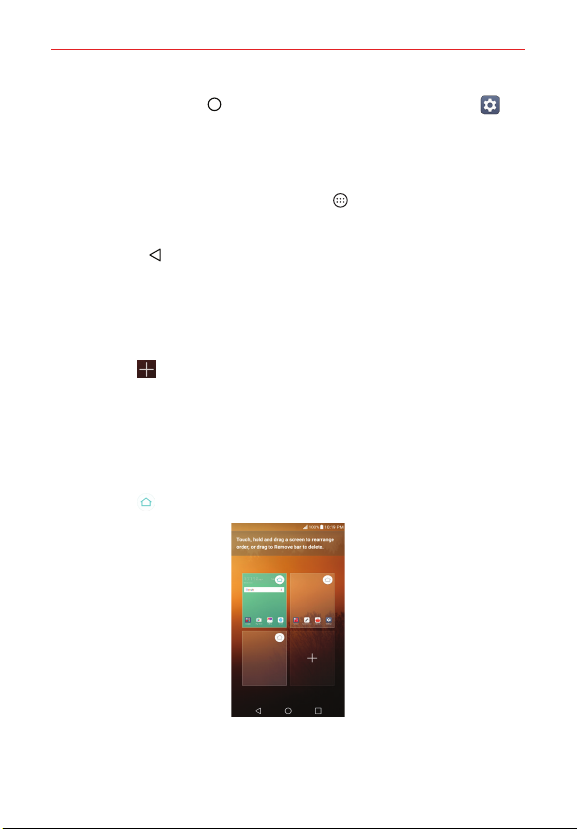
To m a n a g e y o u r H o m e s c r e e n p a n e l s
To a d d a d d it i o na l pa n e ls , pi n ch i n o n t h e H o m e s c re e n , t h en t a p t h e Add
!
panel icon .
To rearrange your panels, touch and hold the panel, then drag it where
!
you want it.
To delete a panel, touch and hold the panel, then drag it to the Remove
!
bar at the top of the screen.
To s e t w h i ch pa n e l i s y o ur d ef a u lt H om e sc r e en p an e l , t a p t h e Default
!
panel icon on the panel you want.
Page 31

The Basics
Apps: How to View, Open, and Switch
Slide the screen left or right to
bring more icons into view.
Tap an app icon to open the
app.
Home screen Home screen
Opening an app
Open an app simply by tapping its icon on the screen.
!
Opening multiple apps
1. Tap a n a pp i co n t o op en i t.
2. Ta p t he Home button .
3. Ta p t he i co n f or t he o th e r ap p yo u wa nt to o pe n.
Switching between multiple apps
1. Tap t he Recent apps button . A screen opens and displays previews of
all of the apps that are currently open.
2. Ta p t he a pp yo u wa nt t o us e , ta p th e Close icon on the app to close it,
or tap the Back button to return to the current screen.
29
Swipe up or down to
view the entire stack of
open apps.
Flick an app icon to the right or left to close
the app and remove it from the list.
Tap a n a pp t o us e i t.
Tap h e re t o cl os e t hi s ap p .
Page 32

The Basics
30
Te x t I n p u t M e t h o d s
The on-screen keyboard displays automatically on the screen when you
need to enter text. To manually display the on-screen keyboard, simply tap a
text field where you want to enter text.
Selectio n Box
Tap a displayed item to
insert it in the text field.
Tap to enter text by voice.
Touch and hold to access your
keyboard settings, or cl ip tray.
Toggles between 123/SYM
mode and ABC mode.
Modifying your LG keyboard characteristics
Ta p th e Home button > swipe left, if necessary > tap Settings >
Language & input > LG Keyboard > Keyboard height and layout.
The QWERTY layout setting allows you to select the default buttons on
!
either side of the Space button.
The Extended keyboard setting allows you to display the numeric
!
buttons on the top row of the keyboard.
The Keyboard height setting allows you to change the size ratio
!
between the keyboard (including the size of its buttons) and the screen.
The Keyboard type in landscape setting allows you to set the keyboard
!
to be expanded or compressed when the phone is in landscape mode.
The Split keyboard switch allows you to split the keyboard in half by
!
spreading two fingers horizontally on the landscape keyboard. This
makes it easier to type using your thumbs.
The One-handed operation setting allows you to swipe the keyboard left
!
or right to adjust the position of the LG keyboard (portrait mode only) to
use just one hand to type.
Page 33

Ty pi ng ti ps
Enter other
charac ters
Enter one capital
letter
Enter all capital
letters
Highlight text
Copying and cutting
text
Paste cut or copied
text
Delete a character
The Basics
Ta p th e Numbers/Symbols button
its keyboard. Tap the Arrow buttons on the
left side of the keyboard to view additional
symbols. From the Numbers/Symbols keyboard,
you can also tap the Graphics button
graphics into your text. To enter foreign
characters, touch and hold the associated button
to display a pop-up of character choices (e.g., the
“a” button also includes an accent mark “á”),
drag your finger to the character you want, then
lift your finger.
Ta p th e Shift button
letter. The button changes to .
Double-tap the Shift button
The button changes to . Tap again to revert to
lowercase.
Double-tap a word to highlight it. To highlight a
range of text, double-tap a word, then drag the
highlight markers to highlight the text you want.
Highlight the desired text, then tap CUT or
COPY in the pop-up menu above the highlighted
text.
Tap the location where you want to paste the
text, then tap the marker
action box that appears (or tap CLIP TRAY to
paste text you copied from other places).
Ta p th e Delete button
to capitalize the next
. Tap PAS TE in the
.
to display
to enter
to set caps lock.
31
Page 34

The Basics
32
Ty pi ng ti ps
Accessing the and
keyboard settings
and Clip Tray
To uc h a n d h o l d t h e Vo ice i np ut button
drag your finger to the Clip Tray icon or the
Settings icon (in the pop-up that appears).
Swipe your finger through all of the letters of the
Path input text entr y
word you want to automatically enter it (instead
of tapping each letter separately).
NOTE Enable the Path input setting to use this feature.
Te x t i n p u t s e t t i n g s
To change your text input settings and see the dictionary of terms you’ve
used, tap the Home button
> Language & input. From this menu you can change the language for your
phone's software, set your keyboard input (including setting multiple
languages and how it reacts), set Google voice settings, set your voice
search and text-to-speech output preferences, as well as the set the pointer
reaction time and more. See the Settings section for more information
about the keyboard settings.
> swipe left, if necessary > tap Settings
, then
Page 35

The Basics
Languages
You can set only one main language for your phone's operating software,
but you can set multiple secondary languages and switch as needed. In
addition, you can set multiple languages used for the on-screen keyboard.
To c h a n g e t h e m a i n l a n g u a g e
Ta p th e Home button > swipe left, if necessary > tap Settings >
!
Language & input > Language > ADD LANGUAGE. Tap the language
you want. Touch and hold the language, then drag it to the top of the
language list to make it your phone's main language.
NOTE After adding additional secondary languages, drag any language to the top of the list
to set it as your main language.
To a d d a d d i t i o n a l l a n g u a g e s f o r y o u r k e y b o a r d
Ta p th e Home button > swipe left, if necessary > tap Settings >
!
Language & input > LG Keyboard > Select languages > checkmark all
of the languages you want to be able to type.
Capturing a Screenshot
Press and hold the Vo lum e Dow n button and the Power/Lock button
!
at the same time for 2 seconds to capture a screenshot of the current
screen.
Double-tap and hold the Power/Lock button to capture a screenshot
!
of the current screen.
To v i e w t h e c a pt u re d im a g e, t a p t h e Home button
necessary > Gallery > the Screenshots album.
Using Capture+ to capture a screenshot
On the screen you want to capture, drag the Status Bar downward and tap
the Capture+ icon
saved until you tap the Done icon and choose a save location.
NOTE Make sure that the paper style is not set to paper.
Access the app (QuickMemo+ or Gallery) where you saved it to view your
captured image.
NOTE Screenshots saved to the Gallery app are in the Capture+ album.
(in the Quick settings). The image is captured, but not
> swipe left, if
33
Page 36

The Basics
34
Phone’s Status Icons
The Status Bar appears at the top of every screen. It displays icons
indicating that you’ve received notifications (on the left) and icons indicating
the phone’s status (on the right), along with the current time.
Notification Icon Status Icons
The following icons may appear in the Status Bar.
Call icons
In call Missed call
Speakerphone on Microphone muted
Video call
Sound icons
Do not disturb - Priority only Do not disturb - Total silence
Vibrate mode Silent mode
Music playing Music paused
Network icons
3G connected 3G in use
4G LTE connected 4G LTE in use
Wi-Fi connected Signal strength
No signal Roaming
Network Extender No SIM card
Unknown SIM card Airplane mode
GPS on App update available
App update successful Downloading
Page 37

Uploading Download successful
Emergency Alert
Connectivity icons
USB connected Mobile Hotspot on
Bluetooth connected USB debugging mode
Bluetooth headset full battery Bluetooth on
Headset connected Bluetooth headset low battery
Internal storage full
Headset with microphone
connected
Email and Messaging icons
New email New Gmail message
New message New Verizon message
New Voicemail Email not sent
Message not sent
Calendar and Alarm icons
Alarm set Upcoming events
Battery icons
Full battery Charging battery
Low batter y Empty battery
Not Charging
Other icons
More notifications Screenshot saved
Keyboard
The Basics
35
Page 38

The Basics
36
Managing Notifications
Notification icons report the arrival of new messages, calendar events,
alarms, as well as ongoing events, such as when you’re on a call.
When you receive a notification, the notification icon will be displayed in the
Status Bar. You can open the Notifications panel to view a list of all of your
recent notifications. Depending on your settings, you may hear a
notification sound, and/or the phone may vibrate, and/or see a notification
light.
To o p e n t h e N o t i f i c a t i o n s p a n e l
To uc h a n d d r a g t h e S t at u s B a r t o t h e b o tt o m o f th e sc r e en .
The Notifications panel displays a list of your current notifications, organized
into ongoing and event-based notifications. The Quick settings (at the top of
the panel) allow you to quickly and easily change commonly used settings.
NOTE
Tap t h e Settings icon
to access the complete Settings app from this panel.
Expand Icon
Notifications Panel Expanded Quick Settings
Settings Icon
Tap here to open the
Settings app.
Quick Settings
Flick right or left to scroll
through the list and tap an
icon to change its setting.
EDIT Button
Tap h e re t o ch an ge y ou r
Quick settings list.
Tap a no ti fi ca ti o n to o pe n i t.
CLEAR ALL Button
Tap here to clear your list of
event-bas ed notificat ions.
Page 39

The Basics
To r e s p o n d t o a n o t i f i c a t i o n
1. Open the Notifications panel. Your current notifications are listed in the
panel, each with a brief description.
2. Ta p a n ot if i ca ti on t o v ie w it .
The Notifications panel will close and the app that corresponds to your
selection will open. For example, Gmail notifications open the Gmail app
so you can read your new messages.
Quick settings on the Notifications panel
You can customize your Notifications panel to allow quick access to change
commonly used settings. Your first 5 Quick settings icons are displayed at
the top of the Notifications panel. Tap the Expand icon
your Quick settings choices and swipe left to view more of your Quick
settings icons, if necessary. You can set which icons to display (and their
placement), include slide bars for Brightness and Volume, and add Sharing
icons.
TIP You can drag downward on the Quick settings section to expand it and drag upward
to compress it.
to access all of
Customizing your Quick settings
You can set the order of your Quick settings icons as well as which icons
are displayed and enable/disable the setting slidebars and sharing icons.
1. Open the Notifications panel, tap the Expand icon , then tap EDIT. The
top white section indicates your Quick settings icons.
To a d d a n i c o n : Touch and hold the icon, then drag it to the upper
!
section of the screen.
To d e l e t e a n i co n : Touch and hold the icon, then drag it to the lower
!
section of the screen.
To m o v e an i c o n: Touch and hold the icon, then drag it to another
!
position in the upper section.
To e n a b l e/ d i s a bl e t h e s l i d eb a r s et t i n gs a n d s h a r i ng i c o ns : Tap the
!
Menu icon
Notifications panel.
2. Ta p t he Done icon to return to the Notifications panel.
, then checkmark the ones you want to appear in your
37
Page 40

The Basics
38
Setting Your Lock Screen
There are several Lock screen types allowing you to lock your phone so that
only you can unlock it to make calls, access your data, buy apps, and
otherwise prevent unauthorized use.
Setting a Screen Lock for the First Time
1. Tap t he Home button > swipe left, if necessary > tap Settings >
Lock screen.
2. Ta p Select screen lock.
3. Ta p Swipe, Knock Code, Pattern, PIN, or Passw ord.
Swipe: A swipe motion in any direction on the screen will unlock the
screen. This is the default Lock screen that simply guards against
unintentional actions.
Knock Code: Unlocks the screen using a tapping a sequence on the
screen's 2x2 grid. (When the screen is in timeout, the 2x2 grid is
invisible, but the grid is displayed on the Knock Code Lock screen.) The
first time you set a Knock Code, you'll see a tutorial with instructions on
how to create it. Tap a sequence on the 2x2 grid (from 6 to 10 taps), then
tap DONE. Tap your sequence again and tap CONFIRM.
Pattern: Unlocks the screen using a pattern you draw with your finger.
Draw your pattern (connect at least 4 dots) and tap NEXT. Then redraw
your pattern and tap CONFIRM.
PIN Unlocks the screen with a number sequence. Enter a PIN (at least 4
digits) and tap NEXT. Reenter your PIN and tap OK to confirm it.
Passw ord Unlocks the screen with an alphanumeric sequence. Enter a
password (at least 4 characters) and tap NEXT. Re-enter your password
and tap OK to confirm it.
From then on, any time you want to unlock the screen, yo u'll nee d to
perform the unlock action you set (swipe, Knock Code, pattern, PIN, or
password) to gain access to it.
Page 41

The Basics
Changing Your Screen Lock
1. Tap t he Home button > swipe left, if necessary > tap Settings >
Lock screen.
2. Ta p Select screen lock.
3. Confirm your unlock information (if necessary).
4. Ta p t he d es i re d sc re en lo ck o pt io n an d c om pl et e a s ne ce ss ar y.
NOTE If you've set up a Microsoft Exchange account, you might only be able to use a
password.
Lock timer
If a security lock is enabled, you can set the delay time after the screen
darkens due to inactivity before the screen automatically locks and requires
you to enter your unlock sequence.
1. Tap t he Home button > swipe left, if necessary > tap Settings >
Lock screen.
2. Ta p Lock timer, then tap the setting you want to use.
Power key instantly locks
If a security lock is enabled, enable the Power key instantly locks switch to
override the Security lock timer setting and lock the screen as soon as you
press the Power /Lock button
1. Tap t he Home button > swipe left, if necessary > tap Settings >
Lock screen.
2. Enable the Power key instantly locks switch.
.
The Lock screen wallpaper
You can set the Lock screen wallpaper separately from your Home screen
wallpaper.
1. Tap t he Home button > swipe left, if necessary > tap Settings >
Lock screen.
2. Ta p Wal lpaper.
Ta p Wallpaper gal lery to select one of the available wallpaper images.
!
Ta p Gallery to select an image from your Gallery.
!
39
Page 42
The Basics
40
Fingerprints and Security
The Fingerprints & security setting allows another secure way to unlock
your phone. Set it up to allow you to place a finger on the Power/Lock
button
using your phone. Once you've set a secure screen lock, you can record a
fingerprint (or multiple fingerprints).
Registering a fingerprint
1. Tap t he Home button > swipe left, if necessary > tap Settings >
2. Read the fingerprint information, then tap NEXT.
3. Enter your unlock sequence or set a screen lock (whichever is needed).
4. Place your finger on the Power/Lock button and follow the screen
to unlock the screen, access QuickMemo+ content, and pay
Fingerprints & security > Fingerprints.
prompts until the fingerprint is registered.
NOTES
t Make sure that your fingers and the Power/Lock button are clean and dry.
t Moisture, lotions, sweat, oils, cut or dry skin might affect the fingerprint
recognition. Certain activities can also temporarily affect fingerprint recognition,
including exercising, showering, swimming, cooking, or other conditions that
chan ge t he cha ract eris tics of yo ur f inge rprin t.
t Cover the Power/Lock button completely. Don't press too hard or too quickly
(hardly move your finger while scanning is in progress).
t As you use the Fingerprint feature, it will continue to learn and improve recognition
of your fingerprint.
Page 43

The Basics
Repeat scanning the fingerprint by moving your finger little by little
!
until the fingerprint registers.
5. When your fingerprint registration is done, tap OK.
Ta p ADD MORE to register another fingerprint. If you register only one
!
fingerprint and the corresponding finger is not in good condition,
fingerprint recognition may not work well. It's a good idea to register
multiple fingerprints to safeguard against fingerprint recognition
problems.
Managing fingerprints
Yo u c a n e d i t o r d e l e t e r e g i s t e r e d f i n g e r p r i n t s .
1. Tap t he Home button > swipe left, if necessary > tap Settings >
Fingerprints & security > Fingerprints.
2. Enter your unlock sequence.
3. From the registered fingerprints list, tap a fingerprint to rename it. To
delete it, tap the Delete icon .
Unlocking the screen with a fingerprint
When enabled, you can unlock the screen and/or view locked content using
your fingerprint.
1. Tap t he Home button > swipe left, if necessary > tap Settings >
Fingerprints & security > Fingerprints.
2. Enter your unlock sequence.
3. On the Fingerprints settings screen, enable the following switches as
desired.
Screen lock: Unlocks the screen with a fingerprint.
!
Content lock: Unlocks content with a fingerprint.
!
NOTE To e n ab l e t h e C o n te n t l o ck s wi t ch , yo u 'l l ne e d t o se t up t h e Content lock setting (on
the Fingerprints screen) with a pattern or a password.
41
Page 44

The Basics
42
Fingerprints & security settings
The Fingerprints & security settings include managing fingerprints
(recording, naming, removing, etc.), setting content lock, encryption, SIM
card lock, password visibility, phone administration, credential storage, trust
agents, Screen pin, and app usage access.
Ta p Fingerprints, then enter your unlock sequence to manage your
!
stored fingerprints, enable screen unlock with your fingerprint, enable
content access with your fingerprint, and enable available payments.
NOTE If your phone doesn’t have a default payment app, go to the Play Store and search
for availa ble payment a pps.
Page 45

The Basics
Multi-Tasking
Multi-window
The Multi-window function splits the screen to enable two app windows to
be active at the same time (multi-tasking). This allows you to use drag and
drop interaction within your recently used apps.
Activating the Multi-window function
The Multi-window function is activated within your open apps.
1. Tap t he Home button > Recent apps button > the Multi window
icon (displayed on one of your compatible open apps), then tap the
other app you want to use.
OR
While using an app, touch and hold the Recent apps button , then tap
an app from your recently-used apps list.
43
NOTE The Multi-window icon will only be displayed on apps that are compatible with
the Multi-window function.
Overview screen
The Overview screen provides a preview of your recently-used apps. To
view the list of recently-used apps, tap
.
Page 46
Connecting to Networks and Devices
44
Wi-Fi
With Wi-Fi, you can use high-speed Internet access within the coverage of
the wireless access point (AP). Enjoy wireless Internet using Wi-Fi, without
extra charges.
Connecting to Wi-Fi networks
To use Wi-Fi on your phone you need to access a wireless access point or
‘hotspot’. Some access points are open and you can simply connect to
them. Others are hidden or use security features. You must configure your
phone to be able to connect to them. Turn off Wi-Fi when you’re not using it
to extend the life of your battery.
Tu r n i ng W i - Fi o n a n d co n n e c t i n g t o a Wi - F i n e t wo r k
1. Tap t he Home button > swipe left, if necessary > tap Settings >
Wi-Fi.
2. Ta p t he Wi-Fi switch to turn Wi-Fi on and start scanning for
available Wi-Fi networks.
3. Ta p SEARCH to see a list of active and in-range Wi-Fi networks.
Secured networks are indicated by a lock icon.
!
4. Ta p a n et wo r k to c on ne c t to i t.
If the network is secured, you're prompted to enter a password or
!
other credentials. (Ask your network administrator for details.)
5. The Status Bar displays icons that indicate your Wi-Fi status.
Wi-Fi Direct
Wi-Fi Direct provides a direct connection between Wi-Fi enabled devices
without requiring an access point.
Tu r n i ng o n Wi - F i D i r ec t
1. Tap t he Home button > swipe left, if necessary > tap Settings >
Wi-Fi.
2. Ta p t he Menu icon > Advanced Wi-Fi > Wi-Fi Direct.
NOTE When in this menu, your device is visible to other visible Wi-Fi Direct devices nearby.
Page 47

Connecting to Networks and Devices
Bluetooth
You can use Bluetooth to send data by running a corresponding application,
but not from the Bluetooth menu as on most other mobile phones.
NOTES t LG is not responsible for the loss, interception, or misuse of data sent or received
Turning on Bluetooth and pairing your phone with a Bluetooth
device
Yo u m u s t p a i r y o u r p h o n e w i t h a B l u e t o o t h d e v i c e b e f o r e y o u c o n n e c t t o i t .
1. Tap t he Home button > swipe left, if necessary > tap Settings >
Bluetooth.
2. Ta p t he Bluetooth switch to turn Bluetooth on and search for the
devices within your phone's range.
3. Choose the device you want to pair with from the list.
Once pairing is successful, your phone will connect to the device.
Send data using the Bluetooth wireless feature
1. Open the item you want to send, then tap the Sharing icon .
OR
To uc h a n d h o l d t h e i t em yo u wa n t t o se n d , t h en s el e c t Share.
OR
Open the item you want to send, then tap the Menu icon > Share.
2. Ta p Bluetooth to share via Bluetooth.
NOTE The meth od for select ing an optio n may var y by data t ype.
via the Bluetooth wireless feature.
t Always ensure that you share and receive data with devices that are trusted and
properly secured. If there are obstacles between the devices, the operating
distance may be reduced.
t Some devices, especially those that are not tested or approved by Bluetooth SIG,
may be incompatible with your device.
45
3. Search for and pair with a Bluetooth-enabled device.
Page 48

Calls
46
Placing and Ending Calls
The Phone app allows you to dial phone numbers manually or make calls
from your phone’s memory. Manually dial calls using the Dial tab. Dial from
your phone’s memory using the Recent tab, the Contacts tab, or the
Groups tab.
To o p e n t h e P h o n e a p p
Ta p th e Home button > the Phone icon .
!
Moving between the Phone app tabs
Ta p an y of t he Ph on e ap p t ab s (D i al , Re ce nt , C on ta ct s , an d Gr ou p s) a t th e
top of the screen to view that tab. You can also swipe the screen
horizontally to scroll to the other tabs. The current tab is displayed with an
underlined white line.
To p l a c e a c a l l b y d i a l i n g
1. Tap t he Home button > the Phone icon > Dial tab.
Dial Tab
Displays the dialpad.
Call Button
Tap here to dial the number that
you ente red manually.
Voi ce Di al er Bu tto n
Tap h e re t o di al by s ay in g th e
number.
Delete Button
Tap here to delete incorrect
number(s) (appears after you
begin entering numbers).
Tou c h a n d h o ld
the plus ( + ) symbol to dial an
international number.
Message Button
Tap here to send a message to
the number that you entered.
Voi cem ai l But to n
Tap here to access your
voicemai l feature.
2. Use the dialpad to enter the number you want to call.
Ta p th e Delete button to erase digits one by one (or touch and hold
!
it to erase the entire number).
to enter
Page 49

Calls
To d i a l a n i n t er n a ti o n al n um b e r, t o u ch an d ho l d to enter the plus
!
(+) symbol. Then enter the international prefix for the country, followed
by the full phone number.
3. Ta p t he Call button (on the dialpad) to dial the number that you
entered.
Press the Vo lu me buttons to adjust the call volume.
!
Use the on-screen buttons to enter additional numbers, add another
!
call, use the speakerphone, end the call, and other options.
You can use other phone features while the call is underway (however
!
you can’t use mobile data during a call). If you open another app, the
Ongoing call portal appears on the screen for the duration of the call
to easily navigate back to the Call screen.
You can make high-definition voice and video calls, and surf the web while
you talk on the phone, when you add Advanced Calling to your line.
Visit verizonwireless.com/AdvancedCalling to learn how.
To e n d a c a l l
Simply tap the End button on the Call screen to end the call.
!
If you accessed other device functions while the call was in progress, there
are several ways to return to the Call screen to end the call.
Ta p th e Ongoing call portal.
!
Ta p th e Home button , then tap the Phone icon .
!
Open the Notifications panel and tap .
!
NOTE
Yo u c a n a l s o p r e s s t h e Power/Lock button
featu re in the Ca ll se ttings (tap the Menu icon > Call settings > Answer and end
calls > enable the End calls with the Power key switch).
to end the call, if you activated this
47
Page 50

Calls
48
Calling numbers in your phone’s memory
You can place calls using information stored in your phone. Anywhere you
see a Call icon
next to a number, tap it to automatically dial it.
Speed dialing
If you set up Speed dials in the Contacts app, you can dial a number by
simply touching and holding the Speed dial number on the dialpad.
Ta p th e Home button > the Phone icon > Dial tab, then touch and
!
hold the Speed dial number (tap the first number, then touch and hold
the second number for 2-digit speed dials).
Direct dialing
A Direct dial widget is like a speed dial button on your Home screen. Tap it
to automatically call the number you set (for example, your home phone
number).
To p l a c e a D i r e c t d i a l w i d g e t o n y o u r H o m e s c r e e n
1. Tou c h a n d h o ld a n e m pt y ar e a on yo u r H o m e s c re e n .
2. Ta p t he Widgets icon .
3. Ta p Contacts and then touch and hold Direct dial and drag it to the
desired location on the Home screen.
4. Ta p t he c on t ac t in y ou r C on ta c ts l is t.
Page 51

Calls
Answering or Rejecting Calls
When you receive a phone call, the Incoming call screen opens with the
caller ID and any additional information about the caller that you’ve saved in
the contact's entry. All incoming calls are recorded in the Recent tab.
To a n s w e r a c a l l
If the screen is unlocked, simply tap the Answer button .
!
If the screen is locked, swipe the Answer icon in any direction to
!
answer the call.
If you were already on a call, tap the Answer button which places
!
the first call on hold and connects the new call.
NOTE To s i le n c e t h e i n co m i ng c al l ri n g er , p r e ss e it h e r o f t h e Vo lu me buttons.
Swipe the Answer
Tap t h e An swer
button to answer
the call.
Unlocked Screen Locked Screen
icon in any direction
to answer the call.
49
Page 52

Calls
50
To i g n o r e a c a l l a n d d i v e r t i t t o V o i c e m a i l
If the screen is unlocked, simply tap the Ignore button .
!
If the screen is locked, swipe the Ignore icon in any direction to
!
ignore the call.
The caller is sent directly to your Voicemail box to leave a message.
!
Tap t h e Ignore button
to ignore the call and
send the caller
directly to your
voicemail box to leave
a message.
Tap t h e Ignore with
message button to
send a quick message
to the caller and
forward them to your
voicemai l.
NOTE To s i le n c e t h e i n co m i ng c al l ri n g er , p r e ss e it h e r o f t h e Vo lu me buttons.
Unlocked Screen Locked Screen
Swipe the Ignore
with message icon in
any direction to send
a quick message to
the caller and forward
them to your
voicemai l.
Swipe the Ignore icon
in any direction to
ignore the call.
To i g n o r e a c a l l a n d s e n d a t e x t m e s s a g e
To display the Ignore with message option on the Incoming call screen,
enable it in the Phone app's Call settings menu.
1. Tap t he Home button > the Phone icon > the Menu icon >
Call settings.
2. Ta p Call blocking & Ignore with message > Allow ignore with message
switch to toggle it On (blue).
TIP Tap Allow ignore with message to manage your text message choices.
NOTE This feature can only be used to send a message to another mobile phone. It's not
applicable to incoming landline calls.
Page 53

Calls
Work ing w ith the Recent Tab
The Recent tab records all of the calls you’ve dialed, received, missed, or
ignored. It offers a convenient way to redial a number, return a call, or add a
number to your Contacts.
To o p e n t h e R e c e n t t a b
Ta p th e Home button > the Phone icon > the Recent tab, if
!
necessary.
The Recent tab lists your calls chronologically by phone number and call
type. The number in parenthesis indicates the number of calls recorded
for that phone number and type.
Recent Ta b
Tap t o d is pl ay t he
history of all of your
calls.
Call Icon
Tap to call this
phone number.
Viewing call entry details
Open the Recent tab, then tap an entry to view all of the entries for that
phone number and call type. Each one includes the call type (received
dialed , missed , and ignored ), the date and the time of the call.
Filtering your list of calls
To v i e w a sp e c if i c c a l l l i st , fr o m t h e Recent tab, tap the Menu icon , then
tap Filter. Tap the call type you want to view.
Ta p th e Back button
to return to the Recent tab screen.
,
51
Page 54

Calls
52
To d i a l a n u m b e r i n t h e R e c e n t t a b
From the Rec ent tab, ta p th e Call icon at the right of the call entry.
!
From the Recent tab, tap the image to the left of the call entry to view
!
other information saved in your phone’s memory for that contact. Tap a
phone number to dial it.
TIP To i n se r t a n ar e a c o d e w h en y ou ' r e t r av e li n g , t o u ch a n d h o l d t h e e n tr y , t h en t a p
Copy number in the context menu. Change to the Dial tab, touch and hold the
phone number field, tap PAS TE , then edit the number as necessary before tapping
the Call button
.
Clearing your Recent calls
Yo u c a n d e l e t e t h e e n t i r e l i s t o f R e c e n t c a l l s a t o n c e o r s e l e c t i v e l y d e l e t e
entries.
1. Open the Recent tab.
2. Ta p t he Menu icon .
Ta p Clear to select entries to remove from the list. Checkmark the
!
entries to delete, tap CLEAR, then CLEAR to confirm.
Ta p Clear all to remove all of the entries from the list. Tap CLEAR to
!
confirm you want to delete the entire list.
NOTE You can also select a specific number to be deleted. Touch and hold an entry in the
Recent tab. Tap Clear all logs of this number, then tap CLEAR to confirm.
Page 55

Calls
Calling Your Contacts
Instead of manually dialing phone numbers using the dialpad, you can use
your Contacts list to dial quickly and easily.
If you have contacts on the web, they’re synchronized with your phone
when you first synchronize with your Google™ Account.
To c a l l a c o n t a c t
1. Tap t he Home button > swipe left, if necessary > tap the Contacts
icon .
2. Tap the contact you want to call, then tap the contact’s phone number
you want to call.
TIP
Instant List
Instant list is displayed on the Dial tab to help you use the information
stored in your phone without needing to search for it first. Once you begin
entering numbers, Instant list displays entries from your Contacts list or
Recent calls that match the sequence you entered.
Sequence matches
Your phone searches for the entered sequence within your stored phone
numbers. The matching number sequence is displayed within the number in
blue text. The name and type of number (i.e., Mobile, Work, etc.) associated
with the number you entered is displayed above the dialpad. When there
are multiple matches, the Instant list displays the number of matches in
your phone's memory. Tap the Instant list icon
screen to view the entire list of matching entries.
Selecting an Instant list entry
Tap an entry in the Instant list to insert it in the phone number field, then
tap the Call button
If the entry only has one phone number saved, simply tap the Call icon
the entry to dial it.
on the right side of the
to dial it.
next to
53
Page 56

Calls
54
Options During a Call
Camera Button
Tap h e re t o sw it ch t o a v id eo
call.
Bluetooth Button
Tap here to switch between
using a Bluetooth device (blue)
and the phone.
Speaker Button
Tap here to turn the
speakerphone on (blue) or off.
NOTE
Tap t h e Menu icon
on the Call screen to access Contacts.
One-way Camera Button
Tap h e re t o sh ar e y ou r ca me ra .
Keypad B utton
Tap h e re t o di sp l ay t he k ey pa d.
Mute Button
Tap here to mute the
microphone during a call. Blue
indicates it's muted.
Managing Multiple Calls
Contact your wireless service provider to find out which call services are
supported.
To switch between current calls
The current call will be placed on hold and you'll be connected with the
other call. To switch calls, tap the desired call on the screen.
Page 57

Calls
To s e t u p a c o n f e r e n c e c a l l
Contact your wireless service provider to find out whether they support
conference calls and how many participants you can include.
1. Place a call to the first participant.
2. When you’re connected, tap the Add call button on the Call screen.
3. Enter a phone number.
Use the Phone app tabs to select a saved number, then tap the Call
!
icon
.
OR
Use the buttons on the dialpad to manually enter a number, then tap
!
the Call button
4. After you’re connected, tap the Merge calls button on the Call screen.
The participant is added to the conference call and the Call screen
indicates a conference call is active.
.
Merge Calls Button
Tap here to merge the separate
calls into a conference call.
55
Page 58

Calls
56
Listening to Your Voicemail
When you have a new voicemail message, the Voicemail notification icon
appears in the Status Bar. If you haven’t set up your voicemail number,
or if you need to change it, you can do that in the Call settings. Tap the
Menu icon
To l i s t e n t o y o u r V o i c e m a i l
Open the Notifications panel and tap the New voicemail icon .
!
OR
Ta p th e Home button > swipe left, if necessary > tap the Ver izo n
!
folder > Vo ic e ma i l .
OR
Ta p th e Home button > the Phone icon > the Dial tab > the
!
Voi ce mail button
To s e t u p y o u r Vo i c e m a i l
Typically, your carrier’s voicemail system guides you through the process of
listening to and managing your voicemail. The first time you call your
voicemail, it also guides you through the process of recording greetings,
setting a password, etc.
1. Tap t he Home button > the Phone icon > the Dial tab.
2. Dial *86 on the dialpad to call to your voicemail box.
3. Fo llow t he setup tutorial.
in the Phone app (from the Dial tab or the Recent tab).
.
Enter a password.
!
Record a voice signature and greetings for your voicemail box.
!
Page 59

Communication
Contacts
The Contacts app allows you to store names, phone numbers, and other
information in your phone’s memory. Entries are listed alphabetically. You
can scroll through the list or select the Groups tab.
Use the Contacts app to add, view, and communicate with your friends,
acquaintances, and associates.
To o p e n y o u r C o n t a c t s a p p
Ta p th e Home button > swipe left, if necessary > tap the Contacts
!
icon
.
NOTE Yo u c a n a l s o t a p t h e Contacts tab from the Phone app.
If you don't have any contacts in your Google Account or on your SIM card,
hints will be displayed to help you start adding contacts to your phone.
Contacts list
When you open the Contacts app, your contacts list is displayed. The
alphabet is displayed vertically along the right side of the screen. You can
drag along it or tap the letter you want.
In Case of Emergency contacts is displayed above your list of contacts. Add
up to 5 emergency entries from your contacts list. These are entries that
someone can contact on your behalf in the event of an emergency,
whether or not the phone is locked.
To a d d I C E e n t r i e s
1. Tap t he Home button > swipe left, if necessary > tap the Contacts
icon .
2. Ta p In Case of Emergency contacts (at the top of the list).
3. Ta p t he Add ent ry icon .
4. Checkmark the entry (or entries) to add to your ICE list, then tap ADD.
57
Page 60

Communication
58
ICE Information
In addition to your emergency contacts, you can enter personal information
about you (such as health record, allergies, medications, special
instructions, etc.) that can be accessed in case of an emergency. To add
your personal information:
1. From the eme rgency contacts screen, t ap t he Information icon .
2. Ta p t he Add icon , enter your information, then tap SAVE.
To s e a r c h f o r a c o n t a c t
1. Tap t he Home button > swipe left, if necessary > tap the Contacts
icon
.
2. Ta p t he Search contacts box and enter the contact name. Matches are
displayed as you begin to type.
Searching your online contacts simultaneously
You can search for your contacts simultaneously from all of your online
accounts.
To s e t y o u r p h on e to s ea r ch si m u lt a n e ou s l y, o p e n t h e Contacts app, tap the
Menu icon
> Contacts settings > enable the Online search switch.
To o p e n y o u r g r o u p s l i s t
Open the Contacts app and tap the Groups tab.
!
Groups displays your contacts by category (at the top of the screen) and
your accounts (at the bottom of the screen).
NOTE
Tap t h e Menu icon
screen, and Contacts settings.
from the Groups tab to access Share, Change order, Default
Page 61

Communication
To v i e w d e t a i l s a b o u t a c o n t a c t
1. Open the Contacts app.
2. Ta p t he c on t ac t wh os e d et ai l s yo u wa nt t o v ie w.
3. The information you entered for the contact is displayed. The following
options are available (depending on the types of information saved).
The Dial icon places a call to the number.
!
The Message icon starts a message.
!
The Email icon starts an email.
!
The Menu icon accesses the following menu options: Share,
!
Forward, Merge, Refresh, Back up, Add to Home screen, and All
calls to voicemail.
Adding Contacts
You can add contacts on your phone and synchronize them with the
contacts in your Google™ Account, Microsoft Exchange account, or other
accounts that support syncing contacts.
Since your contacts can come from a variety of sources, the Contacts app
attempts to join new information with existing similar contact entries to
create a single entry. You can also manage that process manually by joining
or separating entries.
59
Page 62

Communication
60
To a d d a n e w c o n t a c t
1. Open the Contacts app.
2. Ta p t he New contact icon .
3. Tap the Accounts field to select the where you want to save the contact,
if necessary.
NOTE To c ha n g e t h e a c co u n t l a te r, e di t th e en t r y, t ap t he a cc o u nt , th e n t a p th e ac c o un t
4. Enter the contact’s name.
5. Tap a category of contact information, such as phone number or email
address, to enter that kind of information about your contact.
6. Pe rsonaliz e th e co ntact entry.
7. When you’re finished, tap SAVE.
you want it assigned to.
Ta p a ca te go r y’s Add icon to add more than one entry for that
!
category. For example, in the phone number category, enter a work
number and add a home number. Tap the label field to the right of the
entered information to open a drop-down menu of preset labels. For
example, Home, Work or Other for a phone number.
Ta p Add another field to add additional fields including Phonetic
!
name, Organization, IM, Notes, Nickname, Website, and Events.
Set the group this contact belongs in.
!
Set a ringtone to identify calls from this contact.
!
Set a message alert sound to identify notifications from this contact.
!
Ta p th e Image icon to select a picture to identify the name in your
!
list of contacts and in other apps.
Page 63

Communication
Editing a Contacts entry
1. Open the Contacts app, then tap the contact entry you want to edit.
2. Ta p t he Edit icon .
3. Edit the entr y as needed, then tap SAVE.
Merging and separating contacts
When you have two or more entries for the same contact, you can merge
them into a single entry. You can also separate contacts that were merged.
1. Open the Contacts app, then tap the contact entry you want to join with
another entry.
2. Ta p t he Menu icon , then tap Merge.
3. Select the entr y you want to merge.
Once entries have been merged, Separate is included in the options menu
to allow you to separate the joined entries.
1. Open the Contacts app, then tap the contact entry you want to separate.
2. Ta p t he Menu icon , then tap Separate.
3. Ta p SEPARATE to confirm.
Setting Speed Dials
Designating multiple speed dials
1. Open the Contacts app, then tap the Menu icon .
2. Ta p Speed dial.
3. Ta p t he s pe e d di al n um b er t o as s ig n, t he n t ap t he Co nt ac t e nt ry fo r it .
4. Repeat selecting a speed dial number and the desired Contact entry as
necessary.
61
Page 64

Communication
62
Tr a ns f e r t y p e
When you want to send your contacts entries, you can combine them all
into one file or you can send separate vCard files.
To s e t t h e t r a ns f er t y pe , fr o m t h e Contacts app, tap the Menu icon
Contacts settings > Tra n sf er ty pe .
Send as one file: This setting combines all of your contacts into one file.
!
It allows a faster transfer, but some devices can’t receive contact
information sent using this option.
Send separately: This setting sends each contact as a separate vCard
!
file. It allows all devices to receive your files.
Messaging
Three apps are preloaded on your phone that allow you to send messages:
the Messaging app
as your default messaging app which will enable you to use all of app's
features.
To o p e n t h e M e s s a g i n g a p p
Ta p th e Home button > swipe left, if necessary > tap the LG folder
!
> Messaging .
Using the Messaging app
To use the Messaging features, you must set it as the default messaging
app.
NOTE You can view your messages in the Messaging app without setting it as your default
Ta p th e New message icon to start a new text or multimedia
!
message.
app, but you can't create a message.
and the Message+ app but only one can be set
>
Page 65

Communication
Tap h e re t o cr ea t e a ne w me ss a ge .
Ta p an e xi st in g m es sa ge t h re ad t o o pe n it .
!
Ta p th e Delete icon to delete message threads.
!
Ta p th e Menu icon to access Search and Settings.
!
NOTE Pinch in (or spread apart) on your list of messages to resize it for easier viewing or
navigation.
To d e l e t e a m e s s a g e t h r e a d f r o m t h e M e s s a g i n g w i n d o w
1. Tou c h a n d h o ld t he m es s a ge t hr e a d.
2. Ta p Delete in the context menu that opens.
3. Ta p DELETE to confirm you want to delete the message thread.
To s e n d a t e x t m e s s a g e
1. Open the Messaging app (set it as your default, if necessary), then tap
the New message icon .
2. Enter the recipient(s) in the To box.
Ta p th e Contacts icon , select one or more entries from your
!
Contacts list, then tap DONE.
Enter a name (or a partial number), then tap a suggestion displayed
!
from your Contacts list.
Enter a number manually for phone numbers not in your Contacts list.
!
63
Page 66

Communication
64
3. Ta p t he m es s ag e bo x, t he n e nt er y ou r m es sa ge .
To B o x
Tap here to enter the
recipient(s) manually.
Contacts Icon
Tap here to enter the recipient(s) by
selecting from entries in your
Contacts list.
Message Box
Tap here to enter your
message.
Attachment Icon
Tap here to add an attachment to
your mes sage.
If you tap the Back button while composing a message, it’s
automatically saved as a draft. The Draft icon on the right side of the
message thread indicates a pending draft message to the recipient. Tap
the message thread to resume composing it.
4. Ta p t he Send button to send the message.
Your message is displayed and responses appear in the same window,
creating a message thread with that contact.
To c r e a t e a n d s e n d a m u l t i m e d i a m e s s a g e
1. Open the Messaging app (set it as your default, if necessary), then tap
the New message icon .
2. Enter the recipient(s) in the To box.
Ta p th e Contacts icon , select one or more entries from your
!
Contacts list, then tap DONE.
Enter a name (or a partial number or email address), then tap a
!
suggestion displayed from your Contacts list.
Enter a number or email address manually.
!
3. Ta p t he m es s ag e bo x, t he n e nt er y ou r m es sa ge .
4. Ta p t he Menu icon > Add subject to add a message subject.
The subject text appears above the body text in bold letters.
Page 67

Communication
5. Ta p t he Attachment icon to open a dialog box where you can choose
the type of media file to attach to the message.
NOTE
6. Ta p t he Send MMS button.
To d e le t e a n at t a ch me n t , s i mp l y t a p th e Delete icon
on the attached file.
To r e s p o n d t o m e s s a g e s y o u r e c e i v e
While viewing the received message, tap the message box at the bottom
of the screen, complete your response as necessary, then tap the Send
button.
Changing Messaging Settings
To c h an g e t h e M e s sa g i ng s et t in g s , o p en t he Messaging app (set it as
!
your default, if necessary), tap the Menu icon > Settings. Messaging
settings include setting notifications, quick reply text, storage, link &
send, and more.
The following account types are supported: Microsoft Exchange, Outlook,
Ya ho o ! M a i l, AO L Ma i l , Ve ri z o n, a nd o th e r a c c ou n t s.
To o p e n t h e E m a i l a p p
Ta p th e Home button > swipe left, if necessary > tap Email .
!
The first time you open the Email app, a setup wizard opens to help you
add an email account. After the initial setup, the Email app displays the
contents of your Inbox.
NOTE Yo u c a n a l s o a d d y o u r e m a i l a c c o u n t ( s ) u s i n g t h e Accounts menu in the Settings
The Accounts list
The Menu displays all of your email accounts.
Open the Email app. Tap the Email Menu icon
your email accounts and folders. You can also swipe horizontally from the
left side of the screen to open the Email Menu to view your Accounts list.
app.
to display a list of all of
65
Page 68

Communication
66
Each account name is displayed in an identifying color. Tap an account to
!
toggle between displaying and hiding its folders. The number of unread
mail is displayed next to each account's Inbox.
Using the Email app
Ta p th e Compose icon to compose a new message.
!
Ta p th e Email Menu icon to switch between your email accounts and
!
folders.
To uc h a n d h o l d a me s s ag e , t h e n y ou c an t a p MARK AS READ/UNREAD,
!
MOVE TO, or DELETE. You can also tap the Select all icon to select all
of your messages at once, then tap the action to apply to all of them.
Swipe a message off the screen to the left or right to delete the
!
message.
Ta p th e Menu icon to open the options menu to access Sort by,
!
QSlide, and Settings.
Drag downward from the top of the Inbox list to refresh the list.
!
Message search
Ta p th e Search icon , enter the text you’re looking for, then tap one of the
displayed results.
Reading Your Email
You can read your email from the Inbox, or from other folders within each
individual account. Tap a message entry to open it.
NOTE If you enable the Split view setting, the Email app is displayed in a split-screen
To r e a d a n e m a i l
When viewing the combined view for your Inboxes, the color displayed to
the left of each message corresponds with each account's identifying color.
1. Open the Email app, then tap the Email Menu icon .
format when the phone is held horizontally. Your Inbox (or any other selected folder)
is displayed on the left side of the screen. Tap an email to open and display its
contents on the right side of the screen.
Page 69

Communication
2. Ta p Inbox under Combined view to display all of your messages from all
of your accounts together or tap Inbox under the account you want to
view.
To a d d a n a c c o u n t
From the Email app, tap the Menu icon > Settings > A dd a ccou nt.
!
Then, configure the new email account settings as necessary.
Changing Email settings
To c h an g e t h e E m a il s et t in g s , o p en t he Email app, tap the Menu icon
!
> Settings.
Other Settings
The Other Settings menu includes the following options: Preview, Split
view, Save to, Ask before deleting, Auto-advance, and Load images.
Accounts
Tap an account in the list to modify the settings that apply only to that
account including Account name, Signature, Edit signature, Notifications,
Notification sound, Vibrate, Auto-sync email, Sync schedule, Message
size limit, Always Cc/Bcc me, Incoming server settings and Outgoing
server settings.
67
Page 70

Communication
68
Voicemail
The Voicemail app allows the management of voicemail directly from the
phone rather than accessing voicemail via traditional methods.
Voicemail can display a list of your messages allowing you to choose which
message(s) to listen to or delete, without having to dial into your mailbox
and listen to voice instructions or prior messages.
To b e a b l e t o u s e Vo i c e m a i l
1. Tap t he Home button > swipe left, if necessary > tap the Ve ri zon
folder > Voi ce ma il .
NOTE Listening to voicemail and setting up your voicemail service depends on subscription
2. The first time you access the Voicemail app, you'll have to subscribe to
the Visual Voicemail service to be able to use it.
3. After subscribing to the Visual Voicemail service, you'll be prompted to
enter the password. To change the password, call voicemail (dial *86).
4. After entering the password, your voicemail entries will be displayed in
your Inbox.
While viewing the voicemail list, you can select an entry (see step 5). For
additional options, tap the Menu icon
available: Search, Save, Set as heard, Sort by, Saved Voicemail, Refresh,
and Settings.
5. Ta p a v oi ce ma i l en tr y t o li st e n to i t.
to the Visual Voicemail service. When you tap the Voicemail button
dialpad, and you've subscribed to the Visual Voicemail service, the Visual Voicemail
app will be launched.
.The following options are
on the
Page 71

Entertainment
Camera
You can use the Camera app to take and share pictures and videos. Your
phone has an integrated standard camera and wide-angle camera that lets
you capture sharp pictures and videos. It has many state-of-the-art features
such as gesture shots, interval shots, burst shots, still photo capture while
recording video, and much more. These features will allow you to easily and
creatively capture your world.
NOTE Be sure to clean the protective lens cover with a microfiber cloth before taking
To o p e n t h e C a m e r a a p p
Ta p th e Home button > Camera .
!
TIP
NOTES
Switching between cameras
Yo u c a n s w i t c h b e t w e e n u s i n g t h e f r o n t a n d b a c k c a m e r a .
On the camera screen, tap the Lens Swap icon
any direction to switch between the front and back camera.
pictures. A lens cover with smudges from fingers can cause blurry pictures with a
"halo" effect.
With the backlight off, press the Vol um e D ow n button
activate the Camera app (when enabled in the Settings app).
t If the battery level is lower than 5%, charge the battery before using the camera.
t Before taki ng a photo o r recording a video, wipe the camera l ens with a m icrofiber
cloth. If your finger comes into contact with the camera lens, you may get blurry
photos.
t Images included in this user guide may be different from the actual device.
t Photos and videos can be viewed or edited from the Gallery app.
twice to immediately
or swipe the screen in
69
Page 72

Entertainment
70
Camera mode
You can select from a variety of camera modes and options to take your
photos and record videos.
1. Launch the Camera app.
2. To t a ke a p h ot o , ta p th e Capture button . To record a video, tap the
Record button .
Lens Swap – Switches between the rear-facing camera lens and the front-facing camera lens.
Flash – Indicates the current flash mode. Tap it to toggle through the flash modes.
Gallery – Accesses your Gallery to view your saved
photos and videos. Tap it to display the last photo or
video you captured.
Record – Starts recording a video.
Capture – Takes a picture.
Back – Closes the Settings or exits the Camera app.
Settings – Displays the settings for the Auto camera mode. See Customizing the camera
options.
Film Effect – Apply a film filter effect.
Ta k i n g a p h ot o
1. Select a camera mode, and tap the subject to focus the camera on it.
2. Ta p t he Capture button to take a photo.
Yo u c a n a l s o p r e s s t h e Vo lum e Do wn or Vo lum e Up button to take
!
a photo.
NOTE When the screen is turned off or locked, start the camera by pressing the Volume
Recording a video
1. Select a camera mode and tap the subject to focus the camera on it.
2. Ta p t he Record button .
To t a k e a ph o t o w h il e re c o rd i n g a vi d e o, t a p t h e Capture button .
!
button twice. Tap the Home Button > Setti ngs > Shortcut keys and
Down
enable the Open Capture+/Camera option.
Page 73

Entertainment
To p a u se t he r ec o r di n g , t a p t h e Pause button . To resume the
!
recording, tap the Resume button
.
3. Ta p t he Stop button to end the video recording.
Customizing the camera options
Yo u c a n c u s t o m i z e a v a r i e t y o f c a m e r a o p t i o n s t o s u i t y o u r p r e f e r e n c e s .
Ta p Settings
NOTE Avai labl e op tion s va ry depe ndin g on the se lect ed c amer a (f ront or back cam era) and
Photo size Sets values for aspect ratio and size of your photos.
Video resolution Sets values for resolution and size of your videos.
HDR
Timer
Cheese shutter Enables taking photos with voice commands.
Ta g l o c a ti o n s Saves the image with GPS location data.
Grid
Storage
Simple view Hides all menus from the camera screen.
on the camera screen.
the selected camera mode.
Sets compensation effects to produce photos in vivid
colors, even when they are taken against the light.
These functions are provided by the high dynamic
range (HDR) technology equipped in the device's
camera.
Sets the timer to automatically take photos after a
specified period of time.
Displays guide grids so that you can take photos or
record videos based on the horizontal and vertical
reference lines.
Select if you want to store the pictures and videos in
the Internal storage or SD card. (Available when a
memory card is inserted.)
71
Page 74

Entertainment
72
Additional options on the front camera
Selfie shot
Save as flipped
Sets how you want to take your selfies (Gesture or
Auto). Available from the front-facing lens only.
Enables the selfie to be saved as a mirror image of
the screen view. Available from the front-facing lens
only.
Burst shot
Yo u c a n t a k e c o n t i n u o u s s h o t s t o c r e a t e t h e i l l u s i o n o f m o v i n g p i c tu r e s .
In the camera viewfinder, touch and hold the Capture button
Continuous shots are taken at a fast speed while the Capture button
!
is held down.
.
Simple view
In the camera viewfinder, tap the Settings > Simple view to hide the
menus on the camera screen. Tap the Redisplay icon
again.
to display them
Page 75

Entertainment
73
Selfie shot
Yo u c a n u s e t h e f r o n t c a m e r a t o v i e w y o u r f a c e o n t h e s c r e e n a n d t a k e
selfies. The camera settings allow you to set how selfies are taken.
Gesture shot
Yo u c a n t a k e s e l f i e s u s i n g g e s t u r e s .
Show your palm to the front camera and then clench your fist.
Yo u c a n a l s o c l e n c h y o u r f i s t a n d t h e n o p e n i t t o w a r d s t h e f r o n t c a m e r a .
!
In three seconds, a photo is taken.
NOTES
t To u se t hi s fe a tu r e, s wi t ch t o t h e f r on t ca m e ra , th e n t a p t h e Se ttings icon >
Selfie s hot > Gesture shot.
t Make sure that your palm and fist are completely within the recognition area so
that the camera can detect them.
t This feature m ay not available while using some of the camera features .
Page 76

Entertainment
74
Auto shot
You can use the face detection feature to take selfies easily and
conveniently. You can set the device so that, when you look at the screen,
the front camera detects your face and takes a selfie automatically.
The white colored guide frame appears when the front camera detects
!
your face. If the subject within the guide frame stops moving, the guide
frame color turns blue, then the camera takes a photo.
NOTE
To u s e t h is fe a t ur e , s w i tc h t o t h e f r o n t c a me r a , t h en t ap t he Setting s icon >
Selfie s hot > Auto sho t.
Ta k e s e l f ie s u s i n g t h e P o w er / L o c k B u t t o n
You can enable taking selfies by tapping the Power/Lock button. Tap the
Home button
keys > enable Tak e a se l f i e i n C a me r a option.
> swipe left, if necessary > tap Settings > Shortcut
Page 77

Entertainment
Interval shot
Yo u c a n t a k e c o n t i n u o u s s e l f i e s .
While using the front camera, touch and hold the Capture button
You can also show your palm to the camera, then clench your fist twice
quickly.
After a short timer delay, four photos are taken at about two-second
!
intervals.
.
Save as flipped
Before taking a photo with the front camera, tap Settings icon > Save
as flipped to flip the captured image horizontally.
75
Page 78

Entertainment
76
Other useful features in the Camera app
Zoom in or out
Yo u c a n u s e z o o m i n o r o u t o n t h e c a m e r a s c r e e n w h i l e t a k i n g a p h o t o o r
recording a video.
On the camera screen, pinch or spread two fingers to zoom in or out,
!
then use the displayed +/- slide bar.
AE/AF lock
You can fix the current exposure level and focus position. Touch and hold
the desired position on the screen to activate it. To turn it off, tap a blank
area on the screen.
Page 79

Entertainment
77
quick share
You can take a picture or record a video and then immediately share it
through an app.
1. Tap t he Home button > Camera , then take a photo or record a
video.
2. Ta p t he quick share icon that appears on the screen to immediately open
its app and use it to share your photo or video. Swipe the icon towards
the center of the screen to display the quick share list of your other
frequently used sharing apps. You can also tap the Menu icon (in the
quick share selections list) to display all of the available sharing apps.
NOTE The apps displayed in the quick share list may vary depending on your use of the
apps installed on your device. For example, if you frequently use the Messaging
app, it will appear as the first quick share choice.
quick share Icon
Tap to use the previewed
app to immediately share
the file or drag towards the
center of the screen to
display additional options.
Menu Icon
Tap here to display all of the
available sharing app s.
Tap here to close the quick
share list.
Page 80

Entertainment
78
Gallery
Open the Gallery app to view albums of your pictures and videos.
To o p e n t h e G a l l e r y a p p
Ta p th e Home button > Gallery .
!
Viewing photos
1. Tap t he Home button > Gallery .
2. Ta p t he a lb u m yo u wa nt , th e n ta p th e p ho to y ou wan t t o vi ew.
Back to the
previous screen.
Add to or remove
from your
favorites.
Editing photos
1. While viewing a photo, tap the Edit icon .
2. Use a variety of effects and tools to edit the photo.
3. Ta p SAVE to save changes.
The edited photo overwrites the original file.
!
To s a ve t he e di t e d p h ot o as a no t h er f il e , t a p th e Menu icon > Save
!
copy.
Access additional
options.
Delete images.
Share images.
Start the camera.
Edit images.
Page 81

Entertainment
Playing a video
Select a video from an album in your Gallery. Playing it using the Videos app
provides the following options.
Add to or remove
from your favorites.
Access additional
options.
Play the video in
a QSlide window.
79
Adjust t he sound
volume.
Rewind th e video.
Pause or play the vide o.
NOTES t To adjust the sound volume, drag up or down along the right side of the video
screen.
t To adjust the screen brightness, drag up or down along the left side of the video
screen.
Lock or unlock
the screen.
Fast-forward the
video.
Deleting files
Yo u c a n d e l e t e a f i l e u s i n g o n e o f t h e f o l l o w i n g o p t i o n s :
To uc h a n d h o l d a fi l e i n an a lb u m , t a p Delete, then tap DELETE to
!
confirm.
Ta p th e Delete icon in an album, select a file (or files), tap DELETE,
!
then tap DELETE to confirm.
Ta p th e Gallery Menu icon > Tr as h icon to access the files you
!
deleted within the last 7 days. You can move any of these files back to
any of your albums.
Sharing files
Yo u c a n s h a r e a f i l e u s i n g o n e o f t h e f o l l o w i n g o p t i o n s :
On the photo or video screen, tap the Share icon to share the file
!
using the method you select.
While viewing a video, tap the Menu icon > Share to share the file
!
using the method you select.
Page 82

Entertainment
80
Ta p th e Share icon from the Albums screen to select one or more
!
files and share using the method you select.
Assign Pictures
After taking a picture, assign it as a picture ID for a Contacts entry or as the
background image (wallpaper) for your Home screen or Lock screen.
1. Tap t he Home button > Gallery .
2. Ta p a n al bu m a nd t ap an i ma ge to v ie w it .
3. With the picture displayed, tap the screen > the Menu icon > Set
image as.
4. Select an option.
Contact photo assigns the picture to a Contact entry as a picture ID.
!
Ta p an e nt r y fr om Co nt ac ts , c ro p th e i ma ge , th e n ta p OK to assign the
picture.
Lock screen wallpaper assigns the picture as the background image
!
for your Lock screen. Crop the image, t ap OK, then tap SET to assign
the picture.
Home screen wallpaper assigns the picture as the background image.
!
Crop the image, tap OK, then tap SET to assign the picture.
Wal lpap er assigns the picture as the phone's background image. Tap
!
SET WALLPAPER to assign the picture.
Page 83

Entertainment
Music
Your phone has a music player that lets you play all of your favorite tracks.
To a c c es s th e Mu s i c p l ay e r, t a p th e Home button
necessary > Music .
Return to the previous
Add or d elete favorites .
screen.
> swipe left, if
Display the current playlist.
Access a dditional op tions.
Search for music files.
81
Play in random order.
Adjust t he sound volu me.
Tap to play from the
beginning of the current file/
Double-tap to play the
Tou c h a n d h o ld t o r e wi n d .
previous file/
Select a repeat mode.
Open the Music librar
Tap to play the next file/
Touch and hold to
fast-for ward.
Pause or play.
Playing a song
1. Tap t he Home button > swipe left, if necessary > Music .
2. Select a categor y.
3. Ta p t he s on g y ou w an t to p l ay.
TIP
NOTE
To f i nd a s o n g , y ou c an t a p t h e Sear ch icon
hold the letter the song begins with using the alphabet listed along the right side of
the screen.
Tap t h e Music Menu icon
library, Favorites, Playlists, and Folders.
to select your music file access. Select from Music
at the top of the screen or touch and
y.
Page 84

Entertainment
82
Other Music player options
Touch and hold any song in the Music library to access its context menu
!
which can include: Delete, Set as ringtone, and Details.
Ta p th e Menu icon in the Music library to access its options menu
!
which can include: Cloud, Select to play, Add to playlist, Share, and
Settings.
Tu r n i ng t h e M u si c p l a y e r o f f
To stop the Music player, swipe the Status Bar downward, then tap the
Close icon
NOTES t Some file formats are not supported, depending on the device software.
in the upper-right corner of the Music notification.
t If the file size exceeds the available memory, an error can occur when you open
files.
t Music file copyrights may be protected by international treaties and national
copyright laws. Therefore, it may be necessary to obtain permission or a license to
reproduce or copy music. In some countries, national laws prohibit private copying
of copyrighted material. Before downloading or copying the file, check the national
laws of the relevant country concerning the use of such material.
To u s e a s o n g a s a r i n g t o n e
You can use a song as your phone ringtone, in place of one of the ringtones
that come with the phone.
Touch and hold a song in the Music library list. In the context menu that
!
opens, tap Set as ringtone, then tap Phone ringtone or Caller ringtones.
NOTE If you choose Caller ringtones, tap the contact entry to set it.
Wor king w ith Pl ayl ist s
You can create playlists to organize your music files into sets of songs,
which you can play in the order you set or in a shuffle.
To c r e a t e a p l a y l i s t
1. From the Mus ic lib rar y, ta p th e Music Menu icon , then tap Playlists.
2. Ta p t he New icon .
3. Enter a name for the playlist and tap OK.
4. Select the songs you want to add to a playlist, then tap ADD. The new
playlist is added to your Playlists.
Page 85

Entertainment
To a d d a s o n g t o a p l a y l i s t
1. From the Mus ic lib rar y, ta p th e Menu icon , then tap Add to playlist.
2. Select the song(s) you want to add, tap ADD, then tap the name of the
playlist you want to add it to.
To r e m o v e a s o n g f r o m a p l a y l i s t
1. Open your Playlists using the Music Menu icon , then tap the playlist
you want.
2. Ta p t he Menu icon > Remove from playlist.
3. Select the songs you want to remove from the playlist and tap REMOVE.
To d e l e t e a p l a y l i s t
1. Open your Playlists using the Music Menu icon .
2. To u ch a nd h ol d th e pl a y li s t , t h en t ap Delete in the context menu that
appears.
3. Ta p DELETE to confirm.
To r e n a m e a p l a y l i s t
1. Open your Playlists using the Music Menu icon .
2. To u ch a nd h ol d th e pl a y li s t , t h en t ap Rename in the context menu that
appears.
3. Enter a name, then tap OK.
83
Page 86

To o l s
84
Voice Recorde r
The Voice Recorder app records audible files. Use them to simply remind
you about something you don’t want to forget (like a grocer y list) or record
sound effects that you can attach to a message.
Record a voice memo
1. Tap t he Home button > swipe left, if necessary > tap the To o ls folder
> Voi ce Re co rde r .
2. Ta p t he Record button to start recording, then speak into the
microphone.
3. When you’re finished, tap the Stop button .
The recording is automatically saved to your recordings list.
Storage Icon
Tap h er e t o se le ct wh er e
to save your recording.
Location Button
Tap here add a location
marker for your voice
memo.
List Button
Tap h e re t o vi ew a li st o f
your rec ordings.
Back Icon
Tap here to go back to the
Voi ce Rec or der s cre en .
Tap here to listen to this
voice me mo.
Bookmark Icon
Tap here to bookmark a spot
within your voice memo.
Play Button
Tap here to play (or pause)
your rec ording.
Vol ume B utt on
Tap here to control the
volume.
Voi ce Re cor de r Scr ee n
Recorded Files Play Screen
Events Button
Stop Button
Tap h e re t o st op re co rd in g .
Record B utton
Tap here to start recording a
voice me mo.
Delete Icon
Tap here to select voice
memo(s) to delete.
Menu Icon
Tap here to search for or
share your voice memo(s).
New Recording Icon
Tap h e re t o re co r d a ne w vo ic e m em o.
Tri m I co n
Tap h e re t o tr im th e re co r di ng .
Share Icon
Tap h e re t o sh ar e t he v oi ce m e mo .
Recordin g Bar
Displays the recording playback.
Stop Button
Tap h e re t o st op pl ay ba ck .
Page 87

To o l s
Play a voice memo
1. Tap t he Home button > swipe left, if necessary > tap the To ol s folder
> Voi ce Re co rd er .
2. Ta p t he List button .
3. Ta p t he v oi ce me mo y ou w an t t o pl ay.
4. Use the following options while listening to a voice memo.
Ta p th e Pause button to pause the recording.
!
Ta p th e Stop button to end the playback and return to the
!
Recorded files list screen.
Ta p th e Vo l um e button to increase or decrease the volume.
!
It also allows you to modify all phone volumes.
Ta p on t he r e co rd in g ba r t o li st e n to a s pe c if ic p ar t o f th e re c or di ng .
!
Ta p th e Bookmark icon to mark a place within the recording so you
!
can jump directly to that spot when you play the recording.
Ta p th e Tri m icon to trim away segments at the beginning or end
!
of the recording.
Ta p th e Share icon to share the voice memo using the available
!
choice s.
NOTE Voi ce me mos w ith bo ok mar ks ca n' t b e s ha red .
Managing your voice memos
From the Rec orde d files li st screen:
Ta p th e Menu icon . Tap Share, select the file(s), tap SHARE, then
!
complete the sharing method as necessary.
To uc h a n d h o l d a vo i ce m em o to o pe n a c o n te x t m e nu t o s e le c t Delete,
!
Rename, or Details
.
85
Page 88

To o l s
86
Calculator
Using your calculator
1. Tap t he Home button > swipe left, if necessary > tap the To o ls folder
> Calculator .
2. Ta p t he n um b er b ut to ns a nd t h e fu nc ti o n bu tt on s ( , , or ) as
necessary. The result automatically appears as soon as enough
calculation information is entered.
Drag the green sidebar (on the right side of the screen) to the left to
!
access and enter scientific calculator functions.
To c l e ar i np u t , t a p t h e DEL button. To clear the display, touch and hold
!
the DEL button.
NOTE Turn the device to landscape orientation to expand the calculator to keep the
scientific functions displayed on the screen.
Calendar
Viewing Your Calendar and Events
The Calendar app allows you to track your schedule of events (that you
created or that you’ve been invited to), organized by day, week, month,
year, or agenda. Tap the Calendar Menu icon
access your Tasks list.
When you first set up your phone, you configured it to use an existing
Google Account or you created a new account. The first time you open the
Calendar app on your phone, it displays any existing calendar events from
your Google Account on the web.
to switch calendar views or
Page 89

To o l s
Adding an event to your calendar
1. Tap t he Home Button > swipe left, if necessary > tap Calendar .
2. Ta p t he Calendar menu icon to change the calendar view (Day, Week,
Month, Year, or Agenda), if necessary.
3. Tap the date (or the time in the day calendar view) you want to add an
event to and tap the New event icon .
4. Enter the event name.
5. Ta p t he Location field and enter the location. Check the date and enter
the time you wish your event to start and finish.
6. Enable the All day switch, if applicable.
7. Tap More to enter additional options such as Reminders, Repeat, Repeat
until, Description, Show me as, and Privacy, as necessary.
8. Ta p SAVE to save the event in the calendar.
Added information icons
There are several Calendar icons designed to help streamline event entry by
extracting information (such as dates, addresses, etc.) from other sources
and automatically updating corresponding event fields. In addition, there are
icons you can use to embellish your events with identifying images. Simply
tap one of the following icons (displayed below and next to the Location
field) to apply it to the event.
Allows you to insert a photo.
!
Allows you to insert a saved memo.
!
Allows you to insert a saved t ask.
!
Allows you to insert a saved Pocket file.
!
87
Page 90

To o l s
88
Using Event pocket
Use the Event pocket feature to easily add events to your Calendar. You can
add events using images, text, memos, tasks, location, and also invites and
events from your Facebook account.
1. Open the Calendar app, then tap the Event pocket icon to split the
screen (Calendar on the left and Pocket on the right).
2. Tap a pocket type to view the items saved in it, then drag an item on to
the date you want it added to in your Calendar.
Displays your saved tasks.
!
Display memos and images.
!
3. The event is automatically saved. You can edit the event to add additional
details.
NOTE
While viewing items in the Pocket folder, tap the Add icon
memo, then complete as necessary.
to add an image or a
QSlide for the Calendar app
You can view your month calendar in a QSlide window allowing you to
easily check dates, obligations, etc. while using other apps at the same
time.
1. Open the Calendar app.
2. Ta p t he Menu icon , then tap QSlide to display the month Calendar in
a QSlide window.
Swipe left and right to scroll through the months.
!
Ta p a da te t o v ie w th e ev en ts fo r th at d ay i n y ou r da y ca le n da r.
!
Page 91

To o l s
Clock
You use the Clock app to access the Alarm, World clock, Timer, and
Stopwatch functions. Access these functions by tapping the tabs across
the top of the screen or swiping horizontally across the screen.
Setting an alarm
1. Tap t he Home button > swipe left, if necessary > tap Clock > the
Alarm tab > the Add icon .
2. Set the desired alarm time. Tap the hour (or minutes), then tap the time
you want on the clock graphic. Tap the Keypad icon to set the time
using a keypad instead of the clock graphic. Tap AM or PM as necessary.
3. Set Repeat, Alarm sound, Alarm volume, Alarm with vibration, Snooze
duration, Alarm note, and Puzzle lock.
4. Ta p SAVE.
NOTE To a c ce s s ( a n d c ha n g e) t he a la r m s e tt i n gs f ro m th e al a r m l i st s cr e e n, t a p t h e Menu
Activating your alarm(s)
1. Open the Clock app and tap the Alarm tab (if necessary).
2. Tu r n o n th e sw i t ch on t he r ig h t s i d e o f t h e a l a rm y ou wa n t t o ac t i va t e .
NOTE Tap a n a la rm t im e t o mo di f y th e al ar m . Ta pp in g SAVE will automatically activate the
Setting the World Clock
The World clock tab allows you to set up a list of cities to easily check
current times in other time zones with a quick glance.
1. Open the Clock app, then select the World clock tab.
2. Ta p t he New City icon , search through the available cities, then tap
the one you want.
NOTE A network connection is necessary to search for cities.
then tap Settings .
icon
alarm.
89
Page 92

To o l s
90
Timer
The Timer tab can alert you with an audible signal when a set amount of
time has passed.
1. Open the Clock app, then select the Timer tab.
2. Set the desired time on the timer.
3. Ta p t he Start button to start the timer.
Ta p th e Pause button to pause the timer.
!
Ta p th e Resume button to resume the timer.
!
4. Ta p t he Reset button to reset the timer.
Stopwatch
The Stopwatch tab allows you to use your device as a stopwatch.
1. Open the Clock app, then select the Stopwatch tab.
2. Ta p t he Start button to initiate the stopwatch.
Ta p th e Lap button to record lap times.
!
Ta p th e Pause button to pause the stopwatch.
!
Ta p th e Resume button to resume the stopwatch.
!
3. Ta p t he Reset button to reset the stopwatch.
Page 93

To o l s
File Manager
Use the File Manager app to easily view and manage your folders and files
stored in your phone. When you open File Manager, all of your phone's
internal storage file folders are displayed. To access the file(s) you want,
manually browse by tapping any folder icon (and subsequent folder icons
within each folder), or enter search text by tapping the Search icon
To o p e n t h e F i l e M a n a g e r a p p
Ta p th e Home button > swipe left, if necessary > tap the To o l s folder
> File Manager .
Using File Manager
: Allows you to choose which folders to display. Choose from Internal
!
storage, SD card, and Cloud.
: Allows you to search for files you want by entering text.
!
: Allows you to select folders or files to delete.
!
: Allows you to access New folder, Move, Copy, Share, Compress,
!
View as, Sort by, Show/Hide hidden files, SD card settings, and
QSlide.
Searching in File Manager
Open the File Manager app, select where you want to search (Internal
storage, SD card, or Cloud) if necessary, then tap the Search icon
search for your files or information.
.
to
91
Page 94

To o l s
92
QuickMemo+
QuickMemo+ provides you with the ability to make creative notes using a
variety of options. This advanced notepad feature, unlike other conventional
notepad apps, supports image management and screenshots.
Creating a note
1. Tap t he Home button > swipe left, if necessary > tap the LG folder
> QuickMemo+ .
2. Ta p t he Add icon to create a note, then use the tools and options as
needed.
: Tap to save the note you created.
!
: Tap to undo the most recent action.
!
: Tap to redo the most recently deleted action.
!
: Tap to insert text into your memo.
!
: Tap to draw on your memo. Tap again to select the pen type, size,
!
color, and transparency.
: Tap to erase pen marks you’ve made on the memo.
!
: Tap to select a section of your handwritten memo to modify (e.g.,
!
erase, rotate, expand, shrink, etc.).
: Tap to access additional options.
!
3. Ta p t he Done icon to save the note.
Page 95

To o l s
Writin g notes on a photo
1. Tap t he Home button > swipe left, if necessary > tap the LG folder
> QuickMemo+ .
2. Ta p t he Camera icon to use the Camera function. Tap the Capture
icon to take the photo you want, then tap OK.
The photo is automatically inserted in your note.
!
3. Wr ite notes o n t he photo.
Ta p th e Pen icon to write notes by hand on the photo.
!
Ta p th e T y p e icon to enter text below the photo.
!
4. Ta p t he Done icon to save the note.
Writin g notes on a screenshot
1. While viewing the screen you want to capture, drag the Status Bar
downward and then tap the Capture+ icon in the Quick settings.
The screenshot appears as the notepad background theme. Memo
!
tools appear at the top of the screen.
2. Ta ke no te s as de si re d.
To c r o p a n d s a ve a p o rt i o n o f t h e s c r ee n , t a p and specify a portion
!
with the crop tool.
To a t ta c h a sc r e en s h ot t o t h e n o te p a d a n d e n te r te x t , t a p Ty pe icon
!
.
3. Ta p t he Done icon and save the note to the location you want.
Saved notes can be viewed in either QuickMemo+ or Gallery.
!
To s a ve n ot e s i n th e sa m e l o c at i o n a l l t h e t i me , se l e ct t he Use as
!
default app checkbox and select an app.
NOTE If you add text to the note, it will automatically be changed to a QuickMemo+ file.
93
Page 96

To o l s
94
Managing folders
You can view your notes grouped together by type and easily manage your
memo files.
1. Tap t he Home button > swipe left, if necessary > tap the LG folder
> QuickMemo+ .
2. Ta p t he QuickMemo+ Menu icon and select a menu item:
All memos: View all notes saved in QuickMemo+.
!
My memos: View notes created using QuickMemo+.
!
Capture+: View notes created using the Capture+ option from the
!
Status Bar.
Photo memos: View notes created using .
!
Tr as h: View deleted notes.
!
New category: Adds a new category. Enter a name and select an
!
associated graphic.
: Manages (add, delete, rename, and rearrange) your folder
!
categories. To change the name of a category, tap the category.
NOTE Some folders do not appear when launching QuickMemo+ for the first time.
Disabled folders are enabled and appear when they contain at least one related
note.
Page 97

To o l s
QSlide
The QSlide function enables an overlay window on your phone’s display for
easy multi-tasking. The overlay window can be moved, resized, or made
transparent. QSlide windows can be opened directly from the apps that
support the QSlide function.
To o p e n a Q S l i d e w i n d o w
While using an app that supports QSlide, tap the Menu icon , then tap
!
QSlide.
You can add the QSlide icon to the Home touch buttons bar to allow you
!
to easily use QSlide.
1. Tap t he Home button > swipe left, if necessary > tap Settings >
Display > Home touch buttons > Button combination.
2. Drag the QSlide icon on the bar to add it to the Home touch buttons.
95
Page 98

To o l s
96
Using QSlide
The QSlide function opens the associated app in a window in the
foreground, allowing you to access other apps in the background. It’s
displayed continuously on the screen until you close it.
Ta p to r et ur n t o fu ll w in d ow v ie w.
Slide to adjust the transparency.
Ta p to e xi t th e Q Sl id e fu n ct io n.
Drag to adjust the size of the QSlide window.
NOTE The QSlide function can support up to two windows at the same time. QSlide only
supports the following apps: Video, Phone, Contacts, Messaging, Calendar, Email,
and File Manager.
Page 99

To o l s
Google Apps
To use Google apps, a Google Account needs to be registered in your
device first. The Google Account registration window appears automatically
when you use a Google app for the first time (if you didn't register your
account when you initially set up your device). If you do not have a Google
Account, create one from your device. For details on how to use an app,
refer to the Help text in the app.
Drive
Upload, save, open, share, and organize files from your device. Files
accessible from apps can be accessed from anywhere, including online and
offline environments.
Maps
Find your location or the location of a specific place on a map. View
geographical, traffic, or transit information. Get directions to destinations.
Photos
View or share photos or albums saved on your device. Edit or enhance your
photos.
Duo
Exchange real-time messages with the people in your life. Make a video call
with an individual or a group.
Chrome
Sign in to Chrome and import opened tabs, bookmarks, and address bar
data from a computer to your device.
Gmail
Register your Google email account in your device to check or send email.
Play Movies and TV
Use your Google Account to rent or purchase movies. Purchase content and
play it anywhere.
97
Page 100

To o l s
98
Yo uTu be
Search for and play videos. Upload videos on YouTube to share them with
people around the world.
Play Music
Use your Google Account to purchase music files from Play Store. Play
music files saved on your device.
 Loading...