


LG CM4650P Owner’s Manual
<![endif]>ENGLISH
OWNER’S MANUAL
Mini Hi-Fi
System
Please read this manual carefully before operating your set and retain it for future reference.
CM4650P (CM4650, CMS4750F)
P/NO : MFL68941440_REV1.0
www.lg.com
1 GettingStarted
2 Getting Started
Safety Information
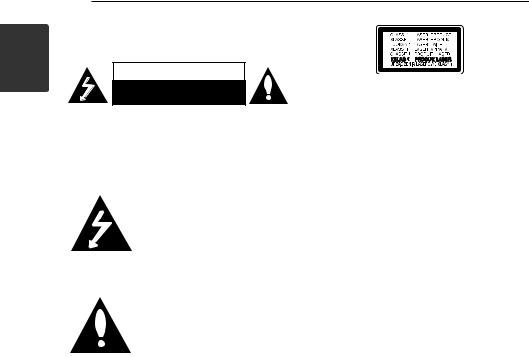
CAUTION
RISK OF ELECTRIC SHOCK
DO NOT OPEN
CAUTION: TO REDUCE THE RISK OF ELECTRIC SHOCK DO NOT REMOVE COVER (OR BACK) NO USER-SERVICEABLE PARTS INSIDE REFER SERVICING TO QUALIFIED SERVICE PERSONNEL.
This lightning flash with arrowhead symbol within an equilateral triangle is intended to alert the user to the presence of uninsulated dangerous voltage within the
product’s enclosure that may be of sufficient magnitude to constitute a risk of electric shock to persons.
The exclamation point within an equilateral triangle is intended to alert the user to the presence of important operating and
maintenance (servicing) instructions in the literature accompanying the product.
WARNING: TO PREVENT FIRE OR ELECTRIC SHOCK HAZARD, DO NOT EXPOSE THIS PRODUCT TO RAIN OR MOISTURE.
WARNING: Do not install this equipment in a confined space such as a book case or similar unit.
CAUTION: Do not block any ventilation openings. Install in accordance with the manufacturer’s instructions.
Slots and openings in the cabinet are provided for ventilation and to ensure reliable operation of the product and to protect it from overheating. The openings shall be never be blocked by placing the product on a bed, sofa, rug or other similar surface. This product shall not be placed in a builtin installation such as a bookcase or rack unless
proper ventilation is provided or the manufacturer’s instruction has been adhered to.
CAUTION: This product employs a Laser System. To ensure proper use of this product, please read this owner’s manual carefully and retain it for future reference. Shall the unit require maintenance, contact an authorized service center.
Use of controls, adjustments or the performance of procedures other than those specified herein may result in hazardous radiation exposure.
To prevent direct exposure to laser beam, do not try to open the enclosure.
CAUTION concerning the Power cord
Most appliances recommend they be placed upon a dedicated circuit;
That is, a single outlet circuit which powers only that appliance and has no additional outlets or branch circuits. Check the specification page of this owner’s manual to be certain. Do not overload wall outlets. Overloaded wall outlets, loose or damaged wall outlets, extension cords, frayed power cords, or damaged or cracked wire insulation are dangerous. Any of these conditions could result in electric shock or fire. Periodically examine the cord of your appliance, and if its appearance indicates damage or deterioration, unplug it, discontinue use of the appliance, and have the cord replaced with an exact replacement part by an authorized service center. Protect the power cord from physical or mechanical abuse, such as being twisted, kinked, pinched, closed in a door, or walked upon. Pay particular attention to plugs, wall outlets, and the point where the cord exits the appliance.
The Power Plug is the disconnecting device. In case of an emergency, the Power Plug must remain readily accessible.

Getting Started |
3 |
|
|
This device is equipped with a portable battery or accumulator.
Safety way to remove the battery or the battery from the equipment: Remove the old battery or battery pack, follow the steps in reverse order than the assembly. To prevent
contamination of the environment and bring on possible threat to human and animal health, the old battery or the battery put it in the appropriate container at designated collection points. Do
not dispose of batteries or battery together with other waste. It is recommended that you use local, free reimbursement systems batteries and accumulators. The battery shall not be exposed to excessive heat such as sunshine, fire or the like.
CAUTION: The apparatus shall not be exposed to water (dripping or splashing) and no objects filled with liquids, such as vases, shall be placed on the apparatus.
CAUTION: Do not use high voltage products around this product. (ex. Electrical swatter) This product may malfunction due to electrical shock.
RF Radiation Exposure Statement
This equipment should be installed and operated with minimum distance 20 cm between the radiator and your body.
yy The appliance is not intended for use by young children or infirm persons without supervision.
yy Young Children should be supervised to ensure that they do not play with appliance.
yy If the appliance is supplied from a cord extension set or an electrical portable outlet device, the cord extension set on electrical portable outlet device must be positioned so that it is not subject to splashing or ingress of moisture.
1 GettingStarted

4 Table of Contents
Table of Contents |
|
3 |
Operating |
||
|
|
16 |
Basic Operations |
||
|
|
16 |
– CD/USB Operations |
||
1 |
Getting Started |
16 |
– Auto Play |
||
17 |
Other Operations |
||||
2 |
Safety Information |
17 |
– Programmed Playback |
||
17 |
– Deleting Programmed list |
||||
6 |
Unique Features |
||||
17 |
– Displaying file information (ID3 TAG) |
||||
6 |
Accesories |
||||
18 |
– Searching for a folder and an MP3/ |
||||
7 |
Playable file Requirement |
||||
|
|
WMA file |
|||
7 |
– Music file requirement |
|
|
||
18 |
– Deleting an MP3/WMA file |
||||
7 |
– USB device requirement |
||||
19 |
– Turn off the sound temporarily |
||||
8 |
Remote control |
||||
19 |
– DEMO |
||||
10 |
Front Panel |
||||
19 |
– AUTO DJ playback |
||||
12 |
Rear Panel |
||||
20 |
Using a Bluetooth wireless technology |
||||
|
|
||||
2 |
Connecting |
20 |
– Listening to music stored on the |
||
|
|
Bluetooth devices |
|||
13 |
Connecting to speakers |
22 |
Using the Music Flow Bluetooth App |
||
22 |
– Install “Music Flow Bluetooth” App |
||||
13 |
– Attaching the speakers to the unit |
||||
|
|
onto Your Bluetooth Device |
|||
14 |
Optional Equipment Connection |
|
|
||
|
|
|
|||
14– Antenna Connection
14– USB Connection
15– AUX IN Connection
15– PORT. IN Connection
15– Listening to the sound from your external device

|
|
|
|
Table of Contents 5 |
||
|
|
|
|
|
|
|
24 |
Radio Operations |
4 |
Troubleshooting |
|||
24 |
– Listening to the radio |
|
|
|
|
|
34 |
Troubleshooting |
|||||
24 |
– Improving poor FM reception |
|||||
|
|
|
|
|||
24 |
– Deleting all the saved stations |
|
|
|
|
|
25 |
Sound adjustment |
5 |
Appendix |
|||
25 |
– Setting the surround mode |
|
|
|
|
|
35 |
General specifications |
|||||
26 |
Advanced Operations |
|||||
26 |
– Recording to USB |
36 |
Speaker specifications |
|||
26 |
– To select recording bit rate and speed |
37 |
Maintenance |
|||
28 |
Setting the Clock |
37 |
– Handling the Unit |
|||
28 |
– Setting the Clock through |
37 |
– Notes on Discs |
|||
|
“Music Flow Bluetooth” App |
37 |
Trademarks and Licenses |
|||
28– Using your player as an alarm clock
29– Sleep Timer Setting
29– Dimmer
30Advanced Operations
30 – Playing the iPod/iPhone
30 – Compatible iPod/iPhone
32– Auto power down
32– AUTO POWER On
32– Auto function change
33LG Sound Sync
1
2
3
4
5
1 GettingStarted
6 Getting Started
Unique Features
BLUETOOTH
Listens to music stored on your bluetooth device.
Portable In
Listens to music from your portable device. (MP3, Notebook, etc.)
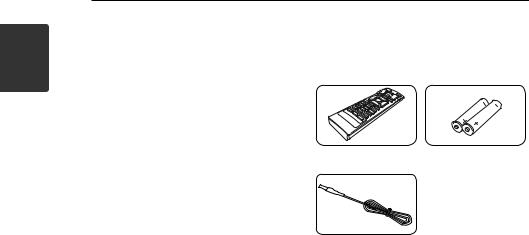
Accessories
Please check and identify the supplied accessories.
Remote Control (1) |
Batteries (2) |
AUTO DJ
Blends the end of one song into the beginning of another for seamless playback.
USB Direct Recording |
FM Antenna (1) |
Records music to your USB device. |
|
Music Flow Bluetooth |
|
Music Flow Bluetooth is an app designed to let you |
|
take control of some of LG’s latest Audio devices. |
|
Refer to page 22-23 |
|
LG Sound Sync |
|
Controls volume level of this unit by the remote |
|
control of your LG TV that is compatible with LG |
|
Sound Sync. |
|

Getting Started |
7 |
|
|
Playable file
Requirement
Music file requirement
MP3/WMA file compatibility with this unit is limited as follows.
yy Sampling frequency : within 32 to 48 kHz (MP3), within 32 to 48 kHz (WMA)
yy Bit rate : within 32 to 320 kbps (MP3), 40 to 192 kbps (WMA)
yy Maximum files : Data CD : 999 / USB : 2000 yy Maximum folders : Data CD : 99 / USB : 200 yy File extensions : “.mp3”/“.wma”
yy Certain MP3/WMA files may not be played depending on the type or format of the file.
yy CD-ROM file format : ISO 9660/JOLIET
yy We recommend that you use Easy-CD Creator, which creates an ISO 9660 file system.
The DTS is not supported. In case of DTS audio format, audio is not output.
You have to set the disc format option to [Mastered] in order to make the discs compatible with the LG players when formatting rewritable discs. When setting the option to Live File System, you cannot use it on LG players.
(Mastered/Live File System : Disc format system for Windows Vista)
Compatible USB Devices
yy MP3 Player : Flash type MP3 player.
yy USB Flash Drive :
Devices that support USB2.0 or USB1.1.
yy The USB function of this unit does not support all USB devices.
USB device requirement
yy Devices which require additional program installation when you have connected it to a computer, are not supported.
yy Do not extract the USB device while in operation.
yy For a large capacity USB, it may take longer than a few minute to be searched.
yy To prevent data loss, back up all data.
yy If you use a USB extension cable or USB hub, the USB device is not recognized.
yy Using NTFS file system is not supported. (Only FAT(16/32) file system is supported.)
yy This unit recognizes up to 2000 files.
yy External HDD, Card readers, Locked devices, or hard type USB devices are not supported.
yy USB port of the unit cannot be connected to PC. The unit cannot be used as a storage device.
yy Some USB may not work with this unit.
1 GettingStarted
1 GettingStarted
8 Getting Started
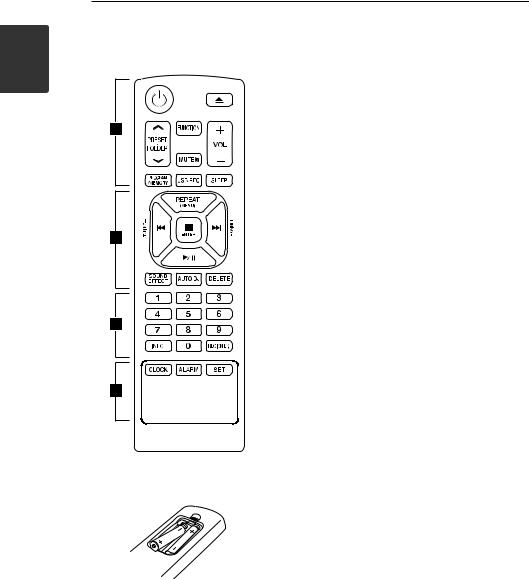
Remote control |
• • • • • • • • • • A • |
|
|
|
1(Power) : Switches the unit ON or OFF. |
|
B(Open/Close) : Opens and closes the disc tray. |
|
PRESET.FOLDER W/S: |
|
-- Searches for a folder of MP3/WMA files. When |
|
a CD/USB containing MP3/WMA files in several |
|
folders is being played, press PRESET.FOLDER |
|
W/Sto select the folder you want to play. |
|
-- Chooses a preset number for a radio station. |
|
FUNCTION : Selects the function and input source. |
|
MUTE@: Mutes the sound. |
|
VOL +/- : Adjusts speaker volume. |
|
PROGRAM/MEMORY : |
|
-- Stores radio stations. |
|
-- Deletes all the saved stations. |
|
-- Creates a programmed list you want to listen to. |
|
USB REC : USB direct recording. |
|
SLEEP : Sets the system to turn off automatically at |
|
a specified time. |
|
(Dimmer : The display window will be darkened by |
|
half.) |
Battery Installation
Remove the battery cover on the rear of the
Remote Control, and insert two (size AAA) batteries with 4and 5matched correctly.

|
Getting Started 9 |
||
|
|
|
|
• • • • • • • • • • B • |
• • • • • • • • • • C • |
||
REPEAT(MENU) : Listens to your tracks/files |
0 to 9 numerical buttons : Selects numbered tracks, |
||
repeatedly or randomly. |
files, or preset number. |
||
C/V(Skip/Search) : |
INFO : |
||
-- Skips fast backward or forward. |
-- Sees information about your music. An MP3 file |
||
-- Searches for a section within a track/file. |
often come with ID3 tag. The tag gives the Title, |
||
TUNING -/+ : Selects the radio station. |
Artist, Album or Time information. |
||
-- Sees the address of connected Bluetooth |
|||
ZENTER : |
|||
device in Bluetooth mode. |
|||
-- Stops playback or recording. |
|||
REGION EQ : Chooses sound impressions |
|||
-- Cancels DELETE function. |
|||
|
|
||
d/M(Play/Pause) : |
• • • • • • • • • • D • |
||
-- Starts or pauses playback. |
CLOCK : Sets a clock and checks a time. |
||
-- Selects STEREO/MONO. |
|||
ALARM : With the ALARM function you can turn |
|||
SOUND EFFECT : Chooses sound impressions. |
|||
CD, USB play and Tuner reception on at a desired |
|||
AUTO DJ : Selects the AUTO DJ mode. (For more |
|||
time. |
|||
information refer to page 19) |
SET : Confirms the setting. |
||
DELETE : |
|||
|
|
||
-- Deletes MP3/WMA files. |
|
|
|
-- Deletes a song on the programmed list. |
|
|
|
1 GettingStarted

1 GettingStarted
10 |
Getting Started |
Front Panel |
|
A |
|
B |
|
C |
J |
D |
K |
E |
L |
F |
M |
G |
N |
|
O |
H |
P |
I |
|
Getting Started 11
A Display window |
J FUNCTION |
|
B |
USB REC. |
Selects the function or input source. |
|
||
Records to USB.
USB
Plays the audio files by connecting the USB device.
C1/!(Power)
Switches the unit ON or OFF.
DI(Stop)
Stops playback or recording.
EAUTO DJ
Selects the AUTO DJ mode.
(For more information refer to page 19)
FY(Skip/Search)
-- Searches backward.
-- Skips to the previous track/file.
GDEMO
Shows demo mode.
HPORT. IN
IDisc tray
K T
ST./MO.
-Starts or pauses playback.
-Selects Stereo/Mono.
LLG EQ
You can choose sound impressions.
MU(Skip/Search)
-- Searches forward.
-- Skips to the next track/file.
NBASS BLAST
Selects BASS or STANDARD effect directly.
OMaster Volume
Adjusts volume of speaker.
PR(Open/Close)
Opens or closes the disc tray.
1 GettingStarted
12 Getting Started
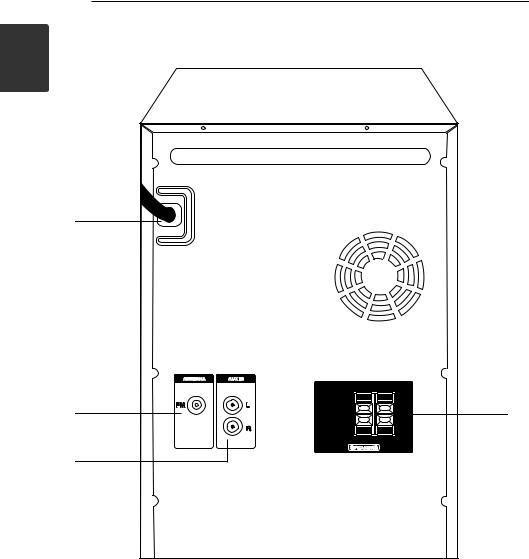
Rear Panel
1 |
|
| <![if ! IE]> <![endif]>Started Getting |
|
|
POWER IN |
A |
|
B |
D |
C |
|
A POWER IN |
|
B ANTENNA (FM) |
|
C AUX IN (L/R) connectors |
|
D SPEAKERS terminal/cord |
|
 Loading...