

Page 1

English
1
English
Table of Contents
Table of Contents
Usage Notice
Safety Instructions .................................................2
Introduction
Product Features ...................................................5
Package Overview .................................................6
Optional Extras ...................................................6
Product Overview ..................................................7
Connection Ports ................................................8
Control Panel ...................................................... 9
Remote Control .................................................10
Remote Control Battery Installation .................. 12
Remote Control Operating Range .................... 12
Installation
Connecting the Projector .....................................13
Connect to Computer/Notebook ....................... 13
Connect to Video ..............................................14
Powering On/Off the Projector ............................. 15
Powering On the Projector ................................15
Powering Off the Projector ................................16
Warning Indicator ..............................................17
Adjusting the Projected Image .............................18
Adjusting the Height of Projector Image ........... 18
Adjusting the Projector Zoom and Focus ..........19
Adjusting Projection Image Size ....................... 19
Appendices
Troubleshooting ................................................... 34
Replacing the lamp .............................................. 39
Computer Compatibility .......................................40
Congurations of Terminals ................................. 41
Terminal : Analog RGB (Mini D-sub 15 pin) ...... 41
Terminal : Mini DIN 3-pin .................................. 41
Regulation & Safety Notices ................................ 42
Dimensions .......................................................... 44
User Controls
On Screen Display ...............................................20
How to operate .................................................20
IMAGE ..............................................................21
IMAGE | Advanced ...........................................23
IMAGE | Advanced | Color ................................ 24
IMAGE | Advanced | Input ................................24
SCREEN ........................................................... 25
SETTING | Language .......................................27
SETTING ..........................................................27
SETTING | Signal .............................................29
SETTING | Advanced .......................................30
OPTIONS ..........................................................31
OPTIONS | Advanced .......................................32
OPTIONS | Lamp Settings ................................33
Page 2
2
English
Usage Notice
Safety Instructions
Please take note of the safety instructions to prevent any potential accident or misuse of the projector.
Safety Instructions are given in two forms as detailed below.
WARNING : The violation of this instruction may cause serious injuries and even death.
NOTES : The violation of this instruction may cause injuries or damage to the projector.
After reading this manual, keep it in the place that you can access easily.
Indoor Installation
Do not place the Projector in direct
sunlight or near heat sources such
as radiators, res, stove etc.
This may cause a re hazard !
Do not block the vents of the pro-
jector or restrict air-ow in any way.
This would cause the internal tem-
perature to increase and could cause
a re hazard or damage to the unit!
Do not use the projector in a damp
place such as a bathroom where it
is likely to get wet.
This may cause a re or an electric
shock hazard!
Indoor Installation
When installing the projector on a
table, be careful not to place it near
the edge.
The projector could fall causing injury
and damage to the projector.
Only use a suitable stand.
Power
Earth wire should be connected.
Ensure that you connect the earth ground wire
to prevent possible electric shock (i.e.a Projector
with a three-prong grounded AC plug must be
connected to a three-prong gronded AC outlet.
If grounding methods are not possible, have
a qualied electrician install a separate circuit
breaker.
Do not try to ground the unit by connecting it to
telephone wires, lightening rods, or gas pipes.
WARNING
Do not place ammable materials
in, on or near the projector
This may cause a re hazard!
Do not place the projector close to
sources of steam or oil such as a
humidier.
This may create a re hazard or an
electric shock hazard !
Do not place the projector directly
on a carpet, rug or place where
ventilation is restricted.
This would cause its internal tempera-
ture to increase and might create a re
hazard or damage the unit.
NOTES
Disconnect from the power supply
and remove all connections before
moving, or cleaning.
WARNING
The power cord should be inserted
fully into the power outlet to avoid
a re hazard!
This may cause a re hazard or dam-
age the unit.
Do not hang on the installed
projector.
It may cause the projector to fall,
causing injury or death.
Do not place the projector where it
might be exposed to dust.
This may cause a re hazard or dam-
age to the unit!
Ensure good ventilation around the
projector. The distance between
the projector and the wall should be
more than 30cm/12 inches.
An excessive increase in its internal
temperature may cause a re hazard
or damage to the unit!
Only use the projector on a level
and stable surface.
It may fall and cause injury and/or
damage to the unit.
Do not place heavy objects on the
power cord.
This may cause a re or an electric
shock hazard !
Page 3
English
3
English
Usage Notice
Power
Never touch the power plug with
a wet hand
This may cause an electric shock-
hazard!
Power
Hold the plug rmly when unplug-
ging. If you pull the cord, it may be
damaged.
This may cause a re hazard !
Place the projector where people
will not trip or tread on the power
cord.
This may cause a re or an electric-
shock hazard or damage to the unit!
Using
Do not place anything containing
liquid on top of the projector such
as owerpot, cup, cosmetics or
candle.
This may cause a re hazard or dam-
age to the unit!
If water is spilt into the projector
unplug it from the power supply
immediately and consult your
Service Agent.
This may cause an electric shock
hazard or damage to the unit!
WARNING
Do not plug-in too many items into
one power outlet.
It may result in overheating of the
outlet and create a re hazard!
Prevent dust from collecting on the
power plug pins or outlet.
This may cause a re hazard!
NOTES
Do not use if the power cord or the
plug is damaged or any part of the
power outlet is loose.
This may cause a re or an electric-
shock hazard or damage to the unit!
Do not turn the projector On/Off by plugging-in or unplugging the power
plug to the wall outlet.
(Allow the unit to cool before removing power.)
It may cause mechanical failure or could cause an electric shock.
Ensure the power cord does not
come into contact with sharp or
hot objects.
This may cause a re or an electric-
shock hazard or damage to the unit!
WARNING
In case of impact shock or damage
to the projector switch it off and
unplug it from the power outlet
and contact an authorized service
center.
This may cause a re or an electric
shock hazard or damage to the unit!
Dispose of used batteries carefully and safely.
In the case of a battery being swallowed by a child please consult a doctor
immediately.
Do not allow any objects to fall into
the projector.
This may cause an electric shock
hazard or damage to the unit!
Do not remove any covers.
High risk of Electric Shock!
CAUTION concerning the Power Cord
It is recommend that most appliances be placed on a dedicated circuit; that is,a single outlet circuit which powers
only that appliance and has no additional outlets or branch circuits. Check the specication page of this owner’s
manual to be certain.
Do not overload wall outlets. Overloaded wall outlets, loose or damaged wall outlets, extension cords, frayed power
cords, or damaged or cracked wire insulation are dangerous. Any of these conditions could result in electric shock
or re. Periodically examine the cord of your appliance, and if its appearance indicates damage or deterioration,
unplug it, discontinue use of the appliance, and have the cord replaced with an exact replacement part by an
authorized service personnel.
Protect the power cord from physical or mechanical abuse, such as being twisted, kinked, pinched, closed in a
door, or walked upon. Pay particular attention to plugs, wall outlets, and the point where the cord exits the appli-
ance.
Don’t look directly into the lens
when the projector is in use. Eye
damage may occur!
Do not touch metal parts during
or soon after operation since the
vents will remain very hot!
Page 4
4
English
Usage Notice
Using
If the projector is in a room that
experiences a gas leak, do not
touch the projector.
It can cause a re or a burn by a
spark.
Using
Do not place heavy objects on top
of projector.
This may cause mechanical failure
orpersonal injury!
Do not use any sharp tools on the
projector as this will damage the
casing.
Cleaning
Do not use water while cleaning
the projector.
This may cause damage to the projec-
tor or an electric shock hazard.
WARNING
Don’t look at laser beam directly as
it can cause eye damage!
NOTES
Take care not to impact the lens
particularly when moving the
projector.
In the event that an image does
not appear on the screen please
switch it off and unplug it from
the power outlet and contact your
Service Agent.
This may cause a re or an electric
shock hazard or damage to the unit!
WARNING
In the unlikely event of smoke or
a strange smell from the projector,
switch it off , unplug it from the wall
outlet and contact your dealer or
service centre.
This may cause a re or an electric
shock hazard or damage to the unit!
Alway open the lens door or
remove the lens cap when the
projector lamp is on.
Do not touch the lens of the
projector. It is delicate and easily
damaged.
Do not drop the projector or allow
impact shock.
This may cause mechanical failure or
personal injury!
Use an air spray or soft cloth that
is moist with a neutral detergent
and water for removing dust or
stains on the projection lens.
Cleaning
Contact the Service
Center once a year to
clean the internal parts of
the projector.
Accumulated dust can
cause mechanical failure.
When cleaning the plastic parts such as projector case, unplug the power and wipe it
with a soft cloth. Do not use cleanser, spray water or wipe with a wet cloth. Especially,
never use cleanser (glass cleaner), automobile or industrial shiner, abrasive or wax,
benzene, alcohol etc., which can damage the product.
Use an air spray or soft cloth that is moist with a neutral detergent and water for
removing dust or stains on the projection lens.
It can cause re, electric shock or product damage (deformation, corrosion and damage).
Others
Do not attempt to service the projector yourself. Contact your dealer or service center.
This may cause damage to the projector and could give an electric Shock as well as invalidating the warranty!
Others
Be sure to unplug if the projector is not to be used for
a long period.
Accumulated dust may cause a re hazard or damage to
the unit!
NOTES
WARNING
NOTES
Only use the specied type of battery.
This could cause damage to the remote control.
Page 5

English
5
English
Introduction
Product Features
This product is an XGA/SVGA single chip 0.55” DLP®
projector. Outstanding features include:
■ XGA (1024x768) / SVGA (800x600) Native resolution
■ One built-in speaker with 2 watt amplier
■ HDTV compatible (720P, 1080i/p)
■ VGA monitor Loop Thru (works on standby mode > 1W)
■ BrilliantColorTM Technology
■ RS232 control
Page 6
6
English
Introduction
N
o
t
e
CR2025
3V
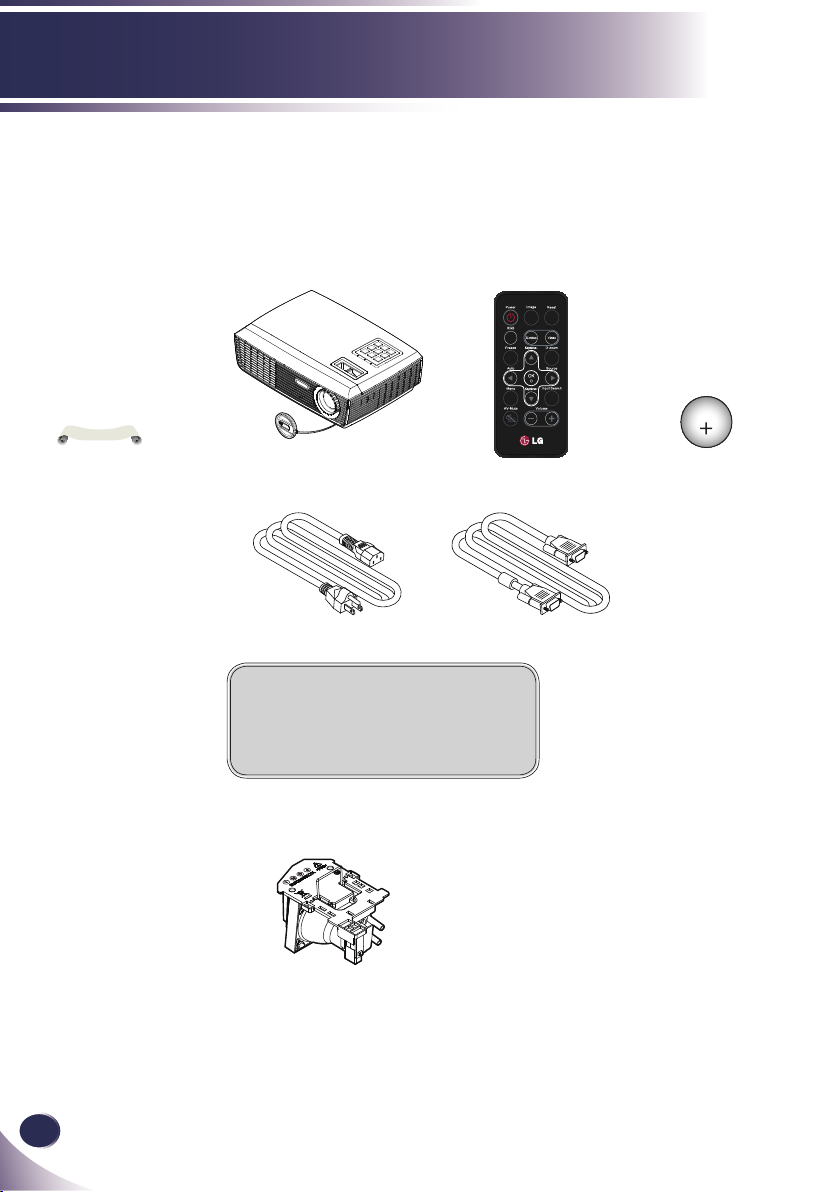
Package Overview
This projector comes with all the items shown below.
Check to make sure your unit is complete. Contact your
dealer immediately if anything is missing.
Due to the differ-
ence in applications
for each country, some
regions may have different accessories.
Wireless Remote ControlProjector with lens cap
Power Cable VGA Cable
Documentation:
CD-ROM User’s Manual
Optional Extras
Lamp
Battery
Page 7
English
7
English
Introduction
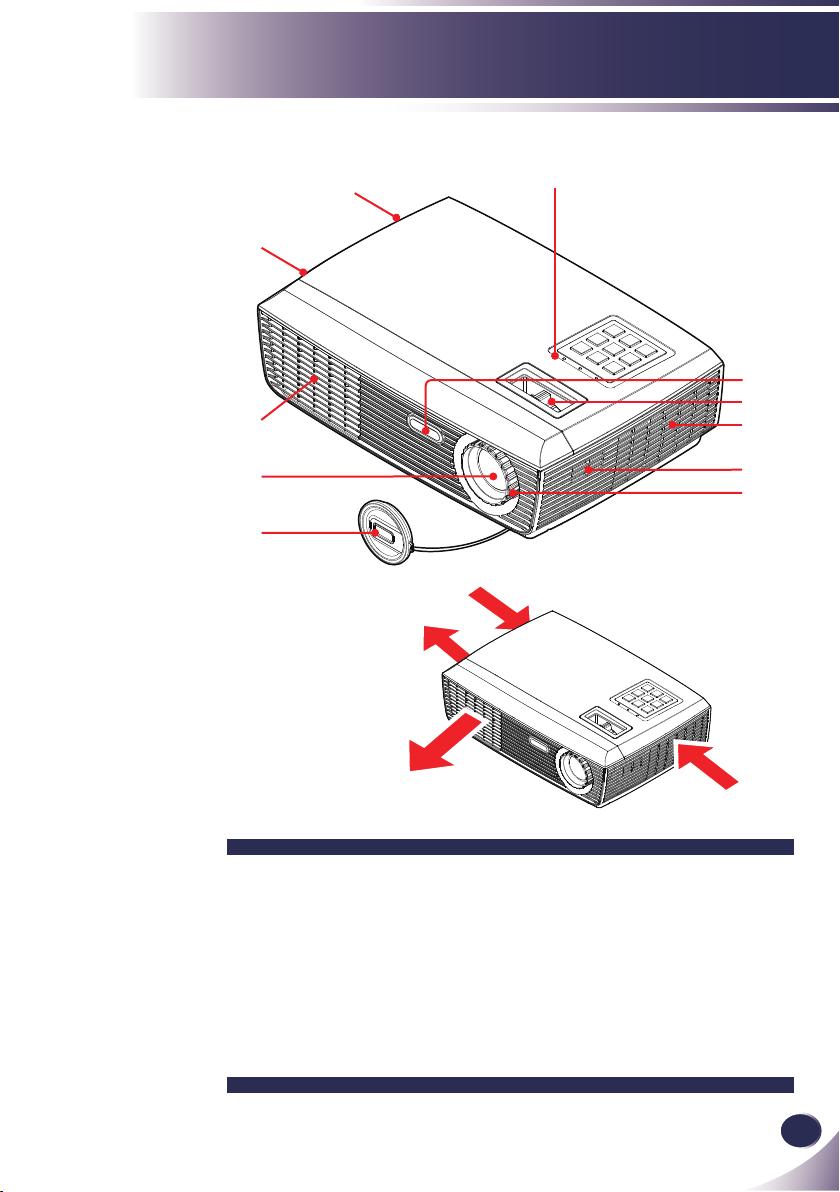
Product Overview
4
7
7
1
2
3
4
8
9
1. Control Panel
2. Remote Sensor
3. Zoom Ring
4. Ventilation (inlet)
5. Speaker
6. Focus Ring
7. Ventilation (outlet)
8. Lens
9. Lens Cap
5
6
Air Flow
Page 8
8
English
Introduction
RGB IN RGB OUT
S-VIDEO RS232C
AUDIO-IN
VIDEO
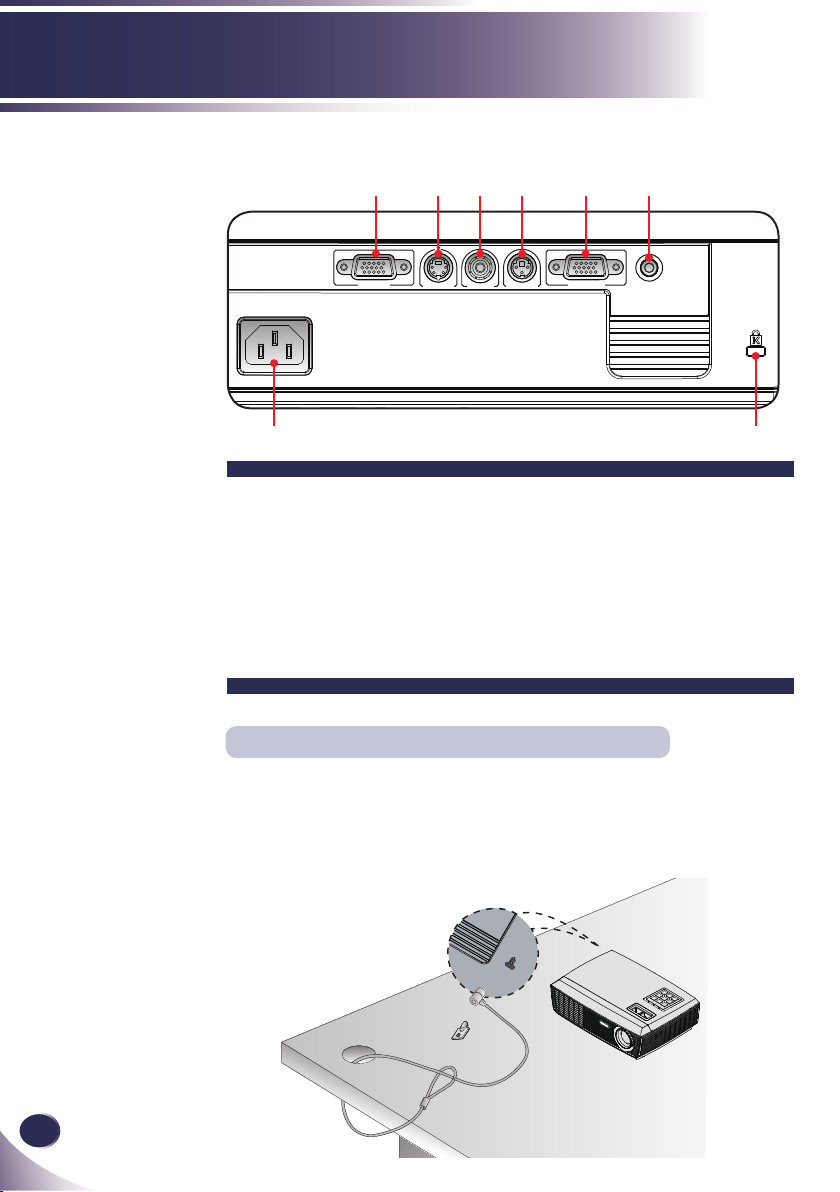
Connection Ports
7 8
1. RGB IN Connector
2. S-VIDEO Connector
3. VIDEO Connector
4. RS232C Service Port
5. RGB OUT Connector
6. AUDIO-IN Jack
7. AC IN
8. KensingtonTM Lock
1 2 3 4 6
5
Kensington Security System
This projector has a Kensington Security System Connector on the side panel. Connect the Kens-
ington Security System cable as below.
For the detailed installation and use of the Kensington Security System, refer to the user’s guide
included with the Kensington Security System set. And for further information, contact
http://www.kensington.com, the internet homepage of the Kensington company that deals with
expensive electronic equipment such as notebook PCs or projectors.
The Kensington Security System is an optional item.
Page 9
English
9
English
Introduction
Menu
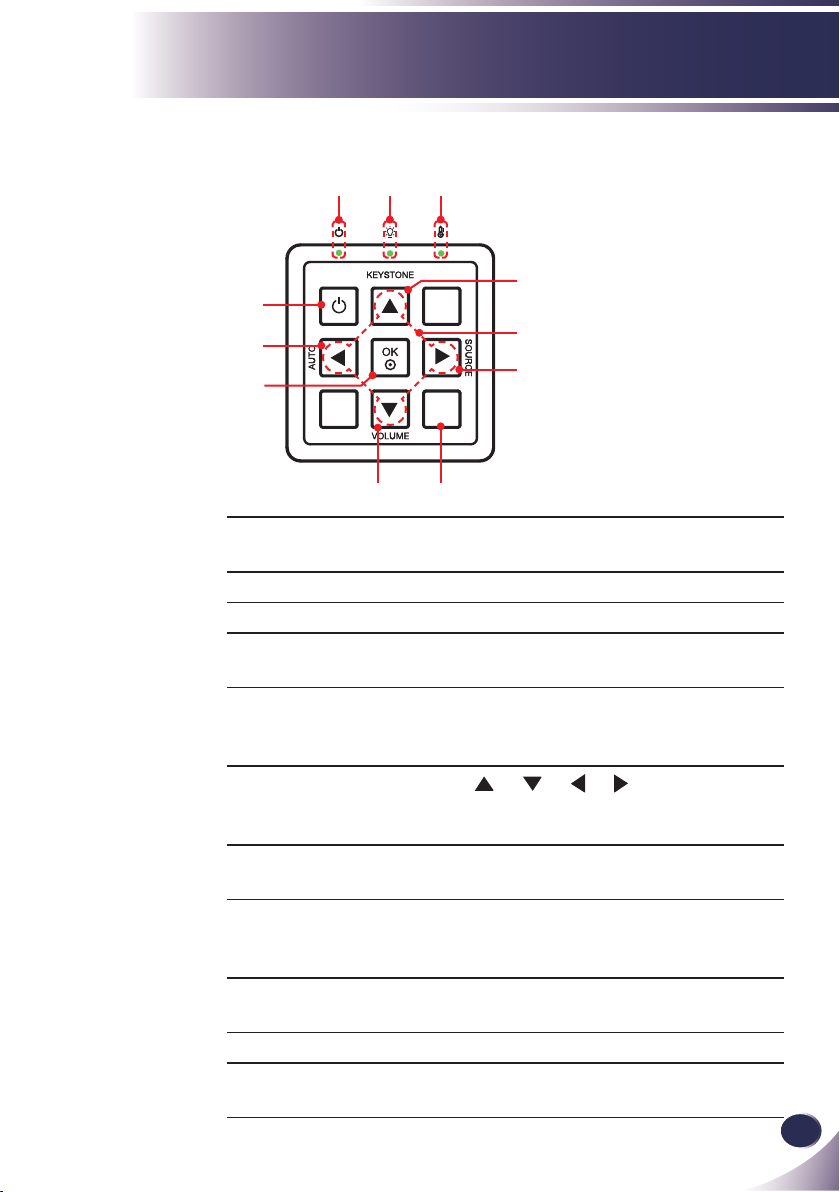
Control Panel
2 3 4
5
1
11
10
9 8
1 POWER Refer to the “Power On/Off the Pro-
jector” section on pages 15~16.
2 POWER LED Indicate the projector’s status.
3 LAMP LED Indicate the projector’s lamp status.
4 TEMP LED Indicate the projector’s temperature
status.
5 KEYSTONE Adjust the image to compensate for
distortion caused by tilting the projector.
6 Four Direction-
al Select Keys
7 SOURCE Press “SOURCE” to select an input
8 MENU Press “MENU” to launch the on-
9 VOLUME Adjust to increase / decrease the
10 OK Conrm your item selection.
11 AUTO Automatically synchronizes the pro-
Use
or make adjustments to your selection.
signal.
screen display (OSD) menu. To exit
OSD, Press “MENU” again.
volume.
jector to the input source.
6
7
or or or to select items
Page 10
10
English
Introduction
N
o
t
e
3
V
O
L
T
S
CR2025
N
o
t
e
Before using the
remote control for the
rst time, remove the
transparent insulation
tape. See page 12 for
battery installation.
Remote Control
1
2
3
4
5
6
7
11
12
13
14
15
16
17
You can only turn
the projector on/off
with POWER button
on the projector.
You can operate all of
the functions of the
projector via the remote
control. Make sure
not to lose the remote
control.
8
18
9
10
1 Infrared trans-
Sends signals to the projector.
19
mitter
2 Image Select the Image mode from Presen-
tation, Bright, Movie, sRGB, Blackboard, Classroom, User1 and User2.
3 Power Refer to the “Power On/Off the Pro-
jector” section. (See pages 15~16)
4 RGB Press “RGB” to choose RGB IN con-
nector.
5 Freeze Pause the screen image. Press again to
resume the screen image.
6 OK Conrm your section of items in sub
menu operation.
Page 11

English
11
English
Introduction
7 Auto Automatically synchronize the projec-
tor to the input source.
8 Menu Press “Menu” to launch the Onscreen
display (OSD), back to the top level of
OSD for the OSD main menu operation
9 Keystone
10 AV-Mute Momentarily turn off/on the audio
11 Reset Return the adjustments and settings
12 S-video Press “S-video” to choose S-VIDEO
13 Video Press “Video” to choose VIDEO con-
14 Keystone
15 D.zoom Zoom out or Zoom in the projector
16 Four
Directional
Select Keys
17 Source Press “Source” to choose RGB,
18 Input Search This function detects the input signal
19 Volume +/- Increase/decrease speaker volume.
Adjust the image to compensate for
distortion caused by tilting the projector.
and video.
to the factory default values. (except
for lamp counter)
connector.
nector.
Adjust the image to compensate for
distortion caused by tilting the projector.
display.
Use
or or or to select items or
make adjustments to your selection.
Component, S-Video and Composite
sources.
automatically. When nding a signal,
the search will stop.
Page 12
12
English
Introduction
23.0’ (7m)
Approx.15°
3
V
O
L
T
S
CR2025
M
3
V
O
L
T
S
CR2025
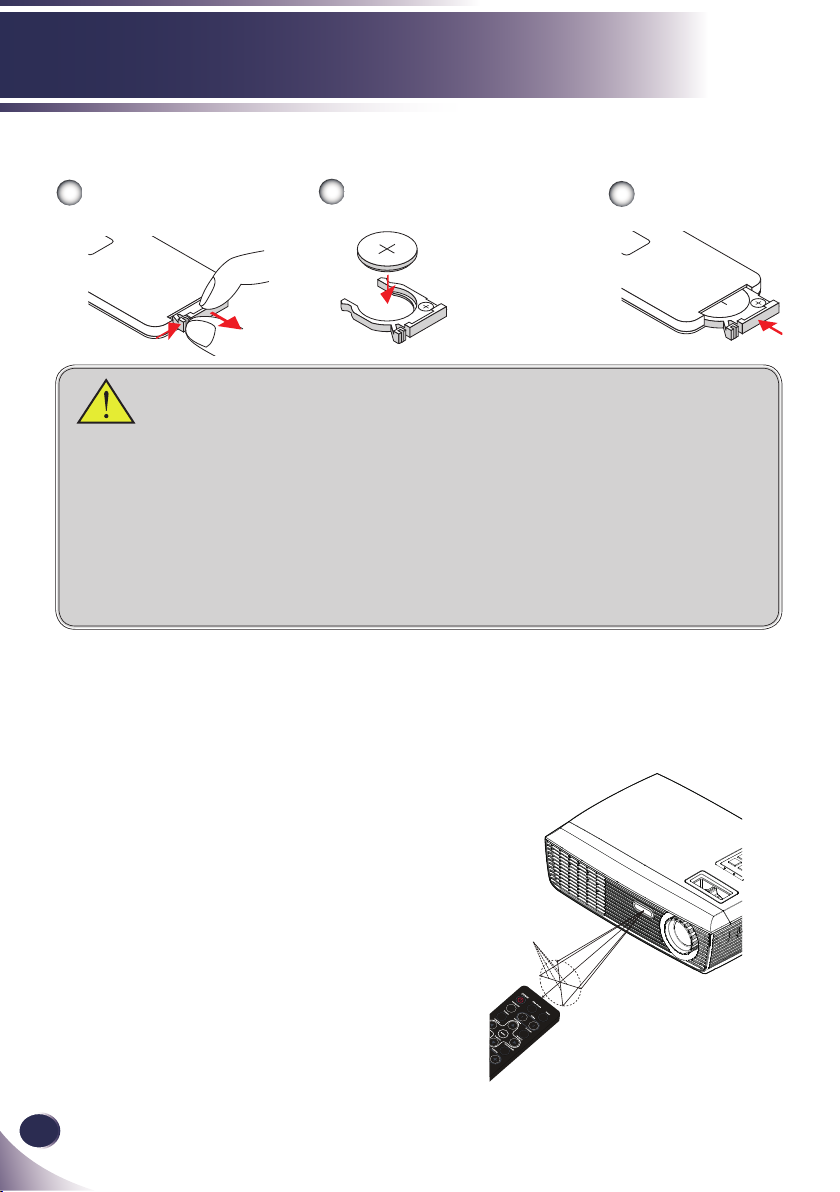
Remote Control Battery Installation
Press rmly and slide
1
the battery cover off.
Install new battery into the
2
compartment.
Remove the old Lithium
coin cell and install new
one (CR2025). Ensure
that the side with a “+”
is facing up.
Put the cover
3
back.
To ensure safe operation, please observe the following precautions :
■ Use CR2025 type battery.
■ Avoid contact with water or liquid.
■ Do not expose the remote control to moisture or heat.
■ Do not drop the remote control.
■ If the battery has leaked in the remote control, carefully wipe the case clean and
install new battery.
■ Risk of an explosion if battery is replaced by an incorrect type.
■ Dispose of used battery according to the instructions.
Remote Control Operating Range
Point the remote control
toward the projector (Infrared Remote Receiver)
when pressing any button.
Maximum operating range
for the remote control is
about 23.0’ (7m) and 30° in
front of the projector.
Page 13
English
13
English
Installation
RGB IN RGB OUT
S-VIDEO RS232C
AUDIO-IN
VIDEO
E62405SP
R
N
o
t
e
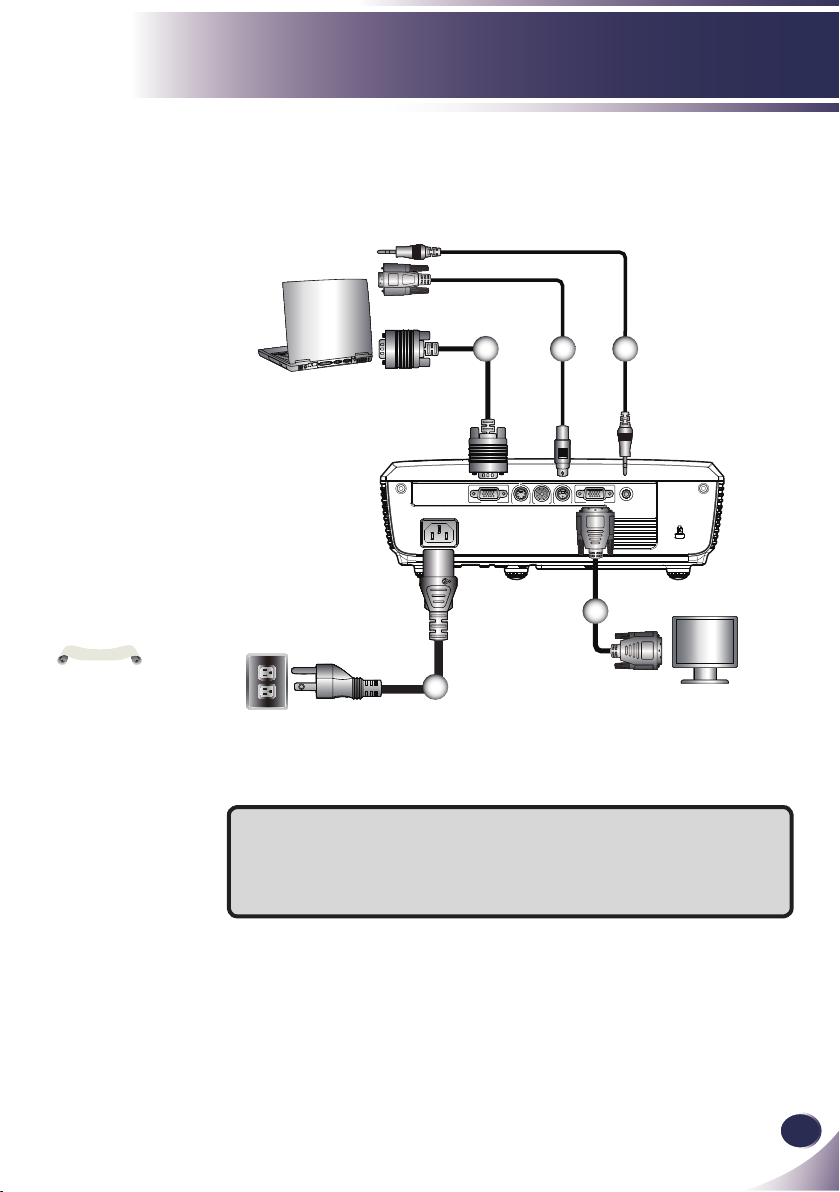
Connecting the Projector
Connect to Computer/Notebook
2 43
VGA, DVI
5
Due to the differ-
ence in applications
for each country, some
regions may have different accessories.
1
1............................................................................................Power cable (supplied)
2.............................................................................................. VGA cable (supplied)
3................................................................................................................RS232 cable
4...................................................................................... Audio in cable jack to jack
5.....................................................................................................Monitor out cable
Monitor Output
Page 14

14
English
Installation
RGB IN RGB OUT
S-VIDEO RS232C
AUDIO-IN
VIDEO
E62405SP
R
N
o
t
e
Connect to Video
DVD player, Set-top Box
HDTV receiver
Video Output
Due to the differ-
ence in applications
for each country, some
regions may have different accessories.
3
5
4
2
6
5
1
S-Video Output
1............................................................................................Power cable (supplied)
2.............................................................................................. VGA to RCA adaptor
3........................................................................................3 RCA Component Cable
4............................................................................................ Composite video cable
5...................................................................................... Audio in cable jack to jack
6............................................................................................................ S-Video cable
Page 15

English
15
English
Installation
N
o
t
e
Powering On/Off the Projector
Powering On the Projector
1. Ensure that the power cable and signal cable are securely
connected. The POWER LED will turn amber.
2. Remove the lens cap.
3. Turn on the lamp by pressing “POWER” on the control
panel or the remote control. The POWER LED will ash
green.
The startup screen will display in approximately 5 seconds.
When disappear startup screen, the POWER LED will turn
green.
4. Turn on your source (computer, notebook, video player,
etc.) The projector will detect your source automatically.
If you connect multiple sources at the same time, use the
“SOURCE” on the remote control or use “RGB”, “S-video”,
“Video” on the remote control to switch inputs.
Turn on the projector
rst and then the signal
sources.
Lens Cap
1
2
POWER
OR
Page 16

16
English
Installation
Powering Off the Projector
1. Press the “POWER” to turn off the projector lamp, you will
see a message as below on the on-screen display.
2. Press the “POWER” again to conrm.
3. The cooling fan continues to operate for about 120 seconds
for cooling cycle and the POWER LED will ash green.
When the light stop ashing and turn amber, the projector
has entered standby mode.
If you wish to turn the projector back on, you must wait
until the projector has completed the cooling cycle and has
entered standby mode. Once in standby mode, simply press
“POWER” to restart the projector.
4. Disconnect the power cable from the electrical outlet and the
projector.
5. Do not turn on the projector immediately following a power
off procedure.
Page 17

English
17
English
Installation
Warning Indicator
When the “TEMP” LED indicator lights red, it indicates the
projector has overheated. The projector will automatically
shut itself down.
When you see the message below displays on-screen, the
projector has detected that the lamp is approaching its end
of life. Please change the lamp as soon as possible or contact
your local dealer or our service center.
When the “TEMP” LED indicator ashes red and the mes-
sage below displays on-screen, it indicates the fan failed.
Stop using the projector and disconnect the power cable
from the electrical outlet, then contact your local dealer or
our service center.
Page 18

18
English
Installation
N
o
t
e
You can raise the
projector front up to 3.7
degrees by rotating the
adjustable feet.
Adjusting the Projected Image
Adjusting the Height of Projector Image
The projector is equipped with adjustable feet to raise and
lower the image to ll the screen.
To raise/lower the image:
1. Use to ne-tune the display angle.
Front Adjustable feet
Maximum Length:9.3mm
1
Page 19

English
19
English
Installation
40"
(101.6cm)
100"
(254.0cm)
150"
(381.0cm)
200"
(508.0cm)
250"
(635.0cm)
307"
(779.8cm)
Lens Center
A
B
H
A
Lens Center
H : A = 6.78
B ÷ H x 100% = 115%(Offset)
B
3.936'
(1.200m)
***
35.833'(10.922m)
28.667'(8.738m)
21.500'(6.553m)
14.333'(4.369m)
Min. zoomMax. zoom
***
39.364'(11.998m)
32.500'(9.906m)
26.000'(7.925m)
19.500'(5.944m)
13.000'(3.962m)
~
~
~
~
~
~
Adjusting the Projector Zoom and Focus
You may turn the zoom ring to zoom in or out. To focus the image, rotate the focus ring until the image is clear. The projector
will focus at distances from 3.94 to 39.36 feet (1.2 to 12.0 meters)
with mechanical travel.
Zoom Ring
Focus Ring
Adjusting Projection Image Size
Diagonal
Screen (Diagonal)
Screen Size (WxH)
Distance (Max. Zoom)
Distance (Min. Zoom)
27.46” (70cm) 100” (254.0cm) 150” (381.0cm) 200” (508.0cm) 250” (635.0cm) 302.8” (769.0cm)
22.0” x 16.5”
(55.8 x 41.8cm)
*** 13.000’ (3.962m) 19.500’ (5.944m) 26.000’ (7.925m) 32.500’ (9.906m) 39.364’ (11.998m)
3.936’ (1.200m) 14.333’ (4.369m) 21.500’ (6.553m) 28.667’ (8.738m) 35.833’ (10.922m) ***
80.0” x 60.0”
(203.2 x 152.4cm)
This graph is for user’s reference only.
120.0” x 90.0”
(304.8 x 228.6cm)
160.0” x 120.0”
(406.4 x 304.8cm)
200.0” x 150.0”
(508.0 x 381.0cm)
242.2” x 181.7”
(615.3 x 461.5cm)
Page 20

20
English
User Controls
N
o
t
e
On Screen Display
The Projector has multilingual On-screen Display menus
that allow you to make image adjustments and change a
variety of settings. The projector will automatically detect
the source.
How to operate
1. To open the OSD, press “MENU” on the Remote Control or Con-
trol Panel.
2. When OSD is displayed, use keys to select any item in the
main menu. While making a selection on a particular page, press
or “OK” key to enter sub menu.
3. Use keys to select the desired item in the sub menu and
adjust the settings using
4. If the setting has icon, you could press “OK” to enter another
sub menu. Press “MENU” to close the sub menu after adjustment.
5. After adjusting the settings, press “MENU” go back to the main
menu.
6. To exit, press “MENU” again. The OSD will be closed and the pro-
jector will automatically save the new settings.
key.
If no button operation
is made for 30 seconds,
the OSD will be closed
automatically.
Main Menu
Sub Menu Setting
Page 21

English
21
English
User Controls
IMAGE
Image Mode
There are many factory presets optimized for various types of im-
ages. Use the or to select the item.
Presentation: For computer or notebook.
Bright: For bright room.
Movie: For home theater.
sRGB: For standard color.
Blackboard: This mode should be selected to achieve optimum
color settings when projecting onto a blackboard (green).
Classroom: This mode is recommended for projecting in a class-
room.
User1/User2: Memorize user’s settings.
Brightness
Adjust the brightness of the image.
Press the to darken image.
Press the to lighten the image.
Contrast
The contrast controls the degree of difference between the lightest
and darkest parts of the picture.
Press the to decrease the contrast.
Press the to increase the contrast.
Page 22

22
English
User Controls
N
o
t
e
Sharpness
Adjust the sharpness of the image.
“Sharpness”,
“Saturation” and “Tint”
functions are only
supported under Video
mode.
Saturation
Adjust a video image from black and white to fully saturated color.
Tint
Adjust the color balance of red and green.
Press the to decrease the sharpness.
Press the to increase the sharpness.
Press the to decrease the amount of color in the image.
Press the to increase the amount of color in the image.
Press the to increase the amount of green in the image.
Press the to increase the amount of red in the image.
Page 23

English
23
English
User Controls
IMAGE | Advanced
Gamma
This allows you to choose a gamma table that has been ne-tuned to
bring out the best image quality for the input.
Film: For home theater.
Video: For video or TV source.
Graphics: For image source.
PC: For computer or notebook.
BrilliantColor
Produces an expanded onscreen color spectrum that delivers en-
hanced color saturation for bright, true-to-life images.
Color Temp.
TM
Adjust the color temperature. At higher temperature, the screen
looks colder; at lower temperature, the screen looks warmer.
Color Space
Select an appropriate color matrix type from AUTO, RGB or YUV.
Page 24

24
English
User Controls
Color
Use these settings for advanced adjustment of the individual Red,
Green, Blue, Cyan, Magenta and Yellow Colors.
Reset
Choose “Yes” to return the factory default settings for “Color”
menu.
IMAGE | Advanced | Color
IMAGE | Advanced | Input
Input
Use this option to enable / disable input sources. Press to enter
the sub menu and select which sources you require. Press “OK” to
nalize the selection. The projector will not search for inputs that
are not selected.
Page 25

English
25
English
User Controls
SCREEN
Aspect Ratio
Use this function to choose your desired aspect ratio.
4:3: This format is for 4×3 input sources not enhanced for Wide-
screen TV.
16:9-I: This format is for 16×9 input sources, like HDTV and
DVD enhanced for Wide screen TV. (576i/p)
16:9-II: This format is for 16×9 input sources, like HDTV and
DVD enhanced for Wide screen TV. (480i/p)
Native: This format displays the original image without any scal-
ing.
AUTO: Automatically selects the appropriate display format.
Aspect ratio
(source detected)
4:3 800 x 600 center
16:9-I 800 x 450 center
16:9-II
Native 1:1 mapping center
Resize image
SVGA model
854 x 480 catch
800 x 480 center
Overscan
Overscan function removes the noise in a video image. Overscan the
image to remove video encoding noise on the edge of video source.
Page 26

26
English
User Controls
N
o
t
e
D. zoom
Adjust the size of projector’s display area.
H Image Shift
Shift the projected image position horizontally.
V Image Shift
Shift the projected image position vertically.
V Keystone
Press the or to adjust image distortion vertically and makes a
rectangular image.
“3D Mode” and “3D
Sync. Invert” functions only supports
800x600@120Hz or
1024x768@120Hz PC
signal.
3D Mode
3D Sync. Invert
Press the to reduce the size of an image on the projection
screen.
Press the to magnify an image on the projection screen.
Off: Select “Off” to turn 3D settings off for 3D images.
On: Select “On” to use optimized settings for 3D images.
Press the “On” to invert left and right frame contents.
Press the “Off” for default frame contents.
Page 27

English
27
English
User Controls
SETTING | Language
Language
Choose the multilingual OSD. Press into the sub menu and then
use the or or or key to select your preferred language.
Press “OK” to nalize the selection.
SETTING
Mounting
Front-Desktop
The factory default setting. The image is projected straight on the
screen.
Rear-Desktop
When you select this function, the projector reverses the image
so you can project behind a translucent screen.
Front-Ceiling
When you select this function, the projector turns the image
upside down for ceiling-mounted projection.
Page 28

28
English
User Controls
When you select this function, the projector reverses and turns
Rear-Ceiling
the image upside down at same time. You can project from behind a translucent screen with ceiling mounted projection.
Menu Location
Choose the menu location on the display screen.
Projector ID
ID denition can be set up by menu (range 0~99), and allow user
control an individual projector by RS232C.
Mute
Choose “On” to mute the volume.
Choose “Off” to restore the volume.
Volume
Press the to decrease the volume.
Press the to increase the volume.
Page 29

English
29
English
User Controls
“Signal” is only sup-
N
o
t
e
ported in Analog VGA
(RGB) signal.
SETTING | Signal
Fine Sync
Eliminate icker from the image displayed. Use the or to adjust
the value.
Total Dots
Adjust the number of total dots in one horizontal period. Use the
or to adjust number to match your PC image.
H. Position (Horizontal Position)
Press the to move the image left.
Press the to move the image right.
V. Position (Vertical Position)
Press the to move the image down.
Press the to move the image up.
Page 30

30
English
User Controls
Logo
Use this function to set the desired startup screen. If changes are
made they will take effect the next time the projector is powered on.
On: LG startup screen.
Off: No logo is displayed.
SETTING | Advanced
Page 31

English
31
English
User Controls
OPTIONS
Input Search
When this function is turned “On”, the projector will search for
other signals if the current input signal is lost. When this function is
turned “Off”, it will only search a specied connection port.
High Altitude
When “On” is selected, the fans will spin faster. This feature is use-
ful in high altitude areas where the air is thin.
Information Hide
On: Choose “On” to hide the “searching” message.
Off: Choose “Off” to show the “searching” message.
Keypad Lock
When the keypad lock function is “On”, the control panel will be
locked however, the projector can be operated by the remote con-
trol. By selecting “Off”, you will be able to reuse the control panel.
Background Color
Use this feature to display a “Black”, “Red”, “Blue”, “Green” or
“White”, screen when no signal is available.
Reset
Choose “Yes” to return the display parameters on all menus to the
factory default settings. (except for lamp counter)
Page 32

32
English
User Controls
Power Mode
Standby: Choose “Standby” to save power dissipation further
Active: Choose “Active” to return to normal standby mode and
Direct Power On
Choose “On” to activate Direct Power mode. The projector will au-
tomatically power on when AC power is supplied, without pressing
the “POWER” key on the projector control panel or “POWER” key
on the remote control.
Auto Power Off (min)
Sets the countdown timer interval. The countdown timer will start,
when there is no signal being sent to the projector. The projector
will automatically power off when the countdown has nished (in
minutes).
Sleep Timer (min)
Sets the countdown timer interval. The countdown timer will start,
with or without a signal being sent to the projector. The projector
will automatically power off when the countdown has nished (in
minutes).
< 1W.
the “MONITOR OUT” port will be enabled.
OPTIONS | Advanced
Page 33

English
33
English
User Controls
OPTIONS | Lamp Settings
Lamp Counter (Normal)
Display the projection time of normal mode.
Lamp Counter (ECO)
Display the projection time of ECO mode.
Lamp Life Reminder
On: Choose “On” to show the lamp end of life warning message.
Off: Choose “Off” to hide the lamp end of life warning message.
Eco Mode
On: Choose “On” to dim the projector lamp which will lower
power consumption and extend the lamp life.
Off: Choose “Off” to increase the brightness.
Lamp Counter Reset
Reset the lamp hour counter after replacing the lamp.
Page 34

34
English
Appendices
Troubleshooting
If you experience trouble with the projector, refer to
the following information. If the problem persists,
please contact your local dealer or service center.
Problem: No image appears on screen
Ensure all the cables and power connections are correctly and
securely connected as described in the “Installation” section.
Ensure the pins of connectors are not crooked or broken.
Check if the projection lamp has been securely installed. Please
refer to the “Replacing the lamp” section.
Make sure you have removed the lens cap and the projector is
switched on.
Ensure that the “AV-Mute” feature is not turned on.
Problem: Partial, scrolling or incorrectly displayed image
Press “Auto” on the remote control or on the control panel.
If you are using a PC:
For Windows 95, 98, 2000, XP:
1. From the “My Computer” icon, open the “Control Panel” folder,
and double click the “Display” icon.
2. Select the “Settings” tab
3. Click on the “Advanced Properties”.
For Windows Vista:
1. From the “My Computer” icon, open the “Control Panel” folder,
and double click the “Appearance and Personalization”
2. Select “Personalization”
3. Click “Adjust screen resolution” to display “Display Settings”.
Click on the “Advanced Settings”.
If the projector is still not projecting the whole image, you will
also need to change the monitor display you are using. Refer to
the following steps.
Page 35

English
35
English
Appendices
4. Verify the resolution setting is less than or equal to 1600 x 1200
resolution.
5. Select the “Change” under the “Monitor” tab .
6. Click on “Show all devices”. Next, select “Standard monitor
types” under the SP box; choose the resolution mode you need
under the “Models” box.
If you are using a Notebook:
1. First, follow the steps above to adjust resolution of the com-
puter.
2. Press the toggle output settings. example: [Fn]+[F4]
Compaq=> [Fn]+[F4]
Dell => [Fn]+[F8]
Gateway=> [Fn]+[F4]
IBM=> [Fn]+[F7]
Macintosh Apple:
System Preference-->Display-->Arrangement-->Mirror
display
If you experience difculty changing resolutions or your monitor
freezes, restart all equipment including the projector.
Hewlett
Packard
NEC=> [Fn]+[F3]
Toshiba => [Fn]+[F5]
=> [Fn]+[F4]
Problem: The screen of the Notebook or PowerBook computer is not displaying a presentation
If you are using a Notebook PC:
Some Notebook PCs may deactivate their own screens when a
second display device is in use. Each has a different way to be
reactivated. Refer to your computer’s documentation for detailed
information.
Problem: Image is unstable or ickering
Adjust the “Total Dots” or “Fine Sync” to correct it. Refer to the
“Setting|signal” section for more information.
Change the monitor color setting from your computer.
Page 36

36
English
Appendices
Check and recongure the display mode of your graphic card to
make it compatible with the product.
Problem: Image is out of focus
Adjust the Focus Ring on the projector lens.
Make sure the projection screen is between the required distance
3.94 to 39.36 feet (1.2 to 12.0 meters) from the projector (refer to
page 19).
Problem: The image is stretched when displaying 16:9 DVD
The projector automatically detects 16:9 DVD and adjusts the aspect
ratio by digitizing to full screen with 4:3 default setting.
If the image is still stretched, you will also need to adjust the aspect
ratio by referring to the following:
Please select 4:3 aspect ratio type on your DVD player if you are
playing a 16:9 DVD.
If you can’t select 4:3 aspect ratio type on your DVD player,
please select 4:3 aspect ratio in the on screen menu.
Problem: Image is too small or too large
Adjust the Zoom Ring on the top of the projector.
Move the projector closer to or further from the screen.
Press “MENU” button on the remote control or projector panel,
go to “SCREEN --> Aspect Ratio” and try the different settings.
Problem: Image is reversed
Select “SETTING-->Mounting” from the OSD and adjust the pro-
jection direction.
Problem: Lamp burns out or makes a popping sound
When the lamp reaches its end of life, it will burn out and may
make a loud popping sound. If this happens, the projector will
Page 37

English
37
English
Appendices
not turn on until the lamp module has been replaced. To replace
N
o
t
e
the lamp, follow the procedures in the “Replacing the Lamp”.
Problem: LED lighting message
Message
Standby (Input power cable)
Normal (Power on)
Powering up (Warming up) Flashing
POWER-LED LAMP-LED TEMP-LED
(Green) (Amber) (Red) (Red)
Power off (Cooling-I: It can’t accept any key at this status)
Power off (Cooling-II: It can
accept power key to turn on the
projector)
Error (Lamp failed)
Error (Fan lock) Flashing
Error (Over temp.)
Steady light =>
No light =>
Flashing
Flashing
Page 38

38
English
Appendices
Problem: Message Reminders
Over temperature - the projector has exceeded its recommended
operating temperature and must be allowed to cool down before it
may be used.
Replacing the lamp - the lamp is about to reach its maximum life-
time. Prepare to replace it soon.
Fan failed - the system fan is not working.
Page 39

English
39
English
Appendices
Warning: Lamp compartment may be hot!
Allow it to cool down
before changing the
lamp!
Replacing the lamp
The projector will detect the lamp life itself. It will show you a
warning message
When you see this message, please contact your local reseller
or service center to change the lamp as soon as possible. Make
sure the projector has been cooled down for at least 45 minutes before changing the lamp.
1
2
3
Warning: To reduce the
risk of personal injury,
do not drop the lamp
module or touch the
lamp bulb. The bulb
may shatter and cause
injury if it is dropped.
4
Lamp Replacing Procedure:
1. Switch off the power to the projector by pressing the “POWER”.
2. Allow the projector to cool down at least 45 minutes.
3. Disconnect the power cable.
4. Use a screwdriver to remove the 2 screws from the cover.
5. Push up and remove the cover.
6. Remove the 2 screws from the lamp module and pull up
the lamp bar.
7. Pull out the lamp module by force.
8. Install the new lamp module by reversing the previous steps.
9. After replacing the lamp, turn on the power, and select the
menu ->[OPTIONS|Lamp Settings] ->[Lamp Counter Reset]
to reset the lamp usage hours. See page 33.
Page 40

40
English
Appendices
N
o
t
e
Computer Compatibility
“*” compressed
computer image.
If projector does
not support the input
signal,” Out of display
range” message appears on the screen.
If the input signal
is not in the compatibility table, the image
may not be displayed
clearly.
The 3D func-
tion only supports
800x600@120Hz or
1024x768@120Hz PC
signal. When projector gets the PC signal
is 800x600@120Hz or
1024x768@120Hz, the
3D function will be
turned “On” automatically. On the contrary,
if the projector gets
the PC signal is not
800x600@120Hz or
1024x768@120Hz; the
function will be turned
“Off”.
Modes Resolution
VGA 640 x 350 85 37.90
640 x 400 85 37.90
640 x 480 60 31.50
640 x 480 72 37.90
640 x 480 75 37.50
640 x 480 85 43.30
720 x 400 70 31.50
720 x 400 85 37.90
SVGA 800 x 600 56 35.20
800 x 600 60 37.90
800 x 600 72 48.10
800 x 600 75 46.90
800 x 600 85 53.70
800 x 600 120 ---
XGA *1024 x 768 60 48.40
*1024 x 768 70 56.50
*1024 x 768 75 60.00
*1024 x 768 85 68.70
*1024 x 768 120 ---
WXGA *1280 x 768 60 47.40
*1280 x 768 75 60.30
*1280 x 720 60 45.00
*1280 x 800 60 49.30
SXGA *1152 x 864 60 53.80
*1152 x 864 70 63.80
*1152 x 864 75 67.50
*1152 x 864 85 77.10
*1280 x 1024 60 63.98
*1280 x 1024 75 79.98
*1280 x 1024 85 91.10
*1280 x 960 60 60.00
SXGA+ *1400 x 1050 60 65.31
UXGA *1600 x 1200 60 75.00
MAC LC 13” 640 x 480 66.66 35.00
MAC 16” *832 x 624 74.55 49.10
MAC 19” *1024 x 768 75 60.24
MAC *1152 x 870 75.06 68.68
MAC G4 640 x 480 66.619 34.98
i Mac DV *1024 x 768 75 60.20
i Mac DV *1152 x 870 75 68.68
i Mac DV *1280 x 960 75 75
V.Frequency
(Hz)
H.Frequency
(kHz)
Page 41

English
41
English
Appendices
3
12
5 4 3 2 1
10 9 8 7 6
15 14 13 12 11
Congurations of Terminals
Terminal : Analog RGB (Mini D-sub 15 pin)
1
Red (R/Cr) Input/R Output
2
Green (G/Y) Input/G Output
3
Blue (B/Cb) Input/B Output
4
5
6
7
8
***
Ground (Horiz.sync.)
Ground (Red)
Ground (Green)
Ground (Blue)
9
10
11
12
Horiz. sync. Input / Output (Composite H/V
13
14
15
5V / ***
Ground (Ver. sync.)
ICP download
DDC data / ***
sync. Input)
Vert. sync. Input / Output
DDC clock / ***
Terminal : Mini DIN 3-pin
1 TXD
2 RXD
GND
3
Page 42

42
English
Appendices
Regulation & Safety Notices
This appendix lists the general notices of your projector.
FCC notice
This device has been tested and found to comply with the
limits for a Class B digital device pursuant to Part 15 of the
FCC rules. These limits are designed to provide reasonable
protection against harmful interference in a residential
installation. This device generates, uses and can radiate radio
frequency energy and, if not installed and used in accordance
with the instructions, may cause harmful interference to radio
communications.
However, there is no guarantee that interference will not
occur in a particular installation. If this device does cause
harmful interference to radio or television reception, which
can be determined by turning the device off and on, the user is
encouraged to try to correct the interference by one or more of
the following measures:
• Reorient or relocate the receiving antenna.
• Increase the separation between the device and receiver.
• Connect the device into an outlet on a circuit different
from that to which the receiver is connected.
• Consult the dealer or an experienced radio/television
technician for help.
Notice: Shielded cables
All connections to other computing devices must be
made using shielded cables to maintain compliance
with FCC regulations.
Caution
Changes or modications not expressly approved by the
manufacturer could void the user’s authority, which is
granted by the Federal Communications Commission,
to operate this projector.
Page 43

English
43
English
Appendices
Operation conditions
This device complies with Part 15 of the FCC Rules. Operation
is subject to the following two conditions:
1. This device may not cause harmful interference and
2. This device must accept any interference received,
including interference that may cause undesired
operation.
Notice: Canadian users
This Class B digital apparatus complies with Canadian
ICES-003.
Remarque à l’intention des utilisateurs
canadiens
Cet appareil numerique de la classe B est conforme a la norme
NMB-003 du Canada.
Declaration of Conformity for EU countries
• EMC Directive 2004/108/EC (including amendments)
• Low Voltage Directive 2006/95/EC
• R & TTE Directive 1999/5/EC (if product has RF
function)
Disposal instructions
Do not throw this electronic device into the
trash when discarding. To minimize pollution
and ensure utmost protection of the global
environment, please recycle it.
Page 44

44
English
3.24"/82.30mm
Lens Center
2.48"/63.00mm
Screw Holes for Ceiling Mount
Screw: M3
Depth: 0.30~0.39"/7.5~10.0mm
11.27"/286.31mm
7.56"/192.00mm
3.96"/100.60mm
1.67"/42.39mm
1.75"/44.39mm
3.47"/88.15mm
3.06"/77.75mm
2.17"/55.00mm
4.33"/110.00mm
4.67"/118.65mm 6.60"/167.66mm
Lens Center
4.94"/125.53mm
2.28"/57.79mm
3.03"/77.00mm
0.41"/10.54mm
3.7° Max.
Menu
Appendices
Dimensions
 Loading...