

Page 1

Owner's Manual
Blu-ray Disc™ Recorder
BR629T
BR625T
Please read this manual carefully before operating your set and retain it for future reference.
*1VMN33053*
EAB31AD / EAB30AD 1VMN33053
http://www.lg.com
Page 2
Getting Started
Getting Started
2
Safety Information
CAUTION
RISK OF ELECTRIC SHOCK
DO NOT OPEN
CAUTION: TO REDUCE THE RISK OF ELECTRIC
SHOCK DO NOT REMOVE COVER (OR BACK) NO
USER-SERVICEABLE PARTS INSIDE REFER SERVICING
TO QUALIFIED SERVICE PERSONNEL.
This lightning flash with arrowhead symbol
within an equilateral triangle is intended to alert
the user to the presence of uninsulated
dangerous voltage within the product’s
enclosure that may be of sufficient magnitude to constitute
a risk of electric shock to persons.
The exclamation point within an equilateral
triangle is intended to alert the user to the
presence of important operating and
maintenance (servicing) instructions in the
literature accompanying the product.
WARNING: TO PREVENT FIRE OR ELECTRIC SHOCK
HAZARD, DO NOT EXPOSE THIS PRODUCT TO RAIN
OR MOISTURE.
WARNING: Do not install this equipment in a confined
space such as a book case or similar unit.
CAUTION: Do not block any ventilation openings. Install in
accordance with the manufacturer’s instructions.
Slots and openings in the cabinet are provided for ventilation
and to ensure reliable operation of the product and to
protect it from over heating. The openings shall be never be
blocked by placing the product on a bed, sofa, rug or other
similar surface. This product shall not be placed in a builtin installation such as a bookcase or rack unless proper
ventilation is provided or the manufacturer’s instruction has
been adhered to.
be certain. Do not overload wall outlets. Overloaded wall
outlets, loose or damaged wall outlets, extension cords,
frayed power cords, or damaged or cracked wire insulation
are dangerous. Any of these conditions could result in
electric shock or fire. Periodically examine the cord of
your appliance, and if its appearance indicates damage or
deterioration, unplug it, discontinue use of the appliance,
and have the cord replaced with an exact replacement
part by an authorized service centre. Protect the power
cord from physical or mechanical abuse, such as being
twisted, kinked, pinched, closed in a door, or walked upon.
Pay particular attention to plugs, wall outlets, and the point
where the cord exits the appliance. To disconnect power
from the mains, pull out the mains cord plug. When installing
the product, ensure that the plug is easily accessible.
This device is equipped with a portable battery or
accumulator.
Safety way to remove the battery or the battery from
the equipment: Remove the old battery or battery pack,
follow the steps in reverse order than the assembly. To
prevent contamination of the environment and bring
on possible threat to human and animal health, the old
battery or the battery put it in the appropriate container at
designated collection points. Do not dispose of batteries
or battery together with other waste. It is recommended
that you use local, free reimbursement systems batteries
and accumulators. The battery shall not be exposed to
excessive heat such as sunshine, fire or the like.
CAUTION: The apparatus shall not be exposed to water
(dripping or splashing) and no objects filled with liquids,
such as vases, shall be placed on the apparatus.
• The appliance is not intended for use by young children
or infirm persons without supervision.
• Young children should be supervised to ensure that
they do not play with appliance.
• If the appliance is supplied from a cord extension
set or an electrical portable outlet device, the cord
extension set on electrical portable outlet device must
be positioned so that it is not subject to splashing or
ingress of moisture.
CAUTION: This product is classified as a class 1 laser
product. This product employs a Laser System. To ensure
proper use of this product, please read this owner’s manual
carefully and retain it for future reference. Shall the unit
require maintenance, contact an authorized service centre.
Only a qualified service person should the cover or attempt
to service this device, due to possible eye injury.
Use of controls, adjustments or the performance of
procedures other than those specified herein may result in
hazardous radiation exposure. To prevent direct exposure
to laser beam, do not try to open the enclosure.
CAUTION: CLASS 3R VISIBLE AND INVISIBLE LASER
RADIATION WHEN OPEN, AVOID DIRECT EYE
EXPOSURE.
LOCATION: INSIDE, NEAR THE DECK MECHANISM.
CAUTION concerning the Power Cord
The main power supply is engaged when the main plug is
plugged in a 220-240 V~, 50Hz AC outlet.
Most appliances recommend they be placed upon a
dedicated circuit;
That is, a single outlet circuit which powers only that
appliance and has no additional outlets or branch circuits.
Check the specification page of this owner’s manual to
Never use a gas duster on this unit.
The gas trapped inside of this unit may cause ignition and
explosion.
Do not place any combustible objects on the unit (candles,
etc.)
This apparatus should not be placed in a built-in
installation, such as a bookcase or rack unless proper
ventilation is provided. Make sure to leave space as
follows.
-Front: 5 cm with no obstacles
-Depth: 10 cm
-Height: 10 cm
Page 3
When viewing 3D content
Ƈ
When viewing 3D content, please note the following.
Also, please carefully read the user manuals of your 3D
television and 3D glasses.
Getting Started
Trademark Information
3
• Do not view 3D content if
-you have a possibility of epilepsy
-you have photosensitive reaction or have a history of
photosensitivity.
-you have a heart condition
-you are feeling sick
These may be exacerbated.
• It is recommended that you view 3D content in
proper posture from the proper position.
• If the following occur while viewing 3D content, stop
viewing immediately.
-If you experience double-vision
-If the images do not seem to be 3D (Please confirm
the 3D settings on your 3D devices.)
• Viewing 3D content is recommended for ages of 6
and older.
Children may not show visible signs of fatigue and
discomfort. When a child is viewing 3D content, please
monitor their condition.
• When viewing 3D content, take a rest every title.
Viewing for a long time may cause ocular fatigue.
• Stop viewing immediately if you feel fatigued and/or
discomfort while viewing 3D content.
If continued, it may lead to deconditioning. Please take
an adequate rest.
Manufactured under license from Dolby Laboratories.
Dolby and the double-D symbol are trademarks of Dolby
Laboratories.
Manufactured under license under U.S. Patent Nos:
5,956,674; 5,974,380; 6,226,616; 6,487,535; 7,392,195;
7,272,567; 7,333,929; 7,212,872 & other U.S. and worldwide
patents issued & pending. DTS-HD, the Symbol, & DTS-HD
and the Symbol together are registered trademarks & DTSHD Master Audio | Essential is a trademark of DTS, Inc.
Product includes software. © DTS, Inc. All Rights Reserved.
Blu-ray Disc™, Blu-ray™, Blu-ray 3D™, BD-Live™,
BONUSVIEW™, and the logos are trademarks of the Bluray Disc Association.
1
Getting Started
• If you are on medication, you may be strongly
affected by the 3D vision. If you feel anything
unusual, stop viewing immediately.
• If you have experienced a major illness or you are
pregnant, you may be strongly affected by the 3D
vision. If you feel anything unusual, stop viewing
immediately.
• For 3D vision, how it appears depends on the viewer
and physical condition. If you feel discomfort, do not
view 3D content.
The terms HDMI and HDMI High-Definition Multimedia
Interface, and the HDMI Logo are trademarks or registered
trademarks of HDMI Licensing LLC in the United States
and other countries.
Java and all Java based trademarks and logos are
trademarks or registered trademarks of Oracle and/or its
affiliates.
“AVCHD” and the “AVCHD” logo are trademarks of
Panasonic Corporation and Sony Corporation.
Continued on next page
Page 4
Getting Started
4
“x.v.Colour” and “x.v.Colour” logo are trademarks of Sony
Corporation.
DLNA®, the DLNA Logo and DLNA CERTIFIED® are
trademarks, service marks, or certification marks of the
Digital Living Network Alliance.
is a trademark of DVD Format/Logo Licensing
Corporation.
DivX®, DivX Certified® and associated logos are trademarks
of Rovi Corporation or its subsidiaries and are used under
license.
THIS PRODUCT IS LICENSED UNDER THE VC-1
PATENT PORTFOLIO LICENSE FOR THE PERSONAL
AND NON-COMMERCIAL USE OF A CONSUMER TO
(i) ENCODE VIDEO IN COMPLIANCE WITH THE VC-1
STANDARD (“VC-1 VIDEO”) AND/OR (ii) DECODE
VC-1 VIDEO THAT WAS ENCODED BY A CONSUMER
ENGAGED IN A PERSONAL AND NONCOMMERCIAL
ACTIVITY AND/OR WAS OBTAINED FROM A VIDEO
PROVIDER LICENSED TO PROVIDE VC-1 VIDEO. NO
LICENSE IS GRANTED OR SHALL BE IMPLIED FOR
ANY OTHER USE. ADDITIONAL INFORMATION MAY BE
OBTAINED FROM MPEG LA, L.L.C.
SEE HTTP://WWW.MPEGLA.COM
MPEG Layer-3 audio coding technology licensed from
Fraunhofer IIS and Thomson.
THIS PRODUCT IS LICENSED UNDER THE MPEG-4
VISUAL PATENT PORTFOLIO LICENSE FOR THE
PERSONAL AND NON-COMMERCIAL USE OF A
CONSUMER FOR (i) ENCODING VIDEO IN
COMPLIANCE WITH THE MPEG-4 VISUAL STANDARD
(“MPEG-4 VIDEO”) AND/OR (ii) DECODING MPEG-4
VIDEO THAT WAS ENCODED BY A CONSUMER
ENGAGED IN A PERSONAL AND NON-COMMERCIAL
ACTIVITY AND/OR WAS OBTAINED FROM A VIDEO
PROVIDER LICENSED BY MPEG LA TO PROVIDE
MPEG-4 VIDEO. NO LICENSE IS GRANTED OR SHALL
BE IMPLIED FOR ANY OTHER USE. ADDITIONAL
INFORMATION INCLUDING THAT RELATING TO
PROMOTIONAL, INTERNAL AND COMMERCIAL USES
AND LICENSING MAY BE OBTAINED FROM MPEG LA,
L. L. C. SEE HTTP://WWW.MPEGLA.COM
About copyright
Ƈ
Unauthorised copying, broadcasting, public performance
and lending of discs are prohibited.
This item incorporates copy protection technology that is
protected by U.S. patents and other intellectual property
rights of Rovi Corporation. Reverse engineering and
disassembly are prohibited.
Windows Media and the Windows logo are trademarks
or registered trademarks of Microsoft Corporation in the
United States and/or other countries.
THIS PRODUCT IS LICENSED UNDER THE AVC
PATENT PORTFOLIO LICENSE FOR THE PERSONAL
AND NON-COMMERCIAL USE OF A CONSUMER TO
(i) ENCODE VIDEO IN COMPLIANCE WITH THE AVC
STANDARD (“AVC VIDEO”) AND/OR (ii) DECODE
AVC VIDEO THAT WAS ENCODED BY A CONSUMER
ENGAGED IN A PERSONAL AND NON-COMMERCIAL
ACTIVITY AND/OR WAS OBTAINED FROM A VIDEO
PROVIDER LICENSED TO PROVIDE AVC VIDEO. NO
LICENSE IS GRANTED OR SHALL BE IMPLIED FOR
ANY OTHER USE. ADDITIONAL INFORMATION MAY BE
OBTAINED FROM MPEG LA, L. L. C.
SEE HTTP://WWW.MPEGLA.COM
Verification and Preparation
Verifying the supplied accessories
If any part is missing, please contact the retailer you
purchased the product from.
• Remote control (1)
• Batteries (R6, 1.5V) (2)
• RF cable (1)
• Video cable (1)
• Audio cables (1)
• AC cord (1)
• Owner’s Manual (This booklet) (1)
• Warranty card (1)
Page 5
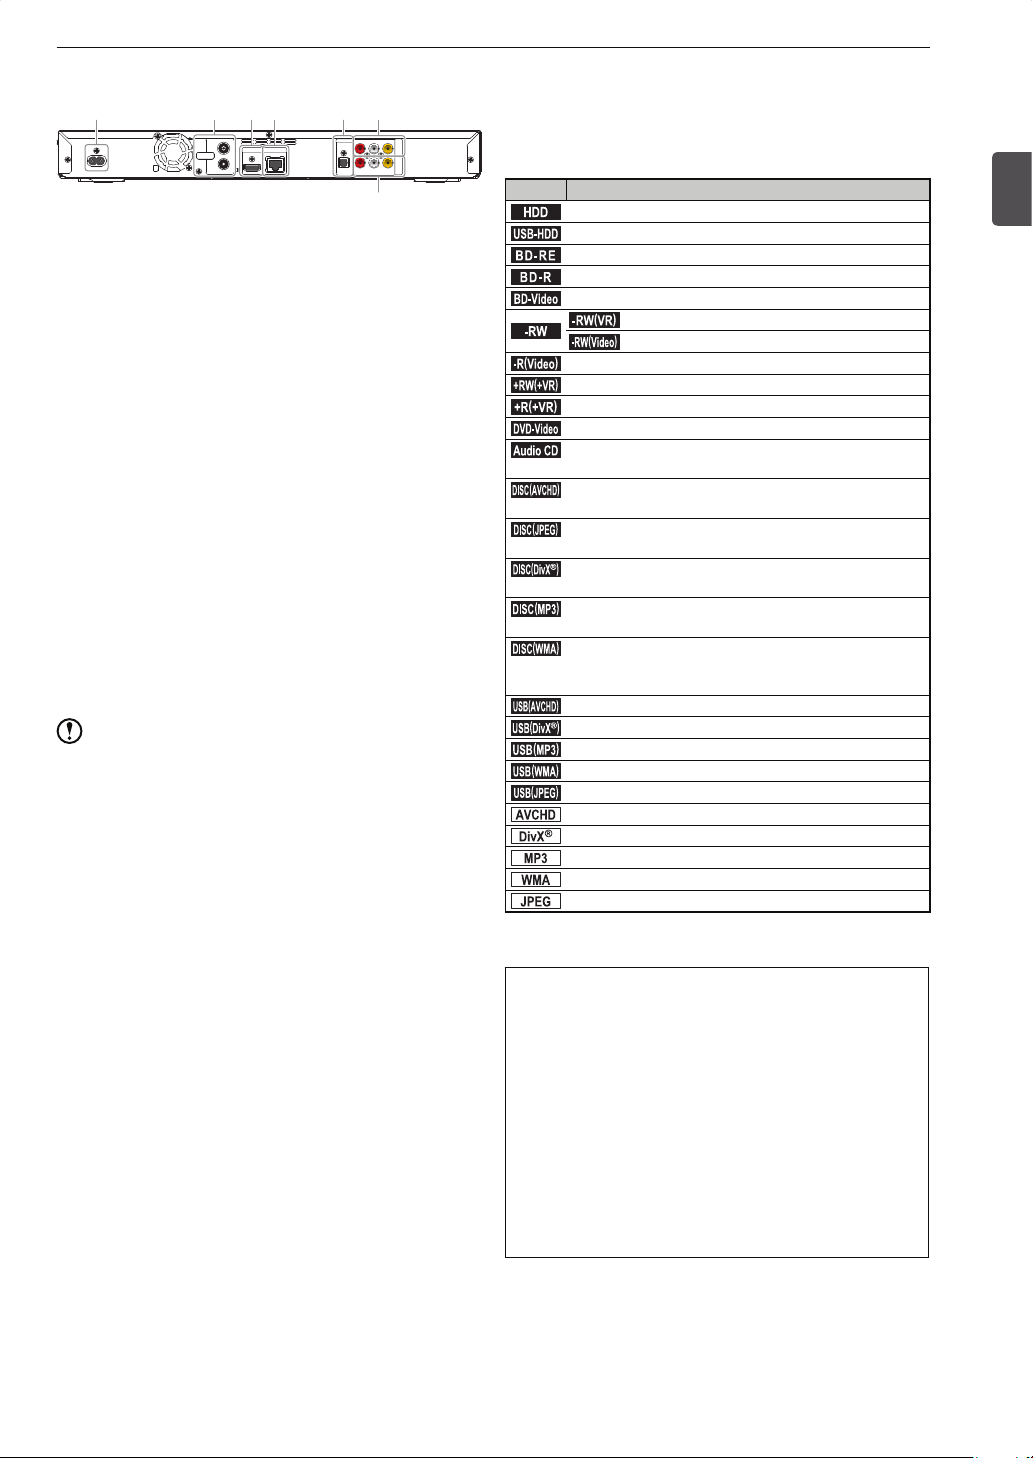
Verifying the types of terminals
123456
DIGITAL OUT
AUDIO VIDEO
RL
IN
HDMI OUT LAN
ANTENNA
AC IN
~
OUT
1. AC inlet
• Plug in the AC cord.
2. ANTENNA IN / OUT
• Connect the RF cable to it to view / record the
digital broadcast programmes.
3. HDMI OUT
• Used to connect this unit and a TV using an HDMI
cable. HDMI connection provides high picture /
sound quality*.
(*Picture / sound quality depends on the TV’s
capability.)
4. LAN terminal
• To connect to the network.
5. DIGITAL OUT (OPTICAL) Jack
• To connect this unit to an audio amplifier with a
built-in digital audio output decoder and such.
6. OUT jacks (AUDIO L/R, VIDEO)
• To connect to the input jacks* on the TV using audio /
video cables.
(*Yellow: to the video input
Red / White: to the audio input)
7. IN jacks (AUDIO L/R, VIDEO)
• To connect a set-top box / another device to this
unit. Also used to record (dub) from another device.
Note
• The cooling fan on the rear panel spins when this
unit is powered on and during the time set for the
“Quick Booting”.
• It is recommended to use an HDMI connection when
your TV has an HDMI input. An HDMI connection
requires one cable only.
OPTICAL
OUT
IN
AUDIORL
VIDEO
7
Getting Started
About This Manual
• Operating instructions in this manual are based on use
of the remote control.
Symbols of supported media / file format
Ƈ
Symbol Description
.
HDD
.
Internal hard disk drive
.
USB-HDD
.
USB external hard disk drive
.
BD-RE
.
BD-RE disc recorded in BDAV format
.
BD-R
.
BD-R disc recorded in BDAV format
.
BD-Video
.
Commercially available BD-Video disc
.-RW(VR).
.
-RW
.
.-R(Video).
.+RW(+VR).
.+R(+VR).
.
DVD-Video
.
.Audio CD.
.DISC (AVCHD).
.DISC (JPEG).
.
DISC(DivX).
.DISC (MP3).
.DISC(WMA).
.
USB(AVCHD).
.
USB(DivX).
.USB (MP3).
.USB (WMA).
).
.USB(JPEG
.
AVCHD
.
.
DivX
.
.MP3.
.
WMA
.
.
JPEG
.
* AVCHD files cannot be played back directly from a USB
storage device.
DVD-RW disc recorded in VR format
.-RW(Video).
DVD-RW disc recorded in Video format
DVD-R disc recorded in Video format
DVD+RW disc recorded in +VR format
DVD+R disc recorded in +VR format
Commercially available DVD-Video disc
Audio CD (CD-DA), finalised CD-RW / CD-R discs
formatted in Audio CD format
DVD-RW / -R, DVD+RW / +R disc containing
movies in AVCHD format
BD-RE / -R, DVD-RW / -R, DVD+RW / +R,
CD-RW / -R disc containing JPEG files
BD-RE / -R, DVD-RW / -R, DVD+RW / +R,
CD-RW / -R disc containing DivX® files
BD-RE / -R, DVD-RW / -R, DVD+RW / +R,
CD-RW / -R disc containing MP3 files
BD-RE / -R, DVD-RW / -R, DVD+RW / +R,
CD-RW / -R disc containing Windows Media™
Audio files
USB device containing movies in AVCHD format
USB device containing DivX® files
USB device containing MP3 files
USB device containing Windows Media™ Audio files
USB device containing JPEG files
AVCHD files*
DivX® files
MP3 files
Windows Media™ Audio files
JPEG files
5
1
Getting Started
ABOUT DIVX VIDEO: DivX® is a digital video format
created by DivX, LLC, a subsidiary of Rovi Corporation.
This is an official DivX Certified® device that plays DivX
video. Visit divx.com for more information and software
tools to convert your files into DivX videos.
ABOUT DIVX VIDEO-ON-DEMAND: This DivX
Certified® device must be registered in order to play
purchased DivX Video-on-Demand (VOD) movies. To
obtain your registration code, locate the DivX VOD
section in your device setup menu. Go to vod.divx.
com for more information on how to complete your
registration.
®
• Media containing the DivX
files with the DivX® GMC
(Global Motion Compensation) playback feature, which
is DivX® supplemental function, cannot be played back
on this unit.
Page 6

Getting Started
2 Getting Started
12 Connections
15 Basic Setup
22 Viewing
24 Supported Media
29 Recording
6
Table of Contents
22 Viewing
4
2 Getting Started
2 Safety Information
3 Trademark Information
4 Verification and Preparation
4 Verifying the supplied accessories
5 Verifying the types of terminals
5 About This Manual
8 Functional Overview
8 Remote control
9 Front panel
9 Display panel
10 On-Screen Display
11 Home Menu
12 Connections
12 Antenna Connection
12 Connections to Your TV
13 When connecting the home terminal / set-top
box to this unit
13 Network Connection
13 Direct connection to a DLNA client device
13
Connection to a DLNA client device via a hub /
broadband router
14 Connection to an Audio System
15 Basic Setup
15 After All Connections Have Been Made
15 Turn on this unit
15 Preparation for the Remote Control
15 Battery installation
15 Operable range of the remote control
16 Operating the TV
16 Setting up the supplied remote control to
control your TV
16 Basic Setup / DTV Operations
16 Basic setup
17 Basic Setup for DTV
17 Available configuration options in “DTV Menu”
17 Limiting the access to the particular channels
18 Network Setup
19 Receiving the Programme Guide
20 SIMPLINK
20 Registration / Deregistration of a USB-HDD
21 DTV Operations
1
2
3
22 Viewing a Programme Currently On Air
22 Selecting a channel
22 Selecting a channel from the “Programme
List” window
22 Editing favourite groups
22 Switching the audio
22 Switching the subtitles
23
Switching the image quality (Super Resolution)
23 Unlock the DTV rating temporarily
23 Viewing from an External Device
23 Switching to the external input
23 Viewing a cable-TV programme
24 Supported Media
24 Supported Media
25 About HDD (internal HDD)
25 About USB-HDD (external HDD)
25 About discs
26 Preparation for a Disc
26 Place a disc
27 Initialise (format) a brand-new Blu-ray Disc™
27 Format a brand-new DVD
27 About DVD recording format
28 Preparation for a USB Device
28 Connecting a USB device
29 Recording
29 Before Recording
29 Select a media to record to
29 Recording mode (image quality) and approx.
recording time
30 Recording along with bilingual audio (dual
audio) / multi audio / surround audio / subtitles
31 Simultaneous operations
33 Recording a Programme Currently On Air
33 Changing the recording mode (image quality)
33 ITR (Instant Timer Recording)
34 Before Timer Programming
34 About “Programme Guide”
34 Programming a Timer Recording from
“Programme Guide”
35 Manual Timer Programming
35 Dual Recording
36 Recording from an External Device
36 To record a cable-TV programme
36 Confirming / Modifying / Cancelling Timer
Programmes, Stopping a Timer Recording
36 Confirming timer programmes
6
5
Page 7

36 Skipping weekly / daily timer recording
40 Playback
48 Editing
52 Media Management
54 Dubbing
60 Useful Functions
68 Others
temporarily
37 Modifying a timer programme
37 Cancel an unnecessary timer programme
38 Stopping the timer recording in process
38 Additional Information about Recording
40 Playback
40 Before Playback
40 Contents list
40 Resume point
41 Playing Back a Programme (Title)
41 Playing Back a Commercially Available
Disc
41 Playing back a Blu-ray Disc™ / DVD
41 Playing an Audio CD
41 Playing back a Blu-ray 3D™ disc
42 Playing back a media containing
MP3 / WMA / DivX
42 Various Playback Functions
42 Change the playback speed
43 Skipping forward / backward
43 Repeat playback
44 Playing back a playlist created on another
device
44 Chase play during recording
44 Switching Settings During Playback
44 Switching the audio language / subtitle
language / camera angle
45 Noise reduction
45 Super resolution
45 PiP (BONUSVIEW™) setting
46 Virtual package
46 PIN Code entry screen
46 Viewing JPEG Files
46 Playing a slide show
46 Recommended spec
47 Playing Back a Disc Containing an AVCHD
High-Definition Video
47 Additional Information about Playback
48 Editing
7
8
®
/ JPEG Files
Getting Started
50 Protecting a title
50 Deleting Unnecessary Titles
50 Deleting a single title
50 Delete multiple titles at one time
51 Deleting Parts of a Title
51 Dividing a Title
51 Converting the Recording Mode (Image
Quality)
52 Media Management
52 Media Management
52 Renaming a disc / USB-HDD
52 Protecting a disc / USB-HDD
52 Finalising a disc recorded on this unit
52 Undoing finalisation
53 Deleting all recording data on the HDD / USB-
HDD
53 Reinitialising (reformatting) a disc
54 Dubbing
54 Before Dubbing
54 Available dubbing types
54 Recording mode for dubbing
55 About the “High-speed dubbing” and “Normal-
speed dubbing”
55 About dubbing restrictions
55 About “Copy” and “Move”
56 Dubbing along with bilingual recording audio
(dual audio) / surround audio / subtitles
56 One Title Dubbing from “Contents List”
screen
56 Dubbing Multiple Titles at One Time
57 Dubbing from a VCR / Camcorder
58 Additional Information about Dubbing
60 Useful Functions
60 Using This Unit as a Home Media Server
60 Function Setup
60 Using “Settings” menu
66 Software Update
67 Language Code List
10
9
11
7
11
Getting Started
2
3
4
5
6
7
8
9
10
11
48 Before Editing
48 Available editing functions
49 Adding / Deleting a Chapter Mark
49 Adding a chapter mark
49 Deleting a chapter mark
49 Hiding chapters
49 Changing a Title Name / Protecting a Title
50 Changing a title name
68 Others
68 Troubleshooting
73 If a following message appears...
74 Glossary
76 Specifications
77 License
12
12
Page 8
Getting Started
AKB73675701
I.REPLAY
I.SKIP
8
Functional Overview
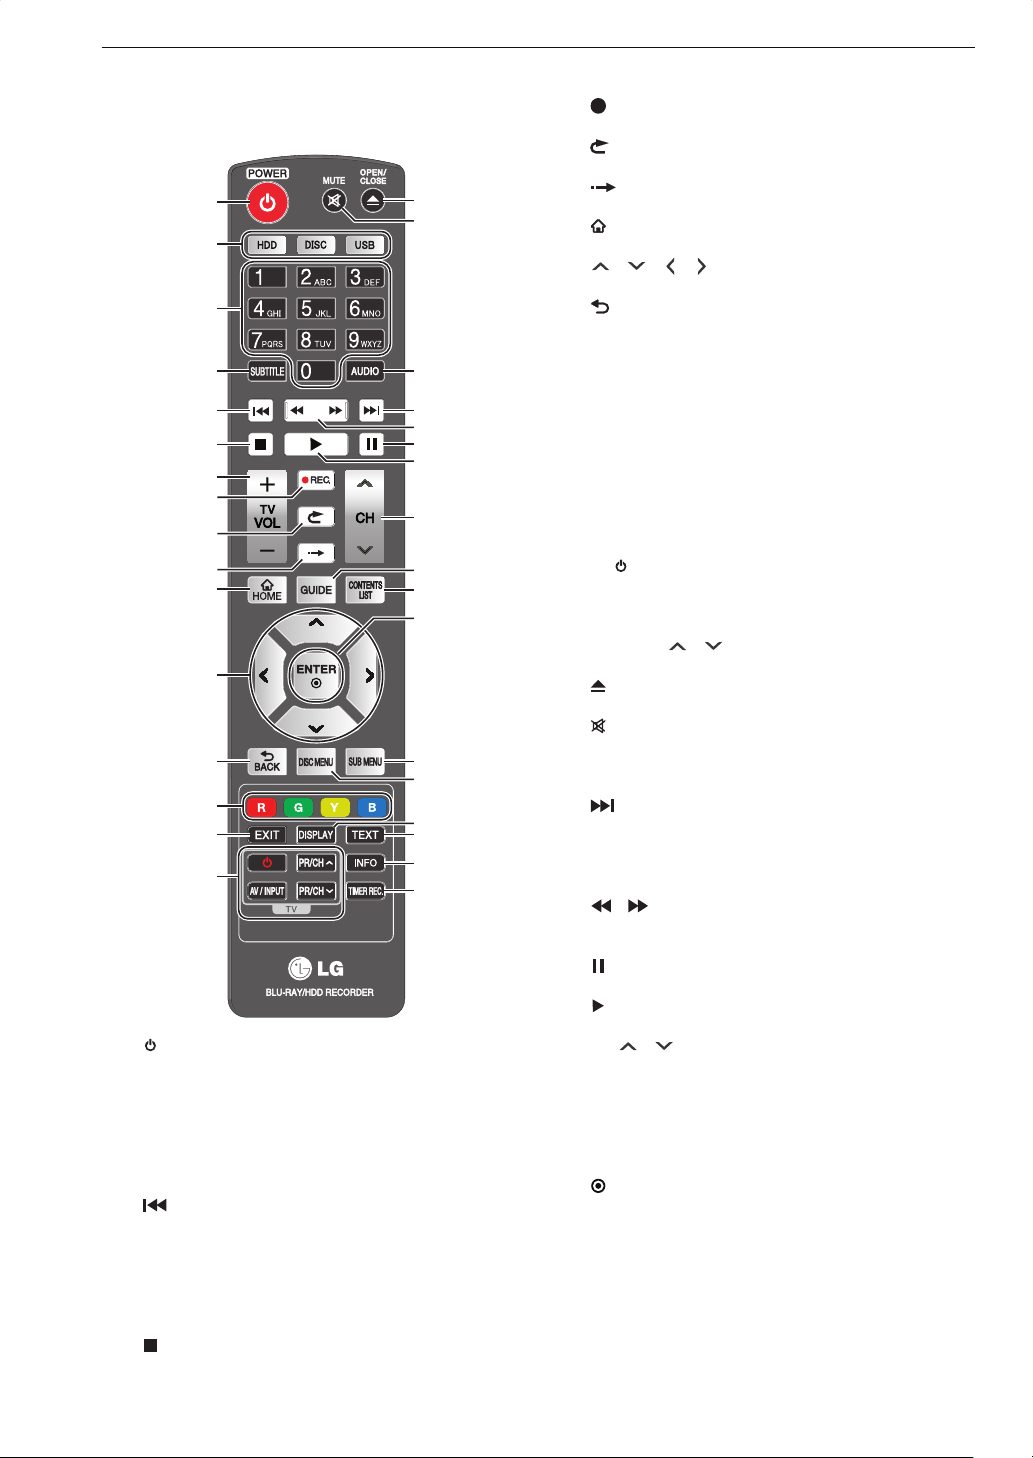
Remote control
1
2
3
4
5
6
7
8
9
10
11
12
13
14
15
16
1. [ POWER] (standby / on) button
• Press to switch the unit on / off.
2. Media buttons ([HDD] / [DISC] / [USB])
• Press to switch to the media to operate.
3. Number buttons
• Used to enter numbers or letters.
4. [SUBTITLE] button
• Press to select a subtitle language.
5. [ ] (skip) button
• During playback, press once to return to the
beginning of the current title / chapter / track / File.
• During playback, press twice to return to the
previous title / chapter / track / File.
• During the JPEG playback, press to return to the
previous File.
6. [ ] (stop) button
• Press to stop playback / recording.
I.REPLAY
I.SKIP
AKB73675701
17
18
19
20
21
22
23
24
25
26
27
28
29
30
31
32
33
7. [TV VOL + / –] button
• Used to control the TV volume.
8. [
REC.] button
• Press to start recording.
9. [ I.REPLAY] button
• Press for the instant replay function.
10. [ I.SKIP] button
• Press for the instant skip function.
11. [
HOME] button
• Press to display the home menu.
12. [ / / / ] buttons
• Press to select items or settings.
13. [ BACK] button
• Press to return to the previously displayed menu or
screen.
14. Coloured buttons ([RED] / [GREEN] / [YELLOW] /
[BLUE])
• Press to activate shortcut keys on some BD-Video
functions. They are also used to switch between
pages in a file / contents list.
• These buttons are also used for “Programme Guide”
and “Edit Channels” in “DTV Menu”.
15. [EXIT] button
• Press to exit from the various screen / windows.
16. TV control buttons
• [ ] (TV power) button
-Press to turn the TV on / off.
• [AV / INPUT] button
-Press to switch the TV’s source input.
• [PR/CH / ] buttons
-Press to switch TV’s channels.
17. [ OPEN/CLOSE] button
• Press to open / close the disc tray.
18. [ MUTE] button
• Press to switch “On” / “Off” the audio.
19. [AUDIO] button
• Press to select the audio channel (audio language).
20. [ ] (skip) button
• During playback, press to skip to the next chapter /
track / file.
• When playback is in pause mode, press to forward
the playback frame by frame.
21. [ / ] (reverse / forward) button
• During playback, press to fast reverse / fast forward
the playback.
22. [ ] (pause) button
• Press to pause playback.
23. [ ] (play) button
• Press to start playback / resume playback.
24. [CH / ] button
• Press to switch up / down through the memorised
channels.
25. [GUIDE] button
• Press to display the programme guide screen.
26. [CONTENTS LIST] button
• Press to display the contents list.
ENTER] button
27. [
• Press to confirm or select menu items.
28. [SUB MENU] button
• Press to display the sub menu / play menu.
29. [DISC MENU] button
• For BD-Video, press to display the pop-up menu /
top menu.
• For DVD-Video, press to display the top menu / disc
menu.
30. [DISPLAY] button
• Press to display chapter / time information.
Page 9
31. [TEXT] button
• Press to switch between teletext mode and normal
TV viewing.
32. [INFO] button
• Press to display the information on the programme.
Information is available on the programme guide
screen and while viewing a DTV programme.
33. [TIMER REC.] button
• Press to display the timer programming screen.
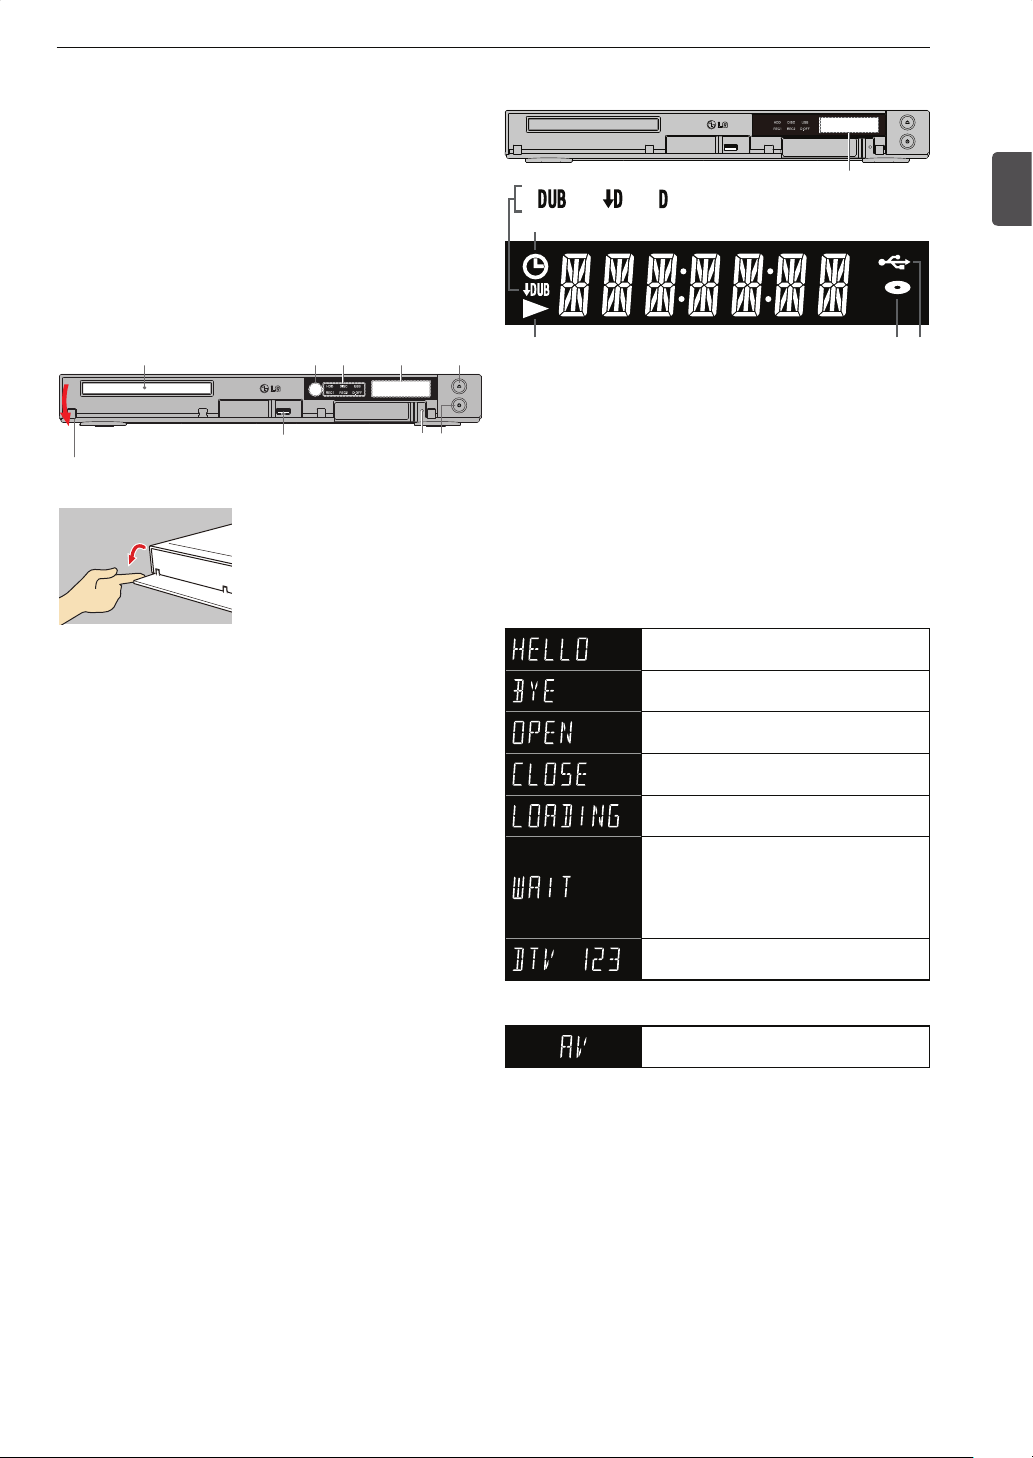
Front panel
12
Open the front cover
How to open the front cover
1. Disc tray
2. Infrared sensor window
3. Indicators
• HDD / DISC / USB
-Currently selected media is on when the unit is
powered on. “HDD” is on when “Quick Booting”
is standing by.
• REC1 is on while recording. It blinks when the
recording is in pause mode.
• REC2 is on while the second recording is in
progress. It blinks when the recording is in pause
mode.
• D.OFF is off when “Panel Display” is set to “On” and
this unit is in standby mode.
• D.OFF is on when “Panel Display” is set to “Off” and
this unit is in standby mode.
• D.OFF is on when “Panel Display” is set to
“Power Interlock” and this unit is in standby mode.
4. Display panel
5. OPEN / CLOSE button
• To open / close the disc tray.
6. USB port
• To connect a USB-HDD / USB device.
7. Reset button
• Press in case this unit operates unexpectedly or
does not operate.
8. POWER (standby / on) button
• To turn the unit on / off.
34785
6
Getting Started
Display panel
1 2 3
4
5 6 7
1. Displayed during dubbing.
2. Displayed while updating the firmware, converting a
pre-existing title to a different recording mode (image
quality).
3. Displayed while streaming content over DLNA.
4. Displayed when a timer programme is set.
5. Displayed during playback.
(It blinks when the playback is in pause mode.)
6. Displayed when a disc is in this unit.
7. Displayed when a USB-HDD / USB device is
connected.
Unit’s behaviour
External input
Displayed when the unit is turned on.
Displayed when the unit is turned off.
Displayed when the disc tray opens.
Displayed when the disc tray closes.
Displayed while the unit is loading the
disc.
Displayed when the unit is finishing a
recording / when the unit is plugged in /
when the unit recovered from a power
outage. (This unit is inoperable while
“WAIT” is displayed.)
Displayed when a DTV programme is
being viewed.
Displayed when the unit is switched to
the external input (AV).
Display panel
9
1
Getting Started
Page 10
Getting Started
CHP
BD R
BDAV O
RG
BD-RE
BD-R
BD-Video
BDAV ORG
BDAV PL
DVD-RW
DVD-R
DVD+RW
DVD+R
DVD-Video
VR ORG
VR PL
+VR
DATA
CD-DA
CD
DATA
AVCHD
T T
CHP
TR
10
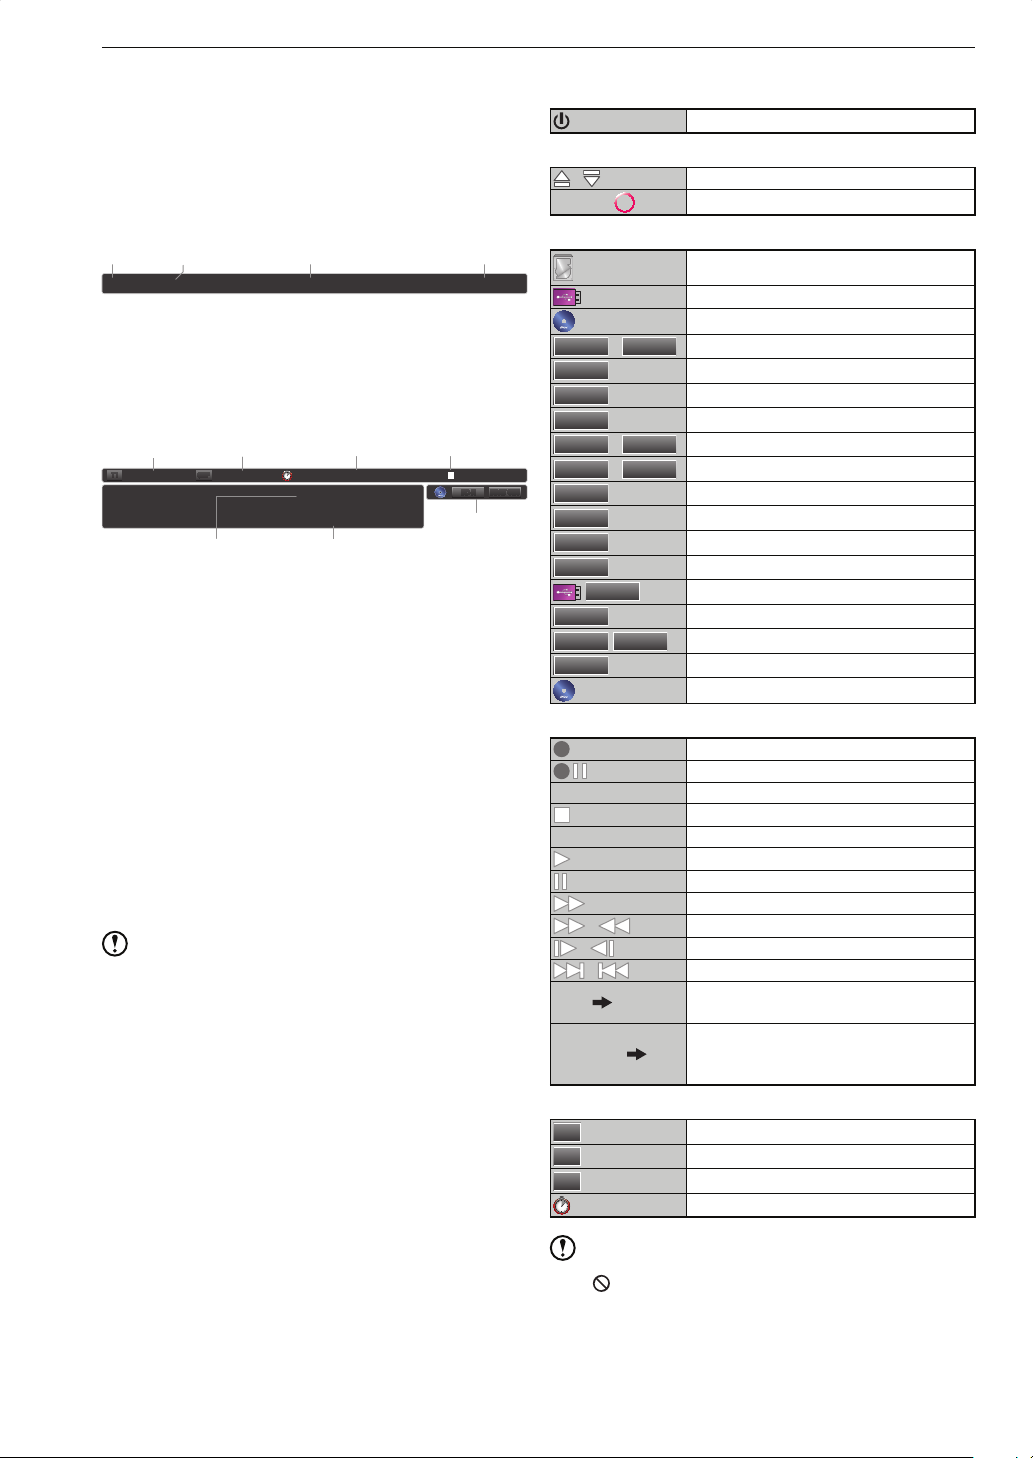
On-Screen Display
Displaying the unit’s status / information
Ƈ
On screen:
You can call up the information windows by pressing
[DISPLAY] when viewing a DTV programme.
Press [DISPLAY] once...
12 3 4
2 Station ABC 16:13 THU 05/01/2012DTV Programme ABC
1. Channel number
2. Service name
3. Event name
4. Current time, day, date / month / year
Press [DISPLAY] twice...
5
TT
1 / 200 1 / 100 0 : 00 : 12 / 1 : 23 : 45
5. Current title / Total title numbers
• “---” will be displayed in stop mode when there is no
resume point.
6. Current chapter / Total chapter numbers
• “---” will be displayed in stop mode when there is no
resume point.
7. Elapsed time / total duration
8. Unit’s status
9. Remaining time
• Remaining time (approx.) by recording mode.
10. List of remaining time / current recording duration
• In stop mode, remaining time for HD / SD will be
displayed. (Remaining time will not be displayed
when using the external input (AV)).
• While recording, the recording media / station name /
current recording duration will be displayed.
11. Media type
6
CHP
HD 2:10 / SD 4:20
Note
• For the discs recorded on other devices, information may
not be displayed properly.
7 8
䋨䋩Remain TS 2:10
109
About icons
Ƈ
Power of this unit
Loading This unit is turned on
Media
/ Disc tray is opening / closing
Loading
Media types
/
BD-RE
BD-R
BD-Video
BDAV ORG
BDAV PL
/
DVD-RW
DVD+RW
BD-R
BDAV ORG
11
DVD-Video
VR ORG
/
DVD-R
DVD+R
VR PL
+VR
DATA
CD-DA
CD
DATA
AVCHD
No Disc No disc is in this unit
Common operations
Wait for a moment.
Resume In resume stop mode
1
/
/
/
DISC
HDD
USB-HDD HDD
Others
T
CHP
TR
Loading a disc / USB device
HDD
USB-HDD
Disc
BD-RE/-R
BD-Video
BDAV (original)
BDAV (playlist)
DVD-RW/-R
DVD+RW/+R
DVD-Video
VR (original)
VR (playlist)
DVD+RW/+R formatted in +VR
USB device
Audio CD
Data CD
Disc containing an AVCHD content
Recording
Pausing the recording
Finishing the recording
In stop mode
Playback
Pausing the playback
Fast forward playback with audio
Fast forward / fast reverse
Slow forward / slow reverse playback
Skipping forward / backward
Dubbing
e.g. From the HDD to a disc
Dubbing
e.g. From a USB-HDD to the internal
HDD
Title
Chapter
Track
Time (playback)
Note
• If “ ” appears on screen, the attempted operation is
prohibited.
Page 11

Home Menu
The home menu screen
Ƈ
Home Menu
Getting Started
11
1
DTV
Timer
GUIDE
Programming
DTV Menu Settings
Media
Manager
DubbingContents List
Some of the functions are operable from the home menu.
You can call up the home menu by pressing [ HOME].
• Home menu can be called up during recording /
playback. If the home menu is called up during playback,
the playback will automatically stop.
• Items which cannot be selected / operated are greyed out.
DTV
• Switches the unit from the home menu to the DTV
viewing screen.
GUIDE
• Enables you to programme timer recordings from the
programme guide screen. (Refer to page 34)
Timer Programming
• Displays the timer programming screen.
• You can also programme a timer recording
manually by pressing [SUB MENU], then selecting
“New Programme”. (Refer to page 35)
Contents List
• Displays the contents list.
• Various playback and editing operations can be performed
from the submenu in the contents list. (Refer to page 40)
Media Manager
• The following operations are available on each media.
(Refer to page 52)
HDD Menu
Delete All Titles (Refer to page 53)
Delete All Unprotected Titles (Refer to page 53)
BD/DVD Menu
Format (Refer to page 53)
Finalise (Refer to page 52)
Edit Disc Name (Refer to page 52)
Disc Protect OffĺOn (Refer to page 52)
Disc Protect OnĺOff (Refer to page 52)
USB-HDD Menu
Register USB-HDD setting (Refer to page 20)
Delete All Titles (Refer to page 53)
Delete All Unprotected Titles (Refer to page 53)
Edit USB-HDD Name (Refer to page 52)
USB-HDD Protect OffĺOn (Refer to page 52)
USB-HDD Protect OnĺOff (Refer to page 52)
Dubbing
• Enables you to select the dubbing direction and programme
dubbings to the dubbing list. (Refer to page 54)
DTV Menu
• Allows you to configure DTV settings. Refer to “Basic
Setup for DTV” on page 17 for details.
Settings
• Allows you to access various kinds of menus to
customise as you prefer. Refer to “Function Setup” on
page 60 for details.
Getting Started
Page 12
Connections
O
L
LAN
D
O
O
L
A
O
N
T
O
V
OINAUDIO
R
L
Connections
12
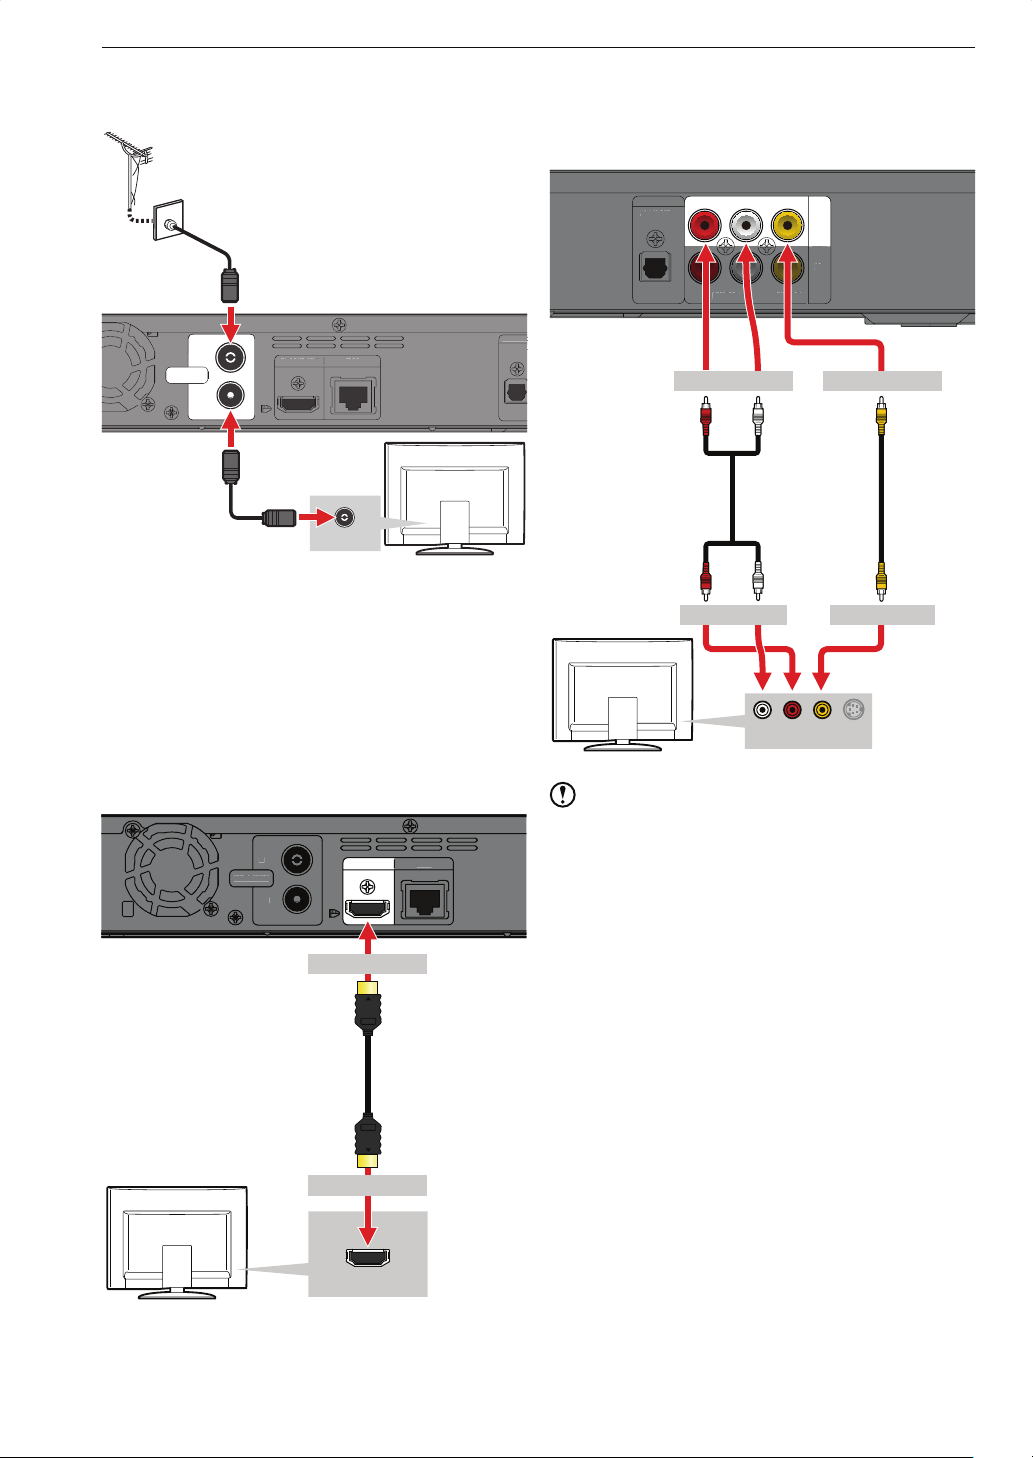
Antenna Connection
RF cable (not supplied)
IN
ANTENNA
OUT
HDMI OUT LAN
HDMI OUT
Connection to the TV using video / audio
Ƈ
cables
AV cable connection is used if an HDMI input is not
available on the TV.
DIGITAL OUT
DIGITAL
IGITAL
OPTICA
PTICA
DIGITAL OU
OPTICAL
PTICAL
(Right)
AUDIO VIDEO
RL
AUDIORL
VIDEO
IDE
To AUDIO OUT To VIDEO OUT
Red
White
(Left)
OUT
IN
Yellow
RF cable (supplied)
Antenna IN
Connections to Your TV
Connection to the TV using an HDMI
Ƈ
cable
HDMI connection allows you to enjoy high picture / sound
quality with one single cable. By connecting this unit and
your high-definition TV, you can enjoy the HD broadcast
programmes. HDMI connection also enables “SIMPLINK”
(Refer to page 20).
IN
ANTENNA
ANTENN
OUT
UT
HDMI cable
(not supplied)
HDMI OUT LAN
To HDMI OUT
LA
Audio cables
(supplied)
Red
(Right)
Video cable
(supplied)
White
(Left)
Yellow
To VIDEO IN To AUDIO IN
Audio L R Video S-video
Auido / Vidoe IN
Note
• Use a High-Speed HDMI cable (with the HDMI logo)
which is complying with the HDMI standard.
• Make sure the shapes of the HDMI cable’s connector
and this unit’s HDMI OUT jack are matched.
• This unit’s HDMI OUT does not support a DVI-HDMI
converter cable. Connect an HDMI cable to a TV /
display monitor with an HDMI input jack which is
complying with the HDMI standard.
• When using Video / Audio cables, connect this unit and
the TV directly.
• If connecting this unit and the TV using via another
device, using Video / Audio cables, images may be
distorted due to the copyright protection system.
To HDMI IN
HDMI IN
Page 13
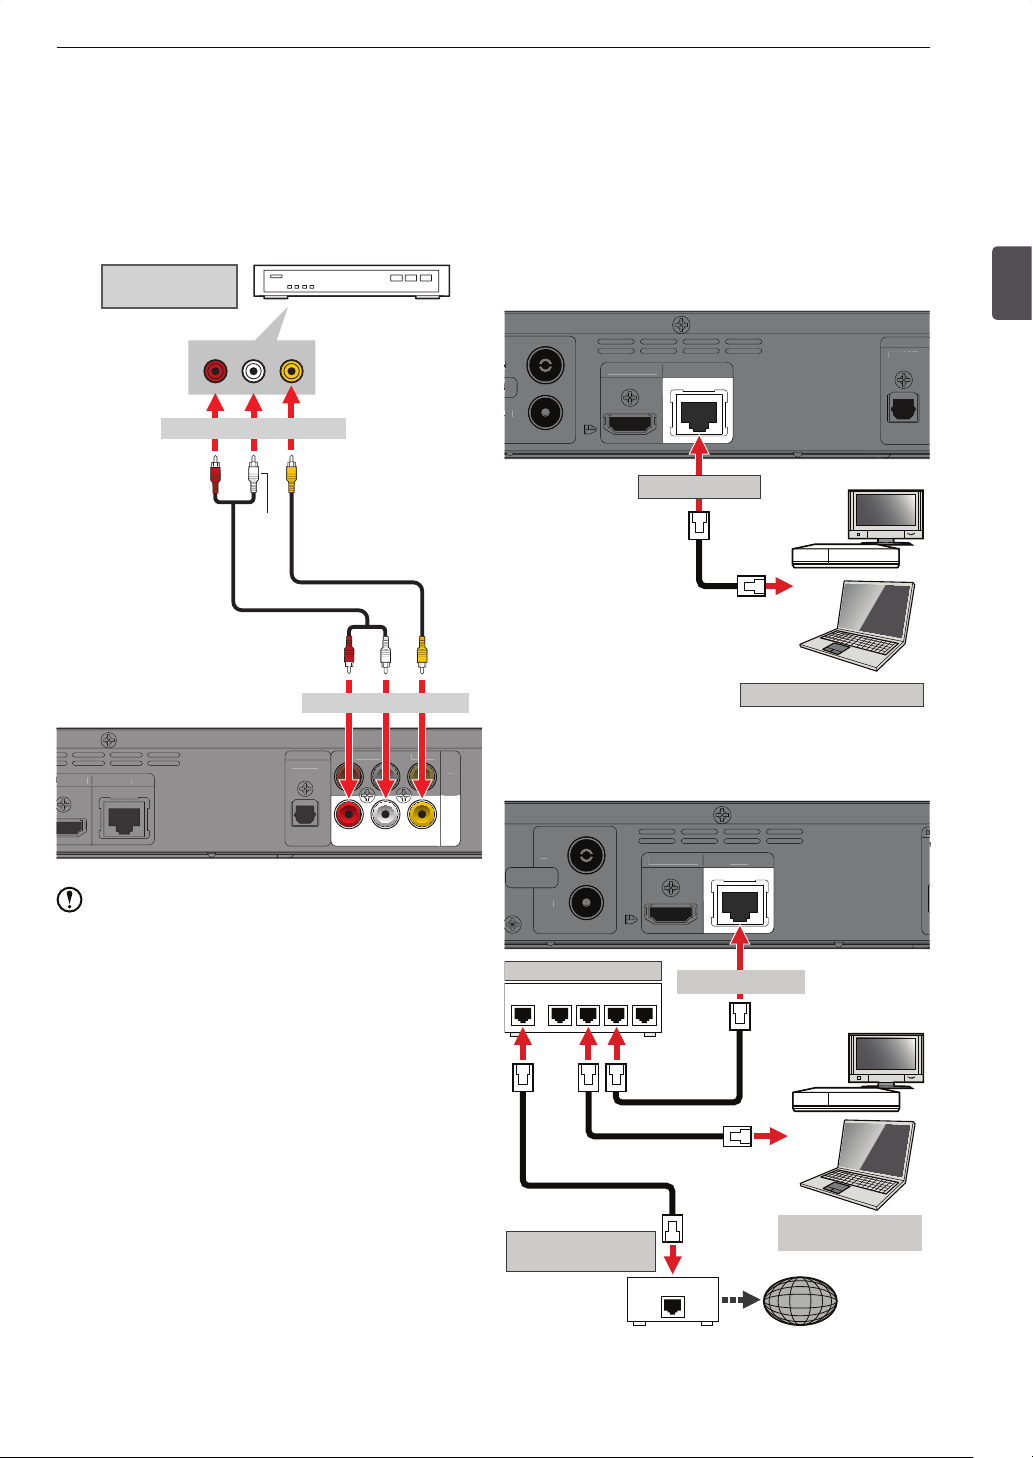
When connecting the home terminal /
LAN
OUT
O
L
AUDIO
V
O
OUT
R
L
OUT
LAN
O
D
O
A
IN
O
D
O
Internet
set-top box to this unit
The cable-TV service can only be received in the service
areas, and you need to become a cable subscriber for each
home terminal / set-top box.
Depending on the cable-TV service provider, the
specifications of the home terminal / set-top box, connection
method and receivable programmes vary.
Connections
Network Connection
By connecting this unit to your broadband Internet, you can
enjoy the network features, such as BD-Live™ functions.
Please contact each content provider for details.
You can also use this unit as a DLNA server, which enables
you to play back contents stored on this unit’s HDD / USBHDD through a DLNA (client) player. Please refer to the user
manual of the DLNA (client) player for how to operate it.
13
Home terminal /
Set-top box
Audio Out
Video Out
RL
To AUDIO / VIDEO OUT
Red
Yellow
(Right)
White
Audio cables
(
not supplied
(Left)
)
Video cable
(
not supplied
)
White
(Left)
Red
Yellow
(Right)
To AUDIO / VIDEO IN
DIGITAL OUT
MI OUT LAN
MI OUT
DIGITAL
OPTICAL
PTICA
AUDIO VIDEO
RL
AUDIORL
VIDEO
IDE
OUT
IN
Note
• When recording a high-definition DTV programme
through the home terminal / set-top box, it will be
recorded in standard-definition quality.
• Pass-through type is a way of broadcasting in which a
cable-TV service provider sends out DTV signals as-is
without converting or compressing.
• If your cable-TV service is the pass-through type, you
can directly select channels on this unit and use the
EPG.
Direct connection to a DLNA client device
DIGITAL OUT
DIGITAL OUT
OPTICAL
HDMI OUT LAN
A
T
T
HDMI
PTICAL
To LAN terminal
LAN cable
(not supplied)
PC / DLNA client device
Connection to a DLNA client device via a hub / broadband router
IN
ANTENNA
ANTENN
UT
OUT
Hub / Broadband router
WAN LAN
HDMI OUT LAN
HDMI OUT LAN
To LAN terminal
LAN cable
(not supplied)
2
Connections
LAN cable
(not supplied)
PC /
Network equipment
(modem, etc.)
LAN
If your Internet modem does not have a
router function, use a broadband router.
DLNA client device
Internet
Page 14
Connections
T
LAN
AUDIO
V
O
V
O
OU
R
AUDIO
14
About BD-Live™
This unit supports BD-Video with the BD-LIVE™ functions
(BD-ROM Profile 2.0).
By connecting this unit to the Internet, you can enjoy various
functions, such as special movie clips, subtitles, additional
contents, network games and so on.
BD-Live™ functions vary depending on the disc. Please
•
refer to the descriptions on screen or on the package for
details.
• In order to activate BD-LIVE™ functions, network
configurations are required. Please refer to “Network
Connection” on page 13, and “Network Setup” on page 18.
• Depending on the disc, you may be required to
change the setting in “Home Menu” > “Settings” >
“Network Settings” > “BD-Live Setting” to “Allow” or
“Limited Allow”.
• It may take extra time to connect to the server or may be
unable to connect.
• The unit or the disc ID may be sent to the content
provider when playing back a disc with BD-Live™
functions. To prevent data transmission, change the
setting of “BD-Live Setting”.
Note
• Please purchase shielded LAN cables at your local
store and use them to connect the unit to the network
equipment.
• When connecting a LAN cable to this unit, you need
to configure the network setting in “Home Menu” >
“Settings” > “Network Settings” > “Network Connection”,
then select “Auto” or “Manual”.
• For a LAN cable, use a category 5 (or higher) straight
cable.
• If you need the MAC address of this unit, you can confirm
it in “Home Menu” > “Settings” > “Network Settings” >
“Displaying network status”.
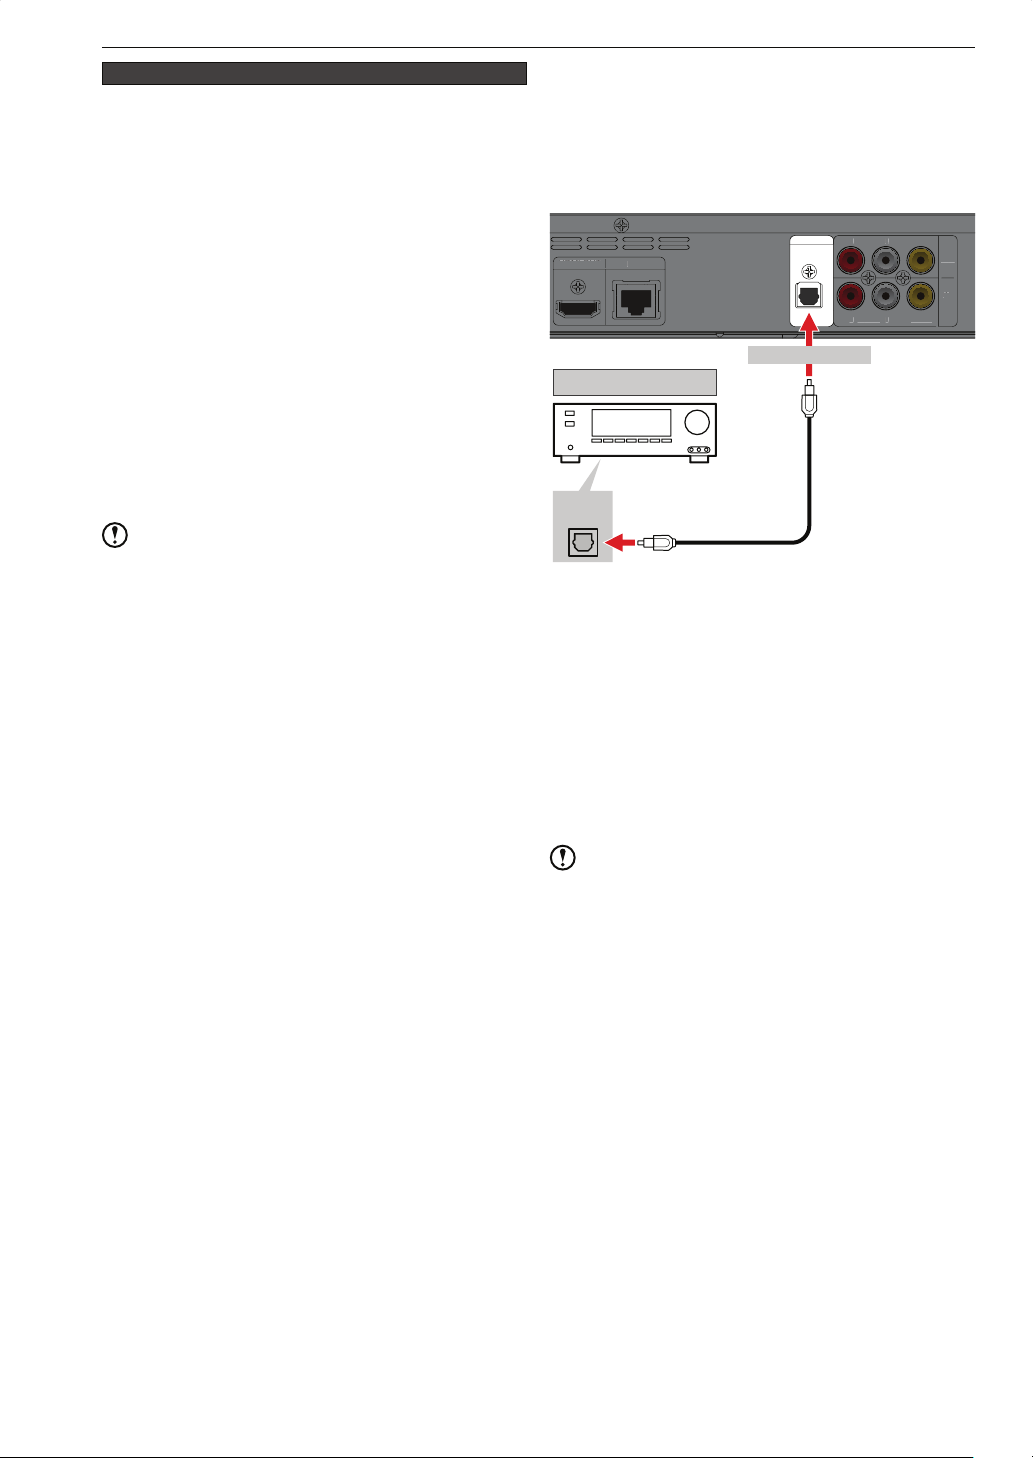
Connection to an Audio System
You can enjoy multi channel audio by connecting this unit to
a digital audio system.
Using an optical audio cable
Ƈ
DIGITAL OUT
HDMI OUT LAN
HDMI OU
OPTICAL
To DIGITAL OUT
Digital audio system
Didital
Audio IN
This unit ʊ Amplifier ʊ TV connection
Ƈ
Optical audio cable
(not supplied)
using HDMI cables
• When the amplifier supports PCM 7.1 ch, you can enjoy
BD-Video with 7.1 ch audio.
• When the amplifier supports Dolby Digital Plus / Dolby
TrueHD / DTS-HD®, you can enjoy each audio output.
(With this connection, audio may not be output from
the TV. In this case, output audio from the speakers
connected to the amplifier. Please refer to the user
manual of the amplifier and TV for details.)
• Use HDMI cables (with the HDMI logo) which are
complying with the HDMI standard.
AUDIO VIDEO
RL
L
VIDEO
AUDIORL
IDE
T
OUT
IN
IDE
Note
When connecting this unit to a digital audio system / HDMI
compatible amplifier, please configure this unit’s audio
settings in “Home Menu” > “Settings” > “Video/Audio”.
• Audio may be distorted or may not be output if the audio
settings are not configured correctly.
Page 15
Basic Setup
After All Connections Have
Basic Setup
Preparation for the Remote
15
Been Made
Turn on this unit
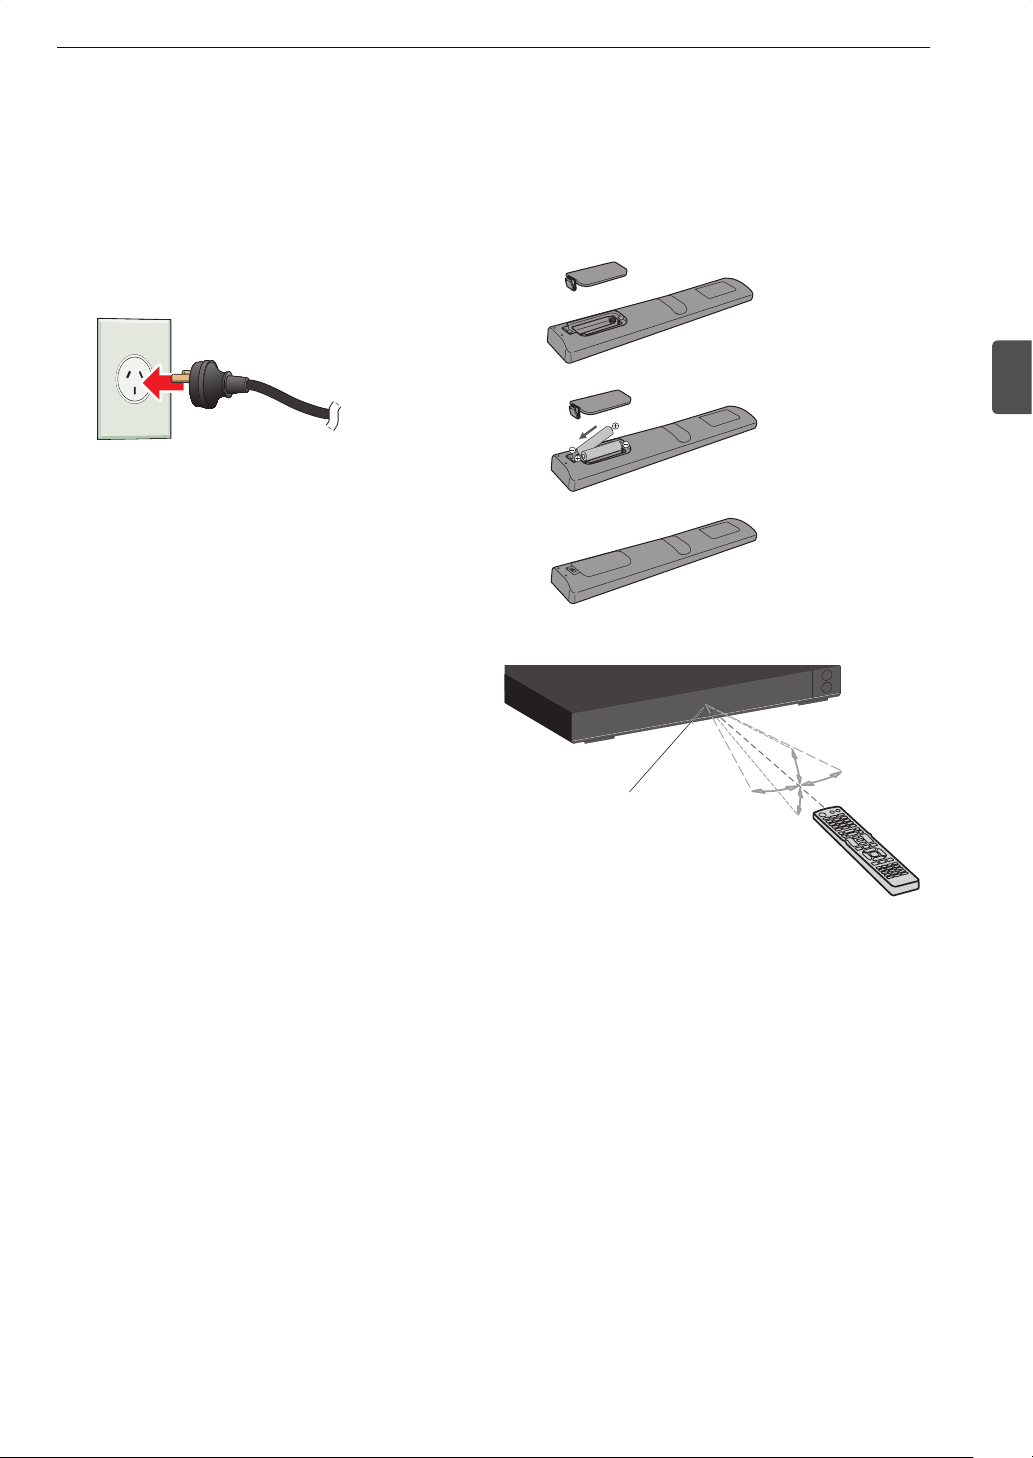
1. After all connections have been made, plug
the AC cord into an AC power outlet.
• The display on the front panel will show “WAIT”.
This unit is inoperable while “WAIT” is being
displayed.
Plug into an AC power outlet
(220-240 V).
2. Turn on the TV, then tune it to the correct
source input associated with this unit.
3. Turn on this unit.
• Please refer to “Basic setup” on page 16 for details.
Please go on to “Ƈ Initial Setting”on page 16.
Control
Battery installation
Install 2 R6 (1.5V) batteries matching the polarity as
indicated inside battery compartment.
1.
2.
3.
Operable range of the remote control
3
Basic Setup
Within 7 m
30°
30°
Infrared sensor window
• Line of sight: approx. 7 m
• Either side of the centre: approx. 5 m within 30°
• Above and below: approx. 5 m within 30°
30°
30°
Page 16
Basic Setup
16
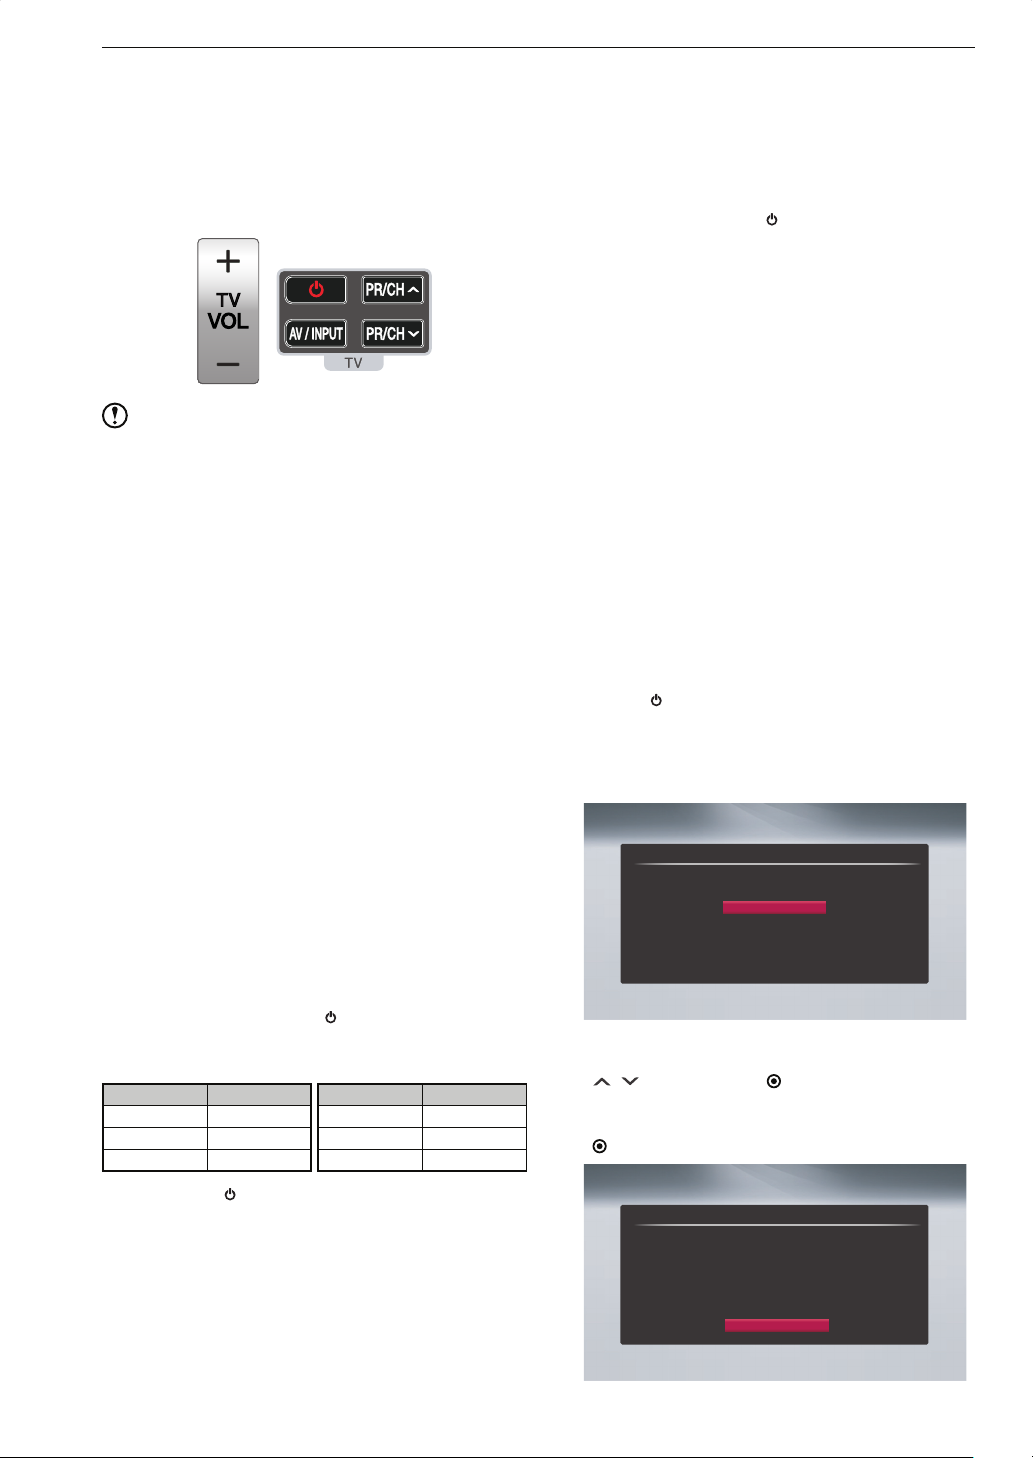
Operating the TV
1. Point the remote control at the TV’s infrared
sensor window.
2. Operate the TV. (Operating the TV with the
buttons shown below.)
Note
Use of the remote control with improper battery installation
may cause heat generation, burn and malfunction.
• Replace both the batteries with new ones in case of the
following:
-Operable distance for the remote control has
decreased.
-The unit does not react to certain button pressed on
the remote control.
• The supplied batteries are meant for operation check.
It is recommended to replace them with new batteries
immediately.
Do not use the following types of batteries as they may
cause poor operation or inoperability of the remote control.
• Oxyride batteries (ZR6)
• Evolta batteries (LR6)
• If the remote control will not be used for an extended
period of time, please remove the batteries from the
battery compartment.
• When disposing of used batteries, please comply with
governmental regulations or environmental public rules
that apply in your country or area.
Setting up the supplied remote control to control your TV
You can operate your TV with the supplied remote control.
If your TV is listed in the table below, set the appropriate
manufacturer code.
Basic Setup / DTV Operations
Basic setup
Finding the viewing source input
Ƈ
1. After having made all the necessary
connections, press [
the unit.
2. Turn on the TV.
3. Find the button on the TV’s remote control
that accesses the external source input.
Press the button repeatedly until you see
the “Initial Setting” screen on the TV screen.
(The button may be labelled “SOURCE”,
“AV”, “AUX” or “SELECT”. Refer to your
TV’s user manual.)
If you see the “Initial Setting” screen, that is the correct
viewing source input associated with this unit’s output. Make
sure to always select this source input on your TV when
using this unit.
• If the TV is connected using an HDMI cable, it may take
extra time for the opening picture to appear.
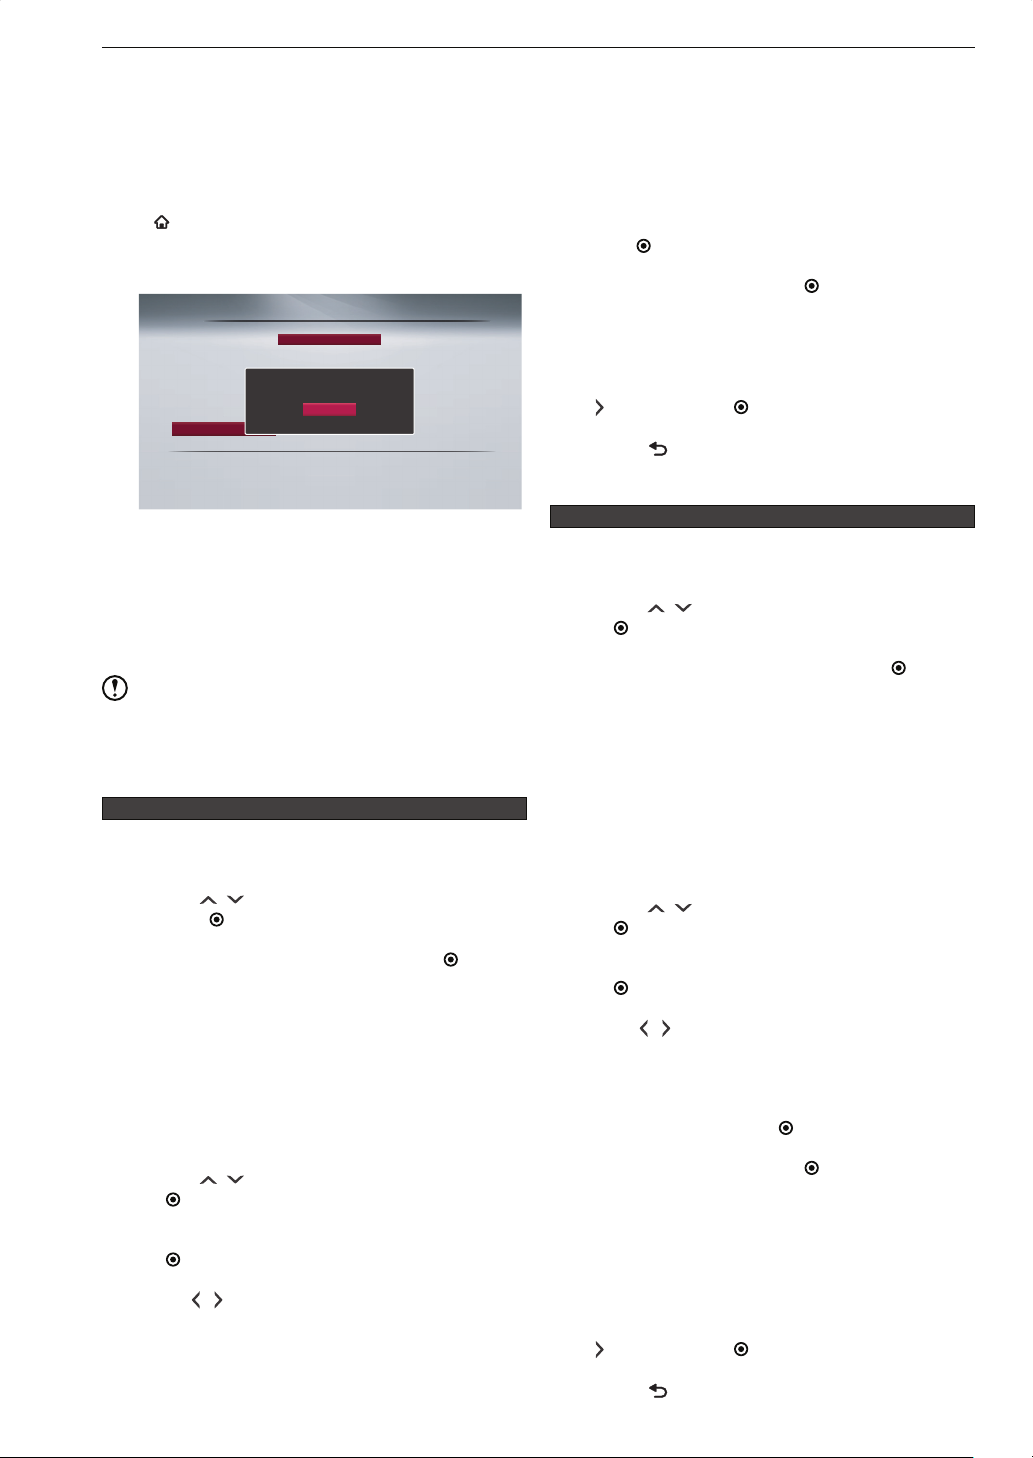
Initial Setting
Ƈ
When you turn on this unit for the first time, “Initial Setting”
will start automatically.
1. Press [ POWER].
2. Turn on the TV. Select the source input
which is associated with this unit.
• “Initial Setting” screen will appear.
Initial Setting
Please press [ENTER] after you select your region.
POWER] to turn on
NSW/ACT
VIC
QLD
SA
WA
TAS
NT
1. While holding down [ ] (TV power), enter
the manufacturer code for your TV using
[number buttons].
Manufacturer Code Number
LG 1(Default), 2
Zenith 1, 3, 4
GoldStar 1, 2
Manufacturer Code Number
Samsung 6, 7
Sony 8, 9
Hitachi 4
2. Release [ ] (TV power) to complete setting.
• Depending on your TV, some or all buttons may not
function on the TV, even after entering the correct
manufacturer code. When you replace the batteries of
the remote, the code number you have set may be reset
to the default setting. Set the appropriate code number
again.
3. Select the region where you live using
[ / ], then press [ ENTER].
4. “Auto Tuning” screen will appear. Press
[
ENTER] to start “Auto Tuning”.
Initial Setting
Auto Tuning
Make sure the antenna is connected to “ANTENNA IN” jack.
Auto tuning will scan Digital channels.
This may take a while to complete.
Auto Tuning is started after you press [ENTER].
Start
Page 17
5. “Clock Setting” screen will appear. It will
automatically adjust the time and date
based on the time zone.
• If the automatic clock setup fails, please set it up
manually by following the instructions on the screen.
Redoing “Initial Setting”
Ƈ
[ HOME] > “DTV Menu” > “Initial Setting”
1. Press [ ENTER] when “Initial Setting” is
highlighted.
2. Follow step 3 to 5 in “
Ƈ
Initial Setting” on
page 16.
Basic Setup for DTV
Basic Setup
Limiting the access to the particular channels
You can set limits to access to particular channels for
parental control purposes.
Once a channel is locked, the PIN Code will be required to
perform the following functions:
• “Auto Tuning”
• Editing the channel map.
• Programming a timer recording of the locked channel.
• Tuning into the locked channel.
Note
• “PIN Code” referred to here is for DTV parental control
and is not to unlock the limitation on a commercially
available video disc.
1. Press [ HOME], then select “DTV Menu” >
“Edit Channels”, then press [ ENTER].
17
3
Basic Setup
Audio language for DTV programmes
Ƈ
Refer to “Audio Language” section in the “Function Setup”
table on page 61 and complete all the necessary setups.
Subtitle language for DTV programmes
Ƈ
Refer to “Subtitle Language” section in the “Function Setup”
table on page 61 and complete all the necessary setups.
Updating DTV channels automatically
Ƈ
With this function, you can have the unit automatically
search for new channels. If new channels are found, they
will be added in the channel map automatically.
Press [
“Service Update” > “Auto”, then press [ ENTER].
• The tuner will start searching for new channel when the
• You can also add new channels manually by selecting
HOME], then select “DTV Menu” > “Installation” >
unit is powered off at 1:00 AM.
“Add New Channels”.
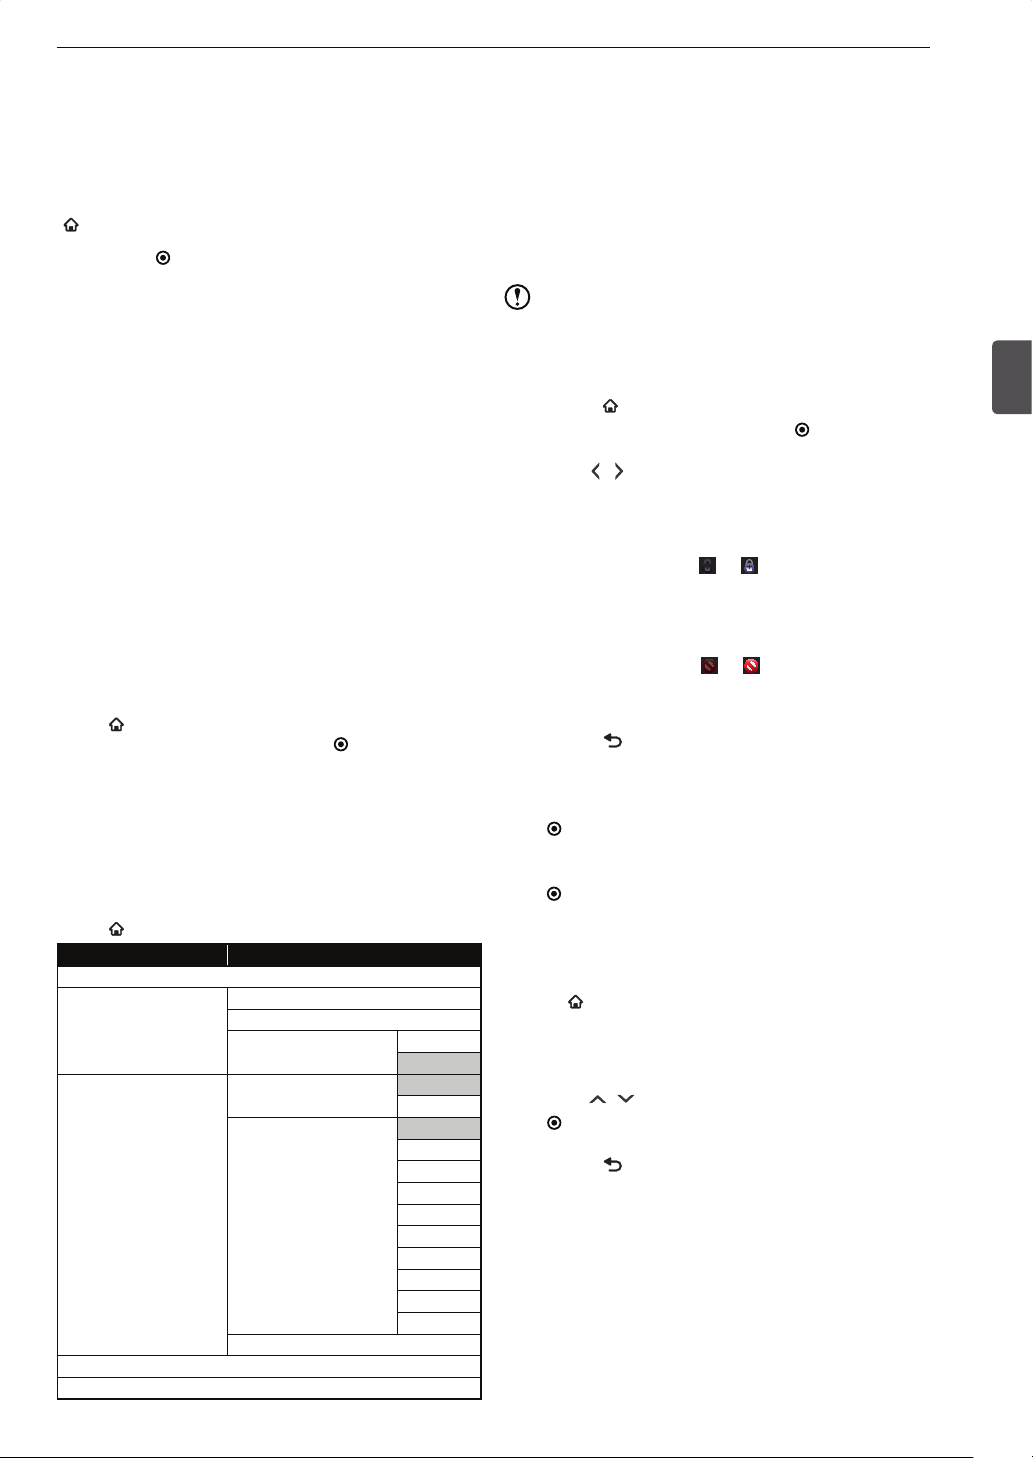
Available configuration options in “DTV Menu”
Press [ HOME], then select “DTV Menu”.
Menus Options
Edit Channels
Installation Auto Tuning
Add New Channels
Service Update Auto
Off
Parental Control Channel Lock Unlock
Lock
DTV Rating Unlock
P (Kids)
C
G
PG
M
MA 15 +
AV 15 +
R (Adult)
All
Change PIN Code
Signal Information
Initial Setting
2. Use [
/ ] to select the desired channel to
limit the access, then press [RED] for your
desired setting.
• For channel lock
Press [RED] once:
highlighted. The locked channels will stay in the
channel map and can be selected, but PIN Code
entry is required to view the programme.
• For access prohibition
Press [RED] twice:
highlighted. Access-prohibited channels will not be
listed in the channel map and cannot be selected.
The icon will be
→
The icon will be
→
3. Press [ BACK] to return to the previous
screen.
4. Select “Parental Control”, then press
[
ENTER].
5. Select “Channel Lock”, then press
[ ENTER].
• PIN Code entry field will appear. Enter the PIN
Code to proceed.
• “0000” cannot be used for a PIN Code.
• If you forget the PIN Code, you can reset it. Press
HOME], then select > “DTV Menu” >
[
“Parental Control”, then highlight “Channel Lock”
or “DTV Rating”, then enter “210499” using
[number buttons].
6. Use [ / ] to select “Lock”, then press
[ ENTER].
7. Press [
BACK] repeatedly to exit.
Page 18
Basic Setup
18
Network Setup
Network settings are to enable the BD-Live™ features on
this unit using the broadband Internet connection.
Please also refer to the information provided by your ISP
(Internet Service Provider) and the user manual of your
modem / router.
Press [
“Network Settings” > “Network Connection” > “Auto” or
“Manual”.
HOME], then select “Settings” >
Settings
Video/Audio
Language
HDMI
3D settings
Playback
Recording
Clock
Network Settings
Others
Check network settings of this device.
Network Connection
BD-Live Setting : Allow
Displaying network status
Network Connection
Please select setting mode.
Auto
Manual
e.g.) When the PC’s IP Address is
“192.168.10.12”, enter a number such as
“192.168.10.223”. The “223” can be any number
except “12”.
-For “Subnet Mask” and “Default Gateway”,
please enter the same numbers as those on
your PC’s network setting.
-When you enter a wrong number, select “Clear”
to clear the incorrect number, then press
ENTER].
[
-After having entered all the necessary numbers,
select “OK”, then press [ ENTER].
-Configure “Subnet Mask” and “Default Gateway”
in the same manner as “IP Address”.
2. After having configured all the network
settings, select “OK” in the sub menu using
[ ], then press [ ENTER].
3. Press [
BACK] repeatedly to exit.
“Auto”:
Automatically configures each setting item in
“Network Connection”, and then performs a connection
test.
“Manual”:
Requests you to manually configure the setting A – E
on pages 18 to 19.
Note
• Please perform a connection test when changing the
network settings in “Network Connection”.
For “Manual”
Ƈ
A: IP Address Setting
1. Configure IP Address / Subnet Mask /
Default Gateway.
1) Use [ / ] to select “IP Address Setting”, then
press [
-The acquisition method will be displayed.
2) Select your desired method, then press [ ENTER].
-“Auto(DHCP)” is recommended in most cases.
3) Use [ / ] to select “IP Address”, then press
[
-Entry screen will be displayed.
4) Enter number using [number buttons], then press
[ ENTER].
-To move from a number cell to another, use
-For an IP Address for this unit, refer to the IP
ENTER].
“Auto(DHCP)”:
Automatically configures the IP Address / Subnet
Mask / Default Gateway. Please proceed to (B).
“Manual”:
Requires you to manually configure the IP
address / Subnet Mask / Default Gateway. In
case your router does not have a DHCP server
function or you would rather not use it, please
select “Manual”, then proceed to 3).
ENTER].
[
/ ].
address on your PC on the same local area
network, then change the last 2-digit number to
your desired number (up to 3-digit numbers).
B: DNS Setting
1. Configure the primary DNS / secondary
DNS.
1) Use [ / ] to select “DNS Setting”, then press
ENTER].
[
-The acquisition method will be displayed.
2) Select your desired method, then press [ ENTER].
-“Auto(DHCP)” is recommended in most cases.
“Auto(DHCP)”:
Automatically configures the primary DNS /
secondary DNS by the DHCP server function.
Please proceed to (C).
“Manual”:
Requires you to manually configure the primary
DNS / secondary DNS. In case your router does
not have a DHCP server function or you would
rather not use it, please select “Manual”, then
proceed to 3).
3) Use [ / ] to select “Primary DNS”, then press
ENTER].
[
-Entry screen will be displayed.
4) Enter number using [number buttons], then press
[ ENTER].
-To move from a number cell to another, use
[
/ ].
-For the primary DNS, enter the same numbers
as those in Preferred DNS Server on your
PC’s network setting. When you enter a wrong
number, select “Clear” to clear the incorrect
number, then press [
ENTER].
-After having entered all the necessary numbers,
select “OK”, then press [ ENTER].
5) Configure “Secondary DNS” in the same manner as
“Primary DNS”.
-For the secondary DNS, enter the same
numbers as those in Alternate DNS Server on
your PC’s network setting.
2. After having configured all the network
settings, select “OK” in the sub menu using
[ ], then press [ ENTER].
3. Press [
BACK] repeatedly to exit.
Page 19
C: Proxy Setting
R
G
NFO
Entertain
ment
1
4
2
5
7
9
Proxy settings will be needed when this unit is connected
to a broadband Internet connection and your ISP requires
proxy settings.
If you are not required to configure proxy setting, proceed to
(D).
1. Enter the Proxy Address and the proxy port.
1) Use [ / ] to select “Proxy Setting”, then press
ENTER].
[
2) Select “Use”, then press [ ENTER].
-Entry screen will appear.
3) Use [number buttons] to enter the proxy address
provided by your ISP, then press [ ENTER].
-The port number entry screen will appear.
4) Use [number buttons] to enter the port number,
then press [ ENTER]. The highlight will
automatically move on “OK”, then press [ ENTER].
D: Connection Speed
“Auto” is recommended in most cases. If a connection test
fails after IP Address setting and DNS-IP setting, then try
following.
1. Configure the connection speed.
1) Use [ / ] to select “Connection Speed”, then
press [
-Available speeds will be displayed.
2) Select the desired speed according to your network
environment, then press [ ENTER].
ENTER].
2. After having configured all the network
settings, select “OK” in the sub menu using
[ ], then press [ ENTER].
3. Press [
BACK] repeatedly to exit.
Basic Setup
Receiving the Programme Guide
The programme guide, also known as EPG (Electronic
Programme Guide), gives you a list of the DTV programmes
and detailed information about programmes.
By selecting a programme in the programme guide, you can
view the programme or set a timer recording.
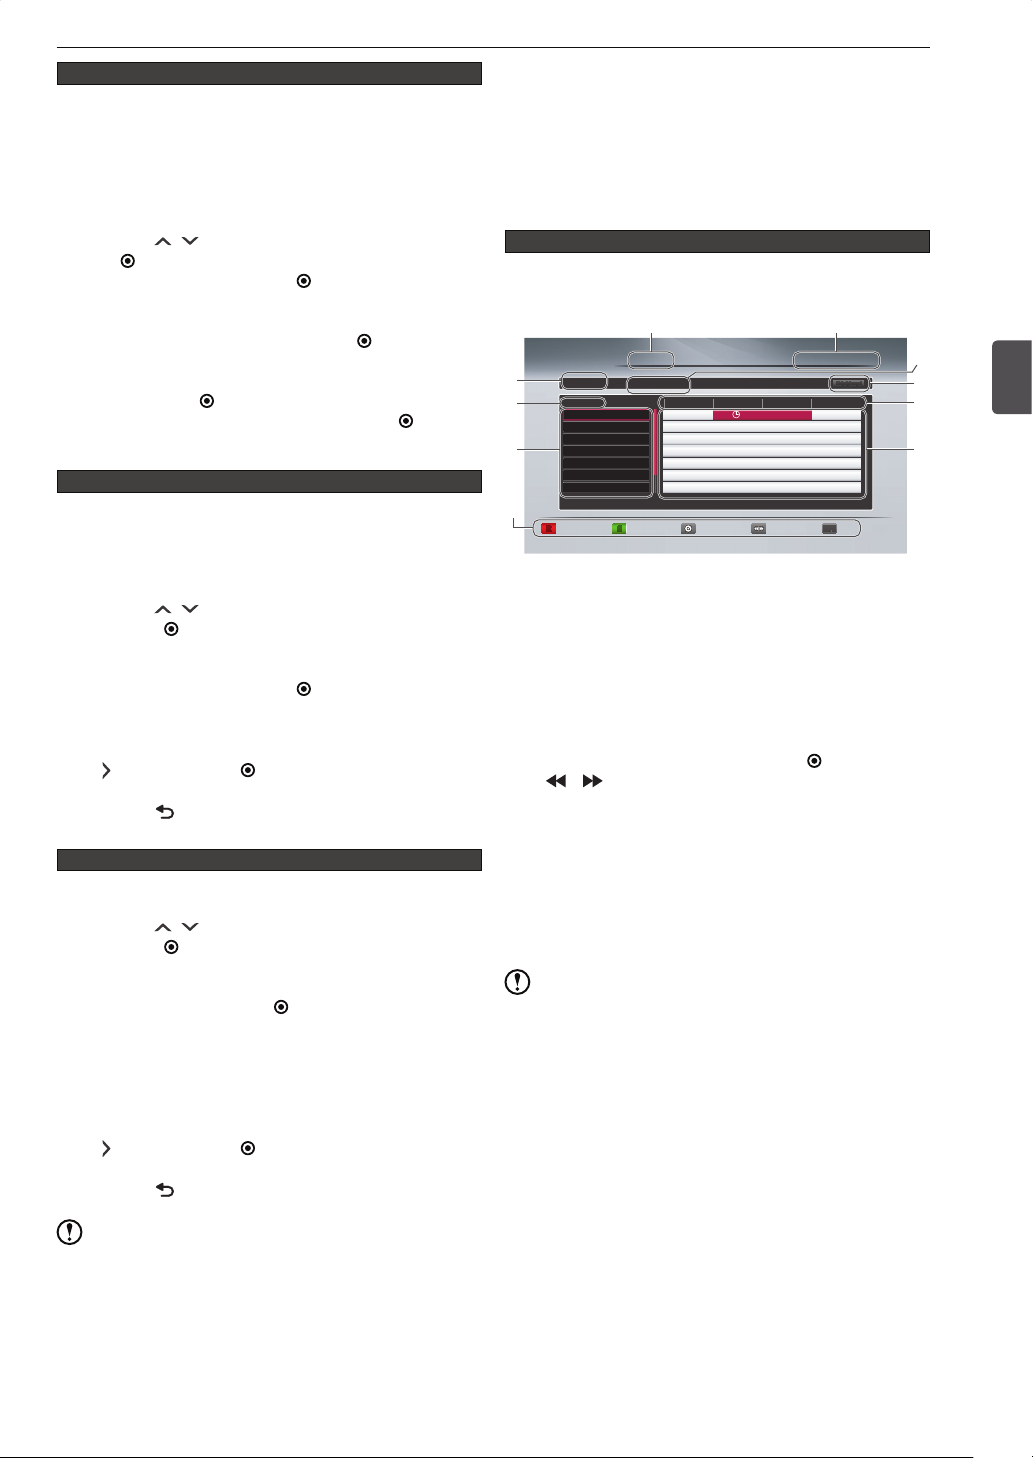
Guide to the “Programme Guide” screen
To call up the “Programme Guide” screen, press [GUIDE] in
DTV viewing mode.
1
Programme Guide
19:30–20:30
3
THU 02/08
6
8
10
Station A
Station B
Station C
Station D
Station E
Station F
Station G
R
RG
Weekly Mode
Programme BBB
19:00 19:30 20:00 20:30
Programme A
Programme F
Weekly
G
Programme B Programme C
Programme D
Programme I
Programme J
Programme L
Programme M
24Hrs Timer Daily
1. Mode: Weekly / Daily
2. Current time, day, date / month / year
3. Start time - End time of the selected programme
4. Programme name
5. Genre / Rating
6. Day, date / month of the programme list
7. Time-shift for 2 hours
8. Channel list (Referring to the channel map)
9. Programme list
10. Operation guide: [RED] / [GREEN] / [
[ / ] / [INFO]
2
19:20 THU 02/08/2012
Entertainment
Programme E
Prog...
Programme H
Programme K
Info
INFO
INFO
ENTER] /
19
4
5
7
9
3
Basic Setup
E: Connection Test
1. Perform a connection test.
1) Use [ / ] to select “Connection Test”, then
press [ ENTER].
-A connection test will start.
-If the test is successful, a confirmation message
will appear. Press [ ENTER].
-If the test fails, an error message will appear.
Please follow the instructions and configure
necessary settings.
2. After having configured all the network
settings, select “OK” in the sub menu using
[ ], then press [ ENTER].
3. Press [
Note
• Depending on the networking device, it may lose its
connection to the network after changing the connection
speed.
BACK] repeatedly to exit.
About programme guide
Ƈ
Programme guide will be available after receiving the EPG
data.
• The EPG data will be received after completing
“Installation” in “DTV Menu”.
Note
• In the following cases, an EPG data reception will not
complete and blank cells will be shown or the old data
will remain.
-In the case of power outage or the AC cord is
unplugged
-Under poor reception conditions
• In the following case, the programme guide will not be
available until next EPG data reception.
-When retuning channels
• When a broadcast station airs a different programme
from the scheduled programme. This may cause an
inconsistency between the actual air and the information
in the programme guide.
Page 20
Basic Setup
20
SIMPLINK
What’s SIMPLINK?
The SIMPLINK function can control an LG’s HDMI
compatible television and other devices connected to this
unit. SIMPLINK may control some of the functions of a non
SIMPLINK compatible device if it meets the HDMI standard;
however, it is not guaranteed.
Example of SIMPLINK control
When this unit is turned on, the TV’s source input will
•
automatically be switched to the correct source input.
-Press [
-Press [GUIDE].
-Press [CONTENTS LIST].
• When changing the TV channel during playback from
HDD / DISC, playback will automatically stop.
• When turning off the TV, this unit will automatically be
turned off. (When this unit is booting or recording to HDD
/ DISC, it is not the case.)
• Depending on the connected device, it may operate
unexpectedly. In this case, set “SIMPLINK” to “Off”.
To activate “SIMPLINK” function, please follow the
instructions below.
• Before activating, complete your TV’s SIMPLINK setup.
(Please refer to your TV’s owner’s manual for details.)
1. Press [ HOME], then select “Settings” >
“HDMI” > “SIMPLINK” > “On”, then press
[ ENTER].
2. Press [
].
BACK] repeatedly to exit.
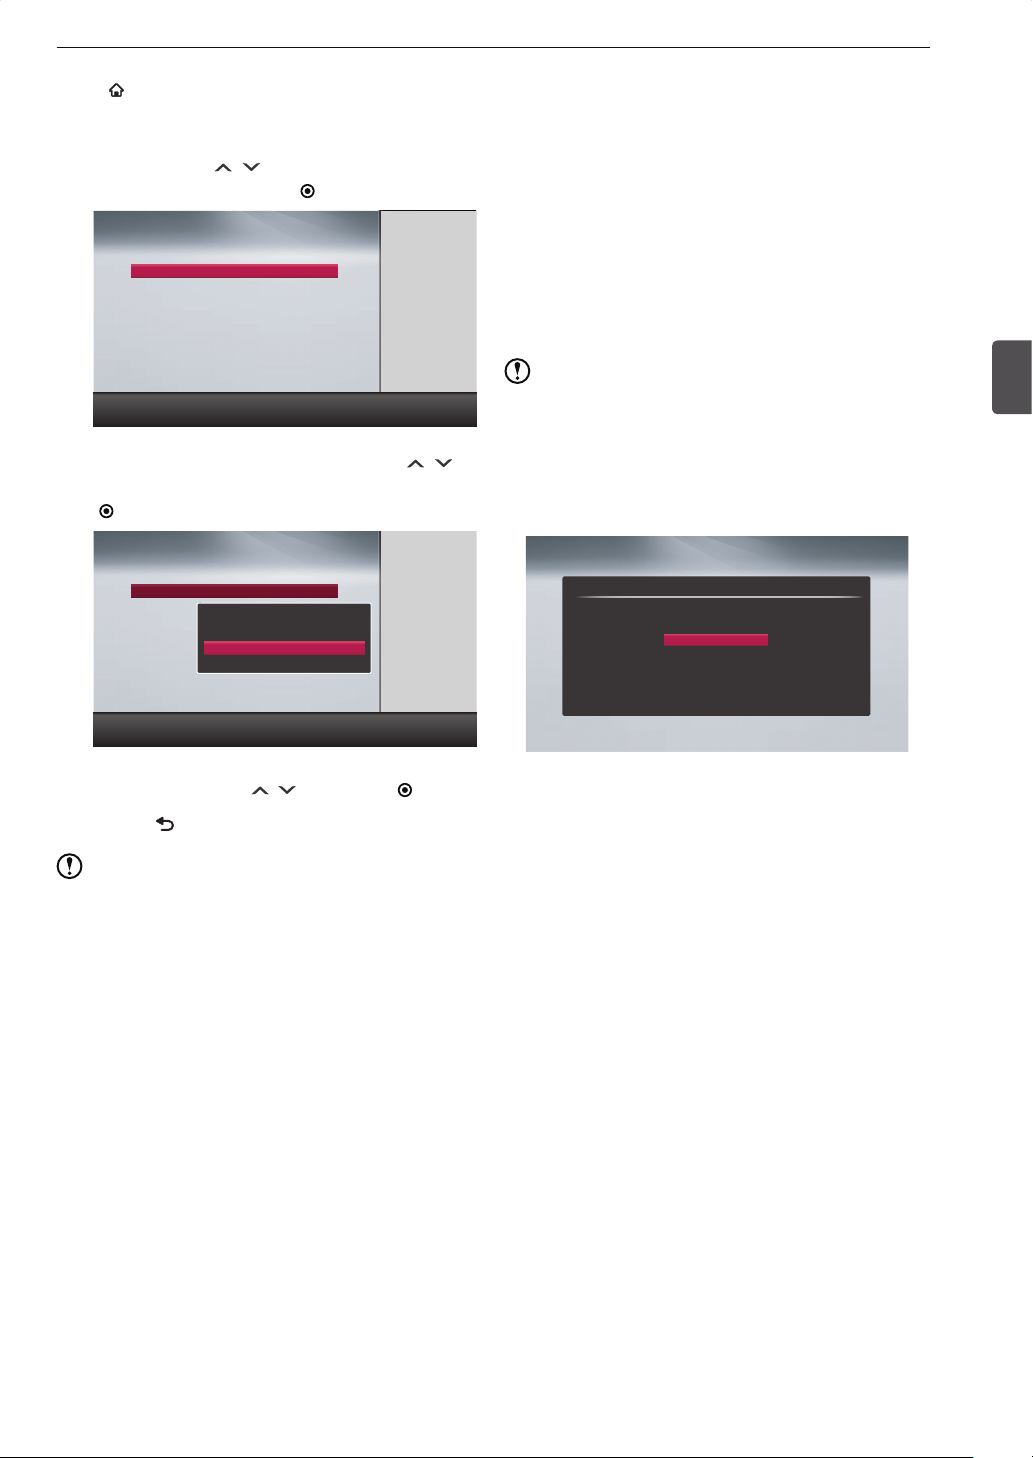
Registration / Deregistration of a USB-HDD
Connect a USB-HDD to this unit and register it. The USBHDD is not ready to use until it is registered. If you connect
an unregistered USB-HDD, a message for registration will
appear. In this case, select “Yes” and follow the instructions
Ƈ
in “
To register”.
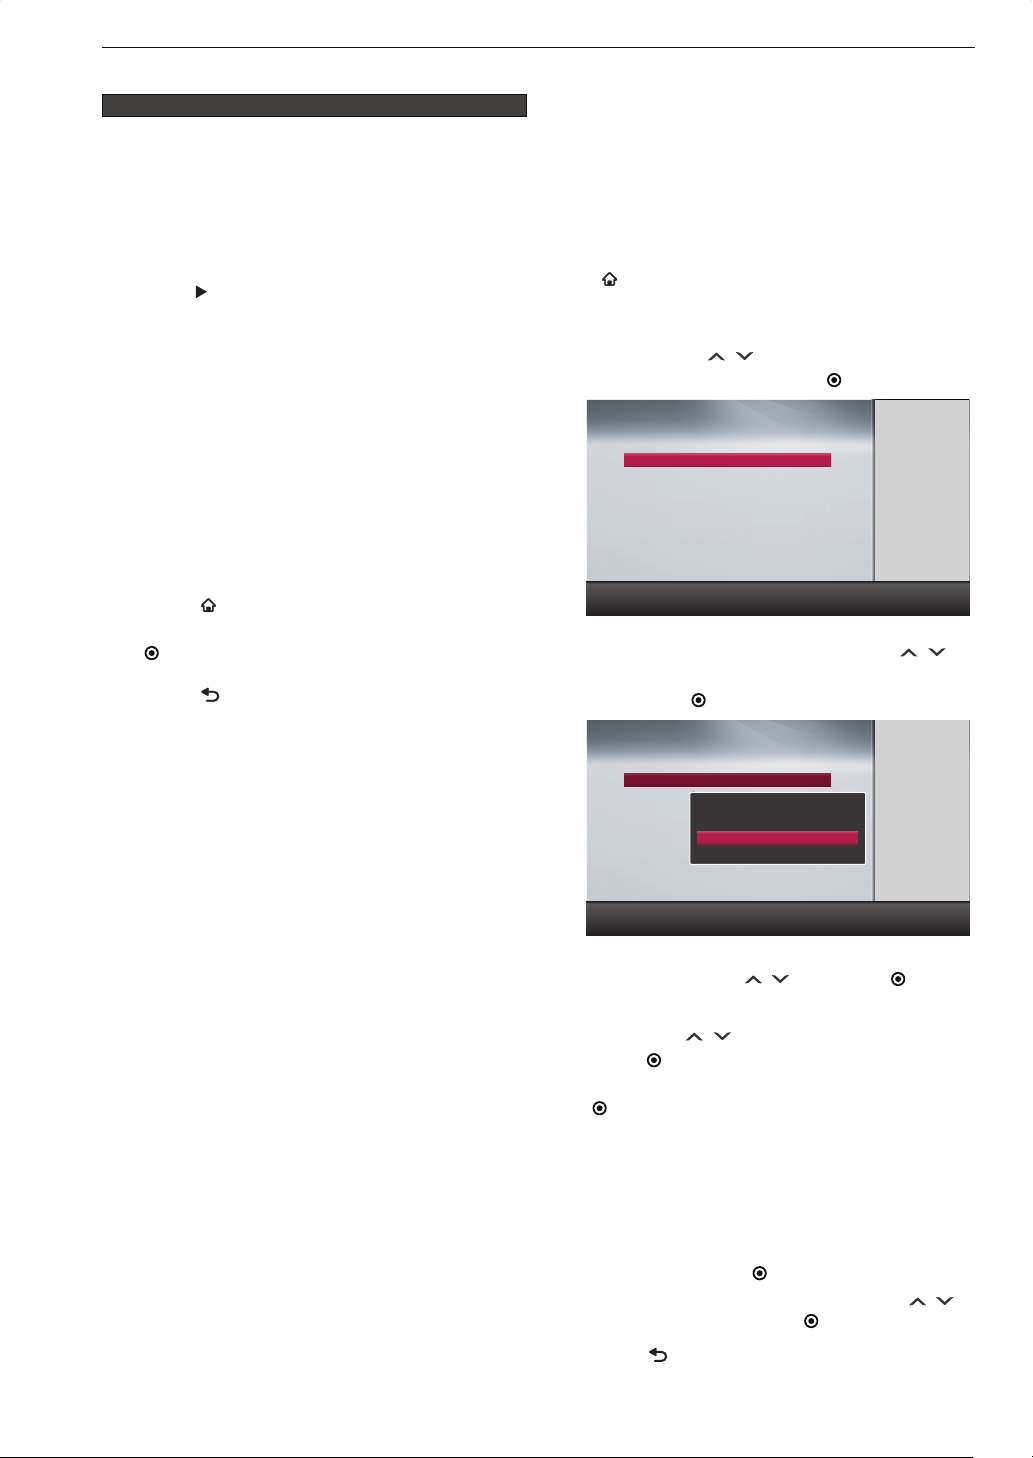
To register
Ƈ
Press [ HOME], then select “Media Manager” >
“USB-HDD Menu” > “Register USB-HDD setting”.
1. The list of USB-HDD registration screen will
appear. Use [ / ] to select a row with
“unregistered”, then press [ ENTER].
Register Setting
List of USB-HDD registration
USB-HDD1. unregistered
USB-HDD2. unregistered
USB-HDD3. unregistered
USB-HDD4. unregistered
USB-HDD5. unregistered
USB-HDD6. unregistered
USB-HDD7. unregistered
USB-HDD8. unregistered
2. A pop-up window will appear. Use [ / ]
to select “Register USB-HDD in this device”,
then press [ ENTER].
Current connected device:unregistered
Return
Register Setting
List of USB-HDD registration
USB-HDD1. unregistered
USB-HDD2. unregistered
USB-HDD3. unregistered
USB-HDD4. unregistered
USB-HDD5. unregistered
USB-HDD6. unregistered
USB-HDD7. unregistered
USB-HDD8. unregistered
Current connected device:unregistered
USB-HDD1. (unregistered
USB-HDD name.
)
Register USB-HDD in this device
Cancel registration setting for USB-HDD
Return
• Confirmation messages will appear. If you agree,
select “Yes” using [ / ], then press [ ENTER].
3. If you wish to change the name of the USBHDD, use [ / ] to select “Yes”, then
press [ ENTER]. If you wish to change the
name later, select “No”, then press
[ ENTER].
• If “Yes” is selected
> Proceed to step 4.
• If “No” is selected
> Registration will be completed, then exit the
screen.
4. The editing screen will appear. Enter a
name, then press [ ENTER].
• A confirmation message will appear. Use [ / ]
to select “Yes”, then press [ ENTER].
5. Press [ BACK] repeatedly to exit.
Page 21
To deregister
Ƈ
Press [ HOME], then select “Media Manager” >
“USB-HDD Menu” > “Register USB-HDD setting”.
1. The list of USB-HDD registration screen will
appear. Use [ / ] to select the desired
USB-HDD, then press [ ENTER].
Register Setting
List of USB-HDD registration
USB-HDD1.
USB-HDD2. unregistered
USB-HDD3. unregistered
USB-HDD4. unregistered
USB-HDD5. unregistered
USB-HDD6. unregistered
USB-HDD7. unregistered
USB-HDD8. unregistered
Current connected device:USB-HDD1
Return
2. A pop-up window will appear. Use [ / ]
to select “Deregister USB-HDD”, then press
[ ENTER].
Basic Setup
DTV Operations
>> Preparation
• Connect this unit to the TV.
1. Turn on the TV.
2. Press the button on the TV’s remote
control which accesses the external source
input repeatedly until you see the DTV
broadcasting from this unit.
• The button on the TV’s remote control may vary on
the TV brand and model.
(e.g., SOURCE / AV / AUX / SELECT and so on.)
Note
• “HELLO” will be displayed on the display of the unit.
After a while, the DTV broadcasting this unit is receiving
will appear on screen.
• If you see the “Initial Setting” screen, this unit has not
been completed with the initial setting. Please perform
“Ƈ Initial Setting” on page 16.
21
3
Basic Setup
Register Setting
List of USB-HDD registration
USB-HDD1.
USB-HDD2. unregistered
USB-HDD3. unregistered
USB-HDD4. unregistered
USB-HDD5. unregistered
USB-HDD6. unregistered
USB-HDD7. unregistered
USB-HDD8. unregistered
Current connected device:USB-HDD1
USB-HDD1. (completed registration)
USB-HDD name.
Deregister USB-HDD
Cancel registration setting for USB-HDD
Return
• Confirmation messages will appear. If you agree,
select “Yes” using [ / ], then press [ ENTER].
3. Press [ BACK] repeatedly to exit.
Note
• When a USB-HDD is registered to this unit, it will be
initialised in this unit’s dedicated format. Note that all
recorded titles on the USB-HDD will be deleted.
• A USB-HDD deregistered from this unit will no longer
be recordable or playable. If you wish to re-register
the USB-HDD, it will be initialised again, and all
recorded titles will be deleted. Please be careful when
deregistering a USB-HDD.
• Recorded titles on a USB-HDD registered to this unit can
only be used on this particular unit and is not compatible
with PC’s or any other recorders including the same
model of this unit.
• Up to 8 USB-HDD’s can be registered to this unit;
however, one single USB-HDD can be connected to this
unit.
• This unit does not support a USB hub.
Initial Setting
Please press [ENTER] after you select your region.
NSW/ACT
VIC
QLD
SA
WA
TAS
NT
Page 22
Viewing
Y
G
G
R
1
4
3
4
Viewing
22
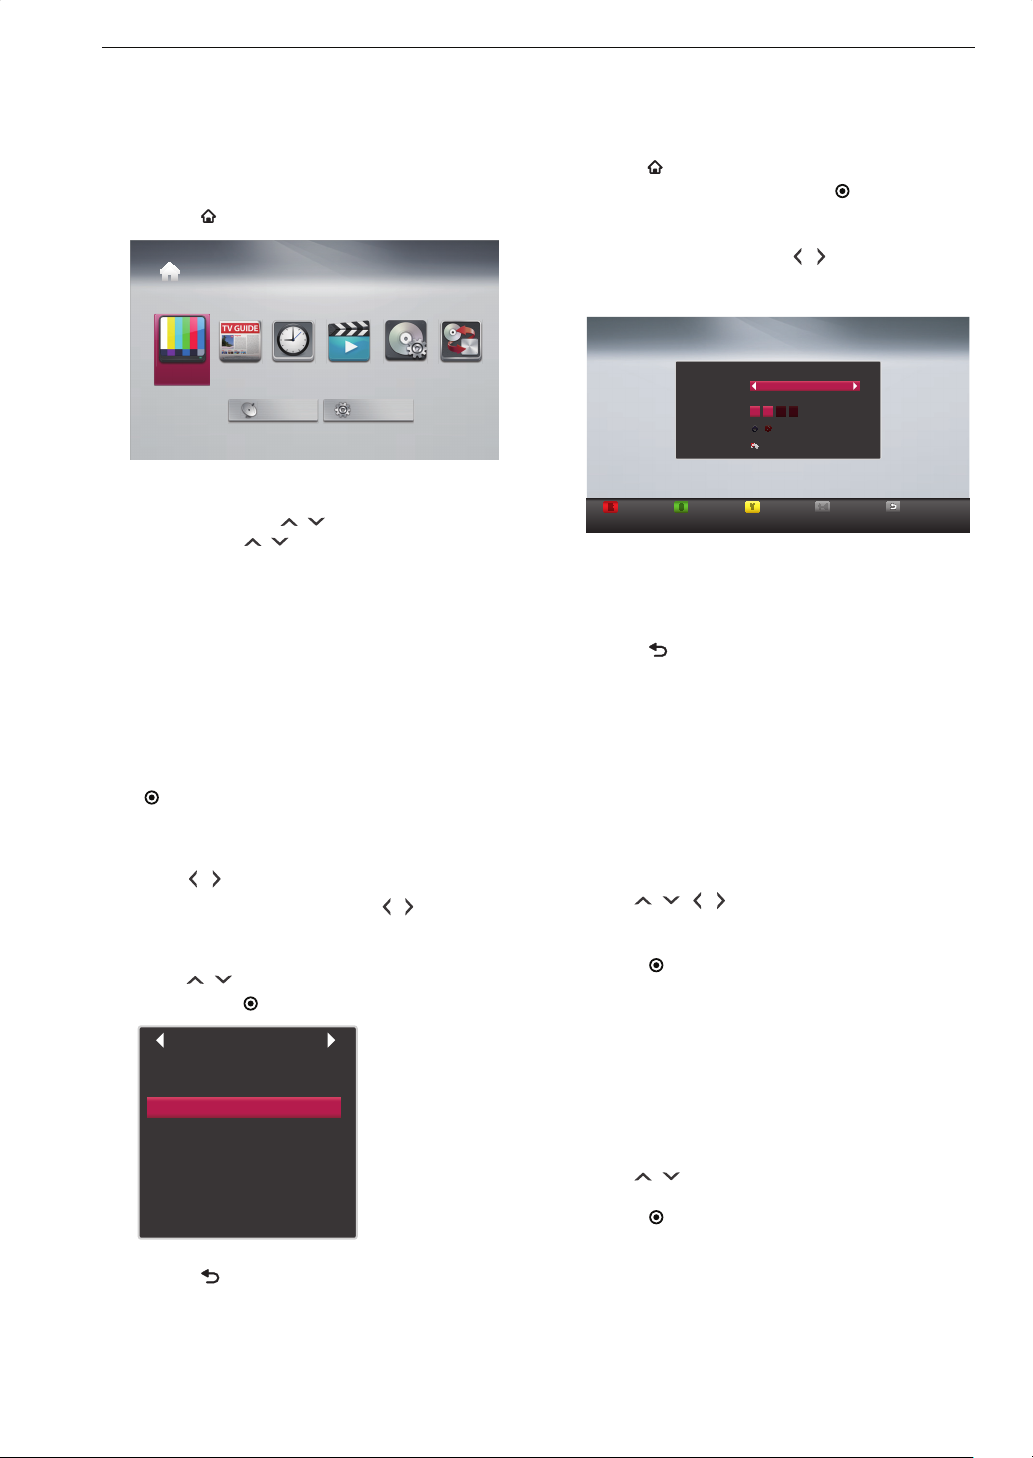
Viewing a Programme Currently On Air
Selecting a channel
1. Press [ HOME], then select “DTV”.
Home Menu
Editing favourite groups
You can sort DTV channels into 4 different favourite groups
(1 - 4). One channel can be assigned to multiple favourite
groups.
1. Press [ HOME], then select “DTV Menu” >
“Edit Channels”, then press [ ENTER].
2. Select the channel you wish to add to a
favourite group, using [ / ].
3. Press a group number [1] / [2] / [3] / [4].
DTV
Timer
GUIDE
Programming
DTV Menu Settings
Media
Manager
DubbingContents List
2. Select a channel.
• For use of [CH / ] for up / down
Press [CH / ].
• For use of a 3 digit number
Use [number buttons] to enter a channel number.
(e.g.)
To select the channel 123, press [1] > [2] > [3].
• If the PIN Code entry screen is displayed, refer
to “Unlock the DTV rating temporarily” on page 23.
Selecting a channel from the “Programme List” window
1. While viewing a DTV programme, press
[ ENTER].
• “Programme List” window will appear. The currently
selected channel is highlighted.
2. Use [ / ] to select a favourite group.
• If no group has been created, [ / ] is not
available.
• A group with no channel will be skipped.
3. Use [ / ] to select the desired channel,
then press [ ENTER].
Programme List
1
Station A
2
Station B
3
Station C
50
Station D
80
Station E
100
Station F
120
Station G
140
Station H
Channels 3 Station C
Favourite
Access
Skip
Access
R
Skip
G
Edit Channels
1234
Move
Y
Favourite
1-4 Exit
• To delete a channel from a favourite group, select
the channel you wish to delete, then press the
group number [1] / [2] / [3] / [4] from which you
wish to delete the channel.
4. Press [ BACK] repeatedly to exit.
Switching the audio
You can switch the audio if the programme has multiple
audio streams.
1. Press [AUDIO] to call up the audio
information.
• You can also call up the audio information by
pressing [SUB MENU], then selecting “Audio”.
2. Use [ / / / ] to select your desired
setting.
3. Press [
ENTER] to finish.
Switching the subtitles
1. Press [SUBTITLE] to call up the subtitle
information.
• You can also call up the subtitle information by
pressing [SUB MENU], then selecting “Subtitle”.
2. Use [ / ] to select your desired setting.
3. Press [
ENTER] to finish.
4. Press [ BACK] to finish.
• As to “Favourite Group”, refer to “Editing favourite
groups” on page 22.
Page 23

Switching the image quality (Super Resolution)
Super Resolution enhances SD quality images output in
1080i / 1080p from the HDMI jack, which gives more crisp
images.
1. When viewing an SD quality programme,
press [SUB MENU] to call up the sub menu.
2. Use [
then press [ ENTER].
• Setting information will appear.
3. Use [ / ] to select “On” , then press
[ ENTER].
/ ] to select “Super Resolution”,
Viewing
Viewing from an External Device
To view from an external device connected to this unit,
switch this unit to the external input (AV). For how to
operate the external device, please refer to the user manual
of the device.
Switching to the external input
1. Press [SUB MENU] to call up the sub
menu.
2. Use [
then press [ ENTER].
/ ] to select “Switch DTV or AV”,
23
Unlock the DTV rating temporarily
If the PIN Code entry screen appears while viewing a
programme, please enter the PIN Code.
1. Use [number buttons] to enter the PIN
Code.
• To turn off “DTV Rating”, press [ HOME],
then select “DTV Menu” > “Parental Control” >
“DTV Rating” > “Unlock”, then press [ ENTER].
3. Use [
/ ] to select “AV”, then press
[ ENTER].
Note
• In the following case, “AV” is not available.
-During a dual recording of 2 DTV programmes
Viewing a cable-TV programme
To view a cable-TV programme through this unit, select
a channel on the home terminal / set-top box provided by
the cable-TV service provider, then switch this unit to the
external input. If your cable-TV service is the pass-through
type, you can directly select channels on this unit (you do
not need to switch the unit to the external input.)
• Please contact your cable-TV service provider for details.
• Please refer to the user manual of the connected device
as well.
>> Preparation
• Connect the cable-TV’s home terminal / set-top box to
this unit’s external input.
1. Select a channel on the home terminal / set-
top box.
2. Switch this unit to the external input.
• Refer to steps 1 to 3 in “Switching to the external
input” on page 23.
4
Viewing
Page 24
Supported Media
Supported Media
24
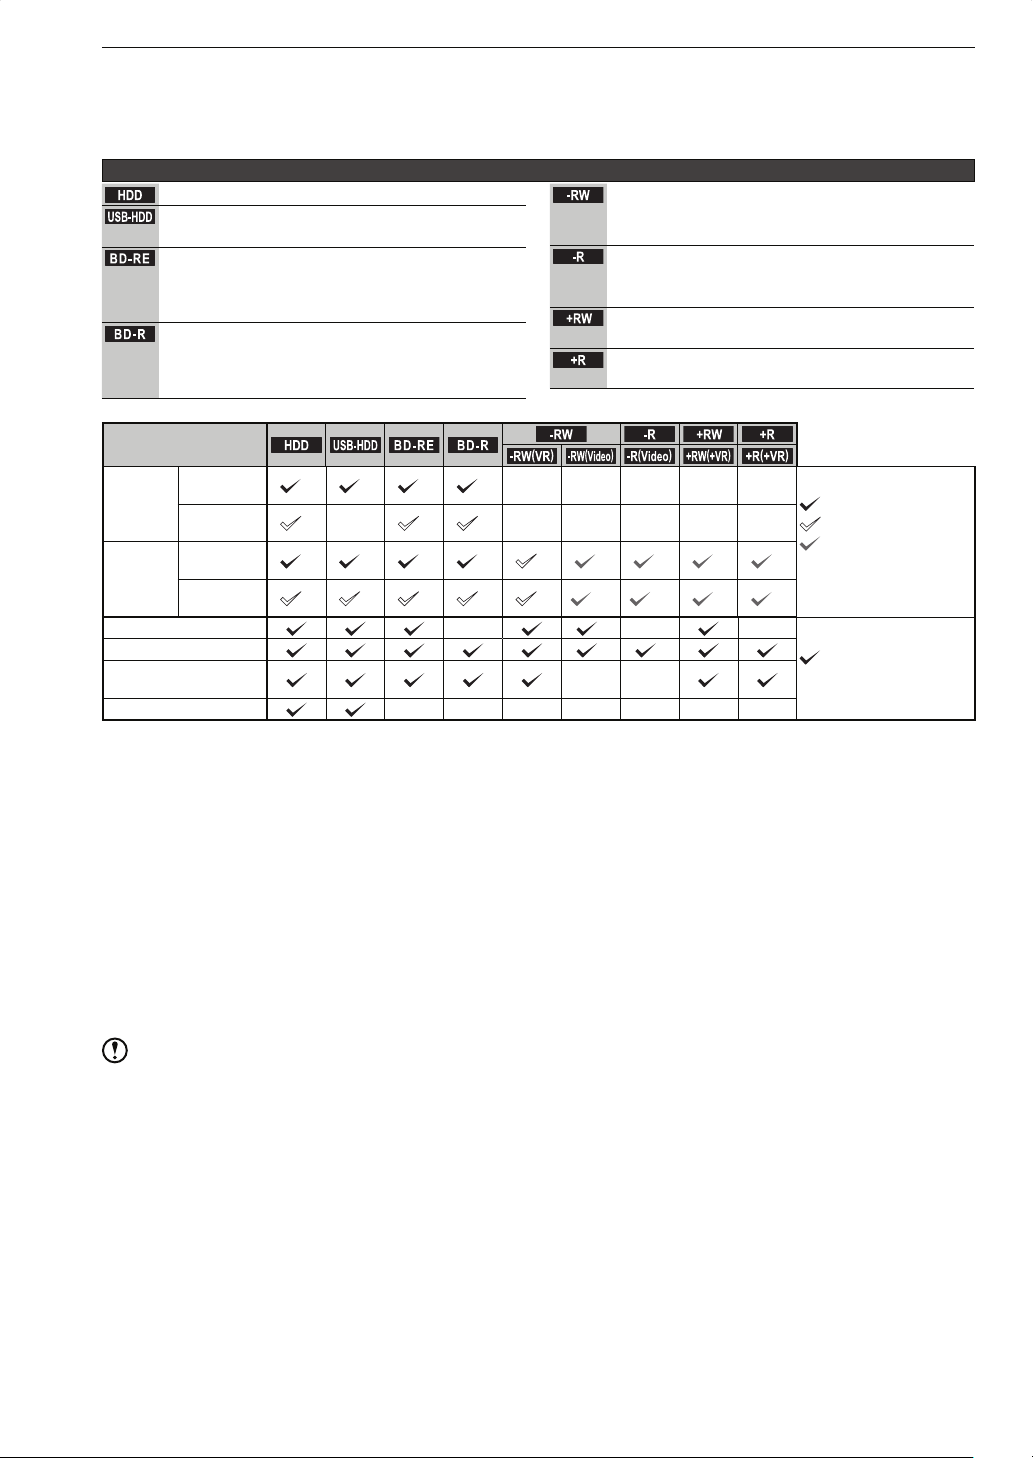
Supported Media
Media other than described below are not supported.
Recordable / playable
About media
.
HDD
.
Internal hard disk drive
.
USB-HDD
.
USB external hard disk drive connected to this
unit’s USB port with a USB cable
.
BD-RE
.
BD-RE SL (Single layer)
BD-RE DL (Dual layer)
Ver 2.1
Usable disc: Up to 2 x
.
BD-R
.
BD-R SL (Single layer)
BD-R DL (Dual layer)
Ver 1.1 / 1.2 / 1.3
Usable disc: Up to 6 x
.
-RW
.
DVD-RW
Ver 1.1 / 1.2
Usable disc: Up to 6 x
.-R.
DVD-R (Single layer)
Ver 2.0 / 2.1
Usable disc: Up to 16 x
.
+RW
.
DVD+RW
Usable disc: Up to 8 x
.+R.
DVD+R (Single layer)
Usable disc: Up to 16 x
Type of media
Recording
(directly to
the media)
*1
Dubbing
Digital
broadcasting
External
input (AV)
Digital
broadcasting
External
input (AV)
.
.
USB-HDD
.
.
BD-RE
HD HD HD HD
—
SD
HD HD HD HD SD SD SD SD SD
SD SD SD SD SD SD
.
BD-R
.
SD SD
.
HDD
Recording multiple times —
Playback
Playback from
“Contents List”
.-R(Video).
.-R.
.+RW(+VR).
.
-RW
.-RW(VR).
.
.-RW(Video).
.
—————
—————
*2
*2
SD
*3
— —
*2 *2
*2
—
*2
—
.
+RW
.
SD SD
.+R.
.+R(+VR).
:
Recordable in HD quality
:
Recordable in SD quality
:
Only copy-free titles are
recordable in SD quality
:
Not available
—
:
Operable
:
Not available
—
Chase play ———————
*1
When dubbing a copy-once programme, refer to “About dubbing restrictions” on page 55 to learn if the dubbing will be
“copy” or “move”.
*2
When dubbing to DVD-RW (Video) / DVD-R (Video), the disc will automatically be finalised after dubbing is completed.
In this owner’s manual, finalised DVD-RW (Video) / DVD-R (Video) discs are described as DVD-Video .
*3
If you wish to add a recording to a finalised DVD-RW (Video) disc, please format the disc again.
(Refer to “Reinitialising (reformatting) a disc” on page 53). Note that all data on the disc will be deleted.
• For DVD-RW discs, “VR” and “Video” format are supported. For DVD-R discs, only “Video” format is supported.
• The 3-layer / 4-layer BD-RE / -R discs are not supported.
• For DVD-R (Single layer), only “Video” format is supported. Only DVD-R (VR) discs recorded and finalised on another
unit are playable on this unit.
• For DVD-R (Dual layer) discs, neither recording nor dubbing is possible on this unit. Only discs recorded and finalised
on another unit are playable on this unit.
• For DVD+R (Dual layer) discs, neither recording nor dubbing is possible on this unit. Only discs recorded and finalised
on another unit are playable on this unit.
• AVCREC is not supported.
Note
• When dubbing a copy-once programme to a DVD-RW (VR) disc, use a CPRM compatible disc.
Page 25
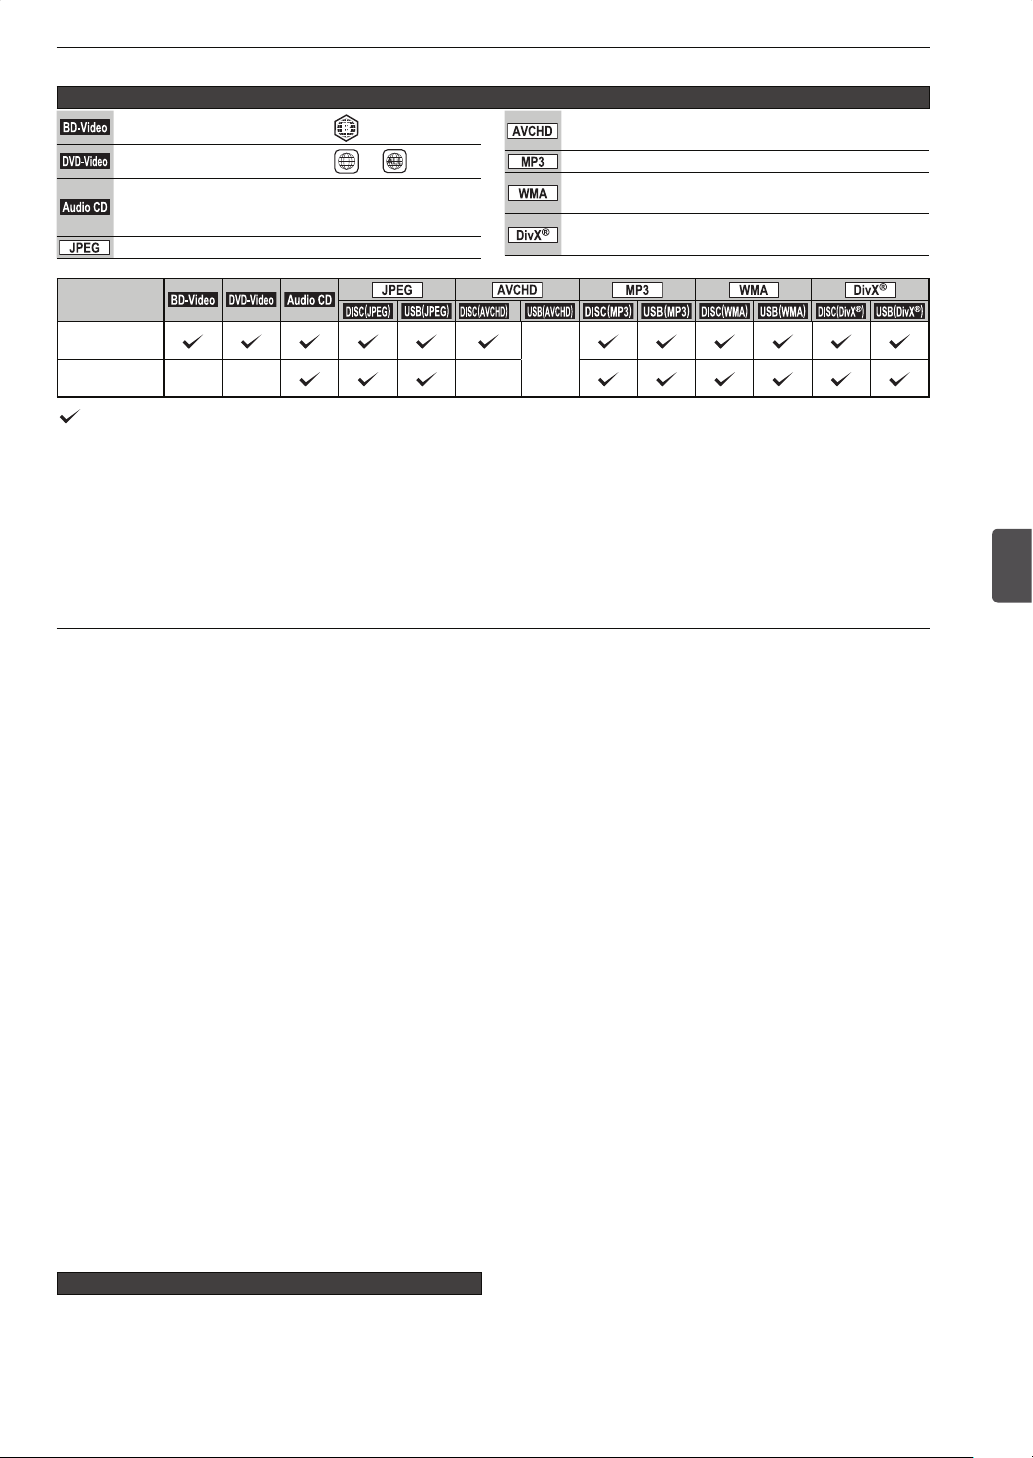
Supported Media
Only playable
About media
.
BD-Video
.
Disc including the region code
.
DVD-Video
.
Disc including the region code 4 or
• Audio CD (CD-DA)
.Audio CD.
• Finalised CD-RW / CD-R discs recorded in
Audio CD format
.
JPEG
.
JPEG image files (from digital cameras)
.
JPEG
Type of media
.
BD-Video
.
DVD-Video
.
.
.Audio CD.
.DISC (JPEG).
.
).
.USB(JPEG
.DISC (AVCHD).
Playback
Playback from
“Contents List”
—— —
*5
: Available
—
: Not available
*4
Including finalised DVD-RW / DVD-R / DVD+RW / DVD+R (including dual-layered discs)
*5
By copying (dubbing) the contents to the HDD, it will become possible to play back from “Contents List”.
®
• For Audio CD / JPEG / MP3 / WMA and DivX
, its special contents list screen will appear.
• AVCREC is not supported.
• For the dual-layered DVD-R / DVD+R discs, only those recorded and finalised on another unit are playable on this unit.
• VCD / SVCD are not supported.
• AVCHD Ver 2.0 is not supported.
High-definition movies recorded on digital
.
AVCHD
.
camcorders, in AVCHD format
.MP3.
For media containing audio files encoded in MP3 format
For media containing audio files encoded in
.
WMA
.
Windows Media™ Audio format
For media containing movie files encoded in DivX®
.
DivX
.
format
.
AVCHD
.
*4
.
USB(AVCHD).
*5
—
.MP3.
.DISC (MP3). .USB (MP3). .DISC(WMA). .USB (WMA).
.
WMA
.
.
DivX
.
.
DISC(DivX). .
USB(DivX).
25
5
Supported Media
About HDD (internal HDD)
Caution about HDD handling
• Do not subject it to vibration or strong impact, especially
when the unit power is on. HDD is also susceptible to
temperature and moisture.
• Operating the unit under such conditions described
above may cause loss of data or malfunctions.
• If a HDD is damaged, the recorded data may be lost.
• Do not unplug the power cord when the unit power is on.
• Do not lift or move the unit soon after the power is turned
off. (Please wait at least 2 minutes.)
• Do not operate this unit under dew condensation
conditions.
Please use the HDD as a temporary data storage device.
• It is highly recommended to copy important recordings to
discs.
• For mechanical reasons, the HDD may degrade quickly.
Other information
• The internal HDD is unreplaceable. Attempting to replace
it causes malfunctions and voids your warranty.
• Please turn the unit power off when it will not be used for
an extended period of time.
• No data is recorded on the HDD. Please record on your
own media before playback.
About USB-HDD (external HDD)
Available functions
Ƈ
The registered USB-HDD can be used in the same manner
as the internal HDD.
Differences from the Internal HDD
• When recording directly to the USB-HDD, recording
mode is TS only.
• USB-HDD cannot record 2 programmes simultaneously.
• One title dubbing cannot be performed from a USB-HDD.
• Recording / editing on a protected USB-HDD is not possible.
About discs
Blu-ray Disc™ / DVD / CD
Ƈ
A disc cannot record or play back properly in the
following cases.
• The source recording is in a bad condition, an
incompatible disc, with scratches / dirt, the unit’s lens for
recording / playback is dirty, under dew condensation
conditions.
• When attempting to play back a disc (recorded on the
unit) on a PC / car GPS system / car audio system /
video game console.
• When attempting to play back a disc authored on a PC.
• When the DVD’s are recorded in an incompatible format,
such as the NTSC system. (This unit is compatible with
the PAL system.)
• When attempting to play back an unauthorised disc
(illegally-copied disc).
• When the disc contains a title with closed captioning.
How to hold a disc
• Hold the disc edges and the centre hole. Try not to touch
the recording surface (shiny side).
• If a disc is dirty, clean with a moist, soft cloth, then wipe
from the centre to the outer edge with a dry cloth. Do
not use commercially available liquid cleaner, thinner,
benzine or alcohol.
Do not use the following discs!
• The following discs may cause damage to the disc and the
unit.
-Scratched disc
-Disc with a label applied on the surface
-Disc with a label that is coming unglued
-Disc with a glued label and the glue is running off
-Cracked / deformed disc repaired with glue
-Specially-shaped disc (e.g., a hexagon disc)
Continued on next page
Page 26
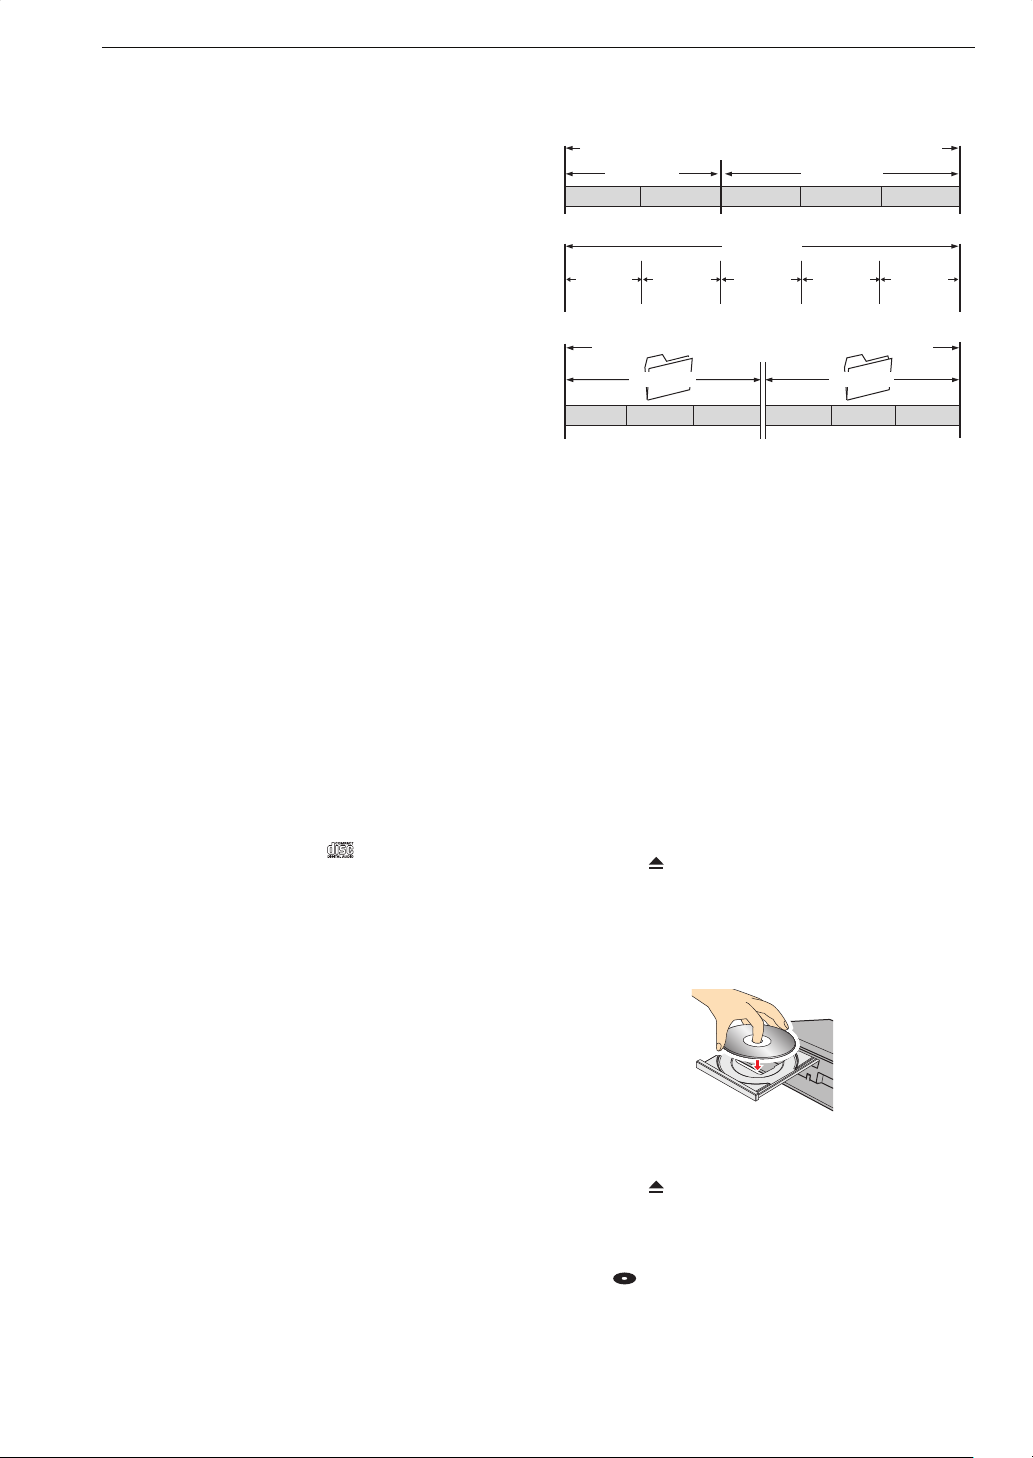
Supported Media
26
When using an 8 cm disc
• 8 cm disc can only be played back on this unit.
Recording / editing cannot be performed.
• Carefully place the disc to the inner disc tray guide.
BD-RE / BD-R
Ƈ
• This unit may not play back unfinalised BD-R discs
recorded on another device or the disc may lose data.
• Initialise a brand-new BD-RE / BD-R disc before using.
• BD-RE Ver 1.0 discs (the cartridge type) are not
compatible with this unit.
DVD-RW / DVD-R
Ƈ
• This unit cannot record directly to a DVD-RW / DVD-R
disc.
• This unit may not play back unfinalised DVD-RW /
DVD-R discs recorded on another device or the disc may
lose data.
• DVD-RW (VR) discs can only be played back on VR
compatible recorders / players.
• CPRM compatible discs can only be played back on
CPRM compatible recorders / players.
• DVD-RW (Video) / DVD-R (Video) discs will automatically
be finalised after the dubbing process finishes. This unit
recognises these finalised discs as DVD-Video discs.
• It may take extra time to eject x 1 speed disc.
DVD+RW / DVD+R
Ƈ
• This unit cannot record directly to a DVD+RW / DVD+R
disc.
• If you make an additional recording to a finalised
DVD+RW disc, it will be unfinalised.
BD-Video / DVD-Video
Ƈ
• Some discs may behave unexpectedly because of
the software producer’s purpose. Please refer to the
instructions of the disc.
About Titles / Tracks / Files
Ƈ
The contents of HDD / disc are generally divided into
sections or folders (groups of titles / files) as shown below.
HDD / USB-HDD / BD-Video / DVD-Video / AVCHD
Title 1 Title 2
Chapter 1 Chapter 2 Chapter 1 Chapter 2 Chapter 3
Audio CD
Track 1 Track 2 Track 3 Track 4 Track 5
Media containing JPEG / MP3 / WMA / DivX® files
Folder A Folder B
File 1 File 2 File 3 File 4 File 5 File 6
Title:
Chapter: A smaller part in a title, which is equivalent to a
Track: A song in an Audio CD
Folder: A directory which can contain files and other
File: Content (data) on the HDD / disc
Content on the HDD / disc, which is equivalent to,
for example, one episode of a TV drama series
chapter in a book
folders
Preparation for a Disc
Audio CD
Ƈ
• Please make sure there is a mark on the label side
of the CD.
• Audio CD’s other than the CD standard, such as a
CD with a copy-control, may not play properly or be
completely incompatible.
About USB devices
Ƈ
• USB devices which can be connect to the USB port on
the front of this unit are;
-USB-HDD
-USB memory stick
-Digital camera containing JPEG files
-Digital camcorder containing AVCHD contents
• Do not connect any other types of USB device other than
the examples above or it may cause damage to this unit
or loss of data. Operations in use of a USB hub or USB
extension cable are not guaranteed.
• Do not charge a cell phone / portable audio player’s
battery using this unit’s USB port or it may cause
malfunction of the unit.
Place a disc
1. Press [ OPEN/CLOSE] to open the disc
tray.
2. Place a disc on the tray with the label side
facing up.
• When playing back a double-sided disc, place
the disc with the playback side down.
3. Press [ OPEN/CLOSE] to close the disc
tray.
• It may take extra time to read some discs.
• Some video discs automatically start playback.
• “ ” will appear on the display on the front panel
when disc loading is completed.
Page 27
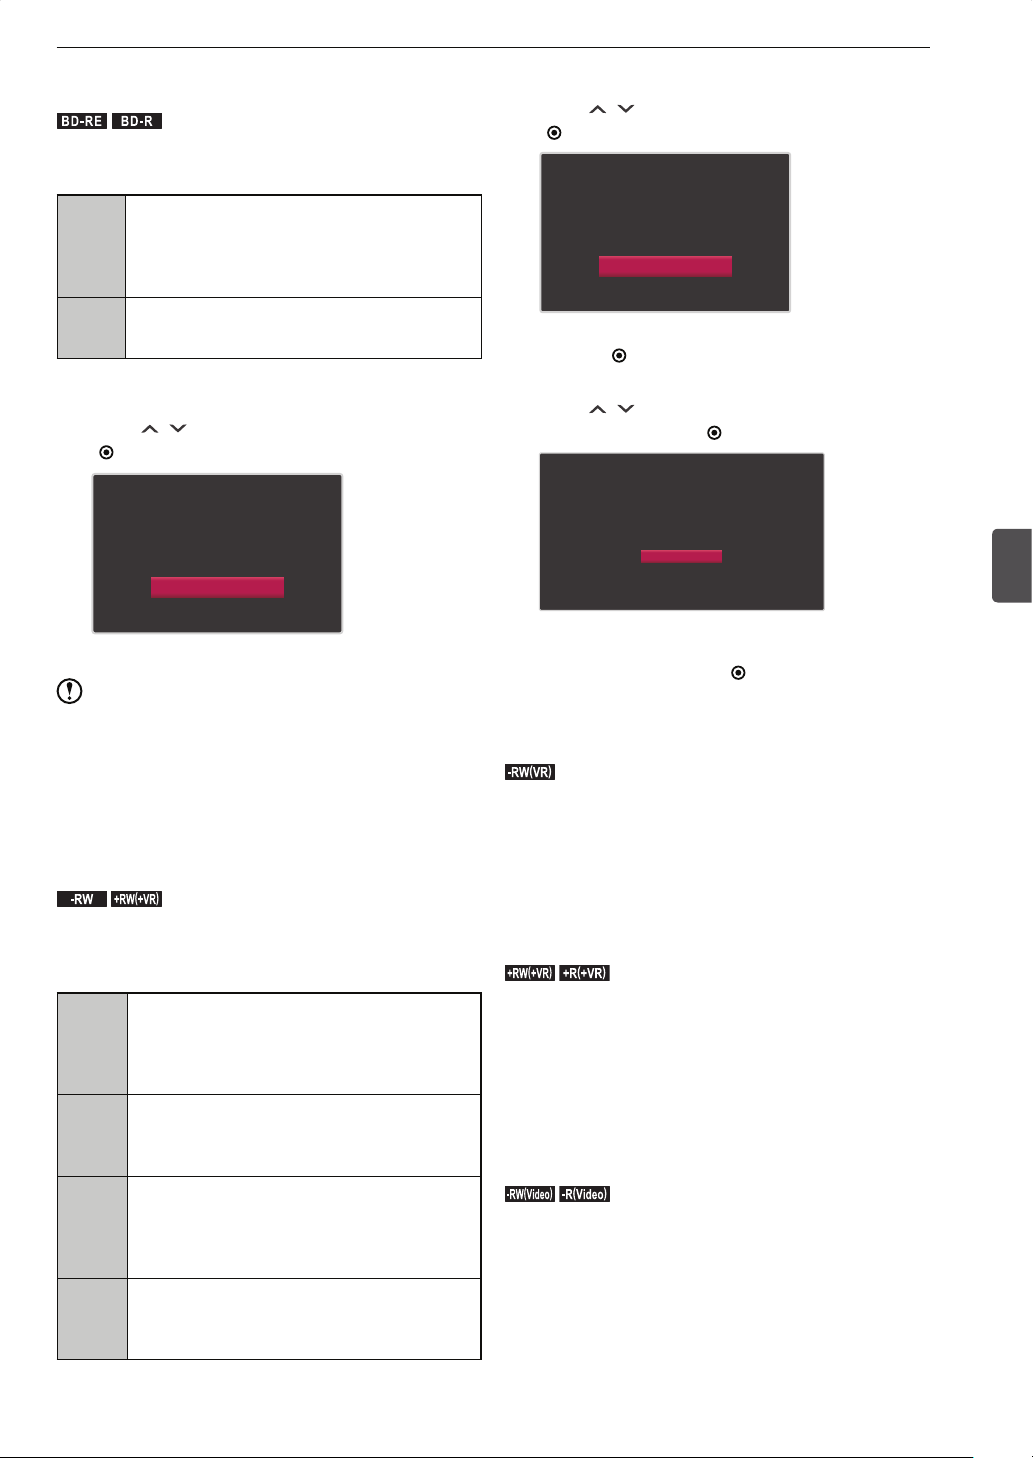
Initialise (format) a brand-new Blu-ray Disc™
.
BD-R
.
BD-RE
.
.
When putting a brand-new disc in the unit, the initialisation
(format) screen will appear. This is a necessary process to
make the disc recordable.
• A brand-new disc is not formatted. Format it
before using.
BD-RE
• BD-RE discs can be formatted multiple times.
Note that this process deletes all data on the
disc.
• A brand-new disc is not formatted. Format it
BD-R
before using.
• BD-R discs can be formatted only once.
1. Place a brand-new disc in the unit.
2. Use [
/ ] to select “Yes”, then press
[ ENTER].
This disc is not formatted and
cannot be played or recorded.
Format Disc?
Yes
No
• It may take extra time to complete.
Note
• Do not unplug the AC cord while loading a disc or
performing a disc format. Doing so may cause damage
to the disc or malfunction of the unit.
• It is not possible to cancel the formatting process once it
has begun.
Format a brand-new DVD
.
-RW
. .+RW(+VR).
When placing a brand-new DVD-RW / DVD+RW disc in the
unit, the initialisation (format) screen will appear. It is not
possible to record on an unformatted disc. (Direct recording
to a DVD is not possible.)
• A brand-new DVD-RW is not formatted.
Format it in VR or Video mode before using.
DVD-RW
DVD-R
DVD+RW
DVD+R
• DVD-RW discs can be formatted multiple
times. Note that this process deletes all data
on the disc. (Refer to page 53.)
• A brand-new DVD-R is formatted in Video
mode at the factory. No need to re-format the
disc before using.
• DVD-R discs cannot be re-formatted.
• A brand-new DVD+RW is not formatted.
Format it in +VR mode before using.
• DVD+RW discs can be formatted multiple
times. Note that this process deletes all data
on the disc. (Refer to page 53.)
• DVD+R discs cannot be re-formatted.
• A brand-new DVD-R is formatted in +VR
mode at the factory. No need to re-format the
disc before using.
Supported Media
1. Place a brand-new disc in the unit.
2. Use [
/ ] to select “Yes”, then press
[ ENTER].
This disc is not formatted and
cannot be played or recorded.
Format Disc?
Yes
No
• For DVD+RW, formatting will begin right after you
press [
ENTER] on “Yes”.
• For DVD-RW, proceed to step 3.
3. Use [ / ] to select the desired format
mode, then press [ ENTER].
Please choose the DVD format.
Copied programme will be recorded with normal resolution.
If you want to Dubbing a Dubbing protection programme,
please use DVD supporting CPRM.
VR Format
Video Format
Cancel
• It may take a while to complete.
• To cancel the formatting process, select
“Cancel”, then press [
ENTER].
About DVD recording format
VR format (DVD Video Recording Format)
Ƈ
.-RW(VR).
• Offers advanced editing features.
• Can record and edit repeatedly.
• Playable only on VR compatible Blu-ray Disc™ / DVD
players.
• Finalisation recommended.
• By unfinalising a finalised disc, additional recordings can
be performed.
+VR format
Ƈ
.+RW(+VR). .+R(+VR).
• Offers basic editing features.
• Can record and edit repeatedly.
• Playable on most Blu-ray Disc™/DVD players.
• Finalisation recommended.
• For DVD+RW, if additional recording is made, the disc
will automatically be unfinalised.
• For DVD+R, additional recordings are not available after
finalisation.
Video format (DVD Video Format)
Ƈ
.-RW(Video).
.-R(Video).
• Same recording format used for the most commercial
DVD-Video.
• Playable on most Blu-ray Disc™ / DVD players.
• When dubbing is completed, the disc will automatically
be finalised.
• Additional recordings are not available after finalisation.
27
5
Supported Media
Page 28

Supported Media
28
Preparation for a USB Device
Connecting a USB device
With this unit, you can play back JPEG / AVCHD / MP3 /
WMA / DivX
USB memory stick or a digital camera. JPEG files can be
played back directly from the USB device.
AVCHD files should first be dubbed to the internal HDD.
Also, you can connect a USB-HDD to this unit and record
broadcast programmes to it or play back the recorded titles
in the same manner as the internal HDD.
®
files recorded on a USB device, such as a
To USB port
USB memory stick
(not supplied)
USB cable (not supplied)
Note
• Be sure to turn off this unit and the USB-HDD before
disconnecting the USB-HDD. If “Quick Booting” is
activated, be sure to deactivate it before turning off this
unit. (Refer to page 65.) No indicators on the display panel
should be lighted when the unit is powered off.
• Do not turn off or disconnect the USB-HDD while it is
running. It may cause data loss or malfunction of this
unit.
• We are not responsible for data-loss or damage to your
USB-HDD caused by malfunction of this unit, repairing
of the USB-HDD or the uninstructed connection of the
USB-HDD to other devices.
USB-HDD (not supplied)
Digital camcorder
(AVCHD file format)
Digital camera
(JPEG file format)
When USB device is connected to this
Ƈ
unit...
• The display on the front panel will show “ ”.
• Setting menu may appear on the display of the
connected device. In such case, select PC connection
mode.
(Refer to the user manual of the USB device for details.)
• It may take a while to recognise the USB device.
• This unit does not support AVCHD Ver 2.0.
• If your USB-HDD has a power switch, turn on the USBHDD first before you turn on this unit.
• To disconnect the USB device, make sure the
playback is stopped, then slowly pull out the
device. As for USB-HDD, make sure the power of
this unit and the USB-HDD are turned off before
disconnecting.
Page 29

Recording
Before Recording
Select a media to record to
For some programmes, recording is prohibited or restricted
for copyright protection reasons.
.
HDD
.
.
BD-RE
Restriction on
recording
.
USB-HDD
.
.
*1
.
BD-R
.-RW(VR).
*2
.
Copy-free
programme
Copy-once
programme
Copy-protected
programme
——
: Available
—
: Not available
*1 In the following cases, recording will be performed to
the HDD even if a timer recording is set for the USBHDD.
-When the USB-HDD is not registered to this unit.
-When the USB-HDD is not connected to this unit.
-When the USB-HDD is not powered on when a timer
recording starts.
-When the USB-HDD does not have enough capacity
to record.
*2 In the following cases, recording will be performed to
the HDD even if a timer recording is set for a BD-RE/R
disc.
-No recordable disc is in the unit.
-The disc does not have enough capacity to record.
Note
• Direct recording to a DVD is not possible.
• When recording a programme with no copy restriction
and copy-once programme in a row at one time, the start
time and the end time makes the recording one title.
Hence, it will “move” when dubbing this title.
Start End
• Data broadcasting cannot be recorded.
• Radio broadcasting can be recorded to the HDD only.
• This unit will pause recording when a programme
changes to a copy-protected programme or parental-lock
programme. The recording will be resumed when the
programme changes back to the recordable programme.
• For recording modes and restrictions on recordings with
audio / subtitles, refer to pages 29 to 31.
Continuous recording as one title
Programme with
no copy restriction
(Copy)
When dubbing...
(Move)
Copy-once programme
.-RW(Video).
.+RW(+VR).
.-R(Video).
.+R(+VR).
———
(Move)
Recording
Recording mode (image quality) and approx. recording time
“Recording mode” refers to the image quality. You can
choose whether to give priority to image quality or recording
duration.
Image quality and recording duration by recording mode
image
TS • Digital
broadcasting
AF
• Digital
AN
broadcasting
AE
XP
• Digital
SP
broadcasting
LP
• External input
EP
.
HDD
.
As is
broadcasted
Compressed
HD quality
SD quality
Recording mode and
Approximate bit rate
DTV (HD): 15 Mbps 147 hours 73 hours
TS
DTV (SD): 8 Mbps 276 hours 137 hours
image
quality
quality
Rec.
Rec.
duration
duration
image
image
quality
quality
Rec.
Rec.
duration
duration
Maximum recordable duration
BR629T
(1TB)
AF 12.9 Mbps 171 hours 85 hours
AN 8.6 Mbps 257 hours 128 hours
4.36 Mbps 506 hours 252 hours
AE
2 Mbps 1097 hours 547 hours
XP 1 hr mode: 9.5 Mbps 231 hours 115 hours
SP 2 hr mode: 4.7 Mbps 462 hours 230 hours
LP 4 hr mode: 2.3 Mbps 930 hours 464 hours
6 hr mode: 1.6 Mbps 1375 hours 686 hours
EP
8 hr mode: 1.2 Mbps 1845 hours 920 hours
.
BD-R
.
TS
BD-RE
.
.
Recording mode and
Approximate bit rate
DTV (HD): 15 Mbps
DTV (SD): 8 Mbps
Maximum recordable duration
Single layer
(25GB)
3 hours and
20 minutes
6 hours and
30 minutes
AF 12.9 Mbps 4 hours 8 hours
AN 8.6 Mbps 6 hours 12 hours
4.36 Mbps 12 hours 24 hours
AE
2 Mbps 26 hours 53 hours
XP 1 hr mode: 9.5 Mbps
SP 2 hr mode: 4.7 Mbps
5 hours and
15 minutes
10 hours and
30 minutes
LP 4 hr mode: 2.3 Mbps 21 hours 44 hours
6 hr mode: 1.6 Mbps 32 hours 66 hours
EP
8 hr mode: 1.2 Mbps 43 hours 88 hours
.
-RW
. .-R(Video). .+RW(+VR). .+R(+VR).
Recording mode and
Approximate bit rate
(for dubbing only)
Maximum recordable duration
XP 1 hr mode: 9.5 Mbps 1 hour
SP 2 hr mode: 4.7 Mbps 2 hours
LP 4 hr mode: 2.3 Mbps 4 hours
6 hr mode: 1.6 Mbps 6 hours
EP
8 hr mode: 1.2 Mbps 8 hours
High
image quality
Standard
image quality
BR625T
(500GB)
Dual layer
(50GB)
7 hours
13 hours
11 hours
22 hours
29
6
Recording
Page 30

Recording
30
Note
• Maximum recordable duration is approximate and will depend on the content.
• Bit rate defers depending on the programme and the possible recordable duration will defer.
• Programmes containing scenes with quick motion or rapid changes in brightness, such as sports and concerts, may
cause block noise.
• The possible recording duration of the recording mode, AE and EP, can be configured in “Home Menu” > “Settings” >
“Recording” > “AE Mode” or “EP Mode”.
• In some cases, the recordable capacity of the disc may decrease due to information, such as chapter markers and other
management information, written along with the recording data.
• This unit employs VBR (Variable Bit Rate) for efficient recording and the possible recording duration differs depending
on the content.
• The longest recording duration is 8 hours. This unit will automatically stop recording when a recording duration reaches
8 hours.
• Direct recording of DTV programme to the HDD / USB-HDD / BD is only available in TS mode.
-AF / AN / AE, XP / SP / LP / EP mode can be used for TS ĺ AVC/PS conversion and dubbing to the HDD / USBHDD.
-TS ĺ AVC/PS conversion is not available for BD-RE /
BD-R discs. When dubbing, AF / AN / AE, XP / SP / LP / EP can be used.
• Recording from the external device to a USB-HDD is not possible.
Recording along with bilingual audio (dual audio) / multi audio / surround audio / subtitles
Before recording, please confirm the recording mode and the setting in “Home Menu” > “Settings” > “Recording” are
configured as you wish.
When recording a programme along with bilingual audio (dual audio) / multi audio /
Ƈ
surround audio / subtitles
(For dubbing / recording mode changing)
Rec. to
Rec. mode TS AF / AN / AE XP / SP / LP / EP XP / SP / LP / EP
Bilingual
audio
(Dual audio)
Multi audio Multiple audio will be
Surround
audio
Subtitles Subtitle information
.
HDD
.
.
USB-HDD
.
.
BD-RE
.
BD-R
.
.
Both Main / Sub audio
will be recorded
• It is switchable
during playback.
.
HDD
.
.
.
BD-RE
USB-HDD
.
BD-R
.
Both Main / Sub audio
will be recorded
• It is switchable
during playback.
When recording / dubbing, one of the audio streams will be recorded.
recorded.
• It is switchable
during playback.
If a programme contains an English audio stream, it will be recorded.
If multiple English audio streams are contained, they will be recorded in the following
order.
• HE-AAC > AAC > AC3 > MPEG
If the programme does not contain an English audio stream, “Audio 1” will be recorded.
• It is not switchable during playback.
Surround audio as is broadcasted will be
recorded.
Ŷ
If “Settings” > “Recording” > “Subtitle Recording” is set to “On”...
will be recorded.
• It is switchable
(On / Off) during
playback.
*2
When recording / dubbing, one of the subtitles will be recorded.
If the programme contains an English subtitles, it will be recorded.
If multiple English subtitles are contained, they will be recorded in the following order.
• Teletext for the hearing impaired > Teletext > Subtitle for the hearing impaired >
Subtitle
If the programme does not contain an English subtitles, “Subtitles 1” will be recorded.
• Subtitles will be burned in the images and it cannot be turned “On” / “Off”.
Ŷ
If “Settings” > “Recording” > “Subtitle Recording” is set to “Off”...
Subtitles will not be recorded.
.
HDD
.
.
*4
.
.
BD-R
.
Both Main / Sub audio will be
recorded.
*1
• The audio is switchable
during playback.
It will be recorded in stereo.
.
USB-HDD
.
.
BD-RE
.
.-RW(VR).
.-RW(Video). .-R(Video).
.+RW(+VR). .+R(+VR).
Only the audio selected in
“Bilingual Recording Audio”
(Main or Sub) will be recorded.
Page 31

If recording a content along with bilingual
Ƈ
audio from an external device...
(For dubbing)
*5
.
HDD
.
.
USB-HDD
.
Rec. to
Rec.
mode
Bilingual
*3
audio
XP / SP / LP / EP XP / SP / LP / EP
Both Main / Sub audio
will be recorded.
.
BD-RE
*5
.
.-RW(VR).
*5
.
BD-R
.
*1
• It is switchable during
playback.
*1
If “Recording” > “Recording Audio Select(XP)” is set
to “PCM” and recording in XP mode, the audio will
be recorded based on the setting in “Recording” >
“Bilingual Recording Audio”. In this case, the audio is not
switchable during playback.
Also, when dubbing to a DVD-RW (Video) / DVD-R
(Video) / DVD+RW (+VR) / DVD+R (+VR) disc, the
setting in “Bilingual Recording Audio” will be applied
likewise.
*2
Subtitles can be switched “On” / “Off” during playback
only when it is high-speed dubbing.
*3
To record from the external input (AV) as a bilingual
audio content, make sure the setting in “Recording” >
“External Input Audio” is set to “Bilingual”. If it is set to
“Stereo”, both Main and Sub audio will be output at the
same time.
*4
When dubbing a title recorded in TS mode using AF /
AN / AE mode or converting it to AF / AN / AE mode, the
audio will be recorded in stereo and when playing back
the title, both Main / Sub audio will be output at the same
time. In order to select either audio, switch the audio to
Left ch or Right ch.
*5
Direct recording is also possible.
.-RW(Video). .-R(Video).
.+RW(+VR). .+R(+VR).
Only the audio selected in
“Bilingual Recording Audio”
Main or Sub) will be
recorded.
Simultaneous operations
Whether a timer recording can be
Ƈ
performed during playback
Media being
played
.
HDD
.
.
USB-HDD
.
.
BD-R
.
BD-RE
.
-RW
.
+RW
.
DVD-Video
.DISC (JPEG).
.DISC (MP3). .DISC(WMA).
.USB(JPEG
.USB (MP3). .USB (WMA).
.
.
.-R.
.
.+R.
.
.
BD-Video
.
.
.Audio CD.
.
DISC(DivX).
).
.
USB(DivX).
.DISC (AVCHD).
: Available
: Available (Playback will stop 2 minutes before a
timer recording starts.)
—
: Not available
*1
The timer recording will be performed to the HDD in
substitution for the originally intended media (alternative
recording).
Recording media
.
HDD
.
.
USB-HDD
.
.
BD-RE
.
—
—
—
—
—
Recording
.
BD-R
.
*1
*1
*1
*1
*1
31
6
Recording
Note
• Recording from the external device to a USB-HDD is not
possible.
Page 32

32
Recording
Available operations while recording a programme
Ƈ
Playback media
Currently recording media
and the recording mode
(single recording)
.
.
USB-HDD
.
BD-RE
.
BD-R
HDD
.
.
.
.
TS —
XP / SP / LP / EP
TS —
TS, XP / SP /
LP / EP
.
HDD
.
USB-HDD
.
.
.
BD-R
.
BD-RE
.
-RW
.
+RW
.
DVD-Video
.
.
.-R.
.
.+R.
.
.
.Audio CD.
.
BD-Video
.DISC (AVCHD).
——
———
Currently recording media and the recording mode (dual recording)
TS —
XP / SP / LP / EP
TS —
XP / SP / LP / EP
TS ——
TS —— —
XP / SP / LP / EP
.
.
USB-HDD
HDD
.
.
TS
XP / SP / LP / EP
TS
.
USB-HDD
.
BD-RE
.
BD-R
.
USB-HDD
.
BD-RE
.
BD-R
.
BD-RE
.
BD-R
.
HDD
.
.
.
.
.
.
.
.
TS,
.
TS,
.
.DISC (JPEG).
.DISC (MP3). .DISC(WMA).
.USB(JPEG
.USB (MP3). .USB (WMA).
.
DISC(DivX).
).
.
USB(DivX).
Playback media
.DISC (JPEG).
.
DISC(DivX).
.DISC (MP3). .DISC(WMA).
).
.USB(JPEG
.
USB(DivX).
.USB (MP3). .USB (WMA).
.
USB-HDD
.
BD-R
.
BD-RE
.
.
HDD
-RW
.
.
+RW
.
DVD-Video
.
.
.
.-R.
.
.+R.
.
.
.Audio CD.
.
BD-Video
.
.DISC (AVCHD).
——
———
———
: Available (Chase play also available)
: Available (Chase play not available)
—
: Not available
Playable media and a possible timer recording while dubbing a title
Ƈ
Playback Timer recording
.
BD-R
.
.
.-R.
.
.+R.
.
.
DVD-Video
.
.Audio CD.
.
.DISC (JPEG).
.DISC (MP3). .DISC(WMA).
).
.USB(JPEG
.USB (MP3). .USB (WMA).
.
DISC(DivX).
.
USB(DivX).
.
HDD
.
.
USB-HDD
.
— —
—— —
.
BD-RE
.
Dubbing direction
.
HDD
.
USB-HDD
.
HDD
.
HDD
.
BD-RE
.
BD-R
.-RW(VR).
.DISC (AVCHD).
.
USB(AVCHD).
.
+RW
.+R.
.
.
.
.
.
.
.
.
USB-HDD
.
HDD
.
BD-RE
.
BD-R
.-RW(VR).
.
+RW
.+R.
.-RW(Video).
.-R(Video).
.
HDD
.
HDD
.
HDD
.
Dubbing
speed
.
HDD
.
.
USB-HDD
High
.
.
Normal — — —
.
High
.
.
Normal — — —
*1
*1
BD-RE
.
-RW
.
+RW
.
BD-Video
.DISC (AVCHD).
.
High — — — —
Normal — — —
High —— —
.
Normal — — —
.
High —— —
.
Normal — — —
: Available
: Available (Dubbing will be cancelled 2 minutes before a timer recording starts.)
—
: Not available
*1
When “moving”, playback of the dubbing source is not possible.
*2
The timer recording will be performed to the HDD in substitution for the originally intended media (alternative recording).
.
BD-R
.
*2
*2
*2
*2
*2
Page 33

Recording a Programme Currently On Air
.
HDD
.
.
USB-HDD
.
>> Preparation
• To record to a USB-HDD, connect it to the unit.
• To record to a disc, place a recordable disc in the unit.
1. Press [HDD] / [DISC] / [USB] to select the
recording media.
2. Follow steps 1 and 2 in “Selecting a
channel” on page 22.
3. Press [
• If pressing [ REC.] twice or more, the recording
• To pause recording (for HDD / USB-HDD only)
• To stop recording
• To pause the following operations, press [HDD] /
• To stop the following operations, press [HDD] /
Note
• You can check the channel of the programme currently
being recorded and the recording media by pressing
[DISPLAY].
REC.] to start recording.
will be ITR (Instant Timer Recording).
Press [HDD] / [USB] to switch the unit to the
recording media, then press [
press [ ] again.
-ITR cannot be paused.
Press [ ].
-If you stop recording, the recording (from the
beginning to where it was stopped) will be one
title. (It may take a moment to accept the next
operation.)
-A confirmation message will appear. Use [ / ]
to select “Yes”, then press [
[USB] to switch the unit to the recording media,
then select the channel which is being recorded,
then press [ ]. (for HDD / USB-HDD only)
-Dual recording
-Chase play
-Simultaneous rec/play
[USB] to switch the unit to the recording media,
then select the channel which is being recorded,
then press [ ].
-Dual recording
-Chase play
-Simultaneous rec/play
.
BD-R
.
BD-RE
.
.
]. To resume,
ENTER].
Recording
Changing the recording mode (image quality)
You can change the recording mode (image quality) when
recording from an external device. (For DTV recording, only
“TS” is available and it is not changeable.)
1. Press [SUB MENU] to call up the sub
menu.
2. Use [
/ ] to select “Rec Mode”, then
press [ ENTER].
3. Use [
/ ] to select the desired setting,
then press [ ENTER].
Remain (HDD) 400:00
XP
SP
LP
EP
Note
• For recording to a USB-HDD, recording mode is not
changeable.
High picture
quality
long time
ITR (Instant Timer Recording)
.
HDD
.
.
USB-HDD
.
You can instantly set the recording duration to stop the
recording automatically.
In step 3 in “Recording a Programme Currently On Air”
on page 33, by pressing [
recording duration increases by 15 minutes. (e.g., pressing
[ REC.] twice sets the unit to stop the recording in 15
minutes, 3 times 30 minutes.)
• You can set an ITR up to 4 hours.
• To cancel an ITR, press [ REC.] repeatedly until a
duration time on the TV screen disappears.
• A confirmation message will appear when the ITR
finishes, then the unit will automatically be turned off
after 1 minute.
• If no ITR is set, the recording will automatically stop in 8
hours.
• The ITR duration will be displayed on the display panel.
• To stop recording during an ITR:
-When recording one programme, refer to “Recording a
Programme Currently On Air” on page 33.
-When recording 2 programmes simultaneously or
during chase play, refer to “Dual Recording” on page 35.
• Recording cannot be paused during an ITR.
.
BD-R
.
BD-RE
.
.
REC.] more than twice, the
33
6
Recording
Page 34

Recording
TS
TS
TS
REC
Undefined
Movie
News
Entertainment
Sport
Children’s
Music
Arts
/Culture
Current affairs
Education
Infotainment
Special
Comedy
Drama
Documentary
34
Before Timer Programming
Programming a Timer
Guide to the “Timer Programming” screen
To call up the “Timer Programming” screen
1) Press [TIMER REC.].
• You also can access the timer programming screen
from “Home Menu” > “Timer Programming”.
Recording mode
Timer Programming
Programme AAA
WED 01/08 19:00 – 20:00 1 Station A
Programme BBB
THU 02/08 18:00 – 18:30 2 Station B
Programme CCC
Daily 02/08 21:00 – 2:00 3 Station C
Skip
Icons
Event name, programmed day, date,
19:00 THU 02/08/2012
Display each function with [SUB MENU].
TS
TS
TS
time, station name
Icons used on the timer programming screen
: Information
REC
REC
: Recording in progress
: Recording media
Skip : This daily timer programme will be skipped this time.
About “Programme Guide”
On the programme guide screen, select the desired
programme for a timer recording, then press [
• The programme guide can display programmes for the
next 8 days.
• “
” will appear on the programmed timer recording.
• To see the detailed information of a programme
-On the programme guide screen, select a programme,
then press [INFO].
ENTER].
Recording from
“Programme Guide”
.
HDD
.
.
USB-HDD
.
You can programme timer recordings for the next 8 days.
>> Preparation
• To record to a USB-HDD, connect it to the unit.
• To record to a disc, place a recordable disc in the unit.
1. Press [GUIDE].
• You can also call up the programme guide screen
from “Home Menu” > “GUIDE”.
• You can switch between “Daily Mode” /
“Weekly Mode”
2. Use [ / / / ] to select a programme to
record, then press [ ENTER].
• “Timer Programming” screen will appear.
• You can modify the end time, recording media and
recording mode.
3. Use [ ] to select “OK”, then press
[ ENTER].
Timer Programming
Date
THU 02/08 1 9 : 3 0 2 1 : 0 0 DTV HDD
4. Press [ BACK] to finish.
.
BD-R
.
BD-RE
.
.
by pressing [RED] / [GREEN].
19:00 THU 02/08/2012
Start End CH REC To
1
Programme A Remain 1 4 0 : 0 0
Select each category with [RIGHT].
Mode(TS
OK
Cancel
)
Programme genre icons
Undefined
Undefined Movie
Entertainment
Entertainment
Music
Music
Education
Education Infotainment
Comedy
Comedy Drama
Movie News
Spo
Sport Children
Art
/Culture
Arts/Culture
Infotainment Special
Drama Documentary
News
Children’s
Current affairs
Current affairs
Special
Documentary
Note
• The programme guide is not available when you first set
up this unit. This unit needs to receive the EPG data.
(Refer to “Receiving the Programme Guide” on page 19.)
• If programme information is unavailable, please view the
channel for a while, then try and call up the programme
guide screen again.
• There are cases in which a broadcast station airs a
different programme from the scheduled programme.
This may cause an inconsistency between the actual air
and the information in the programme guide.
Page 35

Manual Timer Programming
REC
.
HDD
.
.
USB-HDD
.
If the programme you wish to record is unable to set from
the programme guide screen, you can manually programme
a timer recording for it. Manual timer programming allows
you to programme timer recordings for the next one month.
>> Preparation
• To record to a USB-HDD, connect it to the unit.
• To record to a disc, place a recordable disc in the unit.
1. Press [TIMER REC.] to call up
“Timer Programming” screen.
2. Press [SUB MENU] to call up the sub
menu.
3. Use [
/ ] to select “New Programme”,
then press [ ENTER].
Timer Programming
REC
Programme AAA
WED 01/08 19:00 – 20:00 1 Station A
Programme BBB
THU 02/08 18:00 – 18:30 2 Station B
Programme CCC
THU 02/08 21:00 – 2:00 3 Station C
4. Use [ / ] to select “Date”, “Start”, “End”,
“CH” and “REC To”, then set each item
using [ / ].
• For every week / every day recording
You can select it at “Date” pressing [ ] multiple
times.
5. Press [ ] to move to the sub menu.
6. Press [
] to select “Mode”, then press
[ ENTER]. The recording mode list will
appear. Use [ / ] to select your desired
recording mode, then press [ ENTER].
• When timer programming a DTV channel in the
recording mode other than TS, the programme
will be recorded in TS mode first, then it will be
converted to the selected recording mode after the
unit is turned off.
• When timer programming a DTV channel in the
recording mode other than TS, “Remain” in the
timer programming screen still shows the remaining
time based on TS mode recording.
• When timer programming a DTV channel to a BD-
RE / BD-R disc, only TS mode is available.
7. Press [ ] to move to “OK”, then press
[ ENTER].
• If timer programmes overlap, refer to “When
timer programmes overlap” on page 38.
• To programme another timer recording, repeat
steps 2 to 7.
8. Press [ BACK] to finish.
.
BD-R
.
BD-RE
.
.
19:00 THU 02/08/2012
Information
Programme Change
Delete
Delete multi prog.
New Programme
Skip
Recording
Dual Recording
This unit can record 2 DTV programmes or record 1 DTV
programme and another recording from an external device
simultaneously.
>> Preparation
• Start recording the first programme.
1. Start recording another programme.
• To record a programme currently being viewed
(Refer to “Recording a Programme Currently On
Air” on page 33.)
• To programme a timer recording from the
programme guide (Refer to “Programming a Timer
Recording from “Programme Guide”” on page 34.)
• To manually programme a timer recording (Refer to
“Manual Timer Programming” on page 35.)
• To pause a dual recording
Refer to “To pause recording (for HDD / USB-HDD
only)” in “Recording a Programme Currently On Air”
on page 33.
• To pause the recording during chase play
or simultaneous rec/play, press [ ] to stop
playback beforehand.
• To stop a dual recording
Refer to “To stop recording” in “Recording a
Programme Currently On Air” on page 33.
• To stop the recording during chase play or
simultaneous rec/play, press [ ] to stop
playback beforehand.
Possible dual recording on this unit
Ƈ
.
HDD
.
HDD
.
HDD
.
USB-HDD
.
.
.
.
.
HDD
and
.
HDD
and
.
HDD
.
BD-RE
and
.
BD-RE
.
.
USB-HDD
.
.
.
BD-R
.
BD-RE
.
.
.
BD-RE
.
.
.
.
BD-R
.
.
BD-R
.
.
.
BD-R
.
• When recording both to
.
HDD
-DTV
.
-DTV or external input
• When recording to
-DTV or external input
.
USB-HDD
-DTV
.
• When recording to
-DTV or external input
-DTV or external input
• When recording to
.
USB-HDD
-DTV
.
-DTV or external input
• This unit cannot record from an external device to a USBHDD or to the HDD and a BDAV disc simultaneously.
• For DTV programme recording, the recording mode is
TS only. The titles recorded in TS mode, however, can
be converted to AF / AN / AE, XP / SP / LP / EP mode
after this unit is turned off.
• Dual recording cannot be performed to a USB-HDD.
• This unit can record 2 DTV programmes or 1 DTV
programme and content from the external input (AV)
simultaneously.
• Dual recording from the external input (AV) is not
possible.
• During high-speed dubbing for HDD > BD-RE / BD-R,
this unit can perform a dual recording to the HDD/USBHDD other than the dubbing.
Note
• During dual recording, channels other than the recording
channels cannot be viewed.
35
6
Recording
Page 36

Recording
TS
TS
TS
36
Recording from an External Device
To record from an external device connected to this unit,
switch this unit to the external input (AV). For how to
operate the external device, please refer to the user manual
of the device.
To record a cable-TV programme
>> Preparation
• Connect the cable-TV’s home terminal / set-top box.
• Complete “External Input Audio” setting.
• Switch the cable-TV’s home terminal / set-top box to the
desired channel.
1. Switch this unit to the external input. (Refer
to “Viewing from an External Device” on
page 23.)
2. Start recording.
• Refer to page 33 for how to record.
• Refer to page 35 for how to programme a timer
recording.
Skipping weekly / daily timer recording temporarily
1. Press [TIMER REC.] to call up
“Timer Programming” screen.
2. Use [
wish to skip temporarily, then press
[SUB MENU].
3. Use [
[ ENTER].
/ ] to select a programme you
/ ] to select “Skip”, then press
Timer Programming
Programme AAA
WED 01/08 19:00 – 20:00 1 Station A
Programme BBB
THU 02/08 18:00 – 18:30 2 Station B
02/08/12 1:00 DTV 3 TS
M – F 19:00 – 20:00 3 Station C
19:00 THU 02/08/2012
Programme Change
Delete
Delete multi prog.
New Programme
Skip
Note
• Please turn on the home terminal / set-top box before a
timer recording starts.
• During a dual recording, you can only view the currently
recorded channels on this unit.
Confirming / Modifying /
4. Press [ BACK] to finish.
• Skip setting will be effective one time only. Once a
Cancelling Timer Programmes,
Stopping a Timer Recording
Confirming timer programmes
1. Press [TIMER REC.] to call up
“Timer Programming” screen.
(Refer to “Guide to the “Timer Programming”
screen” on page 34.)
Timer Programming
REC
Programme AAA
WED 01/08 19:00 – 20:00 1 Station A
Programme BBB
THU 02/08 18:00 – 18:30 2 Station B
Programme CCC
THU 02/08 21:00 – 2:00 3 Station C
19:00 THU 02/08/2012
TS
TS
TS
• “Skip” will appear. Next recording of this programme
will be skipped.
• To cancel skip setting, proceed to steps 2 and 3 to
cancel it.
Note
programme is skipped, the skip setting will be cancelled.
Display each function with [SUB MENU].
• To move to next page
Press [RED] / [GREEN].
• For the timer programmes set from the programme
guide, select a programme, then press [
or [SUB MENU]. In the sub menu, select
“Information” to confirm the programme.
2. Press [ BACK] to finish.
ENTER]
Page 37

Modifying a timer programme
Modifying a timer programme from
Ƈ
“Timer Programming”
1. Press [TIMER REC.] to call up
“Timer Programming” screen.
2. Use [
modify, then press [SUB MENU].
3. Use [
then press [ ENTER].
4. Use [
it using [ / ].
5. Use [ / ] to move to “Mode”, then press
[ ENTER].
6. Use [
mode, then press [ ENTER].
7. Use [
[ ENTER].
• If timer programmes overlap, refer to “When
8. Press [ BACK] to finish.
/ ] to select a timer programme to
/ ] to select “Programme Change”,
/ ] to move to the item, then modify
Timer Programming
Start End CH REC To
Date
THU 02/08 1 9 : 3 0 2 1 : 0 0 DTV HDD
19:00 THU 02/08/2012
1
Programme A Remain 1 4 0 : 0 0
Select each category with [RIGHT].
Mode(TS
OK
Cancel
/ ] to select the desired recording
/ ] to select “OK”, then press
timer programmes overlap” on page 38.
)
Recording
Modifying a timer programme from
Ƈ
“Programme Guide”
1. Press [GUIDE] to call up the programme
guide screen (Refer to “Guide to the
“Programme Guide” screen” on page 19.)
2. Use [
/ / / ] to select the timer
programme to modify, then press [ ENTER].
3. Use [ / ] to select “Programme Change”,
then press [ ENTER]
4. Modify the timer programme.
5. Press [
], then use [ / ] to select “OK”,
then press [ ENTER].
6. Press [
Note
For timer recording in progress…
• For manual timer programme, only the end time can be
modified.
BACK] to finish.
Cancel an unnecessary timer programme
Cancelling a timer programme set from
Ƈ
the programme guide
• Cancellation will be one-by-one.
1. Press [GUIDE] to call up the programme
guide screen.
(Refer to “Guide to the “Programme Guide”
screen” on page 19.)
2. Use [
programme to cancel, then press [ ENTER]
/ / / ] to select a timer
37
6
Recording
.
3. Use [
/ ] to select “Delete”, then press
[ ENTER].
• A confirmation message will appear. Use [ / ]
to select “Yes”, then press [
ENTER].
4. Press [ BACK] to finish.
Page 38

Recording
38
Cancelling a timer programme from the
Ƈ
“Timer Programming” screen
1. To cancel one timer programme
1) Press [TIMER REC.] to call up the
“Timer Programming” screen.
2) Use [
3) Use [ / ] to select “Delete”, then press
/ ] to select the timer programme to
cancel, then press [SUB MENU].
ENTER].
[
To cancel multiple timer programmes
4) Press [TIMER REC.] to call up the
“Timer Programming” screen.
5) Press [SUB MENU] to call up the sub menu.
6) Use [ / ] to select “Delete multi prog.”, then
press [
7) Use [
cancel, then press [
-“
8) Press [ ] to select “OK”, then press [ ENTER].
ENTER].
/ ] to select the timer programmes to
ENTER].
” will be displayed next to the selected timer
programmes.
2. Use [ / ] to select “Yes” in the
confirmation message window, then press
[ ENTER].
3. Press [
BACK] to finish.
Stopping the timer recording in process
1. If chase play or simultaneous rec/play
is being performed, press [ ] to stop it
beforehand.
2. Press [
3. Use [
confirmation message window, then press
[ ENTER].
• The recording (from the beginning to where it was
• To stop a dual recording
] to stop the recording.
/ ] to select “Yes” in the
stopped) will be one title. (It may take a moment to
accept next operation.)
Switch to the recording channel, then press [
Additional Information about Recording
Overall recording
• Recording will automatically stop in case the HDD / disc
becomes full.
Overall timer recording
When a timer recording is set
Ƈ
• “ ” appears on the display of the unit.
Right before the timer recording
• If the unit is powered off, it will automatically be turned
on 2 minutes before a timer recording starts.
After a timer recording
• The recording will automatically stop.
Alternate recording
When a timer recording cannot be performed for the
following reasons, the unit will record to the HDD (if
possible), then notify on the “Timer Programming” screen.
• If the disc is not recordable or there is no disc in the unit.
• If the BD-RE/-R disc or the USB-HDD does not have
enough capacity for the recording.
• If a recordable USB-HDD is not connected to the unit.
When a normal recording / instant timer recording /
dubbing and a timer recording overlap
In the following cases, a normal recording / instant timer
recording will be cancelled 2 minutes before the timer
recording.
• When a dual recording is already being performed
• When a dual recording cannot be performed
For normal-speed dubbing, it will be cancelled 2 minutes
before a timer recording starts.
When timer programmes overlap
A confirmation message will be displayed
Ƈ
when the last timer recording is set.
• Confirm the message, then press [ ENTER].
“Timer Programming” screen will be displayed. If there
is a programme which will not be recorded or partially
recorded due to overlapping, “ ” will appear and the
programme will be shown in light blue.
].
To confirm overlapping timer recordings
Ƈ
• Press [TIMER REC.] to call up “Timer Programming”
screen. If there is a programme which will not be
recorded or partially recorded due to overlapping,
” will appear and the programme will be shown in
“
light blue.
Page 39

When more than 3 timer recordings
Ti
d
Ƈ
overlap
• If the entire programme or part of the programme
overlaps, the programme of the later schedule will
preferentially be recorded.
Timer
Programme
Actual
Recording
• When 2 timer recordings will start at the same
time, the timer recording located lowest in the
“Timer Programming” screen will preferentially be
recorded.
Timer
Programme
Actual
Recording
• If the end time of a timer recording and the start time of
next timer recording are exactly the same time, the last
15 seconds (approx.) of the earlier recording will be cut.
Timer
Programme
Actual
Recording
(for about 15 seconds) will not be recorded.
*
When more than 2 timer recordings overlap
Ƈ
*
mer programme liste
higher in the contents list
Timer programme listed
lower in the contents list
*
*
in the condition that a dual recording is
not possible (Refer to page 35)
• The latter timer recording will be given priority.
• If the start time of both timer programmes are the
same, the timer programme listed lower in the
“Timer Programming” list will be given priority.
• In the earlier recording, the last 15 seconds before the
latter recording overlaps will be cut (including the case
that the end time of the earlier recording and the start
time of the latter recording are exactly the same time).
Recording
When a power outage occurs
Overall
Ƈ
• When recovered from a power outage, this unit will
automatically be turned on and perform the system
configuration. During system configuration, “WAIT” will
be displayed on the display panel.
• If a timer recording is interrupted due to a power
outage, a notification message will appear in the
“Timer Programming” screen.
By type of recording
Ƈ
If a power outage occurs during normal recording (by
pressing [
• Recording will be terminated.
• This unit will automatically be turned off after system
configuration.
If a power outage occurs before a timer recording.
• After recovering from a power outage, the clock will be
readjusted. Timer programmes will remain.
If a power outage occurs while a timer recording is in
progress.
• Recording will be terminated at the time of power outage.
• If recovering from the power outage before the end time
of the timer recording, this unit will resume recording to
the end time, after system configuration.
• If recovering from the power outage after the end time of
the timer recording, the recording will be terminated at
the time of power outage. This unit will automatically be
turned off after system configuration.
Ƈ
For HDD / USB-HDD
• The recording title will be split into 2 pieces (before and
after power outage) and listed in the “Contents List”
screen.
• A small part of the recording right before a power outage
may be lost.
• The entire recording before a power outage may be lost
according to the circumstances of power outage.
• There are cases that you need to initialise the HDD /
USB-HDD according to the circumstances of power
outage.
• If a power outage occurs during a timer recording to the
USB-HDD, depending on the USB-HDD, this unit may
resume recording to the internal HDD.
For BD-RE / BD-R discs
• The disc may become no longer usable according to the
circumstances of power outage.
• If there is a timer recording right after recovering
from the power outage and this unit cannot record to
the disc for some reason, the timer recording will be
performed to the HDD. This recording will be listed in the
“Contents List” for HDD.
REC.] while viewing a DTV programme)
By type of recording media
39
6
Recording
When a timer recording fails
” appears on the failed timer programme in
• “
“Timer Programming” screen, and the programme is
shown in grey. If selecting the programme then press
ENTER], information will be displayed. Selecting
[
“Return” will bring you back to “Timer Programming”
screen. Selecting “Delete message” will delete the
programme from the “Timer Programming” screen.
Page 40

Playback
R
G
Playback
40
Before Playback
Contents list
.
HDD
.
.
USB-HDD
.
.
BD-RE
.
To view a recorded title, call up the “Contents List” screen,
then select the desired title to play back.
“Title” in this owner’s manual refers to a DTV programme
recorded on this unit.
To call up the “Contents List” screen
Ƈ
1) Press [HDD] / [DISC] / [USB] to select the media to
operate.
2) Press [CONTENTS LIST].
• You can also call up the contents list by pressing
HOME], then selecting “Contents List”.
[
• You can return to the DTV screen by pressing
[CONTENTS LIST] again.
Guide to the “Contents List” screen (e.g., HDD)
Contents List
WED 01/08/2012
19:00
1 AAA
1:00:00
TS Mode
Genre
(10)
All
Order
Recording
R
HDD
Programme AAA
Programme BBB
Programme CCC
Page Up Page Down
G
• To view a different page, use [RED] / [GREEN] to
switch between pages.
• If you wish to narrow down the titles by genre or
sort...
1) Press [SUB MENU] to call up the sub menu.
2) For disc operation, proceed to 4).
For HDD / USB-HDD operation, select
“Genre/Order”, then press [ ENTER] .
3) To narrow down the titles by genre, use [ / ] to
select “Genre”, then press [ ENTER].
• Select the desired genre from the genre list, then
press [ ENTER].
4) To sort titles, use [ / ] to select “Order”, then
press [ ENTER].
• Sort types will be displayed. Select the desired sort
type, then press [ ENTER]. For a disc, sorting will
start. For the HDD / USB-HDD, proceed to 5).
Sort type
Recording Sorts titles in the order of recording date.
(For discs, in the order of title number.)
Name Sorts titles in alphabetical order.
New Sorts titles in the order from new to old.
(If the recording date is unknown, the title will
appear at the end of the list.)
Old Sorts titles in the order from old to new.
(If the recording date is unknown, the title will
appear at the end of the list.)
.-RW(VR). .+RW(+VR). .+R(+VR).
.
BD-R
.
Display each function with [SUB MENU].
):
Remain(TS
THU 02/08/2012
THU 02/08/2012
140 : 00
Resume point
• The resume point will be saved by pressing [ ] during
playback.
• To remove the resume point, press [ ] again in stop
mode.
.
HDD
.
.
USB-HDD
.
Only one resume point can be saved per title.
[ ] / [ ENTER]
[SUB MENU]
.
BD-R
.
BD-RE
.
Only one resume point can be saved per disc.
[ ] / [ ENTER]
[SUB MENU] Only “Play From Start” is available.
.
DISC(DivX).
.Audio CD.
Only one resume point can be saved per disc.
[ ]
[
ENTER]
[SUB MENU] Not available
.
HDD
.
.
USB-HDD
.+R(+VR).
.
DVD-Video
Pressing [ ] without calling up the “Contents List” screen
will resume playback from the resume point of the title /
track where it was last played.
Note
• Resume playback may not function with some discs.
In the following cases, the resume point will be lost.
• When [
currently selected title will lose the resume point.)
• When deleting the title / editing the title or disc (The
resume point in the undeleted / unedited title will be lost
as well.)
• When formatting
• After recording, the resume point will be saved in the
recorded title. (The resume point per title on the HDD will
remain.)
For discs only
• When opening the disc tray
• When finalising the disc
Restarts playback from the resume
point.
Allows you to select “Resume Playback” /
“Play From Start”.
. .-RW(VR).
.+RW(+VR). .+R(+VR).
Resumes playback only when you
select the title which you last played.
Otherwise, playback will start from the
beginning of the title.
Resumes playback only when you
select the track which you last played.
Otherwise, playback will start from the
beginning of the track.
Resumes playback from the beginning
of the track.
.
BD-Video
.
DISC(DivX).
.
.-RW(VR). .+RW(+VR).
.
BD-R
.
.
BD-RE
.
.Audio CD.
.
.
.DISC (JPEG).
] is pressed in stop mode (For HDD, the
5) Use [
/ ] to select “OK”, then press
[ ENTER].
Note
• In disc mode, narrowing down by genre is not available.
• This unit cannot play back AVCHD files directly from a
USB device.
Page 41

Playing Back a Programme
R
G
(Title)
.
HDD
.
.
USB-HDD
.
.
BD-RE
.
This unit can play back titles recorded on the HDD / disc,
and AVCHD contents dubbed from USB devices.
>> Preparation
• When playing back from a USB-HDD, connect it to the
unit
• When playing back a disc, place it in the unit.
• Press [HDD] / [DISC] / [USB] accordingly.
1. Press [CONTENTS LIST] to call up the
“Contents List” screen.
• When you place an Audio CD in the unit, the
“Contents List” screen will automatically be
displayed.
2. Use [ / ] to select the desired title.
Contents List
WED 01/08/2012
19:00
1 AAA
1:00:00
TS Mode
Genre
(10)
All
Order
Recording
R
HDD
Programme AAA
Programme BBB
Programme CCC
Page Up Page Down
G
.-RW(VR). .+RW(+VR). .+R(+VR).
.
BD-R
.
Display each function with [SUB MENU].
):
Remain(TS
THU 02/08/2012
THU 02/08/2012
140 : 00
Playback
Playing back a Blu-ray Disc™ / DVD
.
BD-Video
.
.
DVD-Video
.
1. Place a disc in the unit.
• Some discs automatically start playback.
• If the disc menu appears, follow the instructions on
screen.
2. Press [ ] to start playback.
Operations from the disc menu or pop-up
Ƈ
menu*
* Only when it is available on the disc.
Various operations are available on the disc menu. For
BD-Video, various operations can be performed during
playback. Please refer to the disc instructions on how to
operate the contents of the disc menu / pop-up menu vary
on the disc. Below is a general example.
[DISC MENU] Used to call up the selection screen
for the disc menu. Use [ / ] to
select the desired menu.
[CONTENTS LIST] Used to call up the top menu of the
disc.
[
/ / / ]
[ ENTER]
Used to select and confirm a menu
item.
Playing an Audio CD
.Audio CD.
41
3. Press [ ] or [ ENTER] to start playback.
• For the HDD / USB-HDD, you can choose where to
start playback from the sub menu. Refer to “Resume
point” on page 40.
• To stop playback
Press [ ]. (Resume point will be saved.)
• If the password entry screen appears when
Ƈ
playing back a disc, refer to “
Configuring “BD
Rating Level” / “DVD Rating Level”” on page 66.
• If the PIN Code entry screen appears, refer to
“PIN Code entry screen” on page 46.
Note
• DVD’s which are dubbed on this unit and finalised on
other recorders are playable on this unit.
Playing Back a Commercially Available Disc
>> Preparation
• Press [DISC].
Note
• It may take extra time to read some discs.
1. Place an Audio CD in the unit.
• Track list will appear.
• Press [CONTENTS LIST] to call up the track list
when a disc is already in the unit.
2. Use [ / ] to select the desired track, then
press [ ] or [ ENTER].
• To stop playing, press [ ]. (Resume point will
be saved.)
Playing back a Blu-ray 3D™ disc
.
BD-Video
.
>> Preparation
• Connect this unit and a 3D compatible TV with a High-
Speed HDMI cable.
• On the 3D TV, activate the 3D mode (if necessary).
• Press [DISC].
1. Place a Blu-ray 3D™ disc in the unit.
2. Press [
• To change the 3D setting on this unit
• To play back in the 2D mode
].
“Home Menu” > “Settings” > “3D settings”, then
change further settings.
“Home Menu” > “Settings” > “3D settings” >
“3D Playback”, then change “Auto(3D)” to “2D”.
7
Playback
Page 42

Playback
42
Playing back a media containing
®
MP3 / WMA / DivX
.
DivX
.
.MP3.
.
WMA
>> Preparation
• When playing back from a disc, place it in the unit.
• Press [DISC].
1. Press [CONTENTS LIST] to call up the
contents list.
• When playing back from a USB device, connect it to
the unit, then go to “Home Menu” > “Contents List”,
then select “USB”.
2. Select the desired file using [ / / / ],
then press [ ENTER].
Playable file types and file extensions
• “.mp3” (MP3) • “.wma” (WMA)
• “.divx” (DivX
• “.jpg” (JPEG) • “.jpeg” (JPEG)
Recommended spec for DivX
Item Support
Playable Codec of
®
DivX
(AVI) files
Playable Codec of
MKV files
Maximum size of image 1,920 x 1,080
VBV maximum bit rate 20,000 kbps
Sampling frequency of
audio
Playable Audio type of
®
DivX
(AVI) files
Playable Audio type of
MKV files
Playable Subtitle file
extensions
Playing back a DivX® file with an external
Ƈ
subtitle file
.
DivX
.
Subtitles created by the user can be displayed during DivX
playback.
• Make sure that the appropriate language is selected in
the “DivX Subtitle Language” in the setup menu in order
to avoid character corruption. (Refer to page 62.)
1. In step 2 above, highlight the desired file to
play back, then press [YELLOW].
• List of extensions of the subtitle files will appear.
2. Select the desired extension, then press
[ ENTER].
• DivX® with the subtitle will start playing back
automatically.
.
®
) • “.avi” (DivX®) • “.mkv”
Subtitle List
SMI
SRT
SUB
/ JPEG Files
.
JPEG
.
®
/ MKV files
®
DivX
3.x / 4.x / 5.x / 6.x
MPEG2 / MPEG4-AVC (H.264)
16 kHz - 48 kHz
MPEG1 audio layer 3 (MP3) / MPEG1
audio layer 2 / Dolby Digital
MPEG1 audio layer 3 (MP3) /
Dolby Digital / MPEG BC / PCM / AAC
.ass / .smi / .srt / .ssa / .sub* / .txt*
*.sub and .txt files may not be recognised.
Off
Note for USB device
• This unit cannot read files from a USB device in the
following conditions.
-When the disc tray is in motion
-During disc load, HDD / disc recording, HDD / disc
playback, editing or dubbing
-While the title list or file list of disc is displayed
-While the “Settings” / “Timer Programming” /
“Programme Guide” screen is displayed
• Do not disconnect the USB device while the indicator on
the device is flickering.
Note for MP3 / WMA
• To stop playback, press [ ] while playing.
• For MP3 / WMA files recorded in VBR (Variable Bit
Rate), the unit may not display the actual elapsed time.
Note for DivX® subtitle
• Playback file and the subtitle file must have the same name.
• Playback file and the subtitle file must locate in the same
folder. (DivX® subtitle files are, however, not displayed in
the list.)
• The subtitles that exceed the playback time will not be
displayed.
Various Playback Functions
>> Preparation
• When playing back from a USB-HDD, connect it to the unit.
• When playing back
• When playing back from a USB device, connect it to the unit.
• Press [HDD] / [DISC] / [USB] accordingly.
Change the playback speed
• Sound will be muted except for certain materials.
Fast forward / fast reverse playback
Ƈ
.
HDD
.
.
USB-HDD
.
.+RW(+VR). .+R(+VR).
.
DivX
.
.MP3.
®
During playback, press [ ] / [ ].
• Each time you press of [ ] / [ ], the speed increases
up to 5 steps. (3 steps for Audio CD’s / MP3 / WMA /
®
DivX
files.)
• For Audio CD’s / MP3 / WMA files, the sound is just
about recognisable where it is playing.
• Press [
Fast forward playback with audio
Ƈ
.
HDD
.
.+RW(+VR). .+R(+VR).
] to return to normal playback.
.
USB-HDD
.
During playback, press [ ].
• By one press of [ ], the speed increases 1.3 x.
• Press [ ] to return to normal playback.
Pause
Ƈ
.
HDD
.
.
USB-HDD
.
.+RW(+VR). .+R(+VR).
.
DivX
.
.MP3.
During playback, press [ ].
• Press [ ] to resume playback.
a disc, place it in the unit.
.
BD-R
.
BD-RE
.
DVD-Video
.
WMA
.
BD-RE
.
DVD-Video
.
BD-RE
.
DVD-Video
.
WMA
.
.
.
DVD(AVCHD).
.
.
.
.
.
.
.
.
BD-R
.
.
DVD(AVCHD).
.
BD-R
.
.
DVD(AVCHD).
.
JPEG
.
.
BD-Video
.Audio CD.
.
BD-Video
.
DivX
.
BD-Video
.Audio CD.
.
-RW
. .-R(Video).
.
.
-RW
. .-R(Video).
.
.
.
-RW
. .-R(Video).
.
Page 43

Slow forward / slow reverse playback
Ƈ
.
HDD
.
.
USB-HDD
.+RW(+VR). .+R(+VR).
.
BD-R
.
.
BD-RE
.
DVD-Video
.
.
.
DVD(AVCHD).
.
.
BD-Video
.
DivX
.
-RW
. .-R(Video).
.
.
During pause, press [ ] / [ ].
• Each time you press [ ] / [ ], the speed increases
up to 3 steps.
• Press [ ] to resume playback.
• Press [
] to pause playback.
• You can fast forward / fast reverse by pressing and
holding [ ] / [ ].
Search
Audio
Subtitle
Repeat
Noise Reduction
Super Resolution
Angle
PiP
Playback
43
Frame by frame playback
Ƈ
.
HDD
.
.
USB-HDD
.+RW(+VR). .+R(+VR).
.
BD-R
.
.
BD-RE
.
DVD-Video
.
.
.
DVD(AVCHD).
.
.
BD-Video
.
DivX
.
-RW
. .-R(Video).
.
.
• During playback, press [ ], then press [ ] / [ ].
Note
• For the following media / files, slow reverse / frame by
frame (reverse) are not available.
-BD-Video / DVD-Video / DVD-RW(AVCHD) /
DVD-R(AVCHD) / DVD+RW(AVCHD) /
DVD+R(AVCHD) / DivX
®
• For the following titles / recordings, the slow reverse
playback speeds are up to 2 steps.
-Titles / recordings recorded in the AF / AN / AE mode
or MPEG-4 AVC/H.264 format.
• Fast forward playback with audio is not available when
playing back a BD-Video disc in 3D. During fast forward /
fast reverse, the images are displayed in 2D.
Skipping forward / backward
Skipping to the desired point
Ƈ
.
HDD
.
.
USB-HDD
.+RW(+VR). .+R(+VR).
.
DivX
.
.
.MP3.
.
BD-RE
.
DVD-Video
.
WMA
.
BD-R
.
.
.
DVD(AVCHD).
.
.
.
JPEG
.
Press [ ] / [ ] during playback.
• Every press of [ ] / [ ] will skip the current chapter /
track.
• Single press of [ ] will skip backward to the beginning
of the current chapter.
Instant skip / Instant replay
Ƈ
.
HDD
.
.
USB-HDD
.+RW(+VR). .+R(+VR).
.
.
BD-RE
.
DVD-Video
.
BD-R
.
.
.
DVD(AVCHD).
.
During playback, press [ I.REPLAY] / [ I.SKIP].
• Every press of [ I.REPLAY] / [ I.SKIP] skips /
replays based on the setting in “Playback”. (up to 10
presses at a time)
Search
Ƈ
.
HDD
.
.
USB-HDD
.+RW(+VR). .+R(+VR).
.
DivX
.
.
.MP3.
.
BD-RE
.
DVD-Video
.
WMA
.
BD-R
.
.
.
DVD(AVCHD).
.
.
.
JPEG
.
1. During playback, press [SUB MENU] to
call up the play menu, then select “Search”
using [ / ], then press [ ENTER].
.
BD-Video
.Audio CD.
.
BD-Video
.
BD-Video
.Audio CD.
.
-RW
. .-R(Video).
.
.
-RW
. .-R(Video).
.
.
-RW
. .-R(Video).
.
2. Use [ / ] to select the desired search
option.
• Every press of [ / ] shifts the search option.
• Available search options differ depending on the
media / file being played back.
Playback media / file Search options
.
HDD
.
.
USB-HDD
.
Time search Chapter
search Time search ...
.
BD-R
.
BD-RE
.
-RW
.+R(+VR).
.Audio CD.
.
.
. .-R(Video). .+RW(+VR).
.
DVD-Video
.
DivX
.
BD-Video
.
DVD(AVCHD).
.
.
.
Time search Title search
Chapter search Time
search ...
Time search Track search
Time search ...
.MP3. .
WMA
.
.
JPEG
.
Track search only
3. Press [ ] to move to highlight the value
(chapter number, track number, etc.) you
wish to enter, then enter your desired value
using [ / ] or [number buttons], then
press [ ENTER].
• If you enter the wrong value, press [ ].
Repeat playback
.
HDD
.
.
USB-HDD
.+RW(+VR). .+R(+VR).
.
DivX
.
.MP3.
.
.
BD-RE
.
DVD-Video
.
WMA
.
BD-R
.
.
.
DVD(AVCHD).
.
.
.
JPEG
.
1. During playback, press [SUB MENU] to
call up the play menu, then select “Repeat”
using [ / ], then press [ ENTER].
Search
Audio
Subtitle
Repeat
Noise Reduction
Super Resolution
Angle
PiP
2. Use [ / ] to select the desired repeat
playback option.
• Available repeat playback options differ depending
on the media being played back.
.
BD-Video
.Audio CD.
.
-RW
. .-R(Video).
.
7
Playback
Continued on next page
Page 44

Playback
44
Playback media / file Repeat playback options
.
HDD
.
.
USB-HDD
.
.
BD-Video
.-RW(Video). .-R(Video). .+RW(+VR).
.+R(+VR).
.
DVD-Video
.
BD-R
.
BD-RE
.
.
Off Chapter repeat
Title repeat Off ...
.
DVD(AVCHD).
.
.-RW(VR).
.
Off Chapter repeat Title
repeat All Off ...
.
DivX
.
.Audio CD.
.
WMA
.
.MP3.
.
JPEG
.
Off Track repeat All
Off ...
• To stop repeat playback, select “Off” in step 2.
• To completely stop playback, press [
Note
• The repeat setting will be cancelled if an additional
operation shown below goes beyond the current repeat
range.
-Skip
-Chapter / Title / Track /Time search
-Instant skip -Instant replay
Playing back a playlist created on another device
.-RW(VR).
.
BD-R
.
BD-RE
.
.
1. While the “Contents List” screen is
displayed, press [SUB MENU] to call up the
sub menu, select “Playlist” using [ / ],
then press [ ENTER].
• This unit cannot create or edit a playlist.
Chase play during recording
.
HDD
.
.
USB-HDD
.
You can start playback from the beginning of the title during
recording.
1. Press [HDD] / [USB] to switch to the
recording media.
2. Press [CONTENTS LIST] to call up the
“Contents List” screen.
3. Use [
recorded with the icon (REC1) / (REC2).
4. Press [
• To stop chase play
• To stop the recording
Note
• If fast forward is performed during chase play, then
chase play catches up to the ongoing recording, chase
play will switch to normal playback. (The recording will
keep going.)
• If the operation media (HDD / DISC / USB) is switched to
another during chase play, playback will stop.
/ ] to select the title which is being
] for chase play.
Press [
is going on.
Press [ ], then select
message, then press [ ENTER].
]. This will stop playback, but the recording
“Yes” at the confirmation
Switching Settings During Playback
>> Preparation
• To play back from a USB-HDD, connect it to the unit.
• To play back a disc, place it in the unit.
• Press [HDD] / [DISC] / [USB] accordingly.
• If the password entry screen appears when playing
back a disc, refer to “
].
Level” / “DVD Rating Level”” on page 66.
Switching the audio language / subtitle language / camera angle
• If the password entry screen appears when playing back
a disc, refer to “Ƈ Configuring “BD Rating Level” / “DVD
Rating Level”” on page 66.
Switching the audio language
Ƈ
.
HDD
.
.
USB-HDD
.
.+RW(+VR). .+R(+VR).
You can switch the audio if the programme has multiple
audio streams (Main / Sub).
1. Press [AUDIO] to call up the audio
information.
• You can also call up the audio information by
2. Selecting the desired audio stream.
.
HDD
.
.+R(+VR).
• Use [
• When the selected audio is in stereo, and item
• When the selected audio has the main audio / sub
.
BD-Video
.
• Use [ / ] to select “Primary” or “Secondary”,
• When “Video/Audio” > “BD Audio Mode” is set to
Switching the subtitles
Ƈ
.
HDD
.
.+R(+VR).
When the title has multiple subtitles, you can select a
desired subtitle and set it on / off. (This function is available
for the titles recorded on this unit in recording mode of TS.)
1. Press [SUBTITLE] to call up the subtitle
information.
• You can also call up the subtitle information by
.
pressing [SUB MENU], then selecting “Audio 1”.
.
USB-HDD
.
.
.
DVD-Video
.
/ ] to switch the audio.
selection appears to the right, you can switch
“Stereo” > “Right” > “Left” using [ / ].
audio, and item selection appears to the right, you
can switch “Main/Sub” > “Main” > “Sub” using
[ / ].
then press [ ENTER] to move to the audio
selection area, then switch the audio using [ / ].
“HD Audio Output”, the secondary audio will not be
output.
.
USB-HDD
.
.
DVD-Video
.
.
pressing [SUB MENU], then selecting “Subtitle”.
.
BD-RE
DVD-Video
.
BD-RE
DVD(AVCHD).
.
BD-RE
DVD(AVCHD).
Ƈ
Configuring “BD Rating
.
BD-R
.
.
.
. .
.
DVD(AVCHD).
BD-R
.
BD-Video
.
DivX
.
-RW
.
.
.
. .-R(Video). .+RW(+VR).
.
-RW
.
.
. .-R(Video). .+RW(+VR).
. .
BD-R
.
DivX
.
-RW
. .-R(Video).
Page 45

Search
Audio
Subtitle
Repeat
Noise Reduction
Super Resolution
Angle
PiP
2. Use [ / ] to select your desired subtitles.
Switching the subtitles on BD-Video
Ƈ
.
BD-Video
.
For BD-Video, you can set the subtitles and subtitle style for
each of the primary video / secondary video if available.
1. During playback, press [SUB MENU] to
call up the play menu, then select “Subtitle”
using [ / ], then press [ ENTER].
2. Select “Primary” / “Secondary” / “Style”
using [
/ ], then press [ ENTER] to
move to the subtitle selecting area, then
switch the subtitles using [ / ].
Switching the camera angles
Ƈ
.
BD-Video
.
.
DVD-Video
.
When the title has multiple camera angles, you can view
another angle of the scene during playback.
Playback
Super resolution
.
HDD
.
.
USB-HDD
.+RW(+VR). .+R(+VR).
.
BD-R
.
BD-RE
.
.
DVD-Video
.
.
.
DVD(AVCHD).
.
.
BD-Video
.
DivX
.
-RW
. .-R(Video).
.
.
Super Resolution enhances SD quality images output in
1080i / 1080p from the HDMI jack, which gives crisper
images.
1. During playback, press [SUB MENU]
to call up the play menu, then select
“Super Resolution” using [ / ], then
press [ ENTER].
2. Use [
Super Resolution On
/ ] to select your desired setting.
PiP (BONUSVIEW™) setting
.
BD-Video
.
BD-Video discs have the PiP feature which enables to
display the secondary video within the primary video screen.
You can change the PiP setting whenever the scene
contains the secondary video.
• Refer to the user manual of the disc for how to activate
the secondary video.
45
1. During playback, press [SUB MENU] to call
up the play menu, then select “Angle” using
[ / ], then press [ ENTER].
Search
Audio
Subtitle
Repeat
Noise Reduction
Super Resolution
Angle
PiP
2. Use [ / ] to select your desired angle.
Note
• When another angle is available, “ ” will be displayed.
(You can turn off the icon. Refer to page 62.)
• For BD / DVD-Video, please refer to the instructions of
the disc for audio / subtitles / camera angle.
Noise reduction
.
HDD
.
.
USB-HDD
.+RW(+VR). .+R(+VR).
.
BD-R
.
BD-RE
.
.
DVD-Video
.
.
.
DVD(AVCHD).
.
.
BD-Video
.
DivX
.
-RW
. .-R(Video).
.
.
1. During playback, press [SUB MENU]
to call up the play menu, then select
“Noise Reduction” using [ / ], then press
[ ENTER].
Primary video Secondary video
1. During BD-Video playback, press
[SUB MENU] to call up the play menu, then
use [ / ] to select “PiP”, then press
[ ENTER].
• Setting for the secondary video is only available
when the primary and the secondary videos are
playing simultaneously.
2. Use [ / ] to select the desired setting,
then press [ ENTER].
PiP 1/1
7
Playback
2. Use [
Noise Reduction On
/ ] to select your desired setting.
Page 46

Playback
46
Virtual package
.
BD-Video
.
Virtual Package compatible BD-Video discs let you enjoy
various functions during playback by using data copied
and stored on the local storage device. This unit uses the
internal HDD as a local storage device.
• Images / audio may stop during playback.
• To delete Virtual Package data stored on the HDD,
press [
HOME], then select “Settings” > “Others” >
“Initialisation” > “Delete BD Video data”, then perform
“Delete Virtual package”.
PIN Code entry screen
.
BD-R
.
Code.
.
.
BD-RE
If a PIN Code has been set to the disc on another
manufacturer’s Blu-ray Disc™ recorder to restrict viewing
of the disc, the PIN Code input screen will be displayed.
Please enter the PIN Code. (This unit is unable to set or
change a PIN Code.)
1. Use [number buttons] to enter the PIN
3. Use [ / / / ] to select the desired file,
then press [ ENTER].
• If you wish to view all files in a folder, use
/ / / ] to select the folder, then press
[
ENTER].
[
• To view a different page, use [RED] / [GREEN] to
switch between pages.
4. Press [ ENTER] or [ ] to start a slide
show.
• A slide show will display the selected JPEG file
followed by the rest of the files in turn.
• The slide show speed can be set from “Home Menu” >
“Settings” > “Playback” > “Slide Show”.
• To rotate a picture
During slide show, press [ / ]. The picture
rotates 90 degrees.
• To pause or stop slide show
Press [ ] to pause. (Press [ ] or [ ] to resume.
Press [ ] to stop the slide show.
-A slide show from a USB device will not save the
resume point.
Note
Viewing JPEG Files
.
JPEG
.
Playing a slide show
Guide to the “Thumbnail” screen for JPEG files
Photo
/JPEG
1 / 5
>> Preparation
• When viewing from a disc, press [DISC].
1. Place a disc / connect a USB device which
contains JPEG files.
2. File type selection screen will appear. Use
[
/ ] to select “Photo” or “View photos.”,
then press [ ENTER].
• The “Thumbnail” screen will be displayed.
• For discs containing JPEG files only, the thumbnail
screen will automatically appear (the file type
selection screen will not appear).
• If the file type selection screen is not displayed
1) Press [
2) Use [ / / / ] to select “Contents List”, then
press [ ENTER].
3) Use [ / ] to select the media that contains
JPEG files, then press [ ENTER].
4) Use [ / ] to select “Photo”, then press
[ ENTER].
HOME] to call up the home menu.
• If there is an unrecognizable file, “ ” will be displayed
and the file will be skipped.
• A slide show will automatically stop 2 minutes before a
timer recording starts.
• A slide show is not available during recording / dubbing.
Recommended spec
Maximum number of folders / files
Ƈ
CD-RW / -R 255 folders / 999 files
Other media 999 folders / 9,999files
Resolutions
Ƈ
Sub sampling (4:4:4) 32 × 32 - 4,096 × 4,096
Sub sampling (4:2:2 or 4:2:0) 32 × 32 - 5,120 × 5,120
• Each file must be smaller than 12 MB
Note
• Files with extensions other than JPEG cannot be read.
• Progressive JPEG files are not compatible.
• Motion JPEG files are not compatible.
• Some JPEG files may not be read depending on the file
condition.
Page 47

Playing Back a Disc Containing an AVCHD High-Definition Video
.
DVD(AVCHD).
This unit can play back AVCHD High-Definition videos on
a disc recorded on HD camcorders. (The disc needs to be
finalised on said recording camcorder.)
This unit can also play back AVCHD High-Definition videos
dubbed to the internal HDD.
>> Preparation
• Press [DISC].
1. Place a disc in the unit.
• If the disc contains an AVCHD video, it will
automatically start playing back.
If it does not start, press [ ].
• If the disc menu is displayed, refer to the user
manual of the recording device on how to operate.
Below is a general example.
2. Use [ / / / ] to select the desired title/
Cinavia™
Cinavia Notice
This product uses Cinavia technology to limit the use of
unauthorized copies of some commercially-produced film
and videos and their soundtracks. When a prohibited use
of an unauthorized copy is detected, a message will be
displayed and playback or copying will be interrupted. More
information about Cinavia technology is provided at the
Cinavia Online Consumer Information Center at
http://www.cinavia.com
To request additional information about Cinavia by mail,
send a postcard with your mailing address to: Cinavia
Consumer Information Center, P.O. Box 86851, San Diego,
CA, 92138, USA. This product incorporates proprietary
technology under license from Verance Corporation and
is protected by U.S. Patent 7,369,677 and other U.S. and
worldwide patents issued and pending as well as copyright
and trade secret protection for certain aspects of such
technology. Cinavia is a trademark of Verance Corporation.
Copyright 2004-2012 Verance Corporation. All rights
reserved by Verance. Reverse engineering or disassembly
is prohibited.
item, then [ ENTER].
• To stop play back, press [ ]. (Resume point will
be saved.)
Note
• AVCHD videos stored on a USB device cannot be
played back directly from the device. In order to play
back on this unit, dub the videos to the internal HDD first.
Additional Information about Playback
Overall playback
• For Blu-ray Disc™ / DVD, the picture and audio may
stop momently as the playback shifts from the first layer
to the second layer of the disc.
•
When playing back a title recorded in TS mode, the
screen may stop or show block noise as the title shifts to
another title.
• After finishing playback of a disc, the last image may
be paused and left on screen or the disc menu may
be displayed. If the same image is displayed over an
extended time period, it may cause screen burn-in on a
CRT display / plasma TV.
• Depending on the disc, some playback functions, such
as resume playback / playback speed change /
skipping / language change / angle change / repeat
playback and others may be unavailable.
• Playback cannot be performed during finalisation /
initialisation.
• This unit outputs a video in the same output format as
the disc. For instance, if you place an NTSC format disc,
the unit will output the video in NTSC.
About “Contents List”
• “Contents List” is not available with finalised DVD-RW /
-R (Video) and DVD+RW / +R (+VR) discs. Please play
the disc from the disc menu.
• If you call up “Contents List” during repeat playback, the
repeat setting will be lost.
• When dubbing a disc authored on another device
to this unit’s HDD, the channel numbers shown in
“Contents List” will be blank unless the disc has the
channel information on it.
About audio / subtitles / camera angle switch
Audio / subtitle
• Some video discs let you switch audio / subtitles from
the disc menu.
• When switching audio, the image may stop or the screen
may go black momently.
• If this unit is turned off or the disc tray is opened, the
setting will be restored to how they are set in
“Settings” > “Language” > “Audio Language” /
“Subtitle Language”. (For some video discs, the setting
will be restored to the disc’s default setting.)
• When switching the subtitles, it may take a while to
become effective.
• For BD-Video / DVD-Video, the subtitles during fastforward / fast-reverse playback is not available except in
1.3 x playback mode.
Camera angle
• When switching the camera angle, it may take a while to
become effective.
• If the disc tray is opened, the setting will be restored to
“1”.
Playback
47
7
Playback
Page 48

Editing
Editing
48
Before Editing
Available editing functions
.
BD-R
Editing items
.
HDD
.
.
USB-HDD
.
“Title Delete”: To delete one title —
“Delete Multiple Titles”: To delete multiple titles at one time
“Delete All Titles”: To delete all titles on the media
“Delete All Unprotected Titles”: To delete all titles except protected titles
“Scene Delete”: To delete parts of a title
“Edit Title Name”: To rename the title
“Add” / “Delete”: To add / delete chapter marks
“Hide Chapter”: To set chapters to skip during playback ————
“Title Dividing”: To divide a title
“Protect OnĺOff” /“Protect OffĺOn”: To set the title protection “On” / “Off”
*1 *1
*1 *1
“Edit Disc Name”: To rename the disc name — —
“Edit USB-HDD Name”: To rename the USB-HDD — ————
“Disc Protect OnĺOff” / “Disc Protect OffĺOn”:
To set the disc protection “On” / “On”
“USB-HDD Protect OnĺOff” / “USB-HDD Protect OffĺOn”:
To set the USB-HDD protection “On” / “Off”
——
—
*1
“Format”: To format a disc — —
“Finalise”: To finalise a disc — —
: Available
—
: Not available
.
.
BD-RE
.-RW(VR).
.
————
————
————
——
RW only
——
————
RE only RW only RW only
R only
*2 *3
.+R.
.-R(Video).
.
+RW
.
.-RW(Video).
—
—
—
—
—
*4
—
*1
For a title scheduled to convert to a different recording mode, editing for the title is not available.
*2
This unit can undo finalisation only on DVD-RW(VR) discs which were finalised on this unit.
*3
The disc will automatically be finalised after dubbing is completed.
*4
You can rename the disc when dubbing.
Note
• When the title or the disc is protected, editing shown above cannot be performed during dubbing.
• During recording, only the following editing can be performed.
-While recording to the HDD: One-title deletion / multiple-titles deletion on HDD / USB-HDD / BDAV / DVD-RW /
DVD+RW / DVD+R
-While recording to BDAV: One-title deletion / multiple-titles deletion on HDD / USB-HDD
-While recording to a USB-HDD: One-title deletion / multiple-titles deletion on HDD / BDAV / USB-HDD / DVD-RW /
DVD+RW / DVD+R
• On some BD-R discs, editing functions may not work properly.
Guide to the edit menu screen
>> Preparation
• When editing on a USB-HDD, connect it to the unit.
• When editing on a disc, place it in the unit.
• Press [HDD] / [DISC] / [USB] accordingly.
Common operation for editing
Ƈ
1. Press [CONTENTS LIST] to call up the
“Contents List” screen.
2. Use [
/ ] to select the title to edit, then
press [SUB MENU].
3. Use [
[ ENTER].
/ ] to select “Edit”, then press
Page 49

Adding / Deleting a Chapter
B
R
Mark
.
HDD
.
.
USB-HDD
.
.
BD-RE
.
Adding a chapter mark
1. Follow steps 1 to 3 in “
for editing” on page 48.
2. [ / ] to select “Chapter Mark”, then press
[ ENTER].
.-RW(VR). .+RW(+VR). .+R(+VR).
.
BD-R
.
Ƈ
Common operation
Editing
3. During the visible chapter playback (“Visible”
appears on the preview screen), use [ / ]
to select “Hidden”, then press [ ENTER].
• The chapter will be hidden.
] / [ ] / [ ] / [ ] / [ ] / [ ] are available
• [
to play back.
• You can make a hidden chapter visible again by
selecting “Visible” during hidden chapter playback.
Changing a Title Name /
49
3. “Add” is highlighted. Press [
ENTER].
4. Forward until you reach the point where you
wish to add a chapter mark, then press
ENTER].
[
• [ ] / [ ] / [ ] / [ ] / [ ] / [ ] are available
to play back.
5. A confirmation message will appear.
Use [ / ] to select “Yes”, then press
[ ENTER].
Deleting a chapter mark
1. Follow steps 1 to 3 in “
for editing” on page 48.
2. Use [ / ] to select “Chapter Mark”, then
press [ ENTER].
3. Use [
/ ] to select “Delete”, then press
[ ENTER].
4. Play back the chapter which you wish to
delete, then press [
Edit
Chapter Mark
01/08/12 19:00 1 AAA TS
Add
Delete
Return
0 : 14 : 00
Playback Frame Rev/Adv Slow Rev/Fwd
• If this chapter is to be deleted, press [ ENTER]
while this part is playing back.
• [
] / [ ] / [ ] / [ ] / [ ] / [ ] are available
to play back.
5. A confirmation message will appear. Use
[ / ] to select “Yes”, then press [ ENTER].
Ƈ
Common operation
ENTER].
1 : 00 : 00
Hiding chapters
.+RW(+VR). .+R(+VR).
1. Follow steps 1 to 3 in “Ƈ Common operation
for editing” on page 48.
2. Use [
press [ ENTER].
/ ] to select “Hide Chapter”, then
Protecting a Title
Guide to editing a title name
Available characters
Ƈ
Button
[0] Space 0
[1] 32 symbols
[2] ABCabc 2
[3] DEFdef 3
[4] GHIghi 4
[5] JKLjkl 5
[6] MNOmno 6
[7] PQRSpqrs 7
[8] TUVtuv 8
[9] WXYZwxyz 9
[RED] Switch to Number
[GREEN] ——
[YELLOW] ——
[BLUE] Delete Delete
*1
Every press of [1] changes the character in the
following order.
+ - = ` ^ ‘ “ | \ $ . , ( ) < > [ ] { } / _ @ ~ : ; ! ? % & # *
1. Select the desired character set.
• You can switch the character set (“ABC” / “123”) by
pressing [RED].
• To enter a lower-case letter, “a” for instance, press
[2] repeatedly until the “a” appears.
• If you enter a wrong letter, press [BLUE] to delete it.
2. After having entered your desired name,
press [ ENTER].
• A conformation message will appear. Use [ / ]
to select “Yes”, then press [ ENTER].
3. Press [ BACK] repeatedly to exit.
Roman character /
Edit
Edit Title Name
Programme AAA
1 .@’: 2 ABC 3 DEF
4 GHI 5 JKL 6 MNO
7 PQRS 8 TUV 9 WXYZ
0 SPACE
0 : 00 : 00
ABC
R
R
Symbol
Delete
B
Number
*1
1
Switch to Roman
character / Symbol
1 : 00 : 00
8
Editing
Page 50

Editing
50
Changing a title name
.
HDD
.
.
USB-HDD
.
.
BD-RE
.
1. Follow steps 1 to 3 in “
for editing” on page 48.
2. Use [
press [
/ ] to select “Edit Title Name”, then
ENTER].
3. Enter a new title name, then press
[ ENTER]. (Refer to “Guide to editing a title
name” on page 49.)
4. A confirmation message will appear.
Use [ / ] to select “Yes”, then press
[ ENTER].
5. Press [
BACK] to finish.
.-RW(VR). .+RW(+VR). .+R(+VR).
.
BD-R
.
Ƈ
Common operation
Deleting a single title
1. Press [CONTENTS LIST] to call up the
“Contents List” screen.
2. Use [
press [SUB MENU].
3. Press [
press [ ENTER].
4. Confirmation message will appear.
Use [
[ ENTER].
• The title will be deleted.
5. Press [ BACK] to finish.
/ ] to select a title to delete, then
/ ] to select “Title Delete”, then
/ ] to select “Yes”, then press
Protecting a title
.
HDD
.
.
USB-HDD
.
.
BD-RE
.
.-RW(VR).
.
BD-R
.
1. Follow steps 1 to 3 in “Ƈ Common operation
for editing” on page 48.
2. Use [
/ ] to select “Protect OffĺOn”,
then press [ ENTER].
3. A confirmation message will appear.
Use [
/ ] to select “Yes”, then press
[ ENTER].
• “ ” will appear on the protected titles.
4. Press [ BACK] to finish.
• You can cancel protection by selecting
“Protect OnĺOff” on a protected title in step 2.
Available operations for a protected title
Operations
Cancelling title protection
Dubbing protected titles
HDD initialisation (deleting all titles)
Disc initialisation (deleting all titles)
Deleting Unnecessary Titles
.
HDD
.
.
USB-HDD
.
.
BD-RE
.
Note
• Once a title is deleted, it will not be able to undo. Make
sure it is the correct title before deleting.
>> Preparation
• When editing on a USB-HDD, connect it to the unit.
• When editing on a disc, place it in the unit.
• Press [HDD] / [DISC] / [USB] accordingly.
.-RW(VR). .+RW(+VR). .+R(+VR).
.
BD-R
.
Delete multiple titles at one time
1. Press [CONTENTS LIST] to call up the
“Contents List” screen.
2. Press [SUB MENU].
3. Use [
then press [ ENTER].
4. In the title list, highlight the titles you wish to
delete, then press [
• Repeat the procedure until all the titles you wish to
• To deselect a title, press [ ENTER] on a
5. Once you have selected all the unnecessary
titles, press [ ], then press [ ENTER] on
“OK”.
6. A confirmation message will appear.
Use [
[ ENTER].
7. Press [
Note
• The title currently being recorded cannot be deleted.
About remaining time after deleting titles
.
HDD
.
.-RW(VR). .+RW(+VR).
.
BD-R
.
/ ] to select “Delete Multiple Titles”,
ENTER].
delete are selected.
highlighted title.
/ ] to select “Yes”, then press
BACK] to finish.
.
USB-HDD
.
.
BD-RE
.+R(+VR).
.
Remaining time will increase.
Remaining time will not increase.
Page 51

Deleting Parts of a Title
.
HDD
.
.
USB-HDD
.
Deleting parts (scenes) cannot be undone. Make sure it is
the correct part to delete.
1. Follow steps 1 to 3 in “Ƈ Common operation
for editing” on page 48.
2. Use [
press [ ENTER].
/ ] to select “Scene Delete”, then
4. A confirmation message will appear.
Use [ / ] to select “Yes”, then press
[ ENTER].
• To continue dividing, select the title to divide, then
press [SUB MENU], then select “Edit” and repeat
steps 2 to 4.
5. Press [ BACK] to finish.
Editing
51
3. With “Start” highlighted, find the start point,
then press [
ENTER].
4. With “End” highlighted, find the end point,
then press [
ENTER].
5. With “Preview” highlighted, then press
[
ENTER].
• 5 seconds before and after the deleting scene will
be previewed.
6. Use [ / ] to select “Delete”, then press
[ ENTER].
7. A confirmation message will appear.
Use [
/ ] to select “Yes”, then press
[ ENTER].
8. Press [
• For steps 3 and 4, [ ] / [ ] / [ ] / [ ] / [ ] / [ ]
are available to play back.
BACK] to finish.
Dividing a Title
.
HDD
.
Note
• Dividing a title cannot be undone. Please make sure it is
the correct title to divide.
>> Preparation
• When editing on a USB-HDD, connect it to the unit.
• When editing on a disc, place it in the unit.
• Press [HDD] / [DISC] / [USB] accordingly.
1. Follow steps 1 to 3 in “Ƈ Common operation
for editing” on page 48.
2. Use [
press [ ENTER].
3. Find the point where you wish to divide the
title, then press [
• [ ] / [ ] / [ ] / [ ] / [ ] / [ ] are available
to play back.
.+RW(+VR).
.
USB-HDD
.
/ ] to select “Title Dividing”, then
ENTER].
Converting the Recording Mode (Image Quality)
.
HDD
.
.
USB-HDD
.
By converting the recording mode (image quality) of a
recorded title, you can use the HDD more efficiently.
(Converting a title recorded in the TS quality into AF / AN /
AE / XP / SP / LP / EP.)
>> Preparation
• When editing on a USB-HDD, connect it to the unit.
• Press [HDD] or [USB] accordingly.
1. Press [CONTENTS LIST] to call up the
“Contents List” screen.
2. Use [
press [SUB MENU].
3. Use [
then press [ ENTER].
4. Select the desired recording mode, then
press [
• Recording mode conversion will be performed 5
• Conversion will take the same length of time as the
• To verify the conversion has finished
Note
• Conversion cannot be performed if the title is protected
or the title is currently being recorded.
• Conversion will stop if the unit is turned on while
converting a title. It will start again 5 minutes after the
unit is turned off next time.
• Conversion will not be performed when attempting a
conversion on a USB-HDD while it is not connected to
the unit.
/ ] to select the title to edit, then
/ ] to select “Recording Mode”,
ENTER].
Contents List
WED 01/08/2012
19:00
1 AAA
1:00:00
TS Mode
Genre
(10)
All
Order
Recording
minutes after the unit is turned off. “ ” will be
displayed on the display of this unit.
title duration.
The conversion has finished if “– – ĺ – –” is not
displayed on the contents list screen.
HDD
Programme AAA
Programme BBB
Programme CCC
TS→AF
TS→AN
TS→AE
TS→XP
TS→SP
TS→LP
TS→EP
Cancel the changes
Changing recording mode will be operated during turned off.
8
Editing
Page 52

Media Management
Media Management
52
Media Management
Renaming a disc / USB-HDD
.-RW(VR). .+RW(+VR). .+R(+VR).
.
BD-R
.
USB-HDD
.
.
BD-RE
>> Preparation
• When editing on a USB-HDD, connect it to the unit.
• When editing on a disc, place it in the unit.
Press [
HOME], then select “Media Manager”.
1. Use [ / ] to select “BD/DVD Menu” or
“USB-HDD Menu”, then press [ ENTER].
2. Use [
“Edit USB-HDD Name”, then press
[ ENTER].
• “Edit USB-HDD Name” cannot be selected before
registering the USB-HDD.
3. Enter a name for the disc or USB-HDD.
• For the available characters and how to enter a
name, refer to “Guide to editing a title name” on
page 49.
• Press [
name.
4. A confirmation message will appear.
Use [ / ] to select “Yes”, then press
[ ENTER].
5. Press [
Protecting a disc / USB-HDD
.
USB-HDD
.
.
BD-RE
>> Preparation
• When editing on a USB-HDD, connect it to the unit.
• When editing on a disc, place it in the unit.
• Press [DISC] / [USB] accordingly.
Press [ HOME], then select “Media Manager”.
1. Use [ / ] to select “BD/DVD Menu” /
“USB-HDD Menu”, then press [ ENTER].
2. Use [
“USB-HDD Protect OffĺOn”, then press
[ ENTER].
3. A confirmation message will appear.
Use [ / ] to select “Yes”, then press
[ ENTER].
.
.
/ ] to select “Edit Disc Name” or
ENTER] when you have entered the
BACK] to finish.
.-RW(VR). .+RW(+VR). .+R(+VR).
.
BD-R
.
.
/ ] to select
“Disc Protect OffĺOn”/
Finalising a disc recorded on this unit
.-RW(VR). .+RW(+VR). .+R(+VR).
.
BD-R
.
Finalising a disc recorded on this unit makes the disc
playable on other devices, such as Blu-ray Disc™ players /
recorders / PC’s.
>> Preparation
• Place a disc in the unit to finilise.
Press [
HOME], then select “Media Manager”.
1. Use [ / ] to select “BD/DVD Menu”, then
press [ ENTER].
2. Use [
/ ] to select “Finalise”, then press
[ ENTER].
3. A confirmation message will appear.
Use [
/ ] to select “Yes”, then press
[ ENTER].
• Finalisation process cannot be cancelled once it
has begun.
For DVD-Video
Ƈ
After dubbing is completed, the disc will automatically be
finalised. You cannot manually finalise a disc.
Note
• During a finalisation process, do not turn off the unit or
unplug the AC cord as it may cause damage to the disc
or malfunction of the unit.
• This unit may not be able to finalise a disc which was
recorded on another device.
• For BD-R, finalisation cannot be performed when a timer
recording will start within 2 minutes.
• For DVD-RW(VR) / DVD+RW(+VR) / DVD+R(+VR),
finalisation cannot be performed when a timer recording
will start within 90 minutes.
• Chapter information will remain after finalisation.
• Even if the disc is finalised, it may not be playable
depending on the player / recorder / PC.
• If a power outage occurs during finalisation, the BD-R /
DVD-R / DVD+R disc may become unusable.
Undoing finalisation
.-RW(VR).
This unit can undo finalisation of DVD-RW (VR) discs only,
which were finalised on this unit.
By undoing finalisation, you can record to the disc again.
Please select “Undo Finalise” in step 2 in “Finalising a disc
recorded on this unit”.
4. Press [
BACK] to finish.
• You can cancel protection by selecting
“Disc Protect OnĺOff” / “USB-HDD Protect OnĺOff”
in step 2.
Page 53

Deleting all recording data on the HDD / USB-HDD
Note
• Recording data deleted due to disc initialisation cannot
be undone. Make sure it is the correct media to initialise.
.
HDD
.
.
USB-HDD
.
Press [ HOME], then select “Media Manager”.
1. Use [ / ] to select “HDD Menu” /
“USB-HDD Menu” , then press [ ENTER].
2. If you wish to delete titles including the
protected titles, select “Delete All Titles”,
if excluding the protected titles
but other unprotected titles, select
“Delete All Unprotected Titles” using [ / ],
then press [ ENTER].
3. A confirmation message will appear.
Use [
[ ENTER].
• Deleting process cannot be cancelled once it has
/ ] to select “Yes” , then press
begun.
Media Management
53
Reinitialising (reformatting) a disc
.-RW(VR).
.-RW(Video).
.
BD-RE
.
>> Preparation
• Press [DISC].
You can initialise a disc multiple times. Note that all data will
be deleted.
Press [
HOME], then select “Media Manager”.
1. Use [ / ] to select “BD/DVD Menu”, then
press [ ENTER].
2. Use [
/ ] to select “Format”, then press
[ ENTER].
• For a DVD-RW disc, select a format type.
3. A confirmation message will appear.
Use [ / ] to select “Yes”, then press
[ ENTER].
• Initialisation process cannot be cancelled once it
has begun.
• For a BD-RE disc, it will be initialised in BDAV
format.
Note
• During the initialisation process, do not turn off the unit
or unplug the AC cord as it may cause damage to the
disc or malfunction of the unit.
• Disc initialisation cannot be performed when a timer
recording starts within 15 minutes.
• This unit may not be able to re-finalise discs once
finalised on another device.
• To initialise brand-new, unfinalised discs (BD-RE /
BD-R / DVD-RW / DVD-R / DVD+RW / DVD+R), refer to
“Initialise (format) a brand-new Blu-ray Disc™” on page 27.
.+RW(+VR).
9
Media Management
Page 54

Dubbing
Dubbing
54
Before Dubbing
Available dubbing types
When dubbing multiple titles at one time
Ƈ
(dubbing from the dubbing list)
.
HDD
.
.
HDD
.
.
HDD
.
.
DVD(AVCHD).
.
USB(AVCHD).
Registering the titles to the dubbing list.
• You can select multiple titles at one time.
• You can dub in a different recording mode.
When dubbing one title (dubbing from the
Ƈ
contents list)
.
HDD
.
Easy dubbing from the “Contents List” screen.
• You can dub one title from the “Contents List” screen.
Note
• Most commercially available video discs and rental video
discs are protected with a copy guard. It is not possible
to dub such discs.
• When dubbing a finalised DVD-RW(Video) / DVDR(Video) disc to the HDD, please do it from an external
device.
• For DVD-RW(AVCHD) / DVD-R(AVCHD) /
DVD+RW(AVCHD) / DVD+R(AVCHD), only discs
finalised on the recording device are possible to dub to
this unit.
.
USB-HDD
.
.
BD-RE
.
.-RW(Video). .-R(Video).
.
HDD
.
.
HDD
.
.
BD-RE
.
.+R(+VR).
.
BD-R
.
.
.
BD-R
.
.-RW(VR). .+RW(+VR). .+R(+VR).
-RW
..-R(Video)..+RW(+VR).
Recording mode for dubbing
When dubbing from the contents list
Ƈ
Dubbing source Dubbing to...
Media Rec. mode Media speed
High Same as source
.
BD-RE
.
.
BD-R
.
Normal
TS
.-RW(VR).
.-RW(Video).
.-R(Video).
.
+RW
.+R.
Normal
.
High Same as source
.
BD-RE
.
.
BD-R
.
.
HDD
.
AF / AN /
AE
XP / SP / LP /
EP
Normal
.-RW(VR).
.-RW(Video).
.-R(Video).
Normal
.
+RW
.
.+R.
.
BD-RE
.
.
BD-R
.
Between XP / SP / LP / EP
High Same as source
.-RW(VR).
.-RW(Video).
.-R(Video).
Normal
.
+RW
.
.+R.
High Same as source
.
HDD
.
Normal
High Same as source
.
HDD
.
Normal
.
HDD
.
Normal
.
HDD
.
High Same as source
.
HDD
.
Normal
.
HDD
.
.
BD-RE
.
.
BD-R
.
XP / SP / LP /
XP / SP / LP /
.-RW(VR).
.
+RW
.
XP / SP / LP /
.+R.
.-RW(Video).
XP / SP / LP /
.-R(Video).
TS
AF / AN /
AE
EP
EP
EP
EP
Rec. mode
(fixed)
Between AF / AN /
AE, XP / SP / LP /
EP
Between XP / SP /
LP / EP
Between AF / AN /
AE, XP / SP / LP /
EP
Between XP / SP /
LP / EP
Normal
Between XP / SP /
LP / EP
Between AF / AN /
AE, XP / SP / LP /
EP
Between AF / AN /
AE, XP / SP / LP /
EP
Between XP / SP /
LP / EP
Between XP / SP /
LP / EP
Not possible
Page 55

When dubbing from the dubbing list
Ƈ
Dubbing source Dubbing to...
Media Rec. mode Media speed
High High
.
USB-HDD
TS
.
BD-RE
.
BD-R
.-RW(VR).
.-RW(Video).
.-R(Video).
.
.
.
.
+RW
.
.+R.
AF / AN / AE, XP /
Normal
High High
AF / AN / AE, XP /
Normal
Normal XP / SP / LP / EP
High High
.
USB-HDD
.
HDD
.
XP / SP / LP /
TS, AF / AN /
.
USB-HDD
.
XP / SP / LP /
TS, AF / AN /
.
BD-RE
.
.
BD-R
.
XP / SP / LP /
XP / SP / LP /
.-RW(VR).
.
+RW
.
XP / SP / LP /
.+R.
.-RW(Video).
XP / SP / LP /
.-R(Video).
AF / AN /
AE
EP
AE
EP
AE
EP
EP
EP
EP
.
BD-RE
.
BD-R
.-RW(VR).
.-RW(Video).
.-R(Video).
.
.
USB-HDD
.
BD-RE
.
BD-R
.-RW(VR).
.-RW(Video).
.-R(Video).
.
.
HDD
.
HDD
.
HDD
.
HDD
.
HDD
.
HDD
.
HDD
.
.
.
+RW
.
.+R.
.
.
.
+RW
.
.+R.
.
.
.
.
.
.
.
AF / AN / AE, XP /
Normal
High High
AF / AN / AE, XP /
Normal
Normal XP / SP / LP / EP
High High
Normal XP / SP / LP / EP
Normal XP / SP / LP / EP
High High
Normal XP / SP / LP / EP
High High
AF / AN / AE, XP /
Normal
High High
Normal XP / SP / LP / EP
High High
AF / AN / AE, XP /
Normal
Normal XP / SP / LP / EP
High High
Normal XP / SP / LP / EP
Not possible
Available
Rec. mode
SP / LP / EP
SP / LP / EP
SP / LP / EP
SP / LP / EP
SP / LP / EP
SP / LP / EP
Dubbing
About the “High-speed dubbing” and “Normal-speed dubbing”
High-speed dubbing
Ƈ
• By using a high-speed recording compatible disc,
dubbing will be performed for a shorter length of time
than the title duration.
• High-speed dubbing is performed in the same recording
mode (image quality) as the original title.
• While high-speed dubbing, the channel which is selected
on the unit will be displayed.
Normal-speed dubbing (at the speed of 1 x)
Ƈ
• Normal-speed dubbing takes the same length of time or
longer as the original title.
• When the dubbing is in a different recording mode (image
quality), it is performed as a normal-speed dubbing. Note
that a higher recording mode will not make the image
quality better when dubbing.
About dubbing restrictions
Title with no copy
restriction
.
HDD
.
.
USB-HDD
.
BD-RE
.
BD-R
.-RW(VR).
.-RW(Video).
.-R(Video).
.
Copy / Move Move
HDD
.
.
.
.
Copy Move
Copy / Move Move
Copy Move
Copy Move
Copy —
.
+RW
.
.+R.
Copy —
.
USB-HDD
.
BD-RE
.
BD-R
.-RW(VR).
.+RW(+VR).
.+R(+VR).
.
HDD
.
HDD
.
HDD
.
HDD
.
HDD
.
.
.
.
.
.
.
.
— : Dubbing is not possible.
*1
Dubbing from a DVD or finalised BD-R disc is not possible.
About programmes with no copy restriction
Ƈ
These programmes will be dubbed as “Copy” and the
original titles (recording data) will remain on the source
media.
About copy-once programmes
Ƈ
These programmes will be dubbed as “Move” and the
original titles (recording data) will be deleted from the
source media.
Copy-once title
*1
55
Dubbing
10
Note
• For a title with bilingual audio, high-speed dubbing
from the HDD to a DVD-RW(Video) / DVD-R(Video)
disc or DVD+RW(+VR) / DVD+R(+VR) disc cannot be
performed.
• For a title recorded in EP mode, high-speed dubbing
from the HDD to a DVD+RW(+VR) / DVD+R(+VR) disc
cannot be performed.
• For a title longer than 5 hours, high-speed dubbing from
the HDD to a DVD+RW(+VR) / DVD+R(+VR) disc cannot
be performed.
About “Copy” and “Move”
For copy-once titles, “Copy” / “Move” will affect the original
title (dubbing source) on the HDD. When copying, the
original title will remain on the HDD whereas when moving,
the original title will be deleted from the HDD.
For a title containing a part which must “Move” when dubbing
• If the title contains a part which must “Move” (not “Copy”),
the whole title will be dubbed as “Move”.
• If the title contains a part which must “Move” and the part
is deleted, the whole title will still be dubbed as “Move”.
If such title is divided into the “Copy” part and “Move”
part, the divided two titles will still be dubbed as “Move”.
Page 56

Dubbing
56
Dubbing along with bilingual recording audio (dual audio) / surround audio / subtitles
Refer to “Recording along with bilingual audio (dual audio) /
multi audio / surround audio / subtitles” on page 30.
Note
• Please use the HDD as a temporary data storage device.
• It is highly recommended to copy important recordings to
discs.
• A title containing still images authored on a video
camcorder or PC cannot be dubbed.
• When dubbing from the HDD to a DVD-RW(Video) /-R
(Video) disc, the disc will automatically be finalised.
If you wish to dub multiple titles to a disc, please do it
from the dubbing list.
-When dubbing from the HDD to a DVD-RW(Video) /-R
(Video) disc, you may need to change the setting
in “Settings” > “Video/Audio” > “TV Aspect” to the
appropriate aspect based on the dubbing source.
• This unit can perform dubbing from a DVD to the HDD
only when the title has no copy protection. Copy-once
titles and most commercially available videos cannot be
dubbed.
One Title Dubbing from “Contents List” screen
.
HDD
.
.
BD-RE
.
>> Preparation
• When dubbing from a disc to the HDD, place the disc in
the unit, then press [DISC].
• When dubbing from the HDD to a disc, place a
recordable disc in the unit, then press [HDD].
1. Press [CONTENTS LIST] to call up the
“Contents List” screen.
2. Use [
/ ] to select a title to dub, then
press [SUB MENU].
3. Use [
/ ] to select “Dubbing”, then press
[ ENTER].
• A confirmation message will appear. Use [ / ]
to select “Yes”, then press [
• Dubbing will start. “DUB” will be displayed on the
display of the unit.
• To stop dubbing
Press [
Use [
[
]. A confirmation message will appear.
/ ] to select “Yes”, then press
ENTER].
• “DUB” on the display will disappear when the
dubbing finishes.
When dubbing to a DVD-RW (Video) / -R
Ƈ
(Video) disc
After dubbing finishes, the disc will automatically start
finalising the disc.
Note
• From the “Contents List” screen, only one title dubbing
can be performed at a time.
.
DVD
.
BD-R
.
.
ENTER].
Dubbing Multiple Titles at One Time
>> Preparation
• Prepare as follows according to the dubbing media.
Dubbing direction & Preparation Proceed to ...
.
HDD
.
• Connect a USB-HDD to dub to (as a
recording media).
.
USB-HDD
• Connect a USB-HDD to dub from (as a
source).
.
HDD
.
• Place a disc to dub to (as a recording
media).
.
BD-RE
.
DVD(AVCHD).
• Place a disc to dub from (as a source).
.
USB(AVCHD).
• Connect a USB device (USB memory
stick) to dub from (as a source). The
selection screen will automatically
appear.
1. Use [ / ] to select
“Copy AVCHD to HDD”, then press
[ ENTER], then proceed to step 5.
2. Press [
3. Use [
press [ ENTER].
4. Use [
then press [ ENTER].
5. Use [
press [ ENTER].
• Pressing [ ENTER] will show the numbers of the
• To continue to select another title
• To deselect a title
6. After you have selected all the desired titles,
press [ ].
7. Press [
press [ ENTER].
8. Use [
mode (image quality), then press [ ENTER].
• Available recording modes differ depending on the
9. After having selected the recording mode,
press [ ] to select “OK”, then press [ ENTER].
• Please confirm the dubbing list. If you wish to
.
USB-HDD
.
/
.
.
.
HDD
.
.-RW(VR).
.
BD-R
.
BD-RE
.-R(Video).
.
BD-R
.
.
HDD
.
.
HDD
.
.
.
/
/
.+RW(+VR).
/
/
.-RW(VR).
/
.+RW(+VR).
/
.+R(+VR).
.-RW(Video).
/
.+R(+VR).
/
Step 2
/
Step 1
HOME] to call up the home menu.
/ / / ] to select “Dubbing”, then
/ ] to select the dubbing direction,
/ ] to select a title to dub, then
dubbing order next to the titles.
Repeat the same procedure.
Highlight the title you wish to deselect, then
press [ ENTER].
] to select “Picture quality”, then
/ ] to select your desired recording
recording mode of the source title and the recording
method on the media.
modify the list, see the following.
Page 57

Dubbing list screen
T
O
A
O
V
O
OU
R
L
Dubbing
THU 02/08/2012
19:00
1 AAA
1:00:00
TS Mode
Genre
(10)
All
Order
Recording
HDD
Programme AAA
Programme BBB
1
Programme CCC
2
Programme DDD
3
02/08/12 19:00 1 AAA TS
USB-HDD Remain : 400.0GB
Page Up Page Down Select or deactivate with [ENTER].
Genre/Order
Picture quality (High)
OK
Cancel
• All the registered titles will be dubbed in order.
To add a title to the dubbing list
Ƈ
1) Use [ / ] to select “Add”, then press [ ENTER].
-The title selection screen will appear.
2) Use [ / ] to select a title, then press [ ENTER].
To delete a title from the dubbing list
Ƈ
1) Use [ / ] to select “Delete”, then press
[ ENTER].
2) Use [ / ] to select a title, then press [ ENTER].
3) A confirmation message will appear. Use [ / ]
to select “Yes”, then press [ ENTER].
To delete all titles from the dubbing list
Ƈ
1) Use [ / ] to select “Delete All”, then press
ENTER].
[
2) A confirmation message will appear. Use [
to select “Yes”, then press [
To change dubbing order in the dubbing
Ƈ
ENTER].
/ ]
list
1) Use [ / ] to select “Change order”, then press
ENTER].
[
2) Use [ / ] to select a title, then press [ ENTER].
3) Use [ / ] to move the title to your desired
position, then press [
ENTER].
10. After the modification to the dubbing list,
use [ / / / ] to select “OK”, then press
[ ENTER].
Dubbing
When dubbing to a DVD-RW (Video) / -R
Ƈ
(Video) disc
After dubbing finishes, the disc will automatically start
finalising the disc.
Note
When the dubbing is from the HDD to a DVD-RW (Video) /
DVD-R (Video) disc, you can rename the disc.
1) In step 11, select “Setting for disc name”, then press
ENTER].
[
2) Enter a name, then press [ ENTER].
Dubbing from a VCR / Camcorder
Connection to an external device to this
Ƈ
unit
DIGITAL OUT
DIGITAL OU
OPTICAL
PTICAL
Red (Right)
Audio cables
(not supplied)
Red (Right)
AUDIO VIDEO
RL
UDI
AUDIORL
IDE
VIDEO
OUT
IN
T
To AUDIO IN To VIDEO IN
White (Left) Yellow
Video cable
(not supplied)
YellowWhite (Left)
57
Dubbing
11. “Start” is highlighted. Press [
• When the dubbing is HDD ļ USB-HDD,
“Start (move)” or “Start (copy)” will appear.
• “DUB” will be displayed on the display of the unit.
• To stop dubbing
Press [ ], then select “Yes” in the confirmation
window, then press [
-“DUB” on the display will disappear when the
dubbing finishes.
ENTER].
ENTER].
Camcorder / VCR, etc.
To AUDIO / VIDEO OUT
Audio Out
Video Out
RL
10
Page 58

Dubbing
58
Dubbing from an External Device
Ƈ
>> Preparation
• Press [HDD] when dubbing to the HDD.
• Place a recordable disc in the unit, then press [DISC]
when dubbing to a disc.
• Configure the “External Input Audio” setting in
“Home Menu” > “Settings” > “Recording”.
1. Switch the unit to the external input.
• Follow step 1 to 3 in “Switching to the external
input” on page 23.
2. Select a recording mode.
• Refer to “Changing the recording mode (image
quality)” on page 33.
• Available recording modes are XP / SP / LP / EP.
3. Start playback on the connected device.
• To operate the connected device, refer to the user
manual of the device.
4. Press [ REC.].
• Recording will start.
• To pause recording (HDD)
Press [ ].
-To resume, press [ ] again.
• To stop recording
Press [ ].
-If you stop recording, the recording (from the
beginning to where it was stopped) will be one
title. (It may take a moment to accept next
operation.)
• To stop recording (dual recording, chase play,
simultaneous rec/play)
Refer to “Recording a Programme Currently On
Air” on page 33.
Note
• This unit cannot dub commercially available video discs /
rental video discs / rental video tapes for copyright
protection reasons.
Additional Information about Dubbing
Overall dubbing
For HD-quality movies recorded on a digital camcorder
Depending on the camcorder, scenes recorded on the
•
same day may be separate titles. Please refer to the
user manual of the camcorder for details.
Chapter marks when dubbing
• When dubbing, chapter marks will be dubbed along
with the title. When normal-speed dubbing to DVDVideo, chapter marks will be added based on the
chapter interval setting in “Settings” > “Recording” >
“Auto Chapter”.
Cinavia™
Cinavia Notice
This product uses Cinavia technology to limit the use of
unauthorized copies of some commercially-produced film
and videos and their soundtracks. When a prohibited use
of an unauthorized copy is detected, a message will be
displayed and playback or copying will be interrupted. More
information about Cinavia technology is provided at the
Cinavia Online Consumer Information Center at
http://www.cinavia.com
To request additional information about Cinavia by mail,
send a postcard with your mailing address to: Cinavia
Consumer Information Center, P.O. Box 86851, San Diego,
CA, 92138, USA. This product incorporates proprietary
technology under license from Verance Corporation and
is protected by U.S. Patent 7,369,677 and other U.S. and
worldwide patents issued and pending as well as copyright
and trade secret protection for certain aspects of such
technology. Cinavia is a trademark of Verance Corporation.
Copyright 2004-2012 Verance Corporation. All rights
reserved by Verance. Reverse engineering or disassembly
is prohibited.
If a dubbing is cancelled / a power outage occurs while dubbing
Other than
• Dubbing source:
-The contents remain.
• Dubbing to
-The dubbing will not be performed.
-The data will be written to the disc until the
For
-Reformat will be required.
-The disc will become unplayable or unusable.
• If the message
“Abnormality occurred in USB connection.
USB device has been stopped automatically.” appears
while dubbing from a USB device, this unit will become
inoperable. In this case, disconnect the USB device, and
the message will disappear and this unit will become
operable.
.-RW(Video). .-R(Video).
.
HDD
.
.
USB-HDD
.
.+R(+VR).
.
BD-R
.
:
.
BD-RE
.
.-RW(VR). .+RW(+VR).
:
cancellation / power outage, yet it cannot be played
back.
.-RW(Video). .-R(Video).
.-RW(Video).
:
.-R(Video).
:
Page 59

Approximate time required for a high-speed dubbing
When high-speed dubbing from the HDD to a disc
Dubbing a title (1 hour long) from the HDD to a 4x BD-R
Recording mode Required time
TS
AF
AN 5 minutes 12 x
AE
Dubbing a title (1 hour long) from the HDD to a 6x DVD-R
XP
SP 5 minutes and 30 seconds 11 x
LP 3 minutes 20 x
EP
• Required time may differ depending on the conditions of
• The speed indication, such as 8x / 12x / 30x, is not the
• For a 2x BD-RE/-R disc, a high-speed dubbing will be
• If playback / recording on the HDD is performed while
When high-speed dubbing from a disc to the HDD
• Dubbing will be performed at the equivalent speed of 2x
DTV (HD) 7 minutes 8 x
DTV (SD) 4 minutes and 30 seconds 13 x
DTV (HD)
DTV (HD) 4.36 Mbps
DTV (HD) 2Mbps 2 minutes 30 x
Recording mode Required time
DTV (HD)
DTV (HD) 6 hours
DTV (HD) 8 hours
the disc and dubbing source.
time ratio based on the actual title duration.
performed at the maximum speed of 2x. For a 4x / 6x
BD-R disc, a high-speed dubbing will be performed at
the maximum speed of 4x.
high-speed dubbing, it may take extra time to dub.
of a HDD-to-disc dubbing.
6 minutes and 30 seconds 9 x
3 minutes 10 seconds 19 x
10 minutes 6 x
2 minutes and 20 seconds 26 x
2 minutes and 10 seconds 28 x
Speed
Speed
Dubbing
59
Dubbing
10
Page 60

Useful Functions
Useful Functions
60
Using This Unit as a Home Media Server
.
HDD
.
.
USB-HDD
.
This function allows you to view contents recorded on this
unit’s HDD / USB-HDD* via DLNA client devices connected
to your home network.
JPEG / MP3 / WMA / DivX® / MKV files stored on a USB device,
*
such as USB memory stick, cannot be streamed over DLNA.
• “Client device” referred to here is a DLNA compatible
player connected to the home network to which this unit
is connected. These devices can access the contents
stored on home media servers (e.g., this unit) over the
home network.
To operate the DLNA client device, please refer to the
user’s manual of the device.
>> Preparation
• Connect this unit and a DLNA client device to the home
network.
• Press [
“Network Settings” > “Media Share” > “On”.
1. On the client device, select this unit as a
2. Select either the HDD folder or the USB-
3. Select the desired title, then start playback.
Note
• This unit cannot be used as a client device.
• 2 or more client devices cannot play back simultaneously
from this unit.
About playback on the client device
In the following cases, playback on a
Ƈ
client device is not possible.
When the following operations are being performed on this unit:
• During playback of BD-Video / DVD-RW (AVCHD) /
DVD-R (AVCHD) disc
• Operation screen related to dubbing is being displayed.
• During dubbing
• When the following screen for a title on the HDD / USBHDD is being displayed:
-“Edit” -“Genre/Order”
-“Dubbing” -“Title Delete”
-“Recording Mode” -“Delete Multiple Titles”
• During configuration of the following in “Home Menu” >
“Settings” > ...
-“Network Connection” -“Initialisation”
-“Media Share” -“Download Update”
-“Standby settings”
• When the following menu is being displayed in
“Home Menu” > “Media Manager” > ...
-“HDD Menu”
-“USB-HDD Menu”
• When simultaneous rec/play is performed on the USBHDD or the contents list is being displayed during
recording
• During recording mode conversion while the unit is
powered off
• During software update
HOME], then select “Settings” >
DLNA server.
HDD folder according to the content (title)
you wish to play back.
In the following cases, playback on a
Ƈ
client device will stop or a confirmation
message will appear.
When the following operations are performed on this unit.
• When playing back a BD-Video / DVD-RW (AVCHD) /
DVD-R (AVCHD) disc.
• While recording and playback are being performed
simultaneously on the USB-HDD connected to the unit.
• When selecting a dubbing direction in the dubbing
selection screen.
• When configuring the following in “Home Menu” >
“Settings” > ...
-“Network Connection” -“Initialisation”
-“Media Share” -“Title Delete”
-“Media Share” -“Download Update”
• When selecting “Home Menu” > “Media Manager” >
“HDD Menu” while playing back a title on the internal
HDD.
• When selecting “Home Menu” > “Media Manager” >
“USB-HDD Menu” while playing back a title on the USBHDD.
• When selecting the following for a title on the HDD /
USB-HDD:
-“Edit” -“Title Delete”
-“Dubbing” -“Delete Multiple Titles”
-“Title Delete”
In the following case, the home network
Ƈ
connection may be lost*.
• When the following operation is performed on this unit:
-“Initial Setting”
*If you lost a connection, configure “Home Menu” >
“Settings” > “Media Share” > “On” again.
In the following cases, playback on a
Ƈ
client device will stop.
• When playing back a title(s) on the USB-HDD from the
client device and the unit simultaneously and then a
timer recording starts.
Function Setup
Using “Settings” menu
In the “Settings” menu , you can access various kinds of
menus, and customise them as you prefer.
1. Press [ HOME] to call up the home menu.
2. Use [
press [ ENTER].
3. Use [
item, then press [ ENTER].
• Press [ BACK] if you wish to move back to one
• If a confirmation message appears, use [
4. Press [ BACK] repeatedly to exit.
Note
• If calling up the setting menu during playback, playback
will automatically stop.
/ / / ] to select “Settings”, then
/ ] to select the desired setting
left column.
/ /
/ ] to select “Yes”, then press [ ENTER].
Page 61

Category Menus / Options
Video/Audio TV Aspect 4:3 Letter Box
4:3 Pan & Scan
16:9 Wide
16:9 Squeeze
Still Mode Auto
Field
Frame
Dolby D /
Dolby D+ /
Dolby
TrueHD
DTS / DTS-HDPCM
MPEG PCM
BD Audio
Mode
DRC Auto
Video/Audio
(Cont’d)
Language Audio
Down
Sampling
Language
Subtitle
Language
Disc Menu
Language
PCM
Bitstream
Bitstream
Bitstream
Mix Audio Output
HD Audio Output
On
Off
On
Off
Original
English
Other
Off
English
Other
English
Other
Useful Functions
Allows you to adjust the aspect ratio of the video source which is
different from your TV’s ratio to fit your TV monitor without distorting
the picture.
“4:3 Letter Box”:Outputs the image at 4:3 letter box in full width with
black bars at the top and bottom.
“4:3 Pan & Scan”: Outputs the image at 4:3 pan & scan in full height
with both sides trimmed.
“16:9 Wide”: Outputs the image at 16:9 wide.
“16:9 Squeeze”: If the video source is 4:3, outputs the image at 4:3
squeeze. If the video source is 16:9, outputs the image at 16:9.
Adjusts picture resolution and quality in still mode.
“Auto”: Automatically selects the best resolution setting (“Frame” or
“Field”) based on the data characteristics of the pictures.
“Field”: Stabilises the pictures, although the picture quality may
become coarse due to the limited amount of data. Select “Field” when
the pictures are still unstable even if “Auto” is selected.
“Frame”: Displays relatively motionless pictures in higher resolution.
“Frame” improves the picture quality, although it may unstabilise the
pictures due to alternate output of 2-field data.
• An individual picture on the TV screen is called “Frame”, which
consists of two separate images called “Field”. Some pictures
may be blurred at the auto setting in “Still Mode” setting due to
their data characteristics.
Sets how to output the digital audio source.
If your amplifier / receiver is compatible with multi-channel audio
format such as Dolby Digital, DTS®, or MPEG, etc., select “Bitstream”.
If not, select “PCM”.
When playing back a title in HDD, BD-RE/-R, or VR mode DVD-RW,
select “PCM” so that you can switch to main audio (L), sub audio (R),
or a combination of both (L / R) using your amplifier / decoder.
For Blu-ray Disc™, selects whether to output the secondary and
interactive audio with primary audio if it is available or only the
primary audio.
“Mix Audio Output”:
The audio for the secondary video and the interactive application will
be output together with the audio for the primary video.
• The secondary audio is the audio for the secondary video
(Directors comment etc.) and the interactive audio is the audio for
the interactive application (Button click sounds etc.).
“HD Audio Output”: Outputs only the primary audio. Set this mode
in order to output Dolby Digital, Dolby Digital Plus, Dolby TrueHD,
DTS or DTS-HD audio of Blu-ray Disc™ through HDMI connection.
Sets whether to compress the range of sound volume (Dynamic
Range Control) when Dolby Digital, Dolby Digital Plus or Dolby
TrueHD audio is played back.
“Auto”: When the discs recorded in Dolby TrueHD format are in
playback, this unit detects DRC setting of the disc and set “DRC”
setting to “On” or “Off” automatically.
Sets the digital audio output when playing back Blu-ray Disc™ or
DVD recorded in LPCM.
“On”: LPCM signals are converted to 48 kHz for output. Set to
“On” when using digital connections to an AV amplifier that is not
compatible with sampling frequencies of 96 kHz.
“Off”: For Blu-ray Disc™ and DVD recorded in LPCM without copyright
protection, 2-channel audio signals up to 96 kHz are output as LPCM
signals. If the audio source is 192 kHz, it is down converted to 96 kHz.
Sets the audio language for BD-Video or DVD-Video playback.
“Original”: Activates the disc’s original language.
“Other”: If you select “Other”, enter a 4-digit-code for the desired
language (Refer to page 67).
• Only the languages which the disc supports can be selected.
Sets the subtitle language for BD-Video or DVD-Video playback.
“Other”: If you select “Other”, enter a 4-digit-code for the desired
language (Refer to page 67).
• Only the languages supported by the disc can be selected.
Sets the language for disc menu.
“Other”: If you select “Other”, enter a 4-digit code for the desired
language (Refer to page 67).
• Only the languages supported by the disc can be selected.
Continued on next page
61
Useful Functions
11
Page 62

Useful Functions
62
Category Menus / Options
Language
(Cont’d)
HDMI HDMI Video
3D settings 3D Playback Auto(3D)
Playback BD Rating
DivX Subtitle
Language
Resolution
HDMI Deep
Colour
Progressive
Mode
HDMI Audio
Out
SIMPLINK On
3D Type Frame packing
3D perspective
3D screen
display
Level
DVD Rating
Level
Password
Change
Instant Skip 5 seconds 10 seconds
Instant Replay 5 seconds 10 seconds
Angle Icon On
Czech German Russian1
Dutch
English Italian Spanish
French Polish Swedish
Auto 720p 1080p
480p/576p
Auto
Off
Auto
Video
On
Off
Off
2D
Side by side
Checkerboard
On (Side by side)
Off (Normal)
Password
Password
Password
30 seconds 1 minute
5 minutes
30 seconds 1 minute
5 minutes
Off
Hungarian
1080i 1080p24
Off
Age Setting
Off
84
73
62
51
Russian2
Sets the language for DivX® subtitle.
Sets the resolution of the video signal being output from the HDMI
OUT jack.
“Auto”: HDMI video resolution will be selected automatically
depending on the connected HDMI device.
• When “1080p” is selected, even if the video source is
1080p24, it will be output in 1080p50.
• Even if the video material is 1080p24 and “1080p24” is
selected, when connected device is not compatible with
1080p24, it will be output in 1080p50.
• Even if “720p” is selected, when the playing material is not 720p,
it will be output in 1080i.
• By pressing and holding
“HDMI Video Resolution” will automatically be set to “Auto”.
Reduces the posterisation effect of the playback picture.
“Auto”: Reduces the posterisation effect by automatically outputting
up to 36 bit colour whenever the unit recognises the connected
display device supports Deep Colour feature.
“Off”: Outputs the standard 24 bit colour.
Sets the optimum progressive mode for the image material output
from HDMI OUT jack.
“Auto”: The progressive mode will detect 24-frame film material
(movies) and automatically select appropriate progressive mode.
“Video”: Suited for playing back video material discs (TV shows or
animation).
Sets whether to output the audio from the HDMI OUT jack.
Sets whether to utilise the SIMPLINK function.
“Auto(3D)”: The images will be output in 3D for a 3D compatible TV,
2D for a conventional TV.
“2D”: The 3D contents will be output in 2D.
• Some discs cannot output 2D images.
“Frame packing”: Outputs 3D images in frame packing mode (Left
and right image packed into one video frame).
“Side by side”: Outputs 3D images in side by side mode (One video
frame is split vertically into 2 parts: the left part is intended for the left
eye, right part for the right eye.)
“Checkerboard”: Outputs 3D images in checkerboard mode
(Combines left and right images and outputs left / right / top / bottom
parts alternately.)
• PAL contents in 720p cannot be played back.
Allows you to set the perspective when outputting 3D images.
“On”: Displays the menu on the side of the screen.
• This setting may not work with some menus.
“Off”: Displays the menu in its original position.
Sets the rating level for Blu-ray Disc™ playback.
Sets the rating level for DVD playback.
Sets new password for the parental lock.
When you press
by the amount of time you set here.
When you press
backward by the amount of time you set here.
Sets whether to display the angle icon on the TV when playing back
the scene with various angles.
[ I.SKIP]
[ I.REPLAY]
[ ]
for 5 seconds or longer,
, the playback picture will skip forward
, the playback picture will skip
Page 63

Category Menus / Options
Playback
(Cont’d)
Recording Auto Chapter Off
Slide Show 5 seconds
10 seconds
5 minutes 20 minutes
10 minutes 30 minutes
15 minutes 60 minutes
AE Mode 4.36 Mbps 2 Mbps
EP Mode 6 hours 8 hours
Aspect Ratio
(Video Format)
Recording
Audio Select
(XP)
Subtitle
Recording
Make
Recording
Compatible
Bilingual
Recording
Audio
External
Input Audio
Video Colour
System
Auto
4:3
16:9
PCM
Dolby D
On
Off
On
Off
Main
Sub
Stereo
Bilingual
Auto
PAL
SECAM
Useful Functions
Sets the slide show speed.
• Large-size JPEG files take a few moments to be displayed.
Inserts the chapter marks automatically with every time interval you
set here.
• The length of chapters may slightly deviate.
• When dubbing a title which has chapter marks, the chapter marks
will automatically be dubbed as they are and the interval setting
of “Auto Chapter” will not be effective. However, in the case of
normal-speed dubbing from the HDD to a DVD-RW (Video) /
DVD-R (Video) disc, chapter marks will be added according to the
interval setting of “Auto Chapter”.
Refer to page 29 for details.
When dubbing to a video mode DVD at the normal speed, it allows
you to choose the desired recording aspect ratio.
“Auto”: First aspect ratio of the title to be dubbed will be applied and
be kept throughout the recording.
“4:3”: Records in the aspect ratio of 4:3.
“16:9”: Records in the aspect ratio of 16:9.
• For BD-RE / -R, or VR mode DVD-RW, it will be recorded
in the same aspect ratio with the title to be dubbed.
• For DVD+RW / +R, the image will always be recorded in aspect
ratio of 4:3.
Allows you to choose “PCM” or “Dolby D” when recording the external
input audio in “XP” mode or when dubbing a title to Blu-ray Disc™ /
DVD in “XP” mode.
“PCM”: Records PCM audio for the best quality sound.
“Dolby D”: Records Dolby Digital audio for good quality sound.
• PCM stands for Pulse Code Modulation. It changes analogue
sound to digital sound without compressing audio data.
• When the recording mode is set to other than “XP”, the unit
records “Dolby D” audio automatically even if you select “PCM”.
When dubbing a title recorded in TS mode, and when it has subtitle
information, you can choose whether to dub the subtitle as a part of
the image.
• The subtitle will be recorded as an image, so it cannot be turned
on/off when playing back the dubbed title.
• The English subtitles will preferentially be selected.
• If the preset language does not exist in the title, no subtitle will be
recorded.
This unit prohibits the additional writing to the +VR which has different
type of title list created on other unit.
To make recording to such discs possible, select “On” in this menu.
• When additional recording is made on this unit, the title list type
will be replaced with this unit’s.
Selects either “Main” or “Sub” when dubbing a title with bilingual
audio to a video mode or +VR mode DVD.
• When recording to the HDD / Blu-ray Disc™ / DVD-RW (VR), both
“Main” and “Sub” will be recorded regardless of your setting here.
And you can choose the desired audio format as you playback
later.
When the external input audio is a bilingual broadcast, you can
choose “Stereo” or “Bilingual” as the recording audio.
• This setting is only for recording external input (AV).
• See also “Bilingual Recording Audio” above.
Allows you to select the appropriate colour system to match your TV.
“Auto”: The video colour system will be set automatically according
to the recording material.
“PAL”: The video colour system will be set to PAL.
“SECAM”: The video colour system will be set to SECAM.
• During recording, when a signal other than PAL or SECAM is
detected, an error message appears on the screen and recording
will be paused. Recording will be resumed when a PAL or
SECAM signal is detected.
• Regardless of the setting here, recording colour system is fixed to
PAL.
• When PAL is selected, but the input signal is SECAM or vice
versa, the colour will not be recorded correctly.
63
Useful Functions
11
Continued on next page
Page 64

Useful Functions
64
Category Menus / Options
Clock Clock Setting
Network
Settings
Others Auto
Clock Setting
01 / 08 / 2012 (WED) 15: 00
Press [ENTER].
Auto Clock
Setting
Time Zone NSW/ACT WA
Network
Connection
BD-Live
Setting
Displaying network status
Media Share On
Standby
Panel
Display
TV screen
protection
On
Off
VIC TAS
QLD NT
SA
Auto
Manual
Allow
Limited Allow
Prohibit
Off
On
Off
On
Off
Power Interlock
On
Off
IP Address
Setting
IP Address
Subnet Mask
Default Gateway
DNS
Setting
Primary DNS
Secondary DNS
Proxy
Setting
Connection
Speed
Connection Test
Auto(DHCP)
Manual
Auto(DHCP)
Manual
Use
Do Not Use
Auto
10BASE
Half
10BASE
Full
100BASE
Half
100BASE
Full
Press
[ ENTER]
the date (day / month / year) and time using
[ ENTER]
• Use
[ / ]
• Your clock setting will be lost if either there is a power failure or
the unit is unplugged for more than 30 seconds.
• If “Auto Clock Setting” is set to “On” you cannot select “Clock
Setting”.
Allows the unit to adjust the clock automatically by referring to the
DTV time signal.
• Make sure “Initial Setting” or “Auto Tuning” is completed.
(Refer to page 16)
• Auto clock adjustment will be performed at the following time.
• NSW/ACT (3:00), VIC (3:00), TAS (3:00), QLD (2:00), SA (2:30),
NT (1:30), WA (1:00)
Sets the region where you live.
Sets the IP address. In most cases, you can connect to the Internet
without making any changes to the default setting.
Sets the DNS setting. In most cases, you can connect to the Internet
without making any changes to the default setting.
Sets the proxy server. In most cases, you can connect to the Internet
without using proxy server.
Sets the connection speed. In most cases, you can connect to the
Internet without making any changes to the default setting.
Perform a network connection test. After you change the IP address
or DNS setting, always perform this test.
You can restrict Internet access when BD-Live™ functions are used.
You can confirm “MAC Address”, “Connected server”,
“IP Address”, “Subnet Mask”, “Default Gateway”, “Primary DNS”,
“Secondary DNS”, “Proxy Setting”, “Proxy Port” and
“Connection Speed”.
By setting this to “On”, you can use this unit as a home media server
and your DLNA compatible devices / players can access the contents
stored on this unit’s HDD / USB-HDD.
• When this setting is “On”, “Standby settings” will be set to
“Normal Standby” automatically.
Setting this to “On” places the unit in standby mode automatically if
the unit remains inactive for more than 3 hours.
“On”: Always on.
“Off”: Always off.
“Power Interlock”: When the unit is on, the display panel is on,
when the unit is off, the display panel is off.
If the unit has been inactive for more than 15 minutes while displaying
the home menu screen / setting screen, the screen will automatically
be turned to the DTV screen. If the track list for Audio CD / DivX® /
MP3 / WMA / contents list for JPEG files has been displayed, screen
saver will start.
so that the entry fields will be available. Enter
[ / ]
.
to go back and forth among the fields.
, then press
Page 65

Category Menus / Options
Others
(Cont’d)
Standby
settings
Quick Booting
Normal Standby
ECO Standby
7:00~10:00 19:00~22:00
10:00~13:00 22:00~1:00
13:00~16:00 1:00~4:00
16:00~19:00 4:00~7:00
DivX(R) VOD
Register
Deregister
Product Info
Download Update
Download
Update in
Standby
On
Off
Initialisation Delete BD Video data
Initialise Settings
Initialise for Network setting
Initialise for Personal information
Useful Functions
65
This setting allows you to select whether to have this unit in energy
save mode.
“Normal Standby”:
The unit in “Normal Standby” mode can boot up faster than
“ECO Standby”, power consumption during standby mode will
increase.
“ECO Standby”:
The unit in “ECO Standby” mode takes longer to boot up than
“Normal Standby”, power consumption during standby mode will
decrease.
• When “SIMPLINK” or “Media Share” is set to “On”, this setting will
automatically be set to “Normal Standby”.
• When set to “Normal Standby”, the unit is technically powered-on
during standby mode and ...
-Power consumption during standby mode will increase.
-The cooling fan on the rear panel may spin to avoid a rise of
temperature inside the cabinet.
During the periods of time set here, the boot time will be shorter.
• You can select up to 2 periods of time. (e.g. 7:00 ~ 10:00 and
16:00 ~ 19:00)
• During the selected periods of time…
-Power consumption during standby mode will increase.
-The cooling fan on the rear panel may spin to avoid a rise of
temperature inside the cabinet.
• Do not unplug the AC cord during the selected periods of time.
It may cause malfunction of the unit. If unplugging, deactivate
“Quick Booting” for the period of time, then turn this unit off
before unplugging.
This menu item provides you with the DivX® VOD registration code.
The DivX® registration code is required when downloading DivX®
VOD files from the Internet. To learn more about DivX® VOD, visit
www.divx.com/vod.
To deregister this unit from the activated device list of your DivX
®
VOD
player, a deregistration code is required. This menu item provides you
with the deregistration code, and also prompt you to the registration
screen in case you wish to reregister this unit for another DivX
®
.
Indicates product info and the current software version.
Downloads the latest software through the DTV signal.
Performs the “Download Update” automatically while the unit is in
standby mode. As to the time schedule, refer to the explanation in
“Auto Clock Setting” on page 64.
Initialises all BD-Video data including application data (game score,
etc.), virtual package data (downloaded special contents, audio,
subtitles, etc.)
Resets the setting items to the default settings, except for
“BD Rating Level”, “DVD Rating Level” and “Network Settings” in
“Settings”.
Resets the setting items in “Network Settings” in “Settings” to the
default settings.
Resets the unit to the factory default (the HDD will be initialised), then
turn the unit off.
• Some settings on this unit contain your personal information. In
case this unit is given away or discarded, it is recommended that
you perform “Initialise for Personal information”.
Useful Functions
11
Page 66

Useful Functions
66
Configuring “BD Rating Level” /
Ƈ
“DVD Rating Level”
.
DVD-Video
.
BD-Video
.
.
1. Press [ HOME], then select “Playback” >
“BD Rating Level” or “DVD Rating Level”.
• Password entry screen will appear.
2. Use [0] - [9] to enter a 4-digit number.
• “0000” cannot be used for a password.
• An entered number is replaced with an “*”.
• If a password has not been registered yet, the
number you just entered will be registered.
• If you enter a wrong number
Use [ ] to move back or use [ / ] to select
“Clear all”, then press [
3. Use
[ / ]
to select the desired item to
ENTER].
modify.
DVD rating level
“Off”: No restriction
“8”: Weak (Most DVD’s are allowed)
“1”: Strong (Only DVD’s for children are allowed)
Blu-ray Disc™ rating level
“Off”:
“Age Setting”: Enter age using [0] - [9].
No restriction
4. Press [ BACK] repeatedly to exit.
• Unlocking the parental control on a
commercially available disc
Enter the same password used above.
-Parental lock is unlocked until this unit is turned
off.
Changing the password
Ƈ
1. Press [
HOME], then select “Playback” >
“Password Change”
• Password entry screen will appear.
2. Use [0] - [9] to enter the current password.
• An entered number is replaced with an “*”.
• New password entry screen will appear.
• If you enter a wrong number
Use [ ] to move back or use [ / ] to select
“Clear all”, then press [
ENTER].
3. Use [0] - [9] to enter a new password.
• “0000” cannot be used for a password.
4. Confirmation screen will appear. Enter the
password again, then press [ ENTER].
5. Press [
BACK] repeatedly to exit.
Software Update
You can update the unit using the latest software to enhance
the product’s operation and / or add new features.
Downloading the Software through the DTV Signal:
You can download the latest software through the air and
update this unit.
1. Press [ HOME], then select “Settings” >
“Others” > “Download Update”, then press
[ ENTER].
• A confirmation message will appear.
2. Use
If software is found, the unit will start loading it automatically.
After loading completes, the unit will automatically reboot
and start updating. When updating completes, the unit will
automatically reboot.
• If “Download Update in Standby” is set to “On” in
Using a USB memory stick:
You can download the latest software (if a newer version
is available) from LG’s website and save the software on a
USB memory stick. By connecting the USB memory stick to
the unit, you can update your unit.
>> Preparation
• Prepare an empty USB memory stick.
• Have your PC ready to use the Internet.
On PC
1. Using an Internet browser, go to
2. Save the software on a USB memory stick.
On Unit
3. In stop mode, connect the USB memory
4. A confirmation message will appear.
5. After 2 reboots, disconnect the USB
• Do not change the file name of the downloaded file.
• Do not save any other files than the downloaded
• Do not turn off the unit or disconnect the USB memory
• Software update cannot be performed when there is a
• It may take extra time to load the software.
• You can confirm the current software version on the unit
[ / ]
to select “Yes”, then press
[ ENTER].
• The unit will start scanning all the DTV channels for
the latest software.
Note
“Settings”, the unit will perform “Download Update”
automatically while the unit is in standby.
http://www.lg.com/global/support, then
download the latest software.
stick to the USB port on the front of the unit.
Use [
/ ] to select “Yes”, then press
[ ENTER].
memory stick.
Note
software on the USB memory stick.
stick during update process.
timer recording within 15 minutes.
by pressing [
“Others” > “Product Info””.
HOME], then select “Settings” >
Page 67

Language Code List
Useful Functions
67
Lauguage Abbrev. Code
Afar aa 4747
Abkhazian ab 4748
Afrikaans af 4752
Amharic am 4759
Arabic ar 4764
Assamese as 4765
Aymara ay 4771
Azerbaijani az 4772
Bashkir ba 4847
Byelorussian be 4851
Bulgarian bg 4853
Bihari bh 4854
Bislama bi 4855
Bengali;Bangla bn 4860
Tibetan bo 4861
Breton br 4864
Catalan ca 4947
Corsican co 4961
Czech cs 4965
Welsh cy 4971
Danish da 5047
German de 5051
Bhutani dz 5072
Greek el 5158
English en 5160
Esperanto eo 5161
Spanish es 5165
Estonian et 5166
Basque eu 5167
Persian fa 5247
Finnish fi 5255
Fiji fj 5256
Faroese fo 5261
French fr 5264
Frisian fy 5271
Irish ga 5347
Scots Gaelic gd 5350
Galician gl 5358
Guarani gn 5360
Gujarati gu 5367
Hausa ha 5447
Hebrew he 5451
Hindi hi 5455
Croatian hr 5464
Hungarian hu 5467
Armenian hy 5471
Interlingua ia 5547
Indonesian id 5550
Interlingue ie 5551
Inupiak ik 5557
Icelandic is 5565
Italian it 5566
Japanese ja 5647
Javanese jv 5668
Lauguage Abbrev. Code
Georgian ka 5747
Kazakh kk 5757
Greenlandic kl 5758
Cambodian km 5759
Kannada kn 5760
Korean ko 5761
Kashmiri ks 5765
Kurdish ku 5767
Kirghiz ky 5771
Latin la 5847
Lingala ln 5860
Laothian lo 5861
Lithuanian lt 5866
Latvian;Lettish lv 5868
Malagasy mg 5953
Maori mi 5955
Macedonian mk 5957
Malayalam ml 5958
Mongolian mn 5960
Moldavian mo 5961
Marathi mr 5964
Malay ms 5965
Maltese mt 5966
Burmese my 5971
Nauru na 6047
Nepali ne 6051
Dutch nl 6058
Norwegian no 6061
Occitan oc 6149
(Afan)Oromo om 6159
Oriya or 6164
Panjabi pa 6247
Polish pl 6258
Pashto;Pushto ps 6265
Portuguese pt 6266
Quechua qu 6367
Rhaeto-Romance
Kirundi rn 6460
Romanian ro 6461
Russian ru 6467
Kinyarwanda rw 6469
Sanskrit sa 6547
Sindhi sd 6550
Sangho sg 6553
Serbo-Croatian sh 6554
Singhalese si 6555
Slovak sk 6557
Slovenian sl 6558
Samoan sm 6559
Shona sn 6560
Somali so 6561
Albanian sq 6563
Serbian sr 6564
Siswat ss 6565
rm 6459
Lauguage Abbrev. Code
Sesotho st 6566
Sundanese su 6567
Swedish sv 6568
Swahili sw 6569
Tamil ta 6647
Telugu te 6651
Tajik tg 6653
Thai th 6654
Tigrinya ti 6655
Turkmen tk 6657
Tagalog tl 6658
Setswana tn 6660
Tonga to 6661
Turkish tr 6664
Tsonga ts 6665
Tatar tt 6666
Twi tw 6669
Ukrainian uk 6757
Urdu ur 6764
Uzbek uz 6772
Vietnamese vi 6855
Volapuk vo 6861
Wolof wo 6961
Xhosa xh 7054
Yiddish yi 7155
Yoruba yo 7161
Chinese zh 7254
Zulu zu 7267
Useful Functions
11
Page 68

Others
Others
68
Troubleshooting
If the unit operates unexpectedly, follow the instructions below first, before requesting service for this unit.
Some simple checks or a minor adjustment on your part may solve the problem and restore proper operation.
• Also check the antenna, TV, AV amplifier and other devices connected to the unit and read the user manuals.
Trouble checkup
Ƈ
1. Refer to “Symptom / Things to check” in the following chart and try to find your situation.
• If it does not solve the problem, proceed to step 2.
2. Try the following.
• Please remove the disc, disconnect the USB-HDD / USB device beforehand if possible.
1) Press the power button on the front panel to turn off the unit. (By pressing and holding the power button for 8
seconds or longer, you can force turn off the unit.)
2) Unplug the AC power cord, then wait a few seconds.
3) Plug the AC power cord back in.
4) Turn on the unit and see if the unit operates properly.
• If it does not solve the problem, proceed to step 3.
3. Try the following.
1) Press the reset button inside the front cover using a paper clip or other straight, thin object.
• This unit will automatically be turned on, perform the system configuration, then will be turned off.
• This unit is not operable during system configuration. Please wait until it is completed.
2) Turn on the unit and see if the unit operates properly.
Note
• After reset, please perform the necessary configurations, such as timer programming and other settings.
• If you have tried all the above then the problem has still not been solved, unplug the AC cord and contact the retailer
you purchased the unit from.
Symptom Things to check
The power does not turn on. • Is the AC power cord connected securely?
• Are the batteries in the remote control still good?
• If none of above, try step 2 in “Ƈ Trouble checkup” on page 68.
The unit automatically turns on by
itself.
Power
The “Initial Setting” screen is displayed
when turning on the unit.
When turning on / off the TV, the unit
turns on / off automatically.
The unit automatically turns off. • Is “Settings” > “Others” > “Auto Standby” not set to “On”?
It takes a while to shot down the unit. • When the unit is in the process of finishing the system or updating the
The display panel is off. • Is “Settings” > “Others” > “Panel Display” not set to “Off”?
Overall the unit / Disc / USB
The unit is not operable.
The HDD is not operable. • Is “HDD” on the front panel lighted? If no, press [HDD] on the remote
• If “
• If “ “ and “UPDATE” are shown on the display panel, the unit is
• The unit will automatically turns on 2 minutes before a timer recording.
• The “Initial Setting” screen appears when you turn on this unit for the first
• This happens when connecting the unit to an LG brand TV which supports
• If above is not the case, try step 2 in “
• When “
• Are the batteries in the remote control still good?
• When this unit is turned on for the first time after purchase, the
• During “Initial Setting”, recording / playback and other operations are not
• If none of above, try step 2 in “Ƈ Trouble checkup” on page 68.
• The more titles there are stored on the HDD, the longer the unit will take
” is shown on the display panel, the unit is in the process of recording
mode conversion.
downloading for a software update.
time.
the “SIMPLINK” functions and both the unit and TV’s “SIMPLINK” is set to
“On”. (It may not function depending on the model.)
Ƈ
Trouble checkup” on page 68.
system information, it may take extra time to shut down the unit.
” is displayed on screen, the operation is prohibited.
“Initial Setting” screen will appear.
possible.
to boot up when plugging in the AC power cord.
control.
Page 69

Symptom Things to check
The disc is not operable. • Is “DISC” on the front panel lighted? If no, press [DISC] on the remote
control.
• Is a disc in this unit?
• Depending on the disc, playback speed control is not available.
The disc tray does not open / close. • When the dubbing list is displayed, the disc tray may not open / close.
Overall the unit / Disc / USB (Cont’d)
The setting screen / sub menu are not
displayed or items are not selectable.
This unit does not operate properly. • If the unit is under condensation conditions, let the unit sit (powered on)
The display panel shows an abnormal
indication.
The USB device is not operable.
The USB device is not readable.
While a USB device is connected, this
unit becomes inoperable.
TV programme is not displayed. • Are the connections, the antenna ʊ this unit ʊ TV, made correctly?
Viewing a programme / switching channels
TV’s image quality became low after
connecting this unit.
Unable to switch channels. • During a dual recording, other than the recording channels cannot be
Subtitles are not displayed while
viewing a DTV programme.
“Programme Guide” is not displayed. • “Programme Guide” is not available until this unit receive the EPG data
A different programme is recorded
from the timer programming set from
“Programme Guide”.
• If an unsupported disc is placed in this unit, the disc tray may not open.
In this case, press the power button on the unit for 8 seconds or longer
to turn off the unit, then press [
solve the problem, try step 2 in “Ƈ Trouble checkup” on page 68.
• When the operation is not available, the item may not be displayed or
selectable.
• Does your TV’s external source input corresponds to the unit’s output?
for at least 2 hours.
• Try step 2 in “
• Is the USB device compatible with this unit?
• Is the USB cable connected securely?
• If connecting a USB device during recording / playback / dubbing, it may
not be recognised.
• It is caused by the USB device which has a problem during playback /
slide show or while dubbing the contents to the HDD.
In this case, disconnect the USB cable, then reconnect it.
• Are the cables / cords connected to the correct terminals (including input /
output)?
• Are the cables / cords connected securely?
• When connecting this unit and TV with an HDMI cable, be sure that the
resolution in “Settings” > “HDMI” > “HDMI Video Resolution” is set to the
correct resolution which the TV supports.
If you are not sure, press and hold [ ] for 5 seconds or longer. This
configures the resolution to “Auto” and the selected channel should be
displayed.
• When “HDMI Video Resolution” is set to “Auto” or “1080p24”, the video out
jack (yellow) may not output a signal.
In this case, disconnect the HDMI cable or set the current resolution to
another.
• Does your TV’s external source input corresponds to the unit’s output?
• Do you use a DTV signal splitter? If so, a TV signal booster (commercially
available) may improve. If a signal booster is not effective, contact the
retailer you purchased the unit from.
• When this is not in use, place it in standby mode (turn off the unit, not
unplug the AC power code).
• Avoid arranging the RF cable, HDMI cable and LAN cable, etc. close
together.
• Try “Auto Tuning” in “DTV Menu” > “Installation”.
viewed.
• During playback, this unit is unable to switch channels.
• Be sure “Subtitle” in the sub menu is not set to “Off”.
-The sub menu can be called up by pressing [SUB MENU] while viewing
a DTV programme.
-There are cases in which a subtitle language appears available while
the subtitle information is not actually broadcasted.
after tuning is completed.
• There are cases in which a broadcast station airs a different programme
from the scheduled programme. This causes an inconsistency between
the actual air and the information in the programme guide.
Ƈ
Trouble checkup” on page 68.
OPEN/CLOSE] button. If this does not
Others
69
Others
12
Continued on next page
Page 70

70
Others
Symptom Things to check
Unable to record. • Is the title copy-protected?
• Is the programme record-prohibited?
• Is there enough capacity on the recording media? If no, delete
unnecessary titles or use another recording media.
• The recording media may have reached the maximum number of titles?.
In this case, delete unnecessary titles or use another recording media.
• Is the antenna connection made properly?
Unable to record to the disc. • Use a recordable disc.
• This unit is unable to record directly to a DVD-RW / -R disc and +RW / +R
disc. (Dubbing to the disc is possible.)
• This unit may be unable to make additional recording to a disc which is
recorded on another device.
Recording / Timer programming
Unable to record from another device,
such as the cable tv’s set-top box /
VCR, etc.
Unable to programme a timer
recording / Programmed timer
recording failed.
The recorded title cuts before the
programme ends.
Unable to perform a dual recording. • This unit is unable to perform a dual recording (both programmes)
Unable to record to a USB-HDD. • Is the USB-HDD connected to the unit recordable?
Unable to play back a disc. • Is the TV switched to the correct source input which is associated with this
Playback
Playback does not start from the
beginning of the title.
The picture and audio stops momently. • This happens when the playback shifts from the first layer to the second
The screen aspect does not seem
correct.
• Recording may fail if the disc is scratched or dirty.
• Is the disc protected or finalised?
• Is this unit switched to the external input (AV)?
• Is the connected device turned on?
• Are the cables / cords connected to the correct terminals (including input /
output)?
• Direct recording from the external input (AV) to a USB-HDD is not
possible. (Dubbing from the HDD to a USB-HDD is possible.)
• If a timer programme is set to skip, it will not be recorded.
• If a power outage occurs, a timer recording may not be performed
properly.
• If the unit is in the process which cannot be interrupted, such as finalising
/ formatting a disc, downloading a software update, a timer recording
cannot be performed.
• Do multiple timer programmes overlap?
• This also happens when the end time of the earlier programme and the
start time of the latter programme are exactly the same.
simultaneously to one disc / USB-HDD.
• The USB-HDD formatted on another device is not compatible with this
unit.
• Is the USB-HDD not protected?
• Direct recording from the external input (AV) to a USB-HDD is not
possible. (Dubbing from the HDD to a USB-HDD is possible.)
unit?
• Is the disc compatible with this unit? Is the disc a blank disc?
• Is the disc placed upside-down?
• This unit may not play back a disc recorded on another recorder or PC.
• This unit cannot play back an unfinalised DVD-RW (Video) / DVD-R (Video)
disc recorded on another recorder.
• Some discs may not be playable depending on the recording conditions,
the specifications of the disc or due to scratches / dirt on the disc.
• Confirm BD / DVD-Video rating level in “Settings” > “Playback” >
“BD Rating Level” or “DVD Rating Level”.
• Select “Play From Start” in the sub menu.
layer of the disc.
• Is the setting in “Settings” > “Video/Audio” > “TV Aspect” is set to the
correct aspect?
• When the DVD disc has the specific screen aspect setting
(e.g.
aspect from the TV.
), the pictures may be displayed in a different
Page 71

Symptom Things to check
During playback, the images are
distorted / discoloured.
DVD stops playback on its own. • Some DVD’s have a pause signal which automatically stops playback.
Audio is not output / Subtitles are not
displayed.
Playback (Cont’d)
When playing back a title recorded
from the external input (AV), it outputs
2 mixed audio.
Unable to switch the dual audio of
digital audio.
Unable to switch the audio language
and subtitle language when playing
back a disc.
Unable to switch the camera angles • This function is only available in the scenes with multiple angles.
For a title recorded in other than TS
mode, “TSĺXX” (e.g. TSĺAE) is
displayed.
Unable to delete a title / Unable to edit
a title / chapter marks / disc.
Unable to add a chapter. • The number of chapters may have reached the maximum number for the
Title deletion / Editing / Dubbing
Disc capacity will not increase after
deleting some titles.
Unable to redo title deletion / dividing. • Deleted / divided titles cannot be undone. Make sure the title is the correct
The disc finalised on this unit cannot
be played on another DVD player.
Unable to undo finalisation. • This unit can only undo finalisation on DVD-RW (VR) finalised on this unit.
Unable to dub a disc. • Most commercially available video discs are protected with a copy guard.
After dubbing, the original title will be
deleted.
The subtitles will not be dubbed. • Set “Settings” > “Recording” > “Subtitle Recording” to “On”. With this
• The images may be distorted during fast forward / fast reverse.
• Is the unit connected directly to the TV? If connected via a VCR, playback
may not operate properly due to the copy guard.
• Electric waves from a cell-phone and other devices near this unit may
cause distortion of images.
• For connected devices (e.g. AV amplifier), confirm the following.
-Is the connected device turned on?
-Is the IN/OUT switch of the connected device selected correctly?
-Are the cables / cords connected to the correct terminals (including
input / output)?
• Is the “Video/Audio” setting in “Settings” set correctly based on the
capability of the connected device?
• The selected subtitle language must be included on the disc.
• Before recording, change the setting in “Settings” > “Recording” >
“External Input Audio” > “Stereo” to “Bilingual”.
• When “Settings” > “Video/Audio” > “Dolby D / Dolby D+ / Dolby TrueHD” /
“DTS / DTS-HD” or “MPEG” is set to “Bitstream” and the audio is output
from DIGITAL OUT (OPTICAL), the audio is not switchable. In this case,
change the setting from “Bitstream” to “PCM”.
• Does the disc contain multiple languages?
• Some discs let you switch the audio language and subtitle language using
the disc menu. Refer to the manual of the disc for how to operate.
• All direct recordings are performed in TS mode. In the case of “TSĺAE”,
it means the title was recorded in TS mode and it will be converted to AE
mode after the unit goes standby. Recording mode conversion will be
performed in the order of older to newer titles in the contents list.
• If the title / media is protected, it is not possible to delete or edit. Cancel
protection on the media before editing.
• For a finalised disc, title deletion / editing is not possible.
• For a title to be converted to a different recording mode, title dividing / title
protecting is not possible.
• If a USB-HDD contains a title which is waiting to be converted, this USBHDD cannot be protected.
media. In this case, delete unnecessary chapter marks.
• For BD-R / DVD-R / DVD+R discs, title deletion will not increase the disc
capacity.
one when editing.
• Some DVD players cannot play back a disc finalised on this unit.
It is not possible to dub such discs.
• Unfinalised DVD-RW (Video) / DVD-R (Video) discs recorded on another
recorder cannot be dubbed.
• This unit may be unable to dub the disc if it is scratched and dirty.
• This unit may be unable to dub the disc if it is formatted on another
recorder.
• To dub a protected copy-once title, cancel protection first.
• For copy-once titles, the title will be dubbed as “move” to another media
and the original title on the source media will be deleted.
setting, the subtitles will be burned in the images and it cannot be turned
“On” / “Off”.
Others
71
Others
12
Continued on next page
Page 72

72
Others
Symptom Things to check
The USB-HDD is not usable. • Turn on the USB-HDD first, then turn on this unit.
• Connect the USB-HDD securely to this unit and configured it properly.
• A newly connected USB-HDD needs to be registered to this unit before
using.
Unable to record to the USB-HDD. • The USB-HDD may be full. If that is the case, dub some titles to the
internal HDD or delete some titles to make room for the new recording.
The titles stored on the USB-HDD
USB-HDD
disappeared.
The programme that was supposed
to be recorded to the USB-HDD was
recorded to the internal HDD.
The titles on the USB-HDD cannot be
played back.
The SIMPLINK functions do not
operate.
SIMPLINK
Remote control
The remote control does not operate . • Are the batteries in the remote control still good?
The HDD is not operable. • Is the “HDD” on the front panel lighted? If no, press [HDD].
The disc is not operable. • Is the “DISC” on the front panel lighted? If no, press [DISC].
The USB-HDD is not operable. • Is the “USB” on the front panel lighted? If no, press [USB].
The TV is not operable. • Are the batteries in the remote control still good? If the batteries are
A lot of noise is generated from inside
this unit’s cabinet.
Others
The password for “BD Rating Level” /
“DVD Rating Level” or the PIN Code
for “Parental Control” is forgotten.
• If a power failure occurs (e.g. lightning, unplugging the AC cord, the circuit
breaker was thrown, etc.), the contents on the USB-HDD may disappear.
If this happens and/or the USB-HDD became inoperable, reregister the
USB-HDD.
• Confirm that the USB-HDD is connected securely to this unit and turned
on.
• Make sure that the USB-HDD is registered to this unit.
• There are cases, depending on the connected device, that programmed
timer recordings will be performed to the HDD (alternate recording) if a
power outage occurs.
• After recording, the USB-HDD may have been unregistered. If
unregistered, the titles on the USB-HDD will be unplayable. When
reregistering the USB-HDD, it will be formatted.
• The SIMPLINK functions are only available when connecting this unit and
LG’s SIMPLINK compatible TV with an HDMI cable and the SIMPLINK
setting on both devices is completed.
• The SIMPLINK functions will no longer be effective if this unit’s AC cord
or HDMI cable is unplugged. To restore the settings, connect the AC cord
and HDMI cable securely to this unit, switch the TV’s external source input
to this unit, or set “Settings” > “HDMI” > “SIMPLINK” to “Off”, then set it
“On” again.
exhausted, only TV control may become inoperable.
• While downloading the EPG data and software update, this unit may
generate noise.
• When high-speed dubbing and the cooling fan is spinning fast, this unit
may generate more noise than usual.
• For “BD Rating Level” / “DVD Rating Level”, go to “Home Menu” >
“Settings” > “Playback”, then highlight either “BD Rating Level” or
“DVD Rating Level”, then enter “210499” using [number buttons].
• For “Parental Control”, go to “Home Menu” > “DTV Menu”,
“Parental Control”, then highlight “Channel Lock” or “DTV Rating”, then
enter “210499” using [number buttons].
Page 73

If a following message appears...
Message example Meaning / what to do
• Currently, the operation is prohibited.
This device will be powered off soon by
Overall operations
auto off function.
You cannot operate this during
dubbing.
Please insert the valid disc. • Although a timer recording to a disc will start shortly, a recordable disc is
Please connect valid USB-HDD. • Although a timer recording to a USB-HDD will start shortly, a recordable
Please eject the disc.
Playback feature may not be available
on this Disc.
Disc / USB device
Region Error
Playback is not authorized in your
region.
Abnormality occurred in USB
connection. USB device has been
stopped automatically.
Cannot find USB-HDD,
Or USB-HDD which cannot be
recorded in this device is connected.
It was not completed properly because
of an error.
Recording
You cannot record because it is
prohibited to record.
Cancel recording because of
insufficient capacity
The recording time exceeded 8 hours.
Recording was stopped.
Built-in HDD does not have enough
space to record. If space is not ensured
when you record, at the end of the
programme cannot be recorded.
Timer programming
Remaining capacity of disc is not
enough. If space is not ensured
when you record, a programme will
be recorded on HDD if the HDD has
enough space.
Remaining capacity of the USB-HDD
is not enough, If space is not ensured
when you record, a programme will
be recorded on HDD if the HDD has
enough space.
It was not completed properly because
Deletion / editing / dubbing
of an error.
The title is protected / This title is not
dubbed as this disc is protected.
This title can be registered only once. • A title which will be dubbed as “move” can be registered to the dubbing list
Cannot add title. Limit exceeded. • The dubbing list is full.
Exceeds 8 hours • A title longer than 8 hours cannot be dubbed.
Disc is full. Cannot dub to this disc.
Display panel
WAIT • This unit is in a process of system configuration and not operable. The unit
• Because “Auto Standby” is set to “On”, this unit will be powered off shortly.
Any operation will cancel the auto-standby function this time.
• If you wish to turn off the function, set “Settings” > “Others” >
“Auto Standby” to “Off”.
• Because a dubbing is being performed, the operation is currently not
available.
not found in the unit. Check the disc.
USB-HDD is not found. Please check the USB-HDD.
• The disc may be unsupported or scratched and dirty. Remove the disc
and check the disc.
• The region code of the disc does not correspond to this unit. Eject the
disc.
• The USB device has a problem during playback / slide show or while
dubbing the contents. Disconnect the USB device.
• This unit cannot recognise the USB-HDD. Check the USB-HDD.
• Recognisable USB-HDD’s are from 64 GB to 4 TB.
• An error occurred and the recording was interrupted. It may be caused by
a malfunction of the HDD or scratches and dirt on the disc.
• The programme is record-prohibited.
• The recording was cancelled because the recording media became full.
• The maximum duration of one title is 8 hours.
• There is not enough capacity on the HDD / USB-HDD / disc to complete
a recording. Press [
media.
• The disc may be scratched or dirty. Press [
message window, then eject the disc and check the disc.
• Cancel disc protection.
only once.
• The maximum number of titles in the dubbing list is 36 titles.
• The total data size of the dubbing titles exceeds the available capacity of
the dubbing media. Try to dub less titles or prepare a larger dubbing media.
• ” ” and “UPDATE” indicate that this unit is downloading a software
update. Do not turn off the unit until an update is completed.
• ” ” may be displayed while organising the system data.
will become operable after the indicator disappears.
ENTER], then check the capacity of the recording
ENTER] to close the
Others
73
Others
12
Page 74

Others
74
Glossary
AAC (Advanced Audio Coding)
A lossy compression and encoding scheme for digital audio.
Audio files which have been encoded with AAC generally
achieve better sound quality than MP3 at similar bit rates.
AACS (Advanced Access Content System)
A content protection scheme used with Blu-ray Disc™.
AVCHD
AVCHD is a new format for high definition video camcorders
which can record and play high-resolution HD images.
BD-J
Some BD-Video discs contain Java application software
called BD-J, which enables various interactive functions
other than normal content playback.
BD-Live™
BD-ROM version 2 Profile 2.0, which contains new functions
(e.g. Internet connection), in addition to the BONUSVIEW™
function.
Bit rate
The amount of data of audio / video conveyed or processed
per second.
Bitstream
Audio signal which is compressed and converted to a digital
signal. It is converted to a compatible audio signal according
to the capability of the audio amplifier.
Chapter
Just as a book is split up into several chapters, a title on a
BD-Video or DVD-Video disc is usually divided into
chapters. See also “Title”.
Copy protection
The function for prevention of unauthorised copying of
broadcast programmes and video materials. For this reason,
this unit does not record broadcast programmes and videos
with an embedded copy-protection signal.
Copy-once broadcast
Digital broadcast programmes which allow you to record
only once for the copyright protection and prevention
of unauthorised copying. When a copy-once broadcast
programme is recorded then copied to another storage
device, the programme moves to the destination device,
and will be deleted from the original device.
®
DivX
DivX® is a codec (compression / decompression) which
can compress images to a very small amount of data. The
software can compress video data from almost any devices
to the size that can be sent on the Internet without dropping
visual quality of the images.
Dolby Digital Plus
The next generation digital audio compression technology
developed as an extension to Dolby Digital. Blu-ray Disc™
supports 7.1 multi-channel surround sound output.
Dolby Digital
A method to compress digital sound developed by Dolby
Laboratories. It offers you stereo sound (2ch) or multichannel audio.
DRC (Dynamic Range Control)
Dynamic range is audio level differences between the
minimum and maximum level in the audio source of a title
recorded in the Dolby Digital format. DRC makes it easier to
hear audio at a lower volume while viewing a movie at night.
EPG
Electronic Programme Guide.
Finalising
The process to make BD-R, DVD-RW/-R and DVD+RW/+R
discs recorded on this unit, compatible with other players.
GB (Gigabyte)
A unit for the capacity of storage devices and recording
media, such as HDD’s / USB-HDD’s / USB memory sticks /
discs (Blu-ray™ / DVD).
HD quality
The picture quality of High-Definition digital broadcasting.
The effective scan lines of the screen is 720 or 1080. HD
digital broadcasting enables higher picture and sound
quality than SD (Standard-Definition) broadcasting.
HDD (Hard Disk Drive)
Large capacity data storage device used in digital video
recorders, PC’s, etc. HDD is able to read and write data
quickly, with high retrieval performance. This unit is
equipped with an internal HDD (You cannot replace the
internal HDD on your own).
HDMI (High-Definition Multimedia Interface)
A digital interface between an audio and video source. It
can transmit component video, audio and control signal with
one cable connection.
CPRM (Content Protection for Recordable Media)
Copyright protection technology for the copy-once broadcast
programmes. To record copy-once programmes and/or the
dubbing-ten programmes to a DVD, a CPRM compatible
disc is needed.
Deep Colour
Deep colour reproduces more realistic colours without
colour banding than the traditional 8-bit colour system.
Initialisation (formatting)
This process initialises a recordable disc to be ready for
this unit or to change the recording method.
Interlace scanning (576i)
The process of building an image from two fields, which
has been used by the majority of televisions. The first field
consists of the odd numbered scan lines and the second
field even numbered lines. This process displays an image
at the frame rate of 25 frames per second.
Page 75

JPEG (Joint Photographic Experts Group)
A method of compressing still picture files. You can
copy JPEG files on BD-RE / -R, DVD-RW / -R, DVD+RW /
+R, CD-RW / -R or a USB memory stick from a computer
and play back the files on this unit.
Letterbox
A method to fit the wide screen (16:9) images in a standarddefinition television screen (4:3), keeping the aspect ratio
by adding black bars on both the top and bottom of the
television screen.
Others
Track
Audio CD uses tracks to divide up the content of a disc.
The BD-Video or DVD-Video equivalent is called a Chapter.
See also “Chapter”.
USB (Universal Serial Bus)
An interface to connect electronic devices. For this unit,
USB is used to connect to a digital camcorder / digital
camera to view JPEG photos on your television screen and
retrieve High-Definition movies (recorded in the AVCHD
format) from a camcorder.
75
Linear PCM (Linear Pulse Code Modulation)
A method to record digital audio without compression.
MP3 (MPEG audio layer 3)
MP3 is a method of compressing files. You can copy MP3
files on BD-RE / -R, DVD-RW /-R, DVD+RW / +R, CD-RW /
-R, or USB memory stick from the computer and play back
the files on this unit.
MPEG, MPEG-2, MPEG-4 AVC/H.264
MPEG stands for Moving Picture Experts, which is the
international standard of video / audio compression. MPEG2 is used to record materials for DVD’s. MPEG-4 AVC/H.264
is used to record High-Definition materials.
Pan & scan
A method to fit the wide screen (16:9) images in a standarddefinition television screen (4:3), keeping the aspect ratio by
cropping both the left and right sides of the original images.
Parental level
Setting in digital broadcast programmes and video materials
which makes it possible to control the types of viewable
scenes. This function prevents children from viewing violent
scenes and such.
Progressive scanning (576p)
As opposed to interlace scanning, this process displays
576 scan lines at a time at the frame rate of 50 frames per
second. Progressive scanning enables denser and less
flickering images than interlace scanning.
VBR (Variable Bit Rate)
A recording method which controls the amount of data in
a recording by detecting the differences in the speed of
motions in the content. This technology makes the recorder
record more efficiently and produce smaller movie files.
Virtual Package
The function which copies data to other media (local
storage) from the Internet and plays the secondary video,
secondary audio and subtitles at the same time. The
method of the playback varies depending on the disc.
WMA (Windows Media™ Audio)
Windows Media™ Audio is the audio compressing technology
developed by Microsoft. You can copy Windows Media™
Audio files on BD-RE / -R, DVD-RW / -R, DVD+RW / +R,
CD-RW / -R, or USB memory stick from a computer and play
back on this unit.
Region code
Region associated discs and players with the particular
areas of the world. This unit will only play discs with the
compatible region code. The region code of this unit may
be found on the rear panel. Some discs are compatible with
more than one region or all regions.
Resume playback
This unit memorises where you stopped playback, so you
can continue from where you left off.
SD quality
The quality of the Standard-Definition digital broadcasting.
The effective scan lines of the screen is 576.
SIMPLINK
It enables the integrated system control between this unit
and an LG television.
Title
A collection of chapters on BD-video or DVD-video. See
also “Chapter”.
Others
12
Page 76

Others
76
Specifications
General
HDD 1 TB (BR629T) / 500 GB (BR625T)
Power requirements 220 – 240 V ± 10 %, 50 Hz ± 0.5 %
Power consumption 31 W (BR629T) / 27 W (BR625T)
Weight 3.0 kg (BR629T) / 2.7 kg (BR625T)
Dimensions (width x height x depth) 430.3 x 53.2 x 262.5 mm
Operating temperature 5°C to 40°C
Operating humidity Less than 80% (no condensation)
TV system DVB-T Standard Compliant
Recording
Recording format BDAV format (BD-RE, BD-R), Video Recording (VR) format (DVD-RW only),
video format (DVD-RW, DVD-R), +VR format (DVD+RW, DVD+R)
Recordable discs
Video recording format
Compression format
Audio recording format
Sampling frequency
Compression format
Tuner
DVB-T channels
VHF Band
UHF Band IV
UHF Band
Input / Output
Front Panel:
USB port (TYPE A)
Rear Panel:
VHF / UHF antenna input / output terminal 75 ȍ
Audio input /output Two RCA connectors each
Video input /output
Input /output level
Audio output
Output level
Video output
Output level
Digital audio output One Optical jack
III
V
BD-RE, BD-R, DVD-ReWritable, DVD-Recordable, DVD+ReWritable,
DVD+Recordable
MPEG-2, MPEG-4 AVC(H.264)
48 kHz
Dolby Digital
Linear PCM (XP mode)
Dolby Digital Plus (TS mode)
MPEG (TS mode)
AAC(TS mode)
HE-AAC(TS mode)
6 - 12 ch
27 - 35 ch
36 - 69 ch
USB 2.0 (DC 5 V Max 500 mA )
One RCA connector each
1 Vp-p (75 ȍ) each
Two RCA connectors
2 Vrms (output impedance less than 1 Kȍ)
One RCA connector
1 Vp-p (75 ȍ)
HDMI output HDMI Jack
LAN terminal 10 BASE-T / 100 BASE-TX
Note
• The specifications and design of this product are subject to change without notice.
Page 77

Maximum number of titles / chapters / characters
The actual number which a media can contain may be
smaller than the numbers shown here depending on the
contents and for other reasons.
Others
77
For HDD / USB-HDD
Titles: 2,000
Chapters per title: 999
For BD-RE / BD-R disc
Titles: 200
Chapters per title: 100
Chapters per disc: 999
For DVD-RW (VR)
Titles: 99
Chapters per disc: 999
For DVD+RW (+VR) / DVD+R (+VR)
Titles: 49
Chapters per title: 99
Chapters per disc: 254
Others
Timer programmes: 100
Titles in the dubbing list: 36
Maximum duration of a recording title: 8 hours
Title name / disc name: Up to 60 characters*
* For DVD-RW (Video) / DVD-R (Video), up to 30 characters
for a title name, up to 60 characters for a disc name.
For DVD-RW (Video) / DVD-R (Video)
Titles: 36
Chapters per title: 99
License
This section describes software license used for this
product. This product uses some open source software:
Program name EULA Program name EULA Program name EULA
linux Exhibit A FLAC Exhibit C expat Exhibit E
busybox Exhibit A Tremor Exhibit C giflib Exhibit E
dhcpcd Exhibit A Oniguruma Exhibit C libxml2 Exhibit E
directfb Exhibit B universalchardet Exhibit D cURL Exhibit E
glibc Exhibit B Free Type Exhibit F
gmp Exhibit B LibJPEG Exhibit F
liexif Exhibit B Open SSL Exhibit F
Vera Fonts Exhibit F
TIFF Exhibit F
• Reverse engineering, disassembling, decompiling, dismantling, or otherwise attempting to analyse or modify the
software included in this product is prohibited.
Exhibit A
GPL
GNU GENERAL PUBLIC LICENSE
Version 2, June 1991
Copyright (C) 1989, 1991 Free Software Foundation, Inc., 51 Franklin Street, Fifth Floor,
Boston, MA 02110-1301,
Everyone is permitted to copy and distribute verbatim copies of this license document,
but changing it is not allowed.
The licenses for most software are designed to take away your freedom to share and
change it. By contrast, the GNU General Public License is intended to guarantee your
freedom to share and change free software--to make sure the software is free for all its
users. This General Public License applies to most of the Free Software Foundation's
software and to any other program whose authors commit to using it. (Some other Free
Software Foundation software is covered by the GNU Lesser General Public License
instead.) You can apply it to your programs, too.
When we speak of free software, we are referring to freedom, not price. Our General Public
Licenses are designed to make sure that you have the freedom to distribute copies of free
software (and charge for this service if you wish), that you receive source code or can get
it if you want it, that you can change the software or use pieces of it in new free programs;
and that you know you can do these things.
USA
Preamble
To protect your rights, we need to make restrictions that forbid anyone to deny you
these rights or to ask you to surrender the rights. These restrictions translate to certain
responsibilities for you if you distribute copies of the software, or if you modify it.
For example, if you distribute copies of such a program, whether gratis or for a fee, you
must give the recipients all the rights that you have. You must make sure that they, too,
receive or can get the source code. And you must show them these terms so they know
their rights.
We protect your rights with two steps: (1) copyright the software, and (2) offer you this
license which gives you legal permission to copy, distribute and/or modify the software.
Also, for each author's protection and ours, we want to make certain that everyone
understands that there is no warranty for this free software. If the software is modified by
someone else and passed on, we want its recipients to know that what they have is not the
original, so that any problems introduced by others will not reflect on the original authors'
reputations.
Finally, any free program is threatened constantly by software patents. We wish to avoid
the danger that redistributors of a free program will individually obtain patent licenses,
in effect making the program proprietary. To prevent this, we have made it clear that any
patent must be licensed for everyone's free use or not licensed at all.
The precise terms and conditions for copying, distribution and modification follow.
TERMS AND CONDITIONS FOR COPYING, DISTRIBUTION AND MODIFICATION
0. This License applies to any program or other work which contains a notice placed by
the copyright holder saying it may be distributed under the terms of this General Public
Continued on next page
Others
12
Page 78

Others
78
License. The "Program", below, refers to any such program or work, and a "work based
on the Program" means either the Program or any derivative work under copyright
law: that is to say, a work containing the Program or a portion of it, either verbatim or
with modifications and/or translated into another language. (Hereinafter, translation is
included without limitation in the term "modification".) Each licensee is addressed as
"you".
Activities other than copying, distribution and modification are not covered by this
License; they are outside its scope. The act of running the Program is not restricted, and
the output from the Program is covered only if its contents constitute a work based on
the Program (independent of having been made by running the Program). Whether that
is true depends on what the Program does.
1. You may copy and distribute verbatim copies of the Program's source code as you
receive it, in any medium, provided that you conspicuously and appropriately publish on
each copy an appropriate copyright notice and disclaimer of warranty; keep intact all the
notices that refer to this License and to the absence of any warranty; and give any other
recipients of the Program a copy of this License along with the Program.
You may charge a fee for the physical act of transferring a copy, and you may at your
option offer warranty protection in exchange for a fee.
2. You may modify your copy or copies of the Program or any portion of it, thus forming a
work based on the Program, and copy and distribute such modifications or work under
the terms of Section 1 above, provided that you also meet all of these conditions:
a) You must cause the modified files to carry prominent notices stating that you
changed the files and the date of any change.
b) You must cause any work that you distribute or publish, that in whole or in part
contains or is derived from the Program or any part thereof, to be licensed as a whole
at no charge to all third parties under the terms of this License.
c) If the modified program normally reads commands interactively when run, you must
cause it, when started running for such interactive use in the most ordinary way, to
print or display an announcement including an appropriate copyright notice and a
notice that there is no warranty (or else, saying that you provide a warranty) and that
users may redistribute the program under these conditions, and telling the user how
to view a copy of this License. (Exception: if the Program itself is interactive but does
not normally print such an announcement, your work based on the Program is not
required to print an announcement.)
These requirements apply to the modified work as a whole. If identifiable sections of that
work are not derived from the Program, and can be reasonably considered independent
and separate works in themselves, then this License, and its terms, do not apply to those
sections when you distribute them as separate works. But when you distribute the same
sections as part of a whole which is a work based on the Program, the distribution of the
whole must be on the terms of this License, whose permissions for other licensees extend
to the entire whole, and thus to each and every part regardless of who wrote it.
Thus, it is not the intent of this section to claim rights or contest your rights to work written
entirely by you; rather, the intent is to exercise the right to control the distribution of
derivative or collective works based on the Program.
In addition, mere aggregation of another work not based on the Program with the
Program (or with a work based on the Program) on a volume of a storage or distribution
medium does not bring the other work under the scope of this License.
3. You may copy and distribute the Program (or a work based on it, under Section 2) in
object code or executable form under the terms of Sections 1 and 2 above provided that
you also do one of the following:
a) Accompany it with the complete corresponding machine-readable source code,
which must be distributed under the terms of Sections 1 and 2 above on a medium
customarily used for software interchange; or,
b) Accompany it with a written offer, valid for at least three years, to give any third party,
for a charge no more than your cost of physically performing source distribution, a
complete machine-readable copy of the corresponding source code, to be distributed
under the terms of Sections 1 and 2 above on a medium customarily used for software
interchange; or,
c) Accompany it with the information you received as to the offer to distribute
corresponding source code. (This alternative is allowed only for noncommercial
distribution and only if you received the program in object code or executable form
with such an offer, in accord with Subsection b above.)
The source code for a work means the preferred form of the work for making
modifications to it. For an executable work, complete source code means all the source
code for all modules it contains, plus any associated interface definition files, plus the
scripts used to control compilation and installation of the executable. However, as a
special exception, the source code distributed need not include anything that is normally
distributed (in either source or binary form) with the major components (compiler,
kernel, and so on) of the operating system on which the executable runs, unless that
component itself accompanies the executable.
If distribution of executable or object code is made by offering access to copy from a
designated place, then offering equivalent access to copy the source code from the
same place counts as distribution of the source code, even though third parties are not
compelled to copy the source along with the object code.
4. You may not copy, modify, sublicense, or distribute the Program except as expressly
provided under this License. Any attempt otherwise to copy, modify, sublicense or
distribute the Program is void, and will automatically terminate your rights under this
License. However, parties who have received copies, or rights, from you under this
License will not have their licenses terminated so long as such parties remain in full
compliance.
5. You are not required to accept this License, since you have not signed it. However,
nothing else grants you permission to modify or distribute the Program or its derivative
works. These actions are prohibited by law if you do not accept this License. Therefore, by
modifying or distributing the Program (or any work based on the Program), you indicate
your acceptance of this License to do so, and all its terms and conditions for copying,
distributing or modifying the Program or works based on it.
6. Each time you redistribute the Program (or any work based on the Program), the
recipient automatically receives a license from the original licensor to copy, distribute
or modify the Program subject to these terms and conditions. You may not impose any
further restrictions on the recipients' exercise of the rights granted herein. You are not
responsible for enforcing compliance by third parties to this License.
7. If, as a consequence of a court judgment or allegation of patent infringement or for any
other reason (not limited to patent issues), conditions are imposed on you (whether
by court order, agreement or otherwise) that contradict the conditions of this License,
they do not excuse you from the conditions of this License. If you cannot distribute so
as to satisfy simultaneously your obligations under this License and any other pertinent
obligations, then as a consequence you may not distribute the Program at all. For
example, if a patent license would not permit royalty-free redistribution of the Program
by all those who receive copies directly or indirectly through you, then the only way you
could satisfy both it and this License would be to refrain entirely from distribution of the
Program.
If any portion of this section is held invalid or unenforceable under any particular
circumstance, the balance of the section is intended to apply and the section as a whole
is intended to apply in other circumstances.
It is not the purpose of this section to induce you to infringe any patents or other
property right claims or to contest validity of any such claims; this section has the
sole purpose of protecting the integrity of the free software distribution system,
which is implemented by public license practices. Many people have made generous
contributions to the wide range of software distributed through that system in reliance
on consistent application of that system; it is up to the author/donor to decide if he or
she is willing to distribute software through any other system and a licensee cannot
impose that choice.
This section is intended to make thoroughly clear what is believed to be a consequence
of the rest of this License.
8. If the distribution and/or use of the Program is restricted in certain countries either
by patents or by copyrighted interfaces, the original copyright holder who places the
Program under this License may add an explicit geographical distribution limitation
excluding those countries, so that distribution is permitted only in or among countries
not thus excluded. In such case, this License incorporates the limitation as if written in
the body of this License.
9. The Free Software Foundation may publish revised and/or new versions of the General
Public License from time to time. Such new versions will be similar in spirit to the present
version, but may differ in detail to address new problems or concerns.
Each version is given a distinguishing version number. If the Program specifies a version
number of this License which applies to it and "any later version", you have the option
of following the terms and conditions either of that version or of any later version
published by the Free Software Foundation. If the Program does not specify a version
number of this License, you may choose any version ever published by the Free Software
Foundation.
10. If you wish to incorporate parts of the Program into other free programs whose
distribution conditions are different, write to the author to ask for permission. For
software which is copyrighted by the Free Software Foundation, write to the Free
Software Foundation; we sometimes make exceptions for this. Our decision will be
guided by the two goals of preserving the free status of all derivatives of our free
software and of promoting the sharing and reuse of software generally.
NO WARRANTY
11. BECAUSE THE PROGRAM IS LICENSED FREE OF CHARGE, THERE IS NO WARRANTY
FOR THE PROGRAM, TO THE EXTENT PERMITTED BY APPLICABLE LAW. EXCEPT
WHEN OTHERWISE STATED IN WRITING THE COPYRIGHT HOLDERS AND/OR OTHER
PARTIES PROVIDE THE PROGRAM "AS IS" WITHOUT WARRANTY OF ANY KIND, EITHER
EXPRESSED OR IMPLIED, INCLUDING, BUT NOT LIMITED TO, THE IMPLIED WARRANTIES
OF MERCHANTABILITY AND FITNESS FOR A PARTICULAR PURPOSE. THE ENTIRE RISK AS
TO THE QUALITY AND PERFORMANCE OF THE PROGRAM IS WITH YOU. SHOULD THE
PROGRAM PROVE DEFECTIVE, YOU ASSUME THE COST OF ALL NECESSARY SERVICING,
REPAIR OR CORRECTION.
12. IN NO EVENT UNLESS REQUIRED BY APPLICABLE LAW OR AGREED TO IN WRITING
WILL ANY COPYRIGHT HOLDER, OR ANY OTHER PARTY WHO MAY MODIFY AND/
OR REDISTRIBUTE THE PROGRAM AS PERMITTED ABOVE, BE LIABLE TO YOU FOR
DAMAGES, INCLUDING ANY GENERAL, SPECIAL, INCIDENTAL OR CONSEQUENTIAL
DAMAGES ARISING OUT OF THE USE OR INABILITY TO USE THE PROGRAM (INCLUDING
BUT NOT LIMITED TO LOSS OF DATA OR DATA BEING RENDERED INACCURATE OR
LOSSES SUSTAINED BY YOU OR THIRD PARTIES OR A FAILURE OF THE PROGRAM TO
Page 79

OPERATE WITH ANY OTHER PROGRAMS), EVEN IF SUCH HOLDER OR OTHER PARTY
HAS BEEN ADVISED OF THE POSSIBILITY OF SUCH DAMAGES.
END OF TERMS AND CONDITIONS
How to Apply These Terms to Your New Programs
If you develop a new program, and you want it to be of the greatest possible use to
the public, the best way to achieve this is to make it free software which everyone can
redistribute and change under these terms.
To do so, attach the following notices to the program. It is safest to attach them to the
start of each source file to most effectively convey the exclusion of warranty; and each file
should have at least the "copyright" line and a pointer to where the full notice is found.
Others
The licenses for most software are designed to take away your freedom to share and
change it. By contrast, the GNU General Public Licenses are intended to guarantee your
freedom to share and change free software--to make sure the software is free for all its
users.
This license, the Lesser General Public License, applies to some specially designated
software packages-- typically libraries--of the Free Software Foundation and other authors
who decide to use it. You can use it too, but we suggest you first think carefully about
whether this license or the ordinary General Public License is the better strategy to use in
any particular case, based on the explanations below.
When we speak of free software, we are referring to freedom of use, not price. Our General
Public Licenses are designed to make sure that you have the freedom to distribute copies
of free software (and charge for this service if you wish); that you receive source code or
can get it if you want it; that you can change the software and use pieces of it in new free
programs; and that you are informed that you can do these things.
79
<one line to give the program's name and a brief idea of what it does.>
Copyright (C) <year> <name of author>
This program is free software; you can redistribute it and/or modify it under the terms
of the GNU General Public License as published by the Free Software Foundation; either
version 2 of the License, or (at your option) any later version.
This program is distributed in the hope that it will be useful, but WITHOUT ANY
WARRANTY; without even the implied warranty of MERCHANTABILITY or FITNESS FOR A
PARTICULAR PURPOSE. See the GNU General Public License for more details.
You should have received a copy of the GNU General Public License along with this
program; if not, write to the Free Software Foundation, Inc., 51 Franklin Street, Fifth
Floor, Boston, MA 02110-1301,
Also add information on how to contact you by electronic and paper mail.
If the program is interactive, make it output a short notice like this when it starts in an
interactive mode:
Gnomovision version 69, Copyright (C) year name of author Gnomovision comes with
ABSOLUTELY NO WARRANTY; for details type `show w'. This is free software, and you are
welcome to redistribute it under certain conditions; type `show c' for details.
The hypothetical commands `show w' and `show c' should show the appropriate parts of
the General Public License. Of course, the commands you use may be called something
other than `show w' and `show c'; they could even be mouse-clicks or menu items-whatever suits your program.
You should also get your employer (if you work as a programmer) or your school, if any,
to sign a "copyright disclaimer" for the program, if necessary. Here is a sample; alter the
names:
Yoyodyne, Inc., hereby disclaims all copyright interest in the program `Gnomovision'
(which makes passes at compilers) written by James Hacker.
<signature of
Ty Coon, President of
This General Public License does not permit incorporating your program into proprietary
programs. If your program is a subroutine library, you may consider it more useful to
permit linking proprietary applications with the library. If this is what you want to do, use
the GNU Lesser General Public License instead of this License.
Ty Coon>, 1 April 1989
Vice
USA.
Exhibit B
LGPL
GNU LESSER GENERAL PUBLIC LICENSE Version 2.1, February 1999
Copyright (C) 1991, 1999 Free Software Foundation, Inc. 51 Franklin Street, Fifth Floor,
Boston, MA 02110-1301 USA Everyone is permitted to copy and distribute verbatim
copies of this license document, but changing it is not allowed.
[This is the first released version of the Lesser GPL. It also counts as the successor of the
GNU Library Public License, version 2, hence the version number 2.1.]
To protect your rights, we need to make restrictions that forbid distributors to deny you
these rights or to ask you to surrender these rights. These restrictions translate to certain
responsibilities for you if you distribute copies of the library or if you modify it.
For example, if you distribute copies of the library, whether gratis or for a fee, you must
give the recipients all the rights that we gave you. You must make sure that they, too,
receive or can get the source code. If you link other code with the library, you must provide
complete object files to the recipients, so that they can relink them with the library after
making changes to the library and recompiling it. And you must show them these terms
so they know their rights.
We protect your rights with a two-step method: (1) we copyright the library, and (2) we
offer you this license, which gives you legal permission to copy, distribute and/or modify
the library.
To protect each distributor, we want to make it very clear that there is no warranty for the
free library. Also, if the library is modified by someone else and passed on, the recipients
should know that what they have is not the original version, so that the original author's
reputation will not be affected by problems that might be introduced by others.
Finally, software patents pose a constant threat to the existence of any free program. We
wish to make sure that a company cannot effectively restrict the users of a free program
by obtaining a restrictive license from a patent holder. Therefore, we insist that any patent
license obtained for a version of the library must be consistent with the full freedom of use
specified in this license.
Most GNU software, including some libraries, is covered by the ordinary GNU General
Public License. This license, the GNU Lesser General Public License, applies to certain
designated libraries, and is quite different from the ordinary General Public License. We
use this license for certain libraries in order to permit linking those libraries into non-free
programs.
When a program is linked with a library, whether statically or using a shared library, the
combination of the two is legally speaking a combined work, a derivative of the original
library. The ordinary General Public License therefore permits such linking only if the entire
combination fits its criteria of freedom. The Lesser General Public License permits more lax
criteria for linking other code with the library.
We call this license the "Lesser" General Public License because it does Less to protect
the user's freedom than the ordinary General Public License. It also provides other free
software developers Less of an advantage over competing non-free programs. These
disadvantages are the reason we use the ordinary General Public License for many
libraries. However, the Lesser license provides advantages in certain special circumstances.
For example, on rare occasions, there may be a special need to encourage the widest
possible use of a certain library, so that it becomes a de-facto standard. To achieve this,
non-free programs must be allowed to use the library. A more frequent case is that a free
library does the same job as widely used non-free libraries. In this case, there is little to
gain by limiting the free library to free software only, so we use the Lesser General Public
License.
In other cases, permission to use a particular library in non-free programs enables a greater
number of people to use a large body of free software. For example, permission to use the
GNU C Library in non-free programs enables many more people to use the whole GNU
operating system, as well as its variant, the GNU/Linux operating system.
Although the Lesser General Public License is Less protective of the users' freedom, it does
ensure that the user of a program that is linked with the Library has the freedom and the
wherewithal to run that program using a modified version of the Library.
The precise terms and conditions for copying, distribution and modification follow. Pay
close attention to the difference between a "work based on the library" and a "work that
uses the library". The former contains code derived from the library, whereas the latter
must be combined with the library in order to run.
Others
12
Preamble
TERMS AND CONDITIONS FOR COPYING, DISTRIBUTION AND MODIFICATION
GNU LESSER GENERAL PUBLIC LICENSE
Continued on next page
Page 80

Others
80
0. This License Agreement applies to any software library or other program which
contains a notice placed by the copyright holder or other authorized party saying it may
be distributed under the terms of this Lesser General Public License (also called "this
License"). Each licensee is addressed as "you".
A "library" means a collection of software functions and/or data prepared so as to be
conveniently linked with application programs (which use some of those functions and
data) to form executables.
The "Library", below, refers to any such software library or work which has been
distributed under these terms. A "work based on the Library" means either the Library or
any derivative work under copyright law: that is to say, a work containing the Library or
a portion of it, either verbatim or with modifications and/or translated straightforwardly
into another language. (Hereinafter, translation is included without limitation in the term
"modification".)
"Source code" for a work means the preferred form of the work for making modifications
to it. For a library, complete source code means all the source code for all modules it
contains, plus any associated interface definition files, plus the scripts used to control
compilation and installation of the library.
Activities other than copying, distribution and modification are not covered by this
License; they are outside its scope. The act of running a program using the Library is not
restricted, and output from such a program is covered only if its contents constitute a
work based on the Library (independent of the use of the Library in a tool for writing it).
Whether that is true depends on what the Library does and what the program that uses
the Library does.
1. You may copy and distribute verbatim copies of the Library's complete source code
as you receive it, in any medium, provided that you conspicuously and appropriately
publish on each copy an appropriate copyright notice and disclaimer of warranty; keep
intact all the notices that refer to this License and to the absence of any warranty; and
distribute a copy of this License along with the Library.
You may charge a fee for the physical act of transferring a copy, and you may at your
option offer warranty protection in exchange for a fee.
2. You may modify your copy or copies of the Library or any portion of it, thus forming a
work based on the Library, and copy and distribute such modifications or work under the
terms of Section 1 above, provided that you also meet all of these conditions:
a) The modified work must itself be a software library.
b) You must cause the files modified to carry prominent notices stating that you
changed the files and the date of any change.
in object code or executable form under the terms of Sections 1 and 2 above provided
that you accompany it with the complete corresponding machine-readable source code,
which must be distributed under the terms of Sections 1 and 2 above on a medium
customarily used for software interchange.
If distribution of object code is made by offering access to copy from a designated place,
then offering equivalent access to copy the source code from the same place satisfies the
requirement to distribute the source code, even though third parties are not compelled
to copy the source along with the object code.
5. A program that contains no derivative of any portion of the Library, but is designed to
work with the Library by being compiled or linked with it, is called a "work that uses the
Library". Such a work, in isolation, is not a derivative work of the Library, and therefore
falls outside the scope of this License.
However, linking a "work that uses the Library" with the Library creates an executable
that is a derivative of the Library (because it contains portions of the Library), rather than
a "work that uses the library". The executable is therefore covered by this License. Section
6 states terms for distribution of such executables.
When a "work that uses the Library" uses material from a header file that is part of the
Library, the object code for the work may be a derivative work of the Library even though
the source code is not. Whether this is true is especially significant if the work can be
linked without the Library, or if the work is itself a library. The threshold for this to be true
is not precisely defined by law.
If such an object file uses only numerical parameters, data structure layouts and
accessors, and small macros and small inline functions (ten lines or less in length), then
the use of the object file is unrestricted, regardless of whether it is legally a derivative
work. (Executables containing this object code plus portions of the Library will still fall
under Section 6.)
Otherwise, if the work is a derivative of the Library, you may distribute the object code
for the work under the terms of Section 6. Any executables containing that work also fall
under Section 6, whether or not they are linked directly with the Library itself.
6. As an exception to the Sections above, you may also combine or link a "work that
uses the Library" with the Library to produce a work containing portions of the Library,
and distribute that work under terms of your choice, provided that the terms permit
modification of the work for the customer's own use and reverse engineering for
debugging such modifications.
You must give prominent notice with each copy of the work that the Library is used in
it and that the Library and its use are covered by this License. You must supply a copy of
this License. If the work during execution displays copyright notices, you must include
the copyright notice for the Library among them, as well as a reference directing the user
to the copy of this License. Also, you must do one of these things:
c) You must cause the whole of the work to be licensed at no charge to all third parties
under the terms of this License.
d) If a facility in the modified Library refers to a function or a table of data to be supplied
by an application program that uses the facility, other than as an argument passed
when the facility is invoked, then you must make a good faith effort to ensure that,
in the event an application does not supply such function or table, the facility still
operates, and performs whatever part of its purpose remains meaningful.
(For example, a function in a library to compute square roots has a purpose that
is entirely welldefined independent of the application. Therefore, Subsection 2d
requires that any applicationsupplied function or table used by this function must
be optional: if the application does not supply it, the square root function must still
compute square roots.)
These requirements apply to the modified work as a whole. If identifiable sections of that
work are not derived from the Library, and can be reasonably considered independent
and separate works in themselves, then this License, and its terms, do not apply to those
sections when you distribute them as separate works. But when you distribute the same
sections as part of a whole which is a work based on the Library, the distribution of
the whole must be on the terms of this License, whose permissions for other licensees
extend to the entire whole, and thus to each and every part regardless of who wrote it.
Thus, it is not the intent of this section to claim rights or contest your rights to
work written entirely by you; rather, the intent is to exercise the right to control the
distribution of derivative or collective works based on the Library.
In addition, mere aggregation of another work not based on the Library with the Library
(or with a work based on the Library) on a volume of a storage or distribution medium
does not bring the other work under the scope of this License.
3. You may opt to apply the terms of the ordinary GNU General Public License instead
of this License to a given copy of the Library. To do this, you must alter all the notices
that refer to this License, so that they refer to the ordinary GNU General Public License,
version 2, instead of to this License. (If a newer version than version 2 of the ordinary GNU
General Public License has appeared, then you can specify that version instead if you
wish.) Do not make any other change in these notices.
Once this change is made in a given copy, it is irreversible for that copy, so the ordinary
GNU General Public License applies to all subsequent copies and derivative works made
from that copy.
This option is useful when you wish to copy part of the code of the Library into a program
that is not a library.
4. You may copy and distribute the Library (or a portion or derivative of it, under Section 2)
a) Accompany the work with the complete corresponding machine-readable source
code for the Library including whatever changes were used in the work (which
must be distributed under Sections 1 and 2 above); and, if the work is an executable
linked with the Library, with the complete machine-readable "work that uses the
Library", as object code and/or source code, so that the user can modify the Library
and then relink to produce a modified executable containing the modified Library.
(It is understood that the user who changes the contents of definitions files in the
Library will not necessarily be able to recompile the application to use the modified
definitions.)
b) Use a suitable shared library mechanism for linking with the Library. A suitable
mechanism is one that (1) uses at run time a copy of the library already present on the
user's computer system, rather than copying library functions into the executable, and
(2) will operate properly with a modified version of the library, if the user installs one,
as long as the modified version is interface-compatible with the version that the work
was made with.
c) Accompany the work with a written offer, valid for at least three years, to give the
same user the materials specified in Subsection 6a, above, for a charge no more than
the cost of performing this distribution.
d) If distribution of the work is made by offering access to copy from a designated place,
offer equivalent access to copy the above specified materials from the same place.
e) Verify that the user has already received a copy of these materials or that you have
already sent this user a copy.
For an executable, the required form of the "work that uses the Library" must include
any data and utility programs needed for reproducing the executable from it. However,
as a special exception, the materials to be distributed need not include anything that
is normally distributed (in either source or binary form) with the major components
(compiler, kernel, and so on) of the operating system on which the executable runs,
unless that component itself accompanies the executable.
It may happen that this requirement contradicts the license restrictions of other
proprietary libraries that do not normally accompany the operating system. Such
a contradiction means you cannot use both them and the Library together in an
executable that you distribute.
7. You may place library facilities that are a work based on the Library side-by-side in
a single library together with other library facilities not covered by this License, and
distribute such a combined library, provided that the separate distribution of the
work based on the Library and of the other library facilities is otherwise permitted, and
provided that you do these two things:
Page 81

a) Accompany the combined library with a copy of the same work based on the Library,
uncombined with any other library facilities. This must be distributed under the terms
of the Sections above.
b) Give prominent notice with the combined library of the fact that part of it is a work
based on the Library, and explaining where to find the accompanying uncombined
form of the same work.
8. You may not copy, modify, sublicense, link with, or distribute the Library except
as expressly provided under this License. Any attempt otherwise to copy, modify,
sublicense, link with, or distribute the Library is void, and will automatically terminate
your rights under this License. However, parties who have received copies, or rights, from
you under this License will not have their licenses terminated so long as such parties
remain in full compliance.
9. You are not required to accept this License, since you have not signed it. However,
nothing else grants you permission to modify or distribute the Library or its derivative
works. These actions are prohibited by law if you do not accept this License. Therefore,
by modifying or distributing the Library (or any work based on the Library), you indicate
your acceptance of this License to do so, and all its terms and conditions for copying,
distributing or modifying the Library or works based on it.
10. Each time you redistribute the Library (or any work based on the Library), the recipient
automatically receives a license from the original licensor to copy, distribute, link with
or modify the Library subject to these terms and conditions. You may not impose any
further restrictions on the recipients' exercise of the rights granted herein. You are not
responsible for enforcing compliance by third parties with this License.
11. If, as a consequence of a court judgment or allegation of patent infringement or for any
other reason (not limited to patent issues), conditions are imposed on you (whether
by court order, agreement or otherwise) that contradict the conditions of this License,
they do not excuse you from the conditions of this License. If you cannot distribute so
as to satisfy simultaneously your obligations under this License and any other pertinent
obligations, then as a consequence you may not distribute the Library at all. For
example, if a patent license would not permit royalty-free redistribution of the Library
by all those who receive copies directly or indirectly through you, then the only way
you could satisfy both it and this License would be to refrain entirely from distribution
of the Library.
Others
MERCHANTABILITY AND FITNESS FOR A PARTICULAR PURPOSE. THE ENTIRE RISK AS
TO THE QUALITY AND PERFORMANCE OF THE LIBRARY IS WITH YOU. SHOULD THE
LIBRARY PROVE DEFECTIVE, YOU ASSUME THE COST OF ALL NECESSARY SERVICING,
REPAIR OR CORRECTION.
16. IN NO EVENT UNLESS REQUIRED BY APPLICABLE LAW OR AGREED TO IN WRITING
WILL ANY COPYRIGHT HOLDER, OR ANY OTHER PARTY WHO MAY MODIFY AND/OR
REDISTRIBUTE THE LIBRARY AS PERMITTED ABOVE, BE LIABLE TO YOU FOR DAMAGES,
INCLUDING ANY GENERAL, SPECIAL, INCIDENTAL OR CONSEQUENTIAL DAMAGES
ARISING OUT OF THE USE OR INABILITY TO USE THE LIBRARY (INCLUDING BUT NOT
LIMITED TO LOSS OF DATA OR DATA BEING RENDERED INACCURATE OR LOSSES
SUSTAINED BY YOU OR THIRD PARTIES OR A FAILURE OF THE LIBRARY TO OPERATE
WITH ANY OTHER SOFTWARE), EVEN IF SUCH HOLDER OR OTHER PARTY HAS BEEN
ADVISED OF THE POSSIBILITY OF SUCH DAMAGES.
END OF TERMS AND CONDITIONS
How to Apply These Terms to Your New Libraries
If you develop a new library, and you want it to be of the greatest possible use to the
public, we recommend making it free software that everyone can redistribute and change.
You can do so by permitting redistribution under these terms (or, alternatively, under the
terms of the ordinary General
Public License).
To apply these terms, attach the following notices to the library. It is safest to attach them
to the start of each source file to most effectively convey the exclusion of warranty; and
each file should have at least the "copyright" line and a pointer to where the full notice is
found.
<one line to give the library's name and a brief idea of what it does.> Copyright (C)
<year> <name of author>
This library is free software; you can redistribute it and/or modify it under the terms of
the GNU Lesser General Public License as published by the Free Software Foundation;
either version 2.1 of the License, or (at your option) any later version.
81
If any portion of this section is held invalid or unenforceable under any particular
circumstance, the balance of the section is intended to apply, and the section as a whole
is intended to apply in other circumstances.
It is not the purpose of this section to induce you to infringe any patents or other
property right claims or to contest validity of any such claims; this section has the
sole purpose of protecting the integrity of the free software distribution system
which is implemented by public license practices. Many people have made generous
contributions to the wide range of software distributed through that system in reliance
on consistent application of that system; it is up to the author/donor to decide if he or
she is willing to distribute software through any other system and a licensee cannot
impose that choice.
This section is intended to make thoroughly clear what is believed to be a consequence
of the rest of this License.
12. If the distribution and/or use of the Library is restricted in certain countries either by
patents or by copyrighted interfaces, the original copyright holder who places the
Library under this License may add an explicit geographical distribution limitation
excluding those countries, so that distribution is permitted only in or among countries
not thus excluded. In such case, this License incorporates the limitation as if written in
the body of this License.
13. The Free Software Foundation may publish revised and/or new versions of the Lesser
General Public License from time to time. Such new versions will be similar in spirit to
the present version, but may differ in detail to address new problems or concerns.
Each version is given a distinguishing version number. If the Library specifies a version
number of this License which applies to it and "any later version", you have the option
of following the terms and conditions either of that version or of any later version
published by the Free Software Foundation. If the Library does not specify a license
version number, you may choose any version ever published by the Free Software
Foundation.
14. If you wish to incorporate parts of the Library into other free programs whose
distribution conditions are incompatible with these, write to the author to ask for
permission. For software which is copyrighted by the Free Software Foundation, write
to the Free Software Foundation; we sometimes make exceptions for this. Our decision
will be guided by the two goals of preserving the free status of all derivatives of our free
software and of promoting the sharing and reuse of software generally.
NO WARRANTY
This library is distributed in the hope that it will be useful, but WITHOUT ANY
WARRANTY; without even the implied warranty of MERCHANTABILITY or FITNESS FOR A
PARTICULAR PURPOSE. See the GNU Lesser General Public License for more details.
You should have received a copy of the GNU Lesser General Public License along with
this library; if not, write to the Free Software Foundation, Inc., 51 Franklin Street, Fifth
Floor, Boston, MA 02110-1301 USA.
Also add information on how to contact you by electronic and paper mail.
You should also get your employer (if you work as a programmer) or your school, if any, to
sign a "copyright disclaimer" for the library, if necessary. Here is a sample; alter the names:
Yoyodyne, Inc., hereby disclaims all copyright interest in the library `Frob' (a library for
tweaking knobs) written by James Random Hacker.
<signature of Ty Coon>, 1 April 1990
Ty Coon, President of Vice
That's all there is to it!
Exhibit C
BSD
Copyright (c) 2002, Xiph.org Foundation
Redistribution and use in source and binary forms, with or without modification, are
permitted provided that the following conditions are met:
- Redistributions of source code must retain the above copyright notice, this list of
conditions and the following disclaimer.
- Redistributions in binary form must reproduce the above copyright notice, this list of
conditions and the following disclaimer in the documentation and/or other materials
provided with the distribution.
Others
12
15. BECAUSE THE LIBRARY IS LICENSED FREE OF CHARGE, THERE IS NO WARRANTY
FOR THE LIBRARY, TO THE EXTENT PERMITTED BY APPLICABLE LAW. EXCEPT WHEN
OTHERWISE STATED IN WRITING THE COPYRIGHT HOLDERS AND/OR OTHER PARTIES
PROVIDE THE LIBRARY "AS IS" WITHOUT WARRANTY OF ANY KIND, EITHER EXPRESSED
OR IMPLIED, INCLUDING, BUT NOT LIMITED TO, THE IMPLIED WARRANTIES OF
- Neither the name of the Xiph.org Foundation nor the names of its contributors may be
used to endorse or promote products derived from this software without specific prior
written permission.
Continued on next page
Page 82

Others
82
THIS SOFTWARE IS PROVIDED BY THE COPYRIGHT HOLDERS AND CONTRIBUTORS ''AS
IS'' AND ANY EXPRESS OR IMPLIED WARRANTIES, INCLUDING, BUT NOT LIMITED TO, THE
IMPLIED WARRANTIES OF MERCHANTABILITY AND FITNESS FOR A PARTICULAR PURPOSE
ARE DISCLAIMED. IN NO EVENT SHALL THE FOUNDATION OR CONTRIBUTORS BE LIABLE
FOR ANY DIRECT, INDIRECT, INCIDENTAL, SPECIAL, EXEMPLARY, OR CONSEQUENTIAL
DAMAGES (INCLUDING, BUT NOT LIMITED TO, PROCUREMENT OF SUBSTITUTE GOODS
OR SERVICES; LOSS OF USE, DATA, OR PROFITS; OR BUSINESS INTERRUPTION) HOWEVER
CAUSED AND ON ANY THEORY OF LIABILITY, WHETHER IN CONTRACT, STRICT LIABILITY,
OR TORT (INCLUDING NEGLIGENCE OR OTHERWISE) ARISING IN ANY WAY OUT OF THE
USE OF THIS SOFTWARE, EVEN IF ADVISED OF THE POSSIBILITY OF SUCH DAMAGE.
Exhibit D
MPL
MOZILLA PUBLIC LICENSE
Version 1.1
---------------
1. Definitions.
and complying with all of the terms of, this License or a future version of this License
issued under Section 6.1. For legal entities, "You" includes any entity which controls,
is controlled by, or is under common control with You. For purposes of this definition,
"control" means (a) the power, direct or indirect, to cause the direction or management
of such entity, whether by contract or otherwise, or (b) ownership of more than fifty
percent (50%) of the outstanding shares or beneficial ownership of such entity.
2. Source Code License.
2.1. The Initial Developer Grant.
The Initial Developer hereby grants You a world-wide, royalty-free, non-exclusive license,
subject to third party intellectual property claims:
(a) under intellectual property rights (other than patent or trademark) Licensable by
Initial Developer to use, reproduce, modify, display, perform, sublicense and distribute
the Original Code (or portions thereof) with or without Modifications, and/or as part
of a Larger Work; and
(b) under Patents Claims infringed by the making, using or selling of Original Code,
to make, have made, use, practice, sell, and offer for sale, and/or otherwise dispose of
the Original Code (or portions thereof).
1.0.1. "Commercial Use" means distribution or otherwise making the Covered Code
available to a third party.
1.1. "Contributor" means each entity that creates or contributes to the creation of
Modifications.
1.2. "Contributor Version" means the combination of the Original Code, prior
Modifications used by a Contributor, and the Modifications made by that particular
Contributor.
1.3. "Covered Code" means the Original Code or Modifications or the combination of the
Original Code and Modifications, in each case including portions thereof.
1.4. "Electronic Distribution Mechanism" means a mechanism generally accepted in the
software development community for the electronic transfer of data.
1.5. "Executable" means Covered Code in any form other than Source Code.
1.6. "Initial Developer" means the individual or entity identified as the Initial Developer in
the Source Code notice required by Exhibit A.
1.7. "Larger Work" means a work which combines Covered Code or portions thereof
with code not governed by the terms of this License.
1.8. "License" means this document.
1.8.1. "Licensable" means having the right to grant, to the maximum extent possible,
whether at the time of the initial grant or subsequently acquired, any and all of the rights
conveyed herein.
1.9. "Modifications" means any addition to or deletion from the substance or structure of
either the Original Code or any previous Modifications. When Covered Code is released
as a series of files, a Modification is:
A. Any addition to or deletion from the contents of a file containing Original Code or
previous Modifications.
B. Any new file that contains any part of the Original Code or previous Modifications.
1.10. "Original Code" means Source Code of computer software code which is described
in the Source Code notice required by Exhibit A as Original Code, and which, at the time
of its release under this License is not already Covered Code governed by this License.
1.10.1. "Patent Claims" means any patent claim(s), now owned or hereafter acquired,
including without limitation, method, process, and apparatus claims, in any patent
Licensable by grantor.
1.11. "Source Code" means the preferred form of the Covered Code for making
modifications to it, including all modules it contains, plus any associated interface
definition files, scripts used to control compilation and installation of an Executable, or
source code differential comparisons against either the Original Code or another well
known, available Covered Code of the Contributor's choice. The Source Code can be in a
compressed or archival form, provided the appropriate decompression or de-archiving
software is widely available for no charge.
(c) the licenses granted in this Section 2.1(a) and (b) are effective on the date Initial
Developer first distributes Original Code under the terms of this License.
(d) Notwithstanding Section 2.1(b) above, no patent license is granted: 1) for code
that You delete from the Original Code; 2) separate from the Original Code; or
3) for infringements caused by: i) the modification of the Original Code or ii) the
combination of the Original Code with other software or devices.
2.2. Contributor Grant.
Subject to third party intellectual property claims, each Contributor hereby grants You a
world-wide, royalty-free, non-exclusive license
(a) under intellectual property rights (other than patent or trademark) Licensable by
Contributor, to use, reproduce, modify, display, perform, sublicense and distribute
the Modifications created by such Contributor (or portions thereof) either on an
unmodified basis, with other Modifications, as Covered Code and/or as part of a
Larger Work; and
(b) under Patent Claims infringed by the making, using, or selling of Modifications
made by that Contributor either alone and/or in combination with its Contributor
Version (or portions of such combination), to make, use, sell, offer for sale, have made,
and/or otherwise dispose of: 1) Modifications made by that Contributor (or portions
thereof); and 2) the combination of Modifications made by that Contributor with its
Contributor Version (or portions of such combination).
(c) the licenses granted in Sections 2.2(a) and 2.2(b) are effective on the date
Contributor first makes Commercial Use of the Covered Code.
(d) Notwithstanding Section 2.2(b) above, no patent license is granted: 1) for any
code that Contributor has deleted from the Contributor Version; 2) separate from the
Contributor Version; 3) for infringements caused by: i) third party modifications of
Contributor Version or ii) the combination of Modifications made by that Contributor
with other software (except as part of the Contributor Version) or other devices; or
4) under Patent Claims infringed by Covered Code in the absence of Modifications
made by that Contributor.
3. Distribution Obligations.
3.1. Application of License.
The Modifications which You create or to which You contribute are governed by the
terms of this License, including without limitation Section 2.2. The Source Code version
of Covered Code may be distributed only under the terms of this License or a future
version of this License released under Section 6.1, and You must include a copy of this
License with every copy of the Source Code You distribute. You may not offer or impose
any terms on any Source Code version that alters or restricts the applicable version of
this License or the recipients' rights hereunder. However, You may include an additional
document offering the additional rights described in Section 3.5.
3.2. Availability of Source Code.
Any Modification which You create or to which You contribute must be made available
in Source Code form under the terms of this License either on the same media as an
Executable version or via an accepted Electronic Distribution Mechanism to anyone to
whom you made an Executable version available; and if made available via Electronic
Distribution Mechanism, must remain available for at least twelve (12) months after the
date it initially became available, or at least six (6) months after a subsequent version
of that particular Modification has been made available to such recipients. You are
responsible for ensuring that the Source Code version remains available even if the
Electronic Distribution Mechanism is maintained by a third party.
1.12. "You" (or "Your") means an individual or a legal entity exercising rights under,
3.3. Description of Modifications.
Page 83

You must cause all Covered Code to which You contribute to contain a file documenting
the changes You made to create that Covered Code and the date of any change.
You must include a prominent statement that the Modification is derived, directly or
indirectly, from Original Code provided by the Initial Developer and including the name
of the Initial Developer in (a) the Source Code, and (b) in any notice in an Executable
version or related documentation in which You describe the origin or ownership of the
Covered Code.
3.4. Intellectual Property Matters
(a) Third Party Claims.
If Contributor has knowledge that a license under a third party's intellectual property
rights is required to exercise the rights granted by such Contributor under Sections
2.1 or 2.2, Contributor must include a text file with the Source Code distribution titled
"LEGAL" which describes the claim and the party making the claim in sufficient detail
that a recipient will know whom to contact. If Contributor obtains such knowledge
after the Modification is made available as described in Section 3.2, Contributor shall
promptly modify the LEGAL file in all copies Contributor makes available thereafter
and shall take other steps (such as notifying appropriate mailing lists or newsgroups)
reasonably calculated to inform those who received the Covered Code that new
knowledge has been obtained.
Others
This License applies to code to which the Initial Developer has attached the notice in
Exhibit A and to related Covered Code.
6. Versions of the License.
6.1. New Versions.
Netscape Communications Corporation ("Netscape") may publish revised and/or new
versions of the License from time to time. Each version will be given a distinguishing
version number.
6.2. Effect of New Versions.
Once Covered Code has been published under a particular version of the License, You
may always continue to use it under the terms of that version. You may also choose
to use such Covered Code under the terms of any subsequent version of the License
published by Netscape. No one other than Netscape has the right to modify the terms
applicable to Covered Code created under this License.
83
(b) Contributor APIs.
If Contributor's Modifications include an application programming interface and
Contributor has knowledge of patent licenses which are reasonably necessary to
implement that API, Contributor must also include this information in the LEGAL file.
(c) Representations.
Contributor represents that, except as disclosed pursuant to Section 3.4(a) above,
Contributor believes that Contributor's Modifications are Contributor's original
creation(s) and/or Contributor has sufficient rights to grant the rights conveyed by
this License.
3.5. Required Notices.
You must duplicate the notice in Exhibit A in each file of the Source Code. If it is not
possible to put such notice in a particular Source Code file due to its structure, then You
must include such notice in a location (such as a relevant directory) where a user would
be likely to look for such a notice. If You created one or more Modification(s) You may
add your name as a Contributor to the notice described in Exhibit A. You must also
duplicate this License in any documentation for the Source Code where You describe
recipients' rights or ownership rights relating to Covered Code. You may choose to
offer, and to charge a fee for, warranty, support, indemnity or liability obligations to
one or more recipients of Covered Code. However, You may do so only on Your own
behalf, and not on behalf of the Initial Developer or any Contributor. You must make
it absolutely clear than any such warranty, support, indemnity or liability obligation
is offered by You alone, and You hereby agree to indemnify the Initial Developer and
every Contributor for any liability incurred by the Initial Developer or such Contributor
as a result of warranty, support, indemnity or liability terms You offer.
3.6. Distribution of Executable Versions.
You may distribute Covered Code in Executable form only if the requirements of Section
3.1-3.5 have been met for that Covered Code, and if You include a notice stating that the
Source Code version of the Covered Code is available under the terms of this License,
including a description of how and where You have fulfilled the obligations of Section
3.2. The notice must be conspicuously included in any notice in an Executable version,
related documentation or collateral in which You describe recipients' rights relating
to the Covered Code. You may distribute the Executable version of Covered Code or
ownership rights under a license of Your choice, which may contain terms different from
this License, provided that You are in compliance with the terms of this License and that
the license for the Executable version does not attempt to limit or alter the recipient's
rights in the Source Code version from the rights set forth in this License. If You distribute
the Executable version under a different license You must make it absolutely clear that
any terms which differ from this License are offered by You alone, not by the Initial
Developer or any Contributor. You hereby agree to indemnify the Initial Developer and
every Contributor for any liability incurred by the Initial Developer or such Contributor
as a result of any such terms You offer.
3.7. Larger Works.
You may create a Larger Work by combining Covered Code with other code not
governed by the terms of this License and distribute the Larger Work as a single product.
In such a case, You must make sure the requirements of this License are fulfilled for the
Covered Code.
4. Inability to Comply Due to Statute or Regulation.
If it is impossible for You to comply with any of the terms of this License with respect to
some or all of the Covered Code due to statute, judicial order, or regulation then You
must: (a) comply with the terms of this License to the maximum extent possible; and (b)
describe the limitations and the code they affect. Such description must be included in
the LEGAL file described in Section 3.4 and must be included with all distributions of the
Source Code. Except to the extent prohibited by statute or regulation, such description
must be sufficiently detailed for a recipient of ordinary skill to be able to understand it.
5. Application of this License.
6.3. Derivative Works.
If You create or use a modified version of this License (which you may only do in order
to apply it to code which is not already Covered Code governed by this License), You
must (a) rename Your license so that the phrases "Mozilla", "MOZILLAPL", "MOZPL",
"Netscape", "MPL", "NPL" or any confusingly similar phrase do not appear in your license
(except to note that your license differs from this License) and (b) otherwise make
it clear that Your version of the license contains terms which differ from the Mozilla
Public License and Netscape Public License. (Filling in the name of the Initial Developer,
Original Code or Contributor in the notice described in Exhibit A shall not of themselves
be deemed to be modifications of this License.)
7. DISCLAIMER OF WARRANTY.
COVERED CODE IS PROVIDED UNDER THIS LICENSE ON AN "AS IS" BASIS, WITHOUT
WARRANTY OF ANY KIND, EITHER EXPRESSED OR IMPLIED, INCLUDING, WITHOUT
LIMITATION, WARRANTIES THAT THE COVERED CODE IS FREE OF DEFECTS,
MERCHANTABLE, FIT FOR A PARTICULAR PURPOSE OR NON-INFRINGING. THE ENTIRE
RISK AS TO THE QUALITY AND PERFORMANCE OF THE COVERED CODE IS WITH YOU.
SHOULD ANY COVERED CODE PROVE DEFECTIVE IN ANY RESPECT, YOU (NOT THE
INITIAL DEVELOPER OR ANY OTHER CONTRIBUTOR) ASSUME THE COST OF ANY
NECESSARY SERVICING, REPAIR OR CORRECTION. THIS DISCLAIMER OF WARRANTY
CONSTITUTES AN ESSENTIAL PART OF THIS LICENSE. NO USE OF ANY COVERED CODE IS
AUTHORIZED HEREUNDER EXCEPT UNDER THIS DISCLAIMER.
8. TERMINATION.
8.1. This License and the rights granted hereunder will terminate automatically if You
fail to comply with terms herein and fail to cure such breach within 30 days of becoming
aware of the breach. All sublicenses to the Covered Code which are properly granted
shall survive any termination of this License. Provisions which, by their nature, must
remain in effect beyond the termination of this License shall survive.
8.2. If You initiate litigation by asserting a patent infringement claim (excluding declatory
judgment actions) against Initial Developer or a Contributor (the Initial Developer or
Contributor against whom You file such action is referred to as "Participant") alleging
that:
(a) such Participant's Contributor Version directly or indirectly infringes any patent, then
any and all rights granted by such Participant to You under Sections 2.1 and/or 2.2 of
this License shall, upon 60 days notice from Participant terminate prospectively, unless
if within 60 days after receipt of notice You either: (i) agree in writing to pay Participant
a mutually agreeable reasonable royalty for Your past and future use of Modifications
made by such Participant, or (ii) withdraw Your litigation claim with respect to the
Contributor Version against such Participant. If within 60 days of notice, a reasonable
royalty and payment arrangement are not mutually agreed upon in writing by the
parties or the litigation claim is not withdrawn, the rights granted by Participant to You
under Sections 2.1 and/or 2.2 automatically terminate at the expiration of the 60 day
notice period specified above.
(b) any software, hardware, or device, other than such Participant's Contributor Version,
directly or indirectly infringes any patent, then any rights granted to You by such
Participant under Sections 2.1(b) and 2.2(b) are revoked effective as of the date You first
made, used, sold, distributed, or had made, Modifications made by that Participant.
8.3. If You assert a patent infringement claim against Participant alleging that such
Participant's Contributor Version directly or indirectly infringes any patent where such
claim is resolved (such as by license or settlement) prior to the initiation of patent
infringement litigation, then the reasonable value of the licenses granted by such
Participant under Sections 2.1 or 2.2 shall be taken into account in determining the
amount or value of any payment or license.
8.4. In the event of termination under Sections 8.1 or 8.2 above, all end user license
agreements (excluding distributors and resellers) which have been validly granted by
You or any distributor hereunder prior to termination shall survive termination.
Others
12
Continued on next page
Page 84

Others
84
9. LIMITATION OF LIABILITY.
or the [___] License."
UNDER NO CIRCUMSTANCES AND UNDER NO LEGAL THEORY, WHETHER TORT
(INCLUDING NEGLIGENCE), CONTRACT, OR OTHERWISE, SHALL YOU, THE INITIAL
DEVELOPER, ANY OTHER CONTRIBUTOR, OR ANY DISTRIBUTOR OF COVERED CODE,
OR ANY SUPPLIER OF ANY OF SUCH PARTIES, BE LIABLE TO ANY PERSON FOR ANY
INDIRECT, SPECIAL, INCIDENTAL, OR CONSEQUENTIAL DAMAGES OF ANY CHARACTER
INCLUDING, WITHOUT LIMITATION, DAMAGES FOR LOSS OF GOODWILL, WORK
STOPPAGE, COMPUTER FAILURE OR MALFUNCTION, OR ANY AND ALL OTHER
COMMERCIAL DAMAGES OR LOSSES, EVEN IF SUCH PARTY SHALL HAVE BEEN
INFORMED OF THE POSSIBILITY OF SUCH DAMAGES. THIS LIMITATION OF LIABILITY
SHALL NOT APPLY TO LIABILITY FOR DEATH OR PERSONAL INJURY RESULTING FROM
SUCH PARTY'S NEGLIGENCE TO THE EXTENT APPLICABLE LAW PROHIBITS SUCH
LIMITATION. SOME JURISDICTIONS DO NOT ALLOW THE EXCLUSION OR LIMITATION
OF INCIDENTAL OR CONSEQUENTIAL DAMAGES, SO THIS EXCLUSION AND LIMITATION
MAY NOT APPLY TO YOU.
10. U.S. GOVERNMENT END USERS.
The Covered Code is a "commercial item," as that term is defined in 48 C.F.R. 2.101
(Oct. 1995), consisting of "commercial computer software" and "commercial computer
software documentation," as such terms are used in 48 C.F.R. 12.212 (Sept. 1995).
Consistent with 48 C.F.R. 12.212 and 48 C.F.R. 227.7202-1 through 227.7202-4 (June
1995), all U.S. Government End Users acquire Covered Code with only those rights set
forth herein.
11. MISCELLANEOUS.
This License represents the complete agreement concerning subject matter hereof.
If any provision of this License is held to be unenforceable, such provision shall be
reformed only to the extent necessary to make it enforceable. This License shall be
governed by California law provisions (except to the extent applicable law, if any,
provides otherwise), excluding its conflict-of-law provisions. With respect to disputes in
which at least one party is a citizen of, or an entity chartered or registered to do business
in the United States of America, any litigation relating to this License shall be subject to
the jurisdiction of the Federal Courts of the Northern District of California, with venue
lying in Santa Clara County, California, with the losing party responsible for costs,
including without limitation, court costs and reasonable attorneys' fees and expenses.
The application of the United Nations Convention on Contracts for the International Sale
of Goods is expressly excluded. Any law or regulation which provides that the language
of a contract shall be construed against the drafter shall not apply to this License.
[NOTE: The text of this Exhibit A may differ slightly from the text of the notices in the
Source Code files of the Original Code. You should use the text of this Exhibit A rather
than the text found in the Original Code Source Code for Your Modifications.]
Exhibit E
MIT
Copyright (c)
Permission is hereby granted, free of charge, to any person obtaining a copy of this
software and associated documentation files (the "Software"), to deal in the Software
without restriction, including without limitation the rights to use, copy, modify, merge,
publish, distribute, sublicense, and/or sell copies of the Software, and to permit persons to
whom the Software is furnished to do so, subject to the following conditions:
The above copyright notice and this permission notice shall be included in all copies or
substantial portions of the Software.
THE SOFTWARE IS PROVIDED "AS IS", WITHOUT WARRANTY OF ANY KIND, EXPRESS OR
IMPLIED, INCLUDING BUT NOT LIMITED TO THE WARRANTIES OF MERCHANTABILITY,
FITNESS FOR A PARTICULAR PURPOSE AND NONINFRINGEMENT. IN NO EVENT SHALL THE
AUTHORS OR COPYRIGHT HOLDERS BE LIABLE FOR ANY CLAIM, DAMAGES OR OTHER
LIABILITY, WHETHER IN AN ACTION OF CONTRACT, TORT OR OTHERWISE, ARISING FROM,
OUT OF OR IN CONNECTION WITH THE SOFTWARE OR THE USE OR OTHER DEALINGS IN
THE SOFTWARE.
expat
Copyright (c) 1998, 1999, 2000 Thai Open Source Software Center Ltd
and Clark Cooper
Copyright (c) 2001, 2002, 2003, 2004, 2005, 2006 Expat maintainers.
12. RESPONSIBILITY FOR CLAIMS.
As between Initial Developer and the Contributors, each party is responsible for claims
and damages arising, directly or indirectly, out of its utilization of rights under this
License and You agree to work with Initial Developer and Contributors to distribute such
responsibility on an equitable basis. Nothing herein is intended or shall be deemed to
constitute any admission of liability.
13. MULTIPLE-LICENSED CODE.
Initial Developer may designate portions of the Covered Code as "Multiple-Licensed".
"Multiple-Licensed" means that the Initial Developer permits you to utilize portions
of the Covered Code under Your choice of the NPL or the alternative licenses, if any,
specified by the Initial Developer in the file described in Exhibit A.
EXHIBIT A -Mozilla Public License.
``The contents of this file are subject to the Mozilla Public License Version 1.1 (the
"License"); you may not use this file except in compliance with the License. You may
obtain a copy of the License at http://www.mozilla.org/MPL/
Software distributed under the License is distributed on an "AS IS" basis, WITHOUT
WARRANTY OF ANY KIND, either express or implied. See the License for the specific
language governing rights and limitations under the License.
The Original Code is ______________________________________.
The Initial Developer of the Original Code is ________________________.
Portions created by ______________________ are Copyright (C) ______
_______________________. All Rights Reserved.
Contributor(s): ______________________________________.
Alternatively, the contents of this file may be used under the terms of the _____ license
(the "[___] License"), in which case the provisions of [______] License are applicable
instead of those above. If you wish to allow use of your version of this file only under the
terms of the [____] License and not to allow others to use your version of this file under
the MPL, indicate your decision by deleting the provisions above and replace them
with the notice and other provisions required by the [___] License. If you do not delete
the provisions above, a recipient may use your version of this file under either the MPL
giflib
The GIFLIB distribution is Copyright (c) 1997 Eric S. Raymond
libxml2
Except where otherwise noted in the source code (e.g. the files hash.c, list.c and the trio
files, which are covered by a similar licence but with different Copyright notices) all the files
are:
Copyright (C) 1998-2003 Daniel Veillard. All Rights Reser
cURL
COPYRIGHT AND PERMISSION NOTICE
Copyright (c) 1996 - 2010, Daniel Stenberg, <daniel@haxx.se>.
All rights reserved.
Permission to use, copy, modify, and distribute this software for any purpose
with or without fee is hereby granted, provided that the above copyright
notice and this permission notice appear in all copies.
THE SOFTWARE IS PROVIDED "AS IS", WITHOUT WARRANTY OF ANY KIND, EXPRESS OR
IMPLIED, INCLUDING BUT NOT LIMITED TO THE WARRANTIES OF MERCHANTABILITY,
FITNESS FOR A PARTICULAR PURPOSE AND NONINFRINGEMENT OF THIRD PARTY RIGHTS. IN
NO EVENT SHALL THE AUTHORS OR COPYRIGHT HOLDERS BE LIABLE FOR ANY CLAIM,
DAMAGES OR OTHER LIABILITY, WHETHER IN AN ACTION OF CONTRACT, TORT OR
OTHERWISE, ARISING FROM, OUT OF OR IN CONNECTION WITH THE SOFTWARE OR THE USE
OR OTHER DEALINGS IN THE SOFTWARE.
Except as contained in this notice, the name of a copyright holder shall not
be used in advertising or otherwise to promote the sale, use or other dealings
in this Software without prior written authorization of the copyright holder.
Exhibit F
Free Type
Page 85

The FreeType Project LICENSE
Others
OF THE AUTHORS OR COPYRIGHT HOLDERS BE LIABLE FOR ANY DAMAGES CAUSED BY
THE USE OR THE INABILITY TO USE, OF THE FREETYPE PROJECT.
85
2006-Jan-27
Copyright 1996-2002, 2006 by
David Turner, Robert Wilhelm, and Werner Lemberg
Introduction
The FreeType Project is distributed in several archive packages; some of them may
contain, in addition to the FreeType font engine, various tools and contributions which
rely on, or relate to, the FreeType Project.
This license applies to all files found in such packages, and which do not fall under their
own explicit license. The license affects thus the FreeType font engine, the test programs,
documentation and
makefiles, at the very least.
This license was inspired by the BSD, Artistic, and IJG (Independent JPEG Group) licenses,
which all encourage inclusion and use of free software in commercial and freeware
products alike. As a consequence, its main points are that:
• We don't promise that this software works. However, we will be interested in any
kind of bug reports. (`as is' distribution)
• You can use this software for whatever you want, in parts or full form, without
having to pay us. (`royalty-free' usage)
• You may not pretend that you wrote this software. If you use it, or only parts of it,
in a program, you must acknowledge somewhere in your documentation that you
have used the FreeType code. (`credits')
We specifically permit and encourage the inclusion of this software, with or without
modifications, in commercial products. We disclaim all warranties covering The FreeType
Project and assume no liability related to The FreeType Project.
Finally, many people asked us for a preferred form for a credit/disclaimer to use in
compliance with this license. We thus encourage you to use the following text:
"""
Portions of this software are copyright© <year> The FreeType Project (www.freetype.
org). All rights reserved.
"""
Please replace <year> with the value from the FreeType version you actually use.
Legal Terms
0. Definitions
Throughout this license, the terms `package', `FreeType Project', and `FreeType archive'
refer to the set of files originally distributed by the authors (David Turner, Robert Wilhelm,
and Werner Lemberg) as the `FreeType Project', be they named as alpha, beta or final
release.
`You' refers to the licensee, or person using the project, where `using' is a generic term
including compiling the project's source code as well as linking it to form a `program' or
`executable'. This program is referred to as `a program using the FreeType engine'.
This license applies to all files distributed in the original FreeType Project, including all
source code, binaries and documentation, unless otherwise stated in the file in its original,
unmodified form as distributed in the original archive. If you are unsure whether or not a
particular file is covered by this license, you must contact us to verify this.
The FreeType Project is copyright (C) 1996-2000 by David Turner, Robert Wilhelm, and
Werner Lemberg. All rights reserved except as specified below.
1. No Warranty
THE FREETYPE PROJECT IS PROVIDED `AS IS' WITHOUT WARRANTY OF ANY KIND,
EITHER EXPRESS OR IMPLIED, INCLUDING, BUT NOT LIMITED TO, WARRANTIES OF
MERCHANTABILITY AND FITNESS FOR A PARTICULAR PURPOSE. IN NO EVENT WILL ANY
2. Redistribution
This license grants a worldwide, royalty-free, perpetual and irrevocable right and license
to use, execute, perform, compile, display, copy, create derivative works of, distribute and
sublicense the FreeType Project (in both source and object code forms) and derivative
works thereof for any purpose; and to authorize others to exercise some or all of the
rights granted herein, subject to the following conditions:
• Redistribution of source code must retain this license file (`FTL.TXT') unaltered; any
additions, deletions or changes to the original files must be clearly indicated in
accompanying documentation. The copyright notices of the unaltered, original
files must be preserved in all copies of source files.
• Redistribution in binary form must provide a disclaimer that states that the
software is based in part of the work of the FreeType Team, in the distribution
documentation. We also encourage you to put an URL to the FreeType web page
in your documentation, though this isn't mandatory.
These conditions apply to any software derived from or based on the FreeType Project,
not just the unmodified files. If you use our work, you must acknowledge us. However, no
fee need be paid to us.
3. Advertising
Neither the FreeType authors and contributors nor you shall use the name of the other
for commercial, advertising, or promotional purposes without specific prior written
permission.
We suggest, but do not require, that you use one or more of the following phrases to
refer to this software in your documentation or advertising materials: `FreeType Project',
`FreeType Engine', `FreeType library', or `FreeType Distribution'.
As you have not signed this license, you are not required to accept it. However, as the
FreeType Project is copyrighted material, only this license, or another one contracted
with the authors, grants you the right to use, distribute, and modify it. Therefore, by using,
distributing, or modifying the FreeType Project, you indicate that you understand and
accept all the terms of this license.
4. Contacts
There are two mailing lists related to FreeType:
• freetype@nongnu.org Discusses general use and applications of FreeType, as well
as future and wanted additions to the library and distribution. If you are looking
for support, start in this list if you haven't found anything to help you in the
documentation.
• freetype-devel@nongnu.org Discusses bugs, as well as engine internals, design
issues, specific licenses, porting, etc.
Our home page can be found at
http://www.freetype.org
LibJPEG
LEGAL ISSUES
============
In plain English:
1. We don't promise that this software works. (But if you find any bugs, please let us know!)
2. You can use this software for whatever you want. You don't have to pay us.
3. You may not pretend that you wrote this software. If you use it in a program, you must
acknowledge somewhere in your documentation that you've used the IJG code.
In legalese:
The authors make NO WARRANTY or representation, either express or implied, with
respect to this software, its quality, accuracy, merchantability, or fitness for a particular
purpose. This software is provided "AS IS", and you, its user, assume the entire risk as to its
quality and accuracy.
Continued on next page
Others
12
Page 86

Others
86
This software is copyright (C) 1991-1998, Thomas G. Lane. All Rights Reserved except as
specified below.
Permission is hereby granted to use, copy, modify, and distribute this software (or portions
thereof) for any purpose, without fee, subject to these conditions:
(1) If any part of the source code for this software is distributed, then this README file must
be included, with this copyright and no-warranty notice unaltered; and any additions,
deletions, or changes to the original files must be clearly indicated in accompanying
documentation.
(2) If only executable code is distributed, then the accompanying documentation must
state that "this software is based in part on the work of the Independent JPEG Group".
(3) Permission for use of this software is granted only if the user accepts full responsibility
for any undesirable consequences; the authors accept NO LIABILITY for damages of any
kind.
These conditions apply to any software derived from or based on the IJG code, not just to
the unmodified library. If you use our work, you ought to acknowledge us.
Permission is NOT granted for the use of any IJG author's name or company name in
advertising or publicity relating to this software or products derived from it. This software
may be referred to only as "the Independent JPEG Group's software".
We specifically permit and encourage the use of this software as the basis of commercial
products, provided that all warranty or liability claims are assumed by the product vendor.
ansi2knr.c is included in this distribution by permission of L. Peter Deutsch, sole proprietor
of its copyright holder, Aladdin Enterprises of Menlo Park, CA.
ansi2knr.c is NOT covered by the above copyright and conditions, but instead by the usual
distribution terms of the Free Software Foundation; principally, that
you must include source code if you redistribute it. (See the file ansi2knr.c for full details.)
However, since ansi2knr.c is not needed as part of any program generated from the IJG
code, this does not limit you more than the foregoing paragraphs do.
The Unix configuration script "configure" was produced with GNU Autoconf.
It is copyright by the Free Software Foundation but is freely distributable.
The same holds for its supporting scripts (config.guess, config.sub, ltconfig, ltmain.sh).
Another support script, install-sh, is copyright by M.I.T. but is also freely distributable.
It appears that the arithmetic coding option of the JPEG spec is covered by patents owned
by IBM, AT&T, and Mitsubishi. Hence arithmetic coding cannot
legally be used without obtaining one or more licenses. For this reason, support for
arithmetic coding has been removed from the free JPEG software.
(Since arithmetic coding provides only a marginal gain over the unpatented Huffman
mode, it is unlikely that very many implementations will support it.)
So far as we are aware, there are no patent restrictions on the remaining code.
The IJG distribution formerly included code to read and write GIF files.
To avoid entanglement with the Unisys LZW patent, GIF reading support has been
removed altogether, and the GIF writer has been simplified to produce
"uncompressed GIFs". This technique does not use the LZW algorithm; the resulting GIF
files are larger than usual, but are readable by all standard
GIF decoders.
We are required to state that
"The Graphics Interchange Format(c) is the Copyright property of
CompuServe Incorporated. GIF(sm) is a Service Mark property of
CompuServe Incorporated."
Open SSL
LICENSE ISSUES
==============
The OpenSSL toolkit stays under a dual license, i.e. both the conditions of
the OpenSSL License and the original SSLeay license apply to the toolkit.
See below for the actual license texts. Actually both licenses are BSD-style
Open Source licenses. In case of any license issues related to OpenSSL
please contact openssl-core@openssl.org.
OpenSSL License
/*
Copyright (c) 1998-2008 The OpenSSL Project. All rights reserved.
Redistribution and use in source and binary forms, with or without modification, are
permitted provided
that the following conditions are met:
1. Redistributions of source code must retain the above copyright notice, this list of
conditions and the following disclaimer.
2. Redistributions in binary form must reproduce the above copyright notice, this list of
conditions and the following disclaimer in the documentation and/or other materials
provided with the distribution.
3. All advertising materials mentioning features or use of this software must display the
following acknowledgment: "This product includes software developed by the OpenSSL
Project for use in the OpenSSL Toolkit. (http://www.openssl.org/)"
4. The names "OpenSSL Toolkit" and "OpenSSL Project" must not be used to endorse
or promote products derived from this software without prior written permission. For
written permission, please contact openssl-core@openssl.org.
5. Products derived from this software may not be called "OpenSSL" nor may "OpenSSL"
appear in their names without prior written permission of the OpenSSL Project.
6. Redistributions of any form whatsoever must retain the following acknowledgment:
"This product includes software developed by the OpenSSL Project for use in the
OpenSSL Toolkit (http://www.openssl.org/)"
THIS SOFTWARE IS PROVIDED BY THE OpenSSL PROJECT ``AS IS'' AND ANY EXPRESSED
OR IMPLIED WARRANTIES, INCLUDING, BUT NOT LIMITED TO, THE IMPLIED WARRANTIES
OF MERCHANTABILITY AND FITNESS FOR A PARTICULAR PURPOSE ARE DISCLAIMED.
IN NO EVENT SHALL THE OpenSSL PROJECT OR ITS CONTRIBUTORS BE LIABLE FOR ANY
DIRECT, INDIRECT, INCIDENTAL, SPECIAL, EXEMPLARY, OR CONSEQUENTIAL DAMAGES
(INCLUDING, BUT NOT LIMITED TO, PROCUREMENT OF SUBSTITUTE GOODS OR SERVICES;
LOSS OF USE, DATA, OR PROFITS; OR BUSINESS INTERRUPTION) HOWEVER CAUSED
AND ON ANY THEORY OF LIABILITY, WHETHER IN CONTRACT, STRICT LIABILITY, OR TORT
(INCLUDING NEGLIGENCE OR OTHERWISE) ARISING IN ANY WAY OUT OF THE USE OF THIS
SOFTWARE, EVEN IF ADVISED OF THE POSSIBILITY OF SUCH DAMAGE.
This product includes cryptographic software written by Eric Young (eay@cryptsoft.com).
This product includes software written by Tim Hudson (tjh@cryptsoft.com).
*/
Original SSLeay License
/* Copyright (C) 1995-1998 Eric Young (eay@cryptsoft.com) All rights reserved.
This package is an SSL implementation written by Eric Young (eay@cryptsoft.com).
The implementation was written so as to conform with Netscapes SSL.
This library is free for commercial and non-commercial use as long as the following
conditions are adhered to. The following conditions apply to all code found in this
distribution, be it the RC4, RSA, lhash, DES, etc., code; not just the SSL code. The SSL
documentation included with this distribution is covered by the same copyright terms
except that the holder is Tim Hudson (tjh@cryptsoft.com).
Copyright remains Eric Young's, and as such any Copyright notices in the code are not to be
removed.
If this package is used in a product, Eric Young should be given attribution as the author of the
parts of the library used. This can be in the form of a textual message at program startup or in
documentation (online or textual) provided with the package.
Redistribution and use in source and binary forms, with or without modification, are
permitted provided that the following conditions are met:
Page 87

1. Redistributions of source code must retain the copyright notice, this list of conditions and the
following disclaimer.
2. Redistributions in binary form must reproduce the above copyright notice, this list of conditions
and the following disclaimer in the documentation and/or other materials provided with the
distribution.
3. All advertising materials mentioning features or use of this software must display the following
acknowledgement: "This product includes cryptographic software written by Eric Young (eay@
cryptsoft.com)"
used are not cryptographic related :-).
4. If you include any Windows specific code (or a derivative thereof) from the apps directory
(application code) you must include an acknowledgement: "This product includes software
written by Tim Hudson (tjh@cryptsoft.co
THIS SOFTWARE IS PROVIDED BY ERIC YOUNG ``AS IS'' AND ANY EXPRESS OR IMPLIED
WARRANTIES, INCLUDING, BUT NOT LIMITED TO, THE IMPLIED WARRANTIES OF
MERCHANTABILITY AND FITNESS FOR A PARTICULAR PURPOSE ARE DISCLAIMED. IN NO
EVENT SHALL THE AUTHOR OR CONTRIBUTORS BE LIABLE FOR ANY DIRECT, INDIRECT,
INCIDENTAL, SPECIAL, EXEMPLARY, OR CONSEQUENTIAL DAMAGES (INCLUDING, BUT
NOT LIMITED TO, PROCUREMENT OF SUBSTITUTE GOODS OR SERVICES; LOSS OF USE,
DATA, OR PROFITS; OR BUSINESS INTERRUPTION) HOWEVER CAUSED AND ON ANY
THEORY OF LIABILITY, WHETHER IN CONTRACT, STRICT LIABILITY, OR TORT (INCLUDING
NEGLIGENCE OR OTHERWISE) ARISING IN ANY WAY OUT OF THE USE OF THIS SOFTWARE,
EVEN IF ADVISED OF THE POSSIBILITY OF SUCH DAMAGE.
The licence and distribution terms for any publically available version or derivative of this
code cannot be changed. i.e. this code cannot simply be copied and put under another
distribution licence [including the GNU Public Licence.]
*/
The word 'cryptographic' can be left out if the routines from the library being
m)"
Vera Fonts
Copyright
Copyright (c) 2003 by Bitstream, Inc. All Rights Reserved. Bitstream Vera is a trademark of
Bitstream, Inc.
Permission is hereby granted, free of charge, to any person obtaining a copy of the fonts
accompanying this license (“Fonts”) and associated documentation fi les (the “Font
Software”), to reproduce and distribute the Font Software, including without limitation
the rights to use, copy, merge, publish, distribute, and/or sell copies of the Font Software,
and to permit persons to whom the Font Software is furnished to do so, subject to the
following conditions:
The above copyright and trademark notices and this permission notice shall be included in
all copies of one or more of the Font Software typefaces.
The Font Software may be modifi ed, altered, or added to, and in particular the designs
of glyphs or characters in the Fonts may be modifi ed and additional glyphs or characters
may be added to the Fonts, only if the fonts are renamed to names not containing either
the words “Bitstream” or the word “Vera”.
This License becomes null and void to the extent applicable to Fonts or Font Software that
has been modifi ed and is distributed under the “Bitstream Vera” names.
The Font Software may be sold as part of a larger software package but no copy of one or
more of the Font Software typefaces may be sold by itself.
THE FONT SOFTWARE IS PROVIDED "AS IS", WITHOUT WARRANTY OF ANY KIND, EXPRESS
OR IMPLIED, INCLUDING BUT NOT LIMITED TO ANY WARRANTIES OF MERCHANTABILITY,
FITNESS FOR A PARTICULAR PURPOSE AND NONINFRINGEMENT OF COPYRIGHT,
PATENT, TRADEMARK, OR OTHER RIGHT. IN NO EVENT SHALL BITSTREAM OR THE GNOME
FOUNDATION BE LIABLE FOR ANY CLAIM, DAMAGES OR OTHER LIABILITY, INCLUDING
ANY GENERAL, SPECIAL, INDIRECT, INCIDENTAL, OR CONSEQUENTIAL DAMAGES,
WHETHER IN AN ACTION OF CONTRACT, TORT OR OTHERWISE, ARISING FROM, OUT OF
THE USE OR INABILITY TO USE THE FONT SOFTWARE OR FROM OTHER DEALINGS IN THE
FONT SOFTWARE.
Except as contained in this notice, the names of Gnome, the Gnome Foundation, and
Bitstream Inc., shall not be used in advertising or otherwise to promote the sale, use or
other dealings in this Font Software without prior written authorization from the Gnome
Foundation or Bitstream Inc., respectively. For further information, contact: fonts at gnome
dot org.
Others
IMPLIED OR OTHERWISE, INCLUDING WITHOUT LIMITATION, ANY WARRANTY OF
MERCHANTABILITY OR FITNESS FOR A PARTICULAR PURPOSE.
IN NO EVENT SHALL SAM LEFFLER OR SILICON GRAPHICS BE LIABLE FOR ANY SPECIAL,
INCIDENTAL, INDIRECT OR CONSEQUENTIAL DAMAGES OF ANY KIND, OR ANY DAMAGES
WHATSOEVER RESULTING FROM LOSS OF USE, DATA OR PROFITS, WHETHER OR NOT
ADVISED OF THE POSSIBILITY OF DAMAGE, AND ON ANY THEORY OF LIABILITY, ARISING
OUT OF OR IN CONNECTION WITH THE USE OR PERFORMANCE OF THIS SOFTWARE.
87
Others
TIFF
Copyright (c) 1988-1997 Sam Leffler
Copyright (c) 1991-1997 Silicon Graphics, Inc.
Permission to use, copy, modify, distribute, and sell this software and its documentation for
any purpose is hereby granted without fee, provided that (i) the above copyright notices
and this permission notice appear in all copies of the software and related documentation,
and (ii) the names of Sam Leffler and Silicon Graphics may not be used in any advertising
or publicity relating to the software without the specific, prior written permission of Sam
Leffler and Silicon Graphics.
THE SOFTWARE IS PROVIDED "AS-IS" AND WITHOUT WARRANTY OF ANY KIND, EXPRESS,
12
Page 88

 Loading...