


LG ARNH08GK3A2 User Manual [en, de, es, fr, it, cs, pl]
OWNER’S MANUAL
AIR CONDITIONER
Please read this manual carefully before operating
your set and retain it for future reference.
P/NO : MFL67870215
www.lg.com
TYPE :
Hydro Kit (For High Temperature)
ITALIANO ESPAÑOL
FRANÇAIS
DEUTSCH
ΕΛΛΗΝΙΚΆ
ČEŠTINA
NEDERLANDS
POLSKI
LIMBA ROMÂNĂ
ENGLISH
PORTUGUESE
MAGYAR
БЪЛГАРСKN
SRPSKI
HRVATSKI
SVENDKA
NORSK SUOMI
DANSK

2 Hydro Kit
Hydro Kit Owner’s Manual
TABLE OF CONTENTS
FOR YOUR RECORDS
Write the model and serial numbers here:
Model #
Serial #
You can find them on a label on the side of each
unit.
Installer's Name
Purchased Date
■
Staple your receipt to this page in the event you
need it to prove date of purchase or for warranty
issues.
READ THIS MANUAL
Inside you will find many helpful hints on how to use and
maintain your
Hydro Kit
properly. Just a little preventive
care on your part can save you a great deal of time and
money over the life of your product.
You'll find many answers to common problems in the
chart of troubleshooting tips. If you review our chart of
Troubleshooting Tips first, you may not need to call for
service at all.
PRECAUTION
• Contact the authorized service technician for repair or
maintenance of this unit.
• Contact the installer for installation of this unit.
•
Hydro Kit
is not intended for use by young children
or invalids without supervision.
• Young children should be supervised to ensure that
they do not play with
Hydro Kit
.
• When the power cable is to be replaced, replacement
work must be performed by authorized personnel
only using only genuine replacement parts.
• Installation work must be performed in accordance
with the National Electric Code by qualified and
authorized personnel only.
Safety Precautions .............................3
Product Introduction ..........................6
Owner's Instruction ............................8
Using Thermostat .............................21
Maintenance and Service.................24
Management of plate-type heat
exchanger..........................................25
Safety Precaution
Owner’s Manual 3
Hydro Kit
ENGLISH
Safety Precautions
To prevent injury to the user or other people and property damage, the following instructions must be
followed.
■ Incorrect operation due to ignoring instruction will cause harm or damage. The seriousness is
classified by the following indications.
WARNING
CAUTION
This symbol indicates the possibility of death or serious injury.
This symbol indicates the possibility of injury or damage.
WARNING
Always ground the product.
•
There is a risk of electric shock.
Do not use a defective or underrated circuit breaker. Use this appliance on a
dedicated circuit.
•
There is risk of fire or electric shock.
Do not use a multi outlet. Always use
this appliance on a dedicated circuit and
breaker.
•
It can cause electric shock or fire.
For electrical work, contact the dealer, seller,
a qualified electrician, or an Authorized
Service Center. Do not disassemble or repair
the product by yourself.
•
There is risk of fire or electric shock.
Always ground the product as per the
wiring diagram. Do not connect the
ground wire to gas or water pipes lightening rod or telephone ground wire.
•
There is risk of fire or electric shock.
Install the panel and the cover of control
box securely.
•
There is risk of fire or electric shock
due to dust , water etc.
Use the correctly rated breaker or
fuse.
•
There is risk of fire or electric shock.
Do not modify or extend the power
cable. If the power cable or cord has
scratches or skin peeled off or deteriorated then it must be replaced.
•
There is risk of fire or electric shock.
For installation, removal or reinstallation , always contact the dealer or an
Authorized Service Center.
•
There is risk of fire, electric shock,
explosion, or injury.
Do not install the product on a
defective installation stand. Be sure
that the installation area does not
deteriorate with age.
•
It may cause product to fall.
Never install the outdoor unit on a
moving base or a place from where it
can fall down.
•
The falling outdoor unit can cause
damage or injury or even death of a
person.
When the product is soaked (flooded or
submerged) in water , contact an
Authorized Service Center for repair
before using it again.
•
There is risk of fire or electric shock.
Be sure to check the refrigerant to
be used. Please read the label on the
product.
•
Incorrect refrigerant can prevent the
normal operation of the unit.
Don't use a power cord, a plug or a
loose socket which is damaged.
•
Otherwise it may cause a fire or
electrical shock.
Do not touch , operate, or repair the
product with wet hands.
• T
here is risk of electric shock or fire.

Indoor/outdoor wiring connections must
be secured tightly and the cable should
be routed properly so that there is no
force pulling the cable from the connection terminals.
•
Improper or loose connections can
cause heat generation or fire.
Safely dispose off the packing materials.
Like screws, nails, batteries, broken
things etc after installation or service
and then tear away and throw away the
plastic packaging bags.
•
Children may play with them and
cause injury.
Make sure to check that the power
device is not dirty, loose or broken and
then Turn on the power.
•
Dirty, loose or broken power device
can cause electric shock or fire.
Do not use the product in a tightly
closed space for a long time. Perform
ventilation regularly.
•
Oxygen deficiency could occur and
hence harm your health.
Do not open the front cover or grille of the
product during operation. (Do not touch the
electrostatic filter, if the unit is so equipped.)
•
There is risk of physical injury, electric
shock, or product failure.
If strange sounds, smell or smoke comes
from product, immediately turn the breaker
off or disconnect the power supply cable.
•
There is risk of electric shock or fire.
Ventilate the product room from time
to time when operating it together with
a stove, or heating element etc.
• Oxygen deficiency can occur and hence
harm your health.
Turn the main power off when cleaning or repairing the product.
•
There is risk of electric shock.
Take care to ensure that nobody especially kids could step on or fall onto
the outdoor unit.
• This could result in personal injury and
product damage.
Take care to ensure that power cable
could not be pulled out or damaged
during operation.
•
There is risk of fire or electric shock.
Do not place ANYTHING on the power
cable.
•
There is risk of fire or electric shock.
When flammable gas leaks, turn off the
gas and open a window for ventilation
before turning the product on.
•
Do not use the telephone or turn switches
on or off. There is risk of explosion or fire.
In outdoor unit the step-up capacitor
supplies high voltage electricity to the
electrical components. Be sure to discharge the capacitor completely
before conducting the repair work.
•
An charged capacitor can cause electrical shock.
When installing the unit, use the installation kit provided with the product.
•
Otherwise the unit may fall and cause
severe injury.
Be sure to use only those parts which
are listed in the service parts list. Never
attempt to modify the equipment.
•
The use of inappropriate parts can
cause an electrical shock, excessive
heat generation or fire.
4 Hydro Kit
Safety Precaution
Do not place a heater or other heating
appliances near the power cable.
•
There is risk of fire and electric shock.
Do not allow water to run into electric
parts. Install the unit away from water
sources.
•
There is risk of fire, failure of the product, or electric shock.
Do not store or use or even allow flammable gas or combustibles near the
product.
•
There is risk of fire
.
CAUTION
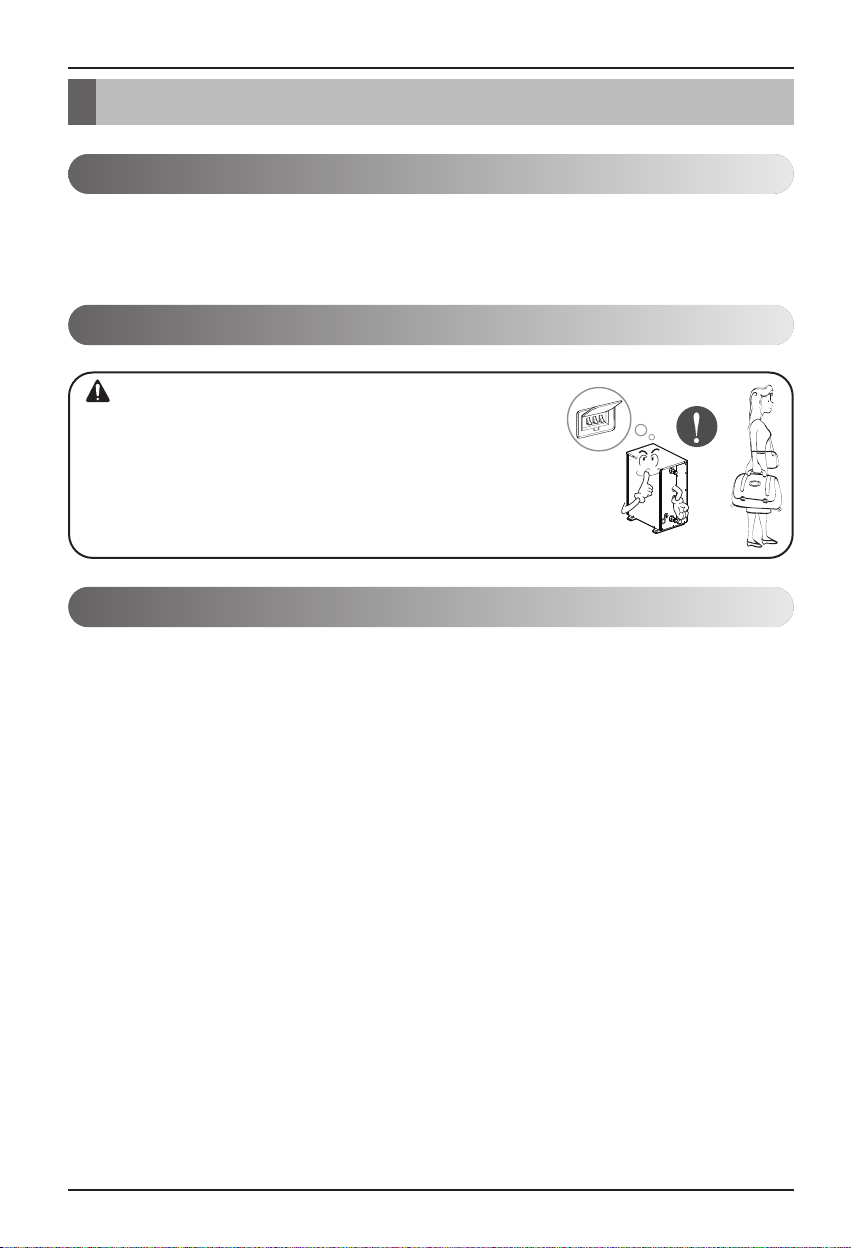
Two or more people must lift and transport the product.
•
Avoid personal injury.
Do not install the product where it will be
exposed to sea wind (salt spray) directly.
•
It may cause corrosion on the product.
Keep level even when installing the
product.
•
To avoid vibration or noise.
Do not install the product where the
noise or hot air from the outdoor unit
could damage or disturb the neighborhoods.
•
It may cause a problem for your neighbors and hence dispute.
Always check for gas (refrigerant) leakage after installation or repair of product.
•
Low refrigerant levels may cause failure
of product.
Do not use the product for special purposes, such as preserving foods, works
of art, etc. It is a consumer Hydro Kit,
not a precision refrigeration system.
•
There is risk of damage or loss of property.
Do not block the inlet or outlet of air
flow.
•
It may cause product failure.
Use a soft cloth to clean. Do not use
harsh detergents, solvents or splashing
water etc .
•
There is risk of fire, electric shock, or
damage to the plastic parts of the product.
Do not step on or put anyting on the
product. (outdoor units)
•
There is risk of personal injury and failure
of product.
Do not insert hands or other objects
through the air inlet or outlet while
the product is operating.
•
There are sharp and moving parts that
could cause personal injury.
Be cautious when unpacking and
installing the product.
•
Sharp edges could cause injury.
If the refrigerant gas leaks during the
repair, do not touch the leakaing refrigerant gas.
•
The refrigernat gas can cause frostbite
(cold burn)
Do not tilt the unit when removing or
uninstalling it.
•
The condensed water inside can spill.
If the refrigerant gas leaks during
the installation, ventilate the area
immediately.
•
Otherwise it can be harmfull for your
health.
Dismantling the unit, treatment of the
refrigerant oil and eventual parts
should be done in accordance with
local and national standards.
Do not expose your skin or kids or
plants to the cool or hot air draft.
•
This could harm to your health.
Use a firm stool or ladder when
cleaning, maintaining or repairing the
product at an height.
•
Be careful and avoid personal injury.
Owner’s Manual 5
Hydro Kit
Safety Precaution
ENGLISH
Product Introduction
Product Introduction
6 Hydro Kit
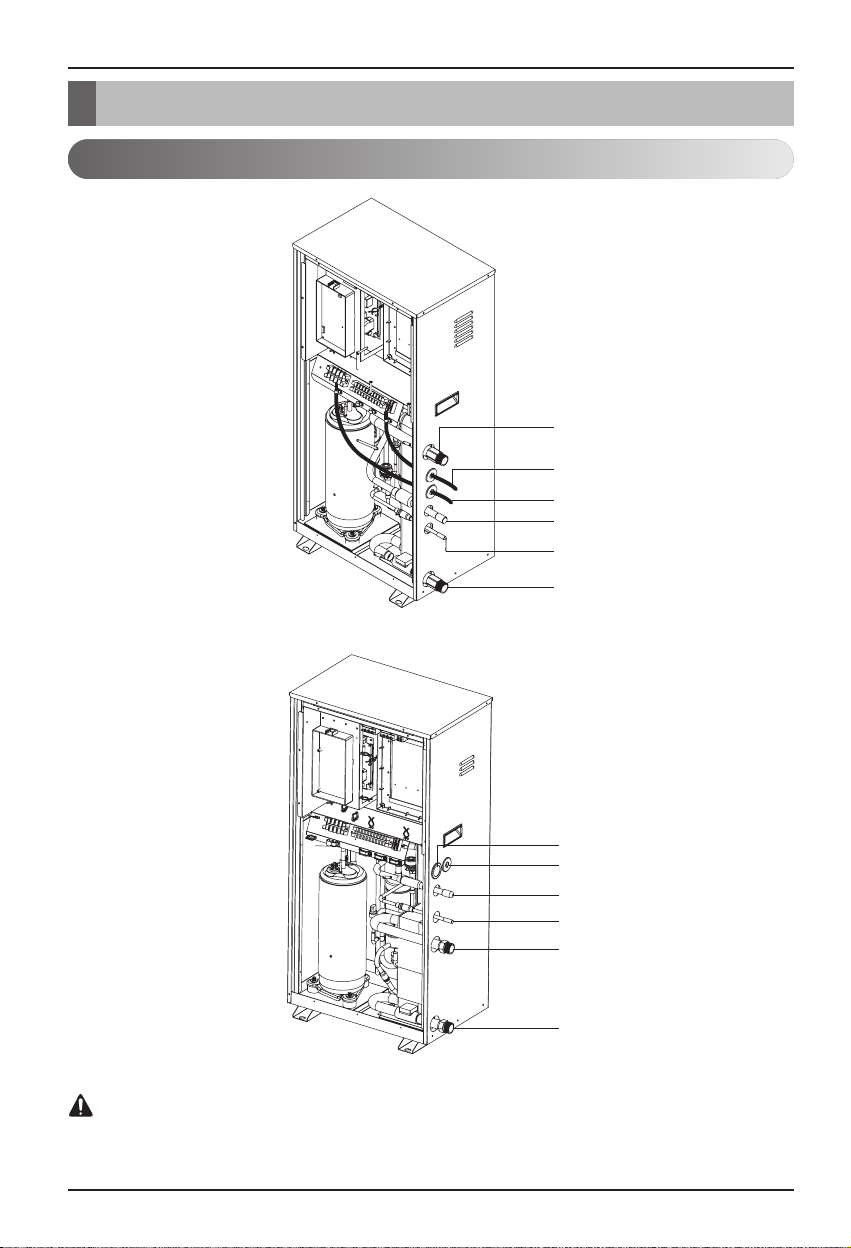
Typical Installation Scene
Water Out
Communication Cable
Power Cable
Gas Side
Liquid Side
Water In
Use of power supply separate power for the indoor unit. (Do not connect and use from the
power terminal of the outdoor unit.)
CAUTION
8HP(ARNH08GK3A2)
4HP(ARNH04GK3A2)
Communication Cable
Power Cable
Gas Side
Liquid Side
Water Out
Water In
❈ Grey painted functions may not be operated and displayed.
Remote Controller
ZDWHU
WHPS
RSHU
KHDWLQJ
PRGH
Owner’s Manual 7
Hydro Kit
Product Introduction
ENGLISH
No Name
1 Display
2 Change Temperature Button
3 Water Heating Enable / Disable Button
4 Power Button
5 Operation Mode Selection Button
6 Silent Mode On / Off Button
7 Temperature Setting Mode Button
8 Temperature View Mode Button
9 Function Setting Button
10 Programming Button
11 Direction Button (Up, Down, Left, Right)
12 Set / Clear button
13 ESC Button
ڸ
ۀ
ڿ
ھ
ڽ
ہ
ۂ
WHPS
ZDWHU
KHDWLQJ
RSHU
PRGH
ڹ
ں
ڻ
ڼ
ۃ
ۄ
8 Hydro Kit
Owner's instruction
WATER PUMP
This icon indicates that the water pump is active.
DEFROSTING
This icon indicates that the defrost mode is active.
In space heating operation or sanitary water tank heating operation, freezing of the outdoor heat exchanger may be occur due to low outdoor temperature and humidity. If this
risk occurs, the product goes into defrost operation. It reverses the cycle and takes heat
from the indoor system to prevent freezing of the outdoor system. This mode is automatically operating.
MAINTAIN LOWEST TEMPERATURE
The purpose of this mode is maintaining the temperature to prevent damage by freezing of
water pipe.
OUTDOOR
This icon indicates that the outdoor unit is active.
CHILD LOCK
NO FUNCTION
Monitoring Information
Owner's Instruction
Owner's instruction
CENTRAL CONTROLLER
This icon indicates that the product is controlled by the central controller.
THERMOSTAT
This icon indicates connection with thermostat.
SLIGHT TROUBLE
This icon indicates that slight trouble occurs.
HEAVY TROUBLE
This icon indicates that heavy trouble occurs.
Owner’s Manual 9
Hydro Kit
ENGLISH
10 Hydro Kit
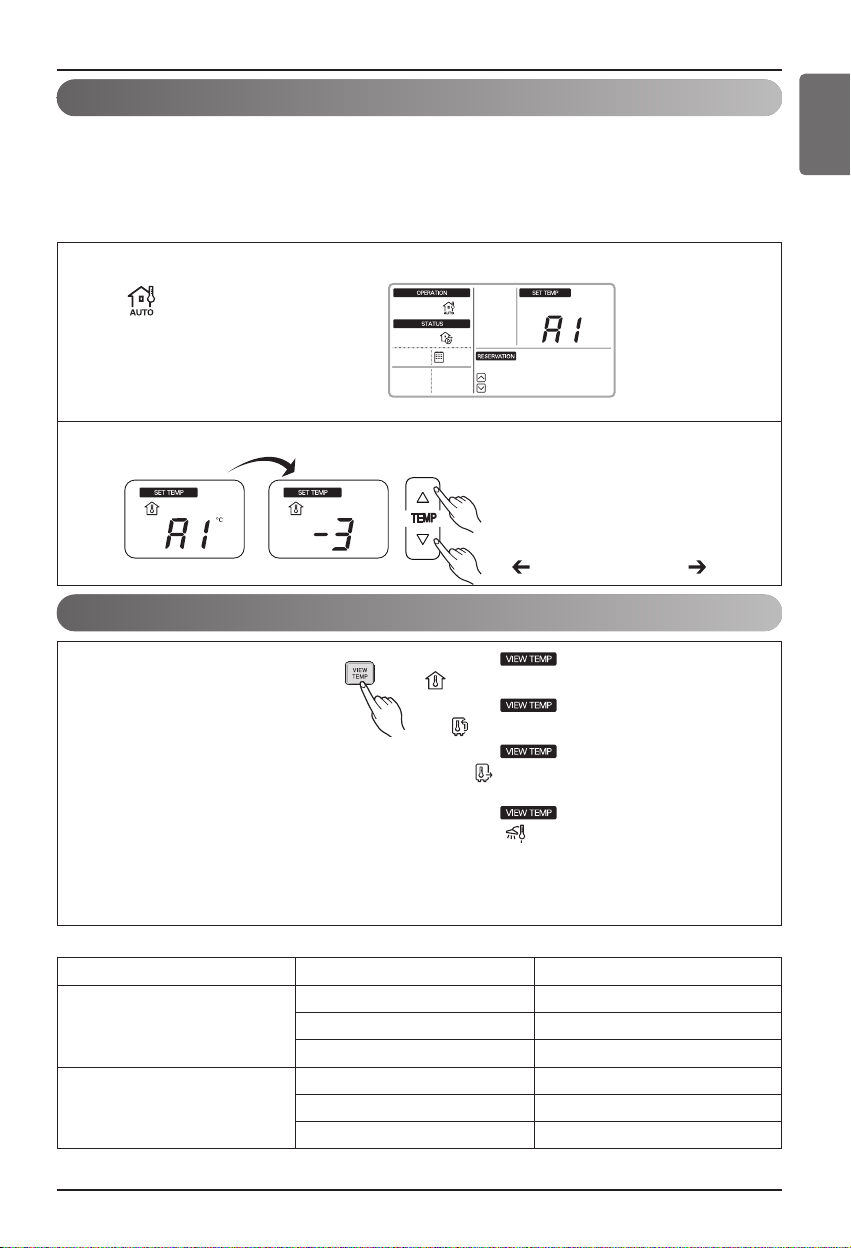
Selecting Target Temperature
❊ Note
: Increase 1°C or 2°F per one time pressing
: Decrease 1°C or 2°F per one time pressing
• We can change the temperature range of each mode on installation setting mode. Please refer
to Function Code 11 to 15.
• Room Temperature setting is available when Remote Room Air Sensor (sold separately) is
installed. Please refer to Function Code 03.
• Sanitary Water Tank temperature setting is available when Sanitary Water Tank is installed.
Owner's instruction
Mode Change
Turn on the product and select operation mode.
Operation Mode
• Heating Operation - The product yields hot water to use in under floor heating or FCU heating.
• Weather dependent Heating Operation - In this mode, heating setpoint is automatically determined
by pre-defined temperature profile.
1
Press Power Button to turn on the product.
2
Press OPER MODE Button to select each operation mode.
Heating operation Weather dependent
operation
1
Press SET TEMP Button to select each operation mode.
2
Adjust desired temperature by pressing Change Temperature buttons on each mode.
Room temperature Leaving Water tempera-
ture
Sanitary Water Tank
temperature
To raise the Temperature
To lower the Temperature
Owner's instruction
Weather-dependent Operation
This mode is only applied to heating.
In order to save energy and to give highest comfort, setting temperature will follow outside tempera-
ture. If outdoor temperature decreases, heating capacity for the house will increase automatically in
order to keep same room temperature. All parameters will be set by installer during start-up procedure and will be adapted to the site characteristic.
Owner’s Manual 11
Hydro Kit
ENGLISH
1
Press OPER MODE Button to select Weather-dependent operation mode.
2
Adjust the desired temperature level by pressing Change Temperature buttons.
1
Press repeatedly View
Temperature Button to select
each Temperature.
(Whenever press View
Temperature button, the room
temperature will be displayed
during 5 seconds.)
View Temperature
Temperature Temperature Range Displayed as
below 11°C(51°F) Lo
Air 11℃(51℉) ~ 39℃(102℉) actual temperature
above 39°C(102°F) Hi
below 0°C(32°F) Lo
Water 0℃(32°F) ~ 92°C(197°F) actual temperature
above 92°C(197°F) Hi
: Weather Dependent
operation icon
Ex)
Decreasing temperature profile by 3°C
(based on room air temperature)
<Temperature adjust step (unit : °C)>
-5, -4, -3, -2, -1, 0, 1, 2, 3, 4, 5
: View Room Temperature
: View Inlet Temperature
: View Outlet Temperature
:
View Sanitary Water Temperature
(ONLY displayed when sanitary
water heating mode)
Hot
Cold
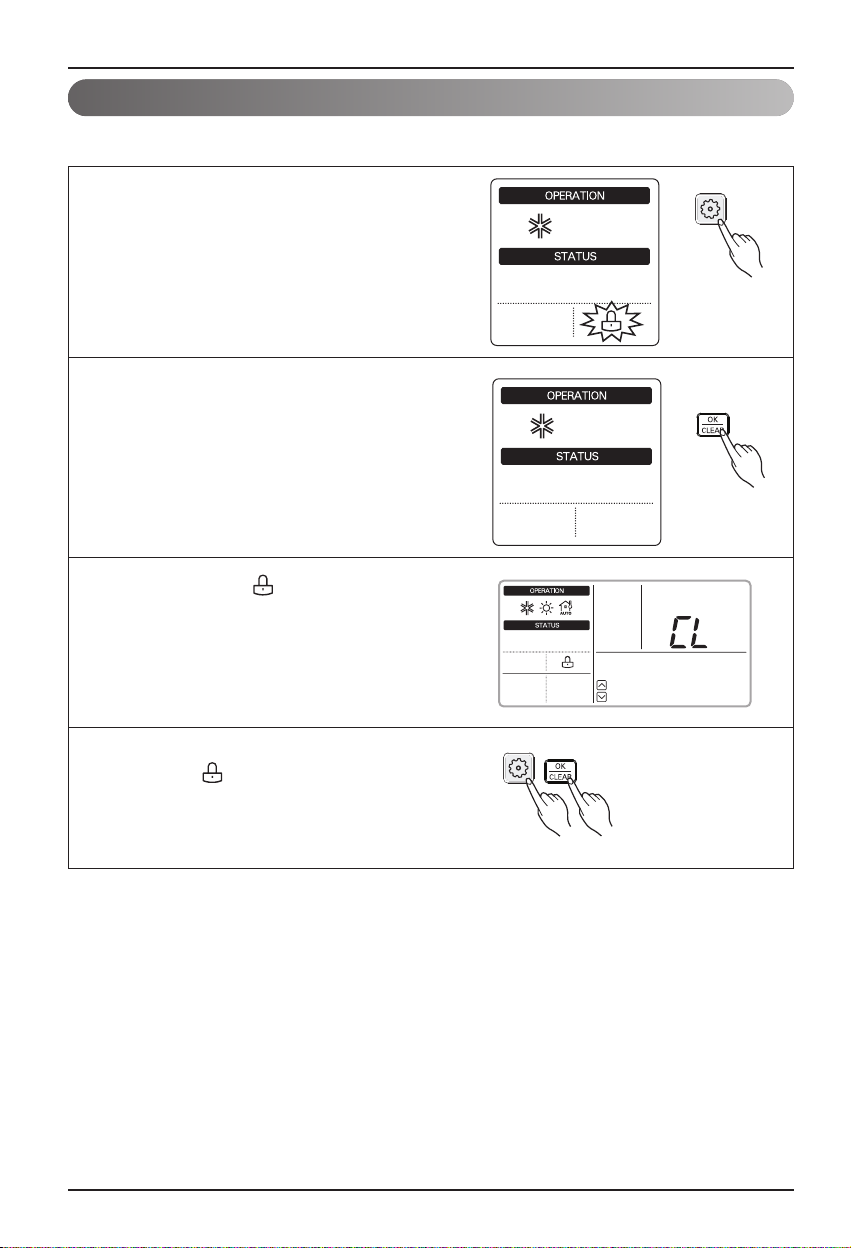
This function is to prevent children or other people from using controller.
Child Lock
12 Hydro Kit
Owner's instruction
1
Press Function Setting Button to enter
user setting mode. (The segment will be flashed)
2
Press set/clear button to finish the selection.
The segment will disappear.
4
To release this setting, press function Setting
button until icon flashes and then enter setting/clear button.
3
During Child Lock, icon and 'CL' will be displayed during 3 seconds whenever entering any
kind of buttons except for view temperature button
and setting/clear button.
Owner's instruction
Owner’s Manual 13
Hydro Kit
ENGLISH
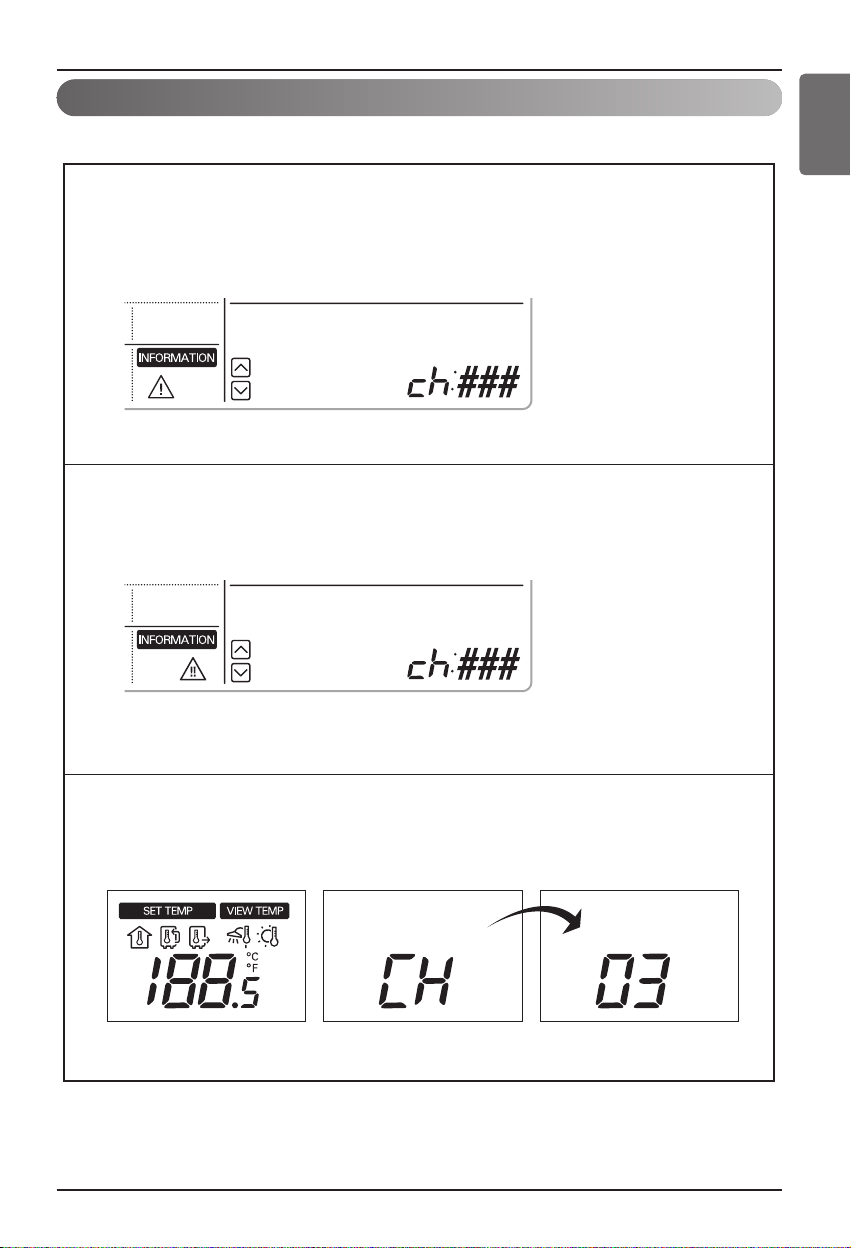
When the error occurs on indoor unit, the error code will be displayed on remote controller.
Slight trouble
A problem is found inside the indoor unit. In most case, this trouble is concerned with
sensor problems. In this case, Hydro Kit can operate in an emergency mode
(only Heating operation).
Heavy trouble
A problem is found inside the outdoor unit.
Critical error
On critical error, the product will stop unconditionally.
At this time, CH' and error code No. keep display by turns.
Error code display
<Display>
<Display>
<Display>

You can set current time.
Setting Current Time
1
Keep pressing programming button twice successively to enter
Setting current time mode.
2
Press left, right button to adjust the current day.
3
Press down button to move to AM/PM
part and adjust it. (The AM/PM segment
will be flashed)
4
Press right button to move to "Hour"
part. (the "Hour" segment will be
flashed)
6
Press right button to move to "Minute"
part. (the "Minute" segment will be
flashed)
7
Press up, down button to adjust the
Minute.
8
If you finish the setting, press set/clear
button.
9
Press exit button to exit or system will automatically release without any
input 25 seconds.
5
Press up, down button to adjust the
Hour.
Owner's instruction
14 Hydro Kit
Owner's instruction
Owner’s Manual 15
Hydro Kit
ENGLISH
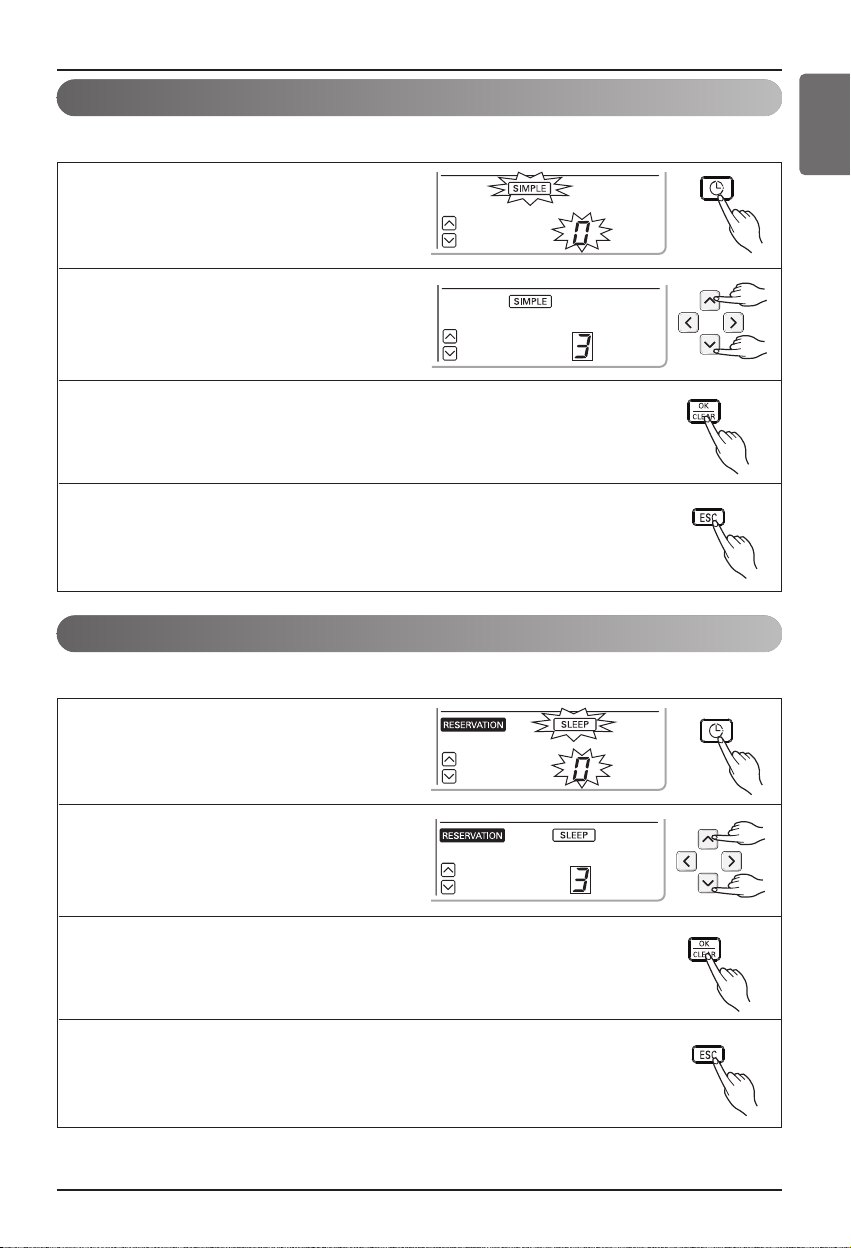
Programming : Setting Simple Reservation
You can easily turn-on reservation.(ONLY enable when unit is stand-by.)
1
Press programming button to enter the
Programming mode. (the segment will be
flashed)
2
Press up, down button to adjust the reservation time.
3
If you finish the setting, press setting/cancel button to complete programming
4
Press exit button to exit or system will automatically release without any
input after 25 seconds.
1
Press programming button to enter the
Programming mode. Press Programming
button repeatedly to select [sleep reservation]. (the segment flashing)
2
Press up, down button to adjust the reservation time.
3
If you finish the setting, press setting/cancel button to complete programming.
4
Press exit button to exit or system will automatically release without any
input after 25 seconds.
Programming : Setting Sleep Reservation
You can easily turn-off(sleep) reservation.(ONLY enable when unit is operating.)

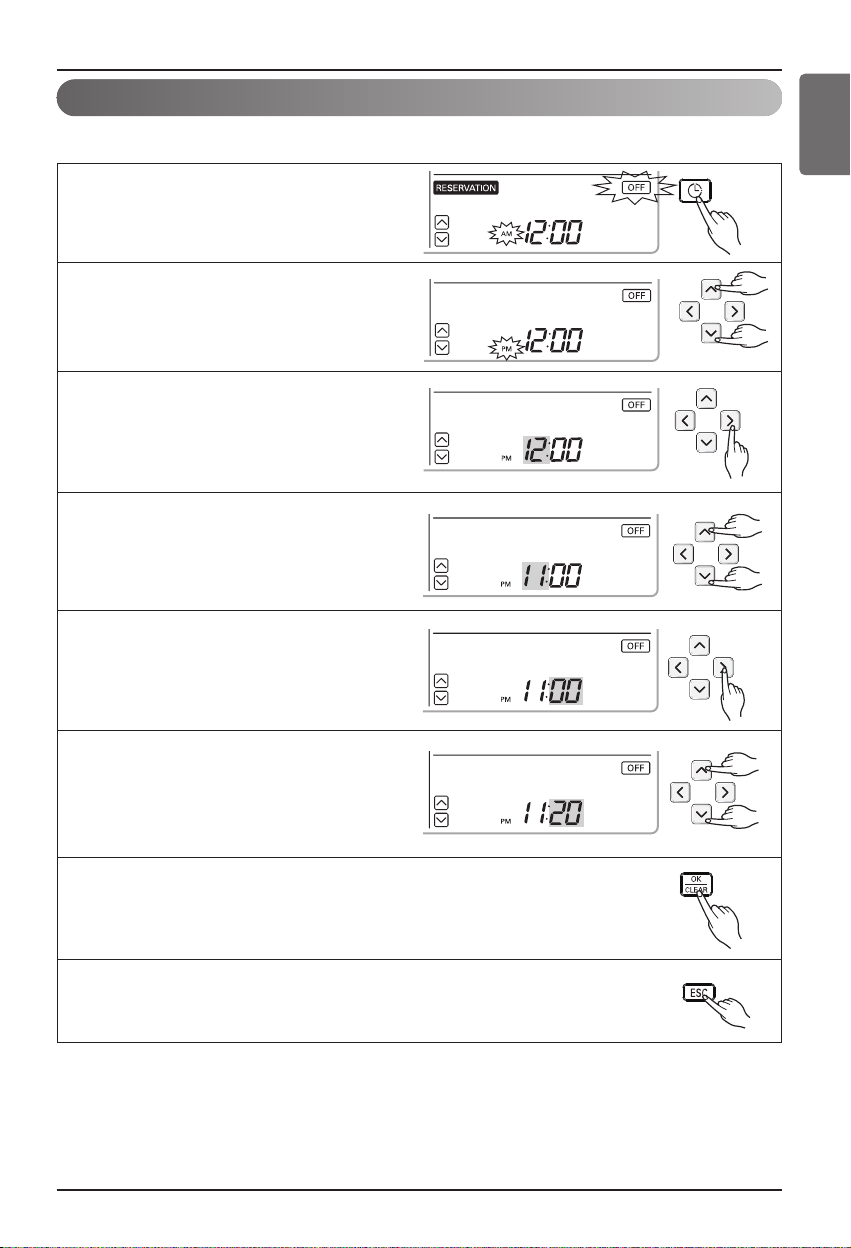
Programming : Setting ON Reservation
This function is able to turn-on after a setting time.
1
Press programming button to enter the
Programming mode. Press Programming button repeatedly to select [on reservation]. (the
segment flashing)
2
Press up, down button to adjust AM/PM.
3
Press right button to move to "Hour"
part. (the "Hour" segment will be
flashed)
4
Press up, down button to adjust the
Hour.
6
Press up, down button to adjust the
Minute.
7
If you finish the setting, press setting/cancel button to complete
programming.
8
Press exit button to exit or system will automatically release
without any input after 25 seconds.
5
Press right button to move "Minute" part.
(the "Minute" segment will be flashed)
Owner's instruction
16 Hydro Kit
Owner's instruction
Programming : Setting OFF Reservation
This function is able to turn-off after a setting time.
1
Press programming button to enter the
Programming mode. Press Programming button repeatedly to select [off reservation]. (the
segment flashing)
2
Press up, down button to adjust AM/PM.
3
Press right button to move to "Hour"
part. (the "Hour" segment will be
flashed)
4
Press up, down button to adjust the
Hour.
6
Press up, down button to adjust the
Minute.
7
If you finish the setting, press setting/cancel button to complete
programming.
8
Press exit button to exit or system will automatically release
without any input after 25 seconds.
5
Press right button to move to "Minute"
part. (the "Minute" segment will be
flashed)
Owner’s Manual 17
Hydro Kit
ENGLISH
Programming : Weekly Reservation
The weekly reservation is active after setting current time.
1
Press programming button to enter the
Programming mode. Press Programming button repeatedly to select [Weekly reservation].
(the segment flashing)
2
Press left, right button to adjust the current day.
3
Press up, down button to adjust the
action number.
4
Press right button to move to "Hour"
part on ON Time section.
(The "Hour" segment will be flashed)
6
Press right button to move to "Minute"
part on Start Time section.
(The "Minute" segment will be flashed)
7
Press up, down button to adjust the
Minute on Start Time section.
8
Press right button to move to "Hour" part
on OFF Time section.
(The "Hour" segment will be flashed)
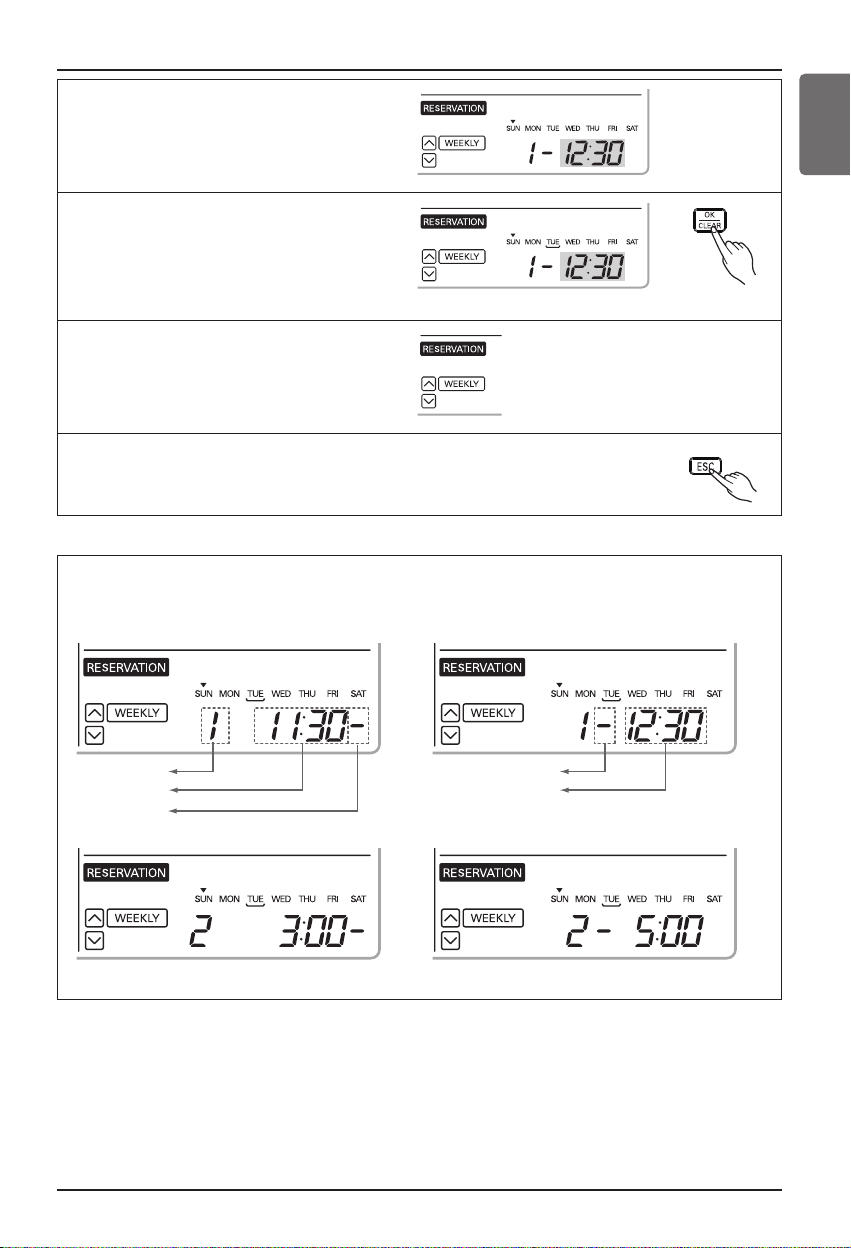
5
Press up, down button to adjust the
Hour on Start Time section.
Start Time Section
Off Time Section
Owner's instruction
18 Hydro Kit
Owner's instruction
Action
Start Time
From
To
Off Time
9
Please refer to the process from No.5 to
No.7 for setting OFF Time. It is the same
method.
10
If you finish the setting, press setting/cancel button to complete programming. The under bar segment
will be created, when finished.
11
Please refer to the process from
No.2 to No.10 for setting other day
weekly program. It is the same
method.
12
Press exit button to exit or system will automatically
release without any input after 25 seconds.
Owner’s Manual 19
Hydro Kit
ENGLISH
<Note>
Description of weekly reservation
<Start Time Section> <Off Time Section>
<Start Time Section> <Off Time Section>
❈ Two actions per weekday can be programmed, in total 14 actions
20 Hydro Kit
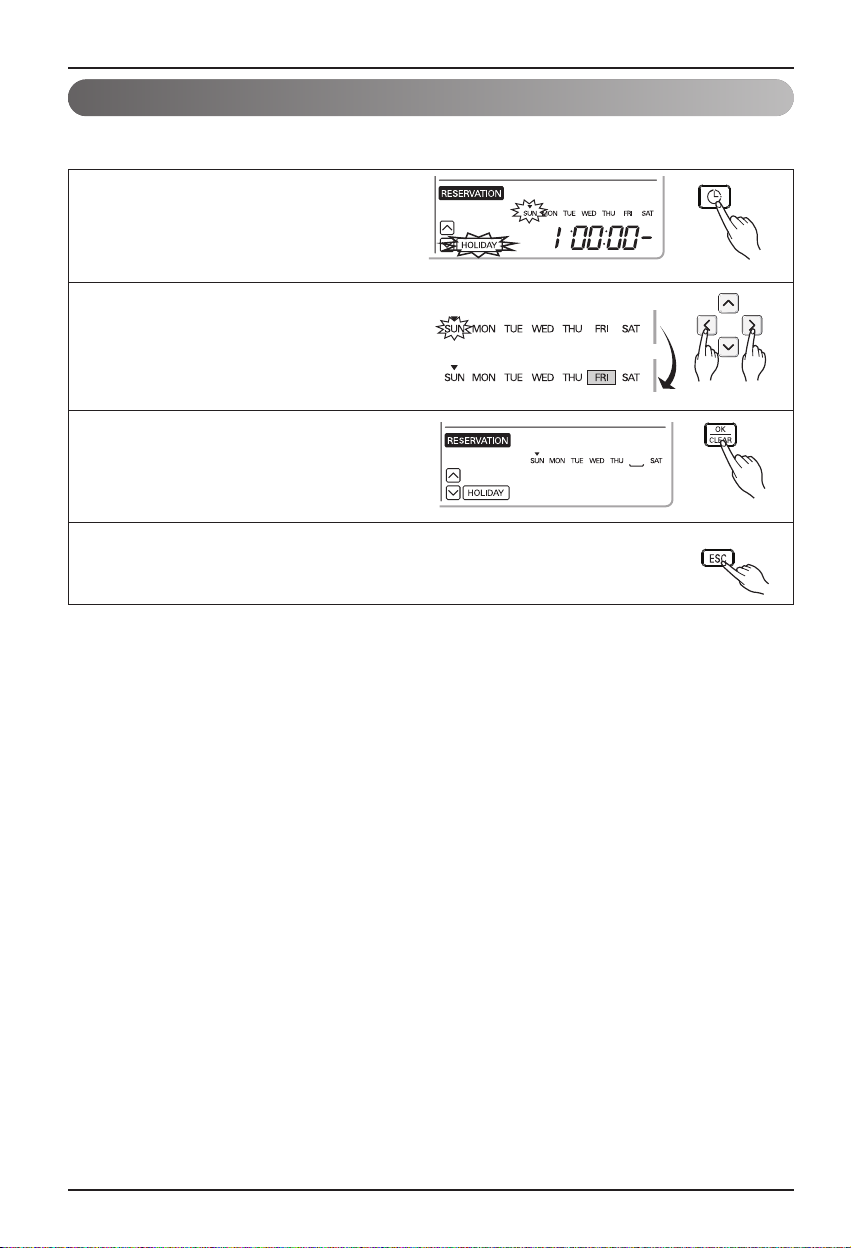
Programming : Holiday Reservation
This function is to automatically stop the machine working on some days.
1
Press programming button to enter the
Programming mode. Press Programming
button repeatedly to select [Holiday reservation]. (the segment flashing)
2
Press left, right button to adjust the holiday.
3
When you press set/clear button after
finishing the selection, the day selected
will disappear.
4
Press exit button to exit or system will automatically release without any input
after 25 seconds.
Owner's instruction
Owner’s Manual 21
Hydro Kit
Using Thermostat
Using Thermostat
1. Some electro-mechanical type thermostat has internal delay time to protect compressor.
In that case, mode change can takes time more than user's expectation. Please read thermostat manual carefully if the product does not response quickly.
2.
Setting temperature range by thermostat can be different with that of the product. The heating set
temperature should be chosen within the setting temperature range of the product.
CAUTION
The term "thermostat", which is widely used in this chapter, is a kind of 3rd party accessory.
LG Electronics does not supply thermostat. but it can be supplied by 3rd party manufacturers.
Room thermostat can be used for easy and convenience control. To utilize thermostat more efficiently and correctly, this chapter presents information about using thermostat.
How to use Thermostat
Operating Thermostat with Remote Controller
To find how to turn on and off, how to set target temperature, how to change operating mode, etc,
please refer to thermostat operating manual provided by thermostat manufacturer.
• Following features are permitted when thermostat is installed :
• SET TEMP button
• VIEW TEMP button
• Temperature adjust button (*)
• Sanitary water heating Enable / Disable
(*) : The product does not turn on / off according to the setting temperature at the remote con-
troller. It turns on / off according to the thermostat signal.
• Following features are NOT permitted when thermostat is installed :
• Operating mode (Heating/ weather-dependent) selection
• Time scheduling
• Operation On / Off
ENGLISH
Using Thermostat
Emergency Operation
• Definition of terms
- Trouble : a problem which can stop system operation, and can be resumed temporally under limited operation without certificated professional's assist.
- Error : problem which can stop system operation, and can be resumed ONLY after certificated
professional's check.
- Emergency mode : temporary heating operation while system met Trouble.
• Objective of introducing 'Trouble'
- Not like airconditioning product, Hydro kit is generally operated in whole winter season without
any system stopping.
- If system found some problem, which is not critical to system operating for yielding heating energy, the system can temporarily continue in emergency mode operation with end user's decision.
• Classified Trouble
- Trouble is classified into two levels according to the seriousness of the problem : Slight Trouble
and Heavy trouble
- Slight Trouble : a problem is found inside the indoor unit. In most case, this trouble is concerned
with sensor problems. The outdoor unit is operating under emergency mode operation condition
which is configured by DIP switch No. 4 of the indoor unit PCB.
- Heavy Trouble : a problem is found inside the outdoor unit.
- Option Trouble : a problem is found for option operation such as water tank heating. In this trouble, the troubled option is assumed as if It does not cause in the Product.
• Emergency operation level
- When system met trouble, it stops operation and waits for user’s decision : Calling service center
or starting emergency operation.
- To start emergency operation, user simply pushes ON / OFF button once more.
- Two different levels are prepared for emergency operation : High temperature cycle and low temperature cycle.
- In emergency operation mode, user can not adjust target temperature.
22 Hydro Kit
Dip Switch
(#4)
Target
Leaving Water
Temperature
Target
Room Air
Temperature
Target
Sanitary Water
Temperature
High temperature cycle OFF 70℃(158℉) 24℃(75℉) 70℃(158℉)
Low temperature cycle ON 50℃(122℉) 19℃(66℉) 50℃(122℉)
Using Thermostat
• Following features are permitted in emergency operation :
- Operation On/Off
- VIEW TEMP button(*)
- Temperature adjust button (*)
- Sanitary water heating Enable / Disable
(*) : Temperature measured by failed sensor is displayed as ‘- -’.
The product does not turn on / off according to the setting temperature at the remote controller.
It turns on / off according to the thermostat signal.
• Following features are NOT permitted in emergency operation :
- Operating mode (Heating/ Weather-dependent) selection
- Time scheduling
- SET TEMP button
• Duplicated trouble : Option trouble with Slight or Heavy trouble
- If option trouble occurs with slight (or heavy) trouble at the same time, the system puts higher priority to slight (or heavy) trouble and operates as if slight (or heavy) trouble occurs.
- Therefore, sometimes sanitary water heating can be impossible in emergency operation mode.
When sanitary water is not warming up while emergency operation, please check if sanitary water
sensor and related wiring are all Ok.
• Emergency operation is not automatically restarted after main electricity power is reset.
- In normal condition, the product operating information is restored and automatically restarted
after main electricity power is reset.
- But in emergency operation, automatic re-start is prohibited to protect the product.
- Therefore, user must restart the product after power reset when emergency operation has been
running.
Owner’s Manual 23
Hydro Kit
ENGLISH
Maintenance and Service
Maintenance and Service
Maintenance activities
In order to ensure optimal availability of the unit, a number of checks and inspections on the unit and
the field wiring have to be carried out at regular intervals, preferably yearly. This maintenance should
be carried out by your local agreed technician.
Call the service immediately in the following situations
1. Anything abnormal such as burning smell, loud noise etc. happen. Stop the unit and turn the
breaker off. Never try to repair by yourself or restart the system in such cases.
2. Main power cord is too hot or damaged.
3. Error code is generated by self diagnosis.
4. Water leaks from indoor unit.
5. Any switch, breaker (safety, earth) or fuse fails to work properly
User must carry routine checkup & cleaning to avoid unit’s poor performance.
In case of special situation, the job must be carried out by the only service person.
When the unit is not going....
• If the product is not used for long time, we strongly recommend NOT TO SWITCH OFF THE POWER SUPPLY to the
product.
• If power is not supplied, some special product-protecting
actions (such as water pump anti-locking) will not performed.
CAUTION
24 Hydro Kit

Management of plate-type heat exchanger
Owner’s Manual 25
Hydro Kit
ENGLISH
Management of plate-type heat exchanger
The efficiency of the plate-type heat exchanger will decrease, or the exchanger can be broken due
to freezing and bursting by the flux decrease, as much as scale formation is accumulated.
Because of these reasons, it is necessary to manage the exchanger periodically to avoid scale formation.
The following items should be checked before the season for use is started. (Interval: Once a year)
1. Analyze water to see if the standard condition is met or not.
2. Clean the strainer.
3. Check whether the flux is proper.
4. Check whether the operating environment is proper.
(Pressure, flow, water outlet temperature, etc.)
Follow the following procedure to clean the plate-type heat exchanger. (Interval: Once a year)
1. For chemical solvent cleaning, check if the water pipe is equipped with service port.
The proper chemical solution for scale cleaning includes formic acid with 5% dilution, citric acid,
oxalic acid, acetic acid, and phosphoric acid. Acetic acid, phosphoric acid, etc. is appropriate.
(※ Never use hydrochloric acid, sulfuric acid and nitric acid as they are corrosive.)
2. When cleaning, make sure to check whether the gate valve of water pipe inlet/outlet and valve of
water discharge pipe are firmly closed.
3. Connect the pipe for chemical solution cleaning through the service plug of the water pipe; and fill
the detergent in 50℃ ~ 60℃ in plate-type heat exchanger and circulate with a pump for 2 ~ 5
hours.
The circulation time depends on the detergent’s temperature or the degree of the scale formation.
Therefore, observe the color change of the chemical solution well to determine the circulation time
to remove scales.
4. After the solution circulation work, drain off all chemical solutions inside the plate-type heat
exchanger; and fill in 1 ~ 2% concentrated sodium hydroxide (NaOH) or sodium hydrogen carbonate NaHCO3 and circulate for 15 ~ 20 minutes to neutralize the heat exchanger.
5. After the neutralization work, wash the inside of the plate-type heat exchanger with clean water.
You can check whether the chemical solution has been successfully removed by measuring pH
concentration of water.
6. In case where other detergent that is available on the market is used, be sure to check in advance
whether it has any corrosive reaction with stainless or copper.
7. For more detail about chemical detergents for cleaning, get consultation from the expert in the
related field.
Maintenance and Service
26 Hydro Kit
Troubleshooting Tips! Save time and money!
Check the following points before requesting repairs or service.... If the malfunction persists, please
contact your dealer.
Case Explanation
Hydro Kit does not operate.
• Have you made a mistake in timer operation?
• Has the fuse blown or has the circuit breaker been tripped?
The room has a peculiar odor.
• Check that this is not a damp smell exuded by the walls, carpet,
furniture or cloth items in the room.
Hydro Kit does not operate for
about 3 minutes when restart.
• This is the protector of the mechanism.
• Wait about three minutes and operation will begin.
Does not cool or heat effectively.
• The room may have been very hot when the Hydro Kit was
first turned on. Allow time for it to cool down.
• Has the setting temperature been set incorrectly?
The unit operation is noisy.
• Refrigerant flow sound
- While the system is being started or stopping, sound from the
refrigerant flow may be heard.
• Sound for the indoor unit heat exchanger
- During the cooling operation, a sound may be heard from the
indoor unit heat exchanger due to water freezing or melting.
• Water noise
- During starting or stopping of the unit, noise can appear in
water piping
• During defrost
- Noise can appear in unit due to defrosting of water.
Steam is raised in outdoor unit.
• Steam from outdoor heat exchanger
- During defrosting operation, ice on the outdoor heat exchanger
is melted, resulting in making steam.
Remote controller display is faint,
or no display at all.
• Has the circuit breaker been tripped?

MANUALE DI ISTRUZIONI
CLIMATIZZATORE
Leggere con attenzione questo manuale prima di usare l’unità e
conservare per uso futuro.
www.lg.com
TYPE :
Hydro Kit (Per alta Temperatura)
ITALIANO
2 Hydro Kit
Manuale dell’utente del
Hydro Kit
SOMMARIO
DATI DA RICORDARE
Annotare qui il numero di serie e il modello:
No. modello
No. di serie
I numeri sono riportati sull'etichetta a lato di ogni
unità.
Nome dell'installatore
Data acquisto
■
Spillare la ricevuta su questa pagina qualora
fosse necessaria per provare la data di acquisto o per motivi di garanzia.
LEGGERE IL MANUALE
In questo manuale troverete molti consigli utili su come
usare e manutenere il
Hydro Kit
in modo corretto.
Una piccola attenzione da parte vostra vi permetterà di
risparmiare molto tempo e denaro durante l'utilizzo del
prodotto.
Nella tabella di riferimento per la risoluzione dei problemi
troverete molte risposte ai problemi più comuni.
Consultando la tabella Risoluzione dei problemi potrebbe
non essere necessario contattare il servizio di assistenza.
AVVERTENZE
• Contattare un tecnico dell'assistenza autorizzato per
la riparazione o la manutenzione dell’unità.
• Contattare l’installatore per eseguire l’installazione
dell’unità.
• Il
Hydro Kit
non è previsto per l'uso da parte di bam-
bini o persone invalide senza una supervisione.
• I vostri figli devono essere controllati per verificare
che non giochino con il
Hydro Kit
.
• Quando il cavo di alimentazione deve essere sostitu-
ito, il lavoro di sostituzione deve essere eseguito solo
da personale autorizzato usando solo parti di sostituzione originali.
• Il servizio d'installazione deve essere eseguito in con-
formità agli standard elettrici nazionali ed esclusivamente da personale autorizzato.
Precauzioni di sicurezza
..............3
Introduzione al prodotto
..............6
Istruzioni per il proprietario
........8
Uso del termostato
.......................21
Manutenzione e assistenza
........24
Gestione dello scambiatore di
calore a piastre .................................25
Precauzioni di sicurezza
Manuale dell'utente del 3
Hydro Kit
ITALIANO
Precauzioni di sicurezza
Per evitare infortuni all'utente o a terzi e danni alla proprietà, attenersi alle seguenti istruzioni.
■
L’uso errato causato dalla mancata osservanza delle istruzioni può causare danni o lesioni.
L’importanza è classificata in base alle seguenti indicazioni.
AVVISO
ATTENZIONE
Questo simbolo indica la possibilità di decesso o di grave infortunio.
Questo simbolo indica il rischio di lesioni alla persona o di
danni alla proprietà.
AVVISO
Il prodotto deve essere sempre
provvisto di messa a terra.
•
Vi è il rischio di scosse elettriche.
Non utilizzare interruttori automatici difettosi
o di potenza inferiore. Usare questo apparecchio con un circuito dedicato ad esso.
•
Vi è il rischio di scosse elettriche o
incendio.
Non usare una presa multipla. Usare sempre questa
apparecchiatura con un circuito di alimentazione
dedicato e interruttore automatico.
•
Si può provocare scossa elettrica o incendio.
Per i collegamenti elettrici, rivolgersi al rivenditore, a un elettricista qualificato o a un centro
di assistenza autorizzato. Non smontare o
tentare di riparare il prodotto da soli.
•
Vi è il rischio di scosse elettriche o incendio.
Prevedere sempre la messa a terra per il prodotto secondo
quanto indicato nello schema elettrico. Non collegare il
filo della messa a terra a tubi di gas o dell’acqua, al parafulmine, o ai fili della messa a terra del telefono.
•
Vi è il rischio di scosse elettriche o
incendio.
Installare il pannello e il coperchio della
scatola di controllo in modo sicuro.
•
Vi è il rischio di scosse elettriche o incendio
dovuti a polvere, acqua, e così via.
Utilizzare fusibili o interruttori automatici di giusta tensione.
•
Vi è il rischio di scosse elettriche o
incendio.
Non modificare o prolungare il cavo di alimentazione. Se il cavo di alimentazione
presenta righe o la guaina esterna rotta o
deteriorata, essa deve essere sostituita.
•
Vi è il rischio di scosse elettriche o
incendio.
Per l'installazione, la rimozione e la
reinstallazione, contattare sempre il
venditore o un centro di assistenza
autorizzato.
•
C'è il rischio di scossa elettrica o incendio, esplosione o lesioni.
Non installare il prodotto su supporti
di installazione difettosi. Accertarsi
che l’area di installazione non sia
soggetta a deterioramento nel tempo.
•
In caso contrario, il prodotto potrebbe
cadere.
Non installare l’unità esterna su una
base rimovibile o in posizioni in cui
possa cadere.
•
La caduta dell'unità esterna può
causare danni o infortuni, e in alcuni
casi anche la morte.
In caso di allagamento del prodotto con acqua
(riempimento di acqua o sommerso in acqua), rivolgersi a un centro di assistenza autorizzato per la
riparazione prima di utilizzare ancora il prodotto.
•
Vi è il rischio di scosse elettriche o
incendio.
Controllare il refrigerante utilizzato.
Leggere attentamente l'etichetta del
prodotto.
•
Il refrigerante non adatto può impedire
il normale funzionamento dell'unità.
Non utilizzare cavi di alimentazione,
spine o prese danneggiate.
•
In caso contrario, si potrebbero verificare incendi o scosse elettriche.
Non toccare, utilizzare o riparare il
prodotto con le mani bagnate.
• Vi è il rischio di scosse elettriche o
incendio.
I collegamenti delle unità interna ed
esterna devono essere saldamente fissati e il cavo deve essere disposto in
modo corretto, in modo che non si verifichino pressioni o torsioni del cavo
prodotte dai terminali di collegamento.
•
Collegamenti non corretti o lenti possono causare la generazione di calore
o un incendio.
Smaltire in modo sicuro i materiali d’imballaggio. Gli oggetti come viti, chiodi,
batterie, parti rotte ecc., dopo l'installazione o la manutenzione devono
essere eliminati e eliminare anche i sacchi di imballaggio di plastica.
•
I bambini potrebbero giocarci e incorrere in lesioni.
Verificare che il dispositivo di alimentazione non sia sporco, allentato o rotto
e quindi attivare l'alimentazione.
•
Il dispositivo di alimentazione sporco,
allentato o rotto può provocare scossa elettrica o incendio.
Non utilizzare il prodotto in ambienti
completamente chiusi per periodi
prolungati. Ventilare regolarmente
l'area.
•
Può verificarsi una deficienza di ossigeno
e quindi un pericolo per la salute.
Non aprire il coperchio anteriore o la griglia
del prodotto durante il suo funzionamento.
(Non toccare il filtro elettrostatico, se l’unità
è equipaggiata con esso.)
•
C'è il rischio di lesioni fisiche, scossa
elettrica o guasto del prodotto.
Se si sentono strani rumori, odori o il fumo
esce dal prodotto, spegnere immediatamente l'interruttore automatico o disconnettere il cavo di alimentazione.
•
Vi è il rischio di scosse elettriche o
incendio.
Di tanto in tanto, aerare la stanza quando il prodotto è utilizzato insieme a fornelli, stufe, elementi riscaldanti, ecc.
• Può verificarsi una deficienza di ossigeno
e quindi un pericolo per la salute.
Disinserire l'alimentazione principale
quando si pulisce o si ripara il prodotto.
•
Vi è il rischio di scosse elettriche.
Assicurarsi che nessuno possa inciampare o cadere sull'unità esterna.
• Ciò potrebbe provocare lesioni personali e
danni al prodotto.
Avere cura di non tirare o danneggiare
il cavo di alimentazione durante il funzionamento.
•
Vi è il rischio di scosse elettriche o
incendio.
Non appoggiare NULLA sul cavo di alimentazione.
•
Vi è il rischio di scosse elettriche o
incendio.
Quando si hanno perdite di gas infiammabile, chiudere il gas e aprire una
finestra per la ventilazione prima di
accendere l'interruttore del prodotto.
•
Non utilizzare il telefono o accendere o
spegnere interruttori. Vi è il rischio di
esplosioni o incendi.
Nell'unità esterna, il condensatore moltiplicatore fornisce elettricità ad alta tensione ai
componenti elettrici. Prima di procedere con
la riparazione, assicurarsi che il condensatore sia completamente scarico.
•
Un condensatore carico può causare
scosse elettriche.
Quando si installa l'unità, utilizzare il kit
di installazione fornito con il prodotto.
•
In caso contrario, l'unità potrebbe
cadere e causare infortuni seri.
Accertare di usare solo quelle parti che
sono elencate nella lista di pezzi di
ricambio. Non provare a modificare l'apparecchio.
•
L'uso di parti non appropriate può
causare scosse elettriche, un'eccessiva generazione di calore e anche un
incendio.
Precauzioni di sicurezza
4 Hydro Kit
Non posizionare stufe o altre apparecchiature di riscaldamento vicino al
cavo di alimentazione.
•
Vi è il rischio di scosse elettriche e
incendio.
Evitare l’ingresso di acqua nelle parti
elettriche. Installare il prodotto lontano
da sorgenti d'acqua.
• Vi è il rischio di scosse elettriche, incendio o
guasti al prodotto.
Non conservare, utilizzare o avvicinare
gas infiammabili o combustibili in
prossimità del prodotto.
•
Vi è il rischio di un incendio.
 Loading...