

Lexus Ls500 2020 Owner's Manual

*: This feature may be operated by Voice command (See P.72)
The Quick Guide is not intended as a substitute for your
OWNER’S MANUAL
the
OWNER’S MANUAL
will have a better understanding of your vehicle’s capabilities
Contents
AHB (Automatic High Beam).......................................................................................................40
Audio System
Audio control screen ...................................................................................................................60
Selecting an audio source..........................................................................................................60
Steering switch operation ...........................................................................................................61
Radio...................................................................................................................................................62
CD........................................................................................................................................................63
DVD ....................................................................................................................................................64
iPod......................................................................................................................................................65
Automatic Transmission..................................................................................................................26
Brake Hold .............................................................................................................................................34
Center Display.....................................................................................................................................47
Door Locks............................................................................................................................................ 89
Driving Mode Select Switch..........................................................................................................43
Driving Position Memory................................................................................................................. 21
Engine (Ignition) Switch...................................................................................................................23
Floor Mat Installation...........................................................................................................................11
Front Automatic Air Conditioning System
Control panel ..................................................................................................................................67
Air conditioning control screen...............................................................................................68
Using automatic mode ................................................................................................................70
Front Seats ..............................................................................................................................................16
Fuel Consumption Information................................................................................................... 50
Fuel Tank Cap.......................................................................................................................................95
Garage Door Opener ..................................................................................................................... 80
Hands-free System For Cellular Phone
Registering/connecting a Bluetooth® device ..................................................................56
Contacts transfer...........................................................................................................................57
Registering the contacts in the favorites list ......................................................................58
Calling by favorites list................................................................................................................58
Calling the message sender..................................................................................................... 58
Receiving a call ...............................................................................................................................59
Steering switches...........................................................................................................................59
*
and limitations.
. We strongly encourage you to review
and supplementary manuals so you
*
*
1

Headlight Switch ................................................................................................................................39
*: This feature may be operated by Voice command (See P.72)
Head-up Display..................................................................................................................................37
Keys ............................................................................................................................................................12
Lexus Climate Concierge..............................................................................................................66
Lexus Enform Remote .....................................................................................................................86
Lexus Enform Safety Connect.....................................................................................................84
Lexus Enform Service Connect ..................................................................................................87
Moon Roof............................................................................................................................................. 92
Multi-information Display..............................................................................................................35
Navigation System
Registering home..........................................................................................................................52
Destination search........................................................................................................................52
Voice Command System ...........................................................................................................72
Panoramic Moon Roof .................................................................................................................... 93
Parking Brake ...................................................................................................................................... 32
Power Rear Seat.................................................................................................................................20
Power Windows....................................................................................................................................91
Rear Air Conditioning System
Rear air conditioning control screen ......................................................................................71
Using automatic mode..................................................................................................................71
Remote Touch...................................................................................................................................... 46
SiriusXM Satellite Radio................................................................................................................88
Smart Access System with Push-button Start........................................................................14
Trunk ........................................................................................................................................................ 96
Turn Signal Lever..................................................................................................................................31
USB/AUX Ports ..................................................................................................................................79
Voice Command System
Basic operation ...............................................................................................................................72
Command list...................................................................................................................................73
Windshield Wipers and Washer ..................................................................................................42
*
*
2
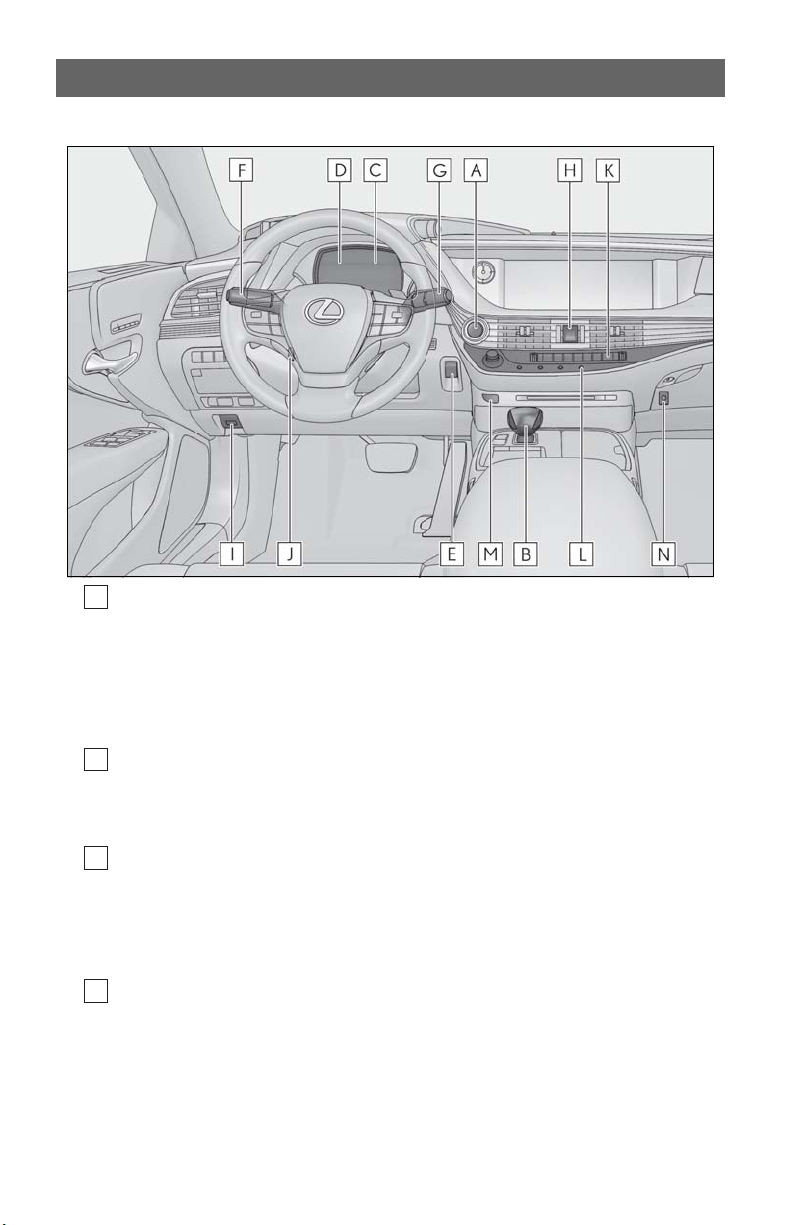
Pictorial Index
ABC
D
■ Instrument panel
Engine switch ............................................................................................................. P.23
Starting the engine/changing the modes...................................................................P.23
Emergency stop of the engine........................................................................................P.25
When the engine will not start ......................................................................................P.105
Warning messages
*
Shift lever .................................................................................................................... P.26
Changing the shift position...............................................................................................P.26
Precautions for towing
Meters*
Reading the meters/adjusting the instrument panel light*
Warning lights/indicator lights...................................................................................... P.99
When a warning light turns on
Multi-information display ...................................................................................... P.35
Display......................................................................................................................................P.35
When a warning messages is displayed
3
*
*
*

Parking brake switch ............................................................................................... P.32
E
F
G
H
I
J
K
L
M
N
Applying/releasing the parking brake........................................................................P.32
Precautions for winter season
Warning buzzer/messages*
Turn signal lever ......................................................................................................... P.31
Headlight switch ....................................................................................................... P.39
Headlights/parking lights/tail lights/license plate lights/
daytime running lights ........................................................................................................P.39
AHB (Automatic High Beam) ........................................................................................P.40
Windshield wiper and washer switch ................................................................. P.42
Usage........................................................................................................................................P.42
Adding washer fluid
Warning messages*
Emergency flasher switch*
Hood lock release lever*
Tilt and telescopic steering control switch*
Adjustment*
Driving position memory ................................................................................................... P.21
*
*
Air conditioning system .......................................................................................... P.67
Usage........................................................................................................................................P.67
Rear window defogger......................................................................................................P.67
Audio system.............................................................................................................. P.60
Brake hold switch ..................................................................................................... P.34
Trunk opener main switch
*
: Refer to the “OWNER’S MANUAL”.
*
4

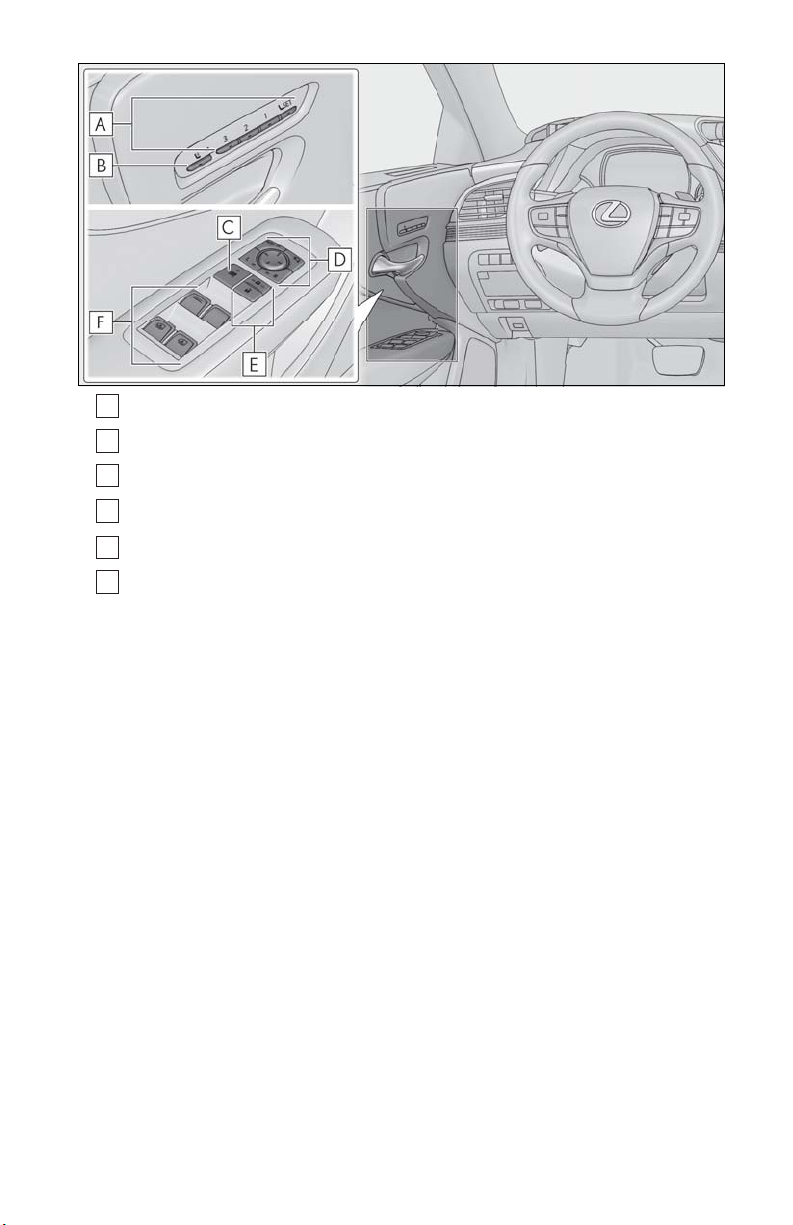
■ Switches
A
B
C
D
E
F
G
H
HUD (Head-up display) switch*1........................................................................ P.37
Camera switch
Instrument panel light control switches*
“ODO TRIP” switch*
VSC OFF switch*
Snow mode switch .................................................................................................... P.28
Driving mode select switch ................................................................................... P.43
1, 2
*
3
3
3
Trunk opener switch ................................................................................................ P.96
Fuel filler door opener switch ............................................................................... P.95
1
*
: If equipped
2
*
: Refer to “NAVIGATION AND MULTIMEDIA SYSTEM OWNER’S MANUAL”.
3
*
: Refer to the “OWNER’S MANUAL”.
5
Position memory buttons ........................................................................................ P.21
A
B
C
D
E
F
Mode change button ................................................................................................ P.18
Window lock switch .................................................................................................. P.91
Outside rear view mirror switches
Door lock switches ...................................................................................................P.89
Power window switches........................................................................................... P.91
Rear door sunshade switches
1
*
: Refer to the “OWNER’S MANUAL”.
2
*
: If equipped
1
*
1, 2
*
6

Meter control switches .......................................................................................... P.36
A
B
C
D
E
F
G
H
Paddle shift switches ....................................................................................... P.29, 30
Phone switch .............................................................................................................. P.59
LTA (Lane Tracing Assist) switch
Vehicle-to-vehicle distance switch*
Cruise control switches*
Audio remote control switches ............................................................................. P.61
Talk switch .................................................................................................................. P.59
*: Refer to the “OWNER’S MANUAL”.
*
7
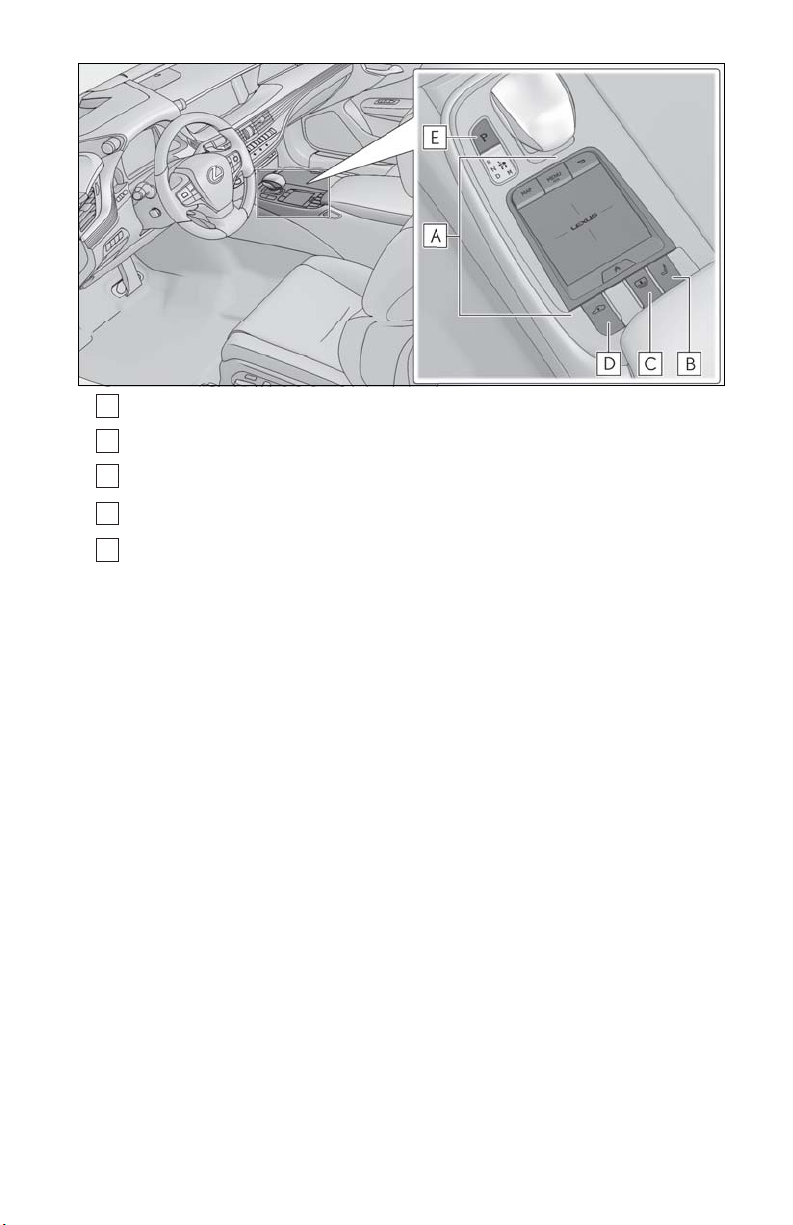
Remote Touch ........................................................................................................... P.46
A
B
C
D
E
Seat switch ................................................................................................................... P.16
Rear sunshade switch
1, 2
*
Vehicle height adjustment switch*
P position switch........................................................................................................ P.27
1
*
: If equipped
2
*
: Refer to the “OWNER’S MANUAL”.
1, 2
8
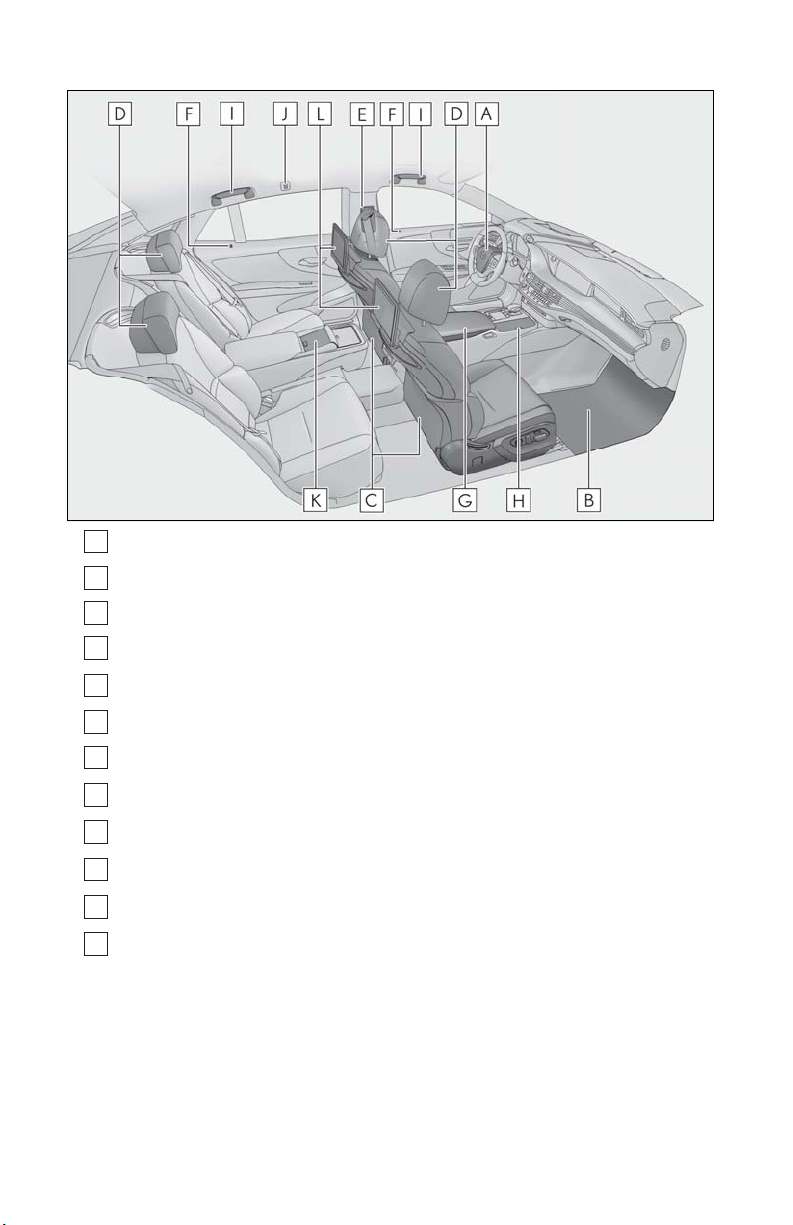
■ Interior
A
B
C
D
E
F
G
H
I
J
K
L
SRS airbags*
1
Floor mats ......................................................................................................................P.11
Front seats ................................................................................................................... P.16
Head restraints
Seat belts*
1
*
1
Inside lock buttons ................................................................................................... P.89
Console box
Cup holders*
Assist grips*
Coat hooks*
Rear Multi Operation Panel*
Rear seat entertainment system*
1
*
: Refer to the “OWNER’S MANUAL”.
2
*
: If equipped
3
*
: Refer to “NAVIGATION AND MULTIMEDIA SYSTEM OWNER’S MANUAL”.
1
*
1
1
1
1, 2
2, 3
9
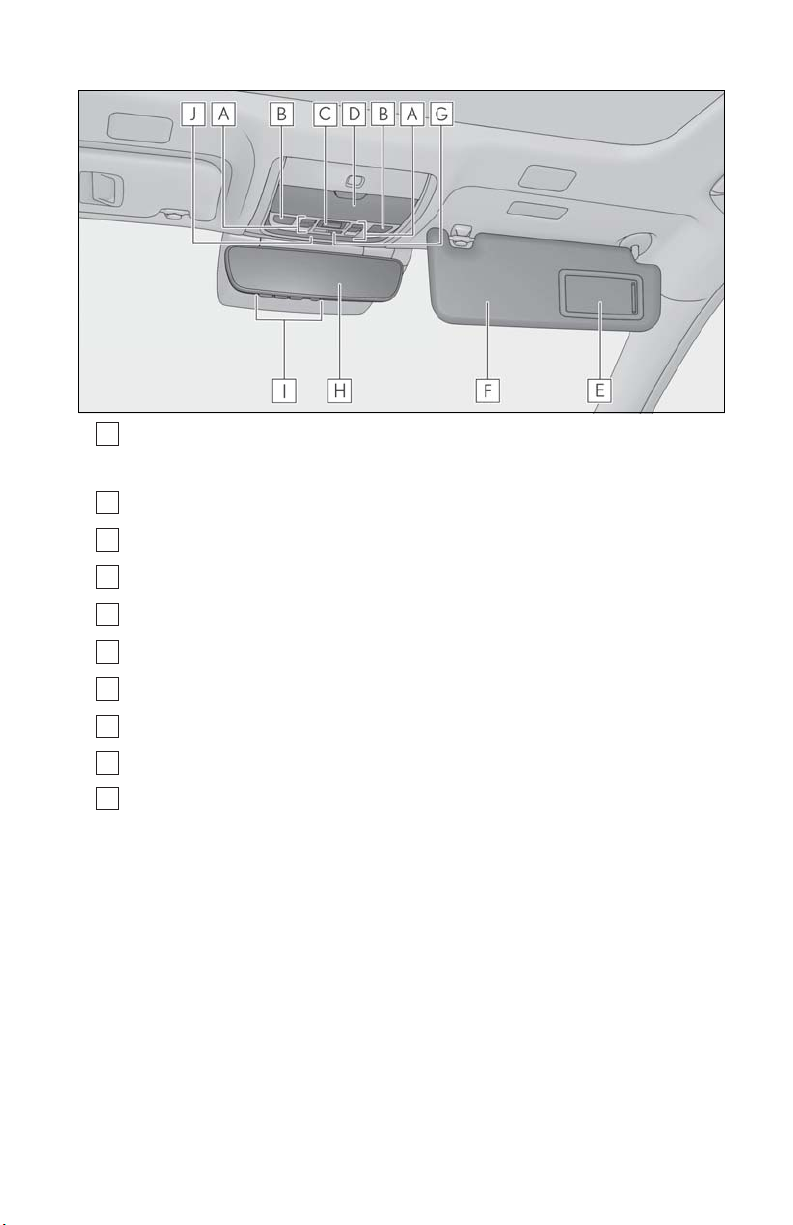
■ Ceiling
A
B
C
D
E
F
G
H
I
J
Moon roof switches*1............................................................................................. P.92
Panoramic moon roof switches
Personal lights
“SOS” button*1.........................................................................................................P.84
Auxiliary box
Vanity mirrors*
Sun visors*
Door-linked interior light switch*
Inside rear view mirror*
1
*
........................................................................ P.94
2
*
2
*
2
2
2
2
Garage door opener buttons................................................................................ P.80
Interior light
1
*
: If equipped
2
*
: Refer to the “OWNER’S MANUAL”.
2
*
10
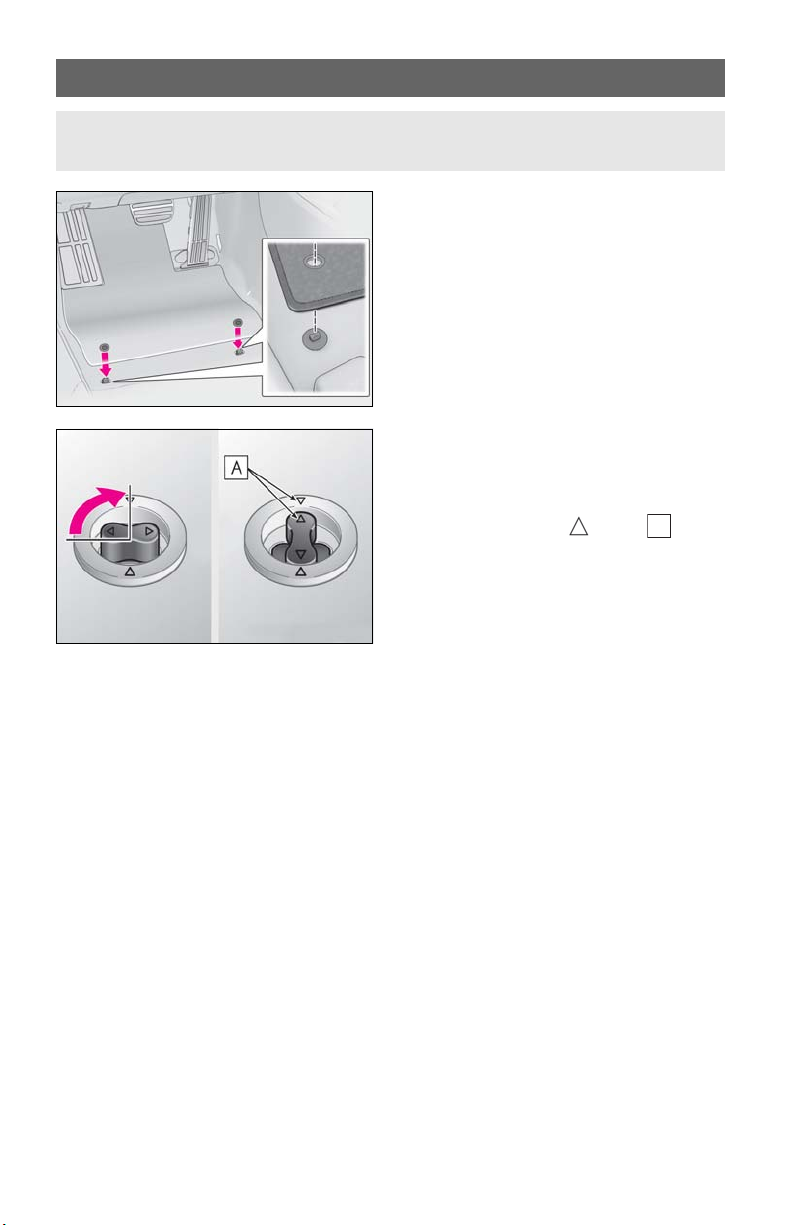
Floor Mat Installation
Use only floor mats designed specifically for vehicles of the same model and model year
as your vehicle. Fix them securely in place onto the carpet.
1 Insert the retaining hooks (clips) into
the floor mat eyelets.
2 Turn the upper knob of each retaining
hook (clip) to secure the floor mats in
place.
Always align the marks .
The shape of the retaining hooks (clips) may differ from that shown in the illustration.
A
11

Keys
A
B
C
D
A
B
C
D
E
The keys
Wireless remote control
Electronic keys
• Operating the smart access system with
push-button start (P.14)
• Operating the wireless remote control
function
Mechanical keys
Key number plate
Card key (electronic key) (if equipped)
Operating the smart access system with
push-button start (P.14)
Locks the doors
Unlocks the doors
1, 2
1
*
and moon
12
Opens the windows
1, 2
roof
*
or panoramic moon roof
(press and hold)
Opens the trunk
Sounds the alarm
1
*
: This setting must be customized at your
Lexus dealer.
2
*
:If equipped
*
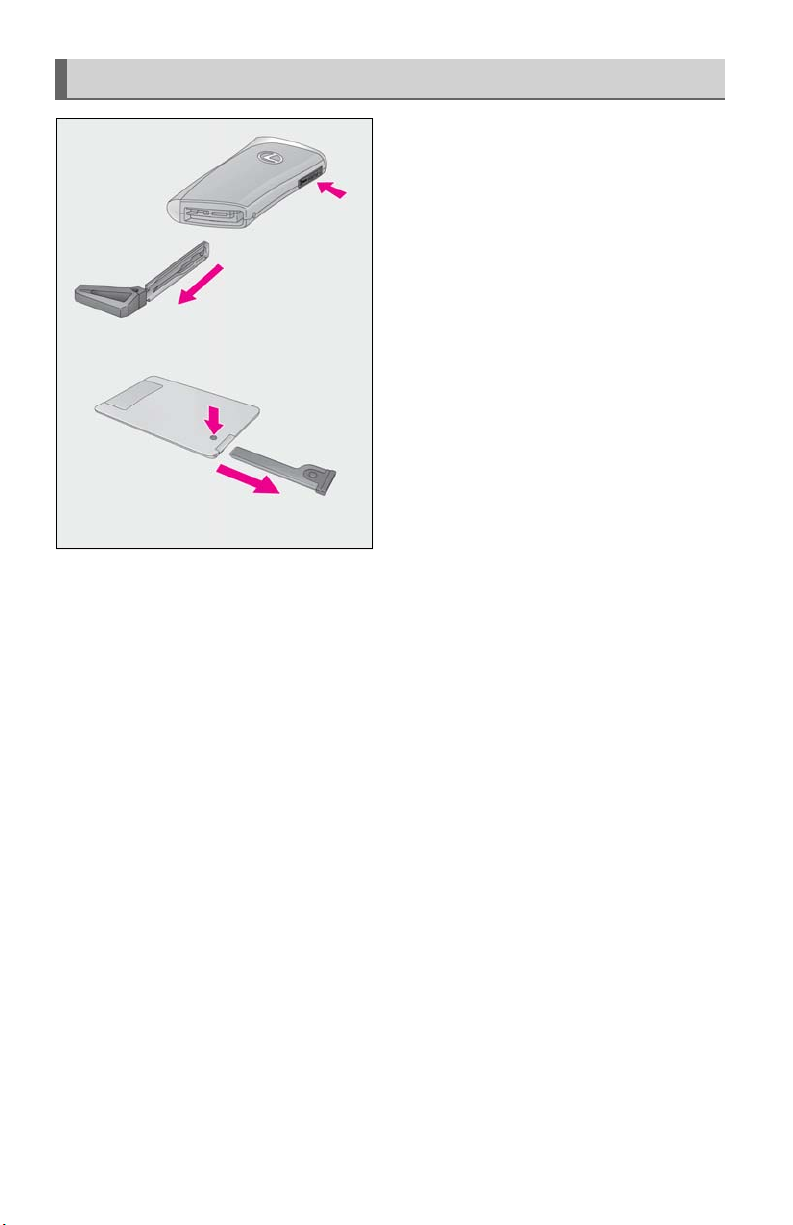
Mechanical key
To take out the mechanical key, push the
release button and take the key out.
The mechanical key can only be inserted in
one direction, as the key only has grooves
on one side. If the key cannot be inserted in
a lock cylinder, turn it over and re-attempt
to insert it.
After using the mechanical key, store it in
the electronic key. Carry the mechanical
key together with the electronic key. If the
electronic key battery is depleted or the
entry function does not operate properly,
you will need the mechanical key.
13
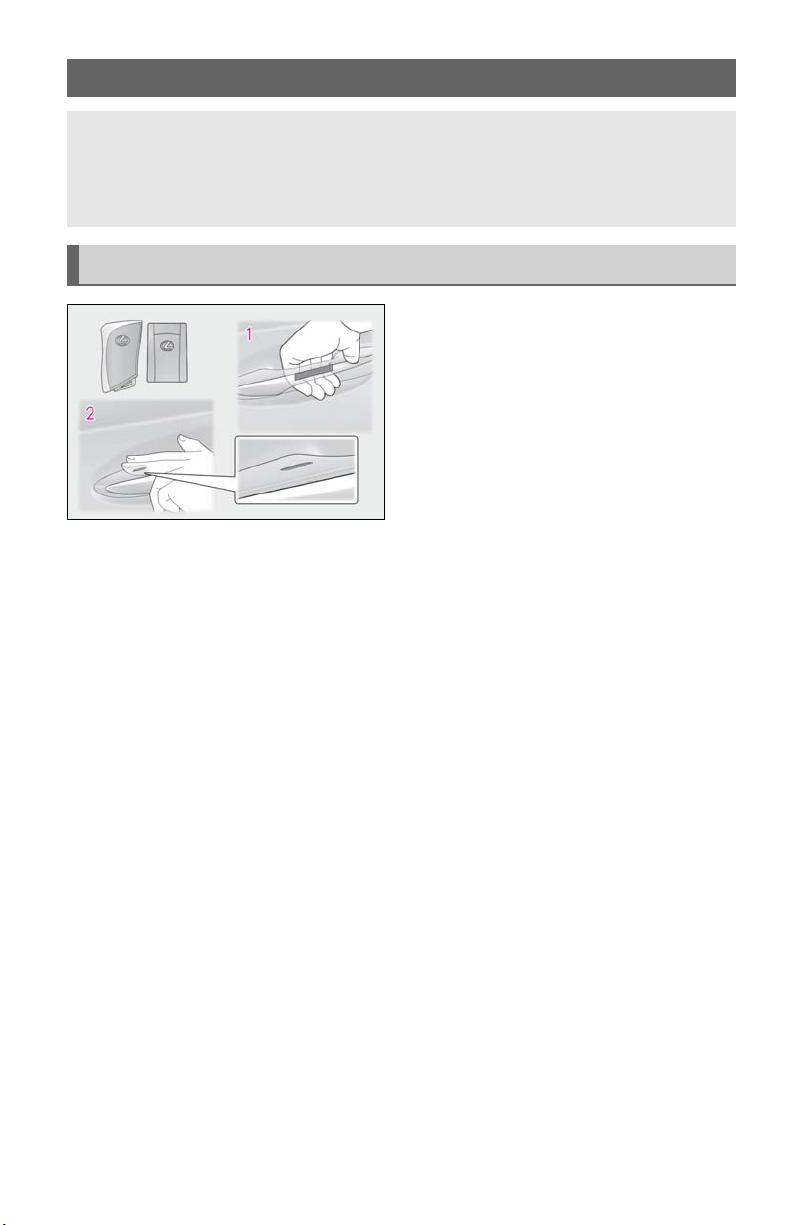
Smart Access System with Push-button Start
The following operations can be performed simply by carrying the electronic key (including the card key) on your person, for example in your pocket. The driver should always
carry the electronic key.
For details on starting the engine, see page 23.
Unlocking and locking the doors from the outside
1 Grip the driver’s door handle to unlock
the door. Holding the driver’s door
handle for approximately 2 seconds
unlocks all the doors. Grip any passenger door handle to unlock all the
*
doors.
Make sure to touch the sensor on the back
of the handle.
The doors cannot be unlocked for 3 seconds after the doors are locked.
*: The door unlock settings can be
changed.
2 Touch the lock sensor (indentation on the upper part of the door handle) to lock all the
doors.
Check that the door is securely locked.
14
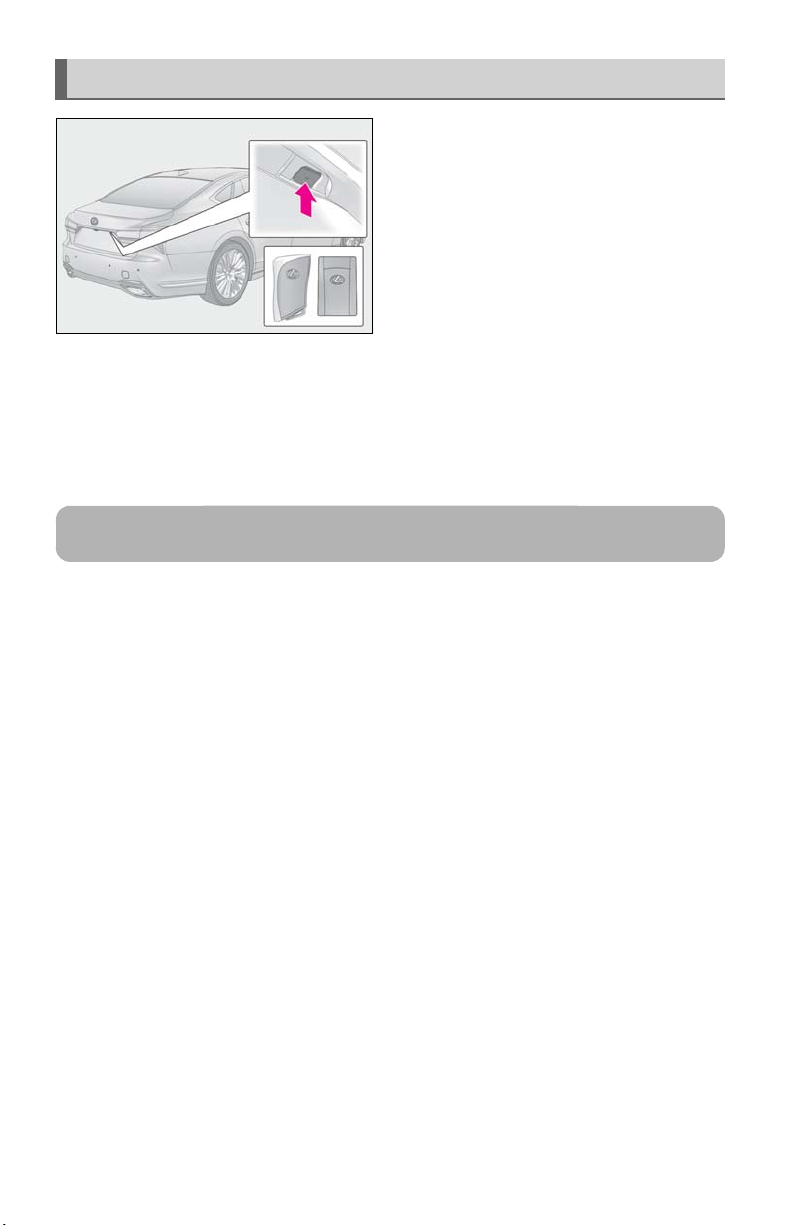
Opening the trunk
Press the button.
If the vehicle is equipped with a power trunk
opener and closer, the trunk lid will fully
open.
If the button is pressed while the trunk lid is
opening, the trunk lid will stop moving.
When all the doors are unlocked using one
of the following methods, the trunk can be
opened without the electronic key:
● Entry function
● Wireless remote control
● Door lock switches
● Automatic door unlocking system
● Mechanical key
For details on what to do when the electronic key does not operate properly, see page 103.
15
Front Seats
A
B
C
D
E
F
G
Adjustment procedure
■ Seat adjustment switches
■ Center Display
Seat position adjustment
Seatback angle adjustment
Head restraint height adjustment (if
equipped)
Seat cushion (front) angle adjustment
Vertical height adjustment
Lumbar support adjustment
Seat cushion length adjustment (if
equipped)
Press the seat switch.
1
2 Using the Remote Touch pad, select “Driver Seat Adjustment” or “Passenger Seat
Adjustment”.
16

3 Select the button for the desired
A
B
C
D
E
F
G
4 Perform adjustment using the displayed buttons.
The seat will move while a button is selected.
adjustment.
Head restraint adjustment (if
equipped)
Shoulder bolster adjustment (if
equipped)
Lumbar support adjustment
Pelvic support adjustment
Seatback side bolster adjustment (if
equipped)
Seat cushion side bolster adjustment (if
equipped)
Hip support adjustment (if equipped)
17
Operating the front passenger’s seat from the driver’s seat
A
■ Using the driver’s seat adjustment switches to adjust the front passenger’s seat
(front passenger mode)
The mode of the driver’s seat adjustment switches can be changed to adjust the front passenger’s seat.
1 Press the mode change button on the
driver’s side door.
The indicator will illuminate when
front passenger mode is selected.
2 Using the seat adjustment switches on
the driver’s seat, adjust the front passenger’s seat.
To cancel front passenger mode, press
the mode change button again.
Front passenger mode will be canceled automatically if the driver’s seat
adjustment switches are not operated
for approximately 30 seconds.
■ Using the Center Display (vehicles with a foldable head restraint)
1
Press the seat switch.
2 Press the sub function button of the Remote Touch. (P.46)
18

3 Select the button for the desired oper-
ation.
Moves the front passenger’s seat for-
A
ward and folds the seatback and head
restraint forward
Moves the front passenger’s seat back-
B
ward and the seatback and head
restraint to the upright position
If the rear seat behind the front passenger’s seat is not in the upright position,
it will move to the upright position
before the front passenger’s seat
moves to its upright position.
To stop the front passenger seat while it
is moving, select the or button
or press the seat switch.
A B
19

Power Rear Seat (if equipped)
Returning the rear seat from the front seats
1 Press the seat switch.
2 Press the sub function button of the Remote Touch. (P.46)
3 Select .
A
The rear seat will move to the upright
position.
20

Driving Position Memory
This feature automatically adjusts the positions of the front seats, steering wheel, outside
rear view mirrors and head-up display (if equipped) to make entering and exiting the vehicle easier or to suit your preferences.
Up to 3 different driving positions can be recorded.
Recording a driving position into memory
1 Turn the engine switch to IGNITION ON mode.
2 Check that the shift position is in P.
3 Adjust the driver’s seat, steering wheel, outside rear view mirrors and head-up display
(if equipped) to the desired positions.
4 While pressing the “SET” button, or
within 3 seconds after the “SET” button
is pressed, press button “1”, “2” or “3”
until the buzzer sounds.
If the selected button has already been
preset, the previously recorded position will be overwritten.
When the driver’s seat adjustment
switches are in front passenger mode
(P.18), the position of the driver’s
seat cannot be registered.
To record the position of the front passenger’s seat, adjust the front passenger’s seat to the
desired position and perform step
4 using the buttons on the front passenger’s side.
Recalling a driving position
1 Turn the engine switch to IGNITION ON mode.
2 Check that the shift position is in P.
21
3 Press one of the buttons for the driving
position you want to recall until the
buzzer sounds.
When the driver’s seat adjustment
switches are in front passenger mode
(P.18), a driving position cannot be
recalled.
Memory recall function (driver’s side only)
Each electronic key (including a card key) can be registered to recall your preferred driving
position.
■ Registering procedure
Record your driving position to button “1”, “2” or “3” before performing the following:
Carry only the key you want to register, and then close the driver’s door.
If 2 or more keys are in the vehicle, the driving position cannot be recorded properly.
1 Turn the engine switch to IGNITION ON mode.
2 Check that the shift position is in P.
3 Recall the driving position that you want to record.
4 While pressing the recalled button,
press and hold the door lock switch
(either lock or unlock) until the buzzer
sounds.
If the button could not be registered,
the buzzer sounds continuously for
approximately 3 seconds.
22
Engine (Ignition) Switch
Performing the following operations when carrying the electronic key on your person
starts the engine or changes engine switch modes.
Starting the engine
1 Press the parking brake switch to check that the parking brake is set.
The parking brake indicator will come on.
2 Firmly depress the brake pedal.
and a message will be displayed on the multi-information display.
If it is not displayed, the engine cannot be started.
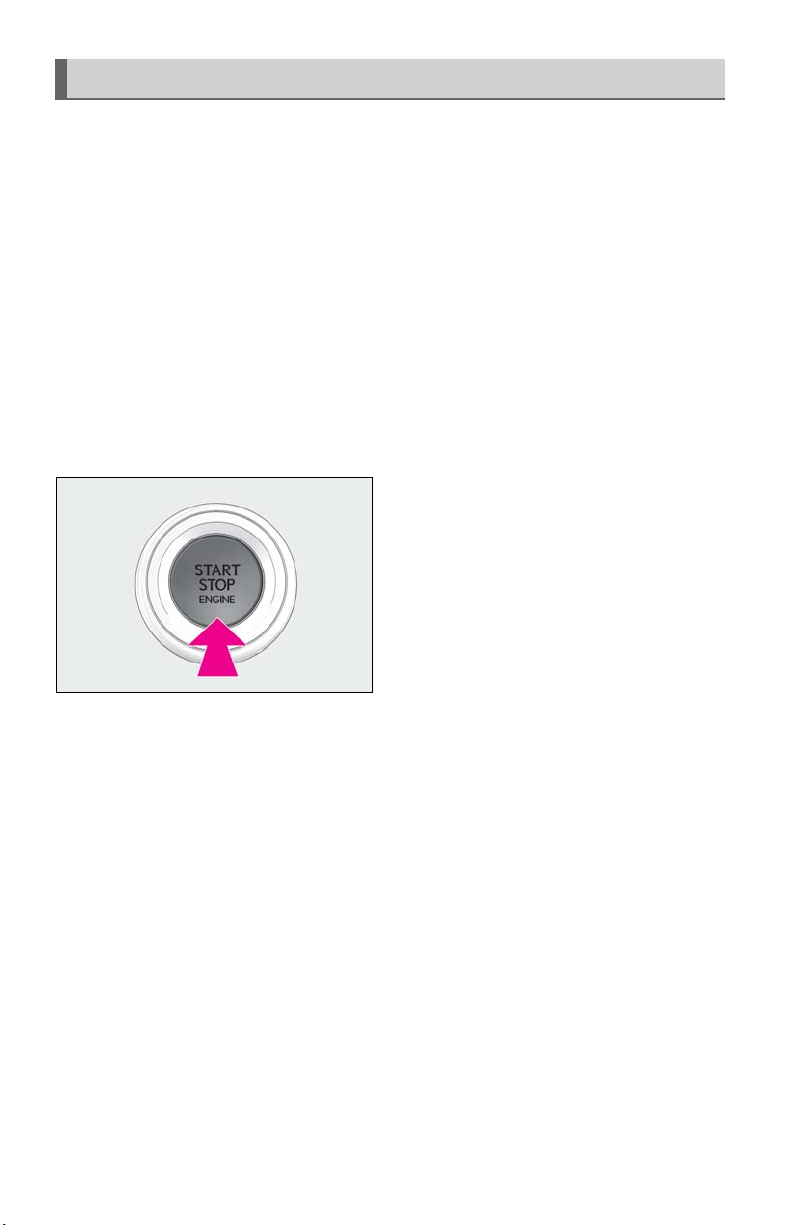
3 Press the engine switch shortly and
firmly.
When operating the engine switch,
one short, firm press is enough. It is not
necessary to press and hold the switch.
The engine will crank until it starts or
for up to 30 seconds, whichever is less.
Continue depressing the brake pedal
until the engine is completely started.
The engine can be started from any
engine switch mode.
23
Stopping the engine
1 Stop the vehicle completely.
2 If the parking brake is in manual mode, set the parking brake.
3 Shift the shift position to P. (P.26)
Check that the shift position indicator shows P and the parking brake indicator is illuminated.
4 Press the engine switch.
5 Release the brake pedal and check that “ACCESSORY” or “IGNITION ON” is not
shown on the meter.
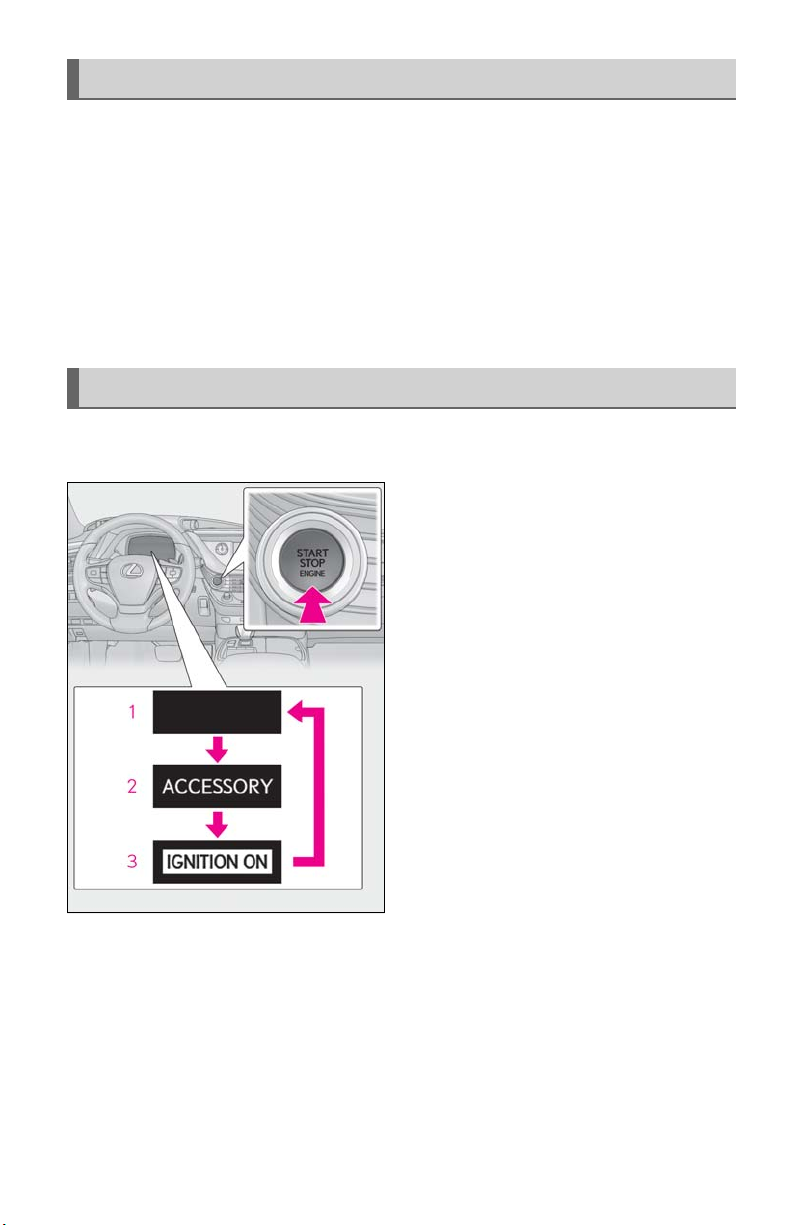
Changing engine switch modes
Modes can be changed by pressing the engine switch with the brake pedal released. (The
mode changes each time the switch is pressed.)
1 Off
The emergency flashers can be used.
2 ACCESSORY mode
Some electrical components such as
the audio system can be used.
“ACCESSORY” will be displayed on
the meter.
3 IGNITION ON mode
All electrical components can be used.
“IGNITION ON” will be displayed on
the meter.
24
If your vehicle has to be stopped in an emergency
Onl y in an em ergency , such as if it becomes impossible to stop the vehicle in the normal way,
stop the vehicle using the following procedure:
1 Steadily step on the brake pedal with both feet and firmly depress it.
Do not pump the brake pedal repeatedly as this will increase the effort required to slow
the vehicle.
2 Shift the shift position to N.
If the shift position is shifted to N
3 After slowing down, stop the vehicle in a safe place by the road.
4 Stop the engine.
If the shift position cannot be shifted to N
3 Keep depressing the brake pedal with both feet to reduce vehicle speed as much as
possible.
4 To stop the engine, press and hold the
engine switch for 2 consecutive seconds or more, or press it briefly 3 times
or more in succession.
5 Stop the vehicle in a safe place by the road.
25
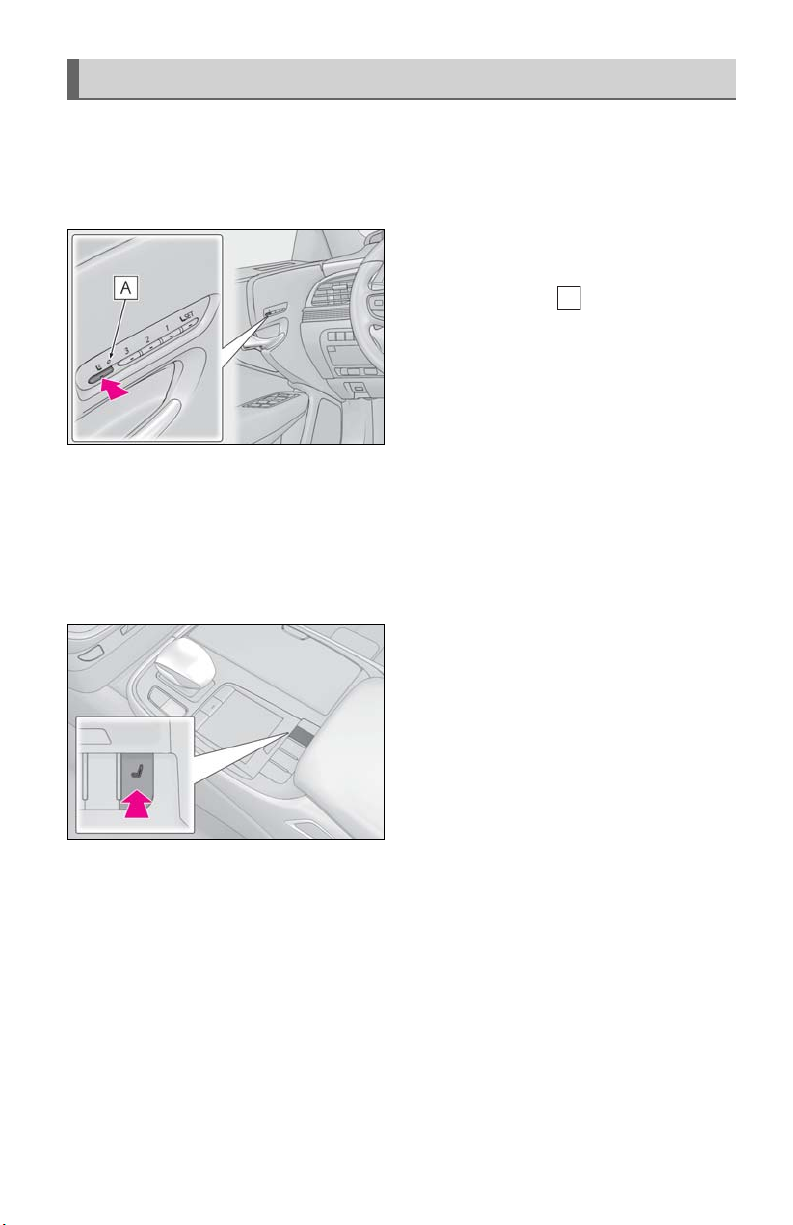
Automatic Transmission
A
B
C
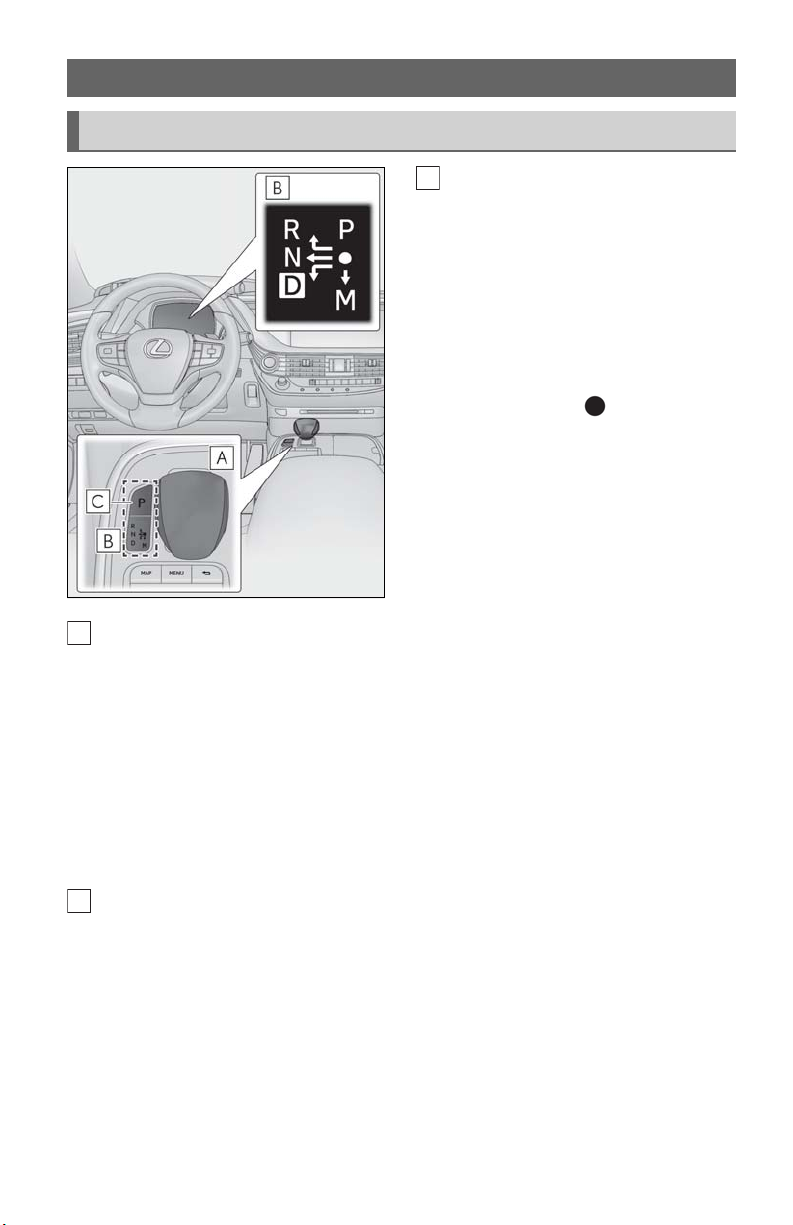
Shifting the shift lever
Shift lever
Operate the shift lever gently and
securely in the direction of the arrow
on the shift position indicator.
To shift to N, slide the shift lever in the
direction of the arrow and hold it.
Release the shift lever after each shifting operation to allow it to return to its
regular position ( ).
Shifting to M is only possible when the
shift position is in D.
When shifting from P to N, D or R,
from N, D, M or R to P, from D or M to
R, or from R to D, ensure that the brake
pedal is being depressed and the vehicle is stationary.
Shift position indicator
Meter display:
The current shift position is highlighted.
When any shift position other than D or M is selected, the arrow toward M and the M
position indicator are displayed in gray.
Shift lever display:
The current shift position is illuminated.
When selecting the shift position, make sure that the shift position has been changed to
the desired position by checking the shift position indicator provided on the instrument
cluster.
P position switch
26
Shift position purpose and functions
Shift position Objective or function
P Parking the vehicle/starting the engine
R Reversing
N Neutral (Condition in which the power is not transmitted)
D Normal driving*
M M mode driving*
1
*
: To improve fuel efficiency and reduce noise, set the shift position in D for normal driving.
You can choose gear range suitable for your driving situation by operating the paddle
shift switches.
2
*
: Any gear range can be fixed when driving in M mode.
1
2
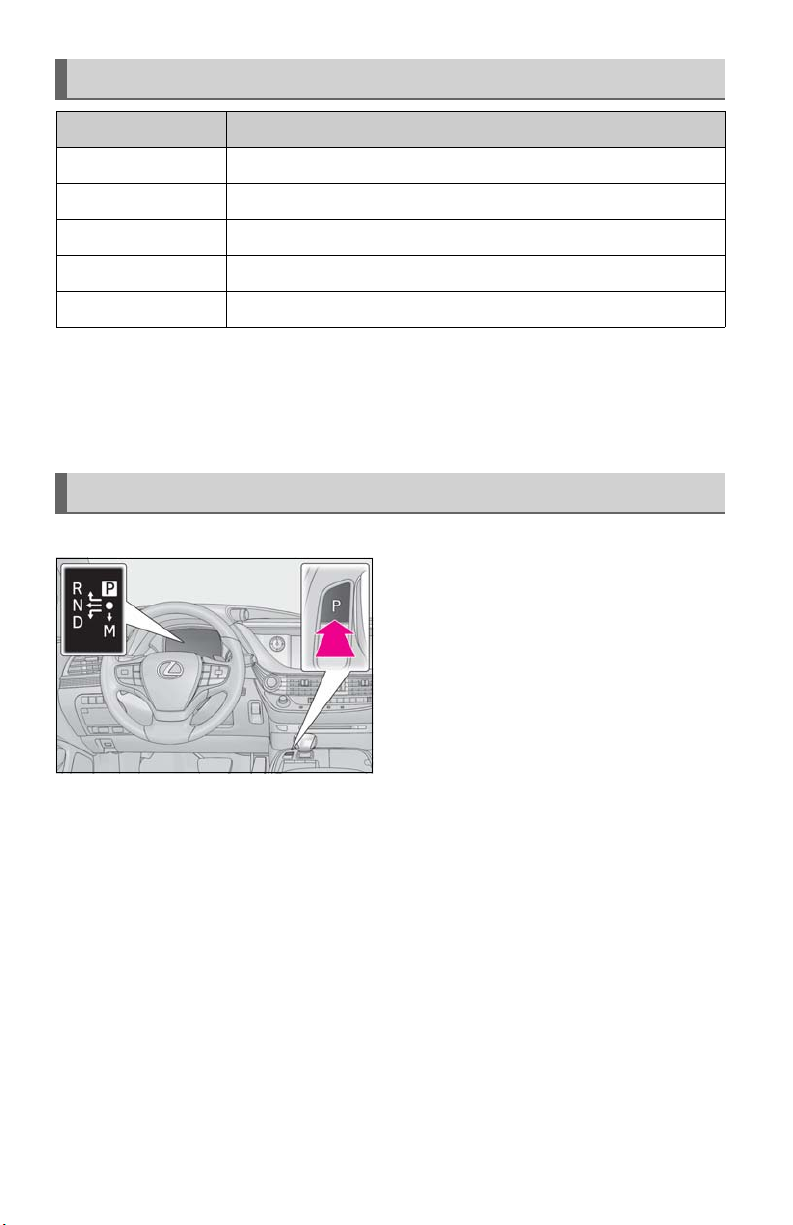
P position switch
■ When shifting the shift position to P
Fully stop the vehicle and set the parking
brake, and then press the P position switch.
When the shift position is changed to P, the
switch illuminates.
Check that the shift position indicator
shows P.
■ Shifting the shift position from P to other positions
● While depressing the brake pedal firmly, operate the shift lever. If the shift lever is oper-
ated without depressing the brake pedal, the buzzer will sound and the shifting operation
will be disabled.
● When selecting the shift position, make sure that the shift position has been changed to
the desired position by checking the shift position indicator provided on the instrument
cluster.
● The shift position cannot be changed from P to M directly.
27
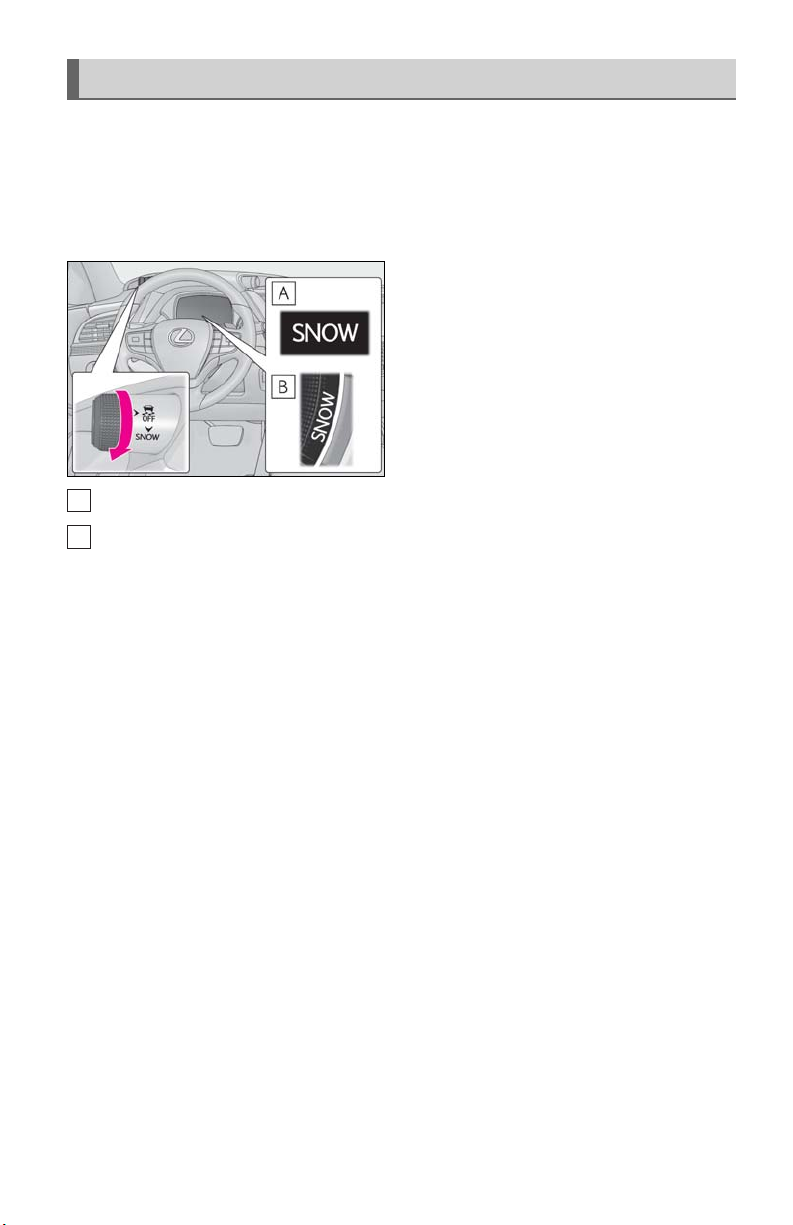
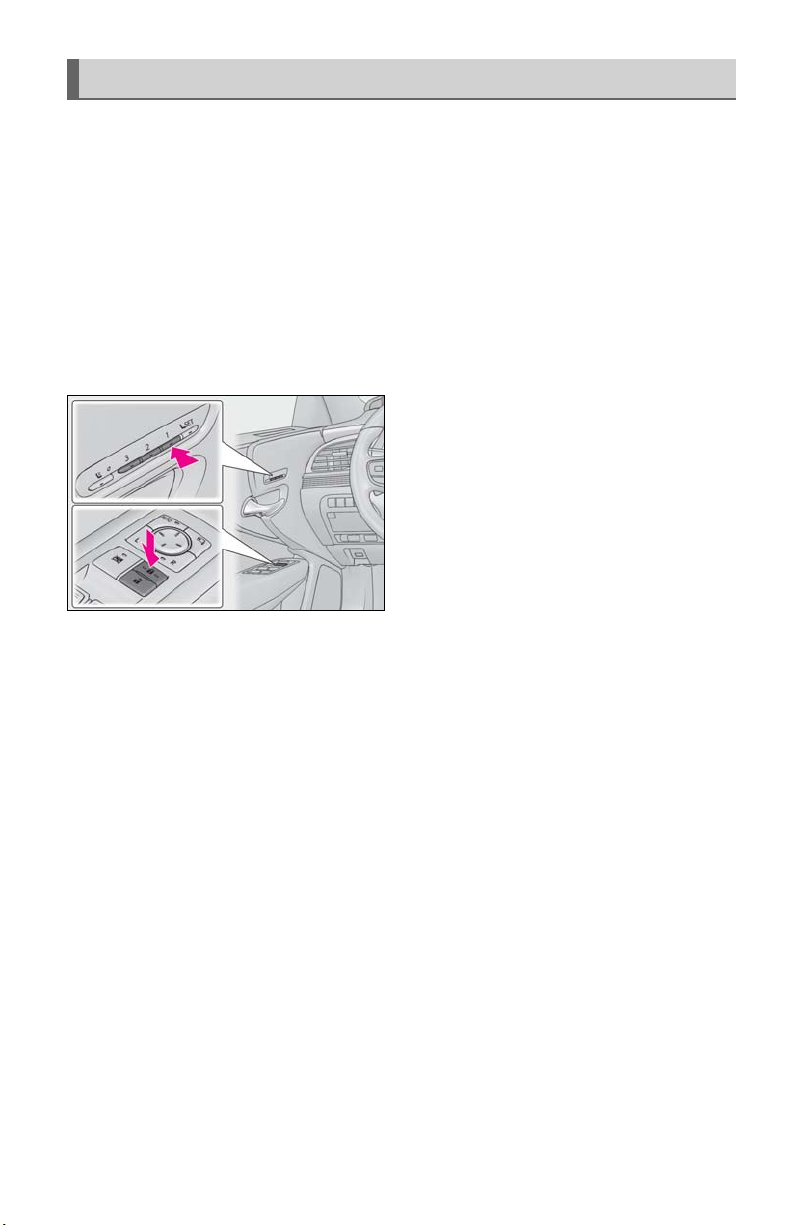
Selecting the driving mode
A
B
■ Driving mode
P.43
■ Snow mode
Snow mode can be selected to suit the conditions when driving on slippery road surfaces,
such as on snow.
Turn the snow mode switch backward.
The snow mode indicator illuminates.
Turn the snow mode switch backward again
to return to normal mode.
Except F SPORT models
F SPORT models
28
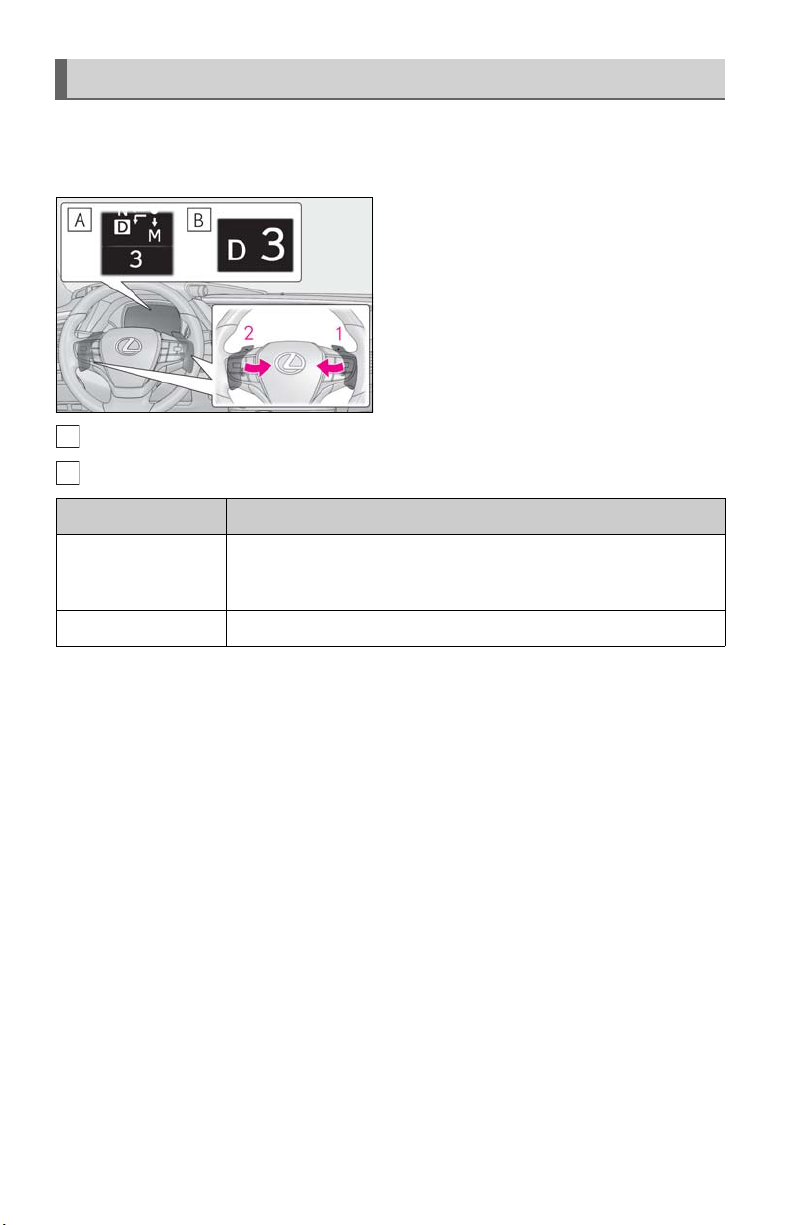
Selecting shift ranges in the D position
A
B
When the “-” paddle shift switch is operated, the shift range switches to a range that enables
engine braking force that is suitable to driving conditions. When the “+” paddle shift switch is
operated, the shift range switches to a range that is one range higher than the current range.
1 Upshifting
2 Downshifting
The selected shift range, from D1 to D10,
will be displayed on the meter.
Except F SPORT models
F SPORT models
Meter display Function
A gear in the range between D1 and the selected shift range is
D2 - D10
D1 Setting the shift range at D1
automatically chosen depending on vehicle speed and driving
conditions
A lower shift range will provide greater engine braking forces than a higher shift range.
29
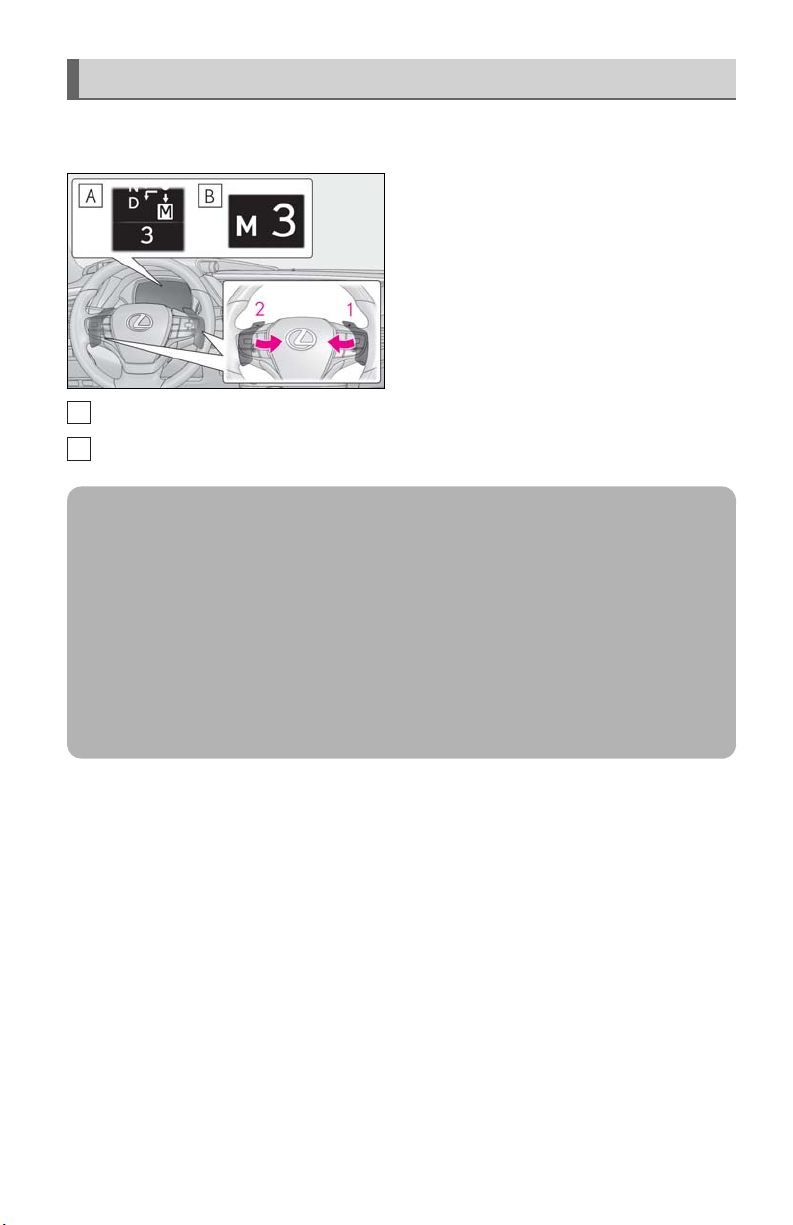
Selecting gears in the M position
A
B
To enter M mode, shift the shift position to M. Gears can be selected by operating the paddle shift switches, allowing you to drive in the gear of your choosing.
1 Upshifting
2 Downshifting
The gear changes once every time the paddle shift switch is operated.
The selected gear, from M1 to M10, will be
fixed and displayed on the meter
Except F SPORT models
F SPORT models.
When in the M position, the gear will not change unless the paddle shift switches are operated.
However, even when in the M position, the gears will be automatically changed in the following situations:
● When vehicle speed drops (downshift only).
● When it is necessary to protect the engine or automatic transmission when the engine
coolant temperature is low, the automatic transmission fluid temperature is high or low,
or other reasons.
Also, the gear will not shift when the vehicle speed is low, even if an upshift operation is performed.
30
 Loading...