


Copying
Printing
Scanning
Troubleshooting
Notices
Basics
Index
Edition Notice
www.lexmark.com
Lexmark X84-X85
Edition: June 2002
The following para graph does not apply to any country where such provisions are inconsistent with local
law: LEXMARK INTERNATIONAL, INC., PROVIDES THIS PUBLICATION “AS IS” WITHOUT WARRANTY OF
ANY KIND , EITHER EXPRESS OR IMPLIED, INCLUDING, BUT NOT LIMITED T O , THE IMPLIED WARRANTIES
OF MERCHANTABILITY OR FITNESS FOR A PARTICULAR PURPOSE. Some states do not allow disclaimer of
express or implied warranties in certain transactions; therefore, this statement may not apply to you.
This publication could include technical inaccuracies or typographical errors. Changes are periodically made to
the information herein; these changes will be incorporated in later editions. Improvements or changes in the
products or the programs desc ribed may be made at any time.
Comments about this publication may be addressed to Lexmark International, Inc., Department F95/032-2, 740
West New Circle Road, Lexington, Kentucky 40550, U.S.A. In the United Kingdom and Eire, send to Lexmark
International Ltd., Marketing and Services Department, Westhorpe House, Westhorpe, Marlow Bucks SL7 3RQ.
Lexmark may use or distribute any of the information you supply in any way it believes appropriate without
incurring any ob ligation to you . You can purchase additional copies of p ubli cations rel ated to this pr oduct b y calli ng
1-800-553-9727. In the United Kingdom and Eire, call +44(0)8704 440 044. In other countries, contact your point
of purchas e.
References in this publication to products, programs, or services do not imply that the manufacturer intends to
make these available in all countries in which it operates. Any reference to a product, program, or service is not
intended to state or im ply that only that product, program, or service may be used. Any functionally equivalent
product, program, or service that does not infringe any existing intellectual property right may be used instead.
Evaluation and verification of operation in conjunction with other products, programs, or services, except those
expressly designated by the manufacturer, are the user’s responsibility.
© Copyright 2001, 2002 Lexmark International, Inc.
All rights reserved.
UNITED STATES GOVERNMENT RESTRICTED RIGHTS
This software and docum en tati on are pr o v id ed with REST RIC TED RI GHTS. Use, duplication or disclosure by the
Government is subject to restrictions as set forth in subparagraph (c)(1)(ii) of the Rights in Technical Data and
Computer Software claus e at DFARS 252.227-7013 and in applicab le FAR provisions: Lexma rk International, Inc.,
Lexington, KY 40550.

Copying
Printing
Scanning
Troubleshooting
Notices
Basics
Index
Home Page
www.lexmark.com
Lexmark X84-X85
Lexmark™ X84-X85 Scan/Print/Copy
Tips for using this guide
• Click the categories on the left side of th e page to na vigat e through t his gui de, sect ion
by section.
• Click the left or right arro w in the lower right corner of the page to navigate through
this guide, page by p age.
• Click the house icon in the lower right corner of the page to return to the Home Page.
• Click Edition Notice to view edition information.
• Select File Print Properties to print this guide. Make sure Landscape is selected.
Select the pages you want to print, and then click OK.

Basics
Copying
Printing
Scanning
Troubleshooting
Notices
5
Basics
Index
www.lexmark.com
Lexmark X84-X85
Congratulations on the pur chase of y our Le xmark™ X84-X85 Scan/Print/Cop y. You can scan,
print, and copy documents using the printer operator panel and the printer software.
• Using the operator panel
• Using the menus
• Using the Scan & Copy Control Program
• Using the Print Control Program
• Loading the paper
• Replacing the cartridges
• Aligning the cartridges
• Preserving the cartridges

Basics
Copying
Printing
Scanning
Troubleshooting
Notices
6
Basics
Index
www.lexmark.com
Lexmark X84-X85
Using the operator panel
1
2
8
9
10
12
13
14
5
7
6
4
11
3

Basics
Copying
Printing
Scanning
Troubleshooting
Notices
7
Basics
Index
www.lexmark.com
Lexmark X84-X85
The following table corresponds to the graphic on the preceding page.
# Press this button: To:
1 Number of Copies Select the number of copies, from 1 to 99.
2 Reduce/Enlarge Make the document smaller or larger than the original.
3 Scroll through menu categories.
4 Menu Change settings using the menus. For menu options, see
page 8.
5 Quality Choose photo, quick, or normal copy setting.
6 Scan To Select a scan destination, such as Application, File, Email,
or Fax.
7 Cancel Cancel a scan or copy job, or return a menu item to its
default.
8 Lighter/Darker Make the document lighter or darker than the original.
9 Paper Type Select glossy, photo, transparency, or plain paper type.
10 Select Choose the displayed selection.
11 Color Copy Make a color copy.
12 Black Copy Make a black and white copy.
or

Basics
Copying
Printing
Scanning
Troubleshooting
Notices
8
Basics
Index
www.lexmark.com
Lexmark X84-X85
Using the menus
1 Press Menu until you see the menu you want.
2 Press Select.
3 Press until you see the menu item you want.
4 Press Select.
13 Scan Press
Scan after selecting a Scan To destination.
14 Power Turn the printer on and off.
Mono Collate
Prints multiple copies of a multipage document
so pages 1 through 5 of copy one print, pages
1 through 5 of copy two print, and so on.
Clone
Prints several copies of one image on the same
page. Select 4, 9, or 16 images per page.
# Press this button: To:
or

Basics
Copying
Printing
Scanning
Troubleshooting
Notices
9
Basics
Index
www.lexmark.com
Lexmark X84-X85
Poster
Prints an image on multiple
pages. Select 4 pages, 9
pages or 16 pages.
Language
•English
• French
•German
• Spanish
• Italian
•Dutch
• Bra zi li an Portu gue se
•Polish
Copy Source Type
•Photo
•Text
• Line Drawing
•Mixed
Copy Source Size
•A4
• Letter
•3 x 5
•4 x 6
Color Intensity
• Less
•More
Set Defaults
Makes the current settings
the default.
Factory Defaults
Returns the settings to the
factory default settings.
Maintenance
• Change Cartridges
• Align Cartridges
• Cle an Cartridge s
•Self Test
Power Saver Timeout
• Immediate
•10 min
•30 min
•60 min
Copy Count Timeout
•2 min
•OFF
Reduce/Enlarge Timeout
•2 min
•OFF
Ink Levels
•Black
• Color

Basics
Copying
Printing
Scanning
Troubleshooting
Notices
10
Basics
Index
www.lexmark.com
Lexmark X84-X85
Using the Scan & Copy Control Program
When the software is installed on your computer, you can use the Scan & Copy Control
Program to customize scan, print, and copy jobs. To open the Scan & Copy Control Program:
1 Click Start Programs Lexmark X84-X85 Scan & Copy Control Program.
Select: To:
The keypad Set the number of copies to print, from 1 to 99.
Reduce/Enlarge Scroll and select the size of your output.
Fit to page Scroll and select the size of your output.
Auto Crop Crop the image during scanning.
Rotate Rotate the image 90 degrees clockwise during scanning.
The brightness bar Adjust how dark or light you want the copy to be.
Color Make a color scan or copy of a color original.
Gray Make a black and white scan or copy of a color original.
B/W Make a black and white scan or copy of a black and white original.
Text/(OCR) Scan a document into an application to let you edit the text.

Basics
Copying
Printing
Scanning
Troubleshooting
Notices
11
Basics
Index
www.lexmark.com
Lexmark X84-X85
To make additional changes to your docu ments before copying, printing, or scanning:
2 Click File S e tu p.
Copy Make a copy of the original document.
Fax Scan the image or document and send it to a fax machine.
Email Scan the image or document and attach it to a new e-mail message.
Send to Application Scan the image or document into the selected image editor or word
processor applica tion .
Scan to File Scan the image or document and save it as an image or text file.
Select this tab: To:
Image Adjust the properties of the scanned image.
Scan Change how or where images are scanned.
Page Set the scan frame position and size.
Copy/Fax Set Printer Properties or choose your fax driver.
Email Change settings related to e-mail operations.
Select: To:

Basics
Copying
Printing
Scanning
Troubleshooting
Notices
12
Basics
Index
www.lexmark.com
Lexmark X84-X85
Using the Print Control Program
The Control Program lets you monitor the printer and install or replace cartridges. To open
the Control Program, click Start Programs Lexmark X84-X85 Print Control Program.
Windows 98/Me
Application Choose and configure any application on your computer for the Send to
Application button.
OCR Select the language you want the Optical Character Recognition (OCR)
to use.
Descreen/Sharpen • Remove a halftone pattern in the background of a scanned image.
• Enable and set the sharpen level.
Click this tab: To:
Status • Monitor the status of your print job.
• Cancel your print job.
Options Enable or disable various software functions, such as Sound Effects
and Buffer Mode.
Select this tab: To:

Basics
Copying
Printing
Scanning
Troubleshooting
Notices
13
Basics
Index
www.lexmark.com
Lexmark X84-X85
Windows 2000/XP
Cartridges • View your ink levels.
• Install or replace cartridges.
• Clean the nozzles.
• Print a test page.
• Align cartridges for best quality.
• View cartridge part numbers and order supplies directly from the
Lexmark Web site.
Click this tab: To:
Status • Monitor the status of your print job.
• Cancel your print job.
Click this tab: To:

Basics
Copying
Printing
Scanning
Troubleshooting
Notices
14
Basics
Index
www.lexmark.com
Lexmark X84-X85
Cartridges • View your ink levels.
• Align cartridges for best quality.
• Clean the nozzles.
• Print a test page.
• View cartridge part numbers and order supplies directly from the
Lexmark Web site.
Options • Control how and when the Control Program displays.
• Disable the printer shortcut.
Click this tab: To:

Basics
Copying
Printing
Scanning
Troubleshooting
Notices
15
Basics
Index
www.lexmark.com
Lexmark X84-X85
Setting defaults
If you are usually copying and scanning using a particular setting, such as a certain size paper, you
may want to set this as your default. If you are using your printer with a computer, you must make
changes using both the operator panel and the Scan & Copy Control Program.
Using the operator panel: Using the computer:
Make sure:
• Paper Size is set to desired paper
size
• Copy Source Size is set to
desired copy size
1 Press
Menu.
2 Press until Language or
Copy Source Size appears on
the display, and then press
Select.
3 Press until the desired
setting appears on the display,
and then press
Select.
4 Press
Menu.
5 Press until Set Def aults
appears on the display, and then
press
Select.
Make sure:
• Paper Size is set to desired paper size
• The area to be scanned is set to the desired paper
size in the Scan & Copy Control Program
1 From your program File menu, select Print.
2 To customize print settings, click Properties or Printer
Preferences.
3 Select the Paper tab to select the paper size you want,
and then click OK.
4 Click Start Programs Lexmark X84-X85 Scan &
Copy Control Program.
5 Click File Setup, and then select the Page tab.
6 Select the paper size you want, and then click OK.
or
or
or
Basics
Copying
Printing
Scanning
Troubleshooting
Notices
16
Basics
Index
www.lexmark.com
Lexmark X84-X85
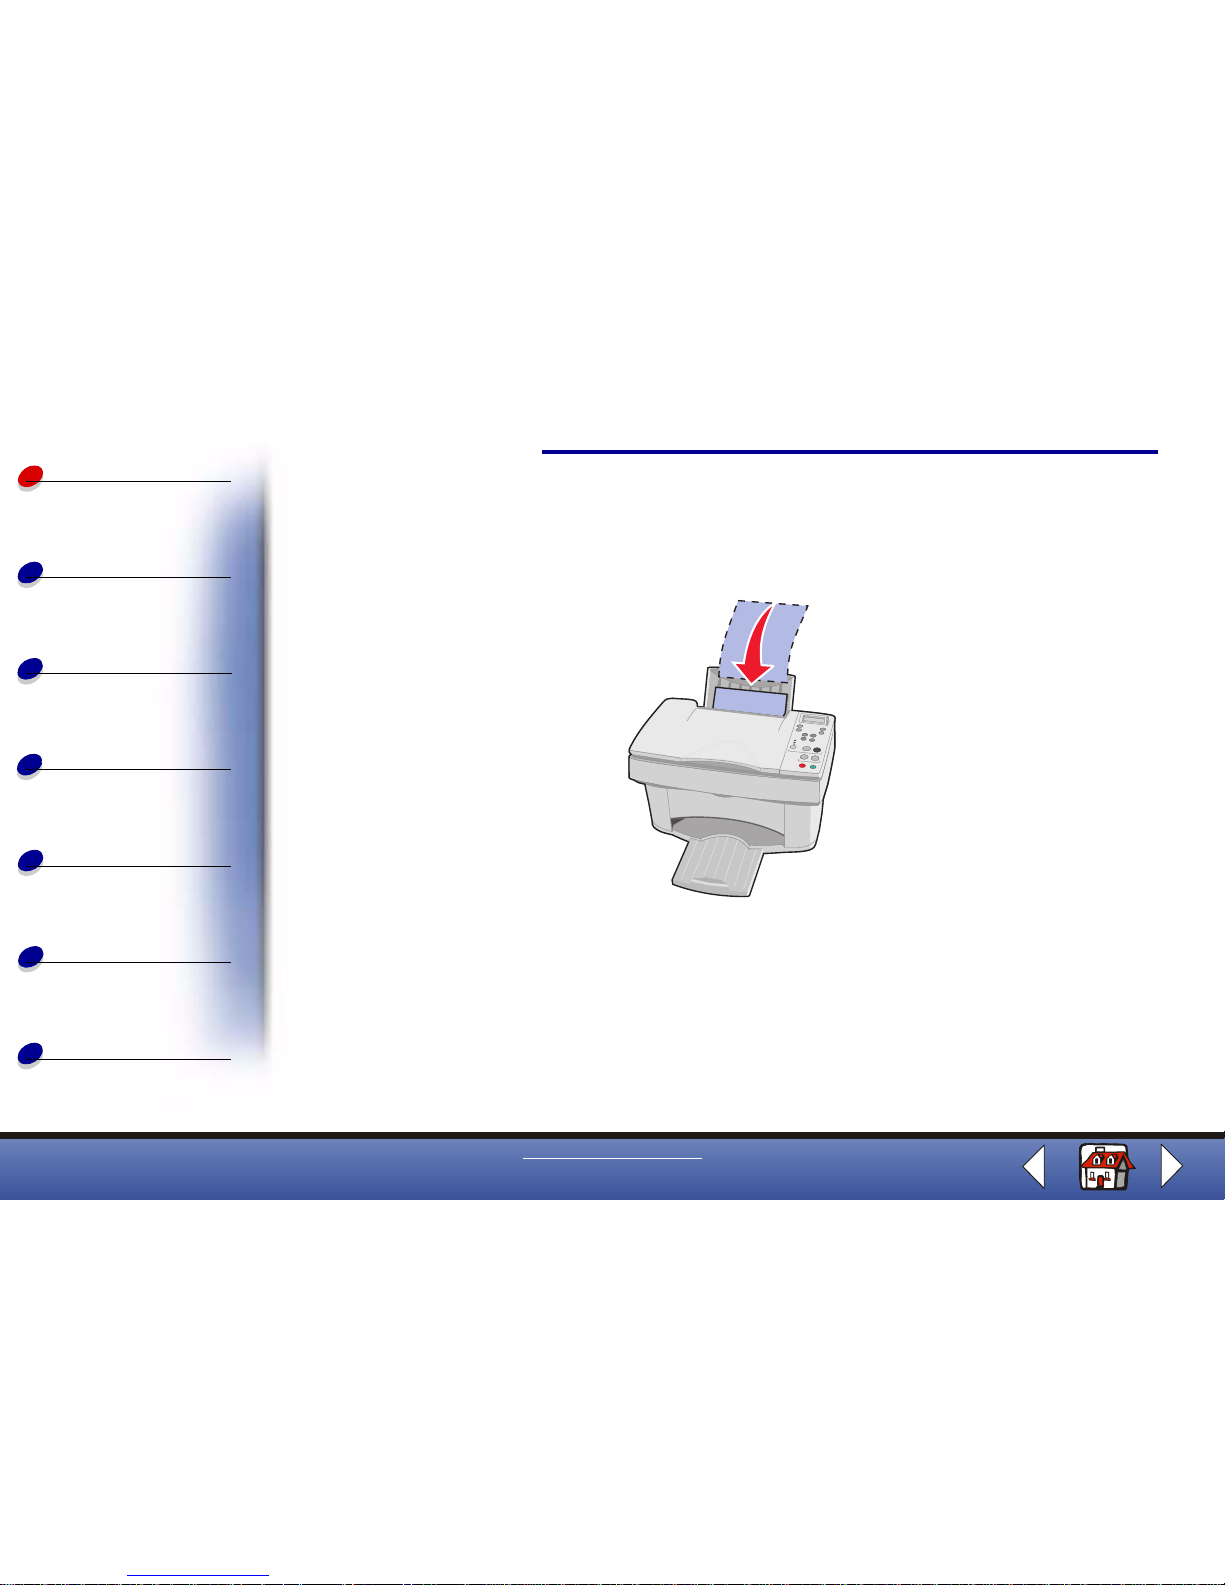
Loading the paper
1 Place the paper against the r ight side of the paper support with the print side facing
you.
Note: Do not force the paper into the printer.

Basics
Copying
Printing
Scanning
Troubleshooting
Notices
17
Basics
Index
www.lexmark.com
Lexmark X84-X85
2 Squeeze the release tab and sli de the paper gui de to the right until it re sts against t he
edge of the paper.

Basics
Copying
Printing
Scanning
Troubleshooting
Notices
18
Basics
Index
www.lexmark.com
Lexmark X84-X85
Loading specialty paper
Follow these guidelines when loading specialty paper:
Load up to: Make sure:
100 sheets of inkjet paper
(depending on thickness)
• The print side is facing you.
• The paper is against the right side of the paper support.
10 envelopes • The print side is facing you.
• The envelopes are loaded vertically against the
right side of the paper support.
• The stamp location is in the upper left corner.
• The paper guide rests against the edge of the
envelopes.
10 greeting cards, index
cards, po stcards , or photo
cards
• The print side is facing you.
• The cards are loaded vertically against the right side of the paper
support.
• The paper guide rests against the edge of the cards.
25 sheets of photo paper • The glossy or coated side is facing you.
• The paper guide rests against the edge of the photo paper.

Basics
Copying
Printing
Scanning
Troubleshooting
Notices
19
Basics
Index
www.lexmark.com
Lexmark X84-X85
10 transparencies • The rough sides of the transparencies are facing you.
• The paper guide rests against the edge of the transparencies.
100 sheets of custom si ze
paper
• The print side is facing you.
• Your paper size fits within these dimensions:
– Width:
76 to 216 mm
3.0 to 8.5 in.
– Length:
127 to 432 mm
5.0 to 17.0 in.
• The paper guide rests against the edge of the paper.
25 iron-on transfers • You follow the loading instructions on the iron-on packaging.
• The print side (blank side) is facing you.
• The paper guide rests against the edge of the iron-on transfers.
Load up to: Make sure:

Basics
Copying
Printing
Scanning
Troubleshooting
Notices
20
Basics
Index
www.lexmark.com
Lexmark X84-X85
Replacing the cartridges
The Lexmark X84-X85 uses the following cartridges:
1 Make sure the printer is on.
2 Open the cartridge door.
The cartridge carrier moves to the loading position, unless the printer is busy.
Black 12A1970
Color 15M0120
High Yield Black 12A1975
High Yield Color 15M0125

Basics
Copying
Printing
Scanning
Troubleshooting
Notices
21
Basics
Index
www.lexmark.com
Lexmark X84-X85
3 Pull the old cartridge toward you, and then lift it out. Sto re it in an air-ti ght container or
dispose of it.
4 Install the new or replacement cartridge.
a If you are installing a ne w cartridge, remove only the sticker and transparent tape
on the bottom of the cartridge.

Basics
Copying
Printing
Scanning
Troubleshooting
Notices
22
Basics
Index
www.lexmark.com
Lexmark X84-X85
b Insert the cartridge into the carrier.
c Push back firmly on the cartridge until it snaps securely into place.
Warning: Do not touch the gold contact area of the cartridge.
SNAP
SNAP

Basics
Copying
Printing
Scanning
Troubleshooting
Notices
23
Basics
Index
www.lexmark.com
Lexmark X84-X85
5 Close the cartridge door.
6 From the operat or panel, select the cartridge type you installed.
7 Use the to scroll through the choices.
8 Press Select.
Note: If you installed a new cartridge, an alignment page prints. Use the arrow
buttons on the operator panel to choose the pattern and select the pattern
numbers that come closest to forming a straight line. For instructions, see
the next section.
Aligning the cartridges
To improve the print quality, you may need to align the
cartridges. You can align cartridges using the operator panel
or the Control Program. For help using the Control Program,
see page 12. To use the operator panel:
1 Press Menu until Maintenance appears on the display.
2 Press until Align Cartridges appears on the display.
3 Press Select.
or
or

Basics
Copying
Printing
Scanning
Troubleshooting
Notices
24
Basics
Index
www.lexmark.com
Lexmark X84-X85
4 An alignment page prints with several patterns. A number appears under each
pattern. The test pattern that prints is similar to the one shown:
5 For each alignment group on the test page, find the number that comes closest to
forming a straight line.
6 Press and scroll to the number you selected on the te st page.
7 Press Select.
or

Basics
Copying
Printing
Scanning
Troubleshooting
Notices
25
Basics
Index
www.lexmark.com
Lexmark X84-X85
Preserving the cartridges
To ensure the longest life from your print cartridge and optimum performance from your
printer:
• Keep a new print cartridge in its packaging until you are ready to install it.
• Do not remove a print cartridge from the printer except to replace, clean, or st ore it in
an air-tight container. The print cartridge does not print correctly if removed from the
printer and left exposed for an extended period of time.
• If a print cartridge runs out of ink, leave the empty cartridge in the printer until you are
ready to replace it. Printing with only one of the print cartridges in the printer may
cause printer problem s.
Lexmark’s printer warranty does not cover repair of failures or damage caused by a refilled
cartridge. Lexmark does not recommend use of refilled cartridges. Refilling cartridges can
affect print quality and cause damage to the printe r. For best results, use Lexmark supplies.

Copying
Copying
Printing
Scanning
Troubleshooting
Notices
26
Basics
Index
www.lexmark.com
Lexmark X84-X85
The following section includes information about:
• Copying instructions
• Customizing copy settings
• Using special copy feature s
• Creating projects

Copying
Copying
Printing
Scanning
Troubleshooting
Notices
27
Basics
Index
www.lexmark.com
Lexmark X84-X85
Copying instructions
Note: A4 users, please see page 15 for setting default paper sizes.
Using the operator panel: Using the computer:
1 Make sure the printer is on.
2 Open the top cover.
3 Place the document face
down on the scanner bed in
the bottom, right corner.
4 Close the top cover.
5 Press
Color Copy or Black Copy.
1 Make sure the printer and the computer are
turned on.
2 Open the top cover.
3 Place the document face down on the
scanner bed in the bottom, right corner.
4 Close the top cover.
5 Click St art Programs Lexmark X84- X85
Scan & Copy Control Program.
6 Select the number of copies.
7 Click the option button that matches the
desired color of your copy.
8 Click Copy.

Copying
Copying
Printing
Scanning
Troubleshooting
Notices
28
Basics
Index
www.lexmark.com
Lexmark X84-X85
Customizing copy settings
You can make additional changes to your document before copying.
1 Click Start Programs Lexmark X84-X85 Scan & Copy Control Program.
2 Click File S e tu p.
3 Select the Copy/Fax tab.
4 Customize the settings .
5 Click OK to copy.

Copying
Copying
Printing
Scanning
Troubleshooting
Notices
29
Basics
Index
www.lexmark.com
Lexmark X84-X85
Using special copy features
1 Click Start Programs Lexmark X84-X85 Scan & Copy Control Program.
2 From the Fit to Page area, scroll and select Poste r, Clone, or Autofit.
3 Click Paper Type/Print Quality and select the Paper tab to choose the collate
feature.
Poster
Prints an
image on
multiple
pages.
Original 2 x 2 3 x 3 4 x 4
You can also create a poster without using the computer. See page 31.
Clone
Prints several
copies of one
image on the
same page.
2 images 3 images 4 images 8 images

Copying
Copying
Printing
Scanning
Troubleshooting
Notices
30
Basics
Index
www.lexmark.com
Lexmark X84-X85
Clone from
the operator
panel
Prints several
copies of one
image on the
same page.
Original 4 images 9 images 16 images
You can also clone an image without using the computer. See page 34.
Autofit
Enlarges an image to fit a full page. Original Fit to page
Collate
Prints multiple copies of a multipage document so pages
1 through 3 of copy one print, pages 1 through 3 of copy two
print, and so on.

Copying
Copying
Printing
Scanning
Troubleshooting
Notices
31
Basics
Index
www.lexmark.com
Lexmark X84-X85
Creating projects
Printing posters
Using the operator panel: Using the computer:
1 Make sure the printer is on.
2 Open the top cover.
3 Place the document face down on the
scanner bed in the bottom, right corner.
4 Close the top cover.
5 Press
Menu until Poster appears on the
display.
6 Press
Select.
7 Press until the desired size (4, 9, or
16 pages) appears on the display.
8 Press
Select.
9 Press
Color Copy or Black Copy.
1 Make sure the printer and the computer are
turned on.
2 Open the top cover.
3 Place the document face down on the
scanner bed in the bottom, right corner.
4 Close the top cover.
5 Click St art Programs Lexmark X84- X85
Scan & Copy Control Program.
6 Select the color button of your choice.
7 Select Poster from the Fit to Page area.
8 Select the size you want your poster to be
(2 x 2, 3 x 3, or 4 x 4) and click OK.
9 Click Copy.
or

Copying
Copying
Printing
Scanning
Troubleshooting
Notices
32
Basics
Index
www.lexmark.com
Lexmark X84-X85
Assembling posters
1 On each printed page, trim the white edges from two adjacent sides .
For example, trim the white edges from the top and left sides of each page.
2 Arrange the pages so that every trimmed edge overlaps an untrimmed edge (the
white edge).
3 Tape the back of the pages together.
4 To complete your poster, trim any remaining white edges.

Copying
Copying
Printing
Scanning
Troubleshooting
Notices
33
Basics
Index
www.lexmark.com
Lexmark X84-X85
Copying receipts
Note: If you have lightly printed receipts, you can use the lighter/darker option of
the operator panel or the Scan & Copy Control Program.
Using the operator panel: Using the computer:
1 Make sure the printer is on.
2 Open the top cover.
3 Place the receipt face down on the scanner
bed in the bottom, right corner.
4 Close the top cover.
5 Press
Black Copy.
1 Make sure the printer
and the computer are
turned on.
2 Open the top cover.
3 Place the receipt face
down on the scanner
bed in the bottom, right corner.
4 Close the top cover.
5 Click St art Programs Lexmark X84- X85
Scan & Copy Control Program.
6 Click Copy.

Copying
Copying
Printing
Scanning
Troubleshooting
Notices
34
Basics
Index
www.lexmark.com
Lexmark X84-X85
Cloning seed packets to label garden rows
Cut out each image and attach to an object that can be inserted into the ground.
Note: If you plan on using the images outdoors, you may want to laminate them.
Using the operator panel: Using the computer:
1 Make sure the printer is on.
2 Open the top cover.
3 Place the seed packet face down on the
scanner bed in the bottom, right corner.
4 Close the top cover.
5 Press
Menu until Clone appears on the
display, and then press
Select.
6 Use until the desired number of
images (4, 9, or 16 im ages) appears on the
display.
7 Press
Select.
8 Press
Color Copy or Black Copy.
1 Make sure the printer
and the computer are
turned on.
2 Open the top cover.
3 Place the seed packet
face down on the
scanner bed in the bottom, right corner.
4 Close the top cover.
5 Click Start Programs Lexmark X84-X85
Scan & Copy Control Program.
6 From the Fit to Page area, select Clone.
7 Select 2, 3, 4, or 8 images.
8 Select Color, Gray, or B/W.
9 Click Copy.
or

Copying
Copying
Printing
Scanning
Troubleshooting
Notices
35
Basics
Index
www.lexmark.com
Lexmark X84-X85
Enlarging patterns
Using the operator panel: Using the computer:
1 Make sure the printer is on.
2 Open the top cover.
3 Place the pattern face down on the scanner
bed in the bottom, right corner.
4 Close the top cover.
5 Press
Reduce/Enlarge until the desired size
or Custom appears on the display.
6 Press
Select.
7 If you selected Custom, press until
the desired percentage appears on the
display.
8 Press
Select.
9 Press
Color Copy or Black Copy.
1 Make sure the
printer and the
computer are
turned on.
2 Open the top
cover.
3 Place the
pattern face
down on the scanner bed in the bottom,
right corner.
4 Close the top cover.
5 Click St art Programs Lexmark X84- X85
Scan & Copy Control Program.
6 From the Reduce/Enlarge area, select the
desired percentage.
7 Select Color, Gray, or B/W.
8 Click Copy.
or

Copying
Copying
Printing
Scanning
Troubleshooting
Notices
36
Basics
Index
www.lexmark.com
Lexmark X84-X85
Restoring old photos
Using the operator panel: Using the computer:
1 Make sure the printer is on.
2 Open the top cover.
3 Place the photo face down on the scanner
bed in the bottom, right corner.
4 Close the top cover.
5 Press
Paper Type until the paper type you
have selected appears on the display.
6 Press
Select.
7 Select Photo Quality.
8 Press
Color Copy
1 Make sure the
printer and the
computer are
turned on.
2 Open the top
cover.
3 Place the
photo face down on the scanner bed in the
bottom, right corner.
4 Close the top cover.
5 Click St art Programs Lexmark X84- X85
Scan & Copy Control Program.
6 From the Reduce/Enlarge or Fit to page
area, select the desired size of your photo.
7 Select Color.
8 Click Copy.

Copying
Copying
Printing
Scanning
Troubleshooting
Notices
37
Basics
Index
www.lexmark.com
Lexmark X84-X85
Creating transparencies
You can create transparencies for an important presentation in black
and white or in color.
1 Print your presentation on plain paper.
2 Load the transparencies in the printer.
3 Place your document f ace down on the scanner bed in the
bottom, right corner.
4 Press Color Copy to make a transparency in color . Press Black Copy to make a
transparency in black.

Printing
Copying
Printing
Scanning
Troubleshooting
Notices
38
Basics
Index
www.lexmark.com
Lexmark X84-X85
The following section includes information about:
• Printing instructions
• Customizing print settings
• Creating projects

Printing
Copying
Printing
Scanning
Troubleshooting
Notices
39
Basics
Index
www.lexmark.com
Lexmark X84-X85
Printing instructions
1 From the application File menu, select Print.
2 From the Print dialog box, click OK.
If you are using Windows 98/Me, click Printer Properties to customize your print job.
If you are using Windows 2000/XP, click Printing Preferences to customize your print
job. For help, see page 42.
Customizing print settings
The software includes several applications that let you perform printing tasks. Printer
Properties or Printing Preferences lets you make changes to the print settings.
Opening Printer Properties or Printing Preferences from an
application
Open Printer Properties or Printing Preferences from an application to change printer
settings only for the documents in the application you are currently creating.
1 Open the application File menu.
2 Choose Print (or Printer) Setup.

Printing
Copying
Printing
Scanning
Troubleshooting
Notices
40
Basics
Index
www.lexmark.com
Lexmark X84-X85
3 In the Printer Setup dialog bo x, click Properties, Options, or Setup (depending on the
application.)
Printer Properties for Windows 98/Me has four tabs: Job Finishing, Paper, Document/
Quality, and Advanced. Each tab has settings for operating the printer and its software.
Click this tab: To:
Job Finishing Print
• Handouts.
•Posters.
•Booklets.
• Two-sided documents.
Paper • Select a paper size and orientation.
• Set the number of copies to print.
• Reverse the printing order of your document pages. The first page
will be on top of the stack in the paper exit tray.
• Collate your document.

Printing
Copying
Printing
Scanning
Troubleshooting
Notices
41
Basics
Index
www.lexmark.com
Lexmark X84-X85
Note: Click the Help button on any tab in the Printer Properties to access the
printer driver Help.
Document/Quality Select
• A color setting .
• A type of paper.
• A print quality setting.
• Web Smoothing to print clearer images from the Internet.
• The Allow pages to dry option.
• The default settings.
Advanced Adjust
• Halftone settings.
• Image settings.
Click this tab: To:

Printing
Copying
Printing
Scanning
Troubleshooting
Notices
42
Basics
Index
www.lexmark.com
Lexmark X84-X85
Printing Preferences for Windows 2000/XP has five tabs: General, Options, Page Setup,
Color, and Features. Each tab has settings for operating the printer and its software.
Click this tab: To:
General Select
•A printer.
• Which pages to print.
• The number of copies.
Options Print
•Frames.
• Al l linked docum ents.
• A table of links.

Printing
Copying
Printing
Scanning
Troubleshooting
Notices
43
Basics
Index
www.lexmark.com
Lexmark X84-X85
Page Setup Select
• A pape r size.
• A media type.
• A pr int quality.
• A pape r orie ntation.
• The Reverse Order Printing option.
• The number of copies to print.
• The Collate Copies option.
Color Select
• The col or.
• The shading.
• A co lor appea rance.
• The brightness and contrast.
Click this tab: To:

Printing
Copying
Printing
Scanning
Troubleshooting
Notices
44
Basics
Index
www.lexmark.com
Lexmark X84-X85
Note: Click the Help button on any tab in the Printer Preferences to access the
printer driver Help.
Opening Printer Properties or Printing Preferences from Windows
Opening Printer Properties or Printing Preferences from Windows lets you apply the settings
to all documents.
1 Select Start Settings Printers.
2 From the P r inters folder, right-click the printer icon for the printer.
3 Select Properties or Printing Preferences from the sidebar m enu.
Features Select
• The Dry Time Delay option.
• The Two-Sided Printing option.
• The Bi ndi ng opti on.
• The Print Instruction Sheet option.
Click this tab: To:

Printing
Copying
Printing
Scanning
Troubleshooting
Notices
45
Basics
Index
www.lexmark.com
Lexmark X84-X85
Printer Properties for Windows 98/Me has seven tabs: Job Finishing, Paper, Document/
Quality, Advanced, General, Details, and Color Management. Each tab has settings for
operating the printer and its software.
Click this tab: To:
Job Finishing Print
• Handouts.
•Posters.
•Booklets.
• Two-sided documents.
Paper • Select a paper size and orientation.
• Set the number of copies to print.
• Reverse the printing order of your document pages. The first page
will be on top of the stack in the paper exit tray.
• Collate your document.

Printing
Copying
Printing
Scanning
Troubleshooting
Notices
46
Basics
Index
www.lexmark.com
Lexmark X84-X85
Document/Quality Select
• A color setting .
• A type of paper.
• A print quality setting.
• Web Smoothing to print clearer images from the Internet.
• Allow pages to dry.
• The default settings.
Advanced Adjust
• Halftone settings.
• Image settings.
General • Add a comment.
• Insert a separator page.
• Print a test page.
Click this tab: To:

Printing
Copying
Printing
Scanning
Troubleshooting
Notices
47
Basics
Index
www.lexmark.com
Lexmark X84-X85
Note: Click the Help button on any tab in the Printer Properties to access the
printer driver Help.
Details • Add or delete printer ports or drivers.
• Select a printer driver.
• Capture printer ports.
• Set timeout settings.
• Customize spool and port settings.
Color Management Set color profiles for the printer.
Click this tab: To:

Printing
Copying
Printing
Scanning
Troubleshooting
Notices
48
Basics
Index
www.lexmark.com
Lexmark X84-X85
Printing Preferences for Windows 2000/XP has three tabs: Page Setup, Color, and
Features. Each tab has settings for operating the printer and its software.
Click this tab: To:
Page Setup Select
• A pape r size.
• A media type.
• A pr int quality.
• A pape r orie ntation.
• The Reverse Order Printing option.
• The number of copies to print.
• The Collate Copies option.
Color Select
• The doc ume nt color.
• The shading.
• A co lor appea rance.
• The brightness and contrast.

Printing
Copying
Printing
Scanning
Troubleshooting
Notices
49
Basics
Index
www.lexmark.com
Lexmark X84-X85
Note: Click the Help button on any tab in the Printer Preferences to access the
printer driver Help.
Features Select
• The Dry Time Delay option.
• The Two-Sided Printing option.
• The Bi ndi ng opti on.
• The Print Instruction Sheet option.
Click this tab: To:

Printing
Copying
Printing
Scanning
Troubleshooting
Notices
50
Basics
Index
www.lexmark.com
Lexmark X84-X85
Customizing print settings for specialty paper
When you install t he softw are , the de f ault settings a re assi gned to Printer Properties. Use th e
default settings for printing most documents on inkjet paper. To change printer settings for
specialty paper, use the following table:
When printing on:
Click this Printer
Properties tab: To make these selections:
Envelopes Paper 1 From the Paper Size
area, scroll to select the
appropriate envelope
size.
2 Select Landscape
Orientation.
Note: Your application
may override the
envelope settings in
Printer Properties.
Greeting cards, index
cards, postcards, or
photo cards
Paper Select the appropriate Paper Size setting.
Document/Quality From the Paper Type area, select Gree tin g Card
Stock.

Printing
Copying
Printing
Scanning
Troubleshooting
Notices
51
Basics
Index
www.lexmark.com
Lexmark X84-X85
Iron-on transfers Document/Quality From the Paper Type area, select Iron-On Transfer.
Note: We recommend printing on plain paper
before printing it on an iron-on transfer.
Custom size paper Paper 1 From the list of Paper Sizes, scroll to select
Custom.
2 Enter the dimensions of your custom paper
size.
Photo paper Document/Quality From the Paper Type area, select Gl ossy /P hot o
Paper.
Note: When printing photos, remove each
photo as it exits the
printer and let it dry
before stacking.
Transparencies Document/Quality From the Pape r Type area, select Transparency.
Select Normal Print Quality.
Note: When printin g transpar enc ie s, remove
each transparency as it exits the printer
and let it dry before stacking.
When printing on:
Click this Printer
Properties tab:
To make these selections:

Printing
Copying
Printing
Scanning
Troubleshooting
Notices
52
Basics
Index
www.lexmark.com
Lexmark X84-X85
Creating projects
Windows 98/Me
Two-sided printing
Besides saving paper, this feature is helpful when you want to print booklets.
1 Customize Printer Properties for a two-sided document .
a Open Printer Properties. For help, see page 39.
b Click the Paper tab to select the page size and orientation.
c Click the Job Finishing tab to select Two-sided printing.
d Select a binding edge.
e To print paper reloading instructions, select the option on the screen that prints
reloading instructions.
f Click OK.
2 From the application File menu, select Print.
3 After the first side of your two-sided document prints, the software prompts you to
reload the paper.

Printing
Copying
Printing
Scanning
Troubleshooting
Notices
53
Basics
Index
www.lexmark.com
Lexmark X84-X85
4 Follow the instructions on the computer screen or the
printed instruction page.
5 Click OK.
To return to single-sided printing:
1 From Printer Properties, click the Job Finishing tab.
2 Clear the Two-sided printing check box.
3 Click OK.
Printing a handout
You can conserve paper by printing handouts or multiple page
images on a single sheet of paper.
1 Customize Printer Properties for handouts.
a Open Printer Properties. For help, see page 39.
b Click the Paper tab to select the page orientat ion and
document size.
c Click the Job Finishing tab and select:
– Handout

Printing
Copying
Printing
Scanning
Troubleshooting
Notices
54
Basics
Index
www.lexmark.com
Lexmark X84-X85
– Number of Prints
– Print Page Borders, if desired
d To print your handout on one side of the paper, clic k OK.
To print your handout on both sides of the paper:
– Select Two-sided printing. For help, see page 52.
– Click Long Edge Binding or Short Edge Binding.
– Click OK.
2 Print your handouts.
a From the application File menu, select Print.
b From the Print dialog box, cli ck OK.
– If you format your handouts to print on one side of each page, return to normal
printing.
– If you format your handouts for two-sided printing, continue printing the second
side of your handouts. For help, see page 52.
To return to normal printing:
1 From the Job Finishing tab, select Normal.
2 Click OK.

Printing
Copying
Printing
Scanning
Troubleshooting
Notices
55
Basics
Index
www.lexmark.com
Lexmark X84-X85
Printing a booklet
You can print and bundle your document to make a booklet.
1 Customize Printer Properties for booklets.
a Select Portrait.
b Select a paper size. Choices include Statement, Letter, A4,
or A5.
c Open Printer Properties. For help, see page 39.
d Click the Job Finishing tab.
e Select Booklet.
f Select the number of Sheets P er Bundle.
Note: A bundle is any number of sheets of paper folded together. When printing
with a heavier paper stock, select a smaller number of sheets per bundle.
g Select the option on the screen that prints reloading instructions.
h Click OK.
2 Print, and then assemble your booklet .

Printing
Copying
Printing
Scanning
Troubleshooting
Notices
56
Basics
Index
www.lexmark.com
Lexmark X84-X85
a From the application File menu, select Print.
b From the Print dialog box, cli ck OK. The first side of your documen t prints.
c After the first side of your booklet is finished printing, the software prompts you to
reload the paper.
Note: For help reloading and printing two-sided documents, see page 52.
d Click OK.
Note: To return to normal printing, see page 53.
e Assemble your booklet.
Assembling a booklet
Once your document prints, stack the bundles and bind the booklet.
1 Take the first bundle fr om the paper exit tray, fold it in half, and set it
aside.
2 Fold and stack the rest of your bundles, one on top of the other, until
your booklet is complete.
3 Bind the bundles.

Printing
Copying
Printing
Scanning
Troubleshooting
Notices
57
Basics
Index
www.lexmark.com
Lexmark X84-X85
Customizing T-shirts
1 Load iron-on transfer paper with the blank side facing you.
2 Open the image editor program supplied with the printer.
3 Create or select the i mag e of your choice (scanned photo, cl ip
art, scanned images) in an image editor program.
4 Select the mirror option.
5 Print your image.
6 Follow the instructions of the iron-on transfer packaging.
Note: You can also personalize pillowcases, tote bags or other items suitable f or
iron-on transfers.
Creating labels
1 Load a sheet of labels.
2 Create or select the image of your choice (scanned photo, clip ar t,
scanned images) in an image editor progr am.
3 Personalize your labels.
4 Print your labels.

Printing
Copying
Printing
Scanning
Troubleshooting
Notices
58
Basics
Index
www.lexmark.com
Lexmark X84-X85
Creating awards and certificates
1 Create awards or certificates in a word processing or image
editor program.
2 Center and enlarge the text for the heading.
3 Reduce the font and customize your award or certificate for
the specified occasion.
4 Use clip art or create your own graphics, if desired.
5 From the application File menu, select Print.
6 Select Properties.
7 From the Document Quality tab, select the Document Type, Paper Type, and Print
Quality for your document.
8 From the Paper tab, select the Paper Size and orientation for your document.
9 Click OK.
10 Click OK.
Note: You may want to print your aw ard or certificate on card stock.

Printing
Copying
Printing
Scanning
Troubleshooting
Notices
59
Basics
Index
www.lexmark.com
Lexmark X84-X85
Creating signs
1 Create a sign in a word processing or image editor program.
2 Create or select graphics of your choice.
3 From the application File menu, select Print.
4 Select Properties.
5 From the Document Qualit y tab, select the Document Type,
Paper Type, and Print Quality for your document.
6 From the Paper tab, select the Paper Size and orientation for your document.
7 Click OK.
8 Click OK.

Printing
Copying
Printing
Scanning
Troubleshooting
Notices
60
Basics
Index
www.lexmark.com
Lexmark X84-X85
Creating refrigerator magnets
1 Load magnetic paper.
2 Create or select the image of your choice (scanned photo, clip ar t,
scanned images, or objects) in an image editor program.
3 From the application File menu, select Print.
4 Click the Printer Properties button.
5 Customize the settings .
6 Click Print.
Pers onal izing objects
1 Select an object to cover.
2 Create or select the image of your choice (scanned photo, clip ar t,
scanned images) in an image editor progr am.
3 Print the image.
4 Fit the image to the specified object, cutting away any excess.
5 Attach the image to the specified object.

Printing
Copying
Printing
Scanning
Troubleshooting
Notices
61
Basics
Index
www.lexmark.com
Lexmark X84-X85
Creating CD covers
1 Create or select an image for your CD cover.
2 Add text to personalize the cover.
3 From the application File menu, select Print.
4 Select Properties.
5 From the Document Quality tab, select the Document Type, Paper Type, and Print
Quality for your document.
6 From the Paper tab, select the Paper Type and Paper Size for your document.
7 Click OK.
8 Click OK.
9 Cut the paper to fit into your CD case.

Scanning
Copying
Printing
Scanning
Troubleshooting
Notices
62
Basics
Index
www.lexmark.com
Lexmark X84-X85
The following section includes information about:
• Scannin g instructions
• Customizing scan options
• Using special scan features
• Creating projects

Scanning
Copying
Printing
Scanning
Troubleshooting
Notices
63
Basics
Index
www.lexmark.com
Lexmark X84-X85
Scanning instructions
A4 users, see page 15 for setting default paper size.
Using the operator panel: Using the computer:
1 Make sure the printer and
the computer ar e tu rned on .
2 Open the top cover.
3 Place the document face
down on the scanner bed in
the bottom, right corner.
4 Close the top cover.
5 Press
Scan T o until you see the category on
the display that matches your scan
destination (Application, File, E-mail,
or Fax).
6 Press
Scan.
– A screen appears for you to select the
destination of your scan.
1 Make sure the printer and the computer are
turned on.
2 Open the top cover.
3 Place the document face down on the
scanner bed in the bottom, right corner.
4 Close the top cover.
5 Click St art Programs Lexmark X84- X85
Scan & Copy Control Program.
6 Click the button that matches your scan
destination (Send to Application, Scan to
File, E-mail, or Fax).
7 If you select Send to Application, scroll and
select an application to scan to.
8 Select the type of file to scan to.
9 Click Send.

Scanning
Copying
Printing
Scanning
Troubleshooting
Notices
64
Basics
Index
www.lexmark.com
Lexmark X84-X85
Customizing scan options
Customize scan settings using the operator panel or the Scan & Copy Control Program. For
help using the operator panel, see page7. For help using th e Scan & Copy Control Program,
see page 10.
You can make additional changes to your document before scanning.
1 Click Start Programs Lexmark X84-X85 Scan & Copy Control Program.
2 Click File S e tu p.
3 Select the Scan tab.
4 Customize the settings .
5 Click OK.
Using special scan features
• Scanning a photo to an e-mail
• Scanning a photo to a file
• Scanning to Text/(OCR)
• Scanning to an application
• Scanning to the clipboard of your Windows system

Scanning
Copying
Printing
Scanning
Troubleshooting
Notices
65
Basics
Index
www.lexmark.com
Lexmark X84-X85
Scanning a photo to an e-mail
1 Open the top cover.
2 Place your photo f ace down on the scanner bed in the bottom, right corner.
3 Close the top cover.
4 Press Scan To until you see E-mail on the display.
5 Press Scan.
6 Enter an e-mail address on your screen.
7 Click Send.
Scanning a photo to a file
1 Open the top cover.
2 Place your photo f ace down on the scanner bed in the bottom, right corner.
3 Close the cover.
4 Click Start Programs Lexmark X84-X85 Scan & Copy Control Program.
5 Click File Setup Scan tab to customize the settings.
6 Click Scan to File.

Scanning
Copying
Printing
Scanning
Troubleshooting
Notices
66
Basics
Index
www.lexmark.com
Lexmark X84-X85
7 Press Scan.
8 From the file list, select the file destination of your scan.
9 Click Save.
Scanning to Text/(OCR)
Using the Text/OCR (Optical Character Recognition) option lets y ou scan in an image of text
which can be modified in word processor applications.
1 Open the top cover.
2 Place the document face down on the scanner bed in the bottom, right corner.
3 Close the cover.
4 Click Start Programs Lexmark X84-X85 Scan & Copy Control Program.
5 Select Text/(OCR).
6 Click the scan button that matches the destination of your scan.
7 Select the software application you want to scan to.
8 Click Send.
You can now edit the document in the word process o r application.

Scanning
Copying
Printing
Scanning
Troubleshooting
Notices
67
Basics
Index
www.lexmark.com
Lexmark X84-X85
Scanning to an application
1 Open the top cover.
2 Place your photo f ace down on the scanner bed in the bottom, right corner.
3 Close the cover.
4 Click Start Programs Lexmark X84-X85 Scan & Copy Control Program.
5 Click Send to Application.
6 From the applicat ion list, select the application you want to scan to.
7 From the file type list, select the file type.
8 Click Send.
Scanning to the clipboard of your Windows system
1 Open the top cover.
2 Place your photo f ace down on the scanner bed in the bottom, right corner.
3 Close the cover.
4 Click Start Programs Lexmark X84-X85 Scan & Copy Control Program.
5 Click Send to Application.

Scanning
Copying
Printing
Scanning
Troubleshooting
Notices
68
Basics
Index
www.lexmark.com
Lexmark X84-X85
6 Select Clipboard.
7 From the file type list, select the file type.
8 Click Send.
Creating projects
Creating personalized recipe cards
1 Load index cards or custom size paper.
2 Select the recipe from a cookbook, magazine or other
source.
3 Place your recipe face down on the scanner bed in the
bottom, right corner.
4 From the Scan & Copy Control Program, select a size from
the Fit to page area.
5 Customize the settings .
6 Click Copy.

Scanning
Copying
Printing
Scanning
Troubleshooting
Notices
69
Basics
Index
www.lexmark.com
Lexmark X84-X85
Personalizing business cards, letterheads, and
envelopes
1 Load the business cards, plain paper, or envelopes.
2 Scan your company logo into an image editor program.
3 Type in your business name and address.
4 From the application File menu, select Print.
5 Select Properties.
6 From the Document Quality tab, select the Document Type, Paper Type, and Print
Quality for your document.
7 From the Paper tab, select the Paper Size and orientation for your document.
8 Click OK.
9 Click OK.

Scanning
Copying
Printing
Scanning
Troubleshooting
Notices
70
Basics
Index
www.lexmark.com
Lexmark X84-X85
Printing a wedding program
1 Place a fresh flower or other object on the scanner bed.
2 Cover the flower with a sheet of paper.
3 Scan the flower or object into an image editor program.
4 Personalize your wedding program with text.
Note: To print your wedding program as a booklet, see page 55.
5 Print your wedding program.
Printing scrapbook pages
1 Scan a photograph into an image editor program.
2 Customize the photograph.
3 Use the text tool to create a title for your page.
4 Print your scrapbook page.

Troubleshooting
Copying
Printing
Scanning
Troubleshooting
Notices
71
Basics
Index
www.lexmark.com
Lexmark X84-X85
If the printer has a problem, first make sure:
• The power supply is plugged into the printer and an electrical outl et.
• The printer is turned on.
• The tape is removed from the bottom of the cartridges.
• The USB cable is securely attached to the computer and printer.
• The paper is loaded correctly.
• The printer is set as the default printer.
• The computer is turned on.
Categories
– Document does not print
– Document prints slowly
– Document misfeeds or jams
– Document prints poorly
– Problems with specialty paper
– Error messages

Troubleshooting
Copying
Printing
Scanning
Troubleshooting
Notices
72
Basics
Index
www.lexmark.com
Lexmark X84-X85
Document does not print
• Make sure the cartridges are properly installed. For help, see page 20.
• Use an undamaged USB cable.
• Check your printer status to make sure your document is not being held or paused.
To check printer status:
1 Click Start Settings Printers.
2 Double-click the Lexmark X84-X85 printer icon.
3 Make sure no check mark appears next to the Pause Printing option.
4 Print a test page.
5 Check the software application.
Document prints slowly
• Close applications not in use.
• Select Normal or Quick on the Document/Quality tab of Printer Properties, Printing
Preferences , or the Scan & Copy Control Progr am. For help, see page 39.

Troubleshooting
Copying
Printing
Scanning
Troubleshooting
Notices
73
Basics
Index
www.lexmark.com
Lexmark X84-X85
• Consider purchasing more Random Access Memory (RAM) for your computer.
Note: Photos or documents containing graphics may take longer to print than
regular text.
Document misfeeds or jams
Paper misfeeds or multiple sheets feed
Make sure:
• You use a paper recommended for inkjet printers.
• You do not force the paper into the printer.
• You do not load too much paper in the printer. For help, see page 16.
• You load the paper corr ectly.
• The paper guide rests against the left edge of the paper and does not cause the
paper to bow in the paper support.
• The printer is on a flat, level surface.
• You select the correct paper type and size in Printer Properties, Printing Preferences,
or in the Scan & Copy Control Program.

Troubleshooting
Copying
Printing
Scanning
Troubleshooting
Notices
74
Basics
Index
www.lexmark.com
Lexmark X84-X85
Paper jam s
Remove the paper from the printer. If the paper is lodged too far into the printer and cannot
be removed:
1 Press Power to turn the printer off.
2 Pull firmly on the paper to remove it.
If you cannot reach the paper because it is too far into the printer
a Open the cartridge door and pull the paper out.
b Close the cartridge door.
3 Press Power to turn the printer on, and then send your document to print.

Troubleshooting
Copying
Printing
Scanning
Troubleshooting
Notices
75
Basics
Index
www.lexmark.com
Lexmark X84-X85
Document prints poorly
Vertical, straight lines are not smooth
To improve the print quality of vertical, straight lines in tabl es, borders, and
graphs:
• Select Photo or Max Photo Quality from the Document/Quality tab of
Printer Properties, Printing Preferences, or the Scan & Copy Control
Program. For help, see page 39.
• Test the cartridge alignment. For help, see page 23.
• Clean the nozzles. For help, see page 78.
Characters are missing or unexpected
Make sure the scanner bed is clean.
1 Dampen a clean lint-free cloth.
2 Gently wipe the glass scanner bed.
Note: Make sure all ink or corrective fluid on the document is dry before placing
the document on the glass scanner bed.

Troubleshooting
Copying
Printing
Scanning
Troubleshooting
Notices
76
Basics
Index
www.lexmark.com
Lexmark X84-X85
Print is too dark or smudged
Make sure:
• You let the ink dry before handling the paper.
• You select the correct paper type and size in Printer Properties, Printing Preferences,
or in the Scan & Copy Control Program.
• The paper is straight and unwrinkled.
• You select the appropriate Quality for the paper type. If you are printing on regular
paper, select the Quick setting from the Document/Quality tab of Printer Properties,
Printing Preferences, or from the Scan & Copy Control Program. For help, see
page 39.
• The nozzles are clean. For help, see page 78.
Printed pages have alternating bands of light and dark print
(intermittent printing)
• Make sure Enable Buf f er Mode is select ed on the Options tab of the Contr ol Progr am.
For help, see page 12.
• Select Photo or Max Photo Quality on the Docume nt/Quality tab of Printer Properties
or Printing Preferences. For help, see page 39.

Troubleshooting
Copying
Printing
Scanning
Troubleshooting
Notices
77
Basics
Index
www.lexmark.com
Lexmark X84-X85
Print quality is poor at the edges of the page
Like other printers, the printer cannot print in the extreme left, right, top or bottom edges of a
page. Use these minimum settings:
• Left and right margins:
– 6.35 mm (0.25 in.) each for all paper sizes except A4
– 3.37 mm (0.133 in.) each for A4 size paper
• Top margin:
– 1.7 mm (0.067 in.)
• Bottom margin:
– 16.51 mm (0.65 in.)
Colors are faded or not printing correctly
• Check the ink level graphic on the Cartridges tab of the Printing Control Program. An
ink cartridge may be out of or low on ink. For help, see page 12.
• Use a different color setting.
• Select Printer Properties or Printing Pref erences Document/Qualit y Natural Color
For help, see page 39.
• Use a different brand of paper. Every paper brand accepts ink differently and prints
with slight color variations.

Troubleshooting
Copying
Printing
Scanning
Troubleshooting
Notices
78
Basics
Index
www.lexmark.com
Lexmark X84-X85
• Clean the nozzles. For help, see the next section.
• Wipe the nozzles. For help, see page 80.
Cleaning the cartridge nozzles
To improve qualit y, you ma y need to c lea n the nozzl es . You can use the operator panel or the
Control Program to clean the nozzles. For help using the Control Program, see page 12. To
use the operator panel:
1 Press Menu.
2 Press and scroll until Maintenance appears on the display.
3 Press Select.
4 Press and scroll until Clean Nozzles appears on the display.
5 Press Select.
or
or

Troubleshooting
Copying
Printing
Scanning
Troubleshooting
Notices
79
Basics
Index
www.lexmark.com
Lexmark X84-X85
The printer feeds a sheet of paper and prints a nozzle test pattern similar to the one shown.
Compare the diagonal lines above the printed bars to the diagonal lines below the printed
bars. Look for a break in the di agonal lines above the printed bars. Broken lines indicate
clogged nozzles. Look for continuity in the diagonal lines below the printed bars. Unbrok en
lines indicate clean nozzles.

Troubleshooting
Copying
Printing
Scanning
Troubleshooting
Notices
80
Basics
Index
www.lexmark.com
Lexmark X84-X85
If the bottom lines have breaks, run the test up to two more times looking for unbroken lines.
If the quality of both lines is not satisfactory after running the test three times, wipe the
cartridge nozzles. For help, see the next section.
Wiping nozzles
If quality does not improve after cleaning the nozzles, there ma y be dried in k on the ca rtridge
nozzles or the cartridge contacts.
To wipe the cartridge nozzles and contacts:
1 Remove the cartridge from the printer. For help, see page 21.
2 Dampen a clean, lint-free cloth with water and gently wipe the gold nozzle area.
Warning: Wipe the nozzles in one direction so the colors do not mix.

Troubleshooting
Copying
Printing
Scanning
Troubleshooting
Notices
81
Basics
Index
www.lexmark.com
Lexmark X84-X85
3 To dissolve dried ink, hold the damp cloth against the nozzles for about three
seconds. Gently blot and wipe dry.
4 Dampen another section of clean, lint-free cloth with water and gently wipe the gold
contact area.
Warning: Do not wipe the nozzles and contacts with the same section of clo th.
5 Let the gold-colored areas dry before you reinsert the cartridge into the printer.
Reinstall the cartridge and repeat the nozzle test. For help, see page 78.

Troubleshooting
Copying
Printing
Scanning
Troubleshooting
Notices
82
Basics
Index
www.lexmark.com
Lexmark X84-X85
Problems with specialty paper
Transparencies or glossy photo papers stick together
• Remove each page as it exits the printer and let it dry completely before stacking.
• Use a transparency or photo paper designed for an inkjet printer.
Transparencies or photo papers contain white lines
• From Printer Properties or Printing Preferences Document/Quality Photo or Max
Photo Quality. For help, see page 39.
• Clean the nozzles. For help, see page 78.
• Wipe the nozzles. For help, see page 80.
• Clean the scanner bed. For help, see page 75.
Envelopes do not feed properly
If regular paper feeds without problems, make sure:
• You load the envelopes correctly. For help, see page 18.
• You use an envelope size supported by the printer and it is selected in Printer
Properties or Printing Preferences.

Troubleshooting
Copying
Printing
Scanning
Troubleshooting
Notices
83
Basics
Index
www.lexmark.com
Lexmark X84-X85
• You have the correct Paper Type and Size selected in Printer Properties or Printing
Preferences.
Error messages
Printer is not communicating or scanner is not communicating
1 Disconnect, and then reconnect the USB cable.
2 Disconnect, and then reconnect the power supply.
3 Restart your computer.
Note: If you still receive this error, uninstall and then reinstall the Lexmark X84-
X85 software. For help, see Uninstalling and reinstalling the printer
software.

Troubleshooting
Copying
Printing
Scanning
Troubleshooting
Notices
84
Basics
Index
www.lexmark.com
Lexmark X84-X85
Paper Jam message
Remove the paper from the printer. If the paper is lodged too far into the printer and cannot
be removed:
1 Press Power to turn the printer off.
2 Pull firmly on the paper to remove it.
If you cannot reach the paper because it is too far into the printer:
a Open the cartridge door and pull the paper out.
b Close the cartridge door.
3 Press Power to turn the printer on, and then send your document to print.
Paper Out message
1 If the printer is out of paper, load the paper. For help, see page 16.
2 Press Select.
3 Resend your document to print.

Troubleshooting
Copying
Printing
Scanning
Troubleshooting
Notices
85
Basics
Index
www.lexmark.com
Lexmark X84-X85
Ink Low message
The cartridge is running out of ink. Purchase a new cartridge. For help replacing the
cartridge, see page 20.
Other error messages
1 Turn the printer o f f.
2 Wait a few seconds, and then turn the printer back on.
3 Resend your document to print.
Note: You may not need to resend your document to print.
Faxing problems
If you are having problems sending or receiving faxes, make sure:
• You have an operat ional fax modem installed on your computer.
• You have instal led the fax software included on CD 2.
• The fax driver you want to use is set as the def ault fax driver in the Scan & Copy
Control Program.
To check or select your default fax driver:

Troubleshooting
Copying
Printing
Scanning
Troubleshooting
Notices
86
Basics
Index
www.lexmark.com
Lexmark X84-X85
1 Click Start Programs Lexmark X84-X85 Scan & Copy Control Program.
2 Click File Setup, and then select the Copy/Fax tab.
If the fax driver you want to use as your default is not listed:
1 Click Fax Setup.
2 From the list , select the fax driv er you want to use as your default.
3 Click Select.
Note: Cable and Digital Subscriber Line (DSL) modems are not supported.
Uninstalling and reinstalling the printer software
If the printer software is not funct ioning properly or a communica tions error message appear s
when you try to use your printer, you may need to uninstall, and then reinstall the printer
software.
Uninstalling software
1 Disconnect the USB cabl e.
2 Click Start Programs Lexmark X84-X85 Uninstall.
3 Follow the instructions on your computer screen to uninstall the printer software.

Troubleshooting
Copying
Printing
Scanning
Troubleshooting
Notices
87
Basics
Index
www.lexmark.com
Lexmark X84-X85
4 Restart the computer.
Installing the software
Windows users:
1 Disconnect the USB cabl e.
2 Insert the Lexmark X84-X85 CD to reinstall the software.
3 Follow the instructions on your computer screen.
Note: Do not connect the USB cable until you are prompted by the CD software.

Notices
Copying
Printing
Scanning
Troubleshooting
Notices
88
Basics
Index
www.lexmark.com
Lexmark X84-X85
The following section contains information about:
• Stateme nt of Limited Warranty
• Electronic emission notices
• Safety information
• ENERGY STAR
• Trademarks

Notices
Copying
Printing
Scanning
Troubleshooting
Notices
89
Basics
Index
www.lexmark.com
Lexmark X84-X85
Statement of Limited Warranty
Lexmark International, Inc. Lexington, KY
This limited warranty applies to the United St ates. F or cust omers outside the U .S ., ref er to the
country-specific warranty information that came with your product.
This limited warranty applies to this product only if it was originally pur chased for your use,
and not for resale, from Lexmark or a Lexmar k remarketer, referred to in this statement as
“Remarketer.”
Limited warranty
Lexmark warran ts that this product:
• Is manufactured from new parts, or new and serviceable used parts, which perform
like new parts
• Is, during normal use, free from defects in material and workmanship
If this product does not function as warranted during the warranty period, contact a
Remarketer or Lexmark for repair or replacement (at Lexmark's option).

Notices
Copying
Printing
Scanning
Troubleshooting
Notices
90
Basics
Index
www.lexmark.com
Lexmark X84-X85
If this product is a feat ure or option, this statement appli es onl y when that feature or option is
used with the product for which it was designed. To obtain warranty service, you may be
required to present the feature or option with the product.
If you transf er this prod uct to another user, warranty service under the terms of this statement
is avail able to that user for the remainder of the warranty period. You should transf er proof of
original purchase and this statement to that user.
Limited warranty service
The warranty period starts on the date of original purchase as shown on the purchase
receipt. The warranty period ends 12 months later.
To obtain warranty service you may be required to present proof of original purchase. You
may be required to deliver your product to the Remarketer or Lexmark, or ship it prepaid and
suitably pac kaged to a Lexmark designated locat ion. You are responsible for loss of , or
damage to, a product in tr ansit to the Remarketer or the designated location.
When warranty service involves the exchange of a product or part, the item replaced
becomes the property of the Remarketer or Lexmark. The replacement may be a new or
repaired item. The replacement item assumes the remaining warranty period of the original
product.

Notices
Copying
Printing
Scanning
Troubleshooting
Notices
91
Basics
Index
www.lexmark.com
Lexmark X84-X85
Replacement is not available to you if the product you present for exchange is defaced,
altered, in need of a repair not included in warr anty service, dama ged beyond repair, or if the
product is not free of all legal obligations, restrictions, liens, and encumbrances.
Before y ou present this product for warranty service, remove all print cartridges, programs,
data, and removable storage media (unless directed otherwise by Lexmark).
For further explanation of your warranty alternatives and the nearest Lexmark authorized
servicer in your area, contact Lexmark at (407) 563-4600, or on the World Wide Web at http:/
/support.lexmark.com.
Remote technical support is provided for this product throughout its warranty period. For
products no longer co v er ed by a Lexmark warranty, technical support may not be a vailable or
only be available for a fee.
Extent of limited warranty
We do not warrant uninterrupted or error-free operation of any product.
Warranty service does not include repair of failures caused by:
• Modification or attachments
• Accidents or misuse
• Unsuitable physical or operating environment

Notices
Copying
Printing
Scanning
Troubleshooting
Notices
92
Basics
Index
www.lexmark.com
Lexmark X84-X85
• Maintenance by anyone other than Lexmark or a Lexmark authorized servicer
• Operation of a product beyond the limit of its duty cycle
• Use of printing media outside of Lexmark specificati ons
• Supplies (such as ink) not furnished by Lexmark
• Products, components, parts, materials, software, or interfaces not furnished by
Lexmark
TO THE EXTENT PERMITTED BY APPLICABLE LAW, NEITHER LEXMARK NOR ITS
THIRD PARTY SUPPLIERS OR REMARKETERS MAKE ANY OTHER WARRANTY OR
CONDITION OF ANY KIND, WHETHER EXPRESS OR IMPLIED, WITH RESPECT TO
THIS PRODUCT, AND SPECIFICALLY DISCLAIM THE IMPLIED WARRANTIES OR
CONDITIONS OF MERCHANTABILITY, FITNESS FOR A PARTICULAR PURPOSE, AND
SATISFACTORY QUALITY. ANY WARRANTIES THAT MAY NOT BE DISCLAIMED
UNDER APPLICABLE LAW ARE LIMITED IN DURATION TO THE WARRANTY PERIOD.
NO WARRANTIES, EXPRESS OR IMPLIED, WILL APPLY AFTER THIS PERIOD. ALL
INFORMATION, SPECIFICATIONS, PRICES, AND SERVICES ARE SUBJECT TO
CHANGE AT ANY TIME WITHOUT NOTICE.
Limitation of liability
Your sole remedy under this limited warranty is set for t h in this document. For any claim
concerning performance or nonperformance of Lexmark or a Remarketer for this product

Notices
Copying
Printing
Scanning
Troubleshooting
Notices
93
Basics
Index
www.lexmark.com
Lexmark X84-X85
under this limited warr anty, you may recover actual damages up to the limit set forth in the
following paragraph.
Lexmark's liability for actual dam ages from any cause whatsoever will be limited to the
amount you paid for the product that caused the damages. This limitation of liability will not
apply to claims by you for bodily injury or damage to real property or tangible personal
property for which Lexmark is legally liab le . IN NO EVENT WILL LEXMARK BE LIABLE FOR
ANY LOST PROFITS, LOST SAVINGS, INCIDENTAL DAMAGE, OR OTHER ECONOMIC
OR CONSEQUENTIAL DAMAGES. This is true even if you advise Lexmark or a Remarketer
of the possibility of such damages . Le xma rk is not liabl e f or an y claim b y y ou based on a thi rd
party claim.
This limitation of remedies also applies to claims agai nst any Suppliers and Remarketers of
Lexmark. Lexmark’s and its Suppliers’ and Remarketers’ limitations of remedies are not
cumulative. Such Suppliers and Remarketers are intended beneficiaries of this limitation.
Additional rights
Some states do not allow limitations on how long an implied warranty last s, or do not allow
the exclusion or limitation of incidental or consequential damages, so the limitations or
exclusions contained above may not apply to you.
This limited warranty gives you specific legal rights. You may also have other rights that vary
from state to state.

Notices
Copying
Printing
Scanning
Troubleshooting
Notices
94
Basics
Index
www.lexmark.com
Lexmark X84-X85
Electronic emission notices
Federal Communications Commission (FCC) compliance
information statement
The Lexmark X84-X85 Scan/Print/Cop y has been tested and found to comply with the limits
for a Class B digital device, pursuant to Part 15 of the FCC Rules. Operation is subj ect to the
following two conditions: (1) this device may not cause harmful interference, and (2) this
device must acce pt any interference received, including interference that may cause
undesired operation.
The FCC Class B limits are designed to provide reasonable protection against harmful
interference in a residential installation. This equip men t generates, uses and can radiate
radio frequency energy and, if not installed and used i n accordance with t he instructions , ma y
cause harmful interference to radio communications. However, there is no guarantee that
interference will not occur in a particular installation. If this equipment does cause harmful
interference to radio or television reception, which can be determined by tur ning the
equipment off and on, the us er is encourage d to t ry to correct the inter f erence b y one or more
of the following measures:
• Reorient or relocate the receiving antenna.
• Increase the separation between the equi pmen t and recei ver.

Notices
Copying
Printing
Scanning
Troubleshooting
Notices
95
Basics
Index
www.lexmark.com
Lexmark X84-X85
• Connect the equipment into an outlet on a circui t different from that to which the
receiver is connected.
• Consult your point of purchase or service representat ive for additional suggestions.
The manufacturer i s not responsible for any radio or television interference caused by using
other than recommended cables or b y unauthorized changes or modifications to this
equipment. Unauthorized changes or modif ications could void the user's authority to operate
this equipment.
Note: To assure compliance with FCC regulations on electromagnetic
interference for a Class B computing device, use a properly shielded and
grounded USB cable such as Lexmark part number 12A2405. Use of a
substitute cable not properly shielded and grounded may result in a
violation of FCC regulations.
Any questions regarding this compl iance information statement should be direct ed to:
Director of Lexmark Technology & Service
Lexmark International, Inc.
740 West New Circle Road
Lexington, KY 40550
(859) 232-3000

Notices
Copying
Printing
Scanning
Troubleshooting
Notices
96
Basics
Index
www.lexmark.com
Lexmark X84-X85
Notices
Industry Canada Compliance Statement
This Class B digital apparatus meets all req u irements of the Canadian Interference-Causing
Equipment Regulations.
Avis de conformité aux normes d’Industrie Canada
Cet appareil numérique de la classe B respecte toutes les exigences du Règlement sur le
matériel brouilleur du Canada.
European Community (EC) Directives Conformity
This product is in conformity with the protection requirements of EC Council directives 89/
336/EEC and 73/23/EEC on the approximation and harmonization of the laws of the Member
States relating to electromagnet ic compatibility and safety of electrical equipment designed
for use within certain voltage limits.
A declaration of conform ity with the requirements of the directives has been signed by the
Director of Manufacturing and Technical Support, Lexmark International, S.A., Boigny,
France.
This product satisfies the Class B limits of EN 55022 and safety requirements of EN 60950.

Notices
Copying
Printing
Scanning
Troubleshooting
Notices
97
Basics
Index
www.lexmark.com
Lexmark X84-X85
Japanese VCCI Notice
The United Kingdom Telecommunications Act 1984
This apparatus is approved under the approval number NS/G/1234/J/100003 for the indirect
connections to the public telecommunications systems in the United Kingdom.
Safety information
• Use only the Lexmark power supply provided with this product or a Lexmark
replacement unit.
• Connect the power cord to an electrical outlet that is near the product and easily
accessible.
• Refer service or repairs, other than those described in the manual, to a professional
service person.

Notices
Copying
Printing
Scanning
Troubleshooting
Notices
98
Basics
Index
www.lexmark.com
Lexmark X84-X85
ENERGY STAR
The EPA ENERGY STAR Office Equipment program is a partnership effort with office
equipment manufactur ers to promote the introduction of energy-efficient products and to
reduce air pollution caused by power generation.
Companies participating in this program introduce products that power down when they are
not being used. This f eature wi ll cut the ener g y used b y up to 5 0 percent. Le xmark is proud to
be a participant in this program.
As an ENERGY STAR Partner, Lexmark International, Inc. has determined that this product
meets the ENERGY STAR guidelines for energy efficiency.
Trademarks
Lexmark and Lexmark with the diamond design are trademarks of Lexmark International,
Inc., registered in the United States and/or other countries.
Other trademarks are the property of their respective owners.

Index
Copying
Printing
Scanning
Troubleshooting
Notices
99
Basics
Index
www.lexmark.com
Lexmark X84-X85
A
aligning
cartridges
B
banding
booklets
assembling
printing
C
cards
loading
setting recommendations
cartridges
aligning
cleaning
installing
preserving
removing
characters, missing or unexpected
clone
Community
contacts, cartridge
cleaning
copy settings
customizing
copying
instructions
with computer
without computer
custom size paper
loading
setting recommendations
E
electronic emission notices
ENERGY STAR
envelopes
loading
problems
setting recommendations
error messages
Ink Low
Paper Jam
Paper Out
printer is not communicating
scanner is not communicatin g
F
faxing
problems
FCC statement
G
greeting cards
loading
setting recommendations
H
handouts
printing
I
index cards
loading
setting recommendations
Ink Low messag e
installing cartridges
instructions
copying
printing
scanning
intermittent printing
Internet printing
Web Smoothing
iron-on transfers
loading
setting recommendations

Index
Copying
Printing
Scanning
Troubleshooting
Notices
100
Basics
Index
www.lexmark.com
Lexmark X84-X85
L
loading
cards
custom size paper
envelopes
greeting cards
index cards
iron-on transfers
paper
photo cards
photo paper
postcards
specialty paper
transparencies
M
margins
minimum settings
menus
using
messages, error
Ink Low
Paper Jam
Paper Out
Printer is not communicating
Scanner is not communicating
N
notices
electronic emission
ENERGY STAR
nozzles
cleaning
wiping
O
operator panel
ordering supplies
P
paper
loading
Paper Jam message
Paper Out message
part numbers
black cartridge
color cartridge
USB cable
photo cards
loading
setting recommendations
photo paper
loading
problems
setting recommendations
postcards
loading
setting recommendations
poster
assembling
printing
print quality
banding
different colors
smudged
too dark
troubleshooting
wavy lines
print settings
customizing
printer
not communicating
printing
instructions
posters
problems
faxing
R
reinstalling software
removing cartridges
reverse order printing

Index
Copying
Printing
Scanning
Troubleshooting
Notices
101
Basics
Index
www.lexmark.com
Lexmark X84-X85
S
safety information
scanner
not communicating
scanning
instructions
to a file
to an application
to an e-mail
to Text/(OCR)
to the clipboard
setting recommendations
cards
custom size paper
envelopes
greeting cards
index cards
iron-on transfers
photo cards
photo paper
postcards
transparencies
software
reinstalling
uninstalling
specialty paper
custom size paper
envelopes
greeting cards
index cards
iron-on transfer
loading
photo cards
photo paper
postcards
transparencies
supplies ordering
T
test page
nozzle test pattern
test pattern
alignment
transparencies
loading
problems
setting recommendations
troubleshooting
envelopes don’t print
paper feed problems
print quality
two-sided printing
U
uninstalling software
USB cable
part number
W
Web Smoothing
Internet printing
wiping nozzles
 Loading...