


 Loading...
Lexmark™ X94x
Clearing Jams Guide
Clearing jams
Avoiding jams
The following hints can help you avoid jams:
•Use only recommended paper or specialty media.
For more information, see the Card Stock & Label Guide available on the Lexmark Web site at www.lexmark.com/publications.
•Do not load too much paper. Make sure the stack height does not exceed the indicated maximum height.
•Do not load wrinkled, creased, damp, or curled paper.
•Flex, fan, and straighten paper before loading it.
•Do not use paper that has been cut or trimmed by hand.
•Do not mix paper sizes, weights, or types in the same stack.
•Store the paper in an appropriate environment.
•Do not remove trays while the printer is printing. Wait for Load tray <x> or Ready to appear before removing a tray.
•Do not load the manual feeder while the printer is printing.
Wait for Load Manual feeder with <x> to appear.
•Push all trays in firmly after loading paper.
•Make sure the guides in the trays are properly positioned, and are not pressing too tightly against the paper.
•Make sure all paper sizes and paper types are set correctly in the control panel menu.
•Make sure all printer cables are attached correctly. For more information, see the setup documentation.
Understanding jam numbers and locations
When a jam occurs, a message indicating the jam location appears. The following illustration and table list the paper jams that can
occur and the location of each jam. Open doors and covers, and remove trays to access jam locations.
|
Jam |
Area name |
Instructions |
|
numbers |
|
|
1 |
200–203 |
Door A |
Open Door A, and then |
|
|
|
remove the jam. |
|
|
|
|
2 |
230–231 |
Door B |
Open Doors A and B, |
|
|
|
and then remove any |
|
|
|
jams. |
|
|
|
|
3 |
241 |
Door C |
Open Door C, and then |
|
|
|
remove the jam. |
|
|
|
Open Tray 1, and then |
|
|
|
remove any jams. |
|
|
|
|
4 |
242–244 |
Door D |
Open Door D, and |
|
|
|
then remove the jam. |
|
|
|
Open Trays 2–4, and |
|
|
|
then remove any jams. |
|
|
|
|
|
Jam |
Area name |
Instructions |
|
numbers |
|
|
5 |
250 |
Multipurpose |
1 Remove all paper |
|
|
feeder |
from the |
|
|
|
multipurpose |
|
|
|
feeder. |
|
|
|
2 Flex and stack the |
|
|
|
paper. |
|
|
|
3 Reload the |
|
|
|
multipurpose |
|
|
|
feeder. |
|
|
|
4 Adjust the paper |
|
|
|
guide. |
|
|
|
|
6 |
280–282 |
Cover F |
Open Cover F, and |
|
|
(Horizontal |
then remove the jam. |
|
|
|
|
|
|
Transport Unit) |
|
|
|
|
|
7 |
283–284 |
Door G |
Open Door G, and |
|
287–288 |
|
then remove the jam. |
|
|
|
|
|
289 |
|
For staple jams, |
|
|
remove the paper |
|
|
|
|
|
|
|
|
from the accumulator. |
|
|
|
Remove the staple |
|
|
|
cartridge, and then |
|
|
|
clear the staple jam. |
|
|
|
|
8 |
284–286 |
Door H |
Open Door H, and |
|
|
|
then remove the jam. |
|
|
|
Door H is located |
|
|
|
between the finisher |
|
|
|
output bins. |
|
|
|
|
9 |
290–295 |
ADF cover |
Open the ADF cover, |
|
|
|
and then remove the |
|
|
|
jam. |
|
|
|
|
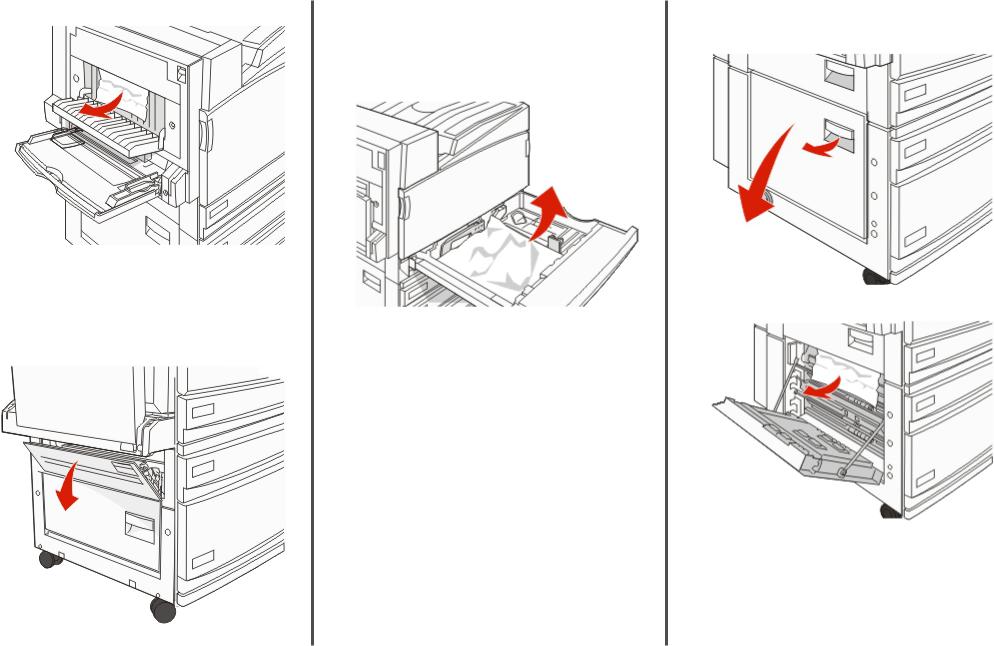
200–203 paper jams
1 Open Door A by lifting the release latch and lowering the door.
CAUTION—HOT SURFACE: The inside of the printer might be hot. To reduce the risk of injury from a hot component, allow the surface to cool before touching.
1

CAUTION—HOT SURFACE: The inside of the printer |
4 Close Door A. |
might be hot. To reduce the risk of injury from a hot |
|
component, allow the surface to cool before touching |
|
it. |
|
2 Lift the green lever, and then pull the paper up and toward |
5 Pull the multipurpose feeder down, and then open Door B. |
you. |
|
2Lift the green lever, and then pull the paper up and toward you.
Note: Make sure all paper fragments are removed.
3Push the green lever down.
4Close Door A.
5 |
Touch Continue. |
Note: Make sure all paper fragments are removed. |
|
|
3 Push the green lever down. |
230–231 paper jams |
|
|
1 |
Open Door A by lifting the release latch and lowering the door. |
|
2
6 Remove the jammed paper. |
2 |
Pull the paper down and toward you. |
|
|
Note: Make sure all paper fragments are removed. |
|
3 |
Close Door C. |
|
4 |
Open Tray 1, and then remove any crumpled paper from the |
|
|
tray. |
7 |
Close Door B. |
|
|
8 |
Touch Continue. |
|
|
241 paper jam |
5 |
Close the tray. |
|
1 |
Open Door C. |
6 |
Touch Continue. |
242–244 paper jams
1 Open Door D.
2 Pull the paper down and away from the printer.
Note: Make sure all paper fragments are removed. 3 Close Door D.
3
Loading...