


XC9225, XC9235, XC9245, XC9255, XC9265
User's Guide
August 2017 |
www.lexmark.com |
|
|
Machine type(s):
7559
Model(s):
098, 198, 398, 598, 798

Contents |
2 |
Contents |
|
Safety information........................................................................................ |
9 |
Conventions.......................................................................................................................................................... |
9 |
Product statements............................................................................................................................................. |
9 |
Learning about the printer......................................................................... |
12 |
Finding information about the printer........................................................................................................... |
12 |
Selecting a location for the printer................................................................................................................ |
13 |
Printer configurations........................................................................................................................................ |
14 |
Attaching cables................................................................................................................................................. |
16 |
Using the control panel.................................................................................................................................... |
18 |
Understanding the status of the power button and indicator light....................................................... |
19 |
Using the home screen..................................................................................................................................... |
19 |
Menu map........................................................................................................................................................... |
20 |
Printing a menu settings page....................................................................................................................... |
22 |
Setting up and using the home screen applications............................. |
23 |
Customizing the home screen....................................................................................................................... |
23 |
Setting up Card Copy....................................................................................................................................... |
23 |
Using Shortcut Center...................................................................................................................................... |
23 |
Setting up Scan Center.................................................................................................................................... |
24 |
Using Customer Support................................................................................................................................. |
24 |
Setting up Device Quotas............................................................................................................................... |
24 |
Using QR Code Generator.............................................................................................................................. |
24 |
Using Google Drive.......................................................................................................................................... |
25 |
Using Display Customization......................................................................................................................... |
25 |
Configuring Eco Settings................................................................................................................................ |
26 |
Managing contacts............................................................................................................................................ |
26 |
Adding contacts........................................................................................................................................................... |
26 |
Adding groups.............................................................................................................................................................. |
26 |
Editing contacts or groups........................................................................................................................................ |
27 |
Deleting contacts or groups ..................................................................................................................................... |
27 |
Setting up and using the accessibility features..................................... |
28 |
Enabling Magnification mode........................................................................................................................ |
28 |
Activating Voice Guidance.............................................................................................................................. |
28 |

Contents |
3 |
Adjusting the Voice Guidance speech rate................................................................................................ |
28 |
Adjusting the default internal speaker volume......................................................................................... |
28 |
Adjusting the default headphones volume................................................................................................ |
29 |
Enabling spoken passwords or personal identification numbers........................................................ |
29 |
Navigating the screen using gestures......................................................................................................... |
29 |
Using the keyboard on the display............................................................................................................... |
29 |
Loading paper and specialty media......................................................... |
30 |
Setting the size and type of the specialty media...................................................................................... |
30 |
Configuring Universal paper settings.......................................................................................................... |
30 |
Loading trays...................................................................................................................................................... |
30 |
Loading the multipurpose feeder.................................................................................................................. |
33 |
Linking trays........................................................................................................................................................ |
34 |
Printing......................................................................................................... |
35 |
Printing from a computer................................................................................................................................. |
35 |
Printing from a flash drive............................................................................................................................... |
35 |
Supported flash drives and file types.......................................................................................................... |
36 |
Configuring confidential jobs......................................................................................................................... |
37 |
Printing held jobs............................................................................................................................................... |
37 |
Printing a font sample list................................................................................................................................ |
37 |
Printing a directory list...................................................................................................................................... |
37 |
Canceling a print job......................................................................................................................................... |
38 |
Copying........................................................................................................ |
39 |
Making copies.................................................................................................................................................... |
39 |
Copying photos.................................................................................................................................................. |
39 |
Copying on letterhead..................................................................................................................................... |
39 |
Copying on both sides of the paper............................................................................................................. |
39 |
Reducing or enlarging copies........................................................................................................................ |
40 |
Collating copies................................................................................................................................................. |
40 |
Placing separator sheets between copies................................................................................................. |
40 |
Copying multiple pages onto a single sheet............................................................................................. |
40 |
Creating a copy shortcut................................................................................................................................. |
40 |
E-mailing....................................................................................................... |
41 |
Setting up the e mail function......................................................................................................................... |
41 |

Contents |
4 |
Configuring e mail settings.............................................................................................................................. |
41 |
Sending an e-mail............................................................................................................................................... |
41 |
Creating an e-mail shortcut............................................................................................................................ |
42 |
Faxing........................................................................................................... |
43 |
Setting up the printer to fax............................................................................................................................ |
43 |
Setting up the fax function........................................................................................................................................ |
43 |
Setting up fax using a standard telephone line .................................................................................................. |
43 |
Setting up fax using digital subscriber line........................................................................................................... |
48 |
Setting up fax using VoIP telephone service ....................................................................................................... |
49 |
Setting up fax using cable modem connection.................................................................................................... |
51 |
Setting up fax in countries or regions with different telephone wall jacks and plugs .............................. |
53 |
Connecting to a distinctive ring service ................................................................................................................ |
56 |
Setting the fax date and time ................................................................................................................................... |
56 |
Configuring daylight saving time............................................................................................................................. |
56 |
Sending a fax...................................................................................................................................................... |
56 |
Scheduling a fax................................................................................................................................................ |
57 |
Creating a fax destination shortcut............................................................................................................... |
57 |
Changing the fax resolution........................................................................................................................... |
57 |
Adjusting the fax darkness.............................................................................................................................. |
57 |
Viewing a fax log............................................................................................................................................... |
58 |
Blocking junk faxes........................................................................................................................................... |
58 |
Holding faxes...................................................................................................................................................... |
58 |
Forwarding a fax................................................................................................................................................ |
58 |
Scanning...................................................................................................... |
59 |
Scanning to an FTP server.............................................................................................................................. |
59 |
Creating an FTP shortcut................................................................................................................................ |
59 |
Scanning to a flash drive................................................................................................................................. |
59 |
Sending scanned documents to a computer............................................................................................ |
60 |
Securing the printer.................................................................................... |
61 |
Locating the security slot................................................................................................................................. |
61 |
Erasing printer memory.................................................................................................................................... |
61 |
Erasing printer hard disk memory.................................................................................................................. |
61 |
Configuring printer hard disk encryption.................................................................................................... |
62 |
Restoring factory default settings................................................................................................................. |
62 |
Statement of Volatility...................................................................................................................................... |
62 |
Contents |
5 |
Maintaining the printer.............................................................................. |
64 |
Networking.......................................................................................................................................................... |
64 |
Connecting the printer to a wireless network using Wi Fi Protected Setup (WPS) ................................... |
64 |
Changing port settings after installing an internal solutions port................................................................... |
65 |
Setting up serial printing (Windows only).................................................................................................... |
65 |
Cleaning printer parts...................................................................................................................................... |
66 |
Cleaning the printer.................................................................................................................................................... |
66 |
Cleaning the scanner ................................................................................................................................................. |
66 |
Cleaning the printhead lens ..................................................................................................................................... |
69 |
Emptying the hole punch box .................................................................................................................................... |
71 |
Ordering parts and supplies........................................................................................................................... |
72 |
Checking the status of parts and supplies ........................................................................................................... |
72 |
Using genuine Lexmark parts and supplies......................................................................................................... |
72 |
Ordering toner cartridges .......................................................................................................................................... |
73 |
Ordering a photoconductor unit............................................................................................................................... |
73 |
Ordering a waste toner bottle................................................................................................................................... |
73 |
Ordering staple cartridges......................................................................................................................................... |
73 |
Ordering maintenance kits ........................................................................................................................................ |
74 |
Configuring supply notifications............................................................................................................................... |
74 |
Replacing parts and supplies......................................................................................................................... |
75 |
Replacing a toner cartridge ...................................................................................................................................... |
75 |
Replacing a photoconductor unit............................................................................................................................ |
78 |
Replacing the waste toner bottle ............................................................................................................................ |
82 |
Replacing the pick, feed, and separator rollers................................................................................................... |
83 |
Replacing the transfer belt........................................................................................................................................ |
88 |
Replacing the transfer roller ...................................................................................................................................... |
91 |
Replacing the ADF separator roller ........................................................................................................................ |
93 |
Replacing the ADF pick and feed rollers .............................................................................................................. |
95 |
Replacing the staple cartridge................................................................................................................................. |
97 |
Moving the printer........................................................................................................................................... |
102 |
Moving the printer to another location................................................................................................................. |
102 |
Shipping the printer ................................................................................................................................................... |
103 |
Saving energy and paper.............................................................................................................................. |
103 |
Setting up power saver modes............................................................................................................................... |
103 |
Adjusting the brightness of the printer display .................................................................................................. |
103 |
Conserving supplies .................................................................................................................................................. |
104 |
Recycling............................................................................................................................................................ |
104 |
Recycling Lexmark products ................................................................................................................................... |
104 |
Recycling Lexmark packaging ................................................................................................................................ |
104 |
Returning Lexmark cartridges for reuse or recycling ....................................................................................... |
104 |
Contents |
6 |
Clearing jams............................................................................................. |
105 |
Avoiding jams................................................................................................................................................... |
105 |
Identifying jam locations................................................................................................................................ |
106 |
Paper jam in the automatic document feeder.......................................................................................... |
107 |
Paper jam in the multipurpose feeder........................................................................................................ |
108 |
Paper jam in door C........................................................................................................................................ |
109 |
Paper jam in door D.......................................................................................................................................... |
113 |
Paper jam in the 3000 sheet tray................................................................................................................. |
114 |
Paper jam in the booklet finisher.................................................................................................................. |
115 |
Paper jam in the staple finisher.................................................................................................................... |
120 |
Staple jam in the staple finisher.................................................................................................................... |
121 |
Staple jam in the staple, hole punch finisher............................................................................................ |
123 |
Staple jam in the booklet finisher................................................................................................................ |
125 |
Troubleshooting........................................................................................ |
128 |
Network connection problems..................................................................................................................... |
128 |
Cannot open Embedded Web Server................................................................................................................... |
128 |
Unable to read flash drive........................................................................................................................................ |
129 |
Enabling the USB port............................................................................................................................................... |
129 |
Checking the printer connectivity.......................................................................................................................... |
129 |
900.xy error ................................................................................................................................................................. |
130 |
Hardware options problems......................................................................................................................... |
130 |
Cannot detect internal option ................................................................................................................................. |
130 |
Defective flash detected ........................................................................................................................................... |
131 |
Not enough free space in flash memory for resources..................................................................................... |
131 |
Unformatted flash detected...................................................................................................................................... |
131 |
Issues with supplies......................................................................................................................................... |
131 |
Non Lexmark supply ................................................................................................................................................. |
131 |
Scanner maintenance required, use ADF Kit...................................................................................................... |
132 |
Paper feed problems...................................................................................................................................... |
132 |
Envelope seals when printing................................................................................................................................. |
132 |
Collated printing does not work............................................................................................................................. |
132 |
Paper curl...................................................................................................................................................................... |
133 |
Tray linking does not work....................................................................................................................................... |
134 |
Check tray connection .............................................................................................................................................. |
134 |
Paper frequently jams ............................................................................................................................................... |
135 |
Jammed pages are not reprinted .......................................................................................................................... |
135 |
Printing problems............................................................................................................................................. |
136 |
Confidential and other held documents do not print........................................................................................ |
136 |
Slow printing................................................................................................................................................................ |
137 |

Contents |
7 |
Print jobs do not print................................................................................................................................................ |
138 |
Print quality is poor .................................................................................................................................................... |
139 |
The printer is not responding.................................................................................................................................. |
159 |
Job prints from the wrong tray or on the wrong paper.................................................................................... |
160 |
Color quality problems.................................................................................................................................... |
161 |
Adjusting toner darkness .......................................................................................................................................... |
161 |
Modifying the colors in printed output................................................................................................................... |
161 |
FAQ about color printing .......................................................................................................................................... |
162 |
The print appears tinted ........................................................................................................................................... |
163 |
Faxing problems............................................................................................................................................... |
164 |
Cannot send or receive faxes ................................................................................................................................. |
164 |
Can receive but not send faxes.............................................................................................................................. |
166 |
Can send but not receive faxes.............................................................................................................................. |
166 |
Poor fax print quality.................................................................................................................................................. |
167 |
Scanning problems.......................................................................................................................................... |
167 |
Adjusting scanner registration................................................................................................................................ |
167 |
Adjusting ADF registration....................................................................................................................................... |
168 |
Cannot scan from a computer ................................................................................................................................ |
168 |
Partial copies of document or photo..................................................................................................................... |
169 |
Poor copy quality........................................................................................................................................................ |
169 |
Scan job was not successful ................................................................................................................................... |
169 |
Scanner does not close ............................................................................................................................................ |
170 |
Scanner does not respond ...................................................................................................................................... |
170 |
Scanning takes too long or freezes the computer ............................................................................................. |
171 |
Contacting customer support........................................................................................................................ |
171 |
Upgrading and migrating......................................................................... |
172 |
Hardware............................................................................................................................................................ |
172 |
Available internal options......................................................................................................................................... |
172 |
Installing a memory card .......................................................................................................................................... |
172 |
Installing an optional card ........................................................................................................................................ |
176 |
Installing the 2 x 500 or 2500 sheet tray .......................................................................................................... |
179 |
Installing the 3000 sheet tray................................................................................................................................. |
184 |
Installing the staple finisher..................................................................................................................................... |
195 |
Installing the staple, hole punch or booklet finisher ......................................................................................... |
201 |
Software............................................................................................................................................................ |
207 |
Installing the printer software................................................................................................................................. |
207 |
Adding available options in the print driver ...................................................................................................... |
208 |
Firmware........................................................................................................................................................... |
208 |
Exporting or importing a configuration file ........................................................................................................ |
208 |
Updating firmware.................................................................................................................................................... |
208 |
Contents |
8 |
Notices........................................................................................................ |
210 |
Product information......................................................................................................................................... |
210 |
Edition notice.................................................................................................................................................... |
210 |
Index........................................................................................................... |
214 |

Safety information |
9 |
Safety information
Conventions
Note: A note identifies information that could help you.
Warning: A warning identifies something that could damage the product hardware or software.
CAUTION: A caution indicates a potentially hazardous situation that could injure you.
Different types of caution statements include:
 CAUTION—POTENTIAL INJURY: Indicates a risk of injury.
 CAUTION—SHOCK HAZARD: Indicates a risk of electrical shock.
 CAUTION—HOT SURFACE: Indicates a risk of burn if touched.
 CAUTION—TIPPING HAZARD: Indicates a crush hazard.
 CAUTION—PINCH HAZARD: Indicates a risk of being caught between moving parts.
 CAUTION—ROTATING FAN BLADES: Indicates a risk of laceration from moving fan blades.
Symbols used in this machine
—On |
—Class II equipment |
—Off |
—Class II equipment with functional earthing |
—Standy |
—Functional earthing |
—Ground/earth (Protective bonding terminal) |
—Electrostatic discharge (ESD) sensitivity |
—Ground/earth (Protective earthing) |
|
Product statements
CAUTION—POTENTIAL INJURY: To avoid the risk of fire or electrical shock, connect the power cord to an appropriately rated and properly grounded electrical outlet that is near the product and easily accessible.
CAUTION—POTENTIAL INJURY: To avoid the risk of fire or electrical shock, use only the power cord provided with this product or the manufacturer's authorized replacement.
CAUTION—POTENTIAL INJURY: Do not use this product with extension cords, multioutlet power strips, multioutlet extenders, or UPS devices. The power capacity of these types of accessories can be easily overloaded by a laser printer and may result in a risk of fire, property damage, or poor printer performance.

Safety information |
10 |
CAUTION—POTENTIAL INJURY: Only a Lexmark Inline Surge Protector that is properly connected between the printer and the power cord provided with the printer may be used with this product. The use of non-Lexmark surge protection devices may result in a risk of fire, property damage, or poor printer performance.
CAUTION—POTENTIAL INJURY: To reduce the risk of fire, use only a 26 AWG or larger telecommunications (RJ-11) cord when connecting this product to the public switched telephone network. For users in Australia, the cord must be approved by the Australian Communications and Media Authority.
CAUTION—SHOCK HAZARD: To avoid the risk of electrical shock, do not place or use this product near water or wet locations.
CAUTION—SHOCK HAZARD: To avoid the risk of electrical shock, do not set up this product or make any electrical or cabling connections, such as the power cord, fax feature, or telephone, during a lightning storm.
CAUTION—POTENTIAL INJURY: Do not cut, twist, bind, crush, or place heavy objects on the power cord. Do not subject the power cord to abrasion or stress. Do not pinch the power cord between objects such as furniture and walls. If any of these things happen, a risk of fire or electrical shock results. Inspect the power cord regularly for signs of such problems. Remove the power cord from the electrical outlet before inspecting it.
CAUTION—SHOCK HAZARD: To avoid the risk of electrical shock, make sure that all external connections (such as Ethernet and telephone system connections) are properly installed in their marked plug-in ports.
CAUTION—SHOCK HAZARD: To avoid the risk of electrical shock, if you are accessing the controller board or installing optional hardware or memory devices sometime after setting up the printer, then turn the printer off, and unplug the power cord from the electrical outlet before continuing. If you have any other devices attached to the printer, then turn them off as well, and unplug any cables going into the printer.
CAUTION—SHOCK HAZARD: To avoid the risk of electrical shock, do not use the fax feature during a lightning storm.
CAUTION—SHOCK HAZARD: To avoid the risk of electrical shock when cleaning the exterior of the printer, unplug the power cord from the electrical outlet and disconnect all cables from the printer before proceeding.
CAUTION—POTENTIAL INJURY: If the printer weight is greater than 18 kg (40 lb), then it requires two or more trained personnel to lift it safely.
CAUTION—POTENTIAL INJURY: When moving the printer, follow these guidelines to avoid personal injury or printer damage:
•Make sure that all doors and trays are closed.
•Turn off the printer, and then unplug the power cord from the electrical outlet.
•Disconnect all cords and cables from the printer.
•If the printer has separate floor-standing optional trays or output options attached to it, then disconnect them before moving the printer.
•If the printer has a caster base, then carefully roll it to the new location. Use caution when passing over thresholds and breaks in flooring.
•If the printer does not have a caster base but is configured with optional trays or output options, then remove the output options and lift the printer off the trays. Do not try to lift the printer and any options at the same time.
Safety information |
11 |
•Always use the handholds on the printer to lift it.
•Any cart used to move the printer must have a surface able to support the full footprint of the printer.
•Any cart used to move the hardware options must have a surface able to support the dimensions of the options.
•Keep the printer in an upright position.
•Avoid severe jarring movements.
•Make sure that your fingers are not under the printer when you set it down.
•Make sure that there is adequate clearance around the printer.
CAUTION—TIPPING HAZARD: Installing one or more options on your printer or MFP may require a caster base, furniture, or other feature to prevent instability causing possible injury. For more information on supported configurations, see www.lexmark.com/multifunctionprinters.
CAUTION—TIPPING HAZARD: To reduce the risk of equipment instability, load each tray separately. Keep all other trays closed until needed.
CAUTION—HOT SURFACE: The inside of the printer might be hot. To reduce the risk of injury from a hot component, allow the surface to cool before touching it.
CAUTION—PINCH HAZARD: To avoid the risk of a pinch injury, use caution in areas marked with this label. Pinch injuries may occur around moving parts, such as gears, doors, trays, and covers.
CAUTION—ROTATING FAN BLADES: To avoid the risk of laceration from moving fan blades, turn off the printer and unplug the power cord from the electrical outlet before accessing areas marked with this symbol.
CAUTION—POTENTIAL INJURY: This product uses a laser. Use of controls or adjustments or performance of procedures other than those specified in the User’s Guide may result in hazardous radiation exposure.
CAUTION—POTENTIAL INJURY: The lithium battery in this product is not intended to be replaced. There is a danger of explosion if a lithium battery is incorrectly replaced. Do not recharge, disassemble, or incinerate a lithium battery. Discard used lithium batteries according to the manufacturer's instructions and local regulations.
This equipment is not suitable for use in locations where children are likely to be present.
This product is designed, tested, and approved to meet strict global safety standards with the use of specific manufacturer's components. The safety features of some parts may not always be obvious. The manufacturer is not responsible for the use of other replacement parts.
Refer service or repairs, other than those described in the user documentation, to a service representative.
This product uses a printing process that heats the print media, and the heat may cause the media to release emissions. You must understand the section in your operating instructions that discusses the guidelines for selecting print media to avoid the possibility of harmful emissions.
This product may produce small amounts of ozone during normal operation, and may be equipped with a filter designed to limit ozone concentrations to levels well below the recommended exposure limits. To avoid high ozone concentration levels during extensive usage, install this product in a well-ventilated area and replace the ozone and exhaust filters if instructed to do so in the product maintenance instructions. If there are no references to filters in the product maintenance instructions, then there are no filters requiring replacement for this product.
SAVE THESE INSTRUCTIONS.

Learning about the printer |
12 |
Learning about the printer 
Finding information about the printer
|
What are you looking for? |
Find it here |
||
|
Initial setup instructions: |
See the setup documentation that came with the |
||
|
• |
Connecting the printer |
printer or go to http://support.lexmark.com. |
|
|
• Installing the printer software |
|
|
|
|
|
|
||
|
More setup and instructions for using the printer: |
Information Center—Go to |
||
|
• Selecting and storing paper and specialty media |
http://infoserve.lexmark.com. |
||
|
• |
Loading paper |
Help Menu Pages—Access the guides on the |
|
|
• |
Configuring printer settings |
printer firmware or go to |
|
|
http://support.lexmark.com. |
|||
|
• |
Viewing and printing documents and photos |
||
|
Touch Screen Guide—Go to |
|||
|
• Setting up and using the printer software |
|||
|
http://support.lexmark.com. |
|||
|
• Configuring the printer on a network |
Product videos—Go to |
||
|
• Caring for and maintaining the printer |
http://infoserve.lexmark.com/idv/. |
||
|
• |
Troubleshooting and solving problems |
|
|
|
|
|
||
|
Information on setting up and configuring the accessibility |
Lexmark Accessibility Guide—Go to |
||
|
features of your printer |
http://support.lexmark.com. |
||
|
|
|
||
|
Help using the printer software |
Help for Microsoft® Windows® or Macintosh |
||
|
|
|
operating systems—Open a printer software |
|
|
|
|
program or application, and then click Help. |
|
|
|
|
Click ? to view context sensitive information. |
|
|
|
|
Notes: |
|
|
|
|
• |
Help is automatically installed with the printer |
|
|
|
|
software. |
|
|
|
• |
Depending on the operating system, the |
|
|
|
|
printer software is located in the printer |
|
|
|
|
program folder or on the desktop. |
|
|
|
|
|
Learning about the printer |
|
13 |
||
|
|
|
|
|
|
What are you looking for? |
Find it here |
||
|
The latest supplemental information, updates, and customer |
Go to http://support.lexmark.com. |
||
|
support: |
Note: Select your country or region, and then |
||
|
• |
Documentation |
||
|
select your product to view the appropriate |
|||
|
• |
Driver downloads |
support site. |
|
|
• |
Live chat support |
Support contact information for your country or |
|
|
• |
E mail support |
region can be found on the website or on the |
|
|
printed warranty that came with the printer. |
|||
|
• |
Voice support |
||
|
Have the following information ready when you |
|||
|
|
|
||
|
|
|
contact customer support: |
|
|
|
|
• |
Place and date of purchase |
|
|
|
• |
Machine type and serial number |
|
|
|
|
|
• |
Safety information |
Warranty information varies by country or region: |
|
• |
Regulatory information |
• In the U.S.—See the Statement of Limited |
|
• |
Warranty information |
Warranty included with the printer, or go to |
|
• |
Environmental information |
http://support.lexmark.com. |
|
• In other countries and regions—See the |
|||
|
|
||
|
|
printed warranty that came with the printer. |
|
|
|
Product Information Guide—See the |
|
|
|
documentation that came with the printer or go to |
|
|
|
http://support.lexmark.com. |
Selecting a location for the printer
When selecting a location for the printer, leave enough room to open trays, covers, and doors and to install hardware options.
• Set up the printer near an electrical outlet.
CAUTION—POTENTIAL INJURY: To avoid the risk of fire or electrical shock, connect the power cord to an appropriately rated and properly grounded electrical outlet that is near the product and easily accessible.
CAUTION—SHOCK HAZARD: To avoid the risk of electrical shock, do not place or use this product near water or wet locations.
•Make sure that airflow in the room meets the latest revision of the ASHRAE 62 standard or the CEN Technical Committee 156 standard.
•Provide a flat, sturdy, and stable surface.
•Keep the printer:
–Clean, dry, and free of dust.
–Away from stray staples and paper clips.
Learning about the printer |
14 |
–Away from the direct airflow of air conditioners, heaters, or ventilators.
–Free from direct sunlight and humidity extremes.
•Observe the recommended temperatures and avoid fluctuations:
Ambient temperature |
10 to 30°C (50 to 86°F) |
|
|
Storage temperature |
-10 to 40°C (14 to 104°F) |
|
|
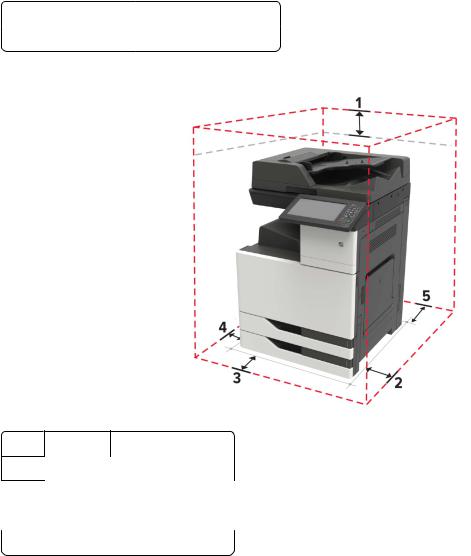
• Allow the following recommended amount of space around the printer for proper ventilation:
1 Top |
400 mm (15.70 in.) |
2Right side 400 mm (15.70 in.)
3 |
Front |
444.5 mm (17.50 in.) |
4 |
Left side |
120 mm (4.80 in.) |
|
|
|
5 |
Rear |
120 mm (4.80 in.) |
Printer configurations
Note: Make sure to configure the printer on a flat, sturdy, and stable surface.
Learning about the printer |
15 |
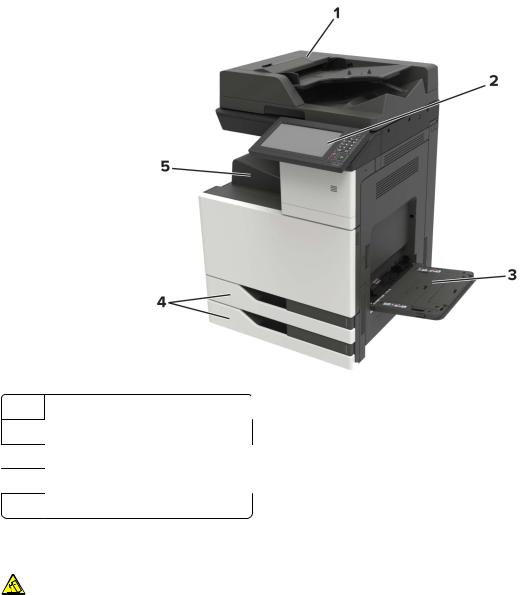
Basic model
1 Automatic document feeder (ADF)
2Control panel
3Multipurpose feeder
4Standard 2 x 500-sheet tray
5 Standard bin
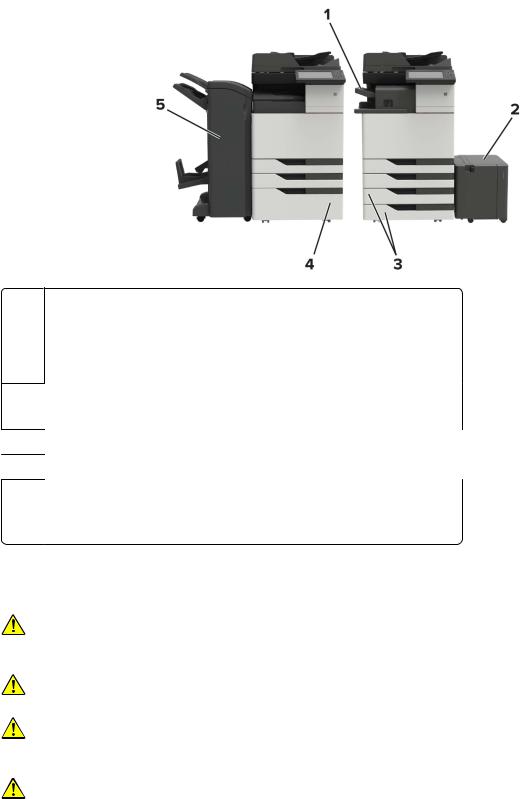
Configured model
CAUTION—TIPPING HAZARD: Installing one or more options on your printer or MFP may require a caster base, furniture, or other feature to prevent instability causing possible injury. For more information on supported configurations, see www.lexmark.com/multifunctionprinters.
Learning about the printer |
16 |
1Staple finisher
Notes:
•This option is not supported if another finisher is installed.
•This option is supported only in some printer models.
2Optional 3000 sheet tray
Note: This option is supported only if another optional tray is installed.
3Optional 2 x 500 sheet tray
4Optional 2500 sheet tray
5Finisher
•Staple, hole punch finisher
•Booklet finisher
Attaching cables
CAUTION—POTENTIAL INJURY: To avoid the risk of fire or electrical shock, connect the power cord to an appropriately rated and properly grounded electrical outlet that is near the product and easily accessible.
CAUTION—POTENTIAL INJURY: To avoid the risk of fire or electrical shock, use only the power cord provided with this product or the manufacturer's authorized replacement.
CAUTION—POTENTIAL INJURY: To avoid the risk of electrical shock, do not set up this product or make any electrical or cabling connections, such as the power cord, fax feature, or telephone, during a lightning storm.
CAUTION—POTENTIAL INJURY: To reduce the risk of fire, use only a 26 AWG or larger telecommunications (RJ-11) cord when connecting this product to the public switched telephone network. For users in Australia, the cord must be approved by the Australian Communications and Media Authority.
Learning about the printer |
17 |
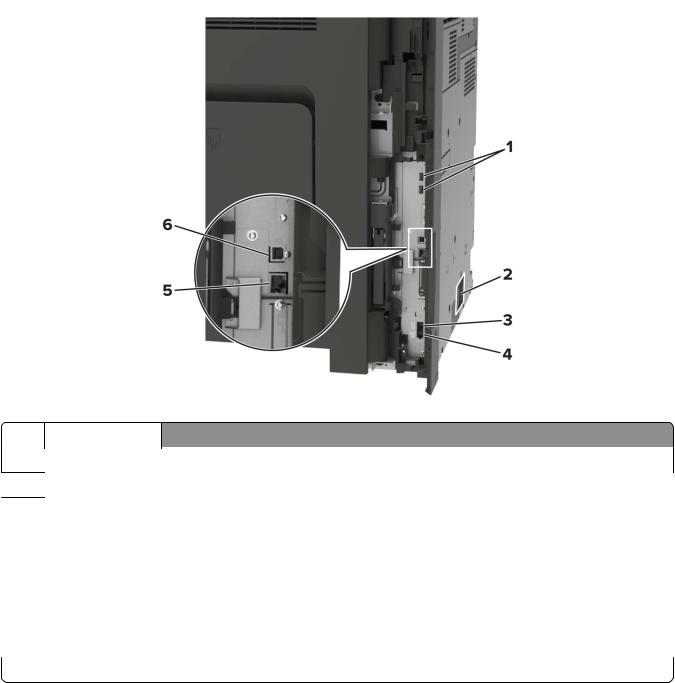
Warning—Potential Damage: To avoid loss of data or printer malfunction, do not touch the USB cable, any wireless network adapter, or the printer in the areas shown while actively printing.
|
Use the |
To |
1 USB ports |
Attach a keyboard or any compatible option. |
|
2Power cord socket Connect the printer to a properly grounded electrical outlet.
3 |
EXT port |
Connect additional devices (telephone or answering machine) to the printer and the |
|
|
telephone line. Use this port if you do not have a dedicated fax line for the printer and |
|
|
if this connection method is supported in your country or region. |
|
|
Note: Remove the plug to access the port. |
|
|
|
4 |
LINE port |
Connect the printer to an active telephone line through a standard wall jack (RJ 11), DSL |
|
|
filter, or VoIP adapter, or any other adapter that allows you to access the telephone line |
|
|
to send and receive faxes. |
|
|
|
5 |
Ethernet port |
Connect the printer to an Ethernet network. |
|
|
|
6 |
USB printer port |
Connect the printer to a computer. |
Learning about the printer |
18 |
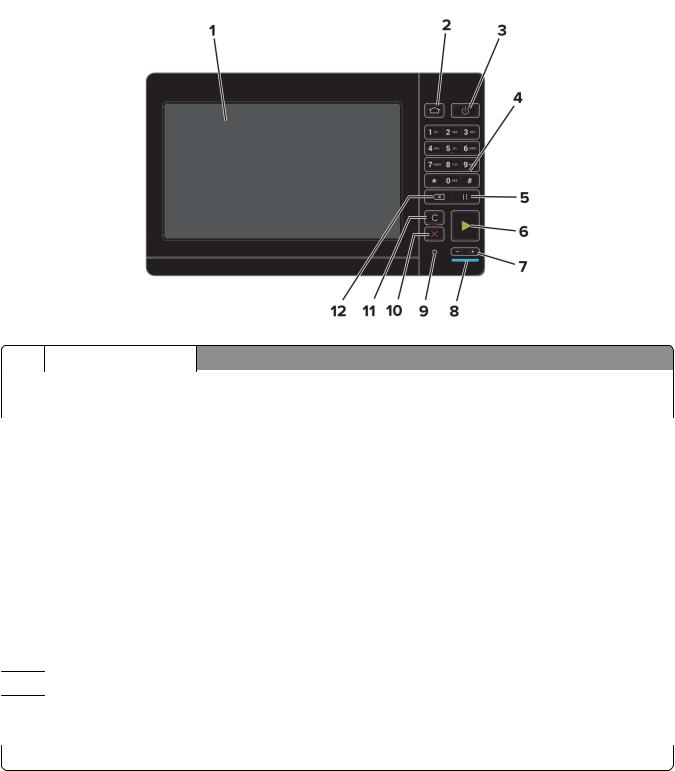
Using the control panel
|
Use the |
To |
|
1 |
Display |
• View the printer messages and supply status. |
|
|
|
• |
Set up and operate the printer. |
|
|
|
|
2 |
Home button |
Go to the home screen. |
|
|
|
|
|
3 |
Power button |
• Turn on or turn off the printer. |
|
|
|
|
Note: To turn off the printer, press and hold the power button for five |
|
|
|
seconds. |
|
|
• |
Set the printer to Sleep or Hibernate mode. |
|
|
• |
Wake the printer from Sleep or Hibernate mode. |
|
|
|
|
4 |
Keypad |
Enter numbers or symbols in an input field. |
|
|
|
|
|
5 |
Pause button |
Place a dial pause in a fax number. |
|
|
|
|
|
6 |
Start button |
Start a job, depending on which mode is selected. |
|
|
|
|
|
7 |
Volume buttons |
Adjust the volume of the headset or speaker. |
|
|
|
|
|
8 |
Indicator light |
Check the status of the printer. |
|
9Headset or speaker port Attach a headset or speaker.
10 |
Stop or Cancel button |
Stop the current job. |
11 |
Clear all or Reset button |
Reset the default settings of a function such as copying, faxing, or scanning. |
|
|
|
12 |
Backspace button |
Move the cursor backward and delete a character in an input field. |
Learning about the printer |
19 |
Understanding the status of the power button and indicator light
|
Indicator light |
Printer status |
|
Off |
The printer is off or in Hibernate mode. |
|
|
|
|
Blue |
The printer is ready or processing data. |
|
|
|
|
Red |
The printer requires user intervention. |
|
|
|
|
Power button light |
Printer status |
|
Off |
The printer is off, ready, or processing data. |
|
|
|
|
Solid amber |
The printer is in sleep mode. |
|
|
|
|
Blinking amber |
The printer is in hibernate mode. |
|
|
|
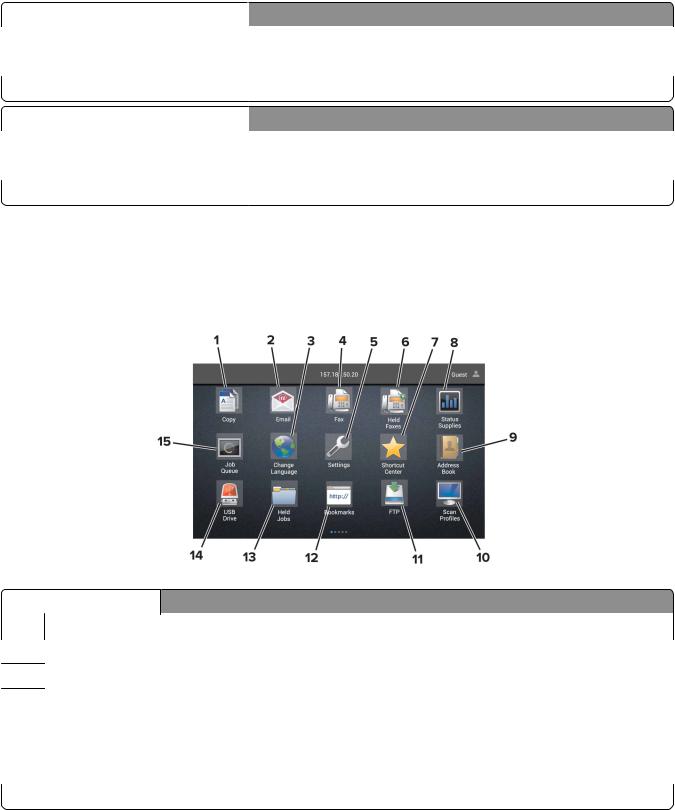
Using the home screen
Note: Your home screen may vary depending on your home screen customization settings, administrative setup, and active embedded solutions.
Touch |
|
To |
1 |
Copy |
Make copies. |
|
|
|
2 |
E mail |
Send e mails. |
3Change Language Change the language on the printer display.
4 |
Fax |
Send fax. |
5 |
Settings |
Access the printer menus. |
|
|
|
6 |
Held Faxes |
Show all the current held fax jobs. |
|
|
Note: If Held Faxes is hidden, then Release Held Faxes appears. |
|
|
|
7 |
Shortcut Center |
Organize all shortcuts. |

Learning about the printer |
|
|
|
20 |
||||
|
|
|
|
|
|
|
|
|
|
Touch |
|
|
To |
|
|
|
|
|
|
8 |
Status/Supplies |
|
• Show a printer warning or error message whenever the printer requires intervention |
|||
|
|
|
|
|
to continue processing. |
|
||
|
|
|
|
|
• View more information on the printer warning or message, and on how to clear it. |
|||
|
|
|
|
|
Note: You can also access this setting by touching the top section of the home |
|||
|
|
|
|
|
screen. |
|
|
|
|
|
|
|
|
|
|
|
|
|
|
9 |
Address Book |
|
Access, create, and organize contacts. |
|||
|
|
|
|
|
|
|
||
|
10 |
Scan Profiles |
|
Scan and save documents directly to the computer. |
||||
|
|
|
|
|
|
|
||
|
11 |
FTP |
|
Scan and save documents directly to an FTP server. |
||||
|
|
|
|
|
|
|
|
|
|
12 |
Bookmarks |
|
Organize all bookmarks. |
|
|||
|
|
|
|
|
|
|
||
|
13 |
Held Jobs |
|
Show all the current held print jobs |
||||
|
|
|
|
|
|
|
||
|
14 |
USB Drive |
|
View, select, or print photos and documents from a flash drive. |
||||
|
|
|
|
|
|
|
||
15 |
Job Queue |
|
Show all the current print jobs. |
|||||
|
|
|
|
|
Note: You can also access this setting by touching the top section of the home |
|||
|
|
|
|
|
screen. |
|
|
|
|
|
|
|
|
|
|||
These settings may also appear on the home screen |
||||||||
|
|
|
|
|
|
|
|
|
|
Touch |
|
|
|
To |
|
||
|
App Profiles |
|
Access application profiles. |
|||||
|
|
|
|
|
||||
|
Lock Device |
|
Prevent users from accessing any printer functions from the home screen. |
|||||
Menu map |
|
|
|
|
||||
Device |
|
|
|
|
||||
|
• |
Preferences |
|
|
• |
Accessibility |
||
|
|
|
||||||
|
• |
Remote Operator Panel |
|
|
• |
Restore Factory Defaults |
||
|
• |
Notifications |
|
|
• |
Maintenance |
||
|
• |
Power Management |
|
|
• Visible Home Screen Icons |
|||
|
• Information Sent to Lexmark |
|
• |
About This Printer |
||||
|
|
|
|
|
|
|||
|
• |
Layout |
|
|
• |
|||
|
|
|
||||||
|
• |
Finishing |
|
|
• |
PostScript |
||
|
• |
Setup |
|
|
• |
PCL |
||
|
• |
Quality |
|
|
• |
HTML |
||
|
• |
Job Accounting |
|
|
• |
Image |
||
|
• |
XPS |
|
|
• |
PPDS |
||
|
|
|
|
|
|
|
|
|

Learning about the printer |
21 |
Paper
• |
Tray Configuration |
• Bin Configuration |
• |
Media Configuration |
|
|
|
|
Copy
 Copy Defaults
Fax
• |
Fax Mode |
• Fax Server Setup |
• |
Analog Fax Setup |
|
|
|
|
E mail
• |
E mail Setup |
• Web Link Setup |
• |
E mail Defaults |
|
|
|
|
Network/Ports
• |
Network Overview |
• |
LPD Configuration |
• |
Wireless |
• |
HTTP/FTP Settings |
• |
AirPrint |
• |
ThinPrint |
• |
Ethernet |
• |
USB |
• |
TCP/IP |
• |
Parallel [x] |
• |
IPv6 |
• |
Serial |
• |
SNMP |
• |
Google Cloud Print |
• |
IPSec |
• |
Wi-Fi Direct |
|
|
|
|
FTP
 FTP Defaults
USB Drive
• Flash Drive Scan |
• Flash Drive Print |
|
|
Security
• |
Login Methods |
• |
Disk Encryption |
• |
Schedule USB Devices |
• Erase Temporary Data Files |
|
• |
Security Audit Log |
• |
Solutions LDAP Settings |
• |
Login Restrictions |
• |
Miscellaneous |
• |
Confidential Print Setup |
|
|
|
|
|
|
Option Card Menu
 Note: This setting appears only when an optional card is installed.

Learning about the printer |
22 |
Reports
• |
Menu Settings Page |
• |
Shortcuts |
• |
Device |
• |
Fax |
• |
• |
Network |
|
|
|
|
|
Help
• |
Print All Guides |
• |
Information Guide |
• |
Color Quality Guide |
• |
Media Guide |
• |
Connection Guide |
• |
Moving Guide |
• |
Copy Guide |
• |
Print Quality Guide |
• |
E mail Guide |
• |
Scan Guide |
• |
Fax Guide |
• |
Supplies Guide |
|
|
|
|
Troubleshooting
• Print Quality Test Pages |
• Advanced Print Quality Test Pages |
|
|
Printing a menu settings page
From the home screen, touch Settings > Reports > Menu Settings Page.

Setting up and using the home screen applications |
23 |
Setting up and using the home screen applications
Customizing the home screen
1Open a web browser, and then type the printer IP address in the address field.
Notes:
•View the printer IP address on the printer home screen. The IP address appears as four sets of numbers separated by periods, such as 123.123.123.123.
•If you are using a proxy server, then temporarily disable it to load the web page correctly.
2 Click Settings > Device > Visible Home Screen Icons.
3 Select the icons that you want to appear on the home screen.
4 Apply the changes.
Setting up Card Copy
1Open a Web browser, and then type the printer IP address in the address field.
Notes:
•View the printer IP address on the printer home screen. The IP address appears as four sets of numbers separated by periods, such as 123.123.123.123.
•If you are using a proxy server, then temporarily disable it to load the Web page correctly.
2 Click Apps > Card Copy > Configure.
3Configure the output options and scan settings.
Notes:
•When scanning a card, make sure that the scan resolution does not exceed 200 dpi for color and 400 dpi for black and white.
•When scanning multiple cards, make sure that the scan resolution does not exceed 150 dpi for color and 300 dpi for black and white.
•You need a printer hard disk to scan multiple cards.
•Make sure that the printer network and e mail settings are configured.
4 Apply the changes.
Using Shortcut Center
1 From the home screen, touch Shortcut Center, and then select a printer function.
2 Touch Create Shortcut, and then configure the settings.
Setting up and using the home screen applications |
24 |
3 Touch Save, and then type a unique shortcut name.
4 Apply the changes.
Setting up Scan Center
1 From the home screen, touch Scan Center.
2Select and create a destination, and then configure the settings.
Notes:
•When creating a network destination, make sure to validate and adjust the settings until no errors occur.
•Only destinations created from the Embedded Web Server are saved. For more information, see the documentation that came with the solution.
3 Apply the changes.
Using Customer Support
1 From the home screen, touch Customer Support.
2 Print or e mail the information.
Note: For information on configuring the application settings, see the Customer Support Administrator’s Guide.
Setting up Device Quotas
You may need administrative rights to access the application.
1Open a Web browser, and then type the printer IP address in the address field.
Notes:
•View the printer IP address on the printer home screen. The IP address appears as four sets of numbers separated by periods, such as 123.123.123.123.
•If you are using a proxy server, then temporarily disable it to load the Web page correctly.
2 Click Apps > Device Quotas > Configure.
3 From the User Accounts section, add or edit a user, and then set the user quota.
4 Apply the changes.
Note: For information on how to configure the application and its security settings, see the Device Quotas Administrator’s Guide.
Using QR Code Generator
You may need administrative rights to access the application.
1 Open a Web browser, and then type the printer IP address in the address field.

Setting up and using the home screen applications |
25 |
Notes:
•View the printer IP address on the printer home screen. The IP address appears as four sets of numbers separated by periods, such as 123.123.123.123.
•If you are using a proxy server, then temporarily disable it to load the Web page correctly.
2 Click Apps > QR Code Generator > Configure.
3Do either of the following:
•Select a default QR code value.
•Type a QR code value.
4 Apply the changes.
Using Google Drive
Scanning a document
Notes:
• Make sure that the printer is connected to your Google account.
• Make sure that you have installed a printer hard disk.
1 Load an original document into the ADF tray or on the scanner glass.
2 From the home screen, touch Google Drive.
3 If prompted, type your user credentials.
4 Select a destination folder.
5 Scan the document, and then follow the instructions on the display.
Printing a document
Note: Make sure that the printer is connected to your Google account.
1 From the home screen, touch Google Drive.
2 If prompted, type your user credentials.
3 |
Touch |
beside the document. |
4 |
Print the document. |
|
Note: For information on how to configure the printer for the application, see the Google Drive Administrator’s Guide.
Using Display Customization
Changing the wallpaper
1 From the home screen, touch Change Wallpaper.
2 Select an image to use.
Setting up and using the home screen applications |
26 |
3 Apply the changes.
Creating a slide show
Before you begin, make sure to configure the slide show settings. For more information, see the documentation that came with the solution.
1 Insert a flash drive into the USB port.
2From the home screen, touch Slideshow.
Note: Images appear in alphabetical order.
Configuring Eco Settings
1 From the home screen, touch Eco Settings.
2 Configure the Eco Mode settings or schedule a power-saving mode.
3 Apply the changes.
Managing contacts
Adding contacts
1Open a web browser, and then type the printer IP address in the address field.
Notes:
•View the printer IP address on the printer home screen. The IP address appears as four sets of numbers separated by periods, such as 123.123.123.123.
•If you are using a proxy server, then temporarily disable it to load the web page correctly.
2 Click Address Book.
3 From the Contacts section, add a contact.
Note: You can assign the contact to one or more groups.
4 If necessary, specify a login method to allow application access.
5 Apply the changes.
Adding groups
1Open a web browser, and then type the printer IP address in the address field.
Notes:
•View the printer IP address on the printer home screen. The IP address appears as four sets of numbers separated by periods, such as 123.123.123.123.
•If you are using a proxy server, then temporarily disable it to load the web page correctly.
2 Click Address Book.
Setting up and using the home screen applications |
27 |
3 From the Contact Groups section, add a group name.
Note: You can assign one or more contacts to the group.
4 Apply the changes.
Editing contacts or groups
1Open a web browser, and then type the printer IP address in the address field.
Notes:
•View the printer IP address on the printer home screen. The IP address appears as four sets of numbers separated by periods, such as 123.123.123.123.
•If you are using a proxy server, then temporarily disable it to load the web page correctly.
2 Click Address Book.
3Do either of the following:
•From the Contacts section, click a contact name, and then edit the information.
•From the Contact Groups section, click a group name, and then edit the information.
4 Apply the changes.
Deleting contacts or groups
1Open a web browser, and then type the printer IP address in the address field.
Notes:
•View the printer IP address on the printer home screen. The IP address appears as four sets of numbers separated by periods, such as 123.123.123.123.
•If you are using a proxy server, then temporarily disable it to load the web page correctly.
2 Click Address Book.
3Do either of the following:
•From the Contacts section, select a contact that you want to delete.
•From the Contact Groups section, select a group name that you want to delete.

Setting up and using the accessibility features |
28 |
Setting up and using the accessibility features
Enabling Magnification mode
1 From the control panel, press and hold the 5 key until you hear a voice message.
2 Select Magnification.
3 Select OK.
For more information on navigating a magnified screen, see “Navigating the screen using gestures” on page 29.
Activating Voice Guidance
From the control panel
1 Press and hold the 5 key until you hear a voice message.
2 Select OK.
From the keyboard
1 Press and hold the 5 key until you hear a voice message.
2 Press Tab to navigate the focus cursor to the OK button, and then press Enter.
Notes:
•Voice Guidance is also activated when you insert headphones into the headphone jack.
•To adjust the volume, use the volume buttons at the bottom part of the control panel.
Adjusting the Voice Guidance speech rate
1 From the home screen, select Settings > Device > Accessibility > Speech Rate.
2 Select the speech rate.
Adjusting the default internal speaker volume
The speaker volume will reset to default value after the session is logged out, when the printer wakes from Sleep or Hibernate mode, or after a power on reset.
1From the control panel, navigate to:
Settings > Device > Preferences > Audio Feedback
2 Select the volume.
Note: If Quiet Mode is enabled, then audible alerts are turned off.

Setting up and using the accessibility features |
29 |
Adjusting the default headphones volume
Headphones volume will reset to default value after the session is logged out, when the printer wakes from Sleep or Hibernate mode, or after a power on reset.
1 From the control panel, select Settings > Device > Accessibility > Headphone Volume.
2 Select the volume.
Enabling spoken passwords or personal identification numbers
1 From the home screen, select Settings > Device > Accessibility > Speak Passwords/PINs.
2 Enable the setting.
Navigating the screen using gestures
Notes:
•The gestures are applicable only when Voice Guidance is activated.
•A physical keyboard is required for typing characters and adjusting certain settings.
Gesture |
Function |
Double tap |
Select an option or item on the screen. |
Triple tap |
Zoom in or zoom out text and images. |
Swipe right or swipe down |
Move to the next item on the screen. |
|
|
Swipe left or swipe up |
Move to the previous item on the screen. |
|
|
Pan |
Access parts of the zoomed image that are beyond the limits of the screen. |
|
Note: This gesture requires the use of two fingers to drag across a zoomed |
|
image. |
|
|
Swipe up then left |
Exit an application and return to the home screen. |
|
|
Swipe down then left |
• Cancel a job. |
•Go back to the previous setting.
•Exit the screen that appears without changing any setting or value.
Swipe up then down |
Repeat a spoken prompt. |
Using the keyboard on the display
Do one or more of the following:
•Drag a finger over the key to announce the character.
•Lift the finger to enter or type the character in the field.
•Press Backspace to delete characters.
•To hear the content in the input field, press Tab, and then press Shift + Tab.
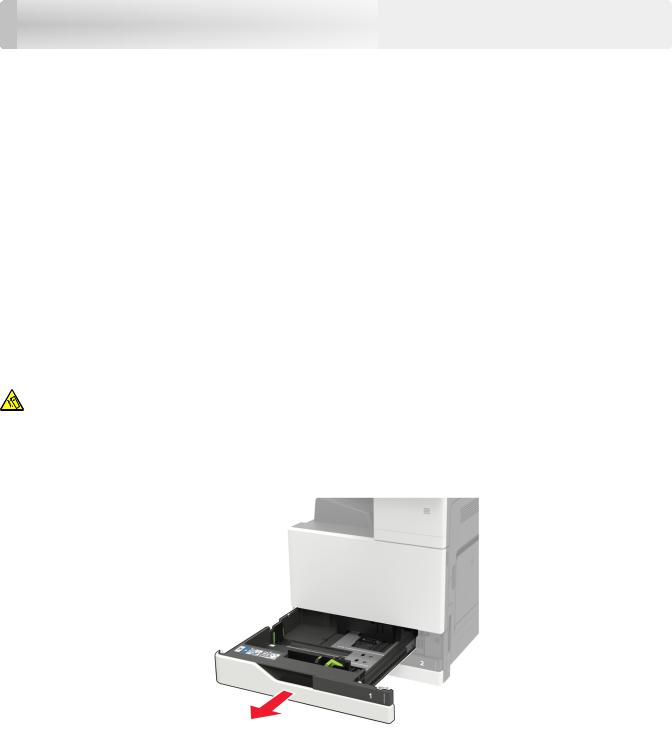
Loading paper and specialty media |
30 |
Loading paper and specialty media
Setting the size and type of the specialty media
The trays automatically detect the size of plain paper. For specialty media like labels, card stock, or envelopes, do the following:
1From the home screen, navigate to:
Settings > Paper > Tray Configuration > Paper Size/Type > select a paper source
2 Set the size and type of the specialty media.
Configuring Universal paper settings
1 From the home screen, touch Settings > Paper > Media Configuration > Universal Setup.
2 Configure the settings.
Loading trays
CAUTION—TIPPING HAZARD: To reduce the risk of equipment instability, load each tray separately. Keep all other trays closed until needed.
1Pull out the tray.
Note: Do not remove trays while the printer is busy.
 Loading...