

Page 1

P agePrinter
Network Adapter:
Utilities & En vir onments
Page 2

Page 3

For use with:
Ethernet C, D
Utilities &
Environments
TCP/IP
Windows 95/NT
Novell NetWare
networks
operating systems
networks
Page 4

The contents of this manual may be revised without prior notice and without obligation to incorporate changes and
improvements into units already shipped.
Every effort has been made to ensure that the information included here is complete and accurate at the time of
publication, but we cannot be held responsible for errors and omissions.
Copyright Lexmark International, Inc. 1994, 1996
Printed in Spain. All rights reserved. No part of this manual may be reproduced or translated, stored in a database or
retrieval system, or transmitted, in any form or by any means, electronic, mechanical, photocopying, recording, or
otherwise, without the prior written permission of Lexmark International, Inc.
C145-E207-02EN, June 1997
Trademark Acknowledgement
Lexmark, MarkVision and Mark Net are registered trademarks of Lexmark International, Inc.
The following companies own the other trademarks used in this manual:
Novell, Inc.: NetWare
PagePrinter Network Adapter: Utilitiies & Environments
Page 5

Contents
Preface.........................................................................................................................................V
Introduction........................................................................................................V
Chapter 1 Overview of the Utilities, the Network Adapter and MarkVision..............................1-1
Introduction..............................................................................................................................1-1
What environments do the utilities run in?..................................................... 1-1
What levels of software and firmware do I need?........................................... 1-1
What is MarkVision?...................................................................................... 1-2
Does the adapter work with Windows 95?...................................................... 1-2
Which protocols support which environments?.............................................. 1-2
Is it possible to turn unused protocols off?..................................................... 1-2
Is it possible to set a password for this adapter?............................................. 1-3
Will the adapters accept print jobs from several servers?............................... 1-3
How do I find out about last-minute information?.......................................... 1-3
Where can I get help? ..................................................................................... 1-3
Chapter 2 Using TCP/IP networks................................................................................................2-1
Introduction..............................................................................................................................2-1
Who this chapter is designed for..................................................................... 2-1
What this chapter does.................................................................................... 2-1
For more information...................................................................................... 2-2
Setup.........................................................................................................................................2-2
Step 1: check the physical connections........................................................... 2-3
Step 2: print a setup page................................................................................ 2-3
Step 3: set the IP address, netmask, and gateway........................................... 2-5
Step 4: verify the setup ................................................................................. 2-12
Step 5: set a community name or change TCP/IP information..................... 2-13
Using the protocols ............................................................................................................... 2-14
Sending print jobs......................................................................................... 2-15
Using a Line Printer Remote (LPR) program............................................... 2-16
Using telnet................................................................................................... 2-18
Using TFTP (Trivial File Transfer Protocol)................................................ 2-18
Using FTP (File Transfer Protocol).............................................................. 2-19
Checking printer status ................................................................................. 2-22
Changing the TCP/IP information................................................................ 2-25
Troubleshooting.....................................................................................................................2-25
Jobs waiting in the queue.............................................................................. 2-26
Printer not receiving jobs.............................................................................. 2-27
PagePrinter Network Adapter: Utilities & Environments i
Page 6

Contents
Adapter lights................................................................................................ 2-28
Adapter service .............................................................................................2-28
Chapter 3 Using Windows 95 operating systems...................................................................... 3-1
Introduction...............................................................................................................................3-1
What you need ................................................................................................3-1
Installing the MarkVision printer utility ..................................................................................3-1
Installing the utility.........................................................................................3-2
Configuring the adapter...........................................................................................................3-2
To process NetWare print jobs........................................................................ 3-2
To process TCP/IP print jobs ..........................................................................3-5
To process Point to Point Printing (LexIP) ..................................................... 3-8
To process Peer to Peer printing.................................................................... 3-11
Troubleshooting .....................................................................................................................3-13
Utility unable to find network printer............................................................3-13
Print jobs stay in the queue ...........................................................................3-14
Print jobs are ending prematurely.................................................................3-14
Adapter lights................................................................................................ 3-15
Adapter service .............................................................................................3-16
Chapter 4 Using Windows NT operating systems.....................................................................4-1
Introduction...............................................................................................................................4-1
How to print ....................................................................................................4-1
Before you begin............................................................................................. 4-1
Printing under Windows NT 3.51.............................................................................................4-1
What you need ................................................................................................4-2
How to Create a Printer using the lpr protocol ............................................... 4-2
Printing under Windows NT 4.0...............................................................................................4-4
What you need ................................................................................................4-4
How to Create a Printer using the lpr protocol ............................................... 4-4
Chapter 5 Using NetWare networks............................................................................................5-1
Introduction...............................................................................................................................5-1
Before you begin............................................................................................. 5-1
What you need ................................................................................................5-1
Installing the utility...................................................................................................................5-2
Starting the network printer utility..........................................................................................5-3
Using the utility.........................................................................................................................5-4
ii PagePrinter Network Adapter: Utilities & Environments
Page 7

Contents
Using the adapter list ...................................................................................... 5-4
Selecting items from the menus...................................................................... 5-5
Setting up the adapter............................................................................................................. 5-6
What setup accomplishes................................................................................ 5-6
Utilities to use................................................................................................. 5-6
To set up the adapter ....................................................................................... 5-6
Deciding whether to use NPRINTER/RPRINTER mode or
PSERVER mode ..................................................................................... 5-7
NPRINT versus PSERVER in NetWare Directory Services (NDS)............... 5-8
Verifying the adapter setup........................................................................... 5-11
Troubleshooting.....................................................................................................................5-12
Utility unable to find the network printer ..................................................... 5-12
Print jobs stay in the queue........................................................................... 5-12
Adapter lights................................................................................................ 5-15
Adapter service............................................................................................. 5-16
Appendix A Using the printer control panel..................................................................................A-1
Introduction..............................................................................................................................A-1
IP protocols settings from the printer control panel .......................................A-2
Glossary ................................................................................................................................................... G-1
PagePrinter Network Adapter: Utilities & Environments iii
Page 8

Contents
iv PagePrinter Network Adapter: Utilities & Environments
Page 9

Preface
Introduction
Thank you for buying this multi-protocol Network Adapter. You can use this
guide to learn how to install and configure utilities so that your printer works
with:
•
TCP/IP networks
Windows 95 operating systems
•
•
Windows NT operating systems
Novell NetWare networks
•
Terminology
In this book, the term
that you received with the printer.
The term
The term
utility displays.
adapter
adapter list
utilities
refers to this Network Adapter.
refers to the list of adapters on your network that the
refers to the files on the CD-ROM or diskettes
Conventions used in this book
Steps requiring action are shown in
•
•
Words or phrases requiring emphasis or explanation appear in
This book and the on-line Help information use slashes (/) to show the path
•
you should follow through the menus and commands.
bold
print.
italic
print.
For example
would choose the File menu, the Print command under File, and the To
Printer option. That path is shown as
File/Print/To Printer.
, suppose you want to print the adapter list to a printer . Y ou
Getting the utility
The Network Printer Utility will be shipped on CD-ROM or diskettes with the
printers.
PagePrinter Network Adapter: Utilities & Environments v
Page 10

Preface
vi PagePrinter Network Adapter: Utilities & Environments
Page 11

CHAPTER
1
Introduction
Overview of the Utilities, the Network Adapter and MarkVision
Thank you for buying this multi-protocol Network Adapter. As with most new
purchases, you probably have a few questions. W e will answer some of them in
this introduction for you.
What environments do the utilities run in?
Since each environment is different, please see the appropriate chapter in this
manual for more details about versions or levels of operating systems that w ork
with these utilities. The utilities work with the following environments:
•
Novell NetWare networks (Windows 95 or Windows 3.1)
•
Transmission Control Protocol/Internet Protocol (TCP/IP) networks
Windows 95 operating systems
•
Windows NT operating systems
•
::
Overview of the
Utilities, the
Network Adapter
and MarkVision
What levels of software and firmware do I need?
You’ve received, in this package, the latest level of the utilities that were
available when the printer was built.
There is firmware that resides on the adapter itself. This firmware handles
communications between the printer, the utility, the adapter, and the network.
The firmware is, therefore, the backbone of this product. The firmware resides
on the adapter’s flash memory, a type of Read-Only Memory that can be erased
electronically and reprogrammed.
(To check an effective firmware level, contact your point of purchase.)
To find out which firmware revision level uses your adapter, print a setup page.
For help, see “Step 2: print a setup page” on page 2-3.
PagePrinter Network Adapter: Utilities & Environments 1-1
Page 12

Introduction
What is MarkVision?
MarkVision is a utility that allows administrators and users to control and see
the status of printers on their networks. In addition, it allows network
administrators to:
automatically configure print drivers. The new bidirectional, network-aware
•
PCL and PostScript Windows drivers can configure themselves with many
printers. This allows users to make sure that their application driver settings
are correct.
•
install MarkVision and print drivers from the network. You can copy the
MarkVision setup utility and MarkVision to a network drive and directory.
Then users on the network can install print drivers and MarkVision from the
network.
You can use MarkVision without slowing down printing because MarkVision
controls the printer directly and not within the queuing and spooling
mechanism of the network.
Does the adapter work with Windows 95?
Yes. See the Windows 95 chapter in this manual for more information.
Which protocols support which environments?
Protocols are provided to reside in the adapter’s firmware. The adapter uses
these protocols to receive print jobs of f the network. The adapters support these
protocols:
•
NetWare, used to support Novell NetWare networks.
TCP/IP, used for TCP/IP networks in many UNIX environments.
•
Is it possible to turn unused protocols off?
Yes. The Network Adapter is shipped with all protocols active. Using the
Network Printer Utility for Windows 3.1 or MarkVision for Windows 95, you
can turn off protocols that you don’t need.
Each protocol consumes some resource on the adapter and network. If you turn
a protocol off, that resource is released. Therefore, to increase throughput on
the adapter, we recommend that you turn unused protocols off. For example, if
you are not using the TCP/IP protocol you may choose to turn it off. This
reduces network traffic.
1-2 PagePrinter Network Adapter: Utilities & Environments
Page 13

Introduction
Is it possible to set a password for this adapter?
Passwords on the Network Adapter work as follows:
The password protects all the adapter’s settings from being changed (for
•
example, nicknames, queue names, file servers).
The passwords protect the adapter from someone inadvertently or mistakenly
•
changing a setting. The password encryption algorithm is not designed to
protect against serious hackers.
One adapter is assigned one password. That password works across all
•
protocols. Therefore, if you set a password in the NetWare protocol, that same
password works for TCP/IP.
Will the adapters accept print jobs from several servers?
Yes. The Network Adapter accepts print jobs from NetWare and TCP/IP, one
job at a time. The adapter accepts print jobs in the order they are received: firstcome, first-served.
Overview of the
Utilities, the
Network Adapter
and MarkVision
How do I find out about last-minute information?
Each diskette or CD-ROM includes a README file. This file contains latebreaking information and offers tips we may have disco v ered after printing this
guide. Please read this file and use it to help you.
Where can I get help?
You can get help from several sources.
•
Use pull-down menus. Each item in the utility’s pull-down menus has help
enclosed with it. To see that help:
a
Point and click on the menu that you want help with.
b
Press F1.
The on-line Help information is thorough, containing more complete
information than offered in this guide.
•
Each chapter of this manual contains problem-solving information. If the
utilities do not run, see the corresponding Troubleshooting section at the end
of each chapter.
•
If you need more help setting up or operating these utilities, contact your
point of purchase.
PagePrinter Network Adapter: Utilities & Environments 1-3
Page 14

Introduction
1-4 PagePrinter Network Adapter: Utilities & Environments
Page 15

CHAPTER
2
Using TCP/IP networks
TCP/IP
networks
Introduction
Thank you for buying this multi-protocol adapter.
This chapter explains how to set up and use your printer on a Transmission
Control Protocol/Internet Protocol (TCP/IP) network using this Network
Adapter.
Who this chapter is designed for
This chapter is designed for technical people such as TCP/IP programmers and
experienced network administrators. It assumes that you have a good working
knowledge of your TCP/IP hardware and software.
What this chapter does
First, it explains how to set an IP address, netmask, and gateway using a
BOOTP server. It tells you how to set the address, netmask, gateway, and other
information at the printer’s control panel.
If you are installing the Network Adapter on a complex network and are
also setting up a NetWare envir onment, set up this environment first. The
utility that comes with this environment may be useful to you in TCP/IP,
too.
Second, this chapter also explains the firmware integrated into the adapter. This
firmware supports the following standard TCP/IP protocols:
•Line Printer Remote/Line Printer Daemon (LPR/LPD)
•File Transfer Protocol (FTP)
•Trivial File Transfer Protocol (TFTP)
•Finger
•BOOTstrap Protocol (BOOTP)
•Telnet
This chapter explains how you can use standard TCP/IP protocols with this
adapter. It gi ves a fe w programming examples. If you are accustomed to writing
your own shell scripts, for example, this chapter can help you.
PagePrinter Network Adapter: Utilities & Environments 2-1
Page 16

For more information
This utility guide uses standard TCP/IP protocols. Information about these
standard protocols is available in RFCs (Request For Comments). These RFCs
contain TCP/IP information that is not unique to the Network Adapter.
To obtain an RFC, use FTP services on the Internet as an anonymous user to:
nic.ddn.mil
Look for the RFC in the /rfc directory.
For more information about TCP/IP, we recommend a book by Douglas Comer
entitled Internetworking with TCP/IP, Volume I: Principles, Protocols, and
Architecture.
Setup Before you can use the adapter, you need to set it up. Setup involves a few
simple steps:
1 Checking the physical connections.
2 Printing a setup page to use while you set up the adapter.
Setup
3 Setting the adapter’s IP address, netmask, and gateway.
4 Verifying the setup.
5 Setting a community name.
The rest of this Setup section tells you how to do these steps.
2-2 PagePrinter Network Adapter: Utilities & Environments
Page 17

Setup
Step 1: check the physical connections
First you need to make sure that your printer and adapter are installed and
working correctly. Check the following items.
•Make sure that the printer you want to use is installed on the LAN with the
appropriate Ethernet cable.
•Make sure that the adapter is installed in the printer. Instructions for setting up
the printer and installing adapters are shipped with the printer.
•Make sure that the printer is connected to the LAN with the appropriate
Ethernet cable.
Step 2: print a setup page
Next you need to print a setup page. Keep the setup page. You’ll use
information from it later.
Printing a setup page
1 Press the Test button on the adapter until the Test light comes on.
The Data light comes on, and the adapter sends a page to the printer,
similar to the one on page 2-4.
TCP/IP
networks
PagePrinter Network Adapter: Utilities & Environments 2-3
Page 18

Sample setup page
The Network Adapter setup page looks similar to the example below.
Network Card
Type: Ethernet
EOJ Timeout: 90
UAA: 00200008A803 0004001015C0
LAA: 000000000000 000000000000
Part Number, EC: 1381603, MN_XL_E
Firmware Revision: 4.124.1
LPT 1
NPAP Active, NPAP Mode: Yes, Auto
Busy Timeout: 90
Printer Type, Port Type: PP14, Enhanced
LexLink (Active)
Nickname: 00200008A803
NetWare (Active)
Login Name: !LEX00200008A803
NetWare Mode: PSERVER
Setup
IP (Active)
BOOTP & RARP Enabled: No
Address: 157.184.8.86
Netmask: 255.255.255.0
Gateway: 157.184.8.30
2-4 PagePrinter Network Adapter: Utilities & Environments
Page 19

Setup
Step 3: set the IP address, netmask, and gateway
You can set the IP address, netmask, and gateway for this adapter in several
ways.
The simplest way to set the information is directly on the printer’s control
panel. For information about setting the information on the printer’s control
panel, go to “Setting the information via the printer control panel” on page 2-8.
You may:
•Use a TCP/IP bootstrap protocol (BOOTP), if you have a BOOTP server
running on your network. For help, go to “Setting the information using a
bootstrap protocol” on page 2-6.
•If you are installing the adapter on a complex network and are also setting up
NetWare, run the Network Printer Utility in that environment. You can set the
address, netmask, and gateway from that environment.
You may also:
•Set the address using a Remote Address Resolution Protocol (RARP) server
running on your network. For help, go to “Setting the information using a
RARP server and telnet” on page 2-10.
•Set the address by editing the Address Resolution Protocol (ARP) table on
one of your host computers
adapter.
using telnet” on page 2-11.
If the above methods won’t work for your network, contact your point of
purchase.
For help, go to “Setting the information by editing an ARP table and
that is on the same local area network as the
TCP/IP
networks
PagePrinter Network Adapter: Utilities & Environments 2-5
Page 20

Setup
Setting the information using a bootstrap protocol
You may set the IP address, netmask, and gateway using a TCP/IP bootstrap
protocol (BOOTP), if you have a BOOTP server running on your network.
Make sure the BOOTP server is running on the same LAN segment as the
adapter. (Some routers will pass the pack ets, b ut man y will not. If the BOOTP
server is on a different LAN segment, check your router’s documentation to be
sure packets will cross.)
To set the IP address, netmask, and gateway using a TCP/IP bootstrap protocol:
1 Find the hardware address for the adapter.
To find the hardware
address, look at the setup page for the adapter. The address is labelled
UAA an LAA on the setup page.
• If you are using an Ethernet adapter, be sure to use the address in the right
column. This is the canonical form of the address, circled on the sample
setup page on
Choose the Locally Administered Address (LAA), unless it is
000000000000. If the LAA is 000000000000, choose the Universally
Administered Address (UAA).
2 Set up the BOOTP server.
computer that is running the BOOTP server. The file is usually located
in /etc/bootptab.
The file contains information such as the hostname and the IP address.
For example, a bootptab record might look similar to this:
jdlprt:\
ht=ether:\
ha=08005A09E610:\
ip=9.51.8.212:\
sm=255.255.255.128:\
gw=9.51.8.132
page 2-4.
To do so, edit the BOOTP file on the host
where the following means:
jdlprt
ht=ether
ha=08005A09E610
ip=9.51.8.212
sm=255.255.255.128
gw=9.51.8.132
hostname.
hardware type.
hardware address.
IP address.
netmask.
gateway.
If you need help editing the BOOTP file, try the man page that came with
your UNIX software. Most popular UNIX workstations contain man
pages that help you with tasks like this. You might try man bootp or man
bootptab. If that doesn’t work, consult your system’s documentation.
2-6 PagePrinter Network Adapter: Utilities & Environments
Page 21

Setup
3 Make sure that BOOTP is enabled.
You can do this from the printer control panel.
To enable BOOTP from the printer control panel, follow
these steps:
a Turn the printer power On (|).
b Use the printer contr ol panel to find the menu item SETUP NETWORK
MENU. Consult your printer documentation to learn the menu path
for your specific printer, or scroll through the control panel menus
until you find it.
c Select SETUP NETWORK MENU.
d Select Enable BOOTP.
e Select Yes.
If you are instructed to do so, turn the printer off.
f When you are finished, select Ready.
TCP/IP
networks
4 Set up the printer’s hostname (network name) in the computer. To do
so, simply define the printer’s IP name and address in the /etc/hosts file
or on the name server.
This IP address and hostname must match those you set earlier in the
BOOTP file. You may w ant to use a hostname that is meaningful in your
environment (for example, a name that identifies the printer’s location).
PagePrinter Network Adapter: Utilities & Environments 2-7
Page 22

Setup
Setting the information via the printer control panel
If you already know the printer’s IP address, netmask, and gateway, you may
want to set them at the printer’s control panel. This process sets the address,
netmask, and gateway at this printer only and does not update any BOOTP
records you have in your server.
1 Using the printer’s control panel, set the IP address, netmask, and gate-
way.
If you need help, follow these steps:
a Turn the printer power On (|).
b Use the printer contr ol panel to find the menu item SETUP NETWORK
MENU. Consult your printer documentation to learn the menu path for
your specific printer, or scroll through the control panel menus until you
find it.
c Select SETUP NETWORK MENU.
d Select Set IP ADDRESS, and press ENTER. A screen similar to the
following appears:
IP ADDRESS
000.000.000.000
e Use the MENU button to place the cursor beneath the part of the IP
address that you want to set. Then use the plus (+) and minus (-) keys
to set the address.
f Press ENTER.
g Select Set IP NETMASK, and press ENTER.
h Set the IP netmask just as you set the IP address.
i Press ENTER.
j Select Set IP GATEWAY, and press ENTER.
k Set the IP gateway just as you set the IP address.
l Press ENTER.
m Press READY. Your settings take effect when you return to the Ready
screen.
If an error message appears on the printer’s control panel, go to “Using the
printer control panel” on page A-1.
2-8 PagePrinter Network Adapter: Utilities & Environments
Page 23

Setup
2 Using the printer’s operator panel, make sure that BOOTP is disabled.
We recommend that you leave BOOTP disabled if you are not using it to set
IP addresses. If you need help, follow these steps:
a Turn the printer power On (|).
b Use the printer control panel to select the menu item SETUP
NETWORK MENU. Consult your printer documentation to learn the menu
path for your specific printer, or scroll through the control panel menus
until you find it.
c Select SETUP NETWORK MENU.
d Select Enable BOOTP.
e Select No.
If you are instructed to do so, turn the printer off.
f When you are finished, select Ready.
3 Set up the printer’s hostname (network name) in the computer. To do so,
simply define the printer’s IP name and address in the /etc/hosts file or on the
name server.
TCP/IP
networks
This address must match the IP address you set earlier on the printer’s
control panel. You may want to use a hostname that is meaningful in
your environment (for example, a name that identifies the printer’s
location).
PagePrinter Network Adapter: Utilities & Environments 2-9
Page 24

Setup
Setting the information using a RARP server and telnet
You may set the IP address using a RARP (Remote Address Resolution
Protocol). You must make sure that you are working on the same physical
network as the adapter. Then you can set the netmask and gateway with telnet.
To set the IP address, netmask, and gateway using a RARP server and telnet:
1 Look at the setup page. Find the hardware address. It is labelled UAA
and LAA.
• If you are using an Ethernet adapter, be sure to use the address in the right
column. This is the canonical form of the address, circled on the sample
setup page beginning on page 2-4.
• Choose the Locally Administered Address (LAA), unless it is
000000000000. If the LAA is 000000000000, choose the Universally
Administered Address (UAA).
2 Look at the setup page. Make sure BOOTP and RARP are enabled.
3 Set up the RARP server, following the instructions provided by your
host operating system.
4 Turn the printer off then on to reset the adapter.
The adapter sends a RARP request, and the server responds.
5 Use telnet to set the netmask and gateway by typing:
telnet ip.address -p 9000
where ip.address is the IP address you’re using, such as 9.51.8.231.
6 Follow the instructions on the screen to set the netmask and gateway.
If you wish to change the address, netmask, gateway, or community
name in the future, you may find this telnet function helpful.
2-10 PagePrinter Network Adapter: Utilities & Environments
Page 25

Setup
Setting the information by editing an ARP table and using telnet
You may set the IP address by editing an Address Resolution Protocol (ARP)
table. You must make sure that the computer where the ARP table is edited is on
the same physical network as the adapter. The adapter cannot send this
information across a router, until the adapter is configured.
Then you can use telnet to set the netmask and gateway.
To set the IP address, netmask, and gateway using an ARP file and telnet:
1 Look at the printer setup page. Find the hardware address. It is labelled
UAA and LAA.
• If you are using an Ethernet adapter, be sure to use the address in the right
column. This is the canonical form of the address, circled on the sample
setup page printed on page 2-4.
Choose the Locally Administered Address (LAA), unless it is
000000000000. If the LAA is 000000000000, choose the Universally
Administered Address (UAA).
2 Edit the ARP table to add an IP address.
form of the IP address, such as 9.51.8.231. Use the commands
appropriate to the host operating system. On many computers you
would type something similar to the following:
arp -s 9.51.8.231 08:00:5A:09:E6:10
Make sure you use the dotted
TCP/IP
networks
If you need help and are using a UNIX system, try the man page.
3 PING the adapter. This sets the new address on the adapter. For
example, you might type something similar to:
ping 9.51.8.231
4 Use telnet to set the netmask and gateway. For example, you might type
something similar to:
telnet 9.51.8.231 -p 9000
5 Follow the instructions on the screen to set the netmask and gateway.
PagePrinter Network Adapter: Utilities & Environments 2-11
Page 26

Setup
Step 4: verify the setup
You can check to make sure the printer is set up correctly. Just follow these
steps.
1 Make sure your computer is on the same physical network as the adap-
ter.
2 Print a test page to verify your settings.
If you need help, go to “Step 2:
print a setup page” on page 2-3.
3 Issue a PING command from your computer, such as:
ping hostname
where hostname is the hostname that you set in the /etc/hosts file or on
the name server.
If PING does not work correctly, make sure that:
•you are using a unique address.
•the ARP table entry is correct.
•all physical connections are working correctly.
•all bridges and routers are operating correctly.
•the hostname that you pinged matches the hostname that you set in the /etc/
hosts
file or on the name server.
•if you set the address, netmask, and gateway using BOOTP, make sure that:
– Your BOOTP server is configured correctly.
– The IP address and the hostname are set correctly in the BOOTP
file.
•If you set the address, netmask, and gateway from the printer control panel,
make sure that:
– The IP address is set correctly on the printer’s control panel. If you
need help, see “Setting the information via the printer control
panel” on page 2-8.
•If you set the IP address, netmask, and gateway using a RARP server or ARP
command and telnet, double-check all your steps. If one of these parameters
is wrong, your connection will be lost.
2-12 PagePrinter Network Adapter: Utilities & Environments
Page 27

Setup
Step 5: set a community name or change TCP/IP information
After you have set the TCP/IP information, you can change it using any of the
ways you set the information, or by doing one of the following. This is also the
way to set a community name.
•Telnet to port 9000 to change the information.
Type the following at the command prompt:
1
telnet ip.address -p 9000
where
Follow the instructions on the screen.
2
ip.address is the IP address you’re using, such as 9.51.8.231.
•FTP a file to the param directory. The param directory is a special directory
where you can change special TCP/IP-related parameters.
The format of this file should be:
PASSWORD: 00000000
ADDRESS: 9.51.8.50
NETMASK: .
GATEWAY: 9.51.8.30
COMMUNITY: paul
END
• You must put a space after the colon, and the headers must be capitalized.
TCP/IP
networks
• If you want a parameter to remain unchanged, you should type a period
for that parameter (such as the NETMASK example above).
• If you have set a password for the adapter, you must include the password
in the file so you’ll be able to change the information. If you have not set
a password for the adapter, substitute a period for the password parameter.
• The community name must be less than 30 characters long.
• You must send the file in ASCII mode (not binary).
PagePrinter Network Adapter: Utilities & Environments 2-13
Page 28

To ftp to the directory:
Type the following at the command prompt:
1
ftp ip.address
Using the protocols
Using the
protocols
where
Type:
2
cd param
3 Type:
put config-file
where
configuration you want to use.
Quit.
4
What to do next
You have set up your adapter and are ready to use it.
Continue with “Using the protocols“.
This section explains how to use standard TCP/IP protocols to send jobs to the
printer and to check the status of print jobs. It explains how this Network
Adapter implements standard TCP/IP protocols such as:
ip.address is the IP address you’re using, such as 9.51.8.231.
config -file is the name of the file containing the
•Line Printer Remote (LPR) programs
•File Transfer Protocol (FTP)
•Trivial File Transfer Protocol (TFTP)
•Finger
•Telnet
Note: The firmware in the Network Adapter includes support for other
adapters. The Network Adapter contains only one port (PORT 1) which
supports this printer. The multi-purpose firmware in the Network Adapter
may make references to port 2 (or IBM 4029 printers), but these statements
apply to other types of hardware. Furthermore, any statuses refering to
MarkNet XLe should be treated as equivalent statuses of the Network
Adapter.
2-14 PagePrinter Network Adapter: Utilities & Environments
Page 29

Using the protocols
Sending print jobs
You can send jobs to the printer in one of four ways:
•Using a Line Printer Remote (LPR) program that you have already installed.
For information about using an LPR program, continue with “Using a Line
Printer Remote (LPR) program” on page 2-16.
•Using TFTP (Trivial File Transfer Protocol). For information about TFTP, go
to “Using TFTP (Trivial File Transfer Protocol)” on page 2-18.
•Using FTP (File Transfer Protocol). For information about FTP, go to “Using
FTP (File Transfer Protocol)” on page 2-19.
• Writing a program that takes advantage of the adapter’s TCP/IP ports. For
information about the ports, go to “Checking printer status” on page 2-22.
TCP/IP
networks
PagePrinter Network Adapter: Utilities & Environments 2-15
Page 30

Using the protocols
Using a Line Printer Remote (LPR) program
You may already use Line Printer Remote and Line Printer Daemon (LPR/
LPD) programs to send print jobs. The LPR program usually runs on the host
computer, sending print jobs and control files to the LPD program running on
the print server.
This TCP/IP adapter includes a line printer daemon, which prints previously
formatted data files, as received, and ignores the control file. You can use your
LPR/LPD program to send jobs to the adapter’s line printer daemon.
Using the LPR command
When you use the following options with your LPR command, be sure that:
•server is the address (hostname) of this adapter.
•queue name or remote queue name is the name of the queue that you set up
for this adapter. (Some LPR implementations refer to this as the printer
name.) See the table below for examples of suffixes you can append to the
queue name:
Example Function
printer_cr
printer
Sends print jobs to the port, and causes the adapter to
add a carrier return (or line feed, if appropriate) at the
end of each line of text.
Sends print jobs to the port.
•If your program allows you to send the job as a binary file (for
example, with a -b or -v flag), do so. We recommend that all print jobs
shall be sent as binary
interpreted clearly.
This adapter ignores control files sent to it. Therefore, options contained in the
control file do not work. For example, options such as
- those relating to the banner page,
- indentations in the print job, or
- mail sent after the job
do not work.
Note: A queue name may end with any character except “2“. If you used a
“2“ at the end of a queue name, your print jobs will not be printed. Under
Windows, you can avoid this error by doing one of the following.
(1) Set “_cr“ at the end of the queue name in Windows NT, or
(2) Select the Carriage Return and Linefeed insertion mode in “Set lpd
options“ when you go into the Main Menu of the Adapter under the
program T elnet.
By doing one of the two above mentioned, the Adapter will add the
Carriage Return and Linefeed codes automatically to your print job.
. Sending binary jobs ensures that all code points are
2-16 PagePrinter Network Adapter: Utilities & Environments
Page 31

Using the protocols
LPR time-outs and retry periods
Some LPR programs wait only a limited amount of time to send their print files.
If you receive a timeout message from your host, the adapter was probably
printing a long job. You should retry the print job.
The adapter supports a finite number of active LPR connections at a time. If
more than this number of connections are attempted, the extra attempts will not
work. Many UNIX programs retry the print job after a specified amount of
time. If you want to use several active LPR connections, we recommend that
you set a short retry period so that print jobs will be sent until they are accepted.
Some UNIX systems may default to a 15-minute retry period. We recommend
that you use the lp-system command to set a shorter retry period for those
computers. You can also telnet to port 9000, then follow the instructions on the
screen.
LPSTAT and LPQ commands
Most line printer status (LPSTAT) commands work as usual with this adapter.
W e recommend that you use the finger command to get the status of the printer,
rather than a line printer query (LPQ) command. Finger returns much more
useful information to you than the LPQ command.
If you need information about using finger to get the printer status, see “Using
Finger” on page 2-22.
TCP/IP
networks
Using telnet to add carrier returns or line feeds to all LPD print jobs
You can use telnet to change the LPD protocol so that it automatically adds
carrier returns or line feeds to all print jobs. You may find this helpful if you are
printing text files without graphics.
1 Type the following at the command prompt:
telnet ip.address -p 9000
where
ip.address is the IP address you’re using, such as 9.51.8.231.
2 From the menu that appears, select Set lpd options.
3 Follow the instructions on the screen.
PagePrinter Network Adapter: Utilities & Environments 2-17
Page 32

Using the protocols
Using telnet
You can use telnet with the adapter. This is an easy way to set the adapter’s
parameters.
1 Set up the host to telnet in line mode, with local echo, and with cr/lf
conversion.
2 If a password is set for the Network Adapter be sure you know it.
3 Type the following at the command prompt:
telnet ip.address -p 9000
(Most hosts use this configuration as the default.)
where
4 Follow the instructions on the screen. You can work with many adapter
ip.address is the IP address you’re using, such as 9.51.8.231.
parameters and take different actions using the Network Adapter. For
example:
• Set the address, netmask, and gateway
• Set the community name
• Set a password
• Set lpd options (such as automatic carriage returns, banner page, etc.)
• Assign lpd queue names
• Enable or disable BOOTP, RARP, FTP, and TFTP
• Set the maximum transmission size
• Set up a list of restricted servers
Using TFTP (Trivial File Transfer Protocol)
You can use TFTP to send a job to the printer just as you normally do.
Remember that TFTP is slower than FTP.
The Network Adapters only recognize the TFTP destination file name:
/prt1
Example
To use TFTP, type a command similar to this:
tftp>put <printfile> /prt1
where <printfile> is the name of print job you’re sending and prt1 is the
destination file.
2-18 PagePrinter Network Adapter: Utilities & Environments
Page 33

Using the protocols
Time-out period
The TFTP protocol used here includes a 30-second inactivity time-out.
If data is not received from the host for 30 seconds, then the adapter closes the
TFTP session and begins listening for a new session. The input/output port to
the printer and the print job are also closed. This time-out prevents incomplete
print jobs from hanging up in the printer and keeping other jobs from printing.
Using FTP (File Transfer Protocol)
You can use FTP to send a job to the printer just as you normally do. FTP
reliably sends files across the network.
The implementation of FTP used here accepts any username and does not
require a password.
Network Adapters default to /prt1 as the destination.
You may also use the cd command with a destination filename. For example,
you might type
ftp>cd /prt1
ftp>put <printfile>
where
<prt1> is the name of the destination and <printfile> is the name of
the print job you’re sending.
TCP/IP
networks
Sending a file to the param directory
You may also FTP a file to a special destination: the param directory. This is a
special directory where you can set special TCP/IP-related parameters. The
format of this file is:
PASSWORD: 00000000
ADDRESS: 9.51.8.50
NETMASK: .
GATEWAY: 9.51.8.30
COMMUNITY: paul
END
You must put a space after the colon, and the headers must be capitalized. If
you want a parameter to remain unchanged, you should type a period for that
parameter (such as the NETMASK example above). The password can be up to
eight characters long. The community name must be less than 30 characters
long. You must send the file in ASCII mode (not binary).
PagePrinter Network Adapter: Utilities & Environments 2-19
Page 34

Using the protocols
Time-out periods
There are two time-out periods that may occur in FTP: one during the control
connection and one on the data connection.
The time-out during the control connection is 60 seconds. If the control
connection is started and no other command is issued for 60 seconds, then the
control session is closed. The adapter sends a 421 reply code (service not
available, closing control connection).
The time-out default on the data connection is 90 seconds.
If data is not received from the host for this data time-out period, then the
adapter closes the FTP data session and begins listening for a new session. The
input/output port to the printer and the print job are also closed. This time-out
prevents incomplete print jobs from hanging up in the printer and keeping other
jobs from printing.
Writing an FTP shell script
If you have written FTP shell scripts to send print jobs to the printer, you can
revise those scripts to be used with this adapter. You may send print jobs to
/prt1. The adapter will respond to the various commands with standard FTP
reply codes.
A sample shell script, on page 2-21, shows you what can be done. We do not
guarantee that this script will be usable on your computer; it is simply given as
an example for you.
This script does as ASCII FTP of files specified on the command line, to the
host identified in the variables. This shell takes data from stdin or from the print
file you specify on the command line.
You can specify several files on the command line. The -b option causes the
transfer to occur in binary.
2-20 PagePrinter Network Adapter: Utilities & Environments
Page 35

Using the protocols
#1 /bin/sh
module = $0
USAGE=”usage: $module [-b] f1 [f2..fn]”
HOST=”silver”
PRT=”/prt1” # overriding device default with prt1,
USER=”printer”
if [ ”`echo $1 | fgrep ’7’`” |= ”” ] # give help if there is a 7 in parm 1
then
echo $USAGE
exit 1
fi
set -- `getopt b $*` # check for ’b’ as a command
if [ $? |= 0 ]
then
echo $USAGE
exit 1
fi
XFER=”ascii” # default transfer type is ASCII
for i in $*
do
case $i in
-b) XFER=”binary”,shift,, # changing transfer type to binary
--) shift,break,,
case
done
FileList=$*
PutCmds=’’
if [ -z “$FileList” ] # no files specified??
then
echo reading standard input 1 >&2
cat <&0 >/tmp/p$$ # put std input to a file
PutCmds=”put /tmp/p$$ SPRT
” # this double quote ”MUST” be on this line
else
for i in $FileList # generate list of puts
do
FileName=$1
if [ -f $FileName ] # make sure the file exists
then
PutCmds=”${PutCmds}put $FileName $PRT
” # this double quote ”MUST” be on this line
else
echo ”$module: file $FileName does not exist - cannot print”
fi
done
fi
ftp -n $HOST <<endofdata 1>/dev/null #startup FTP, passing parms on stdin
user $USER $pw
$XFER
$PutCmds
bye
endofdata
rm -f /tmp/p$$ >/dev/null 2>/dev/null # remove the file if it exists
exit
sss
# change this to reflect the desired
# printer, or leave blank for default
TCP/IP
networks
PagePrinter Network Adapter: Utilities & Environments 2-21
Page 36

Using the protocols
Checking printer status
You can check the status of the network printer by using the TCP finger
command.
Using Finger
Finger is a TCP protocol that normally displays user information on a local or a
reachable host. This adapter uses finger to tell you the status of the printer and
the current print job.
For example, you may use:
finger info@name
where:
info is optional. When you use it, the adapter returns extended information.
name is the IP address or the name stored on the name server or in the
/etc/hosts file. Please note that some UNIX environments require you to use
the adapter’s name instead of its IP address.
By default, finger returns the status of
all the ports.
2-22 PagePrinter Network Adapter: Utilities & Environments
Page 37

Using the protocols
Finger responses
The adapter sends an English response, as shown in the following example.
Example 1
This example shows the response you get from the Network Adapter when you
use the info option with finger. This particular example shows that a job is
printing through the Parallel 1 port.
#finger info@9.51.8.211
[9.51.8.211]
Printer Type: LaserPrinter
Print Job Status for ser:
NPA is supported, NPA mode is set to auto
No Job Currently Active
Printer Status: 0 OK
Print Job Status for prt1:
NPA is supported, NPA mode is set to auto
Printing
Print Job Name: TEST.PRT
User Name: Paul
Queue/LPT Name: /PRT1
Server: 9.51.8.30
Network Operating System: FTP
Printer Status: 0 OK
TCP/IP
networks
Adapter Information
Adapter Type: Ethernet
Firmware Revision: 139.44.1
Adapter Part Number: 1418622
Adapter EC: 543053
Adapter Address: 10005A101348
IP Address: 9.51.8.211
IP Netmask: 255.255.255.128
IP Gateway: 9.51.8.132
BOOTP Server: 0.0.0.0
PagePrinter Network Adapter: Utilities & Environments 2-23
Page 38

Using the protocols
Updating the adapter’s firmware
To update the adapter’s firmware, you send a file to the adapter’s flash
memory, overwriting the existing flash memory. This process is also
known as flashing the adapter.
You can update the firmware by using TFTP.
To use TFTP, do the following:
1 Get the flash file you need by contacting your vendor.
2 Do NOT turn off (or reset) the adapter or printer during the flash
process.
This may damage the adapter. The adapter resets itself after
the flash process is finished.
3 TFTP the file to this destination: /dev/flash.
2-24 PagePrinter Network Adapter: Utilities & Environments
Page 39

Troubleshooting
Changing the TCP/IP information
After you have set the TCP/IP information, you can change it using any of the
ways you set the information, or by doing one of the following:
•Use telnet to change the information.
1 Type the following at the command prompt:
telnet ip.address -p 9000
where ip.address is the IP address you’re using, such as 9.51.8.231.
2 Follow the instructions on the screen.
•FTP a file to the param directory.
The param directory is a special directory where you can change special
TCP/IP-related parameters. The format of this file is:
PASSWORD: 00000000
ADDRESS: 9.51.8.50
NETMASK: .
GATEWAY: 9.51.8.30
COMMUNITY: paul
END
• You must put a space after the colon, and the headers must be capitalized.
• If you want a parameter to remain unchanged, you should type a period
for that parameter (such as the NETMASK example above).
TCP/IP
networks
Troubleshooting
• If you have set a password for the adapter, you must include the password
in the file so you’ll be able to change the information. If you have not set
a password for the adapter, substitute a period for the password parameter.
• The community name must be less than 30 characters long. You must send
the file in ASCII mode (not binary).
This section helps you correct problems you may encounter while using the
adapter on a TCP/IP network. It describes the problems when:
• Print jobs are waiting in the queue and when the
• Printer is not receiving jobs.
PagePrinter Network Adapter: Utilities & Environments 2-25
Page 40

Troubleshooting
Jobs waiting in the queue
The server does not appear to be sending jobs to the network printer you
specified. Jobs are in the queue and appear to be waiting for a long time.
Solution
The printer is probably busy receiving jobs from other servers or from other
links.
1 Double-check the printer to be sure that it is working properly.
2 Print a setup page from the adapter.
• Press the Test button until the Test light comes on. The Data light
comes on, and the adapter sends a setup page to the printer.
If the page prints, then the connection between the adapter and the
printer is working correctly. If the page does not print, check all the
physical connections.
3 Look at the setup page. Make sure the IP protocol is active.
2-26 PagePrinter Network Adapter: Utilities & Environments
Page 41

Troubleshooting
Printer not receiving jobs
The printer is not receiving print jobs.
Solution
1 Make sure the printer is turned on and is ready.
2 Make sure that the adapter is installed properly in the printer. To check
this, print a test page. (This is the test page that you printed when you first
set up your printer.) The adapter will be in the list of attachments on the test
page. Instructions for printing the test page can be found in your printer’s
documentation.
3 Print a setup page from the adapter.
• Press the Test button until the Test light comes on. The Data light
comes on, and the adapter sends a setup page to the printer.
If the page prints, then the connection between the adapter and the
printer is working correctly. If the page does not print, check all the
physical connections.
4 Look at the setup page. Make sure the IP protocol is activated.
5 Make sure that the LAN cable is plugged into the printer and into the
LAN, and that the network is working properly.
TCP/IP
networks
6 Make sure that the print queues are pr operly defined and that the print
server is functioning correctly. Refer to the documentation for your
operating system for help.
7 PING the adapter.
• If PING works, send the finger command. Finger should return the printer
name with the correct information. If it does not, check the IP address,
netmask, and gateway to be sure they are correct. (You can check the
address, netmask, and gateway on the printer’s control panel or from other
Network Printer Utilities.)
• If PING does not work, check to be sure that the IP Protocol is enabled.
(You can check this via the MarkV ision utility.) Also, check to be sure that
bridges and routers are functioning correctly. Finally, verify all the
physical connections between the adapter, the printer, and the network.
If the IP Protocol is enabled, check the IP address, netmask, and
gateway to be sure they are correct. (You can check these on the
printer’s control panel or from other Network Printer Utilities.)
Also, verify all physical connections between the adapter, the
printer, and the LAN.
PagePrinter Network Adapter: Utilities & Environments 2-27
Page 42

Troubleshooting
Adapter lights
Different patterns of lights may appear on the Network Adapter. These patterns
indicate to you various problems that may occur, to help you diagnose them.
In the following table, find the pattern of lights that is displayed on your
adapter, then follo w the action described. If you need to call for service, be sure
to make a note of the light pattern before you call.
Test Status Data Description/Action
off on off Ready.(Idle.)
off on blinking Processing. Normal operation. Data is being received from a host,
or sent to a printer.
on off off Testing. The first light pattern indicates that you have pressed the
Test button.
off on blinking The second light pattern indicates that a setup page is being sent
from the adapter to the printer.
off on blinking Updating flash code. The first light pattern indicates that the flash
code is being downloaded to the adapter.
blinking blinking blinking The second light pattern occurs while the adapter is updating the
flash code. Make sure the adapter stays plugged in.
After the adapter goes through its normal start-up tests, it returns
to its Ready state.
off blinking on Network error. Check all connections to the network.
For example, make sure the network cables are connected.
off blinking off Software error. Turn the printer off then on to reset the adapter.
Then try to re-send the print job. If this error persists, call for service.
on blinking on Flash error. Turn the printer off then on to reset the adapter. If the
error persists, call for service.
Adapter service
If your adapter needs service:
•Make a note of the light pattern, then contact your point of purchase. The
adapter contains no replaceable parts and may need to be returned.
•Make sure that you don’t send print jobs to a non-existent adapter. If you do,
print jobs will hang.
•If your adapter is defective and you need to replace it, be sure you delete or
hold all queues before removing the adapter from the LAN.
2-28 PagePrinter Network Adapter: Utilities & Environments
Page 43

CHAPTER
3
Introduction Thank you for buying this multi-protocol adapter. The information in this
Using Windows 95 operating systems
chapter helps you install and set up your utilities to print to an adapter.
Note: You can not print from DOS.
What you need
To install the Network Adapter and start its operation, you need the following:
1 Microsoft’s Windows 95 operating system installed on your computer.
2 The MarkVision Printer Utility f or W indows 95. Support for this Network
Adapter is built into the MarkVision utilities. You do not need separate
Network Printer Utilities; everything comes with MarkVision. The
MarkVision Printer Utility for Windows 95 is shipped on CD-ROM or
diskettes with many printers.
3 One of the following installed on your network:
Windows 95
operating
systems
• Be sure that the adapter is installed in the printer, and the network cable is
connected. See your printer documentation if you need help.
To check a current firmware level, contact your point of purchase
To check your firmware level, see “Step 2: print a setup page” on page
2-3.
Installing the
MarkVision printer
utility
PagePrinter Network Adapter: Utilities & Environments 3-1
If you already have MarkVision running under Windows 95, skip this section.
Go to "Configuring the adapter" on page 3-2.
Page 44

Configuring the adapter
Installing the utility
If you received the MarkVision Utility with your printer, follow the instructions
on the diskette respectively CD-ROM to install it. Be sure you read the
README.TXT file (using WORDPAD or DOS EDIT) for last-minute
information about the utility.
Configuring the
adapter
You must set up the adapter to process W indows 95 print jobs. The information
in this section should help you. In addition, please consult the on-line help for
the latest information available.
The Network Adapter can process jobs from many different environments (for
example, from NetWare networks and TCP/IP networks).
To process NetWare print jobs
You can use NetWare in a Windows 95 environment.
Note: For networks that are exclusively NDS (NetWare 4.x servers with
bindery emulation turned off) the initial WIN95 utilities will discover
adapters. These adapters will need to be set to RPRINTER mode and assigned
to be connected to a PSERVER. Existing Novell utilities (NWADMIN,
PCONSOLE, etc.) are then used to create queues and define the PSERVER.
Prerequisites
Make sure your Windows 95 desktop is set up to run NetWare jobs.
From the Control Panel:
1 Select Network.
2 Make sure one of these is running:
a Microsoft client for NetWare Networks
b Microsoft client with NDS upgrade
c 16-bit Novell client
d Novell client 32
3-2 PagePrinter Network Adapter: Utilities & Environments
Page 45

Configuring the adapter
Step 1: log on and start MarkVision
1 Log on as an administrator or print operator.
2 Start MarkVision.
MarkVision searches for bidirectional printers and displays the search
results in its main window.
Step 2: make sure the NetWare protocol is on
The NetWare protocol must be turned on in the adapter for the adapter to
process NetWare jobs.
1 In the MarkVision printer window, double-click on the adapter port you
wish to configure for NetWare.
2 Look at the tabs that appear. If the NetWare settings tab is present, the
protocol is on. If the NetWare settings tab is absent or grayed out, then you
must turn the protocol on.
• Use the on-line help for information.
Step 3: set (or verify) the adapter’s general parameters
1 In the MarkVision printer window, double-click on the adapter port
that you wish to configure.
Windows 95
operating
systems
2 Click the Adapter Settings tab.
3 Set or verify all the general parameters for the adapter and port (such
as address, and so forth).
4 If you want this Network Adapter to process TCP/IP settings as well,
you may want to set the TCP/IP address, netmask, and gateway from
this Adapter Settings tab. Simply click the Advanced Settings button, then
set the TCP/IP information in the dialog box that appears.
5 When you finish, select Apply.
Step 4: disable the adapter port
You must disable the adapter port to avoid interfering with incoming NetWare
jobs.
1 Click the NetWare Settings tab.
2 Disable the port by making sure there is no checkmark in the Port
Enabled box.
PagePrinter Network Adapter: Utilities & Environments 3-3
Page 46

Configuring the adapter
Step 5: set the NetWare-specific information
1 On the NetWare Settings tab, set the print mode to PSERVER or
NPRINTER/RPRINTER.
If you need help deciding which mode to
use, see “Deciding whether to use NPRINTER/RPRINTER mode or
PSERVER mode” on page 5-7.
2 Fill in the other fields on the dialog box to configure the port for
NetWare print jobs.
If you need help, click the question mark button,
-7.
then click the field.
3 After you finished setting all the fields on this tab, click Apply.
4 On the NetWare Settings tab, click Manage Queues. You’ll be setting up
queues for the adapter to service.
5 In the Queue Manager dialog box, select existing queues or create new
queues for the adapter to service.
If you need help, click the question
mark button, then click the field.
6 When you finish setting up queues, click OK.
7 If you are using the Network Adapter, on the NetWare Settings tab, click
Advanced Settings. Fill in the fields.
If you need help, click the question
mark button, then click the fields you need help on.
8 After you finished with the Advanced Settings dialog, click OK.
Step 6: enable the adapter port
1 On the NetW are Settings tab, enable the adapter port by putting a check-
mark in the Port Enabled box.
2 Click Apply to activate your changes.
3 MarkVision asks if you want to reset. Click Yes if you want to start using
the adapter for NetWare print jobs now.
Congratulations! Your adapter is ready to process NetWare print jobs.
3-4 PagePrinter Network Adapter: Utilities & Environments
Page 47

Configuring the adapter
To process TCP/IP print jobs
You can use TCP/IP in a Windows 95 environment.
Prerequisites
Make sure your Windows 95 desktop is set up to run TCP/IP jobs.
From the Control Panel:
1 Select Network.
2 Make sure TCP/IP is running. If it is not:
a Select Add.
b Select Protocol.
c Select the Microsoft TCP/IP option.
Step 1: start MarkVision and check the community name
Windows 95
operating
systems
1 Make sure you know the adapter’s community name. The default is
public.
2 Start MarkVision.
3 In the MarkVision printer window, double-click on the adapter port
that you wish to configure.
Step 2: set the TCP/IP address, netmask, and gateway for the adapter
1 If you are using NetWare protocol as well as TCP/IP, you can quickly set
this information within MarkVision.
a Click the Adapter Settings tab.
b Click the Advanced Settings button.
c Set the TCP/IP information in the dialog box that appears.
d When you finish, select Apply.
2 If you are not using NetWare, go to “Step 3: set the IP address, netmask,
and gateway” on page 2-5, or use the MarkVision on-line help for
instructions.
PagePrinter Network Adapter: Utilities & Environments 3-5
Page 48

Configuring the adapter
Step 3: add the adapter to the MarkVision window
If you use version 1.06 follow the steps described below or refer to the
Operation Guide of MarkVision coming with the printer you purchased.
By design, TCP/IP devices do not broadcast their presence (as, for example,
NetWare objects do). Because of this design, MarkVision has no way to
automatically find an adapter and monitor it. Therefore, you must inform
MarkVision about adapters that you want it to show in its list.
To add an IP adapter to the list in the MarkVision window:
1 In the MarkVision printer window, click on the Configure option in the
pull-down menu.
2 Click TCP/IP Settings.
The list of TCP/IP adapters that you want MarkVision to enumerate
appears. (The box is empty until you add the first TCP/IP adapter.)
3 Click Add Adapter.
4 Fill in the IP address that you defined in the previous step.
5 Fill in the community name.
The name you specify must match the
community name stored inside the adapter. The original community
name is public.
6 Fill in the host name field with any name you choose. This is the name
that you use to refer to the adapter.
7 Click OK.
MarkVision saves the changes in an ASCII file named !MVNETIP.INI.
Step 4: set the adapter’s general parameters
1 In the MarkVision printer window, double-click on the adapter port
that you wish to configure.
2 Click the Adapter Settings tab.
3 Set or verify all the general parameters for the adapter and port (such
as address and so forth).
4 Click Apply.
3-6 PagePrinter Network Adapter: Utilities & Environments
Page 49

Configuring the adapter
Step 5: verify that the IP protocol is on
The IP protocol must be turned on in the adapter; otherwise, the adapter will
not recognize or process IP print jobs.
a On the Adapter Settings tab, click Advanced Settings.
b In the Advanced Settings dialog box, look at the Set Active Protocols
group. Make sure the TCP/IP box has a checkmark in it.
c When you finish, select Apply.
Congratulations! The adapter is ready to process TCP/IP print jobs. For more
information about modifying the list of adapters, continue with "To process
Point to Point printing (LexIP)" on page 3-8.
Windows 95
operating
systems
PagePrinter Network Adapter: Utilities & Environments 3-7
Page 50

Configuring the adapter
To process Point to Point printing (LexIP)
Point to Point is an easy way for you to print from a W indo ws 95 workstation to
a network-attached printer. It’s especially useful in small organizations or
departments because you can print without having a server or a network
operating system (such as NetWare) installed.
The following drawing shows how print jobs move from a workstation using
Point to Point.
Printer Attached to
network with internal
Network adapter card.
Windows 95
Workstation
MarkVision provides a way for you to print to a network printer when your
network uses Microsoft TCP/IP. If you run TCP/IP on your network, you can
install Point to Point with MarkVision. Then you can print from Windows
applications to a network printer. Point to Point is supported by the adapters.
MarkVision can monitor the network printer.
Prerequisites:
1 You must have MarkVision installed on your workstation.
Note: MarkVision does not have to be running for you to print.
2 The Microsoft TCP/IP DLL must be installed on your workstation. If it
is not installed, use Custom install to select TCP/IP Network Support.
3 The TCP/IP protocol must be bound to the network interface card in
your Windows 95 computer. Consult your Windows 95 online HELP for
binding an adapter to a protocol (look for Binding in the HELP index), or see
the section on “To process TCP/IP print jobs“ on page 3-5.
3-8 PagePrinter Network Adapter: Utilities & Environments
Page 51

Configuring the adapter
How to configure for TCP/IP protocol:
1 Assign a TCP/IP address, netmask, and gateway for the adapter.
a If you have NetWare running on your network, you can quickly initia-
lize the TCP/IP address, netmask, and gateway for the new adapter.
Otherwise, you can use BOOTP.
2 Add the adapter to the list of TCP/IP adapters you want to see in the
MarkVision printer window.
a In the MarkVision printer window , click Configure from the pull-down
menus.
b Click TCP/IP Settings. The list containing TCP/IP adapters that you want
MarkVision to monitor appears. (The box is empty until you add the first
TCP/IP adapter.)
c Click Add Adapter.
d In the IP address field, enter the TCP/IP address you defined earlier
(step 1).
e Fill in the Host Name field with any name you choose. This is the name
that you use to refer to the adapter. (Other users can have their own host
names for the same adapter.)
Windows 95
operating
systems
f Fill in the Community Name. The name you specify must match the
community name stored inside the adapter. The original community name
is public. The community name is case sensitive.
g Click OK.
3 Set (or verify) the protocol-independent parameters.
a In the MarkVision printer window, double-click the adapter port you
want to configure.
b Click the Adapter Settings tab.
c Enter information in the fields to set the various protocol-independent
parameters.
4 Verify the TCP/IP protocol is turned on in the adapter.
a Still using the Adapter Settings tab, click Advanced Settings.
b Make sur e the TCP/IP check box in the Set Active Protocols group has
a check mark in it.
PagePrinter Network Adapter: Utilities & Environments 3-9
Page 52

Configuring the adapter
How to print Point to Point:
1 Create the printer object:
a In Windows 95, click Start, then click Settings, then Printers.
b Double-click Add Printer to define the printer you want to use.
c Choose LOCAL (not NETWORK) printer.
d Select the appropriate manufacturer and printer.
e Choose any port (LPT or COM or FILE). Later you change the port to
a logical network port.
2 Assign the printer object to the physical printer.
a After the printer object is added to your printer container, highlight
it’s icon. Optionally, double click on it with the right mouse button.
b Click File, then Properties, then Details tab, then Add Port.
c Click Others, then click Network Printer Monitor, then click OK.
d Select the printer you want to use. The printer list was generated using
MarkVision.
e Specify a logical port name to assign to the printer . Use a port name that
is meaningful to you. Click OK.
3 Print
a To print a test page, use Windows 95, then Start, then Settings, then
Printer, then File, then Properties, then General tab, then Print Test
Page.
b To print from a Windows application, select Print as usual.
Note: You can not print from DOS.
3-10 PagePrinter Network Adapter: Utilities & Environments
Page 53

Configuring the adapter
To process Peer to Peer printing
Peer to Peer is an easy way for you to print from a W indo ws 95 workstation to a
printer locally connected to a network attached personal computer. A Peer to
Peer network consist of personal computers linked together so that a computer
can share the hardware and software resources of the other computers on the
network. You can print from Peer to Peer in a Windows 95 environment.
The following drawing shows how print jobs move from a workstation using
Peer to Peer.
Windows 95
operating
systems
MarkVision provides a way for you to print to a local printer connected to a
network attached computer when your workstation uses Windows 95 as an
operating system. Peer to Peer requires that print sharing be enabled on the
computer that has the locally attached printer and that the printer be shared.
MarkVision requires Peer to Peer to be installed to monitor the printer.
Prerequisites
1 The standard Windows 95 Client for Microsoft Networks client must be
installed to provide the ability to logon to the Peer to P eer netw ork. This
is the standard configuration.
Note: MarkVision does not have to be running for you to print.
2 The standard W indows 95 F ile and Print Sharing f or Microsoft Networks
must be installed and configured to allow the workstation to share its
printers across the network.
3 In order for MarkVision to monitor the printer it is required as a
minimum that the following components are custom installed.
a MarkVision Printer Utility.
b MarkVision Sound and Default Setup files.
c MarkVision Peer to Peer client Support.
d MarkVision Server Support.
PagePrinter Network Adapter: Utilities & Environments 3-11
Page 54

Configuring the adapter
How to print Peer to Peer:
How to share your printer:
1 To share your locally attached printer with other workstations click the
Start button on the Windows 95 screen.
2 Point to Settings, and then click Printers.
3 In the Printers window, click the printer you want to share.
4 On the File menu, click Sharing.
5 Click the options you want.
How to enable print sharing:
1 If your workstation is set to use a network, the Network Neighborhood
icon appears. In Network Neighborhood, locate and double-click the com-
puter where the printer you want to use is located.
2 Double-click the printer icon in the window that appears.
3 To set up the printer, follow the instructions on the screen.
Note: You can solve printer problems by using the Print Troubleshooter in
Help.
How to configure MarkVision for Peer to Peer:
1 In the MarkVision printer window, click Configure (pull down menu).
2 Click Peer to Peer Settings.
3 In the dialog that appears, you can specify which Peer to Peer
workgroups and computers you are interested in. The locally attached
printers in these workgroups/computers will be displayed in the MarkVision
printer window.
4 If you want MarkVision to include your defaults workgroup in the next
refresh cycle, make sure the box is checkmarked.
5 If there are any other workgroups or computers outside of your default
workgroup that you want included in the next refresh cycle, specify
these in the fields provided. Right click the selected field if you need help.
6 Click Done to save your changes.
7 Check the MarkVision printer window f or Peer to P eer printers. Look in
the CONNECTION column for a string similar to \\JohnsComputer
\Q25 (for example).
3-12 PagePrinter Network Adapter: Utilities & Environments
Page 55

Troubleshooting
Troubleshooting This section helps you correct problems you may encounter while using
Network Adapters.
To use this section, find a
then follow the
Solution listed below.
Symptom Solution
Symptom that describes the problem you are having,
Windows 95
operating
systems
Adapter unable to find the network printer
"Adapter unable to find network printer" on this page.
Print jobs stay in the queue "Print jobs stay in the queue" on page
3-14.
Print jobs are ending prematurely "Print jobs are ending prematurely"
on page 3-14.
Adapter unable to find network printer
While configuring the adapter, the utility is unable to find the network printer
(that is, the network printer does not appear in the adapter list).
Solution
1 Make sure the printer is turned on and is Ready.
2 Make sure the adapter is installed properly.
To find out, print a test page. (This is the test page that you printed
when you first set up your printer.) The adapter will be in the list of
attachments on the test page. Instructions for printing the test page
are in your printer’s documentation.
Make sure the protocol you’re using is activated.
a On the Adapter Settings tab, click Advanced Settings.
b In the Advanced Settings dialog box, look at the Set Active
Protocols group. Make sure the TCP/IP box has a checkmark in it.
c After you finished, select Apply.
3 Make sure the status light on the adapter is on.
4 Make sure all routers are configured properly.
PagePrinter Network Adapter: Utilities & Environments 3-13
Page 56

Troubleshooting
Print jobs stay in the queue
The server does not appear to be sending jobs to the network printer you
specified.
Solution
1 The printer is probably busy receiving jobs from other servers or from
other links. Check the printer to be sure it is working properly.
2 Make sure the adapter is installed properly.
To find out, print a printer test page. (This is the test page that
you printed when you first set up your printer.) The adapter will be
in the list of attachments on the test page. Instructions for printing
the test page can be found in your printer’s documentation.
3 Print a setup page from the adapter. If the page prints, then the
connection between the adapter and the printer is working correctly . If
the page is not printed out, check all the physical connections.
• Press the Test button until the Test light comes on. The Data light
blinks, and the adapter sends a page to the printer.
4 Look at the setup page. Make sure the protocol is active.
5 Make sure you’ve configured the adapter properly. If you need help,
review the section(s) in this chapter according to your needs.
6 Make sure the LAN cable is connected to the server while the print job
is active.
Print jobs are ending prematurely
Print jobs are partially printed; the printer stops printing in the middle of a
page.
Solution
The adapter stopped receiving data because it believ ed it had reached the end of
a print job.
•If you’re using a PostScript printer, check the printer driver’s configuration.
Increase the print job time-out value there. Try your print job again.
3-14 PagePrinter Network Adapter: Utilities & Environments
Page 57

Troubleshooting
Adapter lights
Different patterns of lights may appear on the Network Adapter. These patterns
indicate various problems that may occur, to help you diagnose them.
In the following table, find the pattern of lights that is occurring on your
adapter, then follo w the action described. If you need to call for service, be sure
to make a note of the light pattern before you call.
Test Status Data Description/Action
off on off Ready (Idle).
off on blinking Processing. Normal operation. Data is being received from a host,
or sent to a printer.
on off off Testing. The first light pattern indicates that you have pressed the
Test button.
off on blinking The second light pattern indicates that a setup page is being sent
from the adapter to the printer.
off on blinking Updating flash code. The first light pattern indicates that the flash
code is being downloaded to the adapter.
Windows 95
operating
systems
blinking blinking blinking The second light pattern occurs while the adapter is updating the
flash code. Make sure the adapter stays plugged in.
After the adapter goes through its normal start-up tests, it returns
to its Ready state.
off blinking on Network error. Check all connections to the network. For ex-
ample, make sure the network cables are connected.
off blinking off Software error. Turn the printer power off then on to reset the
adapter. Then try to re-send the print job. If this error persists, call
for service.
on blinking on Flash error. T urn the printer power off then on to reset the adapter.
If the error persists, call for service.
PagePrinter Network Adapter: Utilities & Environments 3-15
Page 58

Troubleshooting
Adapter service
If your adapter needs service:
•Make a note of the light pattern, then contact your point of purchase. The
adapter contains no replaceable parts and may need to be returned.
•Make sure you don’t send print jobs to a non-existent adapter. If you do, print
jobs will be stored in the queue.
•If your adapter is defective and you need to replace it, make sure you delete or
hold all queues before removing the adapter from the LAN.
3-16 PagePrinter Network Adapter: Utilities & Environments
Page 59

CHAPTER
4
Introduction Thank you for buying this multi-protocol adapter.
Using Windows NT operating systems
This chapter explains how to set up and use your printer on Windows NT
operating systems.
To do this, you should have a basic working knowledge of Windows NT.
How to print
The following methods are used to print in a Windows NT environment.
Windows NT 3.51:
(1) printing using the lpr protocol
Windows NT 4.0:
(1) printing using the lpr protocol
(2) printing using the Network Port (TCP/IP ports)
Windows NT
operating
systems
Before you begin
Before you can use the adapter, you need to set it up. Setup involves a few
simple steps:
1. Checking the physical connections.
2. Printing a setup page to use while you set up the adapter.
3. Setting the adapter’s IP address, netmask, and gateway.
4. Verifying the setup.
If you need help, see “Using TCP/IP networks” on page 2-1.
Printing under
Windows NT 3.51
PagePrinter Network Adapter: Utilities & Environments 4-1
This section explains how to create your printer under Windows NT 3.51
operating systems.
Page 60

Printing under Windows NT 3.51
What you need
If you would like to print with using lpr protocol, you need to install “TCP/IP
Network Printing Support” on your Windows NT operating system.
How to Create a Printer using the lpr protocol
1.From the Windows NT Program Manager, select the Main program
group.
2.Select Print Manager.
3.Select Printer.
4.From the Printer menu, select Create Printer. The Create Printer dialog
box appears.
a. In the Printer Name field, type the name that you want to give to
the printer.
b.From the Driver field, pick a driver that you want to use with this
printer.
c. In the Print To list box, select Other. The Available Print Monitors
dialog box appears.
4-2 PagePrinter Network Adapter : Utilities & Environments
Page 61

Printing under Windows NT 3.51
5.From the Available Print Monitors, select LPR Port. The Add LPR
compatible printer dialog box appears.
My printer name
Windows NT
operating
systems
a.In the Name or address of host providing lpd field, type the host
name or IP address that you set to the adapter.
b.In the Name of printer on that machine field, type the name that
you want to give to the printer.
6. Click OK. The Create Printer dialog box appears.
PagePrinter Network Adapter: Utilities & Environments 4-3
Page 62

Printing under Windows NT 4.0
7. If you would like to share this printer, select Share this printer on the
network and type Share name and the Location in the respective fields.
8.Click OK. Your printer is now created and will appear within Windows NT
Print Manager.
Printing under
Windows NT 4.0
This section explains how to create your printer under Windows NT 4.0
operating systems.
What you need
If you would like to print using the lpr protocol, you need to install “Microsoft
TCP/IP Printing” on your Windows NT.
If you would like to print using the Network Port, you need to install
“MarkVision for Windows NT 4.0” on your Windows NT.
How to Create a Printer using the lpr protocol
1.In the Windows NT user interface, click Start, then click Settings, then
click Printers.
2.Double-click Add Printer.
4-4 PagePrinter Network Adapter : Utilities & Environments
Page 63

Printing under Windows NT 4.0
3.Select My Computer, then click Next. The Available ports dialog box
appears.
Windows NT
operating
systems
4.Click Add Port.
5.From the Available Printer Ports, select LPR Port, then click New Port.
PagePrinter Network Adapter: Utilities & Environments 4-5
Page 64

Printing under Windows NT 4.0
My printer name
a. In the Name or address of server providing lpd field, type the host
name or IP address that you set to the adapter.
b.In the Name of printer or print queue on that server field, type the
name that you want to give to the printer.
Note:
A printer name or a queue name may end with any character except a “2“
or “_CR“. If you used a “2“ or “_CR“ at the end of a printer or queue
name, your print jobs will not be printed.
6. Click OK. The Printer Ports dialog box reappears.
7. Select Close. The Add Printer Wizard dialog box reappears.
4-6 PagePrinter Network Adapter : Utilities & Environments
Page 65

Printing under Windows NT 4.0
Windows NT
operating
systems
8. Make sure the port you just cr eated is selected (check ed) f or this printer
object. Click Next.
9. Choose the correct driver for the printer you want use. Follow the
directions on the screen.
How to Create a Printer using Network Port (TCP/IP ports)
On the CD-ROM or floppy disks included in your printer package, you will also
find information on how to set up a printer using a network port (TCP/IP ports).
PagePrinter Network Adapter: Utilities & Environments 4-7
Page 66

Printing under Windows NT 4.0
4-8 PagePrinter Network Adapter : Utilities & Environments
Page 67

CHAPTER
5
Introduction The following instructions work for Network Adapters.
Using NetWare networks
To install this Network Printer Utility, you need to have a basic working
knowledge of Novell NetWare networks, especially the Print Server software.
Note: If you are running a multi-protocol network, and you would like to use
this NetWare utility to set the TCP/IP address, netmask, and gateway, you’ll
need to begin here.
Before you begin
Follow the steps below to prepare for the installation.
1 Look at the README.1ST file on the NetWare Network Adapter: Net-
work Printer Utility diskettes respectively CD-ROM before you begin to
set up the utility. This file may contain updates about system requirements
or procedures that were not available when this guide was published.
2 Make backup copies of your new diskettes. See your operating system
documentation if you need help.
NetWare
networks
What you need
Prerequisites:
1 One of the following installed:
• Novell NetWare Version 3.11 (or higher).
• Novell NetWare Version 4.01 (or higher). The adapter supports NDS; you
do not need to use bindery emulation.
2 The NetWare Network Adapter: Network Printer Utility diskettes
respectively CD-ROM.
3 One of the following installed in your network:
• A Network Adapter. Make sure the adapter is installed in the printer, and
the network cable is connected. Instructions for installing the adapter are
located in your printer’s documentation.
PagePrinter Network Adapter: Utilities & Environments 5-1
Page 68
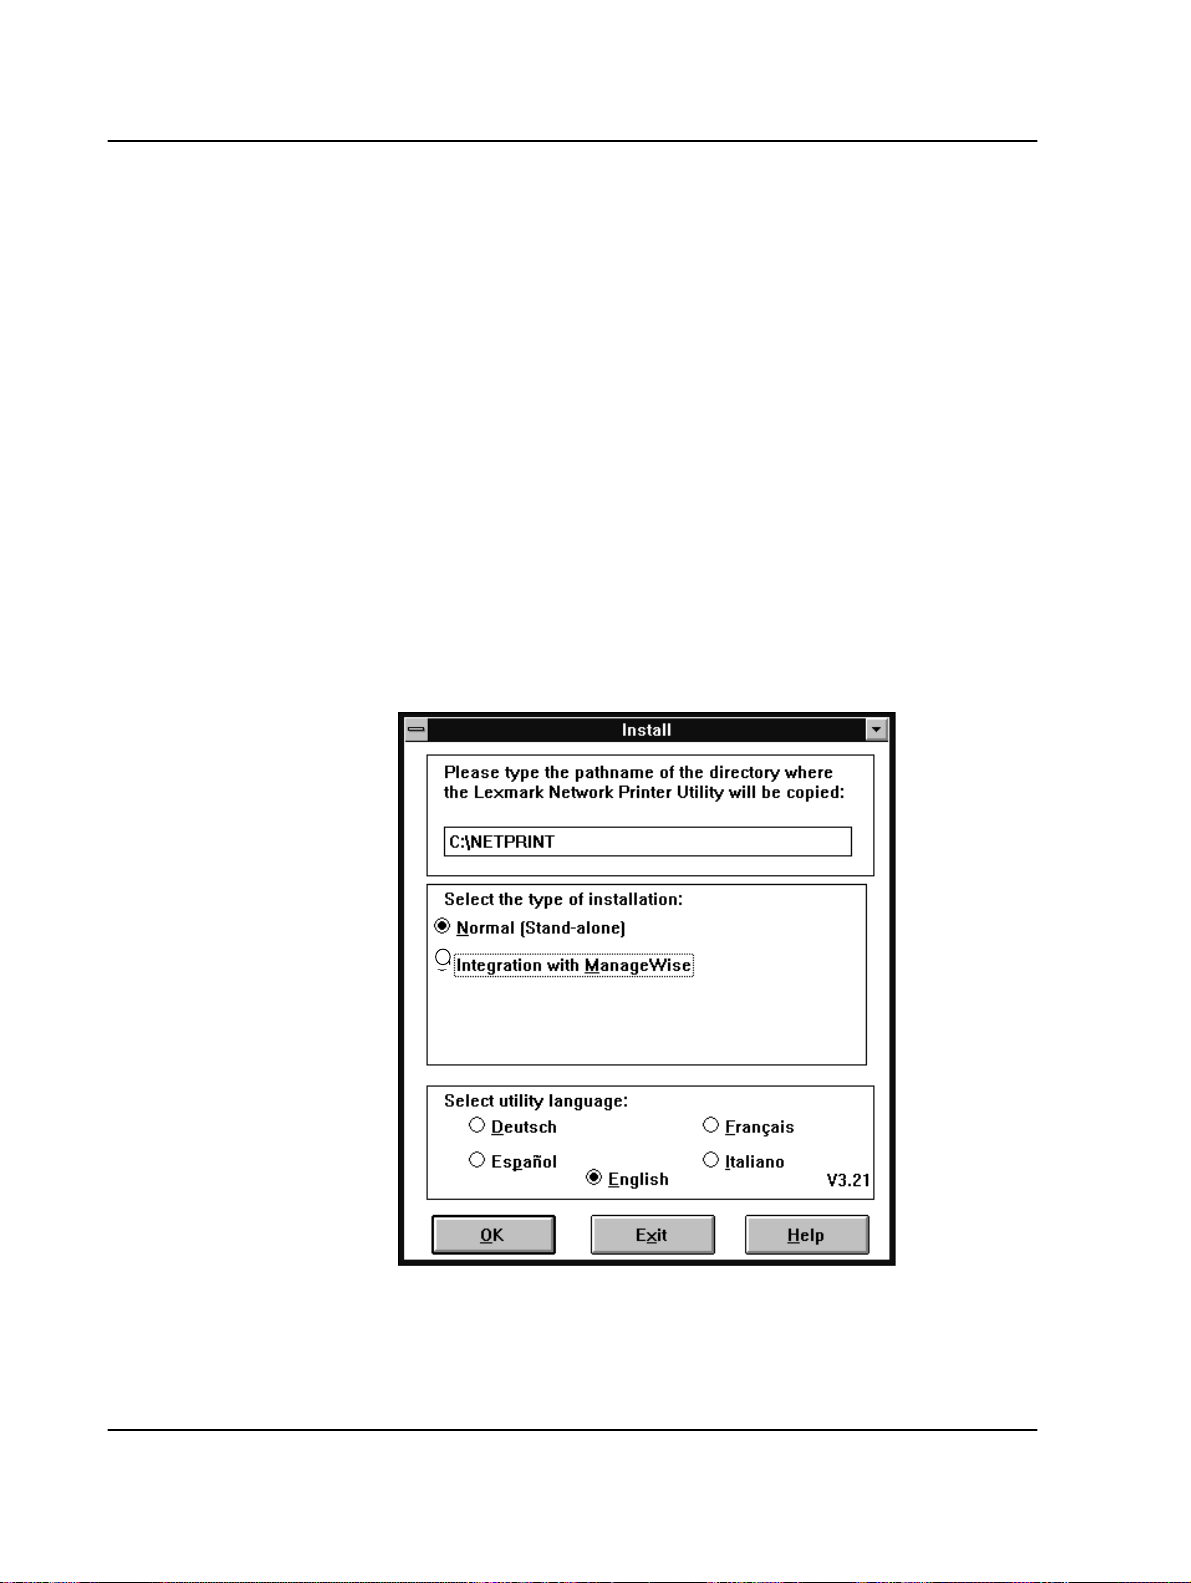
Installing the utility
Installing the
utility
You can install the Network Printer Utility under Windows 3.1 (following) or
Windows 95 (see Chapter 3).
Follow the following steps to install the utility in a Windows 3.1 environment.
You may install the utility as a Stand-alone product, in the program group you
choose.
To install the utility:
1 Insert the NetWare Network Adapter Network:
Network Printer Utility diskette respectively CD-ROM for Windows 3.1
into drive A.
2 From the Program Manager window , select F ile from the menu bar, then
select Run....
3 Type the following in the text box, when installing from diskette:
a:\instwin
4 Select OK.
The Install dialog box opens. It looks similar to the following:
The Run dialog box opens.
5 Follow the instructions on the screen.
5-2 PagePrinter Network Adapter : Utilities & Environments
Page 69
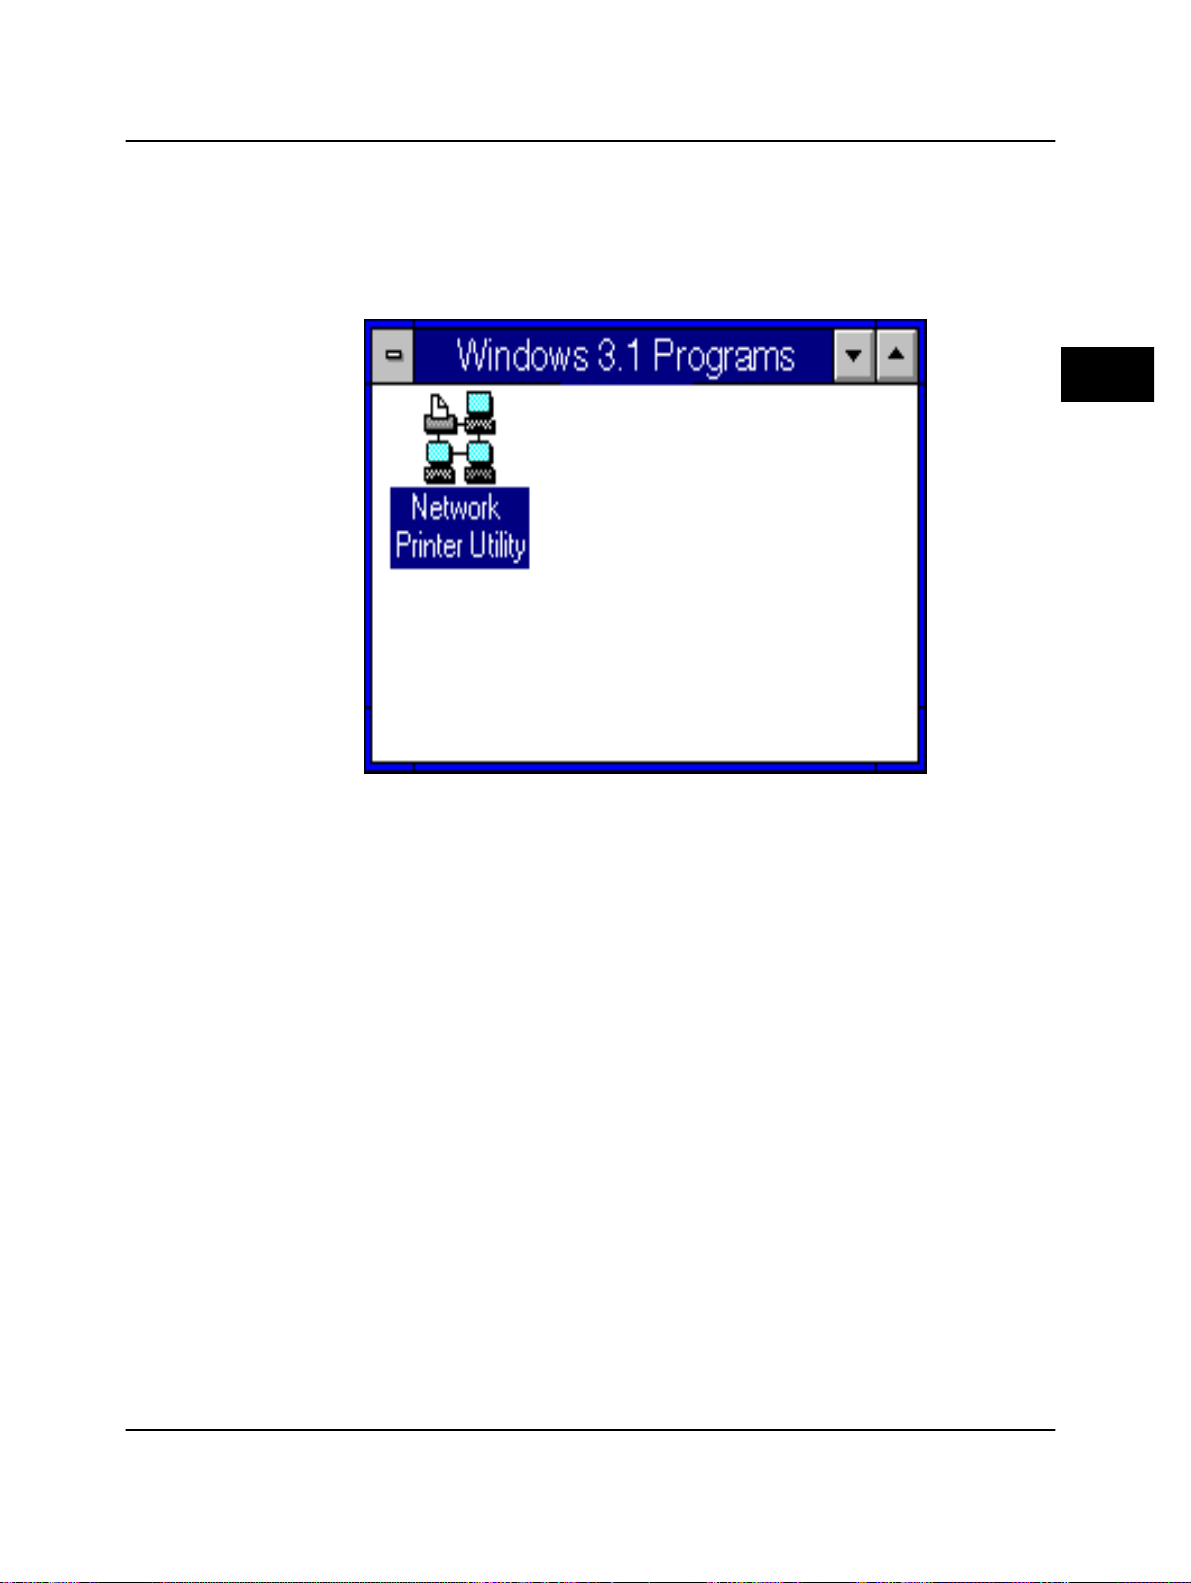
Starting the network printer utility
Starting the network
printer utility
Before you can send print jobs to the adapter, you must start the utility and
configure the adapter.
You can start the Network Printer Utility from wherever you installed it under
Windows 3.1.
The following screenshot illustrates the way.
NetWare
networks
Ways to Start the Network Printer Utility
To start the utility:
1 Log in to NetWare as a user with administrator privileges.
2 Start the utility.
• Go to the Program Group and double-click the Network Printer Utility
The icon is shown in the screenshot above.
icon.
PagePrinter Network Adapter: Utilities & Environments 5-3
Page 70

Using the utility
Using the
utility
When you start the utility, its adapter list appears. This list shows all adapters
that answer a broadcast. You can’t print to the adapters yet, because you have
not set them up to receive jobs. You will use the Network Printer Utility (and
PCONSOLE, if you prefer) to configure the adapters and monitor them.
Using the adapter list
The adapter list looks similar to this:
To work with the utility:
1 On the adapter list, point and click on the adapter that you want to
work with.
• To highlight a range of adapters, hold down the Shift key and click the
mouse once, at the top and bottom of the range of adapters you want to
use.
• To select individual adapters, hold down the Ctrl key, point to each
adapter that you want to choose and click the mouse once.
2 Then use the menu bar to work with the selected adapter.
the list has six items on the menu bar: File, V iew, Setup, Printer Status,
Options, and Help.
For example, to set up an adapter, you first highlight the adapter, then select
Setup from the menu bar.
The utility has six pull-down menus, on the menu bar. Some of the functions
that you can do from the pull-down menus are available for only specific
adapters. The functions that aren’t available are grayed-out on the screen.
5-4 PagePrinter Network Adapter : Utilities & Environments
Notice that
Page 71

Using the utility
The menu items:
File View Setup
Printer
Status Options Help
•save
utility
settings
• print the
adapter
list
• exit the
utility
• search for
adapters that will
be displayed on
the adapter list
• change the
search broadcast,
allowing you to
display different
kinds of adapter
lists
• save the search
results in a file
• change the
appearance of
the adapter list
• refresh the
window
• sort the adapter
list by address,
network
number, or login
name
• filter the adapter
list
• set up the
adapter
quickly
• change
adapter
parameters
• configure
ports
• set LAA
(locally
administered
addresses)
• reset
adapters
• enable/
disable ports
• set a
password
• turn other
protocols on
or off
• set TCP/IP
information
• see a oneline status
of the
printer
connected
to the
adapter
• see a
detailed
status of a
printer
• change the
polling
interval
• display a list of
setup and
configuration
information
about the
adapter
• see a list of
servers the
adapter is
communicating
with
• update the flash
memory on the
adapter
• select
various
kinds of
help
information
NetWare
networks
Selecting items from the menus
You can access items in several ways:
•Move the mouse pointer to the item you want, and click the left mouse button
once.
•Hold down the Alt key and type the character that is underlined or in a
different color than the rest of the word.
•You can also select an item by using the cursor k e ys to mo v e the cursor to the
item you want, then pressing
Enter.
•Shortcut keys are also available to access many items on the pull-down
menus. For a list of what each key does, see the Help/Keyboard pull-down
menu.
PagePrinter Network Adapter: Utilities & Environments 5-5
Page 72

Setting up the adapter
Setting up the
adapter
Now that you have installed and started the utility, you need to set up the
adapter so that you can send print jobs to it.
What setup accomplishes
In the process of setting up the adapter, you accomplish two major tasks:
•creating the components, or objects, that NetWare needs to use with the
adapter
•configuring the adapter so that it operates in the desired mode (PSERVER or
NPRINTER/RPRINTER), and giving the adapter information about its
network components
Please note that NetWare 3.x uses the term RPRINTER for setting up a printer
in remote printer mode. This same mode is called NPRINTER in NetWare 4.x.
Utilities to use
To set up the adapter, you may use either:
• the Network Printer Utility alone.
This utility provides all of the functions you need to set up the adapters
in a NetWare environment. The utility is designed to meet the needs of a
network administrator and can only be started by a person who has
network supervisory rights.
Functions that you may be accustomed to doing from PCONSOLE (such
as setting up print queues) can be managed from the Network Printer
Utility.
• PCONSOLE or NWADMIN, plus the Network Printer Utility.
If you are accustomed to using PCONSOLE or NWADMIN to set up
NetWare components or objects, you may continue to do so. Then use
the Network Printer Utility to configure the adapter.
To set up the adapter
1 From the Network Printer Utility’s menu bar, select Help, (even if you
want to set up the adapter using PCONSOLE and this utility.)
2 From the Help’s Table of Contents, select Configuring the Adapter.
3 Select the section that is relevant to you.
Sections devoted to NetWare 3.x and 4.x are listed, including information about
PCONSOLE methods of setting up the adapter.
5-6 PagePrinter Network Adapter : Utilities & Environments
Page 73
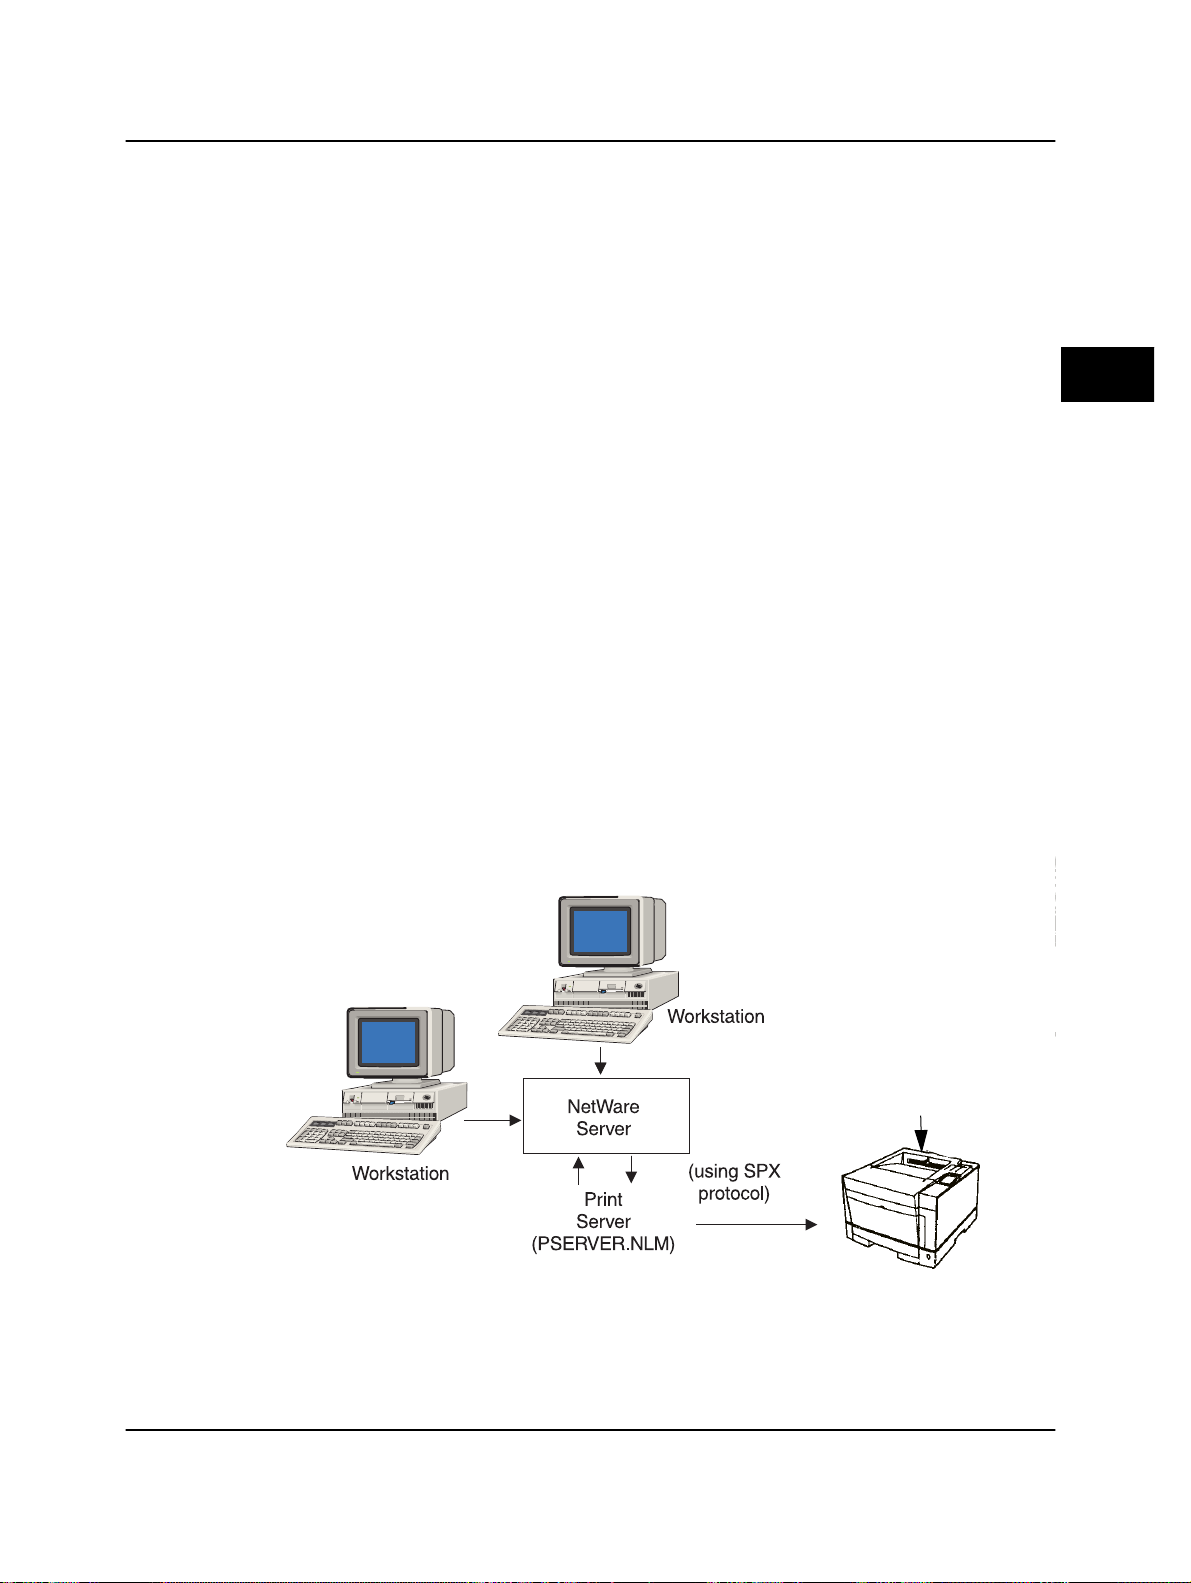
Setting up the adapter
If you need help deciding whether to use PSERVER or NPRINTER/
RPRINTER, continue with “Deciding whether to use NPRINTER/
RPRINTER mode or PSERVER mode” on this page.
4 Print those instructions and follow them to set up your adapter.
What to do next
When you have finished setting up the adapter, continue with “Verifying the
adapter setup” on page 5-11.
Deciding whether to use NPRINTER/RPRINTER mode or PSERVER mode
When configuring your adapter, you’ll have to set it up in either NPRINTER/
RPRINTER or in PSERVER mode.
How NPRINTER/RPRINTER mode works
A network adapter configured in NPRINTER/RPRINTER mode acts as a
remote printer. This remote printer receives print jobs from a print server. The
print server, a program called PSERVER.NLM running on a NetWare server,
obtains print jobs from a queue and sends them to the remote printer.
The following diagram shows how NPRINTER/RPRINTER mode works.
NetWare
networks
Remote printer
PagePrinter Network Adapter: Utilities & Environments 5-7
Page 74

Setting up the adapter
How PSERVER mode works
An adapter set up in PSER VER mode acts as a print serv er attached to NetWare
servers. This adapter obtains print jobs from queues located on one or more
servers. PSERVER adapters actually log into NetWare servers as a NetWare
client and, therefore, require one NetWare user license slot per PSERVER
device.
The following diagram shows how PSERVER mode works.
NPRINT versus PSERVER in NetWare 4 NetWare Directory Services (NDS)
Adapters are fully supported in NetWare 4 NDS, using either NPRINT or
PSERVER mode. You do not need to use bindery emulation in either mode.
NPRINT mode in NetWare 4 NDS
Advantage of using NPRINT mode in NDS:
•Does not require a NetWare server user license slot
Disadvantage of using NPRINT mode in NDS:
•Little information is available about the print job. After a job leaves a print
server queue, it is removed from the queue, regardless of whether it actually
prints. This could cause a print job to be lost, if the printer is turned off in the
middle of the print job. This is inherent in the NetWare design, and is not a
problem caused by the adapter.
5-8 PagePrinter Network Adapter : Utilities & Environments
Page 75

Setting up the adapter
Notes about printing performance:
•Many people prefer to configure their network adapters in PSERVER mode,
because they are used to it, since in early versions of NetWare PSERVER
performance was significantly better than NPRINTER/RPRINTER
performance.
This performance difference is smaller for NetWare 4.x. The actual print job
throughput is affected by many other factors such as topology, job size and
content, and network adapter settings. Under many circumstances, NPRINTER
mode provides an excellent NetWare 4.x NDS solution.
PSERVER mode in NetWare 4.x NDS
Advantages of using PSERVER mode in NDS:
•Does not require that PSERVER.NLM is installed on the NetWare server.
•Performance. Although overall print job throughput is affected by many
factors, file transfer time on the network may be faster using PSERVER mode
because:
– In NPRINTER/RPRINTER mode, NetWare uses SPX to transfer
packets. Packet size for data transmitted in SPX is 512 bytes.
– In PSERVER mode, NetWare uses IPX to transfer packets. Packet
size for data transmitted in IPX is up to 1 Kbyte for Ethernet
networks.
Because of this difference in packet size, PSERVER mode may be faster than
NPRINTER/RPRINTER mode. Please note, however, that the
packet size is negotiated by the client application. This actual IPX packet size is
often less than the maximum because of packet size limitations of gateways and
routers.
If printing is a significant part of your network traffic, and if network traf fic is a
proven concern for your network, you may find it better to use the adapters in
PSERVER mode.
Disadvantage of using PSERVER mode in NDS:
actual IPX
•Requires a NetWare server user license for each PSERVER device
NetWare
networks
RPRINTER versus PSERVER in NetWare 3.x
Adapters are fully supported in NetWare 3.x, using either RPRINTER or
PSERVER mode.
PagePrinter Network Adapter: Utilities & Environments 5-9
Page 76

Setting up the adapter
RPRINTER mode in NetWare 3.x
Advantage of using RPRINTER mode in NetWare 3.x:
•Does not require a NetWare server user license slot
Disadvantage of using RPRINTER mode in NetWare 3.x:
•Little information is available about the print job. After a job leaves a print
server queue, it is removed from the queue, regardless of whether it actually
prints. This could cause a print job to be lost, if the printer is turned off in the
middle of the print job. This is inherent in the NetWare design, and is not
unique to network adapters.
PSERVER mode in NetWare 3.x
Advantages of using PSERVER mode in NetWare 3.x:
•Does not require that PSERVER.NLM is installed on the NetWare server
•Does not require you to unload PSERVER.NLM or reboot your computer
after installation
•Performance. Although overall print job throughput is affected by many
factors, file transfer time on the network may be significantly faster using
PSERVER mode.
– In NPRINTER/RPRINTER mode, NetWare uses SPX to transfer
packets. Packet size for data transmitted in SPX is 512 bytes.
– In PSERVER mode, NetWare uses IPX to transfer packets. Packet
size for data transmitted in IPX is up to 1 Kbyte for Ethernet networks.
Because of this difference in packet size, PSERVER mode may be faster than
NPRINTER/RPRINTER mode. Please note, however, that the
packet size is negotiated by the client application. This actual IPX packet size is
often less than the maximum because of packet size limitations of gateways and
routers.
If printing is a significant part of your network traffic, and if network traf fic is a
proven concern for your network, you may find it better to use the adapters in
PSERVER mode.
actual IPX
•Connects to several file servers and supports many queues:
– Network Adapter connects to as many as 16 file servers, with a
total of 32 queues per adapter, distributed any way you want
among the servers
Disadvantage of using PSERVER mode in NetWare 3.x:
•Requires a NetWare server user license slot for each PSERVER device
5-10 PagePrinter Network Adapter : Utilities & Environments
Page 77

Setting up the adapter
What to do next
Congratulations! Your adapter is ready to work for you.
You have finished setting up the adapter. To make sure you can print to it, you
should test it.
Verifying the adapter setup
To verify that you did everything correctly and that you can print with the
adapter and the utility, do the following:
1 Reset the adapter. If you need help, follow these steps.
a From the utility’s adapter list, select the adapter whose setup y ou want
to verify.
b On the utility’s menu bar, select Setup/Customized.
c Select Reset Adapter .
2 Check the list of servers under Options to be sure the servers you set up
in the previous step are listed there.
If you need help, follow these
steps:
a On the utility’s adapter list, select the adapter whose servers y ou want
to check.
b From the utility’s menu bar, select Options.
c Select Show Adapter’ s Servers.
d Check the list of network servers. Make sure the server you want the
adapter to work with appears in the list.
• If you are using PSERVER mode, make sure you selected a file
server to connect with and that you configured queues for that file
server.
NetWare
networks
• If you are using RPRINTER mode, make sure you selected a print
server and configured queues.
3 Print a page to a queue. If you need help, follow these steps:
a From the utility’s menu bar, select File.
b Select Print.
c Select To Queue. On the Print List to Queue dialog box, select the file
server, select the queue, and then choose Print Adapter List.
If the page doesn’t print, review this section. Be sure the adapter is
configured properly, is enabled, and that all the queues are set up
correctly. Make sure you are logged into the server.
PagePrinter Network Adapter: Utilities & Environments 5-11
Page 78

Troubleshooting
Troubleshooting
This section helps you to correct problems you may encounter while using the
Network Adapters regarding their symptoms:
• Utility unable to find the network printer
• Print jobs stay in the queue
Utility unable to find the network printer
While configuring the adapter, the utility is unable to find the network printer
(that is, the network printer does not appear in the adapter list).
Solution
1 Make sure the printer is turned on and is Ready.
2 Make sure that the adapter is installed properly. To check this, print a
test page. (This is the test page that you printed when you first set up
your printer.) The adapter will be in the list of attachments on the test
page. You can find instructions for printing the test page in your
printer’s documentation.
3 Make sure that:
• The status light on the adapter is on.
• The adapter is completely connected to the LAN.
4 Make sure all routers are configured properly.
5 Make sure the workstation network drivers are up to date.
6 From the Network Printer Utility menu, select View/Search for Adapters
by/Entire Network.
Print jobs stay in the queue
The server does not appear to be sending jobs to the network printer you
specified.
5-12 PagePrinter Network Adapter : Utilities & Environments
Page 79

Troubleshooting
Solution
1 The printer is probably busy receiving jobs from other servers or from
other links. Check the printer to be sure it is working properly.
2 Make sure the adapter is installed properly.
To check this, print a test
page. (This is the test page that you printed when you first set up your
printer.) The adapter will be in the list of attachments on the test page.
You can find instructions for printing the test page in your printer’s
documentation.
3 Print a setup page from the adapter. If the page prints, then the
connection between the adapter and the printer is working correctly . If
the page does not print, check all the physical connections.
• Press the Test button until the Test light comes on. The Data light
blinks, and the adapter sends a page to the printer.
4 Look at the setup page. Make sure the NetWare protocol is active and
the proper frame types are set.
5 Check the Network Printer Utility to make sure you have:
Configured the adapter. If you need help, go to “To set up the
a
adapter” on page 5-6.
b Enabled the port. If you need help, use the utility’s on-line help.
6 If you are using PSERVER mode, make sure you have:
Defined the adapter as a print server. If you need help, go to “To set
a
up the adapter” on page 5-6.
NetWare
networks
b Defined print queue names. If you need help, use the utility’ s on-line
help.
c Assigned the adapter’s login name to service the print queue. If you
need help, use the utility’s on-line help.
d Used Nov ell’s PCONSOLE utility to mak e sure the queue is not being held.
PagePrinter Network Adapter: Utilities & Environments 5-13
Page 80

Troubleshooting
7 If you are using RPRINTER mode, make sure you have:
Defined a NetW are server for the adapter to service. If you need help,
a
go to the utility’s on-line help.
b Defined print queue names. If you need help, go to the utility’s on-
line help.
c Defined the adapter as a remote printer. If you need help, go to the
utility’s on-line help.
d Used Nov ell’s PCONSOLE utility to mak e sure the queue is not being held.
e Unloaded the print server, or rebooted the computer , after you configure the
utility. (After configuration, you will be prompted to unload
PSERVER.NLM or reboot your computer. Be sure you do so.) This is
necessary and a normal function of Novell’ s RPRINTER mode. If you need
help, consult your RPRINTER documentation.
8 If some files stayed in the queues without being printed, then the LAN
cable was probably disconnected from the server while the print job was
active. Reconnect the cable, reset the adapter, and try again.
5-14 PagePrinter Network Adapter : Utilities & Environments
Page 81

Troubleshooting
Adapter lights
Different patterns of lights may appear on the Network adapter. These patterns
indicate various problems that may occur, to help you diagnose them.
In the following table, find the patterns of lights that is occurring on your
adapter, then follo w the action described. If you need to call for service, be sure
to make a note of the light pattern before you call.
Test Status Data Description/Action
off on off Ready (Idle).
off on blinking Processing. Normal operation. Data is being received from a host,
or sent to a printer.
on off off Testing. The first light pattern indicates that you have pressed the
Test button.
off on blinking The second light pattern indicates that a setup page is being sent
from the adapter to the printer.
off on blinking Updating flash code. The first light pattern indicates that the flash
code is being downloaded to the adapter.
NetWare
networks
blinking blinking blinking The second light pattern occurs while the adapter is updating the
flash code. Make sure the adapter stays plugged in.
After the adapter goes through its normal start-up tests, it returns
to its Ready state.
off blinking on Network error. Check all connections to the network. For
example, make sure the network cables are connected.
off blinking off Software error. Turn the printer power off then on to reset the
adapter. Then try to re-send the print job. If this error persists, call
for service.
on blinking on Flash error. T urn the printer power off then on to reset the adapter.
If the error persists, call for service.
PagePrinter Network Adapter: Utilities & Environments 5-15
Page 82

Troubleshooting
Adapter service
If your adapter needs service:
•Make a note of the light pattern, then contact your point of purchase. The
adapter contains no replaceable parts and may need to be returned.
•Make sure you don’t send print jobs to a nonexistent adapter. If you do, these
print jobs will be stored in the queue.
•If your adapter is defective and you need to replace it, make sure you delete or
hold all queues before removing the adapter from the LAN.
5-16 PagePrinter Network Adapter : Utilities & Environments
Page 83

APPENDIX
A
Introduction For your convenience, you can view or change some information about the
Using the printer control panel
adapter from the control panel of the printer.
You can use the printer control panel to set the IP address, netmask and/or
gateway for TCP/IP networks.
Printer
control
panel
PagePrinter Network Adapter: Utilities & Environments A-1
Page 84

Introduction
IP protocol settings from the printer control panel
1 Turn the printer power On (|).
2 Use the printer control panel to select one of the following settings.
Consult your printer documentation to learn the menu path for your specific
printer, or scroll through the control panel menus until you find it.
For further details on the use of the printer control panel see the
corresponding chapter in the Printer User´s Manual.
3 Press READY to return to ready status.
Table A.1 IP Protocol
Menu Item Values Description
Enable BOOTP
Yes
No
Using this menu item, you can set BOOTP on or off.
You should select No
and/or gateway through the printer’ s control panel and you w ant
these settings to always apply to this adapter.
You should select Yes if you want the adapter to automatically
find its BOOTP server to get its IP address, netmask, and/or
gateway.
Set
IP Address
IP Address Using this menu item, you can set the IP address directly on the
printer’s control panel. When you do, be sure to set Enable
BOOTP to No
printer off and on again, the adapter will search for a BOOTP
server and will use the address stored in that file instead of this
*NOTE
Set
IP Netmask
address.
IP Netmask Using this menu item, you can set the IP netmask directly
through the printer’s control panel. When you do, be sure to set
Enable BOOTP to
turn the printer off and on again, the adapter will search for a
BOOTP server and will use the netmask stored in that file
instead of this one.
The default IP netmask is: 255.255.255.0
Set
IP Gateway
IP Gateway Using this menu item, you can set the IP gateway directly
through the printer’s control panel. When you do, be sure to set
Enable BOOTP to No
turn the printer off and on again, the adapter will search for a
BOOTP server and will use the gateway stored in that file
instead of this one.
The default IP gateway is: 0.0.0.0
if you have set the IP address, netmask,
. If Enable BOOTP is set to Yes and you turn the
No. If Enable BOOTP is set to Yes and you
*NOTE
. If Enable BOOTP is set to Yes and you
*NOTE
A-2 PagePrinter Network Adapter: Utilities & Environments
Page 85

Introduction
Note 1: If you’re not using a boot server you can have the bootp function in
the adapter disabled.
Note 2: If a bootp server becomes available and someone has entered this
adapter’s MAC address into the server, then these values are being set by
bootp, not via the control panel.
Printer
control
panel
PagePrinter Network Adapter: Utilities & Environments A-3
Page 86

Introduction
A-4 PagePrinter Network Adapter: Utilities & Environments
Page 87

GLOSSARY
G
A
B
D
Glossary
This glossary contains terms specific to local area networks (LANs) and the use
of the Network adapters.
adapter address. The manufacturer’s identification, or the user-defined
identification, of an adapter. The adapter address is sometimes also used
as the default nickname or login name.
BOOTP. See BOOTstrap protocol (BOOTP).
BOOTstrap Protocol (BOOTP). A TCP/IP protocol that enables a
workstation to find its IP address.
data stream. Print data and control information flowing from a host
system (computer) to the printer, from beginning to end without
interruption.
Glossary
DLC protocol (Data Link Control). A set of rules used by two nodes on
a data link to accomplish an orderly exchange of information.
E
F
PagePrinter Network Adapter: Utilities & Environments G-1
Ethernet. A network with a bus topology that uses carrier sense multiple
access with collision detection (CSMA/CD). An Ethernet network may be
installed using any of three cabling systems: Ethernet 10BASE-T (using
telephone twisted pair); Ethernet 10BASE2 (using RG-58 coax and also
referred to as Cheapernet or Thinnet); Ethernet 10BASE5 (using AUI
cable).
file server. A computer on your network that runs the operating system
software. The software controls the communication among computers
attached to the network and it manages shared resources.
File Transfer Protocol (FTP)
from one computer to another. It is usually implemented in application
programs. This is considered a better way to send files than TFTP (Trivial
File Transfer Protocol) because it uses TCP instead of UDP.
. A TCP/IP protocol that transfers files
Page 88

Finger. A TCP/IP protocol that normally displays user information on a
host computer. When used with Integrated Network Option, finger
displays the status of the printer and the current print job.
firmware. Software that resides in the adapter.
flash memory. A type of ROM (read-only memory) used on all MarkNet
adapters. Flash memory can be erased electronically and reprogrammed
without your removing the adapter from the printer.
FTP. See File Transfer Protocol.
G
H
I
gateway. The connector device between many LANs.
host. The main computer on a network allowing all computers connected
the use of data files or programs installed on it.
ICMP. See Internet Control Message Protocol.
IEEE 802.3. A standard by the Institute of Electrical and Electronics
Engineers (IEEE) for a local area network that uses the CSMA/CD access
method. This standard has been popularized by Ethernet local area
networks.
Integrated Network Option. The Network adapter and its utilities. This
adapter is designed to be installed inside various laser printers and
therefore sometimes referred to as Internal Network Adapters.
integrated port. On the Network adapter, the port physically located on
the adapter. See also
network port.
Internet. Worldwide networks connection via Internet routers so that
information and services may be shared.
Internet Control Message Protocol (ICMP). An important part of the
Internet Protocol, it describes and manages error and control messages.
Internet Protocol (IP). A standard that specifies how packets are passed
through networks. It identifies the format of the packet and describes how
they should be delivered in a seamless manner. Although it is a separate
protocol from TCP, it is often referred to as TCP/IP because both TCP
and IP protocols are often used together.
G-2 PagePrinter Network Adapter: Utilities & Environments
Page 89

IP. See Internet Protocol .
L
LAA. See Locally Administered Addr ess.
LAN. See local area network.
LAN Connection Utility. An OS/2 utility that resides on a network
server used to redirect printer or plotter data from its intended destination
to a printer or plotter on a LAN-attached adapter.
LAN segment. Any portion of a LAN that operates independently of, but
is connected to, the network by bridges or routers.
local area network (LAN). A computer network located within a limited
geographical area of a few hundred meters.
Locally Administered Address (LAA). An address that a
network administrator assigns to a network adapter on the
LAN. Administrators may assign the adapter any address that
they wish (within certain constraints). Many administrators
use the LAA to give the adapter a meaningful address in their workplace
(for example, assigning the adapter an address that identifies its location).
lpd. Line printer daemon. Allows the use of remote printing functions
under TCP/IP. This software registers the print document sent from a
computer. It is a background process that runs all the time.
Glossary
lpd print service. UNIX utility that receives print jobs from remote TCP/
IP hosts.
LPT (Line PrinTer). A representation of one of the logical ports (for
example, LPT1) on a personal computer.
Management Information Base (MIB). A database used to manage a
network and the machines based on RFC 1213, is an example of MIB. The
MIB describes information specific to the Network Adapter and the
printers.
MIB. See Management Information Base.
PagePrinter Network Adapter: Utilities & Environments G-3
Page 90

N
netmask. A bit mask that specifies the local network portion of an IP address,
allowing you to logically subdivide a network
.
O
NetWare.
Apple Macintosh computers. It supports a large number of topologies
including Ethernet.
A family of LAN operating systems that can join PCs and
network port. The port physically located on the adapter. It eliminates
the need to use the parallel and serial ports on the printer. The network
port is used to connect to a LAN. See also integrated port.
network printer. A printer used on a network. In this guide, it refers to a
printer connected to an adapter, receiving jobs as they are sent to the
printer by the adapter.
Network Printer Utility. A user interface that allows you to configure
print servers and the adapter settings to the network.
nickname. A name that a network administrator assigns to the adapter. It
is used to identify the location of the printer.
NLM. Novell NetWare Loadable Module. An optional process used by
Novell NetWare 3.11 to add functions to a file server.
OS/2. Operating System/2, a multitasking operating system from IBM.
P
packet internet groper (PING). Software that tests whether an IP
destination can be reached by sending an ICMP echo request and waiting
for a reply.
PCONSOLE. Novell NetWare Print Console software. PCONSOLE
allows you to control network printing, establish print servers, and set up
print queues.
PING. See packet internet groper (PING).
Print Monitor Utility. In a Windows NT environment it routes print
jobs from the server’s Print Manager program to the printer. In an OS/2
environment, redirects print jobs from the network to the adapter. This
utility includes the basic information for installing and configuring your
adapters.
print queue. A directory in the server where print jobs are stored
for printing.
G-4 PagePrinter Network Adapter: Utilities & Environments
Page 91

print server. Hardware or software (or a combination of hardware and
software) that takes information from a print queue and sends it to a
printer.
protected directory . A directory guarded by security software. Access is
allowed only with the proper password.
protocol. A set of rules managing the communication and transfer of data
between two or more network devices.
PSERVER. A Novell NetWare printing service that takes a print job and
sends it to a printer assigned to a supported queue. The adapter in
PSERVER mode takes the place of the Novell PSERVER process and
directs print jobs from a file server queue to a printer attached to the
adapter.
Glossary
R
S
remote printer. A printer attached to a workstation on a LAN that is set
up to work as a shared network printer.
requester. A workstation that requests access to shared resources, such as
printers or plotters, so that they appear to be running on the user’s own
workstation even though they may be running somewhere on the LAN.
RPRINTER. A terminate-and-stay-resident (TSR) program that runs on
a Novell workstation. This program allows a printer locally attached to
the workstation (instead of the file server) to be used as a shared network
printer.
The adapter in the RPRINTER mode emulates the TSR that would
normally run on the Novell workstation. The adapter in RPRINTER mode
is used in conjunction with the Novell PSERVER utility to direct print
jobs to a printer attached to the adapter. This method does not use any
Novell user login slots.
SAP. See service access point
server. A device that allows people using LAN workstations to share
resources such as printers/plotters on the network.
service access point (SAP). In Open Systems Interconnection
architecture, the point at which the services of a layer are provided by an
entity of the next higher layer.
imple Network Management Protocol (SNMP). A TCP/IP protocol
S
that defines how computers will exchange management information.
PagePrinter Network Adapter: Utilities & Environments G-5
Page 92

SNMP. See Simple Network Management Protocol.
spooler. An intercepting program that prevents output from different
sources or workstations from interfering with each of them.
T
TCP. See Transmission Control Protocol (TCP).
TCP/IP.
See Transmission Control Protocol/Internet Protocol.
TFTP. See Trivial File Transfer Protocol.
Transmission Control Protocol (TCP). The standard protocol that
resides at the transport layer. After two computers establish a connection,
TCP provides a reliable, full duplex, stream service that allows one
computer to send data to another.
Therefore, many operating systems implement TCP; they also implement
the IP protocol to send data across the underlying internet. Although TCP
is a separate protocol from IP, it is often referred to as TCP/IP because
both TCP and IP protocols are often used together.
Transmission Control Protocol/Internet Protocol (TCP/IP). The TCP
and IP protocols, used together.
Trivial File Transfer Protocol (TFTP). A TCP/IP protocol that
transfers files with minimum overhead and no guarantee of delivery.
U
UAA. See Universally Administered Addr ess (UAA).
UDP. See User Datagram Protocol (UDP).
Universally Administered Address (UAA). An adapter’s UAA is the
factory-set default address. Network administrators may choose to set a locally
administered address (LAA) for the adapter so that its address is more
meaningful to their workplace.
G-6 PagePrinter Network Adapter: Utilities & Environments
Page 93

User Datagram Protocol (UDP). The protocol that allows one computer to
send a datagram (unit of data) to another. It uses the IP protocol to deliver
datagrams. UDP datagrams include a protocol port number so that the sending
computer can differentiate among several destinations on the remote computer.
utility. The software that came on the diskettes respectively CD-ROM with
this guide.
V
Z
VAP. Value added process. An optional process used by Novell NetWare
2.2 to add functions to a file server.
Glossary
zone. In AppleTalk, the grouping of network devices in a logical manner
so that they may be easily accessed by the user.
PagePrinter Network Adapter: Utilities & Environments G-7
Page 94

G-8 PagePrinter Network Adapter: Utilities & Environments
Page 95

Fujitsu Offices
Please send your comments on this manual or on Fujitsu products to the
following addresses:
FUJITSU COMPUTER PRODUCTS OF
AMERICA, INC.
2904 Orchard Parkway, San Jose
CA 95134-2022, U.S.A.
TEL: (1-408) 432-6333
FAX: (1-408) 894-1709
FUJITSU CANADA INC.
2800 Matheson Boulevard East
Mississauga, Ontario L4W 4X5, CANADA
TEL: (1-905) 602-5454
FAX: (1-905) 602-5457
FUJITSU AUSTRALIA LIMITED
475 Victoria Avenue, Chatswood
N.S.W., 2067, AUSTRALIA
TEL: (61-2) 410-4555
FAX: (61-2) 411-8603
FUJITSU DEUTSCHLAND GmbH.
Frankfurter Ring 211
80807, München, F.R. GERMANY
TEL: (49-89) 32378-0
FAX: (49-89) 32378-100
FUJITSU ESPAÑA, S.A.
Almagro 40, 28009 Madrid, SPAIN
TEL: (34-1) 581-8400
FAX: (34-1) 581-8125
FUJITSU EUROPE LTD.
2 Longwalk Road, Stockly Park, Uxbridge
Middlesex UB11 1AB, ENGLAND
TEL: (44-81) 573-4444
FAX: (44-81) 573-2643
FUJITSU FRANCE S.A.
1, place des Etats-Unis
Silic 310 94588 RUNGIS Cedex
TEL: (33-1) 41-80-38-80
FAX: (33-1) 41-80-38-66
FUJITSU HONG KONG LIMITED
Room 2521, Sun Hung Kai Centre
30 Harbour Road, HONG KONG
TEL: (852) 827-5780
FAX: (852) 827-4724
FUJITSU ICIM LTD.
Nagar Road, Pune 411 014, INDIA
TEL: (91-212) 681-528
FAX: (91-212) 680-238
FUJITSU ITALIA S.p.A.
Via Nazario Sauro, 38, 20099 Sesto Sau
Giovanni (MI), ITALY
TEL: (39-2) 26294-0
FAX: (39-2) 26294-201
FUJITSU KOREA LTD.
9th Floor, Korean Reinsurance Bldg.
80, Susong-Dong, Chongro-Gu
Seoul Special City, Republic of KOREA
TEL: (82-2) 739-3281
FAX: (82-2) 739-3294
FUJITSU NORDIC AB
Kung Hans Väg 12
S-191 76 Sollentuna, SWEDEN
TEL: (46-8) 626-6000
FAX: (46-8) 626-6711
FUJITSU (SINGAPORE) PTE. LTD.
75 Science Park Drive
#02-06 CINTECH II, SINGAPORE 0511
TEL: (65) 777-6577
FAX: (65) 777-8794
FUJITSU SYSTEMS BUSINESS
(MALAYSIA) SDN. BHD.
Fujitsu Plaza, 1A, Jalan Tandang 204
P.O. Box 636 Pejabat Pos Jalan Sultan
46770 Petaling Jaya
Selangor Darul Ehsan, MALAYSIA
TEL: (60-3) 793-3888
FAX: (60-3) 793-0888
FUJITSU SYSTEMS BUSINESS
THAILAND LTD.
12th Floor, Olympia Thai Tower
444 Rachadapisek Road, Samsennok
Huaykwang, Bangkok 10310, THAILAND
TEL: (662) 512-6066
FAX: (662) 512-6068
FUJITSU TAIW AN LTD.
8th FL., NO. 170, Hung Tai Center
Tun Hwa N. RD., Taipei, TAIWAN, R.O.C.
TEL: (886-2) 545-7700
FAX: (886-2) 717-4644
FUJITSU LIMITED
Computer Products Business Group
1015, Kamikodanaka, Nakahara-ku
Kawasaki-shi 211, JAPAN
TEL: (81-44) 754-8633
FAX: (81-44) 754-8510
Page 96

Page 97

 Loading...