


 Loading...
Contents
Understanding your printer .............................................. |
7 |
Printer parts .................................................................................. |
7 |
Control panel ................................................................................. |
8 |
Loading paper .................................................................. |
10 |
Supported photo paper types ...................................................... |
10 |
Loading the photo paper ............................................................. |
10 |
Inserting memory cards .................................................. |
11 |
Supported memory cards ............................................................ |
11 |
Inserting memory cards .............................................................. |
12 |
Printing from a memory card .......................................... |
13 |
Step 1: Load photo paper ........................................................... |
13 |
Step 2: Insert a memory card ...................................................... |
13 |
Step 3: View your photos ............................................................ |
13 |
Step 4: Select a photo to print ..................................................... |
13 |
Step 5: Customize the photo ....................................................... |
14 |
Step 6: To select another photo, repeat steps 4 and 5. .............. |
14 |
Step 7: Print photo(s) .................................................................. |
14 |
Step 8: Remove the memory card .............................................. |
14 |
3
Printing from a digital camera ........................................ |
15 |
Customizing your photo prints ....................................... |
16 |
Printing an index page ................................................................ |
16 |
Printing all photos ....................................................................... |
16 |
Printing a photo in black and white ............................................. |
17 |
Cropping a photo ........................................................................ |
18 |
Adjusting the brightness .............................................................. |
19 |
Adjusting the number of prints .................................................... |
20 |
Viewing slide show ...................................................................... |
21 |
Printing DPOF selection .............................................................. |
21 |
Customizing your printer settings ................................. |
22 |
Changing the blank paper size ................................................... |
22 |
Changing the blank paper type ................................................... |
22 |
Changing the print quality ........................................................... |
23 |
Adjusting preview before print ..................................................... |
23 |
Changing the control panel display language ............................. |
23 |
Changing the power save ........................................................... |
24 |
Clearing photo settings ............................................................... |
24 |
Restoring factory defaults ........................................................... |
25 |
Traveling with your printer .............................................. |
26 |
Before you travel ......................................................................... |
26 |
Packing the printer ...................................................................... |
26 |
Unpacking the printer .................................................................. |
28 |
Maintaining your print cartridge ..................................... |
30 |
Checking the ink level status ...................................................... |
30 |
4
Refilling the print cartridge .......................................................... |
30 |
Ordering supplies ........................................................................ |
30 |
Replacing the print cartridge ....................................................... |
31 |
Aligning the print cartridge .......................................................... |
34 |
Cleaning the print cartridge nozzles ............................................ |
34 |
Printing a test page ..................................................................... |
35 |
Troubleshooting ............................................................... |
36 |
Setup troubleshooting ................................................................. |
37 |
Print troubleshooting ................................................................... |
38 |
Improving print quality ................................................................. |
40 |
Jams and misfeeds troubleshooting ........................................... |
43 |
Memory card and PictBridge troubleshooting ............................. |
44 |
Error messages troubleshooting ................................................. |
45 |
Finding more information ............................................... |
47 |
Notices .............................................................................. |
48 |
Index .................................................................................. |
51 |
5
6
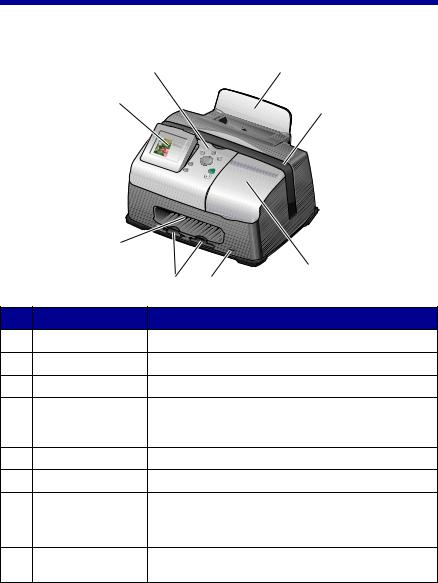
Understanding your printer
Printer parts
8 |
1 |
7
2
|
6 |
|
|
|
|
5 |
3 |
|
|
4 |
|
# |
Part |
Purpose |
|
1 |
Paper support |
Load paper into the printer. |
|
2 |
Carry handle |
Transporting the printer. |
|
3 |
Access cover |
Install or replace print cartridge. |
|
4 |
PictBridge port |
Connect a PictBridge-enabled digital camera to the |
|
|
|
printer. Use the controls on the camera to select and |
|
|
|
print your photos. |
|
5 |
Memory card slots |
Insert memory cards. |
|
6 |
Paper exit |
Allows paper to exit after printing is complete. |
|
7 |
Control panel |
Preview photos on your memory card and check the |
|
|
display |
status of the printer. |
|
|
|
The display has 4 positions: flat, 25°, 50°, and 90°. |
|
8 |
Control panel |
Operate the printer. For more details, see “Control |
|
|
|
panel” on page 8 |
|
7
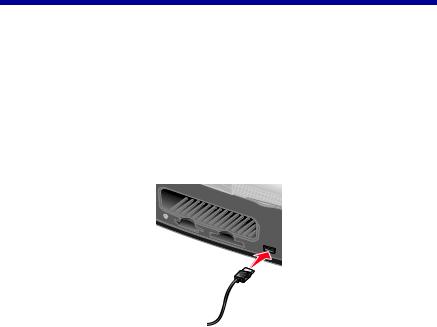
1


# |
Part |
Purpose |
1 |
Power supply cord port |
Install the provided power supply cord. |
|
|
|
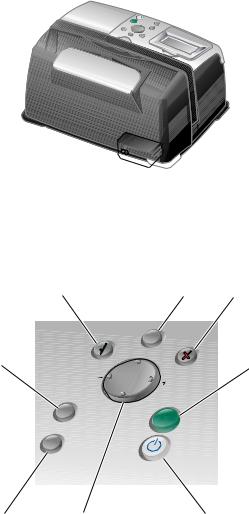
Control panel
8 1 2
7 |
3 |
|
6 |
5 |
|
4 |
|
|
|
|
|
|
|
# |
Button |
|
|
Purpose |
|
1 |
Menu |
|
|
• Display the Photo menu. |
|
|
|
|
|
|
|
2 |
Stop/Clear |
|
|
• |
Deselect the displayed photo for printing. |
|
|
|
|
• |
Stop the print job. |
|
|
|
|
|
|
8
# |
Button |
Purpose |
3 |
Start |
Begin printing the selected photos. |
|
|
|
4 |
Power |
Turn the printer on and off. |
|
|
|
5 |
Up arrow |
• Scroll through menu options. |
|
|
• Change the selected area when cropping an |
|
|
image. |
|
|
• Skip forward through the pictures on the |
|
|
memory card 10 at a time. |
|
|
|
|
Down arrow |
• Scroll through menu options. |
|
|
• Change the selected area when cropping an |
|
|
image. |
|
|
• Skip backward through the pictures on the |
|
|
memory card 10 at a time. |
|
|
|
|
Right arrow (+) |
• Increase the number of prints. |
|
|
• Change the selected area when cropping an |
|
|
image. |
|
|
• Increase the value of a menu item. |
|
|
• Display the next picture on a memory card. |
|
|
|
|
Left arrow (-) |
• Decrease the number of prints. |
|
|
• Change the selected area when cropping an |
|
|
image. |
|
|
• Decrease the value of a menu item. |
|
|
• Display the previous picture on a memory |
|
|
card. |
|
|
|
6 |
Number of Prints |
• Change the number of photos you want to |
|
|
print. |
|
|
• Change the size of the green crop box when |
|
|
cropping an image. |
|
|
|
7 |
Rotate |
Rotate the image on the control panel display |
|
|
90° counterclockwise for easier viewing. |
|
|
|
8 |
Select |
• Choose a menu option. |
|
|
• Choose a displayed photo for printing. |
|
|
|
9
Loading paper
Supported photo paper types
Type |
Size |
Usage |
Photo/Glossy |
Photo paper: 4 x 6 inches |
Print photos |
cards |
(102 x 152 mm) |
|
|
|
|
|
Hagaki card: 3.9 x 5.8 inches |
Print photos |
|
(100 x 148 mm) |
|
|
|
|
|
A6 card: 4.1 x 5.8 inches |
Print photos |
|
(105 x 148 mm) |
|
|
|
|
Card stock |
Index card: 4 x 6 inches |
Print test pages and cartridge |
|
(102 x 152 mm) |
maintenance pages |
|
|
|
Note: Do not load more than 25 sheets into the paper support.
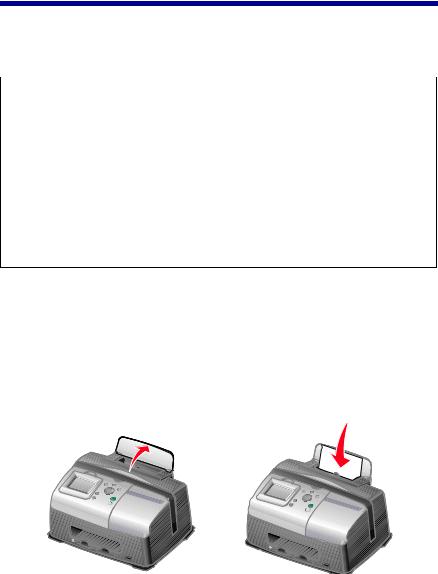
Loading the photo paper
1Lift the paper support.
2Load the photo paper into the paper support with the print side facing you.
Note: Do not force the photo paper into the printer.
10

Inserting memory cards
Supported memory cards
Note: Your card manufacturer may differ from the ones pictured.
Microdrive
SmartMedia
Memory Stick
Memory Stick PRO
Memory Stick Duo (with adapter)
CompactFlash Type I and Type II
Memory Stick PRO Duo (with adapter)
xD Picture Card (up to 512MB)
Secure Digital (SD) |
MultiMedia Card |
11
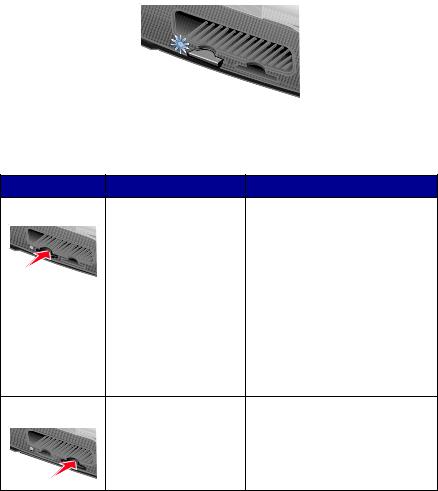
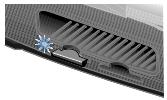
Inserting memory cards
The memory card reader has two slots to accommodate different size memory cards. A small light turns on when a memory card is inserted. The light blinks to indicate the memory card is being read or is transmitting data.
Warning: Do not remove the memory card while the light is blinking.
Slot |
Memory card |
Installation |
|
Left slot |
• |
Secure Digital |
• Insert card with brand name |
|
• |
SmartMedia |
label face up. |
|
• |
MultiMedia |
Note: If you are using |
|
• |
Memory Stick |
SmartMedia cards, make sure the |
|
• |
Memory Stick PRO |
gold contact area faces up. |
|
Note: If you are using a Memory |
||
|
• |
Memory Stick Duo |
|
|
|
(with adapter) |
Stick Duo or Memory Stick PRO |
|
• |
Memory Stick PRO |
Duo card, be sure to connect it to |
|
the adapter that came with the |
||
|
|
Duo (with adapter) |
|
|
|
card before inserting it in the slot. |
|
|
• |
xD Picture Card. |
|
|
• If you have an arrow on your |
||
|
|
|
|
|
|
|
card, make sure it points |
|
|
|
toward the printer. |
Right slot |
• |
CompactFlash Type I |
• The name label faces up. |
|
|
and Type II |
• If you have an arrow on your |
|
• |
Microdrive |
card, make sure it points |
|
|
|
toward the printer. |
Note: Your printer recognizes only one digital media source for photos at a time.
12
Printing from a memory card
Step 1: Load photo paper
Note: For help loading photo paper and a list of supported paper types, see page 10.
Step 2: Insert a memory card
Note: If you are unsure of what type of memory card you have, see page 11.
The I Want To... menu appears.
Step 3: View your photos
1Press the down arrow to highlight Slide Show.
2Press Select.
Each photo will appear on the display for five seconds. To skip ahead, press the right arrow button. To go back, press the left arrow button.
3Press Stop/Clear when you are ready to select the photos you want to print.
Step 4: Select a photo to print
1Press the right or left arrow buttons to scroll to the photo you want to print.
Note: For easier viewing, press Rotate to rotate the image on the display 90° counterclockwise.
2 Press Select.
13
Step 5: Customize the photo
You can adjust the photo settings before you print. If you want to:
•Crop the photo, see page 18.
•Adjust the brightness, see page 19.
•Change the number of prints, press Number Of Prints.
•Change the print quality, see page 23.
•Change the blank paper size, see page 22.
Step 6: To select another photo, repeat steps 4 and 5.
When you are finished selecting your photo(s), continue with step 7.
Step 7: Print photo(s)
Press Start.
If Preview before Print is on, a preview of the print job is first displayed. Press Start again to print the photo.
If Preview before Print is off, the photo prints immediately.
Note: To adjust the Preview setting, see page 23.
Step 8: Remove the memory card
Warning: Do not remove the memory card while the light is blinking. The light blinks to indicate the memory card is being read or is transmitting data.
14
Printing from a digital camera
You can connect a PictBridge-enabled digital camera to your printer and use the buttons on the camera to select and print your photos:
1 Insert one end of the USB cable into the camera.
Note: Use only the USB cable that came with your camera.
2Insert the other end of the cable into the PictBridge port on the front of the printer.
3Refer to the instructions included with your camera for PictBridge connection and usage information.
Note: Make sure the PictBridge-enabled digital camera is set to the correct USB mode. Refer to the camera documentation for more information.
15

Customizing your photo prints
Printing an index page
1Load photo paper.
2Insert a memory card.
Note: If you are unsure of what type of memory card you have, see page 11.
The I Want To... menu appears.
3Press Menu.
The Photo menu appears.
4Press the down arrow button until you highlight Print Index Page.
5Press Select.
If Preview before Print is on, a preview of the print job is first displayed. Press Start to print the index page.
If Preview before Print is off, the index page prints immediately.
Note: To adjust the Preview setting, see page 23.
Printing all photos
1Load photo paper.
2Insert a memory card.
Note: If you are unsure of what type of memory card you have, see page 11.
The I Want To... menu appears.
16
3Press the down arrow button until you highlight Print All Photos.
4Press Select.
If Preview before Print is on, a preview of the print job is first displayed. Press Start to print the photos.
If Preview before Print is off, the photos print immediately.
Note: To adjust the Preview setting, see page 23.
Printing a photo in black and white
1Load photo paper.
2Insert a memory card.
Note: If you are unsure of what type of memory card you have, see page 11.
The I Want To... menu appears with View Photos or Print highlighted.
3Press Select.
4Press the right or left arrow buttons to scroll to the photo you want to adjust.
5Press Select.
6Press Menu.
The Photo menu appears.
7Press the down arrow button until you highlight Print Color.
8Press the right arrow button until you highlight Black & White.
9Press Select.
To adjust other photos, repeat steps 4–8.
10Press Start to print the photo(s).
17
If Preview before Print is on, a preview of the print job is first displayed. Press Start again to print the photo.
If Preview before Print is off, the photo prints immediately.
Note: To adjust the Preview setting, see page 23.
Cropping a photo
1Load photo paper.
2Insert a memory card.
Note: If you are unsure of what type of memory card you have, see page 11.
The I Want To... menu appears with View Photos or Print highlighted.
3Press Select.
4Press the right or left arrow buttons to scroll to the photo you want to adjust.
5Press Menu.
The Photo menu appears.
6Press the down arrow button until you highlight Crop.
7Press Select.
8Adjust the green crop box over the photo. Press the arrow buttons to move the crop box.
Press Number Of Prints to change the size of the crop box.
9Press Select to accept your changes.
To adjust other photos, repeat steps 4–9.
10Press Start to print the photo(s).
If Preview before Print is on, a preview of the print job is first displayed. Press Start again to print the photo.
18
Loading...