

Page 1
L-90
WOODEN TURNTABLE WITH USB
CONNECTION AND BUILT-IN PRE
AMPLIFIER
User Manual
www.lenco.com
V1.0
Page 2

Table of content
What is in the box? ..................................................................................................... 3
Exploring the turntable ................................................................................................ 4
Getting started ............................................................................................................ 5
Where to install ........................................................................................................ 5
Installation of the turntable ...................................................................................... 5
Basic operation ........................................................................................................... 6
Playing records ........................................................................................................ 6
Connect the turntable to a computer for the first time .............................................. 6
Software Configuration (Windows XP, Vista, MAC) ................................................ 6
Software Installation & Configuration (Windows 7).................................................. 7
Digitalizing records ................................................................................................ 10
The Audacity guide ................................................................................................... 10
Maintenance ............................................................................................................. 21
How to replace the stylus ...................................................................................... 22
How to disassemble the cartridge ......................................................................... 22
How to install a new cartridge................................................................................ 22
Recommendations from Lenco.............................................................................. 23
Trouble shooting ....................................................................................................... 23
Specifications ........................................................................................................... 24
Spare parts list .......................................................................................................... 24
Safety instructions .................................................................................................... 25
Declaration of Conformity ................................... Fout! Bladwijzer niet gedefinieerd.
Do not distribute copyright-protected material .......................................................... 27
Disclaimer ................................................................................................................. 27
Service and support ............................................ Fout! Bladwijzer niet gedefinieerd.
End of life ............................................................ Fout! Bladwijzer niet gedefinieerd.
2
Page 3

Dear customer,
Thank you for buying this Lenco product. Quality and usability is our top priority. In
order to let you fully enjoy this turntable, we have manufactured this product using
high quality standards, materials, components, and care.
Please read all safety instructions and national restrictions, before you use
this turntable.
Note:
This user manual was printed prior to the development of this product. When
operability or other functions needed improvement, priority went to the product
specification itself, and not to this manual.
In such instances, the instruction manual may not entirely match all the functions of
the actual product. Therefore, the actual product and packaging, as well as the name
and illustration, may differ from the manual. The screen shown as an example in this
manual may differ from the actual screen display.
Lenco is not liable for any consequential damage.
What is in the box?
This turntable has been assembled with the utmost care. If, however, an accessory is
missing, please contact your local dealer immediately.
Check the supplied accessories:
1 x Turntable
1 x Cartridge
1 x Platter inclusive belt
1 x Rubber plate
1 x Dust cover
2 x hinge
1 x USB Cable
1 x Single puck
1 x Quick Guide
3
Page 4
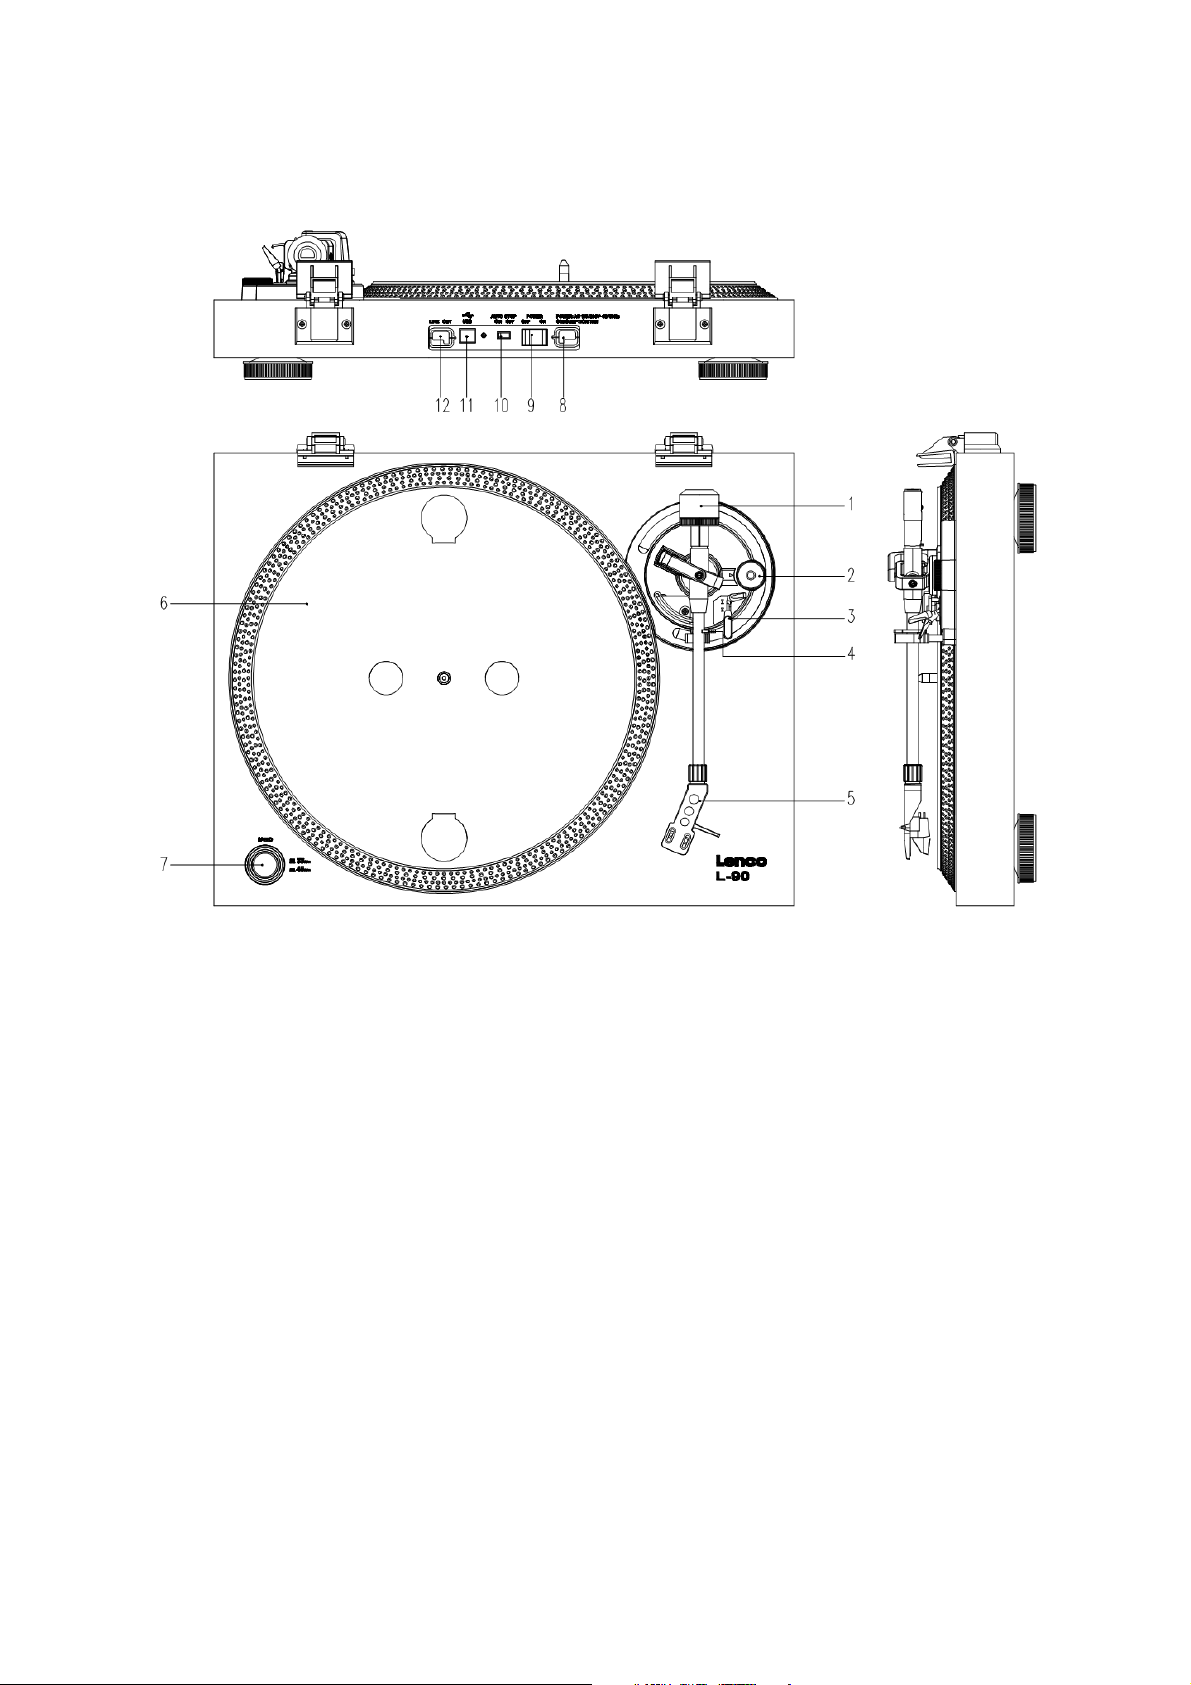
Exploring the turntable
1. Counterweight, use the counterweight to balance the tone arm.
2. Anti-Skating control: sets the anti-skating. Use anti-skating to prevent the
cartridge from swinging in towards the centre.
3. Tone arm lever: lowers or raises the tone arm.
4. Tone arm lock: locks the tone arm if the turntable is not in use.
5. Head shell: holds the removable stylus. When the turntable is not in use, it is
recommendable to place the removable protection cover on the stylus.
6. Platter: this is where you place your record, before playing it.
7. 33/45 RPM switch: sets the playing speed.
8. Power cord: connects the turntable to an AC wall outlet.
9. Main power switch: switches the power on or off.
10. Auto stop switch: this function is for 33 RPM records only. After the record is
finished, the platter automatically stops rotating.
11. USB port: connects the turntable to your computer.
12. Line out: connects the turntable to a mixer or an audio system
Important note: This turntable has a built-in amplifier to avoid damage to the turntable or to your
audio-system. Do not connect this turntable to your audio-system by using the phone-input as
this input is amplified as well.
Page 5
Getting started
Where to install
Keep the turntable out of direct sunlight. When the turntable is not in use, place it on
a sturdy platform of which the surface should be flat and steady, so the turntable
cannot fall. Make sure the turntable is stored in such a manner that no object can fall
on it, as pressure will damage or break the turntable. Prevent insertion of small
objects into the ventilation slots, or openings in the cabinet at all time.
Installation of the turntable
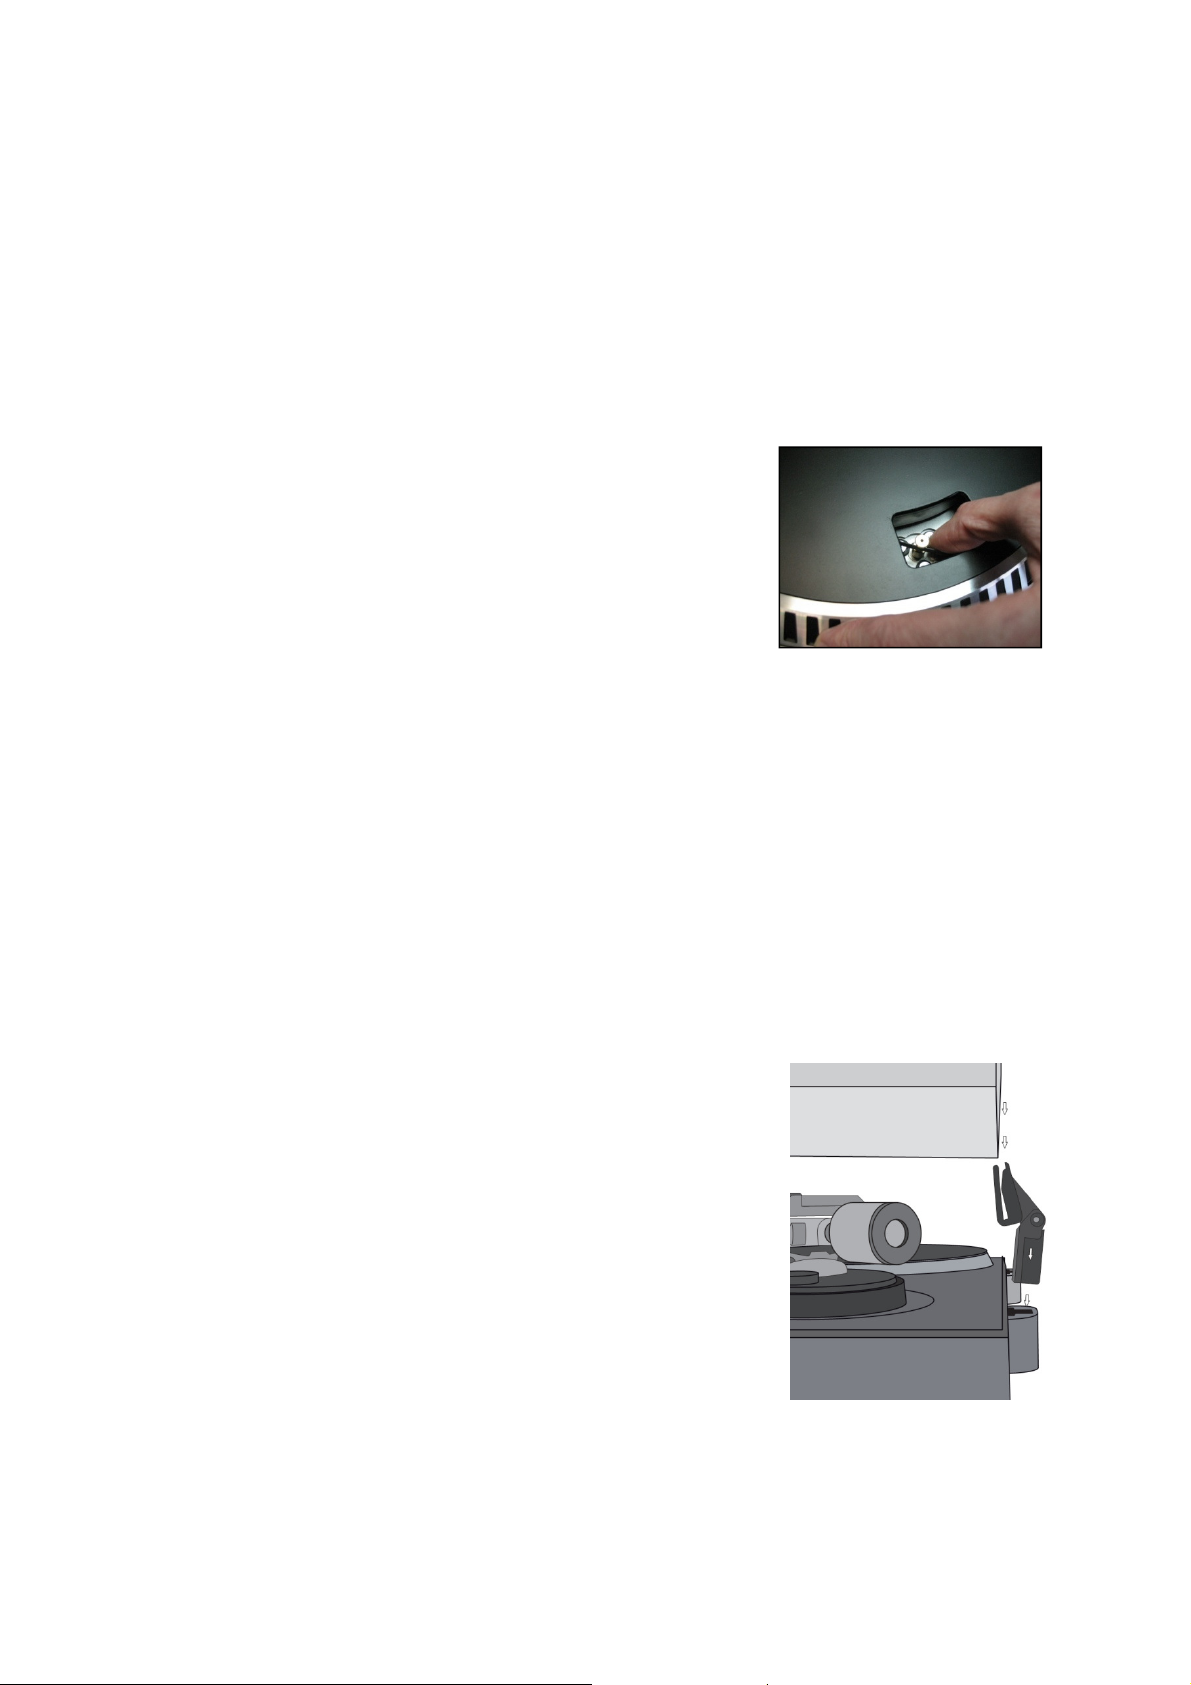
1. Open the box and unpack all parts.
2. Put the platter on the turntable and mount the belt. The
belt is on the downside of the platter.
3. Install the cartridge by placing it on the tone arm and
turn the tone arm’s anti-skate corkscrew until the
cartridge is fixed.
4. Mount and set the counterweight.
Screw the counterweight on the tone arm.
Unlock the tone arm.
Remove the protective cover of the stylus. Make sure you do not touch the
stylus, nor that the stylus touches anything.
Lift the tone arm from the armrest and lower the armrest.
Move the counterweight carefully a little either to the left or to the right until
the tone arm is in balance and floats horizontally.
Bring the tone arm back to the armrest and lock the armrest in such a manner
that the tone arm cannot move during installation.
Move the black plastic part of the counterweight to 0. The 0 should be in line
with the red line on the tone arm. Be careful that you do not move the metal
part.
Turn the metal part to the left to increase the needle
pressure. Lenco recommends to set the needle
pressure to 2,5.
5. Set the anti-skating. Lenco recommends that the
anti-skating should about half the needle pressure,
for the best result try different settings yourself.
6. Place the hinges and mount the dust cover.
7. Connect the AC cable to the wall outlet.
8. Connect the line out cables to a mixer or HiFi
system.
Important note: This turntable has a built-in amplifier to avoid
damage on the turntable or your audio-system. Do not connect this
turntable to your audio-system by using the phone-input because
this input is also amplified.
5
Page 6

Basic operation
Playing records
Switch the main power switch on the backside of the turntable to the “on” position.
Open the dust cover and place the record on the platter. If you play a single, do not
forget to place the single puck first.
Set the correct RPM speed
Remove the needle protection cover from the stylus
Unlock the tone arm on the armrest
Bring the tone arm to the record, the platter now starts rotating
Carefully place the tone arm on the record. Do not forget to lower the arm lever
If you want to interrupt a record during playing, raise the arm lever. Alternatively,
return it to the armrest to stop the record playing. When a record has come to its end,
the platter stops rotating*.
*Auto-stop should be on.
Connect the turntable to a computer for the first time
As this turntable is plug-and-play, no drivers are needed.
Before you connect the turntable to a computer, unplug it from
your mixer or Hi-Fi system.
The included software is a third party application and therefore
Lenco does not handle any questions or problems regarding the
software.
1. Switch the computer on
2. Connect the turntable to an AC wall outlet
3. Place the main power switch on the back side of the turntable in the “on” position
4. If the computer is booted, connect the turntable. The computer will now install the
drivers.
5. After the drivers are installed, you must now install the Audacity software.
For windows users; insert the CD or download the newest software via
http://audacity.sourceforge.net
For MAC users; download the newest software via
http://audacity.sourceforge.net
Important: Make sure that your computer recognizes the turntable as a recording
device. Especially Windows has the tendency to set the turntable default as a playing
device. If the turntable is set as playing device, Audacity cannot record your records.
Software Configuration (Windows XP, Vista, MAC)
1. Connect the turntable to the computer.
Note: Before connecting the turntable to the PC, disconnect the turntable from
your audio-system.
2. Start the Audacity software
3. Click on Microphone in the drop down menu and select “Stereo Mix”
6
Page 7
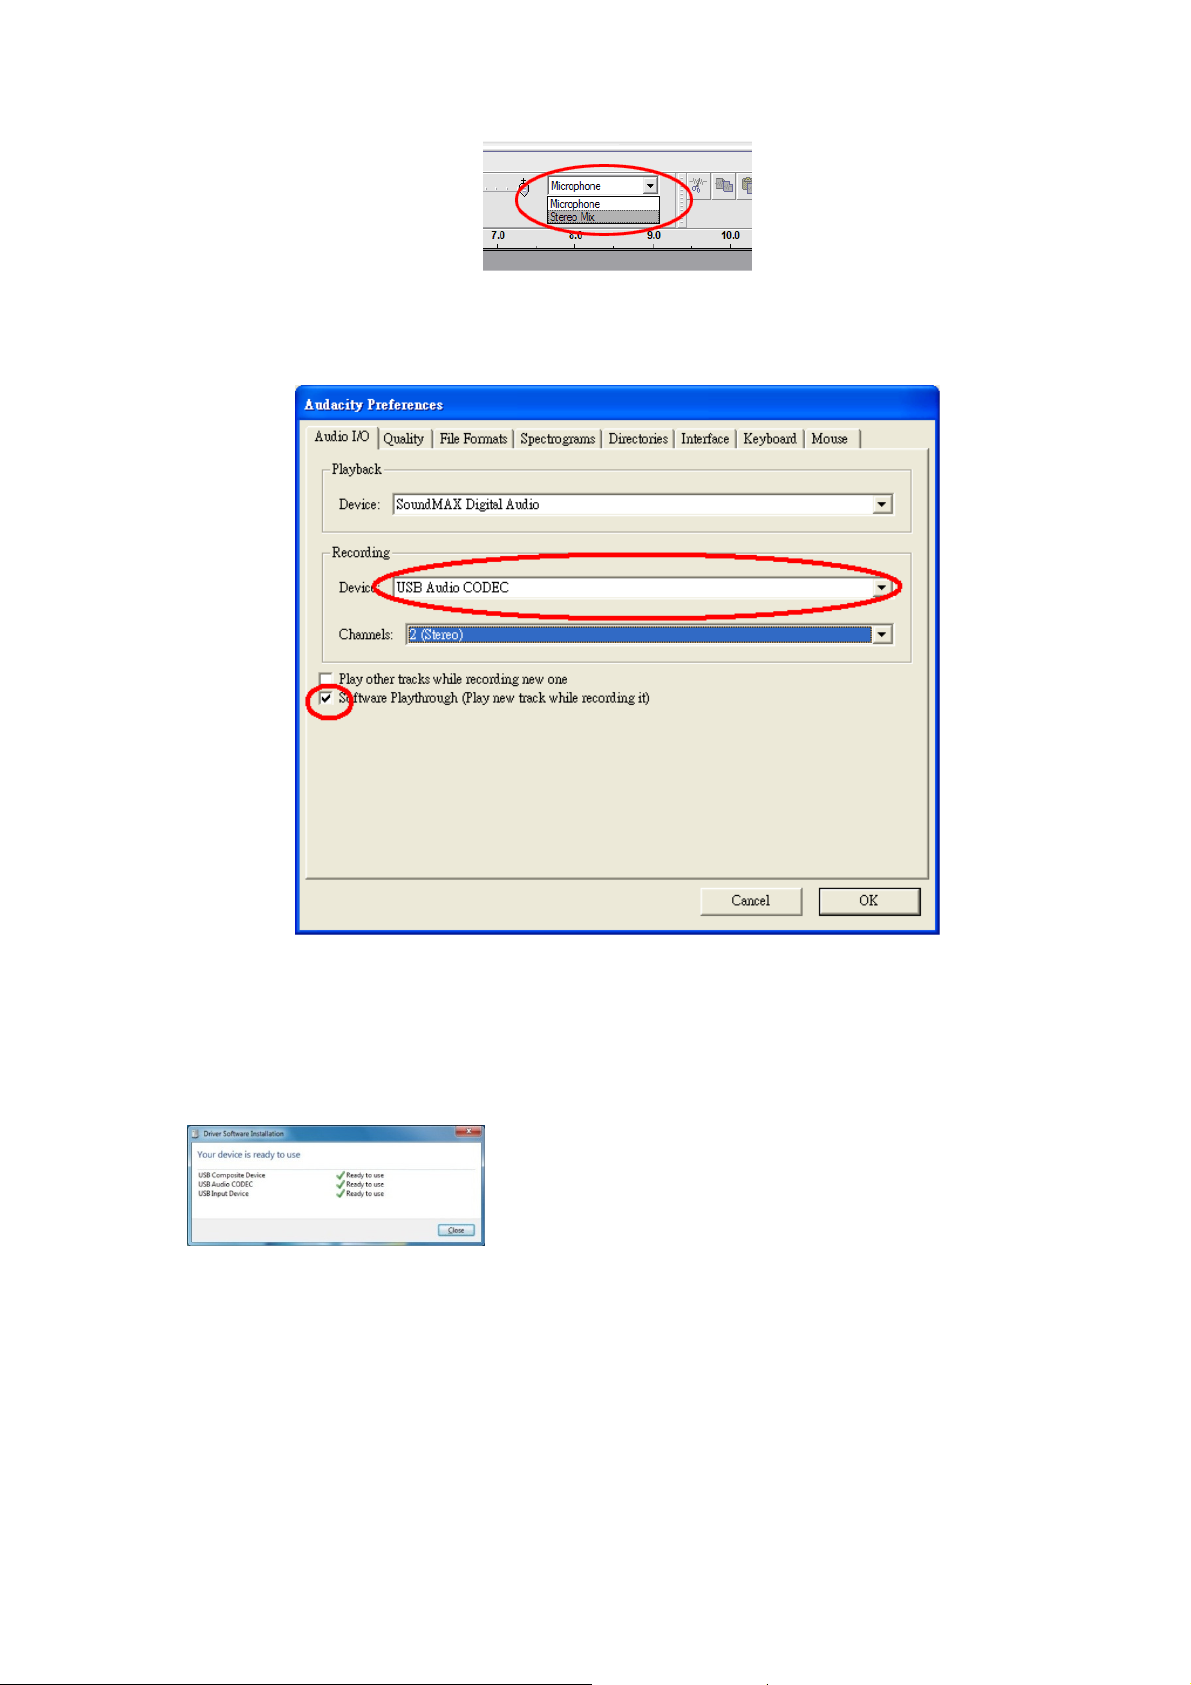
Select the “Edit” menu and then “Preferences”
4. Select the USB audio device under the “Recording” selection as shown in the
example below.
5. Select “Software Playthrough” to listen to the audio while recording.
6. Press “okay” to save your settings.
7. The software is now ready to start recording.
Software Installation & Configuration (Windows 7)
1. Connect the turntable to the AC power outlet.
2. Connect the turntable to a USB socket on your computer. Wait for several
seconds until the pop-up screen appears, as shown in the example below.
3. Click on “close”.
7
Page 8
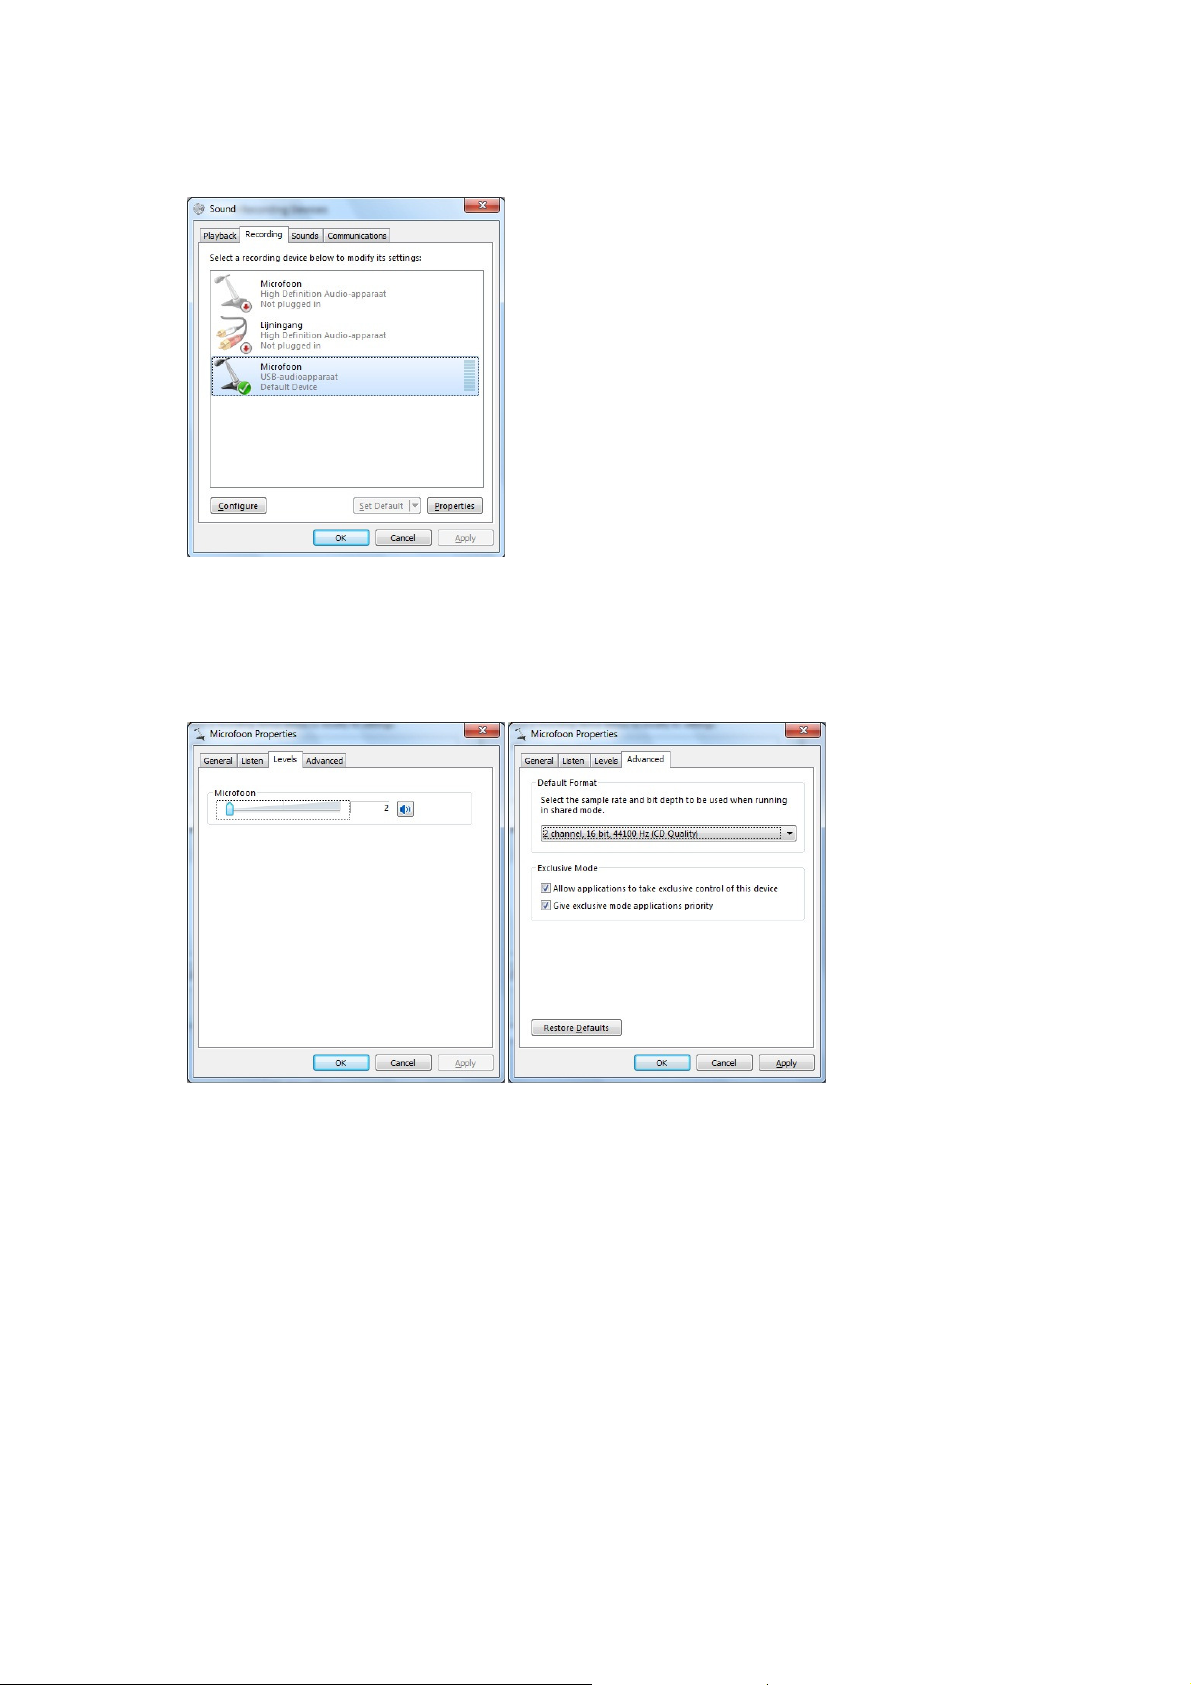
4. Click with the right mouse-button on the speaker icon (taskbar) and select
“recording”. The screen as shown in the example below appears.
5. Click on “microphone USB audio device”.
6. Click on “properties”.
7. Go to the Tab "levels" and move the volume slider down to level 2 as shown in
example below.
8. Go to the tab “advanced” and select in the pull-down menu: “2 channel, 16 bit,
44100 Hz (Cd-Quality)”.
9. Click consecutively on “apply”, “OK” and once again on “OK” (now all programs
are closed).
10. Insert the Audacity software CD into the disk drive, or download new software,
free of charge, via http://audacity.sourceforge.net/.
11. Follow the installation instructions as described in the instruction manual.
12. Run the Audacity software.
8
Page 9
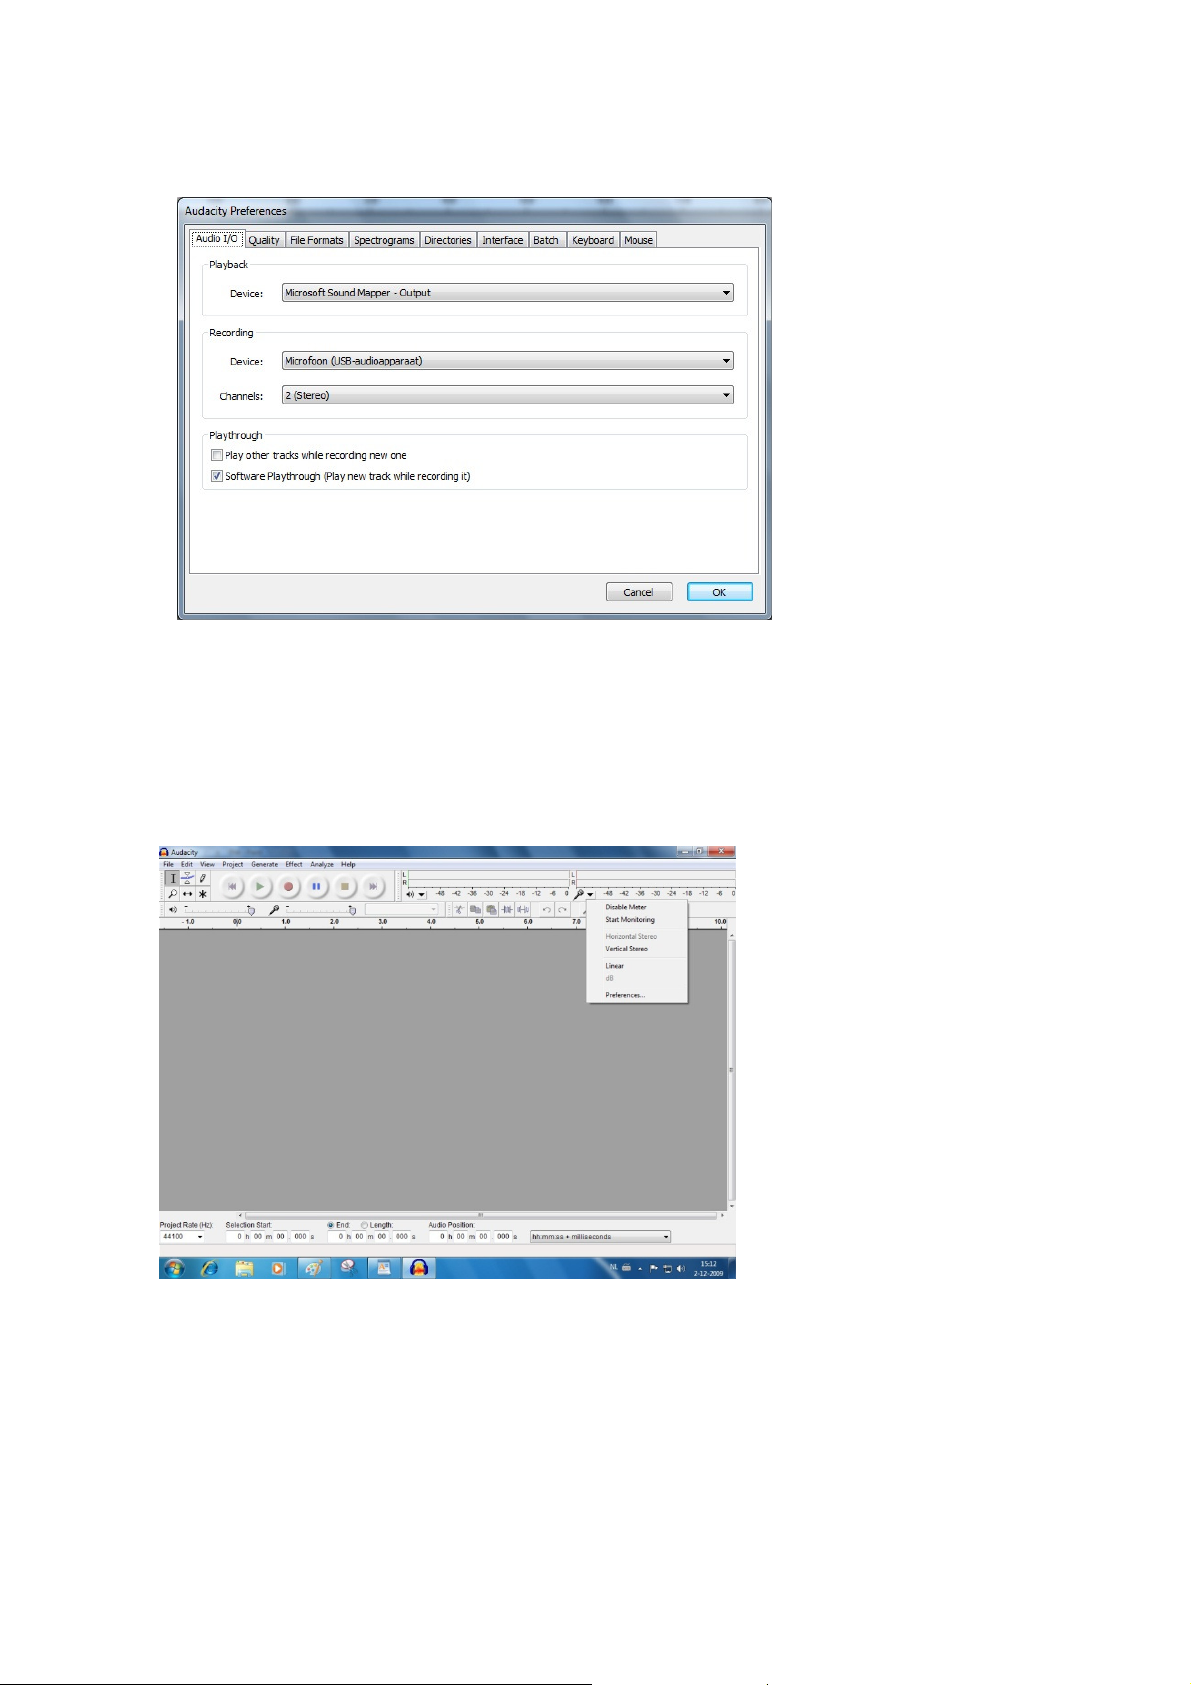
13. Go to the taskbar and click on "edit" and then on "preferences". The screen as
shown in the example below appears.
14. Go to the “recording device” pull-down menu and select the option “microphone”
(USB-audio device).
15. Go to the “channels” pull-down menu and select option 2 (stereo)
16. Mark the selection box “software play through” (play new track while recording
it)”.
17. Click on “OK”.
18. Go to the “microphone” icon in the pull-down menu and select “start monitoring”,
as shown in the picture below.
The software is now set and you can start digitalizing your records.
9
Page 10

Digitalizing records
all of these tools at once depending on the location of
(i.e. the beginning of a
. If you press Play at this point, your project will play from the
you have selected some
As this turntable is plug-and-play, no drivers are needed.
Before you connect the turntable to a computer, unplug it from
your mixer or Hi-Fi system.
The included software is a third party application and therefore
Lenco does not support questions or problems with or about the
software.
1. Switch the computer on
2. Connect the turntable to an AC wall outlet
3. Place the main power switch on the back side of the turntable in the “on” position
4. If the computer is booted, connect the turntable and boot the Audacity software.
Important: Check that your computer recognizes the turntable as a recording device.
Especially Windows has the tendency to set the turntable as the default playing
device. If the turntable is set as playing device, Audacity cannot record your records.
The Audacity guide
For a complete user guide visit http://audacity.sourceforge.net/
Toolbars
Audio Control Buttons
Selection tool: selects the range of audio you want to edit or listen to.
Envelope tool: changes the volume over time.
Draw tool: modifies individual samples.
Zoom tool: zooms in and out.
Time shift tool: slides a track to the left or right.
Multi tool: accesses
the mouse and the keys you are holding down.
Skip to Start: moves the cursor to time 0
song)
beginning.
Play: plays audio at the cursor position. If
audio, only said selection is played.
10
Page 11

Loop:
if you
oop”
records
in the lower
the current cursor position, so click the
you want the track to begin at time 0
temporarily stops playback or recording until you press
again.
stops recording or playing. You must do this before applying
“effects”, “saving”,
Skip to End
n this toolbar perform actions
all just shortcuts of existing menu items
Put the mouse on a tool icon to see
Trim away the audio outside the selection
Silence the selected audio
Redo (repeat last command).
lay”
the selection repeatedly.
sample rate (the sample rate
left corner of the window). The new tr
"skip to start"
(i.e. the beginning of a song)
moves the cursor to the end of the last track.
exceptions, they are
, enabling you to save time using the menu
in case you forget which one is which.
button changes
ack will begin at
button first if
to a “l
press and hold the “shift” key, the “p
button, enabling you to play
Record:
Pause:
“pause”
Stop:
The “Edit” Toolbar
All buttons i
audio at the project’s
-
or “exporting”.
:
- and with a couple of
a "tooltip",
.
.
Cut
Copy
Paste
Undo
Zoom In
11
Page 12

Fit selection in window
Fit project in window
Menu
the title of a music track, t
you access a few special commands that apply to individual tracks.
change the name of the track.
exchange
exchange
sets the display to
similar to Waveform, but measured in decibels (dB)
the track as a spectrogram, showing the amount of energy in
highlights the outline of the fundamental frequency (musical pitch) of
the audio, using the Enhanced Autocorrelation (EAC) algorithm.
the sound comes from just one speaker, either the right, or the left.
plays the track only thru
plays the track only thru
if there is another track below the one playing, this feature joins
into a single stereo track.
the right speaker. When tracks are joined into a stereo pair,
all edits automatically apply to both
if the selected track is a stereo track (a pair of left and right
tracks joined as a single tra
and edit
zooms until the selection just fits inside the window.
zooms until all of the audio just fits inside the window.
enu appears. This lets
method
the left speaker,
ck), this operation splits them into two separate tracks,
Zoom Out
The “Track Pop-Down”
If you click on
Name: here you can
Move Track Up:
Move Track Down:
Waveform:
audio.
:
:
he “track” pop-down m
s places with the track above.
s places with the track below.
“waveform”. This is the default
to visualize the
Waveform (dB): this is
logarithmic scale.
Spectrum: displays
different frequency bands.
Pitch (EAC):
Mono:
Left Channel:
Right Channel:
Make Stereo Track:
them
bottom track represents
Split Stereo Track -
the left speaker.
the right speaker.
The top track represents
channels.
, on a
while the
which you can modify,
, independently.
12
Page 13

Set Sample Format: determines the quality of the audio data, and the amount of
disk space it requires. 16-Bit is the quality used by audio CD's and is the minimum
quality that Audacity uses internally (8-bit audio files are automatically converted
when you open them). 24-Bit is used in higher-end audio hardware. 32-Bit float is the
highest quality supported by Audacity, and it is the recommended format, unless your
computer is either slow, or running out of disk space.
Set Rate: sets the number of samples per second of the track. 44100 Hz is used by
audio CDs. Tracks can have different sample rates in Audacity; they are
automatically re-sampled to the project’s sample rate (in the lower-left corner of the
window).
[MENU]
The “File” Menu
New: creates a new, empty window
Open: opens an audio file or an Audacity project in a new window (unless the current
window is empty). To add audio files to an existing project window, use one of the
“import” commands in the “project” menu.
Close: closes the current window, asking you if you want to save changes. In
Windows and UNIX, closing the last window will close Audacity, unless you modify
this behavior in the “interface preferences”.
Save Project: saves everything in the window into an Audacity-specific format. An
Audacity project consists of a project file, ending in ".aup", and a project data folder,
ending in "_data". For example, if you name your project "Composition", then
Audacity will create a file called "composition.aup" and a folder called
“composition_data”. Audacity project files are not meant to be shared with other
programs - use one of the “export” commands (below) when you have finished
editing a file.
Save Project As: same as “save project” (above), but gives you the opportunity to
rename the file the way you want.
Recent Files: shows a list of recently opened files in Audacity, enabling you to reopen them quickly.
Export as WAV: exports all audio in your project to a WAV file, an industry-standard
format for uncompressed audio. You can change the standard file format used for
exporting from Audacity by opening “file format preferences”. Note that exporting will
automatically mix and re-sample all tracks, in case there are 2 or more tracks, or
varying sample rates. See also File Formats.
Export Selection As WAV: same as above, but only exports the current selection.
13
Page 14

Export as MP3: exports audio as an MP3 file. As MP3 files are compressed, they
use less disk space, but they lose some audio quality. Another compress alternative
is Ogg Vorbis (see below). You can set the quality of MP3 compression in the File
Format Preferences. See also MP3 Exporting.
Export Selection as MP3: same as above, but only exports the current selection.
Export as Ogg Vorbis: exports all audio as an Ogg Vorbis file. Ogg Vorbis files are
compressed files, and therefore use less disk space, but they do lose some audio
quality. Ogg Vorbis files use a little less disk space then MP3 files but have similar
compression quality. Furthermore, Ogg Vorbis is free from patents and licensing
restrictions. However, Ogg Vorbis files are not as widespread as MP3. You can set
the quality of Ogg compression in the “file format preferences”.
Export Selection As Ogg Vorbis: same as above, but only exports the current
selection.
Export Labels: “label track”, if activated, lets you export labels as text files. You can
import labels in the same text format using the "import labels..." command in the
Project Menu.
Export Multiple: lets you split your project into multiple files in just one step. You can
either split them vertically (one new file per track), or horizontally (using labels in a
“label track” to indicate breaks between exported files.
Page Setup: configures how Audacity will print the track waveforms using the “print”
option, and which printer to use.
Print: prints the main window view from Audacity, showing tracks and waveforms.
Exit (Quit): closes all windows and exits Audacity, prompting you to save any
unsaved changes first.
The “Edit” Menu
Undo: undoes the last editing operation you performed in your project. Audacity
supports full-unlimited undo; meaning you can undo every editing operation you
made during a session.
Redo: redoes any editing operation that was just undone. After you perform a new
editing operation, you can no longer redo the operations that were undone.
Cut: removes the selected audio data and stores it on the clipboard. Only one project
can be on the clipboard at a time, but that project may contain multiple tracks.
Copy: copies selected audio data to the clipboard without removing it from the
project.
14
Page 15

Paste: inserts whatever is on the clipboard at the selected position, or cursor position
in the project. This replaces any selected audio data, if any.
Trim: removes everything to the left and right of the selection.
Delete: removes all selected audio data without copying it to the clipboard.
Silence: suppresses all selected audio data, replacing said data with silence, instead
of removing it.
Split: moves the selected region into its own track, or tracks. The affected portion of
the original track will only have silence. See the figure below:
Duplicate: copies the entire track, a part of it, or a set of tracks into new tracks. See
the picture below:
Select ... > All: selects all of the audio in all of the tracks in the project.
Select ... > Start to Cursor: selects everything from the beginning of the selected
tracks to the cursor position.
Select ... > Cursor to End: selects from the location of the cursor to the end of the
selected tracks.
Find Zero Crossings: modifies the selection slightly, so that both edges, left and
right, of the selection appear on a positive-slope zero crossing. This makes it easier
to cut and paste audio without resulting in an audible clicking sound.
Selection Save: remembers the current selection (or cursor position), allowing you to
restore it later.
Selection Restore: restores the cursor position to the last location as saved by
"selection save".
Move Cursor ... > to Track Start: moves the cursor to the start of the selected track.
Move Cursor ... > to Track End: moves the cursor to the end of the selected track.
Move Cursor ... > to Selection Start: moves the cursor to the start of the current
selection.
15
Page 16

Move Cursor ... > to Selection End: moves the cursor to the end of the current
selection.
Snap-To ... > Snap On: enables the “snap-to” mode. This mode constrains the
selection to the nearest interval on the time scale, by default the nearest second.
Therefore, if you click and drag from 4.2 seconds to 9.8 seconds, it results in a
selection from precisely 4 seconds to 10 seconds. You can change the units that are
snapped to using the "set selection format" option in the “view menu”.
Snap-To ... > Snap Off: switches the “snap-to” mode off, letting you select random
time ranges
Preferences: opens the “preferences” dialog box.
The “View” Menu
Zoom In: zooms in on the horizontal axis of the audio, displaying more detail about
less time. You can also use the zoom tool to zoom in on a particular part of the
window.
Zoom Normal: zooms to the default view, which displays about one inch per second.
Zoom Out: zooms out, displaying less detail about more time.
Fit in Window: zooms out until the entire project just fits in the window.
Fit Vertically: vertically resizes all tracks enabling them to fit inside the window (if
possible).
Zoom to Selection: zooms in, or out so the selection fills the window.
Set Selection Format: lets you choose the formatting that is displayed at the bottom
of the window, indicating the current selection time. Options include film, video, and
audio CD frames, seconds + samples, or pure time. If you enable the “snap-to” mode
in the “edit menu”, the selection snaps to the frames, or other quantifications you
have selected in this menu.
History: shows the history window in which all performed actions during the current
session, including importing, are displayed. The right-hand column shows the amount
of hard disk space your operations have used. You can jump back and forth between
editing steps, by simply clicking on the entries in the window. This is the same as
selecting “undo” or “redo” many times in a row. You can also discard the “undo”
history to save disk space. Whilst working, you can keep the history window open.
Float Control Toolbar: moves the “control toolbar” out of the window and into its
own floating window, so you can place it wherever you want. The menu item changes
to “dock control toolbar”, which you can use to put the toolbar back into the main
window.
16
Page 17

Float Edit Toolbar: moves the “edit toolbar” out of the window and into its own
floating window, so you can position it wherever you want. The menu item changes to
“dock edit toolbar”, which you can use to put the toolbar back into the main window.
Float Meter Toolbar: does the same thing for audacity's VU meters, which you use
to set recording levels and adjust playback.
Float Mixer Toolbar: moves the “mixer toolbar” out of the window, into its own
floating window as above.
The “Project” Menu
Import Audio: imports audio from a standard audio format into your project. Use this
command if you already have a couple of tracks, but still want to add another track to
the same project, perhaps to mix them together. You cannot use this option to import
Audacity Projects. The only way to combine two Audacity Projects is to open them in
separate windows, then copy and paste the tracks.
Import Labels: takes a text file containing time codes and labels, and converts them
into a “label track”.
Import MIDI: imports MIDI files and puts them into a MIDI Track. Audacity can
display MIDI files, but cannot play, edit, or save them yet.
Import Raw Data: allows you to open a file in virtually any uncompressed format.
When you select the file, Audacity analyzes it and tries to guess its format. Its guess
percentage is about 90%, therefore you just press on "OK" and listening to the result.
If it is not correct, however, you can use the options in the dialog box to try some
other possible encodings.
At the beginning of your imported track(s), you may notice a little bit of noise. This is
probably the file's header, which Audacity was not able to compress. Just zoom in
and select the noise with the “selection tool”, and then choose “delete” from the “edit
menu”.
Edit ID3 Tags: opens a dialog box, allowing you to edit the ID3 tags associated with
a project for MP3 exporting.
Quick Mix: mixes all selected tracks. If you are mixing stereo tracks, or mixing tracks
that are marked as “left or right channel”, they result in a stereo track (two channels).
Otherwise, the result will be mono.
Whenever you press the Play button and whenever you export, your tracks are
implicitly mixed. This command offers a way to do it permanently and save the results
to the disk, saving space on the playback resources.
Note that if you try to mix two very loud tracks together, you may get clipping (it will
sound like pops, clicks, and noise). To avoid this, drag down the gain slider on the
tracks in order to reduce their volume before mixing.
New Audio Track: creates a new, empty audio track. As importing, recording, and
mixing automatically creates new tracks as needed, this command is hardly needed.
17
Page 18

However, you can use this command to cut, or copy, data from an existing track and
paste it into a blank track. If that track was at a non-default rate, then you may need
to use “set rate” from the “track pop-down” menu to set the correct sample rate.
New Stereo Track: see above, but this command creates a stereo track. You can
also create a stereo track by joining two tracks using the “track pop-down” menu.
New Label Track: creates a new label track, which can be very useful for textual
annotation.
New Time Track: creates a new time track, which varies the playback speed over
time.
Remove Tracks: removes the selected track, or tracks from the project. Even if you
have only selected a part of a track, this feature removes the entire track. You can
also delete a track by clicking on the X in its upper-left corner. To cut out only a part
of the audio in a track, use “delete” or “silence”.
Align Tracks: all align functions only function with complete tracks, or groups of
tracks, rather than on selections, even if they span across multiple tracks. They all
operate by time-shifting tracks (moving them left or right), making it easier to
synchronize tracks or get rid of silences at the beginning. The cursor or selection
stays in the same place unless you use "align and move cursor...", see below.
Align and move cursor: this functions the same as the above, except that the
cursor or selection is moved along with the tracks. That allows you to shift the tracks
without losing your relative place.
Add Label at Selection: creates a new label at the current selection. You can title
the label by typing on the keyboard and then press the "enter" or “return” key when
you are done.
Add Label at Playback Position: creates a new label at the location where you
currently are playing or recording. You can use this to mark a sequence while you
listen to that. You can title the label by typing on the keyboard and then press the
"enter" or "return" key when you are done. This feature is only available if Audacity is
running.
The “Generate” Menu
If you choose an item from the “generate” menu without any tracks in a project, a new
track is created. Otherwise, the current track is used. If a track is selected and the
cursor is placed in a single place on the track, audio is inserted at the cursor position.
The default duration of this operation is 30 seconds. The audio created will replace
the any selection; otherwise, it is inserted into the track, shifting up later parts of the
track.
Silence: inserts silence
18
Page 19

Tone: creates a “sine wave”, “square wave”, or “Sawtooth wave”.
White Noise: inserts random audio samples, sounding like pure static.
Any items, which appear after these three built-ins, are VST, Ladspa, or Nyquist plugins. A poorly written plug-in may crash Audacity, so always save your work before
using a plug-in. Note that any effect that does not take any audio as input will
automatically be placed in the Generate menu.
The “Effect” Menu
The items in this menu only function if you have selected some audio. Audacity does
not have any real-time effects; you must select the audio yourself, apply an effect,
and then listen to the results. Most effects have a “preview” button. Clicking this
button plays up to three seconds of audio, allowing you to hear what it will sound like
once the effect is applied. This is useful for fine-tuning the effect parameters.
Repeat Last Effect: a shortcut to apply the most recent effect with the same
settings. This is a convenient manner to apply the same effect to many different parts
of a file in a quick way.
Amplify: changes the volume of the selected audio. If you click the "allow clipping"
checkbox, it will let you amplify so much that the audio ends up beyond the range of
the waveform, clipping it (distorting). The default value after you open the effect, is to
amplify in such a manner that the loudest part of the selection is as loud as possible
without distortion.
Bass Boost: enhances the bass frequencies in the audio.
Change Pitch: changes the pitch/frequency of the selected audio without changing
the pace. When you open the dialog box, the starting frequency is set to Audacity's
best guess related to the selected frequency. This works very well for recordings of
singing or musical instruments without background noise. You can specify the pitch
change in one of the following four different ways: musical note, semi-tones,
frequency, or percent change.
Change Speed: changes the audio speed by re-sampling. Increasing the speed also
increases the pitch, and vice versa. This will change the length of the selection.
Change Tempo: changes the tempo (pace) of the audio, without changing the pitch.
Obviously, this changes the length of the selection.
Compressor: compresses the dynamic range of the selection. Loud parts will be
softer while keeping the volume of the soft parts the same. You can optionally
normalize the recording afterwards, resulting in the entire piece having a higher
perceived volume.
Echo: this very simple effect repeats the selection with a descending sound, like a
series of echoes. This effect does not change the length of the selection, so you may
19
Page 20

want to add silence to the end of the track before applying it (using the “generate
menu”).
Equalization: boosts or reduces random frequencies. You can select one of a
number of different curves designed to equalize the sound of some popular record
manufacturers, or draw your own curve.
Fade In: fades the selection in linearly
Fade Out: fades the selection out linearly
FFT Filter: similar to “equalization”, lets you enhance or reduce random frequencies.
The curve uses a linear scale for frequency.
Invert: vertically flips the waveform, just as a phase inversion in the analogue
domain.
Noise Removal: cleans up any noise from a recording. First, select a small piece of
audio that is silent except for the noise, select "noise removal", and click on the "get
noise profile" button. Then select all of the audio you want filtered, and re-select
"noise removal". Now click on the "remove noise" button. You can experiment with
the slider to try to remove more or less noise. It is normal for noise removal to result
in some distortion. It works best when the audio signal is much louder than the noise.
Normalize: corrects the DC offset (a vertical displacement of the track) and/or
amplifies a track as such, that the maximum amplitude is a fixed amount: -3 dB. It is
useful to normalize all your tracks before mixing. If you have many tracks, you may
need to use the track’s gain sliders to turn some down.
Nyquist Prompt: this is for advanced users only! This function allows you to
express random transformations, using a powerful functional programming language.
See the Nyquist section of the Audacity website for more information.
Phaser: the name "Phaser" comes from "phase shifter", because it combines phase-
shifted signals with the original signal. Move the phase-shifted signals by using a low
frequency oscillator (LFO).
Repeat: repeats the selection a certain number of times. This operation is quite fast
and space-efficient, so it is practical to use it to create nearly infinite loops.
Reverse: reverses the selected audio temporally. Once in place, the end of the audio
will be heard first, and the beginning last.
Wahwah - uses a moving band pass filter to create its sound. A low frequency
oscillator (LFO) is used to control the movement of the filter throughout the frequency
spectrum. The wahwah adjusts the phase of the left and right channels when given a
stereo selection, so that the effect seems to travel across the speakers.
20
Page 21

Plugins 1 to 15 (etc).: these sub-menus contain any VST, Ladspa, or Nyquist plugins, as loaded by audacity. It is possible for a poorly written plug-in to crash Audacity,
so always save your work before using a plug-in effect.
The “Analyze” Menu
Plot Spectrum: prior to using this feature, you must select an audio section from a
single track first. Then select "plot spectrum". This opens a window displaying the
power spectrum of the audio over said section, calculated using the “fast Fourier
transform”. This graph represents the amount of energy in each frequency. As you
move the mouse over the display, it shows you the nearest peak frequency. This
window also can display other common functions that are calculated using the “fast
Fourier transform”, including three versions of the “autocorrelation” function. The
“enhanced autocorrelation” function is very good at identifying the pitch of a note.
The “analyze” menu is used for effects and plug-in effects, which do not modify the
audio, but simply open a dialog box with some descriptive information. Audacity also
supports Analyze commands that create annotations in a Label Track.
The “Help” Menu
About Audacity: displays the version number and credits. If you have installed
Audacity yourself, check here to verify which optional modules were successfully
compiled.
Contents: opens this reference guide in a searchable form.
Maintenance
21
Page 22

How to replace the stylus
Lock the tone arm.
Remove the protective cap from the stylus.
Pull the stylus in the direction of the arrow (A) and remove it.
Put in the new stylus following the reverse procedure.
Replace the protective cap on the stylus.
How to disassemble the cartridge
Lock the tone arm.
Remove the stylus (see section above).
Release the pick-up head by pushing the cartridge in the
direction of the arrow.
Disconnect the four wires at the level of the pick-up head.
How to install a new cartridge
Connect the link wires.
Push the cartridge into the head shell
Re-position the stylus
Place the protective cap on the stylus.
22
Page 23

Recommendations from Lenco
Problem
Solution
Clean your records with a rag, impregnated with an antistatic product.
Replace the stylus approximately every 250 playing hours. An old cartridge
wears out the records much faster.
Clean the stylus regularly with a soft brush dipped in alcohol.
When transporting the turntable, do not forget to place the protective cap on the
stylus and put the clip of the armrest on the tone arm.
Trouble shooting
Check if the power cable is connected to
the AC wall outlet.
Does not play / platter does not rotate
Tone arm does not touch the platter Check if the tone arm lever is lowered.
The sound is distorted
The record skips
The last part of the record isn't played Set the auto return switch to off.
No or distorted sound while recording
records via Audacity
Check if the main power switch, on the
backside of the turntable, is switched on.
Check if the belt is mounted correctly.
Check if the stylus protection cover has
been removed.
Check if the RPM set is set correctly
Check if the audio cables are properly
connected, i.e. that they are NOT
connected to a phone connection.
Check the needle pressure and AntiSkating.
Clean the needle with a soft brush
dipped in alcohol.
Check the needle pressure and AntiSkating.
Check the computer and Audacity
settings.
23
Page 24

Specifications
Description
Spare parts
number
Order Qty
Power consumption
Drive Belt drive Rubber belt
Amplifier Yes Built in pre-amplifier
Platter rotating speed 33 / 45 RPM
Adjustable counter weight Yes
Anti-skating Yes
Headshell Removable Yes
System
Connections
Materials
Dimensions
Weight 4.62 KG
Cartridge
Model number CR-2861
Replacement model CN-259
Line output
USB output
AC power cord 110-230 Volt
Housing Wooden case in walnut veneering
Platter
Dust cover and hinges Plastic
Tone arm Aluminum
Without dust cover 450 x 367.5 x 120 mm
With dust cover closed 450 x 367.5 x 130 mm
With dust cover opened 450 x 367.5 x 400 mm
Operation 10 Watt
Standby < 1 Watt
Moving magnet
Bonded
Stylus tip
USB 1.1
Compatible
Aluminum
Diameter 332 mm
diamond
Sphere shaped
0.6 mm
Windows XP, Windows Vista
Home & higher, Windows 7
Home & higher, OS X10.4 and
higher
Spare parts list
Dust cover L90-104 1
Hinge L90-105 2
System with needle L90-116 1
Cartridge L90-113 1
Counterweight L90-115 1
Belt L90-119 1
Single Puck L90-125 1
24
Page 25

Safety instructions
IMPORTANT SAFETY INSTRUCTIONS - READ CAREFULLY BEFORE USE.
CAUTION
RISK OF ELECTRICAL SHOCK
DO NOT OPEN
CAUTION: TO PREVENT AN ELECTRICAL SHOCK, DO NOT
REMOVE ANY COVER SCREWS. THERE ARE NO USER
SERVICEABLE PARTS INSIDE. REQUEST A QUALIFIED SERVICE
PERSON TO PERFORM SERVICING.
This symbol indicates that there are important operating maintenance
instructions in the user manual accompanying this turntable.
This symbol indicates that dangerous voltage is present within this
turntable, constituting a risk of electric shock or personal injury.
Keep these instructions in mind:
Do not use this turntable near water.
Clean only with a slightly damp cloth.
Do not cover or block any ventilation opening. When placing the turntable on a
shelf, leave 5 cm (2”) free space around the whole turntable.
Install in accordance with the supplied user manual.
Don’t step on or pinch the power cord. Be very careful, particularly near the plugs
and the cable’s exit point. Do not place heavy items on the power cord, which
may damage it. Keep the entire turntable out of children’s reach! When playing
with the power cable, they can seriously injure themselves.
Unplug this turntable during lightning storms or when unused for a long period.
Keep the turntable away from heat sources such as radiators, heaters, stoves,
candles and other heat-generating products.
Avoid using the device near strong magnetic fields.
25
Page 26

ESD can disturb normal usage of this turntable. If so, simply reset and restart the
device following the instruction manual. During file transmission, please handle
with care and operate in a static-free environment.
Safety instructions - continued
WARNING! NEVER INSERT AN OBJECT INTO THE PRODUCT THROUGH
THE VENTS OR OPENINGS. HIGH VOLTAGE FLOWS THRU THE PRODUCT
AND INSERTING AN OBJECT CAN CAUSE ELECTRIC SHOCK AND/OR
SHORT CIRCUIT INTERNAL PARTS. FOR THE SAME REASON, DO NOT
SPILL WATER OR LIQUID ON THE PRODUCT.
Do NOT use in wet or moist areas such as bathrooms, steamy kitchens or near
swimming pools.
Do not use this turntable when condensation may occur.
This turntable is produced according to all current safety regulations. The following
safety tips should safeguard users against careless use and dangers involved with
such use.
Although this turntable is manufactured with the utmost care, and checked several
times before leaving the factory, it is still possible that problems may occur, as
with all electrical appliances. If you notice smoke, an excessive build-up of heat or
any other unexpected phenomena, you should disconnect the plug from the main
power socket immediately.
This turntable must be well ventilated at all time!
This turntable must operate on a power source as specified on the specification
label. If you are not sure of the type of power supply used in your home, consult
your dealer or local power company.
The socket outlet must be installed near the equipment and must be easily
accessible.
Do not overload AC outlets or extension cords. Overloading can cause fire or
electric shock.
Turntables with a Class 2 power cord do not require an earthed connection.
Keep away from rodents. Rodents enjoy biting on power cords.
Always hold the plug when pulling out the plug from the main supply socket. Do
not pull the power cord. This can cause a short circuit.
Avoid placing the turntable on any surfaces that may be subject to vibrations or
shocks.
To protect the turntable during a thunderstorm unplug the AC power cable.
When the turntable is not used for long periods, unplug the AC power cable for
safety reasons.
To clean the turntable, use a soft dry cloth. Do NOT use solvents or petrol based
fluids. For stubborn stains, you may use a damp cloth with a diluted detergent.
We are not responsible for damage or lost data caused by malfunction, misuse,
modification of the device.
26
Page 27

Do not distribute copyright-protected material
Do not distribute copyright-protected material without the permission of the content
owners. Doing this may violate copyright laws. The manufacturer is not liable for any
legal issues caused by the user’s illegal use of copyrighted material.
Disclaimer
Some content and services accessible through this device belong to third parties and are
protected by copyright, patent-, trademark- and/or other intellectual property laws. Such
content and services are solely provided for your personal and non-commercial use. You
may not use any content or services in a manner that has not been authorized by the content
owner or service provider. Without limiting the foregoing, unless expressly authorized by the
applicable content owner or service provider, you may not modify, copy, republish, upload,
post, transmit, translate, sell, or create derivative works, exploit, or distribute in any manner
or medium any content or services displayed through this device.
“THIRD PARTY CONTENT AND SERVICES ARE PROVIDED ‘AS IS.’ LENCO
DOES NOT WARRANT CONTENT OR SERVICES SO PROVIDED, NEITHER EXPRESSLY
NOR IMPLIED, FOR ANY PURPOSE. LENCO EXPRESSLY DISCLAIMS ANY IMPLIED
WARRANTIES, INCLUDING BUT NOT LIMITED TO, WARRANTIES OF
MERCHANTABILITY OR FITNESS FOR A PARTICULAR PURPOSE. LENCO DOES NOT
GUARANTEE THE ACCURACY, VALIDITY, TIMELINESS, LEGALITY, OR
COMPLETENESS OF ANY CONTENT OR SERVICE MADE AVAILABLE THROUGH THIS
DEVICE. UNDER NO CIRCUMSTANCES, INCLUDING NEGLIGENCE, SHALL LENCO BE
LIABLE. NEITHER IN CONTRACT, NOR TORT, FOR ANY DIRECT, INDIRECT,
INCIDENTAL, SPECIAL OR CONSEQUENTIAL DAMAGES, ATTORNEY FEES,
EXPENSES, OR ANY OTHER DAMAGES ARISING OUT OF, OR IN CONNECTION WITH,
ANY INFORMATION CONTAINED IN, OR AS A RESULT OF THE USE OF ANY CONTENT
OR SERVICE BY YOU OR ANY THIRD PARTY, EVEN IF ADVISED OF THE POSSIBILITY
OF SUCH DAMAGES.”
Third party services may be terminated or interrupted at any time, and Lenco makes no
representation or warranty that any content or service will remain available for any period.
Content and services are transmitted by third parties by means of networks and transmission
facilities over which Lenco has no control. Without limiting the generality of this disclaimer,
Lenco expressly disclaims any responsibility or liability for any interruption or suspension of
any content or service made available through this device. Lenco is neither responsible nor
liable for customer service related to the content and services. Any question or request for
service relating to the content or services should be made directly to the respective content
and service providers.
27
Page 28

Service and support
For information: www.lenco.com
For support: http://lencosupport.zendesk.com
Lenco helpdesk:
Germany 0900-1520530 (Local charges)
The Netherlands 0900-23553626 (Local charges + 1ct p/min)
Belgium 02-6200115 (Local charges)
France 03-81484280 (Local charges)
The helpdesk is accessible from Monday till Friday from 9 AM till 6 PM.
When contacting Lenco, you will always be asked for the model and serial number of
your product. The serial number can be found on the back of the device. Please write
down the serial number below:
Model: L-90
Serial number:_________________________________
Lenco offers service and warranty in accordance to European law, which means that
in case of repairs (both during and after the warranty period) you should contact your
local dealer.
Important note: It is not possible to send products that need repairs to Lenco
directly.
Important note: If this unit is opened or accessed by a non-official service center in
any way, the warranty expires.
This device is not suitable for professional use. In case of professional use, all
warranty obligations of the manufacturer will be voided.
28
Page 29

This symbol indicates that the relevant electrical product or battery
should not be disposed of as general household waste in Europe. To
ensure the correct waste treatment of the product and battery,
please dispose them in accordance to any applicable local laws of
requirement for disposal of electrical equipment or batteries. In so
doing, you will help to conserve natural resources and improve
standards of environmental protection in treatment and disposal of
electrical waste (Waste Electrical and Electronic Equipment
Directive).
Products with the CE marking comply with the EMC Directive
(2004/108/EC) and the Low Voltage Directive (2006/95/EC) issued
by the Commission of the European Community.
The declaration of conformity may be consulted at
http://www.lenco.eu/supportfiles/CE/buia893nf93fdc.pdf
®All rights reserved
29
Page 30

30
 Loading...