


TruSensTM Z-3000
EN |
3 |
DE |
20 |
FR |
37 |
NL |
54 |
IT |
71 |
ES |
88 |
PT |
105 |
DA |
122 |
FI |
139 |
NO |
156 |
SV |
173 |
CS |
190 |
SK |
207 |
HU |
224 |
PL |
241 |
RO |
258 |
RU |
275 |
GR |
292 |
TR |
309 |

Welcome to clean air with TruSens. Thank you for allowing us to join you on your journey towards wellness.
The air you breathe should be clean, no matter where you are in the room. TruSens SensorPod™, PureDirect™ Technology & DuPont™ Filtration ensure the whole room benefits from cleaner air.

SAFETY INFORMATION
PLEASE READ AND SAVE THESE INSTRUCTIONS
Unplug or disconnect the appliance from the power supply before replacing fiilters or UV-C emitter, or when appliance is not in use.
WARNING: To reduce the risk of fiire or electric shock, do not use this fan with any solid-state speed control device.
Do not operate any purifiier with a damaged cord or plug, or if the wall socket is loose. If the supply cord is damaged, it must be replaced by the manufacturer, its service agent or similarly qualifiied persons in order to avoid a hazard.
Do not run cord under carpeting, throw rugs, runners, or similar coverings. Do not run cord under furniture or appliances. Arrange cord away from traffic area and where it will not be tripped over.
WARNING: Skin or eye damage may result from directly viewing the light produced by the UV-C emitter in this apparatus. Unintended use of the appliance or damage to the housing may result in the escape of dangerous UV-C radiation. UV-C radiation may, even in little doses, cause harm to the eyes and skin. Always disconnect power before relamping or servicing. Replace UV-C emitter with 2415108 (for Z-2000), or 2415111 (for Z-3000), Manufactured by ACCO Brands.
•Remove all packaging, including the fiilter bag, before use.
•Appliances that are obviously damaged must not be operated.
•This appliance must only be connected to a wall socket outlet matching the supply plug type and rating stated on the rating plate.
•Locate air purifiier near the outlet wall socket and do not use extension cords.
•This appliance can be used by children aged from 8 years and above and persons with reduced physical, sensory or mental capabilities or lack of experience and knowledge if they have been given supervision or instruction concerning use of the appliance in a safe way and understand the hazards involved.
•Children shall not play with, clean, or try to maintain the appliance.
•Replace the UV-C emitter with the model specifiied within this manual.
•Do not attempt to service or repair this product yourself.
•Only use the purifiier and SensorPod™ with the power cable provided.
•Only clean this machine with a damp cloth, do not use solvents or bleach.
•Ensure appliance is always placed on fiirm level surface before operation.
•Do not block or obstruct the air intake or outlet vents.
•Do not insert fiingers or other items into the air intake or outlet vents.
•When the air purifiier is in standby mode the SensorPod™ is still transmitting a signal/data.
4

Operating Frequency
Wireless: 2462 MHz
Maximum Transmit Power (EIRP)
Wireless: 0 dBm
Antenna Gain
Wireless: 2 Dbi
Hereby, ACCO UK Ltd declares that the radio equipment types, Leitz TruSens Air Purifier Z-2000/Z-3000 are in compliance with Directive 2014/53/EU.
The full text of the EU declaration of conformity is available at the following internet address: https://declarations.accobrands.com/.
Waste Electrical and Electronic Equipment (WEEE)
At the end of its useful life, your product is considered to be WEEE. As such, it is important to note that: WEEE is not to be disposed of as unsorted municipal waste. It is to be collected separately such that it can be disassembled so its components and materials can be recycled, reused, and recovered (burned for energy content in the production of electricity).
Public collection points have been set up by municipalities for the collection of WEEE, free of charge to you. Please return your WEEE to the collection facility nearest your home or office.
If you have difficulty locating a collection facility, the retailer that sold you the product should accept your WEEE. If you are no longer in contact with your retailer, please contact ACCO for assistance with this matter. Recycling of WEEE is geared toward protecting the environment, protecting human health, preserving raw materials, improving sustainable development, and ensuring a better supply of commodities in the European Union. This will be achieved by retrieving valuable secondary raw materials and reducing the disposal of waste. You can contribute to the success of these goals by
returning your WEEE to a collection facility. |
|
Your product is marked with the WEEE symbol |
|
(wheelie bin with an X through it). This symbol is to |
|
inform you that the WEEE is not to be disposed of as |
|
unsorted municipal waste |
|
Leitz TruSens air purifiers also come equipped with a |
|
UV-C emitter. Upon replacement of this item (during the |
|
lifetime of the product), these must also be returned and |
|
disposed of at your local WEEE collection facility. |
|
Further information and installation guides / videos for |
|
the UV-C emitter can be found at www.leitz.com |
5 |
FEATURE HIGHLIGHTS
SensorPod™
Remote air quality monitor that ensures cleaner air, right where you need it.
PureDirect™ Technology
Independent lab testing confirms that two airflow streams are better than one, moving air effectively and more comfortably throughout the room.
AQI |
Informs and Adapts |
|
|
|
Colour-coded illuminated ring provides additional |
|
information by communicating air quality in real-time. |
360° Purification
DuPont™ HEPA filter captures pollutants and VOC gases/odours from all directions. UV light kills germs and bacteria that can get trapped in the filter.
Thoughtful Execution
Exceptional functionality wrapped in a contemporary design that fits any environment.
6
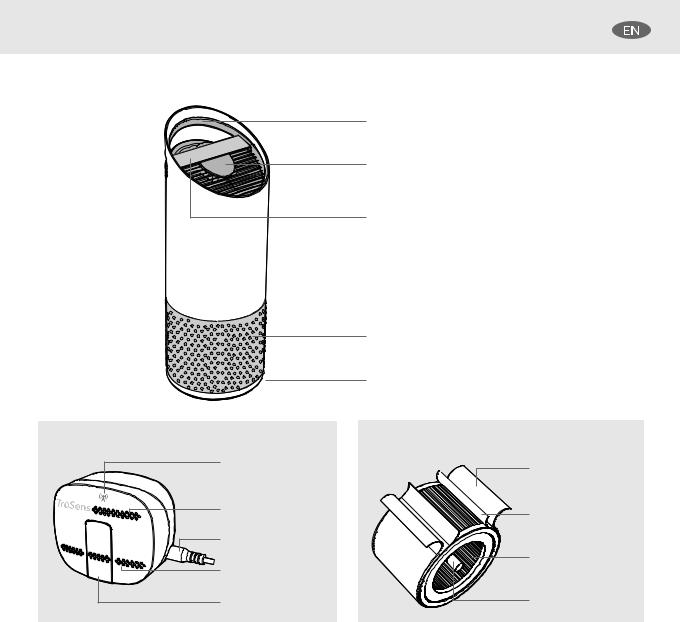
PRODUCT OVERVIEW
Air Purifier
Easy-carry handle
Air quality indicator display
Simple touch control panel
360° air intake
Filter cover & knob (underneath)
SensorPod™ |
Filter & Ultraviolet Sterilisation |
|
Power & signal |
Washable Prefilter |
|
indicator |
||
|
||
Air outlet |
Carbon Filter |
|
|
||
Power cord |
|
|
Air inlet |
True HEPA Filter |
|
|
||
Easy-access door |
UV Sterilisation |
GETTING STARTED
1. Remove plastic bag from filter
Unscrew the bottom cover and remove the plastic bag from the filter.
2. Re-attach filter
Secure filter on the bottom cover and replace inside the purifier.
8

3. Set up
Plug-in your SensorPod™, and place upright on tabletop or counter across the room, within line of sight of the purifier.
Plug-in your air purifier unit and power on. Place the purifier on a flat surface, free from obstructions.
Signal strength may vary by location. In the rare occasion that it doesn’t work – see page 18.
4. Start living with cleaner air!
The purifier will automatically adjust fan speeds based on the air quality readings from SensorPod, and proprietary PureDirect™ technology will deliver purified air throughout the room!
up to 15m
room coverage 70 m2
9

CONTROL PANEL
Power Button |
Timer Mode |
|
Purifier will automatically turn off after 2, 4, 8, or 12 |
|
hours. To cancel this countdown, simply press button |
|
until no timer setting is displayed. |
Fan Speed Settings
Select fan speed or AUTO mode. In AUTO mode, purifier automatically adjusts fan speed based on air quality readings from SensorPod™.
(AUTO mode only available when purifier is paired with SensorPod and receiving signal)
Dimmer Mode
Display illumination turns off – for use while sleeping – without sacrificing the effectiveness of the purifier. Simply press the button again to bring back all display features.
UV Mode
UV bulb within the purifier’s filter chamber is on when the 

 symbol is white. The

 symbol will glow red when it is time to replace the UV bulb.
(See page 15 for replacement instructions)
Filter and UV Indicator Reset
HEPA, Carbon and UV indicators glow red when it is time for each to be replaced.
When 1 indicator is on, simply hold Reset button for 3 seconds to reset that indicator. When 2+ indicators are on, tap the Reset button to select the correct indicator (selected indicator will blink) before holding 3 seconds to reset that indicator.
10 |
(See pages 13-15 for replacement instructions. Follow above Reset |
button instructions after replacing filter.) |
AIR QUALITY DISPLAY
Real-time Feedback
The revolutionary SensorPod™ evaluates the condition of your air by measuring both small (PM2.5) and larger (PM10) particulate matter. It calculates the overall air quality using a proprietary algorithm that is reactive to genuine increases in pollutants without overreacting to someone entering the room or settling into the couch.
The illuminated, colour-coded display communicates good, moderate or poor air quality and a numeric value provides a greater level of detail.
In AUTO mode, the purifier automatically adjusts the fan speed in response to these air quality readings.
GOOD |
|
MODERATE |
|
POOR |
BLUE | 0 - 50 |
|
YELLOW | 50 - 100 |
|
RED | 100 - 500 |
|
|
|
|
|
|
|
|
|
|
|
|
|
|
|
|
|
|
|
|
TruSens utilises the Air Quality Index (1-500) created by the U.S. Environmental Protection Agency (EPA). |
11 |

SPECIFICATIONS
Air Inlet |
360° |
|
|
Air changed 2 times per hr |
70 m² |
|
|
Air Delivery Type |
PureDirect™ |
|
|
Sensor |
SensorPod™, works up to 15 m from purifier |
|
|
Fan Speed Settings |
Whisper, 1, 2, 3, Turbo |
|
|
Purification Levels |
Washable Prefilter, Carbon, True HEPA, UV |
|
|
Timer Settings |
2, 4, 8, 12 hr |
|
|
Filter Change Indicators |
Carbon, HEPA, UV |
|
|
Noise |
32 - 66 dB |
|
|
Dimensions |
263 x 263 x 726 mm |
|
|
Weight |
5.7 kg |
|
|
Motor Type |
DC motor |
|
|
Power Requirements |
220-240v 50/60H 0.5A |
|
|
Power Consumption |
68 W |
|
|
Warranty |
2 years |
Replacement Filters & UV Bulb |
|
|
|
|
|
3-in-1 HEPA drum filter |
2415110 |
|
|
Carbon filter (3-pack) |
2415109 |
|
|
UV Bulb |
2415111 |
|
|
12

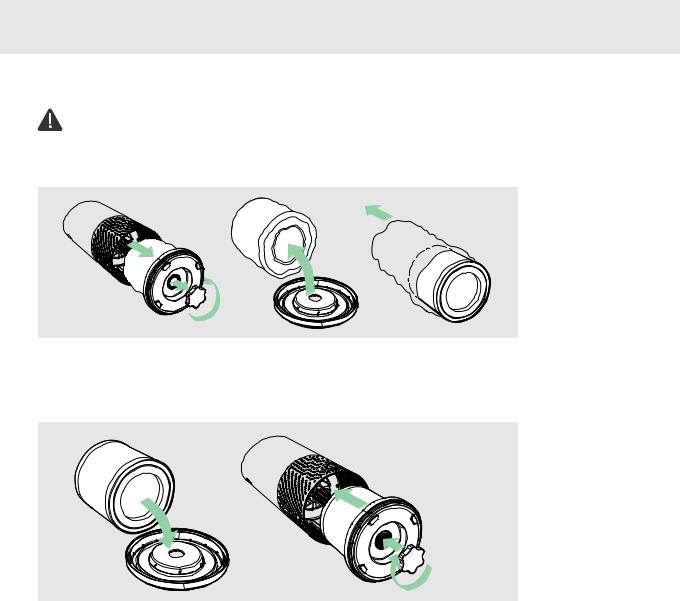
CARE & MAINTENANCE
Accessing the filter chamber
1.Always power off the purifier by pressing the Power Button and unplugging the power cord.
2.Gently place the unit on its side on the floor so that the filter chamber cover and knob are exposed.
3.Turn the knob counter-clockwise and remove the filter cover and 360° HEPA filter drum (Fig. A).
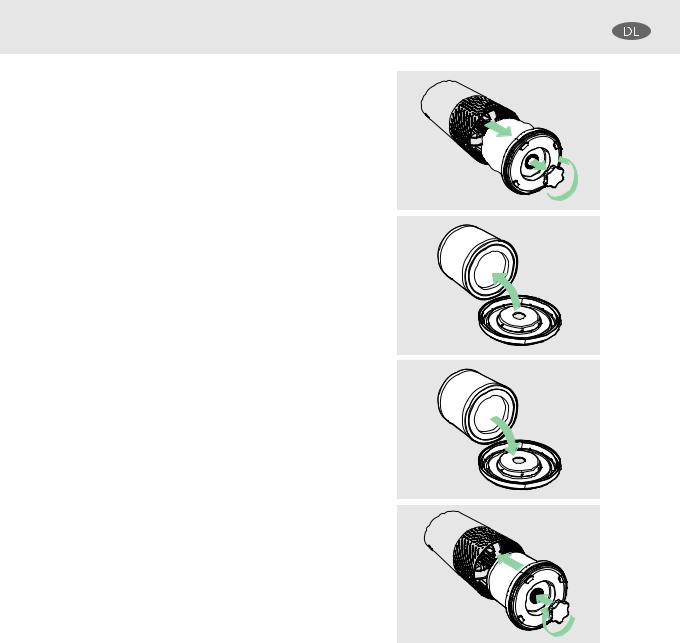
REPLACING 


 HEPA FILTER
1.The HEPA indicator will glow red when it is time to change the entire HEPA drum filter.
2.Gently pull the HEPA drum filter away from its place secured to the filter cover (Fig. B).
3.Secure the replacement HEPA filter onto the filter cover (Fig. C).
4.Gently replace the filter cover with filter drum into the filter chamber and onto the threading, and turn the knob clockwise until the knob and filter chamber cover are securely tightened (Fig. D).
5.Plug-in and power on your purifier, and hold the Reset button until the red HEPA indicator turns off.
Note: HEPA drum filter (on page 12) will include 3 layers: Washable Prefilter, Carbon and HEPA
Fig. A
Fig. B
Fig. C
Fig. D |
13 |
|

REPLACING 


 CARBON FILTER
1.The Carbon indicator will glow red when it is time to replace the Carbon layer.
2.Gently peel away the Prefilter from the fastener strips (Fig. E).
3.Gently peel away the used Carbon layer from the fastener strips (Fig. F).
4.Wrap a new Carbon layer around the filter drum and attach to the same fastener strips (Fig. G).
5.Replace the Prefilter by wrapping it around the Carbon layer and attach to the fastener strips (Fig. H).
6.Once the purifier is powered-on, hold the Reset button until the red Carbon indicator turns off.
Note: Carbon filter 3-pack (on page 12) will cover 3 Carbon changes between replacing the entire HEPA drum filter assemly (on page 13).
WASHING THE PREFILTER
1.We recommend that you visually inspect the Prefilter every month, and clean as needed. At minimum, you should hand wash the Prefilter every time you change the Carbon filter.
2.Gently peel away the Washable Prefilter from the fastener strips (Fig. E).
3.Gently rinse with running water – allow Prefilter to air dry before re-installing.
4.Replace the Prefilter by wrapping it around the filter drum 14and attach to the fastener strips (Fig. H).
Fig. E
Fig. F
Fig. G
Fig. H

REPLACING UV BULB
1.The 

 indicator will glow red when it is time to replace the UV bulb.
2.Remove HEPA filter drum (Fig. A), and use a screwdriver to remove the 4 screws securing the UV housing (Fig. I).
3.Gently remove the UV housing (Fig. J).
4.Disconnect the UV bulb from the socket within the purifier (Fig. K).
5.Your replacement UV bulb (on page 12) will plug directly into the same socket (Fig. L).
6.Replace the UV housing and use a screwdriver to tighten the fastening screws.
7.Once the purifier is powered-on, hold the Reset button until the 

 indicator turns white.
Note: Upon replacement of the UV-C emitter please dispose of at your local WEEE collection facility.
Fig. I |
Fig. J |
Fig. K |
Fig. L |
15 |
|
|

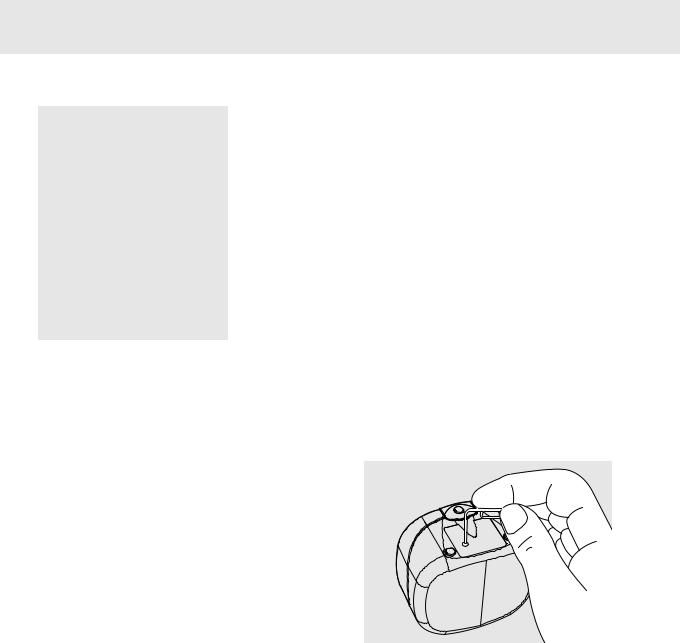
CLEANING THE SENSORPOD™
Cleaning the air quality sensor
The SensorPod™ uses an infrared light to detect particulate matter, so it is important that you clean the viewing chamber every 1-2 months to remove any dust or particles that may affect the accuracy of the sensor’s readings.
1.Turn-off the SensorPod by unplugging the power cord.
2.Open the easy-access door on the front side by pulling the door up at a 90° angle.
3.Use a damp cotton swab to wipe the lens and intake area of the dust sensor (Fig. M).
4.Use a dry cotton swab to wipe away any remaining
moisture. |
Fig. M |
5.Close the cover by rotating the door back down and sliding it back into place until you hear a click.
16

FAQ & TROUBLESHOOTING
Where do I place the SensorPod™? |
Anywhere you want to measure the air quality within the room! |
|
For optimal results, place the SensorPod™ up to 15 m away from the air |
|
purifier on a counter or table, within line of sight of the purifier. In Auto |
|
Mode, the purifier will work to distribute clean air until the SensorPod reads |
|
an acceptable level of air quality. |
|
|
How often do I need to change the |
That’s easy! The purifier’s replacement indicators will notify you when it is |
filters? |
time to replace the Carbon or HEPA filters, or the UV bulb. |
|
Plan on replacing the Carbon every 3-4 months, HEPA every 12-15 months, |
|
and UV bulb every 1-3 years. |
|
|
How often do I need to wash the |
The Prefilter captures larger particles and preserves the effciency of the |
Prefilter? |
other filters, so we recommend that you visually inspect the prefilter every |
|
month and wash as needed. Another good habit is to wash the prefilter |
|
every time you replace the Carbon filter. |
|
|
How often do I need to clean the |
For the most accurate measurement of your air quality, we’d recommend |
dust sensor within SensorPod™? |
you clean the surface of the dust sensor every 1-2 months. |
|
|
Purifier won’t turn on. |
Check that the power cord is connected securely to both the wall outlet and |
|
the purifier. Check if there is a power outage in the outlet by trying a nearby |
|
light or device, or by trying a working device in the same outlet. |
|
Check that the HEPA filter is fitted properly into filter chamber. |
|
Please contact us if you’re still having a problem! (page 19) |
|
|
17
FAQ & TROUBLESHOOTING
Purifier won’t go into Auto Mode. |
First, check that the SensorPod is plugged-in and that its light is solid. |
|
OR |
Next, check that the SensorPod is within range of the purifier (up to 15m). |
|
|
||
Air quality indicators are off. |
If both are true and the connection is still failing, see below instructions on |
|
OR |
||
repairing the SensorPod’s connection. |
||
|
||
Purifier’s sensor signal indicator is |
|
|
blinking. |
|
|
|
|
|
I’ve lost my SensorPod™! |
Don’t worry! Please contact our customer support team and you can order |
|
|
a replacement SensorPod. Follow the easy pairing instructions below to pair |
|
|
your replacement SensorPod with your existing air purifier! |
|
|
|
Pairing SensorPod™ and Purifier
The SensorPod communicates with the purifier using radio frequency signals, and will be paired on the production line and ready for use when you open the box. In the rare event that the signal is interrupted, the purifier’s sensor indicator light 
 will blink. You can repair the connection in just a few easy steps.
1.Unplug the SensorPod.
2.HOLD the Power Button on the purifier for 3 seconds, when you should hear two chimes.
3.Plug-in the SensorPod and use an item with a small point (paper clip) to press and HOLD the pairing button underneath the SensorPod for 5-7 seconds
(Fig. N).
18
4.The connection is established when the purifier’s sensor indicator light is lit with no blinking, and the air quality indicators turn on.
Fig. N

GUARANTEE
Operation of this machine is guaranteed for two years from date of purchase, subject to normal use. Within the guarantee period, ACCO will at its own discretion either repair or replace the defective machine free of charge. Defects due to misuse or use for inappropriate purposes are not covered under the guarantee. Proof of date of purchase will be required. Repairs or alterations made by persons not authorized by ACCO will invalidate the guarantee. It is our aim to ensure that our products perform to the specifications stated. This guarantee does not affect the legal rights which consumers have under applicable national legislation governing the sale of goods.
SUPPORT
Thank you for welcoming TruSens™ into your home. Our customers are at the heart of what we do, and we strive to design products that fit your lifestyle. If you have any questions or feedback, please reach out!
Visit our website at www.leitz.com/trusens
Email us at service.uk@acco.com
Call us at 0800 279 5102
Ireland: (01) 6038010
M-Th 09:00 - 16:30
F 09:00-16:00
To register and activate your warranty go to www.leitz.com/register
19

Willkommen in Ihrem Zuhause mit sauberer Luft. Schön, dass wir Sie auf Ihrem Weg zu mehr Wohlbefinden begleiten dürfen.
Die Raumluft, die wir atmen, sollte bis in die letzte Ecke des Raums sauber sein. Der TruSens SensorPod™, PureDirect™- Technik und DuPont™-Filterung sorgen dafür, dass im gesamten Raum saubere Luft herrscht.
SICHERHEITSHINWEISE
DIESE ANWEISUNGEN BITTE DURCHLESEN UND AUFBEWAHREN
Vor dem Auswechseln der UV-Lampe sowie bei Nichtverwendung des Luftreinigers, ist das Gerät vom Stromnetz zu trennen.
WARNUNG:
Zur Verringerung der Brandund Stromschlaggefahr das Gerät nicht mit einem variablen Drehzahlregler verwenden. Das Gerät nicht mit einem beschädigten Netzkabel/-stecker oder einer losen Wandsteckdose verwenden.
Das Netzkabel nicht unter Teppichen, Läufern oder ähnlichen Belägen verlegen. Das Netzkabel nicht unter Möbeln oder Geräten verlegen. Das Kabel zur Vermeidung von Stolpergefahr außerhalb regelmäßig frequentierter Bereiche verlegen
WARNUNG:
Eine direkte Einwirkung der von der UV-Lampe erzeugten UV-Strahlung auf Haut und Augen kann zu Verletzungen führen. Schäden am Gehäuse und ein unzweckmäßiger Einsatz des Geräts können zum Austreten gefährlicher UV-C-Strahlung führen. UV-C-
Strahlung kann schon in geringen Mengen zu Schäden an Augen und Haut führen. Vor dem Austausch der Lampe und jeglichen Wartungsarbeiten das Gerät vom Stromnetz trennen. Die UV-Lampe durch Artikel 2415108 (Z-2000) bzw. 2415111 (Z-3000) von ACCO Brands ersetzen.
•Vor Gebrauch sämtliche Verpackungen einschließlich Filterbeutel entfernen.
•Weist das Gerät sichtbare Schäden auf, darf es nicht betrieben werden.
•Das Gerät darf nur an eine für den Netzstecker geeignete Steckdose angeschlossen werden, die den Angaben auf dem Typenschild des Geräts entspricht.
•Das Gerät in Steckdosennähe aufstellen. Keine Verlängerungskabel verwenden.
•Das Gerät darf von Kindern ab 8 Jahren und Personen mit eingeschränkten physischen, sensorischen oder geistigen Fähigkeiten oder ohne ausreichende Erfahrung und ausreichendes Wissen verwendet werden, sofern sie beaufsichtigt werden oder über die sichere Verwendung des Geräts und alle Risiken und Gefahren aufgeklärt wurden.
•Kinder dürfen nicht mit dem Gerät spielen, es reinigen oder warten.
•Bei Austausch des UV-C-Strahlers das in der vorliegenden Anleitung genannte Modell verwenden.
•Das Gerät nicht selbst warten oder instandsetzen.
•Das Gerät und den SensorPod™ nur mit dem mitgelieferten Netzkabel verwenden.
•Das Gerät nur mit einem feuchten Tuch abwischen. Keine Lösungsmittel oder Bleiche verwenden.
•Vor Einschalten des Geräts immer sicherstellen, dass dieses auf einer stabilen, ebenen Fläche steht.
•Die Lufteinlassund Luftauslassschlitze nicht blockieren.
•Nicht in die Lufteinlassund Luftauslassschlitze fassen und keine Gegenstände hineinstecken.
•Wenn sich der Luftreiniger im Standby-Modus befindet, überträgt der SensorPod™ weiterhin ein Signal/Daten.
21

Betriebsfrequenz
Drahtlos: 2462 MHz
Maximale Sendeleistung
(EIRP) Drahtlos: 0 dBm
Antennengewinn
Drahtlos: 2 Dbi
Hiermit erklärt ACCO UK Ltd, dass die Funkgerätemodelle Leitz TruSens LuftreinigerZ-2000 und Z-3000 mit der Richtlinie 2014/53/EU übereinstimmen. Der vollständige Text der Konformitätserklärung kann auf https://declarations. accobrands.com/ eingesehen werden.
Elektround Elektronik-Altgeräte
Nach Ablauf der Nutzungsdauer Ihres Produkts gilt dieses als Elektround Elektronik-Altgerät. Für solche Geräte gilt:
Elektround Elektronik-Altgeräte dürfen nicht als unsortierter Siedlungsabfall entsorgt werden. Sie sind getrennt zu sammeln, sodass sie demontiert und die Komponenten und Materialien recycelt, wiederverwendet oder verwertet (d. h. zur Energierückgewinnung als Kraftstoff bei der Stromerzeugung verwendet) werden können.
Elektround Elektronik-Altgeräte können kostenlos bei öffentlichen Rücknahmestellen abgegeben werden. Geben Sie Ihr Elektround Elektronik-Altgerät bei der nächstgelegenen öffentlichen Rücknahmestelle ab.
Lässt sich keine Rücknahmestelle finden, sollte der Händler, bei dem das Produkt erworben wurde, das Altgerät zurücknehmen.
Besteht zu dem Händler kein Kontakt mehr, wenden Sie sich für Hilfe in dieser Sache an ACCO.
Das Recycling von Elektround Elektronik-Altgeräten dient dem Umweltund Gesundheitsschutz, dem Erhalt von Rohstoffen, einer besseren nachhaltigen Entwicklung und einer besseren Versorgung mit Rohstoffen in der Europäischen Union. Dies wird durch Rückgewinnung wertvoller Sekundärrohstoffe und Abfallvermeidung erreicht. Sie können durch die Rückgabe des Altgeräts bei einer Rücknahmestelle Ihren Beitrag zu diesen Zielen leisten.
Das Produkt ist mit dem Symbol für Elektround Elektronik-Altgeräte (durchgestrichene Abfalltonne) gekennzeichnet. Das Symbol bedeutet, dass das Altgerät nicht als unsortierter Siedlungsabfall entsorgt werden darf.
Leitz TruSens Luftreiniger sind außerdem mit einem UV-C-Strahler ausgestattet. Nach dem Austausch dieses Artikels (während der Lebensdauer des Produkts) müssen diese ebenfalls zurückgegeben und bei Ihrer örtlichen Elektround Elektronik-Altgeräte- Sammelstelle entsorgt werden.
Weitere Informationen und Installationsanleitungen / Videos für den UV-C-Emitter finden Sie unter www. leitz.com
22

TECHNIK
 AQI
AQI
SensorPod™
Remote-Luftqualitätsmesser, der saubere Luft im ganzen Raum gewährleistet.
PureDirect™-Technologie
Unabhängige Labortests bestätigen: Zwei Luftströme sind besser als einer und gewährleisten eine effektive und komfortablere Luftverteilung im Raum.
Informiert und passt sich an
Der farbcodierte Leuchtring zeigt die Luftqualität in Echtzeit an.
360 Grad Filtersystem
Der DuPont™ HEPA-Filter saugt Luft aus allen Richtungen an und filtert Schadstoffe und VOC-Gase. Keime und Bakterien, die sich im Filter absetzen können, werden durch UV-Licht vernichtet.
Durchdachte Ausführung
Erstklassige Funktionen, verpackt in einem zeitgemäßen Design, das in jede Umgebung passt.
23

PRODUKT
Luftreiniger
SensorPod™
Leistungsund
Signalanzeige
Luftauslass
Netzkabel
Lufteinlass
Abdeckung
Bequemer Tragegriff
Luftqualitätsanzeige
Einfaches Touch-Bedienfeld
360 Grad Lufteinlass
Filterabdeckung & Knopf (Unterseite)
Filter & UV-Sterilisation
Waschbarer Vorfilter
Aktivkohlefilter
Echter HEPA-Filter
UV-Sterilisation
24

ERSTE SCHRITTE
1. Plastikbeutel vom Filter entfernen
Untere Abdeckung abschrauben. Plastikbeutel vom Filter entfernen.
2. Filter wieder anbringen
Filter an Abdeckung anbringen und Abdeckung anschrauben.
25

3. Einrichtung
SensorPodTM an Steckdose anschließen.
SensorPodTM auf einem Tisch oder einer anderen Fläche in Sichtlinie zum Luftreiniger auf der anderen Raumseite aufstellen.
Gerät an Steckdose anschließen und einschalten.
Luftreiniger auf einer flachen Fläche mit ausreichend Abstand zu Hindernissen aufstellen.
-Von allen Seiten muss Luft ungehindert in den Luftreiniger strömen können.
-Gerät nicht in der Nähe von Wohntextilien (Vorhänge, Bettwäsche usw.), Wärmeund Feuchtigkeitsquellen aufstellen.
Die Signalstärke ist ortsabhängig. Bei einem etwaigen Betriebsproblem Seite 35 lesen.
4. Saubere Luft atmen!
Die Gebläsegeschwindigkeit des Luftreinigers passt sich automatisch an die vom SensorPodTM gemeldeten Luftqualitätswerte an. Die proprietäre PureDirect™-Technologie sorgt für saubere Luft im ganzen Raum.
bis zu 15 m
Geeignet für Räume bis 70 m².
26

BEDIENFELD
Betriebsschalter
Einstellung der Gebläsegeschwindigkeit
Im Automatikmodus wird die Gebläsegeschwindigkeit automatisch gemäß den vom SensorPodTM gemeldeten Luftqualitätswerten eingestellt.
(Der Automatikmodus ist nur verfügbar, wenn der Luftreiniger mit dem SensorPodTM gekoppelt ist und ein Signal empfängt.)
Nachtbetrieb
Die Displaybeleuchtung schaltet sich im Nachtmodus ab. Der Luftreiniger arbeitet unverändert weiter.
Um alle Anzeigefunktionen wiederherzustellen, die Taste erneut drücken.
Timerbetrieb
Der Luftreiniger schaltet nach 2, 4, 8 oder 12 Stunden automatisch ab.
Zum Abbrechen dieses Countdowns die Taste drücken, bis keine Timereinstellung mehr angezeigt wird.
UV-Modus
Die UV-Lampe in der Filterkammer ist eingeschaltet, wenn die Anzeige

 weiß leuchtet.
Die Anzeige

 leuchtet rot, wenn die UV-Lampe ausgetauscht werden muss
(Anweisungen siehe Seite 32).
Zurücksetzen der Wechselanzeige
Die Anzeigen für HEPA-/Aktivkohlefilter und UV-Lampe leuchten rot, wenn ein Austausch der jeweiligen Komponente erforderlich ist.
Leuchtet eine Anzeige, die Reset-Taste drei Sekunden lang gedrückt halten, um die Anzeige zurückzusetzen. Leuchten zwei oder alle drei Anzeigen, durch Antippen der Reset-Taste die gewünschte Anzeige auswählen
(die ausgewählte Anzeige blinkt) und die Reset-Taste dann drei 3 Sekunden gedrückt halten, um die Anzeige zurückzusetzen.
(Anweisungen zum Austausch sind Seite 30-32 zu entnehmen. Nach Austausch eines Filters die Anzeige gemäß den Anweisungen oben zurücksetzen.)
27

LUFTQUALITÄTSANZEIGE
Echtzeit-Rückmeldung
Der revolutionäre SensorPod™ bewertet den Zustand der Raumluft, indem er Feinstaub (PM2,5) und größere Partikel (PM10) misst. Er berechnet die Gesamtluftqualität anhand eines proprietären Algorithmus, der auf echte Steigerungen der Schadstoffe anspricht, jedoch nicht überreagiert, wenn jemand den Raum betritt oder sich auf eine Couch setzt.
Die Luftqualitätsanzeige besteht aus einem farbcodierten Leuchtring, der anzeigt, ob die Luftqualität gut, mäßig oder schlecht ist, und aus einer detaillierten Zahlenangabe.
Im Automatikmodus passt sich die Gebläsegeschwindigkeit den
Luftqualitätswerten automatisch an.
GUT |
|
MÄSSIG |
|
SCHLECHT |
BLAU | 0 - 50 |
|
GELB | 50 - 100 |
|
ROT | 100 - 500 |
|
|
|
|
|
|
|
|
|
|
|
|
|
|
|
|
|
|
|
|
Der TruSens verwendet den von der Umweltschutzbehörde der USA (EPA) erstellten Luftqualitätsindex (1–500). |
28 |

TECHNISCHE DATEN
Lufteinlass |
|
360 Grad |
|
|
|
|
|
2 Lufterneuerungen pro Stunde |
|
70 m² |
|
|
|
|
|
Luftzufuhrtechnik |
|
PureDirect™ |
|
|
|
|
|
Sensor |
|
SensorPod™, funktioniert in einer Entfernung zum Luftreiniger |
|
|
|
von bis zu 15 m |
|
|
|
|
|
Gebläsegeschwindigkeit |
|
Flüsterbetrieb, 1, 2, 3, Turbo |
|
|
|
|
|
Reinigungsstufen |
|
Waschbarer Vorfilter, Aktivkohlefilter, echter HEPA-Filter, UV |
|
|
|
|
|
Timereinstellungen |
|
2, 4, 8, 12 Stunden |
|
|
|
|
|
Wechselanzeigen |
|
Aktivkohle-/HEPA-Filter, UV-Lampe |
|
|
|
|
|
Geräuschentwicklung |
|
32 - 66 dB |
|
|
|
|
|
Abmessungen |
|
263 x 263 x 726 mm |
|
|
|
|
|
Gewicht |
|
5.7 kg |
|
|
|
|
|
Motortyp |
|
Gleichstrommotor |
|
|
|
|
|
Netzanschluss |
|
220-240v 50/60H 0,5A |
|
|
|
|
|
Leistungsaufnahme |
|
68 W |
|
|
|
|
|
Garantie |
|
2 Jahre |
|
Ersatzfilter und UV-Lampe |
|
|
|
|
|
|
|
|
|
|
|
3-in-1 HEPA-Trommelfilter |
|
2415110 |
|
|
|
|
|
Aktivkohlefilter (3er-Pack) |
|
2415109 |
|
|
|
|
|
UV-Lampe |
|
2415111 |
|
|
|
|
|
29
WARTUNG & PFLEGE
Öffnen der Filterkammer
1.Den Luftreiniger immer am Betriebsschalter ausschalten und das Netzkabel ziehen.
2.Das Gerät vorsichtig auf die Seite auf den Boden legen, sodass der Knopf und die Abdeckung der Filterkammer zugänglich sind.
3.Den Knopf gegen den Uhrzeigersinn drehen und die Filterkammerabdeckung mit dem 360°-HEPA- Trommelfilter entfernen (Abb. A).
AUSTAUSCH DES 


 HEPA-FILTERS
1.Die HEPA-Anzeige leuchtet rot, wenn der HEPATrommelfilter ausgetauscht werden muss.
2.Den HEPA-Trommelfilter vorsichtig von der Filterabdeckung abziehen (Abb. B).
3.Den neuen HEPA-Filter an der Filterabdeckung anbringen (Abb. C).
4.Die Filterabdeckung mit dem Trommelfilter vorsichtig in die Filterkammer einführen und auf das Gewinde setzen und den Knopf im Uhrzeigersinn festdrehen (Abb. D).
5.Netzkabel anschließen und Luftreiniger einschalten. Die Reset-Taste gedrückt halten, bis die rote HEPAAnzeige erlischt.
Hinweis: Der HEPA-Trommelfilter (siehe Seite 29) besteht aus 3 Schichten: Waschbarer Vorfilter, Aktivkohlefilter und HEPA-Filter.
Abb. A
Abb. B
Abb. C
Abb. D |
30 |
|
 Loading...