

Page 1
Leica TP1020
Automatic Tissue Processor
Instruction Manual
Leica TP1020 V2.1 English – 12/2000
Always keep this manual near the instrument!
Read carefully prior to operating the instrument!
Page 2

Page 3

1. Important information
Serial No. .....................................................................
Year of manufacture: .................................................
Country of origin: .... Federal Republic of Germany
The information, numerical data, notes and value
judgments contained in this manual represent the
current state of scientific knowledge and state-of-theart technology as we understand it following thorough
investigation in this field. We are under no obligation
to update the present manual periodically and on an
ongoing basis according to the latest technical
developments, nor to provide our customers with
additional copies, updates etc. of this manual.
For erroneous statements, drawings, technical
illustrations etc. contained in this manual we exclude
liability as far as permissible according to the national
legal system applicable in each individual case. In
particular, no liability whatsoever is accepted for any
financial loss or consequential damage caused by or
related to compliance with statements or other
information in this manual.
Statements, drawings, illustrations and other
information as regards contents or technical details of
the present manual are not to be considered as
warranted characteristics of our products. These are
determined only by the contract provisions agreed
between ourselves and our customers.
Leica Microsystems Nussloch GmbH
Heidelberger Str. 17 - 19
D-69226 Nussloch
Germany
Leica reserves the right to change technical
specifications as well as manufacturing processes
without prior notice. Only in this way is it possible to
continuously improve the technology and
manufacturing techniques used in our products.
This document is protected under copyright laws. Any
copyrights of this document are retained by Leica
Microsystems Nussloch GmbH.
Any reproduction of text and illustrations (or of any
parts thereof) by means of print, photocopy, microfiche,
web cam or other methods – including any electronic
systems and media – requires express prior permission
in writing by Leica Microsystems Nussloch GmbH.
For the instrument serial number and year of
manufacture, please refer to the name plate at the back
of the instrument.
Phone: +49 (6224) 143-0
Fax: +49 (6224) 143-200
eMail: histo_info@leica-microsystems.com
Internet: http://www.histo-solutions.com
Leica TP1020 – Automatic Tissue Processor
© Leica Microsystems Nussloch GmbH
3
Page 4

2. Table of contents
1. Important information ........................................................................................................................ 3
2. Table of contents ................................................................................................................................ 4
3. Safety instructions.............................................................................................................................. 6
4. Technical data..................................................................................................................................... 8
5. General description............................................................................................................................ 9
5.1 Description of the instrument ............................................................................................................. 9
5.2 Standard delivery.................................................................................................................................. 9
5.3 General overview Leica TP1020 - Type 1 with additional paraffin station
(optional accessory)........................................................................................................................... 10
5.4 General overview Leica TP1020 - Type 3........................................................................................ 11
5.5 Accessories supplied together with the instrument..................................................................... 12
6. The user interface............................................................................................................................. 14
7. Unpacking and installation ............................................................................................................ 20
7.1 Unpacking ............................................................................................................................................ 20
7.2 Requirements at the installation site ............................................................................................... 21
8. Initial start-up of the instrument .................................................................................................... 22
8.1 Electrical connection ......................................................................................................................... 22
8.1.1 Checking the voltage selector setting............................................................................................. 22
8.1.2 Adjust the voltage selector ............................................................................................................... 23
8.1.3 Connecting the mains cable ............................................................................................................. 23
8.2 Switching on the instrument ............................................................................................................. 24
8.3 Setting the time ................................................................................................................................... 24
8.4 Installing the accessories ................................................................................................................. 25
8.4.1 Installing the paraffin stations.......................................................................................................... 25
8.4.2 Connecting the paraffin stations...................................................................................................... 25
8.4.3 Fixing the paraffin station connection cables (instruments with fume control ...........................
system only) ......................................................................................................................................... 26
8.4.4 Installing the reagent stations.......................................................................................................... 26
9. Programming the instrument ............................................................................................................ 27
9.1 General description ............................................................................................................................ 27
9.1.1 Special characteristics of two-basket programs.......................................................................... 27
9.2 Setting-up / editing programs ........................................................................................................... 28
9.2.1 Selecting programming mode .......................................................................................................... 28
9.2.2 Selecting the program........................................................................................................................ 28
9.2.3 Selecting the number of baskets ..................................................................................................... 28
9.2.4 Selecting the starting station............................................................................................................ 28
9.2.7 Displaying total program duration ................................................................................................... 30
9.2.8 Leaving the programming mode....................................................................................................... 30
10. Preparations for tissue processing ............................................................................................... 31
10.1 Filling the reagent stations ................................................................................................................ 31
10.2 Filling the paraffin stations ................................................................................................................ 32
10.3 Inserting the tissue basket ................................................................................................................ 33
11. Operating the instrument in the manual processing mode ...................................................... 34
11.1 Lifting and lowering the tissue basket ............................................................................................ 34
11.2 Moving the tissue basket to the next station ................................................................................. 35
11.3 Activating the vacuum function ...........................................................................................................
(instruments with vacuum function only) ....................................................................................... 36
4
Instruction Manual V 2.1 – 12/2000
Page 5

2. Table of contents
12. Operating the instrument in the automatic processing mode ................................................. 37
12.1 Starting a program.............................................................................................................................. 37
12.1.1 Immediate start ................................................................................................................................... 37
12.1.2 Delayed start........................................................................................................................................ 38
12.2 Editing and altering programs while a processing cycle is in progress ................................... 41
12.3 Display end of processing time ........................................................................................................ 41
12.4 Pausing a process .............................................................................................................................. 42
12.5 Resuming a paused process............................................................................................................. 42
12.6 Stopping or aborting a process ........................................................................................................ 43
12.7 End of an automatic process ............................................................................................................ 43
12.8 Remove the specimens...................................................................................................................... 44
12.9 Finishing your daily work .................................................................................................................. 44
13. Warning and error codes - troubleshooting ............................................................................. 45
13.1 Warning codes .................................................................................................................................... 45
13.2 Error codes........................................................................................................................................... 46
13.3 ’POWER FAILURE’ and ’WRONG STATION’ messages .............................................................. 48
13.3.1Measures to remove specimen material in case of prolonged power failure ....................... 49
13.4 ‘ABORT’ message............................................................................................................................... 50
15. Maintenance ..................................................................................................................................... 52
15.1 General maintenance instructions .................................................................................................. 52
15.2 Paraffin stations .................................................................................................................................. 53
15.3 Replacing the fuses............................................................................................................................ 55
16. Optional accessories...................................................................................................................... 56
16.1 Three-level tissue basket .................................................................................................................. 56
16.2 Basket removal device ...................................................................................................................... 56
16.3 Basket holder for second tissue basket ......................................................................................... 57
16.4 Connecting the fume outlet tube (optional accessory for instruments with fume .....................
control system).................................................................................................................................... 58
17. Ordering information ....................................................................................................................... 60
18. Appendix ............................................................................................................................................ 62
18.1 Altering the instrument standard configuration ............................................................................ 62
18.2 Reagents appropriate for use with the instrument ....................................................................... 65
18.3 Warranty and service
18.4 Factory-set programs ......................................................................................................................... 68
Leica TP1020 – Automatic Tissue Processor
5
Page 6

3. Safety instructions
Transport and installation
• Keep in mind Chapter 4, 'Technical data'!
• During transport, keep the instrument upright!
• When transporting the instrument, do not
lift it up by the carousel cover!
• This instrument may not be operated in
hazardous locations!
• Attention: the voltage selector is factory
preset.
Before connecting the instrument to the
mains make sure the correct setting matching your laboratory’s power supply has
been selected.
The socket for connecting the mains cable,
located at the rear of the instrument is
sealed with an adhesive tape which indicates the factory preset voltage for your
particular instrument.
• Connecting the instrument to the mains
with the voltage selector set at a wrong
value can cause severe damage to the instrument!
• When adjusting the voltage selector setting, the instrument must be disconnected
from the mains.
• The instrument may only be connected to
the mains with the cable supplied together
with the instrument and it may only be
connected to grounded sockets.
Operating the instrument
• The carousel may not be rotated manually!
Severe damage will result from doing so!
• Caution when lowering the carousel! Keep
your fingers out of the space between the
container lid and the upper rim of the container!
• Caution! In case of a power failure, the
carousel automatically descends into a
station.
• Instruments equipped with vacuum function may only be operated with the aluminium containers supplied together with the
instrument.
• While operating the instrument, no liquid
may enter in contact with any of the electrical connections or the interior of the instrument.
• Make sure to observe the level indicators
on the reagent and paraffin stations.
• Warning! Use caution when handling solvents! Make sure the premises are adequately ventilated! Explosion hazard!
• Spilled reagents have to be wiped away
immediately. In case of long-term exposure, the instrument surfaces are only conditionally resistant to solvents.
• Always observe worker’s protection rules
and use adequate protective gear (gloves,
laboratory coats).
• The heated wax baths may only be used
with paraffin. Under no circumstances may
they be filled with solvents. When solvents
heat, a highly explosive mixture builds up!
• Caution! The interior containers of the par
affin stations become very hot when the
heating function is activated! Do not touch
the gray upper rim of the containers with
your hands! Risk of injury!
• Caution when handling hot paraffin! Risk
of injury!
6
Instruction Manual V 2.1 – 12/2000
Page 7

3. Safety instructions
Cleaning
• Before cleaning the instrument,
disconnect the mains switch.
• Caution! The interior containers of the paraffin stations become very hot when the
heating function is activated!
Do not touch the gray upper rim of the
containers with your hands! Risk of injury!
• Caution when handling hot paraffin! Risk
of injury!
• When cleaning the instrument, no liquid
may enter in contact with any of the electrical connections or the interior of the instrument.
• Spilled reagents have to be wiped away
immediately. In case of long-term exposure, the instrument surfaces are only conditionally resistant to solvents.
• To clean the painted surfaces, the container platform and the control panel, do
not use solvents containing acetone or xylene; neither use abrasive cleaning powders!
Only mild household detergents may be
used!
The lacquered surfaces and the control
panel are not resistant to xylene or
acetone!
Maintenance
• For purposes of maintenance or repair, the
instrument may only be opened by service
technicians authorized by Leica.
• Before exchanging the fuses, switch off the
mains switch and unplug the instrument!
• Burnt-out fuses may only be replaced by
fuses of the same type and specification.
For appropriate brands and specifications,
see Chapter 4 ‘Technical Data’.
Paraffin stations
• If the excess temperature repeatedly please call Leica Technical Service. DO
NOT continue to use the paraffin station.
• Check if the paraffin station works troublefree.
Use of defective paraffin stations has to
be discontinued for safety reasons!
Activated carbon filter (optional accessory)
• Warning! Fire hazard! It is important that
the activated carbon filters are changed
at factory recommended intervals. If a filter
becomes saturated with solvent, there is
a potential fire risk!
Leica TP1020 – Automatic Tissue Processor
7
Page 8

4. Technical data
Type TP1020
Approvals UL / cUL / VDE
Electrical data
Nominal voltage 100 / 120 / 230 /240 V AC ±10%
Rate frequency 50 - 60 Hz
Mains fuses (type MDA; manufacturer: Bussmann) 2 x T 10 A, UL-approved
Nominal capacity 1000 VA
Classifications according to IEC-1010/EN61010-1:
Protective class I
Pollution degree 2
Overvoltage installation category II
Heat emission (max.) 700 J/s
Working temperature range: 5 °C - 40 °C
Relative humidity of air 80%, non-precipitating
Dimensions
Carousel lid 820 mm Ø
Height 595 - 780 mm
Pitch diameter of rollers 610 mm Ø
Weight
Net weight (including accessories) 60 kg
Net weight, including packaging material 116 kg
Paraffin stations
Quantity: 2 (optionally 3)
Capacity: 1.8 l
Nominal voltage / rated frequency: 230 V AC, 50-60 Hz
Nominal capacity per station: 150 VA
Temperature setting range: 45 °C - 65 °C ±3 K
Excess temperature disconnection: 85 °C ±5 K
Reagent stations
Quantity: 10 (9 when 3rd paraffin station is installed)
Capacity: 1.8 l
Tissue basket
Quantity: 1 (optionally 2)
Capacity: 80 cassettes (optionally: 160)
Programs
Quantity: 9, freely selectable
Programmable infiltration time per station: up to 99 hours 59 minutes
Delayed start time of processing: up to 9 days
Dripping time: 60 seconds
Vacuum function (types 2 and 4)
Pressure difference 500 hPa maximum (appr. 0.5 bar)
8
Instruction Manual V 2.1 – 12/2000
Page 9

5. General description
5.1 Description of the instrument
The Leica TP1020 is an automatic tissue processor used
for the fixation, dehydration and infiltration of
histological tissue samples with fixatives, alcohol,
solvents and paraffin wax.
The reagent stations numbered 1 - 10 are used to
contain reagents. Station 10 may be replaced with an
optional third paraffin wax bath. Stations 11, 12, and if
used 10, are heated, temperature controlled wax baths
that can be filled with either wax pellets or molten
paraffin wax.
Embedding cassettes used to hold the tissue samples,
are placed into the tissue basket. The basic instrument
is designed for a single tissue basket. An optional
second basket can be added. The basket, or baskets,
are moved clockwise from station to station.
To ensure thorough infiltration the basket containing
the tissue samples is agitated, by moving up and down,
at each station. This function can be switched off at
any time.
During processing as the tissue basket moves from
station to station there is a delay period of sixty (60)
seconds during which time the basket is suspended
above the station. This ensures that there is minimal
reagent carryover from station to station.
All instrument functions are activated through the
control panel. Real time is displayed via LCD. The
instrument can be operated in manual and automatic
processing mode. Automatic processing is controlled
via 9 different programs which can be individually set
up, altered and edited.
5.2 Standard delivery
The Leica TP1020 is available in 4 different versions:
Type 1 - Basic instrument
Type 2 - Basic instrument with vacuum function
Type 3 - Basic instrument with fume control sy-
stem
Type 4 - Basic instrument with vacuum function
and fume control system
The basic instrument comes with the following accessories:
- 10 glass container with holders
- 2 replacement glass containers
- 2 paraffin containers
- 1 standard tissue basket
- 1 bag of Jet Cassettes without lids
- 1 bag of lids for Jet Cassettes
- 1 set of replacement fuses
- 1 set of mains cables
- 1 screwdriver
- 1 crank handle (fixed in a clip on the housing)
- 1 packing list
- 1 instruction manual in 4 languages (German,
English, French, Spanish)
Types 2 and 4 - instead of glass containers, these
instruments are supplied with
- 10 aluminum containers with holders
Types 3 and 4 include in addition
- 1 hose clamp
Vacuum function and fume control system are not
available as a retrofitting option.
If a power failure occurs, the specimens are protected
from drying out - even when overnight processing has
been selected, since in case of a power failure the
tissue basket will always be immersed into a station.
Once mains power is restored, processing will be
resumed where it had been interrupted. After a longterm power failure, critical excess immersion time in a
station will be visually displayed.
The Leica TP1020 has been designed to comply with
the strict UL and VDE safety regulations. It is
manufactured under a quality system in compliance
with ISO9001.
Leica TP1020 – Automatic Tissue Processor
An option available on a retrofitting basis is the station
holder for a second tissue basket (see Chapter 17,
‘Ordering Information’).
All types can also be retrofitted with a third paraffin
bath at station 10 (optional accessory).
You will find the standard accessories and - in case
you ordered them - further parts in the upper portion
of the packing box.
Compare the delivered parts with the packing list and
your actual order.
If you find any discrepancies, please contact your local
Leica sales organization immediately.
9
Page 10
5. General description
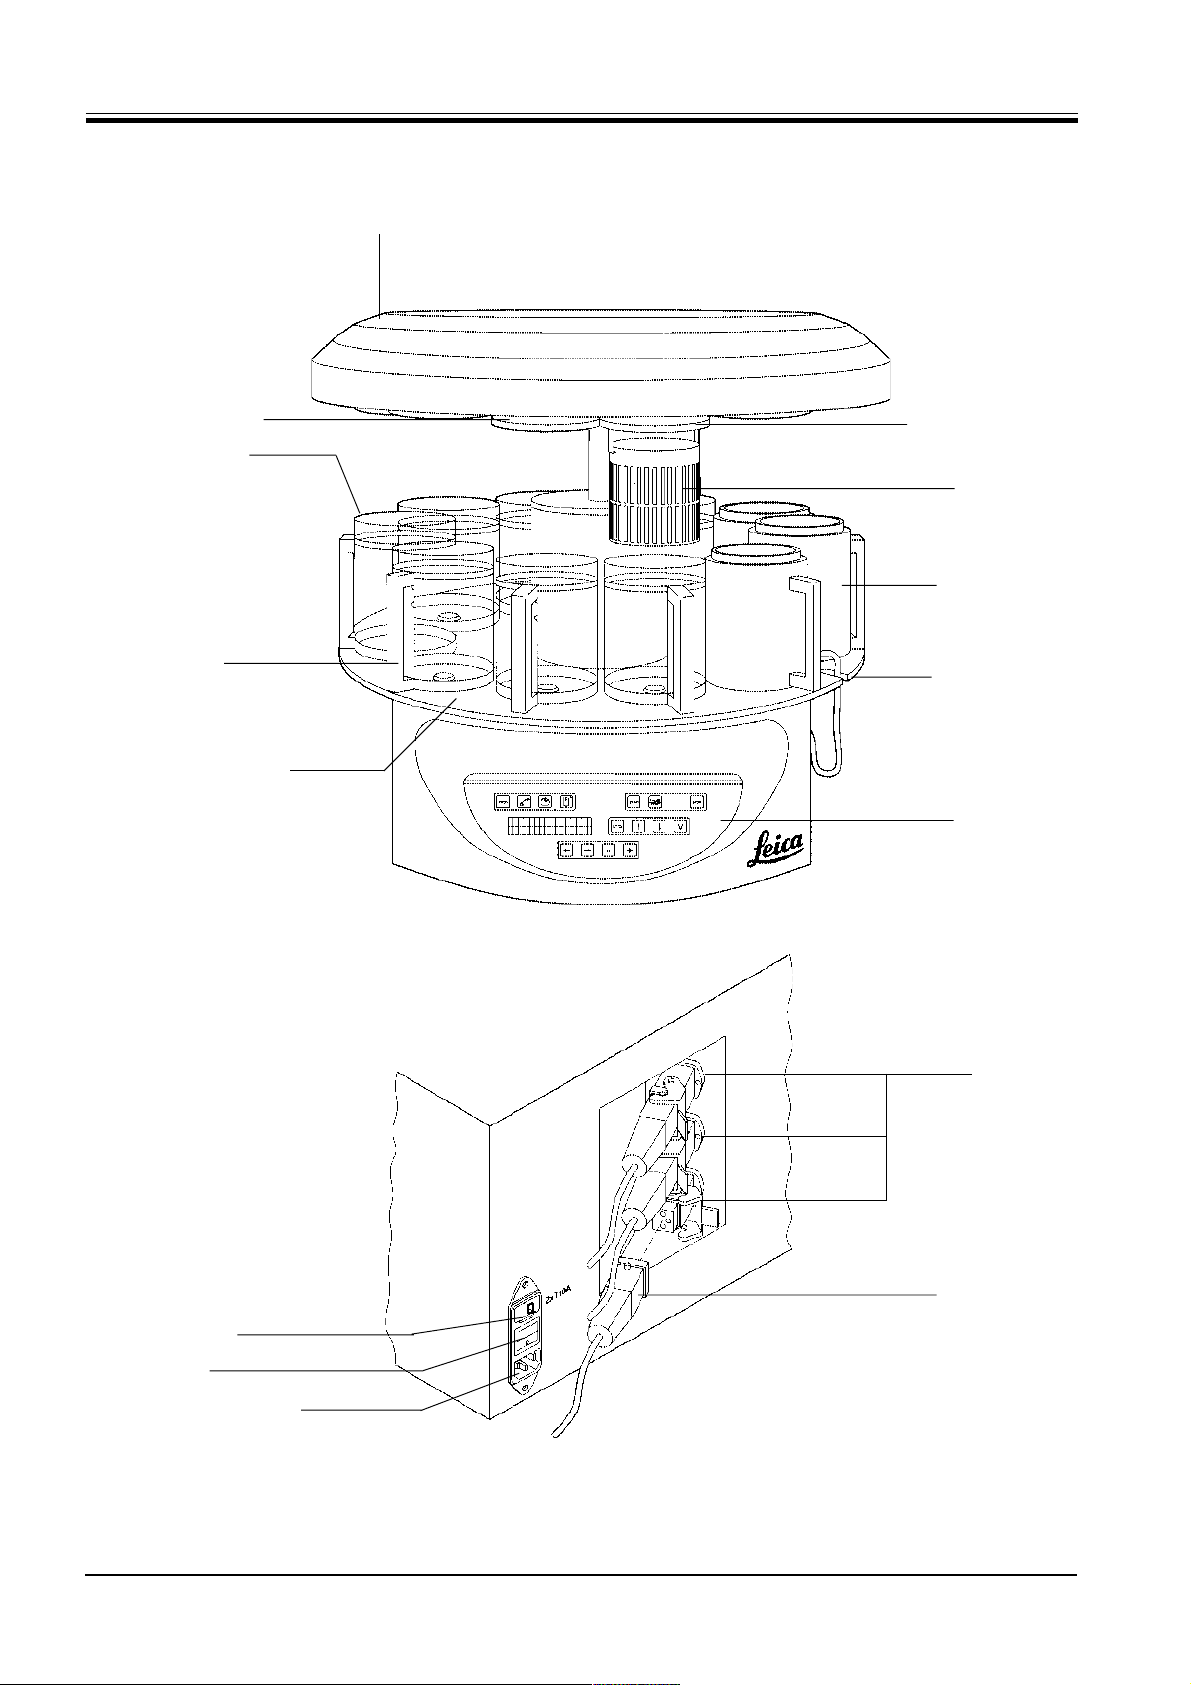
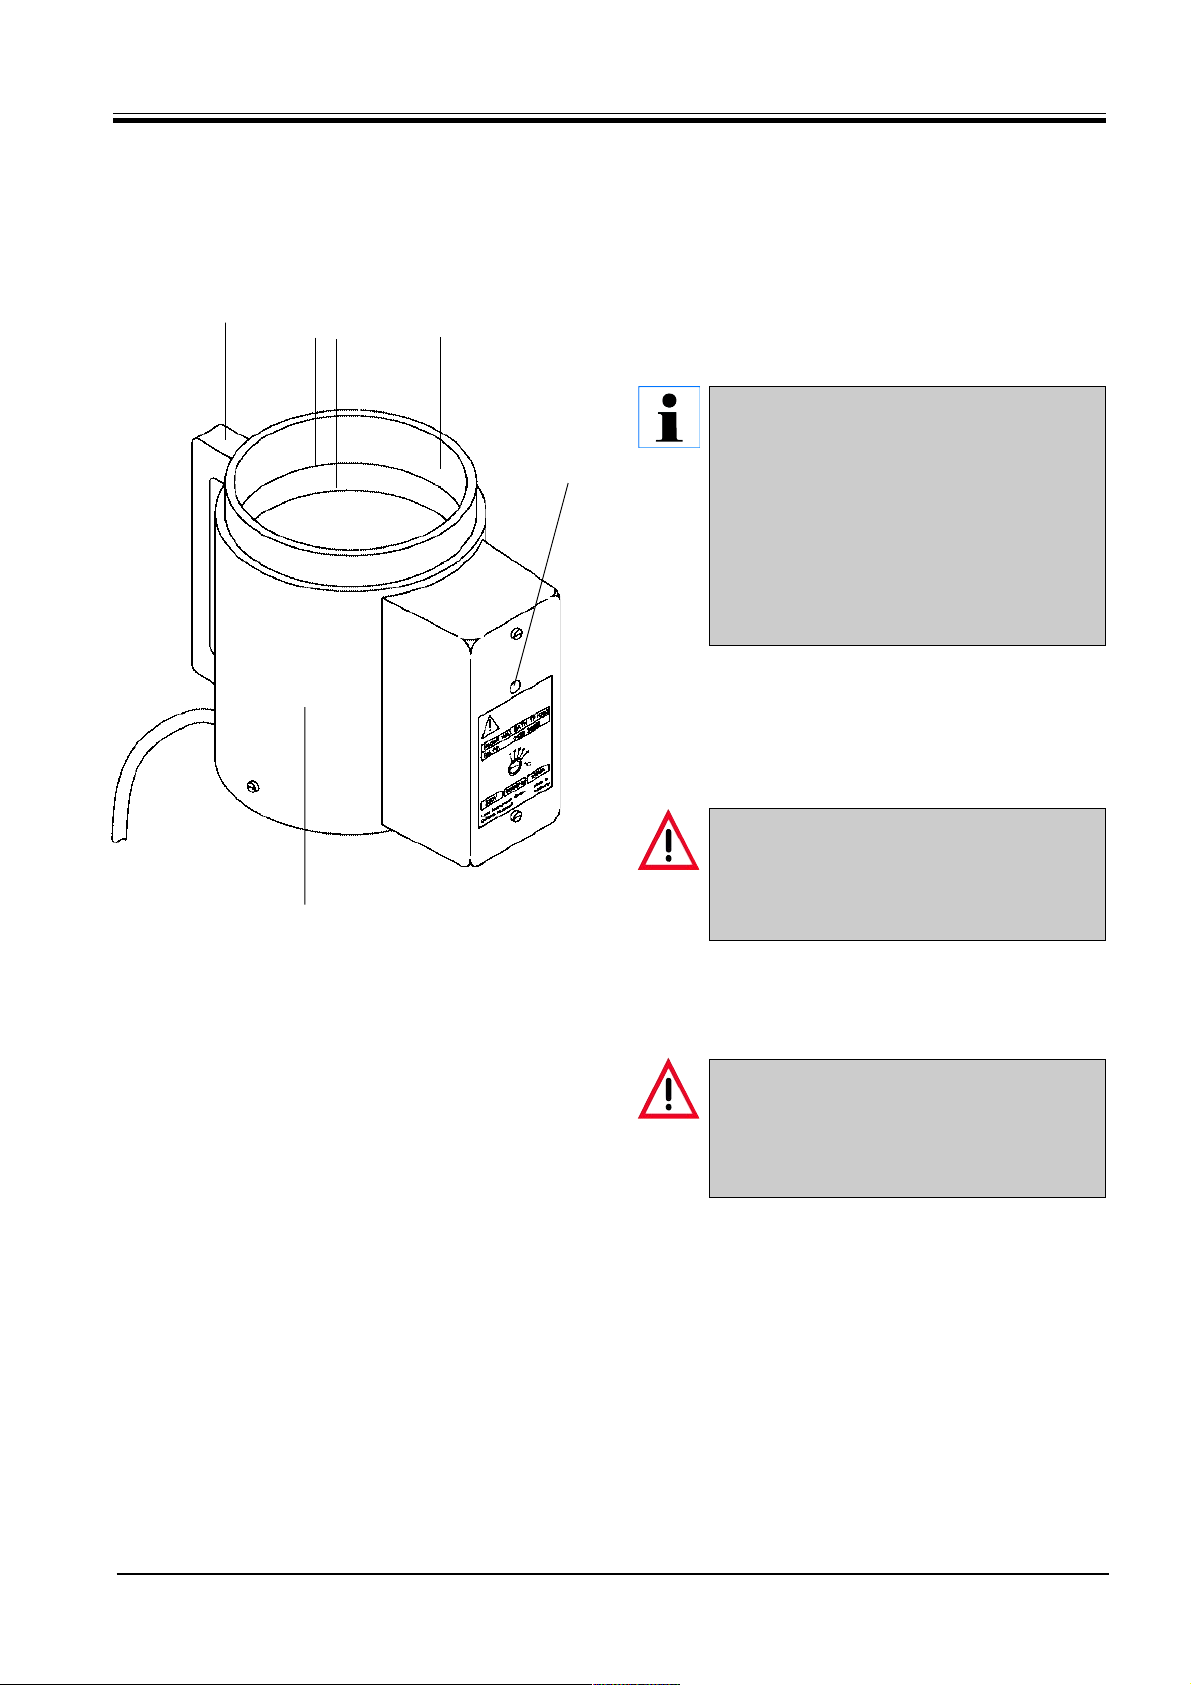
5.3 General overview Leica TP1020 - Type 1 with additional paraffin station (optional accessory)
Carousel cover
Reagent station lid
Glass container with
holder
Container station holder with
level indicator
Container station platform
Fig. 10.1
Tissue basket holder
Standard
tissue basket
Paraffin station
Notch for paraffin
station connection
cable
Control panel
Voltage selector
Mains switch
Socket for mains cable
Fig. 10.2 - TP 1020 - rear side
10
12
11
10
(socket of station no. 10
Instruction Manual V 2.1 – 12/2000
Sockets for
paraffin station
connector plugs
closed
with a cover cap
(not shown))
Paraffin station
connector plug
Page 11
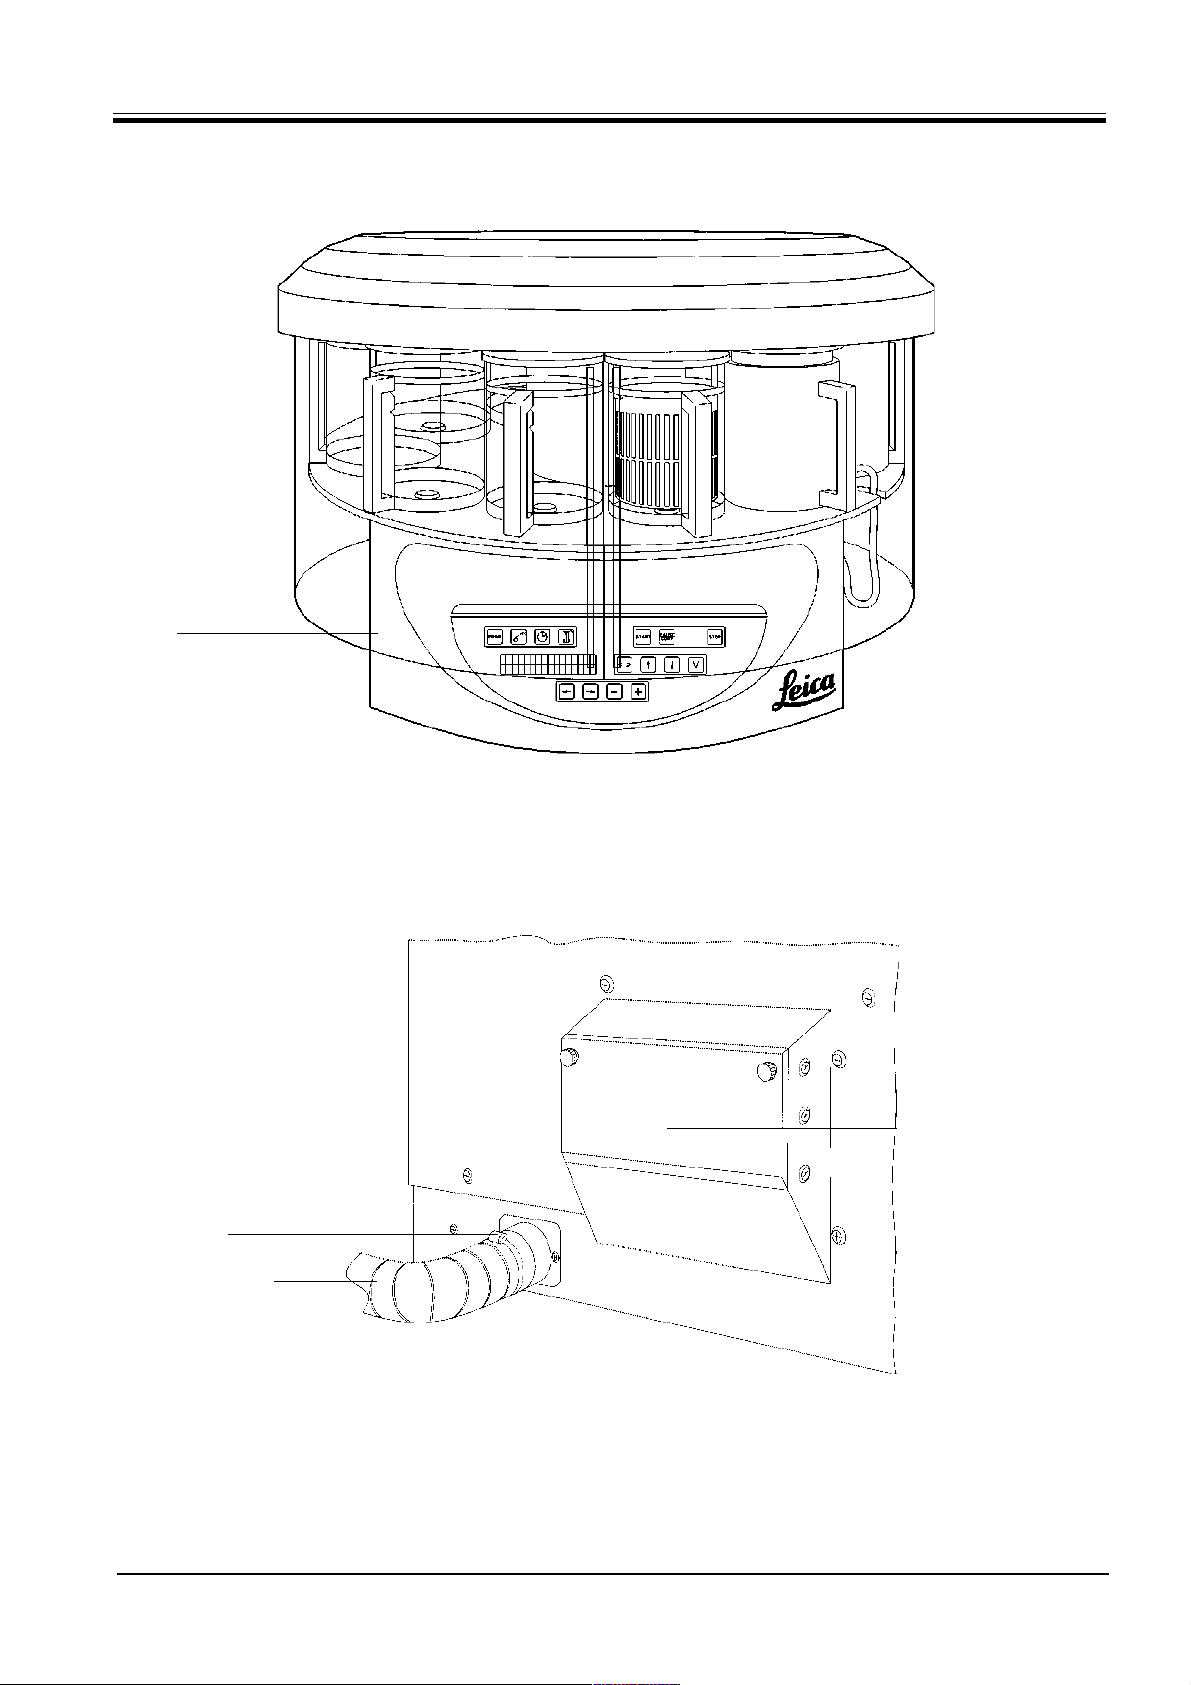
5.4 General overview Leica TP1020 - Type 3
Plexiglass fume
containment
shield
5. General description
Fig. 11.1
Hose clamp
Fume outlet tube
(optional
accessory)
Activated carbon filter
receptacle
Fig. 11.2
Leica TP1020 – Automatic Tissue Processor
11
Page 12
5. General description
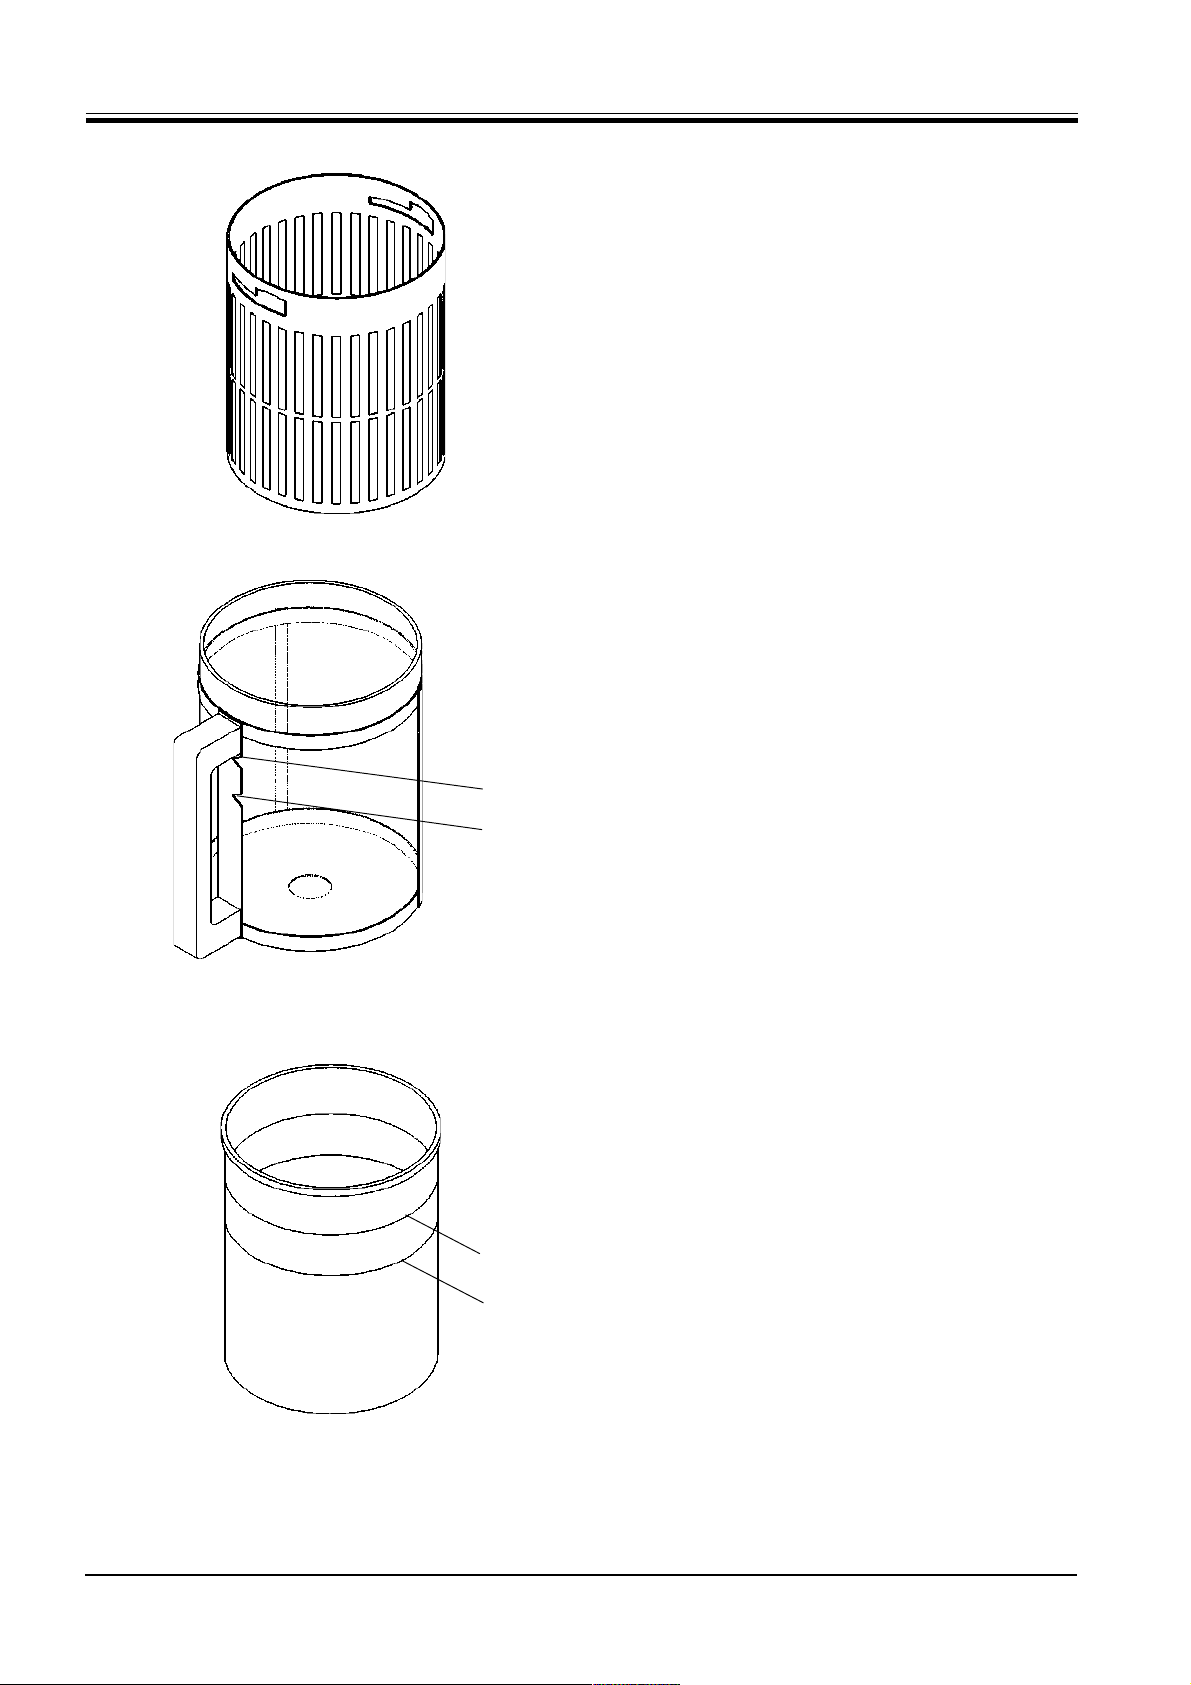
Fig. 12.1
5.5 Accessories supplied together with the instrument
5.5.1 Standard tissue basket
Capacity: 80 cassettes
Tissue cassettes are loosely arranged in the basket.
5.5.2 Glass container with holder
Capacity: 1.8 l
Reagent containers consist of a glass beaker inserted
into a metal holder with handle.
Fig. 12.2
Max
Min
Max
Min
Two marks in the metal holder serve as minimum and
maximum level indicators.
When filling the container the level of liquid should not
be below the minimum or above the maximum level
indication mark.
5.5.3 Aluminum container with holder
(standard outfit in instruments with
vacuum function or available as optional
accessory for other types)
Capacity: 1.8 l
Instruments equipped with vacuum function are
supplied with aluminum containers instead of glass
containers.
In aluminum containers the level indications marks are
located on the inside of the container.
Fig. 12.3
12
When filling the container make sure the filling level is
not below the minimum or above the maximum level
indication mark.
Instruction Manual V 2.1 – 12/2000
Page 13
5. General description
5.5.4 Paraffin station
Capacity: 1.8 l
Nominal voltage: 230 V AC
Rated frequency: 50 - 60 Hz
Nominal capacity (heating): 150 VA
2
5
4
1
Temperature setting range: 45 - 65 °C ± 3 K
Excess temperature
switch-off mechanism: 85 °C ± 5 K
If the actual temperature rises above the range
of normal working temperature, an excess
temperature switch-off mechanism responds.
The paraffin station heating is disconnected.
The yellow signal lamp is extinguished.
Use of the paraffin station can be resumed only
after a cooling down period. For cooling down,
disconnect the paraffin station connector plug
from the socket at the rear of the instrument,
or switch off the main switch.
The paraffin stations are equipped with heating. While
the heating is functioning, the yellow pilot lamp lights.
Fig. 13
The handle (2) is insulated. The paraffin container (3)
is also insulate to ensure that there is no risk of injury.
Caution! The interior containers of the paraffin
stations become very hot when the heating
function is activated! Do not touch the gray
upper rim of the containers with your hands!
3
Risk of injury!
The inside of the interior container (4) is coated with
Teflon. The interior container gets very hot. It has
minimum and maximum level indicator marks (5).
If the excess temperature switch-off
mechanism reacts several times, call
Technical Service without delay. In those
cases, use of the paraffin station in question
has to be discontinued immediately!
Leica TP1020 – Automatic Tissue Processor
13
Page 14
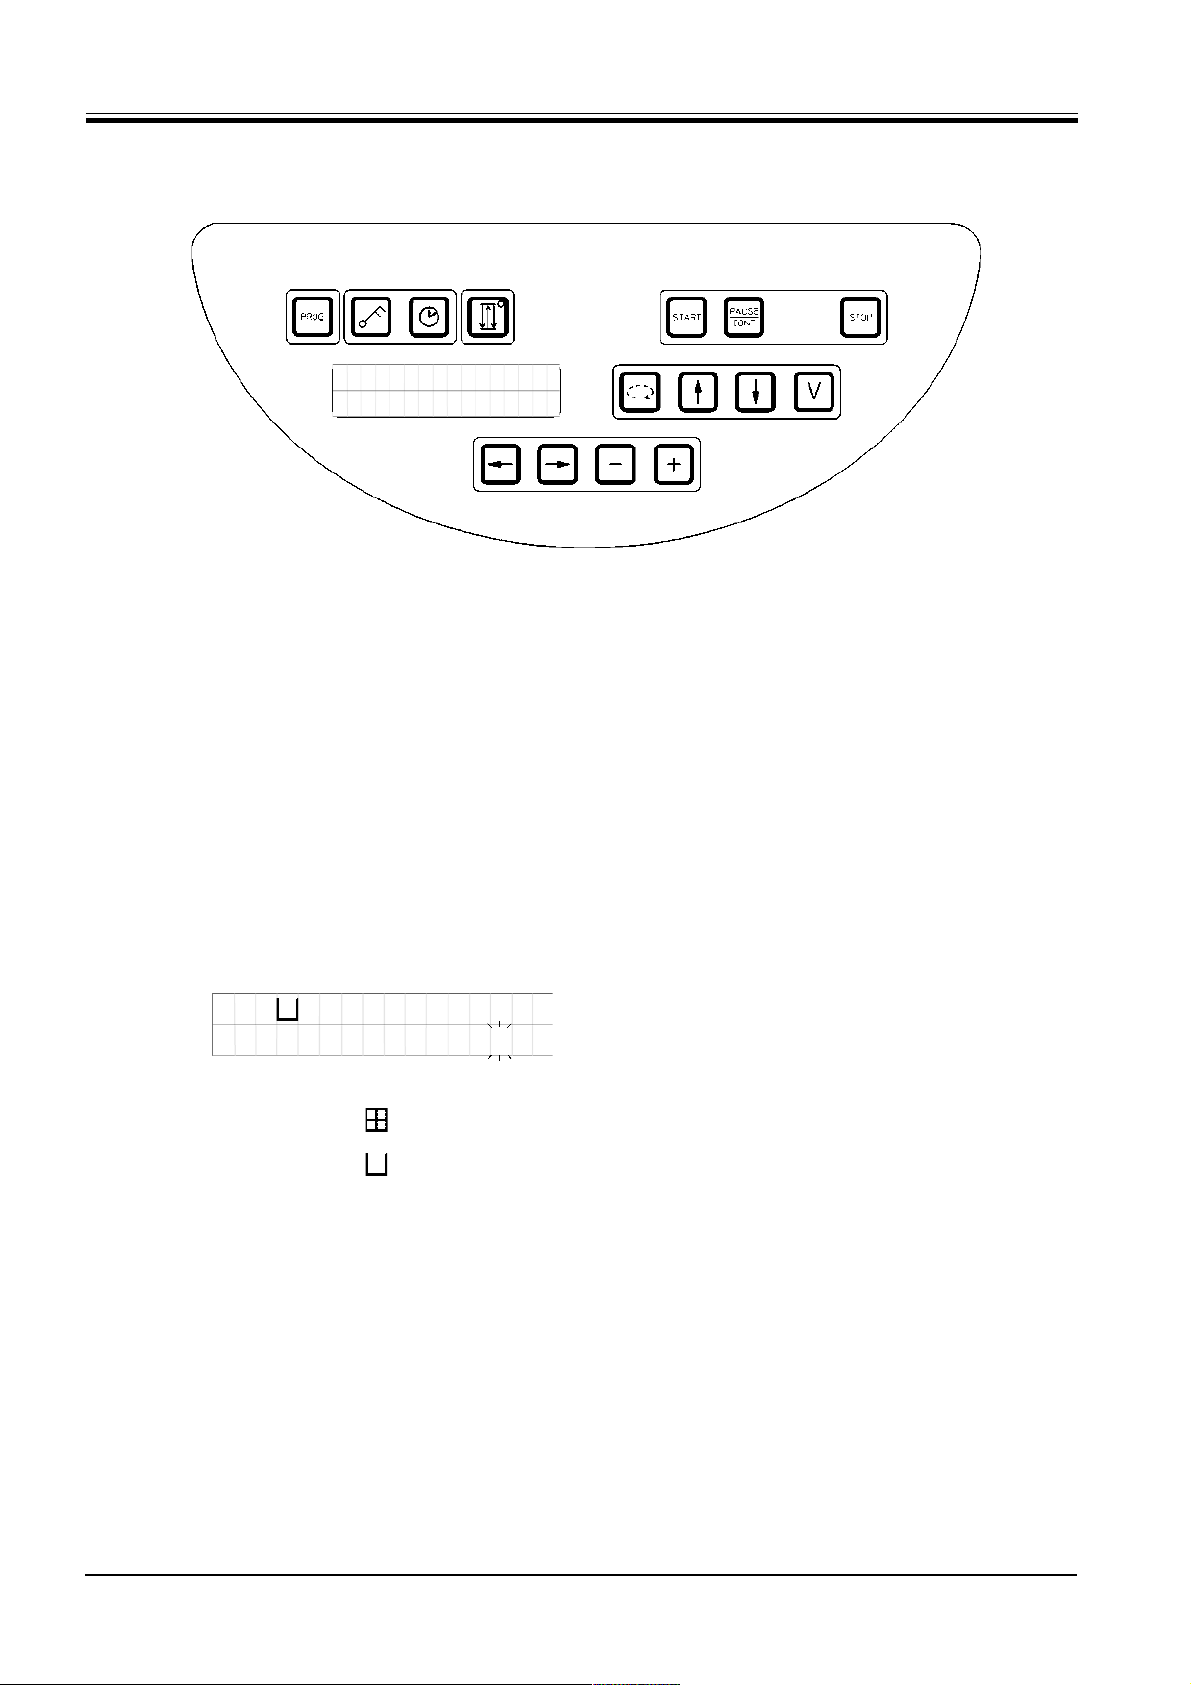
6. The user interface
Fig. 14
Control panel
The control panel is an easy-care key pad.
0 4
Tissue basket
Processing station
0 9 : 1 7
The individual keys are organized in four functional
groups. Pressing any key will be acknowledged by an
audible signal. This function can be disconnected if
required (see Chapter 18).
Display
The display is a two-line LCD indication, each line with
16 single characters. When the instrument is on, the
display is always illuminated.
The display will indicate in which station the tissue
basket is located. At the same time the display also
reads real time (24 hour clock). The colon between
hours and minutes is blinking.
The display shows all tissue processing parameters
as well as the individual programs. Tissue baskets and
processing station are displayed with symbols.
In addition to programming features other useful data
is displayed; such as program duration and end of
processing. Also displayed are warning codes (W:01 W:06) to ensure trouble-free processing, and error
codes (E:01 - E:03) which indicate instrument or data
entry errors.
14
Instruction Manual V 2.1 – 12/2000
Page 15
6. The user interface
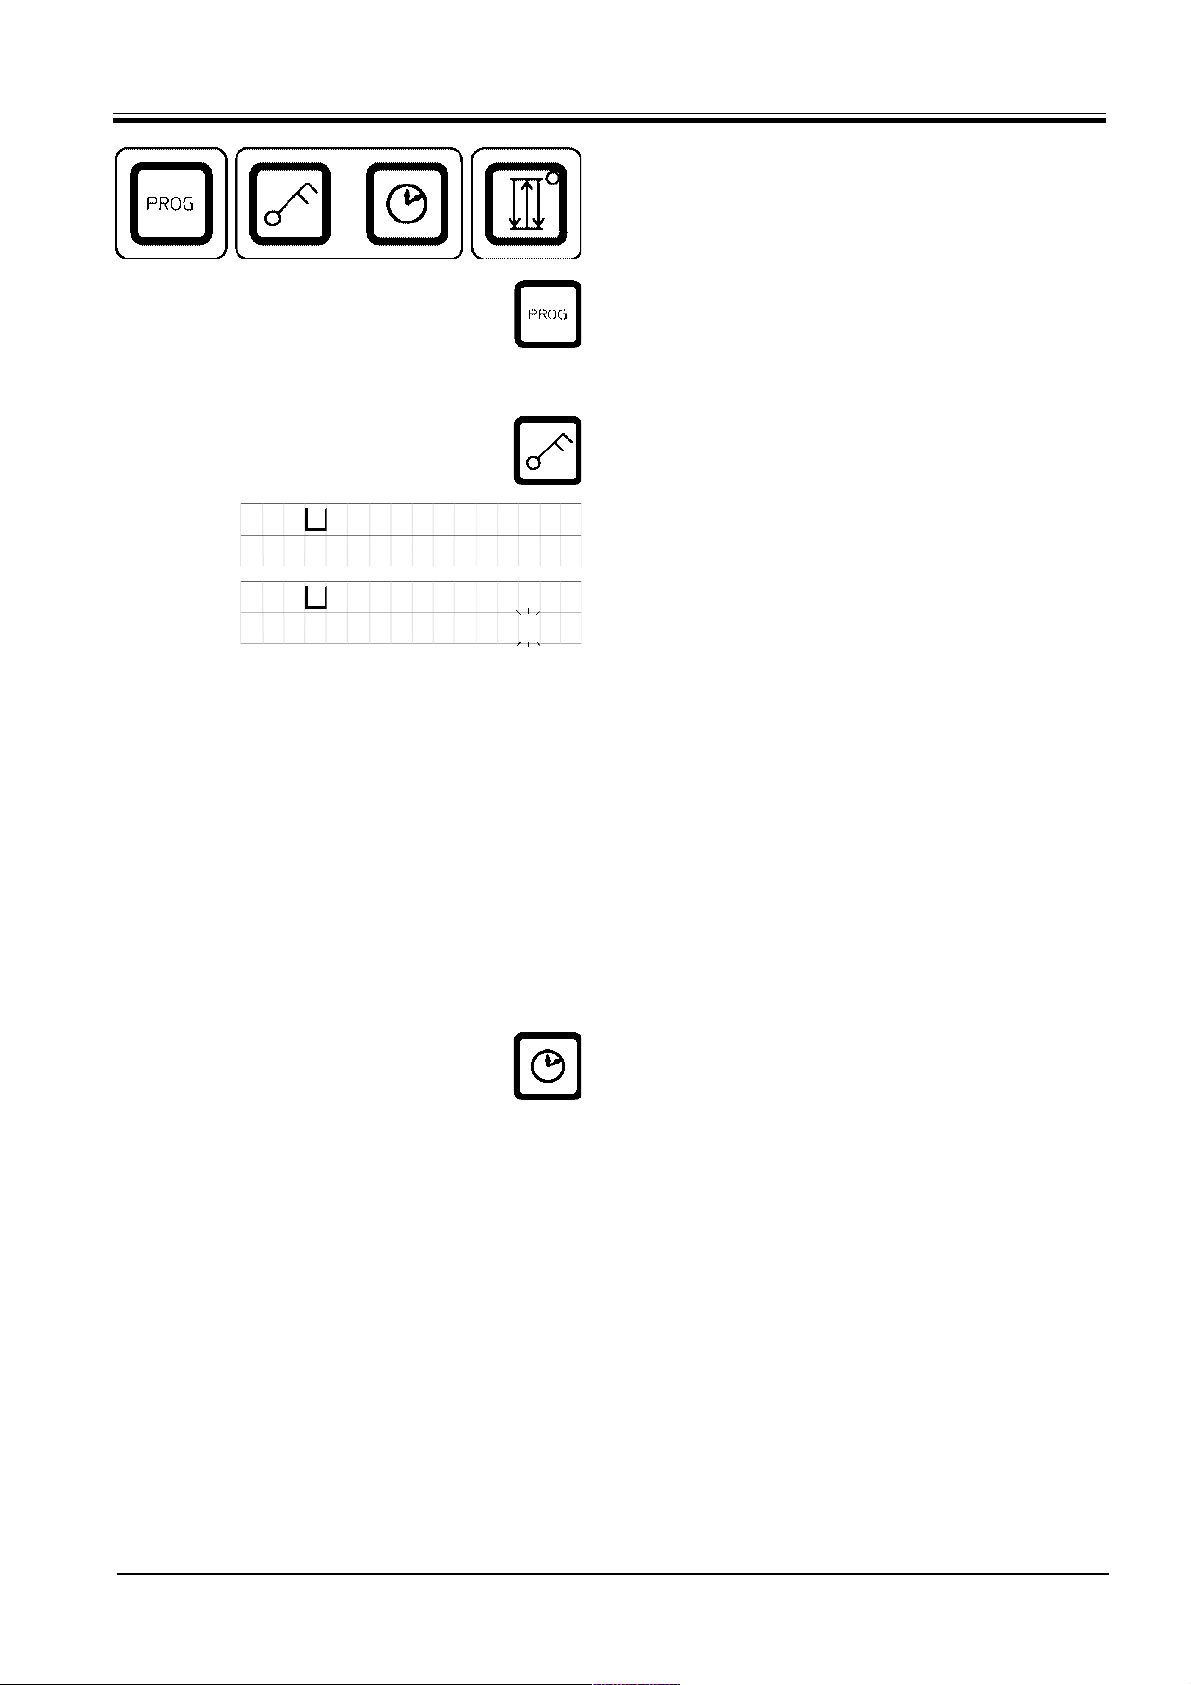
Key functions
Programming, control panel locking, time setting,
up-and-down movement of the tissue basket
Programming button ‘PROG’
To call and quit the programming mode, in which
programs are set up, edited and altered, and to display
a program which is currently activated.
Lock button ‘KEY’.
To lock all control panel functions as protection against
accidental changes of programmed parameters.
0 4
L O C K E D
0 4
• To activate and quit the lock function, press ‘KEY’
for 5 seconds.
The display reads ‘LOCKED’.
1 0 : 2 0
After 10 seconds the display returns to standard
reading.
All key functions with the exception of the locking key
itself are now locked. Non of the key functions can be
activated. When pressing any key, the display will
always read ‘LOCKED’ for 10 seconds.
• To unlock the key functions, press ‘KEY’ again for 5
seconds.
All key functions will return to normal.
‘CLOCK’ symbol button
To set the time and to indicate the total duration, start
time and expected end of automatic tissue processing
programs.
Leica TP1020 – Automatic Tissue Processor
The display differentiates between indication of time
(real time, start time when working with delayed
starting function, end time) - which is indicated through
hyphens and colon - and indication of duration (holding
time of the tissue basket in a particular station, total
duration of process) - which is indicated through the
letters ´d´ and ´h´.
15
Page 16

6. The user interface
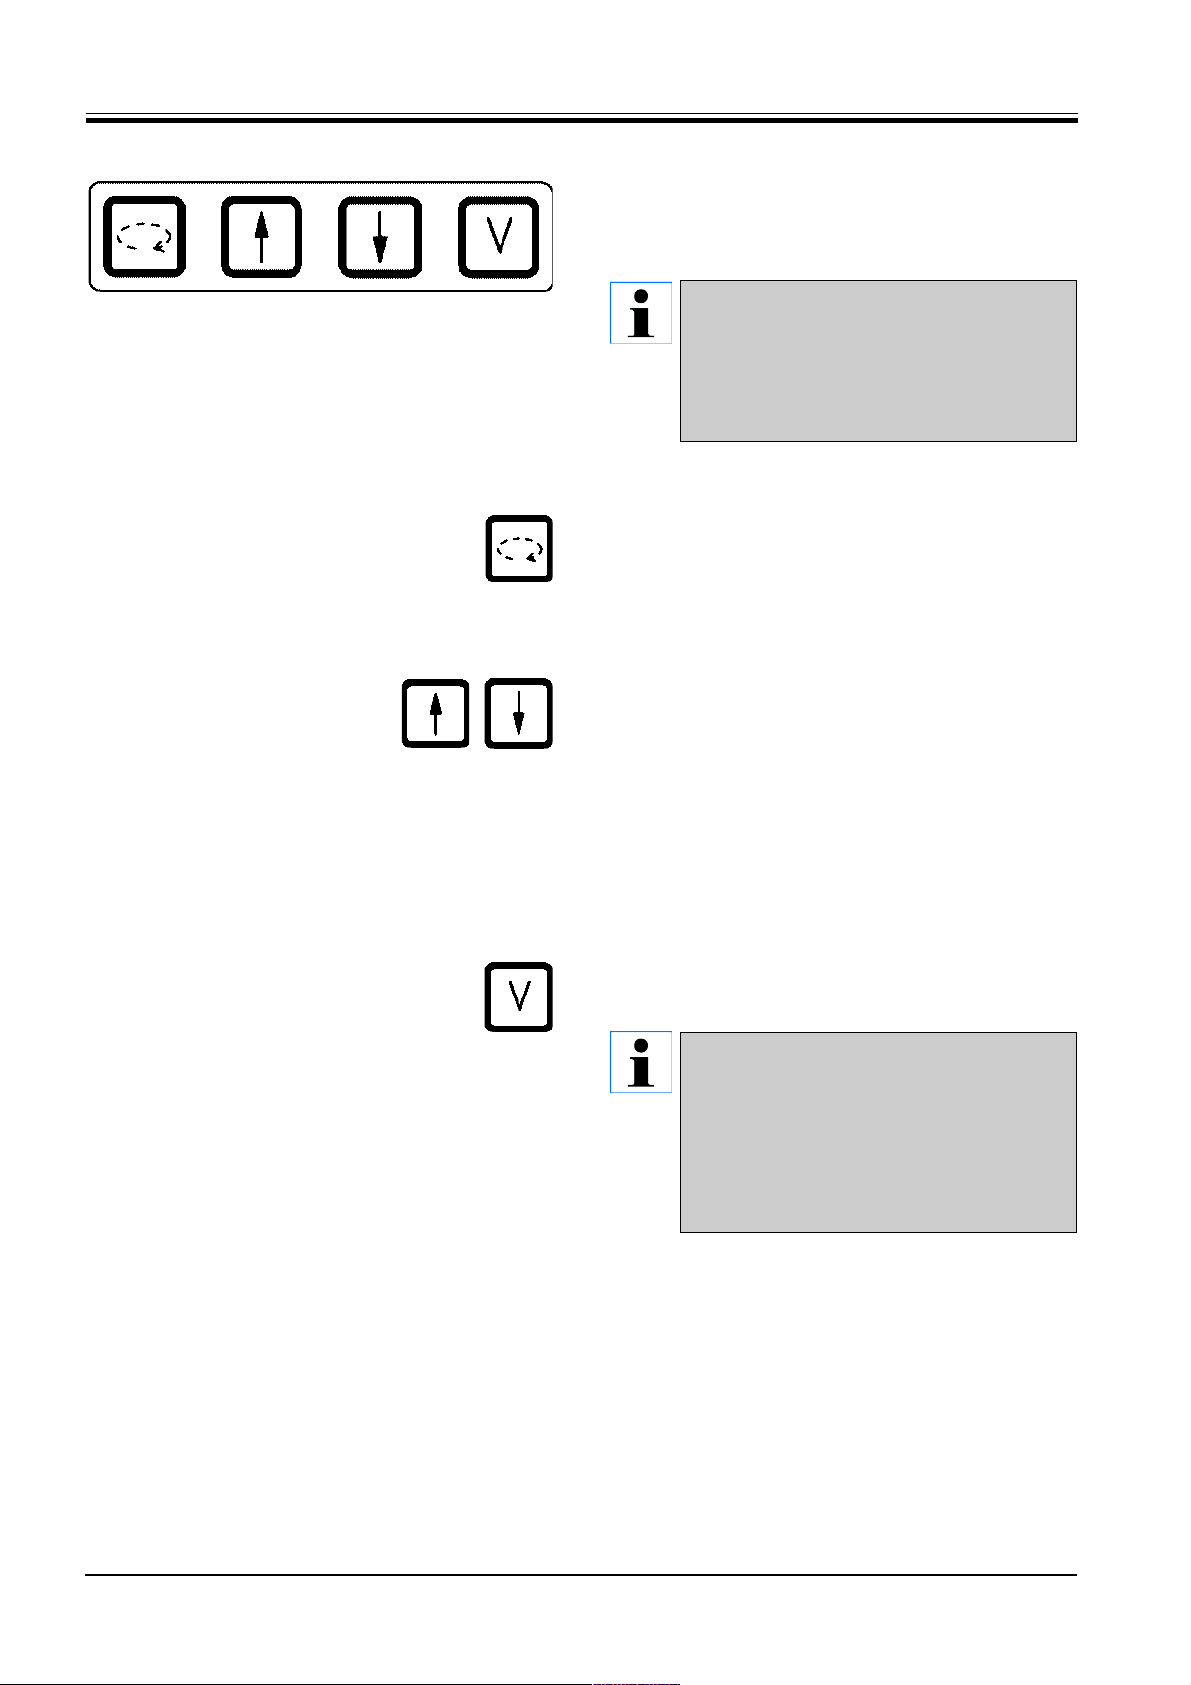
‘THREE ARROW’ button for carousel up and
down movement
The ‘THREE ARROW’ button is used to start and stop
the carousel (tissue basket) up and down movement.
When this function is activated, the tissue basket is
lifted and lowered in three-second intervals within the
processing stations. This ensures a uniform mixing of
all liquids and an optimized tissue infiltration.
This function is automatically activated when a an
automatic processing cycle is started.
It can be switched off and back on at any time, also
when no processing cycle is running.
With the function being activated, the green diode in
the ‘THREE ARROW’ button is lighted.
• To switch off the function, press the ‘THREE ARROW’ button.
The diode is extinguished; the function is switched off.
It can, however, be turned back on at any time.
• To reactivate the function press the ‘THREE ARROW’ button once again.
If the tissue basket is located in a paraffin bath
that contains solid paraffin, the instrument
disconnects the up/down function
automatically.
16
Instruction Manual V 2.1 – 12/2000
Page 17
0 1 V A C 0 h 1 2
P 4 P A U S E
6. The user interface
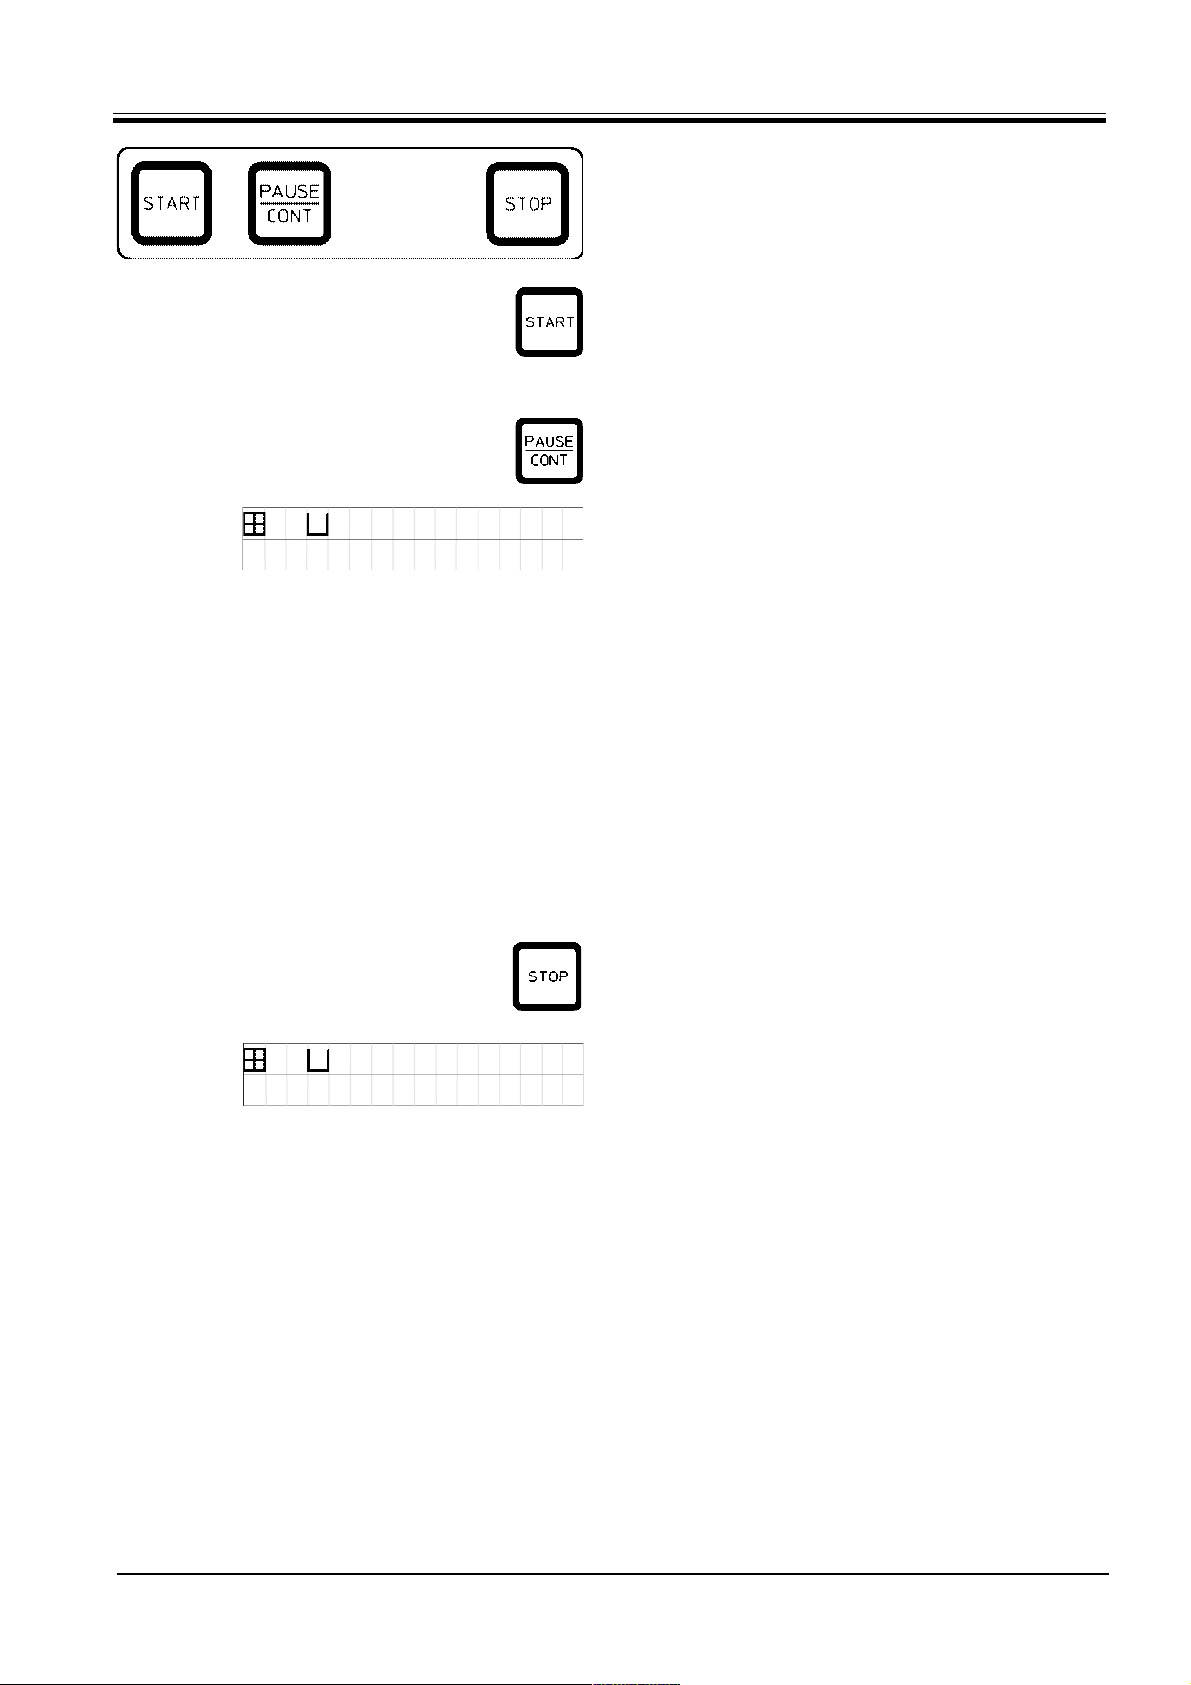
Start, pause, resume, stop and abort automatic
tissue processing cycles
'START' button
To immediately start processing or to insert delayed
starting parameters for automatic processing after
having selected a program.
‘PAUSE/CONT’ button
To pause and resume an automatic processing cycle.
When the function is activated, the display reads
‘PAUSE’. In addition, 5 minutes after last pressing a
button, a double sound signal will remind the user that
processing is still paused. This signal will repeat itself
every 5 minutes until the automatic processing cycle
is resumed.
When automatic processing is paused, the buttons for
manual processing become functional, so that e.g. the
tissue basket can be lifted out of the station to add tissue samples or to unload them for further/special processing.
0 1 V A C 0 h 5 5
P 8 S T O P ?
The pause period is terminated by pressing the 'PAUSE/
CONT' button. The processing cycle is resumed and
the remaining immersion time for that station is completed without interruption.
‘STOP’ button
To immediately stop the carousel up and down movement (press once) or to abort a processing cycle in
progress (press twice).
The display reads ‘STOP?’.
Leica TP1020 – Automatic Tissue Processor
17
Page 18
6. The user interface
Manual processing keys
These buttons are only functional in the manual processing mode an while and, while an automatic processing mode is paused, via the ‘PAUSE/CONT’ button.
While the carousel is moving, the display
reads ‘WAIT!” and two blinking arrows
indicate the direction of the movement. Only
when the carousel has completely come to a
halt, this indication will disappear from the
display.
‘CIRCLE ARROW’ button to rotate the carousel
To move the tissue basket to the next station. Rotation
is only clockwise and while the carousel is in the upper
end position.
‘ARROW UP’ and ‘ARROW DOWN’ button for vertical
carousel movement
Lift and lower respectively the carousel to withdraw
the basket from a processing station or insert a basket
into a processing station.
To halt an up or down movement while still in progress,
push one of the two buttons again. The movement will
stop immediately when pressing the button.
‘V’ button for vacuum function
(types 2 and 4)
To connect / disconnect the vacuum function in the
manual processing mode.
The Leica TP1020 is available with and without a vacuum function. The instrument versions without vacuum functions do have the
‘V’ button in the control panel; however it is
not functional and the letter ‘V’ is not
displayed. Of course a vacuum function
cannot be activated with the ‘V’ buttons in
those cases.
18
Instruction Manual V 2.1 – 12/2000
Page 19
6. The user interface
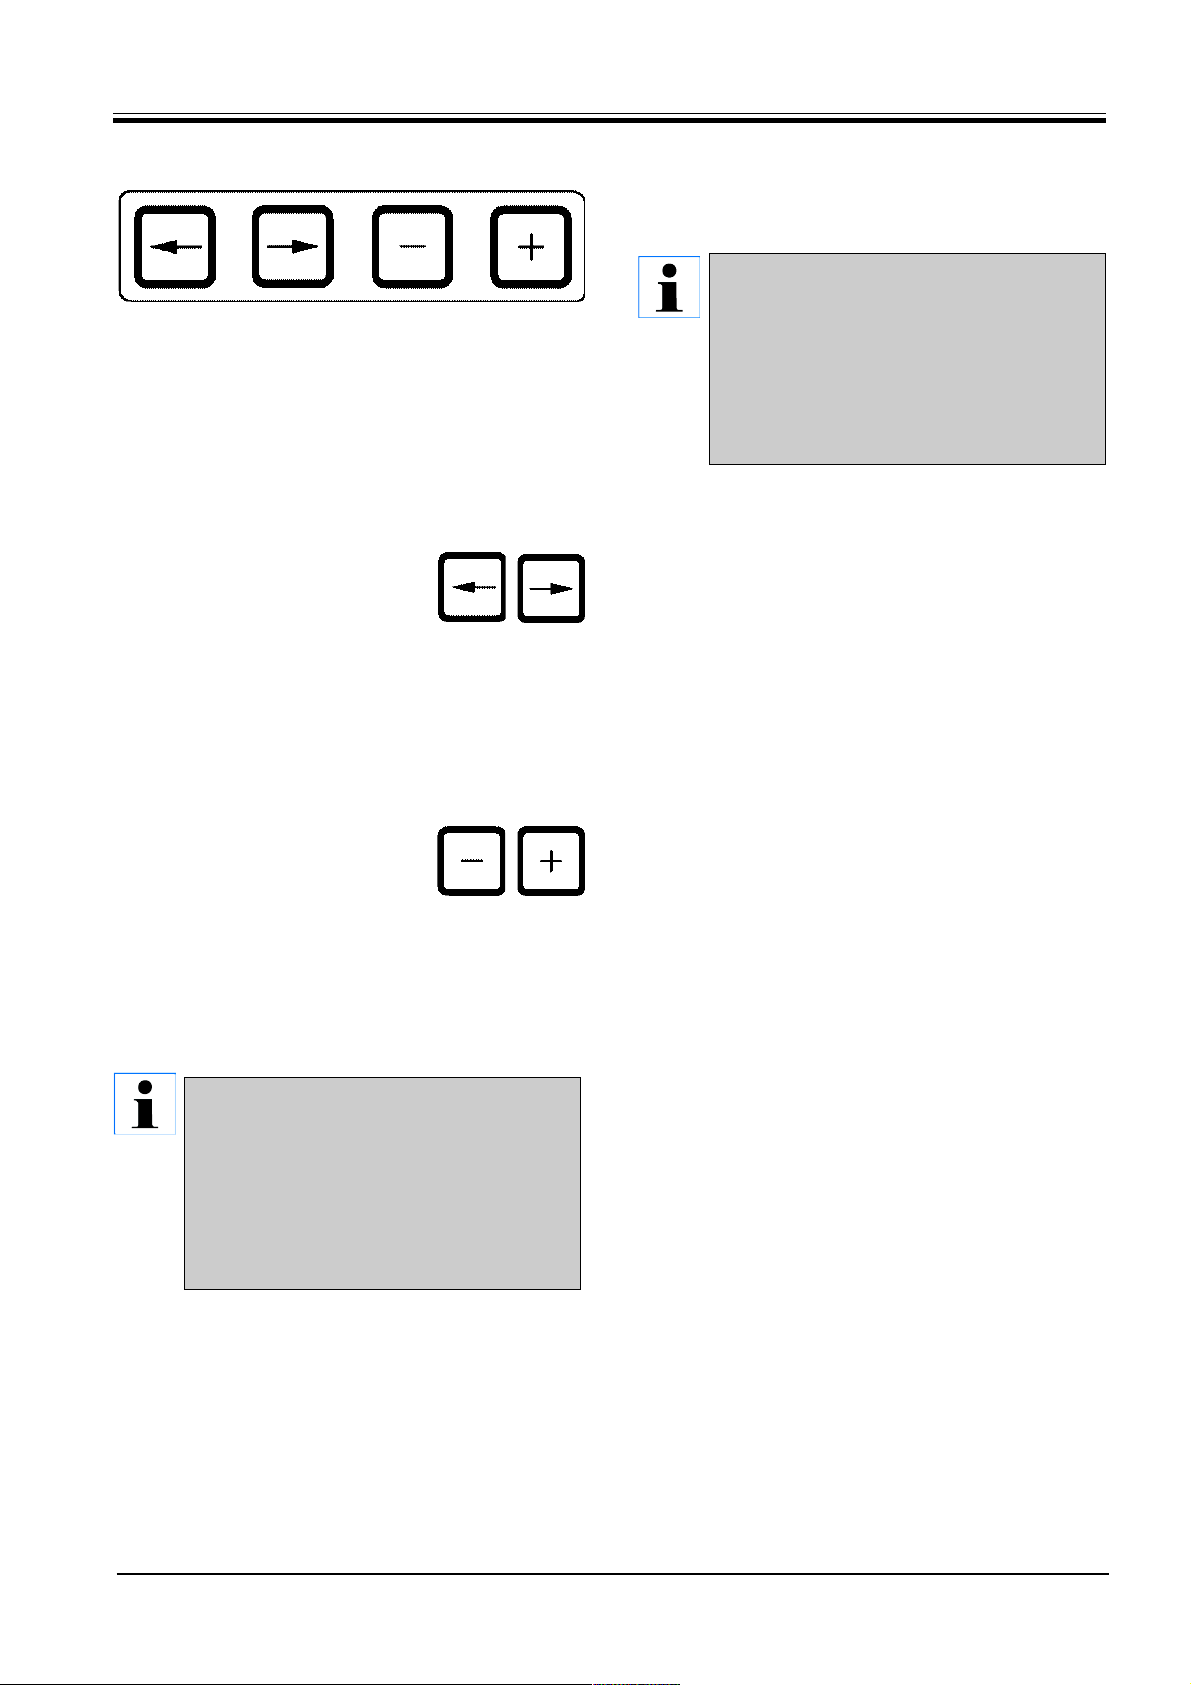
Programming mode buttons
These buttons are used to enter or alter parameters
when programming.
These buttons are equipped with a repeat
function.
If one of the ARROW is pressed for a while,
the cursor jumps to the respectively next data
entry position.
If one of the PLUS / MINUS buttons is pressed
for a while, the displayed numerical value is
continuously increased or decreased.
ARROW LEFT / ARROW RIGHT buttons (cursor)
To move the cursor in the direction of the arrow to the
respectively next data entry position.
• When pressing one of the ARROW buttons, the
cursor jumps to the next data entry position in the
direction of the arrow.
The Leica TP1020 is available with and without a vacuum function. The instrument versions without vacuum functions do have the
‘V’ button in the control panel; however it is
not functional and the letter ‘V’ is not
displayed. Of course a vacuum function
cannot be activated with the ‘V’ buttons in
those cases.
• To switch lines press ARROW LEFT.
PLUS / MINUS buttons
To modify the parameter in the position where
the cursor is located.
• To increase the numerical value, press PLUS.
• To decrease the numerical value, press MINUS.
• To change the number of baskets from 1 to 2, press
PLUS.
• To change the number of baskets from 2 to 1, press
MINUS.
• To change the station number press PLUS or MINUS
respectively.
• To switch on the vacuum function (types 2 and 4)
push PLUS.
• To deactivate the vacuum function (types 2 and 4),
press MINUS.
Leica TP1020 – Automatic Tissue Processor
19
Page 20
7. Unpacking and installation
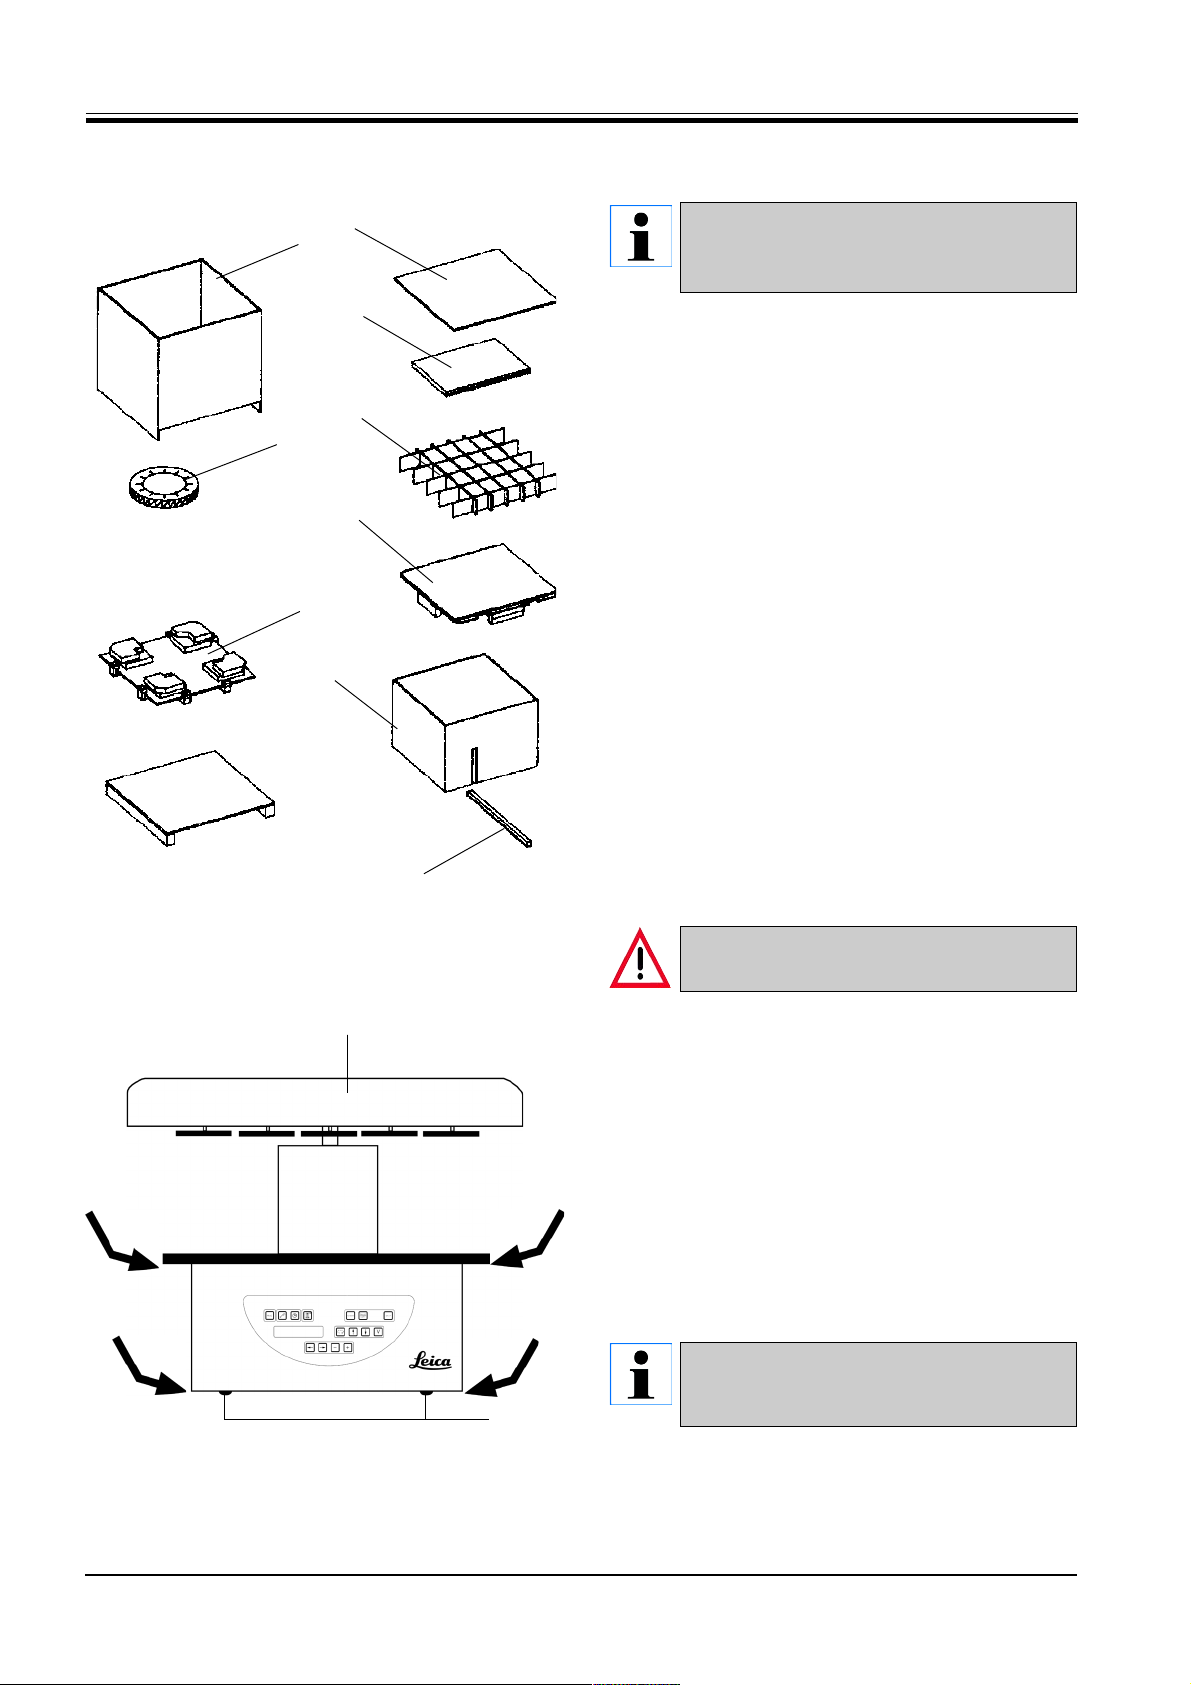
7.1 Unpacking
2
1
3
Check the packaging material for visible
damage. If obviously there is damage, please
contact your freight forwarder immediately.
• Loosen the 3 screws on the upper and lower ends
of each of the four sides of the transport box (1).
4
9
• Remove the wooden lid (2).
• Remove the sponge rubber mat (3).
5
• Remove the instruction manual and the packing list.
• Remove all accessories of the individual compart-
8
7
ments of the cardboard grid (4).
• Remove the cardboard grid (4).
• Remove the intermediate bottom (5).
• Take away the wooden crate (1) moving it upwards.
Fig. 20.1
Fig. 20.2
• Remove the wooden ledge (6) from the interior box
(7).
6
• Remove the interior box (7) in an upward movement.
When transporting the instrument, do not lift
it up by the carousel cover!
11
• To lift up the instrument take it by the reagent
container platform or by the lower end of the
housing (Fig. 20.2) and lift it from the base plate
(8).
• Install the instrument on a stable laboratory bench.
Four rollers (12) under the instrument housing permit
rotating the instrument on the bench.
• Remove the sponge rubber transport safety device
(9) from under the carousel cover.
For further secure transport of the instrument
we recommend you keep the original
12
packaging material.
20
Instruction Manual V 2.1 – 12/2000
Page 21
780 mm
820 mm
7. Unpacking and installation
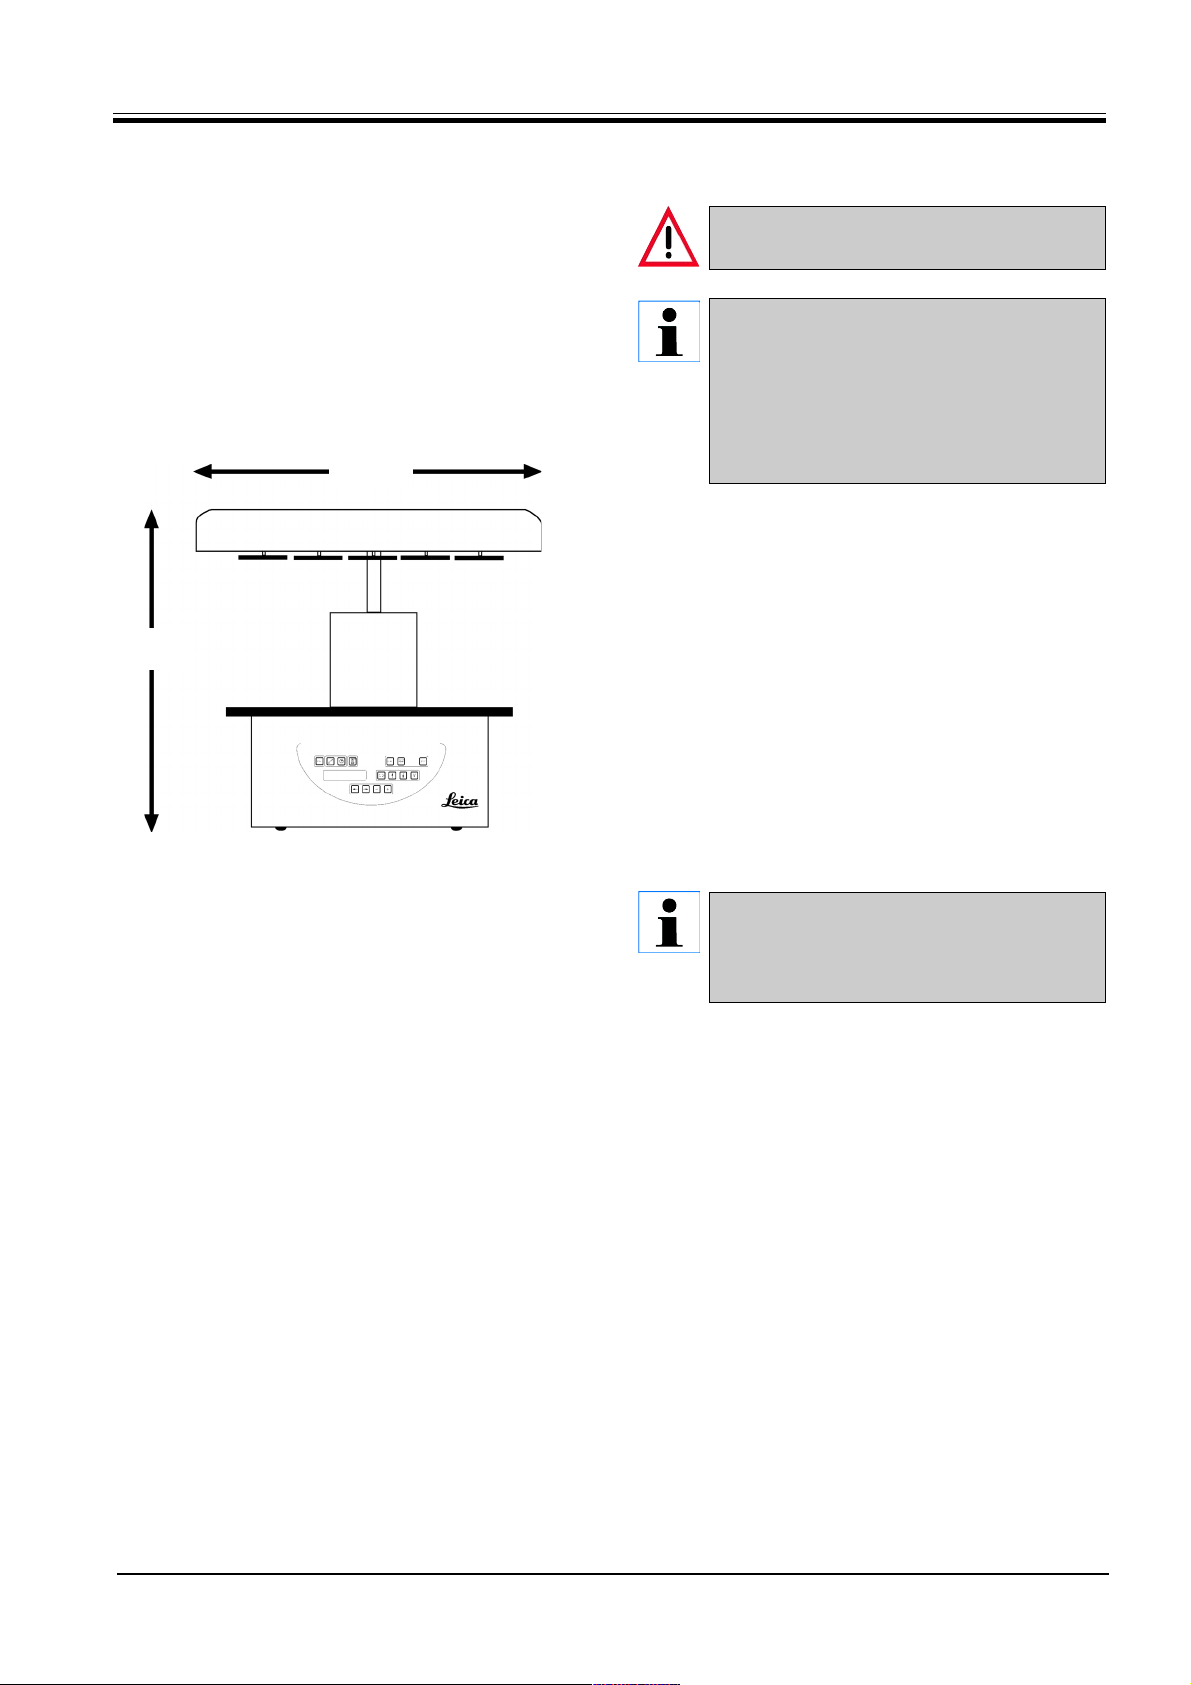
7.2 Requirements at the installation site
This instrument may not be operated in hazardous locations!
Because of the quantity of solvents used for
processing and the solvent concentrations
that build up, for the instrument versions
without fume control system (containment
shields and activated carbon filter) we recommend installation in the laboratory’s fume
hood.
The installation site has to fulfill the following
conditions:
- Stable and plane installation surface
- Minimum installation surface dimensions: 850 x 850
mm
- Stable ambient temperature of +5 °C to +40 °C.
- Relative humidity: 80 % maximum.
Fig. 21
Necessary conditions for electrical connection
- Grounded wall outlet near enough so it can be
reached with the mains cable supplied together
with the instrument.
If you wish to install the basket holder for a
second tissue basket, you should do that now.
For mounting instructions, see Chapter 16
‘Optional accessories’.
Leica TP1020 – Automatic Tissue Processor
21
Page 22

8. Initial start-up of the instrument
230
3
230 V
Fig. 22
8.1 Electrical connection
8.1.1 Checking the voltage selector setting
Attention: the voltage selector is factory
preset.
Before connecting the instrument to the mains
1
2
The voltage selector is located in a shell (3) above the
mains switch (2) at the rear of the instrument. The actual
selected voltage can be seen in the window (1).
make sure the correct setting, matching the
nominal voltage of your laboratory’s power
supply, has been selected.
The socket for connecting the mains cable,
located at the rear of the instrument, is sealed
with an adhesive tape which indicates the
factory preset voltage for your particular
instrument.
Connecting the instrument to the mains with
the voltage selector set at a wrong value can
cause severe damage to the instrument!
• Check if the setting showing in the window (1) cor-
responds to the nominal voltage in your laboratory.
• Remove the adhesive tape.
If the setting is correct proceed at 8.1.3.
If the setting does not correspond to the nominal
voltage in your laboratory, the voltage selector MUST
be adjusted to match your laboratory’s electrical setting
prior to connecting the instrument to the mains.
22
Instruction Manual V 2.1 – 12/2000
Page 23

8. Initial start-up of the instrument
8.1.2 Adjust the voltage selector
Fig. 23.1
230
5
When adjusting the voltage selector setting,
the instrument must be disconnected from the
4
mains.
• Insert the small screw driver (4) into the smaller one
2
of the two notches at the lower end of the lock (5)
using the screw driver as a lever.
• Remove the shell (3).
• Remove the voltage selector (6) from the shell (3)
and reinsert it so that the correct voltage selection
can be seen in the window (1) of the shell.
• Insert the voltage selector shell (3) together with
7
6
the voltage selector (6) and fuses (7) back into the
receptacle in the instrument and press lightly until
it locks.
• Check again if the right setting shows in the window
(1).
Fig. 23.2
Fig. 23.3
230
8.1.3 Connecting the mains cable
The instrument is supplied together with
various country-specific mains cables.
3
1
The instrument may only be connected to the
mains with the cable supplied together with
the instrument and it may only be connected
to grounded sockets.
• Before connecting the mains cable check if the
mains switch (2) at the rear of the instrument is
disconnected (‘O’).
2
8
• Out of the selection of cables, select the one with
the plug that fits into your laboratory’s wall outlets.
• Connect the mains cable to the corresponding
socket (8) at the rear of the instrument and plug the
mains cable into the wall outlet.
The instrument is ready to be switched on.
Leica TP1020 – Automatic Tissue Processor
23
Page 24

8. Initial start-up of the instrument
8.2 Switching on the instrument
• Switch on the instrument with the mains switch on
the right side at the rear of the instrument.
The instrument does a start-up run.
T P 1 0 2 0 V 1 . 0 0
0 1
0 0 : 0 0
0 1
0 9 : 3 8
0 1
0 9 : 3 8
Next, the instrument name and software version (e.g.
V 1.00) are displayed.
This reading disappears after about 10 seconds.
Next, the number of the processing station where the
basket holder is located and the real time indication
are displayed.
8.3 Setting the time
• Press ‘CLOCK’.
The cursor blinks at the hour indication.
• To adjust the hours, press PLUS or MINUS
respectively.
• Press ARROW RIGHT.
The cursor jumps to the minute indication.
• To adjust the minutes, press PLUS or MINUS
respectively.
• To finish setting the time press CLOCK again.
24
Instruction Manual V 2.1 – 12/2000
Page 25

8. Initial start-up of the instrument
8.4 Installing the accessories
• Press ARROW UP to lift the carousel.
To install and remove the reagent and paraffin
stations, the instrument can be rotated on the
bench. This ensures good access to all
stations at any time.
1
8.4.1 Installing the paraffin stations
The Leica TP 1020 basic instrument is delivered with two paraffin stations (no. 11 and 12).
Optionally a third wax bath can be connected
to station no. 10.
• Insert the paraffin station connection cable (1) in
the notch (2) in the platform and mount the paraffin
station onto the station holder (3).
8.4.2 Connecting the paraffin stations
Fig. 25.1
The connection plugs of each paraffin station
has to be inserted into the corresponding
2
socket number at the rear of the instrument.
• Rotate the instrument so that the sockets are easily
3
accessible.
• Insert plug number 12 into socket number 12.
• Insert plug number 11 into socket number 11.
• Lock clip (1) at each plug.
Before connecting a third paraffin bath to
12
11
10
station no. 10, the cover cap has to be
removed. Finally, the standard instrument configuration has to be altered accordingly.
For detailed instructions, see Chapter 18 ‘Altering instrument standard configuration'.
Fig. 25.2
Leica TP1020 – Automatic Tissue Processor
1
25
Page 26

8. Initial start-up of the instrument
8.4.3 Fixing the paraffin station connection
cables (instruments with fume control
system only)
Instruments with fume control system are
equipped with a plexiglass fume containment
shield which consists of two parts.
To ensure the fume containment shields can
be freely rotated and displaced as required
without being obstructed by the paraffin
station connection cables, two magnetic
clamps are provided on each of the cables to
attach the cables to the housing.
• After having mounted and connected the paraffin
stations, place the magnetic clamps on the side wall
of the housing so that the cables are fixed in a
position that ensures free movement of the fume
containment shields.
1
Fig. 26
8.4.4 Installing the reagent stations
• Mount the reagent containers (1) (glass or aluminum) onto the station holders (2) of the platform as
shown in Fig. 25.1.
2
26
Instruction Manual V 2.1 – 12/2000
Page 27

Example of a one-basket-program
9. Programming the instrument
9.1 General description
Programs are created step by step in the programming
mode. Programming parameters have to be entered for
each station individually. For that purpose, the cursor
is moved to the corresponding data entry position with
the ARROW buttons. The actual parameters are
entered with the PLUS / MINUS keys. All entered
parameters are memorized immediately.
Station Reagent VAC Time
1 Formalin V 1h00
2 Formalin V 1h00
3 Alcohol 70% V 1h30
4 Alcohol 80% V 1h30
5 Alcohol 96% V 1h30
6 Alcohol 100% V 1h00
7 Alcohol 100% V 1h00
8 Alcohol 100% V 1h00
9 Xylene V 1h30
10 Xylene V 1h30
11 Paraffin V 2h00
12 Paraffin V 2h00
Example of a two-basket-program
Station Reagent VAC Time
1 Formalin - 2h00
2 Formalin - 2h00
3 Alcohol 70% - 2h00
4 Alcohol 80% - 2h00
5 Alcohol 96% - 2h00
6 Alcohol 100% - 2h00
7 Alcohol 100% - 2h00
8 Xylene - 2h00
9 Xylene - 2h00
10 Paraffin - 2h00
11 Paraffin - 2h00
12 Paraffin - 2h00
The TP1020 has a memory capacity of 9 programs. Each
program can be set up and edited by the user.
Programs nos. 6 to 9 have already been set up ex works.
Programs nos. 6 and 7 contain a short-term or longterm program for one tissue basket each. Programs
nos. 8 and 9 contain a short-term or long-term program
for two tissue baskets each. These programs can be
edited.
9.1.1 Special characteristics of two-basket programs
In one-basket programs, for every processing station
a different infiltration time can be selected.
However, in two-basket programs infiltration time is the
same for every processing station. Basket no. 1 starts
in station no. 2 and basket no. 2 starts to be processed
in station no. 1.
If a one-basket program is modified into a two-basket
program by adding a basket, the instrument
automatically selects station no. 2 as starting container.
At the same time the infiltration time for all stations is
selected the same as the infiltration time for the actually
displayed station. These changes alter the previous
one-basket program permanently.
If the second basket is deleted, the starting container
and the infiltration times remain as set for the twobasket program. They have to be reentered as desired
for each individual station.
Leica TP1020 – Automatic Tissue Processor
27
Page 28

9. Programming the instrument
0 1 V 0 h 5 0
P 3 P R O G
9.2 Setting-up / editing programs
9.2.1 Selecting programming mode
• To select the programming mode, push the PROG
key.
The following parameters are displayed:
- Number of baskets or ,
- Number of processing station 1 - 12,
- Vacuum ‘ON’ or ‘OFF,’
- Tissue infiltration time in the displayed station ‘0 h
50 min’,
- Program number ’P1 - P9’ ,
- Programming mode ’PROG’.
The cursor blinks at the program number.
0 1 V 0 h 5 0
P 3 P R O G
0 1 V 0 h 0 0
P 3 P R O G
0 1 V 0 h 0 0
P 3 P R O G
9.2.2 Selecting the program
• Select the program number you wish to edit with
the PLUS or MINUS buttons.
9.2.3 Selecting the number of baskets
• Push the ARROW LEFT button to move the cursor
to the upper line.
The cursor blinks next to the first basket symbol.
• To increase the number of baskets from 1 to 2, press
PLUS.
• To decrease the number of baskets from 2 to 1,
press MINUS.
With this, the infiltration for the tissue baskets will be
the same in all stations.
9.2.4 Selecting the starting station
• Press ARROW RIGHT to move the cursor to the next
entry position.
28
The cursor blinks at the station number data entry
position.
• Select the desired station number by pressing PLUS
or MINUS.
Instruction Manual V 2.1 – 12/2000
Page 29

9. Programming the instrument
9.2.5 Activating the vacuum function
(instruments with vacuum function only)
0 1 V A C 0 h 0 0
P 3 P R O G
0 1 V 0 h 0 0
P 3 P R O G
0 1 V 0 h 0 0
P 3 P R O G
• Press ARROW RIGHT to move to the next entry
position.
The cursor blinks at the two positions next to the ‘V’ for
vacuum function.
• To activate the vacuum, press PLUS.
• To deactivate the vacuum, press MINUS.
9.2.6 Selecting infiltration times per station
• Press ARROW RIGHT to move to the next entry
position.
The cursor blinks at the hour entry digits.
• Press PLUS or MINUS respectively to enter the
hours.
• To move the cursor to the next digit for data entry,
push the ARROW RIGHT key.
The cursor flashes on both digits destined for entering
the minutes.
• Press PLUS or MINUS to enter the minutes.
Setting range: 0 hrs. 05 min to 99 hrs. 59 min.
For stations you wish to leave out of your
program, select an infiltration time of 0 h 00
min.
Leica TP1020 – Automatic Tissue Processor
29
Page 30

9. Programming the instrument
0 3 V 0 h 0 0
P 3 P R O G
0 1 V A C 2 h 0 0
P 7 T O T A L 1 d 0 0 h 1 2
Press ARROW RIGHT to quickly jump to the next station
for entering the desired parameters (vacuum and infiltration time). Press PLUS/MINUS to enter the desired
parameters.
In two-basket programs infiltration time is the
same for all stations!
9.2.7 Displaying total program duration
Once a program is set up, total run time can be displayed.
• Press CLOCK to display the total run time of the
program.
The total duration displayed here is 1 day, 0 hours and
12 minutes.
• To quit the total run time indication, press CLOCK.
While you are in the programming mode, you
cannot start a program. Prior to starting a
program, you must quit the programming
mode.
9.2.8 Leaving the programming mode
To end programming you have to leave the programming mode.
• Press PROG to quit programming.
30
Instruction Manual V 2.1 – 12/2000
Page 31

10. Preparations for tissue processing
Warning! Use caution when handling
solvents! Make sure the premises are
adequately ventilated!
Explosion hazard!
Always observe worker’s protection rules and
use adequate protective gear (gloves, laboratory coats).
While operating the instrument, no liquid may
enter in contact with any of the electrical connections or the interior of the instrument.
To remove and reinstall the reagent and
paraffin containers, the instrument can be
rotated thus ensuring easy access to all
stations at any time.
10.1 Filling the reagent stations
• Lift the carousel cover.
• Fill all stations with the corresponding reagents.
Make sure to observe the minimum and maximum
level indication marks.
Spilled reagents have to be wiped away immediately.
In case of long-term exposure, the instrument
surfaces are only conditionally resistant to
solvents.
• Mount every container onto the station holder at
the corresponding station.
The container rims and sealing rings of the
lids always have to be clean. The lids have to
close tightly - otherwise larger amounts of
solvent fumes will escape and, in instruments
with vacuum function, vacuum will not be
generated.
Leica TP1020 – Automatic Tissue Processor
31
Page 32

10. Preparations for tissue processing
10.2 Filling the paraffin stations
The heated wax baths may only be used with
paraffin. Under no circumstances may they be
filled with solvents. When solvents heat, a
highly explosive mixture builds up!
Caution! The interior containers of the paraffin
stations become very hot when the heating
function is activated! Do not touch the gray
upper rim of the containers with your hands!
Risk of injury!
Caution when handling hot paraffin! Risk of
injury!
Altering the standard working temperature
Factory-set standard working temperature is
65 °C (70 °C on the special paraffin station
model that is resistant to chloroform).
When working with paraffin that has a melting point below 58 °C, the instrument working
1
temperature can be readjusted with the corresponding setting screw.
Fig. 32
• Use a screw driver to turn the setting screw (1) to
the desired value.
If you find that the paraffin does not melt completely
after lowering the working temperature, slightly
readjust again.
Do not overfill the paraffin stations! Make sure
the paraffin level is not below the minimum
or above the maximum level indicator.
• To fill the paraffin stations, use wax pellets or
paraffin which has already been liquefied.
When filling the station, make sure the
paraffin level is not below the minimum level
in which case there is a risk that not all
specimens will be entirely immersed in
paraffin and thus will not be infiltrated
completely.
32
Instruction Manual V 2.1 – 12/2000
Page 33

10. Preparations for tissue processing
It may take several hours to liquefy solid
paraffin. Make sure to calculate the waiting
time! When refilling wax pellets, again make
sure to observe the waiting time for complete
liquefaction.
• Place the paraffin station onto the corresponding
station holder and push the cable into the notch at
the edge of the platform.
Check for each paraffin station whether it is actually
installed at same station number it is connected to at
the rear of the instrument.
The container rims and sealing rings of the
lids always have to be clean and undamaged.
The lids have to close tightly - otherwise in
instruments with vacuum function vacuum
will not be generated.
Fig. 33.1
10.3 Inserting the tissue basket
• Fill the tissue cassettes or capsules into the tissue
basket.
To hook in the tissue basket(s), the basket holder(s)
should not be located over a paraffin station.
• Lift the carousel in the manual processing mode.
• Rotate the carousel so the basket holder (1) is lo-
cated above the starting container for basket 1.
• Hook the tissue basket (2) into the basket holder as
shown.
Use caution when lowering the carousel!
1
2
• Lower the basket into the starting container in the
Keep your fingers out of the space between
the container led and the upper rim of the
container!
manual processing mode or start an automatic processing cycle.
Leica TP1020 – Automatic Tissue Processor
33
Page 34

11. Operating the instrument in the manual processing mode
The carousel may not be rotated manually!
Severe damage will result from doing so!
When working in the manual mode, all carousel movements are activated through the corresponding
function keys on the control panel.
0 1
W A I T ! 0 9 : 2 0
While the carousel is moving, the display
reads ‘WAIT!” and shows two blinking arrows
which indicate the direction of movement in
each particular case.
When the carousel has completely come to a
halt, this indication will disappear from the
display.
To avoid reagent carryover as far as possible
in the manual mode, allow for a sufficient
dripping time.
11.1 Lifting and lowering the tissue basket
Use caution when lowering the carousel!
Keep your fingers out of the space between
the container led and the upper rim of the
container!
Pressing the corresponding button, the basket can be
lifted out of a station or lowered into one.
0 1
W A I T ! 0 9 : 2 0
• To lift the basket, press ARROW UP.
• To lower the basket, press ARROW DOWN.
The up or down movement is carried out entirely and a
corresponding message is displayed while the action
is in progress.
34
Instruction Manual V 2.1 – 12/2000
Page 35

11. Operating the instrument in the manual processing mode
• To interrupt an up or down movement, before it is
completed, press one of the two ARROW keys
again.
1 1
W : 0 1
As soon as you press the button, the movement will
stop.
If one of the warning codes W:01 - W:03 (see
Chapter 13) is displayed while you try to lower
the basket into one of the paraffin stations,
check whether the paraffin is actually
liquefied.
If yes, you may carry on and lower the basket into or
lift it out of the station.
• To lower the basket press KEY and ARROW DOWN
+
simultaneously.
Or
• To lift the basket, press KEY and ARROW UP
+
simultaneously.
11.2 Moving the tissue basket to the next
station
0 1
W A I T ! 0 9 : 2 0
To transport the tissue basket from one station to the
next, the CIRCLE ARROW button has to be pressed. The
movement can only be carried out in single steps and
clockwise.
• Press CIRCLE ARROW.
The basket is moved to the next station. ‘WAIT!’ and
two blinking arrows, indicating in which direction the
basket is moving, are displayed. The carousel will stop
when the basket is above the next station without
lowering the basket into the station.
• To move on to the next station, press CIRCLE
ARROW again.
Leica TP1020 – Automatic Tissue Processor
35
Page 36

11. Operating the instrument in the manual processing mode
11.3 Activating the vacuum function
(instruments with vacuum function only)
The Leica TP1020 is available in different
types, with or without vacuum function.
Instruments without vacuum function also
have the ‘V’ button for vacuum on the control
panel, however this key is not functional. ‘V’
is not displayed. Of course in those instruments, vacuum cannot be applied or ventilated
via the ‘V’ button.
Instruments equipped with vacuum function
may only be operated with the aluminum
containers supplied together with the
instrument.
In the manual processing mode, pressing a button activates / deactivates the vacuum function.
• Press ‘V’ to activate vacuum.
0 3 V A C
0 9 : 1 7
0 3
W A I T ! 0 9 : 1 8
The display reads ‘VAC’ (vacuum). The pump noise
diminishes while vacuum is generated.
• To deactivate the vacuum, press ‘V’ again.
‘VAC’ disappears from the display. The vacuum is
deactivated.
While the container is being ventilated, a slight hissing
noise can be heard. Only after the station has been
completely ventilated can the tissue basket be lifted
out of it.
36
Instruction Manual V 2.1 – 12/2000
Page 37

12. Operating the instrument in the automatic processing mode
0 1 V A C 1 h 0 0
W : 0 5
12.1 Starting a program
A program can either be started immediately
or at a later point in time using the delay
function.
12.1.1 Immediate start
• To start a program, press START.
The program on display is always the last one
that has been in use. All corresponding
parameters are displayed, such as number of
baskets, starting position (station number),
vacuum on/off, and infiltration time of the
basket in the starting container.
Therefore, check the parameters on display
and decide if you actually wish to start the
displayed program. Otherwise select another
program.
The cursor blinks at the program number data
entry position.
For a program to be selectable for use, at least
one infiltration time for one processing station
must have been set.
• Select the desired program number by pressing
PLUS or MINUS.
• To start the selected program immediately, press
START again.
The warning codes W:04 - W:06 (see Chapter
13) are displayed for programs of less than 8
hours duration from start until the basket
reaches the first paraffin station.
Check if the available amount of time is
sufficient for the paraffin to liquefy completely.
If this is not ensured, fill the paraffin stations
with liquid paraffin.
Leica TP1020 – Automatic Tissue Processor
37
Page 38

12. Operating the instrument in the automatic processing mode
• To override the warning codes and start process-
+
ing, press KEY and START simultaneously.
0 9 V A C - - h - -
P 4 0 9 : 1 7
0 1 V A C 0 h 5 7
P 4 0 9 : 2 9
After the drain time of 60 seconds, the carousel will
automatically move to the programmed starting
position.
While the basket is being moved, the display reads the
numbers of the container stations the carousel is
rotating past. Instead of the infiltration time ‘h’ will be
displayed.
As soon as the basket has arrived at the programmed
starting station, it will be lowered into that station.
From that point on, the remaining infiltration time of the
basket in the current station is displayed. While processing time is running, the display reading is updated
in one-minute intervals; i.e. you can always see exactly
the remaining infiltration time for each station.
12.1.2Delayed start
The delay function enables you to start a
program e.g. during the weekend, so it will
be completed by the time you return to work
on Monday.
0 1 V A C 1 h - -
P 4 0 9 : 1 8
0 1 V A C 1 h 0 0
P 4 S T A R T 0 - 0 0 : 0 0
Select starting time
• Press START.
The program which was used last is displayed. Decide
whether you want to start that particular program or
select another one.
• To enter the desired starting time, press ARROW
RIGHT.
The display reads START and the cursor blinks at the
data entry position for the days of delay.
0 = Start at the same day (= today),
1 = Start the next day (= tomorrow),
2 = Start in two days (= the day after tomorrow)
...etc..
38
Instruction Manual V 2.1 – 12/2000
Page 39

12. Operating the instrument in the automatic processing mode
• Press PLUS / MINUS to enter the number of days.
• Press ARROW to move the cursor to the data entry
position for the hours.
• Press PLUS / MINUS to enter the number of hours.
• To move the cursor to the digits destined for
entering the minutes, push the ARROW key.
• Press PLUS / MINUS to enter the number of minutes.
0 1 V A C 1 h 0 0
P 4 S T A R T 1 - 1 9 : 3 0
0 1 - - h - P 4 1 6 : 3 0
0 1 V A C 1 h 0 0
P 4 E N D 2 - 0 9 : 4 8
The program shown here would be started the next
day at 7.30 PM.
• To activate the delay function press START.
Once the delay function has been activated, the tissue
basket will move immediately to the selected starting
container.
While the basket is waiting in the starting container
for the actual program to start, the display reads
‘- -h - -’.
When pressing CLOCK the display switches from real
time indication to reading the selected starting time and
the resulting end time.
Display end of processing time
To check if the programmed starting time leads to an
acceptable end of run time:
• Press CLOCK
Leica TP1020 – Automatic Tissue Processor
In the example shown here the end of processing would
be the day after next at 9.48 AM.
Edit and change starting time (when using the
delayed starting function)
• Press CLOCK again.
• Check the selected starting time and if necessary
change it as appropriate to achieve the desired end
or run time.
39
Page 40

12. Operating the instrument in the automatic processing mode
• To activate the delay function, press START.
The warning codes W:04 - W:06 (see Chapter
13) are displayed for programs of less than 8
hours duration from start until the basket
reaches the first paraffin station.
Check if the available amount of time is
sufficient for the paraffin to liquefy completely.
If this is not ensured, fill the paraffin stations
with liquid paraffin.
• To override the warning codes and start process-
+
ing, press KEY and START simultaneously.
The program will be started at the selected delay time.
• To quit the display indication, press CLOCK again.
Locking the key functions
To protect program settings against
unintended deletion or alterations, the key
functions of the control panel can be locked.
• To lock the panel, press KEY for 5 seconds.
‘LOCKED’ will be displayed.
After 10 seconds the display will return to standard
reading. Every time a button is pressed, ‘LOCKED’ will
be displayed again.
• To unlock the control panel functions, press KEY
again for 5 seconds.
40
Instruction Manual V 2.1 – 12/2000
Page 41

12. Operating the instrument in the automatic processing mode
12.2 Editing and altering programs while a
processing cycle is in progress
Programs can be edited and changed while a
processing cycle is in progress. All programs
can be edited and changed with the exception
of the program currently in progress. A
program in progress can be displayed but not
changed.
• Activate the programming mode.
• Select a program.
To verify and/or change the selected parameters,
• Move the cursor to the station number entry posi-
tion (ARROW RIGHT / LEFT = cursor buttons)
• Modify the station number pressing PLUS or MI-
NUS and thus edit, and if necessary alter, step by
step all station parameters.
0 1 0 h 5 0
P 7 E N D 1 - 1 0 : 3 8
All modifications are saved immediately.
The program currently in progress cannot be
changed!
• Press PROG to quit programming.
12.3 Display end of processing time
While a processing cycle is in progress, it is possible
to display the expected end of run time.
• To display end of run time, press CLOCK.
In the example shown here end of processing would
be the next day at 10.38 AM.
• To quit the end of run indication, press CLOCK again.
Leica TP1020 – Automatic Tissue Processor
41
Page 42

12. Operating the instrument in the automatic processing mode
12.4 Pausing a process
A tissue processing run can be paused, e.g. to add
samples, and then be resumed.
• To pause a run, press PAUSE/CONT.
’PAUSE’ is displayed.
0 1 V A C 0 h 1 2
P 4 P A U S E
When in ‘PAUSE’, the buttons for manual operation become functional, e.g. to lift the tissue basket out of a
station to add specimens. The carousel can also be
rotated to move the basket to any processing station see ‘Operating the instrument in the manual processing
mode’.
While a run is paused, ‘PAUSE’ will be
displayed continuously.
In addition, 5 minutes after last pressing a key,
a double sound signal reminds the user the
run is still paused. The sound signal will recur
in 5 minute intervals until processing is
resumed.
12.5 Resuming a paused process
• To reassume processing press PAUSE/CONT again.
Pressing this key will lower the basket into the station.
Processing continues as programmed.
While a run is paused, the infiltration time countdown
in the actual station will also be interrupted. When processing is resumed, the remaining infiltration time in
the station will be carried out without interruption. Thus,
the end of run time of a process will be postponed by
the length of time the process was paused.
The display reading will automatically be updated,
showing the new end of run time.
42
Instruction Manual V 2.1 – 12/2000
Page 43

12. Operating the instrument in the automatic processing mode
12.6 Stopping or aborting a process
If there is an emergency, an automatic processing
cycle can be stopped immediately and - in a subsequent step - entirely aborted.
• To stop a processing cycle in progress press STOP.
The carousel up-and-down movement stops immediately.
0 1 V A C 0 h 5 5
P 8 S T O P ?
0 1 V A C 0 h 5 5
P 8 1 0 : 1 9
0 1
1 0 : 3 4
The display reads ‘STOP?’.
With this the instrument is asking you whether you
really want to abort the processing cycle currently in
progress?
• To resume processing, press START.
Processing will continue as programmed.
• To abort the process, press STOP again.
This will abort the run definitely without any option to
resume processing.
The tissue basket remains immersed in the current
station and has to be removed in the manual processing
mode.
1 2
D O N E
Leica TP1020 – Automatic Tissue Processor
12.7 End of an automatic process
Once an automatic processing cycle has been completed, ‘DONE’ and the position (station number) of the
tissue basket will be displayed. In addition, the visual
indication will be reinforced by a sound signal which
is emitted every 30 seconds.
• Press any key to confirm the message and turn off
the sound signal.
The specimens can now be removed in the manual processing mode.
43
Page 44

12. Operating the instrument in the automatic processing mode
12.8 Remove the specimens
• Lift the carousel.
• Allow for the tissue basket to drain in that position.
• Lift the tissue basket slightly with your hand and pull
it out of the basket holder in a horizontal movement.
• Lower the carousel.
12.9 Finishing your daily work
Due to the relatively long time paraffin
requires to melt, the instrument should not be
turned off routinely after finishing the day’s
last processing cycle.
• Check the filling level and quality of the liquid in each
station (reagent and paraffin stations) and refill or
exchange completely if necessary.
• Clean the rims of all stations and the seal of each
lid.
• Wipe the control panel clean.
• Press KEY to lock the panel and that way protect
program settings against accidental alteration or
misuse.
44
Instruction Manual V 2.1 – 12/2000
Page 45

13. Warning and error codes - troubleshooting
13.1 Warning codes
W : 0 3
0 4
The warning codes W:01 - W:06 may be displayed.
W:01, W:02, W:03 - paraffin in station no. 10, 11, 12 still
solid.
W:04, W:05, W:06 - paraffin in station no. 10, 11, 12 may
still be solid when basket no. 1
arrives
When these warning codes are displayed, a short
sound signal (very short sound - very short sound) is
emitted and repeated in 5 minute intervals.
W:01 - W:03 are displayed by the processing cycle upon
occurrence, e.g. when the basket is due to be immersed
into a paraffin station as programmed.
W:04 - W:06 are displayed immediately when starting
an automatic processing cycle of less than 8 hours duration from start until the basket reaches the first
paraffin station.
Solid paraffin takes several hours to melt.
Please keep this in mind and make sure to
switch on the instrument early enough so the
paraffin will be molten and ready for use when
necessary.
• To quit warning codes W:01 - W:03 press any key.
• To lower or lift the tissue basket press KEY and
+
oder
+
ARROW UP or ARROW DOWN simultaneously.
W:01 - W:03 block the transport of the tissue
basket to the paraffin station no. 10, 11 or 12.
If you know though that the paraffin is actually
liquefied, you can immerse the tissue basket
into or remove from one of the paraffin stations
manually.
• To override the warning codes W:04, W:05 and W:06
+
press KEY and START simultaneously to start
processing.
Leica TP1020 – Automatic Tissue Processor
45
Page 46

13. Warning and error codes - troubleshooting
Code Possible root cause Troubleshooting
Warning code W:01, W:02, W:03
in manual processing mode
Warning code ’W:04’ ’W:05’ ’W:06’
when starting an automatic
processing cycle.
Paraffin in stations 10/11/12 still
solid.
Total duration of program from
start until the basket reaches the
first paraffin station is less than 8
hours. Paraffin in stations 10/11/12
possibly still solid upon arrival of
tissue basket.
- To quit the warning code, press
any key.
- Check if the paraffin is really
molten.
- If you find that the paraffin is
molten, pause the automatic
processing cycle and -in the
manual processing mode - by
pressing KEY and the corresponding ARROW button lower
the basket into the paraffin
station or lift it out of the
paraffin station.
- Check if there is sufficient time
for the paraffin to liquefy
completely until the basket
arrives at the paraffin station.
- If this is not ensured, fill the
paraffin station with molten
paraffin.
- To override / quit the warning
code, press KEY and START
simultaneously.
0 4
E : 1 3
13.2 Error codes
To indicate a series of malfunctions, the error codes
E:01 to E:013 are displayed.
Three consecutive and very short sound signals that
are repeated every 10 seconds reinforce the visual
error code.
• To quit the error codes, press any key.
On the next page you will find a complete list
of all error messages, their meaning and how
to troubleshoot them.
46
Instruction Manual V 2.1 – 12/2000
Page 47

13. Warning and error codes - troubleshooting
List of error codes
Code Possible root cause Troubleshooting
Error code ’E:01’
Error code ’E:03’ - ’E:04’ - ’E:05’
Error code ’E:07’
Error code ’E:08’ (Paraffin station 1)
Error code ’E:09’ (Paraffin station 2)
Error code ’E:10’ (Paraffin station 3)
Cache memory defective
Drive malfunction
Clock component defective
- Paraffin station not connected.
- Paraffin station possibly
connected to wrong socket.
- Excess temperature switch-off
mechanism has responded.
- Paraffin station defective.
- Control unit defective.
Call Technical Service
- Switch off the main switch and
next switch it back on. Try
again.
- Call Technical Service
Call Technical Service
- Connect paraffin station.
- Check if paraffin station is
connected to the appropriate
socket. Correct if necessary.
- Disconnect the paraffin station
connection plug from the socket
at the rear of the instrument.
Let paraffin station cool down.
Reconnect paraffin station
If the yellow pilot lamp lights,
use of the paraffin bath may be
continued.
- Exchange paraffin station.
- Call Technical Service.
Error code ’E:11’
Error code ’E:12’
Error code ’E:13’
Loss of processing data (current
process).
Loss of program settings.
Erroneous data entry for delayed
start function (e.g. desired starting
time would be earlier than current
real time.)
- Press any key to confirm error
message; ‘ABORT’ will be
displayed; processing cycle will
be aborted.
- Restart processing cycle.
- If the same problem recurs, call
Technical Service.
- Press any key to confirm error
message; ‘ABORT’ will be
displayed; processing cycle will
be aborted.
- Restart processing cycle.
- If the same problem recurs, call
Technical Service.
Correct erroneous data entry.
Leica TP 1020 – Automatic Tissue Processor
47
Page 48

13. Warning and error codes - troubleshooting
13.3 ’POWER FAILURE’ and ’WRONG STATION’
messages
In case of a power failure the carousel is
lowered immediately into the station where
the tissue basket happens to be located when
the power failure occurs.
Once mains power is restored processing will
be resumed as programmed.
Possible impairment of the processing cycle
through the interruption is displayed.
‘POWER FAILURE’ is displayed when mains power is
restored after a power failure, but only if the processing
cycle in progress has been impaired by the power
failure.
The display reading is accompanied by a sound signal
which intends to attract the user’s attention to the malfunction so he/she can take appropriate measures to
rescue the specimens.
0 1 0 h 4 7
P O W E R F A I L U R E
0 1 0 h 1 6
W R O N G S T A T I O N
The upper line of the display shows the surplus time
the basket remained immersed, and the station number
where it was immersed due to the power failure. In the
example shown here the infiltration time in station no.
3 was exceeded by 47 minutes.
If, due to the power failure, the basket is lowered into
a station which is not part of the program (programmed
infiltration time ‘0 h 00 min’), instead of ‘POWER
FAILURE’ the message ‘WRONG Station’ is displayed.
In addition, when mains power is restored, an
uninterrupted sound signal is emitted.
The upper line of the display shows how long the basket
remained in the wrong station due to the power failure.
In the example shown here the basket remained in
station no. 4 for 16 minutes.
By pressing any key the display reading will switch
back to normal and the sound signal will be turned off.
Once mains power is restored, processing will be reassumed as programmed. The basket will be moved
from the wrong station to the next station that is part of
the current program.
48
Instruction Manual V 2.1 – 12/2000
Page 49

13. Warning and error codes - troubleshooting
13.3.1 Measures to remove specimen material in
case of prolonged power failure
In case of a prolonged power failure the tissue
can be removed from the instrument manually
and also be relocated to the next station by
entirely manual operation.
• Switch off the mains switch.
• Remove the crank handle (1) from the clip and insert
it into the access port (2) on the left side of the
instrument.
Removing the tissue basket
• Lift the carousel rotating the crank handle in the
direction of the arrow until the lower end of the
basket is above the rim of the processing station.
• Hang on to the crank handle to keep it securely in
its position and remove the tissue basket.
1
Fig. 49
Caution when lowering the carousel! Keep
2
your fingers out of the space between the
container lid and the upper rim of the
container!
When you release the crank handle, the carousel will
start to slowly descend.
Manual relocation to the next station
• Rotating the crank handle in the direction of the
arrow, lift the carousel upwards until there is a
notable resistance to the rotating movement.
When you release the crank handle, the carousel will
be lowered into the next processing station.
Skipping stations
To skip one or more processing stations, hold on to the
crank handle to avoid that the basket will actually be
lowered into the station.
• Next, lift the carousel again with the crank handle
until you notice resistance to the rotating movement.
Leica TP1020 – Automatic Tissue Processor
• To lower the basket into the station, release the
crank handle.
49
Page 50

13. Warning and error codes - troubleshooting
When using the manual transporting option, infiltration
times for all stations have to be user-controlled.
• To resume processing once mains power has been
restored, switch on the mains switch.
After mains power is restored the software recognizes
any manual station changes that have occurred during
the power failure. When mains power is back, the program is resumed as originally set up.
13.4 ‘ABORT’ message
0 3 0 h 4 7
A B O R T
‘ABORT’ is displayed after quitting an error code emitted due to instrument malfunction. When confirming
such an error message processing is aborted.
At this point processing can be restarted from the beginning. To skip the stations that had already been
covered during the previous aborted run proceed as
follows:
• Press START.
• To start the currently displayed program, press
START again.
This will cause the instrument to step by step move the
basket to the programmed starting station. Before
reaching that position:
• Press PAUSE/CONT to switch to the manual processing mode.
• Press CIRCLE ARROW to move the basket to the
station where processing was aborted.
50
• Press ARROW DOWN to lower the basket.
• To leave the manual processing mode, press
PAUSE/CONT again.
Processing will then continue where it had previously
been aborted.
Instruction Manual V 2.1 – 12/2000
Page 51

14. Cleaning
• Lift the carousel in the manual processing mode.
• Remove all station containers from the platform.
Spilled reagents have to be wiped away immediately.
In case of long-term exposure, the instrument
surfaces are only conditionally resistant to
solvents.
Caution! The interior containers of the paraffin
stations become very hot when the heating
function is activated! Do not touch the gray
upper rim of the containers with your hands!
Risk of injury!
Caution when handling hot paraffin! Risk of
injury!
• Disconnect the paraffin station plugs, slightly lift the
paraffin station lids and remove the paraffin
containers.
• Lower the carousel in the manual processing mode.
• Remove residual paraffin from the station holders,
lid seals and lid holders.
• Use a soft plastic spatula for removing the paraffin.
When cleaning the instrument, no liquid may
enter in contact with any of the electrical connections or the interior of the instrument.
• Use a moist cleaning cloth to clean platform, lacquered instrument surfaces and control panel.
• Clean the rims of the glass or aluminum reagent
containers and of the paraffin containers.
The glass and aluminum containers are dishwasher-proof.
• Take the glass or aluminum containers out of the
beaker carriers and wash them in the dishwasher.
• Fill the paraffin and reagent containers and put them
back into place.
Before cleaning the instrument, disconnect
the mains switch.
To clean the painted surfaces, the container
platform and the control panel, do not use
solvents containing acetone or xylene; neither
use abrasive cleaning powders!
Only mild household detergents may be used!
The lacquered surfaces and the control panel
are not resistant xylene or acetone!
• Reconnect the paraffin station plugs.
• Switch on the mains switch.
Cleaning the plexiglass fume containment shields of
instruments with fume control system
• Use a soft plastic spatula for removing residual paraffin from the surface of the shields to avoid
scratches.
• Apply some alcohol or xylene on a cloth and wipe
off the surfaces previously cleaned with the plastic
spatula.
Do not allow xylene or alcohol to react on the
surfaces!
Leica TP1020 – Automatic Tissue Processor
51
Page 52

15. Maintenance
15.1 General maintenance instructions
For purposes of maintenance or repair, the instrument may only be opened by service
technicians authorized by Leica.
Overall, the instrument can be considered maintenance-free. To ensure its trouble-free functioning over
a prolonged period of time, we still recommend:
• Have a preventive maintenance done once a year
by a service engineer authorized by Leica.
• Once your warranty period expires, we recommend
to purchase a Leica Service Contract. For details
please contact your local Leica Service
Organization.
• Mop up spilled reagents immediately.
• Clean the instrument on a daily basis (see Chapter
14 ‘Cleaning’).
• Once a month, lift the carousel cover to its upper
end position, clean the carousel axle with a cleaning cloth and subsequently apply a thin coat of
machine oil.
• Never attempt any repairs on the instrument of
paraffin stations on your own - by doing so you will
loose any warranty claims!
52
Instruction Manual V 2.1 – 12/2000
Page 53

15. Maintenance
15.2 Paraffin stations
15.2.1 Altering the standard working
temperature
Factory-set standard working temperature is
65 °C. The paraffin station heating will
automatically switch on when the actual
temperature of the paraffin is 5 °C below
standard working temperature.
When working with paraffin that has a melting
point below 58 °C, the instrument working
temperature can be readjusted with the
corresponding setting screw
Fig. 53
1
• Use a screw driver to turn the setting screw (1) to
the desired value.
If you find that the paraffin does not melt completely
after lowering the working temperature, slightly
readjust again.
15.2.2 Reset after excess temperature shutdown
If the actual temperature rises above the range
of normal working temperature, an excess
temperature switch-off mechanism responds.
The paraffin station heating is disconnected.
The yellow signal lamp is extinguished.
Use of the paraffin station can be resumed only
after a cooling down period. For cooling down,
disconnect the paraffin station connector plug
from the socket at the rear of the instrument,
or switch off the main switch.
• Disconnect the paraffin station connector plug from
the socket at the rear of the instrument.
Leica TP1020 – Automatic Tissue Processor
• Wait for the paraffin station to cool.
Check if the paraffin station works troublefree.Use of defective paraffin stations has to
be discontinued for safety reasons!
53
Page 54

15. Maintenance
Operational test
• Plug the paraffin station back in.
• Check whether the yellow pilot lamp lights when
heating is activated.
• Wait until the paraffin is completely molten. The set
standard working temperature has been reached
when the pilot lamp goes out.
• Measure if the actual temperature of the paraffin
corresponds to the standard working temperature.
If there is any doubt whether the paraffin station is
functioning trouble-free, it has to be exchanged.
54
Instruction Manual V 2.1 – 12/2000
Page 55

15 Maintenance
15.3 Replacing the fuses
Before exchanging the fuses, switch off the
mains switch and unplug the instrument!
Burnt-out fuses may only be replaced by fuses
of the same type and specification.
For appropriate brands and specifications, see
Chapter 4 ‘Technical Data’.
The fuses are located in the voltage selector shell (3).
Fig. 55
7
6
• Remove the shell (3) as described in Chapter 8.1.2
‘Adjust voltage selection’.
• Remove the fuses (7).
• Insert replacement fuses of the same type.
The currently selected voltage can be seen in the small
window (1) in the voltage selector shell.
• Insert the voltage selector shell together with the
3
1
fuses back into the receptacle in the instrument and
press lightly until it locks.
• Check if the setting that shows in the window (1)
corresponds to the nominal voltage in your
laboratory.
Leica TP1020 – Automatic Tissue Processor
55
Page 56

16. Optional accessories
Fig. 56.1
3
2
1
16.1 Three-level tissue basket
Capacity: 20 cassettes per level.
The three-level tissue basket consists of a holder (1) in
which the three levels (2) for the cassettes are stacked.
The upper level is closed with a lid (3).
Fig. 56.2
16.2 Basket removal device
The basket removal device with drip tray makes it easy
2
4
1
3
to remove the hot dripping tissue basket at the end of
the processing cycle. The rubber insert (4) of the drip
tray can be removed for cleaning.
• Grasp the basket removal device at the black handle
and insert the dripping tray under the tissue basket.
• Insert the metal hook (1) under the notch at the
bottom of the tissue basket.
• To lift the hook (2), press the spring (3) downwards
with your thumb.
• Lock the hook (2) into the upper rim of the tissue
basket and release the spring.
• Lift the basket slightly and remove it from the basket
holder in a horizontal movement.
56
Instruction Manual V 2.1 – 12/2000
Page 57

16. Optional accessories
16.3 Basket holder for second tissue basket
To increase the specimen throughput the in-
1
strument can be retrofitted with a basket
holder for a second tissue basket.
A second tissue basket (standard or threelevel type) has to be ordered separately.
Fig. 57.1
8a/8b
2
3
4
Standard delivery
1 basket holder for second tissue basket
1 paraffin station
1 station holder for paraffin station
Installing the second basket holder
• Rotate the carousel cover counterclockwise until
it can be removed from the axle (3) in an upward
movement.
The second basket holder is installed at position 2. For
installation, the station lid with rod which is located in
position 2 has to be removed first.
• Clutch the rod (5) with a pair of tongs and release
the slotted screw (8a) on the upper side of the disc
(4).
• Insert the rod (5) of the second basket holder in the
7
4
bore on the bottom of the disc (4). Adjust the holding
device (6) for the second basket in the same way
as the holding device in position 1 and hold it in that
position.
5
6
Fig. 57.2
Leica TP1020 – Automatic Tissue Processor
• Put the locking washer (7) around the bore in disc
(4).
• Insert the Allen screw (8b) into the bore from above
and tighten with an Allen key no. 3.
• Insert the hub (2) of the carousel cover (1) from
above into the axle (3) of the center piece.
• To secure hold on to the disc (4) and rotate the
carousel cover clockwise.
57
Page 58

16. Optional accessories
Installing the station holder
• Use a screw driver to lift the reagent station holder
out of the platform.
• Insert the paraffin station holder and drive in with a
plastic hammer.
12
Fig. 58.1
11
Connecting the third paraffin station
• Pull off the cover cap from the socket no. 10.
10
• Insert the plug (1) of the third paraffin station into
socket no. 10 and secure with the clip (2).
The instrument standard configuration will
then have to be changed accordingly to acknowledge that a third paraffin station has
been connected - see Chapter 18.
2
1
16.4 Connecting the fume outlet tube (optional
accessory for instruments with fume
control system)
2
Via a solvent resistant fume outlet tube (which
is available in a length of 2 or 4 meters), the
instrument can be connected to a central fume
extraction system. The fume outlet tube can
also be used to conduct solvent fumes outside
a building.
Fig. 58.2
58
Installing the fume outlet tube
• Put the tube (1) over the connecting piece on the
left side of the housing and fasten by means of the
hose clamp (2) that is supplied with the instrument.
1
Instruction Manual V 2.1 – 12/2000
Page 59

16. Optional accessories
16.5 Inserting the activated carbon filters
(optional on instruments with fume
control system)
1
Fig. 59
2
Instruments with fume control system can be
equipped with two activated carbon filters.
One filter is specific to formaldehyde, whilst
the other takes up other solvents.
The working life of the activated carbon filters is dependent on the reagent concentrations actually used, instrument running time
and ambient temperature.
• Unpack the filters.
• To open the lid (3) of the receptacle on the left side
of the instrument, loosen the two knurled knobs.
3
• Fold down the lid (3).
• Insert the activated carbon filter for other solvents
(1) in the lower guide rail and push until it is
completely inserted.
• Insert the activated carbon filter for formaldehyde
(2) in the upper guide rail and push until it is
completely inserted.
• Fold up the lid and lock by tightening the two knurled
knobs.
Warning! Fire hazard! It is important that the
activated carbon filters are changed at factory
recommended intervals. If a filter becomes
saturated with solvent, there is a potential fire
risk!
Leica TP1020 – Automatic Tissue Processor
59
Page 60

17. Ordering information
TP 1020 Automatic tissue processor
Type 1 - Basic instrument
Standard loading capacity with standard tissue basket 100/120/230/240 V, 50-60 Hz.............................0422 30543
Double loading capacity with standard tissue basket 100/120/230/240 V, 50-60 Hz.............................0422 31418
Double loading capacity with three-level tissue basket 100/120/230/240 V, 50-60 Hz.............................0422 31419
Type 2 - Basic instrument with vacuum function
Standard loading capacity with standard tissue basket 100/120/230/240 V, 50-60 Hz.............................0422 30536
Double loading capacity with standard tissue basket 100/120/230/240 V, 50-60 Hz.............................0422 31414
Double loading capacity with three-level tissue basket 100/120/230/240 V, 50-60 Hz.............................0422 31415
Type 3 - Basic instrument with fume control system
Standard loading capacity with standard tissue basket 100/120/230/240 V, 50-60 Hz.............................0422 30537
Double loading capacity with standard tissue basket 100/120/230/240 V, 50-60 Hz.............................0422 31416
Double loading capacity with three-level tissue basket 100/120/230/240 V, 50-60 Hz.............................0422 31417
Type 4 - Basic instrument with vacuum function and fume control system
Standard loading capacity with standard tissue basket 100/120/230/240 V, 50-60 Hz.............................0422 30535
Double loading capacity with standard tissue basket 100/120/230/240 V, 50-60 Hz.............................0422 31412
Double loading capacity with three-level tissue basket 100/120/230/240 V, 50-60 Hz.............................0422 31413
Retrofitting kits for double loading capacity (operation with two tissue baskets)
Basket holder for 2nd tissue basket, paraffin station, station holder for paraffin station............................0422 32156*
* A second tissue basket (standard tissue basket or three-level tissue basket) is not included in the retrofitting kit and has to be
ordered separately.
Accessories
Standard tissue basket .............................................................................................................................................0422 30585
Three-level tissue basket .........................................................................................................................................0422 30547
Single-level compartment for three-level tissue basket ..................................................................................... 0422 30622
Lid for three-level tissue basket..............................................................................................................................0422 30623
Basket removal device with drip tray.....................................................................................................................0422 30637
Glass container, 1.8 l capacity.................................................................................................................................0424 60429
Beaker carrier ............................................................................................................................................................0422 30671
Aluminum container, 1.8 l capacity .........................................................................................................................0422 32166
Station holder for paraffin station ...........................................................................................................................0422 30571
Paraffin station, 1.8 l (230 V) .....................................................................................................................................0422 30665
Paraffin station (resistant to chloroform) 1.8 l, adjustable up to 70 °C ..............................................................0422 32001
Screw driver for paraffin station.............................................................................................................................0170 10702
Fume outlet tube (solvent resistant) 2 m ................................................................................................................0422 31974
Fume outlet tube (solvent resistant) 4 m ................................................................................................................0422 31975
60
Instruction Manual V 2.1 – 12/2000
Page 61

17. Ordering information
Consumables
Activated carbon filter - standard version ............................................................................................................0422 30673
Activated carbon filter - formaldehyde..................................................................................................................0422 30674
Leica HistoWax -bag of 2.5 kg ..............................................................................................................................0374 08585
-bag of 25 kg...............................................................................................................................0374 14374
Leica Jet cassettes (without lids) - bag of 250 white ..............................................................0394 27605
red ..................................................................0394 27606
yellow ............................................................0394 27607
green..............................................................0394 27608
blue ................................................................ 0394 27609
pink.................................................................0394 27610
purple.............................................................0394 27611
Lids for Leica Jet cassettes - bag of 250 white ..............................................................0394 27612
red ..................................................................0394 27613
yellow ............................................................0394 27614
green..............................................................0394 27615
blue ................................................................ 0394 27616
pink.................................................................0394 27617
purple.............................................................0394 27618
Embedding cassettes (without lids) - bag of 250 white ..............................................................0394 12312
red ..................................................................0394 08976
yellow ............................................................0394 08974
green..............................................................0394 08978
blue ................................................................ 0394 08980
grey ................................................................0394 08972
Lids for embedding cassettes - bag of 250 white ..............................................................0394 12315
red ..................................................................0394 08986
yellow ............................................................0394 08984
green..............................................................0394 08988
blue ................................................................ 0394 08990
grey ................................................................0394 08982
Biopsy cassettes (without lids) - bag of 250 white ..............................................................0394 08966
- bag of 1,500 white ..............................................................0394 19581
- bag of 1,500 green ..............................................................0394 15032
Lids for biopsy cassettes - bag of 250 white ..............................................................0394 08970
- bag of 1,500 white ..............................................................0394 19582
- bag of 1,500 green ..............................................................0394 15033
Special lids for specimens
up to 12 mm high - bag of 250 white ..............................................................0394 12767
CellSafe biopsy capsules - bag of 100 ........................................................................ 0394 30014
- bag of 1,000 ........................................................................0394 30015
Accessories for repeat orders
Instruction manual V2.1 – 12/2000 (German, English, French, Spanish)................................................... 0704 37101
Leica TP1020 – Automatic Tissue Processor
61
Page 62

18. Appendix
18.1 Altering the instrument standard
configuration
The instrument has a factory-set standard configuration which can be modified by the user if desired.
Modifications can be done in the configuration menu,
which consists of 4 different menu items:
- Signal level 1 - 4
- 3. Wax bath?
- ProgPreset?
- SystemReset?
Editing the configuration menu
• Switch off the mains switch.
T P 1 0 2 0 V 1 . 0 0
C o n f i g u r a t i o n
S i g n a l l e v e l 4
+
still reads ‘TP1020 V x.xx’ press PROG for a short
while.
The first configuration menu item is displayed.
Modifying the configuration
Signal level = Setting of the desired type and
frequency of sound signal
For this menu item four different settings can
be selected. Setting 4 is factory preset.
Setting 1 is the lowest level. The next higher
level always contains all the parameters of
the next preceding level plus the additional
signals as listed on this page.
Level 1 = sound signal in case of power failure and
malfunctions.
Level 2 = level 1 + sound signal in case of interrup
tion, warning code and end of program.
Level 3 = level 2 + sound signal when confirming
warning codes and error codes.
Level 4 = level 3 and sound signal every time a button
is pressed.
• Switch the mains switch back on. While the display
62
• To change the setting, press the PLUS / MINUS
keys.
Instruction Manual V 2.1 – 12/2000
Page 63

18. Appendix
• For the next menu item, press the CURSOR button.
C o n f i g u r a t i o n
3 . w a x b a t h Y E S
C o n f i g u r a t i o n
P r o g P r e s e t ? N O
The next standard setting is displayed.
3. Wax bath = do you wish to use a third
paraffin station?
In station no. 10 you can install a third paraffin
bath instead of the reagent station.
If you do so, you have to modify the configuration menu accordingly; otherwise the
instrument will not function properly.
If you change from a three paraffin stations
operation mode back to two paraffin stations,
you have to go back and readjust the
configuration menu.
• To change the setting, press the PLUS / MINUS
keys.
• Press CURSOR to get to the next menu item.
The next standard setting is displayed.
ProPreset? = Set programs no. 6 - 9 to factory pre-
selected standard values?
Programs no. 6 - 9 come with a number of
factory preset standard values; however these
may be altered by the user.
Standard setting is ‘NO’.
• To change the setting, press the PLUS key.
When answering ‘YES’, programs no. 6 - 9 are set to
standard values and programs no. 1 - 5 are deleted.
Leica TP1020 – Automatic Tissue Processor
63
Page 64

18. Appendix
C o n f i g u r a t i o n
S y s t e m R e s e t ? Y E S
• Press CURSOR to get to the next menu item.
The next standard setting is displayed.
SystemReset? = Reset a number of settings to
standard value
A system reset will set real time to 0.00 and
maximum heating time for the paraffin stations
to 8 hours.
The ‘Sound Signal Level’ setting and the
number of paraffin baths selected in the
standard configuration menu will remain unaltered by a system reset.
Standard setting is ‘NO’.
• To change the setting, press the PLUS key.
When answering ’YES’ the system clock is set at 0:00
and the maximum heating time for the paraffin wax
baths is set at 8 hours. No other settings are altered.
Leaving the configuration menu
• To leave the configuration menu, press PROG.
64
Instruction Manual V 2.1 – 12/2000
Page 65

18. Appendix
18.2 Reagents appropriate for use with the
instrument
Using other than the reagents listed below can
cause damage to the instrument or to parts of
the instrument.
The following reagents are safe for use with the TP1020:
Fixation
Formalin, buffered or unbuffered
Picric acid
Dehydration
Ethanol
Isopropyl alcohol
Methanol
Butyl alcohol
Industrial alcohol
Clearing
Xylene and xylene substitutes
Toluene
Benzene
Chloroform
Trichlorethane
Acetone
Paraffin
Paraffin
Leica TP1020 – Automatic Tissue Processor
65
Page 66

18. Appendix
18.3 Warrenty and service
Warranty
Leica Microsystems Nussloch GmbH guarantees that the contractual product delivered has been subjected to a comprehensive quality control procedure based on
the Leica in-house testing standards, and that the product is faultless and complies
with all technical specifications and/or agreed characteristics warranted.
The scope of the warranty is based on the content of the concluded agreement. The
warranty terms of your Leica sales organization or the organization from which you
have purchased the contractual product shall apply exclusively.
Technical service information
If you require technical service or replacement parts, please contact your Leica
sales representative or dealer who sold the product.
Please provide the following information:
• Model name and serial number of the instrument.
• Location of the instrument and name of the person to contact.
• Reason for the service call.
• Date of delivery.
Decommissioning and disposal
The instrument or parts of the instrument must be disposed of in compliance with the
local laws.
66
Instruction Manual V 2.1 – 12/2000
Page 67

18. Appendix
18.4 Factory-set programs
Program No. 6 - 1 basket
Station Reagent VAC Duration
1 V 0h15
2 V 0h15
3 V 0h15
4 V 0h15
5 V 0h15
6 V 0h15
7 V 0h15
8 V 0h15
9 V 0h15
10 V 0h15
11 Paraffin V 0h15
12 Paraffin V 0h15
Program No. 7 - 1 basket
Station Reagent VAC Duration
Program No. 8 - 2 baskets
Station Reagent VAC Duration
2 V 0h15
3 V 0h15
4 V 0h15
5 V 0h15
6 V 0h15
7 V 0h15
8 V 0h15
9 V 0h15
10 V 0h15
11 Paraffin V 0h15
12 Paraffin V 0h15
Program No. 9 - 2 baskets
Station Reagent VAC Duration
1 V 1h00
2 V 1h00
3 V 1h00
4 V 1h00
5 V 1h00
6 V 1h00
7 V 1h00
8 V 1h00
9 V 1h00
10 V 1h00
11 Paraffin V 1h00
12 Paraffin V 1h00
2 V 1h00
3 V 1h00
4 V 1h00
5 V 1h00
6 V 1h00
7 V 1h00
8 V 1h00
9 V 1h00
10 V 1h00
11 Paraffin V 1h00
12 Paraffin V 1h00
Leica TP1020 – Automatic Tissue Processor
67
Page 68

Leica TP1020 - Programming Worksheet
Program No. Name: Date:
Written by:
Station Reagent VAC Duration Notes
1
2
3
4
5
6
7
8
9
10
11
12
Program No. Name: Date:
Station Reagent VAC Duration Notes
Paraffin
Paraffin
Written by:
1
2
3
4
5
10
11
12
6
7
8
9
Paraffin
Paraffin
Page 69

Notes
Leica TP1020 – Automatic Tissue Processor
69
Page 70

Notes
70
Instruction Manual V 2.1 – 12/2000
 Loading...