

Page 1

Leica Camera AG / Oskar-Barnack-Straße 11 / D-35606 Solms
www.leica-camera.com / info@leica-camera.com
Telefon +49 (0) 64 42-208-0 / Fax + 49 (0) 6442-208 -333
LEICA RANGEMASTER 900 scan
LEICA RANGEMASTER 1200 scan
Anleitung, Instructions,
Notice d’utilisation, Gebruiksaanwijzing,
Achtung!
Prüfen Sie vor Verwendung des Geräts, ob die gewünschte Maßeinheit (Meter/Yard) eingestellt ist.
Siehe Seite 3.
Attention!
Before using the device check if the desired measuring unit (meter/yard) is set.
See page 14.
Attention!
Avant d’utiliser l’appareil, assurez-vous d’avoir ajusté celui-ci sur l’unité de mesure souhaitée (mètre/yard).
Voir page 25.
XII/02/??/B.
Istruzioni, Instrucciones
Let op!
Controleer voor gebruik van het apparaat of de gewenste meeteenheid (meter/yard) is ingesteld.
Zie pagina 36.
Attenzione!
prima di utilizzare l’apparecchio, verificare che sia impostata l’unità di misura desiderata (metri/yards).
Si veda a pagina 47.
Atención!
antes de utilizar el aparato, compruebe si están ajustadas las unidades deseadas (metros/yardas).
Ver página 58.
Page 2

2 3 4 5
Vorwort
Sehr geehrte Kundin, sehr geehrter Kunde,
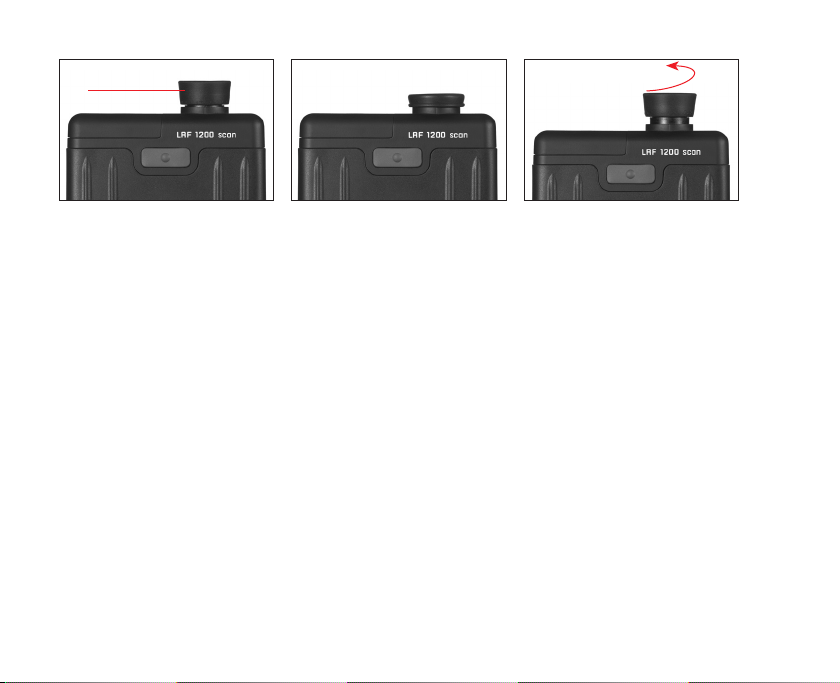
Bezeichnung der Teile
1. Gehäuse mit Vollarmierung
2 Batteriefachdeckel mit darunterliegender
6
Der Name Leica steht weltweit für höchste
optische Qualität, fein mechanische Präzision
bei äußerster Zuverlässigkeit und langer Lebens-
1
dauer.
Mit Ihrem neuen Leica Rangemaster wünschen
wir Ihnen deshalb viel Freude und Erfolg. Er ist
einfach und funktional zu bedienen und bietet
Ihnen ein einzigartiges Seherlebnis.
9 8 7
Meter-/Yard-Umschaltung
3 Auslösetaste zur Distanzmessung
4 Öse für Tragriemen
5 Okular mit Augenmuschel
6 Dioptrien-Skala
7 Laser-Empfängeroptik
8 Objektivlinse
9 Laser-Sendeoptik
Warnhinweis
Vermeiden Sie – wie bei jedem Fernrohr –
den direkten Blick mit dem Leica Range master
in helle Lichtquellen, um Augen verletzungen
zu vermeiden.
Markenzeichen der Leica Camera Gruppe
Trademark of the Leica Camera Group
Marque du Groupe Leica Camera
R
= Registriertes Warenzeichen
Änderungen in Konstruktion und Ausführung vorbehalten.
R
= Registered Trademark
Design subject to alterations without notice.
R
= Marque déposée
Sous réserve de modifications.
R
= Gedeponeerd handelsmerk
Wijzingen in constructie en uitvoering voorbehouden.
R
= Marchio registrato
Ci riserviamo id diritto di modificare i nostri apparecchi.
R
= Marca registrada
Se reserva el derecho a modificaciones en construcción y terminicación.
© 2002 Leica Camera AG
Prospekt-Bestell-Nummer:
dt./engl./frz./nl./ital./span. 93059
Page 3

Inhaltsverzeichnis
Vorwort . . . . . . . . . . . . . . . . . . . . . . . . . . . . . u4
Bezeichnung der Teile . . . . . . . . . . . . . . . . . . u4
Einleitung . . . . . . . . . . . . . . . . . . . . . . . . . . . . 1
Anbringen des Tragriemens . . . . . . . . . . . . . . . 2
Einlegen der Batterie . . . . . . . . . . . . . . . . . . . . 2
Ladezustand der Batterie. . . . . . . . . . . . . . . . . 3
Meter-/Yard-Umschaltung ................ 3
Verwendung mit und ohne Brille ........... 4
Dioptrien-Ausgleich ..................... 4
Distanz-Messung ....................... 5
Scanbetrieb........................... 5
Messreichweite und Genauigkeit ........... 6
Pflege- und Gebrauchshinweise ............ 7
Problembehandlung..................... 8
Technische Daten ...................... 8
Leica Akademie ........................ 9
Leica im Internet ....................... 9
Leica Infodienst ........................ 9
Leica Customer Service.................. 10
Einleitung
Beim Einsatz Ihres Leica Rangemaster wünschen
wir Ihnen viel Freude und Erfolg. Der Rangemaster
sendet unsichtbare und für das Auge unschäd liche
Infrarot-Impulse aus und berechnet über einen
eingebauten Mikroprozessor aus dem reflektierten
Signalanteil die Objektentfernung. Der Leica Rangemaster ist mit einer hervor ra genden, 7fach vergrößernden Zieloptik ausgestattet, die auch unter
schwierigen Bedingungen eine sichere Peilung
ermöglicht. Damit Sie alle
Möglichkeiten dieses
hochwertigen und vielseitigen Laser-Entfernungsmessgerätes richtig nutzen
können, empfehlen wir
Ihnen, zunächst diese Anleitung zu lesen.
LEICA RANGEMASTER 900 scan
Bestell-Nr. 40 515
LEICA RANGEMASTER 1200 scan
Bestell-Nr. 40 525
1
Page 4
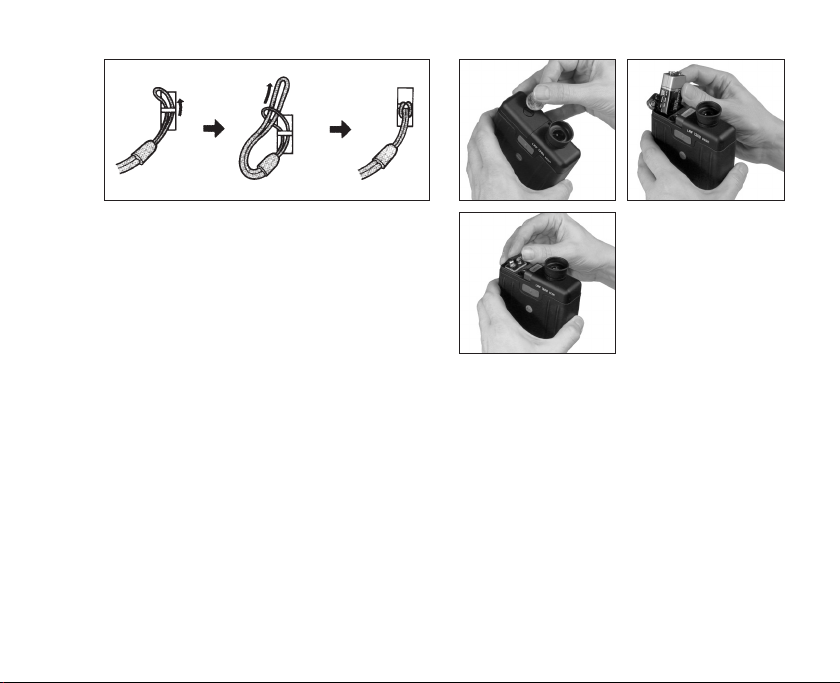
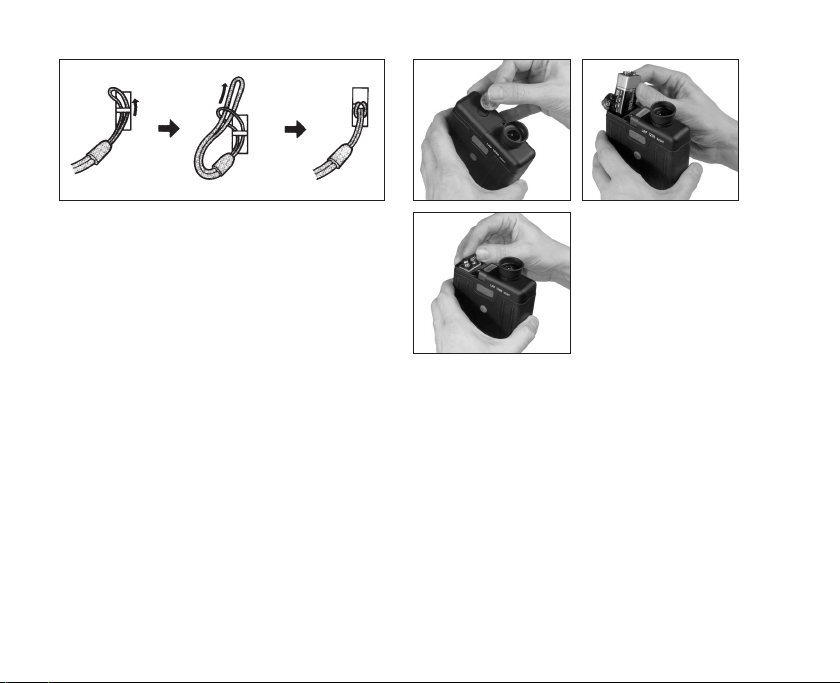
Anbringen des Tragriemens
Bitte die kleine Schlaufe des Tragriemens durch
die Öse (4) am Gehäuse des Leica Rangemaster
schieben. Dann das Ende des Tragriemens durch
die kleine Schlaufe fädeln und so festziehen, dass
sich die entstandene Schlinge fest um die Öse am
Gehäuse legt.
Batterie einlegen
Der Leica Rangemaster
wird aus einer 9V Blockbatterie (Typ E-Block, z.B.
6LR 61, 6AM6, etc.) mit
Energie versorgt. Wir
empfehlen die Verwendung von Alkali-Mangan Batterien. Zum Einlegen
der Batterie die Schraube des Batteriefachdeckels
(2) mit Hilfe einer Münze lösen. Batterie mit den
Plus-/Minus Kontakten nach oben ein legen.
2
Page 5
Achtung:
Kälte reduziert die Batterieleistung. Bei niedrigen
Temperaturen sollte der Leica Rangemaster deshalb möglichst in Körper nähe getragen und mit frischen Batterien betrieben werden.
Hinweis:
Akkubetrieb wird nicht empfohlen.
Verbrauchte Batterien nicht in den normalen Abfall
werfen, denn sie enthalten giftige,
um weltbelastende Substanzen. Um sie einem
Re cycling zuzuführen, die verbrauchten Batterien
bitte beim Handel oder Sammelstellen abgeben.
Ladezustand der Batterie
Eine verbrauchte Batterie wird durch eine blinkende Messwert- und Zielmarkenanzeige signalisiert.
Nach dem erstmaligen Blinken der Anzeige sind
noch mehr als 100 Messungen mit fortschreitend
verminderter Reichweite möglich.
M
Y
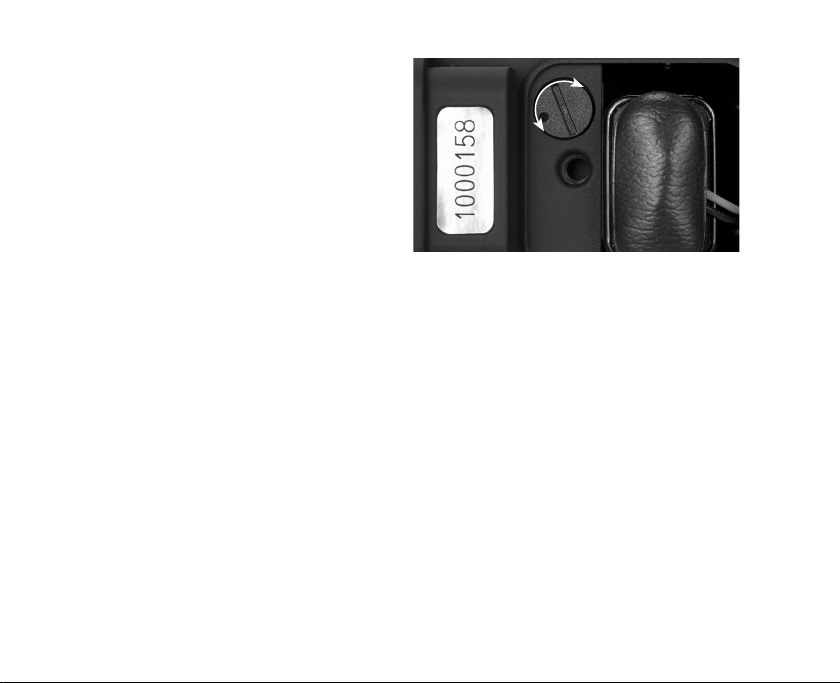
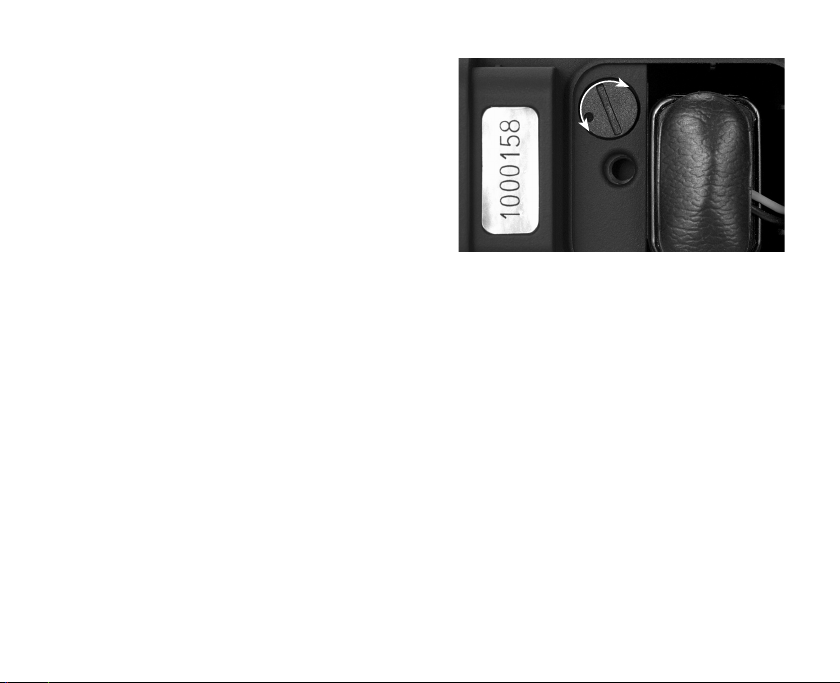
Meter-/Yard-Umschaltung
Mit dem Leica Rangemaster können Sie sich
Entfernungen sowohl in Meter als auch in Yards
anzeigen lassen. Um zwischen Yards und Meter
umzuschalten, stellen Sie einfach an der Stellschraube unter dem Batteriefachdeckel (2) die
gewünschte Maß einheit (M = Meter; Y = Yards)
ein.
3
Page 6
5a 5b
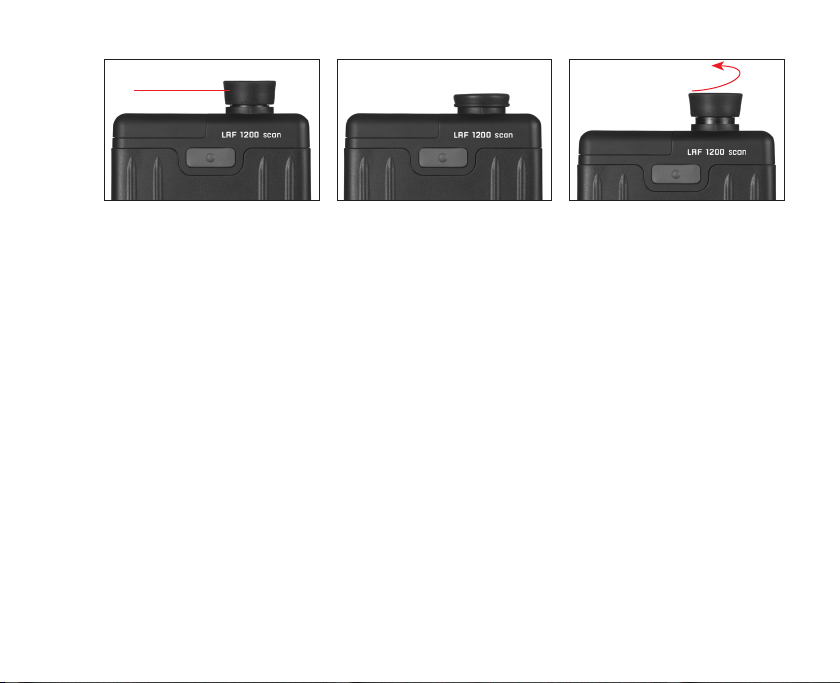
Verwendung mit und ohne Brille
Beobachter, die keine Brille tragen, lassen die
Gummiaugenmuschel (5a) hochgeklappt (Lieferzustand). In dieser Position ist der richtige
Ab stand des Leica Rangemaster zum Auge
ge geben.
Beim Beobachten mit Brille wird die Gummiaugenmuschel nach unten um gestülpt (5b).
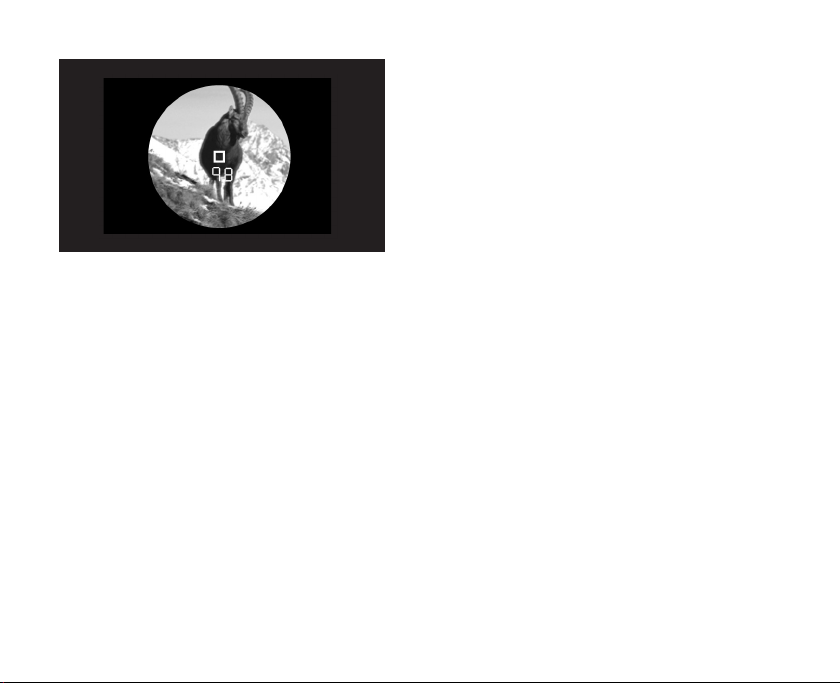
Dioptrien-Ausgleich
Mit dem Dioptrien-Ausgleich können Sie die
Schärfe der Zielmarke auf den für Sie optimalen
Wert einstellen. Einfach durch den Leica Rangemaster ein weit entferntes Objekt anpeilen und
durch drehen an der Gummiaugenmuschel die
Zielmarke auf optimale Schärfe einstellen. Die
Zielmarke er scheint bei Druck auf die Auslösetaste (3). Den eingestellten Wert können Sie an
der „+“ oder „–“ Skala auf der Gummiaugenmuschel ablesen. Ein Dioptrien-Ausgleich ist für
Fehlsichtigkeiten bis ±4 Dioptrien möglich.
4
Page 7
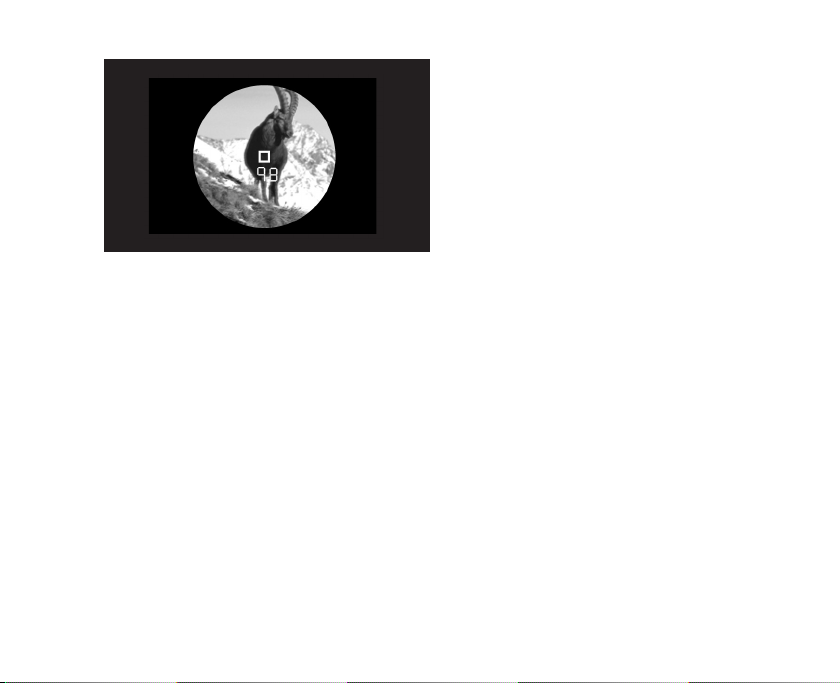
Distanz-Messung
Um die Distanz zu einem Objekt zu messen, muss
es genau an ge peilt werden. Dazu aktiviert man die
Zielmarke, indem man die Auslösetaste (3) einmal
drückt. Nach dem Loslassen der Taste leuchtet die
Zielmarke noch für etwa 4 Sekunden weiter. Bei
gedrückt gehaltener Taste leuchtet die Zielmarke
permanent. Während die Zielmarke leuchtet, wird
das Objekt angepeilt und durch erneuten Druck
auf die Auslösetaste die Entfernungsmessung
durchgeführt und der Messwert anschließend
angezeigt. Die Zielmarke geht bei der Messung
kurz aus. Durch erneuten Druck
auf die Auslösetaste kann jederzeit eine neue
Messung gestartet werden, solange die Zielmarke
noch leuchtet. Beträgt die Ob jekt entfernung weniger als 10 Meter oder wird die Reichweite überschritten, bzw. reflektiert das Ob jekt unge nügend,
so erscheint die Anzeige „---“. Mit dem Erlösch en
der Anzeige schaltet sich der Leica Rangemaster
automatisch ab.
Scanbetrieb
Mit dem Leica Rangemaster kann auch im
Dauerbetrieb gemessen werden. Wenn die Auslösetaste (3) bei der 2. Betätigung gedrückt gehalten wird, schaltet sich das Gerät nach ca. 0,5
Sekunden in den Scanbetrieb und führt dann permanent Messungen durch. Zu erkennen ist dies an
der wechselnden Anzeige: Nach jeweils ca. 1,5
Sekunden wird ein neuer Messwert ausgegeben.
Der Scanbetrieb ist besonders praktisch bei der
Messung auf kleine Ziele.
Hinweis:
Im Scanbetrieb ist der Stromverbrauch aufgrund
der permanenten Messungen höher als bei Einzelmessungen.
5
Page 8
Messreichweite und Genauigkeit
Die Messgenauigkeit des Leica Rangemaster
be trägt bis zu ±1 Meter. Die maximale Reichweite
wird erreicht bei gut reflektierenden Zielobjekten
und einer visuellen Sichtweite von 10km. Die
Mess reichweite wird von folgenden Faktoren
beeinflusst:
Reichweite höher geringer
Farbe weiß schwarz
Winkel zum senkrecht spitz
Objektiv
Objektgröße groß klein
Sonnenlicht wenig (bewölkt) viel (Mittagssonne)
Atmosphärische klar dunstig
Bedingungen
Objektstruktur homogen inhomogen
(Hauswand) (Busch, Baum)
Bei Sonnenschein und guter Sicht gelten folgende
Genauigkeiten:
Rangemaster Rangemaster
900 scan 1200 scan
Reichweite 10m bis ca. 823 m 10m bis ca. 1097m
Genauigkeit ±1m bis 200m ±1m bis 400m
±2 m bis 600m ± 2m bis 800 m
±0,5 % über 600m ± 0,5% über 800 m
6
Page 9

Pflege- und Gebrauchshinweise
Eine besondere Pflege ist nicht notwendig. Grobe
Schmutzteile wie z.B. Sand sollten mit einem
Haarpinsel entfernt oder weggeblasen werden.
Fingerabdrücke u.ä. auf Linsen können mit einem
feuchten Tuch vorgereinigt und mit einem weichen, sauberen Leder oder staubfreien Tuch abgewischt werden. Das Gehäuse sollte nur mit einem
feuchten Leder gereinigt werden. Bei Verwendung
von trockenen Tüchern besteht die Gefahr der statischen Aufladung. Alkohol und andere chemische
Lösungen dürfen nicht zur Reinigung der Optik
oder des Gehäuses verwendet werden.
7
Page 10
Problembehebung
Problem Ursache Behebung
Bei Beobachtung wird kein kreis- Die Stellung der Augenmuschel ent- Brillenträger knicken die Augenmuschel
rundes Bild ohne Vignettierung spricht nicht der richtigen Benutzung um; bei Beobachtung ohne Brille bleibt
erreicht mit und ohne Brille die Augenmuschel hochgeklappt (Seite 4)
Anzeige unscharf Dioptrienausgleich ist nicht exakt Dioptrienausgleich erneut durchführen
durchgeführt (Seite 4)
Bei der Distanzmessung a) Meßbereich ist über- oder unter- Angaben zum Meßbereich berückerscheint die Anzeige „---“ schritten sichtigen (Seite 5/6)
b) Der Reflexionsgrad des Objekts
ist unzureichend
Anzeige blinkt oder keine Messung Batterie verbraucht Batterie auswechseln (Seite 2)
möglich
Technische Daten
Rangemaster 900 scan Rangemaster 1200 scan
Maximale Reichweite: 823m/900 yds. 1097m/1200yds.
Mindestentfernung: ca. 10m/ yds. ca. 10m/ yds.
Messgenauigkeit: ±1m/yds. bis ca. 200m/yds. ±1m/yds. bis ca. 400m/yds.
± 2m/yds. bis ca. 600m/yds. ±2m/yds. bis ca. 800m/yds.
± 0,5% über ca. 600m/yds. ± 0,5% über ca. 800m/yds.
Umschaltung Yard/Meter: ja
Vergrößerung: 7x
Anzeige: LED
Dioptrienausgleich: ±4 dpt.
Brillenträgertauglich: ja
Abmessungen (B x H x T): ca. 10,5 x 12,0 x 4,0cm
Batterie: 9V/Alkali-Mangan E-Block (6LR61)
Laser: Augensicher nach EN und FDA Class 1
Gewicht (ohne/mit Batterie): 280g/320g
Achtung: Das Gerät darf auf keinen Fall geöffnet werden!
8
Page 11

Leica Akademie
In den verschiedenen Seminaren wird dem Teilnehmer in praxisorientierter, zeitgemäßer Form
die Werte-Welt der Leica und die Faszination des
gekonnten Umgangs mit den Leica Produkten vermittelt. Die Inhalte sind anwendungsorientiert und
bieten eine Fülle von Anregungen, Informationen
und Ratschlägen für die Praxis.
Leica Camera AG
Leica Akademie
Oskar-Barnack-Str. 11
D 35606 Solms
Tel: +49 (0)64 42-208 421
Fax: +49 (0)64 42-208 425
e-mail: la@leica-camera.com
Leica Infodienst
Anwendungstechnische Fragen zum Leica
Programm beantwortet Ihnen, schriftlich,
telefonisch, oder per E-Mail der
Leica Informations-Service:
Leica Camera AG
Informations-Service
Postfach 1180
D 35599 Solms
Tel: +49 (0)64 42-208 111
Fax: +49 (0)64 42-208 339
e-mail: info@leica-camera.com
9
Page 12

Leica Customer Service
Für die Wartung Ihrer Leica Ausrüstung sowie in
Schadensfällen steht Ihnen der Customer Service
der Leica Camera AG oder der Reparatur-Service
einer Leica Landesvertretung zur Verfügung (Adressenliste siehe Garantiekarte). Bitte wenden Sie sich
an Ihren autorisierten Leica Fachhändler (in
Deutschland: Leica Repräsentanz).
Leica Camera AG
Customer Service
Oskar-Barnack-Str. 11
D 35606 Solms
Tel: +49 (0)64 42-208 189
Fax: +49 (0)64 42-208 339
e-mail: customer.service@leica-camera.com
10
Page 13

Foreword
Dear Customer
Worldwide, Leica stands for superb optical quality,
close-tolerance precision engineering, absolute
reliability, and long product life.
This is why we wish you every success and a great
deal of pleasure in using your new Leica Rangemaster.
Its functional design makes it easy to use and
offers you an unique visual experience.
Nomenclature
1 Housing with armouring
2 Diopterscale
3 Distance measurement release button
4 Carrying strap loops
5 Eyepiece with eyecup
6 Battery compartment cover with Meter/Yard
selector underneath
7 Laser transmitter optics
8 Lens for viewing optics
9 Laser receiver optics
Warning notice
As with any telescope, to avoid damaging the
eyes, do not look directly at sources of bright
light through the Leica Rangemaster.
11
Page 14

Table of Contents
Foreword . . . . . . . . . . . . . . . . . . . . . . . . . . . . . 11
Nomenclature . . . . . . . . . . . . . . . . . . . . . . . . . 11
Introduction. . . . . . . . . . . . . . . . . . . . . . . . . . . 12
Fitting the wrist strap. . . . . . . . . . . . . . . . . . . . 13
Battery installation. . . . . . . . . . . . . . . . . . . . . . 13
Battery state indicator . . . . . . . . . . . . . . . . . . . 14
Meter/Yard selector . . . . . . . . . . . . . . . . . . . . 14
Use with and without spectacles . . . . . . . . . . . 15
Diopter compensation . . . . . . . . . . . . . . . . . . . 15
Distance measurement . . . . . . . . . . . . . . . . . . 16
Scan mode ........................... 16
Operating range and accuracy. . . . . . . . . . . . . 17
Rangefinder care . . . . . . . . . . . . . . . . . . . . . . . 18
Troubleshooting. . . . . . . . . . . . . . . . . . . . . . . . 19
Technical Data. . . . . . . . . . . . . . . . . . . . . . . . . 19
Leica Academy . . . . . . . . . . . . . . . . . . . . . . . . 20
Leica in the Internet. . . . . . . . . . . . . . . . . . . . . 20
Leica Information Service . . . . . . . . . . . . . . . . 20
Leica Customer Service. . . . . . . . . . . . . . . . . . 21
Introduction
We hope you will enjoy your Leica Rangemaster.
The Rangemaster sends out pulses of laser light,
which are in the infrared wavelength, harmless
and invisible to the naked eye. Some of these pulses are reflected back. The built-in microprocessor calculates the object distance from
these reflected signals. The Leica Rangemaster is
equipped with superb 7x-magnification optics,
which enable good targeting even in difficult conditions.
Please read the following instructions to get the
maximum benefit from this versatile and high quality laser range finder.
LEICA RANGEMASTER 900 scan
Order-No. 40 515
LEICA RANGEMASTER 1200 scan
Order-No. 40 525
12
Page 15
Fitting the wrist strap
Push the smaller loop through the eyelet (4) on
the housing of the Leica Rangemaster. Then,
thread the longer loop through the smaller loop
and pull it tight so that the strap is securely
attached round the eyelet on the housing.
Battery installation
The energy supply for the
Leica Rangemaster
is a 9 V energy block
(type E-Block e.g. 6LR61,
6AM6, etc.). We recom-
mend using an alkaline
battery. Use a coin, to open the battery compartment cover and insert the battery with the
contacts facing up. Ensure that the battery contacts line up with the terminals on the connector.
Finally, push the connector home.
13
Page 16
Warning:
Battery performance suffers in the cold. There fore,
at low temperatures, it is a good idea to keep the
Leica Rangemaster in an inside pocket (close to the
body) and fitted with a fresh battery.
Note:
Rechargeable batteries are not recommen
Used batteries may not be disposed of as normal,
household waste as they contain hazardous
als that are environmentally harmful. In order to
ensure they are properly recy cled, they should be
returned to the supplier or taken to a special waste
disposal center.
Battery state indicator
The distance display and the target mark flash
when battery voltage is low. Over 100 further
measurements (at a progressively reducing range)
can be taken after the display first starts to flash.
ded.
materi-
M
Y
Meter/Yard selector
The Leica Rangemaster allows the distance to
be displayed in meters or in yards. To change the
display, set the position of the selector screw (2)
inside the battery compartment to M = Meters or
Y = Yards.
14
Page 17
5a 5b
Use with and without spectacles
If you are not wearing glasses, leave the rubber
eyecup (5a) folded up, as it comes. This position
gives the correct distance between the eye and
the Leica Rangemaster.
If you are wearing glasses, fold down the rubber
eyecup (5b).
Diopter compensation
The diopter compensator allows you to adjust the
sharpness of the target mark to suit you best.
Simply target the Leica Rangemaster on some far
away object and turn the diopter
compensator until the target mark is as sharp
as possible. The target mark can be seen by pressing the release button (3). The degree of compensation can be read off the “+” or “–” scale on
the rubber eyecup. Compensation with in the
range ±4 diopters is possible.
15
Page 18
Distance measurement
To measure the distance to an object, it must be
perfectly targeted. To do this, activate the target
mark by pressing the release button (3) once. The
target mark remains lit for about 4 seconds after
letting go the release button. The target mark
remains permanently lit as long as the button is
held down. Whilst the target mark is lit, train the
Leica Rangemaster on the object and press the
release button a second time; the distance is then
measured and displayed. The target mark goes
out briefly during the measurement. A new measurement can be made at any time, as long as the
target mark is lit, by pressing the release buttononce again. If the object is less than 10m away,
is out of range or does not provide enough reflection, then “---” appears on the display. The Leica
Rangemaster switches itself off as soon as the
display disappears.
Scan mode
With the Leica Rangemaster, continuous measurements can be made. If the release button (3) is
held down the second time it is pressed, after
approx. 0.5 seconds the unit switches to scan
mode, and then takes continuous measurements.
This is indicated by the changing display: a new
measured value is output around every 1.5
seconds.
Scan mode is particularly practical when measuring to smaller targets.
Note:
Due to the constant measurements, the power
consumption is greater in scan mode than for single measurements.
16
Page 19
Operating range and accuracy
The measuring accuracy of the Leica Rangemaster
is up to ±1 Meter/Yard. The maximum range is
achieved with a well reflecting object and un aided
visibility of 10km. The operating range is influenced by the following factors:
Accuracy is as follows in sunshine and good
visibility:
R
900 scan 1200 scan
Range 10m/36 ft to approx. 10m/36 ft to approx.
823m/900yds 1.097m/1.200yds
angemaster
R
angemaster
Range longer shorter
Color of object white black
Angle of object perpendicular acute
Size of object larger than smaller than
measuring beam measuring beam
Sunlight weak strong
(cloudy) (midday sun)
Atmospheric clear hazy
conditions
Shape of object uniform irregular
(house wall) (bush, tree)
Accuracy ±1m/yd up to ±1m/yd up to
200m/yds 400m/yds
± 2m/yds up to ±2m/yds up to
600m/yds 800m/yds
±0.5% over ±0.5% over
17
Page 20

Rangefinder care
The rangefinder requires no special care. Any
large particles of dirt, such as sand, should be
removed with a soft brush or be blown off. Finger
marks and other smears can be cleaned off the
lenses by first mois tening them with a damp cloth
and then wiping with a soft, clean chamois leather
or lint-free cloth. The housing should be
cleaned only with a damp leather. Using dry cloths
can lead to an electrostatic build-up.
Alcohol and other chemical solvents must not
be used to clean the optics or the housing.
18
Page 21
Troubleshooting
Problem Cause Remedy
Cannot get truly round view without The position of the eyecup is wrong Ensure spectacle frames are not distorting
blurred edges the eyecup is folded up if not wearing
glasses (page 15)
Target mark not sharp Diopter compensation was not perfect Repeat diopter compensation adjustment
(page 15)
“---” displayed when measuring a) Object is out of operating range Consult section “Operating range and
distance b) Insufficient reflection from the object accuracy” (page 16/17)
Display flashes or no measurement Battery flat Replace battery (page 13)
is possible
Technical Data
Rangemaster 900 scan Rangemaster 1200 scan
Maximum operating range: 823m/900 yds. 1097m/1200yds.
Minimum object distance: approx. 10m/yds. approx. 10m/yds.
Accuracy: ±1m/yds. up to approx. 200m/yds. ±1m/yds. up to approx. 400m/yds.
± 2m/yds. up to approx. 600m/yds. ±2m/yds. up to approx. 800m/yds.
± 0.5% over approx. 600m/yds. ± 0.5% over approx. 800m/yds.
Yard/Meter selection: yes
Magnification: 7x
Display: LED
Diopter compensation: ±4 diopters
Usable with spectacles: yes
Dimensions (W x H x D): approx. 10.5 x 12.0 x 4.0cm/3
Battery: 9V alkaline. Transistor E-Block (6LR61)
Laser: Class 1 LASER product according to EN and FDA
Weight (with/without battery): 280g/320g
Attention: Do not open the main body under any circumstance!
15
4
9
x 4
x 1
16
/
in.
3
16
/
/
19
Page 22

Leica Academy
Our seminars offer participants practical
in formation on the Leica world of values and the
fascination of skilled use of Leica products.
Course programs are application-oriented and
informative. They offer a wealth of practical
suggestions, help, and advice.
Leica Camera AG
Leica Akademie
Oskar-Barnack-Str. 11
D 35606 Solms
Tel: +49 (0)64 42-208 421
Fax: +49 (0)64 42-208 425
e-mail: la@leica-camera.com
Leica Information Service
Should you have any technical questions re garding
the use of Leica products, the Leica information
service will be happy to answer
in writing or by phone, fax, or e-mail:
Leica Camera AG
Informations-Service
Postfach 1180
D 35599 Solms
Tel.: +49 (0)64 42-208 111
Fax: +49 (0)64 42-208 339
e-mail: info@leica-camera.com
20
Page 23

Leica Customer Service
For service of your Leica equipment and in
case of necessary repairs please contact the
Customer Service of Leica Camera AG or of
any national Leica agency (see warranty card
for address list). Ask your authorized dealer
and Leica specialist for advice.
Leica Camera AG
Customer Service
Oskar-Barnack-Str. 11
D 35606 Solms
Tel.: +49 (0)64 42-208 189
Fax: +49 (0)64 42-208 339
e-mail: customer.service@leica-camera.com
english
21
Page 24

Avant-propos
Chère cliente, Cher client,
Le nom Leica est dans le monde entier syno nyme
de la plus grande qualité optique, de la précision
mécanique à toute épreuve et pour
une longue durée d’utilisation.
Votre nouvelle jumelle Leica Rangemaster
ré pondra parfaitement à votre attente, et vous
procurera beaucoup de joie et de succès. Son utilisation est extrêmement facile. Elle vous donnera
une merveilleuse, façon de mieux découvrir le
monde.
Description des éléments
1 Boîtier avec gainage
2 Couvercle du compartiment de pile avec com-
mutateur mètre/yard
3 Touche de déclenchement de la mesure de
distance
4 Oeillet d’accrochage
5 Oculaire avec oeillère
6 Échelle de dioptries
7 Optique de réception laser
8 Lentille d’objectif
9 Optique d’émission laser
Avertissement
Pour prévenir d’éventuelles lésions oculaires,
éviter, comme avec toute lunette d’approche,
d’observer directement des sources de lumières
vives avec la Leica Rangemaster.
22
Page 25

Table des matières
Avant-propos. . . . . . . . . . . . . . . . . . . . . . . . . . 22
Description des éléments . . . . . . . . . . . . . . . . 22
Introduction. . . . . . . . . . . . . . . . . . . . . . . . . . . 23
Fixation du cordon de port. . . . . . . . . . . . . . . . 24
Mise en place de la pile . . . . . . . . . . . . . . . . . . 24
Etat de charge de la pile . . . . . . . . . . . . . . . . . 25
Commutation mètre/yard . . . . . . . . . . . . . . . . 25
Utilisation avec ou sans port de lunettes . . . . . 26
Réglage dioptrique. . . . . . . . . . . . . . . . . . . . . . 26
Mesure de distance . . . . . . . . . . . . . . . . . . . . . 26
Mode de balayage ...................... 27
Portée de mesure et précision. . . . . . . . . . . . . 28
Entretien et indications d’utilisation. . . . . . . . . 29
Origine des pannes et dépannage . . . . . . . . . . 30
Caractéristiques techniques . . . . . . . . . . . . . . 30
Leica Académie. . . . . . . . . . . . . . . . . . . . . . . . 31
Leica dans I’Internet . . . . . . . . . . . . . . . . . . . . 31
Service d’information Leica . . . . . . . . . . . . . . . 31
Leica Customer Service. . . . . . . . . . . . . . . . . . 32
Introduction
Avec votre lunette telémétrique Leica Rangemaster performante et facile à utiliser, l’observation devient un plaisir. La lunette telémétrique
Leica Rangemaster émet des impulsions infra-rouge invisibles à l’œil et calcule la distance à l’objet
en fonction du signal résiduel réfléchi, à l’aide de
son microprocesseur intégré. Elle est équipée
d’une excellente optique de visée à grossissement
7x qui permet d’effectuer un relevé même dans
des conditions d’utilisation défavorables. Pour
pouvoir maîtriser de manière optimale toutes les
fonctions de ce télémètre Laser polyvalent de
haute-qualité, veuillez lire tout
d’abord attentivement la présente notice
d’utilisation.
LEICA RANGEMASTER 900 scan
o
N
de code 40 515
LEICA RANGEMASTER 1200 scan
o
N
de code 40 525
23
Page 26

Fixation du cordon de port
Glisser le petit nœud coulant du cordon de port à
travers l’œillet du boîtier (4) de la lunette telémétrique Leica Rangemaster. Passer ensuite
l’extrémité du cordon de port à travers le petit
nœud coulant et serrer fermement de manière à
ce que la boucle ainsi obtenue soit solidement
fixée autour de l’œillet du boîtier.
Mise en place de la
pile
La lunette telémétrique
Leica Rangemaster est
alimentée en énergie par
une pile 9 V monobloc
(type monobloc E, par exemple 6LR 61, 6AM6,
etc.). Nous vous recommandons d’utiliser des
piles mangano-alcalines. Pour introduire la pile,
desserrer la vis de fixation du couvercle du
compartiment de pile à l’aide d’une pièce de monnaie. Introduire tout d’abord la pile avec les contacts dirigés vers le haut. Lors de cette opération,
veiller à bien orienter les contacts de la pile par
rapport à la réglette de contact. Fixer ensuite la
réglette de contact.
24
Page 27

Attention:
Le froid diminue la puissance de la pile. Par conséquent, à basse température, la lunette telémétrique Leica Rangemaster doit être portée le
plus près possible du corps et fonctionner avec
des piles neuves.
Remarque:
Alimentation par accumulateurs dé conseillée. Ne
pas jeter les piles usagées aux ordures
ménagères, elles contiennent des substances
nocives et polluantes. Pour pouvoir être
les piles usagées doivent être déposées
d’un commerçant ou d’un point de col lecte.
Etat de charge de la pile
Le déchargement complet de la pile est signalé
par un clignotement de l’affichage des valeurs de
mesure et des repères de visée. Après le premier
clignotement de l’affichage, vous avez encore la
possibilité d’effectuer 100 mesures avec une diminution progressive de la portée.
recyclées,
auprès
M
Y
Commutation mètre/yard
La lunette telémétrique Leica Rangemaster
vous permet d’afficher les distances aussi bien en
mètre qu’en yard. Pour commuter entre les deux
unités de mesure, tourner la vis de réglage, située
sous le couvercle du compartiment de pile, (2)
dans la position voulue. (M = mètres;
Y = Yards)
25
Page 28

5a 5b
Utilisation avec ou sans port de lunettes
Les utilisateurs non porteurs de lunettes de vue
relèvent l’oeillère en caoutchouc (5a) en la rabattant vers le haut (comme à la livraison). Dans cette
position, l’œil est situé à la bonne distance de la
lunette telémétrique Leica Rangemaster. Les utilisateurs porteurs de lunettes abaissent l’oeillère en
caoutchouc (5b).
Réglage dioptrique
Le réglage dioptrique permet de régler la netteté du
repère de visée sur la valeur que vous considérez
comme étant la meilleure pour vous. Il vous suffit
pour ce faire de relever un objet très éloigné avec la
lunette telémétrique Leica Rangemaster et de régler
sur la netteté optimale en tournant la molette de
réglage dioptrique. Le repère de visée apparaît lorsque vous appuyez sur la touche de déclenchement
(3). Vous pouvez lire la valeur réglée sur l’échelle
des «+» ou des «–» de l’oeillère en caoutchouc. Le
réglage dioptrique est possible jusqu’à ±4 dioptries
selon l’acuité visuelle.
Mesure de distance
Pour mesurer la distance à un objet, le relevé
ef fectué doit être précis. Activer pour ce faire le re -
26
Page 29

père de visée en appuyant une fois sur le bouton de
déclenchement (3). Après le relâchement de la touche, le repère de visée clignote encore environ 4
se
condes. Si la touche est maintenue enfoncée, le
re
père de visée reste allumé. Pendant la période où
le repère est allumé, l’objet est relevé et une nou
le pression sur la touche de déclenchement
mande la mesure de distance et l’affichage de
valeur de mesure. Lors de la mesure, le repère de
visée disparaît un court instant. Aussi longtemps
que le repère de visée est allumé, vous pouvez
ap puyer à tout moment sur la touche de déclenchement pour lancer une nouvelle mesure. Si la dis tance à l’objet est inférieure à 10 mètres ou
portée, ou si l’objet n’est pas suffisamment
vel-
com-
la
dépasse la
ré fléchissant, le symbole «---» s’affiche. Lorsque
l’affi chage s’efface, la lunette telémétrique Leica
Range master se met automatiquement hors tension.
Mode de balayage
Avec le Leica Rangemaster, les mesures peuvent
également être effectuées en mode continu. Il suffit
pour cela d’appuyer à deux reprises sur la touche
de déclenchement (3) et de maintenir celle-ci
enfoncée lors du 2ème actionnement. L’appareil se
commute sur le mode de balayage au bout de 0,5s
environ et effectue ensuite des mesures permanentes. Les variations de l’affichage vous indiquent que
la commutation s’est bien effectuée: une nouvelle
valeur de mesure s’affiche toutes les 1,5 secondes
environ.
Le mode de balayage est particulièrement pratique
lors de la mesure de distances jusqu’à des petites
cibles.
Remarque:
En mode de balayage, la consommation électrique
est, en raison des mesures permanentes, supérieure
à celle enregistrée lors de mesures individuelles.
27
Page 30

Portée de mesure et précision
La précision de mesure du Leica Rangemaster
s’élève à ±1 mètre.
La portée maximale est atteinte pour des cibles
particulièrement réfléchissantes et une portée
visuelle de 10km.
Portée supérieure inférieure
Coleur de l’objet blanc noir
Angle avec perpendiculaire aigu
l’objet
Taille de l’objet grande petite
Lumière solaire faible (nuageux) forte (soleil de midi)
Conditions claires brumeuses
atmosphériques
Structure homogène hétérogène
de l’objet (mur de maison) (buisson, arbre)
Par beau temps et dans le cas d’une bonne visibilité, les valeurs de précision suivantes sont valables
:
R
900 scan 1200 scan
Portée 10m jusqu’à env. 823m 10m jusqu’à env. 1097m
Précision ±1m jusqu’à 200m ±1m jusqu’à 400 m
± 2m jusqu’à 600m ± 2m jusqu’à 800 m
± 0,5% au-delà 600m ±0,5% au-delà 800 m
angemaster
R
angemaster
28
Page 31

Entretien et indications d’utilisation
Cet appareil ne requiert aucun soin particulier. Les
particules grossières, comme les grains de sable,
doivent être éliminées à l’aide d’un pinceau à poils
doux ou par jet d’air. Pour effacer les empreintes
digitales sur les lentilles (entre autres), utiliser
dans un premier temps un linge humide puis
essuyer à l’aide d’une peau de chamois douce
(spéciale optique) et propre ou d’un chiffon
exempt de poussière. Pour le nettoyage du boîtier,
utiliser exclusivement une peau de chamois humide. L’usage de chiffons secs comporte un risque
de charge électrostatique. L’optique et le boîtier
ne doivent en aucun cas être nettoyés avec de
l’alcool ou d’autres solutions chimiques.
29
Page 32

Origine des pannes et dépannage
Problème Origine Dépannage
Lors de l’observation, aucune image La position de l’œillère ne correspond
orbiculaire ne peut être obtenue sans pas à l’utilisation correcte avec ou sans en cas d’observation sans lunettes, l’œilvignetage lunettes de vue lère reste relevée (page 26)
Affichage flou Le réglage dioptrique n’est pas exact Ré-exécuter le réglage dioptrique
(page 26)
Lors de la mesure de distance, a) La mesure est inférieure ou Respecter les données indiquées
le symbole «---» s’affiche supérieure à la portée de mesure pour la portée de mesure (page 27/28)
b) Le facteur de réflexion de l’objet
est insuffisant
L’affichage clignote ou aucune Pile usée Remplacer la pile (page 24)
mesure n’est possible
Les porteurs de lunettes rabattent l’œillère;
Caractéristiques techniques
Rangemaster 900 scan Rangemaster 1200 scan
Portée maximale: 823m/900 yds. 1097m/1200 yds.
Distance minimum: env. 10m/ yds. env. 10m/yds.
Précision de mesure: ±1m/yds. jusqu’à env. 200m/yds. ±1m/yds. jusqu’à env. 400m/yds.
± 2m/yds. jusqu’à env. 600m/yds. ±2m/yds. jusqu’à env. 800m/yds.
± 0,5% au delà env. 600m/yds. ±0,5 % au delà env. 800m/yds.
Commutation yard/mètre: oui
Grossissement: 7x
Affichage lumineux: LED
Réglage dioptrique: ±4 dpt.
Convient aux porteurs de lunettes: oui
Dimensions (L x H x E): env. 10,5 x 12,0 x 4,0cm
Pile: 9V/mangano-alcaline monobloc E (6LR61)
Laser: Protection oculaire selon EN et FDA Classe 1
Poids (sans/avec pile): 280g/320g
Attention: L’appareil ne doit être ouvert en aucun cas !
30
Page 33

Leica Académie
Les différents stages proposent aux participants
un programme complet sur la technique photographique et de nombreux conseils sur la pratique du
Leica et la fascination à l’utilisation des produits
Leica.
Leica Camera AG
Leica Akademie
Oskar-Barnack-Str. 11
D 35606 Solms
Tel: +49 (0)64 42-208 421
Fax: +49 (0)64 42-208 425
e-mail: la@leica-camera.com
Service d’information Leica
Le service Informations Leica répondra volontiers
par écrit, par téléphone, fax ou e-mail à vos questions d’ordre technique se rapportant à la
gamme de produits Leica :
Leica Camera AG
Informations-Service
Postfach 1180
D 35599 Solms
Tel: +49 (0)64 42-208 111
Fax: +49 (0)64 42-208 339
e-mail: info@leica-camera.com
31
Page 34

Leica Customer Service
Pour l’entretien de votre équipement Leica et en
cas d’endommagement, le Customer Service de
Leica Camera AG ou celui d’une des représentations nationales Leica (liste d’adresses sur la carte
de garantie) se tiennent à votre disposition. Veuillez consultez votre centre-conseil
Leica.
Leica Camera AG
Customer Service
Oskar-Barnack-Str. 11
D 35606 Solms
Tel: +49 (0)64 42-208 189
Fax: +49 (0)64 42-208 339
e-mail: customer.service@leica-camera.com
32
Page 35

Voorwoord
Geachte klant,
De naam Leica is wereldwijd bekend om de hoogste optische kwaliteit, fijnmechanische precisie bij
maximale betrouwbaarheid en lange levensduur.
Met uw nieuwe Leica Rangemaster wensen wij u
daarom veel plezier en succes. Deze is eenvoudig
en functioneel te bedienen
en biedt u een unieke waarneming.
Benaming van de onderdelen
1 Beschermende behuizing
2 Batterijvakdeksel met daaronder liggende
meter-/yard-omschakeling
3 Activeringsknop voor afstandsmeting
4 Oog voor draagriem
5 Oculair met oogschelp
6 Dioptrieschaal
7 Laser-ontvangstoptiek
8 Objectieflens
9 Laser-zendoptiek
Waarschuwing
Voorkom – zoals bij elke verrekijker – met
de Leica Rangemaster het rechtstreeks kijken
in heldere lichtbronnen om oogletsel te vermijden.
33
Page 36

Inhoudsopgave
Voorwoord. . . . . . . . . . . . . . . . . . . . . . . . . . . . 33
Benaming van de onderdelen. . . . . . . . . . . . . . 33
Inleiding. . . . . . . . . . . . . . . . . . . . . . . . . . . . . . 34
Aanbrengen van de draagriem . . . . . . . . . . . . . 35
Batterij plaatsen . . . . . . . . . . . . . . . . . . . . . . . 35
Batterijconditie . . . . . . . . . . . . . . . . . . . . . . . . 36
Meter-/yard-omschakeling . . . . . . . . . . . . . . . 36
Gebruik met en zonder bril . . . . . . . . . . . . . . . 37
Dioptriecompensatie . . . . . . . . . . . . . . . . . . . . 37
Afstandsmeting . . . . . . . . . . . . . . . . . . . . . . . . 38
Scanfunctie ........................... 38
Meetbereik en precisie . . . . . . . . . . . . . . . . . . 39
Onderhouds- en gebruikstips . . . . . . . . . . . . . . 40
Probleemoplossing . . . . . . . . . . . . . . . . . . . . . 41
Technische gegevens. . . . . . . . . . . . . . . . . . . . 41
Leica Academie. . . . . . . . . . . . . . . . . . . . . . . . 42
Leica op internet . . . . . . . . . . . . . . . . . . . . . . . 42
Leica Informatiedienst . . . . . . . . . . . . . . . . . . . 42
Leica Customer Service. . . . . . . . . . . . . . . . . . 43
Inleiding
Wij wensen u bij het gebruik van uw Leica
Rangemaster veel plezier en succes.
De Rangemaster zendt onzichtbare en voor het
oog onschadelijke infra roodimpulsen uit en
berekent met een ingebouwde micro processor uit
het gereflecteerde signaal de afstand tot het
object. De Leica Rangemaster is van een uitstekend 7-voudig vergrotend optiek voorzien, dat ook
onder moeilijke omstandigheden een be trouwbare
peiling mogelijk maakt. Om alle mo gelijkheden van
dit hoogwaardige en veelzijdige laserapparaat voor
afstandsmeting goed te kunnen benutten, adviseren wij u eerst deze handleiding te lezen.
LEICA RANGEMASTER 900 scan
Bestelnr. 40 515
LEICA RANGEMASTER 1200 scan
Bestelnr. 40 525
34
Page 37

Aanbrengen van de draagriem
De kleine lus van de draagriem door het oog
(4) van de behuizing van de Leica Rangemaster
schuiven. Daarna het einde van de draagriem door
de kleine lus halen en zodanig vasttrekken dat de
ontstane strik vast om het oog van de behuizing
zit.
Batterij plaatsen
De Leica Rangemaster
wordt met een blokbatterij van 9 V (type E-blok,
bijv. 6LR61, 6AM6 enz.)
van voeding voorzien. Wij
adviseren het gebruik van
alkaline-mangaan batterijen. Voor het plaatsen van
de batterij de schroef van het batterijvakdeksel (2)
met een behulp van een munt losmaken. Batterij
met de plus-/mincontacten naar boven plaatsen.
35
Page 38

Let op:
Kou vermindert de batterijcapaciteit. Bij lage
peraturen moet de Leica Rangemaster
mogelijk in de buurt van het lichaam worden
gedragen en met nieuwe batterijen worden
gebruikt.
Opmerking:
Het gebruik van een accu wordt niet aangeraden.
Lege batterijen niet met het gewone afval meegeven, want ze bevatten giftige, milieubelastende
substanties. Om ze te kunnen recyclen lege batterijen bij een winkelier of verzamelpunt afgeven.
Batterijconditie
Een lege batterij wordt door het knipperen van de
meetwaarde en het richtpunt gemeld. Nadat de
indicatie voor het eerst knippert, zijn nog meer
dan 100 metingen met steeds kleinere reikwijdte
mogelijk.
tem-
daarom zo
M
Y
Meter-/yard-omschakeling
Met de Leica Rangemaster kunnen afstanden in
meters en yards worden aangegeven. Om naar
meter of yard te schakelen, stelt u eenvoudig de
instelschroef onder het batterijvakdeksel (2) op de
gewenste meeteenheid (M = meter; Y = yard).
36
Page 39

5a 5b
Gebruik met en zonder bril
Waarnemers die geen bril dragen, laten de oogschelp van rubber (5a) omhoog geklapt (situatie
bij levering). In deze stand is dit de juiste afstand
van de Leica Rangemaster tot het oog. Bij het
waarnemen met bril wordt de oogschelp van
rubber omlaag geklapt (5b).
Dioptriecompensatie
Met de dioptriecompensatie kunt u de scherpte
van het richtpunt op de voor u optimale waarde
instellen. Gewoon door de Leica Rangemaster
op een ver verwijderd object te richten en door
draaien van de oogschelp van rubber het richt
op optimale scherpte in te stellen. Het richtpunt
verschijnt bij drukken op de activerings
ingestelde waarde kunt u op de „+” of „–” schaal
op de oogschelp van rubber aflezen. Een dioptriecompensatie is voor gezichtsstoornissen tot ±4
dioptrieën mogelijk.
37
knop (3). De
punt
Page 40

Afstandsmeting
Om de afstand tot een object te meten, moet hierop precies worden gericht. Hiervoor activeert
men het richtpunt door eenmaal op de activeringsknop (3) te drukken. Na het loslaten van de knop
licht het richtpunt nog gedurende ca.
4 seconden op. Bij ingedrukt gehouden knop licht
het richtpunt permanent op. Terwijl het richtpunt
oplicht, wordt het object gepeild en door opnieuw
drukken op de activeringsknop wordt de afstandsmeting uitgevoerd en de meetwaarde vervolgens
getoond. Het richtpunt gaat bij de meting even uit.
Door weer op de activeringsknop te drukken kan
telkens een nieuwe meting worden gestart zolang
het richtpunt nog oplicht. Als de afstand tot het
object minder dan 10 meter bedraagt, de reikwijdte wordt overschreden of het object onvoldoende
reflecteert, verschijnt de indicatie „---”. Met het
verdwijnen van de indicatie schakelt de Leica Rangemaster zichzelf automatisch uit.
Scanfunctie
Met de Leica Rangemaster kan ook in continubedrijf worden gemeten.Wanneer de ontspanknop
(3) bij de tweede bediening ingedrukt wordt
gehouden, schakelt het toestel na ca. 0,5 sec.
over naar de scanfunctie en voert dan permanent
metingen uit. Dit is te herkennen aan de wisselende indicatie: Na ca. iedere 1,5 seconde wordt een
nieuwe meetwaarde aangegeven.
De scanfunctie is vooral praktisch bij de meting
op kleine onderwerpen.
Opmerking:
In de scanfunctie is het stroomverbruik op basis
van de permanente metingen hoger dan bij afzonderlijke metingen.
38
Page 41

Meetbereik en precisie
De meetnauwkeurigheid van de Leica Rangemaster
bedraagt minimaal ±1meter. Het maximale be reik
is mogelijk bij goed reflecterende onderwerpen en
een vrij zicht over 10km. Het meetbereik wordt
door de volgende factoren beïnvloed:
Reikwijdte groter kleiner
Kleur wit zwart
Hoek tot object recht schuin
Grootte object groot klein
Zonlicht weinig (bewolkt) veel (middagzon)
Atmosferische helder nevelig
omstandigheden
Structuur object homogeen niet homogeen
(huismuur) (struik, boom)
Bij gemiddelde zonneschijn en goed zicht gelden
de volgende reikwijdten en nauwkeurigheden:
Rangemaster Rangemaster
900 scan 1200 scan
Reikwijdte 10m tot ca. 823 m 10m tot ca. 1097 m
Nauwkeurig- ±1m tot 200 m ±1m tot 400m
heid
± 2m tot 600m ± 2m tot 800m
± 0,5% bij meer ±0,5% bij meer
dan 600 m dan 800 m
39
Page 42

Onderhouds- en gebruikstips
Speciaal onderhoud is niet nodig. Grotere vuildeeltjes als zand moeten met een haarpenseel worden verwijderd of weggeblazen. Vingeraf
op bijv. de lenzen kunnen eerst met een
doek en daarna met een zacht en schoon zeemleer of pluisvrije doek worden afgeveegd. De
behuizing moet uitsluitend met een vochtig zeemleer worden gereinigd. Bij gebruik van droge doeken bestaat het gevaar van statische lading. Alcohol en overige chemische op lossingen mogen niet
voor het schoonmaken
van optiek of behuizing worden gebruikt.
drukken
vochtige
40
Page 43

Probleemoplossing
Probleem Oorzaak Oplossing
Bij waarneming wordt geen cirkel- De stand van de oogschelp komt niet Brildragers slaan de oogschelp om;
vormig beeld zonder vignettering overeen met het juiste gebruik met bij waarneming zonder bril blijft de
verkregen en zonder bril oogschelp omhoog geklapt (pagina 37)
Indicatie onscherp Dioptriecompensatie niet precies Dioptriecompensatie opnieuw instellen
ingesteld (pagina 37)
Bij de afstandsmeting verschijnt a) Onder of boven meetbereik Gegevens van meetbereik in acht nemen
de indicatie „---” b) Reflectie van het object is (pagina 38/39)
onvoldoende
Indicatie knippert of geen meting Batterij is leeg Batterij vervangen (pagina 35)
mogelijk
Technische gegevens
Rangemaster 900 scan Rangemaster 1200 scan
Maximale reikwijdte: 823m/900 yds. 1097m/1200yds.
Minimale afstand: ca. 10m/ yds. ca. 10m/ yds.
Meetnauwkeurigheid: ±1m/yds. tot ca. 200m/yds. ±1m/yds. tot ca. 400m/yds.
± 2m/yds. tot ca. 600m/yds. ±2m/yds. tot ca. 800m/yds.
± 0,5% bij meer dan ca. 600m/yds. ± 0,5% bij meer dan ca. 800m/yds.
Omschakeling yard/meter: ja
Vergroting: 7 x
Indicatie: led
Dioptriecompensatie: ±4 dpt.
Geschikt voor brildragers: ja
Afmetingen (b x h x d): ca. 10,5 x 12,0 x 4,0 cm
Batterij: 9V/alkaline-mangaan E-blok (6LR61)
Laser: veilig voor ogen conform EN en FDA klasse 1
Gewicht (zonder/met batterij): 280g/320g
Let op: het apparaat mag in geen geval worden geopend!
41
Page 44

Leica Academie
Op de verschillende seminars krijgt de deelnemer
in een op de praktijk georiënteerde, mo derne
vorm informatie over de waardenwereld van Leica
en de fascinatie van de vakkundige omgang met
de Leica producten. De inhoud is
op de gebruikgeoriënteerd en biedt een massa
inspiratie, informatie en advies voor de praktijk.
Leica Camera AG
Leica Akademie
Oskar-Barnack-Str. 11
D 35606 Solms
Tel: +49 (0)64 42-208 421
Fax: +49 (0)64 42-208 425
e-mail: la@leica-camera.com
Leica informatiedienst
Technische vragen over het Leica-programma worden schriftelijk, telefonisch of per e-mail beantwoord door Leica Informations-Service.
Leica Camera AG
Informations-Service
Postfach 1180
D 35599 Solms
Tel: +49 (0)64 42-208 111
Fax: +49 (0)64 42-208 339
e-mail: info@leica-camera.com
42
Page 45

Leica Customer Service
Voor het onderhoud van uw Leica uitrusting alsmede in geval van schade kunt u gebruik maken
van de Customer Service van Leica Camera AG
of een nationale vertegenwoordiging van Leica
(voor adressenlijst zie garantiebewijs). Wendt
u zich tot een erkende Leica-speciaalzaak (in
Duitsland: Leica Repräsentanz).
Leica Camera AG
Customer Service
Oskar-Barnack-Str. 11
D 35606 Solms
Tel: +49 (0)64 42-208 189
Fax: +49 (0)64 42-208 339
e-mail: customer.service@leica-camera.com
nederlands
43
Page 46

Premessa
Gentile cliente,
Il nome Leica è ormai sinonimo in tutto il mondo
di elevata qualità ottica, assoluta precisione nella
meccanica e di estrema affidabilità e lunga durata.
Pertanto le auguriamo ottimi risultati e un buon
divertimento con il Suo nuovo cannocchiale Leica
Rangemaster.
E’ semplice e funzionale nell’impiego e Le consentirà di scoprire nuovi e inesplorati orizzonti.
Descrizione delle parti
1 Corpo con armatura
2 Vano batteria e commutatore Metri/Yards
3 Pulsante d’azionamento misurazione distanza
4 Attachi per cinghia a tracolla
5 Oculare con coppetta
6 Regolazione diottrica
7 Ottica di ricezione al laser
8 Lente dell’obiettivo
9 Ottica di trasmissione al laser
Avvertenza
Con tutti i binocoli e cannocchiali è necessario evitare la diretta inquadratura di forti sorgenti di luce per prevenire danni permanenti
agli occhi.
44
Page 47

Indice
Premessa . . . . . . . . . . . . . . . . . . . . . . . . . . . . 44
Descrizione delle parti . . . . . . . . . . . . . . . . . . . 44
Introduzione . . . . . . . . . . . . . . . . . . . . . . . . . . 45
Applicazione della cinghia a tracolla . . . . . . . . 46
Introduzione della batteria . . . . . . . . . . . . . . . . 46
Stato di carica della batteria . . . . . . . . . . . . . . 47
Commutazione Metri/Yards. . . . . . . . . . . . . . . 47
Utilizzo con o senza occhiali . . . . . . . . . . . . . . 48
Regolazione diottrica . . . . . . . . . . . . . . . . . . . . 48
Misurazione della distanza. . . . . . . . . . . . . . . . 49
Modalità di scansione ................... 49
Raggio de misurazione e tolleranza . . . . . . . . . 50
Informazioni per l’uso e la manutenzione . . . . . 51
Soluzioni e problemi . . . . . . . . . . . . . . . . . . . . 52
Dati tecnici . . . . . . . . . . . . . . . . . . . . . . . . . . . 52
Accademia Leica . . . . . . . . . . . . . . . . . . . . . . . 53
Leica in Internet. . . . . . . . . . . . . . . . . . . . . . . . 53
Servizio informazioni Leica . . . . . . . . . . . . . . . 53
Leica Customer Service. . . . . . . . . . . . . . . . . . 54
Garanzia Leica/Polyphoto ................ 54
Magazine Leica ........................ 54
Introduzione
Vi auguriamo tante soddisfazioni e successo
nell’uso del Vostro Leica Rangemaster. Il Rangemaster trasmette dei raggi laser non visibili
all’occhio umano e calcola la distanza dall’oggetto
per mezzo di un microprocessore integrato. Il cannocchiale Leica Rangemaster è equipaggiato con
un ottimo sistema di mira a 7 ingrandimenti, il
quale permette un preciso rilevamento anche
nelle condizioni più difficoltose. Al fine di poter
sfruttare tutte le possibilità di questo pregiato e
versatile misuratore laser, si raccomanda innanzitutto di leggere queste istruzioni.
LEICA RANGEMASTER 900 scan
No. d’ordinazione 40 515
LEICA RANGEMASTER 1200 scan
No. d’ordinazione
40 525
45
Page 48

Applicazione della cinghia a tracolla
Spingere il passante piccolo della cinghia a tracolla attraverso l’occhiello fissato (4) al corpo del
Leica Rangemaster. Dopodiché infilare l’estremità
della cinghia a tracolla attraverso il passante piccolo e stringerla in modo tale che il cappio formatosi chiuda saldamente l’occhiello.
Introduzione della bat-
teria
Il Leica Rangemaster
viene alimentato tramite
una batteria da 9 V (tipo
E, come ad es. 6LR 61,
6AM6, ecc.). Si raccomanda di utilizzare batterie alcaline al manganese.
Per introdurre la batteria, allentare con una monetina la vite del coperchio
ora la batteria con i contat
Osservare a tal fine il corretto orientamento dei
contatti (negativo/positivo).
46
del vano (2). Introdurre
ti rivolti verso l’alto.
Page 49

Attenzione:
Le basse temperature riducono il rendimento della
batteria. Pertanto, in tali condizioni il Leica Rangemaster dovrebbe essere portato vicino al
essere utilizzato con una batteria carica.
Nota:
Non sono consigliate batterie ricaricabili. Non
gettare le batterie usate nei rifiuti urbani, poichè
contengono sostanze nocive ed inquinanti. Le batterie devono essere consegnate al rivenditore o
agli appositi centri di raccolta e smaltimento.
Stato di carica della batteria
Una batteria scarica viene segnalata per mezzo di
un segnale lampeggiante nel mirino. Dopo il primo
lampeggio dell’indicatore a «led» sono possibili
ancora oltre 100 misurazioni con un raggio
d’azione progressivamente in riduzione.
corpo ed
M
Y
Commutazione Metri/Yards
Con il Leica Rangemaster si possono visualizzare
le distanze sia in metri che in Yards. Per la commutazione: portare la vite, situata nel vano batteria (2), nella posizione desiderata (M = Metri;
Y = Yards).
47
Page 50

5a 5b
Utilizzo con o senza occhiali
Gli osservatori che non portano occhiali lascino
l’oculare di gomma (5a) ribaltato verso l’alto (stato
di consegna). In questa posizione si ottiene in oltre
la corretta distanza del Leica Rangemaster
dall’occhio.
Gli osservatori con occhiali ribaltino l’oculare di
gomma (5b) verso il basso.
Regolazione diottrica
E’ possibile regolare la focalizzazione del mirino ad
un ottimo valore individuale. Inquadrare
semplicemente un oggetto distante con il Leica
Rangemaster e regolare la focalizzazione girando
la manopola di compensazione delle diottrie.
Il valore regolato può essere letto nella scala «+»
«–» sull’oculare. La compensazione delle diottrie è
possibile per disturbi visivi fino a ±4 diottrie.
48
o
Page 51

Misurazione della distanza
Per misurare la distanza da un oggetto è necessaria una precisa inquadratura. Attivare a tal fine il
mirino premendo una volta il pulsante
d’azionamento (3). Dopo aver rilasciato il pulsante,
per circa 4 secondi rimane ancora illuminato il
mirino. Mantenendo premuto il pulsante, il mirino
rimane illuminato permanentemente. Mentre rimane illuminato il mirino, viene rilevato l’oggetto e
premendo di nuovo il pulsante, viene rilevata la
distanza e la visualizzazione del valore. Durante la
misurazione si spegne brevemente il mirino. Premendo nuovamente il pulsante, si può iniziare in
qualsiasi momento una nuova misurazione. Se la
distanza dell’oggetto corrisponde a meno di
10 metri, o nel caso venisse oltrepassato il raggio
d’azione, ovvero insufficiente riflessione
dell’oggetto, viene visualizzato «---». Dopo lo spegnimento di questa indicazione, il Leica
Rangemaster si disinserisce automaticamente.
Modalità di scansione
Con il Leica Rangemaster, è possibile eseguire
misurazioni anche a regime continuo. Tenendo
premuto il pulsante di scatto (3) alla 2° pressione,
dopo circa 0,5 secondi l’apparecchio attiva la
modalità di scansione ed esegue costantemente
misurazioni. Sul display compaiono indicazioni
alternate: dopo rispettivamente 1,5 secondi, viene
indicato un nuovo valore misurato.
La modalità di scansione è particolarmente utile
nella misurazione di oggetti di piccole dimen sioni.
Nota:
Nella modalità di scansione, a causa delle misurazioni permanenti, risulta un consumo di corrente
superiore rispetto alle misurazioni singole.
49
Page 52

Raggio di misurazione e tolleranza
La precisione di misurazione del Leica Rangemaster ammonta fino a ±1metro. Il massimo raggio
di misurazione è ottenuto con un soggetto altamente riflettente in condizioni di ottima visibilità
(10km circa).
Raggio favorevoli meno favorevoli
Colore del bianco nero
soggetto
Angolo del perpendicolare appuntito
soggetto
Dimensione maggiore del fascio inferiore al fascio
del soggetto di misurazione di misurazione
Luce del sole poca (nuvoloso) molta (in pieno sole)
Condizioni serene nebbiose
atmosferiche
Struttura del omogenea non omogenea
soggetto (cespuglio, albero)
In presenza di sole e buona visibilità valgono le
seguenti precisioni:
Rangemaster Rangemaster
900 scan 1200 scan
Raggio 10m fino a circa 823m 10 m fino a circa 1097m
Toleranza ±1m fino 200m ±1m fino 400 m
±2m fino 600 m ± 2m fino 800m
±0,5% oltre 600 m ±0,5% oltre 800 m
50
Page 53

Informazioni per l’uso e la manutenzione
Non è necessaria una particolare manutenzione.
Le particelle di sporco, come per esempio sabbia,
devono essere eliminate con un pennello o con
aria compressa. Le impronte digitali o simili sopra
le lenti possono essere pulite con un panno in
microfibra specifico per tutti gli elementi ottici
Leica. Il corpo deve essere pulito con un panno di
daino umido. Nell’uso di panni asciutti persiste il
pericolo di cariche elettrostatiche. Non utilizzare
mai alcool o altre soluzioni chimiche per la pulizia
dei sistemi ottici o del corpo.
51
Page 54

Soluzione di problemi
Problema Causa Rimedio
Nell’osservazione l’immagine La posizione dell’oculare non Le persone che portano occhiali ribaltino
è vignettata corrisponde al corretto utilizzo l’oculare; mentre nell’osservazione senza
con o senza occhiali occhiali, l’oculare deve rimanere rialzato
(pagina 48)
Indicazione non nitida Compensazione diottrie non Eseguire una nouva compensazione
correttamente eseguita delle diottrie (pagina 48)
Nella misurazione della distanza a) Campo di misurazione non Considerare le indicazioni del campo
viene visualizzato «---» raggiunto o oltrepassato di misurazione (pagina 49/50)
b) Il grado di reflessione dell’oggetto
non è sufficiente
Indicazione lampeggiante o Batteria scaricata Cambiare la batteria (pagina 46)
misurazione non possibile
Dati tecnici
Rangemaster 900 scan Rangemaster 1200 scan
Campo di misurazione: 823m/900 yds. 1097m/1200 yds.
Distanza minima: circa 10m/ yds. circa 10m/ yds.
Tolleranza di misurazione: ±1m/yds. fino a circa 200m/yds. ±1m/yds. fino a circa 400 m/yds.
± 2m/yds. fino a circa 600m/yds. ±2m/yds. fino a circa 800m/yds.
± 0,5% oltre circa 600m/yds. ±0,5% oltre circa 800 m/yds.
Commutazione Yards/Metri: si (nel vano batteria)
Ingrandimento: 7x
Lettura dei dati: a mezzo LED
Compensazione diottrie: ±4 diottrie
Oculare ribaltabile per portatori
di occhiali e non: si
Dimensioni (l x a x p): circa 10,5 x 12,0 x 4,0 cm
Batteria di alimentazione: 9 V/alcalina al manganese (6LR61)
Raggio laser: Di sicurezza per gli occhi ai sensi EN e FDA Classe 1
Peso (senza/con batteria): 280g/320 g
Attenzione: l’apparecchio non può essere aperto in nessun caso!
52
Page 55

Accademia Leica
Nei diversi seminari, al partecipante viene presentato in forma practica e attuale il mondo Leica, nonché il fascino dell’impiego coretta dei prodotti
Leica. I temi sono orientati a seconda dell’impiego e
offrono molteplici impulsi, informazioni e consigli
sull’uso quotidiano dei prodotti.
Leica Camera AG
Leica Akademie
Oskar-Barnack-Str. 11
D 35606 Solms
Tel: +49 (0)64 42-208 421
Fax: +49 (0)64 42-208 425
e-mail: la@leica-camera.com
Servizio informazioni Leica
Eventuali domande tecniche sul programma Leica
possono essere rivolte per iscritto, tele fono o per
e-mail al servizio informazioni Leica:
Leica Camera AG
Informations-Service
Postfach 1180
D 35599 Solms
Tel: +49 (0)64 42-208 111
Fax: +49 (0)64 42-208 339
e-mail: info@leica-camera.com
53
Page 56

Leica Customer Service
Per la manutenzione dell’attrezzatura Leica e in
caso di danneggiamento, è a Vostra disposizione il
Customer Service della Leica Camera AG o di una
rappresentanza locale autorizzata Leica (elenco
degli indirizzi sul certificato di garanzia). Rivolgersi
al proprio rivenditore autorizzato Leica (in Germania: Rappresentanza Leica).
Garanzia Leica/Polyphoto
Polyphoto vi offre una garanzia di 5 anni su tutti gli
obiettivi e sulle fotocamere Leica M da essa distribuite. Per ricevere la Leica Card spedite la richiesta di garanzia che troverete negli imballi, timbrata
dal rivenditore e completa della data di acquisto,
alla Polyphoto; la Leica Card sarà spedita direttamente al vostro recapito.
Leica Camera AG
Customer Service
Oskar-Barnack-Str. 11
D 35606 Solms
Tel: +49 (0)64 42-208 189
Fax: +49 (0)64 42-208 339
e-mail: customer.service@leica-camera.com
Magazine Leica
Magazine Leica edita dalla Polyphoto è la rivista che
vi permetterà di vivere a fondo la vostra passione
per Leica. Ogni tre mesi a casa vostra: le prove, le
novità, i consigli tecnici, gli aggiornamenti, il collezionismo, i portfolio dei professionisti che usano
Leica. Chiedete informazioni alla Polyphoto S.p.A.
divisione Leica.
Distributore ufficiale
Polyphoto S.p.A.
Via Cesare Pavese 11/13
I-20090 Opera-Zerbo (Milano)
Tel: +39 - 0253 00 21
Fax: +39 - 0257 6091 41
e-mail: informazioni@leica-italy.com
54
Page 57

Prólogo
Estimado cliente,
El nombre Leica responde mundialmente de calidad óptica suprema y mecánica de precisión en
combinación con extrema seguridad funcional y
larga duración.
Es así que le deseamos mucho éxito y que disfrute
de sus nuevos anteojos Leica Rangemaster.
Su manejo es simple y funcional y le ofrece una
experiencia visual incomparable.
Nomenclatura
1 Ocular con copa
2 Escala de dioptrias
3 Anclajes para la correa de transporte
4 Tapa del compartimiento de la pila; debajo,
selector de metros/yardas
5 Tecla de disparo para medición de la distancia
6 Cuerpo armado
7 Optica de emisor de láser
8 Lente del objetivo
9 Optica de receptor de láser
Nota de advertencia
Como con cualquier telescopio o catalejo, evite
mirar directamente con el Leica
Rangemaster fuentes de luz intensa, para
no sufrir lesiones en los ojos.
55
Page 58

Indice
Prólogo . . . . . . . . . . . . . . . . . . . . . . . . . . . . . . 55
Nomenclatura . . . . . . . . . . . . . . . . . . . . . . . . . 55
Introducción . . . . . . . . . . . . . . . . . . . . . . . . . . 56
Colocación de la correa de transporte. . . . . . . 57
Colocación de la pila . . . . . . . . . . . . . . . . . . . . 57
Estado de carga de la pila . . . . . . . . . . . . . . . . 58
Conmutación Metros/Yardas. . . . . . . . . . . . . . 58
Uso con y sin gafas . . . . . . . . . . . . . . . . . . . . . 59
Corrección de dioptrías . . . . . . . . . . . . . . . . . . 59
Medición de la distancia . . . . . . . . . . . . . . . . . 60
Modo de exploración.................... 60
Alcance y exactitud de la medida. . . . . . . . . . . 61
Conservación e indicaciones para el uso . . . . . 62
Solución de problemas . . . . . . . . . . . . . . . . . . 63
Datos técnicos. . . . . . . . . . . . . . . . . . . . . . . . . 63
Academia Leica . . . . . . . . . . . . . . . . . . . . . . . . 64
Leica en Internet . . . . . . . . . . . . . . . . . . . . . . . 64
Servicio de información Leica . . . . . . . . . . . . . 64
Leica Customer Service. . . . . . . . . . . . . . . . . . 65
Introducción
Le deseamos que disfrute y tenga mucho éxito
con su Leica Rangemaster. Este instrumento
emite impulsos de luz infrarroja invisibles e inofensivos para el ojo humano. Por medio de
un microprocesador integrado calcula la distancia
al objeto basándose en la fracción reflejada de la
señal. El Leica Rangemaster está equipado con
una excelente óptica de 7 aumentos que permite
apuntar con seguridad incluso en condiciones difíciles. Le recomendamos que lea primero con
atención estas instrucciones, para así poder aprovechar óptimamente todas las posibilidades que le
brinda este versátil telémetro láser de alta calidad.
LEICA RANGEMASTER 900 scan
Numero de código 40 515
LEICA RANGEMASTER 1200 scan
Numero de código 40 525
56
Page 59

Colocación de la correa de transporte
Pase el asa pequeña de la correa por el ojal (4)
existente en el cuerpo del Leica Rangemaster.
Pase a continuación el extremo de la correa por
esa asa pequeña y tire de él hasta que la lazada
que se ha formado quede bien apretada alrededor
del mencionado ojal.
Colocación de la pila
El Leica Rangemaster es
abastecido de energía
eléctrica por una pila
monobloc de 9 V (tipo
E-Bloc, p. ej. 6LR 61,
6AM6, etc.). Recomendamos utilizar pilas alcalinas de manganeso. Para
colocar la pila, afloje el tornillo de la tapa del compartimiento de la pila (2) por medio de una moneda o similar. Coloque la pila con los con tactos dirigidos hacia arriba. Preste atención a que los contactos de la pila estén correctamente orientados
respecto a la regleta de contactos. A continuación, enchufe la regleta de contactos.
Atención:
El frío reduce la potencia de las pilas. Por esta
57
Page 60

razón, si las temperaturas son bajas debería llevar
el Leica Rangemaster arrimado al cuerpo,
utilizándolo además con pilas nuevas.
Nota:
No se recomienda el uso de pilas recargables.
No tire las pilas gastadas a la basura normal, ya que
contienen sustancias tóxicas y contaminantes. Entregue las pilas usadas en las tiendas del ramo o en
otros puntos de recogida, desde donde son incorporadas a un sistema de reciclaje.
Estado de carga de la pila
Una pila gastada es señalizada al parpadear la
indicación del valor medido o de la marca de
medición. Después de que la indicación parpadee
por primera vez pueden realizarse aún más de
100 mediciones, si bien el alcance se reduce progresivamente.
M
Y
Conmutación Metros/Yardas
Con el Leica Rangemaster puede hacerse indicar
las distancias tanto en metros como en yardas.
Para cambiar entre estas unidades, sitúe el tornillo
existente debajo de la tapa del compartimiento de
la pila (2) en la posición deseada. (M = Metros; Y =
Yardas)
58
Page 61

5a 5b
Uso con y sin gafas
Los observadores sin gafas dejan la copa de
goma del ocular (5a) en posición levantada (estado a la entrega). En esta posición se tiene la
distancia correcta entre el Leica Rangemaster
y el ojo.
Observadores con gafas voltean la copa de goma
(5b) hacia abajo.
Corrección de dioptrías
Con la corrección de dioptrías puede ajustar la
nitidez de la marca de puntería al valor óptimo
para usted. Para ello, apunte simplemente el Leica
Rangemaster a un objeto alejado y ajuste
entonces la marca de puntería a la nitidez óptima
girando el dispositivo de corrección de dioptrías.
La marca de puntería aparece presionando la
tecla de disparo (3). Puede leer el valor ajustado
en la escala «+» o «–» de la copa de goma del ocular. Es posible una corrección de las dioptrías para
defectos de la vista de hasta ±4 dioptrías.
59
Page 62

Medición de la distancia
Para medir la distancia a un objeto es necesario
apuntar exactamente al mismo. A tal fin se activa la
marca de puntería pulsando una vez la tecla de disparo (3). Tras soltar la tecla, la marca de puntería
permanece encendida durante unos 4 segundos
más. La marca de puntería está encendida permanentemente mientras se mantiene pulsada la tecla.
Mientras está encendida la marca de puntería se
mantiene exactamente localizado el objeto; pulsando de nuevo la tecla de disparo se mide la distancia
y a continuación se visualiza el valor medido. La
marca de puntería se extingue brevemente durante
la medición. Volviendo a pulsar la tecla de disparo
puede iniciarse en todo momento una nueva medi-
ción, mientras aún esté encendida la marca de puntería. Si la distancia hasta el objeto es inferior a 10
metros, si se sobrepasa el alcance máximo o si el
objeto no refleja suficientemente la señal, aparece
la indicación
«---». El Leica Rangemaster se desconecta automáticamente al extinguirse la indicación.
Modo de exploración
Con el Leica Rangemaster también se puede medir
en modo continuo. Cuando se mantiene pulsado el
disparador (3) durante el 2º accionamiento, el aparato se conecta al cabo de aprox. 0,5 segundos en
modo de exploración, y entonces realiza mediciones de forma permanente. Esto se puede reconocer
por la indicación variable: al cabo de aprox. 1,5
segundos respectivamente se emite un nuevo valor
de medición.
El modo de exploración es especialmente práctico
en la medición a objetivos pequeños.
Nota:
En el modo de exploración, el consumo de corriente
es mayor que en las mediciones individuales co mo
consecuencia de las mediciones permanentes.
el
60
Page 63

Alcance y exactitud de la medida
La exactitud de medición del Leica Rangemaster
es de hasta ±1metro. El alcance màximo se
consigue con objetos con un buen valor de
re flexión y a una distancia de visibilidad de 10km.
En el alcance de la medida influyen los factores
siguientes:
Alcance mayor menor
Color del objeto blanco negro
Angulo respecto de 90° agudo
al objeto
Tamaño del mayor que el rayo menor que el rayo
objeto de medición de medición
Luz solar poca (nublado) mucha
(sol de mediodía)
Condiciones tiempo claro tiempo brumoso
atmosféricas
Estructura del homogénea no homogénea
objeto
(pared de una casa)
(arbusto, árbol)
Si brilla el sol y con buena visibilidad rigen las
siguientes exactitudes:
R
900 scan 1200 scan
Alcance 10m hasta 10 m hasta
aprox. 823m aprox. 1097 m
Exactitud ±1m hasta 200m ±1m hasta 400m
±2 m hasta 600m ± 2m hasta 800m
±0,5 % mas de ± 0,5% mas de
600m 800 m
angemaster
R
angemaster
61
Page 64

Conservación e indicaciones para el uso
No son necesarios cuidados especiales. Suciedad
gruesa, como arena y similares, debería ser eliminada con un pincel de cerdas finas o soplando. Si
las lentes están sucias de huellas dactilares o
similares, límpielas primero con un paño húmedo
y frótelas seguidamente con una gamuza suave y
limpia o con un paño que no tenga polvo. El cuerpo del instrumento debería limpiarlo únicamente
con una gamuza húmeda. Si utiliza paños secos
hay peligro de que se formen cargas electrostáticas. No utilice alcohol ni otros productos químicos
para limpiar el sistema óptico ni el cuerpo del
instrumento.
62
Page 65

Solución de problemas
Problema Causa Solución
Al observar no se consigue una La posición de la copa del ocular no es Personas con gafas voltean la copa de
imagen circular sin viñetas correcta para el uso con o sin gafas goma; para obser var sin gafas se deja la
copa en posición levantada (página 59)
Indicación borrosa La corrección de dioptrías no se ha Realice de nuevo la corrección de
efectuado con exactitud dioptrías (página 59)
Al medir una distancia aparece a) Campo de medición rebasado Tenga en cuenta los datos relativos al
la indicación «---» por exceso o por defecto campo de medición (página 60/61)
b) El grado de reflexión del objeto
es insuficiente
La indicación parpadea o no es Pila agotada Cambie la pila (página 57)
posible medir
Datos técnicos
Rangemaster 900 scan Rangemaster 1200 scan
Alcance máximo: 823m/900 yds. 1097m/1200 yds.
Distancia mínima: aprox. 10m/yds. aprox. 10m/yds.
Exactitud de medida: ±1m/yds. hasta aprox. 200m/yds. ±1m/yds. hasta aprox. 400m/yds.
± 2m/yds. hasta aprox. 600m/yds. ±2m/yds. hasta aprox. 800 m/yds.
± 0,5% mas de aprox. 600m/yds. ±0,5% mas de aprox. 800 m/yds.
Conmutación yardas/metros: sí
Aumento: 7x
Indicación: por diodo
Corrección de dioptrías: ±4dpt.
Aptitud para personas con gafas: sí
Dimensiones (a x a x p): aprox. 10,5 x 12,0 x 4,0cm
Pila: 9V/alcalina-manganeso, E-Bloc (6LR61)
Láser: seguro para los ojos según normas EN y FDA Class 1
Peso (sin/con pila): 280g/320g
Atención: no abrir el aparato bajo ningún concepto!
63
Page 66

Academia Leica
En los distintos seminarios, el participante aprende, de una forma adecuada y orientada a
la práctica, el mundo de valores de la Leica y la
fascinatión de saber manejar los productos Leica.
Los contenidos se orientan según las aplicaciones, ofreciendo numerosas iniciativas, informaciones y consejos para la práctica.
Leica Camera AG
Leica Akademie
Oskar-Barnack-Str. 11
D 35606 Solms
Tel: +49 (0)64 42-208 421
Fax: +49 (0)64 42-208 425
e-mail: la@leica-camera.com
Servicio de información Leica
Obtendrá respuesta a sus preguntas sobre aplicaciones del programa Leica dirigiéndose al
Servicio de Información Leica por escrito, por
telé fono o por correo electrónico:
Leica Camera AG
Informations-Service
Postfach 1180
D 35599 Solms
Tel: +49 (0)64 42-208 111
Fax: +49 (0)64 42-208 339
e-mail: info@leica-camera.com
64
Page 67

Leica Customer Service
Para el mantenimiento de su equipo Leica así
como en caso de desperfectos o averías está a
sus disposición el Customer Service de Leica
Camera AG o el Servicio de reparaciones de una
representación de Leica (encontrará la lista de
direcciones en la tarjeta de garantía). Diríjase por
favor a su proveedor autorizado de productos
Leica.
Leica Camera AG
Customer Service
Oskar-Barnack-Str. 11
D 35606 Solms
Tel: +49 (0)64 42-208 189
Fax: +49 (0)64 42-208 339
e-mail: customer.service@leica-camera.com
65
Page 68

Important notice for USA
This equipment has been tested and found to
comply with the limits for a Class B digital de
pursuant to Part 15 of the FCC Rules. These
are designed to provide reasonable protection
against harmful interference in a residential installation. This equip ment generates, uses and can
radiate radio frequency energy and, if not intalled
and used in accordance with the instructions, may
cause harmful interference to radio communications. However, there is no guarantee that interference will not occur in a particular installation. If
this equipment does cause harmful interference to
radio or television reception, which can be determined by turning the equipment off and on, the
user is encouraged to try to correct the interference by one or more of the following measures:
vice,
limits
– Reorient or relocate the receiving antenna.
– Increase the separation between the equipment
and receiver.
–
Connect the equipment into an outlet on a
circuit different from that to which the receiver
is connected.
– Consult the dealer or an experienced radio/TV
technician for help.
66
Page 69

Notizen
Page 70

Notizen
 Loading...